

Page 1

Dell™ Latitude™ C/Port II APR
System Information Guide
Příručka k zařízení
Systeminformation
Systeeminformatiegids
Järjestelmätiedot
Guide d'information sur le système
Systeminformationshandbuch
Informazioni di sistema
Veiledning for systeminformasjon
Przewodnik – informacje o systemie
Информационное руководство по системе
Guía de información del sistema
Model PRX
Systeminformationsguide
www.dell.com | support.dell.com
Page 2

Page 3

Dell™ Latitude™ C/Port II APR
System Information Guide
www.dell.com | support.dell.com
Page 4

Notes, Notices, and Cautions
NOTE: A NOTE indicates important information that helps you make better use of your computer.
NOTICE: A NOTICE indicates either potential damage to hardware or loss of data and tells you
how to avoid the problem.
CAUTION: A CAUTION indicates a potential for property damage, personal injury,
or death.
____________________
Information in this document is subject to change without notice.
© 2001 Dell Computer Corporation. All rights reserved.
Reproduction in any manner whatsoever without the written permission of Dell Computer Corporation is strictly
forbidden.
Trademarks used in this text: Dell, the DELL logo, Latitude, and DellWare are trademarks of Dell Computer Corporation;
3Com is a trademark of 3Com Corporation; Microsoft, Windows, and Windows NT are registered trademarks of
Microsoft Corporation.
Other trademarks and trade names may be used in this document to refer to either the entities claiming the marks and
names or their products. Dell Computer Corporation disclaims any proprietary interest in trademarks and trade names
other than its own.
This product incorporates copyright protection technology that is protected by method claims of certain U.S. patents
and other intellectual property rights owned by Macrovision Corporation and other rights owners. Use of this copyright
protection technology must be authorized by Macrovision Corporation, and is intended for home and other limited
viewing uses only unless otherwise authorized by Macrovision Corporation. Reverse engineering or disassembly is
prohibited.
October 2001 P/N 4G281 Rev. A01
Page 5

Dell™ Latitude™ C/Port II APR
System Information Guide
This document contains getting started, safety, regulatory, and warranty
information about your Dell Latitude C/Port II Advanced Port Replicator
(APR) as well as information about other Dell documents that are available
and how to obtain them.
Other Documents Available
• Documentation updates, which are sometimes included with your
docking device to describe changes to your docking device or software.
Always read these updates before consulting any other documentation
because the updates often contain the latest information.
• Documentation included with any options you purchase separately
from your docking device. This documentation includes information
that you need to configure and install these options in your docking
device.
Getting Help
Dell provides a number of tools to help you if your docking device does not
perform as expected. For information on these help tools, see the “Getting
Help” section in the computer’s User’s Guide.
Docking Device Overview
NOTE: Alert your network administrator before you connect the docking
device to a network.
You must attach an AC adapter to the docking device before you dock the
computer to the docking device and turn on the computer. The AC adapter
powers the docking device and the computer at the same time. Any battery
installed in the computer charges while you use the docking device.
Dell Latitude C/Port II APR System Information Guide 3
Page 6
NOTICE: Always use the Dell PA-6 AC adapter that came with the docking
device. If you use any other commercially available AC adapter—or the AC
adapter from older models of Dell computers—you may damage the docking
device or the computer.
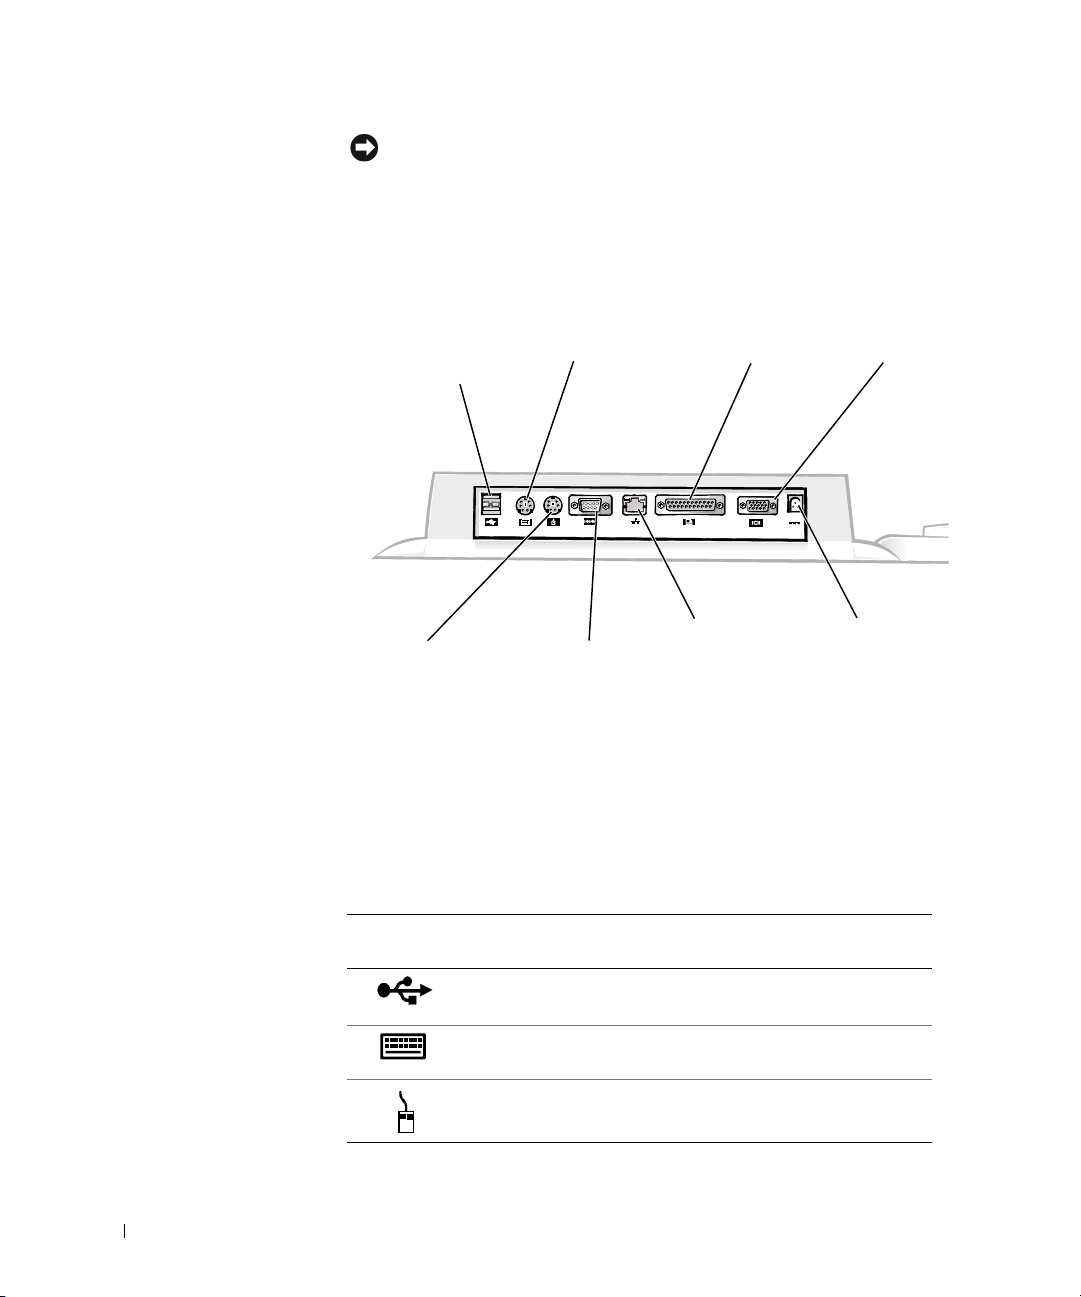
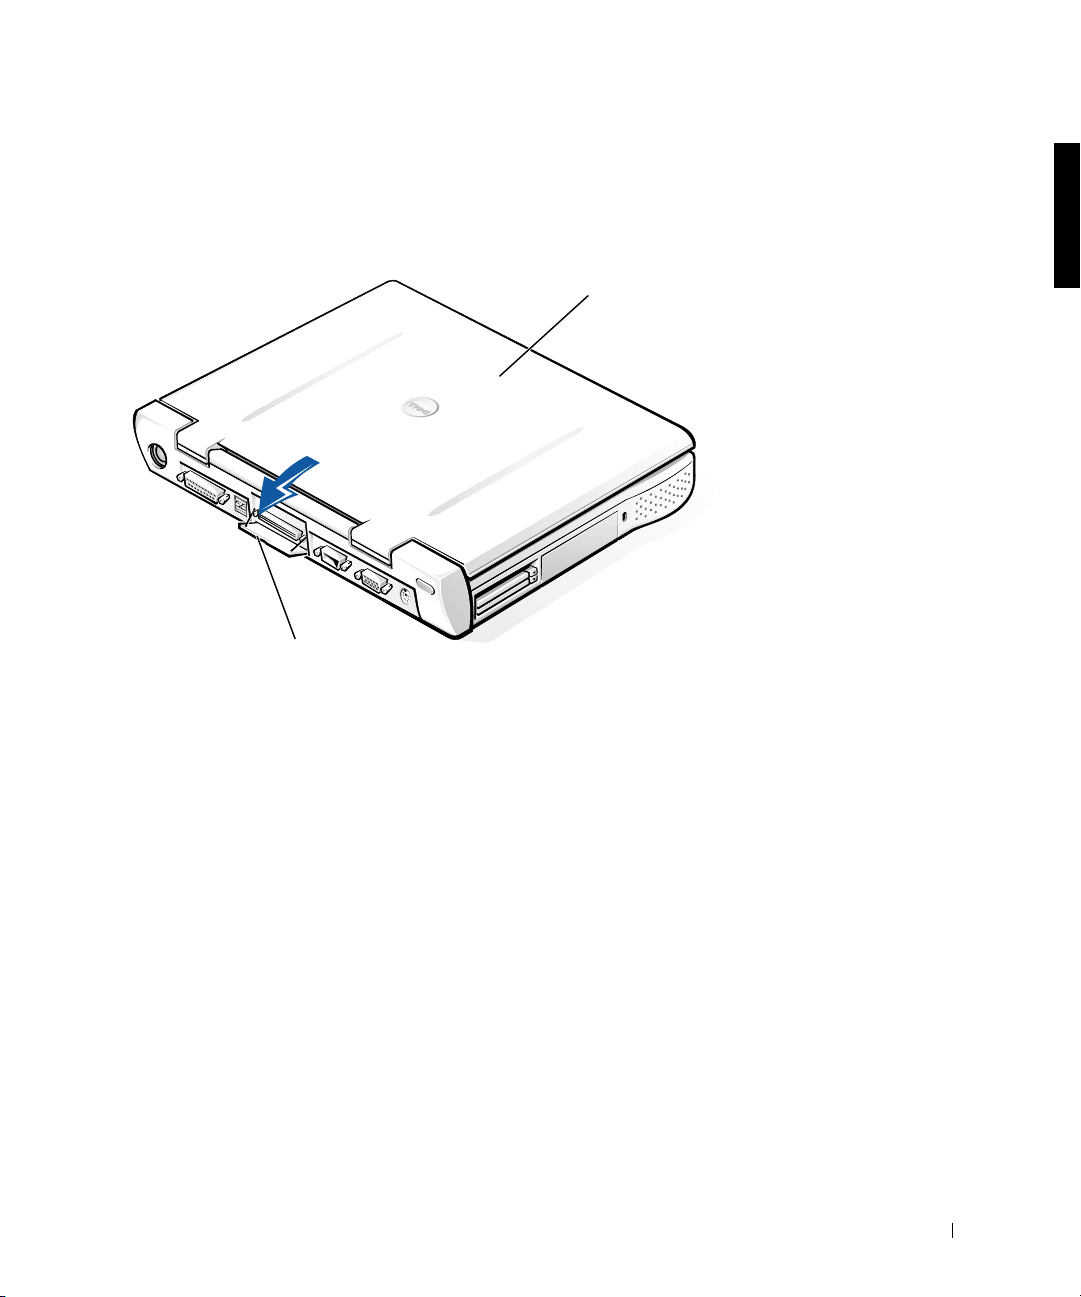
I/O Panel of the Docking Device
www.dell.com | support.dell.com
USB
connectors (2)
PS/2-mouse
connector
serial
connector
PS/2-keyboard
connector
network
connector
parallel
connector
video
connector
AC adapter
connector
The “External I/O Connectors” table shows the icons for each of the
connectors on the back of the APR and indicates the type of external
device(s) that you can attach to each connector.
External I/O Connectors
Connector
Icon
Connector Description
One or two USB devices, such as a USB mouse, connect to
the dual USB connector.
An ex terna l P S/ 2-st yl e key bo ard o r e xtern al numeri c k eypa d
connects to the PS/2 keyboard connector.
An external PS/2-compatible mouse connects to the PS/2
mouse connector.
4 Dell Latitude C/Port II APR System Information Guide
Page 7
External I/O Connectors
A serial device, such as a serial mouse or external modem,
connects to the serial port connector.
A network interface cable connects to the NIC connector.
A parallel device, such as a printer, connects to the parallel
port connector.
An external monitor connects to the video connector.
The AC adapter that came with the APR connects to the AC
adapter connector.
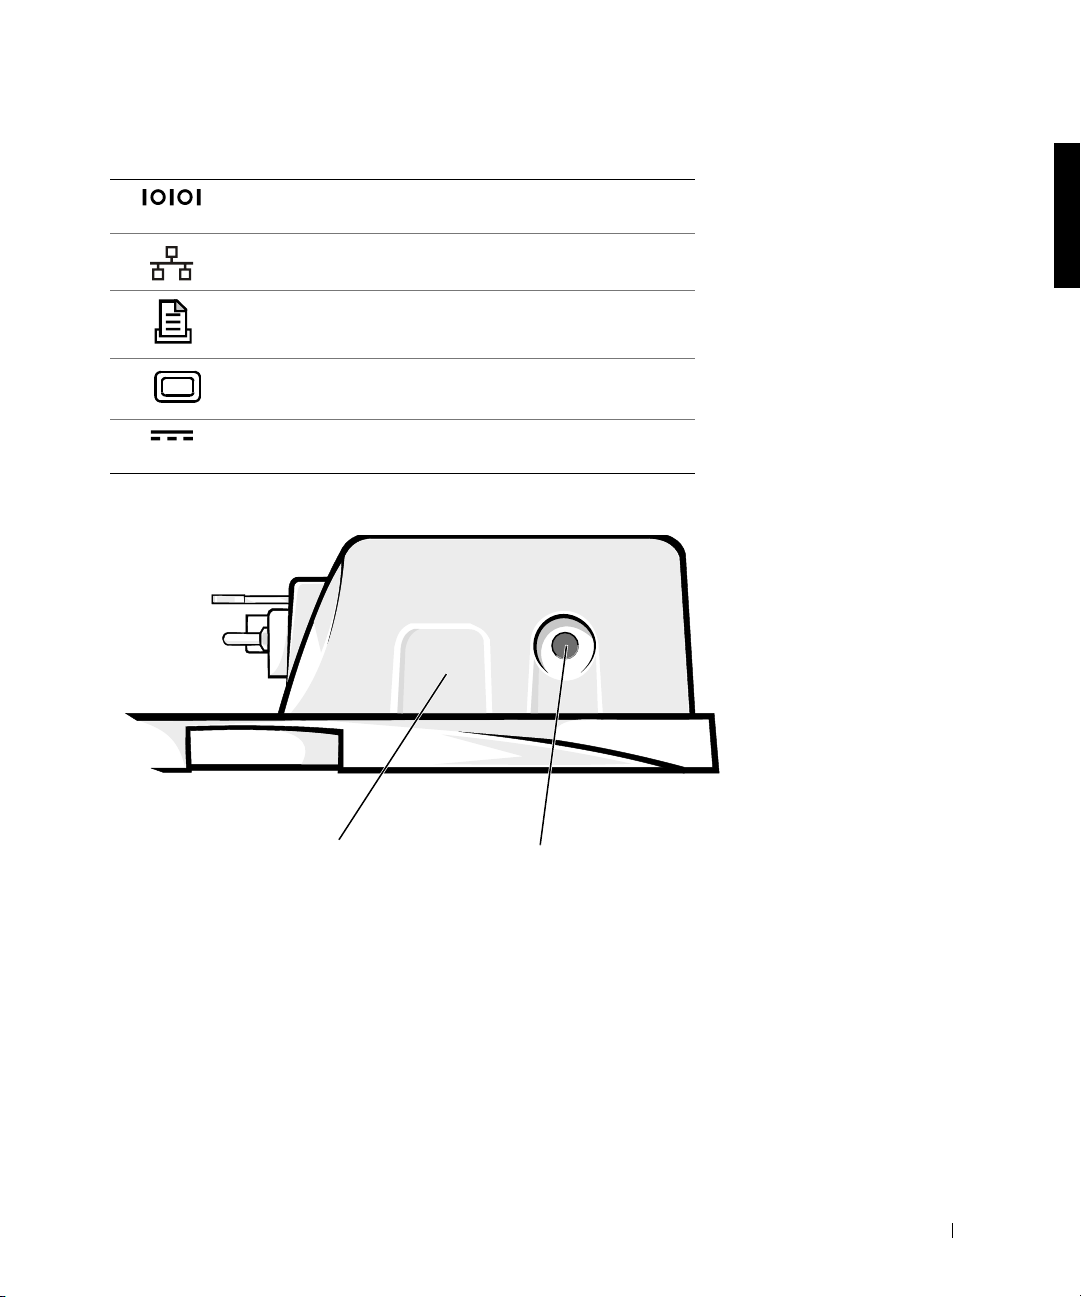
Audio Connectors and Infrared Sensor
infrared sensor
audio line-out connector
Dell Latitude C/Port II APR System Information Guide 5
Page 8
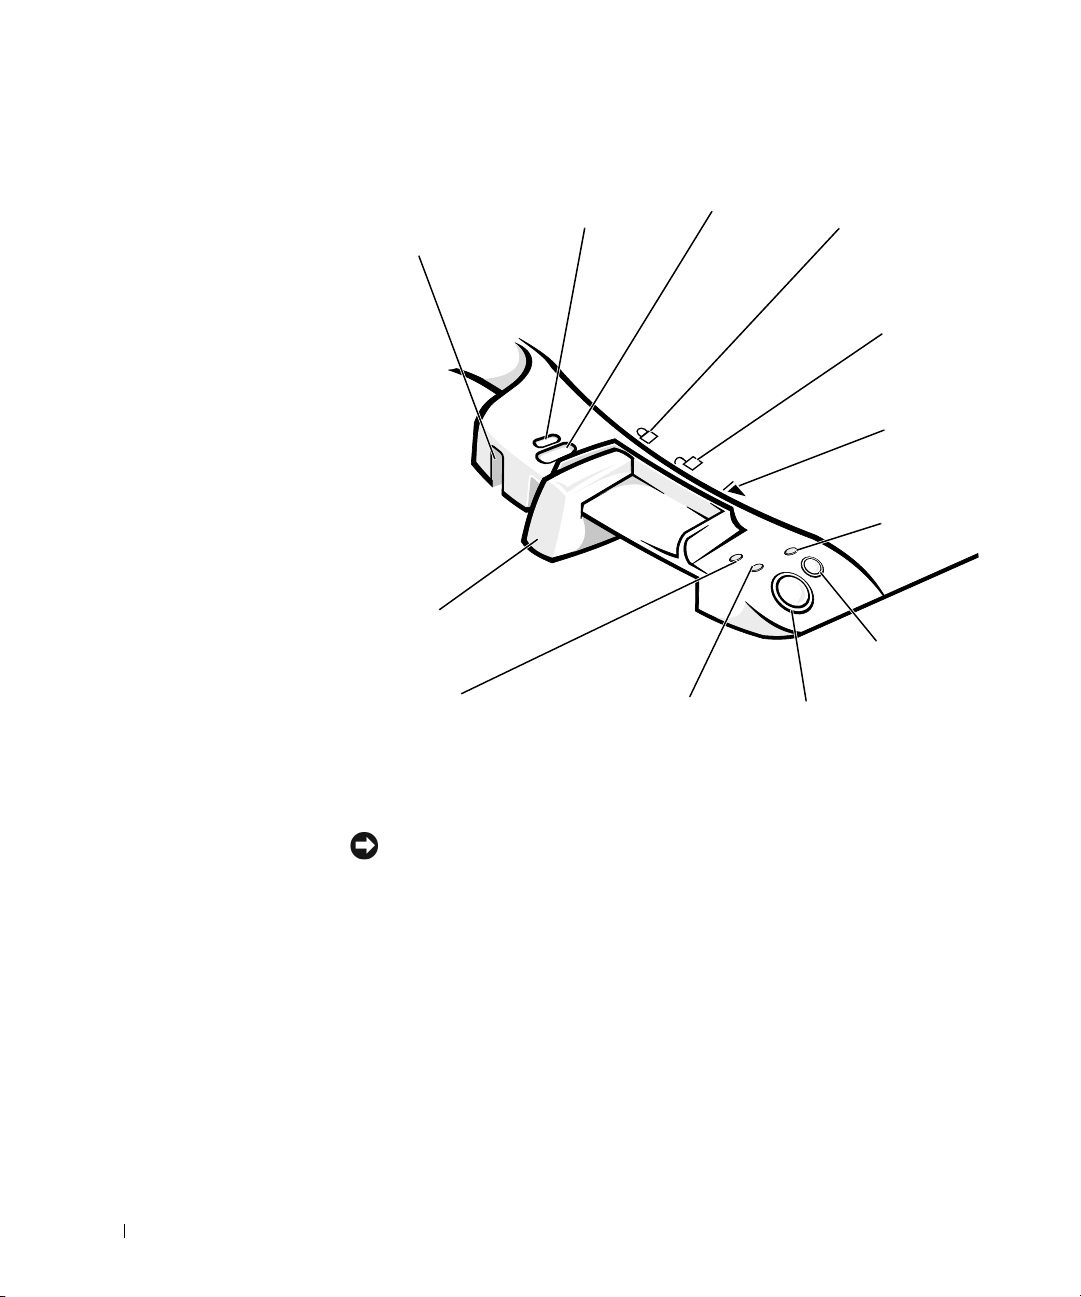
Docking Control Base Controls and Indicators
www.dell.com | support.dell.com
security lock
slot (not on all
devices)
eject/
locking
lever
drive access
indicator
security lock
slot
padlock
slot
power
indicator
locked
position
unlocked
position
eject
position
docking
indicator
undock request
button
power button
Monitor Stand
NOTICE: The stand supports monitors that weigh up to 45.3 kilograms (kg)
(100 pounds [lb]). Heavier monitors may damage the stand
device.
6 Dell Latitude C/Port II APR System Information Guide
, computer, and docking
Page 9
Docking Device With the Monitor Stand
monitor
stand
docking device
computer
NOTE: Be sure that the back legs on the monitor stand engage the slots on
either side of the docking control base.
docking control base
Before Docking the Computer
If your computer is running the Microsoft® Windows® 9x, Windows NT®,
or Windows Millennium (Me) operating system, you must first check your
computer for existing docking drivers. If your computer does not have the
docking drivers, install them before you dock the computer for the first
time. To install the docking drivers, perform the steps in “Installing the
Docking Drivers.”
Dell Latitude C/Port II APR System Information Guide 7
Page 10

www.dell.com | support.dell.com
NOTE: If your computer is running the Windows XP or Windows 2000
operating system
to perform the steps in
Computer.
, the drivers are installed automatically and you do not need
“Installing the Docking Drivers.” Go to “Docking Your
”
Check Your Computer for Existing Docking Drivers
1 Double-click My Computer.
2 Double-click Control Panel.
3 Double-click Add/Remove Programs.
4 Locate the correct docking drivers from the list of programs.
For Windows 9x and Windows Me, check for the driver with Quick
Install in the name. For example: Dell Dock Quick Install for
Windows.
For Windows NT, check for NT Softex Docking Services.
If your computer does not have the docking drivers, go to the next section,
“Installing the Docking Drivers.” If your computer has the docking drivers,
go to “Docking Your Computer.”
Installing the Docking Drivers
You can install your docking drivers in one of the following ways:
• Install the drivers from the ResourceCD or Drivers and Utilities CD
that came with your computer or docking device.
• Download the drivers from the Dell support website.
Installing the Docking Drivers From the ResourceCD or Drivers and
Utilities CD
1 Insert the ResourceCD or Drivers and Utilities CD into the CD drive.
In most cases, the CD should start running automatically. If it does
not, start Windows
Explorer, click your CD drive directory to display
the CD contents, and then double-click the autorcd application file. If
a welcome screen appears, click Next. The first time that you run the
CD, it might prompt you to install some setup files. Click OK and
follow the instructions on the screen to continue.
8 Dell Latitude C/Port II APR System Information Guide
Page 11

2 From the Language pull-down menu on the toolbar, select your
preferred language for the driver (if available).
A welcome screen appears.
3 Click Next.
4 Under Search Criteria, select the appropriate categories from the
System Model and Operating System pull-down menus.
If your system is running Windows 9x or Windows Me, select System
Utilities from the Device Type pull-down menu, and then select
Drivers from the Topic pull-down menu.
If your system is running Windows NT, select System Utilities from the
Device Type pull-down menu, and then select Utilities from the Topic
pull-down menu.
A link or links appear(s) for the specific drivers or utilities used by your
computer.
5 If your system is running Windows 9x or Windows Me, click the link for
the Dell Dock QuickInstall utility.
The Dell Dock QuickInstall file is a utility that installs the required
docking drivers on your computer.
If your computer is running Windows NT, click the link for Softex
Docking Services.
6 Click the Install button to start the automatic installation. At the
welcome screen, follow the screen prompts to complete the
installation.
NOTE: Some ResourceCDs may require users to navigate through folders to
obtain the correct driver. For complete instructions on reinstalling drivers, see
your User’s Guide.
Installing the Docking Drivers From the Dell Support Website
1 Go to the Dell support website at http://support.dell.com. If you are
visiting the website for the first time, specify your country by clicking
the map that appears.
The Welcome to support.dell.com page opens.
Dell Latitude C/Port II APR System Information Guide 9
Page 12

2 Enter your docking device information, and then click Go!
Click Downloads For Your Dell.
The Downloads For Your Dell window appears, including a short form
for you to fill out.
3 Enter your system service tag number, or select your Dell system.
4 Select your operating system and operating system language.
5 Select System and Configuration Utilities as your download category.
6 Click Go!.
www.dell.com | support.dell.com
7 If your computer is running Windows 9x or Windows Me, locate and
click the link for the Dell Dock QuickInstall utility.
If your computer is running Windows NT, locate and click the link for
Softex Docking Services.
8 Follow the instructions on the screen to download and install the
required drivers.
9 After you download the files and before you install the drivers, make
sure to view the readme.txt file that is included in the downloaded files
for important information about the installation.
Docking Your Computer
If you attach a monitor to the docking device and turn the monitor on, the
screen image appears on the monitor. To switch the image to the computer
display, or to both the monitor and the computer display, press
<Fn><F8>.
When you dock the computer to the docking device and turn the computer
on, the green power light on the docking control base lights up (see
“Docking Control Base Controls and Indicators”).
NOTICE: To avoid losing data, save any open files before you dock the
computer.
Save all files, close and exit all application programs, exit the operating
1
system, and turn off the computer.
NOTICE: To avoid damaging the docking connector, open the docking panel
door before you attempt to dock the computer to the docking device.
10 Dell Latitude C/Port II APR System Information Guide
Page 13
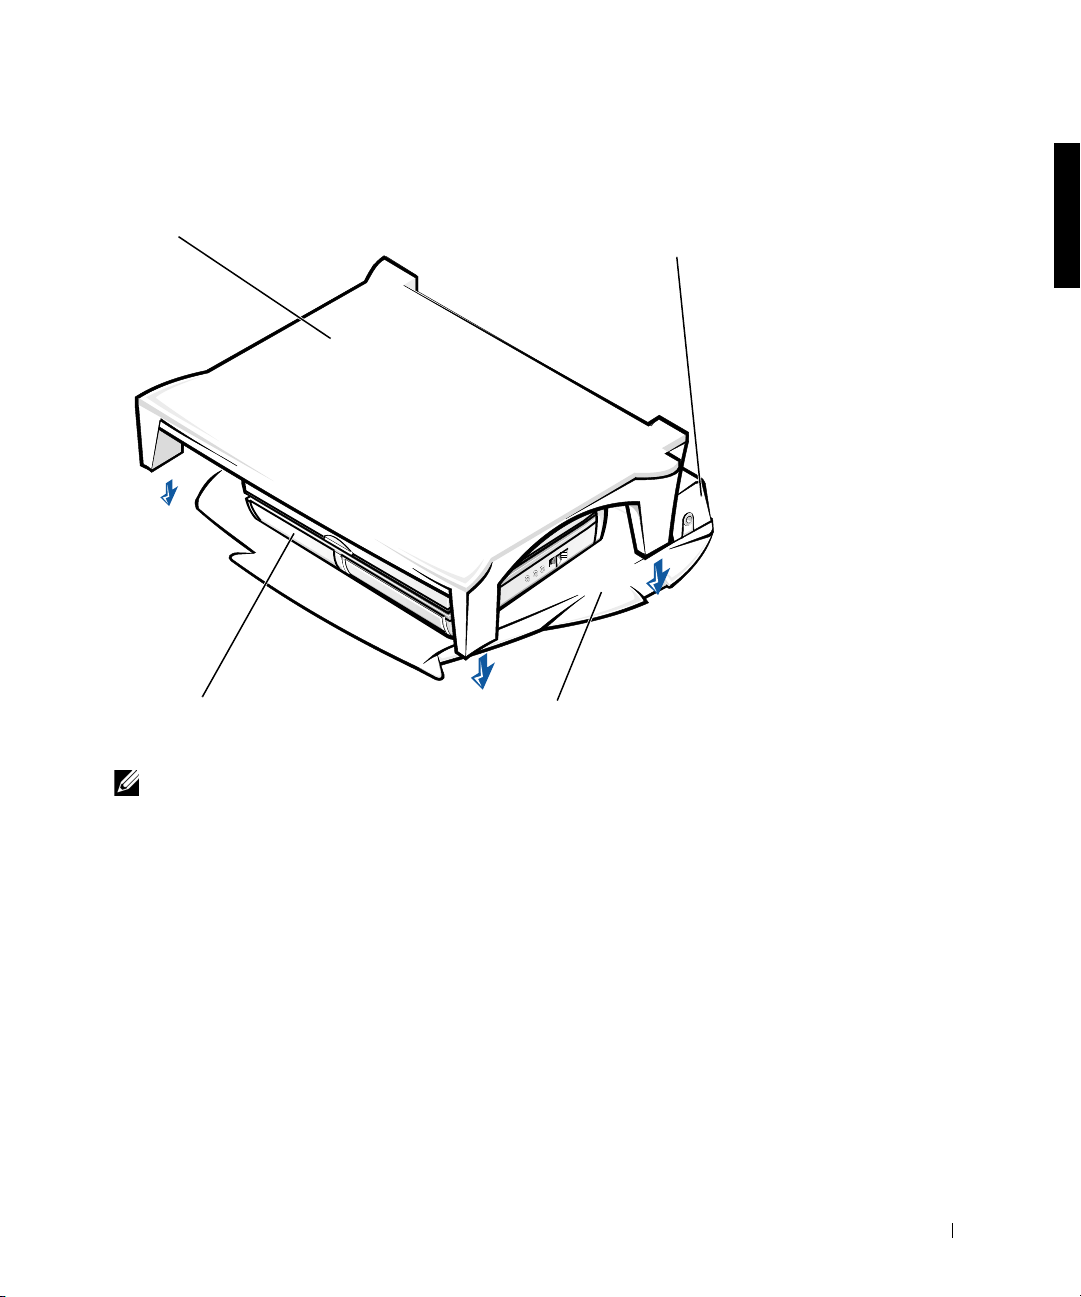
2 If the computer has a docking panel door, open the docking panel door
on the back of the computer.
Docking Panel Door on the Computer
computer
docking panel
door (not on all
computers)
If you are using the docking device with a monitor stand, close the
3
computer display.
4 Ensure that the eject/locking lever is in the unlocked position.
5 Dock the computer to the docking device as follows:
Dell Latitude C/Port II APR System Information Guide 11
Page 14
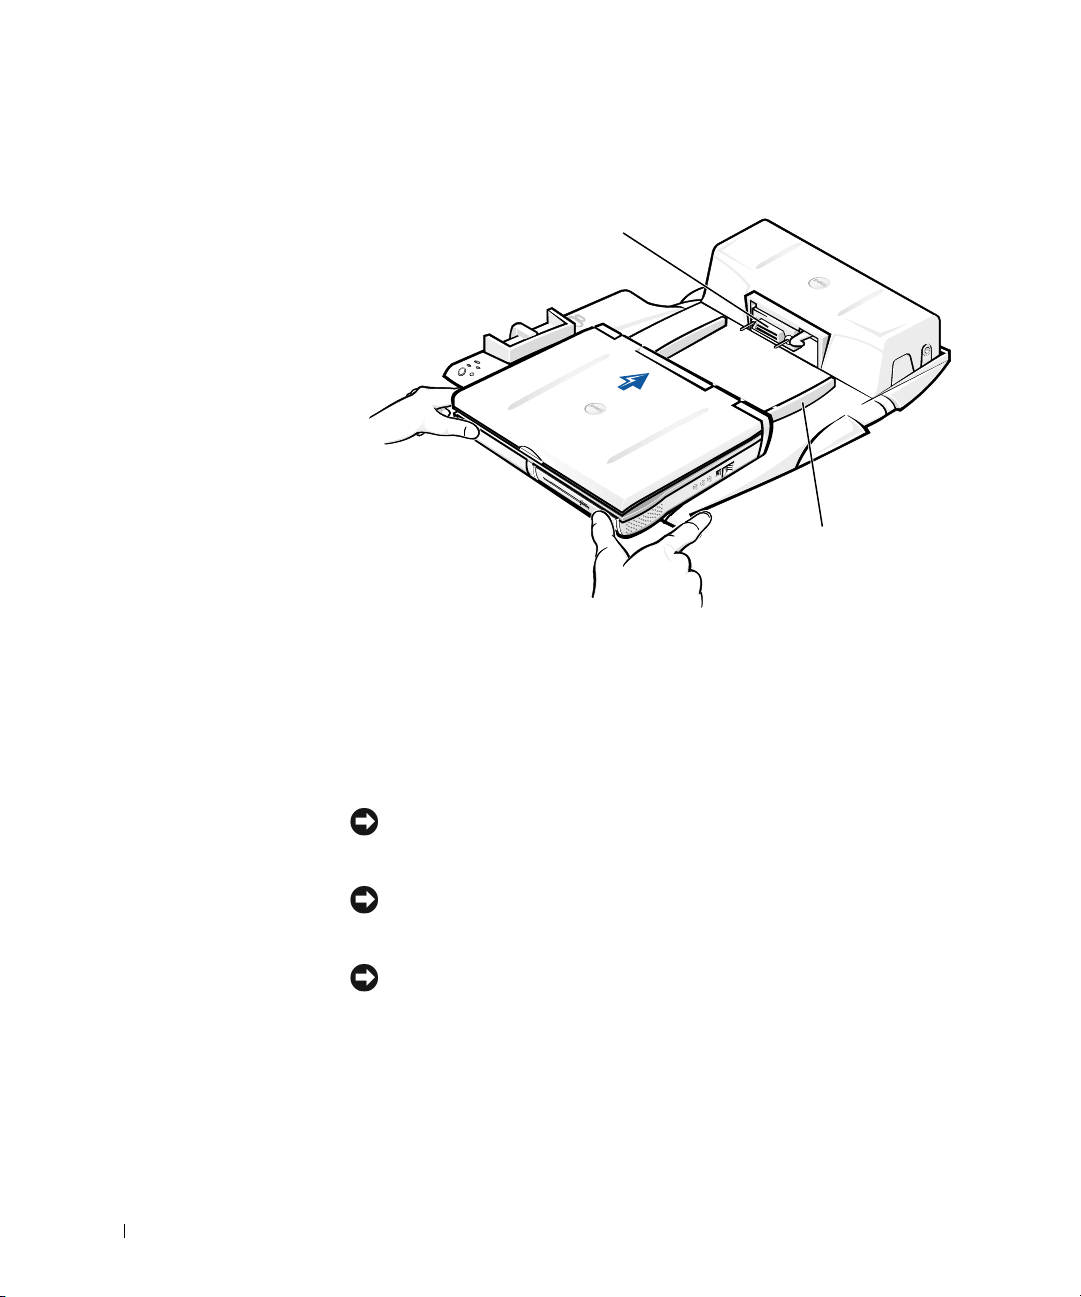
www.dell.com | support.dell.com
Docking the Computer
docking connector
alignment rails (2)
a Horizontally center the computer on the APR platform, with the
back of the computer facing the docking device docking
connector, as shown in “Docking the Computer.”
b Slide the computer toward the connector until you feel the
grooves on the bottom of the computer engage with the alignment
rails.
NOTICE: If you attempt to push the computer all the way into the APR
without engaging the alignment rails, you may irreparably damage the docking
connector on the computer.
NOTICE: Do not pick up the computer or the docking device separately when
they are connected because you may damage the connectors on the computer
and the docking device.
NOTICE: If you are using a monitor with the monitor stand
monitor from the stand before moving the docking control base into place.
c Gently push the computer forward until the docking connector is
fully engaged.
12 Dell Latitude C/Port II APR System Information Guide
, remove the
Page 15

Docking for the First Time With Windows XP and Windows 2000
1 Dock and turn on your computer.
2 Press <F2> during the system boot routine to view the system setup
program.
3 Set Docking IRQ to Optimized.
4 Set Universal Connect to Enabled.
5 Exit the system setup program.
Your system will continue the boot process.
In Windows 2000, the Add New Hardware Wizard appears.
NOTE: If your computer is running Windows XP, the operating system
automatically installs the drivers. If your computer is running Windows 2000,
the Add New Hardware Wizard automatically installs your drivers.
Docking for the First Time With Windows Me
1 Dock and turn on your computer.
2 Press <F2> during the system boot routine to view the system setup
program.
3 Set Docking IRQ to Optimized.
4 Set Universal Connect to Enabled.
5 Exit the system setup program.
Your system will continue the boot process.
The Add New Hardware Wizard appears.
6 Select Search for the Best Driver for Your Device (Recommended)
and click Next.
7 Click Next.
8 Follow the prompts on the Add New Hardware Wizard.
9 Whenever prompted, select Search for the Best Driver for Your
Device (Recommended) and click Next.
10 Continue to follow the prompts to complete the installation.
The Windows desktop appears and the installation is complete.
Dell Latitude C/Port II APR System Information Guide 13
Page 16

www.dell.com | support.dell.com
Docking for the First Time With Windows NT 4.0
1 Dock and turn on your computer.
2 Either press <F2> during the system boot routine, or press
<Fn><F1> after your computer boots to view the system setup
program.
3 Set Docking IRQ to Optimized.
4 Set Universal Connect to Enabled.
5 Exit the system setup program.
6 Press <Ctrl><Alt><Del> to log on.
The Docking Station Setup window appears and indicates that the
computer must be undocked to continue.
7 Click OK and wait for the computer to turn off.
8 Undock the computer (see “Undocking the Computer”).
The computer restarts automatically. If it does not, turn on the
computer.
9 Click Start and select Shut Down.
10 Wait for the computer to turn off completely and redock the computer
to the docking device.
The computer restarts automatically. If it does not, turn on the
computer.
11 Press <Ctrl><Alt><Del> to log on.
The computer automatically detects new devices.
12 When prompted, select Install System Provided Driver for the
Selected Device (Recommended) and click OK.
13 Click Continue at the Windows NT Setup window.
14 Select Install System Provided Driver for the Selected Device
(Recommended) and click OK.
15 Select the name of your network interface controller (NIC) from the
drop down menu.
14 Dell Latitude C/Port II APR System Information Guide
Page 17

16 Select whether the network adapter should obtain an IP address from a
server, or whether an IP address is specified.
If you do not know what to select, see your system administrator.
17 Follow the prompts to complete the installation.
The Windows desktop appears and the installation is complete.
The computer cannot enter suspend-to-disk mode while docked.
Docking for the First Time With Windows 98
1 Dock and turn on your computer.
2 Either press <F2> during the system boot routine, or press
<Fn><F1> after your computer boots to view the system setup
program.
3 Set Docking IRQ to Optimized.
4 Set Universal Connect to Enabled.
5 Exit the system setup program.
The computer detects new hardware.
6 Click OK at the Configuration Setup window.
The Add New Hardware Wizard appears.
7 Click Next.
8 Select Search for the Best Driver for Your Device (Recommended)
and click Next.
9 Remove the check-mark next to each option and click Next.
A window appears, indicating that Windows is ready to install the best
driver for your device.
10 Follow the prompts on the Add New Hardware Wizard.
11 Whenever prompted, select Search for the Best Driver for Your
Device (Recommended) and click Next.
12 Continue to follow the prompts to complete the installation.
The Windows desktop appears and the installation is complete.
Dell Latitude C/Port II APR System Information Guide 15
Page 18

www.dell.com | support.dell.com
Docking for the First Time With Windows 95
1 Dock and turn on your computer.
2 Either press <F2> during the system boot routine, or press
<Fn><F1> after your computer boots to view the system setup
program.
3 Set Docking IRQ to Optimized.
4 Set Universal Connect to Enabled.
5 Exit the system setup program.
The computer automatically detects new hardware.
6 Click Yes at the System Settings Change window.
The computer restarts and automatically detects new hardware.
7 Click OK at the Network window.
8 Select the Identification tab at the next Network window.
9 Enter a Computer Name and Workgroup that will identify your
computer on the network, and click Close.
If you are unsure what Computer Name and Workgroup to enter,
check with your System Administrator.
NOTE: You must enter a Computer Name and Workgroup to proceed with the
driver installation.
The computer automatically copies files and builds a driver
information database.
10 Click OK at the Configuration Setup window.
11 Follow the prompts to complete the installation.
The Windows desktop appears and the installation is complete.
NOTE: To use the USB connectors, you must install the USB supplement from
your ResourceCD in the Win95\OSUpdate directory. If you install the USB
supplement, your computer cannot enter suspend mode. Dell recommends that
you do not install the USB supplement unless you intend to use USB devices.
16 Dell Latitude C/Port II APR System Information Guide
Page 19

Updating Drivers in Windows XP and Windows 2000
To update drivers in Windows XP and Windows 2000:
1 Right-click My Computer and click Manage. (In Windows XP, click
the Start button to access My Computer. In Windows 2000, My
Computer is located on the Windows desktop.)
2 In the Computer Management window, click Device Manager, and
double-click Network adapters.
3 Double-click 3Com 3C920 Integrated Fast Ethernet Controller.
4 Click the Driver tab.
5 Click Update Driver... and follow the prompts.
Updating Drivers in Windows Me
To update drivers in Windows Me:
1 Right-click My Computer on the desktop and click Properties.
2 In the System Properties window, click the Device Manager tab, and
double-click Network adapters.
3 Double-click 3Com 3C920 Integrated Fast Ethernet Controller.
4 Click the Driver tab.
5 Click Update Driver... and follow the prompts.
Dell Latitude C/Port II APR System Information Guide 17
Page 20
www.dell.com | support.dell.com
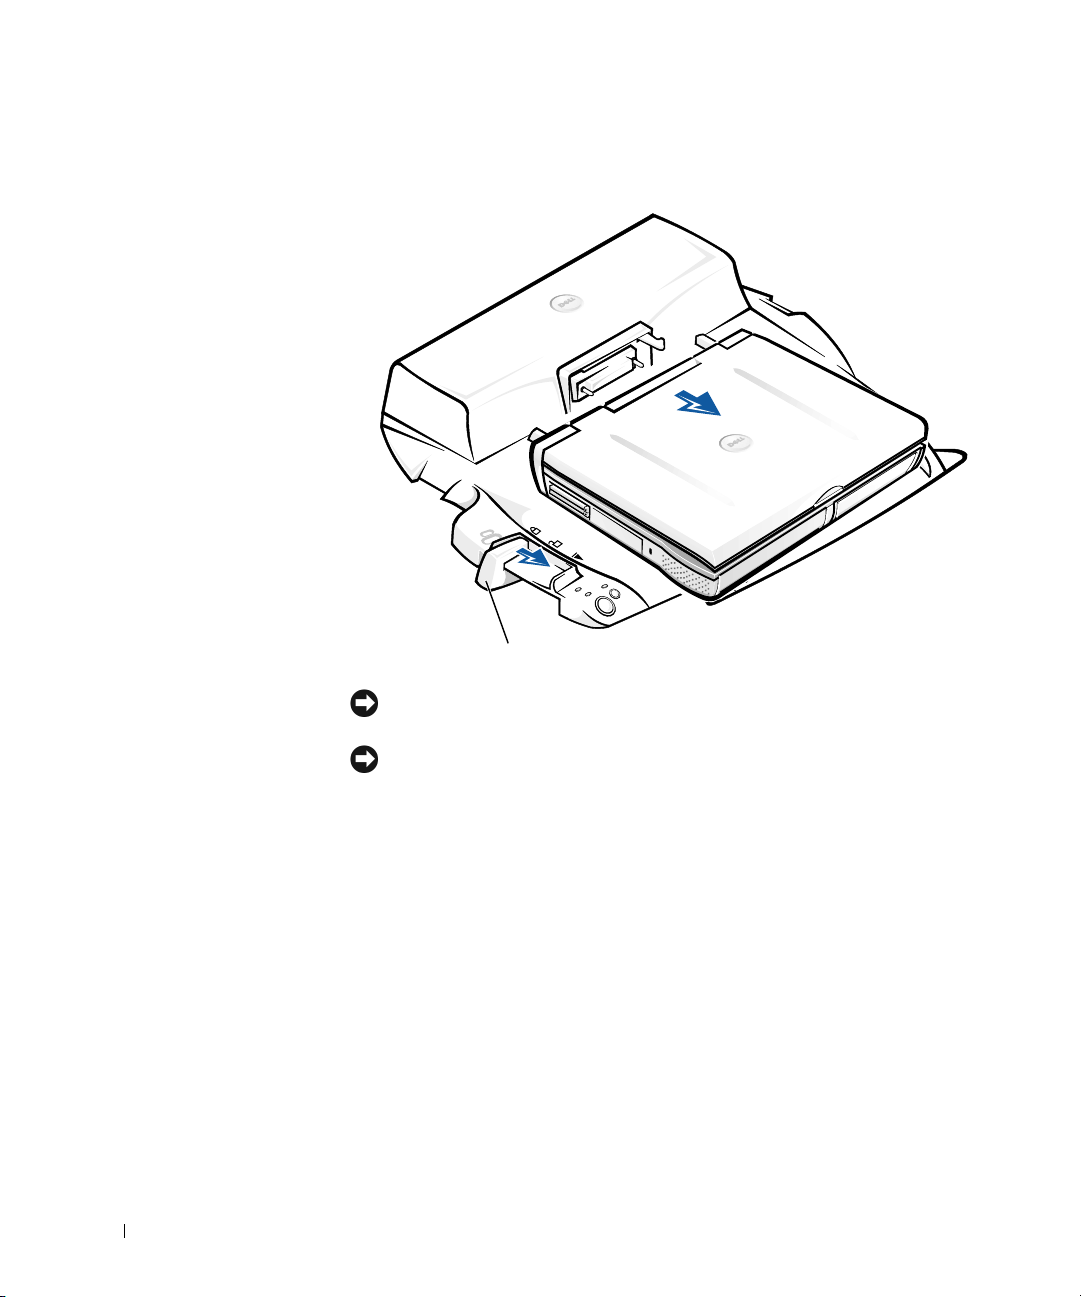
Undocking the Computer
eject/locking lever
NOTICE: If the computer does not have power from a battery, the computer
turns off when you undock it
, and you will lose all unsaved data.
NOTICE: Never undock the computer without first preparing the computer. If
you undock before preparing the computer
may not recover normal operation for several minutes
To prepare the computer for undocking, perform one of these methods:
• Press <Fn><Esc> on the computer's keyboard (or
<Scroll Lock><Esc> on an external keyboard).
Wait a few seconds for the power light on the computer to turn off.
• In Windows XP, click the Start button, and then click Undock
Computer.
In Windows 95, Windows 98, Windows Me, or Windows 2000, click the
Start button, and then click Eject PC.
In Windows NT, click the docking icon on the taskbar, and then click
Undock to place the computer in suspend mode.
18 Dell Latitude C/Port II APR System Information Guide
, you will lose data and the computer
, if at all.
Page 21

Wait a few seconds for the power light on the computer to turn off.
• Press the undock request button on the docking control base (see the
figure “Docking Control Base Controls and Indicators”). Wait for the
green docking light to turn off.
Securing the C/Port II APR
Security Features
The docking device has the following security features:
• An eject/locking lever that allows you to secure and eject your
computer. The back position secures the computer to the C/Port II
APR. The middle position allows you to use the docking device
without securing it. The front position ejects the computer from the
docking device. Push the eject/locking lever to the back position to use
the padlock security lock and the security lock slot.
• A spring-loaded latch on the front of the base that fits into a security
slot on the bottom of the computer secures the computer to the
docking control base. Not all Dell computers have the security slot.
• A secured media-bay eject button that blocks removal of media bay
devices.
• An immobilized catch latch to deter unauthorized computer removal.
Securing the C/Port II APR
Use one of the following methods to secure the docking device:
• Use a padlock alone or a padlock and looped security cable with the
padlock slot (see “Docking Control Base Controls and Indicators”) on
the docking device.
A padlock alone blocks the eject lever and makes it difficult to detach
the computer from the docking device.
A security cable looped around a stationary object and used in
conjunction with the padlock can help prevent the unauthorized
movement of the computer and the C/Port II APR.
Dell Latitude C/Port II APR System Information Guide 19
Page 22

• Attach a commercially available antitheft device to the security lock
slot (see “Docking Control Base Controls and Indicators”) on the
docking device.
Antitheft devices usually include a segment of metal-stranded cable
with an attached locking device and associated key. Dell recommends
that you use a Kensington lock. For instructions on installing this kind
of antitheft device, see the documentation that accompanied the
device.
Dell Diagnostics
www.dell.com | support.dell.com
The Dell Diagnostics that came with your Dell Latitude computer includes
tests that help you troubleshoot the controllers in your docking device.
The subtests in the Network Interface test group of the Dell Diagnostics
verify the basic operation of the network controller in the docking device.
They test the controller's internal functions, including read and write access
to its registers and internal transmit and receive (loopback) capability.
The subtests in the Serial/Infrared Ports test group check the docking
device's interface with external devices (such as a serial mouse or a printer).
The subtests in this test group are not intended as a diagnostic test for the
external device itself.
The subtests in the USB test group check the docking device's interface
with external devices (such as a mouse). The subtests in this test group are
not intended as a diagnostic test for the external device itself.
For complete instructions on using the Dell Diagnostics, see your
computer's User's Guide.
20 Dell Latitude C/Port II APR System Information Guide
Page 23

Technical Specifications
Technical Specifications
Physical
Height:
With monitor stand 10.2 cm (4.0 inches)
Standalone 5.8 cm (2.3 inches)
Depth:
With monitor stand 39.0 cm (15.4 inches)
Standalone 35.8 cm(14.1 inches)
Width:
With monitor stand 40.9 cm (16.1 inches)
Standalone 37.5 cm (14.8 inches)
Weight:
With monitor stand 3.0 kg (6.5 lb)
Standalone 1.6 kg (3.5 lb)
Power
AC Adapter Input:
Voltage 100–200VAC, 50–60 Hz
Amperage 1.5 A
APRII Input:
Voltage requires 20 VDC from AC Adapter
Amperage 3.5 A
Dell Latitude C/Port II APR System Information Guide 21
Page 24

www.dell.com | support.dell.com
Technical Specifications
I/O
Serial (DTE) 16550-compatible, 16-byte buffer connector
Parallel unidirectional, bidirectional, or ECP connector
PS/2 two mini-DIN connectors
USB two USB-compliant connectors
Infrared infrared sensor compatible with IrDA Standards
1.1 (Fast IR) and 1.0
Audio line out audio jack (for optional headphones)
Video one connector
Network one RJ45 connector
Docking (to connect to
one connector
computer)
Ethernet Network Controller
Chip set 3Com
®
3C920; 10/100 BASE-TX
(PC99-compliant)
Data bus width 32-bit PCI host bus interface
IRQ IRQ10
22 Dell Latitude C/Port II APR System Information Guide
Page 25
Safety and EMC Instructions: Portable
Computers
The following information defines the meaning of additional symbols used
only in the Safety and Electromagnetic Compatibility (EMC) Instructions.
Risk of explosion Aircraft
Risk of fire Use of this feature may be prohibited
on aircraft
Risk of electric shock
Safety Instructions
General
• When setting up the APR for work, place it on a level
surface.
• Do not attempt to service the APR yourself unless you
are an authorized service technician. Always follow
installation instructions closely.
• If you use an extension power cable with your AC
adapter, ensure that the total ampere rating of the
products plugged in to the extension power cable does
not exceed the ampere rating of the extension cable.
• Do not push objects into air vents or openings of your
computer. Doing so can cause fire or electric shock by
shorting out interior components.
Dell Latitude C/Port II APR System Information Guide 23
Page 26

www.dell.com | support.dell.com
• Place the AC adapter in a ventilated area, such as a desk
top or on the floor, when you use it to run the computer
or to charge the battery. Do not cover the AC adapter
with papers or other items that will reduce cooling; also,
do not use the AC adapter inside a carrying case.
• Do not use your computer in a wet environment, for
example, near a bath tub, sink, or swimming pool or in a
wet basement.
• To help avoid the potential hazard of electric shock, do
not connect or disconnect any cables or perform
maintenance or reconfiguration of this product during
an electrical storm. Do not use your computer during
an electrical storm unless all cables have been
disconnected and the computer is operating on battery
power.
• Use only the AC adapter and batteries that are
approved for use with this APR as indicated in this
document. Use of another type of battery pack or AC
adapter may risk fire or explosion.
• Before you clean your docking station, turn it off and
disconnect the AC adapter from the electrical outlet.
Clean your docking station with a soft cloth dampened
with water. Do not use liquid or aerosol cleaners, which
may contain flammable substances.
24 Dell Latitude C/Port II APR System Information Guide
Page 27
Power (Safety Instructions)
• Use only the Dell-provided AC adapter approved for
use with this APR. Use of another AC adapter may
cause a fire or explosion.
• Before you connect the APR to an electrical outlet,
check the AC adapter voltage rating to ensure that the
required voltage and frequency match the available
power source.
• To remove power from the computer, turn it off and
disconnect the AC adapter from the electrical outlet.
• To help prevent electric shock, plug the AC adapter and
peripheral power cables into properly grounded power
sources. These power cables may be equipped with
three-prong plugs to provide an earth grounding
connection. Do not use adapter plugs or remove the
grounding prong from the power cable plug. If you use a
power extension cable, use the appropriate type, twoprong or three-prong, to mate with the AC adapter
power cable.
• Be sure that nothing rests on your AC adapter’s power
cable and that the cable is not located where it can be
tripped over or stepped on.
• If you are using a multiple-outlet power strip, use
caution when plugging the AC adapter’s power cable
into the power strip. Some power strips may allow you
to insert the plug incorrectly. Incorrect insertion of the
power plug could result in permanent damage to your
computer, as well as risk of electric shock and/or fire.
Ensure that the ground prong of the power plug is
inserted into the mating ground contact of the power
strip.
Dell Latitude C/Port II APR System Information Guide 25
Page 28

www.dell.com | support.dell.com
Regulatory Notices
Electromagnetic Interference (EMI) is any signal or emission, radiated in
free space or conducted along power or signal leads, that endangers the
functioning of a radio navigation or other safety service or seriously
degrades, obstructs, or repeatedly interrupts a licensed radio
communications service. Radio communications services include but are
not limited to AM/FM commercial broadcast, television, cellular services,
radar, air-traffic control, pager, and Personal Communication Services
(PCS). These licensed services, along with unintentional radiators such as
digital devices, including computers, contribute to the electromagnetic
environment.
Electromagnetic Compatibility (EMC) is the ability of items of electronic
equipment to function properly together in the electronic environment.
While this computer has been designed and determined to be compliant
with regulatory agency limits for EMI, there is no guarantee that
interference will not occur in a particular installation. If this equipment
does cause interference with radio communications services, which can be
determined by turning the equipment off and on, you are encouraged to try
to correct the interference by one or more of the following measures:
• Reorient the receiving antenna.
• Relocate the computer with respect to the receiver.
• Move the computer away from the receiver.
• Plug the computer into a different outlet so that the computer and the
receiver are on different branch circuits.
If necessary, consult a Dell Technical Support representative or an
experienced radio/television technician for additional suggestions.
Dell computers are designed, tested, and classified for their intended
electromagnetic environment. These electromagnetic environment
classifications generally refer to the following harmonized definitions:
• Class A is typically for business or industrial environments.
• Class B is typically for residential environments.
26 Dell Latitude C/Port II APR System Information Guide
Page 29

Information Technology Equipment (ITE), including devices, expansion
cards, printers, input/output (I/O) devices, monitors, and so on, that are
integrated into or connected to the computer should match the
electromagnetic environment classification of the computer.
A Notice About Shielded Signal Cables: Use only shielded cables for
connecting devices to any Dell device to reduce the possibility of
interference with radio communications services. Using shielded cables
ensures that you maintain the appropriate EMC classification for the
intended environment. For parallel printers, a cable is available from Dell.
If you prefer, you can order a cable from Dell on the World Wide Web at
http://accessories.us.dell.com/.
Most Dell computers are classified for Class B environments. However, the
inclusion of certain options can change the rating of some configurations to
Class A. To determine the electromagnetic classification for your computer
or device, refer to the following sections specific for each regulatory agency.
Each section provides country-specific EMC/EMI or product safety
information.
CE Notice (European Union)
Marking by the symbol indicates compliance of this Dell computer to
the EMC Directive and the Low Voltage Directive of the European Union.
Such marking is indicative that this Dell system meets the following
technical standards:
• EN 55022 — “Limits and Methods of Measurement of Radio
Interference Characteristics of Information Technology Equipment.”
• EN 55024 — “Information technology equipment - Immunity
characteristics - Limits and methods of measurement.”
• EN 61000-3-2 — “Electromagnetic compatibility (EMC) - Part 3:
Limits - Section 2: Limits for harmonic current emissions (Equipment
input current up to and including 16 A per phase).”
• EN 61000-3-3 — “Electromagnetic compatibility (EMC) - Part 3:
Limits - Section 3: Limitation of voltage fluctuations and flicker in
low-voltage supply systems for equipment with rated current up to and
including 16 A.”
• EN 60950 — “Safety of Information Technology Equipment.”
Dell Latitude C/Port II APR System Information Guide 27
Page 30

NOTE: EN 55022 emissions requirements provide for two classifications:
• Class A is for typical commercial areas.
• Class B is for typical domestic areas.
This Dell device is classified for use in a typical Class B domestic
environment.
A "Declaration of Conformity" in accordance with the preceding directives
and standards has been made and is on file at Dell Computer Corporation
Products Europe BV, Limerick, Ireland.
www.dell.com | support.dell.com
EN 55022 Compliance (Czech Republic Only)
This device belongs to Class B devices as described in EN 55022, unless
it is specifically stated that it is a Class A device on the specification
label. The following applies to devices in Class A of EN 55022 (radius of
protection up to 30 meters). The user of the device is obliged to take all
steps necessary to remove sources of interference to telecommunication
or other devices.
Pokud není na typovém štitku počítače uvedeno, že spadá do třídy
A podle EN 55022, spadá automaticky do třídy B podle EN 55022.
Pro zařízení zařazená do třídy A (ochranné pásmo 30m) podle EN
55022 platí následující. Dojde−li k rušení telekomunikačních nebo
jinych zařízení, je uživatel povinen provést taková opatření, aby
rušení odstranil.
Polish Center for Testing and Certification Notice
The equipment should draw power from a socket with an attached
protection circuit (a three-prong socket). All equipment that works together
(computer, monitor, printer, and so on) should have the same power supply
source.
The phasing conductor of the room’s electrical installation should have a
reserve short-circuit protection device in the form of a fuse with a nominal
value no larger than 16 amperes (A).
28 Dell Latitude C/Port II APR System Information Guide
Page 31

To completely switch off the equipment, the power supply cable must be
removed from the power supply socket, which should be located near the
equipment and easily accessible.
A protection mark "B" confirms that the equipment is in compliance with
the protection usage requirements of standards PN-93/T-42107 and PN-EN
55022: 1996.
Wymagania Polskiego Centrum Badań i Certyfikacji
Urządzenie powinno być zasilane z gniazda z przyłączonym obwodem
ochronnym (gniazdo z kołkiem). Współpracujące ze sobą urządzenia
(komputer, monitor, drukarka) powinny być zasilane z tego samego
źródła.
Instalacja elektryczna pomieszczenia powinna zawierać w przewodzie
fazowym rezerwową ochronę przed zwarciami, w postaci bezpiecznika
o wartości znamionowej nie większej ni 16A (amperów).
W celu całkowitego wyłączenia urządzenia z sieci zasilania, naley
wyjąć wtyczkę kabla zasilającego z gniazdka, które powinno
znajdować się w pobliu urządzenia i być łatwo dostępne.
Znak bezpieczeństwa "B" potwierdza zgodność urządzenia z
wymaganiami bezpieczeństwa uytkowania zawartymi w
PN−93/T−42107 i PN−EN 55022:1996.
Jeźeli na tabliczce znamionowej umieszczono informację, źe
urządzenie jest klasy A, to oznacza to, źe urządzenie w środowisku
mieszkalnym moźe powodować zaklócenia radioelektryczne. W takich
przypadkach moźna źądać od jego uźytkownika zastosowania
odpowiednich środków zaradczych.
Dell Latitude C/Port II APR System Information Guide 29
Page 32

www.dell.com | support.dell.com
Ni
Pozostałe instrukcje bezpieczeństwa
•
e naley uywać wtyczek adapterowych lub usuwać kołka
obwodu ochronnego z wtyczki. Jeeli konieczne jest uycie
przedłuacza to naley uyć przedłuacza 3−yłowego z
prawidłowo połączonym przewodem ochronnym.
• System komputerowy naley zabezpieczyć przed nagłymi,
chwilowymi wzrostami lub spadkami napięcia, uywając
eliminatora przepięć, urządzenia dopasowującego lub
bezzakłóceniowego źródła zasilania.
• Naley upewnić się, aby nic nie leało na kablach systemu
komputerowego, oraz aby kable nie były umieszczone w miejscu,
gdzie mona byłoby na nie nadeptywać lub potykać się o nie.
• Nie naley rozlewać napojów ani innych płynów na system
komputerowy.
• Nie naley wpychać adnych przedmiotów do otworów systemu
komputerowego, gdy moe to spowodować poar lub poraenie
prądem, poprzez zwarcie elementów wewnętrznych.
• System komputerowy powinien znajdować się z dala od
grzejników i źródeł ciepła. Ponadto, nie naley blokować otworów
wentylacyjnych. Naley unikać kładzenia luźnych papierów pod
komputer oraz umieszczania komputera w ciasnym miejscu bez
moliwości cyrkulacji powietrza wokół niego.
CE Mark Notice
This device complies with the requirements of the European Directive
1999/5/EC.
30 Dell Latitude C/Port II APR System Information Guide
Page 33

Pokročilý replikátor portů Dell™ Latitude™ C/Port II
Příručka k zařízení
www.dell.com | support.dell.com
Page 34

Poznámky, upozornění a výstrahy
POZNÁMKA: POZNÁMKA obsahuje dležité informace, které vám pomohou počítač lépe
využívat.
UPOZORNĚNÍ: UPOZORNNÍ ukazuje na možnost poškození hardwaru nebo ztráty dat
a sdluje vám, jak se problému vyhnout.
POZOR: Odstavec uvozený slovem POZOR označuje možnost poškození
majetku, zranění či smrtelného úrazu.
____________________
Informace v tomto dokumentu se mohou mnit bez pedchozího upozornní.
2001 Dell Computer Corporation. Všechna práva vyhrazena.
Jakákoli reprodukce bez písemného svolení společnosti Dell Computer Corporation je písn zakázána.
Dell
, logo
Ochranné známky použité v textu:
Corporation;
registrované ochranné známky společnosti Microsoft Corporation.
Jiné ochranné známky a obchodní názvy pípadn použité v tomto dokumentu mohou odkazovat na subjekty držící
práva k tmto známkám a názvy jejich výrobk. Společnost Dell Computer Corporation odmítá vlastnické zájmy
k ochranným známkám a obchodním názvm mimo své vlastní.
Tento produkt obsahuje technologie chránné autorským právem a americkými patenty k metodám a jinými právy
k intelektuálnímu vlastnictví náležejícími společnosti Macrovision Corporation a jiným vlastníkm. Používání této
technologie musí být schváleno společností Macrovision Corporation a není-li touto společností stanoveno jinak,
je povoleno pouze pro účely domácího nebo jiného omezeného zobrazování. Dekódování ani rozbor kódu nejsou
povoleny.
Říjen 2001 P/N 4G281 Rev. A01
3Com
je ochranná známka společnosti 3Com Corporation;
DELL, Latitude
a
DellWare
jsou ochranné známky společnosti Dell Computer
Microsoft, Windows
a
Windows NT
jsou
Page 35

Pokročilý replikátor port Dell™ Latitude™ C/Port II
Příručka k zařízení
Tento dokument obsahuje základní informace, informace k bezpečnosti
a zárukám a právní informace k pokročilému replikátoru port Dell Latitude
C/Port II (Advanced Port Replicator, APR) a dále informace o ostatních
dokumentech společnosti Dell, které jsou k dispozici, a zpsob jejich získání.
Ostatní dostupné dokumenty
• Aktualizace dokumentace, které mohou být dodány se základnovou
stanicí, popisují zmny základnové stanice nebo programového
vybavení. Tyto aktualizace je teba si pečíst
dokumentaci, protože aktualizace obsahují nejnovjší informace.
• Dokumentace dodávaná s ostatními volitelnými doplky zakoupenými
samostatn mimo základnovou stanici. Tato dokumentace obsahuje
informace, které jsou teba pro konfiguraci a instalaci tchto doplk
k základnové stanici.
díve
než jakoukoli jinou
Jak získat pomoc
Společnost Dell poskytuje celou adu nástroj, které mohou pomoci
v pípad, že základnová stanice nepracuje podle očekávání. Podrobnjší
informace o tchto pomocných nástrojích jsou uvedeny v oddílu „Jak získat
pomoc“ v
uživatelské píručce
k počítači.
Přehled základnové stanice
POZNÁMKA: Ped pipojením základny k síti se porate se správcem sít.
Ped pipojením počítače k základnové stanici a jeho zapnutím musí být
základna pipojena k napájecímu adaptéru. Napájecí adaptér napájí
současn základnovou stanici i počítač. Bhem práce v základnové stanici
se nabíjí baterie instalovaná v počítači.
Dell Latitude C/Port II - Píručka k pokročilému replikátoru port 33
Page 36

UPOZORNĚNÍ: K napájení používejte výhradn napájecí adaptér Dell PA-6
dodávaný se základnovou stanicí. Použijete-li jiný komerčn prodávaný
adaptér nebo adaptér od starších model počítač DELL, mže dojít
k poškození základnové stanice nebo počítače.
Panel vstupů a výstupů základnové stanice
www.dell.com | support.dell.com
2 konektory USB
konektor myši PS/2
konektor
klávesnice
PS/2
konektor
sériového
rozhraní
konektor
paralelního
rozhraní
sít’ový
konektor
konektor
zobrazovacího
zaízení
konektor
napájení
V tabulce „Externí V/V konektory“ jsou zobrazeny ikony všech konektor
umístných na zadní stran replikátoru port s popisem typ externích
zaízení, která k nim mžete pipojovat.
Externí V/V konektory
Ikona
konektoru
34 Dell Latitude C/Port II - Píručka k pokročilému replikátoru port
Popis konektoru
Ke dvojitému konektoru USB lze pipojit jedno nebo dv
zaízení USB, napíklad myš USB.
Ke konektoru klávesnice PS/2 lze pipojit externí klávesnici
PS/2 nebo externí číselnou klávesnici.
Ke konektoru myši PS/2 lze pipojit externí myš PS/2 nebo
kompatibilní myš.
Page 37

Externí V/V konektory
Ke konektoru sériového portu lze pipojit sériové zaízení,
napíklad sériovou myš nebo externí modem.
K sít’ovému konektoru lze pipojit sít’ový kabel.
Ke konektoru paralelního portu lze pipojit paralelní zaízení,
napíklad tiskárnu.
Ke konektoru zobrazovacího zaízení lze pipojit externí
monitor.
Ke konektoru napájení lze pipojit napájecí adaptér dodaný
sreplikátorem port.
Konektory pro zvuk a infračervený snímač
infračervený snímač
Dell Latitude C/Port II - Píručka k pokročilému replikátoru port 35
výstupní konektor zvuku
Page 38

Ovládací prvky a kontrolky základny
www.dell.com | support.dell.com
otvor pro bezpečnostní
oko (pouze u nkterých
zaízení)
páčka
pro uvolnní
a uzamknutí
kontrolka pístupu
k jednotce
otvor pro
bezpečnostní oko
kontrolka
napájení
otvor pro
visací zámek
vypínač
poloha
zamknuto
poloha
odemknuto
poloha
vysunutí
kontrolka
zasunutí
tlačítko
požadavku
na vysunutí
Podstavec pod monitor
UPOZORNĚNÍ: Podstavec mže nést monitor o hmotností až 45,3 kilogramu (kg).
Tžší monitory by mohly poškodit podstavec
36 Dell Latitude C/Port II - Píručka k pokročilému replikátoru port
, počítač a základnovou stanici.
Page 39

Základnová stanice s podstavcem pod monitor
podstavec pod monitor
základnová stanice
počítač
POZNÁMKA: Zkontrolujte, zda zadní nožky podstavce pod monitor zapadají
do prohlubní na obou stranách základny.
plocha základnové stanice
Před připojením počítače
Pokud počítač pracuje s operačním systémem Microsoft Windows 9x,
Windows NT
zkontrolovat, zda počítač obsahuje potebné ovladače. Pokud počítač
neobsahuje potebné ovladače pro pipojení, musíte je nainstalovat ped
prvním pipojením počítače k základn. Ovladače pro pipojení se instalují
podle postupu v kapitole „Instalace ovladač pro pipojení“.
nebo Windows Millennium (Me) je teba nejprve
Dell Latitude C/Port II - Píručka k pokročilému replikátoru port 37
Page 40

POZNÁMKA: Pokud počítač pracuje s operačním systémem Windows XP
nebo Windows 2000
kroky popsané v kapitole
, ovladače se instalují automaticky a není teba provádt
„Instalace ovladač pro pipojení“. Pejdte k části
„Pipojování počítače“.
Kontrola existujících ovladačů pro připojení v počítači
1 Poklepejte na ikonu Tento počítač (My Computer).
2 Poklepejte na ikonu Ovládací panely (Control Panel).
3 Poklepejte na ikonu Pidat nebo odebrat programy (Add/Remove
Programs).
www.dell.com | support.dell.com
4 V seznamu program vyhledejte správné ovladače pro pipojení.
U systém Windows 9x a Windows Me
hledejte ovladač se slovy
Quick Install v názvu. Napíklad: Dell Dock Quick Install for Windows.
U systému Windows NT
hledejte název NT Softex Docking Services.
Pokud počítač neobsahuje potebné ovladače pro pipojení, pejdte k další
kapitole, „Instalace ovladač pro pipojení“. Pokud počítač potebné
ovladače pro pipojení obsahuje, pejdte k části „Pipojení počítače“.
Instalace ovladačů pro připojení
Ovladače pro pipojení mžete nainstalovat následujícími zpsoby:
• Nainstalujte ovladače z disku
Utilities
(Ovladače a pomocné programy), který jste obdrželi
s počítačem nebo základnovou stanicí.
• Načtte ovladače z webového serveru technické podpory společnosti
Dell.
Instalace ovladačů z disku ResourceCD nebo z disku Drivers and
Utilities (Ovladače a pomocné programy)
1 Vložte disk
Disk CD se vtšinou spustí automaticky. Pokud se tak nestane, spust’te
Przkumník Windows
ResourceCD
, klepnutím na jednotku CD zobrazte obsah disku
CD a poklepejte na soubor autorcd. Na úvodní obrazovce klepnte na
tlačítko Next (Další). Pi prvním spuštní disku CD vás systém mže
požádat o nainstalování nkolika instalačních soubor. Klepnte na
tlačítko OK a postupujte podle pokyn na obrazovce.
ResourceCD
nebo disk
nebo z disku
Drivers and Utilities
Drivers and
do jednotky CD.
38 Dell Latitude C/Port II - Píručka k pokročilému replikátoru port
Page 41

2 V rozevírací nabídce Language (Jazyk) na panelu nástroj vyberte
nkterý z dostupných jazyk ovladače.
Program zobrazí uvítací obrazovku.
3 Klepnte na tlačítko Další (Next).
4 V rozevíracích nabídkách System Model (Model) a Operating System
(Operační systém) v oblasti Search Criteria (Kritéria hledání) vyberte
odpovídající kategorie.
Pokud počítač pracuje s operačním systémem Windows 9x nebo
Windows Me
, vyberte v rozevírací nabídce Device Type (Typ zaízení)
položku System Utilities (Pomocné programy systému) a v rozevírací
nabídce Topic (Oblast) položku Drivers (Ovladače).
Pokud počítač pracuje s operačním systémem Windows NT
, vyberte
v rozevírací nabídce Device Type (Typ zaízení) položku System Utilities
(Pomocné programy systému) a v rozevírací nabídce Topic (Oblast)
položku Utilities (Pomocné programy).
Program zobrazí odkaz nebo odkazy na konkrétní ovladače
a pomocné programy pro váš počítač.
5
Pokud počítač pracuje s operačním systémem Windows 9x nebo
Windows Me
, klepnte na odkaz na pomocný program Dell Dock
QuickInstall.
Soubor Dell Dock QuickInstall je pomocný program, který do počítače
instaluje ovladače potebné pro pipojení k zaízení.
Pokud počítač pracuje s operačním systémem Windows NT
, naleznte
a klepnte na odkaz ke službám Softex Docking Services.
6 Tlačítkem Install (Nainstalovat) spust’te automatickou instalaci.
Pokračujte podle pokyn úvodní obrazovky a instalace bude
dokončena.
POZNÁMKA: U nkterých disk ResourceCD musí uživatel hledat správný
ovladač ve složkách. Podrobné pokyny k peinstalování ovladač naleznete
v
uživatelské píručce
.
Dell Latitude C/Port II - Píručka k pokročilému replikátoru port 39
Page 42

www.dell.com | support.dell.com
Instalace ovladačů pro připojení z webového serveru technické
podpory společnosti Dell
1 Pejdte na webový server technické podpory společnosti Dell na
adrese http://support.dell.com. Pokud tento server navštvujete
poprvé, vyberte klepnutím na zobrazenou mapu svoji zemi.
Oteve se stránka Welcome to support.dell.com (Vítejte na serveru
support.dell.com).
2 Zadejte informace o svém zaízení a klepnte na píkaz Go! (Pejít).
Klepnte na položku Downloads For Your System (Stažení soubor pro
váš systém).
Počítač zobrazí okno Downloads For Your Dell s krátkým formuláem,
který musíte vyplnit.
3 Zadejte servisní číslo svého zaízení nebo vyberte zaízení Dell.
4 Vyberte operační systém a jeho jazyk.
5 Vyberte kategorii System and Configuration Utilities (Systémové
akonfigurační nástroje).
6 Klepnte na ikonu Go! (Pejít).
7
Pokud počítač pracuje s operačním systémem Windows 9x nebo
Windows Me
, naleznte a klepnte na odkaz na pomocný program
Dell Dock QuickInstall.
Pokud počítač pracuje s operačním systémem Windows NT
a klepnte na odkaz ke službám Softex Docking Services.
8 Pi načítání a instalaci požadovaných ovladač se ite pokyny na
obrazovce.
9 Po načtení soubor a ped instalací ovladač si pečtte soubor
readme.txt načtený s ostatními soubory. Jsou v nm uvedeny dležité
informace o instalaci.
Připojování počítače
Pokud k základnové stanici pipojíte monitor a zapnete ho, zobrazují se
informace na monitoru. Chcete-li obraz pepnout na displej počítače, nebo
chcete-li obraz zobrazit na monitoru i na displeji počítače, stisknte
kombinaci kláves <Fn><F8>.
40 Dell Latitude C/Port II - Píručka k pokročilému replikátoru port
, naleznte
Page 43

Po pipojení počítače k základnové stanici a jeho zapnutí se na základn
rozsvítí zelená kontrolka (viz „Ovládací prvky a kontrolky“).
UPOZORNĚNÍ: Aby nedošlo ke ztrát dat, uložte ped pipojováním
počítače k základn všechny otevené soubory.
Uložte všechny soubory, uzavete a ukončete všechny aplikace,
1
ukončete činnost operačního systému a počítač vypnte.
UPOZORNĚNÍ: Aby nedošlo k poškození konektor určených pro pipojení
počítače k zaízení, ped pokusem o pipojení počítače k základn otevete
kryt pipojovacích konektor na zadním panelu počítače.
Pokud je počítač vybaven krytem konektor pro pipojení, otevete kryt
2
konektor na zadní stran počítače.
Kryt připojovacích konektorů na počítači
počítač
kryt pipojovacích konektor
(pouze u nkterých počítač)
Používáte-li základnovou stanici s podstavcem pro monitor, zavete
3
displej počítače.
4 Páčku pro uvolnní a uzamknutí nastavte do polohy odemknuto.
Dell Latitude C/Port II - Píručka k pokročilému replikátoru port 41
Page 44

www.dell.com | support.dell.com
5 Následujícím postupem pipojte počítač k základnové stanici:
Připojování počítače
konektor pro pipojení
2 zarovnávací kolejničky
a Podle obrázku umístte počítač do stedu replikátoru port zadní
stranou ke konektoru základnové stanice.
b Posunujte počítač smrem ke konektoru, až ucítíte, že drážky na
spodní stran počítače zapadají do vodicích kolejniček.
UPOZORNĚNÍ: Pokud byste počítač tlačili až na konektor replikátoru port,
aniž by zapadl do vodicích kolejniček, mohli byste neopraviteln poškodit
konektor pro pipojení na počítači.
UPOZORNĚNÍ: Je-li počítač spojen se základnovou stanicí, zvedejte ho vždy
pouze současn se stanicí , jinak by mohlo dojít k poškození pipojovacích
konektor.
UPOZORNĚNÍ: Používáte-li monitor a podstavec pro monitor, odstrate ped
zasunutím základny stanice monitor z podstavce.
c Opatrn zatlačte počítač do stanice, až se konektory zcela
propojí.
42 Dell Latitude C/Port II - Píručka k pokročilému replikátoru port
Page 45

První připojování počítače se systémem Windows XP nebo
Windows 2000
1 Počítač pipojte k základnové stanici a zapnte ho.
2 Bhem zavádní systému stisknte klávesu <F2>. Počítač zobrazí
program pro nastavení systému.
3 Položku Docking IRQ (IRQ pipojení) nastavte na hodnotu Optimized
(Optimální).
4 Položku Universal Connect (Univerzální pipojení) nastavte na hodnotu
Enabled (Zapnuto).
5 Ukončete program pro nastavení systému.
Počítač bude pokračovat v zavádní systému.
Ve Windows 2000 se objeví prvodce pidáním nového hardwaru.
POZNÁMKA:
nainstaluje ovladače automaticky operační systém.
s operačním systémem Windows 2000
prùvodce pøidáním nového hardwaru.
Pokud počítač pracuje s operačním systémem Windows XP
Pokud počítač pracuje
, nainstaluje ovladače automaticky
První připojování počítače se systémem Windows Me
1 Počítač pipojte k základnové stanici a zapnte ho.
2 Bhem zavádní systému stisknte klávesu <F2>. Počítač zobrazí
program pro nastavení systému.
3 Položku Docking IRQ (IRQ pipojení) nastavte na hodnotu Optimized
(Optimální).
4 Položku Universal Connect (Univerzální pipojení) nastavte na hodnotu
Enabled (Zapnuto).
5 Ukončete program pro nastavení systému.
Počítač bude pokračovat v zavádní systému.
Objeví se prvodce pidáním nového hardwaru.
6 Vyberte možnost Vyhledat nejvhodnjší ovladač pro zaízení
(Doporučeno) (Search for the Best Driver for Your Device
[Recommended]) a klepnte na tlačítko Další (Next).
7 Klepnte na tlačítko Další (Next).
,
Dell Latitude C/Port II - Píručka k pokročilému replikátoru port 43
Page 46

8 Dále postupujte podle pokyn prvodce pidáváním hardwaru.
9 Pi každém dotazu vyberte možnost Vyhledat nejvhodnjší ovladač pro
zaízení (Doporučeno) (Search for the Best Driver for Your Device
[Recommended]) a klepnte na tlačítko Další (Next).
10 Pokračujte podle pokyn prvodce; instalace bude dokončena.
Zobrazí se pracovní plocha systému Windows a instalace je hotova.
První připojování počítače se systémem Windows NT 4.0
1 Počítač pipojte k základnové stanici a zapnte ho.
www.dell.com | support.dell.com
2 Bhem zavádní systému stisknte klávesu <F2> nebo po dokončení
zavádní stisknte kombinaci kláves <Fn><F1>. Počítač zobrazí
program pro nastavení systému.
3 Položku Docking IRQ (IRQ pipojení) nastavte na hodnotu Optimized
(Optimální).
4 Položku Universal Connect (Univerzální pipojení) nastavte na hodnotu
Enabled (Zapnuto).
5 Ukončete program pro nastavení systému.
6 Stisknutím kombinace kláves <Ctrl><Alt><Del> se pihlaste.
Počítač zobrazí okno Docking Station Setup (Nastavení základnové
stanice) se zprávou, že ped pokračováním je teba počítač odpojit od
stanice.
7 Klepnte na tlačítko OK a počkejte, až se počítač vypne.
8 Odpojte počítač (viz část „Odpojování počítače“).
Počítač se automaticky restartuje. Pokud se nerestartuje, počítač
zapnte.
9 Klepnte na tlačítko Start a vyberte píkaz Vypnout (Shut Down).
10 Počkejte, až se počítač zcela vypne, a znovu ho pipojte k základnové
stanici.
Počítač se automaticky restartuje. Pokud se nerestartuje, počítač
zapnte.
11 Stisknutím kombinace kláves <Ctrl><Alt><Del> se pihlaste.
Počítač automaticky zjistí nová zaízení.
44 Dell Latitude C/Port II - Píručka k pokročilému replikátoru port
Page 47

12 Na výzvu systému vyberte možnost Install System Provided Driver for
the Selected Device (Recommended) (Instalovat dodané systémové
ovladače pro vybrané zaízení [Doporučeno]) a klepnte na tlačítko
OK.
13 V okn Windows NT Setup (Instalace Windows NT) klepnte na
tlačítko Continue (Pokračovat).
14 Vyberte možnost Install System Provided Driver for the Selected Device
(Recommended) (Instalovat dodané systémové ovladače pro vybrané
zaízení [Doporučeno]) a klepnte na tlačítko OK.
15 V rozbalovací nabídce vyberte název sít’ového adaptéru (NIC).
16 Rozhodnte, zda má sít’ový adaptér získávat IP adresu ze serveru,
nebo zda je IP adresa pevn stanovena.
Pokud nevíte, kterou možnost vybrat, obrat’te se na správce systému.
17 Pokračujte dál a ite se pokyny na obrazovce. Instalace bude
dokončena.
Zobrazí se pracovní plocha systému Windows a instalace je hotova.
Je-li počítač pipojen k základn, nemže pejít do režimu pozastavení
s uložením na disk.
První připojování počítače se systémem Windows 98
1 Počítač pipojte k základnové stanici a zapnte ho.
2 Bhem zavádní systému stisknte klávesu <F2> nebo po dokončení
zavádní stisknte kombinaci kláves <Fn><F1>. Počítač zobrazí
program pro nastavení systému.
3 Položku Docking IRQ (IRQ pipojení) nastavte na hodnotu Optimized
(Optimální).
4 Položku Universal Connect (Univerzální pipojení) nastavte na hodnotu
Enabled (Zapnuto).
5 Ukončete program pro nastavení systému.
Počítač zjistí nový hardware.
6 V okn Configuration Setup (Nastavení konfigurace) klepnte na
tlačítko OK.
Program zobrazí prvodce pidáním nového hardwaru.
Dell Latitude C/Port II - Píručka k pokročilému replikátoru port 45
Page 48

7 Klepnte na tlačítko Další (Next).
8 Vyberte možnost Vyhledat nejvhodnjší ovladač pro zaízení
(Doporučeno) (Search for the Best Driver for Your Device
[Recommended]) a klepnte na tlačítko Další (Next).
9 Odstrate zaškrtnutí u všech možností a klepnte na tlačítko Další
(Next).
Počítač zobrazí okno se zprávou, že systém Windows je pipraven
nainstalovat optimální ovladač zaízení.
10 Dále postupujte podle pokyn prvodce pidáváním hardwaru.
www.dell.com | support.dell.com
11 Pi každém dotazu vyberte možnost Vyhledat nejvhodnjší ovladač pro
zaízení (Doporučeno) (Search for the Best Driver for Your Device
[Recommended]) a klepnte na tlačítko Další (Next).
12 Pokračujte podle pokyn prvodce; instalace bude dokončena.
Zobrazí se pracovní plocha systému Windows a instalace je hotova.
První připojování počítače se systémem Windows 95
1 Počítač pipojte k základnové stanici a zapnte ho.
2 Bhem zavádní systému stisknte klávesu <F2> nebo po dokončení
zavádní stisknte kombinaci kláves <Fn><F1>. Počítač zobrazí
program pro nastavení systému.
3 Položku Docking IRQ (IRQ pipojení) nastavte na hodnotu Optimized
(Optimální).
4 Položku Universal Connect (Univerzální pipojení) nastavte na hodnotu
Enabled (Zapnuto).
5 Ukončete program pro nastavení systému.
Počítač automaticky zjistí nový hardware.
6 V okn System Settings Change (Zmna nastavení systému) klepnte na
tlačítko Yes (Ano).
Počítač se restartuje a automaticky zjistí nový hardware.
7 V okn Network (Sít’) klepnte na tlačítko OK.
8 V dalším okn Network (Sít’) klepnte na kartu Identification
(Identifikace).
46 Dell Latitude C/Port II - Píručka k pokročilému replikátoru port
Page 49

9 Zadejte údaje do položek Název počítače a Pracovní skupina, které
budou identifikovat váš počítač v síti, a klepnte na tlačítko Zavít.
Nejste-li si jisti, jak pole Název počítače a Pracovní skupina vyplnit,
obrat’te se na správce systému.
POZNÁMKA: Ped pokračováním v instalaci ovladač musí být pole Název
počítače a Pracovní skupina vyplnna.
Počítač automaticky zkopíruje soubory a vytvoí databázi informací
o ovladačích.
10 V okn Configuration Setup (Nastavení konfigurace) klepnte na
tlačítko OK.
11 Pokračujte dál a ite se pokyny na obrazovce. Instalace bude
dokončena.
Zobrazí se pracovní plocha systému Windows a instalace je hotova.
POZNÁMKA: Chcete-li používat konektory USB, musíte nainstalovat doplnk
USB umístný na disku
nainstalujete doplnk USB, počítač nebude moci pejít do režimu pozastavení.
Společnost Dell doporučuje, abyste doplnk USB neinstalovali, pokud
nehodláte používat žádné zaízení USB.
ResourceCD
v adresái Win95\OSUpdate. Pokud
Aktualizace ovladačů ve Windows XP a Windows 2000
Aktualizace ovladač ve Windows XP a Windows 2000:
1 Klepnte pravým tlačítkem myši na ikonu My Computer (Tento počítač)
a klepnte na položku Manage (Správa). (V operačním systému
Windows XP
klepnutí na tlačítko Start.
získáte pístup k oknu My Computer (Tento počítač) po
Ve Windows 2000
je ikona My Computer
(Tento počítač) umístna na pracovní ploše Windows.)
2 V okn Computer Management (Správa počítače) klepnte na položku
Device Manager (Správce zaízení) a poklepejte na položku Network
adapters (Sít’ové adaptéry).
3 Poklepejte na položku 3Com 3C920 Integrated Fast Ethernet
Controller.
4 Klepnte na kartu Driver (Ovladač).
5 Klepnte na položku Update Driver… (Aktualizovat ovladač)
a postupujte podle pokyn.
Dell Latitude C/Port II - Píručka k pokročilému replikátoru port 47
Page 50

Aktualizace ovladačů v systému Windows Me
Aktualizace ovladač v systému Windows Me:
1 Klepnte pravým tlačítkem myši na ikonu My Computer (Tento počítač)
na pracovní ploše a klepnte na položku Properties (Vlastnosti).
2 V okn System Properties (Vlastnosti systému) klepnte na položku
Device Manager (Správce zaízení) a poklepejte na položku Network
adapters (Sít’ové adaptéry).
3 Poklepejte na položku 3Com 3C920 Integrated Fast Ethernet
Controller.
www.dell.com | support.dell.com
4 Klepnte na kartu Driver (Ovladač).
5 Klepnte na položku Update Driver… (Aktualizovat ovladač)
a postupujte podle pokyn.
Odpojování počítače
páčka pro uvolnní a uzamknutí
UPOZORNĚNÍ: Pokud počítač nemá k dispozici napájení z baterie, po
vysunutí ze základny stanice se vypne a ztratíte všechna neuložená data.
48 Dell Latitude C/Port II - Píručka k pokročilému replikátoru port
Page 51

UPOZORNĚNÍ: Počítač nikdy neodpojujte, aniž byste ho na tuto akci
pipravili. Pokud odpojíte počítač bez pípravy, ztratíte data a počítač se
nepodaí znovu spustit po nkolik minut (nebo vbec).
Pi píprav počítače k odpojení od základny použijte nkterou z tchto
metod:
• Stisknte klávesy <Fn><Esc> na klávesnici počítače (nebo
<Scroll Lock><Esc> na externí klávesnici.
Počkejte nkolik sekund, dokud se nevypne kontrolka napájení na
počítači.
• V operačním systému Windows XP
klepnte na tlačítko Start a klepnte
na tlačítko Undock Computer (Odpojit počítač).
V operačním systému Windows 95, Windows 98, Windows Me nebo
Windows 2000
klepnte na tlačítko Start a klepnte na tlačítko Eject
PC (Vysunout PC).
V operačním systému Windows NT
klepnte na ikonu pipojení
k základn a klepnutím na položku Undock (Odpojit) pevete počítač
do režimu pozastavení.
Počkejte nkolik sekund, dokud se nevypne kontrolka napájení na
počítači.
• Stisknte tlačítko požadavku k odpojení počítače na základn (viz
obrázek „Ovládací prvky a kontrolky základny“). Počkejte, dokud
zelená kontrolka pipojení počítače nezhasne.
Dell Latitude C/Port II - Píručka k pokročilému replikátoru port 49
Page 52

www.dell.com | support.dell.com
Zabezpečení replikátoru portů Dell™
Latitude™ C/Port II
Funkce zabezpečení
Základnová stanice má následující možnosti zabezpečení.
• Páčku pro uvolnní a uzamknutí umožující zajištní a uvolnní
počítače. V zadní poloze je počítač v replikátoru port C/Port II
zajištn. Ve stední poloze mžete základnovou stanici používat bez
zabezpečení. Pední poloha slouží k uvolnní a vysunutí počítače ze
základnové stanice. Pi zatlačení páčky pro uvolnní a uzamknutí do
zadní polohy mžete pomocí visacího zámku a otvoru pro
bezpečnostní oko počítač uzamknout.
• Pružinovou západku v pední části základny zapadající do
bezpečnostního otvoru ve spodní části počítače a pipevující počítač
k základn stanice. Bezpečnostní otvor mají pouze nkteré počítače
Dell.
• Bezpečnostní tlačítko pro uvolnní pozice pro média znemožující
odstranní zaízení z pozice pro média.
• Nepohyblivou západku bránící neoprávnnému odstranní počítače.
Zabezpečení replikátoru portů Dell™ Latitude™ C/Port II
Základnovou stanici mžete zabezpečit nkterým z následujících zpsob:
• Visacím zámkem nebo zámkem s bezpečnostním okem protaženým
otvorem v základnové stanici (viz obrázek „Ovládací prvky a kontrolky
základny“).
Samotný visací zámek blokuje páčku pro uvolnní a znesnaduje
vyjmutí počítače ze základnové stanice.
Bezpečnostní oko zajištné k pevnému pedmtu mže v kombinaci
s visacím zámkem zabránit neoprávnnému odnesení počítače
sreplikátorem C/Port II.
50 Dell Latitude C/Port II - Píručka k pokročilému replikátoru port
Page 53

• Do otvoru pro bezpečnostní oko na základnové stanici (viz obrázek
„Ovládací prvky a kontrolky základny“) pipojte bžn dostupné
zaízení proti odcizení.
Zaízení proti odcizení obvykle tvoí lanko z kovových vláken
s pipojeným zámkem a klíčem. Společnost Dell doporučuje zámky
Kensington. Pokyny k instalaci takového zaízení naleznete
v dokumentaci k nmu piložené.
Diagnostika počítačů Dell
Program Dell Diagnostics dodávaný s počítači Dell Latitude obsahuje testy
pro ešení problém s adiči v základnové stanici.
Zkoušky ve skupin Network Interface (Sít’ové rozhraní) kontrolují základní
operace sít’ového adaptéru v základnové stanici. Kontrolují vnitní funkce
adaptéru včetn pístupu pro čtení i zápis do jeho registr a vnitní funkce
penosu a píjmu (smyčku).
Zkoušky ve skupin Serial/Infrared Ports (Sériové a infračervené porty)
kontrolují rozhraní základnové stanice pro externí zaízení (napíklad sériovou
myš nebo tiskárnu). Zkoušky této skupiny neslouží ke zkoušení samostatného
externího zaízení.
Zkoušky ve skupin USB kontrolují rozhraní základnové stanice pro externí
zaízení (napíklad myš). Zkoušky této skupiny neslouží ke zkoušení
samostatného externího zaízení.
Úplné informace o práci s programem Dell Diagnostics naleznete
uživatelské píručce
v
k počítači.
Dell Latitude C/Port II - Píručka k pokročilému replikátoru port 51
Page 54

www.dell.com | support.dell.com
Technické údaje
Technické údaje
Fyzikální
Výška:
S podstavcem pod monitor 10,2 cm
Bez podstavce 5,8 cm
Hloubka:
S podstavcem pod monitor 39,0 cm
Bez podstavce 35,8 cm
Šíka:
S podstavcem pod monitor 40,9 cm
Bez podstavce 37,5 cm
Hmotnost:
S podstavcem pod monitor 3,0 kg
Bez podstavce 1,6 kg
Napájení
Vstupní hodnoty adaptéru
Naptí 100–200 V st, 50–60 Hz
Proud 1.5 A
Vstup APRII:
Naptí vyžaduje z adaptéru 20 V ss
Proud 3,5 A
52 Dell Latitude C/Port II - Píručka k pokročilému replikátoru port
Page 55

Technické údaje
V/V rozhraní
Sériové (DTE) kompatibilní s obvodem 16550, konektor,
16bajtová vyrovnávací pamt’
Paralelní konektor jednosmrný, obousmrný nebo ECP
PS/2 dva konektory mini-DIN
USB dva konektory kompatibilní s rozhraním USB
infračervené infračervený snímač kompatibilní s normami IrDA
1.1 (Fast IR) a 1.0
zvukový výstup zvuková zdíka (pro volitelná sluchátka)
zobrazovací zaízení jeden konektor
sít’ jeden konektor RJ45
pipojovací rozhraní (pipojení
jeden konektor
k počítači)
Sít’ový adaptér Ethernet
Sada obvod 3Com
3C920; 10/100 BASE-TX
(kompatibilní s PC99)
Šíka datové sbrnice 32bitové rozhraní sbrnice PCI
IRQ (požadavek na perušení) IRQ10
Dell Latitude C/Port II - Píručka k pokročilému replikátoru port 53
Page 56

Bezpečnostní pokyny a pokyny
k elektromagnetické kompatibilitě:
Přenosné počítače
Další
symboly používané
k elektromagnetické kompatibilit mají následující význam.
Riziko výbuchu Letadla
pouze
v bezpečnostních pokynech a v pokynech
www.dell.com | support.dell.com
Riziko požáru Používání této funkce mže být
v letadlech zakázáno
Riziko úrazu
elektrickým proudem
Bezpečnostní pokyny
Obecné
• Replikátor ped zahájením práce umístte na rovný
povrch.
• Nejste-li oprávnným servisním technikem, nepokoušejte
se replikátor opravovat vlastními silami. Vždy postupujte
dsledn podle pokyn pro instalaci.
• Pokud je ped napájecím adaptérem prodlužovací
kabel, zkontrolujte, zda celkový proud odebíraný
zaízeními pipojenými k prodlužovacímu kabelu
nepekračuje povolenou hodnotu.
• Do vtracích ani jiných otvor počítače nevkládejte
žádné pedmty. Mohlo by dojít ke zkratu vnitních
součástí a následnému požáru nebo úrazu elektrickým
proudem.
54 Dell Latitude C/Port II - Píručka k pokročilému replikátoru port
Page 57

• Pi napájení počítače nebo nabíjení baterie umístte
napájecí adaptér na vtrané místo, napíklad na stl
nebo na podlahu. Nezakrývejte ho papíry ani jinými
pedmty znemožujícími chlazení. Adaptér
nepoužívejte v obalu.
• Počítač nepoužívejte ve vlhkém prostedí, napíklad
v blízkosti vany, dezu či bazénu, ani ve vlhkém
suterénu.
• Pro zamezení riziku úrazu elektrickým proudem
nepipojujte ani neodpojujte kabely a zaízení
neopravujte ani nekonfigurujte bhem bouky. Počítač
nepoužívejte za bouky jinak než po odpojení všech
kabel a pi napájení z baterií.
• Používejte pouze napájecí adaptér a baterie schválené
k používání s tímto replikátorem. Pi použití jiných baterií
nebo adaptéru mže hrozit požár nebo výbuch.
• Ped čištním základnovou stanici vypnte a odpojte ze
zásuvky. Základnovou stanici čistte mkkým hadíkem
navlhčeným vodou. Nepoužívejte tekuté čisticí
prostedky ani spreje. Ty mohou obsahovat holavé látky.
Dell Latitude C/Port II - Píručka k pokročilému replikátoru port 55
Page 58

www.dell.com | support.dell.com
Napájení (bezpečnostní pokyny)
• Používejte pouze adaptér dodávaný společností Dell,
schválený pro použití s tímto replikátorem. Použití jiného
adaptéru mže zpsobit požár nebo výbuch.
• Ped pipojením replikátoru do zásuvky zkontrolujte, zda
naptí a frekvence zdroje souhlasí s hodnotami
uvedenými na adaptéru.
• Chcete-li vypnout napájení počítače, vypnte počítač
a odpojte napájecí adaptér ze zásuvky.
• Napájecí kabely adaptéru a periferních zaízení
zapojujte do ádn uzemnného zdroje napájení,
abyste pedešli úrazu elektrickým proudem. Tyto
napájecí kabely mohou mít tívodičové zástrčky
zajišt’ující uzemnní. Nepoužívejte adaptéry zástrček
ani neodstraujte zemnicí kolík. Používáte-li prodlužovací
kabel, použijte vhodný dvojvodičový nebo tívodičový
typ odpovídající napájecímu kabelu adaptéru.
• Zkontrolujte, zda na kabelu napájecího adaptéru nic
neleží a zda kabel není umístn tak, že by o nj mohl
nkdo zakopnout nebo na nj stoupnout.
• Používáte-li prodlužovací kabel s více zásuvkami,
zapojujte napájecí kabel adaptéru opatrn. Nkteré
zásuvky prodlužovacích kabel umožují nesprávné
zapojení zástrčky. Nesprávné zapojení zástrčky
napájení mže zpsobit trvalé poškození počítače, úraz
elektrickým proudem či požár. Zkontrolujte, zda se
zemnicí kolík zástrčky zasouvá do odpovídajícího
zemnicího kontaktu prodlužovacího kabelu.
56 Dell Latitude C/Port II - Píručka k pokročilému replikátoru port
Page 59

Právní předpisy
Elektromagnetické rušení (EMI) jsou jakékoli signály nebo záení vyzaované
do volného prostoru nebo vedené podél napájecích či signálových vodič,
které ohrožují funkci rádiové navigace nebo jiných bezpečnostních služeb
nebo vážn snižují, zhoršují, nebo opakovan perušují licencované
radiokomunikační služby. Radiokomunikační služby zahrnují napíklad
komerční rozhlasové vysílání AM/FM, televizi, služby mobilních telefon,
radary, ízení letového provozu, služby operátor a osobní komunikační
služby. Tyto licencované služby spolu s dalšími neúmyslnými záiči (včetn
počítač) pispívají k elektromagnetickému prostedí.
Elektromagnetická kompatibilita (EMC) je schopnost součástí elektronických
zaízení pracovat správn v daném elektronickém prostedí. Tento počítač byl
konstruován a je určen k provozu v souladu s pedpisy o limitních hodnotách
EMI podle platných zákonných ustanovení, neexistují žádné záruky, že se
u jednotlivých instalací neobjeví rušení. Pokud zaízení zpsobuje interference
s radiokomunikačními službami (což lze zjistit zapnutím a vypnutím zaízení),
mžete se pokusit zjednat nápravu pomocí nkterého z následujících
opatení:
•Zmte orientaci pijímací antény.
• Pemístte počítač vzhledem k pijímači.
• Pemístte počítač od pijímače.
• Zapojte počítač do jiné zásuvky, aby počítač a pijímač byly pipojeny
k rzným okruhm.
V pípad poteby se porate s pracovníky technické podpory společnosti
Dell nebo se zkušeným televizním či rozhlasovým technikem.
Počítače Dell jsou konstruovány, zkoušeny a označovány podle
elektromagnetického prostedí, ve kterém mají pracovat. Tato klasifikace
elektromagnetického prostedí odpovídá následujícím definicím:
• Tída A je typická pro komerční nebo prmyslové prostedí.
• Tída B je typická pro domácí prostedí.
Zaízení informačních technologií (ITE) včetn zaízení, rozšiujících karet,
tiskáren, zaízení vstup a výstup (I/O), monitor atd., která jsou
integrována nebo pipojena k počítači, musí odpovídat klasifikaci
elektromagnetického prostedí daného počítačového systému.
Dell Latitude C/Port II - Píručka k pokročilému replikátoru port 57
Page 60

www.dell.com | support.dell.com
Poznámka ke stínným signálovým kabelm: Ke snížení pravdpodobnosti
interference s radiokomunikačními systémy používejte k pipojení zaízení
k jakémukoli zaízení Dell výhradn stínné kabely. Použitím stínných
kabel zajistíte zachování klasifikace EMC určené pro dané prostedí.
Kabel pro paralelní tiskárny mžete získat od společnosti Dell. Kabel si
mžete objednat u společnosti Dell na adrese
http://accessories.us.dell.com/.
Vtšina počítač Dell je klasifikována pro prostedí tídy B. Používání
nkterých volitelných prvk píslušenství však mže zmnit zaazení nkterých
konfigurací na tídu A. Elektromagnetickou klasifikaci vašeho počítače nebo
zaízení naleznete v následujících oddílech pro jednotlivé orgány.
Následující kapitoly poskytují informace EMC/EMI a bezpečnostní
informace specifické pro vaši zemi.
Upozornění CE (Evropská unie)
Symbol označuje shodu tohoto počítače Dell se smrnicí EMC
a smrnicí Evropské unie k nízkonapt’ovým zaízením. Toto označení
znamená, že tento systém Dell vyhovuje následujícím technickým normám:
• EN 55022 - „Limits and Methods of Measurement of Radio Interference
Characteristics of Information Technology Equipment“ (Limity a metody
mení charakteristik radiové interference zaízení informačních
technologií).
• EN 55024 - „Information technology equipment - Immunity
characteristics - Limits and methods of measurement“ (Zaízení
informačních technologií - charakteristiky odolnosti - limity a metody
mení).
• EN 61000-3-2 - „Electromagnetic compatibility (EMC) - Part 3: Limits
- Section 2: Limits for harmonic current emissions (Equipment input current
up to and including 16 A per phase)“ (Elektromagnetická kompatibilita část 3: Limity - oddíl 2: Limity emisí harmonických proud pro zaízení
se vstupním proudem do 16 A na fázi).
• EN 61000-3-3 - „Electromagnetic compatibility (EMC) - Part 3: Limits
- Section 3: Limitation of voltage fluctuations and flicker in low-voltage
supply systems for equipment with rated current up to and including
16 A“ (Elektromagnetická kompatibilita - část 3: Limity - oddíl 3: Limity
kolísání a kmitání naptí v nízkonapt’ových zdrojích se jmenovitým
proudem do 16 A).
58 Dell Latitude C/Port II - Píručka k pokročilému replikátoru port
Page 61

• EN 60950 - „Safety of Information Technology Equipment“ (Bezpečnost
zaízení informačních technologií).
POZNÁMKA: Požadavky na vyzaování normy EN 55022 uvádjí dv
klasifikace:
• Tída A pro typické komerční oblasti.
• Tída B pro typické obytné oblasti.
Toto zaízení Dell je klasifikováno pro použití v typickém obytném prostedí
tídy B.
Podle požadavk pedchozích direktiv a norem bylo pipraveno „Prohlášení
o shod“, které je uloženo v pobočce Dell Computer Corporation Products
Europe BV, Limerick, Irsko.
Shoda s normou EN 55022 (Pouze pro Českou republiku)
This device belongs to Class B devices as described in EN 55022,
unless it is specifically stated that it is a Class A device on the
specification label. The following applies to devices in Class A of EN
55022 (radius of protection up to 30 meters). The user of the device is
obliged to take all steps necessary to remove sources of interference to
telecommunication or other devices.
Pokud není na typovém štítku počítače uvedeno, že spadá do tídy A
podle EN 55022, spadá automaticky do tídy B podle EN 55022. Pro
zaízení zaazená do tídy A (ochranné pásmo 30 m) podle EN 55022
platí následující podmínky: Dojde-li k rušení telekomunikačních nebo
jiných zaízení, je uživatel povinen provést taková opatení, aby rušení
odstranil.
Upozornění ke značce CE
Toto zaízení spluje požadavky evropské direktivy č. 1999/5/EC.
Dell Latitude C/Port II - Píručka k pokročilému replikátoru port 59
Page 62

www.dell.com | support.dell.com
60 Dell Latitude C/Port II - Píručka k pokročilému replikátoru port
Page 63

Dell™ Latitude™ C/Port II APR
Systeminformation
www.dell.com | support.dell.com
Page 64

Bemærkninger, meddelelser og advarsler
BEMÆRK! En BEMÆRKNING angiver vigtige oplysninger, som du kan bruge til at udnytte
computeren optimalt.
MEDDELELSE: En MEDDELELSE angiver enten mulig beskadigelse af hardware eller tab
af data og oplyser dig om, hvordan du kan undgå dette problem.
ADVARSEL! En ADVARSEL angiver mulig tingsskade, legemsbeskadigelse
eller død.
____________________
Oplysningerne i dette dokument kan ændres uden varsel.
© 2001 Dell Computer Corporation. Alle rettigheder forbeholdes.
Enhver form for gengivelse uden skriftlig tilladelse fra Dell Computer Corporation er strengt forbudt.
Anvendte varemærker i denne tekst: Dell, DELL-logoet, Latitude og DellWare er varemærker tilhørende Dell Computer
Corporation. 3Com er et varemærke tilhørende 3Com Corporation, Microsoft, Windows og Windows NT er registrerede
varemærker tilhørende Microsoft Corporation.
Andre varemærker og firmanavne kan være brugt i dette dokument til at henvise til enten de fysiske eller juridiske
personer, som gør krav på mærkerne og navnene, eller til deres produkter. Dell Computer Corporation fraskriver sig
enhver tingslig rettighed for så vidt angår varemærker og firmanavne, som ikke er deres egne.
Dette produkt inkorporerer teknologi til ophavsretlig beskyttelse, der er omfattet af metodekrav indeholdt i visse
patenter i USA og andre immaterielle rettigheder, der ejes af Macrovision Corporation og andre rettighedsindehavere.
Brug af denne teknologi til ophavsretlig beskyttelse skal være autoriseret af Macrovision Corporation og er kun beregnet
til hjemmebrug og andre begrænsede former for gennemsyn, medmindre der er givet tilladelse til andet af Macrovision
Corporation. Reverse engineering eller disassemblering er ikke tilladt.
Oktober 2001 Artikelnr. 4G281 Udgave A01
Page 65

Dell™ Latitude™ C/Port II APR
Systeminformation
Dette dokument indeholder oplysninger om, hvordan du kommer
i gang, sikkerheds-, godkendelses- og garantioplysninger vedrørende
Dell Latitude C/Port II APR (udvidet portreplikering) samt oplysninger
om andre tilgængelige Dell-dokumenter, og hvordan disse anskaffes.
Andre dokumenter til rådighed
• Dokumentationsopdateringer, der undertiden leveres sammen
med dockingenheden og beskriver eventuelle ændringer af
dockingenheden eller softwaren. Læs altid disse opdateringer,
inden du læser anden dokumentation, da opdateringerne som
oftest indeholder nyere oplysninger.
• Dokumentation, der leveres sammen med eventuelt ekstraudstyr,
du anskaffer til dockingenheden. Denne dokumentation indeholder
oplysninger, som du skal bruge til konfiguration og installation af
ekstraudstyret på dockingenheden.
Sådan får du hjælp
Dell har et antal værktøjer, du kan bruge, hvis din dockingenhed ikke
fungerer som forventet. Oplysninger om disse hjælpeværktøjer finder
du i afsnittet "Sådan får du hjælp" i computerens brugerhåndbog.
Gennemgang af dockingenheden
BEMÆRK! Adviser din netværksadministrator, inden du slutter
dockingenheden til et netværk.
Du skal slutte en vekselstrømsadapter til dockingenheden, inden
du indsætter computeren i dockingenheden og tænder for den.
Vekselstrømsadapteren forsyner samtidigt dockingenheden og computeren
med strøm. Eventuelle batterier, der er installeret i computeren, bliver
opladet, når du bruger dockingenheden.
Dell Latitude C/Port II APR Systeminformation 63
Page 66

MEDDELELSE: Brug altid den Dell PA-6-vekselstrømsadapter,
der blev leveret sammen med dockingenheden. Hvis du bruger andre
vekselstrømsadaptere eller en vekselstrømsadapter fra ældre modeller
af Dell-computere, kan du beskadige dockingenheden eller computeren.
I/O-panel på dockingenheden
www.dell.com | support.dell.com
USB-stik (2)
PS/2-musestik
PS/2-tastaturstik
serielt portstik
netværksstik
parallelt stik
vekselstrømsadapterstik
skærmstik
I tabellen Eksterne I/O-stik vises ikonerne for hvert stik på bagsiden af
APR'en, samt hvilken type eksterne enheder du kan tilslutte hvert stik.
64 Dell Latitude C/Port II APR-Systeminformation
Page 67

Eksterne I/O-stik
Stikikon Stikbeskrivelse
En eller to USB-enheder, f.eks. en USB-mus, kan sluttes
til det dobbelte USB-stik.
Et eksternt PS/2-tastatur eller et eksternt numerisk tastatur
kan sluttes til PS/2-tastaturstikket.
En ekstern PS/2-kompatibel mus kan sluttes til
PS/2-musestikket.
En seriel enhed, f.eks. en seriel mus eller et eksternt
modem, kan sluttes til det serielle portstik.
NIC-stikket passer til et netværkskabel.
En parallel enhed, f.eks. en printer, kan sluttes til
det parallelle portstik.
En ekstern skærm kan sluttes til skærmstikket.
Vekselstrømsadapteren, som fulgte med APR'en, kan
sluttes til vekselstrømsadapterstikket.
Lydstik og infrarød sensor
infrarød sensor
udgangsstik til lyd
Dell Latitude C/Port II APR Systeminformation 65
Page 68

Dockingkontrolbasens betjening og indikatorer
www.dell.com | support.dell.com
rille til sikkerhedslås
(ikke på alle enheder)
udløsning/låserløfter
udløsningsindikator
rille til sikkerhedslås
strømindikator
låserille
låst position
ulåst
position
udløsningsposition
dockingindikator
udløsningsknappen
for docking
tænd/sluk-knappen
Skærmfod
MEDDELELSE: Skærmfoden er konstrueret til at kunne bære skærme, der
vejer op til 45,3 kg. Tungere skærme kan ødelægge skræmfoden, computeren
og dockingenheden.
66 Dell Latitude C/Port II APR-Systeminformation
Page 69

Dockingenhed med skærmfod
skærmfod
dockingenhed
computer
BEMÆRK! Kontroller, at skærmfodens bagerste ben er på plads i rillerne
på begge sider af dockingkontrolbasen.
dockingkontrolbase
Dell Latitude C/Port II APR Systeminformation 67
Page 70

Inden placering af computeren
i dockingenheden
www.dell.com | support.dell.com
Hvis din computer kører med operativsystemet Microsoft® Windows® 9x,
Windows NT
computeren for eksisterende dockingdrivere. Hvis computeren ikke er
udstyret med dockingdrivere, skal du installere dem, før du placerer
computeren i dockingenheden første gang. Udfør trinene under
"Installation af dockingdriverne" for at installere dockingdrivere.
BEMÆRK! Hvis computeren kører med operativsystemet Windows XP eller
Windows 2000,
at udføre trinene under
af computeren i dockingenheden".
®
eller Windows Millennium (Me), skal du først kontrollere
installeres driverne automatisk, og det er ikke nødvendigt
"Installation af dockingdriverne". Gå til "Placering
Kontrol af computeren for eksisterende dockingdrivere
1 Dobbeltklik på Denne computer.
2 Dobbeltklik på Kontrolpanel.
3 Dobbeltklik på Tilføj/fjern programmer.
4 Find de korrekte dockingdrivere på listen over programmer.
I forbindelse med Windows 9x og Windows Me skal du se efter en
driver med Quick Install i navnet. F.eks.: Dell Dock Quick Install
for Windows.
I forbindelse med Windows NT skal du se efter
NT Softex Docking Services.
Hvis din computer ikke har dockingdriverne, skal du gå videre til
næste afsnit, "Installation af dockingdriverne". Hvis din computer har
dockingdriverne, skal du gå til "Placering af computeren i dockingenheden".
Installation af dockingdriverne
Du kan installere dockingdriverne på følgende måder:
• Installer driverne fra ressource-CD'en eller fra CD'en med drivere
og værktøjer, som fulgte med computeren eller dockingenheden.
• Hent driverne på Dells supportwebsted.
68 Dell Latitude C/Port II APR-Systeminformation
Page 71

Installation af dockingdriverne fra ressource-CD'en eller fra CD'en
med drivere og værktøjer
1 Indsæt ressource-CD'en eller CD'en med drivere og værktøjer i
CD-drevet.
I de fleste tilfælde vil CD'en starte automatisk. Hvis den ikke
starter automatisk, skal du starte Windows
Stifinder, klikke på CDmappedrevet for at få vist CD'ens indhold og derefter dobbeltklikke
på autorcd-programfilen. Hvis der vises en velkomstskærm, skal du
klikke på Næste. Første gang du kører CD'en, kan du blive bedt om
at installere nogle installationsfiler. Klik på OK, og følg instruktionerne
på skærmen for at fortsætte.
2 Fra rullemenuen Sprog på værktøjslinjen kan du vælge det sprog,
du foretrækker til driveren (hvis det er tilgængeligt).
Der vises en velkomstskærm.
3 Klik på Næste.
4 Under Søgekriterier skal du vælge de relevante kategorier
fra rullemenuerne Systemmodel og Operativsystem.
Hvis systemet kører Windows 9x eller Windows Me, skal du vælge
Systemværktøjer i rullemenuen Enhedstype og derefter vælge
Drivere fra rullemenuen Emne.
Hvis systemet kører Windows NT, skal du vælge Systemværktøjer
i rullemenuen Enhedstype og derefter vælge Funktioner fra
rullemenuen Emne.
Et eller flere link til de specifikke drivere eller funktioner, der bruges
af computeren, vises.
5 Hvis systemet kører Windows 9x eller Windows Me, skal du klikke
på linket til værktøjet Dell Dock QuickInstall.
Filen Dell Dock QuickInstall er et program, der installerer de
nødvendige dockingdrivere på din computer.
Hvis computeren kører Windows NT, skal du klikke på linket til
Softex Docking Services.
6 Klik på knappen Installer for at starte den automatiske installation.
I velkomstskærmen skal du følge prompterne for at afslutte
installationen.
Dell Latitude C/Port II APR Systeminformation 69
Page 72

BEMÆRK! Nogle ressource-CD'er kræver, at brugeren navigerer gennem
mapperne for at finde det korrekte drev. Der findes flere oplysninger om,
hvordan du geninstallerer drivere i brugerhåndbogen.
Installation af dockingdriverne fra Dells supportwebsted
1 Gå til Dells supportwebsted på http://support.dell.com. Hvis det
er først gang, du besøger webstedet, skal du angive dit land ved at
klikke på det viste kort.
Siden Welcome to support.dell.com (Velkommen til
support.dell.com) åbnes.
www.dell.com | support.dell.com
2 Indtast oplysningerne om din dockingenhed, og klik derefter på Go!
Klik på Downloads For Your Dell (Overførsler til din Dell).
Vinduet Downloads For Your Dell (Overførsler til din
Dell)vises sammen med en kort formular, som du skal udfylde.
3 Angiv computerens servicenummer, eller vælg dit Dell-system.
4 Vælg operativsystem og sprog for operativsystemet.
5 Væ lg System and Configuration Utilities (System- og
konfigurationsværktøjer) som overførselskategori.
6 Klik på Go!.
7 Hvis computeren kører Windows 9x eller Windows Me, skal du
klikke på linket til værktøjet Dell Dock QuickInstall.
Hvis computeren kører Windows NT, skal du finde og klikke
på linket til Softex Docking Services.
8 Følg instruktionerne på skærmen for at hente og installere
de nødvendige drivere.
9 Efter at du har hentet filerne, og før du installerer driverne, skal
du gennemse filen readme.txt, som følger med de hentede filer,
for vigtige oplysninger om installationen.
70 Dell Latitude C/Port II APR-Systeminformation
Page 73

Placering af computeren
i dockingenheden
Hvis du kobler en ekstern skærm til dockingenheden og tænder
for skærmen, vises skærmbilledet på den eksterne skærm. Du skifter
billedet til computerskærmen eller til både den eksterne skærm og
computerskærmen ved at trykke på <Fn><F8>.
Når du placerer computeren i dockingenheden og tænder for den,
tændes den grønne strømindikator på dockingkontrolbasen
("se Dockingkontrolbasens betjening og indikatorer").
MEDDELELSE: Gem åbne filer, før du placerer computeren
i dockingenheden, for at undgå tab af data.
Gem alle filer, luk og afslut alle programmer, afslut operativsystemet,
1
og sluk for computeren.
MEDDELELSE: Åbn dockingpaneldækslet, før du forsøger at placere
computeren i dockingenheden, for at undgå at beskadige dockingstikket.
2
Hvis computeren har et dockingpaneldæksel, skal du åbne
dockingpaneldækslet bag på computeren.
Dockingpaneldæksel på computeren
dockingpaneldæksel
(ikke på alle computere)
computer
Dell Latitude C/Port II APR Systeminformation 71
Page 74

www.dell.com | support.dell.com
3 Hvis du bruger dockingenheden sammen med en skærmfod,
skal du lukke computerskærmen.
4 Sørg for at udløser/låsehåndtaget er i den ulåste position.
5 Placer computeren i dockingenheden på følgende måde:
Placering af computeren i dockingenheden
dockingstik
styreskinner (2)
a Placer computeren horisontalt og midt på platformen til
APR'en med bagsiden af computeren mod dockingstikket
i dockingenheden som vist i "Placering af computeren
i dockingenheden".
b Lad computeren glide ind mod stikket, indtil du mærker rillerne
i bunden af computeren glide på plads i styreskinnerne.
MEDDELELSE: Hvis du forsøger at skubbe computeren hele vejen ind
i APR'en, uden at den glider på plads i styreskinnerne, kan du beskadige
dockingstikket på computeren permanent.
MEDDELELSE: Computeren eller dockingenheden må ikke løftes separat,
når de er forbundet, da det kan beskadige stikkene på computeren eller
dockingenheden.
72 Dell Latitude C/Port II APR-Systeminformation
Page 75

MEDDELELSE: Hvis du bruger en skærm sammen med skærmfoden, skal
du fjerne skærmen fra foden, før du flytter dockingkontrolbasen på plads.
c Skub forsigtigt computeren frem, indtil dockingstikket er gledet
helt på plads.
Placering af computeren i dockingenheden for første gang
med Windows XP og Windows 2000
1 Placer din computer i dockingenheden, og tænd for den.
2 Tryk på <F2> under systemstart for at se programmet til
indstilling af systemet.
3 Indstil Docking IRQ til Optimeret.
4 Indstil Universal Connect (Universel forbindelse) til Aktiveret.
5 Afslut programmet til indstilling af systemet.
Systemet fortsætter startprocessen.
I Windows 2000 vises guiden Tilføj ny hardware.
BEMÆRK! Hvis computeren kører Windows XP, installeres driverne
automatisk af operativsystemet. Hvis computeren kører Windows 2000,
installeres driverne automatisk af guiden Tilføj ny hardware.
Placering af computeren i dockingenheden første gang
med Windows Me
1 Placer din computer i dockingenheden, og tænd for den.
2 Tryk på <F2> under systemstart for at se programmet til
indstilling af systemet.
3 Indstil Docking IRQ til Optimeret.
4 Indstil Universal Connect (Universel forbindelse) til Aktiveret.
5 Afslut programmet til indstilling af systemet.
Systemet fortsætter startprocessen.
Guiden Tilføj ny hardware vises.
6 Væ lg Søg efter den bedste driver til din enhed (Anbefales),
og klik på Næste.
7 Klik på Næste.
Dell Latitude C/Port II APR Systeminformation 73
Page 76

8 Følg prompterne i guiden Tilføj ny hardware.
9 Væ lg Søg efter den bedste driver til din enhed (Anbefales),
og klik på Next, når du bliver bedt om det.
10 Fortsæt med at følge prompterne for at afslutte installationen.
Windows-skrivebordet vises, og installationen er fuldført.
Placering af computeren i dockingenheden første gang
med Windows NT 4.0
1 Placer din computer i dockingenheden, og tænd for den.
www.dell.com | support.dell.com
2 Tryk enten på <F2> under systemstart, eller tryk på <Fn><F1>,
efter at computeren er startet, for at se programmet til indstilling
af systemet.
3 Indstil Docking IRQ til Optimeret.
4 Indstil Universal Connect (Universel forbindelse) til Aktiveret.
5 Afslut programmet til indstilling af systemet.
6 Tryk på <Ctrl><Alt><Del> for at logge på.
Vinduet Docking Station Setup (Opsætning af dockingstationen)
vises for at angive, at computeren skal fjernes fra dockingenheden
for at fortsætte.
7 Klik på OK, og vent på, at computeren lukkes.
8 Fjern computeren fra dockingenheden (se "Fjernelse af computeren
fra dockingenheden").
Computeren genstartes automatisk. Hvis den ikke gør det, skal du
tænde for computeren.
9 Klik på Start, og vælg Luk computeren.
10 Vent på, at computeren lukkes helt, og placer derefter computeren
i dockingenheden igen.
Computeren genstartes automatisk. Hvis den ikke gør det, skal du
tænde for computeren.
11 Tryk på <Ctrl><Alt><Del> for at logge på.
Computeren registrerer automatisk nye enheder.
74 Dell Latitude C/Port II APR-Systeminformation
Page 77

12 Væ l g Installer driver leveret med system for den valgte enhed
(Anbefales), når du bliver bedt om det, og klik på OK.
13 Klik på Fortsæt i vinduet Windows NT Installation.
14 Væ l g Installer driver leveret med system for den valgte enhed
(Anbefales), og klik derefter på OK.
15 Vælg navnet på din NIC (network interface controller)
fra rullemenuen.
16 Vælg, om din netværksadapter skal hente en IP-adresse fra en server,
eller om en IP-adresse er angivet.
Kontakt systemadministratoren, hvis du ikke ved, hvad du skal vælge.
17 Følg prompterne for at fuldføre installationen.
Windows-skrivebordet vises, og installationen er fuldført.
Computeren kan ikke gå i tilstanden Luk ned, og gem ram på disk,
mens den er placeret i dockingenheden.
Placering af computeren i dockingenheden første gang
med Windows 98
1 Placer din computer i dockingenheden, og tænd for den.
2 Tryk enten på <F2> under systemstart, eller tryk på <Fn><F1>,
efter at computeren er startet, for at se programmet til indstilling
af systemet.
3 Indstil Docking IRQ til Optimeret.
4 Indstil Universal Connect (Universel forbindelse) til Aktiveret.
5 Afslut programmet til indstilling af systemet.
Computeren registrerer ny hardware.
6 Klik på OK i vinduet Konfigurationsindstillinger.
Guiden Tilføj ny hardware vises.
7 Klik på Næste.
8 Væ lg Søg efter den bedste driver til din enhed (Anbefales),
og klik på Næste.
Dell Latitude C/Port II APR Systeminformation 75
Page 78

9 Fjern markeringen i afkrydsningsfeltet ud for hver indstilling,
og klik på Næste.
Der vises et vindue, som oplyser, at Windows er klar til at installere
den bedste driver til din enhed.
10 Følg prompterne i guiden Tilføj ny hardware.
11 Væ l g Søg efter den bedste driver til din enhed (Anbefales),
og klik på Næste, når du bliver bedt om det.
12 Fortsæt med at følge prompterne for at afslutte installationen.
Windows-skrivebordet vises, og installationen er fuldført.
www.dell.com | support.dell.com
Placering af computeren i dockingenheden første gang
med Windows 95
1 Placer din computer i dockingenheden, og tænd for den.
2 Tryk enten på <F2> under systemstart, eller tryk på <Fn><F1>,
efter at computeren er startet, for at se programmet til indstilling
af systemet.
3 Indstil Docking IRQ til Optimeret.
4 Indstil Universal Connect (Universel forbindelse) til Aktiveret.
5 Afslut programmet til indstilling af systemet.
Computeren registrerer automatisk ny hardware.
6 Klik på Ja i vinduet Ændring af systemindstillinger.
Computeren starter igen og registrerer automatisk ny hardware.
7 Klik på OK i vinduet Netværk.
8 Vælg fanen Identifikation i det næste netværksvindue.
9 Angiv et computernavn og en arbejdsgruppe, som vil
identificere computeren på netværket, og klik på Luk.
Hvis du er i tvivl om, hvilket computernavn og hvilken arbejdsgruppe
du skal angive, kan du spørge systemadministratoren.
BEMÆRK! Du skal angive et computernavn og en arbejdsgruppe
for at kunne fortsætte driverinstallationen.
Computeren kopierer automatisk filer og opbygger en database
med driveroplysninger.
76 Dell Latitude C/Port II APR-Systeminformation
Page 79

10 Klik på OK i vinduet Konfigurationsindstillinger.
11 Følg prompterne for at fuldføre installationen.
Windows-skrivebordet vises, og installationen er fuldført.
BEMÆRK! Hvis du vil bruge USB-stikkene, skal du installere USB-
supplementet fra ressource-CD'en i biblioteket Win95\OSUpdate. Hvis du
installerer USB-supplementet, kan din computer ikke gå i pausetilstand.
Dell anbefaler, at du ikke installerer USB-supplementet, medmindre du har
til hensigt at bruge USB-enheder.
Opdatering af drivere i Windows XP og Windows 2000
Sådan opdaterer du drivere i Windows XP og Windows 2000:
1 Højreklik på Denne computer, og klik på Administrer.
(I Windows XP skal du klikke på knappen Start for at få adgang
til Denne computer. I Windows 2000 er Denne computer placeret
på Windows-skrivebordet).
2 I vinduet Computerstyring skal du klikke på Enhedshåndtering og
dobbeltklikke på Netværkskort.
3 Dobbeltklik på 3Com 3C920 Integrated Fast Ethernet-controller.
4 Klik på fanen Driver.
5 Klik på Opdater driver..., og følg prompterne.
Opdatering af drivere i Windows Me
Sådan opdaterer du drivere i Windows Me:
1 Højreklik på Denne computer på skrivebordet, og klik på Egenskaber.
2 I vinduet Systemegenskaber skal du klikke på fanen Enhedshåndtering
og dobbeltklikke på Netværkskort.
3 Dobbeltklik på 3Com 3C920 Integrated Fast Ethernet-controller.
4 Klik på fanen Driver.
5 Klik på Opdater driver..., og følg prompterne.
Dell Latitude C/Port II APR Systeminformation 77
Page 80

www.dell.com | support.dell.com
Fjernelse af computeren
fra dockingenheden
udløser/låsehåndtag
MEDDELELSE: Hvis der ikke er et batteri i computeren, slukkes
computeren, når den fjernes fra dockingenheden, og data, der ikke er
gemt, vil gå tabt.
MEDDELELSE: Computeren skal altid gøres klar, inden den kobles fra
dockingenheden. Hvis computeren frakobles, før den er gjort klar, vil data,
der ikke er gemt, gå tabt, og computeren genoptager måske ikke normal
drift i flere minutter, hvis den overhovedet gør det.
Du kan forberede computeren på frakoblingen ved at bruge en af
nedenstående metoder:
• Tryk på <Fn><Esc> på computerens tastatur
(eller på <Scroll Lock><Esc> på et eksternt tastatur).
Vent nogle få sekunder, til computerens strømindikator slukkes.
78 Dell Latitude C/Port II APR-Systeminformation
Page 81

•I Windows XP skal du klikke på knappen Start og derefter
på Undock Computer (Fradock computeren).
I Windows 95, Windows 98, Windows Me eller Windows 2000 skal
du klikke på knappen Start og derefter klikke på Skub pc ud.
I Windows NT skal du klikke på dockingikonet på proceslinjen og
derefter klikke på Fra dock for at sætte computeren i pausetilstand.
Vent nogle få sekunder, til computerens strømindikator slukkes.
• Tryk på udløsningsknappen for docking på dockingkontrolbasen
(se figuren "Dockingkontrolbasens betjening og indikatorer"). Vent
på, at den grønne dockingindikator slukkes.
Sikring af C/Port II APR
Sikkerhedsegenskaber
Dockingenheden har følgende sikkerhedsegenskaber:
• Et udløser/låsehåndtag, som gør det muligt at fastspænde og skubbe
computeren ud. I den bagerste position fastspændes computeren i
C/Port II APR. I den miderste position kan du bruge dockingenheden,
uden at computeren fastspændes. I den forreste position skubbes
computeren ud af dockingenheden. Skub udløser/låsehåndtaget til
den bagerste position for at bruge låserillens sikkerhedslås og rillen
til sikkerhedslåsen.
• En fjederlås forrest på dockingkontrolbasen, som passer ind i
en sikkerhedsrille under computeren, fastspænder computeren
til dockingkontrolbasen. Ikke alle Dell-computere har denne
sikkerhedsrille.
• En udløsningsknap til en fastspændt mediebås, der blokerer
fjernelse af mediebåsenheder.
• Et ubevægeligt låsehåndtag, der forhindrer uautoriseret fjernelse
af computeren.
Dell Latitude C/Port II APR Systeminformation 79
Page 82

www.dell.com | support.dell.com
Sikring af C/Port II APR
Brug en af følgende metoder til at sikre dockingenheden:
• Brug en lås alene eller en lås og et kabel med sikkerhedsløkke
sammen med låserillen (se under "Dockingkontrolbasens
betjening og indikatorer") på dockingenheden.
En lås alene blokerer udløserhåndtaget og gør det svært at
fjerne computeren fra dockingenheden.
Et sikkerhedskabel, der vikles om et stationært objekt og bruges
i forbindelse med låserillen, kan forhindre uautoriseret flytning af
computeren og C/Port II APR.
• Fastgør en tyverisikring til rillen til sikkerhedslåsen (se under
"Dockingkontrolbasens betjening og indikatorer") på dockingenheden.
Med tyverisikringen følger normalt et stykke snoet metalkabel med
en lås og tilhørende nøgle. Oplysninger om, hvordan du installerer
denne type tyverisikring, finder du i den dokumentation, der blev
leveret sammen med enheden.
Dell-fejlfinding
Dell-fejlfinding, som blev leveret sammen med din Dell Latitude-computer,
indeholder tests, som kan hjælpe dig med at finde fejl i controllerne i
dockingenheden.
Undertestene i gruppen til kontrol af netværksgrænseflade under
Dell-fejlfinding kontrollerer netværkscontrollerens grundlæggende
funktioner i dockingenheden. De tester controllerens interne funktioner,
herunder læse- og skriveadgang til dens registre og interne send og
modtag-(løkke)funktion.
Undertesterne i gruppen til kontrol af serielle/infrarøde porte kontrollerer
dockingenhedens grænseflade til eksterne enheder (f.eks. en seriel mus
eller en printer). Undertestene i denne kontrolgruppe er ikke beregnet
til at finde fejl på selve den eksterne enhed.
80 Dell Latitude C/Port II APR-Systeminformation
Page 83

Undertestene i gruppen til kontrol af USB kontrollerer dockingenhedens
grænseflade til eksterne enheder, f.eks. en mus. Undertestene i denne
kontrolgruppe er ikke beregnet til at finde fejl på selve den eksterne enhed.
Der findes flere oplysninger om, hvordan du bruger Dell-fejlfinding,
i computerens brugerhåndbog.
Tekniske specifikationer
Tekniske specifikationer
Fysiske mål
Højde:
Med skærmfod 10,2 cm
Stand-alone 5,8 cm
Dybde:
Med skærmfod 39,0 cm
Stand-alone 35,8 cm
Bredde:
Med skærmfod 40,9 cm
Stand-alone 37,5 cm
Vægt:
Med skærmfod 3,0 kg
Stand-alone 1,6 kg
Strøm
Vekselstrømsadapterindgang:
Spænding 100-200VAC, 50-60 Hz
Strømstyrke 1,5 A
APRII-indgang
Spænding kræver 20 VDC fra vekselstrømsadapter
Strømstyrke 3,5 A
Dell Latitude C/Port II APR Systeminformation 81
Page 84

www.dell.com | support.dell.com
Tekniske specifikationer
I/O
Seriel (DTE) 16550-kompatibel, 16-byte bufferstik
Parallel envejs, tovejs eller ECP-stik
PS/2 to mini DIN-stik
USB to USB-kompatible stik
Infrarød infrarød sensor kompatibel med
IrDa-standarder 1.1 (Fast IR) og 1.0
Udgang til lyd lydstik (til ekstra hovedtelefoner)
Video et stik
Netværk et RJ45-stik
Docking (til tilslutning til
et stik
computeren)
Ethernet-netværkscontroller
Chipsæt 3Com
®
3C920; 10/100 BASE-TX
(PC99-kompatibel)
Databusbredde 32-bit PCI Host Bus-grænseflade
IRQ IRQ10
82 Dell Latitude C/Port II APR-Systeminformation
Page 85

Sikkerheds- og EMC-instruktioner:
Bærbare computere
I det følgende defineres betydningen af de ekstra symboler, der kun
bruges i forbindelse med sikkerheds- og EMC-instruktioner.
Eksplosionsfare Fly
Brandfare Brug af denne funktion er forbudt
ombord på fly
Fare for elektrisk
stød
Sikkerhedsinstruktioner
Generelt
• Når du gør APR'en klar til brug, skal du placere den
på en jævn overflade.
• Forsøg ikke at foretage vedligeholdelse af APR'en selv,
medmindre du er en autoriseret servicetekniker. Følg
altid installationsinstruktionerne nøje.
• Hvis du bruger en forlængerledning med
vekselstrømsadapteren, skal du sørge for, at
den samlede strømstyrke på de produkter,
som forlængerledningen er tilsluttet, ikke
overstiger forlængerledningens strømstyrke.
Dell Latitude C/Port II APR Systeminformation 83
Page 86

• Skub ikke genstande ind i computerens
ventilationshuller eller andre åbninger. Dette
kan forårsage brand eller elektrisk stød, idet
indvendige komponenter kortslutter.
• Anbring vekselstrømsadapteren i et ventileret område,
såsom på et skrivebord eller på gulvet, når den bruges
til at forsyne computeren med strøm eller til at oplade
batteriet. Tildæk ikke vekselstrømsadapteren med papir
eller andet, som kan forhindre afkøling. Brug heller ikke
vekselstrømsadapteren, mens den ligger i en taske.
www.dell.com | support.dell.com
• Brug ikke computeren i et vådt miljø, f.eks. i nærheden
af et badekar, en håndvask eller et svømmebassin eller
i en fugtig kælder.
• Som en hjælp til at undgå den potentielle fare for
elektrisk stød bør du ikke tilslutte eller frakoble nogen
kabler eller udføre vedligeholdelse eller rekonfiguration
af dette produkt i tordenvejr. Brug ikke computeren
i tordenvejr, medmindre alle kabler er frakoblet, og
computeren kører på batterier.
• Brug kun den vekselstrømsadapter, der er godkendt
til brug sammen med APR'en som angivet i dette
dokument. Hvis du bruger en anden type batteripakke
eller vekselstrømsadapter, kan der opstå brand eller
eksplosion.
• Før du rengører dockingstationen, skal du slukke
for den og frakoble vekselstrømsadapteren fra
stikkontakten. Rengør dockingstationen med en
blød klud fugtet med vand. Brug ikke flydende
rengøringsmidler eller aerosolrengøringsmidler,
som kan indeholde brændbare stoffer.
84 Dell Latitude C/Port II APR-Systeminformation
Page 87

Strøm (Sikkerhedsinstruktioner)
• Brug kun den vekselstrømsadapter, der er leveret af
Dell, og som er godkendt til brug sammen med APR'en.
Hvis du bruger en anden vekselstrømsadapter, kan der
være risiko for brand eller eksplosion.
• Før du tilslutter APR'en til en stikkontakt, skal du
kontrollere vekselstrømsadapterens spænding for at
sikre, at den nødvendige spænding og frekvens svarer
til strømkilden.
• Hvis du vil fjerne strømmen fra computeren, skal du
slukke for den og frakoble vekselstrømsadapteren fra
stikkontakten.
• Sæt vekselstrømsadapteren og periferinetledninger
i strømkilder med korrekt jordforbindelse som en
hjælp til at forhindre elektrisk stød. Disse ledninger er
udstyret med tre ben, som sikrer jordforbindelse. Brug
ikke adapterstik, og fjern ikke det jordforbindende ben
fra et ledningsstik. Hvis du bruger en forlængerledning,
skal du bruge en med to- eller trebenede stik, som
passer til netledningen.
• Sørg for, at der ikke er noget, som hviler på
vekselstrømsadapterens netledning, og at
ledningen ikke er lagt således, at man kan
falde over den eller træde på den.
• Hvis du bruger en fordelerdåse, skal du være forsigtig,
når du tilslutter vekselstrømsadapterens ledning til
fordelerdåsen. I forbindelse med visse stikdåser er det
muligt at komme til at isætte stikket forkert. Hvis du
sætter stikket i forkert, kan det resultere i permanent
beskadigelse af computeren, og der kan være risiko for
elektrisk stød og/eller brand. Du skal sikre dig, at det
jordforbindende ben på ledningsstikket er sat i det
tilsvarende hul i stikdåsen.
Dell Latitude C/Port II APR Systeminformation 85
Page 88

www.dell.com | support.dell.com
Lovgivningsmæssige meddelelser
EMI (elektromagnetisk interferens) er ethvert signal eller enhver udladning,
der udstråler i det frie rum eller ledes langs strøm- eller signalkabler, der
bringer funktionen af radionavigation eller andre sikkerhedstjenester i fare,
eller som væsentligt forringer, forhindrer eller gentagne gange afbryder en
licenseret radiokommunikationstjeneste. Radiokommunikationssystemer
omfatter, men er ikke begrænset til, AM/FM-udsendelser, TV,
mobiltjenester, radar, kontrolsystemer til lufttrafik, personsøgere og
personlige kommunikationstjenester. Disse licenserede tjenester, samt
utilsigtede udstrålingsemner, f.eks. digitale enheder, herunder computere,
indgår som bestanddele af det elektromagnetiske miljø.
Elektromagnetisk kompatibilitet er udtryk for elektroniske komponenters
evne til at fungere korrekt sammen i det elektroniske miljø. Selv om dette
computersystem er designet og bestemt til at overholde de gængse, fastlagte
grænser for EMI, er der ingen garanti for, at interferens ikke vil kunne
opstå i en bestemt installation. Hvis dette udstyr er årsag til forstyrrelser
af radiokommunikationstjenester, hvilket kan fastslås ved at tænde og
slukke for udstyret, anbefales det at forsøge at rette forstyrrelsen ved at
følge en eller flere af følgende fremgangsmåder:
• Drej modtagerantennen.
• Placér computeren anderledes i forhold til modtageren.
• Flyt computeren væk fra modtageren.
• Tilslut computeren til en anden kontakt, så computeren
og modtageren befinder sig i forskellige kredsløb.
Kontakt eventuelt en medarbejder fra Dells afdeling for teknisk support
eller en erfaren radio/tv-tekniker, hvis du vil have yderligere løsningsforslag.
Dells computersystemer er designede, testede og klassificerede til
det påregnede elektromagnetiske miljø. Disse elektromagnetiske
miljøklassifikationer refererer generelt til følgende harmoniserede
definitioner:
• Klasse A er typisk til erhvervs- eller industrielle miljøer.
• Klasse B er typisk til private miljøer.
86 Dell Latitude C/Port II APR-Systeminformation
Page 89

ITE (Information Technology Equipment), herunder tilbehør,
udvidelseskort, printere, input/output (I/O)-enheder, skærme osv., som
er integreret i eller sluttet til systemet, bør opfylde computersystemets
elektromagnetiske miljøklassifikation.
Bemærkning om afskærmede signalkabler: Brug kun afskærmede kabler
til at tilslutte enheder til Dell-enheder for at formindske muligheden
for interferens med radiokommunikationstjenester. Når der bruges
afskærmede kabler, kan du være sikker på, at den korrekte EMCklassificering til det tilsigtede miljø opretholdes. Dell har kabler til
parallelle printere. Du kan bestille et kabel fra Dell på World Wide
Web på adressen: http://accessories.us.dell.com/.
De fleste Dell-computersystemer er klassificerede til Klasse B-miljøer.
Men medtagelse af bestemte indstillinger kan ændre denne klassificering
til Klasse A. Du kan finde ud af, hvilken elektromagnetisk klassifikation,
der er bestemt for din computer eller enhed, ved at læse følgende afsnit,
som er specifik for hver enkelt regulerende myndighed. Hvert afsnit angiver
specifikke oplysninger om EMC/EMI eller produktsikkerhed for hvert land.
Bemærkning om CE (EU)
Mærkning med symbolet angiver, at denne Dell-computer
overholder direktiverne om EMC og lavspænding fra Den Europæiske
Union. Mærkningen angiver, at dette Dell-system lever op til følgende
tekniske standarder:
• EN 55022 – "Informationsteknologisk udstyr.
Radiostøjskarakteristikker. Grænseværdier og målemetoder".
• EN 55024 – "Informationteknologisk udstyr –
Immunitetskarakteristikker – Grænseværdier og målemetoder".
• EN 61000-3-2 – "Elektromagnetisk kompatibilitet (EMC) –
Del 3: Grænseværdier – Artikel 2: Grænseværdier for udsendelse
af harmoniske strømme (udstyrets strømforbrug op til og
inklusive 16 A per fase)".
• EN 61000-3-3 – "Elektromagnetisk kompatibilitet (EMC) – Del 3:
Grænseværdier – Artikel 3: Begrænsning af spændingsfluktuationer
og flimmer i lavspændingsforsyninger fra udstyr med mærkestrøm
op til og med 16 A".
• EN 60950 – "Databehandlingsudstyr og elektriske kontormaskiner".
Dell Latitude C/Port II APR Systeminformation 87
Page 90

BEMÆRK! De i EN 55022 beskrevne krav til udsendelse af stråler har
to mulige klassifikationer:
• Klasse A er typisk til brug inden for kommercielle områder.
• Klasse B er typisk til brug i hjemmet.
Denne Dell-enhed er klassificeret til brug i et typisk Klasse B-hjemmemiljø.
Der er udarbejdet en overensstemmelseserklæring i overensstemmelse med
de foregående direktiver og standarder. Denne erklæring er registreret hos
Dell Products Europe BV, Limerick, Irland.
www.dell.com | support.dell.com
Overensstemmelse med EN 55022 (kun Tjekkiet)
Denne enhed hører til Klasse B-enheder som beskrevet i EN 55022,
medmindre det er udtrykkeligt angivet på specifikationsmærkatet,
at det er en Klasse A-enhed. Følgende gælder for enheder i Klasse A i
henhold til EN 55022 (beskyttelsesradius på op til 30 meter). Brugeren
af denne enhed er forpligtet til at tage alle nødvendige forholdsregler
for at fjerne kilder, der kan forstyrre telekommunikation eller andre
enheder.
Pokud není na typovém štitku počítače uvedeno, že spadá do třídy
A podle EN 55022, spadá automaticky do třídy B podle EN 55022.
Pro zařízení zařazená do třídy A (ochranné pásmo 30m) podle EN
55022 platí následující. Dojde−li k rušení telekomunikačních nebo
jinych zařízení, je uživatel povinen provést taková opatření, aby
rušení odstranil.
88 Dell Latitude C/Port II APR-Systeminformation
Page 91

Polish Center for Testing and Certification Notice
Udstyret bør kun forsynes med strøm fra et stik med en
beskyttelsesstrømkreds (et trebenet stik). Al udstyr, der arbejder sammen
(computer, skærm, printer osv.), bør have samme strømforsyningskilde.
Faseledningen i rummets elektriske installation bør have en ekstra
kortslutningsbeskyttelsesenhed i form af en sikring med en nominel
værdi, der ikke overstiger 16 ampere (A).
Hvis udstyret skal slukkes helt, skal strømforsyningskablet tages ud af
stikket, som bør befinde sig tæt ved udstyret og være lettilgængeligt.
Beskyttelsesmærkat "B" bekræfter, at udstyret overholder kravene om
beskyttelsesanvendelse i henhold til PN-93/T-42107 og PN-EN 55022: 1996.
Wymagania Polskiego Centrum Badań i Certyfikacji
Urządzenie powinno być zasilane z gniazda z przyłączonym obwodem
ochronnym (gniazdo z kołkiem). Współpracujące ze sobą urządzenia
(komputer, monitor, drukarka) powinny być zasilane z tego samego
źródła.
Instalacja elektryczna pomieszczenia powinna zawierać w przewodzie
fazowym rezerwową ochronę przed zwarciami, w postaci bezpiecznika
o wartości znamionowej nie większej ni 16A (amperów).
W celu całkowitego wyłączenia urządzenia z sieci zasilania, naley
wyjąć wtyczkę kabla zasilającego z gniazdka, które powinno
znajdować się w pobliu urządzenia i być łatwo dostępne.
Znak bezpieczeństwa "B" potwierdza zgodność urządzenia
z wymaganiami bezpieczeństwa uytkowania zawartymi w
PN−93/T−42107 i PN−EN 55022:1996.
Jeźeli na tabliczce znamionowej umieszczono informację, źe
urządzenie jest klasy A, to oznacza to, źe urządzenie w środowisku
mieszkalnym moźe powodować zaklócenia radioelektryczne. W takich
przypadkach moźna źądać od jego uźytkownika zastosowania
odpowiednich środków zaradczych.
Dell Latitude C/Port II APR Systeminformation 89
Page 92

www.dell.com | support.dell.com
Ni
Pozostałe instrukcje bezpieczeństwa
•
e naley uywać wtyczek adapterowych lub usuwać kołka
obwodu ochronnego z wtyczki. Jeeli konieczne jest uycie
przedłuacza to naley uyć przedłuacza 3−yłowego z
prawidłowo połączonym przewodem ochronnym.
• System komputerowy naley zabezpieczyć przed nagłymi,
chwilowymi wzrostami lub spadkami napięcia, uywając
eliminatora przepięć, urządzenia dopasowującego lub
bezzakłóceniowego źródła zasilania.
• Naley upewnić się, aby nic nie leało na kablach systemu
komputerowego, oraz aby kable nie były umieszczone w miejscu,
gdzie mona byłoby na nie nadeptywać lub potykać się o nie.
• Nie naley rozlewać napojów ani innych płynów na system
komputerowy.
• Nie naley wpychać adnych przedmiotów do otworów systemu
komputerowego, gdy moe to spowodować poar lub poraenie
prądem, poprzez zwarcie elementów wewnętrznych.
• System komputerowy powinien znajdować się z dala od
grzejników i źródeł ciepła. Ponadto, nie naley blokować otworów
wentylacyjnych. Naley unikać kładzenia luźnych papierów pod
komputer oraz umieszczania komputera w ciasnym miejscu bez
moliwości cyrkulacji powietrza wokół niego.
Bemærkning om CE-mærkning
Denne enhed opfylder kravene i EU-direktiv 1999/5/EC.
90 Dell Latitude C/Port II APR-Systeminformation
Page 93

Dell™ Latitude™ C/Port II APR
Systeeminformatiegids
www.dell.com | support.dell.com
Page 94

Opmerkingen, kennisgevingen
en voorzichtig-meldingen
OPMERKING: Een OPMERKING duidt belangrijke informatie aan voor een beter gebruik
van de computer.
KENNISGEVING: Een KENNISGEVING duidt mogelijke beschadiging van de hardware
of gegevensverlies aan en geeft aan hoe u dit probleem kunt voorkomen.
VOORZICHTIG: Een VOORZICHTIG-melding duidt het risico op schade aan
eigendommen, persoonlijk letsel of de dood aan.
____________________
De informatie in dit document kan zonder voorafgaande kennisgeving worden gewijzigd.
© 2001 Dell Computer Corporation. Alle rechten voorbehouden.
Verveelvoudiging van dit materiaal, op welke wijze dan ook, is alleen toegestaan na uitdrukkelijke, schriftelijke
toestemming van Dell Computer Corporation.
Handelsmerken in dit document: Dell, het DELL-logo, Latitude en DellWare zijn handelsmerken van Dell Computer
Corporation; 3Com is een handelsmerk van 3Com Corporation; Microsoft, Windows en Windows NT zijn gedeponeerde
handelsmerken van Microsoft Corporation.
Andere handelsmerken en handelsnamen die mogelijk in dit document worden gebruikt, dienen ter aanduiding
van de rechthebbenden met betrekking tot de merken en namen of ter aanduiding van hun producten. Dell Computer
Corporation claimt op geen enkele wijze enig eigendomsrecht ten aanzien van andere handelsmerken of handelsnamen
dan zijn eigen handelsmerken en handelsnamen.
Dit product maakt gebruik van copyright-beschermingstechnologie die wordt beschermd door claims van bepaalde U.S.
patenten en andere intellectuele eigendomsrechten in het bezit van Macrovision Corporation en andere rechthebbenden.
Deze copyright-beschermingstechnologie mag alleen worden gebruikt na toestemming van Macrovision Corporation
en is alleen bedoeld voor thuisgebruik en andere, beperkte, weergavedoeleinden, tenzij anders is bepaald door
Macrovision Corporation. Reverse-engineering en disassembleren is verboden.
oktober 2001 P/N 4G281 Rev. A01
Page 95

Dell™ Latitude™ C/Port II APR
Systeeminformatiegids
Dit document bevat informatie over de installatie, veiligheidsmaatregelen,
de garantie en andere voorschriften met betrekking tot uw Dell Latitude
C/Port II Advanced Port Replicator (APR). U vindt hier tevens informatie
over andere beschikbare Dell-documenten en over hoe u deze in uw bezit
kunt krijgen.
Overige beschikbare documenten
• Aanvullingen op de documentatie die soms met uw dockingstation
worden meegeleverd en waarin wijzigingen met betrekking tot uw
dockingstation of software worden beschreven. De bijgewerkte versie
bevat gewoonlijk de recentste informatie. Het is dan ook raadzaam de
bijgewerkte versie altijd door te lezen voordat u andere documentatie
raadpleegt.
• Documentatie die behoort bij opties die afzonderlijk van uw
dockingstation zijn aangeschaft. Deze documenten bevatten
informatie die u nodig heeft voor het configureren en installeren
van deze opties in uw dockingstation.
Help opvragen
Dell biedt een aantal hulpmiddelen die u kunt gebruiken wanneer
uw dockingstation niet naar wens functioneert. Informatie over deze
hulpmiddelen vindt u in het gedeelte "Help opvragen" in de on line
Gebruikershandleiding van uw computer.
Dell Latitude C/Port II APR Systeeminformatiegids 93
Page 96

www.dell.com | support.dell.com
r
Overzicht van het dockingstation
OPMERKING: Neem contact op met de netwerkbeheerder voordat
u het dockingstation op een netwerk aansluit.
U moet een wisselstroomadapter aan het dockingstation bevestigen
voordat u de computer op het dockingstation aansluit en aanzet.
De wisselstroomadapter voorziet het dockingstation en de computer
tegelijkertijd van stroom. In de computer geïnstalleerde accu's worden
opgeladen terwijl u het dockingstation gebruikt.
KENNISGEVING: Gebruik altijd de Dell PA-6-wisselstroomadapter die
met het dockingstation is meegeleverd. Wanneer u een wisselstroomadapter
van derden of de wisselstroomadapter van een ouder model Dell-computer
gebruikt, zou u het dockingstation of de computer kunnen beschadigen.
I/O-paneel van het dockingstation
PS/2-toetsenbordconnector
USB-connectoren (2)
Parallelle
connector
Videoconnecto
Seriële
PS/2-muisconnector
connector
In de tabel "Externe I/O-connectoren" worden pictogrammen weergegeven
voor de connectoren aan de achterzijde van de APR en het type extern
apparaat dat op elke connector kan worden aangesloten.
94 Dell Latitude C/Port II APR Systeeminformatiegids
Stroomadapterconnector
Netwerkconnector
Page 97

Externe I/O-connectoren
Connectorpictogram
Audioconnectoren en infraroodsensor
Connectorbeschrijving
Een of twee USB-apparaten, zoals een USB-muis,
sluit u aan op de dubbele USB-connector.
Een extern met Personal System/2 (PS/2) compatibel
toetsenbord of extern numeriek toetsenblok sluit u
aan op de PS/2-toetsenbordconnector.
Een externe met Personal System/2 (PS/2) compatibele
muis sluit u aan op de PS/2-muisconnector.
Een serieel apparaat, zoals een seriële muis of externe
modem, sluit u aan op de seriële poortconnector.
Een netwerkinterfacekabel sluit u aan op de NIC-connector.
Een parallel apparaat, zoals een printer, sluit u aan
op de parallelle poortconnector.
Een externe monitor sluit u aan op de videoconnector.
De stroomadapter die met de APR is meegeleverd,
sluit u aan op de stroomadapterconnector.
Infraroodsensor
Audio-lijnuitgangconnector
Dell Latitude C/Port II APR Systeeminformatiegids 95
Page 98

Besturingselementen en controlelampjes op het koppelstuk
www.dell.com | support.dell.com
Veiligheidsslotvergrendeling
(niet op alle apparatuur
aanwezig)
Hendel voor
ontgrendelen/
vergrendelen
Controlelampje
stationstoegang
Veiligheidsslotvergrendeling
Hangslotvergrendeling
Controlelampje
stroomvoorziening
Vergrendelde
positie
Ontgrendelde
positie
Uitwerppositie
Controlelampje
aansluiting
Knop voor
loskoppelen
Aan/uit-knop
Monitorvoetstuk
KENNISGEVING: Het voetstuk ondersteunt monitors tot een
maximumgewicht van 45,3 kilogram (kg). Zwaardere monitors kunnen
mogelijk het voetstuk
96 Dell Latitude C/Port II APR Systeeminformatiegids
, de computer en het dockingstation beschadigen.
Page 99

Het dockingstation met het monitorvoetstuk
Monitorvoetstuk
Dockingstation
Computer
OPMERKING: Controleer of de poten aan de achterzijde van het
monitorvoetstuk in de sleuven aan beide zijden van het koppelstuk vallen.
Koppelstuk
Voordat u de computer aansluit
op het dockingstation
Als uw computer onder het Microsoft® Windows® 9x-, Windows NT®of het Windows Millennium (Me)-besturingssysteem draait, moet
u uw computer eerst controleren op aanwezige dockingdrivers. Als
geen dockingdrivers op uw computer zijn geïnstalleerd, installeert
u deze voordat u de computer voor de eerste keer aansluit op het
dockingstation. Voor het installeren van de dockingdrivers volgt u
de stappen in "Dockingdrivers installeren".
Dell Latitude C/Port II APR Systeeminformatiegids 97
Page 100

www.dell.com | support.dell.com
OPMERKING: Als uw computer onder het besturingssysteem Windows XP
of Windows 2000 draait
geïnstalleerd en hoeft u de stappen in
uit te voeren
. U kunt direct doorgaan naar "De computer aansluiten".
, zijn de stuurprogramma's reeds automatisch
"Dockingdrivers installeren" niet
Controleer uw computer op de aanwezigheid van dockingdrivers
1 Dubbelklik op My Computer (Deze computer).
2 Dubbelklik op Control Panel (Configuratiescherm).
3 Dubbelklik op Add/Remove Programs (Software).
4 Zoek naar de juiste dockingdrivers in de programmalijst.
Zoek voor Windows 9x en Windows Me naar het stuurprogramma
met Quick Install in de naam. Bijvoorbeeld: Dell Dock Quick Install
for Windows.
Zoek voor Windows NT naar NT Softex Docking Services.
Als uw computer geen dockingdrivers heeft, gaat u naar het volgende
gedeelte, "Dockingdrivers installeren". Als uw computer wel dockingdrivers
heeft, gaat u naar het gedeelte "De computer aansluiten".
Dockingdrivers installeren
U kunt uw dockingdrivers op een van de volgende manieren installeren:
• Installeer de stuurprogramma's vanaf de ResourceCD (Bron-CD)
of de CD Drivers and Utilities (Stuur- en hulpprogramma's) die
met uw computer of dockingstation is meegeleverd.
• Download de stuurprogramma's vanaf de Dell support-website.
98 Dell Latitude C/Port II APR Systeeminformatiegids
 Loading...