

Page 1

Dell™ Latitude™ C/Port Advanced Port Replicator
User's Guide
D0LL
www.dell.com
Page 2

^Varnings, Cautions, and Notes
Throughout this document, there may be blocks of text
printed in bold type within boxes or in italic type. These
blocks are warnings, cautions, and notes, and they are
used as follows:
WARNING: A WARNING indicates the potential
for bodily harm and tells yon how to avoid the
problem.
CAUTION: A CAUTION indicates either potential
damage to hardware or loss of data and tells yon
how to avoid the problem.
NOTE: A NOTE indicates important information that
helps you make better use of your computer system.
Some warnings may appear in alternate formats and may
be unaccompanied by an icon. In such cases, the specific
presentation of the warning is mandated by regulatory
authority.
Information in this docnment is snbject to change withont notice.
© 1997-1999 Dell Compnter Corporation. All rights reserved.
Reproduction in any manner whatsoever without the written permission of Dell Computer Corporation is strictly forbidden.
Trademarks used in this text: Dell, the DELL logo, and Latitude are trademarks and DellWare is a service mark of Dell Computer Corporation;Mi'croso/i,
Windows, and Windows NT are registered trademarks of Microsoft Corporation;Novell and NetWare are registered trademarks of Novell, Inc.; 3Com is
a registered trademark of 3Com Corporation.
Other trademarks and trade names may be used in this document to refer to either the entities claiming the marks and names or tleir products. Dell
Computer Corporation disclaims any proprietary interest in trademarks and trade names other than its own.
March 1999 P/N 53647 Rev. A02
Page 3

Contents
Before You Doek the Computer................................................................................1-1
Windows 95 and Windows 98............................................................................1-1
Windows NT...................................................................................................... 1-1
Features......................................................................................................................1-2
Conneeting External Deviees to the C/Port APR
Doekinj the Computer................................................................................................1-5
Doeking Control Base Controls and Indieators
Undoeking the Computer...........................................................................................1-6
Softex Doeking Serviees............................................................................................1-7
Seeuring the C/Port APR...........................................................................................1-7
Using the C/Port APR With a Network
Network Cable Requirements.............................................................................1-8
Network Conneetor Indieators............................................................................1-8
Diagnosties.................................................................................................................1-9
Getting Help...............................................................................................................1-9
Teehnieal Speeifieations............................................................................................ 1-9
Regulatory Notiees.................................................................................................. 1-11
FCC Class B Notiee (U.S. Only).............................................................................1-11
IC Notiee (Canada Only)
EN 55022 Complianee (Czeeh Republie Only).......................................................1-12
CE Notiee.................................................................................................................1-12
VCCI Notiees (Japan Only).....................................................................................1-13
Class A ITE.......................................................................................................1-13
Class B ITE.......................................................................................................1-13
Korean Regulatory Notiee.......................................................................................1-13
Class A Deviee................................................................................................. 1-13
Class B Deviee ................................................................................................ 1-13
Polish Center for Testing and Certifieation Notiee..................................................1-14
Wymagania Polskiego Centrum Badan i Certyfikaeji
Pozostale instrukeje bezpieezenstwa........................................................................1-14
.........................................................................................
.....................................................................
......................................................
.........................................................
.............................................
1-3
1-6
1-8
1-12
1-14
III
Page 4

NOM 024 Information (Mexico Only)
Información para NOM 024 (únicamente para México)
...................................................................
.........................................
1-15
1-15
Warranties............................................................................................................... 1-16
Limited One-Year Warranty(U.S. and Canada Only)
......................................
1-16
“Total Satisfaction” Return Policy (U.S. and Canada Only)............................1-17
Index
Figures
Figure 1-1.
Figure 1-2.
Figure 1-3.
Figure 1-4.
Figure 1-5.
Figure 1-6.
Figure 1-7.
Figure 1-8.
Figure 1-9.
Tables
Table 1-1.
Dell Latitude C/Port Advanced Port Replicator
................................
1-2
I/O Panel on the C/Port APR ............................................................ 1-3
Infrared Port and Audio Line-Out Jack............................................. 1-4
Attaching the Monitor Stand
Docking Panel Door on the Computer
Docking the Computer
............................................................
..............................................
.....................................................................
1-4
1-5
1-5
Docking Control Base Controls and Indicators................................ 1-6
Undocking the Computer.................................................................. 1-7
N etwork Connector Indicators......................................................... 1-8
Technical Specifications................................................................... 1-9
IV
Page 5

Dell ™ Latitude ™ C/Port Advanced Port Replicator
User’s Guide
□
I he Dell Latitude C/Port Advaneed Port Replieator
(C/Port APR) integrates your Dell Latitude portable eom-
puter quiekly and easily into a desktop environment.
Before You Dock the Computer
Use the instruetions in this seetion to install the appropri
ate drivers for the C/Port APR.
If your computer uses the Microsoft® Windows® 95 or
Windows 98 operating system, see “Windows 95 and
Windows 98” found later in this seetion.
If your computer uses the Microsoft Windows NT®
operating system, see “Windows NT” found later in this
seetion.
Windows 95 and Windows 98
If your eomputer uses Windows 95 or Windows 98, the
eomputer is already eonfigured to work with the Dell
Latitude C/Port APR. Use the following proeedure the
first time you turn on the eomputer.
CAUTION: Do not dock the computer before turn
ing it on for the first time.
1. If the computer has never been turned on, turn it
on now while undocked and complete the operat
ing system setup. Then go to step 2.
If the operating system setup has already been eompleted, turn on the eomputer and go to step 2.
For setup instruetions, see the operating system
Setup Guide that eame with the eomputer.
2. Dock the computer.
The operating system ereates a hardware profile for
the C/Port APR.
Windows NT
If your eomputer uses Windows NT, the eomputer is
already eonfigured to work with the Dell Latitude C/Port
APR. Use the following proeedure the first time your turn
on the eomputer.
CAUTION: Do not dock the computer before turn
ing it on for the first time.
1. If the computer has never been turned on, turn it
on now while undocked and complete the operat
ing system setup. Then go to step 2.
If the operating system setup has already been com
pleted, turn on the eomputer and go to step 2.
For setup instruetions, see the Dell-Installed
Microsoft Windows NT Workstation 4.0 Setup Guide.
2. If you plan to connect a C/Port APR to a network,
shut down the computer, dock it, and turn it on
again.
Follow the instruetions on the display to load the
appropriate drivers.
Dell Latitude C/Port Advanced Port Replicator User’s Guide 1-1
Page 6
F eatures
The C/Port APR, which is designed around Peripheral
Component Interconnect (PCI) technology, has the fol
lowing features (see Figures 1-1, 1-2, and 1-3):
• A 10/100 megabit-per-second (Mbps) BASE-TX
3Com® Ethernet network controller.
NOTE: To connect the computer to a Token Ring net
work, use a Tokcen Ring PC Card in the computer.
• Standard input/output (I/O) connectors to attach
a serial and a parallel device, an external monitor
or other video device, a Personal System (PS)/2compatible mouse, and a PS/2-style keyboard or
external keypad.
• Two stacked Universal Serial Bus (USB) connectors.
• A line-out jack to attach optional speakers or
headphones.
C/Port Advanced Port Replicator
An infrared port compatible with the Infrared Data
Association (IrDA) Standards 1.1 (Fast IR) and 1.0
A docking control base to facilitate the proper con
nection between the C/Port APR and the computer.
CAUTION: Do not connect the compnter and
the C/Port APR if the C/Port APR is not
attached to a docking control base. Snch a
connection conld damage the connectors on the
C/Port APR and the compnter.
NOTE: In some regions the C/Port APR can be pur
chased with a short alignment tray. Use this tray if
you plan to use the C/Port APR without a monitor
stand or if you travel with the C/Port APR.
A monitor stand that fits onto the docking control
base and provides a platform for an external monitor.
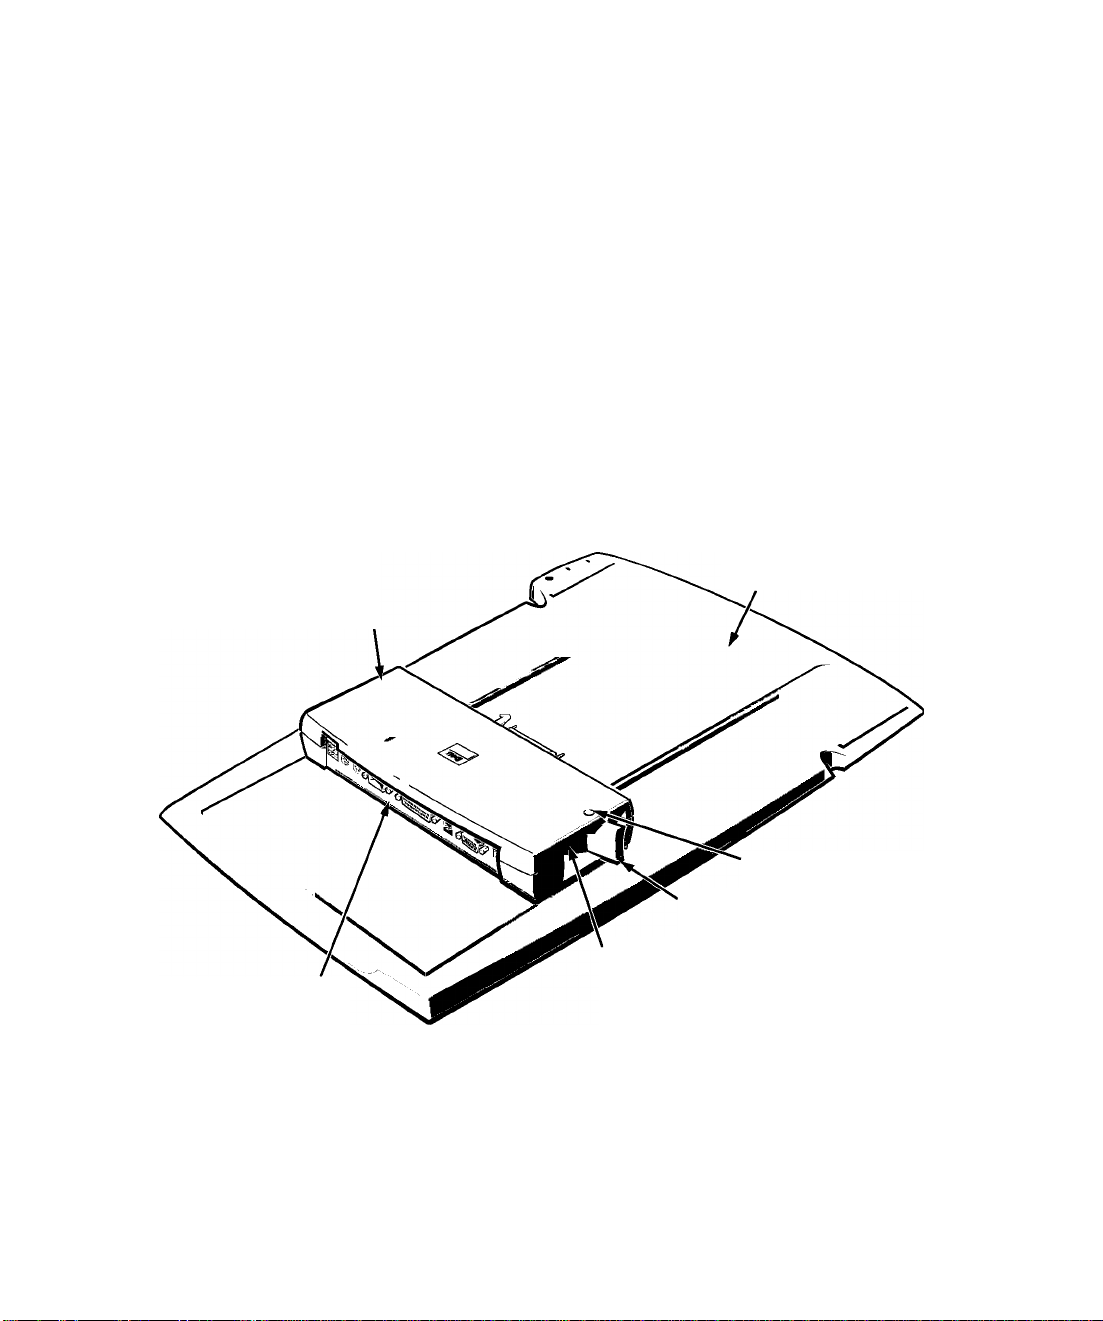
docking control base
I/O panel
Figure 1-1. Dell Latitude C/Port Advanced Port Replicator
1-2 Dell Latitude C/Port Advanced Port Replicator User’s Guide
padlock hole
eject lever
security lock slot
Page 7
Connecting External Devices to
the C/Port APR
Use the following instruetions to eonneet external
deviees to the C/Port APR:
1. Make sure the C/Port APR is attached to the docking control base.
The C/Port APR was attaehed to the doeking eontrol
base before being shipped to you.
2. Refer to Figures 1-2 and 1-3 to locate the appro
priate connector, jack, or port on the C/Port
APR.
You ean attaeh the following external deviees to the
C/Port APR:
• USB deviees, sueh as a mouse, keyboard, eam-
era, or speakers, eonneeted to one of the two
staeked USB eonneetors.
Both USB eonneetors support the use of a USB
hub deviee for eonneeting multiple deviees. For
more information, see the instruetions that
aeeompanied the USB deviee.
• A PS/2-eompatible mouse eonneeted to the PS/2
mouse eonneetor.
When a PS/2 mouse is attaehed to the C/Port
APR, the toueh pad on the eomputer is disabled
automatieally.
A PS/2-style keyboard or external numerie key
pad eonneeted to the PS/2 keyboard eonneetor.
When an external keyboard or numerie keypad
is eonneeted to the C/Port APR, the eomputer’s
built-in keyboard still funetions.
A serial deviee, sueh as a serial mouse or exter
nal modem, eonneeted to the serial eonneetor.
A parallel deviee, sueh as a tape drive or printer,
eonneeted to the parallel eonneetor.
An Ethernet network interfaee eable with an
RJ45 plug eonneeted to the network eonneetor.
NOTE: Alert your network administrator before
connecting the C/Port APR to a network.
For information about available network driv
ers, network eabling requirements, and the
network eonneetor indieators, see “Using the
C/Port APR With a Network” found later in this
doeument.
An external monitor or other video deviee eonneeted to the video eonneetor.
If an external monitor is eonneeted to the C/Port
APR, the eomputer’s built-in display still funetions. However, the eomputer display must be
elosed when using an external monitor on top of
the monitor stand.
NOTE: Check the technical specifications of
your Dell portable computer to determine the
kind of external monitor the C/Port APR
supports.
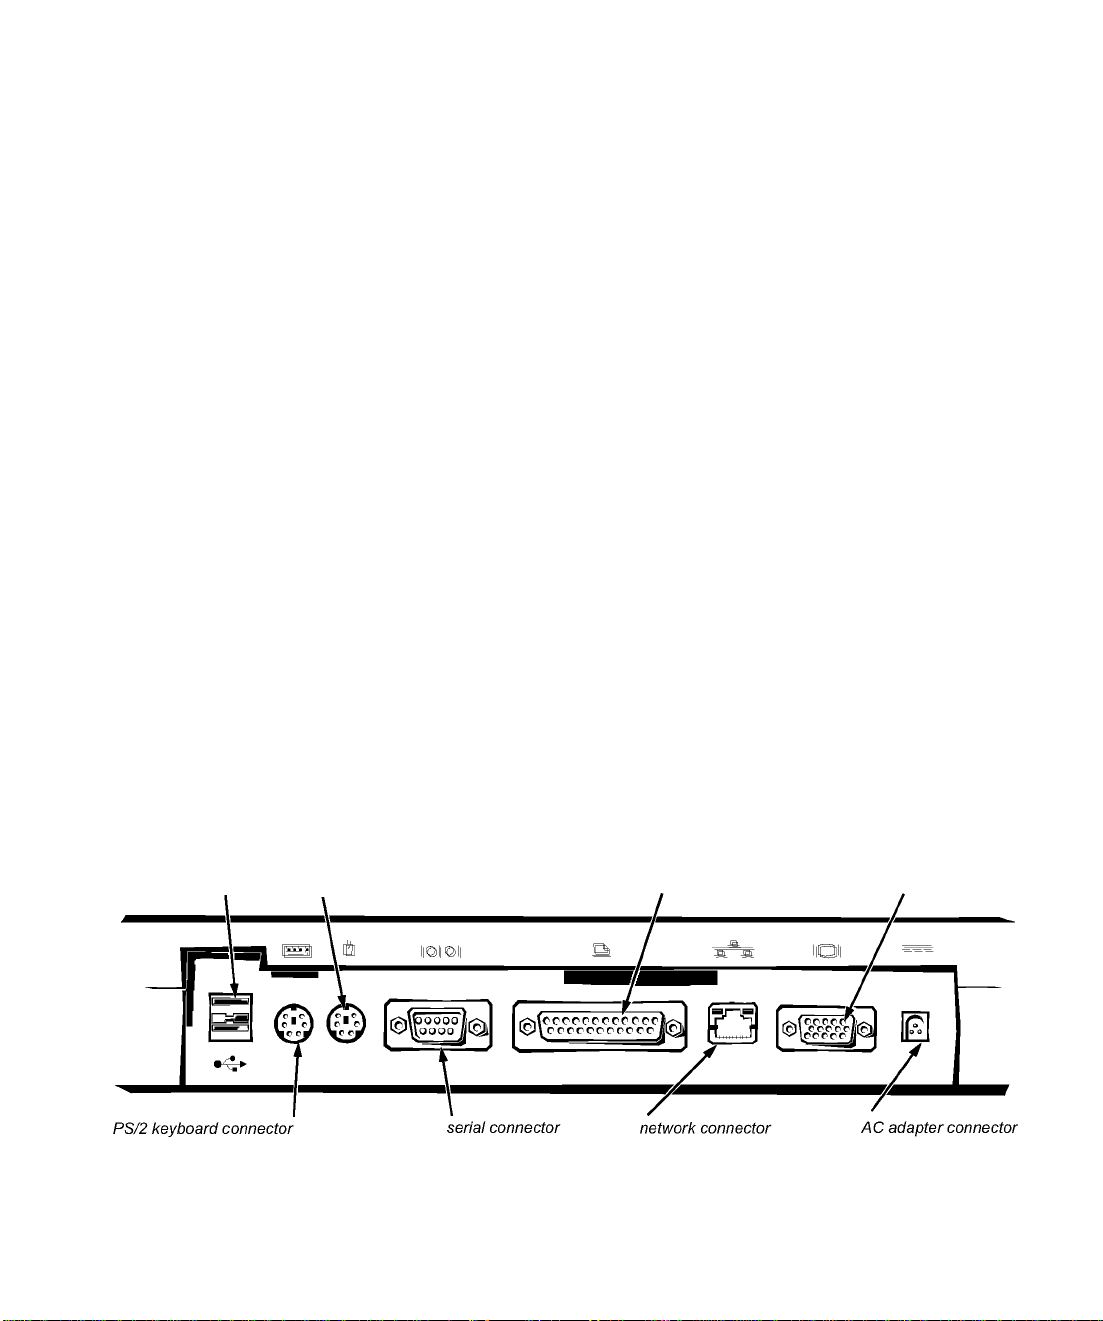
USB connectors
Figure 1-2. I/O Panel on the C/Port APR
PS/2 mouse connector
parallel connector
Dell Latitude C/Port Advanced Port Replicator User’s Guide 1-3
video connector
Page 8

For information on changing the resolution of
an external monitor connected to the C/Port
APR, see “Video Drivers and Video Resolution”
in the online System User V Guide on your
computer.
• Speakers or headphones connected to the audio
line-out jack (see Figure 1-3).
• An infrared device that works with the infrared
port on the C/Port APR (see Figure 1-3) and the
data communications software on the com
puter’s hard-disk drive.
For more information, see “Using External Devices”
in the online System User S Guide on your computer.
Figure 1-3. Infrared Port and Audio Line-Out
Jack
The AC adapter powers the C/Port APR and the
computer at the same time. A battery inside the com
puter charges while you use the C/Port APR.
CAUTION: Always use the Dell AC adapter
that came with the C/Port APR. (Look for
model number PA-2 or PA-6 on the bottom of
the AC adapter.) Using any other commer
cially available AC adapter—or the AC
adapter from older models of Dell computers—could damage the C/Port APR or the
computer.
If the AC adapter cable is accidentally unplugged
from the C/Port APR, your data is safe as long as
you have a charged battery in the computer.
5. Place the C/Port APR and docking control base in a convenient location on your desk or work area.
6. Attach the monitor stand to the docking control
base (see Figure 1-4), and then set an external
monitor on top of the stand.
The stand supports monitors that weigh up to
45.3 kilograms (kg) (100 pounds [lb]).
NOTE: If you are using the short alignment tray, you
cannot use the monitor stand.
3. Connect the external devices to their power sources.
4. Connect the C/Port APR to alternating current (AC) power.
Connect the AC power cable to the AC adapter. Next,
plug the AC adapter cable into the AC adapter con
nector on the C/Port APR. Then plug the AC power
cable into awn AC power source.
1-4 Dell Latitude C/Port Advanced Port Replicator User’s Guide
monitor stand
Figure 1-4. Attaching the Monitor Stand
Page 9

Docking the Computer
Use the following instruetions to doek the eomputer to
the C/Port APR:
1. Open the docking panel door on the back of the compnter (see Fignre 1-5).
Figure 1-5. Docking Panei Door on the
Computer
First, eenter the eomputer on the doeking eontrol
base. To do this, plaee the eomputer onto the doeking
eontrol base, and align the ridges on top of the eomputer with the ridges on top of the C/Port APR.
When properly aligned, you should feel the guide
rails on the doeking eontrol base eonneet with the
grooves on the bottom of the eomputer.
Next, put your thumbs along the front edge of the
eomputer and your fingers in the doeking eontrol
base indents. Then push the eomputer toward the
C/Port APR gently but firmly with your thumbs. You
should hear or feel a eliek as the eateh lever loeks
into plaee. The eateh lever keeps the C/Port APR
from being aeeidentally diseonneeted from the
eomputer.
CAUTION: Do not pick np the compnter or
the C/Port APR separately when they are
connected. Doing so conld damage the I/O
connectors on the compnter and the C/Port
APR. To change the position of the C/Port
APR and the compnter,, slide or pick np the
docking control base.
2. If yon are nsing the C/Port APR with a monitor stand, close the compnter display.
3. Dock the C/Port APR to the compnter (see Fignre 1-6).
Figure 1-6. Docking the Computer
CAUTION: If yon are nsing an external mon
itor with the monitor stand, remove the
monitor from the stand before moving the
docking control base into place.
You ean immediately use the network, the infrared port
(with Windows 95 and Windows 98 only), and all
deviees attaehed to the C/Port APR for whieh deviee
drivers are installed. While doeked, you ean eonneet Plug
and Play deviees to the I/O panel of the C/Port APR.
If an external monitor is attaehed to the C/Port APR and
is turned on, the sereen image appears on the external
monitor. To switeh the image to the eomputer display or
to both the monitor and the eomputer display, press
<Fn><F8>.
When the eomputer is attaehed to the C/Port APR and is
turned on, the green power indieator on the doeking
eontrol base lights up (see Figure 1-7). For more informa
tion about the doeking eontrol base, see “Doeking
Control Base Controls and Indieators” in the following
seetion.
Dell Latitude C/Port Advanced Port Replicator User’s Guide 1-5
Page 10

While the eomputer and C/Port APR are doeked, you ean
use key eombinations or System Setup time-outs to put
the eomputer into suspend mode.
The eomputer eannot enter suspend-to-disk mode while
doeked.
Docking Control Base Controls
and Indicators
When the eomputer is used with the C/Port APR and a
monitor stand, the power button, power indieator, and
drive aeeess indieator on the eomputer are not visible.
However, these features are duplieated on the doeking
eontrol base (see Figure 1-7).
NOTE: The short alignment tray, which is available in
some regions, Goes not have these features.
Figure 1-7. Docking Contrai Base Contrais and
indicators
To prepare the eomputer eleetrieally for undoeking,
press the undoek request button.
The green doeking indieator lights up when the eomputer and C/Port APR are doeked and eomputer is
turned on. After you press the undoek request button,
the doeking indieator turns off when the eomputer is
ready to be undoeked.
Undocking the Computer
Use the following instruetions to undoek the eomputer:
1. Make sure there is a charged battery in the computer.
CAUTION: If the computer does not have
power from a battery, the computer turns off
when it is detached from the C/Port APR, and
all unsaved data is lost.
2. Use one of the following methods to prepare the computer electrically for undocking.
CAUTION: Never undock the computer and
the C/Port APR without first preparing the
computer electrically. Any of the three follow
ing methods prepares the operating system,
network, and storage devices for undocking by
completing data transfers. If the computer is
undocked before these transfers are com
pleted, data will be lost and it could take
several minutes for the computer to recover
normal operation.
The eontrols and indieators on the doeking eontrol base
work as follows:
• To turn the eomputer on and off, press the power but
ton on the doeking eontrol base.
• The green power indieator lights up when the
eomputer and C/Port APR are doeked and the eomputer is on.
• The green drive aeeess indieator fliekers when a
hard-disk drive, diskette drive, or CD-ROM drive is
being aeeessed.
1-6 Dell Latitude C/Port Advanced Port Replicator User’s Guide
Press <Fn><Ese> on the eomputer’s built-in
keyboard (or <Seroll Loek><Ese> on an exter
nal keyboard). Wait a few seeonds for the power
indieator on the eomputer to turn off.
On the Windows 95 or Windows 98 taskbar,
eliek the Start button, point to Ejeet PC, and
eliek. Wait a few seeonds for the power indieator on the eomputer to turn off.
On the Windows NT taskbar, eliek the Doeking
Serviees ieon, and then eliek the Undoek button.
Page 11

• If you are using the C/Port APR with a monitor
stand, you ean also press the undoek request
button on the doeking eontrol base (see
Figure 1 -7). Wait for the green doek indieator to
turn off.
Gently push the eject lever toward the back of the
3.
C/Port APR to separate the computer from the
C/Port APR (see Figure 1-8).
4. If you are using Windows NT, you will see several Device Removal messages. Click OK for each one.
6oftex Docking Services
If your eomputer is using Windows NT 4.0, the Softex
Doeking Serviees software has been installed. This soft
ware eontains support for the following features:
• Hot-doeking and warm-undoeking a Latitude CP
Series portable eomputer from supported doeking
stations
• Hot-swapping deviees sueh as diskette drives, hard
disk drives, large-storage drives and CD-ROM
drives to and from your portable eomputer’s deviee
bay
• Compatibility with the Power Management Control
ler that allows you to suspend and resume your
portable eomputer without affeeting your ability to
use the doeking station
• Doeking or undoeking your portable eomputer while
it is in suspend mode
• Doeking serviees available in Freneh, German,
Italian, Spanish and Japanese
For the latest information on these serviees and the
Softex user’s guides, see
products/notebook/latitude/NT40.htm.
http://www.dell.com/
Securing the C/Port APR
Use one of the following methods to seeure the C/Port
APR:
• A padloek alone or a padloek and looped seeurity
eable with the padloek hole (see Figure 1-1) on the
C/Port APR.
A padloek alone bloeks the ejeet lever and makes
it diffieult to detaeh the eomputer from the C/Port
APR.
A seeurity eable looped around a stationary objeet
and used in eonjunetion with the padloek ean help
prevent the unauthorized movement of the eomputer
and the C/Port APR.
• A eommereially available antitheft deviee attaehed
to the seeurity loek slot (see Figure 1-1) on the
C/Port APR. Antitheft deviees usually inelude a seg
ment of metal-stranded eable with an attaehed
loeking deviee and assoeiated key. Complete instruetions for installing this kind of antitheft deviee are
ineluded with the deviee.
• Bolt the doeking eontrol base (with the C/Port APR
eonneeted) to the desk or work surfaee using the fol
lowing proeedure:
1. Drill two holes in the desk or work surface.
The centers of the holes should be
6 inches apart.
2. Save all files, close and exit all application
programs, and exit the operating system.
Turn off the computer.
3. Remove the monitor stand if one is attached
to the docking control base.
4. Undock the computer.
For instruetions, see “Undoeking the Computer”
found earlier in this doeument.
Dell Latitude C/Port Advanced Port Replicator User’s Guide 1-7
Page 12

5. Detach all cables—including the AC adapter cable—from the C/Dock Expansion Station.
6. Turn over the docking control base, and
locate the two slotted bolt holes at the top of
the tray. Insert the head of a carriage bolt
into each bolt hole.
Use a l/4-inch (6-millimeter [mm]) earriage bolt.
Seleet a bolt length appropriate for the thickness
of your desk.
7. Turn the tray back over, and fit the bolts into the holes you drilled in step one.
8. Finish bolting the tray to the desk.
Select a washer and nut appropriate for the bolt.
Using the C/Port APR With a
Network
Drivers for running Windows 95, Windows 98 and
Windows NT 4.0 in a Novell® NetWare® environment
are installed on your computer. Drivers for NetWare 3.12
and 4.10 are also installed.
NOTE: Alert your network administrator before connect
ing the C/Port APR to a network.
• The maximum cable run length (from a workstation
to a concentrator) is 100 meters (m) (328 feet [ft]).
• The maximum number of workstations (not counting
concentrators) on a network is 1024.
• The maximum number of daisy-chained concentra
tors on one network segment is four.
Network Connector Indicators
The network connector on the C/Port APR has two indi
cators (see Figure 1-9):
network connector
Figure 1-9. Network Connector Indicators
Network Cable Requirements
The C/Port APR’s RJ45 network connector (see
Figure 1-9) is designed for attaching a shielded or
unshielded twisted pair (UTP) Ethernet cable. Press one
end of the UTP cable into the network connector until the
cable snaps securely into place.
Connect the other end of the cable to an RJ45 jack wall
plate or to an RJ45 port on a UTP concentrator or hub,
depending on your network configuration. Observe the
following cabling restrictions for 10BASE-T and
100BASE-TX networks:
• For 10-Mbps operation, use Category 3 or greater
wiring and connectors. For 100-Mbps operation, use
Category 5 wiring and connections. Voice and data
lines should be in separate sheaths.
1-8 Dell Latitude C/Port Advanced Port Replicator User’s Guide
• A green link integrity indicator lights up when a
good connection exists between the network and the
network connector on the C/Port APR. When the
green indicator is off, the computer is not detecting a
physical connection to the network. When the green
light blinks, the network cable has reversed polarity
and you should use another cable.
• A yellow activity indicator flashes when the system
is transmitting or receiving network data. (A high
volume of network traffic may make this indicator
appear to be in a steady “on” state.)
Page 13

Diagnostics
The Dell Diagnosties that eame with your Dell Latitude
eomputer ineludes tests that help you troubleshoot the
eontrollers in your C/Port APR.
The subtests in the Network Interfaee Test Group of the
Dell Diagnosties verify the basie operation of the net
work eontroller in the C/Port APR. They test the
eontroller’s internal funetions, ineluding read and write
aeeess to its registers and internal transmit and reeeive
(loopbaek) eapability.
The subtests in the Serial/Infrared Ports Test Group
eheek the C/Port APR’s interfaee with external deviees
(sueh as a serial mouse or a printer). The subtests in this test
group are not intended as a diagnostie test for the external
deviee itself.
The subtests in the USB Test Group eheek the C/Port
APR’s interfaee with external deviees (sueh as a mouse).
The subtests in this test group are not intended as a diag-
nostie test for the external deviee itself.
Tabie 1-1. Technicai Specifications
Physical
For eomplete instruetions on using the Dell Diagnosties,
see Chapter 4, “Running the Dell Diagnosties,” in the
Reference and Troubleshooting Guide that aeeompanied
your eomputer.
Getting Heip
If you do not understand a proeedure deseribed in this
doeument, or if your C/Port APR does not perform as
expeeted, you ean eall Dell for teehnieal assistanee. Use
the appropriate telephone number found in the “Contaeting Dell” seetion of the eomputer’s online System User’s
Guide or in Chapter 5, “Getting Help,” of the Reference and
Troubleshooting Guide that aeeompanied your eomputer.
TecKnicai Specifications
Table 1-1 lists the teehnieal speeifieations for the C/Port
APR.
Height:
With doeking eontrol base and
monitor stand
With doeking eontrol base only. .
With short alignment tray
Standalone
Depth:
With doeking eontrol base and
monitor stand
With doeking eontrol base only. . . . . . 475.8 mm (18.73 inehes)
With short alignment tray
Standalone
NOTE: For the full name of an abbreviation or acronym used in this table, see the Glossary in the
online System User’s Guide.
...............................
...........
...................................
...............................
...........
...................................
. . . . 95.6 mm (3.76 inehes)
. . . . 55.2 mm (2.17 inehes)
. . . . 54.8 mm (2.15 inehes)
. . . . 49.9 mm (2.00 inehes)
. . . . 475.8 mm (18.73 inehes)
. . . . 206.7 mm (8.14 inehes)
. . . . 127.4 mm (5.01 inehes)
Dell Latitude C/Port Advanced Port Replicator User’s Guide 1-9
Page 14

Table 1-1. Technical Specifications (continued)
Width:
With docking control base and
monitor stand
.......................................
Physical (continued)
374.7 mm (14.75 inches)
With docking control base only
With short alignment tray
Standalone
...........................................
..........
....................
374.7 mm (14.75 inches)
301.7 mm (11.87 inches)
301.7 mm (11.87 inches)
Weight:
With docking control base and
monitor stand
With docking control base only
With short alignment tray
Standalone
Voltage
Amperage
.......................................................
...................................................
Serial (DTE)
.......................................
..........
....................
..........................................
...............................................
4.1 kg (9.03 lb)
2.87 kg (6.32 lb)
0.88 kg (1.94 lb)
0.67 kg (1.47 lb)
Power
requires 20 VDC from AC adapter
3.5 A
I/O
one 6550-compatible, 16-byte buffer
connector
Parallel........................................................ one unidirectional, bidirectional, or ECP
connector
PS/2............................................................. two mini-DIN connectors
USB
............................................................
Infrared
......................................................
two stacked USB-compliant connectors
one infrared port compatible with IrDA
Standards 1.1 (Fast IR) and 1.0
Audio line out
.............................................
audio jack (for optional headphones or
speakers)
NOTE: For the full name of an abbreviation or acronym used in this table, see the Glossary in the
online System User’s Guide.
1-10 Dell Latitude C/Port Advanced Port Replicator User’s Guide
Page 15

Video
........................
Table 1-1. Technical Specifications (continued)
\IO (continued)
..........
one connector
Network
Docking (to connect to computer). .
Chip set
Data bus width
IRQ
NOTE: For the full name of an abbreviation or acronym used in this table, see the Glossary in the
online System User’s Guide.
...................
.....................
.........
...........................
..........
..........
Ethernet Network Controller
..........
..........
..........
Regulatory Notices
All regulatory labels for the Dell Latitude C/Port APR
are located on the bottom.
Fee eiass B Notice (U.S. Only)
NOTE: This equipment generates, uses, and can radiate
radio frequency energy and, if not installed and used in
accordance with the manufacturer’s instruction manual,
may cause interference with radio and television
reception. This equipment has been tested and found to
comply with the limits for a Class B digital device pursu
ant to Part 15 of the Federal Communications
Commission (FCC) Rules. These limits are designed to
provide reasonable protection against harmful interfer
ence in a residential installation. However, there is no
guarantee that interference will not occur in a particular
installation. If this equipment does cause harmful inter
ference with radio or television reception, which can be
determined by turning the equipment off and on, you are
encouraged to try to correct the interference by one or
more of the following measures:
• Reorient the receiving antenna.
• Relocate the computer with respect to the receiver.
one RJ45 connector
one connector
3Com 3C916B; 10/100 BASE-TX
(PC97-compliant)
32-bit PCI host bus interface
IRQ10
• Move the computer away from the receiver.
• Plug the computer into a different outlet so that the
computer and the receiver are on different branch
circuits.
If necessary, consult a representative of Dell Computer
Corporation or an experienced radio/television technician
for additional suggestions. You may find the following
booklet helpful: FCC Interference Handbook, 1986,
available from the U.S. Government Printing Office,
Washington, DC 20402, Stock No. 004-000-00450-7.
Note that FCC regulations provide that changes or modi
fications not expressly approved by Dell Computer
Corporation could void your authority to operate this
equipment Furthermore, shielded cables must be used
when you connect peripherals to any Dell device.
This device complies with Part 15 of the FCC Rules.
Operation is subject to the following two conditions:
• This device may not cause harmful interference.
• This device must accept any interference received,
including interference that may cause undesired
operation.
Dell Latitude C/Port Advanced Port Replicator User’s Guide 1-11
Page 16

The following information is provided about the deviee
or deviees eovered by this doeument in eomplianee with
FCC regulations:
• Produet name: Dell Latitude C/Port Advaneed Port
Replieator
• Model number: PDS
• Company name: Dell Computer Corporation
Regulatory Department
One Dell Way
Round Roek, Texas 78682 USA
512-338-4400
Ic Notice (Canada Only)
Most Dell portable eomputers (and other Dell digital
apparatus) are elassified by the Industry Canada (IC)
Interferenee-Causing Equipment Standard #3
(ICES-003) as Class B digital deviees. To determine
whieh elassifieation (Class A or B) applies to your
eomputer (or other Dell digital apparatus), examine all
registration labels loeated on the bottom or the baek
panel of your eomputer (or other digital apparatus). A
statement in the form of “IC Class A ICES-3” or “IC
Class B ICES-3” will be loeated on one of these labels.
Note that Industry Canada regulations provide that
ehanges or modifieations not expressly approved by Dell
Computer Corporation eould void your authority to oper
ate this equipment.
This Class B (or Class A, if so indieated on the regis
tration label) digital apparatus meets the requirements
of the Canadian Interferenee-Causing Equipment
Regulations.
Cet appareil numérique de la Classe B (ou Classe A, si
ainsi indiqué sur l’étiquette d’enregistration) respeete
toutes les exigenees du Reglement sur le Materiel
Brouilleur du Canada.
En 55022 Compliance (Czech
Republic Only)
This deviee belongs to eategory B deviees as
deseribed in EN 55022, unless it is speeifieally stated
that it is a eategory A deviee on the speeifieation label.
The following applies to deviees in eategory A of
EN 55022 (radius of proteetion up to 30 meters). The
user of the deviee is obliged to take all steps neeessary
to remove sourees of interferenee to teleeommunieation or other deviees.
Pokud neni na typovem stitku pocitace uvedeno, ze
spada do tridy A podle EN 55022, spada automatieky
do tridy B podle EN 55022. Pro zarizeni zarazena do
tridy A (oehranne pasmo 30m) podle EN 55022 plati
nasledujiei. Dojde-li k ruseni telekomunikaCnieh nebo
jinyeh zarizeni, je uzivatel povinen provest takova
opatreni, aby ruseni odstranil.
Ce
Notice
Marking by the symbol ^ ^ indieates eomplianee of
this Dell portable eomputer to the EMC (Eleetromagnetie
Compatibility) direetive of the European Community.
Sueh marking is indieative that this Dell portable eomputer meets or exeeeds the following teehnieal standards:
• EN 55022 — “Limits and Methods of Measurement
of Radio Interferenee Charaeteristies of Information
Teehnology Equipment.”
NOTE: EN 55022 emissions requirements provide
for two classifications—Class A and Class B. If any
one of the registration labels (located on the bottom
or back panel of your computer, on card-mounting
brackets, or on the cards themselves) carries an
FCC Class A rating, the following warning applies
to your portable computer.
C€
1-12 Dell Latitude C/Port Advanced Port Replicator User’s Guide
WARNING: This is a Class A product. In a
domestic environment this product may cause
radio interference in which case the user may
be required to take adequate measures.
Page 17

• EN 50082-1 — “Electromagnetic compatibility—
Generic immunity standard Part 1: Residential, com
mercial, and light industry.”
• lEC 801-2 — “Electromagnetic compatibility for
industrial-process measurement and control equip
ment Part 2: Electrostatic discharge requirements.” —
Severity level 3.
• lEC 801-3 — “Electromagnetic compatibility for
industrial-process measurement and control equip
ment Part 3: Radiated electromagnetic field
requirements.” — Severity level 2.
• lEC 801-4 — “Electromagnetic compatibility for
industrial-process measurement and control equip
ment Part 4: Electrical fast transient/burst
requirements.” — Severity level 2.
• EN60950:! 992 + Amd. 1:1993 + Amd.2:1993 —
“Safety of Information Technology Equipment
including Electrical Business Equipment.”
A “Declaration of Conformity” in accordance with the
above standards has been made and is on file at Dell
Products Europe BV, Limerick, Ireland.
VcCI Notices (Japan Only)
Most Dell computer systems are classified by the Volun
tary Control Council for Interference (VCCI) as Class B
information technology equipment (ITE). However, the
inclusion of certain options changes the rating of some
configurations to Class A. To determine which classifica
tion applies to your computer system, examine the FCC
classification on the registration labels located on the
back panel of your computer, on card-mounting brackets,
and on the cards themselves. If any one of the labels car
ries an FCC Class A designation, your entire system is
considered to be VCCI Class A ITE. If all labels carry
either an FCC Class B identification number or the FCC
logo ^g), your system is considered to be VCCI Class B
ITE.
Once you have determined your system’s VCCI classifi
cation, read the appropriate VCCI notice. Note that VCCI
regulations provide that changes or modifications not
expressly approved by Dell Computer Corporation could
void your authority to operate this equipment.
Class $ ITE
This is a Class A product based on the standard of the
Voluntary Control Council for Interference for informa
tion technology equipment. If this equipment is used in a
domestic environment, radio disturbance may arise.
When such trouble occurs, the user may be required to
take corrective actions.
Class B ITE
This is a Class B product based on the standard of the
Voluntary Control Council for Interference for informa
tion technology equipment. If this equipment is used near
a radio or television receiver in a domestic environment,
it may cause radio interference. Install and use the equip
ment according to the instruction manual.
K,
orean Regulatory Notice
To determine which classification (Class A or B) applies
to your portable computers (or other Dell digital appara
tus), examine all registration labels located on the bottom
or the back panel of your computer (or other digital appa
ratus), on card-mounting brackets, and on the cards
themselves. If any one of the labels carries a Class A rat
ing, your entire computer is considered to be a Class A
digital device. If all labels carry the Class B rating, your
computer is considered to be a Class B digital device.
NOTE: Class A devices are for business purposes. Class B
devices are for nonbusiness purposes.
Class A Device
Please note that this device has been approved for
business purposes with regard to electromagnetic inter
ference. If you find that this device is not suitable for
your use, you may exchange it for a device that has been
approved for use in residential as well as business
environments.
Class B Device
Please note that this device has been approved for non
business purposes and may be used in any environment,
including residential areas.
Dell Latitude C/Port Advanced Port Replicator User’s Guide 1-13
Page 18

Polish Center for Testing and
Certification Notice
Pozostaie instrukcje
bezpieezenstwa
All equipment that works together (eomputer, monitor,
printer, and so on) should have the same power supply
souree.
The phasing eonduetor of the room’s eleetrieal installa
tion should have a reserve short-eireuit proteetion deviee
in the form of a fuse with a nominal value no larger than
10 amperes (A).
To eompletely switeh off the equipment, the power sup
ply eable must be removed from the power supply soeket,
whieh should be loeated near the equipment and easily
aeeessible.
A proteetion mark “B” eonfirms that the equipment is in
eomplianee with the proteetion usage requirements of
standards PN-93/T-42107 and PN-89/E-06251.
^^ymagania Polskiego Centrum
Badah i Certyfikacji
Wspolpraeujqee ze sob" urz"dzenia (komputer, monitor,
dmkarka) powinny bye zasilane z tego samego zrodla.
Instalaeja elektryezna pomieszezenia powinna zawierae
w przewodzie fazowym rezerwow" oehronq przed zwar-
eiami, w postaei bezpieeznika o wartosei znamionowej
nie wiqkszej niz lOA (amperow).
W eelu ealkowitego wyl"ezenia urz"dzenia z sieei
zasilania, nalezy wyj"e wtyezkq kabla zasilaj"eego z
gniazdka, ktore powinno znajdowae siq w poblizu
urz"dzenia i bye latwo dostqpne.
Znak bezpieezenstwa "B" potwierdza zgodnose urz"dzenia z wymaganiami bezpieezenstwa uzytkowania
zawar-tymi w PN-93/T-421O7 i PN-89/E-O6251.
Nie nalezy uzywae wtyezek adapterowyeh lub usuwae kolka obwodu oehronnego z wtyezki. Jezeli
konieezne jest uzyeie przedluzaeza to nalezy uzye
przedluzaeza 3-zylowego z prawidlowo pol"ezonym
przewodem oehronnym.
System komputerowy nalezy zabezpieezye przed
naglymi, ehwilowymi wzrostami lub spadkami
napiqeia, uzywaj"e eliminatora przepiqe, urz"dzenia
dopasowuj"eego lub bezzakloeeniowego zrodla
zasilania.
Nalezy upewnie siq, aby nie nie lezalo na kablaeh
systemu komputerowego, oraz aby kable nie byly
umieszezone w miejseu, gdzie mozna byloby na nie
nadeptywae lub potykae siq o nie.
Nie nalezy rozlewae napojow ani innyeh plynow na
system komputerowy.
Nie nalezy wpyehae zadnyeh przedmiotow do
otworow systemu komputerowego, gdyz moze to
spowodowae pozar lub porazenie pr"dem, poprzez
zwareie elementow wewnqtrznyeh.
System komputerowy powinien znajdowae siq z dala
od grzejnikow i zrodel eiepla. Ponadto, nie nalezy
blokowae otworow wentylaeyjnyeh. Nalezy unikae
kladzenia luznyeh papierow pod komputer oraz
umieszezania komputera w eiasnym miejseu bez
mozliwosei eyrkulaeji powietrza wokol niego.
1-14 Dell Latitude C/Port Advanced Port Replicator User’s Guide
Page 19

NoM 024 Information (Mexico
Only)
Información para NOM 024
(únicamente para México)
The following information is provided on the deviee(s)
deseribed in this doeument in eomplianee with the
requirements of the offieial Mexiean standards
(NOM 024):
Exporter:
Importer:
Ship to:
Supply voltage:
Frequeney:
Current
eonsumption:
Dell Computer Corporation
One Dell Way
Round Roek, TX 78682
Dell Computer de Méxieo,
S.A. de C.V.
Rio Lerma No. 302 - 4° Piso
Col. Cuauhtemoe
16500 Méxieo, D.F.
Dell Computer de Méxieo,
S.A. de C.V al Cuidado
de Kuehne & Nagel de
Méxieo S. de R.I.
Avenida Soles No. 55
Col. Peñon de los Baños
15520 Méxieo, D.F.
100/250 VAC ±10%
50/60 Hz
0.8/0.4 A
La informaeión siguiente se proporeiona en el dispositivo
o en los dispositivos deseritos en este doeumento, en
eumplimiento eon los requisitos de la Norma Ofieial
Mexieana (NOM 024):
Exportador:
Importador:
Embarear a:
Tensión
alimentaeión:
Freeueneia:
Consumo de
eorriente:
Dell Computer Corporation
One Dell Way
Round Roek, TX 78682
Dell Computer de Méxieo,
S.A. de C.V.
Rio Lerma No. 302 - 4° Piso
Col. Cuauhtemoe
16500 Méxieo, D.F.
Dell Computer de Méxieo,
S.A. de C.V al Cuidado
de Kuehne & Nagel de
Méxieo S. de R.I.
Avenida Soles No. 55
Col. Peñon de los Baños
15520 Méxieo, D.F.
100/250 V.C.A. ±10%
50/60 Hz
0.8/0.4 A
Dell Latitude C/Port Advanced Port Replicator User’s Guide 1-15
Page 20

Warranties
If you purchased the Dell Latitude C/Port APR at the
same time you purchased the Dell portable computer
designed to be used with the C/Port APR, warranty infor
mation can be found in Appendix D, “Warranties and
Return Policy,” of the Reference and Troubleshooting
Guide that accompanied the computer.
If you purchased the C/Port APR separately, see the fol
lowing subsections for warranty information.
Limited One-Year Warranty
(U.S. and Canada Only)
Dell Computer Corporation (“Dell”) manufactures its
hardware products from parts and components that are
new or equivalent to new in accordance with industry-
standard practices. Dell warrants that the hardware
products it manufactures will be free from defects in
materials and workmanship. The warranty term is one
year beginning on the date of invoice, as further
described in the following text.
Damage due to shipping the products to you is covered
under this warranty. Otherwise, this warranty does not
cover damage due to external causes, including accident,
abuse, misuse, problems with electrical power, servicing
not authorized by Dell, usage not in accordance with
product instructions, failure to perform required preven
tive maintenance, and problems caused by use of parts
and components not supplied by Dell.
This warranty does not cover any items that are in one or
more of the following categories: software; external
devices (except as specifically noted); accessories or
parts added to a Dell system after the system is shipped
from Dell; accessories or parts added to a Dell system
through Dell’s system integration department; accesso
ries or parts that are not installed in the Dell factory; or
DellWareSM products. Monitors, keyboards, and mice that
are Dell-branded or that are included on Dell’s standard
price list are covered under this warranty; all other moni
tors, keyboards, and mice (including those sold through
the DellWare program) are not covered.
Dell will repair or replace products covered under this
limited warranty that are returned to Dell’s facility. To
request warranty service, you must call Dell’s Customer
Technical Support within the warranty period. Refer to
the chapter titled “Getting Help” in your Diagnostics and
Troubleshooting Guide or the section titled “Contacting
Dell” in your online System User S Guide to find the
appropriate telephone number for obtaining customer
assistance. If warranty service is required, Dell will issue
a Return Material Authorization Number. You must ship
the products back to Dell in their original or equivalent
packaging, prepay shipping charges, and insure the ship
ment or accept the risk of loss or damage during
shipment. Dell will ship the repaired or replacement
products to you (freight prepaid) if you use an address in
the continental U.S. or Canada, where applicable. Ship
ments to other locations will be made freight collect.
NOTE: Before you ship the product(s) to Dell, back up
the data on the hard-disk drive(s) and any other storage
device(s) in theproduct(s). Remove any removable
media, such as diskettes, CDs, or PC Cards.
Dell owns all parts removed from repaired products. Dell
uses new and reconditioned parts made by various manu
facturers in performing warranty repairs and building
replacement products. If Dell repairs or replaces a prod
uct, its warranty term is not extended.
DELL MAKES NO EXPRESS WARRANTIES OR
CONDITIONS BEYOND THOSE STATED IN THIS
WARRANTY STATEMENT. DELL DISCLAIMS ALL
OTHER WARRANTIES AND CONDITIONS,
EXPRESS OR IMPLIED, INCLUDING WITHOUT
LIMITATION IMPLIED WARRANTIES AND STATES
(OR JURISDICTIONS) DO NOT ALLOW LIMITA
TIONS ON IMPLIED WARRANTIES OR
CONDITIONS, SO THIS LIMITATION MAY NOT
APPLY TO YOU.
DELL’S RESPONSIBILITY FOR MALFUNCTIONS
AND DEFECTS IN HARDWARE IS LIMITED TO
REPAIR AND REPLACEMENT AS SET FORTH IN
THIS WARRANTY STATEMENT. THESE WARRAN
TIES GIVE YOU SPECIFIC LEGAL RIGHTS AND
YOU MAY ALSO HAVE OTHER RIGHTS WHICH
VARY FROM STATE TO STATE (OR JURISDICTION
TO JURISDICTION).
1-16 Dell Latitude C/Port Advanced Port Replicator User’s Guide
Page 21

DELL DOES NOT ACCEPT LIABILITY BEYOND
THE REMEDIES SET FORTH IN THIS WARRANTY
STATEMENT OR LIABILITY FOR INCIDENTAL OR
CONSEQUENTIAL DAMAGES, INCLUDING WITH
OUT LIMITATION ANY LIABILITY FOR
PRODUCTS NOT BEING AVAILABLE FOR USE OR
FOR LOST DATA OR SOFTWARE.
SOME STATES (OR JURISDICTIONS) DO NOT
ALLOW THE EXCLUSION OR LIMITATION OF
INCIDENTAL OR CONSEQUENTIAL DAMAGES,
SO THE PRECEDING EXCLUSION OR LIMITATION
MAY NOT APPLY TO YOU.
These provisions apply to Dell’s limited one-year war
ranty only. For provisions of any serviee eontraet
eovering your system, refer to the separate serviee eon
traet that you will reeeive.
If Dell eleets to exehange a produet or portion of a prod
uet, the exehange will be made in aeeordanee with Dell’s
Exehange Poliey in effeet on the date of the exehange.
“Total Satisfaction” Return Policy (U.S.
and Canada Only)
If you are an end-user eustomer who bought produets
direetly from a Dell eompany, you may return them to
Dell up to 30 days from the date of invoiee for a refund of
the produet purehase priee if already paid. This refund
will not inelude any shipping and handling eharges
shown on your invoiee. If you are an organization who
bought the produets from Dell under a written agreement
with Dell, there may be different terms for the return of
produets under this poliey, based on your agreement with
Dell. To return produets, you must eall Dell Customer
Serviee (at the telephone number listed in the ehapter
titled “Getting Help” in your Reference and
Troubleshooting Guide or the seetion titled “Contaeting
Dell” in your online System User S Guide) to reeeive a
Credit Return Authorization Number. You must ship the
produets to Dell in their original paekaging, prepay ship
ping eharges, and insure the shipment or aeeept the risk
of loss or damage during shipment. You may return soft
ware for refund or eredit only if the sealed paekage
eontaining the diskette(s) or CD(s) is unopened. Returned
produets must be in as-new eondition, and all of the man
uals, diskette(s), CD(s), power eables, and other items
ineluded with a produet must be returned with it.
This “Total Satisfaetion” Return Poliey does not apply to
DellWare produets, whieh may be returned under
DellWare’s then-eurrent return poliey.
Dell Latitude C/Port Advanced Port Replicator User’s Guide 1-17
Page 22

1-18 Dell Latitude C/Port Advanced Port Replicator User’s Guide
Page 23

Index
AC adapter, 1 -4
assistance
technical, 1-9
C/Port APR
connecting external devices, 1-3
docking control base, 1 -6
docking software, 1 -7
docking to computer, 1-1, 1-5
features, 1-2
I/O panel connectors, 1-3
infrared port, 1-4
line-out jack, 1-4
monitor stand, 1-4
network usage, 1-8
securing, 1-7
undocking from computer, 1 -6
connecting external devices, 1-3
features, 1-2
+
help
calling for technical assistance, 1-9
I/O panel connectors, 1 -3
indicators
docking control base, 1 -6
network connector, 1-8
infrared port, 1-4
line-out jack, 1-4
Dell Diagnostics, 1 -9
docking C/Port APR to computer, 1 -5
docking control base, 1 -6
docking software, 1 -7
0
monitor stand, 1 -4
Index 1
Page 24

1
network connector
about, 1-3
cable requirements, 1indicators, 1-8
network drivers, 1-8
regulatory notices, 1-11
return policy, 1-16, 1-17
securing the C/Port APR, 1 -7
technical assistance, 1 -9
technical specifications, 1 -9
8
undocking C/Port APR, 1 -6
:
warranty information, 1-16
Dell Latitude C/Port Advanced Port Replicator User’s Guide
 Loading...