

Page 1

RACADM Command Line
Reference Guide for
iDRAC6 1.7, iDRAC6 3.2, and
CMC 3.2
Page 2

Notes and Cautions
NOTE: A NOTE indicates important information that helps you make better use of
your computer.
CAUTION: A CAUTION indicates potential damage to hardware or loss of data if
instructions are not followed.
_____________________
Information in this publication is subject to change without notice.
© 2011 Dell Inc. All rights reserved.
Reproduction of these materials in any manner whatsoever without the written permission of Dell Inc.
is strictly forbidden.
Trademarks used in this text: Dell™, the DELL logo, OpenManage™, and PowerEdge™, are
trademarks of Dell Inc. Microsoft
trademarks or registered trademarks of Microsoft Corporation in the United States and/or other
countries. UNIX
Other trademarks and trade names may be used in this document to refer to either the entities claiming
the marks and names or their products. Dell Inc. disclaims any proprietary interest in trademarks and
trade names other than its own.
®
is a registered trademark of The Open Group in the United States and other countries.
®
, Windows®, Windows Server®, and Active Directory® are either
2011 - 03
Page 3

Contents
1 Introduction . . . . . . . . . . . . . . . . . . . . . . . 25
What’s New in This Release. . . . . . . . . . . . . . . 25
Sub-Commands
Groups
. . . . . . . . . . . . . . . . . . . 25
. . . . . . . . . . . . . . . . . . . . . . . 25
Supported RACADM Interfaces
RACADM Syntax Usage
Local RACADM
. . . . . . . . . . . . . . . . . . . 26
SSH/Telnet RACADM
Remote RACADM
. . . . . . . . . . . . . . . . . . 27
. . . . . . . . . . . . . 25
. . . . . . . . . . . . . . . . . 26
. . . . . . . . . . . . . . . . 27
RACADM Command Options . . . . . . . . . . . . 27
Supported RACADM Subcommands
. . . . . . . . . . . 29
Other Documents You May Need . . . . . . . . . . . . 33
2 RACADM Subcommand Details . . . . . . . . 37
Guidelines to Quote Strings Containing Special
Characters When Using RACADM Commands . . . . . 37
"?" and "? <subcommand>"
"help" and "help <subcommand>"
arp
. . . . . . . . . . . . . . . . . . . . . . . . . . . . 41
chassisaction
. . . . . . . . . . . . . . . . . . . . . . 41
. . . . . . . . . . . . . . . 38
. . . . . . . . . . . . 40
Contents 3
Page 4

clearasrscreen . . . . . . . . . . . . . . . . . . . . . . 43
closessn
clrraclog
. . . . . . . . . . . . . . . . . . . . . . . . . 43
. . . . . . . . . . . . . . . . . . . . . . . . . 45
clrsel . . . . . . . . . . . . . . . . . . . . . . . . . . . 45
cmcchangeover
. . . . . . . . . . . . . . . . . . . . . . . . . . . 46
config
. . . . . . . . . . . . . . . . . . . . . 46
connect . . . . . . . . . . . . . . . . . . . . . . . . . . 49
coredump
coredumpdelete
. . . . . . . . . . . . . . . . . . . . . . . . . 50
. . . . . . . . . . . . . . . . . . . . . 51
deploy . . . . . . . . . . . . . . . . . . . . . . . . . . 51
. . . . . . . . . . . . . . . . . . . . . . . . . . 54
feature
featurecard
fwupdate
. . . . . . . . . . . . . . . . . . . . . . . . 56
. . . . . . . . . . . . . . . . . . . . . . . . . 58
getassettag . . . . . . . . . . . . . . . . . . . . . . . . 65
getchassisname
. . . . . . . . . . . . . . . . . . . . . 65
4 Contents
getconfig
. . . . . . . . . . . . . . . . . . . . . . . . . 66
getdcinfo . . . . . . . . . . . . . . . . . . . . . . . . . 68
getflexaddr
getfanreqinfo
getioinfo
getkvminfo
. . . . . . . . . . . . . . . . . . . . . . . . 70
. . . . . . . . . . . . . . . . . . . . . . . 73
. . . . . . . . . . . . . . . . . . . . . . . . . 75
. . . . . . . . . . . . . . . . . . . . . . . . 76
Page 5

getled. . . . . . . . . . . . . . . . . . . . . . . . . . . 77
getmacaddress
getmodinfo
. . . . . . . . . . . . . . . . . . . . . . 78
. . . . . . . . . . . . . . . . . . . . . . . . 83
getniccfg . . . . . . . . . . . . . . . . . . . . . . . . . 85
getpbinfo
getpminfo
. . . . . . . . . . . . . . . . . . . . . . . . . 87
. . . . . . . . . . . . . . . . . . . . . . . . 89
getraclog . . . . . . . . . . . . . . . . . . . . . . . . . 90
getractime
getredundancymode
. . . . . . . . . . . . . . . . . . . . . . . . 91
. . . . . . . . . . . . . . . . . . . 92
getsel. . . . . . . . . . . . . . . . . . . . . . . . . . . 93
getsensorinfo
getslotname
getssninfo
. . . . . . . . . . . . . . . . . . . . . . 94
. . . . . . . . . . . . . . . . . . . . . . . 95
. . . . . . . . . . . . . . . . . . . . . . . . 97
getsvctag. . . . . . . . . . . . . . . . . . . . . . . . . 98
getsysinfo
. . . . . . . . . . . . . . . . . . . . . . . . 99
gettracelog
. . . . . . . . . . . . . . . . . . . . . . . . 103
getuscversion . . . . . . . . . . . . . . . . . . . . . . 104
getversion
ifconfig
krbkeytabupload
kmcSelfSignedCertGen
. . . . . . . . . . . . . . . . . . . . . . . . 105
. . . . . . . . . . . . . . . . . . . . . . . . . . 108
. . . . . . . . . . . . . . . . . . . . . 109
. . . . . . . . . . . . . . . . . 110
Contents 5
Page 6

localConRedirDisable . . . . . . . . . . . . . . . . . 110
. . . . . . . . . . . . . . . . . . . . . . . . . 111
netstat
. . . . . . . . . . . . . . . . . . . . . . . . . . . 111
ping
ping6 . . . . . . . . . . . . . . . . . . . . . . . . . . 112
racdump
racreset
. . . . . . . . . . . . . . . . . . . . . . . . 113
. . . . . . . . . . . . . . . . . . . . . . . . . 116
racresetcfg . . . . . . . . . . . . . . . . . . . . . . . 117
remoteimage
serveraction
. . . . . . . . . . . . . . . . . . . . . . 118
. . . . . . . . . . . . . . . . . . . . . . 118
setassettag . . . . . . . . . . . . . . . . . . . . . . . 119
setchassisname
setflexaddr
. . . . . . . . . . . . . . . . . . . . . . . . . . 122
setled
. . . . . . . . . . . . . . . . . . . . 120
. . . . . . . . . . . . . . . . . . . . . . . 121
setniccfg . . . . . . . . . . . . . . . . . . . . . . . . 124
setractime
setslotname
. . . . . . . . . . . . . . . . . . . . . . . 125
. . . . . . . . . . . . . . . . . . . . . . 127
setsysinfo . . . . . . . . . . . . . . . . . . . . . . . . 128
sshpkauth
. . . . . . . . . . . . . . . . . . . . . . . 129
6 Contents
sslcertdownload
sslcertupload
sslcertview
. . . . . . . . . . . . . . . . . . . . . . 132
. . . . . . . . . . . . . . . . . . . . . . . 134
. . . . . . . . . . . . . . . . . . . . 131
Page 7

sslcsrgen. . . . . . . . . . . . . . . . . . . . . . . . . 136
sslkeyupload
sslresetcfg
. . . . . . . . . . . . . . . . . . . . . . . 137
. . . . . . . . . . . . . . . . . . . . . . . . 138
testemail . . . . . . . . . . . . . . . . . . . . . . . . . 139
testkmsconnectivity
testfeature
. . . . . . . . . . . . . . . . . . . . . . . . 141
. . . . . . . . . . . . . . . . . . . 140
testtrap . . . . . . . . . . . . . . . . . . . . . . . . . . 144
traceroute
traceroute6
. . . . . . . . . . . . . . . . . . . . . . . . 145
. . . . . . . . . . . . . . . . . . . . . . . . 145
usercertupload. . . . . . . . . . . . . . . . . . . . . . 146
usercertview
version
vflashsd
. . . . . . . . . . . . . . . . . . . . . . . 147
. . . . . . . . . . . . . . . . . . . . . . . . . . 147
. . . . . . . . . . . . . . . . . . . . . . . . . 148
vflashpartition . . . . . . . . . . . . . . . . . . . . . . 148
vmdisconnect
. . . . . . . . . . . . . . . . . . . . . . 152
. . . . . . . . . . . . . . . . . . . . . . . . . . 152
vmkey
3 iDRAC6 and CMC Property Database
Group and Object Descriptions . . . . . . 155
Displayable Characters . . . . . . . . . . . . . . . . . 156
idRacInfo
. . . . . . . . . . . . . . . . . . . . . . . . . 158
idRacProductInfo (Read Only)
idRacDescriptionInfo (Read Only)
. . . . . . . . . . . 158
. . . . . . . . . 159
Contents 7
Page 8

idRacVersionInfo (Read Only). . . . . . . . . . . 159
idRacBuildInfo (Read Only) . . . . . . . . . . . . 159
idRacName (Read Only)
idRacType (Read Only)
. . . . . . . . . . . . . 159
. . . . . . . . . . . . . . 159
cfgLanNetworking
cfgNicIPv4Enable (Read/Write)
cfgNicSelection (Read/Write)
. . . . . . . . . . . . . . . . . . . 160
. . . . . . . . . . 160
. . . . . . . . . . 161
cfgNicVLanEnable (Read/Write) . . . . . . . . . 162
cfgNicVLanId (Read/Write)
cfgNicVLanPriority (Read/Write)
. . . . . . . . . . . . 163
. . . . . . . . . 163
cfgDNSDomainNameFromDHCP
(Read/Write) . . . . . . . . . . . . . . . . . . . 163
cfgDNSDomainName (Read/Write)
. . . . . . . . 164
cfgDNSRacName (Read/Write). . . . . . . . . . 164
cfgDNSRegisterRac (Read/Write)
cfgDNSServersFromDHCP (Read/Write)
. . . . . . . . 165
. . . . . 166
cfgDNSServer1 (Read/Write) . . . . . . . . . . . 166
cfgDNSServer2 (Read/Write)
. . . . . . . . . . . 166
cfgNicEnable (Read/Write) . . . . . . . . . . . . 167
cfgNicIpAddress (Read/Write)
cfgNicNetmask (Read/Write)
. . . . . . . . . . 167
. . . . . . . . . . . 167
cfgNicGateway (Read/Write). . . . . . . . . . . 168
cfgNicUseDhcp (Read/Write)
cfgNicMacAddress (Read Only)
cfgRemoteHosts
. . . . . . . . . . . . . . . . . . . . 169
. . . . . . . . . . . 168
. . . . . . . . . 168
cfgRhostsFwUpdateTftpEnable
(Read/Write)
. . . . . . . . . . . . . . . . . . . 169
cfgRhostsFwUpdateIpAddr (Read/Write). . . . . 169
cfgRhostsFwUpdatePath (Read/Write)
. . . . . . 170
cfgRhostsSmtpServerIpAddr
(Read/Write) . . . . . . . . . . . . . . . . . . . 170
cfgRhostsNtpEnable
cfgRhostsNtpServer1
. . . . . . . . . . . . . . . 170
. . . . . . . . . . . . . . . 171
8 Contents
Page 9

cfgRhostsNtpServer2. . . . . . . . . . . . . . . . 171
cfgRhostsNtpServer3. . . . . . . . . . . . . . . . 171
cfgRhostsNtpMaxDist
cfgRhostsSyslogEnable (Read/Write)
. . . . . . . . . . . . . . . 172
. . . . . . . 172
cfgRhostsSyslogPort (Read/Write) . . . . . . . . . 172
cfgRhostsSyslogServer1 (Read/Write)
cfgRhostsSyslogServer2 (Read/Write)
. . . . . . . 173
. . . . . . . 173
cfgRhostsSyslogServer3 (Read/Write) . . . . . . . 173
cfgRhostsSyslogPowerLoggingEnabled
cfgRhostsSyslogPowerLoggingInterval
. . . . . . 174
. . . . . . 174
cfgUserAdmin
cfgUserAdminIndex (Read Only)
. . . . . . . . . . . . . . . . . . . . . . 175
. . . . . . . . . . 175
cfgUserAdminIpmiLanPrivilege
(Read/Write) . . . . . . . . . . . . . . . . . . . . 176
cfgUserAdminPrivilege (Read/Write)
cfgUserAdminUserName (Read/Write)
. . . . . . . 176
. . . . . . 178
cfgUserAdminPassword (Write Only) . . . . . . . 179
cfgUserAdminEnable (Read/Write)
. . . . . . . . . 179
cfgUserAdminSolEnable (Read/Write) . . . . . . . 179
cfgUserAdminIpmiSerialPrivilege
(Read/Write)
cfgEmailAlert
cfgEmailAlertIndex (Read Only)
cfgEmailAlertEnable (Read/Write)
. . . . . . . . . . . . . . . . . . . . 180
. . . . . . . . . . . . . . . . . . . . . . 180
. . . . . . . . . . 180
. . . . . . . . . 181
cfgEmailAlertAddress (Read/Write) . . . . . . . . 181
cfgEmailAlertCustomMsg (Read/Write)
cfgEmailAlertEmailName
cfgSessionManagement
. . . . . . . . . . . . . . 181
. . . . . . . . . . . . . . . . . 182
cfgSsnMgtRacadmTimeout (Read/Write)
. . . . . . 181
. . . . . 182
cfgSsnMgtConsRedirMaxSessions
(Read/Write) . . . . . . . . . . . . . . . . . . . . 183
Contents 9
Page 10

cfgSsnMgtWebserverTimeout
(Read/Write)
cfgSsnMgtSshIdleTimeout (Read/Write)
. . . . . . . . . . . . . . . . . . . 183
. . . . . 184
cfgSsnMgtTelnetIdleTimeout
(Read/Write) . . . . . . . . . . . . . . . . . . . 185
cfgSerial . . . . . . . . . . . . . . . . . . . . . . . . 185
cfgSerialBaudRate (Read/Write)
. . . . . . . . . 186
cfgSerialConsoleEnable (Read/Write) . . . . . . 186
cfgSerialConsoleQuitKey (Read/Write)
cfgSerialConsoleIdleTimeout (Read/Write)
. . . . . . 187
. . . . 188
cfgSerialConsoleNoAuth (Read/Write) . . . . . . 188
cfgSerialConsoleCommand (Read/Write)
cfgSerialConsoleColumns
. . . . . . . . . . . . 188
. . . . 188
cfgSerialHistorySize (Read/Write) . . . . . . . . 189
cfgSerialCom2RedirEnable (Read/Write)
cfgSerialSshEnable (Read/Write)
. . . . . 189
. . . . . . . . . 189
cfgSerialTelnetEnable (Read/Write) . . . . . . . 190
cfgOobSnmp . . . . . . . . . . . . . . . . . . . . . . 190
cfgOobSnmpAgentCommunity
(Read/Write)
cfgOobSnmpAgentEnable (Read/Write)
. . . . . . . . . . . . . . . . . . . 191
. . . . . 191
10 Contents
cfgTraps
. . . . . . . . . . . . . . . . . . . . . . . . 191
cfgTrapsIndex (Read Only)
cfgTrapsEnable
. . . . . . . . . . . . . . . . . . 192
. . . . . . . . . . . . 192
cfgTrapsAlertDestIpAddr . . . . . . . . . . . . . 192
cfgTrapsCommunityName
cfgRacTuning
. . . . . . . . . . . . . . . . . . . . . . 193
cfgRacTuneConRedirPort (Read/Write)
. . . . . . . . . . . . 192
. . . . . 193
cfgRacTuneRemoteRacadmEnable
(Read/Write)
cfgRacTuneCtrlEConfigDisable
cfgRacTuneHttpPort (Read/Write)
. . . . . . . . . . . . . . . . . . . 194
. . . . . . . . . . 194
. . . . . . . . 194
Page 11

cfgRacTuneHttpsPort (Read/Write) . . . . . . . . 195
cfgRacTuneIpRangeEnable (Read/Write) . . . . . 195
cfgRacTuneIpRangeAddr (Read/Write)
cfgRacTuneIpRangeMask (Read/Write)
. . . . . . 195
. . . . . . 196
cfgRacTuneIpBlkEnable (Read/Write) . . . . . . . 196
cfgRacTuneIpBlkFailCount (Read/Write)
cfgRacTuneIpBlkFailWindow (Read/Write)
. . . . . . 196
. . . . 197
cfgRacTuneIpBlkPenaltyTime
(Read/Write) . . . . . . . . . . . . . . . . . . . . 197
cfgRacTuneSshPort (Read/Write)
. . . . . . . . . 197
cfgRacTuneTelnetPort (Read/Write) . . . . . . . . 197
cfgRacTuneConRedirEnable (Read/Write)
. . . . . 198
cfgRacTuneConRedirEncryptEnable
(Read/Write) . . . . . . . . . . . . . . . . . . . . 198
cfgRacTuneAsrEnable (Read/Write)
cfgRacTuneDaylightOffset (Read Only)
. . . . . . . . 198
. . . . . . . 198
cfgRacTuneTimezoneOffset (Read Only) . . . . . . 199
cfgRacTuneLocalServerVideo
(Read/Write)
. . . . . . . . . . . . . . . . . . . . 200
cfgRacTuneLocalConfigDisable
(Read/Write) . . . . . . . . . . . . . . . . . . . . 200
cfgRacTuneWebserverEnable
(Read/Write) . . . . . . . . . . . . . . . . . . . . 200
cfgRacTuneVirtualConsoleAuthorize
MultipleSessions (Read/Write)
cfgRacTunePluginType (Read/Write)
. . . . . . . . . . . 201
. . . . . . . . 201
ifcRacManagedNodeOs
. . . . . . . . . . . . . . . . . 202
ifcRacMnOsHostname (Read Only)
ifcRacMnOsOsName (Read Only)
cfgRacVirtual
. . . . . . . . . . . . . . . . . . . . . . 203
cfgVirMediaAttached (Read/Write)
cfgVirtualBootOnce (Read/Write)
cfgVirMediaFloppyEmulation (Read/Write)
. . . . . . . . 202
. . . . . . . . . 202
. . . . . . . . 203
. . . . . . . . . 203
. . . . 204
Contents 11
Page 12

cfgVirMediaKeyEnable (Read/Write) . . . . . . . 204
cfgSDWriteProtect (Read only). . . . . . . . . . 205
cfgLCDriveEnable (Read/Write)
. . . . . . . . . . 205
cfgServerInfo
cfgServerInfoIndex (Read only)
cfgServerSlotNumber (Read only)
cfgServerServiceTag (Read only)
. . . . . . . . . . . . . . . . . . . . . . 206
. . . . . . . . . 206
. . . . . . . . 206
. . . . . . . . . 207
cfgServerName (Read/Write). . . . . . . . . . . 207
cfgServerFW (Read only)
cfgServerBIOS (Read only)
. . . . . . . . . . . . . 207
. . . . . . . . . . . . 207
cfgServerBmcMacAddress (Read only) . . . . . 208
cfgServerNic1MacAddress (Read only)
cfgServerNic2MacAddress (Read only)
. . . . . 208
. . . . . 208
cfgServerNic3MacAddress (Read only) . . . . . 208
cfgServerNic4MacAddress (Read only)
cfgServerPriority (Read/Write)
. . . . . 209
. . . . . . . . . . 209
cfgServerNicEnable (Read/Write) . . . . . . . . 209
cfgServerIPMIOverLanEnable
(Read/Write) . . . . . . . . . . . . . . . . . . . 209
cfgServerPowerBudgetAllocation
(Read only)
. . . . . . . . . . . . . . . . . . . . 210
cfgServerDNSRegisterIMC (Read/Write). . . . . 210
cfgServerDNSIMCName (Read/Write)
cfgServerRootPassword (Write only)
. . . . . . 210
. . . . . . 210
cfgServerFirstBootDevice (Read/Write) . . . . . 211
cfgServerBootOnce (Read/Write)
. . . . . . . . 211
cfgServerPowerConsumption
(Read only) . . . . . . . . . . . . . . . . . . . . 212
12 Contents
cfgActiveDirectory
. . . . . . . . . . . . . . . . . . . 213
cfgADRacDomain (Read/Write)
cfgADRacName (Read/Write)
cfgADRootDomain
cfgADEnable (Read/Write)
. . . . . . . . . . 214
. . . . . . . . . . 214
. . . . . . . . . . . . . . . . 214
. . . . . . . . . . . . 214
Page 13

cfgADSCLEnable . . . . . . . . . . . . . . . . . . 215
cfgADSSOEnable (Read/Write). . . . . . . . . . . 215
cfgADDomainController
cfgADDomainController1 (Read/Write)
. . . . . . . . . . . . . . 215
. . . . . . . 215
cfgADDomainController2 (Read/Write). . . . . . . 216
cfgADDomainController3 (Read/Write)
cfgADAuthTimeout (Read/Write)
. . . . . . . 216
. . . . . . . . . . 216
cfgADType (Read/Write) . . . . . . . . . . . . . . 216
cfgADSpecifyServerEnable
cfgADGlobalCatalog
. . . . . . . . . . . . 217
. . . . . . . . . . . . . . . . 217
cfgADGlobalCatalog1 (Read/Write) . . . . . . . . 218
cfgADGlobalCatalog2 (Read/Write)
cfgADGlobalCatalog3 (Read/Write)
. . . . . . . . 218
. . . . . . . . 218
cfgADCertValidationEnable (Read/Write) . . . . . 219
cfgADDcSRVLookupEnable (Read/Write)
. . . . . 219
cfgADDcSRVLookupbyUserdomain
(Read/Write) . . . . . . . . . . . . . . . . . . . . 219
cfgADDcSRVLookupDomainName
(Read/Write)
. . . . . . . . . . . . . . . . . . . . 220
cfgADGcSRVLookupEnable (Read/Write) . . . . . 220
cfgADGcRootDomain (Read/Write)
. . . . . . . . 220
cfgLDAP
. . . . . . . . . . . . . . . . . . . . . . . . . 220
cfgLdapEnable (Read/Write)
cfgLdapServer (Read/Write)
. . . . . . . . . . . . 221
. . . . . . . . . . . . 221
cfgLdapPort (Read/Write) . . . . . . . . . . . . . 221
cfgLdapBasedn (Read/Write)
cfgLdapUserAttribute (Read/Write)
. . . . . . . . . . . 222
. . . . . . . . 222
cfgLdapGroupAttribute (Read/Write). . . . . . . . 222
cfgLdapGroupAttributeIsDN (Read/Write)
cfgLdapBinddn (Read/Write)
. . . . . . . . . . . . 223
cfgLdapBindpassword (Write only)
cfgLdapSearchFilter (Read/Write)
. . . . . 223
. . . . . . . . 223
. . . . . . . . . 224
Contents 13
Page 14

cfgLDAPCertValidationEnable
(Read/Write)
cfgLDAPNetworkTimeout
cfgLDAPSearchTimeout
. . . . . . . . . . . . . . . . . . . 224
. . . . . . . . . . . . . 224
. . . . . . . . . . . . . 224
cfgLDAPSRVLookupEnable . . . . . . . . . . . . 225
cfgLDAPSRVLookupDomainName
cfgLDAPSRVLookupServiceName
. . . . . . . . 225
. . . . . . . . 225
cfgLdapRoleGroup
cfgLdapRoleGroupIndex (Read Only)
cfgLdapRoleGroupDN (Read/Write)
. . . . . . . . . . . . . . . . . . . 225
. . . . . . . 226
. . . . . . . 226
cfgLdapRoleGroupPrivilege
(Read/Write) . . . . . . . . . . . . . . . . . . . 227
cfgStandardSchema
cfgSSADRoleGroupIndex (Read Only)
cfgSSADRoleGroupName (Read/Write)
. . . . . . . . . . . . . . . . . . 227
. . . . . . 227
. . . . . 228
cfgSSADRoleGroupDomain
(Read/Write) . . . . . . . . . . . . . . . . . . . 228
cfgSSADRoleGroupPrivilege
(Read/Write) . . . . . . . . . . . . . . . . . . . 228
cfgChassisPower . . . . . . . . . . . . . . . . . . . 229
cfgChassisInPower (Read Only)
. . . . . . . . . 229
cfgChassisPeakPower (Read Only). . . . . . . . 229
cfgChassisPeakPowerTimestamp
(Read Only)
. . . . . . . . . . . . . . . . . . . . 229
cfgChassisMinPower (Read Only) . . . . . . . . 230
cfgChassisMinPowerTimestamp
(Read Only)
. . . . . . . . . . . . . . . . . . . . 230
cfgChassisPowerStatus (Read Only) . . . . . . . 230
cfgChassisRedundantState (Read Only)
cfgChassisPowerCap (Read/Write)
cfgChassisPowerCapF (Read/Write)
cfgChassisPowerCapBTU (Read/Write)
cfgChassisPowerCapFBTU (Read/Write)
. . . . . 230
. . . . . . . . 230
. . . . . . . 231
. . . . . 231
. . . . . 231
14 Contents
Page 15

cfgChassisPowerCapPercent
(Read/Write)
. . . . . . . . . . . . . . . . . . . . 232
cfgChassisPowerCapFPercent
(Read/Write)
. . . . . . . . . . . . . . . . . . . . 232
cfgChassisRedundancyPolicy
(Read/Write) . . . . . . . . . . . . . . . . . . . . 232
cfgChassisDynamicPSUEngagementEnable
(Read/Write) . . . . . . . . . . . . . . . . . . . . 232
cfgChassisAllow110VACOperation
(Read/Write)
. . . . . . . . . . . . . . . . . . . . 233
cfgChassisMaxPowerConservationMode
(Read/Write) . . . . . . . . . . . . . . . . . . . . 233
cfgChassisPerformanceOverRedundancy
(Read/Write) . . . . . . . . . . . . . . . . . . . . 233
cfgChassisInMaxPowerCapacity
(Read Only)
. . . . . . . . . . . . . . . . . . . . . 234
cfgChassisInRedundancyReserve
(Read Only) . . . . . . . . . . . . . . . . . . . . . 234
cfgChassisInPowerServerAllocation
(Read Only) . . . . . . . . . . . . . . . . . . . . . 234
cfgChassisInfrastructureInPowerAllocation
(Read Only) . . . . . . . . . . . . . . . . . . . . . 234
cfgChassisTotalInPowerAvailable
(Read Only)
. . . . . . . . . . . . . . . . . . . . . 234
cfgChassisStandbyInPowerCapacity
(Read Only) . . . . . . . . . . . . . . . . . . . . . 234
cfgChassisPowerClear (Write Only)
. . . . . . . . 234
cfgChassisPowerClearTimestamp
(Read Only) . . . . . . . . . . . . . . . . . . . . . 234
cfgChassisPowerButtonEnable
(Read/Write) . . . . . . . . . . . . . . . . . . . . 235
cfgSystemEnergyConsumptionClear
(Write Only)
. . . . . . . . . . . . . . . . . . . . . 235
cfgIpmiSol
. . . . . . . . . . . . . . . . . . . . . . . . 236
cfgIpmiSolEnable (Read/Write)
cfgIpmiSolBaudRate (Read/Write)
. . . . . . . . . . . 236
. . . . . . . . . 236
Contents 15
Page 16

cfgIpmiSolMinPrivilege (Read/Write) . . . . . . 236
cfgIpmiSolAccumulateInterval
(Read/Write) . . . . . . . . . . . . . . . . . . . 237
cfgIpmiSolSendThreshold
(Read/Write) . . . . . . . . . . . . . . . . . . . 237
cfgIpmiLan . . . . . . . . . . . . . . . . . . . . . . . 237
cfgIpmiLanEnable (Read/Write)
. . . . . . . . . 237
cfgIpmiLanPrivLimit (Read/Write) . . . . . . . . 238
cfgIpmiLanAlertEnable (Read/Write)
cfgIpmiEncryptionKey (Read/Write)
. . . . . . . 238
. . . . . . . 238
cfgIpmiPetCommunityName
(Read/Write) . . . . . . . . . . . . . . . . . . . 238
cfgIpmiPetIpv6
cfgIpmiPetIPv6Index (Read Only)
cfgIpmiPetIPv6AlertDestIpAddr
. . . . . . . . . . . . . . . . . . . . . 239
. . . . . . . . . 239
. . . . . . . . . 239
cfgIpmiPetIPv6AlertEnable
(Read/Write) . . . . . . . . . . . . . . . . . . . 239
cfgIpmiPef . . . . . . . . . . . . . . . . . . . . . . . 239
cfgIpmiPefName (Read Only)
cfgIpmiPefIndex (Read/Write)
cfgIpmiPefAction (Read/Write)
. . . . . . . . . . . 240
. . . . . . . . . . 240
. . . . . . . . . . 240
cfgIpmiPefEnable (Read/Write). . . . . . . . . . 240
cfgIpmiPet
. . . . . . . . . . . . . . . . . . . . . . . 241
cfgIpmiPetIndex (Read Only)
. . . . . . . . . . . 241
cfgIpmiPetAlertDestIpAddr (Read/Write) . . . . 241
cfgIpmiPetAlertEnable (Read/Write)
cfgUserDomain
. . . . . . . . . . . . . . . . . . . . . 242
cfgUserDomainIndex (Read Only)
cfgUserDomainName (Read Only)
cfgServerPower
. . . . . . . . . . . . . . . . . . . . 242
. . . . . . . 241
. . . . . . . . 242
. . . . . . . . 242
16 Contents
Page 17

cfgServerPowerStatus (Read Only) . . . . . . . . 242
cfgServerPowerAllocation (Read Only) . . . . . . 243
cfgServerActualPowerConsumption
(Read Only)
. . . . . . . . . . . . . . . . . . . . . 243
cfgServerPowerCapEnable (Read Only) . . . . . . 243
cfgServerMinPowerCapacity
(Read Only)
. . . . . . . . . . . . . . . . . . . . . 244
cfgServerMaxPowerCapacity
(Read Only) . . . . . . . . . . . . . . . . . . . . . 244
cfgServerPeakPowerConsumption
(Read Only) . . . . . . . . . . . . . . . . . . . . . 244
cfgServerPeakPowerConsumptionTimestamp
(Read Only)
. . . . . . . . . . . . . . . . . . . . . 244
cfgServerPowerConsumptionClear
(Write Only) . . . . . . . . . . . . . . . . . . . . . 245
cfgServerPowerCapWatts
(Read/Write) . . . . . . . . . . . . . . . . . . . . 245
cfgServerPowerCapBtuhr
(Read/Write)
. . . . . . . . . . . . . . . . . . . . 245
cfgServerPowerCapPercent
(Read/Write) . . . . . . . . . . . . . . . . . . . . 245
cfgServerPowerLastMinAvg
(Read Only) . . . . . . . . . . . . . . . . . . . . . 246
cfgServerPowerLastHourAvg
(Read Only) . . . . . . . . . . . . . . . . . . . . . 246
cfgServerPowerLastDayAvg
(Read Only)
. . . . . . . . . . . . . . . . . . . . . 246
cfgServerPowerLastWeekAvg (Read Only) . . . . 246
cfgServerPowerLastHourMinPower
(Read Only)
. . . . . . . . . . . . . . . . . . . . . 247
cfgServerPowerLastHourMinTime
(Read Only) . . . . . . . . . . . . . . . . . . . . . 247
cfgServerPowerLastHourMaxPower
(Read Only) . . . . . . . . . . . . . . . . . . . . . 247
cfgServerPowerLastHourMaxTime
(Read Only)
. . . . . . . . . . . . . . . . . . . . . 248
Contents 17
Page 18

cfgServerPowerLastDayMinPower
(Read Only)
. . . . . . . . . . . . . . . . . . . . 248
cfgServerPowerLastDayMinTime
(Read Only)
. . . . . . . . . . . . . . . . . . . . 249
cfgServerPowerLastDayMaxPower
(Read Only) . . . . . . . . . . . . . . . . . . . . 249
cfgServerPowerLastDayMaxTime
(Read Only) . . . . . . . . . . . . . . . . . . . . 250
cfgServerPowerLastWeekMinPower
(Read Only)
. . . . . . . . . . . . . . . . . . . . 250
cfgServerPowerLastWeekMinTime
(Read Only) . . . . . . . . . . . . . . . . . . . . 251
cfgServerPowerLastWeekMaxPower
(Read Only) . . . . . . . . . . . . . . . . . . . . 251
cfgServerPowerLastWeekMaxTime
(Read Only)
. . . . . . . . . . . . . . . . . . . . 252
cfgServerPowerInstHeadroom
(Read Only) . . . . . . . . . . . . . . . . . . . . 252
cfgServerPowerPeakHeadroom
(Read Only) . . . . . . . . . . . . . . . . . . . . 253
cfgServerActualAmperageConsumption
(Read Only) . . . . . . . . . . . . . . . . . . . . 253
cfgServerPeakAmperage
(Read Only)
. . . . . . . . . . . . . . . . . . . . 253
cfgServerPeakAmperageTimeStamp
(Read Only) . . . . . . . . . . . . . . . . . . . . 254
cfgServerCumulativePowerConsumption
(Read Only)
. . . . . . . . . . . . . . . . . . . . 254
cfgServerCumulativePowerConsumption
TimeStamp (Read Only)
. . . . . . . . . . . . . . 255
cfgServerCumulativePowerClear
(Write Only) . . . . . . . . . . . . . . . . . . . . 255
cfgServerPeakPowerClear (Write Only)
. . . . . 255
cfgServerPowerPCIeAllocation
(Read/Write)
. . . . . . . . . . . . . . . . . . . 256
18 Contents
cfgKVMInfo
. . . . . . . . . . . . . . . . . . . . . . . 256
Page 19

cfgKVMAccessToCMCEnable . . . . . . . . . . . 256
cfgKVMFrontPanelEnable . . . . . . . . . . . . . 257
cfgAlerting . . . . . . . . . . . . . . . . . . . . . . . . 257
cfgAlertingEnable
. . . . . . . . . . . . . . . . . . 257
cfgAlertingFilterMask . . . . . . . . . . . . . . . 257
cfgAlertingSourceEmailName
. . . . . . . . . . . 258
cfgServerPowerSupply
cfgServerPowerSupplyIndex
. . . . . . . . . . . . . . . . . 258
. . . . . . . . . . . . 258
cfgServerPowerSupplyMaxInputPower
(Read Only)
. . . . . . . . . . . . . . . . . . . . . 259
cfgServerPowerSupplyMaxOutputPower
(Read Only) . . . . . . . . . . . . . . . . . . . . . 259
cfgServerPowerSupplyOnlineStatus
(Read Only) . . . . . . . . . . . . . . . . . . . . . 259
cfgServerPowerSupplyFwVer
(Read Only)
. . . . . . . . . . . . . . . . . . . . . 259
cfgServerPowerSupplyCurrentDraw
(Read Only) . . . . . . . . . . . . . . . . . . . . . 259
cfgServerPowerSupplyType . . . . . . . . . . . . 260
cfgIPv6LanNetworking . . . . . . . . . . . . . . . . . 260
cfgIPv6Enable (Read/Write)
. . . . . . . . . . . . 260
cfgIPv6Address. . . . . . . . . . . . . . . . . . . 260
cfgIPv6Address1 (Read/Write)
cfgIPv6Gateway (Read/Write)
. . . . . . . . . . . 261
. . . . . . . . . . . 261
cfgIPv6PrefixLength (Read/Write) . . . . . . . . . 261
cfgIPv6AutoConfig (Read/Write)
cfgIPv6LinkLocalAddress (Read Only)
. . . . . . . . . . 262
. . . . . . . 262
cfgIPv6Address2 (Read Only) . . . . . . . . . . . 262
cfgIPv6Address3 (Read Only)
cfgIPv6Address4 (Read Only)
cfgIPv6Address5 (Read Only)
cfgIPv6Address6 (Read Only)
. . . . . . . . . . . 263
. . . . . . . . . . . 263
. . . . . . . . . . . 263
. . . . . . . . . . . 263
Contents 19
Page 20

cfgIPv6Address7 (Read Only). . . . . . . . . . . 264
cfgIPv6Address8 (Read Only). . . . . . . . . . . 264
cfgIPv6Address9 (Read Only)
cfgIPv6Address10 (Read Only)
. . . . . . . . . . . 264
. . . . . . . . . . 264
cfgIPv6Address11 (Read Only) . . . . . . . . . . 265
cfgIPv6Address12 (Read Only)
cfgIPv6Address13 (Read Only)
. . . . . . . . . . 265
. . . . . . . . . . 265
cfgIPv6Address14 (Read Only) . . . . . . . . . . 265
cfgIPv6Address15 (Read Only)
. . . . . . . . . . 266
cfgIPv6DNSServersFromDHCP6
(Read/Write) . . . . . . . . . . . . . . . . . . . 266
cfgIPv6DNSServer1 (Read/Write)
cfgIPv6DNSServer2 (Read/Write)
. . . . . . . . 266
. . . . . . . . 267
cfgCurrentLanNetworking (Read only)
cfgNicCurrentIpAddress
cfgNicCurrentNetmask
. . . . . . . . . . . . . 268
. . . . . . . . . . . . . . 268
. . . . . . . . 268
cfgNicCurrentGateway . . . . . . . . . . . . . . 268
cfgNicCurrentDhcpWasUsed
. . . . . . . . . . . 268
cfgDNSCurrentServer1 . . . . . . . . . . . . . . 268
cfgDNSCurrentServer2
cfgDNSCurrentDomainName
. . . . . . . . . . . . . . 268
. . . . . . . . . . . 268
cfgNicCurrentIPv4Enabled . . . . . . . . . . . . 269
cfgCurrentIPv6LanNetworking (Read only)
cfgCurrentIPv6Enabled
. . . . . . . . . . . . . . 269
. . . . . . 269
cfgCurrentIPv6AutoConfigWasUsed . . . . . . . 270
cfgCurrentLinkLocalAddress
cfgCurrentIPv6Address1
. . . . . . . . . . . 270
. . . . . . . . . . . . . 270
cfgCurrentIPv6Gateway . . . . . . . . . . . . . 270
cfgCurrentIPv6DNSServersFromDHCP6
cfgCurrentIPv6DNSServer1
cfgCurrentIPv6DNSServer2
cfgIPv6URL
. . . . . . . . . . . . . . . . . . . . . . . 271
. . . . . . . . . . . . 270
. . . . . . . . . . . . 270
. . . . . 270
20 Contents
Page 21

cfgIPv6URLstring (Read Only) . . . . . . . . . . . 271
cfgIpmiSerial
cfgIpmiSerialBaudRate (Read/Write)
. . . . . . . . . . . . . . . . . . . . . . . 271
. . . . . . . 271
cfgIpmiSerialConnectionMode
(Read/Write) . . . . . . . . . . . . . . . . . . . . 272
cfgIpmiSerialChanPrivLimit
(Read/Write)
. . . . . . . . . . . . . . . . . . . . 272
cfgIpmiSerialFlowControl
(Read/Write) . . . . . . . . . . . . . . . . . . . . 272
cfgIpmiSerialHandshakeControl
(Read/Write) . . . . . . . . . . . . . . . . . . . . 273
cfgIpmiSerialLineEdit (Read/Write)
cfgIpmiSerialEchoControl (Read/Write)
. . . . . . . . 273
. . . . . . 273
cfgIpmiSerialDeleteControl (Read/Write) . . . . . 273
cfgIpmiSerialNewLineSequence
(Read/Write)
. . . . . . . . . . . . . . . . . . . . 274
cfgIpmiSerialInputNewLineSequence
(Read/Write) . . . . . . . . . . . . . . . . . . . . 274
cfgSmartCard
cfgSmartCardLogonEnable (Read/Write)
cfgSmartCardCRLEnable (Read/Write)
cfgNetTuning
cfgNetTuningNicSpeed
cfgNetTuningNicAutoneg (Read/Write)
. . . . . . . . . . . . . . . . . . . . . . 275
. . . . . 275
. . . . . . . 275
. . . . . . . . . . . . . . . . . . . . . . . 276
. . . . . . . . . . . . . . . 276
. . . . . . 276
cfgNetTuningNic100MB (Read/Write) . . . . . . . 277
cfgNetTuningNicFullDuplex (Read/Write)
cfgNetTuningNicMtu (Read/Write)
. . . . . 277
. . . . . . . . . 277
cfgSensorRedundancy
cfgSensorRedundancyIndex (Read Only)
. . . . . . . . . . . . . . . . . . 277
. . . . . 278
cfgSensorRedundancyPolicy
(Read/Write) . . . . . . . . . . . . . . . . . . . . 278
Contents 21
Page 22

cfgSensorRedundancyCapabilities
(Read Only)
. . . . . . . . . . . . . . . . . . . . 278
cfgSensorRedundancyStatus
(Read Only)
. . . . . . . . . . . . . . . . . . . . 279
cfgVFlashSD
. . . . . . . . . . . . . . . . . . . . . . 279
cfgVFlashSDEnable (Read/Write)
cfgVFlashSDSize (Read Only)
. . . . . . . . . 279
. . . . . . . . . . . 279
cfgVFlashSDLicensed (Read Only) . . . . . . . . 280
cfgVFlashSDAvailableSize (Read Only)
cfgVFlashSDHealth (Read Only)
. . . . . . 280
. . . . . . . . . 280
cfgVFlashSDWriteProtect (Read Only) . . . . . . 281
cfgVFlashPartition . . . . . . . . . . . . . . . . . . . 281
cfgVFlashPartitionIndex (ReadOnly)
. . . . . . . 281
cfgVFlashPartitionSize (ReadOnly) . . . . . . . . 281
cfgVFlashPartitionEmulationType
(ReadWrite)
. . . . . . . . . . . . . . . . . . . . 282
cfgVFlashPartitionOSVolLabel
(ReadOnly) . . . . . . . . . . . . . . . . . . . . 282
cfgVFlashPartitionFormatType
(ReadOnly) . . . . . . . . . . . . . . . . . . . . 282
cfgVFlashPartitionAccessType
(Read/Write) . . . . . . . . . . . . . . . . . . . 283
cfgVFlashPartitionAttachState
(Read/Write)
cfgLogging
. . . . . . . . . . . . . . . . . . . 283
. . . . . . . . . . . . . . . . . . . . . . . 283
cfgLoggingSELOEMEventFilterEnable
(Read/Write)
. . . . . . . . . . . . . . . . . . . 283
22 Contents
cfgKMSProfile
. . . . . . . . . . . . . . . . . . . . . 284
cfgKMSProfileIndex(Read only)
cfgKMSProfileIPAddress(Read/Write)
cfgKMSProfilePortNumber(Read/Write)
cfgKMSProfileTimeout(Read/Write)
. . . . . . . . . 284
. . . . . . 284
. . . . . 284
. . . . . . . 285
Page 23

cfgKMSProfileDeviceGroup(Read/Write) . . . . . 285
cfgRacSecurity
. . . . . . . . . . . . . . . . . . . . . . 285
cfgRacSecCsrCommonName
(Read/Write)
. . . . . . . . . . . . . . . . . . . . 286
cfgRacSecCsrOrganizationName
(Read/Write) . . . . . . . . . . . . . . . . . . . . 286
cfgRacSecCsrOrganizationUnit
(Read/Write) . . . . . . . . . . . . . . . . . . . . 286
cfgRacSecCsrLocalityName
(Read/Write)
. . . . . . . . . . . . . . . . . . . . 286
cfgRacSecCsrStateName (Read/Write) . . . . . . 286
cfgRacSecCsrCountryCode
(Read/Write)
. . . . . . . . . . . . . . . . . . . . 287
cfgRacSecCsrEmailAddr (Read/Write). . . . . . . 287
cfgRacSecCsrKeySize (Read/Write)
cfgRacSecurityData
cfgRacSecCsrIndex
cfgRacSecCsrKeySize
. . . . . . . . . . . . . . . . . . . 288
. . . . . . . . . . . . . . . . 288
. . . . . . . . . . . . . . . 288
. . . . . . . . 287
cfgRacSecCsrCommonName
(Read/Write) . . . . . . . . . . . . . . . . . . . . 288
cfgRacSecCsrOrganizationName
(Read/Write) . . . . . . . . . . . . . . . . . . . . 289
cfgRacSecCsrOrganizationUnit
(Read/Write)
. . . . . . . . . . . . . . . . . . . . 289
cfgRacSecCsrLocalityName
(Read/Write)
cfgRacSecCsrStateName
. . . . . . . . . . . . . . . . . . . . 289
. . . . . . . . . . . . . 289
cfgRacSecCsrCountryCode . . . . . . . . . . . . 289
cfgRacSecCsrEmailAddr
. . . . . . . . . . . . . . 290
Contents 23
Page 24

4 Deprecated Commands, Groups,
and Objects . . . . . . . . . . . . . . . . . . . . . . 293
Index . . . . . . . . . . . . . . . . . . . . . . . . . . . . . . 295
24 Contents
Page 25

1
Introduction
This document provides information about the RACADM subcommands,
supported RACADM interfaces, and property database groups and object
definitions for the following:
• iDRAC6 Enterprise on Blade Servers
• iDRAC6 Enterprise or Express on Rack and Tower Servers
• Dell Chassis Management Controller (CMC)
What’s New in This Release
Sub-Commands
• sslresetcfg
•setled
• getuscversion
Groups
• cfgLogging
• cfgRacTunePluginType under cfgRacTuning (for Monolithic)
Supported RACADM Interfaces
The RACADM command-line utility provides a scriptable interface that
allows you to locally or remotely configure your Remote Access Controller
(RAC). The utility runs on the management station and the managed system.
It is available on the Dell OpenManage Systems Management and
Documentation DVD or at support.dell.com.
Introduction 25
Page 26

The RACADM utility supports the following interfaces:
• Local — Supports executing RACADM commands from the managed
server’s operating system. You must install the OpenManage software on
the managed server to run local racadm commands. Only one instance of
local RACADM can be executed on a system at a time. If the user tries to
open another instance, an error message is displayed and the second
instance of local RACADM closes immediately.
• SSH or Telnet — Also referred as Firmware racadm. Supports executing
RACADM commands from a SSH or Telnet session to iDRAC.
• Remote — Supports executing RACADM commands from a remote
management station such as a laptop or desktop computer. You must
install the OpenManage software on the remote computer to run remote
RACADM commands. To execute remote RACADM commands, you
must formulate the command like a local or SSH/Telnet RACADM
command except that you must also use the –r –i options or the –r –u –p
options. For more information on these options, see the "RACADM
Subcommand Details" on page 37.
RACADM Syntax Usage
The following section describes the syntax usage for local, SSH/Telnet, and
Remote RACADM.
Local RACADM
racadm getconfig -g <groupname> [-o <objectname>] [-i
<indexnumber>]
racadm <subcommand>
Example
racadm getconfig -g idracinfo
racadm getsysinfo
26 Introduction
Page 27

SSH/Telnet RACADM
racadm getconfig -g <groupname> [-o <objectname>] [-i
<indexnumber>]
racadm <subcommand>
Example
racadm getconfig -g idracinfo
racadm getsysinfo
Remote RACADM
racadm -r -u -p getconfig -g <groupname> [-o
<objectname>] [-i <indexnumber>]
racadm -r -u -p <subcommand>
Example
racadm -r -u -p getconfig -g idracinfo
racadm -r -u -p getsysinfo
RACADM Command Options
Table 1-1 lists the options for the RACADM command.
Table 1-1. RACADM Command Options
Option Description
-r <racIpAddr>
-r <racIpAddr>:<port
number>
-u <usrName> Specifies the user name that is used to authenticate
-p <password> Specifies the password used to authenticate the
Specifies the controller’s remote IP address.
Use:<port number> if the iDRAC6 port number is not
the default port (443)
the command transaction. If the -u option is used, the
-p option must be used, and the -i option (interactive)
is not allowed.
command transaction. If the -p option is used, the -i
option is not allowed.
Introduction 27
Page 28

Table 1-1. RACADM Command Options
Option Description
-S Specifies that RACADM should check for invalid
certificate errors. RACADM stops the execution of the
command with an error message if it detects an invalid
certificate.
-i <indexnumber> Specifies the index number for the indexed group, if
applicable.
-g <groupname> Specifies the group name if applicable.
-o <objectname> Specifies the object name if applicable.
(continued)
Table 1-2 provides the supported RACADM interfaces for iDRAC6
Enterprise and iDRAC6 Express.
Table 1-2. Supported RACADM Interfaces
iDRAC Type Local RACADM SSH/Telnet RACADM Remote RACADM
iDRAC6 Enterprise
iDRAC6 Express
CMC
= Supported; = Not supported
NOTE: Multiple instances of remote racadm can be executed on a management
station, while only one instance of local racadm can be executed on a managed
node.
28 Introduction
Page 29
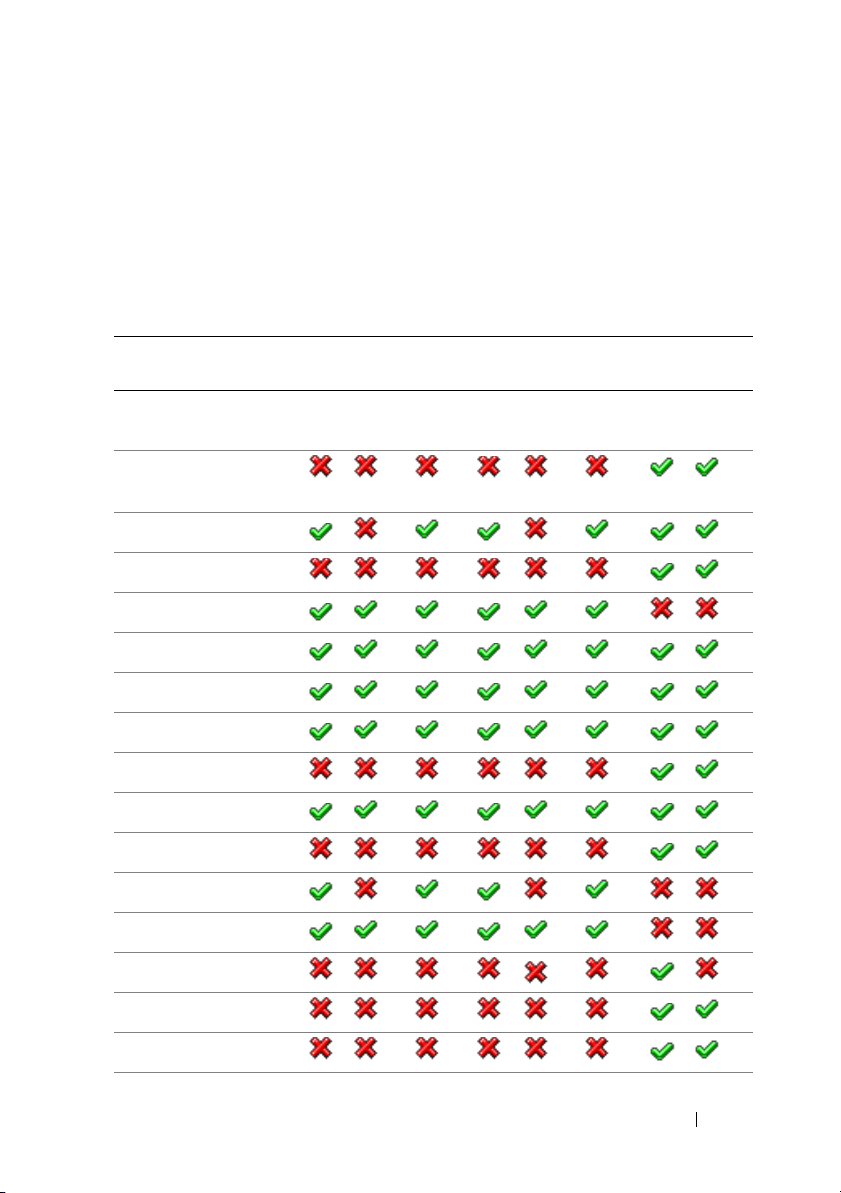
Supported RACADM Subcommands
Table 1-3 provides the list of RACADM subcommands and their
corresponding interface support. For detailed information of the RACADM
subcommands including syntax and valid entries, see "RACADM
Subcommand Details" on page 37.
Table 1-3. RACADM Subcommands
Subcommand iDRAC6 on Blade
Servers
Tel ne t
/SSH/
Serial
Local
RACADM
Remote
RACADM
"?" and "?
<subcommand>"
arp
chassisaction
clearasrscreen
closessn
clrraclog
clrsel
cmcchangeover
config
connect
coredump
coredumpdelete
iDRAC6 on Rack and
Tower Servers
Telnet
/SSH/
Serial
Local
RACADM
Remote
RACADM
CMC
Tel ne t
/SSH/
Serial
Remote
RACADM
deploy
feature
featurecard
Introduction 29
Page 30
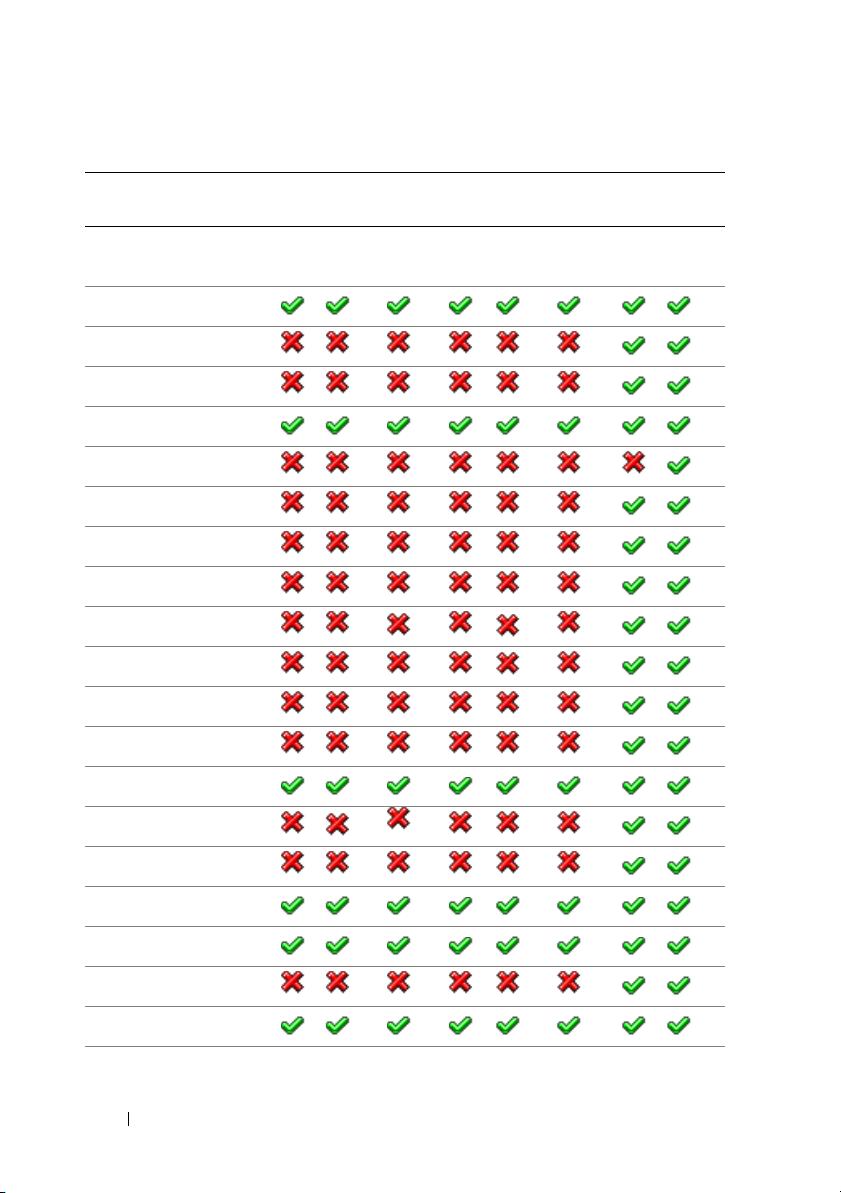
Table 1-3. RACADM Subcommands
(continued)
Subcommand iDRAC6 on Blade
Servers
Telnet
/SSH/
Serial
Local
RACADM
Remote
RACADM
fwupdate
getassettag
getchassisname
getconfig
getdcinfo
getfanreqinfo
getflexaddr
getioinfo
getkvminfo
getled
getmacaddress
getmodinfo
iDRAC6 on Rack and
Tower Servers
Telnet
/SSH/
Serial
Local
RACADM
Remote
RACADM
CMC
Telnet
/SSH/
Serial
Remote
RACADM
getniccfg
getpbinfo
getpminfo
getraclog
getractime
getredundancymode
getsel
30 Introduction
Page 31

Table 1-3. RACADM Subcommands
(continued)
Subcommand iDRAC6 on Blade
Servers
Tel ne t
/SSH/
Serial
Local
RACADM
Remote
RACADM
getsensorinfo
getslotname
getssninfo
getsvctag
getsysinfo
gettracelog
getversion
getuscversion
"help" and "help
<subcommand>"
ifconfig
krbkeytabupload
iDRAC6 on Rack and
Tower Servers
Telnet
/SSH/
Serial
Local
RACADM
Remote
RACADM
CMC
Tel ne t
/SSH/
Serial
Remote
RACADM
kmcSelfSignedCertGen
localConRedirDisable
netstat
ping
ping6
racdump
racreset
racresetcfg
Introduction 31
Page 32

Table 1-3. RACADM Subcommands
(continued)
Subcommand iDRAC6 on Blade
Servers
Telnet
/SSH/
Serial
Local
RACADM
Remote
RACADM
remoteimage
serveraction
setassettag
setchassisname
setflexaddr
setled
setniccfg
setractime
setslotname
setsysinfo
sshpkauth
sslcertdownload
iDRAC6 on Rack and
Tower Servers
Telnet
/SSH/
Serial
Local
RACADM
Remote
RACADM
CMC
Telnet
/SSH/
Serial
Remote
RACADM
sslcertupload
sslcertview
sslcsrgen
sslkeyupload
sslresetcfg
testemail
testfeature
32 Introduction
Page 33

Table 1-3. RACADM Subcommands
(continued)
Subcommand iDRAC6 on Blade
Servers
Tel ne t
Local
/SSH/
RACADM
Serial
iDRAC6 on Rack and
Tower Servers
Remote
Telnet
RACADM
/SSH/
Serial
Local
RACADM
Remote
RACADM
CMC
Tel ne t
/SSH/
Serial
Remote
RACADM
testtrap
testkmsconnectivity
traceroute
traceroute6
usercertupload
usercertview
version
vflashsd
vflashpartition
vmdisconnect
Other Documents You May Need
In addition to this guide, you can access the following guides available on the
Dell Support website at support.dell.com/manuals. On the Manuals page,
click SoftwareSystems Management. Click on the appropriate product
link on the right-side to access the documents.
•The
•The
Integrated Dell Remote Access Controller 6 (iDRAC6)
Blade Servers User Guide
provides information about configuring and
Enterprise for
using an iDRAC6 for blade servers to remotely manage and monitor your
system and its shared resources through a network.
Integrated Dell Remote Access Controller 6 (iDRAC6)
User Guide
provides complete information about configuring and using an iDRAC6
for rack and tower servers to remotely manage and monitor your system
and its shared resources through a network.
Introduction 33
Page 34

• The CMC online Help provides information about using the CMC Web
interface.
•The
•The
• Documentation specific to your third-party management console
•The
•The
•The
The following system documents are also available to provide more
information about the system in which CMC is installed:
•The
•The
• Documentation for any components you purchased separately provides
• Release notes or readme files may be included to provide last-minute
• For more information on IOM network settings, see the
Chassis Management Controller (CMC) Secure Digital (SD) Card
Technical Specification
installation and usage information.
Dell OpenManage IT Assistant User’s Guide
about IT Assistant.
application.
Dell OpenManage Server Administrator’s User’s Guide
information about installing and using Dell OpenManage Server
Administrator.
Dell Update Packages User's Guide
obtaining and using Dell Update Packages as part of your system update
strategy.
Glossary
Rack Installation Guide
with your rack solution describe how to install your system into a rack.
Hardware Owner’s Manual
features and describes how to troubleshoot the system and install or
replace system components.
information to configure and install these options.
updates to the system or documentation or advanced technical reference
material intended for experienced users or technicians.
PowerConnect M6220 Switch Important Information
Dell PowerConnect 6220 Series Port Aggregator
provides information about the terms used in this document.
provides minimum BIOS and firmware version,
provides information
provides
provides information about
and
Rack Installation Instructions
provides information about system
document and the
White Paper.
included
Dell
34 Introduction
Page 35

Updates are sometimes included with the system to describe changes to the
system, software, and/or documentation. Always read the updates first
because they often supersede information in other documents.
See the Safety and Regulatory information that is shipped with your system.
NOTE: Warranty information may be included within this document or as a
separate document.
Introduction 35
Page 36

36 Introduction
Page 37

2
RACADM Subcommand Details
This section provides detailed descriptions of the RACADM subcommands
including the syntax and valid entries.
Guidelines to Quote Strings Containing Special Characters When Using RACADM Commands
When using strings that contain special characters, use the following
guidelines:
Strings containing the following special characters must be quoted using
single quotes or double quotes:
• $ (dollar sign)
•" (double quote)
•' (single quote)
•` (back quote)
•\ (backslash)
•~ (tilde)
• ; (semicolon)
•| (vertical bar)
• ( (left parentheses)
• ) (right parentheses)
•& (ampersand)
• > (greater than)
•< (less than)
• # (pound)
• ASCII code 32 (space)
NOTE: The - (dash) character cannot be the first character of the string, regardless
of whether the string is quoted.
RACADM Subcommand Details 37
Page 38

There are different escaping rules for single quoting versus double quoting.
For double quoting:
The following characters must be escaped by prepending a backslash:
• $ (dollar sign)
• " (double quote)
• ' (single quote)
•` (back quote)
•\ (backslash)
For example, use the following for a string that contains the special
characters, $, ",',`and \
For single quoting:
• No character escaping is necessary.
• A single quote cannot be used even with a backslash escaped.
NOTE: An empty string may be specified as either "" (using double quotes) or ''
(using single quotes).
"?" and "? <subcommand>"
NOTE: To use this subcommand, you must have CMC Login User privilege.
Subcommand Description
? Displays all the subcommands you can use with the racadm
command and a one-line description of each subcommand.
? <subcommand> Displays the syntax for the specified command.
NOTE: You can also use the help and help <
same information.
Synopsis
subcommand
> commands to obtain the
racadm ?
racadm ? <subcommand>
38 RACADM Subcommand Details
Page 39

Example for racadm ?
NOTE: The following output example shows only part of the actual output for the
racadm ? command. Descriptions shown in this example may vary slightly from the
descriptions in your racadm session.
racadm ?
help -- list racadm subcommand description
help <subcommand> -- display usage summary for a
subcommand
? -- list racadm subcommand description
? <subcommand> -- display usage summary for a
subcommand
arp -- display the networking arp table
chassisaction -- execute chassis or switch powerup/down/cycle or KVM powercycle
clrraclog -- clear the CMC log
clrsel -- clear the System Event Log (SEL)
cmcchangeover -- Changes the redundant state of the
CMC from active to standby and vice versa
config -- modify CMC configuration properties
...
setniccfg -- modify network configuration
properties
setractime -- set the time on the CMC
setslotname -- sets the name of the slot in the
chassis
setsysinfo -- set the chassis name and chassis
location
sslcertview -- display a CA/server certificate in
the CMC
sslcsrgen -- generate a certificate CSR from the
CMC
testemail -- test CMC e-mail notifications
testfeature -- test CMC feature x
testtrap -- test CMC SNMP trap notifications
traceroute -- determine the route of a packet
traceroute6 -- determine the route of a packet
RACADM Subcommand Details 39
Page 40

Example for racadm ? <subcommand>
racadm ? getsysinfo
getsysinfo -- display general CMC and system
information
Usage:
racadm getsysinfo [-d] [-c] [-A] [-4] [-6]
-----------------------------------------------------
-----Valid Options:
-d : show CMC information
-c : show chassis information
-A : do not show headers or labels
-4 : show CMC IPv4 information
-6 : show CMC IPv6 information
"help" and "help <subcommand>"
NOTE: To use this subcommand, you must have Login to iDRAC permission.
Subcommand Description
help Lists all the subcommands available to use with RACADM
and provides a short description for each. You may also type
a subcommand after help to get the syntax for a specific
subcommand.
Synopsis
racadm help
racadm help <subcommand>
Output
The racadm help command displays a complete list of subcommands.
The racadm help <subcommand> command displays information for the
specified subcommand only.
40 RACADM Subcommand Details
Page 41

arp
NOTE: To use this subcommand, you must have Administrator and Execute
Diagnostic Commands permission.
Subcommand Description
arp Displays the contents of the Address Resolution
Protocol (ARP) table. ARP table entries cannot be
added or deleted.
Synopsis
racadm arp
chassisaction
IP Address HW Type Flags HW Address Mask Device
192.168.1.1 0x1 0x2 00:00:0C:07:AC:0F * eth0
NOTE: To use this subcommand, you must have Chassis Control Administrator
privilege.
Subcommand Description
chassisaction Executes a power action on the chassis, iKVM, or a
server.
Synopsis
racadm chassisaction [-m <module>] <action>
Table 2-1 describes the chassasaction subcommand
options
RACADM Subcommand Details 41
Page 42

Table 2-1. chassisaction Subcommand Options
Option Description
-m
<module>
<action> Action that you want to execute on the specified module. Values are:
NOTE: When <
Module on which you want to carry out the action. Values are:
•
chassis
switch-n
•
• kvm
•
powerdown
powerup
•
powercycle
•
nongraceshutdown
•
gracefully.
reset
•
module
- this is the default value if -m is not specified.
where n=1–6
— (Chassis only) Powers down the chassis.
— (Chassis only) Powers up the chassis.
— Power cycles the module.
— (Chassis only) Shuts down the chassis non-
— Performs a hard reset of the module.
> = kvm or switch, <
action
> must be powercycle or reset.
Example
• Perform a reset of switch-3.
racadm chassisaction -m switch-3 reset
Module power operation successful.
42 RACADM Subcommand Details
Page 43

clearasrscreen
NOTE: To use this subcommand, you must have Clear Logs permission.
Subcommand Description
clearasrscreen Clears the last crash (ASR) screen that is in memory. See
Configuring the Managed Server to Capture the Last Crash
Screen and Disabling the Windows Automatic Reboot Option
sections in the iDRAC6 Enterprise for Blade Servers User
Guide.
Synopsis
racadm clearasrscreen
closessn
NOTE: To use this subcommand, you must have Administrator permission.
Subcommand Description
closessn Closes a communication session on the device. Use
getssninfo to view a list of sessions that can be
closed using this command.
Synopsis
racadm closessn –i <session id>
racadm closessn -a
racadm closessn -u <username>
RACADM Subcommand Details 43
Page 44

Table 2-2 describes the closessn subcommand options.
Table 2-2. closessn Subcommand Options and Descriptions
Option Description
-i<session id> The session ID of the session to close, which can be retrieved
using racadm getssninfo subcommand.
NOTE: Session executing this command cannot be closed.
-a Closes all sessions.
-u <user name> Close all sessions for a particular user name.
NOTE: -u option can be used in local RACADM only if the username
contains upto 16 characters.
If the user name contains more than 16 characters, use one of the
following options to close a session:
Local RACADM: -i option
Remote RACADM: -u option or -i option
Examples:
• racadm closessn -i 1234
Closes the session 1234.
•
racadm closessn –u root
Closes all the sessions for root user.
• racadm closessn –a
Closes all the sessions.
44 RACADM Subcommand Details
Page 45

clrraclog
NOTE: To use this subcommand, you must have Clear Logs permission. .
Subcommand Description
clrraclog Removes all existing records from iDRAC6 log. A new
single record is created to record the date and time when
the log was cleared.
Synopsis
racadm clrraclog
clrsel
NOTE: To use this subcommand, you must have Clear Logs permission.
Subcommand Description
clrsel Removes all existing records from the System Event Log
(SEL).
Synopsis
racadm clrsel
RACADM Subcommand Details 45
Page 46

cmcchangeover
NOTE: To use this subcommand, you must have Administrator privilege.
Subcommand Description
cmcchangeover Changes the state of the CMC from active to standby, or
vice versa, in a redundant CMC configuration. This
subcommand is useful for remote debugging or testing
purposes.
NOTE: This command is valid only in redundant CMC environments. For more
information, see the "Understanding the Redundant CMC Environment" section of
the
Dell Chassis Management Controller User Guide
Synopsis
.
racadm cmcchangeover
Output
CMC failover initiated successfully.
config
NOTE: To use this subcommand, you must have Log In iDRAC permission.
Subcommand Description
config This subcommand allows you to set iDRAC6
configuration parameters individually or to batch them as
part of a configuration file. If the data is different, that
iDRAC6 object is written with the new value.
46 RACADM Subcommand Details
Page 47

Synopsis
racadm config [-c|-p] -f <filename>
racadm config -g <groupName> -o <objectName> [-i
<index>] <Value>
NOTE: The configuration file retrieved using remote racadm and local racadm are
not interoperable. The configuration file retrieved using remote racadm shows the
index property for some of the indexed groups as read-write, for example
cfgSSADRoleGroupIndex. For the config -f <file name> command, use
the configuration file retrieved from the same interface. For example, for local
racadm config -f <file name>, use the file generated from the local
racadm command getconfig -f <file name>.
Input
Table 2-3 describes the config subcommand options.
NOTE: The -f and -p options are not supported for the serial/Telnet/ssh console.
Table 2-3. config Subcommand Options and Descriptions
Option Description
-f The -f <filename>
specified by <filename> and configure iDRAC6. The file must contain
data in the format specified in the section Par s i ng Rul e s in the iDRAC6
User’s Guide available on the Dell Support website at
support.dell.com/manuals.
-p The -p, or password option, directs config to delete the password entries
contained in the config file -f <filename> after the configuration is
complete.
-g The -g <groupName>, or group option, must be used with the -o option.
The <groupName> specifies the group containing the object that is to be
set.
<
-o The -o
option. This option specifies the object name that is written with the string
<value>.
objectName> <Value>, or object option, must be used with the -g
option causes config to read the contents of the file
RACADM Subcommand Details 47
Page 48

Table 2-3. config Subcommand Options and Descriptions
Option Description
-i The -i <index>, or index option, is valid only for indexed groups and can be
used to specify a unique group. The <index> is a decimal integer from 1
through n, where n can vary from 1 to maximum number of indexes a
particular group supports. If -i <index> is not specified, a value of 1 is
assumed for groups, which are tables that have multiple entries. The index
is specified by the index value, not a named value.
-c The -c, or check option, is used with the config subcommand and allows the
user to parse the .cfg file to locate syntax errors. If errors are found, the line
number and a short description of what is incorrect are displayed. Writes do
not occur to iDRAC6. This option is a check only.
Output
(continued)
This subcommand generates error output for any of the following reasons:
• Invalid syntax, group name, object name, index, or other invalid
database members
• RACADM CLI failures
This subcommand returns an indication of the number of configuration
objects that were written out of the total objects in the .cfg file.
Examples
•
racadm config -g cfgLanNetworking -o
cfgNicIpAddress 10.35.10.100
Sets the
cfgNicIpAddress
configuration parameter (object) to the value
10.35.10.110. This IP address object is contained in the group
cfgLanNetworking
.
•
racadm config -f myrac.cfg
Configures or reconfigures iDRAC6. The
from the
getconfig
command. The
manually as long as the parsing rules are followed.
NOTE: The myrac.cfg file does not contain passwords. To include passwords
in the file, you must enter them manually. If you want to remove password
information from the myrac.cfg file during configuration, use the -p option.
48 RACADM Subcommand Details
myrac.cfg
myrac.cfg
file may be created
file may also be edited
Page 49

connect
Subcommand Description
connect Connects to the switch or server serial console.
NOTE: You cannot use this subcommand with remote RACADM.
Synopsis
• racadm connect [-b] <server-n>
• racadm connect [-b] <switch-n>
Table 2-4 describes the connect subcommand options.
Table 2-4. connect Subcommand Options
Option Description
-b Connects to the switch or console using the binary
mode. This is an optional argument; a server or a switch
must be present.
server-n or
switch-n
Server or switch to connect to.
•
server-n where n=1–16
switch-n where n=<a1 | a2 | b1 | b2 | c1 | c2>
•
NOTE: If you use the -b option, reset the CMC to terminate the connect operation.
NOTE: See the
using the connect subcommand.
Dell Chassis Management Controller User Guide
RACADM Subcommand Details 49
for examples on
Page 50

coredump
NOTE: This option is applicable only for iDRAC6.
NOTE: To use this subcommand, you must have Execute Debug Commands
permission.
Subcommand Description
coredump Displays detailed information related to any recent
critical issues that have occurred with the RAC. The
coredump information can be used to diagnose these
critical issues.
If available, the coredump information is persistent across
iDRAC6 power cycles and remains available until either
of the following conditions occur:
• The coredump information is cleared with the
coredumpdelete subcommand.
• Another critical condition occurs on the RAC. In this
case, the coredump information is relative to the last
critical error that occurred.
See the coredumpdelete subcommand for more
information about clearing the coredump.
Synopsis
racadm coredump
50 RACADM Subcommand Details
Page 51

coredumpdelete
NOTE: This option is applicable only for iDRAC6.
NOTE: To use this subcommand, you must have Clear Logs or Execute Debug
Commands permission.
Subcommand Description
coredump Clears any currently resident coredump data stored in the
RAC.
NOTE: If a coredumpdelete command is issued and a coredump is not
currently stored in the RAC, the command displays a success message.
This behavior is expected.
See the coredump subcommand for more information on viewing
a coredump.
Synopsis
racadm coredumpdelete
deploy
NOTE: To use this subcommand, you must have Server Administrator privilege.
Subcommand Description
deploy Configures the static IP address, subnet mask, gateway,
and password for the root user on iDRAC for the
specified server.
NOTE: You can also use setniccfg to configure static IP address, subnet mask, and
gateway, as well as DHCP, speed, and duplex properties.
RACADM Subcommand Details 51
Page 52

Synopsis
•
racadm deploy -m <
<
ipaddress
•
racadm deploy -m <
<
ipv6Address
> <
> <
subnet
prefixlen
> <
module
gateway
module
> <
gateway
> -u root -p <
> -b <
device
> -o <no|yes>
> -u root -p <
> -b <
device
password
password
> -s
> -s -6
> -o <no|yes>
NOTE: <
•
racadm deploy -m <
prefixlen
> must be a number between 0 and 128.
module
> -u root -p <
password
> -d [-
6]
•
racadm deploy -a -u root -p <
password
>
Table 2-5 describes the deploy subcommand options.
Table 2-5. deploy Subcommand Options
Option Description
<device> Specifies the first boot device; must be used with
-b
-o.
Use with -m <module> to specify for a individual
server, or with -a for all servers
Legal values: device=None, PXE, HDD, CD-
DVD, vFDD, vCD-DVD, iSCSI, SD, FDD
<no|yes> Indicates if the server should boot from the
-o
device once; must be used with -o.
Use with -m <module> to specify for a individual
server, or with -a for all servers
-a Creates and enables an iDRAC root user if it does
not already exist, and is executed on all the
existing servers in the chassis
-u root Indicates that the <password> is supplied for the
root user on the server. root is a constant
parameter, the only value that is valid with the -u
option.
<module> Specifies the server you want to configure.
-m
Legal values: server-n, where n=1–16
<password> Specifies the password for the root user on the
-p
server.
52 RACADM Subcommand Details
Page 53

Table 2-5. deploy Subcommand Options
Option Description
-s <ipaddress subnet gateway> Sets the IP address, subnet mask, and gateway for
-d Enables DHCP for the specified server.
(continued)
the specified server, separated by single spaces.
•
ipaddress —
address. For example, 192.168.0.20.
subnet —
•
mask. For example, 255.255.255.0.
gateway —
•
address. For example, 192.168.0.1.
A string representing a valid IP
A string representing a valid subnet
A string representing a valid gateway
NOTE: The -s and -d options cannot be used
together in the same command.
-6 Enables IPv6 auto configuration (when used with
-d)
Sets static IPv6 addresses (when used with -s)
Example
• racadm deploy -m server-8 -s 192.168.0.20
255.255.255.0 192.168.0.1
The server was deployed successfully.
NOTE: The deploy command generates an error when used on the extension slot
of a multi-slot server.
• racadm deploy -m server-9 192.168.0.11
255.255.255.0 192.168.0.1
ERROR: Server in slot 9 is an extension of the
server in slot 1.
• racadm deploy -m server-7 -u root -p calvin -s -6
::/64 :: 10
RACADM Subcommand Details 53
Page 54

feature
NOTE: To use this subcommand to deactivate FlexAddress, you must have Chassis
Configuration Administrator privilege. A user with login privileges can view status
only.
Subcommand Description
feature Displays all active chassis features. The information displayed
includes feature name, date activated, and the serial number of the
SD card used to activate the feature.
Dell Feature Cards may contain more than one feature. After any
feature included on a Dell Feature Card is activated on a chassis,
any other features that may be included on that Dell Feature Card
cannot be activated on a different chassis.
NOTE: To deactivate FlexAddress features, the chassis must be powered off.
Synopsis
racadm feature -s
racadm feature -d -c <featurename>
racadm feature -a -c ExtendedStorage
racadm feature -1 -c ExtendedStorage
racadm feature -2 -c ExtendedStorage
racadm feature -r -c ExtendedStorage
Table 2-6. feature Subcommand Options
Option Description
-s Displays the status of active features.
-d Deactivates feature specified in -c option.
-a Activates ExtendedStorage feature.
-1 Configures ExtendedStorage feature for standalone use.
-2 Configures ExtendedStorage feature for redundant use.
54 RACADM Subcommand Details
Page 55

Table 2-6. feature Subcommand Options
Option Description
-r Reformats damaged/unformatted ExtendedStorage media.
(continued)
CAUTION: Using the -r switch deactivates the ExtendedStorage
feature, if active; reformats the SD media in the active CMC cardslot;
and may reboot the active CMC.
-c <featurename> must be one of the following:
• flexaddress (with -d)
• flexaddressplus (with -d)
• ExtendedStorage (with -a,-d,-1,-2, or -r)
Example
• racadm feature -d -c flexaddress
The feature FlexAddress is deactivated on the
chassis successfully
• racadm feature -s
Feature Name = FlexAddress
Date/time Activated = 26 Apr 2010 - 10:16:48
Feature installed from SD-card serial number =
TEST0123456789012345678
Feature Name = FlexAddressPlus
Date/time Activated = 26 Apr 2010 - 10:16:48
Feature installed from SD-card serial number =
TEST0123456789012345678
Feature name = ExtendedStorage (for redundant use)
Date/time Activated = 06 May 2010 - 07:42:20
Feature installed from SD-card serial number =
TEST0123456789012345678
RACADM Subcommand Details 55
Page 56

featurecard
NOTE: To use this subcommand, you must have Chassis Configuration
Administrator privilege.
Subcommand Description
featurecard Verifies proper SD card installation and displays the SD card status.
Table 2-7 lists the status messages returned by the command.
Table 2-7. Status Messages Returned by featurecard -s Command
Status Message Actions
No feature card inserted. Check the CMC to verify that the SD card was
properly inserted. In a redundant CMC
configuration, make sure the CMC with the
SD feature card installed is the active CMC
and not the standby CMC.
The feature card inserted is valid and
contains the following feature(s)
FlexAddress: The feature card is
bound to this chassis
No features active on the chassis Install the SD card into the CMC.
The feature card inserted is valid and
contains the following feature(s)
FlexAddress: The feature card is
bound to another chassis,
svctag = ABC1234, SD card
SN = 01122334455
The feature card inserted is valid and
contains the following feature(s)
FlexAddress: The feature card is not
bound to any chassis
No action required.
Remove the SD card; locate and install the SD
card for the current chassis.
The feature card can be moved to another
chassis, or can be reactivated on the current
chassis. To reactivate on the current chassis,
enter racadm racreset until the CMC
module with the feature card installed
becomes active.
56 RACADM Subcommand Details
Page 57

Synopsis
racadm featurecard -s
Table 2-8 describes the featurecard subcommand option.
Table 2-8. featurecard Subcommand Options
Option Description
-s Lists active SD card features and SD card status.
Example
$ racadm featurecard -s
The feature card inserted is valid, serial number
TEST0123456789012345678
The feature card contains the following feature(s):
FlexAddress: The feature is bound to this chassis
FlexAddressPlus: The feature is bound to this
chassis
ExtendedStorage: The feature is bound to this
chassis
RACADM Subcommand Details 57
Page 58

fwupdate
NOTE: To use this subcommand for CMC you must have Chassis Configuration
Administrator privilege and for iDRAC you must have Configure iDRAC6 permission.
Subcommand Description
fwupdate Allows you to update the firmware on the iKVM, active CMC,
standby CMC, server iDRACs, or an IOM infrastructure device.
You can:
• Check the firmware update process status.
• Update iDRAC6 or CMC firmware from a TFTP server by
providing an IP address and optional path.
• Update iDRAC6 or CMC firmware from the local file system
using local RACADM.
• Rollback to the standby firmware.
Table 2-9 describes the fwupdate subcommand options.
Table 2-9. fwupdate Subcommand Options
Option Description
-s Lists active SD card features and SD card status.
NOTE: This subcommand performs updates to the iDRAC firmware (if CMC
firmware version is 2.0 or later and iDRAC firmware version is 1.4) when the existing
firmware is corrupted. There can only be a single update operation in progress at
any time. In addition, the fwupdate subcommand may only update one or more
devices of a single kind at a time.
Before you begin your firmware update, see the Advanced iDRAC6
Configuration section in the iDRAC6 User’s Guide available on the Dell
Support website at support.dell.com/manuals.
NOTE: Running the fwupdate subcommand to update the firmware on the active
CMC resets itself causing all network connections to be dropped. During update of
all other modules, including the standby CMC, the active CMC continues to run
normally without resetting.
58 RACADM Subcommand Details
Page 59

Table 2-10 describes the firmware update method supported for each
interface.
Table 2-10. Firmware Update Matrix
FW Update Method Monolithic Modular CMC
Local RACADM
Local RACADM - TFTP
Remote RACADM
Remote RACADM-TFTP
Remote RACADM-FTP
Firmware RACADM-TFTP
Firmware RACADM-FTP
Synopsis for iDRAC6
racadm fwupdate -s
racadm fwupdate -g -u -a <TFTP_Server_IP_Address> [-d
<path>]
racadm fwupdate -r
racadm fwupdate -p -u [-d <path>]
Synopsis for CMC
For local RACADM:
racadm fwupdate -g -u -a <tftp server ip address or
FQDN> -d <path> [-m <module>]
racadm fwupdate -f <ftp server ip address or FQDN>
<username> <password> -d <path> [-m <module>]
racadm fwupdate -u -m iominf-<n>
racadm fwupdate -s [-m <module>]
racadm fwupdate -c [-m <module>]
RACADM Subcommand Details 59
Page 60

For remote RACAD M:
racadm fwupdate -p -u -d <firmware image>
NOTE: When using FTP, if you provide the full path to the image file on the CLI, then
the CMC uses that path to locate that file on the host. If you do not provide a full
path, then the CMC searches the home directory of the specified user for the file if
the host system is running Linux or another variant of UNIX. If the host system is
running Windows, then a default folder, such as C:\ftproot is searched.
NOTE: When attempting to run firmware update task using "racadm fwupdate"
command, if the firmware image path length is greater than 64 characters, remote
RACADM client exits with the error message "ERROR: Specified path is too long".
Input
Table 2-11 describes the fwupdate subcommand options.
NOTE: The -p option is supported on local and remote RACADM and is not
supported with the serial/Telnet/ssh console. The -p option is also not supported on
Linux operating systems.
Table 2-11 describes the fwupdate subcommand options.
Table 2-11. fwupdate Subcommand Options
Option Description
-u For iDRA C : T h e update option performs a checksum of the firmware update
file and starts the actual update process. This option may be used along with the
-g or -p options. At the end of the update, iDRAC6 performs a soft reset.
For CMC: Performs the firmware update operation.
-s For iDRA C : T h e status option returns the current status of where you are in
the update process. This option is always used by itself.
For CMC: Displays the current status of the firmware update.
NOTE: Use -m to display the status of the module update. Omit -m to display
the status of the active CMC update.
NOTE: The all value can only be used to obtain the status of all targets to be
updated.
60 RACADM Subcommand Details
Page 61

Table 2-11. fwupdate Subcommand Options
Option Description
-g The get option instructs the firmware to get the firmware update file from
the TFTP server. You must also specify the -a, -u, and -d options. In the
absence of the -a option, the defaults are read from properties contained in
the group cfgRemoteHosts, using properties cfgRhostsFwUpdateIpAddr
and cfgRhostsFwUpdatePath.
For CMC: Downloads the firmware update using the TFTP server.
-a The IP Address option specifies the TFTP server IP address, used with -g
option.
For CMC: Specifies the TFTP server IP address or FQDN used for the
firmware image (used with -g).
-d For iDRAC: The -d, or directory, option specifies the directory on the TFTP
server or on iDRAC6’s host server where the firmware update file resides.
For CMC: Specifies the source path where the firmware image resides.
Default: Designated TFTP default directory on that host for the file if -g
option is absent. If -g is used, defaults to directory configured on the TFTP
server.
-p For i DRAC: The -p, or put, option is used to update the firmware file from
the managed system to iDRAC6. The -u option must be used with the -p
option.
(continued)
NOTE: This option is not applicable for CMC.
-r The rollback option is used to rollback to the standby firmware.
NOTE: This option is not applicable for CMC.
-c Cancels the current firmware update of a module.
NOTE: This option is applicable only for CMC.
RACADM Subcommand Details 61
Page 62

Table 2-11. fwupdate Subcommand Options
Option Description
-m
<
e>
NOTE: This option is applicable only for CMC.
modul
Specifies the module or device to be updated. <module> is one of the
following values:
•
cmc-active
• cmc-standby
• kvm
•
server-n
server-generation
•
iominf-n
•
(default)
where n = 1–16
where generation = iDRAC or iDRAC6
where n = 1–6
NOTE: CMC version 3.00 accepts IPv4, IPv6, or fully qualified domain names
(FQDN) for both FTP and TFTP servers.
NOTE: You can specify the cmc-active and cmc-standby modules at
the same time along with one or more
devices to be updated together.
NOTE: See "Updating the IOM Infrastructure Device Firmware" section of the
"Using the CMC Web Interface" chapter of the
Controller User Guide
device firmware update process.
When you use the
iDRACs of that particular generation that can be updated.
for additional information on the IOM infrastructure
server-generation option, the CMC updates all
NOTE: Verify that the update applied to servers for a particular generation has
been validated for all impacted server models.
(continued)
server-n modules. This enables the
Dell Chassis Management
Examples for CMC
• Upload the firmware image from the TFTP server and start the firmware
update.
racadm fwupdate -g -u -a 192.168.0.100 -d
firmimg.cmc -m cmc-active
TFTP firmware update has been initiated. This
update process may take several minutes to
complete.
62 RACADM Subcommand Details
Page 63

• Upload the firmware image from the FTP server and start the firmware
update.
racadm fwupdate -f 192.168.0.100 fred password123
-d firmimg.cmc -m cmc-active
• Start IOM infrastructure firmware update.
racadm fwupdate -u -m iominf-1
• Update firmware on both the CMCs.
racadm fwupdate -g -u -a 192.168.0.100 -d
firmimg.cmc -m cmc-active -m cmc-standby
• Update firmware on multiple servers.
racadm fwupdate -g -u -a 192.168.0.100 -d
firmimg.imc -m server-1 -m server-2 -m server-3
• Update firmware on servers of iDRAC6 generation.
racadm fwupdate -g -u -a 192.168.0.100 -d
firmimg.imc -m server-idrac6
• Update firmware on multiple IOM infrastructures.
racadm fwupdate -u -m iominf-4 -m iominf-5 -m
iominf-6
• Query the current status of all firmware targets to be updated.
racadm fwupdate -s -m all
RACADM Subcommand Details 63
Page 64

• Query the current status of the firmware update process for a particular
module.
racadm fwupdate -s -m <module>
• Cancel a firmware update in progress.
racadm fwupdate -c
• Upload a firmware image from the client and start the firmware update.
racadm fwupdate -p -u -d firmimg.cmc
NOTE: The fwupdate command generates an error when used on the extension
slot of a multi-slot server.
NOTE: Image path length for Remote RACADM is 256 characters and for local
RACADM, it is 64 characters.
Output
Displays a message indicating the operation that is being performed.
Examples
• racadm fwupdate -g -u - a 143.166.154.143 -d
<path>
In this example, the -g option tells the firmware to download the firmware
update file from a location (specified by the
at a specific IP address (specified by the
-d
option) on the TFTP server
-a
option). After the image file is
downloaded from the TFTP server, the update process begins. When
completed, iDRAC6 is reset.
• racadm fwupdate -s
This option reads the current status of the firmware update.
NOTE: Firmware update from local racadm (using -p -u -d options) is not supported
on linux OS.
NOTE: For CMC, these commands specifically apply to an active-CMC update.
64 RACADM Subcommand Details
Page 65

getassettag
NOTE: To use this subcommand, you must have CMC Login User privilege.
Subcommand Description
getassettag Displays the asset tag for the chassis.
Synopsis
racadm getassettag [-m <module>]
Table 2-12 describes the getassettag subcommand options.
Table 2-12. getassettag Subcommand Options
Option Description
-m <module> Specifies the module whose asset tag you want to view.
Legal value: chassis
Example
• racadm getassettag -m chassis
or
racadm getassettag
chassis 78373839–33
getchassisname
NOTE: To use this subcommand, you must have CMC Login User privilege.
Subcommand Description
getchassisname Displays the name of the chassis.
Synopsis
racadm getchassisname
RACADM Subcommand Details 65
Page 66

Example
• racadm getchassisname
PowerEdge 2955
getconfig
Subcommand Description
getconfig Retrieves iDRAC6 configuration parameters individually, or all
iDRAC6 configuration groups may be retrieved and saved to a file.
Synopsis
racadm getconfig -f <filename>
racadm getconfig -g <groupName> [-i <index>]
racadm getconfig -u <username>
racadm getconfig -h
racadm getconfig -g <groupName> -o <objectName> [-i
index]
Input
Table 2-13 describes the getconfig subcommand options.
Table 2-13. getconfig Subcommand Options
Option Description
-f The -f <filename> option directs getconfig to write the entire iDRAC6
configuration to a configuration file. This file can be used for batch
configuration operations using the config subcommand.
-g The -g <groupName>, or group option, can be used to display the
configuration for a single group. The groupName is the name for the group
used in the racadm.cfg files. If the group is an indexed group, use the -i option.
-h The -h, or help option, displays a list of all available configuration groups in
alphabetical order. This option is useful when you do not remember exact
group names.
66 RACADM Subcommand Details
Page 67

Table 2-13. getconfig Subcommand Options
Option Description
-i The -i <index>, or index option, is valid only for indexed groups and can be
used to specify a unique group. The <index> is a decimal integer from 1
through n, where n can vary from 1 to maximum number of indexes a
particular group supports. If -i <index> is not specified, a value of 1 is
assumed for groups, which are tables that have multiple entries. The index is
specified by the index value, not a named value.
-o The -o <objectname> or object option specifies the object name that is used
in the query. This option is optional and can be used with the -g option.
-u The -u <username>, or user name option, can be used to display the
configuration for the specified user. The <username> option is the login
name for the user.
-v The -v option displays additional details with the display of the properties and
is used with the -g option.
Output
This subcommand generates error output upon encountering either of the
following:
• Invalid syntax, group name, object name, index, or other invalid database
members
• RACADM CLI transport failures
If errors are not encountered, this subcommand displays the contents of the
specified configuration.
Examples
•
racadm getconfig -g cfgLanNetworking
Displays all of the configuration properties (objects) that are contained in
the group
•
racadm getconfig -f myrac.cfg
Saves all group configuration objects from iDRAC6 to
cfgLanNetworking
.
myrac.cfg
RACADM Subcommand Details 67
.
Page 68

•
racadm getconfig -h
Displays a list of the available configuration groups on iDRAC6 in an
alphabetical order.
• racadm getconfig -u root
Displays the configuration properties for the user named root.
•
racadm getconfig -g cfgUserAdmin -i 2 -v
Displays the user group instance at index 2 with verbose information for
the property values.
getdcinfo
NOTE: To use this subcommand, you must have CMC Login User privilege.
Subcommand Description
getdcinfo Displays general I/O module and daughter card configuration
information.
NOTE: Fabric verification for server DCs is performed only when the chassis is
powered on. When the chassis is on standby power, iDRACs on the server modules
remain powered off and thus are unable to report the server's DC fabric type. The
DC fabric type may not be reported in the CMC user interface until iDRAC on the
server is powered on.
Synopsis
racadm getdcinfo
Table 2-14 describes the getdcinfo subcommand options.
Table 2-14. getdcinfo Subcommand Options
Option Description
-n Displays the model names for the daughter cards in servers.
68 RACADM Subcommand Details
Page 69

Example
The example output below is for a system with multi-slot servers.
racadm getdcinfo
Group A I/O Type : Gigabit Ethernet
Group B I/O Type : Gigabit Ethernet
Group C I/O Type : Gigabit Ethernet
<IO#> <Type> <State> <Role>
switch-1 Gigabit Ethernet OK Master
switch-2 None N/A N/A
switch-3 Gigabit Ethernet OK Master
switch-4 None N/A N/A
switch-5 Gigabit Ethernet OK Member
switch-6 None N/A N/A
<Server#> <Presence> <DC1 Type> <DC1
server-1 Present None N/A None N/A
server-2 Not Present None N/A None N/A
server-3 Not Present None N/A None N/A
server-4 Present None N/A Gigabit
server-5 Not Present None N/A None N/A
server-6 Not Present None N/A None N/A
server-7 Not Present None N/A None N/A
server-8 Present FibreChannel 4 Invalid None N/A
server-9 Extension(1) None N/A None N/A
server-10 Not Present None N/A None N/A
server-11 Not Present None N/A None N/A
server-12 Not Present None N/A None N/A
server-13 Not Present None N/A None N/A
server-14 Not Present None N/A None N/A
server-15 Not Present None N/A None N/A
server-16 Not Present None N/A None N/A
State>
<DC2 Type> <DC2
Ethernet
State>
OK
RACADM Subcommand Details 69
Page 70

getdcinfo -n
<Server#> <Presence> <DC1 Model Name> <DC2 Model Name>
server-1 Present None None
server-2 Not Present None None
server-3 Not Present None None
server-4 Present None Broadcom M5708t
server-5 Not Present None None
server-6 Not Present None None
server-7 Not Present None None
server-8 Present LPe1105-M4 None
server-9 Extension(1) None None
server-10 Not Present None None
server-11 Not Present None None
server-12 Not Present None None
server-13 Not Present None None
server-14 Not Present None None
server-15 Not Present None None
server-16 Not Present None None
getflexaddr
NOTE: To use this subcommand, you must have CMC Login User privilege.
Subcommand Description
getflexaddr Displays enabled/disabled status for the entire chassis. If used with
-i, the command displays MACs/WWN on a per slot basis.
NOTE: If FlexAddress is not activated on the chassis, the command displays
server-assigned MAC/WWN addresses. If the slot is empty, the command leaves
the server-assigned MAC/WWN addresses blank. If an external console controls
the MAC/WWN addresses, the command displays an externally managed message.
Synopsis
racadm getflexaddr [-i <slotNum>]
70 RACADM Subcommand Details
Page 71

Table 2-15 describes the getflexaddr subcommand options.
Table 2-15. getflexaddr Subcommand Options
Option Description
-i <slotNum> Specifies the slot information to be displayed. <slotNum> can be
from 1 to 16.
Example
• Display current flex address settings for all slots and fabrics
racadm getflexaddr
<Slot#> <Status> <Server Presence>
1 Enabled Present
2 Enabled Present
3 Enabled Not Present
4 Enabled Not Present
5 Enabled Present
6 Enabled Not Present
7 Enabled Not Present
8 Enabled Not Present
9 Enabled Not Present
10 Enabled Extension(2)
11 Enabled Not Present
12 Enabled Not Present
13 Enabled Extension(5)
14 Enabled Not Present
15 Enabled Not Present
16 Enabled Not Present
RACADM Subcommand Details 71
Page 72

<Fabric> <Type> <Status>
A Gigabit Ethernet Enabled
B None Enabled
C None Enabled
idrac Management Controller Disabled
• Display the current flex address setting for slot 1.
racadm getflexaddr -i 1
Slot-1 server presence = Present
Slot-1 flexaddress enabled = 1
<Fabric> <Type> <Server-Assigned> <Chassis-Assigned>
slot1-A1 Gigabit
slot1-A2 Gigabit
slot1-B1 Gigabit
slot1-B2 Gigabit
slot1-C1 Fiber
slot1-C2 Fiber
Ethernet
iSCSI 00:1C:23:CD:AC:D3
Ethernet
iSCSI 00:1C:23:CD:AC:D5
Ethernet
iSCSI 00:1D:09:71:B3:61 00:1E:C9:FF:E3:26(active)
Ethernet
iSCSI 00:1D:09:71:B3:63 00:1E:C9:FF:E3:28(active)
Channel 4
Channel 4
00:1C:23:CD:AC:D2
(active)
(active)
00:1C:23:CD:AC:D4
(active)
(active)
00:1D:09:71:B3:60 00:1E:C9:FF:E3:25(active)
00:1D:09:71:B3:62 00:1E:C9:FF:E3:27(active)
10:00:00:00:C9:63
:51:0E
10:00:00:00:C9:63
:51:0D
00:1E:C9:FF:E3:21
00:1E:C9:FF:E3:22
00:1E:C9:FF:E3:23
00:1E:C9:FF:E3:24
20:01:00:1E:C9:FF:E3:29(active)
20:02:00:1E:C9:FF:E3:29(active)
72 RACADM Subcommand Details
Page 73

getfanreqinfo
NOTE: To use this subcommand, you must have CMC Login User privilege.
Subcommand Description
getfanreqinfo Displays fan request for Servers and Switches in percent (%).
Synopsis
racadm getfanreqinfo
Example
racadm getfanreqinfo
[Ambient Temperature Fan Request %]
38
[Server Module Fan Request Table]
<Slot#> <Server
Name>
1 SLOT-01 PowerEdgeM600 ON Present 33
2 SLOT-02 PowerEdgeM905 ON Present 35
3 SLOT-03 PowerEdgeM710 ON Present 44
4 SLOT-04 PowerEdgeM610 ON Present 46
5 SLOT-05 PowerEdgeM610 ON Present 46
6 SLOT-06 N/A N/A Not Present N/A
7 SLOT-07 PowerEdgeM605 ON Present 100
fwupdate
8 SLOT-08 PowerEdgeM710 ON Present 44
9 SLOT-09 N/A N/A Not Present N/A
10 SLOT-10 N/A Extension
11 SLOT-11 N/A Extension
<Blade Type> <Power
State>
(2)
(3)
<Presence> <Fan
Request%>
N/A N/A
N/A N/A
RACADM Subcommand Details 73
Page 74

12 SLOT-12 N/A N/A Not Present N/A
13 SLOT-13 N/A N/A Not Present N/A
14 SLOT-14 PowerEdgeM600 ON Present 33
15 SLOT-15 N/A N/A Not Present N/A
16 SLOT-16 N/A Extension
(8)
N/A N/A
[Switch Module Fan Request Table]
<Slot#> <Server
Name>
1 SLOT-01 PowerEdgeM600 ON Present 33
2 SLOT-02 PowerEdgeM905 ON Present 35
3 SLOT-03 PowerEdgeM710 ON Present 44
4 SLOT-04 PowerEdgeM610 ON Present 46
5 SLOT-05 PowerEdgeM610 ON Present 46
6 SLOT-06 N/A N/A Not Present N/A
7 SLOT-07 PowerEdgeM605 ON Present 100
fwupdate
8 SLOT-08 PowerEdgeM710 ON Present 44
9 SLOT-09 N/A N/A Not Present N/A
10 SLOT-10 N/A Extension
11 SLOT-11 N/A Extension
12 SLOT-12 N/A N/A Not Present N/A
13 SLOT-13 N/A N/A Not Present N/A
14 SLOT-14 PowerEdgeM600 ON Present 33
15 SLOT-15 N/A N/A Not Present N/A
16 SLOT-16 N/A Extension
<Blade Type> <Power
State>
(2)
(3)
(8)
<Presence> <Fan
Request%>
N/A N/A
N/A N/A
N/A N/A
74 RACADM Subcommand Details
Page 75

[Switch Module Fan Request Table]
<IO
Name>
Switch-1 Dell Ethernet Pass-
Switch-2 Dell PowerConnect
Switch-3 N/A None Not Present N/A
Switch-4 N/A None Not Present N/A
Switch-5 N/A None Not Present N/A
Switch-6 N/A None Not Present N/A
<Name> <Type> <Presence> <Fan
Through
M6220
Gigabit
Ethernet
Gigabit
Ethernet
Present 30
Present 30
Request%>
getioinfo
NOTE: To use this subcommand, you must have CMC Login User privilege.
Subcommand Description
getioinfo Displays general information about the I/O modules on the chassis.
NOTE: The fabric type may be any supported I/O fabric type, such as Ethernet,
Fiber Channel, and Infiniband.
Synopsis
racadm getioinfo
RACADM Subcommand Details 75
Page 76

Example
racadm getioinfo
<IO> <Name> <Type> <Presence> <POST> <Power> <Role>
switch-1 Dell Ethernet
switch-2 N/A None Not Present N/A N/A N/A
switch-3 Brocade 4424 Fibre
switch-4 N/A None Not Present N/A N/A N/A
switch-5 N/A None Not Present N/A N/A N/A
switch-6 N/A None Not Present N/A N/A N/A
Passthrough
Gigabit
Ethernet
Channel 4
Present OK ON Master
Present OK ON Master
getkvminfo
NOTE: To use this subcommand, you must have CMC Login User privilege.
Subcommand Description
getkvminfo Displays iKVM module information.
Synopsis
racadm getkvminfo
Example
racadm getkvminfo
<module> <presence> <model> <FW Version> <status>
KVM Present Avocent iKVM Switch 00.05.00.04 Ready
76 RACADM Subcommand Details
Page 77

getled
NOTE: To use this subcommand, you must have CMC Login User privilege.
Subcommand Description
getled Displays the LED settings on a module: blinking, not blinking, or
unknown (for empty slots).
Synopsis
racadm getled -m <module>
Table 2-16 describes the getled subcommand options.
Table 2-16. getled Subcommand Options
Option Description
-m <module> Specifies the module whose LED settings you want to view.
<module> can be one of the following:
•
server-n
switch-n
•
• chassis
• cmc-active
Examples
• racadm getled -m server-10
<module> <LED state>
server-10 Blinking
• racadm getled -m chassis
<module> <LED state>
server-10 Not blinking
• racadm getled -m server-1
<module> <LED state>
server-1 ON
where n=1–16
where n=1–6
RACADM Subcommand Details 77
Page 78

racadm getled -m server-9
<module> <LED state>
server-9 Extension(1)
getmacaddress
NOTE: To use this subcommand, you must have CMC Login User privilege.
Subcommand Description
getmacaddress Displays the MAC/WWN addresses for all modules or for a
specified module.
Synopsis
racadm getmacaddress [-m <module>] [-t iscsi] [-x]
racadm getmacaddress [-a]
Table 2-17 describes the getmacaddress subcommand options.
Table 2-17. getmacaddress Subcommand Options
Option Description
-m <module> Specifies the module whose MAC address you want to view.
<module> may be one of the following:
• chassis
•
server-n
switch-n
•
-t Displays the iSCSI MAC addresses for all servers or the specified
server if used with -m option.
-x Displays the extra MACs (Ethernet or iSCSI) for servers with
additional LOM MACs and must be used with -m option.
-a Displays the Ethernet and iSCSI MAC/WWN addresses for all
iDRAC/LOMs/mezzanine cards. When FlexAddress is enabled for
a particular slot, then the chassis-assigned MAC/WWN address is
displayed.
where n=1–16
where n=1–6
78 RACADM Subcommand Details
Page 79

Example
• Display iSCSI MAC addresses for all servers.
racadm getmacaddress -t iscsi
• Display iSCSI MAC for server-1.
racadm getmacaddress -m server-1 -t iscsi
• Display extra iSCSI MACs for server-1 (if available).
racadm getmacaddress -m server-1 -t iscsi -x
• Display MAC for server-1.
racadm getmacaddress -m server-1
<Name> <Presence> <BMC MAC Address> <NIC1 MAC
Address>
server-1 Present 00:11:43:FD:B7:2A 00:11:43:FD:B7:2A00:11:43:FD:B7:2B
server-9 Extension(1) N/A 00:11:43:FD:B7:2C00:11:43:FD:B7:2D
<NIC2 MAC
Address>
• Display extra MACs for server-1 (if available).
racadm getmacaddress -m server-1 -x
<Name> <Presence> <BMC MAC Address> <NIC1 MAC
Address>
server-1 Present 00:11:43:FD:B7:2A 00:11:43:FD:B7:2A00:11:43:FD:B7:2B
00:11:43:FD:B7:2C00:11:43:FD:B7:2D
<NIC2 MAC
Address>
racadm getmacaddress
<Name> <Presence> <BMC MAC Address> <NIC1 MAC
CMC Present N/A 00:1E:4F:1F:3C
Server-1 Present 00:1E:4F:2A:AF:7B 00:1E:4F:2A:D3
Server-2 Present 00:22:19:D2:1E:84 N/A N/A
Address>
:58
:97
<NIC2 MAC
Address>
N/A
00:1E:4F:2A:D3:99
RACADM Subcommand Details 79
Page 80

Server-3 Not Present N/A N/A N/A
Server-4 Present 00:18:8B:FF:45:2A 00:18:8B:FF:AA
Server-5 Present 00:19:B9:FF:FE:E2 00:19:B9:FF:FC
Server-6 Present 00:22:19:D2:1D:D4 N/A N/A
Server-7 Present 00:1E:4F:FF:FC:DC 00:1E:4F:FF:F0
Server-8 Not Present N/A N/A N/A
Server-9 Not Present N/A N/A N/A
Server-10 Not Present N/A N/A N/A
Server-11 Not Present N/A N/A N/A
Server-12 Not Present N/A N/A N/A
Server-13 Present 00:18:8B:FF:45:26 00:18:8B:FF:A9
Server-14 Present 00:22:19:D2:1E:A2 N/A N/A
Server-15 Extension(7) N/A 00:1E:4F:FF:F0
Server-16 Not Present N/A N/A N/A
Switch-1 Present N/A 00:00:00:00:00
Switch-2 Present N/A 00:00:00:00:00
Switch-3 Present N/A 00:00:00:00:00
Switch-4 Present N/A 00:00:00:00:00
Switch-5 Present N/A 00:05:1E:08:EB
Switch-6 Not Present N/A N/A N/A
:02
:0C
:B0
:F2
:B4
:00
:00
:00
:00
:0B
00:18:8B:FF:AA:04
00:19:B9:FF:FC:0E
00:1E:4F:FF:F0:B2
00:18:8B:FF:A9:F4
00:1E:4F:FF:F0:B6
N/A
N/A
N/A
N/A
N/A
• Display Ethernet and iSCSI MACS of all LOMs/mezzanine cards.
racadm getmacaddress -a
<Name> <Type> <Presence> <BMC MAC
Address>
CMC N/A Present N/A 00:1E:4F:1F:3
<NIC1 MAC
Address>
C:58
80 RACADM Subcommand Details
<NIC2 MAC
Address>
N/A
Page 81

Server-1-AGigabit
Server-1-BGigabit
Server-1-CFibre
Server-2-AGigabit
Server-2-BGigabit
Server-2-CFibre
Server-3 N/A Not Present N/A N/A N/A
Server-4-AGigabit
Server-4-BGigabit
Server-4-CFibre
Server-5-AGigabit
Server-5-BGigabit
Server-5-CFibre
Ethernet
iSCSI Present 00:1E:4F:2A:D
Ethernet
iSCSI Present Not Installed Not
Channel 4
Ethernet
iSCSI Present N/A N/A
Ethernet
iSCSI Present Not Installed Not
Channel 4
Ethernet
iSCSI Present 00:18:8B:FF:A
Ethernet
iSCSI Present Not Installed Not
Channel 4
Ethernet
iSCSI Present 00:19:B9:FF:F
Ethernet
iSCSI Present Not Installed Not
Channel 4
Present 00:1E:4F:2A:
Present Not Installed Not
Present Not Installed Not
Present 00:22:19:D2:
Present Not Installed Not
Present Not Installed Not
Present 00:18:8B:FF:
Not Present Not Installed Not
Present Not Installed Not
Present 00:19:B9:FF:
Present Not Installed Not
Present Not Installed Not
AF:7B
1E:84
45:2A
FE:E2
00:1E:4F:2A:D
3:97
3:98
N/A N/A
00:18:8B:FF:A
A:02
A:03
00:19:B9:FF:F
C:0C
C:0D
00:1E:4F:2A
:D3:99
00:1E:4F:2A
:D3:9A
Installed
Installed
Installed
Installed
Installed
Installed
00:18:8B:FF
:AA:04
00:18:8B:FF
:AA:05
Installed
Installed
Installed
00:19:B9:FF
:FC:0E
00:19:B9:FF
:FC:0F
Installed
Installed
Installed
RACADM Subcommand Details 81
Page 82

Server-6-AGigabit
Server-6-BGigabit
Server-6-CFibre
Server-7-AGigabit
Server-7-BGigabit
Server-7-CFibre
Server-8 N/A Not Present N/A N/A N/A
Server-9 N/A Not Present N/A N/A N/A
Server-10 N/A Not Present N/A N/A N/A
Server-11 N/A Not Present N/A N/A N/A
Server-12 N/A Not Present N/A N/A N/A
Server13-A
Server13-B
Server13-C
Server14-A
Server14-B
Ethernet
iSCSI Present N/A N/A
Ethernet
iSCSI Present Not Installed Not
Channel 4
Ethernet
iSCSI Present 00:1E:4F:FF:F
Ethernet
Channel 4
Gigabit
Ethernet
iSCSI Present 00:18:8B:FF:A
Gigabit
Ethernet
iSCSI Present 00:1D:09:71:E
Fibre
Channel 4
Gigabit
Ethernet
iSCSI Present N/A N/A
Gigabit
Ethernet
iSCSI Present Not Installed Not
Present 00:22:19:D2:
Present Not Installed Not
Present Not Installed Not
Present 00:1E:4F:FF:
Present 00:1D:09:72:0
Present 21:00:00:1B:3
Present 00:18:8B:FF:
Present 00:1D:09:71:E
Present 21:00:00:1B:3
Present 00:22:19:D2:
Present Not Installed Not
1D:D4
FC:DC
45:26
1E:A2
N/A N/A
Installed
Installed
Installed
00:1E:4F:FF:F
0:B0
0:B1
1:C8
2:0E:CF:34
00:18:8B:FF:A
9:F2
9:F3
0:78
0:79
2:0E:EF:30
N/A N/A
00:1E:4F:FF
:F0:B2
00:1E:4F:FF
:F0:B3
00:1D:09:72
:01:CA
21:01:00:1B
:32:2E:CF:3
4
00:18:8B:FF
:A9:F4
00:18:8B:FF
:A9:F5
00:1D:09:71
:E0:7A
00:1D:09:71
:E0:7B
21:01:00:1B
:32:2E:EF:3
0
Installed
Installed
82 RACADM Subcommand Details
Page 83

Server14-C
Server15-A
Server15-B
Server15-C
Server-16 N/A Not Present N/A N/A N/A
Switch-1 None Present N/A 00:00:00:00:0
Switch-2 None Present N/A 00:00:00:00:0
Switch-3 None Present N/A 00:00:00:00:0
Switch-4 None Present N/A 00:00:00:00:0
Switch-5 None Present N/A 00:05:1E:08:E
Switch-6 N/A Not Present N/A N/A N/A
Fibre
Channel 4
Gigabit
Ethernet
iSCSI Extension(7) N/A 00:1E:4F:FF:F
Gigabit
Ethernet
iSCSI Extension(7) N/A 00:1D:09:71:E
Fibre
Channel 4
Present Not Installed Not
Extension(7) N/A 00:1E:4F:FF:F
Extension(7) N/A 00:1D:09:71:E
Extension(7) N/A 21:00:00:1B:3
0:B4
0:B5
1:20
1:21
2:17:3A:66
0:00
0:00
0:00
0:00
B:0B
Installed
00:1E:4F:FF
:F0:B6
00:1E:4F:FF
:F0:B7
00:1D:09:71
:E1:22
00:1D:09:71
:E1:23
21:00:00:1B
:32:37:3A:6
6
N/A
N/A
N/A
N/A
N/A
getmodinfo
NOTE: To use this subcommand, you must have CMC Login User privilege.
NOTE: The service tag field is blank for modules that do not have service tags.
Subcommand Description
getmodinfo Displays configuration and status information for all modules or a
specified module (server, switch, CMC, fan unit, power supply
unit, KVM, or I2C cable) in the chassis.
Synopsis
racadm getmodinfo [-m <module>] [-A]
RACADM Subcommand Details 83
Page 84

Table 2-18 describes the getmodinfo subcommand options.
Table 2-18. getmodinfo Subcommand Options
Option Description
-m <module> Specifies the module whose configuration and status information
you want to view. The default command (no options) displays
information about all major components in the chassis.
<module> may be any of the following values:
•
server-n
switch-n
•
CMC-n
•
fan-n
•
ps-n
•
where n=
where n=
where n=1–2
where n=1–9
where n=
1–6
1–16
1–6
• chassis
kvm
•
•
io-cable
•
fpc-cable
-A Suppresses headers and labels in the output.
Example
• racadm getmodinfo -m switch-1
<module> <presence> <pwrState> <health> <svcTag>
Switch-1 Present ON OK CG09074
• racadm getmodinfo
<module> <presence> <pwrState> <health> <svcTag>
Chassis Present ON Not OK ABC1234
Fan-1 Present ON OK
Fan-2 Present ON OK
Fan-3 Present ON OK
Fan-4 Present ON OK
Fan-5 Present ON OK
Fan-6 Present ON OK
Fan-7 Present ON OK
Fan-8 Present ON OK
Fan-9 Present ON OK
PS-1 Present Online OK
84 RACADM Subcommand Details
Page 85

PS-2 Not Present N/A N/A N/A
PS-3 Present Online OK
PS-4 Not Present N/A N/A N/A
PS-5 Not Present N/A N/A N/A
PS-6 Not Present N/A N/A N/A
CMC-1 Present Primary OK N/A
CMC-2 Not Present N/A N/A N/A
Switch-1 Not Present N/A N/A N/A
Switch-2 Not Present N/A N/A N/A
Switch-3 Not Present N/A N/A N/A
Switch-4 Not Present N/A N/A N/A
Switch-5 Not Present N/A N/A N/A
Switch-6 Not Present N/A N/A N/A
Server-1 Not Present N/A N/A N/A
Server-2 Present OFF OK
Server-3 Present ON OK S YW
Server-4 Present ON OK
Server-5 Present ON OK
Server-6 Present ON OK 1234567
Server-7 Present ON OK
Server-8 Not Present N/A N/A N/A
Server-9 Not Present N/A N/A N/A
Server-10 Extension(2) N/A N/A N/A
Server-11 Not Present N/A N/A N/A
Server-12 Present ON OK
Server-13 Not Present N/A N/A N/A
Server-14 Present ON OK 0000015
Server-15 Present ON OK
Server-16 Present ON OK
KVM Present ON OK
IO-Cable Present ON OK ABC1234
FPC-Cable Present ON OK ABC1234
NOTE: For CMC (only) a power state of "Primary" denotes Active CMC.
getniccfg
NOTE: To use this subcommand, you must have Login to iDRAC permission.
Subcommand Description
getniccfg The getniccfg subcommand displays the current NIC settings.
Synopsis
racadm getniccfg
RACADM Subcommand Details 85
Page 86

Sample Output
The getniccfg subcommand displays an appropriate error message if the
operation is not successful. Otherwise, on success, the output is displayed in
the following format:
IPv4 settings:
NIC Enabled = 1
IPv4 Enabled = 1
DHCP Enabled = 1
IP Address = 10.35.0.64
Subnet Mask = 255.255.255.0
Gateway = 10.35.0.1
IPv6 settings:
IPv6 Enabled = 0
DHCP6 Enabled = 1
IP Address 1 = ::
Gateway = ::
Link Local Address = ::
IP Address 2 = ::
IP Address 3 = ::
IP Address 4 = ::
IP Address 5 = ::
IP Address 6 = ::
IP Address 7 = ::
IP Address 8 = ::
IP Address 9 = ::
IP Address 10 = ::
IP Address 11 = ::
IP Address 12 = ::
IP Address 13 = ::
IP Address 14 = ::
86 RACADM Subcommand Details
Page 87

IP Address 15 = ::
LOM Status:
NIC Selection = Dedicated
Link Detected = Yes
Speed = 10Mb/s
Duplex Mode = Half Duplex
NOTE: IPv6 information is displayed only if IPv6 is enabled in iDRAC6.
NOTE: LOM Status is displayed only for iDRAC6 on Rack and Tower servers and is
not displayed for iDRAC6 Enterprise on Blade servers.
getpbinfo
NOTE: To use this subcommand, you must have CMC Login User privilege.
Subcommand Description
getpbinfo Displays power budget status information.
Synopsis
racadm getpbinfo
Example
racadm getpbinfo
[Power Budget Status]
System Input Power = 700 W
Peak System Power = 0 W
Peak System Power Timestamp = 01:08:23 01/27/2009
Minimum System Power = 0 W
Minimum System Power Timestamp = 20:18:30 01/27/2000
Overall Power Health = Not OK
Redundancy = No
System Input Power Cap = 7928 W
Redundancy Policy = None
Dynamic PSU Engagement Enabled = No
System Input Max Power Capacity = 0 W
Input Redundancy Reserve = 0 W
Input Power Allocated to Servers = 0 W
RACADM Subcommand Details 87
Page 88

Input Power Allocated to Chassis Infrastructure = 51 watts
Total Input Power Available for Allocation = 0 W
Standby Input Power Capacity = 0 W
[Chassis Power Supply Status Table]
<Name> <Presence> <Power State> <Input Current> <Input Volts>
<Output Rating>
PS1 Online On 16.1 A 32 V
2360 W
PS2 Not Present Slot Empty N/A N/A
N/A
PS3 Not Present Slot Empty N/A N/A
N/A
PS4 Not Present Slot Empty N/A N/A
N/A
PS5 Not Present Slot Empty N/A N/A
N/A
PS6 Not Present Slot Empty N/A N/A
N/A
[Server Module Power Allocation Table]
<Slot#><Server Name><PowerState><Allocation><Priority><Blade Type>
1 SLOT-01 N/A N/A 5 N/A
2 SLOT-02 OFF 0 W 5 PowerEdgeM805
3 SLOT-03 ON 164 W 5 N/A
4 SLOT-04 ON 155 W 5
5 SLOT-05 ON 180 W 5
6 SLOT-06 ON 180 W 5 PowerEdgeM600
7 SLOT-07 ON 170 W 5
8 SLOT-08 N/A N/A 5 N/A
9 SLOT-09 N/A N/A 5 N/A
10 SLOT-10 Extension(2) N/A 5 N/A
11 SLOT-11 N/A N/A 5 N/A
12 SLOT-12 ON 125 W 5 PowerEdgeM600
13 SLOT-13 N/A N/A 5 N/A
14 SLOT-14 ON 342 W 5 N/A
15 SLOT-15 ON 140 W 5
16 SLOT-16 ON 125 W 5 N/A
88 RACADM Subcommand Details
Page 89

getpminfo
NOTE: To use this subcommand, you must have CMC Login User privilege.
Subcommand Description
getpminfo Displays power management status information.
Synopsis
racadm getpminfo
Example
racadm getpminfo
[Real-Time Power Statistics]
System Input Power = 600 W (188 BTU/hr)
Peak System Power = 600 W (188 BTU/hr
Peak System Power Start Time = 16:02:10 01/16/2008
Peak System Power Timestamp = 06:32:55 01/26/2009
Minimum System Power = 400 W (177 BTU/hr)
Minimum System Power Start Time = 22:43:21 01/21/2008
Minimum System Power Timestamp = 06:32:55 01/26/2009
System Idle Power = 68 W (188 BTU/hr)
System Potential Power = 68 W (188 BTU/hr)
System Input Current Reading = 31.2 A
[Real-Time Energy Statistics]
System Energy Consumption = 6.4 kWh
System Energy Consumption Start Time = 16:02:10
01/16/2008
System Energy Consumption Timestamp = 16:02:10
01/16/2008
[System Power Status]
Chassis Power State = ON
Overall Power Health = OK
Redundancy = No
RACADM Subcommand Details 89
Page 90

[System Power Policy Configuration]
System Input Power Cap = 7928 W (7928
BTU/hr | 10%)
Surplus for Peak Performance = 7000 W (6130
BTU/hr)
Redundancy Policy = None
Dynamic PSU Engagement Enabled = No
[Power Budgeting]
System Input Max Power Capacity = 0 W
Input Redundancy Reserve = 0 W
Input Power Allocated to Servers = 0 W
Input Power Allocated to Chassis Infrastructure = 51W
Total Input Power Available for Allocation = 0 W
Standby Input Power Capacity = 0 W
getraclog
NOTE: To use this subcommand, you must have Login to iDRAC permission.
Subcommand Description
getraclog The getraclog -i command displays all the RAC log entries in the
DRAC.
Synopsis
racadm getraclog -i
racadm getraclog [-A] [-o] [-c count] [-s start-
record] [--more]
Table 2-19 lists the options that allow the getraclog command to read entries.
Table 2-19. getraclog Subcommand Options
Option Description
-A Displays the output with no headers or labels.
-c Provides the maximum count of entries to be returned.
90 RACADM Subcommand Details
Page 91

Table 2-19. getraclog Subcommand Options
Option Description
--more Displays one screen at a time and prompts the user to continue (similar to
the UNIX more command).
-o Displays the output in a single line.
-s Specifies the starting record used for the display.
NOTE: If no options are provided, the entire log is displayed.
Output
(continued)
The default output display shows the record number, time stamp, source, and
description. The timestamp begins at midnight, January 1 and increases until
the system boots. After the system boots, the system’s timestamp is used.
NOTE: For iDRAC6 Enterprise on Blade Servers, iDRAC6 Log entries for
SystemBoot
may not be correctly formatted. For example, some extra characters may be
displayed in the Description field, or the Source field may be empty.
Sample Output
displayed using the local racadm command racadm getraclog
Record: 1
Date/Time: Dec 8 08:10:11
Source: login[433]
Description: root login from 143.166.157.103
getractime
NOTE: To use this subcommand, you must have Login to iDRAC permission.
Subcommand Description
getractime The getractime subcommand displays the current DRAC time.
Table 2-20 lists the options that allow the getractime command to display the
time in specific formats:
RACADM Subcommand Details 91
Page 92

Table 2-20. getractime Subcommand Options
Option Description
-d Displays the time in the format, yyyymmddhhmmss.mmmmmms.
-z Displays timezone.
NOTE: This option is specific to CMC only.
-n Displays NTP peer information.
NOTE: This option is specific to CMC only.
NOTE: If no options are provided, the getractime subcommand displays the time in
a common readable format.
Synopsis
racadm getractime [-d]
racadm getractime [-d] [-z] [-n]
Sample Output
racadm getractime
Thu Dec 8 20:15:26 2005
racadm getractime -d
20051208201542.000000
getredundancymode
NOTE: To use this subcommand, you must have CMC Login User privilege.
Subcommand Description
getredundancy
mode
Synopsis
racadm getredundancymode
92 RACADM Subcommand Details
Displays the redundancy status (Redundant or Non-Redundant) of
the CMC.
Page 93

Example
racadm getredundancymode
Redundant
getsel
NOTE: To use this subcommand, you must have Login to iDRAC permission.
Subcommand Description
getsel The getsel subcommand display all sensor event log entries in the
DRAC.
Synopsis
racadm getsel -i[-A]
racadm getsel [-s <start>] [-c <count>] [-A] [-o] [-E]
[-R] [--more]
NOTE: If no arguments are specified, the entire log is displayed.
The following getsel options (without the -i option) are used to read entries.
Table 2-21 describes the getsel subcommand options.
Table 2-21. getsel Subcommand Options
Option Description
-A Specifies output with no display headers or labels.
-c Provides the number of records to be displayed.
-o Displays each entry in the SEL in a single line.
-s Specifies the starting record used for the display.
-E Displays RAW SEL data with the other data for each entry.
-R Displays only RAW SEL data for each entry.
-i Displays the number of entries in the SEL.
--more Displays one screen at a time and prompts the user to continue (similar to
the UNIX more command).
RACADM Subcommand Details 93
Page 94

Output
The default output display shows the record number, timestamp, severity,
and description.
For exampl e :
Record: 1
Date/Time: 11/16/2005 22:40:43
Severity: Ok
Description: System Board SEL: event log sensor for
System Board, log cleared was asserted
getsensorinfo
NOTE: To use this subcommand, you must have CMC Login User privilege.
Subcommand Description
getsensorinfo Displays status for system sensors.
Synopsis
racadm getsensorinfo
Examples
racadm getsensorinfo
<senType> <Num> <sensorName> <status> <reading> <units> <lc> <uc>
FanSpeed 1 Fan-1 OK 4768 rpm 2344 14500
FanSpeed 2 Fan-2 OK 4873 rpm 2344 14500
FanSpeed 3 Fan-3 OK 4832 rpm 2344 14500
FanSpeed 4 Fan-4 OK 4704 rpm 2344 14500
FanSpeed 5 Fan-5 OK 4833 rpm 2344 14500
FanSpeed 6 Fan-6 OK 4829 rpm 2344 14500
FanSpeed 7 Fan-7 OK 4719 rpm 2344 14500
FanSpeed 8 Fan-8 Not OK 1 rpm 2344 14500
FanSpeed 9 Fan-9 OK 4815 rpm 2344 14500
<senType> <Num> <sensorName> <status> <reading> <units> <lc> <uc>
Temp 1 Ambient_Temp OK 22 celcius N/A 40
94 RACADM Subcommand Details
Page 95

<senType> <Num> <sensorName> <status> <AC-OK status>
PWR 1 PS-1 Online OK
PWR 2 PS-2 Online OK
PWR 3 PS-3 Online OK
PWR 4 PS-4 Slot Empty N/A
PWR 5 PS-5 Failed OK
PWR 6 PS-6 Slot Empty N/A
<senType> <Num> <sensorName> <status>
Cable 1 IO-Cable OK
Cable 2 FPC-Cable OK
getslotname
NOTE: To use this subcommand, you must have CMC Login User privilege.
Subcommand Description
getslotname Displays the name and hostname (if available) of all 16 slots, or of a
specified slot (indicated by the slot number) in the chassis.
Optionally, this command can be used to find if the slot name or
hostname is displayed in the CMC User Interface or with the
getslotname -i <slot ID> command. If the hostname
is not available, the static slot name is used.
Synopsis
racadm getslotname
racadm getslotname -i <slot ID>
racadm getslotname -h
RACADM Subcommand Details 95
Page 96

Table 2-22 describes the getslotname subcommand options.
Table 2-22. getslotname Subcommand Options
Option Description
(None) Displays the slot name for all 16 slots in
the chassis.
-i
<slot ID> Specifies the ID of the slot.
Legal values: 1–16
-h Specifies whether to use the slot name
or the hostname (if available).
1=use hostnames, 0=use slotnames
Example
• racadm getslotname
<Slot #> <Slot Name> <Host name>
1 SLOT-01
2 Webserver01 WXP-8GRB221
3 Webserver3 WXP-319QWEecet5
4 SLOT-04
5 SLOT-05
6 SLOT-06
7 SLOT-07
8 SLOT-08
9 SLOT-09
10 SLOT-10
11 SLOT-11
12 SLOT-12
13 SLOT-13
14 SLOT-14
15 SLOT-15
16 SLOT-16
• racadm getslotname -i 1
Webserver-1
96 RACADM Subcommand Details
Page 97

getssninfo
NOTE: To use this subcommand, you must have Login to iDRAC permission.
Subcommand Description
getssinfo Displays a list of users that are connected to iDRAC6. The
following information is displayed:
•Session ID
•Username
• IP address (if applicable)
• Session type (for example, serial or Telnet)
• Login date and time in MM/DD/YYYY HH:MM:SS format
Based on the Session ID (SSNID) or the user name (User), the iDRAC
administrator can close the respective sessions or all the sessions using the ,
closessn subcommand. For more information, see "closessn" on page 43 .
Synopsis
racadm getssninfo [-A] [-u <username> | *]
Table 2-23 describes the getssninfo subcommand options.
Table 2-23. getssninfo Subcommand Options
Option Description
-A The -A option eliminates the printing of data headers.
-u The -u <username> user name option limits the printed output to only
the detail session records for the given user name. If an (*) symbol is given
as the user name, all users are listed. Summary information is not printed
when this option is specified.
RACADM Subcommand Details 97
Page 98

Examples
• racadm getssninfo
SSNID Type User IP Address Login Date/Time
6 GUI root 192.168.0.10 04/07/2010 12:00:34
• racadm getssninfo -A
"root" "143.166.174.19" "Telnet" "NONE"
• racadm getssninfo -A -u *
"root" "143.166.174.19" "Telnet" "NONE"
"bob" "143.166.174.19" "GUI" "NONE"
getsvctag
NOTE: To use this subcommand, you must have Login to iDRAC permission.
Subcommand Description
getsvctag Displays the service tag of the host system.
Synopsis
racadm getsvctag
Example
Ty p e getsvctag at the command prompt. The output is displayed as
follows:
Y76TP0G
98 RACADM Subcommand Details
Page 99

getsysinfo
NOTE: To use this subcommand, you must have Login to iDRAC permission.
Subcommand Description
getsysinfo Displays information related to iDRAC, managed system, and
watchdog configuration.
NOTE: The local racadm getsysinfo subcommand on Linux displays the
PrefixLength
Local Address.
Synopsis
racadm getsysinfo [-d] [-s] [-w] [-A] [-c] [-4] [-6]
Table 2-24 describes the getsysinfo subcommand options.
Table 2-24. getsysinfo Subcommand Options
Option Description
-4 Displays IPv4 settings
-6 Displays IPv6 settings
-c Displays common settings
-d Displays iDRAC6 information
-s Displays system information
-w Displays watchdog information
-A Eliminates the printing of headers/labels
on separate lines for IPv6 Address 2 – IPv6 Address 15 and the Link
If the -w option is not specified, then the other options are used as defaults.
Sample Output
RAC Information:
RAC Date/Time = 10/27/2009 14:38:00
Firmware Version = 1.30
Firmware Build = 20
RACADM Subcommand Details 99
Page 100

Last Firmware Update = 10/26/2009 16:55:08
Hardware Version = 0.01
MAC Address = 00:24:e8:2e:c5:d3
Common settings:
Register DNS RAC Name = 1
DNS RAC Name = eval710-08-r
Current DNS Domain = blr.amer.dell.com
Domain Name from DHCP = 1
IPv4 settings:
Enabled = 1
Current IP Address = 10.94.20.134
Current IP Gateway = 10.94.20.1
Current IP Netmask = 255.255.254.0
DHCP Enabled = 1
Current DNS Server 1 = 163.244.180.39
Current DNS Server 2 = 163.244.180.40
DNS Servers from DHCP = 1
IPv6 settings:
Enabled = 1
Current IP Address 1 = ::
Current IP Gateway = ::
Autoconfig = 1
Link Local IP Address = fe80::224:e8ff:fe2e:c5d3/255
Current IP Address 2 = ::
Current IP Address 3 = ::
Current IP Address 4 = ::
100 RACADM Subcommand Details
 Loading...