


Dell Chassis Management Controller Firmware
Version 4.3 User’s Guide

Notes, Cautions, and Warnings
NOTE: A NOTE indicates important information that helps you make better use of your computer.
CAUTION: A CAUTION indicates either potential damage to hardware or loss of data and tells you how to avoid the
problem.
WARNING: A WARNING indicates a potential for property damage, personal injury, or death.
© 2013 Dell Inc.
Trademarks used in this text: Dell™, the Dell logo, Dell Boomi™, Dell Precision™ , OptiPlex™, Latitude™, PowerEdge™, PowerVault™,
PowerConnect™, OpenManage™, EqualLogic™, Compellent™, KACE™, FlexAddress™, Force10™ and Vostro™ are trademarks of Dell
Inc. Intel®, Pentium®, Xeon®, Core® and Celeron® are registered trademarks of Intel Corporation in the U.S. and other countries. AMD
is a registered trademark and AMD Opteron™, AMD Phenom™ and AMD Sempron™ are trademarks of Advanced Micro Devices, Inc.
Microsoft®, Windows®, Windows Server®, Internet Explorer®, MS-DOS®, Windows Vista® and Active Directory® are either trademarks
or registered trademarks of Microsoft Corporation in the United States and/or other countries. Red Hat® and Red Hat
Enterprise Linux® are registered trademarks of Red Hat, Inc. in the United States and/or other countries. Novell® and SUSE® are
registered trademarks of Novell Inc. in the United States and other countries. Oracle® is a registered trademark of Oracle Corporation
and/or its affiliates. Citrix®, Xen®, XenServer® and XenMotion® are either registered trademarks or trademarks of Citrix Systems, Inc. in
the United States and/or other countries. VMware
trademarks of VMware, Inc. in the United States or other countries.
Corporation.
2012 - 12
®
,
Virtual SMP
®
®
,
vMotion
®
is a registered trademark of International Business Machines
IBM
,
vCenter
®
and
vSphere
®
are registered trademarks or
®
®
Rev. A00

Contents
Notes, Cautions, and Warnings...................................................................................................2
1 Overview.....................................................................................................................................13
What Is New In This Release.................................................................................................................................14
Key Features...........................................................................................................................................................14
Management Features.....................................................................................................................................14
Security Features.............................................................................................................................................15
Chassis Overview...................................................................................................................................................15
CMC Port Information.............................................................................................................................................16
Minimum CMC Version...........................................................................................................................................17
Supported Remote Access Connections................................................................................................................18
Supported Platforms...............................................................................................................................................19
Supported Web Browsers......................................................................................................................................19
Viewing Localized Versions of the CMC Web Interface.........................................................................................19
Supported Management Console Applications......................................................................................................19
Other Documents You May Need...........................................................................................................................20
2 Installing and Setting Up CMC................................................................................................21
Before You Begin....................................................................................................................................................21
Installing CMC Hardware.......................................................................................................................................21
Checklist To Set up Chassis.............................................................................................................................21
Basic CMC Network Connection......................................................................................................................22
Daisy chain CMC Network Connection............................................................................................................22
Installing Remote Access Software on a Management Station............................................................................24
Installing RACADM on a Linux Management Station......................................................................................25
Uninstalling RACADM From a Linux Management Station..............................................................................25
Configuring Web Browser......................................................................................................................................25
Proxy Server.....................................................................................................................................................26
Microsoft Phishing Filter..................................................................................................................................26
Certificate Revocation List (CRL) Fetching.......................................................................................................26
Downloading Files From CMC With Internet Explorer......................................................................................27
Allow Animations in Internet Explorer.............................................................................................................27
Setting Up Initial Access to CMC............................................................................................................................27
Configuring Initial CMC Network......................................................................................................................28
Interfaces and Protocols to Access CMC..............................................................................................................30
Launching CMC Using Other Systems Management Tools.............................................................................32
Downloading and Updating CMC Firmware...........................................................................................................32

Setting Chassis Physical Location and Chassis Name...........................................................................................32
Setting Chassis Physical Location and Chassis Name Using Web Interface..................................................32
Setting Chassis Physical Location and Chassis Name Using RACADM..........................................................33
Setting Date and Time on CMC...............................................................................................................................33
Setting Date and Time on CMC Using CMC Web Interface.............................................................................33
Setting Date and Time on CMC Using RACADM..............................................................................................33
Configuring LEDs to Identify Components on the Chassis......................................................................................33
Configuring LED Blinking Using CMC Web Interface.......................................................................................33
Configuring LED Blinking Using RACADM........................................................................................................34
Configuring CMC Properties...................................................................................................................................34
Understanding Redundant CMC Environment........................................................................................................34
About Standby CMC.........................................................................................................................................35
CMC Failsafe Mode..........................................................................................................................................35
Active CMC Election Process..........................................................................................................................35
Obtaining Health Status of Redundant CMC....................................................................................................36
3 Logging In to CMC.....................................................................................................................37
Accessing CMC Web Interface..............................................................................................................................37
Logging Into CMC as Local User, Active Directory User, or LDAP User................................................................38
Logging Into CMC Using Smart Card......................................................................................................................38
Logging Into CMC Using Single Sign-on.................................................................................................................39
Logging In to CMC Using Serial, Telnet, or SSH Console.......................................................................................39
Accessing CMC Using RACADM............................................................................................................................40
Logging in to CMC Using Public Key Authentication..............................................................................................40
Multiple CMC Sessions...........................................................................................................................................41
4 Updating Firmware....................................................................................................................43
Downloading CMC Firmware..................................................................................................................................43
Viewing Currently Installed Firmware Versions.....................................................................................................43
Viewing Currently Installed Firmware Versions Using CMC Web Interface....................................................44
Viewing Currently Installed Firmware Versions Using RACADM....................................................................44
Updating CMC Firmware.........................................................................................................................................44
Updating CMC Firmware Using Web Interface................................................................................................45
Updating CMC Firmware Using RACADM........................................................................................................45
Updating iKVM Firmware........................................................................................................................................46
Updating iKVM Firmware Using CMC Web Interface......................................................................................46
Updating iKVM Firmware Using RACADM.......................................................................................................46
Updating IOM Infrastructure Device Firmware......................................................................................................46
Updating IOM Firmware Using CMC Web Interface........................................................................................47
Updating IOM Firmware Using RACADM.........................................................................................................47
Updating Server iDRAC Firmware..........................................................................................................................47
Updating Server iDRAC Firmware Using Web Interface.................................................................................48

Updating Server iDRAC Firmware Using RACADM..........................................................................................48
Updating Server Component Firmware..................................................................................................................48
Enabling Lifecycle Controller...........................................................................................................................49
Filtering Components for Firmware Updates....................................................................................................50
Viewing Firmware Inventory............................................................................................................................51
Lifecycle Controller Job Operations.................................................................................................................52
Recovering iDRAC Firmware Using CMC...............................................................................................................55
5 Viewing Chassis Information and Monitoring Chassis and Component Health.............57
Viewing Chassis Component Summaries...............................................................................................................57
Chassis Graphics..............................................................................................................................................58
Selected Component Information....................................................................................................................59
Viewing Server Model Name and Service Tag................................................................................................59
Viewing Chassis Summary.....................................................................................................................................59
Viewing Chassis Controller Information and Status...............................................................................................59
Viewing Information and Health Status of All Servers...........................................................................................59
Viewing Health Status and Information for Individual Server................................................................................60
Viewing Storage Array Status................................................................................................................................60
Viewing Information and Health Status of All IOMs...............................................................................................60
Viewing Information and Health Status For Individual IOM...................................................................................61
Viewing Information and Health Status of Fans.....................................................................................................61
Viewing iKVM Information and Health Status........................................................................................................61
Viewing PSU Information and Health Status..........................................................................................................62
Viewing Information and Health Status of Temperature Sensors..........................................................................62
Viewing LCD Information and Health......................................................................................................................62
6 Configuring CMC.......................................................................................................................63
Viewing and Modifying CMC Network LAN Settings.............................................................................................64
Viewing and Modifying CMC Network LAN Settings Using CMC Web Interface............................................64
Viewing and Modifying CMC Network LAN Settings Using RACADM.............................................................64
Enabling the CMC Network Interface..............................................................................................................64
Enabling or Disabling DHCP for the CMC Network Interface Address............................................................65
Enabling or Disabling DHCP for DNS IP Addresses.........................................................................................65
Setting Static DNS IP addresses......................................................................................................................66
Configuring DNS Settings (IPv4 and IPv6)........................................................................................................66
Configuring Auto Negotiation, Duplex Mode, and Network Speed (IPv4 and IPv6)........................................66
Setting the Maximum Transmission Unit (MTU) (IPv4 and IPv6).....................................................................67
Configuring Network Security Settings..................................................................................................................67
Configuring Network Security Settings Using CMC Web Interface................................................................67
Configuring CMC Network Security Settings Using RACADM........................................................................67
Configuring Virtual LAN Tag Properties for CMC...................................................................................................67
Configuring Virtual LAN Tag Properties for CMC Using Web Interface..........................................................68

Configuring Virtual LAN Tag Properties for CMC Using RACADM..................................................................68
Configuring Services..............................................................................................................................................69
Configuring Services Using CMC Web Interface.............................................................................................69
Configuring Services Using RACADM..............................................................................................................70
Configuring CMC Extended Storage Card..............................................................................................................70
Setting Up Chassis Group.......................................................................................................................................71
Adding Members to Chassis Group.................................................................................................................71
Removing a Member from the Leader..............................................................................................................72
Disbanding a Chassis Group............................................................................................................................72
Disabling an Individual Member at the Member Chassis................................................................................72
Launching a Member Chassis’s or Server’s Web page...................................................................................73
Propagating Leader Chassis Properties to Member Chassis..........................................................................73
Server Inventory for MCM group.....................................................................................................................74
Saving Server Inventory Report.......................................................................................................................74
Obtaining Certificates.............................................................................................................................................75
Secure Sockets Layer (SSL) Server Certificates.............................................................................................76
Certificate Signing Request (CSR)....................................................................................................................76
Uploading Server Certificate............................................................................................................................77
Uploading Webserver Key and Certificate.......................................................................................................78
Viewing Server Certificate...............................................................................................................................78
Configuring Multiple CMCs Using RACADM..........................................................................................................79
Creating a CMC Configuration File...................................................................................................................80
Parsing Rules...................................................................................................................................................81
Modifying the CMC IP Address........................................................................................................................82
Viewing and Terminating CMC Sessions................................................................................................................82
Viewing and Terminating CMC Sessions Using Web Interface.......................................................................83
Viewing and Terminating CMC Sessions Using RACADM...............................................................................83
7 Configuring Server....................................................................................................................85
Configuring Slot Names..........................................................................................................................................85
Configuring iDRAC Network Settings.....................................................................................................................86
Configuring iDRAC QuickDeploy Network Settings.........................................................................................86
Modifying iDRAC Network Settings for Individual Server iDRAC....................................................................88
Modifying iDRAC Network Settings Using RACADM.......................................................................................89
Configuring iDRAC VLAN Tag Settings...................................................................................................................89
Configuring iDRAC VLAN Tag Settings Using Web Interface..........................................................................89
Configuring iDRAC VLAN Tag Settings Using RACADM..................................................................................89
Setting First Boot Device........................................................................................................................................90
Setting First Boot Device For Multiple Servers Using CMC Web Interface.....................................................91
Setting First Boot Device For Individual Server Using CMC Web Interface....................................................91
Setting First Boot Device Using RACADM.......................................................................................................91
Configuring Server FlexAddress.............................................................................................................................91

Configuring Remote File Share...............................................................................................................................91
Configuring BIOS Settings Using Server Clone......................................................................................................92
Accessing BIOS Profile Page...........................................................................................................................93
Adding or Saving Profile...................................................................................................................................93
Managing Stored Profiles................................................................................................................................93
Applying Profile................................................................................................................................................94
Importing Profile...............................................................................................................................................94
Exporting Profile...............................................................................................................................................94
Editing Profile...................................................................................................................................................95
Deleting Profile.................................................................................................................................................95
Viewing BIOS Settings.....................................................................................................................................95
Viewing Profile Settings...................................................................................................................................95
Viewing Profile Log..........................................................................................................................................96
Completion Status and Troubleshooting..........................................................................................................96
Launching iDRAC using Single Sign-On...........................................................................................................96
Launching Remote Console from CMC Web Interface....................................................................................97
8 Configuring CMC To Send Alerts............................................................................................99
Enabling Or Disabling Alerts...................................................................................................................................99
Enabling Or Disabling Alerts Using CMC Web Interface.................................................................................99
Enabling Or Disabling Alerts Using RACADM..................................................................................................99
Configuring Alert Destinations..............................................................................................................................100
Configuring SNMP Trap Alert Destinations...................................................................................................100
Configuring E-Mail Alert Settings...................................................................................................................102
9 Configuring User Accounts and Privileges.........................................................................105
Types of Users......................................................................................................................................................105
Modifying Root User Administrator Account Settings.........................................................................................109
Configuring Local Users........................................................................................................................................109
Configure Local Users Using CMC Web Interface.........................................................................................109
Configure Local Users Using RACADM..........................................................................................................110
Configuring Active Directory Users......................................................................................................................111
Supported Active Directory Authentication Mechanisms.............................................................................112
Standard Schema Active Directory Overview...............................................................................................112
Configuring Standard Schema Active Directory............................................................................................113
Extended Schema Active Directory Overview...............................................................................................115
Configuring Extended Schema Active Directory............................................................................................118
Configuring Generic LDAP Users..........................................................................................................................126
Configuring the Generic LDAP Directory to Access CMC.............................................................................127
Configuring Generic LDAP Directory Service Using CMC Web-Based Interface.........................................127
Configuring Generic LDAP Directory Service Using RACADM......................................................................128

10 Configuring CMC For Single Sign-On Or Smart Card Login............................................131
System Requirements...........................................................................................................................................131
Client Systems................................................................................................................................................132
CMC................................................................................................................................................................132
Prerequisites For Single Sign-On Or Smart Card Login........................................................................................132
Generating Kerberos Keytab File...................................................................................................................132
Configuring CMC For Active Directory Schema.............................................................................................133
Configuring Browser For SSO Login...............................................................................................................133
Configuring Browser For Smart Card Login...................................................................................................134
Configuring CMC SSO Or Smart Card Login For Active Directory Users..............................................................134
Configuring CMC SSO Or Smart Card Login For Active Directory Users Using Web Interface.....................134
Configuring CMC SSO Login Or Smart Card Login For Active Directory Users Using RACADM...................135
11 Configuring CMC to Use Command Line Consoles..........................................................137
CMC Command Line Console Features.................................................................................................................137
CMC Command Line Commands....................................................................................................................137
Using Telnet Console With CMC...........................................................................................................................138
Using SSH With CMC............................................................................................................................................138
Supported SSH Cryptography Schemes........................................................................................................138
Configure Public Key Authentication over SSH.............................................................................................139
Enabling Front Panel to iKVM Connection............................................................................................................141
Configuring Terminal Emulation Software............................................................................................................141
Configuring Linux Minicom.............................................................................................................................141
Connecting to Servers or I/O Modules Using Connect Command........................................................................142
Configuring the Managed Server BIOS for Serial Console Redirection........................................................143
Configuring Windows for Serial Console Redirection....................................................................................144
Configuring Linux for Server Serial Console Redirection During Boot..........................................................144
Configuring Linux for Server Serial Console Redirection After Boot.............................................................145
12 Using FlexAddress and FlexAdress Plus Cards...............................................................147
About Flexaddress................................................................................................................................................147
About FlexAddress Plus........................................................................................................................................147
FlexAddress and FlexAddress Plus Comparison..................................................................................................148
Activating FlexAddress.........................................................................................................................................148
Activating FlexAddress Plus.................................................................................................................................150
Verifying FlexAddress Activation..........................................................................................................................150
Deactivating FlexAddress.....................................................................................................................................151
Viewing FlexAddress Information.........................................................................................................................151
Viewing FlexAddress Information For Chassis...............................................................................................151
Viewing FlexAddress Information For All Servers.........................................................................................152
Viewing FlexAddress Information for Individual Servers...............................................................................152

Configuring FlexAddress.......................................................................................................................................153
Wake-On-LAN with FlexAddress...................................................................................................................153
Configuring FlexAddress for Chassis-Level Fabric and Slots........................................................................153
Configuring FlexAddress for Server-Level Slots............................................................................................154
Additional FlexAddress Configuration for Linux.............................................................................................155
Viewing World Wide Name/Media Access Control (WWN/MAC) IDs.................................................................155
Fabric Configuration.......................................................................................................................................155
WWN/MAC Addresses..................................................................................................................................155
Command Messages............................................................................................................................................155
FlexAddress DELL SOFTWARE LICENSE AGREEMENT........................................................................................156
13 Managing I/O Fabric.............................................................................................................159
Fabric Management Overview.............................................................................................................................159
Invalid Configurations...........................................................................................................................................161
Fresh Power-up Scenario.....................................................................................................................................161
Monitoring IOM Health.........................................................................................................................................161
Configuring Network Settings for IOM(s).............................................................................................................161
Configuring Network Settings for IOMs Using CMC Web Interface..............................................................162
Configuring Network Settings for IOMs Using RACADM...............................................................................162
Resetting IOM to Factory Default Settings...........................................................................................................162
Updating IOM Software Using CMC Web Interface.............................................................................................163
Managing VLAN for IOM......................................................................................................................................164
Configuring VLAN settings on IOMs Using CMC Web Interface...................................................................164
Viewing the VLAN settings on IOMs Using CMC Web Interface...................................................................165
Adding Tagged VLANs for IOMs Using CMC Web Interface.........................................................................165
Removing VLANs for IOMs Using CMC Web Interface..................................................................................165
Updating Untagged VLANs for IOMs Using CMC Web Interface..................................................................166
Resetting VLANs for IOMs Using CMC Web Interface..................................................................................166
Managing Power Control Operation for IOMs......................................................................................................166
Enabling or Disabling LED Blinking for IOMs........................................................................................................166
14 Configuring and Using iKVM ..............................................................................................167
iKVM User Interface.............................................................................................................................................167
iKVM Key Features...............................................................................................................................................167
Physical Connection Interfaces............................................................................................................................168
iKVM Connection Precedences.....................................................................................................................168
Tiering Through ACI Connection....................................................................................................................168
Using OSCAR........................................................................................................................................................168
Launching OSCAR..........................................................................................................................................168
Navigation Basics..........................................................................................................................................169
Configuring Oscar..........................................................................................................................................170
Managing Servers With iKVM..............................................................................................................................172

Peripherals Compatibility and Support...........................................................................................................172
Viewing and Selecting Servers......................................................................................................................172
Video Connections.........................................................................................................................................174
Preemption Warning......................................................................................................................................174
Setting Console Security................................................................................................................................175
Changing the Language.................................................................................................................................177
Displaying Version Information......................................................................................................................177
Scanning the System......................................................................................................................................177
Broadcasting to Servers................................................................................................................................179
Managing iKVM From CMC..................................................................................................................................179
Enabling or Disabling Access to iKVM from Front Panel...............................................................................180
Enabling Access to iKVM from the Dell CMC Console...................................................................................180
15 Managing and Monitoring Power......................................................................................181
Redundancy Policies............................................................................................................................................182
AC Redundancy Policy...................................................................................................................................182
Power Supply Redundancy Policy.................................................................................................................183
No Redundancy Policy...................................................................................................................................183
Dynamic Power Supply Engagement...................................................................................................................184
Default Redundancy Configuration.......................................................................................................................185
AC Redundancy..............................................................................................................................................185
Power Supply Redundancy............................................................................................................................185
No Redundancy..............................................................................................................................................186
Power Budgeting For Hardware Modules............................................................................................................186
Server Slot Power Priority Settings......................................................................................................................187
Assigning Priority Levels to Servers..............................................................................................................188
Viewing Power Consumption Status....................................................................................................................188
Viewing Power Consumption Status Using CMC Web Interface...................................................................188
Viewing Power Consumption Status Using RACADM....................................................................................188
Viewing Power Budget Status..............................................................................................................................189
Viewing Power Budget Status Using CMC Web Interface............................................................................189
Viewing Power Budget Status Using RACADM.............................................................................................189
Redundancy Status and Overall Power Health....................................................................................................189
PSU Failure With Degraded or No Redundancy Policy..................................................................................189
PSU Removals With Degraded or No Redundancy Policy.............................................................................189
New Server Engagement Policy....................................................................................................................190
Power Supply and Redundancy Policy Changes in System Event Log..........................................................191
Configuring Power Budget and Redundancy.......................................................................................................191
Power Conservation and Power Budget........................................................................................................192
Maximum Power Conservation Mode............................................................................................................192
Server Power Reduction to Maintain Power Budget.....................................................................................193
110V PSUs AC Operation................................................................................................................................193

Server Performance Over Power Redundancy..............................................................................................193
Remote Logging..............................................................................................................................................193
External Power Management........................................................................................................................194
Configuring Power Budget and Redundancy Using CMC Web Interface......................................................194
Configuring Power Budget and Redundancy Using RACADM......................................................................195
Executing Power Control Operations...................................................................................................................196
Executing Power Control Operations on the Chassis....................................................................................196
Executing Power Control Operations on a Server.........................................................................................197
Executing Power Control Operations on an IOM...........................................................................................198
16 Troubleshooting and Recovery...........................................................................................201
Gathering Configuration Information and Chassis Status and Logs Using RACDUMP........................................201
Supported Interfaces.....................................................................................................................................201
Downloading SNMP Management Information Base (MIB) File...................................................................202
First Steps to Troubleshooting a Remote System.................................................................................................202
Power Troubleshooting..................................................................................................................................202
Troubleshooting Alerts.........................................................................................................................................204
Viewing Event Logs...............................................................................................................................................204
Viewing Hardware Log...................................................................................................................................204
Viewing CMC Log...........................................................................................................................................205
Using Diagnostic Console.....................................................................................................................................206
Resetting Components..........................................................................................................................................206
Saving or Restoring Chassis Configuration..........................................................................................................206
Troubleshooting Network Time Protocol (NTP) Errors.........................................................................................207
Interpreting LED Colors and Blinking Patterns.....................................................................................................208
Troubleshooting Non-responsive CMC................................................................................................................210
Observing LEDs to Isolate the Problem..........................................................................................................210
Obtain Recovery Information From DB-9 Serial Port.....................................................................................210
Recovering Firmware Image..........................................................................................................................211
Troubleshooting Network Problems.....................................................................................................................211
Resetting Administrator Password.......................................................................................................................211
17 Using LCD Panel Interface...................................................................................................215
LCD Navigation.....................................................................................................................................................215
Main Menu.....................................................................................................................................................217
LCD Setup Menu.............................................................................................................................................217
Language Setup Screen.................................................................................................................................217
Default Screen...............................................................................................................................................217
Graphical Server Status Screen....................................................................................................................218
Graphical Module Status Screen...................................................................................................................218
Enclosure Menu Screen.................................................................................................................................218
Module Status Screen....................................................................................................................................219

Enclosure Status Screen................................................................................................................................219
IP Summary Screen........................................................................................................................................219
Diagnostics...........................................................................................................................................................219
LCD Hardware Troubleshooting...........................................................................................................................219
Front Panel LCD Messages...................................................................................................................................221
LCD Error Messages.............................................................................................................................................221
LCD Module and Server Status Information.........................................................................................................225
18 Frequently Asked Questions................................................................................................229
RACADM...............................................................................................................................................................229
Managing and Recovering a Remote System......................................................................................................229
Active Directory....................................................................................................................................................231
FlexAddress and FlexAddressPlus.......................................................................................................................231
iKVM.....................................................................................................................................................................233
IOM.......................................................................................................................................................................234

1
Overview
The Dell Chassis Management Controller (CMC) is a systems management hardware and software solution for managing
multiple Dell blade chassis. It is a hot-pluggable module that sits at the back of Dell PowerEdge M1000e chassis. The
CMC has its own microprocessor and memory and is powered by the modular chassis into which it is plugged.
The CMC enables an IT administrator to:
• View inventory
• Perform configuration and monitoring tasks
• Remotely power on or off blades
• Enable alerts for events on servers and components in the blade chassis
You can configure the M1000e chassis either with a single CMC, or with redundant CMCs. In redundant CMC
configurations, if the primary CMC loses communication with the M1000e chassis or the management network, the
standby CMC takes over chassis management.
The CMC provides multiple systems management functions for blade servers. Power and thermal management are the
primary functions of the CMC.
• Enclosure-level real-time automatic power and thermal management.
– CMC monitors system power requirements and supports the optional Dynamic Power Supply
Engagement mode. This enables CMC to enable or set power supplies in standby, dynamically
depending on load and redundancy requirements to improve power efficiency.
– CMC reports real-time power consumption, which includes logging high and low points with a time
stamp.
– CMC supports setting an optional enclosure Maximum Power Limit, which either alerts or takes actions,
such as throttling server modules and/or preventing the power up of new blades to keep the enclosure
under the defined maximum power limit.
– CMC monitors and automatically controls cooling of fans based on actual ambient and internal
temperature measurements.
– CMC provides comprehensive enclosure inventory and status/error reporting.
• CMC provides a mechanism for centralized configuration of the following:
– The M1000e enclosure’s network and security settings
– Power redundancy and power ceiling settings
– I/O switches and iDRAC network settings
– First boot device on the server blades
– Checks I/O fabric consistency between the I/O modules and blades and disables components, if
necessary, to protect the system hardware
– User access security
You can configure CMC to send e-mail alerts or SNMP trap alerts for warnings or errors related to temperatures,
hardware misconfigurations, power outages, and fan speeds.
13

What Is New In This Release
This release of CMC supports:
• Cisco FEX switch
• FC16 switch — Brocade M6505
• Mezzanine cards
– QLogic FC16 2P QME2662
– Emulex FC16 LPm16002B-D
• One-to- many agent free, OS independent firmware update capability for supported 12G Fibre Channel (FC)
mezzanine cards
• Updating firmware for Dell PowerEdge M IO Aggregator
• Saving the BIOS configuration information to the hard disk and restoring the information to the same or different
server.
• Configuring Dell EqualLogic PS-M4110 blade array using RACADM
• Multi-chassis management:
– capability to select chassis configuration properties from Lead Chassis and push to Group Members
– capability for Group Members to keep their chassis settings synchronized with the Lead Chassis
• Display of indication that the Chassis is fresh air compliant — The term "Fresh Air" is displayed after the Model
name.
• Resetting iDRAC without rebooting the operating system.
Key Features
The CMC features are grouped into management and security features.
Management Features
The CMC provides the following management features:
• Redundant CMC Environment.
• Dynamic Domain Name System (DDNS) registration for IPv4 and IPv6.
• Remote system management and monitoring using SNMP, a Web interface, iKVM, Telnet or SSH connection.
• Monitoring — Provides access to system information and status of components.
• Access to system event logs — Provides access to the hardware log and CMC log.
• Firmware updates for various chassis components — Enables you to update the firmware for CMC, servers,
iKVM, and I/O module infrastructure devices.
• Firmware update of server components such as BIOS, Network Controllers, Storage Controllers, and so on
across multiple servers in the chassis using Lifecycle Controller.
• Dell OpenManage software integration — Enables you to launch the CMC Web interface from Dell OpenManage
Server Administrator or IT Assistant.
• CMC alert — Alerts you about potential managed node issues through an e-mail message or SNMP trap.
• Remote power management — Provides remote power management functions, such as shutdown and reset on
any chassis component, from a management console.
• Power usage reporting.
14

• Secure Sockets Layer (SSL) encryption — Provides secure remote system management through the Web
interface.
• Launch point for the Integrated Dell Remote Access Controller (iDRAC) Web interface.
• Support for WS-Management.
• FlexAddress feature — Replaces the factory-assigned World Wide Name/Media Access Control (WWN/MAC)
IDs with chassis-assigned WWN/MAC IDs for a particular slot, an optional upgrade.
• Graphical display of chassis component status and health.
• Support for single and multi-slot servers.
• LCD iDRAC configuration wizard supports iDRAC network configuration.
• iDRAC single sign-on.
• Network time protocol (NTP) support.
• Enhanced server summary, power reporting, and power control pages.
• Forced CMC failover, and virtual reseat of servers.
• iDRAC reset without rebooting the operating system.
• Multi-chassis management, allows up to eight other chassis to be visible from the lead chassis.
• Support for storage array configuration using RACADM — Allows you to configure IP, join or create group, and
select fabric for storage arrays using RACADM.
• Multi-chassis management:
– capability to select chassis configuration properties from Lead Chassis and push to Group Members
– capability for Group Members to keep their chassis settings synchronized with the Lead Chassis
• Support to save BIOS configuration information to hard disk and restore to same or different server.
Security Features
The CMC provides the following security features:
• Password-level security management — Prevents unauthorized access to a remote system.
• Centralized User authentication through:
– Active Directory using Standard Schema or an Extended Schema(optional.)
– Hardware-stored user IDs and passwords.
• Role-based authority — Enables an administrator to configure specific privileges for each user.
• User ID and password configuration through the Web interface.
• Web interface supports 128-bit SSL 3.0 encryption and 40-bit SSL 3.0 encryption (for countries where 128-bit is
not acceptable).
NOTE: Telnet does not support SSL encryption.
• Configurable IP ports (if applicable).
• Login failure limits per IP address, with login blocking from the IP address when the limit is exceeded.
• Configurable session auto time out, and more than one simultaneous sessions.
• Limited IP address range for clients connecting to the CMC.
• Secure Shell (SSH), which uses an encrypted layer for higher security.
• Single Sign-on, Two-Factor Authentication, and Public Key Authentication.
Chassis Overview
The following figure shows the facing edge of a CMC (inset) and the locations of the CMC slots in the chassis.
15
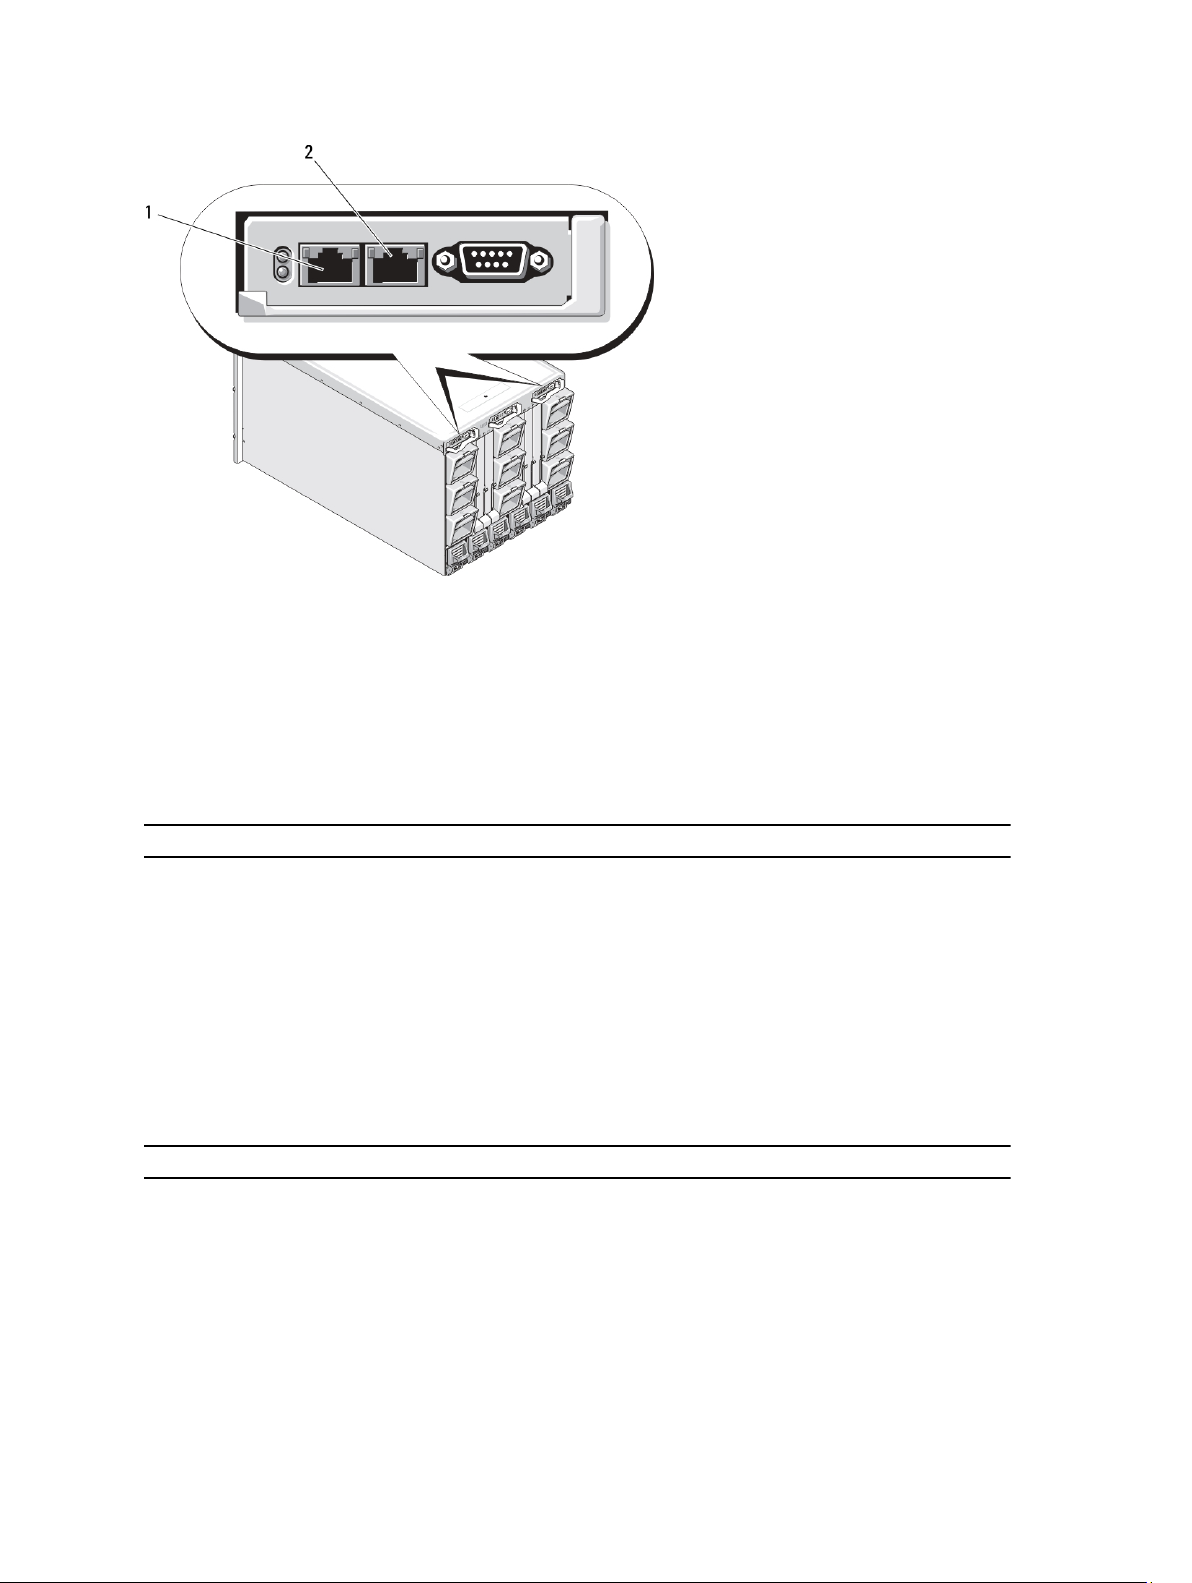
1 GB Port
2 STK Port
CMC Port Information
The following TCP/IP ports are required to remotely access CMC through firewalls. These are the ports CMC listens to
for connections.
Table 1. CMC Server Listening Ports
Port Number Function
22* SSH
23* Telnet
80* HTTP
161 SNMP Agent
443* HTTPS
* Configurable port
The following table lists the ports that CMC uses as a client.
Table 2. CMC Client Port
Port Number Function
25 SMTP
53 DNS
68 DHCP-assigned IP address
69 TFTP
162 SNMP trap
16

Port Number Function
514* Remote syslog
636 LDAPS
3269 LDAPS for global catalog (GC)
* Configurable port
Minimum CMC Version
The following table lists the minimum CMC version required to enable the listed Blade Servers.
Table 3. Minimum CMC Version for Blade Servers
Servers Minimum version of CMC
PowerEdge M600 CMC 1.0
PowerEdge M605 CMC 1.0
PowerEdge M805 CMC 1.2
PowerEdge M905 CMC 1.2
PowerEdge M610 CMC 2.0
PowerEdge M610x CMC 3.0
PowerEdge M710 CMC 2.0
PowerEdge M710HD CMC 3.0
PowerEdge M910 CMC 2.3
Power Edge M915 CMC 3.2
PowerEdge M420 CMC 4.1
PowerEdge M520 CMC 4.0
PowerEdge M620 CMC 4.0
PowerEdge M820 CMC 4.11
PowerEdge PSM4110 CMC 4.11
The following table lists the minimum CMC version required to enable the listed IOMs.
Table 4. Minimum CMC Version for IOMs
IOM Switches Minimum version of CMC
PowerConnect M6220 CMC 1.0
PowerConnect M6348 CMC 2.1
PowerConnect M8024 CMC 1.2
PowerConnect M8024-k CMC 3.2
PowerConnect M8428-k CMC 3.1
17

IOM Switches Minimum version of CMC
Dell 10/100/1000Mb Ethernet Pass-Through CMC 1.0
Dell 4Gbps FC Pass-Through Module CMC 1.0
Dell 8/4Gbps FC SAN Module CMC 1.2
Dell 10Gb Ethernet Pass-Through CMC 2.1
Dell 10Gb Ethernet Pass-Through II CMC 3.0
Dell 10Gb Ethernet Pass-Through-K CMC 3.0
Brocade M4424 CMC 1.0
Brocade M5424 CMC 1.2
Cisco Catalyst CBS 3130X-S CMC 1.0
Cisco Catalyst CBS 3130G CMC 1.0
Cisco Catalyst CBS 3032 CMC 1.0
Dell Force10 MXL 10/40GbE CMC 4.11
Dell PowerEdge M I/O Aggregator CMC 4.2
Mellanox M2401G DDR Infiniband Switch CMC 1.0
Mellanox M3601Q QDR Infiniband Switch CMC 2.0
Mellanox M4001F/M4001Q FDR/QDR Infiniband Switch CMC 4.0
Mellanox M4001T FDR10 Infiniband Switch CMC 4.1
Brocade M6505 CMC 4.3
Cisco Nexus B22DELL CMC 4.3
Supported Remote Access Connections
The following table lists the supported Remote Access Controllers.
18

Table 5. Supported Remote Access Connections
Connection Features
CMC Network Interface ports
Serial port
Other connections
Supported Platforms
• GB port: Dedicated network interface for the CMC Web interface. Two
10/100/1000 Mbps ports; one for management and the other for chassis to
chassis cable consolidation
• STK: Uplink port for chassis to chassis management network cable
consolidation
• 10Mbps/100Mbps/1Gbps Ethernet through CMC GbE port
• DHCP support
• SNMP traps and e-mail event notification
• Network interface for the iDRAC and I/O Modules (IOMs)
• Support for Telnet/SSH command console and RACADM CLI commands
including system boot, reset, power-on, and shutdown commands
• Support for serial console and RACADM CLI commands including system
boot, reset, power-on, and shutdown commands
• Support for binary interchange for applications specifically designed to
communicate with a binary protocol to a particular type of IOM
• Serial port can be connected internally to the serial console of a server, or
I/O module, using the connect (or racadm connect) command
• Access to the Dell CMC Console through the Avocent Integrated KVM
Switch Module (iKVM)
The CMC supports modular systems designed for the M1000e platform. For information about compatibility with the
CMC, see the documentation for your device.
For the latest supported platforms, see the
Readme
located at dell.com/support/manuals.
Supported Web Browsers
For the latest information on supported Web browsers, see the
Readme
located at dell.com/support/manuals.
Viewing Localized Versions of the CMC Web Interface
To view localized versions of the CMC Web interface:
1. Open the Windows Control Panel.
2. Double-click the Regional Options icon.
3. Select the required locale from the Your locale (location) drop-down menu.
Supported Management Console Applications
The CMC supports integration with Dell OpenManage IT Assistant. For more information, see the IT Assistant
documentation set available on the Dell Support Web site at dell.com/support/manuals.
19

Other Documents You May Need
In addition to this guide, you can access the following guides available at dell.com/support/manuals. Select Choose from
a list of all Dell products and click Continue. Click Software → Monitors → Electronics & Peripherals → Software :
• Click Remote Enterprise System Management and then click Dell Chassis Management Controller Version 4.3 to
view:
– The
CMC Online Help
– The
Chassis Management Controller (CMC) Secure Digital (SD) Card Technical Specification
minimum BIOS and firmware version, installation and usage information.
– The
RACADM Command Line Reference Guide for iDRAC7 and CMC
supported interfaces, and property database groups and object definitions.
– The
Chassis Management Controller Version 4.3 Release Notes
system or documentation or advanced technical reference material intended for experienced users or
technicians.
• Click Remote Enterprise System Management and then click the required iDRAC7 version number to view the
Integrated Dell Remote Access Controller 7 (iDRAC7) User’s Guide
configuration and maintenance of the iDRAC on managed systems.
• Click Enterprise System Management and then click the product name to view the following documents:
– The
Dell OpenManage Server Administrator’s User’s Guide
using Server Administrator.
– The
Dell Update Packages User's Guide
Packages as part of your system update strategy.
provides information about using the Web interface.
provides
about the RACADM sub-commands,
provides last-minute updates to the
that provides information about installation,
provides information about installing and
provides information about obtaining and using Dell Update
The following system documents available at dell.com/support/manuals provide more information about the system in
which CMC is installed:
• The safety instructions that came with your system provide important safety and regulatory information. For
additional regulatory information, see the Regulatory Compliance home page at www.dell.com/
regulatory_compliance. Warranty information may be included within this document or as a separate document.
• The
Rack Installation Guide
install your system into a rack.
• The
Hardware Owner’s Manual
the system and install or replace system components.
• Systems management software documentation describes the features, requirements, installation, and basic
operation of the software.
• Documentation for any components you purchased separately provides information to configure and install
these options.
• Release notes or readme files may be included to provide last-minute updates to the system or documentation
or advanced technical reference material intended for experienced users or technicians.
• For more information on IOM network settings, refer to the
Information
• Documentation specific to your third-party management console application.
Updates are sometimes included with the system to describe changes to the system, software, and/or documentation.
Always read the updates first because they often supersede information in other documents.
document and the
and
Rack Installation Instructions
provides information about system features and describes how to troubleshoot
included with your rack solution describe how to
Dell PowerConnect M6220 Switch Important
Dell PowerConnect 6220 Series Port Aggregator White Paper
.
20

2
Installing and Setting Up CMC
This section provides information about how to install your CMC hardware, establish access to CMC, configure your
management environment to use CMC, and guides you through the next steps for configuring the CMC:
• Set up initial access to CMC.
• Access CMC through a network.
• Add and configure CMC users.
• Update CMC firmware.
For more information about installing and setting up redundant CMC environments, see Understanding Redundant CMC
Environment.
Before You Begin
Before setting up your CMC environment, download the latest version of CMC firmware from the Dell Support website at
support.dell.com.
Also, make sure that you have the
your system.
Installing CMC Hardware
Dell Systems Management Tools and Documentation
DVD that was included with
CMC is pre-installed on your chassis and hence no installation is required. You can install a second CMC to run as a
standby to the active CMC.
Related Links
Understanding Redundant CMC Environment
Checklist To Set up Chassis
The following steps enable you to setup the chassis accurately:
1. CMC and the management station where you use your browser must be on the same network, which is called the
management network. Connect an Ethernet network cable from CMC port labelled GB to the management network.
NOTE: Do not place a cable in CMC Ethernet port labelled STK. For more information to cable the STK port,
see Understanding Redundant CMC Environment.
2. Install the IO modules in the chassis and cable them.
3. Insert the servers in the chassis.
4. Connect the chassis to the power source.
5. Push the power button at the lower left corner of the chassis or power on the chassis from the CMC Web interface
after completing step 7.
NOTE: Do not power on the servers.
6. Using the LCD panel on the front of the system, provide CMC with a static IP address or configure it for DHCP.
7. Connect to the CMC IP address through the Web browser using the default username (root) and password (calvin).
21

8. Provide each iDRAC with an IP address in the CMC Web interface and enable the LAN and IPMI interface.
NOTE: iDRAC LAN interface on some servers are disabled by default.
9. Provide each IO module with an IP address in the CMC Web interface.
10. Connect to each iDRAC through the Web browser and provide final configuration of iDRAC. Default user name is
root
and password is
11. Connect to each IO module through the Web browser and provide final configuration of the IO module.
12. Power on the servers and install the operating system.
calvin
.
Basic CMC Network Connection
For the highest degree of redundancy, connect each available CMC to your management network.
Each CMC has two RJ-45 Ethernet ports, labeled GB (the uplink port) and STK (the stacking or cable consolidation port).
With basic cabling, you connect the GB port to the management network and leave the STK port unused.
CAUTION: Connecting the STK port to the management network can have unpredictable results. Cabling GB and
STK to the same network (broadcast domain) can cause a broadcast storm.
Daisy chain CMC Network Connection
If you have multiple chassis in a rack, you can reduce the number of connections to the management network by daisychaining up to four chassis together. If each of the four chassis contains a redundant CMC, by daisy-chaining you can
reduce the number of management network connections required from eight to two. If each chassis has only one CMC,
you can reduce the connections required from four to one.
When daisy-chaining chassis together, GB is the uplink port and STK is the stacking (cable consolidation) port. Connect
the GB ports to the management network or to the STK port of CMC in a chassis that is closer to the network. You must
connect the STK port only to a GB port further from the chain or network.
Create separate chains for CMCs in the active CMC slot and the second CMC slot.
The following figure illustrates the arrangement of cables for four daisy-chained chassis, each with active and standby
CMCs.
22

1 Management Network
2 Standby CMC
3 Active CMC
The following figures provide examples of incorrect cabling of CMC.
23

To daisy-chain up to four chassis:
1. Connect the GB port of the active CMC in the first chassis to the management network.
2. Connect the GB port of the active CMC in the second chassis to the STK port of the active CMC in the first chassis.
3. If you have a third chassis, connect the GB port of its active CMC to the STK port of the active CMC in the second
chassis.
4. If you have a fourth chassis, connect the GB port of its active CMC to the STK port of the third chassis.
5. If you have redundant CMCs in the chassis, connect them using the same pattern.
CAUTION: The STK port on any CMC must never be connected to the management network. It can only be
connected to the GB port on another chassis. Connecting a STK port to the management network can disrupt
the network and cause a loss of data. Cabling GB and STK to the same network (broadcast domain) can
cause a broadcast storm.
NOTE: Do not connect an active CMC to a standby CMC.
NOTE: Resetting a CMC whose STK port is chained to another CMC can disrupt the network for CMCs that
appear later in the chain. The child CMCs may log messages indicating that the network link has been lost
and they may fail over to their redundant CMCs.
6. To get started with CMC, see Installing Remote Access Software on a Management Station.
Installing Remote Access Software on a Management Station
You can access CMC from a management station using remote access software, such as the Telnet, Secure Shell (SSH),
or serial console utilities provided on your operating system or using the Web interface.
To use remote RACADM from your management station, install remote RACADM using the
Tools and Documentation
components:
DVD that is available with your system. This DVD includes the following Dell OpenManage
Dell Systems Management
• DVD root — Contains the Dell Systems Build and Update Utility.
• SYSMGMT — Contains the systems management software products including Dell OpenManage Server
Administrator.
• Docs — Contains documentation for systems, systems management software products, peripherals, and RAID
controllers.
• SERVICE — Contains the tools required to configure your system, and delivers the latest diagnostics and Delloptimized drivers for your system.
For information about installing Dell OpenManage software components, see the
Security User's Guide
the Dell DRAC Tools from dell.com/support.
24
available on the DVD or at dell.com/support/manuals. You can also download the latest version of
Dell OpenManage Installation and

Installing RACADM on a Linux Management Station
1. Log in as root to the system running a supported Red Hat Enterprise Linux or SUSE Linux Enterprise Server
operating system where you want to install the managed system components.
2. Insert the
3. To mount the DVD to a required location, use the mount command or a similar command.
4. Navigate to the SYSMGMT/ManagementStation/linux/rac directory. To install the RAC software, type the following
command:
rpm -ivh *.rpm
5. For help on the RACADM command, type racadm help after you run the previous commands. For more
information about RACADM, see
Dell Systems Management Tools and Documentation DVD
NOTE: On the Red Hat Enterprise Linux 5 operating system, DVDs are auto-mounted with the -noexec
mount option. This option does not allow you to run any executable from the DVD. You need to mount the
DVD-ROM manually and then run the executables.
RACADM Command Line Reference Guide for iDRAC7 and CMC
NOTE: When using the RACADM remote capability, you must have write permission on the folders where you
are using the RACADM subcommands involving file operations, for example: racadm getconfig -f
<file name>
into the DVD drive.
.
Uninstalling RACADM From a Linux Management Station
1. Log on as root to the system where you want to uninstall the management station features.
2. Use the following rpm query command to determine which version of the DRAC Tools is installed:
rpm -qa | grep mgmtst-racadm
3. Verify the package version to be uninstalled and uninstall the feature by using the rpm -e `rpm -qa | grep
mgmtst-racadm command.
Configuring Web Browser
You can configure and manage CMC, servers, and modules installed in the chassis through a Web browser. See the
Supported Browsers
The CMC and the management station where you use your browser must be on the same network, which is called the
management network
secure network.
NOTE: Make sure that the security measures on the management network, such as firewalls and proxy servers, do
not prevent your Web browser from accessing CMC.
Some browser features can interfere with connectivity or performance, especially if the management network does not
have a route to the Internet. If your management station is running a Windows operating system, some Internet Explorer
settings can interfere with connectivity even though you use a command line interface to access the management
network.
Related Links
Proxy Server
Microsoft Phishing Filter
Certificate Revocation List (CRL) Fetching
Downloading Files From CMC With Internet Explorer
Allow Animations in Internet Explorer
section in the
. Depending on your security requirements, the management network can be an isolated, highly
Readme
at dell.com/support/manuals.
25

Proxy Server
To browse through a proxy server that does not have access to the management network, you can add the management
network addresses to the browser’s exception list. This instructs the browser to bypass the proxy server while
accessing the management network.
Internet Explorer
To edit the exception list in Internet Explorer:
1. Start Internet Explorer.
2. Click Tools → Internet Options → Connections .
3. In the Local Area Network (LAN) settings section, click LAN Settings.
4. In the Proxy server section, click Advanced.
5. In the Exceptions section, add the addresses for CMCs and iDRACs on the management network to the semicolonseparated list. You can use DNS names and wildcards in your entries.
Mozilla FireFox
To edit the exception list in Mozilla Firefox version 3.0:
1. Start Mozilla Firefox.
2. Click Tools → Options (for Windows) or click Edit → Preferences (for Linux).
3. Click Advanced and then click the Network tab.
4. Click Settings.
5. Select the Manual Proxy Configuration.
6. In the No Proxy for field, type the addresses for CMCs and iDRACs on the management network to the commaseparated list. You can use DNS names and wildcards in your entries.
Microsoft Phishing Filter
If the Microsoft Phishing Filter is enabled in Internet Explorer 7 on your management system, and your CMC does not
have Internet access, accessing CMC may be delayed by a few seconds. This delay can happen if you are using the
browser or another interface such as remote RACADM. Follow these steps to disable the phishing filter:
1. Start Internet Explorer.
2. Click Tools → Phishing Filter, and then click Phishing Filter Settings.
3. Select the Disable Phishing Filter check box and click OK.
Certificate Revocation List (CRL) Fetching
If your CMC has no route to the Internet, disable the certificate revocation list (CRL) fetching feature in Internet Explorer.
This feature tests whether a server such as the CMC Web server uses a certificate that is on a list of revoked
certificates retrieved from the Internet. If the Internet is inaccessible, this feature can cause delays of several seconds
when you access the CMC using the browser or with a command line interface such as remote RACADM.
To disable CRL fetching:
1. Start Internet Explorer.
2. Click Tools → Internet Options, and then click Advanced.
26

3. Scroll to the Security section, clear the Check for publisher’s certificate revocation checkbox, and click OK.
Downloading Files From CMC With Internet Explorer
When you use Internet Explorer to download files from CMC you may experience problems when the Do not save
encrypted pages to disk option is not enabled.
To enable the Do not save encrypted pages to disk option:
1. Start Internet Explorer.
2. Click Tools → Internet Options , then click Advanced.
3. Scroll to the Security section and select Do not save encrypted pages to disk.
Allow Animations in Internet Explorer
When transferring files to and from the Web interface, a file transfer icon spins to show transfer activity. For Internet
Explorer, this requires that the browser be configured to play animations, which is the default setting.
To configure Internet Explorer to play animations:
1. Start Internet Explorer.
2. Click Tools → Internet Options, then click Advanced.
3. Scroll to the Multimedia section and check Play animations in web pages.
Setting Up Initial Access to CMC
To manage CMC remotely, connect CMC to your management network and then configure CMC network settings.
NOTE: To manage the M1000e solution, it must be connected to your management network.
For information to configure CMC network settings, see Configuring Initial CMC Network. This initial configuration
assigns the TCP/IP networking parameters that enable access to CMC.
CMC and iDRAC on each server and the network management ports for all switch I/O Modules are connected to a
common internal network in the M1000e chassis. This allows the management network to be isolated from the server
data network. It is important to separate this traffic for uninterrupted access to chassis management.
CMC is connected to the management network. All external access to CMC and iDRACs is accomplished through CMC.
Access to the managed servers, conversely, is accomplished through network connections to I/O modules (IOMs). This
allows the application network to be isolated from the management network.
It is recommended to isolate chassis management from the data network. Dell cannot support or guarantee uptime of a
chassis that is improperly integrated into your environment. Due to the potential of traffic on the data network, the
management interfaces on the internal management network can be saturated by traffic intended for servers. This
results in CMC and iDRAC communication delays. These delays may cause unpredictable chassis behavior, such as
CMC displaying iDRAC as offline even when it is up and running, which in turn causes other unwanted behavior. If
physically isolating the management network is impractical, the other option is to separate CMC and iDRAC traffic to a
separate VLAN. CMC and individual iDRAC network interfaces can be configured to use a VLAN.
If you have one chassis, connect CMC and the standby CMC to the management network. If you have a redundant CMC,
use another network cable and connect the GB CMC port to a second port of the management network.
If you have more than one chassis you can choose between the basic connection, where each CMC is connected to the
management network, or a daisy-chained chassis connection, where the chassis are connected in series and only one
CMC is connected to the management network. The basic connection type uses more ports on the management network
27

and provides greater redundancy. The daisy-chain connection type uses fewer ports on the management network but
introduces dependencies between CMCs, reducing the redundancy of the system.
NOTE: Failure to cable CMC properly in a redundant configuration can cause loss of management and create
broadcast storms.
Related Links
Basic CMC Network Connection
Daisy chain CMC Network Connection
Configuring Initial CMC Network
Configuring Initial CMC Network
NOTE: Changing your CMC Network settings may disconnect your current network connection.
You can perform the initial network configuration of CMC before or after CMC has an IP address. If you configure CMC’s
initial network settings before you have an IP address, you can use either of the following interfaces:
• The LCD panel on the front of the chassis
• Dell CMC serial console
If you configure initial network settings after the CMC has an IP address, you can use any of the following interfaces:
• Command line interfaces (CLIs) such as a serial console, Telnet, SSH, or the Dell CMC Console through iKVM
• Remote RACADM
• CMC Web interface
The CMC supports both IPv4 and IPv6 addressing modes. The configuration settings for IPv4 and IPv6 are independent
of one another.
Configuring CMC Network Using LCD Panel Interface
NOTE: The option to configure CMC using the LCD panel is available only until CMC is deployed or the default
password is changed. If the password is not changed, the LCD can continue to be used to reconfigure the CMC
causing a possible security risk.
The LCD panel is located on the bottom left corner on the front of the chassis.
To set up a network using the LCD panel interface:
1. Press the chassis power button to turn it on.
The LCD screen displays a series of initialization screens as it powers up. When it is ready, the Language Setup
screen is displayed.
2. Select the language using the arrow buttons, press the center button to select the Accept/Yes, and press the
center button again.
The Enclosure screen displays the following question: Configure Enclosure?
– Press the center button to continue to CMC Network Settings screen. See step 4.
– To exit the Configure Enclosure menu, select the NO icon and press the center button. See step 9.
3. Press the center button to continue to CMC Network Settings screen.
4. Select the network speed (10Mbps, 100Mbps, Auto (1 Gbps)) using the down arrow button.
The Network Speed setting must match your network configuration for effective network throughput. Setting the
Network Speed lower than the speed of your network configuration increases bandwidth consumption and slows
network communication. Determine whether your network supports the above network speeds and set it
28

accordingly. If the network configuration does not match any of these values, it is recommended to use Auto
Negotiation (the Auto option) or refer to your network equipment manufacturer.
Press the center button to continue to the next CMC Network Settings screen.
5. Select the duplex mode (half or full) that matches the network environment.
NOTE: The network speed and duplex mode settings are not available if Auto Negotiation is set to On or
1000MB (1Gbps) is selected.
If auto negotiation is turned on for one device but not the other, then the device using auto negotiation can
determine the network speed of the other device, but not the duplex mode; in this case, duplex mode defaults to
the half duplex setting during auto negotiation. Such a duplex mismatch results in a slow network connection.
Press the center button to continue to the next CMC Network Settings screen.
6. Select the Internet Protocol (IPv4, IPv6, or both) that you want to use for CMC and press the center button to
continue to the next CMC Network Settings screen.
7. Select the mode in which CMC must obtain the NIC IP addresses:
Dynamic Host Configuration
Protocol (DHCP)
Static You manually enter the IP address, gateway, and subnet mask in the screens
8. If you selected DHCP in the previous step, go to step 10.
To register your DNS server’s IP address, press the center button to proceed. If you have no DNS, press the right
arrow key. The Register DNS? screen appears; go to step 10.
Set the DNS IP Address using the right or left arrow keys to move between positions, and the up and down arrow
keys to select a number for each position. When you have finished setting the DNS IP address, press the center
button to continue.
9. Indicate whether you want to configure iDRAC:
CMC retrieves IP configuration (IP address, mask, and gateway) automatically
from a DHCP server on your network. CMC is assigned a unique IP address
allotted over your network. If you have selected the DHCP option, press the
center button. The Configure iDRAC7 screen appears; go to step 9.
immediately following.
If you have selected the Static option, press the center button to continue to
the next CMC Network Settings screen, then:
– Set the Static IP Address by using the right or left arrow keys to move
between positions, and the up and down arrow keys to select a
number for each position. When you have finished setting the Static IP
Address, press the center button to continue.
– Set the subnet mask, and then press the center button.
– Set the gateway, and then press the center button. The Network
Summary screen displays.
The Network Summary screen lists the Static IP Address, Subnet
Mask, and Gateway settings you entered. Check the settings for
accuracy. To correct a setting, navigate to the left arrow button then
press the center key to return to the screen for that setting. After
making a correction, press the center button.
– When you have confirmed the accuracy of the settings you entered,
press the center button. The Register DNS? screen appears.
NOTE: If the Dynamic Host Configuration Protocol (DHCP) mode is
selected for CMC IP configuration, then DNS registration is also
enabled by default.
– No: Skip to step 13.
– Yes: Press the center button to proceed.
You can also configure iDRAC from the CMC GUI.
29

10. Select the Internet Protocol (IPv4, IPv6, or both) that you want to use for the servers.
Dynamic Host Configuration
Protocol (DHCP)
Static You manually enter the IP address, gateway, and subnet mask in the screens
– Select whether to Enable or Disable the IPMI LAN channel. Press the center button to continue.
– On the iDRAC Configuration screen, to apply all iDRAC network settings to the installed servers, highlight
the Accept/Yes icon and press the center button. To not apply the iDRAC network settings to the installed
servers, highlight the No icon and press the center button and continue to step c.
– On the next iDRAC Configuration screen, to apply all iDRAC network settings to newly installed servers,
highlight the Accept/Yes icon and press the center button; when a new server is inserted into the chassis,
the LCD prompts the user on whether to automatically deploy the server using the previously configured
network settings/policies. To not apply the iDRAC network settings to newly installed servers, highlight the
No icon and press the center button; when a new server is inserted into the chassis, the iDRAC network
settings do not get configured.
11. On the Enclosure screen, to apply all enclosure settings highlight the Accept/Yes icon and press the center button.
To not apply the enclosure settings, highlight the No icon and press the center button.
12. On the IP Summary screen, review the IP addresses you provided to make sure the addresses are accurate. To
correct a setting, navigate to the left arrow button and then press the center key to return to the screen for that
setting. After making a correction, press the center button. If necessary, navigate to the right arrow button and
then press the center key to return to the IP Summary screen.
When you have confirmed that the settings you entered are accurate, press the center button. The Configuration
Wizard closes and returns you to the Main Menu screen.
iDRAC retrieves IP configuration (IP address, mask, and gateway)
automatically from a DHCP server on your network. The iDRAC is assigned a
unique IP address allotted over your network.Press the center button.
immediately following.
If you have selected the Static option, press the center button to continue to
the next iDRAC Network Settings screen, then:
– Set the Static IP Address by using the right or left arrow keys to move
between positions, and the up and down arrow keys to select a
number for each position. This address is the static IP of the iDRAC
located in the first slot. The static IP address of each subsequent
iDRAC is calculated as a slot number increment of this IP address.
When you have finished setting the Static IP Address, press the center
button to continue.
– Set the subnet mask, and then press the center button.
– Set the gateway, and then press the center button.
NOTE: If you selected Yes/Accept, a Wait screen is displayed before the IP Summary screen is displayed.
CMC and iDRACs are now available on the network. You can access the CMC on the assigned IP address using the
Web interface or CLIs such as a serial console, Telnet, and SSH.
NOTE: After you have completed network setup through the LCD Configuration Wizard, the Wizard is no
longer available.
Interfaces and Protocols to Access CMC
After you have configured CMC network settings, you can remotely access CMC using various interfaces. The following
table lists the interfaces that you can use to remotely access CMC.
NOTE: Since telnet is not as secure as the other interfaces, it is disabled by default. Enable Telnet using Web, ssh,
or remote RACADM.
30

NOTE: Using more than one interface at the same time may generate unexpected results.
Table 6. CMC Interfaces
Interface Description
Web interface Provides remote access to CMC using a graphical user interface. The Web
interface is built into the CMC firmware and is accessed through the NIC interface
from a supported Web browser on the management station.
For a list of supported Web browsers, see the Supported Browsers section in the
Readme
at dell.com/support/manuals.
Remote RACADM command line
interface
Use this command line utility to manage CMC and its components. You can use
remote or firmware RACADM:
• Remote RACADM is a client utility that runs on a management station. It
uses the out-of-band network interface to run RACADM commands on the
managed system and uses the HTTPs channel. The –r option runs the
RACADM command over a network.
• Firmware RACADM is accessible by logging in to CMC using SSH or telnet.
You can run the firmware RACADM commands without specifying the
CMC IP, user name, or password. After you enter the RACADM prompt,
you can directly run the commands without the racadm prefix.
Chassis LCD Panel Use the LCD on the front panel to:
• View alerts, CMC IP or MAC address, user programmable strings.
• Set DHCP
• Configure CMC static IP settings.
To reset CMC without rebooting the server, press and hold the System
Identification button for 16 seconds.
Telnet Provides command line access to CMC through the network. The RACADM
command line interface and the connect command, which is used to connect to
the serial console of a server or IO module, are available from the CMC command
line.
NOTE: Telnet is not a secure protocol and is disabled by default. Telnet
transmits all data, including passwords in plain text. When transmitting
sensitive information, use the SSH interface.
SSH Use SSH to run RACADM commands. It provides the same capabilities as the
Telnet console using an encrypted transport layer for higher security. The SSH
service is enabled by default on CMC and can be disabled.
WS-MAN The LC-Remote Services is based on the WS-Management protocol to do one-to-
many systems management tasks. You must use WS-MAN client such as WinRM
client (Windows) or the OpenWSMAN client (Linux) to use the LC-Remote
Services functionality. You can also use Power Shell and Python to script to the
WS-MAN interface.
Web Services for Management (WS-Management) is a Simple Object Access
Protocol (SOAP)–based protocol used for systems management. CMC uses WS–
Management to convey Distributed Management Task Force (DMTF) Common
Information Model (CIM)–based management information. The CIM information
31

Interface Description
defines the semantics and information types that can be modified in a managed
system.
The CMC WS-MAN implementation uses SSL on port 443 for transport security,
and supports basic authentication. The data available through WS-Management is
provided by CMC instrumentation interface mapped to the DMTF profiles and
extension profiles.
For more information, see the following:
• MOFs and Profiles — delltechcenter.com/page/DCIM.Library
• DTMF Web site — dmtf.org/standards/profiles/
• WS-MAN release notes or Read Me file.
• www.wbemsolutions.com/ws_management.html
• DMTF WS-Management Specifications: www.dmtf.org/standards/wbem/
wsman
Web services interfaces can be utilized by leveraging client infrastructure, such
as Windows WinRM and Powershell CLI, open source utilities like WSMANCLI,
and application programming environments like Microsoft .NET.
For client connection using Microsoft WinRM, the minimum required version is 2.0.
For more information, refer to the Microsoft article, <support.microsoft.com/kb/
968929>.
NOTE: CMC default user name is root and the default password is calvin.
Launching CMC Using Other Systems Management Tools
You can also launch CMC from the Dell Server Administrator or Dell OpenManage IT Assistant.
To access CMC interface using Dell Server Administrator, launch Server Administrator on your management station.
From the system tree on the left pane of the Server Administrator home page, click System → Main System Chassis →
Remote Access Controller . For more information, see the
Dell Server Administrator User’s Guide
.
Downloading and Updating CMC Firmware
To download the CMC firmware, see Downloading CMC Firmware.
To update the CMC firmware, see Updating CMC Firmware.
Setting Chassis Physical Location and Chassis Name
You can set the chassis location in a data center and the chassis name to identify the chassis on the network (the
default name is Dell Rack System.) For example, an SNMP query on the chassis name returns the name you configure.
Setting Chassis Physical Location and Chassis Name Using Web Interface
To set the chassis location and chassis name using the CMC Web interface:
1. In the system tree, go to Chassis Overview, and then click Setup → General .
The General Chassis Settings page is displayed.
2. Type the location properties and the chassis name. For more information, see the
CMC Online Help
.
32

NOTE: The Chassis Location field is optional. It is recommended to use the Data Center, Aisle, Rack, and Rack
Slot fields to indicate the physical location of the chassis.
3. Click Apply. The settings are saved.
Setting Chassis Physical Location and Chassis Name Using RACADM
To set the chassis name or location, date and time using the command line interface, see the setsysinfo and
setchassisname commands. For more information, see
RACADM Command Line Reference Guide for iDRAC7 and CMC
Setting Date and Time on CMC
You can set the date and time manually, or you can synchronize the date and time with a Network Time Protocol (NTP)
server.
Setting Date and Time on CMC Using CMC Web Interface
To set the date and time on CMC using the CMC Web interface:
1. In the system tree, go to Chassis Overview, and then click Setup → Date/Time .
The Date/Time page is displayed.
2. To synchronize the date and time with a Network Time Protocol (NTP) server, select Enable NTP and specify up to
three NTP servers.
3. To set the date and time manually, clear Enable NTP and edit the Date and Time fields, select the Time Zone from
the drop-down menu, and then click Apply.
.
Setting Date and Time on CMC Using RACADM
To set the date and time using the command line interface, see the config command and cfgRemoteHosts database
property group sections in the
RACADM Command Line Reference Guide for iDRAC7 and CMC
.
Configuring LEDs to Identify Components on the Chassis
You can set component LEDs for all or individual components (chassis, servers, and IOMs) to blink as a means of
identifying the component on the chassis.
NOTE: To modify these settings, you must have Chassis Configuration Administrator privilege.
Configuring LED Blinking Using CMC Web Interface
To enable blinking for one, multiple, or all component LEDs using the CMC Web interface:
1. Go to any of the following pages:
– Chassis Overview → Troubleshooting → Identify .
– Chassis Overview → Chassis Controller → Troubleshooting → Identify.
– Chassis Overview → Server Overview → Troubleshooting → Identify.
NOTE: Only servers can be selected on this page.
– Chassis Overview → I/O Module Overview → Troubleshooting → Identify.
33

The Identify page is displayed.
2. To enable blinking for a component LED, select required component and click Blink.
3. To disable blinking for a component LED, clear the required component and click UnBlink.
Configuring LED Blinking Using RACADM
Open a serial/Telnet/SSH text console to CMC, log in, and type:
racadm setled -m <module> [-l <ledState>]
where <module> specifies the module whose LED you want to configure. Configuration options:
• server-nx where n = 1-8 and x = a, b, c, or d
• switch-n where n=1–6
• cmc-active
and <ledState> specifies whether the LED should blink. Configuration options:
• 0 — not blinking (default)
• 1 — blinking
Configuring CMC Properties
You can configure CMC properties such as power budgeting, network settings, users, and SNMP and e-mail alerts using
the Web interface or RACADM.
Understanding Redundant CMC Environment
You can install a standby CMC that takes over if your active CMC fails. The redundant CMC may be pre-installed or can
be installed later. It is important that CMC network is properly cabled to ensure full redundancy or best performance.
Failovers can occur when you:
• Run the RACADM cmcchangeover command. (See the cmcchangeover command section in the
Command Line Reference Guide for iDRAC7 and CMC)
• Run the RACADM racreset command on the active CMC. (See the racreset command section in the
Command Line Reference Guide for iDRAC6 and CMC)
• Reset the active CMC from Web interface. (See the Reset CMC option for Power Control Operations that is
described in Executing Power Control Operations.)
• Remove the network cable from the active CMC.
• Remove the active CMC from the chassis.
• Initiate a CMC firmware flash on the active CMC.
• Have an active CMC that is no longer functional.
NOTE: In the event of a CMC failover, all iDRAC connections and all active CMC sessions are lost. Users
with lost sessions must reconnect to the new active CMC.
Related Links
About Standby CMC
CMC Failsafe Mode
Active CMC Election Process
Obtaining Health Status of Redundant CMC
.
.
RACADM
RACADM
34

About Standby CMC
The standby CMC is identical to and is maintained as a mirror of the active CMC. The active and standby CMCs must
both be installed with the same firmware revision. If the firmware revisions differ, the system reports as redundancy
degraded.
The standby CMC assumes the same settings and properties of the active CMC. You must maintain the same firmware
version on both CMCs, but you do not need to duplicate configuration settings on the standby CMC.
NOTE: For information about installing a standby CMC, see the
installing CMC firmware on your standby CMC, follow the instructions in Updating Firmware.
Hardware Owner’s Manual
. For instructions on
CMC Failsafe Mode
In the failsafe mode, similar to the failover protection offered by the redundant CMC, the M1000e enclosure enables the
fail-safe mode to protect the blades and I/O modules from failures. The fail-safe mode is enabled when no CMC is in
control of the chassis. During the CMC failover period or during a single CMC management loss:
• You cannot turn on newly installed blades.
• You cannot access existing blades remotely.
• Chassis cooling fans run at 100% for thermal protection of the components.
• Blade performance reduces to limit power consumption until management of the CMC is restored.
The following are some of the conditions that can result in CMC management loss:
• CMC removal — Chassis management resumes after replacing CMC, or after failover to standby CMC.
• CMC network cable removal or network connection loss — Chassis management resumes after the chassis fails
over to the standby CMC. Network failover is only enabled in redundant CMC mode.
• CMC reset — Chassis management resumes after CMC reboots or chassis fails over to the standby CMC.
• CMC failover command issued — Chassis management resumes after the chassis fails over to the standby CMC.
• CMC firmware update — Chassis management resumes after CMC reboots or chassis fails over to the standby
CMC. It is recommended that you update the standby CMC first so that there is only one failover event.
• CMC error detection and correction — Chassis management resumes after CMC resets or chassis fails over to
the standby CMC.
NOTE: You can configure the enclosure either with a single CMC or with redundant CMCs. In redundant
CMC configurations, if the primary CMC loses communication with the enclosure or the management
network, the standby CMC takes over chassis management.
Active CMC Election Process
There is no difference between the two CMC slots; that is, slot does not dictate precedence. Instead, CMC that is
installed or booted first assumes the role of the active CMC. If AC power is applied with two CMCs installed, CMC
installed in CMC chassis slot 1 (the left) normally assumes the active role. The active CMC is indicated by the blue LED.
If two CMCs are inserted into a chassis that is already powered on, automatic active/standby negotiation can take up to
two minutes. Normal chassis operation resumes when the negotiation is complete.
35

Obtaining Health Status of Redundant CMC
You can view the health status of the standby CMC in the Web interface. For more information about accessing CMC
health status in the Web interface, see Viewing Chassis Information and Monitoring Chassis and Component Health.
36

Logging In to CMC
You can log in to CMC as a CMC local user, as a Microsoft Active Directory user, or as an LDAP user. The default user
name and password is root and calvin, respectively. You can also log in using Single Sign-On or Smart Card.
Related Links
Accessing CMC Web Interface
Logging Into CMC as Local User, Active Directory User, or LDAP User
Logging Into CMC Using Smart Card
Logging Into CMC Using Single Sign-on
Logging In to CMC Using Serial, Telnet, or SSH Console
Accessing CMC Using RACADM
Logging in to CMC Using Public Key Authentication
Accessing CMC Web Interface
Before you log in to CMC using the Web interface, make sure that you have configured a supported Web browser
(Internet Explorer or Firefox) and the user account is created with the required privileges.
NOTE: If you are using Microsoft Internet Explorer, connecting through a proxy, and if you see the error "The XML
page cannot be displayed," you need to disable the proxy to continue.
To access the CMC Web interface:
3
1. Open a supported Web browser window.
For the latest information on supported Web browsers, see the
2. In the Address field, type the following URL, and press <Enter>:
– To access CMC using IPv4 address: https://<CMC IP address>
If the default HTTPS port number (port 443) was changed, type: https://<CMC IP
address>:<port number>
– To access CMC using IPv6 address: https://[<CMC IP address>]
If the default HTTPS port number (port 443) was changed, type: https://[<CMC IP
address>]:<port number>
NOTE: While using IPv6, you must enclose the
where
<CMC IP address>
The CMC Login page appears.
Related Links
Configuring Web Browser
Logging Into CMC as Local User, Active Directory User, or LDAP User
Logging Into CMC Using Smart Card
Logging Into CMC Using Single Sign-on
is the IP address for CMC and
<CMC IP address>
Readme
located at dell.com/support/manuals.
<port number>
in square brackets ([ ]).
is the HTTPS port number.
37

Logging Into CMC as Local User, Active Directory User, or LDAP User
To log in to CMC, you must have a CMC account with Log In to CMC privilege. The default CMC user name is root, and
the password is calvin. The root account is the default administrative account that ships with CMC.
NOTE: For added security, it is strongly recommended that you change the default password of the root account
during initial setup.
CMC does not support extended ASCII characters, such as ß, å, é, ü, or other characters used primarily in non-English
languages.
You cannot log in to the Web interface with different user names in multiple browser windows on a single workstation.
To log in as local user, Active Directory user, or LDAP user.
1. In the Username field, type your user name:
– CMC user name: <user name>
– Active Directory user name: <domain>\<user name>, <domain>/<user name> or <user>@<domain>.
– LDAP user name: <user name>
NOTE: This field is case sensitive. For Active Directory user.
2. In the Password field, type the user password.
NOTE: This field is case-sensitive.
3. Optionally, select a session timeout. This is the amount of time you can stay logged in with no activity before you
are automatically logged out. The default value is the Web Service Idle Timeout.
4. Click OK.
You are logged into CMC with the required user privileges.
Related Links
Configuring User Accounts and Privileges
Accessing CMC Web Interface
Logging Into CMC Using Smart Card
You can log in to CMC using a smart card. Smart cards provide Two Factor Authentication (TFA) that provide two-layers
of security:
• Physical smart card device.
• Secret code such as a password or PIN.
Users must verify their credentials using the smart card and the PIN.
NOTE: You cannot use the IP address to log in to CMC using Smart Card login. Kerberos validates your credentials
based on the Fully Qualified Domain Name (FQDN).
Before you log in as a Active Directory user using Smart Card, make sure to:
• Upload a Trusted Certificate Authority (CA) certificate (CA-signed Active Directory certificate) to CMC
• Configure the DNS server.
• Enable Active Directory login.
• Enable Smart Card login.
38

To log in to CMC as an Active Directory user using smart card:
1.
Log in to CMC using the link https://<cmcname.domain-name>.
The CMC Login page is displayed prompting you to insert the smart card.
NOTE: If you changed the default HTTPS port number (port 80), access the CMC Web page using
<cmcname.domain-name>:<port number>, where cmcname is the CMC host name for CMC, domain-
is the domain name, and port number is the HTTPS port number.
name
2. Insert the smart card and click Login.
The PIN pop-up is displayed.
3. Enter the PIN and click Submit.
NOTE: If the smart card user is present in Active Directory, an Active Directory password is not required.
You are logged in to CMC with your Active Directory credentials.
Related Links
Configuring CMC SSO Or Smart Card Login For Active Directory Users
Logging Into CMC Using Single Sign-on
When Single Sign-On (SSO) is enabled, you can log in to CMC without entering your domain user authentication
credentials, such as user name and password.
NOTE: You cannot use the IP address to log into the Single Sign-On. Kerberos validates your credentials against
the Fully Qualified Domain Name (FQDN).
Before logging in to CMC using Single Sign-on, make sure that:
• You have logged into your system using a valid Active Directory user account.
• Single Sign-On option is enabled during Active Directory configuration.
To log in to CMC using Single Sign-on:
1. Log into the client system using your network account.
2. Access the CMC Web interface using: https://<cmcname.domain-name>
For example, cmc-6G2WXF1.cmcad.lab, where cmc-6G2WXF1 is the cmc-name and cmcad.lab is the domain-name.
NOTE: If you have changed the default HTTPS port number (port 80), access the CMC Web interface using
<cmcname.domain-name>:<port number>, where the cmcname is the CMC host name for CMC,
domain-name is the domain name, and port number is the HTTPS port number.
CMC logs you in, using the Kerberos credentials that were cached by your browser when you logged in using your
valid Active Directory account. If the login fails, the browser is redirected to the normal CMC login page.
NOTE: If you did not log in to the Active Directory domain and are using a browser other then Internet
Explorer, the login fails and the browser only displays a blank page.
Related Links
Configuring CMC SSO Or Smart Card Login For Active Directory Users
Logging In to CMC Using Serial, Telnet, or SSH Console
You can log in to CMC through a serial, Telnet, or SSH connection, or through Dell CMC console on iKVM.
39

After you have configured your management station terminal emulator software and managed node BIOS, perform the
following steps to log in to CMC:
1. Connect to the CMC using your management station terminal emulation software.
2. Type your CMC user name and password, and press <Enter>.
You are logged in to the CMC.
Related Links
Configuring CMC to Use Command Line Consoles
Enabling Access to iKVM from the Dell CMC Console
Accessing CMC Using RACADM
RACADM provides a set of commands that allow you to configure and manage the CMC through a text-based interface.
RACADM can be accessed using a Telnet/SSH or serial connection, using the Dell CMC console on the iKVM, or
remotely using the RACADM command line interface installed on a management station.
The RACADM interface is classified as follows:
NOTE: Remote RACADM is included on the Dell Systems Management Tools and Documentation DVD and is
installed on a management station.
• Remote RACADM — Allows you to run RACADM commands on a management station with the -r option and the
DNS name or IP address of the CMC.
• Firmware RACADM — Allows you to log in to the CMC using Telnet, SSH, a serial connection, or the iKVM. With
Firmware RACADM, you run the RACADM implementation that is part of the CMC firmware.
You can use remote RACADM commands in scripts to configure multiple CMCs. CMC does not have support for
scripting, so you cannot run the scripts directly on the CMC.
For more information about RACADM, see the
For more information about configuring multiple CMCs, see Configuring Multiple CMCs Using RACADM.
RACADM Command Line Reference Guide for iDRAC7 and CMC
.
Logging in to CMC Using Public Key Authentication
You can log into the CMC over SSH without entering a password. You can also send a single RACADM command as a
command line argument to the SSH application. The command line options behave similar to remote RACADM since the
session ends after the command is completed.
Before logging in to CMC over SSH, make sure that the public keys are uploaded.
For example:
• Logging in: ssh service@<domain> or ssh service@<IP_address> where IP_address is the CMC
IP address.
• Sending RACADM commands: ssh service@<domain> racadm getversion and ssh
service@<domain> racadm getsel
When you log in using the service account, if a passphrase was set up when creating the public or private key pair, you
may be prompted to enter that passphrase again. If a passphrase is used with the keys, both Windows and Linux clients
provide methods to automate that as well. For Windows clients, you can use the Pageant application. It runs in the
background and makes entering the passphrase transparent. For Linux clients, you can use the sshagent. For setting up
and using either of these applications, see the documentation provided from that application.
Related Links
Configure Public Key Authentication over SSH
40

Multiple CMC Sessions
The following table provides the list of multiple CMC sessions that are possible using the various interfaces.
Table 7. Multiple CMC Sessions
Interface Number of Sessions
CMC Web Interface 4
RACADM 4
Telnet 4
SSH 4
41

42

Updating Firmware
You can update firmware for the following:
• CMC - active and standby
• iKVM
• IOMs
You can update firmware for the following server components:
• iDRAC - iDRACs earlier than iDRAC6 must be updated using the recovery interface. iDRAC6 firmware can also be
updated with the recovery interface, but is deprecated for iDRAC6 and future versions.
• BIOS
• Unified Server Configurator
• 32-Bit Diagnostics
• OS-Drivers Pack
• Network Interface Controllers
• RAID Controllers
Related Links
Downloading CMC Firmware
Viewing Currently Installed Firmware Versions
Updating CMC Firmware
Updating iKVM Firmware
Updating Server iDRAC Firmware
Updating Server Component Firmware
Recovering iDRAC Firmware Using CMC
Updating IOM Infrastructure Device Firmware
4
Downloading CMC Firmware
Before beginning the firmware update, download the latest firmware version from support.dell.com, and save it to your
local system.
The following software components are included with the CMC firmware package:
• Compiled CMC firmware code and data
• Web interface, JPEG, and other user interface data files
• Default configuration files
Viewing Currently Installed Firmware Versions
You can view the currently installed firmware versions using the CMC Web interface or RACADM.
43

Viewing Currently Installed Firmware Versions Using CMC Web Interface
In the CMC Web interface, go to any of the following pages to view the current firmware versions:
• Chassis Overview → Update
• Chassis Overview → Chassis Controller → Update
• Chassis Overview → Server Overview → Update
• Chassis Overview → I/O Module Overview → Update
• Chassis Overview → iKVM → Update
The Firmware Update page displays the current version of the firmware for each listed component and allows you to
update the firmware to the latest revision.
If the chassis contains an earlier generation server whose iDRAC is in recovery mode or if CMC detects that iDRAC has
corrupted firmware, then the earlier generation iDRAC is also listed on the Firmware Update page.
Viewing Currently Installed Firmware Versions Using RACADM
To view the currently installed firmware versions using RACADM, use the getkvminfo subcommand. For more
information, see the
RACADM Command Line Reference Guide for iDRAC7 and CMC
.
Updating CMC Firmware
You can update CMC firmware using Web interface or RACADM. The firmware update, by default, retains the current
CMC settings. During the update process, you can reset CMC configuration settings back to the factory default settings.
NOTE: To update firmware on CMC, you must have Chassis Configuration Administrator privilege.
If a Web user interface session is used to update system component firmware, the Idle Timeout setting must be set high
enough to accommodate the file transfer time. In some cases, the firmware file transfer time may be as high as 30
minutes. To set the Idle Timeout value, see Configuring Services.
During updates of CMC firmware, it is normal for some or all of the fan units in the chassis to spin at 100%.
If you have redundant CMCs installed in the chassis, it is recommended to update both the CMCs to the same firmware
version at the same time with a single operation. If CMCs have different firmware and a failover occurs, unexpected
results may occur.
The Active CMC resets and becomes temporarily unavailable after the firmware has been uploaded successfully. If a
standby CMC is present, the standby and active roles swap. The standby CMC becomes the active CMC. If an update is
applied only to the active CMC, after the reset is complete the active CMC does not run the updated image, only the
standby CMC has that image. In general, it is highly recommended to maintain identical firmware versions for the active
and standby CMCs.
When the standby CMC has been updated, swap the CMCs’ roles so that the newly updated CMC becomes the active
CMC and CMC with the older firmware becomes the standby. See the cmcchangeover command section in the
RACADM Command Line Reference Guide for iDRAC7 and CMC
information about swapping roles. This allows you to verify that the update has succeeded and that the new firmware is
working properly, before you update the firmware in the second CMC. When both CMCs are updated, you can use the
cmcchangeover command to restore the CMCs to their previous roles. CMC Firmware revision 2.x updates both the
primary CMC and the redundant CMC without using the cmcchangeover command.
for
44

To avoid disconnecting other users during a reset, notify authorized users who may log in to CMC and check for active
sessions in the Sessions page. To open the Sessions page, select Chassis in the tree, click the Network tab, and then
click the Sessions subtab.
When transferring files to and from CMC, the file transfer icon spins during the transfer. If your icon is animated, make
sure that your browser is configured to allow animations. For instructions, see Allow Animations in Internet Explorer.
If you experience problems downloading files from CMC using Internet Explorer, enable the Do not save encrypted
pages to disk option. For instructions, see Downloading Files From CMC With Internet Explorer.
Related Links
Downloading CMC Firmware
Viewing Currently Installed Firmware Versions
Updating CMC Firmware Using Web Interface
To update the CMC firmware using the CMC Web interface:
1. Go to any of the following pages:
– Chassis Overview → Update
– Chassis Overview → Chassis Controller → Update
– Chassis Overview → I/O Module Overview → Update
– Chassis Overview → iKVM → Update
The Firmware Update page is displayed.
2. In the CMC Firmware section, select the checkbox(s) in the Update Targets column for the CMC or CMCs (if
standby CMC is present) you want to update the firmware and click Apply CMC Update.
3. In the Firmware Image field, enter the path to the firmware image file on the management station or shared
network, or click Browse to navigate to the file location. The default CMC firmware image name is firmimg.cmc.
4. Click Begin Firmware Update and then click Yes to continue. The Firmware Update Progress section provides
firmware update status information. A status indicator displays on the page while the image file uploads. File
transfer time varies based on connection speed. When the internal update process begins, the page automatically
refreshes and the Firmware update timer is displayed.
5. Additional instructions:
– Do not click the Refresh icon or navigate to another page during the file transfer.
– To cancel the process, click Cancel File Transfer and Update. This option is available only during file
transfer.
– The Update State field displays the firmware update status.
NOTE: The update may take several minutes for CMC.
6. For a standby CMC, when the update is complete the Update State field displays Done. For an active CMC, during
the final phases of the firmware update process, the browser session and connection with CMC is lost temporarily
as the active CMC is taken offline. You must log in again after a few minutes, when the active CMC has rebooted.
After CMC resets, the new firmware is displayed on the Firmware Update page.
NOTE: After the firmware update, clear the Web browser cache. For instructions on how to clear the browser
cache, see your Web browser’s online help.
Updating CMC Firmware Using RACADM
To update CMC firmware using RACADM, use the fwupdate subcommand For more information, see
Line Reference Guide for iDRAC7 and CMC
.
RACADM Command
45

Updating iKVM Firmware
The iKVM resets and becomes temporarily unavailable after the firmware is successfully uploaded.
Related Links
Downloading CMC Firmware
Viewing Currently Installed Firmware Versions
Updating iKVM Firmware Using CMC Web Interface
To update the iKVM firmware using in the CMC Web interface:
1. Go to any of the following pages:
– Chassis Overview → Update
– Chassis Overview → Chassis Controller → Update
– Chassis Overview → iKVM → Update
The Firmware Update page is displayed.
2. In the iKVM Firmware section, select the checkbox in the Update Targets column for the iKVM you want to update
the firmware and click Apply iKVM Update.
3. In the Firmware Image field, enter the path to the firmware image file on the management station or shared
network, or click Browse to navigate to the file location. The default iKVM firmware image name is iKVM.bin.
4. Click Begin Firmware Update and then click Yes to continue.
The Firmware Update Progress section provides firmware update status information. A status indicator displays on
the page while the image file uploads. File transfer time varies based on connection speed. When the internal
update process begins, the page automatically refreshes and the Firmware update timer is displayed.
5. Additional instructions to follow:
– Do not click the Refresh icon or navigate to another page during the file transfer.
– To cancel the process, click Cancel File Transfer and Update. This option is available only during file
transfer.
– The Update State field displays the firmware update status.
NOTE: The update may take up to two minutes for iKVM.
When the update is complete, iKVM resets and the new firmware is displayed on the Firmware Update page.
Updating iKVM Firmware Using RACADM
To update iKVM firmware using RACADM, use the fwupdate subcommand. For more information, see the
Command Line Reference Guide for iDRAC7 and CMC
.
RACADM
Updating IOM Infrastructure Device Firmware
By performing this update, the firmware for a component of the IOM device is updated, but not the firmware of the IOM
device itself; the component is the interface circuitry between the IOM device and CMC. The update image for the
component resides in the CMC file system, and the component displays as an updatable device on the CMC Web
interface only if the current revision on the component and the component image on CMC do not match.
Before updating IOM infrastructure device firmware, make sure the CMC firmware is updated.
46

NOTE:
CMC allows IOM infrastructure device firmware (IOMINF) updates only if it detects that the IOMINF firmware is out-ofdate with the image contained in CMC file system. If the IOMINF firmware is up-to-date, CMC prevents IOMINF updates.
Up-to-date IOMINF devices are not listed as updatable devices.
Related Links
Downloading CMC Firmware
Viewing Currently Installed Firmware Versions
Updating IOM Software Using CMC Web Interface
Updating IOM Firmware Using CMC Web Interface
To update the IOM Infrastructure device firmware, in the CMC Web interface:
1. Go to Chassis Overview → I/O Module Overview → Update .
The IOM Firmware and Software page is displayed.
Alternatively, go to any of the following:
– Chassis Overview → Update
– Chassis Overview → Chassis Controller → Update
– Chassis Overview → iKVM → Update
The Firmware Update page is displayed, which provides a link to access the IOM Firmware and Software page.
2. In the IOM Firmware and Software page, in the IOM Firmware section, select the checkbox in the Update column
for the IOM you want to update the firmware and click Apply Firmware Update .
The Update Status section provides firmware update status information. A status indicator displays on the page
while the image file uploads. File transfer time varies based on connection speed. When the internal update
process begins, the page automatically refreshes and the Firmware update timer is displayed.
NOTE: Do not click the Refresh icon or navigate to another page during the file transfer.
NOTE: The file transfer timer is not displayed when updating IOMINF firmware.
When the update is complete, there is a brief loss of connectivity to the IOM device since it resets and the new
firmware is displayed on the IOM Firmware and Software page.
Updating IOM Firmware Using RACADM
To update IOM infrastructure device firmware using RACADM, use the fwupdate subcommand For more information,
see
RACADM Command Line Reference Guide for iDRAC7 and CMC
.
Updating Server iDRAC Firmware
You can update firmware for iDRAC6 and iDRAC7.
The iDRAC firmware must be at version 1.4 or later for servers with iDRAC, or 2.0 or later for servers with iDRAC6
Enterprise. If updating iDRAC firmware to 3.0 or later from an iDRAC version less than 2.3, the iDRAC firmware must first
be updated to version 2.3 before updating to version 3.0 or greater.
The iDRAC (on a Server) resets and become temporarily unavailable after firmware updates is successfully uploaded.
Related Links
Downloading CMC Firmware
47

Viewing Currently Installed Firmware Versions
Updating Server iDRAC Firmware Using Web Interface
To update the iDRAC firmware in the server using CMC Web interface:
1. Go to any of the following pages:
– Chassis Overview → Update
– Chassis Overview → Chassis Controller → Update
– Chassis Overview → iKVM → Update
The Firmware Update page is displayed.
You can also update server iDRAC firmware at Chassis Overview → Server Overview → Update . For more
information, see the Updating Server Component Firmware.
2. To update iDRAC6 firmware, in the iDRAC6 Enterprise Firmware section, select the checkbox in the Update Targets
column for the iKVM you want to update the firmware and click Apply iDRAC6 Enterprise Update and go to step 4.
3. To update iDRAC7 firmware, in the iDRAC7 Enterprise Firmware section, click the Update link for the server for
which you want to update the firmware.
The Server Component Update page is displayed. To continue, see the Updating Server Component
Firmwaresection.
4. In the Firmware Image field, enter the path to the firmware image file on the management station or shared
network, or click
Browse to navigate to the file location. The default iDRAC firmware image name is firming.imc.
5. Click Begin Firmware Update and then click Yes to continue.
The Firmware Update Progress section provides firmware update status information. A status indicator displays on
the page while the image file uploads. File transfer time varies based on connection speed. When the internal
update process begins, the page automatically refreshes and the Firmware update timer is displayed.
6. Additional instructions to follow:
– Do not click the Refresh icon or navigate to another page during the file transfer.
– To cancel the process, click Cancel File Transfer and Update. This option is available only during file
transfer.
– The Update State field displays the firmware update status.
NOTE: It may take up to 10 minutes to update the iDRAC firmware.
When the update is complete, iKVM resets and the new firmware is displayed on the Firmware Update page.
Updating Server iDRAC Firmware Using RACADM
To update iDRAC firmware using RACADM, use the fwupdate subcommand. For more information, see
Command Line Reference Guide for iDRAC7 and CMC
RACADM
Updating Server Component Firmware
The Lifecycle Controller service available on each server and is facilitated by iDRAC. You can manage the firmware of
the components and devices on the servers using the Lifecycle Controller service. The Lifecycle controller uses an
optimization algorithm to update the firmware that reduces the number of reboots efficiently.
48

Dell Update Packages (DUPs) are used to perform the firmware updates using Lifecycle Controller. The default CMC
configuration has a 48 MB limit on the size of the DUP. The OS-Driver Pack component DUP exceeds this limit and must
be updated separately using the Extended Storage feature.
The Lifecycle Controller provides module update support for iDRAC6 and later servers. The iDRAC firmware version must
be 3.20 or later to update firmware using Lifecycle Controller.
Before using the Lifecycle Controller based update feature, server firmware versions must be updated.
You must update the CMC firmware before updating the server component firmware modules.
Always update the server component firmware modules in the following order:
1. BIOS
2. Lifecycle Controller
3. iDRAC
In the CMC Web interface, you can update the server component firmware on the Chassis Overview → Server Overview
→ Update → Server Component Update page.
If the server does not support the Lifecycle Controller service, the Component/Device Firmware Inventory section
displays Not Supported. For the latest generation servers, install the Lifecycle Controller firmware and update the iDRAC
firmware to enable the Lifecycle Controller service on the server. For earlier generation servers, this upgrade may not be
possible.
Normally, the Lifecycle Controller firmware is installed using an appropriate installation package that is executed on the
server operating system. For supported servers, a special repair or installation package with .usc file extension is
available. This enables you to install the Lifecycle Controller firmware through the firmware update facility available on
the native iDRAC Web-Browser interface.
You can also install Lifecycle Controller firmware through an appropriate installation package executed on the server
OS. For more information, see the
If Lifecycle Controller service is disabled on the server, the Component/Device Firmware Inventory section displays
Lifecycle Controller may not be enabled
Related Links
Enabling Lifecycle Controller
Filtering Components for Firmware Updates
Viewing Firmware Inventory
Lifecycle Controller Job Operations
Updating IOM Infrastructure Device Firmware
Dell Lifecycle Controller User’s Guide
.
.
Enabling Lifecycle Controller
You can enable the Lifecycle Controller service during the server boot process:
• For iDRAC6 servers, on the boot console, when prompted with the message Press <CTRL-E> for
Remote Access Setup within 5 sec., press <CTRL-E>. Then, on the setup screen, enable System
Services.
• For iDRAC7 servers, on the boot console, select F2 for System Setup. On the setup screen, select iDRAC Settings
and then select System Services.
Cancelling System Services enables you to cancel all scheduled jobs that are pending and remove them from
the queue.
For more information on the Lifecycle Controller and Server Component, and Device Firmware Management, see:
•
Lifecycle Controller Remote Services User’s Guide
• delltechcenter.com/page/Lifecycle+Controller.
.
49

The Server Component Update page enables you to update various firmware components on your system. To use the
features and functions on this page, you must have:
• For CMC: Server Administrator privilege.
• For iDRAC: Configure iDRAC privilege and Log in to iDRAC privilege.
In case of insufficient privileges, you can only view the firmware inventory of components and devices on the server.
You cannot select any components or devices for any kind of Lifecycle Controller operation on the server.
Filtering Components for Firmware Updates
Information for all the components and devices across all servers is retrieved at one time. To manage this large amount
of information, the Lifecycle Controller provides various filtering mechanisms. These filters enable you to:
• Select one or more categories of components or devices for easy viewing.
• Compare firmware versions of components and devices across the server.
• Filter the selected components and devices automatically, to narrow the category of a particular component or
device based on types or models.
NOTE: Automatic filtering feature is important while using the Dell Update Package (DUP). The update
programming of a DUP can be based on the type or model of a component or device. The automatic
filtering behavior is designed to minimize the subsequent selection decisions after an initial selection is
made.
Examples
Following are some examples where the filtering mechanisms are applied:
• If the BIOS filter is selected, only the BIOS inventory for all servers is displayed. If the set of servers consists of a
number of server models, and a server is selected for BIOS update, the automatic filtering logic automatically
removes all the other servers that do not match with the model of the selected server. This ensures that the
selection of the BIOS firmware update image (DUP) is compatible with the correct model of the server.
Sometimes, a BIOS firmware update image may be compatible across a number of server models. Such
optimizations are ignored in case this compatibility is no longer true in the future.
• Automatic filtering is important for firmware updates of Network Interface Controllers (NIC) and RAID
Controllers. These device categories have different types and models. Similarly, the firmware update images
(DUP) may be available in optimized forms where a single DUP may be programmed to update multiple types or
models of devices of a given category.
Filtering Components for Firmware Updates Using CMC Web Interface
To filter the devices:
1. In the system tree, go to Server Overview, and then click Update → Server Component Update.
The Server Component Update page is displayed.
2. In the Component/Device Update Filter section, select one or more of the following:
– BIOS
– iDRAC
– Lifecycle Controller
– 32-Bit Diagnostics
– OS Driver Pack
– Network I/F Controller
– RAID Controller
50

The Firmware Inventory section displays only the associated components or devices across all servers present in
the chassis. The filter is a pass filter; this means that it only permits components or devices associated with the
filter and excludes all others.
After the filtered set of components and devices is displayed in the inventory section, further filtering may occur
when a component or device is selected for update. For example, if the BIOS filter is selected, then the inventory
section displays all the servers with only their BIOS component. If a BIOS component on one of the servers is
selected, the inventory is further filtered to display the servers that match the model name of the selected server.
If no filter is selected and a selection for update of a component or device is made on the inventory section, then
the filter associated with that selection is automatically enabled. Further filtering may occur where the inventory
section displays all the servers that have a match for the selected component in terms of model, type or some form
of identity. For example, if a BIOS component on one of the servers is selected for update, the filter is set to the
BIOS automatically and the inventory section displays the servers that match the model name of the selected
server.
Filtering Components for Firmware Updates Using RACADM
To filter components for Firmware Updates using RACADM, use the getversion command:
racadm getversion -l [-m <module>] [-f <filter>]
For more information, see the RACADM Command Line Reference Guide for iDRAC7 and CMC available at dell.com/
support/manuals.
Viewing Firmware Inventory
You can view the summary of the firmware versions for all components and devices for all servers currently present in
the chassis along with their status.
Viewing Firmware Inventory Using CMC Web Interface
To view the firmware inventory:
1. In the system tree, go to Server Overview, and then click Update → Server Component Update .
The Server Component Update page is displayed.
2. View the firmware inventory details in the Component/Device Firmware Inventory section. Table provides
– Servers that currently do not support the Lifecycle Controller service are listed as Not Supported. A
hyperlink is provided to an alternative page where you can directly update only the iDRAC firmware. This
page supports only iDRAC firmware update and not any other component and device on the server. iDRAC
firmware update is not dependent on the Lifecycle Controller service.
– If the server is listed as Not Ready, it indicates that when the firmware inventory was retrieved, the iDRAC
on the server was still initializing. Wait for the iDRAC to be fully operational and then refresh the page for
the firmware inventory to be retrieved again.
– If the inventory of components and devices does not reflect what is physically installed on the server, you
must invoke the Lifecycle Controller when the server is in the boot process. This helps to refresh the
internal components and devices information and allows you to verify the currently installed components
and devices. This occurs when:
* The server iDRAC firmware is updated to newly introduce the Lifecycle Controller functionality to
the server management.
* The new devices are inserted into the server.
51

To automate this action, iDRAC Configuration Utility (for iDRAC6) or the iDRAC Settings Utility (for iDRAC7)
provides an option that can be accessed through the boot console:
* For iDRAC6 servers, on the boot console, when prompted with the message Press <CTRL-E>
for Remote Access Setup within 5 sec., press <CTRL-E>. Then, on the setup
screen, enable Collect System Inventory on Restart.
* For iDRAC7 servers, on the boot console, select F2 for System Setup. On the setup screen, select
iDRAC Settings, and then select System Services (USC). On the setup screen, enable Collect
System Inventory on Restart.
– Options to perform the various Lifecycle Controller operations such as Update, Rollback, Reinstall, and Job
Deletion are available. Only one type of operation can be performed at a time. Components and devices
that are not supported may be listed as part of the inventory, but do not permit Lifecycle Controller
operations.
The following table displays the component and devices information on the server:
Table 8. : Component and Devices Information
Field Description
Slot Displays the slot occupied by the server in the chassis. Slot numbers are
sequential IDs, from 1 to 16 (for the 16 available slots in the chassis), that help
to identify the location of the server in the chassis. When there are less than 16
servers occupying slots, only those slots populated by servers are displayed.
Name Displays the name of the server in each slot.
Model Displays the model of the server.
Component/Device Displays a description of the component or device on the server. If the column
width is too narrow the mouse-over tool provides a view of the description.
Current Version Displays the current version of component or device on the server.
Rollback Version Displays the rollback version of component or device on the server.
Job Status Displays the job status of any operations that are scheduled on the server. The
job status is continuously updated dynamically. If a job completion with state
completed is detected, then the firmware versions for the components and
devices on that server are automatically refreshed in case there has been a
change of firmware version on any of the components or devices. An
information icon is also presented adjacent to the current state, which
provides additional information of the current job status. This information can
be viewed by clicking or hovering over the icon.
Update Selects the component or device for firmware update on the server.
Viewing Firmware Inventory Using RACADM
To view Firmware Inventory using RACADM, use the getversion command:
racadm getversion -l [-m <module>] [-f <filter>]
For more information, see the RACADM Command Line Reference Guide for iDRAC7 and CMC available at dell.com/
support/manuals.
Lifecycle Controller Job Operations
You can perform Lifecycle Controller operations such as:
52

• Re-install
• Rollback
• Update
• Delete Jobs
Only one type of operation can be performed at a time. Components and devices that are not supported may be listed as
part of the inventory, but do not permit Lifecycle Controller operations.
To perform the Lifecycle Controller operations, you must have:
• For CMC: Server Administrator privilege.
• For iDRAC: Configure iDRAC privilege and Log in to iDRAC privilege.
A Lifecycle Controller operation scheduled on a server may take 10 to 15 minutes to complete. The process involves
several server reboots during which the firmware installation is performed, which also includes a firmware verification
stage. You can view the progress of this process using the server console. If there are several components or devices
that need to be updated on a server, you can consolidate all the updates into one scheduled operation thus minimizing
the number of reboots required.
Sometimes, when an operation is in the process of being submitted for scheduling through another session or context,
another operation is attempted. In this case, a confirmation popup message is displayed indicating the situation and the
operation must not be submitted. Wait for the operation in process to complete and then submit the operation again.
Do not navigate away from the page after an operation is submitted for scheduling. If an attempt is made, a confirmation
popup message is displayed allowing the intended navigation to be cancelled. Otherwise, the operation is interrupted.
An interruption, especially during an Update operation may cause the firmware image file upload to be terminated
before proper completion. After an operation has been submitted for scheduling, ensure that the confirmation popup
message indicating that the operation has been successfully scheduled is acknowledged.
Related Links
Re-installing Server Component Firmware
Rolling Back Server Component Firmware
Upgrading Server Component Firmware
Deleting Scheduled Server Component Firmware Jobs
Re-installing Server Component Firmware
You can re-install the firmware image of the currently installed firmware for selected components or devices across one
or more servers. The firmware image is available within the Lifecycle Controller.
Re-installing Server Component Firmware Using Web Interface
To re-install Server Component Firmware:
1. In the system tree, go to Server Overview, and then Click → Update → Server Component Update.
The Server Component Update page is displayed.
2. Filter the component or device (optional).
3. In the Current Version column, select the checkbox for the component or device for which you want to re-install the
firmware.
4. Select one of the following options:
– Reboot Now - Reboot immediately.
– On Next Reboot - Manually reboot the server at a later time.
5. Click Reinstall. The firmware version is re-installed for the selected component or device.
53

Rolling Back Server Component Firmware
You can install the firmware image of the previously installed firmware for selected components or devices across one
or more servers. The firmware image is available within the Lifecycle Controller for a rollback operation. The availability
is subject to the version compatibility logic of the Lifecycle Controller. It also assumes the previous update was
facilitated by the Lifecycle Controller.
Rolling Back Server Component Firmware Using CMC Web Interface
To rollback the server component firmware version to an earlier version:
1. In the CMC Web interface, expand the system tree, go to Server Overview and then click Update → Server
Component Update .
The Server Component Update page is displayed.
2. Filter the component or device (optional).
3. In the Rollback Version column, select the checkbox for the component or device for which you want to roll back
the firmware.
4. Select one of the following options:
– Reboot Now - Reboot immediately.
– On Next Reboot - Manually reboot the server at a later time.
5. Click Rollback. The previously installed firmware version is re-installed for the selected component or device.
Upgrading Server Component Firmware
You can install the next version of the firmware image for selected components or devices across one or more servers.
The firmware image is available within the Lifecycle Controller for a rollback operation.
NOTE: For iDRAC and OS Driver packs firmware update, make sure the Extended Storage feature is enabled.
It is recommended to clear the job queue before initializing a server component firmware update. A list of all jobs on the
server(s) is available on the Lifecycle Controller Jobs page. This page enables deletion of single or multiple jobs or
purging of all jobs on the server. See the Troubleshooting section, "Managing Lifecycle Controller jobs on a remote
system" .
BIOS updates are specific to the model of the server. The selection logic is based on this behavior. Sometimes, even
though a single Network Interface Controller (NIC) device is selected for firmware update on a server, the update may
get applied to all the NIC devices on the server. This behavior is inherent in the lifecycle controller functionality and
particularly the programming contained with the Dell Update Package (DUP). Currently, Dell Update Packages (DUP)
that are less than 48MB in size are supported.
If the update file image size is greater, the job status indicates that the download has failed. If multiple server
component updates are attempted on a server, the combined size of all the firmware update files may also exceed
48MB. In such a case, one of the component updates fails as its update file is truncated. To update multiple components
on a server, it is recommended to update the Lifecycle Controller and 32-Bit Diagnostics components together first.
These do not require a server reboot and are relatively quick to complete. The other components can then be updated
together.
All Lifecycle Controller updates are scheduled for immediate execution. However, the system services can delay this
execution sometimes. In such situations, the update fails as a result of the remote share that is hosted by the CMC being
no longer available.
Upgrading Server Component Firmware Using CMC Web Interface
To upgrade the firmware version to the next version:
1. In the CMC Web interface, in the system tree, go to Server Overview and then click Update → Server Component
Update .
54

The Server Component Update page is displayed.
2. Filter the component or device (optional).
3. In the Update column, select the checkbox(es) for the component or device for which you want to update the
firmware to the next version. Use the CRTL key shortcut to select a type of component or device for update across
all the applicable servers. Pressing and holding the CRTL key highlights all the components in yellow. While the
CRTL key is pressed down, select the required component or device by enabling the associated check box in the
Update column.
A second table is displayed that lists the selected type of component or device and a selector for the firmware
image file. For each type of component, one selector for the firmware image file is displayed.
Few devices such as Network Interface Controllers (NICs) and RAID Controllers contain many types and models.
The update selection logic automatically filters the relevant device type or model based on the initially selected
devices. The primary reason for this automatic filtering behavior is that only one firmware image file for the
category can be specified.
NOTE: The update size limitation of either a single DUP or combined DUPs can be ignored if the Extended
Storage feature is installed and enabled. For information on enabling extended storage, see Configuring CMC
Extended Storage Card.
4. Specify the firmware image file for the selected component(s) or devic(es). This is a Microsoft Windows Dell
Update Package (DUP) file.
5. Select one of the following options:
– Reboot Now - Reboot immediately.
– On Next Reboot - Manually reboot the server at a later time.
NOTE: This step is not valid for Lifecycle Controller and 32-bit Diagnostics firmware update. A server reboot is
performed immediatly for these devices.
6. Click Update. The firmware version is updated for the selected component or device.
Deleting Scheduled Server Component Firmware Jobs
You can delete jobs scheduled for the selected components and/or devices across one or more servers.
Deleting Scheduled Server Component Firmware Jobs Using Web Interface
To delete scheduled server component firmware jobs:
1. In the CMC Web interface, in the system tree, go to Server Overview and then click Update → Server Component
Update .
The Server Component Update page is displayed.
2. Filter the component or device (optional).
3. In the Job Status column, if a check box is displayed next to the job status, this indicates a Lifecycle Controller job
is in progress and currently is in the indicated state. It can be selected for a job deletion operation.
4. Click Job Deletion. The jobs are deleted for the selected component(s) or device(s).
Recovering iDRAC Firmware Using CMC
iDRAC firmware is typically updated using iDRAC interfaces such as the iDRAC Web interface, the SM-CLP command
line interface, or operating system specific update packages downloaded from support.dell.com. For more information,
see the iDRAC User’s Guide.
Early generations of servers can have corrupted firmware recovered using the new update iDRAC firmware process.
When CMC detects corrupted iDRAC firmware, it lists the server on the Firmware Update page. Perform the steps as
mentioned for updating firmware.
55

56

5
Viewing Chassis Information and Monitoring Chassis and Component Health
You can view information and monitor the health for the following:
• Active and standby CMCs
• All severs and individual servers
• Storage arrays
• All IO Modules (IOMs) and individual IOMs
• Fans
• iKVM
• Power supplies (PSUs)
• Temperature sensors
• LCD assembly
Viewing Chassis Component Summaries
When you log in to the CMC Web interface, the Chassis Health page allows you to view the health of the chassis and its
components. It displays a live graphical view of the chassis and its components. It is dynamically updated, and the
component subgraphic overlays and text hints are automatically changed to reflect the current state.
Figure 1. Example of Chassis Graphics in the Web Interface
To view the chassis health, go to Chassis Overview → Properties → Health . It displays the overall health status for the
chassis, active and standby CMCs, sever modules, IO Modules (IOMs), fans, iKVM, power supplies (PSUs), temperature
sensors, and LCD assembly. Detailed information for each component is displayed when you click on that component. In
addition, the latest events in the CMC Hardware Log are also displayed. For more information, see the
If your chassis is configured as a Group Lead, the Group Health page is displayed after login. It displays the chassis level
information and alerts. All active critical and non-critical alerts are displayed.
CMC Online Help
57
.

Chassis Graphics
The chassis is represented by front and back views (the upper and lower images, respectively). Servers and the LCD are
shown in the front view and the remaining components are shown in the back view. Component selection is indicated by
a blue cast and is controlled by clicking the image of the required component. When a component is present in the
chassis, an icon of that component type is shown in the graphics in the position (slot) where the component has been
installed. Empty positions are shown with a charcoal gray background. The component icon visually indicates the state
of the component. Other components display icons that visually represent the physical component. Icons for servers and
IOMs span multiple slots when a double size component is installed. Hovering over a component displays a tooltip with
additional information about that component.
Table 9. : Server Icon States
Icon Description
Server is powered on and is operating normally.
Server is off.
Server is reporting a non-critical error.
Server is reporting a critical error.
58

Icon Description
No server is present.
Selected Component Information
Information for the selected component is displayed in three independent sections:
• Health and Performance and Properties — Displays the active critical and non-critical events as shown by the
hardware logs and the performance data that vary with time.
• Properties — Displays the component properties that do not vary with time or change only infrequently.
• Quick Links — Provides links to navigate to the most frequently accessed pages, and also the most frequently
performed actions. Only links applicable to the selected component are displayed in this section.
Viewing Server Model Name and Service Tag
You can view the model name and service tag of each server instantly using the following steps:
1. Expanding Servers in the System tree. All the servers (1-16) appear in the expanded Servers list. A slot without a
server has its name grayed out.
2. Using the cursor to hover over the slot name or slot number of a server; a tool tip is displayed with the server’s
model name and service tag (if available).
Viewing Chassis Summary
You can view the summary of the installed components in the chassis.
To view the chassis summary information, in the CMC Web interface, go to Chassis Overview → Properties →
Summary .
The Chassis Summary page is displayed. For more information, see the
CMC Online Help
.
Viewing Chassis Controller Information and Status
To view the chassis controller information and status, in the CMC Web interface, go to Chassis Overview →
Chassis Controller → Properties → Status.
The Chassis Controller Status page is displayed. For more information, see the
CMC Online Help
.
Viewing Information and Health Status of All Servers
To view the health status of all the servers, do any of the following:
1. Go to Chassis Overview → Properties → Health .
The Chassis Health page displays a graphical overview of all the servers installed in the chassis. Server health
status is indicated by the overlay of the server subgraphic. For more information, see the
2. Go to Chassis Overview → Server Overview → Properties → Status.
CMC Online Help
.
59

The Servers Status page provides overviews of the servers in the chassis. For more information, see the
Online Help
.
CMC
Viewing Health Status and Information for Individual Server
To view health status for individual servers, do any of the following:
1. Go to Chassis Overview → Properties → Health .
The Chassis Health page displays a graphical overview of all the servers installed in the chassis. Server health
status is indicated by the overlay of the server subgraphic. Move the cursor to hover over an individual server
subgraphic. A corresponding text hint or screen tip provides additional information for that server. Click the server
subgraphic to view the IOM information on the right. For more information, see the
2. Go to Chassis Overview and expand Server Overview in the system tree. All the servers (1–16) appear in the
expanded list. Click the server (slot) you want to view.
The Server Status page (separate from the Servers Status page) provides the health status of the server in the
chassis and a launch point to the iDRAC Web interface, which is the firmware used to manage the server. For more
information, see the
NOTE: To use the iDRAC Web interface, you must have an iDRAC user name and password. For more
information about iDRAC and the using the iDRAC Web interface, see the
Controller User’s Guide
CMC Online Help
.
.
CMC Online Help
Integrated Dell Remote Access
.
Viewing Storage Array Status
To view health status for storage servers, do any of the following:
1. Go to Chassis Overview → Properties → Health .
The Chassis Health page displays a graphical overview of all the servers installed in the chassis. Server health
status is indicated by the overlay of the server subgraphic. Move the cursor to hover over an individual server
subgraphic. A corresponding text hint or screen tip provides additional information for that server. Click the server
subgraphic to view the IOM information on the right. For more information, see the
2. Go to Chassis Overview and expand Server Overview in the system tree. All the slots (1–16) appear in the expanded
list. Click the slot where the storage array is inserted.
The Storage Array Status page provides the health status and properties of the storage array. For more information,
see the
CMC Online Help
.
CMC Online Help
.
Viewing Information and Health Status of All IOMs
To view health status of the IOMs, in the CMC Web interface, do any of the following:
1. Go to Chassis Overview → Properties → Health .
The Chassis Health page is displayed. The lower section of Chassis Graphics depicts the rear view of the chassis
and contains the health status for the IOMs. IOM health status is indicated by the overlay of the IOM subgraphic.
Move the cursor to hover over the individual IOM subgraphic. The text hint provides additional information on that
IOM. Click the IOM subgraphic to view the IOM information on the right.
2. Go to Chassis Overview → I/O Module Overview → Properties → Status.
The I/O Module Status page provides overviews of all IOMs associated with the chassis. For more information, see
the
CMC Online Help
.
60

Viewing Information and Health Status For Individual IOM
To view health status of the individual IOMs, in the CMC Web interface, do any of the following:
1. Go to Chassis Overview → Properties → Health .
The Chassis Health page is displayed. The lower section of Chassis Graphics depicts the rear view of the chassis
and contains the health status for the IOMs. IOM health status is indicated by the overlay of the IOM subgraphic.
Move the cursor to hover over the individual IOM subgraphic. The text hint provides additional information on that
IOM. Click the IOM subgraphic to view the IOM information on the right.
2. Go to Chassis Overview and expand I/O Module Overview in the system tree. All the IOMs (1–6) appear in the
expanded list. Click the IOM (slot) you want to view.
The I/O Module Status page (separate from the overall I/O Module Status page) specific to the IOM slot is
displayed. For more information, see the
CMC Online Help
.
Viewing Information and Health Status of Fans
CMC, which controls fan speeds, automatically increases or decreases fan speeds based on system wide events. CMC
generates an alert and increases the fan speeds when the following events occur:
• CMC ambient temperature threshold is exceeded.
• A fan fails.
• A fan is removed from the chassis.
NOTE: During updates of CMC or iDRAC firmware on a server, some or all of the fan units in the chassis spin at
100%. This is normal.
To view the health status of the fans, in the CMC Web interface, do any of the following:
1. Go to Chassis Overview → Properties → Health .
The Chassis Health page is displayed. The lower section of chassis graphics provides the rear view of the chassis
and contains the health status of the fan. Fan health status is indicated by the overlay of the fan subgraphic. Move
the cursor over the fan subgraphic. The text hint provides additional information on the fan. Click the fan
subgraphic to view the fan information on the right.
2. Go to Chassis Overview → Fans → Properties .
The Fans Status page provides the status and speed measurements in revolutions per minute, or RPMs, of the fans
in the chassis. There can be one or more fans.
NOTE: In the event of a communication failure between CMC and the fan unit, CMC cannot obtain or display
health status for the fan unit.
For more information, see the
CMC Online Help
.
Viewing iKVM Information and Health Status
The local access KVM module for the Dell M1000e server chassis is called the Avocent Integrated KVM Switch Module,
or iKVM.
To view the health status of the iKVMs associated with the chassis, do any of the following:
1. Go to Chassis Overview → Properties → Health .
The Chassis Health page is displayed. The lower section of chassis graphics provides the rear view of the chassis
and contains the health status of the iKVM. iKVM health status is indicated by the overlay of the iKVM subgraphic.
61

Move the cursor over an iKVM subgraphic and a corresponding text hint or screen tip is displayed. The text hint
provides additional information for the iKVM. Click the iKVM subgraphic to view the iKVM information on the right.
2. Go to Chassis Overview → iKVM → Properties .
The iKVM Status page displays the status and readings of the iKVM associated with the chassis. For more
information, see the
CMC Online Help
.
Viewing PSU Information and Health Status
To view the health status of the Power Supply Units (PSUs) associated with the chassis, do any of the following:
1. Go to Chassis Overview → Properties → Health .
The Chassis Health page is displayed. The lower section of chassis graphics provides the rear view of the chassis
and contains the health status of all PSUs. PSU health status is indicated by the overlay of the PSU subgraphic. Use
the cursor to hover over an individual PSU subgraphic and a corresponding text hint or screen tip is displayed. The
text hint provides additional information on that PSU. Click the PSU subgraphic to view the PSU information on the
right.
2. Go to Chassis Overview → Power Supplies.
The Power Supply Status page displays the status and readings of the PSUs associated with the chassis. It
provides the overall power health, system power status, and the power supply redundancy status. For more
information, see the
CMC Online Help
.
Viewing Information and Health Status of Temperature Sensors
To view the health status of the temperature sensors:
Go to Chassis Overview → Temperature Sensors.
The Temperature Sensors Status page displays the status and readings of the temperature probes on the entire
chassis (chassis and servers). For more information, see the
NOTE: The temperature probes value cannot be edited. Any change beyond the threshold generates an alert
that causes the fan speed to vary. For example, if the CMC ambient temperature probe exceeds threshold, the
speed of the fans on the chassis increases.
CMC Online Help
.
Viewing LCD Information and Health
To view the health status for the LCD:
1. In the CMC Web interface, in the system tree go to Chassis Overview, and then click Properties → Health.
The Chassis Health page is displayed. The top section of Chassis Graphics depicts the front view of the chassis.
LCD health status is indicated by the overlay of the LCD subgraphic.
2. Move the cursor over the LCD subgraphic. The corresponding text hint or screen tip provides additional information
on the LCD.
3. Click the LCD subgraphic to view the LCD information on the right. For more information, see the
CMC Online Help
.
62

6
Configuring CMC
CMC enables you to configure CMC properties, set up users, and set up alerts to perform remote management tasks.
Before you begin configuring the CMC, you must first configure the CMC network settings to allow the CMC to be
managed remotely. This initial configuration assigns the TCP/IP networking parameters that enable access to the CMC.
For more information, see Setting Up Initial Access to CMC.
You can configure CMC using Web interface or RACADM.
NOTE: When you configure CMC for the first time, you must be logged in as root user to execute RACADM
commands on a remote system. Another user can be created with privileges to configure CMC.
After setting up the CMC and performing the basic configuration, you can do the following:
• Modify the network settings if required.
• Configure interfaces to access CMC.
• Configure LED display.
• Setup Chassis Groups if required.
• Configure Servers, IOMs, or iKVM.
• Configure VLAN Settings.
• Obtain the required certificates.
• Add and configure CMC users with privileges.
• Configure and enable e-mail alerts and SNMP traps.
• Set the power cap policy if required.
Related Links
Logging In to CMC
Viewing and Modifying CMC Network LAN Settings
Configuring Network Security Settings
Configuring Virtual LAN Tag Properties for CMC
Configuring Services
Configuring LEDs to Identify Components on the Chassis
Setting Up Chassis Group
Configuring Server
Managing I/O Fabric
Configuring and Using iKVM
Obtaining Certificates
Configuring User Accounts and Privileges
Configuring CMC To Send Alerts
Managing and Monitoring Power
Configuring Multiple CMCs Using RACADM
63

Viewing and Modifying CMC Network LAN Settings
The LAN settings, such as community string and SMTP server IP address, affect both the CMC and the external settings
of the chassis.
If you have two CMCs (active and standby) on the chassis, and they are connected to the network, the standby CMC
automatically assumes the network settings of the active CMC in the event of failover.
When IPv6 is enabled at boot time, three router solicitations are sent every four seconds. If external network switches
are running the Spanning Tree Protocol (SPT), the external switch ports may be blocked for more than twelve seconds in
which the IPv6 router solicitations are sent. In such cases, there may be a period when IPv6 connectivity is limited, until
router advertisements are gratuitously sent by the IPv6 routers.
NOTE: Changing the CMC network settings may disconnect your current network connection.
NOTE: You must have Chassis Configuration Administrator privilege to set up CMC network settings.
Viewing and Modifying CMC Network LAN Settings Using CMC Web Interface
To view and modify the CMC LAN network settings using CMC Web interface:
1. In the system tree, go to Chassis Overview and click Network → Network. The Network Configuration page
displays the current network settings.
2. Modify the general, IPv4 or IPv6 settings as required. For more information, see the
3. Click Apply Changes for each section to apply the settings.
CMC Online Help
Viewing and Modifying CMC Network LAN Settings Using RACADM
To view IPv4 settings, use the following subcommands and objects:
• getniccfg
• getconfig
• cfgCurrentLanNetworking
To view IPv6 settings, use the following subcommands and objects:
• getconfig
• cfgIpv6LanNetworking
To view IPv4 and IPv6 addressing information for the chassis, use getsysinfo subcommand.
For more information about the subcommands and objects, see the
iDRAC7 and CMC
.
RACADM Command Line Reference Guide for
Enabling the CMC Network Interface
To enable/disable the CMC Network Interface for both IPv4 and IPv6, type:
racadm config -g cfgLanNetworking -o cfgNicEnable 1
racadm config -g cfgLanNetworking -o cfgNicEnable 0
.
NOTE: The CMC NIC is enabled by default.
64

To enable/disable the CMC IPv4 addressing, type:
racadm config -g cfgLanNetworking -o cfgNicIPv4Enable
1
racadm config -g cfgLanNetworking -o cfgNicIPv4Enable
0
NOTE: The CMC IPv4 addressing is enabled by default.
To enable/disable the CMC IPv6 addressing, type:
racadm config -g cfgIpv6LanNetworking -o cfgIPv6Enable
1
racadm config -g cfgIpv6LanNetworking -o cfgIPv6Enable
0
NOTE: The CMC IPv6 addressing is disabled by default.
By default, for IPv4, the CMC requests and obtains a CMC IP address from the Dynamic Host Configuration Protocol
(DHCP) server automatically. You can disable the DHCP feature and specify static CMC IP address, gateway, and subnet
mask.
For an IPv4 network, to disable DHCP and specify static CMC IP address, gateway, and subnet mask, type:
racadm config -g cfgLanNetworking -o cfgNicUseDHCP 0
racadm config -g cfgLanNetworking -o cfgNicIpAddress <static IP address>
racadm config -g cfgLanNetworking -o cfgNicGateway <static gateway>
racadm config -g cfgLanNetworking -o cfgNicNetmask <static subnet mask>
By default, for IPv6, the CMC requests and obtains a CMC IP address from the IPv6 Autoconfiguration mechanism
automatically.
For an IPv6 network, to disable the Autoconfiguration feature and specify a static CMC IPv6 address, gateway, and
prefix length, type:
racadm config -g cfgIPv6LanNetworking -o
cfgIPv6AutoConfig 0
racadm config -g cfgIPv6LanNetworking -o
cfgIPv6Address <IPv6 address>
racadm config -g cfgIPv6LanNetworking -o
cfgIPv6PrefixLength 64
racadm config -g cfgIPv6LanNetworking -o
cfgIPv6Gateway <IPv6 address>
Enabling or Disabling DHCP for the CMC Network Interface Address
When enabled, the CMC’s DHCP for NIC address feature requests and obtains an IP address from the Dynamic Host
Configuration Protocol (DHCP) server automatically. This feature is enabled by default.
You can disable the DHCP for NIC address feature and specify a static IP address, subnet mask, and gateway. For more
information, see Setting Up Initial Access to CMC.
Enabling or Disabling DHCP for DNS IP Addresses
By default, the CMC’s DHCP for DNS address feature is disabled. When enabled, this feature obtains the primary and
secondary DNS server addresses from the DHCP server. While using this feature, you do not have to configure static
DNS server IP addresses.
To disable the DHCP for DNS address feature and specify static preferred and alternate DNS server addresses, type:
racadm config -g cfgLanNetworking -o
cfgDNSServersFromDHCP 0
65

To disable the DHCP for DNS address feature for IPv6 and specify static preferred and alternate DNS server addresses,
type:
racadm config -g cfgIPv6LanNetworking -o
cfgIPv6DNSServersFromDHCP6 0
Setting Static DNS IP addresses
NOTE: The Static DNS IP addresses settings are not valid unless the DCHP for DNS address feature is disabled.
For IPv4, to set the preferred primary and secondary DNS IP server addresses, type:
racadm config -g cfgLanNetworking -o cfgDNSServer1 <IP-address>
racadm config -g cfgLanNetworking -o cfgDNSServer2 <IPv4-address>
For IPv6, to set the preferred and secondary DNS IP Server addresses, type:
racadm config -g cfgIPv6LanNetworking -o
cfgIPv6DNSServer1 <IPv6-address>
racadm config -g cfgIPv6LanNetworking -o
cfgIPv6DNSServer2 <IPv6-address>
Configuring DNS Settings (IPv4 and IPv6)
• CMC Registration — To register the CMC on the DNS server, type:
racadm config -g cfgLanNetworking -o
cfgDNSRegisterRac 1
NOTE: Some DNS servers only register names of 31 characters or fewer. Make sure the designated name
is within the DNS required limit.
NOTE: The following settings are valid only if you have registered the CMC on the DNS server by setting
cfgDNSRegisterRac to 1.
• CMC Name — By default, the CMC name on the DNS server is cmc-<
the DNS server, type:
racadm config -g cfgLanNetworking -o cfgDNSRacName <name>
service tag
>. To change the CMC name on
where <name> is a string of up to 63 alphanumeric characters and hyphens. For example: cmc-1, d-345.
• DNS Domain Name — The default DNS domain name is a single blank character. To set a DNS domain name,
type:
racadm config -g cfgLanNetworking -o
cfgDNSDomainName <name>
where <name> is a string of up to 254 alphanumeric characters and hyphens. For example: p45, a-tz-1, r-id-001.
Configuring Auto Negotiation, Duplex Mode, and Network Speed (IPv4 and IPv6)
When enabled, the auto negotiation feature determines whether the CMC automatically sets the duplex mode and
network speed by communicating with the nearest router or switch. Auto negotiation is enabled by default.
You can disable auto negotiation and specify the duplex mode and network speed by typing:
racadm config -g cfgNetTuning -o cfgNetTuningNicAutoneg 0
racadm config -g cfgNetTuning -o cfgNetTuningNicFullDuplex <duplex mode>
where:
<duplex mode> is 0 (half duplex) or 1 (full duplex, default)
racadm config -g cfgNetTuning -o cfgNetTuningNicSpeed <speed>
66

where:
<speed> is 10 or 100 (default).
Setting the Maximum Transmission Unit (MTU) (IPv4 and IPv6)
The MTU property allows you to set a limit for the largest packet that can be passed through the interface. To set the
MTU, type:
racadm config -g cfgNetTuning -o cfgNetTuningMtu <mtu>
where <mtu> is a value between 576–1500 (inclusive; default is 1500).
NOTE: IPv6 requires a minimum MTU of 1280. If IPv6 is enabled, and cfgNetTuningMtu is set to a lower value,
the CMC uses an MTU of 1280.
Configuring Network Security Settings
You can configure the network security settings for IPv4 only.
Configuring Network Security Settings Using CMC Web Interface
NOTE: To perform the following steps, you must have Chassis Configuration Administrator privilege.
To configure the network security settings using CMC Web interface:
1. In the system tree, go to Chassis Overview and click Network → Network. The Network Configuration page is
displayed.
2. In the IPv4 Settings section, click Advanced Settings. The Network Security page is displayed.
3. Specify the IP range and IP blocking values. For more information, see the
4. Click Apply to save your settings.
CMC Online Help
.
Configuring CMC Network Security Settings Using RACADM
IP filtering compares the IP address of an incoming login to the IP address range that is specified in the following
cfgRacTuning properties:
• cfgRacTuneIpRangeAddr
• cfgRacTuneIpRangeMask
A login from the incoming IP address is allowed only if both the following are identical:
• cfgRacTuneIpRangeMask bit-wise and with incoming IP address
• cfgRacTuneIpRangeMask bit-wise and with cfgRacTuneIpRangeAddr
Configuring Virtual LAN Tag Properties for CMC
VLANs are used to allow multiple virtual LANs to co-exist on the same physical network cable and to segregate the
network traffic for security or load management purposes. When you enable the VLAN functionality, each network
packet is assigned a VLAN tag.
67

Configuring Virtual LAN Tag Properties for CMC Using Web Interface
To configure VLAN for CMC using the CMC Web interface:
1. Go to any of the following pages:
– In the system tree, go to Chassis Overview and click Network → VLAN.
– In the system tree, go to Chassis Overview → Server Overview and click Network → VLAN.
The VLAN Tag Settings page is displayed. VLAN tags are chassis properties. They remain with the chassis even
when a component is removed.
2. In the CMC section, enable VLAN for CMC, set the priority and assign the ID. For more information about the fields,
CMC Online Help
see the
3. Click Apply. The VLAN tag settings are saved.
You can also access this page from the Chassis Overview → Servers → Setup → VLAN subtab.
.
Configuring Virtual LAN Tag Properties for CMC Using RACADM
1. Enable the VLAN capabilities of the external chassis management network:
racadm config -g cfgLanNetworking -o
cfgNicVLanEnable 1
2. Specify the VLAN ID for the external chassis management network:
racadm config -g cfgLanNetworking -o cfgNicVlanID <VLAN id>
The valid values for <VLAN id> are 1– 4000 and 4021– 4094. Default is 1.
For example:
racadm config -g cfgLanNetworking -o cfgNicVlanID
1
3. Then, specify the VLAN priority for the external chassis management network:
racadm config -g cfgLanNetworking -o
cfgNicVLanPriority <VLAN priority>
The valid values for <VLAN priority> are 0–7. Default is 0.
For example:
racadm config -g cfgLanNetworking -o
cfgNicVLanPriority 7
You can also specify both the VLAN ID and the VLAN priority with a single command:
racadm setniccfg -v <VLAN id> <VLAN priority>
For example:
racadm setniccfg -v 1 7
4. To remove the CMC VLAN, disable the VLAN capabilities of the external chassis management network:
racadm config -g cfgLanNetworking -o
cfgNicVLanEnable 0
You can also remove the CMC VLAN using the following command:
racadm setniccfg -v
68

Configuring Services
You can configure and enable the following services on CMC:
• CMC Serial console — Enable access to CMC using the serial console.
• Web Server — Enable access to CMC Web interface. If you disable the option, use local RACADM to re-enable
the Web Server, since disabling the Web Server also disables remote RACADM.
• SSH — Enable access to CMC through firmware RACADM.
• Telnet — Enable access to CMC through firmware RACADM
• RACADM — Enable access to CMC using RACADM.
• SNMP — Enable CMC to send SNMP traps for events.
• Remote Syslog — Enable CMC to log events to a remote server.
CMC includes a Web server that is configured to use the industry-standard SSL security protocol to accept and transfer
encrypted data from and to clients over the Internet. The Web server includes a Dell self-signed SSL digital certificate
(Server ID) and is responsible for accepting and responding to secure HTTP requests from clients. This service is
required by the Web interface and remote RACADM CLI tool for communicating with CMC.
If the Web server resets, wait at least one minute for the services to become available again. A Web server reset usually
happens as a result of any of the following events:
• Network configuration or network security properties are changed through the CMC Web user interface or
RACADM.
• Web Server port configuration is changed through the Web user interface or RACADM.
• CMC is reset.
• A new SSL server certificate is uploaded.
NOTE: To modify Service settings, you must have Chassis Configuration Administrator privilege.
Remote syslog is an additional log target for CMC. After you configure the remote syslog, each new log entry generated
by CMC is forwarded to the destination(s).
NOTE: Since the network transport for the forwarded log entries is UDP, there is no guaranteed delivery of log
entries, nor is there any feedback to CMC whether the log entries were received successfully.
Configuring Services Using CMC Web Interface
To configure CMC services using CMC Web interface:
1. In the system tree, go to Chassis Overview, and then click Network → Services. The Services page is displayed.
2. Configure the following services as required:
– CMC serial console
– Web server
– SSH
– Telnet
– Remote RACADM
– SNMP
– Remote Syslog
For information about the fields, see
CMC Online Help
.
69

3. Click Apply, and then update all default time outs and maximum time out limits.
Configuring Services Using RACADM
To enable and configure the various services, use the following RACADM objects:
• cfgRacTuning
• cfgRacTuneRemoteRacadmEnable
For more information about these objects, see
at dell.com/support/manuals.
If the firmware on the server does not support a feature, configuring a property related to that feature displays an error.
For example, using RACADM to enable remote syslog on an unsupported iDRAC displays an error message.
Similarly, when displaying the iDRAC properties using the RACADM getconfig command, the property values are
displayed as N/A for an unsupported feature on the server.
For example:
$ racadm getconfig -g cfgSessionManagement -m server-1
# cfgSsnMgtWebServerMaxSessions=N/A
# cfgSsnMgtWebServerActiveSessions=N/A
# cfgSsnMgtWebServerTimeout=N/A
# cfgSsnMgtSSHMaxSessions=N/A
# cfgSsnMgtSSHActiveSessions=N/A
# cfgSsnMgtSSHTimeout=N/A
# cfgSsnMgtTelnetMaxSessions=N/A
# cfgSsnMgtTelnetActiveSessions=N/A
# cfgSsnMgtTelnetTimeout=N/A
RACADM Command Line Reference Guide for iDRAC7 and CMC
available
Configuring CMC Extended Storage Card
You can enable or repair the optional Removable Flash Media for use as an extended non-volatile storage. Some CMC
features depend on extended nonvolatile storage for their operation.
To enable or repair the Removable Flash Media using the CMC Web interface:
1. In the System tree, go to Chassis Overview, and then click Chassis Controller → Flash Media. The Removable Flash
Media page is displayed.
2. From the drop-down menu, select one of the following as required:
– Use flash media for storing chassis data
– Repair active controller media
– Begin replicating data between media
– Stop replicating data between media
– Stop using flash media for storing chassis data
For more information about these options, see the
3. Click Apply to apply the selected option.
If two CMCs are present in the chassis, both CMCs must contain flash media. CMC features which depend on flash
media (except for Flexaddress) do not function properly until the Dell-authorized media is installed and enabled on
this page.
70
CMC Online Help
.

Setting Up Chassis Group
CMC enables you to monitor multiple chassis from a single lead chassis. When a Chassis Group is enabled, CMC in the
lead chassis generates a graphical display of the status of the lead chassis and all member chassis within the Chassis
Group.
The Chassis group features are:
• The Chassis Group page displays images portraying the front and back of each chassis, a set for the leader and
a set for each member.
• Health concerns for the leader and members of a group are recognized by red or yellow overlays and an X or
an ! on the component with the symptoms. Details are visible below the chassis image when you click the
chassis image or Details.
• Quick Launch links are available for opening member chassis’s or server’s web pages.
• A blade and Input/Output inventory is available for a group.
• A selectable option is available to synchronize a new member’s properties to the leader’s properties when the
new member is added to the group.
A Chassis Group may contain a maximum of eight members. Also, a leader or member can only participate in one group.
You cannot join a chassis, either as a leader or member, that is part of a group to another group. You can delete the
chassis from a group and add it later to a different group.
To set up the Chassis Group using the CMC Web interface:
1. Log in with chassis administrator privileges to the chassis planned as the leader.
2. Click Setup → Group Administration. The Chassis Group page is displayed.
3. In the Chassis Group page, under Role, select Leader. A field to add the group name is displayed.
4. Enter the group name in the Group Name field, and then click Apply.
NOTE: The same rules that apply for a domain name apply to the group name.
When the Chassis Group is created, the GUI automatically switches to the Chassis Group page. The system tree
indicates the group by the Group Name and the lead chassis and the unpopulated member chassis appear in the
system tree.
Related Links
Adding Members to Chassis Group
Removing a Member from the Leader
Disbanding a Chassis Group
Disabling an Individual Member at the Member Chassis
Launching a Member Chassis’s or Server’s Web page
Propagating Leader Chassis Properties to Member Chassis
Adding Members to Chassis Group
After the Chassis Group is setup, you can add members to the group:
1. Login with chassis administrator privileges to the leader chassis.
2. Select the Lead chassis in the tree.
3. Click Setup → Group Administration.
4. Under Group Management, enter the member’s IP address or DNS name in the Hostname/IP Address field.
5. Enter a user name with chassis administrator privileges on the member chassis, in the Username field.
71

6. Enter the corresponding password in the Password field.
7. Click Apply.
8. Repeat step 4 through step 8 to add a maximum of eight members. The new members’ Chassis Names appear in the
Members dialog box.
The status of the new member is displayed by selecting the Group in the tree. Details are available by clicking on
the chassis image or the details button.
NOTE: The credentials entered for a member are passed securely to the member chassis, to establish a trust
relationship between the member and lead chassis. The credentials are not persisted on either chassis, and
are never exchanged again after the initial trust relationship is established.
For information on propagation of leader chassis properties to member chassis, see the Propagating Leader
Chassis Properties to Member Chassis
Removing a Member from the Leader
You can remove a member from the group from the lead chassis. To remove a member:
1. Login with chassis administrator privileges to the leader chassis.
2. Select the Lead chassis in the tree.
3. Click Setup → Group Administration.
4. From the Remove Members list, select the member’s name or names to be deleted, and then click Apply.
The lead chassis then communicates to the member or members, if more than one is selected, that it has been
removed from the group. The member name is removed. The member chassis may not receive the message, if a
network issue prevents contact between the leader and the member. In this case, disable the member from the
member chassis to complete the removal.
Related Links
Disabling an Individual Member at the Member Chassis
Disbanding a Chassis Group
To disband a chassis group from the lead chassis:
1. Login with administrator privileges to the leader chassis.
2. Select the Lead chassis in the tree.
3. Click Setup → Group Administration.
4. In the Chassis Group page, under Role, select None, and then click Apply.
The lead chassis then communicates to all the members that they have been removed from the group. Finally the
lead chassis discontinues its role. It can now be assigned as a member or a leader of another group.
The member chassis may not receive the message, if a network issue prevents contact between the leader and the
member. In this case, disable the member from the member chassis to complete the removal.
Disabling an Individual Member at the Member Chassis
Sometimes a member cannot be removed from a group by the lead chassis. This can happen if network connectivity to
the member is lost. To remove a member from a group at the member chassis:
1. Login with chassis administrator privileges to the member chassis.
2. Click Setup → Group Administration.
72

3. Select None, and then click Apply.
Launching a Member Chassis’s or Server’s Web page
Links to a member chassis’s Web page, a server’s Remote Console or the server iDRAC’s Web page within the group are
available through the lead chassis’s group page. You can use the same user name and password that was used to log in
to the lead chassis, to log in to the member device. If the member device has the same login credentials then no
additional login is required. Otherwise, the user is directed to the member device’s login page.
To navigate to member devices:
1. Login to the lead chassis.
2. Select Group: name in the tree.
3. If a member CMC is the required destination, select Launch CMC for the required chassis.
If a server in a chassis is the required destination:
a) Select the image of the destination chassis.
b) In the chassis image that appears under the Health and Alerts pane, select the server.
c) In the box labeled Quick Links, select the destination device. A new window is displayed with the destination
page or login screen.
Propagating Leader Chassis Properties to Member Chassis
You can apply the properties from the leader to the member chassis of a group. To synchronize a member with the
leader properties:
1. Login with administrator privileges to the leader chassis.
2. Select the Lead chassis in the tree.
3. Click Setup → Group Administration.
4. In the Chassis Properties Propagation section, select one of the propagation types:
– On-Change Propagation — Select this option for automatic propagation of the selected chassis property
settings. The property changes are propagated to all current group members, whenever lead properties are
changed.
– Manual Propagation — Select this option for manual propagation of the chassis group leader properties
with its members. The lead chassis property settings are propagated to group members only when a lead
chassis administrator clicks Propagate.
5. In the Propagation Properties section, select the categories of lead configuration properties to be propagated to
member chassis.
Select only those setting categories that you want identically configured, across all members of the chassis group.
For example, select Logging and Alerting Properties category, to enable all chassis in the group to share the
logging and alerting configuration settings of the lead chassis.
6. Click Save.
If On-Change Propagation is selected, the member chassis take on the properties of the leader. If Manual
Propagation is selected, click Propagate whenever you want to propagate the chosen settings to member chassis.
For more information on Propagation of leader chassis properties to member chassis, see the
CMC Online Help
.
73

Server Inventory for MCM group
The Chassis Group Health page displays all the member chassis and allows you to save the server inventory report to a
file, using standard browser download capability. The report contains data for:
• All servers currently in all the group chassis (including the leader.)
• Empty slots and extension slots (including full height and double width blades.)
Saving Server Inventory Report
To save the server inventory report using CMC Web interface:
1. In the system tree, select the Group. The Chassis Group Health page is displayed.
2. Click Save Inventory Report. The File Download dialog box is displayed prompting you to open or save the file.
3. Click Save and specify the path and file name for the blade inventory report.
NOTE: The Chassis Group leader and Chassis Group member chassis, and the blades in the associated
chassis, must be On to get the most accurate blade inventory report.
Exported Data
The server inventory report contains data that was most recently returned by each Chassis Group member during the
Chassis Group leader’s normal polling (once every 30s.)
To get the most accurate server inventory report:
• The Chassis Group leader chassis and all Chassis Group member chassis must be in Chassis Power State On.
• All servers in the associated chassis must be powered on.
The inventory data for the associated chassis and servers may be missing in inventory report, if a subset of the Chassis
Group member chassis are:
• In Chassis Power State Off
• Powered off
NOTE: If a server is inserted while the chassis is powered off, the model number is not displayed anywhere
in the Web interface until the chassis is powered back.
The following table lists the specific data fields and specific requirements for fields to be reported for each server:
Table 10. : Blade Inventory Field Descriptions
Data Field Example
Chassis Name Data Center Chassis Leader
Chassis IP Address 192.168.0.1
Slot Location 1
Slot Name SLOT-01
Host Name Corporate Webserver
NOTE: Requires a Server Administrator agent running
on the Server; otherwise shown as blank.
74

Data Field Example
Operating System Windows Server 2008
NOTE: Requires a Server Administrator agent running
on the Server; otherwise shown as blank.
Model PowerEdgeM610
Service Tag 1PB8VF1
Total System Memory 4.0 GB
NOTE: Requires CMC 4.0 (or higher) on member;
otherwise shown as blank.
# of CPUs 2
NOTE: Requires CMC 4.0 (or higher) on member;
otherwise shown as blank.
CPU Info Intel (R) Xeon (R) CPU E5502 @1.87GHzn
NOTE: Requires CMC 4.0 (or higher) on member;
otherwise shown as blank.
Data Format
The inventory report is generated in a .CSV file format such that it can be imported to various tools, such as Microsoft
Excel. The inventory report .CSV file can be imported into the template by selecting the Data → From Text in MS Excel.
After the inventory report is imported into MS Excel, and if a message is displayed prompting for additional information,
select comma-delimited to import the file into MS Excel.
Obtaining Certificates
The following table lists the types of certificates based on the login type.
Table 11. : Types of Login and Certificate
Login Type Certificate Type How to Obtain
Single Sign-on using Active Directory Trusted CA certificate Generate a CSR and get it signed from
a Certificate Authority
Smart Card login as Active Directory
user
Active Directory user login Trusted CA certificate This certificate is issued by a CA.
Local User login SSL Certificate Generate a CSR and get it signed from
• User certificate
• Trusted CA certificate
• User Certificate — Export the
smart card user certificate as
Base64-encoded file using the
card management software
provided by the smart card
vendor.
• Trusted CA certificate — This
certificate is issued by a CA.
a trusted CA
75

Login Type Certificate Type How to Obtain
NOTE: CMC ships with a default
self-signed SSL server certificate.
The CMC Web server and Virtual
Console use this certificate.
Related Links
Secure Sockets Layer (SSL) Server Certificates
Secure Sockets Layer (SSL) Server Certificates
CMC includes a Web server that is configured to use the industry-standard SSL security protocol to transfer encrypted
data over the Internet. Built upon public-key and private-key encryption technology, SSL is a widely accepted technique
for providing authenticated and encrypted communication between clients and servers to prevent eavesdropping
across a network.
SSL allows an SSL-enabled system to perform the following tasks:
• Authenticate itself to an SSL-enabled client.
• Allow the client to authenticate itself to the server.
• Allow both systems to establish an encrypted connection.
This encryption process provides a high level of data protection. CMC employs the 128-bit SSL encryption standard, the
most secure form of encryption generally available for Internet browsers in North America.
The CMC Web server includes a Dell self-signed SSL digital certificate (Server ID). To ensure high security over the
Internet, replace the Web server SSL certificate by submitting a request to CMC to generate a new Certificate Signing
Request (CSR).
Certificate Signing Request (CSR)
A CSR is a digital request to a certificate authority (referred to as a CA in the Web interface) for a secure server
certificate. Secure server certificates ensure the identity of a remote system and ensure that information exchanged
with the remote system cannot be viewed or changed by others. To ensure the security for your CMC, it is strongly
recommended that you generate a CSR, submit the CSR to a certificate authority, and upload the certificate returned
from the certificate authority.
A certificate authority is a business entity that is recognized in the IT industry for meeting high standards of reliable
screening, identification, and other important security criteria. Examples of CAs include Thawte and VeriSign. After the
certificate authority receives your CSR, they review and verify the information the CSR contains. If the applicant meets
the certificate authority’s security standards, the certificate authority issues a certificate to the applicant that uniquely
identifies that applicant for transactions over networks and on the Internet.
After the certificate authority approves the CSR and sends you a certificate, you must upload the certificate to the CMC
firmware. The CSR information stored on the CMC firmware must match the information contained in the certificate.
NOTE: To configure SSL settings for CMC, you must have Chassis Configuration Administrator privilege.
NOTE: Any server certificate you upload must be current (not expired) and signed by a certificate authority.
Related Links
Generating a New Certificate Signing Request
Uploading Server Certificate
76

Viewing Server Certificate
Generating a New Certificate Signing Request
To ensure security, it is strongly recommended that you obtain and upload a secure server certificate to CMC. Secure
server certificates ensure the identity of a remote system and that information exchanged with the remote system
cannot be viewed or changed by others. Without a secure server certificate, CMC is vulnerable to access from
unauthorized users.
To obtain a secure server certificate for CMC, you must submit a Certificate Signing Request (CSR) to a certificate
authority of your choice. A CSR is a digital request for a signed, secure server certificate containing information about
your organization and a unique, identifying key.
After generating the CSR, you are prompted to save a copy to your management station or shared network, and the
unique information used to generate the CSR is stored on CMC. This information is used later to authenticate the server
certificate you receive from the certificate authority. After you receive the server certificate from the certificate
authority, you must then upload it to CMC.
NOTE: For CMC to accept the server certificate returned by the certificate authority, authentication information
contained in the new certificate must match the information that was stored on CMC when the CSR was
generated.
CAUTION: When a new CSR is generated, it overwrites any previous CSR on CMC. If a pending CSR is overwritten
before its server certificate is granted from a certificate authority, CMC does not accept the server certificate
because the information it uses to authenticate the certificate has been lost. Take caution when generating a CSR
to prevent overwriting any pending CSR.
Generating a New Certificate Signing Request Using Web Interface
To generate a CSR using the CMC Web interface:
1. In the system tree, go to Chassis Overview, and then click Network → SSL. The SSL Main Menu is displayed.
2. Select Generate a New Certificate Signing Request (CSR) and click Next. The Generate Certificate Signing Request
(CSR) page is displayed.
3. Type a value for each CSR attribute value.
4. Click Generate. A File Download dialog box appears.
5. Save the csr.txt file to your management station or shared network. (You may also open the file at this time and
save it later.) You must later submit this file to a certificate authority.
Generating CSR Using RACADM
To generate a CSR, use the objects in cfgRacSecurityData group to specify the values and use the sslcsrgen
command to generate the CSR. For more information, see the
CMC
available at dell.com/support/manuals.
RACADM Command Line Reference Guide for iDRAC7 and
Uploading Server Certificate
After generating a CSR, you can upload the signed SSL server certificate to the CMC firmware. CMC resets after the
certificate is uploaded. CMC accepts only X509, Base 64 encoded Web server certificates.
CAUTION: During the certificate upload process, CMC is not available.
Uploading Server Certificate Using CMC Web Interface
To upload a server certificate using the CMC Web interface:
77

1. In the system tree, go to Chassis Overview, and then click Network → SSL. The SSL Main Menu is displayed.
2. Select Upload Server Certificate Based on Generated CSR option and click Next.
3. Click Choose File and specify the certificate file.
4. Click Apply. If the certificate is invalid, an error message is displayed.
NOTE: The File Path value displays the relative file path of the certificate you are uploading. You must type the
absolute file path, which includes the full path and the complete file name and file extension.
Uploading Server Certificate Using RACADM
To upload the SSL server certificate, use the sslcertupload command. For more information, see the
Command Line Reference Guide for iDRAC7 and CMC
available at dell.com/support/manuals.
RACADM
Uploading Webserver Key and Certificate
You can upload a Web server key and a server certificate for the Web server key. The server certificate is issued by the
Certificate Authority (CA).
The Web server certificate is an essential component used by the SSL encryption process. It authenticates itself to an
SSL-enabled client, and allows the client to authenticate itself to the server, thereby enabling both the systems to
establish an encrypted connection.
NOTE: To upload a Web server key and server certificate, you must have Chassis Configuration Administrator
privileges.
Uploading Webserver Key and Certificate Using CMC Web Interface
To upload a webserver key and certificate using the CMC Web interface:
1. In the system tree, go to Chassis Overview and click Network → SSL. The SSL Main Menu is displayed.
2. Select Upload Web Key and Certificate option and click Next.
3. Specify the Private Key File and the Certificate File by clicking Choose File.
4. After both the files are uploaded, click Apply. If the Web server key and certificate do not match, an error message
is displayed.
NOTE: Only X509, Base-64 encoded certificates are accepted by CMC. Certificates using other encoding
schemes such as DER, are not accepted. Uploading a new certificate replaces the default certificate you
received with your CMC.
CMC resets and becomes temporarily unavailable after the certificate has been uploaded successfully. To avoid
disconnecting other users during a reset, notify authorized users who might log into CMC and check for active
sessions in the Sessions page under the Network tab.
Uploading Webserver Key and Certificate Using RACADM
To upload SSL key from the client to iDRAC, type the following command:
racadm sslkeyupload -t <type> -f <filename>
For more information, see the
support/manuals.
RACADM Command Line Reference Guide for iDRAC7 and CMC
available at dell.com/
Viewing Server Certificate
You can view the SSL server certificate that is currently being used in CMC.
78

Viewing Server Certificate Using Web Interface
In the CMC Web interface, go to Chassis Overview → Network → SSL , select View Server Certificate and click Next.
The View Server Certificate page displays the SSL server certificate currently in use. For more information, see CMC
Online Help.
Viewing Server Certificate Using RACADM
To view the SSL server certificate, use the sslcertview command. For more information, see the
Command Line Reference Guide for iDRAC7 and CMC
available at dell.com/support/manuals.
RACADM
Configuring Multiple CMCs Using RACADM
Using RACADM, you can configure one or more CMCs with identical properties.
When you query a specific CMC card using its group ID and object ID, RACADM creates the racadm.cfg configuration
file from the retrieved information. By exporting the file to one or more CMCs, you can configure your controllers with
identical properties in a minimal amount of time.
NOTE: Some configuration files contain unique CMC information (such as the static IP address) that must be
modified before you export the file to other CMCs.
1. Use RACADM to query the target CMC that contains the desired configuration.
NOTE: The generated configuration file is myfile.cfg. You can rename the file. The .cfg file does not contain
user passwords. When the .cfg file is uploaded to the new CMC, you must re-add all passwords.
2. Open a Telnet/SSH text console to the CMC, log in, and type:
racadm getconfig -f myfile.cfg
NOTE: Redirecting the CMC configuration to a file using getconfig -f is only supported with the remote
RACADM interface.
3. Modify the configuration file using a plain-text editor (optional). Any special formatting characters in the
configuration file may corrupt the RACADM database.
4. Use the newly created configuration file to modify a target CMC. At the command prompt, type:
racadm config -f myfile.cfg
5. Reset the target CMC that was configured. At the command prompt, type:
racadm reset
The getconfig -f myfile.cfg subcommand (step 1) requests the CMC configuration for the active CMC
and generates the myfile.cfg file. If required, you can rename the file or save it to a different location.
You can use the getconfig command to perform the following actions:
– Display all configuration properties in a group (specified by group name and index)
– Display all configuration properties for a user by user name
The config subcommand loads the information into other CMCs. The Server Administrator uses the config
command to synchronize the user and password database.
Related Links
Creating a CMC Configuration File
79

Creating a CMC Configuration File
The CMC configuration file, <filename>.cfg, is used with the racadm config -f <filename>.cfgcommand to
create a simple text file. The command allows you to build a configuration file (similar to a .ini file) and configure the
CMC from this file.
You may use any file name, and the file does not require a .cfg extension (although it is referred to by that designation in
this subsection).
NOTE: For more information about the getconfig subcommand, see the
Guide for iDRAC7 and CMC
RACADM parses the .cfg file when it is first loaded onto the CMC to verify that valid group and object names are present
and that some simple syntax rules are being followed. Errors are flagged with the line number that detected the error,
and a message explains the problem. The entire file is parsed for correctness, and all errors display. Write commands
are not transmitted to the CMC if an error is found in the .cfg file. You must correct all errors before any configuration
can take place.
To check for errors before you create the configuration file, use the -c option with the config subcommand. With the
-c option, config only verifies syntax and does not write to the CMC.
Follow these guidelines when you create a .cfg file:
• If the parser encounters an indexed group, it is the value of the anchored object that differentiates the various
indexes.
The parser reads in all of the indexes from the CMC for that group. Any objects within that group are
modifications when the CMC is configured. If a modified object represents a new index, the index is created on
the CMC during configuration.
• You cannot specify a desired index in a .cfg file.
Indexes may be created and deleted. Over time the group may become fragmented with used and unused
indexes. If an index is present, it is modified. If an index is not present, the first available index is used.
This method allows flexibility when adding indexed entries where you do not need to make exact index matches
between all the CMCs being managed. New users are added to the first available index. A .cfg file that parses
and runs correctly on one CMC may not run correctly on another if all indexes are full and you must add a new
user.
• Use the racresetcfg subcommand to configure both CMCs with identical properties.
Use the racresetcfg subcommand to reset the CMC to original defaults, and then run the racadm
config -f <filename>.cfg command. Ensure that the .cfg file includes all desired objects, users,
indexes, and other parameters. For a complete list of objects and groups, see the database property chapter of
the
RACADM Command Line Reference Guide for iDRAC6 and CMC
.
RACADM Command Line Reference
.
CAUTION: Use the racresetcfg subcommand to reset the database and the CMC Network Interface
settings to the original default settings and remove all users and user configurations. While the root user is
available, other users’ settings are also reset to the default settings.
• If you type racadm getconfig -f <filename> .cfg, the command builds a .cfg file for the current
CMC configuration. This configuration file can be used as an example and as a starting point for your unique .cfg
file.
Related Links
Parsing Rules
80

Parsing Rules
• Lines that start with a hash character (#) are treated as comments.
A comment line must start in column one. A "#" character in any other column is treated as a # character.
Some modem parameters may include # characters in their strings. An escape character is not required. You
may want to generate a .cfg from a racadm getconfig -f <filename> .cfg command, and then
perform a racadm config -f <filename> .cfg command to a different CMC, without adding
escape characters.
For example:
#
# This is a comment
[cfgUserAdmin]
cfgUserAdminPageModemInitString= <Modem init # not
a comment>
• All group entries must be surrounded by open- and close-brackets ([ and ]).
The starting [ character that denotes a group name must be in column one. This group name must be specified
before any of the objects in that group. Objects that do not include an associated group name generate an error.
The configuration data is organized into groups as defined in the database property chapter of the
Command Line Reference Guide for iDRAC6 and CMC
the object’s property value:
[cfgLanNetworking] -{group name}
cfgNicIpAddress=143.154.133.121 {object name}
{object value}
• All parameters are specified as "object=value" pairs with no white space between the object, =, or value. White
spaces that are included after the value are ignored. A white space inside a value string remains unmodified.
Any character to the right of the = (for example, a second =, a #, [, ], and so on) is taken as-is. These characters
are valid modem chat script characters.
[cfgLanNetworking] -{group name}
cfgNicIpAddress=143.154.133.121 {object value}
• The .cfg parser ignores an index object entry.
You cannot specify which index is used. If the index already exists, it is either used or the new entry is created in
the first available index for that group.
The racadm getconfig -f <filename>.cfg command places a comment in front of index objects,
allowing you to see the included comments.
. The following example displays a group name, object, and
RACADM
NOTE: You may create an indexed group manually using the following command:
racadm config -g <groupname> -o <anchored object> -i <index 1-16>
<unique anchor name>
• The line for an indexed group cannot be deleted from a .cfg file. If you do delete the line with a text editor,
RACADM stops when it parses the configuration file and alert you of the error.
You must remove an indexed object manually using the following command:
racadm config -g <groupname> -o <objectname> -i <index 1-16> ""
NOTE: A NULL string (identified by two " characters) directs the CMC to delete the index for the specified
group.
To view the contents of an indexed group, run the following command:
racadm getconfig -g <groupname> -i <index 1-16>
81

• For indexed groups the object anchor must be the first object after the [ ] pair. The following are examples of the
current indexed groups:
[cfgUserAdmin]
cfgUserAdminUserName= <USER_NAME>
• When using remote RACADM to capture the configuration groups into a file, if a key property within a group is
not set, the configuration group is not saved as part of the configuration file. If these configuration groups are
needed to be cloned onto other CMCs, the key property must be set before executing the getconfig -f
command. Alternatively, you can manually enter the missing properties into the configuration file after running
the getconfig -f command. This is true for all the racadm indexed groups.
This is the list of the indexed groups that exhibit this behavior and their corresponding key properties:
– cfgUserAdmin — cfgUserAdminUserName
– cfgEmailAlert — cfgEmailAlertAddress
– cfgTraps — cfgTrapsAlertDestIPAddr
– cfgStandardSchema — cfgSSADRoleGroupName
– cfgServerInfo — cfgServerBmcMacAddress
Modifying the CMC IP Address
When you modify the CMC IP address in the configuration file, remove all unnecessary <variable> = <value>
entries. Only the actual variable group’s label with [ and ] remains, including the two <variable> = <value>
entries pertaining to the IP address change.
Example:
#
# Object Group "cfgLanNetworking"
#
[cfgLanNetworking]
cfgNicIpAddress=10.35.10.110
cfgNicGateway=10.35.10.1
This file is updated as follows:
#
# Object Group "cfgLanNetworking"
#
[cfgLanNetworking]
cfgNicIpAddress=10.35.9.143
# comment, the rest of this line is ignored
cfgNicGateway=10.35.9.1
The command racadm config -f <myfile>.cfg parses the file and identifies any errors by line number. A
correct file updates the proper entries. Additionally, you can use the same
example to confirm the update.
Use this file to download company-wide changes or to configure new systems over the network with the command,
racadm getconfig -f <myfile> .cfg.
NOTE:
Anchor
is a reserved word and should not be used in the .cfg file.
getconfig command from the previous
Viewing and Terminating CMC Sessions
You can view the number of users currently logged in to iDRAC7 and terminate the user sessions.
NOTE: To terminate a session, you must have Chassis Configuration Administrator privilege.
82

Viewing and Terminating CMC Sessions Using Web Interface
To view or terminate a session using Web interface:
1. In the system tree, go to Chassis Overview and click Network → Sessions.
The Sessions page displays the session ID, username, IP address, and session type. For more information about
these properties, see the
2. To terminate the session, click Terminate for a session.
CMC Online Help
.
Viewing and Terminating CMC Sessions Using RACADM
You must have administrator privileges to terminate CMC sessions using RACADM.
To view the current user sessions, use the getssninfo command.
To terminate a user session, use the closessn command.
For more information about these commands, see the
available at dell.com/support/manuals.
RACADM Command Line Reference Guide for iDRAC7 and CMC
83

84

Configuring Server
You can do the following for the server:
• Configuring Slot Names
• Configuring iDRAC Network Settings
• Configuring iDRAC VLAN Tag Settings
• Setting First Boot Device
• Configuring Server FlexAddress
• Configuring Remote File Share
• Configuring BIOS Settings Using Server Clone
Configuring Slot Names
Slot names are used to identify individual servers. When choosing slot names, the following rules apply:
• Names may contain a maximum of 15 non-extended ASCII characters (ASCII codes 32 through 126).
• Slot names must be unique within the chassis. No two slots may have the same name.
• Strings are not case-sensitive. Server-1, server-1, and SERVER-1 are equivalent names.
• Slot names must not begin with the following strings:
– Switch-
– Fan-
– PS-
– KVM
– DRAC-
– MC-
– Chassis
– Housing-Left
– Housing-Right
– Housing-Center
• The strings Server-1 through Server-16 may be used, but only for the corresponding slot. For example,
Server-3 is a valid name for slot 3, but not for slot 4. Note that Server-03 is a valid name for any slot.
NOTE: To change a slot name, you must have Chassis Configuration Administrator privilege.
7
The slot name setting in the Web interface resides on CMC only. If a server is removed from the chassis, the slot name
setting does not remain with the server.
The slot name setting does not extend to the optional iKVM. The slot name information is available through the iKVM
FRU.
The slot name setting in the CMC Web interface always overrides any change you make to the display name in the
iDRAC interface.
To edit a slot name using the CMC Web interface:
85

1. In the system tree, go to Chassis Overview → Server Overview and then click Setup → Slot Names. The Slot
Names page is displayed.
2. In the Slot Name field, edit the slot name. Repeat this step for each slot you want to rename.
3. To use the server’s host name as slot name, select Use Host Name for the Slot Name option. This override the
static slot names with the server’s Host Name (or system name), if it is available. This requires the OMSA agent to
be installed on the server. For more details on the OMSA agent, see the
User's Guide
4. Click Apply to save the settings.
5. To restore the default slot name (SLOT-01 to SLOT-16, based on the server's slot position) to the server, click
Restore Default Value.
.
Dell OpenManage Server Administrator
Configuring iDRAC Network Settings
You can configure installed or newly inserted server's iDRAC network configuration settings. A user can configure one
or more installed iDRAC devices. The user can also configure the default iDRAC network configuration settings and root
password for severs that are installed later; these default settings are the iDRAC QuickDeploy settings.
For more information about iDRAC, see the
Related Links
Configuring iDRAC QuickDeploy Network Settings
Modifying iDRAC Network Settings for Individual Server iDRAC
Modifying iDRAC Network Settings Using RACADM
Configuring iDRAC QuickDeploy Network Settings
iDRAC7 User’s Guide
at dell.com/support/manuals.
Use the QuickDeploy Settings to configure the network settings for newly inserted servers. After enabling QuickDeploy,
the QuickDeploy settings are applied to servers when that server is installed.
To enable and set the iDRAC QuickDeploy settings using the CMC Web interface:
1. In the system tree, go to Server Overview, and then click Setup → iDRAC. The Deploy iDRAC page is displayed.
2. In the QuickDeploy Settings section, specify the settings mentioned in the following table.
Table 12. : QuickDeploy Settings
Setting Description
QuickDeploy Enabled Enables or disables the QuickDeploy feature that
automatically applies the iDRAC settings configured on
this page to newly inserted servers; the auto
configuration must be confirmed locally on the LCD
panel.
NOTE: This includes the root user password if the
Set iDRAC Root Password on Server Insertion box
is checked.
By default, this option is disabled.
Set iDRAC Root Password on Server Insertion Specifies whether a server’s iDRAC root password must
be changed to the value provided in the iDRAC Root
Password field when the server is inserted.
iDRAC Root Password When Set iDRAC Root Password on Server Insertion
and QuickDeploy Enabled options are selected, this
86

Setting Description
password value is assigned to a server's iDRAC root
user password when the server is inserted into chassis.
The password can have 1 to 20 printable (including
spaces) characters.
Confirm iDRAC Root Password Verifies the password entered into the iDRAC Root
Password field.
Enable iDRAC LAN Enables or disables the iDRAC LAN channel. By default,
this option is disabled.
Enable iDRAC IPv4 Enables or disables IPv4 on iDRAC. By default, this
option is enabled.
Enable iDRAC IPMI over LAN Enables or disables the IPMI over LAN channel for each
iDRAC present in the chassis.By default, it is disabled.
Enable iDRAC DHCP Enables or disables DHCP for each iDRAC present in the
chassis. If this option is enabled, the fields QuickDeploy
IP, QuickDeploy Subnet Mask, and QuickDeploy
Gateway are disabled, and cannot be modified since
DHCP is used to automatically assign these settings for
each iDRAC. By default, this option is disabled.
Starting iDRAC IPv4 Address (Slot 1) Specifies the static IP address of iDRAC in the server, in
slot 1 of the enclosure. The IP address of each
subsequent iDRAC is incremented by 1 for each slot
from slot 1's static IP address. In the case where the IP
address plus the slot number is greater than the subnet
mask, an error message is displayed.
NOTE: The subnet mask and the gateway are not
incremented like the IP address.
For example, if the starting IP address is
192.168.0.250 and the subnet mask is
255.255.0.0 then the QuickDeploy IP address for
slot 15 is
255.255.255.0, the QuickDeploy IP
address range is not fully within
QuickDeploy Subnet
when you click the Save QuickDeploy Settings or AutoPopulate Using QuickDeploy Settings.
iDRAC IPv4 Netmask Specifies the QuickDeploy subnet mask that is assigned
to all newly inserted servers.
iDRAC IPv4 Gateway Specifies the QuickDeploy default gateway that is
assigned to all iDRAC present in the chassis.
Enable iDRAC IPv6 Enables IPv6 addressing for each iDRAC present in the
chassis that is IPv6 capable.
Enable iDRAC IPv6 Autoconfiguration Enables the iDRAC to obtain IPv6 settings (address and
prefix length) from a DHCPv6 server and also enables
192.168.0.265. If the subnet mask were
error message is displayed
87

Setting Description
stateless address auto configuration. By default, this
option is enabled.
iDRAC IPv6 Gateway Specifies the default IPv6 gateway to be assigned to the
iDRACs. The default value is "::".
iDRAC IPv6 Prefix Length Specifies the prefix length to be assigned for the IPv6
addresses on the iDRAC. The default value is 64.
3. Click Save QuickDeploy Settings to save the settings. If you have made changes to the iDRAC network setting, click
Apply iDRAC Network Settings to deploy the settings to the iDRAC.
The QuickDeploy feature only executes when it is enabled, and a server is inserted in the chassis. If Set iDRAC Root
Password on Server Insertion and QuickDeploy Enabled are enabled, the user is prompted using the LCD interface
to allow or not allow the password change. If there are network configuration settings that differ from the current
iDRAC settings, the user is prompted to either accept or not accept the changes.
NOTE: When there is a LAN or IPMI over LAN difference, the user is prompted to accept the QuickDeploy IP
address setting. If the difference is the DHCP setting, the user is prompted to accept the DHCP QuickDeploy
setting.
To copy the QuickDeploy settings into the iDRAC Network Settings section, click Auto-Populate Using QuickDeploy
Settings. The QuickDeploy network configurations settings are copied into the corresponding fields in the iDRAC
Network Configuration Settings table.
NOTE: Changes made to QuickDeploy fields are immediate, but changes made to one or more iDRAC server
network configuration settings may require a couple of minutes to propagate from CMC to iDRAC. Clicking
Refresh too soon may display only partially correct data for one or more iDRAC servers.
Modifying iDRAC Network Settings for Individual Server iDRAC
Using this table you can configure the iDRAC network configurations settings for each installed server. The initial values
displayed for each of the fields are the current values read from the iDRAC.
To modify the iDRAC Network Settings using the CMC Web interface:
1. In the system tree, go to Server Overview, and then click Setup → iDRAC. The Deploy iDRAC page is displayed. The
iDRAC Network Settings section lists all installed server’s iDRAC IPv4 and IPv6 network configuration settings.
2. Modify the iDRAC network settings as required for the server(s).
NOTE: You must select the Enable LAN option to specify the IPv4 or IPv6 settings. For information about the
fields, see CMC Online Help.
3. To deploy the setting to iDRAC, click Apply iDRAC Network Settings. If you made changes to the QuickDeploy
settings, they are also saved.
The iDRAC Network Settings table reflects future network configuration settings; the values shown for installed
servers may or may not be the same as the currently installed iDRAC network configuration settings. Click Refresh
to update the iDRAC Deploy page with each installed iDRAC network configuration settings after changes are
made.
NOTE: Changes made to QuickDeploy fields are immediate, but changes made to one or more iDRAC server
network configuration settings may require a couple of minutes to propagate from CMC to iDRAC. Clicking
Refresh too soon may display only partially correct data for a one or more iDRAC servers.
88

Modifying iDRAC Network Settings Using RACADM
RACADM config or getconfig commands support the -m <module> option for the following configuration
groups:
• cfgLanNetworking
• cfgIPv6LanNetworking
• cfgRacTuning
• cfgRemoteHosts
• cfgSerial
• cfgSessionManagement
For more information on the property default values and ranges, see the
iDRAC7 and CMC
.
RACADM Command Line Reference Guide for
Configuring iDRAC VLAN Tag Settings
VLANs are used to allow multiple virtual LANs to co-exist on the same physical network cable and to segregate the
network traffic for security or load management purposes. When you enable the VLAN functionality, each network
packet is assigned a VLAN tag. VLAN tags are chassis properties. They remain with the chassis even when a
component is removed.
Configuring iDRAC VLAN Tag Settings Using Web Interface
To configure VLAN for server using the CMC Web interface:
1. Go to any of the following pages:
– In the system tree, go to Chassis Overview and click Network → VLAN.
– In the system tree, go to Chassis Overview → Server Overview and click Network → VLAN. The VLAN Tag
Settings page is displayed.
2. In the iDRAC section, enable VLAN for the server(s), set the priority and enter the ID. For more information about
the fields, see the
3. Click Apply to save the settings.
CMC Online Help
.
Configuring iDRAC VLAN Tag Settings Using RACADM
• Specify the VLAN ID and priority of a particular server with the following command:
racadm setniccfg -m server-<n> -v <VLAN id> <VLAN priority>
The valid values for <n> are 1 – 16.
The valid values for <VLAN> are 1 – 4000 and 4021 – 4094. Default is 1.
The valid values for <VLAN priority> are 0 – 7. Default is 0.
For example:
racadm setniccfg -m server-1 -v 1 7
For example:
89

• To remove a server VLAN, disable the VLAN capabilities of the specified server's network:
racadm setniccfg -m server-<n> -v
The valid values for <n> are 1-16.
For example:
racadm setniccfg -m server-1 -v
Setting First Boot Device
You can specify the CMC first boot device for each server. This may not be the actual first boot device for the server or
even represent a device present in that server; instead it represents a device sent by CMC to the server and used as its
first boot device in regard to that server.
You can set the default boot device and set a one-time boot device so that you can boot a image to perform tasks such
as running diagnostics or reinstalling an operating system.
You can set the first boot device for the next boot only or for all subsequent reboots. Based on this selection, you can set
the first boot device for the server. The system boots from the selected device on the next and subsequent reboots and
remains as the first boot device in the BIOS boot order, until it is changed again either from the CMC Web interface or
from the BIOS boot sequence.
NOTE: The first boot device setting in CMC Web Interface overrides the System BIOS boot settings.
The boot device that you specify must exist and contain bootable media.
You can set the following devices for first boot.
Table 13. : Boot Devices
Boot Device Description
PXE Boot from a Preboot Execution Environment (PXE) protocol
on the network interface card.
Hard Drive Boot from the hard drive on the server.
Local CD/DVD Boot from a CD/DVD drive on the server.
Virtual Floppy Boot from the virtual floppy drive. The floppy drive (or a
floppy disk image) is on another computer on the
management network, and is attached using the iDRAC
GUI console viewer.
Virtual CD/DVD Boot from a virtual CD/DVD drive or CD/DVD ISO image.
The optical drive or ISO image file is located on another
computer or disk available on the management network
and is attached using the iDRAC GUI console viewer.
iSCSI Boot from an Internet Small Computer System Interface
(iSCSI) device.
Local SD Card Boot from the local SD (Secure Digital) card - for servers
that support iDRAC6 and iDRAC7 systems only.
Floppy Boot from a floppy disk in the local floppy disk drive.
RFS Boot from a Remote File Share (RFS) image. The image file
is attached using the iDRAC GUI console viewer.
Related Links
Setting First Boot Device For Multiple Servers Using CMC Web Interface
Setting First Boot Device For Individual Server Using CMC Web Interface
90

Setting First Boot Device Using RACADM
Setting First Boot Device For Multiple Servers Using CMC Web Interface
NOTE: To set the first boot device for servers, you must have Server Administrator privileges or Chassis
Configuration Administrator privileges and iDRAC login privileges.
To set the first boot device for multiple servers using the CMC Web interface:
1. In the system tree, go to Server Overview, and then click Setup → First Boot Device. A list of servers is displayed.
2. In the First Boot Device column, from the drop-down menu, select the boot device you want to use for each server.
3. If you want the server to boot from the selected device every time it boots, clear the Boot Once option for the
server. If you want the server to boot from the selected device only on the next boot cycle, select the
option for the server.
4. Click Apply to save the settings.
Boot Once
Setting First Boot Device For Individual Server Using CMC Web Interface
To set the first boot device for servers, you must have Server Administrator privileges or Chassis Configuration
Administrator privileges and iDRAC login privileges.
To set the first boot device for individual server using the CMC Web interface:
1. In the system go to Server Overview, and then click the server for which you want to set the first boot device.
2. Go to Setup → First Boot Device. The First Boot Device page is displayed.
3. From the First Boot Device drop-down menu, select the boot device you want to use for each server.
4. If you want the server to boot from the selected device every time it boots, clear the Boot Once option for the
server. If you want the server to boot from the selected device only on the next boot cycle, select the Boot Once
option for the server
5. Click Apply to save the settings.
Setting First Boot Device Using RACADM
To set the first boot device, use the cfgServerFirstBootDevice object.
To enable boot once for a device, use the cfgServerBootOnce object.
For more information about these objects, see the
available at dell.com/support/manuals.
RACADM Command Line Reference Guide for iDRAC and CMC
Configuring Server FlexAddress
For information to configure FlexAddress for servers, see Configuring FlexAddress for Server-Level Slots.
Configuring Remote File Share
The Remote Virtual Media File Share feature maps a file from a share drive on the network to one or more servers
through CMC to deploy or update an operating system. When connected, the remote file is accessible as if it is on the
local system. Two types of media are supported: floppy drives and CD/DVD drives.
To perform a remote file share operation (connect, disconnect, or deploy), you must have Chassis Configuration
Administrator or Server Administrator privileges.
91

To configure the remote file share using CMC Web interface:
1. In the system tree, go to Server Overview, and then click Setup → Remote File Sharing. The Deploy Remote File
Share page is displayed.
Enter the result of your step here (optional).
2. Specify the required settings. For more information, see the
3. Click Connect to connect to a remote file share. To connect a remote file share, you must provide the path, user
name, and password. A successful operation allows access to the media.
Click Disconnect to disconnect a previously connected remote file share.
Click Deploy to deploy the media device.
NOTE: Save all working files before executing the Deploy command because this action causes the server
to be restarted.
This command involves these actions:
– The remote file share is connected.
– The file is selected as the first boot device for the servers.
– The server is restarted.
– Power is applied to the server if the server is turned off.
CMC Online Help
.
Configuring BIOS Settings Using Server Clone
The server cloning feature allows you to apply all BIOS settings from a specified server to one or more servers. BIOS
settings that can be cloned are those BIOS settings, which can be modified and are intended to be replicated across
servers.
The server cloning feature supports iDRAC6 and iDRAC7 Servers. Earlier generation RAC servers are listed, but are
greyed out on the main page, and are not enabled to use this feature.
To use the server cloning feature:
• iDRAC must have the minimum version that is required. iDRAC6 servers require a minimum version of 3.2 and
iDRAC7 servers require version 1.00.00.
• Server must have supported generation of iDRAC.
• Server must be powered on.
The source and target servers need not belong to the same generation. Only the available cloneable settings are applied
from one server profile to other servers.
You can:
• Copy the BIOS settings of one server to another.
• Save a profile from a server.
• Apply a profile to other servers.
• View BIOS settings from a server or from a saved profile.
• Display the log activity for recent BIOS profile tasks.
Related Links
Accessing BIOS Profile Page
Adding or Saving Profile
Managing Stored Profiles
Applying Profile
Viewing BIOS Settings
92

Viewing Profile Log
Completion Status and Troubleshooting
Accessing BIOS Profile Page
You can add, manage, and apply BIOS profiles to one or more servers using the BIOS Profile page.
To access the BIOS Profile page using the CMC Web interface, in the system tree, go to Chassis Overview → Server
Overview and click Setup → Profiles. The BIOS Profiles page is displayed.
Related Links
Adding or Saving Profile
Managing Stored Profiles
Applying Profile
Viewing BIOS Settings
Viewing Profile Log
Completion Status and Troubleshooting
Adding or Saving Profile
Before root cloning the BIOS properties of a server, you must first capture the properties to a Stored Profile.
When you create a Stored Profile, you provide a name and optional description for each profile. You can save a
maximum of 16 Stored Profiles on the CMC non-volatile extended storage media.
Removing or disabling the non-volatile extended storage media prevents access to Stored Profiles, and disables the
Server Cloning feature.
To add or save a profile:
1. In the BIOS Profile page, in Save and Apply Profiles section, select the server from whose settings the profile is to
be generated and then click Save Profile.
The Save BIOS Profile section is displayed.
2. In the Profile Name and Description fields, enter the profile name and description (optional), and click Save Profile.
CMC communicates with the LC to get the available BIOS settings and store them as a named profile.
A progress indicator indicates that the Save operation is in progress. After the action is complete, a message,
"Operation Successful" is displayed.
Related Links
Accessing BIOS Profile Page
Managing Stored Profiles
You can edit, view, or delete BIOS profiles.
To manage the stored profiles on the CMC:
1. In the BIOS Profile page, in the Apply Profile section, click Manage Profiles. The Manage BIOS Profiles page is
displayed.
2. To edit a profile, click Edit.
3. To view BIOS settings, click View.
4. To delete a profile, click Delete.
For more information, see the
CMC Online Help
.
93

Applying Profile
When stored profiles are available in the non-volatile media on the CMC, to initiate a server cloning operation, you can
apply a Stored Profile to one or more servers.
NOTE: If a server does not support Lifecycle Controller or the chassis is powered off, you cannot apply a profile to
the server.
To apply a profile to one or more server(s):
1. In the BIOS Profiles page, in the Save and Apply Profiles section, select the servers for which you want to apply the
selected profile.
The Select Profile drop-down menu gets enabled.
2. From the Select Profile drop-down menu, select the required profile.
The Apply Profile option gets enabled.
3. Click Apply Profile.
A warning message is displayed that applying a new BIOS profile will overwrite the current settings and also
reboot the selected servers. You are prompted to confirm if you want to continue the operation.
NOTE: If CSIOR option is disabled, a warning message is displayed that CSIOR is not enabled for servers
targeted by the blade cloning operation. You must first enable CSIOR to complete the blade cloning operation.
4. Click OK to apply the profile to the selected server.
The selected profile is applied to the server(s) and the server(s) is rebooted immediately. For more information, see
the
CMC Online Help
.
Related Links
Accessing BIOS Profile Page
Importing Profile
You can import a BIOS profile that is stored previously on a server to CMC.
To import a stored profile on a server to CMC:
1. In the BIOS Profile page, in the Manage Profiles on SD Card section, click Import Profile.
The Import BIOS Profile section is displayed.
2. Click Browse to access the profile from the required location and then click Import Profile.
For more information, see the
CMC Online Help
.
Exporting Profile
You can export a stored BIOS profile saved on the CMC non-volatile media (SD Card) to a specified path on another
server.
To export a stored profile:
1. In the BIOS Profile page, in the Manage Profiles on SD Card section, select the required profile, and then click
Export Profile.
A File Download message box is displayed asking you to open or save the file.
2. Click Save or Open to export the profile to the required location.
94

For more information, see the
CMC Online Help
.
Editing Profile
You can edit the name and description of a BIOS profile that is stored on the CMC non-volatile media (SD Card).
To edit a stored profile:
1. In the BIOS Profile page, in the Manage Profiles on SD Card section, select the required profile and then click Edit
Profile.
The Edit BIOS Profile — <Profile Name> section is displayed.
2. Edit the profile name and description of the BIOS Profile as required and then click Edit Profile.
For more information, see the
CMC Online Help
.
Deleting Profile
You can delete a BIOS profile that is stored on the CMC non-volatile media (SD Card).
To delete a stored profile:
1. In the BIOS Profile page, in the Manage Profiles on SD Card section, select the required profile and then click
Delete Profile.
A warning message is displayed indicating that deleting a profile would permanently delete the selected profile.
2. Click OK to delete the selected profile.
For more information, see the
CMC Online Help
.
Viewing BIOS Settings
To view BIOS settings for a selected server, in the BIOS Profiles page, in the Save and Apply Profiles section, click View
in the BIOS settings column for the server for which you want to view the BIOS settings information. The View Settings
page is displayed.
Only BIOS settings on the server which may be modified by applying a profile (cloneable settings) are displayed. The
settings are partitioned into groups in the same way they are displayed in the iDRAC BIOS Setup screen.
NOTE: The CMC Server Cloning application retrieves and displays the correct BIOS and Boot settings for a specific
server, only if the Control System Inventory on Restart (CSIOR) option is enabled.
To enable CSIOR on:
• 11th generation servers — After rebooting the server, from the Ctrl-E setup, select System Services, enable
CSIOR and save the changes.
• 12th generation servers — After rebooting the server, from the F2 setup, select iDRAC Settings → Lifecycle
Controller, enable CSIOR and save the changes.
Related Links
Accessing BIOS Profile Page
Viewing Profile Settings
To view Profile settings of the stored BIOS profiles, go to the BIOS Profiles page. In the Manage Profiles on SD Card
section, click View in the Profile settings column for the BIOS Profile for which you want to view the profile settings
information. The View Settings page is displayed.
95

Viewing Profile Log
To view the profile log, in the BIOS Profiles page, see the Recent Profile Log section that lists the 10 latest profile log
entries directly from server cloning operations. Each recent profile log displays the severity, the time and date when
server cloning operation was submitted, and the description of the cloning log message. The log entries are also
available in the RAC log. To view the other available entries, click Go to Profile Log. The Profile Log page is displayed.
Completion Status and Troubleshooting
To check the completion status of an applied BIOS profile:
1. In the BIOS Profiles page, note down the Job ID (JID) of the submitted job from the Recent Profile Log section.
2. In the system tree, go to Server Overview and click Troubleshooting → Lifecycle Controller Jobs. Look up the same
JID in the Jobs table.
Launching iDRAC using Single Sign-On
CMC provides limited management of individual chassis components, such as servers. For complete management of
these individual components, CMC provides a launch point for the server’s management controller (iDRAC) Web-based
interface.
A user may be able to launch iDRAC Web interface without having to login a second time, as this feature utilizes single
sign-on. Single sign-on policies are:
• A CMC user who has server administrative privilege, is automatically logged into iDRAC using single sign-on.
Once on the iDRAC site, this user is automatically granted Administrator privileges. This is true even if the same
user does not have an account on iDRAC, or if the account does not have the Administrator’s privileges.
• A CMC user who does NOT have the server administrative privilege, but has the same account on iDRAC is
automatically logged into iDRAC using single sign-on. Once on the iDRAC site, this user is granted the privileges
that were created for the iDRAC account.
• A CMC user who does not have the server administrative privilege, or the same account on the iDRAC, does
NOT automatically logged into iDRAC using single sign-on. This user is directed to the iDRAC login page when
the Launch iDRAC GUI is clicked.
NOTE: The term "the same account" in this context means that the user has the same login name with a
matching password for CMC and for iDRAC. The user who has the same login name without a matching
password, is considered to have the same account.
NOTE: Users may be prompted to log in to iDRAC (see the third Single Sign-on policy bullet above).
NOTE: If the iDRAC network LAN is disabled (LAN Enabled = No), single sign-on is not available.
If the server is removed from the chassis, the iDRAC IP address is changed, or the iDRAC network connection
experiences a problem, then clicking Launch iDRAC GUI may display an error page.
Related Links
Launching iDRAC from Servers Status Page
Launching iDRAC from Server Status Page
Launching iDRAC from Servers Status Page
To launch the iDRAC management console from the Servers Status page:
1. In the system tree, click Server Overview. The Servers Status page is displayed.
2. Click Launch iDRAC for the server you want to launch the iDRAC Web interface.
96

Launching iDRAC from Server Status Page
To launch the iDRAC management console for an individual server:
1. In the system tree, expand Server Overview. All of the servers (1–16) appear in the expanded Servers list.
2. Click the server for which you want to launch the iDRAC Web interface. The Server Status page is displayed.
3. Click Launch iDRAC GUI. The iDRAC Web interface is displayed.
Launching Remote Console from CMC Web Interface
You can launch a Keyboard-Video-Mouse (KVM) session directly on the server. The remote console feature is supported
only when all of the following conditions are met:
• The chassis power is on.
• Servers that support iDRAC6 and iDRAC7.
• The LAN interface on the server is enabled.
• The iDRAC version is 2.20 or later.
• The host system is installed with JRE (Java Runtime Environment) 6 Update 16 or later.
• The browser on host system allows pop-up windows (pop-up blocking is disabled).
Remote Console can also be launched from the iDRAC Web interface. For more details, see
Related Links
Launching Remote Console from Chassis Health Page
Launching Remote Console from Server Status Page
Launching Remote Console from Servers Status Page
iDRAC User’s Guide
Launching Remote Console from Chassis Health Page
To launch a remote console from the CMC Web interface, do any of the following:
1. In the system tree, go to Chassis Overview, and then click Properties → Health. The Chassis Health page is
displayed.
2. Click on the specified server in the chassis graphic.
3. In the Quicklinks section, click the Launch Remote Console link to launch the remote console.
Launching Remote Console from Server Status Page
To launch a remote console for an individual server:
1. In the system tree, expand Server Overview. All servers (1–16) appear in the expanded servers list.
2. Click the server for which you want to launch the remote console. The Server Status page appears.
3. Click Launch Remote Console.
Launching Remote Console from Servers Status Page
.
To launch a remote console from the Servers Status page:
1. In the system tree, go to Server Overview, and then click Properties → Status. The Servers Status page is
displayed.
2. Click Launch Remote Console for the required server.
97

98

8
Configuring CMC To Send Alerts
You can set alerts and actions for certain events that occur on the managed system. An event occurs when the status of
a system component is greater than the pre-defined condition. If an event matches an event filter and you have
configured this filter to generate an alert (e-mail alert or SNMP trap), then an alert is sent to one or more configured
destinations.
To configure CMC to send alerts:
1. Enable the global chassis event alerts.
2. Optionally, you can select the events for which alerts must be generated.
3. Configure the e-mail alert or SNMP trap settings.
Related Links
Enabling Or Disabling Alerts
Configuring Alert Destinations
Enabling Or Disabling Alerts
To send alerts to configured destinations, you must enable the global alerting option. This property overrides the
individual alert setting.
Make sure that the SNMP or e-mail alert destinations are configured to receive the alerts.
Enabling Or Disabling Alerts Using CMC Web Interface
To enable or disable generating alerts:
1. In the system tree, go to Chassis Overview, and then click Alerts → Chassis Events.
The Chassis Events page is displayed.
2. Under Chassis Event Filters Configuration section, select Enable Chassis Event Alerts option to enable alert
generation. Else, clear this option.
3. Under the Chassis Event List section, do one of the following:
– Select individual events for which alerts must be generated.
– Select the Enable Alert option on the column header to generate alerts for all events. Else, clear this option.
4. Click Apply to save the setting.
Enabling Or Disabling Alerts Using RACADM
To enable or disable generating alerts, use the cfgIpmiLanAlertEnable RACAM object. For more information, see the
RACADM Command Line Reference Guide for iDRAC7 and CMC
.
99

Configuring Alert Destinations
The management station uses Simple Network Management Protocol (SNMP) to receive data from CMC.
You can configure the IPv4 and IPv6 alert destinations, e-mail settings, and SMTP server settings, and test these
settings.
Before configuring the e-mail alert or SNMP trap settings, make sure that you have Chassis Configuration Administrator
privilege.
Related Links
Configuring SNMP Trap Alert Destinations
Configuring E-Mail Alert Settings
Configuring SNMP Trap Alert Destinations
You can configure the IPv6 or IPv4 addresses to receive the SNMP traps.
Configuring SNMP Trap Alert Destinations Using CMC Web Interface
To configure IPv4 or IPv6 alert destination settings using CMC Web interface:
1. In the system tree, go to Chassis Overview , and then click Alerts → Trap Settings .
The Chassis Event Alert Destinations page is displayed.
2. Enter the following:
– In the Destination field, enter a valid IP address. Use the quad-dot IPv4 format, standard IPv6 address
notation, or FQDN. For example: 123.123.123.123 or 2001:db8:85a3::8a2e:370:7334 or dell.com .
Choose a format that is consistent with the networking technology or infrastructure. The Test Trap
functionality cannot detect incorrect choices based on the current network configuration (example, use of
an IPv6 destination in an IPv4-only environment).
– In the Community String field, enter a valid community string to which the destination management station
belongs.
This community string differs from the community string on the Chassis → Network → Services page. The
SNMP traps community string is the community that CMC uses for outbound traps destined to management
stations. The community string on the Chassis → Network → Services page is the community string that
management stations use to query the SNMP daemon on CMC.
– Under Enabled , select the check box corresponding to the destination IP to enable the IP address to
receive the traps. You can specify up to four IP addresses.
3. Click Apply to save the settings.
4. To test whether the IP address is receiving the SNMP traps, click Send in the Test SNMP Trap column.
The IP alert destinations are configured.
Configuring SNMP Trap Alert Destinations Using RACADM
To configure IP alert destination using RACADM:
1. Open a serial/Telnet/SSH text console to CMC and log in.
NOTE: Only one filter mask may be set for both SNMP and e-mail alerting. You can skip step 2 if you have
already selected filter mask.
2. Enable alert generation:
racadm config -g cfgAlerting -o cfgAlertingEnable 1
100
 Loading...