

Page 1
Desktop 4500 System
Installation and User Guide
Includes Liberty Printer
110715-000 Revision D
Use this manual to help you:
• Select and configure your PC.
• Install and cable the Desktop autoloader and printer.
• Operate autoloader functions.
Page 2
Desktop 4500 Autoloader – Model RAS13
Notice for USA
Tested to Comply with FCC Standards FOR HOME OR OFFICE USE. This device complies
with part 15 of the FCC Rules. Operation is subject to the following two conditions: (1) This
device may not cause harmful interference, and (2) this device must accept any interference
received, including interference that may cause undesired operation. Any unauthorized
modification to this equipment may result in the revocation by the FCC of the user's
authority to operate this equipment.
This product complies with UL 60950 3
Notice for Canada
This Class B digital apparatus complies with Canadian ICES-003. Cet appareil numerique de
la classe B est conforme a la norme NMB-003
This product complies with CAN/CSA-C22.2 No. 60950-00 3
rd
Edition.
du Canada.
rd
Edition.
Notice for Europe
This product is in conformity with the EMC Directive (89/336/EEC) and the Low-Voltage
Directive (73/23/EEC) through compliance with the following European standards:
EN 55022: 1998 + Amd. 1: 2000 Class B Limit
affixed in accordance with the CE Marking Directive 93/68/EEC
Liberty Printer – Model CDPR3
Notice for USA
Tested to Comply with FCC Standards FOR HOME OR OFFICE USE.
This device complies with part 15 of the FCC Rules. Operation is subject to the following two
conditions: (1) This device may not cause harmful interference, and (2) this device must
accept any interference received, including interference that may cause undesired operation.
Any unauthorized modification to this equipment may result in the revocation by the FCC of
the user's authority to operate this equipment.
This product contains a radio transmitter FCC ID: QT5-RFID1.
This product complies with UL 60950 3
Notice for Canada
This Class B digital apparatus complies with Canadian ICES-003. Cet appareil numerique de
la classe B est conforme a la norme NMB-003
This product contains a radio transmitter IC: 4496A-RFID1 in conformance with RSS-210:
Issue 5: 2001. The term "IC" before the radio certification number only signifies that Industry
Canada Technical specifications were met.
This product complies with CAN/CSA-C22.2 No. 60950-00 3
; EN 55024; EN 60950. The CE mark has been
.
rd
Edition.
du Canada.
rd
Edition.
Notice for Europe
This product is in conformity with the EMC Directive (89/336/EEC) and the Low-Voltage
Directive (73/23/EEC) through compliance with the following European standards:
EN 55022: 1998 + Amd. 1: 2000 Class B Limit
affixed in accordance with the CE Marking Directive 93/68/EEC
This product contains a radio transmitter (RFID1) in conformity with the following R&TTE
directive 1995/5/EC through compliance with the following European standards: EN 300 330-2
!
v1.1.1: 2001; EN 301 489-3: 2002 Class B Limit.
; EN 55024; EN 60950. The CE mark has been
.
ii
Page 3
Rimage Corporation
7725 Washington Avenue South
Minneapolis, MN 55439
FAX: (952) 946-6956
Service: (952) 946-0004 (Asia/Pacific · Mexico/Latin America)
(800) 553-8312 (North America)
email: support@rimage.com
Rimage Technical Website:
http://www.rimage.com/technical/
Rimage Europe GmbH
Hans-Böckler-Straße 7
63128 Dietzenbach, Germany
Tel: +49-(0) 6074-8521-0
FAX: +49-(0) 6074-8521-21
Record of Revisions—PN 110715-000
Revision Date Description
C 06/26/03 Changed printer driver installation directions for new driver.
Changed “Align Cartridge” to “
D 09/03/03 Added copy disc disclaimer and a warning about using too much
force may damage the black ink cartridge. Computer
Specifications changed on page 57
Copyright© 2003 Rimage Corporation
Rimage™ is a trademark of the Rimage Corporation.
Perfect Image® is a registered trademark of the Rimage Corporation.
Dell is registered trademark of Dell Computer Corporation.
Firewire is a registered trademark of Apple Computer, Inc.
All other trademarks and registered trademarks are the property of their respective
owners.
Center Image” on page 48.
.
Document Disclaimer
Rimage Corporation reserves the rights to make improvements to the equipment and
software described in this document at any time without any prior notice. Rimage
Corporation reserves the right to revise this publication and to make changes from
time to time in the content hereof without obligation of Rimage Corporation to notify
any person or organization of such revisions or changes.
This document may contain links to web sites that were current at the time of
publication, but may have moved or become inactive since. This document may
contain links to sites on the Internet, which are owned and operated by third parties.
Rimage Corporation is not responsible for the content of any such third-party site.
iii
Page 4

LIMITED 1-Year Warranty
Rimage warrants, to the original end user only, that all non-consumable parts of the
Rimage Desktop 4500 products will be free from defects in material and workmanship
for 12 months, according to the following terms:
• Rimage will replace or repair, at Rimage's discretion, any non-consumable parts
found defective within the Warranty period.
• Valid from the date Rimage ships the product to you.
• Factory depot repair to Rimage Minnesota or Rimage Germany with a typical
response of 15 business days (25 business days for International). On-site repair,
Advanced Replacement, or faster response Maintenance Contracts are available for
an additional fee.
• Rimage will pay ground service freight charges for components shipped to you.
The use of non-Rimage ink cartridges or refilling of ink cartridges voids the equipment
warranty or maintenance coverage. Any applicable ink cartridge warranty shall not
apply to Rimage ink cartridges that have been refilled, remanufactured, refurbished,
misused, or tampered with in any way.
This Warranty Does
Not include the following:
• Work done at the customer's location, or customer's loss of data.
• Shipment costs of equipment or components returned to the Rimage factory.
• Software and/or firmware enhancements released after purchase of the product.
• Equipment or parts that were tampered with, misused, neglected, or that were
modified in any respect without the written consent of Rimage.
• Equipment or parts that have been damaged due to shipping or accidents, or
damaged by lightning, storms, water, or power surges.
• Printer consumables including ink cartridges or print head.
You may not assign this Warranty without Rimage's written consent. Rimage is the
intended beneficiary of this Warranty; if there is any inconsistency between this
Warranty and any other agreement included with or relating to Rimage products, this
Warranty shall govern. If any term of this Warranty is illegal or unenforceable, the
legality and enforceability of the remaining provisions are not affected or impaired.
This Warranty is to be interpreted under the laws of the State of Minnesota, without
giving effect to conflict of law rules.
Rimage must receive written notice of any claimed defect or failure to perform within
five (5) days after such failure or defect is first observed. For warranty service, call
Rimage at (952) 946-0004. For Europe, call +49-(0) 6074-8521-0.
The Limited Warranty set forth above is Rimage's only Warranty in connection with
the Desktop family of products. All other Warranties, whether written or oral, express
or implied, contractual or statutory, including, but not limited to any Warranties of
merchantability or fitness for any particular purpose are specifically excluded and
disclaimed. In no event shall Rimage's liability under this Warranty exceed the
obligation to repair or replace, at Rimage's discretion, a Warranted product, and,
without limiting the foregoing, Rimage's liability under this Warranty shall not exceed
the cost of the covered product.
To check order shipment information, return goods data, shipping details, or tracking
specifics on the Rimage web site go to www.rimage.com
and select Order Status.
iv
Page 5

Table of Contents
Safety Precautions .................................................................................................................... vi
Overview -----------------------------------------------------------------------------------------------------------------7
Box Contents.............................................................................................................................. 7
Setup Computer -------------------------------------------------------------------------------------------------------8
Install Computer Hardware ...................................................................................................... 8
Install Carousel --------------------------------------------------------------------------------------------------------9
Desktop 4500 Setup ------------------------------------------------------------------------------------------------ 10
Install Printer .......................................................................................................................... 10
Connect Cables......................................................................................................................... 11
Install Liberty Printer Driver ................................................................................................. 14
Install Printer Driver on Windows 2000 ........................................................................... 15
Install Printer Driver on Windows XP .............................................................................. 17
Install Ink Cartridges .............................................................................................................. 22
Align Ink Cartridges ................................................................................................................ 23
Check Printer Tray Alignment to the Picker ......................................................................... 27
Tray Controller Help .......................................................................................................... 31
Releasing Picker Motor Energy ......................................................................................... 31
Desktop 4500 Parts-------------------------------------------------------------------------------------------------32
Front View................................................................................................................................ 32
Liberty Printer.................................................................................................................... 32
Carousel .............................................................................................................................. 32
Disc Recorders .................................................................................................................... 32
Operator Panel.................................................................................................................... 33
Operator Button .................................................................................................................33
Rear View ................................................................................................................................. 34
Liberty Operator Panel............................................................................................................ 35
User Operations ----------------------------------------------------------------------------------------------------- 36
Loading Discs ........................................................................................................................... 36
Handling CDs...................................................................................................................... 36
Bin Configuration ...............................................................................................................36
Reloading Discs ........................................................................................................................ 37
Installing the Carousel ............................................................................................................ 37
Label Design Requirements .................................................................................................... 38
Media Requirements................................................................................................................ 38
Replace Ink Cartridge.............................................................................................................. 39
Ink Cartridge Status................................................................................................................ 41
Change Printer Driver Settings --------------------------------------------------------------------------------- 42
Advanced Tab........................................................................................................................... 45
Printing............................................................................................................................... 46
Settings ............................................................................................................................... 47
Maintenance........................................................................................................................ 48
Center Image ...................................................................................................................... 48
Update Autoloader Flash.........................................................................................................51
Tray Controller ........................................................................................................................ 52
v
Page 6

Find Additional Information ------------------------------------------------------------------------------------- 53
Online Help .............................................................................................................................. 53
Online Manuals........................................................................................................................ 54
Technical Support and Product Updates................................................................................ 54
Related Documents .................................................................................................................. 54
Desktop 4500 Specifications------------------------------------------------------------------------------------ 55
Liberty Printer Specifications----------------------------------------------------------------------------------- 56
Computer Specifications ----------------------------------------------------------------------------------------- 57
Computer Requirements ......................................................................................................... 57
CD and DVD Recording Software Disclaimer
This Product, Software, or Documentation may be designed to assist you in reproducing
material in which you own the copyright or have obtained permission to copy from the
copyright owner. Unless you own the copyright or have permission to copy from the
copyright owner, you may be violating copyright law and be subject to payment of
damages and other remedies. If you are uncertain about your rights, you should contact
your legal advisor. If you are neither in possession of the copyright nor have authorization
from the owner of the copyright, unauthorized copying of CDs violates national and
international legislation and can result in severe penalties.
Safety Precautions
This manual and the indications on the product allow proper and safe operation. The indication
marks below help protect you and other persons from injury, and equipment from damage.
To ensure safety, please read the precautions in the online User Guide manual and familiarize
yourself with their meaning before using the equipment.
Warning! Ignoring this symbol and performing wrong operation may cause death or
severe injury.
Caution Ignoring this symbol and performing wrong operation may cause bodily harm
or equipment damage.
WARNING:
The laser beam used by this CD Recorder is a Class 1 laser and may be harmful to the eyes. Do
not attempt to open the recorder. An authorized field technician should perform all service
procedures.
CAUTION:
For continued protection against risk of fire, replace the fuse only with same type and rating.
An authorized field technician should perform all service procedures.
WARNING:
Ink may be harmful if swallowed. Avoid contact with eyes. Ink contains nitrites. If ingested,
seek immediate medical attention. Keep out of reach of children.
vi
Page 7

Chapter 1 – Overview
Overview
This manual provides the information needed to unpack, install, and operate the
Desktop 4500 autoloader and Liberty printer. The Desktop 4500 consists of an
autoloader that can move discs from a three-bin carousel to recorders, and a printer,
all integrated into one machine. The three-bin carousel has a capacity of 120 discs and
may be loaded or unloaded without interrupting the current order. The Desktop 4500
works in conjunction with Rimage OfficeNet Software running on Windows 2000 or
XP.
For a basic overview of the Desktop 4500 parts, go to page 32.
Box Contents
After all the boxes are opened and the components are removed, you can use the check
boxes to check off the included components:
Desktop 4500:
Rimage Desktop 4500 Installation and User Guide
Rimage OfficeNet Software Suite
AC Power Cord
Autoloader Control Cable
Firewire Cable
USB Cable
IEEE 1394 (Firewire) Host Adapter Card
Software Activation Card
3-Bin Carousel
Desktop QuickStart Directions
Software Suite 6 Install Guide
Software Suite 6 Getting Started Guide
Printer:
Liberty Printer
Color Ink Cartridge
Black Ink Cartridge
Computer:
These parts are included only if a computer was ordered with the autoloader.
Computer
Monitor
Keyboard
Mouse and mouse pad
Two AC Power Cords
Inspect the shipping boxes before installing the hardware. Contact your reseller or
Rimage Corporation if items are missing or damaged.
Next Step
If the Desktop system came with a computer (PC), go to the “Install Carousel” section
on page 9. If the Desktop 4500 did not come with a computer, start at “Setup
Computer” on page 8.
7 Overview
Page 8

Chapter 2 – Installation
Setup Computer
If a Rimage Control Center (PC) came with your system, the software is already
installed. Go to the “Desktop 4500 Setup” section on page 10. If the system did not
come with a computer, the following procedures describe how to configure a computer
for the Desktop 4500 autoloader. The computer must meet certain specifications in
order to handle two to four recorders and the printing process. Refer to the “Computer
Specifications” on page 57.
Install Computer Hardware
If you are not familiar with installing adaptor cards or hard drives in a computer,
request help from your company’s network administrator.
1. Power off the computer power.
2. Remove the computer’s cover.
3. Install the IEEE 1394 (Firewire) host adapter card in one of the card slots, unless
your computer has one included.
4. If using the recommended computer specifications on page 57, install the
recommended SCSI Hard drive Controller in one of the card slots.
5. Install the recommended hard drives.
6. Connect all hard drives to the appropriate hard drive controller.
A hard drive is recommended for every two recorders. Tremendously improves
performance when recording each disc as a unique disc image. Disabling the
power management features to prevent underrun errors is recommended.
7. Format the cache hard drives as a Basic Disk with NTFS file system. Refer to
Windows online help, or get help from your network administrator. Do NOT
install the Rimage software until instructed!
8 Installation
Page 9
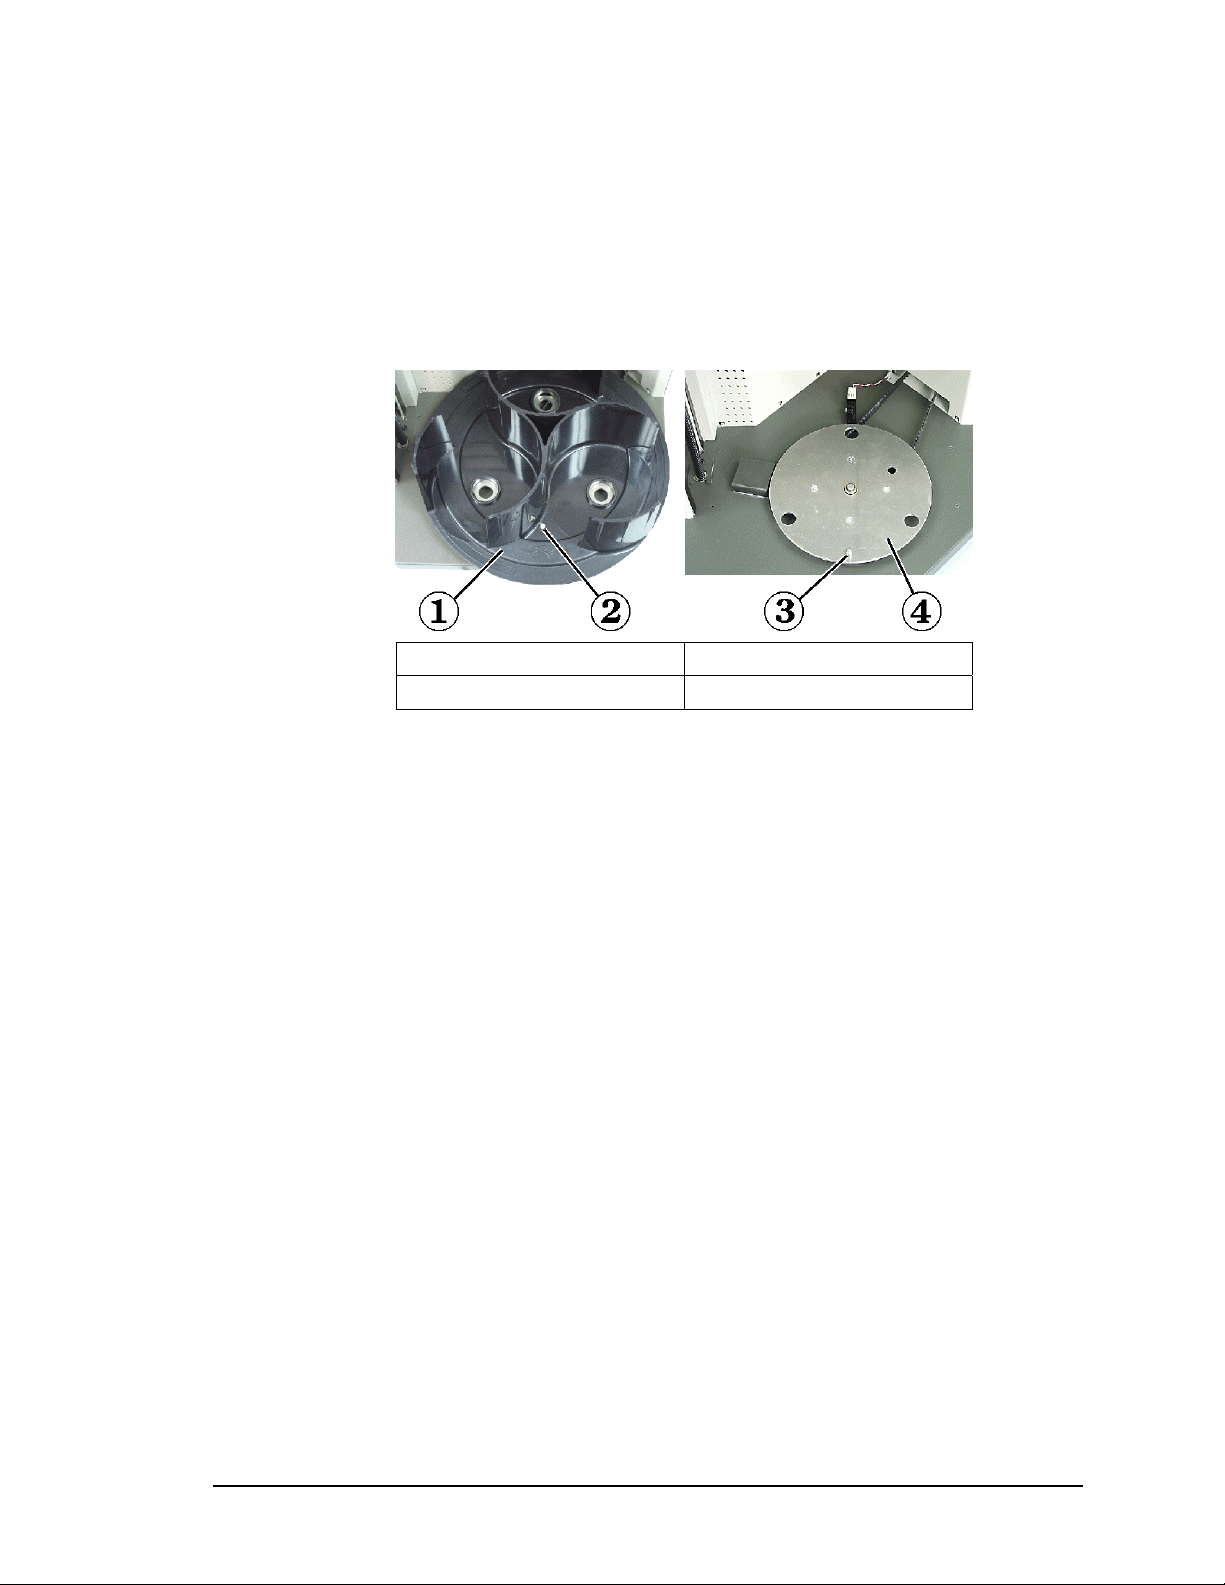
Install Carousel
1. Place the carousel on the carousel platter so the alignment hole is aligned with the
alignment pin.
2. Press the carousel down firmly.
3. Go to the “Desktop 4500 Setup” on page 10.
1 – Carousel 3 – Alignment Pin
2 – Alignment Hole 4 – Carousel Platter
9 Installation
Page 10
Desktop 4500 Setup
Proceed through the following directions to set up your system. You may need a 5/32”
Allen wrench and a T10 Torx screwdriver to align the printer.
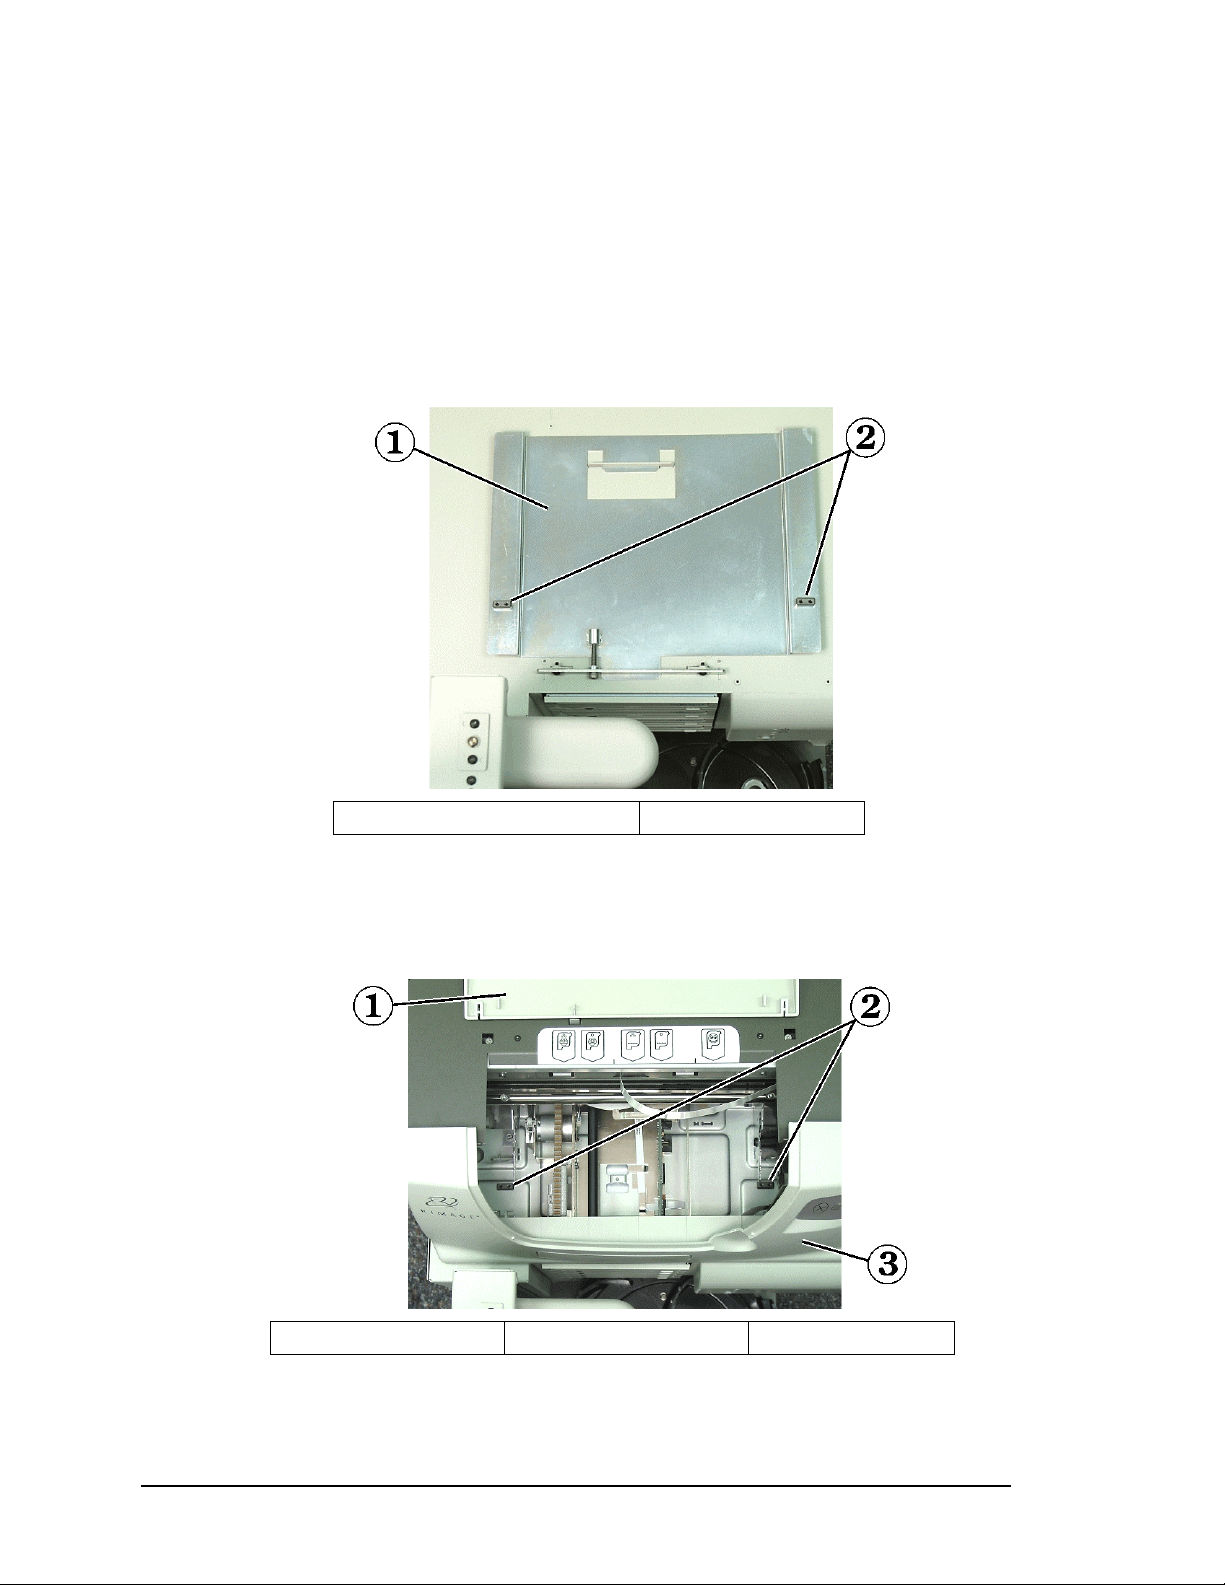
Install Printer
The following procedure explains how to install the Liberty printer on the Desktop
4500. The Desktop 4500 includes two alignment blocks on the printer adjustment
plate to hold and position the printer.
1 – Printer Adjustment Plate 2 – Alignment Blocks
1. Open the printer top cover and place the Liberty printer on the printer adjustment
plate so the alignment slots slide over the alignment blocks. The picture below
shows the alignment blocks coming up through the alignment slots located at the
bottom of the printer. Make sure the printer is pressed down so the blocks
protrude through the hole openings.
1 – Printer Top Cover 2 – Alignment Blocks 3 – Liberty Printer
2. Close the printer top cover.
3. Go to the “Connect Cables” section on page 11.
Installation 10
Page 11

Connect Cables
The Desktop 4500 and the Liberty printer require one AC outlet. The PC requires two
AC outlets. The Desktop 4500 and Liberty printer features a universal power supply
that automatically switches between 120 and 220 Volts. The recorders in the Desktop
4500 are controlled through a Firewire host adapter card. Before connecting the cables,
the PC should have the Firewire card installed.
1. Do NOT power on the Desktop system after connecting the cables!
2. Connect the AC power cord to the autoloader.
3. Connect one end of the Firewire cable to the connector as shown on the rear of the
Desktop 4500 autoloader.
1 – Desktop 4500 Autoloader 2 – Firewire Cable 3 – AC Power Cord
4. Connect the opposite end of the Firewire cable to the Firewire card on the PC.
Either Firewire connection will work. Your computer may not look like this one,
but the Firewire card is the same.
1 – Firewire Card 2 – Firewire
11 Installation
Page 12
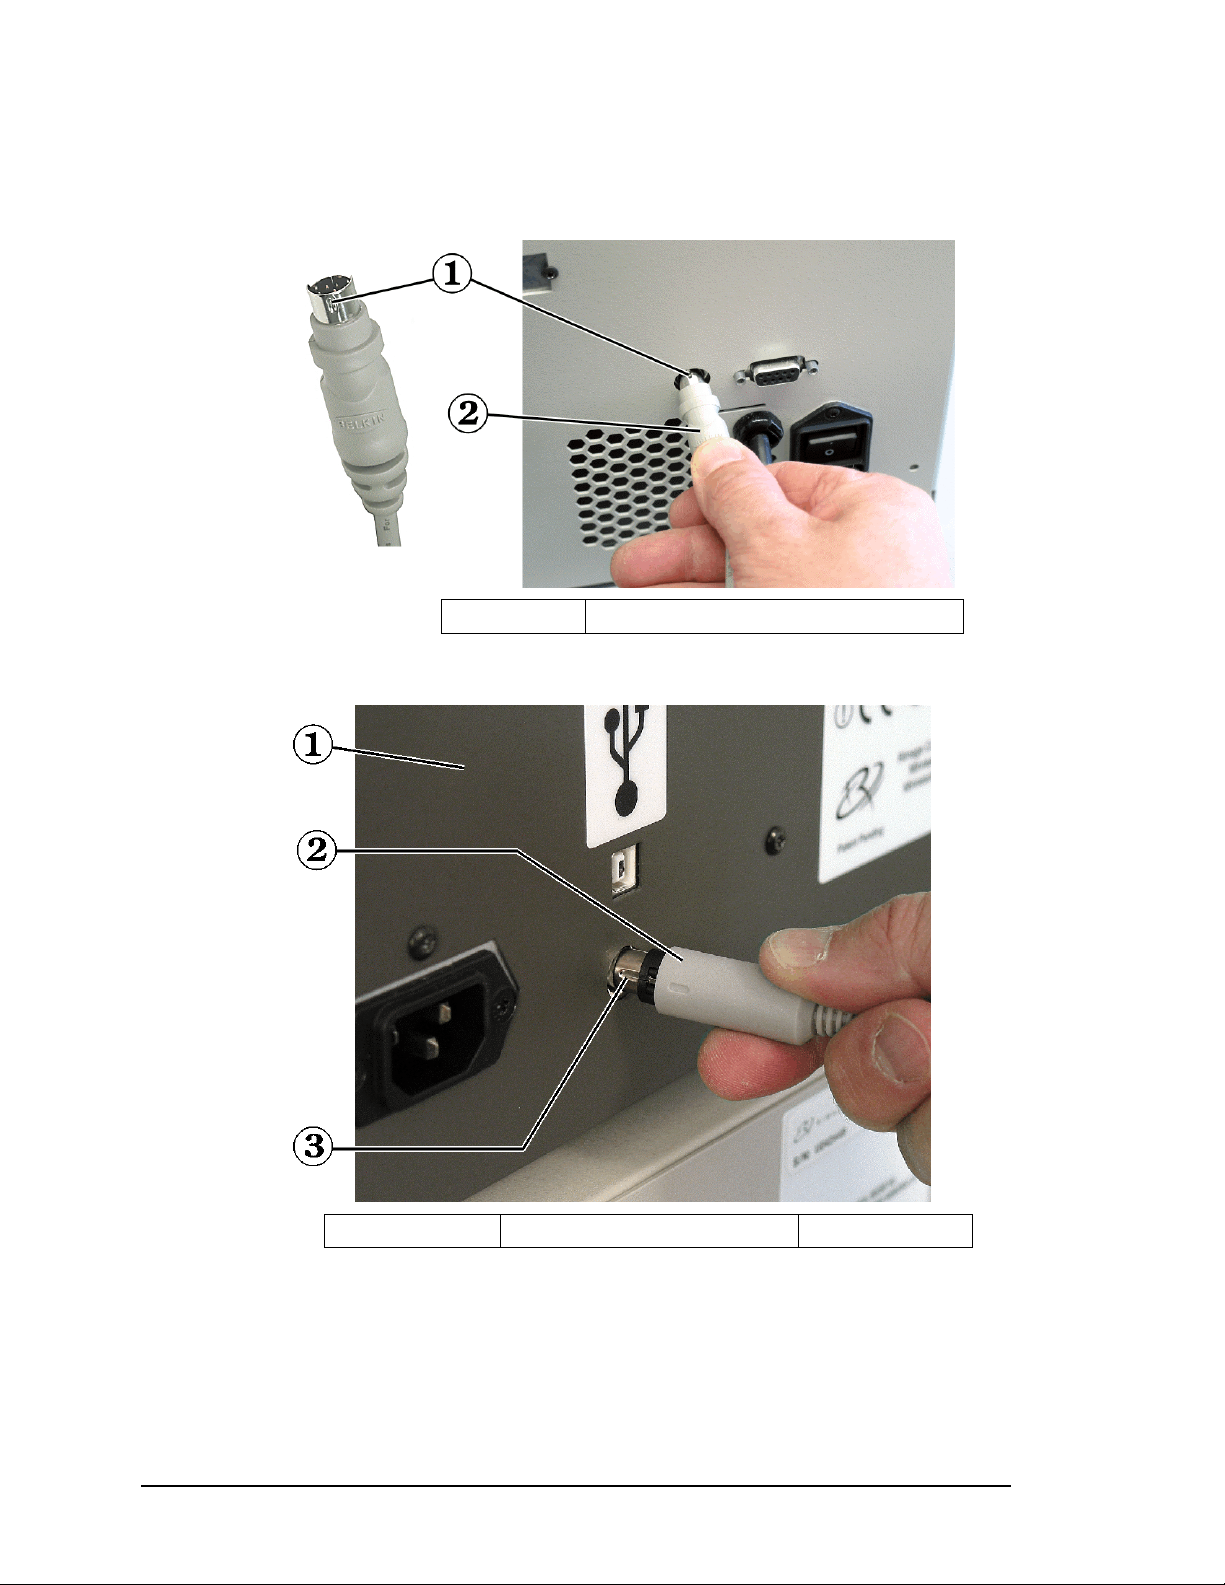
5. Connect one end of the autoloader control cable to the rear of the autoloader so the
key of the autoloader control cable is facing up as shown in the picture on the right
side.
1 – Key 2 – Autoloader Control Cable
6. Connect the opposite end of the autoloader control cable to the Liberty printer so
the key is facing to the left as shown here.
1 – Printer 2 – Autoloader Control Cable 3 – Key
Installation 12
Page 13
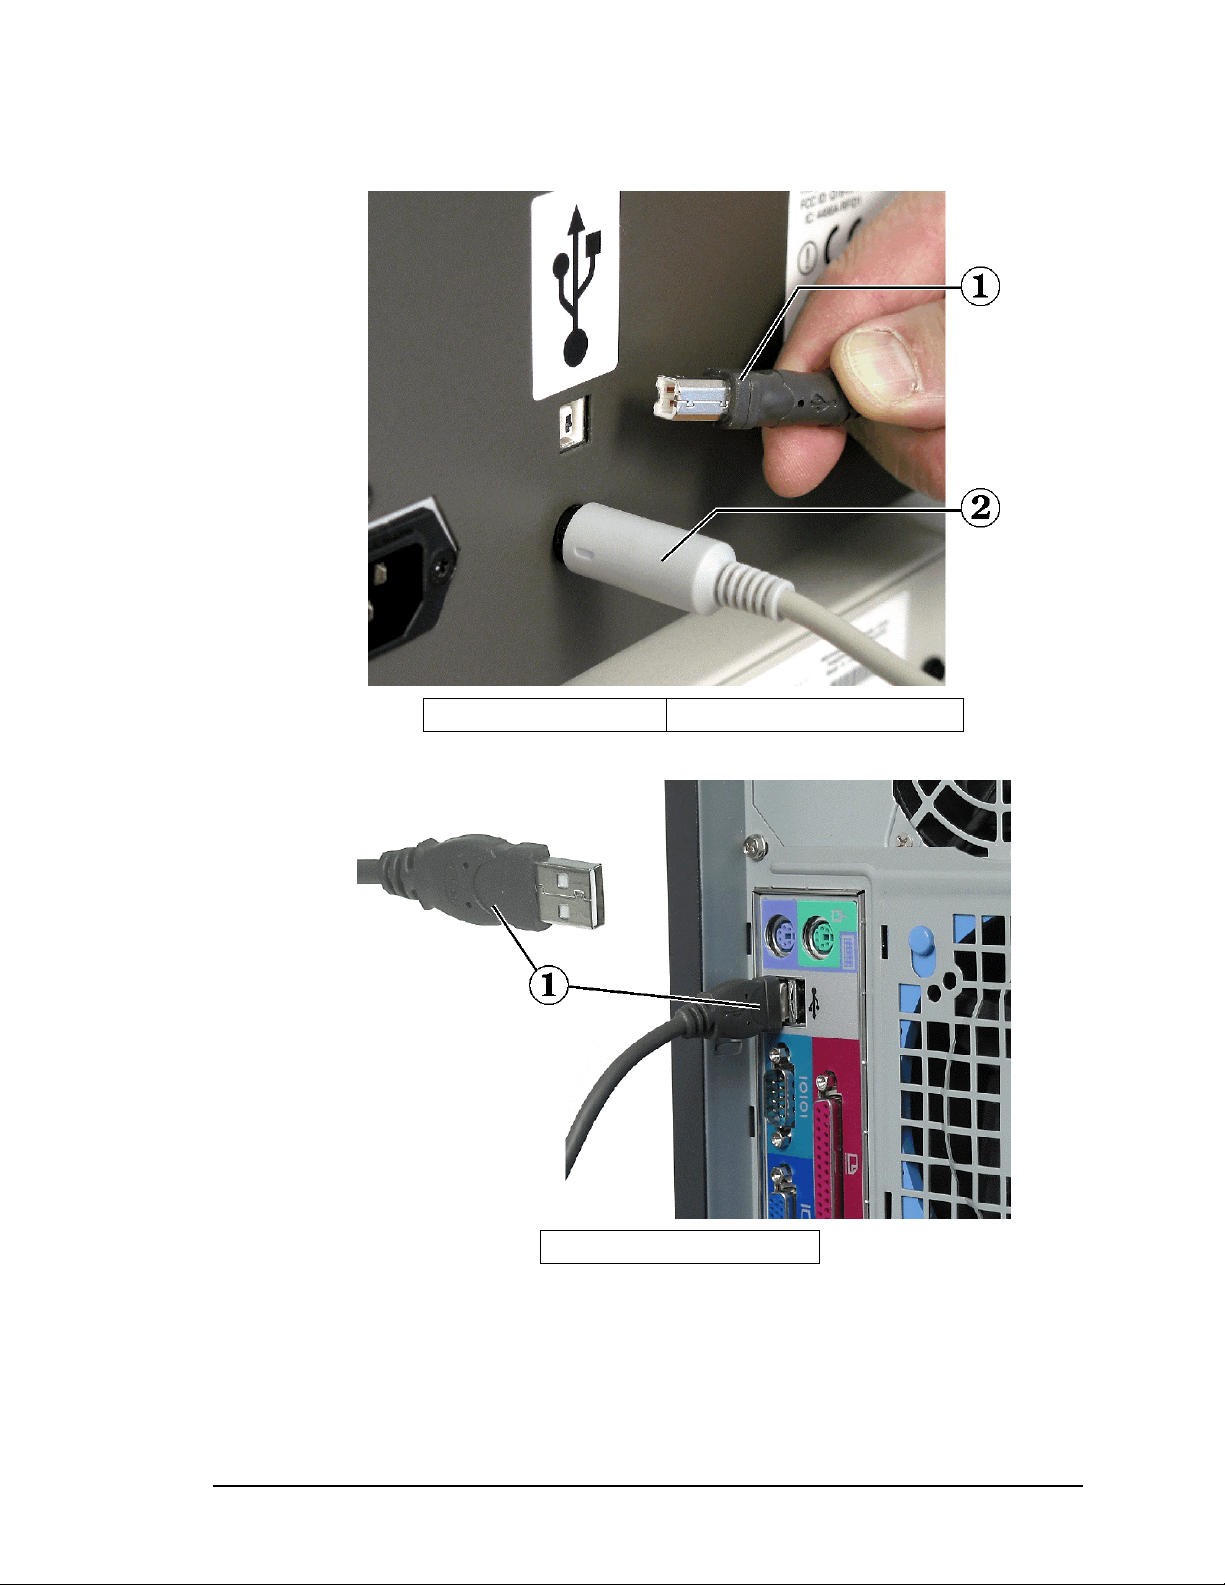
7. Connect the matching end of the USB cable to the printer.
1 – USB Cable 2 – Autoloader Control Cable
8. Connect the other end of the USB cable to the USB connection on the PC.
1 – USB Cable
13 Installation
Page 14
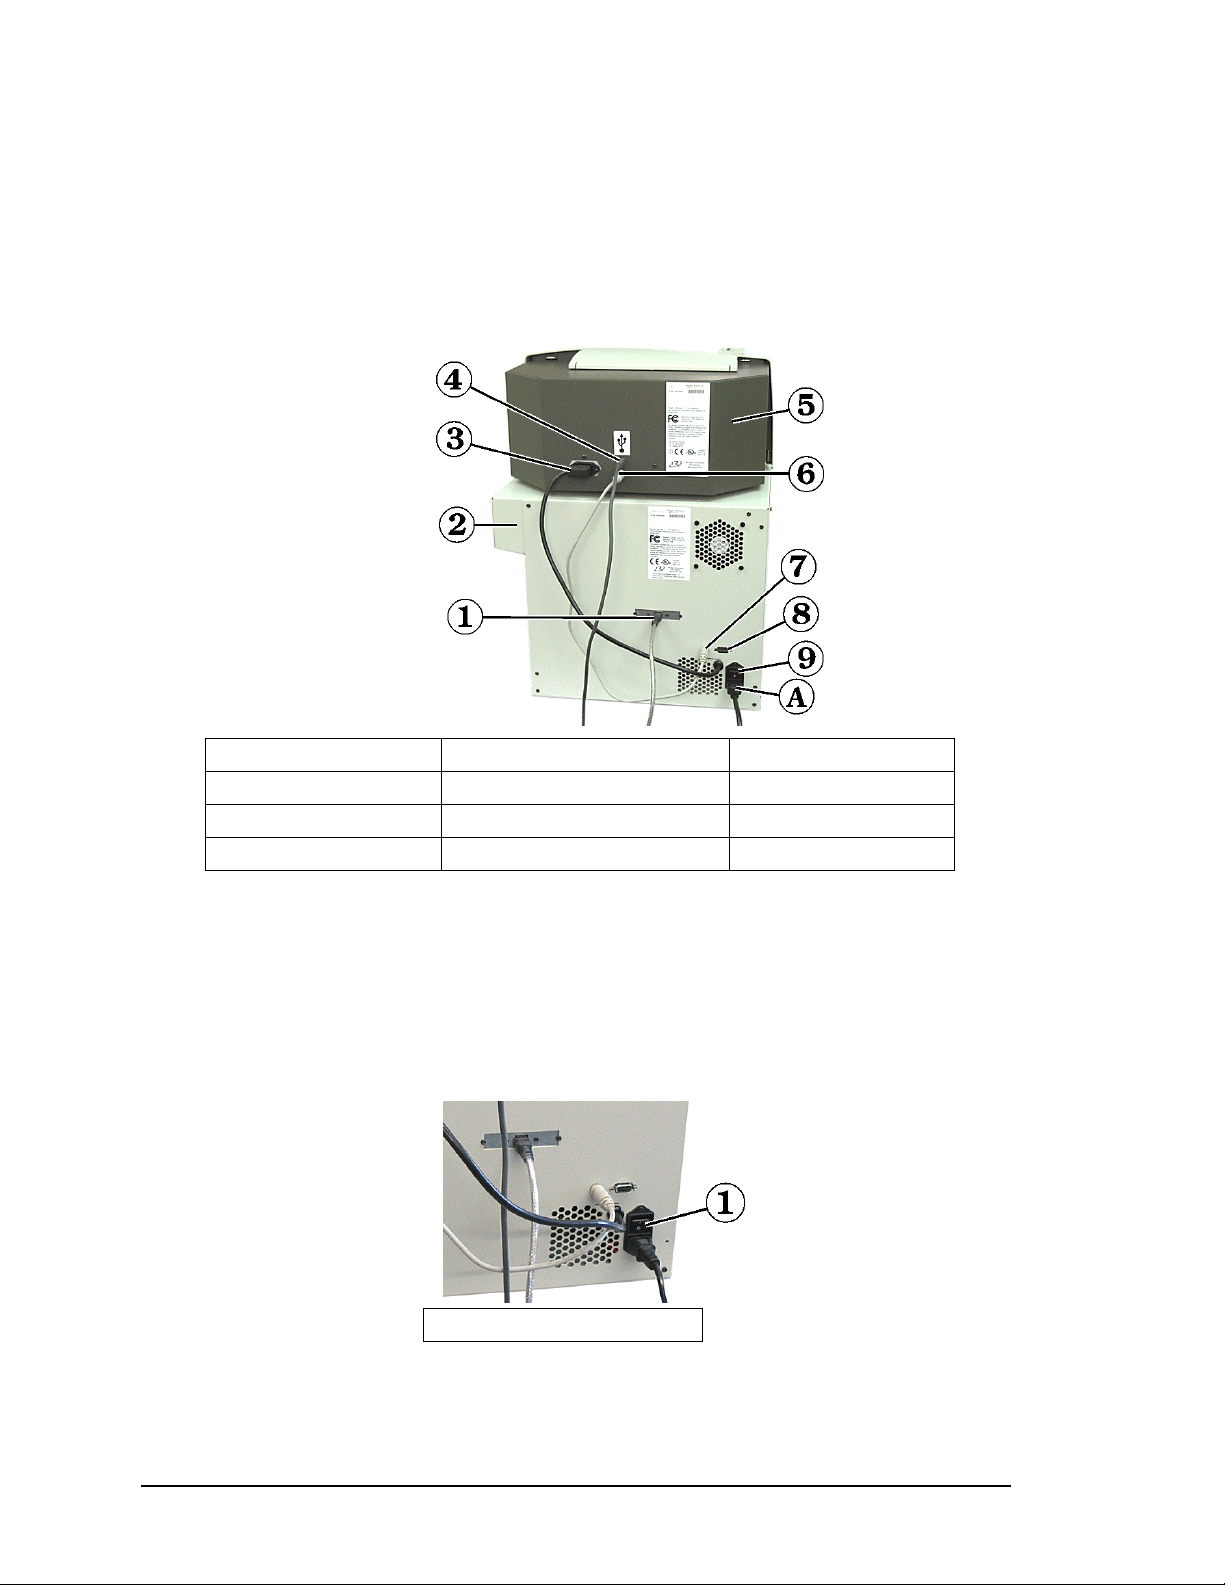
9. Connect the printer power cord from the autoloader to the printer.
10. Check all the cable connections as shown in the picture below. Remember, do NOT
power on the Desktop system until instructed.
11. Connect all remaining cables to the monitor, mouse, keyboard, and the AC power cords.
12. If your system came with a PC, go to “Install Ink Cartridges” section on page 22.
13. Go to the “Install Liberty Printer Driver” section next.
1 – Firewire Cable 5 – Liberty Printer 9 – AC Power Switch
2 – Autoloader 6 – Autoloader Control Cable A – AC Power Cord
3 – Printer Power Cord 7 – Autoloader Control Cable
4 – USB Cable 8 – Serial Port (not used)
Install Liberty Printer Driver
To install the Liberty Printer Driver, you must be logged on as a member of the
Administrators group. Do not install the Liberty Printer Driver with the printer powered
on! Install the driver before the printer is powered on. Do not install the Rimage OfficeNet
Software Suite until instructed!
Make sure the system is powered off by the Power Switch on the autoloader. If the
Liberty printer was connected to the PC and powered on when the PC started, reboot
the PC.
1 – AC Power Switch - OFF
To install the printer driver on Windows XP, go to page 17.
To install the printer driver on Windows 2000, go to the next section.
Installation 14
Page 15
Install Printer Driver on Windows 2000
1. Insert the OfficeNet Software Suite disc in the CD-ROM drive.
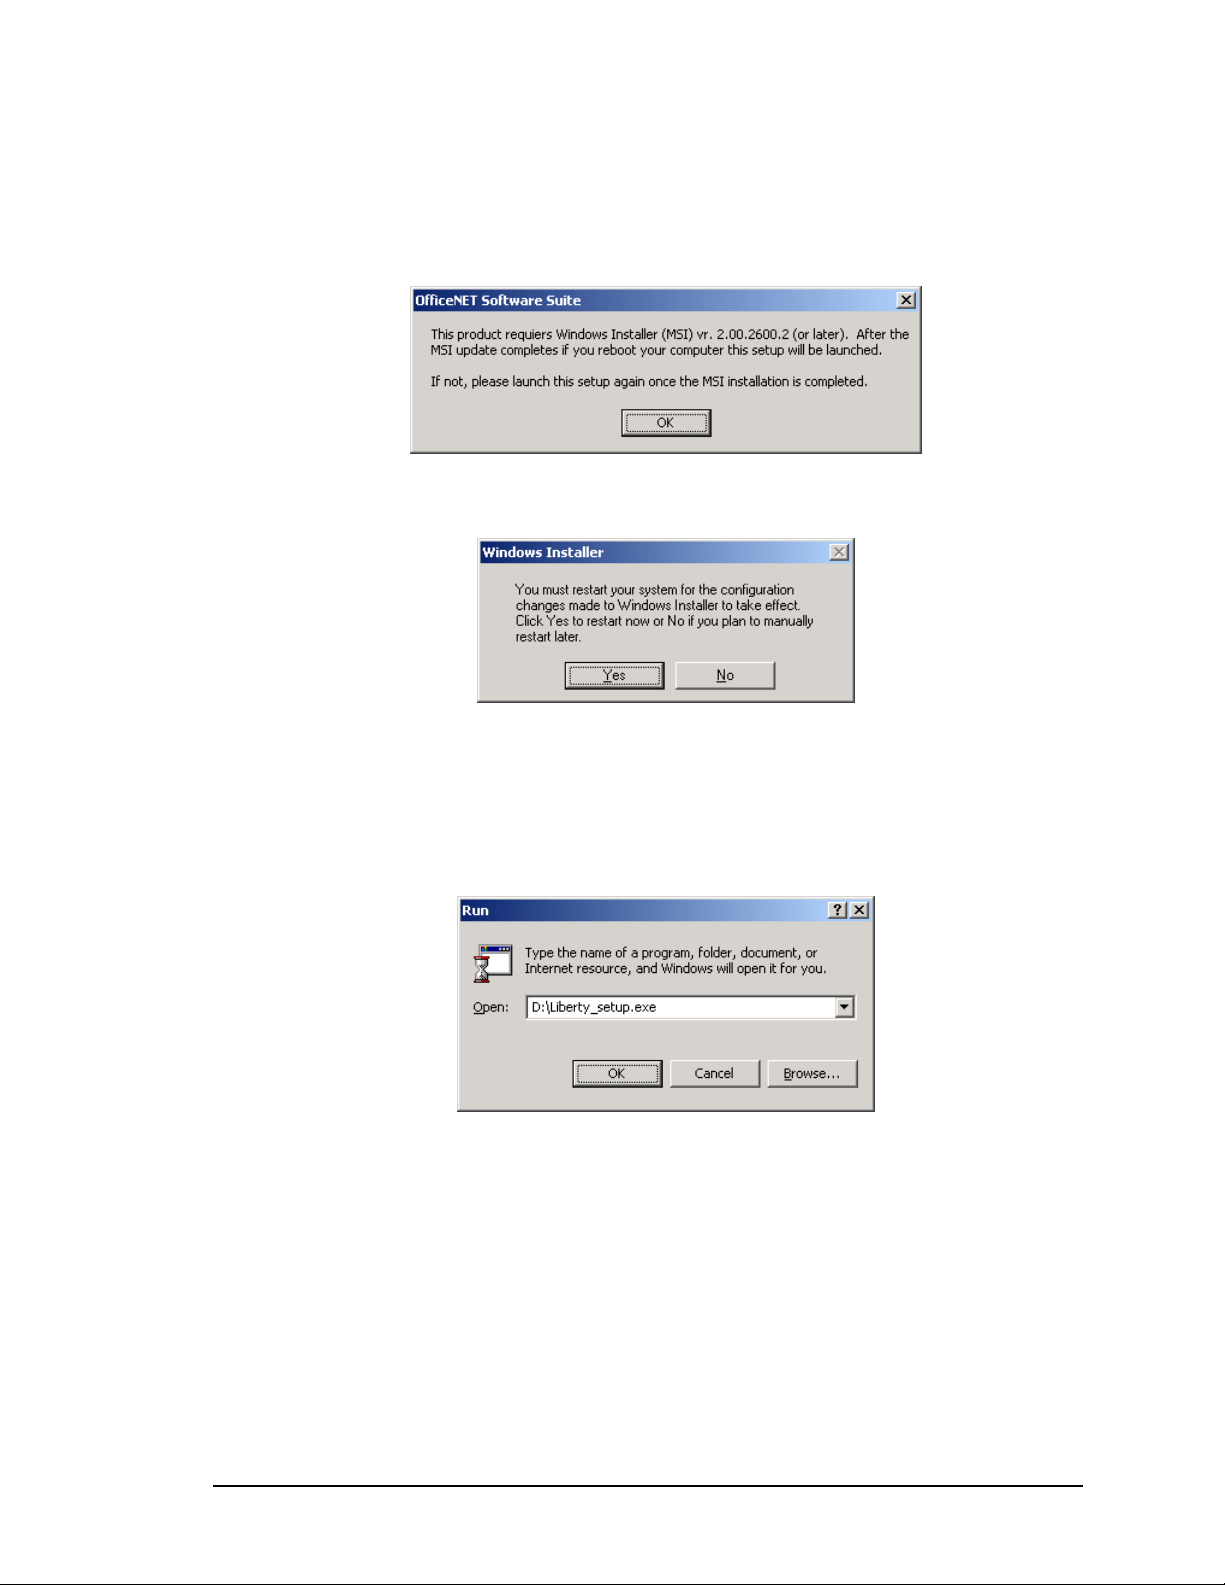
2. An MSI prompt may appear as below. Select OK and the software will repair itself. If
it does not appear, go to step 5.
3. When the Windows Installer is complete, select OK.
4. Select Yes to reboot the computer.
5. If the OfficeNet software installation starts, cancel the installation process. The
printer driver must be installed first.
6. Select Windows Start menu and select Run.
7. Use the Browse button to select the Liberty_setup.exe file in the root of the OfficeNet
Software Suite disc and select Open. If your Windows is not configured to see the file
extensions, you will just see Liberty_Setup.
8. Select OK to start the driver installation.
15 Installation
Page 16
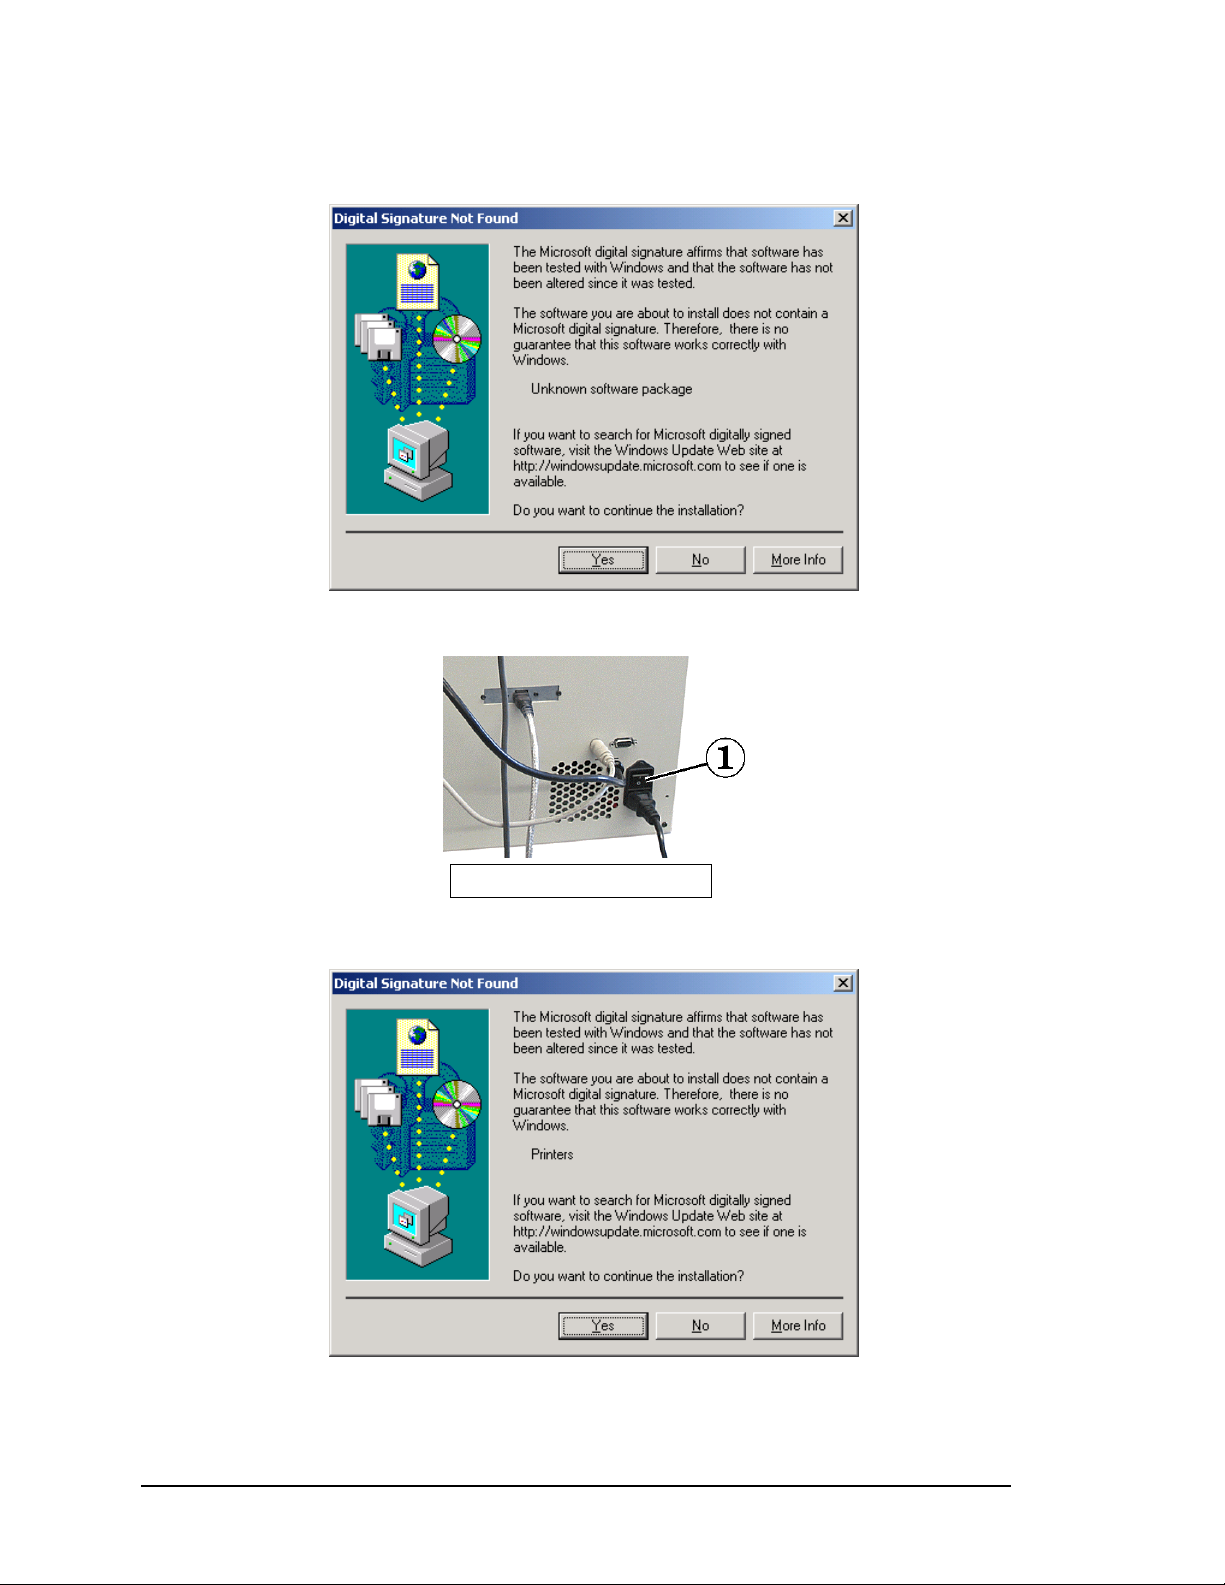
9. A “Digital Signature Not Found” dialog displays, indicating that the driver is not
signed, select
Yes to continue.
10. After the Digital Signature Not Found window closes, apply power to your printer by
switching the power switch on the back of the autoloader.
1 – Power Switch
11. After the files are installed, a second dialog displays as shown. Select Yes to
continue.
12. Several dialogs appear indicating that the driver files are being installed. The Liberty
Printer Driver installation is complete.
Installation 16
Page 17
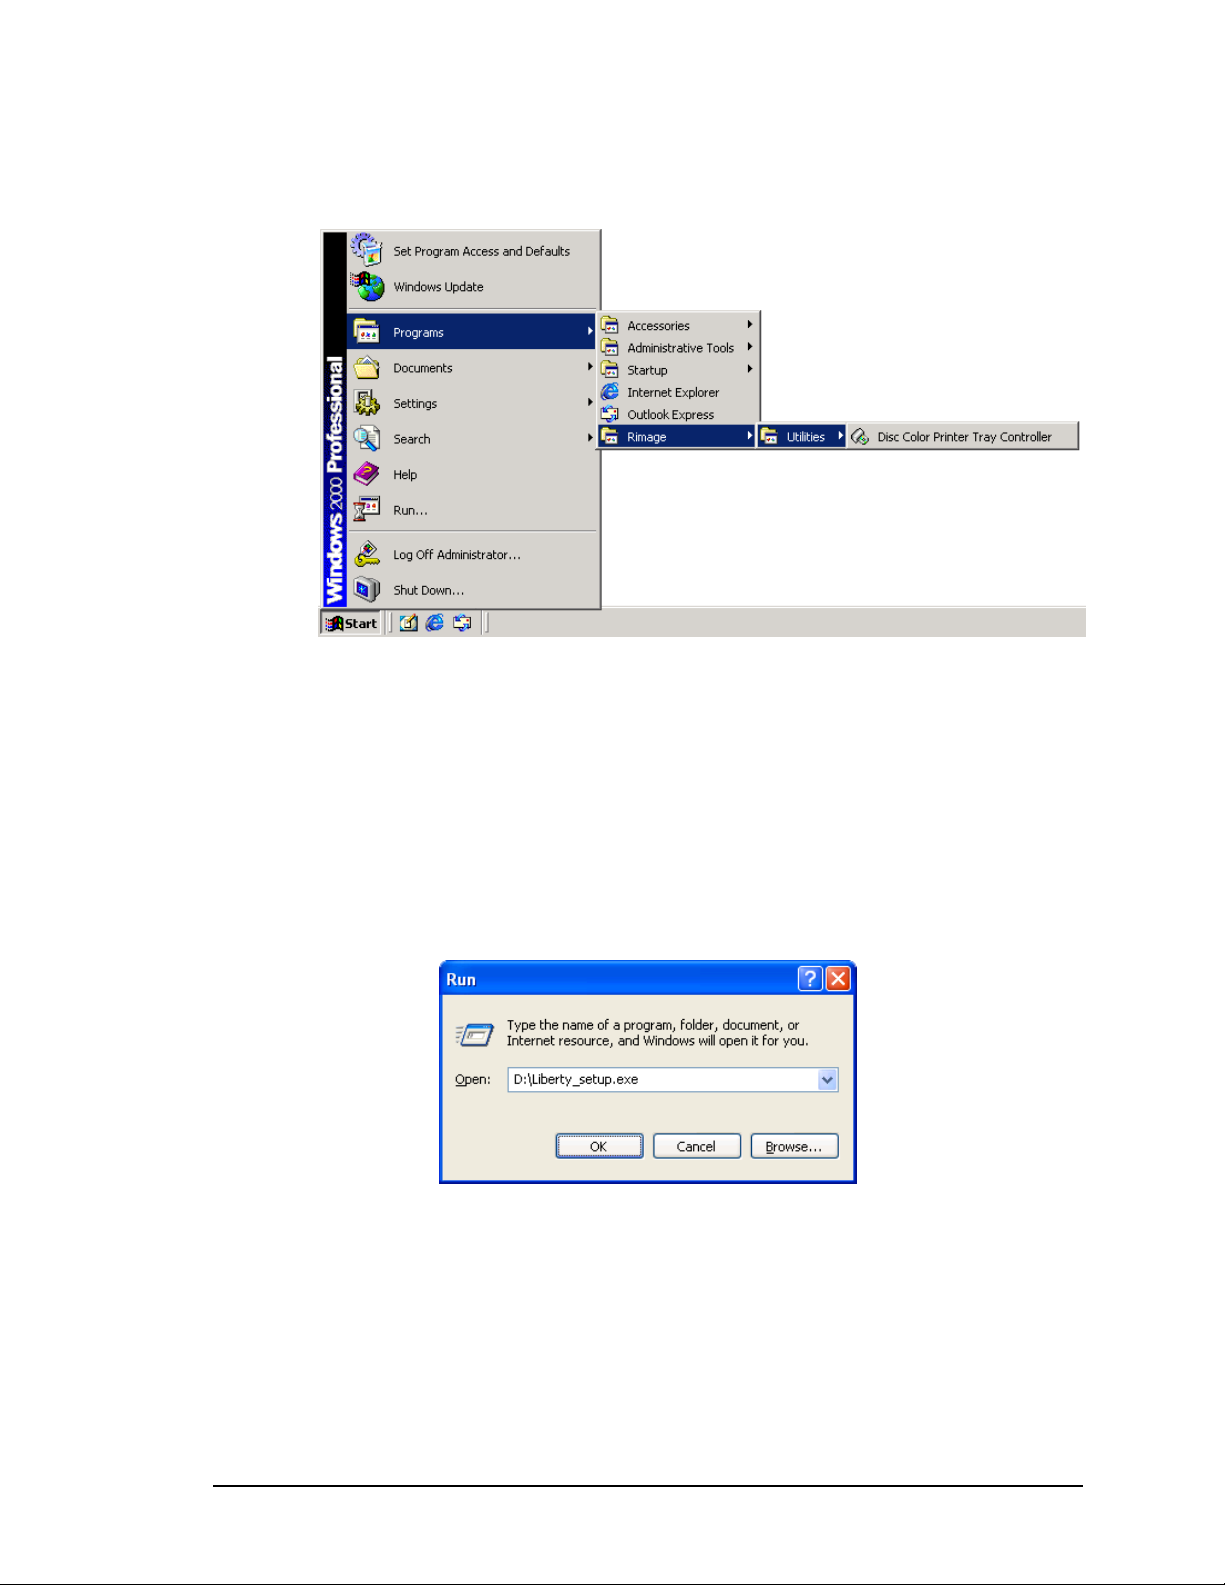
13. Use Windows’ Start|Programs|Rimage|Utilities|Disc Color Tray Controller to
start the Rimage Tray Controller. The tray controller is used with the printer driver to
move the printer tray in and out.
14. Go to the “Install Ink Cartridges” section on page 22.
Install Printer Driver on Windows XP
1. Insert the OfficeNet Software Suite disc in the CD-ROM drive.
2. If the OfficeNet software installation starts, cancel the installation process. The
printer driver must be installed first.
3. Select Windows Start menu and select Run.
4. Use the Browse button to select the Liberty_setup.exe file in the root of the OfficeNet
Software Suite disc and select Open. If Windows is not configured to see file
extensions, you will just see Liberty_Setup.
5. Select OK.
17 Installation
Page 18
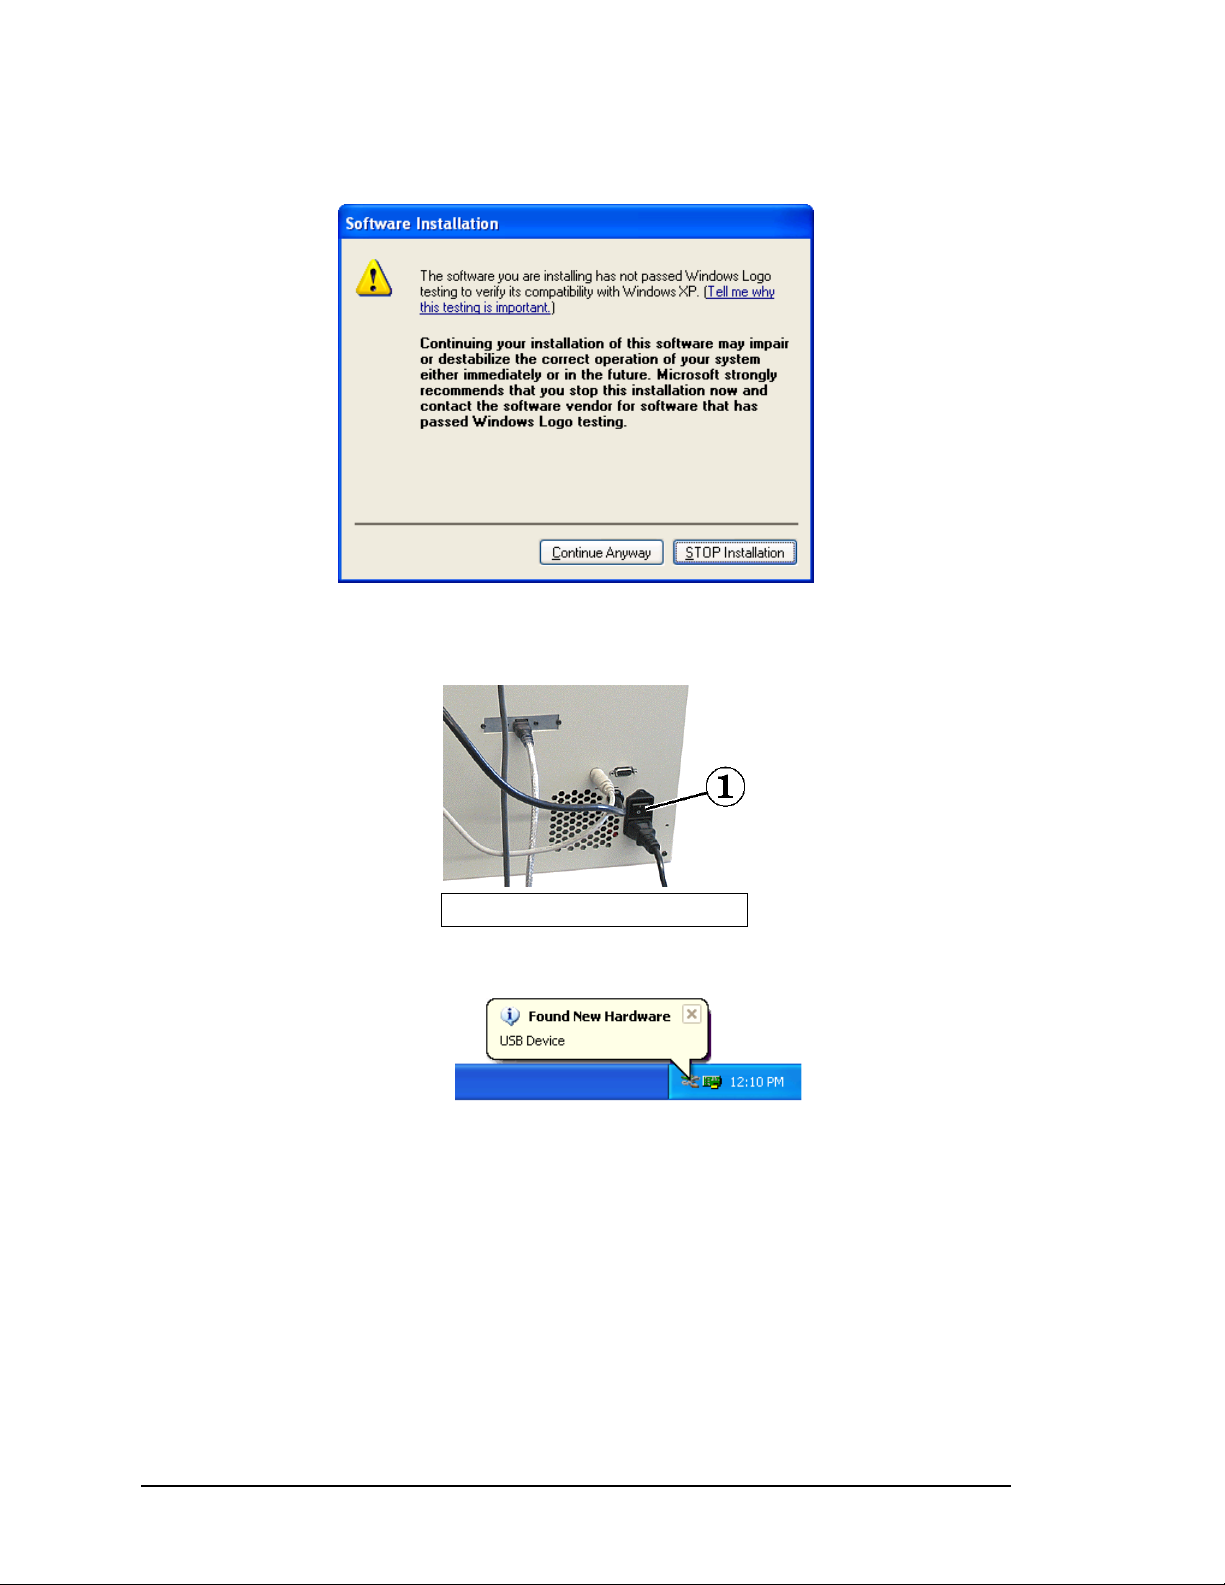
6. When the Windows Logo testing dialog box appears as shown, select Continue
Anyway.
7. When a second Windows Logo testing dialog window appears, select Continue
Anyway.
8. When the all prompts are gone, apply power to the autoloader.
1 – Power Switch
Several devices are found and displayed in the icon tray area.
Installation 18
Page 19

9. When the Found New Hardware Wizard window displays, select Next.
The next window displays the wizard searching for files.
19 Installation
Page 20

10. The next window displays “Disc Color Printer – Firmware missing”. This is
normal for this printer since it automatically loads the latest firmware from the
PC after the driver is installed. Select Continue Anyway.
11. Select Finish.
12. The prior steps (9-11) are repeated three more times (once for each of the Plug and
Play components related to this Printer Driver). The following driver names are
installed in the following sequence:
Disc Color Printer TCH
a.
b. Disc Color Printer LDR
Rimage Disc Color Printer
c.
After the last driver is installed, a message appears in the icon tray area indicating
the hardware is installed and is ready to use.
Installation 20
Page 21

13. Use Windows’ Start|All Programs|Rimage|Utilities|Disc Color Tray
Controller to start the Rimage Tray Controller. The tray controller is used with
the printer driver to move the printer tray in and out.
14. Go to the “Install Ink Cartridges” section on page 22.
21 Installation
Page 22

Install Ink Cartridges
The printer is shipped without ink cartridges installed. Before installing the ink
cartridges in the Liberty printer, allow the cartridge to reach room temperature before
installing it. Store ink cartridges at a temperature between 50–90°F (10–32 °C) and
avoid moisture and direct sunlight.
1. With the power still on, open the top cover. The ink cartridge cradle moves into
position to install the ink cartridges.
1 – Top Cover 2 – Cradle Latches 3 – Cartridge Cradle
2. Raise the cradle latches.
3. Remove each ink cartridge from its packaging.
4. Carefully remove the plastic tape. Hold the ink cartridge so that the copper strip is
on the bottom (see below). Do not remove the copper strips and do Not touch the
ink nozzles!
1 – Plastic Tape 2 – Ink Nozzles
3 – Copper Strip 4 – Ink Cartridge
Installation 22
Page 23

5. Install the ink cartridge into the cartridge cradle so the label is facing toward you.
Caution: The black ink cartridge can be damaged when installing it in the printer. Use
minimal force when installing the Ink cartridge; it takes little pressure to install
an ink cartridge.
1 – Cradle Latch 2 – Ink Cartridge 3 – Label
6. Push the ink cartridge firmly into position and secure the cradle latch.
7. Install the other ink cartridge using the same procedure.
8. Close the top cover.
For best prints, the cartridges must be aligned after installation or replacement. For
more information about cartridge alignment, see “Align Ink Cartridges” section next.
Align Ink Cartridges
For optimal print quality, align the ink cartridges using the steps below.
1. Windows 2000 – Select the Windows Start button and select Settings|Printers.
Windows XP – Select the Windows Start button and select Printers and Faxes.
2. Right-click on the Disc Color Printer and select Printing Preferences from
the drop-down menu.
23 Installation
Page 24

3. Select the Advanced tab.
4. Select the
If the buttons are grayed out, the tray controller must be started. For Windows 2000, select
Align Cartridges button.
Windows’ Start|Programs|Rimage|Utilities|Disc Color Tray Controller to
start the Rimage Tray Controller.
For Windows XP, select Windows’ Start|All Programs|Rimage|Utilities|Disc
Color Tray Controller to start the Rimage Tray Controller.
Align Cartridges dialog displays.
The
5. Select the
Print Test Pattern 1 button and the printer tray comes out.
6. Place an inkjet printable disc on the printer tray.
Installation 24
Page 25

7. When prompted, press the disc button on the printer to close the tray and start the
printing test.
8. There are four pattern groups (A, B, C, D) printed on the disc. Each group has a
numbered index, shown as a set of numbers from 1 to 21. Locate the two lines
that make the straightest line and enter the matching index value for each lettered
group. You may enter decimal values if the lines are not exactly aligned.
9. In the above example, looking at group A, the straightest lines are at A11. Enter
11 in the group A field. In group C, the straightest lines are at C11. Enter the
remaining groups and select
Save.
10. Place a disc on the printer tray and select the Print Test Pattern 2 button.
25 Installation
Page 26

11. When prompted, press the Disc button to print the following test pattern on a disc.
12. The black and magenta lines should be straight as shown above. If they are not
inline with each other, repeat the alignment process starting at step 5.
13. Close the Align Cartridges window.
14. Close the Printing Preference window.
15. Select the Disc button to close the printer tray. If the printer tray does not close,
close the tray controller application and open it again. Wait for the tray controller
to initialize, about 60 seconds, and press the Disc button to close the tray.
16. If you are installing the equipment, go to step 4 of the “Check Printer Tray
Alignment to the Picker” section, to complete installation.
Installation 26
Page 27

Check Printer Tray Alignment to the Picker
For the Desktop 4500 autoloader to operate with the printer, the printer tray must be
aligned to the picker. The printer adjustment plate is factory adjusted but it may
move after shipment. Therefore, it may be necessary to check the printer alignment
after installation. All of the cables must be connected and the Liberty Printer Driver
and Tray Controller application must be installed before performing this procedure.
The Tray Controller is installed when the printer driver was installed.
Required Tools
• T10 Torx screwdriver
• 5/32” Allen wrench
• Disc
1. Power on the Desktop 4500 and the PC if you have not already done so.
2. Log on if you have not already done so.
3. If the connected PC has the Rimage OfficeNet Software Suite installed, wait for
the Production Server to complete the configuration process before aligning the
printer tray. If the Software Registration screen appears, select Cancel.
Close the Production Server application if it is running.
4. Rotate the leadscrew clockwise to move the picker to the top of the picker column.
1 – Picker 2 – Leadscrew
5. Press a disc into the picker as shown.
27 Installation
Page 28

6. Press the Disc button and the printer tray comes out. If the tray does not come
out, go to page 31 for help.
7. Manually rotate the leadscrew counterclockwise to lower the picker down to the
printer tray. The leadscrew can only be rotated if the picker motor is not
energized. Do not press the operator button on the autoloader! If the leadscrew
cannot be rotated, refer to “Releasing Picker Motor Energy” section on page 31.
If the printer tray was moved during the alignment, you must run the tray in and
out again.
8. If the picker fingers are not centered over the hole of the disc, alignment is
necessary.
Installation 28
Page 29

9. If the printer needs to move left or right, loosen the side-to-side screws (T10) and move
the printer until the picker fingers are centered over the hole.
10. If the printer needs to move forward or backwards, turn the front-to-back screw (5/32”
Allen screw) counterclockwise to move the printer back, or clockwise to move it
forward so the picker fingers are aligned over the hole.
1 – Side-to-Side Screws 2 – Front-to-Back Screw
11. With the picker fingers centered over the hole, rotate the leadscrew counterclockwise
to move the picker into the hole. The disc should snap into the picker fingers. With
the disc held by the picker, finer adjustments can now be made.
12. Move the printer so the right edge of the disc matches the right edge of the print pad.
After the side-to-side adjustment is complete, tighten the side-to-side screws.
13. Move the printer with the front-to-back screw so the front edge of the disc is about
0.040”/1mm from the front edge of the print pad. Make sure you are aligning to the front
edge of the disc, not the coating on the disc. If necessary, make final adjustments.
1 – Front Edge of Disc 2 – Print Pad
29 Installation
Page 30

14. Rotate the leadscrew counterclockwise to move the picker up from the printer tray.
15. Press the disc button to close the tray. If the printer tray does not close, close the tray
controller application and open it again. Wait for the tray controller to initialize, about
60 seconds, and press the disc button to close the tray.
16. Remove the disc from the picker fingers by pulling the disc down from the picker.
17. If you were required to release the picker motor energy by using the operator button,
press the operator button nine times and hold on the ninth press. The Mode LED will
go off and you can release the button.
18. If a PC was not shipped with the Desktop 4500, refer to the Software Suite 6 Install
Guide to install the OfficeNet Software Suite.
You can refer to pages 32 through 57 for the user guide information for the Desktop 4500
autoloader and Liberty printer.
Installation 30
Page 31

Tray Controller Help
This section is a helpful procedure if the printer tray did not come out after pressing the
disc button.
1. Make sure the USB cable is plugged in at the printer and the PC.
2. Make sure the tray controller application is running. This is seen in the icon tray as
shown here.
3. Make sure the tray controller application has finished initializing, by doubleclicking on the tray controller icon.
4. Check for the status. If the status is OK and there are no error messages in the tray
controller application, close the tray controller application and unplug the USB cable
from the printer.
5. Plug the USB cable back in the printer.
6. Select the windows Start menu and select |Programs|Rimage|Utilities| and
select Disc Color Printer Tray Controller.
7. After the tray controller has completed the initialization, try opening the printer tray
again by pressing the disc button. If you came from the printer alignment process,
return to page 28.
Releasing Picker Motor Energy
This section is a helpful reference to the installation process on page 28.
1. Press and hold the operator button for about eight seconds. When the mode
LED and button LED are lit, it indicates you can release the button.
2. Press the operator button six times and hold on the last press to release the
picker motor energy. Return to page 28 to complete the alignment process.
31 Installation
Page 32

Chapter 3 – User Guide
Desktop 4500 Parts
This section identifies the Desktop 4500 parts. The Desktop 4500 has several major
functional parts: the Carousel, the Disc Recorders, the Liberty printer, and the
Operator Panel.
Front View
1 – Picker 4 – Printer Control Panel 7 – Operator Panel
2 – Tower 5 – Liberty Printer 8 – Recorder
3 – Printer Top Cover 6 – Printer Tray Door 9 – Carousel
Liberty Printer
The Rimage Liberty printer is a flexible, cost-effective inkjet printer for use in a
standalone or Rimage system application. Capable of color or black printing, the
Liberty printer uses special ink cartridges intended for CD and DVD printing.
The Liberty can print laser-quality black text, plus professional color photos, at up to
4800-optimized DPI (with 1200 x 1200 DPI input resolution) on 120 mm CD and DVD
discs with ink-jet receptive coatings. Liberty also features controlled ink drop
placement for faster operation and optimized color resolution. A single ink cartridge
will print about 300-500 full discs depending on print mode and image complexity.
Partial disc coverage extends cartridge capacity.
Carousel
The Carousel, located at the bottom of the Desktop 4500 contains three bins and each
bin can hold up to 60 discs. Discs may vary in thickness.
Disc Recorders
The Desktop 4500 models can accommodate up to four CD or DVD recorders or a
combination of two CD and two DVD recorders.
User Guide Reference 32
Page 33

Operator Panel
The Desktop 4500 has an Operator Panel located on the right side of the autoloader.
The following Status Lights (LEDs) provide you with operational information.
Power LED
The green Power LED lights whenever the power switch is on.
Active LED
The yellow Active LED lights when there is communication through the autoloader
control port.
Mode LED
The yellow Mode LED lights when the button diagnostic function is selected.
Button LED
The yellow Button LED, located in the operator button, is lit when the autoloader is
paused. It may also be lit during the button diagnostics. Directions for the Desktop
4500 button diagnostics may be downloaded from the service procedures on the
Rimage Technical Web site.
1 – Power LED 3 – Mode LED 5 – Operator Button
2 – Active LED 4 – Button LED
Operator Button
The operator button may be used to pause the Desktop 4500 from processing discs.
Pausing the autoloader is used so the operator can add and remove discs from
carousel, or change ink cartridges. The carousel rotates each time the operator pauses
the autoloader. To pause the Desktop 4500, press the operator button. To return to
normal operation mode, press the operator button again. When the button LED is on
and the mode LED is off, the autoloader is in the paused mode.
33 User Guide Reference
Page 34

Rear View
1 – Firewire Cable 5 – Liberty Printer 9 – AC Power Switch
2 – Autoloader 6 – Autoloader Control Cable A – AC Power Cord
3 – Printer Power Cord 7 – Autoloader Control Cable
4 – USB Cable 8 – Serial Port (not used)
User Guide Reference 34
Page 35

Liberty Operator Panel
The Liberty printer operator panel has three buttons and four LEDs to indicate
certain conditions.
1 – Cancel Button 3 – Disc Button and LED
2 – Ink Cartridge Status LED 4 – Power Button and LED
Cancel Button: Not used.
Ink Cartridge Status LED: Flashes when an ink cartridge is low on ink,
incorrectly installed, or when the printer cover is open. To check the ink
cartridge status, refer to “Ink Cartridge Status” on page 41.
Disc Button and LED: The Disc button is used to move the tray in and out,
and to load a disc for manual printing used in testing alignments. The Disc LED
shows the status if a disc is on the tray: lit to indicate a disc is present, off for
disc absent.
Power Button and LED: The Power button is unused, as the printer is either
on, or in Sleep mode (as controlled by the printer driver). The Power LED
flashes when the printer is printing, or it indicates it is in an error state. Error
conditions may be viewed at the Production Server, or in the status field
the printer driver under the advanced tab.
inside
35 User Guide Reference
Page 36

User Operations
The user of the Desktop 4500 fills the carousel with blank discs, removes the
completed discs, and changes ink cartridges. Other user operations are performed in
the software. Refer to the Software Suite 6 Getting Started Guide and Online Helps.
Loading Discs
Discs may be loaded with the carousel installed or removed from the Desktop 4500.
When loading discs, make sure the recording side is facing down. The carousel bins
may be configured in the Production Server as input bins or output bins. To add more
discs or remove completed discs when an order is in process, refer to the “Reloading
Discs” section on the next page.
Handling CDs
Hold the discs by the outer edge so you do not put fingerprints on either the top or
bottom surfaces. Fingerprints on the top can affect printing. It is recommended to
wear lint-free gloves. Place discs in the supply bin with the print side facing up. Most
discs have an extruded stacking ring (see next figure) that identifies the bottom of the
disc. Some DVD-R discs may have a stacking ring on both sides. The recording side has
a shiny surface and the print side has a matte surface.
Bin Configuration
Bins 1 and 2 are configured as the default supply and output bins. The Desktop 4500
starts picking unrecorded discs from bin 2 and places the completed and failed discs
into bin 3. When Bin 2 is empty, it picks discs from bin 1 and places them into bin 2.
When removing the completed discs, the reject discs should be removed from the
completed discs. The rejects should have a reject label printed on the disc unless that
function was disabled in the Production Server options. Refer to the Reject Pattern
Printing options located in the Printing Parameters of the Production Server.
Another option is to configure the bins so there is one input bin, one output bin and
one reject bin. Refer to the Production Server online help file for directions.
User Guide Reference 36
Page 37

Reloading Discs
The carousel may be reloaded at the time it runs out of discs, or it may be reloaded
while discs are recording. To reload while orders are still in process, pause the
Desktop 4500 by pressing the operator button. The carousel may be manually rotated
to reload discs in the bins.
1. If an order is in process, pause the Desktop 4500 by pressing the operator button.
2. Manually remove the carousel and remove any completed discs.
The system picks all discs from the supply bins and places the completed discs in
the output bins. Output bins are configured at the Production Server and may be
viewed in the Production Server Parameters. Each bin is numbered on the
carousel. Rejected discs may be dispersed in the output bins and may be identified
by a reject label. The system will print a reject label if the Production Server is
configured to print a reject label. Refer to the Reject Pattern Printing options
located in the Printing Parameters.
3. Place discs to be recorded in the input bin(s) of the carousel. Bin #2 may be either
input or output, depending on how the Production Server software is configured.
Fill bin 2 if required.
4. At the Production Server, select Reset Input Bin in the Options menu. The
supply and output bin status will be rechecked by the Production Server.
5. Press the operator button to resume operation.
The button LED should be off, to process discs.
Installing the Carousel
Place the carousel on the carousel platter so the alignment hole is aligned with the
alignment pin. Press the carousel down firmly.
1 – Carousel 3 – Alignment Pin
2 – Alignment Hole 4 – Carousel Platter
37 User Guide Reference
Page 38

Label Design Requirements
This section provides some things you need to consider before you create a label. Your
first consideration is the media you will use. Select media that has an ink printable
surface.
The OfficeNet software comes with a label editor called “CD Designer” which is
installed on your system. Use CD Designer to design your labels.
If you have another software application that you prefer, you can create the label
image and output it as an Acrobat (.pdf) file, or you can output a Windows bitmap
(.bmp) file. The Acrobat file can print directly to the Liberty through the Rimage
software. If you output a Windows bitmap file, insert it into CD Designer to create a
label that prints with the Rimage software. To create a label with another program,
use the following criteria when creating a label:
Color Depth: Save the artwork for the label with the color set to at least 256 colors; a
higher color setting is recommended.
DPI: Use pictures or logos set to 300 DPI (Dots Per Inch).
Label Design Size: A full size disc is 120mm (4.723”) with a hub size that is 38mm
(1.5”). The actual printable area is around 118mm (4.65”). The printable area and hub
sizes vary depending on the disc manufacturer. The hole is 15mm (0.59”).
You can mask the outer non-printable area and hub area so it does not print in these
areas. Set parameters in the Run Masker section of the printer driver. Refer to page
47.
Media Requirements
Discs must be coated with a surface designed for ink-jet printing. Recommended inkjet printable discs are listed on the Rimage Web site
User Guide Reference 38
.
Page 39

Replace Ink Cartridge
When one of the ink cartridges requires replacement, use the Production Server
software, or use the operator button to pause the processing of orders. The Liberty
printer uses the following ink cartridges:
Ink Cartridge Rimage Part Number
Black (Single Cartridge) 210755-001
12 Pack of Black Cartridges 210764-001
Color (Single Cartridge) 210753-001
10 Pack of Color Cartridges 210765-001
Note: You can only use authentic Rimage ink cartridges in the Liberty printer.
1. Press the operator button to pause the autoloader.
2. Open the top cover of the printer. The ink cartridge cradle moves to one of the
cartridge status positions. For information on Status Positions, see “Ink Cartridge
Status” on page 41.
1 – Top Cover 3 – Cradle Latch 5 – Ink Cartridge Cradle
2 – Status Positions 4 – Ink Cartridges
3. Raise the cradle latch.
4. Lift the ink cartridge out of the ink cartridge cradle.
5. Remove the ink cartridge from the box.
39 User Guide Reference
Page 40

6. Carefully remove the plastic tape from the new cartridge. Hold the ink cartridge so
you do not touch the copper strip (see below). Do not remove the copper strips and
do Not touch the ink nozzles!
1 – Plastic Tape 2 – Ink Nozzles 3 – Copper Strip 4 – Ink Cartridge
7. Install the ink cartridge into the cartridge cradle so the label is facing toward you.
8. Push the ink cartridge firmly into position and close the cradle latch.
9. Close the top cover.
10. For best prints, the cartridges must aligned after replacing a cartridge. For more
information about cartridge alignment, see “Align Ink Cartridges” section on page 23.
11. Press the autoloader’s operator button to resume operation. The LED inside the
operator button should be off after pressing the operator button.
Warning
•
Ink may be harmful if swallowed.
•
Avoid contact with eyes.
•
Ink contains nitrites. If ingested, seek immediate medical attention.
•
Keep out of reach of children.
•
Refilling ink cartridges may result in damage to the cartridge or printer.
•
Rimage ink cartridges are not licensed for modification.
1 – Cradle Latch 2 – Ink Cartridge 3 – Label
User Guide Reference 40
Page 41

Ink Cartridge Status
When the top cover is open, the ink cartridge cradle moves so that its arrow points to
one of the ink cartridge status indicators, indicating the cartridge status as shown
below.
1 – Color Ink Cartridge Trouble 4 – Black Ink Cartridge Low
2 – Black Ink Cartridge Trouble 5 – Ink Cartridges Normal
3 – Color Ink Cartridge Low 6 – Status Indicator Arrow
In the figure above, the Status Indicator Arrow is pointing to the Normal status
indicator. Refer to the “Advanced Tab” section on page 45 of this manual for
additional problem solving information.
41 User Guide Reference
Page 42

Change Printer Driver Settings
You can change the printer driver properties to select print quality, print orientation,
ink volume, or other image adjustments.
You can right-click and select
1. On the
Start menu, point to Settings, and then click Printers.
for more information on any topic.
2. Right-click the printer you want to change on the shortcut menu, and then
click Printing
Preferences
Preferences. The Liberty Disc Color Printer Printing
dialog box opens.
3. At the
Orientation (Portrait or Landscape).
Best quality produces the highest print quality and can eliminate the 'banding'
Setup tab, select the Print Quality (Best or Normal) and select the
effect that sometimes occurs in solid print areas. However,
slower than
Normal quality delivers high-quality output at a faster print rate.
Portrait orientation prints the label vertically so the top of the label comes out
of the printer first.
Normal quality for most applications.
Landscape orientation prints the label horizontally so the
top of the label is located on the side of the printer tray.
Select the
CD/DVD (120 mm).
CD Type (Inkjet Premium or Plain) and CD Size (Standard
Select Factory Settings to return all settings to their factory default settings.
4. Select the Features tab.
User Guide Reference 42
Best quality prints
Page 43

5. Select Advanced Features to open the Advanced Features dialog.
Advanced Features dialog displays.
The
6. Adjust the
(less ink) or to the right for denser images (more ink). Select
Ink Volume if desired. Drag the slider to the left for lighter images
OK when done.
The Dry Time and Low Memory Mode selections are not used.
43 User Guide Reference
Page 44

7. Adjust the Color tab settings (Print in Grayscale, Saturation, Brightness, and
Color Tone) as needed.
•
Print in Grayscale print colors as various shades of gray.
o High Quality uses the tri-color ink cartridge to print high
quality grayscale images.
Black Only uses the black ink cartridge to print in grayscale.
o
Optimize for Photocopy or Fax is not used.
o
•
Saturation adjusts the relative intensity of printed colors from Muted
Vibrant.
to
•
Brightness adjusts the lightness or darkness of the printed image.
•
Color Tone adjusts the perceived warmth or coolness of printed colors.
•
Factory Settings returns the Color tab parameter changes to the
factory set defaults.
Select OK to accept all the changes, or select Cancel to ignore the changes.
User Guide Reference 44
Page 45

Advanced Tab
The Advanced tab provides access to diagnostic functions, alignments, and a flash
update function. The Advanced tab also displays Liberty status information, including
Driver, Printer, TCH, Loader, and Status information.
Driver - displays the installed Liberty Printer Driver version number.
Printer - displays the port number, serial number, and firmware version of the
printer.
TCH (
Loader - displays the Rimage Desktop autoloader it is physically attached to and the
version and serial number of the autoloader. If the Liberty printer displays (Not
Attached), the autoloader control cable may not be connected.
Status - displays the current Liberty printer operating status.
45 User Guide Reference
Tray Controller Handler) - displays the Handler name and version number.
Page 46

Printing
The Printing section allows you to run a test print without running the complete
system. A print file (.prn) must be created prior to running this operation.
1. At the
dialog.
2. Select the
purposes. The file you select must have been prepared for the Liberty printer. The
label file will be printed as many times as set in the Copies box.
Printing Preferences dialog, select the Advanced tab to open the following
Print File button and select a pre-rendered file to print for print testing
User Guide Reference 46
Page 47

Settings
The Settings selection lets you elect whether to ignore the Disc switch, run the Masker
application, and/or hide the Status dialog box.
Ignore Disc Switch
If selected, causes the printer not to wait for the activation of the disc switch before
printing. This option is ignored when connected to a Desktop 4500 autoloader.
Hide Status Dialog
If selected, prevents the pop-up status dialog box from opening when a print job is
initiated. This option is ignored when connected to a Desktop 4500 autoloader.
Run Masker
When selected, the Rimage Raster Masker displays allowing you adjust the mask (nonprintable area) settings for the selected media type (
This works well when printing rectangle or square pictures on the disc and you do not
want the edges printed. If you print on the edges of a disc where there is not printable
surface, the ink will smear or run.
Standard Area Settings let you adjust the standard outer and inner diameter settings,
etc.
Hub Settings lets you select the Print On Hub feature and adjust the related outer and
inner diameter settings.
Standard CD/DVD 120 mm only).
Parameter Unit lets you switch between a unit of measure of times 1.0 mm or times
0.1 mm.
47 User Guide Reference
Page 48

Maintenance
The maintenance section allows you to select alignment functions, diagnostics, or update the
flash.
Center Image – The Center Image function is only required if the print is not
centered on the label. Directions are found below.
Align Cartridges – directions are found on page 23.
Diagnostics – directions are found on page 48.
Update Loader Flash – Rimage recommends using the Production Server to update
the autoloader flash firmware. Refer to page 51.
Center Image
This function is used only when the printed label is not centered on the disc.
1. Stop all orders from processing. You can press the operator button on the Desktop
autoloader or pause orders from the Production Server software.
2. Select the windows Start menu and select |Settings|Printers|.
3. Right-click on Disc Color Printer and select Printing Preferences.
4. Select the Advanced tab and select the Center Image button.
User Guide Reference 48
Page 49

5. Select the Print Test Pattern button and the printer tray opens.
6. Place a full sized disc (120mm) on the printer tray.
7. When prompted, press the Disc button to close the printer tray.
8. When it has finished printing, rotate the disc 180 degrees. Align three of the position
lines, located on the outer edges of the disc, to the tray bracket edge as shown here.
1 – Position Lines 2, 3, 4 – Tray Bracket Edge
49 User Guide Reference
Page 50

9. Select the Print Test Pattern button again.
10. When prompted, press the Disc button to close the printer tray.
11. When done printing, remove the disc.
12. Look at where each long line crosses the set of index lines.
13. Enter the decimal index value where the long line crosses the index line in the
Horizontal and Vertical group. Enter negative numbers with a negative character (-).
Each line has a value of 0.5 units. The horizontal value from above would be
about –1.2.
14. Select the Save Settings button.
15. To verify that the new values corrected the offset, place a new disc on the printer tray.
16. Select the Print Test Pattern button.
17. When prompted, press the Disc button to close the printer tray.
18. When it has finished printing, rotate the disc 180 degrees. Align the position lines on
the outer edges of the disc to the printer’s tray bracket.
19. Select the Print Test Pattern button.
20. When prompted, press the Disc button to close the printer tray.
21. After it completed printing the final pattern, remove the disc and check if the long
lines cross the 0 index lines.
22. If the long lines do not cross the zero index line in the vertical and horizontal groups,
make final corrections and try again.
23. Select the Close button.
User Guide Reference 50
Page 51

24. Select the Disc button to close the printer tray.
25. Close the Printing Preference window.
Diagnostics
At the Advanced tab under Maintenance, the Diagnostics dialog provides several
device tests.
Mech
Select Power Off and Power On to cycle power to the tray mechanism. Select the
Power ON button to resume operation.
Cartridges
Select the Validate button to verify if the ink cartridges are authentic ink cartridges.
Select the Test button to test communications between the printer and the cartridges.
Tray Sensors
The Tray Sensors function is for use only by, or at the direction of, Rimage Service
personnel. Contact Rimage Corporation for additional information.
Update Autoloader Flash
To update the autoloader’s flash firmware, download the latest flash from the Rimage
Website.
Save the flash file to the root of your local hard drive.
1. Open Production Server.
2. Stop the automation by making sure the Start button is not depressed as
shown in here.
51 User Guide Reference
Page 52

3. Insert Rimage software suite disc into the CD-ROM drive or download the
latest flash version from the Rimage web site.
4. Unzip the flash file if it was downloaded from the website.
5. From the menu bar, select Options/Update Transporter Flash.
6. Select the location of the flash file from the Rimage OfficeNet Software Suite
disc or the saved location if it was downloaded from the website.
7. Double-click the filename name.bin file.
8. The updating procedure runs until the flash file is updated to the autoloader.
A dialog box appears that it completed the flash update.
Tray Controller
The Rimage Tray Controller icon ( ) is installed in the Windows Icon Tray once it
was initiated.
The Tray Controller application automatically runs in the background after the
Production Server starts. The Tray Controller is only available if the Liberty printer
driver was installed. The Printer Tray opens only if the PC is connected to the printer
and the Tray Controller is running.
User Guide Reference 52
Page 53

Find Additional Information
Each software module contains online Help. Help features a Table of Contents pane
on the left side of the window and the selected topic on the right. You may need to
resize the windows to fit your screen.
Locate your printed Software Suite 6 Getting Started Guide for a short tutorial on
creating your first disc.
Online Help
1. In QuickDisc for Windows, on the Help menu, click Help Topics. The initial
QuickDisc help window displays.
2. Select the desired Help topic from the Table of Contents pane.
53 User Guide Reference
Page 54

Online Manuals
Many other user manuals are installed in the Rimage folder and are organized by type
as shown here:
Technical Support and Product Updates
Support for the Desktop 4500 is available directly from your authorized reseller. If
you have difficulty using the Desktop 4500, please review the User Guide before
calling.
Online support for the Desktop 4500 is available on our website at
http://www.rimage.com/technical/
Be sure to register your Desktop 4500 online or complete and return the registration
card so we can notify you of upgrades as they become available.
Related Documents
The following Rimage Software 6.x manuals, Help, and related documents are
installed on the Control Center:
•
Software Suite 6 Getting Started Guide
•
eMS Messaging System Overview and Administrator’s Guide manual
•
QuickDisc for Windows Online Help
•
QuickDiscJ Online Help
•
Messaging Administrator Online Help
•
PSS 6/OfficeNET 6 Release Notes and Readme.txt
•
Software Suite 6 Install Guide
•
Production Server online Help
•
Image Server online Help
•
Advanced Setup Guide for Software Suite 6
Visit the Rimage Web site at http://www.rimage.com
for additional documentation.
User Guide Reference 54
Page 55

Appendix
Desktop 4500 Specifications
Print Technology Inkjet
Disc Capacity Input: 120
Output: 120
Configurations Two or four recorders, CD-R, DVD-R, or both
Printing Resolution Up to 4800 DPI
Height 25.5 inches (57.2 cm)
Width 17.5 inches (44.5 cm)
Depth 21 inches (53.4 cm)*
Weight 60 pounds (27.2 kg)
Power 100-120/220-240 V, 1.8-0.75 A, 50/60 Hz
Operating Temperature 60–86° F (16-30° C)
Humidity 40–60% non-condensing
Certifications Emissions: FCC Class B
Safety UL, cULus, CE
Firewire (IEEE 1394) Interfaces
USB 1.1
Software OfficeNet Software Suite
Recorders The installed recorders have an ATAPI interface that has a
Required AC Outlets Two AC outlets, one for the printer, and another for the
small adapter board that converts it to a Firewire interface.
robotics. The PC requires at least two more outlets.
*Allow an additional 3.5 inches (9 cm) at the back of the autoloader for attached
cables.
55 Appendix - Specifications
Page 56

Liberty Printer Specifications
This appendix provides Liberty printer specifications, related documentation. The
Rimage Liberty printer specifications are provided in the table below.
Printing Speeds
Color Spectrum
Droplet Size
Pixel Density
Ink Cartridges
Printing Direction
Printing Modes
Print Quality
Media Types
Cartridge Capacity
Physical Properties
Printing Resolution
Printer Driver
Interface
Power
Operating Temp.
Relative Humidity
Certifications
OS Compatibility
108 seconds for 100% coverage, full color, Photo Normal mode
20 seconds for 100% coverage, Text and Graphics mode
12 seconds for 20% coverage, Text and Graphics Best mode
16.7 million colors
4 pl (pico-liter)
5.76 million pixels per square inch
Three Color (CMY)—Part Number 210753-001
Black—Part Number 210755-001
Images print from top to bottom as the media moves out of the printer.
Black or Three-color
Laser-quality black text, plus professional color photos
Standard CD-R or DVD with ink-jet receptive surface coating,
300-500 full discs depending on print mode and image complexity.
Partial coverage images extend cartridge capacity.
7.75” H x 18” W x 12.5” D (19.7 cm x 45.8 cm x 31.8 cm)
16 pounds (7.3 kg)
4800 dpi
Supplied with drivers for Windows 2000 and Windows XP
USB 1.1
100-120/220-240 V, 0.7-0.29 A, 50/60 Hz
59 °F-86 °F (15 °C-30 °C)
30%-70% non-condensing (dew)
FCC Class B. Safety:
Windows 2000, Windows XP
cULus, CE
Appendix - Specifications 56
Page 57

Computer Specifications
The computer selection is crucial for good system operation. In the following pages are
minimum and recommended specifications for CD-R and DVD-R recorders. The
computer must be dedicated just for running the Desktop autoloader.
Computer Requirements
These are the minimum and recommended requirements to operate a CD-R Rimage
system. The minimum requirements work fine for “duplication” operation.
Duplication occurs when a client application sends a single order to record multiple
copies to multiple or single recorders. The recommended requirements are for power
users that use the “publishing” operation or want optimum system performance and
reliability. Publishing occurs when a client application submits multiple orders of
single disc images to the multiple recorders.
Processor
(Minimum)
Memory (Minimum) 256 MB SDRAM (PC133 compliant) 512 MB ECC, DDR-200 SDRAM
Video 800 x 600 Resolution (65,536 colors) 1024 x 768 Resolution (16-bit colors)
System Hard
Drive(s)
Partitioning and
Formatting Drives
Hard Drive
Controller
USB Ports One USB port for printer One USB port for printer
Parallel Ports Not Required Not Required
Serial Ports Not Required Not Required
Firewire Ports One IEEE 1394 Port* One IEEE 1394 Port*
Rimage Software OfficeNet Software Suite 6.x OfficeNet Software Suite 6.x
Operating System Windows 2000 Professional (Service Pack 3)
Minimum PC Requirements Recommended Requirements
Pentium III 933 MHz (133 MHz bus) Pentium 4 1.8 GHz (400 MHz Front Side Bus)
An IDE hard drive that supports UDMA and
Ultra ATA/133, with a 8 MB Cache buffer,
rotation speed of 7,200RPM
Partition system hard drive with 4 GB (20 GB
for DVD-R) of free space for Production
Server and space for your source files.
An IDE hard drive controller that supports
UDMA (Bus mastering) and Ultra ATA
technologies. By default Windows 2000 does
not install the correct device driver for this
controller type. Obtain the driver through your
computer manufacturer or Intel's Web site.
or Windows XP
One 18 GB for CD-R (36 GB for DVD-R), LVD
SCSI hard drives, 15,000 RPM, Ultra160 – for
operating system.
Two 18 GB for CD-R (two 36 GB for DVD-R),
LVD SCSI hard drives, 15,000 RPM, Ultra160
– for caching disc image files.
All partitions are formatted with NTFS using the
default allocation unit size. System drive is a
basic disk containing one primary partition
(C:\). The remaining hard drive(s), used for
caching, is formatted as one large basic
partition using NTFS. (Change Production
Server’s first cache HD to drive letter F:\.)
Adaptec 160 SCSI controller or equivalent.
Windows 2000 Professional (Service Pack 4)
or Windows XP
* System includes a Firewire (IEEE 1394) Host adapter and cable.
After selecting the proper PC, go to the “Setup Computer” on the page 8.
Appendix – Specifications 57
 Loading...