

Page 1

Owner’s Manual
Dell GPS Navigation System
Page 2

IMPORTANT INFORMATION
THIS DOCUMENT INCLUDES DELL'S CURRENT RETURN POLICY AND IT
SUPERCEDES ALL OTHER PUBLISHED POLICIES.
Please read this document carefully! This document contains very important
information about your rights and obligations, as well as limitations and
exclusions that may apply to you.
Notes, Notices, and Cautions
NOTE: A NOTE indicates important information that helps you make better use
of your computer.
www.dell.com | support.dell.com
NOTICE: A NOTICE indicates either potential damage to hardware or loss of
data and tells you how to avoid the problem.
CAUTION: A CAUTION indicates a potential for property damage, personal
injury, or death.
Information in this document is subject to change without notice.
©2004 Dell Inc. All rights reserved
Reproduction in any manner whatsoever without the written permission of
Dell Inc. is strictly forbidden.
Trademarks used in this text: Dell™, the DELL logo, Axim™, TrueMobile, and
DellNet are trademarks of Dell Inc.; Intel, Pentium, and Celeron are
registered trademarks of Intel Corporation; Microsoft, Windows, and
ActiveSync are registered trademarks of Microsoft Corporation; Bluetooth is
a trademark owned by Bluetooth SIG, Inc. and is used by Dell Inc. under
license.
Other trademarks and trade names may be used in this document to refer to
either the entities claiming the marks and names or their products. Dell Inc.
disclaims any proprietary interest in trademarks and trade names other than
its own.
July 2004 Rev. A01
Page 3

Contents
Safety Instructions
1 Getting Started
Notes, Notices, and Cautions . . . . . . . . . . . . . . . . . . 2
General . . . . . . . . . . . . . . . . . . . . . . . . . . . . . . . . . . . . . . . . 5
Power. . . . . . . . . . . . . . . . . . . . . . . . . . . . . . . . . . . . . . . . . . 6
Battery. . . . . . . . . . . . . . . . . . . . . . . . . . . . . . . . . . . . . . . . . 7
Air Travel. . . . . . . . . . . . . . . . . . . . . . . . . . . . . . . . . . . . . . . 8
When Using Your Device. . . . . . . . . . . . . . . . . . . . . . 8
Protecting Against Electrostatic Discharge . . . . . . . . . 8
Battery Disposal. . . . . . . . . . . . . . . . . . . . . . . . . . . . . . . . . 9
What’s in the Box? . . . . . . . . . . . . . . . . . . . . . . . . . 11
System Requirements. . . . . . . . . . . . . . . . . . . . . . . 12
Installing the Navigation System Software. . . . . . . 13
Downloading Map Data . . . . . . . . . . . . . . . . . . . . . . 14
Downloading by region. . . . . . . . . . . . . . . . . . . . . . . . . . 14
Downloading by city . . . . . . . . . . . . . . . . . . . . . . . . . . . . 15
Starting the Application on the Pocket PC . . . . . . . 17
Exiting the Navigation System . . . . . . . . . . . . . . . . 19
Installing the Mount . . . . . . . . . . . . . . . . . . . . . . . . 19
Using the Car Charger . . . . . . . . . . . . . . . . . . . . . . 21
General precautions . . . . . . . . . . . . . . . . . . . . . . . . . . . . 21
Troubleshooting power. . . . . . . . . . . . . . . . . . . . . . . . . . 22
2 Using the GPS Device
Exploring the GPS Receiver . . . . . . . . . . . . . . . . . . 23
Owner’s Manual 1
Page 4

Partnering the Receiver with the Pocket PC . . . . . 24
Partnering with Windows Mobile 2003 Operating System 25
Other GPS Connection Options . . . . . . . . . . . . . . . 26
Checking the GPS Connection Status . . . . . . . . . . 29
Signal Reception . . . . . . . . . . . . . . . . . . . . . . . . . . 31
3 Navigation Views and Options
Map view . . . . . . . . . . . . . . . . . . . . . . . . . . . . . . . . 34
Map Legend. . . . . . . . . . . . . . . . . . . . . . . . . . . . . . . . . . . . 35
www.dell.com | support.dell.com
Guidance Instructions . . . . . . . . . . . . . . . . . . . . . . . . . . . 36
Zooming in and out. . . . . . . . . . . . . . . . . . . . . . . . . . . . . . 37
POI Icons . . . . . . . . . . . . . . . . . . . . . . . . . . . . . . . . . . . . . . 37
Panning the map. . . . . . . . . . . . . . . . . . . . . . . . . . . . . . . . 37
Location Information . . . . . . . . . . . . . . . . . . . . . . . . . . . . 38
Maneuver detail. . . . . . . . . . . . . . . . . . . . . . . . . . . 39
Guidance Instructions . . . . . . . . . . . . . . . . . . . . . . . . . . . 40
Route instructions . . . . . . . . . . . . . . . . . . . . . . . . . 41
Display Options . . . . . . . . . . . . . . . . . . . . . . . . . . . 42
Route Options . . . . . . . . . . . . . . . . . . . . . . . . . . . . 44
Distance Units . . . . . . . . . . . . . . . . . . . . . . . . . . . . 46
Input Options. . . . . . . . . . . . . . . . . . . . . . . . . . . . . 46
Safety Features . . . . . . . . . . . . . . . . . . . . . . . . . . . 46
Speed alert. . . . . . . . . . . . . . . . . . . . . . . . . . . . . . . . . . . . . 47
Fog driving . . . . . . . . . . . . . . . . . . . . . . . . . . . . . . . . . . . . . 48
Favorite Locations . . . . . . . . . . . . . . . . . . . . . . . . . 48
4 Navigating
Entering a destination . . . . . . . . . . . . . . . . . . . . . . 51
Entering a destination by address . . . . . . . . . . . . . . . . . 52
Entering a destination by intersection . . . . . . . . . . . . . 59
Selecting a Point of Interest . . . . . . . . . . . . . . . . . . . . . . 65
2 Owner’s Manual
Page 5

Selecting a Destination from Recent Destinations . . 75
Selecting a Destination from Favorites . . . . . . . . . . . . 76
Specifying a destination from Contacts. . . . . . . . . . . . 78
Selecting a City Center . . . . . . . . . . . . . . . . . . . . . . . . . . 79
Changing Your Starting Location . . . . . . . . . . . . . . 84
Clearing Your Destination . . . . . . . . . . . . . . . . . . . . 85
Waypoints and Detours. . . . . . . . . . . . . . . . . . . . . . 85
Waypoints. . . . . . . . . . . . . . . . . . . . . . . . . . . . . . . . . . . . . 86
Detours . . . . . . . . . . . . . . . . . . . . . . . . . . . . . . . . . . . . . . . 88
5 Other Features
Hotkeys . . . . . . . . . . . . . . . . . . . . . . . . . . . . . . . . . 91
Disabling and Enabling Hotkeys . . . . . . . . . . . . . . . . . . 93
Almanac . . . . . . . . . . . . . . . . . . . . . . . . . . . . . . . . . 95
Playing a Demo . . . . . . . . . . . . . . . . . . . . . . . . . . . . 96
Recording and Playing Back GPS Paths . . . . . . . . . 97
6 Troubleshooting
Troubleshooting . . . . . . . . . . . . . . . . . . . . . . . . . . . 99
7 Appendix A: POI Details
POI Icon Categories . . . . . . . . . . . . . . . . . . . . . . . 105
8 Appendix B: Regulatory Notices
FCC Notices (U.S. Only). . . . . . . . . . . . . . . . . . . . . . . . . 108
IC Notice (Canada Only) . . . . . . . . . . . . . . . . . . . . . . . . 109
CE Notice (European Union) . . . . . . . . . . . . . . . . . . . . 110
CE Mark Notice . . . . . . . . . . . . . . . . . . . . . . . . . . . . . . . 111
Finding Information . . . . . . . . . . . . . . . . . . . . . . . 111
Limited Warranties and Return Policy. . . . . . . . . . 141
Owner’s Manual 3
Page 6

www.dell.com | support.dell.com
Limited Warranty for Dell-Branded Hardware Products (U.S.
Only) . . . . . . . . . . . . . . . . . . . . . . . . . . . . . . . . . . . . . . . . . 141
Limited Warranty Terms for Dell-Branded Hardware
Products (Canada Only). . . . . . . . . . . . . . . . . . . . . . . . . 148
1-Year End-User Manufacturer Guarantee (Latin America
and the Caribbean Only) . . . . . . . . . . . . . . . . . . . . . . . . 155
U.S. Terms and Conditions of Sale . . . . . . . . . . . 157
ENDUSER LICENSE AGREEMENT . . . . . . . . . . 162
9 Index
4 Owner’s Manual
Page 7

Safety Instructions
Use the following safety guidelines to help ensure your own personal safety
and to help protect your device and working environment from potential
damage.
General
• User should not operate the device while in motion. User remains
responsible for the safety of his/her travel and should obey traffic and
pedestrian laws and exercise good judgment at all times. Some of the
map data may be outdated, incomplete or inaccurate and the device may
produce inaccurate or inappropriate results. Due to road, weather and
other conditions, some route guidance and/or directions may not be
appropriate.
• Do not attempt to service the device yourself unless you are a trained
service technician. Always follow installation instructions closely.
• If you use an extension power cable with your AC adapter, ensure that
the total ampere rating of the products plugged in to the extension power
cable does not exceed the ampere rating of the extension cable.
• Do not push objects into air vents or openings of your device. Doing so
can cause fire or electric shock by shorting out interior components.
• Keep your device away from radiators and heat sources. Also, do not
block cooling vents. Avoid placing loose papers underneath your device;
do not place your device in a closed-in wall unit or on a bed, sofa, or rug.
• Place the AC adapter in a ventilated area, such as a desk top or on the
floor, when you use it to run the device or to charge the battery. Do not
cover the AC adapter with papers or other items that will reduce cooling;
also, do not use the AC adapter inside a carrying case.
• The AC adapter may become hot during normal operation of your device.
Use care when handling the adapter during or immediately after
operation.
• Do not use your device in a wet environment, for example, near a bath
tub, sink, or swimming pool or in a wet basement.
Owner’s Manual 5
Page 8

• To help avoid the potential hazard of electric shock, do not connect or
disconnect any cables or perform maintenance or reconfiguration of
this product during an electrical storm. Do not use your device during
an electrical storm unless all cables have been disconnected and the
device is operating on battery power.
• Before you clean your device, disconnect the device from the electrical
outlet. Clean your device with a soft cloth dampened with water. Do
not use liquid or aerosol cleaners, which may contain flammable
substances.
• Do not expose the GPS receiver to temperatures above 60 degree
Centigrade (128 degrees Fahrenheit). Failure to follow those
www.dell.com | support.dell.com
instructions may present risk of explosion, fire or high temperature. In
particular do not leave your GPS receiver exposed to direct sunlight in
your vehicle for extended time periods when you are not using your
navigation system.
Power
• Use only the Dell-provided DC charger or the standard Dell AC
adapter provided with your Dell™ Axim™ PDA approved for use with
this device. Use of another AC adapter or DC charger may cause a fire
or explosion.
• Before you connect the device to an electrical outlet, check the DC
charger or AC adapter voltage rating to ensure that the required
voltage and frequency match the available power source.
• To remove the device from all power sources, turn the device off, and
disconnect the DC charger and/or the AC adapter from the electrical
outlet.
• To help prevent electric shock, plug the AC adapter and device power
cables into properly grounded power sources. These power cables may
be equipped with 3-prong plugs to provide an earth grounding
connection. Do not use adapter plugs or remove the grounding prong
from the power cable plug. If you use a power extension cable, use the
appropriate type, 2prong or 3-prong, to mate with the AC adapter
power cable.
6 Owner’s Manual
Page 9

• Be sure that nothing rests on your AC adapter’s power cable and that
the cable is not located where it can be tripped over or stepped on.
• If you are using a multiple-outlet power strip, use caution when
plugging the AC adapter’s power cable into the power strip. Some
power strips may allow you to insert the plug incorrectly. Incorrect
insertion of the power plug could result in permanent damage to your
device, as well as risk of electric shock and/or fire. Ensure that the
ground prong of the power plug is inserted into the mating ground
contact of the power strip.
• Do not leave the GPS receiver or the PDA connected to the car charger
when the car is not running.
Battery
• The GPS receiver contains an internal battery. This battery is not user
serviceable.
• The GPS receiver poses a burn hazard if you handle it improperly. Do
not disassemble it. Handle a damaged or leaking GPS receiver pack
with extreme care. If the battery within the GPS receiver is damaged,
electrolyte may leak from the cells and may cause personal injury.
• Keep the GPS receiver away from children.
• Do not store or leave your device near a heat source such as a radiator,
fireplace, stove, electric heater, or other heat-generating appliance or
otherwise expose it to temperatures in excess of 60ºC (140ºF). When
heated to excessive temperatures, battery cells could explode or vent,
posing a risk of fire.
• Do not dispose of your GPS receiver in a fire or with normal household
waste. The Battery cells may explode. Discard the device according to
the manufacturer’s instructions or contact your local waste disposal
agency for disposal instructions.
Owner’s Manual 7
Page 10

Air Travel
• Certain Federal Aviation Administration regulations and/or airlinespecific restrictions may apply to the operation of your Dell device
while you are on board an aircraft. For example, such
regulations/restrictions may prohibit the use of any personal electronic
device (PED) that has the capacity for intentional transmission of
radio frequency or other electromagnetic signals while on an aircraft.
• In order to best comply with all such restrictions, do not use your
GPS receiver while on board an aircraft.
www.dell.com | support.dell.com
When Using Your Device
Observe the following safe-handling guidelines to prevent damage to your
device:
• When traveling, do not place the device in overhead storage
compartments where it could slide around. Do not drop your device or
subject it to other mechanical shocks.
• Protect your device, battery, and hard drive from environmental
hazards such as dirt, dust, food, liquids, temperature extremes, and
overexposure to sunlight.
• When you move your device between environments with very different
temperature and/or humidity ranges, condensation may form on or
within the device. To avoid damaging the device, allow sufficient time
for the moisture to evaporate before using the device.
NOTE: When taking the device from low-temperature conditions into a warmer
environment or from high-temperature conditions into a cooler environment,
allow the device to acclimate to room temperature before turning on power.
Protecting Against Electrostatic Discharge
Static electricity can harm electronic components inside your device. To
prevent static damage, discharge static electricity from your body before you
touch any of your device’s electronic components, such as a memory
module. You can do so by touching an unpainted metal surface.
8 Owner’s Manual
Page 11

You can also take the following steps to prevent damage from electrostatic
discharge (ESD):
• When unpacking a static-sensitive component from its shipping
carton, do not remove the component from the antistatic packing
material until you are ready to install the component. Just before
unwrapping the antistatic packaging, be sure to discharge static
electricity from your body.
• When transporting a sensitive component, first place it in an antistatic
container or packaging.
• Handle all sensitive components in a static-safe area. If possible, use
antistatic floor pads and workbench pads.
Battery Disposal
• The GPS receiver contains an internal battery. This battery is not user
serviceable.
• The GPS receiver poses a burn hazard if you handle it improperly. Do
not disassemble it. Handle a damaged or leaking GPS receiver pack
with extreme care. If the battery within the GPS receiver is damaged,
electrolyte may leak from the cells and may cause personal injury.
• Keep the GPS receiver away from children.
• Do not store or leave your device near a heat source such as a radiator,
fireplace, stove, electric heater, or other heat-generating appliance or
otherwise expose it to temperatures in excess of 60ºC (140ºF). When
heated to excessive temperatures, battery cells could explode or vent,
posing a risk of fire.
• Do not dispose of your GPS receiver in a fire or with normal household
waste. The Battery cells may explode. Discard the device according to
the manufacturer’s instructions or contact your local waste disposal
agency for disposal instructions.
Owner’s Manual 9
Page 12

www.dell.com | support.dell.com
10 Owner’s Manual
Page 13

1
Getting Started
Congratulations on purchasing the Dell GPS Navigation System (Navigation
System). The Navigation System is a full featured software application that
uses the latest in satellite technology and detailed street maps from NAVTEQ to
guide you through the most complex streets.
The Navigation System is designed for the Dell™ Axim™ Pocket PC, but will run
on all Pocket PCs with the appropriate specifications. The complete map of the
United States and Canada is on the two CDs. You use the Map Loader software
on your desktop or laptop computer to transfer selected map information to
your Pocket PC, either by city or by region. A different map can be loaded to
your Pocket PC at any time using the Map Loader software.
Since the map of the United States and Canada is very large, it does not fit on
the Dell™ Axim™ Pocket PC. You can transfer map data by city or region, but
not both at the same time. To transfer the portion of the map you want to your
Pocket PC, use the companion map loading software on your desktop (or
laptop). The time needed to download a map varies based on system
capabilities and the size of the map.
When you travel to a different area of the country, the map loader lets you
easily change the maps on your Pocket PC as needed. Smaller maps load more
quickly, and you can use multiple memory cards to keep a selection of maps
available.
NOTE: Because of the relatively small memory of Pocket PCs compared to
desktops, you will receive a warning if you try to load too much map data as a
single map. Maps of 100 Mb and smaller are easily managed by the Navigation
System.
What’s in the Box?
The Navigation System box includes the following items:
• CD ROM 1, containing the desktop Map Loader and Pocket PC
application, this
map data
• CD ROM 2, containing the Eastern U.S. and Canada map data
Owner’s Manual
, and the Western U.S. and Canada
Owner’s Manual 11
Page 14
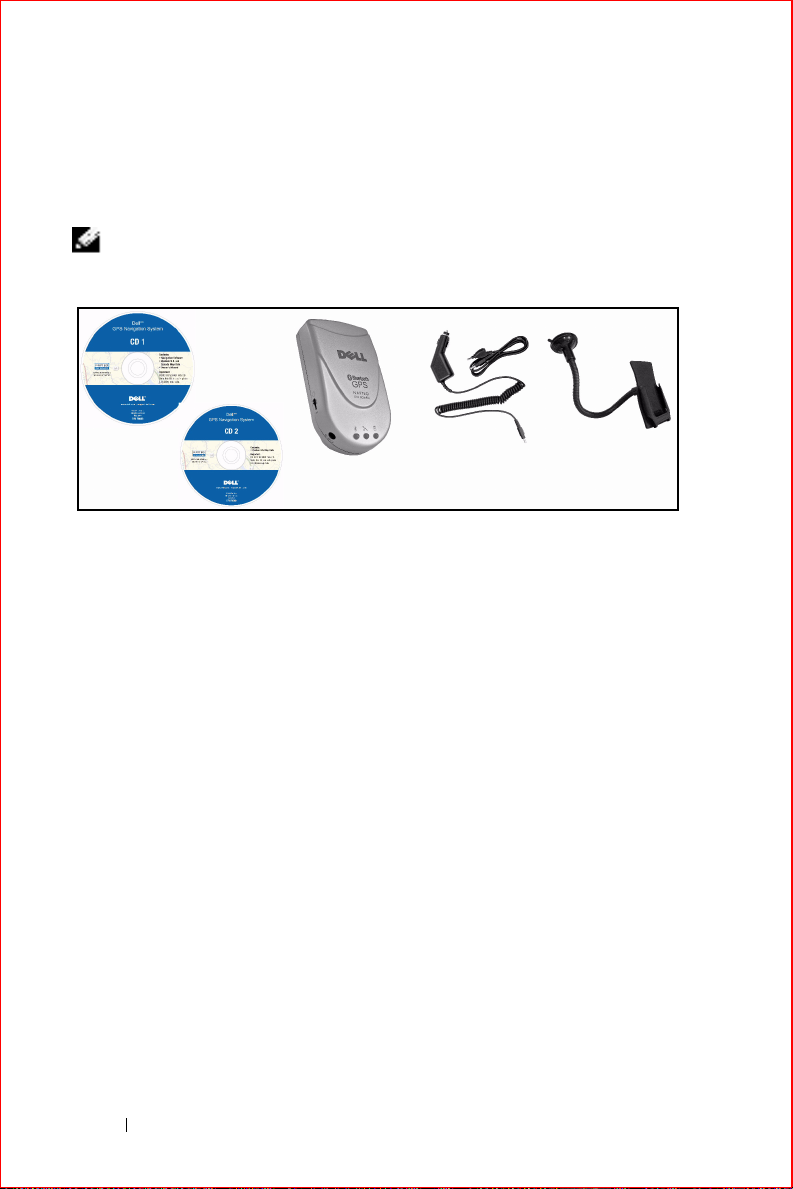
• GPS Receiver with Bluetooth® wireless technology
• 12 V DC Adapter for charging in the car
• Mount
NOTE: If you are missing any of these items, please contact your dealer.
www.dell.com | support.dell.com
System Requirements
The Navigation System is designed to run on any 64 MB Dell™ Axim™ Pocket
PC with Bluetooth® wireless technology:
•Dell™ Axim™ X30
•Dell™ Axim™ X3i
• Dell™ Axim™ X5 (with Bluetooth Radio CF card adapter)
Desktop or Laptop PC system requirements include:
•Microsoft® Windows 98, ME, 2000 Professional, or XP operating
system
• Microsoft ActiveSync 3.7 or higher
• 266 MHZ Intel Pentium
equivalent
•64 MB RAM
• 80 MB available hard drive space
•CD ROM drive
®
II microprocessor with MMX™ or
12 Owner’s Manual
Page 15

Handheld PC system requirements include:
•Microsoft
®
Windows Pocket PC 2002 or Microsoft Windows Mobile
2003 Operating System
•64 MB RAM
• 64 MB storage space on SD card, CF card, or main memory
• 200 Mhz or faster processor
• Original Equipment Manufacturer installed Bluetooth® wireless
technology
Installing the Navigation System Software
When you install the Navigation System Software the Map Loader
application is loaded onto your desktop or laptop computer and the
Navigation System software is loaded onto your Pocket PC. Both devices
must be available during the installation process.
To install the Navigation System:
1
Synchronize your Pocket PC with your computer using ActiveSync.
When you have finished synchronizing, leave your Pocket PC
connected to your computer and the ActiveSync application running.
NOTE: For information on synchronizing your Pocket PC, refer to the
User’s Guide that came with your Pocket PC.
2
Close all other applications running on both the computer and the
Pocket PC.
NOTE: To close all applications running on the Pocket PC, from the Start
menu, tap Settings > System tab > Memory and then tap Running
Programs. Tap Stop All to stop all running applications.
Insert the Install CD in a CD drive. The installation process should
3
start automatically.
NOTE: If the setup program does not start automatically, select Run from
the Start menu, enter D:\setup.exe (where D: represents the drive letter
for the CD drive containing the Install CD), and click the OK button.
Follow the installation directions. You will need to agree to the End
4
User License Agreement to be able to complete the installation.
Owner’s Manual 13
Page 16
Downloading Map Data
Once you have installed the software, you use the Map Loader to load map
data to your Pocket PC. There are two methods of selecting map data:
• By Region
•By City
You can load additional maps to additional storage cards, or load a new map
onto the current storage card.
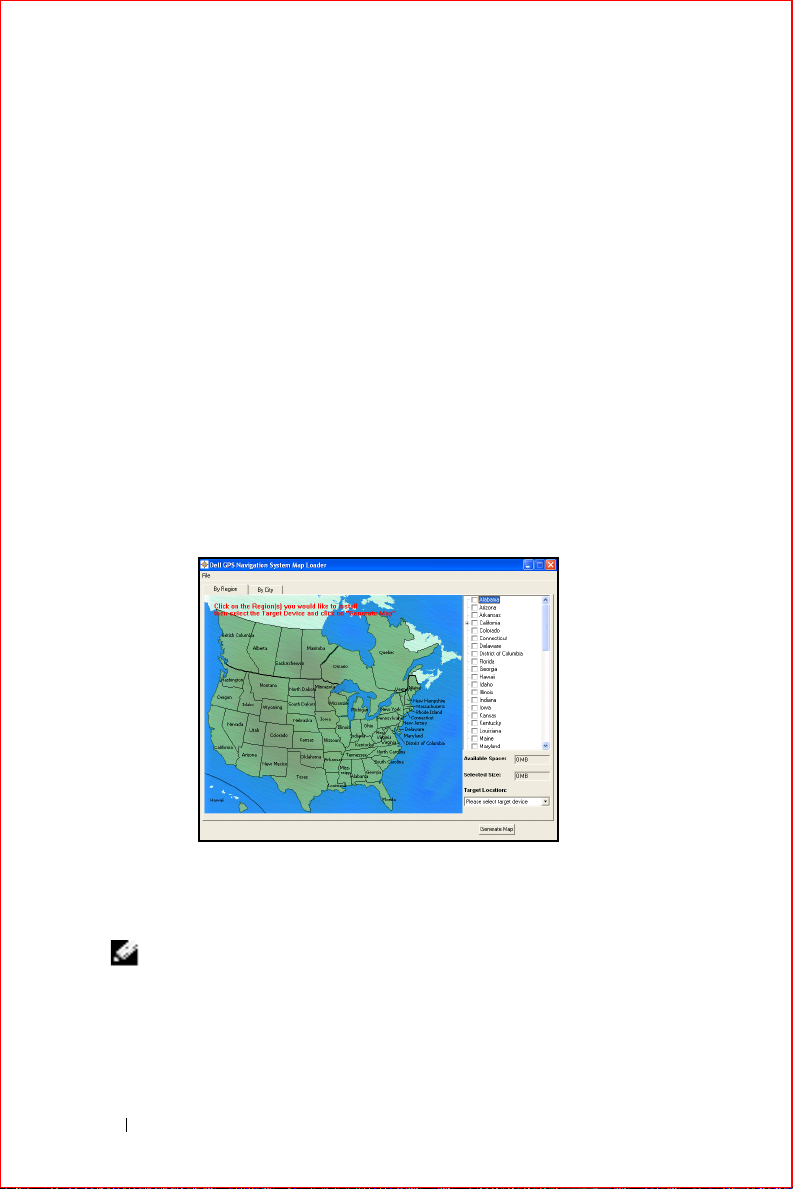
Downloading by region
www.dell.com | support.dell.com
When you download map data by region, you can include one or more than
one region. You can select regions that are adjacent to each other or from
separate areas.
To download map data by region:
1
If the Map Loader application is not open, click
Dell> Axim Navigation System
NOTE: The first time you run the Map Loader, a message appears
indicating that if you have limited memory available in your Pocket PC you
should use the By City method. Check the Don’t show this message again
check box if you do not want to see this warning again.
Click the
2
14 Owner’s Manual
By Region
tab if it is not the active tab.
>
Map Loader
Start
.
>
Programs
>
Page 17

3
Do one of the following:
• On the map, click on the states and/or provinces you want
included in the map data loaded onto the Pocket PC.
or
• In the list of regions, click the check boxes for the states and/or
provinces you want included in the map data loaded onto the
Pocket PC.
As you select regions the
Selected Size
field shows the approximate
amount of storage space required for the selected map data.
4
From the
Targeted Location
list, select the location where the map
data should be stored.
NOTE: Storing map data in storage cards is recommended. If you select
the storage card, the Storage Card Selection dialog box appears. Select
the appropriate storage card and click OK.
If existing map data is found on the storage card, the Existing map
message appears, giving you the opportunity to overwrite the existing
map data. To overwrite the existing map data, click
5
Click
Generate Map
. The Generating Map progress screen appears. If
OK
.
the correct CD is not available or the second CD is needed, you will be
prompted to insert the CD.
6
When the map data has been successfully loaded onto the Pocket PC,
a message appears. Click the
7
To exit the Map Loader application, from the
OK
button.
File
menu choose
Exit
.
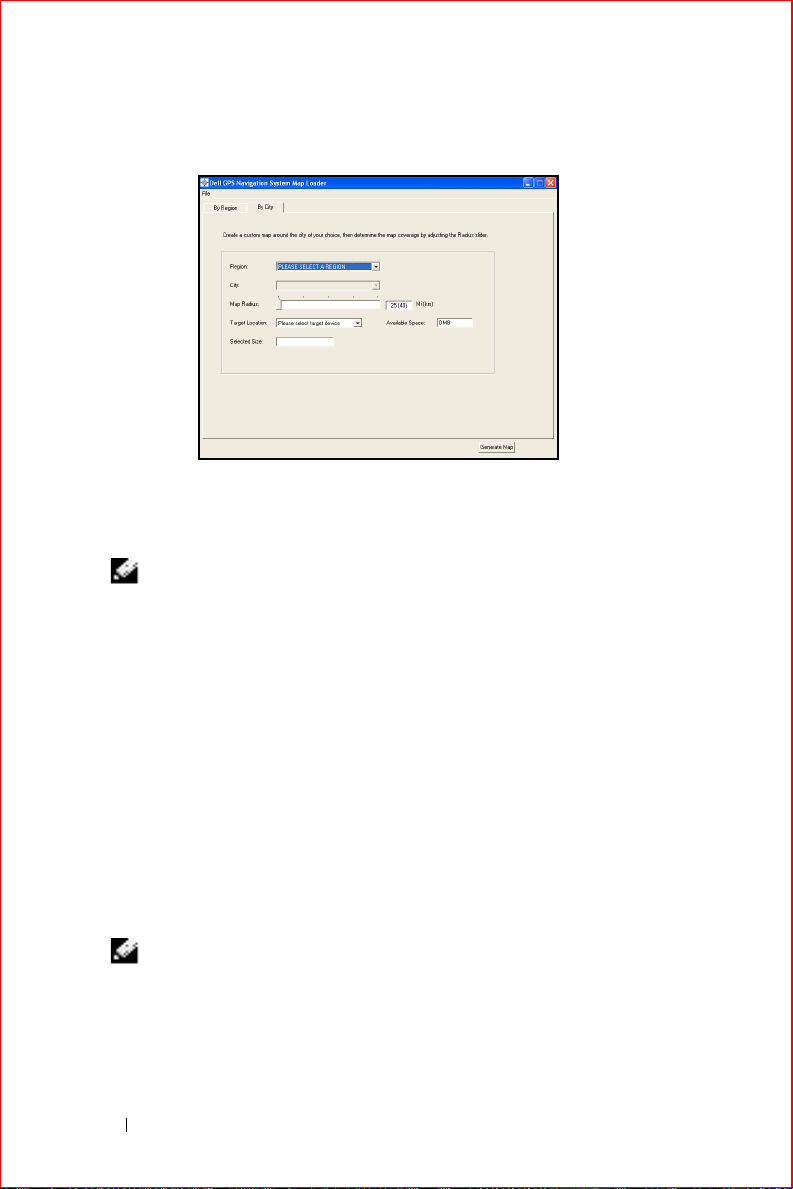
Downloading by city
When you download map data by city, you select a city from within a region,
and then specify the radius around that city.
Owner’s Manual 15
Page 18
www.dell.com | support.dell.com
To download map data by city:
1
If the Map Loader application is not open, click
Dell>Axim Navigation System
NOTE: The first time you run the Map Loader, a message appears
indicating that if you have limited memory available in your Pocket PC you
should use the By City method. Check the Don’t show this message again
check box if you do not want to see this warning again.
Click the
2
3
Select the
By City
Region
tab if it is not the active tab.
containing the city you want to select. The
is populated with the cities in that region.
4
Select the
5
Move the
City
.
Map Radius
range from 25 to 125 miles around the selected city. As you move the
slider the
Selected Size
space required for the selected map data.
6
From the
Targeted Location
data should be stored.
NOTE: Storing map data in storage cards is recommended. If you select
the storage card, the Storage Card Selection dialog box appears. Select
the appropriate storage card and click OK. If existing map data is found on
Start
>
>
Map Loader
Programs
.
City
>
list
slider to the appropriate distance. Distances
field shows the approximate amount of storage
list, select the location where the map
16 Owner’s Manual
Page 19

the storage card, the Existing map message appears, giving you the
opportunity to overwrite the existing map data. To overwrite the existing
map data, click OK.
Click
7
Generate Map
. The Generating Map progress screen appears. If
the correct CD is not available or the second CD is needed, you will be
prompted to insert the CD.
8
When the map data has been successfully loaded onto the Pocket PC,
a message appears. Click the
9
To exit the Map Loader application, from the
OK
button.
File
menu choose
Exit
Starting the Application on the Pocket PC
Once you have loaded the map to your Pocket PC you are ready to start the
application.
To start the Navigation System:
1
Turn on the GPS receiver and place it where it can receive signals. A
blinking green light on the GPS receiver indicates that you have a GPS
fix (strong GPS signal).
NOTE: It may take up to 15 minutes to acquire a satellite fix.
2
Tap t h e
appears.
Tap the Navigation System icon on the Programs screen. A safety
3
warning screen appears.
Start
menu and then tap
NOTE: Once you have used the Navigation System on your Pocket PC the
Navigation System icon will appear in the recently used programs. You
can tap the icon to start the Navigation System.
Programs
. The Programs screen
.
NOTE: Important: You should not operate your Pocket PC while driving a
moving vehicle.
Owner’s Manual 17
Page 20
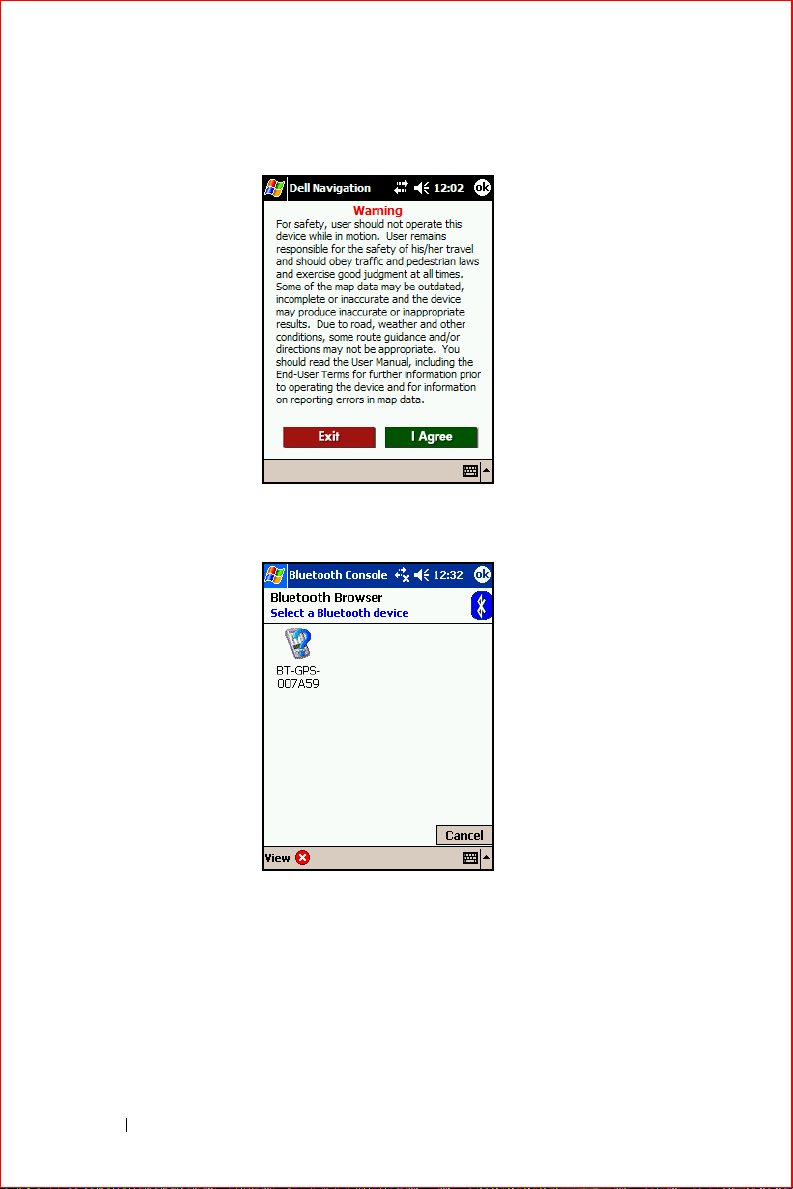
www.dell.com | support.dell.com
4
Ta p
I Agree
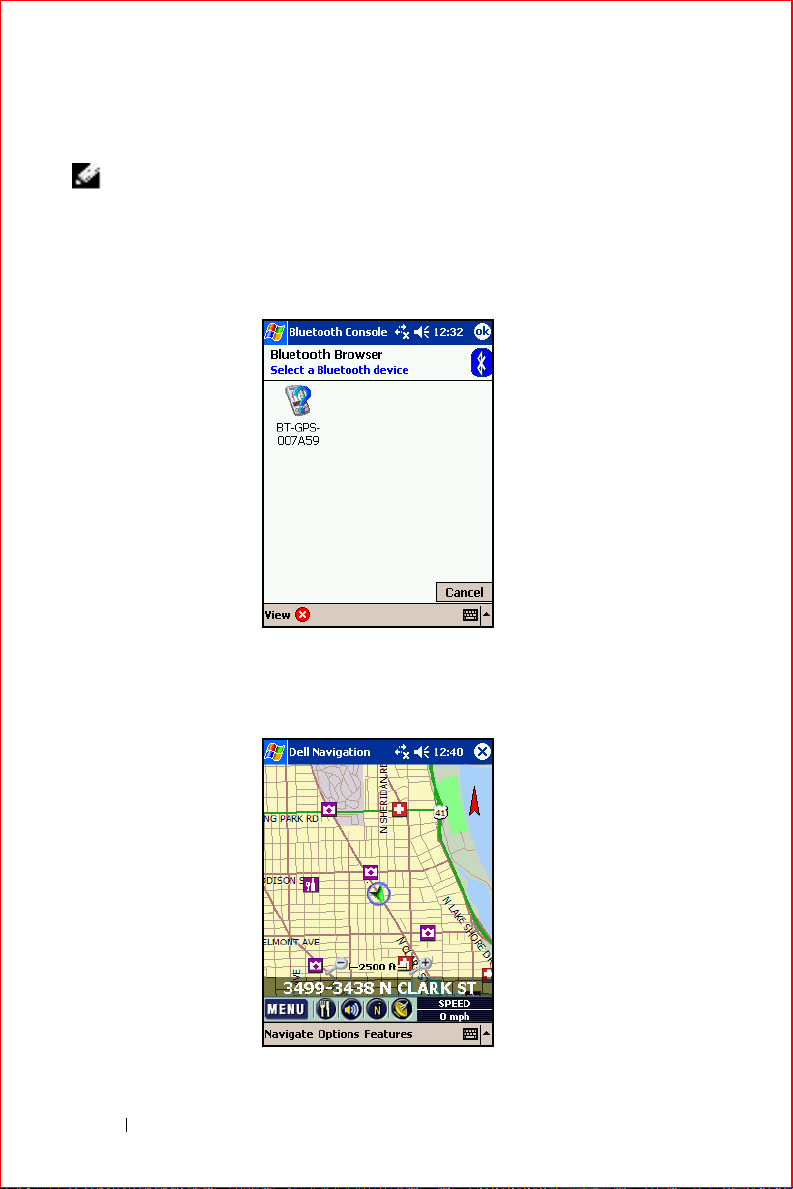
to start the program. The Bluetooth Browser screen
appears.
5
Tap the appropriate Bluetooth® device. All GPS receivers contain GPS
in their identifier. The Map view of the Navigation System appears.
18 Owner’s Manual
Page 21

Exiting the Navigation System
It is important that you exit the Navigation System on the Pocket PC before
loading new maps. Exiting the application avoids conflicts if a new map
replaces an existing map.
To exit the Navigation System:
1
Tap t h e
2
The application is stopped and will no longer appear on the Running
Programs list.
Navigate
menu and then tap
Exit
.
Installing the Mount
The Navigation System comes with a convenient dashboard mount. The
mount comes with a PDA holder attached to a suction cup.
Owner’s Manual 19
Page 22
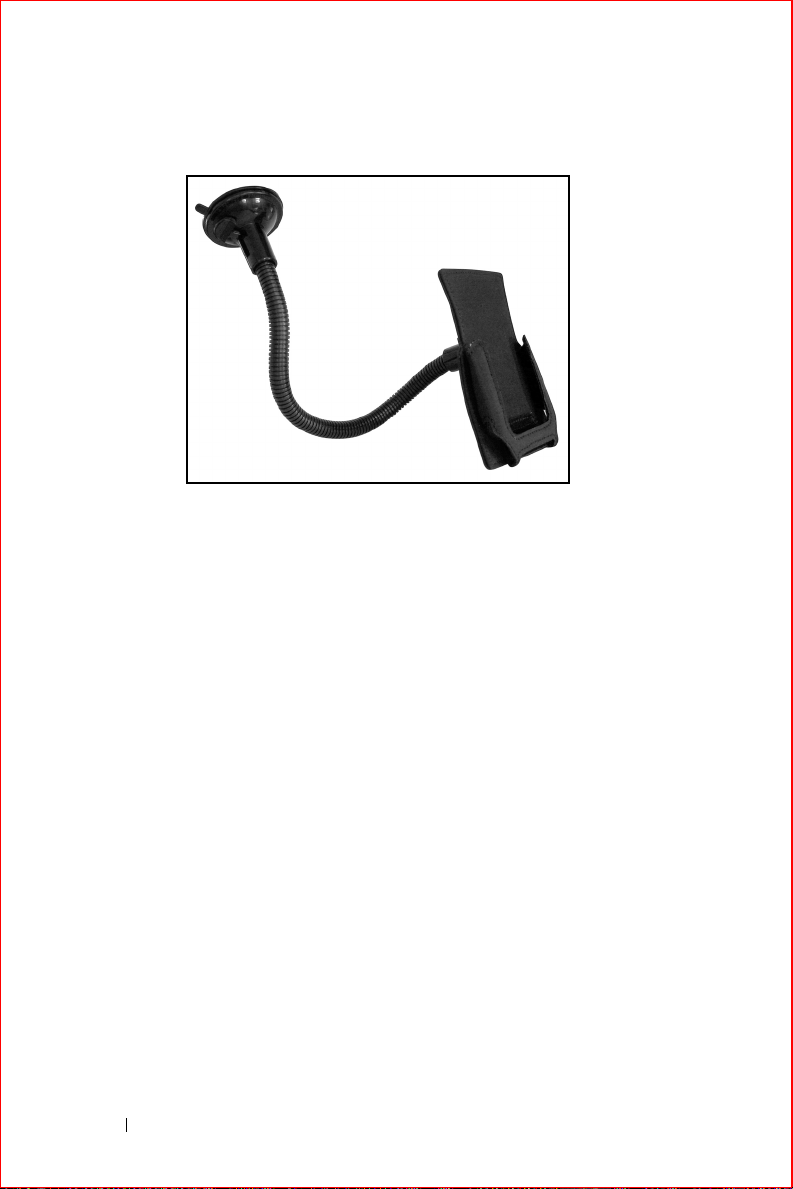
www.dell.com | support.dell.com
To install the mount:
1
Remove the PDA Flex-Arm, Attachment Bracket and PDA Pouch from
the box. You will need to straighten and re-shape to fit your vehicle’s
windshield and dashboard configuration before use.
2
Align the slot on the back of the Attachment Bracket and slide onto
the end of the Flex-Arm.
3
PDA Pouch can now be fastened by first passing the vertical attaching
straps through the back of the Attachment Bracket, then repeat by
passing the horizontal straps through the bracket. Place your PDA into
the jacket and adjust the straps accordingly to create a pocket on the
front-side to properly conform to your PDA.
4
Use a glass cleaner to thoroughly clean the inside of the windshield
where the suction cup will be mounted.
5
Peel the protective paper off the rubber suction cup and decide how
you want to shape the mount so it attaches to the windshield and a
portion rests on the dashboard for support.
6
Pull the lever on the mount back (away from the suction cup), then
place the rubber cup against the glass and move the lever towards the
glass to secure it in place. To release arm, simply move lever back and
pull the protruding rubber tab on the suction cup.
20 Owner’s Manual
Page 23

7
Re-shape the arm so that a portion of it is resting on the dashboard for
support.
Using the Car Charger
General precautions
• For most vehicles, the engine must be running to get power to the
cigarette lighter.
• Do not expose the car charger to excessive heat, moisture, or gasoline.
• Do not disassemble the unit or attempt to replace internal parts.
• Do not allow children to operate or play with the cord.
• Unplug the charger after use.
• The vehicle’s power source must be within 10 to 30 V DC to function
properly. A built-in fuse with a rating of 1.5A offers protection to the
device being charged. Do not replace fuse with anything other than a
1.5A fuse.
To install the dashboard mount:
1
Start the vehicle’s engine before inserting the 12V DC Car Charger
into the cigarette lighter socket. A small LED will light to indicate that
power is active.
2
To charge the PDA only: Insert the power plug into your PDA for
charging.
3
To charge the GPS only: Insert the power plug into your GPS receiver
for charging.
4
To charge both the PDA and GPS: Insert the GPS Charger Cable with
the Y-connector supplied into your PDA. Then insert the opposite end
into your GPS receiver.
The 12V DC charger can now be inserted into the Y-connector for
charging of both devices.
Owner’s Manual 21
Page 24

Troubleshooting power
Unplug the charger, wait 15 seconds, then reinsert into the power outlet. If
this does not correct the problem please check the following:
• That the 12V DC Car Charger adapter is inserted all the way into the
cigarette lighter socket.
• That there is power to the lighter (check fuse in the vehicle’s main fuse
box).
• That the fuse in the 12V DC Car Charger adapter is also not blown.
www.dell.com | support.dell.com
22 Owner’s Manual
Page 25

2
Using the GPS Device
The Navigation System uses a Bluetooth® GPS Receiver (the Receiver) to get
signals from satellites orbiting the earth. Using these signals, the Receiver
identifies your position within 30 feet.
Bluetooth® is a short-range wireless technology that allows devices to pass
information between them without wires.
GPS stands for Global Positioning System. Twenty four satellites orbit the earth,
spaced so that at any given time and position on earth at least four satellites
are visible. Using a process called triangulation, the Receiver calculates your
position on the earth from the data received from the satellites. The satellites
do not receive data back from the Receiver.
The Receiver gets satellite signals only when there is a clear view of the sky.
Trees and tall buildings can block the view, and signals are rarely received
within a building.
NOTE: For best reception, place the Receiver on the front or rear dashboard of
the vehicle. For navigation, there must be an active Bluetooth® connection, the
GPS position must be fixed (receiving signals from several satellites), and the
battery must be charged or connected to a power supply.
Exploring the GPS Receiver
The Receiver has the following features:
• Power Switch - Turns the Receiver on (-) or off (0).
• Power Jack - Connects a DC car power charger (included with the
Receiver) or an AC power charger to recharge the internal battery.
• Bluetooth® Status LED (blue) - Blinking slowly indicates there is no
Bluetooth® connection. Blinking quickly indicates there is
communication with another Bluetooth® device.
• GPS Status LED (green) - Blinking indicates that the GPS position is
fixed. Steady indicates that the GPS position is not fixed (information is
being received from fewer than three satellites).
Owner’s Manual 23
Page 26
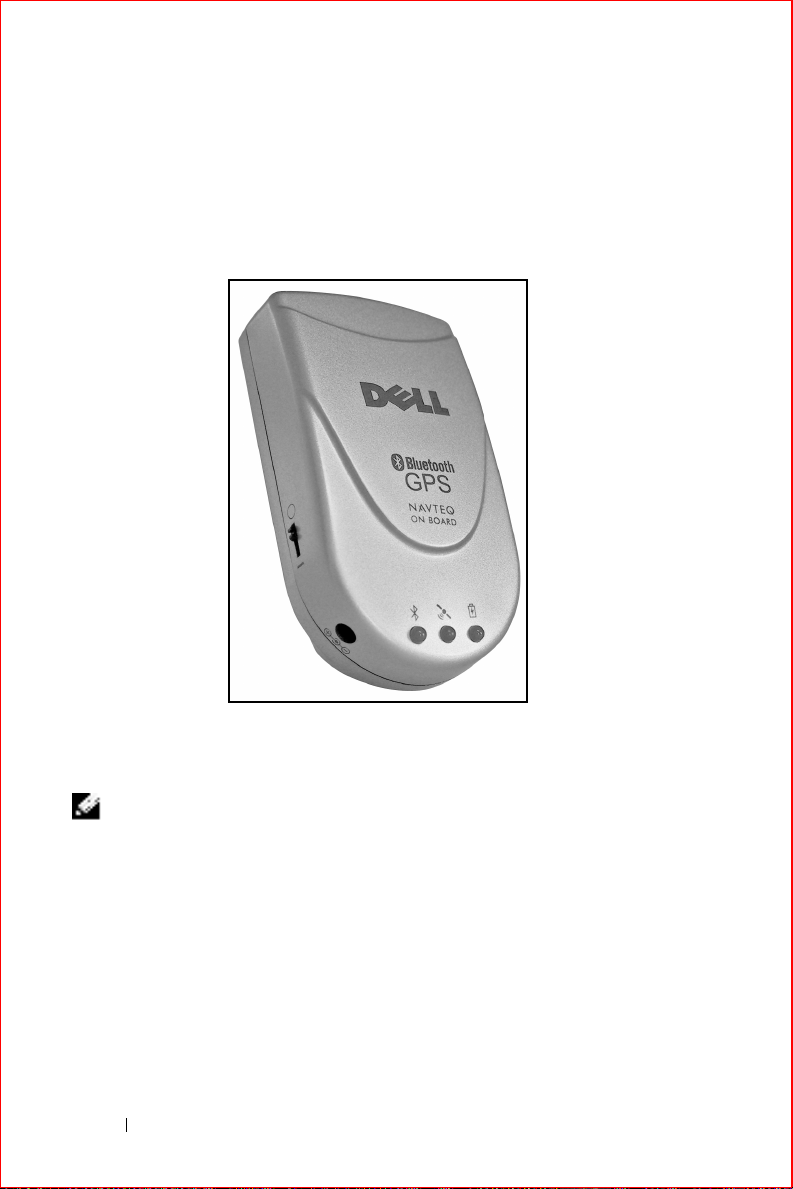
• Battery Status LED (red/yellow) - Red indicates that the battery power
is extremely low and that the device should be recharged immediately.
Yellow indicates that the battery is being charged. The LED is off
when the battery is partially or fully charged.
www.dell.com | support.dell.com
The Receiver must be charged prior to use. Initial charging takes up to three
hours. Future charging will depend on how depleted the battery is when the
Receiver is plugged in.
NOTE: The first time you use the Receiver it can take from five to fifteen
minutes to receive satellite signals. Thereafter it should take approximately 90
seconds to begin receiving signals.
Partnering the Receiver with the Pocket PC
A partnership must be established between the Receiver and the Pocket PC
to allow communication between the devices. Most of the time the
partnering will happen automatically when you start the Navigation System.
24 Owner’s Manual
Page 27

Partnering the GPS Receiver with your Pocket PC requires:
• The Navigation System must be successfully installed
• The Receiver must be charged or plugged in
• The Pocket PC must be turned on
• The Receiver must be turned on
• The Pocket PC and the Receiver must be within 15 to 30 feet of each
other
Sometimes you may need to manually partner the Receiver with the Pocket
PC. The process of partnering differs between different versions of the
Pocket PC operating system.
Partnering with Windows Mobile 2003 Operating System
You use the Bluetooth Manager that comes on your Pocket PC to manually
partner the Pocket PC with the Receiver.
To manually partner in Mobile Windows 2003:
1
Tap t h e
Manager screen appears.
2
Ta p
wizard appears.
3
Scroll down and tap
4
Tap the icon labeled
identifier for a specific GPS receiver.
5
In the service selection box, tap
Next
6
To establish the partnership, tap and hold the icon labeled
xxxxxx: BT-GPS COM Port
7
Ta p
that the connection has been made.
Start
menu and then tap
New
at the bottom of the screen. The Bluetooth Connection
Explore a Bluetooth device
BT-GPS-xxxxxx
. A shortcut is created.
Connect
. Two small green arrows appear on the icon indicating
Bluetooth Manager
, where xxxxxx represents the
BT-GPS COM Port
. A menu appears.
. The Bluetooth
.
and then tap
BT-GPS-
Owner’s Manual 25
Page 28
Other GPS Connection Options
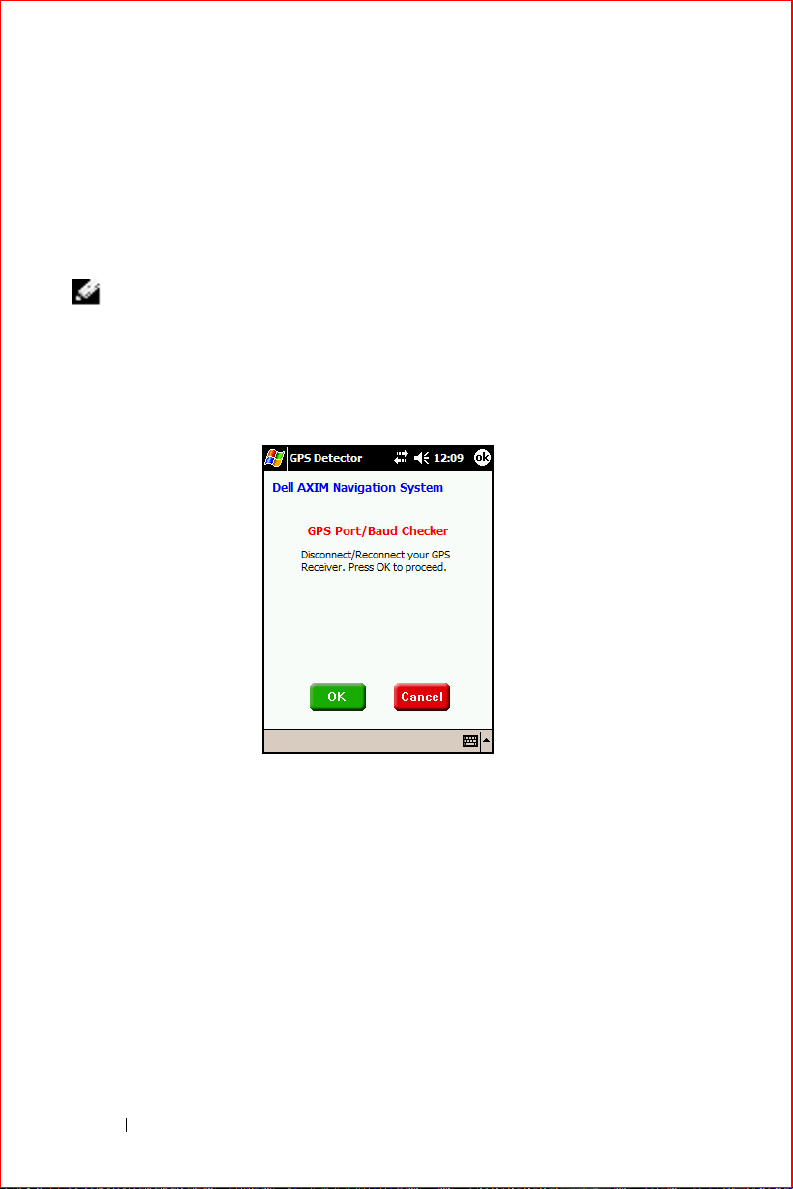
Automatically or manually partnering the Receiver with your Pocket PC are
the best ways to connect the two. Sometimes you may need to use the GPS
Options menu. You can use auto detect or manually select a COM port and
baud rate. The default values are COM Port 7 and Baud Rate 4800.
NOTE: Important. You should use auto-detect unless otherwise directed.
To use auto detect:
1
Ta p
Options
Port/Baud Checker screen appears.
www.dell.com | support.dell.com
, tap
GPS Options
, and then tap
Auto Detect
. The GPS
2
To use auto detect, tap OK. The Bluetooth Browser screen appears.
26 Owner’s Manual
Page 29
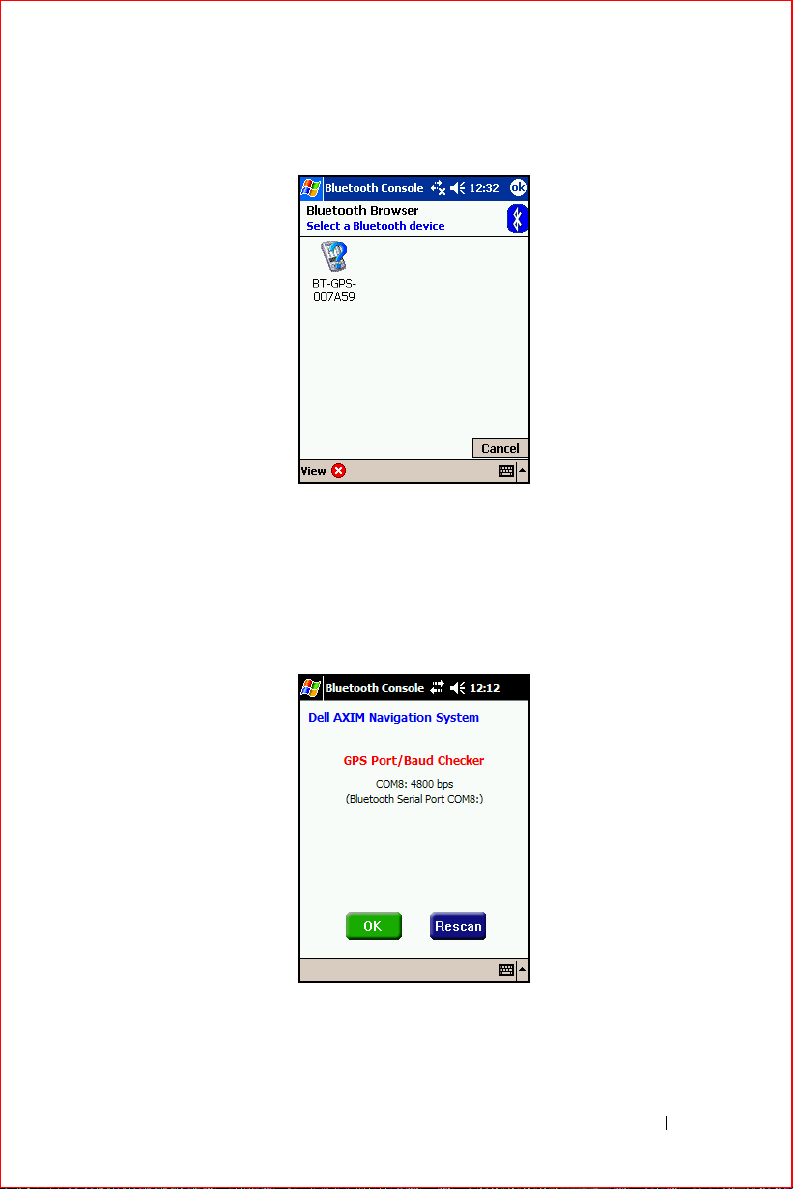
3
Tap the appropriate Bluetooth device. All GPS receivers contain GPS
in their identifier. The GPS Port/Baud Checker screen reappears,
listing the current port and baud rate.
4
Ta p OK to use the selected device. The COM Port Setting screen
appears.
5
Ta p OK to use the indicated COM Port and Baud Rate. The Map view
appears.
Owner’s Manual 27
Page 30
To manually set the COM port:
NOTE: If you are currently connected to your Bluetooth device you must
disconnect before manually setting the COM port or the baud rate.
1
Ta p
Options
, tap
GPS Options
, tap
COM Port
and then tap a port
(COM 1 to COM 9). The Bluetooth Browser screen appears.
www.dell.com | support.dell.com
2
Tap the appropriate Bluetooth device. All GPS receivers contain GPS
in their identifier. The Map view appears.
28 Owner’s Manual
Page 31

To manually set the baud rate:
NOTE: If you are currently connected to your Bluetooth device you must
disconnect before manually setting the COM port or the baud rate.
1
Ta p
Options
rate (4800 to 115200). The Bluetooth Browser screen appears.
2
Tap the appropriate Bluetooth device. All GPS receivers contain GPS
in their identifier. The Map view appears.
, tap
GPS Options
, tap
baud rate
and then tap a baud
Checking the GPS Connection Status
The GPS Status screen provides you with details about the data being
received from the satellites.The Receiver needs at least three satellite
connections to provide navigation.
Owner’s Manual 29
Page 32

www.dell.com | support.dell.com
• UTC Time shows Universal date and time (Greenwich Mean Time).
• Location shows your current position and speed using latitude,
longitude, and altitude. Satellite indicates how many satellites you are
receiving signals from and how many satellites are potentially available
based on the orbit of the satellites.
• Local Time shows the time at your current location.
• NMEA shows incoming satellite data, which is shown graphically
below.
• The graphic to the left shows the position of all reporting satellites
relative to your current position.
• The bar graph to the right shows the strength of the satellite signals.
Each bar represents a single satellite. White bars indicate signals are
being received, but no position fix (minimum of three satellites) has
been made. Green bars indicate strong signals. Red bars indicate weak
or bad signals.
To check the GPS connection status:
• Do one of the following:
• Tap the satellite icon in the menu bar.
or
•Tap the
Feature s
menu and then tap
GPS Status
.
30 Owner’s Manual
Page 33

or
•Tap
The GPS Status screen appears.
Menu
and then tap
GPS Status
.
Signal Reception
Once the Receiver and the Pocket PC are partnered, you receive satellite
signals. Based on satellite position and your geographic location, you may
experience the following:
• Satellite signals are received more quickly at specific times of the day.
For example, at 10:00 a.m., you might receive signals in under a
minute because more satellites are visible in the sky. At 3:00 p.m., you
may not receive signals because only two satellites are visible in the sky
• Buildings can block satellite signals. Setting up the GPS receiver in a
vertical window blocks at least 50% of the sky. Trees also can block
satellite signals.
NOTE: A window with a Southern view, rather than Northern view, should be
used to receive signals.
The Receiver performs at its best when the battery is fully charged. If you are
having trouble receiving signals, try plugging in the Receiver.
The color of the vehicle arrow on the map indicates the connection strength
between your Receiver and the satellites:
• Green indicates that 4 or more satellites are available. This is the
strongest level of GPS connection, sometimes referred to as a 3D fix.
• Yellow indicates that 3 satellites are available. This is a weaker level of
GPS connection, sometimes referred to as a 2D fix.
• Red indicates that less than 3 satellites are available. The system will
seek additional satellites before providing navigation.
.
Owner’s Manual 31
Page 34

www.dell.com | support.dell.com
32 Owner’s Manual
Page 35

3
Navigation Views and Options
The Navigation System has several ways of displaying navigation information,
including:
•Map view
•Maneuver detail
• Route instructions
You can switch between these displays using the Navigate menu.
Map view is the default view and shows your current location at the bottom if
you have a GPS connection. If you do not have a GPS connection or your
location is not included in the available map, it shows the last known location.
You can zoom in and out on the map and mute/unmute the guidance
instructions using the icons.
Maneuver detail shows a close-up view of your current location as you travel
to your destination. If you do not have a GPS connection, it shows the last
known location. You can mute/unmute the guidance instructions using the
icons.
Route instructions lists the individual maneuvers on the route to your
destination. The direction of each turn, the route to turn on to and the distance
between maneuvers are listed.
The Navigation System will automatically switch to Full Screen mode when you
have selected a destination and are in motion. Full Screen mode hides the
menu bar at the bottom of the screen, allowing more map to be shown.
The Navigation System also allows you control over a wide variety of options,
including:
• Display Options
• Route Options
• Distance Units
• Input Options
• Safety Features
• Favorite Locations
Owner’s Manual 33
Page 36

Map view
Map view is the default view and lists your current location at the bottom if
you have a GPS connection. If you are not currently on a known road or your
location is not included in the available map, your location is listed as OFF
ROAD. If you do not have a GPS connection, the last known location is listed.
When navigating, the next road you turn onto is listed at the top, with the
direction of your turn in the left corner and the remaining distance to the turn
in the top right corner.
www.dell.com | support.dell.com
The lower right corner displays one of the following: current SPEED,
REMaining time to destination, ETA - estimated time of arrival, or distance to
your DESTination. Tap the indicator to toggle through these options.
The arrow moving about the map represents your vehicle. A green arrow
indicates a strong GPS connection. Yellow indicates a weak connection. Red
indicates no GPS connection. If you are using Heads Up (see Display
Options), this arrow always points to the top of the screen.
The direction arrow to the upper right of the map indicates where North is.
Tap on the arrow to view your current direction (N, NE, etc.). If you are using
North Up (see Display Options), this arrow always points north.
You can mute or unmute the guidance instructions, zoom in and out on the
map, and hide or view POI icons using the icons at the bottom. You can also
pan the map, moving the map to look at adjacent areas.
34 Owner’s Manual
Page 37

To show the Map view:
• Do one of the following:
•Tap
or
•Tap the
The map appears.
Menu
Navigate
and then tap
menu and then tap
Map view
.
Map
.
Map Legend
The following legend explains the colors shown on the map in Day mode. The
colors used in Night mode are darker.
NOTE: This legend is in color, and will print in shades of gray if you have
printed this document in black and white.
Owner’s Manual 35
Page 38

www.dell.com | support.dell.com
Guidance Instructions
The guidance instructions can be muted.
36 Owner’s Manual
Page 39

To mute or unmute the guidance instructions tap the speaker icon at the
bottom of the screen. The guidance instructions are muted in the second
icon.
Zooming in and out
Zooming allows you to adjust the scale of the map from a scale of 100 ft. to a
scale of 10 miles.
To zoom in and out:
• Do one of the following:
•Tap the
showing you more detail.
or
• Use the Navigator button on the Dell™ Axim™. Press up to zoom
in or down to zoom out.
The zoom range is from 100 feet to 10 miles.
+
or - icons at the bottom of the screen. + zooms in,
-
zooms out.
POI Icons
The Navigation System includes a large number of Points of Interest (POIs).
You control whether or not POIs are shown on the map, and can select
specific types using the Customize Your Display screen.
NOTE: POIs can be selected as a destination whether or not they are currently
being shown on the map.
To show or hide the POI icons tap the POI icon at the bottom of the screen.
A red X indicates the POI icons are hidden.
Panning the map
Panning the map allows you to view portions of the map not currently shown.
When you are panning the map, GPS is disabled until you return to Map view.
Panning is only available from Map view.
Owner’s Manual 37
Page 40

www.dell.com | support.dell.com
To pan the map on the Map view screen tap and drag the map area.
To return to Map view from the Panning map: tap the red Exit button in the
lower right corner.
Location Information
You can view information about any point on the map in Map view, unless
you are using the 3D display option. Location information includes
information about the block (street name, numbering information, and city)
and geographic coordinates (latitude and longitude).
38 Owner’s Manual
Page 41

NOTE: If you tap on a Point of Interest, the POI(s) at Current Location screen
appears, listing the Points of Interest. You can tap NAV to navigate to the Point
of Interest or tap the red X to return to the map. POI icons can be tapped in 3D
display.
To view location information:
1
Tap and hold on a location on the map. A popup menu appears.
2
Ta p
Info
. The Location Information screen appears.
3
Ta p OK when you are done with the Location Information screen.
Maneuver detail
Maneuver detail shows a close-up view of your current location as you travel
to your destination. When navigating, the route you turn onto next is listed at
the top, with the direction of your turn in the left corner and the remaining
distance to the turn in the right. Below the distance a bar indicates how
much of this segment has been traveled. If you do not have a GPS
connection, Maneuver detail shows the last known location. Your current
location is listed at the bottom.
Owner’s Manual 39
Page 42

www.dell.com | support.dell.com
The lower right corner displays one of the following: current SPEED,
REMaining time to destination, ETA - estimated time of arrival, or distance to
your DESTination. Tap the indicator to toggle through these options.
The arrow moving about the map represents your vehicle. A green arrow
indicates a strong GPS connection. Yellow indicates a weak connection. Red
indicates no GPS connection.
You can use the Customize Your Display screen to automatically show the
Maneuver detail prior to the next instruction. See Display Options for more
details.
To show the Maneuver detail manually tap the
Maneuver detail.
Navigate
menu and then tap
Guidance Instructions
The guidance instructions can be muted.
40 Owner’s Manual
Page 43

To mute or unmute the guidance instructions tap the speaker icon at the
bottom of the screen. The guidance instructions are muted in the second
icon.
Route instructions
Route instructions lists the maneuvers from your current location to your
destination. The direction of the turn, the route to turn on to and the distance
to the maneuver are listed. You can view a close-up map of any maneuver
listed.
To show the Route instructions tap the
instructions
To view a maneuver:
1
2
3
.
On the Route instructions screen, select the maneuver you want to
view.
Ta p
Show on Map
in the center of the map.
When you have finished viewing the maneuver, tap the red X in the
lower left corner. You return to the Map view.
. The Panning map appears, showing the maneuver
Navigate
menu and then tap
Owner’s Manual 41
Route
Page 44

Display Options
Display options are used to customize the appearance of the map. You can
specify the following options on the Customize Your Display screen:
•Display Mode
• Orientation
• Show Maneuver details (automatic appearance or not)
•Map Perspective
• Point of Interest Options
Display Mode: Auto changes between Day and Night schemes near sunrise
www.dell.com | support.dell.com
and sunset. Day shows the map with a bright background. Night shows the
map with a darker background to reduce glare in the vehicle.
Orientation: North Up orients the map with North toward the top. Heading Up
orients the map with the direction you are driving in toward the top of the
screen.
Show Maneuver details: Auto automatically switches from Map view to
Maneuver details as you approach a maneuver. Manual requires the use of
the Navigate menu to switch to the Maneuver detail screen.
Map Perspective: 3D-1 shows the map in the highest of the 3D (threedimensional) views. 3D-2 shows the map in the middle of the 3D views. 3D-3
shows the map in the lowest of the 3D views. 2D shows the map as if you
were looking straight down on it.
Point of Interest Options: Default displays a common list of Point of Interest
(POI) types, including transportation, hospitals and shopping POIs. A check
mark next to Show indicates the icons will be displayed. Clearing the check
mark does not display the icons. Choose opens the Categories to Display
screen, where you select which categories of POIs you want displayed.
NOTE: A maximum of 50 POI icons can be shown on the map simultaneously.
42 Owner’s Manual
Page 45

The Navigation System groups Points of Interest into categories and lets you
choose which categories are shown on the map. Categories that have check
marks on the Categories to Display screen are shown on the map when POIs
are displayed.
NOTE: Appendix A includes a list of POI categories and subcategories.
To set the display options:
1
Ta p
Menu
and then tap
Display Options
.
or
Tap t h e
Options
menu and then tap
Display Options
.
The Customize Your Display screen appears.
2
Tap y o u r
3
Tap your
4
Tap y o u r
5
Tap y o u r
6
Tap y o u r
Display Mode
Orientation
preference.
preference.
Show Maneuver details
Map Perspective
preference.
Point of Interest Options
of POIs, see Changing POI types, below.
7
Ta p
OK
to set your display options.
To change the POI types:
1
Tap t h e
Options
menu and then tap
preference.
preference. To select specific types
Display Options
.
Owner’s Manual 43
Page 46

2
Ta p
Choose
under
Points of Interest Options
. The Categories to
Display screen appears.
www.dell.com | support.dell.com
3
To include only specific categories, tap each category. Categories have
a check mark when they are selected.
4
To select all categories, tap
5
To clear all currently selected categories, tap
6
Ta p
OK
to return to the Customize Your Display screen.
7
Ta p
OK
to set your display options.
Select All
.
Clear All
.
Route Options
Route options are used to define the type of route you want the Navigation
System to map for you.You can specify the following options on the
Customize Your Route screen:
• Route Preference
• Carpool
• Ferries
• Toll Roads
44 Owner’s Manual
Page 47

Route Preference: Fastest calculates routes based on time. Shortest
calculates routes based on distance. Main Roads calculates routes using
major roads. Local Roads calculates routes with local roads.
Carpool: When checked, routes are calculated to include High Occupancy
Vehicle (HOV) lanes where available.
Ferries: When checked, routes are calculated to include ferries where
available. Note that ferry schedules cannot be included in estimating arrival
times.
Toll Roads: When checked, routes are calculated to include toll roads where
availalble.
To set the route options:
1
Ta p
Menu
and then tap
Route Options
.
or
Tap t h e
Options
menu and then tap
Route Options
.
The Customize Your Route screen appears.
2
Tap your
3
To i nc lu de
4
To i nc lu de
5
To i nc lu de
Route Preference
Carpool
Ferries
Tol l Ro ad s
(HOV) lanes, tap to turn on the check mark.
, tap to turn on the check mark.
, tap to turn on the check mark.
.
Owner’s Manual 45
Page 48

6
Ta p
OK
to set your route options.
Distance Units
The Navigation System offers you a choice of three distance units. Choose
the units you are most comfortable with. A check mark appears next to the
units currently selected.
• Metric (Km) reports in kilometers.
• English (Mi/Ft) reports in miles and feet.
• English (Mi/Yd) reports in miles and yards.
To change distance units:
www.dell.com | support.dell.com
1
Tap t h e
2
Tap the units you prefer.
Options
menu and then tap
Distance Display Units
.
Input Options
The Navigation System offers you a large key alphabetical keyboard for
entering text. You can choose to use your current Pocket PC input option
instead.
• Pocket PC input method uses your current Pocket PC input option
• Navigation System Keyboard uses the large key alphabetical keyboard
To change the input option:
1
Tap t h e
2
Tap the input option you prefer.
Options
menu and then tap
Keyboard Options
.
Safety Features
The Navigation System offers you two safety features:
• Speed Alert
• Fog Driving
46 Owner’s Manual
Page 49

Speed alert
Speed Alert notifies you with an audible sound when you have exceeded the
target speed. The target speed can be set automatically by the class of the
roadway or set to a fixed speed.
NOTE: Warning: Auto Speed Alert (using the roadway speed class) should only
be used for information and should not be used as an indicator for legal speed
limits or safe driving speeds. Drivers should abide by the law and use best
judgment for safe driving at all times.
To set the speed alert:
1
Tap t h e
The Speed Alert screen appears.
Feature s
menu, tap
Safety Features
, and then tap
Speed Alert
.
2
To use roadway speed:
•Tap the
Enable Auto Speed Alert
this feature is to be used only as a reference.
•Tap
3
To use a specific speed:
•Tap the
OK
to return to the Speed Alert screen.
Enable Fixed Speed Alert
• Use the numbers to enter a specific speed.
4
Ta p
OK
to save your speed alert setting.
option. A warning appears that
option.
Owner’s Manual 47
Page 50

Fog driving
Fog driving notifies you when an intersection is approaching. This safety
feature helps you be aware of possible incoming traffic and traffic signals,
which is especially important during foggy conditions. When approaching a
4-way intersection, you will hear a special “dong” tone.
When Fog Driving is on, a check mark appears next to it on the Safety
Features submenu of the Features menu.
To toggle Fog Driving on or off tap the
and then tap
www.dell.com | support.dell.com
Favorite Locations
Your Favorite Locations list can help you select destinations very quickly. You
can add a location to your Favorite Locations list from the map, or while
selecting a destination. You can edit the name of a favorite on the Edit
Favorites screen.
Fog Driving
.
Features
menu, tap
Safety Features
,
NOTE: If you are in 3D display mode you cannot add a location to your Favorite
Locations list from the map.
To add to your Favorite Locations from the map:
1
Tap and hold on a location on the map. A popup menu appears.
2
Ta p
Add Origin to Favorites
appears.
48 Owner’s Manual
. The Save Location in Favorites screen
Page 51

3
Do one of the following:
• To add this location directly to your Favorites list, tap
or
• To add a meaningful name before saving, tap
Edit
Favorites screen appears.
• Enter a name and then tap
OK
. You return to the Save Location in
Favorites screen.
NOTE: If you try to add a location that is already on your list, you
will see a Duplicate Entry Found message. Tap Save to update the
entry, or tap the red X to cancel.
Save
.
. The Edit
•Tap
Save
.
To add to your Favorite Locations list while setting a destination:
NOTE: These steps are part of the process of setting a destination. Setting a
destination is covered fully in Chapter 4.
On the Select Address screen, tap
1
Save
. The Save Location in Favorites
screen appears.
2
Do one of the following:
• To add this location directly to your Favorites list, tap
Save
or
• To add a meaningful name before saving, tap
Edit
. The Edit
Favorites screen appears.
• Enter a name and then tap
OK
. You return to the Save Location in
Favorites screen.
NOTE: If you try to add a location that is already on your list, you
will see a Duplicate Entry Found message. Tap Save to update the
entry, or tap the red X to cancel.
•Tap OK.
To edit the name of a Favorite:
1
Tap
Menu
, tap
Set Destination
, and then tap
Favorites
. The Favorite
Locations screen appears.
2
Tap on the favorite you want to edit. Use the scroll bars to move up
and down the list.
.
Owner’s Manual 49
Page 52

3
Ta p
Edit
. The Edit Favorites screen appears.
www.dell.com | support.dell.com
4
Enter a name and then tap
OK
. You return to the Favorite Locations
screen.
5
If you do not want to set this as your destination, tap the red X until
you return to the map.
50 Owner’s Manual
Page 53

4
Navigating
The Navigation System is used to guide you to a destination, and provides many
ways to enter a destination. Most of the options are available from the Set
Destination screen.
In addition to setting a destination, you can also set a start location. You do not
need to set a start location if you want the route to be calculated from your
current location and are receiving GPS signals.
Entering a destination
You can enter a destination directly from the map, or you can use the Set
Destination screen to use any of the following options:
•
Address
•
Intersection
•
Points of Interest
•
Recent
•
Favorites
•
Contacts
PC
•
City Center
lets you enter a specific address
lets you enter two cross streets
lets you select a Point of Interest
lets you select from a list of recent destinations
lets you select from a list of previously created favorites
lets you select a contact from the address book on your Pocket
lets you select the center of a city
Owner’s Manual 51
Page 54

www.dell.com | support.dell.com
To select a destination from the map:
1
On the map, tap and hold on the location. A popup menu appears.
2
Ta p
Set Destination
. Your route is calculated and shown on the map.
Instructions begin.
Entering a destination by address
There are two ways to enter a destination by address. You can select a street
first, which is useful if you are not sure of the city. Or you can enter a city
first, which is usually faster.
NOTE: If a large number of records are found by the By Street method, the
program automatically reverts to By City.
To enter an address using By City:
1
Tap
Menu
, tap
Set Destination
Address screen appears.
, and then tap
Address
. The Enter
52 Owner’s Manual
Page 55

2
If you need to change the region:
•Tap
Change Region
. The Enter Region Name screen appears.
• Type the name of the region or select it from the list.
•Tap
3
Select the city:
•Tap
OK
. You return to the Enter Address screen.
By City
. The Enter City Name screen appears.
Owner’s Manual 53
Page 56

www.dell.com | support.dell.com
• Type the first letters of the city. As you type, the list of available
cities scrolls to show matching cities.
• Select the name of the city and then tap
OK
. The Enter Street
Name screen appears.
4
Select the street:
• Type the first letters of the street name. As you type, the list of
available streets scrolls to show matching streets.
54 Owner’s Manual
Page 57

NOTE: Do not enter the street type.
• Select the name of the street and then tap OK. The Enter House
Number screen appears.
5
To go to a specific number, enter the number within the range shown
and then tap
OK
. Tap OK without entering a number if you do not
know the number. The Select Address screen appears.
6
Tap on the correct address. Use the scroll bars to move up and down
the list.
Owner’s Manual 55
Page 58

7
Do one of the following:
• To be guided to the destination now, tap
becomes your current destination, the map appears and
instructions begin.
• To add this destination to your Favorites list, tap
Location in Favorites screen appears. You can add the destination
as is (tap
Save
) or edit it to provide a meaningful name (tap
• To show the destination on the map without starting guidance,
tap
Show
. The Panning map appears with a crosshairs cursor on
the address.
To enter an address using By Street:
www.dell.com | support.dell.com
1
Tap
Menu
, tap
Destinations
Address screen appears.
, and then tap
Navigate
Address
. The address
Save
. The Save
. The Enter
Edit
).
2
If you need to change the region:
•Tap
Change Region
56 Owner’s Manual
. The Enter Region Name screen appears.
Page 59

• Type the name of the region or select it from the list.
•Tap
3
Select the street:
•Tap
OK
. You return to the Enter Address screen.
By Street
. The Enter Street Name screen appears.
• Type the first letters of the street name. As you type, the list of
available streets scrolls to show matching streets.
NOTE: Do not enter the street type.
Owner’s Manual 57
Page 60

• Select the name of the street and then tap OK. The Enter House
Number screen appears.
www.dell.com | support.dell.com
4
To go to a specific number, enter the number within the range shown
and then tap
OK
. Tap OK without entering a number if you do not
know the number. The Select Address screen appears.
5
Tap on the correct address. Use the arrows or the scroll bars to move up
and down the list.
58 Owner’s Manual
Page 61

6
Do one of the following:
• To be guided to the destination now, tap
becomes your current destination, the map appears and
instructions begin.
• To add this destination to your Favorites list, tap
Location in Favorites screen appears. You can add the destination
as is (tap
• To show the destination on the map without starting guidance,
tap
the address.
Save
) or edit it to provide a meaningful name (tap
Show
. The Panning map appears with a crosshairs cursor on
Navigate
. The address
Save
. The Save
Edit
Entering a destination by intersection
There are two ways to enter a destination by intersection. You can select a
street first, which is useful if you're not sure of the city. Or you can enter a
city first, which is usually faster.
NOTE: Information If a large number of records are found by the By Street
method, the program automatically reverts to By City.
To enter an intersection using By City:
1
Tap
Menu
, tap
Destinations
Intersection screen appears.
, and then tap
Intersection
. The Enter
).
Owner’s Manual 59
Page 62

2
If you need to change the region:
•Tap
www.dell.com | support.dell.com
Change Region
. The Enter Region Name screen appears.
• Type the name of the region or select it from the list.
•Tap
3
Select the city:
•Tap
OK
. You return to the Enter Intersection screen.
By City
. The Enter City Name screen appears.
• Type the first letters of the city. As you type, the list of available
cities scrolls to show matching cities.
60 Owner’s Manual
Page 63

• Select the name of the city and then tap
OK
. The Enter Street
Name screen appears.
4
Select the first street:
• Type the first letters of the first street name. As you type, the list
of available streets scrolls to show matching streets.
NOTE: Do not enter the street type.
• Select the name of the street and then tap OK. The Enter 2nd
Street Name screen appears.
Owner’s Manual 61
Page 64

5
Select the second street by typing the first letters of the name or select
one and then tap
www.dell.com | support.dell.com
6
Tap on the correct intersection. Use the arrows or the scroll bars to
OK
. The Select Address screen appears.
move up and down the list.
7
Do one of the following:
• To be guided to the destination now, tap
intersection becomes your current destination, the map appears
and instructions begin.
• To add this destination to your Favorites list, tap
Location in Favorites screen appears. You can add the destination
as is (tap
Save
) or edit it to provide a meaningful name (tap Edit).
• To show the destination on the map without starting guidance,
tap
Show
. The Panning map appears with a crosshairs cursor on
the address.
To enter an intersection using By Street:
1
Tap
Menu
, tap
Destinations
Intersection screen appears.
, and then tap
Navigate
Save
Intersection
. The
. The Save
. The Enter
62 Owner’s Manual
Page 65

2
If you need to change the region:
•Tap
Change Region
. The Enter Region Name screen appears.
• Type the name of the region or select it from the list.
•Tap
3
Select the first street:
•Tap
OK
. You return to the Enter Intersection screen.
By Street
. The Enter Street Name screen appears.
Owner’s Manual 63
Page 66

www.dell.com | support.dell.com
• Type the first letters of the first street name. As you type, the list
of available streets scrolls to show matching streets.
NOTE: Do not enter the street type.
• Select the name of the street and then tap OK. The Enter 2nd
Street Name screen appears.
4
Select the second street by typing the first letters of the name or select
one and then tap
OK
. The Select Address screen appears.
64 Owner’s Manual
Page 67

5
Tap on the correct intersection. Use the arrows or the scroll bars to
move up and down the list.
6
Do one of the following:
• To be guided to the destination now, tap
becomes your current destination, the map appears and
instructions begin.
• To add this destination to your Favorites list, tap
Location in Favorites screen appears. You can add the destination
as is (tap
• To show the destination on the map without starting guidance,
tap
the address.
Save
) or edit it to provide a meaningful name (tap
Show
. The Panning map appears with a crosshairs cursor on
Navigate
. The address
Save
. The Save
Edit
Selecting a Point of Interest
There are several ways to select a Point of Interest (POIs) as a destination.
You can select one from the map, or you can select one from the menus.
Because many types of POIs are available in the Navigation System, they are
grouped into categories. When you select a high level category, the subcategories are listed. When you have selected a sub-category (or All to see
).
Owner’s Manual 65
Page 68

POIs from all of the sub-categories), you can then select among the closest,
where you can pick alphabetically or by distance. Or you can select within a
specific city.
NOTE: The high level category Lodging does not have sub-categories. The high
level category Restaurant has so many sub-categories (Food Types) that they
do not fit on a single screen. You use the Food Type screen to select a food type
from the list of available sub-categories.
To select a POI from the map:
1
Tap and hold on a POI symbol on the map. The POI Information
screen appears.
www.dell.com | support.dell.com
2
Ta p
Navigate
. The map appears and instructions begin.
To select a nearby POI:
1
Tap
Menu
, tap
Destinations
Points of Interest screen appears.
66 Owner’s Manual
, and then tap
Points of Interest
. The
Page 69

2
Select the type of POI. A list of sub-categories appears, with Include All
listed at the bottom.
NOTE: Lodging does not have sub-categories. Go to step 4. Restaurant
shows the Food Types dialog box.
3
Select a sub-category or tap All. The Find Point of Interest screen
appears
Owner’s Manual 67
Page 70

www.dell.com | support.dell.com
NOTE: To select a sub-category of Restaurant, use the Food Type dialog
box. Type the first letters of a food type. As you type, the list of available
food types scrolls to show matching types. Select the food type and then
tap OK.
If you need to change the region:
4
•Tap
Change Region
. The Enter Region Name screen appears.
68 Owner’s Manual
Page 71

• Type the name of the region or select it from the list.
•Tap
5
To select a POI by name:
•Tap
OK
. You return to the Find Point of Interest screen.
By Name
. The Enter POI Name screen appears.
• Type the first letters of the POI or select one and then tap OK.
The Enter POI Name screen appears.
Owner’s Manual 69
Page 72

www.dell.com | support.dell.com
• Tap a POI on the list.
6
To select by distance:
•Tap
By Distance
. The POI List screen appears showing all POIs of
the selected type with the closest one first.
• Tap a POI on the list.
70 Owner’s Manual
Page 73

7
Do one of the following on either the Selected Point of Interest or POI
List screen:
• To be guided to the POI now, tap
Navigate
. The POI becomes
your current destination, the map appears and instructions begin.
• To add this POI to your Favorites list, tap
Save
. The Save Location
in Favorites screen appears. You can add the POI as is (tap
or edit it to provide a meaningful name (tap
Edit
).
• To show the POI on the map without starting guidance, tap
The Panning map appears with a crosshairs cursor on the POI.
• To see detailed information about this POI, tap
Info
. The POI
Information screen shows the name, address, and phone number.
You can then tap
Navigate, Save
, or
Show
.
To select a POI within a selected city:
1
Tap
Menu
, tap
Destinations
, and then tap
Points of Interest
Points of Interest screen appears.
Save
Show
. The
)
.
2
Select the type of POI. A list of sub-categories appears, with Include All
listed at the bottom.
Owner’s Manual 71
Page 74

www.dell.com | support.dell.com
NOTE: Lodging does not have sub-categories. Go to step 4. Restaurant
shows the Food Types dialog box.
3
Select a sub-category or tap All. The Find Point of Interest screen
appears.
NOTE: To select a sub-category of Restaurant, use the Food Type dialog
box. Type the first letters of a food type. As you type, the list of available
food types scrolls to show matching types. Select the food type and then
tap OK.
72 Owner’s Manual
Page 75

4
If you need to change the region:
•Tap
Change Region
. The Enter Region Name screen appears.
• Type the name of the region or select it from the list.
•Tap
5
Ta p
OK
By City
. You return to the Find Point of Interest screen.
. The Enter City Name screen appears.
Owner’s Manual 73
Page 76

www.dell.com | support.dell.com
6
Type the first letters of the city. As you type, the list of available cities
scrolls to show matching cities.
7
Select the name of the city and then tap OK. The Enter POI Name
screen appears.
8
Type the first letters of the POI or select one and then tap OK. The
Selected Point of Interest appears, listing the POI information.
74 Owner’s Manual
Page 77

9
Do one of the following:
• To be guided to the POI now, tap
your current destination, the map appears and instructions begin.
• To add this POI to your Favorites list, tap
in Favorites screen appears. You can add the POI as is (tap
or edit it to provide a meaningful name (tap
• To show the POI on the map without starting guidance, tap
The Panning map appears with a crosshairs cursor on the POI.
Navigate
. The POI becomes
Save
. The Save Location
Edit
).
Save
Show
)
Selecting a Destination from Recent Destinations
The Navigation System remembers recent destinations to make specifying a
destination easier.
To select from recent destinations:
1
Tap
Menu
, tap
Destinations
Destinations screen appears.
, and then tap
Recent
. The Recent
.
Owner’s Manual 75
Page 78

www.dell.com | support.dell.com
2
Tap on the destination you want. Use the arrows or the scroll bars to
move up and down the list.
3
Do one of the following:
• To be guided to the location now, tap
becomes your current destination, the map appears and
instructions begin.
• To add this destination to your Favorites list, tap
Location in Favorites screen appears. You can add the destination
as is (tap
• To show the location on the map without starting guidance, tap
Show
location.
• To delete this location from your recent destinations list, tap
The entry is removed from the list.
Save
) or edit it to provide a meaningful name (tap
. The Panning map appears with a crosshairs cursor on the
Navigate
. The location
Save
. The Save
Selecting a Destination from Favorites
You can set up a list of Favorites to make specifying a destination easier.
Edit
Del
).
.
76 Owner’s Manual
Page 79

To select a destination from Favorites:
1
Tap
Menu
, tap
Destinations
, and then tap
Favorites
. The Favorite
Locations screen appears.
2
Tap on the destination you want. Use the arrows or the scroll bars to
move up and down the list.
3
Do one of the following:
• To be guided to the location now, tap
Navigate
. The location
becomes your current destination, the map appears and
instructions begin.
• To edit this entry, tap
Edit
. The Edit Favorites screen appears.
Enter a name or edit the existing name and then tap
• To show the location on the map without starting guidance, tap
Show
. The Panning map appears with a crosshairs cursor on the
location.
• To delete this location from your Favorites list, tap
Delete
entry is removed from the list.
OK
.
. The
Owner’s Manual 77
Page 80

Specifying a destination from Contacts
The Navigation System can use address information for contacts that
already exist in your Outlook Contacts list as a destination. The address
information must be accurate for the Navigation System to find a match.
Abbreviated words in addresses may not be interpreted correctly.
To select a destination from Contacts:
1
Ta p
Menu
, tap
Destinations
Contact Name screen appears, listing your contacts.
www.dell.com | support.dell.com
2
Type the first letters of the contact (starting with last name). As you
type, the list of contacts scrolls to show matching names.
3
Select a contact and then tap OK. The Select Contact Address screen
appears, listing all addresses entered for that contact.
, and then tap
Contacts
. The Enter
78 Owner’s Manual
Page 81

4
Tap the address you want to use as your destination. One of the
following occurs:
• If the system can find the address, the map appears and
instructions begin.
• If the system cannot find the specific address, you see an Address
Not Found message. Tap
Name screen.
• If the system cannot match the address to an existing street, a
message appears stating you must correct the address in your
Contacts list before the system can use the address as a
destination. Tap
OK
OK
to return to the Enter Contact
to return to the Enter Contact Name screen.
Selecting a City Center
City Centers are a specific type of Point of Interest. You can select a City
Center from the closest, where you can pick alphabetically or by distance. Or
you can select from all City Centers included in the map data currently
available.
To select a nearby City Center:
1
Ta p
Menu
, tap
Destinations
City Center screen appears.
, and then tap
City Center
. The Enter
Owner’s Manual 79
Page 82

www.dell.com | support.dell.com
2
To s el ec t b y n am e:
•Tap
By Name
. The Enter City Name screen appears.
• Type the first letters of the city or select one and then tap
Selected Point of Interest screen appears.
80 Owner’s Manual
OK
. The
Page 83

3
To select by distance:
•Tap
By Distance
. The Enter City Center screen appears showing
all cities within 25 miles of your current location with the closest
one first. The direction of each city from your current location is
indicated by the arrow.
NOTE: The direction arrow pointing to the City Center is oriented
with North up.
• Tap a city on the list.
Owner’s Manual 81
Page 84

4
Do one of the following on either the Selected Point of Interest or City
List screen:
• To be guided to the City Center now, tap
Center becomes your current destination, the map appears and
instructions begin.
• To add this city center to your Favorites list, tap
Location in Favorites screen appears. You can add the city center
as is (tap
Save
) or edit it to provide a meaningful name (tap
• To show the city center on the map without starting guidance, tap
Show
. The Panning map appears with a crosshairs cursor on the
POI.
www.dell.com | support.dell.com
• To see detailed information about this city center, tap
Selected Point of Interest screen shows the name, address, and
phone number. You can then tap
To select from all available City Centers:
1
Tap
Menu
, tap
Destinations
City Center screen appears.
Navigate, Save
, and then tap
Navigate
Save
, or
City Center
. The City
. The Save
Info
. The
Show
.
. The Enter
Edit
).
2
If you need to change the region:
•Tap
Change Region
82 Owner’s Manual
. The Enter Region Name screen appears.
Page 85

• Type the name of the region or select it from the list.
•Tap
3
Ta p
4
Type the first letters of the city. As you type, the list of available cities
OK
List All
. You return to the Enter City Center screen.
. The Enter City Name screen appears.
scrolls to show matching cities.
5
Select the name of the city and then tap OK. The Selected Point of
Interest screen appears.
Owner’s Manual 83
Page 86

www.dell.com | support.dell.com
6
Do one of the following:
• To be guided to the City Center now, tap
Center becomes your current destination, the map appears and
instructions begin.
• To add this city center to your Favorites list, tap
Location in Favorites screen appears. You can add the city center
as is (tap
• To show the city center on the map without starting guidance, tap
Show
POI.
• To see detailed information about this city center, tap
Selected Point of Interest screen shows the name, address, and
phone number. You can then tap
Save
) or edit it to provide a meaningful name (tap
. The Panning map appears with a crosshairs cursor on the
Navigate, Save
Navigate
Save
, or
. The City
. The Save
Info
. The
Show
.
Changing Your Starting Location
The Navigation System automatically uses your current location as the
starting point. If you want to change to another starting point, you must do so
before you select a destination.
If the location you want to use as a starting point is not currently shown, pan
the map until you can see the location or select the location as a destination.
Edit
).
84 Owner’s Manual
Page 87

To change your starting point:
1
On the map, tap and hold on the location. A popup menu appears.
2
Ta p
Set Start Location
the system will navigate from the specified start location.
. You are now ready to select a destination, and
Clearing Your Destination
You can clear your destination.
To clear your destination:
1
Ta p
Menu
and then tap
screen appears.
Destinations
. The Current Route Options
2
Ta p
Cancel Route
. You return to the map.
Waypoints and Detours
The Navigation System lets you add a waypoint to your route. A waypoint is
an intermediate location on your route. Waypoints are entered the same way
destinations are. Once you reach your waypoint, you are asked if you want to
proceed to your original destination. You can add only one waypoint to a
route.
Owner’s Manual 85
Page 88

Waypoints
The Waypoint feature is only available when a destination has been entered.
You can add a waypoint using the map or by selecting a destination.
To a dd a w ay po in t f ro m th e m ap :
1
On the map, tap and hold on the waypoint location. A popup menu
appears.
2
Ta p
Set Waypoint
Instructions to the waypoint begin.
To specify a destination for a waypoint:
1
Ta p
Menu
www.dell.com | support.dell.com
screen appears.
and then tap
. Your route is recalculated and shown on the map.
Destinations
. The Current Route Options
2
Ta p
Add Waypoint
86 Owner’s Manual
. The Set Waypoint screen appears.
Page 89

3
Enter a destination using any of these options:
• Entering a destination by address
• Entering a destination by intersection
• Selecting a City Center
• Selecting a Point of Interest
• Selecting from contacts
• Selecting from your Favorites list
• Selecting from recent destinations
4
When you select the waypoint destination and then tap
route is calculated and instructions begin
To cancel your waypoint destination:
1
Do one of the following:
•Tap
Menu
and then tap
Destinations
(WAYPOINT appears
above the listed destination). The Current Route Options screen
appears.
• Tap
Cancel Route
.
or
•Tap
Navigate
and then tap
Cancel Route
Navigate
, your
.
Owner’s Manual 87
Page 90

A confirmation message appears asking if you want to continue to your
final destination.
2
Ta p
Ye s
to clear the waypoint from your route. The map appears and
instructions begin.
Detours
You can also add a detour around a section of street on your current route.
The Detour feature is only available when a destination has been entered.
To add a detour:
1
Ta p
Menu
www.dell.com | support.dell.com
screen appears.
and then tap
Destinations
. The Current Route Options
2
Ta p
Add Detour
on your route.
88 Owner’s Manual
. The Detour Around screen appears, listing the roads
Page 91

3
To mark a road(s) to be avoided, tap on the road. A "No Entry" symbol
appears next to the road.
4
To clear a road, tap on the road again. The "No Entry" symbol
disappears.
NOTE: To clear all marked roads, tap Reset.
5
When all roads to be avoided are marked, tap
Navigate
. The map
appears and revised instructions begin.
NOTE: Road sections to be avoided appear on the map in purple.
To cancel a detour:
1
Tap
Menu
and then tap
Destinations
. The Current Route Options
screen appears.
Owner’s Manual 89
Page 92

www.dell.com | support.dell.com
2
Ta p
Add Detour
. The Detour Around screen appears, listing the
revised roads on your route.
3
Ta p
Reset
to restart instructions without avoiding the previously
marked roads.
90 Owner’s Manual
Page 93

5
Other Features
The Navigation System has additional useful features:
•Hotkeys
•Almanac
•Playing a Demo
• Recording and Playing Back GPS paths
Hotkeys
The Hotkeys feature lets you use a button on the Pocket PC to show a specific
screen or toggle a specific feature on and off. Hotkey assignments in the
Navigation System work only when you are using the Navigation System, and
do not affect the use of the button in other Pocket PC applications. The
following features can be assigned to Hotkeys:
• 3D Mode—Toggles between 3D on and off in Map view.
• Current Position—Opens the Location Information screen for your
current location.
• Customize POI Icons—Opens the Categories to Display screen.
• Detour—If a destination has been selected, opens the Detour Around
screen. If no destination is set, nothing happens when the button is
pressed.
• Display Options—Opens the Customize Your Display screen.
• Enter Destination—If no destination is set, opens the Set Destination
screen. If a destination is currently selected, opens the Current Route
Options screen.
• Full screen—Toggles Full screen mode on and off.
• GPS Info—Toggles the GPS Status screen on and off.
• Menu—Opens the Menu screen.
• Mute—Toggles the muting of instructions on and off.
Owner’s Manual 91
Page 94

• North/Heading Up—Toggles the direction arrow between North and
Heading Up.
• POI Icons On/Off—Toggles the display of POI icons on the map.
• Route List—Toggles between the Route instructions and Map view.
• Route Options—Opens the Current Route Options screen.
• Rotate StatBox—
Toggles the display in the lower right corner of the
map between current SPEED, REMaining time to destination, ETA estimated time of arrival, or distance to your DESTination.
• Speed Alert—Opens the Speed Alert screen.
• Volume—Opens the Guidance Volume screen.
www.dell.com | support.dell.com
To assign a hotkey:
1
Tap t h e
Feature s
menu and then tap
Hotkeys
. The Hotkeys screen
appears.
2
Tap the function to be assigned a hotkey.
3
Press the button on the Pocket PC you want to use for the selected
function. The function is assigned to the button you pressed.
To clear one or more hotkeys:
1
Tap t h e
Feature s
menu and then tap
Hotkeys
. The Hotkeys screen
appears.
92 Owner’s Manual
Page 95

2
To clear a single hotkey:
• Tap the function assigned to the hotkey.
•Tap
3
To clear all hotkeys, tap
Clear Key
. The hotkey is cleared.
Clear All
. All hotkeys are cleared.
Disabling and Enabling Hotkeys
A hotkey can be disabled, allowing the button assignment used with other
applications and your Pocket PC to work when you are using the Navigation
System. A hotkey that has been disabled can be enabled again.
NOTE: Button assignments when you are not using the Navigation System are
part of your Pocket PC settings. To view or change button assignments, tap
Start, Settings, and then Buttons.
To disable a hotkey assignment:
1
Tap t h e
appears.
Feature s
menu and then tap
Hotkeys
. The Hotkeys screen
Owner’s Manual 93
Page 96

www.dell.com | support.dell.com
2
Tap the function whose hotkey you want to disable.
3
Ta p
Disable
. The hotkey is disabled.
To enable a hotkey assignment:
1
Tap t h e
Feature s
menu and then tap
appears.
Hotkeys
. The Hotkeys screen
94 Owner’s Manual
Page 97

2
Tap the function whose hotkey you want to enable.
3
Ta p
Enable
. The hotkey is enabled.
Almanac
The almanac provides information about the sun and the moon. The SUN
area shows the time of today's sunrise and sunset in local time. The MOON
area shows you a picture of the moon in its current phase, and shows the
age of the current moon and the date and time of the next full and new
moons.
To view the almanac:
1
Tap t h e
appears.
Feature s
menu and then tap
Almanac
. The Almanac screen
Owner’s Manual 95
Page 98

www.dell.com | support.dell.com
2
Tap the red X in the lower right corner to close the Almanac screen.
Playing a Demo
If a destination has been entered, you can use the Demo feature to follow
along the path of the route and hear the verbal instructions. When playing a
demo, the Map view screen displays PLAY under the direction arrow.
To play a demo:
1
If you have not already done so, enter a destination. For help in
entering a destination, use one of the following methods from
Chapter 4:
• Entering a destination by address
• Entering a destination by intersection
• Selecting a Point of Interest
• Selecting from recent destinations
• Selecting from your Favorites list
• Selecting from contacts
• Selecting a City Center
96 Owner’s Manual
Page 99

2
Tap t h e
appears under the direction arrow on the map, the arrow representing
your vehicle begins to move along the route and the voice guidance
begins.
3
To s to p t he de mo wh il e in process, tap the
tap
Feature s
Stop Demo
menu and then tap
.
Demo current route
Feature s
menu and then
. PLAY
Recording and Playing Back GPS Paths
A driving path can be recorded for future playback. When recording, a red
REC appears under the direction arrow on the Map view screen.
You can play back a driving path that has been recorded. When playing a
track, the Map view screen displays PLAY under the direction arrow.
To record a GPS path:
1
To start recording tap the
Path
. The Save As screen appears.
Feat ures
menu and then tap
Record GPS
2
Enter the file information:
•
Name:
Accept the suggested name or enter a new one.
•
Folder
:Select a folder from the list.
•
Ty p e :
GPS Log File is the only available type.
•
Location:
3
Ta p OK. REC appears under the direction arrow on the map.
Select a storage location from the list.
Owner’s Manual 97
Page 100

4
Drive your route.
To end the recording tap the
To play back a GPS path:
1
Tap t h e
Feature s
menu and then tap
screen appears.
2
Select the appropriate file. If the file you want is not listed, use the
Folder list to look in another folder.
The playback begins, showing you the route taken on the map.
3
To end the playback tap the
www.dell.com | support.dell.com
Playback
.
Feature s
Features
menu and then tap
Playback GPS Path
menu and then tap
Stop Recording
. The Open
Stop
.
98 Owner’s Manual
 Loading...