


 Loading...
53-1002744-01 |
® |
14 December 2012 |
|
EZSwitchSetup
Administrator’s Guide
Supporting Brocade 300, 4100, 4900, 5000, 5100, 5300, 6505, 6510, 6520, 7800, 8000, and VA-40FC
Copyright © 2009-2012 Brocade Communications Systems, Inc. All Rights Reserved.
Brocade, Brocade Assurance, the B-wing symbol, BigIron, DCX, Fabric OS, FastIron, MLX, NetIron, SAN Health, ServerIron, TurboIron, VCS, and VDX are registered trademarks, and AnyIO, Brocade One, CloudPlex, Effortless Networking, ICX, NET Health, OpenScript, and The Effortless Network are trademarks of Brocade Communications Systems, Inc., in the United States and/or in other countries. Other brands, products, or service names mentioned may be trademarks of their respective owners.
Notice: This document is for informational purposes only and does not set forth any warranty, expressed or implied, concerning any equipment, equipment feature, or service offered or to be offered by Brocade. Brocade reserves the right to make changes to this document at any time, without notice, and assumes no responsibility for its use. This informational document describes features that may not be currently available. Contact a Brocade sales office for information on feature and product availability. Export of technical data contained in this document may require an export license from the United States government.
The authors and Brocade Communications Systems, Inc. shall have no liability or responsibility to any person or entity with respect to any loss, cost, liability, or damages arising from the information contained in this book or the computer programs that accompany it.
The product described by this document may contain “open source” software covered by the GNU General Public License or other open source license agreements. To find out which open source software is included in Brocade products, view the licensing terms applicable to the open source software, and obtain a copy of the programming source code, please visit http://www.brocade.com/support/oscd.
Brocade Communications Systems, Incorporated
Corporate and Latin American Headquarters |
Asia-Pacific Headquarters |
|
|
Brocade Communications Systems, Inc. |
Brocade Communications Systems China HK, Ltd. |
||
130 Holger Way |
No. 1 Guanghua Road |
|
|
San Jose, CA 95134 |
Chao Yang District |
|
|
Tel: 1-408-333-8000 |
Units 2718 and 2818 |
|
|
Fax: 1-408-333-8101 |
Beijing 100020, China |
|
|
E-mail: info@brocade.com |
Tel: +8610 6588 8888 |
|
|
|
Fax: +8610 6588 9999 |
|
|
|
E-mail: china-info@brocade.com |
|
|
European Headquarters |
Asia-Pacific Headquarters |
|
|
Brocade Communications Switzerland Sàrl |
Brocade Communications Systems Co., Ltd. (Shenzhen WFOE) |
||
Centre Swissair |
Citic Plaza |
|
|
Tour B - 4ème étage |
No. 233 Tian He Road North |
|
|
29, Route de l'Aéroport |
Unit 1308 – 13th Floor |
|
|
Case Postale 105 |
Guangzhou, China |
|
|
CH-1215 Genève 15 |
Tel: +8620 3891 2000 |
|
|
Switzerland |
Fax: +8620 3891 2111 |
|
|
Tel: +41 22 799 5640 |
E-mail: china-info@brocade.com |
|
|
Fax: +41 22 799 5641 |
|
|
|
E-mail: emea-info@brocade.com |
|
|
|
Document History |
|
|
|
|
|
|
|
Title |
Publication number |
Summary of changes |
Date |
|
|
|
|
EZSwitchSetup Administrator’s Guide |
53-1001344-02 |
Added support for the |
August 2009 |
|
|
Brocade VA-40FC. |
|
|
|
|
|
EZSwitchSetup Administrator’s Guide |
53-1001344-03 |
Removed software support |
February 2010 |
|
|
statement from title page, as this |
|
|
|
document supports multiple |
|
|
|
Fabric OS versions. |
|
|
|
|
|
EZSwitchSetup Administrator’s Guide |
53-1002157-01 |
Added support for Brocade 6510. |
April 2011 |
|
|
|
|
EZSwitchSetup Administrator’s Guide |
53-1002511-01 |
Added support for Brocade 6505. |
December 2011 |
|
|
|
|
EZSwitchSetup Administrator’s Guide |
53-1002744-01 |
Added support for Brocade 6520. |
December 2012 |
|
|
|
|

Contents
About This Document
How this document is organized . . . . . . . . . . . . . . . . . . . . . . . . . . . . . v Supported hardware and software . . . . . . . . . . . . . . . . . . . . . . . . . . . v What’s new in this document. . . . . . . . . . . . . . . . . . . . . . . . . . . . . . . . vi Document conventions. . . . . . . . . . . . . . . . . . . . . . . . . . . . . . . . . . . . . vi Notice to the reader . . . . . . . . . . . . . . . . . . . . . . . . . . . . . . . . . . . . . . vii Additional information. . . . . . . . . . . . . . . . . . . . . . . . . . . . . . . . . . . . . viii Getting technical help. . . . . . . . . . . . . . . . . . . . . . . . . . . . . . . . . . . . . viii Document Feedback. . . . . . . . . . . . . . . . . . . . . . . . . . . . . . . . . . . . . . . ix
Chapter 1 |
Introducing EZSwitchSetup |
|
|
Overview of EZSwitchSetup . . . . . . . . . . . . . . . . . . . . . . . . . . . . . . . . . |
1 |
EZSwitchSetup software and hardware requirements. . . . . . . . . . . . 2 Configuring Internet Explorer . . . . . . . . . . . . . . . . . . . . . . . . . . . . 3
Supported switches . . . . . . . . . . . . . . . . . . . . . . . . . . . . . . . . . . . . . . . 3 Language support for EZSwitchSetup . . . . . . . . . . . . . . . . . . . . . . . . . 4
Chapter 2 |
Setting Up Your Switch |
|
|
Installing and running the EZSwitchSetup wizard. . . . . . . . . . . . . . . |
. 7 |
|
Launching the EZSwitchSetup wizard . . . . . . . . . . . . . . . . . . . . |
. 8 |
|
Connecting cables . . . . . . . . . . . . . . . . . . . . . . . . . . . . . . . . . . . . |
. 9 |
|
Discovering the switch. . . . . . . . . . . . . . . . . . . . . . . . . . . . . . . . . |
12 |
|
Confirming IP addresses . . . . . . . . . . . . . . . . . . . . . . . . . . . . . . . |
14 |
|
Switch discovery failure. . . . . . . . . . . . . . . . . . . . . . . . . . . . . . . . |
17 |
Configuring the switch . . . . . . . . . . . . . . . . . . . . . . . . . . . . . . . . . . . . 17 Setting switch parameters . . . . . . . . . . . . . . . . . . . . . . . . . . . . . 18
Zoning selection options. . . . . . . . . . . . . . . . . . . . . . . . . . . . . . . . . . . 19 Configuring zones on the switch. . . . . . . . . . . . . . . . . . . . . . . . .20 Specifying devices . . . . . . . . . . . . . . . . . . . . . . . . . . . . . . . . . . . .20
Connecting devices and completing the setup . . . . . . . . . . . . . . . . . 21
EZSwitchSetup Administrator’s Guide |
iii |
53-1002744-01 |
|
Chapter 3 |
Managing Your Switch |
|
|
Switch Manager overview. . . . . . . . . . . . . . . . . . . . . . . . . . . . . . . . . . |
27 |
|
Task panel . . . . . . . . . . . . . . . . . . . . . . . . . . . . . . . . . . . . . . . . . . |
28 |
|
Switch View. . . . . . . . . . . . . . . . . . . . . . . . . . . . . . . . . . . . . . . . . . |
29 |
|
Content page . . . . . . . . . . . . . . . . . . . . . . . . . . . . . . . . . . . . . . . . |
29 |
|
Status bar . . . . . . . . . . . . . . . . . . . . . . . . . . . . . . . . . . . . . . . . . . . |
30 |
Launching the EZSwitchSetup Switch Manager . . . . . . . . . . . . . . . .30 Logging in . . . . . . . . . . . . . . . . . . . . . . . . . . . . . . . . . . . . . . . . . . . 31 Switch Manager sessions . . . . . . . . . . . . . . . . . . . . . . . . . . . . . . 31 Logging out. . . . . . . . . . . . . . . . . . . . . . . . . . . . . . . . . . . . . . . . . . 31
Viewing switch information. . . . . . . . . . . . . . . . . . . . . . . . . . . . . . . . .32 Viewing the status indicator legend . . . . . . . . . . . . . . . . . . . . . .33 Viewing fan, temperature, and power supply status . . . . . . . . .33 Port status . . . . . . . . . . . . . . . . . . . . . . . . . . . . . . . . . . . . . . . . . .34 Switch Information tab . . . . . . . . . . . . . . . . . . . . . . . . . . . . . . . .36 Port Information tab. . . . . . . . . . . . . . . . . . . . . . . . . . . . . . . . . . .36
Changing switch information . . . . . . . . . . . . . . . . . . . . . . . . . . . . . . . 37 Adding a port license . . . . . . . . . . . . . . . . . . . . . . . . . . . . . . . . . . . . .38
Managing devices . . . . . . . . . . . . . . . . . . . . . . . . . . . . . . . . . . . . . . . .38 Device connections . . . . . . . . . . . . . . . . . . . . . . . . . . . . . . . . . . .40 Assigning and renaming device aliases . . . . . . . . . . . . . . . . . . . 41
Zoning management. . . . . . . . . . . . . . . . . . . . . . . . . . . . . . . . . . . . . .43 Viewing the zone access map . . . . . . . . . . . . . . . . . . . . . . . . . . .44 Editing the zoning configuration . . . . . . . . . . . . . . . . . . . . . . . . .45 Validating zoning configuration. . . . . . . . . . . . . . . . . . . . . . . . . . 47 Restoring Typical Zoning . . . . . . . . . . . . . . . . . . . . . . . . . . . . . . . 47
Accessing Web Tools for advanced management. . . . . . . . . . . . . . .48 Making EZSwitchSetup your default switch manager . . . . . . . .48
Appendix A |
EZSwitchSetup Limitations |
|
|
General limitations . . . . . . . . . . . . . . . . . . . . . . . . . . . . . . . . . . . . . . . |
49 |
Index |
|
|
iv |
EZSwitchSetup Administrator’s Guide |
|
53-1002744-01 |

About This Document
In this chapter
•How this document is organized . . . . . . . . . . . . . . . . . . . . . . . . . . . . . . . . . . . |
v |
•Supported hardware and software. . . . . . . . . . . . . . . . . . . . . . . . . . . . . . . . . . |
v |
•What’s new in this document . . . . . . . . . . . . . . . . . . . . . . . . . . . . . . . . . . . . . . |
vi |
•Document conventions . . . . . . . . . . . . . . . . . . . . . . . . . . . . . . . . . . . . . . . . . . . |
vi |
•Notice to the reader . . . . . . . . . . . . . . . . . . . . . . . . . . . . . . . . . . . . . . . . . . . . |
vii |
•Additional information. . . . . . . . . . . . . . . . . . . . . . . . . . . . . . . . . . . . . . . . . . . |
viii |
•Getting technical help . . . . . . . . . . . . . . . . . . . . . . . . . . . . . . . . . . . . . . . . . . . |
viii |
•Document Feedback . . . . . . . . . . . . . . . . . . . . . . . . . . . . . . . . . . . . . . . . . . . . . |
ix |
How this document is organized
This document contains the following components:
•Chapter 1, “Introducing EZSwitchSetup”, provides basic information about the EZSwitchSetup interface, including system requirements and installation instructions.
•Chapter 2, “Setting Up Your Switch”, describes how to set up your switch for the first time.
•Chapter 3, “Managing Your Switch”, describes how to monitor and manage your switch using the EZSwitchSetup Switch Manager.
•Appendix A, “EZSwitchSetup Limitations”, discusses the limitations of and provides workarounds for using EZSwitchSetup.
Supported hardware and software
In those instances in which procedures or parts of procedures documented here apply to some switches but not to others, this guide identifies exactly which switches are supported and which are not.
Although many different software and hardware configurations are tested and supported by Brocade Communications Systems, Inc., documenting all possible configurations and scenarios is beyond the scope of this document.
The following platforms are supported by this release of EZSwitchSetup:
•Brocade 300 switch
•Brocade 4100 switch
•Brocade 4900 switch
EZSwitchSetup Administrator’s Guide |
v |
53-1002744-01 |
|
•Brocade 5000 switch
•Brocade 5100 switch
•Brocade 5300 switch
•Brocade 6505 switch
•Brocade 6510 switch
•Brocade 6520 switch
•Brocade 7800 Extension Switch
•Brocade 8000 FCoE Switch
•Brocade VA-40FC switch
What’s new in this document
The following change has been made since this document was last released:
•Added support for the Brocade 6520 switch.
Document conventions
This section describes text formatting conventions and important notice formats used in this document.
Text formatting
The narrative-text formatting conventions that are used in this document are as follows:
bold text |
Identifies command names |
|
Identifies the names of user-manipulated GUI elements |
|
Identifies keywords and operands |
|
Identifies text to enter at the GUI or CLI |
italic text |
Provides emphasis |
|
Identifies variables |
|
Identifies paths and Internet addresses |
|
Identifies document titles |
code text |
Identifies CLI output |
|
Identifies syntax examples |
For readability, command names in the narrative portions of this guide are presented in mixed lettercase: for example, switchShow. In actual examples, command lettercase is all lowercase.
Notes, Cautions, and Warnings
The following notices and statements are used in this manual. They are listed below in order of increasing severity of potential hazards.
vi |
EZSwitchSetup Administrator’s Guide |
|
53-1002744-01 |

NOTE
A note provides a tip, guidance, or advice, emphasizes important information, or provides a reference to related information.
ATTENTION
An Attention statement indicates potential damage to hardware or data.
CAUTION
A Caution statement alerts you to situations that can be potentially hazardous to you or cause damage to hardware, firmware, software, or data.
DANGER
A Danger statement indicates conditions or situations that can be potentially lethal or extremely hazardous to you. Safety labels are also attached directly to products to warn of these conditions or situations.
Key terms
For definitions specific to Brocade and Fibre Channel, see the technical glossaries on MyBrocade. See “Brocade resources” on page viii for instructions on accessing MyBrocade.
For definitions of SAN-specific terms, visit the Storage Networking Industry Association online dictionary at:
http://www.snia.org/education/dictionary
Notice to the reader
This document may contain references to the trademarks of the following corporations. These trademarks are the properties of their respective companies and corporations.
These references are made for informational purposes only.
Corporation |
Referenced Trademarks and Products |
|
|
Microsoft Corporation |
Windows, Windows NT, Internet Explorer |
|
|
Oracle Corporation |
Java |
|
|
Netscape Communications Corporation |
Netscape |
|
|
Red Hat, Inc. |
Red Hat, Red Hat Network, Maximum RPM, Linux Undercover |
|
|
EZSwitchSetup Administrator’s Guide |
vii |
53-1002744-01 |
|
Additional information
This section lists additional Brocade and industry-specific documentation that you might find helpful.
Brocade resources
To get up-to-the-minute information, go to http://my.brocade.com to register at no cost for a user ID and password.
White papers, online demonstrations, and data sheets are available through the Brocade website at:
http://www.brocade.com/products-solutions/products/index.page For additional Brocade documentation, visit the Brocade website:
http://www.brocade.com
Release notes are available on the MyBrocade website and are also bundled with the Fabric OS firmware.
Other industry resources
For additional resource information, visit the Technical Committee T11 website. This website provides interface standards for high-performance and mass storage applications for Fibre Channel, storage management, and other applications:
http://www.t11.org
For information about the Fibre Channel industry, visit the Fibre Channel Industry Association website:
http://www.fibrechannel.org
Getting technical help
Contact your switch support supplier for hardware, firmware, and software support, including product repairs and part ordering. To expedite your call, have the following information available:
1.General Information
•Switch model
•Switch operating system version
•Browser version
•JRE version installed on host
•Error numbers and messages received
•Java console window messages
•Screen shots
•supportSave command output
viii |
EZSwitchSetup Administrator’s Guide |
|
53-1002744-01 |

•Detailed description of the problem, switch or fabric behavior immediately following the problem, and specific questions
•Description of any troubleshooting steps already performed and results
2.Switch Serial Number
The switch serial number and corresponding bar code are provided on the serial number label, as shown here:
:
*FT00X0054E9*
FT00X0054E9
The serial number label is located as follows:
•Brocade 300, 4100, 4900, 5000, 5100, 5300, 7800, 8000, and VA-40FC switches: On the switch ID pull-out tab located on the bottom of the port side of the switch.
•Brocade 6505, 6510, and 6520 switches: On the switch ID pull-out tab located inside the chassis on the port side on the left.
3.World Wide Name (WWN)
•The WWN is in the same place as the serial number.
Document Feedback
Quality is our first concern at Brocade and we have made every effort to ensure the accuracy and completeness of this document. However, if you find an error or an omission, or you think that a topic needs further development, we want to hear from you. Forward your feedback to:
documentation@brocade.com
Provide the title and version number of the document and as much detail as possible about your comment, including the topic heading and page number and your suggestions for improvement.
EZSwitchSetup Administrator’s Guide |
ix |
53-1002744-01 |
|
x |
EZSwitchSetup Administrator’s Guide |
|
53-1002744-01 |
|
Chapter |
|
Introducing EZSwitchSetup |
1 |
|
|
|
|
In this chapter
•Overview of EZSwitchSetup . . . . . . . . . . . . . . . . . . . . . . . . . . . . . . . . . . . . . . . |
1 |
•EZSwitchSetup software and hardware requirements . . . . . . . . . . . . . . . . . . |
2 |
•Supported switches. . . . . . . . . . . . . . . . . . . . . . . . . . . . . . . . . . . . . . . . . . . . . . |
3 |
•Language support for EZSwitchSetup . . . . . . . . . . . . . . . . . . . . . . . . . . . . . . . |
4 |
Overview of EZSwitchSetup
EZSwitchSetup is an easy-to-use graphical user interface application for setting up and managing your switch. It has the following components:
•EZSwitchSetup wizard (on the installation CD)
•EZSwitchSetup switch configuration wizard
•EZSwitchSetup Switch Manager
Figure 1 illustrates the high-level workflow of EZSwitchSetup.
FIGURE 1 EZSwitchSetup components
Chapter 2, “Setting Up Your Switch,” describes how to use the EZSwitchSetup wizard and Switch Configuration to set up and configure your switch for the first time. For additional information about your switch, see the hardware reference manual included on the Brocade Documentation CD, which ships with the switch.
Chapter 3, “Managing Your Switch,” describes how to use the Switch Manager to monitor and manage your switch.
EZSwitchSetup Administrator’s Guide |
1 |
53-1002744-01 |
|

1 EZSwitchSetup software and hardware requirements
NOTE
Although your switch may have advanced capabilities, EZSwitchSetup is for a single-switch fabric with FC ports only. To configure and manage other features on your switch, use the command line interface, Web Tools, or Brocade Network Advisor.
EZSwitchSetup software and hardware requirements
You can run EZSwitchSetup on a SAN host computer or you can use a different computer that is not part of the SAN, such as a laptop.
EZSwitchSetup requires a browser that conforms to HTML version 4.0 and JavaScript version 1.0. The EZSwitchSetup installation CD automatically installs the correct Java Runtime Environment (JRE) for the disk-based installation wizard. This does not affect any pre-installed JREs, but other program components launched from the switch require Oracle JRE 1.7.0_9 or higher installed on the host.
EZSwitchSetup is supported on the platforms shown in Table 1.
TABLE 1 |
Supported platforms |
|
|
|
|
|
|
Operating system |
Browser |
JRE version |
|
|
|
|
|
SUSE Linux Enterprise 11 |
Firefox 12 |
Oracle JRE 1.7.0_9 |
|
|
|
|
|
Linux Red Hat 9 |
Mozilla |
Oracle JRE 1.7.0_9 |
|
|
|
|
|
Windows 7 Professional (x86) |
Internet Explorer 9.0 |
Oracle JRE 1.7.0_9 |
|
|
|
Internet Explorer 8.0 |
|
|
|
Firefox 12 |
|
|
|
|
|
Windows Server 2008 Standard |
Internet Explorer 9.0 |
Oracle JRE 1.7.0_9 |
|
|
|
Internet Explorer 8.0 |
|
|
|
Firefox 12 |
|
|
|
|
|
Windows 2003 Server, SP2 |
Internet Explorer 9.0 |
Oracle JRE 1.7.0_9 |
|
|
|
Internet Explorer 8.0 |
|
|
|
Firefox 12 |
|
|
|
|
|
Windows XP, SP3 |
Internet Explorer 9.0 |
Oracle JRE 1.7.0_9 |
|
|
|
Internet Explorer 8.0 |
|
|
|
Firefox 12 |
|
|
|
|
|
The minimum hardware requirements for a Windows system are as follows:
•90 MB of hard drive space for the EZSwitchSetup installation directory.
•512 MB or more RAM for fabrics containing up to 15 switches.
•A minimum of 8 MB of video RAM is also recommended.
•An Ethernet port.
•A serial (COM) port if you plan to connect to the serial port on the switch.
2 |
EZSwitchSetup Administrator’s Guide |
|
53-1002744-01 |

Supported switches |
1 |
Configuring Internet Explorer
Correct operation of EZSwitchSetup Switch Manager with Internet Explorer requires specifying the appropriate settings for browser refresh frequency and process model. Browser pages should be refreshed frequently to ensure the correct operation of Switch Manager.
1.Select Tools > Internet Options.
2.Select the General tab.
3.Click the Settings button under “Browsing history.”
4.Click Every time I visit the webpage under “Check for newer versions of stored pages,” as shown in Figure 2.
5.Click OK to save the changes.
FIGURE 2 Configuring Internet Explorer
Supported switches
You can use EZSwitchSetup with the switches listed in “Supported hardware and software” on page v.
Your switch must meet the following requirements:
•It must be connected to an Ethernet LAN that is accessible by the host. If it is not, the system issues the message “Page not Found.”
•It must have licensed FC ports. If the switch has no licensed FC ports, you must first install a POD license and then enable the affected ports. For more information, refer to “Adding a port license” on page 38
EZSwitchSetup Administrator’s Guide |
3 |
53-1002744-01 |
|

1 Language support for EZSwitchSetup
•It must be in a single-switch fabric. If your switch connects to another switch (if there is an E_Port on the switch), you cannot manage the switch using EZSwitchSetup until you disconnect the switch connection.
NOTE
If there is an E_Port on the switch and if there is a zone conflict, then the fabric is segmented; in this case, the switch is in a fabric by itself and EZSwitchSetup treats it as a single-switch fabric.
You cannot use EZSwitchSetup to manage a switch that has any of the following features enabled:
•Virtual Fabrics with non-default logical switches
•Access Gateway
•User-defined Admin Domains
You can, however, use the EZSwitchSetup wizard to discover these switches and set their IP addresses. The Brocade VA-40FC switch comes pre-configured in Access Gateway mode. If you use the EZSwitchSetup wizard to discover the Brocade VA-40FC switch and set the IP address, Web Tools will launch automatically for you to manage the Access Gateway features.
Language support for EZSwitchSetup
The EZSwitchSetup wizard and the Switch Manager interface display the following languages:
•English (default)
•Brazilian Portuguese
•French
•German
•Italian
•Japanese
•Korean
•Simplified Chinese
•Spanish
•Traditional Chinese
When you launch EZSwitchSetup, the interface detects the operating system and language environment and installs and displays the appropriate language. For example, if you set up the switch using a German operating system, EZSwitchSetup installs the German language interface and displays text, messages, and labels in that language.
If localization resources are not fully available in the user host environment, EZSwitchSetup uses the default language, English.
Regardless of the local language, the following is displayed in English:
•User input, which must consist of printable ASCII characters
•Switch-based information (such as firmware version and switch name)
•Some globally accepted industry terms (such as SAN and HBA)
•The End User License Agreement (EULA)
4 |
EZSwitchSetup Administrator’s Guide |
|
53-1002744-01 |
Language support for EZSwitchSetup |
1 |
•System files (such as the summary file, setting file, and log file)
EZSwitchSetup Administrator’s Guide |
5 |
53-1002744-01 |
|
1 Language support for EZSwitchSetup
6 |
EZSwitchSetup Administrator’s Guide |
|
53-1002744-01 |

|
Chapter |
|
Setting Up Your Switch |
2 |
|
|
|
|
In this chapter
•Installing and running the EZSwitchSetup wizard. . . . . . . . . . . . . . . . . . . . . . 7
•Configuring the switch. . . . . . . . . . . . . . . . . . . . . . . . . . . . . . . . . . . . . . . . . . . 17
•Zoning selection options . . . . . . . . . . . . . . . . . . . . . . . . . . . . . . . . . . . . . . . . . 19
•Connecting devices and completing the setup . . . . . . . . . . . . . . . . . . . . . . . 21
Installing and running the EZSwitchSetup wizard
You can run EZSwitchSetup from a computer you are currently using for SAN administration, or you can use a different computer that is not part of the SAN, such as a laptop. In this chapter, the computer running EZSwitchSetup is called the setup computer.
The first step in setting up your switch is to install the EZSwitchSetup wizard, which is located on the EZSwitchSetup installation CD.
1.Insert the EZSwitchSetup CD into the CD-ROM drive of your setup computer.
•On Windows: The installer will autostart in about a minute.
•On Linux: Navigate to the following path location on the CD-ROM: CDROM_Path/CDROM_Installers/Linux/Disk1/InstData/VM/install.bin
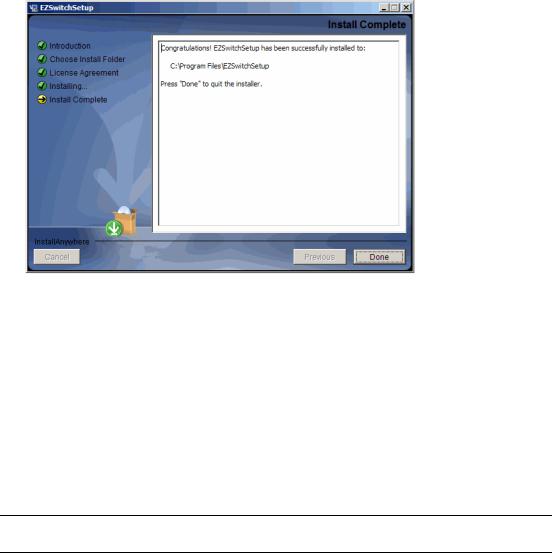
2.Install EZSwitchSetup following the onscreen directions. Installation will take a few minutes after you click OK.
3.Click Done on the last screen (shown in Figure 3) to exit the installer.
EZSwitchSetup Administrator’s Guide |
7 |
53-1002744-01 |
|
2 Installing and running the EZSwitchSetup wizard
FIGURE 3 EZSwitchSetup Installer
On Windows, EZSwitchSetup starts automatically after it is installed. If it does not, see “Launching the EZSwitchSetup wizard” to launch the wizard manually.
On Linux, follow the procedure in “Launching the EZSwitchSetup wizard” to launch the wizard.
Launching the EZSwitchSetup wizard
Perform the following, depending on your operating system:
•On Windows: EZSwitchSetup starts automatically after it is installed. If it does not, then from the Start menu, select Programs > EZSwitchSetup > EZSwitchSetup
•On Linux: EZSwitchSetup does not start automatically, so you must start it manually.
NOTE
The Linux installation requires root access.
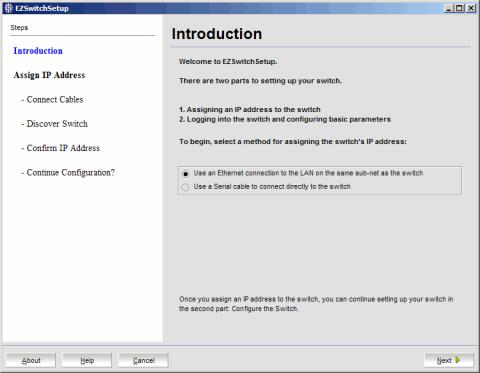
The EZSwitchSetup wizard starts, as shown in Figure 4.
8 |
EZSwitchSetup Administrator’s Guide |
|
53-1002744-01 |
Installing and running the EZSwitchSetup wizard |
2 |
FIGURE 4 EZSwitchSetup introduction window
Connecting cables
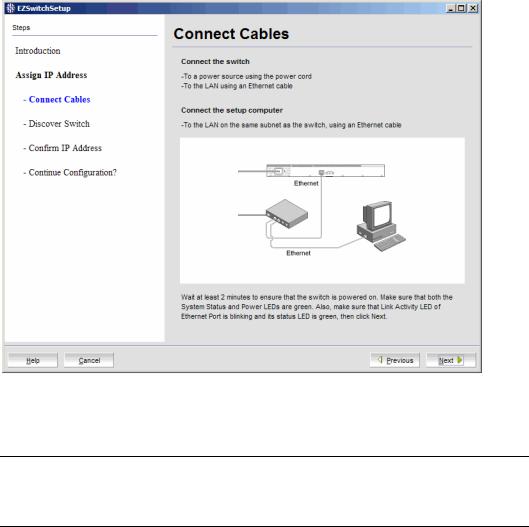
1.Choose the method of connecting to your LAN.
You have the choice of using a serial connection or an Ethernet connection to your LAN to set the IP address for the switch. The Ethernet connection is generally more convenient and preferred. Use the serial connection if it is not possible or not convenient to connect the host on the same subnet as the switch.
2.Click Next.
The Connect Cables window is displayed (Figure 5).
EZSwitchSetup Administrator’s Guide |
9 |
53-1002744-01 |
|
2 Installing and running the EZSwitchSetup wizard
FIGURE 5 Connect Cables window (Ethernet version, without serial cable)
Figure 6 on page 11 shows the cables connecting to the Brocade Fibre Channel switch, setup computer, Ethernet hub or switch, and network.
NOTE
Not all switches have their serial and Ethernet connectors in the same place as in Figure 6. Refer to the hardware documentation to determine the correct placement of the serial and Ethernet connections.
10 |
EZSwitchSetup Administrator’s Guide |
|
53-1002744-01 |
Loading...