

Page 1

Dell™ 1200MP Projector
Owner’s Manual
www.dell.com | support.dell.com
Page 2

Notes, Notices, and Cautions
NOTE: A NOTE indicates important information that helps you make better use
of your projector.
NOTICE: A NOTICE indicates either potential damage to hardware or loss of
data and tells you how to avoid the problem.
CAUTION: A CAUTION indicates a potential for property damage, personal
injury, or death.
____________________
Information in this document is subject to change without notice.
© 2006 Dell Inc. All rights reserved.
Reproduction in any manner whatsoever without the written permission of Dell Inc. is strictly
forbidden.
Trademarks used in this text: Dell and the DELL logo are trademarks of Dell Inc.;
Microsoft and Windows are registered trademarks of Microsoft Corporation.
Other trademarks and trade names may be used in this document to refer to either the entities
claiming the marks and names or their products. Dell Inc. disclaims any proprietary interest in
trademarks and trade names other than its own.
Model 1200MP
January 2006 P/N CG356 Rev. A00
Page 3

Contents
1 Your Dell™ Projector
2 Connecting Your Projector
Connecting to a Computer . . . . . . . . . . . . . . 8
About Your Projector . . . . . . . . . . . . . . . 6
Connecting a DVD Player, Set Top Box, VCR, or TV
Connecting With a Component Cable
Connecting With an S-Video Cable
Connecting With a Composite Cable
Connecting to a Wired RS232 Remote Control
Connecting to a Computer
Connecting to a Commercial
RS232 Control Box
3 Using Your Projector
Turning Your Projector On . . . . . . . . . . . . . . . 11
Turning Your Projector Off
Adjusting the Projected Image
Raising the Projector Height
Lowering the Projector Height
Adjusting Projection Image Size
. . . 8
. . . . . . . 8
. . . . . . . . 9
. . . . . . . 9
. . . . . 10
. . . . . . . . . . . . 10
. . . . . . . . . . . . . . . . 10
. . . . . . . . . . . . . . 11
. . . . . . . . . . . . 12
. . . . . . . . . . . 12
. . . . . . . . . . 12
. . . . . . . . . . . 13
Contents 3
Page 4

Adjusting the Projector Zoom and Focus . . . . . . . 14
Password Security
Using the Control Panel
Using the Remote Control
Using the On-Screen Display
Main Menu
All Images Menu
Computer Image Menu
Video Image Menu
Audio Menu
Management Menu
Language Menu
Test Pattern Menu
Factory Reset Menu
. . . . . . . . . . . . . . . . . 14
. . . . . . . . . . . . . . . 16
. . . . . . . . . . . . . . 17
. . . . . . . . . . . . 18
. . . . . . . . . . . . . . . . . . . 19
. . . . . . . . . . . . . . . . 19
. . . . . . . . . . . . . 20
. . . . . . . . . . . . . . . 21
. . . . . . . . . . . . . . . . . . 21
. . . . . . . . . . . . . . . 22
. . . . . . . . . . . . . . . . 24
. . . . . . . . . . . . . . . 24
. . . . . . . . . . . . . . 24
4 Troubleshooting Your Projector
Changing the Lamp . . . . . . . . . . . . . . . . . 28
5 Specifications
6 Contacting Dell
7 Glossary
4 Contents
Page 5

Your Dell™ Projector
Your projector comes with all the items shown below. Ensure that you have all the
items, and contact Dell if anything is missing. For more information see,
"Contacting Dell".
Package Contents
Power cable (1.8m) VGA cable (D-sub to D-sub) (1.8m)
S-Video cable (2.0m) USB cable (1.8m)
Composite cable (1.8m) VGA to component cable (1.8m)
RCA to audio cable (1.8m) Mini pin to Mini pin cable (1.8m)
Your Dell™ Projector 5
Page 6

Package Contents (continued)
Remote control Batteries
Carrying Case Documentation
www.dell.com | support.dell.com
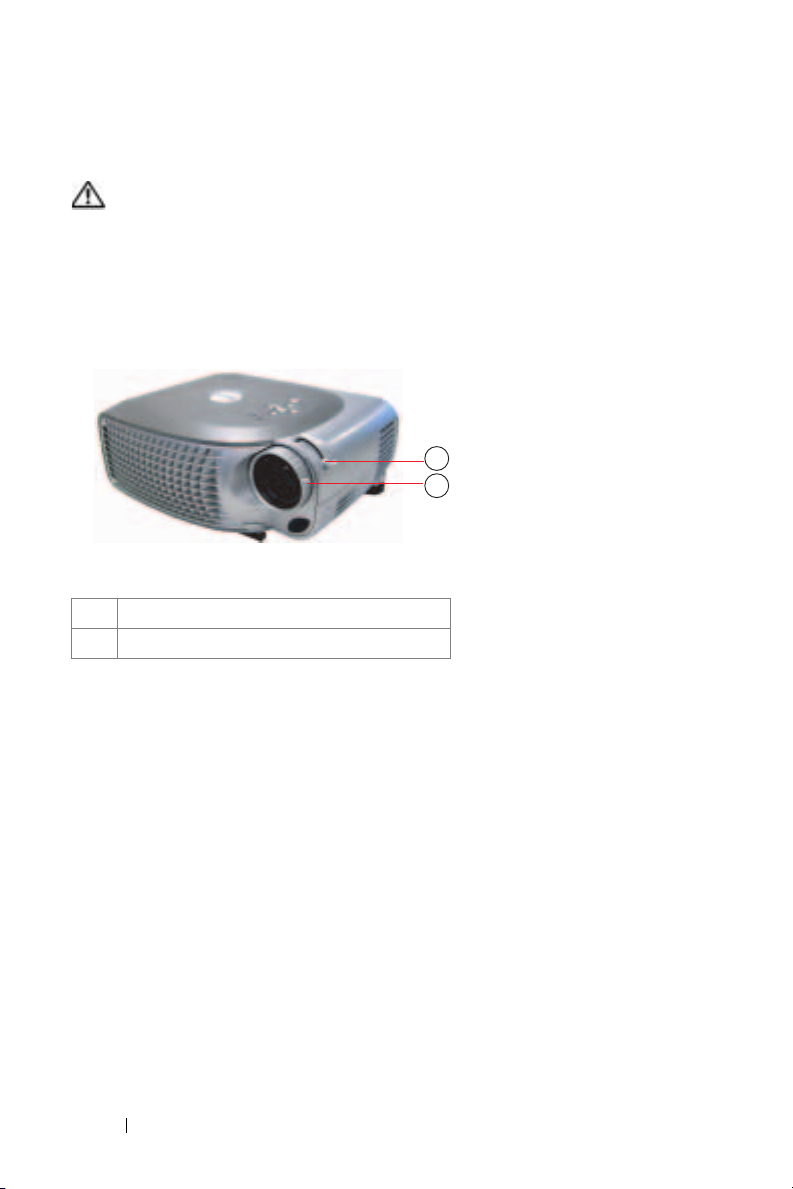
About Your Projector
1
1 Control panel
2 Zoom tab
3 Focus r ing
4 Lens
5 Remote control receiver
6 Elevator button
6 Your Dell™ Projector
2
3
4
5
6
Page 7
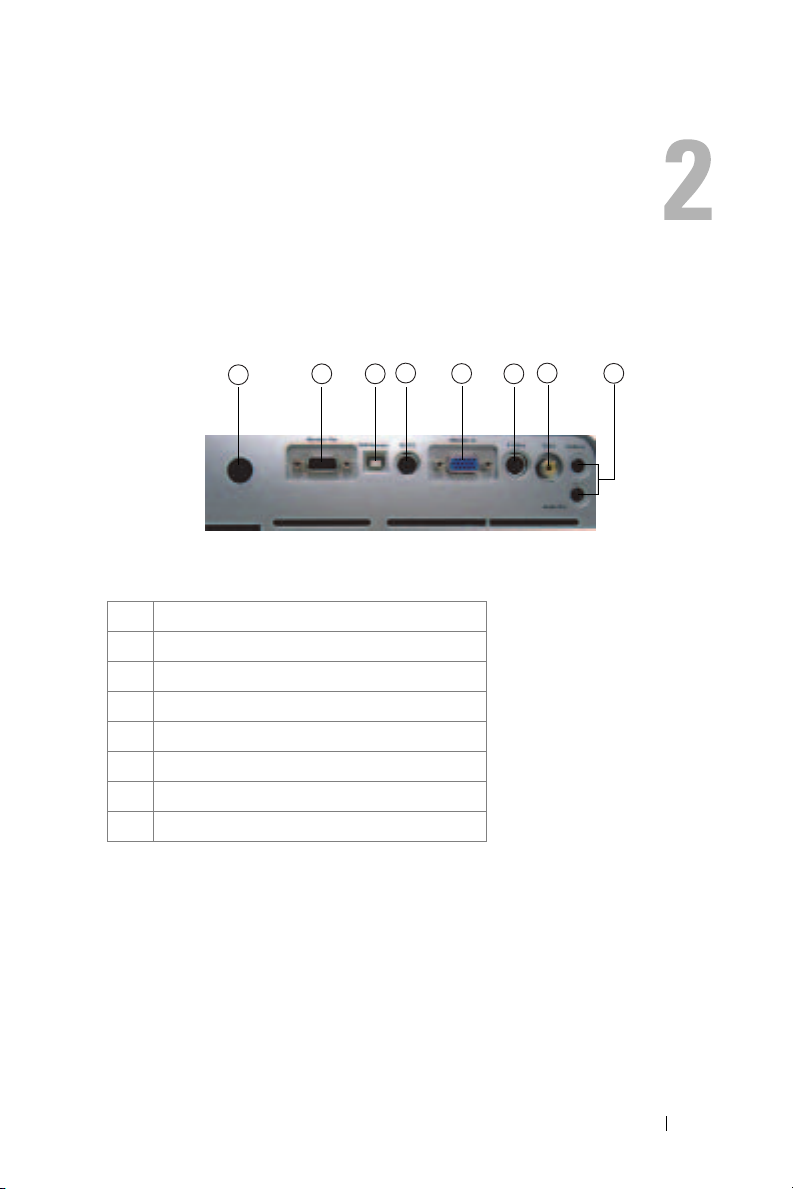
Connecting Your Projector
1
1 IR receiver
2 VGA out (monitor loop-through)
3 USB connector
4 RS232 connector
5 VGA in (D-sub) connector
6 S-video connector
7 Composite video connector
8 Audio input connector
2 3
4
5
7
6
8
Connecting Your Projector 7
Page 8

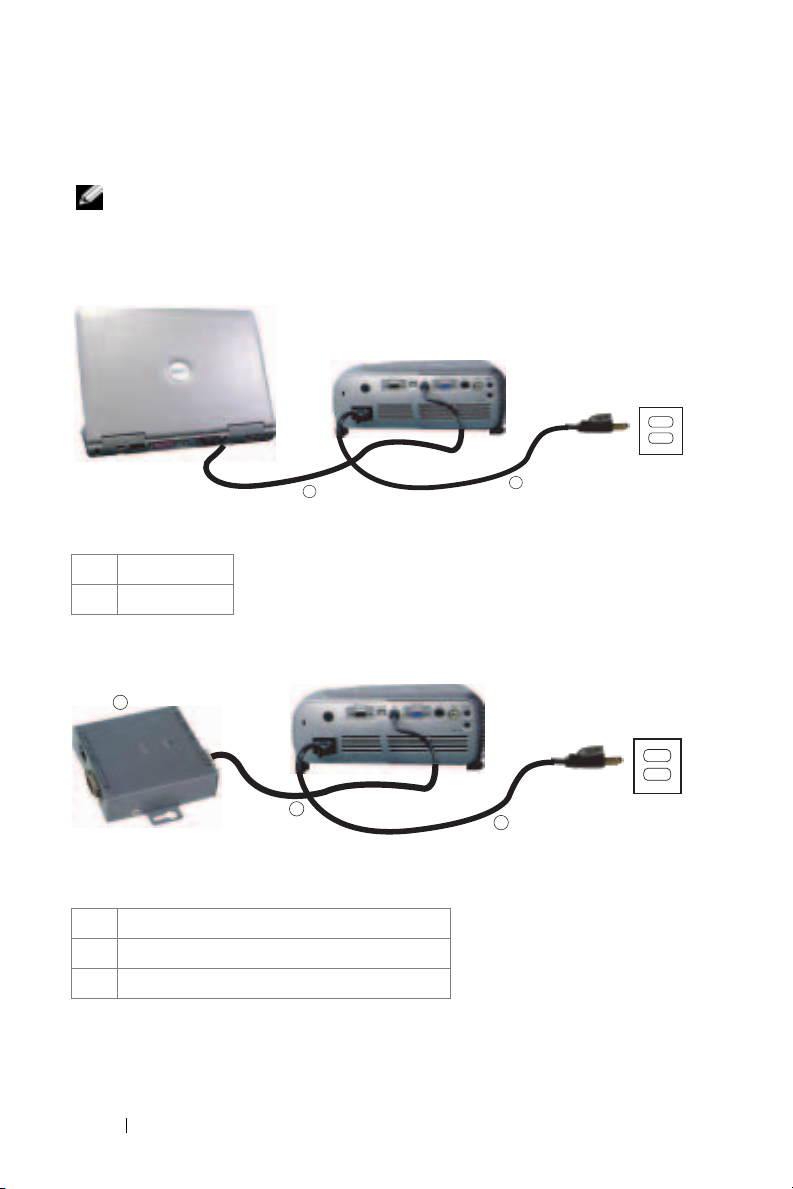
Connecting to a Computer
2
3
www.dell.com | support.dell.com
1 Power cord
2 VGA to VGA cable
3 USB to USB cable
NOTE: The USB cable must be connected if you want to use the Next Page and
Previous Page features on the remote control.
1
Connecting a DVD Player, Set Top Box, VCR, or TV
Connecting With a Component Cable
2
1 Power cord
2 D-sub to HDTV/Component cable
8 Connecting Your Projector
1
Page 9
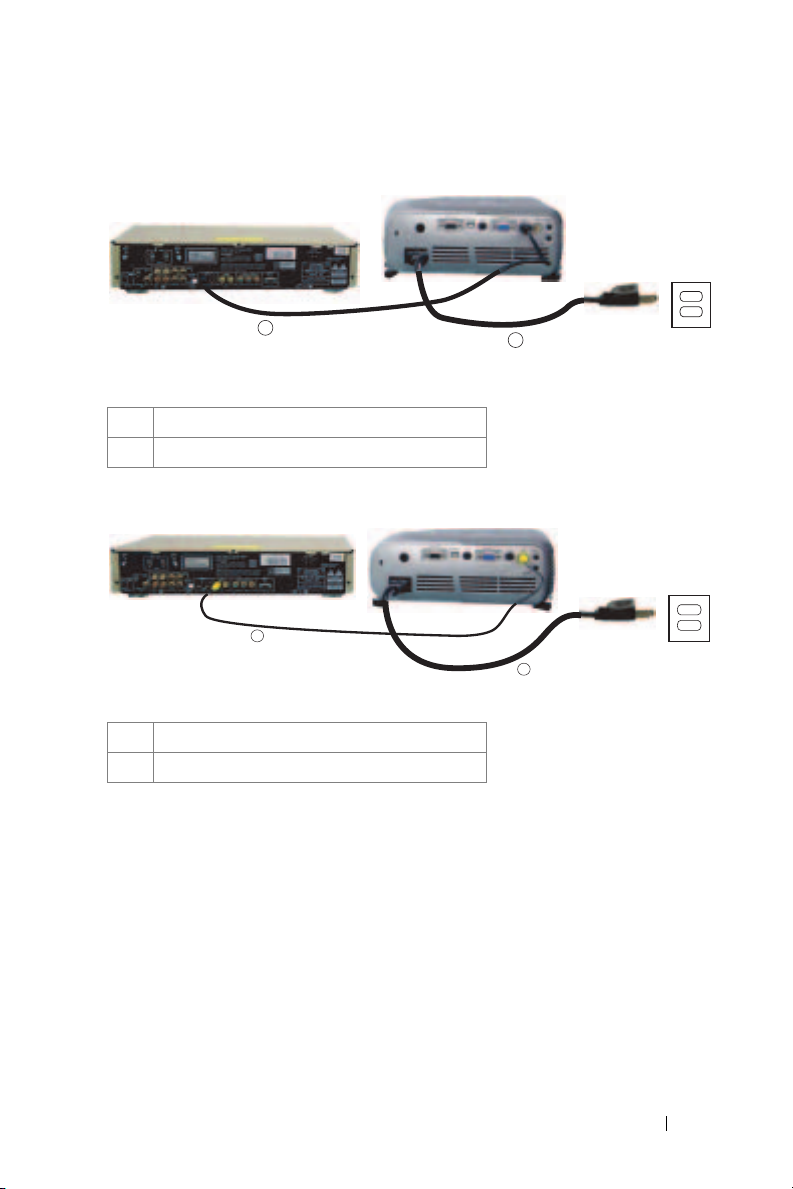
Connecting With an S-Video Cable
2
1 Power cord
2 S-video cable
Connecting With a Composite Cable
2
1 Power cord
2 Composite video cable
1
1
Connecting Your Projector 9
Page 10
Connecting to a Wired RS232 Remote Control
NOTE: The RS232 cable is not provided by Dell. Consult a professional installer
for the cable and RS232 remote control software.
Connecting to a Computer
www.dell.com | support.dell.com
2
1 Power cord
2 RS232 cable
Connecting to a Commercial RS232 Control Box
3
2
1 Power cord
2 RS232 cable
3 Commercial RS232 control box
1
1
10 Connecting Your Projector
Page 11

Using Your Projector
Turning Your Projector On
NOTE: Turn on the projector before you turn on the source (computer,
notebook, DVD, etc.). The Power button light blinks green until pressed.
1
Remove the lens cap.
2
Connect the power cord and appropriate cables. For information about
connecting the projector, see "Connecting Your Projector" on page 7.
3
Press the Power button (see "About Your Projector" on page 6 to locate the Power
button). The Dell logo displays for 30 seconds.
4
Turn on your source (computer, DVD player, etc.). The projector automatically
detects your source.
NOTE: Allow the projector some time to search for the source.
If the "Searching..." message appears on the screen, ensure that the
appropriate cables are securely connected.
If you have multiple sources connected to the projector, press the Source button
on the remote control or control panel to select the desired source.
Turning Your Projector Off
NOTICE: Unplug the projector after properly shutting down as explained in the
following procedure.
1
Press the Power button twice. The cooling fan continues to operate for 90 seconds.
2
Disconnect the power cord from the electrical outlet and the projector.
NOTE: If you press the Power button while the projector is running, the
following message appears:
" Press Power button to Turn Off Projector.
Projector must cool down for 90 seconds before
unplugging or restarting." The message disappears in 5 seconds or
you can press any button on the control panel to erase it.
Using Your Projector 11
Page 12
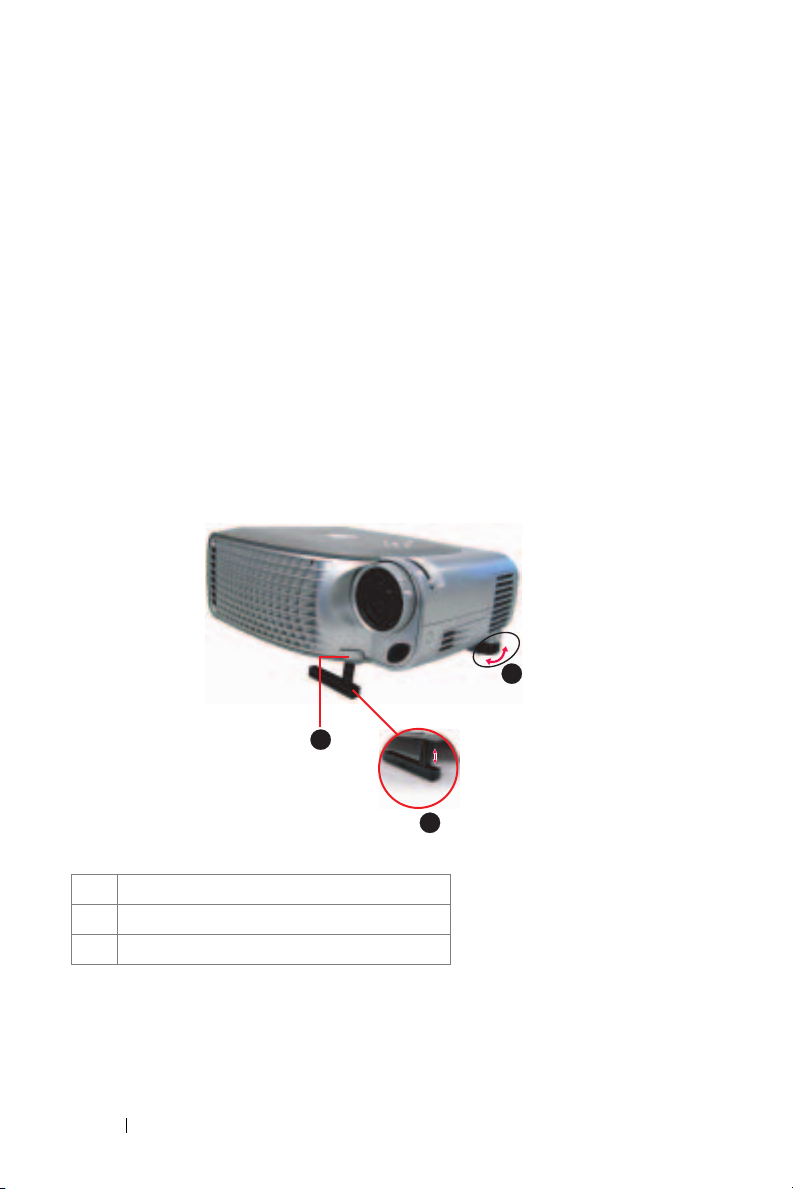
Adjusting the Projected Image
Raising the Projector Height
1
Press the elevator button.
2
Raise the projector to the desired display angle, and then release the button to
lock the elevator foot into position.
3
Use the tilt adjustment wheel to fine-tune the display angle; if necessary, press the
side elevator buttons to raise the rear side of the projector to the desired display
angle.
Lowering the Projector Height
1
Press the elevator button.
www.dell.com | support.dell.com
2
Lower the projector, and then release the button to lock the elevator foot into
position.
3
1
1 Elevator button
2 Elevator foot
3 Tilt adjustment wheel
12 Using Your Projector
2
Page 13
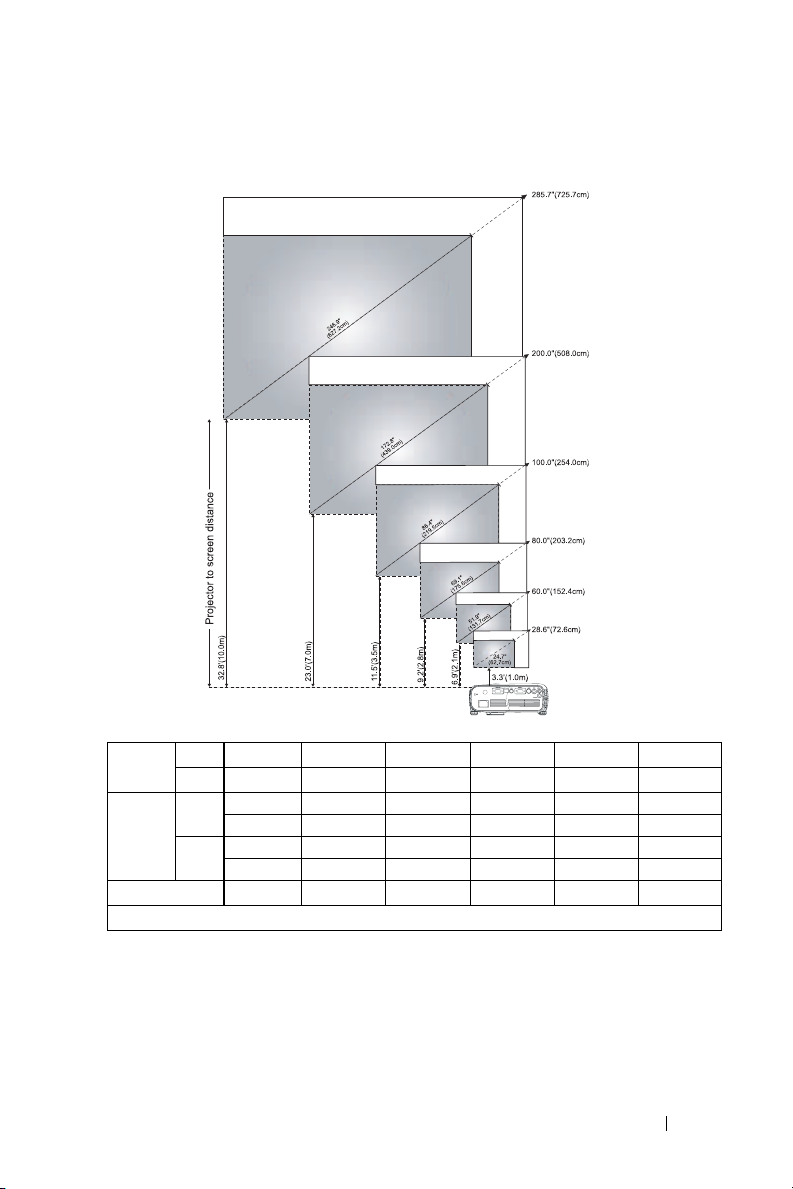
Adjusting Projection Image Size
Screen
(Diagonal)
Screen
size
Distance
*This graph is for user reference only.
28.6" (72.6cm) 60.0"(152.4cm) 80.0"(203.2cm) 100.0"(254.0cm) 200.0"(508.0cm) 285.7"(725.7cm)
Max.
24.7"(62.7cm) 51.9"(131.7cm) 69.1"(175.6cm) 86.4"(219.5cm) 172.8"(439.0cm) 246.9"(627.2cm)
Min.
22.9"x58.1" 48.0"x121.9" 64.0"x162.6" 80.0"x203.2" 160.0"x406.4" 228.6"x580.6"
Max.
(WxH)
17.1cmx43.5cm 36.0cmx91.4cm 48.0cmx121.9cm 60.0cmx152.4cm 120.0cmx304.8cm 171.4cmx435.4cm
19.8"x50.2" 41.5"x105.4" 55.3"x140.5" 69.1"x175.6" 138.3"x351.2" 197.5"x501.7"
Min.
(WxH)
14.8cmx37.6cm 31.1cmx79.0cm 41.5cmx105.4cm 51.9cmx131.7cm 103.7cmx263.4cm 148.1cmx376.3cm
3.3ft(1.0m) 6.9ft(2.1m) 9.2ft(2.8m) 11.5ft(3.5m) 23ft(7.0m) 32.8ft(10.0m)
Using Your Projector 13
Page 14
Adjusting the Projector Zoom and Focus
CAUTION: To avoid damaging the projector, ensure that the zoom lens and
elevator foot are fully retracted before moving the projector or placing the
projector in its carrying case.
1
Rotate the zoom tab to zoom in and out.
2
Rotate the focus ring until the image is clear. The projector focuses at distances
from 3.3ft to 32.8ft (1m to 10m).
www.dell.com | support.dell.com
1
2
1 Zoom tab
2 Focus r ing
3
Password Security
Protect your projector and restrict access to it with Password Security feature. This
security utility enables you to impose a variety of access restrictions to protect your
privacy and stop others from tampering with your projector. This means that the
projector cannot be used if it is taken without authorization, and thus serves as a
theft-prevention feature.
When Password Protect is enabled (On), a Password Protect screen requesting you
to enter a password will be displayed when the power plug is inserted into the
electrical outlet and the power for the projector is first turned on.
By default, this function is disabled. You can enable this feature using the Password
menu. Refer to section in this manual titled "Management Menu-Password" for
further details. This password security feature will be activated on the next time
you turn on the projector.
14 Using Your Projector
Page 15
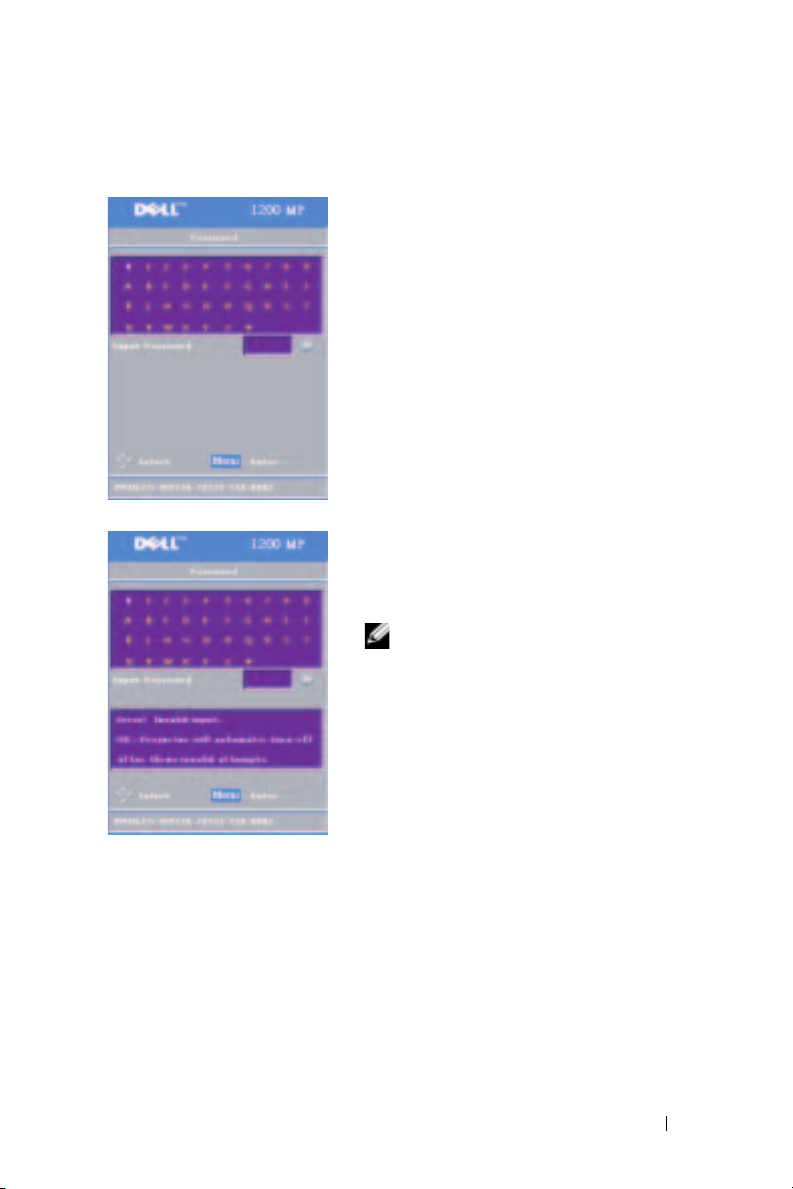
If you enable this feature, you will be asked to enter the projector's password after
you turn on the projector:
1
1st time password input request:
a
Use the directional keys to enter the
password.
b
Press the Menu button to confirm.
c
If the password verification is successful, you
may resume with accessing the projector's
functions and its utilities.
2
If you have entered incorrect password, you will
be given another 2 chances. After the three
invalid attempts, the projector will
automatically turn off.
NOTE: If you forget your password, contact
Dell. For more information see, "Contacting
Dell".
Using Your Projector 15
Page 16

Using the Control Panel
4
3
2
www.dell.com | support.dell.com
1
5
6
7
8
1 Power Turn the projector on and off. For more information,
see "Turning Your Projector On" on page 11 and
"Turning Your Projector Off" on page 11.
2 Source Press to toggle through Analog RGB, Composite,
Component-i, S-video, and Analog YPbPr sources when
multiple sources are connected to the projector.
3 Four Directional
Keys
4 TEMP warning light
The four directional keys can be used to
toggle through the tabs in the OSD.
• A solid orange TEMP light indicates that the projector
has overheated. The display automatically shuts
down. Turn the display on again after the projector
cools down. If the problem persists, contact Dell.
• A blinking orange Temp light indicates that a
projector fan has failed and the projector
automatically shuts down. If this problem persists,
contact Dell.
5 LAMP warning light
If the Lamp light is solid orange, replace the lamp.
6 Keystone adjustment If your image is not perpendicular to the screen, then it
does not appear square. Press to adjust image distortion
caused by tilting the projector. (±16 degrees)
7 Resync Press to synchronize the projector to the input source.
Resync does not operate if the on-screen display (OSD)
is displayed.
16 Using Your Projector
Page 17
8 Menu Press to activate the OSD. Use the directional keys and
the Menu button to navigate through the OSD.
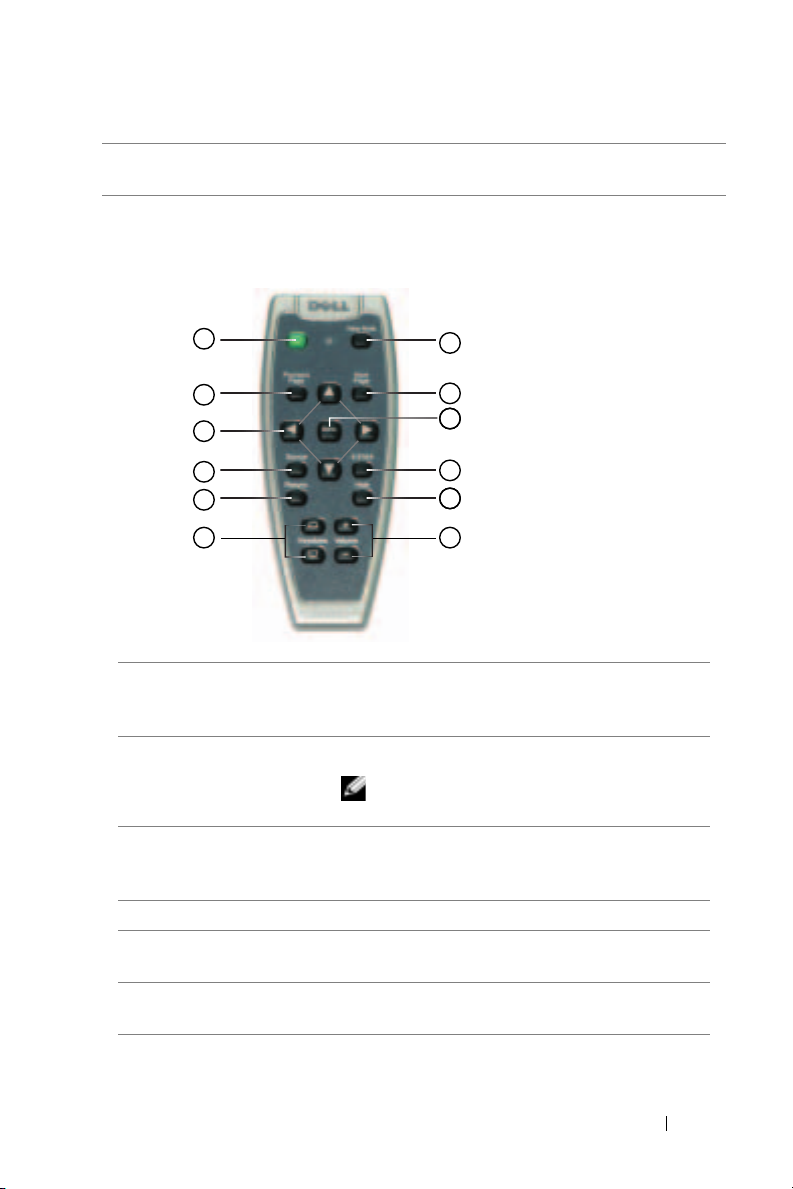
Using the Remote Control
12
11
10
9
8
1 Video Mode Press once to show the current display mode.
Press the button again to toggle between PC,
Movie, sRGB, or User mode.
2 Next Page Press to move to the next page.
NOTE: The USB cable must be connected to
use this function.
3 Menu Press to activate the on-screen display (OSD).
Use the directional keys and the Menu button to
navigate through the OSD.
4 4:3/16:9 Press to switch the aspect ratio: 1:1, 16:9, 4:3.
5 Hide button Press to hide the image, press again to display the
image.
6 Volume +/- Press to increase (+) or decrease (-) the volume
or toggle through the OSD tabs.
1
2
3
4
5
67
Using Your Projector 17
Page 18

7 Keystone adjustment If your image is not perpendicular to the screen,
then it does not appear square. Press to adjust
image distortion caused by tilting the projector
(±16 degrees).
8 Resync Press to synchronize the projector to the input
source. Resync does not operate if the OSD is
displayed.
9 Source Press to toggle through Analog RGB, Composite,
Component-i, S-video, and Analog YPbPr sources
when multiple sources are connected to the
projector.
10 Directional keys Use the or button to select OSD items, use
www.dell.com | support.dell.com
11 Previous Page Press to go to the previous page.
12 Power Turn the projector on and off. For more
the or button to make adjustments.
NOTE: The USB cable must be connected to
use this function.
information, see "Turning Your Projector On" on
page 11 and "Turning Your Projector Off" on
page 11.
Using the On-Screen Display
The projector has a multi-language On-Screen Display (OSD) that can be
displayed with or without an input source present.
In the Main Menu, press the or button on the control panel or the or
button on the remote control navigate through the tabs. Press the button on
the control panel or the Menu button on the remote control to select a submenu.
In the submenus, press the or button on the control panel or the or
button on the remote control to make a selection. When an item is selected, the
color changes to dark gray. Use the or button on the control panel or the
or button on the remote control make adjustments to a setting.
To exit the OSD, go to the Exit tab and press the button on the control panel
or the Menu button on the remote control.
18 Using Your Projector
Page 19
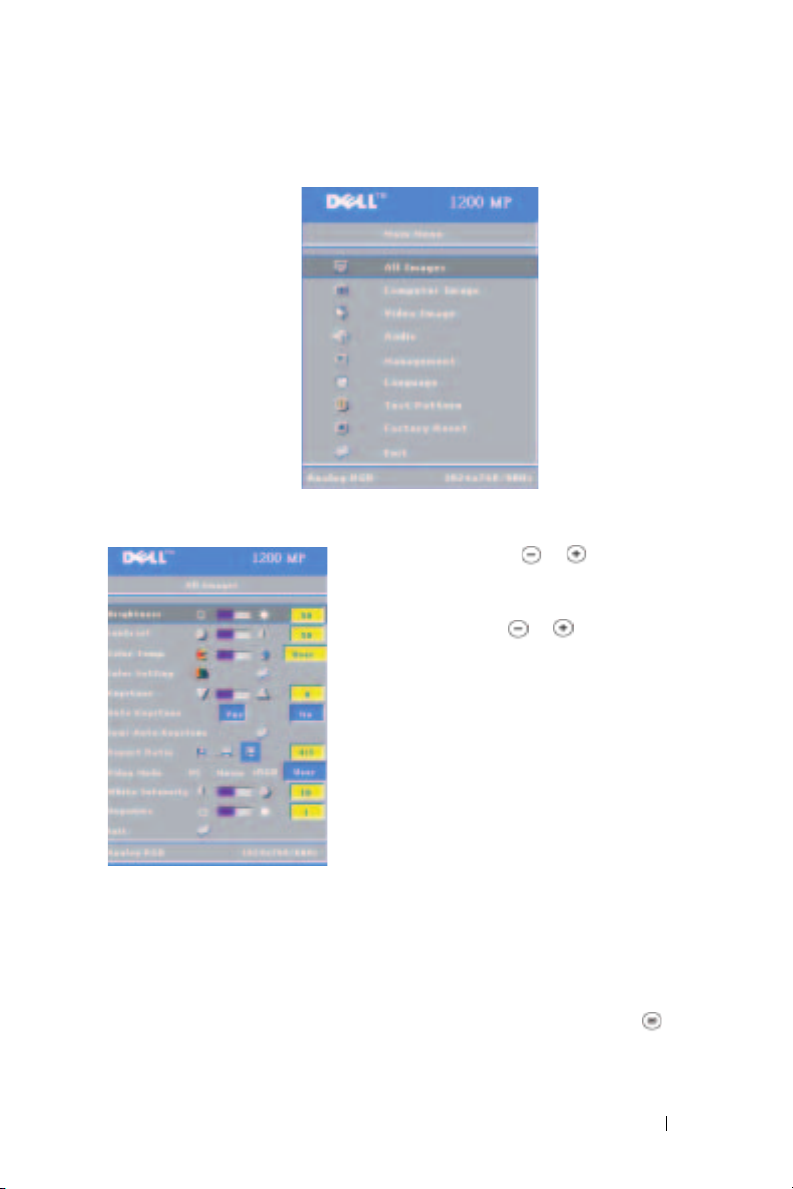
Main Menu
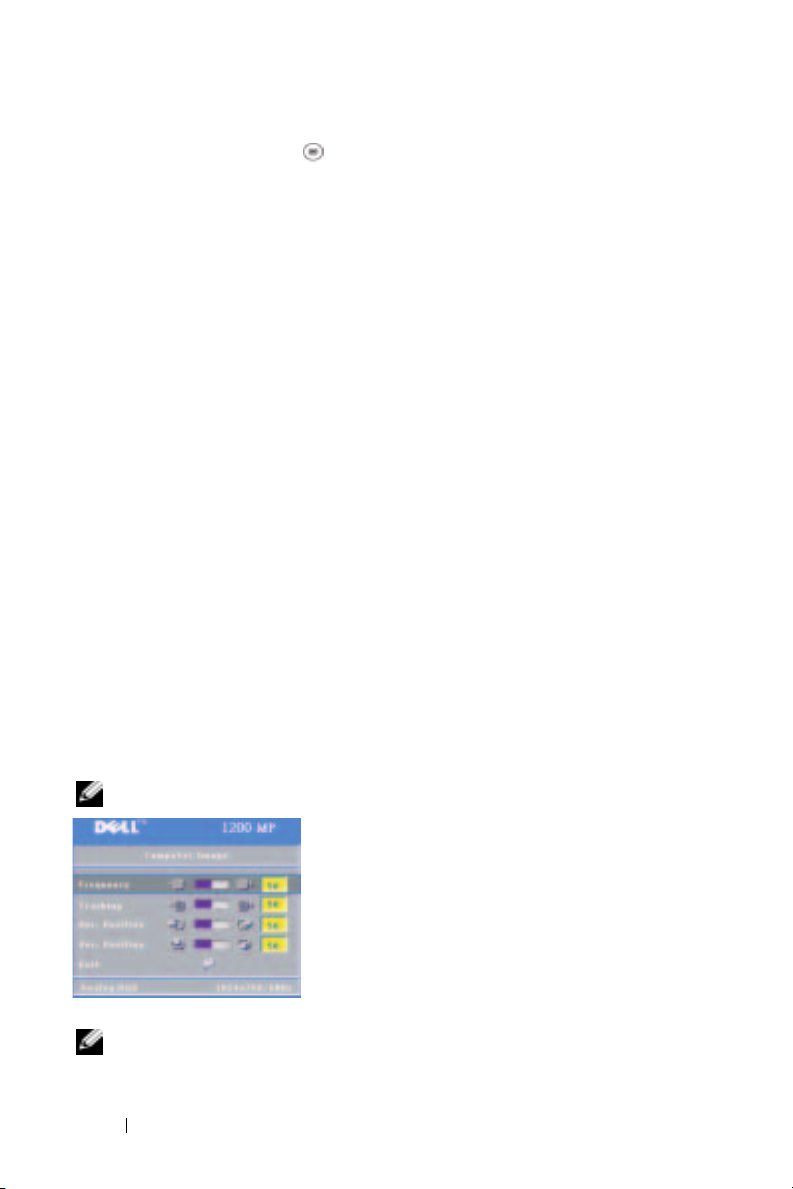
All Images Menu
BRIGHTNESS—Use the
control panel or the
control to
ONTRAST—Use the
C
adjust the brightness of the image.
control panel or the
control to adjust
between the brightest and darkest parts of the
picture. Adjusting the contrast changes the
amount of black and white in the image.
OLOR TEMP—Adjust the color temperature. The
C
screen appears more blue at higher
temperatures. The screen appears more red at
lower temperatures.
User mode activates the values in the color
setting menu.
OLOR SETTING—Manually adjust red, green, and blue color.
C
EYSTONE—Adjust the image distortion caused by tilting the projector (
K
degrees).
AUTO KEYSTONE—
Select
Ye s
to enable the auto correction for vertical image distortion
caused by tilting the projector. To manually adjust the keystone, press the button
on the control panel or the Menu button on the remote control.
or button on the
or
button on the remote
or button on the
or
button on the remote
the degree of difference
±16
Using Your Projector 19
Page 20
SEMI-AUTO KEYSTONE—
Press the
button on the control panel or the Menu button
on the remote control to activate the Semi-Auto Keystone correction for image
distortion.
ASPECT RATIO—Select an aspect ratio to adjust how the image appears.
• 1:1 — The input source displays without scaling.
Use 1:1 aspect ratio if you are using one of the following:
– VGA cable and the computer has a resolution less than XGA (1024 x 768)
– Component cable (576p/480i/480p)
–S-Video cable
– Composite cable
• 16:9 — The input source scales to fit the width of the screen.
• 4:3 — The input source scales to fit the screen.
www.dell.com | support.dell.com
Use 16:9 or 4:3 if you are using one of the following:
– Computer resolution greater than XGA
– Component cable (1080i or 720p)
VIDEO MODE—Select a mode to optimize the display image based on how the
projector is being used: Movie, PC, sRGB (provides more accurate color
representation), and User (set your preferred settings). If you adjust the settings
for White Intensity or Degamma, the projector automatically switches to User.
HITE INTENSITY—Select 0 to maximize the color reproduction and 10 to maximize
W
the brightness.
D
EGAMMA—Adjust between 1 and 6 to change the color performance of the display.
The default setting is 0.
Computer Image Menu
NOTE: This menu is only available when a computer is connected.
REQUENCY—Change the display data clock
F
frequency to match the frequency of your
computer graphics card. If you see a vertical
flickering bar, use Frequency control to minimize
the bars. This is a coarse adjustment.
RACKING—Synchronize the phase of the display
T
signal with the graphics card. If you experience
an unstable or flickering image, use Tracking to
correct it. This is a fine adjustment.
NOTE: Adjust Frequency first and then Tracking.
20 Using Your Projector
Page 21

HOR. POSITION—
remote control to adjust the horizontal position of the image to the left and press the
button on the control panel or the
horizontal position of the image to the right.
VER. POSITION—
remote control to adjust the vertical position of the image downward and press the
button on the control panel or the
vertical position of the image upward.
Press the button on the control panel or the button on the
button on the remote control to adjust the
Press the button on the control panel or the button on the
button on the remote control to adjust the
Video Image Menu
NOTE: This menu is only available when an S-video or composite video source
is connected.
S
ATURATION—Press the
panel or the
decrease the amount of color in the image and
press the
button on the remote control to increase the
amount of color in the image.
S
HARPNESS—
panel or the
decrease the sharpness and press the button on
the control panel or the
TINT—Press the button on the control panel or the
control to increase the amount of green in the image and press the
the control panel or the
red in the image.
button on the remote control to increase the sharpness.
button on the remote control to increase the amount of
button on the remote control to
button the control panel or the
Press the button on the control
button on the remote control to
button on the control
button on the remote
button on
Audio Menu
VOLUME—
panel or the - button on the remote control to
decrease the volume and press the
the control panel or the + button on the remote
control to increase the volume.
MUTE—Allows to mute the volume.
Press the button on the control
button on
Using Your Projector 21
Page 22

Management Menu
MENU LOCATION—Select the location of the OSD
on the screen.
P
ROJECTION MODE—Select how the image appears:
• Front Projection-Desktop (the default).
• Rear Projection-Desktop — The projector
reverses the image so you can project from behind
a translucent screen.
• Front Projection-Ceiling Mount — The
projector turns the image upside down for ceilingmounted projection.
www.dell.com | support.dell.com
AMP HOUR—Displays the operating hours since the last timer reset.
L
L
AMP RESET—After you install a new lamp, select Yes to reset the lamp timer.
OWER SAVING—Select Yes to set the power saving delay period. The delay period is
P
the amount of time you want the projector to wait without signal input. After that
set time, the projector enters power saving mode and turns off the lamp. The
projector turns back on when it detects an input signal or you press the Power
button. After two hours, the projector turns off and you need to press the Power
button to turn the projector on.
SD LOCK—Select On to enable the OSD Lock for hiding the OSD menu. To
O
display OSD menu, press the button on the control panel or the Menu button
on the remote control for 15 seconds.
UTO SOURCE—Select On (the default) to auto detect the available input signals.
A
When the projector is on and you press Source, it automatically finds the next
available input signal. Select Off to lock the current input signal. When Off is
selected and you press Source, you select which input signal you want to use.
CO MODE—Select On to use the projector at a lower power level (150 Watts),
E
which may provide longer lamp life, quieter operating, and dimmer luminance
output on the screen. Select Off to operate at normal power level (200 Watts).
SD TIMEOUT —Use this function to set the duration OSD menu stay active (at idle state).
O
• Rear Projection-Ceiling Mount — The
projector reverses and turns the image upside
down. You can project from behind a translucent
screen with a ceiling-mounted projection.
SIGNAL TYPE—Manually select the signal type
(RGB, YCbCr, or YPbPr).
22 Using Your Projector
Page 23

PASSWORD —Select On to enable you to impose a variety of access restrictions to
protect your privacy and stop others from tampering with your projector.
a
Press the button to select On.
Off
, the
• If this setting is set to
b
Set your password with the directional keys and press the Menu button to
Change Password
feature will be disabled.
confirm.
NOTE: To disable the Password setting, user
will be asked to enter the correct password.
If the password verification is successful,
only then the Password can be set to Off.
HANGE PASSWORD—Use this function to modify
C
the password to your preference.
a
Enter your current password with the
directional keys.
b
Set your new password.
c
Verify again your new password.
d
Press the Menu button to confirm.
NOTE: The current Password can only be
reset if the Password setting is set to Off.
Using Your Projector 23
Page 24
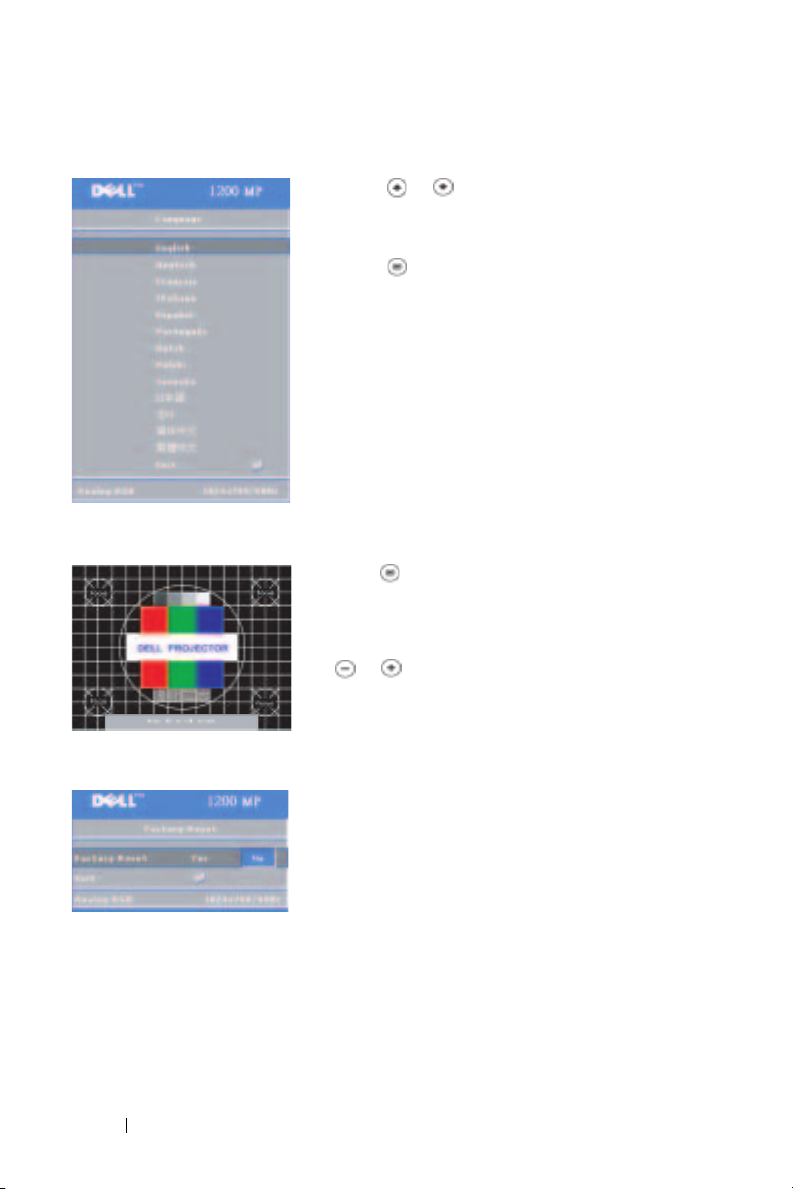
Language Menu
www.dell.com | support.dell.com
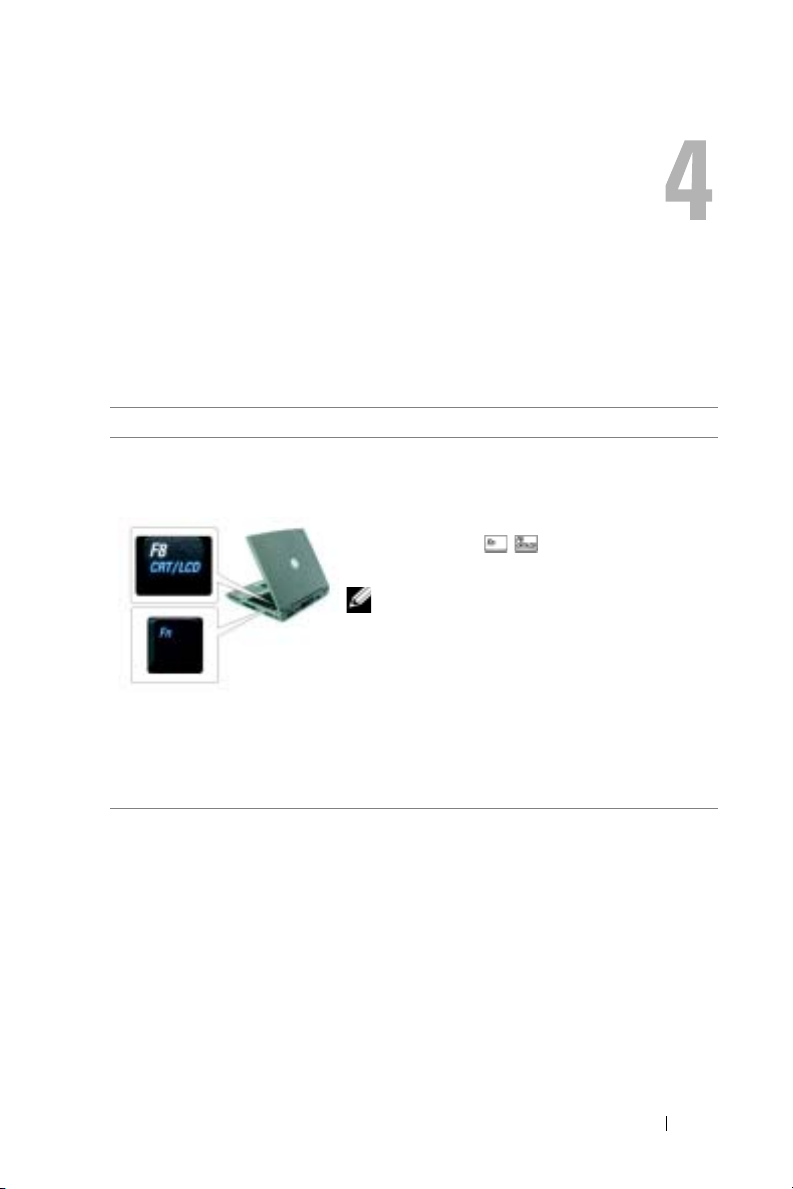
Test Pattern Menu
Press the or button on the control panel
or the
or
button on the remote control to
select the preferred language for the OSD.
Press the
on the control panel or the Menu
button on the remote control to confirm the
language selection.
Press the button on the control panel or the
Menu button on the remote control to display
the test pattern chart. Use this function to
adjust the focus of the projected screen. Use
the
or
button on the control panel or the
or
button on the remote control to exit
from this mode.
Factory Reset Menu
24 Using Your Projector
Select
Yes
to reset the projector to its factory
default settings. Reset items include both
computer image and video image settings.
Page 25
Troubleshooting Your Projector
If you experience problems with your projector, see the following troubleshooting
tips. If the problem persists, contact Dell. For more information see, "Contacting
Dell".
Problem Possible Solution
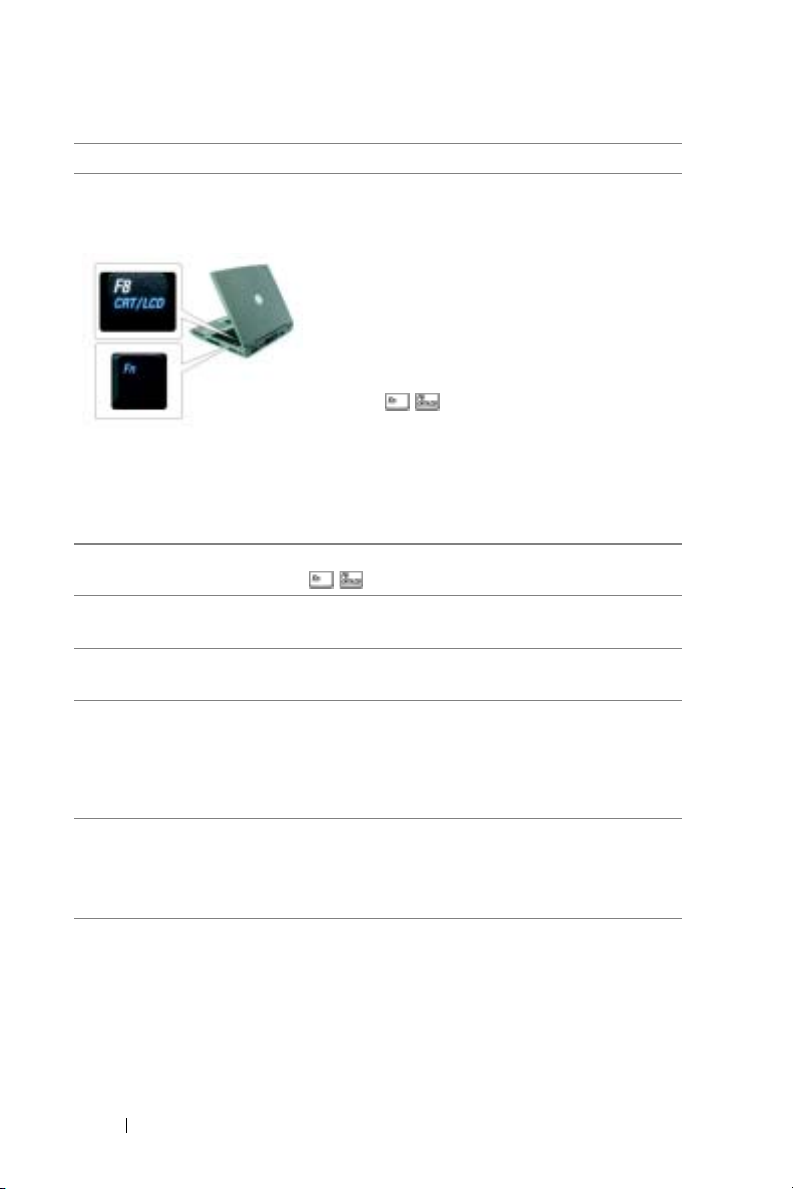
No image appears on the
screen
• Ensure that the lens cap is removed and the
projector is turned on.
• Ensure that the external graphics port is
enabled. If you are using a Dell portable
computer, press . For other computers,
see respective documentation.
NOTE: Allow the projector some time to
search for the source.
• Ensure that all the cables are securely
connected. See "Connecting Your Projector" on
page 7.
• Ensure that the pins of the connectors are not
bent or broken.
• Ensure that the lamp is securely installed (see
"Changing the Lamp" on page 28).
Troubleshooting Your Projector 25
Page 26
Problem (continued) Possible Solution (continued)
Partial, scrolling, or
incorrectly displayed image
1
Press the
Resync
or the control panel.
2
If you are using a Dell portable computer, set the
resolution of the computer to XGA (1024 x 768):
a
Right-click the unused portion of your
Windows desktop, click
Settings
select
b
Verify the setting is 1024 x 768 pixels for the
external monitor port.
c
Press .
www.dell.com | support.dell.com
If you experience difficulty in changing
resolutions or your monitor freezes, restart all the
equipment and the projector.
If you are not using a Dell portable, see related
documentation.
The screen does not display
your presentation
Image is unstable or
flickering
Image has vertical
flickering bar
Image color is not correct
If you are using a Dell portable computer, press
.
Adjust the tracking in the OSD Computer Image
tab.
Adjust the frequency in the OSD Computer
Image tab.
• If your graphic card output signal appears green,
and you would like to display VGA at 60Hz
signal, please go into the OSD select
Management, select Signal Type, and then select
RGB.
Image is out of focus 1
Adjust the focus ring on the projector lens.
2
Ensure that the projection screen is within the
required distance from the projector (3.3ft [1m]
to 32.8ft [10m]).
button on the remote control
Properties
and then
tab.
26 Troubleshooting Your Projector
Page 27

Problem (continued) Possible Solution (continued)
The image is stretched
when displaying a 16:9
DVD
The projector automatically detects 16:9 DVD
and adjusts the aspect ratio to full screen with a
4:3 (letter-box) default setting. If the image is still
stretched, adjust the aspect ratio as follows:
• If you are playing a 16:9 DVD, select 4:3 aspect
ratio type on your DVD player (if capable).
• If you cannot select 4:3 aspect ratio type on your
DVD player, select 4:3 aspect ratio in the
menu in the OSD.
Images
All
Image is reversed Select Management from the OSD and adjust the
projection mode.
Lamp is burned out or
makes a popping sound
When the lamp reaches its end of life, it may burn
out and may make a loud popping sound. If this
occurs, the projector does not turn back on, and
displays Lamp Defective in the LCD display
until the lamp is replaced. To replace the lamp,
see "Changing the Lamp" on page 28.
The remote control is not
operating smoothly or in
The battery may be low. If so, replace it with 2
new AAA batteries.
very limited range
OSD display window does
not appear on the screen
after pressing the Menu
button on the remote
control or on the control
panel
Try the following procedures:
1 Press the Menu button on the remote control
or on the control panel for 15 seconds until
OSD pops up.
2 Select Management from the OSD.
3 Set OSD Lock to "Off".
LAMP & TEMP indicator information
LAMP light is solid orange If the Lamp light is solid orange, replace the lamp.
TEMP light is solid orange The projector has overheated. The display
automatically shuts down. Turn the display on
again after the projector cools down. If the
problem persists, contact Dell.
TEMP light is blinking
orange
A projector fan has failed and the projector
automatically shuts down. If this problem persists,
contact Dell.
Troubleshooting Your Projector 27
Page 28
Changing the Lamp
Replace the lamp when the message "Lamp is approaching the end of its useful life
in full power operation. Replacement suggested!" appears on the screen. If this
problem persists after replacing the lamp, contact Dell. For more information see,
"Contacting Dell".
CAUTION: The lamp becomes very hot when in use. Do not attempt to replace
the lamp until the projector has been allowed to cool down for at least
30 minutes.
1
Turn off the projector and disconnect the power cord.
2
Let the projector cool for at least 30 minutes.
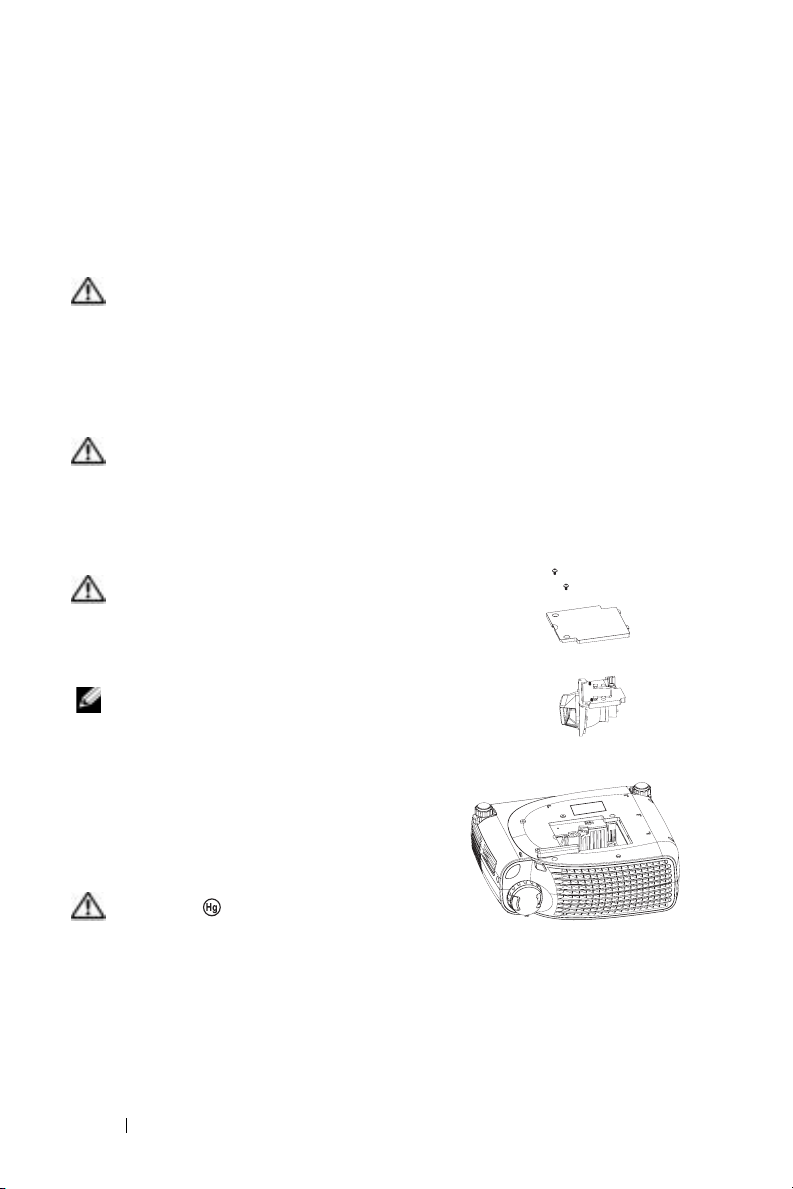
3
Loosen the 2 screws that secure the lamp cover, and remove the cover.
www.dell.com | support.dell.com
CAUTION: If the lamp has shattered, be careful as the broken pieces are
sharp and can cause injury. Remove all broken pieces from the projector and
dispose or recycle according to state, local or federal law. Go to
www.dell.com/hg for addtitional information.
4
Loosen the 2 screws that secure the lamp.
CAUTION: Do not touch the bulb or the
lamp glass at any time. Projector lamps are
very fragile and may shatter if touched.
5
Pull up the lamp by its metal handle.
NOTE: Dell may require that lamps replaced
under warranty be returned to Dell.
6
Replace with the new lamp.
7
Tighten the 2 screws that secure the lamp.
8
Place the lamp cover and tighten the 2 screws.
9
Reset the lamp usage time by selecting Yes for
Lamp Reset
(Refer to Management Menu in Owner's Manual)
icon in the OSD Management tab.
CAUTION: LAMP(S) INSIDE THIS
PRODUCT CONTAIN MERCURY AND MUST
BE RECYCLED OR DISPOSED OF
ACCORDING TO LOCAL, STATE OR FEDERAL
LAWS. FOR MORE INFORMATION, GO TO WWW.DELL.COM/HG OR CONTACT
THE ELECTRONIC INDUSTRIES ALLIANCE AT WWW.EIAE.ORG. FOR LAMP
SPECIFIC DISPOSAL INFORMATION CHECK WWW.LAMPRECYCLE.ORG.
28 Troubleshooting Your Projector
Page 29

Specifications
5
Light Valve Single-chip DLP™ DDR
(double data rate) technology
Brightness 2000 ANSI Lumens (Max)
Contrast Ratio 2100:1 Typical (Full On/Full Off)
Uniformity 80% Typical (Japan Standard - JBMA)
Lamp 200-watt user-replaceable UHP 2500-
hour lamp(up to 3000 hours in
eco mode)
Number of Pixels 800 x 600 (SVGA)
Displayable Color 16.7M colors
Color Wheel Speed 100~127.5Hz (2X)
Projection Lens F/2.4-2.58, f=19~21.9mm with 1.15x
manual zoom lens
Projection Screen Size 28.57-285.7 inches (diagonal)
Projection Distance 3.3~32.8 ft (1m~10m)
Video Compatibility NTSC, NTSC 4.43, PAL, PAL-M, PAL-
N, SECAM, and HDTV (1080i, 720P,
576i/P, 480i/P) compatibility
Composite video, Component video
and S-video capability
H. Frequency 31kHz-79kHz (Analog)
V. Frequency 50Hz-85Hz (Analog)
Power Supply Universal 100-240V AC 50-60Hz with
PFC input
Power Consumption 250 Watts full power (typical),
200 Watts in eco mode
Specifications 29
Page 30

Audio 1 speaker, 2 Watts RMS
Noise Level 36dB(A) Full-on mode,
33dB(A) Eco-mode
Weight 2.24kg (4.94 lbs)
Dimensions (W x H x D) External 9.9 x 3.96 x 8.4 ± 0.04 inches
(251 x 101 x 213 ± 1mm)
o
Environmental Operating temperature: 5
(41
o
F–95oF)
C–35oC
Humidity: 80% maximum
o
C to 60oC
www.dell.com | support.dell.com
Storage temperature: –20
o
F to 140oF)
(–4
Humidity: 80% maximum
Regulatory FCC, CE, VCCI, UL, cUL,
Nemko-GS, ICES-003, MIC, C-Tick,
GOST, CCC, PSB, NOM, IRAM,
SABS
I/O Connectors Power: AC power input socket
Computer input: one D-sub for
analog/component, HDTV input
signals
30 Specifications
Computer output: one 15-pin D-sub
Video input: one composite video RCA
and one S-video
USB input: one USB connector
Audio input: one phone jack (diameter
3.5mm)
One mini-DIN RS232 for wired remote
projector control from PC
Page 31

RS232 Pin Assignment
RS232 Protocol
• Communication Settings
Connection settings Value
Baud Rate: 19200
Data Bits: 8
Parity None
Stop Bits 1
• Control command Syntax (From PC to Projector)
[H][AC][SoP][CRC][ID][SoM][COMMAND]
• Example: power on the projector
Enter the following code: 0xBE 0xEF 0x10 0x05 0x00 0xC6 0xFF 0x11
0x11 0x01 0x00 0x01
NOTE: Send least significant bytes first.
Specifications 31
Page 32

• Control Commands List
Control
Commands
List
Address
Code
(BYTE)
Size of the
Payload
(WORD)
CRC16 for
the entire
packet
(WORD)
MsG ID
(WORD)
MsG size
(WORD)
Command
code
(BYTE)
Command Description
0xefbe 0x10 0x0005 0xffc6 0x1111 0x0001 0x01 Power on
0xbfc7 0x02 Menu
0x7e07 0x03 Up
0x3fc5 0x04 Down
0xfe05 0x05 Left
0xbe04 0x06 Right
0x7fc4 0x07 Resync
www.dell.com | support.dell.com
0x3fc0 0x08 Source
0xfe00 0x09 Volume+
0xbe01 0x0a Volume-
0xffc3 0x0d Mute
0x7e02 0x0f Hide
0x3fca 0x10 Video Mode
0x7fcb 0x13 V. Keystone Up
0x3e09 0x14 V. Keystone Down
0x7e08 0x17 Aspect ratio
0x3e0c 0x18 Power OFF
0xffcc 0x19 Source-VGA
0xbfcd 0x1a Source-VGA YPbPr
0x7e0d 0x1b Source-VGA YCbCr
0xbe1f 0x22 Source-S-Video
0x7fdf 0x23 Source-Composite
0xbfd9 0x2a ECO Mode ON
0x7e19 0x2b ECO Mode OFF
0x3fdb 0x2c Auto Source ON
0xfe1b 0x2d Auto Source OFF
0xbe1a 0x2e Factory Reset
0x7fda 0x2f Lamp Hour
0x3e12 0x30 Firmware Version
0x7e46 0xff System Status
(4:3/16:9)
(480p/576p/720p/
1080i)
(480i/576i)
32 Specifications
Page 33

Compatibility Modes
Mode Resolution (ANALOG)
V. Frequency (Hz) H. Frequency (KHz)
VGA 640x350 70 31.5
VGA 640x350 85 37.9
VGA 640x400 85 37.9
VGA 640x480 60 31.5
VGA 640x480 72 37.9
VGA 640x480 75 37.5
VGA 640x480 85 43.3
VGA 720x400 70 31.5
VGA 720x400 85 37.9
SVGA 800x600 56 35.2
SVGA 800x600 60 37.9
SVGA 800x600 72 48.1
SVGA 800x600 75 46.9
SVGA 800x600 85 53.7
XGA 1024x768 43.4 35.5
XGA 1024x768 60 48.4
XGA 1024x768 70 56.5
XGA 1024x768 75 60.0
XGA 1024x768 85 68.7
SXGA 1280x1024 60 63.98
SXGA+ 1400x1050 60 63.98
MAC LC13" 640x480 66.66 34.98
MAC II 13" 640x480 66.68 35
MAC 16" 832x624 74.55 49.725
MAC 19" 1024x768 75 60.24
MAC 1152x870 75.06 68.68
MAC G4 640x480 60 31.35
MAC G4 640x480 120 68.03
IMac DV 640x480 117 60
IMac DV 800x600 95 60
IMac DV 1024x768 75 60
IMac DV 1152x870 75 68.49
IMac DV 1280x960 75 75
Specifications 33
Page 34

www.dell.com | support.dell.com
34 Specifications
Page 35

Contacting Dell
To contact Dell electronically, you can access the following websites:
• www.dell.com
• support.dell.com (support)
For specific web addresses for your country, find the appropriate country
section in the table below.
NOTE: Toll-free numbers are for use within the country for which they are
listed.
NOTE: In certain countries, support specific to Dell XPS™ portable computers
is available at a separate telephone number listed for participating countries. If
you do not see a telephone number listed that is specific for XPS portable
computers, you may contact Dell through the support number listed and your
call will be routed appropriately.
When you need to contact Dell, use the electronic addresses, telephone
numbers, and codes provided in the following table. If you need assistance in
determining which codes to use, contact a local or an international operator.
Contacting Dell 35
Page 36

Country (City)
International Access Code
Country Code City Code
Anguilla General Support
Antigua and Barbuda General Support
Argentina (Buenos Aires)
International Access Code:
00
Country Code: 54
City Code: 11
www.dell.com | support.dell.com
Aruba General Support
Australia (Sydney)
International Access Code:
0011
Country Code: 61
City Code: 2
Austria (Vienna)
International Access Code:
900
Country Code: 43
City Code: 1
Department Name or Service Area,
Website and E-Mail Address
Website: www.dell.com.ar
E-mail: us_latin_services@dell.com
E-mail for desktop and portable
computers:
la-techsupport@dell.com
E-mail for servers and EMC
storage products:
la_enterprise@dell.com
Customer Care
Hardware and Warranty Support
Hardware And Warranty Support
Services
Sales
Website: support.ap.dell.com
E-mail:
support.ap.dell.com/contactus
General Support
Website: support.euro.dell.com
E-mail:
tech_support_central_europe@
dell.com
Home/Small Business Sales
Home/Small Business Fax
Home/Small Business Customer
Care
Preferred Accounts/Corporate
Customer Care
Support for XPS portable computers
only
Home/Small Business Support for
all other Dell computers
Preferred Accounts/Corporate
Support
Switchboard
Area Codes,
Local Numbers, and
Toll-Free Numbers
toll-free: 800-335-0031
1-800-805-5924
®
toll-free: 0-800-444-0730
toll-free: 0-800-444-0733
toll-free: 0-800-444-0724
0-810-444-3355
toll-free: 800-1578
13DELL-133355
0820 240 530 00
0820 240 530 49
0820 240 530 14
0820 240 530 16
0820 240 530 81
0820 240 530 14
0660 8779
0820 240 530 00
36 Contacting Dell
Page 37

Country (City)
International Access Code
Country Code City Code
Bahamas General Support
Barbados General Support
Belgium (Brussels)
International Access Code:
00
Country Code: 32
City Code: 2
Bermuda General Support
Bolivia General Support
Brazil
International Access Code:
00
Country Code: 55
City Code: 51
British Virgin Islands General Support
Brunei
Country Code: 673
Department Name or Service Area,
Website and E-Mail Address
Website: support.euro.dell.com
Hardware And Warranty Support for
XPS portable computers only
Hardware And Warranty Support for
all other Dell computers
Hardware And Warranty Support
Fax
Customer Care
Corporate Sales
Fax
Switchboard
Website: www.dell.com/br
Customer Support, Hardware and
Warranty Support
Hardware and Warranty Support
Fax
Customer Care Fax
Sales
Hardware and Warranty Support
(Penang, Malaysia)
Customer Care (Penang, Malaysia)
Transaction Sales (Penang,
Malaysia)
Area Codes,
Local Numbers, and
Toll-Free Numbers
toll-free: 1-866-278-6818
1-800-534-3066
024819296
024819288
024819295
027131565
024819100
024819299
024819100
1-800-342-0671
toll-free: 800-10-0238
0800 90 3355
51 481 5470
51 481 5480
0800 90 3390
toll-free: 1-866-278-6820
604 633 4966
604 633 4888
604 633 4955
Contacting Dell 37
Page 38

Country (City)
International Access Code
Country Code City Code
Canada (North York,
Ontario)
International Access Code:
011
www.dell.com | support.dell.com
Cayman Islands General Support
Chile (Santiago)
Country Code: 56
City Code: 2
Department Name or Service Area,
Website and E-Mail Address
Online Order Status:
www.dell.ca/ostatus
AutoTech (automated Hardware
and Warranty Support)
Customer Service (Home
Sales/Small Business)
Customer Service (med./large
business, government)
Customer Service (printers,
projectors, televisions, handhelds,
digital jukebox, and wireless)
Hardware Warranty Support (Home
Sales/Small Business)
Hardware Warranty Support
(med./large bus., government)
Hardware Warranty Support
(printers, projectors, televisions,
handhelds, digital jukebox, and
wireless)
Sales (Home Sales/Small Business)
Sales (med./large bus., government)
Spare Parts Sales & Extended
Service Sales
Sales and Customer Support
Area Codes,
Local Numbers, and
Toll-Free Numbers
toll-free: 1-800-247-9362
toll-free: 1-800-847-4096
toll-free: 1-800-326-9463
toll-free: 1-800-847-4096
toll-free: 1-800-906-3355
toll-free: 1-800-387-5757
1-877-335-5767
toll-free: 1-800-387-5752
toll-free: 1-800-387-5755
1 866 440 3355
1-800-805-7541
toll-free: 1230-020-4823
38 Contacting Dell
Page 39

Country (City)
International Access Code
Country Code City Code
China (Xiamen)
Country Code: 86
City Code: 592
Department Name or Service Area,
Website and E-Mail Address
Hardware and Warranty Support
website: support.dell.com.cn
Hardware and Warranty Support Email: cn_support@dell.com
Customer Care E-mail:
customer_cn@dell.com
Hardware and Warranty Support
Fax
Hardware and Warranty Support
(Dell™ Dimension™ and Inspiron)
Hardware and Warranty Support
(OptiPlex™, Latitude™, and Dell
Precision™)
Hardware and Warranty Support
(servers and storage)
Hardware and Warranty Support
(projectors, PDAs, switches, routers,
and so on)
Hardware and Warranty Support
(printers)
Customer Care
Customer Care Fax
Home and Small Business
Preferred Accounts Division
Large Corporate Accounts GCP
Large Corporate Accounts Key
Accounts
Large Corporate Accounts North
Large Corporate Accounts North
Government and Education
Large Corporate Accounts East
Large Corporate Accounts East
Government and Education
Large Corporate Accounts Queue
Te am
Large Corporate Accounts South
Large Corporate Accounts West
Large Corporate Accounts Spare
Parts
Area Codes,
Local Numbers, and
Toll-Free Numbers
592 818 1350
toll-free: 800 858 2968
toll-free: 800 858 0950
toll-free: 800 858 0960
toll-free: 800 858 2920
toll-free: 800 858 2311
toll-free: 800 858 2060
592 818 1308
toll-free: 800 858 2222
toll-free: 800 858 2557
toll-free: 800 858 2055
toll-free: 800 858 2628
toll-free: 800 858 2999
toll-free: 800 858 2955
toll-free: 800 858 2020
toll-free: 800 858 2669
toll-free: 800 858 2572
toll-free: 800 858 2355
toll-free: 800 858 2811
toll-free: 800 858 2621
Contacting Dell 39
Page 40

Country (City)
International Access Code
Country Code City Code
Colombia General Support
Costa Rica General Support
Czech Republic (Prague)
International Access Code:
00
Country Code: 420
Denmark (Copenhagen)
www.dell.com | support.dell.com
International Access Code:
00
Country Code: 45
Dominica General Support
Dominican Republic General Support
Ecuador General Support
El Salvador General Support
Department Name or Service Area,
Website and E-Mail Address
Website: support.euro.dell.com
E-mail: czech_dell@dell.com
Hardware and Warranty Support
Customer Care
Fax
Hardware and Warranty Fax
Switchboard
Website: support.euro.dell.com
Hardware and Warranty Support for
XPS portable computers only
Hardware and Warranty Support for
all other Dell computers
Customer Care (Relational)
Home/Small Business Customer
Care
Switchboard (Relational)
Switchboard Fax (Relational)
Switchboard (Home/Small
Business)
Switchboard Fax (Home/Small
Business)
Area Codes,
Local Numbers, and
Toll-Free Numbers
980-9-15-3978
0800-012-0435
22537 2727
22537 2707
22537 2714
22537 2728
22537 2711
7010 0074
7023 0182
7023 0184
3287 5505
3287 1200
3287 1201
3287 5000
3287 5001
toll-free: 1-866-278-6821
1-800-148-0530
toll-free: 999-119
01-899-753-0777
40 Contacting Dell
Page 41

Country (City)
International Access Code
Country Code City Code
Finland (Helsinki)
International Access Code:
990
Country Code: 358
City Code: 9
France (Paris)
(Montpellier)
International Access Code:
00
Country Code: 33
City Codes: (1) (4)
Department Name or Service Area,
Website and E-Mail Address
Website: support.euro.dell.com
Hardware and Warranty Support
Customer Care
Fax
Switchboard
Website: support.euro.dell.com
Home and Small Business
Hardware and Warranty Support for
XPS portable computers only
Hardware and Warranty Support for
all other Dell computers
Customer Care
Switchboard
Switchboard (calls from outside of
France)
Sales
Fax
Fax (calls from outside of France)
Corporate
Hardware and Warranty Support
Customer Care
Switchboard
Sales
Fax
Area Codes,
Local Numbers, and
Toll-Free Numbers
09 253 313 60
09 253 313 38
09 253 313 99
09 253 313 00
0825 387 129
0825 387 270
0825 823 833
0825 004 700
04 99 75 40 00
0825 004 700
0825 004 701
04 99 75 40 01
0825 004 719
0825 338 339
01 55 94 71 00
01 55 94 71 00
01 55 94 71 01
Contacting Dell 41
Page 42

Country (City)
International Access Code
Country Code City Code
Germany (Langen)
International Access Code:
00
Country Code: 49
City Code: 6103
www.dell.com | support.dell.com
Greece
International Access Code:
00
Country Code: 30
Grenada General Support
Guatemala General Support
Guyana General Support
Department Name or Service Area,
Website and E-Mail Address
Website: support.euro.dell.com
E-mail:
tech_support_central_europe@
dell.com
Hardware and Warranty Support for
XPS portable computers only
Hardware and Warranty Support for
all other Dell computers
Home/Small Business Customer
Care
Global Segment Customer Care
Preferred Accounts Customer Care
Large Accounts Customer Care
Public Accounts Customer Care
Switchboard
Website: support.euro.dell.com
Hardware and Warranty Support
Gold Service Hardware and
Warranty Support
Switchboard
Gold Service Switchboard
Sales
Fax
Area Codes,
Local Numbers, and
Toll-Free Numbers
06103 766-7222
06103 766-7200
0180-5-224400
06103 766-9570
06103 766-9420
06103 766-9560
06103 766-9555
06103 766-7000
00800-44 14 95 18
00800-44 14 00 83
2108129810
2108129811
2108129800
2108129812
toll-free: 1-866-540-3355
1-800-999-0136
toll-free: 1-877-270-4609
42 Contacting Dell
Page 43

Country (City)
International Access Code
Country Code City Code
Hong Kong
International Access Code:
001
Country Code: 852
India E-mail:
Department Name or Service Area,
Website and E-Mail Address
Website: support.ap.dell.com
Hardware and Warranty Support Email: apsupport@dell.com
Hardware and Warranty Support
(Dimension and Inspiron)
Hardware and Warranty Support
(OptiPlex, Latitude, and Dell
Precision)
Hardware and Warranty Support
(PowerApp™, PowerEdge™,
PowerConnect™, and PowerVault™)
Customer Care
Large Corporate Accounts
Global Customer Programs
Medium Business Division
Home and Small Business Division
india_support_desktop@dell.com
india_support_notebook@dell.com
india_support_Server@dell.com
Hardware And Warranty Support
Sales (Large Corporate Accounts)
Sales (Home and Small Business)
Area Codes,
Local Numbers, and
Toll-Free Numbers
2969 3188
2969 3191
2969 3196
3416 0910
3416 0907
3416 0908
3416 0912
2969 3105
1600338045
and 1600448046
1600 33 8044
1600 33 8046
Contacting Dell 43
Page 44

Country (City)
International Access Code
Country Code City Code
Ireland (Cherrywood)
International Access Code:
00
Country Code: 353
City Code: 1
www.dell.com | support.dell.com
Italy (Milan)
International Access Code:
00
Country Code: 39
City Code: 02
Department Name or Service Area,
Website and E-Mail Address
Website: support.euro.dell.com
E-mail:
dell_direct_support@dell.com
Hardware and Warranty Support for
XPS portable computers only
Hardware and Warranty Support for
all other Dell computers
U.K. Hardware and Warranty
Support (dial within U.K. only)
Home User Customer Care
Small Business Customer Care
U.K. Customer Care (dial within
U.K. only)
Corporate Customer Care
Corporate Customer Care (dial
within U.K. only)
Ireland Sales
U.K. Sales (dial within U.K. only)
Fax/Sales Fax
Switchboard
Website: support.euro.dell.com
Home and Small Business
Hardware and Warranty Support
Customer Care
Fax
Switchboard
Corporate
Hardware and Warranty Support
Customer Care
Fax
Switchboard
Area Codes,
Local Numbers, and
Toll-Free Numbers
1850 200 722
1850 543 543
0870 908 0800
01 204 4014
01 204 4014
0870 906 0010
1850 200 982
0870 907 4499
01 204 4444
0870 907 4000
01 204 0103
01 204 4444
02 577 826 90
02 696 821 14
02 696 821 13
02 696 821 12
02 577 826 90
02 577 825 55
02 575 035 30
02 577 821
44 Contacting Dell
Page 45

Country (City)
International Access Code
Country Code City Code
Jamaica General Support (dial from within
Japan (Kawasaki)
International Access Code:
001
Country Code: 81
City Code: 44
Department Name or Service Area,
Website and E-Mail Address
Jamaica only)
Website: support.jp.dell.com
Hardware And Warranty Support
(servers)
Hardware And Warranty Support
outside of Japan (servers)
Hardware And Warranty Support
(Dimension and Inspiron)
Hardware And Warranty Support
outside of Japan (Dimension and
Inspiron)
Hardware And Warranty Support
(Dell Precision, OptiPlex, and
Latitude)
Hardware And Warranty Support
outside of Japan (Dell Precision,
OptiPlex, and Latitude)
Hardware And Warranty Support
(PDAs, projectors, printers, routers)
Hardware And Warranty Support
outside of Japan (PDAs, projectors,
printers, routers)
Faxbox Service
24-Hour Automated Order Service
Customer Care
Business Sales Division (up to 400
employees)
Preferred Accounts Division Sales
(over 400 employees)
Large Corporate Accounts Sales
(over 3500 employees)
Public Sales (government agencies,
educational institutions, and
medical institutions)
Global Segment Japan
Individual User
Switchboard
Area Codes,
Local Numbers, and
Toll-Free Numbers
1-800-682-3639
toll-free: 0120-198-498
81-44-556-4162
toll-free: 0120-198-226
81-44-520-1435
toll-free:0120-198-433
81-44-556-3894
toll-free: 0120-981-690
81-44-556-3468
044-556-3490
044-556-3801
044-556-4240
044-556-1465
044-556-3433
044-556-3430
044-556-1469
044-556-3469
044-556-1760
044-556-4300
Contacting Dell 45
Page 46

Country (City)
International Access Code
Country Code City Code
Korea (Seoul)
International Access Code:
001
Country Code: 82
City Code: 2
Latin America Customer Hardware and Warranty
www.dell.com | support.dell.com
Luxembourg
International Access Code:
00
Country Code: 352
Macao
Country Code: 853
Department Name or Service Area,
Website and E-Mail Address
E-mail: krsupport@dell.com
Support
Support (Dimension, PDA,
Electronics and Accessories)
Sales
Fax
Switchboard
Support (Austin, Texas, U.S.A.)
Customer Service (Austin, Texas,
U.S.A.)
Fax (Hardware and Warranty
Support and Customer Service)
(Austin, Texas, U.S.A.)
Sales (Austin, Texas, U.S.A.)
SalesFax (Austin, Texas, U.S.A.)
Website: support.euro.dell.com
Support
Home/Small Business Sales
Corporate Sales
Customer Care
Fax
Hardware and Warranty Support
Customer Service (Xiamen, China)
Transaction Sales (Xiamen, China)
Area Codes,
Local Numbers, and
Toll-Free Numbers
toll-free: 080-200-3800
toll-free: 080-200-3801
toll-free: 080-200-3600
2194-6202
2194-6000
512 728-4093
512 728-3619
512 728-3883
512 728-4397
512 728-4600
or 512 728-3772
3420808075
+32(0)27131596
26 25 77 81
+32(0)24819119
26 25 77 82
toll-free: 0800 105
34 160 910
29 693 115
46 Contacting Dell
Page 47

Country (City)
International Access Code
Country Code City Code
Malaysia (Penang)
International Access Code:
00
Country Code: 60
City Code: 4
Mexico
International Access Code:
00
Country Code: 52
Montserrat General Support
Netherlands Antilles General Support
Department Name or Service Area,
Website and E-Mail Address
Website: support.ap.dell.com
Hardware And Warranty Support
(Dell Precision, OptiPlex, and
Latitude)
Hardware And Warranty Support
(Dimension, Inspiron, and
Electronics and Accessories)
Hardware And Warranty Support
(PowerApp, PowerEdge,
PowerConnect, and PowerVault)
Customer Care
Transaction Sales
Corporate Sales
Customer Hardware And Warranty
Support
Sales
Customer Service
Main
Area Codes,
Local Numbers, and
Toll-Free Numbers
toll-free: 1 800 880 193
toll-free: 1 800 881 306
toll-free: 1800 881 386
toll-free:
1800 881 306
(option 6)
toll-free: 1 800 888 202
toll-free: 1 800 888 213
001-877-384-8979
or 001-877-269-3383
50-81-8800
or 01-800-888-3355
001-877-384-8979
or 001-877-269-3383
50-81-8800
or 01-800-888-3355
toll-free: 1-866-278-6822
001-800-882-1519
Contacting Dell 47
Page 48

Country (City)
International Access Code
Country Code City Code
Netherlands (Amsterdam)
International Access Code:
00
Country Code: 31
City Code: 20
www.dell.com | support.dell.com
New Zealand
International Access Code:
00
Country Code: 64
Nicaragua General Support
Norway (Lysaker)
International Access Code:
00
Country Code: 47
Pan ama General Support
Per u General Support
Department Name or Service Area,
Website and E-Mail Address
Website: support.euro.dell.com
Hardware and Warranty Support for
XPS portable computers only
Hardware and Warranty Support for
all other Dell computers
Hardware and Warranty Support
Fax
Home/Small Business Customer
Care
Relational Customer Care
Home/Small Business Sales
Relational Sales
Home/Small Business Sales Fax
Relational Sales Fax
Switchboard
Switchboard Fax
Website: support.ap.dell.com
E-mail:
support.ap.dell.com/contactus
General Support
Website: support.euro.dell.com
Hardware and Warranty Support for
XPS portable computers only
Hardware and Warranty Support for
all other Dell products
Relational Customer Care
Home/Small Business Customer
Care
Switchboard
Fax Switchboard
Area Codes,
Local Numbers, and
Toll-Free Numbers
020 674 45 94
020 674 45 00
020 674 47 66
020 674 42 00
020 674 4325
020 674 55 00
020 674 50 00
020 674 47 75
020 674 47 50
020 674 50 00
020 674 47 50
0800 441 567
001-800-220-1006
815 35 043
671 16882
671 17575
23162298
671 16800
671 16865
001-800-507-0962
0800-50-669
48 Contacting Dell
Page 49

Country (City)
International Access Code
Country Code City Code
Poland (Warsaw)
International Access Code:
011
Country Code: 48
City Code: 22
Portugal
International Access Code:
00
Country Code: 351
Puerto Rico General Support
St. Kitts and Nevis General Support
St. Lucia General Support
St. Vincent and the
Grenadines
Singapore (Singapore)
International Access Code:
005
Country Code: 65
Department Name or Service Area,
Website and E-Mail Address
Website: support.euro.dell.com
E-mail: pl_support_tech@dell.com
Customer Service Phone
Customer Care
Sales
Customer Service Fax
Reception Desk Fax
Switchboard
Website: support.euro.dell.com
Hardware and Warranty Support
Customer Care
Sales
Fax
General Support
Website: support.ap.dell.com
Hardware and Warranty Support
(Dimension, Inspiron, and
Electronics and Accessories)
Hardware and Warranty Support
(OptiPlex, Latitude, and Dell
Precision)
Hardware and Warranty Support
(PowerApp, PowerEdge,
PowerConnect, and PowerVault)
Customer Care
Transaction Sales
Corporate Sales
Area Codes,
Local Numbers, and
Toll-Free Numbers
57 95 700
57 95 999
57 95 999
57 95 806
57 95 998
57 95 999
707200149
800 300 413
800 300 410 or
800 300 411 or
800 300 412 or
214220710
214240112
1-800-805-7545
toll-free: 1-877-441-4731
1-800-882-1521
toll-free: 1-877-270-4609
toll-free: 1800 394 7430
toll-free: 1800 394 7488
toll-free: 1800 394 7478
toll-free:
(option 6)
toll-free: 1 800 394 7412
toll-free: 1 800 394 7419
1 800 394 7430
Contacting Dell 49
Page 50

Country (City)
International Access Code
Country Code City Code
Slovakia (Prague)
International Access Code:
00
Country Code: 421
South Africa
(Johannesburg)
International Access Code:
www.dell.com | support.dell.com
09/091
Country Code: 27
City Code: 11
Southeast Asian and Pacific
Countries
Spain (Madrid)
International Access Code:
00
Country Code: 34
City Code: 91
Department Name or Service Area,
Website and E-Mail Address
Website: support.euro.dell.com
E-mail: czech_dell@dell.com
Hardware and Warranty Support
Customer Care
Fax
Tech Fax
Switchboard (Sales)
Website: support.euro.dell.com
E-mail: dell_za_support@dell.com
Gold Queue
Hardware and Warranty Support
Customer Care
Sales
Fax
Switchboard
Hardware and Warranty Support,
Customer Service, and Sales
(Penang, Malaysia)
Website: support.euro.dell.com
Home and Small Business
Hardware and Warranty Support
Customer Care
Sales
Switchboard
Fax
Corporate
Hardware and Warranty Support
Customer Care
Switchboard
Fax
Area Codes,
Local Numbers, and
Toll-Free Numbers
02 5441 5727
420 22537 2707
02 5441 8328
02 5441 8328
02 5441 7585
011 7097713
011 709 7710
011 709 7707
011 709 7700
011 706 0495
011 709 7700
604 633 4810
902 100 130
902 118 540
902 118 541
902 118 541
902 118 539
902 100 130
902 115 236
917229200
917229583
50 Contacting Dell
Page 51

Country (City)
International Access Code
Country Code City Code
Sweden (Upplands Vasby)
International Access Code:
00
Country Code: 46
City Code: 8
Switzerland (Geneva)
International Access Code:
00
Country Code: 41
City Code: 22
Department Name or Service Area,
Website and E-Mail Address
Website: support.euro.dell.com
Hardware and Warranty Support for
XPS portable computers only
Hardware and Warranty Support for
all other Dell products
Relational Customer Care
Home/Small Business Customer
Care
Employee Purchase Program (EPP)
Support
Hardware and Warranty Support
Fax
Sales
Website: support.euro.dell.com
E-mail:
Tech_support_central_Europe@dell
.com
Hardware and Warranty Support for
XPS portable computers only
Hardware and Warranty Support
(Home and Small Business) for all
other Dell products
Hardware and Warranty Support
(Corporate)
Customer Care (Home and Small
Business)
Customer Care (Corporate)
Fax
Switchboard
Area Codes,
Local Numbers, and
Toll-Free Numbers
0771 340 340
0859005199
0859005642
0858770527
201401444
0859005594
0859005185
0848 33 88 57
0844 811 411
0844 822 844
0848 802 202
0848 821 721
022 799 01 90
022 799 01 01
Contacting Dell 51
Page 52

Country (City)
International Access Code
Country Code City Code
Taiwan
International Access Code:
002
Country Code: 886
Department Name or Service Area,
Website and E-Mail Address
Website: support.ap.dell.com
E-mail: ap_support@dell.com
Hardware and Warranty Support
(OptiPlex, Latitude, Inspiron,
Dimension, and Electronics and
Accessories)
Hardware and Warranty Support
(PowerApp, PowerEdge,
PowerConnect, and PowerVault)
Customer Care
www.dell.com | support.dell.com
Transaction Sales
Corporate Sales
Thailand
International Access Code:
001
Country Code: 66
Trinidad/Tobago General Support
Turks and Caicos Islands General Support
Website: support.ap.dell.com
Hardware and Warranty Support
(OptiPlex, Latitude, and Dell
Precision)
Hardware and Warranty Support
(PowerApp, PowerEdge,
PowerConnect, and PowerVault)
Customer Care
Corporate Sales
Transaction Sales
Area Codes,
Local Numbers, and
Toll-Free Numbers
toll-free: 00801 86 1011
toll-free: 00801 60 1256
toll-free:
00801 60 1250
(option 5)
toll-free: 00801 65 1228
toll-free: 00801 651 227
toll-free: 1800 0060 07
toll-free: 1800 0600 09
toll-free:
1800 006 007
(option 7)
toll-free: 1800 006 009
toll-free: 1800 006 006
1-800-805-8035
toll-free: 1-866-540-3355
52 Contacting Dell
Page 53

Country (City)
International Access Code
Country Code City Code
U.K. (Bracknell)
International Access Code:
00
Country Code: 44
City Code: 1344
Uruguay General Support
Department Name or Service Area,
Website and E-Mail Address
Website: support.euro.dell.com
Customer Care website:
support.euro.dell.com/uk/en/ECare/Form/Home.asp
E-mail:
dell_direct_support@dell.com
Hardware and Warranty Support
(Corporate/Preferred Accounts/PAD
[1000+ employees])
Hardware and Warranty Support for
XPS portable computers only
Hardware and Warranty Support
(direct and general) for all other
products
Global Accounts Customer Care
Home and Small Business Customer
Care
Corporate Customer Care
Preferred Accounts (500–5000
employees) Customer Care
Central Government Customer
Care
Local Government & Education
Customer Care
Health Customer Care
Home and Small Business Sales
Corporate/Public Sector Sales
Home and Small Business Fax
Area Codes,
Local Numbers, and
Toll-Free Numbers
0870 908 0500
0870 366 4180
0870 908 0800
01344 373 186
0870 906 0010
01344 373 185
0870 906 0010
01344 373 193
01344 373 199
01344 373 194
0870 907 4000
01344 860 456
0870 907 4006
toll-free: 000-413-5982521
Contacting Dell 53
Page 54

Country (City)
International Access Code
Country Code City Code
U.S.A. (Austin, Texas)
International Access Code:
011
Country Code: 1
www.dell.com | support.dell.com
Department Name or Service Area,
Website and E-Mail Address
Automated Order-Status Service
AutoTech (portable and desktop
computers)
Hardware and Warranty Support
(Dell TV, Printers, and Projectors)
for Relationship customers
Consumer (Home and Home
Office) Support for all other Dell
products
Customer Service
Employee Purchase Program (EPP)
Customers
Financial Services website:
www.dellfinancialservices.com
Financial Services (lease/loans)
Financial Services (Dell Preferred
Accounts [DPA])
Business
Customer Service and Support
Employee Purchase Program (EPP)
Customers
Printers and Projectors Support
Public (government, education, and healthcare)
Customer Service and Support
Employee Purchase Program (EPP)
Customers
Dell Sales
Dell Outlet Store (Dell refurbished
computers)
Software and Peripherals Sales
Spare Parts Sales
Extended Service and Warranty
Sales
Fax
Dell Services for the Deaf, Hard-ofHearing, or Speech-Impaired
Area Codes,
Local Numbers, and
Toll-Free Numbers
toll-free: 1-800-433-9014
toll-free: 1-800-247-9362
toll-free 1-877-459-7298
toll-free: 1-800-624-9896
toll-free: 1-800-624-9897
toll-free: 1-800-695-8133
toll-free: 1-877-577-3355
toll-free: 1-800-283-2210
toll-free: 1-800-456-3355
toll-free: 1-800-695-8133
toll-free: 1-877-459-7298
toll-free: 1-800-456-3355
toll-free: 1-800-695-8133
toll-free: 1-800-289-3355
or toll-free: 1-800-8793355
toll-free: 1-888-798-7561
toll-free: 1-800-671-3355
toll-free: 1-800-357-3355
toll-free: 1-800-247-4618
toll-free: 1-800-727-8320
toll-free: 1-877-DELLTTY
(1-877-335-5889)
54 Contacting Dell
Page 55

Country (City)
International Access Code
Country Code City Code
U.S. Virgin Islands General Support
Venezuela General Support
Department Name or Service Area,
Website and E-Mail Address
Area Codes,
Local Numbers, and
Toll-Free Numbers
1-877-673-3355
8001-3605
Contacting Dell 55
Page 56

www.dell.com | support.dell.com
56 Contacting Dell
Page 57

Glossary
ANSI Lumens—A standard for measuring light output, used for comparing
projectors.
Aspect Ratio—The most popular aspect ratio is 4:3 (4 by 3). Early television and
computer video formats are in a 4:3 aspect ratio, which means that the width of
the image is 4/3 times the height.
Backlit (Backlight)—Refers to a remote control, or a projector control panel, that
has buttons and controls that are illuminated.
Bandwidth—The number of cycles per second (Hertz) expressing the difference
between the lower and upper limiting frequencies of a frequency band; also, the
width of a band of frequencies.
Brightness—The amount of light emitting from a display or projection display or
projection device. The brightness of projector is measured by ANSI lumens.
Color Temperature—A method of measuring the whiteness of a light source.
Metal halide lamps have a higher temperature compared to halogen or
incandescent lights.
Component Video—A method of delivering quality video in a format that
contains all the components of the original image. These components are referred
to as luma and chroma and are defined as Y'Pb'Pr' for analog component and
Y'Cb'Cr' for digital component. Component video is available on DVD players and
projectors.
Composite Video—The combined picture signal, including vertical and
horizontal blanking and synchronizing signals.
Compression—A function that deletes resolution lines from the image to fit in
the display area.
Compressed SVGA—To project an 800x600 image to a VGA projector, the
original 800x600 signal must be compressed down. The data displays all the
information with only two thirds of the pixels (307,000 vs 480,000). The resulting
image is SVGA page size but sacrifices some of the image quality. If you are using
an SVGA computers, connecting VGA to a VGA projector provide better results.
Compressed SXGA—Found on XGA projectors, compressed SXGA handling
allows these projectors to handle up to 1280x1024 SXGA resolution.
Compressed XGA—Found on SVGA projectors, compressed XGA handling allows
these projectors to handle 1024x768 XGA resolution.
Glossary 57
Page 58

Contrast Ratio—Range of light and dark values in a picture, or the ratio between
their maximum and minimum values. There are two methods used by the
projection industry to measure the ratio:
1
Full On/Off
— measures the ratio of the light output of an all white image
(full on) and the light output of an all black (full off) image.
2
ANSI
— measures a pattern of 16 alternating black and white rectangles. The
average light output from the white rectangles is divided by the average light
output of the black rectangles to determine the
ANSI
contrast ratio.
Full On/Off contrast is always a larger number than ANSI contrast for the same
projector.
dB—decibel—A unit used to express relative difference in power or intensity,
usually between two acoustic or electric signals, equal to ten times the common
www.dell.com | support.dell.com
logarithm of the ratio of the two levels.
Diagonal Screen—A method of measuring the size of a screen or a projected
image. It measures from one corner to the opposite corner. A 9ft high, 12ft wide,
screen has a diagonal of 15ft. This document assumes that the diagonal
dimensions are for the traditional 4:3 ratio of a computer image as per the example
above.
DLP—Digital Light Processing — Reflective display technology developed by
Texas Instruments, using small manipulated mirrors. Light passes through a color
filter is sent to the DLP mirrors which arrange the RGB colors into a picture
projected onto screen, also known as DMD.
DMD—DMD — Digital Micro-mirror Device — Each DMD consists of
thousands of tilting, microscopic aluminum alloy mirrors mounted on a hidden
yoke.
DVI—Digital Visual Interface — Defines the digital interface between digital
devices such as projectors and personal computers. For devices that support DVI,
a digital to digital connection can be made that eliminates the conversion to
analog and thereby delivers an unblemished image.
Focal Length—The distance from the surface of a lens to its focal point.
Frequency—It is the rate of repetition in cycles per seconds of electrical signals.
Measured in Hz.
Hz—Frequency of an alternating signal. See Frequency.
Keystone Correction—Device that will correct an image of the distortion(usually
a wide-top narrow-bottom effect) of a projected image caused by improper
projector to screen angle.
58 Glossary
Page 59

Laser Pointer—A small pen or cigar-sized pointer, that contains a small battery
powered laser, which can project a small, red (typically), high intensity beam of
light that is immediately very visible on the screen.
Maximum Distance—The distance from a screen the projector can be to cast an
image that is useable (bright enough) in a fully darkened room.
Maximum Image Size—The largest image a projector can throw in a darkened
room. This is usually limited by focal range of the optics.
Metal Halide Lamp—The type of lamp used in many medium and all high end
portable projectors. These lamps typically have a "half-life" of 1000-2000 hours.
That is they slowly lose intensity (brightness) as they are used, and at the "half-life"
point, they are half as bright as when new. These lamps output a very "hot"
temperature light, similar to mercury vapor lamps used in street lights. Their
whites are extremely white (with a slight bluish cast) and make a halogen lamp's
whites look very yellowish by comparison.
Minimum Distance—The closest position that a projector can focus an image
onto a screen.
NTSC—The United States broadcast standard for video and broadcasting.
PAL—A European and international broadcast standard for video and
broadcasting. Higher resolution than NTSC.
Power Zoom—A zoom lens with the zoom in and out controlled by a motor,
usually adjusted from the projector's control panel and also the remote control.
Reverse Image—Feature that allows you to flip the image horizontally. When
used in a normal forward projection environment text, graphics, etc, are
backwards. Reverse image is used for rear projection.
RGB—Red, Green, Blue — typically used to describe a monitor that requires
separate signals for each of the three colors.
S-Video—A video transmission standard that uses a 4 pin mini-DIN connector to
send video information on two signal wires called luminance (brightness, Y) and
chrominance (color, C). S-Video is also referred to as Y/C.
SECAM—A French and international broadcast standard for video and
broadcasting. Higher resolution than NTSC.
SVGA—Super Video Graphics Array — 800 x 600 pixels count.
SXGA—Super Ultra Graphics Array, — 1280 x 1024 pixels count.
UXGA—Ultra Extended Graphics Array — 1600 x 1200 pixels count.
Glossary 59
Page 60

VGA—Video Graphics Array — 640 x 480 pixels count.
XGA—Extra Video Graphics Array — 1024 x 768 pixels count.
Zoom Lens—Lens with a variable focal length that allows operator to move the
view in or out making the image smaller or larger.
Zoom Lens Ratio—Is the ratio between the smallest and largest image a lens can
projector from a fixed distance. For example, a 1.4:1 zoom lens ratio means that a
10-foot image without zoom would be a 14-foot image with full zoom.
www.dell.com | support.dell.com
60 Glossary
Page 61

Index
A
Adjusting Projection Image
Size, 28
Adjusting the Projected
Image, 12
Adjusting the Projector
Height, 12
lower the projector
Elevator button, 12
Elevator foot, 12
Tilt adjustment wheel, 12
Adjusting the Projector Zoom
and Focus, 14
Focus ring, 14
Zoom tab, 14
C
Changing the Lamp, 28
Connecting the Projector
Commercial RS232 control
box, 10
Composite video cable, 9
Connecting with component
cable, 8
Connecting with composite
cable, 9
Connection with Commercial
RS232 control box, 10
Connection with PC, 10
D-sub to D-sub cable, 8
D-sub to HDTV/Component
cable, 8
Installation for wired RS232
remote control, 10
Power cord, 8-10
Professional Installation
Options, 9
RS232 cable, 10
S-video cable, 9
To Computer, 8
USB to USB cable, 8
Connection Ports
Audio input connector, 7
Composite video connector, 7
IR Receiver, 7
RS232 connector, 7
S-video connector, 7
USB connector, 7
VGA in (D-sub) connector, 7
VGA Out (monitor
loop-through), 7
Control Panel, 16
D
Dell
contacting, 35
Index 61
Page 62

M
Main Unit, 6
Control panel, 6
Elevator button, 6
Focus ring, 6
Lens, 6
Zoom tab, 6
O
On-Screen Display, 18
All Images, 19
Degamma, 21
White Intensity, 21
Audio, 21
Computer Image, 20
Frequency, 20
Tracking, 20
Language, 24
Management, 22
Video Image, 21
P
Powering On/Off the Projector
Powering Off the Projector, 11
Powering On the Projector, 11
R
Remote Control, 6, 17
RS232 Pin Assignment
RS232 Protocol, 31
Communication
Settings, 31
Control Command
Syntax, 31
Control Commands
List, 32
S
Specifications
Audio, 3 0
Brightness, 29
Color Wheel Speed, 29
Compatibility Modes, 33
Contrast Ratio, 29
Dimensions, 30
Displayable Color, 29
Environmental, 30
H. Frequency, 29
I/O Connectors, 30
Lamp, 29
Light Valve, 29
Noise Level, 30
Number of Pixels, 29
Power Consumption, 29
Power Supply, 29
Projection Distance, 29
Projection Lens, 29
Projection Screen Size, 29
Regulatory, 30
RS232 Pin Assignment, 31
Uniformity, 29
V. Frequency, 29
Video Compatibility, 29
Weigh t, 3 0
support
contacting Dell, 35
62 Index
Page 63

T
Troubleshooting, 25
contact Dell, 25
remote control, 27
Index 63
Page 64

64 Index
Page 65

Proyector 1200MP Dell™
Manual del usuario
www.dell.com | support.dell.com
Page 66

Notas, avisos y precauciones
NOTA: Una NOTA indica información importante que ayuda a una mejor
utilización del proyector.
AVISO: Un AVISO indica un posible daño al equipo o una pérdida de
información y explica cómo evitar el problema.
PRECAUCIÓN: Una PRECAUCIÓN indica posibles daños materiales, daños
personales o incluso muerte.
____________________
La información contenida en este documento puede cambiar sin previo aviso.
© 2006 Dell Inc. Reservados todos los derechos.
Queda totalmente prohibida la reproducción de este documento por cualquier procedimiento sin
el permiso por escrito de Dell Inc.
Marcas comerciales utilizadas en este texto: Dell y el logotipo de DELL son marcas comerciales
de Dell Inc.; Microsoft y W indows son marcas comerciales registradas de MicrosoftCorporation.
En este documento pueden aparecer otras marcas y nombres comerciales para hacer referencia a
las entidades propietarias de las marcas, nombres o productos. Dell Inc. renuncia a todo interés
propietario sobre otras marcas y nombres comerciales aparte de los suyos.
Modelo 1200MP
Enero de 2006 P/N CG356 Rev. A00
Page 67

Contenido
1 Proyector Dell™
Acerca del proyector . . . . . . . . . . . . . . 70
2 Conexión del proyector
Conexión a un ordenador . . . . . . . . . . . . . . . 72
Conexión de un reproductor de DVD, un decodificador
de televisión, un reproductor de vídeo o una TV
Conexión mediante un cable de componente
Conexión mediante un cable S-Vídeo
Conexión mediante un cable compuesto
. . . . 72
. . . 72
. . . . . . . 73
. . . . . 73
Conexión a un mando a distancia con cable RS232
Conexión a un ordenador
Conexión a una caja de control
comercial RS232
3 Uso del proyector
Encendido del proyector . . . . . . . . . . . . . . . 75
Apagado del proyector
Imagen proyectada, ajuste de la
Elevación de la altura del proyector
Bajada de la altura del proyector
Ajuste del tamaño de la imagen proyectada
. . 74
. . . . . . . . . . . . . 74
. . . . . . . . . . . . . . . . . 74
. . . . . . . . . . . . . . . . 75
. . . . . . . . . . . 76
. . . . . . . . 76
. . . . . . . . . 76
. . . . . . 77
Contenido 67
Page 68

Ampliación y del enfoque del proyector,
ajuste de la
. . . . . . . . . . . . . . . . . . . . . 78
Seguridad mediante contraseña . . . . . . . . . . . 78
Uso del panel de control
Uso del mando a distancia
Uso de menús en pantalla (OSD)
Menú Principal
Menú Toda la imagen
Menú Imagen del ordenador
Menú Imagen de vídeo
Menú Audio
Menú Administración
Menú Lenguaje
Menú Patrón prueba
Menú Restaurar
. . . . . . . . . . . . . . . 80
. . . . . . . . . . . . . . 81
. . . . . . . . . . . 82
. . . . . . . . . . . . . . . . . 83
. . . . . . . . . . . . . . 83
. . . . . . . . . . 84
. . . . . . . . . . . . . 85
. . . . . . . . . . . . . . . . . . 85
. . . . . . . . . . . . . . 86
. . . . . . . . . . . . . . . . . 88
. . . . . . . . . . . . . . 88
. . . . . . . . . . . . . . . . 88
4 Solución de problemas del proyector
Cambio de la lámpara . . . . . . . . . . . . . . . . 92
5 Especificaciones
6 Contactar con Dell
7 Glosario
68 Contenido
Page 69

Proyector Dell™
El proyector se suministra con todos los elementos que se muestran a continuación.
Compruebe que están todos y póngase en contacto con Dell en caso de que falte
alguno. Para obtener más información, consulte “Contactar con Dell”.
Contenido del paquete
Cable de alimentación (1,8 m) Cable VGA (de D-sub a D-sub) (1,8 m)
Cable S-Vídeo (2 m) Cable USB (1,8 m)
Cable compuesto (1,8 m) Cable VGA a componente (1,8 m)
Cable RCA a audio (1,8 m) Cable de punto de conexión mini
a punto de conexión mini (1,8 m)
Proyector Dell™ 69
Page 70

Contenido del paquete (continuación)
Mando a distancia Pilas
Funda para transporte Documentación
www.dell.com | support.dell.com
Acerca del proyector
1
1 Panel de control
2 Ampliación, lengüeta de
3 Enfoque, anillo de
4 Lentes
5 Receptor del mando a distancia
6 Elevador, botón del
70 Proyector Dell™
2
3
4
5
6
Page 71

Conexión del proyector
1
1 Receptor de infrarrojos
2 Salida VGA (ciclo monitor)
3 USB, conector
4 RS232, conector
5 Conector de entrada VGA (D-sub)
6 Conector S-Vídeo
7 Conector de vídeo compuesto
8 Conector de entrada de audio
2 3
4
5
7
6
8
Conexión del proyector 71
Page 72

Conexión a un ordenador
2
3
www.dell.com | support.dell.com
1 Alimentación, cable de
2 Cable VGA a VGA
3 Cable USB a USB
NOTA: El cable USB debe estar conectado en caso de que desee utilizar las
funciones de página siguiente y página anterior en el mando a distancia.
1
Conexión de un reproductor de DVD, un decodificador de televisión, un reproductor de vídeo o una TV
Conexión mediante un cable de componente
2
1 Alimentación, cable de
2 D-sub a HDTV/cable de componente
72 Conexión del proyector
1
Page 73

Conexión mediante un cable S-Vídeo
2
1 Alimentación, cable de
2 S-Vídeo, cable
Conexión mediante un cable compuesto
2
1 Alimentación, cable de
2 Vídeo compuesto, cable de
1
1
Conexión del proyector 73
Page 74

Conexión a un mando a distancia con cable RS232
NOTA: Dell no suministra el cable RS232. Consulte con un instalador profesional
en caso de que desee un cable y el software del mando a distancia RS232.
Conexión a un ordenador
www.dell.com | support.dell.com
2
1 Alimentación, cable de
2 RS232, cable
Conexión a una caja de control comercial RS232
3
2
1 Alimentación, cable de
2 RS232, cable
3 Caja de control comercial RS232
1
1
74 Conexión del proyector
Page 75

Uso del proyector
Encendido del proyector
NOTA: Encienda el proyector antes de encender la fuente (ordenador, portátil,
DVD, etc.). El botón de alimentación parpadea en verde hasta que se pulsa.
1
Quite la tapa de la lente.
2
Conecte el cable de alimentación y los cables adecuados. Para obtener información
sobre la conexión del proyector, consulte “Conexión del proyector” en la página 71.
3
Pulse el botón de alimentación (consulte “Acerca del proyector” en la página 70
para localizar el botón de alimentación). Se visualiza el logotipo de Dell durante
30 segundos.
4
Encienda la fuente (ordenador, reproductor de DVD, etc.). El proyector detecta
la fuente automáticamente.
NOTA: Permita al proyector buscar la fuente durante un tiempo.
Si aparece en la pantalla el mensaje “Buscando...”, compruebe que están
conectados correctamente los cables correspondientes.
En caso de tener varias fuentes conectadas al proyector, pulse el botón Fuente del
mando a distancia o del panel de control para seleccionar la fuente que desea.
Apagado del proyector
AVISO: Desenchufe el proyector después de apagarlo debidamente tal como
se explica en el procedimiento incluido a continuación.
1
Pulse dos veces el botón de alimentación. El ventilador de refrigeración sigue
funcionando 90 segundos.
2
Desconecte el cable de alimentación de la toma de corriente y del proyector.
NOTA: Si pulsa el botón de alimentación mientras está en marcha el proyector,
aparecerá el siguiente mensaje:
“ Pulse Encendido para apagar el proyector. Enfríe el
proyector 90sg para desc o reiniciar.” El mensaje desaparece
en cinco segundos, o también si pulsa cualquier botón del panel de control.
Uso del proyector 75
Page 76

Imagen proyectada, ajuste de la
Elevación de la altura del proyector
1
Pulse el botón del elevador.
2
Eleve el proyector al ángulo de visualización que desee y, a continuación,
suelte el botón para bloquear el pie del elevador en su posición.
3
Emplee la rueda de ajuste de inclinación para afinar el ángulo de visualización;
en caso necesario, pulse los botones laterales del elevador para elevar la parte
posterior del proyector hasta alcanzar el ángulo de visualización adecuado.
Bajada de la altura del proyector
1
Pulse el botón del elevador.
www.dell.com | support.dell.com
2
Baje el proyector y, a continuación, suelte el botón para bloquear el pie del
elevador en su posición.
3
1
1 Elevador, botón del
2 Elevador, pie del
3 Ajuste de inclinación, rueda de
76 Uso del proyector
2
Page 77

Ajuste del tamaño de la imagen proyectada
Pantalla
(Diagonal)
Tamaño de
la pantalla
Distancia
28,6 pulgadas
Máx.
(72,6 cm)
24,7 pulgadas
Mín.
(62,7 cm)
22,9 pulgadas x
Máx.
58,1 pulgadas
(Ancho
x alto)
(Ancho
x alto)
17,1 cm x
43,5 cm
19,8 pulgadas x
Mín.
50,2 pulgadas
14, 8 cm x
37,6 cm
3,3 pies (1,0 m) 6,9 pies (2,1 m) 9,2 pies (2,8 m) 11,5 pies (3,5 m) 23 pies (7,0 m) 32,8 pies (10,0 m)
60,0 pulgadas
(152,4 cm)
51,9 pulgadas
(131,7 cm)
48,0 pulgadas x
121,9 pulgadas
36,0 cm x
91,4 cm
41,5 pulgadas x
105,4 pulgadas
31,1 cm x
79,0 cm
80,0 pulgadas
(203,2 cm)
69,1 pulgadas
(175, 6cm)
64,0 pulgadas x
162,6 pulgadas
48,0 cm x
121,9 cm
55,3 pulgadas x
140,5 pulgadas
41,5 cm x
105,4 cm
*Este gráfico sirve únicamente como referencia para el usuario.
100,0 pulgadas
(254,0 cm)
86,4 pulgadas
(219,5 cm)
80,0 pulgadas x
203,2 pulgadas
60,0 cm x
152,4 cm
69,1 pulgadas x
175,6 pulgadas
51,9 cm x
131,7 cm
200,0 pulgadas
(508,0 cm)
172,8 pulgadas
(439,0 cm)
160,0 pulgadas x
406,4 pulgadas
120,0 cm x
304,8 cm
138,3 pulgadas x
351,2 pulgadas
103,7 cm x
263,4 cm
Uso del proyector 77
285,7 pulgadas
(725,7 cm)
246,9 pulgadas
(627,2 cm)
228,6 pulgadas x
580,6 pulgadas
171,4 cm x
435,4 cm
197,5 pulgadas x
501,7 pulgadas
148,1 cm x
376,3 cm
Page 78

Ampliación y del enfoque del proyector, ajuste de la
PRECAUCIÓN: Para evitar dañar el proyector, asegúrese de que la lente
del zoom y la parte inferior del elevador están totalmente plegadas antes
de mover el proyector o colocarlo en su funda para transportarlo.
1
Gire la lengüeta de ampliación para acercar y alejar.
2
Gire el anillo de enfoque hasta que la imagen sea nítida. El proyector enfoca
a distancias de 3,3 pies a 32,8 pies (de 1 a 10 m).
www.dell.com | support.dell.com
1
2
1 Ampliación, lengüeta de
2 Enfoque, anillo de
3
Seguridad mediante contraseña
Proteja su proyector y restrinja el acceso a él con la función Seguridad mediante
contraseña. Esta función de seguridad permite aplicar una serie de restricciones de
acceso para proteger su privacidad y evitar que otras personas utilicen su proyector.
Esto significa que el proyector no se puede utilizar sin autorización y, por tanto,
es una medida de prevención contra robo.
Cuando la seguridad mediante contraseña está activada, y el enchufe de
alimentación se conecta a la toma de corriente y se enciende por primera vez
el proyector, aparece una pantalla de seguridad mediante contraseña en la que
se pide una contraseña.
De forma predeterminada, esta función está desactivada. Puede activarla mediante
el menú Contraseña. Consulte la sección “Menú Administración-Contraseña” de
este manual para obtener más información. Esta función de seguridad mediante
contraseña se activará cuando vuelva a encender el proyector.
78 Uso del proyector
Page 79

Si activa esta función, se le pedirá que introduzca la contraseña antes de encender
el proyector:
1
Primera solicitud de introducción de contraseña:
a
Utilice las teclas de dirección para
introducir la contraseña.
b
Pulse el botón Menú para confirmar.
c
Si la verificación de contraseña se realiza
correctamente, puede seguir accediendo a
las funciones del proyector y a sus utilidades.
2
Si ha introducido una contraseña incorrecta,
se le ofrecerán otras dos oportunidades.
Al tercer intento no válido, el proyector se
apaga automáticamente.
NOTA: Si ha olvidado su contraseña, póngase
en contacto con Dell. Para obtener más
información, consulte “Contactar con Dell”.
Uso del proyector 79
Page 80

Uso del panel de control
4
3
2
www.dell.com | support.dell.com
1
5
6
7
8
1 Alimentación Enciende y apaga el proyector. Para obtener más
información, consulte “Encendido del proyector” en la
página 75 y “Apagado del proyector” en la página 75.
2 Fuente Púlselo para cambiar entre las fuentes RGB analógica,
Compuesta, Componente-i, S-Vídeo, y YPbPr analógica
cuando haya varias fuentes conectadas al proyector.
3 Cuatro teclas
de dirección
4 Indicador luminoso
de aviso TEMP
Las cuatro teclas de dirección se pueden
emplear para cambiar entre fichas del menú en pantalla.
• Cuando el indicador luminoso TEMP está en
naranja continuo, eso significa que el proyector se
ha sobrecalentado. Se apaga automáticamente la
pantalla. Vuelva a encender la pantalla cuando el
proyector se haya enfriado. Si el problema continúa,
póngase en contacto con Dell.
• Cuando el indicador luminoso Temp parpadea
en color naranja, eso significa que ha fallado uno
de los ventiladores del proyector y éste se apaga
automáticamente. Si el problema continúa,
póngase en contacto con Dell.
5 Indicador luminoso
de aviso LAMP
Si el indicador luminoso LAMP es naranja continuo,
sustituya la lámpara.
6 Ajuste clave Si la imagen no se encuentra en posición perpendicular
a la pantalla, entonces parece no estar recta. Pulse este
botón para ajustar la distorsión de la imagen provocada
por la inclinación del proyector. (±16 grados).
80 Uso del proyector
Page 81

7 Resync Pulse el botón para sincronizar el proyector con
la fuente de entrada. Resync no funcionará si
se muestra el menú en pantalla (OSD).
8 Menú Pulse el botón para activar el menú en pantalla.
Utilice las teclas de dirección y el botón Menú
para navegar por el menú en pantalla.
Uso del mando a distancia
12
11
10
9
8
1 Modo de vídeo Pulse una vez el botón para mostrar el modo
de visualización actual de la pantalla. Pulse de
nuevo el botón para alternar entre los modos PC,
Película, sRGB o Usuario.
2 Página siguiente Pulse este botón para pasar a la página siguiente.
NOTA: Para emplear esta función,
debe estar conectado el cable USB.
3 Menú Pulse este botón para activar el menú en pantalla
(OSD). Utilice las teclas de dirección y el botón
Menú para navegar por el menú en pantalla.
4 4:3/16:9 Pulse estos botones para cambiar la proporción
de aspecto: 1:1, 16:9, 4:3.
5 Botón Ocultar Pulse el botón para ocultar la imagen y vuelva
a pulsarlo para mostrarla.
1
2
3
4
5
67
Uso del proyector 81
Page 82

6 Volumen +/- Pulse (+) para aumentar el volumen, o (-) para
disminuirlo, o bien para cambiar entre las fichas
del menú en pantalla.
7 Ajuste clave Si la imagen no se encuentra en posición
perpendicular a la pantalla, entonces parece
no estar recta. Pulse este botón para ajustar
la distorsión de la imagen provocada por la
inclinación del proyector (±16 grados).
8 Resync Pulse el botón para sincronizar el proyector con
la fuente de entrada. Resync no funcionará si
se muestra el menú en pantalla.
9 Fuente Púlselo para cambiar entre las fuentes RGB
www.dell.com | support.dell.com
10 Teclas de dirección Utilice los botones o para seleccionar
11 Página anterior Pulse este botón para regresar a la página anterior.
12 Alimentación Enciende y apaga el proyector. Para obtener más
analógica, Compuesta, Componente-i, S-Vídeo,
y YPbPr analógica cuando haya varias fuentes
conectadas al proyector.
elementos del OSD y emplee los botones o
para realizar ajustes.
NOTA: Para emplear esta función, debe
estar conectado el cable USB.
información, consulte “Encendido del proyector”
en la página 75 y “Apagado del proyector” en la
página 75.
Uso de menús en pantalla (OSD)
El proyector dispone de un menú en pantalla (OSD) multilingüe que se puede
mostrar con o sin fuente de entrada.
En el menú Principal, pulse los botones o del panel de control o los botones
o del mando a distancia para desplazarse por las fichas. Pulse el botón del
panel de control o el botón Menú del mando a distancia para seleccionar un submenú.
En los submenús, pulse los botones o del panel de control o los botones o
del mando a distancia para realizar una sele cción. Cuando se selecciona un elemento,
el color cambia a gris oscuro. Utilice los botones o del panel de control o los
botones o del mando a distancia para ajustar alguna opción de configuración.
Para salir del menú en pantalla, vaya a la ficha Salir y pulse el botón del panel
de control o el botón Menú del control remoto.
82 Uso del proyector
Page 83

Menú Principal
Menú Toda la imagen
BRILLO—Utilice los botones
de control o los botones
distancia
C
para ajustar el brillo de la imagen.
ONTRASTE—Utilice los botones
panel de control o los botones
a distancia para ajustar
entre las partes más claras y más oscuras de la
imagen. Al ajustar el contraste, se modifica la
cantidad de blanco y negro de la imagen.
EMP. COLOR—Ajuste la temperatura del color.
T
La pantalla se vuelve más azul con temperaturas
altas. La pantalla se vuelve más roja con
temperaturas bajas.
El modo de usuario activa los valores en
el menú Config. Color.
ONFIG. COLOR—Configuración manual de los colores rojo, verde y azul.
C
C
LAVE—Ajuste de la distorsión de la imagen provocada por la inclinación
del proyector (
CLAVE AUTOM.—
±16 grados).
Seleccione
Sí
para permitir la corrección automática de la distorsión
vertical de la imagen provocada por la inclinación del proyector. Para ajustar
manualmente la clave, pulse el botón del panel de control o el botón Menú
del mando a distancia.
o del panel
o
del mando a
o del
o
del mando
el grado de diferencia
Uso del proyector 83
Page 84

CLAVE SEMI-AUTOM.—
Pulse el botón
del panel de control o el botón Menú del mando
a distancia para activar la corrección Clave semi-autom. de la distorsión de la imagen.
R. ASPECTO (RELACIÓN DE ASPECTO)—Seleccione una relación de aspecto para ajustar
cómo van a mostrarse las imágenes.
• 1:1: La fuente de entrada aparecerá sin escala.
Utilice la relación de aspecto 1:1 si está utilizando lo siguiente:
– Cable VGA y el ordenador tiene una resolución inferior a XGA (1.024 x 768)
– Cable de componente (576p/480i/480p)
– Cable S-Video
– Cable compuesto
• 16:9: La fuente de entrada aparecerá en el modo de pantalla ancha.
• 4:3: La fuente de entrada se modificará para abarcar toda la pantalla.
www.dell.com | support.dell.com
Utilice las relaciones de aspecto 16:9 y 4:3 si está utilizando lo siguiente:
– Un ordenador con resolución superior a XGA
– Un cable de componente (1080i o 720p)
MODO DE VÍDEO—Seleccione un modo para optimizar la imagen en pantalla
en función del uso que se haga del proyector: Película, PC, sRGB (ofrece
una representación del color más precisa), y Usuario (configuración personal).
Si se define la configuración como Int. Blanco o Degamma, el proyector cambia
automáticamente a Usuario.
LANCO, INT.—Seleccione 0 para maximizar la reproducción del color y 10 para
B
maximizar el brillo.
D
EGAMMA—Se puede ajustar entre 1 y 6 para cambiar el rendimiento del color en
la pantalla. El valor predeterminado es 0.
Menú Imagen del ordenador
NOTA: Este menú sólo está disponible cuando hay un ordenador conectado.
F
RECUENCIA—Cambie la frecuencia de datos
de pantalla para que coincida con la frecuencia
de la tarjeta gráfica de su ordenador. Si aparece
una línea vertical que parpadea, utilice el control
de frecuencia para minimizar las barras. Se trata
de un ajuste aproximado.
PISTA—Sincronice la fase de la señal de la pantalla
con la de la tarjeta gráfica. Si aparecen imágenes
inestables o que parpadean, utilice la función Pista
para corregirlo. Se trata de un ajuste preciso.
NOTA: Ajuste primero la Frecuencia y después la Pista.
84 Uso del proyector
Page 85

POSICIÓN H (POSICIÓN HORIZONTAL)—
del mando a distancia para ajustar la posición horizontal de la imagen hacia la
izquierda, y pulse el botón del panel de control o el botón
distancia para ajustar la posición horizontal de la imagen hacia la derecha.
POSICIÓN V (POSICIÓN VERTICAL)—
del mando a distancia para ajustar la posición vertical de la imagen hacia abajo, y
pulse el botón del panel de control o el botón
ajustar la posición vertical de la imagen hacia arriba.
Pulse el botón del panel de control o el botón
del mando a
Pulse el botón del panel de control o el botón
del mando a distancia para
Menú Imagen de vídeo
NOTA: Este menú sólo está disponible cuando hay una fuente de S-vídeo o
de vídeo compuesto conectada.
S
ATUR. COLOR—Pulse el botón del panel de
control o el botón
para disminuir la cantidad de color de la imagen,
y pulse el botón
botón
la cantidad de color de la imagen.
A
o el botón
la nitidez, y pulse el botón del panel de control
o el botón
TONO DE COLOR—Pulse el botón del panel de control o el botón
distancia para aumentar la cantidad de color verde de la imagen, y pulse el botón
cantidad de color rojo de la imagen.
del mando a distancia para aumentar la nitidez.
del panel de control o el botón del mando a distancia para aumentar la
del mando a distancia para aumentar
GUDEZ—
Pulse el botón del panel de control
del mando a distancia para disminuir
del mando a distancia
del panel de control o el
del mando a
Menú Audio
VOLUMEN—
o el botón - del mando a distancia para disminuir
el volumen, y pulse el botón del panel de
control o el botón + del mando a distancia
para aumentar el volumen.
SILENCIAR—Permite silenciar el volumen.
Pulse el botón del panel de control
Uso del proyector 85
Page 86

Menú Administración
UBICACIÓN MENÚ—Selecciona la ubicación del
OSD en la pantalla.
M
ODO PROYEC (MODO DE PROYECCIÓN)—Seleccione
cómo se mostrará la imagen:
• Presentación frontal de escritorio
(valor predeterminado).
• Presentación posterior de escritorio:
El proyector invierte la imagen para que se pueda
proyectar desde una pantalla translúcida.
• Montaje frontal en techo: El proyector vuelca
www.dell.com | support.dell.com
ORA LÁMPARA—Muestra las horas de funcionamiento desde el último
H
restablecimiento del temporizador.
R
EST LÁMPARA—Tras instalar una nueva lámpara, seleccione Sí para restablecer
el temporizador de la lámpara.
A
HORRO ENERGÍA—Seleccione Sí para establecer el período de retardo para ahorro de
energía. El período de retardo es la cantidad de tiempo que desea que el proyector
espera sin entrada de señal. Una vez transcurrido dicho período, el proyector entra
en modo de ahorro de energía y apaga la lámpara. El proyector se vuelve a
encender cuando detecta una señal de entrada o al pulsar el botón Alimentación.
Una vez transcurridas dos horas, el proyector se apaga y es necesario pulsar
el botón Alimentación para encender el proyector.
LOQ. OSD—Seleccione Act. para activar el Bloq. OSD con el fin de ocultar
B
el menú OSD. Para mostrar el menú OSD, pulse el botón del panel de
control o el botón Menú del mando a distancia durante 15 segundos.
UTO FUENTE—Seleccione Act. (el valor predeterminado) para detectar
A
automáticamente las señales de entrada disponibles. Cuando se ha seleccionado
Act. en el proyector y se pulsa Fuente, éste busca automáticamente la señal de
entrada disponible más cercana. Seleccione Des. para bloquear la señal de entrada
actual. Cuando se ha seleccionado Des. y se pulsa Fuente, se puede seleccionar la
señal de entrada que se desea emplear.
la imagen hacia abajo para proyectar desde el techo.
• Montaje posterior en techo: El proyector
invierte y gira la imagen al mismo tiempo.
Se puede proyectar detrás de una pantalla
translúcida con la proyección desde el techo.
TIPO DE SEÑAL—Seleccione manualmente
el tipo de señal (RGB, YCbCr o YPbPr).
86 Uso del proyector
Page 87

MODO ECO—Seleccione Act. si desea utilizar el proyector a un nivel de bajo
consumo (150 vatios), que garantiza una mayor duración de la lámpara, un
funcionamiento más silencioso y con una iluminación más tenue en la pantalla.
Seleccione Des. si desea un funcionamiento con consumo normal (200 vatios).
IEMPO OSD —Utilice esta función para definir el tiempo que el menú OSD permanece
T
activo (en estado de reposo).
C
ONTRASEÑA —Seleccione Act. para poder aplicar una serie de restricciones de acceso
con el fin de proteger su privacidad y evitar que otras personas utilicen su proyector.
a
Pulse el botón para seleccionar Act.
• Si esta opción se establece en
b
Defina su contraseña con las teclas de dirección y pulse el botón Menú
Des.
, se desactivará la función
Cambiar contraseña
para confirmarla.
NOTA: Para desactivar la función de
contraseña, se le pedirá que introduzca
la contraseña correcta. Sólo podrá
establecerse la contraseña en Des.,
si la verificación de contraseña se
realiza correctamente.
.
AMBIAR CONTRASEÑA—Utilice esta función
C
para modificar la contraseña a su gusto.
a
Escriba su contraseña actual con las
teclas de dirección.
b
Defina la nueva contraseña.
c
Vuelva a verificar la nueva contraseña.
d
Pulse el botón Menú para confirmar.
NOTA: La contraseña actual sólo se puede
restablecer si la opción Contraseña está
establecida en Des..
Uso del proyector 87
Page 88

Menú Lenguaje
www.dell.com | support.dell.com
Menú Patrón prueba
Pulse los botones o del panel de control
o los botones
o
del mando a distancia
para seleccionar el lenguaje que prefiere
para el OSD.
Pulse el botón
del panel de control
o el botón Menú del mando a distancia
para confirmar la selección del idioma.
Pulse el botón del panel de control o
el botón Menú del mando a distancia para
mostrar el gráfico de patrón de prueba.
Utilice esta función para ajustar el foco de la
pantalla proyectada. Use los botones
del panel de control o los botones
o
o
del
mando a distancia para salir de este modo.
Menú Restaurar
88 Uso del proyector
Seleccione Sí para restablecer el proyector a los
valores predeterminados de fábrica. Restablecer
las opciones incluye la imagen del ordenador y
la configuración de la imagen de vídeo.
Page 89

Solución de problemas del proyector
Si tiene problemas con el proyector, consulte los siguientes consejos para la
solución de problemas. Si el problema continúa, póngase en contacto con Dell.
Para obtener más información, consulte “Contactar con Dell”.
Problema Solución posible
No aparece ninguna
imagen en la pantalla
• Compruebe que la tapa de la lente esté quitada
y que el proyector esté encendido.
• Asegúrese de que el puerto externo de gráficos
esté habilitado. Si utiliza un ordenador portátil
Dell, pulse . Para otros ordenadores,
consulte la documentación correspondiente.
NOTA: Permita al proyector buscar la fuente
durante un tiempo.
• Asegúrese de que todos los cables estén bien
conectados. Consulte “Conexión del proyector”
en la página 71.
• Asegúrese de que los terminales de los
conectores no estén torcidos o rotos.
• Asegúrese de que la lámpara esté bien
instalada (consulte “Cambio de la lámpara”
en la página 92).
Solución de problemas del proyector 89
Page 90

Problema (continuación) Solución posible (continuación)
Imagen parcial, desplazada
o incorrecta
1
Pulse el botón
Resync
o del panel de control.
2
Si utiliza un ordenador portátil Dell, establezca
la resolución del ordenador a XGA (1024 x 768):
a
Haga clic con el botón derecho en un lugar
del escritorio de Windows que no utilice,
seleccione
la ficha
b
Verifique que la configuración del
Propiedades
Configuración
puerto de monitor externo esté definida
www.dell.com | support.dell.com
a1024x768píxeles.
c
Pulse .
Si experimenta dificultad cambiando las
resoluciones o su monitor se bloquea,
reinicie todo el equipo y el proyector.
Si no utiliza un ordenador portátil Dell,
consulte la documentación relacionada.
La pantalla no muestra
su presentación
La imagen es inestable
o parpadea
La imagen presenta una
línea vertical que se mueve
El color de la imagen
no es correcto
Si utiliza un ordenador portátil Dell,
pulse .
Ajuste la pista en la ficha
Imagen de ordenador en el OSD.
Ajuste la frecuencia en la ficha
Imagen de ordenador en el OSD.
• Si la señal de salida de su tarjeta gráfica es verde
y desea mostrar VGA a una señal de 60 Hz, en
el OSD, vaya a Administración, seleccione Tipo
de señal y, a continuación, seleccione RGB.
La imagen está
desenfocada
1
Ajuste el anillo de enfoque en la lente
del proyector.
2
Asegúrese de que la pantalla de proyección
esté dentro de la distancia requerida
(de 3,3 pies [1 m] a 32,8 pies [10 m]).
del mando a distancia
y, a continuación,
.
90 Solución de problemas del proyector
Page 91

Problema (continuación) Solución posible (continuación)
La imagen aparece estirada
en el modo DVD 16:9
El proyector detectará automáticamente
el modo DVD 16:9 y ajustará la proporción
del aspecto para pantalla completa con la
configuración por defecto de 4:3 (buzón).
Si la imagen está aún estirada, ajuste la
proporción del aspecto de la manera siguiente:
• Seleccione el tipo de proporción del aspecto 4:3
en su reproductor de DVD si está reproduciendo
un DVD de 16:9, si es posible.
• Si no puede seleccionar el tipo de proporción
del aspecto 4:3 en su reproductor de DVD,
seleccione la relación de aspecto 4:3 en el
Todas las imágenes
menú
del OSD.
La imagen aparece al revés Seleccione Administración en el OSD
y ajuste el modo de proyección.
La lámpara se agota o
emite un ruido en seco
Cuando la duración de la lámpara termina,
se agotará y puede que emita un ruido en seco.
Si esto ocurre, el proyector no se encenderá
de nuevo y mostrará Lámpara defectuosa
en la pantalla LCD hasta que la cambie.
Para cambiar la lámpara, consulte
“Cambio de la lámpara” en la página 92.
El mando a distancia no
funciona bien o el alcance
Puede que las pilas estén bajas. Si es así,
coloque dos pilas nuevas AAA.
es muy limitado
La ventana de visualización
de OSD no aparece en
la pantalla tras pulsar el
botón Menú del mando
a distancia o del panel
de control
Intente lo siguiente:
1 Pulse el botón Menú del mando a distancia
o del control remoto durante 15 segundos
hasta que aparezca el OSD.
2 Seleccione Administración desde el OSD.
3 Establezca Bloq. OSD en “Des”.
Solución de problemas del proyector 91
Page 92

Información sobre los indicadores LAMP y TEMP
El indicador luminoso
LAMP es naranja continuo
El indicador luminoso
TEMP es naranja continuo
El indicador luminoso
TEMP parpadea en
color naranja
www.dell.com | support.dell.com
Cambio de la lámpara
Sustituya la lámpara cuando aparezca en la pantalla el mensaje “La lámpara llega
al final de su vida útil en su funcionamiento al máximo. Reemplazo sugerido”. Si
el problema continúa una vez sustituida la lámpara, póngase en contacto con Dell.
Para obtener más información, consulte “Contactar con Dell”.
PRECAUCIÓN: La lámpara se calienta cuando está en uso. No intente cambiar
la lámpara hasta que haya dejado que se enfríe el proyector al menos 30 minutos..
1
Apague el proyector y desconecte el cable de alimentación.
2
Deje que se enfríe el proyector durante al menos 30 minutos.
3
Afloje los dos tornillos que sujetan la cubierta de la lámpara y retire la cubierta.
PRECAUCIÓN: Si la lámpara se ha roto, tenga cuidado al manipularla ya que
podría cortarse con los trozos rotos. Quite todas las piezas rotas del proyector
y deséchelas o recíclelas de acuerdo con las leyes estatales, locales o
federales. Visite www.dell.com/hg para obtener información adicional.
Si el indicador luminoso LAMP es
naranja continuo, sustituya la lámpara.
El proyector se ha sobrecalentado. Se apaga
automáticamente la pantalla. Vuelva a encender la
pantalla cuando el proyector se haya enfriado. Si el
problema continúa, póngase en contacto con Dell.
Ha fallado uno de los ventiladores del proyector
y éste se apaga automáticamente. Si el problema
continúa, póngase en contacto con Dell.
92 Solución de problemas del proyector
Page 93

4
Afloje los dos tornillos que sujetan la lámpara.
PRECAUCIÓN: No toque ni el cristal de
la lámpara ni el de la bombilla en ningún
momento. Las lámparas del proyector son
muy frágiles y pueden romperse si se tocan.
5
Tire de la lámpara por el asa metálica.
NOTA: Dell podría solicitar la devolución
a Dell de las lámparas que se hayan
reemplazado dentro del período de garantía.
6
Coloque la nueva lámpara.
7
Afloje los dos tornillos que sujetan la lámpara.
8
Coloque la cubierta de la lámpara y apriete
los dos tornillos.
9
Restaure la lámpara por tiempo de uso
seleccionando Yes (Sí) en el icono
Rest lámpara
en la ficha Administración del OSD.
(Consulte la sección Menú Administración
en el Manual del propietario)
PRECAUCIÓN: LAS LÁMPARAS SITUADAS EN EL INTERIOR DE ESTE
PRODUCTO CONTIENEN MERCURIO Y SE DEBEN RECICLAR O DESECHAR EN
FUNCIÓN DE LAS LEYES LOCALES, ESTATALES O FEDERALES. PARA OBTENER
MÁS INFORMACIÓN, VISITE WWW.DELL.COM/HG O PÓNGASE EN CONTACTO
CON LA ALIANZA DE INDUSTRIAS ELECTRÓNICAS (ELECTRONIC INDUSTRIES
ALLIANCE) EN LA DIRECCIÓN WWW.EIAE.ORG. PARA OBTENER
INFORMACIÓN ESPECÍFICA SOBRE CÓMO DESECHAR LAS LÁMPARAS,
VISITE WWW.LAMPRECYCLE.ORG.
Solución de problemas del proyector 93
Page 94

www.dell.com | support.dell.com
94 Solución de problemas del proyector
Page 95

Especificaciones
5
Luz, válvula de Tecnología DDR (tasa doble de datos)
de un solo chip DLP™
Brillo 2000 ANSI lumens (máx.)
Contraste, tasa de 2100:1 típica (completo
encendido/apagado)
Uniformidad 80% típica (estándar de Japón - JBMA)
Lámpara Lámpara de 200 vatios, UHP de
2.500 horas reemplazable por el usuario
(hasta 3.000 horas en modo económico)
Píxeles, número de 800 x 600 (SVGA)
Color visible 16,7 M colores
Rueda del color, velocidad de la 100~127,5 Hz (2X)
Lente de proyección F/2,4-2,58, f=19~21,9 mm con
lente ampliada manual a 1,15 x
Pantalla de proyección, tamaño de la 28,57-285,7 pulgadas (diagonal)
Proyección, distancia de 3,3~32,8 pies (1 m~10 m)
Vídeo, compatibilidad del Compatible con NTSC, NTSC 4.43,
PAL, PAL-M, PAL-N, SECAM y
HDTV (1080i, 720P, 576i/P, 480i/P)
Capacidad para vídeo compuesto,
vídeo componente y S-vídeo
Frecuencia H. 31 kHz-79 kHz (analógica)
Frecuencia V. 50 Hz-85 Hz (analógica)
Alimentación, fuente de Entrada universal CA 50-60 Hz de
100-240 V con PFC
Energía, consumo de 250 vatios a pleno consumo (típica),
200 vatios en modo económico
Especificaciones 95
Page 96

Audio 1 altavoz, 2 vatios RMS
Ruido, nivel de 36 dB(A) en modo completo,
33 dB(A) en modo económico
Peso 2,24 kg (4,94 libras)
Dimensiones (Ancho x Alto x Fondo) Externas 9,9 x 3,96 x 8,4 ± 0,04
pulgadas (251 x 101 x 213 ± 1 mm)
Ambiente Temperatura en funcionamiento:
o
5
C–35oC (41oF–95oF)
Humedad: 80% máxima
Temperatura de almacenamiento:
o
C a 60oC (–4oF a 140oF)
www.dell.com | support.dell.com
–20
Humedad: 80% máxima
Regulación FCC, CE, VCCI, UL, cUL,
Nemko-GS, ICES-003, MIC, C-Tick,
GOST, CCC, PSB, NOM, IRAM, SABS
Conectores E/S Alimentación: Zócalo de entrada
de alimentación CA
Entrada de ordenador: Un D-sub
para señales de entrada analógica,
componente, HDTV
Salida de ordenador: Un D-sub
de 15 contactos
96 Especificaciones
Entrada de vídeo: Un RCA de
vídeo compuesto y S-vídeo
Entrada USB: Un conector USB
Entrada de audio: Una clavija
tipo jack (diámetro 3,5 mm)
Un mini-DIN RS232 para control a
distancia del proyector desde el PC
Page 97

Asignación de contactos RS232
RS232, protocolo
• Comunicación, configuración de la
Configuración de la conexión Valor
Tasa de baudios: 19200
Bits de datos: 8
Paridad Ninguno
Bits de parada 1
• Sintaxis de comandos de control (desde el PC al proyector)
[H][AC][SoP][CRC][ID][SoM][COMMAND]
• Ejemplo: Encendido del proyector
Introduzca el siguiente código: 0xBE 0xEF 0x10 0x05 0x00 0xC6 0xFF
0x11 0x11 0x01 0x00 0x01
NOTA: Enviar primero los bytes menos significativos.
Especificaciones 97
Page 98

• Comandos de control, lista de
Lista de
comandos
de control
Código de
dirección
(BYTE)
Tamaño
del Payload
(WORD)
CRC16
para todo el
paquete
(WORD)
Identificador de
MsG
(WORD)
Tamaño
de MsG
(WORD)
Código de
comandos
(BYTE)
Descripción
del comando
0xefbe 0x10 0x0005 0xffc6 0x1111 0x0001 0x01 Encendido
0xbfc7 0x02 Menú
0x7e07 0x03 Arriba
0x3fc5 0x04 Abajo
0xfe05 0x05 Izquierda
0xbe04 0x06 Derecha
0x7fc4 0x07 Volver a sincronizar
www.dell.com | support.dell.com
0x3fc0 0x08 Fuente
0xfe00 0x09 Volumen+
0xbe01 0x0a Volumen-
0xffc3 0x0d Silenciar
0x7e02 0x0f Ocultar
0x3fca 0x10 Modo de vídeo
0x7fcb 0x13 Clave V. arriba
0x3e09 0x14 Clave V. abajo
0x7e08 0x17 Relación de aspecto
0x3e0c 0x18 Apagado
0xffcc 0x19 Fuente-VGA
0xbfcd 0x1a Fuente-VGA YPbPr
(480p/576p/720p/
0x7e0d 0x1b Fuente-VGA YCbCr
0xbe1f 0x22 Fuente-S-Vídeo
0x7fdf 0x23 Fuente-Compuesto
0xbfd9 0x2a Modo económico
0x7e19 0x2b Modo económico
0x3fdb 0x2c Auto fuente activada
0xfe1b 0x2d Auto fuente
0xbe1a 0x2e Restaurar
0x7fda 0x2f Hora lámpara
0x3e12 0x30 Versión de firmware
0x7e46 0xff Estado del sistema
(4:3/16:9)
1080i)
(480i/576i)
activado
desactivado
desactivada
98 Especificaciones
Page 99

Compatibilidad, modos de
Modo Resolución (ANALÓGICO)
Frecuencia V. (Hz) Frecuencia H. (KHz)
VGA 640x350 70 31.5
VGA 640x350 85 37.9
VGA 640x400 85 37.9
VGA 640x480 60 31.5
VGA 640x480 72 37.9
VGA 640x480 75 37.5
VGA 640x480 85 43.3
VGA 720x400 70 31.5
VGA 720x400 85 37.9
SVGA 800x600 56 35.2
SVGA 800x600 60 37.9
SVGA 800x600 72 48.1
SVGA 800x600 75 46.9
SVGA 800x600 85 53.7
XGA 1024x768 43.4 35.5
XGA 1024x768 60 48.4
XGA 1024x768 70 56.5
XGA 1024x768 75 60.0
XGA 1024x768 85 68.7
SXGA 1280x1024 60 63.98
SXGA+ 1400x1050 60 63.98
MAC LC13 pulgadas 640x480 66.66 34.98
MAC II 13 pulgadas 640x480 66.68 35
MAC 16 pulgadas 832x624 74.55 49.725
MAC 19 pulgadas 1024x768 75 60.24
MAC 1152x870 75.06 68.68
MAC G4 640x480 60 31.35
MAC G4 640x480 120 68.03
IMac DV 640x480 117 60
IMac DV 800x600 95 60
IMac DV 1024x768 75 60
IMac DV 1152x870 75 68.49
IMac DV 1.280 x 960 75 75
Especificaciones 99
Page 100

www.dell.com | support.dell.com
100 Especificaciones
 Loading...