

Page 1
FR GUIDE D'UTILISATION
CS NÁVOD K POUŽITÍ
DA BRUGERVEJLEDNING
DE BETRIEBSANLEITUNG
EN USER GUIDE
ES MANUAL DE UTILIZACIÓN
IT MANUALE D'USO
NL GEBRUIKSAANWIJZING
PT MANUAL DE UTILIZAÇÃO
Four
Trouba
Ovn
Backofen
Oven
Horno
Forno
Oven
Forno
99641611_A_MULTI.qxp 20/03/2007 17:34 Page 1
Page 2

2
FR
02
DE
44
EN
58
ES
72
IT
86
NL
100
PT
114
DA
30
CS
16
Chère Cliente, Cher Client,
Vous venez d'acquérir un four
DDEE DDIIEETTRRIICCHH
et nous vous en remer-
cions.
Nos équipes de recherche ont conçu pour vous cette nouvelle génération d’appareils, qui par leur qualité, leur esthétique, leurs fonctions
et leurs évolutions technologiques en font des produits d’exception,
révélateurs de notre savoir-faire.
Votre nouveau four
DDEE DDIIEETTRRIICCHH
s’intégrera harmonieusement dans
votre cuisine et alliera parfaitement les performances de cuisson, et la
facilité d’utilisation. Nous avons voulu vous offrir un produit d’excellence.
Vous trouverez également dans la gamme des produits
DDEE DDIIEETTRRIICCHH
,
un vaste choix de cuisinières, de tables de cuisson, de hottes aspirantes, de lave-vaisselle, et de réfrigérateurs intégrables, que vous
pourrez coordonner à votre nouveau four
DDEE DDIIEETTRRIICCHH
.
Bien entendu, dans un souci permanent de satisfaire le mieux possible
vos exigences vis-à-vis de nos produits, notre service consommateurs
est à votre disposition et à votre écoute pour répondre à toutes vos
questions ou suggestions (coordonnées à la fin de ce livret).
Et connectez-vous aussi sur notre site:
wwwwww..ddeeddiieettrriicchh--eelleeccttrroommeennaag
geerr..ccoomm
sur lequel vous trouverez nos
dernières innovations ainsi que des informations utiles et complémentaires.
DDEE DDIIEETTRRIICCHH
LLeess nnoouuvveeaauuxx oobbjjeettss ddee vvaalleeuurr
Dans le souci d'une amélioration constante de nos produits, nous nous réservons le droit d'apporter à leurs caractéristiques techniques, fonctionnelles ou esthétiques toutes modifications
liées à leur évolution.
Important :
Avant de mettre votre appareil en marche, veuillez lire attentivement ce guide d'installa-
tion et d'utilisation afin de vous familiariser plus rapidement avec son fonctionnement.
99641611_A_MULTI.qxp 20/03/2007 17:34 Page 2
Page 3

3
SOMMAIRE
FR
1 / DESCRIPTION DE VOTRE APPAREIL
••
Présentation de votre four
___________________________________ 4
••
Accessoires
_______________________________________________ 4
••
Présentation du programmateur
______________________________
5
2 / UTILISATION DE VOTRE APPAREIL
••
Utilisation du programmateur
º
Comment régler l’heure
_________________________________
6
º
Cuisson immédiate
_____________________________________
7
••
Cuisson programmée
º
Départ immédiat
_______________________________________
8
º
Départ différé
_________________________________________
9
••
Utilisation de la fonction minuterie
____________________________
10
3 / MODES DE CUISSON DU FOUR
_________________________________
11
4 / ENTRETIEN ET NETTOYAGE DE VOTRE FOUR
____________________
13
5 / SERVICE APRES-VENTE
••
Interventions
______________________________________________ 15
••
Relations consommateurs
___________________________________ 15
99641611_A_MULTI.qxp 20/03/2007 17:34 Page 3
Page 4

4
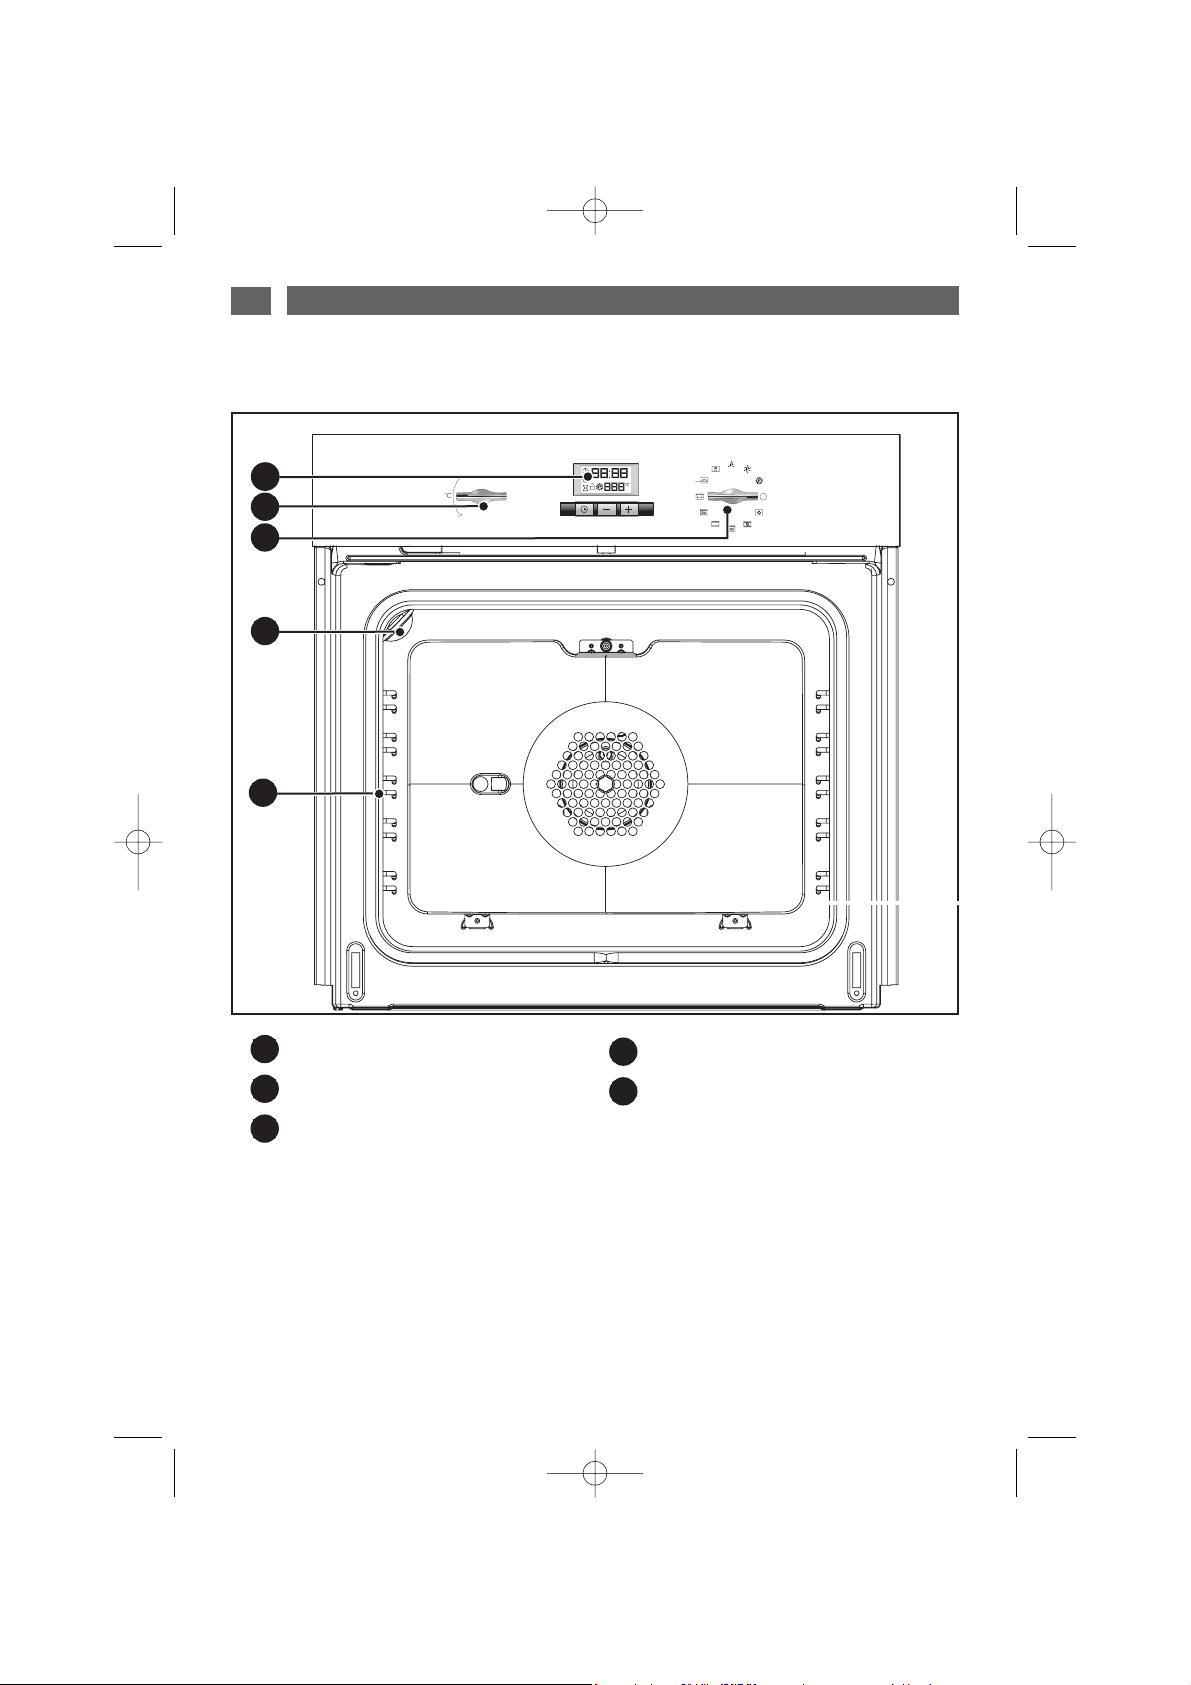
1 / DESCRIPTION DE VOTRE APPAREIL
FR
PRESENTATION DE VOTRE FOUR
••
A
B
Programmateur
Sélecteur de température
Sélecteur de fonctions
C
D
E
Lampe
Gradins fil
E
D
B
A
C
•Accessoires
Votre appareil est équipé de deux grilles sécurité avec poignée, d’une grille avec poignées pour
plat 45 mm, un plat pâtisserie Lissium et un plat 45 mm.
99641611_A_MULTI.qxp 20/03/2007 17:34 Page 4
Page 5
5
1 / DESCRIPTION DE VOTRE APPAREIL
FR
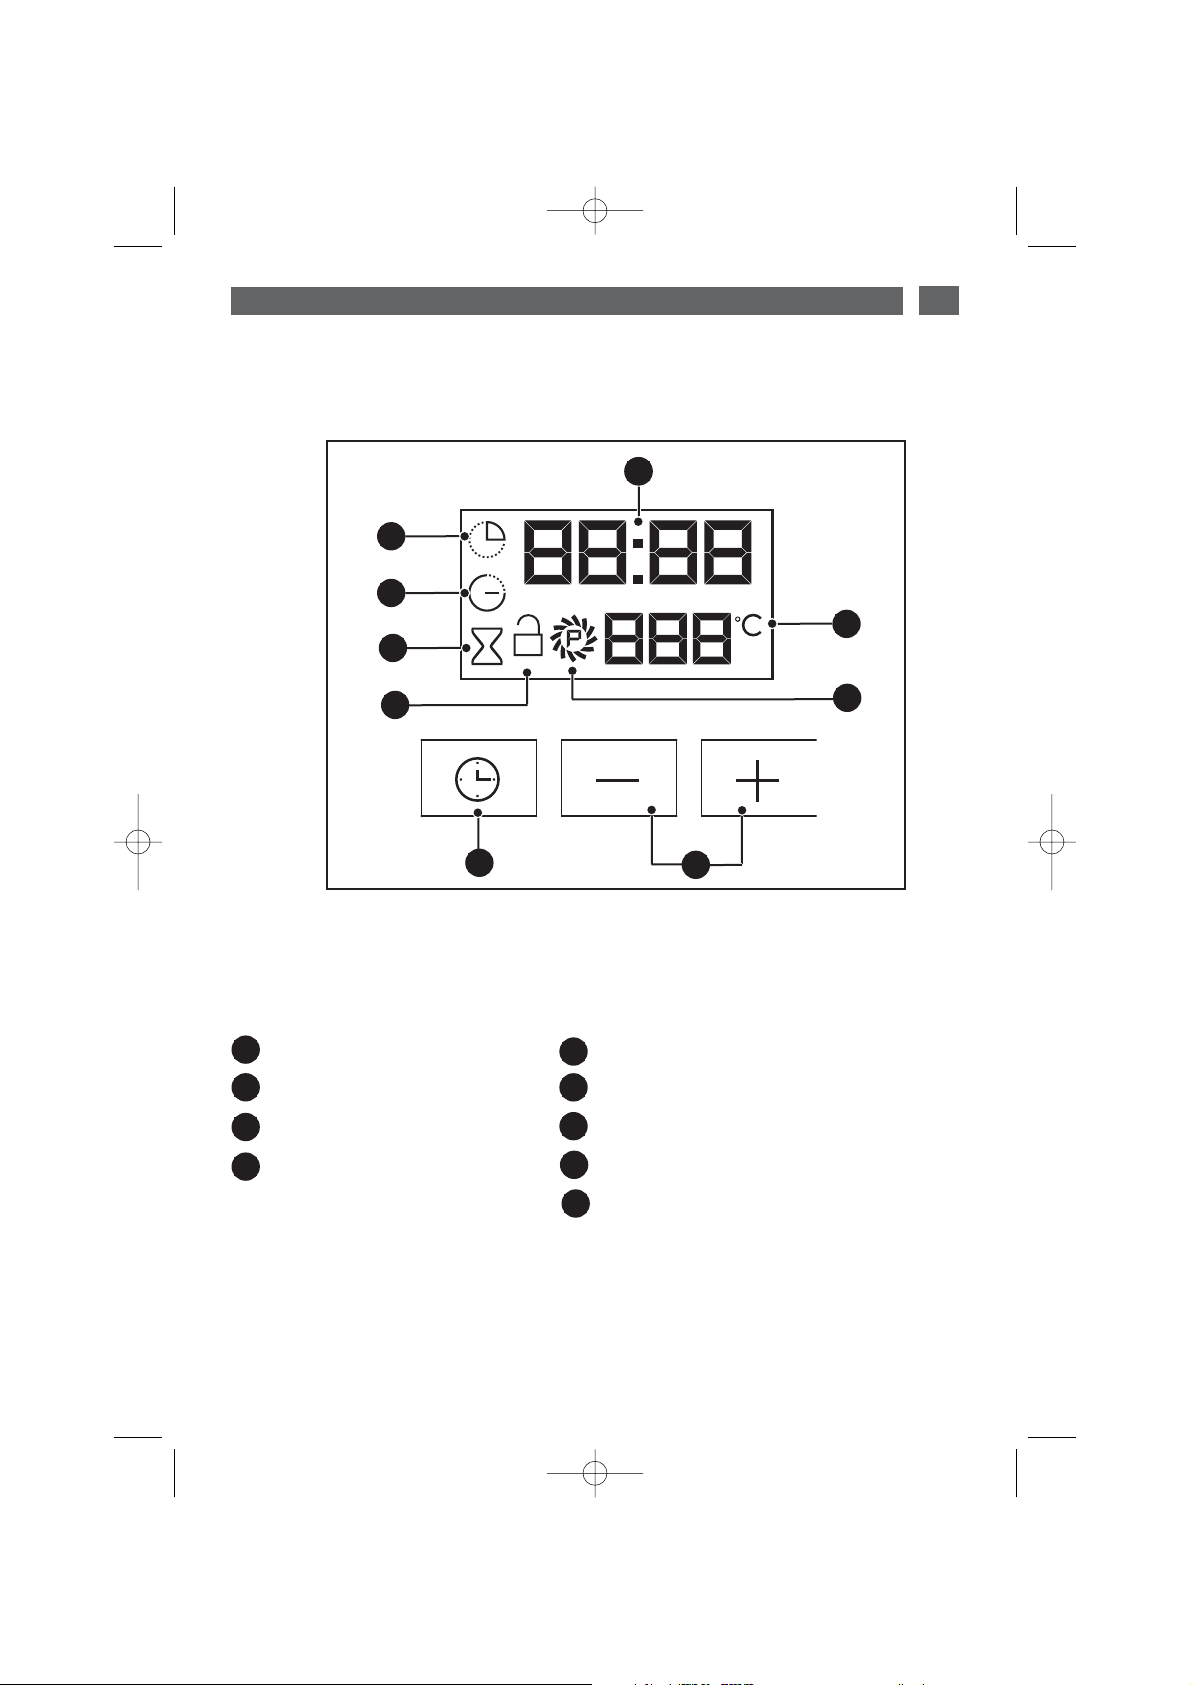
PRESENTATION DU PROGRAMMATEUR
••
A
D
A
B
Affichage de l’heure et des durées
Indicateur de durée de cuisson
Indicateur de fin de cuisson
Indicateur du minuterie
C
D
E
Indicateur de verrouillage
Indicateur de nettoyage
Affichage de la température
Touche de sélection (durées et heures)
Touches de réglage du temps
F
G
G
H
H
C
B
F
I
E
I
99641611_A_MULTI.qxp 20/03/2007 17:34 Page 5
Page 6
6
2 / UTILISATION DE VOTRE APPAREIL
FR
UTILISATION DU PROGRAMMATEUR
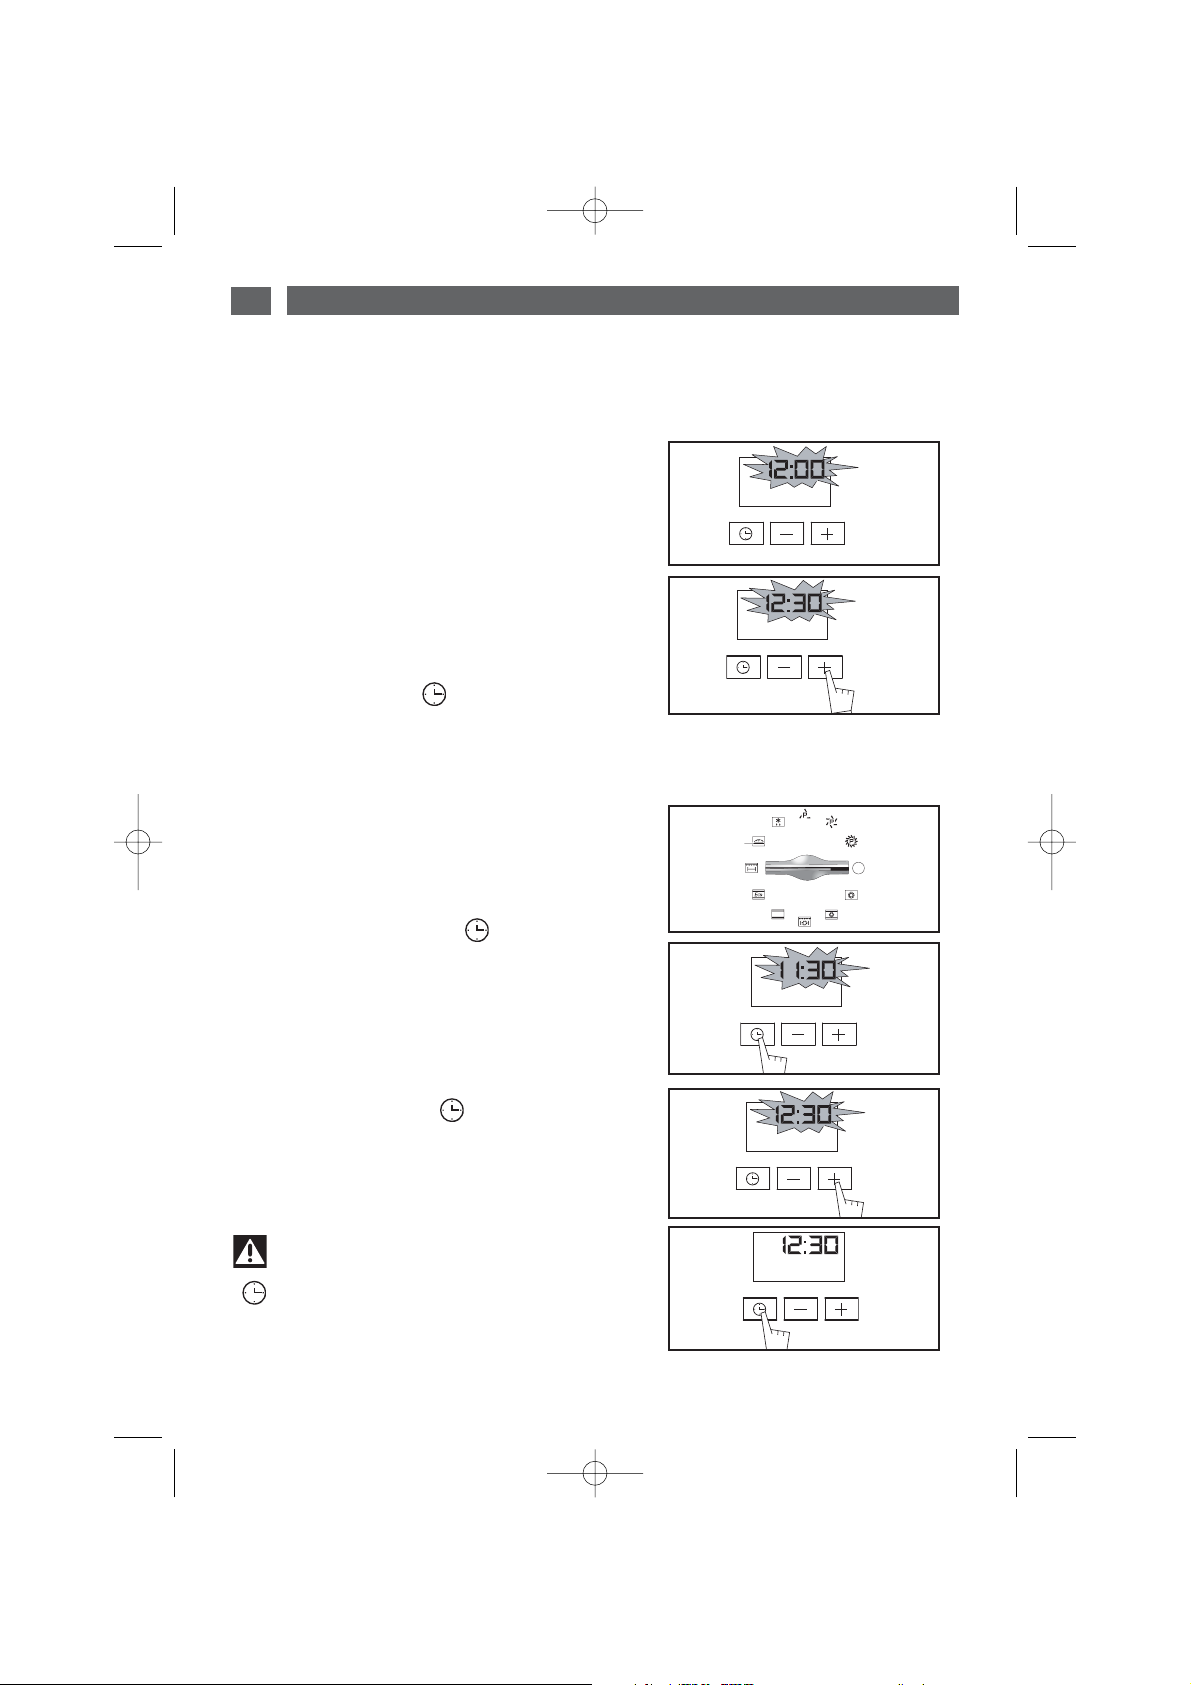
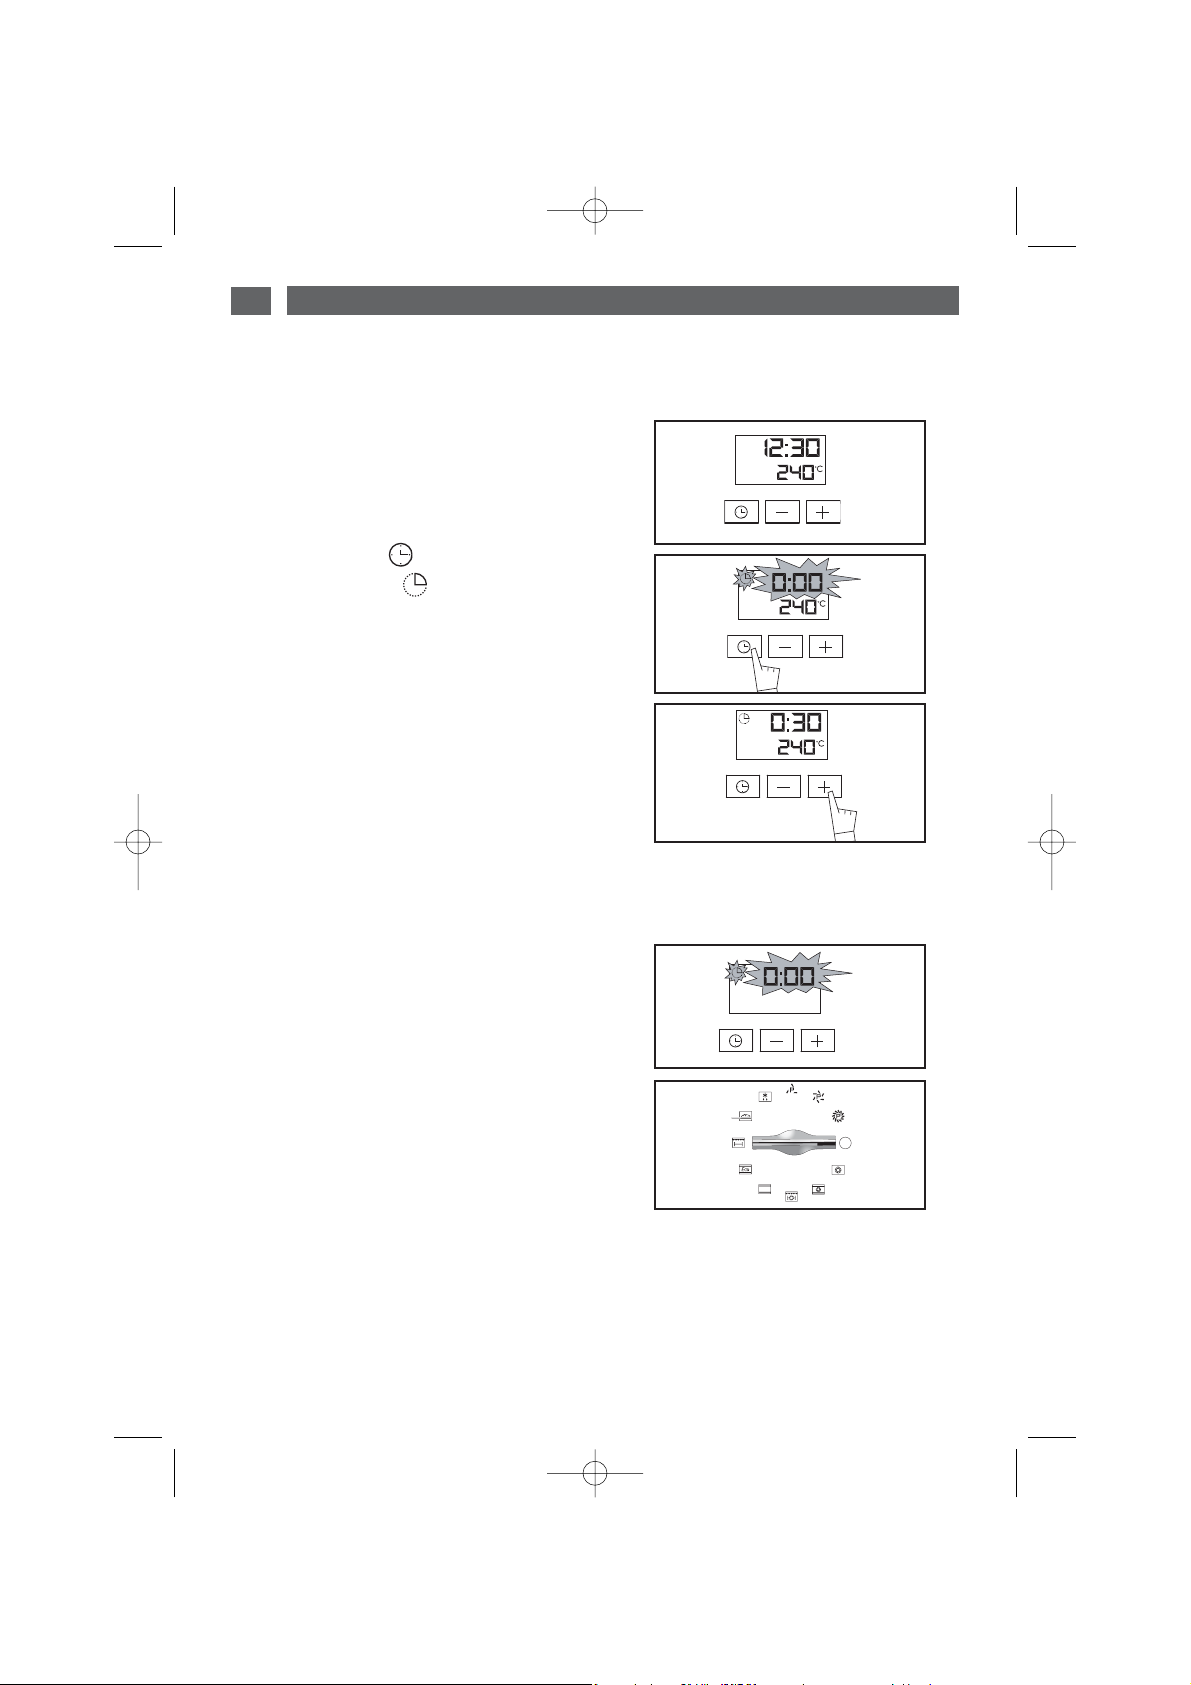
•
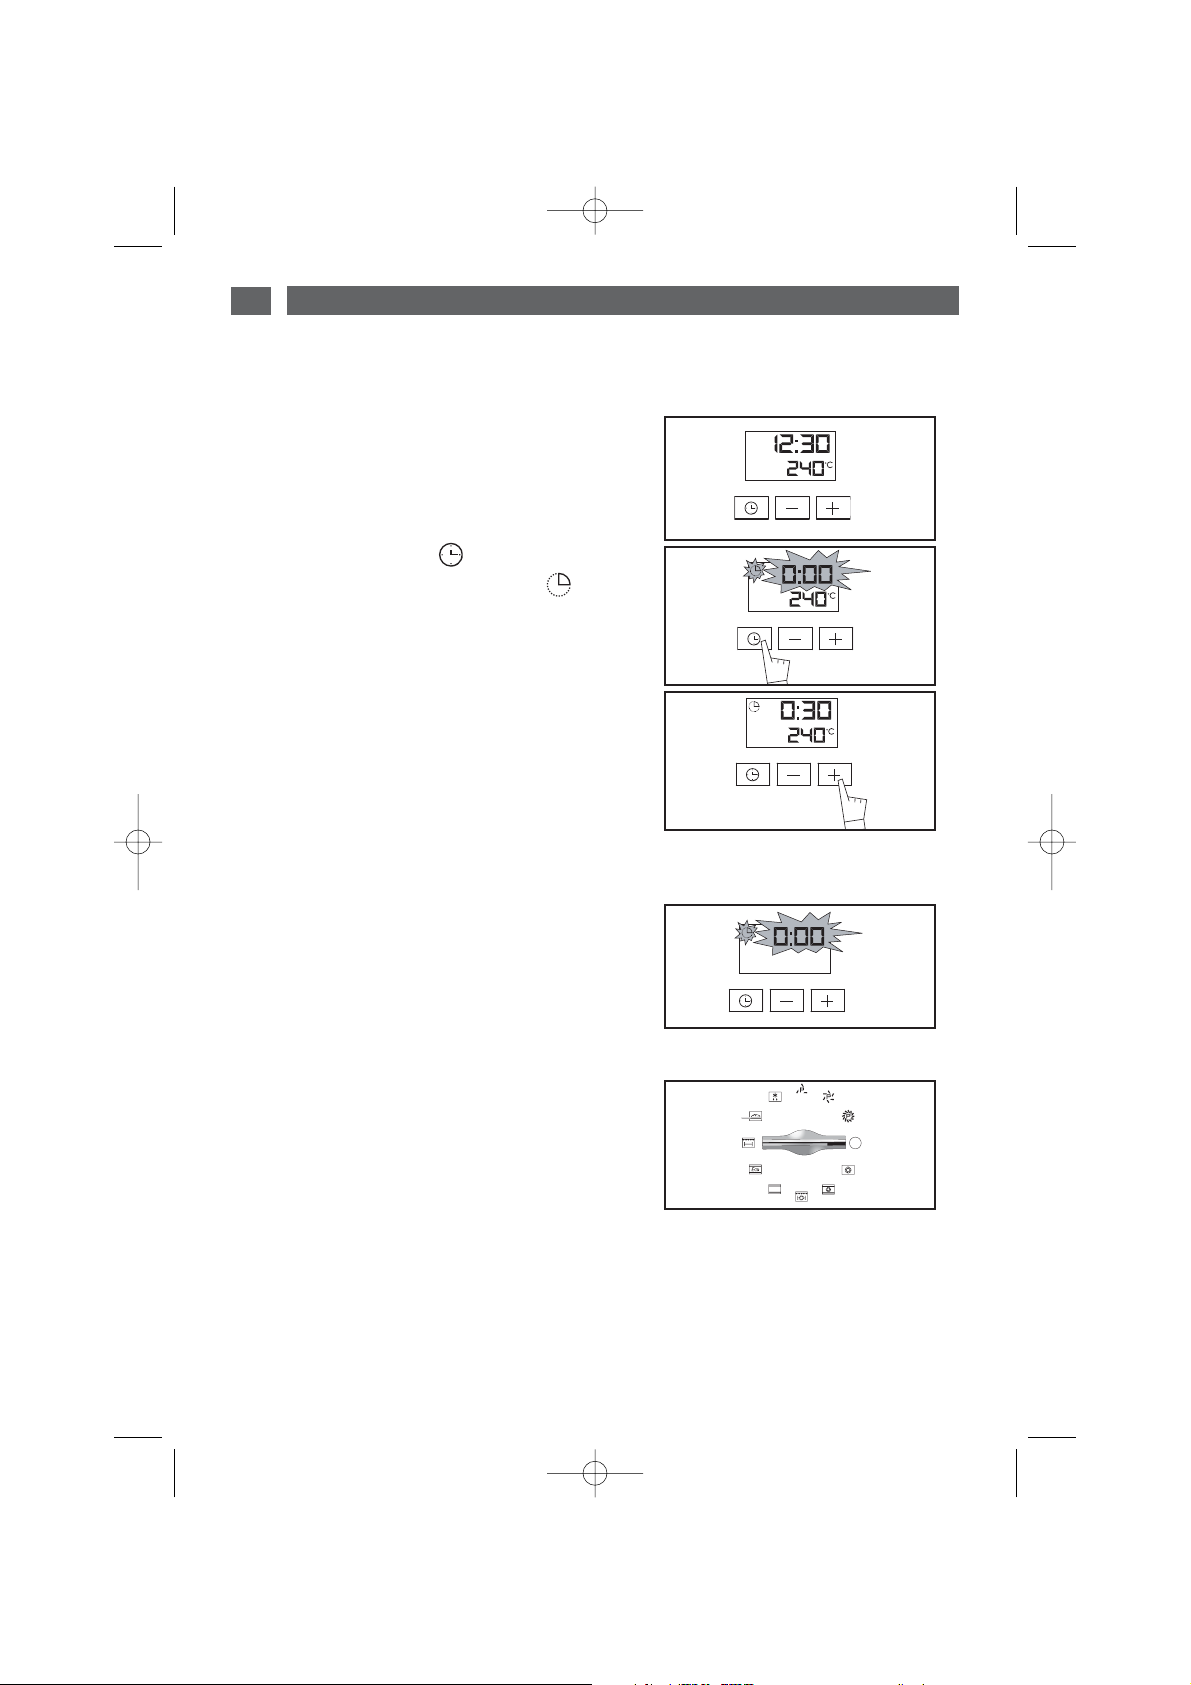
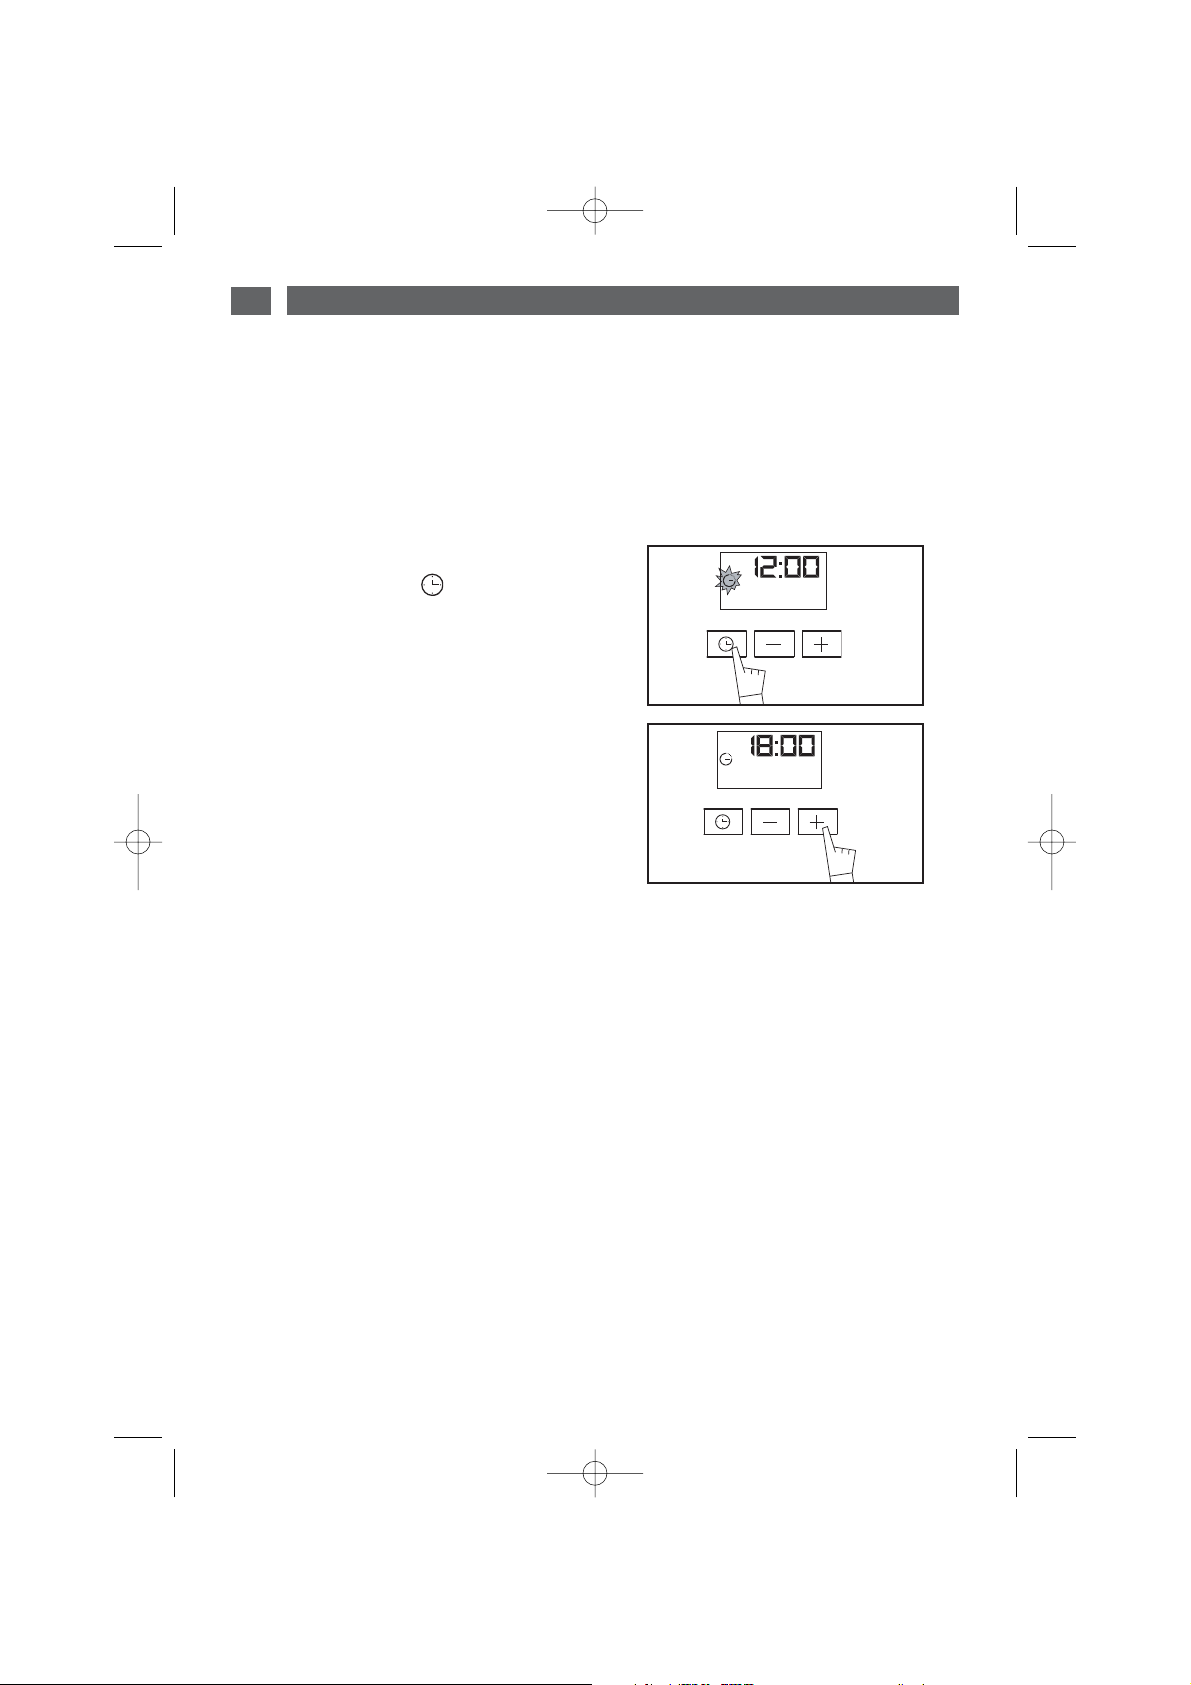
Comment régler l’heure
--
A la mise sous tension
L’afficheur clignote à 12:00 (fig.1).
Réglez l’heure en appuyant sur les touches +
et - (le maintien de la touche permet d’obtenir
un défilement rapide) (fig.2).
Exemple : 12H30
Appuyez sur la touche “ ” pour valider.
L’affichage ne clignote plus.
- Pour remettre à l’heure l’horloge
Le sélecteur de fonction doit obligatoirement
être sur la position 0 (fig.1).
Appuyez sur la touche “ ” pendant
quelques secondes jusqu’à faire clignoter
l’afficheur (fig.2), puis relâchez. Des bips
sonores indiquent que le réglage est alors
possible.
Ajustez le réglage de l’heure avec les
touches + et - (fig.3).
Appuyez sur la touche “ ” pour valider
(fig.4).
fig.1
fig.2
fig.2
fig.3
fig.4
fig.1
Attention
S’il n’y a pas de validation par la touche
“ ”, l’enregistrement est automatique au
bout de quelques secondes.
••
99641611_A_MULTI.qxp 20/03/2007 17:34 Page 6
Page 7
7
2 / UTILISATION DE VOTRE APPAREIL
FR
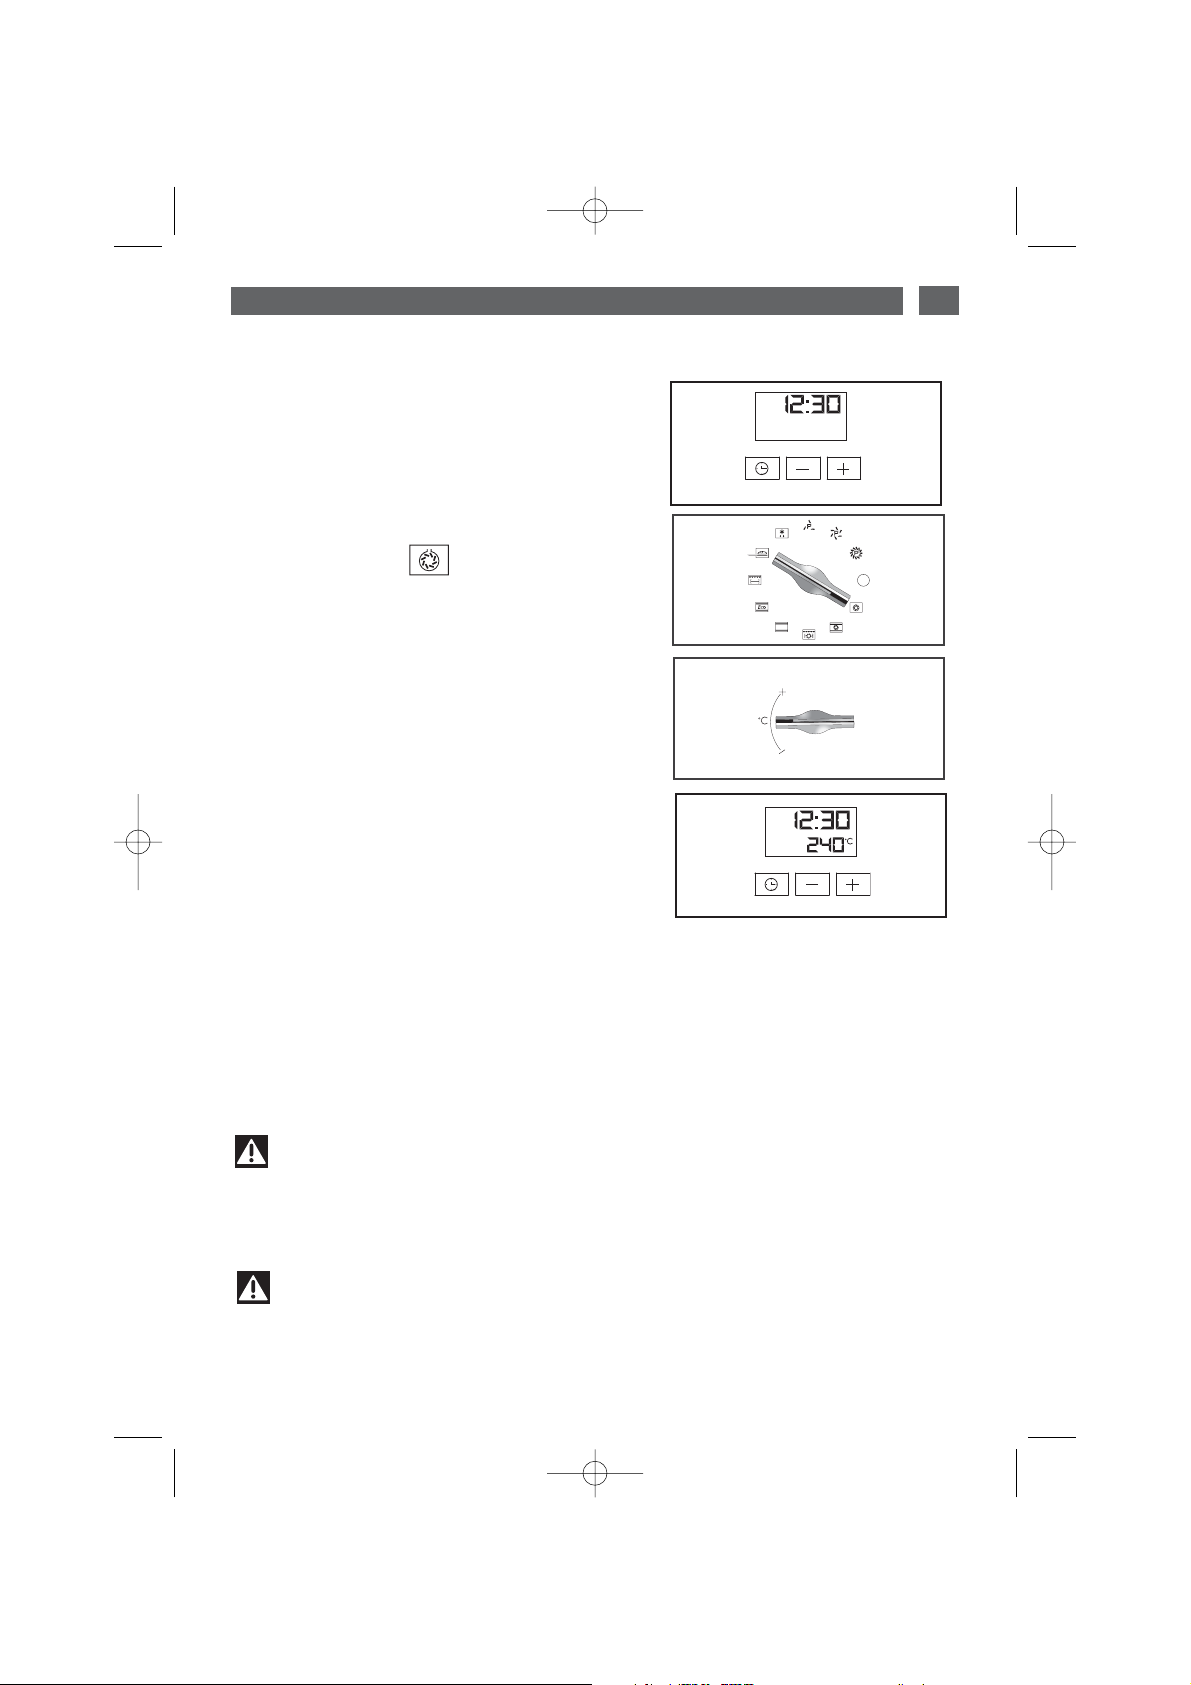
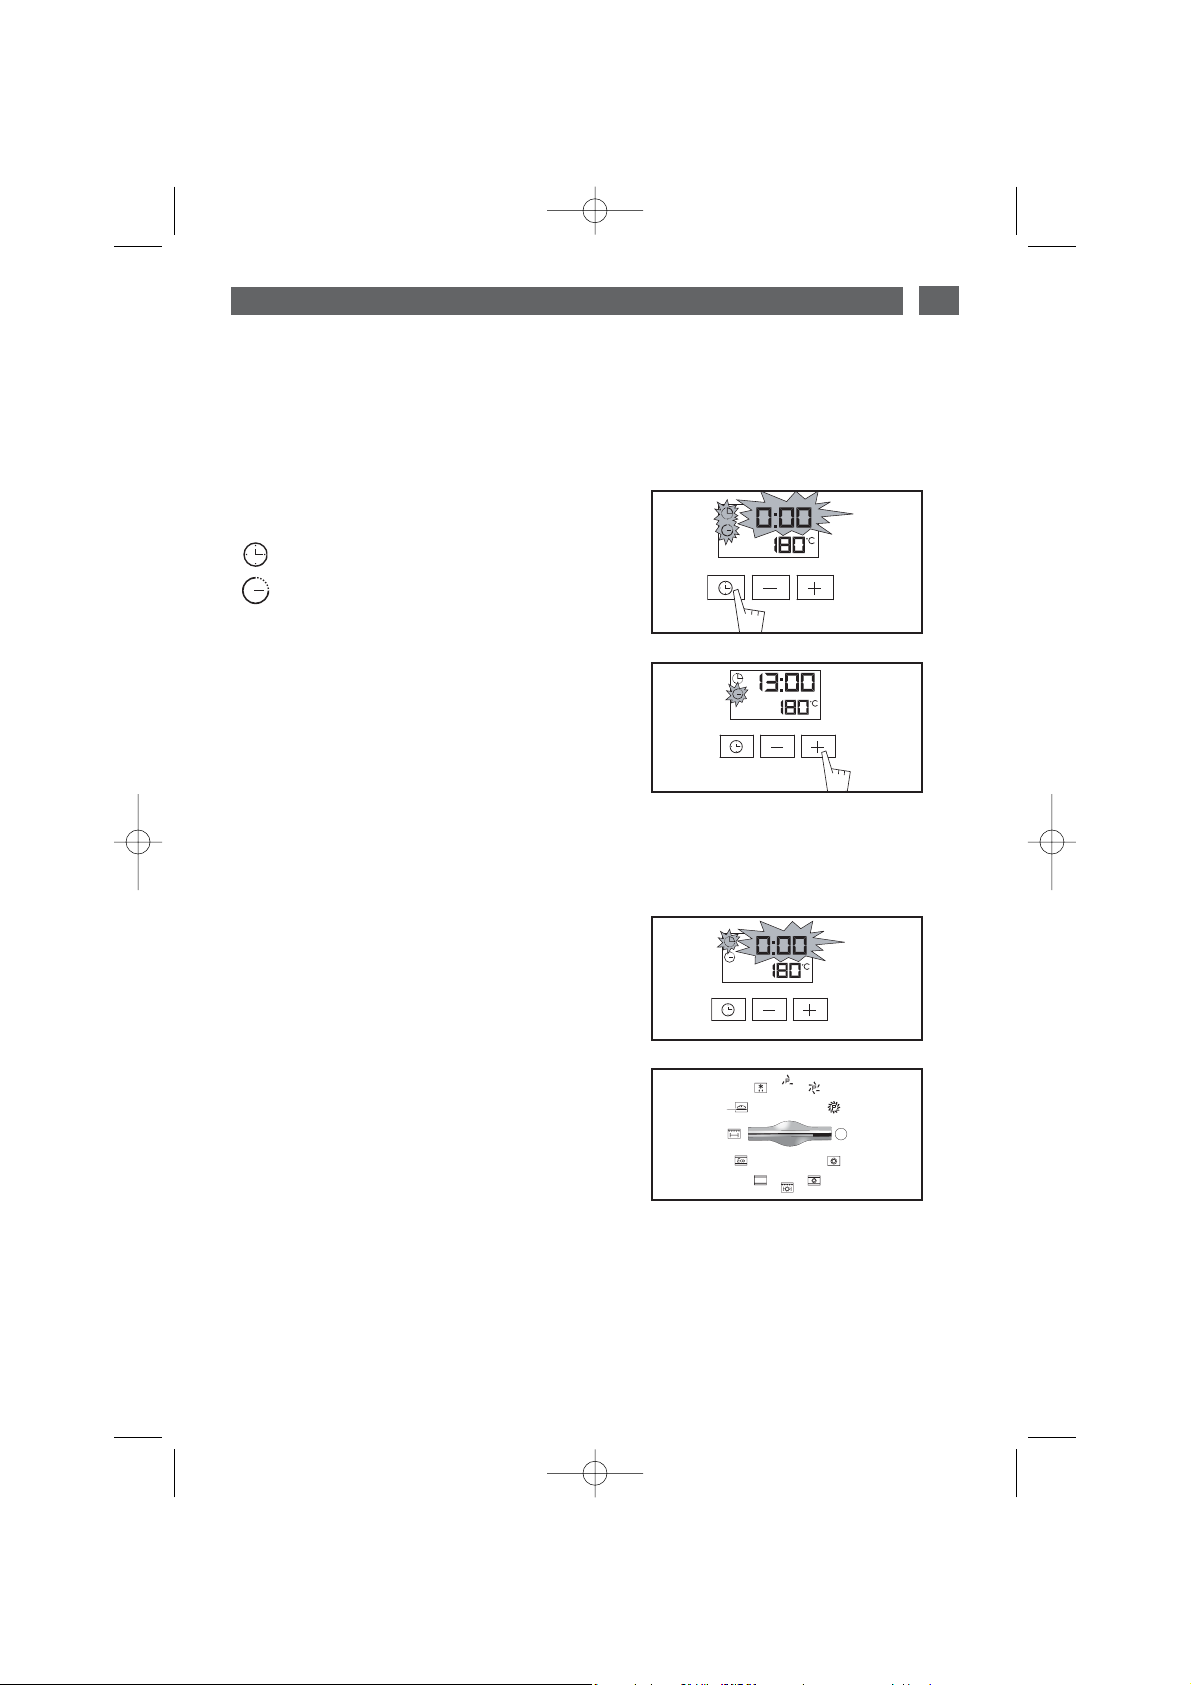
•Cuisson immédiate
— Le programmateur ne doit afficher que
l’heure.
Celle-ci ne doit pas clignoter (fig.1).
Tournez le sélecteur de fonctions sur la position de votre choix.
Exemple : position (fig.2).
Votre four vous propose la température optimale pour ce type de cuisson.
Il vous est cependant possible d’ajuster la
température en actionnant la manette de sélection de température vers ++ou
--
(fig.3).
PPllaacceezz vvoottrree ppllaatt ddaannss llee ffoouurr
selon les recommandations fournies par le guide de cuisson.
Après ces actions, le four chauffe, et l’indicateur de température clignote.
Une série de bips sonores retentit lorsque le
four atteint la température choisie.
Celle-ci cesse de clignoter.
Pour arrêter la cuisson, ramenez le sélecteur
de fonctions sur 0.
fig.2
fig.4
Attention
Toutes les cuissons se font porte fermée.
Attention
Après un cycle de cuisson, la turbine de refroidissement continue de fonctionner
pendant un certain temps, afin de garantir une bonne fiabilité du four.
fig.1
fig.3
99641611_A_MULTI.qxp 20/03/2007 17:34 Page 7
Page 8
8
FR
2 / UTILISATION DE VOTRE APPAREIL
--
Cuisson avec départ immédiat et durée
programmée
- Choisissez le mode de cuisson souhaité et
ajustez la température (fig.1).
- Appuyez sur la touche “ ” jusqu’à faire clignoter l’indicateur de durée de cuisson “ ”.
L’affichage clignote à 0h00 pour indiquer que le
réglage est alors possible (fig.
2).
- Appuyez sur la touche ++ou --pour régler le
temps souhaité.
Exemple : 30 min de cuisson (fig.
3).
L’enregistrement du temps de cuisson est automatique au bout de quelques secondes.
L’affichage de la durée ne clignote plus.
Le décompte de la durée se fait immédiatement
après le réglage.
AApprrèèss cceess 33 aaccttiioonnss,, llee ffoouurr cchhaauuffffee ::
Une série de bips sonores retentit lorsque le four
atteint la température choisie.
En fin de cuisson (fin du temps programmé),
- le four s’arrête,
- l’indicateur de durée de cuisson et 0:00 clignotent (fig.
4),
- une série de bips sonores est émise durant
quelques minutes. L’arrêt définitif de ces bips se
fait en appuyant sur n’importe quelle touche.
L’affichage repasse à l’heure du jour en ramenant
le sélecteur de fonctions sur 0 (fig.
5).
fig.2
fig.3
CUISSON PROGRAMMEE
••
fig.1
fig.4
fig.5
99641611_A_MULTI.qxp 20/03/2007 17:34 Page 8
Page 9
9
FR
2 / UTILISATION DE VOTRE APPAREIL
--
Cuisson avec départ différé et heure de
fin choisie
PPrrooccééddeezz ccoommmmee uunnee ccuuiissssoonn pprrooggrraammmmééee..
- Après le réglage de la durée de cuisson, appuyez sur la touche “ ” jusqu’à faire cli-
gnoter l’indicateur de fin de cuisson “ ”.
L’affichage clignote pour indiquer que le réglage est alors possible (fig.
1).
- Appuyez sur la touche ++ou --pour régler
l’heure de fin de cuisson souhaitée.
Exemple : fin de cuisson à 13h (fig.
2).
L’enregistrement de la fin de cuisson est automatique au bout de quelques secondes.
L’affichage de la fin de cuisson ne clignote
plus.
AApprrèèss cceess 33 aaccttiioonnss,, llee ddééppaarrtt ddee llaa cchhaauuffffee
eesstt ddiifffféérréé ppoouurr qquuee llaa ccuuiissssoonn ssooiitt ffiinniiee àà 1133hh..
En fin de cuisson (fin du temps programmé),
- le four s’arrête,
- l’indicateur de durée de cuisson et 0:00 clignotent (fig.
3),
- une série de bips sonores est émise durant
quelques minutes. L’arrêt définitif de ces bips
se fait en appuyant sur n’importe quelle
touche.
L’affichage repasse à l’heure du jour en ramenant le sélecteur de fonctions sur 0 (fig.
4).
La cavité est éclairée à partir du démarrage
de la cuisson et s’éteint en fin de cuisson.
fig.1
fig.2
fig.3
fig.4
CUISSON PROGRAMMEE
••
99641611_A_MULTI.qxp 20/03/2007 17:34 Page 9
Page 10
10
2 / UTILISATION DE VOTRE APPAREIL
FR
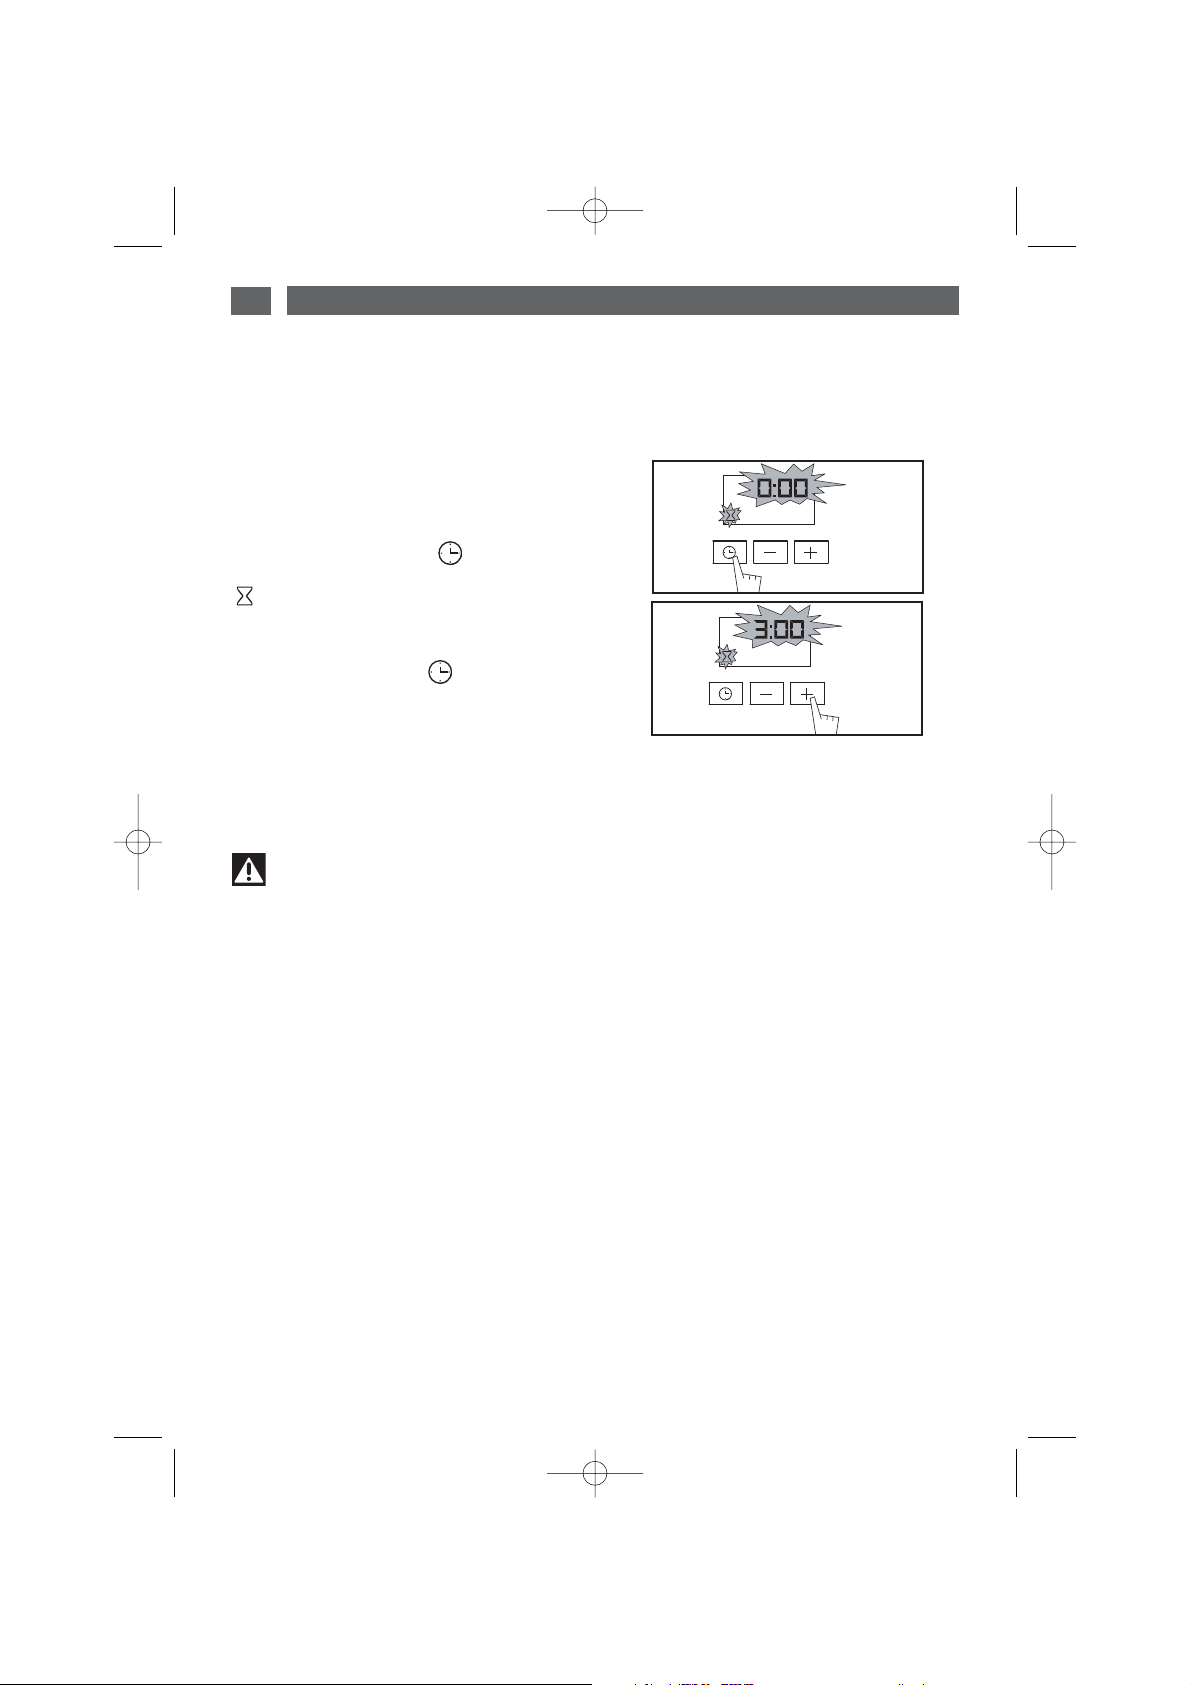
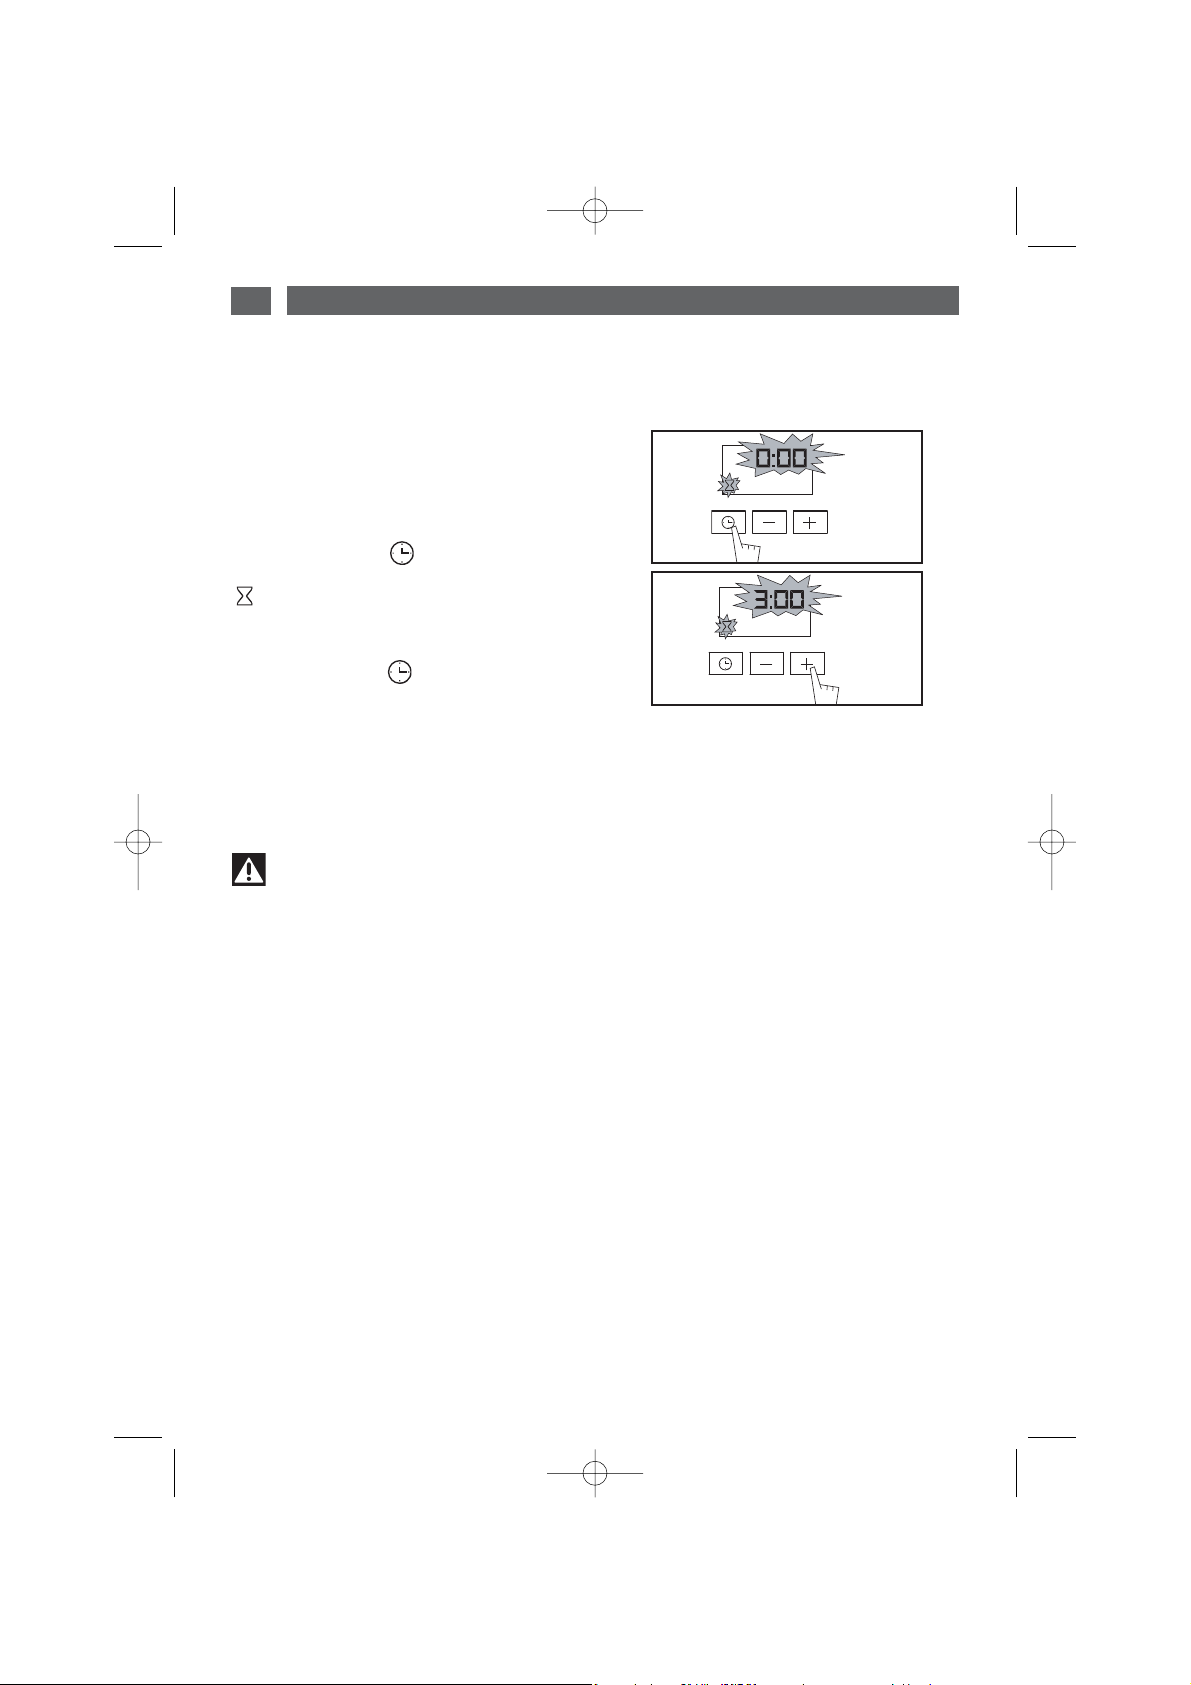
-- LLee pprrooggrraammmmaatteeuurr ddee vvoottrree ffoouurr ppeeuutt êêttrree
uuttiilliisséé ccoommmmee mmiinnuutteerriiee iinnddééppeennddaannttee ppeerr--
mmeettttaanntt ddee ddééccoom
mpptteerr uunn tteemmppss ssaannss ffoonncc--
ttiioonnnneemmeenntt dduu ffoouurr..
Dans ce cas, l’affichage de la minuterie est
prioritaire sur l’afficheur de l’heure du jour.
- Appuyez sur la touche “ ” (fig.1) jusqu’à
faire clignoter le symbole minuterie.
-> 0.00 et un petit sablier clignotent.
- Ajustez le temps choisi en appuyant sur les
touches ++ou
--
(fig.2).
- Appuyez sur la touche “ ” pour valider ou
attendre quelques secondes.
Attention
Il est possible de modifier ou d’annuler à n’importe quel moment la programmation de
la minuterie.
fig.1
fig.2
UTILISATION DE LA FONCTION
MINUTERIE
••
L’afficheur s’arrête de clignoter au bout de quelques secondes et la minuterie se met en marche
et décompte le temps de secondes en secondes.
Une fois la durée écoulée, la minuterie émet une série de bips sonores pour vous avertir.
L’arrêt de ces bips se fait en appuyant sur n’importe quelle touche.
99641611_A_MULTI.qxp 20/03/2007 17:34 Page 10
Page 11

11
3 / LES MODES DE CUISSON DU FOUR
FR
*
Séquences(s) utilisée(s) pour l’annonce écrite sur l’étiquette énergétique conformément à la norme
européenne EN 50304 et selon la directive Européenne 2002/40/CE.
CCHHAALLEEUURR TTOOUURRNNAANNTTEE
(température préconisée
118800°°CC
mini 35°C maxi 235°C)
•
La cuisson s’effectue par l’élément chauffant situé au fond du four et par l’hélice de
brassage d’air.
•
Montée rapide en température : Certains plats peuvent être enfournés four froid.
•
Recommandé pour garder le mœlleux des viandes blanches, poissons, légumes.
Pour les cuissons multiples jusqu’à 3 niveaux.
CCHHAALLEEUURR CCOOMMBBIINNEEEE
(température préconisée
220055°°CC
mini 35°C maxi 275°C)
•
La cuisson s’effectue par les éléments inférieur et supérieur et par l’hélice de brassage
d’air.
•
Trois sources de chaleur associées : beaucoup de chaleur en bas, un peu de chaleur
tournante et un soupcon de gril pour dorer.
•
Recommandé pour les quiches, tourtes, tarte aux fruits juteux, posés dans un plat en
terre de préference.
GGRRIILL PPUULLSSEE ++ TTOOUURRNNEEBBRROOCCHHEE
(température préconisée
220000°°CC
mini 180°C maxi 230°C)
•
La cuisson s'effectue , alternativement, par l’élément supérieur et par l’hélice de bras-
sage d’air.
•
Préchauffage inutile. Volailles et rôtis juteux et croustillants sur toutes les faces.
•
Le tournebroche continue de fonctionner jusqu’à l’ouverture de la porte.
•
Glissez la léchefrite au gradin du bas.
•
Recommandé pour toutes les volailles ou rôtis au tourne broche, pour saisir et cuire à
cœur gigot, côtes de bœuf. Pour garder leur fondant aux pavés de poissons.
TTRRAADDIITTIIOONNNNEELL
(température préconisée
224400°°CC
mini 35°C maxi 275°C)
•
La cuisson s’effectue par l’élément inférieur et supérieur.
•
Après un préchauffage, vous cuirez la majorité de vos plats, recommandé pour garder
le mœlleux des viandes blanches, poissons, légumes.
EECCOO
(température préconisée
220000°°CC
mini 35°C maxi 275°C)
•
La cuisson s'effectue par les éléments inférieur et supérieur.
•
Cette position permet de faire un gain d’énergie tout en conservant les qualités de cuis-
son.
•
La position ECO est utilisée pour l’étiquetage énergétique.
•
Toutes les cuissons se font
ssaannss pprréécchhaauuffffaaggee..
*
*
99641611_A_MULTI.qxp 20/03/2007 17:34 Page 11
Page 12

12
3 / LES MODES DE CUISSON DU FOUR
FR
GGRRIILL FFOORRTT ++ TTOOUURRNNEEBBRROOCCHHEE
(position préconisée 44- mini 1 - maxi 4)
•
La cuisson s'effectue par l’élément supérieur.
•
Le gril fort couvre toute la surface de la grille.
•
Il est recommandé pour griller les côtelettes, saucisses, tranches de pain, gambas
posées sur la grille.
PPAAIINN
(température préconisée
220055°°CC
mini 35°C maxi 275°C)
•
Séquence de cuisson préconisée pour la cuisson du pain.
•
Après un préchauffage, posez la boule de pain sur le plat pâtisserie - 2ème gradin.
•
N’oubliez pas de déposer un ramequin d’eau sur la sole pour obtenir une croûte crous-
tillante et dorée.
99641611_A_MULTI.qxp 20/03/2007 17:34 Page 12
Page 13
13
4 / ENTRETIEN ET NETTOYAGE DE VOTRE FOUR
FR
fig.1
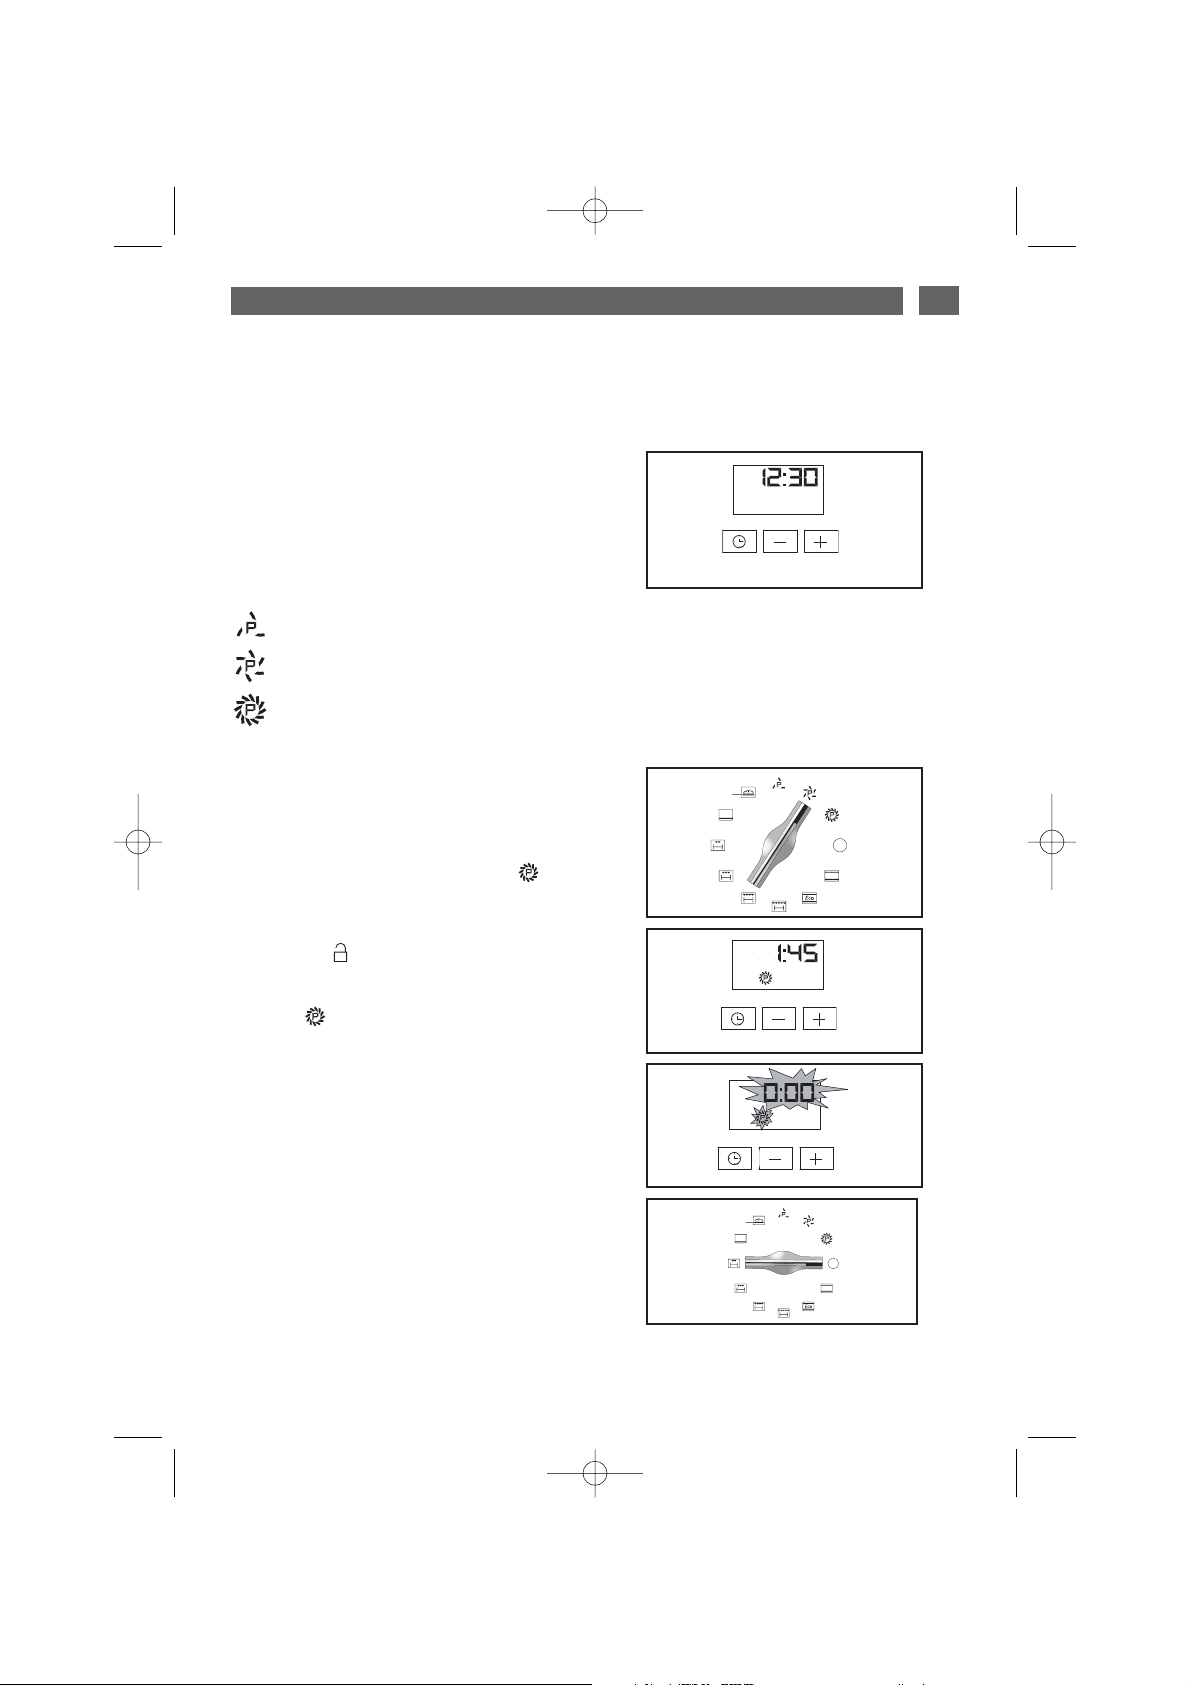
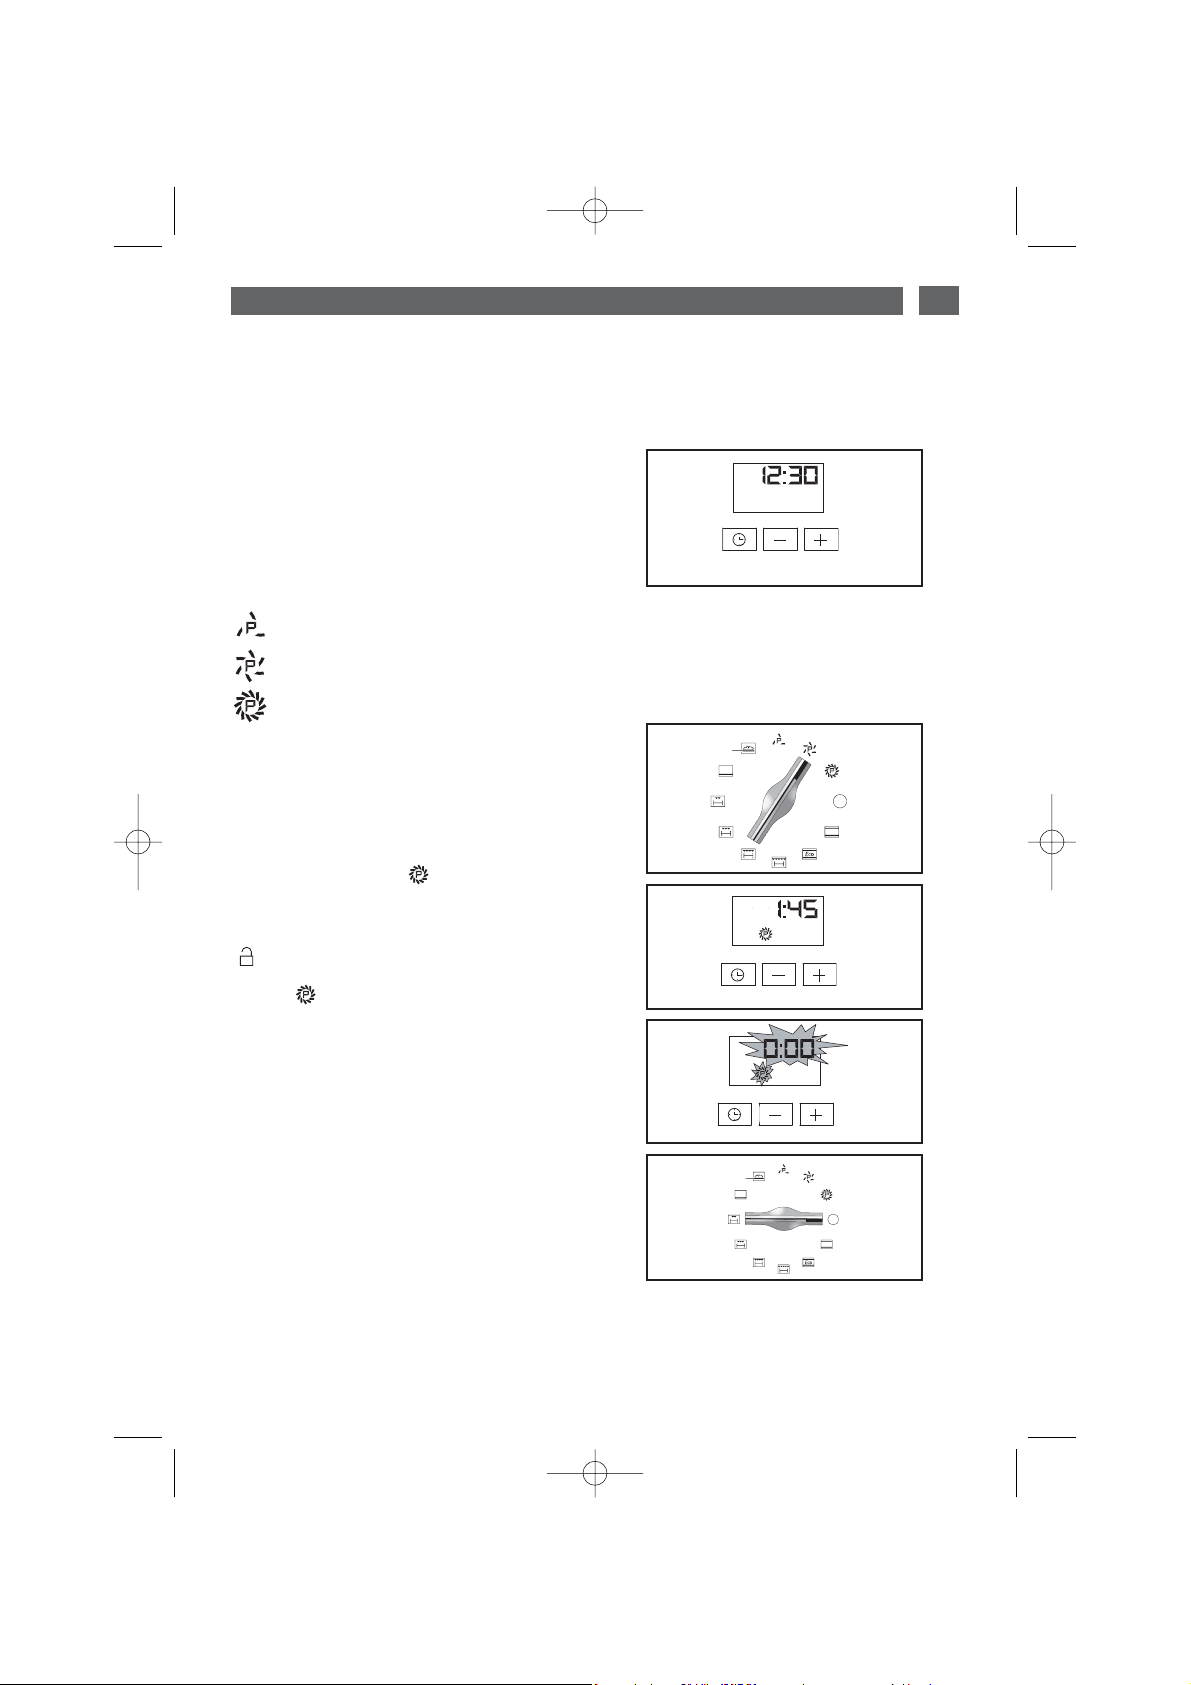
•Pyrolyse immédiate
--
Retirez la casserolerie du four et enlevez les
débordements importants qui auraient pu se
produire.
--
Vérifiez que le programmateur affiche l’heure
du jour et que celle-ci ne clignote pas (fig.1).
Vous avez la possibilité de choisir 3 durées de
cycle pyrolyse :
durée de pyrolyse de 1 heure 30.
durée de pyrolyse de 1 heure 45.
durée de pyrolyse de 2 heures.
--
Tounez le sélecteur de fonctions sur la posi-
tion de pyrolyse désirée.
Exemple: 1 heure 45 (fig.2).
Au départ de la pyrolyse, le symbole s’affiche dans le programmateur ainsi que la
durée du cycle de pyrolyse (fig.3).
Le symbole s’affiche dans le programmateur vous indiquant que la porte est verrouillée.
En fin de pyrolyse, 0:00 clignote ainsi que le
symbole (fig.4).
Pour retrouver l’affichage de l’heure, tournez
le sélecteur de fonctions sur la position arrêt
(fig.5).
- Lorsque le four est froid, utilisez un chiffon humide
pour enlever la cendre blanche.
Le four est propre et à nouveau utilisable pour effectuer une cuisson de votre choix.
Remarques : La température de nettoyage
n’est pas modifiable. Durant le cycle de pyrolyse, l’éclairage est éteint. Si votre four n’est pas
propre après une pyrolyse, vous avez attendu
trop longtemps. Renouvellez l’opération.
FAIRE UNE PYROLYSE
••
fig.2
fig.3
fig.4
fig.5
99641611_A_MULTI.qxp 20/03/2007 17:34 Page 13
Page 14
14
4 / ENTRETIEN ET NETTOYAGE DE VOTRE FOUR
FR
fig.1
•Pyrolyse différée
--
Suivre les instructions décrites dans le para-
graphe “Pyrolyse immédiate” puis:
--
Tounez le sélecteur de fonctions sur la posi-
tion de pyrolyse désirée.
- Appuyez sur la touche .
Le symbole fin de cuisson clignote pour indiquer que le réglage est alors possible (fig.1).
- Appuyez sur la touche + ou - pour régler
l’heure de fin souhaitée (fig.2).
Exemple : fin de nettoyage à 18 heures.
--
Après ces actions, le départ de la pyrolyse est
différé pour qu’elle se termine à 18 heures.
Lorsque votre pyrolyse est terminée, remettez le
sélecteur de fonctions sur arrêt.
FAIRE UNE PYROLYSE
••
fig.2
99641611_A_MULTI.qxp 20/03/2007 17:34 Page 14
Page 15
15
5 / SERVICE APRES-VENTE
FR
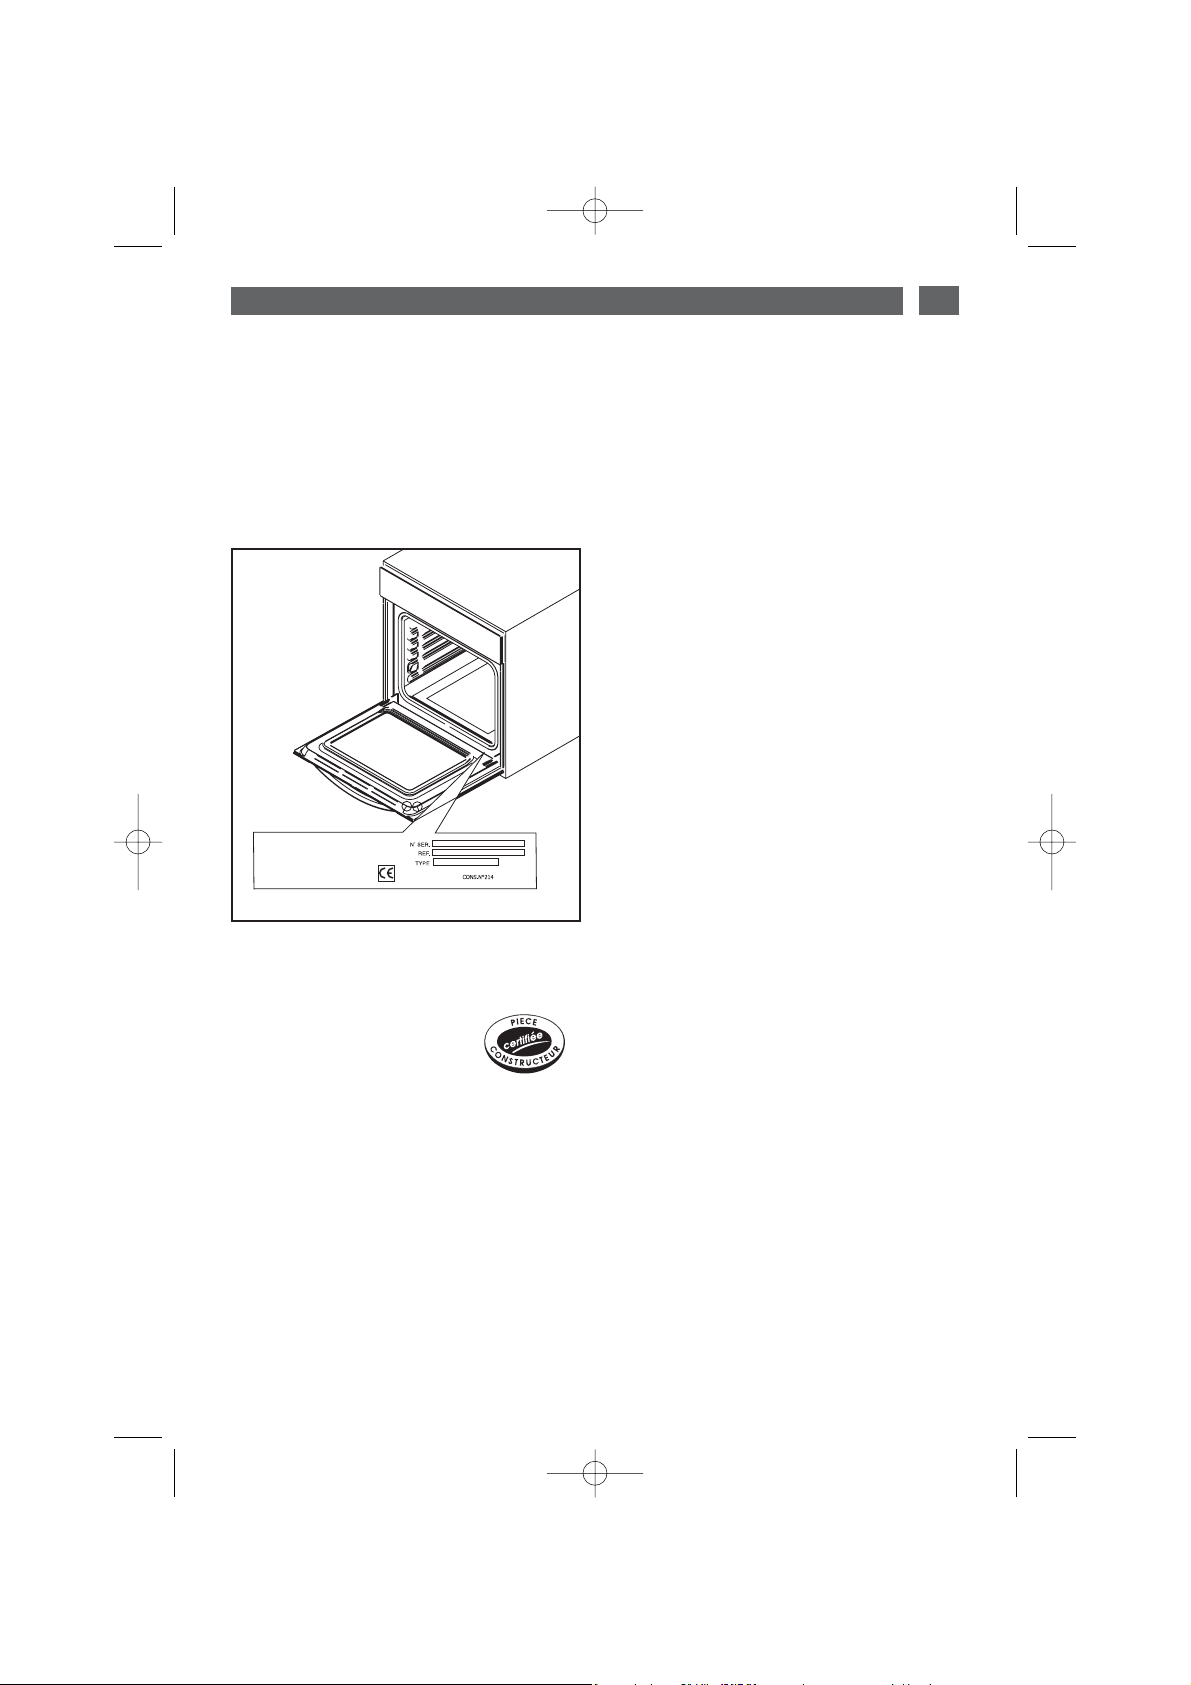
Les éventuelles interventions sur votre appareil doivent être effectuées par un professionnel qualifié dépositaire de la marque. Lors de
votre appel, mentionnez la référence complète
de votre appareil (modèle, type, numéro de série). Ces renseignements figurent sur la plaque
signalétique
(fig.1).
PIÈCES D’ORIGINE
Lors d’une intervention d’entretien, deman-
dez l'utilisation exclusive de
pièces déta-
chées certifiées d’origine.
•INTERVENTIONS
•RELATIONS CONSOMMATEURS
**
Service fourni par Brandt Customer Services, société par actions simplifiée au capital de 2.5000.000 euros,
5/7 avenue des Béthunes, 95310 Saint Ouen l’Aumône - RCS Pontoise 440 303 303
BBrraannddtt AApppplliiaanncceess
- société par actions simplifiée au capital de 10.000.000 euros RCS Nanterre 440 302 347.
BRANDT APPLIANCES SAS
7 rue Henri Becquerel
92500 RUEIL MALMAISON
230V ~ 50 Hz
MADE IN FRANCE
fig.1
•Pour en savoir plus sur tous les produits de
la marque :
informations, conseils, les points de vente, les
spécialistes après-vente.
•Pour communiquer :
nous sommes à l'écoute de toutes vos remarques, suggestions, propositions auxquelles nous vous répondrons personnellement.
> Vous pouvez nous écrire :
Service Consommateurs
DE DIETRICH
BP 9526
95069 CERGY PONTOISE CEDEX
> ou nous téléphoner au :
Tarif en vigueur au 1er avril 2004
99641611_A_MULTI.qxp 20/03/2007 17:34 Page 15
Page 16
16
FR
02
DE
44
EN
58
ES
72
IT
86
NL
100
PT
114
DA
30
CS
16
Vážená zákaznice, vážený zákazníku,
Právě jste zakoupil(-a) troubu
DDEE DDIIEETTRRIICCHH
za což Vám děkujeme.
Naši výzkumní pracovníci pro Vás vyvinuli tuto novou generaci
přístrojů, které jsou díky své kvalitě, estetickému vzhledu a úrovni
technologického vývoje výjimečnými výrobky a bezpochyby dokazují
naše know-how.
Vaše nová trouba
DDEE DDIIEETTRRIICCHH
harmonicky zapadne do Vaší kuchyně
a dokonale sloučí funkce pečení s jednoduchostí obsluhy. Přáli jsme
si nabídnout Vám výrobek výborné jakosti.
Ve škále výrobků pod značkou
DDEE DDIIEETTRRIICCHH
najdete také širokou
nabídku sporáků, varných desek, digestorů, myček nádobí a
integrovatelných chladniček, které můžete doplnit k Vaší nové troubě
DDEE DDIIEETTRRIICCHH
.
Snažíme se neustále co nejlépe uspokojovat požadavky, které kladete
na naše výrobky, a proto pracovníci našeho oddělení péče o zákazníky
kdykoliv rádi odpoví na Vaše dotazy nebo náměty (kontakty na konci
této brožury).
Připojte se na naši internetovou stránku:
wwwwww..ddeeddiieettrriicchh--eelleeccttrroommeennaaggeerr..ccoomm
kde najdete naše nejnovější
inovace a také užitečné a doplňující informace.
DDEE DDIIEETTRRIICCHH
NNoovvéé hhooddnnoottnnéé ppřřeeddmměěttyy
Ve snaze neustále zlepšovat naše výrobky si vyhrazujeme právo provádět změny jejich
technických, funkčních nebo vzhledových vlastností v souvislosti s technickým vývojem.
Důležité
Před instalací a použitím přístroje si pozorně přečtěte tento návod na instalaci a
použití, abyste se rychle seznámili s jeho funkcemi.
99641611_A_MULTI.qxp 20/03/2007 17:34 Page 16
Page 17

17
OBSAH
CS
1 / POPIS VAŠEHO SPOTŘEBIČE
••
Popis přístroje
_____________________________________________
18
••
Příslušenství
______________________________________________
18
••
Popis programačního panelu
_________________________________
19
2 / POUŽITÍ PŘÍSTROJE
••
Ovládání programačního panelu
º
Jak nastavit čas
________________________________________
20
º
Okamžitý start
_________________________________________
21
••
Pečení naprogramované
º
Okamžitý start
_________________________________________
22
º
Odložený start
_________________________________________
23
••
Použití funkce minutky
______________________________________
24
3 / RŮZNÉ ZPŮSOBY PEČENÍ V TROUBĚ
___________________________
25
4 / ÚDRŽBA A ČIŠTĚNÍ PŘÍSTROJE
________________________________
27
5 / POPRODEJNÍ SERVIS
••
Opravy
___________________________________________________
29
99641611_A_MULTI.qxp 20/03/2007 17:34 Page 17
Page 18
18
1 / POPIS VAŠEHO SPOTŘEBIČE
CS
POPIS PŘÍSTROJE
••
A
B
Programový panel
Volič funkcí
Volič funkcí
C
D
E
Žárovka
Stupeň lišty
E
D
B
A
C
•Příslušenství
Váš přístroj je vybaven dvěmi bezpečnostními mřížkami s úchytkou, jedním grilem s úchytkou
pro plech o 45mm, formou na pečení Lissium a plechem 45mm.
99641611_A_MULTI.qxp 20/03/2007 17:34 Page 18
Page 19

19
1 / POPIS VAŠEHO SPOTŘEBIČE
CS
POPIS PROGRAMAČNÍHO PANELU
••
A
D
A
B
Zobrazení času a doby pečení
Ukazatel doby pečení
Ukazatel konce pečení
Ukazatel minutky
C
D
E
Ukazatel uzamčení
Ukazatel čištění
Zobrazení teploty
Tlačítko výběru (dob a hodin)
Tlačítka pro nastavení času
F
G
G
H
H
C
B
F
I
E
I
99641611_A_MULTI.qxp 20/03/2007 17:34 Page 19
Page 20

20
2 / POUŽITÍ PŘÍSTROJE
CS
OVLÁDÁNÍ PROGRAMAČNÍHO PANELU
•
Jak nastavit čas
--
Při zapojení do elektrické sítě
Na displeji bliká údaj 12:00h (obr.1).
Nastavte hodinu stiskem tlačítka + nebo (přidržením prstu na tlačítku umožníte
rychlejší změnu hodin) (obr.2)
Příklad: 12H30
Potvrďte stiskem tlačítka “ ”.
Hodiny přestanou blikat.
- Pro seřízení hodin
Musí být volič funkcí v poloze 0 (obr.1).
Stiskněte tlačítko “ ” a přidržte jej, až
začne blikat symbol doby pečení (obr.2), pak
pusťte. Zvukové signály značí, že je možno
provést nastavení.
Seřiďte hodiny pomocí tlačítka + nebo (obr.3).
Stiskem tlačítka nastavení potvrdíte
(obr.4).
obr.1
obr.2
obr.2
obr.3
obr.4
obr.1
Pozor
Pokud nedošlo k potvrzení
tlačítkem “ ”, nastavení se za několik
vteřin uloží automaticky.
••
99641611_A_MULTI.qxp 20/03/2007 17:35 Page 20
Page 21

21
2 / POUŽITÍ PŘÍSTROJE
CS
•Okamžitý start
— Programátor má zobrazovat pouze hodiny.
Ty nesmějí blikat (obr.1).
Otočte volič funkcí do zvolené polohy.
Příklad: pozice (obr.2).
Trouba Vám navrhne optimální teplotu pro
zvolený způsob pečení :
Nyní můžete nastavit teplotu otočením
výběrového knoflíku směrem k ++nebo
--
(obr.3).
ZZaassuuňňttee ppookkrrmm ddoo ttrroouubbyy
podle doporučení,
uvedených v návodu k pečení.
Po provedení těchto úkonů se trouba začne
vyhřívat a kontrolka termostatu se rozsvítí.
Jakmile trouba dosáhne nastavené teploty,
ozve se série zvukových signálů.
Kontrolka přestane blikat.
Pro ukončení pečení vraťte volič funkcí do
polohy 0.
obr.2
obr.4
Pozor
Dbejte na to, aby byla dvířka při pečení zavřená.
Pozor
Po dokončení cyklu pečení je chladicí turbína ještě po nějakou dobu v provozu, aby
byla zachována dobrá spolehlivost trouby.
obr.1
obr.3
99641611_A_MULTI.qxp 20/03/2007 17:35 Page 21
Page 22
22
CS
2 / POUŽITÍ PŘÍSTROJE
--
Pečení s okamžitým startem a
naprogramovanou dobou.
- Vyberte způsob pečení a nastavte teplotu
(obr.1).
Stiskněte tlačítko “ ”, dokud nezačne blikat
ukazatel doby pečení .
Na displeji bliká 0h00, což Vám oznamuje, že lze
provést nastavení (obr.
2).
- Stiskněte tlačítko ++nebo--, čímž nastavíte
požadovanou dobu.
Příklad: Pečení po dobu 30 min (obr.
3).
Uložení konce pečení se provede automaticky po
několika vteřinách.
Zobrazená doba pečení už nebliká.
Doba pečení se začne odpočítávat ihned po
nastavení.
PPoo ttěěcchhttoo 33 úúkkoonneecchh ssee ttrroouubbaa zzaaččnnee vvyyhhřříívvaatt::
Jakmile trouba dosáhne nastavené teploty, ozve
se série zvukových signálů.
Na konci pečení (konec naprogramovaného času)
- trouba se zastaví,
- symbol doby pečení a 0:00 blikají (obr.
4),
- během několika minut se vydávají zvukové
signály. Definitivne je zastavíte stlačením
jakéhokoliv tlačítka.
Zobrazení na displeji se vrátí na zobrazení času,
když vrátíme volič funkcí do polohy 0 (obr.5
).
obr.2
obr.3
PEČENÍ NAPROGRAMOVANÉ
••
obr.1
obr.4
obr.5
99641611_A_MULTI.qxp 20/03/2007 17:35 Page 22
Page 23
23
CS
2 / POUŽITÍ PŘÍSTROJE
--
Pečení s posunutým začátkem a
zvolená hodina konce pečení
PPoossttuuppuujjttee jjaakkoo uu nnaapprrooggrraammoovvaannééhhoo ppeeččeenníí..
- Po nastavení délky pečení, stiskněte tlačítko
“ ”, až začne blikat symbol konce pečení
“ ” symbol bliká, čímž oznamuje, že je
možno provést nastavení (obr.
1).
Stiskněte tlačítko ++nebo --, čímž nastavíte
požadovanou hodinu konce pečení.
Příklad: Konec pečení ve 13h (obr.
2).
Uložení konce pečení se provede automaticky
po několika vteřinách.
Zobrazení konce pečení již nebliká.
PPoo ttěěcchhttoo 33 úúkkoonneecchh jjee zzaaččáátteekk vvyyhhřříívváánníí
ooddlloožžeenn ttaakk,, aabbyy ppeeččeenníí sskkoonnččiilloo vvee 1133hh..
Na konci pečení (konec naprogramovaného
času)
- trouba se zastaví,
- ukazatel doby pečení a 0:00 blikají (obr.
3),
- během několika minut se vydávají zvukové
signály. Definitivne je zastavíte stlačením
jakéhokoliv tlačítka.
Zobrazení se vrátí na hodiny, když vrátíme
volič funkcí na 0 (obr.
4).
Vnitřek trouby je osvětlen od začátku pečení a
zhasne na konci pečení.
obr.1
obr.2
obr.3
obr.4
PEČENÍ NAPROGRAMOVANÉ
••
99641611_A_MULTI.qxp 20/03/2007 17:35 Page 23
Page 24
24
2 / POUŽITÍ PŘÍSTROJE
CS
-- PPrrooggrraammoovvýý ppaanneell VVaaššíí ttrroouubbyy mmůůžžee bbýýtt
ppoouužžíívváánn jjaakkoo nneezzáávviisslléé ooddppooččííttaaddlloo,,
uummoožžnnuujjííccíí ooddppooččííttáávvaatt č
čaass,, aanniižž bbyy bbyyllaa
ttrroouubbaa zzaappnnuuttaa..
V tomto případě má zobrazení minutky
přednost před zobrazením hodiny dne.
- Stiskněte tlačítko “ ” (obr.1) a podržte jej,
dokud nezačne blikat symbol minutky.
-> 0.00 et symbol minutky blikají.
- Nařiďte požadovaný čas stiskem tlačítek
++
nebo
--
(obr.2).
- Stiskem tlačítka “ ” potvrďte nastavení,
nebo vyčkejte několik vteřin.
Pozor
Naprogramování minutky lze kdykoliv změnit nebo zrušit.
obr.1
obr.2
POUŽITÍ FUNKCE MINUTKY
••
Zobrazení po několika vteřinách přestane blikat a zapne se minutka, která začne po vteřinách
odpočítávat čas.
Po uplynutí doby začne časový spínač vydávat sérii zvukových signálů, aby Vás upozornil.
Zvukové signály vypněte stlačením kteréhokoliv tlačítka.
99641611_A_MULTI.qxp 20/03/2007 17:35 Page 24
Page 25

25
3 / RŮZNÉ ZPŮSOBY PEČENÍ V TROUBĚ
CS
*
Sekvence používaná(é) pro oznam, uvedený na energetické etiketě podle evropské normy EN 50304 a
podle Evropské směrnice 2002/40/ES.
VVÍÍŘŘEENNÍÍ HHOORRKKÉÉHHOO VVZZDDUUCCHHUU
(doporučená teplota
118800°°CC
min. 35°C max. 235°C)
•
Pečení vyhřívacím tělesem umístěným v zadní části trouby a vrtulí rozhánění vzduchu.
•
Rychlý vzestup teploty : Některé pokrmy je možno vložit do nevyhřáté trouby.
•
Doporučuje se k uchování lahodné měkkosti bílých mas, ryb, zeleniny.
Pro vícenásobné pečení až na 3 etapy.
KKOOMMBBIINNOOVVAANNÝÝ HHOORRKKÝÝ VVZZDDUUCCHH
(doporučená teplota
220055°°CC
min. 35°C max. 275°C)
•
Pečení uskutečnuje dolní a horní těleso a vrtule rozhánění vzduchu.
•
Tři sdužené zdroje tepla : silné vyhřívání odspodu, trocha vířivého horkého vzduchu a
špetka grilu na zbarvení dozlatova.
•
Doporučuje se pro slané koláče quiche, koláče s náplní, šťavnaté ovocné koláče,
nejlépe v hliněné formě.
GGRRIILL ++ OOTTÁÁČČEECCÍÍ RROOŽžEEŇŇ
(doporučená teplota
220000°°CC
min. 180°C max. 230°C)
•
Peče se střídavě, shora a rozháněním vzduchu vrtulí rozhánění vzduchu.
•
Předehřátí není nutné. Drůbež a pečeně šťavnaté a křupavé ze všech stran
•
Otáčecí rožeň je dále v provozu až do otevření dvíře.
•
Zasuňte plech na zachytávání tuku do spodní vodící lišty.
•
Doporučuje se pro drůbeží maso nebo pečeně na rožni, pro jejich uchycení a dobré
propečení, pro hovězí žebírka. Pro zachování šťavnatosti kousků ryb.
TTRRAADDIIČČNNÍÍ
(doporučená teplota
224400°°CC
min. 35°C max. 275°C)
•
Ohřev dolním a horním tělesem.
•
Po předehřátí takto upečete většinu Vašich jídel, doporučené pro zachování měkkosti
bílých mas, ryb, zeleniny.
EECCOO
(doporučená teplota
220000°°CC
min. 35°C max. 275°C)
•
Pečení shora a zespodu.
•
Tato volba umožňuje dosáhnout úspory energie a přitom zachovat skvělé vlastnosti
pečení.
•
Volba ECO se používá pro energetické etikety.
•
Pečení se děje
bbeezz ppřřeeddeehhřřááttíí..
*
*
99641611_A_MULTI.qxp 20/03/2007 17:35 Page 25
Page 26

26
3 / RŮZNÉ ZPŮSOBY PEČENÍ V TROUBĚ
CS
DDVVOOJJIITTÝÝ GGRRIILL ++ OOTTÁÁČČEECCÍÍ RROOŽžEEŇŇ
(doporučená pozice 44- min. 1 - max. 4)
•
Ohřev horním tělesem.
•
Dvojitý gril pokrývá celou plochu roštu.
•
Doporučuje se pro grilování kotlet, klobás, plátků chleba , obřích krevet položených na
roštu.
CCHHLLEEBBAA
(doporučená teplota
220055°°CC
min. 35°C max. 275°C)
•
Sekvence pečení se doporučuje pro pečení chleba.
•
Po předehřání položte pecen chleba na pečící plech - 2 vodicí lištu.
•
Nezapomeňte do trouby vložit ohnivzdornou misku s vodou, abyste získali křupavou a
zlatavou kúrku.
99641611_A_MULTI.qxp 20/03/2007 17:35 Page 26
Page 27
27
4 / ÚDRŽBA A ČIŠTĚNÍ PŘĺSTROJE
CS
obr.1
•Pyrolýza s okamžitým začátkem
--
Vyjměte z trouby všechny potřeby pro pečení
a odstraňte velké nečistoty, které mohly
vzniknout.
--
Zkontrolujte, zda je na programátoru
nastavena hodina dne a zda nebliká (obr.1).
Máte možnost vybrat si 3 různětrvající cykly
pyrolýzy:
doba pyrolýzy 1hod30.
doba pyrolýzy 1hod45.
doba trvání pyrolýzy 2 hodiny.
--
Otočte volič funkcí do zvolené polohy.
Příklad: 1 hod 45 (obr.2).
Na začátku pyrolýzy se na programovém
panelu zobrazí symbol , a stejně tak i délka
trvání cyklu pyrolýzy (obr.3).
Na programovém panelu se zobrazí symbol
, označující, že dvířka jsou blokována.
Na konci pyrolýzy bliká 0:00, stejně jako
symbol (obr.4).
Pro návrat k zobrazení hodiny otočte volič
funkcí do polohy stop (obr.5).
--
Jakmile trouba vychladne, setřete vlhkým
hadříkem bílý prášek.
Trouba je čistá a znovu připravena k použití
podle Vaší volby.
Poznámky: Teplota čištění se nedá změnit. V
průběhu provádění cyklu pyrolýzy je osvětlení
vypnuto. Pokud trouba po provedení pyrolýzy
není čistá, čekali jste s jejím provedením příliš
dlouho. Opakujte úkon.
JAK PROVÉST PYROLÝZU
••
obr.2
obr.3
obr.4
obr.5
99641611_A_MULTI.qxp 20/03/2007 17:35 Page 27
Page 28

28
4 / ÚDRŽBA A ČIŠTĚNÍ PŘĺSTROJE
CS
obr.1
• Pyrolýza s posunutým začátkem
--
Řiďte se pokyny v odstavci “Pyrolýza s
okamžitým začátkem”, a pak:
--
Otočte volič funkcí do zvolené polohy.
-Stiskněte tlačítko .
Bliká údaj o konci pečení, čímž Vám oznamuje,
že lze provést nastavení (obr.1).
-Stiskněte tlačítko + nebo -, čímž nastavíte
požadovanou hodinu konce pečení (obr.2).
Příklad: konec čištění v 18h.
--
Po těchto úkonech je začátek čištění
pyrolýzou odložen a ukončí se ve 18h.
Jakmile je pyrolýza dokončena, vraťte volič
funkcí na stopku.
JAK PROVÉST PYROLÝZU
••
obr.2
99641611_A_MULTI.qxp 20/03/2007 17:35 Page 28
Page 29
29
5 / POPRODEJNÍ SERVIS
CS
Případné opravy na Vašem přístroji musí
provádět kvalifikovaný personál spolupracující
s výrobcem. Při objednávání opravy uveďte
kompletní referenci Vašeho přístroje (typ,
druh, sériové číslo). Tyto informace jsou
uvedeny na výrobním štítku
(obr.1).
PŮVODNÍ SOUČÁSTKY
Při zákroku údržby, požadujte
používání
výlučně originálních certifikovaných
náhradních dílů.
•OPRAVY
**
Služba poskytovaná společností Brandt Customer Services, akciovou společností se jměním 2.5000.000
euro, 5/7 avenue des Béthunes, 95310 Saint Ouen l’Aumône - RCS Pontoise 440 303 303
BBrraannddtt AApppplliiaanncceess
- akciová společnost se jměním 10.000.000 euro RCS Nanterre 440 302 347.
BRANDT APPLIANCES SAS
7 rue Henri Becquerel
92500 RUEIL MALMAISON
230V ~ 50 Hz
MADE IN FRANCE
obr.1
99641611_A_MULTI.qxp 20/03/2007 17:35 Page 29
Page 30

30
FR
02
DE
44
EN
58
ES
72
IT
86
NL
100
PT
114
DA
30
CS
16
Kære kunde
Tak, fordi du har købt en
DDEE DDIIEETTRRIICCHH
ovn.
Vores forskningsteam har udviklet denne nye generation af
kogeplader, hvis kvalitet, æstetik, funktion og teknologiske udvikling
resulterer i fremragende produkter, som understreger DE DIETRICH’s
enestående knowhow.
Din nye ovn fra
DDEE DDIIEETTRRIICCHH
integreres på harmonisk vis i køkkenet,
hvor dens fantastiske bage- og stegeegenskaber og den lette
anvendelse fremhæves. Og det har netop været vores mål at kunne
tilbyde et uovertruffent produkt.
Den brede vifte af produkter fra
DDEE DDIIEETTRRIICCHH
tilbyder ligeledes et
stort udvalg af komfurer, kogeborde, emhætter, opvaskemaskiner og
integrerede køleskabe, som du kan sammensætte med din nye ovn fra
DDEE DDIIEETTRRIICCHH
.
For at kunne opfylde alle dine krav til vores produkter er vores
kundeservice til rådighed og er klar til at svare på alle dine spørgsmål
og modtage dine forslag (se adresse og tlf.nr. bag i vejledningen).
Du kan også klikke ind på:
wwwwww..ddeeddiieettrriicchh--eelleeccttrroommeennaaggeerr..ccoomm
for at se de sidstenye produkter,
få nyttige oplysninger og yderligere oplysninger om vores produkter.
DDEE DDIIEETTRRIICCHH
FFoorrøøggeett vvæærrddii
Med en konstant forbedring af vores produkter for øje forbeholder vi os ret til ændringer af de
tekniske, funktionelle og æstetiske egenskaber i forbindelse med den teknologiske udvikling.
Vigtigt!
Inden apparatet tages i brug, bør du læse denne installations- og brugervejledning
grundigt, så du hurtigt kan sætte dig ind i dets funktion.
99641611_A_MULTI.qxp 20/03/2007 17:35 Page 30
Page 31

31
INDHOLDSFORTEGNELSE
DA
1 / BESKRIVELSE AF APPARATET
••
Oversigt over ovnen
________________________________________
32
••
Tilbehør
__________________________________________________
32
••
Oversigt over programvælger
________________________________
33
2 / ANVENDELSE AF APPARATET
••
Brug af programvælger
º
Sådan indstilles klokkeslættet
____________________________
34
º
Omgående kogning eller stegning
________________________
35
••
Programmeret bagning eller stegning
º
Omgående bagning eller stegning
________________________
36
º
Forskudt start
_________________________________________
37
••
Brug af minuturet
__________________________________________
38
3 / FREMGANGSMÅDE FOR BAGNING OG STEGNING I OVN
__________
39
4 / VEDLIGEHOLDELSE OG RENGØRING AF OVNEN
_________________
41
5 / KUNDESERVICE
••
Reparation
________________________________________________
43
99641611_A_MULTI.qxp 20/03/2007 17:35 Page 31
Page 32

32
1 / BESKRIVELSE AF APPARATET
DA
OVERSIGT OVER OVNEN
••
A
B
Programvælger
Temperaturvælger
Funktionsvælger
C
D
E
Lampe
Indsats til rist
E
D
B
A
C
•Tilbehør
Apparatet er udstyret med to riste, som er forsynet med sikkerhedsgreb, en rist med greb til
plade på 45 mm, en Lissium bageplade og en plade på 45 mm.
99641611_A_MULTI.qxp 20/03/2007 17:35 Page 32
Page 33

33
1 / BESKRIVELSE AF APPARATET
DA
OVERSIGT OVER PROGRAMVÆLGER
••
A
D
A
B
Klokkeslætsdisplay og varigheder
Indikator for varighed af bagning eller stegning
Indikator for afsluttet bagning eller stegning
Indikator til minutur
C
D
E
Indikator til fastlåsning
Indikator for rengøring
Temperaturdisplay
Vælgerknap (varighed og tider)
Knapper til tidsregulering
F
G
G
H
H
C
B
F
I
E
I
99641611_A_MULTI.qxp 20/03/2007 17:35 Page 33
Page 34

34
2 / ANVENDELSE AF APPARATET
DA
BRUG AF PROGRAMVÆLGER
•
Sådan indstilles klokkeslættet
--
Ved spændingsføring
Displayet blinker kl. 12:00 (fig.1)
Indstil klokkeslættet ved at trykke på
knapperne + og - (hvis du holder knappen
nede, ruller tallene forbi) (fig.2).
Eksempel: 12H30
Tryk på knappen “ ” for at bekræfte dit
valg.
Displayet holder op med at blinke.
- For at indsætte det aktuelle klokkeslæt igen
Funktionsvælgeren skal være i positionen 0
(fig.1).
Tryk på knappen “ ” i nogle få sekunder,
indtil displayet (fig.2) blinker, og slip tasten
igen. Nogle biplyde angiver, at indstilling nu
kan udføres.
Foretag indstillingen af klokkeslættet ved
hjælp af tasterne + og - (fig.3).
Tryk på knappen “ ” for at bekræfte dit valg
(fig.4).
fig.1
fig.2
fig.2
fig.3
fig.4
fig.1
Advarsel!
Hvis valget ikke bekræftes ved hjælp af
tasten “ ”, foretages registreringen
automatisk i løbet af nogle få sekunder.
••
99641611_A_MULTI.qxp 20/03/2007 17:35 Page 34
Page 35

35
2 / ANVENDELSE AF APPARATET
DA
•Omgående kogning eller stegning
— Programvælgeren skal kun vise
klokkeslættet.
Den skal ikke blinke (fig.1).
Drej funktionsvælgeren til den ønskede
position.
Eksempel: Stilling (fig.2).
Ovnen foreslår den optimale temperatur til
den valgte ret.
Du kan dog justere temperaturen ved at
sætte temperaturvælgeren manuelt mod
++
eller
--
(fig.3).
AAnnbbrriinngg rreetttteenn ii oovvnneenn
i henhold til
anvisningerne i bage- og stegeguiden.
Efter denne handling opvarmes ovnen, og
temperaturindikatoren begynder at blinke.
Der lyder en række biplyde, når den valgte
temperatur er nået.
Temperaturdisplayer ophører med at blinke.
For at stoppe tilberedningen skal du sætte
funktionsvælgeren på 0.
fig.2
fig.4
Advarsel!
Al bagning og stegning udføres med lukket ovnlåge.
Advarsel!
Efter en bage- eller stegecyklus fortsætter ovnens ventilator med at køre i en periode
for at sikre en nedkøling af ovnens elementer.
fig.1
fig.3
99641611_A_MULTI.qxp 20/03/2007 17:35 Page 35
Page 36

36
DA
2 / ANVENDELSE AF APPARATET
--
Bagning eller stegning med omgående
start og programmeret bage- eller stegetid
- Vælg fremgangsmåde for bagning eller
stegning, og indstil temperaturen (fig.1).
- Tryk på tasten “ ”, indtil indikatoren for bageeller stegetid begynder at blinke
Displayet blinker ved 0:00 for at angive, at du nu
kan regulere tiden (fig.
2).
- Tryk på tasten ++eller --for at regulere den
ønskede tid.
Eksempel: 30 min. kogetid (fig.
3).
Efter nogle få sekunder sker tidsregistreringen af
bage- eller stegetiden automatisk.
Displayet holder op med at blinke.
Nedtællingen starter straks efter reguleringen.
NNåårr ddiissssee ttrree hhaannddlliinnggeerr eerr uuddfføørrtt,, ooppvvaarrmmeess
oovvnneenn::
Der lyder en række biplyde, når den valgte
temperatur er nået.
Efter endt bagning eller stegning
(programmerede tid),
- stopper ovnen,
- indikatoren for bage- og stegetid angiver 0:00
og begynder at blinke (fig.
4),
- der udsendes en række biplyde i et par
minutter. For at stoppe disse biplyde skal du
trykke på en vilkårlig tast.
Displayet går tilbage til det aktuelle klokkeslæt,
og funktionsvælgeren går tilbage til 0 (fig.5
).
fig.2
fig.3
PROGRAMMERET BAGNING
ELLER STEGNING
••
fig.1
fig.4
fig.5
99641611_A_MULTI.qxp 20/03/2007 17:35 Page 36
Page 37

37
DA
2 / ANVENDELSE AF APPARATET
--
Bagning eller stegning med forskudt
start og valgt sluttid
FFoorrttssæætt ssoomm ffoorr pprrooggrraammmmeerreett bbaaggee-- eelllleerr
sstteeggeettiidd..
- Når du har indstillet kogetiden, skal du trykke
på tasten “ ”, indtil indikatoren for sluttid
begynder at blinke “ ”.
Displayet blinker for at angive, at du nu kan
indstille tiden (fig.
1).
- Tryk på tasten ++eller --for at indstille den
ønskede tid.
Eksempel: sluttid kl. 13.00 (fig.
2).
Efter nogle få sekunder sker
tidsregistreringen af endt kogetid automatisk.
Displayet holder op med at blinke.
NNåårr ddiissssee ttrree hhaannddlliinnggeerr eerr uuddfføørrtt,, ooppvvaarrmmeess
oovvnneenn ffoorrsskkuuddtt,, ssåå bbaaggnniinnggeenn eelllleerr sstteeggnniinngg
sslluutttteerr
kkll.. 1133..0000..
Efter endt bagning eller stegning
(programmerede tid),
- stopper ovnen,
- indikatoren for bage- og stegetid angiver 0:00
og begynder at blinke (fig.
3),
- der udsendes en række biplyde i et par
minutter. For at stoppe disse biplyde skal du
trykke på en vilkårlig tast.
Displayet går tilbage til det aktuelle
klokkeslæt, og funktionsvælgeren går tilbage
til 0 (fig.4
).
Ovnlyset tændes, når bagningen eller
stegningen starter og slukkes ved endt
bagning eller stegning.
fig.1
fig.2
fig.3
fig.4
PROGRAMMERET BAGNING
ELLER STEGNING
••
99641611_A_MULTI.qxp 20/03/2007 17:35 Page 37
Page 38

38
2 / ANVENDELSE AF APPARATET
DA
-- OOvvnneennss pprrooggrraammvvæællggeerr kkaann bbeennyytttteess ssoomm
sseellvvssttæænnddiiggtt mmiinnuuttuurr,, uuddeenn aatt dduu bbrruuggeerr
oovvnneenn..
I dette tilfælde har minuturets display
fortrinsret over for klokkeslætsdisplayet.
- Tryk på tasten “ ” (fig.1), indtil symbolet
for minuturet begynder at blinke.
-> 0.00, og det lille timeglas blinker.
- Reguler den valgte tid ved hjælp af tasterne
++
eller
--
(fig.2).
- Tryk på tasten “ ” for at bekræfte, eller
vent i nogle sekunder.
Advarsel!
Du kan nårsomhelst ændre eller annullere minuturets programmering.
fig.1
fig.2
BRUG AF MINUTURET
••
Displayet holder op med at blinke i løbet af nogle få sekunder, og minuturet starter og tæller
sekunderne nedad.
Når tiden er udløbet, udsender minuturet en række biplyde for at gøre opmærksom på, at
forløbet er afsluttet.
For at stoppe disse biplyde kan du trykke på en vilkårlig tast.
99641611_A_MULTI.qxp 20/03/2007 17:35 Page 38
Page 39

39
3 / FREMGANGSMÅDE FOR BAGNING OG STEGNING I OVN
DA
*
Anvendt(e) sekvens(er) til skriftlig meddelelse om energimærkning til el-ovne til husholdningsbrug i
overensstemmelse med den europæiske standard EN 50304 og i henhold til EF-direktiv 2002/40/EF.
CCIIRRKKUULLEERREENNDDEE VVAARRMMEE
(foreslået temperatur
118800°°CC
min. 35°C maks. 235°C)
•
Bagning eller stegning udføres ved hjælp af det nedre varmeelement i ovnen og ved
hjælp af den luftdrevne propel.
•
Hurtig temperaturstigning: Nogle retter kan sættes i en kold ovn.
•
Anbefales til at holde hvidt kød, fisk og grøntsager saftigt.
Til bagning eller stegning i indtil 3 niveauer.
KKOOMMBBIINNEERREETT VVAARRMMEE
(foreslået temperatur
220055°°CC
min. 35°C maks. 275°C)
•
Bagning og stegning udføres ved hjælp af de nedre og øvre elementer uden
luftopvarmning.
•
Tre kombinerede varmekilder: Meget varme nederst, lidt varme fra den cirkulerende
varme og en smule grill.
•
Anbefales til mad- eller desserttærter, som er anbragt i et lerfad.
VVAARRMMLLUUFFTTSSGGRRIILLLL ++ SSTTEEGGEESSPPIIDDVVEENNDDEERR
(foreslået temperatur
220000°°CC
min. 180°C maks. 230°C)
•
Bagning eller stegning udføres skiftevis ved hjælp af det øvre element og den luftdrevne
propel.
•
Forvarmning er ikke nødvendig. Fjerkræ, stege og flæskesvær steges og brunes på alle
flader.
•
Stegespidvenderen fortsætter med at køre, indtil lågen åbnes.
•
Sæt bradepanden på det nederste trin.
•
Anbefales til alt fjerkræ eller stege på spyd samt til brasning og rosastegning af køller
og oksestege. For at bevare saften fra fiskestykker.
TTRRAADDIITTIIOONNEELL
(foreslået temperatur
224400°°CC
min. 35°C maks. 275°C)
•
Tilberedningen udføres ved hjælp af det nedre og øvre varmeelement.
•
Efter foropvarmning tilberedes de fleste af retterne her. Denne stilling anbefales til at
holde hvidt kød, fisk og grøntsager saftigt.
EECCOO ((ØØKKOO))
(foreslået temperatur
220000°°CC
min. 35°C maks. 275°C)
•
Bagning eller stegning udføres ved hjælp af de nedre og øvre varmeelementer.
•
Denne stilling gør det muligt at spare energi, alt imens bage- og stegekvaliteten
bibeholdes.
•
Stilligen ECO anvendes til energimærkning.
•
Alle tilberedninger sker
uuddeenn ffoorrooppvvaarrmmnniinngg..
*
*
99641611_A_MULTI.qxp 20/03/2007 17:35 Page 39
Page 40

40
3 / FREMGANGSMÅDE FOR BAGNING OG STEGNING I OVN
DA
KKRRAAFFTTIIGG GGRRIILLLLFFUUNNKKTTIIOONN ++ SSTTEEGGEESSPPIIDDVVEENNDDEERR
(foreslået stilling
44 --
min. 1 - maks. 4)
•
Tilberedningen udføres ved hjælp af det øvre varmeelement.
•
Den kraftige grillfunktion dækker hele grillens overflade.
•
Anbefales til stegning af koteletter, ristning af pølser og brødskiver samt til grilning af
kæmperejer anbragt på grillen.
BBRRØØDD
(foreslået temperatur
220055°°CC
min. 35°C maks. 275°C)
•
Foreslået tilberedningsrækkefølge til bagning af brød.
•
Efter foropvarmning sættes brøddejen på kagepladen og ind på 2. trin i ovnen.
•
Husk at sætte en krus med vand på ovnbunden for at opnå en sprød og gylden
overflade.
99641611_A_MULTI.qxp 20/03/2007 17:35 Page 40
Page 41

41
4 / VEDLIGEHOLDELSE OG RENGØRING AF OVNEN
DA
fig.1
•Omgående pyrolyse
--
Tag plader, rist og bradepande ud af oven og
fjern evt. overskydende snavs.
--
Kontroller, at programvælgerens display
viser det korrekte klokkeslæt, og at displayet
ikke blinker (fig.1).
Du kan vælge 3 forskellige varigheder til
pyrolysecyklussen:
varighed af pyrolyse 1 time og
30 minutter.
varighed af pyrolyse 1 time og
45 minutter.
varighed af pyrolyse 2 timer.
--
Drej funktionsvælgeren til den ønskede
stilling.
Eksempel: 1 time og 45 min. (fig.2).
Ved start af pyrolysen tændes symbolet i
programvælgeren, som også viser
pyrolysecyklussen (fig.3).
Symbolet vises i programvælgeren for at
angive, at lågen er fastlåst.
Efter endt pyrolyse blinker 0:00 og symbolet
(fig.4).
For at vende tilbage til det aktuelle klokkeslæt
skal du dreje funktionsvælgeren til stop (fig.5).
--
Når ovnen er blevet kold, skal du tage en
fugtig klud og tørre den hvide aske op.
Nu er ovnen ren igen, og du kan bage eller
stege i den.
Bemærk! Rengøringstemperaturen kan ikke
ændres. Under en pyrolysecyklus er ovnlyset
tændt. Hvis ovnen ikke er helt ren efter en
pyrolyse, har du ventet for længe med at rense
den. Gentag handlingen.
SÅDAN UDFØRES EN PYROLYSE
••
fig.2
fig.3
fig.4
fig.5
99641611_A_MULTI.qxp 20/03/2007 17:35 Page 41
Page 42

42
4 / VEDLIGEHOLDELSE OG RENGØRING AF OVNEN
DA
fig.1
•Forskudt pyrolyse
--
Følg instruktionerne i afsnittet “Omgående
pyrolyse” og:
--
Drej funktionsvælgeren til den ønskede
stilling.
- Tryk på tasten .
Efter endt stegning blinker vælgeren for at
angive, at du nu kan foretage en indstilling
(fig.1).
- Tryk på knappen + eller – for at indstille den
ønskede sluttid. (fig.2).
Eksempel: Endt rengøring kl. 18.
--
Når disse handlinger er udført, starter
pyrolysen forskudt, så den slutter kl. 18.00.
Når pyrolysen er udført, skal funktionsvælgeren igen sættes på stop.
SÅDAN UDFØRES EN PYROLYSE
••
fig.2
99641611_A_MULTI.qxp 20/03/2007 17:35 Page 42
Page 43

43
5 / KUNDESERVICE
DA
Eventuelle reparationer skal udføres af en
professionel kvalificeret tekniker. Når du
ringer, skal du referere til apparatets model,
type og serienr. Disse oplysninger finder du på
skiltet
(fig.1).
ORIGINALDELE:
I forbindelse med reparationer skal du anmode
om, at der kun anvendes
originaldele.
• REPARATION
**
Service leveret af Brandt Customer Services, forenklet aktieselskab med en kapital på 2.500.000 euro,
5/7 avenue des Béthunes, 95310 Saint Ouen l’Aumône - RCS Pontoise 440 303 303
BBrraannddtt AApppplliiaanncceess
- forenkelt aktieselskab med en kapital på 10.000.000 euro - RCS Nanterre 440 302 347.
BRANDT APPLIANCES SAS
7 rue Henri Becquerel
92500 RUEIL MALMAISON
230V ~ 50 Hz
MADE IN FRANCE
fig.1
99641611_A_MULTI.qxp 20/03/2007 17:35 Page 43
Page 44

44
FR
02
DE
44
EN
58
ES
72
IT
86
NL
100
PT
114
DA
30
CS
16
Liebe Kundin, lieber Kunde,
Sie haben soeben einen
DDEE DDIIEETTRRIICCHH
Backofen erworben, und wir
danken Ihnen dafür.
Unsere Forschungsteams haben für Sie diese neue Generation von
Geräten entwickelt, die durch Qualität, Ästhetik, Funktionen und
technische Fortentwicklung Ausnahmeprodukte sind und unser
Know-how unter Beweis stellen.
Ihr neuer
DDEE DDIIEETTRRIICCHH
Ofen fügt sich harmonisch in Ihre Küche ein
und verbindet perfekt Kochleistung mit einfacher Benutzung. Wir
wollten Ihnen ein exzellentes Produkt bieten.
In der
DDEE DDIIEETTRRIICCHH
Produktpalette finden Sie auch eine große
Auswahl an Küchenherden, Kochfeldern, Dunstabzugshauben,
Geschirrspülern und Einbaukühlschränken, die Sie auf Ihren neuen
DDEE DDIIEETTRRIICCHH
Ofen abstimmen können.
Wir sind stets darum bemüht, Ihrer Anforderungen an unsere
Produkte so gut wie möglich zu erfüllen. Unser Verbraucherservice
steht Ihnen daher selbstverständlich immer zur Verfügung und geht
auf alle Ihre Fragen und Anregungen ein (Adresse am Schluss dieser
Anleitung).
Besuchen Sie uns auch unter:
wwwwww..ddeeddiieettrriicchh--eelleeccttrroommeennaaggeerr..ccoomm
. Dort finden Sie unsere letzten
Innovationen und weitere nützliche Information.
DDEE DDIIEETTRRIICCHH
DDiiee nneeuueenn WWeerrttoobbjjeekkttee
Da wir unsere Produkte ständig verbessern möchten, behalten wir uns im Zuge der technischen
Weiterentwicklung das Recht vor, ihre technischen, funktionellen und ästhetischen Merkmale zu
verändern.
Wichtig:
Bitte lesen Sie die vorliegenden Hinweise zu Einbau und Gebrauch aufmerksam vor
der ersten Inbetriebnahme durch, damit Sie Ihr Gerät schnell beherrschen.
99641611_A_MULTI.qxp 20/03/2007 17:35 Page 44
Page 45

45
INHALT
DE
1 / BESCHREIBUNG DES GERÄTS
••
Übersicht über den Ofen
____________________________________
46
••
Zubehör
__________________________________________________
46
••
Beschreibung des Programmierers
___________________________
47
2 / BENUTZUNG DES GERÄTS
••
Nutzung des Programmierers
º
Einstellung der Uhr
_____________________________________
48
º
Sofortiger Garvorgang
__________________________________
49
••
Programmierter Garvorgang
º
Sofortiger Start
________________________________________
50
º
Späterer Start
_________________________________________
51
••
Nutzung der Funktion Kurzzeitwecker
_________________________
52
3 / ZUBEREITUNGSARTEN IM BACKOFEN
__________________________
53
4 / PFLEGE UND REINIGUNG DES OFENS
___________________________
55
5 / KUNDENDIENST
••
Reparaturarbeiten
__________________________________________
57
99641611_A_MULTI.qxp 20/03/2007 17:35 Page 45
Page 46

46
1 / BESCHREIBUNG DES GERÄTS
DE
ÜBERSICHT ÜBER DEN OFEN
••
A
B
Programmierer
Temperaturwahlschalter
Funktionswahlschalter
C
D
E
Lampe
Einschubleistenhalter
E
D
B
A
C
•Zubehör
Ihr Ofen wird mit zwei Sicherheitsrosten mit Griff, einem Rost mit Griffen für ein 45 mm Blech,
einem Lissium-Backblech und einem Blech 45 mm geliefert.
99641611_A_MULTI.qxp 20/03/2007 17:35 Page 46
Page 47

47
1 / BESCHREIBUNG DES GERÄTS
DE
BESCHREIBUNG DES PROGRAMMIERERS
••
A
D
A
B
Anzeige von Uhrzeit und Dauer
Anzeiger der Gardauer
Anzeige des Endes der Garzeit
Anzeige des Kurzzeitweckers
C
D
E
Verriegelungsanzeige
Reinigungsanzeige
Temperaturanzeige
Auswahltaste (Dauer und Zeit)
Zeiteinstelltasten
F
G
G
H
H
C
B
F
I
E
I
99641611_A_MULTI.qxp 20/03/2007 17:35 Page 47
Page 48

48
2 / BENUTZUNG DES GERÄTS
DE
NUTZUNG DES PROGRAMMIERERS
•
Einstellung der Uhrzeit
--
Bei Anschluss an den Strom
In der Anzeige blinkt 12:00 (Abb.1).
Die Uhrzeit durch Drücken der Tasten + und einstellen (bei Festhalten der Taste erfolgt ein
Schnelldurchlauf) (Abb.2).
Beispiel: 12.30 Uhr
Zur Bestätigung die Taste “ ” drücken.
Die Anzeige blinkt nicht mehr.
- Einstellung der korrekten Uhrzeit
Der Funktionswahlschalter muss sich in
Position 0 (Abb.1) befinden.
Taste “ ” einige Sekunden lang gedrückt
halten, bis die Anzeige blinkt (Abb.2), dann
loslassen. Signaltöne geben an, dass eine
Einstellung vorgenommen werden kann.
Die Uhrzeit mit den Tasten + und - einstellen
(Abb.3).
Zur Bestätigung die Taste “ ” drücken
(Abb.4).
Abb.1
Abb.2
Abb.2
Abb.3
Abb.4
Abb.1
Achtung
Wenn keine Bestätigung über Taste
“ ” erfolgt, wird nach einigen Sekunden
automatisch gespeichert.
••
99641611_A_MULTI.qxp 20/03/2007 17:35 Page 48
Page 49

49
2 / BENUTZUNG DES GERÄTS
DE
•Sofortiger Garvorgang
— Der Programmierer darf nur die Uhrzeit
anzeigen;
Diese darf nicht blinken (Abb.1).
Den Funktionswahlschalter auf die gewünschte
Position drehen.
Beispiel: Position (Abb.2).
Der Backofen schlägt die für die gewählte
Garart optimale Temperatur vor.
Die Temperatur kann jedoch noch reguliert
werden. Dazu den Temperaturwahlschalter in
Richtung ++oder --(Abb.3) drehen.
DDiiee ZZuubbeerreeiittuunngg eennttsspprreecchheenndd ddeenn
Empfehlungen der Gartabelle in den Ofen
schieben.
Danach heizt der Ofen und die
Temperaturanzeige blinkt.
Wenn die gewählte Temperatur erreicht wird,
ertönen Signaltöne.
Die Anzeige hört auf zu blinken.
Zum Stoppen des Garvorgangs den
Funktionswahlschalter auf 0 stellen.
Abb.2
Abb.4
Achtung
Garvorgänge erfolgen immer bei geschlossener Ofentür.
Achtung
Nach einem Garzyklus funktioniert die Gebläseturbine noch einige Zeit, um
zuverlässigen Ofenbetrieb sicher zu stellen.
Abb.1
Abb.3
99641611_A_MULTI.qxp 20/03/2007 17:36 Page 49
Page 50

50
DE
2 / BENUTZUNG DES GERÄTS
--
Unmittelbar anlaufender Garvorgang über
vorprogrammierte Zeit
- Garmodus wählen und Temperatur anpassen
(Abb.1).
- Die Taste “ ” drücken, bis die Anzeige für die
Dauer der Garzeit blinkt.
Die Anzeige 0:00 Uhr blinkt und zeigt an, dass die
Garzeit jetzt eingestellt werden kann (Abb.2).
- Über Taste ++oder --die gewünschte Zeit
einstellen.
Beispiel: 30 Minuten Garzeit (Abb.3).
Nach einigen Sekunden wird die Garzeit
automatisch abgespeichert.
Die Anzeige für die Dauer der Garzeit blinkt nicht
mehr.
Die eingestellte Zeit läuft sofort ab Einstellung.
NNaacchh ddiieesseenn 33 SScchhrriitttteenn bbeeggiinnnntt ddeerr OOffeenn zzuu
hheeiizzeenn::
Wenn die gewählte Temperatur erreicht wird,
ertönen Signaltöne.
Am Ende der Garzeit (Ende der programmierten
Garzeit)
- schaltet sich der Backofen aus,
- blinken der Anzeiger für die Dauer der Garzeit
und 0:00 (Abb.4),
- ertönt einige Minuten lang eine Reihe von
Signaltönen. Die Signaltöne können durch Druck
auf eine beliebige Taste abgestellt werden.
Wird der Funktionswahlschalter auf 0 gestellt
(Abb.5), erscheint die Tageszeit wieder in der
Anzeige.
Abb.2
Abb.3
PROGRAMMIERTER
GARVORGANG
••
Abb.1
Abb.4
Abb.5
99641611_A_MULTI.qxp 20/03/2007 17:36 Page 50
Page 51

51
DE
2 / BENUTZUNG DES GERÄTS
--
Zeitlich versetzt anlaufende Garzeit und
Wahl des Endzeitpunkts des Garvorgangs
WWiiee bbeeii eeiinneemm pprrooggrraammmmiieerrtteenn GGaarrvvoorrggaanngg
vvoorrggeehheenn..
- Nach Einstellung der Garzeit Taste “ ”
drücken, bis der Anzeiger für das Ende der
Garzeit “ ” blinkt.
Die Anzeige blinkt und zeigt an, dass die
Einstellung vorgenommen werden kann
(Abb.1).
- Den gewünschten Endzeitpunkt mit der Taste
++
oder --einstellen.
Beispiel: Ende der Garzeit um 13 Uhr (Abb.2).
Das gewünschte Ende der Garzeit wird nach
einigen Sekunden automatisch abgespeichert.
Die Anzeige für das Ende der Garzeit blinkt
nicht mehr.
NNaacchh ddiieesseenn 33 SScchhrriitttteenn wwiirrdd ddaass AAuuf
fhheeiizzeenn
zzeeiittlliicchh ssoo vveerrsseettzztt,, ddaassss ddeerr GGaarrvvoorrggaanngg uumm
1133..0000 UUhhrr aabbggeesscchhlloosssseenn iisstt..
Am Ende der Garzeit (Ende der
programmierten Garzeit)
- schaltet sich der Backofen aus,
- blinken die Anzeige für die Dauer der Garzeit
und 0:00 (Abb.3),
- ertönt einige Minuten lang eine Reihe von
Signaltönen. Die Signaltöne können durch
Druck auf eine beliebige Taste abgestellt
werden.
Wird der Funktionswahlschalter auf 0 gestellt
(Abb.4), erscheint die Tageszeit wieder in der
Anzeige.
Die Beleuchtung des Ofenraums springt zu
Beginn des Garvorgangs an und geht nach
Abschluss des Garvorgangs wieder aus.
Abb.1
Abb.2
Abb.3
Abb.4
PROGRAMMIERTER
GARVORGANG
••
99641611_A_MULTI.qxp 20/03/2007 17:36 Page 51
Page 52

52
2 / BENUTZUNG DES GERÄTS
DE
-- DDeerr PPrrooggrraammmmiieerreerr ddeess OOffeennss kkaannnn aallss
uunnaabbhhäännggiiggeerr KKuurrzzzzeeiittwweecckkeerr eeiinnggeesseettzztt
wweerrddeenn,, oohhnnee ddaassss ddeerr O
Offeenn eeiinnggeesscchhaalltteett iisstt..
In diesem Fall hat die Anzeige des
Kurzzeitweckers Vorrang vor der Anzeige der
Tageszeit.
- Taste “ ” (Abb.1) drücken, bis das Symbol
des Kurzzeitweckers -> 0.00 und eine kleine
Sanduhr blinken.
- Die Zeiteinstellung über die Tasten ++oder
--
(Abb.2) einstellen.
- Über die Taste “ ” abspeichern, oder
einige Sekunden warten.
Achtung
Die Programmierung des Kurzzeitweckers kann jederzeit geändert oder aufgehoben
werden.
Abb.1
Abb.2
NUTZUNG DER FUNKTION
KURZZEITWECKER
••
Der Anzeiger blinkt nach einigen Sekunden nicht mehr, der Kurzzeitwecker startet und zählt die
Zeit sekundenweise rückwärts.
Wenn die eingestellte Zeit abgelaufen ist, ertönt ein akustisches Signal.
Dieses kann durch Druck auf eine beliebige Taste abgestellt werden.
99641611_A_MULTI.qxp 20/03/2007 17:36 Page 52
Page 53

53
3 / ZUBEREITUNGSARTEN IM BACKOFEN
DE
*
Für die Angabe auf dem Energieetikett gemäß der europäischen Norm EN 50304 und der Europäischen
Richtlinie 2002/40/EG benutzte Sequenz(en).
UUMMLLUUFFTT
(empfohlene Temperatur
118800°°CC
mindestens 35°C, maximal 235°C)
•
Das Garen erfolgt durch das Heizelement an der Rückwand des Backofens und die
Luftschraube.
•
Schneller Temperaturanstieg: Gewisse Gerichte können in den kalten Backofen gestellt
werden.
•
Für safitges helles Fleisch, Fisch und Gemüse empfohlen.
Für Koch- und Backvorgänge auf bis zu 3 Ebenen.
KKOOMMBBII--WWÄÄRRMMEE
(empfohlene Temperatur
220055°°CC
mindestens 35°C, maximal 275°C)
•
Das Garen erfolgt durch Ober- und Unterhitze sowie Luftumwälzung.
•
Kombination dreier Wärmequellen: viel Unterhitze, ein wenig Umlufthitze und etwas
Grillwirkung zum Anbräunen.
•
Für Quiches, Blätterteigpasteten, saftige Obskuchen vorzugsweise in Tongefäßen
empfohlen.
UUMMLLUUFFTTGGRRIILLLL ++ SSPPIIEESSSS
(empfohlene Temperatur
220000°°CC
mindestens 180°C, maximal 230°C)
•
Das Garen erfolgt abwechselnd durch Oberhitze und Umluft.
•
Vorheizen nicht erforderlich. Geflügel und saftige, rundum knusprige Braten.
•
Der Spieß dreht sich bis zum Öffnen der Backofentür weiter.
•
Die Fettpfanne auf die untere Einschubleiste einschieben.
•
Für alle Geflügelsorten oder Spießbraten zum Anbraten und Garen von Lammkeule,
Rinderkoteletts empfohlen. Zur Erhaltung des zarten Charakters von Fischkoteletts.
TTRRAADDIITTIIOONNEELLLL
(empfohlene Temperatur
224400°°CC
mindestens 35°C, maximal 275°C)
•
Das Garen erfolgt durch Ober- und Unterhitze.
•
Nach dem Vorheizen werden die meisten Gerichte gegart. Empfohlen, um den zarten
Charakter von hellem Fleisch, Fisch und Gemüse zu bewahren.
EECCOO
(empfohlene Temperatur
220000°°CC
mindestens 35°C, maximal 275°C)
•
Das Backen erfolgt durch Unter- und Oberhitze.
•
Mit dieser Einstellung kann unter Beibehaltung gleicher Backergebnisse Energie
eingespart werden.
•
Die Energiesparposition dient als Grundlage für die Angaben auf dem Energieetikett.
•
Alle Garvorgänge erfolgen
oohhnnee VVoorrwwäärrmmeenn..
*
*
99641611_A_MULTI.qxp 20/03/2007 17:36 Page 53
Page 54

54
3 / ZUBEREITUNGSARTEN IM BACKOFEN
DE
SSTTAARRKKEERR GGRRIILLLL ++ SSPPIIEESSSS
(empfohlene Position
44 --
mindestens 1 - maximal 4)
•
Das Garen erfolgt anhand der Oberhitze.
•
Der starke Grill deckt die gesamte Fläche des Gitters ab.
•
Wird für das Grillen von Koteletts,Würstchen, Brotscheiben und Gambas auf dem
Grillgitter empfohlen.
BBRROOTT
(empfohlene Temperatur
220055°°CC
mindestens 35°C, maximal 275°C)
•
Empfohlene Einstellung zum Backen von Brot.
•
Nach dem Vorheizen die Teigkugel auf das Kuchenblech legen - Einschubleiste 2.
•
Nicht vergessen, eine Form mit etwas Wasser auf den Ofenboden zu geben. Dadurch
entsteht eine knusprige, goldbraune Kruste.
99641611_A_MULTI.qxp 20/03/2007 17:36 Page 54
Page 55

55
4 / PFLEGE UND REINIGUNG DES OFENS
DE
Abb.1
•Sofortige Pyrolyse
--
Alles Zubehör aus dem Backofen nehmen
und eventuell vorhandene stark übergelaufene
Reste entfernen.
--
Prüfen, dass der Programmierer die Tageszeit
anzeigt und diese nicht blinkt (Abb.1).
Es besteht die Auswahl zwischen
3 Pyrolysezyklen:
Pyrolysedauer 1 1/2 Stunden.
Pyrolysedauer 1 3/4 Stunden.
Pyrolysedauer 2 Stunden.
--
Den Funktionswähler auf die Position der
gewünschten Pyrolyse stellen.
Beispiel: 1 3/4 Stunden (Abb.2).
Zu Beginn der Pyrolyse wird das Symbol ,
wie auch die Dauer des Pyrolysezyklus (Abb.3)
in der Programmierleiste angezeigt.
Das Symbol erscheint in der Programmierleiste und zeigt die Türverriegelung an.
Am Ende der Pyrolyse blinken 0:00 und das
Symbol (Abb.4).
Um zur Anzeige der Uhrzeit zurück zu kehren,
den Funktionswahlschalter ausschalten
(Abb.5).
--
Wenn der Backofen kalt ist, die weiße Asche
mit einem feuchten Tuch entfernen.
Der Backofen ist sauber und wieder für einen
beliebigen Garvorgang bereit.
Anmerkungen: Die Reinigungstemperatur
kann nicht verändert werden. Während der
Pyrolyse ist die Beleuchtung abgeschaltet.
Wenn der Backofen nach einer Pyrolyse nicht
sauber ist, ist zu lange damit gewartet worden.
Den Vorgang wiederholen.
PYROLYSEVORGANG
••
Abb.2
Abb.3
Abb.4
Abb.5
99641611_A_MULTI.qxp 20/03/2007 17:36 Page 55
Page 56

56
4 / PFLEGE UND REINIGUNG DES OFENS
DE
Abb.1
•Spätere Pyrolyse
--
Die Anweisungen aus dem Absatz “Sofortige
Pyrolyse” befolgen, anschließend:
--
Den Funktionswähler auf die Position der
gewünschten Pyrolyse stellen.
- Taste drücken.
Das Symbol für das Ende der Garzeit blinkt
und gibt an, dass eine Einstellung
vorgenommen werden kann (Abb.1).
- Den gewünschten Endzeitpunkt mit der Taste
+ oder - einstellen (Abb.2).
Beispiel: Ende der Garzeit um 18 Uhr.
--
Anschließend wird der Beginn der Pyrolyse so
verschoben, dass sie um 18.00 Uhr
abgeschlossen ist.
Am Ende der Pyrolyse den Funktionswahlschalter ausstellen.
PYROLYSEVORGANG
••
Abb.2
99641611_A_MULTI.qxp 20/03/2007 17:36 Page 56
Page 57

57
5 / KUNDENDIENST
DE
Eventuelle Reparaturarbeiten an dem Gerät
müssen von qualifiziertem Fachpersonal des
Händlers vorgenommen werden. Bei
Benachrichtigung des Kundendienstes die
vollständigen Geräteangaben (Modell, Typ
und Seriennummer) mitteilen. Diese Angaben
sind dem Typenschild
(Abb.1)
zu entnehmen.
ORIGINAL ERSATZTEILE
Bei Reparaturarbeiten darum bitten, dass
ausschließlich
zertifizierte Original Ersatzteile
verwendet werden.
•REPARATURARBEITEN
**
Dienstleistung des Brandt Customer Service, einfache Aktiengesellschaft mit einem Kapital von 2.5000.000 Euro,
5/7 avenue des Béthunes, 95310 Saint Ouen l’Aumône - RCS Pontoise 440 303 303
BBrraannddtt AApppplliiaanncceess
- vereinfachte Aktiengesellschaft mit einem Kapital von 10.000.000 Euro RCS Nanterre 440 302 347.
BRANDT APPLIANCES SAS
7 rue Henri Becquerel
92500 RUEIL MALMAISON
230V ~ 50 Hz
MADE IN FRANCE
Abb.1
99641611_A_MULTI.qxp 20/03/2007 17:36 Page 57
Page 58

58
FR
02
DE
44
EN
58
ES
72
IT
86
NL
100
PT
114
DA
30
CS
16
Dear Customer,
You have just acquired a
DDEE DDIIEETTRRIICCHH
oven and we would like to
thank you.
Our research teams have created this new generation of appliances
for you. Their quality, appearance, functions and technological
advances make them exceptional products, showcases of our unique
know-how.
Your new
DDEE DDIIEETTRRIICCHH
oven will blend harmoniously into your
kitchen and perfectly combine cooking performance and ease of use.
We wanted to offer you a product of excellence.
In the line of
DDEE DDIIEETTRRIICCHH
products, you will also find a wide range of
cookers, hobs, ventilation hoods, dishwashers, and refrigerators, all of
which can be built in and coordinated with your new
DDEE DDIIEETTRRIICCHH
oven.
Of course, in an ongoing effort to better satisfy your demands with
regard to our products, our after-sales service department is at your
disposal and ready to listen in order to respond to all of your questions
and suggestions (contact information at the end of this booklet).
You can also log onto our site:
wwwwww..ddeeddiieettrriicchh--eelleeccttrroommeennaaggeerr..ccoomm
where you will find our latest
new ideas and useful additional information.
DDEE DDIIEETTRRIICCHH
SSeettttiinngg NNeeww VVaalluueess
As part of our commitment to constantly improving our products, we reserve the right to make
changes to them based on advances to their technical, functional and/or aesthetic properties.
Important:
Before installing and using your appliance, please read this Installation and Usage
Guide carefully, as it will allow you to quickly familiarise yourself with its operation.
99641611_A_MULTI.qxp 20/03/2007 17:36 Page 58
Page 59

59
TABLE OF CONTENTS
EN
1 / DESCRIPTION OF YOUR APPLIANCE
••
Introduction to your oven
____________________________________
60
••
Accessories
_______________________________________________
60
••
Introduction to the programmer
______________________________
61
2 / USING YOUR APPLIANCE
••
Using the programmer
º
How to set the time
_____________________________________
62
º
Immediate cooking
_____________________________________
63
••
Programmed cooking
º
Immediate start
________________________________________
64
º
Delayed start
__________________________________________
65
••
Using the timer function
_____________________________________
66
3 / OVEN COOKING MODES
_______________________________________
67
4 / CARING FOR AND CLEANING YOUR OVEN
_______________________
69
5 / AFTER-SALES SERVICE
••
Service calls
______________________________________________
71
99641611_A_MULTI.qxp 20/03/2007 17:36 Page 59
Page 60

60
1 / DESCRIPTION OF YOUR APPLIANCE
EN
INTRODUCTION TO YOUR OVEN
••
A
B
Programmer
Temperature selector switch
Function selector switch
C
D
E
Light
Wire shelf supports
E
D
B
A
C
•Accessories
Your appliance has two safety grids with handles, one with handles for a 45 mm dish, a Lissium
pastry dish and a 45 mm dish.
99641611_A_MULTI.qxp 20/03/2007 17:36 Page 60
Page 61

61
1 / DESCRIPTION OF YOUR APPLIANCE
EN
INTRODUCTION TO THE PROGRAMMER
••
A
D
A
B
Time and cooking time display
Cooking time indicator
Cooking end time indicator
Timer display
C
D
E
Lock indicator
Cleaning indicator
Temperature display
Selection button (cooking time and time)
Time setting buttons
F
G
G
H
H
C
B
F
I
E
I
99641611_A_MULTI.qxp 20/03/2007 17:36 Page 61
Page 62

62
2 / USING YOUR APPLIANCE
EN
USING THE PROGRAMMER
•
How to set the time
--
When plugged in
The display flashes 12:00 (fig.1).
Set the time by pressing the + or - buttons
(holding your finger on the button allows you
to scroll through the numbers rapidly) (fig.2).
Example: 12:30
Press the “ ” button to confirm.
The display stops flashing.
- To set the time on the clock
The function selector switch must be in the 0
position (fig.1).
Press and hold the “ ” button for a few
seconds until the display starts flashing (fig.2),
then release. Audible beeps indicate that it is
now possible to set the time.
Adjust the clock setting with the + and buttons (fig.3).
Press the “ ” button to confirm (fig.4).
fig.1
fig.2
fig.2
fig.3
fig.4
fig.1
Warning
If there is no confirmation from the
“ ” button, the time is recorded
automatically after a few seconds.
••
99641611_A_MULTI.qxp 20/03/2007 17:36 Page 62
Page 63

63
2 / USING YOUR APPLIANCE
EN
•Immediate cooking
— The programmer should display only the
time.
It should not be flashing (fig.1).
Turn the function selector to the position of
your choice.
Example: position (fig.2).
Your oven recommends the optimal
temperature for the chosen cooking mode.
It is, however, possible to adjust the
temperature by pushing the selection lever
towards ++or
--
(fig.3).
PPllaaccee yyoouurr ddiisshh iinn tthhee oovveenn
based on the
recommendations provided by the cook book.
After these steps, the oven heats up and the
temperature indicator flashes.
A series of beeps will sound when the oven
reaches the selected temperature.
The temperature stops flashing.
To stop this heating, return the function
selector to 0.
fig.2
fig.4
Warning
All types of cooking are done with the door closed.
Warning
After a cooking cycle, the cooling fan continues to operate for a period of time in order
to guarantee optimal oven reliability.
fig.1
fig.3
99641611_A_MULTI.qxp 20/03/2007 17:36 Page 63
Page 64

64
EN
2 / USING YOUR APPLIANCE
--
Cooking with immediate start and
programmed duration
- Select the desired cooking mode and adjust the
temperature (fig.1).
- Press the “ ” button until the cooking time
indicator starts to flash .
The display flashes 0:00 to indicate that you can
now adjust the setting (fig.2).
- Press the ++or --buttons to set the desired time.
Example: 30 mins cooking time (fig.3).
The cooking time is automatically recorded after
a few seconds.
The cooking time display stops flashing.
The countdown of the cooking time begins
immediately after it has been set.
AAfftteerr tthheessee tthhrreeee sstteeppss,, tthhee oovveenn hheeaattss uupp::
A series of beeps will sound when the oven
reaches the selected temperature.
At the end of cooking (end of programmed time),
- the oven turns off,
- the cooking time indicator and 00:00 both flash
(fig.4),
- a series of beeps sounds for a few minutes.
Press any button to stop the beeping.
The display shows the time once again when the
function selector switch is returned to 0 (fig.5).
fig.2
fig.3
PROGRAMMED COOKING
••
fig.1
fig.4
fig.5
99641611_A_MULTI.qxp 20/03/2007 17:36 Page 64
Page 65

65
EN
2 / USING YOUR APPLIANCE
--
Cooking with delayed start and chosen
cooking end time
PPrroocceeeedd aass wwiitthh pprrooggrraammmmeedd ccooookkiinngg..
- After setting the cooking time, press the “ ”
button until the end of cooking indicator flashes
“”.
The display flashes to indicate that you can
now adjust the setting (fig.1).
- Press the ++or --button to set the desired
cooking end time.
Example: end of cooking at 13:00 (fig.2).
The cooking end time is automatically
recorded after a few seconds.
The cooking end time display stops flashing.
AAfftteerr tthheessee 33 sstteeppss,, tthhee oovveenn hheeaattiinngg iiss
ddeellaayyeedd s
soo tthhaatt ccooookkiinngg eennddss aatt 1133::0000..
At the end of cooking (end of programmed
time),
- the oven turns off,
- the cooking time indicator and 0:00 both
flash (fig.3),
- a series of beeps sounds for a few minutes.
Press any button to stop the beeping.
The display shows the time once again when
the function selector switch is returned to 0
(fig.4).
The light inside the oven turns on when
cooking starts and goes out when cooking
stops.
fig.1
fig.2
fig.3
fig.4
PROGRAMMED COOKING
••
99641611_A_MULTI.qxp 20/03/2007 17:36 Page 65
Page 66

66
2 / USING YOUR APPLIANCE
EN
-- YYoouurr oovveenn’’ss pprrooggrraammmmeerr ccaann bbee uusseedd aass aann
iinnddeeppeennddeenntt ttiimmeerr tthhaatt aalllloowwss yyoouu ttoo ccoouunntt
ddoowwnn aa ttiimmee wwiit
thhoouutt ooppeerraattiinngg tthhee oovveenn..
In this case, the timer display has priority over
the clock display.
- Press the “ ” button (fig.1) until the timer
symbol begins flashing.
-> 0.00 and a small hourglass both flash.
- Adjust the chosen time by pressing the
buttons ++or
--
(fig.2).
- Press the button “ ” to confirm, or wait for
a few seconds.
Warning
It is possible to change or cancel the timer at any time.
fig.1
fig.2
USING THE TIMER FUNCTION
••
The display stops flashing after a few seconds and the timer starts working, counting down the
time in seconds.
Once the time has expired, the timer emits a series of beeps to notify you.
Press any button to stop the beeping.
99641611_A_MULTI.qxp 20/03/2007 17:36 Page 66
Page 67

67
3 / OVEN COOKING MODES
EN
*
Program(s) used to obtain the results indicated on the energy label in accordance with European
standard EN 50304 and European Directive 2002/40/CE.
CCIIRRCCUULLAATTIINNGG HHEEAATT
(recommended temperature
118800°°CC
min 35°C max 235°C)
•
Cooking is by a heating element at the bottom of the oven and the oven fan.
•
Rapid temperature increase: Some dishes can be placed in the oven while it is still cold.
•
Recommended to retain moisture in white meat, fish, vegetables.
For cooking multiple items on up to 3 levels.
CCOOMMBBIINNEEDD HHEEAATT
(recommended temperature
220055°°CC
min 35°C max 275°C)
•
Cooking controlled by the upper and lower heating elements and by the fans.
•
Three combined sources of heat: a lot of heat from the bottom, a little circulating heat
and a bit from the grill.
•
Recommended for quiches, tarts, wet fruit tarts, placed preferebly in a terracotta dish.
FFAANN GGRRIILLLL ++ RROOTTIISSSSEERRIIEE
(recommended temperature
220000°°CC
min 180°C max 230°C)
•
Cooking controlled, alternately, by the upper element and by oven fan.
•
Preheating is unnecessary. Roasts and poultry are juicy and crispy all over.
•
The spit keeps turning until the door is opened.
•
Slide the drip tray onto the bottom shelf support.
•
Recommended for all poultry and spit roasts, to thoroughly cook legs and large cuts of
beef. To keep fish steaks moist.
CCOONNVVEENNTTIIOONNAALL
(recommended temperature
224400°°CC
min 35°C max 275°C)
•
Cooking done by the upper and lower elements.
•
After preheating, you will cook most of your dishes, recommended for making sure
white meat, fish, and vegetables stay moist.
EECCOO
(recommended temperature
220000°°CC
min 35°C max 275°C)
•
Cooking controlled by the upper and lower heating elements.
•
This position allows for energy savings while preserving the quality of the cooking.
•
The ECO position is used for energy label performance.
•
All cooking is done
wwiitthhoouutt pprreehheeaattiinngg..
*
*
99641611_A_MULTI.qxp 20/03/2007 17:36 Page 67
Page 68

68
3 / OVEN COOKING MODES
EN
GGRRIILLLL HHIIGGHH ++ RROOTTIISSSSEERRIIEE
(recommended position 44- min 1 - max 4)
•
Cooking done by the upper element.
•
The grill on high setting covers the entire grid surface.
•
Recommended for grilling chops, sausages, toast or prawns, placed on the grid.
BBRREEAADD
(recommended temperature
220055°°CC
min 35°C max 275°C)
•
Cooking sequence recommended for baking bread.
•
After preheating, place the dough on the pastry dish - 2nd shelf support.
•
Place a bowl of water at the botom of the oven to get a crusty and shiny crust.
99641611_A_MULTI.qxp 20/03/2007 17:36 Page 68
Page 69

69
4 / CARING FOR AND CLEANING YOUR OVEN
EN
fig.1
•Immediate pyrolysis
--
Remove the grids and trays from the oven
and clean any major spill residue.
--
Check that the programmer is displaying the
time of day and that it is not flashing (fig.1).
You can choose 3 durations of pyrolysis:
pyrolysis lasting 1 hour 30 minutes.
pyrolysis lasting 1 hour 45 minutes.
pyrolysis lasting 2 hours.
--
Turn the function selector to the desired
pyrolysis setting.
Example: 1 hr 45 mins (fig.2).
When pyrolysis starts, the symbol
displays in the programmer as well as the
duration of the pyrolysis cycle (fig.3).
The symbol displays in the programmer to
indicate that the door is locked.
When pyrolysis finishes, 0:00 starts flashing as
well as the symbol (fig.4).
To return to the time of day, set the function
selector to stop (fig.5).
--
When the oven is cool, use a damp cloth to
remove the white ashes.
The oven is clean and once again ready for the
cooking cycle of your choice.
Notes: The cleaning temperature cannot be
adjusted. During the pyrolysis cycle, the oven
lighting is off. If your oven is not clean after a
pyrolysis cycle, you waited too long before
launching a cleaning cycle. Repeat the cycle.
PERFORM A PYROLYSIS
••
fig.2
fig.3
fig.4
fig.5
99641611_A_MULTI.qxp 20/03/2007 17:36 Page 69
Page 70

70
4 / CARING FOR AND CLEANING YOUR OVEN
EN
fig.1
•Delayed pyrolysis
--
Follow the instructions described in the
section “Immediate pyrolysis”, then:
--
Turn the function selector to the desired
pyrolysis setting.
- Press the button.
The end of cooking symbol flashes to indicate
that it is now possible to set it (fig.1).
- Press the + or - button to set the desired end
time (fig.2).
Example: end of cooking at 18:00.
--
After tthese steps, the beginning of pyrolysis
is delayed so that it finishes at 18:00.
When the pyrolysis cycle is over, return the
function selector to stop.
PERFORM A PYROLYSIS
••
fig.2
99641611_A_MULTI.qxp 20/03/2007 17:36 Page 70
Page 71

71
5 / AFTER-SALES SERVICE
EN
Any repairs that are made to your appliance
must be handled by a qualified professional
authorised to work on the brand. When you
call, mention your appliance’s complete
reference (model, type, serial number). This
information appears on the manufacturer’s
nameplate
(fig.1).
GENUINE REPLACEMENT PARTS
During maintenance work, request that only
certified genuine replacement parts are
used.
•SERVICE CALLS
**
Service provided by Brandt Customer Services, simplified shareholder company with capital of 25,000,000 Euros,
5/7 avenue des Béthunes, 95310 Saint Ouen l’Aumône - RCS Pontoise 440 303 303
BBrraannddtt AApppplliiaanncceess
- simplified shareholder company with capital of 10,000,000 Euros RCS Nanterre 440,302,347.
BRANDT APPLIANCES SAS
7 rue Henri Becquerel
92500 RUEIL MALMAISON
230V ~ 50 Hz
MADE IN FRANCE
fig.1
99641611_A_MULTI.qxp 20/03/2007 17:36 Page 71
Page 72

72
ES
02
DE
44
EN
58
ES
72
IT
86
NL
100
PT
114
DA
30
CS
16
Estimado cliente, estimada clienta:
Acaba de adquirir un horno
DDEE DDIIEETTRRIICCHH
por lo que le quedamos
sumamente agradecidos.
Nuestros equipos de investigación han diseñado para usted esta
nueva generación de aparatos que por su calidad, su estética, sus
funciones y su desarrollo tecnológico los convierten en productos
excepcionales, exponentes de nuestra maestría.
Su nuevo horno
DDEE DDIIEETTRRIICCHH
se integrará armoniosamente en su
cocina combinando perfectamente el dominio tecnológico, las
prestaciones de cocción y la facilidad de utilización. Hemos querido
ofrecerle un producto óptimo.
En la gama de productos
DDEE DDIIEETTRRIICCHH
, también encontrará un
amplio surtido de cocinas, placas de cocción, campanas extractoras,
lavavajillas y frigoríficos integrables, que podrá combinar con su
nuevo horno
DDEE DDIIEETTRRIICCHH
.
Por supuesto, con el deseo permanente de satisfacer al máximo sus
exigencias con relación a nuestros productos, nuestro servicio de
atención al cliente está a su entera disposición para responder a
todas sus preguntas o sugerencias (datos al final de este manual).
Asimismo, visite nuestra página web:
wwwwww..ddeeddiieettrriicchh--eelleeccttrroommeennaaggeerr..ccoomm
donde encontrará nuestras
últimas innovaciones y otras informaciones útiles y adicionales.
DDEE DDIIEETTRRIICCHH
LLooss nnuueevvooss oobbjjeettooss ddee vvaalloorr
Con el objetivo de mejorar constantemente nuestros productos, nos reservamos el derecho de
efectuar modificaciones en sus características relacionadas con los avances.
Importante:
Antes de poner en marcha el horno, lea atentamente esta guía de instalación y
utilización para familiarizarse más rápidamente con su funcionamiento.
99641611_A_MULTI.qxp 20/03/2007 17:36 Page 72
Page 73

73
ÍNDICE
ES
1 / DESCRIPCIÓN DEL APARATO
••
Presentación del horno
_____________________________________
74
••
Accesorios
________________________________________________
74
••
Presentación del programador
_______________________________
75
2 / UTILIZACIÓN DEL APARATO
••
Utilización del programador
º
Cómo ajustar la hora
___________________________________
76
º
Cocción inmediata
_____________________________________
77
••
Cocción programada
º
Puesta en marcha inmediata
_____________________________
78
º
Puesta en marcha retardada
_____________________________
79
••
Utilización de la función minutería
_____________________________
80
3 / MODOS DE COCCIÓN DEL HORNO
_____________________________
81
4 / MANTENIMIENTO Y LIMPIEZA DEL HORNO
______________________
83
5 / SERVICIO TÉCNICO
••
Intervenciones
_____________________________________________
85
99641611_A_MULTI.qxp 20/03/2007 17:36 Page 73
Page 74

74
1 / DESCRIPCIÓN DEL APARATO
ES
PRESENTACIÓN DEL HORNO
••
A
B
Programador
Selector de temperatura
Selector de funciones
C
D
E
Lámpara
Niveles de altura cable
E
D
B
A
C
•Accesorios
Su aparato está equipado con dos rejillas de seguridad con empuñadura, una rejilla con
empuñaduras para bandeja de 45 mm, una bandeja de repostería Lissium y una bandeja de
45 mm.
99641611_A_MULTI.qxp 20/03/2007 17:36 Page 74
Page 75

75
1 / DESCRIPCIÓN DEL APARATO
ES
PRESENTACIÓN DEL PROGRAMADOR
••
A
D
A
B
Visualización de hora y duración
Indicador de duración de cocción
Indicador de final de cocción
Indicador de minutería
C
D
E
Indicador de bloqueo
Indicador de limpieza
Visualización de la temperatura
Mando de selección (duración y hora)
Mandos de regulación del tiempo
F
G
G
H
H
C
B
F
I
E
I
99641611_A_MULTI.qxp 20/03/2007 17:36 Page 75
Page 76

76
2 / UTILIZACIÓN DEL APARATO
ES
UTILIZACIÓN DEL PROGRAMADOR
•
Cómo ajustar la hora
--
Al conectar el horno
El visor parpadea a las 12:00 (fig.1).
Regule la hora pulsando los mandos + y (manteniendo pulsado el mando, los números
pasan rápidamente) (fig.2).
Ejemplo: 12H30
Pulse el mando “ ” para validar.
La visualización deja de parpadear.
- Para volver a poner el reloj en hora
El selector de función debe estar
obligatoriamente en la posición 0 (fig.1).
Pulse el mando “ ” durante unos segundos
hasta que parpadee el visor (fig.2) y luego
suéltelo. Unos pitidos indican que se puede
comenzar la regulación.
Regule la hora con los mandos + y - (fig.3).
Pulse el mando “ ” para validar (fig.4).
fig.1
fig.2
fig.2
fig.3
fig.4
fig.1
Atención
Si no se efectúa la validación mediante
el mando “ ”, el registro es automático al
cabo de unos segundos.
••
99641611_A_MULTI.qxp 20/03/2007 17:36 Page 76
Page 77

77
2 / UTILIZACIÓN DEL APARATO
ES
•Cocción inmediata
— El programador sólo debe indicar la hora.
Ésta no debe parpadear (fig.1).
Gire el selector de funciones a la posición
seleccionada.
Ejemplo: posición (fig.2).
El horno le propone la temperatura óptima
para este tipo de cocción.
Sin embargo, es posible ajustar la
temperatura accionando la manecilla de
selección de temperatura a ++o
--
(fig.3).
CCoollooqquuee llaa bbaannddeejjaa eenn eell hhoorrnnoo
según las
recomendaciones indicadas en la guía de
cocción.
Después de estas acciones, el horno calienta
y el indicador de la temperatura parpadea.
Se emite una serie de pitidos cuando el horno
alcanza la temperatura seleccionada.
Esta deja de parpadear.
Para parar la cocción, ponga el selector de
funciones en 0.
fig.2
fig.4
Atención
Todas las cocciones se realizan con la puerta cerrada.
Atención
Después de un ciclo de cocción, la turbina de enfriamiento sigue funcionando durante
cierto tiempo, para garantizar una buena fiabilidad del horno.
fig.1
fig.3
99641611_A_MULTI.qxp 20/03/2007 17:36 Page 77
Page 78

78
ES
2 / UTILIZACIÓN DEL APARATO
--
Cocción con puesta en marcha inmediata
y duración programada
- Elija el modo de cocción deseado y ajuste la
temperatura (fig.1).
- Pulse el mando “ ” hasta que el indicador de
duración de la cocción parpadee “ ”.
La visualización parpadea a 0,00 h para indicar
que es posible realizar el ajuste (fig.
2).
- Pulse el mando ++o --para ajustar el tiempo
deseado.
Ejemplo: 30 min de cocción (fig.
3).
El registro del tiempo de cocción es automático
al cabo de unos segundos.
El visor del tiempo deja de parpadear.
La cuenta atrás del tiempo se efectúa
inmediatamente después del ajuste.
DDeessppuuééss ddee eessttaass 33 aacccciioonneess,, eell hhoorrnnoo ccaalliieennttaa::
Se emite una serie de pitidos cuando el horno
alcanza la temperatura seleccionada.
Al final de la cocción (fin del tiempo programado),
- el horno se para,
- el indicador de duración de cocción y 0:00
parpadean (fig.
4),
- se emite una serie de pitidos durante unos
minutos. La parada definitiva de estos pitidos se
realiza pulsando cualquier mando.
La visualización pasa de nuevo a la hora del día
volviendo a colocar el selector de funciones en 0
(fig.5
).
fig.2
fig.3
COCCIÓN PROGRAMADA
••
fig.1
fig.4
fig.5
99641611_A_MULTI.qxp 20/03/2007 17:37 Page 78
Page 79

79
ES
2 / UTILIZACIÓN DEL APARATO
--
Cocción con puesta en marcha
retardada y hora de fin de cocción
elegida
PPrroocceeddaa ccoommoo ppaarraa uunnaa ccoocccciióónn pprrooggrraammaaddaa..
- Una vez regulada la duración de la cocción,
pulse el mando “ ” hasta que parpadee el
indicador de fin de cocción “ ”.
La visualización parpadea para indicar que es
posible realizar el ajuste (fig.
1).
- Pulse el mando ++o --para regular la hora de
fin de cocción deseada.
Ejemplo: fin de cocción a las 13h (fig.
2).
El final de cocción queda registrado
automáticamente al cabo de unos segundos.
El visor del fin de cocción deja de parpadear.
UUnnaa vveezz eeffeeccttuuaaddaass eessttaass ooppeerraacciioonneess,, llaa
ppuueessttaa eenn mmaarrcchhaa qquueeddaa rreettaarrddaaddaa ppaarraa qquuee
llaa ccoocccciióónn tteer
rmmiinnee aa llaass 1133hh..
Al final de la cocción (fin del tiempo
programado),
- el horno se para,
- el indicador de duración de cocción y 0:00
parpadean (fig.
3),
- se emite una serie de pitidos durante unos
minutos. La parada definitiva de estos pitidos
se realiza pulsando cualquier mando.
La visualización pasa de nuevo a la hora del
día volviendo a colocar el selector de
funciones en 0 (fig.4).
El interior del horno queda iluminado desde el
inicio de la cocción y se apaga al final de la
cocción.
fig.1
fig.2
fig.3
fig.4
COCCIÓN PROGRAMADA
••
99641611_A_MULTI.qxp 20/03/2007 17:37 Page 79
Page 80

80
2 / UTILIZACIÓN DEL APARATO
ES
-- EEll pprrooggrraammaaddoorr ddeell hhoorrnnoo ppuueeddee uuttiilliizzaarrssee
ccoommoo mmiinnuutteerrííaa iinnddeeppeennddiieennttee qquuee ppeerrmmiittee llaa
ccuueennttaa aattrrááss
ddee cciieerrttoo ttiieemmppoo ssiinn
ffuunncciioonnaammiieennttoo ddeell hhoorrnnoo..
En ese caso, la visualización de la minutería
predomina sobre la visualización de la hora.
- Pulse el mando “ ” (fig.1) hasta que
parpadee el símbolo correspondiente a la
minutería.
-> 0.00 y un pequeño reloj de arena parpadean.
- Ajuste el tiempo elegido pulsando los mandos
++o --
(fig.2).
- Pulse el mando “ ” para validar o esperar
unos segundos.
Atención
Se puede modificar o anular en cualquier momento la programación del minutero.
fig.1
fig.2
UTILIZACIÓN DE LA FUNCIÓN
MINUTERÍA
••
El visualizador deja de parpadear al cabo de unos segundos y el minutero se pone en marcha
y descuenta el tiempo de segundo en segundo.
Una vez transcurrido el tiempo, el minutero emite una serie de pitidos para advertirle.
La parada de estos pitidos se realiza pulsando cualquier mando.
99641611_A_MULTI.qxp 20/03/2007 17:37 Page 80
Page 81

81
3 / MODOS DE COCCIÓN DEL HORNO
ES
*
Secuencia o secuencias utilizadas para el anuncio escrito en la etiqueta energética de conformidad con
la norma europea EN 50304 y según la directiva europea 2002/40/CE.
CCAALLOORR GGIIRRAATTOORRIIOO
(temperatura recomendada
118800°°CC
mín. 35°C máx. 235°C)
•
La cocción se efectúa con el elemento calefactor situado al fondo del horno y con la
hélice para mover el aire.
•
Aumento rápido de la temperatura. Algunos platos se pueden introducir en el horno
frío.
•
Recomendado para conservar tiernas las carnes blancas, pescados y verduras.
Para las cocciones múltiples de hasta 3 niveles.
CCAALLOORR CCOOMMBBIINNAADDOO
(temperatura recomendada
220055°°CC
mín. 35°C máx. 275°C)
•
La cocción se efectúa con la resistencia inferior y la superior y con la hélice de
movimiento de aire.
•
Tres fuentes de calor asociadas: mucho calor en la parte inferior, un poco de calor
giratorio y un toque de grill para dorar.
•
Recomendado para quiches, empanadas, tartas de frutas jugosas, colocadas
preferentemente en una bandeja de barro.
GGRRIILLLL PPUULLSSAADDOO ++ AASSAADDOORR
(temperatura recomendada
220000°°CC
mín. 180°C máx. 230°C)
•
La cocción se realiza alternativamente con el elemento superior y con la hélice para
mover el aire.
•
No hace falta precalentamiento. Aves y asados jugosos y crujientes por todos los
lados.
•
El asador rotativo continua funcionando hasta que se abre la puerta.
•
Coloque la bandeja para recoger la grasa en la posición más baja.
•
Recomendado para todas las aves o asados hechos con el asador, para soasar y
cocinar hasta el centro piernas de cordero y chuletas de buey. Para que los bloques de
pescado queden jugosos y tiernos.
TTRRAADDIICCIIOONNAALL
(temperatura recomendada
224400°°CC
mín. 35°C máx. 275°C)
•
La cocción se efectúa con la resistencia inferior y superior.
•
Después de un precalentamiento, cocinará la mayoría de sus platos, recomendado
para conservar tiernas las carnes blancas, pescados y verduras.
EECCOO
(temperatura recomendada
220000°°CC
mín. 35°C máx. 275°C)
•
La cocción se efectúa con la resistencia inferior y superior.
•
Esta posición permite una ganancia de energía conservando las cualidades de cocción.
•
La posición ECO se utiliza para el etiquetado energético.
•
Todas las cocciones se realizan
ssiinn pprreeccaalleennttaammiieennttoo..
*
*
99641611_A_MULTI.qxp 20/03/2007 17:37 Page 81
Page 82

82
3 / MODOS DE COCCIÓN DEL HORNO
ES
GGRRIILLLL FFUUEERRTTEE ++ AASSAADDOORR
(posición recomendada 44- mín. 1 - máx. 4)
•
La cocción se efectúa con la resistencia superior.
•
El grill fuerte cubre toda la superficie de la rejilla.
•
Recomendado para asar chuletillas, salchichas, rebanadas de pan, langostinos a la
parrilla.
PPAANN
(temperatura recomendada
220055°°CC
mín. 35°C máx. 275°C)
•
Secuencia de cocción recomendada para la cocción del pan.
•
Tras un precalentamiento, coloque la bola de pan en la bandeja de repostería - 2º nivel.
•
No olvide colocar un molde de agua en la solera para obtener una corteza crujiente y
dorada.
99641611_A_MULTI.qxp 20/03/2007 17:37 Page 82
Page 83

83
4 / MANTENIMIENTO Y LIMPIEZA DEL HORNO
ES
fig.1
•Pirólisis inmediata
--
Retire la batería de cocina del horno y los
desbordamientos importantes que hubieran
podido producirse.
--
Verifique que el programador indica la hora
del día y que ésta no parpadea (fig.1).
Tiene la posibilidad de elegir 3 duraciones de
ciclo de pirólisis:
duración de pirólisis de 1 hora 30.
duración de pirólisis de 1 hora 45.
duración de pirólisis de 2 horas.
--
Gire el selector de funciones a la posición de
pirólisis deseada.
Ejemplo: 1 hora 45 (fig.2).
Al inicio de la pirólisis, el símbolo se
visualiza en el programador así como la
duración del ciclo de pirólisis (fig.3).
El símbolo se visualiza en el programador
indicándole que la puerta está bloqueada.
Al final de la pirólisis, 0:00 parpadea así como
el símbolo (fig.4).
Para recuperar la visualización de la hora, gire
el selector de funciones a la posición de
parada (fig.5).
--
Cuando el horno esté frío, utilice un paño
húmedo para retirar la ceniza blanca.
El horno está limpio y puede ser utilizado de
nuevo para efectuar la cocción que desee.
Observaciones: La temperatura de limpieza no
puede ser modificada. Durante el ciclo de
pirólisis, la luz permanece apagada. Si el
horno no está limpio después de una pirólisis,
es que ha esperado demasiado tiempo. Repita
la operación.
HACER UNA PIRÓLISIS
••
fig.2
fig.3
fig.4
fig.5
99641611_A_MULTI.qxp 20/03/2007 17:37 Page 83
Page 84

84
4 / MANTENIMIENTO Y LIMPIEZA DEL HORNO
ES
fig.1
•Pirólisis diferida
--
Siga las instrucciones descritas en el párrafo
“Pirólisis inmediata” y, a continuación:
--
Gire el selector de funciones a la posición de
pirólisis deseada.
- Pulse el mando .
El símbolo de fin de cocción parpadea
indicando que se puede comenzar la
regulación (fig.1).
- Pulse el mando + o - para regular la hora de
fin de cocción que desea (fig.2).
Ejemplo: fin de limpieza a las 18 horas.
--
Una vez hecho esto, la puesta en marcha de
la pirólisis queda retardada para que finalice a
las 18:00.
Una vez terminada la pirólisis, vuelva a poner
el selector de funciones en posición de
parada.
HACER UNA PIRÓLISIS
••
fig.2
99641611_A_MULTI.qxp 20/03/2007 17:37 Page 84
Page 85

85
5 / SERVICIO TÉCNICO
ES
Las posibles intervenciones en su aparato
deberán ser realizadas por un profesional
cualificado depositario de la marca. Cuando
realice su llamada, mencione la referencia
completa del aparato (modelo, tipo, número
de serie). Esta información figura en la placa
de características
(fig.1).
PIEZAS ORIGINALES
Al realizar una intervención de mantenimiento,
solicite el uso exclusivo de
piezas de recambio
certificadas originales.
•INTERVENCIONES
**
Servicio proporcionado por Brandt Customer Services, sociedad por acciones simplificada con un capital
de 2.5000.000 euros, 5/7 avenue des Béthunes, 95310 Saint Ouen l’Aumône - RCS Pontoise 440 303 303
BBrraannddtt AApppplliiaanncceess
- sociedad por acciones simplificada con un capital de 10.000.000 euros RCS Nanterre 440 302 347.
BRANDT APPLIANCES SAS
7 rue Henri Becquerel
92500 RUEIL MALMAISON
230V ~ 50 Hz
MADE IN FRANCE
fig.1
99641611_A_MULTI.qxp 20/03/2007 17:37 Page 85
Page 86

86
FR
02
DE
44
EN
58
ES
72
IT
86
NL
100
PT
114
DA
30
CS
16
Cara Cliente, Caro Cliente,
Grazie per avere acquistato un forno
DDEE DDIIEETTRRIICCHH
.
I nostri team di ricerca hanno progettato per Lei questa nuova
generazione di forni che, per la loro qualità, il design, le funzionalità e
le evoluzioni tecnologiche, sono prodotti eccezionali, frutto del nostro
know-how.
Il nuovo forno
DDEE DDIIEETTRRIICCHH
s'integrerà perfettamente nella Sua
cucina associando performance di cottura e facilità di utilizzo.
Abbiamo voluto offrirLe un prodotto d'eccellenza.
Troverà, inoltre, nella gamma dei prodotti
DDEE DDIIEETTRRIICCHH
, un'ampia
scelta di cucine, piani di cottura, cappe, lavastoviglie e frigoriferi a
incasso, che potrà coordinare con questo nuovo forno
DDEE DDIIEETTRRIICCHH
.
Al fine di soddisfare al meglio le esigenze della clientela, il nostro
servizio consumatori è a Sua disposizione per rispondere a tutte le
Sue domande o ascoltare i Suoi suggerimenti (estremi alla fine del
presente manuale).
E' possibile inoltre collegarsi al nostro sito:
wwwwww..ddeeddiieettrriicchh--eelleeccttrroommeennaaggeerr.
.ccoomm
nel quale troverà le nostre ultime
novità e tante informazioni utili e complementari.
DDEE DDIIEETTRRIICCHH
II nnuuoovvii ooggggeettttii ddii vvaalloorree
Al fine di migliorare sempre i nostri prodotti, ci riserviamo il diritto di modificarne le
caratteristiche tecniche, funzionali o estetiche, conformemente alla loro evoluzione.
Importante:
Prima di utilizzare il forno, leggere attentamente il presente manuale d'installazione e
d'uso per conoscerne meglio il funzionamento.
99641611_A_MULTI.qxp 20/03/2007 17:37 Page 86
Page 87

87
INDICE
IT
1 / DESCRIZIONE DEL FORNO
••
Presentazione del forno
_____________________________________
88
••
Accessori
_________________________________________________
88
••
Presentazione del programmatore
____________________________
89
2 / UTILIZZAZIONE DEL FORNO
••
Utilizzazione del programmatore
º
Regolazione dell’ora
____________________________________
90
º
Cottura immediata
______________________________________
91
••
Cottura programmata
º
Avviamento immediato
__________________________________
92
º
Avviamento differito
____________________________________
93
••
Utilizzazione del timer
______________________________________
94
3 / MODALITA’ DI COTTURA DEL FORNO
___________________________
95
4 / MANUTENZIONE E PULIZIA DEL FORNO
_________________________
97
5 / SERVIZIO POST VENDITA
••
Interventi
_________________________________________________
99
99641611_A_MULTI.qxp 20/03/2007 17:37 Page 87
Page 88

88
1 / DESCRIZIONE DEL FORNO
IT
PRESENTAZIONE DEL FORNO
••
A
B
Programmatore
Selettore di temperatura
Selettore delle funzioni
C
D
E
Lampada
Scanalature
E
D
B
A
C
•Accessori
Il forno ha due griglie di sicurezza con manico, una griglia con manici per teglia di 45 mm, una
teglia per dolci Lissium e una teglia di 45 mm.
99641611_A_MULTI.qxp 20/03/2007 17:37 Page 88
Page 89

89
1 / DESCRIZIONE DEL FORNO
IT
PRESENTAZIONE DEL PROGRAMMATORE
••
A
D
A
B
Visualizzazione dell'ora e della durata
Indicatore durata di cottura
Indicatore di fine cottura
Indicatore del timer
C
D
E
Indicatore di bloccaggio
Indicatore di pulizia
Visualizzazione della temperatura
Tasto di selezione (durata e ora)
Tasti di regolazione del tempo
F
G
G
H
H
C
B
F
I
E
I
99641611_A_MULTI.qxp 20/03/2007 17:37 Page 89
Page 90

90
2 / UTILIZZAZIONE DEL FORNO
IT
UTILIZZAZIONE DEL PROGRAMMATORE
•
Regolazione dell’ora
--
Al momento dell'accensione
Il display lampeggia alle ore 12 (fig.1).
Regolare l'ora premendo i tasti + e - (tenendo
il tasto premuto è possible far scorrere
rapidamente i numeri) (fig.2).
Esempio: Ore 12,30
Premere il tasto “ ” per confermare.
Il display non lampeggia più.
- Per ripristinare l'ora dell'orologio
Il selettore delle funzioni deve essere
posizionato su 0 (fig.1).
Premere il tasto “ ” per pochi secondi fino
a far lampeggiare il display (fig.2); lasciare il
tasto. Una serie di segnali acustici indica che
la regolazione può essere effettuata.
Regolare l'ora con i tasti + e - (fig 3).
Premere il tasto “ ” per confermare (fig.4).
fig.1
fig.2
fig.2
fig.3
fig.4
fig.1
Attenzione
Se la regolazione non viene confermata
con il tasto “ ”, la registrazione diventa
automatica dopo pochi secondi.
••
99641611_A_MULTI.qxp 20/03/2007 17:37 Page 90
Page 91

91
2 / UTILIZZAZIONE DEL FORNO
IT
•Cottura immediata
— Sul programmatore deve apparire soltanto
l'ora e quest'ultima non deve lampeggiare
(fig.1).
Girare il selettore delle funzioni e posizionarlo
sul valore desiderato.
Esempio: posizione (fig.2).
Il forno propone la temperatura ottimale per
questo tipo di cottura.
E' possibile tuttavia regolare la temperatura
girando la manopola di selezione della
temperatura verso ++o --(fig.3).
MMeetttteerree iill ppiiaattttoo nneell ffoorrnnoo
seguendo i consigli
della guida di cottura.
Dopo queste operazioni, il forno comincia a
riscaldare e l'indicatore di temperatura
lampeggia.
Una serie di segnali acustici indica che il
forno ha raggiunto la temperatura scelta.
Quest'ultima smette di lampeggiare.
Per interrompere la cottura, riposizionare il
selettore delle funzioni su 0.
fig.2
fig.4
Attenzione
Tutti i tipi di cottura devono essere effettuati con la porta del forno chiusa.
Attenzione
Dopo un ciclo di cottura, la turbina di raffreddamento continua a funzionare per un
certo lasso di tempo, al fine di garantire il corretto funzionamento del forno.
fig.1
fig.3
99641611_A_MULTI.qxp 20/03/2007 17:37 Page 91
Page 92

92
IT
2 / UTILIZZAZIONE DEL FORNO
--
Cottura con avviamento immediato e
durata programmata
- Scegliere la modalità di cottura desiderata e
regolare la temperatura (fig.1).
- Premere il tasto “ ” fino a far lampeggiare
l'indicatore di durata della cottura “ ”.
Il display lampeggia a 0h00 per indicare che è
possibile effettuare la regolazione (fig.
2).
-Premere il tasto ++o --per regolare il tempo
desiderato.
Esempio: 30 min di cottura (fig.
3).
La registrazione del tempo di cottura è
automatica dopo pochi secondi.
Il display della durata non lampeggia più.
Il calcolo del tempo di cottura restante inizia
subito dopo la regolazione.
DDooppoo qquueessttee 33 ooppeerraazziioonnii,, iill ffoorrnnoo ccoommiinncciiaa aa
rriissccaallddaarree::
Una serie di segnali acustici indica che il forno ha
raggiunto la temperatura scelta.
Alla fine della cottura (fine del tempo
programmato),
- il forno si spegne,
- l'indicatore di durata della cottura e 0:00
lampeggiano (fig.
4),
- una serie di segnali acustici è emessa per
qualche minuto. E' possibile interrompere questi
segnali acustici premendo un tasto qualsiasi.
Il display ritorna all'ora del giorno se il selettore
delle funzioni viene posizionato su 0 (fig.
5).
fig.2
fig.3
COTTURA PROGRAMMATA
••
fig.1
fig.4
fig.5
99641611_A_MULTI.qxp 20/03/2007 17:37 Page 92
Page 93

93
IT
2 / UTILIZZAZIONE DEL FORNO
--
Cottura con avviamento differito e ora
di fine cottura selezionata
PPrroocceeddeerree ccoommee ppeerr llaa ccoottttuurraa pprrooggrraammmmaattaa..
- Dopo avere regolato la durata della cottura,
premere il tasto “ ” fino a far lampeggiare
l'indicatore di fine cottura “ ”.
Il display lampeggia per indicare che è
possible effettuare la regolazione (fig.
1).
- Premere il tasto ++o --per regolare l'ora di fine
cottura desiderata.
Esempio: fine della cottura alle ore 13 (fig.
2).
La registrazione della fine della cottura è
automatica dopo pochi secondi.
Il display di fine cottura non lampeggia più.
DDooppoo qquueessttee 33 ooppeerraazziioonnii,, ll''aavvvviiaammeennttoo ddeell
rriissccaallddaammeennttoo èè ddiiffffeerriittoo aaffffiinncchhéé llaa ccoottttuurraa
tteerrmmiinnii
aallllee oorree 1133..
Alla fine della cottura (fine del tempo
programmato),
- il forno si spegne,
- l'indicatore di durata della cottura e 0:00
lampeggiano (fig.
3),
- una serie di segnali acustici è emessa per
qualche minuto. E' possibile interrompere
questi segnali premendo un tasto qualsiasi.
Il display ritorna all'ora del giorno se il
selettore delle funzioni viene posizionato su 0
(fig.
4).
La lampadina posta all'interno del forno si
accende quando inizia la cottura e si spegne
alla fine della cottura.
fig.1
fig.2
fig.3
fig.4
COTTURA PROGRAMMATA
••
99641611_A_MULTI.qxp 20/03/2007 17:37 Page 93
Page 94

94
2 / UTILIZZAZIONE DEL FORNO
IT
-- IIll pprrooggrraammmmaattoorree ddeell ffoorrnnoo ppuuòò eesssseerree
uussaattoo ccoommee ttiimmeerr iinnddiippeennddeennttee ppeerr
ddeetteerrmmiinnaarree iill llaassssoo ddii tteem
mppoo dduurraannttee iill qquuaallee
iill ffoorrnnoo nnoonn ffuunnzziioonnaa..
In tal caso, il display del timer è prioritario
rispetto al display dell'ora del giorno.
- Premere il tasto “ ” (fig.1) fino a far
lampeggiare il simbolo del timer.
-> 0.00 e una piccola clessidra lampeggiano.
- Regolare il tempo scelto premendo i tasti
++
o--(fig.2).
- Premere il tasto “ ” per confermare o
aspettare pochi secondi.
Attenzione
E' possibile modificare o annullare la programmazione del timer in qualsiasi momento.
fig.1
fig.2
UTILIZZAZIONE DEL TIMER
••
Il display smette di lampeggiare dopo pochi secondi e il timer comincia a calcolare il tempo
restante in secondi.
Quando il tempo programmato è finito, il timer emette una serie di segnali acustici per avvisare
che la cottura è terminata.
E' possibile interrompere questi segnali acustici premendo un tasto qualsiasi.
99641611_A_MULTI.qxp 20/03/2007 17:37 Page 94
Page 95

95
3 / MODALITA’ DI COTTURA DEL FORNO
IT
*
Modalità usata(e) nel rispetto dell'etichetta energetica, conformemente alla norma europea EN 50304 e
secondo la direttiva europea 2002/40/CE.
CCAALLOORREE UUNNIIFFOORRMMEE
(temperatura consigliata
118800°°CC
/ minima 35°C/ massima 235°C)
•
La cottura si effettua mediante il dispositivo di riscaldamento posto in fondo al forno e
mediante il dispositivo di ventilazione.
•
Aumento rapido della temperatura: alcune pietanze possono essere messe nel forno
freddo.
•
Raccomandata per mantenere tenera la carne bianca, il pesce, le verdure.
Per cuocere più alimenti, fino a 3 livelli.
CCAALLOORREE CCOOMMBBIINNAATTOO
(temperatura consigliata
220055°°CC
/ minima 35°C/ massima 275°C)
•
La cottura si effettua mediante gli elementi inferiore e superiore e mediante il dispositivo
di ventilazione.
•
Tre fonti di calore sono associate: calore forte in basso, un po' di calore uniforme e un
po' di grill per dorare.
•
Raccomandata per le quiche, le torte rustiche, le torte di frutta molto succosa, messe
preferibilmente in un piatto di terracotta.
GGRRIILLLL PPUULLSSEE ++ SSPPIIEEDDOO
(temperatura consigliata
220000°°CC
/ minima 180°C/ massima 230°C)
•
La cottura si effettua, alternativamente, mediante l'elemento superiore e il dispositivo di
ventilazione.
•
Non serve il pre-riscaldamento. Il pollame e gli arrosti sono saporiti e croccanti su tutta
la loro superficie.
•
Lo spiedo continua a funzionare fino all'apertura della porta.
•
Mettere la leccarda nella scanalatura più bassa.
•
Raccomandata per il pollame o gli arrosti allo spiedo, per cuocere a fuoco vivo e in
profondità il cosciotto d'agnello e le costate di manzo, per mantenere tenere le grosse fette
di pesce.
CCLLAASSSSIICCAA
(temperatura consigliata
224400°°CC
/ minima 35°C/ massima 275°C)
•
La cottura si effettua mediante l'elemento inferiore e superiore.
•
Dopo il pre-riscaldamento, è possibile cuocere praticamente tutti i tipi di pietanze.
Raccomandata per mantenere tenera la carne bianca, il pesce, le verdure.
EECCOONNOOMMIICCAA
(temperatura consigliata
220000°°CC
/ minima 35°C/ massima 275°C)
•
La cottura si effettua mediante gli elementi inferiore e superiore.
•
Questa posizione permette di risparmiare energia senza influire sulla qualità della
cottura.
•
La cottura ECONOMICA viene usata nel rispetto dell'etichettatura energetica.
•
Tutti i tipi di cottura sono realizzati
sseennzzaa pprree--rriissccaallddaammeennttoo
.
*
*
99641611_A_MULTI.qxp 20/03/2007 17:37 Page 95
Page 96

96
3 / MODALITA’ DI COTTURA DEL FORNO
IT
GGRRIILLLL FFOORRTTEE ++ SSPPIIEEDDOO
(posizione consigliata 44- minima 1 - massima 4)
•
La cottura si effettua mediante l'elemento superiore.
•
Il grill forte copre tutta la superficie della griglia.
•
Raccomandata per grigliare le costolette, le salsicce, le fette di pane, i gamberoni.
PPAANNEE
(temperatura consigliata
220055°°CC
/ minima 35°C/ massima 275°C)
•
Tipo di cottura consigliata per cuocere il pane.
•
Dopo il pre-riscaldamento, mettere la pasta del pane nella teglia per i dolci, nella
seconda scanalatura.
•
Non dimenticare di mettere un tegamino pieno d'acqua sulla suola del forno per
ottenere una crosta dorata e croccante.
99641611_A_MULTI.qxp 20/03/2007 17:37 Page 96
Page 97

97
4 / MANUTENZIONE E PULIZIA DEL FORNO
IT
fig.1
•Pirolisi immediata
--
Togliere tutte le teglie dal forno ed eliminare
lo sporco e le incrostazioni.
--
Controllare che sul programmatore appaia
l'ora del giorno e che quest'ultima non
lampeggi (fig.1).
E' possibile scegliere 3 durate di pirolisi:
pirolisi di 1 ora e 30 min.
pirolisi di 1 ora e 45 min.
pirolisi di 2 ore.
--
Girare il selettore delle funzioni e
posizionarlo sul tipo di pirolisi desiderato.
Esempio: 1 ora e 45 min (fig.2).
All'inizio della pirolisi, il simbolo appare
sul programmatore insieme alla durata del
ciclo di pirolisi (fig.3).
Il simbolo appare sul programmatore e
indica che la porta è chiusa.
Alla fine della pirolisi, 0:00 lampeggia insieme
al simbolo (fig.4).
Per visualizzare di nuovo l'ora, girare il
selettore delle funzioni e posizionarlo su Stop
(fig.5).
- Quando il forno è freddo, usare un panno umido
per eliminare la cenere bianca.
Il forno è pulito e di nuovo utilizzabile per
realizzare la cottura desiderata.
N.B.: La temperatura della pulizia non può
essere modificata. Durante il ciclo di pirolisi, la
lampadina è spenta. Se il forno non è pulito
dopo una pirolisi, significa che avete
aspettato troppo tempo. Ripetere
l'operazione.
EFFETTUARE UNA PIROLISI
••
fig.2
fig.3
fig.4
fig.5
99641611_A_MULTI.qxp 20/03/2007 17:37 Page 97
Page 98

98
4 / MANUTENZIONE E PULIZIA DEL FORNO
IT
fig.1
•Pirolisi differita
--
Seguire le istruzioni indicate nel paragrafo
“Pirolisi immediata”, poi:
--
Girare il selettore delle funzioni
posizionandolo sul tipo di pirolisi desiderato.
- Premere il tasto .
Il simbolo di fine cottura lampeggia per
indicare che è possibile effettuare la
regolazione (fig.1).
- Premere il tasto + o - per regolare l'ora
desiderata di fine cottura (fig.2).
Esempio: fine della cottura alle ore 18.
--
Dopo queste operazioni, l'avviamento della
pirolisi è differito affinché quest'ultima termini
alle ore 18.
Quando la pirolisi è terminata, riposizionare il
selettore delle funzioni su Stop.
EFFETTUARE UNA PIROLISI
••
fig.2
99641611_A_MULTI.qxp 20/03/2007 17:37 Page 98
Page 99

99
5 / SERVIZIO POST VENDITA
IT
Gli eventuali interventi sull'apparecchio
devono essere effettuati da un professionista
qualificato, depositario del marchio. Al
momento della richiesta, comunicare tutte le
referenze del forno (modello, tipo, numero di
serie). Queste informazioni si trovano sulla
targhetta delle caratteristiche
(fig.1).
PEZZI D'ORIGINE
In occasione di un intervento di manutenzione,
chiedere che vengano usati esclusivamente
ppeezzzzii cceerrttiiffiiccaattii dd''oorriiggiinnee..
•INTERVENTI
**
Servizio fornito da Brandt Customer Services, società per azioni semplificata con capitale di 2.500.000 euro
5/7, avenue des Béthunes, 95310 Saint Ouen l'Aumône - RCS Pontoise 440 303 303
BBrraannddtt AApppplliiaanncceess
- società per azioni semplificata con capitale di 10.000.000 di euro RCS Nanterre 440 302 347.
BRANDT APPLIANCES SAS
7 rue Henri Becquerel
92500 RUEIL MALMAISON
230V ~ 50 Hz
MADE IN FRANCE
fig.1
99641611_A_MULTI.qxp 20/03/2007 17:37 Page 99
Page 100

100
FR
02
DE
44
EN
58
ES
72
IT
86
NL
100
PT
114
DA
30
CS
16
Geachte Klant,
U hebt net een oven van
DDEE DDIIEETTRRIICCHH
aangekocht, wij willen u hier
graag voor bedanken.
Onze onderzoeksteams hebben voor u deze nieuwe generatie
apparaten ontworpen die uitzonderlijk is door de kwaliteit, de
vormgeving, de functies en de technologische vooruitgang. Hierdoor
zijn het unieke producten die getuigen van onze knowhow.
Uw nieuwe oven
DDEE DDIIEETTRRIICCHH
past harmonieus in uw keuken en
combineert optimale kookprestaties en gebruiksgemak. Wij wilden u
een voortreffelijk product bieden.
In het gamma van producten
DDEE DDIIEETTRRIICCHH
vindt u ook een ruime
keuze aan fornuizen, kookplaten, afzuigkappen, vaatwassers en
koelkasten die allemaal kunnen worden ingebouwd en harmonisch
met uw nieuwe oven van
DDEE DDIIEETTRRIICCHH
kunnen worden
gecombineerd.
Uiteraard streven wij ernaar zo goed mogelijk aan uw wensen ten
aanzien van onze producten te voldoen. Daarom staat onze
klantenservice voor u klaar en luistert naar u om al uw vragen te
beantwoorden of uw suggesties te noteren (gegevens achter in dit
boekje).
Bezoek ook onze site:
wwwwww..ddeeddiieettrriicchh--eelleeccttrroommeennaaggeerr..ccoomm
waar u de laatste nieuwigheden
en alle nodige en bijkomende informatie vindt.
DDEE DDIIEETTRRIICCHH
DDee nniieeuuwwee wwaaaarrddeeoobbjjeecctteenn
Uit een voortdurend streven naar het verbeteren van onze producten, behouden we ons het
recht voor om wijzigingen aan te brengen aan de technische, functionele of esthetische
eigenschappen ervan, om de technische evolutie op de voet te volgen.
Belangrijk:
Alvorens het apparaat in gebruik te nemen vragen wij u eerst deze installatie- en
gebruikshandleiding aandachtig te lezen om u snel met de werking vertrouwd te maken.
99641611_A_MULTI.qxp 20/03/2007 17:37 Page 100
 Loading...