

Page 1
DVD HARD DISC RECORDER
Owner’s Manual
Model : DHD-4000D
DVD HARD DISC RECORDER
GB
English
HELP LINE ; 0870 100 2525
With queries, please quote the page number,
reference number and model number.
DH-A61D1D-LS(GB)_DESUK 03.7.27 11:45 PM ˘ ` 1
Page 2
1
Safety Instructions
Please keep the PVR/DVD Combo’s guarantee sheet and receipt in a safe place.
Precautions
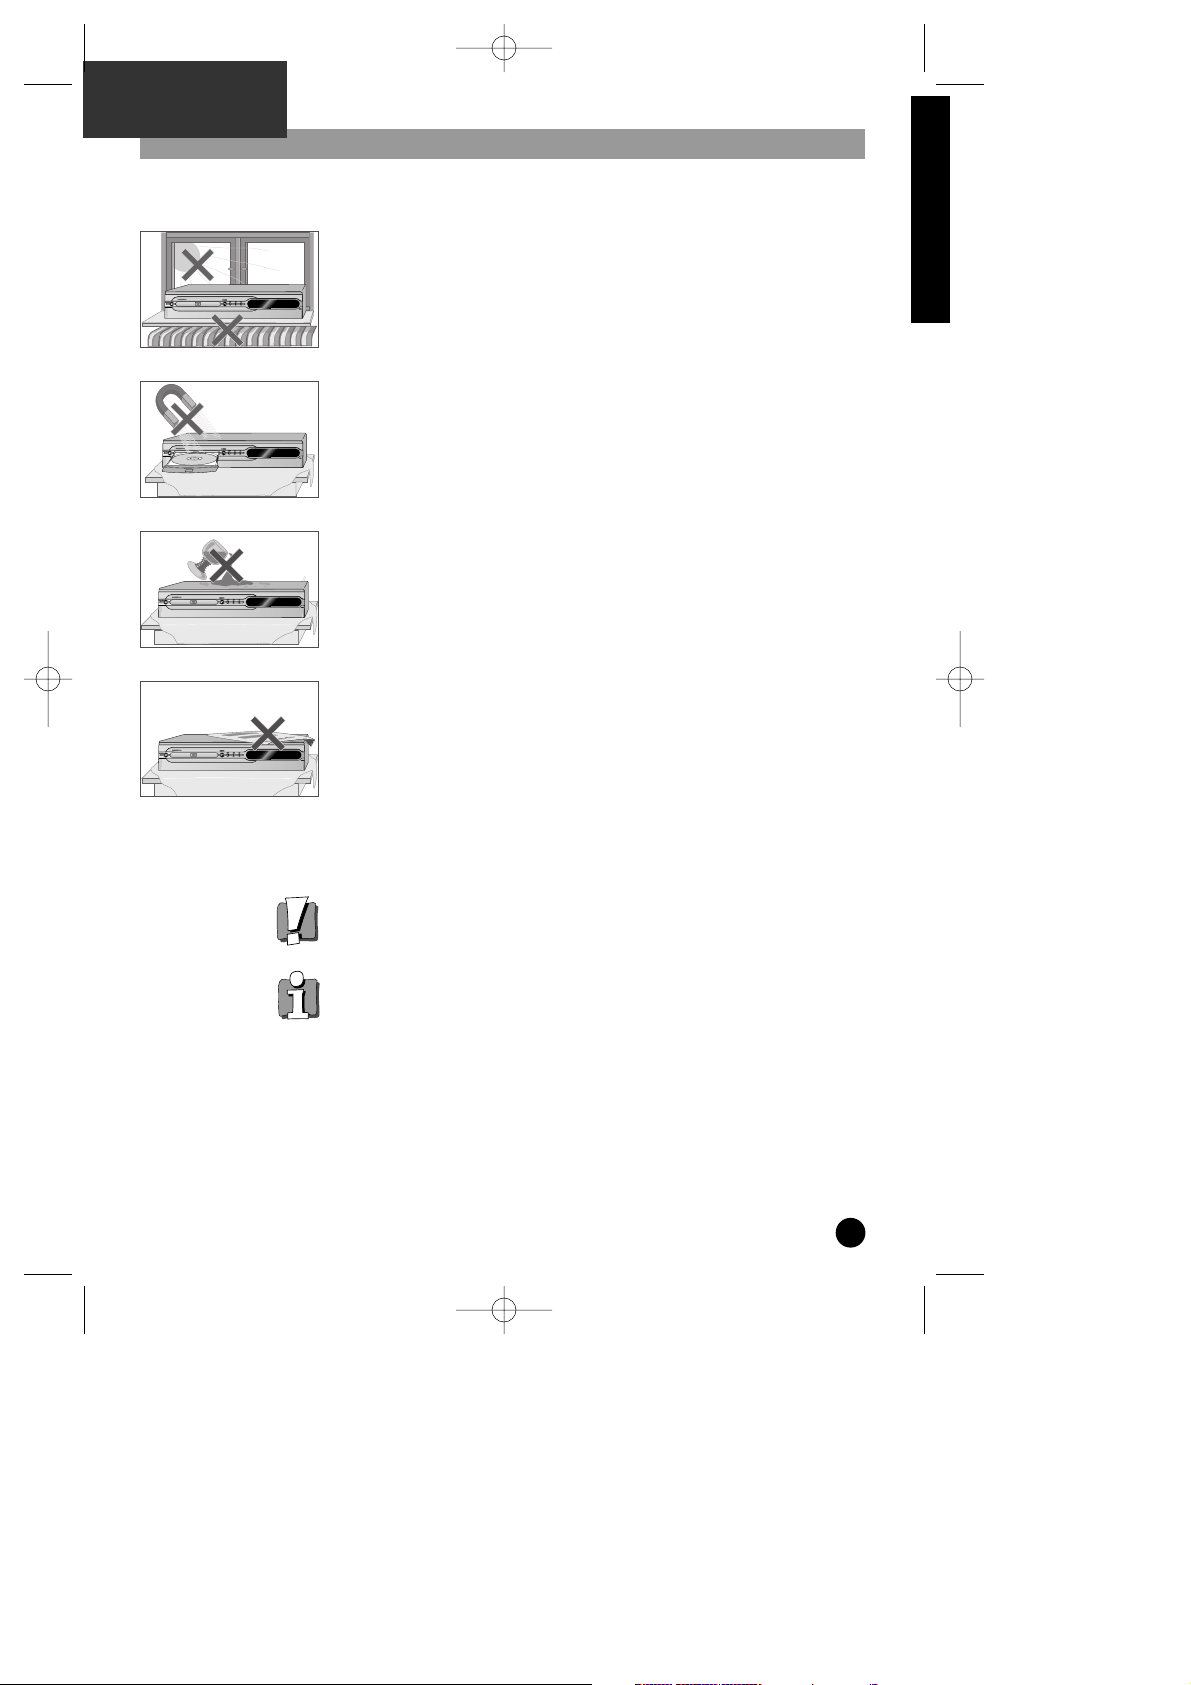
• Read this booklet carefully
• Make sure the rating of your household electricity supply matches that
shown on the back of your PVR/DVD Combo.
• Read this page and chapter “ Setting up your PVR/DVD Combo” to help you
set up and adjust your product correctly
• Do not put the PVR/DVD Combo in a hot or humid place.
• Do not open the PVR/DVD Combo. Get a qualified technician to carry out any
repairs.
• Do not connect the PVR/DVD Combo to the power supply if you have just
moved it from a cold environment to a warm room. This can lead to
condensation inside the PVR/DVD Combo, which can damage it. Wait for
approx. 2 hrs for it to reach room temperature.
• Make sure the PVR/DVD Combo is placed at least 10 cm apart from other
home appliances or obstacles to ensure sufficient ventilation.
• The apparatus should not be exposed to dripping or splashing and no objects
filled with liquids, such as vases should be placed on top of the recorder.
• During a storm and/or lightning, unplug the PVR/DVD Combo from the mains
jack and aerial.
• Put the recorder on a steady flat surface.
• Only clean the recorder with a soft, lint-free cloth. Do not use harsh or
alcohol- based cleaning agents.
• The power cable must be fitted with a fused plug approved by ASTA or BSI to
BS 1362 and provided with a 5A fuse
• The fuse must always be securely replaced. If the video recorder is not
working, the fuse may need to be replaced.
For your own Safety
• There are no components in this product you can service or repair yourself.
• Do not open the case of the PVR/DVD Combo. Only allow a qualified
engineer to repair or service your video
• This PVR/DVD is designed to work continuously. Switching it off ( stand-by
mode) does not disconnect it from the mains. To disconnect it from the mains
you have to unplug it.
PRODUCT INFORMATION
DH-A61D1D-LS(GB)_DESUK 03.7.27 11:45 PM ˘ ` 1
Page 3

PVR
Key Features of the PVR/DVD Combo
Digital Video Recording
Instant Recording of a television programme by a
single button press.
Live TV Buffer –
This feature allows you to actively
time-shift live television. The buffer can store up to
one hour of material allowing you to go back in time,
replay part of a programme that you might have
missed or you just want to see again.
Live Television Pause
Pause a current live television programme and return
to it at your convenience. If you need to Pause press
the Pause/Play button on the remote control and the
live picture will freeze, to resume watching press the
Pause/Play button and the programme will resume
exactly where you left off.
Hard Disk Recording
Recording onto a hard disk means you don’t have to
search though videotapes trying to find a programme
you recorded, nor do you have to find videotape if
something you want to record comes on the television
you can record it instantly with the touch of a button.
Choice of Recording Qualities : with this feature you
can select the recording quality you would like your
timed recordings to be recorded in.
There are three options Basic /Medium/High.
Basic : 34 hrs and 12 mins
Medium : 18 hrs 42 mins
High : 13 hrs 12 mins
You can also set a recording using Show View / Video
Plus(+) and select to record Once, Daily, Twice or
Weekly. All instant records are performed in High
quality mode.
Recording Television
Instant Recording –
you can record a programme with
the touch of a button. You can record for as long as
you like or until you run out of disk space.
Record Until –
you can instantly record television but
can also specify a “Stop Time” after which the unit
will automatically power off.
Set Recording –
Using the Set Recording Menu you can
set a timed recording.
Using the Set Recording menu you can set up to eight
recordings. You can choose to record a programme
Once, Twice, Daily or Weekly. You can also set a
recording using Show View / Video Plus(+) and select
to record once daily twice or weekly.
Show View / Video Plus(+) -
simply input the Show
View / Video Plus(+) code and the unit will do the
rest, you will also have the opportunity to select the
recording quality and the frequency of the recording.
Trick Modes -
You can perform various trick modes
such as pausing, fast-forwarding and rewinding
images when using the PVR/DVD player.
Record Monitor -
You can watch the recorded
programme when you are recording a programme
without stopping Rec.
DVD Title Copy -
When you watch DVD Title, press
[Rec] on the remote control and you can copy DVD
Title to HDD. The recorder does not copy DVD Title
including Macro Vision.
Multiple Speed Forward and Reverse –
You can fast
forward and reverse at different speeds to change the
speed press the Fast Forward and Rewind buttons
multiple times on the remote control.
2
DH-A61D1D-LS(GB)_DESUK 03.7.27 11:45 PM ˘ ` 2
Page 4

3
Key Features of the PVR/DVD Combo
• DVD, VCD, CD, CD-R (MP3, JPEG), CD-RW
playback function
• MP3, JPEG file playback function ( CD-R disc
having Files such as MP3 and JPEG)
• GUI (Graphical User Interface) OSD (On
Screen Display)
By using the [INFO] button on the remote control,
information on the DVD/VCD/CD player and disc,
can be displayed on the TV screen.
• Screensaver function
• 3D sound (3D sound effect using 2 speakers)
• High bit / high sampling with 27MHz /10bit
video encoder
This unit has 27MHz / 10bit capability, that
enables the faithful reproduction of fine images.
• High bit / high sampling with 96KHz /24bit
audio D/A converter
With this 96KHz / 24bit linear Pulse Code
Modulated signals, which constitute the highest
specifications in the DVD standards, you can enjoy
faithfully reproduced sound in all of its various
modes. To support 96KHz sampling / 24bit sound,
the shaping noise of this multi-level digital sigma
type of D/A converter is kept flat up to 44KHz, thus
preventing the important audio signals from being
affected.
• Coaxial / Optical digital output (PCM, Dolby
Digital, dts)
You can enjoy high-level digital audio by
connecting with amp embedded with Dolby Digital
/ dts decoder.
• Built-in Dolby Digital decoder
• Analog audio 2-channels output for
DOWNMIX (x1)
• Composite video out (x1)
• Slow Forward / Reverse (DVD) playback
• Fast Forward / Reverse playback
• Search of title, chapter, and time in DVD
disc, and search of track and time in VCD
and CD
• Various TV aspect (DVD)
4:3 for Pan and Scan, 4:3 for Letter Box, and 16:9
for Wide
• Repeat playback (title and chapter for DVD,
track and disc for VCD/CD)
• Repeat a defined period from A to B
• Selective Play (DVD/VCD/CD)
You can select and play the desired title / chapter
of DVD and track of Video CD/CD in STOP mode.
• Various OSD (On Screen Display) languages
function (DVD)
You can select and display OSD among various
languages.
• Parental Lock function (DVD)
This function can prevent playback of software
that may be unsuitable for children.
• Multi Audio function (DVD)
The audio soundtrack can be heard in up to 8
languages. In the case of SVCD or VCD, it will
depend on the disc. (The number of audio
languages depends on the software.)
• Multi Subtitle function (DVD)
The subtitle can be seen in up to 32 languages. In
the case of SVCD or VCD, it depends on the disc.
(The number of subtitle languages depends on the
software. )
• Multi Angle function (DVD)
This function allows you to choose the viewing
angle of scenes which were shot from a number of
different angles. (The number of angles depends
on the software.)
• Screen zoom function (DVD/VCD)
DVD
PRODUCT INFORMATION
DH-A61D1D-LS(GB)_DESUK 03.7.27 11:45 PM ˘ ` 3
Page 5
Contents
Safety Instructions 1
Key Features of the PVR/DVD Combo 2
Contents 4
Identification of Controls 5
4
Product Information
Playing Disc 37
Playing a desired scene 38
Confirming the current PLAY mode on screen
41
AUDIO language and SUBTITLE language 42
ZOOM and Multi Angle 43
About MP3, JPEG discs 44
Displaying menus in a disc 46
DVD Setup 47
DVD part
About DVD 50
Problems and Solutions 53
Specifications 56
Miscellaneous
Connections 10
Basic connection 10
Other devices 11
Programme the Remote for a TV 12
Installation
Initial Set-Up menu in PVR 13
Installation Menu 15
Manual Set 16
Auto Set 17
Set Clock 18
Adjust Channels 18
Satellite & Cable Box 19
Additional Settings 22
System Information Screen 22
Restore Defaults settings 23
Preferences 23
About Recorded Programmes 24
Watching a recorded programme 24
Edit Title of recorded programmes 25
Video Edit 26
Set Recording 30
Show View / Video Plus(+) recording 32
Record a television programme 33
Information Bars 34
Guide and Warning Messages 35
PVR part
DH-A61D1D-LS(GB)_DESUK 03.7.27 11:45 PM ˘ ` 4
Page 6
5
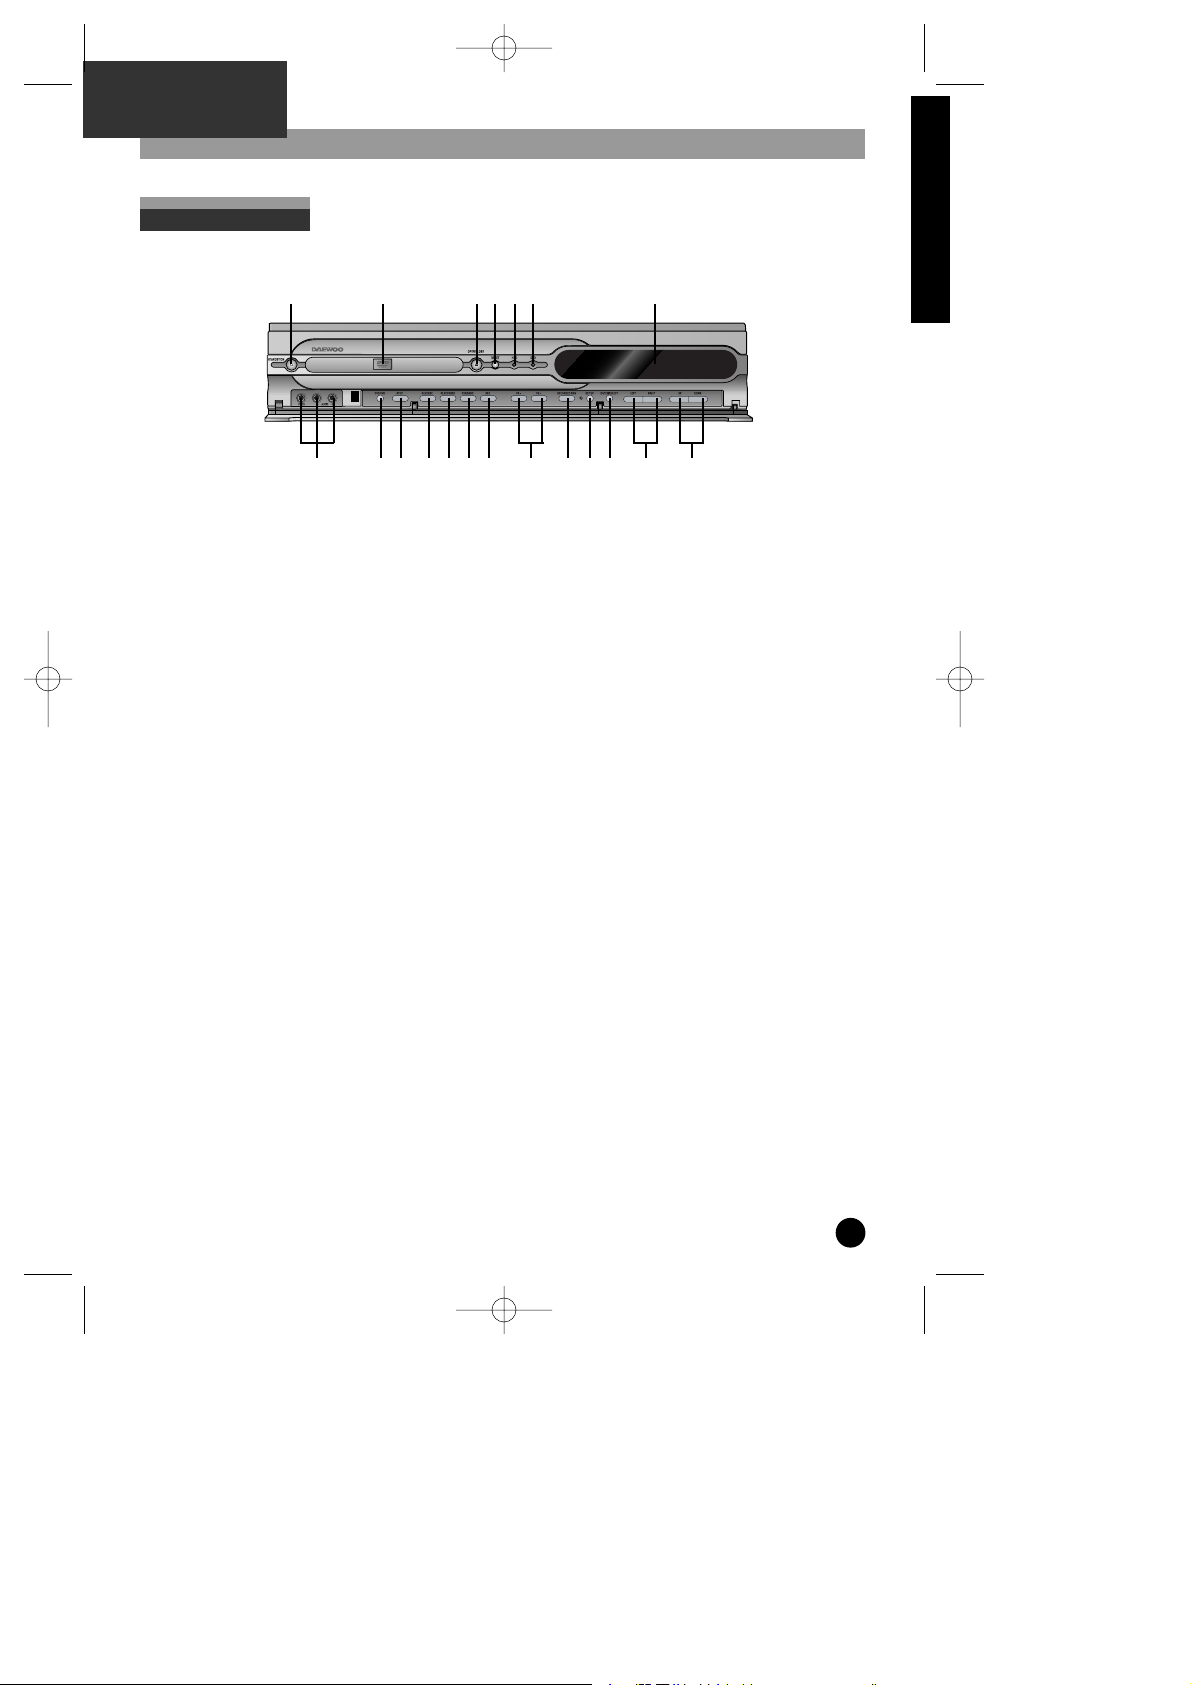
Identification of Controls
! STANDBY/ON button
Use to power the device on/off if AC power supply
is connected.
@ Disc tray
# Open/Close Tray button
$ RESET button
% HDD indicator
Lights in red when the unit is in PVR mode.
^ DVD indicator
Lights in green when the unit is in DVD mode.
& Operation Display Window
Displays the operation of the device, for more
information, see the next page.
* Video/Audio input jack
( DVD/PVR button
Use to change DVD mode to PVR mode, and vice
versa.
) STOP button
Use to stop playing.
1 REVERSE button
Use to playback back rapidly.
2 Playback/PAUSE button
Plays back video recording or disc. The button can
also be used to pause the picture being played
back.
3 FORWARD button
Use to playback rapidly.
4 RECORD button
5 PR- / PR+ button
6 RECORDED PRG button
Press this button to view a list of recorded
programmes.
7 SETUP button
8 ENTER/SELECT button
9 LEFT/RIGHT button
Navigate the On Screen Display using these
buttons.
0 UP/DOWN button
Navigate the On Screen Display using these
buttons.
Front panel
PRODUCT INFORMATION
! @ #$%^ &
* 5 9 0() 123 4 6 78
DH-A61D1D-LS(GB)_DESUK 03.7.27 11:45 PM ˘ ` 5
Page 7
Identification of Controls
6
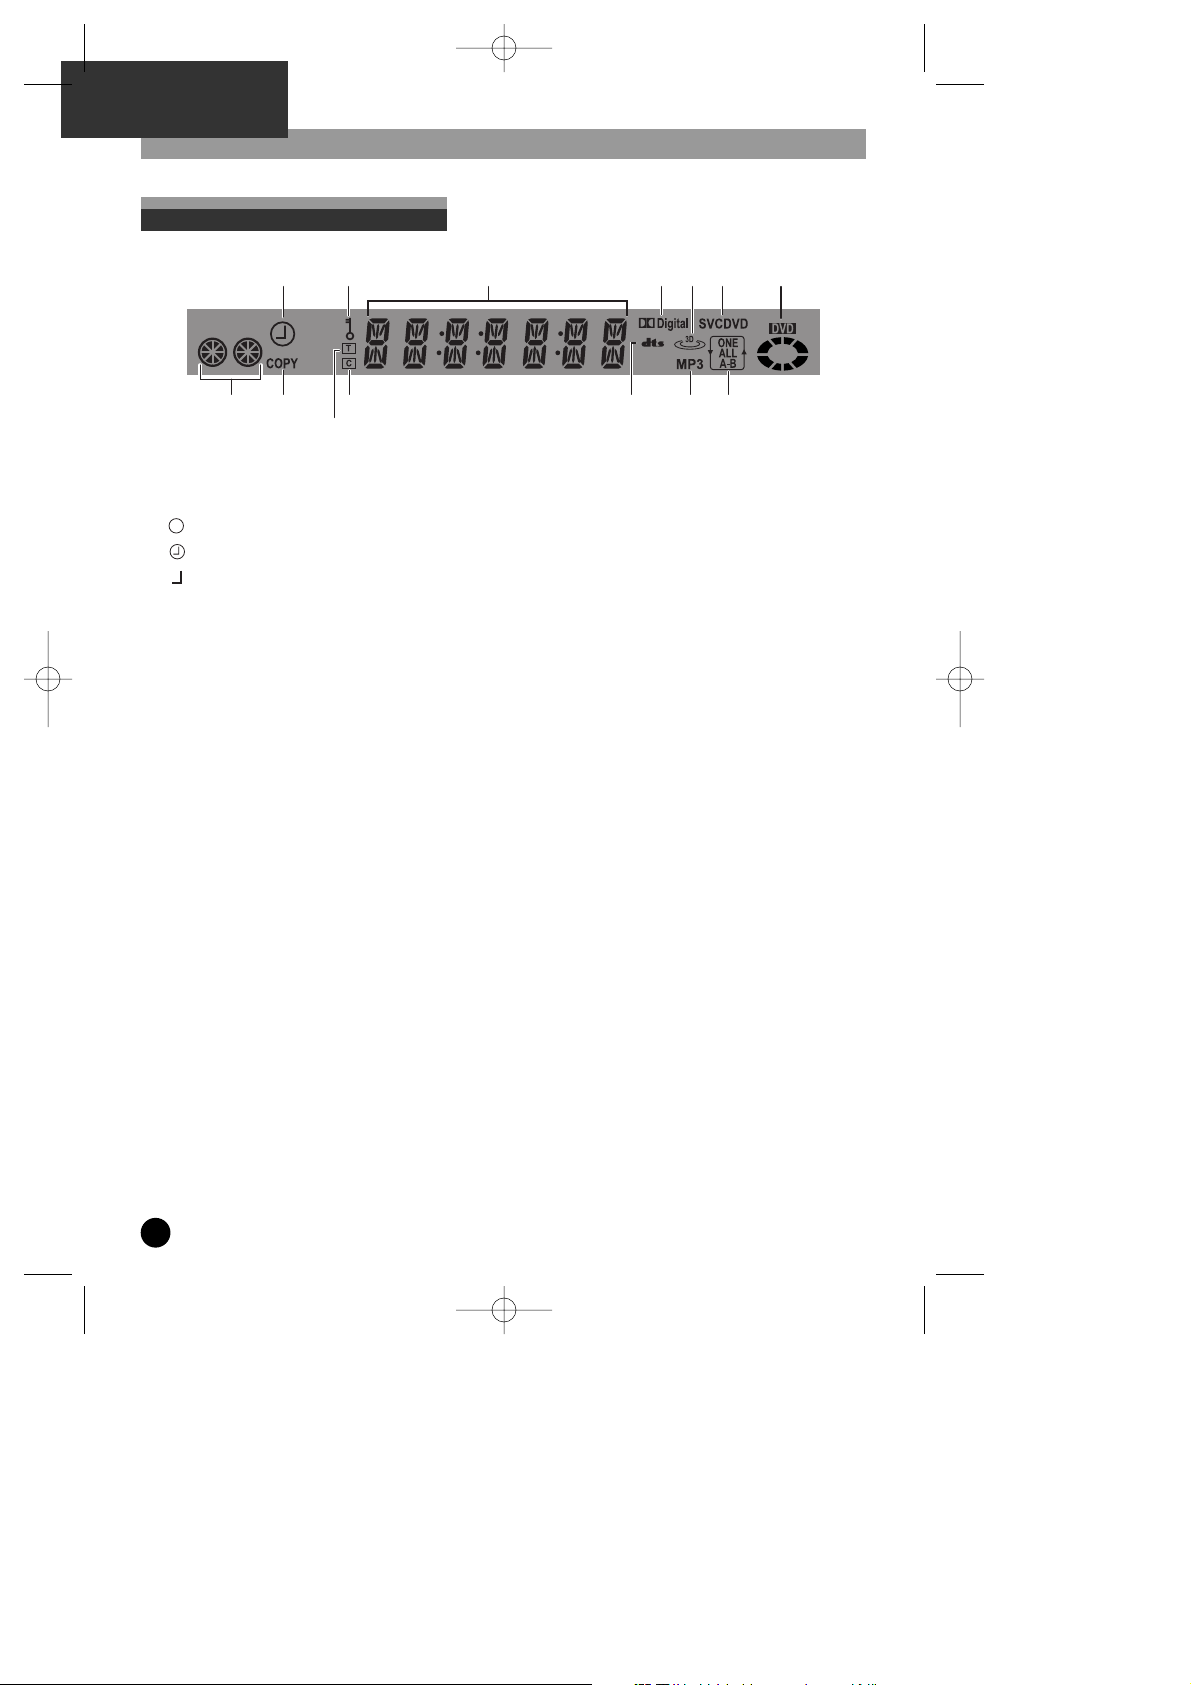
Operation Display Window
@
#!
%
^(13
$& *)24
!
PVR Operation
@
REC and TIMER REC display
: Recording ,
: TIMER Recording ,
: To be Timer-recorded
#
Copying
Used to copy contents from a disc onto the hard
disk.
$
Parental (Lock)
When you set Parental Lock on DVD mode, this
indicator is lit up.
Parental Lock consists of 8 levels of parental
control, violence, sexual scene, strong sexual
scene and others to protect children from
watching those scenes.
%
Title
This is displayed in VCD and CD disc.
^
Chapter
This is displayed in DVD disc.
&
Time, Counter and Current Operation
TV : TV from PVR mode
PVR : PVR from TV mode
PLAY : Play
PAUSE : Pause
OFF : Power is OFF
PR## : PVR mode from DVD mode
LIVE : Live TV
SEARCH + : Forward in PVR
SEARCH - : backward in PVR
REC : P## : Recording in PVR
DVD : DVD mode from PVR mode
OPEN : Tray is opened
CLOSE : Tray is closed
LOAD : Disc is loaded
NO DISC : There is no disc in tray
Err DISC : Disc has some error
MENU : Menu screen is displayed
SETUP : Setup menu is displayed
CUE : Forward in DVD
REVIEW : Backward in DVD
REC : DVD : Recording in DVD
*
Dolby Digital Indicator
(
dts Disc Indicator
)
3D Sound Indicator
1
MP3 Disc Indicator
2
Disc type Indicator
displays the currently loaded disc type ( SVCD,
VCD, DVD )
3
Repeat Playback
It indicates that the repeat playback function is
currently being used.
ONE indicates that a chapter or a track is being
repeatedly played back,
ALL indicates that a title or the entire contents of
a disc is being repeatedly played back and A-B
indicates that repeated playback between two
specific points is taking place.
4
DVD Disc Operation
DH-A61D1D-LS(GB)_DESUK 03.7.27 11:45 PM ˘ ` 6
Page 8
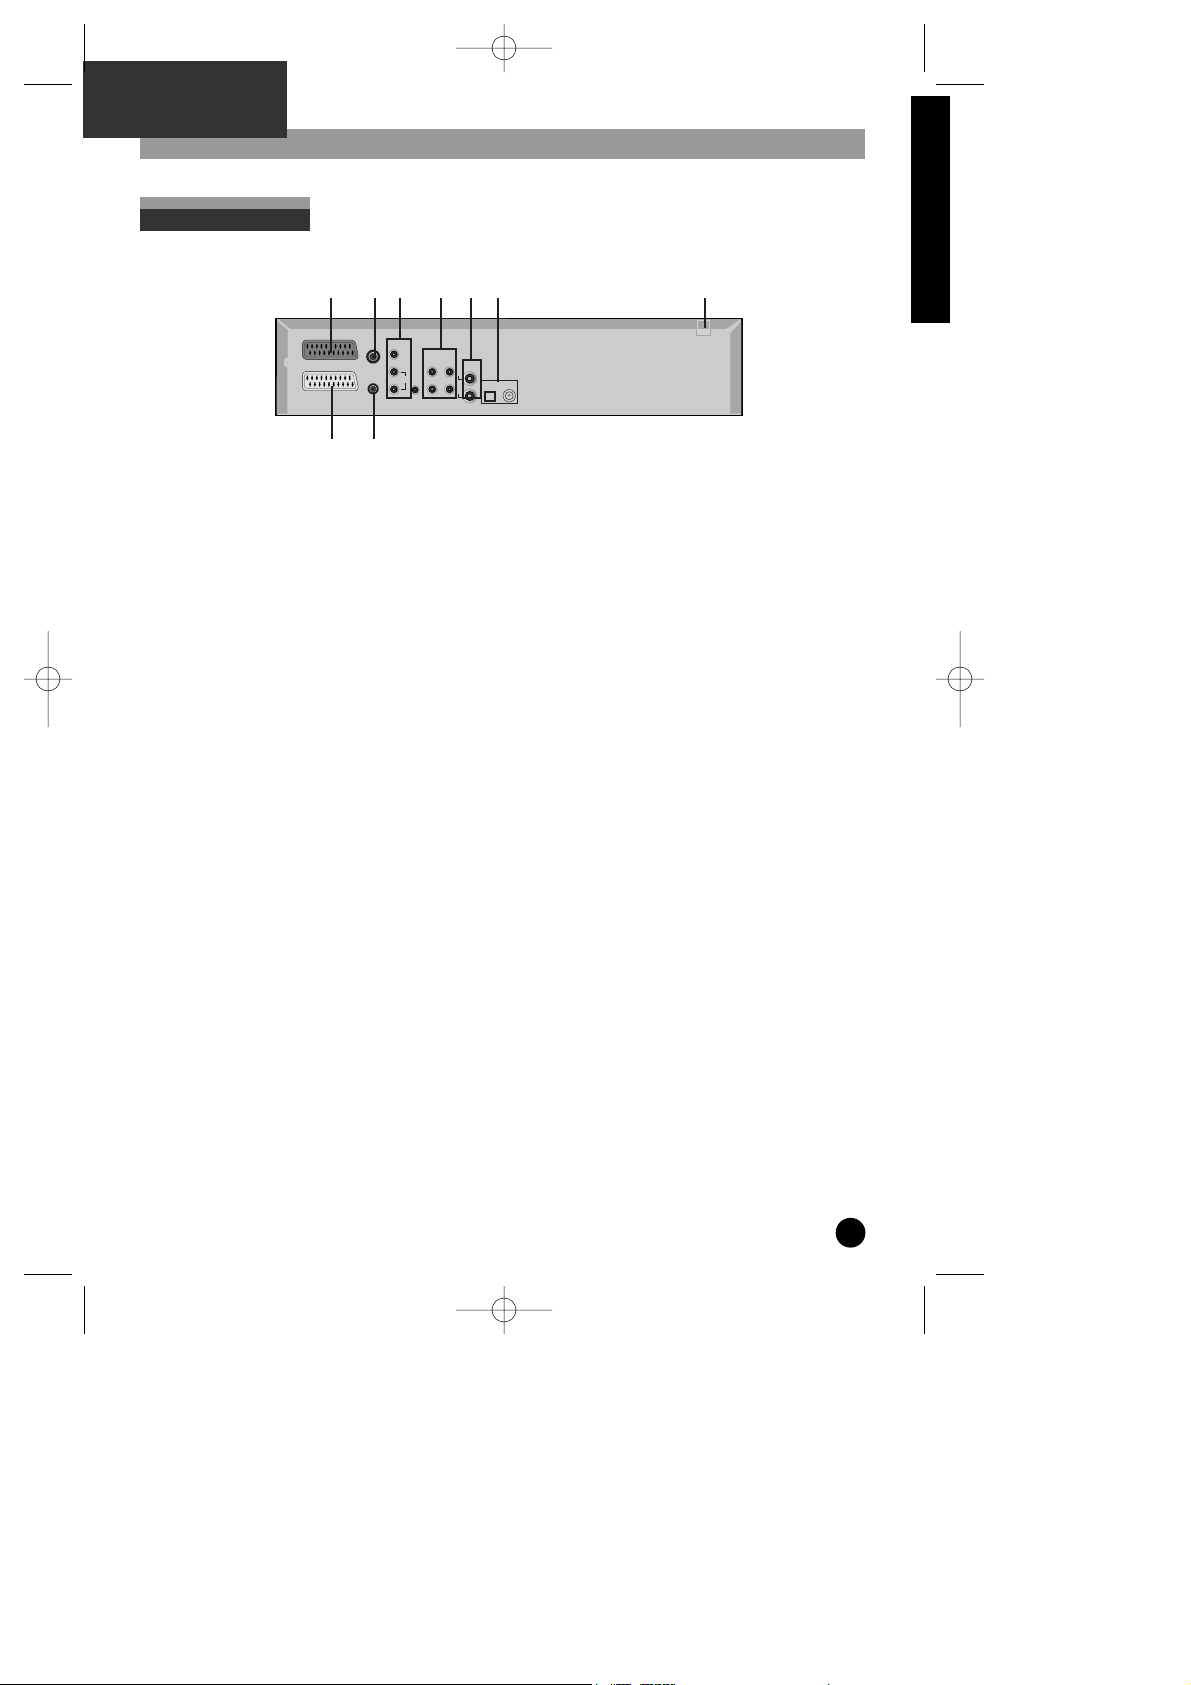
7
Identification of Controls
Rear panel
PRODUCT INFORMATION
! EURO AV2/DECODER jack
@ Connection for the ANTENNA cable
# VIDEO/AUDIO OUTPUT jack
$ AUDIO FOR S-VIDEO Input/Output jack
% S-VIDEO Input/Output jack
^ Digital Output (OPTICAL, COAXIAL) Jack
To enjoy DVD sound quality via a home cinema
system, connect this jack to the amplifier or the
unit embedded with the digital audio decoder. This
is an output only for DVD audio.
& Power Cord
* Connection to TV
( ANT OUT
Connection for the RF cable from TV
EURO AV2/DECODER
ANT IN
ANT OUT
CBC OUT
OUTPUT
VIDEO
AUDIO
AUDIO FOR S-VIDEO
SÐVIDEO
DIGITAL AUDIO OUT
OPTICAL COAXIAL
OUT IN
OUT
IN
EURO AV1
! @ # $ % ^ &
* (
DH-A61D1D-LS(GB)_DESUK 03.7.27 11:45 PM ˘ ` 7
Page 9
Identification of Controls
!
[DVD]
OPEN/CLOSE
@
[PVR]
PVR select,
[TV]
TV select,
[DVD]
DVD select
#
[PVR, DVD]
INFO bar
View the programme banner. To view the transport
bar press it twice.
$
[PVR]
LAST Clip,
[DVD]
LAST Skip
[PVR]
View the previous recorded programme,
[DVD]
Move to a previous chapter or track
%
[PVR, DVD]
Up/Down/Left/Right Direction,
[TV, PVR]
Programme +/– ,
[TV]
Volume Controls
^
[PVR]
Recorded Programmes List
View a list of recorded programmes.
&
[PVR, DVD]
Rewind
Press up to five times to increase the speed in
gradual stages.
x2 (x 1 press) ➝ x4 (x 2 presses) ➝ x8 (x3 presses)
➝ x16 (x 4 presses) ➝ x32 (x 5 presses)
*
[PVR, DVD]
PLAY/PAUSE
(
[PVR, DVD]
SETUP
)
[PVR, DVD]
STOP
1
[PVR]
REC–MON,
[DVD]
MENU
2
[PVR]
Show View /Video Plus (+),
[DVD]
TITLE/PBC
3
[PVR]
JUMP –/+
Jump backwards 5 mins / Jump Forwards 5 mins
4
[DVD]
SUBTITLE language select
5
[PVR]
AUDIO select,
[DVD]
AUDIO language select
6
[DVD]
REPEAT (Repeat current title or chapter in DVD
while repeating current track or disc in VCD/CD)
7
[PVR, DVD]
REPEAT a defined period from A to B
8
[PVR]
TV/PVR button
9
[PVR, DVD, TV]
STAND-BY button
0
[TV]
MUTE button
“
[PVR]
NEXT Clip,
[DVD]
NEXT Skip
[PVR]
View the next recorded programme,
[DVD]
Move onto the next chapter or track
‘
[PVR]
CAPTURE,
[DVD]
CLEAR/3D
8
Remote Control
OPEN/CLOSE
INFO
LAST
SETUP
SV/VP+
MON
T
REPEAT
SUBTITLE
AUDIO
AÐB
TV/PVR
AV
1
2
3
4
5
6
7
8
0
9
STOP SELECT
ENTER
NEXT
CAPTURE
PR +
VOL
VOL
PR Ð
MUTE
PVR
STAND-BY
DVD
TV
R
E
C
O
R
D
E
D
P
R
O
G
C
L
E
A
R
/
3
D
TITLE/PBC
MENU
REC
SEARCH
JU
MP
ZOOM
ANGLE
!9
0
“
‘
+
=
Q
q
W
w
E
e
@
#
$
%
^
&
*
(
)
1
2
3
4
5
6
7
8
DH-A61D1D-LS(GB)_DESUK 03.7.27 11:45 PM ˘ ` 8
Page 10
9
Identification of Controls
+
[PVR, DVD]
Fast Forward
Press up to five times to increase the speed in
gradual stages.
x2 (x 1 press) ➝ x4 (x 2 presses) ➝ x8 (x 3
presses) ➝ x16 (x 4 presses) ➝ x32 (x 5 presses)
=
[PVR]
SELECT,
[DVD]
ENTER
Q
[PVR]
Record
To perform an Instant Record or a Record Until.
q
[PVR]
Timer Recording,
[DVD]
SEARCH
W
[PVR]
CM SKIP,
[DVD]
ANGLE
w
[PVR]
Instant Replay,
[DVD]
ZOOM
E
[PVR, DVD, TV]
Numbers buttons
To select a channel. For 2-digit channels, first
press 0/-- (0, 1, 2 for Pr012).
e
[TV, PVR]
AV button
PRODUCT INFORMATION
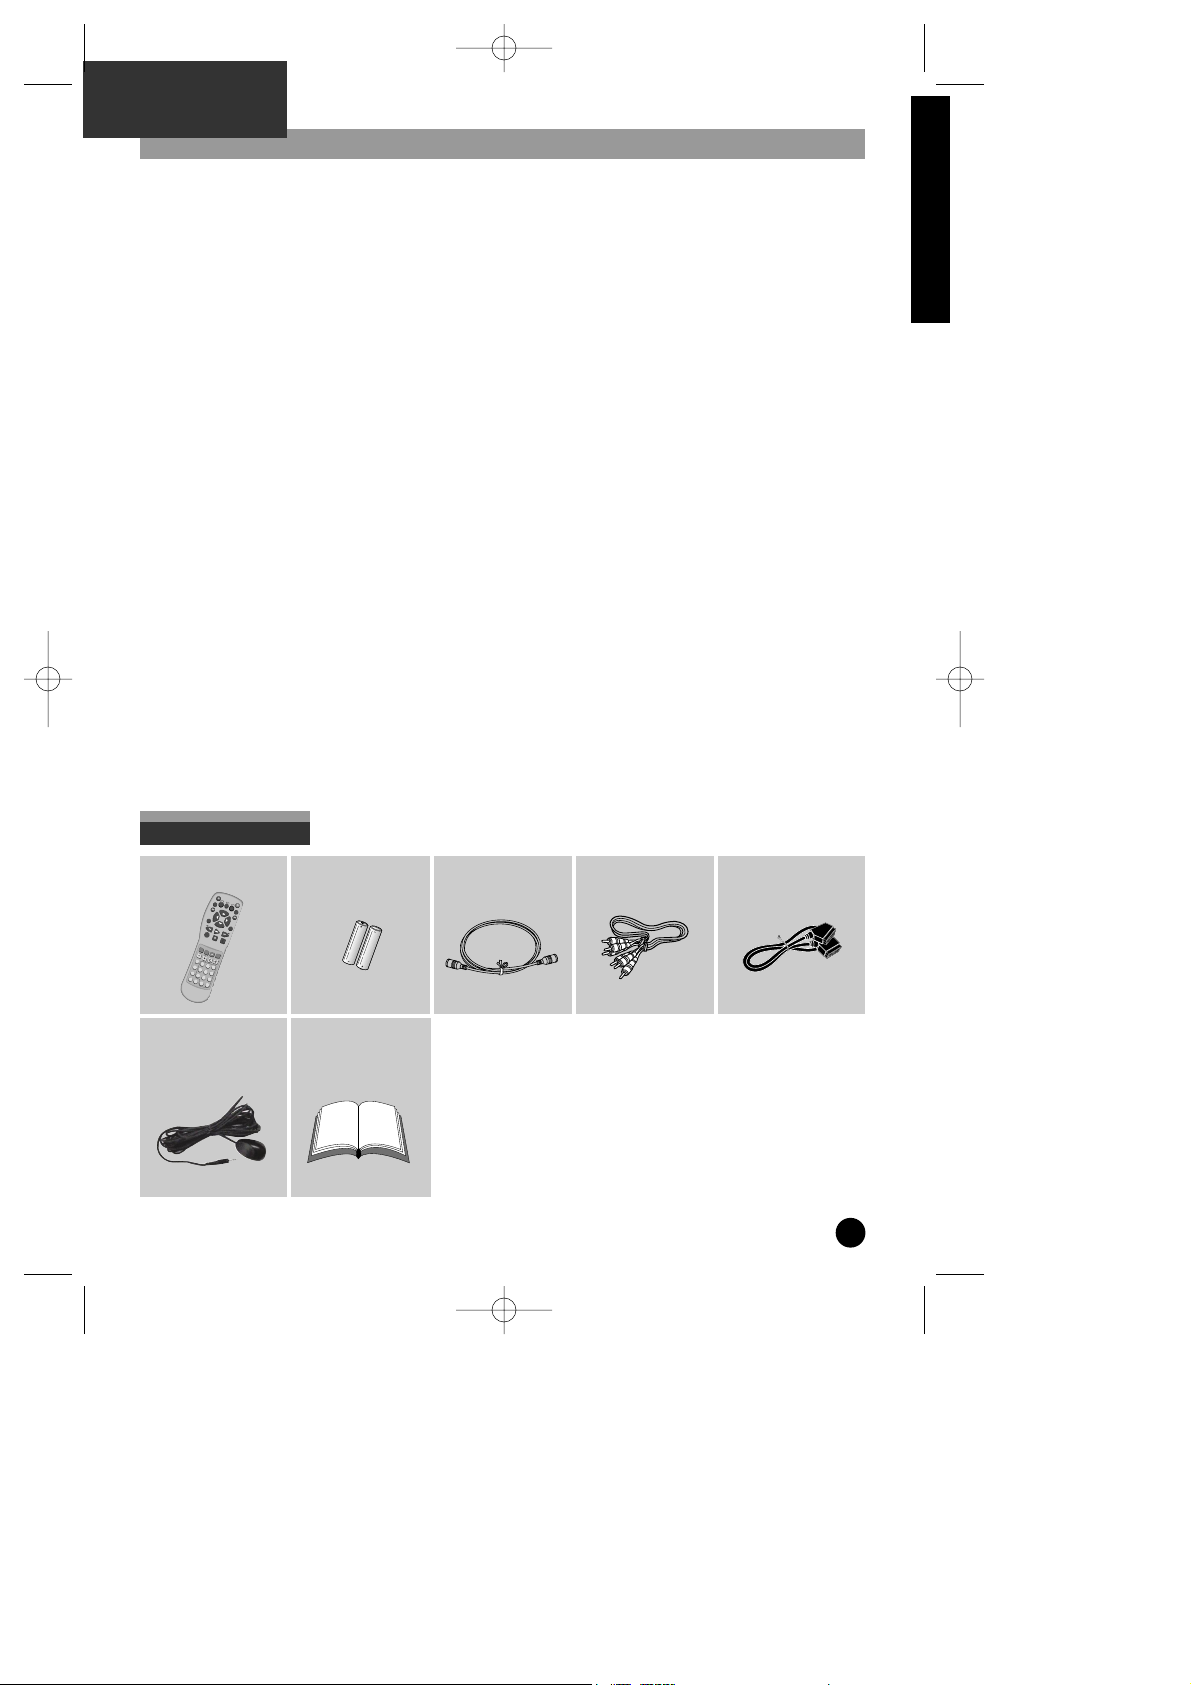
Remote Control
CBC Cable
2 Batteries
Owner’s Manual/
Warranty
RF cable Audio/Video cable Scart Cable
Accessories
OPEN/CLOSE
INFO
LAST
SETUP
SV/VP+
MON
T
REPEAT
SUBTITLE
AUDIO
AÐB
TV/PVR
AV
1
2
3
4
5
6
7
8
0
9
STOP SELECT
ENTER
NEXT
CAPTURE
PR +
VOL
VOL
PR Ð
MUTE
PVR
STAND-BY
DVD
TV
R
E
C
O
R
D
E
D
P
R
O
G
C
L
E
A
R
/
3
D
TITLE/PBC
MENU
REC
SEARCH
JU
MP
ZOOM
ANGLE
To purchase these accessories ( with the exception of this
owner’s manual ) and other non supplied parts, please contact
your nearest dealer or service center.
Warning)
Connect the CBC cable only when the power cable
was unplugged.
DH-A61D1D-LS(GB)_DESUK 03.7.27 11:45 PM ˘ ` 9
Page 11
Connections
1
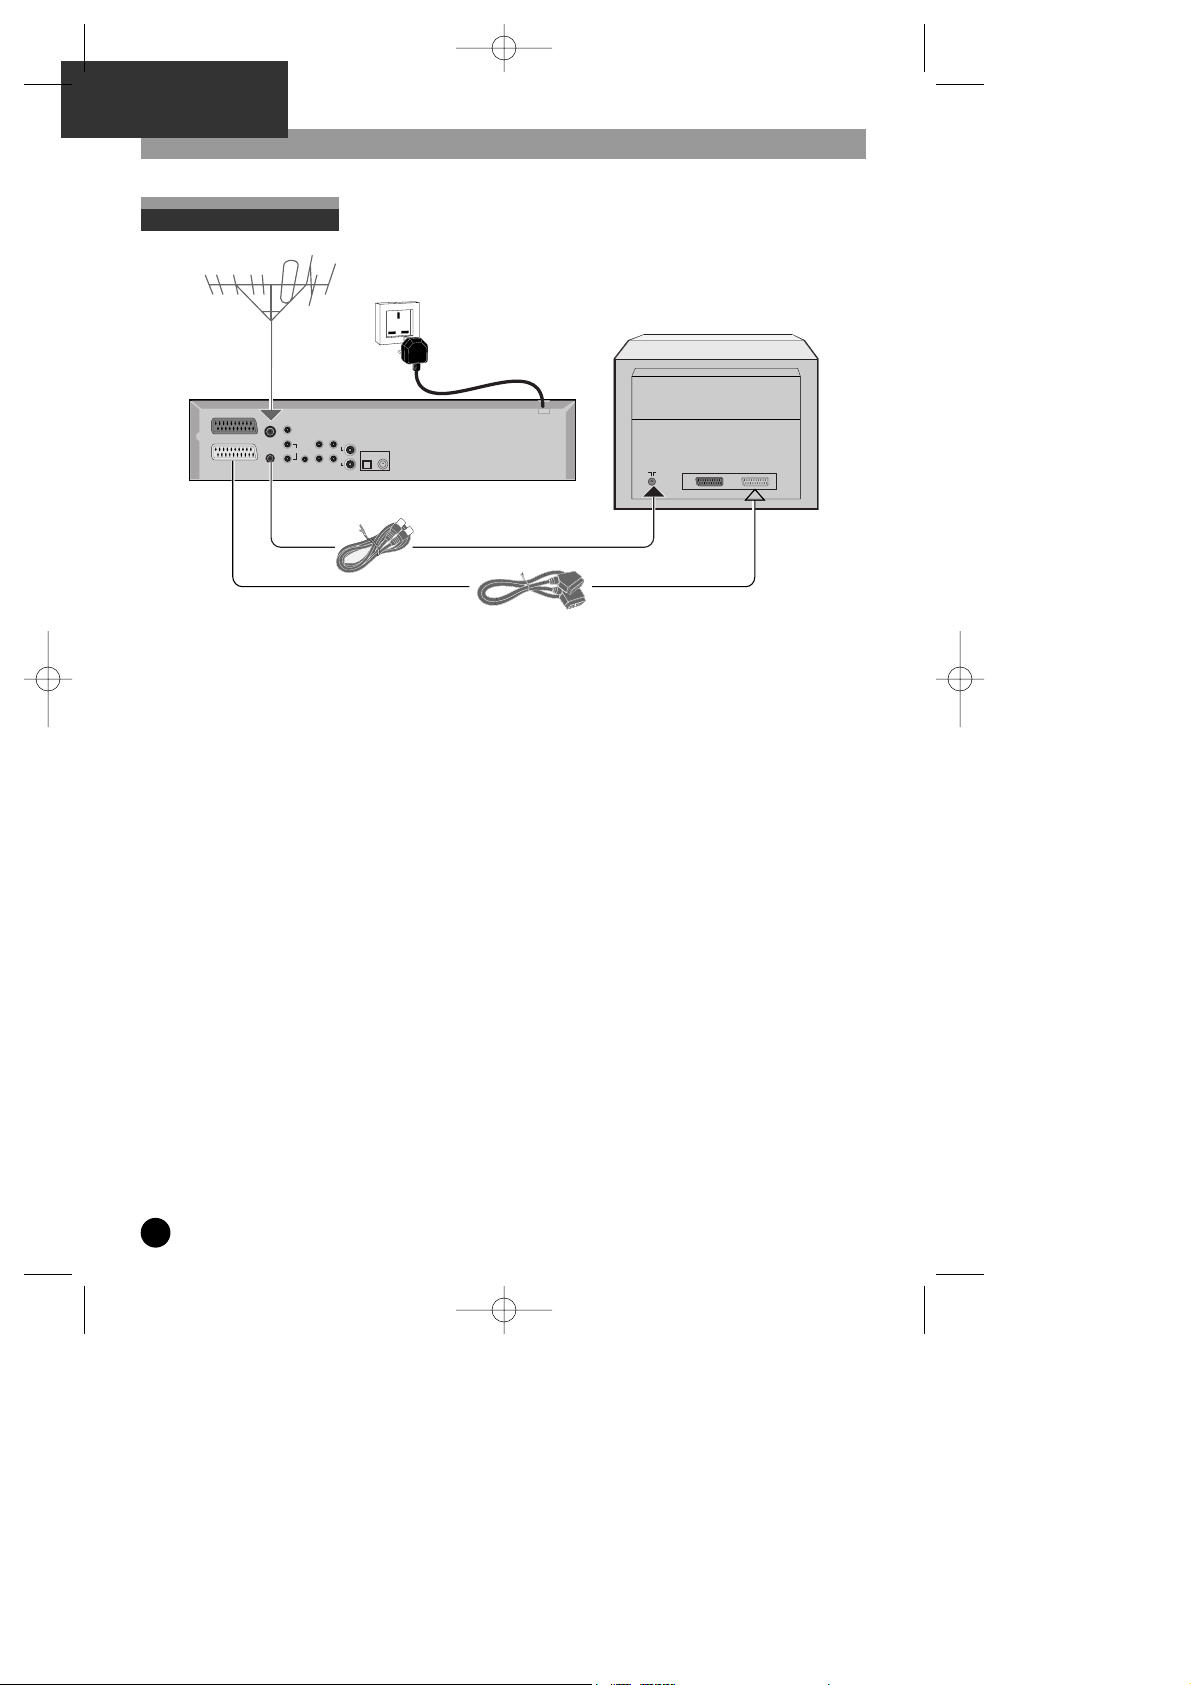
Disconnect the aerial cable from your TV set and reconnect it to the ANT IN socket of the PVR/DVD.
2
Using the RF cable (supplied), connect the ANT OUT socket of the PVR/DVD to the aerial socket of
the TV.
3
A SCART cable ( one supplied with this set ) will provide a superior connection between this appliance and
the TV, making it easier to use, and improving both picture and sound quality. Connect the EURO AV1 socket
of the PVR/DVD to the primary SCART socket of the TV. ( This will be labeled AV1, EXT1, AUX1 etc,
depending on the make of television. )
4
Using the mains lead, connect the appliance to a mains socket.
Warning)
Connect the CBC cable only when the power cable was unplugged.
Other connection possibilities
The connections described above are the manufacturer’s recommended method to connect this apparatus to
your television. However if your TV set does not have a SCART socket , connect the PVR/DVD using one of the
following two methods.
Video connection
Connect the
VIDEO OUT
socket of the PVR/DVD to the
VIDEO IN
socket of the TV set using a video cable (not
supplied).
Audio connection
To obtain 6-channel multichannel sound, connect an appropriate audio amplifier to the
DIGITAL AUDIO OUT
coaxial socket of the PVR/DVD using a coaxial cable (not supplied), or to the
DIGITAL AUDIO OUT
optical socket
of the PVR/DVD using an optical cable (not supplied).
Alternatively, you can connect the
AUDIO OUT L
and Rsockets of the PVR/DVD to the
AUDIO IN L
and Rsockets
of the TV using an audio cable (not supplied).
10
Basic connection
EURO AV2/DECODER
ANT IN
ANT OUT
CBC OUT
OUTPUT
VIDEO
AUDIO
AUDIO FOR S-VIDEO
SÐVIDEO
DIGITAL AUDIO OUT
OPTICAL COAXIAL
OUT IN
OUT
IN
EURO AV1
DH-A61D1D-LS(GB)_DESUK 03.7.27 11:45 PM ˘ ` 10
Page 12
11
Connections
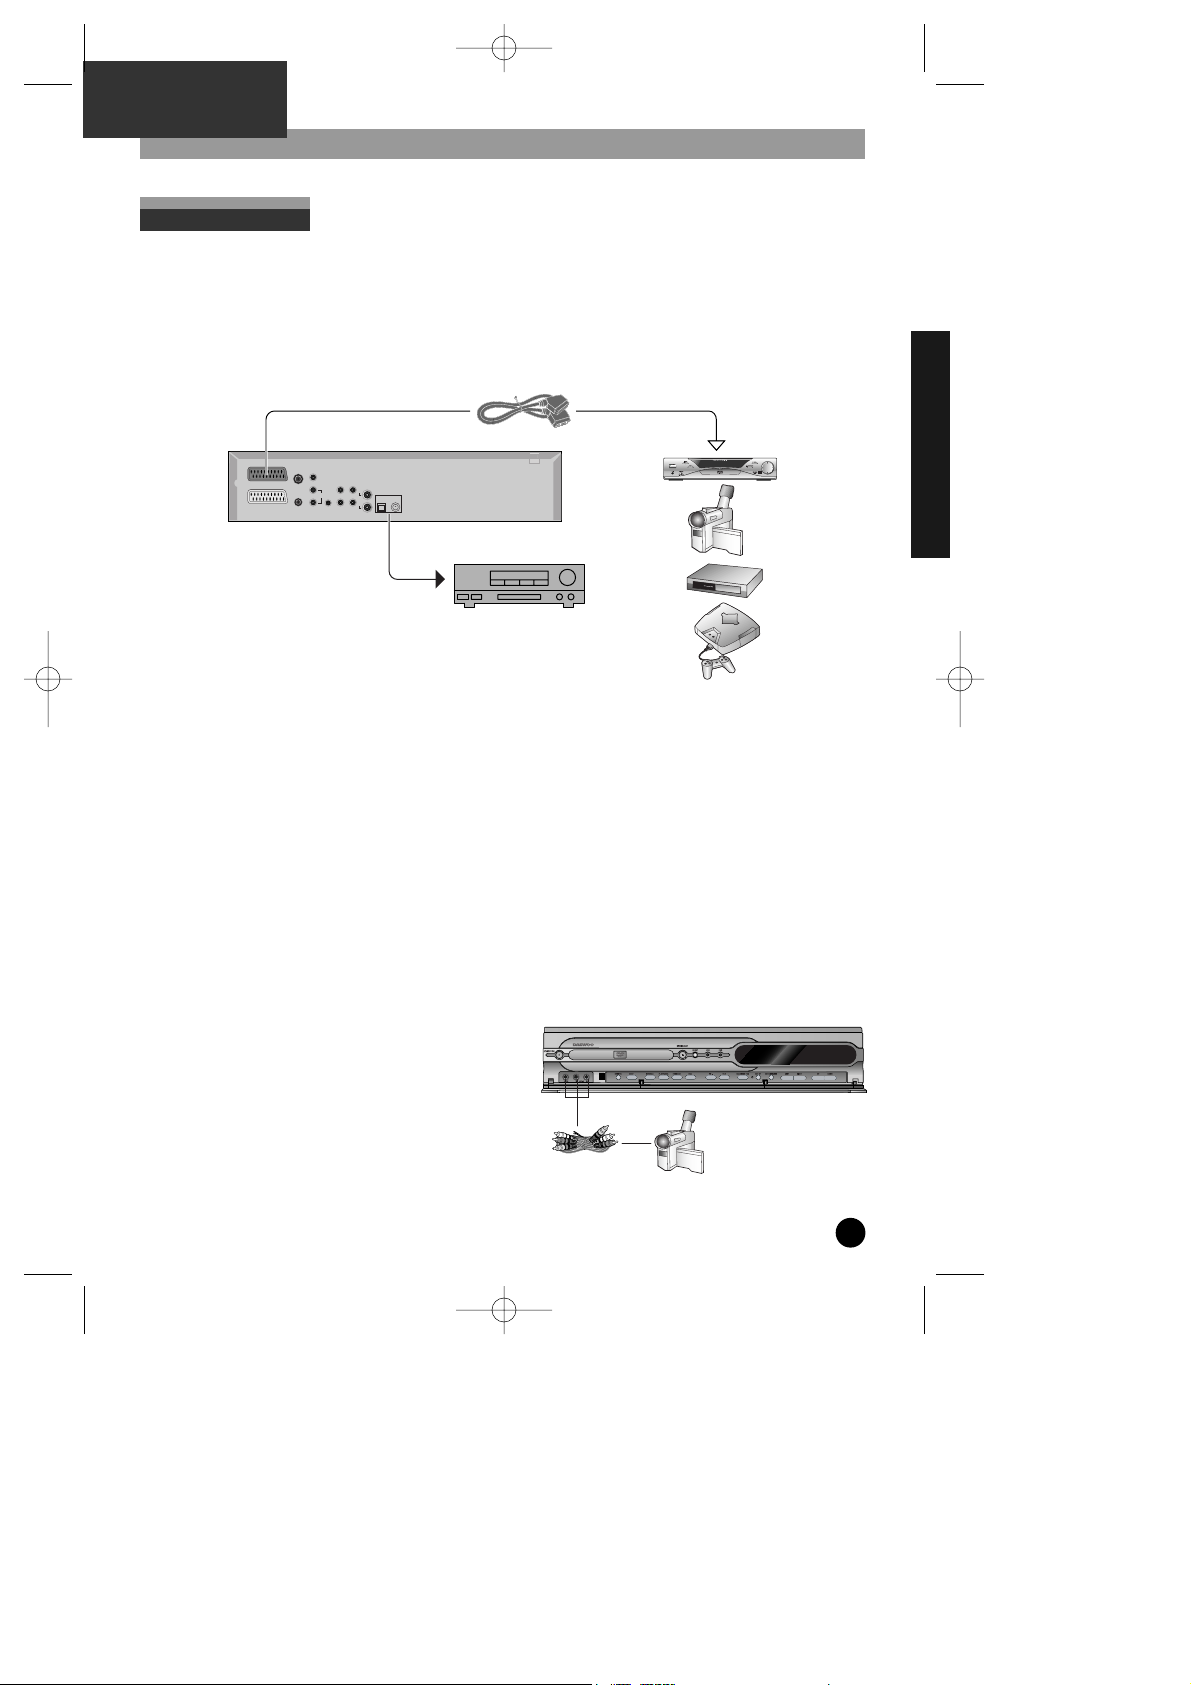
Decoder, camcorder, satellite receiver, another DVD player, another video recorder, etc. (AV2
socket)
Connect the other device to the EURO AV2/DECODER jack using another SCART cable ( only one has been
supplied with this unit ) : the video and audio information from this other device will loop through the AV
sockets of this unit and can be displayed on your TV set.
Audio/video amplifier
Video connection
Connect your audio/video amplifier to the AV1 SCART socket of the PVR/DVD. You can also connect it to the
VIDEO OUT socket of the PVR/DVD with a video cable (not supplied). You will get the best picture quality with
the SCART socket.
Audio connection
For 6-channel multichannel sound, connect the amplifier to the DIGITAL AUDIO OUT coaxial socket of the
PVR/DVD using a coaxial cable (not supplied), or to the DIGITAL AUDIO OUT optical socket of the PVR/DVD
using an optical cable (not supplied).
You can also connect your audio/video amplifier to the AUDIO OUT L and R sockets of the PVR/DVD using an
audio cable (not supplied).
You will get the best sound quality with a connection via the DIGITAL AUDIO OUT socket.
Stereo HiFi system
Connect your HiFi system to the DIGITAL AUDIO OUT socket of the DVD/VIDEO,, or to the DIGITAL AUDIO OUT
optical socket of the PVR/DVD, or to the AUDIO OUT L and R sockets of the PVR/DVD.
Camcorder (AV-F socket)
Connect your camcorder to the AUDIO L (left), AUDIO R
(right) and VIDEO sockets located at the front of the
PVR/DVD. Select the AV-F input on the PVR/DVD by
pressing the AV key.
Caution)
PVR does not record when there is Macro Vision in
Video input signal.
Other devices
INSTALLATION
EURO AV2/DECODER
ANT IN
ANT OUT
CBC OUT
OUTPUT
VIDEO
AUDIO
AUDIO FOR S-VIDEO
SÐVIDEO
DIGITAL AUDIO OUT
OPTICAL COAXIAL
OUT IN
OUT
IN
EURO AV1
DH-A61D1D-LS(GB)_DESUK 03.7.27 11:45 PM ˘ ` 11
Page 13
Programme the Remote for a TV
1
Turn on the TV.
2
Point the PVR's remote at the TV.
3
Holding the TV button down, press the two numbers listed below that is relevant to your brand of TV.
4
After releasing the buttons, check that the remote is programmed to operate your TV.
5
If the above does not work, repeat steps 2 - 4 using one of the alternative 2 digit codes.
NO Maker (Brand) Name Code Number (2 digit) List
1 AIWA 73
2 AKAI 02 07 30 67
3 AKARI 70
4 BANG& OLUFSEN 82
5 BLAUPUNKT 27 28
6 BRANDT 23 50 56
7 BRIONVEGA 82
8 BLUESKY 02
9 BUSH 34 37
10 CGE 64
11 CONTINETAL EDISON 42
12 CURTIS 37
13 DAEWOO 02 22 65
14 DESMET 37
15 DUAL 34 37
16 ELBE 25 27 40
17 ELEMIS 37
18 FERGUSON 23 42 47 50 56 57 58
19 FINLUX 02 63 77 82
20 FISHER 67
21 FORMENTI 82
22 FUNAI 05
23 GOLDSTAR(LG) 02 37 68
24 GOODMANS 34 37
25 GRUNDIG 27 28 63 64
26 HITACHI 44 37 52
27 IMPERIAL 64
28 INNO HIT 37
29 IRRADIO 07
30 ITT 78
31 JVC 04 07 45 46 53
32 KNEISSEL 02 22
33 LOEWE 02 34
34 LOEWE OPTA 02 82
35 LUXOR 40
36 METZ 27 37 46 82
37 MITSUBISHI 02 34 62 75
NO Maker (Brand) Name Code Number (2 digit) List
38 MIVAR 26 64 76
39 NEC 66
40 NOKIA 30 32 40 78 80
41 NORDMENDE 02 23 47 50 56
42 ORION 02 37 40
43 PANASONIC 03 33 40 43
44 PHILIPS 02 20 34 37 82
45 PHONOLA 02 20 37 82
46 PIONEER 23 40 72
47 POLYTRON 02 37 74
48 PYE 34 37
49 RADIOLA 02 20 34 37 82
50 RADIOMARELLI 82
51 REX 40
52 SABA 23 40 47 50 56 82
53 SALORA 40 80
54 SAMSUNG 02 06 08 37 38 48 54
55 SANYO 06 62
56 SANSUI 37
57 SBR 34
58 SCHAUB-LORENZ 02 40 64
59 SCHNEIDER 02 07 20 34 37 82
60 SELECO 34 40 78
61 SHARP 24 62
62 SIEMENS 27 28
63 SINGER 23 82
64 SINUDYNE 34 37 82
65 SONITRON 67
66 SONY 60 62 83
67 TELEAVIA 02 23 50
68 TELEFUNKEN 02 23 47 50 55 56
69 THOMSON 02 23 47 50 56
70 TOSHIBA 35 62 63 64
71 WEGA 82
72 WHITE WESTINGHOUSE 34 37
73 YOKAN 02 22
74 YOKO 02
12
DH-A61D1D-LS(GB)_DESUK 03.7.27 11:45 PM ˘ ` 12
Page 14
13
INSTALLATION
Initial Setup menu in PVR
• If you want to perform any function, you must ensure the PVR is switched on. To access the PVR, press the
[PVR] button on the remote control.
• All menus use the […†œ √] keys on the remote control.
• To confirm, press the [SELECT] button on the remote control.
• To Exit, press the [Setup] button on the remote control.
Navigation Keys
Before you do anything with your PVR/DVD combo please ensure that you have read and fully understand this
chapter.
Setup Menu
POWER ON
When you first plug in and power up the PVR/DVD Combo, the product will begin the automatic installation
process. If you do not want to install the product, select the
Cancel
option.
• To access the PVR , press the [PVR] button on the Remote
Control.
• To Choose, use the […†] Keys on the remote control.
• To continue, highlight
Next
and press the [SELECT] key on
the remote control.
To cancel, highlight the Cancel option and press [SELECT] on the
remote control.
To exit, press [SETUP] on the remote control.
Initial Setup Menu
Next
Cancel
AAuuttoo SSeettuupp
This procedure will help you
configure your PVR. Would you like
to begin the setup procedure, now?
Select : Confirm Setup : Exit Choose :
…
†
LANGUAGE SELECTION
If you continue Auto Installation, the next screen will ask you to select your language.
• Use the [œ √] keys to select the language.
• Use the […†] keys to toggle between the Next /Cancel
options.
• To confirm, highlight
Next
and press the [SELECT] button
on the remote control.
To cancel, highlight the Cancel option and press [SELECT] on the
remote control.
To exit, press [SETUP] on the remote control.
œœ English √√
Next
Cancel
LLaanngguuaaggee SSeettuupp
Please select your language.
Select : Confirm Setup : Exit Choose: Edit :
œ √
…
†
PVR PART
DH-A61D1D-LS(GB)_DESUK 03.7.27 11:45 PM ˘ ` 13
Page 15
14
– – : – –
Time:
– – / – – / – – – –
Date:
Save
Cancel
CClloocckk SSeett
Please enter the current date and time.
Select : Confirm Setup : Exit Edit : Choose:
œ √
…
†
COUNTRY SELECT
The next stage is to select the country in which you are currently residing.
• Use the [œ √] keys to select your country.
• Use the […†] keys to toggle between the Next/ Cancel
options
• If you wish to proceed, highlight
Next
and press the
[SELECT] button on the remote control.
To cancel, highlight the Cancel option and press [SELECT] on the
remote control.
To exit, press [SETUP] on the remote control.
œœ UK(&Ireland) √√
Next
Cancel
CCoouunnttrryy SSeelleecctt
Please select your country.
Select : Confirm Setup : Exit Choose: Edit :
œ √
…
†
CLOCK SET
To perform timed recordings it is important that the internal clock is set to the correct time.
• Use the [œ √] keys to toggle between hours/mins.
• Use the [œ √] keys to toggle between Time and Date.
• Use the [œ √] keys to toggle between Date/Month/Year.
• Use the […†] Keys to change the Date/Time.
• Use the [œ √] keys to toggle between Save/Cancel.
• To Save, highlight
Save
and press [SELECT] on the remote
control.
To cancel, highlight the Cancel option and press [SELECT] on the
remote control.
To exit, press [SETUP] on the remote control.
AUTO CHANNEL SEARCH
Once you have selected your language and country, the
PVR/DVD combo will begin to automatically search for
television channels.
This may take a short while.
The PVR/DVD combo will search for and store all the channels
it finds.
Found 04 Channels
AAuuttoo SSeett
Searching for available channels.
Please wait . . . .
Initial Setup menu in PVR
DH-A61D1D-LS(GB)_DESUK 03.7.27 11:45 PM ˘ ` 14
Page 16

15
PVR PART
Installation Menu
This menu will allow you to make further adjustments to the PVR after initial set- up.
Installation menu
• Press the [PVR] button on the remote control.
• Press the [SETUP] button on the remote control.
• Scroll though the options using the […†] keys on the
remote control.
• To Confirm a selection, press the [SELECT] Button on the
remote control.
To exit, press [SETUP] on the remote control.
Manual Set –
Manually tune in new television channels.
Auto Set –
Automatically tune in new television channels.
Set Clock –
Set the Clock.
Adjust Channel –
allows you to change the order of the
television channels.
Satellite and Cable Box –
allows you to configure your external
satellite or cable box so that the PVR can receive its television
channels.
IInnssttaallllaattiioonn
Manual Set
Set Clock
Adjust Channels
Satellite & Cable Box
Select : Confirm Setup : Exit Choose:
…
†
Auto Set
DH-A61D1D-LS(GB)_DESUK 03.7.27 11:45 PM ˘ ` 15
Page 17
This may be useful if you move house, new television channels become available or if you wish to rearrange the
existing memorized channels.
Manual Set
16
Manual Set Screen
• Use the [œ √] keys to choose your settings
• This menu is superimposed on the television picture so
that you can adjust the various settings until you are happy
with the picture and the setup.
• It is important to ensure that all settings are correct.
To exit, press [SETUP] on the remote control.
Standard –
this refers to the type of signal being received. If
unsure, the rear of the television set will probably have this
information.
Reception –
Refers to how the television signal is being
received, either via an external aerial for terrestrial reception
or through a satellite or CABLE decoder.
Auto Search –
allows you to input a real channel number that
the unit will automatically tune it in.
Fine Tuning –
Adjust the picture quality.
Decoder -
turn it off if you want to receive your picture
through a cable or satellite box rather than the PVR/DVD
combo.
Store on PR –
Select the channel number you want to store the
television channel on.
Name -
Input the name of the channel.
œœ PAL–I √√
Standard :
Cable
Reception :
CC01
Auto Search :
Fine Tuning :
Off
Decoder :
Pr22
Store on PR :
BBC2
Name :
Cancel
MMaannuuaall SSeett
Select : Confirm Setup : Exit Choose: Edit :
œ √
…
†
Save
Installation Menu
DH-A61D1D-LS(GB)_DESUK 03.7.27 11:45 PM ˘ ` 16
Page 18
17
PVR PART
Installation Menu
This allows you to reconfigure your unit in a similar way as manual set except rather than you choosing various
settings the unit will do choose the optimum settings automatically.
Auto Set
Country Select
• Use the [œ √] keys to select the county.
France, Finland, Germany, Greece, Italy, Luxembourg, Netherlands,
Norway, Spain, Sweden, Switzerland, Turkey, UK(&Ireland), Belgium,
Denmark, OTHERS ( other countries not mentioned)
• Use the […†] keys to toggle between the Next/ Cancel
options. If you wish to proceed, highlight
Next
and press
the [SELECT] button on the remote control.
To cancel, highlight the Cancel option and press [SELECT] on the
remote control. To exit, press [SETUP] on the remote control.
œœ UK(&Ireland) √√
Next
Cancel
CCoouunnttrryy SSeelleecctt
Please select your country.
Select : Confirm Setup : Exit Choose: Edit :
œ √
…
†
Channel Search
The unit will start to automatically search for new channels:
please be patient as this may take a few minutes.
Found 04 Channels
AAuuttoo SSeett
Searching for available channels.
Please wait . . . .
Channel Sorting
The unit will then begin sorting the channels.
• If the PVR is connected to a television with the AV link facility,
the channels within the TV settings will be downloaded
automatically.
AAuuttoo SSeett
Sorting channels found.
Please wait . . . .
10 : 22
Time:
02 / Oct / 2003
Date:
Save
Cancel
CClloocckk SSeett
Please enter the current date and time.
Select : Confirm Setup : Exit Edit : Choose:
œ √
…
†
Set Clock
• Use the [œ √] keys to toggle between hours/mins.
• Use the [œ √] keys to toggle between Time and Date.
• Use the [œ √] keys to toggle between Date/Month/Year.
• Use the […†] keys to change the Date/Time.
• Use the [œ √] keys to toggle between Save/Cancel.
• To Save, highlight
Save
option and press [SELECT] on the
remote control.
To cancel, highlight the Cancel option and press [SELECT] on the
remote control.
To exit, press [SETUP] on the remote control.
DH-A61D1D-LS(GB)_DESUK 03.7.27 11:45 PM ˘ ` 17
Page 19

Set Clock
10 : 22
Time:
02 / Oct / 2003
Date:
Save
Cancel
CClloocckk SSeett
Please enter the current date and time.
Select : Confirm Setup : Exit Edit : Choose:
œ √
…
†
• Use the [œ √] keys to toggle between hours/mins.
• Use the [œ √] keys to toggle between Time and Date.
• Use the [œ √] keys to toggle between Date/Month/Year.
• Use the […†] keys to change the Date/Time.
• Use the [œ √] keys to toggle between Save/Cancel.
• To Save, highlight
Save
option and press [SELECT] on the
remote control.
To cancel, highlight the Cancel option and press [SELECT] on the
remote control.
To exit, press [SETUP] on the remote control.
Adjust channels allows you to order your television channels in a way which may be more convenient. This will
stop you having to scroll up and down to reach your favorite channels
Adjust Channels
• Select option using the […†] keys on the remote control.
• Change Values using the […†] keys on the remote
control.
• Toggle using the [œ √] keys on the remote control.
• To confirm the changes and exit, press [SETUP] button on
the remote control.
Select PR –
Select the TV Channel direct channel entry
number. E.g. 01
Name –
Select a name for the television channel. E.g. BBC2
Programme Align –
Select new direct channel entry number.
E.g. 06
Programme Erase –
Select whether or not to delete a
television channel.
œœ 01 √√
Select PR :
BBC1
Name :
22
PR Align :
No
PR Erase :
AAddjjuusstt CChhaannnneellss
Select : Confirm Setup : Exit Choose: Edit :
œ √
…
†
18
Installation Menu
DH-A61D1D-LS(GB)_DESUK 03.7.27 11:45 PM ˘ ` 18
Page 20

19
Installation Menu
PVR PART
This function will allow you to connect your cable or satellite decoder to the PVR.
Satellite & Cable Box
• Press the [PVR] button on your remote control.
• Press the [SETUP] button on your remote control.
• Using the […†] keys on the remote control highlight
Installation.
• Confirm by pressing [SELECT] Key on the Remote Control.
• Using the […†] keys on the remote control, highlight
Satellite and Cable Box.
• To confirm, press [SELECT] on the remote control.
IInnssttaallllaattiioonn
Manual Set
Set Clock
Adjust Channels
Satellite & Cable Box
Select : Confirm Setup : Exit Choose:
…
†
Auto Set
• Using the [œ √] keys on the remote control, select the
numeric code belonging to the brand of the satellite
decoder. If you are unsure, refer to the table on Page 21 or
the decoder’s user manual.
• If you wish to proceed, highlight
Next
and press the
[SELECT] button on the remote control.
To cancel, use the […† ] to highlight Cancel.
To exit, press [SETUP] on the remote control.
œœ AV1 √√
Input :
Next
Cancel
SSaatteelllliittee && CCaabbllee BBooxx
Please select input where your box
is connected.
Select : Confirm Setup : Exit Choose: Edit :
œ √
…
†
• Select your decoder using the [œ √] keys on the remote
control.
• To confirm your choice, highlight
Next
and press the
[SELECT] button on the remote control.
To cancel, highlight the Cancel option and press [SELECT] on the
remote control.
To exit, press [SETUP] on the remote control.
œœ On PVR √√
Decoder :
Next
Cancel
SSaatteelllliittee && CCaabbllee BBooxx
Please select where your decoder is
connected.
Select : Confirm Setup : Exit Choose: Edit :
œ √
…
†
• Using the [œ √] keys on the remote control, select the
numeric Satellite brand.
If you are unsure, check your Satellite Box’s user manual.
• To confirm your choice, highlight
Next
and press the
[SELECT] button on the remote control.
To cancel, highlight the Cancel option and press [SELECT] on the
remote control.
To exit, press [SETUP] on the remote control.
œœ 00 √√
Receiver :
Next
Cancel
SSaatteelllliittee && CCaabbllee BBooxx
Please select your SAT brand.
Refer to user’s manual for type number.
Select : Confirm Setup : Exit Choose: Edit :
œ √
…
†
DH-A61D1D-LS(GB)_DESUK 03.7.27 11:45 PM ˘ ` 19
Page 21

Installation Menu
20
The unit will begin initializing the configuration so you may
have to wait a few minutes.
The confirmation screen will appear, when your satellite box
can communicate with the PVR.
• Once the unit has completed initialization, you will be
asked to confirm the channel you have tuned your Satellite
or Cable box into to.
• Using the […†] keys toggle between Next and Cancel.
• To continue, highlight Next and press the [SELECT] key on
the remote control.
To cancel, highlight the Cancel option and press [SELECT] on the
remote control.
To exit, press [SETUP] on the remote control.
00–99Receiver :
SSaatteelllliittee && CCaabbllee BBooxx
Transmitting... Please Wait...
Select : Confirm Setup : Exit Choose: Edit :
œ √
…
†
Is your SAT receiver on Programme 12?
SSaatteelllliittee && CCaabbllee BBooxx
Please Confirm...
Select : Confirm Setup : Exit Choose:
…
†
Cancel
Next
SSaatteelllliittee && CCaabbllee BBooxx
Your PVR can communicate with
satellite or cable box.
Setup : Exit
DH-A61D1D-LS(GB)_DESUK 03.7.27 11:45 PM ˘ ` 20
Page 22

21
Installation Menu
PVR PART
Satellite and Cable Box code table
DH-A61D1D-LS(GB)_DESUK 03.7.27 11:45 PM ˘ ` 21
Page 23

Installation Menu
The Additional Settings menu will allow you to select a default recording quality for all future timer and Show
View / Video Plus(+) recordings. You can change this setting for specific recordings. (See Set a Recording
section). PDC ( Programme Delivery Control ) will provide a buffer, so that if a programme overruns, the PVR will
continue to record until it finishes: PDC is broadcast with most UK channels, but not all.
22
Additional Settings
œœ High √√
Recording Mode:
Off
VPS/PDC:
AAddddiittiioonnaall SSeettttiinnggss
Select : Confirm Setup : Exit Edit : Choose:
œ √
…
†
• Use the […†] keys to toggle between Recording
Mode/PDC/Save/Cancel.
• Select recording mode using the [œ √] keys.
• Select PDC On/Off using the [œ √] keys.
• To confirm the changes and exit, press [SETUP] button on
the remote control.
This screen is not interactive. It provides information on the remaining disk space in all recording quality modes.
It’s a useful screen to refer to before setting a timed recording.
System Information Screen
Version : HD2000000V (03.01.03)
Disk Space : 38.09GB
Recording Used : 02.05
Remain :
Basic Quality : 33Hrs 06MIns
Medium Quality : 12Hrs 33Mins
High Quality : 08Hrs 03Mins
SSyysstteemm IInnffoorrmmaattiioonn
Setup : Exit
To exit, press [SETUP] on the remote control.
DH-A61D1D-LS(GB)_DESUK 03.7.27 11:45 PM ˘ ` 22
Page 24

23
Installation Menu
PVR PART
Offers you the opportunity to revert to original factory settings. All information stored in the unit, including
recorded material, television channel settings and set preferences will be erased.
It is useful if 1. You move country
2. You want to re-configure your box.
3. You move house.
Restore Defaults settings
• Press the Set- Up button on the Remote Control
• Scroll using the † key until system information is
highlighted.
• To confirm press Select button on the remote control.
• To restore the default setting, highlight
Yes
and press the
[SELECT] button on your remote control.
• A final superimposed menu will then appear allowing you
to toggle between the YES and NO options using the [œ
√] keys on the remote control.
To cancel, highlight the Cancel option and press [SELECT] on the
remote control.
To exit, press [SETUP] on the remote control.
If you select this function, Recorded
Programme Data, Set Channel Data &
Clock Data will be removed.
The PVR will be set into initial (factory
Setting) mode.
The initial setup procedure will then
have to be undertaken.
RReessttoorree DDeeffaauullttss
Select : Confirm Setup : Exit Choose:
Cancel
Yes
…
†
This menu will allow you to set preferences for:
Auto Clock – automatically changes with Day light saving
AV Link – Will enable you to download television channels from another source directly into the PVR
Picture Format – Change according to your Television.
Language – Set language for Subtitles.
Preferences
• Use the […†] keys to toggle between options.
• Use the [œ √] Keys to toggle between the settings.
• To confirm the changes and exit, press [SETUP] button on
the remote control.
On
Auto Clock Set:
Off
AV Link:
œœ Auto √√
Picture Format:
English
Language:
PPrreeffeerreenncceess
Select : Confirm Setup : Exit Choose: Edit :
œ √
…
†
DH-A61D1D-LS(GB)_DESUK 03.7.27 11:45 PM ˘ ` 23
Page 25

About Recorded Programmes
To select a previously recorded programme to watch, press [RECORDED PROG] button on the remote control.
Now in the recorded programs list the recordings that will be auto deleted in the very near future are shown
against a yellow icon.
24
Watching a recorded programme
RReeccoorrddeedd PPrrooggrraammmmeess
Select : Confirm Setup : Exit Choose:
…
†
Title Date Length
Load of the Rings 30:01 02:10
Star Wars 11:02 03:30
Harry Potter 12:06 03:30
Video Games 20:07 10:10
No
Thumbnail
Selected
Play
• To select your programme, scroll though the recorded
programmes list using the […†] keys on the remote
control.
• To confirm, press the [SELECT] button on the remote
control.
• A submenu will appear.
• To Play the programme, highlight the
Play
option and press
[SELECT] on the remote control.
Delete
• To delete a recording, highlight the
Delete
option and
press the [SELECT] button on the remote control
• A float over screen will appear asking you to confirm the
deletion.
• Using the [œ √] keys to toggle between Yes/No.
• To delete, highlight
Yes
and press [SELECT] on the remote
control.
• To cancel, highlight
No
and press [SELECT] on the remote
control.
Lock&Unlock
• To lock a programme, highlight the
Lock
option and confirm
by pressing [SELECT] on the remote control.
• Locking a programme will prevent it being erased by auto
delete.
• To unlock, highlight the
unlock
option and press [SELECT]
on the remote control.
Video Edit
• To edit a programme video, highlight the Video Edit option
and press the [SELECT] button on the remote control.
• A submenu will appear.
To exit, press [SETUP] on the remote control.
RReeccoorrddeedd PPrrooggrraammmmeess
Select : Confirm Setup : Exit Choose:
…
†
Title Date Length
Load of the Rings 30:01 02:10
Star Wars 11:02 03:30
Harry Potter 12:06 03:30
Video Games 20:07 10:10
Play
Delete
Unlock
EDIT Title
Video Edit
No
Thumbnail
Selected
DH-A61D1D-LS(GB)_DESUK 03.7.27 11:45 PM ˘ ` 24
Page 26

25
About Recorded Programmes
Edit Title of recorded programmes
PVR PART
RReeccoorrddeedd PPrrooggrraammmmeess
Select : Confirm Setup : Exit Choose:
…
†
Title Date Length
Load of the Rings 30:01 02:10
Star Wars 11:02 03:30
Harry Potter 12:06 03:30
Video Games 20:07 10:10
Title: Load of the Rings
• Press [RECORDED PROG] button on the remote control.
• Select the programme using the […†] keys on the remote
control.
• To confirm selection, press the [SELECT] button on the
remote control.
• Use the […†] keys to toggle though options in the sub
menu.
• To confirm an
EDIT Title
, highlight the option and press the
[SELECT] button on the remote control.
• To navigate the Keyboard, use the […†] keys to go up and
down.
• Use the [œ √] keys to move left and right.
• To clear the existing title, highlight the
Clear
button and
press the [SELECT] button on the remote control.
• To input a new title, navigate the keyboard and press the
[SELECT] button to confirm a letter choice.
• To add a space between words, highlight the Space button
and press [SELECT] on the remote control.
• To Delete a letter, highlight
Delete
and press the [SELECT]
button on the remote control.
• To save the new programme title, highlight
Save
and press
the [SELECT] button on the remote control.
To exit, press [SETUP] on the remote control.
……
œœ
††
√√
CLEAR SPACE DELETE SAVE
A B C D E F G H I J K L M
N O P Q R S T U V W X Y Z
a b c d e f g h i j k l m
RReeccoorrddeedd PPrrooggrraammmmeess
Select : Confirm Setup : Exit Choose:
…
†
Title Date Length
Load of the Rings 30:01 02:10
Star Wars 11:02 03:30
Harry Potter 12:06 03:30
Video Games 20:07 10:10
Play
Delete
Unlock
EDIT Title
Video Edit
No
Thumbnail
Selected
DH-A61D1D-LS(GB)_DESUK 03.7.27 11:45 PM ˘ ` 25
Page 27

Video Edit
Video Edit enables you to edit the television programmes stored on the hard disk.
“Partial delete” enables the user to delete up to eight different sections of a recorded Programme.
“Divide” enables the viewer to separate a single recording into as many as eight separate recordings.
“Combine” enables the user to merge separate recordings together.
• Once you have selected your recorded programme use the […†] keys to select from the 3 possible video
edit functions or exit.
• The original recording used for any editing function is not affected and remains in the recorded programme
list. Thus it is possible to repeat the editing if you change your mind and the same recording can be used for
multiple editing and different forms of editing.
• Live buffering, recording or timer records are not disrupted by editing.
Note.
The recorder has an advanced disk management function that avoids extra disk space being used for edited recordings
while the original(s) still remain on the disk. Thus it is possible to make many edited recordings without wasting any disk
space.
26
Partial Delete
RReeccoorrddeedd PPrrooggrraammmmeess
Select : Confirm Setup : Exit Choose:
…
†
Title Date Length
Load of the Rings 10/01 02:10
Star Wars 11/02 00:30
Harry Potter 12/06 03:10
Video Games 20/07 00:01
Play
Delete
Unlock
EDIT Title
Video Edit
No
Thumbnail
Selected
• Press the [PVR] Button on the remote control.
• Press [RECORDED PROG] button on the remote control.
• Using the […†] Keys on the remote control, select the
programme that you wish to edit.
• To confirm, press [SELECT] button on the remote control.
• Select Video Edit using the […†] keys on the remote
control.
• To confirm, press [SELECT] button on the remote control.
You will then be taken to the Video Edit Screen.
• Using the […†] keys, select from the four possible Video
Edit options.
• To confirm your choice, press [SELECT] on the remote
control.
To exit, press [SETUP] on the remote control.
DH-A61D1D-LS(GB)_DESUK 03.7.27 11:45 PM ˘ ` 26
Page 28

27
Video Edit
PVR PART
RReeccoorrddeedd PPrrooggrraammmmeess
Select : Confirm Setup : Exit Choose:
…
†
Title Date Length
Load of the Rings 10/01 02:10
Star Wars 11/02 00:30
Harry Potter 12/06 03:10
Video Games 20/07 00:01
Partial Delete
Divide
Combine
Exit
No
Thumbnail
Selected
• Partial Delete will enable you to erase specific parts of a
recorded programme. e.g you can use it to remove
advertisements or eliminate some parts of a movie
unsuitable for younger viewers.
• When selecting positions to be edited, it is possible to use
the standard trick mode functions. However, during editing
just the major frames are displayed, representing valid
editing start and end positions.
• During the partial delete you may fast forward, rewind,
single step and pause.
• Selecting partial delete will take you to the Selected
Recording. The first frame of the recording is displayed in
[PAUSE] Mode.
• Press either [PLAY] or [FF] to start navigating through the
recording.
• Sections to be deleted are marked by pressing the
[SELECT] key. Marked sections are shown as shaded areas
in the transport bar.
• The white line on the transport bar indicates your current
location in the recorded programme.
• To confirm or cancel the partial delete, use the […†]
buttons on the remote control to highlight
Save
or
Cancel
.
• Confirm your choice by pressing [SELECT] button on the
remote control.
• During the partial delete you may fast forward, rewind,
single step and pause.
√√√√ √√ √√ PPaarr ttiiaa ll DDeellee ttee
DH-A61D1D-LS(GB)_DESUK 03.7.27 11:45 PM ˘ ` 27
Page 29

28
Video Edit
Divide
RReeccoorrddeedd PPrrooggrraammmmeess
Select : Confirm Setup : Exit Choose:
…
†
Title Date Length
Load of the Rings 10/01 02:10
Star Wars 11/02 00:30
Harry Potter 12/06 03:10
Video Games 20/07 00:01
Play
Delete
Unlock
EDIT Title
Video Edit
No
Thumbnail
Selected
RReeccoorrddeedd PPrrooggrraammmmeess
Select : Confirm Setup : Exit Choose:
…
†
Title Date Length
Load of the Rings 10/01 02:10
Star Wars 11/02 00:30
Harry Potter 12/06 03:10
Video Games 20/07 00:01
Partial Delete
Divide
Combine
Exit
No
Thumbnail
Selected
• Press the [PVR] Button on the remote control.
• Press [RECORDED PROG] button on the remote control.
• Using the […†] Keys on the remote control, select the
programme that you wish to edit.
• To confirm, press [SELECT] button on the remote control.
• Select Video Edit using the […†] keys on the remote
control.
• To confirm, press [SELECT] button on the remote control.
You will then be taken to the Video Edit Screen.
• Using the […†] keys, select from the four possible Video
Edit options.
• To confirm your choice, press [SELECT] on the remote
control.
To exit, press [SETUP] on the remote control.
• Divide is used to extract and keep portions of interest as
individual recordings. For example you can select the goals
from a soccer match or your favorite pop video from a TV
show.
• Selecting divide will display the first frame of the recording
in [PAUSE] Mode.
• Press either [PLAY] or [FF] to start navigating through the
recording.
• Sections to be kept are marked by pressing the [SELECT]
key. Marked sections are shown as shaded areas in the
transport bar.
• To confirm or cancel Divide, use the […†] buttons on the
remote control to highlight
Save
or
Cancel
.
• Confirm your choice by pressing [SELECT] button on the
remote control.
• A programme can be divided a maximum of eight times.
√√√√ √√ √√ DDii vviiddee
DH-A61D1D-LS(GB)_DESUK 03.7.27 11:45 PM ˘ ` 28
Page 30

29
PVR PART
Video Edit
Combine
RReeccoorrddeedd PPrrooggrraammmmeess
Select : Confirm Setup : Exit Choose:
…
†
Title Date Length
Load of the Rings 10/01 02:10
Star Wars 11/02 00:30
Harry Potter 12/06 03:10
Video Games 20/07 00:01
Play
Delete
Unlock
EDIT Title
Video Edit
No
Thumbnail
Selected
RReeccoorrddeedd PPrrooggrraammmmeess
Select : Confirm Setup : Exit Choose:
…
†
Title Date Length
Load of the Rings 10/01 02:10
Star Wars 11/02 00:30
Harry Potter 12/06 03:10
Video Games 20/07 00:01
Partial Delete
Divide
Combine
Exit
No
Thumbnail
Selected
VViiddeeoo EEddiitt -- CCoommbbiinnee
Select : Confirm Setup : Exit Choose:
…
†
Title Date Length
Load of the Rings 10/01 02:10
Star Wars 11/02 00:30
Harry Potter 12/06 03:10
Video Games 20/07 00:01
1. Star Wars
2. Saturday NIght Boxing
• Press the [PVR] Button on the remote control.
• Press [RECORDED PROG] button on the remote control.
• Using the […†] Keys on the remote control, select the
programme that you wish to edit.
• To confirm, press [SELECT] button on the remote control.
• Select Video Edit using the […†] keys on the remote
control.
• To confirm, press [SELECT] button on the remote control.
You will then be taken to the Video Edit Screen.
• Using the […†] keys, select from the four possible Video
Edit options.
• To confirm your choice, press [SELECT] on the remote
control.
To exit, press [SETUP] on the remote control.
• The title of the programme you have selected to combine
then appears in a box at the bottom of the screen
• Use the […†] keys to select additional recorded
programme{s} to be combined.
• To Confirm press the [SELECT] button on the remote
control.
• A maximum of 8 recordings can be chosen.
• At any time during selection use the [œ √] keys to toggle
between the [Combine/ Cancel] buttons, the main
programme list and the smaller list of programmes
currently selected for combining.
• If you make a mistake at any time it is possible to delete a
choice from the list by selection using the [œ √] keys to
highlight the combine list and pressing [SELECT] to delete.
• When you have chosen all the programmes you want to
combine use the [œ √] keys to select the [Combine/
Cancel] buttons
• Use the […†] to Highlight Combine or Cancel
• Press the [SELECT] Key to confirm your choice.
Combine
Cancel
DH-A61D1D-LS(GB)_DESUK 03.7.27 11:45 PM ˘ ` 29
Page 31

30
Set Recording
There are two different ways to set a recording.
Manual Set
SSeett RReeccoorrddiinngg
Select : Confirm Setup : Exit Choose:
…
†
No Date Start End Prog. Mode Freq.
1 01.10 03:00 04:00 SAT022 MO Weekly
2 05.11 03:00 03:30 FRE2 MO Once
3 04.12 11:15 11:30 AV1 MO Weekly
4 12.12 22:30 00:00 AV2 MO Daily
Edit
Delete
Exit
Free Space
Basic : 22 kbps
Medium : 1.2 kbps
High : 0.3 kbps
SSeett RReeccoorrddiinngg
Select : Confirm Setup : Exit Edit : Choose:
œ √
…
†
No Date Start End Prog. Mode Freq.
1 01.10 03:00 04:00 SAT022 MO Weekly
2 05.11 03:00 03:30 FRE2 MO Once
3 04.12 11:15 11:30 AV1 MO Weekly
4 12.12 22:30 00:00 AV2 MO Daily
Edit Set Recording
……
12:12 22:50 00:20 FRE2 BO Once
††
SSeett RReeccoorrddiinngg
Select : Confirm Setup : Exit Choose:
…
†
No Date Start End Prog. Mode Freq.
1 01.10 03:00 04:00 SAT022 MO Weekly
2 05.11 03:00 03:30 FRE2 MO Once
3 04.12 11:15 11:30 AV1 MO Weekly
4 12.12 22:30 00:00 AV2 MO Daily
Free Space
Basic : 22 kbps
Medium : 1.2 kbps
High : 0.3 kbps
Save
Cancel
• To access the Set Recording Menu, press [T] button on the
remote control.
There are eight slots for set recordings.
• To select a slot scroll up/down using the […†] keys on
the remote control.
• To confirm selection, press [SELECT] button on the remote
control.
• To set or edit a recording, highlight the
Edit
option in the
submenu and press [SELECT] button.
• The date, the start time, the end time, programme number,
Mode and frequency of recording can all be input and
edited.
• When choosing the recording quality mode, refer to the
Free Space and select your recording quality option based
on the amount of storage space available in each of the
recording quality options.
• To toggle left/right, use the [œ √] keys on the remote
control.
• To change any of the options, use the […†] keys on the
remote control.
• To Save, highlight
Save
and confirm by pressing [SELECT]
on the remote control.
• To cancel, highlight
Cancel
and confirm by pressing
[SELECT] on the remote control.
To exit, press [SETUP] on the remote control.
Warning)
After the electricity failure, recording files will be lost.
The important data on HDD should be backed up to
separated storage.
DH-A61D1D-LS(GB)_DESUK 03.7.27 11:45 PM ˘ ` 30
Page 32

31
PVR PART
Set Recording
Delete a recording
SSeett RReeccoorrddiinngg
Select : Confirm Setup : Exit Choose:
…
†
No Date Start End Prog. Mode Freq.
1 01.10 03:00 04:00 SAT022 MO Weekly
2 05.11 03:00 03:30 FRE2 MO Once
3 04.12 11:15 11:30 AV1 MO Weekly
4 12.12 22:30 00:00 AV2 MO Daily
Edit
Delete
Exit
Free Space
Basic : 22 kbps
Medium : 1.2 kbps
High : 0.3 kbps
• Select the programme you want to delete using the […†]
keys on the remote control.
• Once the programme is selected, use the […†] keys on
the remote control to highlight
Delete
.
• To confirm Delete, press [SELECT] button on the remote
control.
• A final superimposed menu will appear and allow you to
toggle between the Yes and No options using the [œ √]
keys on the remote control.
• To confirm your final selection, press [SELECT] button on
the remote control.
To exit, press [SETUP] on the remote control.
Performing multiple tasks
SSeett RReeccoorrddiinngg
Select : Confirm Setup : Exit Choose:
…
†
No Date Start End Prog. Mode Freq.
1 01.10 03:00 04:00 SAT022 MO Weekly
2 05.11 03:00 03:30 FRE2 MO Once
3 04.12 11:15 11:30 AV1 MO Weekly
4 12.12 22:30 00:00 AV2 MO Daily
Edit
Delete
Exit
Free Space
Basic : 22 kbps
Medium : 1.2 kbps
High : 0.3 kbps
• To perform multiple tasks in the menu, Highlight
Exit
and
press [SELECT] key on the remote control.
• This will allow you to re-access the set recording list.
DH-A61D1D-LS(GB)_DESUK 03.7.27 11:45 PM ˘ ` 31
Page 33

32
Show View / Video Plus(+) recording
……
– – – – – – – – –
††
Next
Cancel
VViiddeeoo PPlluuss
Please enter the Video Plus code
using number 0-9.
Select : Confirm Setup : Exit Choose: Edit :
œ √
…
†
• To access a timer record, press the [SV/VP+] button on the
remote control.
• You will need to have the Videoplus or Show View code
(available from TV listings ) with you.
• To enter the code, press numbers 0-9 keys on the remote
control.
• Use the [œ √] keys on the remote control to move left and
right.
• Toggle between Next /Cancel using the […†] keys on the
remote control.
• To confirm, press [SELECT] button on the remote control.
• Selection will bring you to the Set Recording List where
you will have the choice of editing anything about the
programme that you wish to change, following the same
procedure as outlined earlier.
To exit, press [SETUP] on the remote control.
DH-A61D1D-LS(GB)_DESUK 03.7.27 11:45 PM ˘ ` 32
Page 34

33
PVR PART
Record a television programme
This feature will allow you to record a programme you are currently watching without setting the timer. The
recording will continue until you press [STOP] button on the remote control or the unit runs out of available disk
space.
One Touch Recording
• Press [PVR] button.
• Press [REC] button on the remote control.
• Press [STOP] button when you want to finish recording.
- The transport bar will be coloured red to indicate you are in
recording mode.
- The vertical white line will indicate your current position in a
recording.
- You can play and Timeshift recorded material whilst the
programme is still recording.
- The bar will rescale itself according the length of the recording.
Warning)
After the electricity failure, recording files will be lost.
The important data on HDD should be backed up to
separated storage.
01:00 02:00
√ ● RR eecc oo rr dd
This feature will allow you to record live television for a specified amount of time after which the PVR will
automatically power- off. The Recording can be between 30 mins and 10 hours in length although this will be
dependent on the amount of free disk space you have. You can increase the length of recording in 30-minute
increments. The vertical white line will indicate your position within the recording.
Record Until
• Select the channel you want to record.
• Press [PVR] button on the remote control.
• Press [REC] button until the Record info bar appears on the
screen.
• Further presses of the [REC] button will increase the
recording time by thirty minute sections each time. e.g
press the record button an additional two times to set the
unit to record for 1 hour.
• Recording times are a minimum of 30 mins and a maximum
of 10 hours.
- The length of recording will depend on the disk space available on the PVR.
- The time on the left hand side indicates the start time of the recording.
- The time on the right hand side will indicate the end time of the
recording.
- To stop the recording at anytime press the [STOP] button on the
remote control.
- You can PLAY and Timeshift the recording whilst the recording is
still in progress.
01:00 02:00
√ ● RR eeccoo rr dd UUnnttiill
DH-A61D1D-LS(GB)_DESUK 03.7.27 11:45 PM ˘ ` 33
Page 35

34
Information Bars
There are two information bars. The bar that appears at the top of the screen is the programme banner and by
pressing the [INFO] button on the remote control will show you what you are watching.
11/12 (Mon) 12:22 PR01 BBC1 Stereo
• Press [PVR] button on the remote control.
• Press [INFO] button once to access the info bar.
• If the bar is
green,
you are in
live television
mode.
• The bar will display “The Date / The Day / The Time / The
Channel / Audio Selection”.
Pressing the [INFO] button twice will allow you to view the transport bar at the bottom of the screen. This bar
will help you to keep track of where you are in a programme. The green portion of the bar is a graphic indication
of how much information has been stored. Thus in live television the rightmost edge of the green bar will
indicate the end of recorded material and the start of what is currently being played live.
• If the bar is coloured green, you are in live television mode
and the stored information will only be available
temporarily.
• If you change channels, the buffer will clear and material
on the new channel will be stored.
• The buffer will store material for a maximum of one hour,
before it will refresh, erasing the oldest unlocked material,
replacing it with the new material.
• If the buffer is full i.e. the info bar is totally green, you will
have one hour stored material.
• If you pause the television broadcast, the buffer will
continue to store the live stream.
- The info bar is just a visual indication of how much information
you have recorded on your hard disk.
- The Vertical White Line is a visual indication of your current
position in a programme.
- An icon representing any play function you are using will appear
below the transport bar.
- If you pause, play etc the transport bar will immediately appear.
11/12 (Mon) 12:22 PR01 BBC1 Stereo Medium
• If the bar is
red,
you are in
recording
mode.
• The bar will display “The Date / The Day / The Time / The
Channel / Audio Selection / Recording Quality”.
11/12 (Mon) 12:22 Return of the Jedi
• If the bar is
yellow,
you are
playing back
a recorded
programme.
• The bar will display “The Date / The Day / The Time / The
title of the recording”.
Live Picture
01:00 02:00
√
DH-A61D1D-LS(GB)_DESUK 03.7.27 11:45 PM ˘ ` 34
Page 36

35
PVR PART
Guide and Warning Messages
The following is a list of guide messages that may appear on the screen.
You have entered the wrong data. Make sure the data you
have entered is correct. Go back and re enter data.
You have entered the wrong data please reconfirm it.
To record anything on the PVR it is important to set the
clock. If you have not done so go to the Set Up menu and
the Clock Set screen.
For timer recording the clock must be set
In the same way a VCR cannot record two simultaneous
programmes, this unit will display this message to show
that an overlap exists.
Go to the Set recording Screen and delete one of the
recordings. If you do not delete the unit will automatically
record the timer recording which was set first.
Overlap
The new recording conflicts with others already
set
If you want to switch the unit off and something is
currently being recorded, the unit will display this
warning.
A programme is currently being recorded. This
will stop the recording. Are you sure?
If you are trying to delete a programme that you have
previously locked, you will have to unlock it before it is
possible to delete it.
This programme is locked.Please unlock it if you
really want to delete it !
If you are deleting a recording.
Do you really want to delete it?
If you are restoring default settings.
Do you want to restore all the defaults settings?
If you try to record a programme and there is not enough
space on the disk this message will appear. You need to
go to the Recorded Programmes list and delete a recording
to free up some space. If you do not wish to delete any
recordings you will not be able to record the programme.
There is no more space left on the disk. Please,
delete some previously recorded programmes
DH-A61D1D-LS(GB)_DESUK 03.7.27 11:45 PM ˘ ` 35
Page 37

36
Guide and Warning Messages
You do not have enough disk space to perform a new set
recording. To continue delete recordings until there is
enough free disk space.
No set recording available please remove a set
recording in advance.
The PVR can only record the channel it is tuned to and this
message will be displayed if the user tries to change the
channel. Changing the channel will stop the recording :
alternatively use the TV controls to view an alternative
channel.
A programme is currently being recorded. To
change channel, you have to stop recording.
A timer record is pending. Continue with time
record & stop current recording?
If you try to delete a programme on the Recorded
Programmes list that has not finished recording this
message will appear.
The Programme is currently being recorded &
cannot be deleted.
When you are watching a channel, before T-REC records
the channel, this message will appear.
A timer record is pending. Continue with timer
record? (the channel could change)
If the recording of a programme is currently underway and
there is not sufficient remaining disk space, this message
will appear. In order to complete the recording the PVR
will automatically discard the oldest recording and
displays this prompt to give you the option to stop the
recording.
Hard disk space insufficient. Cannot complete
task. The oldest recorded programme will be
removed automatically. Please confirm.
If you have started an instant record or a record until and a
time recorded is scheduled to begin. You can either
complete the current recording and discard the timed
recording or you can stop the current recording and
commence the timer record.
DH-A61D1D-LS(GB)_DESUK 03.7.27 11:45 PM ˘ ` 36
Page 38

37
PVR PART DVD PART
Playing Discs
1
Press [√] button to power on.
2
Press [DVD] button to enter into DVD mode.
3
Press [OPEN/CLOSE] button to open the disc tray.
Place a disc accurately within the disc tray, ensuring that the label is facing upwards.
4
Press [OPEN/CLOSE] button to close the tray.
The disc tray is closed and after checking the disc’s condition, Playback or Stop function starts to operate.
5
To playback, press [PLAY
√/»
] button.
•In the case of DVD, menus and titles are displayed on the TV screen.
• In the case of S-VCD and VCD2.0, the menus are displayed on the TV screen and the unit goes into PBC (
Play Back Control ) Mode.
• In the case of CD, VCD1.1 and MP3, the disc plays in order of its track numbers.
6
To stop, press [STOP
■
] button.
For pause, press [PAUSE] button in playback mode. If you press [PLAY] button, it starts playback again.
7
Press [OPEN/CLOSE] button to remove the disc.
* If no button is pressed within 5 minutes after the opening of the tray, it will automatically close in order to prevent
damage.
Various Playback Methods
If you want fast (or fast reverse) playback,
press [ √√] or [œœ ] button in Playback mode. You can watch fast (or fast reverse) playing screen.
* This reverse playback can be unavailable for certain DVD. Unavailable for MP3.
* The real playback speed may not coincide with displayed speed.
If you want slow playback,
press [PAUSE] and [ √√]. You can watch the desired screen in the slow forward playback.
Or press [PAUSE] and [œœ ] button. You can watch the desired screen in the slow backward playback.
* The real playback speed may not coincide with displayed speed.
If you want a still picture,
press [PAUSE
√/»
] button in Playback mode. You can watch the desired screen in Pause status.
DH-A61D1D-LS(GB)_DESUK 03.7.27 11:45 PM ˘ ` 37
Page 39

38
DVD, VCD, CD, MP3
Playing a desired scene
To move to the next chapter (or track), press [NEXT
√√❚
] button.
The current chapter (or track) moves to the next chapter (or track).
Press [LAST
❚œœ
] button.
The current scene moves to the previous chapter (or track) or first scene of current chapter (or track).
To skip scenes in a disc
DVD, VCD
Some movie discs may contain multiple titles. If the disc has a movie title menu recorded on it, the [TITLE]
button can be used to select the movie title. Details of operation may differ depending on the disc used.
* Selecting a title may not be available on certain DVD discs.
1
Press the [TITLE/PBC] or [MENU] button.
A list of the titles on the disc is displayed.
If playing a VCD disc, the menu screen will appear only when the disc has PBC
function and PBC ON is activated.
2
Press the [ENTER] button or [
√
] button after pressing the [
…†œ √
] button to
select the desired title.
The selected title now starts playing.
Directly moving to a desired title
DH-A61D1D-LS(GB)_DESUK 03.7.27 11:45 PM ˘ ` 38
Page 40

39
DVD PART
Playing a desired scene
Each time you press [REPEAT] button in playback mode, repeat playback starts as below.
Repeating a defined period
DVD, VCD, CD, MP3
• CHAPTER : Current chapter will repeatedly played back.
• TITLE : Current title will repeatedly played back.
• TRACK : Current track will repeatedly played back.
• DISC : Current disc will repeatedly played back.
• RANDOM : Tracks in the disc will played back in random order.
• FOLDER : Current folder will repeatedly played back.
• OFF : Repeat playback will be cancelled.
- DVD -
CHAPTER
TITLE
OFF
➝➝
➝
- VCD -
TRACK
DISC
OFF
➝➝
➝
- CD -
TRACK
DISC
RANDOM
➝➝
OFF
➝
➝
- MP3 -
TRACK
FOLDER
RANDOM
➝➝
OFF
➝
➝
1
If you want to search for a title number, press [SEARCH] button once.
It shows current and total title numbers. Please enter the new title number to be
searched using the [NUMBER] buttons.
2
If you want to search for a chapter number, press [SEARCH] button twice.
It shows current and total chapter numbers. Please enter the new chapter
number to be searched using the [NUMBER] buttons.
3
If you want to search for a particular time, press [SEARCH] button three times.
Please enter the new time to be searched using the [NUMBER] buttons.
4
In order to complete the search process, press [ENTER] button.
PLAY starts from the selected position.
Searching DVD with a title number, a chapter number or a time
DVD
001/003
001/023
01:03:20
DH-A61D1D-LS(GB)_DESUK 03.7.27 11:45 PM ˘ ` 39
T
C
Page 41

40
Playing a desired scene
1
If you want to search for a particular track, press [SEARCH] button once.
In the case of PBC OFF, a screen as shown to the right will appear showing the
current and total track numbers. Please enter the required track number using the
[NUMBER] buttons on the remote control.
* If PBC is on, entering the track number will default the unit’s PBC to off.
2
If you want to search for a particular track time, press [SEARCH] button twice.
In the case of PBC OFF, a screen as shown to the right will appear showing the
total time: please enter the required time using the [NUMBER] buttons on the
unit’s remote control.
3
On completion of either search process, please press [ENTER].
PLAY starts from the selected position.
Searching VCD, CD and MP3 with a track or track time
VCD, CD, MP3
001/013
01:03:20
DH-A61D1D-LS(GB)_DESUK 03.7.27 11:45 PM ˘ ` 40
T
Page 42

41
DVD PART
Confirming the current PLAY mode on screen
During play, press [INFO] button.
This will display the current disc mode.
If you want to change any of the modes displayed, select the item using the up/ down cursors and choose the
new setting using either the [
œ
] or [√] button or the numeric buttons on the remote control. On completion,
press [ENTER] button.
Exit from this Display mode by pressing the [INFO] button.
T
C
DISPLAY
001/003
001/023
00:01:03
1/3 ENG
1/3 ENG
OFF
1/4
➟
current title number / total title number
➟
current chapter number / total chapter number
➟
time elapsed
➟
current subtitle number / total subtitle number / subtitle selected
➟
current audio language number / total audio language number / audio language selected
➟
repeat playback mode
➟
current angle number / total angle number
T
C
DISPLAY
001/003
00:10:54
OFF
OFF
1/3
➟
current track number / total track number
➟
time elapsed
➟
repeat playback mode
➟
PBC mode
➟
current audio language number / total audio language number
T
C
DISPLAY
001/005
00:07:13
OFF
OFF
➟
current track number / total track number
➟
time elapsed
➟
repeat playback mode
➟
PBC mode
T
C
DISPLAY
001/005
00:07:13
OFF
➟
current track number / total track number
➟
time elapsed
➟
repeat playback mode
- DVD -
- SVCD -
- VCD -
- CD, MP3, JPEG -
DH-A61D1D-LS(GB)_DESUK 03.7.27 11:45 PM ˘ ` 41
Page 43

42
DVD
AUDIO language and SUBTITLE language
Keep pressing [AUDIO] button until the user’s preferred language appears in playback
mode.
If that particular DVD disc includes this audio information, the user can press
[AUDIO] button to scroll through the available languages.
• Certain discs may not support audio select..
The user may select the audio track or the subtitle language if the disc supports this
multi-language function.
Selecting an audio language
DVD
Keep pressing the [SUB-T] button until the user’s preferred subtitle language appears in
the playback mode.
If that particular DVD disc includes this subtitle information, each time the user
presses the [SUBTITLE] button the available subtitles will appear in rotation, OFF
will also be an option in this rotation.
• Certain discs may not support subtitle select.
Selecting a subtitle language
01/03 ENG
AUDIO : DOLBY D
01/03 ENG
DH-A61D1D-LS(GB)_DESUK 03.7.27 11:45 PM ˘ ` 42
Page 44

43
DVD PART
ZOOM and Multi Angle
DVD, SVCD, VCD
The user can enlarge the current screen by either 2 or 4 times.
Keep pressing the [ZOOM] button until the preferred zoom appears.
Every time the user presses the [ZOOM] button, the magnification changes: 2 times (X2) ➝4 times (X4) ➝ OFF
➝ 2 times (X2) ➝ ... in rotation.
The center of the screen is taken as the base point for the enlargement. It is impossible to change this point
using the [
…†œ √
] button on the remote control.
• For the case of SVCD and VCD, only 2 times ZOOM is not available.
• During 4 times zoom, the subtitle facility is not available.
Using a zoom function
DVD
If a disc includes multi angle information, the user can watch a screen using a
variety of angles. The function is limited to a DVD disc supporting multi angle
information.
Keep pressing the [ANGLE] button until the preferred angle appears.
Every time the user presses the [ANGLE] button, the angle changes in a consecutive
order.
Multi Angle
01/03
X 2 _ _ _ _ _
_
_
_
_
_
X 4 _ _ _ _ _
_
_
_
_
_
DH-A61D1D-LS(GB)_DESUK 03.7.27 11:45 PM ˘ ` 43
Page 45

44
About MP3 and JPEG discs
4
The figure such as that displayed on the right should appear.
5
Select your disc type.
Move the cursor to FILTER by pressing [
…†œ √
] button.
Keep pressing the [ENTER] button until the user’s preferred disc type. Each
time the user presses the [ENTER] button, the disc type changes from
MIXED ➝ MP3 ONLY ➝ JPG ONLY ➝ MP3 AND JPG ➝ MIXED ... in
rotation.
6
Select the repeat playback model.
Move the cursor to REPEAT by pressing [
…†œ √
] button.
Keep pressing the [ENTER] button until the user’s preferred repeat
playback mode becomes available. Every time the user presses the
[ENTER] button, the repeat playback mode changes from TRACK ➝
FOLDER ➝ RANDOM ➝ OFF ... in rotation.
7
Select the folder.
Move the cursor to the desired folder by pressing [
…†œ √
] button and
press the [ENTER] button to confirm.
8
Select the file to listen to (or view).
Move the cursor to the desired file which you want to listen to (or view) by
pressing [
…†œ √
] button and press the [ENTER] button to confirm. The
selected file will play back.
* To exit the directory screen press the [MENU] button in playback or stop mode.
Press [MENU] button to make it reappear.
DISC:
FILTER MP3 ONLY
REPEAT TRACK
00:00 / 00:00
❑
… † œ √ ENTER MENU
..
DIR--01
DIR--02
DIR--03
DISC:
..
DIR--01
DIR--02
DIR--03
FILTER MP3 ONLY
REPEAT TRACK
00:00 / 00:00
❑
… † œ √ ENTER MENU
DISC:
..
DIR--01
DIR--02
DIR--03
FILTER MP3 ONLY
REPEAT TRACK
00:00 / 00:00
❑
… † œ √ ENTER MENU
DISC:
..
DIR--01
DIR--02
DIR--03
FILTER MP3 ONLY
REPEAT TRACK
00:00 / 00:00
❑
… † œ √ ENTER MENU
DISC: \DIR--01
..
FILEOPEN--01
FILEOPEN--02
FILEOPEN--03
FILTER MP3 ONLY
REPEAT TRACK
00:00 / 00:00
❑
… † œ √ ENTER MENU
This unit will play MP3, JPEG files recorded on CD-R and CD-RW discs.
1
Turn on your television and select the channel assigned to this DVD player.
2
Press the DVD [OPEN/CLOSE] button, to open the disc tray.
Place the disc containing MP3, JPEG files on the disc tray with the label facing upwards.
3
Press the DVD open [OPEN/CLOSE] button, to close the disc tray.
The unit will take a short time to load the disc and display the directory structure.
DH-A61D1D-LS(GB)_DESUK 03.7.27 11:45 PM ˘ ` 44
Page 46

45
DVD PART
About MP3, JPEG discs
PLAY and PAUSE
Press the [PLAY] or [PAUSE] button toggle between those functions.
Search for a track
The [SEARCH] button works on MP3/JPEG discs as well as VCD/CD audio.
* If the [SEARCH] button is pressed in playback mode the folder tree view will disappear to be replaced by the search bar.
To stop playback
Press the [STOP] button.
To skip to the next or previous file
• Press the [NEXT √√ ] button of the remote control briefly while playing, to skip ahead to the beginning of
the next file. Each time you press the button consecutively, the beginning of the next file is located and
played back.
• Press the [œœ LAST] button of the remote control briefly while playing, to skip back to the beginning of the
previous file. Each time you press the button consecutively, the beginning of the previous file is located and
played back.
The ability of this unit to read MP3 discs is dependent on the following:
• The Bit Rate must in the range of 64-256 kpbs.
• The maximum number of directories should not exceed 32.
• The maximum depth level of directories should not exceed 4.
• In case of the file that is recorded with the variable bit rate (VBR) in one file (Example : 54~256kbps) occurrence of the
sound breaking may happen during the playback.
• File names should be named using 8 or fewer letters and/or numbers, and must incorporate the “MP3” file extension.
EXAMPLE: ******** . MP3 where each * is a letter or number.
• Use only letters and/ or numbers in file names. If you use special characters, the file and/ or folder names may not be
displayed correctly on the on-screen display.
The ability of this unit to read JPEG discs is dependent on the following:
• If you press the [PLAY] button instead of [ENTER] in JPEG image, the slide show will begin at the current image.
• To stop the slide show, press the [STOP] button. By pressing the [STOP] and [PLAY] button, you can start the slide show
from the first JPEG image.
Cautions
• Don’t use the CD-RW (Rewritable) disc if possible because it can not be played back.
• The CD-R must be recorded with the standard format because it can not be played back according to the recording
format.
• The CD-R should be written using the ‘disc at once’ method.
• The disc which is made using the IS0 9660 format can be Played back.
DH-A61D1D-LS(GB)_DESUK 03.7.27 11:45 PM ˘ ` 45
Page 47

46
DVD, VCD2.0
Displaying menus in a disc
If a disc includes menus, the user may use them.
1
Press [TITLE/PBC] or [MENU] button.
• This will show the available menus held on the disc, which will differ between formats (“Return” will
appear on the OSD with VCD2.0)
• If it is a VCD2.0, select PBC ON mode by pressing [TITLE/PBC] button.
CD and VCD1.1 do not support the function.
2
Move the cursor to the particular item by using the [
…†œ √
] buttons on the remote control, selecting one
using either {ENTER] or [PLAY] button.
To display menus in a disc
DH-A61D1D-LS(GB)_DESUK 03.7.27 11:45 PM ˘ ` 46
Page 48

47
DVD PART
DVD Setup
1
Press [SETUP] button when the DVD player is either in the STOP or the
Resume STOP mode.
2
Selecting an OSD LANGUAGE
Please select a language to be displayed on the DVD screen.
Each time the user presses the [ENTER] button, the available OSD
LANGUAGE changes in rotation.
3
Selecting an AUDIO language
The preferred audio language maybe set if the audio language is set and recorded in the DISC.
Every time the user presses the [ENTER] button, AUDIO language changes ENGLISH ➝FRENCH ➝ AUTO in
rotation.
4
Selecting a SUBTITLE language
The preferred language for the subtitles may be set within this menu. When a subtitle language is set and
recorded in the DISC, it is automatically played in the set language every time it is played. ( no need for the
sentence beginning for example )
Every time the user presses the [ENTER] button, the SUBTITLE language options are scrolled through
changes in rotation.
5
Selecting a DISC MENU language.
Every time the user presses the [ENTER] button, the DISC MENU language will change, rotating through the
various options.
If a disc does not include this language setting information, this function will not be available.
Language Setup
OSD LANGUAGE
ENGLISH
ENGLISH
AUDIO ENGLISH
SUBTITLE ENGLISH
DISC MENU ENGLISH
LANGUAGE
VIDEO AUDIO
OTHERS
MOVE :œ √†… SELECT:ENTER EXIT:SETUP
DH-A61D1D-LS(GB)_DESUK 03.7.27 11:45 PM ˘ ` 47
Page 49

48
1
Press [SETUP] button when the DVD player is either in the STOP or the
Resume STOP mode. Press [
…†œ √
] button to move the cursor across to
the audio menu.
2
Selecting DIGITAL OUT.
Every time the user presses the [ENTER] button, one of two DIGITAL OUT
options ( BITSTREAM & LPCM ) are made available to both the coaxial
and optical outputs of this unit.
BITSTREAM: the same format as that recorded on the DVD.
LPCM : the decoded audio signal.
3
Selecting DYNAMIC RANGE.
Every time the user presses the [ENTER] button, the DYNAMIC RANGE changes from OFF to FULL to OFF
again, in rotation.
• Set “OFF” to hear a programme in the full dynamic range as a recorded disc.
• In order to compress the dynamic range of the soundtrack set to FULL.
DVD Setup
1
Press [SETUP] button when the DVD player is either in the STOP or the
Resume STOP mode.
2
Selecting TV ASPECT
Every time the user presses the [ENTER] button, the TV ASPECT changes
4:3 LB ➝ 16:9 WIDE ➝ 4:3 in rotation.
If a user selects “4:3”, the user can watch the original scene in “16:9”,
but with black bars at the top and bottom of the screen.
If a user selects “4:3 PS”, the user can only watch a selection of the original “16:9” screen.
If the disc’s TV aspect is originally recorded in 4:3, the user will not be able to watch it in a widescreen
format even though the “16:9 WIDE” option has been selected.
Video Setup
DIGITAL OUT
BITSTREAM
BITSTREAM
DYNAMIC RANGE OFF
LANGUAGE
VIDEO AUDIO
OTHERS
MOVE :œ √†… SELECT:ENTER EXIT:SETUP
TV ASPECT
4:3 PS
4:3 PS
LANGUAGE
VIDEO AUDIO
OTHERS
MOVE :œ √†… SELECT:ENTER EXIT:SETUP
Audio Setup
DH-A61D1D-LS(GB)_DESUK 03.7.27 11:45 PM ˘ ` 48
Page 50

49
DVD PART
DVD Setup
1
Press [SETUP] button when the DVD player is either in the STOP or the
Resume STOP mode.
2
Selecting OSD.
Select “ON” to allow OSD (On Screen Display) to be displayed on the TV.
3
Selecting SCREEN SAVER.
If bright scenes continue to be displayed on the screen, the TV can
become damaged. If the screensaver option is set to “ON”, the screensaver functions automatically and the
DVD logo will move continuously if the Resume stop, Stop or Open status is maintained for more than 5
minutes.
4
Changing DEFAULTS.
If you press the [ENTER] button, “RESET” changes to “LOADING” for 2 seconds. Then it changes again to
“RESET”. This operation will reset every function to the original factory defaults, with the exception of the
Parental settings.
5
Change the level of Parental Control.
Using the correct password, it is possible to change the PARENTAL
settings by pressing the [ENTER] button. Every time the user presses the
[ENTER] button, the parental level of control will change in the following
sequence: 1KIDS, 2G, 3PG, 4PG-13, 5PG-R, 6R, 7NC-17 & 8ADULT.
These 8 levels of parental control are provided to prevent children from
viewing scenes of a violent or sexual nature. The level of parental control
can be incremented to a suitable level.
The default password is “3308” : you may enter this password if your
chosen one has been lost or forgotten.
6
Changing a password.
To change the user’s password, please move cursor to “CHANGE PASSWORD” and enter new password.
Others Setup
OSD
ON
ON
SCREEN SAVER ON
DEFAULTS RESET
PARENTAL 8 ADULT
LANGUAGE
VIDEO AUDIO
OTHERS
MOVE :œ √†… SELECT:ENTER EXIT:SETUP
OSD ON
SCREEN SAVER ON
DEFAULTS RESET
CHANGE PASSWORD
- - - -
- - - -
LANGUAGE
VIDEO AUDIO
OTHERS
MOVE :œ √†… SELECT:ENTER EXIT:SETUP
OSD ON
SCREEN SAVER ON
DEFAULTS RESET
PARENTAL
8 ADULT
8 ADULT
CHANGE PASSWORD
- - - -
LANGUAGE
VIDEO AUDIO
OTHERS
MOVE :œ √†… SELECT:ENTER EXIT:SETUP
DH-A61D1D-LS(GB)_DESUK 03.7.27 11:45 PM ˘ ` 49
Page 51

50
About DVD
Playable Disc
REGION MANAGEMENT INFORMATION
If the region number described on the DVD disc does not correspond to the Region number of this player,
the player will not play this disc.
(Region 2) (Region ALL)
2
ALL
• DVD, Video CD (Version 1.1, 2.0), S-VCD and Audio CD
Disc type Playable Restriction
DVD Possible Region 2 or Region All
Video CD Possible Version 1.0/1.1/2.0, SVCD
CD Possible PCM or dts
CD-G Possible Audio with graphic
CD-ROM Possible MP3/JPEG File
CD-R Possible Video-CD/CD/MP3/JPEG
CD-RW Possible Video-CD/CD/MP3/JPEG
DVD-R Possible DVD Video
DVD-RW Possible DVD Video
DVD+RW Possible DVD Video
DVD-ROM Impossible
DVD-RAM Impossible
Photo CD Impossible
DH-A61D1D-LS(GB)_DESUK 03.7.27 11:45 PM ˘ ` 50
Page 52

51
MISCELLANEOUS
About DVD
DVD
A DVD (abbreviation of Digital Versatile Disc or Digital Video Disc) can include 135 minutes of
video information. And for audio, it can hold up to 8 kinds of languages and 32 kinds of
subtitle languages. By using MPEG-2 video compression and digital 3D surround sound, DVD
realizes high definition images and quality sound similar to that found in a movie theatre.
CDDA
A CDDA (abbreviation of Compact disc digital audio) is a music disc that is currently used.
MP3
Audio compression format that enables audio files to be stored and transferred on a computer
with a relatively small file size. It enables you to enjoy CD quality music. (Short for MPEG-1
Layer 3)
PBC
This is recorded on a Video CD 2.0, Video CD 3.0, SVCD and CVD. The scenes or information to
be viewed (or listened to) can be selected interactively with the TV monitor by looking at the
menu shown on the TV monitor. It stands for PlayBack Control.
CHAPTER
This relates to the information recorded onto a DVD. A title in a DVD may be divided into
many tracks and these tracks are called a chapter. A certain scene contained on the disc can
be quickly searched with this chapter number.
TITLE
This relates to the information recorded onto a DVD. A DVD can be divided into many titles.
TRACK
This relates to the information recorded onto a video CD and audio CD. A disc may consist of
many tracks which will allow a user to search to a certain position.
dts
Digital Theatre System is a 5.1 -channel surround sound system, which is widely used in movie
theatres around the world. It enables the bit rate to be increased to provide good sound quality.
“DTS” and “DTS Digital Out” are trademarks of Digital Theatre Systems, Inc.
Multi Angle
Some DVD discs contain the various scenes that have been simultaneously shot from a
number of different angles.
PCM
PCM (Pulse Code Modulation) means digital sound.
Dolby Digital
Dolby Digital enables the delivery of mono through 5.1-channel audio at data rates from 32
kbps to 640 kbps, thus offering flexibility and economical performance as well as
uncompromised sound quality.
Bitstream
Digital audio data that is decoded into an analogue signal for subsequent output to speakers.
Lt/Rt
It indicates Left/Right Audio of Dolby Digital 2CH Downmix Output.
L/R/C/SW/LS/RS
6 channels are used in Dolby Digital and dts. They are 3 channels for the front screen, 2
channels for surround and 1 subwoofer. The front left speaker is referred as L, right speaker
as R, centre speaker as C, subwoofer as SW, left surround speaker as LS, right speaker as RS.
* L/R of 6CH output like upper case is displayed as Lo/Ro.
Downmix
Downmix is the technology for playing proper audio in case the recorded audio channel
construction and that of the output channel does not match each other. Downmix will provide
5.1 channel-audio by using 2 stereo speakers.
S-Video
S-Video offers clearer and sharper pictures than COMPOSITE Video by separately transmitting
the signal of colour (C ) and brightness (Y).
Terms relating to DVD
DH-A61D1D-LS(GB)_DESUK 03.7.27 11:45 PM ˘ ` 51
Page 53

About DVD
52
• To keep a disc in a clean condition, please do not touch the side containing play information.
• Do not attach a bit of paper or sticky tape on it.
• Do not expose a disc to direct sunlight or electric heating systems.
• After using it, please keep the disc in a case.
The safe keeping of discs.
Cleaning a disc
Region Code
• Please rub gently, from the center outwards, with clean cloth.
• Do not use thinners, benzol (benzene), commercial cleaning goods or antistatic
sprays.
Macrovision
This product incorporates copyright protection technology that is protected by method claims of certain U.S
patents and other intellectual property rights owned by Macrovision Corporation and other rights owners.
Use of this copyright protection technology must be authorized by Macrovision Corporation, and is intended
for home and other limited viewing uses only unless otherwise authorized by Macrovision Corporation.
Reverse engineering or disassembly is prohibited.
This product and all DVD’s have
region codes allocated to them. If
both codes do not match the disc
can not be played. A map showing
the codes allocated to each
region, is given to the side.
DH-A61D1D-LS(GB)_DESUK 03.7.27 11:45 PM ˘ ` 52
Page 54

53
MISCELLANEOUS
Problems and Solutions
➤ Check that the power plug is connected to the wall
outlet and you have pressed the Power On/Standby
button.
➤ Due to the time it takes to initialize the Hard disk drive
it may take a few moments for the picture to appear.
➤ Check the aerial connections.
➤ Check the disk space.
➤ Check the clock is set to the correct time.
➤ Check the PVR/DVD is tuned in correctly.
➤ Was the PVR/DVD Combo powered – on?
➤ Did you set the timer recording correctly?
➤ Were you on the right channel?
➤ Was there sufficient disk space?
➤ In order to make room for new recordings on the disk, if
there is not enough disk space the unit will
automatically delete unlocked recordings. It will delete
the oldest programmes first. To protect a recording that
you do not wish to be deleted lock it in the Recorded
Programmes List.
PVR
No Power
When the power is turn on it takes some time
for the picture to be displayed
The television programme has not recorded
Timer Recording was unsuccessful
A recording has been erased from the
Recorded Programmes List
DH-A61D1D-LS(GB)_DESUK 03.7.27 11:45 PM ˘ ` 53
Page 55

54
Problems and Solutions
➤ If a DVD is from overseas, it may not be played. Please
check the DVD’s region code whether it has the relative
region code 2 or All.
➤ Please check whether a DVD is inserted in the right
direction.
➤ This unit does not support CD-ROM or DVD-ROM
playback.
➤ Play mode may be “SLOW” or “PAUSE/STEP” (In
abnormal speed play, no sound comes through).
➤ Did you connect the parts in the correct way?
➤ Please check the operative condition of TV or amplifier.
➤ From “DEFAULT” SET, please check “Audio” items.
➤ Did you turn on your TV set?
➤ Did you connect the parts in the correct way?
➤ The play may be in “PAUSE”.
➤ The disc may be contaminated or damaged.
➤ Please check the connection with the Dolby Digital
amplifier.
➤ Please check the plugs are connected tightly with one
another.
➤ The connection terminals may be contaminated.
➤ Please check the angle of the remote control and that
there is nothing impeding the signal.
➤ Battery may be weak or exhausted.
➤ Unplug the power plug and plug it in again.
➤ Please check the connection with the Dolby DIgital
Amplifier.
➤ Please check “Dolby Digital ” mark on your DVD.
➤ When playing it through digital output, while pressing
[STOP], please check whether “DIGITAL OUT” is
“BITSTREAM” by pressing [SETUP].
➤ Please check the connection is correct.
DVD
The DVD player does not play.
No sound comes through.
A disc is playing but screen does not appear
or poor screen appears.
The sound is irregular.
Remote control does not work
No sound comes through during Dolby Digital
mode.
DH-A61D1D-LS(GB)_DESUK 03.7.27 11:45 PM ˘ ` 54
Page 56

55
MISCELLANEOUS
Problems and Solutions
➤ If the DVD does not include language information, it
does not support the function.
➤ “ANGLE” will support only the DVD containing Multi
angle scenes.
➤ Please check the angle of the remote control with
respect to the unit, also the distance or any interruption.
➤ Please check the battery in the remote control whether
it is exhausted or not.
➤ The DVD may not contain menu information.
➤ The disc may have some contaminants or be damaged.
➤ Please check the DVD’s region code 2.
➤ The file name of MP3 recognises only the Alphabet
(A~Z, a~z), numbers (0~9) and special symbols on the
keyboard (~,!, @, #, $ ....). Only a maximum of 10 letters
can be displayed.
➤ The letters except in the above case will be displayed
like “- - - -”.
➤ If the surface of disk is damaged, the file display and
playback may be impossible.
[AUDIO] or [SUBTITLE] button
does not work.
[ANGLE] button does not work
while a DVD is playing.
“MENU” does not appear while a
DVD is playing.
Screen shakes or appears only in
black and white.
The file name of MP3 (CD-R)
appears with strange letters.
Any MP3 (CD-R) file isn’t
Displayed.
DH-A61D1D-LS(GB)_DESUK 03.7.27 11:45 PM ˘ ` 55
Page 57

56
Specifications
Model Description DVD HARD DISC Recorder
1st Target Market Europe
Mass Production Start JULY. 2003
Power Consumption50W(Max), 45W(working), 15W (Stand-By), 6W (Power-off)
Set Gross Weight (Estimated) 5.5 Kg
Set Size (WxHxD) 420 x 80 x 300 (mm)
Stuffing Quantity (40ft) 1750 units
General
Drive interface ATA (IDE bus) Interface
Capacity 40 GB (1platter)
RPM 5400
Start time 8 sec ( 15 sec max )
Stop time 12 sec ( 20 sec max )
Video Recording Format MPEG II
Horizontal Resolution ( line input ) High : 350 lines Pass-through : Min 350 lines
Standard : 350 lines Time-shifting : Min 350 lines
Basic : 250 lines
Screen size(MPEG encoder) High : full D1 (720 x 576) Pass-through : full D1 (720 x 576)
Standard : 2/3 D1 (480 x 576) Time-shifting : full D1 (720 x 576)
Basic : 1/2 D1 (352 x 576)
Video DAC 10bit
Recording Rate (Mb/sec) 2 - 4 - 6 (Mb/sec) Time-shifting : 6 Mb/sec
; Low-to-High Quality
Time-shifting buffering time 1 hour T-S and System region : about 3GB
Recording Capacity ( 40GB/20GB) High Quality : up to 13.4 Hours 6Mbps
Medium Quality : up to 18.8 Hours 4Mbps
Basic Quality : up to 34.2 Hours 2Mbps (Max 40H Incl. Space for Time
shift & filing
Audio Recording Format MPEG I Layer II (2 channel)
Analoge in/out Yes
Sampling Rate 44.1KHz
Audio ADC/DAC 20bit
S/N Ratio ( line input ) 65 dB weighted
Dynamic range ( line input ) 80 dB
Muting Yes
Broadcasting Station Memory Number 99CH
Auto Channel Setting Auto Search & Memory, Auto Channel Sorting, Auto Station Name Display
Manual Channel Setting Channel Direct Input / Manual Search & Memory / Channel Clear
PVR Features
DH-A61D1D-LS(GB)_DESUK 03.7.27 11:45 PM ˘ ` 56
Page 58

57
MISCELLANEOUS
Specifications
Time Shifting Yes
Forward / Reverse Search Speed 5 steps(x2, x10, x20 , x40 ,x80 )
x2 forward digest function Normal audio out
Still Picture O
Slow (Variable Slow Speed) Yes ( 1/2, 1/4, 1/8, 1/16, 1/32 : 5 steps ) - Available only forward
Repeat Play Yes - "A-B repeat"
"A-B" REC Yes - Press "REC" during Repeat Play
Recorded Programme Search Yes - next clip,last clip
REC Bit Rate Select Yes - By OSD menu
System information Yes - By OSD menu
Number of Timer Recording 8 Events / 1 Year
Auto Clock Setting Yes
Timer Recording System Yes General, Show View / Video Plus(+)
(Show View / Video Plus(+), etc)
One Touch Recording Yes
Daily Recording Yes
Weekly Recording Yes
Timer Recording Contents Display Yes
Timer Recording Contents Correct Yes
Initial Partial Guide Setup Yes - first AC power cord input
Child Lock Yes
Power Failure Compensation More than 1 day
Special Playback & Recording
Video format supported DVD / DVD+RW / DVD+R / DVD-RW / DVD-R / CD / CD-R / CR-RW /
VCD / SVCD
Audio format supported CDDA / MP3
Disc size 8cm/12cm
NTSC & PAL Discs playback Yes
Video output signal NTSC / PAL
Video Digital-to-analogue converter 10bit/54MHz
Progressive Scanning Yes ( Option )
S-Video & Component or RGB Switchable
Smooth motion picture in reverse mode Yes
Audio Digital-to-analogue converter 96kHz/24bit
DVD Audio Digital-to-Analogue Converter No
S/N Ratio 90 dB
3D Virtual Surround for 2Ch Audio Yes
Dolby Digital Down Mix (5.1ch to LtRt out) Yes
Dolby Digital Passthrough Yes
DTS Digital Passthrough Yes
Dynamic range compression Yes
DSP Mode No
Equalizer No
Fast Scan Motion (FWD / REV) DVD : (O/O) : x2,x4,x8,x16,x32
VCD : (O/O) : x2,x4,x8,x16,x32
CDDA : (O/O) : x2,x4,x8,x16,x32
DVD features
DH-A61D1D-LS(GB)_DESUK 03.7.27 11:45 PM ˘ ` 57
Page 59

58
Specifications
Slow Motion (FWD / REV) DVD : (O/O) : x1/2, x1/4, x1/8, x1/16, x1/32
Slow Motion (FWD / REV) VCD : (O/O) : x1/2, x1/4, x1/8, x1/16, x1/32
Still picture/freeze frame) Yes
( jitter-free : auto-switching: Field / Frame)
Frame by Frame (forward) Yes
Skip (FWD / REV) Yes
2x Subtitle Display Yes
Repeat playback function Yes
Programme Play Yes for DVD/VCD/CD
Random Play Yes for CD/MP3
BOOK Mark function No (No. of Marks)
Time Search Yes
Zoom on Still / Running DVD Video (Zoom x) x2, x4 Zoom (magnify)
JPG files playback Yes only slide show under 500K
Compatibility with Kodak Picture CD No
OSD languages Eng/Fre/Ger/Spa/Dut/Ita/Swe/Fin 8 Languages
Disk Type displayed OSD / Front Panel Display O/O
Screen saver On/Off selection Yes
Resume play Yes
Parental lock Yes
Picture mode selector 4x3, 16x9, letterbox Yes
Multi-angle playback Yes
Upgradeable Flash Memory Capability Yes
Selectable Audio Streams (total quantity) No
Selectable Subtitle Languages (total quantity) No
User Interface & Operation
Mic input on front panel Yes
Antenna Jack Type 1 Pair
Rear Audio/Video Jack AV1 Jack(Scart Jack) 1
Video (composite) Output(RCA Jack) 1
AV2/DECODER Jack(Scart Jack) 2
Audio Input (Analogue, RCA jacks) 1
Audio Output (Analogue, RCA jacks) 2
Digital Audio Output - Optical(DVD only)
Digital Audio Output - Coaxial(DVD only)
S-Video 1 Pair ( In & Output )
CBC Control Yes
Remote Standard (45Keys)
Connections
DVD features continued
DH-A61D1D-LS(GB)_DESUK 03.7.27 11:45 PM ˘ ` 58
Page 60

59
MISCELLANEOUS
Specifications
Remote controller 1 EA Incl. Battery
Scart cable(21pin) 1 EA cf) Scart+Phone cable for Australia
RF Cable 1 EA
S-Video cable Option
CBC cable 1 EA
User manual 1 EA
Accessory
4-coloured coating box Yes 1 unit per carton
Carrying Handle No
Packaging
DH-A61D1D-LS(GB)_DESUK 03.7.27 11:45 PM ˘ ` 59
 Loading...