


OWNER’S MANUAL
Model:
•DDT-14H9 ZZF
TV/DVD COMBO

1 Read Instructions - All the safety and operating instructions should be read before the appliance is
operated.
2 Retain Instructions - The safety and operating instructions should be retained for future reference.
3 Heed Warnings - All warnings on the appliance and in the operating instructions should be adhered to.
4 Follow Instructions - All operating and use instructions should be followed.
5 Cleaning - Unplug TV/DVD from the wall outlet before cleaning. Do not use liquid cleaners or aerosol
cleaners. Use a damp cloth for cleaning.
6 Attachments - Do not use attachments not recommended by the TV/DVD manufacturer as they may cause
hazards.
7 Water and Moisture - The apparatus shall not be exposed to dripping or splashing water and that no
object filled with liquids, such as vases, shall be placed on the apparatus.
8 Accessories - Do not place this TV/DVD on an unstable cabinet, stand,
bracket, or table. The TV/DVD may fall, causing serious injury to someone,
and serious damage to the appliance. Use only with a cabinet, stand, bracket,
or table recommended by the manufacturer, or sold with the TV/DVD. Any mounting
of the appliance should follow the manufacturer’s instructions and use a mounting
accessory recommended by the manufacturer. An appliance and cart combination
should be moved with care. Quick stops, excessive force, and uneven surfaces may
cause the appliance and cabinet combination to overturn.
9 Ventilation - Slots and openings in the cabinet and the back or bottom are provided for ventilation and to
ensure reliable operation of the TV/DVD and to protect it from overheating, and these openings must not be
blocked or covered. The openings should never be blocked by placing the TV/DVD on a bed, sofa, rug, or
other similar surface. This TV/DVD should never be placed near or over a radiator or heat register. This
TV/DVD should not be placed in a built-in installation such as a bookcase or rack unless proper ventilation is
provided or the manufacturer’s instructions have been adhered to. Around the unit, the space should be more
than 10cm.
10 Power Sources - This TV/DVD should be operated only from the type of power source indicated on the
marking label. If you are not sure of the type of power supply to your home, consult your appliance dealer or
local power company.
11 Grounding or Polarization - This TV/DVD is equipped with a polarized alternating - current line plug (a
plug having one blade wider than the other). This plug will fit into the power outlet only one way. This is a
safety feature. If you are unable to insert the plug fully into the outlet, contact your electrician to replace your
obsolete outlet. Do not defeat the safety purpose of the polarized plug.
12 Power-Cord Protection - Power-supply cords should be routed so that they are not likely to be walked
on or pinched by items placed upon or against them, paying particular attention to cords at plugs, and the
point where they exit from the appliance.
13 Lightning - For added protection for this TV/DVD receiver during a lightning storm, or when it is left
unattended and unused for long periods of time, unplug it from the wall outlet and disconnect the antenna or
cable system. This will prevent damage to the TV/DVD due to lightning and power-line surges.
14 Power Lines - An outside antenna system should not be located in the vicinity of overhead power lines or
other electric light or power circuits, or where it can fall into such power lines or circuits. When installing an
outside antenna system, extreme care should be taken to keep from touching such power lines or circuits as
contact with them might be fatal.
IMPORTANT SAFEGUARDS
IMPORTANT SAFEGUARDS
PORTABLE CABINET WARNING
1

2
15 Overloading - Do not overload wall outlets and extension cords as this can result in a risk of fire or
electric shock.
16 Object and Liquid Entry - Never push objects of any kind into this TV/DVD through openings as they
may touch dangerous voltage points or short out parts that could result in a fire or electric shock. Never spill
liquid of any kind on the TV/DVD.
17 Servicing - Do not attempt to service this TV/DVD yourself as opening or removing covers may expose you
to dangerous voltage or other hazards. Refer all servicing to qualified service personnel.
18 Damage Requiring Service - Unplug this TV/DVD from the wall outlet and refer servicing to qualified
service personnel under the following conditions:
A. When the power-supply cord or plug is damaged or frayed.
B. If liquid has been spilled, or objects have fallen into the TV/DVD.
C. If the TV/DVD has been exposed to rain or water.
D. If the TV/DVD does not operate normally by following the operating instructions. Adjust only those controls
that are covered by the operating instructions, as improper adjustment of other controls may result in
damage and will often require extensive work by a qualified technician to restore the TV/DVD to its
normal operation.
E. If the TV/DVD has been dropped or damaged in any way.
F. When the TV/DVD exhibits a distinct change in performance - this indicates a need for service.
19 Replacement Parts - When replacement parts are required, be sure the service technician has used
replacements parts specified by the manufacturer that have the same characteristics as the original part.
Unauthorized substitutions may result in fire, electric shock, injury to persons or other hazards.
20 Safety Check - Upon completion of any service or repairs to this TV/DVD, ask the service technician to
perform routine safety checks to determine that the TV/DVD is in proper operating condition.
21 Heat - This TV/DVD product should be situated away from heat sources such as radiators, heat registers,
stoves, or other products (including amplifiers) that produce heat.
22 Electrostatic - In DVD mode, your DVD Disc may be playback from the first parts because of the
electrostatic symptom.
23 Secondary Switch - When switching off, the apparatus is not completely switched off from the mains. To
disconnect it from the mains, you have to unplug mains.
WARNING : TO REDUCE THE RISK OF FIRE OR ELECTRIC SHOCK, DO NOT EXPOSE THIS
APPLIANCE TO RAIN OR MOISTURE.
CAUTION : TO PREVENT ELECTRIC SHOCK, MATCH WIDE BLADE OF PLUG TO WIDE
SLOT, FULLY INSERT.
3
IMPORTANT SAFEGUARDS
CAUTION : TO REDUCE THE RISK OF
ELECTRIC SHOCK, DO NOT REMOVE
COVER (OR BACK) NO USER-SERVICEABLE PARTS INSIDE.
REFER SERVICING TO QUALIFIED SERVICE PERSONNEL.
CAUTION
RISK OF ELECTRIC SHOCK
DO NOT OPEN
The lightning flash with arrowhead symbol, within an
equilateral triangle, is intended to alert the user to the
presence of uninsulated “dangerous voltage” within
the product’s enclosure that may be of sufficient magnitude to constitute a risk electric shock.
The exclamation point within an equilateral triangle is
intended to alert the user to the presence of important
operating and servicing instructions in the literature
accompanying the appliance.
IMPORTANT FOR LASER PRODUCTS
LASER
This Digital Video Disc Player employs a Laser System. To ensure proper use of this product
please read this owner’s manual carefully and retain for future reference. Should the unit
require maintenance, contact an authorized service location - see service procedure. Use of
control adjustments or the performance of procedures other than those specified may result
in hazardous radiation exposure.
To prevent direct exposure to the laser beam, do not try to open the enclosure. Visible laser
radiation when open and interlocks defeated. DO NOT STARE INTO THE BEAM.
DANGER Visible laser radiation when open and interlock failed or defeated.
Avoid direct exposure to beam.
CAUTION Do not open the top cover. There are no user serviceable parts
inside the Unit; leave all servicing to qualified service
personnel.
CLASS 1
LASER PRODUCT
CAUTION : Any changes or modification in construction of this device which are not
expressly approved by the party responsible for compliance could void the
user’s authority to operate the equipment.
Advantages of this Product Are 22
Playing the DVD video disc 23
Basic Playback 23
Playing a desired scene 24
To skip scenes in a disc 24
Directly moving to a desired title
24
Playing Programmed order 25
Repeating a defined period 25
Repeating a defined period from
A to B 26
Searching DVD with a title number,
a chapter number or a time 26
Searching VCD, CD and MP3 with a
track or track time 27
Confirming the current PLAY mode on screen
28
Confirming the current DVD disc mode 28
Confirming the current SVCD disc mode
28
Confirming the current VCD disc mode 29
Confirming the current CD,MP3, JPEG
disc mode 29
Selecting an AUDIO language, SUBTITLE
language and 3D AUDIO 30
Selecting an audio language 30
Selecting a subtitle language 30
Selecting 3D Audio 30
Selecting ZOOM and Multi Angle 31
Using a zoom function 31
Multi Angle 31
About MP3 and JPEG discs 32
Playing a disc containing MP3, JPEG files
32
Displaying menus in a disc 34
To display menus in a disc 34
LANGUAGE Setup 35
VIDEO Setup 36
AUDIO Setup 36
Other Setup 37
DVD Operation ....
Table of Contents
4
IMPORTANT SAFEGUARDS 1
Table of Contents 4
Identification of Controls 5
Remote Control 7
Before use ....
Basic Installation 10
Connecting to Various Equipment 11
Installation ....
About DVD 38
Playable Disc 38
REGION MANGEMENT Information 38
Terms related with DVD 39
Disc 40
Region Code 40
Before doubting about troubles (DVD) 41
Before Calling Service Personnel 42
Specification 43
Others
Watching TV 13
TELETEXT 14
Setting TV 15
To Display the Setting Screen 15
Setting Picture 16
Setting Sound 17
Installing Channels 18
Setting Other Features 21
Basic TV operation ....
IMPORTANT COPYRIGHT INFORMATION
Unauthorized copying, broadcasting, public
performance and lending of discs are prohibited.
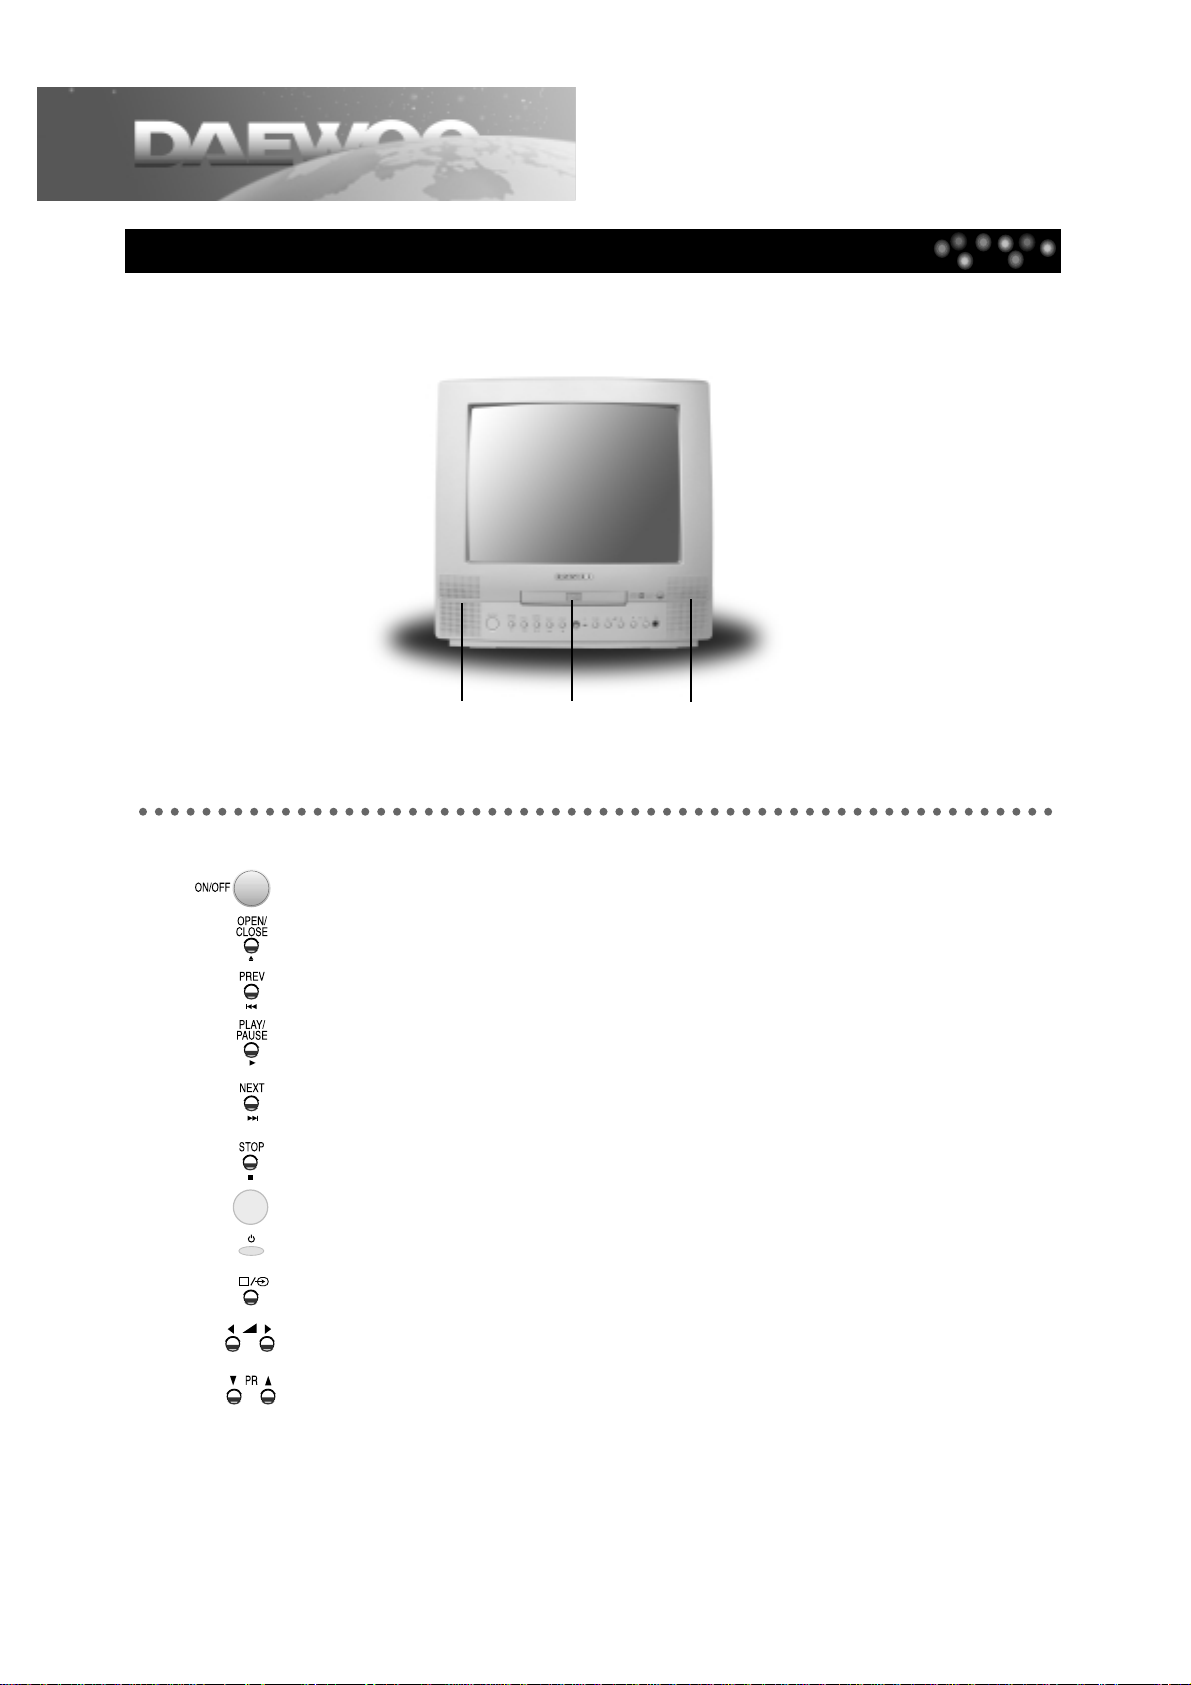
Main Body (Front Part)
5
Identification of Controls
POWER button (Power of TV/DVD is fully intercepted.)
OPEN/CLOSE button (For opening /closing disc tray)
PREVIOUS button
PLAY/PAUSE button
NEXT button
STOP button
REMOTE SENSOR
STAND-BY indicator
TV/AV/DVD MODE CONVERT button
TV VOLUME button
TV CHANNEL button
Speaker Left Disc Loading
Tray
Speaker Right
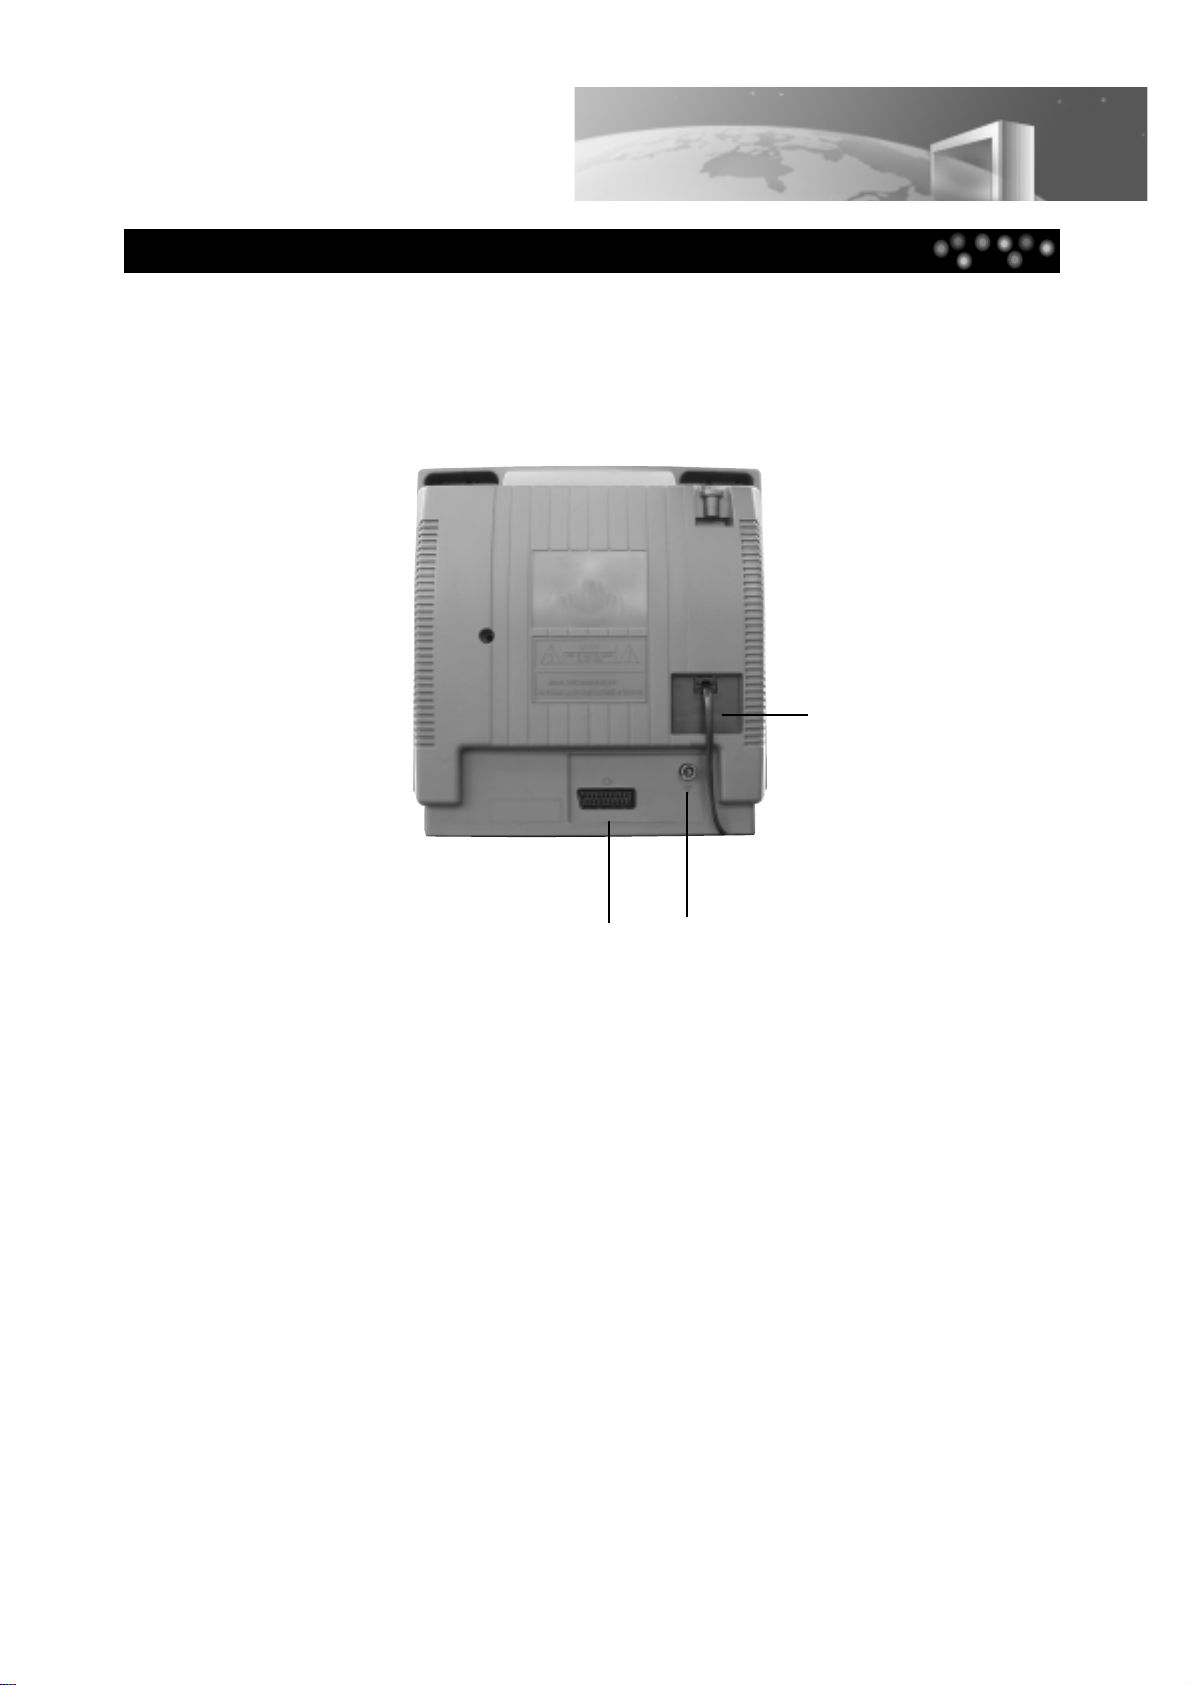
Main Body (Rear Part)
6
Identification of Controls
SCART Jack
CONNECTION
to ANTENNA
CABLE
POWER
CORD

Remote Control Buttons
7
Remote Control
POWER button
If you press POWER button on remocon under the POWER button in the
front part of TV/DVD pressed down, you can turn on/off the TV/DVD.
DISPLAY button
Operating status and GUI(Graphic User Interface) menu are displayed in
a screen.
TV/AV, DVD button
You can select input mode.
NORMAL button
NORMAL I/ NORMAL II/ FAVOURITE picture control
NUMBER button
You can enter the relevant number directly or select a desired channel.
SLEEP button
You can set automatic POWER OFF(0, 20, 40, 60, 80, 100, 120).
F.R/SLOW or F.F/SLOW button
You can search screen whilst playing back or forward.
Slow screen is displayed whilst pausing.
STOP button
PREV/NEXT(BACK STEP/STEP) button
You can skip a screen whilst playing back or forward.
Back Step/Step screen is displayed whilst pausing.
PLAY/PAUSE button
Start playback of the disc contents. Pause screen whilst playing.
TV MENU button
The Menu screen relating to TV is displayed.
VOLUME button
CURSOR( ), CHANNEL SELECT button
This button functions as cursor or channel select button in setting
TV/DVD and operating TV respectively.
MUTE button
Press this button if you only want to turn off the sound.
OK/ENTER button
Press this button if TV or DVD setting is completed.

8
Remote Control
DVD MENU button
The DVD menu screen is displayed.
AUDIO button
You can select the desired audio language.
SUBTITLE button
You can select the desired subtitle language.
DISC TRAY OPEN/CLOSE button
SETUP button
You can set the DVD player.
REPEAT button
You move into REPEAT mode whenever you press this button.
A-B REPEAT button
You can play the given sections repeatedly.
TITLE/PBC button
You can select the desired title.
Angle button
You can select the desired screen angle.
ZOOM button
You can zoom in a screen.
PROGRAM button
You can program the desired playing order.
CLEAR button
You can clear settings.
SEARCH button
You can search the scene that you want.
SOUND MODE button
You can select the desired audio mode when watching TV.
ASPECT button
You can modify TV Aspect in TV/AV/DVD Mode.
3D button
You can set Sound Fields.
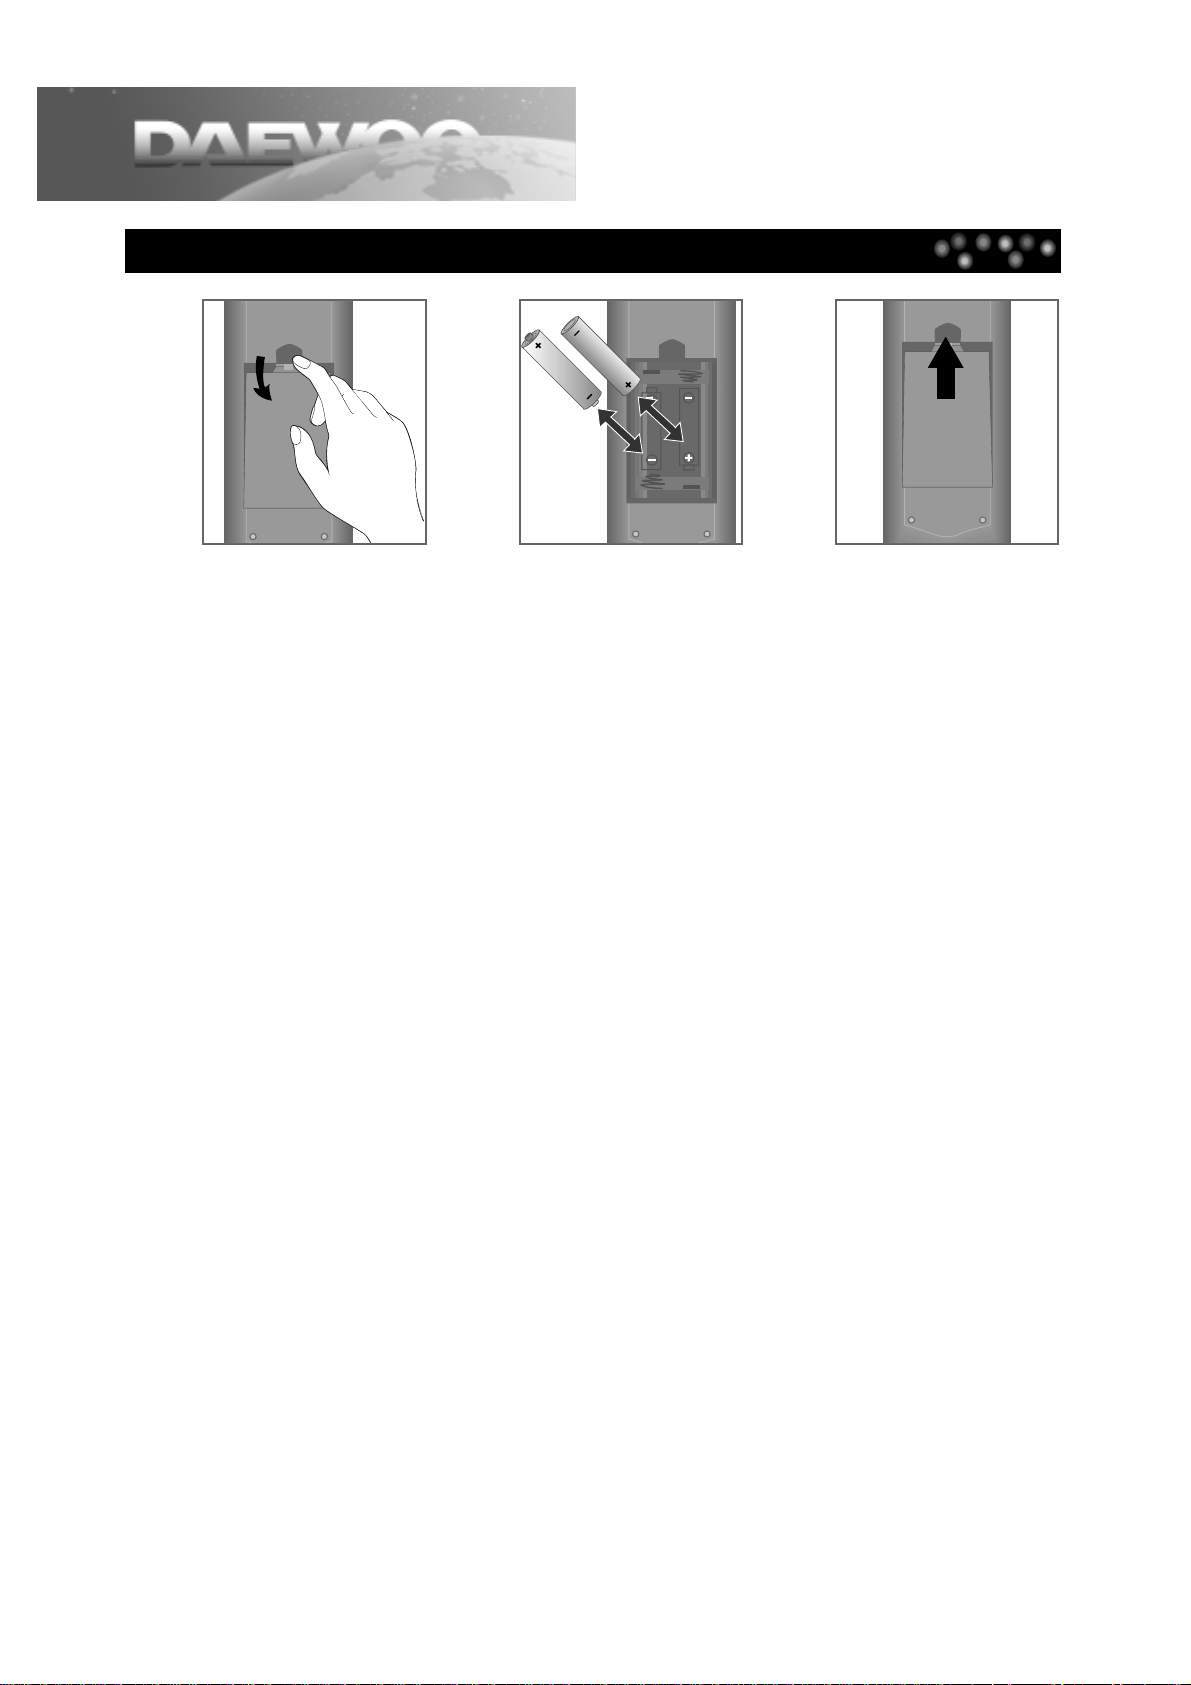
Inserting the Batteries
9
Remote Control
123
Please respect the environment and prevailing regulations. Before you dispose of batteries, ask your dealer
whether they are subject to special recycling and if he accepts to take them back.
AERIAL SOCKET : (75Ohms-VHF/UHF/cable)
The aerial socket, located at the back of the TV/DVD set, enables the connection of an external aerial or one
from another item of equipment fitted with a modulator (video recorder, satellite receiver, etc.).
(NB: A modulator converts basic video and sound signals to radio frequencies, ‘R.F.’.)
MAINS PLUG:
The mains plug carries the power supply to your TV/DVD set. It should only be connected to an AC supply at
220-240V ~ 50Hz.
It must not be connected to a DC supply. If the plug is detached from the cable, do not under any
circumstances connect it to a mains socket as there is a danger of electrocution.
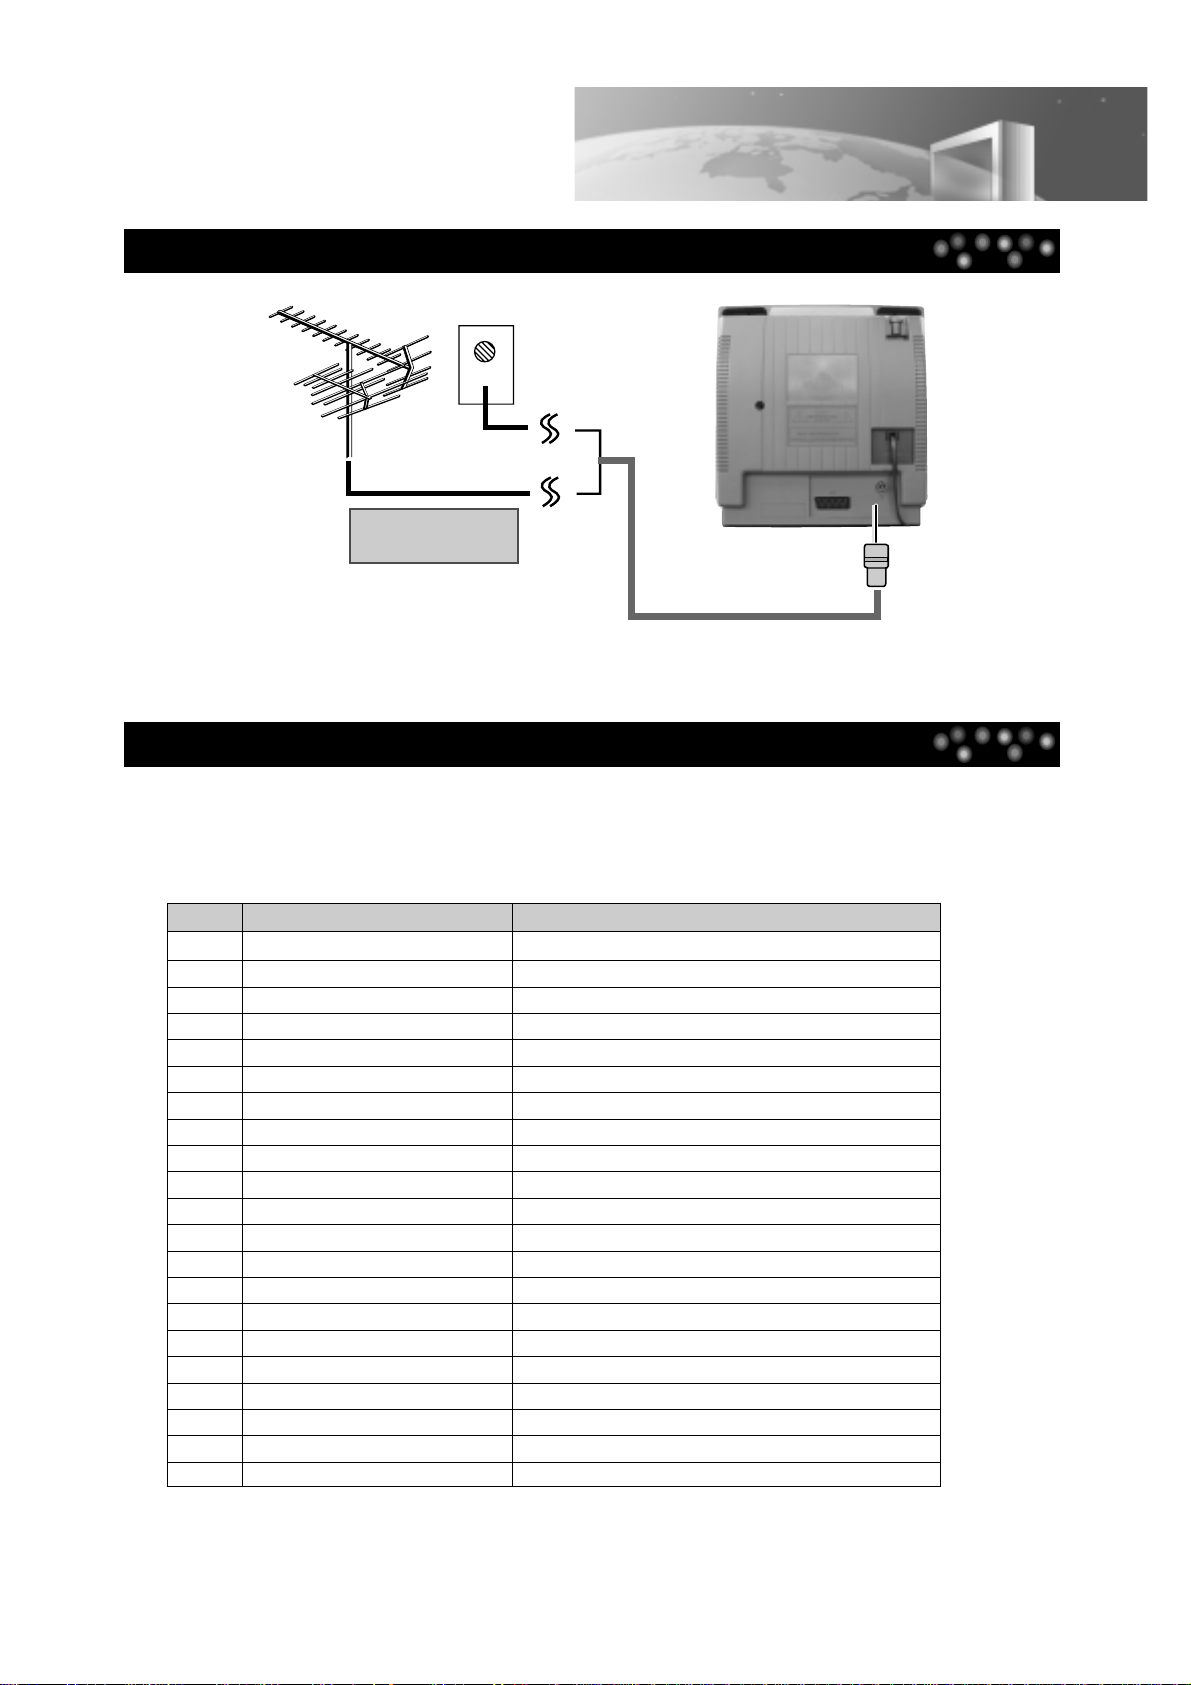
Connecting the Antenna Cable
Connecting a SCART SOCKET
10
Basic Installation
Outdoor antenna or
wall antenna outlet
This connection is used to connect this player to an external device (VCR, CAMCORDER, DVD) and to
be displayed in TV/DVD. If the peripheral is powered on in TV mode, some peripherals are converted into
AV mode automatically and displayed. Otherwise, you should press the TV/AV/DVD button to convert into
AV mode. Pin specification of SCART SOCKET is as follows.
PIN Signal Designation Matching Values
1 Audio Out (linked with 3) 0.5Vrms, Imp < 1kΩ(RF 60% MOD)
2 Audio In (linked with 6) 0.5Vrms, Imp > 10kΩ
3 Audio Out (linked with 1) 0.5Vrms, Imp < 1kΩ(RF 60% MOD)
4 Audio Earth
5 Blue Earth
6 Audio In (linked with 2) 0.5Vrms, Imp > 10kΩ
7 Blue In 0.7Vp-p±10%, Imp 75Ω
8 Slow (Function) Switching TV:0~2V, 16:9: 4~8V, Peri:9.5~12V, Imp>10kΩ
9 Green Earth
10 NC
11 Green In 0.7Vp-p±10%, Imp 75Ω
12 NC
13 Red Earth 0.7Vp-p±10%, Imp 75
14 NC
15 Red In 0.7Vp-p±10%, Imp 75
16 Rapid Blanking, Switching Logic 0: 0~0.4V, Logic 1: 1~3V, Imp 75Ω
17 Video Earth
18 Rapid Blanking Earth
19 Video Out 1.0 Vp-p±10%, Imp 75Ω
20 Video In 1.0 Vp-p±10%, Imp 75Ω
21 Common Earth
If TV picture is not clear, it usually result from the wrong antenna connection.
Please install the antenna in the proper place and in the right direction.
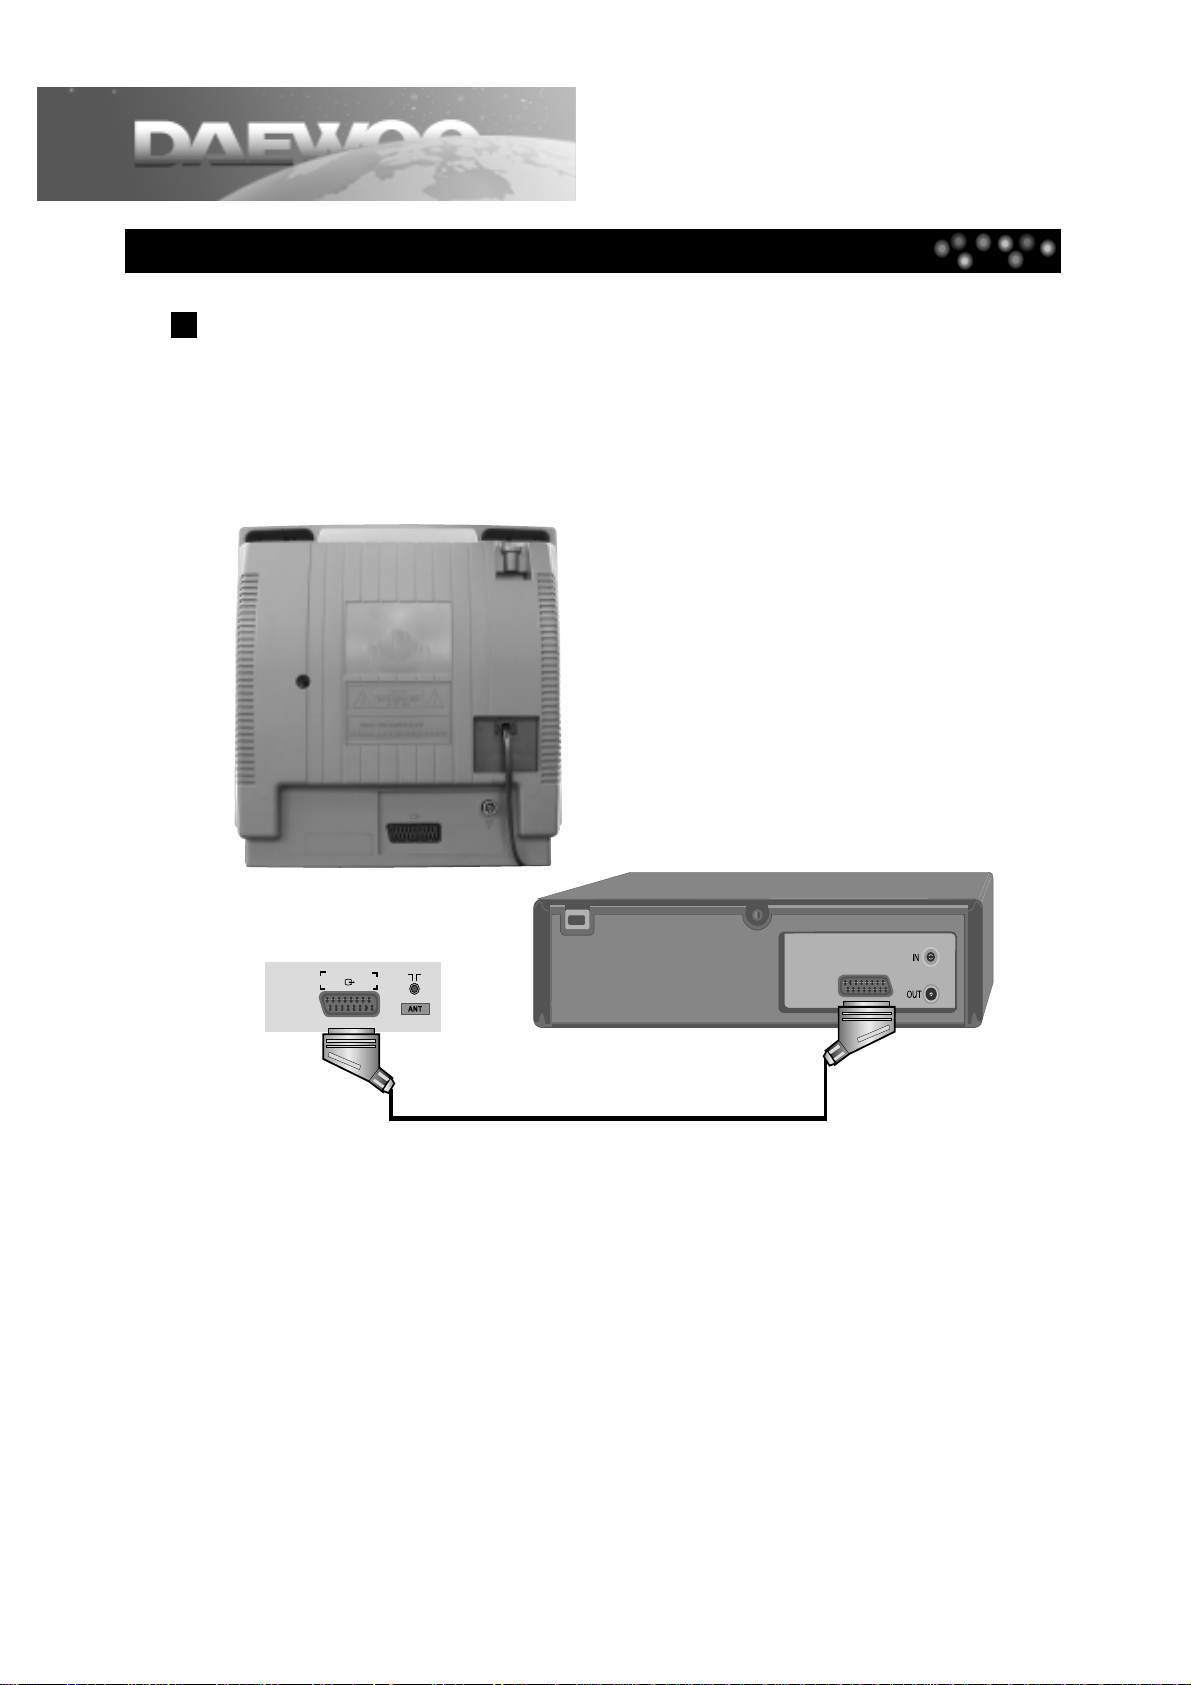
Connecting to a Camcorder or Other Video Player
11
Connecting to Various Equipment
Connection with SCART Jack (AV)
Connect the SCART jack of your video player (or camcorder) to SCART terminal of TV/DVD with SCART
jack.

12
Connecting to Various Equipment
N O T E
• Refer to the owner’s manual of your audio system to connect.
• Before you connect the TV/DVD to other equipment, be sure to turn off the power and unplug all of the
equipment from the wall outlet before making any connections.
• The output sound of TV/DVD has a wide dynamic range. Be sure to adjust the receiver’s volume to a moderate
listening level. Otherwise, the speakers may be damaged by a sudden high volume sound.
• Turn off the audio system before you connect or disconnect the TV/DVD’s power cord. If you leave the audio
system power on, the speakers may be damaged.
13
W atching TV
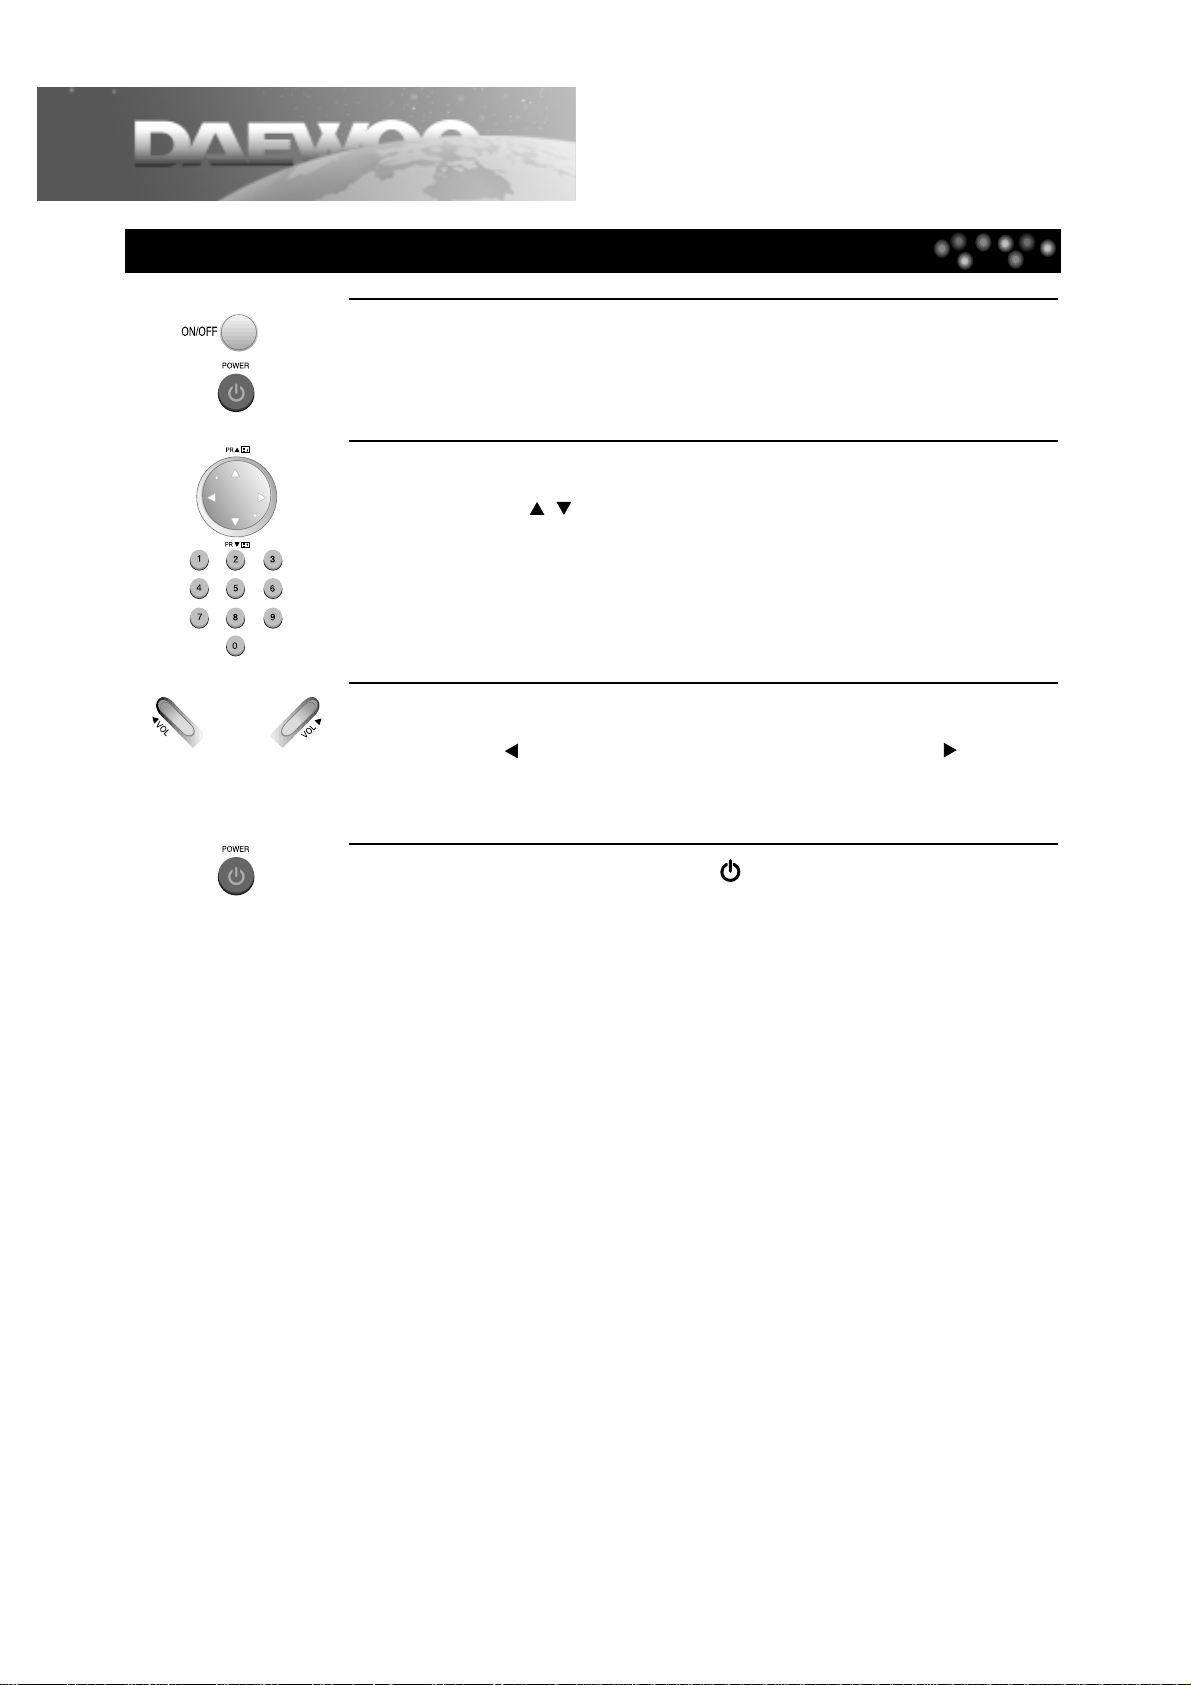
1
2
3
4
To turn on the TV, press the [ON/OFF] button in the front
part of the set. Now TV set is in STANDBY status.
Then, press the power button on the remote control.
Selecting the Channel.
Press the PR [ , ] button or [Number] button to select the desired
channel. If input status is set to AV or DVD, press the [TV/AV/DVD] button
to select TV.
Adjusting the Volume.
Press the [ VOL] button to decrease the volume level or [VOL ] button to
increase the volume level.
To turn off the TV, press the [ ] button on the remote
control.
Pressing the ON/OFF button of the set will clear the clock memory. If you
press the power button on the remote control instead of pressing the
ON/OFF button in the front part of the set, The set will be stand-by state.
And stand-by LED becomes RED.
 Loading...