


Installation and Operating Instructions
Under Sink Water Filter
Model US-550
NOTE: This filter housing does not include a filter cartridge. |
NOTE: |
Choose the appropriate filter cartridge for your needs and install in housing according to the Cartridge Replacement instructions (page 3) before proceeding with installation. See Cartridge Selection Guide (below) to determine the best cartridge for your filtration needs.
Operating Specifications
Pressure Range: |
30–125 psi (2.1–8.6 bar) |
Temperature Range: |
40–100°F (4.4–37.7°C) |
Parts Included
•filter housing
•mounting bracket kit
Tools Required & Materials Required (not included)
•screwdriver
•file
•pencil
•pipe cutter or hacksaw
•2 adjustable wrenches
•3/8-inch compression fittings for standard 3/8-inch under-sink installation
•3/8-inch plastic tubing
•Teflon® tape
Optional Materials
•For cold water use only.
•Make certain that installation complies with all state and local laws and regulations.
•The contaminants or other substances removed or reduced by the selected cartridge are not necessarily in your water. Ask your local water municipality for a copy of their water analysis, or have your private well tested by a reputable water testing lab.
•After prolonged periods of non-use (such as during a vacation) it is recommended that the system be flushed thoroughly. Let water run for 5–6 minutes before using.
•The filter cartridge used with this system has a limited service life. Changes in taste, odor, color, and/or flow of the water being filtered indicate that the cartridge should be replaced.
•Some harmless bacteria may attack cellulose media cartridges (such as the D- 10). If your cartridge seems to disintegrate or develops a musty or moldy odor, switch to a synthetic media cartridge or call Technical Support.
The US-550 is Tested and Certified by NSF International to NSF/ANSI Standards 42/53 with cartridges D-10, D-20, D-30 and D-40.
See Performance Data Sheet in Manual for specific claims.
•SW-1 housing wrench
•FT-10 faucet kit (recommended for use with D-40 filter cartridge)
Cartridge Selection Guide
Precautions
 WARNING: Do not use with water that is microbiologically unsafe or of unknown quality without adequate disinfection before or after the system. Systems certified for cyst reduction may be used on disinfected waters that may contain filterable cysts.
CAUTION: Filter must be protected against freezing, which can cause cracking of the filter and water leakage.
CAUTION: The rubber o-ring provides the water-tight seal between the cap and the bottom of the housing. It is important that the o-ring be properly seated in the groove below the threads of the housing or a water leak could occur.
CAUTION: Because of the product’s limited service life and to prevent costly repairs or possible water damage, we strongly recommend that the bottom of all plastic housings be replaced every ten years. If the bottom of your housing has been in use for longer than this period, it should be replaced immediately. Date the bottom of any new or replacement housing to indicate the next recommended replacement date.
Select the right cartridge |
D-10 |
D-20 |
D-30 |
D-40† |
for your water needs. |
155528 |
155532 |
155465 |
155466 |
|
|
|
|
|
Sediment |
• |
|
• |
• |
Bad taste & odor |
• |
• |
• |
• |
Chlorine: taste & odor |
• |
• |
• |
• |
Giardia/Cryptosporidium |
|
|
• |
• |
Asbestos |
|
|
• |
• |
Lead/Mercury |
|
|
|
• |
Lindane/Atrazine |
|
|
|
• |
filter life in gallons (months)* |
250 (3) |
1000 (12) |
1000 (12) |
600 (6) |
service flow rate gpm (Lpm)** |
1.0 (3.8) |
1.0 (3.8) |
0.9 (3.4) |
0.6 (2.3) |
|
|
|
|
|
* Filter cartridge life varies depending on filter type, usage and water conditions. **Flow rates measured at 60 psi (4.1 bar).
† Contains built in flow control at 0.6 gpm (2.3 Lpm). For use with separate faucet (FT-10) in under-sink installations.
NOTE: Substances reduced are not necessarily in your water. Filter must be maintained according to manufacturer’s instructions, including replacement of filter cartridges.
Technical Support: 1-800-645-5426
(M-F 7:30 am - 5:00 pm CST)
1 |
11/03 145765 Rev C |

Installation
NOTE:
•For standard under-sink installation on 3/8-inch (10 mm) cold water line (copper or PVC pipe).
•Please read all instructions, specifications, and precautions before installing and using your water filter.
•Install filter cartridge in housing before proceeding with installation (see Filter Cartridge Replacement on page 3).
•Numbered diagrams correspond with numbered steps.
1. Prepare Area and Adapters
(A)Turn off cold water supply and open nearest faucet to release pressure in pipes before starting installation. Place a tray or towel under the cold water line to catch excess water.
(B)Apply about 3–4 inches (76–102 mm) of Teflon® tape in clockwise direction to pipe threads of each adapter.
2. Attach Mounting Bracket
Using the self-tapping screws, attach mounting bracket to cap, then mark location under sink where filter is to be mounted.
NOTE: Allow 1-1/2 inches (33 mm) under filter to enable filter cartridge changes.
3. Attach Pipe Adapters to Filter Cap
Start connector into inlet on filter cap by hand. Using an adjustable wrench, tighten connector firmly. DO NOT OVERTIGHTEN. About one thread should remain visible. Repeat for outlet on filter cap.
Mount filter in marked location with mounting bracket.
4. Attach to Cold Water Line
(A)Using a pipe cutter or hacksaw, remove a 3-inch (76 mm) section of pipe from the cold water line. Deburr ends of remaining pipe with a file.
(B)Disassemble nuts and ferrules from compression elbows. Install a compression elbow onto each end of remaining cold water line as shown. Using two wrenches, tighten compression nuts firmly.
NOTE: Use metal ferrules with copper pipe and plastic ferrules with plastic pipe.
5. Installing the Tubing
Determine the lengths of tubing needed to connect the inlet and outlet sides of filter to the compression elbows on the cold water line. Measure tubing short enough to prevent kinking. Assemble as shown. Using two wrenches, tighten compression nuts 1–2 turns.
6. Completing the Installation
Turn on the water supply to allow filter to slowly fill with water and then press the red pressure-relief button on top of the housing to release trapped air. Check for leaks and tighten as needed.
NOTE: A drinking water cartridge may contain carbon fines (very fine black powder). After installation, flush the cartridge for 5 minutes before using the water.
It is recommended that you run the tap at least 20 seconds prior to using the water for drinking or cooking purposes.
1 |
B |
2 |
OUT
cold water line
A |
nut |
|
ferrule
B
elbow
2
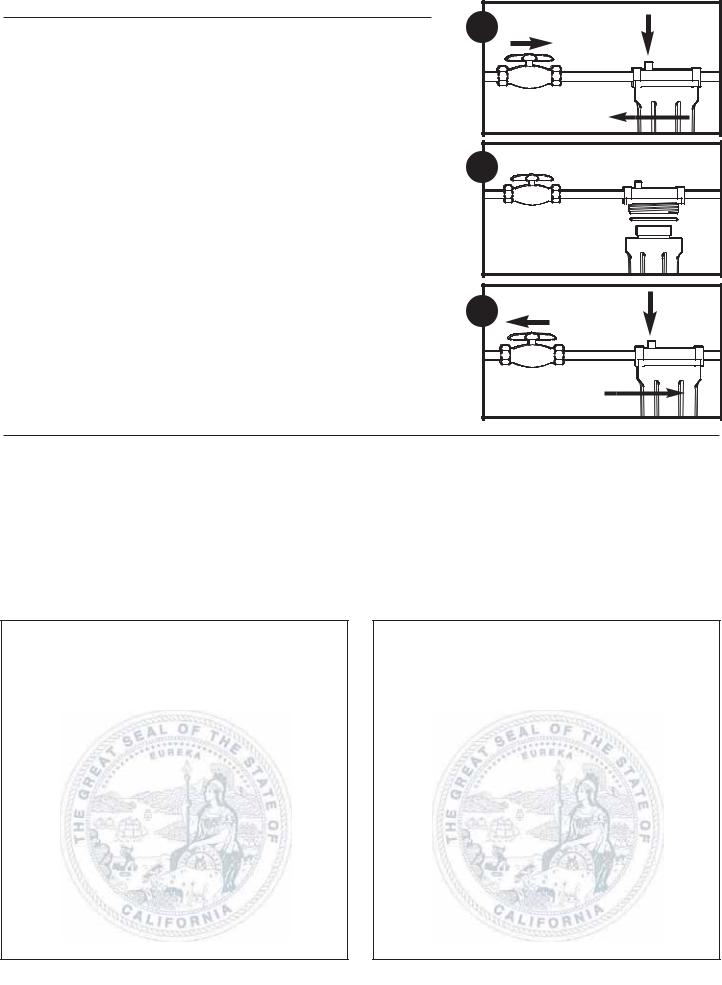
Filter Cartridge Replacement
(A)1. Turn off water supply to filter.
2.Depress red pressure-relief button on top of filter.
3.Unscrew and remove bottom of housing.
(B)Locate and remove large o-ring, wipe clean of lubricant and set aside. Discard used cartridge. Rinse out bottom of housing and fill 1/3 full with water. Add about 2 tablespoons of bleach and scrub cap and bottom of housing with non-abrasive sponge or cloth. Rinse thoroughly.
Lubricate o-ring with clean silicone grease. Insert o-ring back into groove and smooth into place with finger.
NOTE: This step is important to ensure a proper housing seal. Make certain o-ring is seated level in the groove.
Insert new cartridge over standpipe in bottom of housing. Cartridges with one gasket should be inserted with the gasketed end towards the threads of the housing. (gasketed end would point upwards if housing is mounted as shown in illustrations).
(C)4. Screw bottom of housing onto the cap and hand-tighten. DO NOT OVER-TIGHTEN.
5.Turn on water supply slowly to allow filter to fill with water.
6.Depress red pressure-relief button to release trapped air.
Check for leaks before leaving installation.
NOTE: A drinking water cartridge may contain carbon fines (very fine black powder). After installation, flush the cartridge for 5 minutes to remove the fines before using the water. You should run the tap at least 20 seconds prior to using the water for drinking or cooking purposes.
Troubleshooting
A 1 |
2 |
|
3 |
B |
|
5 |
6 |
4 |
Leaks:
...between cap and bottom of housing:
1.Turn off water supply and press pressure-relief button. Remove bottom of housing.
2.Clean o-ring and o-ring groove (located directly beneath threads of housing). Lubricate o-ring with clean silicone grease and replace securely into groove. Screw bottom of housing back on cap and hand-tighten. DO NOT OVER-TIGHTEN.
...on inlet/outlet connections:
1.Turn off water supply. For brass fittings, tighten nut snugly 1/2-turn with wrench.
2.Turn on water supply. If leaks persist, or if there are other leaks on system, turn off water supply. Call Technical Support at 1-800-645-5426.
State of California |
State of California |
Department of Health Services |
Department of Health Services |
Water Treatment Device |
|
Water Treatment Device |
||||
Certificate Number |
|
Certificate Number |
||||
03 - 1544 |
|
|
|
- 1546 |
||
03 |
||||||
Date Issued: |
January 21, 2003 |
|
Date Issued: |
January 21, 2003 |
||
|
|
|
|
|
|
|
|
|
|
|
|
|
|
Trademark/Model Designation |
Replacement Elements |
|
Trademark/Model Designation |
Replacement Elements |
||
US-600 |
D-30 |
|
US-600 |
D-40 |
||
US-550 |
D-30 |
|
US-550 |
D-40 |
||
Manufacturer: Culligan |
|
|
Manufacturer: Culligan |
|
||
|
|
|
|
|
||
The water treatment device(s) listed on this certificate have met the testing requirements pursuant to Section |
|
The water treatment device(s) listed on this certificate have met the testing requirements pursuant to Section |
||||
116830 of the Health and Safety Code for the following health related contaminants: |
|
116830 of the Health and Safety Code for the following health related contaminants: |
||||
Microbiological Contaminants and Turbidity |
Inorganic/Radiological Contaminants |
|
Microbiological Contaminants and Turbidity |
Inorganic/Radiological Contaminants |
||
Cysts |
Asbestos |
|
Cysts |
Asbestos |
||
Turbidity |
|
|
Turbidity |
Lead |
||
Organic Contaminants |
|
|
|
|
|
Mercury |
|
|
Organic Contaminants |
|
|||
None |
|
|
|
|||
|
|
|
Atrazine |
|
||
|
|
|
Lindane |
|
||
|
|
|
|
|
|
|
Rated Service Capacity: 1000 gal. |
Rated Service Flow: 0.9 gpm |
|
Rated Service Capacity: 600 gal. |
Rated Service Flow: 0.6 gpm |
||
Conditions of Certification: |
|
Conditions of Certification: |
||||
Do not use where water is microbiologically unsafe or with water of unknown quality, except that systems certified for |
|
Do not use where water is microbiologically unsafe or with water of unknown quality, except that systems certified for |
||||
cyst reduction may be used on disinfected waters that may contain filterable cysts. |
|
cyst reduction may be used on disinfected waters that may contain filterable cysts. |
||||
3
 Loading...