


Use & Care Guide
Guide d’utilisation et d’entretien
Electronic Dryer
Sécheuse électronique
If you have any problems or questions, visit us at www.crosley.com
Pour tout problème ou question, consulter www.crosley.com
W11032122A W11032124A - SP

Table of Contents |
|
|
DRYER SAFETY........................................................................ |
|
2 |
ACCESSORIES......................................................................... |
|
4 |
CHECK YOUR VENT SYSTEM FOR GOOD AIRFLOW |
............5 |
|
CONTROL PANEL AND FEATURES......................................... |
|
6 |
CYCLE GUIDE.......................................................................... |
|
7 |
USING YOUR DRYER............................................................... |
|
8 |
CYCLE STATUS INDICATORS................................................ |
|
10 |
ADDITIONAL FEATURES ....................................................... |
|
10 |
DRYER CARE.......................................................................... |
|
11 |
TROUBLESHOOTING............................................................. |
|
13 |
WARRANTY............................................................................ |
|
16 |
ASSISTANCE OR SERVICE..................................... |
Back Cover |
|
Dryer Safety
Table de matières |
|
|
SÉCURITÉ DE LA SÉCHEUSE................................................ |
|
17 |
ACCESSOIRES....................................................................... |
|
19 |
VÉRIFICATION D’UNE CIRCULATION D’AIR ADÉQUATE |
|
|
POUR LE SYSTÈME D’ÉVACUATION..................................... |
|
20 |
TABLEAU DE COMMANDE ET CARACTÉRISTIQUES........... |
21 |
|
GUIDE DES PROGRAMMES.................................................. |
|
23 |
UTILISATION DE LA SÉCHEUSE............................................ |
|
25 |
TÉMOINS LUMINEUX DE PROGRAMME............................... |
|
27 |
CARACTÉRISTIQUES SUPPLÉMENTAIRES.......................... |
|
28 |
ENTRETIEN DE LA SÉCHEUSE.............................................. |
|
29 |
DÉPANNAGE........................................................................... |
|
31 |
GARANTIE............................................................................... |
|
35 |
ASSISTANCE OU SERVICE........................... |
Couverture arrière |
|
2

 WARNING:
FIRE OR EXPLOSION HAZARD
Failure to follow safety warnings exactly could result in serious injury, death or property damage.
–Do not store or use gasoline or other flammable vapors and liquids in the vicinity of this or any other appliance.
–WHAT TO DO IF YOU SMELL GAS:
•Do not try to light any appliance.
•Do not touch any electrical switch; do not use any phone in your building.
•Clear the room, building, or area of all occupants.
•Immediatelyinstructions.call your gas supplier from a neighbor's phone. Follow the gas supplier's
•If you cannot reach your gas supplier, call the fire department.
–Installation and service must be performed by a qualified installer, service agency, or the gas supplier.
IMPORTANT: The gas installation must conform with local codes, or in the absence of local codes, with the National Fuel Gas Code, ANSI Z223.1/NFPA 54, or the Natural Gas and Propane Installation Code, CSA B149.1.
The dryer must be electrically grounded in accordance with local codes, or in the absence of local codes, with the National Electrical Code, ANSI/NFPA 70, or the Canadian Electrical Code, Part 1, CSA C22.1.
IMPORTANT: When discarding or storing your old clothes dryer, remove the door.
3

Accessories
INSTALLATION & MAINTENANCE
ACCESSORIES
FACTORY CERTIFIED PARTS – these three words represent quality parts and accessories designed specifically for your appliance.
Time tested engineering that meets our strict quality specifications.
FACTORY CERTIFIED PARTS
Accessories designed for your appliance:
Enhance your dryer with these premium accessories.
For more high-quality items or to order, call 1-800-901-2042, or visit us at www.applianceaccessories.com. In Canada, call 1-800-807-6777 or visit us at www.whirlpoolparts.ca.
15" Pedestal
Color-matched pedestals raise the washer and dryer to a more comfortable working height. The large drawer provides convenient storage.
Stack Kit
If space is at a premium, the stack kit allows the dryer to be installed on top of the washer.
Drying Rack
The Drying Rack provides a stationary drying surface for items such as sweaters and tennis shoes. See the “Additional Features” section for more information.
4
Check Your Vent System for Good Airflow
Good airflow
Along with heat, dryers require good airflow to efficiently dry laundry. Proper venting will reduce your drying times and improve your energy savings. See Installation Instructions.
The venting system attached to the dryer plays a big role in good airflow.
Service calls caused by improper venting are not covered by the warranty and will be paid for by the customer, regardless of who installed the dryer.
Maintain good airflow by:
nCleaning your lint screen before each load.
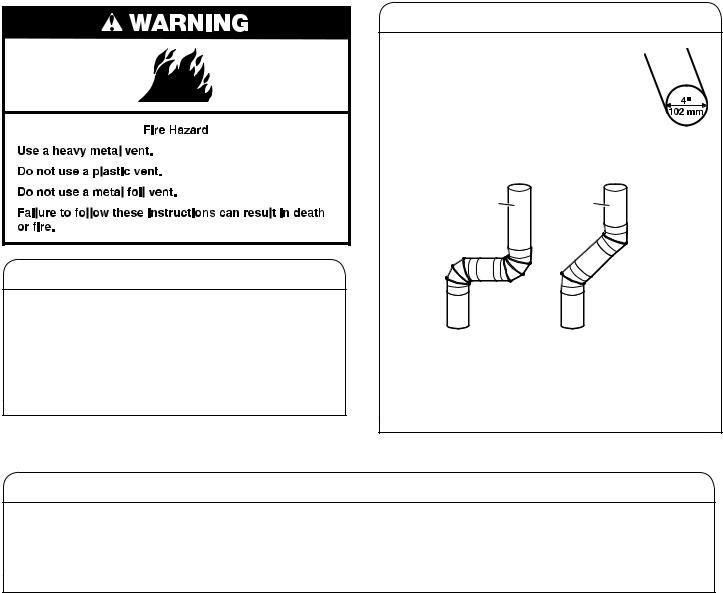
nReplace plastic or foil vent material with 4" (102 mm) diameter heavy, rigid vent material.
nUse the shortest length of vent possible.
nUse no more than four 90° elbows in a vent system; each bend and curve reduces airflow.
Good |
Better |
nRemove lint and debris from the exhaust hood.
nRemove lint from the entire length of the vent system at least every 2 years. When cleaning is complete, be sure to follow the Installation Instructions supplied with your dryer for final product check.
nClear away items from the front of the dryer.
Use Automatic Cycles for better fabric care and energy savings
Use the Automatic Cycles to provide the most energy savings and enhanced fabric care from the dryer. During Automatic Cycles, drying air temperature and moisture level are sensed in the load. This sensing occurs throughout the drying cycle and the dryer shuts off when the load reaches the selected dryness. Use the NORMAL dryness level to provide optimal energy savings.
With Timed Dry, the dryer runs the amount of time set and sometimes results in shrinkage, wrinkling, and static due to over-drying. Use Timed Dry for the occasional damp load that needs a little more drying time or when using the drying rack.
5

Control Panel and Features
Not all features and cycles are available on all models.
NOTE: The control panel features a sensitive surface that responds to a light touch of your finger. To ensure your selections are registered, touch the control panel with your finger tip, not your fingernail. When selecting a setting or option, simply touch its name.
1 |
|
2 |
3 |
4 |
|||
|
|
|
|
|
|
|
|
|
|
|
|
|
|
|
|
|
|
|
|
|
|
|
|
|
|
|
|
|
|
|
|
|
|
|
|
|
|
|
|
|
|
|
|
|
|
|
|
|
|
|
|
|
|
|
|
|
|
|
|
|
|
|
|
1POWER
Touch to turn the dryer on and off. Touch to stop/cancel a cycle at any time.
2CYCLE CONTROL KNOB
Turn the knob to select a cycle for your laundry load. Automatic Cycles are Heavy Duty, Normal, Bulky, and Delicates. Manual Cycles are Quick Dry and Timed Dry. See “Cycle Guide” for detailed descriptions of cycles.
3START/PAUSE
Touch and hold until the LED comes on to start a cycle, or touch once while a cycle is in process to pause it.
4LED DISPLAY AND SETTINGS
When you select a cycle, its settings will light up and the estimated time remaining (for Automatic Cycles) or actual time remaining (for Manual Cycles) will be displayed. On 2-digit displays, for times longer than 99 minutes, hours will be displayed followed by minutes.
See “Cycle Guide” for available settings on each cycle. Not all settings are available with all cycles.
Cycle Status Lights
The indicators at the top of the display will let you know what stage of the drying cycle is in process.
For more information on each stage, see “Cycle Status Indicators.”
–/+ (Adjust Drying Time)
Touch “+” or “–” with Manual Cycles to increase or decrease the length of a Timed Dry or Quick Dry cycle.
Temp
When using Manual Cycles, you may select a dry temperature based on the type of load you are drying. Use the warmest setting safe for the garments in the load. Follow garment label instructions.
NOTE: Automatic Cycles use a preset temperature that is not adjustable.
Dryness Level
When using Automatic Cycles, you may select a Dryness Level based on the type of load you are drying.
NOTE: Dryness Level is for use with Automatic Cycles only.
A B C
5
Wrinkle Prevent Option
If you will be unable to remove a load immediately, touch Wrinkle Prevent to add up to 140 minutes of periodic tumbling to help reduce wrinkling.
5OPTIONS
Use to select available options for your dryer.
AEco Dry Option
Touch to activate the Eco Dry option, which allows you to increase your energy savings by using a slightly lower heat level. The Eco Dry option will increase drying times by approximately 40 minutes; the LED Display will reflect this time.
The Eco Dry option is only available for Normal. For optimal energy turn on the Eco Dry option. For optimal time turn off the Eco Dry option.
NOTE: Energy savings may vary across loads.
BCycle Signal
Use this to turn the signal indicating the end of a drying cycle on or off.
NOTE: You may also turn off the tones that sound when a feature, setting, or option is touched. Touch and hold Cycle Signal for about one second to turn sounds on or off.
Control Lock
CUse to lock the controls of the dryer and avoid
an accidental change in cycle options or preferences during a drying cycle.
Touch and hold CONTROL LOCK for 3 seconds to lock or unlock the controls of the dryer. During this time, the LED Display will count down 3-2-1. Once the controls are locked, the LED Display will display “Lc” or “Loc.”
NOTE: The Control Lock function may be enabled when recovering from a power failure. To unlock the control, touch and hold CONTROL LOCK for at least 3 seconds.
6
 Loading...