


Crosley CDBEH600SW2A, CDBEH600SW0A, CDBEH600SS2A, CDBEH600SB0A, CDBEH600SS0A Owner’s Manual
...Crosley®
All about the
Use&Care
of your Dishwasher
TABLE OF CONTENTS
Important Safety Instructions...................... |
2 |
Dishwasher Dispenser and Detergents |
.......10 |
Product Registration ................................... |
3 |
Factors Affecting Performance................... |
11 |
Features at a Glance................................... |
4 |
Care and Cleaning............................... |
12 -13 |
Operating Instructions ............................. |
5-6 |
Before you Call.................................... |
13 -15 |
Preparing and Loading Dishes .................. |
7-9 |
Major Appliance Warranty ......................... |
16 |
www.crosley.com USA and Canada 1-336-761-1212
2016) (July A05763001Rev001 Artwork A05763001RevA P/N

IMPORTANT SAFETY INSTRUCTIONS
 WARNING
Please read all instructions before using this dishwasher.
For your Safety
•Use your dishwasher only as instructed in this Use and Care Manual.
•This Manual does not cover every possible condition and situation that may occur. Use common sense and caution when installing, operating and maintaining any appliance.
•NSF certifi ed residential dishwashers are not intended for licensed food establishments.
•DISHWASHER MUST BE ELECTRICALLY GROUNDED. Read the Installation Instructions for details.
•This dishwasher is designed to operate on regular house current (120V, 60Hz). Use a circuit equipped with a 15 ampere fuse or circuit breaker. Use a 20 ampere fuse if dishwasher is connected with a food disposer.
•Do not operate dishwasher unless all enclosure panels are in their proper place.
•To avoid entrapment and/or suffocation, remove door or door latch mechanism from any dishwasher that is discarded or not in use.
•Keep young children and infants away from dishwasher when it is operating.
•Do not let children abuse, sit, stand or play on door or racks of a dishwasher.
•Use only detergents and rinse agents recommended for use in a dishwasher.
•Store dishwasher detergent and rinse agents out of the reach of children.
•Do not wash plastic items unless marked: “Dishwasher Safe” or equivalent. Check with manufacturer for recommendations, if not marked. Items that are not marked dishwasher safe may melt and create a potential fi re hazard.
•Disconnect electrical power to dishwasher before servicing.
•If the dishwasher drains into a food disposer, make sure disposer is completely empty before running dishwasher.
•Repairs should be done by a qualifi ed technician.
•Do not tamper with controls.
•Do not touch the heating element during or immediately after wash has completed.
•Use care unloading the dishwasher when the SANITIZE option has been selected. Contents may be hot to the touch immediately after the end of cycle.
•Water vapor from the vent may be hot to the touch when the SANITIZE option has been selected. Use care and do not let small children play around or touch the vent area of the dishwasher.
•When loading items to be washed:
•Locate sharp items and knives so that they are not likely to damage the door seal or tub.
•Load sharp items and knives with the handles up to reduce the risk of cut-type injuries.
•Under certain conditions, hydrogen gas may be produced in a hot water, system that has not been used for 2 weeks or more. HYDROGEN GAS IS EXPLOSIVE. If hot water system has not been used for such a period, before using dishwasher, turn on for several minutes This will release any accumulated hydrogen gas. HYDROGEN GAS IS FLAMMABLE. Do not smoke or use an open fl ame during this time.
•Do not store or use combustible materials, gasoline or other fl ammable vapors and liquids in the vicinity of this or any other appliance.
 WARNING
To reduce the risk of fi re, electrical shock or injury when using your dishwasher, follow the above basic precautions ..
 WARNING
This symbols will help alert you to such dangers as personal injury, burns, fi re and electrical shock..
2

PRODUCT REGISTRATION
Thank you for choosing Frigidaire
This Use & Care Guide is part of our commitment to customer satisfaction and product quality throughout the service life of your new appliance.
We view your purchase as the beginning of a relationship. To ensure our ability to continue serving you, please use this page to record important product information.
_________________________________
Purchase Date
_________________________________
Model Number
_________________________________
Serial Number
Registering your product with Frigidaire enhances our ability to serve you. You can register online at www.frigidaire.com or by dropping your Product Registration Card in the mail.
ëNOTE
Very Important Information
- Read Before Operating Your
Dishwasher!
Normal Operating Sounds
This dishwasher does not sound like most dishwashers - IT’S QUIETER.
Your Precision Direct Wash System dishwasher uses energy effi cient motors for the wash and drain portions of the cycle you select. Each cycle has a series of water fi lls and drains for washing and rinsing dishes. As each cycle begins, you may - or may not - hear the drain motor.
The next sound you will hear is the splashing water as it enters the tub. Then the lower arm rotates and circulates water. This is followed by a pause and a slightly different sound as the
upper arms spray water. If you listen closely, you will hear the change in sound as the wash action switches from one arm to the other.
PLEASE BE ADVISED: If you compare this dishwasher to previous models, you may be surprised at what you DON’T hear.
3

FEATURES AT A GLANCE
Your dishwasher cleans by spraying a mixture of hot water and detergent through the spray arms against soiled surfaces. First, the dishwasher fi lls with water covering the fi lter area. Water is then pumped through the spray arms. Soil particles go through and across the fi lter and down the drain as the water is pumped out. This series of steps are repeated as needed. The number of water fi lls vary with the cycle being used. Features may vary according to model
Nozzle or Spray Arm
Cup Shelves
Middle Spray Arm
Lower Spray Arm
Overfi ll Protector
Top Rack |
Serial Label |
(Located on Right) |
Lower Rack |
Silverware Basket |
Glass Trap
Rinse Aid
Heating Element
Detergent Dispenser 
Vent
Getting Started
1.Load Dishwasher (See Preparing and Loading Dishes).
2.Add detergent (See Dishwasher Dispenser & Detergents).
3.Add Rinse Aid, if needed (See Rinse Aid).
4.Close door to latch.
5.Select desired CYCLE (See Cycle
Chart). The indicator light above the pad |
will glow when selected. |
6.Select desired OPTION (See Energy Options). The indicator light above the pad will glow when selected.
7.Run hot water faucet nearest
dishwasher until water is hot. Turn water off. 8. To start, press START/CANCEL pad.
ëNOTE
Not all cycles and options available on all models.
ëNOTE
The dishwasher is programmed to remember your last cycle so you do not have to reset each time. To start the dishwasher using the same cycle and options selected on the previous wash, just press the START/CANCEL pad.
Wash Cycle Selections
Cycle times are approximate and will vary with options selected. Hot water is necessary to activate dishwasher detergent and melt fatty food soils. An automatic sensor will check the incoming water temperature and, if it is not hot enough, the cycle will be lengthened for automatic water heating in the main wash and fi nal rinse of all cycles. This happens even when HI-TEMP WASH option has not be selected. When HI-TEMP WASH is selected, an even higher temperature will be reached to handle heavier soil loads.
4

OPERATING INSTRUCTIONS
Option Selections (*available on select Models)
*Sanitize Option
To sanitize your dishes and glassware, select SANITIZE option. When selected, the light above the pad will come on and remain on until end of cycle. The water temperature in the
fi nal rinse will be raised to 155oF (68oC) and will maintain that temperature for 9 minutes. This option is available in Heavy and Normal Cycles. Only these sanitization cycles have been designed to meet NSF requirements.
The cycle time will be extended until the proper water temperature is reached. Washing action will continue during the water heating delay. For best results, the incoming water temperature should be at least 120oF (49oC).
The sanitize criteria may not be satisfi ed if there is an interruption of the cycle, power failure or if the incoming water temperature is below 120oF (49oC).
To turn off the SANITIZE option, press the pad a second time. The light above the pad will turn off.
*Hi-Temp Wash Option
When HI-TEMP WASH option is selected, the dishwasher heats water in the main wash to approximately 140oF (60oC).
This increase in water temperature helps the dishwasher detergent remove food grease and soil from dishes more effectively and aids in improved drying performance. HI-TEMP WASH option can be used with all cycles except RINSE ONLY. HI-TEMP WASH is automatically provided when the HEAVY WASH cycle is selected.
When HI-TEMP WASH option is selected, the light above the pad will come on and remain on until end of cycle. To turn off the HI-TEMP WASH option, press the pad a second time.
The light above the pad will turn off.
Heat Dry
The HEAT DRY option in combination with rinse aid will enhance drying performance. The energy required to use the HEAT DRY option costs pennies per cycle; however you will have items in your dish load that will not be completely dry at the end of the cycle.
To Cancel a Cycle
You can cancel a cycle anytime during the cycle. Press and hold the START/CANCEL pad for 3 seconds. The light above the cycle and option selected will go out, the START/CANCEL light will remain illuminated, the dishwasher will start a 90 second drain. At the end of the drain, select the next desired cycle.
*Delay Start
The DELAY START option allows you to automatically delay starting your dishwasher for either 2-4-6 hours.
To activate delay start option for 2-4-6 hour delay, press the pad once for a 2 hour delay, twice for 4 hours and three times for 6 hours. A light will come on indicating the delay start hours and will remain on until cycle starts.
Press the START/CANCEL pad to start the delay option. If the delay option is interrupted, the START/CANCEL pad will have to be pressed again to return to delay option.
To cancel the DELAY START option and begin the cycle before the delay period is over, press and hold the START/CANCEL pad for 3 seconds.
Child Lock Controls
To prevent children from accidently changing the dishwasher cycle or starting the dishwasher, lock the dishwasher controls by pressing and releasing the DRY OPTION pad for 3 seconds while the door is latched. An indicator light on the lock graphic pad will illuminate when the controls are locked and no new selections can be made until the lock is released. To unlock the controls, press the same pad, DRY OPTION, again for 3 seconds until the indicator light goes out.
*Status Indicator Lights
The WASHING light comes on at the beginning of the cycle and remains on until the end of the main wash.
Whether heated or unheated dry is selected the DRYING light will come on during the drying portion of the cycle.
When the SANITIZE option is selected, the SANITIZED light will glow when the SANITIZE cycle is fi nished. If the dishwasher did not properly sanitize the dishes, the light will not come on. This can happen if the cycle is interrupted. The light will remain on until the door is opened.
The CLEAN light will come on at the end of cycle and remain on until the door is opened.
ëNOTE
If the dishwasher door is opened while the unit is running, the START/CANCEL pad must be pressed and the door shut immediately to return the unit to the selected cycle and option, this must happen within 10 minutes for the unit to continue the cycle.
5

OPERATING INSTRUCTIONS
Model CDBEH600
Cycle and Option Chart
Cycle and intended use |
Available Options |
Water per |
|
Duration* |
||||||
|
Temperature; |
Cycle |
|
(approx.) |
||||||
|
Drying |
(approx.) |
|
|
|
|
|
|
|
|
|
|
|
|
|||||||
Heavy Wash |
Sanitize, Hi-Temp |
9 gal. |
2 1/4 - 2 1/2 Hours |
|||||||
Recommended for pots, pans, |
Heat Dry, Air Dry |
34 L. |
|
|
|
|
|
|
|
|
casseroles and dinnerware |
|
|
|
|
|
|
|
|
|
|
having light to heavily soiled |
|
|
|
|
|
|
|
|
|
|
loads. |
|
|
|
|
|
|
|
|
|
|
|
|
|
|
|
|
|
|
|
||
Normal Wash |
Sanitize, Hi-Temp, |
2.9 - 7.6 gal. |
1 |
1/ |
2 |
- 2 1/ |
4 |
Hours |
||
|
Normal; |
11 - 29 L. |
|
|
|
|
|
|
||
Recommended for lightly to |
|
|
|
|
|
|
|
|
||
Heat Dry, Air Dry |
|
|
|
|
|
|
|
|
||
heavily soiled loads. |
|
|
|
|
|
|
|
|
|
|
|
|
|
|
|
|
|
|
|
|
|
|
|
|
|
|
|
|
|
|||
Light Wash |
Hi-Temp, Normal |
5 gal. |
|
1 |
1/ |
2 |
Hours |
|||
Recommended for lightly |
Heat Dry, Air Dry |
19 L. |
|
|
|
|
|
|
|
|
|
|
|
|
|
|
|
|
|||
soiled loads only. |
|
|
|
|
|
|
|
|
|
|
|
|
|
|
|
||||||
Energy Saver |
Normal |
5 gal. |
|
1 1/2 Hours |
||||||
A cycle used to reduce |
Heat Dry, Air Dry |
19 L. |
|
|
|
|
|
|
|
|
dishwasher energy |
|
|
|
|
|
|
|
|
|
|
consumption. |
|
|
|
|
|
|
|
|
|
|
|
|
|
|
|
|
|
||||
Rinse Only |
N/A |
2 gal. |
|
|
|
16 Mins. |
||||
For rinsing dishware that will be |
|
8 L. |
|
(Air Dry Only) |
||||||
washed later. |
|
|
|
|
|
|
|
|
|
|
|
|
|
|
|
|
|
|
|
|
|
*Does not include drying time. |
|
|
|
|
|
|
|
|
|
|
6
PREPARING AND LOADING DISHES
Dish Preparation
Scrape away large pieces of food, bones, pits, toothpicks, etc. The continuously fi ltered wash fl uid will remove remaining food particles.
Burned-on foods should be loosened before loading. Empty liquids from glasses and cups.
Foods such as mustard, mayonnaise, vinegar, lemon juice and tomato based products may cause discoloration of stainless steel and plastics if allowed to sit for a long period of time. Unless the dishwasher is to be operated at once, it is best to pre-rinse or use the rinse only cycle to rinse off these food soils.
• |
Load racks so that large items do not |
|
|
prevent the detergent dispenser from |
|
|
opening. |
10 place settings standard loading pattern |
•Check manufacturer’s recommendations before washing items in question.
•If the dishwasher drains into a Food
Disposer, be sure disposer is completely empty before starting dishwasher.
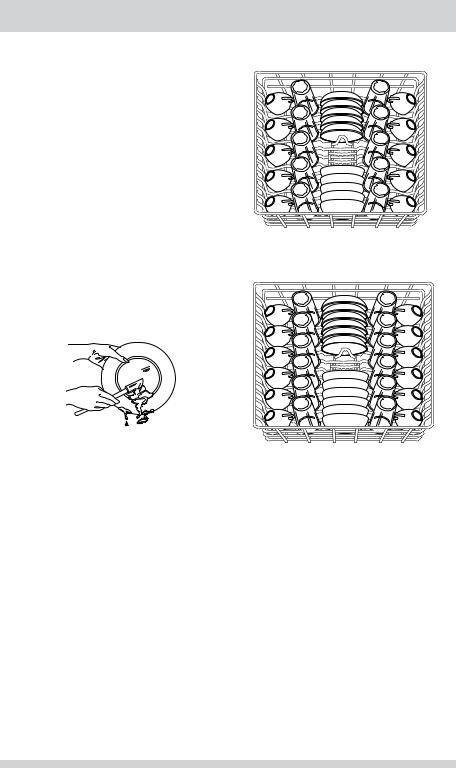
Loading the Top Rack
12 place settings standard loading pattern
Features and appearance of racks and silverware basket may vary from your model.
The upper rack is designed for fl exibility in loading a wide variety of items including cups, glasses, stemware, small plates, bowls, etc.
Load glasses in top rack only. Damage may occur if placed in bottom rack.
Load plastic items in top rack only. Melting may occur if placed in bottom rack.
Load items with open ends facing down for better cleaning and draining.
Damage may occur if delicate items touch each other during dishwasher operation.
Long-handled knives and utensils can be placed in top rack.
Be sure nothing protrudes through the bottom of the rack to block rotation of middle spray arm.
Some models have a fold-down cup shelf or a cup shelf/stemware holder. They can be used to load two levels of cups, juice glasses, and other short items. Stagger items on upper level so that water can reach all inside surfaces. Fold up to load tall glasses.
7

PREPARING AND LOADING DISHES
Top Rack |
Loading the Bottom Rack |
The TOP RACK option can be used to wash a wide assortment of items when you don’t have a full load. Also, when the upper rack
fi lls up with glasses and the lower rack is still empty, you don’t have to wait anymore for clean glasses.
STEMWARE HOLDER/CUPSHELF not available on all models.
Features and appearance of racks and silverware basket may vary from your model.
The lower rack is best for plates, saucers, bowls, and cookware. Large items should be placed along the edge so they do not block the spray arm rotation. For best results, place bowls, casseroles, and sauce pans with soiled surface facing down or toward the center. Tilt slightly for better drainage.
Make sure tall items do not block spray arm rotation.
Be sure pan handles do not protrude through the bottom of the rack and block the spray arm rotation.
10 place settings standard loading pattern.
12 place settings standard loading pattern.
8
PREPARING AND LOADING DISHES
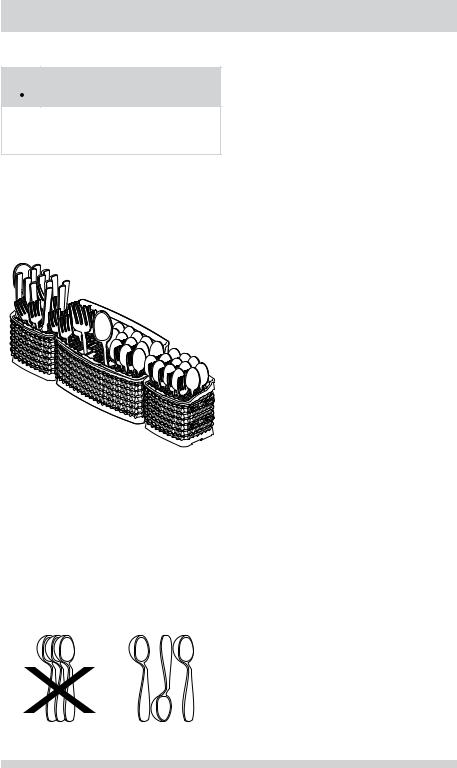
Loading the Silverware Basket
 CAUTION
Load sharp items (knives, skewers, etc.) pointing down.
Failure to do so may result in injury.
Features and appearance of racks and silverware basket may vary from your model.
Load the silverware basket while it is in the bottom rack or take the basket out for loading on a counter or table.
Use suggested loading patterns, as shown, to increase washability of the silverware.
Be sure nothing protrudes through bottom of basket or rack to block the spray arm.
Do not mix silver and stainless to avoid damaging the silver fi nish.
When covers are up, mix items in each section of the basket with some pointing up and some down to avoid nesting. Water spray cannot reach nested items.
Adding a Dish
To add or remove items after wash cycle starts:
•Unlatch door and wait a few seconds until wash action stops before opening.
•Add the item and wait a few seconds to allow cold air to slowly expand inside dishwasher.
•Close door fi rmly to latch and press the START/CANCEL pad to resume.
9

DISHWASHER DISPENSER & DETERGENTS
 CAUTION
The use of industrial grade detergent can damage the heating coil and other parts of the dishwasher leading to damage to the unit and surrounding property. Use only household grade automatic dishwasher detergents.
Filing the Detergent Dispenser
The detergent dispenser has two detergent cups. The smaller one is for addition to the pre-wash and the larger is for release to the main wash.
•Use only fresh automatic dishwashing detergent. Other detergents may cause oversudsing.
•When using automatic dishwashing detergent tabs, place one tab in main wash cup and close.
•Add detergent just before starting cycle.
•Store detergent in a cool, dry location. Moist or caked detergent may not dissolve properly.
Cover
Main Wash
Cup


 Cover
Cover
Latch
Pre-Wash
Cup
If the cover is closed on the Main Wash Cup open by pressing the Cover Latch.
How much Detergent to use
The amount of detergent to use depends on the water hardness. Water hardness is
measured in grains per gallon. Using too little detergent can result in poor cleaning and hard water fi lming or spotting. Using too much detergent in soft water can cause etching
to some glassware which is surface damage that appears like a fi lm but cannot be wiped off. Your local water company, water softener company or county extension agent can tell you the water hardness in your area.
Detergent Usage Chart
Cycle |
Soft Water |
Medium Hard Water |
Hard Water |
Very Hard Water |
|
|
(0-3 grains) |
(4-8 grains) |
(9-12 grains) |
(Over 12 grains) |
|
|
|
|
|
|
|
Heavy Wash |
2 teaspoons |
5 teaspoons |
8 teaspoons |
Each Cup- |
|
or |
(each cup- |
(each cup- fi ll |
(each cup- |
Completely |
|
|
Full (water |
||||
Normal Wash |
1/4 full) |
to line above |
completely full) |
||
|
“Regular”) |
|
softener |
||
|
|
|
|||
|
|
|
recommended) |
||
|
|
|
|
||
Top Rack |
2 teaspoons |
5 teaspoons |
8 teaspoons |
Main |
|
(Main Wash |
(each cup- fi ll |
(Main Wash |
Wash Cup- |
||
|
|||||
|
Completely Full |
||||
|
cup- |
to line above |
cupcompletely |
||
|
(water softener |
||||
|
1/4 full) |
“Regular”) |
full) |
||
|
recommended) |
||||
|
|
|
|||
|
|
|
|
||
|
|
|
|
|
|
Rinse Only |
No Detergent |
No Detergent |
No Detergent |
No Detergent |
|
|
|
|
|
(water softener |
|
|
|
|
|
recommended) |
|
|
|
|
|
|
As a rule, use 1 teaspoon for each grain above 12. For very hard water, detergent alone may not be enough and then a water softener is recommended to improve water quality and dishwashing performance.
10
 Loading...