

Page 1

Page 2

Corel®WordPerfect®8
®
for UNIX
User’s Guide
Page 3

Contents
Getting Started Documentation for Corel WordPerfect ............................. 11
The Basics ................................................... 12
Getting Help ................................................ 16
A Brief Lesson ................................................ 16
Reference Advance .................................................... 21
Append ..................................................... 24
Attributes ................................................... 25
Auto Code Placement .......................................... 28
Backup, Original .............................................. 30
Backup, Timed ............................................... 32
BarCode ................................................... 33
Beep Options ................................................ 35
Binding ..................................................... 36
Block, Define ................................................ 38
Block Protect ................................................ 40
Cancel ..................................................... 42
Capitalization ................................................ 43
Cartridges/Fonts/Print Wheels ................................... 44
Center Page ................................................. 49
Center Text .................................................. 50
Change Mode ................................................ 53
Colors/Fonts/Attributes ........................................ 54
Columns, Display ............................................. 56
Columns, Newspaper .......................................... 57
Columns, Parallel ............................................. 61
Compose ................................................... 65
Conditional End of Page ........................................ 67
Convert Program ............................................. 69
®
Corel
Cross-Reference .............................................. 71
Cursor Movement ............................................. 77
Date ....................................................... 79
Delete Codes ................................................ 82
Delete Files .................................................. 83
Delete Text .................................................. 84
Directories .................................................. 85
Display Pitch ................................................ 87
Display Setup ................................................ 89
Document Comments ......................................... 90
Document Compare ........................................... 92
Document Conversion, Versions 4.2 and 5.0 to 8c .................... 95
Document Conversion, Versions 8c to 5.1 .......................... 96
Document Format ............................................ 96
Document Summary .......................................... 97
Edit-Screen Options .......................................... 102
Environment Setup ........................................... 104
Equations .................................................. 107
Equations, Commands, and Symbols ............................. 116
Versions®.............................................. 70
Page 4

Equations: Commands Syntax .................................. 124
Exit....................................................... 135
Fast Save (unformatted) ....................................... 139
Find ...................................................... 139
Find, Conditions ............................................ 142
Flush Right ................................................. 144
Font ...................................................... 146
Footnotes and Endnotes ....................................... 149
Footnotes and Endnotes, Options ................................ 153
Force Odd/Even Page ......................................... 156
Format .................................................... 157
Generate ................................................... 159
GoTo..................................................... 161
Go to Corel Shell ............................................ 162
GotoUNIX................................................ 163
Graphics, Conversion Program .................................. 164
Graphics, Create ............................................. 166
Graphics, Define a Box ........................................ 170
Graphics, Edit ............................................... 178
Graphics, Formats and Programs ................................. 182
Graphics Lines .............................................. 187
Graphics Options ............................................ 190
Graphics Screen Type ......................................... 193
Hard Space ................................................. 196
Headers and Footers .......................................... 196
Help/Keystrokes ............................................. 199
Hyphenation ................................................ 201
Hyphenation Zone ........................................... 204
Indent ..................................................... 206
Index ..................................................... 207
Index, Concordance, and Mark Text .............................. 208
Index, Define ............................................... 211
Initial Codes ................................................ 212
Initial Settings ............................................... 214
Job Control ................................................ 218
JobType ................................................... 220
Justification ................................................. 221
Kerning .................................................... 224
Keyboard Layout ............................................ 225
Keyboard Layout, Edit ........................................ 228
Keyboard Layout, Map ........................................ 232
Labels ..................................................... 236
Language .................................................. 243
Language Resource File ........................................ 245
Line Draw .................................................. 250
Line Format ................................................ 252
Line Height ................................................ 253
Line Numbering ............................................. 256
Line Spacing ................................................ 257
List Files ................................................... 258
Lists ...................................................... 264
Page 5

Lists, Define ................................................ 265
Lists, Mark Text ............................................. 266
Location of Files ............................................. 267
Locked Documents ........................................... 270
Look ...................................................... 272
Macros .................................................... 275
Macros, Conversion Program ................................... 276
Macros, Define .............................................. 278
Macros, Execute ............................................. 283
Macros, International Interface .................................. 284
Macros, Macro Editor ......................................... 285
Macros, Message Display ...................................... 289
MakeItFit™ ............................................... 297
Margin Release .............................................. 298
Margins, Left and Right ....................................... 298
Margins, Top and Bottom ...................................... 299
Master Documents ........................................... 300
Math...................................................... 304
Math, Define Columns ........................................ 308
Math, Formulas ............................................. 311
Math—Row Titles, Numbers, and Functions ....................... 314
Menu Options .............................................. 316
Merge ..................................................... 318
Move ..................................................... 327
Move, Block ................................................ 329
Other Format ............................................... 334
Outline, Create .............................................. 335
Outline, Define ............................................. 341
Outline, Style ............................................... 346
Overstrike .................................................. 350
Page, Soft and Hard .......................................... 352
Page Format ................................................ 353
Page Numbering ............................................. 355
Paper Size/Type .............................................. 358
Paragraph Numbering ......................................... 364
Port Control ................................................ 368
Print, Document on Disk ...................................... 370
Print, Document on Screen ..................................... 373
Print Color ................................................. 374
Print Job, Cancel ............................................. 375
Print Options ............................................... 377
Print Quality ................................................ 378
Printer, Edit ................................................ 380
Printer, Select ............................................... 382
Printer Commands ........................................... 385
Printer Functions ............................................ 386
Printer Program .............................................. 390
Printer Program, AutoFont ..................................... 395
Printer Program, Customize Substitute Fonts ....................... 398
Printer Program, Modify Automatic Font Changes ................... 400
Printing—General Information .................................. 403
Page 6

Printing, Landscape ........................................... 406
Printing, Stop ............................................... 409
Printing to Disk ............................................. 410
Pull-Down Menus ............................................ 411
QuickCorrect™ ............................................. 413
Redline/Strikeout ............................................ 414
Repeat Value ................................................ 414
Replace .................................................... 416
Retrieve .................................................... 418
Return, Soft and Hard ........................................ 420
Reveal Codes ............................................... 423
Rewrite .................................................... 425
Save ...................................................... 426
Screen ..................................................... 427
Search ..................................................... 428
Setup ..................................................... 430
Sheet Feeder ................................................ 431
Sort....................................................... 432
Sort,Keys .................................................. 437
Sort, Select Records ........................................... 439
Speller, Check Spelling ........................................ 441
Speller, Dictionaries .......................................... 446
Speller, Look Up Words ....................................... 449
Speller, Word Count .......................................... 450
Speller Utility ............................................... 451
Spreadsheet, Import and Link ................................... 456
Spreadsheet, Link Options ..................................... 462
Style ...................................................... 463
Style, Create ................................................ 468
Suppress Page Format ......................................... 472
Switch ..................................................... 474
Tab ....................................................... 476
Tab Align .................................................. 478
TabSet .................................................... 479
Table, Create ................................................ 484
Table, Edit Structure .......................................... 491
Table, Format Columns and Cells ................................ 502
Table, Math ................................................ 507
Table of Authorities .......................................... 512
Table of Authorities, Define .................................... 513
Table of Authorities, Mark Text ................................. 515
Table of Contents ............................................ 518
Table of Contents, Define ...................................... 519
Table of Contents, Mark Text ................................... 520
TextIn/Out ................................................ 521
TextScreenSize ............................................. 524
Thesaurus .................................................. 525
Typeover ................................................... 527
Undelete ................................................... 529
Units of Measure ............................................. 530
View Document ............................................. 532
Page 7

View Document, Options ...................................... 533
Widow/Orphan ............................................. 534
Window ................................................... 535
Word and Letter Spacing ....................................... 536
Appendix Appendix A: ASCII Conversion Chart ............................ 541
Appendix B: Codes ........................................... 545
Appendix C: Environment Variables .............................. 549
Appendix D: Equation Palette ................................... 552
Appendix E: Error Messages .................................... 563
Appendix F: Graphics Images ................................... 569
Appendix G: Initial Settings .................................... 572
Appendix H: Keyboards ....................................... 576
Appendix I: Macros and Merge, Comparison ....................... 582
Appendix J: Macros and Merge, Expressions ........................ 586
Appendix K: Macros and Merge, Programming Commands ............ 592
Appendix L: Macros and Merge, Value Tables ....................... 675
Appendix M: Macros and Merge, Variables ......................... 709
Appendix N: Pull-Down Menus ................................. 714
Appendix O: Startup Options ................................... 718
Appendix P: Corel WordPerfect Characters ......................... 721
Appendix Q: NROFF/TROFF Convert Program .................... 728
Glossary/Index Glossary ................................................... 731
Index ..................................................... 735
Page 8

Page 9

Getting Started
••••••••••••••••••••••••
Getting Started
Page 10

Page 11

Documentation for Corel WordPerfect
This manual is designed to assist you in using Corel WordPerfect 8 for characterbased terminals. If you want help with Corel WordPerfect 8 for the X Window
System, there are several resources available.
Online Manual
The online User’s Guide is available locally in Adobe Acrobat (.pdf ) format, in
ASCII text format for the SCO version of Corel WordPerfect, or from the Word
Wide Web (in HTML format).
The Acrobat version of the Corel WordPerfect 8 for the X Window System User’s
Guide is available on the Corel WordPerfect for UNIX CD. See your system
administrator if the wp8gui.pdf file has not been installed with the rest of the Corel
WordPerfect files. If you are using the SCO version of Corel WordPerfect, the User’s
Guide is available in ASCII text format instead of Acrobat format. See your system
administrator if the wp8gui.txt file has not been installed with the rest of the Corel
WordPerfect files. You can view acopy of the manual in HTML format using your
Internet browser for all versions of Corel WordPerfect 8 for the XWindow System.
To open the local version of the manual,
1 Start Corel WordPerfect 8 for the X Window System.
2 Choose Online Help from the Help menu.
3 Choose WP Online Manual.
To view the HTML version of the manual,
1 Start Corel WordPerfect 8 for the X Window System.
2 Choose Online Help from the Help menu.
3 Choose WP HTML Manual.
You can access the manual directly from your Web browser using the following URL:
http://www.sdcorp.com/products/wp8/info
Using the Online
Manual
The online User’s Guide includes Getting Started, Lessons, and Reference sections.
Getting Started
This section includes an overview of the manual and online Help, and a brief
introduction to Corel WordPerfect 8.
Lessons
The lessons help you to create and format a variety of documents using Corel
WordPerfect. These lessons are useful if you’re new to word processing or to
Corel WordPerfect.
Reference
The alphabetically-arranged, task-oriented sections in the Reference can answer
questions you have as you use Corel WordPerfect. The sections include general
steps for using a feature, as well as additional information when needed.
Documentation for Corel WordPerfect 11
Page 12

Online Help Use Corel WordPerfect’s online Help system to get immediate information
about Corel WordPerfect 8 for the X Window System features and options.
Help Menu
You can access the full range of Help topics using the following items from the
Help menu:
Choose Menu
Item
Contents List of Help contents and access to Search (Index),
Search for Help on List of Help topics in alphabetical order
How Do I Instructions for performing common tasks; for
Macros Online Macros Manual
Online Help Access to Automated Support, the online manual in
About Corel
WordPerfect
To G e t
How Do I, Glossary, Menu Commands, Corel
WordPerfect Bars, and Using Help
example, you might ask, “How do I save a document?”
Adobe Acrobat format, and the online manual on the
World Wide Web
Information about your license number, your network
username, your version of Corel WordPerfect, the
network setup, system, printer, and environment
README Files
README files contain information about changes to the program that were
made after the manuals were printed. Be sure to retrieve README files into
Corel WordPerfect and read through them.
The Basics
Installation Your system administrator should have already installed Corel WordPerfect 8 for
character-based terminals. If it is not working, please contact your system
administrator.
The Template
Start Corel
WordPerfect
The template is an optional menu card that fits onto your keyboard and shows
the locations of Corel WordPerfect function keys. If your template does not fit
the keyboard you are using, contact your system administrator for a replacement.
Once Corel WordPerfect has been installed by your system administrator, you
are ready to start the program.
12 The Basics
Page 13
First log on to your terminal, then follow the procedure below that matches your
system setup.
•
If you see the shell prompt after you log on, enter wp to start Corel
WordPerfect.
•
If you see a menu of applications to select from, choose the letter or number
that corresponds to Corel WordPerfect.
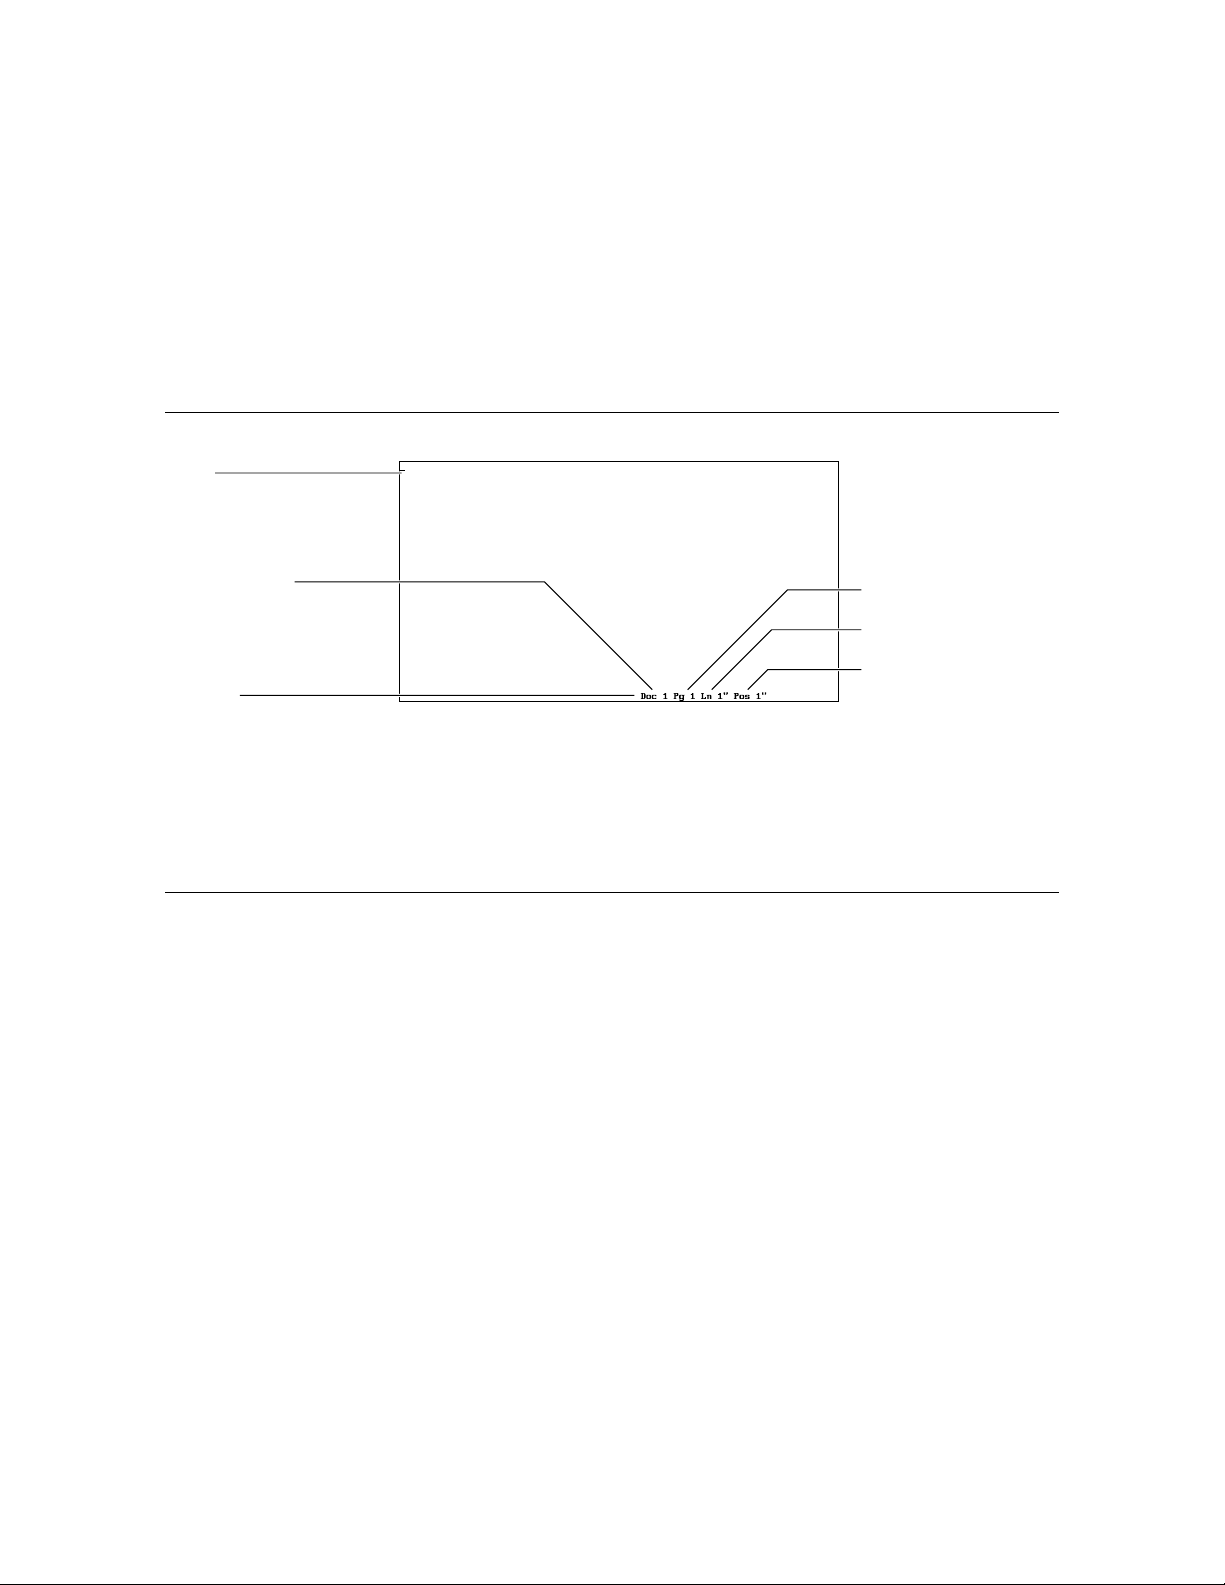
Clean Screen
Cursor
Document (1 of 9)
Status line
Keys to Know
When you begin a new document, you are in the editing screen.
Page
Line
Position
The cursor points to the current position on the screen. The status line displays
the position of the cursor, messages, or warnings. When you save a document,
the status line also displays the filename of the document on the editing screen.
Initial (default) formats, such as margins, tabs, and line spacing, are already set.
You can, however, change them at any time in the document (see Appendix G:
Initial Settings for a complete list of initial format settings).
Backspace
Erases characters to the immediate left of the cursor as you type.
Cancel
Backs you out of features that display a message on the status line, such as Block,
Exit, or Retrieve. It also backs you out of any menu. Cancel can also be used to
restore text that has been erased by the delete keys.
Delete
Deletes text at the cursor position.
Exit
Saves or exits a menu or a document, exits Corel WordPerfect without saving a
document, or clears the screen.
Help
Displays on-screen information about any feature you are using. You can also
use this feature to display the Corel WordPerfect template or a list of features
that begin with a specific letter. Pressing Return or the Space Bar exits the help
screen.
The Basics 13
Page 14

Return
Ends a short line of text, or sends a command to your terminal. For example, to
save or retrieve a file, you must type a filename, then press Return. You can also
use Return to accept a default prompt.
Function Keys
Pull-Down Menus
You use function keys to access the many features in the program. The function
keys you press will vary depending on the keyboard you are using. The template
shows the location of function keys.
You can change these assignments to suit your needs. For further information
on keyboard assignments, see Keyboard Layout.
For more information about assigning Help to Cancel, Cancel to Escape, and
Repeat Value to Help, see Alternate Keyboard under Environment Setup.
Use pull-down menus to select features.
Pull-down menu titles appear in a bar at the top of the screen. Hold down the
Escape key and press the equal sign key (=). To select features in the pull-down
menus, use the arrow keys and press Return. You can also select these features by
typing the mnemonic letter that is highlighted in the feature name (S for Save).
If you prefer to use the pull-down menus, look for this symbol:
j. Throughout
the documentation, this symbol will be followed by the name of the pull-down
menu where you can find the feature.
Example:
Or
j Select Append from the Edit menu.
14 The Basics
Page 15

Menu Options Some features, such as Print, give you a menu of options, as in the example
below.
When you are in one of these menus, there are two ways to select an option.
•
Type the option number, such as (1) for Full Document. (Use the numbers
at the top of the keyboard, not the numbers on the number pad.)
•
Type the mnemonic letter that is highlighted in the option name (P for
Page).
Codes
Exit Corel WordPerfect
Codes are commands that tell Corel WordPerfect and your printer what to do.
When you use a feature such as Block or Underline, the commands are inserted
in your document. You can see the codes in Reveal Codes. See Appendix B:
Codes for a list of all codes.
When you finish using Corel WordPerfect, you must exit before turning off your
terminal.
1 Press Exit.
Or
j Select Exit from the File menu.
2 Press y to save the document, then enter a filename.
or
Press n to continue exiting without saving the document.
3 Press y to exit.
There are several save options. For further information, see Save.
The Basics
15
Page 16

Getting Help
If you want help with Corel WordPerfect as you work, there are several sources
available.
Help Feature
Reference Manual
Press the Help key to display on-screen information about features.
This manual describes how each feature works.
A Brief Lesson
Creating the Document After you start Corel WordPerfect, you are ready to start typing. If you make
any mistakes, you can use Backspace to erase them.
When a line fills with text, the cursor returns to the left margin on a new line.
This automatic return is known as word wrapping.
1 Type the following note without pressing Return at the end of a line.
Remember the discussion we had about starting a study abroad
program? I just returned from a study abroad conference in Illinois,
and I have an outline I want you to read. Please stop by my office when
you are at this end of campus, and we can talk about it.
Editing the Document
You just created your first document, but you see parts of the document you
want to edit.
Moving the Cursor
Move the cursor by using the Up and Down Arrow keys, or the Left and Right
Arrow keys on your keyboard.
Some keyboards have a separate number pad that is also used for cursor control. The Num Lock key
(or its equivalent) operates as a toggle to turn Num Lock on and off. When Num Lock is turned
off, the number pad can be used for cursor control. To find the alternate cursor toggle keystroke,
press Help, Help, Right Arrow. An additional help screen labeled Miscellaneous Corel
WordPerfect Functions appears. The function name is Keypad Numeric/Application-mode toggle.
1 Using the arrow keys, move the cursor to the uppercase R in Remember.
Insert vs. Typeover
By default, Insert is on. Text you type is inserted at the cursor, moving the
existing text to the right. To type over existing text use Typeover. Press Help to
access appropriate keystrokes.
2 Type Do you and press the Space Bar.
3 Press Insert. Notice that Typeover appears at the bottom left of the screen.
4 Type a lowercase r to replace the existing R.
16 A Brief Lesson
Page 17

5 Press Insert to end Typeover and return to Insert.
6 Move the cursor to the h in have in the second sentence.
7 Press Delete until the sentence (including the period) is erased.
Many keyboard functions will repeat if you hold down the key. Holding down a key too long can
insert unwanted codes and delete other necessary codes.
8 Type think I've come up with an outline that will make us all very
happy.
9 Move the cursor to the v in very.
Block and Underline
Block defines portions of text for use with other features.
1 Press Block, then press Right Arrow until very is highlighted.
Or
j Select Block from the Edit menu, then press Right Arrow until very is highlighted.
2 Press Underline.
Select Appearance from the Font menu, then select Underline.
You can block characters, words, sentences, or entire pages. If you had blocked
the rest of the note from very forward, the entire block would have been
underlined.
3 Move the cursor to the D in Do at the beginning of the note.
4 Press Return two times to add blank lines at the beginning of the note.
Using the Home Key
Use the Home key to move through the document quickly.
1 Press Home key twice, then Up Arrow to go to the top of the document.
2 Type Mitch,
3 Return to the D in Do at the beginning of the note.
4 Press Ta b .
A Brief Lesson 17
Page 18

Saving the Document You typed the note and now you want to save it. When you save a document, all
document initial settings are saved, including printer selection.
1 Press Save.
Or
j Select Save from the File menu.
A message appears on the status line at the bottom of the screen: “Document to
be Saved:”
2 Type study as the filename, then press Return.
The name of your document and the directory appear on the status line at the
bottom of the screen. This original document is now saved. Any changes you
make in the rest of the lesson are only temporary. The changes do not affect the
original document, unless you save them under the same filename.
Printing the Document
Saving the Document
and Exiting
From the screen, you can print a document, page, or a block of text.
1 Press Print to display the Print menu.
Or
j Select Print from the File menu.
2 Select Full Document (1) from the Print menu to send the note to the
printer.
If your printer does not print, make sure it is turned on, it is on-line, and the
printer cable is attached securely to your computer and printer. If you still
cannot print, contact your system administrator.
You already saved your original document. You can also save your document
and exit Corel WordPerfect at the same time.
1 Press Exit.
Or
j Select Exit from the File menu.
A message appears on the status line at the bottom of the screen asking you if
you want to “Save Document? Yes (No).”
2 Type y, then press Return to save it with the study filename.
Pressing Return will automatically select the default option.
Because there is already a document with the filename study, the message on the
status line asks if you want to replace the previously saved document. If you had
changed any text, the new version of the text would replace the old version.
3 Type y.
The message on the status line asks if you want to “Exit WP? No(Yes).”
4 Type y to exit.
For information on other saving and filing options, see Save and List Files.
18 A Brief Lesson
Page 19

Reference
••••••••••••••••••••••••
Reference
Page 20

Page 21

Advance
Use Advance to position text at an exact location on a page. Advance can place
text in graphics images. In the image below, Advance positions “Help!” inside
the cartoon bubble.
HELP!
Use Advance to fill in spaces in existing forms, such as positioning text to fit in a
pre-printed form (see Filling in Forms below).
When you use different fonts and type sizes, use Advance to move to a specific
position on a page without having to calculate the line height required to reach
that position. You can also used Advance to manually kern characters (see Wo r d
and Letter Spacing).
To use advance,
1 Move the cursor to where you want the advance to begin.
2 Press Format, then select Other (4).
Or
j Select Other from the Layout menu.
3 Select Advance (1), then select the advance option of your choice (see
Advance Options below).
4 Enter a distance.
5 Press Exit to return to the document.
6 Type the text.
Advance 21
Page 22

Notes Advance and Graphics Images
If you use Advance to position text in a graphics image, make sure the Wrap
Text Around Box option for the graphics box that contains the image is set to
No. If it is set to yes, you cannot position text inside the box (see Graphics,
Define a Box).
Advance and Page Breaks
Use Advance to move the cursor on the current page only. You cannot enter an
Advance measurement which advances the cursor past a page break (see Page,
Soft and Hard).
Advance Options
If you select Advance Up (1), Down (2), Left (4), or Right (5), the distance you
enter is measured relative to the cursor position. For example, if you enter an
Advance Left measurement of 1 and the cursor is at position 3.5 , you will be
advanced to position 2.5 on the same line.
If you select Advance to Line (3) or Position (6), the distance you enter is an
absolute position on the page, regardless of where the cursor is located at that
time.
Advance to Line is a vertical measurement, measured from the top edge of the
page. For example, if you enter an Advance to Line measurement of 3 , you will
be advanced 3 down from the top edge of the page.
Advance to Position is a horizontal measurement, measured from the left edge of
the page. For example, if you enter an Advance to Position measurement of 3 ,
you will be advanced 3 in from the left edge of the page.
You cannot advance vertically and horizontally using one Advance code. To
change the cursor position to a new vertical and horizontal position, you must
enter two Advance codes.
Cursor Position
Advance inserts an Advance code into your document which indicates the type
of advance you selected and the distance. This does not change the on-screen
position of the cursor. However, any change in location is reflected in the “Ln”
and “Pos” numbers on the status line.
If you do not know the position of specific text in your document, move the
cursor to that text, using Reveal Codes. Make sure the cursor is placed after the
Advance code, then check the position displayed on the status line. You can also
use View Document to preview where the text will be printed on the page.
Filling in Forms
When you select Advance to Line (3) from the Advance options and enter a
distance, text is printed immediately below the distance you enter. For example,
22 Advance
Page 23

Advance measurement
if you enter an Advance to Line measurement of 3 , the full line of text is
printed immediately below 3 from the top of the page.
Line of text
Baseline
Advance measurement
Line of text
Baseline
Text is immediately below the distance you enter.
When you place text in pre-printed forms, set the Baseline Placement for
Typesetters option on the Format: Printer Functions menu to Yes. You may also
want to enter a fixed line height and enter a fixed line measurement (see Line
Height). Text is printed on top of the line instead of below the line. If you enter
an Advance to Line measurement of 3 , the bottom or baseline of your text is
printed 3 down from the top of the page.
The baseline of your text will be 3 inches down.
Advance 23
Page 24

Append
Returning to the Original Position
To return the cursor to its original position after using Advance, insert an
Advance to Line and an Advance to Position measurement. For example, if you
were originally at the Position 1 Line 1 position, return the cursor to that
position by entering an Advance to Line measurement of 1 and an Advance to
Position measurement of 1 .
Text Boxes
Advance code measurements inside text boxes are measured from the top left
corner of the box.
Append adds text on the screen to an existing file on disk. Text is added to the
end of the file.
1 Move the cursor to the text you want to append.
2 Press Move.
Or
j Choose Select from the Edit menu.
3 Select Sentence (1), Paragraph (2), or Page (3) to highlight the sentence,
paragraph, or page on which the cursor is resting.
You can also append a block of text (see Blocks of Text below).
4 Select Append (4).
5 Enter the name of the file to which you want to append the text (see Entering
Filenames below). If the file does not exist, it will be created.
Notes
24 Append
Append and Macros
If you use Append in macros, a new file is automatically created if the filename
you enter does not exist.
Blocks of Text
You can append a block of text to a file on disk. Select Block to block the text,
press Move, select Block (1), and follow steps 4 and 5 above.
Entering Filenames
If the file is in your default directory, enter only the filename. If the file is in
another directory, you must enter the full pathname for the file.
Locked Files
To append to a locked file, use the above steps, then enter the correct password
for the locked file.
Page 25

Sentence, Paragraph, and Page Delimiters
Sentences, paragraphs, and pages are distinguished by delimiters such as periods,
Hard Return codes [HRt], Soft Page codes [SPg], and Hard Page codes [HPg]. If
you have trouble blocking a sentence, paragraph, or page, one or more of the
necessary delimiters is missing.
For more information about sentence, paragraph, and page delimiters, see Move.
Tabular Columns and Rectangles
Use Block to block a tabular column or a rectangle. You cannot enter a filename
to append a blocked tabular column or rectangle directly to a file. You can,
however, move these items by appending them to a temporary buffer.
To move a blocked tabular column or rectangle,
1 Select Block to block a tabular column or a rectangle (see Move, Block).
2 Press Move, with the block on the screen.
3 Select Tabular Column (2) or Rectangle (3).
4 Select Append (4) to save the block to a temporary buffer.
The text will remain in that temporary buffer until you move new text to that
buffer or exit Corel WordPerfect. To move the buffer to another file, switch to
the new file and retrieve the buffer.
To retrieve the block,
1 Press Move.
2 Select Retrieve (4).
3 Select Tabular Column (2) or Rectangle (3).
You cannot use the Tabular Column or Rectangle option to block and append
graphics boxes unless the graphics box is empty or contains only text. If you use
the Tabular Column or Rectangle option to block and append a graphics box
which contains a graphics image, you will get an error message.
Attributes
Attributes change the size or appearance of printed text. They can provide
emphasis to a word or set text apart on a page.
Size attributes change the size of printed text, while appearance attributes
enhance the printed text.
Attributes 25
Page 26

In the following example, size attributes create headlines of different sizes.
Seeing Things Clearly
Proposal Summary
As we suspected, aquarium operations in both production and marketing have a determinant effect on how well
our marine and freshwater fish operations perform. A comparative study of the two financial histories shows that
our revenues followed the same fiscal pattern as that of Clearly Aquariums: when aquarium sales are up, we
prosper. But this symbiotic relationship also has a downside. Currently, there is little activity among aquarium
manufacturers to stimulate their weak market—output is at a standstill.
These indicators lead us to believe that if aquarium sales continue to soften, our profits will begin to recede
symptomatically. One way of breaking from the aquarium industry's downward spiral and increasing our potential
for growth is to adopt a more aggressive posture in aquarium manufacturing.
This proposal suggests that we purchase the aquarium industry leader, Clearly Aquariums, to fortify our company and our sales for the future. Because our sales depend on aquarium output, acquiring Clearly would allow
us to improve productivity, oversee marketing, and give us tighter control over our fish sales. Agreed, acquiring
another business in these volatile times is risky, but the returns for us on an aquarium venture will essentially be
guaranteed; everyone who buys our fish will have to have somewhere to put them, and everyone who buys an
aquarium will want to fill it with fish.
.
To add an attribute as you type text,
1 Press Font to display the Font menu on the status line.
2 Select Size (1) or Appearance (2).
Or
j Select specific size attributes from the Font menu. For appearance attributes, select
Appearance from the Font menu.
3 Select the attribute of your choice.
4 Type the text.
5 To turn off the attribute, reselect the attribute (steps 1 through 3 above), or
move the cursor past the attribute off code (see Codes below). You can also
turn off all current active attributes at the same time (see Normal Text
below).
Notes
26 Attributes
Appearance Attributes
Appearance attributes specify text style text. Select Bold (1), Underline (2),
Double Underline (3), Italic (4), Outline (5), Shadow (6), Small Caps (7),
Redline (8), or Strikeout (9).
Base Font
The attributes you select are variations of the current document's base font. You
can use size attributes to temporarily change font size without changing the base
font. If the attributes do not look the way you expect them to print, your printer
does not have the necessary fonts to print them (see Colors/Fonts/Attributes and
Font).
To preview appearance attributes, use View Document.
Page 27

Bold and Underline
Bold and Underline are assigned to specific keystrokes. Select Bold or
Underline, then press the keystroke again to turn off the attribute, or press
Right Arrow to move past the attribute off code.
Codes
When you select an attribute, on and off codes are inserted, with the cursor
resting before the off code. For example, the on code inserted for the Bold
attribute is [BOLD] and the off code is [bold]. You can display these codes by
pressing Reveal Codes. Any text between the codes takes on the attribute.
To turn off the attribute, press Right Arrow to move past the off code.
Existing Text
To add attributes to existing text, block the text using Block, then select the
attribute using steps 1 through 3 above. When you use this method, the cursor
is placed after the attribute off code.
Normal Text
When you have more than one attribute active at a time, you can turn off all
current attributes. Press Font, then select Normal (3) to return the text to the
base font. This inserts the necessary off codes or moves the cursor past existing
off codes. Text which follows the off codes is printed in the current base font
(see Base Font above).
On-Screen Appearance
The attribute currently selected appears in the text you type and in the numbers
next to the “Pos” indicator at the status line. When attributes are displayed on
the screen, they can be represented in several ways, depending on your terminal.
To learn more about the on-screen appearance of attributes, see
Colors/Fonts/Attributes.
Printing
Since the printed appearance of text depends upon the capabilities of your
printer, you may not be able to print certain attributes. For example, some
printers print underlining as a solid line, while others can only produce a broken
line. To learn more about how attributes are printed, see Font.
You can determine which attributes are available on your printer by retrieving
and printing the printer.tst file (select your printer before printing). It includes
several attributes and the most common attribute combinations.
Important: printer.tst is installed with the Corel WordPerfect Program files. It is originally
copied to the wplrn directory.
Removing Attributes
You can remove attributes by deleting either one of the pair of attribute codes
which surround the text. Corel WordPerfect then deletes the matching code.
We suggest you turn on Reveal Codes to see the attribute codes you are deleting.
Also, if you delete an attribute code in the normal editing screen, you are
prompted to confirm the deletion. You can type y to confirm the deletion, or
type any other key to skip the code without deleting it.
Attributes 27
Page 28

Size Attributes
The size attributes deal with the height and width of a character or character
position in a line.
Select either Superscript (1), Subscript (2), Fine (3), Small (4), Large (5), Very
Large (6), or Extra Large (7).
To alternate type sizes, use these size attributes instead of adjusting Base Font
settings.
Using the size attributes, however, may not actually change the size of the text
you print. It depends on what fonts your printer has available. For example, if
your printer has only Courier 10 point, it will print only in that font regardless
of the size attributes you select.
The actual sizes used for Fine, Small, Large, Very Large, and Extra Large are
determined by your current base font and the printer fonts you select (see Base
Font above, and Font).
You can also change the fonts being used for the attributes by editing the .prs file
(see Printer Program, Modify Automatic Font Changes).
Size Attribute Ratios
A new feature, Size Attribute Ratios, helps you determine the size of the font
attributes (see Initial Settings).
See Also: Colors/Fonts/Attributes; Font; Printer, Select; Redline/Strikeout
Auto Code Placement
Certain Corel WordPerfect codes are designed for insertion at the beginning of a
paragraph or page, depending on the code. When inserting a code, Auto Code
Placement moves the code to the top of the paragraph or page where the
insertion point is located. Auto Code Placement removes duplicate codes by
deleting the old code before inserting the new code.
The code then affects the paragraph or page, and all subsequent text, unless
Corel WordPerfect encounters the same code later in the document.
If you select text before you insert a code listed in the table below, the code affects the entire
paragraphs or pages containing the selection.
If you start Corel WordPerfect with a -A startup option, Auto Code Placement
brackets are made visible around the Page or Paragraph code here ([Auto
Placement>>] [<<Auto Placement]).
When you retrieve a Corel WordPerfect UNIX document into the DOS version
of Corel WordPerfect, the Auto Code Placement codes will appear as
[Unknown].
28 Auto Code Placement
Page 29

The table below lists the codes placed at the top of the page and at the beginning
of each paragraph. Codes not listed in the table are character codes. Such codes
are placed where the insertion point is located.
Formatting Code Code Placement
Alignment Character Paragraph
Baseline Line Height Paragraph
Block Protect Paragraph
Columns, Def Paragraph
Columns, On Paragraph
Endnote Print Here Paragraph
Footer, A or B Page
Force Odd/Even Page Page
Header, A or B Page
Hyphenation Zone Paragraph
Justification, Center, Full, Left, or Right Paragraph
Leading Adjustment Paragraph
Line Height Paragraph
Line Numbering Paragraph
Line Spacing Paragraph
Margins, Left or Right Paragraph
Margins, Top or Bottom Page
Math Columns, Define Paragraph
Math Columns, On Paragraph
Page, Center Page
Page Number Page
Page Number Position Page
Page Number Style Page
Paragraph Numbering Paragraph
Suppress Page Page
Tab Set Paragraph
Widow/Orphan, On or Off Page
Word/Letter Spacing Paragraph
Notes
Placement
To reposition a code that has been automatically positioned at the beginning of a
page or paragraph, block the desired code and use Move to move it to the new
location.
For example, if you want Line Numbering to start in the middle of a paragraph,
you must turn Line Numbering on. With Reveal Codes on, go to the beginning
of the paragraph, block the line numbering code, then move the code to the line
where you want Line Numbering to begin.
Placement Restrictions
Auto Code Placement restricts where regular text and character codes can be
entered. If you enter text when the insertion point is between page or paragraphtype codes, the insertion point is moved past all page and paragraph functions
before the text is inserted.
Auto Code Placement 29
Page 30
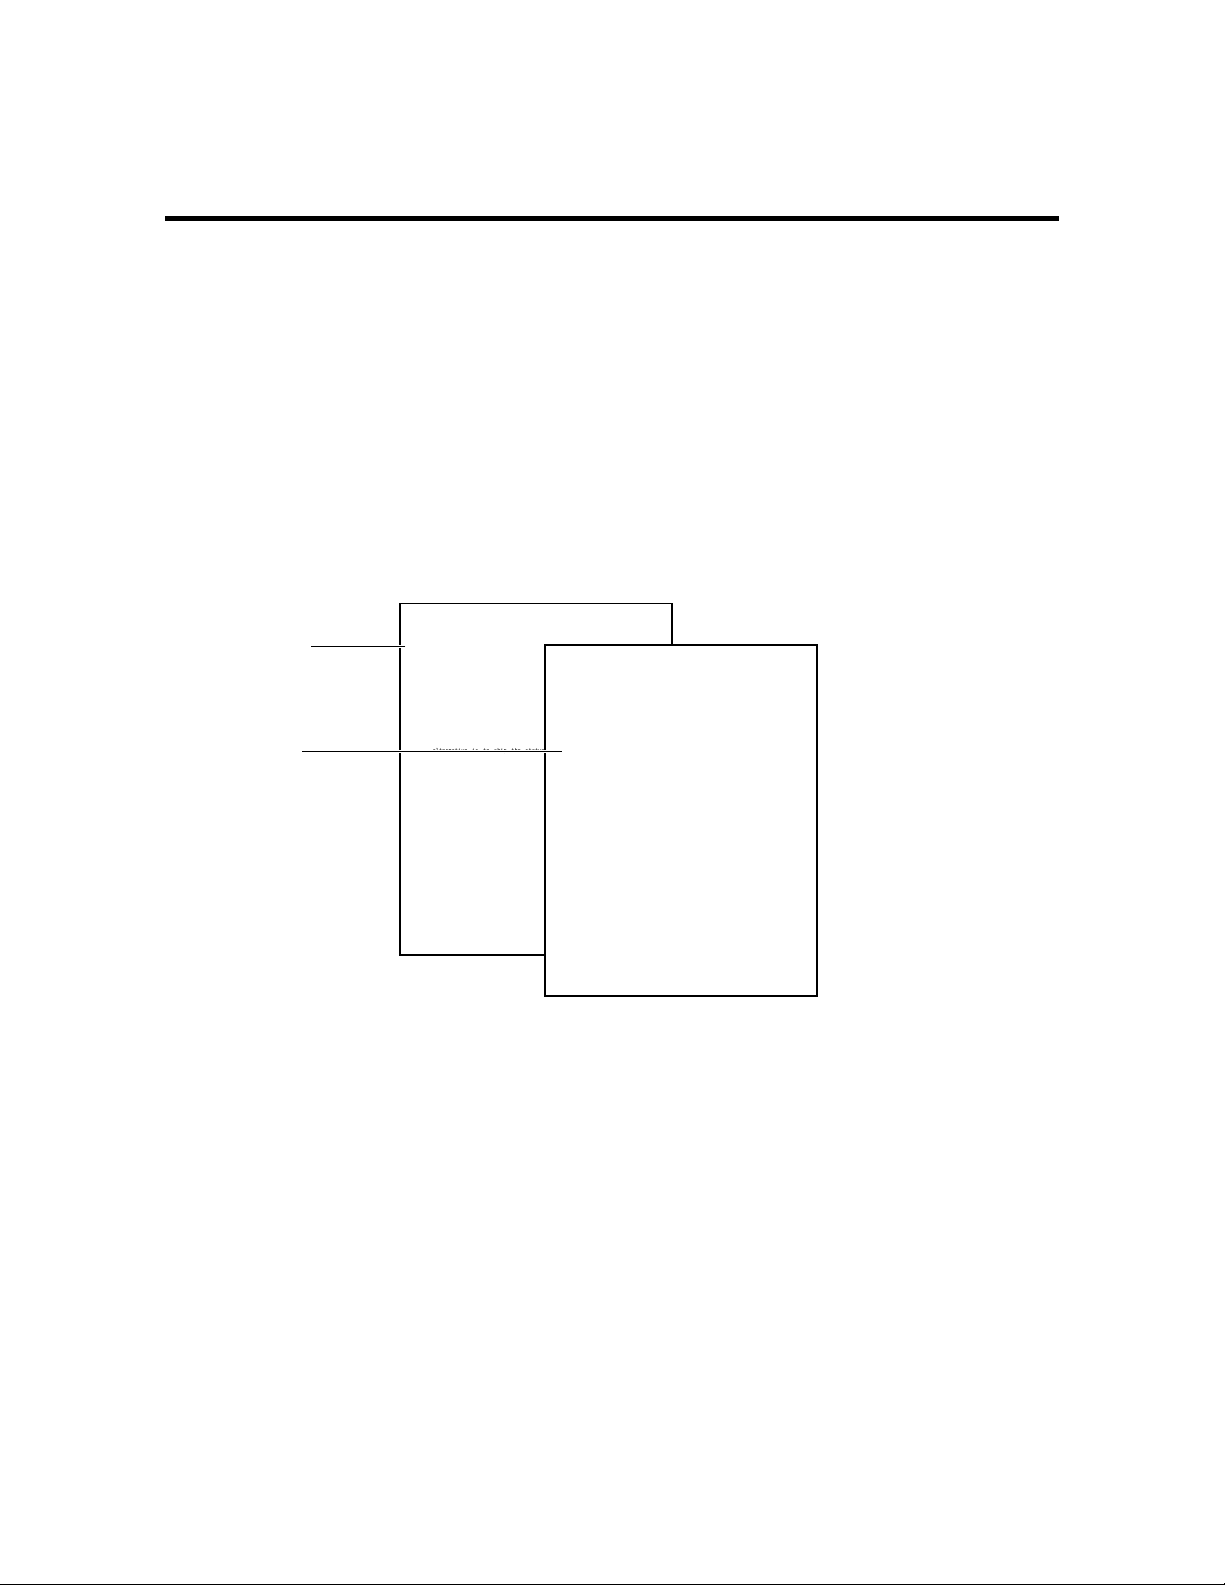
Backup, Original
First draft (letterBK!)
Second draft (letter)
Normally, when you replace a document with one of the same name, the original
is deleted. The Original Backup option lets you save the original and the
replacement version of the document.
Original Backup is a safeguard against replacing previous versions of a
document.
When you replace a file with Original Backup on, the original version of a file is
renamed filenameBK! (where filename is the name of the original file). As you
continue to replace the same file, the BK! file is replaced with the current original
file. The BK! files are stored in the same directory as the replacement file.
For example, if you save the first draft of a document named letter, when you
replace the first draft with the second draft, the first draft is renamed letterBK!
and the second draft is named letter.
Samson Air Freighters
222 Seal Drive, Suite A, Newport Beach, CA 92663
Mr. Cecil Armstrong
The Great Gem Company
14 Keller Rd
Houston, TX 77004
Dear Mr. Cecil Armstrong,
Our only reservation in transporting the jade statuary concerns the
packaging. Unlike sea transport, air freight is bound by packaging
regulations which determine what can ship by air.
Our primary concern is the size of the cargo. To ensure safe
transport of the statuary, each statue should be contained in a
palletized crate. This could create a problem since our largest
carrier, the B747F, is limited to crates that are 350 x 260 x 260
cm. in size with a maximum payload of 750 kilograms. The only
alternative is to ship the statues as indivisible items which
requires no packaging. However, we strongly discourage this because
of the statuary’s fragile nature.
You should be aware that Samson Air Freighters can only insure each
piece for $1,000,000, which is included in the $9.60 (per 100 miles
X 50 kilograms) price we quoted. Any increase in the insurance will
increase the shipping cost. To make it cost effective for you, you
may want to seek an independent insurer to supplement our schedule.
Another concern is the Customs process. When freight arrives in Los
Angeles, customs officials will randomly select and unpack cargo
for inspection. If any damage results from this procedure, our
underwriter cannot be held responsible for coverage.
September 19, 1991
Mr. Cecil Armstrong
The Great Gem Company
14 Keller Rd
Houston, TX 77004
Dear Mr. Cecil Armstrong,
Our only reservation in transporting the jade statuary concerns the
packaging. Unlike sea transport, air freight is bound by packaging
regulations which determine what can ship by air.
Our primary concern is the size of the cargo. To ensure safe
transport of the statuary, each statue should be contained in a
palletized crate. This could create a problem since our largest
carrier, the B747F, is limited to crates that are 350 x 260 x 260
cm. in size with a maximum payload of 750 kilograms. The only
alternative is to ship the statues as indivisible items which
requires no packaging. However, we strongly discourage this because
of the statuary’s fragile nature.
You should be aware that Samson Air Freighters can only insure each
piece for $1,000,000, which is included in the $9.60 (per 100 miles
X 50 kilograms) price we quoted. Any increase in the insurance will
increase the shipping cost. To make it cost effective for you, you
may want to seek an independent insurer to supplement our schedule.
Another concern is the Customs process. When freight arrives in Los
Angeles, customs officials will randomly select and unpack cargo
for inspection. If any damage results from this procedure, our
underwriter cannot be held responsible for coverage. In order to
comply with the restrictions of our coverage, the crate dismantling
must be done by The Great Gem Company. As a precaution, SAF will
designate Los Angeles as a final destination. At that time, a
representative of The Great Gem Company must accept delivery of the
statuary. Once that transaction is completed, we will draw up a new
invoice to continue delivery to Houston.
Feel free to contact us if you have further questions.
Sincerely,
Diana West,
Assistant Director of Shipping
Samson Air Freighters
222 Seal Drive, Suite A, Newport Beach, CA 92663
30 Backup, Original
Page 31

First draft (deleted)
Samson Air Freighters
222 Seal Drive, Suite A, Newport Beach, CA 92663
Mr. Cecil Armstrong
The Great Gem Company
14 Keller Rd
Houston, TX 77004
Dear Mr. Cecil Armstrong,
Our only reservation in transporting the jade statuary concerns the
packaging. Unlike sea transport, air freight is bound by packaging
regulations which determine what can ship by air.
Our primary concern is the size of the cargo. To ensure safe
transport of the statuary, each statue should be contained in a
palletized crate. This could create a problem since our largest
carrier, the B747F, is limited to crates that are 350 x 260 x 260
cm. in size with a maximum payload of 750 kilograms. The only
alternative is to ship the statues as indivisible items which
requires no packaging. However, we strongly discourage this because
of the statuary’s fragile nature.
You should be aware that Samson Air Freighters can only insure each
piece for $1,000,000, which is included in the $9.60 (per 100 miles
X 50 kilograms) price we quoted. Any increase in the insurance will
increase the shipping cost. To make it cost effective for you, you
may want to seek an independent insurer to supplement our schedule.
Another concern is the Customs process. When freight arrives in Los
Angeles, customs officials will randomly select and unpack cargo
for inspection. If any damage results from this procedure, our
underwriter cannot be held responsible for coverage.
Samson Air Freighters
222 Seal Drive, Suite A, Newport Beach, CA 92663
September 19, 1991
Mr. Cecil Armstrong
The Great Gem Company
14 Keller Rd
Houston, TX 77004
Dear Mr. Cecil Armstrong,
Our only reservation in transporting the jade statuary concerns the
packaging. Unlike sea transport, air freight is bound by packaging
regulations which determine what can ship by air.
Our primary concern is the size of the cargo. To ensure safe
transport of the statuary, each statue should be contained in a
palletized crate. This could create a problem since our largest
carrier, the B747F, is limited to crates that are 350 x 260 x 260
cm. in size with a maximum payload of 750 kilograms. The only
alternative is to ship the statues as indivisible items which
requires no packaging. However, we strongly discourage this because
of the statuary’s fragile nature.
You should be aware that Samson Air Freighters can only insure each
piece for $1,000,000, which is included in the $9.60 (per 100 miles
X 50 kilograms) price we quoted. Any increase in the insurance will
increase the shipping cost. To make it cost effective for you, you
may want to seek an independent insurer to supplement our schedule.
Another concern is the Customs process. When freight arrives in Los
Angeles, customs officials will randomly select and unpack cargo
for inspection. If any damage results from this procedure, our
underwriter cannot be held responsible for coverage. In order to
comply with the restrictions of our coverage, the crate dismantling
must be done by The Great Gem Company. As a precaution, SAF will
designate Los Angeles as a final destination. At that time, a
representative of The Great Gem Company must accept delivery of the
statuary. Once that transaction is completed, we will draw up a new
invoice to continue delivery to Houston.
Feel free to contact us if you have further questions.
Sincerely,
Diana West,
Assistant Director of Shipping
Samson Air Freighters
222 Seal Drive, Suite A, Newport Beach, CA 92663
September 19, 1991
Mr. Cecil Armstrong
The Great Gem Company
14 Keller Rd
Houston, TX 77004
Dear Mr. Cecil Armstrong,
Our only reservation in transporting the jade statuary
concerns the packaging. Unlike sea transport, air freight is bound
by packaging regulations which determine what can ship by air.
Our primary concern is the size of the cargo. To ensure safe
transport of the statuary, each statue should be contained in a
palletized crate. This could create a problem since our largest
carrier, the B747F, is limited to crates that are 350 x 260 x 260
cm. in size with a maximum payload of 750 kilograms. The only
alternative is to ship the statues as indivisible items which
requires no packaging. However, we strongly discourage this because
of the statuary’s fragile nature.
You should be aware that Samson Air Freighters can only insure
each piece for $1,000,000, which is included in the $9.60 (per 100
miles X 50 kilograms) price we quoted. Any increase in the
insurance will increase the shipping cost. To make it cost
effective for you, you may want to seek an independent insurer to
supplement our schedule.
Another concern is the Customs process. When freight arrives
in Los Angeles, customs officials will randomly select and unpack
cargo for inspection. If any damage results from this procedure,
our underwriter cannot be held responsible for coverage. In order
to comply with the restrictions of our coverage, the crate
dismantling must be done by The Great Gem Company. As a precaution,
SAF will designate Los Angeles as a final destination. At that
time, a representative of The Great Gem Company must accept
delivery of the statuary. Once that transaction is completed, we
will draw up a new invoice to continue delivery to Houston.
Feel free to contact us if you have further questions.
Sincerely,
Diana West,
Assistant Director of Shipping
DW:sjh
Second draft (letterBK!)
Third draft (letter)
When you replace the second draft of letter with the third draft of letter, the first
draft of letter is deleted, the second draft of letter is renamed letterBK!, and the
third draft is named letter.
To use Original Backup,
1 Press Setup.
Or
j Select Setup from the File menu.
2 Select Environment (2), then select Backup Options (1).
3 Select Original Document Backup (2).
4 Type y to use the Original Backup option.
5 Press Exit to exit the Setup: Backup menu.
Copying Files
Because disks can become corrupted, resulting in lost data and unusable files
(both original and backup), we recommend you make backup copies of your
files.
Location of Backup Files
Original backup files are stored in the same directory as the files they back up.
Retrieving Original Backup Files
To retrieve an original backup file, use the Rename feature in List Files to
rename the backup file, then retrieve it as you would a text file.
Turning off the Original Backup option deletes the original backup file the next time you save the
document. Rename original backup files before you turn off Original Backup.
Backup, Original
31
Page 32

Backup, Timed
Timed Backup
Timed Backup is a safeguard against losing text during a power outage, machine
failure, or other computer-related problem.
You can use original and timed backup at the same time.
See Also: Save
Timed Backup is a safeguard against the loss of work due to machine failure,
power outage, or other computer-related problem.
Timed Backup backs up or makes a copy of your document at specified intervals.
Every few minutes, a “Timed Backup” message is displayed on the status line,
and the file is copied to the directory you specify in the Location of Files feature.
Timed Backup is a powerful option, but it is not a substitute for saving your files.
Timed backup files are deleted when you properly exit Corel WordPerfect.
To set Timed Backup,
1 Press Setup.
Or
j Select Setup from the File menu.
2 Select Environment (2), then select Backup Options (1).
3 Select Timed Document Backup (1).
4 Type y to back up your documents at specified intervals.
5 Enter the time interval (in minutes).
6 Press Exit to exit the Setup: Backup menu.
Notes
32 Backup, Timed
Copying Files
Because disks can become corrupted, resulting in lost data and unusable files, we
strongly recommend you make backup copies of your files.
Disks can become corrupted by static, power surges, magnets, or other computer-related problems.
Retrieving Timed Backup Files
Timed backup files are temporary files that are stored in the directory you specify
in Location of Files. If you do not specify a location, they are stored in the tmp
drive. When you exit Corel WordPerfect properly, timed backup files are
deleted.
wp_bk1.<pid> (<pid> is the Process ID number) is the name of the timed
backup file for the document on the Document 1 screen, while wp_bk2.<pid> is
the name of the timed backup file for the document on the Document 2 screen.
Page 33

Bar Code
An 11-digit ZIP Code
converted to a POSTNET bar
code
After the first backup, a document is backed up again only if you have made
changes.
To retrieve a timed backup file, go to List Files, then retrieve the file as you
would a text file.
See Also: Backup, Original; Save
You can speed mail sorting, increase delivery accuracy, and reduce postage costs
by including a POSTNET (Postal Numeric Encoding Technique) bar code with
the mailing address on your envelopes.
You create POSTNET bar codes by entering a 5-, 9-, or 11-digit ZIP Code in
the Bar Codes option of Other on the Layout menu. When you print the
envelope or document, Corel WordPerfect converts the ZIP Code into a
combination of tall and short lines called a POSTNET bar code.
Creating a POSTNET
Bar Code on an
Envelope
POSTNET bar code specifications are regulated by the U.S. Postal Service. For
the benefits of bar codes, contact the U.S. Postal Service Business Center,
Account Representative, or Postmaster in your area.
1 Press Format, then select Page (2).
Or
j Select Page from the Layout menu.
2 Select Paper Size (7).
3 Select a paper size, then select Envelope (5).
4 Press Return and select Other (4).
5 Select Bar Codes (9).
6 Enter a 5-, 9-, or 11-digit ZIP Code at the PostNet Bar Code prompt, then
press Return three times.
POSTNET Bar Codes can be inserted above the addressee line or below the last
address line.
Bar Code 33
Page 34

Adding a POSTNET Bar
Code to a Line of Text
A bar code and mailing
address on an insert
You can add a POSTNET bar code anywhere in a document. This feature is a
time-saver if you are using window envelopes to mail inserts (such as letters or
cards).
Window envelope
34 Bar Code
1 Place the cursor where you want the bar code to appear in your document.
2 Press Format, then select Other (4).
Or
j Select Other from the Layout menu.
3 Select Bar Codes (9).
Page 35

4 Enter a 5-, 9-, or 11-digit ZIP Code at the PostNet Bar Code prompt, then
press Enter three times.
Changing an Existing
Bar Code in a
Document
Notes
A bar code cannot be edited. Once it has been inserted in the document, it must
be deleted and reinserted to make any changes.
1 Place the cursor immediately to the right of the bar code or bar code block.
2 Press Backspace to delete the bar code.
You can also delete a bar code by placing the cursor immediately to the left of
the bar code and pressing Delete or by deleting [Bar Code] in the Reveal Codes
window.
If you change your mind after deleting the bar code, choose Undelete from the
Edit menu, then choose Restore.
3 Press Format, then select Other (4).
4 Select Bar Codes (9).
5 Enter a 5-, 9-, or 11-digit ZIP Code at the PostNet Bar Code prompt, then
press Enter three times.
Typing Bar Code Numbers
When you type a 9- or 11-digit ZIP code, you can include hyphens (for example,
84097-8602 or 84097-8602-81).
Printing Envelopes with Bar Codes for Mass Mailings
If you frequently do mass mailings, you can save time creating envelopes or
address blocks with bar codes by using the Merge feature. See POSTNET Bar
Codes under Merge.
Printing Address Labels
You can print address labels that contain a bar code much like printing envelopes
for mass mailings. See Labels.
Beep Options
Use the Beep Options feature if you want your computer to notify you with a
beep when certain messages are displayed on the status line.
1 Press Setup.
Or
j Select Setup from the File menu.
2 Select Environment (2), then select Beep Options (2).
3 Select an option (see the option headings under Notes below).
Beep Options 35
Page 36

4 Press y to turn on the option.
or
Press n to turn off the option.
5 Repeat steps 3 and 4 above for any other options you want to change.
6 Press Exit to exit the Setup: Beep Options menu.
Notes
Binding
Beep on Error
This option determines whether the computer will beep when an “ERROR: ...”
message appears on the status line.
Beep on Hyphenation
This option determines whether the computer will beep when Hyphenation is
on and the “Position Hyphen; Press ESC ...” message appears on the status line.
Beep on Search Failure
This option determines whether the computer will beep when the “*Not
Found*” message appears on the status line after a search.
See Also: Hyphenation; Search; Appendix E: Error Messages.
Use Binding to print two-sided documents, and to shift text to the right on oddnumbered pages and to the left on even-numbered pages.
This feature is especially helpful with printers that print in duplex (see Double-
Sided Printing under Paper Size/Type).
1 Press Print.
Or
j Select Print from the File menu.
2 Select Binding Offset (b), then enter the amount you want the text shifted.
3 Press Exit to exit the menu.
36 Binding
Page 37

Notes Changing the Default
To change the default binding offset for all new documents, use the Print
Options feature on the Setup: Initial Settings menu (see Initial Settings).
Documents previously saved with a different binding offset must be retrieved, have the binding
changed, then be saved again.
Codes
A code for binding is not inserted into your document, but it is saved with the
document. This setting remains in effect for the document until you change it
again. When you exit the current document, the Binding Offset setting on the
Print menu returns to the default for the next document.
Margin Settings
The binding offset shifts text on a page. On odd pages, the left margin is
increased by the amount entered for the binding offset and the right margin is
decreased by the same amount. On even pages, the left margin is decreased by
the amount entered for the binding offset and the right margin is increased by
the same amount. For example, if your left and right margins are set to 1˝ and
you want the text to start printing 1.5˝ from the left edge of the page, enter .5˝
as the binding offset. The right margin will then be only .5˝ wide.
Employee Information
Having established a general procedure for most daily business, we,
as an administration, feel that these policies should be published
and distributed through-out the entire company. The following
Left margin
Binding offset
should be made available to all employees and posted in clearly
visible places throughout all corporate buildings.
1. Outgoing mail should be gathered as mail is distributed.
Incoming mail should be distributed as soon as it comes in.
2. Only corporate business correspondence is to be mailed in
business letterhead envelopes. Postage for all other mail should be
paid for by the employees.
3. Any nonbusiness long distance phone calls must be paid for by
the employee upon receipt of the billing statement.
4. Employees may remain in any building until 10:00
time security personnel will ask them to leave.
5. Food may be eaten at an employee’s desk as long as any trash
is disposed of as soon as possible.
6. All cars parked in company parking lots are to be registered
with personnel. Parking guidelines generally parallel the state
laws regarding motor vehicles. No parking in red zones. No double
parking. Parallel or angle parking is permitted only where
specified. Unauthorized cars found in company lots or reserved
parking areas may be towed. Cars should be locked for the
employee’s own security and to reduce opportunity for theft.
7. Employees should use the printers and copiers and other
equipment found in their own work areas unless there is a special
need to go elsewhere.
8. Employees should find everything they need to accomplish their
work through the resources of the company. There should be no need
to bring any supplies or equipment of their own for work-related
projects. Department receptionists will order needed supplies when
requested.
Don’t forget that July 12th is our company party. Employees and
their families are invited. There will be plenty of food and soda
pop. Bring softball mitts and swimming suits. There will be lots of
games and plenty for the little children to do. Come and see Jack
Reanoy bob for apples and see Jenine get thrown in the pool. Be
sure to RSVP to Julia in HR at Ext. 734.
There will be no meeting this Friday because too many people will
Company Party
Meeting Change
P.M.
, at which
If you want the margins to be even (not including the binding offset) on both
odd and even pages, there is a formula you can follow.
1 Decide what you want your binding offset to be.
2 Divide that number by 2, then enter that number as the binding offset in the
step above.
3 Now you need to change the left and right margin settings.
4 Add the amount you entered for the binding offset to the left and right
margin settings (see Margins, Left and Right).
Binding 37
Page 38

Block, Define
These steps increase the bound edge of the page to a 1.5˝ margin (allowing .5˝
for binding) and decrease the other edge of the page to a 1˝ margin, regardless of
whether the page is odd or even.
One-Sided Documents
If you create a one-sided document, increase the left margin instead of using the
Binding feature.
Resetting
To change the binding offset back to zero, repeat steps 1 through 3 above,
entering 0 as the binding offset.
Top Binding
You can also add the binding offset to the top of the page using the Binding
Edge option (7) on the Format: Edit Paper Definition menu (see Paper
Size/Type). If you select Top (1), the binding offset you enter in step 2 above
moves the text up or down on the page.
See Also: Print, Document on Disk; Print, Document on Screen; Print
Options; Printing—General Information
Block highlights any portion of the on-screen document file. You can use the
block of text with many other features.
To define a block,
1 Move the cursor to one edge of the text you want to block.
2 Press Block to turn on the Block feature.
Or
j Select Block from the Edit menu to turn on Block.
3 Move the cursor to the opposite edge of the text to highlight it.
38 Block, Define
4 Select the feature you want to use.
Page 39

Notes Associated Features
Once a block is defined, you can do a variety of things with it. For example,
pressing Bold or Underline bolds or underlines the block of text. Pressing Font
and selecting an attribute gives the block the attribute. Pressing Save, and
entering a filename saves the block as a file.
The following features work with Block:
•
Append
•
Attributes
•
Block Protect
•
Bold
•
Capitalization (Case Conversion)
•
Center
•
Comment
•
Delete
•
Flush Right
•
Justification
•
Mark Text
•
Move
•
Print
•
Replace
•
Save
•
Search
•
Shell (Append to Clipboard, Save to Clipboard)
•
Sort
•
Spell
•
Styles
•
Switch
When you press Backspace or Delete to delete a block, you are asked to confirm
whether you want the block deleted. Type y to delete the block or n to cancel
the command.
Canceling Block
Block turns off after you perform a function. To cancel a block without
performing a function, press Block again or press Cancel.
Codes
Since codes can be included in a block, make sure you press Reveal Codes before
defining a block. This lets you see the cursor’s location in relation to existing
codes. When Block is on, a Block code [Block] in the codes portion of the
screen pinpoints the location where the block begins.
Cursor Movement
When Block is on, typing any character moves the cursor forward to the next
occurrence of that character. If the character is not found in approximately 2000
characters, the cursor remains in place and a beep sounds.
Press Return to block the text from the cursor to the end of that paragraph (the
next Hard Return code [HRt]).
Block, Define 39
Page 40

To block text in a forward or reverse direction, use the arrow keys. You can also
!Search or @Search to search for and highlight text to the end of the search
use
string.
Once you block text, you can use all of the features you normally use with a
block (see Associated Features above).
Once you block text and release the left arrow key, you can change the block size
by pressing the arrow keys. You can also use !Search or @Search to search for
and highlight text to the end of the next search string.
On-Screen Display
Blocked text usually appears on the screen in reverse video. You can change the
appearance of the block using Colors/Fonts/Attributes.
Redefining a Block
You can perform more than one function on the same block of text. For
example, to underline a block of text, and then bold the same block, press Block,
then press Go To twice.
Saving and Retrieving
Once a block has been defined, press Save and enter a filename to save the block
to a permanent file, or press Return to save the block in a temporary buffer.
If a block exists in the temporary buffer, pressing Retrieve then pressing Return
retrieves the block at the cursor. This temporary buffer is deleted when you exit
Corel WordPerfect, or when you save another block to the temporary buffer.
Block Protect
40 Block Protect
Block Protect prevents a block of text from being split between two pages.
When you work with a document in which the number of lines frequently
increases or decreases, Block Protect keeps a block of text together. You can add
and delete text from the block itself or from the document. As long as the block
is less than a page in length, it will remain together on the same page.
To protect a block,
1 Use Block to block the text you want protected. It must be less than a page
in length.
2 Press Format, then type y to confirm that you want to protect the block.
Or
j Select Protect Block from the Edit menu.
The block is protected by codes (see Codes below). If part of the protected block
must be moved to the next page, the entire block will be moved to the next page.
Page 41

Notes Block Protect and Hard Returns
Two consecutive protected blocks must be separated by at least one Soft Return
code [SRt] or Hard Return code [HRt] (see Page, Soft and Hard). If they are not
separated, the blocks are treated as one large block. To avoid these problems,
you can define blocks from character to character and exclude all Hard Return
codes when you protect blocks of text.
Block Protect vs. Conditional End of Page
Block Protect keeps a block of text together even though you may add or delete
text from the block. Conditional End of Page keeps a specific number of lines
together, such as a heading and the first two lines of a paragraph.
Codes
When you protect a block, it places a Block Protect On code [Block Pro:On] at
the beginning of the block and a Block Protect Off code [Block Pro:Off] at the
end.
Block protect codes
Even if the Block Protect On code does not come at the beginning of the line,
the entire line of text is protected.
You can cancel the block protection by deleting the codes. Deleting either code
deletes the pair.
Block Protect 41
Page 42

Cancel
Press Cancel to do any of the following:
•
Back out of a menu or status line message without saving changes.
•
Cancel a hyphenation request, forcing the word to wrap to the next line.
•
Recover up to nine levels of deleted text.
•
Turn off Block.
•
Cancel a search or macro in operation.
Notes
Backing Out of Menus and Options
To back out of a menu, press Cancel. For some menus, you must press Cancel
more than once.
To save any changes you have made, press Exit. Pressing any letter or number
that is not listed as a menu option also backs you out of a menu and saves any
changes you have made.
Help Menus
When you press Cancel in a Help menu, it displays the help screen for the
Cancel feature. Cancel does not back you out of the Help menus. Press Return
or the Space Bar to exit the Help menus.
Macros
Pressing Cancel cancels a macro in operation, but it does not cancel a macro
definition. To end a macro definition, press Macro Define. When you press
Cancel in a macro definition, it inserts the Cancel keystroke into the definition.
Recovering Text
When you press Cancel in the editing screen, a highlighted block appears in
your document and a message appears on the status line asking if you want to
restore that block.
The highlighted block contains the last text or codes you deleted from your
document and appears at the cursor. If nothing appears in the block in the
normal editing screen, you can press Cancel, press Reveal Codes, then press
Cancel again to see the codes inserted into your document.
Select Restore (1) to restore the highlighted block, or select Previous Deletion
(2). You can press Up Arrow or Down Arrow to display up to your last nine
deletions. Corel WordPerfect stores the nine previous deletions in temporary
files. These temporary files are erased when you exit Corel WordPerfect. You
can also use the Undelete and Restore features to move text in a document.
Reveal Codes
Pressing Cancel in the Reveal Codes screen does not turn off Reveal Codes. You
must press Reveal Codes.
See Also: Exit; Undelete
42 Cancel
Page 43

Capitalization
To capitalize individual characters, type the character while holding down the
Shift key. You can also use the Caps Lock key to type a group of uppercase
letters.
1 Press Caps Lock to begin typing uppercase letters.
2 Type the text.
3 Press Caps Lock again to end typing uppercase letters.
Notes
Converting Existing Text
To convert existing text to all uppercase or lowercase letters,
1 Block the text.
2 Press Switch.
Or
j Select Convert Case from the Edit menu.
3 Select Uppercase (1) or Lowercase (2).
Corel WordPerfect is case sensitive. This means that words that start with “I”
followed by an apostrophe and the first words of sentences remain capitalized
when you select lowercase. When you block the text to be converted, include the
punctuation from the end of the preceding sentence in the block to make sure
that Corel WordPerfect recognizes the first letter of a sentence. If there is no
preceding punctuation, Corel WordPerfect does not recognize the beginning of a
sentence and will not leave a capital letter.
Shift and Caps Lock
Caps Lock affects only letters A through Z. To type the characters displayed
above the numbers at the top of your keyboard, press Shift, then the number.
Small Caps
If your printer has a small caps font, you can select it using the Attributes
feature. The text you type will then be printed in the small caps font with
slightly larger letters for the letters you type in uppercase.
Status Line
When Caps Lock is on, “Pos” on the status line is displayed in all uppercase
letters.
See Also: Attributes; Block; Switch
Capitalization 43
Page 44

Cartridges/Fonts/Print Wheels
Many printers let you access additional fonts with interchangeable print
cartridges, print wheels, or downloadable font files. Cartridges/Fonts/Print
Wheels lets you mark the cartridges, soft fonts, and print wheels you plan to use
with your printer.
If you have not purchased any soft fonts, cartridges, or additional print wheels for your printer, you
do not need to go into the Cartridges/Fonts/Print Wheels menu.
1 Press Print.
Or
j Select Print from the File menu.
2 Choose Select Printer, then move the cursor to the desired printer.
You need to have already selected a printer for this feature to work.
3 Select Edit (3), then select Cartridges/Fonts/Print Wheels (4) to display a list
of font categories (built-in, cartridges, soft fonts, or print wheels) your
printer supports.
If you receive a “Printer files not found” message, Corel WordPerfect cannot find the .all file that
was used to define your printer. If you have moved the .all files since the initial installation, you
must specify the new directory where the .all files can be found. Or, if you deleted the .all files, you
must reinstall the printers.
4 Move the cursor to the type of font you want to mark (see Font Category
below), then choose Select (1) to display a list of all fonts of that type which
Corel WordPerfect supports.
If you choose Select with the Soft Fonts category highlighted, a Font Groups
screen is displayed. Move the cursor to the group which contains the font you
want to mark and choose Select (1).
5 Move the cursor to the cartridge, font, or print wheel you want to use with
your printer, then mark it as Present When Print Job Begins (*) and/or Can
be Loaded/Unloaded During Job (+) (see Marking Cartridges/Fonts/Print
below).
Important: Do not mark fonts you do not have. Corel WordPerfect does not create fonts or
provide them for you. It accesses only the font capabilities of your printer.
6 Press Exit to save the markings and return to the list of font categories.
You may need to press Exit twice to return to the list of font categories, depending on whether or not
a Font Groups screen was displayed.
You can select another font type and repeat steps 4 through 6 or press Exit to
return to the Select Printer: Edit menu. Corel WordPerfect updates the fonts
before it returns you to this screen if you have made changes in font selection.
44 Cartridges/Fonts/Print Wheels
Page 45

Notes Available
The Available column screen on the Select Printer: Cartridges/Fonts/Print
Wheels shows you the quantity available for cartridges, fonts, or print wheels.
This amount is decreased when you mark cartridges, soft fonts, or print wheels
with an asterisk (*) (see Marking Cartridges/Fonts/Print below). This keeps you
from selecting more cartridges, soft fonts, or print wheels than your printer can
accommodate.
If you change the total quantity (see Quantity below), the Available quantity is
also changed by the same amount.
Cartridges
still available. For example, if you have two slots for cartridges, but have not
yet marked any cartridges, the Available column will show “2.” Each
cartridge you mark with an asterisk (*) decreases this amount by 1.
Print Wheels
print wheels your printer still has available. Each print wheel you mark with
an asterisk (*) decreases this amount by 1.
Soft Fonts
memory still available. This amount is decreased when you mark fonts with
an asterisk (*).
Base Font
The fonts you mark using the above steps appear on all Base Font menus as long
as they match the Font Type (which is set with the Paper Size/Type feature). In
other words, if you have landscape fonts available, they will not appear on the
Base Font menus until you select a landscape paper type (see Paper Size/Type).
The printer’s built-in fonts also appear on the Base Font menus if they match
the Font Type (see Font).
Built-In
Built-In is one of the font categories on the Select Printer:
Cartridges/Fonts/Print Wheels screen for dot matrix and laser printers (not for
daisy wheel printers); however, no amount is listed under the Quantity or
Available headings. Corel WordPerfect marks all these fonts automatically to
indicate they are currently in the printer. You can unmark these fonts (see
Marking Cartridges/Fonts/Print below) if you do not want Corel WordPerfect to
access them.
Corel WordPerfect makes the built-in fonts available (includes them on the Base
Font menus) when you select a printer. Information about each printer’s builtin fonts is copied to the .prs file when you add a printer to the printer definition
list (see Printer, Select).
Downloading Soft Fonts
Soft fonts are purchased as software (on diskettes or tape), and must be sent from
your computer to your printer. This process is called “downloading” fonts.
Corel WordPerfect can download fonts in two ways. If you mark a soft font
with an asterisk (*) (see Marking Cartridges/Fonts/Print Wheels below), you will
have to initialize your printer every time you turn it on. This sends all fonts
•
The Available column for cartridges shows how many slots are
•
The Available column for print wheels gives the number of
•
The Available column for soft fonts shows the amount of
Cartridges/Fonts/Print Wheels 45
Page 46

marked with an asterisk to the printer. These fonts remain in the printer (even if
you exit Corel WordPerfect) until you turn off the printer (or until you unmark
the font, then reinitialize the printer).
If you mark a font with a plus sign (+), it will be downloaded only when it is
needed. Then it will be deleted from the printer’s memory.
After marking or unmarking fonts with asterisks and plus signs, reinitialize the
printer to make sure the proper fonts are available. If you only mark fonts with a
plus sign (no asterisks), you will not need to reinitialize your printer.
Important: Mark the fonts you have. Specify a path using the Path for Downloadable Fonts and
Printer Command Files option on the Select Printer: Edit menu (see Printer, Edit).
Font Category
This heading on the Select Printer: Cartridges/Fonts/Print Wheels screen lists
the different types of fonts available for your printer. The choices for this column
might include: Built-In, Cartridges, Print Wheels, Slot Fonts, and Soft Fonts. If
your printer only has its built-in fonts available, that is the only thing listed
under this heading.
Font Groups
If you choose Select (1) with the Soft Fonts category highlighted in step 4 above,
a Font Groups screen could be displayed (depending on your printer). You
would then need to select the font group containing the fonts you want to mark.
Once you mark fonts (see Marking Cartridges/Fonts/Print Wheels below), the font
group containing the marked fonts is displayed with a bullet (•).
Font group containing marked
fonts
46 Cartridges/Fonts/Print Wheels
Marking Cartridges/Fonts/Print Wheels
After you choose Select (1) in step 4 above, a list of available cartridges, soft
fonts, or print wheels (depending on which font category you select) is displayed.
If you selected soft fonts, you may need to select a font group before the list is
Page 47

Font name
Quantity
displayed. The list includes each font, cartridge, or print wheel name and the
quantity it represents.
In the upper-right corner of the screen, Corel WordPerfect displays the total
quantity of that type of font that your printer can support, along with the
quantity still available. In addition, if you are marking soft fonts, the number of
fonts your printer lets you mark with an asterisk (*) at one time may be
displayed.
For example, if you are marking soft fonts and your printer has 350K of
memory, the Available Quantity and the Total Quantity start at 350. As you
mark soft fonts with an asterisk (*), the Available Quantity is decreased by the
amount of memory needed by those soft fonts, while the Available number of
fonts is decreased by one for every font marked.
Depending on the printer, there may be a limit to the number of soft fonts you
can mark with an asterisk, regardless of the memory available. (This limit is
displayed in the Select Printer: Soft Fonts screen to let you know when you are
approaching the limit.) For example, if your printer lets you mark 32 fonts
(displayed under “* Fonts” in the upper right corner of the Select Printer: Soft
Fonts screen) and you mark 32 fonts, you cannot mark another font with an
asterisk (*) or a plus sign (+), even if you have memory available.
Mark the soft fonts or print wheels you have available for your printer with one
or both of two possible settings: Present When Print Job Begins (*) or Can be
Loaded/Unloaded During Job (+). Cartridges can only be marked with an
asterisk.
You can mark soft fonts until the maximum quantity (in memory or number of
fonts) is reached. Corel WordPerfect counts all fonts you mark with an asterisk
(*) when calculating the available quantity.
•
Can be Loaded/Unloaded During Print Job
Mark a print wheel with a
plus sign (+) to be prompted to change the print wheel. Mark a soft font this
way if you want it to be loaded and unloaded during a print job. Fonts
marked with a plus sign are downloaded only when needed. You cannot
mark a font with a plus sign (+) if that font is larger than the remaining
available quantity or if the “* Fonts” amount displays 0. For example, if you
Cartridges/Fonts/Print Wheels 47
Page 48

have 350K of memory and have marked 300K of fonts with an asterisk, you
cannot mark any single font that is larger than 50K with a plus sign. (You
cannot mark it because it could not be loaded that font during a print job.)
If you marked a print wheel with a plus sign and selected that font in your
document, the printer stops and your computer beeps to signal a print wheel
change. When this happens, display the Job Control screen, follow the
displayed instructions (shown next to “Action:”), then select Go (3) to
continue the print job.
If you have one print wheel you use more than any other, mark that print wheel with an
asterisk (*) (see Present When Print Job Begins below). Otherwise, you will be prompted to
insert it every time you print with that print wheel.
Some printers can load and unload soft fonts during a print job. Others can
only load fonts during a print job and unload them after the job is finished.
And still others will not let you load and unload fonts at all during a print
job. If the fonts can be loaded and unloaded, the “+ Can be
Loaded/Unloaded During Job” message appears at the bottom of the screen.
If this message does not appear, Corel WordPerfect will not let you mark any
fonts with a plus sign. In this case, the fonts you intend to use during a print
job must be present when the print job begins (marked with an asterisk).
•
Marking with Both Settings
Fonts on some printers can be marked with
both an asterisk (*) and a plus sign (+). If a font is marked with both
settings, it is considered “swappable” and Corel WordPerfect will unload it if
the space is needed in the printer’s memory to swap in another font.
Swappable fonts (those marked with an asterisk and a plus sign) are reloaded
at the end of the print job if they were swapped out during the print job.
Any fonts marked with both settings remain marked as initially present each
time Corel WordPerfect is started.
•
Present When Print Job Begins
Mark a cartridge, soft font, or print
wheel with an asterisk (*) if the cartridge is in a slot, the soft font is in the
printer memory, or the print wheel is already installed when you start a print
job. Marking a cartridge, soft font, or print wheel with this option decreases
the available quantity.
You must select the Initialize Printer option on the Print menu every time
you turn on your printer to download soft fonts marked with this option (see
Downloading Soft Fonts above).
Quantity
Quantity refers to the number of slots available for cartridges, the amount of
printer memory available for soft fonts, or the number of print wheels available.
The quantity number is preset to original printer specifications. If you have
added more memory to your printer, you can change the quantity number by
selecting Change Quantity (2) from the Select Printer: Cartridges/Fonts/Print
menu, then entering the new quantity. The largest number you can enter for the
quantity is 65535.
48 Cartridges/Fonts/Print Wheels
Page 49

Center Page
Important: Increasing the quantity of memory available for soft fonts will work properly only if
you have physically installed more memory in your printer. If you increase the quantity number
and mark more fonts than can be downloaded to your printer’s memory, documents will not print
properly when using the fonts that are not completely downloaded.
Soft Font Programs
Some third-party soft font programs have installation programs that can add
names of fonts and information about those fonts to your printer files. If you
have used such a program, the names of those fonts will appear on the Select
Printer: Soft fonts screen when you are marking fonts.
See Also: Font; Printer, Edit; Printer, Select
Center Page centers text vertically between the top and bottom margins on a
page.
30 June 1992
All Supervisors
Halva Corporation
921 Knudsen Corner
Salt Lake City, UT 84000
Dear Supervisor:
Having established a general procedure for most daily business, we
as an administration, feel that these policies should be posted in
clearly visible places throughout all corporate buildings. Please
be sure that this is taken care of in your division.
Sincerely,
Richard S. Petty
Corporate Administration
1 Press Go To, then press Up Arrow to move the cursor to the top of the page
you want to center, before any codes (see Codes below).
2 Press Format, then select Page (2).
Or
j Select Page from the Layout menu.
3 Select Center Page (1), then type y to turn on this option.
4 Press Exit to exit the Page Format menu and to return to the document.
Center Page 49
Page 50

Notes Center Lines of Text
To center individual lines of text between the left and right margins, use Center.
To center several lines of text, use Center Justification (see Justification).
Codes
Selecting Center Page (1) inserts a Center Page code [Center Pg] at the location
of the cursor.
The Center Page code is placed automatically at the top of the current page (see
Auto Code Placement).
For a block of text to be correctly centered on a page, it cannot have any extra
Hard Return codes [HRt] before or after it. Consequently, when you need to
force a page break at the end of a block of text that you want to center on a page,
you should press Hard Page instead of Return to insert a series of extra Hard
Return codes. The extra hard returns would keep the text from being centered
correctly.
Footnotes and Endnotes
You should not center a page that contains endnotes or footnotes. When you
center text on a page that contains either code, only the text is centered. The
footnote or endnote remains at the bottom of the page.
On-Screen Page
Center Page affects only the way the page is printed or displayed in View
Document. It does not change the way text is displayed on the normal editing
screen.
Uncentering a Page
Once you have turned on the Center Page option, you can turn it off for that
page by deleting the Center Page code. You can also set the Center Page entry to
No.
See Also: Block; Center Text; Justification
Center Text
50 Center Text
Use Center to center text between the left and right margins or over a particular
point in a line.
Page 51

The page displayed below shows a title centered between the left and right
margins, and several titles centered over columns of text.
Welcome New Employees
TAKE NOTE
Outgoing Mail
Only corporate
business correspondence is to be
mailed in business
letterhead envelopes. Postage for
all other mail
should be paid by
the employees.
Long Distance
Calls
Any nonbusiness
long distance phone
calls must be paid
by the employee
upon receipt of the
billing statement.
Dress Standard
All employees will
wear shoes, pants
and shirt or
dresses, while at
work or using corporate facilities.
Food in the
Work Area
Food may be eaten
at an employee’s
desk if trash is
disposed of as soon
as possible.
Please be
responsible and
remember that
personal cleanliness in the work
area is a
necessity.
Employee Parking
All cars parked in
company parking
lots are to be
registered with
personnel. Parking
guidelines generally parallel the
state laws regarding motor
vehicles. No
parking in red
zones. No double
parking. Parallel
or angle parking is
permitted only
where specified.
Unauthorized cars
found in company
lots or reserved
parking areas may
be towed. Cars
should be locked
for the employee’s
own security and to
reduce opportunity
for theft.
Employees should
use the printers,
copiers, and other
equipment in their
own work area
unless there is a
special need to go
elsewhere.
Employees should
Department
Facilities
Supplies
find everything
they need to accomplish their work
through the
resources of the
company. There
should be no need
to bring any
supplies or
equipment of their
own for workrelated projects.
Department receptionists will order
needed supplies
when requested.
Important Dates
7/3 Managers Conf.
7/8 New Emp. Mtg.
7/12 Company Party
7/23 End-user Conf.
8/17 Acc. Training
8/23 Summer Social
Company Party
Don’t forget that
July 12th is our
company party. All
employees and their
families are invited. There will
be plenty of food
and soda pop. Bring
softball mitts and
swimming suits.
There will be lots
of games and plenty
for the little
children to do.
Come and see Jack
Reanoy bob for
apples and make a
complete fool of
himself.
When you type new text, you can center a line of text between the left and right
margins.
1 Move the cursor to the left margin.
2 Press Center to move the cursor to the center of the line.
3 Type the text you want centered.
4 Press Return to end centering.
Notes
Center Code
Pressing Center inserts a Center code [Center]. Pressing Return inserts a Hard
Return code [HRt] and ends the centering. A Center code affects only the line
of text which it is on. If you insert a Center code at the beginning of a line and
type text that extends beyond that line, only the first line of that text will be
centered. The code will not affect subsequent lines of text.
A Center code takes precedence over other text. For example, if you are in the
middle of a line of text when you press Center, or if the text you are typing runs
into a Center code, on-screen text may seem to disappear. Use Reveal Codes to
view and delete the unwanted text or code.
Center vs. Justification
Center is designed to center only one line of text at a time. When you want to
center several lines of text at once, use Center Justification.
Centering at a Specific Position
You do not have to center text between margins. If the cursor is not at the left
margin and is preceded by a Tab code, or at least two spaces, pressing Center,
then typing text centers that text over the cursor position.
Center Text 51
Page 52

For example, to center text over a tab stop at position 5˝, tab to that position,
press Center, then type the text. You can center text more than once on a line if
the text is preceded by a tab, or at least two spaces. However, when you center
text at a line position, it may overlap any preceding text on-screen and when the
document is printed.
Centering Existing Text
You can center an existing line of text by moving the cursor to the beginning of
the line of text, pressing Center, then pressing Down Arrow.
This method will not work if the cursor is not at the beginning of the line when
you press Center. When the cursor is not at the beginning of the line, or two
spaces in from the beginning of a line, pressing Center centers the text to the
right of the cursor at the cursor position. This can cause the text to overlap.
Dot Leader
When centering text between margins, you can insert a dot leader from the left
margin to the beginning of the centered text by pressing Center twice.
To continue the dot leader to the right of centered text, press Flush Right twice.
You can also insert a dot leader using the Home keystrokes (see Hard Center Tab
below).
Hard Center Tab
A Hard Tab is a tab that does not change its type, even if you change the type
with the Tab Set feature. You can insert a Hard Center Tab over the next tab
stop by pressing Home, Center. Corel WordPerfect inserts a [CNTR TAB]
code in the document. To insert a Hard Center Tab with dot leaders, press
Home,Home,Center.
Pages of Text
You can use Center Page to center an entire page of text vertically.
Removing Centering
To remove centering, delete the Center code [Center].
Text in Columns
If you are centering text in columns created with the Columns feature, move to
the left margin of the column, then follow the steps given at the beginning of
this section.
If you are centering text in columns created with tabs or indents, use the method
for centering text at a specific line position described under Centering at a Specific
Position above.
See Also: Block; Center Page; Justification
52 Center Text
Page 53

Change Mode
When you create a Corel WordPerfect file, you can give access privileges (read,
write, and execute) to various users. As the creator of the document, you are
called the file owner. Only the file owner or person with superuser privileges can
change a file’s access privileges. The combined access privileges assigned to a file
are called the file’s privileges mode.
To change the privileges mode of a file,
1 Press List.
2 Move to the desired file.
3 Press Change Mode (6).
4 To modify the code, type in the new privileges.
5 Press Return to accept the new code.
6 Press Exit to return to the normal editing screen.
Notes
The Privileges Mode
You can display and change a document’s privileges mode from the List Files
screen. The sixth column of the List Files screen shows a ten-character code that
describes the user privileges, as in the example below.
drwxrwxrwx
The first character in the code shows whether a listing is a directory file.
The first “rwx” sequence shows the read (r), write (w), and execute (x) privileges
of the file owner.
The second “rwx” sequence shows the read, write, and execute privileges of the
owner’s group. (The owner’s group is the subgroup of system users to which the
file owner belongs.)
The third “rwx” sequence shows the user privileges assigned to other users on the
owner’s system.
A hyphen (-) means that the privilege indicated by the character space is not
presently assigned.
Change Mode 53
Page 54

Colors/Fonts/Attributes
Colors/Fonts/Attributes specifies how text is displayed on the screen. Depending
on the capabilities of your terminal, text can be displayed with and without
attributes. For example, you may be able to highlight bolded characters on the
screen or assign a color to underlined text. For information on printed text, see
Font.
1 Press Setup.
Or
j Select Setup from the File menu.
2 Select Display (1), then select Colors/Fonts/Attributes (1).
The screen varies according to terminals.
3 Assign a screen color or screen font to each attribute listed (see Assigning
Fonts and Colors below).
4 Press Exit twice to return to the normal editing screen.
These settings are in effect for the current editing screen only. For information
about setting them for the other editing screen, see Multiple Documents below.
All settings you select are stored in the .wp7c.set file if Corel WordPerfect is run
as root. They are in effect each time you start the program.
Notes Assigning Fonts and Colors
When you assign fonts and colors with Colors/Fonts/Attributes, you assign screen
fonts and screen colors. Options vary according to terminals. The way text
appears on the screen is independent of the way it is printed.
As you assign screen fonts and screen colors, the first column of the Setup: Fonts
menu is a list of the size and appearance attributes found on the Font key. The
last column is a sample column that shows you the result of your selections.
Between the first and last columns are columns you use to assign screen fonts or
screen colors to the list of attributes. The number and types of these columns
vary according to your terminal. The screen shown below is the Setup: Fonts
menu for most monochrome displays.
54 Colors/Fonts/Attributes
Page 55

Move your cursor to the row representing the attribute appearance you want to
change, then change the settings by pressing a letter or number.
For example, to change the Redline attribute to blinking, bolded text in the
screen above, use the Up or Down Arrows to move to the Redline line, then type
y under the Blink column and y under the Bold column. The Left and Right
Arrows move you from column to column.
To see how text with a particular attribute will appear on the screen, look at the sample column for
that attribute.
Attribute Combinations
Text can have more than one attribute at a time. For example, text can be both
bolded and italicized.
The Setup: Colors/Fonts/Attributes screen does not list all possible
combinations. It does, however, list an Other Combinations heading. Most
attribute combinations are displayed according to the Other Combinations
setting.
Multiple Documents
When you set attributes, you are setting them for the current editing screen only.
For example, if you are in the Document 6 screen, you are setting them for
Document 6. If you are in the Document 9 screen, you are setting them only
for Document 9.
Check the “Doc” heading on the status line to find out which editing screen you
are in. To move to another document, press Home, followed by the number key
of the document you want to switch to. For example, pressing Home-9 takes
you to the Setup screen for document 9.
To copy settings from one editing screen to another, go to the Setup: Fonts
screen by following the steps at the beginning of this reference section. Press
Switch to switch setup screens, press Move, type y, then enter the document
number to copy the setting from.
For example, to copy settings from the Document 2 screen to the Document 5
screen, go to the Setup: Fonts screen for Document 2 by following the steps at
the beginning of this reference section. Press Switch while in the Document 2
setup screen to switch to the setup screen of Document 5. Press Move, type y,
then type 2 followed by Return.
Colors/Fonts/Attributes 55
Page 56

Columns, Display
When you display columns on the screen side-by-side, it can slow the speed with
which Corel WordPerfect reformats text as you edit a document.
You can speed up display of columns by turning off Side-by-side Column
Display. Columns are separated by page breaks, instead of appearing side-byside, as in the following example.
1 Press Setup, then select Display (1).
Or
j Select Setup from the File menu, then select Display.
2 Select Edit-Screen Options (6).
3 Select Side-by-side Column Display (7), then type n to turn off this option.
4 Press Exit to return to your document.
Notes
56 Columns, Display
Automatic Reformatting
When Side-by-side Column Display is off, Corel WordPerfect reformats
columnar text with the same speed it uses to reformat any text. You can also
increase the speed of editing in columns by turning off Automatic Reformatting.
Text usually reformats each time certain keys are pressed. When this feature is
turned off, the screen is only reformatted as you move the cursor through text. It
does not reformat each time you press certain keys. To turn this option off,
repeat steps 1 and 2 above, select Automatically Format and Rewrite (1), then
type n. Press Exit to return to your document.
Cursor Movement
If columns are not displayed side-by-side on the screen, you can use the same
cursor movements to move the cursor through each column, and from column
to column (see Moving from Column to Column under Columns, Parallel and
Columns, Newspaper).
When columns are not displayed side-by-side on the screen, the Up Arrow and
the Down Arrow keys move from column to column each time the cursor crosses
a page break. They do not remain in the same column.
Page 57

Printing
Newspaper and parallel columns are always printed side-by-side on a page,
regardless of the type of on-screen display you select. You can see how they will
appear in print by using View Document.
See Also: Columns, Newspaper; Columns, Parallel
Columns, Newspaper
Newspaper-style columns let text flow continuously from column to column on
a page, and are often used to create newsletters, like the one shown below.
Issue 24
Only corporate
business correspondence is to be
mailed in business
letterhead envelopes. Postage for
all other mail
should be paid by
the employees.
Any nonbusiness
long distance phone
calls must be paid
by the employee
upon receipt of the
billing statement.
Dress Standard
All employees will
wear shoes, pants
and shirt or
dresses, while at
work or using corporate facilities.
Food may be eaten
at an employee’s
desk if trash is
disposed of as soon
as possible.
Please be
Welcome New Employees
Halva Corporate Newsletter
TAKE NOTE
Outgoing Mail
Long Distance
Calls
Food in the
Work Area
responsible and
remember that
personal cleanliness in the work
area is a
necessity.
Employee Parking
All cars parked in
company parking
lots are to be
registered with
personnel. Parking
guidelines generally parallel the
state laws regarding motor
vehicles. No
parking in red
zones. No double
parking. Parallel
or angle parking is
permitted only
where specified.
Unauthorized cars
found in company
lots or reserved
parking areas may
be towed. Cars
should be locked
for the employee’s
own security and to
reduce opportunity
for theft.
Employees should
use the printers,
copiers, and other
equipment in their
own work area
Department
Facilities
unless there is a
special need to go
elsewhere.
Employees should
find everything
they need to accomplish their work
through the
resources of the
company. There
should be no need
to bring any
supplies or
equipment of their
own for workrelated projects.
Department receptionists will order
needed supplies
when requested.
7/3 Managers Conf.
7/8 New Emp. Mtg.
7/12 Company Party
7/23 End-user Conf.
8/17 Acc. Training
8/23 Summer Social
Don’t forget that
July 12th is our
company party. All
employees and their
families are invited. There will
be plenty of food
June 1992
Supplies
Important Dates
Company Party
Column width and spacing is automatically calculated when you specify
margins and the number of equal-sized columns on a page. You can also use
Columns to put existing text into columns.
To define and create newspaper columns,
1 Move the cursor to where you want the columns to begin.
Or
j Select Columns from the Layout menu.
2 Press Columns/Table, then select Columns (1).
3 Select Define (3).
4 Enter the number of columns and the margins you want (see Number and
Margins below), then press Return or Exit to return to your document with
the Columns menu displayed on the status line.
5 Select On (1) to turn on the Columns feature (see Turning Columns On and
Off below).
Columns, Newspaper 57
Page 58

6 Type the text you want in the columns, if necessary. Press Hard Page when
you want to end a column and start a new one before reaching the bottom of
a page (see Text Flow in Newspaper Columns below).
7 Press Columns/Table, select Columns (1), then select Off (2) to turn off the
Columns feature.
Or
j Select Columns from the Layout menu, then select Off.
Notes Defining Columns
If you want columns in a document, use the Columns/Definition feature to
specify the number of columns and the margins you want. When you define
columns, a Column Definition code [Col Def:column type; #columns;margins]is
inserted in your document. Column type is the type of columns defined.
#columns is the number of columns. Margins indicates the left and right margins
for each column. The definition is in effect until another column definition is
inserted.
You can turn on Columns only after they have been defined. When Columns are
on, “Col #” is displayed before the document number at the status line. # is the
number of the current column.
You can have multiple column definitions in a document, but Columns must be
off before you can create a new definition.
Distance Between Columns
If you do not specify a distance between columns, the distance will be
approximately one-half inch. To specify a different distance, select Distance
Between Columns (3) from the text Column Definition menu, then enter a new
measurement.
Changing the left and right margin settings of columns can also affect the
distance between columns.
Editing in Newspaper Columns
The cursor keys that move up and down scroll all columns at the same time.
These cursor keys include the Up Arrow, Down Arrow, Home,Up Arrow,
Home,Down Arrow, Page Up, and Page Down.
The delete keys work inside a single column. For example, if you use Delete to
End of Page, only the text from the cursor to the bottom of the current column
is deleted.
Use Move within a single column to cut or copy a sentence. Use Block with
Move to move an entire column of text. Block a column, press Move, select
Block (1), then select a move option. When using move with Newspaper
columns, do not select Tabular Column (2), because this option does not let you
retrieve the moved text correctly.
58 Columns, Newspaper
Page 59

Features
You can use columns with several other features such as graphics text boxes and
headers. You cannot use columns in footnotes, endnotes, or tables.
To include a table in a column, create the table in a graphics box (see Table, Create).
Margins
Once you select the number of columns, equal columns are created according to
your current margin setting. These settings are displayed in the text Column
Definition menu under Margins. If you do not want equal columns, or you
need to change the displayed column sizes, select Margins (4) on the Text
Column Definition menu. Enter a new measurement for each setting, or press
Return to skip a displayed setting.
Changing column margins does not change the left and right margin settings of
the document. Make sure the left margin of the first column corresponds to the
current left margin setting for the page, and the right margin of the last column
corresponds to the current right margin setting for the page. When you place
graphic images in columns, problems can occur if these settings do not
correspond.
Moving from Column to Column
To move the cursor from column to column,
•
Press Go To, then press Right Arrow to move one column to the right, or
press Left Arrow to move one column to the left.
•
Press Go To, Home, Left or Right Arrow to move to the first or last
column on a page.
•
Press Go To, then press Up Arrow or Down Arrow to move the cursor to
the top or bottom of the current column.
Newspaper vs. Parallel Columns
The default column style is newspaper-style. You can also create parallel columns
in which blocks of text are held together side-by-side on a page. Text does not
flow from column to column in parallel columns (see Columns, Parallel and
Table, Format Columns and Cells).
Number
The default number of columns is two. To change the number on the Text
Column Definition menu, select Number of Columns (2), then enter the
number of columns you want across a page (up to 24 are possible). If you have
already entered a column definition, you can change the number of newspaper
columns by placing the cursor immediately after the previous Column
Definition code [Col Def:column type;#columns;margins] and redefining the
columns. The columns will adjust automatically. You can then delete the
previous Column Definition code.
Removing Columns
If you create columns and then want to delete them, you can return your text to
normal format by deleting the Column Definition code [Col Def:column
type;#columns;margins]. This can be done in Reveal Codes or in the normal
Columns, Newspaper 59
Page 60

editing screen. The Hard Page codes [HPg] remain and must be deleted
manually. To delete one set of columns, delete the [Col On] or [Col Off ] codes.
If a previous column definition exists in a document when you delete a column
definition, the codes within the column definition remain. The existing
columns are formatted according to the previous column definition.
If you have several sets of columns in your document and want to delete only
one set, do not delete the Column Definition code. Delete the Column On [Col
On] or Column Off [Col Off ] code for that set.
Text Flow in Newspaper Columns
When the text in a newspaper column reaches the bottom of a page, a Soft Page
code [SPg] is automatically inserted and the text moves to the top of the next
column on the page. At the end of the last column on a page, a Soft Page break
is inserted and the cursor moves to the beginning of the next page.
To end a column before the bottom of a page, press Hard Page to insert a Hard Page
code [HPg]. This moves the cursor to thenext column. In the last column on a page,
press Hard Page to move the cursor to the first column on the next page.
To display columns side-by-side, use the current column display selection in
Setup (see Columns, Display).
Turning Columns On and Off
Columns can be turned on before or after text has been entered. For example,
you can turn on Columns anywhere after a Column Definition code, then turn
off Columns where you want the columns to end. Hard page breaks between
the [Col On] and [Col Off] codes end the current column of text and begin a
new one.
See Also: Columns, Display; Columns, Parallel; Table, Create
60 Columns, Newspaper
Page 61

Columns, Parallel
Use parallel columns for unequal blocks of text that do not flow to the next
column. Do not use tabs, indents, or newspaper columns.
HALVA International
Product Quantity Date Comments
File Cabinets 14 8/1/90 Need to reorder in
Executive Desks 22 8/1/90 Need to order at
Light Tables 8 8/1/90 Need 4 more by
Linotype Machines 2 8/1/90 Good for at least
Magazine Stands 1 8/1/90 Could use but do
Office Chairs 55 8/1/90 Records show two
Personal Computers 35 8/1/90 Need to order at
Surge Protectors 40 8/1/90 Good quantity--
Wastebaskets 40 8/1/90 Need 25 more--10
Office Inventory
September.
least 15 more.
December.
another year.
not have to have
one more.
more--need to
locate.
least 10 more.
haven’t needed any
in the past year.
immediately, 15
more before
January.
This same format can also be created using the Tables feature (see Table, Create).
To define and create parallel columns,
1 Move the cursor to where you want the columns to begin.
2 Press Columns/Table, then select Columns (1).
Or
j Select Columns from the Layout menu.
3 Select Define (3).
4 Select Type (1) to display the choice of columns at the status line, then select
the type of parallel columns you want (see Parallel vs. Parallel with Block
Protect below).
5 Enter the number and margins of the columns you want (see Number and
Margins below), then press Return or Exit to return to the document with
the Columns menu displayed on your status line.
6 Select On (1) to turn on the Columns feature.
7 Type the text (see Entering Text in Parallel Columns below). Press Hard
Page when you want to end a column and start a new one.
8 Press Columns/Table, select Columns (1), then select Off (2) to turn off the
Columns feature.
Or
j Select Columns from the Layout menu, then select Off.
Columns, Parallel
61
Page 62

Notes Defining Columns
Use Columns to specify the number and size of columns.
When you define Parallel columns, a Column Definition code [Col Def:column
type;#columns;margins] is inserted in your document. When you turn on
columns, a Column On code [Col On] is inserted. After you enter the text you
want in the columns, turn off columns. Text between the [Col On] and [Col
Off] codes is in columnar format.
If you turn on Columns in existing text, the remaining text in the document
from the cursor forward will be formatted in the current columns. It can,
however, be confusing in parallel columns. For example, if your first parallel
column is only one inch wide, all the remaining text in your document will be
formatted with a one-inch width.
To insert a group of parallel columns into an existing document, turn on
Columns, then turn off Columns. This inserts a Column On code [Col on] and
a Column Off code [Col off]. The format of the subsequent text returns to
normal. You can then move the cursor between the Column On and Column
Off codes, and insert the new text you want in columns.
Distance Between Columns
The distance between columns is automatically calculated unless you enter a
Distance Between Columns. To set your own distance, select Distance Between
Columns (3) from the text Column Definition menu, then enter a new
measurement.
Changing the left and right margin settings of columns can also affect the
distance between columns.
Editing in Parallel Columns
With the exception of using Move, editing text in parallel columns works the
same as it does in newspaper columns (see Columns, Newspaper).
To edit parallel columns, select Move to move the columns. When you want to
move sets of parallel columns, edit the columns with Reveal Codes on.
Typing a set of parallel columns across a page inserts a Column On code [Col
On] and a Column Off code [Col Off ] at the beginning and end of the set.
When you move a set of parallel columns to another place in the same file, you
must block both the Column On and Column Off codes and move them with
the text. Without the Column On and Column Off codes, the text in parallel
columns is separated by a series of Hard Page codes [HPg]. It displays and prints
as a series of separate pages.
When you use Block Protect, a Block Protect On code [Block Pro:On] and a
Block Protect Off code [Block Pro:Off] are inserted at the beginning and at the
end of each set, next to the Column On and Off codes. When you want to
move sets of parallel columns that have been created with Block Protect on, you
must also move the Block Protect codes.
62 Columns, Parallel
Page 63

Entering Text in Parallel Columns
When you first enter text in parallel columns, type the text you want in the first
column, then press Hard Page to move to the next column. Press Hard Page to
continue moving the cursor from column to column across the page. When you
reach the last column on the page, pressing Hard Page starts a new set of
columns, which places you in the first column of a new page in your document.
It also inserts an extra Hard Return code [HRt] so that each separate set of
columns will be separated by an extra space. If you want your sets of columns to
be single-spaced on a page, you must delete the Hard Return code [HRt]
between each set of columns.
Features
You can use columns with other features such as graphics text boxes, headers,
and footers. You cannot include columns in footnotes, endnotes, or tables.
To include a table in a column, create the table in a graphics box (see Table, Create).
Margins
Once you select the number of columns, settings for equal columns are
calculated automatically. These settings are displayed in the Text Column
Definition menu under Margins. If you do not want equal columns, or you
want to change the displayed column sizes, select Margins (4) on the Text
Column Definition menu. Enter a new measurement for each setting, or press
Return to skip over a displayed setting.
To change the column margins for parallel columns, enter a new parallel column
definition directly after your existing one and delete the old code. The new
column margins take effect, and the existing text is formatted in the new column
margins. You can also change the number of columns, but it will reformat the
existing text. For example, when two columns are combined into one column,
the text in those columns is also combined.
Changing the margins for your columns does not change the left and right
margin settings of your document. Make sure the left margin of the first column
corresponds to the current left margin setting for the page, and the right margin
of the last column corresponds to the current right margin setting for the page.
When you place graphic images in columns, problems can occur if these settings
do not correspond (see Graphics, Define a Box).
Moving from Column to Column
To move the cursor from column to column, once you have typed text,
•
Press Go To, then press Right Arrow to move one column to the right, or
Left Arrow to move one column to the left.
•
Press Go To, Home, Left or Right Arrow to move to the first or last
column on a page.
•
Press Go To, then press Up Arrow or Down Arrow to move the cursor to
the top or bottom of the current column.
Columns, Parallel 63
Page 64

Number
In the default setting, Corel WordPerfect creates two columns on each page
within the existing margins in your document. To change the number of
columns on the Text Column Definition menu, select Number of Columns (2),
then enter the number of columns you want across a page.
The maximum number of columns you can create is 24. If you enter more
columns than can fit within your margins, you will get an error message. If this
happens, you can reduce the distance between columns (see Distance Between
Columns above).
Parallel vs. Newspaper
In parallel columns, blocks of text are held together side-by-side on a page. You
can also create newspaper-style columns, where text moves down the first
column to the bottom of the page, then moves to the top of the next column (see
Columns, Newspaper).
Parallel vs. Parallel with Block Protect
When you create parallel columns, you can select Parallel (2) or Parallel with
Block Protect (3). Using Parallel, a single parallel column can be longer than
one page.
In Parallel with Block Protect, each set of columns is held together on one page
(unless the text in one of the columns is longer than a page). This is useful when
typing such things as inventories where you want to keep sets of items together.
Removing Columns
If you create columns and then want to delete them, you can return your text to
normal format by deleting the Column Definition code [Col Def:column
type;#columns;margins] from Reveal Codes or in the normal editing screen.
When you delete a column definition, all the codes that go with the column
definition are deleted. The Hard Page codes [HPg] remain and must be deleted
manually. To delete one set of columns, delete the [Col On] or [Col Off ] codes.
If a previous column definition exists in a document when you delete a column
definition, the codes that go with the previous column definition remain and the
existing columns are formatted according to the previous column definition.
If you have several sets of columns in a document but want to delete only one
set, do not delete the Column Definition code. Delete the Column On [Col
On] code and Column Off [Col Off ] code for that set.
See Also: Columns, Display; Columns, Newspaper
64 Columns, Parallel
Page 65

Compose
Use Compose to access characters not found on your keyboard. A list of these
characters is found in the Corel WordPerfect Character Sets (see Appendix P).
1 Press Compose.
Or
j Select Characters from the Font menu.
Pressing Ctrl-v displays a “Key =” prompt at the bottom of the screen; the keys
you press in steps 2 through 4 below are displayed. Pressing Ctrl-2 displays no
prompt and the keys you press do not appear on the screen. However, both
keystrokes perform the same function in the normal editing screen.
2 Type the number of the character set containing the character you want to
create.
3 Type a comma (,).
or
Press Return.
4 Enter the number of the character you want to create.
For example, to create Æ (character number 36 in Corel WordPerfect Character
Set 1), press Compose, then enter 1,36.
Notes
Characters on the Screen
Not all characters in the character sets can be displayed on the editing screen.
Some are represented by a tilde or other default character. Use View Document
to see how the characters will appear when printed.
Compose with Limited Characters
If you use Compose to enter a character from a Corel WordPerfect Character Set
into a long document name, macro description, graphics caption, or other
situation where the number of characters is limited, you may not be able to enter
as many characters as if you did not use any Compose characters.
Do not use any Compose characters in a UNIX filename. Many of these characters are not valid.
Ctrl-v
Press Ctrl-v to access Compose from the normal editing window. However, if
you press Ctrl-v in Window Edit structures such as comments and document
summaries, or in Line Edit structures such as macro descriptions and other
document summary fields, the “Key =” prompt will not be displayed.
In the Macro Editor press Ctrl-2 instead if Ctrl-v.
Digraphs, Symbols, and Diacritics
You can use Compose to access some of the common digraphs and diacritics
from the Corel WordPerfect Character Sets without typing the character set or
character numbers. After pressing Compose, type one character followed by
another character. You do not need to type a comma between the two characters
Compose 65
Page 66

or press Return after typing the characters. You can type either character in the
pair first.
Diacritics
•
Diacritics are marks used with characters to represent a certain
phonetic value. Accessing diacritics is not as specific as accessing digraphs
and symbols. Examples of some diacritics are listed below. Try the diacritics
with the character of your choice, or use the Corel WordPerfect Character
Set number.
Mark Example Result
Acute 'i í
Caron vz ž
Cedilla ,c ç
Centered Dot :l l•
Circumflex ^a â
Crossbar -t -t
Dot Above .c c˙
Grave ‘e è
Macron _u u¯
Ogonek ;a a˛
Ring Above @a å
Slash /o ø
Stroke \l ł
Tilde ˜n ñ
Umlaut “u ü
•
Digraphs and Symbols
The following are some of the digraphs and
symbols that can be created with Compose:
Type Character Result
AE [1,36] Æ
ae [1,37] æ
IJ [1,138] IJ
ij [1,139] ij
OE [1,166] Œ
oe [1,167] œ
ox [4,24] ¤
ss [1,23] ß
L- [4,11] £
P
[4,5] 
<< [4,9] «
>> [4,10] »
Y= [4,12] ¥
Pt [4,13] Pt
c/ [4,19] ¢
+- [6,1] ±
<= [6,2]
>= [6,3]
== [6,14]
66 Conditional End of Page
Page 67

Type Character Result
˜˜ [6,13]
/= [6,99]
tm [4,41] ™
sm [4,42]
ro [4,22] ®
co [4,23] ©
rx [4,43]
/2 [4,17] ½
/4 [4,18] ¼
*. [4,3] ·
** [4,0] •
*o [4,45]
*O [4,1]
ao [1,35] å
f- [4,14] ƒ
a= [4,15] ª
o= [4,16] º
?? [4,8] ¿
!! [4,7] ¡
n- [4,33] –
m- [4,34] —
-- [4,34] —
Keyboard Mapping
You can “map” characters you frequently use to a specific key (or keys) on the
keyboard. Use Compose with Keyboard Layout to map these characters.
Printable Characters
If your printer can print graphics, you can print every character in the Corel
WordPerfect Character Sets (see Appendix P). If your printer does not have a
specific character, the character is created with the .drs (driver resource) file and
then printed as a graphic image. With diacritics, often only the diacritical mark
must be created graphically.
If your printer cannot print graphics, some characters from the Character Sets
will not print. See Printer Program, Customize Substitute Fonts to find out how
you can increase the number of characters you can print as text.
See Also: Keyboard Layout; Printer Program, Customize Substitute Fonts;
Appendix P
SM
Conditional End of Page
Use Conditional End of Page to keep titles and subsequent paragraphs together.
This protects a specified number of lines from being split between pages.
Conditional End of Page 67
Page 68

In the document below, the paragraph title is separated from the paragraph by a
page break.
Page break
Paragraph
Page break
Paragraph
Title
In the document below, Conditional End of Page keeps the title and paragraph
on the same page.
Title
Before you use Conditional End of Page, determine the number of lines you
want to keep together.
1 Move the cursor to the line immediately above the lines you want kept
together (even if there is text on that line).
2 Press Format, then select Other (4).
Or
j Select Other from the Layout menu.
3 Select Conditional End of Page (2).
4 Enter the number of lines to keep together.
5 Press Exit to return to the document.
Notes
68 Convert Program
Codes
Places a Conditional End of Page code Cndl EOP:#] in your document, where #
is the number of lines to be held together. A soft page break is inserted instead
of splitting the protected lines. To separate protected lines, press Hard Page.
Page 69

Convert Program
Conditional End of Page vs. Block Protect
Conditional End of Page protects a specific number of lines from a certain point
forward. Block Protect protects a block of text.
Line Spacing
When entering the number of lines to be protected, consider any blank lines that
will result from double- or triple-spaced text. For example, to keep a heading
and the first line of a paragraph together in double-spaced text, enter 4 and not 2
as the number of lines to protect.
The Corel WordPerfect Convert Program (cvt) converts files from selected
programs to Corel WordPerfect, and Corel WordPerfect files to other programs.
To convert a file to ASCII format (with no word-processing codes), use Text
In/Out.
Command Line Convert
Notes
Corel WordPerfect 8c for UNIX uses a command line format to convert files
from the UNIX command line.
To use the Convert Utility,
1 Make sure the Convert Utility (cvt) is in your path (the Installation Program
copies it to the shbin directory).
2 Enter cvt [-ohi] input output type
The table below gives examples of the conversion process, using the Convert
Utility.
Input Filename Convert Command Output Filename and File Type
doc.in cvt doc.in doc.out
wp8c
doc2.in cvt -i doc2.in
doc2.out ndif
Options
Three flags are available. The -h flag displays a help screen which describes the
usage of cvt. This screen also appears if cvt is called without arguments.
The -i flag specifies the ISO Latin-1 character set. If -i is not specified, cvt uses
the extended ASCII character set.
The -o flag overwrites existing output files. If -o is not specified, and the output
file already exists, nothing will be converted or written to the output file.
doc.out
(Corel WordPerfect 8c file)
doc2.out
(Navy DIF file)
Convert Program 69
Page 70

Auto-Detection
The Convert Utility automatically detects the input file type. You only need to
specify the output file type in the type argument.
If the Convert Utility detects a file it cannot convert, the output file will not be
created, and cvt will return an error message to the UNIX shell. Because Corel
WordPerfect 8c calls cvt for file conversions, cvt cannot generate error messages.
Output File Conversion Types
The type argument specifies the format of the output file. The table below
shows the abbreviation of each output file type.
Abbreviation Output File Type
asc 7-bit ASCII
asci 8-bit Extended ASCII
dw40 DisplayWrite
mm37 Multimate
ndif Navy DIF Standard
rft IBM
fft IBM
®
®
wd40 Microsoft
wp42 WordPerfect
wp50 WordPerfect
wp51 Corel
ws33 WordStar
®
4.0
®
Advantage II
DCA Revisable-Form-Text
DCA Final-Form-Text
®
Word 4.0
®
Corporation’s WordPerfect 4.2
®
®
Corporation’s WordPerfect 5.0
WordPerfect 5.1
®
3.3
See Also: Document Conversion; Retrieve; Text In/Out
Corel®Versions
70 Corel Versions
®
Corel®Versions®is the solution to the problem of trying to control and track
multiple copies of the same file. Instead of trying to keep track of all your
updates to a file by saving new versions of it under different file names, Corel
Versions lets you save the changes you have made to each successive version of
your file. Each version is archived to its own directory, or the directory of your
choice, on any read/write drive, including hard drives and disks.
Corel Versions lists all your archived files in a history list, allowing you to
retrieve any archived file if you need a previous version. Corel Versions also lets
you compare any two files to see the text differences between them.
With Corel Versions you can
•
Archive previous versions of your files
•
Retrieve any archived version of a file
•
View any archived version of a file
•
Compare archived files to see the differences between them
Page 71

Cross-Reference
•
Attach meaningful information to each archived version that can be viewed
in the document history window
•
Track multiple users of a common file
•
Delete any archived file from the history list
•
Specify how many versions to keep in the document history list (when the
number is reached the oldest version is discarded), or keep all of them
•
Protect a specific archived version from being discarded from the history list
by using the permanent option
Corel Versions can also be used on a network when a group will work on the
same files. Each saved version displays the name of the user who archived it.
For more information on how to use Corel Versions, see Corel WordPerfect’s
online Help.
Cross-references are often used in legal documents, research papers, or other
documents to refer the reader to a page number, table number, or footnote
number.
Cross-references
Despite advice to the contrary, Metcalf has always maintained that
employees should be given direction instead of management. To that
end, he has worked to give employees a voice in both their job
description and the goals of this company.
Maximizing the Organization
However, in all the attention to employees, the goal to provide
quality merchandise at discount prices (see figure 4) continues to
give purpose and direction to the company.
As indicated in the Operating Expenses table (again, see page 2),
that goal contributes to the recent venture into retail outlets.
After the opening of several retail stores in 1990, sales increased
by 50% in the last quarter. However, as demonstrated by the table
figures, operating expenses were often more than twice those of the
third quarter.
Operating Expenses
1990
Expense Quarter Quarter Change
Fourth Third
Use Cross-Reference to marks references and targets. After editing the document,
generate to update the cross-references.
Cross-Reference 71
Page 72

Cross-references consist of:
•
Reference
•
Target
•
Target name
The reference is the location from which you are referring. It is where you create
the text and numbers that send a reader to other parts of the document. The
examples shown at the beginning of this section are references.
The target is the location to which you refer the reader. In the examples shown
above, the targets are where you look after you read the information.
The target name is a unique identifier that ties references and targets together.
When you generate or compile your cross-references, the target name matches
references and targets.
The target name is only used during generation. It is not printed, and is only displayed in Reveal
Codes.
To create a cross-reference,
•
Mark the references and targets and include a target name.
•
Generate the cross-references.
To mark the reference and target in one operation,
1 Move the cursor to where you want to create the reference.
2 Type any introductory text you want to include, then press the Space Bar to
add a space between the introductory text and the location of the reference
(see Introductory Text below).
3 Press Mark Text, then select Cross-Ref (1).
Or
j Select Cross-Reference from the Mark Menu.
4 Select Mark Both Reference and Target (3) to begin marking the reference
and target.
Or
j Select Both from the Cross-Reference submenu.
5 Select the type of reference you want to use (see Reference Types below).
6 Move the cursor to a position immediately after the target, then press
Return.
Make sure the cursor is after the target by checking Reveal Codes.
7 Enter a target name (see Target Name below).
8 If necessary, finish typing the introductory text for the reference.
9 Repeat the steps above, marking all references and targets in your document.
10 Press Mark Text, then select Generate (6).
Or
j Select Generate from the Mark menu.
72 Cross-Reference
Page 73

11 Select Generate Tables, Indexes, Cross-References, etc. (5), then type y to
generate.
The last cross-references generated are the cross-references that are printed. You
should generate the cross-references before you print the document to ensure
that cross-references are correct. For a more detailed explanation of Generate,
see Generate.
Notes
Introductory Text
Corel WordPerfect inserts a number, letter, or character at the spot of the
reference when the cross-references are generated. If you want introductory text
that explains the number or letter, you must type the text.
The only exceptions to this rule occur if you reference graphics box numbers or
page numbers. For graphics box numbers, Corel WordPerfect inserts the
Caption Number Style before the box number. If the Caption Number Style
includes text, the text appears when the cross-reference is generated. For more
information about Caption Number Styles, see Graphics Options.
For page numbers, Corel WordPerfect inserts the Page Number Style. If the
Page Number Style includes text, the text appears when the cross-reference is
generated. See Page Numbering.
Mark Reference Only
You can create the reference before the target is created.
To mark only the reference,
1 Move the cursor to the position where you want to create the reference.
2 Type any introductory text you want to include, then press the Space Bar to
add a space between the introductory text and the location of the reference
(see Introductory Text above).
3 Press Mark Text, then select Cross-Ref (1).
Or
j Select Cross-Reference from the Mark menu.
4 Select Mark Reference (1) to begin marking the reference.
Or
j Select Reference from the Cross-Reference submenu.
5 Select the type of reference you want to use (see Reference Types below).
6 Enter a target name.
7 If necessary, finish typing the introductory phrase for the reference.
Repeat the steps above for additional references you want to mark separately.
When you mark a reference, [Ref(target name):type ] can be seen in Reveal
Codes.
A question mark (?) appears in place of the reference number. Once you mark
targets and generate cross-references, the question mark is replaced by the correct
information (see Mark Target Only below).
Cross-Reference 73
Page 74

Mark Target Only
If you marked or plan to mark a reference separately and want to create a target,
you can mark the target separately.
To mark only a target,
1 Move the cursor to a position immediately after the target.
Use Reveal Codes to be sure of the cursor location.
2 Press Mark Text, then select Cross-Ref (1).
Or
j Select Cross-Reference from the Mark menu.
3 Select Mark Target (2) to mark the target.
Or
j Select Target from the Cross-Reference submenu.
4 Enter a target name. The target name should be the same as the target name
for the reference (see Target Name below).
Repeat the steps above for all targets you want to mark separately. When you
mark a target, [Target (target name)] can be seen in Reveal Codes.
If you marked all your references and targets, you are ready to generate the crossreferences.
To generate the cross-references,
1 Press Mark Text.
2 Select Generate (6).
3 Select Generate Tables ... (5), then type y.
Master Documents
If your document is extremely long, you can use Master Document to divide it
into smaller files. You can still generate cross-references which include any
references and targets marked in subdocuments.
Multiple Cross-References
You can create two types of multiple cross-references. The first type crossreferences the same target with one or more reference types. The second type
cross-references one or more targets with the same reference type.
74 Cross-Reference
Page 75

Cross-reference
To create the first type, mark a reference for each different reference type. You
only need one target. For example, in the following cross-reference mark two
references, a page number reference and a graphics box reference.
The Next Fifty Years
While the recent upswing in the growth of HALVA International is a
welcome indicator, there are also potential problems that need to
be addressed.
However, if these needs are met, the company can look forward to a
bright and exciting future through the decade of the 1990’s and
beyond.
Expanding Markets
From oriental rugs to imported jewelry, HALVA International has
always provided a variety of merchandise to its customers.
However, the variety of products has often been limited to those
items that are a known quantity.
Recent trends indicate, however, that there is profit to be made in
areas such as oriental furniture and music boxes. In fact, our
research indicates that music boxes may become a long-term,
profitable investment (see page 4, figure 2).
Expanding Resources
You must mark the target once if both references use the same target name. The
target can be marked in the same operation as one of the references, or separate
from both of the references.
To create the second kind of cross-reference, you must mark the reference once,
but mark each target separately. The targets should have the same target name.
For example, in the following cross-reference you should mark one page number
reference.
Cross-reference
In this report, the past, present, and future status of HALVA
International are reviewed (see pages 4, 10, 12), with an emphasis
on these characteristics as being vital to the continued survival
of the company.
The European Connection
The year was 1939, and the rumors of war had become a nightmare of
reality. With the transportation of goods between many countries
blocked, and the lines of economic communication virtually severed,
intercontinental business was at a standstill.
"Suddenly, the entire face of economics changed to a survival
industry. Manufacturing resources were transformed overnight into
a war machine. Sacrifice of conveniences became the test of civil
loyalty."
It was an awkward, if not impossible, time for the birth of
an import/export business. But, then, Bryan Metcalf was no
ordinary individual.
The Roots of Mail Order
Cross-Reference 75
Page 76

You should mark a target on each page you refer to. Y\ou can mark one of the
targets in the same operation as the reference, but you must mark at least two
targets separately. When you generate, the cross-references will be separated by a
comma and a space.
Reference Types
You can reference page numbers, paragraph/outline numbers, footnote numbers,
endnote numbers, and graphics box numbers. If you cross-reference a graphics
box number, you must also select the type of graphics box you want to crossreference.
To mark a target for most of these items, move the cursor to the immediate right
of the code that represents that item, then mark the target. For example, mark a
paragraph number by moving the cursor to the immediate right of the paragraph
number code you want to cross-reference, then mark the target.
You can mark the target with Reveal Codes on to make sure the cursor location is correct.
The following are exceptions:
•
If you mark a page number, move to the text on the page that you want to
cross-reference, then mark the target. Make sure you mark the target within
the text. This ensures that the cross-reference will be correct even if the text
is moved to a different page.
•
To mark a page number for a footnote or endnote, display the footnote or
endnote in its editing screen, Footnote (1) or Endnote (2), Edit (2), note
number) before marking the target.
To mark a page number for an endnote, you must generate endnotes for the page number to
appear correctly (see Generate).
•
To mark a page number for a graphics box, place the target in the graphics
box caption. If the box “bumps,” the correct page number is still referenced.
•
If your reference is located in a graphics box caption, a header, or a footer,
you cannot mark the reference and the target in the same operation. You
must mark the reference and target separately (see Mark Reference Only and
Mark Target Only above).
Target Name
The Target Name “ties” the reference and target together. When Corel
WordPerfect generates cross-references, it looks for matching target names, then
creates the cross-reference.
The target names must be an exact match. For example, if you type “Bird” at
the reference and mistakenly type “Birds” at the target, the two will not match,
and Corel WordPerfect cannot create the correct cross-reference.
Target names, however, are not case specific. “BIRD” and “bird” are considered
the same.
76 Cross-Reference
Page 77

Cursor Movement
Update Cross-References
The last cross-references generated are the cross-references that are printed. You should
generate the cross-references before you print the document, so cross-references will be
correct. For a more detailed explanation of Generate, see Generate.
See Also: Generate
The cursor is the on-screen box that indicates where you are in a document.
Use cursor movement keys to move a character, a word, a screen, or a page at a
time. You can also move to either edge of the screen or to the top or bottom of
your document.
Notes
Codes
As you move the cursor through text, it also moves through codes. If you press
Left Arrow or Right Arrow and the cursor does not appear to move, it is
probably moving through codes. Use Reveal Codes to display the codes on the
screen as you move the cursor through the document.
Cursor Appearance
The cursor is usually displayed on the screen as a small blinking box, but may
differ depending on your terminal.
Cursor Movement Keystrokes
The following table lists the keystrokes you can use to move the cursor through
text in a document.
Location Cursor Keys
Left One Character Left Arrow
Right One Character Right Arrow
Left One Word Word Left
Right One Word Word Right
Left Side of Screen Home,Left Arrow
Right Side of Screen Home,Right Arrow
Far Left of Line (even when
the line extends beyond the
left edge of the screen)
Far Right of Line (even
when the line extends
beyond the right edge of
the screen)
Up One Line Up Arrow
Home,Home,Left Arrow
Home,Home,Right Arrow or End
Cursor Movement 77
Page 78

Location Cursor Keys
Down One Line Down Arrow
Top of Screen (then up one
screen at a time)
Bottom of Screen (then
forward one screen at a time)
Home,Up Arrow or Minus (–) on the
number keypad
Home,Down Arrow or Plus (+) on the
number keypad
First Line on the Previous Page Page Up
Up One Paragraph Ctrl-Up Arrow
Down One Paragraph Ctrl-Down Arrow
First Line on the Next Page Page Down
Beginning of a Document
Home,Home,Up Arrow
(after any formatting codes)
Beginning of a Document
Home,Home,Home,Up Arrow
(before any formatting codes)
End of a Document (after
Home,Home,Down Arrow
any formatting codes)
Cursor Movement Pattern
As you move the cursor up or down in a document, the cursor retains its current
horizontal position. For example, if the cursor is at Position 4.5˝ on one line, it
stays at Position 4.5˝ in all the lines it moves through. If they are shorter than
4.5˝ long, the cursor moves to the right edge of the line.
Escape
Use Escape to move the cursor a specific number of characters, lines, or pages.
Press Escape, type a number, then select the cursor control key you want
repeated.
Go To
Use Go To to move the cursor to a specific character or page, the top or bottom
of the current page, a different column, or back to its original position.
See Also: Go To; Repeat Value; Reveal Codes
78 Cursor Movement
Page 79

Date
Samson Air Freighters
222 Seal Drive, Suite A, Newport Beach, CA 92663
Thursday, September 19, 1991
Mr. Cecil Armstrong
The Great Gem Company
14 Keller Rd
Houston, TX 77004
Dear Mr. Cecil Armstrong,
Our only reservation in transporting the jade statuary
concerns the packaging. Unlike sea transport, air freight is bound
by packaging regulations which determine what can ship by air.
Our primary concern is the size of the cargo. To ensure safe
transport of the statuary, each statue should be contained in a
palletized crate. This could create a problem since our largest
carrier, the B747F, is limited to crates that are 350 x 260 x 260
cm. in size with a maximum payload of 750 kilograms. The only
alternative is to ship the statues as indivisible items which
requires no packaging. However, we strongly discourage this because
of the statuary’s fragile nature.
You should be aware that Samson Air Freighters can only insure
Samson Air Freighters
222 Seal Drive, Suite A, Newport Beach, CA 92663
September 19, 1991
Mr. Cecil Armstrong
The Great Gem Company
14 Keller Rd
Houston, TX 77004
Dear Mr. Cecil Armstrong,
Our only reservation in transporting the jade statuary
concerns the packaging. Unlike sea transport, air freight is bound
by packaging regulations which determine what can ship by air.
Our primary concern is the size of the cargo. To ensure safe
transport of the statuary, each statue should be contained in a
palletized crate. This could create a problem since our largest
carrier, the B747F, is limited to crates that are 350 x 260 x 260
cm. in size with a maximum payload of 750 kilograms. The only
alternative is to ship the statues as indivisible items which
requires no packaging. However, we strongly discourage this because
of the statuary’s fragile nature.
You should be aware that Samson Air Freighters can only insure
Date format
Date inserts the current date as text or as a code that is replaced by the current
date each time you retrieve or print that document.
You can select one of the three formats.
Samson Air Freighters
222 Seal Drive, Suite A, Newport Beach, CA 92663
Mr. Cecil Armstrong
The Great Gem Company
14 Keller Rd
Houston, TX 77004
Dear Mr. Cecil Armstrong,
Our only reservation in transporting the jade statuary
concerns the packaging. Unlike sea transport, air freight is bound
by packaging regulations which determine what can ship by air.
Our primary concern is the size of the cargo. To ensure safe
transport of the statuary, each statue should be contained in a
palletized crate. This could create a problem since our largest
carrier, the B747F, is limited to crates that are 350 x 260 x 260
cm. in size with a maximum payload of 750 kilograms. The only
alternative is to ship the statues as indivisible items which
requires no packaging. However, we strongly discourage this because
of the statuary’s fragile nature.
You should be aware that Samson Air Freighters can only insure
09/19/91
To use Date,
1 Move the cursor to the place where you want the date inserted.
2 Press Date/Outline to display the Date/Outline menu on the status line.
3 Select an option to insert the current date or a Date code into your text (see
Date Text or Date Code below).
Or
Notes Date Code
Selecting Date Code (2) from the Date/Outline menu inserts a Date code at the
cursor position. In the normal editing screen and when the document is printed,
the Date code is replaced by the current date. Each time you retrieve the
document at a later date, the Date code is updated to reflect the current date.
j Select a Date option from the Tools menu.
Date 79
Page 80

Numbers
Date elements
You can see the code in Reveal Codes. It is displayed as [Date:format] where format
represents the format in which thedate will be printed (see Date Format below).
Date Format
Normally, the date is inserted as month day, year (November 19, 1991). You can
change the format to other formats. For example, November 19, 1991 can also
be printed as: 19 November, 1991; Sun Nov 19, 1991; or 11/19/91 (Sunday).
A date can also include the time, single words, or phrases.
To change the date format, select Date Format (3) from the Date/Outline menu.
Enter a new date format, then press Exit to return to your document.
The numbers 0 through 9 on the date format screen represent different ways the
parts of the date and time can be written. You can include words, spaces, and
other punctuation with these numbers to create a date format.
Format Display
3 1, 4 March 15, 1990
3 1, 4 — 8:90 March 15, 1990 — 10:55am
DATE: 2/1/5 (6) DATE: 3/15/90 (Tuesday)
TIME: 8:90 TIME: 10:55am
Inserting the percent sign (%) before a format number adds a zero to any
number that is less than ten or abbreviates the names of the months and days.
Format Display
2/1/5 3/6/90
%2/%1/5 03/06/90
3 1, 4 (6) November 21, 1990 (Monday)
%3. 1, 4 (%6) Nov. 21, 1990 (Mon)
Inserting the dollar sign ($) before a format number adds a space to any number
that is less than ten, and abbreviates the names of the months and days.
Format Display
2/1/5 3/6/90
$2/$1/5 3/ 6/90
80 Date
Page 81

The month names, day names, and their abbreviations are determined by a
language resource file (wp.lrs) provided with Corel WordPerfect. To change the
month and day names or their abbreviations, edit the wp.lrs file (see Language
Resource File).
Changing the date format affects only those date codes which are inserted after
the format has been changed. This lets you insert different date formats in a
document.
Any changes made to the date format are erased when you exit Corel
WordPerfect.
To change the date format permanently,
1 Press Setup.
2 Select Initial Settings (3).
3 Select Date Format (2).
4 Enter a new format.
5 Press Exit to save your changes and return to the normal editing screen (see
Initial Settings).
Date Text
Selecting Date Text (1) from the Date/Outline menu inserts the current date at
the cursor as text (March 18, 1991). The way the date is written is determined
by the current date format (see Date Format above).
Language
If a language code is in effect at the Date code, the text of the date and the date
format corresponds with the language code. To change the language being used,
change the language code (see Language).
You can also change the way the month and day names and their abbreviations
are written in a specific language by editing the language resource file (see
Language Resource File).
Merge Files
You can include a {DATE} command in a primary merge file. Corel
WordPerfect inserts the current date when you perform the merge. Move the
cursor to the place in the file where you want the code inserted, press Merge
Codes, select More (6), type d to move to the {DATE} code, then press Return
(see Merge).
Wrong Date and Time
Corel WordPerfect does not set the date and time. If your system clock is
incorrect, contact your system administrator.
See Also: Initial Settings; Language; Language Resource File; Merge Codes
Date 81
Page 82

Delete Codes
Codes determine how your text looks on the screen and the printed document.
However, these codes are not shown in the normal editing screen.
When you run into problems with on-screen text, you can move through the text
in the Reveal Codes screen and delete any unwanted codes.
1 Press Reveal Codes
Or
j Select Reveal Codes from the Edit menu.
The cursor is displayed in the normal editing screen. It is highlighted in the
screen which displays text accompanied by codes (see Reveal Codes).
2 Move the cursor to a code using any of the cursor keys or Search (see
Searching for Codes below).
3 Press Delete to delete the code at the cursor.
4 Press Reveal Codes again to return to the normal editing screen.
Or
j Select Reveal Codes from the Edit menu.
Notes Normal Editing Screen
You can delete codes while in the normal editing screen. When you use Delete
or Backspace to delete text in the normal editing screen, you are usually asked to
confirm the deletion of any codes.
Using any deletion method other than Delete and Backspace usually deletes any
codes within the deleted text. For example, most codes are deleted when you use
Delete Word, Delete to End of Line, or Delete to End of Page. Most codes are
also deleted when you use Block to block text and delete it.
Corel WordPerfect, however, keeps the attributes of text the same unless you
change them. If you block only one of the two codes in a paired code (bold,
underline) and delete the block, Corel WordPerfect inserts the necessary code to
keep the bolded text bolded, or the underlined text underlined (see Attributes).
If you delete codes by mistake, you can restore them using Undelete.
Searching for Codes
To delete multiple occurrences of unwanted codes from your text, press !Search
@Search, press the keys used for a specific feature, then press !Search again to
or
begin the search. The cursor moves to the right of the first occurrence of the
code. Press Backspace to delete it.
For example, to search for a left or right margin setting press
Format, select Line (1), then select Margins (6) to insert a Left/Right Margin
code [L/R Mar] in the Search string. You cannot press
Mar] to search for the Left/Right Margin code. You must use the necessary
keystrokes to insert the code into the search string (see Search).
To search for the second code in a set of paired codes, insert both codes in the
pair into the search string and delete the first code. For example, to search for
!Search, press
!Search, then type [L/R
82 Delete Codes
Page 83

Delete Files
the Bold Off code [bold], press !Search, press Bold twice to insert a pair of bold
codes ([BOLD][bold]) into the search string, press Left Arrow to move to the
immediate right of the Bold On code [BOLD], press Backspace to delete it,
then press
Replace can also search for unwanted codes and delete them. If you do not enter
a replacement string, the code you search for is deleted when you use Replace.
See Also: Replace; Reveal Codes; Search
Once you delete a file, Corel WordPerfect cannot restore that file.
To delete files,
1 Use List to display an on-screen listing of the files in a directory (see List
2 Use one of the Delete features as described in Notes below.
!Search to begin the search.
Files).
Or
j Select List Files from the File menu.
Notes
Deleting a Single File
To delete a file on a displayed file list, use the cursor keys or Name Search to
move to the file, select Delete (2), then type y.
Deleting All the Files in a Directory
Files are divided into groups called directories. When a list of files is displayed
on-screen, the name of the directory being listed is displayed at the top center of
the screen. The names of any subdirectories within that directory appear
alphabetically at the first of the list, with a <DIR> to the right of each directory
name.
When a list of the files in a directory is displayed, you can delete all the files in
that directory by pressing Mark Text or Home,* to mark all the files with an
asterisk (*), selecting Delete (2), then typing y twice. Because the deleted files
will be erased, you are asked twice to confirm whether you want to delete the
marked files.
You cannot delete a directory until all the files in it have been deleted. Once a
directory is empty, you can highlight the empty directory, select Delete (2), and
type y to delete it (see Directories).
Deleting Several Files in a Directory
To delete several files at the same time, move the cursor to each file you want to
delete, type an asterisk (*) to mark each file, then select Delete (2). Type y twice,
and the marked files are deleted.
After pressing Delete or selecting Delete (2) to delete the marked files, if you
answer No by typing n, you are asked if you want to delete the file on which the
Delete Files 83
Page 84

cursor is resting even if it is not marked. You can delete that file by typing y or
skip over it by pressing any other key.
You can unmark a marked file by moving the cursor to the filename and typing
an asterisk (*) again. Before selecting Delete (2), you can mark or unmark any
file on the list. Even after selecting Delete, you can press Cancel at any time
before completing the deletion process.
Restoring Lost Files
If you delete an important file, you can try to restore it using a file recovery
program. See your computer dealer for more information.
Short Cuts
You can display a specific group of files in a directory and then use Mark Text to
mark and delete the files as described in Deleting All the Files in a Directory
above.
When you press List, the name of the current directory is displayed, followed by
*. This character causes all the files in that directory to be displayed
(usr/work/*).
For example, if a directory contains several files with the .ltr extension, changing
the * to *.ltr (usr/work/*.ltr), then pressing Return will display only the .ltr files.
You can then press Mark Text to mark all the .ltr files, select Delete (2), then
type y twice to delete them.
See Also: Directories; List Files
Delete Text
Notes
84 Delete Text
There are many ways you can delete part of a document.
Codes
When you use Delete and Backspace to delete text in the normal editing screen,
you can delete both text and codes (see Appendix B: Codes for a list of codes).
When you use any other deletion keystroke, any unseen codes within the text are
automatically deleted (see Deletion Keystrokes below).
Deleting Using Block
Block makes it easy to delete large portions of text in a document. You can use
Move or Block and the cursor keys to block several paragraphs or pages of text,
and then delete the blocked text by pressing Backspace or Delete and typing y.
When you delete a block of text, any codes within that text are also deleted.
Press Reveal Codes before you block the text you are going to delete to avoid
deleting any important codes.
Page 85

Directories
Deletion Keystrokes
The following table lists keystrokes to delete text.
Deletion Keystrokes
Character to the left of the cursor Backspace
Character at the cursor Delete
Word at the cursor Delete Word
From the cursor to the end of the line Delete to End of Line
From the cursor to the end of the page Delete to End of Page, y
Blocked text Backspace, y or Delete, y
Delete from cursor to beginning of word Home,Backspace
Delete from cursor to end of word Home,Delete
Restoring Deletions
If you delete text by mistake, it is not immediately lost. Corel WordPerfect
stores your last nine deletions. Pressing Cancel displays your last deletion on the
screen and highlights it. You can select Restore (1) to insert the currently
displayed deletion into your text at the cursor, select Previous Deletion (2), or
press Up Arrow or Down Arrow to continue displaying up to your last nine
deletions (see Undelete).
A directory is a special file that stores the names of a group of files, groups the
files, and keeps them organized. (You can organize your directories with List
Files.)
To create a new directory while in Corel WordPerfect,
1 Press List.
Or
j Select List Files from the File menu.
2 Type an equal sign (=).
or
Press Return, then select Other Directory (7) from the List Files menu.
3 Enter the name of a new directory (see Pathnames below).
4 Type y to create the directory.
Notes
Default Directory
Each time you start Corel WordPerfect, a directory is selected to save and
retrieve document files. This directory is called the default directory. When you
save or retrieve a document file, enter a filename to save the file to, or retrieve the
file from the default directory.
You can find out which directory is the default by pressing List. The directory
displayed at the bottom left of the screen is the default directory.
Directories 85
Page 86

If you specify a documents directory using Location of Files in Setup, that
directory is used as the default directory. If you do not specify a documents
directory, the default directory is the working directory from which you entered
Corel WordPerfect.
•
Changing the Default
To change the default directory, follow the steps
above for creating a directory, but enter the name of a directory that already
exists instead of the name of a new directory. This changes the default while
you are in Corel WordPerfect.
However, if you exit and restart Corel WordPerfect, the default returns to
the working directory from which you entered Corel WordPerfect.
Deleting a Directory
You can delete a directory from the List Files screen, but the directory must be
empty before you can delete it.
1 Move the cursor to an empty directory (<DIR> appears in the Size column
to indicate directories) in the List Files screen.
2 Select Delete (2).
or
Press Delete.
3 Type y to delete the directory.
If the directory contains any files, you will receive an error message indicating the
directory is not empty. Look in the directory (see Look), to delete or move all
files in the directory, then repeat steps 1 through 3 above.
List Files
List Files lets you display all or some of the files in a directory. (A directory has
<DIR> in the Size column of the List Files screen.)
The file size, date, and time it was created (or last revised) are displayed with
each filename, and kept in the directory.
Pathnames
A full pathname includes subdirectory names. Each name is separated by a slash
(/). For example, “/usr/home” refers to the home directory in /usr.
“/usr/home/test” refers to the test subdirectory (or file) in the home directory in
/usr.
To specify a document filename that is not found in the default directory, enter
the full pathname, including the filename. For example, to retrieve a document
named letter from your home directory, enter /usr/home/letter at the
“Document to be Retrieved:” prompt.
See Also: List Files
86 Directories
Page 87

Display Pitch
When you change the base font, text can wrap differently on the screen,
depending on the size of the font. The width of the on-screen characters does
not change, but the number of characters that fit on one line varies.
In the screen below, notice where the text wraps.
Here is the same text. Now notice where the text wraps.
The only difference between the two screens is that the first screen represents text
that will be printed in 10pt text, while the second screen represents text that will
be printed in 18pt text. Since 18pt text is taller and wider than 10pt text, fewer
18pt characters can fit on one line.
Corel WordPerfect does not change the size of the characters on the screen, but
it accurately represents the number of characters that will fit on one line of the
page when the text is printed. It calculates the printed width of characters and
spaces (taken from information in the printer files) to determine how many
characters will fit on the line of text.
Corel WordPerfect may run across certain codes (Indents, Tabs, Table Margins,
or Column Margins) that require an absolute measurement, a code that is
represented by a specific distance (1.5˝), not a specific number of characters.
When Corel WordPerfect encounters these codes, it cannot use character
Display Pitch 87
Page 88

information from the printer files to determine the correct on-screen
representation of the code. Instead, it uses the display pitch.
Display pitch determines the amount of space (in width) one on-screen character
or space represents. It helps Corel WordPerfect display codes that require an
absolute measurement. For example, if the display pitch is set to .1˝, a 1˝
indent occupies the same space as 10 characters or spaces (10 x .1 = 1).
When the display pitch measurement is decreased, the document on the screen
expands horizontally. If you use the 1˝ indent from the example above and
change the display pitch to .05˝, the indent occupies the same space on the
screen as 20 characters or spaces (20 x .05 = 1).
Corel WordPerfect is initially set to adjust the display pitch automatically. You
can, however, enter your own display pitch setting. Since Corel WordPerfect
uses the display pitch for only the few codes mentioned above, change the
display pitch when you want to change the space allotted on the screen to these
codes.
Display Pitch only affects the way text is displayed on the screen. It does not
affect the way text is printed. To see how a document will appear when it prints,
use View Document.
To set the display pitch,
1 Press Format, then select Document (3).
Or
j Select Document from the Layout menu.
2 Select Display Pitch (1).
3 Press y to set the display pitch automatically.
or
Press n to enter a display pitch.
4 Enter a display pitch width. The initial (default) setting is .1˝.
If Corel WordPerfect is setting the display pitch automatically, the display pitch you enter has no
effect.
5 Press Exit to return to the document.
The setting made with this option is in effect for the entire document. When
you save the document, the display pitch is saved with it. When you exit the
document, the display pitch setting is returned to Automatic.
Notes
88 Display Pitch
Codes
Unlike most other features, a display pitch change does not insert a code into
your document. The setting can be changed anywhere in your document and is
in effect for the entire document.
Page 89

Display Setup
Columns
Display Pitch makes columns more readable on the screen. For example, if text
in columns overlaps, you can decrease the display pitch to increase the amount of
space between columns.
Rewrite
If there are no absolute measurement codes in the portion of the document on
the screen, selecting Rewrite resets Display Pitch and adjusts the text.
Tables
Display Pitch can increase or decrease the amount of on-screen space allotted to
table cells. The setting only affects the width of the cells and does not affect the
amount of text that can be entered in a cell.
See Also: Display Setup
Display Setup lets you change the way text and menus are displayed on-screen.
This can help you simplify document creation and editing. Each option is
described in its own section (Colors/Fonts/Attributes; Edit-Screen Options;
Graphics Screen Type; Menu Options; View Document, Options).
The options in Display Setup do not affect printed text.
1 Press Setup.
Or
j Select Setup from the File menu.
2 Select Display (1).
3 Select an option from the Setup: Display menu, then make the necessary
changes.
4 Press Exit to return to the normal editing screen.
Selections made with any of the Setup: Display menu options are stored in the
.wp8c.set file and remain in effect each time you start Corel WordPerfect.
Notes
Options
Options are described in Colors/Fonts/Attributes; Edit-Screen Options;
Graphics Screen Type; Menu Options; and View Document, Options in
Reference.
Display Setup 89
Page 90

Document Comments
Document Comments lets you add comments or reminders to your text that do
not print as part of the document. These comments appear in a box when your
document is displayed on the screen.
Comments have several purposes. For example, you can use comments to
remind you of changes you need to make to a document (information that needs
to be added when it becomes available). You can include suggested test
questions on a class-study paper as comments. Also, people who are reading the
same file can list their suggested changes as comments so the original text of the
document remains intact.
To create a comment,
1 Press Text In/Out, then select Comment (4).
2 Select Create (1).
An empty comments box is displayed.
90 Document Comments
3 Type the text of your comment (see Entering and Editing Text below).
4 Press Exit to save the comment and return to your document.
The comment is inserted at the cursor.
Page 91

Notes Codes
Creating a comment inserts a Comment code [Comment] in your text.
When comments are hidden (see Hiding Comments below), you can find them
by using
A comment may artificially separate a line of text when it does not appear at the
beginning of the line, as in the following example.
One line of text
A comment is considered a single code. When you use the arrow keys to move
through text, you can pass over the comment with a single keystroke. The
comment does not affect the line of printed text.
Columns and Comments
When you include a comment in text that is formatted in parallel or newspaper
columns, the comment does not appear on-screen. If you format existing text
into newspaper columns, any comments within the text will not appear. The
comments will reappear when you remove the Column codes (see Turning
Columns On and Off under Columns, Newspaper).
Editing an Existing Comment
To edit an existing comment, move the cursor after the comment, press Text/In
Out, select Comment (4), then select Edit (2).
Corel WordPerfect initially searches backward for a comment. If it cannot find a
comment, it searches forward. Corel WordPerfect then displays the first
comment it finds on the screen in the comments box. You can edit the
comment and press Exit to save your changes.
Entering and Editing Text
You can use the standard cursor movement and deletion keys to edit the text of a
comment. You can also use Bold and Underline to emphasize text, or add other
characters with Compose.
You cannot use the Speller, Thesaurus, or Search in the Comments screen.
!Search and @Search to search for the Comment code (see Search).
Document Comments 91
Page 92

Document Compare
Hiding Comments
You can edit a document without having on-screen space taken up by
comments. You can keep comments from being displayed on the screen by
turning off Comments Display in Setup (see Edit-Screen Options).
Printing Comments
The Comment code and the comment itself do not effect printed text. If you
want to print the comment, you must change it into text. With the cursor after
the comment, press Text/In Out, select Comment (4), then select Convert to
Text (3).
Corel WordPerfect searches backward from the cursor. If it does not find a
comment, it searches forward. Corel WordPerfect then changes the first
comment it finds to text. Since the characters in the comment are inserted
immediately at the comment code, you may need to add spacing and
punctuation before and after the comment to blend it correctly into the existing
text.
See Also: Edit-Screen Options
Document Compare compares two different versions of the same document and
notes the differences between the documents.
Differences are marked phrase-by-phrase, not word-by-word (see Phrases below).
When you compare two documents, keep a copy of both documents stored on
disk before making the comparison. You can then exit the new compared
document without saving it and retrieve either original.
To compare a document on the screen with another document on disk,
1 Press Mark Text, then select Generate (6).
Or
j Select Generate from the Mark menu.
2 Select Compare Screen and Disk Documents and Add Redline and Strikeout
(2).
You are asked to enter the name of a document on disk you want to compare
with the on-screen document. If the on-screen document has been saved, its
filename is displayed as the default choice.
3 If you made changes to the document on screen and you want to compare it
with the original which is still on disk, press Return.
or
Enter the name of a document on disk.
While the two documents are being compared, a counter appears at the left end
of the status line.
92 Document Compare
Page 93

When the comparison is finished, the differences are marked and the cursor is
placed at the beginning of the on-screen document (see Difference Indicators
below).
Notes
Difference Indicators
Document Compare uses several indicators to mark differences.
Difference Indicators
Added Phrases A pair of Redline codes [REDLN][redln] are placed
around the phrase that was added.
Deleted Phrases A pair of Strikeout codes [STKOUT][stkout] are placed
around the phrase that was deleted.
Moved Phrases Inserts THE FOLLOWING TEXT WAS MOVED
before and THE PRECEDING TEXT WAS MOVED
after the phrase that was moved.
Redline and Strikeout codes do not appear in the normal editing screen. They
can be seen in Reveal Codes.
Normally, Strikeout puts a dash through text (see Redline/Strikeout). You have
three options as to how redlined text appears in print (see Redline Method under
Document Format).
The appearance of Redline and Strikeout text in the normal editing screen
depends on your monitor and display card capabilities. If Redline and Strikeout
markings are not displayed in your normal editing screen, you can modify your
settings for the Redline and Strikeout attributes under Colors/Fonts/Attributes
in Setup so that you can clearly identify these passages (see
Colors/Fonts/Attributes).
You can also display the marked passages by printing the document, or by
previewing the printed text in View Document, as in the following example.
Added phrase
Deleted phrase
Moved phrase
Document Compare 93
Page 94

Phrases
The phrases used as a basis of comparison are, as much as possible, the sentences
in your document (not the words).
A phrase is defined as the text found between two phrase markers. The phrase
markers Corel WordPerfect uses are those items which normally punctuate
sentences, including punctuation marks (period, comma, exclamation point,
question mark, colon, semicolon), Hard Return codes [HRt], Hard Page codes
[HPg], Footnote codes [Footnote:#;[Note Num] text], Endnote codes
[Endnote:#;[Note Num] text], and the end of the document.
Corel WordPerfect starts from the first word in your document and compares
the text in the two documents until it reaches a phrase marker. If any change has
been made, Corel WordPerfect marks the phrase, noting the change (see
Difference Indicators above). Corel WordPerfect then starts the comparison again
from that point. It continues to the end of the document, marking from phrase
marker to phrase marker.
The comparison includes any text found within the footnotes, endnotes, or
tables in your document. If a change has been made to the text included in these
features, it is marked.
The comparison does not include changes made to text found within graphics
boxes, headers, or footers.
Because punctuation can vary, the phrases that Corel WordPerfect marks may
not always correspond to the grammatical sentences in your document. For
example, to cut down on the length of the phrases being used for comparison,
Corel WordPerfect considers any group of words that end with commas as a
phrase. Grammatically, such a group is an incomplete sentence.
Undoing the Comparison
After making a comparison, you can restore the document on the screen to its
original format before the comparison was made. To have Corel WordPerfect
remove the markings, press Mark Text, select Generate (6), select Remove
Redline Markings and Strikeout Text from Document (1), then type y.
This deletes Redline codes, Strikeout codes (and the text found between them),
and the notations around the moved phrases (see Difference Indicators above).
This also deletes any Redline codes and Strikeout codes (and the text found in
between them) that were already a part of your document before you made the
comparison. It leaves the cursor at the end of the document.
If many differences have been marked, restoring a compared document to its
original state can become complicated. When you compare two documents you
want to keep, have a copy of both documents stored on disk before making the
comparison. You can then exit the new compared document without saving it
and retrieve either original.
See Also: Redline/Strikeout
94 Document Compare
Page 95

Document Conversion, Versions 4.2 and 5.0 to 8c
To convert a document created in WordPerfect Corporation’s WordPerfect 4.2,
retrieve the 4.2 document. The “Document Conversion in Progress” message
will be displayed. All text and most codes will be converted to 8c. If the
document displays correctly, save it in 8c and your document conversion will be
complete.
To convert a 5.0 or 5.1 document, retrieve the document, then save it. All codes
should convert.
To convert a 8c document to 5.1 or 5.0, see Text In/Out.
Changing Fonts
When you retrieve a 4.2 document, 4.2 fonts are automatically converted to a 8c
equivalent.
Fonts converted from 4.2 to 5.0 used a now-obsolete standard.crs file. If your
5.0 document used any of these fonts, play the font macro to convert them to
8c.
1 Turn on Reveal Codes to locate any fonts that need to be changed.
2 Press Macro.
3 At the macro prompt, type the full path to the wplib directory (where
font.wpm is located), followed by font (for example, /usr/.wprc/wplib/font).
4 Press Return.
5 From the Base Font menu, cursor up or down to highlight the font you want
to replace.
6 Press Return.
The macro cannot distinguish between different point sizes of a scalable font. For example, a CG
Times 12-point font and a CG Times 14-point font are treated as the same font. The macro will
replace both. After the message, you are asked whether you want to continue with replacement of
the font.
7 Select Y to return to the Base Font Menu. Cursor up or down to highlight
the replacement font, and press Return. Enter the point size and press
Return.
or
Press N to stop the macro and return to the normal editing screen.
The macro replaces the fonts in your document, and will show how many fonts
were replaced.
See Also: Convert Program; Document Conversion, Versions 8c to 5.1; Text
In/Out
Document Conversion, Versions 4.2 and 5.0 to 8c 95
Page 96

Document Conversion, Versions 8c to 5.1
The easiest way to convert a Corel WordPerfect 8c document to WordPerfect
Corporation’s WordPerfect 5.1 is to use the Save as option on the Text In/Out
key. If the document displays correctly as it is, you do not need to do anything.
See Also: Convert Program; Document Conversion, Versions 4.2 and 5.1 to 8c;
Text In/Out
Document Format
Use Document Format options to change the format of the current document.
For example, use Document Format to change the initial base font or create a
document summary.
1 Press Format, then select Document (3).
Or
j Select Document from the Layout menu.
2 Select an option, then make any necessary changes in your document (see
Notes below).
3 Press Exit to return to the normal editing screen.
Notes
Display Pitch
To change the space on the screen allotted to tabs, indents, or column “gutters,”
change the display pitch.
Changing the display pitch does not insert a code in your text, but it does affect
the on-screen appearance of the text.
Initial Base Font
When you select a printer, an initial base font is assigned with that printer (see
Printer, Select). The Initial Base Font lets you override the setting for a
document. The font you select using this option becomes the base font for that
document, unless you change it using Base Font (see Font).
Initial Codes
The Initial Codes option lets you display the codes you inserted in the Initial
Codes option on the Setup: Initial Settings menu. You can then edit these
settings or insert new codes for a document. Any changes you make using this
option override the settings made on the Setup: Initial Settings menu. The
method for entering the codes is the same for both features (see Initial Codes).
The codes you enter using this option do not appear in the document, but they
take effect from the beginning of the document, and remain in effect until you
enter new codes in the document to change them.
96 Document Format
Page 97

Document Summary
Redline Method
This feature determines how Redline marking is displayed on the printed page
for a specific document (see Redline/Strikeout).
Select Printer Dependent (1), Left (2), or Alternating (3).
Printer Dependent marks the redlined text according to the redline string in the
.prs file, as displayed when you print printer.tst (see Font). Left marks redlined
text with a vertical bar ( ) in the left margin. Alternating marks redlined text
with a vertical bar in the left margin for even-numbered pages and in the right
margin for odd-numbered pages.
When you select Left or Alternating, you are asked for a redline character that
will be placed in the margins. The default is the vertical bar (
the redline character by typing the character or by using Compose to enter any
character in the Corel WordPerfect character sets.
Summary
Select Summary (5) to create or edit a document summary for the document you
are creating.
See Also: Display Pitch; Document Summary; Font; Initial Settings;
Redline/Strikeout
Document Summary helps you organize and quickly locate your documents.
If you create a document summary for a file, that summary is the first thing
which is displayed when you look at the contents of the file in List Files. When
you look through a directory that contains many large files, you do not have to
scroll through the text of each file to determine the file’s contents.
Instead, you are presented with a brief on-screen summary of each document
which shows the author, the typist, and a short description of the file’s contents.
). You can enter
Long filename
Information about the file
UNIX name
Document Summary 97
Page 98

If you use Long Document Name, the summary lists the UNIX name and the
long name for each document (see Name and Type below).
The document summary also displays the date the summary was created and the
latest revision date of the document. If you make different revisions of the same
file, you can edit the document summary for each revision, indicating the
differences. You can quickly display a summary of the changes made in that
revision and the revision date.
Document summaries also let you search when you use Find in List Files (see the
information on keywords under Document Summary Menu below).
You can create or edit a document summary anywhere in your document.
1 Press Format, then select Document (3).
Or
j Select Document from the Layout menu.
2 Select Summary (5).
3 Select the options and enter the information you want in the document
summary (see Document Summary Menu below).
4 Press Exit to return to the document and save your changes.
The cursor returns to its original place in the document.
With the Document Summary menu on-screen, press Cancel to return to the
previous menu, ignoring any changes you made.
Notes
98 Document Summary
Create Summary
You can set Create Summary on Save/Exit in Setup to Yes to be prompted to
create document summaries. When Create Summary is set to Yes, Corel
WordPerfect displays the Document Summary menu each time you save or exit
a document (see Document Management/Summary under Environment Setup).
Delete
Creating a document summary does not insert any codes in a document. When
you create a summary for a document, the only way you can delete it is by
pressing Delete, then typing y while the cursor is on the status line in the
Document Summary menu. This deletes the document summary and returns
you to the normal editing screen.
If you delete a document summary, you cannot restore it. You must create a
new summary for that document.
Page 99

Information entries
Document Summary Menu
When you display the document summary menu using steps 1 and 2 at the
beginning of this section, it shows the information contained in the current
summary.
The Creation Date is still displayed on the Document Summary menu if no
summary exists for a document. If the document has a Revision Date, Long
Document Name, or Long Document Type, these entries are also displayed.
The Revision Date is the latest date the document was revised. A revision date
cannot be edited or changed. When you edit and save a document, Corel
WordPerfect updates the date according to your computer's date and time.
To change an entry on the document summary menu, select the entry, then
enter the information you want. You can use the standard cursor movement and
delete keys to edit text. You can also use Bold, Underline, and Compose. However, you cannot use other editing features such as the Speller, Thesaurus, or
Search.
•
Abstract
The Abstract entry (7) can contain 780 characters, which excludes
any space required for extended characters created using Compose. An
abstract is usually a brief summary of a document's contents. You can type
an abstract in this entry, or you can press Retrieve when the cursor is on the
Document Summary menu and type y. This retrieves the first 400 characters
of the document as its abstract (see Retrieve below).
•
Author and Typist
The Author and Typist entries (3) can contain 60
characters, which excludes any extra space required for extended characters.
You can type names in these entries, or you can press Retrieve and type y
when the cursor is on the Document Summary menu. This retrieves the
latest Author and Typist entries which you saved to a document summary
during that editing session (see Retrieve below).
•
Creation Date
The Creation Date (1) is the date the document summary
was created. It remains the same unless you change it.
Once you select this entry, you can edit the existing date and time, or enter a
new one. For the date, enter the month, day, and year, separated by slashes.
For the time, enter the complete time.
Document Summary 99
Page 100

Information Entries •
Entries 4 through 6 on the Document Summary
menu can contain 160 characters, which excludes any extra space required
for extended characters.
Select Subject (4) to enter any information that will help you identify a
document. You can type a subject or you can move to the status line in the
Document Summary menu, press Retrieve, then type y to retrieve the first
160 characters of the Subject entry from the document (see Subject Entries
below).
Select Account (5) to enter any information which will help you identify the
document.
Select Keywords (6) to enter keywords that label a document. When you use
Find in List Files, you can search for the Keyword entries from the document
summaries.
•
Name and Type
The Document Name entry (2) applies to the Long
Document Name. A long document name can contain 68 characters. A
long document type can contain 20 characters.
Corel WordPerfect does not recognize pathnames in long document names,
and treats them as part of the long document name.
If a document already has a long name and type, they are displayed in this
entry. You can enter or edit the long name and the type in Document
Summary. If you change them, the new name and type appear when you
exit or save the document.
If you set Long Document Names in Setup to No, a long document name
and type you place in the Document Summary will be included with the
document when you save it. The long document name is displayed onscreen when you use Long Display in List Files.
Retrieve
When the cursor is on the status line in the Document Summary menu, you can
press Retrieve and type y to retrieve all of the following entries into the
Document Summary menu:
•
The latest author and typist entries saved with a document summary during
that editing session.
•
The first 160 characters of a subject entry in the document as the Document
Summary Subject entry (see Subject Entries below).
•
The first 400 characters of the document as the Document Summary
Abstract entry.
These entries are retrieved at the same time.
Saving and Printing Summaries
To save a document summary to a file while the Document Summary menu is
on-screen, press Save, then enter a filename. If the filename you enter already
exists, you are asked if you want to replace the file or add to it. Select Replace
100 Document Summary
 Loading...