


|
CONTENTS |
ENGLISH .................................................................................................. |
1 |
FRANÇAIS ................................................................................................ |
7 |
DEUTSCH ................................................................................................ |
13 |
ESPAÑOL ................................................................................................ |
19 |
QUICK START GUIDE
This Quick Start Guide provides a quick reference for operating your new digital camera. Refer to the User’s Guide, which can be found on the CDRom and a hard copy in your Concord Eye-Q Duo 2000 box, for detailed instructions on how to use all of your camera’s features. Before using the camera, make sure to read all safety instructions and precautions outlined in the User’s Guide.
|
|
|
|
ENGLISH |
|
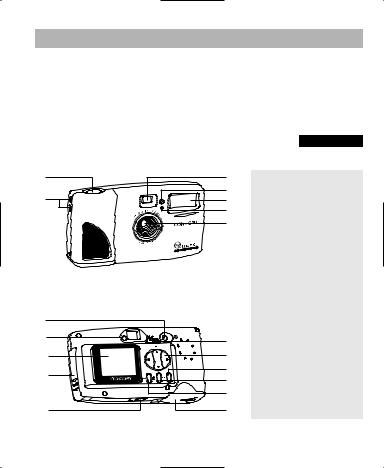
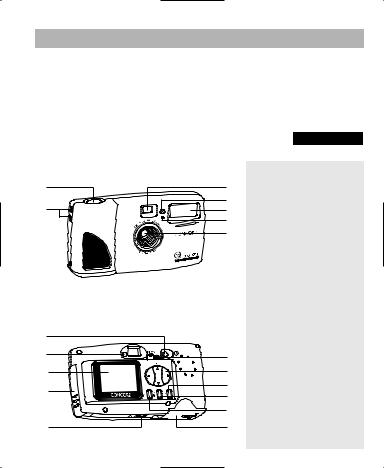
FRONT/TOP |
|
|
|
|
|
1 |
3 |
1. Shutter Button |
|||
|
4 |
||||
|
2. |
Lug for Neck / Wrist Strap |
|||
2 |
5 |
||||
3. |
Viewfinder |
||||
|
6 |
||||
|
7 |
4. |
Self-timer LED |
||
|
|
5. |
Flash |
||
|
|
6. |
Flash Sensor |
||
|
|
7. |
Ir Filter and Lens |
||
|
|
8. |
Power Button |
||
BACK/BOTTOM |
|
9. |
Camera Ready LED |
||
|
10. |
LCD |
|||
|
|
||||
8 |
|
11. Cable Connection Panel |
|||
|
12. |
Tripod Socket |
|||
9 |
|
||||
13 |
13. |
Mode Switch |
|||
|
|||||
10 |
14 |
14. |
Navigation Button |
||
11 |
15 |
15. |
Menu Button |
||
16 |
16. |
OK Button |
|||
|
|||||
|
17 |
17. |
LCD On/Off Button |
||
12 |
18 |
18. |
Battery Door |
||
1
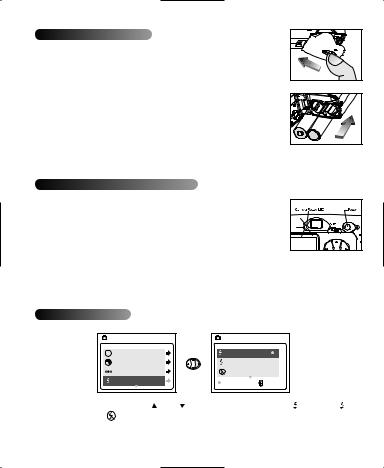
LOADING THE BATTERIES
The Concord Eye-Q Duo 2000 uses 2x AA LR6 (sold separately) batteries.
To load the batteries:
1.Locate the battery door on the bottom of the camera.
2.Slide the button on the battery door toward the center of the camera. (fig.1.1)
3.Lift the battery door to open.
4.Insert the batteries with the positive terminal toward the + sign, and the negative terminal toward the – sign. (fig.1.2)
5.Close the battery door.
fig.1.1 |
fig.1.2 |
TURNING THE CAMERA ON AND OFF
When the camera is turned on, the camera ready LED on the back of the camera blinks and the LCD displays the current settings.
1.Press the Power button.
2.The camera is ready for picture taking when the camera ready LED stops blinking and LCD icons appear on the LCD. (fig.1.3)
3.To turn the camera off, press the Power button.
fig.1.3 |
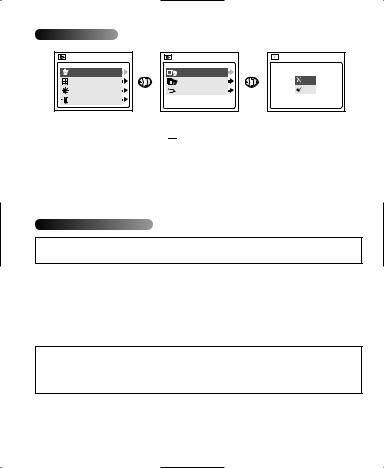
SETTING THE FLASH
MAIN MENU |
M Mode |
Size |
Quality |
Flash |
FLASH |
|
A Auto |
|
Flash |
|
Flash Off |
|
OK |
MENU |
1. |
In the FLASH menu, press |
or |
to choose between Auto ( A ), Flash ( ), |
|
|
and Flash Off ( |
). |
|
|
2. |
Press OK to select the flash mode and press MENU to exit. |
|||
|
|
|
|
2 |
Flash Status |
Distance from subject |
Auto (  A ) 3.9ft (1.2m) to 8.5ft (2.5m)
Flash (  ) 3.9ft (1.2m) to 8.5ft (2.5m)
Flash Off (  ) 3.9ft (1.2m) to infinity
Note: The flash may need time to recharge between photos. While it is charging the camera ready LED blinks. When it stops blinking you are ready to take another picture. If the batteries are low, the flash will not work. Insert fresh batteries.
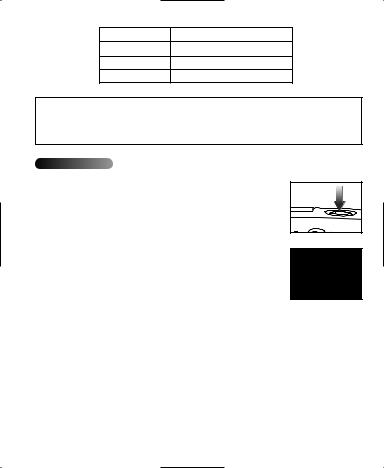
TAKING IMAGES
1.Set the camera to Camera Mode by moving the Mode Switch to  .
.
2.Position the subject in the viewfinder OR the LCD.
3.Gently press the Shutter button (fig.1.4) and keep the camera still until the camera ready LED next to the viewfinder flashes. (fig.1.5)
4.When the image has been captured, the camera ready LED next to the viewfinder begins to blink. This indicates that the image is being processed.
5.A preview of the image will be displayed on the LCD for 1 second after it is captured and the file counter number displayed in the LCD will be updated.
fig.1.4 |
fig.1.5 |
3
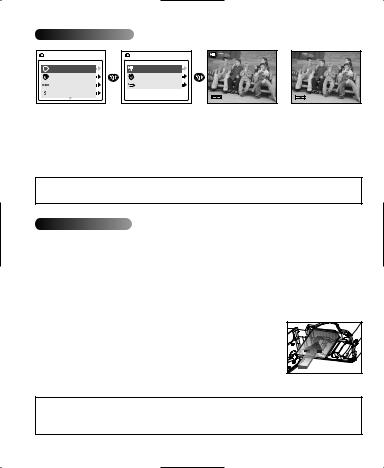
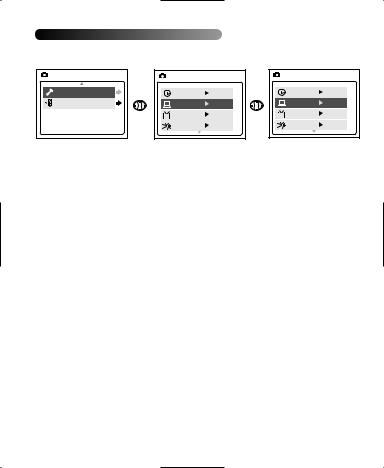
TAKING VIDEO CLIPS
MAIN MENU |
M Mode |
Size |
Quality |
Flash |
MODE |
Video Clip |
Self-timer |
Main Menu |
 •REC
•REC
SHUTTER TO •REC |
|
MENU TO CANCEL |
SHUTTER TO STOP |
1.When Video Clip is highlighted in the MODE menu press  .
.
2.Press the Shutter button to begin recording a continuous video clip.
3.Press the Shutter button again to stop recording.
4.The camera will continue recording until the memory is full.
OR
5. When the recording is completed, the camera will return to Camera Mode.
Note: If you would like to cancel your video clip session before pressing the Shutter button, press MENU to exit.
USING THE MMC/SD
In addition to internal memory, the camera features an external memory port that uses a removable MMC/SD that allows you to store additional images. When the MMC/SD is inserted, the camera uses it as its default memory. The stored images and video clips in the internal memory will be transferred automatically to the MMC/SD, and all photos taken from that point will be stored on it. The images will remain stored on the MMC/SD until deleted.
Inserting the MMC/SD:
1.Locate the battery door on the bottom of the camera.
2.Slide the button on the battery door toward the center of the camera.
3.Lift the battery door to open.
4.Insert the MMC/SD in the direction specified on the card. (fig.1.6)
5.Close the battery door.
fig.1.6 |
NOTE: If a MMC/SD with insufficient memory is inserted, there will only be a partial transfer and the MMC/SD will be filled. Please insert an MMC/SD with sufficient memory.
4
DELETE ONE FILE
MAIN MENU |
Delete |
Thumbnail |
Brightness |
Exit |
DELETE |
Delete One |
Delete All |
Main Menu |
DELETE |
THIS FILE? |
No |
Yes |
To delete a single file from the internal memory:
1.Slide the mode switch towards  .
.
2.Press MENU.
3.When Delete One is highlighted in the DELETE menu, press  .
.
4.The next screen will read "Delete This File?" Press  or
or  to highlight No or Yes and press OK to select.
5.If Yes is selected, the file will be deleted.
6.If No is selected, no change will be made.
SOFTWARE INSTALLATION
NOTE: Do not connect the camera to your computer before the camera drivers and software installation is completed.
Installing the Camera Drivers and ArcSoft Applications:
1.Insert the CD-ROM included in your Concord Eye-Q Duo 2000 box.
2.The installation screen appears on the computer’s monitor. Follow the software installation instructions on your screen to install the software.
3.When the CD-Rom installation is finished, connect your camera to the computer to complete installation.
4.Follow the on-screen instructions to complete the installation.
NOTE: If your computer has the CD-ROM automatic installation disabled,click on START. Select MY COMPUTER and locate the CD-ROM Drive. Double click on the CD-ROM Drive icon to show its contents. Double-click on the file named SETUP.EXE and follow the instructions on your screen.
5
TRANSFERRING FILES TO THE COMPUTER
After installing the drivers and software, you may transfer files to your computer.
MAIN MENU |
Setup |
Exit |
SETUP |
|
Time-out |
60S |
Driver |
PC |
TV |
PAL |
PlayLogo |
O f f |
SETUP |
|
Time-out |
60S |
Driver |
DSC |
TV |
PAL |
PlayLogo |
O f f |
1.Select either PC (Windows Only) or DSC in the Setup Menu.
•Set the Mode switch to  .
.
•Press the MENU button. Use the  button until Setup is highlighted.
•Press  to enter the Setup menu.
•In the Setup menu, press  until Driver is highlighted.
•Press  to select DSC or PC.
2.Connect your camera to the computer using the USB cable provided.
USING THE PC DRIVER MODE:
1.Launch ArcSoft PhotoImpression by clicking on Start-Programs-ArcSoft Camera Suite.
2.Click on the (Camera/Scanner) button.
3.Click on the drop-down list under SELECT SOURCE and choose Concord Eye-Q Duo 2000.
4.Click on the Camera/Scanner icon. A window will appear with the images you have transferred.
USING THE DSC MODE (Windows):
1.Open My Computer.
2.Click on the removable disk drive.
3.Double-click on an image or video clip and windows will automatically open the file.
USING THE DSC MODE (Mac):
1.The external hard drive will appear on the desktop.
2.Open the “untitled” removable drive that is on your desktop and open DCIM to view your files.
3.Click on the file that you would like to view.
Concord, Concord Eye-Q and the Concord Eye-Q logo are registered trademarks or trademarks of Concord Camera Corp., in the United States and/or other countries. Microsoft and Windows are either registered trademarks or trademarks of Microsoft Corporation in the United States and/or other countries. Mac and Macintosh are registered trademarks or trademarks of Apple Computer, Inc. in the U.S. and other countries. All other brands and product names are either registered trademarks or trademarks of their respective owners.
Copyright 2002 Concord Camera Corp.
6
GUIDE DE DEMARRAGE RAPIDE
Les références de ce guide de démarrage rapide vous permettent d’utiliser rapidement votre nouvel appareil digital. Pour des explications plus détaillées sur toutes les caractéristiques de votre appareil, veuillez lire le guide de l’utilisateur qui se trouve sur le CD-Rom situé dans le coffret du Concord Eye-Q Duo 2000. Avant d’utiliser l’appareil, veuillez lire toutes les instructions de sécurité et de précaution décrites dans ce guide.
|
|
|
FRANÇAIS |
|
AVANT/DESSUS |
|
|
|
|
|
|
1. |
Déclencheur |
|
1 |
3 |
2. |
Fixation pour dragonne |
|
|
4 |
3. |
Viseur |
|
2 |
5 |
4. |
Indicateur Lumineux de la |
|
|
6 |
|
Minuterie Automatique |
|
|
7 |
5. |
Flash |
|
|
|
6. |
Capteur du flash |
|
|
|
7. |
Filtre Ir et objectif |
|
|
|
8. |
Bouton d’Alimentation |
|
|
|
9. |
Indicateur Lumineux Prêt à |
|
|
|
|
l’Emploi de votre Appareil- |
|
|
|
|
Photo |
|
ARRIERE/BASE |
|
10. |
LCD |
|
|
11. |
Panneau de Branchement du |
||
|
|
|||
8 |
|
|
Câble |
|
|
12. |
Prise d’Adaptation sur |
||
|
|
|||
9 |
13 |
|
Trépied |
|
|
13. Bouton Mode |
|||
10 |
14 |
|||
14. |
Bouton de Fleches |
|||
11 |
15 |
15. Bouton Menu |
||
16 |
16. Bouton OK |
|||
|
||||
|
17 |
17. |
Écran LCD Sous tension/Hors |
|
|
|
tension |
||
|
|
|
||
12 |
18 |
18. Trappe du Compartiment à |
||
|
|
|
Piles |
|
7
 Loading...