


|
LANGUAGES |
ENGLISH................................................................................................................ |
1 |
FRANÇAIS ............................................................................................................ |
7 |
DEUTSCH ............................................................................................................ |
13 |
ESPAÑOL ............................................................................................................ |
19 |
ITALIANO ............................................................................................................ |
25 |
DUTCH ................................................................................................................ |
31 |
QUICK START GUIDE
ENGLISH
This Quick Start Guide provides a quick reference for operating your new digital camera. Refer to the User’s Guide, which can be found on the CD-ROM and a hard copy in your Concord Eye-Q 4060AF box, for detailed instructions on how to use all of your camera’s features. Before using the camera, make sure to read all safety instructions and precautions outlined in the User’s Guide.
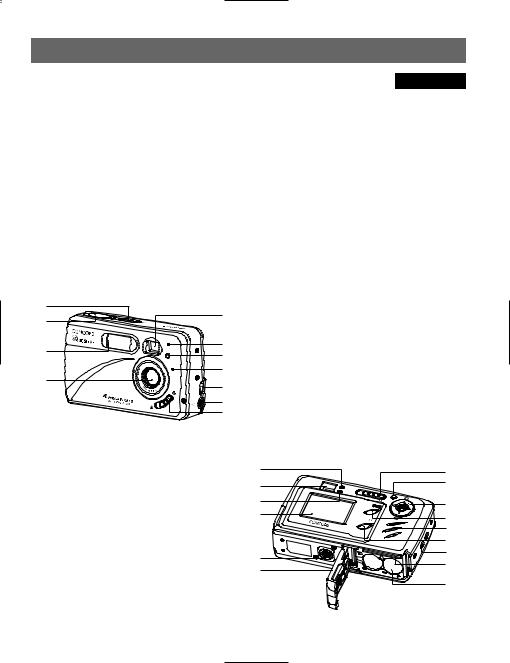
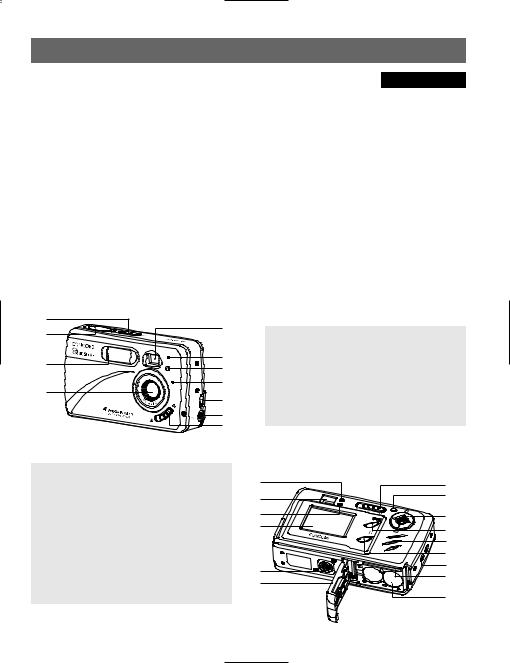
CAMERA OVERVIEW |
|
|
Top/Front |
|
|
1 |
|
|
2 |
5 |
|
|
||
3 |
6 |
|
7 |
||
|
||
|
8 |
|
4 |
9 |
|
|
||
|
10 |
|
|
11 |
1. |
Power Switch |
7. |
Red-eye Reduction |
2. |
Shutter Button |
|
LED/Self-Timer LED |
3. |
Flash |
8. |
Microphone |
4. |
Lens/ Lens Door |
9. |
Mini-USB port |
5. |
Viewfinder |
10. |
TV-Out port |
6. |
Flash Sensor |
11. Macro Mode Switch |
|
|
|
|
|
12. |
Flash Ready LED |
20. |
Joystick/OK button/ |
13. |
Viewfinder |
|
Zoom button/Flash |
14. |
Auto-Focus LED |
|
button |
15. |
LCD |
21. |
MENU Button |
16. Tripod Socket |
22. |
Speaker |
|
17. |
Battery/Memory |
23. |
LCD On/Off Button |
|
Card Door |
24. |
Wrist Strap Holder |
18. |
Mode Switch |
25. |
Memory Card Slot |
19. |
Reset Button |
26. |
Battery Compartment |
|
|
|
|
Bottom/Back |
|
|
12 |
18 |
|
|
||
13 |
19 |
|
|
||
14 |
20 |
|
|
||
15 |
21 |
|
|
||
|
22 |
|
|
23 |
|
16 |
24 |
|
25 |
||
17 |
||
|
||
|
26 |
1
CAMERA OVERVIEW
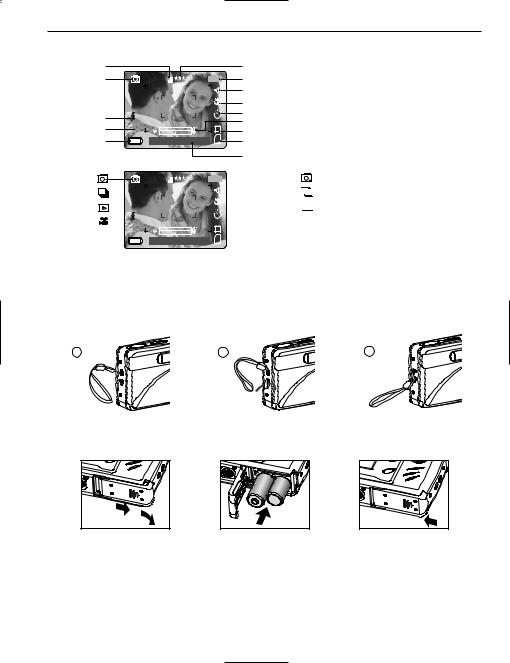
LCD ICONS
A |
|
|
F |
B |
4M |
28/45 |
G |
|
|
|
H |
|
|
|
I |
C |
A |
|
J |
|
K |
D |
AWB |
N |
L |
E |
07 ⁄ 04 ⁄ |
03 |
02:40PM |
M |
|
|
|
|
N |
|
4M |
|
|
28/45 |
|
A |
|
|
|
|
AWB |
|
|
N |
|
07 ⁄ 04 ⁄ |
03 |
02:40PM |
|
Attaching the Wrist Strap
Please attach the wrist strap to prevent dropping the camera.
A. Resolution |
H. Sound |
|
B. Camera Mode |
I. Macro |
|
C. Flash |
J. Self-Timer |
|
K. Zoom Bar |
||
D. White Balance |
||
L. TV Option |
||
E. Battery Level |
||
M. Memory |
||
|
||
F. Image Quality |
N. Date / Time |
|
G. Frame Counter |
|
|
|
|
: Single Shot


 : Continuous Shot


 : Review

 : Video Clips
1 |
2 |
3 |
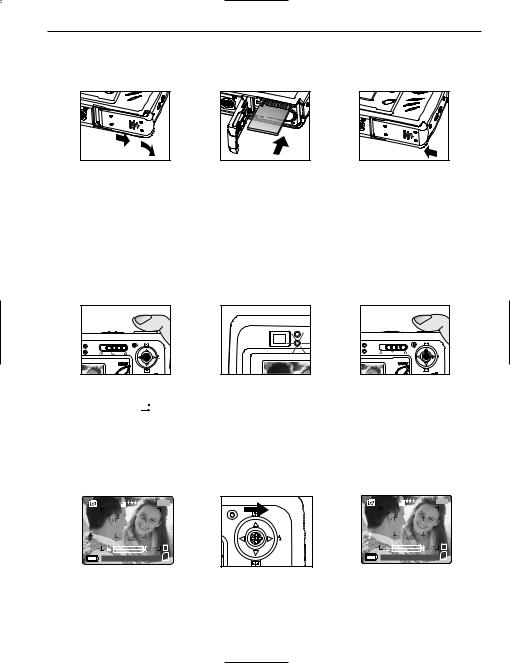
LOADING THE BATTERIES
fig.1.1 |
fig.1.2 |
fig.1.3 |
The camera can use 2x AA alkaline, lithium or NiMH rechargeable batteries.
1.Open the Battery/Memory Card door. (fig.1.1)
• Slide the door in the direction of the arrow, and lift it open.
2.Insert the batteries according to the polarity indicators on the top edge of the battery compartment. (fig.1.2)
3.Shut the Battery/Memory Card door by sliding it in the opposite direction of the arrow marked on it, and close it securely. (fig.1.3)
2
GETTING STARTED
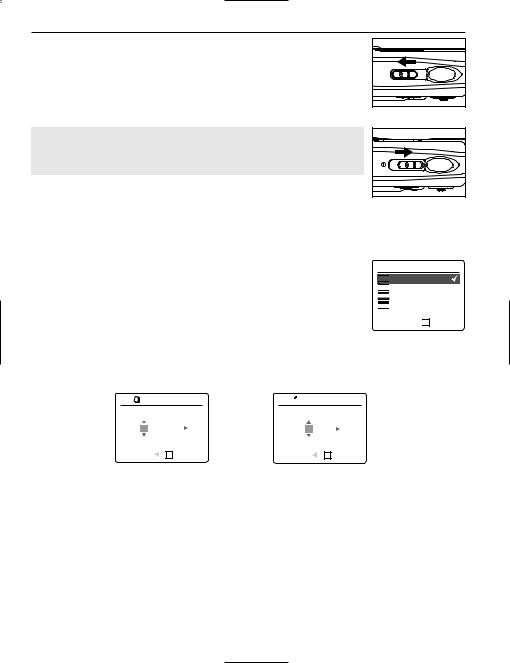
TURNING THE CAMERA ON AND OFF
The Power Switch is located on the top of the camera.
1.Slide the Power Switch toward the (  ) icon to power the camera on. (fig.1.1)
•The lens cover will open.
•The LCD will turn on automatically.
2.To turn the camera off, slide the Power Switch away from (  ). (fig.1.2)
Note:
To extend battery life, the camera will automatically power off after 60 seconds of inactivity. Press the shutter button to power the camera back on.
fig.1.1 |
Camera On |
fig.1.2 |
Camera Off |
SETTING THE LANGUAGE
When the camera is powered on for the first time, the Language, Date and Time menus will appear.
1.Turn the camera on.
•The Language Setup screen will appear on the LCD.
2.Press the joystick 
 to highlight the language you would like to use.
3.Press the OK button by pressing the joystick in to select.
4.The next screen will read “Are You Sure?” press the joystick 
 to select No or Yes.
5.Press the OK button to select.
•If you select No, you will return to the Language select screen.
•If you select Yes, all menu screens will be displayed in the new language.
 LANGUAGE OPTION

 English


 Français

 Español

 Deutsch
RETURN 
 OK SET
SETTING THE DATE AND TIME
1
ADJUST DATE
 ADJUST TIME
01 ⁄ 01 ⁄ 2003 |
01:01AM |
||
RETURN |
OK SET |
RETURN |
OK SET |
1. Press the joystick 
 to change the option in the blinking position until you reach the desired number. 2. Press the joystick
  to highlight the other options.
• The option will blink when it is selected.
3.Repeat steps 1 and 2 to change the date and time setting.
4.Press the OK button.
3
GETTING STARTED / TICKING PICTURES
INTERNAL MEMORY/INSERTING THE MEMORY CARD
The camera has 16MB internal memory that can be used right away. The camera can also use secure digital (SD) memory cards (not included) to store images and video clips.
fig.1.1 |
fig.1.2 |
fig.1.3 |
1.Open the Battery/Memory Card door.
•Slide the door in the direction of the arrow marked on it, and lift it open. (fig.1.1)
2.Insert the memory card as indicated by the diagram. (fig.1.2)
•Please insert the card in straight, not on an angle.
3.Shut the Battery/Memory Card door by sliding it in the opposite direction of the arrow marked on it, and close it securely. (fig.1.3)
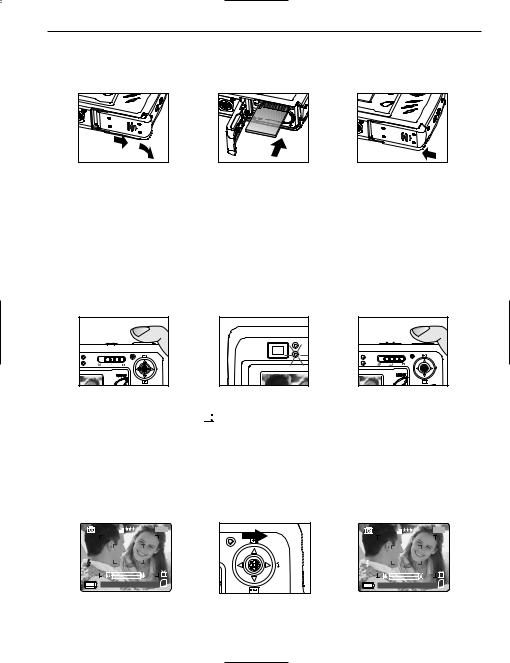
TAKING A PICTURE
TAKING A PICTURE WITH THE VIEWFINDER OR LCD
fig.1.1 |
fig.1.2 |
fig.1.3 |
1.Turn the camera on.
2.Set the camera to (  ) Camera Mode and make sure the Macro Mode Switch is set to the (
  ) Distant Mode. (fig.1.1)
3.Frame the subject in the viewfinder or LCD.
4.Press the shutter button half-way to activate the auto-focus until the green AF LED lights up. (fig.1.2)
5.Press the shutter button fully to capture the image. (fig.1.3)
SETTING THE FLASH |
|
|
|
|
|
4M |
|
28/45 |
|
|
|
A |
|
|
|
A |
|
AWB |
|
N |
AWB |
AWB |
|
07 ⁄ 04 ⁄ |
03 02:40PM |
|
⁄ |
⁄ |
⁄ |
4M |
28/45 |
AWB |
N |
07 ⁄ 04 ⁄ 03 02:40PM
1. Press the joystick  toward (
  ) repeatedly until the desired indicator appears on the LCD.
4
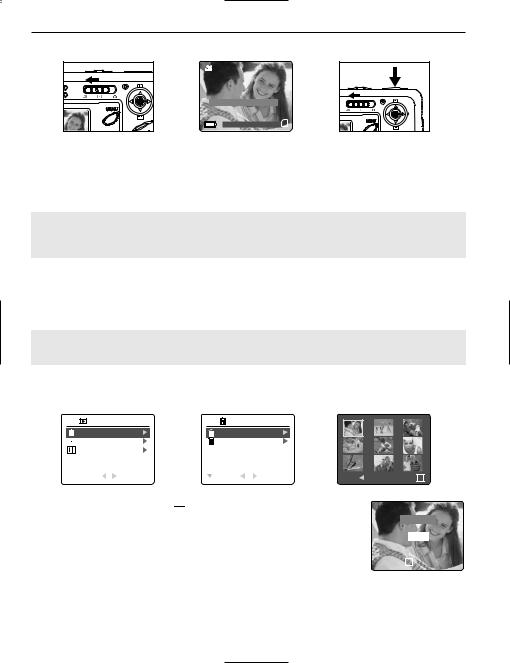
TICKING PICTURES / DELETE ONE FILE
TAKING A VIDEO CLIP
28 SEC
Press Shutter to Record
07 ⁄ 04 ⁄ 2003 02:40
To record a video clip:
1.Slide the Mode Switch to (  ) Video Clip Mode.
2.Position the subject in the viewfinder or LCD.
3.Press the shutter button fully to capture a continuous video clip.
4.To stop recording, press the shutter button again.
Note: There is a time limit for each video clip. The time will vary depending on the amount of available memory space. The alloted amount of recording time will appear on the top right hand corner of the screen. The video clip capture will stop automatically when it reaches its time limit.
Video Clip Information
Resoluton: QVGA (320 x 240)
Frame rate: 30fps
File Format: AVI (Motion Picture)
Note: The Flash Ready LED will turn red when the camera is storing the video clip. Do not open the battery door or turn the camera off while recording, or the video clip may not be stored.
DELETE ONE FILE
REVIEW |
|
DELETE FILES |
|
|
DELETE FILES |
|
DELETE ONE |
|
|
THUMBNAIL |
|
DELETE ALL |
|
|
SETUP |
|
|
|
|
RETURN |
SELECT |
RETURN |
SELECT |
MENU DELETE OK |
1.Slide the Mode Switch towards (  ).
).
2.When Delete File is highlighted, press the joystick  to enter the Delete File
submenu.
3.In the Delete File menu, press the joystick  when Delete One is highlighted.
4.The next screen will display the stored pictures and video clips as thumbnails. Press the joystick  ,
,  ,
,  ,
,  to highlight the file you want to delete.
5.Press the OK button to select.
6.The next screen will read "Are You Sure?" press the joystick  or
or  to highlight No or Yes.
7.Press the OK button to select.
Are You Sure?
 No
No
 Yes
Yes
OK SELECT
28 SEC
•If No is selected, no change will be made, and you will return to the Delete One thumbnail view.
•If Yes is selected, the selected file will be deleted.
5
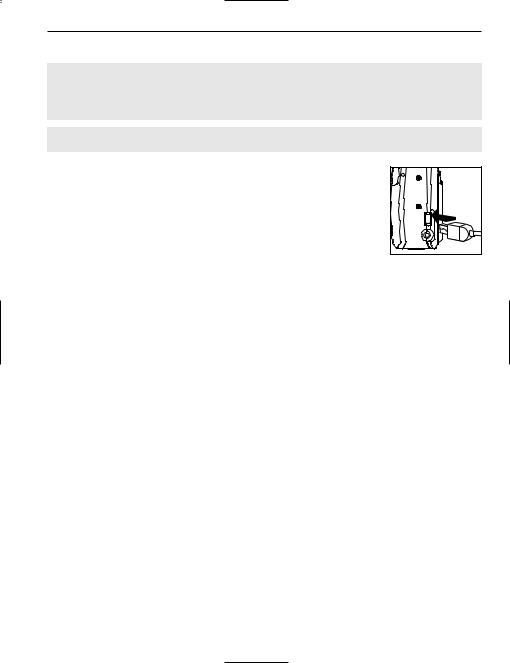
CONNECTING THE CAMERA TO THE COMPUTER
DOWNLOADING PICTURES AND VIDEO CLIPS ONTO YOUR COMPUTER
Note: Windows 98/98SE users must install the camera driver first. Windows 2000 users must install DirectX in order to view video clips on the computer. Please refer to the Installation Guide section on page 34 in the User's Guide for more information on installing the drivers and other software found on the CDROM.
Caution: Do not insert or remove the memory card when the camera is connected to the computer.
Downloading files from the camera:
•Internal memory: Do not insert the memory card.
•Memory Card: Insert the memory card.
FOR WINDOWS USERS
1. Connect the camera to the computer.
2. Double-click on My Computer>Removable Disk>DCIM>100CD_4060.
•The stored pictures (JPG) and video clips (AVI) stored in the memory card will be displayed
3.Click and drag the files into a directory in your computer to save them.
•To select all files, click Edit > Select all.
FOR MACINTOSH USERS
1.Connect the camera to the computer.
After a few moments, the external hard drive “untitled” will appear on the desktop.
2.Double-click on untitled>DCIM>100_4060.
•The stored pictures (JPG) and video clips (AVI) stored in the memory card will be displayed.
3.Drag and drop the image you want to save in the computer.
•To select all files, click Edit > Select all.
Concord, Concord Eye-Q and the Concord Eye-Q logo are registered trademarks or trademarks of Concord Camera Corp., in the United States and/or other countries. Microsoft and Windows are either registered trademarks or trademarks of Microsoft Corporation in the United States and/or other countries. Mac and Macintosh are registered trademarks or trademarks of Apple Computer, Inc. in the U.S. and other countries. All other brands and product names are either registered trademarks or trademarks of their respective owners.
6
GUIDE DE DEMARRAGE RAPIDE
FRANÇAIS
Les références de ce guide de démarrage rapide vous permettent d’utiliser rapidement votre nouvel appareil digital. Pour des explications plus détaillées sur toutes les caractéristiques de votre appareil, veuillez lire le guide de l’utilisateur qui se trouve sur le CD-ROM situé dans le coffret du Concord Eye-Q 4060AF. Avant d’utiliser l’appareil, veuillez lire toutes les instructions de sécurité et de précaution décrites dans ce guide.
VUE D’ENSEMBLE DE L’APPAREIL PHOTO
Vue du haut/devant
1 |
|
|
2 |
5 |
|
|
||
3 |
6 |
|
7 |
||
|
||
|
8 |
|
4 |
9 |
|
|
||
|
10 |
|
|
11 |
1.Bouton de mise en marche
2.Bouton de l’obturateur
3.Flash
4.Objectif et couvreobjectif
5.Viseur
6.Capteur du flash
7.DEL du retardateur / de du réducteur des yeux rouges
8.Microphone
9.Port USB
10.Port Vidéo
11.Commutateur de mode Macro
12.DEL de flash
13.Viseur
14.DEL auto-focus
15.LCD
16.Écrou du trépied
17.Porte d’accès aux piles et à la carte mémoire
18.Cadran de sélection de mode
19.Bouton de remise à zéro
20.Bouton de navigation/ bouton OK/ bouton zoom/bouton Flash
21.Bouton du menu
22.Haut-parleur
23.Interrupteur arrêt/marche de l’ACL
24.Dragonne
25.Logement de la carte mémoire
26.Compartiment à piles
Vue du dessous/ derrière |
|
|
12 |
18 |
|
|
||
13 |
19 |
|
|
||
14 |
20 |
|
|
||
15 |
21 |
|
|
||
|
22 |
|
|
23 |
|
16 |
24 |
|
25 |
||
17 |
||
|
||
|
26 |
7

VUE D’ENSEMBLE DE L’APPAREIL PHOTO
ICÔNES DE L’AFFICHAGE À CRISTAUX LIQUIDES
A |
|
|
B |
4M |
28/45 |
C  A
A
D |
AWB |
N |
E |
07 ⁄ 04 ⁄ |
03 |
02:40PM |
|
4M |
|
28/45 |
|
A |
|
|
|
AWB |
|
N |
|
07 ⁄ 04 ⁄ |
03 |
02:40PM |
F
G |
A. Résolution |
H. Son |
|
B. Mode Caméra |
I. Macro |
||
H |
|||
C. Flash |
J. Retardateur |
||
I |
|||
D. Équilibrage de blancs |
K. La barre du zoom |
||
J |
|||
E. Piles |
L. Option TV |
||
K |
|||
F. Qualité |
M. Mémoire |
||
L |
|||
G. Compteur de fichiers |
N. Date / Heure |
||
M |
N
: Photo Individuelle


 : Photos en rafale


 : Visonnage

 : Séquences vidéo
Fixation de la dragonne
Pour éviter d’échapper l’appareil, veuillez attacher la dragonne.
1 |
2 |
3 |
CHARGEMENT DES PILES DANS L’APPAREIL
fig.1.1 |
fig.1.2 |
fig.1.3 |
Pour utiliser l’appareil photo numérique, vous pouvez utiliser 2 piles alcalines, au lithium ou rechargeables.
1.Ouvrez la porte d’accès aux piles et à la carte mémoire. (fig.1.1)
• Pour ouvrir, déplacer le volet dans le sens indiqué par la flèche et le soulever.
2.Insérer les piles selon les indicateurs de polarité sur la partie supérieure du logement des piles. (fig.1.2)
3.Bien fermer le volet de la carte mémoire et des piles en le déplaçant dans le sens opposé de la flèche. (fig.1.3)
8
DESCRIPTION ET PRÉPARATION DE L’APPAREIL PHOTO
MISE EN MARCHE ET ARRÊT DE L’APPAREIL PHOTO
L’interrupteur marche/arrêt est situé sur le dessus de l’appareil photo.
1.Pour mettre l’appareil sous tension, déplacer le bouton de mise en marche de l’appareil vers l’icône. (fig.1.1)
•La cache de l’objectif s’ouvrira.
•L’ACL s’allumera automatiquement.
2.Pour mettre l’appareil hors tension, déplacer le bouton de mise en marche dans le sens opposé à l’icône. (fig.1.2)
Remarque:
Pour prolonger la vie de la pile, la caméra s’éteindra automatiquement au bout de 60 secondes d’inactivité. Appuyer l'obturateur pour propulser l'appareil-photo de retour sur.
fig.1.1 Appareil-photo sous tension
fig.1.2 Appareil-photo hors tension
SÉLECTION DE LA LANGUE
Lorsque l’appareil photo est mis sous tension pour la première fois, les menus se rapportant à la langue d’utilisation, à l’heure ainsi qu’à la date seront affichés.
1.Mettez en marche l’appareil photo.
• L’écran de sélection de la langue apparaîtra sur l’ACL.
2.Appuyez sur le bouton de navigation 
 , afin de mettre en surbrillance la langue que vous désirez utiliser.
3.Appuyez sur le bouton OK pour effectuer votre choix.
4.Le prochain écran qui apparaîtra se lira « Êtes-vous sûr? » appuyez sur le bouton de navigation 
 pour choisir entre Oui et Non.
 OPTION LANGUE

 English


 Français

 Español

 Deutsch
RETOUR 
 OK CONFIG
5.Appuyez sur pour effectuer votre choix.
•Si vous avez indiqué Non, vous reviendrez à l’écran de sélection de la langue.
•Si vous avez indiqué Oui, tous les écrans de menu seront dorénavant affichés dans la nouvelle langue choisie.
RÉGLAGE DE LA DATE ET L'HEURE
1 |
RÉGLAGE DATE |
01 ⁄ 01 ⁄ 2003
RETOUR 
 OK CONFIG
 RÉGLAGE HEURE
01:01AM 
RETOUR 
 OK CONFIG
1.Appuyez sur le bouton de navigation 
 pour changer le numéro clignotant jusqu’à ce que vous ayez atteint le réglage désiré.
2. Appuyez sur le bouton de navigation  pour mettre en surbrillance le mois, la date et l’année.
• Le choix que vous avez fait clignotera lorsque mis en surbrillance.
3.Répétez les étapes 1 et 2 jusqu'à ce que la date et l'heure soit placée.
4.Appuyez sur OK pour programmer.
9
DESCRIPTION ET PRÉPARATION DE L’APPAREIL PHOTO / PRISE DE PHOTO
MÉMOIRE INTERNE/INSERTION DE LA CARTE MÉMOIRE
L'appareil photo dispose de 16 Mo de mémoire interne qui peuvent être utilisés immédiatement. L'appareil photo peut utiliser des cartes de mémoire SD pour enregistrer des photos et des clips vidéo.
fig.1.1 |
fig.1.2 |
fig.1.3 |
1.Ouvrez la porte d’accès aux piles/à la carte mémoire.
•Pour ouvrir, déplacer le volet dans le sens indiqué par la flèche et le soulever. (fig.1.1)
2.Insérez la carte mémoire tel qu’indiqué sur le diagramme. (fig.1.2)
•Lors de l’insertion de la carte, assurez-vous qu’elle soit parfaitement droite par rapport à l’ouverture et non pas en angle.
3.Refermez la porte d’accès aux piles/à la carte mémoire en le déplaçant dans le sens opposé de la flèche. (fig.1.3)
PRISE DE PHOTO
PRISE DE PHOTO AVEC LE VISEUR OU ACL
fig.1.1 |
fig.1.2 |
fig.1.3 |
1.Mettez l’appareil en marche.
2.Régler l’appareil en mode Caméra (  ) et s’assurer que le commutateur de mode Macro est réglé en mode Distant (
  ). (fig.1.1)
3.Cadrez le sujet à l’aide du viseur ou ACL.
4.Pour effectuer la mise au point automatique, appuyer à mi-chemin sur le déclencheur jusqu’à ce que s’allume le témoin vert AF. (fig.1.2)
5.Enfoncez à fond le bouton de l’obturateur afin de saisir l’image. (fig.1.3)
COMMENT RÉGLER LE FLASH
4M |
|
28/45 |
|
|
|
A |
|
|
|
A |
|
AWB |
|
N |
AWB |
AWB |
|
07 ⁄ 04 ⁄ |
03 02:40PM |
|
⁄ |
⁄ |
⁄ |
4M |
28/45 |
AWB |
N |
07 ⁄ 04 ⁄ 03 02:40PM
1.Appuyer à plusieurs reprises sur la manette  dans le sens de la flèche (
  ) jusqu’à ce que le mode souhaité s'affiche au moniteur ACL.
10
 Loading...