


®
6065 A/E/AX/EX
Rim Clamp®
Tire Changer
For servicing single piece automotive and most light truck tire/wheel assemblies
Safety Instructions
Operating Instructions
Installation Instructions
Maintenance Instructions
READ these instructions before placing unit in service. KEEP these and other materials delivered with the unit in a binder near the machine for ease of reference by supervisors and operators.
1601 J. P. Hennessy Drive, LaVergne, TN USA 37086-3565 615/641-7533 800/688-6359 |
Manual Part No.: |
8183540 00 |
HENNESSY INDUSTRIES INC. Manufacturer of AMMCO®, COATS® and BADA® Automotive Service Equipment and Tools. |
Revision: |
01/98 |

Table of Contents |
|
|
Definitions of Hazard Levels ................................ |
|
1 |
Owner’s Responsibility ........................................ |
|
1 |
Principal Operating Parts ..................................... |
|
2 |
Operating Instructions ......................................... |
|
3 |
Bead Loosening and Demounting .................... |
|
3 |
Mounting ........................................................... |
|
6 |
Inflation .................................................................. |
|
7 |
Bead Sealing .................................................... |
|
7 |
Bead Seating .................................................... |
|
8 |
Inflation ............................................................. |
|
8 |
Performance, Custom, and Aluminum Wheels |
..9 |
|
Aluminum and Custom Wheels ........................ |
|
9 |
Performance Tires and Wheels • Demounting .9 |
||
Performance Tires and Wheels • Mounting .... |
11 |
|
Custom and Special Wheels .............................. |
|
12 |
Tube Type Tires .................................................. |
|
12 |
Stages of Inflation ............................................... |
|
13 |
Bead Seal ....................................................... |
|
13 |
Bead Seat ....................................................... |
|
13 |
Inflation ........................................................... |
|
13 |
Mis-Matched Tires and Wheels .......................... |
|
13 |
Maintenance Instructions ................................... |
|
14 |
Installation Instructions ..................................... |
|
15 |
Critical Safety Instructions ................. |
Back Cover |
|
Operator Protective Equipment
Personal protective equipment helps make tire changing safer. However, equipment does not take the place of safe operating practices. Always wear durable work clothing during tire service activity. Shop aprons or shop coats may also be worn, however loose fitting clothing should be avoided. Tight fitting leather gloves are recommended to protect operator’s hands when handling worn tires and wheels. Sturdy leather work shoes with steel toes and oil resistant soles should be used by tire service personnel to help prevent injury in typical shop activities. Eye protection is essential during tire service activity. Safety glasses with side shields, goggles, or face shields are acceptable. Back belts provide support during lifting activities and are also helpful in providing operator protection. Consideration should also be given to the use of hearing protection if tire service activity is performed in an enclosed area, or if noise levels are high.
Failure to follow danger, WARNING warning, and caution
instructions may lead to serious personal injury or death to operator or bystander or damage to property. Do not operate this machine until you read and understand all the dangers, warnings and cautions in this manual. Download a copy of the manual from our website at www.ammcoats.com, or for further information, contact:
Hennessy Industries, Inc. 1601 J.P. Hennessy Drive LaVergne, TN 37086-3565
(615) 641-7533 or (800) 688-6359 www.ammcoats.com
For additonal tire, wheel, and/or inflation information contact the following:
RUBBER MANUFACTURERS ASSOCIATION 1400 K Street N.W.
Washington, DC 20005 (202) 682-4800 www.rma.com
TIRE GUIDES, INC.
The Tire Information Center 1101-6 South Rogers Circle Boca Raton, FL 33487-2795 (561) 997-9229 www.tireguides.com
Definitions of Hazard Levels
Identify the hazard levels used in this manual with the following definitions and signal words:
DANGER
Watch for this symbol:
DANGER
It Means: Immediate hazards which will result in severe personal injury or death.
WARNING
Watch for this symbol:
WARNING
It Means: Hazards or unsafe practices which could result in severe personal injury or death.
CAUTION
Watch for this symbol:
CAUTION
It Means: Hazards or unsafe practices which may result in minor personal injury or product or property damage.
Watch for this symbol! It means BE ALERT! Your safety, or the safety of others, is involved!
Owner’s Responsibility
To maintain machine and user safety, the responsibility of the owner is to read and follow these instructions:
•Follow all installation instructions.
•Make sure installation conforms to all applicable Local, State, and Federal Codes, Rules, and Regulations; such as State and Federal OSHA Regulations and
Electrical Codes.
•Carefully check the unit for correct initial function.
•Read and follow the safety instructions. Keep them readily available for machine operators.
•Make certain all operators are properly trained, know how to safely and correctly operate the unit, and are properly supervised.
•Allow unit operation only with all parts in place and operating safely.
•Carefully inspect the unit on a regular basis and perform all maintenance as required.
•Service and maintain the unit only with authorized or approved replacement parts.
•Keep all instructions permanently with the unit and all decals on the unit clean and visible.

 DANGER
Explosion Hazard
Never exceed 40 PSI while seating beads.

 DANGER
Explosion Hazard
Never inflate tire above manufacturer’s recommended pressure after bead is seated.
COATS 6065A/AX/EX Rim Clamp Tire Changer • 1
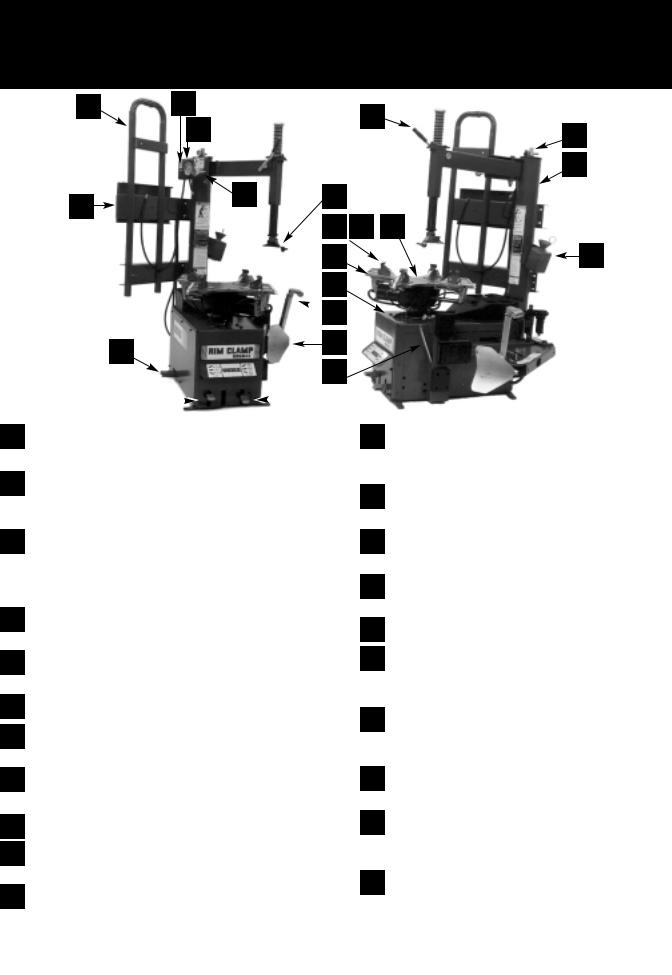
Principal Operating Parts
Know Your Unit
Compare this illustration with the unit before placing it into service. Maximum performance and safety will be obtained only when all persons using the unit are fully trained in its parts and operation. Each user should learn the function and location of all controls. Prevent accidents and injuries by ensuring the unit is properly installed, operated, and maintained.
20 |
19 |
|
12 |
|
|
2 |
|
|
|
|
|
|
18 |
|
|
|
|
|
|
|
|
|
|
1 |
21 |
11 |
10 |
|
|
|
|
|
|
|
|
|
7 |
8 |
6 |
|
|
17 |
|
9 |
16
 15
15
14
3
13
4 |
|
|
|
5 |
|
|
|
||
|
|
|
|
|
1Tower — Support for horizontal and vertical slides, also air storage tank.
2Air Inflation Gauge — Registers tire pressure when clip-on chuck is attached to valve stem
and inflation pedal is released.
3Inflation Pedal — Single position pedal allows input line air pressure to flow through the clip-
on chuck. Provides line air pressure through the bead sealing jets on the tabletop.
4Clamp Control Pedal — Three position pedal that opens and closes rim clamps.
5Table Top Pedal — Three position pedal that controls rotation of table top.
6Table Top — Rotating chuck for tire changing.
7Clamps — Secures wheel to table top for tire changing.
8Adjustable Clamp (AX/EX) — Adjusts outward to allow outside clamping of wheels up to 21”.
9Lube Bottle — Dispenser for rubber lubricant.
10 Combination Mount/Demount Head —
Mounts and demounts tire from wheel.
11 Swing Arm Adjustment Knob — Adjusts swing arm/vertical slide assembly for proper
horizontal positioning of mount/demount head.
12Vertical Slide Locking Handle — Locks and unlocks vertical slide and sets correct vertical
position to maintain head/wheel clearance.
13Bead Lifting Tool — Used to lift and position tire bead correctly on mount/demount head.
14Bead Loosener Shoe — Pivoting shoe for loosening tire beads.
15Bead Loosener Handle/Button — Controls operation of bead loosener shoe.
16Oil Check Dipstick — Transmission oil level.
17Bead Sealing Nozzles — Expands tire sidewall to bead seat area of rim to seal and
allow inflation.
18Pressure Safety Valve — High pressure safety valve set to exhaust at line pressures above
185 PSI.
19Release Valve — Allows the manual release of air pressure from tire.
20Inflation Guard – Tubular structure to help protect operator from physical danger during
inflation process.
21 Inflation Control Panel – Inflation of tire is controlled by these two levers. Operator must actuate both levers from behind the barrier tubes to
inflate tire.
2 • COATS 6065A/AX/EX Rim Clamp Tire Changer

Operating Instructions
The unit must be properly operated and properly maintained to help avoid accidents that could damage the unit and injure the operator or bystanders. This section of the Operating Instructions manual review basic operations and use of controls. These instructions should be reviewed with all employees before they are allowed to work with the machine. Keep these instructions near the machine for easy reference.
Bead Loosening and Demounting
This machine may operate CAUTION differently from machines you have previously operated. Practice with a regular steel wheel and
tire combination to familiarize yourself with the machine’s operation and function.
A.Remember to remove all weights from both sides of the wheel. Weights left on back side of wheel may cause the wheel to be clamped unlevel. This may result in the combination mount/demount head contacting the rim causing scratches. On alloy wheels, always rotate the wheel one turn after setting the head to insure proper wheel chucking.
B.Always review nicks and scratches with owners of expensive wheel and tire combinations prior to servicing.
C.Review the performance wheel section of this manual prior to servicing performance tire/wheel combinations.
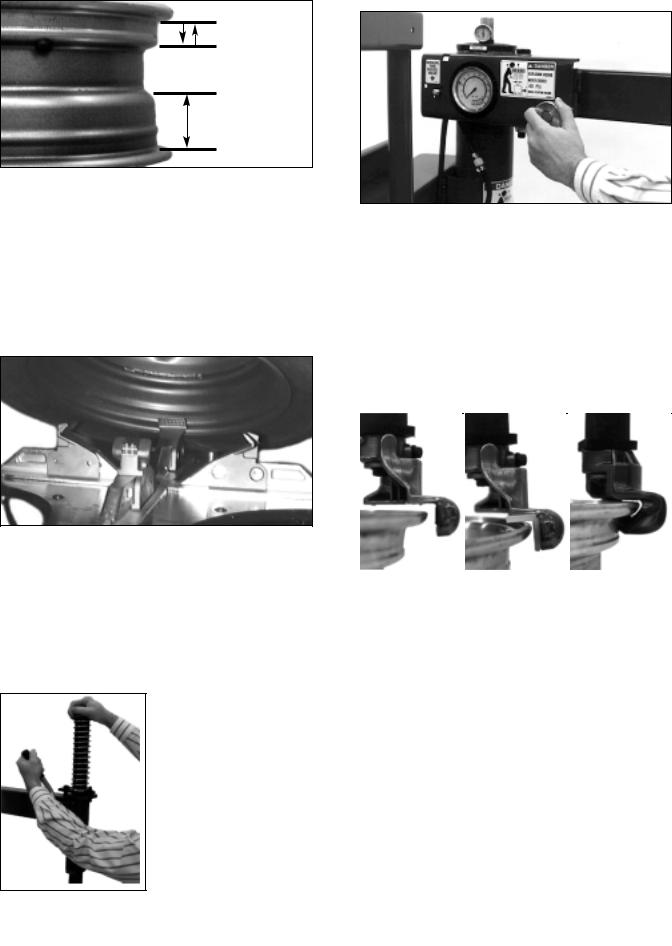
1.Deflate tire completely by removing the valve core from the valve stem (Figure 1).
D.Always loosen the bead on the narrow side of the wheel’s drop center first. See Figure 4 for more information on the drop center.
E.The clamps on the table top may extend beyond the table top itself. To avoid damaging the clamps, move them to their full inward position before positioning a tire for bead loosening.
F. Use extra care in positioning the bead loosener shoe on larger wheels/tires, and on alloy wheels. Make sure the shoe rests next to but not on the rim, and not on the tire sidewall.
2.Pull the bead loosener shoe away from the machine and roll wheel into position. The valve stem should be in the 3 o’clock position. Position the bead loosener shoe against the tire next to, but not on, the rim. Press the button on the bead loosener to actuate the shoe and loosen the bead. It may be necessary to loosen the bead in multiple locations around the tire (Figure 2).
Figure 2 – Position Tire and Bead Loosener Shoe
3.Turn wheel around and repeat loosening procedure on the other side of the wheel. This should be the long side of the drop center (see Figure 4).
G. It will be easier to clamp the wheel to the table top if the lower bead is loosened last.
4.Apply tire manufacturer’s approved rubber lubricant liberally to entire circumference of both tire beads after loosening (Figure 3).
Figure 1 – Remove Valve Core to Deflate Tire
NOTE: Loosening the beads on a partially or fully inflated tire is unsafe and causes excess movement and friction against the bumper pads and excessive wear on pivots. Deflate the tire completely to prolong the life of your machine.
Figure 3 – Apply Rubber Lubricant to Tire Beads
COATS 6065A/AX/EX Rim Clamp Tire Changer • 3
5.Determine the mounting side of the wheel. The mounting side is the narrow side of the drop center. (Tire removed in Figure 4 for clarity.)
Narrow Side
 Drop Center
Long Side
Figure 4 – Determining Mounting Side of Wheel
6.Place tire/wheel assembly on table top with mounting side up (Figure 5). Use the clamp control pedal to move the clamps inwards (push pedal down) or outwards (toggle pedal up). Clamp steel wheels from the inside (clamps push outwards against wheel). Clamp mag and custom wheels from the outside (clamps push inwards against the outside rim edge). Refer to the Performance Tires and Wheels section.
Figure 5 – Place Tire/Wheel Assembly on Table Top
7.Move the swing arm into position. Pull the locking handle forward to release the slide. Push down on the top of the vertical slide to move the demount head into contact with the rim edge. Push the locking handle back to lock the slide into place. As the slide is locked, the mount/demount head will move upward approximately 1/8 inch from rim edge (Figure 6).
Figure 6 - Position
Mount/Demount Tool
8.The mount/demount head roller should be in contact with the rim edge. Turn the swing arm adjusting knob to move the roller away from the rim 1/8 to 1/4 inch (Figure 7).
Figure 7 - Adjust Swing Arm to Position Head Roller
9.Check head positioning. Mount/demount head should be positioned with 1/8 to 3/16" clearance between the top of the rim edge and the bottom of the head, and 1/8 to 1/4 inch clearance between the rim edge and the head roller. This clearance will be maintained as long as the locking handle and adjustment knob are not changed. The operator may swing the arm out of the way and back into place again without needing to reposition the head (when changing a like set of wheels) (Figure 8).
|
A |
|
|
B |
|
|
C |
|
|
|
|
|
|
|
|
Figure 8 - Proper Mount/Demount Head Position
Figure 8A – Depicts proper mount/demount head positioning with the standard 6065 head.
Figure 8B – For additional protection on decorative wheels, the nylon "bootie" (part #182963) should be used. The clearance may also be reduced when using the "bootie."
Figure 8C – For maximum protection on decorative wheels, the optional nylon head should be used (part #182960). This head replaces the metal head. The vertical locking mechanism "lift" feature must also be reduced to
1⁄16".
H.The vertical tool clearance may change with machine use and should be inspected often. Failure to maintain the proper clearance may result in damage to the wheel rim and/or tire.
4 • COATS 6065A/AX/EX Rim Clamp Tire Changer
 Loading...