

Page 1
Bedienungsanleitung/Garantie
Gebruiksaanwijzing/Garantie • Instrucciones de servicio/Garantía
Istruzioni per l’uso/Garanzia • Instruction Manual/Guarantee
Mikrowellengerät mit Grill
Magnetron met grill • Horno microondas con parrilla
Apparecchio microonde con grill
• Microwave Oven with Grill
MWG 743 H
6....-05-MWG 743 H NEW 1 07.01.2005, 12:33:06 Uhr
Page 2

DEUTSCH
Inhalt
Übersicht Bedienelemente ....................................... Seite 3
Bedienungsanleitung................................................ Seite 4
Garantie...................................................................... Seite 10
NEDERLANDS
Inhoud
Overzicht bedieningselementen ........................... Pagina 3
Gebruiksaanwijzing................................................ Pagina 12
Garantie................................................................... Pagina 19
ESPAÑOL
Indice
Vista de conjunto Elementos de mando ..............Página 3
Instrucciones de servicio.......................................Página 20
Garantia...................................................................Página 27
ITALIANO
Indice
Descrizione dei singoli pezzi .................................Pagina 3
Istruzioni per l’uso................................................... Pagina 28
Garanzia..................................................................Pagina 35
ENGLISH
Contents
Control element overview.........................................Page 3
Instruction Manual.....................................................Page 36
Guarantee ..................................................................Page 43
2
6....-05-MWG 743 H NEW 2 07.01.2005, 12:33:10 Uhr
Page 3
Beschreibung der Bedienelemente
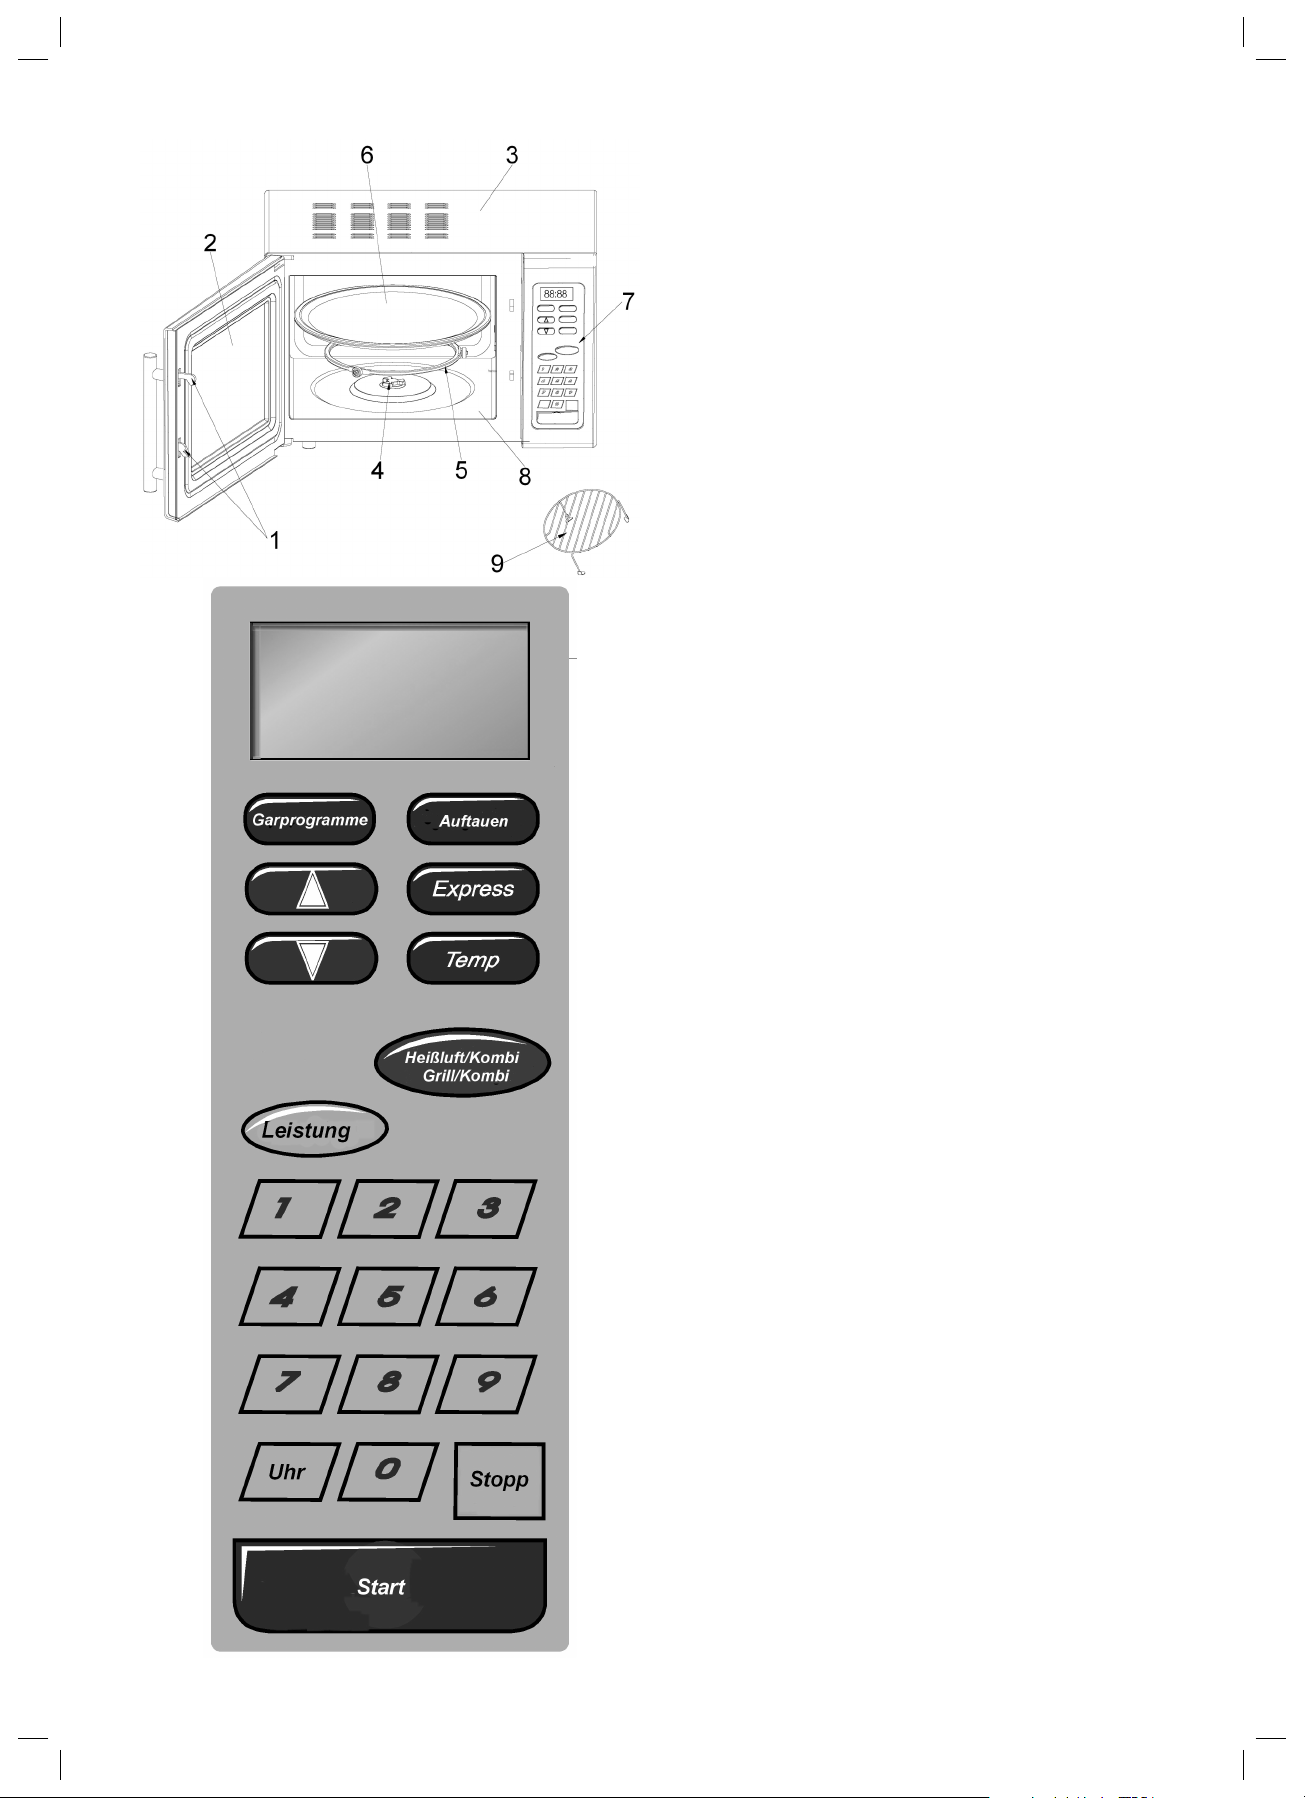
Grafik 1: Teilebezeichnung
1 Türverschluss
2 Sichtfenster
3 Gehäuse
4 Antriebsachse
5 Gleitring
6 Drehteller
7 Bedienblende
8 Garraum
9 Grillrost
Achtung:
Entfernen Sie keine montierten Teile aus dem Garraum
und von der Innenseite der Tür!
Grafi k 2: Bedienelemente
LEISTUNG (Mikrowelle) Wahl der Leistungsstufen
HEIßLUFT/KOMBI GRILL/KOMBI
HEIßLUFT: Reiner Heißluftbetrieb,
Thermostat gesteuert
HEIßLUFT/KOMBI: Heißluft und Mikrowelle arbei-
ten abwechselnd
GRILL: Zum Grillen und Überbacken
GRILL/KOMBI: Grill und Mikrowelle arbeiten
abwechselnd
GARPROGRAMME Auswahl eines Automatikpro-
gramms durch mehrmaliges
Drücken
AUFTAUEN Aktiviert die Auftaufunktion in
Verbindung mit einer Gewichtseinstellung
EXPRESS Schnellstart der Mikrowelle
TEMP Ermöglicht im Heißluftbetrieb
eine Temperaturwahl
Pfeiltasten Zum Einstellen von Tempera-
tur- oder Gewichtswerten
NUMMERN-Tasten Zum Einstellen von Uhrzeit
und Gardauer
UHR In Verbindung mit den NUM-
MERN-Tasten zum Einstellen
der Uhrzeit
START Start des Programms
STOPP (Stopp/Sperren)
Einmal drücken zum Stoppen
des Garvorgangs
Zweimal drücken zum Lö-
schen des Programms
3 Sekunden halten zum
Sperren/Entsperren des
Gerätes
3
6....-05-MWG 743 H NEW 3 07.01.2005, 12:33:11 Uhr
Page 4

Allgemeine Sicherheitshinweise
• Lesen Sie vor Inbetriebnahme dieses Gerätes die Bedienungsanleitung sehr sorgfältig durch und bewahren
Sie diese inkl. Garantieschein, Kassenbon und nach
Möglichkeit den Karton mit Innenverpackung gut auf.
DEUTSCH
• Benutzen Sie das Gerät ausschließlich für den privaten
und den dafür vorgesehenen Zweck. Dieses Gerät
ist nicht für den gewerblichen Gebrauch bestimmt.
Benutzen Sie es nicht im Freien (außer es ist für den
bedingten Einsatz im Freien vorgesehen). Halten Sie
es vor Hitze, direkter Sonneneinstrahlung, Feuchtigkeit
(auf keinen Fall in Flüssigkeiten tauchen) und scharfen
Kanten fern. Benutzen Sie das Gerät nicht mit feuchten
Händen. Bei feucht oder nass gewordenem Gerät sofort den Netzstecker ziehen. Nicht ins Wasser greifen.
• Schalten Sie das Gerät aus und ziehen Sie immer den
Stecker aus der Steckdose (ziehen Sie am Stecker,
nicht am Kabel) wenn Sie das Gerät nicht benutzen,
Zubehörteile anbringen, zur Reinigung oder bei Störung.
• Betreiben Sie das Gerät nicht unbeaufsichtigt. Sollten
Sie den Arbeitsplatz verlassen, schalten Sie das Gerät
bitte immer aus, bzw. ziehen Sie den Stecker aus der
Steckdose (ziehen Sie am Stecker, nicht am Kabel).
• Um Kinder vor Gefahren elektrischer Geräte zu
schützen, sorgen Sie bitte dafür, dass das Kabel nicht
herunter hängt und Kinder keinen Zugriff auf das Gerät
haben.
• Prüfen Sie Gerät und Kabel regelmäßig auf Schäden.
Ein beschädigtes Gerät bitte nicht in Betrieb nehmen.
• Reparieren Sie das Gerät nicht selbst, sondern suchen
Sie bitte einen autorisierten Fachmann auf. Um Gefährdungen zu vermeiden, ein defektes Netzkabel bitte
nur vom Hersteller, unserem Kundendienst oder einer
ähnlich qualifi zierten Person durch ein gleichwertiges
Kabel ersetzen lassen.
• Verwenden Sie nur Original-Zubehör.
• Beachten Sie bitte die nachfolgenden
”Speziellen Sicherheitshinweise...”.
Wichtige Sicherheitsanweisungen!
Bitte sorgfältig lesen und für den weiteren Gebrauch
aufbewahren.
• Warnung: Wenn die Tür oder die Türdichtungen
beschädigt sind, darf das Kochgerät nicht betrieben
werden, bevor es von einer dafür ausgebildeten Person
repariert worden ist.
• Warnung: Bitte reparieren Sie das Gerät auf keinen
Fall selbst, sondern suchen Sie einen autorisierten
Fachmann auf. Es ist für alle anderen, außer für einen
Fachmann, gefährlich, irgendwelche Wartungs- oder
Reparaturarbeiten auszuführen, die die Entfernung
einer Abdeckung erfordern, die den Schutz gegen
Strahlenbelastung durch Mikrowellenenergie sicherstellt.
• Warnung: Erwärmen Sie Flüssigkeiten oder andere
Speisen nicht in geschlossenen Behältern. Explosionsgefahr!
• Warnung: Kindern darf die Benutzung des Kochge-
rätes ohne Aufsicht nur erlaubt werden, wenn eine angemessene Anweisung gegeben wurde, die das Kind
in die Lage versetzt, das Kochgerät in sicherer Weise
zu benutzen und die Gefahren falscher Bedienung zu
verstehen.
• Möchten Sie Ihre Mikrowelle in einem Schrank, Regal
o. ä. unterbringen, achten Sie bitte darauf, dass Sie an
allen Seiten des Gerätes mindestens 10 cm Ventilationsabstand zu Schränken, Wänden u.a. einhalten.
• Verwenden Sie nur geeignetes Geschirr wie:
– Glas, Porzellan, Keramik, hitzebeständiges Kunst-
stoff- oder spezielles Mikrowellengeschirr.
• Beim Erwärmen oder Kochen von Speisen in brenn-
baren Materialien, wie Kunststoff- oder Papierbehälter, muss das Mikrowellenkochgerät häufi g wegen der
Möglichkeit einer Endzündung überwacht werden.
• Bei Rauchentwicklung ist das Gerät abzuschalten
und der Netzstecker zu ziehen. Halten Sie die Tür geschlossen, um evtl. auftretende Flammen zu ersticken.
• Achtung Siedeverzug: Beim Kochen, insbesondere
beim Nacherhitzenvon Flüssigkeiten (Wasser) kann es
vorkommen, das die Siedetemperatur zwar erreicht ist,
die typischen Dampfblasen aber noch nicht aufsteigen.
Die Flüssigkeit siedet nicht gleichmäßig. Dieser
sogenannte Siedeverzug kann beim Entnehmen des
Gefäßes durch leichte Erschütterung zu einer plötzlichen Dampfblasenbildung und damit zum Überkochen
führen. Verbrennungsgefahr! Um ein gleichmäßiges
Sieden zu erreichen, stellen Sie bitte einen Glasstab
oder etwas Ähnliches, nichtmetallisches in das Gefäß.
• Der Inhalt von Babyfl äschchen und Gläsern mit Kindernahrung muss umgerührt oder geschüttelt und die
Temperatur vor dem Verbrauch überprüft werden. Es
besteht Verbrennungsgefahr.
• Speisen mit Schale oder Haut, wie Eier, Würste,
geschlossenen Glaskonserven usw. dürfen nicht in
Mikrowellenkochgeräten erwärmt werden, da Sie
explodieren können, selbst wenn die Erwärmung durch
Mikrowellen beendet ist.
• Türrahmen/Türdichtung und benachbarte Teile müssen bei Verschmutzung sorgfältig mit einem feuchten
Tuch gereinigt werden.
• Reinigen Sie das Mikrowellenkochgerät regelmäßig
und entfernen Sie Nahrungsmittelreste aus dem Innenraum.
• Bei mangelhafter Sauberkeit des Gerätes, kann es zu
einer Zerstörung der Oberfl äche kommen, welches die
Lebensdauer des Gerätes beeinfl usst und möglicherweise zu gefährlichen Situationen führt.
Hinweise zum Grill- und Kombibetrieb
• Da im Grill- und Kombibetrieb Strahlungshitze benutzt
wird, benutzen Sie bitte nur hitzebeständiges Geschirr.
• Im reinen Grillbetrieb dürfen Sie auch Metall- oder
Alugeschirr benutzen – nicht jedoch bei Kombi- oder
Mikrowellenbetrieb.
• Für die Betriebsarten GRILL und KOMBI ist nur der
Grillrost geeignet.
• Stellen Sie nichts auf die Oberseite des Gehäuses.
Diese wird heiß. Lassen Sie die Lüftungsschlitze immer
frei.
• Verwenden Sie bitte den Grillrost, um das Gargut
näher an das Heizelement heranzuführen.
Inbetriebnahme
• Entnehmen Sie alles im Garraum befi ndliche Zubehör,
packen Sie es aus und legen Sie den Gleitring in
die Mitte. Positionieren Sie den Glasteller so auf der
Antriebsachse, das dieser in die Ausbuchtungen der
Antriebswelle einrastet und gerade aufl iegt.
4
6....-05-MWG 743 H NEW 4 07.01.2005, 12:33:14 Uhr
Page 5
• Kontrollieren Sie das Gerät auf sichtbare Schäden,
besonders im Bereich der Tür. Bei Schäden jeglicher
Art darf das Gerät auf keinen Fall in Betrieb genommen
werden.
• Um beim Betrieb Störungen anderer Geräte zu vermeiden, stellen Sie Ihr Gerät nicht in unmittelbarer Nähe
von anderen elektronischen Geräten auf.
• Entfernen Sie evtl. auf dem Gehäuse haftende Schutzfolien.
• Bitte entfernen Sie in keinem Fall Folien auf der
Innenseite der Tür!
• Stecken Sie den Netzstecker in eine korrekt installierte
Schutzkontaktsteckdose 230 V, 50 Hz.
• Entfernen Sie keine montierten Teile aus dem Garraum
und von der Innenseite der Tür!
Benutzung des Gerätes
Wissenswertes zum Mikrowellenbetrieb:
• Ihr Gerät arbeitet mit Mikrowellenstrahlung, welche
Wasserteilchen in Speisen in sehr kurzer Zeit erhitzt.
Hier gibt es keine Wärmestrahlung und somit auch
kaum Bräunung.
• Erwärmen Sie mit diesem Gerät nur Lebensmittel.
• Das Gerät ist nicht zum Backen in schwimmendem
Fett geeignet.
• Erhitzen Sie nur 1-2 Portionen auf einmal. Das Gerät
verliert sonst an Effi zienz.
• Zur Unterbrechung des Garvorgangs drücken Sie die
STOPP-Taste.
• Mikrowellen liefern sofort volle Energie. Ein Vorheizen
ist somit nicht erforderlich.
• Betreiben Sie das Gerät im Mikrowellen- oder Kombibetrieb niemals leer.
• Der Mikrowellenherd ersetzt nicht Ihren herkömmlichen Herd. Er dient hauptsächlich zum:
– Auftauen von Tiefgekühltem/Gefrorenem
– schnellen Erhitzen/Aufwärmen von Speisen oder
Getränken
– Garen von Speisen
• Bitte benutzen Sie kein Plastik- bzw. Papier-Geschirr.
Einstellen der Uhrzeit:
Hinweis: Beim ersten Einschalten leuchten erst alle
Displayanzeigen auf, dann erscheint ein Doppelpunkt
blinkend.
• Drücken Sie die STOPP-Taste.
• Drücken Sie die UHR-Taste. Die Anzeige wechselt auf
00:00. Die erste Ziffer blinkt.
• Mit Hilfe der NUMMERN-Tasten tragen Sie gewünschte Uhrzeit 4-stellig ein.
• Die neue Uhrzeit wird aktiviert.
Bedienung Mikrowelle:
Geben Sie die zu erhitzende Speise in ein geeignetes Geschirr. Öffnen Sie die Tür und stellen Sie das Gefäß mittig
auf den Glasteller. Türe bitte schließen. (Das Gerät arbeitet
aus Sicherheitsgründen nur mit fest geschlossener Tür).
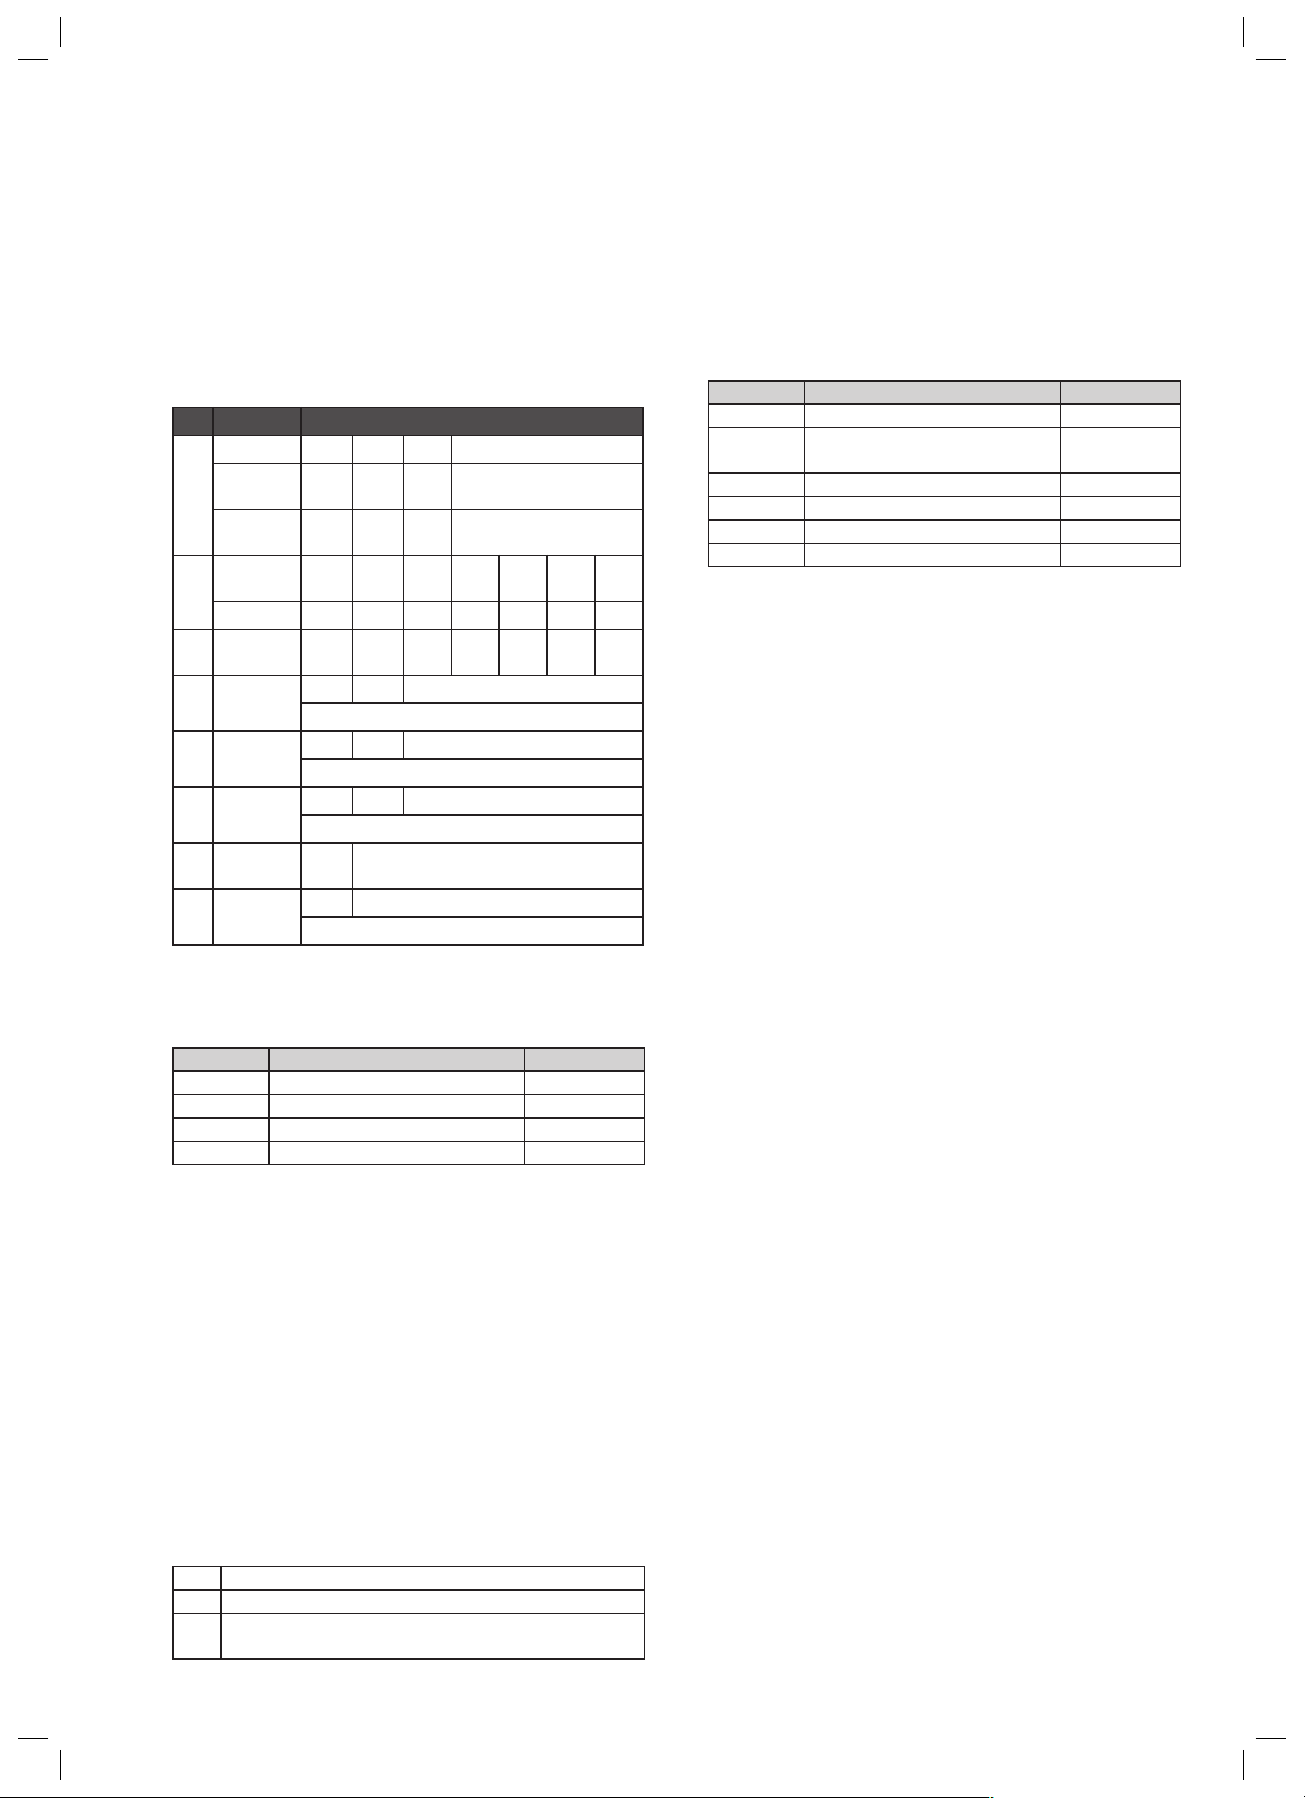
1. Drücken Sie die STOPP-Taste.
2. Wählen Sie durch ein-/mehrmaliges Drücken der LEISTUNG-Taste die gewünschte Mikrowellenleistung.
Leistung im Display
wie gewählt in %
100 900 Schnelles Erhitzen
80 720 Garen
60 540 Fortkochen
40 360
20 180
START 900 Schnelles Erhitzen
3. Mit Hilfe der NUMMERN-Tasten tragen Sie die gewünschte Gardauer ein.
Zum Beispiel:10:30Min Gardauer auf 100% Leistung
Schritt Taste/n Anzeige
1
2
3
4
4. Drücken Sie zum Starten die START-Taste.
Die Gardauer richtet sich nach Menge und Beschaffenheit des Inhaltes. Bei etwas Übung lernen Sie schnell,
die Gardauer einzuschätzen.
Bitte beachten Sie: Das Garen im Mikrowellenherd
geschieht sehr viel schneller als in einem Backofen.
Stellen Sie die Gardauer, wenn Sie sich nicht sicher
sind, gering ein und garen Sie ggf. nach.
Nach Ablauf der Zeit schaltet sich das Gerät aus und
im Display erscheint END. Entnehmen Sie dann die
Speise.
Leistung
in Watt (ca.)
STOPP
LEISTUNG 10 0P
1 0 3 0 10:30
START
Anwendungsgebiet
Schmelzen von
Käse usw.
Auftauen von
Gefrorenem
Automatisches Auftauen
Zum automatischen Auftauen von gefrorenem Fleisch,
Gefl ügel und Meeresfrüchten gehen Sie wie folgt vor:
1. Drücken Sie die STOPP-Taste.
2. Drücken Sie die AUFTAUEN-Taste. Sie befi nden sich nun
im Auftau-Programm. Durch wiederholtes Drücken der
AUFTAUEN-Taste wählen Sie eines der Auftauprogramme aus:
AD1 Auftauen von Fleisch von 0,1 – 2,0kg
AD2 Auftauen von Gefl ügel von 0,2 – 3,0kg
AD3 Auftauen von Meeresfrüchten von 0,1 – 0,9kg
3. Wählen Sie dann mit Hilfe der Pfeiltasten ein Gewicht
aus.
Zum Beispiel: 2,0kg Gefl ügel auftauen.
Schritt Taste/n Anzeige
1
2
3
4
4. Drücken Sie zum Starten die START-Taste.
Nach Ablauf der Zeit schaltet sich das Gerät aus und im
Display erscheint END. Entnehmen Sie dann die Speise.
In der nachfolgenden Tabelle erhalten Sie Informationen
zum manuellen Auftauen.
STOPP
AUFTAUEN AD -2
왖 / 왔
START
2.0
DEUTSCH
5
6....-05-MWG 743 H NEW 5 07.01.2005, 12:33:15 Uhr
Page 6
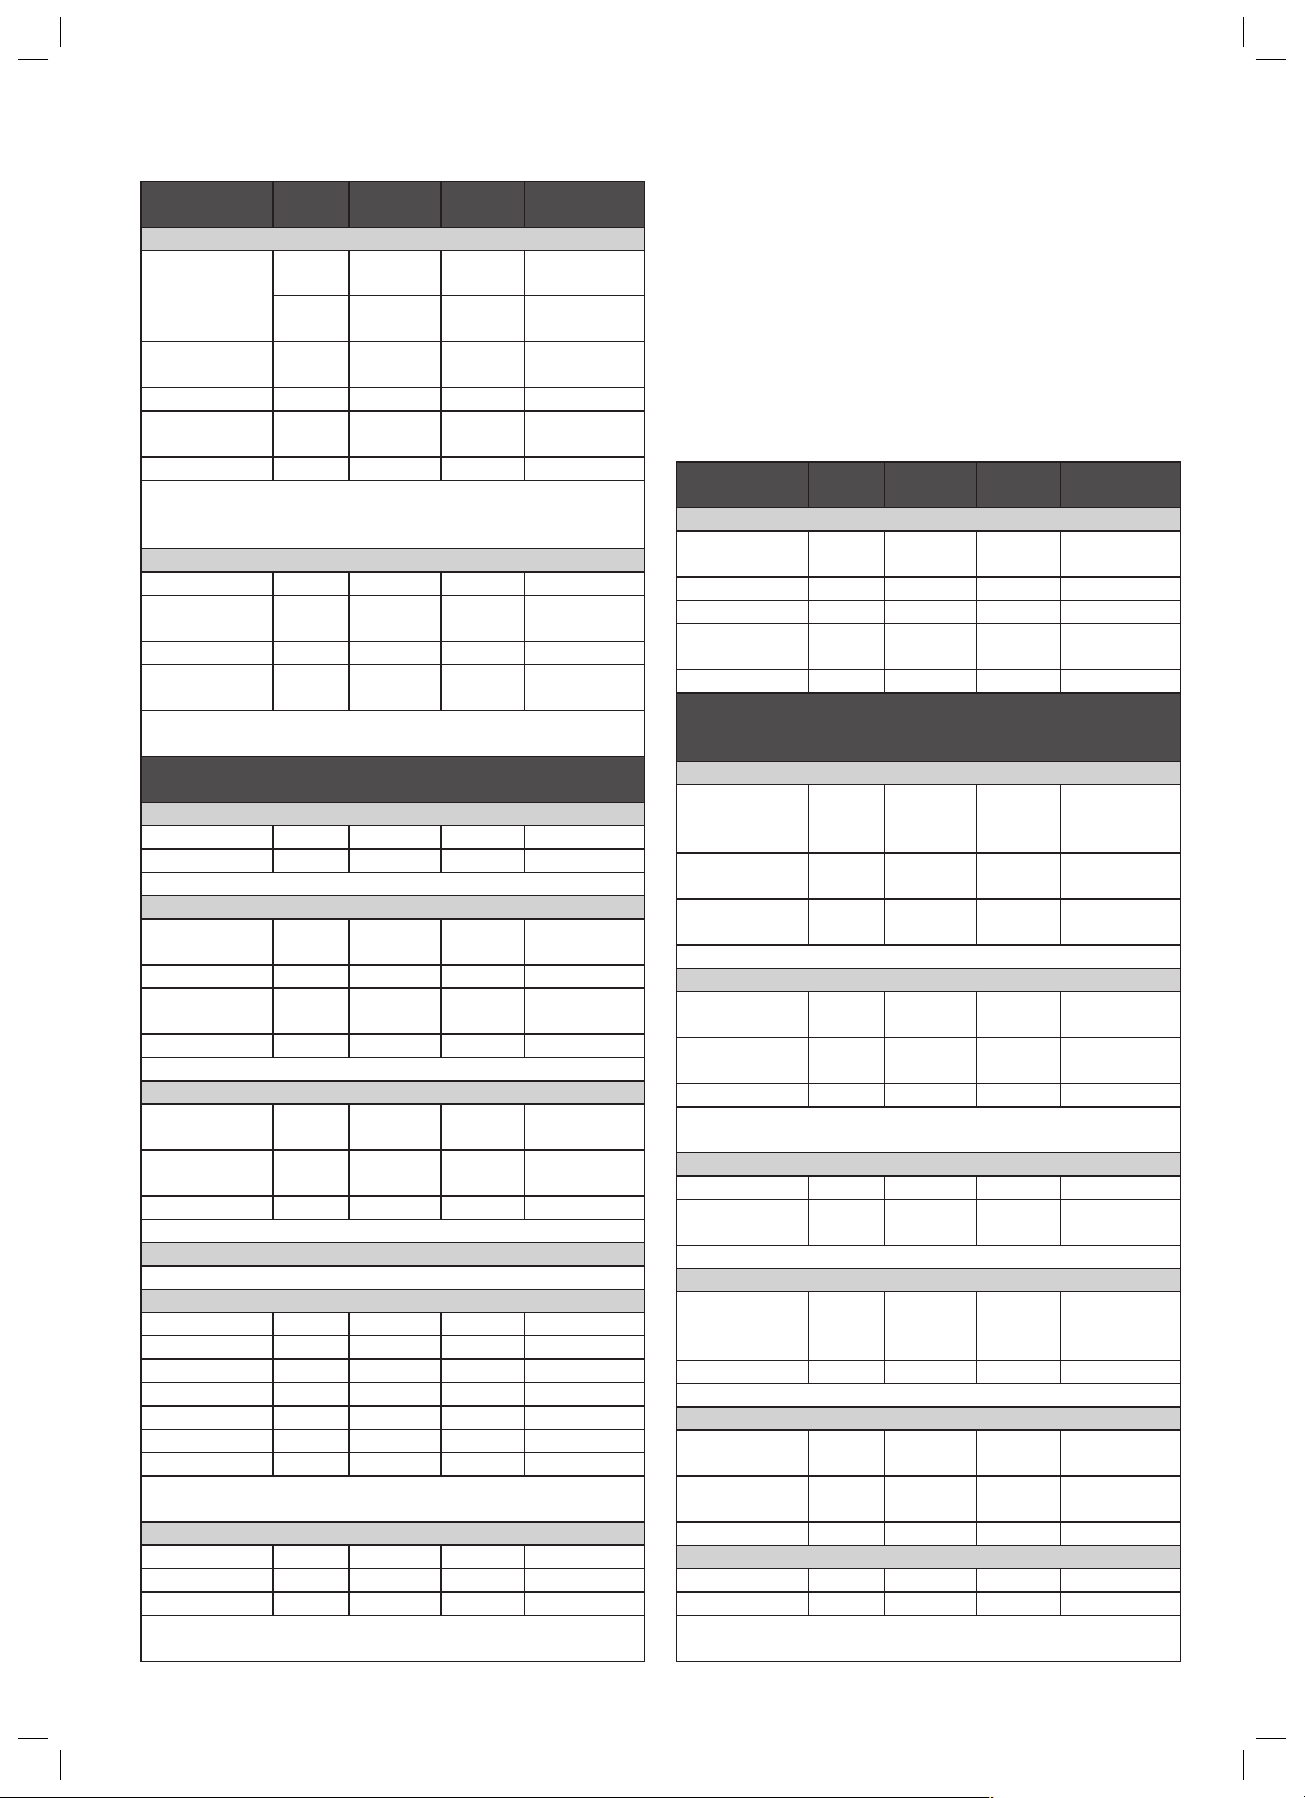
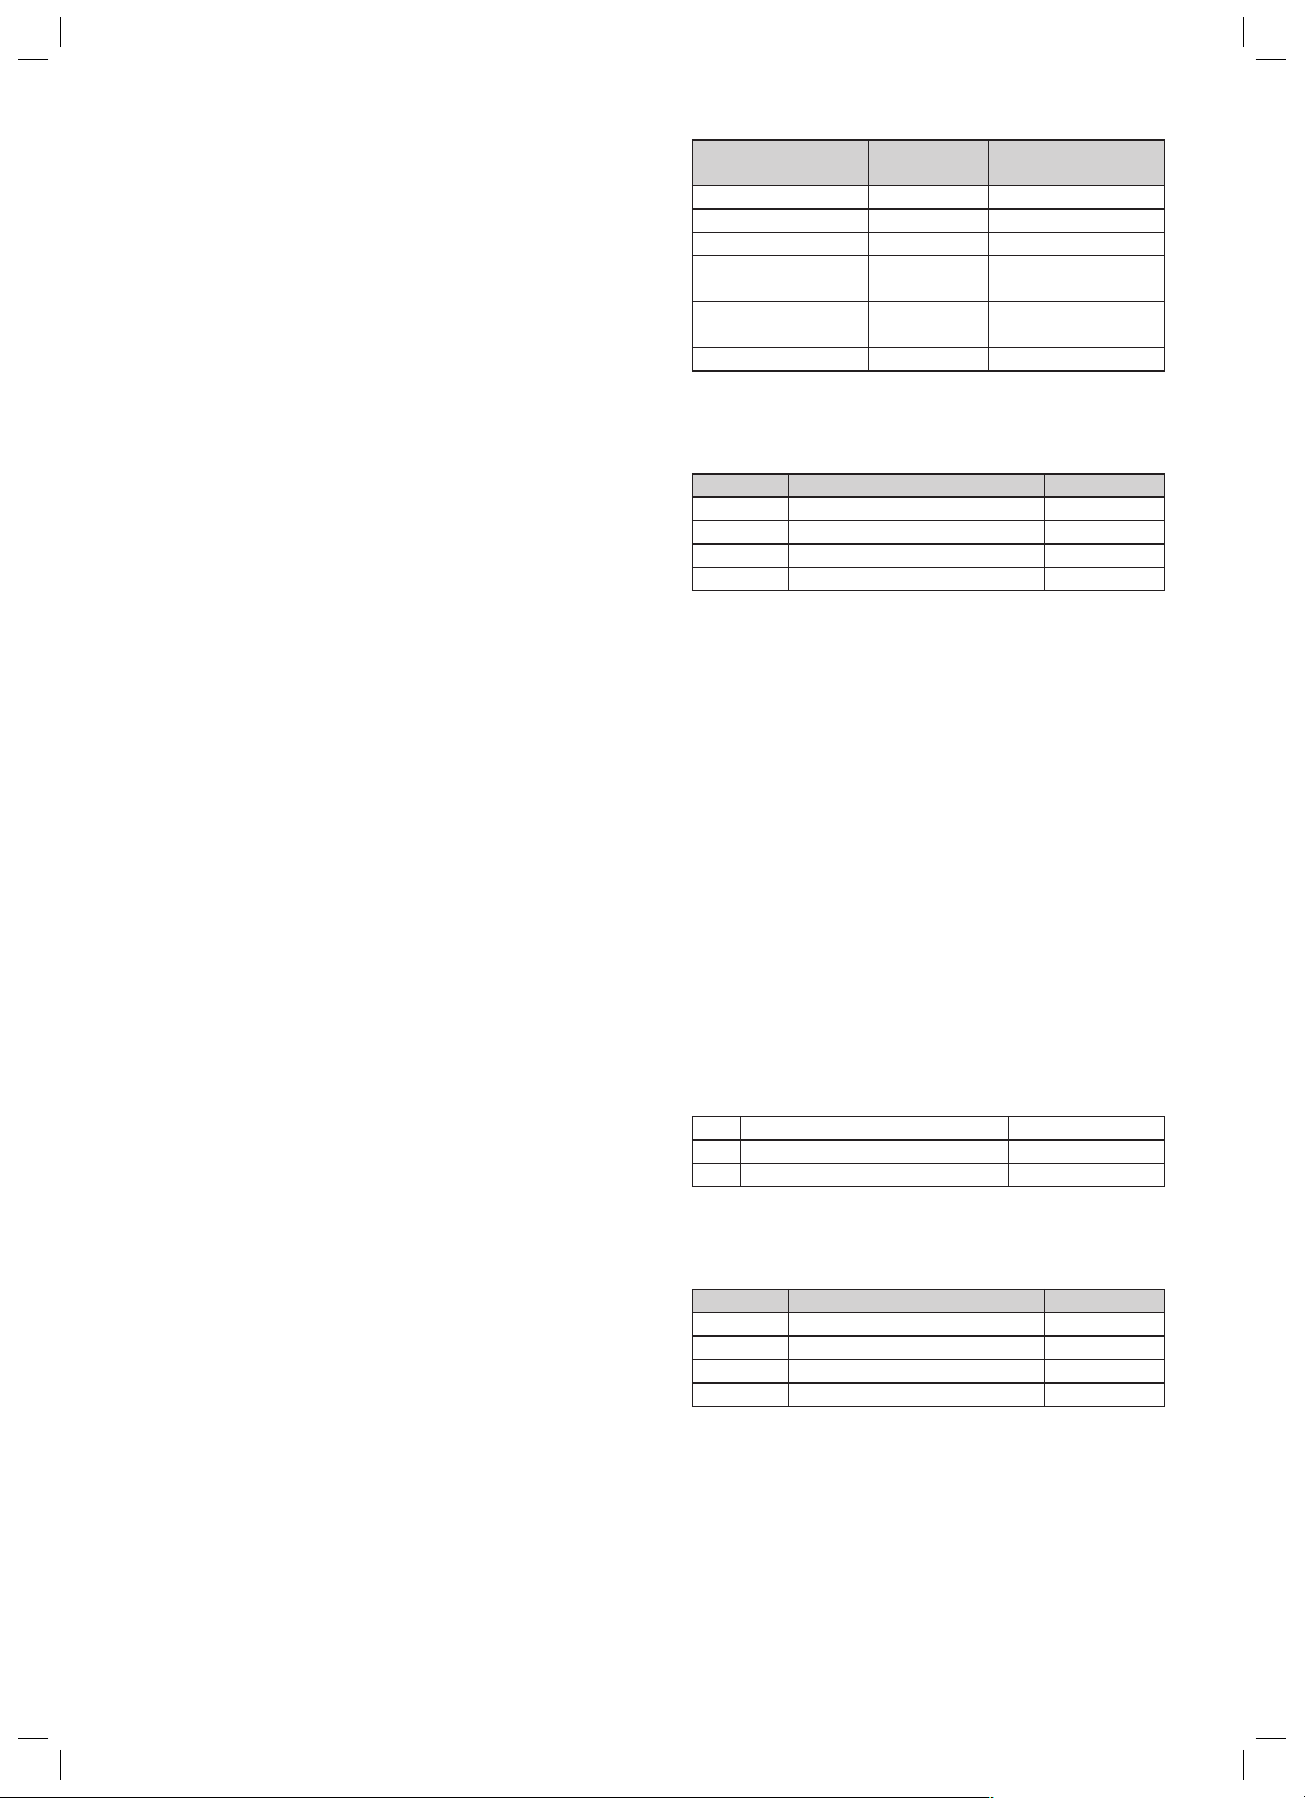
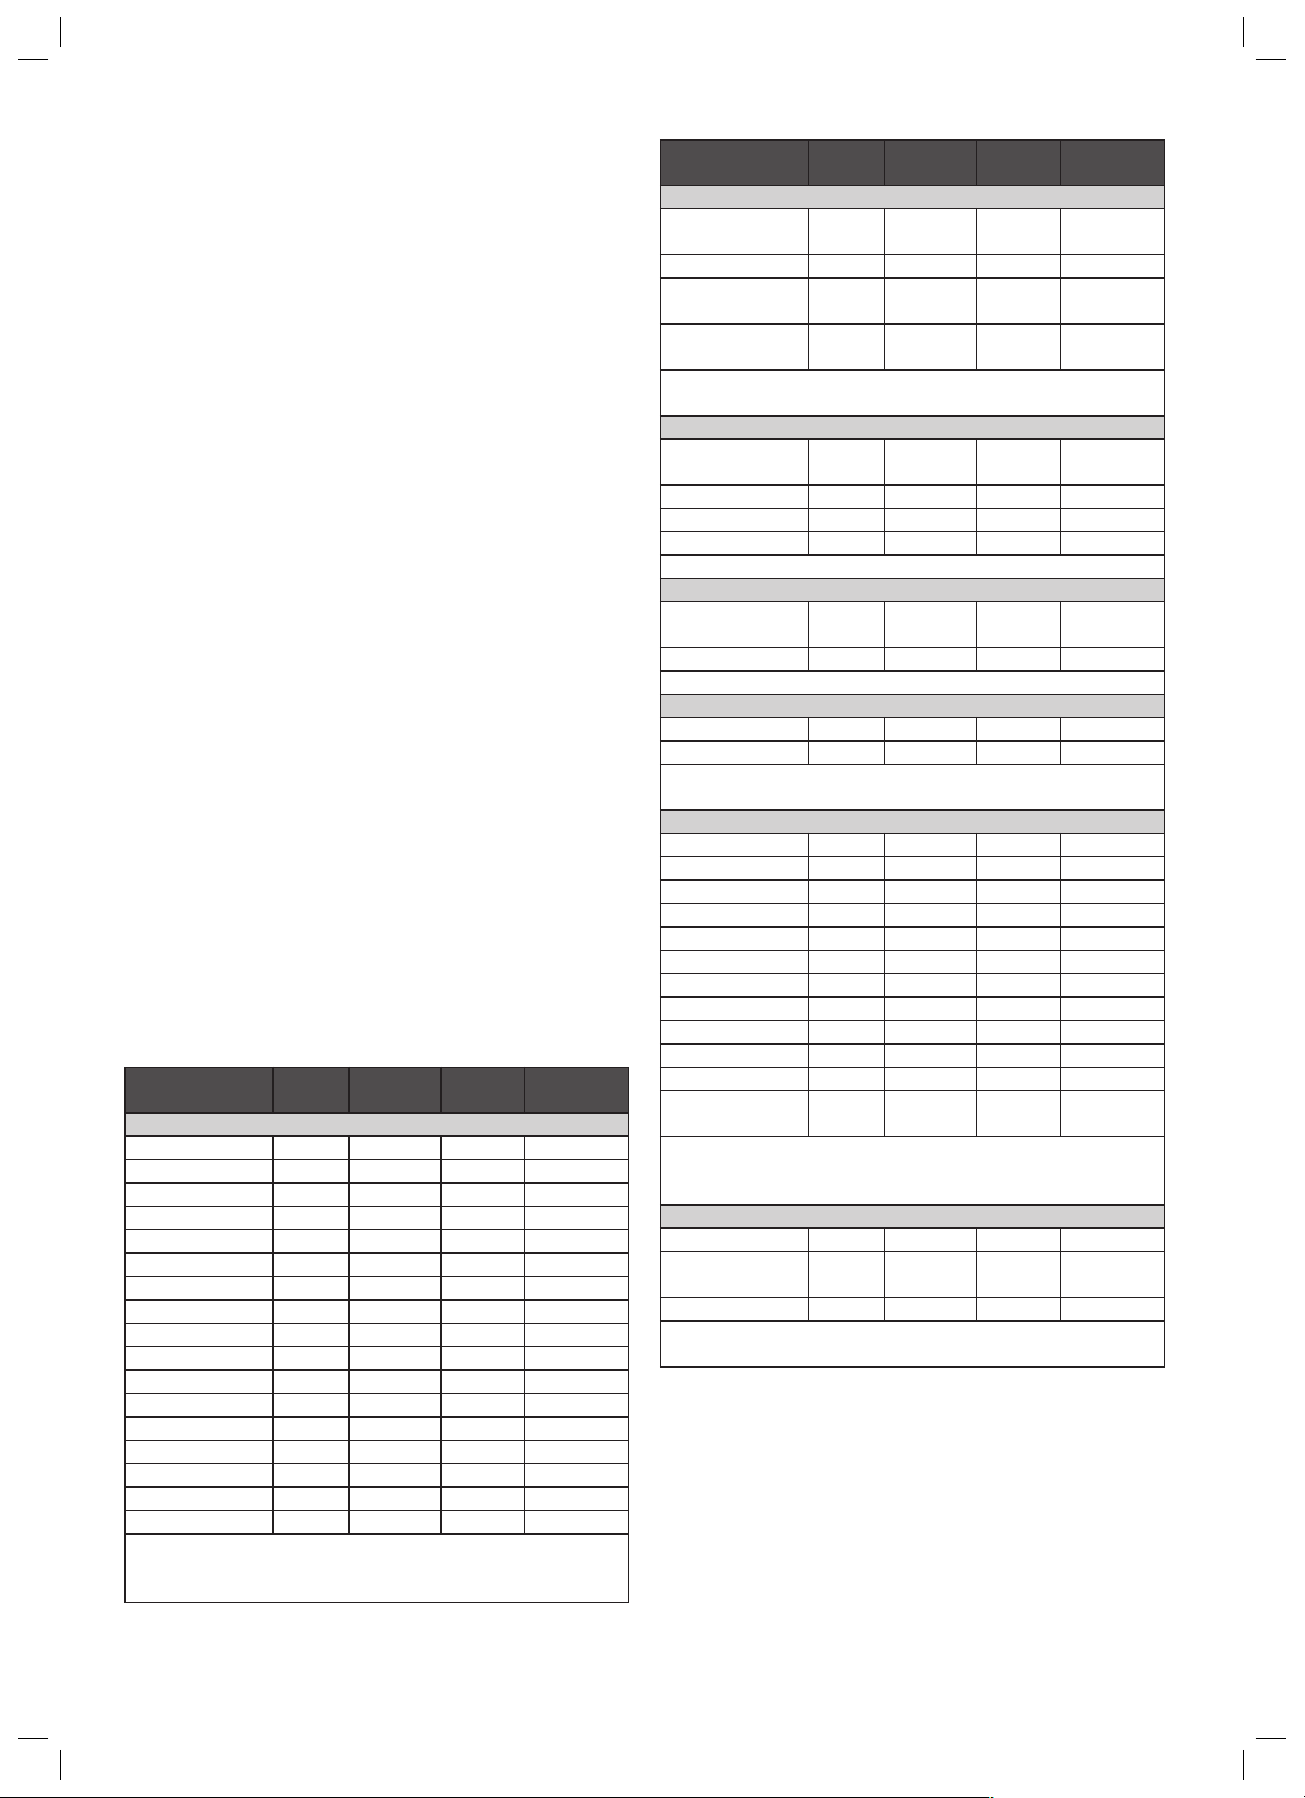
Tabelle Auftauen
Erwärmen
Lebensmittel/
Speise
Fleisch, Wurstwaren
DEUTSCH
Fleisch
(Rind, Kalb,
Schwein) im
Stück
Schnitzel,
Kotelett
Hackfl eisch 250 g 180 6 - 8 5 - 10
Bratwurst,
Bockwurst
Aufschnitt 300 g 180 4 - 6 5 - 10
Tipp: nach halber Zeit Fleisch wenden, empfi ndliche Teile
abdecken; Hackfl eisch zerteilen, bereits aufgetaute Teile
entfernen; Wurstscheiben trennen.
Gefl ügel
Hähnchen 1000 g 180 20 - 25 10 - 15
Hähnchenteile
Ente 1700 g 180 25 - 40 20 - 25
Gans- ,
Putenteile
Tipp: Gefl ügel nach halber Zeit wenden, Flügel und
Keulen abdecken.
Achtung: Auftaufl üssigkeit wegschütten und nicht mit
anderen Speisen in Berührung bringen.
Wild
Rehrücken 1000 g 180 20 - 35 20 - 30
Hasenrücken 500 g 180 12 - 13 10 - 20
Tipp: einmal wenden, Randteile abdecken.
Fisch
Krabben,
Shrimps
Forelle 340 g 180 4 - 6 5 - 10
Fisch im
Ganzen
Fischfi let 250 g 180 5 - 7 5 - 10
Tipp: mehrmals wenden.
Obst
Himbeeren,
Erdbeeren
Kirschen,
Pfl aumen
Apfelmus 500 g 180 9 - 12 5 - 10
Tipp: Vorsichtig umrühren, bzw. zerteilen.
Gemüse
Siehe „Tabelle Garen“, „Gemüse auftauen und garen“
Brot und Gebäck
Brötchen 4 Stück 180 ca. 1 - 3 5
Brot 1000 g 180 13 - 15 8 - 10
Toastbrot 500 g 180 5 - 6 5 - 10
Rührkuchen 500 g 180 6 - 8 5 - 10
Obstkuchen 1 Stück 180 2 - 3 2 - 3
Torte 1 Stück 180 0,5 - 1 3 - 5
Torte 1200 g 180 10 - 12 30 - 60
Tipp: Brot und Gebäck auf Küchenkrepppapier legen, das die
Feuchtigkeit aufnimmt; empfi ndliches Gebäck nur antauen.
Milchprodukte
Butter 250 g 180 5 - 7 10 - 15
Quark 250 g 180 6 - 8 5 - 10
Sahne 200 g 180 3 - 5 2 - 3
Tipp: Alufolie entfernen, nach halber Zeit umrühren;
Sahne noch halb gefroren schlagen.
6
Menge
500 g 180 14 – 18 10 – 15
1000 g 180 25 - 30 20 - 25
200 g 180 4 - 6 5 - 10
200 g 180 4 - 6 5 - 10
500 g 180 12 - 15 5 - 10
500 g 180 12 - 18 10 - 15
250 g 180 5 - 7 5 - 10
500 g 180 7 - 10 10 - 15
250 g 180 4 - 6 5 - 10
250 g 180 5 - 7 5 - 10
Leistung
Watt
Zeit
ca. Min.
Nachtauzeit
Min.
Das Erwärmen und Erhitzen ist eine besondere Stärke der
Mikrowelle. Kühlschrankkalte Flüssigkeiten und Speisen
lassen sich sehr leicht auf Zimmertemperatur oder Verzehrtemperatur bringen, ohne viele Töpfe benutzen zu müssen.
Die in der folgenden Tabelle angegebenen Erhitzungszeiten können nur Richtwerte sein, da die Zeit sehr stark
von der Ausgangstemperatur und der Zusammensetzung
der Speise abhängt. Es empfi ehlt sich deshalb, ab und zu
nachzusehen, ob das Gericht schon heiß genug ist.
Tabelle Erwä rmen
Lebensmittel/
Speise
Flüssigkeiten
Wasser,
1 Tasse
Wasser, 0,5 l 500 g 900 3,5 - 5 nein
Wasser, 0,75 l 750 g 900 5 - 7 nein
Kaffee,
1 Tasse
Milch, 1 Tasse 150 g 900 0,5 - 1 nein
Achtung: Einen Glasstab o. ä. (nichts metallisches)
gegen Siedeverzug in das Gefäß geben, vor dem Trinken
gut umrühren.
Tellergerichte
Schnitzel,
Kartoffeln
und Gemüse
Gulasch
mit Nudeln
Fleisch, Kloß
und Soße
Tipp: vorher leicht anfeuchten, zwischendurch umrühren.
Fleisch
Schnitzel,
paniert
Frikadellen,
4 Stück
Bratenstück 250 g 900 2 - 3 nein
Tipp: Mit Öl bepinseln, damit die Panade bzw. die Kruste
nicht aufweicht.
Gefl ügel
1/2 Hähnchen 450 g 900 3,5 - 5 nein
Hühnerfrikassee
Tipp: Mit Öl bepinseln, zwischendurch umrühren.
Beilagen
Nudeln, Reis
1 Port.
2 Port.
Kartoffeln 500 g 900 3 - 4 ja
Tipp: Vorher leicht anfeuchten.
Suppen / Soßen
Klare Brühe,
1 Teller
Suppe mit
Einlagen
Soße 250 g 900 1 - 2 ja
Babykost
Milch 100 ml 540 0,5 - 1 nein
Brei 200 g 540 1 - 1,5 nein
Tipp: Gut durchschütteln oder umrühren. Temperatur
überprüfen!
Menge
150 g 900 0,5 - 1 nein
150 g 900 0,5 - 1 nein
450 g 900 2,5 - 3,5 ja
450 g 900 2 - 2,5 ja
450 g 900 2,5 - 3,5 ja
200 g 900 1 - 2 nein
500 g 900 3 - 4 nein
400 g 900 3 - 4,5 ja
150 g
300 g
250 g 900 1 - 1,5 ja
250 g 900 1,5 - 2 ja
Leistung
Watt
900
900
Zeit
ca. Min.
1 - 2
2,5 - 3,5
Abdecken
ja
ja
6....-05-MWG 743 H NEW 6 07.01.2005, 12:33:17 Uhr
Page 7
Garen
Praktische Tipps zum Garen
Halten Sie sich an die Richtwerte in der Gartabelle und
den Rezepten. Beobachten Sie den Kochvorgang, solange
Sie noch nicht soviel Übung haben.
Die Tür des Gerätes können Sie jederzeit öffnen. Das
Gerät schaltet automatisch ab.
Es arbeitet erst wieder, wenn die Tür geschlossen ist.
Lebensmittel aus dem Kühlschrank, benötigen eine etwas
längere Garzeit als solche mit Raumtemperatur.
Je kompakter eine Speise ist, desto länger ist die Garzeit.
So benötigt z.B. ein größeres Stück Fleisch eine längere
Garzeit als geschnetzeltes Fleisch gleicher Menge. Es
empfi ehlt sich, größere Mengen bei maximaler Leistung
anzukochen und für ein gleichmäßiges Garen auf mittlerer
Leistung fortzukochen.
Flache Speisen und kleinere Mengen garen schneller als
hohe und große Mengen, die Lebensmittel daher möglichst
fl ach verteilen. Dünnere Teile, z.B. Hähnchenschenkel
oder Fischfi let, nach innen legen oder überlappen lassen.
Es gilt die Faustregel:
Doppelte Menge = fast doppelte Zeit
Halbe Menge = halbe Zeit
Wenn Sie für ein Gericht keine passende Zeitangabe
fi nden können, gilt die Regel:
pro 100 g ca. 1 Minute Garzeit
Alle Speisen, die Sie am Herd abdecken, sollten Sie auch
im Mikrowellengerät abdecken.
Ein Deckel verhindert, dass die Speisen austrocknen. Zum
Abdecken eignen sich ein umgedrehter Teller, Pergamentpapier oder Mikrowellenfolie. Speisen, die eine Kruste
erhalten sollen, offen garen.
Tabelle Garen
Lebensmittel/
Speise
Gemüse
Auberginen 500 g 720 7 - 10 ja
Blumenkohl 500 g 720 8 - 11 ja
Brokkoli 500 g 720 6 - 9 ja
Chicoree 500 g 720 6 - 7 ja
Erbsen 500 g 720 6 - 7 ja
Fenchel 500 g 720 8 - 11 ja
Grüne Bohnen 300 g 720 13 - 15 ja
Kartoffeln 500 g 720 9 - 12 ja
Kohlrabi 500 g 720 8 - 10 ja
Lauch 500 g 720 7 - 9 ja
Maiskolben 250 g 720 7 - 9 ja
Möhren 500 g 720 8 - 10 ja
Paprika 500 g 720 6 - 9 ja
Rosenkohl 300 g 720 7 - 10 ja
Spargel 300 g 720 6 - 9 ja
Tomaten 500 g 720 6 - 7 ja
Zucchini 500 g 720 9 - 10 ja
Tipp: Gemüse kleinschneiden und mit 2 - 3 El Flüssigkeit
garen, Zwischendurch umrühren, 3 - 5 Min. nachgaren
lassen, erst vor dem Servieren würzen.
Menge
Leistung
Watt
Zeit
ca. Min.
Abdecken
Lebensmittel/
Speise
Obst
Apfel-,
Birnenkompott
Pfl aumenmus 250 g 720 4 - 6 nein
Rhabarberkompott
Bratäpfel,
4 Stück
Tipp: 125 ml Wasser zufügen, Zitronensaft verhindert,
dass das Obst sich verfärbt, 3 - 5 Min. nachgaren lassen.
Fleisch *)
Fleisch
mit Soße
Gulasch,
Geschnetzeltes 500 g 720 10 - 15 ja
Rindsrouladen 250 g 720 7 - 8 ja
Tipp: Zwischendurch umrühren, 3 - 5 Min. ruhen lassen.
Gefl ügel *)
Hühnerfrikassee
Gefl ügelsuppe 200 g 720 5 - 6 ja
Tipp: Zwischendurch umrühren, 3 - 5 Min. ruhen lassen.
Fisch
Fischfi let 300 g 720 7 - 8 ja
Fischfi let 400 g 720 8 - 9 ja
Tipp: Nach der Hälfte der Zeit wenden, 3 - 5 Min. nachgaren lassen.
Gemüse auftauen und garen
Apfelrotkohl 450 g 720 14 -16 ja
Blattspinat 300 g 720 11 - 13 ja
Blumenkohl 200 g 720 7 - 9 ja
Brechbohnen 200 g 720 8 - 10 ja
Brokkoli 300 g 720 8 - 9 ja
Erbsen 300 g 720 7 - 8 ja
Kohlrabi 300 g 720 13 -15 ja
Lauch 200 g 720 10 - 11 ja
Mais 200 g 720 4 - 6 ja
Möhren 200 g 720 5 - 6 ja
Rosenkohl 300 g 720 7 - 8 ja
Spinat
Tipp: mit 1 -2 El Flüssigkeit garen, zwischendurch umrüh-
ren bzw. vorsichtig zerteilen, 2 - 3 Min. nachgaren lassen,
erst vor dem Servieren würzen.
Suppen / Eintöpfe *)
Eintopf 500 g 720 13 - 15 ja
Suppe
mit Einlage
Crèmesuppe 500 g 720 13 - 15 ja
Tipp: Zwischendurch umrühren, 3 - 5 Min. nachgaren
lassen.
*) Bereits vorgefertigte Speisen
Menge
500 g 720 5 - 8 ja
250 g 720 5 - 8 ja
500 g 720 7 - 9 ja
400 g 720 10 - 12 ja
250 g 720 6 - 7 ja
450 g
600 g
300 g 720 7 - 8 ja
Leistung
Watt
720
720
Zeit
ca. Min.
12 - 13
15 - 17
Abdecken
ja
ja
Express Kochen
• Zum Starten des Express-Kochens drücken Sie
EXPRESS-Taste wiederholt.
Durch jedes weitere Drücken der Taste wird die Garzeit
um 30 Sekunden verlängert.
• Drücken Sie die START-Taste.
Die Leistung der Mikrowelle beträgt dabei 100%. Die
maximale Express-Zeit beträgt 1:30 Minuten.
DEUTSCH
7
6....-05-MWG 743 H NEW 7 07.01.2005, 12:33:20 Uhr
Page 8
Automatik-Programme
Mit Hilfe der Automatik können Sie bestimmte Mengen von
Speisen automatisch garen. Gardauer und Mikrowellenleistung sind im Programm hinterlegt.
DEUTSCH
Gehen Sie dazu wie folgt vor:
1. Drücken Sie die STOPP-Taste.
2. Drücken Sie die GARPRORAMME-Taste. Sie befi nden
sich nun im Garprogramm.
Durch wiederholtes Drücken der GARPRORAMMETaste wählen Sie eines der Programme aus:
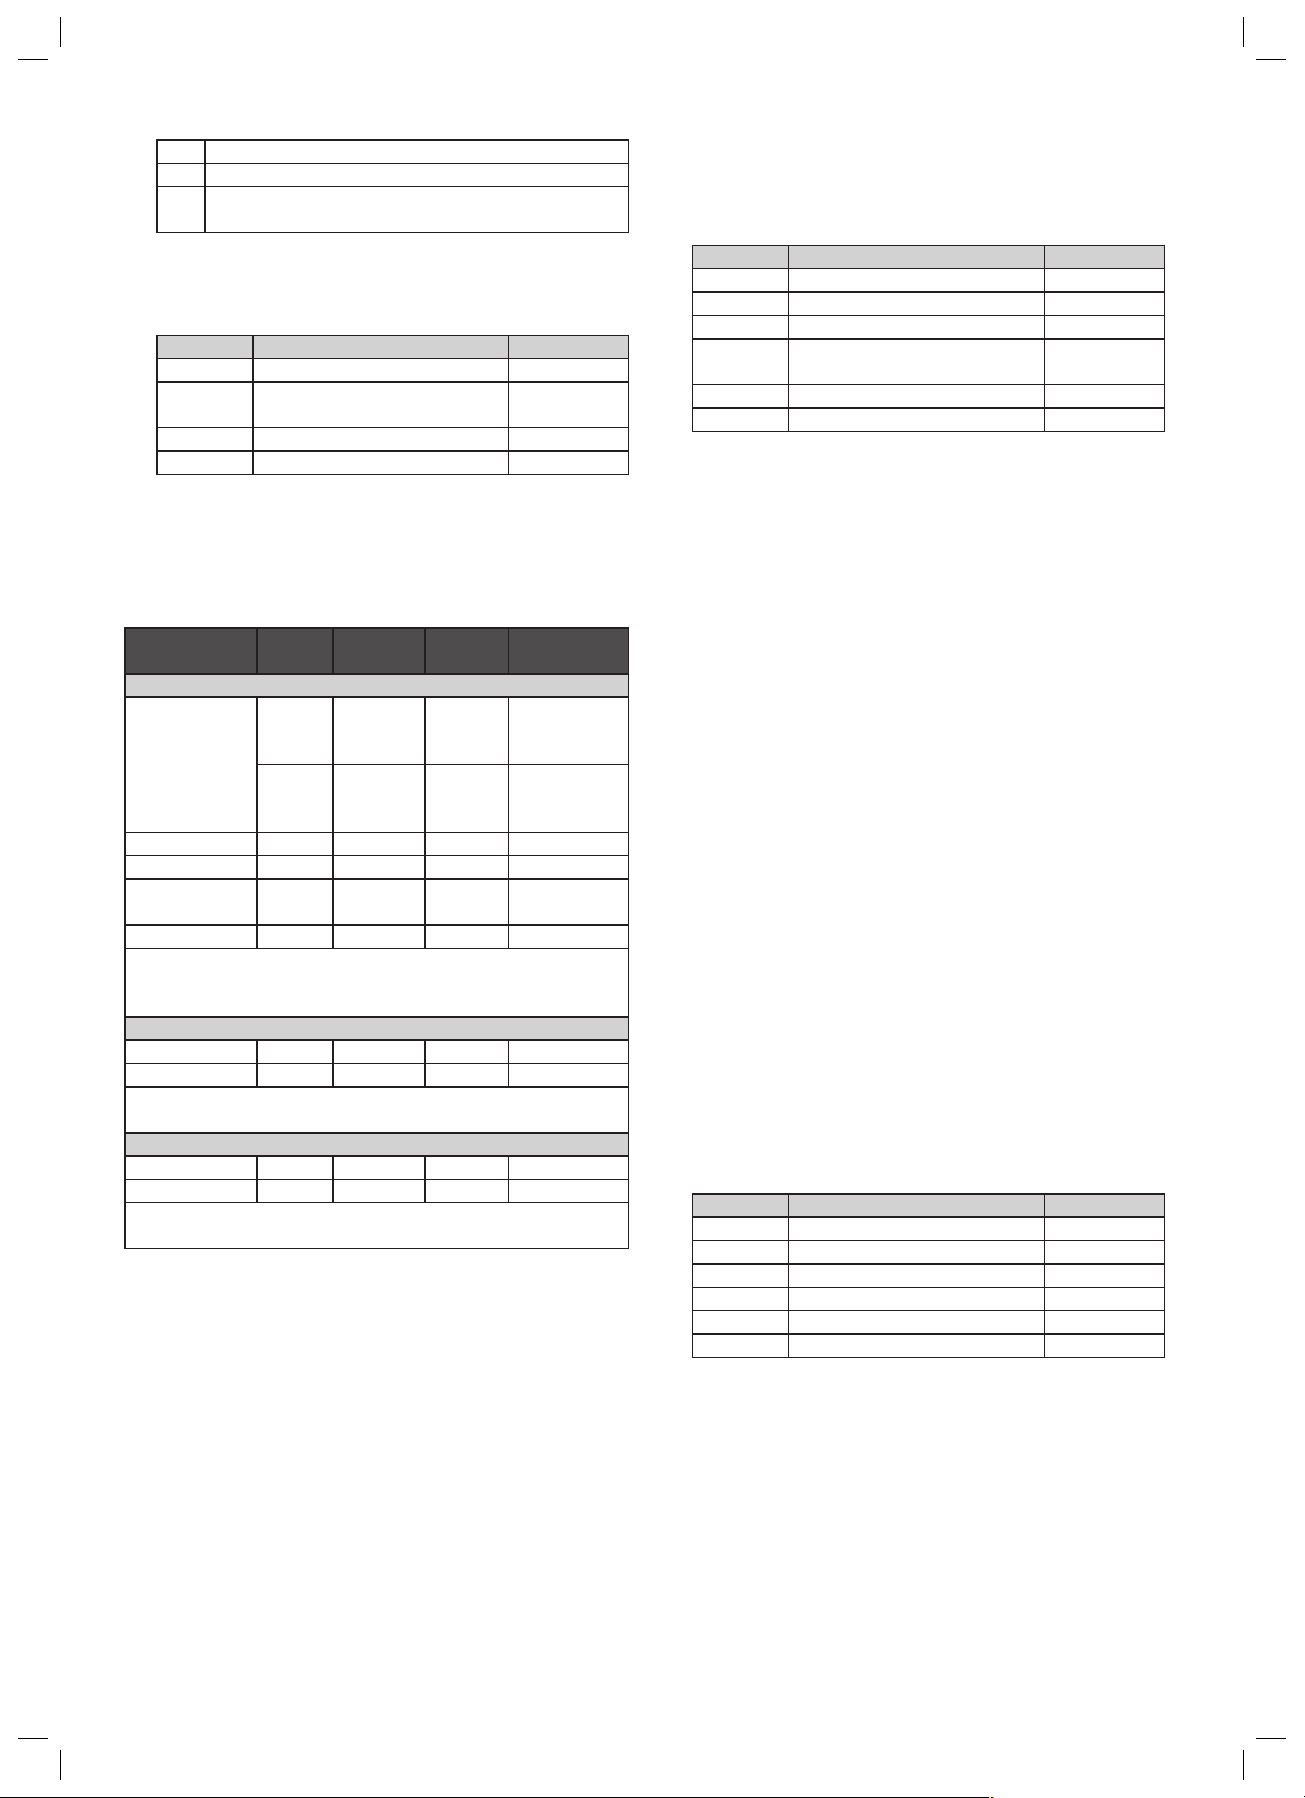
Code Programm Gewicht
Reis/Nudeln 0,1 kg 0,2 kg 0,3 kg
Reis,
AC-1
dazu Wasser
Nudeln,
dazu Wasser
Gemüse,
frisch
AC-2
Dazu Wasser 2 EL 2 EL 2 EL 4 EL 4 EL 4 EL 4 EL
Gemüse,
AC-3
gefroren
AC-4 Popkorn
AC-5 Flüssigkeiten
AC-6 Kartoffeln
Pizza
AC-7
(erwärmen)
AC-8 Fisch
180 ml 33 0ml 480 ml Speise abdecken
300 ml 60 0ml 900 ml Speise nicht abdecken
0,2 kg 0,3 kg 0,4 kg 0,5 kg 0,6 kg 0,7 kg 0,8 kg
0,2 kg 0,3 kg 0,4 kg 0,5 kg 0,6 kg 0,7 kg 0,8 kg
3,0 Oz 3,5 Oz Entspricht ca. 80/100 g
Bitte nur Mikrowellen Popcorn im Beutel verwenden
250 ml 500 ml
Nicht abdecken! Achtung Siedeverzug!
0,45k g 0,65 kg
Kartoffeln einstechen, mit Abstand auf den Drehteller legen.
0,15kg
0,45kg
Fisch vorher einschneiden
3. Bestätigen Sie mit Hilfe der TEMP-Taste die Standardeinstellung von 160°C oder
4. stellen Sie anschließend mit Hilfe der Pfeiltasten eine
Temperatur zwischen 80°C und 230°C ein.
5. Mit Hilfe der NUMMERN-Tasten geben Sie die gewünschte Gardauer ein.
Hinweis: Die Standardeinstellung beträgt 15Min.
Zum Beispiel:
Programm C2, bei 180°C, 8Min Gardauer.
Schritt Taste/n Anzeige
1
2
3
4
5
6
6. Drücken Sie zum Starten die START-Taste.
Nach Ablauf der Zeit schaltet sich das Gerät aus und im
Display erscheint END. Entnehmen Sie dann die Speise.
Fehlermeldungen
• Während des Betriebs erscheint im Display „Err2“.
Die Temperatur im Garraum hat den voreingestellten
Temperaturwert überstiegen.
Möglicherweise ist die Temperatur für diese Zubereitung zu gering gewählt. Bitte nehmen Sie eine
Korrektur der Einstellung vor.
• Während des Betriebs erscheint im Display „Err3“.
Der voreingestellte Temperaturwert konnte innerhalb
einer vorgegebenen Zeit nicht erreicht werden.
Bitte nehmen Sie eine Korrektur der Einstellung vor.
STOPP
HEISSLUFT/KOMBI
GRILL/KOMBI
TEMP 160C
왖 / 왔
0 8 0 0 08:00
START
C -2
180C
3. Wählen Sie dann in den Programmen AC-1 bis AC-6
mit den Pfeiltasten ein Gewicht aus.
Zum Beispiel: 0,2kg frisches Gemüse garen.
Schritt Taste/n Anzeige
1
2
3
4
4. Drücken Sie zum Starten die START-Taste.
Nach Ablauf der Zeit schaltet sich das Gerät aus und im
Display erscheint END. Entnehmen Sie dann die Speise.
Hinweis: EL entspricht einem Esslöffel.
STOPP
GARPROGRAMME AC -2
왖 / 왔
START
0.2
Heißluft/Kombi Grill/Kombi
Heißluft und Heißluft-/Kombibetrieb
Für den Heißluft und den Heißluft-/Kombibetrieb gehen Sie
bitte wie folgt vor:
1. Drücken Sie die STOPP-Taste.
2. Drücken Sie die HEIßLUFT/KOMBI GRILL/KOMBITaste. Durch wiederholtes Drücken der HEIßLUFT/
KOMBI GRILL/KOMBI-Taste wählen Sie eines der
Programme aus:
C Nur Heißluft
C1 Heißluft und Mikrowelle in Kombination
Heißluft und Mikrowelle in Kombination
C2
mit höherem Mikrowellenanteil
Grill und Grill-/Kombibetrieb
Zum Grillen benutzen Sie bitte den Grillrost, um eine
schnelle und gleichmäßige Bräunung zu erzielen. Verwenden Sie eine geeignetes hitzebeständiges Geschirr oder
legen Sie das Grillgut direkt auf den Grillrost.
Große, dicke Lebensmittel werden direkt auf dem Drehteller gegrillt!
Ein „Vorheizen“ des Grills ist nicht erforderlich, da der
Infrarotgrill unmittelbar Strahlungshitze erzeugt.
Wenn Sie Speisen im Kombibetrieb Mikrowelle- Grill zubereiten, sollten Sie folgendes beachten:
Für große, dicke Lebensmittel, wie z.B. Schweinebraten,
ist die Mikrowellenzeit entsprechend länger als für kleine,
fl ache Lebensmittel. Beim Grill verhält es sich jedoch
umgekehrt. Je näher das Lebensmittel an den Grill
gelangt, desto schneller wird es braun. Das heißt, wenn
Sie große Bratenstücke im Kombibetrieb zubereiten, ist die
Grillzeit gegebenenfalls kürzer als für kleinere Bratenstücke.
Für den Grill und den Grill-/Kombibetrieb gehen Sie bitte
wie folgt vor:
1. Drücken Sie die STOPP-Taste.
2. Drücken Sie die HEIßLUFT/KOMBI GRILL/KOMBITaste. Durch wiederholtes Drücken der HEIßLUFT/
KOMBI GRILL/KOMBI-Taste wählen Sie eines der
Programme aus:
8
6....-05-MWG 743 H NEW 8 07.01.2005, 12:33:23 Uhr
Page 9
GNur Grill
G1 Grill und Mikrowelle in Kombination
Grill und Mikrowelle in Kombination
G2
mit höherem Grillanteil
3. Mit Hilfe der NUMMERN-Tasten geben Sie die gewünschte Gardauer ein.
Zum Beispiel: Programm G2, 10:30Min Gardauer
Schritt Taste/n Anzeige
1
2
3
4
4. Drücken Sie zum Starten die START-Taste.
Nach Ablauf der Zeit schaltet sich das Gerät aus und im
Display erscheint END. Entnehmen Sie dann die Speise.
STOPP
HEISSLUFT/KOMBI
GRILL/KOMBI
1 0 3 0 10:30
START
G 2
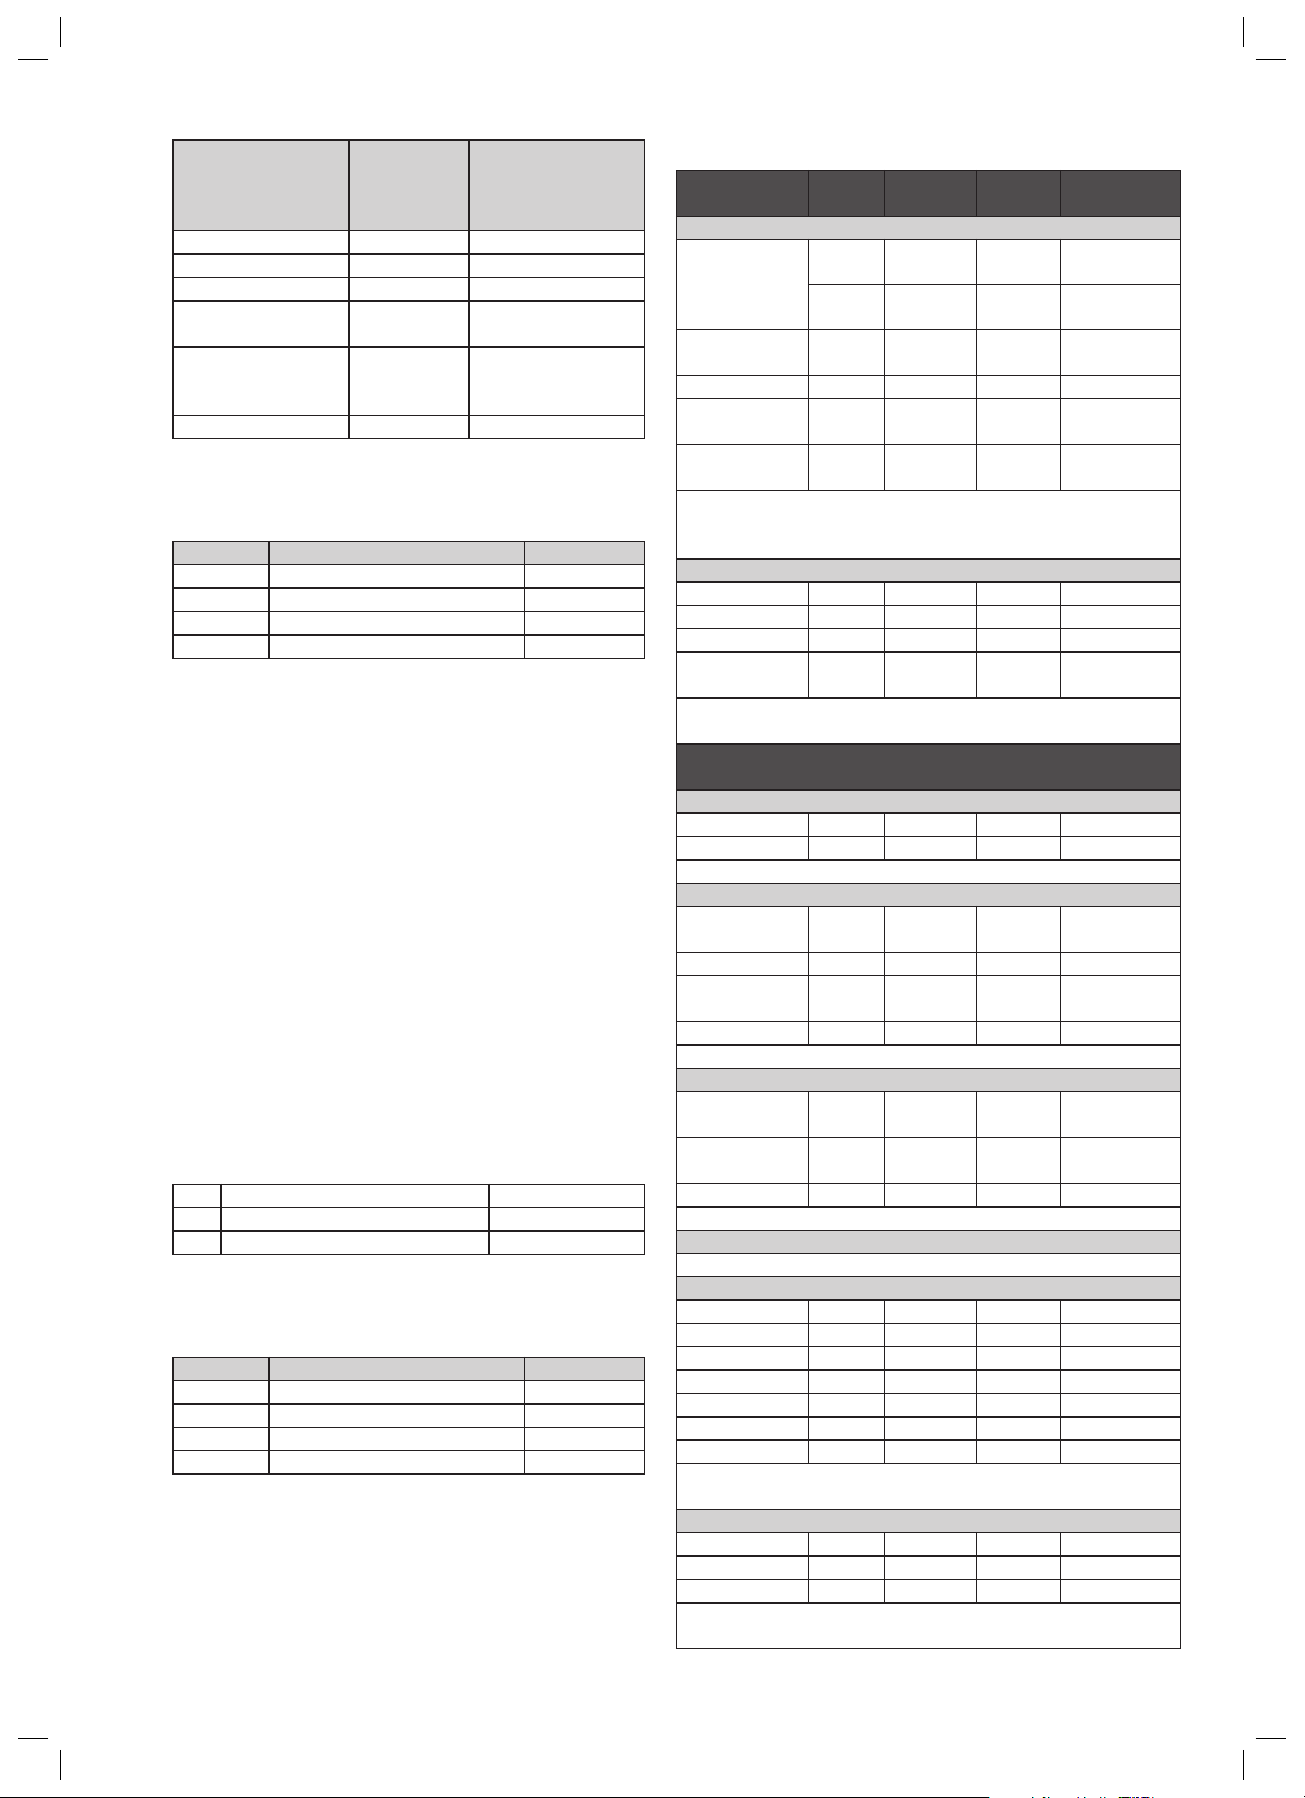
Tabelle Grill/ Kombibetrieb
Lebensmittel/
Speise
Fleisch, Wurstwaren
Rind-,
Schwein oder
Kalbfl eisch
im Stück
Kasseler 500 g 12 - 14 nein
Hackbraten 500 g 13 - 15 nein
Wiener
Würstchen
Bockwurst 200 g 2 - 3 nein
Tipp: Fleisch nach der Hälfte der Zeit wenden, 3 - 5 Min.
nachgaren lassen; Hackbraten mit Eiklar bestreichen; Würstchen mit einer Gabel anstechen.
Gefl ügel
Suppenhuhn 1000 g 13 - 15 nein
Hähnchenteile 250 g 4 - 5 nein
Tipp: Ohne Flüssigkeit im eigenen Saft garen lassen, einmal
wenden, 4 - 5 Min. nachgaren lassen.
Fisch
Forelle, blau 300 g 5 - 6 nein
Fischfi let 300 g 3 - 4 nein
Tipp: Nach der Hälfte der Zeit wenden, 3 - 5 Min. nachgaren
lassen.
Menge
500 g 10 - 12 nein
750 g 12 - 15 nein
200 g 2 - 3 nein
Kombibetrieb
Zeit
ca. Min.
Abdecken
Individuelles Garprogramm
Möchten Sie für bestimmte Zubereitungen ein eigenes
Garprogramm eingeben, können Sie dies aus den
Programmen Leistung der Mikrowelle und Grill/Kombi (G,
G1, G2) und/oder Heißluft/Kombi (C, C1, C2) zusammenstellen.
Gehen Sie zum Beispiel so vor:
1. Drücken Sie die STOPP-Taste.
2. Wählen Sie durch ein-/mehrmaliges Drücken der LEISTUNG-Taste die gewünschte Mikrowellenleistung.
3. Mit Hilfe der NUMMERN-Tasten tragen Sie die gewünschte Gardauer ein.
4. Wählen Sie durch ein-/mehrmaliges Drücken der
HEIßLUFT/KOMBI GRILL/KOMBI-Taste eines der
Programme C, C1, C2, G, G1 oder G2 aus.
5. Mit Hilfe den NUMMERN-Tasten tragen Sie die gewünschte Gardauer ein.
Zum Beispiel: 3:00Min Gardauer auf 100% Mikrowel-
lenleistung und anschließend 9:00Min Grill
Schritt Taste/n Anzeige
1
2
3
4
5
6
6. Drücken Sie zum Starten die START-Taste.
Nach Ablauf der Zeit schaltet sich das Gerät aus und im
Display erscheint END. Entnehmen Sie dann die Speise.
Hinweis:
Auf diese Weise können bis zu 4 unterschiedliche Garsequenzen hintereinander kombinieren.
Sie können das Programm auch mit einer Grill/Kombioder Heißluft/Kombi- Einstellung beginnen.
STOPP
LEISTUNG 10 0P
0 3 0 0 03:00
HEISSLUFT/KOMBI
GRILL/KOMBI
0 9 0 0 09:00
START
G
Sonderfunktionen
Automatischer Start:
Sie können die Mikrowelle oder auch eine Grill/Kombioder Heißluft/Kombi- Einstellung zu einer vorbestimmten
Zeit starten. Stellen dazu erst die Uhrzeit ein.
Um die Mikrowelle automatisch zu starten gehen Sie wie
folgt vor:
1. Drücken Sie die STOPP-Taste.
2. Wählen Sie durch ein-/mehrmaliges Drücken der LEISTUNG-Taste die gewünschte Mikrowellenleistung.
3. Mit Hilfe der NUMMERN-Tasten tragen Sie die gewünschte Gardauer ein.
4. Drücken Sie die UHR-Taste länger als 2 Sekunden.
Ein Signal ertönt und die Anzeige wechselt auf die
aktuelle Uhrzeit. Die erste Ziffer blinkt.
5. Mit Hilfe den NUMMERN-Tasten tragen Sie die gewünschte Startzeit ein. Ein längeres Signal ertönt und
im Display erscheint ein „M“.
Zum Beispiel:12:30Min Gardauer auf 100% Leistung,
Startzeit 14:20 Uhr
Schritt Taste/n Anzeige
1
2
3
4
5
6
6. Möchten Sie sich die Startzeit noch einmal ansehen,
drücken Sie die UHR-Taste.
Zur voreingestellten Zeit beginnt der Betrieb der Mikrowelle.
Achtung, Brandgefahr! Betreiben Sie das Gerät grundsätzlich nur unter Aufsicht. Stellen Sie beim zeitversetzten
Garen die Zeit immer so ein, dass das Gerät während des
Betriebes unter geeigneter Aufsicht steht.
Betreiben Sie die Mikrowelle nicht leer. Sollten Sie das
Gargut vorzeitig entnehmen, müssen Sie das Programm
durch die STOPP-Taste stornieren.
STOPP
LEISTUNG 10 0P
1 2 3 0 12:30
UHR 10:00
1 4 2 0 14:20
UHR 14:20
DEUTSCH
9
6....-05-MWG 743 H NEW 9 07.01.2005, 12:33:25 Uhr
Page 10

Nach Ablauf der Zeit schaltet sich das Gerät aus und im
Display erscheint END. Entnehmen Sie dann die Speise.
Automatische Erinnerung:
Nach Beenden eines Garvorgangs werden Sie alle 2
DEUTSCH
Minuten durch einen Piepton aufgefordert, die Speise zu
entnehmen.
Durch Öffnen der Tür oder Drücken der STOPP-Taste
wird diese Erinnerung ausgeschaltet.
Sperren:
Drücken Sie die STOPP-Taste länger als 2 Sek., um das
Gerät zu sperren. Die Sperrung wird im Display angezeigt.
Die Funktion der Bedienelemente ist blockiert. Drücken
Sie die STOPP-Taste erneut länger als 2 Sek., um die
Sperrung aufzuheben.
Störungsmeldungen
Während des Betriebs erscheint im Display „Err0“ oder
„Err1“. In diesem Fall gibt es ein Problem in der elektronischen Steuerung.
Senden Sie das Gerät mit einer Fehlerbeschreibung an
unser Servicecenter.
Reinigung
Ziehen Sie vor der Reinigung immer den Netzstecker.
• Reinigen Sie den Garraum nach der Benutzung mit
einem leicht feuchten Tuch.
• Reinigen Sie die Mikrowelle von außen mit einem leicht
feuchten Tuch.
• Reinigen Sie das Zubehör in gewohnter Weise mit
warmem Wasser und Spülmittel.
• Türrahmen/Türdichtung und benachbarte Teile müssen bei Verschmutzung sorgfältig mit einem feuchten
Tuch gereinigt werden.
Technische Daten
Modell: MWG 743 H
Bemessungsspannung/-frequenz: 230 V, 50 Hz
Bemessungsaufnahme: 1400 Watt
Leistungsaufnahme Heißluft: 1300 Watt
Leistungsaufnahme Grill: 1000 Watt
Bemessungs-Mikrowellenausgangsleistung: 900 Watt
Garraumvolumen: 25 Liter
Schutzklasse: Ι
Garantie
Wir übernehmen für das von uns vertriebene Gerät eine
Garantie von 24 Monaten ab Kaufdatum (Kassenbon).
Innerhalb der Garantiezeit beseitigen wir unentgeltlich
die Mängel des Gerätes oder des Zubehörs*), die auf
Material- oder Herstellungsfehler beruhen, durch Reparatur oder, nach unserem Ermessen, durch Umtausch.
Garantieleistungen bewirken weder eine Verlängerung der
Garantiefrist, noch beginnt dadurch ein Anspruch auf eine
neue Garantie!
Als Garantienachweis gilt der Kaufbeleg. Ohne diesen
Nachweis kann ein kostenloser Austausch oder eine
kostenlose Reparatur nicht erfolgen.
Im Garantiefall geben Sie bitte das komplette Gerät in der
Originalverpackung zusammen mit dem Kassenbon an
Ihren Händler.
*) Schäden an Zubehörteilen führen nicht automatisch
zum kostenlosen Umtausch des kompletten Gerätes.
Wenden Sie sich in diesem Fall bitte an unsere Hotline!
Glasbruchschäden bzw. Brüche von Kunststoffteilen sind
grundsätzlich kostenpfl ichtig!
Sowohl Defekte an Verbrauchszubehör bzw. Verschleißteilen (z.B. Motorkohlen, Knethaken, Antriebsriemen,
Ersatzfernbedienung, Ersatzzahnbürsten, Sägeblättern
usw.), als auch Reinigung, Wartung oder der Austausch
von Verschleißteilen, fallen nicht unter die Garantie und
sind deshalb kostenpfl ichtig!
Die Garantie erlischt bei Fremdeingriff.
Nach der Garantie
Nach Ablauf der Garantiezeit können Reparaturen
kostenpfl ichtig vom entsprechenden Fachhandel oder
Reparaturservice ausgeführt werden.
Service
Sehr geehrter Kunde,
ca. 95% aller Reklamationen sind leider auf Bedienungs-
fehler zurück zu führen und könnten ohne Probleme
behoben werden, wenn Sie sich telefonisch oder über
E-mail mit unserer für Sie eingerichteten Service-Hotline in
Verbindung setzen.
Wir bitten Sie daher, bevor Sie Ihr Gerät an den Händler
zurückgeben, diese Hotline zu nutzen. Hier wird Ihnen,
ohne das Sie Wege auf sich nehmen müssen, schnell
geholfen.
Clatronic International GmbH
Industriering Ost 40
D-47906 Kempen/Germany
Für technische Fragen haben wir für Sie folgende TelefonHotline eingerichtet:
0 21 52 / 20 06 – 888
Verschleißteile für Haushaltsartikel (soweit diese nicht vom
Fachmann ausgewechselt werden müssen), Ersatzkannen, Staubsaugerfi lterbeutel usw. können Sie mit Angabe
des Gerätetyps unter folgender E-mail-Adresse bestellen:
hotline@clatronic.de
Interessieren Sie sich für weitere Clatronic-Produkte?
Besuchen Sie doch einmal unsere Homepage unter
www.clatronic.de
10
6....-05-MWG 743 H NEW 10 07.01.2005, 12:33:27 Uhr
Page 11

DEUTSCH
11
6....-05-MWG 743 H NEW 11 07.01.2005, 12:33:28 Uhr
Page 12

Beschrijving van de bedieningselementen
Grafi ek 1: Onderdelen
1 Deurslot
2 Kijkraam
3 Ruimten
4 Aandrijfas
5 Glijring
NEDERLANDS
6 Draaibord
7 Bedieningsveld
8 Doorkookruimten
9 Grilrooster
Let op:
Verwijder géén vast gemonteerde onderdelen uit de gaarruimte en niets van de binnenzijde van de deur!
Grafi ek 2: Bedieningselementen
LEISTUNG (magnetron) (Vermogen) Keuze van de
vermogensstand
HEIßLUFT/KOMBI GRILL/KOMBI
HEIßLUFT: (Hete lucht) Werkt zuiver op
hete lucht, thermostaatregeling
HEIßLUFT/KOMBI: (Hete lucht/combi) Wissel-
werking tussen hete lucht en
microgolf
GRILL: (Grill) Voor grillen en gratineren
GRILL/KOMBI: (Grill/combi) Wisselwerking
tussen grill en magnetron
GARPROGRAMME (Doorkookprogramma) Door
meerdere keren op de toets te
drukken wordt het automatische keuzeprogramma in
werking gesteld
AUFTAUEN (Ontdooien) Stel de ontdooi-
functie in en geeft het gewicht
in
EXPRESS (Snelprogramma) Snelpro-
gramma van de magnetron
TEMP (Temp) Temperatuurkeuze bij
hete lucht
Pijltjestoetsen Voor het instellen van de
temperatuur of het gewicht
NUMMERN-toetsen (Nummertoetsen) Voor het
instellen van de tijd en de
tijdsduur
UHR (Tijd) Instelbaar met behulp
van de nummertoetsen
START (Start) Start het programma
STOPP (stop/blokkeren)
één keer indrukken om het
gaarproces te stoppen
twee keer indrukken om het
programma te wissen
3 seconden ingedrukt houden
om het apparaat te blokkeren/
deblokkeren
Algemene veiligheidsinstructies
• Lees vóór de ingebruikname van dit apparaat de
handleiding uiterst zorgvuldig door en bewaar deze
goed, samen met het garantiebewijs, de kassabon en
zo mogelijk de doos met de binnenverpakking.
• Gebruik het apparaat uitsluitend privé en uitsluitend
voor de voorgeschreven toepassing. Dit apparaat is
niet geschikt voor commercieel gebruik (tenzij het
bedoeld is voor beperkt gebruik in de buitenlucht).
Bescherm het tegen hitte, directe zonnestralen, vocht (i
geen geval in vloeistoffen dompelen) en scherpe kanten. Gebruik het apparaat niet met vochtige handen.
Bij vochtig of nat geworden apparaat onmiddellijk de
stroomtoevoer onderbreken. Niet in het water grijpen.
• Schakel het apparaat uit en onderbreek altijd de
stroomtoevoer (trek aan de steker, nooit aan de kabel)
wanneer u het apparaat niet gebruikt, hulpstukken
aanbrengt, reinigt of wanneer storingen optreden.
• Laat het ingeschakelde apparaat niet zonder toezicht
werken. Schakel het apparaat altijd uit of trek de steker
uit de contactdoos (trek aan de steker, niet aan de
kabel) voordat u de werkplek verlaat.
• Bescherm kinderen tegen gevaren en zorg ervoor dat
kabels nooit los omlaag hangen en dat het apparaat
buiten het bereik van kinderen blijft.
• Controleer regelmatig of het apparaat beschadigingen
vertoont. Een beschadigd apparaat mag niet in gebruik
worden genomen.
• Repareer het apparaat nooit zelf, maar breng het naar
een geautoriseerde vakman. Voorkom gevaren en
laat een defecte kabel altijd alleen door de fabrikant,
onze technische dienst of een eender gekwalifi ceerde
persoon vervangen door een soortgelijke kabel.
• Gebruik alleen originele reserveonderdelen.
• Neem de onderstaande “Speciale veiligheidsinstructies“ in acht.
Belangrijke veiligheidsinstructies!
A.u.b. zorgvuldig doorlezen en voor verder gebruik
bewaren.
• Waarschuwing: wanneer de deur of de deurafdichtingen zijn beschadigd, mag het kookapparaat niet
worden bediend voordat het door daarvoor opgeleid
persoon is gerepareerd.
• Waarschuwing: repareer het apparaat in géén geval
zelf, maar neem contact op met een geautoriseerde
vakman. Het is voor iedereen, behalve voor de vakman, gevaarlijk onderhouds- en reparatiewerkzaamheden uit te voeren die een verwijdering van de afdekking
vereisen. De afdekking waarborgt de bescherming
tegen stralenbelasting door magnetronenergie.
• Waarschuwing: Verhit de vloeistoffen niet in gesloten
kommen of glazen. Explosiegevaar!
• Waarschuwing: kinderen mogen het kookapparaat
alleen zonder toezicht gebruiken wanneer een voldoende duidelijke instructie werd gegeven waardoor het
kind in staat gesteld wordt, het kookapparaat op een
veilige manier te gebruiken en de gevaren van een
verkeerde bediening te begrijpen.
• Wanneer u uw magnetron in een kas of op een schap
of iets dergelijks wilt plaatsen, dient u erop te letten dat
aan alle zijden van het apparaat een minimale ventilatieafstand van 10 cm tot kasten, wanden enz. wordt
aangehouden.
12
6....-05-MWG 743 H NEW 12 07.01.2005, 12:33:28 Uhr
Page 13

• Gebruik alléén geschikt serviesgoed zoals:
– glas, porselein, keramiek, hittebestendig kunststof-
of speciaal magnetronserviesgoed.
• Bij het opwarmen of koken van maaltijden in brandba-
re materialen zoals kunststof- of papierbakjes moet de
magnetron vaak worden gecontroleerd vanwege een
mogelijk brandgevaar.
• In geval van rookontwikkeling dient het apparaat uitgeschakeld en de netsteker uit de contactdoos getrokken
te worden. Houd de deur gesloten om eventueel
optredende vlammen te verstikken.
• Opgelet -Kookvertraging: bij het koken en vooral
bij het naverwarmen van vloeistoffen (water) kan het
gebeuren dat de kooktemperatuur weliswaar bereikt
is, maar de daarvoor karakteristieke stoombellen
nog niet opstijgen. De vloeistof kookt niet gelijkmatig. Deze zogenaamde kookvertraging kan bij het
verwijderen van de beker of kom door een lichte trilling
tot een plotselinge stoombelvorming en daarmee tot
overkoken leiden. Gevaar voor verbranding! Om een
gelijkmatig koken te bereiken dient u een glasstaaf of
een soortgelijk, niet-metalen voorwerp in de beker of
kom te plaatsen.
• De inhoud van babyfl esjes en potjes met kindervoeding moet worden omgeroerd of geschud en de
temperatuur moet voor gebruik worden gecontroleerd.
Er bestaat gevaar voor verbranding!
• Maaltijden met schil of huid zoals eieren, worstjes,
gesloten conserveren in een glas enz. mogen niet
in magnetronapparaten worden verwarmd omdat ze
kunnen exploderen – zelfs als de verwarming door de
magnetron al is beëindigd.
• Wanneer het/de deurframe/deurafdichtingen en aangrenzende delen verontreinigd zijn, dienen deze met
een vochtige doek te worden gereinigd.
• Reinig de magnetron regelmatig en verwijder de
levensmiddelresten uit de binnenruimte.
• Wanneer het apparaat niet regelmatig wordt gereinigd,
kan het oppervlak onherstelbaar worden beschadigd,
hetgeen de levensduur van het apparaat kan verkorten
en tot gevaarlijke situaties kan leiden.
Aanwijzingen voor het gril-
en combibedrijf
• Omdat voor het gril- en combibedrijf stralingshitte
wordt gebruikt, mag u alléén hittebestendig serviesgoed gebruiken.
• Bij het gebruik van alléén de grilfunctie kunt u ook
metalen of aluminium serviesgoed gebruiken – dit is
echter niet toegestaan bij combi- of magnetronbedrijf.
• Alleen het grillrooster is geschikt voor GRILL en KOMBI.
• Plaats géén voorwerpen op de bovenzijde van de behuizing. Deze wordt heet. Laat de ventilatieopeningen
altijd vrij.
• Gebruik het grilrooster om het te grillen product dichter
naar het verwarmingselement te voeren.
Ingebruikname
• Verwijder alle toebehoren uit de gaarruimte, pak het
uit en plaats de glijring in het midden. Positioneer het
glazen bord zodanig op de aandrijfas dat het in de
uitsparingen van de aandrijfas klikt en recht ligt.
• Controleer het apparaat op zichtbare schade, let hierbij
in het bijzonder op het bereik van de deur. Wanneer u
een schade vaststelt, mag het apparaat in géén geval
in gebruik worden genomen.
• Voorkom storingen tijdens het bedrijf door andere
apparatuur en plaats de magnetron niet in de buurt van
andere elektrische apparaten.
• Verwijder eventueel op de behuizing plakkende beschermfolie.
• Verwijder in géén geval folie die op de binnenzijde
van de deur is aangebracht!
• Sluit de netsteker aan op een correct geïnstalleerde en
geaarde contactdoos 230 V / 50 Hz.
• Verwijder géén vast gemonteerde onderdelen uit de
gaarruimte en van de binnenzijde van de deur!
Gebruiksaanwijzing
Wetenswaardigheden over het magnetronbedrijf
• Uw apparaat werkt met microgolven die de waterdeeltjes in gerechten binnen zeer korte tijd verhitten. Hier
ontstaat géén warmtestraling en dus ook nauwelijks
bruinering.
• Verwarm alléén levensmiddelen met dit apparaat!
• Het apparaat is niet geschikt voor het bakken in overvloedig vet.
• Verwarm slechts 1-2 porties in één keer. Het apparaat
verliest in het andere geval aan effi ciëntie.
• Druk voor de onderbreking van het gaarproces op de
STOPP-toets.
• Magnetrons werken direct met volle energie. Daarom
komt het voorverwarmen te vervallen.
• Schakel het apparaat in het magnetron- of combibedrijf
nooit in als het leeg is.
• De magnetron is geen vervanging voor uw normale
fornuis. De magnetron is uitsluitend bestemd voor:
– het ontdooien van diepgevroren/gevroren levens-
middelen
– het snel verhitten/verwarmen van gerechten of
dranken
– het garen van gerechten
• Gebruik géén plastic of papieren serviesgoed.
De kloktijd instellen
Tip: Wanneer u het toestel voor de eerste keer aanzet,
lichten eerst alle schermen op, vervolgens knippert er een
dubbele punt.
• Druk op de STOPP-toets.
• Druk op de UHR-toets. De cijfers in het scherm springen op 00:00. Het eerste cijfer knippert.
• Met behulp van de NUMMERN-toetsen stelt u de
gewenste tijd op de vier plaatsen in.
• Het nieuwe tijdstip wordt ingeschakeld.
Bediening magnetron
Plaats het te verwarmen gerecht op een daarvoor geschikt
bord. Open de deur en plaats het in het midden op het
glazen draaibord. Sluit de deuren. (Het apparaat werkt om
veiligheidsredenen alléén met correct gesloten deur.)
1. Druk op de STOPP-toets.
2. Kies het gewenste magnetronvermogen door dienovereenkomstig vaak op de toets-LEISTUNG te drukken.
NEDERLANDS
13
6....-05-MWG 743 H NEW 13 07.01.2005, 12:33:29 Uhr
Page 14
Het vermogen wordt
volgens keuze in
% op het display
weergegeven
100 900 Snel verhitten
80 720 Garen
60 540 Doorkoken
NEDERLANDS
3. Met behulp van de NUMMERN-toetsen stelt u de
gewenste tijdsduur in.
Bijvoorbeeld: tijdsduur 10,30 min op 100% vermogen
4. Druk op de START-toets om de magnetron te starten.
De gaartijd is afhankelijk van de hoeveelheid en de
aard van de inhoud. Met een beetje oefening leert u
snel de gaartijd goed in te schatten
Let op: het garen in de magnetron gaat veel sneller
dan in een oven. Wanneer u niet helemaal zeker bent,
stelt u de gaartijd lager in en herhaalt dan eventueel de
procedure.
Als de tijd om is, schakelt het toestel automatisch uit
en verschijnt er END in het scherm. Verwijder dan het
gerecht.
40 360
20 180
START 900 Snel verhitten
Stap Toets(en) Scherm
1
2
3
4
Vermogen
in Watt (ca.)
STOPP
LEISTUNG 10 0P
1 0 3 0 10:30
START
Toepassingsgebied
Smelten van kaas
enz.
Ontdooien van
bevroren levens-
middelen
Automatisch ontdooien
Voor het automatisch ontdooien van ingevroren vlees,
gevogelte en zeevruchten gaat u als volgt te werk:
1. Druk op de STOPP-toets.
2. Druk op de AUFTAUEN-toets. U bevindt zich nu in
het ontdooiprogramma. Door meerdere keren op
de AUFTAUEN-toets te drukken, kunt u een van de
ontdooiprogramma’s kiezen:
AD1 Vlees ontdooien 0,1 – 2,0kg
AD2 Gevogelte ontdooien 0,2 – 3,0kg
AD3 Zeevruchten ontdooien 0,1 – 0,9kg
3. Kies vervolgens het gewicht met behulp van de pijltjestoetsen.
Bijvoorbeeld: 2,0 kg gevogelte ontdooien.
Stap Toets(en) Scherm
1
2
3
4
4. Druk op de START-toets om de magnetron te starten.
Als de tijd om is, schakelt het toestel automatisch uit en
verschijnt er END in het scherm. Neem het voedsel uit het
toestel.
In onderstaand tabel vindt u informatie over het handmatig
ontdooien.
STOPP
AUFTAUEN AD -2
왖 / 왔
START
2.0
Tabel Ontdooien
Levensmiddelen/
gerechten
Vlees, worstwaren
Vlees (rund,
kalf, varken)
aan het stuk
Schnitzel,
karbonade
Gehakt
Braadworst,
kookworst
Beleg
(vleeswaren)
Tip: nadat de helft van de tijd verstreken is: vlees omdraaien,
kwetsbare delen afdekken; gehakt kleinmaken, reeds ontdooide
delen verwijderen; worstplaatjes scheiden.
Gevogelte
Kip 1000 g 180 20 - 25 10 - 15
Kipdelen 500 g 180 12 - 15 5 - 10
Eend 1700 g 180 25 - 40 20 - 25
Gans-,
kalkoendelen
Tip: gevogelte na het verstrijken van de helft van de tijd:
omdraaien, vleugels en bouten afdekken.
Let op: Dooiwater verwijderen en niet met andere gerechten in contact laten komen.
Wild
Reerug 1000 g 180 20 - 35 20 - 30
Hazenrug 500 g 180 12 - 13 10 - 20
Tip: een keer omdraaien, randdelen afdekken.
Vis
Garnalen,
shrimps
Forel 340 g 180 4 - 6 5 - 10
Vis aan het
stuk
Visfi let 250 g 180 5 - 7 5 - 10
Tip: meerdere keren omroeren, vaker omdraaien.
Fruit
Frambozen,
aardbeien
Kersen,
pruimen
Appelmoes 500 g 180 9 - 12 5 - 10
Tip: voorzichtig omdraaien of kleinmaken.
Groenten
zie „Tabel garen“, „Groenten ontdooien en garen“
Brood en gebak
Broodjes 4 stuks 180 ca. 1 - 3 5
Brood 1000 g 180 13 - 15 8 - 10
Toastbrood 500 g 180 5 - 6 5 - 10
Cake 500 g 180 6 - 8 5 - 10
Fruitcake 1 stuk 180 2 - 3 2 - 3
Taart 1 stuk 180 0,5 - 1 3 - 5
Taart 1200 g 180 10 - 12 30 - 60
Tip: brood en gebak op absorberend keukencrêpepapier plaatsen dat
het vocht opneemt; kwetsbaar gebak slechts heel even laten dooien.
Melkproducten
Boter 250 g 180 5 - 7 10 - 15
Kwark 250 g 180 6 - 8 5 - 10
Slagroom 200 g 180 3 - 5 2 - 3
Tip: aluminiumfolie verwijderen, na de helft van de tijd
omroeren; slagroom nog half bevroren kloppen.
Hoeveel-
heid
500 g 180 14 – 18 10 – 15
1000 g 180 25 - 30 20 - 25
200 g 180 4 - 6 5 - 10
250 g 180 6 - 8 5 - 10
200 g 180 4 - 6 5 - 10
300 g 180 4 - 6 5 - 10
500 g 180 12 - 18 10 - 15
250 g 180 5 - 7 5 - 10
500 g 180 7 - 10 10 - 15
250 g 180 4 - 6 5 - 10
250 g 180 5 - 7 5 - 10
Vermogen
Watt
Tijd
ca. min.
Ontdooitijd
min.
14
6....-05-MWG 743 H NEW 14 07.01.2005, 12:33:31 Uhr
Page 15

Verwarmen
Het verwarmen en verhitten is een bijzonder sterk punt van
de magnetron. Koelkastkoude vloeistoffen en gerechten
kunnen heel eenvoudig op kamertemperatuur of consumptietemperatuur worden gebracht zonder dat u daarvoor
veel potjes en pannetjes nodig hebt.
De in onderstaande tabel aangegeven verwarmingstijden
zijn slechts richtwaarden omdat de tijd in grote mate afhankelijk is van de uitgangstemperatuur en de samenstelling
van het gerecht. Het is dan ook raadzaam, af en toe te
controleren of het gerecht al heet genoeg is.
Tabel verwarming
Levensmiddelen/
gerechten
Vloeistoffen
Water, 1 kop 150 g 900 0,5 - 1 nee
Water 0,5 l 500 g 900 3,5 - 5 nee
Water 0,75 l 750 g 900 5 - 7 nee
Koffi e, 1 kop 150 g 900 0,5 - 1 nee
Melk, 1 kop 150 g 900 0,5 - 1 nee
Let op: Doe geen glazen of metalen staven of andere
voorwerpen die het koken vertragen in de beker. Goed
roeren voor gebruik.
Bordgerechten
Schnitzel,
aardappelen
en groenten
Goulash met
macaroni
Vlees, knoedels
en saus
Tip: eerst iets bevochtigen, tussendoor omroeren.
Vlees
Schnitzel,
gepaneerd
Gehaktballen,
4 stuks
Braadvlees 250 g 900 2 - 3 nee
Tip: met olie bestrijken, zodat de panade of de korst niet
zacht wordt.
Gevogelte
1/2 haan 450 g 900 3,5 - 5 nee
Kipfricassee 400 g 900 3 - 4,5 ja
Tip: met olie bestrijken, tussendoor omroeren.
Bijlagen
Macaroni, rijst
1 portie
2 porties
Aardappelen 500 g 900 3 - 4 ja
Tip: eerst iets bevochtigen.
Soepen / sauzen
Heldere
bouillon,
1 bord
Soep met
ingrediënten
Saus 250 g 900 1 - 2 ja
Babyvoeding
Melk 100 ml 540 0,5 - 1 nee
Pap 200 g 540 1 - 1,5 nee
Tip: goed schudden of omroeren. Temperatuur controleren!
Hoeveel-
heid
450 g 900 2,5 - 3,5 ja
450 g 900 2 - 2,5 ja
450 g 900 2,5 - 3,5 ja
200 g 900 1 - 2 nee
500 g 900 3 - 4 nee
150 g
300 g
250 g 900 1 - 1,5 ja
250 g 900 1,5 - 2 ja
Vermogen
Watt
900
900
Tijd
ca. min.
1 - 2
2,5 - 3,5
afdekken
ja
ja
Garen
Handige tips voor het garen
Volg de richtwaarden in de gaartabel en de recepten op.
Controleer het kookproces zolang u nog niet over genoeg
ervaring beschikt.
U kunt de deur van het apparaat te allen tijde openen. Het
apparaat schakelt automatisch uit.
Het apparaat functioneert pas weer nadat u de deur hebt
gesloten.
Levensmiddelen uit de koelkast hebben een iets langere
gaartijd dan die op kamertemperatuur.
Hoe compacter een gerecht, hoe langer de gaartijd. Een
groot stuk vlees heeft bijvoorbeeld een langere gaartijd
dan dezelfde hoeveelheid in reepjes gesneden vlees. Het
is raadzaam, grotere hoeveelheden bij maximaal vermogen even te koken en voor een gelijkmatig gaarproces op
de middelste stand door te koken.
”Lage” gerechten garen snellen dan hoge. Verdeel daarom
de levensmiddelen zo gelijkmatig mogelijk. Dunnere delen
zoals bijv. kippenboutjes of visfi let kunt u het best naar
binnen plaatsen of laten overlappen.
Kleiner hoeveelheden worden sneller gaar dan grote.
Hier geldt de vuistregel:
dubbele hoeveelheid = ongeveer twee keer zoveel tijd
halve hoeveelheid = half zoveel tijd
Wanneer u voor een gerecht geen passende tijdaanduiding kunt vinden, geldt de regel:
per 100 g ongeveer 1 minuut gaartijd
Alle gerechten die u op het fornuis afdekt, dient u ook in de
magnetron af te dekken.
Een deksel voorkomt dat de gerechten uitdrogen. U kunt
voor het afdekken een omgedraaid bord, perkamentpapier
of magnetronfolie gebruiken. Gerechten die een korstje
moeten krijgen, moet u open garen.
Tabel garen
Levensmiddelen/
gerechten
Gemüse
Aubergines 500 g 720 7 - 10 ja
Bloemkool 500 g 720 8 - 11 ja
Broccoli 500 g 720 6 - 9 ja
Witlof 500 g 720 6 - 7 ja
Erwten 500 g 720 6 - 7 ja
Venkel 500 g 720 8 - 11 ja
Groene bonen 300 g 720 13 - 15 ja
Aardappelen 500 g 720 9 - 12 ja
Koolrabi 500 g 720 8 - 10 ja
Prei 500 g 720 7 - 9 ja
Maïskolven 250 g 720 7 - 9 ja
Wortels 500 g 720 8 - 10 ja
Paprika 500 g 720 6 - 9 ja
Spruitjes 300 g 720 7 - 10 ja
Asperges 300 g 720 6 - 9 ja
Tomaten 500 g 720 6 - 7 ja
Courgettes 500 g 720 9 - 10 ja
Tip: groenten klein snijden en met 2-3 eetlepels vloeistof
garen, tussendoor omroeren, 3-5 min laten nagaren, pas
kort vóór het serveren kruiden
Hoeveel-
heid
Vermogen
Watt
Tijd
ca. min.
afdekken
NEDERLANDS
15
6....-05-MWG 743 H NEW 15 07.01.2005, 12:33:34 Uhr
Page 16

Levensmiddelen/
gerechten
Fruit
Appel-,
perencompote
Pruimenmoes 250 g 720 4 - 6 nee
Rabarbercompote
NEDERLANDS
Gebraden appels, 4 stuks
Tip: 125 ml water toevoegen (een beetje citroensap voorkomt dat het fruit verkleurt), 3 – 5 minuten laten nagaren.
Vlees *)
Vlees met saus 400 g 720 10 - 12 ja
Goulash, in
reepjes gesneden vlees
Runderrollade 250 g 720 7 - 8 ja
Tip: tussendoor omroeren, 3 – 5 minuten laten rusten.
Gevogelte *)
Kipfricassee 250 g 720 6 - 7 ja
Kippensoep 200 g 720 5 - 6 ja
Tip: tussendoor omroeren, 3 – 5 minuten laten rusten.
Vis
Visfi let 300 g 720 7 - 8 ja
Visfi let 400 g 720 8 - 9 ja
Tip: na de helft van de tijd omdraaien, 3- 5 minuten laten
nagaren.
Groenten ontdooien en garen
Rode kool
met appel
Bladspinazie 300 g 720 11 - 13 ja
Bloemkool 200 g 720 7 - 9 ja
Sperziebonen 200 g 720 8 - 10 ja
Broccoli 300 g 720 8 - 9 ja
Erwten 300 g 720 7 - 8 ja
Koolrabi 300 g 720 13 -15 ja
Prei 200 g 720 10 - 11 ja
Maïs 200 g 720 4 - 6 ja
Wortels 200 g 720 5 - 6 ja
Spruitjes 300 g 720 7 - 8 ja
Spinazie
Tip: met 1 – 2 eeltlepels vloeistof garen, tussendoor
omroeren of voorzichtig kleinmaken, 2-3 minuten laten
nagaren, pas kort vóór het serveren kruiden.
Soepen / eenpansgerechten *)
Eenpansgerecht
Soep met
ingrediënten
Crèmesoep 500 g 720 13 - 15 ja
Tip: tussendoor omroeren, 3 – 5 minuten laten nagaren.
*) reeds voorbereide gerechten
Hoeveel-
heid
500 g 720 5 - 8 ja
250 g 720 5 - 8 ja
500 g 720 7 - 9 ja
500 g 720 10 - 15 ja
450 g 720 14 -16 ja
450 g
600 g
500 g 720 13 - 15 ja
300 g 720 7 - 8 ja
Vermogen
Watt
720
720
Tijd
ca. min.
12 - 13
15 - 17
afdekken
Express koken
• Voor het starten van het express koken druk u meerdere malen op EXPRESS. Met iedere druk op de toets de
gaartijd met 30 seconden verlengd wordt.
• Druk op de STOPP-toets.
Het vermogen van de magnetron bedraagt daarbij 100%.
De maximale express-tijd bedraagt 1:30 minuten.
Automatisch programma
Met behulp van de automatische functie kunt u bepaalde
hoeveelheden voedsel automatisch koken. Tijdsduur en
magnetronvermogen zijn in het programma geïntegreerd.
Doe dit als volgt:
1. Druk op de STOPP-toets.
2. Druk op de GARPRORAMME-toets om het doorko-
okprogramma in werking te stellen. U bent nu in het
doorkookprogramma. Door meerdere keren op de
GARPRORAMME-toets te drukken, kunt u een van de
doorkookprogramma’s kiezen:
Code Programma Gewicht
Rijst/noedels 0,1 kg 0,2 kg 0,3 kg
Rijst
AC-1
met water
Noedels
met water
Groente, vers 0,2 kg 0,3 kg 0,4 kg 0,5 kg 0,6 kg 0,7 kg 0,8 kg
AC-2
Met water 2 EL 2 EL 2 EL 4 EL 4 EL 4 EL 4 EL
Groente,
AC-3
diepgevroren
AC-4 Popcorn
AC-5 Vloeistoffen
AC-6 Aardappels
Pizza
AC-7
(opwarmen)
AC-8 Vis
3. Kies vervolgens met de pijltjestoetsen een gewicht uit
de programma’s AC-1 tot AC- 6.
Bijvoorbeeld: 0,2 kg verse groenten koken.
ja
ja
Stap Toets(en) Scherm
1
2
3
4
4. Druk op de START-toets om de magnetron te starten.
Als de tijd om is, schakelt het toestel automatisch uit en
verschijnt er END in het scherm. Neem het voedsel uit het
toestel.
Tip: EL komt overeen met een eetlepel.
180 ml 33 0ml 480 ml Voedsel afdekken
300 ml 60 0ml 900 ml Voedsel niet afdekken
0,2 kg 0,3 kg 0,4 kg 0,5 kg 0,6 kg 0,7 kg 0,8 kg
3,0 Oz 3,5 Oz Komt overeen met circa 80/100 g
Gebruik alleen magnetronpopcorn
250 ml 500 ml
Niet afdekken! Pas op voor kookvertraging!
0,45k g 0,65 kg
Prik gaatjes in de aardappels.
Leg ze met voldoende tussenruimte op het draaiplateau.
0,15kg
0,45kg
Snijdt de vis eerst in stukken.
STOPP
GARPROGRAMME AC -2
왖 / 왔
START
0.2
Hete lucht/combi, grill/combi
Hete lucht en hete lucht/combiwerking
Voor de hete lucht en hete lucht/combiwerking gaat u als
volgt te werk:
1. Druk op de STOPP-toets.
2. Druk op de HEIßLUFT/KOMBI GRILL/KOMBI-toets. Door meerdere keren op de HEIßLUFT/KOMBI
GRILL/KOMBI-toets te drukken, kunt u een van de
programma’s kiezen:
16
6....-05-MWG 743 H NEW 16 07.01.2005, 12:33:36 Uhr
Page 17

C Alleen hete lucht
C1 Hete lucht en magnetron samen
Hete lucht en magnetron met hoger magnetron-
C2
vermogen
3. Bevestig door middel van de TEMP-toets de standaardinstelling van 160 °C of
4. Stel met behulp van de pijltjestoetsen een temperatuur
in tussen 80 °C en 230 °C.
5. Met behulp van de NUMMERN-toetsen geeft u de
tijdsduur aan.
Tip: De standaardinstelling is 15 minuten.
Bijvoorbeeld:
programma C2, bij 180 °C, tijdsduur 8 minuten.
Stap Toets(en) Scherm
1
2
3
4
5
6
6. Druk op de START-toets om de magnetron te starten.
Als de tijd om is, schakelt het toestel automatisch uit en
verschijnt er END in het scherm. Neem het voedsel uit het
toestel.
Foutmeldingen
• Wanneer bij de bereiding ‘Err2’ in het scherm komt.
De temperatuur in de doorkookruimte is hoger dan
de vooraf ingestelde temperatuur. Waarschijnlijk is
de temperatuur voor deze bereiding te laag gekozen.
Verander de instelling.
• Wanneer bij de bereiding ‘Err3’ in het scherm komt.
De vooraf ingestelde temperatuur kan niet binnen de
opgegeven tijd worden gehaald. Verander de instelling.
Grill en grill/combiwerking
Gebruik het grilrooster voor het grillen. Gebruik daarvoor
geschikt hittebestendig serviesgoed of plaats het grilproduct direct op het grilrooster.
Grote, dikke levensmiddelen worden direct op het draaiplateau gegrilld!
Het is niet nodig de gril voor te verwarmen omdat de infraroodgril direct stralingswarmte produceert.
Wanneer u gerechten in het combibedrijf magnetron-gril
wilt toebereiden, dient u op het volgende te letten:
Voor grote, dikke levensmiddelen, zoals bijv. varkensfricandeau is de magnetrontijd dienovereenkomstig langer
dan voor kleine, vlakke levensmiddelen. Bij het grillen is
dit echter omgekeerd. Hoe dichter het levensmiddel
tegen de gril ligt, hoe sneller het bruin wordt. Dat wil
zeggen: wanneer u grote braadstukken in combibedrijf
toebereidt, is de griltijd eventueel korter dan voor kleinere
braadstukken.
Voor de grill en de grill/combiwerking gaat u als volgt te
werk:
1. Druk op de STOPP-toets.
2. Druk op de hete HEIßLUFT/KOMBI GRILL/KOMBItoets. Door meerdere keren op de HEIßLUFT/KOMBI
STOPP
HEISSLUFT/KOMBI
GRILL/KOMBI
TEMP 160C
왖 / 왔
0 8 0 0 08:00
START
C -2
180C
GRILL/KOMBI-toets te drukken, kunt u een van de
programma’s kiezen:
GAlleen grill
G1 Grill en magnetron samen
G2 Grill en magnetron met hoger grillvermogen
3. Met behulp van de NUMMERN-toetsen geeft u de
gewenste tijdsduur aan.
Bijvoorbeeld: programma G2, tijdsduur 10,30 minuten.
Stap Toets(en) Scherm
1
2
3
4
4. Druk op de START-toets om de magnetron te starten.
Als de tijd om is, schakelt het toestel automatisch uit en
verschijnt er END in het scherm. Neem het voedsel uit het
toestel.
STOPP
HEISSLUFT/KOMBI
GRILL/KOMBI
1 0 3 0 10:30
START
G 2
Tabel grill/combiwerking
Levensmiddelen/
gerechten
Vlees, worstwaren
Rund-,
varkens-, of
kalfsvlees aan
het stuk
Casselerrib 500 g 12 - 14 nee
Gehakt 500 g 13 - 15 nee
Weense
worstjes
Kookworst 200 g 2 - 3 nee
Tip: na de helft van de tijd: omdraaien, 3- 5 minuten laten
nagaren; gehakt met eiwit bestrijken; met een vork in de
worstjes prikken.
Gevogelte
Soepkip 1000 g 13 - 15 nee
Kipdelen 250 g 4 - 5 nee
Tip: zonder vloeistof in eigen jus laten garen, een keer
omdraaien, 4 – 5 minuten laten nagaren.
Vis
Forel, blauw 300 g 5 - 6 nee
Visfi let 300 g 3 - 4 nee
Tip: na de helft van de tijd omdraaien, 3- 5 minuten laten
nagaren.
Hoeveel-
heid
500 g 10 - 12 nee
750 g 12 - 15 nee
200 g 2 - 3 nee
Combi-
bedrijf
Tijd
ca. min.
afdekken
Individueel doorkookprogramma
Indien u voor bepaalde bereidingen een eigen doorkookprogramma wilt samenstellen, kan dat door een keuze
te maken uit de programma’s van de magnetron en grill/
combi (G, G1, G2) en/of hete lucht/combi (C, C1, C2).
U kunt als volgt te werk gaan:
1. Druk op de STOPP-toets.
2. Door één of meerdere keren de LEISTUNG-toets in
te drukken, kunt u het gewenste magnetronvermogen
kiezen.
3. Met behulp van de NUMMERN-toetsen geeft u de
gewenste tijdsduur aan.
NEDERLANDS
17
6....-05-MWG 743 H NEW 17 07.01.2005, 12:33:39 Uhr
Page 18

4. Door één of meerdere keren op de HEIßLUFT/KOMBI
GRILL/KOMBI-toets te drukken, kunt u een keuze
maken uit de programma’s C, C1, C2, G, G1 of G2.
5. Met behulp van de NUMMERN-toetsen geeft u de
gewenste tijdsduur aan.
Bijvoorbeeld: tijdsduur 3 minuten op 100% magnet-
ronvermogen en aansluitend 9 minuten grillen.
NEDERLANDS
Stap Toets(en) Scherm
1
2
3
4
5
6
6. Druk op de START-toets om de magnetron te starten.
Als de tijd om is, schakelt het toestel automatisch uit en
verschijnt er END in het scherm. Neem het voedsel uit het
toestel.
Tip:
Op deze manier kunt u tot vier verschillende kookseries
achtereenvolgend combineren.
U kunt het programma ook met een grill/combi of hete
lucht/combi-instelling laten starten.
STOPP
LEISTUNG 10 0P
0 3 0 0 03:00
HEISSLUFT/KOMBI
GRILL/KOMBI
0 9 0 0 09:00
START
G
Speciale functies
Automatisch starten
U kunt de magnetron of de grill/combi of hete lucht/combiinstelling ook op een bepaalde tijd laten starten. Daarvoor
dient u eerst de klok in te stellen.
Om de magnetron automatisch te laten starten, gaat u als
volgt te werk:
1. Druk op de STOPP-toets.
2. Door één of meerdere keren op de LEISTUNG-toets
te drukken, kunt u het gewenste magnetronvermogen
kiezen.
3. Met behulp van de NUMMERN-toetsen geeft u de
gewenste doorkooktijd in.
4. Druk de UHR-toets langer dan 2 seconden in. U hoort
een toon en de huidige tijd wordt ingeschakeld. Het
eerste cijfer knippert.
5. Met behulp van de NUMMERN-toetsen geeft u de
gewenste starttijd in. U hoort een langere toon en in het
scherm verschijnt de letter ‘M’.
Bijvoorbeeld: tijdsduur 12,30 minuten op 100%
vermogen, starttijd 14:20 uur.
Stap Toets(en) Scherm
1
2
3
4
5
6
STOPP
LEISTUNG 10 0P
1 2 3 0 12:30
UHR 10:00
1 4 2 0 14:20
UHR 14:20
Zet de magnetron niet aan als de ruimte leeg is. Wanneer
u het voedsel voortijdig uit de magnetron wilt nemen, dient
u eerst op de STOPP-toets te drukken om het programma
te annuleren.
Als de tijd om is, schakelt het toestel automatisch uit en
verschijnt er END in het scherm. Neem het voedsel uit het
toestel.
Automatische herinnering
Na afl oop van een gaarproces wordt u om de 2 minuten
door middel van een piepgeluid gewaarschuwd dat het
gerecht uit de magnetron kan worden genomen.
U kunt de herinnering uitschakelen door de deur te openen
of op de STOPP-toets te drukken.
Blokkeren
Druk langer dan 2 seconden op de STOPP-toets om het
apparaat te blokkeren. De blokkade wordt op het display
weergegeven. De functie van de bedieningselementen is
geblokkeerd. Druk opnieuw langer dan 2 seconden op de
STOPP-toets om de blokkade te verwijderen.
Storingen
Tijdens het in werking zijn van de magnetron verschijnt de
code ‘Err0’ of ‘Err1’ op het scherm. In dit geval, is er een
probleem in het elektrische besturingsapparaat.
Stuurt u het toestel met een beschrijving van de foutmelding naar uw handelaar.
Reiniging
Trek vóór de reiniging van het apparaat altijd de steker uit
de contactdoos.
• Reinig de gaarruimte na gebruik met een iets vochtige
doek.
• Reinig de buitenkant van de magnetron met een lichtvochtige doek.
• Reinig het toebehoren zoals gewoonlijk in een sopje.
• Wanneer het/de deurframe/deurafdichtingen en aangrenzende delen verontreinigd zijn, dienen deze met
een vochtige doek te worden gereinigd.
Technische gegevens
Model: MWG 743 H
Toelaatbare belasting, frequentie: 230 V, 50 Hz
Toelaatbare opname: 1400 Watt
Hete luchtvermogen: 1300 Watt
Grillvermogen: 1000 Watt
Toelaatbaar vermogen magnetronuitgang: 900 Watt
Volume doorkookruimte: 25 Liter
Veiligheidscategorie
: Ι
6. Indien de starttijd nog op het scherm zichtbaar is, drukt
u nogmaals op de UHR-toets.
De magnetron start op de vooraf ingegeven tijd.
Pas op! Brandgevaar! Gebruik de magnetron in principe al-
leen onder toezicht. Bij vooraf ingestelde starttijd, kiest u een
tijdstip waarop er iemand thuis is en toezicht kan houden.
18
6....-05-MWG 743 H NEW 18 07.01.2005, 12:33:41 Uhr
Dit apparaat is gekeurd conform de op dit moment van
toepassing zijnde CE-richtlijnen zoals bijvoorbeeld elektromagnetische compatibiliteit en laagspanningsvoorschriften
en is gecon strueerd volgens de nieuwste veiligheidstechnische voorschriften.
Technische wijzigingen voorbehouden!
Page 19

Garantie
Voor het door ons geleverde apparaat verlenen wij een
garantie van 24 maanden vanaf koopdatum (kassabon).
Eventuele gebreken aan het apparaat of aan het toebehoren*) die zijn ontstaan door productie- of materiaalfouten
verhelpen wij binnen deze periode kosteloos door middel
van reparatie of, naar ons oordeel, door vervanging. Eventuele garantiegevallen verlengen noch de geldigheidsduur van de garantie, noch begint daardoor een nieuwe
garantieperiode!
Het koopbewijs geldt als garantiebewijs. Zonder dit bewijs
kan geen kosteloze reparatie of vervanging plaatsvinden.
Geef in garantiegevallen het complete apparaat in de
originele verpakking samen met de kassabon af bij uw
handelaar.
*) Schade aan onderdelen leidt niet automatisch tot
kosteloze vervanging van het complete apparaat. Neem
in dit geval contact op met onze hotline! De reparatie van
glasbreuk of breuk van kunststofonderdelen wordt altijd
berekend!
Niet defecten aan de hulpstukken of aan de slijtende onderdelen (bijv. koolborstels, deeghaken, drijfriemen, reserveafstandsbediening, reservetandenborstels, zaag bladen
enz.), maar ook reiniging, onderhoud of de vervanging van
slijtende delen vallen niet onder de garantie en geschieden
altijd tegen berekening!
Bij ingrepen door derden komt de garantieverlening te
vervallen.
NEDERLANDS
Na de garantieperiode
Na afl oop van de garantieperiode kunnen reparaties
tegen berekening worden uitgevoerd door de betreffende
vakhandelaar of de technische dienst.
19
6....-05-MWG 743 H NEW 19 07.01.2005, 12:33:42 Uhr
Page 20

Indicación de los elementos de mando
Gráfi co 1: Descripción de las piezas
1 Cerradura de puerta
2 Ventana del microondas
ESPAÑOL
3 Carcasa
4 Eje de mando
5 Anillo de rozamiento
6 Plato giratorio
7 Panel de manejo
8 Espacio de cocción
9 Parrilla
Atención:
¡No retire ningunas piezas montadas del espacio interior
de cocción o de la parte interior de la puerta!
Gráfi co 2: Elementos de mando
LEISTUNG (microondas) (Potencia) Elección de
los grados de potencia
HEIßLUFT/KOMBI GRILL/KOMBI
HEIßLUFT: (Aire caliente) Funcionamiento
exclusivo de aire caliente,
termostato controlado
HEIßLUFT/KOMBI: (Aire caliente/Combinado) El
aire caliente y el microondas
trabajan alternativamente
GRILL: (Parrilla) Para asar a la parrilla
y para gratinar
GRILL/KOMBI: (Parrilla/Combinado) La par-
rilla y el microondas trabajan
alternativamente
GARPROGRAMME (Programas de cocción)
Selección de un programa
automático presionando
repetidamente
AUFTAUEN (Descongelación) Activa la
función de descongelación en
combinación con el ajuste de
peso
EXPRESS (Expres) Inicio rápido del
microondas
TEMP (Temp) Facilita una selección
de temperatura en el funcionamiento de aire caliente
Teclas de fl echa Para el ajuste de valores de
temperatura y de peso
NUMMERN-Teclas (Teclas numéricas)
Para el ajuste de la hora y del
tiempo de cocción
UHR (Reloj) En combinación con
las teclas numéricas para el
ajuste de la hora
START (Inicio) Inicio del programa
STOPP (Stop/Bloquear)
Presionar una vez para parar
el proceso de cocción
Presionar dos veces para
borrar el programa
Mantener 3 segundos
Indicaciones generales de seguridad
• Antes de la puesta en servicio de este aparato lea
detenidamente el manual de instrucciones y guarde
este bien incluido la garantía, el recibo de pago y si es
posible también el cartón de embalaje con el embalaje
interior.
• Solamente utilice el aparato para el uso privado y para
el fi n previsto. Este aparato no está destinado para el
uso profesional. No lo utilice al aire libre
(en excepto que esté destinado para el uso limitado al
aire libre). No lo exponga al calor, a la entrada directa
de rayos de sol, a la humedad ( en ningún caso sumerja el aparato en agua) y a los cantos agudos. No utilice
el aparato con las manos húmedas. En caso de que el
aparato esté húmedo o mojado retire de momento la
clavija de la caja de enchufe. No tocar el agua.
• Desconecte el aparato y siempre retire la clavija de la
caja de enchufe (tire de la clavija no del cable), cuando
no quiera utilizar el aparato, montar piezas o en caso
de limpieza o defectos.
• No utilice el aparato sin vigilancia. En caso de que tenga que dejar su lugar de trabajo, desconecte siempre
el aparato o retire la clavija de la caja de enchufe (por
favor tire de la clavija y no del cable).
• Para evitar que los niños se hagan daños eléctricos,
siempre tenga atención, que el cable no cuelgue hacia
abajo y que los niños no tengan acceso al aparato.
• Controle regularmente si el aparato o el cable tiene
defectos. No ponga en servicio un aparato defecto.
• No repare el aparato por su cuenta, sino vaya a un
establecimiento autorizado. Para evitar peligros, deje
sustituir un cable defecto por uno de la misma calidad
solamente por el fabricante, nuestro servicio al cliente
o una similar persona cualifi cada.
• Solamente utilice accesorios originales.
• Por favor tenga atención a las “Indicaciones especiales
de seguridad…“ indicadas a continuación.
¡Importantes indicaciones de seguridad!
Se ruega leer estas indicaciones cuidadosamente y
guardarlas bien para su posterior utilización.
• Aviso: En caso de que la puerta o la obturación de
goma de la puerta estén dañadas, no se puede poner
en marcha el aparato, hasta que una persona especializada no lo haya reparado.
• Aviso: En ningún caso repare el aparato por su
cuenta, sino contacte a un servicio autorizado. Excepto
para la persona especializada, para los demás signifi ca un peligro realizar trabajos de mantenimiento o de
reparación, que exijan descubrir la cubierta que normalmente asegura la protección contra la exposición a
la radiación de la energía por microondas.
• Aviso: Se ruega no calentar líquidos en recipientes
cerrados. ¡Existe peligro de explosión!
• Aviso: Niños solamente pueden utilizar sin vigilancia
el aparato para cocinar, si han sido instruidos de forma
adecuada de modo que el niño pueda utilizar el aparato para cocinar con seguridad y entienda los peligros
de mal uso.
• Si desea colocar su microondas en un armario, una
estantería o algo similar, asegúrese que el microondas
presionados para bloquear /
desbloquear el aparato
20
6....-05-MWG 743 H NEW 20 07.01.2005, 12:33:42 Uhr
Page 21

tenga por todos los lados una mínima distancia de
ventilación de 10cm entre otras cosas a los armarios o
a la pared.
• Solamente utilice vajilla apropiada como:
– Vidrio, porcelana, cerámica, vajilla de plástico re-
sistente al calor o vajilla especial para microondas.
• Al calentar o al cocinar alimentos en materiales infl a-
mables, como pueden ser recipientes de plástico o de
papel, se tiene que observar con frecuencia el aparato
de microondas para cocinar, causado por la posibilidad
de una infl amación.
• En caso de emisión de humos se ruega desconectar el
aparato y retirar la clavija de la caja de enchufe. Mantenga la puerta cerrada, para apagar posible llamas
que aparezcan.
• Atension demora en la ebullicion: En la ebullición,
sobre todo al recalentar líquidos (agua) puede ocurrir,
que la temperatura de ebullición se haya alcanzado;
pero que las típicas burbujas de vapor todavía no
suban. El líquido no hierve de forma uniforme. Esta
llamada demora en la ebullición puede, al apartar el
recipiente con una leve vibración, causar una repentina
formación de burbujas de vapor y originar que rebase
el agua. ¡Existe peligro de quemarse! Para conseguir
una ebullición uniforme, se ruega colocar una varilla de
vidrio o algo similar, no metálico, en el recipiente.
• Se ruega no calentar líquidos en recipientes cerrados.
¡Existe peligro de explosión!
• El contenido de biberones y tarros con alimentación infantil se debe remover o agitar y revisar la temperatura
antes de su uso. Existe peligro de quemarse.
• Alimentos con cáscara o piel, como huevos, salchichas, conservas de vidrio cerradas, etc., no se
deben calentar en el microondas, ya que podrían
explotar, aunque el calentamiento haya sido fi nalizado
por microondas.
• El marco de la puerta y la obturación, así como piezas
vecinas, en caso de que estén sucias, deben ser
limpiadas cuidadosamente con un paño húmedo.
• Limpie el microondas con regularidad y retire restos de
alimentos del interior.
• Si se ha limpiado mal el aparato puede destruirse
su superfi cie, lo cual acortaría su duración y podría
originar situaciones peligrosas.
Indicaciones para el funcionamiento
de asar a la parrilla y el funcionamiento
combinado
• Como en el funcionamiento de asar a la parrilla y el
funcionamiento combinado se utiliza calor radiante, se
ruega usar solamente vajilla resistente al calor.
• Si solamente utiliza el funcionamiento de asar a la
parrilla, también puede utilizar vajilla de metal o de aluminio – pero no al utilizar el funcionamiento combinado
o de microondas.
• Para el modo de operación GRILL y KOMBI sólo es
apropiado la rejilla para asar a la parrilla.
• No coloque nada sobre la parte superior de la carcasa.
Está se calentará. Deje las rejillas de ventilación
siempre libres.
• Se ruega utilizar la parrilla para acercar el alimento que
se quiera asar al elemento calorífi co.
Puesta en marcha
• Retire todo el accesorio que se encuentre en el
espacio interior de cocción, desempaquételo y coloque
el anillo de rozamiento en el centro. Coloque de tal
manera el plato de vidrio sobre el eje de mando que
éste encaje en las hendiduras del eje conductor y de
esta forma poder conseguir una colocación fi ja.
• Supervise el aparato si tiene algunos defectos visibles,
sobre todo en la zona de la puerta. Si hubiera defectos
de cualquier tipo, de ninguna forma se deberá poner
en marcha el aparato.
• Para evitar perturbaciones de otros aparatos al poner
en marcha el microondas, no coloque su aparato cerca
de otros aparatos electrónicos.
• Si hubiera, retire el fi lm de plástico de la carcasa.
• Se ruega no retirar de ninguna manera la hoja de
plástico que hay en la parte interior de la puerta.
• Introduzca la clavija en una caja de enchufe con tomatierra 230 V, 50 Hz y correctamente instalada.
• ¡No retire ningunas piezas montadas del espacio
interior de cocción o de la parte interior de la puerta!
Uso del aparato
Indicaciones de interés en el funcionamiento del
microondas
• Su aparato trabaja con radiación de microondas que
calienta en muy corto tiempo las partículas de agua en
los alimentos. En este proceso no hay radiación calorífi ca y por ello casi nada de tostado en los alimentos.
• Caliente con este aparato solamente alimentos.
• Este aparato no está apropiado para la cocción de
alimentos bañados en aceite.
• Solamente caliente de 1-2 raciones a la vez. Si no
pierde el aparato en efi cacia.
• Para interrumpir el proceso de cocción presione la
tecla-STOPP.
• Microondas suministran directamente energía. Por ello
no es necesario precalentar los alimentos.
• Nunca use el aparato en el funcionamiento de microondas o combinado de forma vacía, es decir sin alimentos.
• El horno tradicional no se puede reemplazar por el
microondas. El microondas sirve principalmente para:
– Descongelación de productos congelados
– Calentamiento rápido de alimentos o bebidas
– Cocción de comidas
• Se ruega no utilizar vajilla de plástico o de papel.
Ajuste de la hora
Nota: En la primera conexión se iluminan todos las indica-
ciones del display, a continuación aparecerán dos puntos
que parpadean.
• Presione la tecla-STOPP.
• Presione la tecla-UHR (Reloj). La indicación cambia a
00:00. El primer dígito parpadea.
• Con ayuda de las teclas-NUMMERN inserte la hora
deseada de cuatro dígitos.
• Se activa la hora nueva.
Manejo del microondas
Coloque la comida que quiera calentar en la vajilla apropiada. Abra la puerta y ponga la vajilla en el centro del plato
de vidrio. Se ruega cerrar la puerta (Por razones de seguridad, el aparato sólo se activará al estar cerrada la puerta).
ESPAÑOL
21
6....-05-MWG 743 H NEW 21 07.01.2005, 12:33:44 Uhr
Page 22

1. Presione la tecla-STOPP.
2. Presionando una o varias veces la tecla-LEISTUNG,
podrá regular la potencia del microondas.
Potencia en el
ESPAÑOL
visualizador como
elegido en %
100 900
80 720 Cocción
60 540
40 360 Derretir queso etc.
20 180
START 900
3. Con ayuda de las teclas numéricas inserte el tiempo
de cocción deseado.
Por ejemplo: 10:30 minutos de cocción en 100% de
potencia
Paso Tecla(s) Indicación
1
2
3
4
4. Para iniciar el proceso presione la tecla-START. El
tiempo de cocción se orienta según la cantidad y el
tipo del contenido. Con un poco de práctica aprenderá
rápido cuanto tiempo supone el tiempo de cocción de
los distintos alimentos.
Por favor preste atención: La cocción en un microon-
das es mucho más rápida que en un horno convencional. Si no está seguro, es preferible ajustar el tiempo
de cocción más bajo y si es necesario aumentarla.
Al haber transcurrido el tiempo, se desconectará el
aparato y en el display aparecerá END. Ahora puede
apartar la comida.
Potencia en
vatios (aprox.)
STOPP
LEISTUNG 10 0P
1 0 3 0 10:30
START
Campo de aplicación
Calentamiento
rápido
Continuación
de la cocción
Descongelación
de productos
congelados
Calentamiento
rápido
Descongelación automática
Para la descongelación automática de carne congelada, aves congeladas y marisco congelado, proceda de
siguiente manera:
1. Presione la tecla-STOPP.
2. Presione la tecla-AUFTAUEN. Ahora se encuentra en el
programa de descongelactión. Presionando repetidamente
la tecla-AUFTAUEN, seleccione uno de los programas
de descongelación:
AD1 Descongelación de carne de 0,1 – 2,0kg
AD2 Descongelación de aves de 0,2 – 3,0kg
AD3 Descongelación de marisco de 0,1 – 0,9kg
3. Seleccione un peso con las teclas de fl echa.
Por ejemplo: 2,0kg de aves para la descongelación.
Paso Tecla(s) Indicación
1
2
3
4
4. Para iniciar el proceso presione la tecla-START.
STOPP
AUFTAUEN AD -2
왖 / 왔
START
2.0
Al haber transcurrido el tiempo, se desconectará el aparato y en el display aparecerá END. Ahora retire el alimento.
En la tabla a continuación se suministra información para
la descongelación manual.
Tabla descongelación
Alimento / plato
Carne, embutidos
Carne
(de vaca, de
ternera,
de cerdo)
Escalope,
chuleta
Carne picada 250 g 180 6 - 8 5 - 10
Salchicha
frita, salchicha
cocida
Fiambre 300 g 180 4 - 6 5 - 10
Consejo: Dar la vuelta a la carne después de haber
transcurrido la mitad de tiempo, tapar piezas delicadas,
trocear la carne picada, retirar piezas ya descongeladas,
separar rodajas de embutido
Carne de ave
Pollo 1000 g 180 20 - 25 10 - 15
Trozos de
pollo
Pato 1700 g 180 25 - 40 20 - 25
Trozos de
ganso,
trozos de
pavo
Consejo: Dar la vuelta a la carne de ave después de
haber transcurrido la mitad de tiempo, tapar las alas y los
muslos.
Atención: Retirar el líquido que salga de la descongelación y tener cuidado que no entre en contacto con los
demás alimentos.
Carne de caza
Lomo de
corzo
Lomo de
liebre
Consejo: Dar la vuelta una vez, cubrir los lados
Pescado
Cangrejos de
mar, gambas
Trucha 340 g 180 4 - 6 5 - 10
Pescado
entero
Filete de
pescado
Consejo: Remover repetidas veces, dar la vuelta con
frecuencia.
Fruta
Frambuesas,
fresas
Cerezas,
ciruelas
Compota
de manzana
Consejo: Remover con cuidado es decir trocear con
cuidado.
Canti-
dad
500 g 180 14 – 18 10 – 15
1000 g 180 25 - 30 20 - 25
200 g 180 4 - 6 5 - 10
200 g 180 4 - 6 5 - 10
500 g 180 12 - 15 5 - 10
500 g 180 12 - 18 10 - 15
1000 g 180 20 - 35 20 - 30
500 g 180 12 - 13 10 - 20
250 g 180 5 - 7 5 - 10
500 g 180 7 - 10 10 - 15
250 g 180 5 - 7 5 - 10
250 g 180 4 - 6 5 - 10
250 g 180 5 - 7 5 - 10
500 g 180 9 - 12 5 - 10
Potencia
en vatios
Tiempo
aprox. en
minutos
Tiempo de
descongela-
ción
22
6....-05-MWG 743 H NEW 22 07.01.2005, 12:33:45 Uhr
Page 23

Alimento / plato
Verduras
vea „Tabla Cocción“, „Descongelación y cocción de
verdura“
Pan y repostería
Panecillos
Pan 1000 g 180 13 - 15 8 - 10
Pan de molde 500 g 180 5 - 6 5 - 10
Bizcocho 500 g 180 6 - 8 5 - 10
Bizcocho de
fruta
Tarta 1 obra 180 0,5 - 1 3 - 5
Tarta 1200 g 180 10 - 12 30 - 60
Consejo: Colocar el pan y la repostería sobre papel de
crespón de cocina para que absorba la humedad, repostería delicada descongelar muy breve.
Productos lácteos
Mantequilla 250 g 180 5 - 7 10 - 15
Requesón 250 g 180 6 - 8 5 - 10
Nata 200 g 180 3 - 5 2 - 3
Consejo: Apartar el papel de aluminio, remover después
de haber transcurrido la mitad de tiempo, batir la nata
cuando esté todavía media congelada
Canti-
dad
4 piezas
1 obra 180 2 - 3 2 - 3
Potencia
en vatios
180 ca. 1 - 3 5
Tiempo
aprox. en
minutos
Tiempo de
descongela-
ción
Calentamiento
El calentamiento de alimentos es un punto fuerte del microondas. Líquidos o comidas con temperatura de frigorífi co
se pueden calentar rápidamente a una temperatura de
ambiente o de consumo, sin haber utilizado muchas ollas.
Los tiempos indicados para calentar las comidas son
solamente valores indicativos, ya que el tiempo depende
fundamentalmente de la temperatura de partida y de la
composición de la comida. Por ello se recomienda revisar
de vez en cuando si la comida ya está sufi cientemente
caliente.
Tabla – Calentamiento
Alimento / plato
Líquidos
Agua, 1 taza 150 g 900 0,5 - 1 no
Agua, 0,5 l 500 g 900 3,5 - 5 no
Agua, 0,75 l 750 g 900 5 - 7 no
Café, 1 taza 150 g 900 0,5 - 1 no
Leche, 1 taza 150 g 900 0,5 - 1 no
Atención: Para evitar el retardo de ebuIlición, introduzca
una varilla de vidrio o algo similar (nada metálico) en el
recipiente. Remueva bien la bebida antes de beberla.
Platos combinados
Escalope,
patatas y
verduras
Estofado de
carne con
pasta
Carne, albóndiga de masa
de patata y
salsa
Consejo: Humedecer anteriormente un poco y remover
entremedias.
Canti-
dad
450 g 900 2,5 - 3,5 si
450 g 900 2 - 2,5 si
450 g 900 2,5 - 3,5 si
Potencia
en vatios
Tiempo
aprox. en
minutos
Cubrir
Alimento / plato
Carne
Escalope,
empanado
Albóndigas,
4 piezas
Trozo d e
carne asada
Consejo: Dar unas pinceladas con aceite, para que el
empanado no se reblandezca.
Carne de ave
1/2 pollo 450 g 900 3,5 - 5 no
Fricasé de
gallina
Consejo: Dar unas pinceladas con aceite y remover
entremedias.
Guarnición
Pasta, arroz
1 ración
2 raciones
Patatas 500 g 900 3 - 4 si
Consejo: Humedecer anteriormente un poco.
Sopas / salsas
Caldo claro, 1
plato
Sopa con
trozitos
de otros
alimentos
Salsa 250 g 900 1 - 2 si
Alimentación para bebés
Leche 100 ml 540 0,5 - 1 no
Papilla 200 g 540 1 - 1,5 no
Consejo: Agitar o remover bien. ¡Comprobar la temperatura!
Canti-
dad
200 g 900 1 - 2 no
500 g 900 3 - 4 no
250 g 900 2 - 3 no
400 g 900 3 - 4,5 si
150 g
300 g
250 g 900 1 - 1,5 si
250 g 900 1,5 - 2 si
Potencia
en vatios
900
900
Tiempo
aprox. en
minutos
1 - 2
2,5 - 3,5
Tiempo de
descongela-
ción
si
si
Cocción
Consejos útiles para la cocción
Oriéntese en los valores indicativos de la tabla de cocción
y de las recetas. Observe el proceso de cocción, hasta
que vaya tomando práctica.
Puede abrir en cada momento la puerta del aparato. El
aparato se desconectará de forma automática. Se conectará de nuevo al cerrar la puerta.
Alimentos del frigorífi co, necesitan un poco más de
tiempo para la cocción que aquellos con temperatura de
ambiente.
Cuanto más compacta sea una comida, más tiempo
necesita para su cocción. Por ello un trozo de carne más
bien grande necesita más tiempo de cocción que un
asado de carne trozeada, aunque tengan el mismo peso.
Para grandes cantidades se recomienda iniciar la cocción
con la potencia máxima y después seguir con la potencia
media conseguiendo de esta forma una cocción uniforme.
Comidas planas cuecen antes que comidas altas, por
ello se debería repartir los alimentos en el plato de forma
plana. Piezas más fi nas, p.ej, muslos de pollo o fi letes de
pescado, se deberían colocar hacia el interior y dejar que
se solapen.
Cantidades pequeñas cuecen antes que cantidades grandes.
ESPAÑOL
23
6....-05-MWG 743 H NEW 23 07.01.2005, 12:33:48 Uhr
Page 24

Es válida siguiente regla general:
Cantidad doble = casi el doble de tiempo
Mitad de cantidad = mitad de tiempo
Si para un plato no encuentra la indicación de horario
ESPAÑOL
adecuada, es válida siguiente regla:
cada 100 g aprox. 1 minuto de tiempo de cocción
Todos los alimentos que tape en el horno, también debería
tapar en el microondas.
Una tapadera evita que se sequen los alimentos. Para
tapar los alimentos puede utilizar un plato dado de vuelta,
papel de pergamino o láminas para microondas.
Tabla Cocción
Alimento / plato
Verduras
Berenjenas 500 g 720 7 - 10 si
Colifl or 500 g 720 8 - 11 si
Brécol 500 g 720 6 - 9 si
Achicoria 500 g 720 6 - 7 si
Guisantes 500 g 720 6 - 7 si
Hinojo 500 g 720 8 - 11 si
Alubias verdes 300 g 720 13 - 15 si
Patatas 500 g 720 9 - 12 si
Colinabo 500 g 720 8 - 10 si
Puerro 500 g 720 7 - 9 si
Mozarca 250 g 720 7 - 9 si
Zanahorias 500 g 720 8 - 10 si
Pimiento 500 g 720 6 - 9 si
Col de Bruselas 300 g 720 7 - 10 si
Espárrago 300 g 720 6 - 9 si
Tomates 500 g 720 6 - 7 si
Zucchini 500 g 720 9 - 10 si
Consejo: Cortar la verdura en trozos pequeños y cocer
con 2-3 cucharas soperas de líquido. Entremedias
remover, recocinar de 3-5 minutos, condimentar primero
al servir la comida.
Fruta
Compota de
manzana, compota de pera
Mermelada
de ciruela
Compota
de ruibarbo
Manzanas asadas, 4 piezas
Consejo: Añadir 125 ml de agua, zumo de limón evita el
cambio de color de la fruta, recocinar de 3-5 minutos.
Carne *)
Carne con salsa 400 g 720 10 - 12 si
Estofado de
carne, asado de
carne trozeada
Filetes de vaca
rellenos
Consejo: Remover entremedias, reposar de 3-5 minutos.
Carne de ave *)
Fricasé de
gallina
Sopa de gallina 200 g 720 5 - 6 si
Consejo: Remover entremedias, reposar de 3-5 minutos.
Canti-
dad
500 g 720 5 - 8 si
250 g 720 4 - 6 no
250 g 720 5 - 8 si
500 g 720 7 - 9 si
500 g 720 10 - 15 si
250 g 720 7 - 8 si
250 g 720 6 - 7 si
Potencia
en vatios
Tiempo
aprox. en
minutos
Cubrir
Alimento / plato
Pescado
Filete de pescado 300 g 720 7 - 8 si
Filete de pescado 400 g 720 8 - 9 si
Consejo: Después de haber pasado la mitad de tiempo
dar la vuelta al pescado, recocinar de 3-5 minutos.
Descongelación y cocción de verdura
Col lombarda 450 g 720 14 -16 si
Espinacas de
hoja
Colifl or 200 g 720 7 - 9 si
Alubias verdes
cortadas
Brécol 300 g 720 8 - 9 si
Guisantes 300 g 720 7 - 8 si
Colinabo 300 g 720 13 -15 si
Puerro 200 g 720 10 - 11 si
Maíz 200 g 720 4 - 6 si
Zanahorias 200 g 720 5 - 6 si
Col de Bruselas 300 g 720 7 - 8 si
Espinacas
Consejo: Cocer con 1-2 cucharas soperas de líquido,
remover entremedias es decir trozear con cuidado,
recocinar de 2-3 minutos, condimentar primero al servir
la comida.
Sopas / potajes *)
Potaje 500 g 720 13 - 15 si
Sopa con
trocitos
de otros alimentos
Sopa de crema 500 g 720 13 - 15 si
Consejo: Remover entremedias, recocinar de 3-5
minutos.
*) Alimentos precocinados
Canti-
dad
300 g 720 11 - 13 si
200 g 720 8 - 10 si
450 g
600 g
300 g 720 7 - 8 si
Potencia
en vatios
720
720
Tiempo
aprox. en
minutos
12 - 13
15 - 17
Cubrir
si
si
Cocción-Express
• Para iniciar la cocción-express presione repetidamente EXPRESS. Cade vez que presione la tecla se
alargará el tiempo de cocción unos 30 segundos más.
• Presione la tecla-STOPP.
En este proceso la potencia del microondas es del 100%.
El tiempo express máximo es de 1:30 minutos.
Programas automáticos
Con ayuda de la automaticidad puede cocinar de forma
automática determinadas cantidades de comida. El tiempo
de cocción y la potencia de microondas están programados.
Para ello proceda de la siguiente manera:
1. Presione la tecla-STOPP.
2. Presione la tecla-GARPROGRAMME. Ahora se
encuentra en el programa de cocción.
Presionando repetidamente la tecla-GARPROGRAMME seleccione uno de los siguientes programas:
24
6....-05-MWG 743 H NEW 24 07.01.2005, 12:33:50 Uhr
Page 25

Código
Programa Peso
Arroz/Pasta 0,1 kg 0,2 kg 0,3 kg
Arroz,
AC-1
además agua
Pasta,
además agua
Verdura,fresca 0,2 kg 0,3 kg 0,4 kg 0,5 kg 0,6 kg 0,7 kg 0,8 kg
AC-2
Además agua 2 EL 2 EL 2 EL 4 EL 4 EL 4 EL 4 EL
Verdura,
AC-3
congelada
AC-4 Palomitas
AC-5 Líquidos
AC-6 Patatas
Pizza
AC-7
(calentar)
AC-8 Pescado
3. A continuación seleccione en los programas AC-1 a
AC- 6 un peso con ayuda de las teclas de fl echa.
Por ejemplo: Cocinar 0,2kg de verdura fresca.
Paso Tecla(s) Indicación
1
2
3
4
4. Para iniciar el proceso presione la tecla-START.
Al haber transcurrido el tiempo, se desconectará el aparato y en el display aparecerá END. Ahora retire el alimento.
Nota: EL corresponde a una cucharada.
180 ml 33 0ml 480 ml cubrir la comida
300 ml 60 0ml 900 ml no cubrir la comida
0,2 kg 0,3 kg 0,4 kg 0,5 kg 0,6 kg 0,7 kg 0,8 kg
3,0 Oz 3,5 Oz corresponda a aprox. 80/100g
Se ruega utilizar exclusivamente palomitas en bolsas
para microondas
250 ml 500 ml
¡No cubrir ! ¡Atención con el retardo de ebullición!
0,45k g 0,65 kg
No pinchar las patatas,
colocarlas con distancia sobre el plato giratorio.
0,15kg
0,45kg
Entallar el pescado con anterioridad
STOPP
GARPROGRAMME AC -2
왖 / 왔
START
0.2
Aire caliente/Parrilla combinada/
Funcionamiento combinado
Aire caliente y Funcionamiento aire caliente/
combinado
Para el modo aire caliente y aire caliente/funcionamiento
combinado proceda de siguiente manera:
1. Presione la tecla-STOPP.
2. Presione la tecla-HEIßLUFT/KOMBI GRILL/KOMBI .
Presionando repetidamente la tecla-HEIßLUFT/KOMBI
GRILL/KOMBI seleccione uno de estos programas:
C Solamente aire caliente
C1 Aire caliente y microondas en combinación
Aire caliente y microondas en combinación con
C2
factor superior de microondas
3. Confi rme con ayuda de la tecla-TEMP el ajuste estandar de 160°C o
4. Ajuste a continuación con ayuda de las teclas de
fl echa una temperatura entre 80°C y 230°C.
5. Con ayuda de la teclas-NUMMERN inserte el tiempo
de cocción deseado.
Nota: El ajuste estandar es de 15 minutos.
Por ejemplo : Programa C2, en 180°C, Tiempo de
cocción 8 minutos.
Paso Tecla(s) Indicación
1
2
3
4
5
6
6. Para iniciar el proceso presione la tecla-START.
Al haber transcurrido el tiempo, se desconectará el apara-
to y en el display aparecerá END. Ahora retire el alimento.
Avisos de error
• Durante el funcionamiento aparece en el display
«Err2». La temperatura en el espacio de cocción ha
soprepasado el valor de temperatura preajustado.
Posiblemente se ha seleccionado una temperatura
muy baja para esta preparación. Se ruega corregir el
ajuste.
• Durante el funcionamiento aparece en el display
«Err3». El valor de temperatura preajustado no se
pudo alcanzar durante el tiempo previsto.
Se ruega corregir el ajuste.
Parrilla y Funcionamiento parrilla/combinado
Para asar a la parrilla se ruega utilizar la parrilla. Utilice
una vajilla apropiada y resistente al calor o coloque los
alimentos a asar directamente sobre la parrilla.
¡Alimentos grandes y gruesos se asan directamente sobre
el plato giratorio!
No es necesario “precalentar” la parrilla, ya que la parrilla
infrarroja genera inmediatamente calor radiante.
Al preparar comida en el funcionamiento combinado microondas-parrilla debería prestar atención a lo siguiente:
Para alimentos grandes y gruesos, como p.ej. asado de
cerdo, el tiempo de cocción en el microondas es más largo
que para alimentos pequeños y planos. Sin embargo en
el funcionamiento de parrilla es al contrario. Cuanto
más cerca esté el alimento de la parrilla, más rápido
se asa. Esto signifi ca que si prepara trozos grandes de
carne con el funcionamiento combinado, puede ocurrir
que el tiempo de cocción sea más corto que para trozos
pequeños de carne asada.
Para el funcionamiento parrilla y parrilla/combinado proceda de siguiente manera:
1. Presione la tecla-STOPP.
2. Presione la tecla-HEIßLUFT/KOMBI GRILL/KOMBI .
Presionando repetidamente la tecla-HEIßLUFT/KOMBI
GRILL/KOMBI seleccione uno de estos programas:
G Solamente parrilla
G1 Parrilla y microondas en combinación
Parrilla y microondas en combinación
G2
con factor superior de parrilla
3. Con ayuda de la teclas-NUMMERN inserte el tiempo
de cocción deseado.
Por ejemplo: Programa G2, Tiempo de cocción
10:30 minutos.
STOPP
HEISSLUFT/KOMBI
GRILL/KOMBI
TEMP 160C
왖 / 왔
0 8 0 0 08:00
START
C -2
180C
ESPAÑOL
25
6....-05-MWG 743 H NEW 25 07.01.2005, 12:33:52 Uhr
Page 26

Paso Tecla(s) Indicación
1
2
ESPAÑOL
4. Para iniciar el proceso presione la tecla-START.
Al haber transcurrido el tiempo, se desconectará el apara-
to y en el display aparecerá END. Ahora retire el alimento.
3
4
STOPP
HEISSLUFT/KOMBI
GRILL/KOMBI
1 0 3 0 10:30
START
G 2
Tabla funcionamiento parrilla/combinado
Alimento / plato
Carne, embutidos
Carne de
vaca, de
cerdo o de
ternera en
una pieza
Carne de
cerdo cocida
y ahumada
Asado de
carne picada
Salchicha
de Viena
Salchicha
cocida
Consejo: Dar la vuelta a la carne después de haber
transcurrido la mitad de tiempo, recocinar de 3-5 minutos,
untar clara de huevo sobre el asado de carne picada,
pinchar la salchicha con un tenedor.
Carne de ave
Pollo para
hacer sopa
Trozos de
pollo
Consejo: Dejar cocinar sin líquido en su propio jugo, dar
la vuelta una vez, recocinar de 4-5 minutos.
Pescado
Trucha, azul 300 g 5 - 6 no
Filete
de pescado
Consejo: Dar la vuelta al pescado después de haber
transcurrido la mitad de tiempo, recocinar de 3-5 minutos.
Canti-
dad
500 g 10 - 12 no
750 g 12 - 15 no
500 g 12 - 14 no
500 g 13 - 15 no
200 g 2 - 3 no
200 g 2 - 3 no
1000 g 13 - 15 no
250 g 4 - 5 no
300 g 3 - 4 no
Funcion-
amiento
combinado
Tiempo
aprox. en
minutos
Cubrir
Programa de cocción individual
Si desea insertar un propio programa de cocción para
determinadas preparaciones, puede hacerlo con ayuda
de los programas Potencia del microondas y Parrilla/
Combinado (G, G1, G2) y/o Aire caliente/Combinado (C,
C1, C2).
Proceda de siguiente manera:
1. Presione la tecla-STOPP.
2. Seleccione presionando una o varias veces la teclaLEISTUNG la potencia de microondas deseada.
3. Con ayuda de las teclas-NUMMERN inserte la duración deseada de cocción.
4. Seleccione presionando una o varias veces la teclaHEIßLUFT/KOMBI GRILL/KOMBI uno de los programas C, C1, C2, G, G1 o G2.
26
5. Con ayuda de las teclas-NUMMERN inserte la duración deseada de cocción.
Por ejemplo: 3:00 minutos de tiempo de cocción con
el 100% de potencia de microondas y a continuación
9:00 minutos de parrilla.
Paso Tecla(s) Indicación
1
2
3
4
5
6
6. Para iniciar el proceso presione la tecla-START.
Al haber transcurrido el tiempo, se desconectará el aparato y en el display aparecerá END. Ahora retire el alimento.
Nota:
De este modo podrá combinar hasta 4 diferentes secuencias de cocción una tras otra.
También puede iniciar el programa con un ajuste parrilla/
combinado o aire caliente/combinado.
STOPP
LEISTUNG 10 0P
0 3 0 0 03:00
HEISSLUFT/KOMBI
GRILL/KOMBI
0 9 0 0 09:00
START
G
Funciones especiales
Inicio automático
Puede iniciar el microondas o también un ajuste parrilla/
combinado o aire caliente/combinado a un horario determinado. Para ello, ajuste primero la hora.
Para iniciar el microondas de forma automática, proceda
de siguiente manera:
1. Presione la tecla-STOPP.
2. Seleccione presionando una o varias veces la teclaLEISTUNG la potencia de microondas deseada.
3. Con ayuda de las teclas-NUMMERN inserte la duración deseada de cocción.
4. Presione la tecla-UHR más de 2 segundos. Suena un
tono de señal y la indicación cambia a la hora actual.
Parpadea el primer dígito.
5. Con ayuda de la teclas-NUMMERN inserte la hora de
inicio deseada. Suena un tono de señal más largo y en
el visualizador aparece “M”.
Por ejemplo: 12:30 minutos de tiempo de cocción con
el 100% de potencia de microondas, hora de inicio: 14 :
20h.
Paso Tecla(s) Indicación
1
2
3
4
5
6
6. Si desea ver la hora de inicio nuevamente, presione la
tecla-UHR.
El funcionamiento de microondas se iniciará a la hora
preajustada.
Atención: ¡Peligro de incendio! Ponga el aparato fundamentalmente bajo vigilancia en marcha. En el caso de la
cocción con diferencia de hora ajuste siempre el tiempo de
tal manera que esté vigilado a la hora de funcionamiento.
STOPP
LEISTUNG 10 0P
1 2 3 0 12:30
UHR 10:00
1 4 2 0 14:20
UHR 14:20
6....-05-MWG 743 H NEW 26 07.01.2005, 12:33:55 Uhr
Page 27

Nunca ponga el microondas en marcha estando vacío.
Si desea retirar el alimento a cocer con antelación, debe
cancelar el programa con la tecla-STOPP.
Al haber transcurrido el tiempo, se desconectará el aparato y en el display aparecerá END. Ahora retire el alimento.
Memoria automática
Después de haber fi nalizado el proceso de cocción, cada
2 minutos le recordará un tono de piar que debe apartar su
plato del microondas.
Dicha memoria se desconectará al abrir la puerta o al
presionar la tecla-STOPP.
Bloqueo
Para bloquear el aparato, presione más de 2 segundos
la tecla-STOPP. El bloqueo se indicará en el visualizador.
La función de los elementos de mando está bloqueada.
Para el desbloqueo del aparato, presione de nuevo la teclaSTOPP más de 2 segundos.
Indicaciones de fallos
Durante el funcionamiento aparece en el visualizador
“Err0” o “Err1”. En este caso existe un problema en el
control electrónico.
Envíe el aparato con una descripción del fallo a nuestro
del cliente.
Limpieza
Antes de la limpieza retire siempre la clavija de red de la
caja de enchufe.
Garantía
Para el aparato comercializado por nosotros nos responsabilizamos con una garantía de 24 meses a partir de la
fecha de compra (factura de compra).
Durante el período de garantía nos encargamos gratuítamente de los defectos del aparato y de los accesorios*),
que se hayan originado por defectos del material o de la fabricación. Dependiendo de nuestra estimación se realizará
una reparación o un cambio. ¡Los servicios de garantía no
prolangan la garantía, ni se incia por ello un período nuevo
de garantía!
Como comprobante para la garantía es válido la factura
de compra. Sin este comprobante no se podrá realizar un
cambio o una reparación gratuíta.
En caso de garantía entregue el aparato completo en
su embalaje original junto con la factura a su agente
comerciante.
*) Defectos en las piezas de accesorio, no signifi can automáticamente el recambio gratuito del aparato completo.
¡En este caso dirijase por favor a nuestra linea de atención
al cliente! ¡Rotos de vidrio o roturas en las piezas de plástico deben pagarse siempre por el cliente !
Defectos en los accesorios de uso o en las piezas de
desgaste (p.ej. escobillas de carbón del motor, varillas
amasadoras, correas de transmisión, mando a distancia
de repuesto, cepillos de dientes de repuesto, hojas de
sierra etc.), como también la limpieza, mantenimiento o el
recambio de piezas de desgaste no recaen en la garantía
e irán al cargo del cliente!
En caso de intervención ajena se expira la garantía.
ESPAÑOL
• Después del uso limpie con un paño levemente humedecido el espacio interior de cocción.
• Limpíe el microondas por afuera con un paño levemente humedecido.
• Limpie el accesorio de forma habitual en un baño
jabonoso.
• Marco de la puerta / junta de la puerta y piezas vecinas
deberían, al estar sucias, ser limpiadas cuidadosamente con un paño húmedo.
Datos técnicos
Modelo: MWG 743 H
Tensión tolerable / frecuencia asignada: 230 V, 50 Hz
Absorción asignada: 1400 vatios
Consumo de potencia aire caliente: 1300 vatios
Consumo de potencia parrilla: 1000 vatios
Potencia de salida asignada microondas: 900 vatios
Volumen del espacio de cocción: 25 litros
Clase de protección: Ι
Después de la garantía
Después de haber expirado la garantía se pueden realizar
las reparaciones por el concesionario o por el servicio de
reparaciones. Los gastos irán al cargo del cliente.
Este aparato se ha examinado según las normativas actuales y vigentes de la Comunidad Europea, como p.ej. compatibilidad electromagnética y directiva de baja tensión y
se ha construido según las más nuevas especifi caciones
en razón de la seguridad.
No reservamos el derecho de efectuar modifi caciones
técnicas.
27
6....-05-MWG 743 H NEW 27 07.01.2005, 12:33:57 Uhr
Page 28

Descrizione dei comandi
Grafi co 1: Descrizione dei pezzi
1 Chiusura sportello
2 Apertura di controllo
ITALIANO
3 Alloggiamento
4 Asse motrice
5 Anello scorrevole
6 Piatto girevole
7 Comandi
8 Vano cottura
9 Griglia
Attenzione:
non togliere pezzi montati nella camera di cottura e dal lato
interno dello sportello!
Grafi co 2: Comandi
LEISTUNG (microonde) (Potenza) Scelta della potenza
HEIßLUFT/KOMBI GRILL/KOMBI
HEIßLUFT: (Aria calda) Modalità di fun-
zionamento esclusivamente
ad aria calda, con sistema di
controllo mediante termostato
HEIßLUFT/KOMBI: (Aria calda/modalità combina-
ta) Le opzioni di aria calda e di
microonde entrano in funzione
alternatamente
GRILL: (Grill) Per cuocere al grill e per
gratinare
GRILL/KOMBI: (Grill/modalità combinata) Le
opzioni di grill e di microonde
entrano in funzione alternatamente
GARPROGRAMME (Programmi di cottura)
Selezione di un programma automatico attraverso
l’azionamento ripetuto di un
tasto
AUFTAUEN (Scongelamento) Consente
di attivare la funzione di
scongelamento, unitamente
all’impostazione del peso
EXPRESS (Express) Attivazione rapida
della funzione microonde
TEMP (Temp) Consente di selezio-
nare un valore di temperatura
durante la modalità di funzionamento ad aria calda
Tasti direzionali Consentono l’impostazione
dei valori di temperatura o dei
parametri di peso
Tasti NUMMERN (Tasti numerici) Consentono
l’impostazione dell’ora e della
durata della fase di cottura
UHR (Orologio) Unitamente ai
tasti NUMERICI, consente
l’impostazione dell’ora
START (Start) Avvio del programma
STOPP (Stop/Blocco)
Premere due volte per annulla-
Tenere premuto 3 secondi
• Prima di mettere in funzione questo apparecchio,
leggere molto attentamente le istruzioni per l’uso e conservarle con cura unitamente al certifi cato di garanzia,
allo scontrino e, se possibile, alla scatola di cartone
con la confezione interna.
• Utilizzare l’apparecchio esclusivamente per scopi privati e conformemente al tipo di applicazione previsto.
Questo prodotto non è stato concepito ai fi ni di un
impiego in ambito industriale. Non utilizzarlo all’aperto
(a meno che non sia contemplato un particolare tipo
di uso all’aperto nel rispetto di specifi che condizioni).
Proteggerlo dal calore, nonché dall’esposizione diretta
ai raggi solari e dall’umidità (non immergerlo mai in
sostanze liquide) e tenerlo a distanza da oggetti con
spigoli affi lati. Non utilizzare l’apparecchio con le
mani umide. Nel caso in cui si bagni o si inumidisca
l’apparecchio, staccare immediatamente la spina.
Evitare il contatto con l’acqua.
• Disattivare l’apparecchio e staccare sempre la spina
dalla relativa presa
(si raccomanda di afferrare il connettore e non il cavo
quando si effettua questa operazione) allorché non
si utilizza l’apparecchio, quando si applicano degli
accessori oppure nel caso in cui lo si debba pulire o si
siano manifestate anomalie.
• Non mettere in funzione l’ apparecchio senza sorveglianza. Se si dovesse assentarsi dal posto di lavoro,
spegnere e disconnettere sempre l’ apparecchio,
(prendendo in mano la spina, non tirando il cavo).
• Allo scopo di proteggere i bambini contro i pericoli che
possono derivare dagli apparecchi elettrici, accertarsi
che non vi siano cavi pendenti e che i bambini non possano accedere in alcun modo all’apparecchio stesso.
• Controllare periodicamente l’apparecchio per verifi care
che non vi siano danni. Non mettere in funzione
l’apparecchio nel caso in cui sia guasto.
• Non tentare di riparare l’apparecchio, bensì rivolgersi
a un tecnico autorizzato. Al fi ne di evitare l’insorgere
di situazioni di pericolo, si raccomanda di contattare il
costruttore, il nostro servizio di assistenza tecnica o un
tecnico ugualmente qualifi cato per la sostituzione del
cavo di alimentazione difettoso con un cavo equivalente.
• Utilizzare esclusivamente accessori originali.
• Rispettare le seguenti “Speciali norme di sicurezza...“.
Importanti avvertenze di sicurezza!
Leggere attentamente e conservare per l’uso futuro.
• Attenzione: se lo sportello o le guarnizioni dello sportello sono danneggiate, il forno non può essere usato
prima che siano state effettuate riparazioni da una
persona addestrata allo scopo.
• Attenzione: non riparare mai il forno direttamente,
contattare un esperto autorizzato. Tranne che per
l’esperto, per tutti è pericoloso eseguire lavori di ma-
Premere una volta per bloccare il procedimento di cottura.
re il programma.
per bloccare/sbloccare
l’apparecchio.
Norme di sicurezza generali
28
6....-05-MWG 743 H NEW 28 07.01.2005, 12:33:58 Uhr
Page 29

nutenzione o riparazione che richiedano la rimozione
di un coperchio che garantisce la protezione contro le
radiazioni dell’energia microonde.
• Attenzione: Non riscaldare liquidi in recipienti chiusi.
Pericolo di esplosione!
Attenzione: ai bambini è permesso di usare l’ appa-
recchio senza sorveglianza di adulti unicamente se
viene data l’ istruzione adatta che permette al bambino
di usare l’ apparecchio in modo che sia sicuro e che
capisca i pericoli di un uso sbagliato.
• Se desiderate alloggiare il vostro microonde in un
armadio, scaffale o simili, fate attenzione che su ogni
lato dell’apparecchio ci sia una distanza di ventilazione
di almeno 10 cm da armadi, pareti ecc.
• Utilizzare solo stoviglie idonee come:
– vetro, porcellana, ceramica, materiale sintetico re-
sistente al calore o stoviglie speciali per microonde.
• Se si desidera riscaldare o cuocere cibi in contenitori
combustibili come di carta o di materia plastica, è
necessario sorvegliare la microonde per evitare la
possibilità di combustione.
• Se si sviluppa fumo, spegnere l’apparecchio e staccare
la spina. Tenere chiuso lo sportello per soffocare eventuali fi amme.
• Attenzione ebollizione rallentata: durante la cottura,
soprattutto quando si riscaldano liquidi (acqua) può
accadere che la temperatura di ebollizione sia raggiunta
ma che le tipiche bollicine di vapore ancora non salgano. L’ebollizione non è uniforme. Quando si toglie il recipiente, questo fenomeno tramite una scossa leggera
può dar luogo ad un’ebollizione rallentata, provocando
quindi una formazione improvvisa di bollicine di vapore,
perciò il liquido può traboccare. Pericolo di ustione! Per
ottenere un’ebollizione uniforme, mettere nel recipiente
una barra di vetro o qualcosa di simile, ma non metallo.
• L’apparecchio non deve essere assolutamente riparato
dall’utente. Dopo aver tolto il coperchio c’è pericolo di
radiazioni provenienti dall’energia microonde.
• Alimenti con guscio o scorza, come uova, salami,
conserve sottovetro chiuse ecc. non possono essere
riscaldati nel forno microonde perché possono esplodere anche quando il riscaldamento da parte delle
microonde è terminato.
• In presenza di sporco il telaio dello sportello, la
guarnizione e le parti limitrofe devono essere ripuliti
accuratamente con un panno umido.
• Pulire accuratamente il forno microonde e togliere
residui di sporco dall’interno.
• La mancanza di suffi ciente pulizia dell’ apparecchio ha
come conseguenza la distruzione della superfi cie, ciò
che può infl uenzare la durata di vita dell’ apparecchio e
causare eventualmente situazioni pericolose.
Avvertenze per l’uso grill e combinato
• Nella funzione grill e combinata si sfrutta calore di
radiazione, usare dunque solo stoviglie resistenti.
• Nella funzione solo grill si possono usare anche
stoviglie in metallo o alluminio, ma non nella funzione
combinata o microonde.
• Per le modalità di funzionamento GRILL e KOMBI si
deve utilizzare esclusivamente la griglia, in quanto
unico strumento appropriato.
• Non appoggiare nulla sul piano superiore della custodia. Diventa molto caldo. Lasciare sempre libere le
fessure per la ventilazione.
• Per avvicinare i cibi all’elemento radiante usare la griglia.
Messa in funzione
• Estrarre tutti gli accessori che si trovano nella
camera di cottura, toglierli dall’imballaggio e porre al
centro l’anello scorrevole. Posizionate il piatto di vetro
sull’asse di azionamento in modo che si incassi nelle
convessità dell’albero e poggi dritto.
• Controllare che l’apparecchio non presenti danni visibili, soprattutto in prossimità dello sportello. In presenza
di danni di qualsiasi genere l’apparecchio non deve
assolutamente essere messo in funzione.
• Per evitare danni ad altri apparecchi durante il
funzionamento, non porre il forno in prossimità di altri
apparecchi elettronici.
• Rimuovere eventuali pellicole protettive incollate sulla
custodia.
• Non togliere mai pellicole dall’interno dello spor-
tello!
• Infi late la spina in una presa correttamente installata
con contatto di terra da 230 V, 50 Hz.
• Non rimuovere pezzi montati dalla camera di cottura e
dall’interno dello sportello!
Uso dell’apparecchio
Cosa si deve sapere sull’uso del microonde:
• Il forno microonde lavora con una radiazione di microonde che riscalda in brevissimo tempo le particelle
d’acqua nei cibi. Qui non c‘è nessuna radiazione di
calore e quindi nemmeno doratura.
• Usare questo apparecchio solo per riscaldare generi
alimentari!
• L’apparecchio non si presta per la cottura al forno di
alimenti che galleggiano nel grasso.
• Riscaldare solo 1-2 porzioni alla volta, altrimenti
l’apparecchio perde la sua effi cacia.
• Per interrompere la cottura premere il tasto-STOPP.
• Le microonde forniscono subito il massimo di energia,
quindi non è necessario preriscaldare.
• Non accendere mai l’apparecchio nella funzione microonde o combinata se è vuoto.
• Il forno microonde non sostituisce il forno tradizionale.
Esso serve principalmente per:
– scongelare alimenti surgelati/congelati
– riscaldare rapidamente alimenti solidi o liquidi
– fi nire di cuocere alimenti
• Non utilizzare stoviglie di plastica o carta.
Impostare l’ora
Avvertenza: Quando si attiva l’apparecchio per la prima
volta, si illuminano dapprima i display e successivamente
viene visualizzato un segno di due punti lampeggiante.
• Premere il tasto-STOPP.
• Premere il tasto-UHR. Il display visualizza in questo
modo’ 00:00’. La prima cifra lampeggia.
• Servendosi dei tasti-NUMMERN, impostare l’ora a
4 cifre desiderata.
• Viene in questo modo attivata la nuova ora impostata.
Uso microonde
Mettere gli alimenti da scaldare in un recipiente idoneo.
Aprire lo sportello e porre il recipiente al centro del piatto
di vetro. Chiudere lo sportello (Per motivi di sicurezza
l’apparecchio lavora solo se lo sportello è ben chiuso).
ITALIANO
29
6....-05-MWG 743 H NEW 29 07.01.2005, 12:33:59 Uhr
Page 30

1. Premere il tasto-STOPP.
2. Premendo una o più volte il tasto-LEISTUNG seleziona-
re la potenza microonde desiderata.
Potenza nel display
ITALIANO
come selezionato in %
100 900
80 720 Cuocere
60 540 Finire di cuocere
40 360
20 180
START 900
3. Servendosi dei tasti-NUMMERN, impostare la durata di
cottura desiderata.
Per esempio: 10:30 minuti per la durata di cottura a
una potenza pari al 100%
Operazione Tasto/i Visualizzazione
1
2
3
4
4. Per avviare premere il tasto-START. La durata di
cottura si basa sulla quantità e sulle caratteristiche del
contenuto. Con un po’ di esercizio si impara velocemente a valutare la durata di cottura.
Per cortesia osservare: la cottura nel forno micro-
onde è molto più rapida che in un forno tradizionale.
Se non siete certi sui tempi di cottura, impostate
preferibilmente un tempo più basso ed eventualmente
continuate dopo la cottura.
Una volta trascorso l’intervallo di tempo impostato,
l’apparecchio si disattiva automaticamente e sul display
viene visualizzato “END”. Estrarre quindi gli alimenti.
Potenza
in Watt (ca.)
STOPP
LEISTUNG 10 0P
1 0 3 0 10:30
START
Campo d’applicazione
Riscaldare
rapidamente
Fondere formaggi
ecc.
Scongelare alimen-
ti congelati
Riscaldare
rapidamente
Scongelamento automatico
Per impostare lo scongelamento automatico di carne,
pesce, pollame e frutti di mare surgelati, è necessario
procedere nel seguente modo:
1. Premere il tasto-STOPP.
2. Premere il tasto-AUFTAUEN. Ora siete nel programma
di scongelamento. Premendo ripetutamente il tastoAUFTAUEN, selezionare uno dei programmi di scongelamento:
AD1 Scongelamento della carne da 0,1 a 2,0kg
AD2Scongelamento del pollameda 0,2 a 3,0kg
Scongelamento dei frutti di
AD3
mare
3. Servendosi dei tasti direzionali, selezionare un parametro di peso.
Per esempio: scongelamento di un pollo dal peso di 2,0 kg.
Operazione Tasto/i Visualizzazione
1
2
3
4
4. Per avviare premere il tasto-START.
30
STOPP
AUFTAUEN AD -2
왖 / 왔
START
da 0,1 a 0,9kg
2.0
Una volta trascorso l’intervallo di tempo impostato,
l’apparecchio si disattiva automaticamente e sul display
viene visualizzato “END”. Prelevare quindi gli alimenti.
La tabella riportata di seguito fornisce informazioni in
merito alla procedura di scongelamento manuale.
Tabella scongelamento
Generi
alimentari/Cibo
Carne, salumi
Carne
(manzo,
vitello, maiale)
in un pezzo
Bistecche,
costolette
Carne
macinata
Salsiccia arrostita, wurstel
Affettato 300 g 180 4 - 6 5 - 10
Consiglio: a metà cottura girare la carne, coprire parti
sensibili; dividere la carne macinata, rimuovere le parti già
scongelate; Separare le fette di salame
Volatili
Pollo 1000 g 180 20 - 25 10 - 15
Pollo in pezzi 500 g 180 12 - 15 5 - 10
Anatra 1700 g 180 25 - 40 20 - 25
Pezzi di oca
e tacchina
Consiglio: a metà cottura girare la carne, coprire ali e cosce
Attenzione: buttare via il liquido dello scongelamento e
non portarlo in contatto con altri alimenti.
Selvaggina
Lombo di
capriolo
Lombo di
leprecken
Consiglio: girare una volta, coprire i pezzi ai margini
Pesce
Granchi,
gamberetti
Trota 340 g 180 4 - 6 5 - 10
Pesce intero 500 g 180 7 - 10 10 - 15
Filetto di pesce
Consiglio: mescolare più volte, girare spesso.
Frutta
Lamponi,
fragole
Ciliegie, prugne
Marmellata di
mele
Consiglio: girare con cautela o distribuire.
Verdura
veda „Tabella cottura“, „Scongelare e cuocere verdura“
Pane e dolci
Panini 4 pezzo 180 ca. 1 - 3 5
Pane 1000 g 180 13 - 15 8 - 10
Pane da toast 500 g 180 5 - 6 5 - 10
Torta 500 g 180 6 - 8 5 - 10
Torta alla frutta
Torta 1 pezzo 180 0,5 - 1 3 - 5
Torta 1200 g 180 10 - 12 30 - 60
Consiglio: porre pane e dolci su carta per forno che assorba
l’umidità, per dolci delicati fare solo uno scongelamento brevissimo.
Quantità
500 g 180 14 – 18 10 – 15
1000 g 180 25 - 30 20 - 25
200 g 180 4 - 6 5 - 10
250 g 180 6 - 8 5 - 10
200 g 180 4 - 6 5 - 10
500 g 180 12 - 18 10 - 15
1000 g 180 20 - 35 20 - 30
500 g 180 12 - 13 10 - 20
250 g 180 5 - 7 5 - 10
250 g 180 5 - 7 5 - 10
250 g 180 4 - 6 5 - 10
250 g 180 5 - 7 5 - 10
500 g 180 9 - 12 5 - 10
1 pezzo 180 2 - 3 2 - 3
Potenza
Watt
Tempo
ca. min.
Tempo di
riposo min.
6....-05-MWG 743 H NEW 30 07.01.2005, 12:34:01 Uhr
Page 31

Generi
alimentari/Cibo
Melkproducten
Burro 250 g 180 5 - 7 10 - 15
Ricotta 250 g 180 6 - 8 5 - 10
Panna 200 g 180 3 - 5 2 - 3
Consiglio: togliere la pellicola di alluminio, a metà cottura mescolare, montare la panna quando è ancora per metà congelata.
Quantità
Potenza
Watt
Tempo
ca. min.
Tempo di
riposo min.
Riscaldare
Riscaldare è uno dei punti forti del forno microonde.
È ideale per portare a temperatura ambiente o da consumo
liquidi e alimenti dal frigorifero senza dover usare pentole.
I tempi di riscaldamento riportati nella seguente tabella
sono solo valori indicativi perché il tempo dipende molto
dalla temperatura di partenza e dalla composizione degli
alimenti. Si consiglia perciò di controllare se gli alimenti
sono già abbastanza caldi.
Tabella tempi di riscaldamento
Generi
alimentari/Cibo
Liquidi
Acqua,
1 tazza
Acqua, 0,5 l 500 g 900 3,5 - 5 no
Acqua, 0,75 l 750 g 900 5 - 7 no
Caffè, 1 tazza 150 g 900 0,5 - 1 no
Latte, 1 tazza 150 g 900 0,5 - 1 no
Attenzione: Mettere nel contenitore una bacchetta di
vetro o simile (non utilizzare a tale scopo oggetti in metallo) al fi ne di evitare che si verifi chino ritardi di ebollizione.
Successivamente, mescolare prima di bere.
Pietanze
Bistecche,
patate e
verdura
Gulasch con
pasta
Carne, gnocchi e salsa
Consiglio: prima inumidire leggermente, ogni tanto
mescolare.
Carne
Cotolette 200 g 900 1 - 2 no
Polpette, 4 pz. 500 g 900 3 - 4 no
Arrosto, un
pezzo
Consiglio: spennellare con olio affi nché la panata o la
crosta non si ammorbidiscano.
Volatili
1/2 pollo 450 g 900 3,5 - 5 no
Fricassea
di pollo
Consiglio: spennellare con olio, ogni tanto girare.
Contorni
Pasta, riso
1 porzione
2 porzioni
Patate 500 g 900 3 - 4 sì
Consiglio: prima inumidire leggermente.
Minestre / Salse
Brodo, 1
piatto
Quantità
150 g 900 0,5 - 1 no
450 g 900 2,5 - 3,5 sì
450 g 900 2 - 2,5 sì
450 g 900 2,5 - 3,5 sì
250 g 900 2 - 3 no
400 g 900 3 - 4,5 sì
150 g
300 g
250 g 900 1 - 1,5 sì
Potenza
Watt
900
900
Tempo
ca. min.
1 - 2
2,5 - 3,5
Coprire
sì
sì
Generi
alimentari/Cibo
Minestra
con pastina
o simili
Salsa 250 g 900 1 - 2 sì
Latte e pappe
Latte 100 ml 540 0,5 - 1 no
Pappa 200 g 540 1 - 1,5 no
Consiglio: scuotere o mescolare bene. Controllare la
temperatura!
Quantità
250 g 900 1,5 - 2 sì
Potenza
Watt
Tempo
ca. min.
Coprire
Cuocere
Consigli pratici per cuocere
Orientarsi ai valori indicativi nella tabella di cottura e
nelle ricette. Osservare la cottura fi nché non avete molta
esperienza
Lo sportello dell’apparecchio si può aprire in qualsiasi
momento. L’apparecchio si spegne automaticamente.
Si riaccende solo quando lo sportello è chiuso.
Generi alimentari provenienti dal frigorifero hanno bisogno
di tempi di cottura un po’ più lunghi rispetto agli alimenti a
temperatura ambiente.
Se gli alimenti sono più compatti, i tempi di cottura sono
più sono lunghi. Un pezzo di carne grosso richiede una
cottura più lunga rispetto alla stessa quantità di carne
sotto forma di spezzatino. Per quantità di carne più grosse
si consiglia quindi una precottura alla potenza massima,
proseguendo poi cottura a potenza media per ottenere un
risultato uniforme.
I cibi piatti cuociono più rapidamente di quelli spessi, quindi
distribuire i generi alimentari possibilmente piatti. Disporre
all’interno o sovrapporre i pezzi più sottili, per esempio
cosce di pollo o fi letto di pesce.
Quantità di carne più piccole cuociono più rapidamente di
quantità grandi. Vale la regola:
quantità doppia = tempo quasi doppio
quantità dimezzata = tempo dimezzato
se per una pietanza non trovate un’indicazione adatta, vale
la regola
pro 100 g. ca. 1 minuto di cottura
Tutti gli alimenti sopra i quali viene posto un coperchio
durante la cottura tradizionale, devono essere coperti
anche nel microonde.
Il coperchio impedisce che i cibi si asciughino. Per coprire
si può usare un piatto girato, carta pergamenata o carta
per microonde. Cucinare senza coperchio se si desidera
una crosta.
Tabella cottura
Generi alimentari/
Cibo
Verdura
Melanzane 500 g 720 7 - 10 sì
Cavolo 500 g 720 8 - 11 sì
Broccoli 500 g 720 6 - 9 sì
Cicoria 500 g 720 6 - 7 sì
Piselli 500 g 720 6 - 7 sì
Finocchio 500 g 720 8 - 11 sì
Fagiolini 300 g 720 13 - 15 sì
Quantità
Potenza
Watt
Tempo
ca. min.
Coprire
ITALIANO
31
6....-05-MWG 743 H NEW 31 07.01.2005, 12:34:04 Uhr
Page 32

Generi alimentari/
Cibo
Patate 500 g 720 9 - 12 sì
Cavolo rapa 500 g 720 8 - 10 sì
Porro 500 g 720 7 - 9 sì
ITALIANO
Pannocchie
di mais
Carote 500 g 720 8 - 10 sì
Peperoni 500 g 720 6 - 9 sì
Cavolini di
Bruxelles
Asparagi 300 g 720 6 - 9 sì
Pomodori 500 g 720 6 - 7 sì
Zucchini 500 g 720 9 - 10 sì
Consiglio: tagliare la verdura a pezzi e cuocere con 2 - 3
cucchiai di liquido, ogni tanto mescolare, lasciar cuocere
3 - 5 min., insaporire solo prima di servire.
Frutta
Composta di
mele, pere
Marmellata di
prugne
Composta di
rabarbaro
Mele al forno,
4 pz.
Consiglio: aggiungere 125 ml di acqua, il succo di limone
impedisce che la frutta perda il suo colore, lasciar cuocere
altri 3 - 5 min.
Carne *)
Carne con salsa 400 g 720 10 - 12 sì
Gulasch,
spezzatino
Involtini di
manzo
Consiglio: di tanto in tanto girare, lasciar riposare 3 - 5 min.
Volatili *)
Fricassea di
pollo
Brodo con
carni bianche
Consiglio: di tanto in tanto girare, lasciar riposare 3 - 5 min.
Pesce
Filetto di pesce 300 g 720 7 - 8 sì
Filetto di pesce 400 g 720 8 - 9 sì
Consiglio: trascorsa la metà del tempo girare, lasciar
cuocere altri, 3 - 5 min.
Scongelare e cuocere verdura
Cavolo rossomela
Spinaci in foglia 300 g 720 11 - 13 sì
Cavolo 200 g 720 7 - 9 sì
Fagiolini 200 g 720 8 - 10 sì
Broccoli 300 g 720 8 - 9 sì
Piselli 300 g 720 7 - 8 sì
Cavolo rapa 300 g 720 13 -15 sì
Porri 200 g 720 10 - 11 sì
Mais 200 g 720 4 - 6 sì
Carote 200 g 720 5 - 6 sì
Cavolini di
Bruxelles
Spinaci
Consiglio: cuocere con 1 -2 cucchiai di liquido, di tanto
in tanto girare o dividere con cautela, lasciar cuocere altri
2 - 3 min. insaporire prima di servire.
32
Quantità
250 g 720 7 - 9 sì
300 g 720 7 - 10 sì
500 g 720 5 - 8 sì
250 g 720 4 - 6 no
250 g 720 5 - 8 sì
500 g 720 7 - 9 sì
500 g 720 10 - 15 sì
250 g 720 7 - 8 sì
250 g 720 6 - 7 sì
200 g 720 5 - 6 sì
450 g 720 14 -16 sì
300 g 720 7 - 8 sì
450 g
600 g
Potenza
Watt
720
720
Tempo
ca. min.
12 - 13
15 - 17
Coprire
Generi alimentari/
Cibo
Minestre / Piatti unici *)
Piatto unico 500 g 720 13 - 15 sì
Minestra con
pastina o simili
Vellutata 500 g 720 13 - 15 sì
Consiglio: di tanto in tanto mescolare, lasciar cuocere
altri 3 - 5 min.
*) Alimenti precotti
Quantità
300 g 720 7 - 8 sì
Potenza
Watt
Tempo
ca. min.
Coprire
Cottura Express
• Per avviare la cottura rapida premere più volte il tasto
EXPRESS. Ogni volta che si preme di nuovo il tasto la
cottura si prolunga di 30 secondi
• Premere il tasto-STOPP.
La potenza del microonde è 100%. La cottura Express
massima è di 1:30 minuti.
Programmi automatici
Servendosi del sistema automatico è possibile far cuocere
automaticamente determinate quantità di alimenti. La durata del programma e la potenza microonde sono indicate
nel programma.
Procedere come qui di seguito indicato:
1. Premere il tasto-STOPP.
2. Premere il tasto-GARPRORAMME. In questo modo si
accederà al programma di cottura.
Premendo ripetutamente il tasto-GARPRORAMME, si
seleziona uno dei programmi:
Codice Programma Peso
Riso / pasta 0,1 kg 0,2 kg 0,3 kg
Riso, con acqua 180 ml 330 ml 480 ml Coprire gli alimenti
AC-1
Pasta,
con acqua
Verdure fresche 0,2 kg 0,3 kg 0,4 kg 0,5 kg 0,6 kg 0,7 kg 0,8 kg
AC-2
Con acqua 2 EL 2 EL 2 EL 4 EL 4 EL 4 EL 4 EL
Verdure
AC-3
surgelate
AC-4 Popcorn
AC-5 Liquidi
AC-6 Patate
AC-7 Pizza (riscaldare) 0,15 kg
AC-8 Pesce
3. Successivamente, selezionare un parametro di peso
nei programmi da AC-1 ad AC-6, servendosi dei tasti
direzionali.
Per esempio: far cuocere 0,2 kg di verdure fresche.
sì
sì
Operazione Tasto/i Visualizzazione
1
2
3
4
300 ml 600 ml 900 ml Non coprire gli alimenti
0,2 kg 0,3 kg 0,4 kg 0,5 kg 0,6 kg 0,7 kg 0,8 kg
3,0 Oz 3,5 Oz Corrisponde a ca. 80/100 g
Utilizzare esclusivamente il popcorn in sacchetti per
microonde
250 ml 500 ml
Non coprire! Attenzione: rischio di ritardo di ebollizione!
0,45 kg 0,65 kg
Perforare le patate e disporle sul piatto girevole, distanziandole le une dalle altre.
0,45 kg
Intagliare dapprima il pesce
STOPP
GARPROGRAMME AC -2
왖 / 왔
START
0.2
6....-05-MWG 743 H NEW 32 07.01.2005, 12:34:06 Uhr
Page 33

4. Per avviare premere il tasto-START.
Una volta trascoro l’intervallo di tempo in oggetto,
l’apparecchio si disattiva e sul display viene visualizzato il
messaggio “END”. Prelevare quindi gli alimenti.
Avvertenza: l’abbreviazione EL corrisponde all’unità di
misura di ‘un cucchiaio’.
Aria calda / modalità grill combinata /
modalità combinata
Opzioni ‘aria calda’ e ‘aria calda/modalità combinata’’
Per le opzioni ‘aria calda’ e ‘aria calda/modalità combinata’,
è necessario procedere come indicato di seguito:
1. Premere il tasto-STOPP.
2. Premere il tasto-HEIßLUFT/KOMBI GRILL/KOMBI.
Aziondando ripetutamente il tasto-HEIßLUFT/KOMBI
GRILL/KOMBI, si seleziona uno dei programmi:
C Solo aria calda
C1 Abbinamento di aria calda e microonde
Abbinamento di aria calda e microonde
C2
con elevata percentuale di microonde
3. Con l’ausilio del tasto-TEMP, confermare l’impostazione
standard pari a 160 °C, oppure
4. Impostare successivamente un valore di temperatura
compresa tra 80 °C e 230 °C, servendosi a tale scopo
dei tasti direzionali.
5. Con l’ausilio dei tasti-NUMMERN, impostare la durata
di cottura desiderata.
Avvertenza:
l’impostazione standard corrisponde a 15 minuti.
Per esempio: programma C2, a una temperatura pari
a 180 °C e con una durata di cottura corrispondente a
8 minuti.
Operazione Tasto/i Visualizzazione
1
2
3
4
5
6
STOPP
HEISSLUFT/KOMBI
GRILL/KOMBI
TEMP 160C
왖 / 왔
0 8 0 0 08:00
START
C -2
180C
Opzioni ‘grill’ e ‘grill/modalità combinata’
Per grigliare usare la griglia. Usare stoviglie idonee resistenti al calore o porre gli alimenti direttamente sulla griglia.
Gli alimenti spessi e di grandi dimensioni devono essere
cotti al grill direttamente sul piatto girevole!
Non è necessario “presiscaldare” il forno perché il grill a
infrarossi produce direttamente calore da radiazione.
Quando si preparano alimenti nella funzione combinata
microonde-grill, ricordare che:
per cibi in pezzi grandi e spessi, come per esempio arrosto di
maiale, il tempo del microonde è più lungo che per cibi piccoli
e piatti. Nel grill è viceversa, quanto più vicino è il cibo al
grill, tanto più rapidamente diventa dorato. Questo signifi ca che se preparate arrosti grossi nella funzione combinata,
la durata del grill è più breve che per arrosti piccoli.
Per le opzioni ‘grill e ‘grill/modalità combinata’, è necessario procedere come indicato di seguito:
1. Premere il tasto-STOPP.
2. Premere il tasto-HEIßLUFT/KOMBI GRILL/KOMBI.
Aziondando ripetutamente il tasto-HEIßLUFT/KOMBI
GRILL/KOMBI, si seleziona uno dei programmi:
G Solo grill
G1 Abbinamento di grill e microonde
Abbinamento di grill e microonde
G2
con elevata percentuale di funzione grill
3. Con l’ausilio dei tasti-NUMMERN, impostare la durata
di cottura desiderata.
Per esempio: programma G2, con una durata di
cottura corrispondente a 10:30 minuti.
Operazione Tasto/i Visualizzazione
1
2
3
4
4. Per avviare premere il tasto-START.
Una volta trascorso l’intervallo di tempo impostato,
l’apparecchio si disattiva automaticamente e sul display
viene visualizzato “END”. Prelevare quindi gli alimenti.
STOPP
HEISSLUFT/KOMBI
GRILL/KOMBI
1 0 3 0 10:30
START
G 2
ITALIANO
6. Per avviare premere il tasto-START.
Una volta trascorso l’intervallo di tempo impostato,
l’apparecchio si disattiva automaticamente e sul display
viene visualizzato “END”. Prelevare quindi gli alimenti.
Messaggi d’errore
• Durante il funzionamento dell’apparecchio, sul display
viene visualizzato il messaggio “Err2”. La temperatura
all’interno del vano di cottura ha superato il parametro
di temperatura impostato come predefi nito. Probabilmente è stato selezionato un valore di temperatura
troppo basso per questo tipo di preparazione. Correggere l’impostazione.
• Durante il funzionamento dell’apparecchio, sul display
viene visualizzato il messaggio “Err3”. Non è stato
possibile raggiungere il parametro di temperatura impostato come predefi nito nell’intervallo di tempo precedentemente impostato. Correggere l’impostazione.
6....-05-MWG 743 H NEW 33 07.01.2005, 12:34:09 Uhr
Generi
alimentari/Cibo
Carne, salumi
Carne di manzo, maiale o
vitello in un
unico pezzo
Cotoletta
di maiale in
salamoia
Carne
macinata
Salsiccia 200 g 2 - 3 no
Wurstel 200 g 2 - 3 no
Consiglio: a metà cottura girare la carne, lasciar cuocere
altri 3 – 5 min.; spennellare la carne macinata con albume, pungere la salsiccia con una forchetta.
Tabella relativa all’opzione grill/
modalità combinata
Quantità
500 g 10 - 12 no
750 g 12 - 15 no
500 g 12 - 14 no
500 g 13 - 15 no
Funzione
combinata
Tempo
ca. min.
Coprire
33
Page 34

Generi
alimentari/Cibo
Volatili
Polo per
brodo
ITALIANO
Pezzi di pollo 250 g 4 - 5 no
Consiglio: lasciar cuocere senza liquidi nel proprio brodo, girare una volta, lasciar cuocere altri 4 – 5 min.
Pesce
Trota al blu 300 g 5 - 6 no
Filetto di
pesce
Consiglio: a metà cottura girare, lasciar cuocere altri
a3 - 5 min.
Quantità
1000 g 13 - 15 no
300 g 3 - 4 no
Funzione
combinata
Tempo
ca. min.
Coprire
Programma di cottura personalizzato
Nel caso in cui si desideri defi nire un proprio personale
programma di cottura per la preparazione di determinate
pietanze, è possibile abbinare i programmi relativi alla
potenza microonde e le opzioni ‘grill/modalità combinata’
(G,G1, G2) e/o ‘aria calda/modalità combinata’ (C, C1, C2).
Procedere, per esempio, nel seguente modo:
1. Premere il tasto-STOPP.
2. Premendo una o più volte il tasto-LEISTUNG, selezio-
nare la potenza microonde desiderata.
3. Con l’ausilio dei tasti-NUMMERN impostare la durata di
cottura desiderata.
4. Premendo una o più volta il tasto-HEIßLUFT/KOMBI
GRILL/KOMBI, selezionare uno dei programmi C, C1,
C2, G, G1 oppure G2.
5. Con l’ausilio dei tasti-NUMMERN impostare la durata di
cottura desiderata.
Per esempio: durata di cottura pari a 3 minuti, con
una potenza microonde del 100%, e successivamente
funzione grill per 9 minuti.
Operazione Tasto/i Visualizzazione
1
2
3
4
5
6
6. Per avviare premere il tasto-START.
Una volta trascorso l’intervallo di tempo impostato,
l’apparecchio si disattiva automaticamente e sul display
viene visualizzato “END”. Prelevare quindi gli alimenti.
Avvertenza:
in questo modo è possibile abbinare fi no a 4 differenti
sequenze di cottura.
Il programma può inoltre essere iniziato anche con
l’impostazione ‘grill/modalità di cottura’ oppure ‘aria calda/
modalità combinata’.
STOPP
LEISTUNG 10 0P
0 3 0 0 03:00
HEISSLUFT/KOMBI
GRILL/KOMBI
0 9 0 0 09:00
START
G
Per poter avviare automaticamente la funzione microonde,
è necessario procedere nel seguente modo:
1. Premere il tasto-STOPP.
2. Premendo una o più volte il tasto-LEISTUNG, selezio-
nare la potenza microonde desiderata.
3. Con l’ausilio dei tasti-NUMMERN impostare la durata di
cottura desiderata.
4. Tenere premuto per più di due secondi il tasto UHR. Risuona in questo modo un segnale acustico e il display
visualizza l’ora attuale. La prima cifra lampeggia.
5. Con l’ausilio dei tasti-NUMMERN inserire l’ora di attivazione desiderata. Risuona quindi un segnale acustico
prolungato e il display visualizza il carattere “M”.
Per esempio: durata di cottura pari a 12:30 minuti, con
una potenza del 100%. Ora di attivazione: h. 14:20.
Operazione Tasto/i Visualizzazione
1
2
3
4
5
6
6. Nel caso in cui si desideri visualizzare nuovamente
l’ora di attivazione, è suffi ciente premere il tasto UHR.
La modalità microonde entra in funzione in corrispondenza
dell’ora precedentemente impostata.
Attenzione: pericolo di incendio! Mantenere sempre
l’apparecchio sotto controllo quando è in funzione. Nel
caso in cui si defi nisca un’ora di inizio cottura posticipata,
è necessario impostare sempre l’ora in modo tale per cui
l’apparecchio possa essere mantenuto costantemente
sotto controllo durante il suo funzionamento.
L’apparecchio non deve essere vuoto quando si utilizza
la funzione microonde. Qualora si debbano prelevare
gli alimenti anticipatamente, è necessario annullare il
programma azionando il tasto-STOPP.
Una volta trascorso l’intervallo di tempo impostato,
l’apparecchio si disattiva automaticamente e sul display
viene visualizzato “END”. Prelevare quindi gli alimenti.
Memoria automatica
Al termine di un procedimento di cottura un segnale acustico segnala ogni 2 minuti di togliere gli alimenti.
Aprendo lo sportello o premendo il tasto-STOPP, questo
segnale viene annullato.
Blocco
Premendo il tasto-STOPP per più di 2 secondi, si blocca
l’apparecchio. Il blocco viene segnalato nel display. La
funzione degli elementi di comando è bloccata. Premendo il tasto-STOPP di nuovo per oltre 2 sec. si sblocca la
funzione.
STOPP
LEISTUNG 10 0P
1 2 3 0 12:30
UHR 10:00
1 4 2 0 14:20
UHR 14:20
Speciale functies
Avvio automatico
l’opzione microonde oppure le stesse impostazioni
‘grill/modalità combinata’ oppure ‘aria calda/modalità combinata’ possono essere avviate anche a una determinata
ora precedentemente impostata. A tale scopo, impostare
dapprima l’ora.
34
6....-05-MWG 743 H NEW 34 07.01.2005, 12:34:11 Uhr
Messaggi di anomalia
Durante il funzionamento dell’apparecchio, sul display
viene visualizzato il messaggio “Err0” oppure “Err1”. In
questo caso sussiste un problema a livello del sistema di
comando elettronico.
Spedire l’apparecchio al servizio di assistenza tecnica,
unitamente alla descrizione dell’anomalia registrata.
Page 35

Pulizia
Prima di pulire staccare sempre la spina.
• Dopo l’uso pulire la camera di cottura con un panno
leggermente umido.
• Pulire le pareti esterne dell’apparecchio a microonde
servendosi di un panno leggermente inumidito.
• Lavare gli accessori come sempre in acqua e detergente per stoviglie.
• Il telaio e la guarnizione dello sportello e le zone vicine
devono essere pulite accuratamente da residui di
sporco con un panno umido.
Dati Tecnici
Modello: MWG 743 H
Tensione/frequenza di misurazione: 230 V, 50 Hz
Misurazione assorbita: 1400 watt
Potenza assorbita aria calda: 1300 watt
Potenza assorbita grill: 1000 watt
Potenza microonde in uscita: 900 watt
Volume del vano cottura: 25 litri
Classe di protezione: Ι
Questo apparecchio è stato controllato sulla base di tutte
le direttive CE attuali in vigore in questo settore, quali per
esempio la normativa in materia di compatibilità elettromagnetica e la direttiva in materia di bassa tensione, ed
è stato costruito conformemente alle norme di sicurezza
più moderne.
Con riserva di apportare modifi che tecniche.
Garanzia
Per l’apparecchio da noi messo in commercio ci assumiamo una garanzia di 24 mesi dalla data di acquisto
(scontrino).
Durante la garanzia noi ci impegniamo ad eliminare gratuitamente i guasti dell’apparecchio o degli accessori*), dovuti
a difetti di materiale o di fabbricazione, riparandoli o, a
nostra discrezione, sostituendoli. Le prestazioni in garanzia
danno luogo a una proroga della garanzia né danno diritto
ad una nuova garanzia!
Per la garanzia è suffi ciente lo scontrino di acquisto. Senza
questo scontrino non sussiste il diritto né ad una sostituzione né ad una riparazione gratuita.
Nel caso si ricorra alla garanzia, restituire al rivenditore
l’apparecchio completo in ogni sua parte, nell’imballaggio
originale unitamente allo scontrino.
*) Danni agli accessori non giustifi cano automaticamente
lo scambio gratuito dell’apparecchio completo. Si prega di
mettersi in contatto con la nostra centrale telefonica. Danni
alle parti di vetro oppure fratture ai pezzi di materia plastica
sono obbligatoriamente a spese del cliente.
La riparazione di pezzi d’uso ovvero soggetti a logoramento (cursori, ganci impastatori, cinghie di trasmissione, telecomandi di ricambio, spazzolini di ricambio, lame di seghe
ecc.) come anche operazioni di pulizia e manutenzione o la
sostituzione di pezzi soggetti a logoramento non rientrano
nella garanzia e quindi sono a pagamento!
La garanzia si annulla nel caso di intervento da parte di
terzi.
Dopo la garanzia
Al termine della garanzia le riparazioni possono essere
eseguite dietro pagamento dal corrispettivo negozio specializzato o servizio riparazioni.
ITALIANO
35
6....-05-MWG 743 H NEW 35 07.01.2005, 12:34:12 Uhr
Page 36

Description of the Operating Controls
Diagram 1: Description of Parts
1 Door lock
2 Viewing window
ENGLISH
3 Housing
4 Drive axle
5 Sliding ring
6 Rotating plate
7 Control panel
8 Cavity
9 Grilling grid
Caution:
Do not remove any installed parts from inside the oven or
anything from the inside of the door!
Diagram 2: Operating Controls
LEISTUNG (microwave) (Power) Power level selection
HEIßLUFT/KOMBI GRILL/KOMBI
HEIßLUFT: (Hot air) Hot air only operation,
thermostat-controlled
HEIßLUFT/KOMBI: (Hot air/combi) Alternating hot
air and microwave operation
GRILL: (Grill) For grilling and browning
on top
GRILL/KOMBI: (Grill/combi) Alternating grill
and microwave operation
GARPROGRAMME (Cooking programmes) Selec-
tion of an automatic programme by pressing repeatedly
AUFTAUEN (Defrosting) Activates the
defrost function and sets the
weight
EXPRESS (Express) Express start of the
microwave
TEMP (Temp) Allows temperature se-
lection during hot air operation
Arrow keys For setting temperatures or
weights
NUMMERN keys (Number keys) For setting the
time and length of cooking
UHR (Clock) For setting the clock
time in conjunction with the
NUMBERS keys
START (Start) Start of the programme
STOPP (stop/disable)
Press once to stop the cooking
process.
Press twice to delete the
programme.
Hold down for 3 seconds to
disable/reactivate the device.
General Safety Instructions
• Read the operating instructions carefully before putting
the appliance into operation and keep the instructions
including the warranty, the receipt and, if possible, the
box with the internal packing.
• The appliance is designed exclusively for private use
and for the envisaged purpose. This appliance is not
fi t for commercial use. Do not use it outdoors (except
if it is designed to be used outdoors). Keep it away
from sources of heat, direct sunlight, humidity (never
dip it into any liquid) and sharp edges. Do not use the
appliance with wet hands. If the appliance is humid or
wet, unplug it immediately. Do not put it in water.
• When cleaning or putting it away, switch off the appliance and always pull out the plug from the socket (pull
on the plug, not the cable) if the appliance is not being
used and remove the attached accessories.
• Do not operate the machine without supervision. If you
should leave the workplace, always switch the machine
off or remove the plug from the socket (pull the plug
itself, not the lead).
• To protect children from the dangers posed by electrical appliances, make sure that the cable is hanging low
and that children do not have access to the appliance.
• Check the appliance and the cable for damage on a
regular basis. Do not use the appliance if it is damaged.
• Do not try to repair the appliance on your own. Always
contact an authorized technician. To avoid the exposure to danger, always have a faulty cable be replaced
only by the manufacturer, by our customer service or
by a qualifi ed person and with a cable of the same
type.
• Use only original spare parts.
• Pay careful attention to the following “Special Safety
Instructions“.
Important Safety Information!
Please read carefully and keep for future use.
• Warning: When the door or the door seals are damaged, the microwave oven must not be used until it has
been repaired by a qualifi ed specialist.
• Warning: Please do not repair the device yourself, but
have it repaired by an authorised specialist. Carrying
out maintenance or repair work which involves removal
of the cover that protects the surroundings from microwave radiation is dangerous unless carried out by an
expert.
• Warning: Do not heat liquids in closed containers.
Danger of explosion!
• Warning: children must only be allowed to use the
oven without supervision if they have been given
adequate instructions enabling them to use the device
safely and informing them of the dangers of misuse.
• If you would like to use your microwave in a cupboard,
on a shelf or similar item, please ensure that you
maintain a space of at least 10 cm to cupboards, walls
etc for ventilation purposes on all sides of the machine.
• Only suitable tableware should be used such as:
– glass, porcelain, ceramics, heat-resistant plastic or
special microwave tableware.
• If food is being heated or cooked in combustible
materials, such as plastic or paper containers, the
microwave oven should be checked frequently due to
the risk of fi re.
36
6....-05-MWG 743 H NEW 36 07.01.2005, 12:34:13 Uhr
Page 37

• If smoke is produced, turn the device off and remove
the plug. Keep the door closed in order to suffocate any
fl ames.
• Delay in boiling: During boiling, particularly during
the reheating of liquids (water), it may happen that the
boiling temperature has been reached but the typical
bubbles have not yet started to rise. The liquid does not
boil evenly. When the vessel is removed this so-called
delay in boiling may result in the sudden formation of
bubbles when the vessel is knocked, causing the water
to boil over. There is a serious danger of burns! In order
to achieve even boiling, please place a glass rod or
similar item, but nothing metallic, in the vessel.
• The contents of babies‘ bottles and jars of baby food
must be stirred or shaken and the temperature checked before use. There is a danger of burns.
• Food with a shell or skin, such as eggs, sausages,
sealed jars etc. must not be heated up in the microwave as they may explode even when heating by the
microwaves is fi nished.
• Any dirt on the door frame/door seal and neighbouring
parts must be carefully cleaned with a damp cloth.
• Clean the microwave oven regularly and remove any
food residues from the interior.
• If the machine is not clean the surface may be damaged, affecting its serviceable life and possibly resulting
in hazardous situations..
Information on Grilling and
Combined Operation
• As heat radiation is used during grilling and combined
operation, please use only heat-resistant tableware.
• When food is only being grilled, metal or aluminium
tableware may also be used -but not during combined
or microwave operation.
• For the GRILL and KOMBI operating modes only the
grilling grid is suitable.
• Do not place anything on top of the housing as this
becomes hot. Always leave the ventilation slits uncovered.
• Please use the grilling grid to move the food to be
cooked nearer to the heating element.
Initial Operation
• After removing all the accessories from inside the oven,
unpack them and place the sliding ring in the middle.
Position the glass plate on the drive axle in such a way
that it locks into the dents of the drive shafts and is
lying fl at.
• Check the device for any visible damage, particularly
in the area of the door. If any damage is found, the
machine must not be used.
• In order to avoid interference to other machines when
the microwave oven is operated, do not place it in the
direct vicinity of other electronic devices.
• Remove any protective foils that may be adhered to the
housing.
• The foils on the inside of the door must not be removed!
• Insert the mains plug into a properly installed 230 V,
50 Hz power socket.
• Do not remove any installed parts from inside the oven
or from inside the door!
Using the Device
What you should know about microwave operation:
• Your device works with microwave radiation, which heats up water particles in food in a very short time. There
is no heat radiation and therefore hardly any browning.
• Only food should be heated up with this device.
• The device is not suitable for baking in fl oating fat.
• Only 1-2 portions should be heated up at the same
time. Otherwise the microwave will become less effi cient.
• If you want to interrupt the cooking process, press the
STOPP-button.
• Microwaves provide their full energy levels immediately. Pre-heating is therefore not necessary.
• Never operate the machine in microwave or combined
mode if it is empty.
• The microwave oven does not replace your traditional
cooker. It is used mainly for:
– defrosting deep-frozen food
– rapid warming/heating of food or drinks
– cooking meals
• Please do not use any plastic or paper tableware.
Setting the Time
Note: When the microwave oven is fi rst switched on, at fi rst
all display messages light up followed by a fl ashing colon.
• Press the STOPP-button.
• Press the UHR-button. The display changes to 00:00.
The fi rst fi gure fl ashes.
• Please enter the desired time in a four-fi gure format
using the NUMMERN-buttons.
• The new time is activated.
Operating the Microwave
Place the food to be heated up into suitable tableware.
Open the door and place the vessel in the middle of the
glass plate. Then close the door. (For safety reasons the
device only works when the door is fi rmly closed).
1. Press the STOPP-button.
2. Select the desired microwave power by pressing the
LEISTUNG-button once or several times.
Power in the display
as selected in %
100 900 Rapid heating
80 720 Cooking
60540Continued cooking
40 360 Melting cheese etc.
20 180
START 900 Rapid heating
3. With the help of the NUMMERN-buttons you can now
enter the desired length of cooking.
For example: 10:30 min length of cooking at 100%
power
Step Button/s Display
1
2
3
4
Power in watts
(approx.)
STOPP
LEISTUNG 10 0P
1 0 3 0 10:30
START
Field of application
Defrosting deep-
frozen food
ENGLISH
37
6....-05-MWG 743 H NEW 37 07.01.2005, 12:34:15 Uhr
Page 38

4. Press the START-button to start the machine. The
length of cooking depends on the quantity and consistency of the contents. With a little practice you will soon
learn to estimate the cooking time.
Please note: cooking in the microwave oven is very
ENGLISH
much faster than in a standard cooker. If you are not
sure, set the cooking time to low and continue cooking
afterwards if necessary.
After the time has elapsed the oven switches itself off
and the word „END“ appears in the display. Then you
can remove the food.
Automatic Defrosting
For automatic defrosting of frozen meat, poultry and
seafood please proceed as follows:
1. Press the STOPP-button.
2. Press the AUFTAUEN-button. You are now in the defrost
programme. Select one of the defrost programmes by
pressing the AUFTAUEN-button repeatedly:
AD1 Defrosting meat from 0,1 – 2,0kg
AD2 Defrosting poultry from 0,2 – 3,0kg
AD3 Defrosting seafood from 0,1 – 0,9kg
3. Then select a weight with the help of the arrow keys.
For example: Defrosting 2.0kg of poultry.
Step Button/s Display
1
2
3
4
4. Press the START-button to start the machine.
After the time has expired the device switches off and the
word „END“ appears in the display. You can then take out
the food.
The following table provides information on manual
defrosting.
STOPP
AUFTAUEN AD -2
왖 / 왔
START
2.0
Defrosting Table
Food/dish Quantity
Meat, Sausages
Meat (beef,
veal, pork) in
pieces
Schnitzel,
cutlet
Minced meat 250 g 180 6 - 8 5 - 10
Frying sausage,
Frankfurter
Slices of cold
meat
Tip: turn the meat halfway through and cover sensitive
pieces; break up the minced meat and remove pieces that
have already thawed; separate sausage slices.
Poultry
Chicken 1000 g 180 20 - 25 10 - 15
Chicken
pieces
500 g 180 14 – 18 10 – 15
1000 g 180 25 - 30 20 - 25
200 g 180 4 - 6 5 - 10
200 g 180 4 - 6 5 - 10
300 g 180 4 - 6 5 - 10
500 g 180 12 - 15 5 - 10
Power in
watts
Approx.
time in
minutes
Additional
thawing time
in minutes
Food/dish Quantity
Duck 1700 g 180 25 - 40 20 - 25
Goose and
turkey pieces
Tip: turn poultry halfway through, cover wings and legs.
Caution: throw away thawed liquid and do not allow to
come into contact with other foods.
Game
Saddle
of venison
Saddle
of hare
Tip: turn once and cover edges.
Fish
Prawns,
shrimps
Trout 340 g 180 4 - 6 5 - 10
Whole fi sh 500 g 180 7 - 10 10 - 15
Fish fi llet 250 g 180 5 - 7 5 - 10
Tip: stir several times and turn frequently.
Fruit
Raspberries,
strawberries
Cherries,
plums
Stewed apple 500 g 180 9 - 12 5 - 10
Tip: stir carefully or break up into pieces.
Vegetables
see „Cooking Table“, „Defrosting and
Cooking Vegetables“
Bread and Pastries
Rolls
Bread 1000 g 180 13 - 15 8 - 10
Bread for
toasting
Stirred cake 500 g 180 6 - 8 5 - 10
Fruit cake 1 piece 180 2 - 3 2 - 3
Flan 1 piece 180 0,5 - 1 3 - 5
Flan 1200 g 180 10 - 12 30 - 60
Tip: place the bread and pastries on kitchen crepe paper
to take up the moisture; only defrost sensitive pastry
slightly.
Milk Products
Butter 250 g 180 5 - 7 10 - 15
Curds 250 g 180 6 - 8 5 - 10
Cream 200 g 180 3 - 5 2 - 3
Tip: remove the aluminium foil and stir halfway through;
whip the cream until it is semisolid.
500 g 180 12 - 18 10 - 15
1000 g 180 20 - 35 20 - 30
500 g 180 12 - 13 10 - 20
250 g 180 5 - 7 5 - 10
250 g 180 4 - 6 5 - 10
250 g 180 5 - 7 5 - 10
pieces
500 g 180 5 - 6 5 - 10
Power in
watts
4
180 ca. 1 - 3 5
Approx.
time in
minutes
Additional
thawing time
in minutes
Warming
The warming and heating of food is a particular strength
of the microwave. Liquids and foods that are in the refrigerator can be easily brought up to room temperature or
the right temperature for consumption without the need for
many pots.
The heating times contained in the following table are
only rough guides as the time depends very much on the
starting temperature and the composition of the food. You
are therefore advised to check from time to time whether
the dish is already hot enough.
38
6....-05-MWG 743 H NEW 38 07.01.2005, 12:34:16 Uhr
Page 39

Heating Table
Food/dish Quantity
Liquids
Water, 1 cup 150 g 900 0,5 - 1 no
Water, 0.5 l 500 g 900 3,5 - 5 no
Water, 0.75 l 750 g 900 5 - 7 no
Coffee, 1 cup 150 g 900 0,5 - 1 no
Milk, 1 cup 150 g 900 0,5 - 1 no
Caution: Place a glass rod or similar item (but nothing
made of metal) into the vessel to prevent delayed boiling.
Stir well before drinking.
One-Course Meals
Schnitzel,
potatoes and
vegetables
Goulash with
noodles
Meat,
dumpling and
sauce
Tip: moisten slightly beforehand, stir from time to time.
Meat
Schnitzel,
coated with
breadcrumbs
Meatballs,
4 in total
Joint 250 g 900 2 - 3 no
Tip: brush with oil so that the breadcrumbs or crust do not
become soft.
Poultry
Half a chicken 450 g 900 3,5 - 5 no
Chicken
fricassee
Tip: brush with oil, stir from time to time.
Extras
Noodles, rice
1 portion
2 portions
Potatoes 500 g 900 3 - 4 yes
Tip: moisten slightly beforehand.
Soups/Sauces
Clear soup,
1 plate
Soup with
garnish
Sauce 250 g 900 1 - 2 yes
Baby Food
Milk 100 ml 540 0,5 - 1 no
Mash 200 g 540 1 - 1,5 no
Tip: shake well or stir. Check the temperature!
450 g 900 2,5 - 3,5 yes
450 g 900 2 - 2,5 yes
450 g 900 2,5 - 3,5 yes
200 g 900 1 - 2 no
500 g 900 3 - 4 no
400 g 900 3 - 4,5 yes
150 g
300 g
250 g 900 1 - 1,5 yes
250 g 900 1,5 - 2 yes
Power in
watts
900
900
Approx.
time in
minutes
1 - 2
2,5 - 3,5
Cover
yes
yes
Cooking
Practical Cooking Tips
Please keep to the recommended values in the cooking
table and the recipes. Keep an eye on the cooking process
until you have more experience.
The door of the microwave can be opened at any time. The
machine switches off automatically.
It starts again when the door is closed.
Foods taken directly from the refrigerator require a slightly
longer cooking time than those at room temperature.
The more compact a food is, the longer is the cooking time.
For example, a large piece of meat has to be cooked longer than the same quantity of sliced meat. It is advisable to
start cooking sizeable quantities on maximum power and
then to continue cooking evenly on medium power.
Flat dishes cook faster than thick ones. Therefore it is
advisable to spread the food as thinly as possible. Thinner
pieces, e.g. chicken legs or fi sh fi llets should be placed
towards the inside or allowed to overlap.
Smaller quantities cook faster than large ones.
The following rule of thumb applies:
Double the quantity = almost double the time
Half the quantity = half the time
If you are not able to fi nd a suitable time for a dish, the
following rule applies:
approx. 1 minute cooking time for each 100 g.
All dishes which are covered up on a normal cooker should
also be covered in the microwave oven.
A lid prevents the food from drying out. Suitable covers
are an inverted plate, parchment paper or microwave foil.
Dishes which are to be given a crust should not be covered
when cooked.
Cooking Table
Food/dish Quantity
Vegetables
Aubergines 500 g 720 7 - 10 yes
Caulifl ower 500 g 720 8 - 11 yes
Broccoli 500 g 720 6 - 9 yes
Chicory 500 g 720 6 - 7 yes
Peas 500 g 720 6 - 7 yes
Fennel 500 g 720 8 - 11 yes
Green beans 300 g 720 13 - 15 yes
Potatoes 500 g 720 9 - 12 yes
Turnip cabbage 500 g 720 8 - 10 yes
Leek 500 g 720 7 - 9 yes
Maize cob 250 g 720 7 - 9 yes
Carrots 500 g 720 8 - 10 yes
Paprika 500 g 720 6 - 9 yes
Sprouts 300 g 720 7 - 10 yes
Asparagus 300 g 720 6 - 9 yes
Tomatoes 500 g 720 6 - 7 yes
Courgettes 500 g 720 9 - 10 yes
Tip: Cut the vegetables into small pieces and cook with
2 - 3 tablespoons of liquid, stir from time to time, continue
cooking for 3 - 5 minutes, season just before serving.
Fruit
Stewed apple,
pear
Plum jam 250 g 720 4 - 6 no
Stewed rhubarb 250 g 720 5 - 8 yes
4 baked apples 500 g 720 7 - 9 yes
Tip: add 125 ml water. Lemon juice prevents the fruit from
changing colour. Cook for a further 3 - 5 minutes.
Meat *)
Meat with sauce 400 g 720 10 - 12 yes
Goulash, stewed
strips of meat
500 g 720 5 - 8 yes
500 g 720 10 - 15 yes
Power in
watts
Approx.
time in
minutes
Cover
ENGLISH
39
6....-05-MWG 743 H NEW 39 07.01.2005, 12:34:18 Uhr
Page 40

Food/dish Quantity
Roulade of beef 250 g 720 7 - 8 yes
Tip: stir from time to time, allow to stand for 3 - 5 minutes.
ENGLISH
Poultry *)
Chicken fricassee
Poultry soup 200 g 720 5 - 6 yes
Tip: stir from time to time, allow to stand for 3 - 5 minutes.
Fish
Fish fi llet 300 g 720 7 - 8 yes
Fish fi llet 400 g 720 8 - 9 yes
Tip: turn halfway through, continue cooking for 3 - 5
minutes.
Defrosting and Cooking Vegetables
Apple and
red cabbage
Leaf spinach 300 g 720 11 - 13 yes
Caulifl ower 200 g 720 7 - 9 yes
French beans 200 g 720 8 - 10 yes
Broccoli 300 g 720 8 - 9 yes
Peas 300 g 720 7 - 8 yes
Turnip cabbage 300 g 720 13 -15 yes
Leek 200 g 720 10 - 11 yes
Corn 200 g 720 4 - 6 yes
Carrots 200 g 720 5 - 6 yes
Sprouts 300 g 720 7 - 8 yes
Spinach
Tip: cook in 1 - 2 tablespoons of liquid, stir from time to
time or divide carefully into pieces. Continue cooking for
2 - 3 minutes and season just before serving.
Soups/Stews *)
Stew 500 g 720 13 - 15 yes
Soup with
garnish
Crème soup 500 g 720 13 - 15 yes
Tip: stir from time to time and continue cooking for 3 - 5
minutes.
*) Ready-made meals
250 g 720 6 - 7 yes
450 g 720 14 -16 yes
450 g
600 g
300 g 720 7 - 8 yes
Power in
watts
720
720
Approx.
time in
minutes
12 - 13
15 - 17
Cover
yes
yes
Express Cooking
• To start express cooking press EXPRESS again. Each
time the button is pressed the cooking time is extended
by 30 seconds.
• Press the STOPP-button.
The power of the microwave is then 100%. The maximum
express time is 1:30 minutes.
Automatic Programmes
With the help of the automatic control you can cook certain
quantities of food automatically. The length of cooking and
microwave power level are included in the programme.
Please proceed as follows:
1. Press the STOPP-button.
2. Press the GARPRORAMME-button. The oven is now in
the cooking programmes.
Select one of the programmes by pressing the GARPRORAMME-button repeatedly:
Code Programme Weight
Rice/noodles 0,1 kg 0,2 kg 0,3 kg
Rice,
AC-1
with water
Noodles,
with water
Vegetables,
fresh
AC-2
With water 2 EL 2 EL 2 EL 4 EL 4 EL 4 EL 4 EL
Vegetables,
AC-3
frozen
AC-4 Popcorn
AC-5 Liquids
AC-6 Potatoes
Pizza
AC-7
(warming)
AC-8 Fish
3. Then use the arrow keys to select a weight in the
programmes AC-1 to AC-6.
For example: Cook 0.2kg fresh vegetables.
Step Button/s Display
1
2
3
4
4. Press the START-button to start the machine.
After the time has elapsed the oven switches off and the
word „END“ appears in the display. Then take out the food.
Note: EL refers to a tablespoon.
180 ml 33 0ml 480 ml Cover the food
300 ml 60 0ml 900 ml Do not cover the food
0,2 kg 0,3 kg 0,4 kg 0,5 kg 0,6 kg 0,7 kg 0,8 kg
0,2 kg 0,3 kg 0,4 kg 0,5 kg 0,6 kg 0,7 kg 0,8 kg
3,0 Oz 3,5 Oz Corresponds to approx. 80/100 g
Please only use microwave popcorn in a bag.
250 ml 500 ml
Do not cover! Caution - delayed boiling!
0,45k g 0,65 kg
Prick the potatoes and place spaced out on the rotating plate.
0,15kg
0,45kg
Cut into the fi sh beforehand
STOPP
GARPROGRAMME AC -2
왖 / 왔
START
0.2
Hot air/Combi Grill/Combi
Hot air and hot air/combined operation
For the hot air and the hot air/combined operation please
proceed as follows:
1. Press the STOPP-button.
2. Press the HEIßLUFT/KOMBI GRILL/KOMBI-button. By
repeatedly pressing the HEIßLUFT/KOMBI GRILL/
KOMBI-button you can select one of the following
programmes:
C Hot air only
C1 Hot air and microwave in combination
Hot air and microwave in combination with an
C2
increased microwave share
3. Use the TEMP-button to confi rm the standard setting of
160°C or
4. Then set a temperature of between 80°C and 230°C
using the arrow keys.
5. With the help of the NUMMERN-buttons you can now
enter the desired length of cooking.
Note: The standard setting is 15 minutes.
For example: Programme C2, 180°C, cooking length
8 minutes.
40
6....-05-MWG 743 H NEW 40 07.01.2005, 12:34:21 Uhr
Page 41

Step Button/s Display
1
2
3
4
5
6
6. Press the START-button to start the machine.
After this time has expired the oven switches off and the
word „END“ appears in the display. Then remove the food.
Error Messages
• During operation “Err2” appears in the display. The
temperature in the cavity has exceeded the pre-set
temperature. It is possible that the selected temperature is too low for this preparation. Please correct the
setting.
• During operation “Err3” appears in the display. The
pre-set temperature could not be reached within the
given time. Please correct the setting.
Grill and Grill/Combi Operation
For grilling please use the grilling grid. Use suitable heatresistant tableware or place the food to be grilled directly
on the grid.
Large, thick food is grilled directly on the rotating plate!
It is not necessary to „pre-heat“ the grill as the infrared grill
produces radiation energy immediately.
If you prepare food using the combined microwave-grill
functions you should note the following:
For large, thick foods such as roast pork the microwave
time is correspondingly longer than for small, fl at foods.
However, in the case of the grill it is the other way
round. The closer the food is to the grill, the faster
it turns brown. This means that when large joints are
prepared using combined operation the grilling time may
be shorter than for smaller joints.
For grill and grill/combi operation please proceed as
follows:
1. Press the STOPP-button.
2. Press the HEIßLUFT/KOMBI GRILL/KOMBI-button.
By pressing the HEIßLUFT/KOMBI GRILL/KOMBIbutton repeatedly you can select one of the following
programmes:
GGrill only
G1 Grill and microwave in combination
Grill and microwave in combination
G2
with an increased grill share
3. With the help of the NUMMERN-buttons you can enter
the desired length of cooking.
For example: Programme G2, 10:30 minutes cooking
time
Step Button/s Display
1
2
3
4
STOPP
HEISSLUFT/KOMBI
GRILL/KOMBI
TEMP 160C
왖 / 왔
0 8 0 0 08:00
START
STOPP
HEISSLUFT/KOMBI
GRILL/KOMBI
1 0 3 0 10:30
START
C -2
180C
G 2
4. Press the START-button to start the machine.
After this time has expired the oven switches off and the
word „END“ appears in the display. Now take out the food.
Grill/Combi Operation Table
Food/dish Quantity
Meat, Sausages
500 g 10 - 12 no
Beef, pork or
veal in pieces
750 g 12 - 15 no
Smoked pork
loin
Meat loaf 500 g 13 - 15 no
Wienerwurst 200 g 2 - 3 no
Frankfurter 200 g 2 - 3 no
Tip: turn the meat halfway through and continue cooking
for 3 - 5 minutes; coat the meat loaf with egg white; prick
the sausages with a fork.
Poultry
Boiling fowl 1000 g 13 - 15 no
Chicken
pieces
Tip: allow to cook without liquid in its own juice, turn once
and continue cooking for 4 - 5 minutes.
Fish
Trout, blue 300 g 5 - 6 no
Fish fi llet 300 g 3 - 4 no
Tip: turn halfway through and continue cooking for 3 - 5
minutes.
500 g 12 - 14 no
250 g 4 - 5 no
Combined
operation
Approx.
time in
minutes
Cover
Individual Cooking Programme
If you would like to enter your own cooking programme
for certain preparations you can put this together from the
programmes „Power of the Microwave“ and „Grill/Combi
(G, G1, G2)“ and/or „Hot Air/Combi (C, C1, C2)“.
Examples of the above:
1. Press the STOPP-button.
2. Select the desired microwave power by pressing the
LEISTUNG-button once or repeatedly.
3. With the help of the NUMMERN-buttons you can now
enter the desired length of cooking.
4. Select one of the programmes C, C1, C2, G, G1 or
G2 by pressing the HEIßLUFT/KOMBI GRILL/KOMBIbutton once or repeatedly.
5. Enter the desired length of cooking with the NUM-
MERN-buttons.
For example: 3:00 minutes cooking time at 100% and
microwave power and then 9:00 minutes grilling
Step Button/s Display
1
2
3
4
5
6
6. Press the START-button to start the machine.
STOPP
LEISTUNG 10 0P
0 3 0 0 03:00
HEISSLUFT/KOMBI
GRILL/KOMBI
0 9 0 0 09:00
START
G
ENGLISH
41
6....-05-MWG 743 H NEW 41 07.01.2005, 12:34:23 Uhr
Page 42

After this time has expired the oven switches off and the
word „END“ appears in the display. Then take out the food.
Note:
In this way it is possible to combine up to 4 different
cooking sequences one after the other.
ENGLISH
You can also begin the programme with a grill/combi or hot
air/combi setting.
Special Functions
Automatic Start
You can start the microwave or also a grill/combi or hot
air/combi setting at a predetermined time. To do so, fi rst
set the clock.
In order to start the microwave automatically please
proceed as follows:
1. Press the STOPP-button.
2. Press the LEISTUNG-button once or repeatedly to
select the desired microwave power.
3. With the help of the NUMMERN-buttons you can enter
the desired length of cooking.
4. Press the UHR-button for more than 2 seconds. A
signal is heard and the display changes to the current
time. The fi rst fi gure fl ashes.
5. With the help of the NUMMERN-buttons you can now
enter the desired starting time. A longer signal is now
heard and the letter “M” appears in the display.
For example: 12:30 minutes cooking time at 100%
power, start time 14:20
Step Button/s Display
1
2
3
4
5
6
STOPP
LEISTUNG 10 0P
1 2 3 0 12:30
UHR 10:00
1 4 2 0 14:20
UHR 14:20
Disabling
Press the STOPP-button for more than 2 seconds to
disable the machine. The fact that the machine is disabled
is then shown in the display. The function of the operating
controls is now blocked. Press the STOPP-button again for
more than 2 seconds to reactivate the machine.
Error Messages
During operation „Err0“ or „Err1“ appears in the display. In
this case there is a problem with the electronic control unit.
Please return the device to our dealer with a description
of the fault.
Cleaning
Always remove the mains plug before cleaning the
machine.
• Clean the inside of the oven after use with a slightly
damp cloth.
• Clean the outside of the microwave oven with a slightly
damp cloth.
• Clean the accessories in the usual manner in soapy
water.
• The door frame/door seal and neighbouring parts must
be carefully cleaned when dirty with a damp cloth.
Technical Data
Model: MWG 743 H
Rated voltage/frequency: 230 V, 50 Hz
Rated power input: 1400 watts
Power consumption - hot air: 1300 watts
Power consumption - grill: 1000 watts
Rated microwave output power: 900 watts
Cooking cavity volume: 25 litres
Protection class:
Ι
6. If you would like to see the start time again, press the
UHR-button.
At the preset time the microwave begins cooking.
Caution, danger of fi re! The device must never be left
unattended during operation. When setting a delayed
cooking time always ensure that when the device is operating it is not left unattended.
Do not operate the microwave oven when it is empty. If
you remove the cooked food before the programme has
fi nished, the programme must be cancelled by pressing
the STOPP-button.
After the time has expired the device switches off and the
word “END” appears in the display. Now remove the food.
Automatic Reminder
After cooking has fi nished you are reminded every 2 minutes by a beep to remove the food.
This reminder is switched off by opening the door or pressing the STOPP-button.
This device has been tested according to all relevant
current CE guidelines,
such as electromagnetic compatibility and low voltage
directives, and has been constructed in accordance with
the latest safety regulations.
Subject to technical changes without prior notice!
42
6....-05-MWG 743 H NEW 42 07.01.2005, 12:34:25 Uhr
Page 43

Guarantee
The device supplied by our Company is covered by a
24 month guarantee starting on the date of purchase
(receipt).
During the life of the guarantee any fault of the device or
its accessories *) ascribable to material or manufacturing
defects will be eliminated free of charge by repairing or, at
our discretion, by replacing it. The guarantee services do
not entail an extension of the life of the guarantee nor do
they give rise to any right to a new guarantee!
Proof of the guarantee is provided by the proof of
purchase. Without proof of purchase no free replacement
or repair will be carried out.
If you wish to make a claim under the guarantee please
return the entire machine in the original packaging to your
dealer together with the receipt.
*) Damage to accessories does not mean automatic free
replacement of the whole machine. In such cases please
contact our hotline. Broken glass or breakage of plastic
parts are always subject to a charge.
Defects to consumables or parts subject to wearing
(e.g. motor pistons, kneading blades, drive shafts, spare
remote control, spare toothbrushes, saw blades, etc.) as
well as cleaning, maintenance or the replacement of said
parts are not covered by the guarantee and hence are to
be paid!
The guarantee lapses in case of unauthorized tampering.
ENGLISH
After the expiry of the guarantee
After the expiry of the guarantee repairs can be carried
by the competent dealer or repair service against the
payment of the ensuing costs.
43
6....-05-MWG 743 H NEW 43 07.01.2005, 12:34:26 Uhr
Page 44

6....-05-MWG 743 H NEW 44 07.01.2005, 12:34:27 Uhr
Page 45

6....-05-MWG 743 H NEW 45 07.01.2005, 12:34:27 Uhr
Page 46

D-47906 Kempen/Germany · Industriering Ost 40
Telefon 02152/20 06-888
Internet: http://www.clatronic.de · email: info@clatronic.de
6....-05-MWG 743 H NEW 46 07.01.2005, 12:34:27 Uhr
Stünings Medien, Krefeld • 01/05
 Loading...