

Page 1

CDP 604 MP3/VCD
Bedienungsanleitung/Garantie
Gebruiksaanwijzing/Garantie • Mode d’emploi/Garantie
Instrucciones de servicio/Garantía • Istruzioni per l’uso/Garanzia
Instruction Manual/Guarantee • Instrukcja obsługi/Gwarancja
A használati utasítás/garancia
Tragbarer CD-Player
Draagbare cd-speler • Lecteur de CD portable
Compact-Disc portable • Lettore portabile CD
Portable CD Player • Przenośny odtwarzacz CD
Hordozható CD-lejátszó
5....-05-CDP 604 neu 15.06.2004 14:19 Uhr Seite 1
Page 2
Inhalt
Inhoud • Sommaire • Indice • Indice • Contents • Spis treści • Tartalom
D
Übersicht Bedienelemente . . . . . . . . . . . . . . . . . . . . . . . . . . . .Seite 3
Bedienungsanleitung . . . . . . . . . . . . . . . . . . . . . . . . . . . . . . . .Seite 4
Garantie . . . . . . . . . . . . . . . . . . . . . . . . . . . . . . . . . . . . . . . . . .Seite 14
NL
Overzicht bedieningselementen . . . . . . . . . . . . . . . . . . . . . . . .Pagina 3
Gebruiksaanwijzing . . . . . . . . . . . . . . . . . . . . . . . . . . . . . . . . .Pagina 16
Garantie . . . . . . . . . . . . . . . . . . . . . . . . . . . . . . . . . . . . . . . . . .Pagina 26
F
Aperçu des éléments de commande . . . . . . . . . . . . . . . . . . . .Page 3
Mode d’emploi . . . . . . . . . . . . . . . . . . . . . . . . . . . . . . . . . . . . .Page 28
Garantie . . . . . . . . . . . . . . . . . . . . . . . . . . . . . . . . . . . . . . . . . .Page 38
E
Vista de conjunto Elementos de mando . . . . . . . . . . . . . . . . .Página 3
Instrucciones de servicio . . . . . . . . . . . . . . . . . . . . . . . . . . . . .Página 40
Garantia . . . . . . . . . . . . . . . . . . . . . . . . . . . . . . . . . . . . . . . . . .Página 51
I Descrizione dei singoli pezzi . . . . . . . . . . . . . . . . . . . . . . . . .Pagina 3
Istruzioni per l’uso . . . . . . . . . . . . . . . . . . . . . . . . . . . . . . . . . .Pagina 52
Garanzia . . . . . . . . . . . . . . . . . . . . . . . . . . . . . . . . . . . . . .Pagina 62
GB
Control element overview . . . . . . . . . . . . . . . . . . . . . . . . . . . . .Page 3
Instruction Manual . . . . . . . . . . . . . . . . . . . . . . . . . . . . . . . . . .Page 64
Guarantee . . . . . . . . . . . . . . . . . . . . . . . . . . . . . . . . . . . . . . . .Page 74
PL
Przegląd elemetów obsługi . . . . . . . . . . . . . . . . . . . . . . . . . .Strona 3
Instrukcja obsługi . . . . . . . . . . . . . . . . . . . . . . . . . . . . . . . . . .Strona 76
Gwarancja . . . . . . . . . . . . . . . . . . . . . . . . . . . . . . . . . . . . .Strona 87
H
A hasznalt elemek megtekintése . . . . . . . . . . . . . . . . . . . . . .Oldal 3
A hasznalati utasítás . . . . . . . . . . . . . . . . . . . . . . . . . . . . . . . .Oldal 89
Garancia . . . . . . . . . . . . . . . . . . . . . . . . . . . . . . . . . . . . . . . . . .Oldal 100
5....-05-CDP 604 neu 15.06.2004 14:19 Uhr Seite 2
Page 3
3
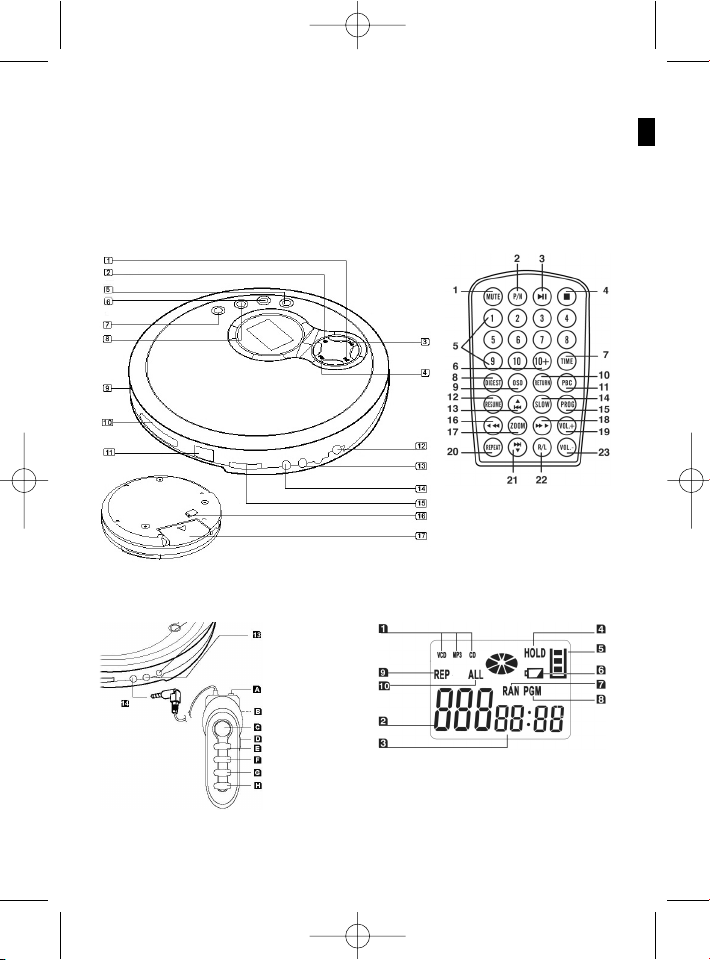
Übersicht der Bedienelemente
Overzicht van de bedieningselementen • Liste des différents éléments de commande
Indicación de los elementos de manejo • Elementi di comando
Overview of the Components • Przegld elementów obsugi
A kezelő elemek áttekintéseé
ABB. 1
ABB. 2
ABB. 4ABB. 3
5....-05-CDP 604 neu 15.06.2004 14:19 Uhr Seite 3
Page 4
Allgemeine Sicherheitshinweise
Um das Risiko von Feuer oder einem elektrischen Schlag zu vermeiden, sollten
Sie das Gerät nicht Regen oder Feuchtigkeit aussetzen. Das Gerät nicht in
unmittelbarer Nähe von Wasser betreiben (z.B. Badezimmer, Schwimmbecken,
feuchte Keller).
Verwenden Sie das Gerät nur für den vorgesehenen Zweck.
Das Gerät ausschließlich an eine vorschriftsmäßig installierte Steckdose ansch-
ließen. Achten Sie darauf, dass die angegebene Spannung mit der Spannung der
Steckdose übereinstimmt.
Bei Verwendung von externen Netzteilen auf die richtige Polarität und Spannung
achten, Batterien stets richtigherum einlegen.
Das Gerät so aufstellen, dass vorhandene Lüftungsöffnungen nicht verdeckt werden.
Niemals das Gehäuse des Gerätes öffnen. Durch unsachgemäße Reparaturen
können erhebliche Gefahren für den Benutzer entstehen. Bei Beschädigung des
Gerätes, insbesondere des Netzkabels, das Gerät nicht mehr in Betrieb nehmen,
sondern von einem Fachmann reparieren lassen. Netzkabel regelmäßig auf
Beschädigungen prüfen.
Ein defektes Netzkabel darf nur vom Hersteller, unserem Kundendienst oder einer
ähnlich qualifizierten Person durch ein gleichwertiges Kabel ersetzt werden, um
Gefährdungen zu vermeiden.
Benutzen Sie das Gerät längere Zeit nicht, ziehen Sie den Netzstecker aus der
Steckdose, bzw.entnehmen Sie die Batterien.
Diese Symbole können sich ggfs. auf dem Gerät befinden und sollen Sie auf folgendes hinweisen:
Das Blitz-Symbol soll den Benutzer auf Teile im Inneren des Gerätes hinweisen, die gefährlich hohe Spannungen führen.
Das Symbol mit Ausrufezeichen soll den Benutzer auf wichtige
Bedienungs- oder Wartungs-Hinweise in den Begleitpapieren hinweisen.
Geräte mit diesem Symbol arbeiten mit einem „Klasse 1-Laser“ zur
Abtastung der CD. Die eingebauten Sicherheitsschalter sollen verhindern,
dass der Benutzer gefährlichem, für das menschliche Auge nicht sichtbarem Laserlicht ausgesetzt wird, wenn das CD-Fach geöffnet ist.
Diese Sicherheitsschalter sollten auf keinen Fall überbrückt oder manipuliert werden, sonst besteht die Gefahr, dass Sie sich dem Laser-Licht aussetzen.
4
D
5....-05-CDP 604 neu 15.06.2004 14:19 Uhr Seite 4
Page 5

Beschreibung der Bedienelemente
CD-Player (ABB. 1)
1 II CD Wiedergabe/Pause Taste
2 CD Stop/off Taste
3 I PREV Taste (Suchlauf rückwärts)
4 I NEXT Taste (Suchlauf vorwärts)
5 MODE Taste
6 AUDIO/EQ Taste (linker/rechter Kanal/Equalizer)
7 PROG/PBC Taste
8 NP/ESP/DIR Taste
9 HOLD OFF/ON Tastensperre
10 OPEN CD-Fach
11 Sensor für die Fernbedienung
12 DC 4,5V: Anschluss für Netzadapters
13 AV OUT Anschluss an den Fernseher
14 PHONES Kopfhöreranschluss
15 VOLUME / Lautstärkeregler
16 CHARGE ON/OFF
17 Batteriefach
Fernbedienung (ABB. 2)
1 MUTE (Stummschalten) Taste
2 P/N (PAL / NTSC) Taste
3 II CD Wiedergabe/Pause Taste
4 CD Stop Taste
5 Zifferntasten 1-10
6 10 + Taste
7 TIME Taste
8 DIGEST Taste
9 OSD Taste
10 RETURN Taste
11 PBC Taste
12 RESUME Taste
13 I CD SKIP Taste (rückwärts springen)
14 SLOW Taste
15 PROG Taste (CD - Programmierung)
16 CD Taste (Suchlauf rückwärts)
17 ZOOM Taste
18 CD Taste (Suchlauf vorwärts)
19 VOL + Lautstärke Taste
20 REPEAT Taste (Wiederholen)
21 I CD SKIP Taste (vorwärts springen)
22 L/R (linker/rechter Kanal) Taste
23 VOL – Lautstärke Taste
5
D
5....-05-CDP 604 neu 15.06.2004 14:19 Uhr Seite 5
Page 6

Kopfhörer - Fernbedienung (ABB. 3)
A PHONES
B HOLD OFF/ON
C PLAY/PAUSE
D VOLUME
E STOP/OFF
F I BACK
G I NEXT
H ESP/LR/DIR
Hinweis: Einige Tasten finden Sie sowohl am Gerät als auch auf der
Fernbedienung. Gleichlautende Tasten bewirken die gleiche Funktion.
Möchten Sie die Kopfhörer-Fernbedienung nutzen gehen Sie bitte wie folgt vor:
Verbinden Sie den Stecker der Kopfhörer-Fernbedienung mit der Buchse (14) am
Gerät und stecken Sie nun den Stecker des Kopf-/Ohrhörer in die Anschlussbuchse
(A).
Anzeigen auf dem Display (ABB. 4)
1 VCD / MP3 / CD Format
2 Nummer des Titels
3 Spielzeit
4 Anzeige Tastensperre
5 ESP Funktion
6 Anzeige Batteriewechsel
7 RAN - RANDOM Funktion
8 PGM - PROGRAMM Funktion
9 REP - Wiederholung einfach
10 REP ALL - Wiederholung alle
Inbetriebnahme des Gerätes
Batterien einlegen (Nicht im Lieferumfang enthalten)
• Öffnen Sie das Batteriefach (17) auf der Rückseite.
• Legen Sie 2 Batterien 1,5 V, Type AA ein. Achten Sie auf richtige Polarität
(Siehe Batteriefachboden bzw. Aufprägung an der Außenseite).
• Wird das Gerät längere Zeit nicht benutzt, nehmen Sie bitte die Batterien aus
dem Gerät, um ein „Auslaufen“ von Batteriesäure zu vermeiden.
• Ein Batteriesymbol im Display weist darauf hin, dass die Batterien ausgetauscht
werden sollten. Wechseln Sie immer den kompletten Batteriesatz aus, erneuern
Sie nicht nur eine Batterie.
Achtung: Batterien gehören nicht in den Hausmüll. Bitte geben Sie verbrauchte
Batterien bei zuständigen Sammelstellen oder beim Händler ab.
Werfen Sie Batterien niemals ins Feuer.
6
D
5....-05-CDP 604 neu 15.06.2004 14:19 Uhr Seite 6
Page 7

Batterien der Fernbedienung
Bei der Batterie der Fernbedienung handelt es sich um eine langlebige LithiumZelle. Sollte im Laufe der Anwendung die Reichweite der Fernbedienung nachlassen, gehen Sie bitte wie folgt vor:
• Öffnen Sie das Batteriefach an der Seite der Fernbedienung.
• Ersetzen Sie die Zelle durch eine Batterie der gleichen Bauart. Achten Sie auf
die richtige Polarität.
• Schließen Sie das Batteriefach.
Netzteilbetrieb
Sie haben die Möglichkeit das Gerät auch über ein Steckernetzteil zu betreiben.
1. Stecken Sie das Steckernetzteil in eine vorschriftsmäßig installierte
Schutzkontakt Steckdose 230V, 50 Hz.
2. Verbinden Sie den CD Player mit dem Steckernetzteil, indem Sie den Stecker
des Netzteiles in die DC 4,5 V Buchse (12) einstecken.
3. Bei der Verwendung eines Netzteils (DC 4,5V/700mA) achten Sie bitte auf die
richtige Polung gemäß der Aufschriften am CD Player.
Autobetrieb
Mit der Adapterkassette und dem Zigarettenanzünderadapter, lässt sich der CD
Player in fast jedem Auto über das vorhandene Autoradio mit Kassettenteil, betreiben.
1. Schieben Sie den Zigarettenanzünderadapter in den Zigarettenanzünder und
stecken Sie den Stecker am Kabelende in die DC 4,5 V Buchse des CD
Players.
2. Stecken Sie den Stecker der Adapterkassette in die AV OUT Buchse (13) des
CD Players.
3. Schalten Sie Ihr Autoradio ein und schieben Sie die Adapterkassette in das
Kassettenfach. Achten Sie darauf, dass das Anschlusskabel der
Adapterkassette korrekt in der Führungsrille der Kassette liegt! Die Mechanik
des Kassettenlaufwerks könnte verklemmen.
Einige wenige Autoradios können u.U.die Adapterkassette sofort nach dem
Einlegen wieder auswerfen. Legen Sie in diesem Fall das Anschlusskabel der
Kassette gegenüberliegend in die Führungsrille und schieben Sie die Kassette mit
der anderen Seite wieder ein. Falls das Autoradio die Adapterkassette erneut auswirft, können Sie die Adapterkassette leider nicht verwenden.
Allgemeine Bedienung
AUDIO/ Wechsel zwischen Lautsprechereinstellungen:
CH L, CH R, STEREO = Anzeige im Display,
MONO L; MONO R; STEREO = Anzeige auf dem
Bildschirm (nur im VCD Modus).
7
D
5....-05-CDP 604 neu 15.06.2004 14:19 Uhr Seite 7
Page 8

EQ (6): Es stehen verschiedene Sound Modi zur Verfügung
(CLASS(IC), DISCO, JAZZ, POP).
HOLD (9): Sperrt die Funktionen aller Tasten am Gerät, als Schutz vor
unbeabsichtigter Auslösung einer Taste. Schieben Sie den
Schalter nach rechts, erscheint „HOLD“ auf dem Display.
OPEN (10): Zum Öffnen des CD Fachs.
DC 4,5V (12): Zum Anschluss des Netzadapters.
AV OUT (13): Zum Anschluss an den Fernseher mit
Videoeingangsbuchse. Stecken Sie bitte den schwarzen
Stecker in die Buchse am CD-Player, den gelben Stecker in
die Videoeingangsbuchse, den roten Stecker in den rechten
Lautsprechereingang (R) und den weißen Stecker in den
linken Lautsprechereingang (L) Ihres Fernsehers.
PHONES (14): Zum Anschluss des Kopf- oder Ohrhörers.
VOLUME (15): Dient der Abstimmung der Lautstärke (19/23 an der
Fernbedienung). Im VCD Modus nur über die
Fernbedienung oder den Fernseher regelbar.
CHARGE
ON/OFF (16): Schaltet die Ladefunktion bei angeschlossenem, externen
Netzteil ein.
Bitte beachten Sie, dass im Batteriefach keine Batterien eingelegt sind. Es besteht Explosionsgefahr! Verwenden Sie
nur geeignete Akkus!
Hinweis: Benutzen Sie bitte die beigefügte Ladehülse, um
den Kontakt zum Akku herzustellen.
Infrarot Fernbedienung
Zur kabellosen Fernbedienung aus einer Entfernung von bis zu 5 Metern. Lässt die
Reichweite nach, müssen die Batterien ausgetauscht werden. Achten Sie bei
Bedienung auf freie Sicht zwischen Fernbedienung und Infrarotempfänger des
Gerätes.
Ausschalten
Sie schalten das Gerät aus, indem Sie die STOP Taste (2) (4 an der
Fernbedienung) 1x bzw. bei laufendem Gerät 2x drücken, bzw. etwa 10 Sekunden
nicht mehr bedienen.
Beschreibung der CD Tasten
II Wiedergabe/
Pause (1/3): Sie können die Wiedergabe kurz unterbrechen.
Nochmaliges Drücken der Taste setzt die Wiedergabe an
derselben Stelle fort.
STOP/OFF (2/4): Die CD wird angehalten. Nochmaliges Drücken schaltet das
Gerät aus.
8
D
5....-05-CDP 604 neu 15.06.2004 14:19 Uhr Seite 8
Page 9
I PREV (3)/
I NEXT (4): Mit diesen Tasten können Sie zum nächsten bzw. vorheri-
gen Titel springen. Halten Sie die Taste gedrückt, setzt ein
Musiksuchlauf ein.
ESP/NP/DIR (8): ESP im CD Modus:
Deaktiviert / aktiviert die Anti-Schock Funktion bei eingelegter Audio CD (Speicher 40 +/- 5 Sek.). Bei Störungen werden die CD-Musikdaten aus einem Zwischenspeicher
störungsfrei herausgelesen. Ablesefehler werden im
Zwischenspeicher nachträglich korrigiert. Bei aktiviertem
Anti-Shock erscheint eine Balkenanzeige auf dem Display,
die sich langsam füllt. Drücken Sie erneut die ESP Taste um
die Funktion zu deaktivieren.
DIR Funktion nur im MP3 Modus:
Diese Taste dient, bei eingelegter MP3 CD, als Auswahltaste zum Wechsel der auf der CD angelegten Ordner.
N/P Funktion nur im VCD Modus:
Wechsel zwischen „NTSC“ und „PAL“ Videoausgangsystem.
MODE (5): Folgende Funktionen können Sie mit der MODE Taste aus-
wählen:
1 x drücken = „REP“: Der aktuelle Titel wird ständig wieder-
holt.
2 x drücken = „REP ALL“: Die aktuelle CD wird ständig wie-
derholt.
3 x drücken = „RAN“: Alle Titel werden nacheinander in
einer zufälligen Reihenfolge wiedergegeben.
4 x drücken = Alle Funktionen sind aufgehoben. Der norma-
le Abspielbetrieb wird fortgesetzt.
Funktionen im Wiedergabemodus bei einer MP3 CD:
1 x drücken = „REP“: Der aktuelle Titel wird ständig wieder-
holt.
2 x drücken = „REP DIR“: Der aktuell ausgewählte Ordner
(das Album) wird ständig wiedergegeben.
3 x drücken = „REP ALL“: Die ganze CD wird ständig wie-
derholt.
4 x drücken = „RAN“: Alle Titel werden nacheinander in
einer zufälligen Reihenfolge wiedergegeben.
5 x drücken = Alle Funktionen sind aufgehoben. Der norma-
le Abspielbetrieb wird fortgesetzt.
Beschreibung der CD Tasten an der Fernbedienung
MUTE (1): Dient zum schnellen Abstellen der Lautstärke. Zum
Aufheben dieser Funktion erneut auf die MUTE Taste
drücken.
9
D
5....-05-CDP 604 neu 15.06.2004 14:19 Uhr Seite 9
Page 10
P/N (2): Wechsel zwischen „NTSC“ und „PAL“ Videoausgangsystem.
TIME (7): Mit der TIME Taste können Sie die Wiedergabe ab einer
bestimmten Zeit eingeben. Drücken Sie Taste erscheint auf
dem Bildschirm GOTO --:--. Geben Sie die entsprechende
Nummer ein. Die ersten beiden Zahlen, stellen die Minuten
da, die zweiten Zahlen die Sekunden. Die Zahl „0“ wählen
Sie mit der Taste „10“.
DIGEST (8): Wird die Taste gedrückt, unterteilt der Player die aktuelle
abspielende VCD Datei in 9 gleichgroße Teile auf und stellt
Bilder gleichzeitig auf dem Bildschirm dar. Dieses kann je
nach Dateigröße einige Minuten dauern. Mit den
Zifferntasten 1-9 können Sie zu dem gewünschten
Abschnitt wechseln, dieser wird nun animiert. Drücken Sie
nun die DIGEST Taste, so nimmt das Gerät die Wiedergabe
ab dem gewählten Ausschnitt im Vollbildmodus auf.
OSD (9): Sie sehen den CD Typen die Funktionen z.B. SINGLE
REMAIN, die Nummer des Titel und die verbleibende
Spielzeit der CD. Drücken Sie die Taste bis zu 5 x und
wählen Sie zwischen den verschiedenen Einstellungen.
RETURN (10): Drücken der Taste stoppt die CD Wiedergabe.Das
Hauptmenü wird angezeigt. Diese Funktion kann nur
benutzt werden, wenn es sich bei der eingelegten CD um
eine Video 2.0 CD handelt und der PBC Modus aktiviert
(ON) ist (nur im VCD Modus).
PBC (11): Schaltet PBC ein/aus (nur im VCD Modus).
RESUME (12): Drücken Sie die Stop Taste, wird die Wiedergabe der CD
angehalten. Drücken Sie dann die RESUME Taste wird die
Wiedergabe an dem Punkt fortgesetzt, an dem die
Wiedergabe unterbrochen wurde (nur im VCD Modus).
SLOW (14): Schaltet auf Zeitlupe bei der Wiedergabe von Video CDs.
Bei jedem Drücken der SLOW Taste wird die
Geschwindigkeit verändert. 1/2x, 1/4x, 1/8x und 1/16x.
Wollen Sie in die normale Wiedergabe zurückkehren,
drücken Sie die II Taste (nur im VCD Modus).
ZOOM (17): Um einen Bildausschnitt zu vergrößern, drücken Sie die
Taste ZOOM während der Wiedergabe. Das jeweilige Bild
kann mit der ZOOM Taste in zwei verschiedenen Größen
dargestellt werden. Mit den I I / Cursor-
Tasten können Sie noch den Bildausschnitt genauer anpeilen. Um auf normale Wiedergabe umzustellen, drücken die
ZOOM Taste bis „RESTORE“ erscheint (nur im VCD
Modus).
REPEAT (20): siehe beide Tabellen.
R/L (22): Wechsel zwischen Lautsprechereinstellungen: MONO L,
MONO R, STEREO (nur im VCD Modus).
10
D
5....-05-CDP 604 neu 15.06.2004 14:19 Uhr Seite 10
Page 11

CD’s abspielen
1. Öffnen Sie mit der Taste OPEN das CD Fach.
2. Legen Sie eine CD mit dem Etikett nach oben so auf den Zentrierkegel, dass
diese einrastet. Schließen Sie das CD Fach.
3. Drücken Sie die II Wiedergabe/Pause Taste (1) am Gerät um es einzuschalten. Im Display erscheint „“rEAd“ (lesen).Die CD wird vom ersten Titel an abgespielt. Das aktuelle Lied und die abgelaufene Spielzeit wird im Display angezeigt.
4. Um eine CD zu entnehmen, drücken Sie die STOP Taste, öffnen den CD
Deckel mit der OPEN Taste und heben die CD vorsichtig ab. Halten Sie den CD
Deckel stets geschlossen.
Hinweis: Wenn eine Disk falsch herum eingelegt wird erscheit im Display „BAdisc“,
bzw. ist keine Disk eingelegt, erscheint die Meldung „NO DISC“.
Wiedergabe von Musik im MP3 Format
Sie haben die Möglichkeit mit diesem Gerät Musikstücke im MP3 Format wiederzugeben. Das Gerät unterstützt außerdem die gängigen CD Typen: CD, CD-RW, CDR. Im Display erscheint immer die aktive ESP Funktion (Speicher 100 Sek.), s.
Punkt „ESP/NP/DIR“.
Programmierte Wiedergabe
Lässt die Programmierung einer beliebigen Titelfolge zu. Siehe Abschnitt „PROGRAM“ in den unten aufgeführten Tabellen.
Das Gerät stoppt automatisch, nachdem alle programmierten Titel wiedergegeben
wurden. Drücken Sie einmal die Stop Taste, wird die Wiedergabe gestoppt, das
Programm wird gelöscht. Ebenso nach Beendigung der Wiedergabe, sowie nach
ca. 10 Sekunden, sobald sich das Gerät ausschaltet.
Sie haben die Möglichkeit die programmierten Titel mit der REPEAT-Funktion zu
kombinieren. Nachdem Sie programmiert und das Gerät gestartet haben, drücken
Sie bitte die REPEAT Taste bis zu 3 x und die Funktionen können, wie unter
Abschnitt „REPEAT“ beschrieben, angewendet werden.
Funktionsübersichten
1. VCD Funktionen
• Schalten Sie Ihr Fernsehgerät ein.
• Stellen Sie Ihr Fernsehgerät auf AV Modus um.
• Schalten Sie das Gerät ein und legen Sie eine Video CD, wie bereits beschrieben, ein.
• Drücken Sie die II Wiedergabe/Pause Taste.
• Am Bildschirm Ihres Fernsehgerätes können Sie den Videoclip sehen, während
der Ton über Ihren CD Player zu hören ist.
11
D
5....-05-CDP 604 neu 15.06.2004 14:19 Uhr Seite 11
Page 12
12
D
Bedienung VCD Funktionen
Drücken Sie (II)
1. Gerät wird eingeschaltet und die Disc wird durchsucht.
2. Pause während der Wiedergabe.
3. Die Wiedergabe wird wieder gestartet.
Drücken Sie
STOP ()
Die Wiedergabe wird gestoppt.
Drücken Sie
(I (3/13))
Springt zum vorherigen Titel.
Drücken Sie
(I (4/21))
Mit dieser Taste können Sie zum nächsten bzw. übernächsten Titel springen usw.
Halten
(I / (3/16))
Halten Sie die Taste gedrückt, setzt ein Schnellsuchlauf ein (rückwärts).
Halten
(I / (4/18))
Halten Sie die Taste gedrückt, setzt ein Schnellsuchlauf ein (vorwärts).
Drücken Sie MODE Wechsel zwischen Wiederholung einfach, Wiederholung alle und RAN-
DOM Funktion.
Drücken Sie NP Wechsel zwischen „NTSC“ und „PAL“ Videoausgangsystem.
Drücken Sie PBC
(Playback Control)
1 x drücken: PBC eingeschaltet, Anzeige auf dem Bildschirm
2 x drücken: PBC ausgeschaltet.
Drücken Sie
AUDIO/EQ
AUDIO Funktion: Wahl zwischen den Einstellungen linker Kanal, rechter
Kanal und Stereo.
REPEAT 1 x drücken = „REPEAT 1“: Der aktuelle Titel wird ständig wiederholt.
2 x drücken = „REPEAT ALL“: Die aktuelle CD wird ständig wiederholt.
3 x drücken = „REPEAT CANCEL“ Alle Funktionen sind aufgehoben. Der
normale Abspielbetrieb wird fortgesetzt.
PROGRAM
Drücken Sie erst () dann PROG. Auf dem Bildschirm erscheint „PROG“
und „TRK“. Wählen Sie die Reihenfolge mit den I / I Tasten (Taste
3 = +10, Taste 4 =+1) oder mit den Tasten / (16/18).
Wählen Sie die Reihenfolge über die Zifferntasten (5) direkt. Bei zweistelli-
ger Nummer erst die +10 Taste und dann die einstellige Zahl. Die
Programmierung ist bereits abgespeichert. Drücken Sie (II).
SLOW Wählen Sie zwischen den Geschwindigkeiten 1/2 ,1/4, 1/8, 1/16
RESUME Fortsetzung an der selben Stellen nach Stop (s. Punkt RESUME)
DIGEST Darstellung der Bilder in Kleinformat (s. Punkt DIGEST)
ZOOM Um einen Bildausschnitt zu vergrößern (s. Punkt ZOOM)
R/L Wechsel zwischen den Audio-Kanälen
1. VCD Funktionen
5....-05-CDP 604 neu 15.06.2004 14:19 Uhr Seite 12
Page 13
2. CD, MP 3 Funktionen
13
D
Bedienung
Funktionen
CD MP3
Drücken Sie (II)
1. Gerät wird eingeschaltet und die Disc wird durchsucht.
2. Pause während der Wiedergabe.
3. Die Wiedergabe wird wieder gestartet.
Drücken Sie
STOP ()
Die Wiedergabe wird gestoppt.
Drücken Sie
(I (3/13))
Springt zum vorherigen Titel.
Drücken Sie
(I (4/21))
Mit dieser Taste können Sie zum nächsten bzw. übernächsten Titel springen usw.
Halten
(I / (3/16))
Halten Sie die Taste gedrückt, setzt ein Musiksuchlauf ein (rückwärts).
Halten
(I / (4/18))
Halten Sie die Taste gedrückt, setzt ein Musiksuchlauf ein (vorwärts).
MODE am Gerät:
REPEAT auf der FB:
Wechsel zwischen Wiederholung einfach, Wiederholung DIR (nur MP3),
Wiederholung alle. RANDOM Funktion nur über die Taste am Gerät.
Drücken Sie
ESP/DIR
Aktiviert bzw. deaktiviert die AntiSchock-Funktion.
Springt zum nächsten Verzeichnis/
Ordner (DIRECTORY).
Drücken Sie
AUDIO/EQ
EQ Funktion: Wählen Sie mit den I / I Tasten zwischen den
Einstellungen STAND, CLASS; DISCO; JAZZ; POP.
PROGRAM
Drücken Sie erst () dann PROG. Wählen Sie die Reihenfolge mit den
I / I Tasten (Taste 3 = +10, Taste 4 =+1). Drücken Sie erneut
PROG. Die Anzeige im Display wechselt auf Speicherplatz P-02. usw.
Speichern Sie mit der PROG Taste. Drücken Sie (II) (nur am Gerät).
Oder wählen Sie die Reihenfolge über die Zifferntasten (5) direkt. Bei
zweistelliger Nummer erst die +10 Taste und dann die einstellige Zahl.
Die Programmierung ist bereits abgespeichert. Drücken Sie (II).
5....-05-CDP 604 neu 15.06.2004 14:19 Uhr Seite 13
Page 14
Spezial Funktionen
MP3 – CDs: Sie können mit Ihrem Gerät MP3 CDs abspielen. Auf diesen CDs
können bis zu 200 Titel verdichtet abgespeichert werden. Ihr Gerät erkennt
eine MP3 CD automatisch. Die Klangqualität bleibt somit erhalten. Zum
Abspielen dieser CDs gehen Sie bitte vor, wie unter CDs abspielen beschrieben. Die Programmierung von Titeln können Sie, wie bereits unter
„Programmierte Wiedergabe“ beschrieben, durchführen.
VCD:
Ihr Gerät verfügt über einen Video Anschluss für Video CDs. Es können
CD,VCD, CD-R und MP3 Disks abgespielt werden. Ihr Gerät erkennt die Art
der CD automatisch. Schließen sie das Gerät über das mitgelieferte Video
Kabel an Ihr Fernsehgerät an. Drücken Sie die OSD Taste (auf der
Fernbedienung). Auf Ihrem Fernsehbildschirm erscheint das Menü (Erhalten
Sie hier nur ein schwarz-weiß Bild, drücken Sie die N/P Taste, evtl. bei geöffneten CD Fach).
Störungsbehebung
Garantie
Wir übernehmen für das von uns vertriebene Gerät eine Garantie von 24 Monaten
ab Kaufdatum (Kassenbon).
Innerhalb der Garantiezeit beseitigen wir unentgeltlich die Mängel des Gerätes oder
des Zubehörs*), die auf Material- oder Herstellungsfehler beruhen, durch Reparatur
oder, nach unserem Ermessen, durch Umtausch. Garantieleistungen bewirken
weder eine Verlängerung der Garantiefrist, noch beginnt dadurch ein Anspruch auf
eine neue Garantie!
Als Garantienachweis gilt der Kaufbeleg. Ohne diesen Nachweis kann ein kostenloser Austausch oder eine kostenlose Reparatur nicht erfolgen.
Im Garantiefall geben Sie bitte das Grundgerät in der Originalverpackung zusammen
mit dem Kassenbon an Ihren Händler.
Symptome Ursache Lösung
VCD kann nicht wiedergegeben werden.
VCD ist nicht oder nicht korrekt eingelegt
Stellen Sie sicher, dass die
Disc mit der Beschriftung nach
oben gerichtet eingelegt ist.
VCD springt während der
Wiedergabe
Kontrollieren Sie die Disc auf
Fingerabdrücke, Schmutz oder
Kratzer
Säubern Sie diese mit einem
weichen Tuch von der Mitte
heraus.
Keine Farbe Farbsystem falsch eingestellt Drücken Sie die P/N Taste (2)
und wählen Sie die richtige
Farbnorm.
14
D
5....-05-CDP 604 neu 15.06.2004 14:19 Uhr Seite 14
Page 15

*) Schäden an Zubehörteilen führen nicht automatisch zum kostenlosen Umtausch
des kompletten Gerätes. Wenden Sie sich in desem Fall bitte an unsere Hotline!
Glasbruchschäden bzw. Brüche von Kunststoffteilen sind grundsätzlich kostenpflichtig!
Sowohl Defekte an Verbrauchszubehör bzw. Verschleißteilen (z.B. Motorkohlen,
Knethaken, Antriebsriemen, Ersatzfernbedienung, Ersatzzahnbürsten, Sägeblättern
usw.), als auch Reinigung, Wartung oder der Austausch von Verschleißteilen, fallen
nicht unter die Garantie und sind deshalb kostenpflichtig!
Die Garantie erlischt bei Fremdeingriff.
Nach der Garantie
Nach Ablauf der Garantiezeit können Reparaturen kostenpflichtig vom entsprechenden Fachhandel oder Reparaturservice ausgeführt werden.
Service für unsere Haushaltsartikel
und Unterhaltungselektronik
Zu technischen Fragen oder zur Bestellung von Verschleißteilen (soweit diese nicht
vom Fachmann ausgewechselt werden müssen), wie z.B. Ersatzkannen,
Staubsaugerfilterbeutel, Fernbedienung usw. können Sie sich, mit Angabe des
Gerätetyps, an unsere Hotline-Adresse wenden:
hotline@clatronic.de
Interessieren Sie sich für weitere Clatronic-Produkte?
Besuchen Sie doch einmal unsere Homepage unter
www.clatronic.de oder www.clatronic.com
15
D
5....-05-CDP 604 neu 15.06.2004 14:19 Uhr Seite 15
Page 16
Algemene veiligheidsinstructies
Voorkom risico’s voor brand en elektrische schokken en stel het apparaat niet bloot
aan regen of vocht. Gebruik het apparaat niet in de directe nabijheid van water
(bijv. badkamer, zwembad, vochtige kelder).
Gebruik het apparaat uitsluitend voor het daarvoor bestemde doel.
Sluit het apparaat uitsluitend aan op een correct geïnstalleerde contactdoos. Let op
dat de aangegeven spanning overeenstemt met de spanning van de contactdoos.
Let bij het gebruik van externe adapters op de juiste polariteit en spanning en
plaats batterijen altijd in de juiste richting.
Plaats het apparaat zodanig dat de aangebrachte luchtopeningen niet worden afgedekt.
Open nooit de behuizing van het apparaat. Door ondeskundige reparaties kunnen
aanzienlijke gevaren voor de gebruiker ontstaan. Neem het apparaat niet meer in
gebruik wanneer het apparaat - en in het bijzonder de kabel - beschadigingen vertoont, maar laat het eerst door een vakman repareren. Controleer de kabel regelmatig op beschadigingen.
Een defecte kabel mag alleen door de fabrikant, onze technische dienst of een
soortgelijk gekwalificeerd persoon worden vervangen. Alleen zo kunnen gevaren
vermeden worden.
Onderbreek de stroomtoevoer of verwijder de batterijen wanneer u denkt, het apparaat langere tijd niet te gebruiken.
Volgende symbolen kunnen op uw apparaat zijn aangebracht. Zij hebben de volgende betekenis:
Het bliksemsymbool wijst de gebruiker op onderdelen in het inwendige
van het apparaat die gevaarlijk hoge spanning voeren.
Het symbool met het uitroepteken verwijst naar belangrijke
bedienings- en onderhoudsinstructies in de begeleidende documentatie.
Apparaten met dit symbool werken met een „klasse 1-laser„ voor de aftasting van de CD.De ingebouwde veiligheidsschakelaars moeten voorkomen dat de gebruiker wordt blootgesteld aan gevaarlijke, voor het menselijk oog onzichtbaar laserlicht wanneer het CD-vak geopend is.
Deze veiligheidsschakelaars mogen in geen geval overbrugd of gemanipuleerd
worden omdat u anders gevaar loopt, aan het laserlicht te worden blootgesteld.
16
NL
5....-05-CDP 604 neu 15.06.2004 14:19 Uhr Seite 16
Page 17

Beschrijving van de bedieningselementen
CD-speler (ABB. 1)
1 II CD-weergave-/pauzetoets
2 CD Stop/off-toets
3 I PREV-toets (zoeken - terug)
4 I NEXT-toets (zoeken - vooruit)
5 MODE-toets
6 AUDIO/EQ-toets (linker/rechter kanaal/equalizer)
7 PROG/PBC-toets
8 NP/ESP/DIR-toets
9 HOLD OFF/ON toetsenblokkering
10 OPEN CD-lade
11 Sensor voor de afstandsbediening
12 DC 4,5V: aansluiting voor voedingsapparaat
13 AV OUT aansluiting op de televisie
14 PHONES aansluiting koptelefoon
15 VOLUME / volumeregelaar
16 CHARGE ON/OFF
17 Batterijenvakje
Afstandsbediening (ABB. 2)
1 MUTE (stomschakeling)-toets
2 P/N (PAL / NTSC)-toets
3 II CD-weergave-/pauzetoets
4 CD stoptoets
5 Cijfertoetsen 1 - 10
6 10 + toets
7 TIME-toets
8 DIGEST-toets
9 OSD-toets
10 RETURN-toets
11 PBC-toets
12 RESUME-toets
13 I CD SKIP-toets (terug springen)
14 SLOW-toets
15 PROG-toets (CD-programmering)
16 CD-toets (zoeken - terug)
17 ZOOM-toets
18 CD-toets (zoeken - vooruit)
19 VOL + toets - geluidssterkte
20 REPEAT-toets (herhalen)
21 I CD SKIP-toets (vooruit springen)
22 L/R-toets (linker/rechter kanaal)
23 VOL - toets - geluidssterkte
17
NL
5....-05-CDP 604 neu 15.06.2004 14:19 Uhr Seite 17
Page 18

Koptelefoon - afstandsbediening (ABB. 3)
A PHONES
B HOLD OFF/ON
C PLAY/PAUSE
D VOLUME
E STOP/OFF
F I BACK
G I NEXT
H ESP/LR/DIR
Opmerking: sommige toetsen bevinden zich zowel op het apparaat als op de
afstandsbediening. Eensluidende toetsen hebben dezelfde functie.
Wanneer u de koptelefoonafstandsbediening wilt gebruiken, gaat u als volgt te
werk: steek de steker van de koptelefoonafstandsbediening in de bus (14) aan het
apparaat en steek nu de steker van de kop- /oortelefoon in de aansluitbus (A).
Weergaven op het display (ABB. 4)
1 VCD / MP3 / CD Formaat
2 Nummer van de titel
3 Speelduur
4 Weergave toetsblokkering
5 ESP-functie
6 Indicatie voor batterij(en) vervangen
7 RAN - RANDOM-functie
8 PGM - PROGRAMM-functie
9 REP - Herhaling - afzonderlijk
10 REP ALL - Herhaling - alle
Ingebruikname van het apparaat
Plaatsen van de batterijen (niet bij de levering inbegrepen)
• Open het batterijvakje (17) aan de achterzijde.
• Plaats 2 batterijen 1,5 V, type AA. Let op de juiste polariteit (zie hiervoor bodem
van het batterijvakje of de markering aan de buitenzijde).
• Verwijder de batterijen wanneer het apparaat gedurende een langere periode
niet wordt gebruikt. Zo voorkomt u lekkage van batterijzuur.
• Een batterijsymbool op het display signaleert dat de batterijen moeten worden
vervangen. Wissel altijd de complete set batterijen uit, vervang nooit alleen
maar één batterij.
Let op! Batterijen horen niet in het huisafval. Geef verbruikte batterijen af bij het
gemeentelijke milieupark of bij de handelaar.
Gooi batterijen nooit in het vuur.
18
NL
5....-05-CDP 604 neu 15.06.2004 14:19 Uhr Seite 18
Page 19

Batterij van de afstandsbediening
De batterij van de afstandsbediening is een duurzame lithiumcel. Wanneer tijdens
het gebruik de reikwijdte van de afstandsbediening vermindert, gaat u als volgt te
werk:
• Open het batterijvakje opzij van de afstandsbediening.
• Vervang de cel door een batterij van dezelfde bouwwijze. Let goed op de juiste
polariteit.
• Sluit het batterijvakje.
Gebruik via voedingsapparaat
U kunt het apparaat ook via het voedingsapparaat gebruiken.
1. Steek de netsteker in een correct geïnstalleerde en geaarde contactdoos
230 V, 50 Hz.
2. Verbind de CD-speler met het voedingsapparaat door de steker van het voedingsapparaat in de DC 4,5 V-bus (12) te steken.
3. Wanneer u een voedingsapparaat (DC 4,5V/700mA) gebruikt, dient u op de juiste polariteit volgens de kenmerking op de CD-speler te letten.
Autobedrijf
Met de adaptercassette en de adapter voor de sigarettenaansteker kunt u de CDspeler in bijna iedere auto via de voorhanden autoradio met cassettegedeelte
gebruiken.
1. Schuif de adapter voor de sigarettenaansteker in de sigarettenaansteker en
steek de steker aan het kabeleinde in de DC 4,5 V bus van de CD-speler.
2. Steek de steker van de adaptercassette in de AV OUT-bus (13) van de CD-speler.
3. Schakel uw autoradio in en schuif de adaptercassette in het cassettevakje. Let
op dat de aansluitkabel van de adaptercassette correct in de geleiderail van
cassette ligt! Het mechanisme van het cassetteloopwerk zou anders kunnen
klemmen.
Bij sommige autoradio's kan het gebeuren dat de adaptercassette meteen na het
plaatsen weer wordt uitgeworpen. Plaats de aansluitkabel van de cassette in dit
geval tegenoverliggend in de geleiderail en schuif de cassette met de andere zijde
weer terug in het cassettevakje. Indien de autoradio de adaptercassette opnieuw
uitwerpt, kunt u de adaptercassette helaas niet gebruiken.
Algemene bediening
AUDIO/ wisselen tussen luidsprekerinstellingen:
CH L, CH R, STEREO = Weergave op het display,
MONO L; MONO R; STEREO = Weergave op het beeldscherm (alleen in de VCD-modus).
19
NL
5....-05-CDP 604 neu 15.06.2004 14:19 Uhr Seite 19
Page 20

EQ (6): U kunt kiezen uit verschillende sound-modi
(CLASS(IC), DISCO, JAZZ, POP).
HOLD (9): blokkeert de functies van alle toetsen aan het apparaat als
bescherming tegen abusievelijk bedienen van een toets.
Wanneer u de schakelaar naar rechts schuift, verschijnt op
het display de melding ”HOLD”.
OPEN (10): voor het openen van de CD-lade.
DC 4,5V (12): voor de aansluiting van het voedingsapparaat.
AV OUT (13): voor de aansluiting op de televisie met video-ingangsbus.
Steek de zwarte steker in de bus aan de CD-speler, de gele
steker in de video-ingangsbus, de rode steker in de rechter
luidsprekeringang (R) en de witte steker in de linker (L) luidsprekeringang van uw televisietoestel.
PHONES (14): voor de aansluiting van de kop- of oortelefoon.
VOLUME (15): voor de afstemming van de geluidssterkte (19/23 aan de
afstandsbediening). In de VCD-modus alleen regelbaar via
de afstandsbediening of de televisie.
CHARGE
ON/OFF (16): schakelt de laadfunctie in bij aangesloten, extern voedings-
apparaat.
Let op dat er geen batterijen in het batterijvakje geplaatst
mogen zijn. Daardoor bestaat explosiegevaar! Gebruik
alleen de geschikte accu’s!
Opmerking: gebruik voor de verbinding met de accu de bijgevoegde laadhuls.
Infrarood afstandsbediening
Voor een kabelloze bediening tot op een afstand van 5 meter.Wanneer de reikwijdte minder wordt, dienen de batterijen te worden vervangen. Let bij de bediening op
een vrij signaalveld tussen de afstandsbediening en de infraroodsensor aan het
apparaat.
Uitschakelen
U schakelt het apparaat uit door de STOP-toets (2) (4 aan de afstandsbediening)
1x in te drukken, bij afspelend apparaat 2x, of het apparaat gedurende 10 sec. niet
meer te bedienen.
Beschrijving van de CD-toetsen
II Weergave/
pauze (1/3): hiermee kunt u de weergave even onderbreken. Door het
nogmaals indrukken van de toets wordt de weergave vanaf
dit punt voortgezet.
STOP/OFF (2/4): de CD wordt stilgezet. Door het nogmaals indrukken scha-
kelt u het apparaat uit.
20
NL
5....-05-CDP 604 neu 15.06.2004 14:19 Uhr Seite 20
Page 21

I PREV (3)/
I NEXT (4): Met deze toetsen kunt u naar de vorige of de volgende titel
springen. Wanneer u de toets langer ingedrukt houdt, wordt
de zoekfunctie geactiveerd.
ESP/NP/DIR (8): ESP in de CD-modus:
deactiveert / activeert de antishock-functie bij geplaatste
audio-CD (geheugen 40 +/- 5 sec). Bij storingen worden de
CD-muziekgegevens storingsvrij uit een buffergeheugen
gelezen. Leesfouten worden in het tijdelijke geheugen achteraf gecorrigeerd. Bij geactiveerde antishock verschijnt een
balk op het display die langzaam volloopt. Druk opnieuw op
de ESP-toets om deze functie te deactiveren.
DIR-functie alleen in de MP3-modus:
Bij geplaatste MP3-CD is deze toets bedoeld voor de selectie van de op de CD aangemaakte mappen.
N/P-functie alleen in de VCD-modus:
wisselen tussen ”NTSC”- en ”PAL”-video-uitgangssysteem.
MODE (5): U kunt de volgende functies met de MODE-toets uitkiezen:
1 x indrukken = ”REP”: de actuele titel wordt steeds her-
haald.
2 x indrukken = ”REP ALL”: de complete CD wordt steeds
herhaald.
3 x indrukken = ”RAN”: alle nummers worden in een wille-
keurige volgorde weergegeven.
4 x indrukken = alle functies zijn opgeheven. De normale
weergave wordt voortgezet.
Functies in de weergavemodus bij een MP3-CD:
1 x indrukken = „REP“: de actuele titel wordt steeds her-
haald.
2 x indrukken = „REP DIR“: de geselecteerde map (het
album) wordt voortdurend weergegeven.
3 x indrukken = „REP ALL“: de complete CD wordt steeds
herhaald.
4 x indrukken = „RAN“: alle nummers worden in een wille-
keurige volgorde weergegeven.
5 x indrukken = alle functies zijn opgeheven. De normale
weergave wordt voortgezet.
Beschrijving van de CD-toetsen op de afstandsbediening
MUTE (1): gebruik deze toets om het geluid snel uit te schakelen. Druk
de MUTE-toets opnieuw in om deze functie te deactiveren.
P/N (2): wisselen tussen ”NTSC”- en ”PAL”-video-uitgangssysteem.
21
NL
5....-05-CDP 604 neu 15.06.2004 14:19 Uhr Seite 21
Page 22

TIME (7): met de TIME-toets kunt u nu de weergave vanaf een
bepaalde tijdstip instellen. Wanneer u de toets indrukt, verschijnt op het beeldscherm “GOTO --:--“.Voer de desbetreffende cijfers in. De eerste beide cijfers geven de minuten en
de tweede twee cijfers de seconden aan. U kiest het cijfer
”0” met de toets ”10”.
DIGEST (8): wanneer u deze toets indrukt, verdeelt de speler het af te
spelen VCD-bestand in 9 even grote delen en geeft foto’s
gelijktijdig op het beeldscherm weer. Al naargelang het
bestand kan dit enkele minuten duren. Met de cijfertoetsen
1-9 kunt u naar het gewenste deel schakelen dat vervolgens wordt weergegeven.Wanneer u nu op de DIGEST
toets drukt, start het apparaat de weergave vanaf het door u
gekozen gedeelte in volledige schermweergave.
OSD (9): u ziet de CD-types, de functies, bijv. SINGLE REMAIN, het
nummer van de titel en de resterende speelduur van de CD.
Druk de toets tot 5x in en kies uit de verschillende instellingen.
RETURN (10): door het indrukken van deze toets onderbreekt u de CD-
weergave. Het hoofdmenu verschijnt. U kunt deze functie
alleen gebruiken wanneer de geplaatste CD een video 2.0CD is en de PBC-modus is ingeschakeld (ON) (alleen in de
VCD-modus).
PBC (11): Schakelt de PBC in/uit. (alleen in de VCD-modus).
RESUME (12): door het indrukken van de Stop-toets wordt de CD-weer-
gave onderbroken.Wanneer u daarna weer op de RESUME-toets drukt, wordt de weergave van de CD voortgezet
vanaf het punt waar deze werd onderbroken (alleen in de
VCD-modus).
SLOW (14): schakelt de slow motion in bij de weergave van video-CD’s.
Bij elk indrukken van de SLOW -toets wordt de snelheid
veranderd. 1/2x, 1/4x, 1/8x en 1/16x.Wanneer u naar de
normale weergave wilt terugkeren, drukt u de II -toets in
(alleen in de VCD-modus).
ZOOM (17): om een beeldfragment te vergroten, drukt u tijdens de weer-
gave op de toets ZOOM. De desbetreffende foto kan met
behulp van de ZOOM-toets in twee verschillende formaten
worden weergegeven. Met de I I / cursor-
toetsen kunt u het beeldfragment exacter selecteren. Druk
op de ZOOM-toets totdat ”RESTORE” verschijnt (alleen in
de VCD-modus) om naar de normale weergave terug te
keren.
REPEAT (20): zie beide tabellen.
R/L (22): wisselen tussen luidsprekerinstellingen: MONO L, MONO R,
STEREO (alleen in de VCD-modus).
22
NL
5....-05-CDP 604 neu 15.06.2004 14:19 Uhr Seite 22
Page 23

CD‘s afspelen
1. Open de CD-lade met de toets OPEN.
2. Plaats een audio-CD met het etiket naar boven zodanig op de centreerkegel
dat de CD mechanisch inklikt. Sluit de CD-lade weer.
3. Drukt op de II weergave-/pauze-toets (1) aan het apparaat om het in te schakelen. Op het display verschijnt ”READ” (lezen). De CD wordt vanaf de eerste
titel afgespeeld. Op het display wordt de huidige titel en de verstreken speelduur weergegeven.
4. Om een CD te verwijderen, drukt u de STOP-toets in, opent daarna de CDlade met de OPEN-toets en neemt vervolgens de CD voorzichtig naar boven uit
de lade. Houd het CD-deksel steeds gesloten.
Opmerking: wanneer een CD verkeerd in de lade is geplaatst, verschijnt op
het display „Badisc”. Wanneer geen CD is geplaatst, verschijnt de melding
„NO DISC“.
Weergave van muziek in MP3-formaat
U kunt met dit apparaat ook muziek in MP3-formaat afspelen. Bovendien ondersteunt het apparaat de gangbare CD-types: CD, CD-RW, CD-R. Op het display verschijnt steeds de actieve ESP-functie (geheugen 100 sec.), zie onder
”ESP/NP/DIR”.
Geprogrammeerde weergave
Biedt de mogelijkheid om een willekeurige titelvolgorde te programmeren. Zie onder
”PROGRAM” in de onderstaande tabellen.
Na het afspelen van alle geprogrammeerde titels stopt het apparaat automatisch.
Wanneer u één keer op de stoptoets drukt, wordt de weergave onderbroken en
het programma wordt gewist. Dit gebeurt ook na be‘indiging van de weergave en
na afloop van 10 seconden, zodra het apparaat uitschakelt.
U hebt de mogelijkheid om de geprogrammeerde titels met de REPEAT-functie te
combineren. Nadat u de programmering hebt afgesloten en het apparaat gestart
hebt, drukt u de REPEAT-toets tot 3 x in. Op deze wijze kunt u de functies zoals
onder „REPEAT“ beschreven, gebruiken.
Functieoverzichten
1. VCD-functies
• Schakel uw televisietoestel in.
• Schakel uw televisie over naar de AV-modus.
• Schakel het apparaat in en plaats een video-CD zoals eerder beschreven.
• Druk op de II weergave-/pauze-toets.
• Op het beeldscherm ziet u nu de videoclip terwijl u het geluid hoort via de CDspeler.
23
NL
5....-05-CDP 604 neu 15.06.2004 14:19 Uhr Seite 23
Page 24

Bediening VCD-functies
Druk op (II)
1. Apparaat wordt ingeschakeld en de CD wordt afgetast.
2. Pauze tijdens de weergave
3. De weergave wordt weer gestart.
Druk op STOP ()
De weergave wordt onderbroken.
Druk op
(I (3/13))
Sprong naar de voorafgaande titel.
Druk op
(I (4/21))
Met deze toets kunt u naar de volgende of de daaropvolgende titel springen enz.
Houd
(I / (3/16))
Wanneer u de toets ingedrukt houdt, wordt de snelzoekfunctie (terug)
geactiveerd.
Houd
(I / (4/18))
Wisselen tussen normale weergave, herhaling van alle titels en RANDOMfunctie.
Druk op MODE. Wisselen tussen normale weergave, herhaling van alle titels en RANDOM-
functie.
Druk op NP. Wisselen tussen ”NTSC”- en ”PAL”-video-uitgangssysteem.
Druk op PBC.
(Playback Control)
1 x indrukken: PBC ingeschakeld, weergave op het beeldscherm
2 x indrukken: PBC uitgeschakeld.
Druk op AUDIO/EQ AUDIO-functie: keuze uit de instellingen ”linkerkanaal”, ”rechterkanaal” en
”stereo”.
REPEAT 1 x indrukken = ”REPEAT 1”: De actuele titel wordt steeds herhaald.
2 x indrukken = ”REPEAT ALL”: de complete CD wordt steeds herhaald.
3 x indrukken = ”REPEAT CANCEL”: alle functies worden opgeheven.
De normale weergave wordt voortgezet.
PROGRAM
Druk eerst op STOP () en dan op PROG. Op het beeldscherm verschijnt
”PROG” en ”TRK”. Kies de volgorde met de I / I -toetsen
(toets 3 = +10, toets 4 =+1) of met de toetsen / (16/18).
Kies de volgorde direct via de cijfertoetsen (5). Bij tweecijferige nummers
drukt u eerst de +10-toets en vervolgens de eencijferige toets in.
De programmering is al opgeslagen. Druk op (II).
SLOW Kies hier uit de snelheden 1/2 ,1/4, 1/8, 1/16
RESUME Voortzetting vanaf hetzelfde punt na stop (zie onder RESUME)
DIGEST Weergave van de foto’s in klein formaat (zie onder DIGEST)
ZOOM Voor het uitvergroten van een beeldfragment (zie onder ZOOM)
R/L Wisselen tussen de audiokanalen.
1. VCD-functies
24
NL
5....-05-CDP 604 neu 15.06.2004 14:19 Uhr Seite 24
Page 25
2. CD-, MP3-functies
Bediening
Functies
CD MP3
Druk op (II)
1. Apparaat wordt ingeschakeld en de CD wordt afgetast.
2. Pauze tijdens de weergave.
3. De weergave wordt weer gestart.
Druk op
STOP ()
De weergave wordt onderbroken.
Druk op
(I (3/13))
Sprong naar de voorafgaande titel.
Druk op
(I (4/21))
Met deze toets kunt u naar de volgende of de daaropvolgende titel springen enz.
Houd
(I / (3/16))
Wanneer u de toets ingedrukt houdt, wordt de zoekfunctie (terug) geactiveerd.
Houd
(I / (4/18))
Wanneer u de toets ingedrukt houdt, wordt de zoekfunctie (vooruit) geactiveerd.
MODE aan het
apparaat:
REPEAT op de AB:
Wisselen tussen normale weergave, herhaling van DIR (alleen MP3) en
herhaling van alle titels. RANDOM-functie alleen via toets aan het apparaat.
Druk op ESP/DIR Activeert/deactiveert de anti-shock-
functie
Springt naar de volgende map/ordner (DIRECTORY).
Druk op AUDIO/EQ
EQ-functie: kies met de I / I -toetsen uit de instellingen STAND,
PROGRAM
Druk eerst op STOP () en dan op PROG. Kies de volgorde met de
I / I -toetsen (toets 3 = +10, toets 4 =+1). Druk opnieuw op PROG.
De weergave op het display schakelt naar geheugenplaats P02 enz.
Opslaan met de PROG-toets. Druk op ( / II) (alleen aan het apparaat).
U nach kunt de volgorde ook direct kiezen via de cijfertoetsen (5).
Bij tweecijferige nummers drukt u eerst de +10-toets en vervolgens de
eencijferige toets in. De programmering is al opgeslagen. Druk op (II).
25
NL
5....-05-CDP 604 neu 15.06.2004 14:19 Uhr Seite 25
Page 26
Speciale functies
MP3 – CDs: U kunt met uw apparaat MP3-CD‘s afspelen. Op deze CD‘s kunnen tot 200 titels gecomprimeerd opgeslagen worden. Uw apparaat herkent
een MP3 automatisch. De geluidskwaliteit blijft op deze wijze behouden. Om
deze CD‘s af te spelen gaat u te werk volgens de stappen die onder „CD‘s“
beschreven staan. U kunt de programmering van titels uitvoeren zoals
beschreven onder „Geprogrammeerde weergave“.
VCD:
uw apparaat beschikt over een videoaansluiting voor video-CD’s. U
kunt CD,VCD, CD-R en MP3 CD’s afspelen. Uw apparaat herkent het type CD
automatisch. Sluit het apparaat via de meegeleverde videokabel aan op uw
televisietoestel. Druk op OSD-toets (op de afstandsbediening). Op uw televisiescherm verschijnt het menu (wanneer u hier alleen een zwart-wit-beeld krijgt, drukt u op de N/P-toets, evt. bij geopende CD-lade).
Verhelpen van storingen
Dit apparaat is gekeurd conform de op dit moment van toepassing zijnde CErichtlijnen zoals bijvoorbeeld elektromagnetische compatibiliteit en laagspanningsvoorschriften en is geconstrueerd volgens de nieuwste veiligheidstechnische voorschriften.
Technische wijzigingen voorbehouden!
Garantie
Voor het door ons geleverde apparaat verlenen wij een garantie van 24 maanden
vanaf koopdatum (kassabon).
Eventuele gebreken aan het apparaat of aan het toebehoren*) die zijn ontstaan
door productie- of materiaalfouten verhelpen wij binnen deze periode kosteloos
door middel van reparatie of, naar ons oordeel, door vervanging. Eventuele garantiegevallen verlengen noch de geldigheidsduur van de garantie, noch begint daardoor een nieuwe garantieperiode!
Het koopbewijs geldt als garantiebewijs. Zonder dit bewijs kan geen kosteloze
reparatie of vervanging plaatsvinden.
26
NL
Symptomen Oorzaak Oplossing
VCD kan niet worden weergegeven.
VCD is niet of niet correct
geplaatst.
Controleer of de disc met het
opschrift naar boven is
geplaatst.
VCD springt tijdens de weergave
Controleer de CD op vingerafdrukken, vuil of krassen
Reinig de CD vanuit het midden met een zachte doek.
Geen kleur Kleursysteem niet goed
ingesteld
Druk op de P/N-toets (2) en
kies de juiste kleurnorm.
5....-05-CDP 604 neu 15.06.2004 14:19 Uhr Seite 26
Page 27

Geef in geval van garantie het apparaat met de kassabon en in de originele verpakking af bij uw handelaar.
*) Schade aan onderdelen leidt niet automatisch tot kosteloze vervanging van het
complete apparaat. Neem in dit geval contact op met onze hotline! De reparatie van
glasbreuk of breuk van kunststofonderdelen wordt altijd berekend!
Niet defecten aan de hulpstukken of aan de slijtende onderdelen (bijv. koolborstels,
deeghaken, drijfriemen, reserveafstandsbediening, reservetandenborstels, zaagbladen enz.), maar ook reiniging, onderhoud of de vervanging van slijtende delen
vallen niet onder de garantie en geschieden altijd tegen berekening!
Bij ingrepen door derden komt de garantieverlening te vervallen.
Na de garantieperiode
Na afloop van de garantieperiode kunnen reparaties tegen berekening worden uitgevoerd door de betreffende vakhandelaar of de technische dienst.
27
NL
5....-05-CDP 604 neu 15.06.2004 14:19 Uhr Seite 27
Page 28
Conseils de sécurité
Pour éviter tout risque d’incendie ou d’électrocution ne mettez en aucun cas votre
appareil en contact avec la pluie ou de l’humidité. Ne laissez jamais fonctionner
votre appareil à proximité d’eau (par ex. salle de bains, bassin de piscine, cave
humide).
N’utilisez l’appareil qu’aux fins auxquelles il est destiné.
Ne branchez l’appareil que dans une prise de courant en bon état de fonctionne-
ment. Veillez à ce que la tension électrique de l’appareil corresponde à celle indiquée sur la prise de courant.
Si vous utilisez une alimentation électrique externe, vérifiez la polarité et la tension
électrique. Placez toujours correctement les piles.
Installez toujours l’appareil de façon à ce que les ouvertures de ventilation ne
soient pas obstruées.
N’ouvrez jamais le bloc moteur de l’appareil. Des réparations mal appropriées peuvent entraîner des risques importants pour l’utilisateur. En cas d’endommagement
de l’appareil, en particulier du câble d’alimentation, ne mettez plus l’appareil en
marche et laissez un spécialiste se charger de la réparation. Contrôlez régulièrement le bon état du câble d’alimentation.
Pour éviter tout risque, seul le fabricant, son service après-vente ou un spécialiste
à qualification similaire sont aptes à remplacer un câble défectueux par un câble
équivalent.
Si l’appareil n’est pas utiliser pendant assez longtemps, débranchez le câble d’alimentation ou retirez les piles.
Vous pouvez éventuellement trouver ces symboles sur l’appareil, qui ont la signification suivante:
L’éclair indique à l’utilisateur les pièces dangereuses, situées à l’intérieur
de l’appareil, qui conduisent de hautes tensions.
Le point d’exclamation attire l’attention de l’utilisateur sur les remarques
importantes d’utilisation et d’entretien données dans les documents de
l’appareil.
Les appareils dotés de ce symbole fonctionnent avec un „laser de la classe 1“ pour la lecture des disques CD. Les boutons de sécurité intégrés
sont chargés d’éviter qu’à l’ouverture du compartiment à CD l’utilisateur
entre en contact avec la lumière laser qui est dangereuse et invisible à
l’oeil humain.
Il est absolument interdit de court-circuiter ou manipuler ces boutons de sécurité,
ce qui risquerait sinon de mettre l’utilisateur en contact avec la lumière laser.
28
F
5....-05-CDP 604 neu 15.06.2004 14:19 Uhr Seite 28
Page 29

Description des éléments de commande
Lecteur de CD (ABB. 1)
1 II CD Touche; Lecture CD /Pause
2 Touche CD Stop/off
3 I Touche PREV (recherche en arrière)
4 I Touche NEXT (recherche en avant)
5 Touche MODE
6 Touche AUDIO/EQ (canal gauche/droit/égaliseur)
7 Touche PROG/PBC
8 Touche NP/ESP/DIR
9 HOLD OFF/ON blocage des touches
10 OPEN compartiment à CD
11 Capteur pour télécommande
12 DC 4,5V: prise pour câble d’alimentation
13 AV OUT prise téléviseur
14 PHONES prise casque
15 VOLUME / variateur de volume
16 CHARGE ON/OFF
17 Compartiment à piles
Télécommande (ABB. 2)
1 Touche MUTE (couper le son)
2 Touche P/N (PAL / NTSC)
3 II Touche ;lecture CD/Pause
4 Touche CD Stop
5 Touches numérotées de 1à 10
6 Touche 10 +
7 Touche TIME
8 Touche DIGEST
9 Touche OSD
10 Touche RETURN
11 Touche PBC
12 Touche RESUME
13 Touche I CD SKIP (plage précédente)
14 Touche SLOW
15 Touche PROG (programmation CD)
16 Touche CD (recherche en arrière)
17 Touche ZOOM
18 Touche CD (recherche en avant)
19 Touche volume VOL +
20 Touche REPEAT (répétition)
21 Touche I CD SKIP (plage suivante)
22 Touche L/R (canal gauche/droit)
23 Touche volume VOL –
29
F
5....-05-CDP 604 neu 15.06.2004 14:19 Uhr Seite 29
Page 30

Casque à télécommande (ABB. 3)
A PHONES
B HOLD OFF/ON
C PLAY/PAUSE
D VOLUME
E STOP/OFF
F I BACK
G I NEXT
H ESP/LR/DIR
Remarque: certaines touches se trouvent à la fois sur l’appareil et sur la télécommande. Les touches dénommées de façon identique ont la même fonction.
Si vous souhaitez utiliser le casque à télécommande, procédez de la façon suivante: connectez la fiche du casque dans la prise (14) de l’appareil puis l’autre extrémité du câble du casque dans la prise de raccordement (A).
Affichage sur l’écran (ABB. 4)
1 VCD / MP3 / CD Format
2 Numéro du titre
3 Durée de lecture
4 Affichage verrouillage des touches
5 Fonction ESP
6 Affichage remplacement des piles
7 RAN - Fonction RANDOM
8 PGM - Fonction PROGRAMM
9 REP - Répétition simple
10 REP ALL - Répéter tous les titres
Avant la première utilisation
Installer les piles (non livrées)
• Ouvrez le compartiment à piles (17) situé au dos de l’appareil.
• Placez 2 piles de 1,5 V de type AA.Respectez le polarité indiquée (voir fond du
compartiment à piles ou impressions sur la paroi extérieure).
• Si vous n’utilisez pas l’appareil pendant un laps de temps prolongé, retirez les
piles de l’appareil afin d’éviter que l’acide des piles ne coule dans l’appareil.
• Le symbole d’une pile sur l’écran indique que les piles doivent être changées.
Remplacez toujours toutes les piles en même temps et non pas une seulement.
Attention: ne jetez pas vos piles avec les ordures ménagères. Rapportez vos piles
usagées à un centre de recyclage ou au fabricant.
Ne jetez jamais de piles dans le feu.
30
F
5....-05-CDP 604 neu 15.06.2004 14:19 Uhr Seite 30
Page 31

Piles de la télécommande
La pile de la télécommande est une pile au lithium de longue durée. Si le champ
d’action de la télécommande diminue en cours d’utilisation, procédez de la façon
suivante:
• Ouvrez le compartiment à piles situé sur le côté de la télécommande.
• Remplacez la pile par une autre du même type. Respectez la polarité.
• Refermez le compartiment à piles.
Fonctionnement avec câble d’alimentation
Vous pouvez également utiliser cet appareil avec un câble d’alimentation.
1. Branchez le câble d’alimentation dans une prise de courant en bon état de fonctionnement de 230V, 50 Hz.
2. Pour raccorder le lecteur de CD avec le câble d’alimentation, introduisez la fiche
du câble d’alimentation dans la prise DC de 4,5 V (12).
3. Si vous utilisez le câble d’alimentation (DC 4,5V/700mA), veillez à respecter la
polarité conformément aux données indiquées sur le lecteur de CD.
Fonctionnement automatique
Grâce à l’adaptateur cassette et à l’adaptateur pour allume-cigares, le lecteur de
CD fonctionne dans presque tous les véhicules, sur presque tous les autoradios
avec lecteur de cassettes.
1. Introduisez l’adaptateur pour allume-cigares dans l’allume-cigares et branchez
l’autre extrémité du câble dans la prise DC 4,5 V du lecteur de CD.
2. Introduisez la fiche de l’adaptateur cassette dans la prise AV OUT (13) du lecteur de CD.
3. Mettez votre autoradio en marche puis introduisez l’adaptateur cassette dans le
compartiment à cassettes. Veillez à ce que le câble de raccordement de la cassette soit correctement placé dans la fente de guidage de la cassette ! La
mécanique du lecteur de cassettes risque sinon de se bloquer.
Il arrive rarement que certains autoradios rejettent aussitôt l’adaptateur cassette.
Placez alors le câble de raccordement de la cassette du côté opposé à la fente de
guidage et introduisez la cassette dans le sens inverse à nouveau dans l’appareil.
Si l’autoradio rejette à nouveau la cassette, il vous est alors impossible d’utiliser
l’adaptateur cassette.
Généralités d’utilisation
AUDIO/ Pour changer le réglage des haut-parleurs: CH L, CH R,
STEREO = Affichage sur le display, MONO L, MONO R,
STEREO = Affichage sur l’écran (seulement en mode
VCD).
EQ (6): Vous disposez de différents modes d’écoute (CLASS(IC),
DISCO, JAZZ, POP).
31
F
5....-05-CDP 604 neu 15.06.2004 14:19 Uhr Seite 31
Page 32

HOLD (9): Pour verrouiller les fonctions de toutes les touches de l’ap-
pareil, comme éviter le déclenchement involontaire d’une
touche. Si vous placez le bouton vers la droite, le mot
”HOLD” apparaît sur l’écran.
OPEN (10): Pour ouvrir le compartiment à CD.
DC 4,5V (12): Pour le raccordement de l’unité d’alimentation.
AV OUT (13): Pour le raccordement au téléviseur sur la prise entrée
vidéo. Introduisez la fiche noire dans la prise du lecteur de
CD, la fiche jaune dans la prise entrée vidéo, la fiche rouge
dans la prise entrée du haut-parleur droit (R) et la fiche
blanche dans la prise entrée du haut-parleur gauche (L) de
votre téléviseur.
PHONES (14): Pour le raccordement du casque ou des écouteurs.
VOLUME (15): Pour le réglage du volume (19/23 sur la télécommande). En
mode VCD, réglable uniquement sur la télécommande ou le
téléviseur.
CHARGE
ON/OFF (16): Pour mettre la fonction charge en marche lorsqu’un câble
d’alimentation externe est branché.Vérifiez que le compartiment à piles est vide. Risque d’explosion! N’utilisez que des
accus appropriés!
Télécommande à infrarouges:
Pour une commande sans fil à une distance de maximum 5 mètres. Si le champ
d’action diminue, les piles doivent être changées.Veillez lors de l’utilisation à l’absence d’obstacle entre la télécommande et le récepteur à infrarouges du téléviseur.
Pour arrêter l’appareil
Pour arrêter l’appareil, enfoncez 1x la touche STOP (2) (4 sur la télécommande)
ou 2x si l’appareil est en marche ou n’activez aucune fonction de l’appareil pendant
environ 10 secondes .
Description des touches CD
II Lecture/
Pause (1/3): Vous pouvez interrompre la lecture pour un court instant. Si
vous enfoncez à nouveau la touche la lecture reprend là où
vous l’aviez arrêtée.
STOP/OFF (2/4): Le CD est arrêté. Si vous enfoncez à nouveau la touche,
l’appareil s’arrête.
I PREV (3)/
I NEXT (4): Vous pouvez, grâce à ces touches, passer au titre suivant
ou précédent. Si vous maintenez la touche enfoncée, la fonction de recherche automatique est activée.
32
F
5....-05-CDP 604 neu 15.06.2004 14:19 Uhr Seite 32
Page 33

ESP/NP/DIR (8): ESP en mode CD:
Désactive ou active la fonction antichoc Fonction active lorsqu’un disque audio se trouve dans l’appareil (mémorisation
40 +/- 5 sec.). En cas de perturbations, les données musicales du disque seront importées d’une plage de mémorisation temporaire. Les parasites de lecture seront ultérieurement corrigés dans la plage de mémorisation temporaire.
Lorsque la fonction antichoc est activée, un affichage à plusieurs bâtons apparaît sur l’écran et se remplit progressivement. Enfoncez à nouveau la touche ESP pour désactiver la
fonction.
Fonction DIR seulement en mode MP3:
Cette touche sert, lorsqu’un disque MP3 se trouve dans
l’appareil, à sélectionner les fichiers du disque.
Fonction N/P seulement en mode VCD:
Pour passer de ”NTSC” au système vidéo de sortie ”PAL”.
MODE (5): Vous pouvez choisir les fonctions suivantes grâce à la tou-
che MODE:
1 x pression = „REP“: Le titre actuel est lu en boucle.
2 x pression = „REP ALL“: Le disque se trouvant dans l’ap-
pareil est lu en boucle.
3 x pression = „RAN“: Tous les titres sont lus dans un ordre
aléatoire.
4 x pression = Toutes les fonctions sont désactivées. Le dis-
que est lu tout à fait normalement.
Fonctions en mode lecture avec un disque MP3:
1 x pression = „REP“: Le titre actuel est lu en boucle.
2 x pression = „REP DIR“: Le fichier choisi (l’album) est lu
en boucle.
3 x pression = „REP ALL“: Tout le disque est lu en boucle.
4 x pression = „RAN“: Tous les titres sont lus dans un ordre
aléatoire.
5 x pression = Toutes les fonctions sont désactivées. Le dis-
que est lu tout à fait normalement.
Description des touches CD sur la télécommande
MUTE (1): Pour couper instantanément le son. Pour désactiver cette
fonction, enfoncez à nouveau la touche MUTE.
P/N (2): Pour passer de ”NTSC” au système vidéo de sortie ”PAL”.
TIME (7): Grâce à la touche TIME, vous pouvez programmer la lectu-
re pour une heure donnée. Si vous enfoncez cette touche,
les lettres GOTO --:-- apparaissent sur l’écran. Tapez les
chiffres correspondant. Les deux premiers chiffres corre-
33
F
5....-05-CDP 604 neu 15.06.2004 14:19 Uhr Seite 33
Page 34

spondent aux minutes, les deux suivants aux secondes.
Pour taper le chiffre ”0”, enfoncez la touche ”10”.
DIGEST (8): Si vous enfoncez cette touche, l’appareil répartit le fichier du
disque se trouvant dans l’appareil en 9 fichiers de la même
taille et fait simultanément apparaître les images sur l’écran.
Cela peut durer plusieurs minutes selon la taille du fichier.
Vous pouvez, grâce aux touches numérotées de 1à 9, passer à l’emplacement que vous désirez, qui est alors animé.
Enfoncez ensuite la touche pour que l’appareil lance la lecture à partir de l’emplacement que vous avez sélectionné,
en mode grand format.
OSD (9): Vous pouvez lire le type du CD, les fonction par ex. SINGLE
REMAIN, le numéro du titre et le temps de lecture restant.
Enfoncez la touche au maximum 5 x pour sélectionner les
différents réglages.
RETURN (10): Si vous enfoncez cette touche, le disque s’arrête. Le menu
principal apparaît. Cette fonction ne peut être utilisée qu’avec des disques vidéo 2.0 et en mode PBC (ON) (seulement en mode VCD).
PBC (11): Pour activer/désactiver PBC. (seulement en mode VCD).
RESUME (12): Enfoncez la touche Stop pour arrêter la lecture. Si vous
enfoncez la touche RESUME, la lecture recommence là où
elle avait été interrompue (seulement en mode VCD).
SLOW (14): Pour passer en fonction ”ralenti” lors de la lecture d’un dis-
que vidéo. La vitesse est modifiée à chaque fois que vous
enfoncez la touche SLOW. 1/2x, 1/4x, 1/8x et 1/16x. Si vous
voulez à nouveau passer en lecture normale, enfoncez la
touche II (seulement en mode VCD).
ZOOM (17): Pour agrandir une partie de l’image, enfoncez la touche
ZOOM pendant la lecture. Grâce à la touche ZOOM, l’image sélectionnée peut être présentée en deux formats différents. Grâce aux touches curseurs I I /
vous pouvez délimiter la partie d’image sélectionnée avec
davantage de précision. Pour revenir en lecture normale,
enfoncez la touche ZOOM jusqu’à ce que ”RESTORE”
apparaisse (seulement en mode VCD).
REPEAT (20): voir les deux tableaux.
R/L (22): Pour changer le réglage des haut-parleurs: MONO L,
MONO R, STEREO (seulement en mode VCD).
Pour lire un CD
1. Ouvrez le compartiment à CD grâce à la touche OPEN.
2. Placez un disque dans l’appareil en orientant la face imprimée vers le haut, sur
le cône de centrage, jusqu’au clic. Fermez le compartiment à CD.
3. Enfoncez la touche II Lecture/Pause (1) pour mettre l’appareil en marche.Le
34
F
5....-05-CDP 604 neu 15.06.2004 14:19 Uhr Seite 34
Page 35

mot ”rEAd” (lecture) apparaît sur l’écran. Le disque est lu à partir du premier
titre. Le titre en cours de lecture et le temps restant sont indiqués sur l’écran.
4. Pour retirer le disque, enfoncez la touche STOP, ouvrez le couvercle du com-
partiment à CD à l’aide de la touche OPEN et soulevez doucement le disque.
Laissez toujours le couvercle du compartiment à CD fermé.
Remarque: si le disque n’est pas placé correctement dans l’appareil, les lettres
”BAdisc” apparaissent sur l’écran. S’il n’y a aucun disque dans l’appareil,
”NO DISC” apparaît sur l’écran.
Lecture de musique en format MP3
Vous pouvez, avec cet appareil, lire de la musique en format MP3. L’appareil est
également compatible avec les types usuels de disques: CD, CD-RW, CD-R.
L’écran indique toujours que la fonction ESP est active (mémoire 100 sec.), voir
”ESP/NP/DIR”.
Programmation de lecture
Pour permettre la programmation de titres dans l’ordre désiré.Voir ”PROGRAMME”
dans les tableaux ci-après.
L’appareil s’arrête automatiquement dès que tous les titres programmés ont été lus.
Enfoncez une fois la touche Stop pour arrêter la lecture. La programmation est
alors effacée. De même après la fin de la lecture ainsi qu’environ 10 secondes
après avoir arrêter l’appareil.
Vous pouvez combiner les titres programmés avec la fonction REPEAT.Après avoir
mis l’appareil en marche et effectué la programmation, enfoncez la touche REPEAT
au maximum 3 x et les fonction peuvent être utilisées comme décrit dans la section
”REPEAT”.
Récapitulatif des différentes fonctions
1. Fonctions VCD
• Mettez votre téléviseur en marche.
• Passez en mode AV sur votre téléviseur.
• Mettez votre appareil en marche et placez un disque vidéo, comme décrit
précédemment, dans l’appareil.
• Enfoncez la touche II Lecture/Pause.
• Vous pouvez visionner le vidéoclip sur l’écran de votre téléviseur et entendre le
son par l’intermédiaire de votre lecteur de CD.
35
F
5....-05-CDP 604 neu 15.06.2004 14:19 Uhr Seite 35
Page 36

36
F
Utilisation Fonctions VCD
Enfoncez (II)
1. L’appareil est mis en marche et le disque identifié.
2. Pause pendant la lecture.
3. La lecture recommence.
Enfoncez STOP ()
La lecture est arrêtée.
Enfoncez
(I (3/13))
Titre précédent.
Enfoncez
(I (4/21))
Vous pouvez, grâce à cette touche, passer au titre suivant ou celui
d’après, etc.
Maintenez enfoncée
(I / (3/16))
Maintenez la touche enfoncée pour activer la recherche automatique (en
arrière).
Maintenez enfoncée
(I / (4/18))
Maintenez la touche enfoncée pour activer la recherche automatique (en
avant).
Enfoncez MODE Choisir entre une simple répétition, la répétition de tous les titres et la fon-
ction RANDOM.
Enfoncez NP Passer de ”NTSC” au système vidéo de sortie ”PAL”.
Enfoncez PBC
(Playback Control)
1 x pression: PBC activé, affichage sur l’écran
2 x pressions: PBC désactivé.
Enfoncez
AUDIO/EQ
Fonction AUDIO: choix de réglage du canal gauche, droit et stéréo.
REPEAT 1 x pression = ”REPEAT 1”: Le titre en cours est lu en boucle.
2 x pressions = ”REPEAT ALL”: Le disque en cours est lu en boucle.
3 x pressions = ”REPEAT CANCEL” Toutes les fonctions sont
désactivées. La lecture est normale.
PROGRAM
Enfoncez d’abord () puis PROG. ”PROG” et ”TRK” apparaissent sur
l’écran. Choisissez l’ordre grâce aux touches I / I (touche 3 = +10,
touche 4 =+1) ou aux touches / (16/18).
Choisissez l’ordre directement avec les touches numérotées (5). Pour un
nombre à deux chiffres, enfoncez d’abord la touche +10 puis le nombre à
un chiffre. La programmation est sauvegardée. Enfoncez la touche (II).
SLOW Choisissez entre les vitesses suivantes: 1/2 ,1/4, 1/8, 1/16
RESUME Lecture à partir de l’emplacement d’arrêt (voir section RESUME)
DIGEST Affichage des images en petit format (voir section DIGEST)
ZOOM Pour agrandir une partie d’une image (voir section ZOOM)
R/L Pour changer de canal audio
1. Fonctions VCD
5....-05-CDP 604 neu 15.06.2004 14:19 Uhr Seite 36
Page 37

Utilisation
Fonctions
CD MP3
Enfoncez (II)
1. L’appareil est mis en marche et le disque identifié.
2. Pause pendant la lecture.
3. La lecture recommence.
Enfoncez STOP ()
La lecture est arrêtée.
Enfoncez
(I (3/13))
Titre précédent.
Enfoncez
(I (4/21))
Vous pouvez, grâce à cette touche, passer au titre suivant ou celui d’après, etc.
Maintenez enfoncée
(I / (3/16))
Maintenez la touche enfoncée pour activer la recherche automatique
(en arrière).
Maintenez enfoncée
(I / (4/18))
Maintenez la touche enfoncée pour activer la recherche automatique
(en avant).
MODE sur l’appareil:
REPEAT sur la télécommande:
Choisir entre une simple répétition, la répétition DIR (seulement MP3) et la
répétition de tous les titres. Fonction RANDOM seulement sur l’appareil.
Enfoncez
ESP/DIR
Active ou désactive la fonction
antichoc.
Pour passer à l’index ou au fichier
suivant (DIRECTORY).
Enfoncez
AUDIO/EQ
Fonction EQ: choisissez, grâce aux touches I / I entre les réglages
STAND, CLASS; DISCO; JAZZ; POP.
PROGRAM
Enfoncez d’abord () puis PROG. Choisissez l’ordre grâce aux touches
I / I (touche 3 = +10, touche 4 =+1). Enfoncez à nouveau PROG.
L’affichage sur l’écran passe à la plage P-02. etc. Sauvegardez grâce à la
touche PROG. Enfoncez la touche (II) (seulement sur l’appareil).
Vous pouvez aussi choisir l’ordre directement grâce aux touches
numérotées (5). Pour un nombre à deux chiffres, enfoncez d’abord la touche +10 puis le nombre à un chiffre. La programmation est sauvegardée.
Enfoncez la touche (II).
2. Fonctions CD, MP3
37
F
5....-05-CDP 604 neu 15.06.2004 14:19 Uhr Seite 37
Page 38

Fonctions spéciales
MP3 – CDs: Vous pouvez, avec votre appareil, lire des disques MP3. Ces disques peuvent contenir jusqu’à 200 titres comprimés. Votre appareil reconnaît
automatiquement un disque MP3. La qualité sonore est ainsi intacte. Pour lire
ces disques, procédez comme indiqué dans la section ”Pour lire un CD”.
Vous pouvez faire des programmations de titres comme décrit dans
”Programmation de lecture”.
VCD:
Votre appareil est équipé d’un raccordement vidéo pour disques vidéo.
Il est compatible avec les disques CD,VCD, CD-R et MP3.Votre appareil identifie automatiquement le type de disque. Connectez votre appareil à votre
téléviseur à l’aide du câble vidéo livré. Enfoncez la touche OSD (sur la télécommande). Le menu apparaît sur votre téléviseur (si vous n’obtenez qu’une
image noir et blanc, enfoncez la touche N/P, le cas échéant lorsque le compartiment à CD est ouvert).
En cas de problèmes
Cet appareil a été contrôlé d’après toutes les directives européennes actuelles
applicables, comme par exemple concernant la compatibilité électromagnétique et
la basse tension. Cet appareil a été fabriqué en respect des réglementations techniques de sécurité les plus récentes.
Sous réserve de modifications techniques.
Garantie
Nous accordons une garantie de 24 mois à dater de la date d’achat (ticket de
caisse) pour l’appareil que nous vendons.
Pendant la durée de la garantie, nous éliminons gratuitement les défauts de l’appareil ou des accessoires *) découlant d’un vice de matériau ou de fabrication au
moyen d’une réparation ou, selon notre estimation, au moyen d’un remplacement.
38
F
Symptômes Cause Solution
VCD ne peut pas être lu. VCD n’est pas dans l’appareil
ou mal positionné.
Vérifiez que la face imprimée
du disque se trouve vers le
haut.
VCD saute pendant la lecture Vérifiez l’état du disque
(empreintes de doigts, salissures ou rayures)
Nettoyez le disque à l’aide
d’un torchon doux, du centre
vers le bord.
Aucune couleur Le système de couleur est mal
réglé
Enfoncez la touche P/N (2) et
sélectionnez la bonne norme
de couleur.
5....-05-CDP 604 neu 15.06.2004 14:19 Uhr Seite 38
Page 39

Les prestations dans le cadre de la garantie n’entraînent aucune prorogation de la
durée de garantie et ne donnent pas droit à une nouvelle garantie !
Le justificatif de garantie est le reçu. Sans ce justificatif, aucun remplacement
gratuit ni aucune réparation gratuite ne peuvent être effectués.
En cas de recours à la garantie, rapportez l’appareil dans son emballage d’origine
accompagné du ticket de caisse à votre revendeur.
*) Les endommagements de pièces d’accessoires ne justifient pas automatiquement l’échange gratuit de l’appareil complet. Contactez alors notre centrale téléphonique! La casse de pièces en verre ou en plastique est dans tous les cas à votre
charge!
Les défauts sur les accessoires ou les pièces d’usure (p.ex.les charbons de
moteurs, crochets, courroies d’entraînement, télécommande de rechange, brosses
à dents de rechange, lames de scies etc.) ainsi que le nettoyage, l’entretien ou le
remplacement de pièces d’usure ne sont pas garantis et sont donc payants !
En cas d’intervention étrangère, la garantie devient caduque.
Après la garantie
Après écoulement de la durée de garantie, les réparations peuvent être effectuées,
contre paiement, par le commerce spécialisé ou le service de réparation.
39
F
5....-05-CDP 604 neu 15.06.2004 14:19 Uhr Seite 39
Page 40

Indicaciones generales para su seguridad
Vd. no debe dejar expuesto el aparato ni a la lluvia ni a la humedad, a fin de disminuir así el riesgo de incendio o de sacudida eléctrica.
Por tanto, no debe utilizar el aparato cerca de agua – por ejemplo, cerca de la
bañera, de una piscina o de un sótano húmedo.
Utilice el aparato únicamente para la finalidad para la que ha sido construido.
El aparato se ha de conectar únicamente a una caja de toma de corriente instalada
reglamentariamente. Cerciórese de que la tensión indicada concuerda con la tensión de la caja de enchufe.
Preste atención a que sea correcta la polaridad cuando se empleen fuentes de alimentación externas. Las pilas se han de introducir siempre correctamente.
El aparato se ha de dejar puesto de modo que no se tapen los orificios de aireación existentes.
Jamás se abrirá la carcasa del cuerpo del aparato. Las reparaciones mal hechas
pueden generar considerables peligros para el usuario.
En caso de estar deteriorado el aparato, en especial el cable de conectar a red, ya
no se ha de poner más en servicio el aparato, sino que se hará que lo repare un
especialista. Controle periódicamente el cable de conexión a red para ver si se ha
deteriorado.
Sólo el fabricante, nuestro servicio posventa o un técnico con una cualificación
similar pueden cambiar un cable defectuoso por otro similar, para evitar todo tipo
de riesgo.
Saque de la toma de corriente la clavija de conectar a la red o bien quite las pilas
cuando no se vaya a usar el aparato durante largo tiempo.
Estos símbolos pueden encontrarse en caso dado en el aparato, y son para indicar
lo siguiente:
El símbolo del rayo advierte al usuario que hay componentes internos del
aparato que pueden tener tensiones peligrosamente altas.
El símbolo con el signo de exclamación advierte al usuario que hay
instrucciones de manejo y de mantenimiento importantes en la documentación que va adjunta.
Aparatos que llevan puesto este símbolo operan con un ”Lector Clase 1”
para explorar el CD. Los interruptores de seguridad incorporados sirven
para impedir que el usuario esté expuesto a luz láser invisible peligrosa
para la vista del usuario cuando está abierto el compartimiento del CD.
Bajo ningún concepto se ha de hacer un puenteado sobre estos interruptores de
seguridad ni deben ser manipulados. De hacerlo, existe el peligro de que Vd. esté
expuesto a la luz láser.
40
E
5....-05-CDP 604 neu 15.06.2004 14:19 Uhr Seite 40
Page 41

Descripción de los elementos de mando
Lettore CD (ABB. 1)
1 Tecla II Reproducción CD / Pausa
2 Tecla CD Stop / Off
3 Tecla I PREV (Búsqueda en retroceso)
4 Tecla I NEXT (Búsqueda en avance)
5 Tecla MODE
6 Tecla AUDIO/EQ (Canal/ecualizador izquierdo/derecho)
7 Tecla PROG/PBC
8 Tecla NP/ESP/DIR
9 HOLD OFF/ON Bloqueo de tecla
10 OPEN Portadisco
11 Sensor para el mando a distancia
12 DC 4,5V: Conexión al adaptador de la red
13 AV OUT Conexión al televisor
14 PHONES Toma de auriculares
15 Regulador de volumen / VOLUME
16 CHARGE ON/OFF
17 Cámara de pilas
Mando a distancia (ABB. 2)
1 Tecla MUTE (Supresión de sonido)
2 Tecla P/N (PAL/NTSC)
3 Tecla II Reproducción CD / Pausa
4 Tecla CD Stop
5 Teclas numéricas 1-10
6 Tecla 10+
7 Tecla TIME
8 Tecla DIGEST
9 Tecla OSD
10 Tecla RETURN
11 Tecla PBC
12 Tecla RESUME
13 Tecla I CD SKIP (saltar en retroceso)
14 Tecla SLOW
15 Tecla PROG (Programación de CD)
16 Tecla CD (Búsqueda en retroceso)
17 Tecla ZOOM
18 Tecla CD (Búsqueda en avance)
19 Tecla de volumen VOL +
20 Tecla REPEAT (Repetición)
21 Tecla I CD SKIP (saltar en avance)
22 Tecla L/R (Canal derecho/izquierdo)
23 Tecla de volumen VOL –
41
E
5....-05-CDP 604 neu 15.06.2004 14:19 Uhr Seite 41
Page 42

Mando a distancia para auriculares (ABB. 3)
A PHONES
B HOLD OFF/ON
C PLAY/PAUSE
D VOLUME
E STOP/OFF
F I BACK
G I NEXT
H ESP/LR/DIR
Nota: Algunas teclas se encuentran en el aparato como también en el mando
a distancia. Teclas idénticas originan la misma función.
Si desea utilizar el mando a distancia para auriculares, proceda de siguiente manera: Empalme la clavija del mando a distancia para auriculares con el jack (14) en el
aparato e introduzca ahora la clavija del auricular/receptor en el jack de conexión
(A).
Indicar en el display (ABB. 4)
1 VCD / MP3 / CD Formato
2 Número del título
3 Duración de reproducción
4 Indicación bloqueo de tecla
5 Función ESP
6 Indicación cambio de pilas
7 RAN - Función RANDOM
8 PGM - Función PROGRAMM
9 REP - Repetición simple
10 REP ALL - Repetición completa
Puesta en marcha del aparato
Introduzca las pilas (No son contenido del suministro)
• Abra la cámara de pilas (17) en la parte trasera.
• Coloque dos pilas del tipo AA, 1,5 V. Tenga atención con la polaridad correcta
(Vea la indicación en la cámara de pilas o en el impreso en la parte exterior).
• Si no utilizará las pilas durante un tiempo, se recomienda retirar las pilas del
aparato, para evitar un derrame del ácido de pilas.
• Un símbolo de pila indica que se deberían cambiar las pilas. Siempre cambie el
juego completo de pilas, no sólo una.
Atención: Las pilas no se tiran en el desecho casero. Se ruega llevar las pilas usadas a un depósito central o al concesionario.
Nunca tire las pilas al fuego.
42
E
5....-05-CDP 604 neu 15.06.2004 14:19 Uhr Seite 42
Page 43

Las pilas del mando a distancia
En respecto a la pila del mando a distancia se trata de una célula de litio de larga
duración. Si con el tiempo de aplicación se disminuye el alcance del mando a
distancia, proceda de siguiente manera:
1. Abra la cámara de pilas en la parte lateral del mando a distancia.
2. Recambie la célula por otra del mismo tipo.Tenga atención con la polaridad
correcta.
3. Cierre la cámara de pilas.
Funcionamiento con adaptador de red
También tiene la posibilidad de poner en marcha su aparato con un adaptador de
red.
1. Introduzca el adaptador de red en una caja de enchufe con tomatierra e instalada por la norma 230 V, 50 Hz.
2. Conecte el reproductor de discos compactos con el adaptador de red, introduciendo la clavija en el jack DC 4,5V (12).
3. Al utilizar un adaptador de red (DC 4,5V/700mA) se ruega tener atención con la
polaridad correcta según las indicaciones en el reproductor CD.
Funcionamiento en coche
En casi todos los coches se puede hacer funcionar el reproductor de CD mediante
el radiocasete, la casete adaptadora y el adaptador para encender cigarillos.
1. Introduzca el adaptador para encender cigarillos en el encendedor de cigarillos
e introduzca la clavija al final del cable en el conector DC 4,5 V del reproductor
de CD.
2. Introduzca la clavija de la casete adaptadora en el conector AV-OUT (13) del
reproductor de CD.
3. Conecte su radiocasete e introduzca la casete adaptadora en el portacasete.
¡Tenga atención que el cable de conexión de la casete adaptadora esté colocada correctamente en la garganta de guía de la casete! ¡La mecánica de la platina para casetes podría atraparse!
Algunos pocos radiocasetes podrían, bajo ciertas circunstancias, echar la casete
adaptadora después de haberla introducido. En este caso coloque el cable de
conexión de la casete enfrente en la garganta de guía e introduzca la casete con la
otra cara en el portacasete. Si el radiocasete arroja de nuevo la casete adaptadora,
lamentablemente no puede utilizar la casete adaptadora.
Uso en general
AUDIO/ Cambio entre los ajustes de altavoz:
CH L, CH R, STEREO = Indicación en el display,
MONO L; MONO R; STEREO = Indicación en la pantalla
(sólo en el modo VCD).
43
E
5....-05-CDP 604 neu 15.06.2004 14:19 Uhr Seite 43
Page 44

EQ (6): Hay diferentes modos de sonido a disposición (CLASS(IC),
DISCO, JAZZ, POP).
HOLD (9): Bloquea la función de todas las teclas del aparato, como
protección de una pulsación no intencionada. Si empuja el
interruptor hacia la derecha, aparecerá „HOLD“ en el display.
OPEN (10): Para abrir el portadiscos.
DC 4,5V (12): Para la conexión del adaptador de red.
AV OUT (13): Para la conexión a un televisor con jack de entrada video.
Introduzca por favor la clavija negra en el jack del reproductor de discos compactos, la clavija amarilla en el jack de
entrada video, la clavija roja en la entrada derecha del altavoz ( R) y la clavija blanca en la entrada izquierda del altavoz (L) de su televisor.
PHONES (14): Para la conexión de auriculares / receptor auricular.
VOLUME (15): Sirve para ajustar el volumen (19/23 en el mando a
distancia). En el modo VCD sólo es posible la regulación a
través del mando a distancia o el televisor.
CHARGE
ON/OFF (16): Conecta la función de carga habiendo una clavija de la red
externa conectada. Se ruega tener atención que no haya
ningunas pilas colocadas en la cámara de pilas. ¡Existe
peligro de explosión! ¡Solamente utilice acumuladores apropiados!
Nota: Se ruega utilizar el cartucho de carga suministrado,
para establecer el contacto con el acumulador.
Mando a distancia infrarrojo:
Para el mando a distancia inalámbrico desde una distancia de 5 metros. Si disminuye el alcance, se deben cambiar las pilas. Al utilizar el mando a distancia procure tener visibilidad entre el mando a distancia y el receptor infrarrojo del aparato.
Desconexión
Puede desconectar el aparato, presionando la tecla STOP (2) (4 en el mando a
distancia) 1x o teniendo el aparato en marcha 2x, o no manejando el aparato
durante unos 10 segundos.
Descripción de las teclas del CD
II Reproducción/
Pausa (1/3): Puede interrumpir brevemente la reproducción.
Presionando de nuevo el aparato se reiniciará la reproducción en el mismo sitio.
STOP/OFF (2/4): Se parará el disco compacto.Si presiona otra vez, se des-
conectará el aparato.
44
E
5....-05-CDP 604 neu 15.06.2004 14:19 Uhr Seite 44
Page 45

I PREV (3)/
I NEXT (4): Con estas teclas puede saltar al título próximo o anterior. Si
mantiene presionada la tecla, se iniciará una búsqueda
rápida.
ESP/NP/DIR (8): ESP en el modo CD:
Desactiva/activa la función de anti-choque al haber colocado un disco compacto audio (Memoria 40+/-5 segundos).
En caso de interferencias se reproducirán sin interferencias
los datos de música desde una memoria intermedia. Faltas
de lectura se corregirán posteriormente en la memoria
intermedia. Al tener la función de anti-choque activada, aparecerá una indicación de barra en el display que se llenará
poco a poco. Presione de nuevo la tecla ESP para deactivar
la función.
Función DIR sólo en el modo MP3:
Esta tecla sirve, al tener un CD MP3 colocado, como tecla de
selección para cambiar los archivadores aplicados en el CD.
Función N/P sólo en el modo VCD:
Cambio entre los sistemas de salida video „NTSC“ y „PAL“.
MODE (5): Siguientes funciones puede seleccionar con la tecla MODE:
1 x presionar = „REP“: El título actual se repetirá continua-
mente.
2 x presionar = „REP ALL“: El CD actual se repetirá conti-
nuamente.
3 x presionar = „RAN“: Todos los títulos se reproducirán uno
detrás del otro en un orden casual.
4 x presionar = Se borrarán todas las funciones. El funcio-
namiento normal de reproducción continua
Funciones en el modo de reproducción de un CD MP3
1 x presionar = „REP“: El título actual se repetirá continua-
mente.
2 x presionar = „REP DIR“: El archivador actualmente sel-
eccionado (el álbum) se repetirá continuamente.
3 x presionar = „REP ALL“: El CD completo se repite conti-
nuamente.
4 x presionar = „RAN“: Todos los títulos se reproducirán uno
detrás del otro en un orden casual.
5 x presionar = Se borrarán todas las funciones. El funcio-
namiento normal de reproducción continua.
Descripción de las teclas CD en el mando a distancia
MUTE (1): Sirve para la supresión rápida del volumen. Para desactivar
esta función presione de nuevo la tecla MUTE.
45
E
5....-05-CDP 604 neu 15.06.2004 14:19 Uhr Seite 45
Page 46

P/N (2): Cambio entre los sistemas de salida video „NTSC“ y „PAL“.
TIME (7): Con la tecla TIME puede fijar la reproducción a partir de
una hora determinada. Si presiona la tecla aparecerá en la
pantalla GOTO --:--. Introduzca el número correspondiente.
Las primeras dos cifras, representan los minutos, las
siguientes dos cifras los segundos. El número „0“ se elige
con la tecla „10“.
DIGEST (8): Si presiona la tecla, el reproductor dividirá el archivo VCD
actual y en proceso de reproducción en 9 partes del mismo
tamaño y representará al mismo tiempo las imágenes en la
pantalla. Esto, dependiendo del tamaño del archivo, puede
tardar varios minutos. Con las teclas numéricas 1-9 puede
cambiar al apartado deseado, éste se animará ahora. Si
presiona ahora la DIGEST tecla, el aparato reproducirá a
partir del apartado seleccionado en el modo de imagen
completa.
OSD (9): Verá el tipo de CD, las funciones p.ej. SINGLE REMAIN, el
número del título y el tiempo restante de reproducción del
CD. Presione la tecla hasta 5x y elija entre los diferentes
ajustes.
RETURN (10): Al presionar la tecla, se parará la reproduccón del CD. Se
indicará el menú principal. Esta función solamente se podrá
utilizar, si el CD introducido es un CD Video 2.0 y si el
modo PBC está activado (ON) (sólo en el modo VCD).
PBC (11): Conecta / desconecta PBC. (sólo en el modo VCD).
RESUME (12): Si presiona la tecla Stop, se parará la reroducción del
CD. Si presiona después la tecla RESUME continuará la
reproducción en el punto donde ha sido parada la reproducción (sólo en el modo VCD).
SLOW (14): Conmuta a cronolupa al reproducir Video CDs. Cada pulsa-
ción de la tecla SLOW hará cambiar la velocidad. 1/2x,
1/4x, 1/8x y 1/16x. Si desea regresar a la reproducción normal, presione la tecla II (sólo en el modo VCD).
ZOOM (17): Para agrandar un recorte de imagen, presione la tecla
ZOOM durante la reproducción. La correspondiente imagen
se podrá mostrar con la tecla ZOOM en dos diferentes
tamaños. Con las teclas Cursor I I / podrá
determinar más exacto el recorte de imagen. Para cambiar
a la reproducción normal, presione la tecla ZOOM hasta
que aparezca “RESTORE” (sólo en el modo VCD).
REPEAT (20): Vea las dos tablas.
R/L (22): Cambio entre los ajustes de altavoz: MONO L, MONO R,
STEREO (sólo en el modo VCD).
46
E
5....-05-CDP 604 neu 15.06.2004 14:19 Uhr Seite 46
Page 47

Reproducción de discos compactos
1. Abra con la tecla OPEN el portadiscos.
2. Coloque un disco compacto con la etiqueta hacia arriba sobre el cono de centrado, hasta que éste encaje. Cierre el portadiscos.
3. Presione la tecla Reproducción/Pausa II (1) en el aparato para conectarlo.
En el display aparece “READ” (leer). El disco compacto se reproducirá desde el
primer título. La canción actual y el tiempo reproducido se indicará en el display.
4. Para retirar un CD presione la tecla STOP, abra la tapadera del CD con la
tecla OPEN y eleve con cuidado el CD. Mantenga la tapadera del CD siempre
cerrada.
Nota: Si un disco ha sido colocado de forma incorrecta, aparecerá “BAdisc”. Si no
hay ningún disco colocado, aparecerá la notificación “NO DISC”.
Reproducción de música en formato MP3
Con este aparato tiene la posibilidad de reproducir piezas de música en formato
MP3. El aparato soporta además los tipos de discos compactos corrientes: CD,
CD-RW, CD-R. En el display aparece siempre la función activa ESP (Memoria 100
segundos), vea punto “ESP/NP/DIR”.
Reproducción programada
Deja progamar un orden de título al alzar.Vea el apartado “PROGRAM” en las
tablas de abajo
El aparato se para automáticamente, después de haber sido reproducidos todos
los títulos programados. Si presiona una vez la tecla Stop , se parará la reproducción, el programa se borrará. También al finalizar la reproducción, así como
después de 10 segundos, al desconectar el aparato.
Tiene la posibilidad de combinar los títulos programados con la función-REPEAT.
Después de haber programado y conectado el aparato, presione por favor la tecla
REPEAT hasta 3x y las funciones se podrán utilizar, como indicado bajo el apartado “REPEAT”.
Resumen de las funciones
1. Funciones VCD
• Conecte el televisor.
• Ajuste su televisor al modo AV.
• Conecte el aparato y coloque un disco compacto video, como indicado anteriormente.
• Presione la tecla Reproducción/Pausa II.
• En la pantalla de su televisor podrá ver el videoclip, mientras que el sonido se
transmitirá a través de su reproductor de discos compactos.
47
E
5....-05-CDP 604 neu 15.06.2004 14:19 Uhr Seite 47
Page 48

Manejo Funciones VCD
Presione (II)
1. El aparato se conectará y el disco será revisado.
2. Pausa durante la reproducción.
3. La reproducción se reinicia.
Presione
STOP ()
Se para la reproducción.
Presione
(I (3/13))
Salta al título anterior.
Presione
(I (4/21))
Con esta tecla puede saltar al próximo o al subsiguiente título etc.
Mantener
(I / (3/16))
Si mantiene la tecla presionada, se iniciará una búsqueda rápida (en
retroceso).
Mantener
(I / (4/18))
Si mantiene la tecla presionada, se iniciará una búsqueda rápida (en
avance).
Presione MODE Cambio entre repetición simple, repetición todos y función RANDOM.
Presione NP Cambio entre los sistemas de salida video „NTSC“ y „PAL“.
Presione PBC
(Playback Control)
1 x presionar: PBC conectado, indicación en la pantalla.
2 x presionar: PBC desconectado.
Presione AUDIO/EQ Función AUDIO: Selección entre los ajustes canal izquierdo, canal dere-
cho y Stereo.
REPEAT 1 x presionar = “REPEAT 1”: El título actual se repite continuamente.
2 x presionar = “REPEAT ALL”: El CD actual se repite continuamente.
3 x presionar = “REPEAT CANCEL”: Todas las funciones se han suprimido. Continuará el funcionamiento normal de reproducción.
PROGRAM
Presione primero () y después PROG. En la pantalla aparecerá “PROG”
y “TRK”. Elija el orden con las teclas I / I (Tecla 3 = +10, Tecla 4 =
+1) o con las teclas / (16/18). Elija el orden directamente con las
teclas numéricas (5). En caso de tener cifras con dos dígitos presione
primero la tecla +10 y después la cifra de un dígito. La programación ya
está almacenada. Presione (II).
SLOW Elija entre las velocidades 1/2 ,1/4, 1/8, 1/16
RESUME Continuación en el mismo sitio después de la parada (vea punto RESUME)
DIGEST Presentación de las imágenes en formato pequeño (vea punto DIGEST)
ZOOM Para agrandar un recorte de imagen (vea punto ZOOM)
R/L Cambio entre los canales de audio
1. Funciones VCD
48
E
5....-05-CDP 604 neu 15.06.2004 14:19 Uhr Seite 48
Page 49

Manejo
Funciones
CD MP3
Presione (II)
1. El aparato se conectará y el disco será revisado.
2. Pausa durante la reproducción.
3. La reproducción se reinicia.
Presione
STOP ()
Se para la reproducción.
Presione
(I (3/13))
Salta al título anterior.
Presione
(I (4/21))
Con esta tecla puede saltar al próximo o al subsiguiente título etc.
Mantener
(I / (3/16))
Si mantiene la tecla presionada, se iniciará una búsqueda rápida
(en retroceso).
Mantener
(I / (4/18))
Si mantiene la tecla presionada, se iniciará una búsqueda rápida (en
avance).
MODE en el aparato.
REPEAT en el
mando a distancia.
Cambio entre repetición simple, repetición DIR (sólo MP3), repetición
todos. Función RANDOM sólo posible a través de la tecla en el aparato.
Presione ESP/DIR Activa o desactiva la función de
anti-choque.
Salta al próximo directorio/archivador (DIRECTORY).
Presione AUDIO/EQ
Función EQ: Elija con las teclas I / I entre los ajustes STAND,
CLASS, DISCO, JAZZ, POP.
PROGRAM
Presione primero () y después PROG. Elija el orden con las teclas
I / I (Tecla 3 = +10, tecla 4 = +1). Presione de nuevo PROG. La
indicación en el display cambia al sitio de memoria P-02 etc. Grabe con
la tecla PROG. Presione la tecla (II) (sólo en el aparato).
O elija el orden directamente con las teclas numéricas (5). En caso de
tener cifras con dos dígitos presione primero la tecla +10 y después la
cifra de un dígito. La programación ya está almacenada. Presione (II).
2. CD, Funciones MP3
49
E
5....-05-CDP 604 neu 15.06.2004 14:19 Uhr Seite 49
Page 50

Funciones especiales
MP3 – CDs: Con su aparato puede reproducir CDs MP3. En estos discos
compactos se pueden grabar de forma comprimida hsta 200 títulos. Su aparato reconoce automáticamente un CD MP3. De esta forma se mantendrá la
calidad del sonido. Para reproducir estos discos compactos proceda como
indicado bajo el apartado reproducción de discos compactos. La programación de títulos se puede realizar como indicado bajo el apartado
“Reproducción programada”.
VCD:
Su aparato dispone de una conexión de audio para CDs Video. Se pueden reproducir CD,VCD, CD-R y discos MP3. Su aparato reconoce de forma
automática el tipo de CD. Conecte el aparato con su televisor, mediante el
video-cable suministrado. Presione la tecla OSD (en el mando a distancia). En
su pantalla aparece el menú (si sólo recibe una imagen en blanco y negro,
presione la tecla N/P, quizás con portadiscos abierto).
Reparación de fallos
Este aparato se ha examinado según las normativas actuales y vigentes de la
Comunidad Europea, como p.ej. compatibilidad electromagnética y directiva de
baja tensión y se ha construido según las más nuevas especificaciones en razón
de la seguridad.
No reservamos el derecho de efectuar modificaciones técnicas.
50
E
Síntomas Causa Solución
No se puede reproducir VCD. VCD no está colocado o no
está colocado correctamente.
Asegúrese que el disco esté
introducido con la etiqueta
hacia arriba.
VCD salta durante la
reproducción.
Controle el disco si tiene huellas dactilares, suciedad o
arañazos.
Limpie estos con un paño
suave desde el centro.
Ningún color. El sistema de color está aju-
stado mal.
Presione la tecla P/N (2) y elija
la norma correcta de color.
5....-05-CDP 604 neu 15.06.2004 14:19 Uhr Seite 50
Page 51

Garantía
Para el aparato comercializado por nosotros nos responsabilizamos con una
garantía de 24 meses a partir de la fecha de compra (factura de compra).
Durante el período de garantía nos encargamos gratuítamente de los defectos del
aparato y de los accesorios*), que se hayan originado por defectos del material o
de la fabricación. Dependiendo de nuestra estimación se realizará una reparación
o un cambio. ¡Los servicios de garantía no prolangan la garantía, ni se incia por
ello un período nuevo de garantía!
Como comprobante para la garantía es válido la factura de compra. Sin este comprobante no se podrá realizar un cambio o una reparación gratuíta.
En el caso de garantía lleve el aparato base en el embalaje original y la factura de
compra a su concesionario.
*) Defectos en los accesorios de uso o en las piezas de desgaste (p.ej. escobillas
de carbón del motor, varillas amasadoras, correas de transmisión, mando a
distancia de repuesto, cepillos de dientes de repuesto, hojas de sierra etc.), como
también la limpieza, mantenimiento o el recambio de piezas de desgaste no recaen en la garantía e irán al cargo del cliente!
En caso de intervención ajena se expira la garantía.
Después de la garantía
Después de haber expirado la garantía se pueden realizar las reparaciones por el
concesionario o por el servicio de reparaciones. Los gastos irán al cargo del cliente.
51
E
5....-05-CDP 604 neu 15.06.2004 14:19 Uhr Seite 51
Page 52

Avvertenze generali per la sicurezza
Per evitare il rischio di incendio o di scosse, non si deve mai tenere l’apparecchio
sotto la pioggia o in ambienti umidi. Quindi non usare l’apparecchio nelle immediate
vicinanze di acqua, per esempio in prossimità di una vasca, di una piscina o in una
cantina umida.
Utilizzare l’apparecchio solo per l’uso previsto.
Collegare l’apparecchio esclusivamente ad una presa installata a norma. Fare
attenzione a che la tensione indicata corrisponda alla tensione della presa. Se si
impiegano alimentatori esterni, fare attenzione all’esattezza di polarità e di tensione, inserire le batterie sempre correttamente.
Collocare l’apparecchio in modo che le aperture per l’aerazione esistenti non vengano coperte.
Non togliere mai la protezione dell’apparecchio. Riparazioni non a regola d’arte
possono causare notevoli pericoli per l’utente. Se l’apparecchio presenta danni,
soprattutto nella zona del cavo di collegamento, non metterlo più in funzione, ma
farlo riparare prima da un esperto. Esaminare regolarmente il cavo di collegamento
alla rete per verificare che non ci siano danni.
Un cavo di collegamento difettoso può essere sostituito con un cavo equivalente
solo dal produttore, dal nostro servizio assistenza o da persone similmente qualificate, al fine di evitare pericoli.
Se l’apparecchio non viene usato per un periodo di tempo prolungato, togliere il
blocchetto alimentatore dalla presa ovvero estrarre le batterie.
Questi simboli possono trovarsi eventualmente sull’apparecchio e rimandano ai
seguenti elementi:
Il simbolo del lampo fa presente all’utente la presenza di pezzi all’interno
dell’apparecchio che possono produrre alte tensioni pericolose.
Il simbolo con il punto esclamativo fa presente all’utente la presenza di
importanti avvertenze per l’uso e la manutenzione nei fogli di accompagnamento dell’apparecchio.
Gli apparecchi dotati di questo simbolo lavorano con un „Laser classe 1“
per riprodurre i CD. Gli interruttori di sicurezza integrati hanno lo scopo di
impedire che l’utente venga esposto alla luce non visibile del laser, pericolosa per l’occhio umano, aprendo lo scomparto per i CD.
Questi interruttori di sicurezza non devono mai essere cavallottati né manipolati
perché altrimenti sussiste il rischio di esposizione alla luce del laser.
52
I
5....-05-CDP 604 neu 15.06.2004 14:19 Uhr Seite 52
Page 53

Descrizione dei comandi
Leitor de CDs (ABB. 1)
1 II Tasto riproduzione/pausa CD
2 Tasto CD Stop/off
3 I Tasto PREV (ricerca indietro)
4 I Tasto NEXT (ricerca avanti)
5 Tasto MODE
6 Tasto AUDIO/EQ (canale sinistro/destro/equalizer)
7 Tasto PROG/PBC
8 Tasto ESP/NP/DIR
9 HOLD OFF/ON blocco tasti
10 Vano CD OPEN
11 Sensore remoto
12 DC 4,5V: collegamento adattatore di rete
13 AV OUT colllegamento televisore
14 PHONES collegamento cuffie
15 VOLUME / regolatore volume
16 CHARGE ON/OFF
17 Vano batterie
Telecomando (ABB. 2)
1 Tasto MUTE (sospensione audio)
2 Tasto P/N (PAL / NTSC)
3 II Tasto riproduzione/pausa CD
4 Tasto stop CD
5 Tasti numerici 1-10
6 Tasto 10 +
7 Tasto TIME
8 Tasto DIGEST
9 Tasto OSD
10 Tasto RETURN
11 Tasto PBC
12 Tasto RESUME
13 I Tasto CD SKIP (saltare indietro)
14 Tasto SLOW
15 Tasto PROG (programmazione CD)
16 Tasto CD (ricerca indietro)
17 Tasto ZOOM
18 Tasto CD (ricerca avanti)
19 Tasto volume VOL +
20 Tasto REPEAT
21 I Tasto CD SKIP (saltare avanti)
22 Tasto L/R (canale sinistro/destro)
23 Tasto VOL – volume
53
I
5....-05-CDP 604 neu 15.06.2004 14:19 Uhr Seite 53
Page 54

Telecomando cuffie (ABB. 3)
A PHONES
B HOLD OFF/ON
C PLAY/PAUSE
D VOLUME
E STOP/OFF
F I BACK
G I NEXT
H ESP/LR/DIR
Nota: alcuni tasti si trovano sia sull’apparecchio che sul telecomando. I tasti
uguali si riferiscono alla medesima funzione.
Se si desidera utilizzare il telecomando cuffie, procedere come qui di seguito
descritto: Collegare la spina del telecomando cuffie con la presa (14) sull’apparecchio e inserire la spina di cuffie/auricolare nella presa di collegamento (A).
Visualizzazioni nel display (ABB. 4)
1 VCD / MP3 / CD Formato
2 Numero del titolo
3 Durata della riproduzione
4 Indicatore blocco tasti
5 Funzione ESP
6 Indicatore cambio batterie
7 RAN - Funzione RANDOM
8 PGM - Funzione PROGRAMM
9 REP - Ripetizione semplice
10 REP ALL - Ripetizione di tutti i titoli
Messa in funzione dell’apparecchio
Inserire le batterie (non comprese nella fornitura)
• Aprire il vano batterie (17) sul retro.
• Inserire 2 batterie 1,5 V, tipo AA. Fare attenzione all’inserimento corretto dei poli
(v. fondo del vano batterie o indicazione impressa sul lato esterno).
• Se l’apparecchio non viene usato per un periodo di tempo più lungo, estrarre le
batterie per evitare che si ossidino.
• Un simbolo della batteria nel display segnala che le batterie devono essere
sostituite. Sostituire sempre il set completo di batterie, non un solo elemento.
Attenzione: non buttare le batterie nei rifiuti domestici. Conferire le batterie usate in
un centro di raccolta o consegnarle al venditore.
Non buttare mai le batterie nel fuoco.
54
I
5....-05-CDP 604 neu 15.06.2004 14:19 Uhr Seite 54
Page 55

Batterie del telecomando
La batteria del telecomando è una cella al litio di lunga durata. Se nel corso dell’uso
il raggio d’azione del telecomando dovesse ridursi, procedere come qui di seguito
illustrato:
• Aprire il vano batterie a lato del telecomando.
• Sostituire l’elemento con un altro dello stesso tipo. Fare attenzione che i poli
corrispondano.
• Chiudere il vano batterie.
Funzionamento alimentatore
È possibile usare l’apparecchio anche mediante un alimentatore.
1. Inserire la spina dell’alimentatore in una presa regolarmente installata con contatto di protezione da 230V, 50 Hz.
2. Collegare il lettore CD con l’alimentatore inserendo la spina dell’alimentatore
nella presa DC 4,5 V (12).
3. Quando si usa un alimentatore (DC 4,5V/700mA) fare attenzione che i poli
coincidano conformemente alle diciture sul lettore CD.
Autoesercizio
Con la cassetta dell'adattatore e l'adattatore dell'accendisigari è possibile far funzionare il lettore CD in quasi ogni automobile tramite l'autoradio esistente con funzione
di riproduzione di audiocassette.
1. Inserire l'adattatore dell'accendisigari nell'accendisigari ed infilare la spina all'e-
stremità del cavo nella presa DC 4,5 V del lettore CD.
2. Inserire la spina della cassetta dell'adattatore nella presa AV OUT (13) del letto-
re CD.
3. Accendere l'autoradio ed inserire la cassetta dell'adattatore nel vano cassette.
Fare attenzione che il cavo di collegamento della cassetta dell'adattatore sia
posizionato correttamente nella scanalatura di guida della cassetta! Altrimenti la
meccanica dell'unità della cassetta potrebbe incepparsi!
In alcune autoradio può accadere che la cassetta dell'adattatore fuoriesca subito
dopo essere stata inserita. In questo caso porre il cavo di collegamento della cassetta di fronte nella scanalatura di guida ed inserire la cassetta dall'altro lato. Se
l'autoradio respinge di nuovo la cassetta, ciò significa che purtroppo non la si può
utilizzare.
55
I
5....-05-CDP 604 neu 15.06.2004 14:19 Uhr Seite 55
Page 56

Uso generale
AUDIO/ Passaggio tra le diverse impostazioni dell’altoparlante:
CH L, CH R, STEREO = Indicatore nel display,
MONO L; MONO R; STEREO = Indicatore sullo schermo
(solo nel modo VCD).
EQ (6): Sono a disposizione vari modi Sound (CLASS(IC), DISCO,
JAZZ, POP).
HOLD (9): Blocca le funzioni di tutti i tasti sull’apparecchio, protezione
contro l’azionamento involontario dei tasti. Spingendo l’interruttore verso destra sul display appare ”HOLD”.
OPEN (10): Per aprire il vano CD.
DC 4,5V (12): Per il collegamento dell’alimentatore.
AV OUT (13): Per collegare il televisore con una presa video d’ingresso.
Inserire la spina nera nella presa sul lettore CD, quella gialla
nella presa video d’ingresso, quella rossa nell’ingresso altoparlante destro (R) e quella bianca nell’ingresso altoparlante sinistro (L) del televisore.
PHONES (14): Per il collegamento dell’alimentatore.
VOLUME (15): Serve per regolare il volume (19/23 sul telecomando). Nel
modo CD regolabile solo tramite telecomando o televisore.
CHARGE
ON/OFF (16): Accende la funzione di ricarica con l’alimentatore esterno
collegato.Attenzione: il vano batterie deve essere vuoto.
Pericolo di esplosione! Usare solo accumulatori idonei!
Nota: usare la custodia di ricarica acclusa per realizzare il
contatto con l’accumulatore.
Telecomando a infrarossi
Per il telecomando senza cavi da una distanza fino a 5 metri. Se la portata del raggio d’azione diminuisce, si devono sostituire le batterie. Quando si usa il telecomando, lo spazio tra il telecomando medesimo e il sensore remoto dell’apparecchio
deve essere libero.
Spegnere
Spegnere l’apparecchio premendo 1x il tasto STOP (2) (4 sul telecomando) o 2x
se l’apparecchio è in funzione, o non usarlo più per 10 secondi.
Descrizione dei tasti CD
II Riproduzione/
Pause (1/3): Si può sospendere temporaneamente la riproduzione.
Premendo di nuovo il tasto la riproduzione riprende dallo
stesso punto.
STOP/OFF (2/4): Si arresta il CD. Premendo un’altra volta si spegne l’appa-
recchio.
56
I
5....-05-CDP 604 neu 15.06.2004 14:19 Uhr Seite 56
Page 57

I PREV (3)/
I NEXT (4): Con questi tasti si può passare al titolo precedente o suc-
cessivo.Tenendo premuto il tasto ha inizio una ricerca musicale.
ESP/NP/DIR (8): ESP nel modo CD:
disattiva/attiva la funzione antishock con il CD audio
(memoria 40 +/- 5 sec.) inserito. In presenza di disturbi i dati
musicali del CD vengono letti senza disturbi da una memoria intermedia. Errori di lettura vengono corretti a posteriori
nella memoria intermedia. Se l’antishock è attivato, nel display appare una barra che si riempie lentamente. Premere
di nuovo il tasto ESP per disattivare la funzione.
Funzione DIR solo nel modo MP3:
questo tasto serve da tasto di selezione quando è inserito
un CD MP3 per cambiare le cartelle create sul CD.
Funzione N/P solo nel modo VCD:
passaggio tra i sistemi di uscita “NTSC” e “PAL” .
MODE (5): Le funzioni seguenti si possono selezionare con il tasto
MODE:
premere 1 x = „REP“: il titolo attuale viene continuamente
riprodotto.
premere 2 x = „REP ALL“: il CD attuale viene continua-
mente ripetuto.
premere 3 x = „RAN“: tutti i titoli vengono riprodotti in una
successione casuale.
premere 4 x = tutte le funzioni sono annullate. Continua la
riproduzione normale.
Funzioni nel modo di riproduzione con un CD MP3:
premere 1 x = „REP“: il titolo attuale viene continuamente
riprodotto.
premere 2 x = „REP DIR“: la cartella attualmente seleziona-
ta (l’album) viene continuamente riprodotta.
premere 3 x = „REP ALL“: tutto il CD viene continuamente
ripetuto.
premere 4 x = „RAN“: tutti i titoli vengono riprodotti in una
successione casuale.
premere 5 x = tutte le funzioni sono annullate. Continua la
riproduzione normale.
Descrizione dei tasti CD sul telecomando
MUTE (1): Serve per annullare rapidamente l’audio. Per ripristinarlo
premere di nuovo il tasto MUTE.
P/N (2): Passaggio tra i sistemi di uscita video “NTSC” e “PAL”.
57
I
5....-05-CDP 604 neu 15.06.2004 14:19 Uhr Seite 57
Page 58

TIME (7): Con il tasto TIME si può far partire la riproduzione da una
determinata ora. Premendo il tasto sullo schermo appare
GOTO --:--. Immettere il corrispettivo numero. La prima coppia di cifre rappresenta i minuti, la seconda coppia di cifre i
secondi. Selezionare la cifra “0” con il tasto “10”.
DIGEST (8): Se si preme il tasto, il lettore suddivide il file VCD attual-
mente riprodotto in 9 parti di pari dimensioni e visualizza le
immagini sullo schermo contemporaneamente. A seconda
delle dimensioni del file questa procedura può richiedere
alcuni minuti. Con i tasti numerici 1-9 si può passare alla
sezione desiderata, che viene animata. Se ora si preme il
tasto DIGEST l’apparecchio inizia la riproduzione partendo
dalla sequenza selezionata, nel modo di visualizzazione
estesa.
OSD (9): Si vedono i tipi di CD, le funzioni, per esempio SINGLE
REMAIN, il numero del titolo e la durata di riproduzione
rimanente del CD. Premere il tasto fino a 5 x e selezionare
tra le varie impostazioni.
RETURN (10): Premendo il tasto si arresta la riproduzione del CD. Viene
visualizzato il menu principale. Questa funzione può essere
utilizzata solo se il CD inserito è un video CD 2.0 ed è attivato il modo PBC (ON) (solo nel modo VCD).
PBC (11): Spegne/accende PBC. (solo nel modo VCD).
RESUME (12): Premendo il tasto Stop, si arresta la riproduzione del CD.
Premendo poi il tasto RESUME, la riproduzione riprende
dal punto in cui è stata interrotta (solo nel modo VCD).
SLOW (14): Passa al rallentatore nella riproduzione di video CD. Ogni
volta che si preme il tasto SLOW la velocità cambia. 1/2x,
1/4x, 1/8x e 1/16x. Se si vuole tornare alla riproduzione normale premere il tasto II (solo nel modo VCD).
ZOOM (17): Per ingrandire una sezione di immagine premere il tasto
ZOOM durante la riproduzione. La corrispettiva immagine
può essere visualizzata con il tasto ZOOM in due dimensioni diverse. Con i tasti freccia I I / si può definire la sezione di immagine con maggior precisione. Per
passare alla normale riproduzione premere il tasto ZOOM
fino quando appare “RESTORE” (solo nel modo VCD).
REPEAT (20): V. le due tabelle.
R/L (22): Passaggio tra le impostazioni dell’altoparlante: MONO L,
MONO R, STEREO (solo nel modo VCD).
58
I
5....-05-CDP 604 neu 15.06.2004 14:19 Uhr Seite 58
Page 59

Riprodurre CD
1. Con il tasto OPEN aprire il vano CD.
2. Mettere un CD sulla sfera di centraggio con l’etichetta rivolta verso l’alto in
modo che si inserisca in posizione. Chiudere il vano CD.
3. Premere il tasto II Riproduzione/Pausa (1) sull’apparecchio per accenderlo.
Nel display appare ”rEAd” (leggere). Il CD viene riprodotto partendo dal primo
titolo. Il brano musicale attuale e la durata di riproduzione trascorsa vengono
visualizzati nel display.
4. Per estrarre un CD premere il tasto STOP, con il tasto OPEN aprire il
coperchio del CD e sollevare il CD con cautela.Tenere il coperchio del CD sempre chiuso.
Nota: se un disco viene inserito sul lato errato, nel display appare ”BAdisc”, e se
non c’è nessun disco inserito, appare la segnalazione ”NO DISC”.
Riproduzione di musica in formato MP3
Con questo apparecchio è possibile riprodurre brani musicali in formato MP3.
L’apparecchio supporta inoltre i tipi di CD correnti: CD, CD-RW, CD-R. Nel display
appare sempre la funzione ESP attiva (memoria 100 sec.), v.punto ”ESP/NP/DIR”.
Riproduzione programmata
Consente la programmazione di una successione qualsiasi di titoli. V. cap. ”PROGRAM” nelle tabelle riportate in seguito.
L’apparecchio si arresta automaticamente dopo che sono stati riprodotti tutti i titoli
programmati. Premendo una volta il tasto Stop si arresta la riproduzione e si cancella il programma. Parimenti al termine della riproduzione e dopo ca. 10 secondi,
non appena l’apparecchio si spegne.
Con la funzione REPEAT è possibile combinare i titoli programmati. Dopo la programmazione e l’avvio dell’apparecchio, premere il tasto REPEAT fino a 3 x e le
funzioni possono essere applicate come descritto in ”REPEAT”.
Schema funzioni
1. Funzioni VCD
• Accendere il televisore.
• Mettere il televisore nel modo AV.
• Accendere l’apparecchio ed inserire un video CD come già descritto.
• Premere il tasto II Riproduzione/Pausa.
• Sullo schermo del televisore si può vedere il videoclip mentre l’audio si può
sentire tramite il lettore CD.
59
I
5....-05-CDP 604 neu 15.06.2004 14:19 Uhr Seite 59
Page 60

Uso VCD Funzioni
Premere (II)
1. L’apparecchio si accende e il disco viene analizzato.
2. Pausa durante la riproduzione.
3. La riproduzione viene riavviata.
Premere
STOP ()
La riproduzione viene arrestata.
Premere
(I (3/13))
Si passa al titolo precedente.
Premere
(I (4/21))
Con questo tasto si può passare di volta in volta al titolo successivo.
Tenere
(I / (3/16))
Tenendo premuto il tasto inizia una ricerca rapida (indietro).
Tenere
(I / (4/18))
Tenendo premuto il tasto inizia una ricerca rapida (avanti).
Premere MODE Passaggio tra ripetizione semplice, ripetizione di tutti i brani e funzione
RANDOM.
Premere NP Passaggio tra i sistemi di uscita video “NTSC” e “PAL”.
Premere PBC
(Playback Control)
Premere 1 x: PBC acceso, visualizzazione sullo schermo.
Premere 2 x: PBC spento.
Premere AUDIO/EQ Funione AUDIO: selezione tra le impostazioni del canale sinistro, canale
destro e stereo.
REPEAT Premere 1 x = “REPEAT 1”: il titolo attuale viene riprodotto in continuazione.
Premere 2 x = “REPEAT ALL”: il CD attuale viene riprodotto in continuazione.
Premere 3 x= “REPEAT CANCEL”: tutte le funzioni sono annullate. La ripro-
duzione normale continua.
PROGRAM
Premere prima () poi PROG. Sullo schermo appare “PROG” e “TRK”.
Selezionare la successione con i tasti I / I (tasto 3 = +10, tasto 4
=+1) oppure con i tasti / (16/18). Selezionare la successione
direttamente con i tasti numerici (5). Se il numero è di due cifre prima pre-
mere il tasto +10 e poi il numero con una cifra. La programmazione è già
stata salvata. Premere (II).
SLOW Selezionare tra le velocità 1/2 ,1/4, 1/8, 1/16
RESUME Continuazione dallo stesso punto in cui è stata arrestata la riproduzione
(v. punto RESUME)
DIGEST Visualizzazione delle immagini in formato piccolo (v. punto DIGEST)
ZOOM Per ingrandire una sezione di immagine (v. punto ZOOM)
R/L Passaggio tra i canali audio
1. Funzioni VCD
60
I
5....-05-CDP 604 neu 15.06.2004 14:19 Uhr Seite 60
Page 61

Uso
Funzioni
CD MP3
Premere (II)
1. L’apparecchio si accende e il disco viene analizzato.
2. Pausa durante la riproduzione.
3. La riproduzione viene riavviata.
Premere
STOP ()
La riproduzione viene arrestata.
Premere
(I (3/13))
Si passa al titolo precedente.
Premere
(I (4/21))
Con questo tasto si può passare di volta in volta al titolo successivo.
Tenere
(I / (3/16))
Tenendo premuto il tasto inizia una ricerca rapida (indietro).
Tenere
(I / (4/18))
Tenendo premuto il tasto inizia una ricerca rapida (avanti).
MODE sull‘ apparecchio:
Repeat sul telecomando:
Passaggio tra ripetizione semplice, ripetizione DIR (solo MP3), ripetizione
di tutto. Funzione RANDOM solo mediante il tasto sull’apparecchio.
Premere
ESP/DIR
Attiva e disattiva la funzione antishock.
Passa alla directory/cartella successiva (DIRECTORY).
Premere
AUDIO/EQ
Funzione EQ: selezionare con i tasti I / I tra le impostazioni
STAND, CLASS; DISCO; JAZZ; POP.
PROGRAM
Premere prima () poi PROG. Selezionare la successione con i tasti
I / I (tasto 3 = +10, tasto 4 =+1). Premere di nuovo PROG.
L’indicazione nel display passa alla posizione di memoria P-02. ecc.
Salvare con il tasto PROG. Premere (II) (solo sull’apparecchio).
Oppure selezionare la successione direttamente con i tasti numerici (5).
Se il numero è di due cifre premere prima il tasto +10 e poi il numero con
una cifra. La programmazione è già stata salvata. Premere (II).
2. Funzioni CD, MP 3
61
I
5....-05-CDP 604 neu 15.06.2004 14:19 Uhr Seite 61
Page 62

Funzioni speciali
MP3 – CDs: con questo apparecchio si possono riprodurre CD MP3. Su questi CD si possono salvare compressi fino a 200 titoli. L’apparecchio riconosce
automaticamente un CD MP3. Quindi la qualità del suono rimane. Per riprodurre questi CD procedere come descritto in “Riproduzione CD”. La programmazione titoli può essere effettuata come già descritto in “Riproduzione programmata”.
VCD:
L’apparecchio dispone di un collegamento video per video CD. Si possono riprodurre CD,VCD, CD-R e dischi MP3. L’apparecchio riconosce automaticamente il tipo di CD. Collegare l’apparecchio al televisore mediante il
cavo video accluso alla fornitura. Premere il tasto OSD (sul telecomando).
Sul vostro schermo appare il menu (se ricevete solo un’immagine in bianco e
nero, premete il tasto N/P, eventualmente mentre il vano cd è aperto).
Rimozione guasti
Questo apparecchio è stato controllato sulla base di tutte le direttive CE attuali in
vigore in questo settore, quali per esempio la normativa in materia di compatibilità
elettromagnetica e la direttiva in materia di bassa tensione, ed è stato costruito
conformemente alle norme di sicurezza più moderne.
Con riserva di apportare modifiche tecniche.
Garanzia
Per l’apparecchio da noi messo in commercio ci assumiamo una garanzia di
24 mesi dalla data di acquisto (scontrino).
Durante la garanzia noi ci impegniamo ad eliminare gratuitamente i guasti dell’apparecchio o degli accessori*), dovuti a difetti di materiale o di fabbricazione, riparandoli o, a nostra discrezione, sostituendoli. Le prestazioni in garanzia danno luogo a
una proroga della garanzia né danno diritto ad una nuova garanzia!
62
I
Sintomi Causa Soluzione
Non si riesce a riprodurre il
VCD.
Il VCD non è inserito o lo è,
ma non correttamente.
Accertarsi che il disco sia inserito con la dicitura rivolta verso
l’alto.
Il VCD salta durante la riproduzione.
Controllare che sul disco non
ci siano impronte di dita,
sporco o graffi.
Pulirlo con un panno morbido
partendo dal centro.
Nessun colore L’impostazione del sistema
colore è erronea.
Premere il tasto P/N (2) e selezionare la norma di colore
esatta.
5....-05-CDP 604 neu 15.06.2004 14:19 Uhr Seite 62
Page 63

Per la garanzia è sufficiente lo scontrino di acquisto. Senza questo scontrino non
sussiste il diritto né ad una sostituzione né ad una riparazione gratuita.
In caso di garanzia consegnare al vostro rivenditore l’apparecchio base nell’imballaggio originale unitamente allo scontrino.
*) Danni agli accessori non giustificano automaticamente lo scambio gratuito dell’apparecchio completo. Si prega di mettersi in contatto con la nostra centrale telefonica. Danni alle parti di vetro oppure fratture ai pezzi di materia plastica sono obbligatoriamente a spese del cliente.
La riparazione di pezzi d’uso ovvero soggetti a logoramento (cursori, ganci impastatori, cinghie di trasmissione, telecomandi di ricambio, spazzolini di ricambio,
lame di seghe ecc.) come anche operazioni di pulizia e manutenzione o la sostituzione di pezzi soggetti a logoramento non rientrano nella garanzia e quindi sono a
pagamento!
La garanzia si annulla nel caso di intervento da parte di terzi.
Dopo la garanzia
Al termine della garanzia le riparazioni possono essere eseguite dietro pagamento
dal corrispettivo negozio specializzato o servizio riparazioni.
63
I
5....-05-CDP 604 neu 15.06.2004 14:19 Uhr Seite 63
Page 64

General safety instructions
To avoid the risk of fire or an electric shock, you should not expose the device to
rain or moisture. Consequently, do not use the device in the immediate vicinity of
water - for example near a bath tub, a swimming pool or in a damp cellar.
Use the device only for the intended purpose.
Only connect the device at a properly installed plug socket. Pay attention that the
specified voltage corresponds to the voltage of the plug socket.
When using external mains supply, pay attention to the correct polarity and voltage.
Always place the batteries in the correct direction.
Assemble the device in such a way that the available ventilation openings are not
covered.
Never open the housing of the device. Incorrect repairs can constitute a considerable risk for the user. Should the device become damaged, in particular the mains
supply cable, do not operate the device any longer, but rather have it repaired by an
expert. Check the mains supply cable regularly for damage.
For safety reasons a broken or damaged mains lead may only be replaced by an
equivalent lead from the manufacturer, our customer service department or a
similary qualified person.
If the device is not used for a longer period, remove the plug connector from the
plug socket or take out the batteries.
These symbols may be found on the machine and are intended to indicate the
following:
The lightning symbol should advise the user of parts in the inside of the
device which carry dangerously high voltage levels.
The symbol with an exclamation mark should advise the user of important
operation or maintenance instructions in the accompanying documentation.
Devices bearing this symbol work with a „class 1 laser“ for tracing the CD.
The built-in safety switches should prevent the user being exposed to dangerous laser light, which is invisible to the human eye, when the CD compartment is opened.
Under no circumstances should these safety switches be bypassed or manipulated,
as this could result in a danger of exposure to the laser light.
64
GB
5....-05-CDP 604 neu 15.06.2004 14:19 Uhr Seite 64
Page 65

Controls
CD-Player (ABB. 1)
1 II CD play/pause key
2 CD stop/off key
3 I PREV key (reverse search)
4 I NEXT key (forward search)
5 MODE key
6 AUDIO/EQ key (left/right channel/equalizer)
7 PROG/PBC key
8 NP/ESP/DIR key
9 HOLD OFF/ON key lock
10 OPEN CD compartment
11 Sensor for the remote control
12 DC 4.5V: connection for mains adapter
13 AV OUT connection to the television set
14 PHONES headphone connection
15 VOLUME control
16 CHARGE ON/OFF
17 Battery compartment
Remote Control (ABB. 2)
1 MUTE key
2 P/N (PAL / NTSC) key
3 II CD play/pause key
4 CD stop key
5 Number keys 1-10
6 10 + key
7 TIME key
8 DIGEST key
9 OSD key
10 RETURN key
11 PBC key
12 RESUME key
13 I CD SKIP key (reverse skip)
14 SLOW key
15 PROG key (CD programming)
16 CD key (reverse search)
17 ZOOM key
18 CD key (forward search)
19 VOL + volume key
20 REPEAT key
21 I CD SKIP key (forward skip)
22 L/R (left/right channel) key
23 VOL – volume key
65
GB
5....-05-CDP 604 neu 15.06.2004 14:19 Uhr Seite 65
Page 66

Headphones - Remote Control (ABB. 3)
A PHONES
B HOLD OFF/ON
C PLAY/PAUSE
D VOLUME
E STOP/OFF
F I BACK
G I NEXT
H ESP/LR/DIR
Note: Some keys are to be found both on the device itself and on the remote
control. Keys with the same designation have the same function.
In order to use the headphone remote control, please proceed as follows: Connect
the plug of the headphone remote control to the socket (14) on the device and then
insert the plug of the headphones/earphones into the connection socket (A).
Messages in the Display (ABB. 4)
1 VCD / MP3 / CD Format
2 Track number
3 Playing time
4 Button lock display
5 ESP function
6 Battery replacement display
7 RAN - RANDOM function
8 PGM - PROGRAMM function
9 REP - Single repeat
10 REP ALL - All repeat
Initial Use of the Device
Inserting the Batteries (not supplied)
• Open the battery compartment (17) on the back.
• Insert two 1.5 V batteries of type AA. Ensure the correct polarity (see the bot-
tom of the battery compartment or the imprint on the outside).
• If the device is not used for a prolonged period, please remove the batteries in
order to avoid the leakage of battery acid.
• A battery symbol in the display indicates that the batteries need to be replaced.
Always replace a complete set of batteries and not just one.
Note: Batteries should not be disposed of in the domestic waste. Please return
used batteries to the appropriate collection points or the dealer where you bought
them.
Batteries must never be thrown into a fire.
66
GB
5....-05-CDP 604 neu 15.06.2004 14:19 Uhr Seite 66
Page 67

Batteries in the Remote Control
The battery in the remote control is a long-life lithium cell. If the range of the remote
control decreases, please proceed as follows:
• Open the battery compartment on the side of the remote control.
• Replace the cell with a battery of the same type. Ensure the correct polarity.
• Close the battery compartment.
Mains Operation
It is possible to operate the device using the mains power unit.
1. Insert the plug of the power unit into a correctly installed 230V, 50 Hz wall
socket.
2. Connect the CD player to the power unit by inserting the plug of the power unit
into the DC 4.5 V socket (12).
3. When using a power unit (DC 4.5V/700mA) ensure the correct polarity according to the inscriptions on the CD player.
Car Operating Mode
Thanks to the adapter cassette and the cigarette lighter adapter the CD player can
be used on your car radio with the cassette adapter.
1. Insert the cigarette lighter adapter in the cigarette lighter and the jack at the end
of the cable into the 4.5V/DC socket of the CD player.
2. Insert the jack of the adapter cassette into the AV OUT socket of the CD player.
3. Switch on your car radio and insert the adapter cassette into the cassette deck.
Make sure that the connector cable of the adapter cassette is inserted correctly
into the cassette slot! The cassette mechanism may jam!
Some car radios may eject the adapter cassette immediately after inserting it. In
this case fit the cassette's connector cable along the slot and insert the cassette
turned over on the other side. If the car radio ejects the adapter cassette again, the
adapter cassette cannot be used.
General Operation
AUDIO/ Switches between loudspeaker settings:
CH L, CH R, STEREO = Message in the display,
MONO L; MONO R; STEREO = Message on the screen
(only in VCD mode).
EQ (6): Various sound modes are available (CLASS(IC), DISCO,
JAZZ, POP).
HOLD (9): This blocks the functions of all keys on the device and is
intended to protect against a key being activated accidentally. When the switch is pushed to the right the word ”HOLD”
appears in the display.
67
GB
5....-05-CDP 604 neu 15.06.2004 14:19 Uhr Seite 67
Page 68

OPEN (10): For opening the CD compartment.
DC 4,5V (12): For connecting to the mains adapter.
AV OUT (13): For connecting to the television set with a video input
socket. Please insert the black plug into the socket of the
CD player, the yellow plug into the video input socket, the
red plug into the right-hand loudspeaker input (R) and the
wide plug into the left-hand loudspeaker input (L) of your
television set.
PHONES (14): For connecting to the headphones or earphones.
VOLUME (15): This is used to control the volume (19/23 on the remote
control). In VCD mode this can only be adjusted using the
remote control or on the television set itself.
CHARGE
ON/OFF (16): Switches on the charge function when the external power
unit is connected. Please ensure that there are no batteries
inserted into the battery compartment, as otherwise there is
a danger of explosion! Only the correct rechargeable batteries should be used!
Note: Please use the charging sleeve supplied to make the
contact with the battery.
Infrared remote control
This is used for controlling the device without a cable connection from a distance of
up to five metres. If the range decreases, the batteries need replacing. Please
ensure that there are no objects blocking the direct path between the remote control and the infrared receiver of the device.
Switching Off
Switch the device off by pressing the STOP key (2) (4 on the remote control)
once, or twice if the device is running. Alternatively, do not operate the device for 10
seconds.
CD Keys
II Playback/
Pause (1/3): Playback can be briefly interrupted. If the key is pressed
again, playback continues from the same position.
STOP/OFF (2/4): Die CD is stopped. Pressing again switches the device off.
I PREV (3)/
I NEXT (4): With these keys is possible to jump to the next or previous
track. Keeping the key pressed starts the music search function.
68
GB
5....-05-CDP 604 neu 15.06.2004 14:19 Uhr Seite 68
Page 69

ESP/NP/DIR (8): ESP in CD mode:
Deactivates / activates the anti-shock function when an
audio CD is inserted (memory 40 +/- 5 seconds). If the player is jolted, the CD music data is read out continuously from
an intermediate memory. Reading errors are corrected subsequently in the intermediate memory. When the anti-shock
function is activated a bar appears in the display which slowly fills up. Press the ESP key again to deactivate this function.
DIR function only in MP3 mode:
When an MP3 CD is inserted, this key is used to select the
various directories stored on the CD.
N/P function only in VCD mode:
Used to switch between the ”NTSC” and ”PAL” video output
systems.
MODE (5): The following functions can be selected with the MODE key:
Press once = „REP“: The current track is repeated
continuously.
Press twice = „REP ALL“: The current CD is repeated
continuously.
Press 3 times = „RAN“: All tracks are played back in
random order.
Press 4 times = All functions are cancelled. Normal play-
back is resumed.
Functions in Playback Mode of an MP3 CD:
Press once = „REP“: The current track is repeated conti-
nuously.
Press twice = „REP DIR“: The currently selected directory
(the album) is repeated continuously.
Press 3 times = „REP ALL“: The entire CD is repeated
continuously.
Press 4 times = „RAN“: All tracks are played back in
random order.
Press 5 times = All functions are cancelled. Normal play-
back is resumed.
CD Keys on the Remote Control
MUTE (1): Used for switching off the sound immediately. To cancel this
function, press the MUTE key again.
P/N (2): Switches between the ”NTSC” and ”PAL” video output
system.
69
GB
5....-05-CDP 604 neu 15.06.2004 14:19 Uhr Seite 69
Page 70

TIME (7): With the TIME key you can enter the time from which playb-
ack is to start. When this key is pressed, the words GOTO -:-- appear on the screen. Please enter the corresponding
figures. The first set of figures represents the minutes and
the second set the seconds. The figure ”0” is entered using
the ”10” key.
DIGEST (8): When this key is pressed, the player subdivides the VCD file
currently being played into nine parts of equal size and displays pictures on the screen at the same time.This may
take a few minutes, depending on the size of the file. With
the 1-9 number keys you can change to the desired section,
which is then animated. Press the key DIGEST again to
continue from the selected section in full picture mode.
OSD (9): This displays the CD type, the functions - e.g. SINGLE
REMAIN, the number of the track and the remaining playing
time of the CD. Press the key up to five times and select
between the various settings.
RETURN (10): Pressing this key stops CD playback. The main menu is dis-
played.This function can only be used if the CD that has
been inserted is a video 2.0 CD and the PBC mode is
activated (ON) (only in VCD mode).
PBC (11): Switches PBC on and off (only in VCD mode).
RESUME (12): If the stop key is pressed, CD playback is halted. If the
RESUME key is then pressed, playback resumes from the
position where playback was interrupted (only in VCD
mode).
SLOW (14): Switches on the slow motion function during the playback of
video CDs. Each time the SLOW key is pressed, the speed
is changed between 1/2x, 1/4x, 1/8x and 1/16x. To return to
normal playback, press the II key (only in VCD mode).
ZOOM (17): In order to enlarge a picture segment, press the key ZOOM
during playback. The respective picture can be displayed
using the ZOOM key in two different sizes. With the I
I / cursor keys it is possible to locate the picture
segment more accurately. To return to normal playback,
press the ZOOM key until the word ”RESTORE” appears
(only in VCD mode).
REPEAT (20): See both tables.
R/L (22): Switches between the loudspeaker settings: MONO L,
MONO R, STEREO (only in VCD mode).
70
GB
5....-05-CDP 604 neu 15.06.2004 14:19 Uhr Seite 70
Page 71

Playing CDs
1. Open the CD compartment with the OPEN key.
2. Insert a CD with the label facing upwards on to the central cone until it clicks
into place. Then close the CD compartment.
3. Press the II Play/Pause key (1) on the device in order to switch it on. The
word ”rEAd” appears in the display. The CD is now played back starting with the
first track. The current song and the time that has elapsed are shown in the display.
4. In order to remove a CD, press the STOP key, open the lid of the CD compartment with the OPEN key and carefully remove the CD. Always keep the lid
of the CD compartment closed.
Note: When a disc is inserted incorrectly, ”BAdisc” appears in the display. If no disc
is inserted, the words ”NO DISC” appear.
Playing back Music in MP3 Format
With this device it is possible to play back pieces of music in MP3 format. The device also supports all standard CD types: CD, CD-RW, CD-R.The active ESP function always appears in the display (memory 100 seconds); see item ”ESP/NP/DIR”.
Programmed Playback
This makes it possible to program any order of tracks. See the ”PROGRAM” section
in the tables below.
The device stops automatically after all programmed tracks have been played. If the
stop key is pressed once, playback is stopped and the program is deleted. It is
also deleted once playback has finished or after approximately 10 seconds as soon
as the device switches off automatically.
The programmed tracks can also be combined with the REPEAT function. After you
have programmed and started the device, please press the REPEAT key up to
three times to use the functions described in the ”REPEAT” section.
Function Overviews
1. VCD Functions
• Please switch on your television set.
• Switch your television set to AV mode.
• witch on the device and insert a video CD, as described above.
• Press the II Play/Pause key.
• You can now watch the video clip on your television screen while the sound can
be heard through your CD player.
71
GB
5....-05-CDP 604 neu 15.06.2004 14:19 Uhr Seite 71
Page 72

1. VCD Functions
72
GB
Operation VCD Functions
Press (II)
1. The device is switched on and the disc searched.
2. Pause during playback
3. Playback is resumed.
Press
STOP ()
Playback is stopped.
Press
(I (3/13))
Skips to the previous track.
Press
(I (4/21))
With this key you can skip to the next or next-but-one track etc.
Hold
(I / (3/16))
Keep this key pressed down to start the fast reverse search.
Hold
(I / (4/18))
Keep this key pressed down to start the fast forward search.
Press MODE Switches between the simple repeat, repeat all and RANDOM function.
Press NP Switches between “NTSC” and “PAL” video output systems.
Press PBC
(Playback Control)
Press once : PBC switched on, display on the screen
Press twice : PBC switched off.
Press AUDIO/EQ AUDIO function: selects between the settings left-hand channel, right-
hand channel and stereo.
REPEAT Press once = “REPEAT 1”: The current track is repeated continuously.
Press twice = “REPEAT ALL”: The current CD is repeated continuously.
Press 3 times = “REPEAT CANCEL” All functions are cancelled. Normal
playback is resumed.
PROGRAM
First press (), then PROG. The words “PROG” and “TRK” appear in the
display. Select the order with the I / I keys (key 3 = +10, key 4
=+1) or with the / (16/18).
Select the order directly using the number buttons (5). For a two-digit
number, first the +10 key and then the units figure. Programming is already stored. Press (II).
SLOW Select between the speeds 1/2 ,1/4, 1/8, 1/16
RESUME Resumes from the same position after stop (see RESUME)
DIGEST Shows the pictures in a small format (see DIGEST)
ZOOM Used to enlarge a picture section (see ZOOM)
R/L Switches between the audio channels
5....-05-CDP 604 neu 15.06.2004 14:19 Uhr Seite 72
Page 73

2. CD, MP 3 Functions
73
GB
Operation
Functions
CD MP3
Press (II)
1. Device is switched on and the disc searched.
2. Pause during playback.
3. Playback is resumed.
Press
STOP ()
Playback is stopped.
Press
(I (3/13))
Skips to the previous track.
Press
(I (4/21))
With this key you can skip to the next or next-but-one track etc.
Hold
(I / (3/16))
Keep this key pressed down to start the reverse music search.
Hold
(I / (4/18))
Keep this key pressed down to start the forward music search.
MODE on the device:
REPEAT on the
remote control:
Switches between simple repeat, DIR repeat (only MP3), repeat all. RANDOM function only using the key on the device.
Press ESP/DIR Activates and deactivates the anti
shock function.
Jumps to the next folder/directory
(DIRECTORY).
Press AUDIO/EQ
EQ function: Use the I / I keys to switch between the settings
STAND, CLASS; DISCO; JAZZ; POP.
PROGRAM
First press () then PROG. Select the order with the I / I keys (key
3 = +10, key 4 =+1). Press PROG again. The display switches to storage
location P-02 etc. Store with the PROG key. Press (II) (only on the devi-
ce).
Or select the order directly using the number keys (5). For two-digit numbers first press the +10 key and then the units figure. Programming is
already stored. Press (II).
5....-05-CDP 604 neu 15.06.2004 14:19 Uhr Seite 73
Page 74

Special Functions
MP3 – CDs: With this device it is possible to play back MP3 CDs. On such
CDs up to 200 tracks can be stored.This device detects an MP3 CD automatically, thus retaining the sound quality. In order to play back such CDs please
proceed as described under „Playing CDs“.Tracks can be programmed as
described above under “Programmed Playback”.
VCD:
This device has a video connection for video CDs.The formats CD,VCD,
CD-R and MP3 disks can be played back.Your device detects the type of CD
automatically. Connect the device to your television set using the video cable
supplied. Press the OSD key (on the remote control).The menu appears on
your television screen (if only a black and white picture can be seen, press
the N/P key, with the CD compartment open if necessary).
Troubleshooting
This device has been tested according to all relevant current CE guidelines,
such as electromagnetic compatibility and low voltage directives, and has been
constructed in accordance with the latest safety regulations.
Subject to technical changes without prior notice!
Guarantee
The device supplied by our Company is covered by a 24 month guarantee starting
on the date of purchase (receipt).
During the life of the guarantee any fault of the device or its accessories *) ascribable to material or manufacturing defects will be eliminated free of charge by repairing or, at our discretion, by replacing it.The guarantee services do not entail an
extension of the life of the guarantee nor do they give rise to any right to a new
guarantee!
Proof of the guarantee is provided by the proof of purchase.Without proof of
purchase no free replacement or repair will be carried out.
74
GB
Symptoms Course Solution
VCD can not be played back. VCD is not inserted or inserted
incorrectly
Ensure that the disc is inserted
with the label facing upwards.
VCD jumps during playback Check the disc for fingerprints,
dirt or scratches
Clean the disc starting at the
centre with a soft cloth.
No colour Colour system incorrectly set Press the P/N key (2) and sel-
ect the correct colour norm.
5....-05-CDP 604 neu 15.06.2004 14:19 Uhr Seite 74
Page 75

For repairs or replacement during the life of the guarantee return the device in its
original packing together with the proof of purchase to your dealer.
*) Damage to accessories does not mean automatic free replacement of the whole
machine. In such cases please contact our hotline.Broken glass or breakage of
plastic parts are always subject to a charge.
Defects to consumables or parts subject to wearing (e.g. motor pistons, kneading
blades, drive shafts, spare remote control, spare toothbrushes, saw blades, etc.) as
well as cleaning, maintenance or the replacement of said parts are not covered by
the guarantee and hence are to be paid!
The guarantee lapses in case of unauthorized tampering.
After the expiry of the guarantee
After the expiry of the guarantee repairs can be carried by the competent dealer or
repair service against the payment of the ensuing costs.
75
GB
5....-05-CDP 604 neu 15.06.2004 14:19 Uhr Seite 75
Page 76

Ogólne wskazówki związane z bezpieczną obsługą
Urządzenie chronić należy przed deszczem i wilgocią, aby zapobiec groźbie
pożaru lub porażeniu prądem. Nie należy go więc używać w pobliżu wody, a
więc przykładowo w pobliżu wanny, basenu lub w zawilgoconej piwnicy.
Urządzenie należy używać tylko zgodnie z jego przeznaczeniem.
Urządzenie należy podłączyć tylko i wyłącznie do przepisowo zamontowanego
gniazdka.
Proszę zwrócić uwagę na to, żeby podane napięcie zgadzało się z napięciem w
gniazdku.
W przypadku używania oddzielnych zasilaczy należy zwrócić uwagę na biegunowość i napięcie, baterie muszą zostać włożone do urządzenia zgodnie z oznaczoną biegunowością.
Urządzenie należy w taki sposób ustawić, żeby istniejące otwory wentylacyjne
nie zostały przykryte.
Nigdy nie wolno otwierać obudowy urządzenia. Niefachowo przeprowadzone
naprawy mogą być groźne w skutkach dla użytkownika. Przy uszkodzeniu
urządzenia, w szczególności kabla sieciowego, urządzenie nie może być
używane dopóki nie zostanie naprawione przez osobę z wymaganymi uprawnieniami. Przewód zasilający należy regularnie sprawdzać, czy nie jest uszkodzony.
W razie awarii proszę nie naprawiać urządzenia samemu lecz skorzystać z
pomocy autoryzowanego specjalisty.Jeżeli przewód zasilający nieodłączalny
ulegnie uszkodzeniu, to powinien on być wymieniony u wytwórcy lub w specjalnym zakładzie naprawczym albo przez wykwalifikowaną osobę w celu uniknięcia zagrożenia.
Jeżeli urządzenie nie będzie przez dłuższy czas używane, należy wyciągnąć
wtyczkę z gniazdka lub wyjąć baterie.
Poniższe symbole mogą znajdować się na urządzeniu i mają zwracać Państwa
uwagę na:
Symbol błyskawicy ma zwrócić uwagę użytkownika na znajdujące się
we wnętrzu urządzenia części, które są pod niebezpiecznie wysokim
napięciem.
Symbol z wykrzyknikiem ma zwrócić uwagę użytkownika na znajdujące
się w załączonych dokumentach ważne wskazówki związane z
obsługą i konserwacją urządzenia.
Urządzenia z tym symbolem używają do odczytywania dźwięku z płyty
kompaktowej „Lasera klasy A“. Wbudowany wyłącznik bezpieczeństwa
ma zapobiec temu, żeby użytkownik w czasie otwierania kieszeni odtwarzacza płyt kompaktowych został poddany niebezpiecznemu dla
ludzkich oczu oddziaływaniu niewidocznego światła lasera.
76
PL
5....-05-CDP 604 neu 15.06.2004 14:19 Uhr Seite 76
Page 77

Wyłącznika tego nie należy w żadnym wypadku zmostkować lub też przy nim
manipulować, ponieważ grozi to niebezpieczeństwem, że użytkownik poddany
zostanie oddziaływaniu niebezpiecznego dla ludzkich oczu niewidocznego
światła lasera.
Opis elementów obsługi
Odtwarzacz CD (ABB. 1)
1 II Przycisk Odtwarzanie CD/ Przerwa
2 Przycisk CD Stop/off
3 I Przycisk PREV (szybki przesuw do tyłu)
4 I Przycisk NEXT (szybki przesuw do przodu)
5 Przycisk MODE
6 Przycisk AUDIO/EQ (lewy/prawy kanał/Equalizer)
7 Przycisk PROG/PBC
8 Przycisk NP/ESP/DIR
9 Blokada przycisków HOLD OFF/ON
10 OPEN Otwieranie szufladki CD
11 Sensor zdalnego sterowania
12 DC 4,5V: Podłączenie zasilacza do sieci
13 AV OUT Podłączenie do telewizora
14 PHONES Gniazdo słuchawek
15 VOLUME / Regulator głośności
16 CHARGE ON/OFF
17. Pojemnik na baterie
Zdalne sterowanie (ABB. 2)
1 Przycisk MUTE (wyciszanie)
2 Przycisk P/N (PAL / NTSC)
3 II Przycisk Odtwarzanie CD / Przerwa
4 Przycisk CD Stop
5 cyfrowe 1-10
6 Przycisk 10 +
7 Przycisk TIME
8 Przycisk DIGEST
9 Przycisk OSD
10 Przycisk RETURN
11 Przycisk PBC
12 Przycisk RESUME
13 I Przycisk CD SKIP (przeskok do tyłu)
14 Przycisk SLOW
15 Przycisk PROG (programowanie CD)
16 Przycisk CD (szybki przesuw do tyłu)
17 Przycisk ZOOM
77
PL
5....-05-CDP 604 neu 15.06.2004 14:19 Uhr Seite 77
Page 78

18 Przycisk CD (szybki przesuw do przodu)
19 Przycisk głośności VOL +
20 Przycisk REPEAT (powtarzanie)
21 I Przycisk CD SKIP (przeskok do przodu)
22 Przycisk L/R (lewy/prawy kanał)
23 Przycisk głośności VOL –
Zdalne sterowanie do słuchawek (ABB. 3)
A PHONES
B HOLD OFF/ON
C PLAY/PAUSE
D VOLUME
E STOP/OFF
F I BACK
G I NEXT
H ESP/LR/DIR
Wskazówka: Niektóre przyciski znajdują się zarówno w urządzeniu jak i na
pilocie zdalnego sterowania. Tak samo oznaczone przyciski mają to samo
działanie.
Jeśli chcą Państwo korzystać z pilota do słuchawek, proszę postępować w
następujący sposób: Proszę połączyć wtyczkę pilota do słuchawek z gniazdkiem (14) w urządzeniu, a następnie włożyć wtyczkę słuchawek (słuchawek
miniaturowych) do gniazdka połączeniowego (A).
Meldunki w wyświetlaczu (ABB. 4)
1 VCD / MP3 / CD Format
2 Numer tytułu
3 Czas odtwarzania
4 Wskaźnik blokady przycisków
5 Funkcja ESP
6 Wskaźnik wymiany baterii
7 RAN - Funkcja RANDOM
8 PGM - Funkcja PROGRAMM
9 REP - Powtarzanie normalne
10 REP ALL - Powtarzanie wszystkiego
78
PL
5....-05-CDP 604 neu 15.06.2004 14:19 Uhr Seite 78
Page 79

Uruchomienie urządzenia
Włożyć baterie (Nie objęte tym zakupem)
• Proszę otworzyć pojemnik na baterie (17) z tyłu urządzenia.
• Proszę włożyć 2 baterie 1,5 V typu AA. Proszę zwrócić uwagę na właściwe
ułożenie biegunów (patrz spód pojemnika na baterie lub nadruk na
zewnętrznej stronie).
• Jeżeli urządzenie nie jest używane przez dłuższy czas, to proszę wyjąć z
niego baterie, aby uniknąć wydostania się elektrolitu.
• Symbol baterii w wyświetlaczu sygnalizuje, że baterie powinny być wymienione. Proszę zawsze wymieniać baterie w komplecie, proszę nie wymieniać
baterii pojedynczo.
Uwaga: Baterie nie należą do zwykłych śmieci. Zużyte baterie proszę zwracać
w odpowiednich punktach zbiorczych lub w sklepie.
Proszę nigdy nie wrzucać baterii do ognia.
Baterie do pilota zdalnego sterowania
W przypadku baterii do pilota zdalnego sterowania chodzi o ogniwa litowe o
długiej żywotności. Gdyby z upływem czasu zasięg pilota zmalał, proszę
postępować w następujący sposób:
• Proszę otworzyć pojemnik na baterie z boku pilota.
• Proszę zastąpić ogniwo baterią tego samego typu. Proszę zwrócić uwagę na
właściwe ułożenie biegunów.
• Proszę zamknąć pojemnik na baterie.
Używanie zasilacza
Mają Państwo także możliwość zasilania urządzenia poprzez zasilacz z wtyczką.
1. Proszę włożyć zasilacz z wtyczką do przepisowo zainstalowanego gniazdka
ze stykiem uziemiającym na 230V, 50 Hz.
2. Proszę połączyć odtwarzacz CD z zasilaczem wtykowym, wkładając wtyczkę zasilacza do gniazda DC 4,5 V (12).
3. Używając zasilacza (DC 4,5V/ 700mA) proszę zwrócić uwagę na właściwe
ułożenie biegunów zgodnie z napisami na odtwarzaczu CD.
Zasilanie samochodowe
Dzięki kasecie adaptera i adapterowi zapalniczki odtwarzacz CD można zainstalować w prawie każdym samochodzie wykorzystując istniejące radio samochodowe z częścią kasetową.
1. Proszę wsunąć adapter zapalniczki w miejsce zapalniczki samochodowej a
wtyczkę znajdującą się na końcu kabla do gniazdka DC 4,5 V odtwarzacza
CD.
79
PL
5....-05-CDP 604 neu 15.06.2004 14:19 Uhr Seite 79
Page 80

2. Proszę wsunąć kasetę adaptera do gniazdka AV-OUT (13) odtwarzacza CD.
3. Proszę włączyć radio samochodowe i wsunąć kasetę adaptera do kieszeni
kasetowej. Proszę zwracać uwagę, aby kabel podłączenia kasety adaptera
znalazł się dokładnie w rowku prowadzenia kasety. W przeciwnym razie
mogłoby dojść do zablokowania mechanizmu przewijania kasety!
Nieliczne radia samochodowe mogą wyrzucać kasetę zaraz po jej włożeniu. W
takim wypadku proszę ułożyć kabel podłączeniowy kasety w rowku prowadzenia po przeciwnej stronie i powtórnie wsunąć kasetę, tym razem drugą stroną.
Jeśli radio samochodowe ponownie wyrzuci kasetę, oznacza to, że nie jest ono
przystosowane do kasety adaptera.
Obsługa ogólna
AUDIO/ Przełączanie ustawień głośników:
CH L, CH R, STEREO = Meldunek w wyświetlaczu,
MONO L; MONO R; STEREO = Meldunek na ekranie
(tylko w trybie VCD).
EQ (6): Do dyspozycji są różne rodzaje brzmienia dźwięku
(CLASSIC, DISCO, POP, JAZZ).
HOLD (9): Blokuje działanie wszystkich przycisków urządzenia, jako
zabezpieczenie przed niezamierzonym wciśnięciem jakiegoś klawisza. Po przesunięciu przełącznika w prawo w
wyświetlaczu pojawia się „HOLD“.
OPEN (10): Do otwierania szufladki CD.
DC 4,5V (12): Do podłączenia zasilacza.
AV OUT (13): Do połączenia z telewizorem posiadającym gniazdo wejś-
ciowe wideo. Czarną wtyczkę proszę włożyć do gniazdka
w odtwarzaczu CD, żółtą wtyczkę do gniazdka wejściowego wideo, czerwoną wtyczkę do wejścia prawego
głośnika (R), a białą wtyczkę do wejścia lewego głośnika (L) telewizora.
PHONES (14):
Do podłączenia słuchawek lub słuchawek miniaturowych.
VOLUME (15): Służy do ustawienia głośności (19/23 na pilocie). W
trybie VCD daje się regulować tylko poprzez pilota zdalnego sterowania lub przez telewizor.
CHARGE
ON/OFF (16): Włącza funkcję ładowania przy podłączonym zewnętrz-
nym zasilaczu. Proszę pamiętać o tym, by w pojemniku
na baterie nie znajdowały się zwykłe baterie. Istnieje niebezpieczeństwo wybuchu! Proszę używać tylko odpowiednich akumulatorków!
Wskazówka: proszę użyć załączonej wkładki do ładowania, by uzyskać styk z akumulatorem.
80
PL
5....-05-CDP 604 neu 15.06.2004 14:19 Uhr Seite 80
Page 81

Zdalne sterowanie na podczerwień:
Do bezprzewodowej obsługi z odległości do 5 metrów. Jeśli zasięg maleje,
baterie muszą być wymienione. Przy obsłudze proszę zwrócić uwagę na wolną
przestrzeń między pilotem zdalnego sterowania a odbiornikiem podczerwieni w
urządzeniu.
Wyłączanie
Urządzenie wyłączają Państwo wciskając przycisk STOP (2) (4 na pilocie
zdalnego sterowania) 1 raz, wzgl. przy pracującym urządzeniu 2 razy, lub nie
obsługują go Państwo około 10 sekund.
Opis przycisków CD
II Odtwarzanie/
Pause (1/3): Mogą Państwo przerwać na krótko odtwarzanie.
Ponowne wciśnięcie klawisza powoduje kontynuowanie
odtwarzania od tego samego miejsca.
STOP/OFF (2/4): Płyta CD zostaje zatrzymana. Ponowne wciśnięcie
wyłącza urządzenie.
I PREV (3)/
I NEXT (4): Przy pomocy tych przycisków mogą Państwo przejść do
następnego wzgl. poprzedniego tytułu. Jeśli przytrzymają
Państwo ten klawisz wciśnięty, włącza się szybki przesuw.
ESP/NP/DIR (8): ESP w trybie CD: Wyłącza / włącza funkcję przeciww-
strząsową przy włożonej płycie Audio CD (pamięć 40 +/5 sek.). W razie zakłóceń informacje muzyczne CD czytane są bez zakłóceń z pamięci przejściowej. Błędy
odczytu korygowane są po wczytaniu w pamięci przejściowej. W przypadku aktywnej funkcji przeciwwstrząsowej
w wyświetlaczu pojawia się wskaźnik w postaci belki,
która powoli się wypełnia. Proszę ponownie wcisnąć
przycisk ESP, by wyłączyć tą funkcję.
Funkcja DIR tylko w trybie MP3:
Przy włożonej płycie MP3 CD przycisk ten, jako przycisk
wybierania, służy do zmiany katalogów założonych na
CD.
Funkcja N/P tylko w trybie VCD:
Przełączanie systemu sygnału wyjściowego wideo
“NTSC” lub “PAL”.
MODE (5): Przyciskiem MODE mogą Państwo wybierać następujące
funkcje:
wcisnąć 1 x = „REP“: Stale powtarzany jest aktualny tytuł.
wcisnąć 2 x = „REP ALL“: Stale powtarzana jest aktualna
płyta CD.
81
PL
5....-05-CDP 604 neu 15.06.2004 14:19 Uhr Seite 81
Page 82

wcisnąć 3 x = „RAN“: Wszystkie tytuły odtwarzane są
jeden po drugim w przypadkowej kolejności.
wcisnąć 4 x = Wszystkie funkcje zostają wyłączone.
Kontynuowany jest normalny tryb odtwarzania.
Funkcje w trybie odtwarzania MP3 CD:
wcisnąć 1 x = „REP“: Stale powtarzany jest aktualny tytuł.
wcisnąć 2 x = „REP DIR“: Stale odtwarzany jest aktualnie
wybrany katalog (album).
wcisnąć 3 x = „REP ALL“: Stale powtarzana jest cała
płyta CD.
wcisnąć 4 x = „RAN“: Wszystkie tytuły odtwarzane są
jeden po drugim w przypadkowej kolejności.
wcisnąć 5 x = Wszystkie funkcje zostają wyłączone.
Kontynuowany jest normalny tryb odtwarzania.
Opis przycisków CD na pilocie zdalnego sterowania
MUTE (1): Służy do szybkiego wyłączenia głośności. Dla skasowa-
nia tej funkcji ponownie wcisnąć przycisk MUTE.
P/N (2): Przełączanie systemu sygnału wyjściowego wideo
“NTSC” lub “PAL”.
TIME (7): Przyciskiem TIME mogą Państwo wpisać początek odt-
warzania od określonego czasu. Po wciśnięciu tego przycisku na ekranie pojawia się GOTO --:--. Proszę wpisać
odpowiedni numer. Dwie pierwsze cyfry stanowią minuty,
następne cyfry oznaczają sekundy. Cyfrę “0” wybiorą
Państwo przyciskiem “10”.
DIGEST (8): Jeśli wciśnięty zostanie ten przycisk, odtwarzacz dzieli
aktualnie odtwarzany plik VCD na 9 części równej wielkości i pokazuje obrazy jednocześnie na ekranie. Może to
potrwać kilka minut, w zależności od wielkości pliku.
Klawiszami cyfrowymi 1-9 mogą Państwo przejść do
pożądanego fragmentu, który następnie zostaje uaktywniony. Jeśli teraz wcisną Państwo (DIGEST) przycisk, to
urządzenie rozpoczyna odtwarzanie od wybranego miejsca w trybie pełnego obrazu.
OSD (9): Widzą Państwo typ CD, funkcje, np. SINGLE REMAIN,
numer tytułu i pozostający czas odtwarzania CD. Proszę
wcisnąć przycisk do 5 razy i wybrać różne ustawienia.
82
PL
5....-05-CDP 604 neu 15.06.2004 14:19 Uhr Seite 82
Page 83

RETURN (10): Po wciśnięciu tego przycisku odtwarzanie CD zostaje
zatrzymane. Pokazuje się menu główne. Funkcja ta może
być wykorzystana tylko wtedy, gdy włożona CD to Video
2.0 CD, zaś tryb PBC jest aktywny (ON) (tylko w trybie
VCD).
PBC (11): Włącza i wyłącza PBC (tylko w trybie VCD).
RESUME (12): Po wciśnięciu przycisku Stop odtwarzanie CD zostaje
zatrzymane. Następnie po wciśnięciu przycisku RESUME
odtwarzanie kontynuowane jest od miejsca, w którym
zostało przerwane (tylko w trybie VCD).
SLOW (14): Przełącza na zwolnione tempo podczas odtwarzania
Video CD. Po każdym wciśnięciu przycisku SLOW zmienia
się prędkość: 1/2x, 1/4x, 1/8x i 1/16x. Jeśli chcą
Państwo wrócić do normalnego odtwarzania, proszę
wcisnąć przycisk II (tylko w trybie VCD).
ZOOM (17): By powiększyć jakiś fragment obrazu, proszę wcisnąć
przycisk ZOOM podczas odtwarzania. Przy pomocy tego
przycisku dany obraz można oglądać w dwóch różnych
wielkościach. Używając przycisków kursora I I /
mogą Państwo jeszcze dokładniej wybrać fragment obrazu. By przełączyć urządzenie na normalne odtwarzanie, proszę wcisnąć przycisk ZOOM, aż pojawi się
“RESTORE” (tylko w trybie VCD).
REPEAT (20): patrz obydwie tabele.
R/L (22): Przełączanie ustawień głośników: MONO L, MONO R,
STEREO (tylko w trybie VCD).
Odtwarzanie płyt CD
1. Przyciskiem OPEN proszę otworzyć szufladkę CD.
2. Proszę włożyć płytę CD etykietką do góry w ten sposób na stożek centrujący, by zaskoczyła. Proszę zamknąć szufladkę CD.
3. Proszę wcisnąć przycisk Odtwarzanie/ Przerwa /II (1) na urządzeniu, by
je włączyć. W wyświetlaczu pojawia się “”rEAd” (odczyt). CD odtwarzana
jest od pierwszego tytułu. W wyświetlaczu pokazywana jest aktualna piosenka i dotychczasowa długość odtwarzania.
4. By wyjąć CD, proszę wcisnąć przycisk STOP, otworzyć pokrywkę płyty
klawiszem OPEN i unieść ostrożnie dysk. Pokrywka płyty powinna być stale
zamknięta.
Wskazówka: Jeśli dysk włożony został niewłaściwą stroną, w wyświetlaczu
pojawia się “BAdisc”. Jeśli dysk nie został włożony w ogóle, pojawia się meldunek “NO DISC”.
83
PL
5....-05-CDP 604 neu 15.06.2004 14:19 Uhr Seite 83
Page 84

Odtwarzanie muzyki w formacie MP3
Mają Państwo możliwość odtwarzania na tym urządzeniu utworów muzycznych
w formacie MP3. Poza tym urządzenie to obsługuje będące w powszechnym
użyciu płyty kompaktowe typu: CD, CD-RW, CD-R. W wyświetlaczu pojawia się
zawsze aktywna funkcja ESP (pamięć 100 Sek.), patrz punkt “ESP/NP/DIR”.
Zaprogramowane odtwarzanie
Pozwala na zaprogramowanie tytułów w dowolnej kolejności. Patrz ustęp “PROGRAM” w podanych niżej tabelach.
Urządzenie zatrzymuje się automatycznie po odtworzeniu wszystkich zaprogramowanych tytułów. Jeżeli wcisną Państwo jeden raz przycisk Stop, odtwarzanie zostaje zatrzymane, a program skasowany. Tak samo po zakończeniu odtwarzania, jak i po ok. 10 sekundach, jak tylko urządzenie się wyłączy.
Mają Państwo możliwość połączenia zaprogramowanych tytułów z funkcją
REPEAT. Po zaprogramowaniu i uruchomieniu urządzenia proszę wcisnąć przycisk REPEAT do 3 razy, a funkcje mogą być zastosowane zgodnie z opisem w
ustępie “REPEAT”.
Przegląd funkcji
1. Funkcje VCD
• Proszę włączyć telewizor.
• Proszę przestawić telewizor na tryb AV.
• Proszę włączyć urządzenie i włożyć płytę Video CD, zgodnie z przedstawionym już opisem.
• Proszę wcisnąć przycisk II Odtwarzanie/ Przerwa.
• Na ekranie swego telewizora widzą Państwo teledysk, podczas gdy dźwięk
słyszany jest przez odtwarzacz CD.
84
PL
5....-05-CDP 604 neu 15.06.2004 14:19 Uhr Seite 84
Page 85

1. Funkcje VCD
85
PL
Obsługa Funkcje VCD
Proszę wcisnąć
(II)
1. Urządzenie zostaje włączone i następuje przeszukanie dysku.
2. Przerwa podczas odtwarzania.
3. Ponownie rozpoczyna się odtwarzanie.
Proszę wcisnąć
STOP ()
Odtwarzanie zostaje zatrzymane.
Proszę wcisnąć
(I (3/13))
Przeskok do poprzedniego tytułu.
Proszę wcisnąć
(I (4/21))
Przy pomocy tego przycisku mogą Państwo przejść do następnego
tytułu lub do jeszcze jednego dalej, itd.
Przytrzymać
(I / (3/16))
Przytrzymując ten klawisz wciśnięty włącza się szybki przesuw (do
tyłu).
Przytrzymać
(I / (4/18))
Przytrzymując ten klawisz wciśnięty włącza się szybki przesuw (do
przodu).
Proszę wcisnąć
MODE
Przełączanie - wybieranie funkcji powtarzania zwykłego, powtarzania
wszystkiego lub funkcji RANDOM.
Proszę wcisnąć NP Przełączanie na system sygnału wyjściowego wideo “NTSC” lub “PAL”.
Proszę wcisnąć
PBC (Playback
Control)
wcisnąć1 raz: PBC włączone, meldunek na ekranie
wcisnąć2 razy: PBC wyłączone.
Proszę wcisnąć
AUDIO/EQ
Funkcja AUDIO: wybór między ustawieniami kanał lewy, kanał prawy i
stereo.
REPEAT
wcisnąć 1 raz = “REPEAT 1”: Stale powtarzany jest aktualny tytuł.
wcisnąć 2 razy = “REPEAT ALL”: Stale powtarzana jest aktualna płyta
CD.wcisnąć 3 razy = “REPEAT CANCEL” Wszystkie funkcje zostają
wyłączone. Kontynuowany jest normalny tryb odtwarzania.
PROGRAM
Proszę wcisnąć najpierw () a następnie PROG. Na ekranie pojawia się
“PROG” i “TRK”. Proszę wybrać kolejność przyciskami I / I
(przycisk 3 = +10, przycisk 4 =+1) lub przyciskami / (16/18).
Proszę wybrać kolejność bezpośrednio przy pomocy przycisków cyfro-
wych (5). W przypadku numeru dwucyfrowego najpierw przycisk +10,
a następnie liczbę jednocyfrową. Programowanie jest już zapisane w
pamięci. Proszę wcisnąć (II).
SLOW
Proszę wybierać między prędkościami 1/2 ,1/4, 1/8, 1/16
RESUME
Kontynuacja od tego samego miejsca po funkcji stop (patrz punkt
RESUME)
DIGEST
Pokaz obrazu w małym formacie (patrz punkt DIGEST)
ZOOM
Dla powiększenia fragmentu obrazu (patrz punkt ZOOM)
R/L
Przełączanie – wybieranie między kanałami audio.
5....-05-CDP 604 neu 15.06.2004 14:19 Uhr Seite 85
Page 86

2. Funkcje CD, MP 3
86
PL
Obsługa
Funkcje
CD MP3
Proszę wcisnąć
(II)
1. Urządzenie zostaje włączone i następuje przeszukanie dysku.
2. Przerwa podczas odtwarzania.
3. Ponownie rozpoczyna się odtwarzanie.
Proszę wcisnąć
STOP ()
Odtwarzanie zostaje zatrzymane.
Proszę wcisnąć
(I (3/13))
Przeskok do poprzedniego tytułu.
Proszę wcisnąć
(I (4/21))
Przy pomocy tego przycisku mogą Państwo przejść do następnego
tytułu lub do jeszcze jednego dalej, itd.
Przytrzymać
(I / (3/16))
Przytrzymując ten klawisz wciśnięty włącza się szybki przesuw (do
tyłu).
Przytrzymać
(I / (4/18))
Przytrzymując ten klawisz wciśnięty włącza się szybki przesuw (do
przodu).
MODE przy urządzeniu:
REPEAT na pilocie:
Przełączanie – wybieranie funkcji powtarzania zwykłego, powtarzania
DIR (tylko MP3), powtarzania wszystkiego. Funkcja RANDOM tylko
przyciskiem przy urządzeniu.
Proszę wcisnąć
ESP/DIR
Włącza lub wyłącza funkcję przeciwwstrząsową (Anti-Schock).
Przeskok do następnego indeksu/
katalogu (DIRECTORY).
Proszę wcisnąć
AUDIO/EQ
Funkcja EQ: Przyciskami I / I proszę wybierać między ustawieniami STAND, CLASS; DISCO; JAZZ; POP
PROGRAM
Proszę wcisnąć najpierw () a następnie PROG. Proszę wybrać kolejność przyciskami I / I (przycisk 3 = +10, przycisk 4 =+1). Proszę
wcisnąć ponownie PROG. Wskaźnik w wyświetlaczu przechodzi do
pozycji w pamięci P-02 itd. Proszę zapisywać w pamięci przyciskiem
PROG. Proszę wcisnąć (II) (tylko przy urządzeniu).
Lub też proszę wybrać kolejność używając bezpośrednio przycisków
cyfrowych (5). W przypadku numeru dwucyfrowego najpierw przycisk
+10, a następnie liczbę jednocyfrową. Programowanie jest już zapisane
w pamięci. Proszę wcisnąć (II).
5....-05-CDP 604 neu 15.06.2004 14:19 Uhr Seite 86
Page 87

Funkcje specjalne
Płyty MP3 – CD: Na tym urządzeniu mogą Państwo odtwarzać płyty MP3
CD. Na tych płytach może być zapisanych do 200 tytułów w zagęszczonym formacie. Urządzenie to rozpoznaje automatycznie MP3 CD. Tak
więc jakość dźwięku pozostaje zachowana. Celem odtwarzania tych dysków proszę postępować zgodnie z opisem w rozdziale Odtwarzanie CD.
Zaprogramowania tytułów mogą Państwo dokonać tak, jak to już zostało
opisane w rozdziale “Zaprogramowane odtwarzanie”.
VCD:
Urządzenie to dysponuje podłączeniem wideo do Video CD.
Odtwarzane mogą być dyski CD, VCD, CD-R i MP3. Niniejszy sprzęt
rozpoznaje automatycznie rodzaj CD. Proszę podłączyć urządzenie do
telewizora przy pomocy załączonego kabla wideo. Proszę wcisnąć przycisk OSD (na pilocie zdalnego sterowania). Na ekranie telewizyjnym pojawia się menu (Jeśli uzyskają tu Państwo tylko czarno-biały obraz, proszę
wcisnąć przycisk N/P, ewentualnie przy otworzonej szufladce na CD).
Usuwanie zakłóceń
Niniejsze urządzenie odpowiada wymaganiom normy bezpieczeństwa użytkowania oraz spełnia wymagania dyrektywy niskonapięciowej i kompatybilności elektromagnetycznej.
Zastrzega się prawo do zmian technicznych!
WARUNKI GWARANCJI
Przyznajemy 24 miesiące gwarancji na produkt licząc od daty zakupu.
W tym okresie będziemy bezpłatnie usuwać w terminie 14 dni od daty dostarczenia wadliwego sprzętu z kartą gwarancyjną do miejsca zakupu wszystkie uszko-
87
PL
Zakłócenie Przyczyna Rozwiązanie
VCD nie daje się odtworzyć. VCD nie jest włożona w ogóle
lub włożona niewłaściwie
Proszę się upewnić, że dysk
włożony jest napisami do
góry.
VCD przeskakuje podczas
odtwarzania
Proszę sprawdzić dysk pod
względem pozostawionych
odcisków palców, zabrudzeń
lub porysowania
Proszę oczyścić go miękką
ściereczką, zaczynając od
środka.
Brak kolorów Źle ustawiony system barw Proszę wcisnąć przycisk P/N
(2) i wybrać właściwą normę
kolorów.
5....-05-CDP 604 neu 15.06.2004 14:19 Uhr Seite 87
Page 88

dzenia powstałe w tym urządzeniu na skutek wady materiałów lub wadliwego
wykonania, naprawiając oraz wymieniając wadliwe części lub (jeśli uznamy za stosowne) wymieniając całe urządzenie na nowe.
Sprzęt do naprawy powinien być dostarczony w komplecie wraz z dowodem
zakupu oraz z ważną kartą gwarancyjną do sprzedawcy w miarę możliwości w
oryginalnym opakowaniu lub innym odpowiednim dla zabezpieczenia przed uszkodzeniem. W razie braku kompletnego opakowania fabrycznego, ryzyko uszkodzenia sprzętu podczas transportu do i z miejsca zakupu ponosi reklamujący.
Naprawa gwarancyjna nie dotyczy czynności przewidzianych w instrukcji obsługi,
do wykonania których zobowiązany jest użytkownik we własnym zakresie i na
własny koszt.
Gwarancja nie obejmuje:
• mechanicznych, termicznych, chemicznych uszkodzeń sprzętu i wywołanych
nimi wad,
• uszkodzeń powstałych w wyniku działania sił zewnętrznych takich jak wyładowania atmosferyczne, zmiana napięcia zasilania i innych zdarzeń losowych,
• nieprawidłowego ustawienia wartości napięcia elektrycznego, zasilanie z nieodpowiedniego gniazda zasilania,
• sznurów połączeniowych, sieciowych, żarówek, baterii, akumulatorów,
• uszkodzeń wyrobu powstałych w wyniku niewłaściwego lub niezgodnego z
instrukcją jego użytkowania, przechowywania, konserwacji, samowolnego
zrywania plomb oraz wszelkich przeróbek i zmian konstrukcyjnych dokonanych
przez użytkownika lub osoby niepowołane,
• roszczeń z tytułu parametrów technicznych wyrobu, o ile są one zgodne z
podanymi przez producenta,
• prawidłowego zużycia i uszkodzeń, które mają nieistotny wpływ na wartość
lub działanie tego urządzenia.
Karta gwarancyjna bez pieczątki sklepu, daty sprzedaży, nie wypełniona, źle
wypełniona, ze śladami poprawek, nieczytelna wskutek zniszczenia, bez możliwości ustalenia miejsca sprzedaży oraz dołączonego dowodu zakupu jest nieważna.
Korzystanie z usług gwarancyjnych nie jest możliwe po upływie daty ważności
gwarancji. Gwarancja na części lub całe urządzenie, które są wymieniane kończy
się, wraz z końcem gwarancji na to urządzenie.
Wszystkie inne roszczenia, wliczając w to odszkodowania są wykluczone chyba, że
prawo przewiduje inaczej. Roszczenia wykraczające poza tą umowę nie są
uwzględniane przez tą gwarancję.
Gwarancja na sprzedany towar konsumpcyjny nie wyłącza, nie ogranicza ani
nie zawiesza uprawnień kupującego wynikających z niezgodności towaru z umową.
Gwarancja oraz zawarte w niej warunki obowiązują na terenie Rzeczpospolitej
Polskiej.
88
PL
5....-05-CDP 604 neu 15.06.2004 14:19 Uhr Seite 88
Page 89

Általános biztonsági rendszabályok
A tűzkeletkezés vagy az áramütés kockázatának elkerülése végett ne tegye ki a
készüléket esőnek vagy nedvességnek! Ne működtesse a készüléket víz közvetlen közelében (pl. fürdőszobában, úszómedence mellett, nedves pincében).
Csak arra a célra használja a készüléket, mire készült!
Mindig csak előírásszerűen szerelt konnektorba csatlakoztassa a készüléket!
Ügyeljen rá, hogy a megadott feszültség egyezzen a hálózati feszültséggel!
Külső áramforrás használata esetén ügyeljen a megfelelő polaritásra és fes-
zültségre, az elemeket mindig jó irányban helyezze be!
Úgy állítsa fel a készüléket, hogy ne záródjanak el a meglévő szellőzőnyílások!
Soha ne nyissa ki a készülék burkolatát! A szakszerűtlen javítások jelentős ves-
zély forrásai lehetnek a használók számára. Ha a készülék, különösen a hálózati
csatlakozó kábel megsérült, a készüléket nem szabad üzembe helyezni, hanem
előbb szakemberrel meg kell javíttatni. Rendszeresen ellenőrizendő, hogy a
hálózati csatlakozó kábelen nincs-e sérülés.
Veszélyhelyzetek elkerülése végett a hibás csatlakozó kábelt csak a gyártóval, a
mi vevőszolgálatunkkal vagy hasonló szakképzettségű más személlyel szabad
pótoltatni azonos értékű kábellel.
Ha hosszabb időn át nem használja a készüléket, húzza ki a csatlakozó dugaszt
a konnektorból, ill. vegye ki belőle az elemeket!
Adott esetben a készüléken az alábbi szimbólumokat láthatja, amelyek a
következőkre hívják fel az Ön figyelmét:
A villám-szimbólum olyan alkatrészekre figyelmeztet a készülék belsejében, amelyek veszélyesen nagy feszültséget vezetnek.
A felkiáltójellel ellátott szimbólum a kísérőpapírokban található fontos
kezelési vagy karbantartási útmutatásokra hívja fel a használó figyelmét.
Az ezzel a szimbólummal jelzett készülékek „1. osztályú lézerrel“
működve tapogatják le a CD-t. A beépített biztonsági kapcsolók megakadályozzák, hogy a használó emberi szemmel nem látható, veszélyes
lézersugárzás hatásának legyen kitéve, amikor a CD-rekesz fel van
nyitva.
Ezeket a biztonsági kapcsolókat semmi esetre sem szabad „megpatkolni“ vagy
más módon manipulálni, különben Ön lézersugárhatás veszélyének teheti ki
magát.
89
H
5....-05-CDP 604 neu 15.06.2004 14:19 Uhr Seite 89
Page 90

A kezelőelemek leírása
CD-lejátszó (ABB. 1)
1 II CD lejátszás/szünet gomb
2 CD Stop/off gomb
3 I PREV gomb (folyamatos keresés visszafelé)
4 I NEXT gomb (folyamatos keresés előre)
5 MODE gomb
6 AUDIO/EQ gomb (bal/jobb csatorna /equalizer)
7 PROG/PBC gomb
8 NP/ESP/DIR gomb
9 HOLD OFF/ON billentyűzár
10 OPEN CD-fiók
11 A távkapcsoló érzékelője
12 DC 4,5V: a hálózati adapter csatlakozása
13 AV OUT csatlakoztatás tévé-készülékhez
14 PHONES fejhallgató-csatlakozó
15 VOLUME / hangerő-szabályozó
16 CHARGE ON/OFF
17 Elemtartó rekesz
Távkapcsoló (ABB. 2)
1 MUTE (elnémító) gomb
2 P/N (PAL / NTSC) gomb
3 II CD lejátszás/szünet gomb
4 CD Stop gomb
5 Számjegyes gombok 1-10
6 10 + gomb
7 TIME gomb
8 DIGEST gomb
9 OSD gomb
10 RETURN gomb
11 PBC gomb
12 RESUME gomb
13 I CD SKIP gomb (ugrás vissza)
14 SLOW gomb
15 PROG gomb (CD - programozás)
16 CD gomb (folyamatos keresés visszafelé)
17 ZOOM gomb
18 CD gomb (folyamatos keresés előre)
19 VOL + hangerő gomb
20 REPEAT gomb (ismétlés)
21 I CD SKIP gomb (ugrás előre)
22 L/R (bal/jobb csatorna) gomb
23 VOL – hangerő gomb
90
H
5....-05-CDP 604 neu 15.06.2004 14:19 Uhr Seite 90
Page 91

Fejhallgató – távirányító (ABB. 3)
A PHONES - hangok
B HOLD OFF/ON – tartás be/ki
C PLAY/PAUSE – lejátszás/szünet
D VOLUME - hangerő
E STOP/OFF – leállít/kikapcsol
F I BACK - vissza
G I NEXT - következő
H ESP/LR/DIR
Megjegyzés: Néhány gomb mind a készüléken, mind a távirányítón megtalálható. Az azonos elnevezésű gombok azonos funkciót látnak el.
A fejhallgató-távirányító használatához tegye a következőket: Csatlakoztassa a
fejhallgató-távirányító csatlakozóját a készüléken lévő csatlakozóaljzathoz (14),
majd dugja be a fej-/füllhallgató dugóját a csatlakozó hüvelybe (A).
Kijelzés a display-n (ABB. 4)
1 VCD / MP3 / CD Formátum
2 A darab száma
3 Játékidő
4 Billentyűzár kijelző
5 ESP funkció
6 Telepcsere kijelző
7 RAN - RANDOM funkció
8 PGM - PROGRAMM funkció
9 REP - Egy szám ismétlése
10 REP ALL - Minden szám ismétlése
A készülék használatba vétele
Elemek behelyezése (az elem nem hozzá adott tartozék)
• Nyissa ki az elemtartó rekeszt (17) a hátlapon!
• Helyezzen be 2 db 1,5 V-os, AA típusú elemet! Ügyeljen a helyes polaritásra
(lásd a rekesz fenekén, ill. a külső felén lévő domborított feliratot)!
• Ha hosszabb időn át nem használja a készüléket, vegye ki belőle az elemeket, hogy elkerülje az akkumulátorsav “kifutását”!
• A display-n megjelenő elem-piktogramm arra figyelmeztet, hogy az elemeket célszerű cserélni. Mindig a komplett elemkészletet cserélje, ne csak az
egyik elemet!
Figyelem: Az elemek nem a háztartási szemétbe valók! Adja le az elhasznált
elemeket az illetékes gyűjtőhelyen vagy a kereskedőnél!
Soha ne dobjon elemeket a tűzbe!
91
H
5....-05-CDP 604 neu 15.06.2004 14:19 Uhr Seite 91
Page 92

A távkapcsoló elemei
A távkapcsolóban lévő elem tartós lítiumcella. Ha a használat során csökkenne
a távkapcsoló hatótávolsága, a következőképpen járjon el:
• Nyissa ki a távkapcsoló oldalán lévő elemtartó rekeszt!
• Pótolja a cellát hasonló jellegű elemmel! Ügyeljen a helyes polaritásra!
• Zárja vissza az elemtartó rekeszt!
Hálózati üzem
Lehetősége van arra is, hogy hálózati adapterrel működtesse a készüléket.
1. Dugja a hálózati adaptert előírásszerűen szerelt, 230V, 50 Hz-es, érintésvédett konnektorba!
2. Az adapter dugaszát a DC 4,5 V-os kimenetbe dugva, kösse össze a CDlejátszót a hálózati adapterrel (12)!
3. Amikor hálózati adaptert használ (DC 4,5V/700mA), ügyeljen a CD-lejátszón
lévő feliratoknak megfelelő helyes polaritásra!
Használat autóban
Az adapterkazettával és a cigarettagyújtó-adapterrel a CD-lejátszó a meglévő
kazettás autórádió segítségével csaknem minden autóban működtethető.
1. Tolja be a cigarettagyújtó-adaptert a cigarettagyújtóba, és dugja a kábel
végén lévő dugaszt a CD-lejátszó 4,5 V-os DC bemenetébe.
2. Dugja az adapterkazetta dugaszűát a CD-lejátszó AV OUT bemenetébe (13)!
3. Kapcsolja be az autórádiót, és tegye be az adapterkazettát a kazettatartóba!
Ügyeljen rá, hogy az adapterkazetta csatlakozó kábele pontosan belefeküdjön a kazetta megvezető barázdájába. Különben a kazettamotor mechanikája megszorulhat.
Néhány autórádió esetében olykor megtörténik, hogy az adapterkazettát nyomban a behelyezés után kiveti. Ebben az esetben helyezze a kábelt a szemben
lévő megvezető barázdába, és a másik oldalával előre dugja be ismét a kazettát! Ha az autórádió így is kiveti, akkor az adapterkazettát ezzel az autórádióval
sajnos nem tudja használni.
Általános kezelési tudnivalók
AUDIO/ Váltás a CH L, CH R, STEREO = Kijelzés a display-n,
MONO L; MONO R; STEREO = Kijelzés a képernyőn
hangszóró-beállítás között (csak VCD üzemmódban).
EQ (6): Különböző hangzásmódozatok állnak rendelkezésre
(CLASS(IC), DISCO, JAZZ, POP).
HOLD (9): A készüléken lévő összes billentyű funkcióját zárolja, ily
módon nyújtva védelmet a gombok akaratlan megnyomása ellen. Ha a kapcsolót jobbra tolja, a display-n a
“HOLD” szó jelenik meg.
92
H
5....-05-CDP 604 neu 15.06.2004 14:19 Uhr Seite 92
Page 93

OPEN (10): A CD-fiók felnyitásához.
DC 4,5V (12): A hálózati adapter csatlakoztatására.
AV OUT (13): Video-bemenettel ellátott tévé-készülékekhez való csatla-
koztatáshoz. Dugja a fekete dugaszt a CD-lejátszón lévő
csatlakozó hüvelybe, a sárga dugaszt tévé-készülék
video-bemeneti hüvelyébe, a piros dugaszt a tévé jobb
oldali (R), a fehér dugaszt pedig a bal oldali (L) hangszóró-bemeneti hüvelyébe!
PHONES (14): A fej- vagy fülhallgató csatlakoztatására.
VOLUME (15): A hangerő beállítására szolgál (19/23 a távkapcsolón).
VCD üzemmódban a hangerő csak a távkapcsolón vagy a
tévé-készüléken keresztül szabályozható.
CHARGE
ON/OFF (16): Ha külső hálózati adapter van csatlakoztatva, bekapcsolja
a feltöltő funkciót.Ügyeljen rá, hogy az elemtartó rekeszben ne legyen elem. Ellenkező esetben fennáll a robbanás veszélye. Csak megfelelő akkukat használjon!
Figyelem: Az akkuval való összekapcsoláshoz a hozzá
adott töltőhüvelyt használja!
Infravörös távkapcsoló
Kábel nélküli távvezérlésre szolgál legfeljebb 5 méternyi távolságból. Ha a
hatótávolság csökken, cserélni kell az elemeket. A kezeléskor ügyelje, rá, hogy
a távkapcsoló és a készülék infravörös érzékelője között semmi se álljon az
útban!
Kikapcsolás
A készüléket úgy tudja kikapcsolni, hogy 1-szer, ill. működő készülék esetén 2szer megnyomja a STOP gombot (2) (4 a távkapcsolón), ill. kb. 10 másodpercig egyik gombot sem nyomja meg.
A CD gombok leírása
II Lejátszás/
Pause (1/3): A lejátszás rövid időre félbeszakítható, ha ismét megny-
omja a gombot, a lejátszás ugyanattól a helytől folytatódik.
STOP/OFF (2/4): A CD leáll, Ha ismét megnyomja, a készülék kikapcsol.
I PREV (3)/
I NEXT (4): Ezekkel a gombokkal ugorhat a következő, ill. az előző
számra. Ha a gombot lenyomva tartja, folyamatos zenekeresés indul.
ESP/NP/DIR (8): ESP a CD üzemmódban:
Ha audio CD van betéve, deaktiválja / aktiválja a zavargátló (anti-schock) funkciót CD (40 +/- 5 mp memória).
93
H
5....-05-CDP 604 neu 15.06.2004 14:19 Uhr Seite 93
Page 94

Zavarok esetén a CD zeneadatait zavarmentesen kiolvassa egy köztes memóriából. A készülék a köztes memóriában utólag korrigálja a leolvasási hibákat. Amikor az antischock aktiválva van, a display-n egy
gerenda-piktogramm jelenik meg, amely lassan megtelik.
Ha deaktiválni kívánja ezt a funkciót, nyomja meg újra az
ESP gombot!
DIR funkció csak az MP3-as üzemmódban:
Ha MP3-as CD van behelyezve, az a gomb szolgál a CDn lévő albumok közötti váltásra, a kívánt album kiválasztására.
N/P funkció csak a VCD üzemmódban:
Vált az “NTSC” és a “PAL” video-kimeneti rendszer
között.
MODE (5): A MODE gombbal a következő funkciókat választhatja:
1 x megnyomva = „REP“: Folyamatosan ismétli az éppen
futó számot.
2 x megnyomva = „REP ALL“: Folyamatosan megismétli
az éppen feltett CD-t.
3 x megnyomva = „RAN“: Véletlenszerű sorrendben
egymás után megismétli a CD-n lévő
összes számot.
4 x megnyomva = Megszünteti az összes funkciót.
Folytatódik a normál lejátszó üzem.
A lejátszó üzemmód funkciói MP3-as CD esetén:
1 x megnyomva = „REP“: Folyamatosan ismétli az éppen
futó számot.
2 x megnyomva = „REP DIR“: Folyamaotsan ismétli aki-
választott albumot.
3 x megnyomva = „REP ALL“: Folyamatosan megismétli
az egész CD-t.
4 x megnyomva = „RAN“: Véletlenszerű sorrendben
egymás után megismétli a CD-n lévő
összes számot.
5 x megnyomva = Megszünteti az összes funkciót.
Folytatódik a normál lejátszó üzem.
A távkapcsolón lévő CD-gombok leírása
MUTE (1): A hangerő gyors lekapcsolására szolgál. Ha meg akarja
szüntetni a funkciót, ismét meg kell nyomni a MUTE
gombot.
P/N (2): Vált az “NTSC” és a“PAL” video-kimenenti rendszer
között.
94
H
5....-05-CDP 604 neu 15.06.2004 14:19 Uhr Seite 94
Page 95

TIME (7): A TIME gomb segítségével egy bizonyos időponttól kezd-
ve indíthatja a lejátszást. Ha megnyomja a gombot, a
képernyőn GOTO --:-- jelenik meg. Írja be a megfelelő
számokat! Az első két számjegy a percet, a második két
számjegy a másodpercet jelöli. A “0” számjegy a “10”
gombbal választható.
DIGEST (8): Ha ezt a gombot nyomja meg, a lejátszó az éppen játs-
zandó VCD-t (kép CD-t) 9 egyenlő hosszúságú részre
osztja, és egyidejűleg bemutatja a képeket a képernyőn.
Ez az adott fájl nagyságától függően néhány percig is
eltarthat. Az 1-9 számjegyes (DIGEST) gombokkal léphet
a kívánt szakaszra. Ha ezután megnyomja a gombot, a
készülék a kijelölt szakasztól kezdve indítja meg a lejátszást teljeskép-üzemmódban.
OSD (9): Látható teszi a CD-típust, a funkciót, pl. SINGLE REMAIN,
az adott cím számát és a CD hátralévő műsoridejét.
Nyomja meg a gombot legfeljebb 5-ször, és válasszon a
különféle beállítások közül!
RETURN (10): Ha megnyomja a gombot, leáll a CD-lejátszás. Megjelenik
a főmenü. Ez a funkció csak akkor használható, amikor a
behelyezett korong video 2.0 CD, és a PBC üzemmód
aktiválva van (ON) (csak VCD lejátszásakor).
PBC (11): Be- és kikapcsolja a PBC-t (csak a VCD üzemmódban).
RESUME (12): Ha megnyomja a Stop gombot, leállítja a CD lejáts-
zását. Ha ezután megnyomja a RESUME gombot, a
lejátszás attól a helytől folytatódik, amelynél rövid időre
félbeszakította (csak a VCD üzemmódban).
SLOW (14): Video CD-k lejátszása esetén lassított lejátszásra kapcsol.
A SLOW gomb minden egyes megnyomására csökken a
sebesség: 1/2-ére, 1/4-ére, 1/8-ára és 1/16-ára. Ha vissza kíván térni a normál lejátszásra, nyomja meg a II
gombot (csak a VCD üzemmódban)!
ZOOM (17): Ha fel akar nagyítani egy képrészletet, nyomja meg
lejátszás közben a ZOOM gombot! Az adott kép a ZOOM
gomb segítségével két különböző méretben jeleníthető
meg. A I I / kurzor-gombokkal még pontosabban ki lehet jelölni a képrészletet. Ha ismét vissza
akar térni a normál lejátszáshoz, nyomja a ZOOM gombot, míg csak meg nem jelenik a “RESTORE” felirat (csak
a VCD üzemmódban).
REPEAT (20): lásd a két táblázatot!
R/L (22): Vált a MONO L, MONO R, STEREO hangszóró-beállítások
között (csak a VCD üzemmódban).
95
H
5....-05-CDP 604 neu 15.06.2004 14:19 Uhr Seite 95
Page 96

CD-k lejátszása
1. Az OPEN gombbal nyissa ki a CD-fiókot!
2. Helyezzen rá egy CD-t címkéjével felfelé a központozó kúpra úgy, hogy
bekattanjon! Utána zárja be a CD-fiókot!
3. A bekapcsoláshoz nyomja meg a készüléken lévő / II lejátszás/szünet
gombot (1)! A display-n ”rEAd” (olvas) szó jelenik meg. Az első számtól
kezdve végigfut a CD-n lévő műsor. A display mutatja az éppen játszott
nótát és a lefutott műsoridőt.
4. Ha ki akarja venni a CD-t, nyomja meg a STOP gombot, az OPEN gombbal nyissa fel a CD-fedelet, és elővigyázatosan emelje le a korongot! Tartsa
a CD-fedelet mindig csukva!
Figyelem: Ha hibásan helyezte be a CD-t, a display-n “BAdisc” jelenik meg, ill.
ha nincs CD- betéve, akkor a “NO DISC” jelentés látható.
MP3-as formátumú zene lejátszása
Ezzel a készülékkel MP3-as formátumban is le lehet játszani zenedarabokat. A
készülék ezenkívül az alábbi forgalomban lévő CD-típusokat támogatja: CD, CDRW, CD-R. A display-n mindig az aktív ESP funkció jelenik meg (100 mp-es
memória), l. az “ESP/NP/DIR” pontot.
Programozott lejátszás
Lehetővé teszi tetszés szerinti címsorrend programozását. Lásd az alábbi
táblázatokban a “PROGRAM” c. fejezetet!
Miután az összes beprogramozott címet lejátszotta, a készülék automatikusan
leáll. Ha a Stop gombot egyszer megnyomja, a lejátszás megszakad, a program pedig letörlődik. Ugyanez történik a lejátszás befejeződése után, valamint
kb. 10 másodperc elteltével, és mihelyt kikapcsolják a készüléket.
Lehetősége van arra, hogy kombinálja a programozott címeket a REPEAT-funkcióval. Miután a programozást elvégezte, és a készüléket elindította, nyomja
meg legfeljebb 3-szor a REPEAT gombot, és így a “REPEAT” c, fejezetben leírtak szerint használni tudja a funkciókat.
Funkció-áttekintések
1. VCD funkciók
• Kapcsolja be a tévé-készülékét!
• Állítsa át a tévé-készülékét AV üzemmódra!
•
Kapcsolja be a CD-lejátszót, és a már leírtak szerint tegyen be egy video CD-t!
• Nyomja meg a / II lejátszás/szünet gombot!
• A tévéje képernyőjén láthatja a videoklipet, miközben a hang a CD-lejátszón
hallható.
96
H
5....-05-CDP 604 neu 15.06.2004 14:19 Uhr Seite 96
Page 97

1. VCD funkciók
97
H
Kezelés VCD funkciók
Ha megnyomja a
(II)
1. A készülék bekapcsol, és átvizsgálja a lemezt.
2. Szünet lejátszás közben
3. A lejátszás újra indul.
Ha megnyomja a
STOP ()
A lejátszás leáll.
Ha megnyomja a
(I (3/13))
Az előző címre ugrik.
Ha megnyomja a
(I (4/21))
Ennek a gombnak a segítségével ugorhat a következő, ill. a következő
utáni stb. címre.
Ha lenyomva tartja
a (I / (3/16))
Ha ezt a gombot lenyomva tartja, folyamatos keresés indul (visszafelé).
Ha lenyomva tartja
a(I / (4/18))
Ha ezt a gombot lenyomva tartja, folyamatos keresés indul (előre).
Ha megnyomja a
MODE-ot
Váltás az egy szám ismétlése, az összes ismétlése és a RANDOM funkció között
Ha megnyomja a
NP-t
Váltás az “NTSC” és a “PAL” video-kimeneti rendszer között
Ha megnyomja a
PBC-t (Playback
Control)
1 x megnyomva: a PBC bekapcsol. Kijelzés a képernyőn
2 x megnyomva: a PBC kikapcsol.
Ha megnyomja a
AUDIO/EQ-t
AUDIO funkció: Választ a bal csatorna, jobb csatorna és a sztereó
beállítások közül.
REPEAT
1 x megnyomva = “REPEAT 1”:
Folyamatosan ismétli az éppen futó számot.
2 x megnyomva = “REPEAT ALL”: Folyamatosan ismétli az éppen futó
CD-t.
3 x megnyomva = “REPEAT CANCEL” Az összes funkciót megszünteti.
Folytatódik a normál lejátszás.
PROGRAM
Nyomja meg előszöt a ()-t, utána a PROG-ot! A képernyőn “PROG” és
“TRK” jelenik meg. Jelölje ki a sorrendet a I / I gombokkal (3-es
gomb = +10, 4-as gomb =+1) vagy a / (16/18) gombokkal!
Jelölje ki a sorrendet közvetlenül a számjeggyel jelölt gombokkal (5)!
Kétjegyű számok esetén először a +10 gombot nyomja meg, utána az
egyjegyű számot! Ezzel már tárolta is a programozást. Nyomja meg a
(II).
SLOW
Válasszon a 1/2 ,1/4, 1/8, 1/16 sebességváltozatok közül!
RESUME
Folytatás ugyanattól a helytől Stop után (l. a RESUME pontot)
DIGEST
A képek bemutatás ki formátumban (l. a DIGEST pontot)
ZOOM
Egy-egy képrészlet felnagyítására (l. a ZOOM pontot)
R/L
A hangcsatornák közötti váltásra
5....-05-CDP 604 neu 15.06.2004 14:19 Uhr Seite 97
Page 98
2. CD, MP 3 funkciók
98
H
Kezelés
funkciók
CD MP3
Ha megnyomja a
(II)
1. A készülék bekapcsol, és átvizsgálja a lemezt.
2. Szünet lejátszás közben.
3. A lejátszás újra indul.
Ha megnyomja a
STOP ()
A lejátszás leáll.
Ha megnyomja a
(I (3/13))
Az előző címre ugrik.
Ha megnyomja a
(I (4/21))
Ennek a gombnak a segítségével ugorhat a következő, ill. a következő
utáni stb. címre.
Ha lenyomva
(I / (3/16))
Ha ezt a gombot lenyomva tartja, folyamatos keresés indul (visszafelé).
Ha lenyomva
(I / (4/18))
Ha ezt a gombot lenyomva tartja, folyamatos keresés indul (előre).
MODE a
készüléken:
REPEAT a távkapcsolón:
Vált az egyszeri ismétlés, a DIR ismétlés (csak MP3-ason) és az összes
ismétlése funkciók között. RANDOM funkció csak a készüléken lévő
gomb segítségével.
Ha megnyomja
ESP/DIR
Aktiválja, ill deaktiválja a zavargátló
(anti-schock) funkciót.
A következő könyvtárra/albumra
ugrik (DIRECTORY).
Ha megnyomja
AUDIO/EQ
EQ funkció: Válasszon a I / I gombokkal a következő beállítások
közül: STAND, CLASS; DISCO; JAZZ; POP.
PROGRAM
Nyomja meg először az ()-at, utána a PROG-ot! Jelölje ki a sorrendet
a I / I gombokkal (3-es gomb = +10, 4-as gomb =+1). Nyomja
meg ismét a PROG-ot! A display-n a kijelzés a P-02 stb. tárhelyre vált
A PROG gomb segítségével végezze el a tárolást! Nyomja meg a (II)-t
(csak a készüléken).Vagy jelölje ki a sorrendet közvetlenül a számjeggyel jelölt gombokkal (5)! Kétjegyű számok esetén először a +10 gombot nyomja meg, utána az egyjegyű számot! Ezzel már tárolta is a programozást. Nyomja meg a (II)-t!
5....-05-CDP 604 neu 15.06.2004 14:19 Uhr Seite 98
Page 99

Speciális funkciók
MP3-as CD-k: Ezzel a készülékkel MP3-as CD-k is lejátszhatók. Ilyen CDken akár 200 címet is tömörítve tárolni. A készülék az MP3-as CD-t automatikusan felismeri. Ily módon változatlan marad a hangzásminőség.
Ilyen CD-k lejátszásakor ugyanúgy kell eljárni, mint ahogy a CD-k alatt
olvasható. A programozás is elvégezhető a „Programozott lejátszás“ c.
fejezetben már leírtak szerint.
VCD:
A készüléken video-csatlakozás van a video CD-khez. Lejátszhatók
vele CD-k, VCD-k, CD-R-ek és MP3-as diszkek. A készülék automatikusan felismeri a CD fajtáját. Csatlakoztassa a készüléket a hozzá adott
video-kábel segítségével a tévé-készülékéhez! Nyomja meg az OSD gombot (a távkapcsolón)! Tévéje képernyőjén megjelenik a menü (ha csak
fekete-fehér képet kapna rajta, nyomja meg az N/P gombot, esetleg nyitott CD-fiók mellett).
Zavarelhárítás
Ezt a készüléket az Európa Tanács minden vonatkozó aktuális irányelve szerint
(pl. elektromágnesesség-elviselő képesség vagy kisfeszültség-elviselő képesség) ellenőriztük, és a legújabb biztonságtechnikai előírások szerint készült.
Megjegyezzük az esetleges müszaki változásokat!
99
H
Tünet Ok Megoldás
A VCD-t nem lehet lejátszani. Nincs betéve, vagy hibásan
van betéve a VCD.
GyŒzŒdjék meg róla, hogy a
diszk úgy van-e behelyezve,
hogy a rajta lévŒ felirat felfelé
néz.
A VCD lejátszás közben ugrik EllenŒrizze, hogy nincsenek-e
a diszken ujjlenyomatok,
szennyezŒdés vagy karcolás!
Tisztítsa meg a diszket puha
ruhával úgy, hogy a ruhát a
diszk középétŒl a széle felé
húzza.
Nincs szín A színes rendszer hibásan van
beállítva.
Nyomja meg a P/N gombot
(2), és válassza a helyes színes
szabványt!
5....-05-CDP 604 neu 15.06.2004 14:19 Uhr Seite 99
Page 100

Garancia
Garanciális igényeivel forduljon, kérem, a szerződéses kereskedőjéhez!
A garancia igazolására a pénztári nyugta szolgál. E nélkül az igazolás nélkül sem
díjmentes csere, sem díjtalan javítás nem végezhető.
Garanciális esetben eredeti csomagolásában adja át az alapkészüléket a pénz-
tári bizonylattal együtt annak a kereskedőnek, akitől a készüléket vásárolta!
*) A tartozékok hibái nem eredményezik automatikusan az egész készülék
díjtalan cseréjét. Ilyen esetekben forduljon „forró vonalunkhoz”! Az üvegtörésből,
ill. a műanyag alkatrészek töréséből eredő hibák megszüntetése mindenkor
térítésköteles.
Sem az elhasználódó tartozékokban, ill. kopó alkatrészekben (pl. szénkefe,
dagasztóhorog, hajtószíj, póttávvezérlő, pótfogkefe, fűrészlap stb.) bekövetkező
hibák, sem a tisztítás, karbantartás vagy a kopó alkatrészek cseréje nem esik a
garancia hatálya alá, következésképp térítésköteles.
Illetéktelen beavatkozás a garancia megszűnését eredményezi.
A garanciális idő után
A garanciális idő eltelte után a megfelelő szakkereskedésben vagy javítószolgálatnál végeztethet térítésköteles javításokat.
100
H
5....-05-CDP 604 neu 15.06.2004 14:19 Uhr Seite 100
 Loading...