

Page 1

Bedienungsanleitung/Garantie
Gebruiksaanwijzing • Mode d’emploi • Instrucciones de servicio
Manual de instruções • Istruzioni per l’uso • Instruction Manual
Instrukcja obsługi/Gwarancja • Használati utasítás
Інструкція з експлуатації
BO D E N S T A U B S A U G E R
Stofzuiger • Aspirateur-traîneau • Aspiradora • Aspirador • Aspirapolvere a carrello
Floor-type vacuum cleaner • Odkurzacz • Vysavač koberců • Напольний пилосос
BS 1276
Stofzuiger • Aspirateur-traîneau • Aspiradora • Aspirador • Aspirapolvere a carrello
Floor-type vacuum cleaner • Odkurzacz • Vysavač koberců •
05-BS 1276.indd 1 08.10.2009 14:19:41 Uhr
Page 2
2
DEUTSCH
NEDERLANDS
FRANÇAISESPAÑOL
PORTUGUÊS
ITALIANO
УКРАЇНСЬКА
ENGLISH
JĘZYK POLSKI
MAGYARUL
DEUTSCH
Inhalt
Übersicht der Bedienelemente ................................... Seite 3
Bedienungsanleitung .................................................. Seite 4
Technische Daten ....................................................... Seite 7
Garantiebedingungen ................................................. Seite 7
NEDERLANDS
Inhoud
Overzicht van de bedieningselementen ................... Pagina 3
Gebruiksaanwijzing .................................................. Pagina 9
Technische gegevens .............................................. Pagina 12
FRANÇAIS
Sommaire
Liste des différents éléments de commande .............. Page 3
Mode d’emploi ............................................................. Page 13
Données techniques ................................................... Page 16
ESPAÑOL
Indice
Indicación de los elementos de manejo................... Página 3
Instrucciones de servicio.......................................... Página 17
Datos técnicos .......................................................... Página 20
PORTUGUÊS
Índice
Descrição dos elementos ......................................... Página 3
Manual de instruções ............................................... Página 21
Características técnicas ........................................... Página 24
ITALIANO
Indice
Elementi di comando ............................................... Pagina 3
Istruzioni per l’uso .................................................... Pagina 25
Dati tecnici ................................................................ Pagina 28
ENGLISH
Contents
Overview of the Components ..................................... Page 3
Instruction Manual ....................................................... Page 29
Technical Data............................................................. Page 32
JĘZYK POLSKI
Spis tres´ ci
Przegląd elementów obłsugi .....................................Strona 3
Instrukcja obsługi ......................................................Strona 33
Dane techniczne .......................................................Strona 36
Gwarancja ................................................................. Strona 36
MAGYARUL
Tartalom
A kezelőelemek áttekintése ........................................ Oldal 3
Használati utasítás ...................................................... Oldal 37
Műszaki adatok ........................................................... Oldal 40
УКРАЇНСЬКА
Зміст
Огляд елементів управління ...............................сторінка 3
Інструкція з експлуатації ......................................сторінка 41
Технічні параметри ..............................................сторінка 44
05-BS 1276.indd 2 08.10.2009 14:19:41 Uhr
Page 3
3
Übersicht der Bedienelemente
Overzicht van de bedieningselementen • Liste des différents éléments de commande
Indicación de los elementos de manejo • Descrição dos elementos
Elementi di comando • Overview of the Components • Przegląd elementów obsługi
A kezelőelemek áttekintése • Огляд елементів управління
05-BS 1276.indd 3 08.10.2009 14:19:42 Uhr
Page 4
4
DEUTSCH
Allgemeine Sicherheitshinweise
Lesen Sie vor Inbetriebnahme dieses Gerätes die Bedienungsanleitung sehr sorgfältig durch und bewahren Sie diese inkl.
Garantieschein, Kassenbon und nach Möglichkeit den Karton
mit Innenverpackung gut auf. Falls Sie das Gerät an Dritte
weitergeben, geben Sie auch die Bedienungsanleitung mit.
• Benutzen Sie das Gerät ausschließlich für den privaten und
den dafür vorgesehenen Zweck. Dieses Gerät ist nicht für
den gewerblichen Gebrauch bestimmt. Benutzen Sie es
nicht im Freien. Halten Sie es vor Hitze, direkter Sonneneinstrahlung, Feuchtigkeit (auf keinen Fall in Flüssigkeiten
tauchen) und scharfen Kanten fern. Benutzen Sie das Gerät
nicht mit feuchten Händen. Bei feucht oder nass gewordenem Gerät sofort den Netzstecker ziehen.
• Schalten Sie das Gerät aus und ziehen Sie immer den
Stecker aus der Steckdose (ziehen Sie am Stecker, nicht
am Kabel), wenn Sie das Gerät nicht benutzen, Zubehörteile anbringen, zur Reinigung oder bei Störung.
• Betreiben Sie das Gerät nicht unbeaufsichtigt. Sollten Sie
den Raum verlassen, schalten Sie das Gerät immer aus.
Ziehen Sie den Stecker aus der Steckdose.
• Das Gerät und das Netzkabel müssen regelmäßig auf
Zeichen von Beschädigungen untersucht werden. Wird
eine Beschädigung festgestellt, darf das Gerät nicht mehr
benutzt werden.
• Reparieren Sie das Gerät nicht selbst, sondern suchen Sie
einen autorisierten Fachmann auf. Um Gefährdungen zu
vermeiden, ein defektes Netzkabel nur vom Hersteller, unserem Kundendienst oder einer ähnlich qualizierten Person
durch ein gleichwertiges Kabel ersetzen lassen.
• Verwenden Sie nur Original-Zubehör.
• Beachten Sie die nachfolgenden „Speziellen Sicherheitshinweise“.
Kinder und gebrechliche Personen
• Zur Sicherheit Ihrer Kinder lassen Sie keine Verpackungsteile (Plastikbeutel, Karton, Styropor, etc.) erreichbar liegen.
WARNUNG!
Lassen Sie kleine Kinder nicht mit Folie spielen.
Es besteht Erstickungsgefahr!
• Dieses Gerät ist nicht dafür bestimmt, durch Personen (einschließlich Kinder) mit eingeschränkten physischen, sensorischen oder geistigen Fähigkeiten oder mangels Erfahrung
und/oder mangels Wissen benutzt zu werden, es sei denn,
sie werden durch eine für ihre Sicherheit zuständige Person
beaufsichtigt oder erhielten von ihr Anweisungen, wie das
Gerät zu benutzen ist.
• Kinder sollten beaufsichtigt werden, um sicherzustellen,
dass sie nicht mit dem Gerät spielen.
Symbole in dieser Bedienungsanleitung
Wichtige Hinweise für Ihre Sicherheit sind besonders gekennzeichnet. Beachten Sie diese Hinweise unbedingt, um Unfälle
und Schäden am Gerät zu vermeiden:
WARNUNG:
Warnt vor Gefahren für Ihre Gesundheit und zeigt mögliche
Verletzungsrisiken auf.
ACHTUNG:
Weist auf mögliche Gefährdungen für das Gerät oder andere
Gegenstände hin.
HINWEIS:
Hebt Tipps und Informationen für Sie hervor.
Spezielle Sicherheitshinweise für dieses Gerät
• Saugen Sie keine Feuchtigkeit, bzw. Flüssigkeiten auf!
• Saugen Sie keine heiße Asche, spitze oder scharfe Gegenstände!
• Benutzen Sie das Gerät nicht in feuchten Räumen!
• Saugen Sie niemals ohne Filter. Prüfen Sie stets den korrekten Sitz der Filter nach dem Einsetzen!
• Halten Sie während des Betriebes Haare, Kleidung und
Körperteile von der Staubsaugerdüse fern!
• Halten Sie den Staubsauger von Wärmequellen wie Radiatoren, Öfen usw. fern!
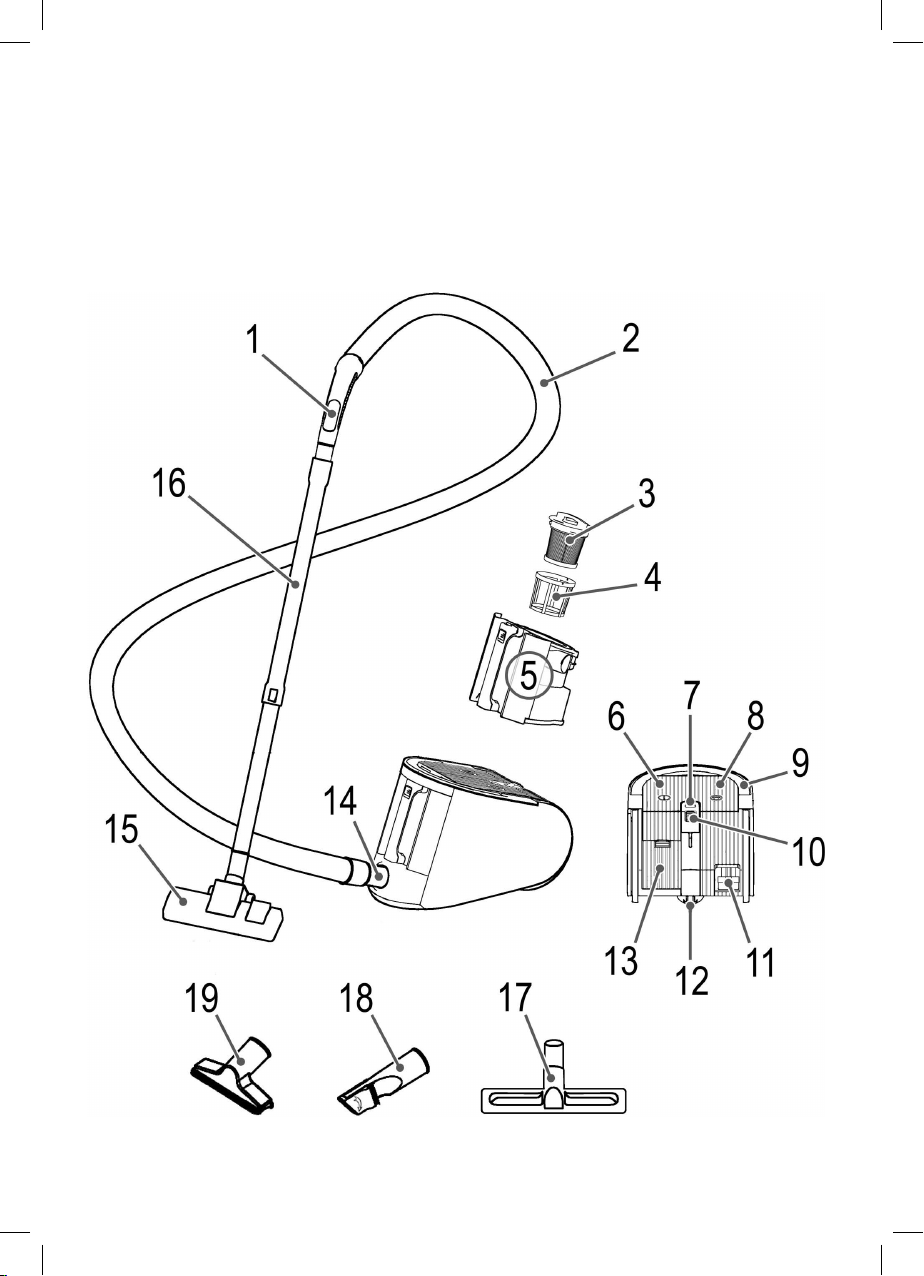
Übersicht der Bedienelemente
1 Luftschieber
2 Saugschlauch
3 HEPA-Filter
4 Nylon-Vorlter
5 Staubbehälter mit Motorschutzlter
6 Ein/Aus Schalter
7 Entleerungsanzeige
8 Taste zur Kabelaufwicklung
9 Tragegriff
10 Saugleistungsregler
11 Kabel
12 Parkhilfe
13 Filterabdeckung – Auslasslter
14 Schlauchanschluss
15 Bodendüse (mit Haken (ohne Abb.))
16 Teleskop-Saugrohr
Zubehör
17 Parkettbürste
18 Fugen- und Bürstdüse
19 Polsterdüse
Inbetriebnahme
• Stecken Sie den Verbindungskopf des Saugschlauches in
den Schlauchanschluss, bis er mechanisch einrastet. Um
den Schlauch wieder zu lösen, drücken Sie die Taste am
Verbindungskopf und ziehen den Schlauch heraus.
• Stecken Sie ggf. das Saugrohr am Griffstück auf.
• Montieren Sie die Bodendüse bzw. das Zubehör.
05-BS 1276.indd 4 08.10.2009 14:19:42 Uhr
Page 5
5
DEUTSCH
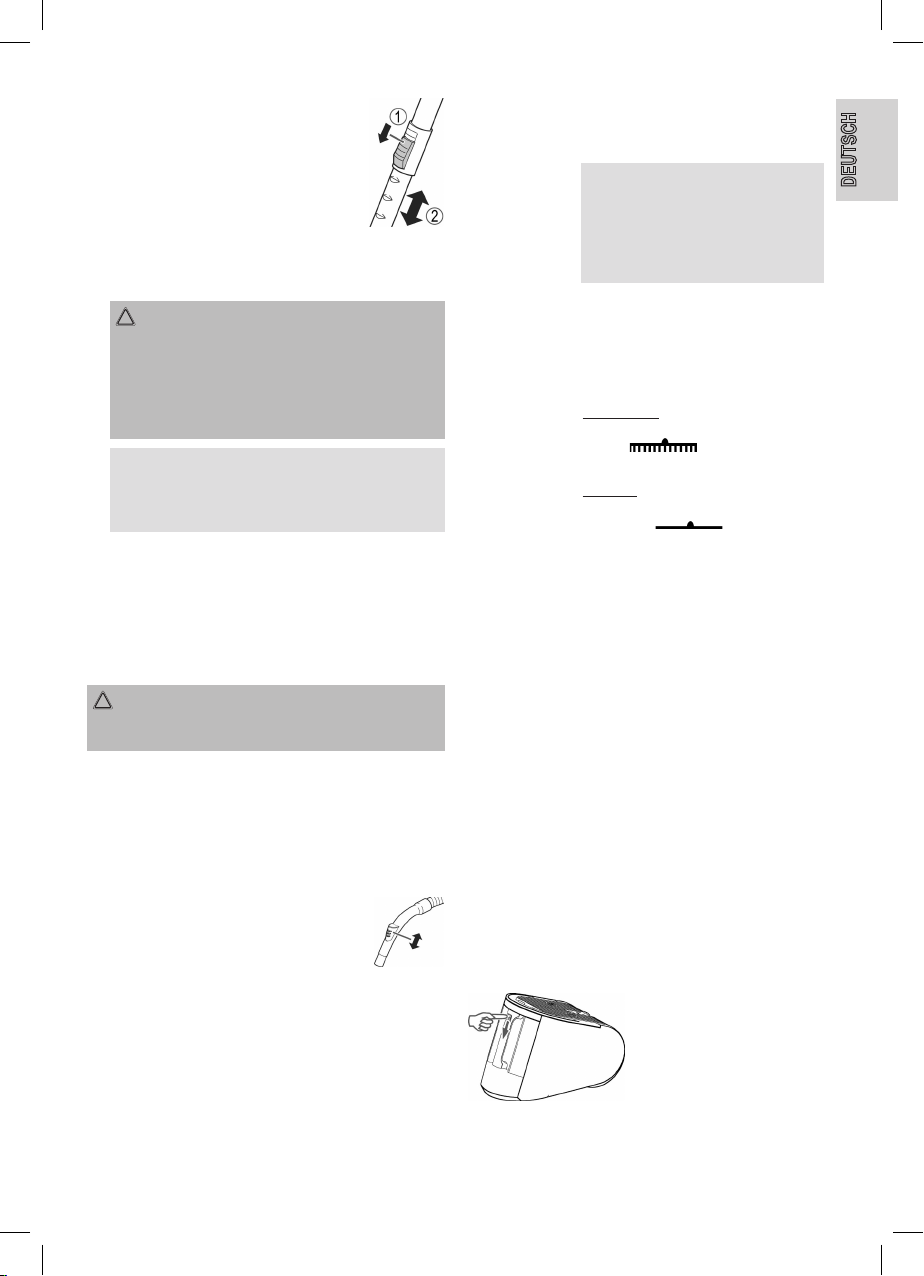
Teleskop-Saugrohr
Durch das höhenverstellbare Saugrohr, wird eine
individuelle Anpassung auf Ihre Körpergröße
ermöglicht. Entriegeln Sie die Kupplung durch Drücken der Taste in Pfeilrichtung. Verschieben Sie die
Saugrohre wie gewünscht. Zum Verriegeln lösen
Sie die Taste, bis es deutlich hörbar einrastet.
Benutzen des Gerätes
1. Wickeln Sie die benötigte Kabellänge ab.
ACHTUNG:
• Ziehen Sie das Netzkabel max. bis zur gelben Markierung.
• Ziehen Sie das Kabel auf keinen Fall bis zur roten
Markierung, da die Kabelaufwicklung Schaden
nehmen kann. Solche Schäden fallen nicht in den
Garantieanspruch.
HINWEIS:
Falls die rote Markierung sichtbar ist, ziehen Sie das
Kabel mithilfe der Kabelaufrolltaste wieder bis zur gelben
Markierung ein.
2. Stecken Sie den Netzstecker in eine vorschriftsmäßig
installierte Schutzkontakt-Steckdose 230 V, 50 Hz. Schalten
Sie das Gerät mit dem Ein-/Aus Schalter ein, indem Sie die
Taste mit dem Fuß nach unten drücken.
3. Stellen Sie die Saugleistung mit dem Saugleistungsregler
ein (MIN bis MAX).
4. Saugen Sie nun mit gleichmäßiger Geschwindigkeit. Andrücken ist nicht nötig.
ACHTUNG:
Achten Sie auf die durch die Kabellänge begrenzte Reichweite!
Saugleistungsregler
Niedrige Saugleistung: Für Gardinen, empndliche Stoffe.
Mittlere Saugleistung: Für hochorige Veloursteppiche und
Textilböden.
Hohe Saugleistung: Für robuste Teppiche und Fußböden.
Luftschieber
Öffnen Sie den Luftschieber am Schlauchgriff zur
Luftregulierung oder, um an der Düse haftende
Teile zu lösen.
Ausschalten und Stromkabel aufrollen
1. Schalten Sie den Bodenstaubsauger am Ein-/Aus-Schalter
aus und ziehen Sie den Stecker aus der Steckdose.
2. Behalten Sie den Stecker in der Hand.
3. Drücken Sie die Taste für die Kabelaufwicklung und führen
Sie das Kabel nach. Halten Sie das Kabel fest, um ein
Herumschlagen zu vermeiden.
Düsenaufsatz
Fugen-, Bürstdüse: Zum Saugen von Polstern, Vorhängen und
in Ecken und Schlitzen usw.
HINWEIS: „2 in 1“ Düse:
Zusammengeklappt können Sie sie als
Fugendüse benutzen. Möchten Sie die
Bürstendüse verwenden, ziehen Sie
am Bürstenteil in Pfeilrichtung, bis diese
mechanisch einrastet.
Polsterdüse: Zur Reinigung von Polstern, Vorhängen
usw.
Bodendüse: Die Bodendüse ist zur leichteren Führung
mit Rollen ausgestattet. Zur Reinigung von
Teppichen oder glatten Flächen.
Glatte Böden:
Drücken Sie den Hebel mit dem Bürstensymbol „ “ mit dem Fuß nieder.
Die Bürsten sind jetzt sichtbar.
Teppiche:
Stellen Sie den Hebel mit dem Fuß um auf
das Symbol „ “. Die Bürsten
sind jetzt eingefahren.
Parkettbürste: Die Parkettbürste ist zur leichteren Füh-
rung mit Rollen ausgestattet. Für größere
Flächen, wie Parkett, Laminat oder Fliesen
u. a.
Lösen der Düsen: Ziehen Sie diese unter leichtem Drehen
ab.
Wartung
Filter
Ihr Gerät verfügt über 3 Filtersysteme. Das herkömmliche
Staubbeutelsystem wurde ersetzt durch einen transparenten
Staubbehälter. In ihm werden grober Schmutz und kleinste
Schwebepartikel durch die hohe Strömungsgeschwindigkeit aus
der „Saugluft“ gewirbelt.
Der Erwerb von Staubbeuteln entfällt.
Elektronische Entleerungsanzeige für den Staubbehälter
Halten Sie den Saugschlauch unbelastet in die Luft. Leuchtet
die Entleerungsanzeige für den Staubbehälter, gehen Sie wie
folgt vor:
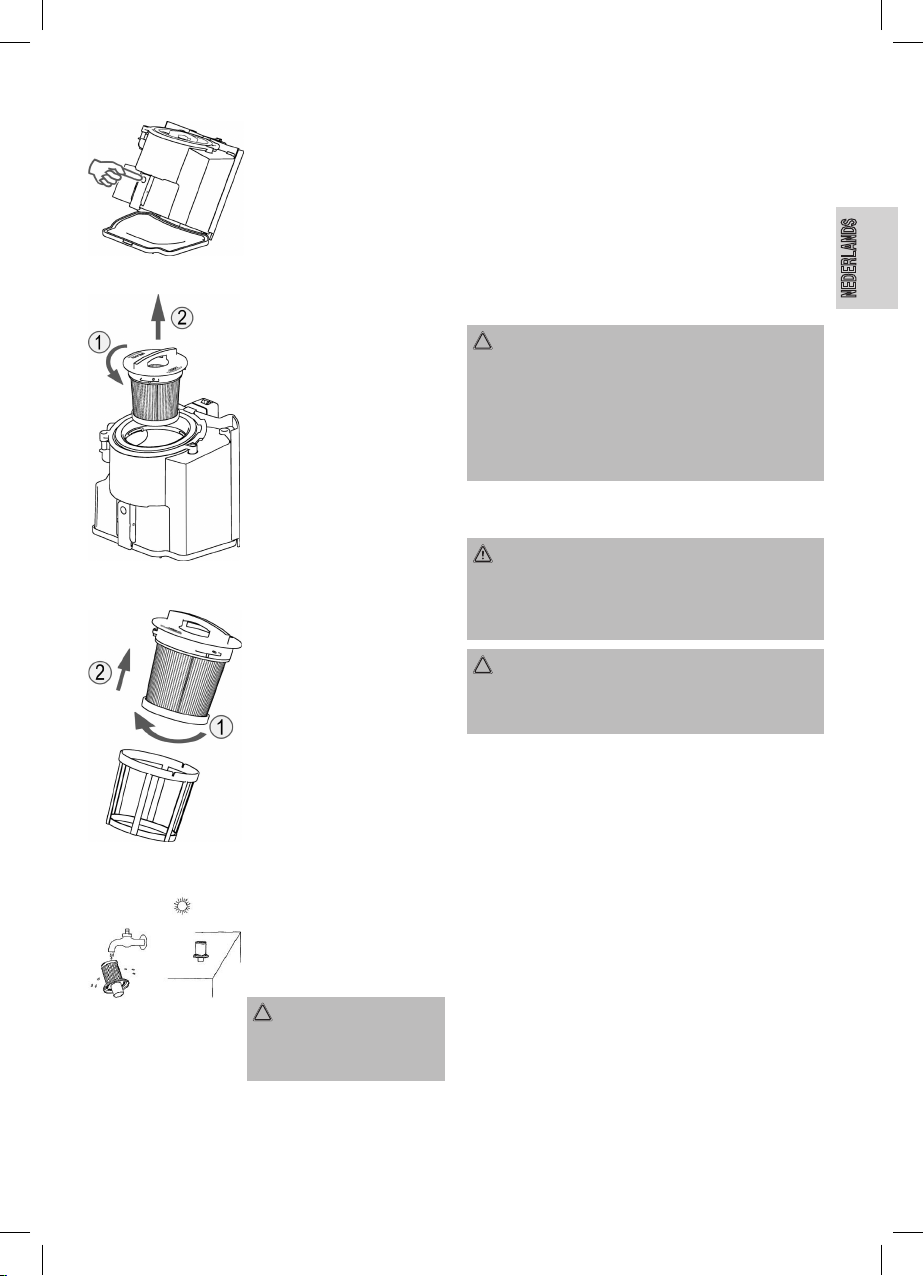
Abb. 1
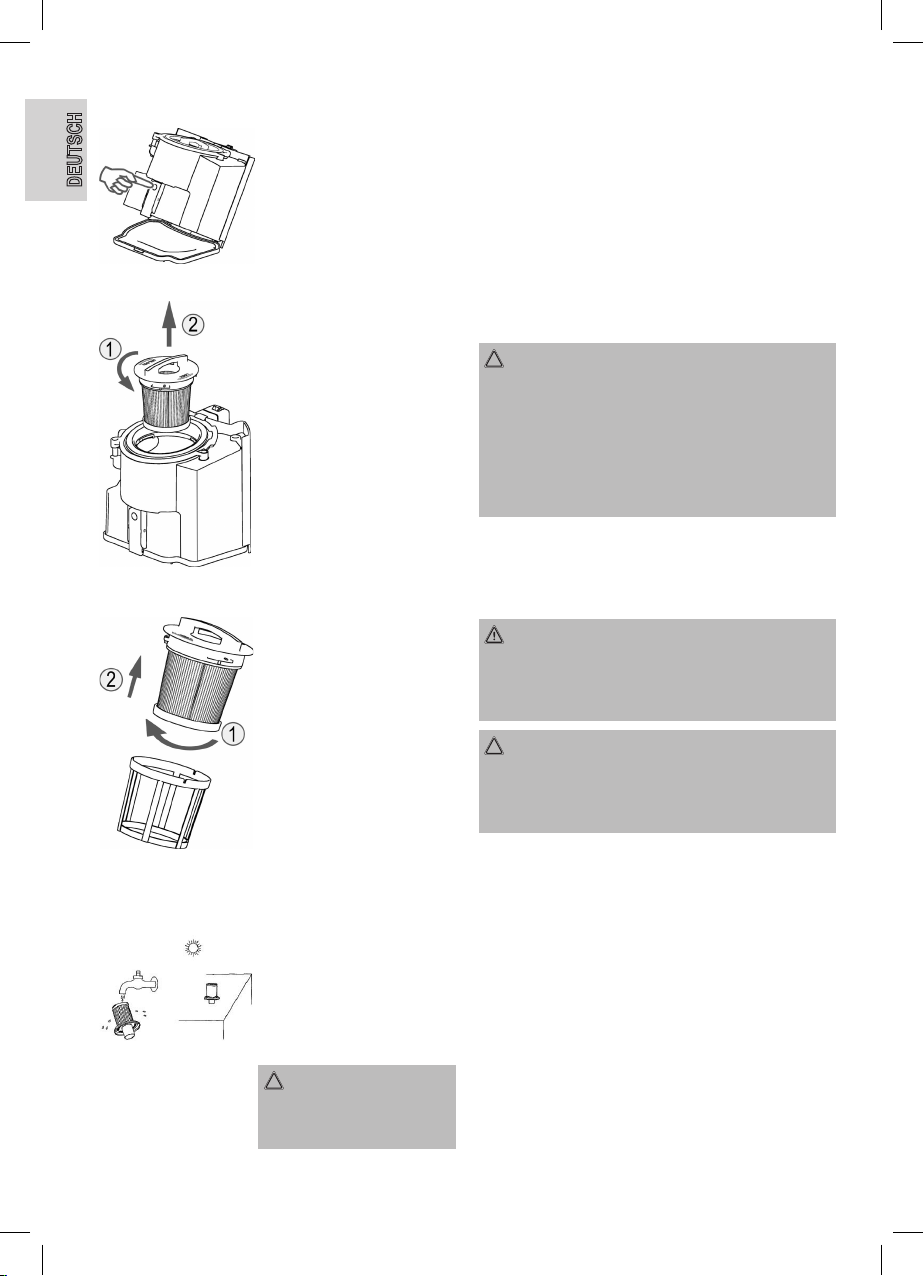
Entleeren des Staubbehälters
• Ziehen Sie den Netzstecker
aus der Steckdose.
• Schieben Sie die Taste zum
Lösen des Staubbehälters
nach unten und entnehmen Sie
den Staubbehälter (siehe
Abb. 1).
05-BS 1276.indd 5 08.10.2009 14:19:43 Uhr
Page 6
6
DEUTSCH
Abb. 2 • Halten Sie den Staubbehäl-
ter über einen Mülleimer.
Entleeren Sie den Inhalt des
Staubbehälters. Drücken Sie
dazu die Taste (PUSH) am
Staubbehälter (siehe Abb. 2).
• Schließen Sie die Bodenplatte
wieder, so dass sie hörbar
einrastet.
Abb. 3
Abb. 4
HEPA-Motorschutzlter (im
Staubbehälter)
Reinigen des Filtereinsatzes
• Ziehen Sie den Netzstecker
aus der Steckdose.
• Schieben Sie die Taste zum
Lösen des Staubbehälters
nach unten und entnehmen Sie
den Staubbehälter (siehe
Abb. 1).
• Entleeren Sie den Inhalt des
Staubbehälters (siehe Abb. 2).
• Entriegeln Sie den Filtereinsatz durch kurzes Drehen in
Richtung UNLOCK. Nehmen
Sie ihn heraus (siehe Abb. 3).
Im zweiten Schritt trennen Sie
den Nylon-Vorlter (4) vom
HEPA-Filter (3) durch Drehen
entgegen der Verriegelung.
(siehe Abb. 4). Reinigen Sie
den Nylon-Vorlter durch Ausklopfen und den HEPA-Filter
durch sanftes Ausbürsten.
• Setzen Sie die Bauteile wieder
ein.
• Verriegeln Sie den Filtereinsatz
im Staubbehälter durch Drehen
in Richtung LOCK bis zum
Anschlag.
• Befestigen Sie den Staubbehälter wieder, bis dieser hörbar
einrastet.
Abb. 5
Nach jedem dritten Entleeren oder
bei stärkeren Verschmutzungen
reinigen Sie den Filter, indem Sie
ießendes Wasser entgegen der
Blasrichtung durch das Filtervlies
laufen lassen.
Setzen Sie diesen nur vollständig
getrocknet wieder ein!
ACHTUNG:
Waschen Sie die Filter niemals in
der Waschmaschine und verwenden Sie keinen Haartrockner.
Auslasslter
Des Weiteren verfügt Ihr Gerät über einen Auslasslter. Sie
nden diesen Filter unter der Filterabdeckung (13). Um eine
einwandfreie Funktion des Filters zu gewährleisten, empfehlen
wir den Filter alle 6 Monate zu reinigen.
• Ziehen Sie den Netzstecker aus der Steckdose.
• Öffnen Sie das Lüftungsgitter durch Drücken des Hebels
oben am Lüftungsgitter.
• Ziehen Sie dann das Gitter nach vorne heraus. Entnehmen
Sie den Filter und reinigen Sie diesen, wie bereits beschrieben.
• Setzen Sie bitte den Filter richtig wieder ein und schließen
Sie das Lüftungsgitter (bis es einrastet)
ACHTUNG:
Bitte beachten Sie diesen wichtigen Hinweis!
Die Reinigung kann je nach Einsatzbedingungen, z. B beim
Saugen von feinem Staub, auch nach kürzerer Zeit nötig werden. Sollte die Saugleistung Ihres Staubsaugers nachlassen,
reinigen Sie bitte die Filter, wie beschrieben.
Wenn die Saugleistung plötzlich während des Betriebes
nachlässt, kann dies auch auf eine Verstopfung der Filter
hinweisen.
Ersatz Motorschutz- sowie Auslasslter erhalten Sie bei
unserer Hotline.
Reinigung und Aufbewahrung
WARNUNG:
• Ziehen Sie immer den Netzstecker vor der Reinigung!
• Das Gerät auf keinen Fall zum Reinigen in Wasser tauchen. Es könnte zu einem elektrischen Schlag oder Brand
führen.
ACHTUNG:
• Benutzen Sie keine Drahtbürste oder andere scheuernde
Gegenstände.
• Benutzen Sie keine scharfen oder scheuernden Reinigungsmittel.
Reinigen Sie das Gehäuse mit einem trockenen Tuch.
Aufbewahrung
• Lassen Sie das Gerät vollständig abkühlen.
• Rollen Sie das Kabel komplett ein.
• Hängen Sie bitte den Haken der Bodendüse in die Parkhilfe
auf der Rückseite des Gerätes ein.
05-BS 1276.indd 6 08.10.2009 14:19:44 Uhr
Page 7

7
DEUTSCH
Störungsbehebung
• Gerät ist ohne Funktion.
Abhilfe:
Überprüfen Sie den Netzanschluss.
Überprüfen Sie die Stellung des Schalters.
• Gerät saugt nicht.
Mögliche Ursache:
Die Saugleistung ist zu gering eingestellt.
Abhilfe:
Kontrollieren Sie die Position des Reglers.
oder
Mögliche Ursache:
Der Staubbehälter oder die Filter sind verschmutzt.
Abhilfe:
Entleeren bzw. reinigen Sie die Bauteile.
oder
Mögliche Ursache:
Im Saugschlauch oder der Düse bendet sich ein Fremdkörper.
Abhilfe:
Kontrollieren Sie das Zubehör auf Fremdkörper.
Geräuschentwicklung
Gemessen wurde der Schalldruckpegel am Ohr einer Bedienperson (LpA) in Übereinstimmung mit der DIN EN ISO 3744.
Ermittelter Schalldruckpegel: 80,0 dB(A) (kein Limit)
Technische Daten
Modell: ..............................................................................BS 1276
Spannungsversorgung: .............................................230 V, 50 Hz
Leistungsaufnahme:
P
nom.
: ...........................................................................1800 W
P
max.
: ............................................................................2400 W
Schutzklasse: .............................................................................. ΙΙ
Nettogewicht: .......................................................................7,2 kg
Technische Änderungen vorbehalten!
Konformitätserklärung
Hiermit erklärt die Firma Clatronic International GmbH, dass sich
das Gerät BS 1276 in Übereinstimmung mit den grundlegenden
Anforderungen, der europäischen Richtlinie für elektromagnetische Verträglichkeit (2004/108/EG) und der Niederspannungsrichtlinie (2006/95/EG) bendet.
Garantiebedingungen
1. Gegenüber Verbrauchern gewähren wir bei privater Nutzung
des Geräts eine Garantie von 24 Monaten ab Kaufdatum.
Ist das Gerät zur gewerblichen Nutzung geeignet, gewähren
wir beim Kauf durch Unternehmer für das Gerät eine Garantie von 12 Monaten.
Die Garantiezeit für Verbraucher reduziert sich auf 12 Mo-
nate, sofern sie ein zur gewerblichen Nutzung geeignetes
Gerät – auch teilweise – gewerblich nutzen.
2. Voraussetzung für unsere Garantieleistungen sind der Kauf
des Geräts in Deutschland bei einem unserer Vertragshändler sowie die Übersendung einer Kopie des Kaufbelegs und
dieses Garantiescheins an uns.
Bendet sich das Gerät zum Zeitpunkt des Garantiefalls im
Ausland, muss es auf Kosten des Käufers uns zur Erbringung der Garantieleistungen zur Verfügung gestellt werden.
3. Mängel müssen innerhalb von 14 Tagen nach Erkennbarkeit
uns gegenüber schriftlich angezeigt werden. Besteht der
Garantieanspruch zu Recht, entscheiden wir, auf welche Art
der Schaden/Mangel behoben werden soll, ob durch Reparatur oder durch Austausch eines gleichwertigen Geräts.
4. Garantieleistungen werden nicht für Mängel erbracht, die
auf der Nichtbeachtung der Gebrauchsanweisung, unsachgemäßer Behandlung oder normaler Abnutzung des Geräts
beruhen. Garantieansprüche sind ferner ausgeschlossen für
leicht zerbrechliche Teile, wie zum Beispiel Glas oder Kunststoff. Schließlich sind Garantieansprüche ausgeschlossen,
wenn nicht von uns autorisierte Stellen Arbeiten an dem
Gerät vornehmen.
5. Durch Garantieleistungen wird die Garantiezeit nicht verlängert. Es besteht auch kein Anspruch auf neue Garantieleistungen. Diese Garantieerklärung ist eine freiwillige Leistung
von uns als Hersteller des Geräts. Die gesetzlichen Gewährleistungsrechte (Nacherfüllung, Rücktritt, Schadensersatz
und Minderung) werden durch diese Garantie nicht berührt.
Stand 03 2008
Garantieabwicklung
Sollte Ihr Gerät innerhalb der Garantiezeit einen Mangel aufweisen, bitten wir Sie, uns Ihren Garantieanspruch mitzuteilen.
Die schnellste und komfortabelste Möglichkeit ist die Anmeldung
über unser SLI (Service Logistik International) Internet-Serviceportal.
www.sli24.de
Sie können sich dort direkt anmelden und erhalten alle Informationen zur weiteren Vorgehensweise Ihrer Reklamation.
Über einen persönlichen Zugangscode, der Ihnen direkt nach
Ihrer Anmeldung per E-Mail übermittelt wird, können Sie den
Bearbeitungsablauf Ihrer Reklamation auf unserem Serviceportal online verfolgen.
05-BS 1276.indd 7 08.10.2009 14:19:44 Uhr
Page 8
8
DEUTSCH
Alternativ können Sie uns den Servicefall per E-Mail
hotline@clatronic.de
oder per Fax
0 21 52 – 20 06 15 97
mitteilen.
Bitte teilen Sie uns Ihren Namen, Vornamen, Straße,
Hausnummer, PLZ und Wohnort, Telefon-Nummer, soweit
vorhanden, Fax-Nummer und E-Mail-Adresse mit. Im Weiteren
benötigen wir die Typenbezeichnung des reklamierten Gerä-
tes, eine kurze Fehlerbeschreibung, das Kaufdatum und den
Händler, bei dem Sie das Neugerät erworben haben.
Nach Prüfung Ihres Garantieanspruches erhalten Sie von uns
einen fertig ausgefüllten Versandaufkleber. Sie brauchen diesen
Aufkleber nur noch auf die Verpackung Ihres gut verpackten Gerätes zu kleben und das Paket bei der nächsten Annahmestelle
der Deutschen Post / DHL abzugeben. Der Versand erfolgt für
Sie kostenlos an unser Servicecenter bzw. Servicepartner.
Bitte fügen Sie dem Paket eine Kopie Ihres Kaufbeleges (Kassenbon, Rechnung, Lieferschein) sowie eine kurze Fehlerbeschreibung bei.
Ohne den Garantienachweis (Kaufbeleg) kann Ihre Reklamation nicht kostenfrei bearbeitet werden.
Bitte nehmen Sie in keinem Fall eine unfreie Einsendung Ihres
Gerätes vor. Bei unfreien Lieferungen entfällt Ihr Anspruch auf
Garantieleistungen.
Clatronic International GmbH
Industriering Ost 40
D-47906 Kempen/Germany
Bedeutung des Symbols „Mülltonne“
Schonen Sie unsere Umwelt, Elektrogeräte gehören nicht in den
Hausmüll.
Nutzen Sie die für die Entsorgung von Elektrogeräten vorgesehenen Sammelstellen und geben dort Ihre Elektrogeräte ab, die
Sie nicht mehr benutzen werden.
Sie helfen damit die potenziellen Auswirkungen, durch falsche
Entsorgung, auf die Umwelt und die menschliche Gesundheit
zu vermeiden.
Sie leisten damit Ihren Beitrag zur Wiederverwertung, zum
Recycling und zu anderen Formen der Verwertung von Elektround Elektronik-Altgeräten.
Informationen, wo die Geräte zu entsorgen sind, erhalten Sie
über Ihre Kommunen oder die Gemeindeverwaltungen.
05-BS 1276.indd 8 08.10.2009 14:19:44 Uhr
Page 9
9
NEDERLANDS
Algemene veiligheidsinstructies
Lees vóór de ingebruikname van dit apparaat de handleiding
uiterst zorgvuldig door en bewaar deze goed, samen met het
garantiebewijs, de kassabon en zo mogelijk de doos met de
binnenverpakking. Geef ook de handleiding mee wanneer u de
machine aan derden doorgeeft.
• Gebruik het apparaat uitsluitend privé en uitsluitend voor de
voorgeschreven toepassing. Dit apparaat is niet geschikt
voor commercieel gebruik. Gebruik het apparaat niet buiten.
Bescherm het tegen hitte, directe zonnestralen, vocht (in
geen geval in vloeistoffen dompelen) en scherpe randen.
Gebruik het apparaat niet met vochtige handen. Bij vochtig
of nat geworden apparaat onmiddellijk de stroomtoevoer
onderbreken.
• Schakel het apparaat uit en onderbreek altijd de stroomtoevoer (trek aan de stekker, niet aan de kabel) wanneer u het
apparaat niet gebruikt, hulpstukken aanbrengt, reinigt of
wanneer storingen optreden.
• Laat het ingeschakelde apparaat niet zonder toezicht
werken. Schakel het apparaat altijd uit voordat u de ruimte
verlaat. Trek de netsteker uit de contactdoos.
• Het apparaat en de netkabel moeten regelmatig op zichtbare schade worden gecontroleerd. Wanneer u schade
vaststelt, mag het apparaat niet meer worden gebruikt.
• Repareer het apparaat nooit zelf, maar breng het naar een
geautoriseerde vakman. Voorkom gevaren en laat een
defecte kabel altijd alleen door de fabrikant, onze technische
dienst of een eender gekwaliceerde persoon vervangen
door een soortgelijke kabel.
• Gebruik alleen originele reserveonderdelen.
• Neem de onderstaande “Speciale veiligheidsinstructies“ in
acht.
Kinderen en gebrekkige personen
• Laat om veiligheidsredenen geen verpakkingsdelen (plasticzak, doos, piepschuim, enz.) binnen het bereik van uw
kinderen liggen.
WAARSCHUWING!
Laat kleine kinderen niet met de folie spelen. Er bestaat
gevaar voor verstikking!
• Dit product mag niet worden gebruikt door personen
(inclusief kinderen) met beperkte fysieke, sensorische of
geestelijke vermogens of gebrekkige ervaring en/of kennis,
tenzij een voor hun veiligheid verantwoordelijke persoon
toezicht houdt of hun vooraf instructies gegeven heeft voor
het gebruik van het product.
• Houd toezicht op kinderen om te waarborgen dat ze niet met
het apparaat spelen.
Symbolen in deze bedieningshandleiding
Belangrijke aanwijzingen voor uw veiligheid zijn speciaal gekenmerkt. Neem deze aanwijzingen strikt in acht om ongevallen en
schade aan het apparaat te vermijden:
WAARSCHUWING:
waarschuwt voor gevaren voor uw gezondheid en toont
mogelijk letselrisico’s.
OPGELET:
wijst op mogelijke gevaren voor het apparaat of andere
voorwerpen.
OPMERKING:
kenmerkt tips en informatie voor u.
Speciale veiligheidsinstructies
• Zuig nooit vocht of vloeistoffen op.
• Zuig nooit hete as, spitse of scherpe voorwerpen op!
• Gebruik het apparaat niet in vochtige ruimtes.
• Zuig nooit zonder lter. Controleer altijd of de lter en na het
plaatsen correct zit!.
• Houd tijdens het zuig in haar een, kleding en lichaamsdelen
van de zuigmond verwijderd!
• Houd de stofzuiger ver verwijderd van warmtebronnen zoals
radiatoren, kachels enz.!
Overzicht van de bedieningselementen
1 Luchtschuif
2 Zuigslang
3 HEPA-lter
4 Nylon voorlter
5 Stofvak met motorlter
6 Aan-/uitschakelaar
7 Legingsindicator
8 Toets voor kabeloprolling
9 Handvat
10 Zuigkrachtregelaar
11 Kabel
12 Parkeerhulp
13 Filterafdekking - Uitlaatlter
14 Slangaansluiting
15 Vloermondstuk (met haak (zonder afb.))
16 Telescopische zuigbuis
Toebehoren
17 Parketmondstuk
18 Voegen- en borstelmondstuk
19 Textielmondstuk
Ingebruikname
• Steek de verbindingskop van de zuigslang in de slangaansluiting totdat de kop mechanisch vastklikt. Druk op de toets
aan de verbindingskop en trek de slang eruit om de slang te
verwijderen.
• Steek eventueel de zuigbuis op de handgreep.
• Monteer het vloermondstuk of het toebehoren.
05-BS 1276.indd 9 08.10.2009 14:19:44 Uhr
Page 10
10
NEDERLANDS
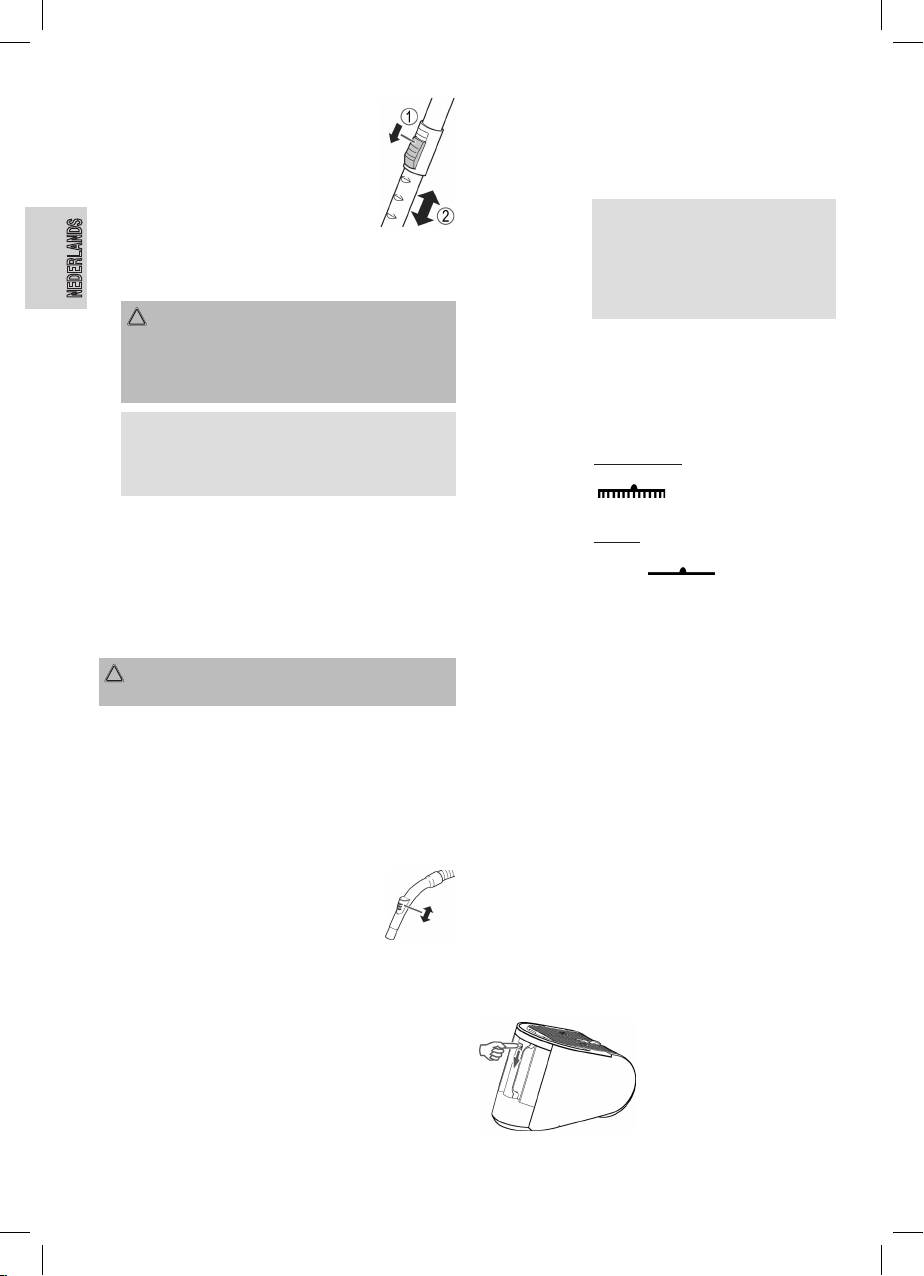
Telescopische zuigbuis
De zuigbuis is in de hoogte verstelbaar, hierdoor
kunt u de buis naar wens aan uw lichaamshoogte
aanpassen. Druk op de toets in pijlrichting om de
koppeling te ontgrendelen.Verschuif de zuigbuis
naar wens. Voor de vergrendeling laat u de toets
los totdat zij duidelijk hoorbaar inklikt.
Bediening van het apparaat
1. Rol de benodigde kabellengte af.
OPGELET:
• Trek de netkabel maximaal uit tot de gele markering.
• Trek de netkabel in geen geval uit tot de rode markering, omdat daardoor de kabeloprolling beschadigd
kan worden.
OPMERKING:
Wanneer de rode markering zichtbaar is, trekt u de kabel
met behulp van de kabeloprolling weer tot aan de gele
markering naar binnen.
2. Steek de netsteker in een correct geïnstalleerde en geaarde
contactdoos 230 V, 50 Hz. Schakel het apparaat in met de
aan-/uitschakelaar door de toets met de voet naar beneden
te drukken.
3. Stel de zuigkracht in met behulp van de zuigkrachtregelaar
(MIN tot MAX).
4. Zuig nu met gelijkmatige snelheid. U hoeft geen druk uit te
oefenen.
OPGELET:
Let erop dat de kabel slechts een beperkte reikwijdte heeft!
Zuigkrachtregelaar
Geringe zuigkracht: voor gordijnen en gevoelige stoffen.
Gemiddelde zuigkracht: voor hoogpolige tapijten en textiele
vloerbedekkingen.
Hoge zuigkracht: voor robuuste tapijten en men vloerbe-
dekking in.
Luchtregelschuif
Open de luchtregelschuif aan de slanggreep om
de luchtaanzuiging te regelen of aan het mondstuk
hechtende delen te verwijderen.
Uitschakelen en stroomkabel oprollen
1. Schakel de vloerstofzuiger uit via de aan-/uitschakelaar en
trek de steker uit de contactdoos.
2. Houd de steker in uw hand.
3. Druk op de toets voor de kabeloprolling en voer de kabel
met u mee. Houd de kabel vast zodat hij niet rondslingert.
Hulpmondstuk
Voegen-,
borstelmondstuk: Voor het afzuigen van kussens en gordijnen
en het schoonmaken van hoeken en gleuven enz.
OPMERKING: „Twee in een“-mond-
stuk: dichtgeklapt kunt u het gebruiken
als voegenmondstuk. Wanneer u het wilt
gebruiken als borstelmondstuk, trekt u
aan het borstelgedeelte in de pijlrichting
totdat het mechanisch inklikt.
Textielmondstuk: Voor het reinigen van kussens, gordijnen
enz.
Vloermondstuk:
Voor een gemakkelijke bediening is het
vloermondstuk voorzien van rolletjes.
Voor de reiniging van tapijten of gladde
oppervlakken.
Gladde vloeren:
Druk de hendel met het borstelsymbool
„ “ met de voet omlaag. De
borstels zijn nu zichtbaar.
Tapijten:
Zet de hendel met de voet over naar het
symbool „ “. De borstels zijn nu
ingetrokken.
Parketmondstuk:
De parketmundstuk is uitgerust met rollen
voor een eenvoudige reiniging van de vloer. Voor grotere oppervlakken zoals parket,
laminaat of tegels e.d.
Verwijderen
van het mondstuk:
Trek het mondstuk terwijl u het licht draait
eraf.
Onderhoud
Filter
Uw apparaat beschikt over 3 ltersystemen. Het gebruikelijke stofzaksysteem werd vervangen door een transparante
stofopvangbak. In deze bak worden grove verontreinigingen
en kleinste zweefdeeltjes door de hoge stroomsnelheid uit de
“zuiglucht” gewerveld.
U hoeft geen stofzakken meer te kopen.
Elektronische legingsindicator voor de stofbak
Houd de zuigslang onbelast in de lucht. Waneer de legingsindicator voor het stofvak brandt, gaat u als volgt te werk:
Afb. 1
Stofopvangbak legen
• Trek de netsteker uit de
contactdoos.
• Schuif de toets voor het
ontgrendelen van de stofbak
naar beneden en verwijder de
stofbak uit het apparaat (zie
afb. 1).
05-BS 1276.indd 10 08.10.2009 14:19:45 Uhr
Page 11
11
NEDERLANDS
Afb. 2
• Houd de stofbak boven de
afvalemmer. Leeg de stofbak.
Druk hiervoor op de toets
(PUSH) aan de stofbak (zie
afb. 2).
• Sluit de bodemplaat weer
zodat deze hoorbaar vastklikt.
Afb. 3
Afb. 4
HEPA-Motorveiligheidslter
(in de stofopvangbak)
Reiniging van de lterinzet
• Trek de netsteker uit de
contactdoos.
• Schuif de toets voor het
ontgrendelen van de stofbak
naar beneden en verwijder de
stofbak uit het apparaat (zie
afb. 1).
• Leeg de stofbak (zie afb. 2).
• Ontgrendel de lterinzet
door deze kort in de richting
UNLOCK te draaien. Verwijder
de inzet vervolgens (zie afb. 3).
In de tweede stap verwijdert
u de nylon voorlter (4) van
de HEPA-lter (3) door hem
tegen de vergrendeling in te
draaien (zie afb. 4). Reinig de
nylon voorlter door uitkloppen
en de HEPA-lter door zacht
uitborstelen.
• Plaats de onderdelen weer
terug.
• Vergrendel de lterinzet in het
stofvak door hem tot aan de
aanslag in de richting LOCK te
draaien.
• Bevestig de stofbak weer zodanig dat hij hoorbaar vast klikt.
Afb. 5
Reinig de lter na ieder derde
leging of bij sterkere verontreinigingen, door stromend water tegen de
blaasrichting in door het ltervlies
te laten lopen. Plaats de lter
pas weer wanneer deze volledig
gedroogd is!
OPGELET:
Was de lter nooit in de wasmachine en gebruik geen föhn
om hem te drogen.
Uitlaatlter
Uw apparaat beschikt tevens over een uitlaatlter. De lter
bevindt zich onder de lterafdekking (13). Om een optimale
werking van alle functies te waarborgen, adviseren wij u, de lter
om de 6 maanden te reinigen.
• Trek de netsteker uit de contactdoos.
• Open het ventilatierooster door aan de hendel opzij van het
ventilatierooster te trekken.
• Trek daarna het lter naar voor uit. Verwijder de lter en
reinig deze op de reeds beschreven wijze.
• Plaats de lter weer correct terug en sluit het ventilatierooster (totdat het vastklikt).
OPGELET:
Neem deze belangrijke aanwijzing in acht!
De reiniging kan al naargelang de toepassingsvoorwaarden
bijv. bij het zuigen van jnstof, ook al vroeger nodig zijn.
Wanneer het zuigvermogen van uw stofzuiger minder wordt,
reinigt u de lters zoals beschreven.
Wanneer het zuigvermogen tijdens het bedrijf plotseling minder wordt, kan dit het gevolg zijn van een verstopte lter.
Reinigen en bewaren
OPGELET:
• Trek vóór de reiniging eerst de netsteker uit de contactdoos!
• Dompel het apparaat voor de reiniging niet onder water.
Dit zou tot een elektrische schok of brand kunnen leiden
OPGELET:
• Gebruik géén draadborstel of andere schurende voorwerpen.
• Gebruik geen scherpe of schurende reinigingsmiddelen.
Reinig de buitenkant met een droge doek.
Bewaren
• Laat het apparaat volledig afkoelen.
• Rol de kabel volledig op.
• Hangt u de haak van het vloermondstuk in de parkeerhulaan de achterzijde van het apparaat.
Verhelpen van storingen
• Apparaat functioneert niet.
Maatregel:
Controleer de netaansluiting.
Controleer de stand van de schakelaar.
• Apparaat zuigt niet.
Mogelijk oorzaak:
Het zuigvermogen is te laag ingesteld.
Maatregel:
Controleer de positie van de regelaar.
of
05-BS 1276.indd 11 08.10.2009 14:19:46 Uhr
Page 12
12
NEDERLANDS
Mogelijk oorzaak:
De stofbak of de lters zijn verontreinigd.
Maatregel:
Leeg resp. reinig de onderdelen.
of
Mogelijk oorzaak:
In de zuigerslang of de mondstukken bevindt zich een
vreemd voorwerp.
Maatregel:
Controleer het toebehoren op vreemde voorwerpen.
Technische gegevens
Model: ...............................................................................BS 1276
Spanningstoevoer: ....................................................230 V, 50 Hz
Opgenomen vermogen:
P
nom.
: ............................................................................1800 W
P
max.
: ............................................................................2400 W
Beschermingsklasse: .................................................................. ΙΙ
Nettogewicht: ........................................................................7,2 kg
Dit apparaat is gekeurd conform de op dit moment van toepassing zijnde CE-richtlijnen zoals bijvoorbeeld elektromagnetische
compatibiliteit en laagspanningsvoorschriften en is geconstrueerd volgens de nieuwste veiligheidstechnische voorschriften.
Technische wijzigingen voorbehouden!
Betekenis van het symbool ‘vuilnisemmer’
Bescherm ons milieu, elektrische apparaten horen niet in het
huisafval.
Maak voor het afvoeren van elektrische apparaten gebruik van
de voorgeschreven verzamelpunten en geef daar de elektrische
apparaten af die u niet meer gebruikt.
Daardoor helpt u de potentiële effecten te voorkomen die een
verkeerde afvoer op het milieu en de menselijke gezondheid
kunnen hebben.
Op deze wijze levert u uw bijdrage aan het hergebruik, de
recycling en andere verwerkingsvormen voor oude elektronische
en elektrische apparaten.
Voor informatie over verzamelpunten voor uw apparaten kunt u
contact opnemen met uw gemeente of gemeenteadministratie.
05-BS 1276.indd 12 08.10.2009 14:19:46 Uhr
Page 13
13
FRANÇAIS
Conseils généraux de sécurité
Lisez attentivement ce mode d’emploi avant de mettre l’appareil
en marche pour la première fois. Conservez le mode d’emploi
ainsi que le bon de garantie, votre ticket de caisse et si possible,
le carton avec l’emballage se trouvant à l’intérieur. Si vous
remettez l‘appareil à des tiers, veuillez-le remettre avec son
mode d‘emploi.
• N’utilisez cet appareil que pour un usage privé et pour les
taches auxquelles il est destiné. Cet appareil n’est pas prévu
pour une utilisation professionnelle. Ne l’utilisez pas en plein
air. Protégez-le de la chaleur, des rayons directs du soleil,
de l’humidité (ne le plongez en aucun cas dans l’eau) et des
objets tranchants. N’utilisez pas cet appareil avec des mains
humides. S’il arrive que de l’humidité ou de l’eau atteignent
l’appareil, débranchez aussitôt le câble d’alimentation.
• Arrêtez l’appareil et débranchez toujours le câble d’alimentation de la prise de courant (en tirant sur la che et non pas
sur le câble) si vous n’utilisez pas l’appareil, si vous installez
les accessoires, pour le nettoyage ou en cas de panne.
• Ne laissez jamais fonctionner l’appareil sans surveillance.
Lorsque vous quittez la pièce, toujours arrêter l’appareil.
Débranchez la che de la prise.
• Il y a lieu d’inspecter l’appareil et le bloc d’alimentation régulièrement en vue d’éventuels signes d’endommagements.
Lorsqu’un endommagement est détecté, l’appareil ne doit
plus être utilisé.
• Ne réparez pas l’appareil vous-même. Contactez plutôt
un technicien qualié. Pour éviter toute mise en danger,
ne faites remplacer le câble défectueux que par un câble
équivalent et que par le fabricant, notre service après-vente
ou toute personne de qualication similaire.
• N’utilisez que les accessoires d’origine.
• Respectez les „Conseils de sécurité spéciques“ ci-dessous.
Enfants et personnes fragiles
• Par mesure de sécurité vis-à-vis des enfants, ne laissez pas
les emballages (sac en plastique, carton, polystyrène) à leur
portée.
DANGER!
Ne pas laisser les jeunes enfants jouer avec le lm. Il y a
risque d’étouffement!
• Le présent appareil n’est pas destiné à être utilisé par des
personnes (y compris les enfants) aux facultés mentales,
sensorielles ou physiques limitées ou n’ayant pas l’expérience et / ou les connaissances requises, à moins d’être sous
la surveillance d’une personne responsable de leur sécurité
ou d’avoir reçu par elle des instructions sur le maniement de
l’appareil.
• Les enfants doivent être surveillés an de garantir qu’ils ne
jouent pas avec l’appareil.
Symboles de ce mode d’emploi
Les informations importantes pour votre sécurité sont particulièrement indiquées. Veillez à bien respecter ces indications
an d’éviter tout risque d’accident ou d’endommagement de
l’appareil:
DANGER:
Prévient des risques pour votre santé et des risques éventuels
de blessure.
ATTENTION:
Indique les risques pour l’appareil ou tout autre appareil.
REMARQUE:
Attire votre attention sur des conseils et informations.
Conseils de sécurité spéciques à cet appareil
• N’aspirez jamais d’emplacement humide ou de liquide!
• N’aspirez jamais de cendres chaudes, d’objets pointus ou
tranchants!
• Ne pas utiliser l’appareil dans des locaux humides!
• N’aspirez jamais sans ltre. Vériez toujours que le ltre est
correctement installé!
• N’approchez jamais les embouts de l’appareil en utilisation
de cheveux, vêtements et parties du corps!
• Maintenez l’aspirateur à l’écart de sources de chaleur
comme radiateurs, fours, etc.!
Liste des différents éléments de commande
1 Régulateur d’air
2 Tuyau d’aspiration
3 Filtre HEPA
4 Pré-ltre nylon
5 Récipient de poussière avec ltre de protection
du moteur
6 Bouton Marche / Arrêt
7 Afchage de dégorgement
8 Bouton de rangement du câble
9 Poignée
10 Variateur de puissance d’aspiration
11 Câble
12 Position parking
13 Cache ltre - Filtre d’échappement
14 Raccordement du tuyau
15 Embout pour les sols
(comprenant un crochet (sans g.))
16 Tuyau d’aspiration téléscopique
Accessoire
17 Brosse aspirante pour parquet
18 Suceur et brosse
19 Embout à canapés
Avant la première utilisation
• Placez la tête de connexion du exible d’aspiration dans la
connexion du exible jusqu‘à ce qu’il s’encliquette mécaniquement. An de désolidariser le exible, appuyez sur la
touche sur la tête de connexion et retirez le exible.
• Fixer si nécessaire le tuyau d’aspiration à la poignée.
• Installez l’accessoire pour les sols ou tout autre accessoire.
05-BS 1276.indd 13 08.10.2009 14:19:46 Uhr
Page 14
14
FRANÇAIS
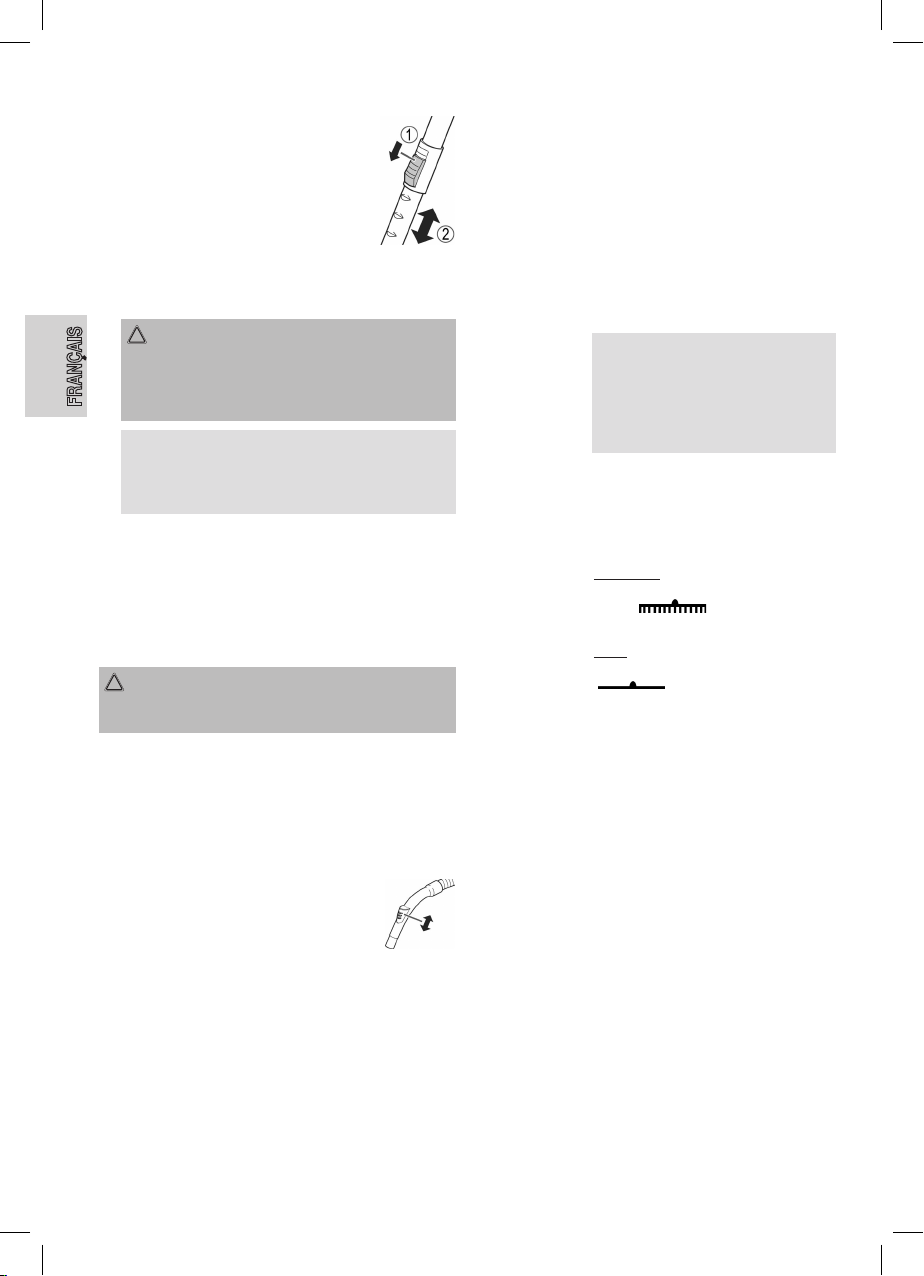
Tuyau d’aspiration télescopique
Grâce au tuyau d’aspiration réglable en hauteur,
il est possible d’adapter l’appareil à votre taille.
Déverrouillez l’accouplement en pressant sur la
touche en direction de la èche. Faites glisser
les tuyaux d’aspiration comme vous le souhaitez.
Pour verrouiller, déverrouillez la touche jusqu’à
emboîtement par un bruit sec.
Utilisation de l’appareil
1. Déroulez la longueur de câble nécessaire.
ATTENTION:
• Vous êtes priés de ne dérouler le câble d’alimentation
que jusqu’à la marque jaune.
• Ne le déroulez en aucun cas jusqu’à la marque rouge,
cela risque d’endommager le dispositif.
REMARQUE:
Si le marquage est visible, faites rentrer le câble à l’aide
de la touche d’enroulement du câble jusqu’au marquage
jaune.
2. Enchez la che au secteur dans une prise de courant de
sécurité 230 V, 50 Hz installée conformément aux normes.
Pour mettre l’appareil en marche à l’aide de la touche
Marche/Arrêt, enfoncez le bouton à l’aide du pied.
3. Réglez la puissance d’aspiration à l’aide du variateur de
puissance (MIN à MAX).
4. Aspirez maintenant avec régularité. Il est inutile d’exercer
une pression pendant que vous aspirez.
ATTENTION:
Tenez compte du rayon d’action limité dû à la longueur de
câble!
Variateur de puissance d’aspiration
Faible puissance: pour rideaux, tissus fragiles.
Puissance moyenne: pour tapis à poil long et revêtements
de sol textiles.
Forte puissance: pour tapis et moquettes robustes.
Régulateur d’air
Ouvrez le régulateur d’air situé sur la poignée du
exible pour réguler l’air ou pour libérer des objets
ayant pu se xer sur l’embout.
Arrêter et enrouler le câble du secteur
1. Arrêtez l’aspirateur à l’aide de l’interrupteur Marche / Arrêt et
retirez la che de la prise électrique.
2. Gardez la che dans la main.
3. Appuyez sur le bouton de rangement du câble tout en
guidant le câble. Maintenez le câble fermement entre vos
doigts pour éviter qu’il ne s’agite de façon incontrôlée.
Embout suceur
Embout suceur,
embout articulé: Pour aspirer les canapés, les rideaux, les
recoins et les fentes.
REMARQUE: Embout „2 en 1“:
vous pouvez utilizer l’accessoire, comme
suceur. Si vous voulez utiliser la brosse,
tirez sur la partie brosse dans le sens
de la èche jusqu’à ce que l’accessoire
s’enclenche.
Embout à canapés: Pour le nettoyage de canapés, rideaux, etc.
Embout pour les
sols:
Pour faciliter son maniement, la brosse aspirante pour le sol est munie de rouleaux.
Pour nettoyer les tapis ou surfaces planes.
Sols lisses:
Poussez le levier portant le symbole de
brosse „ “ en bas à l’aide du
pied. Les brosses sont maintenant visibles.
Tapis:
Placez le levier sur le symbole
„ “ à l’aide du pied. Les brosses
sont maintenant sorties.
Brosse aspirante
pour parquet:
An de faciliter son maniement, la brosse
à parquet est munie de galets. Pour les
surfaces plus importantes, comme p. ex. le
parquet, le faux parquet ou les carrelages.
Pour libérer
l’embout:
Retirez-le en le dévissant légèrement.
Entretien
Filtre
Votre aspirateur dispose de 3 systèmes de ltres. Le système
classique du sac d’aspirateur a été remplacé par un sac
d’aspirateur transparent. Dans le bac, les particules de poussière les plus grosses comme les plus nes sont récupérées dans
l’air aspiré grâce à la grande vitesse du ux d’air.
Pas besoin d’acheter des sacs d’aspirateur.
Afchage électronique de dégorgement du récipient de
poussière
Maintenez le tuyau d’aspirateur non obstrué en l’air. Lorsque
l’afchage de dégorgement pour le récipient de poussière
s’allume, procédez comme suit :
05-BS 1276.indd 14 08.10.2009 14:19:46 Uhr
Page 15

15
FRANÇAIS
Illustr. 1
Vider le récipient de poussière
• Débranchez le câble d’alimentation de la prise de courant.
• Pour désolidariser le récipient
de poussière, poussez la
touche vers le bas et enlevez
le récipient de poussière (cf.
l’illustr. 1).
Illustr. 2
• Maintenez le récipient de
poussière au-dessus d’une
poubelle. Videz le contenu du
récipient de poussière. À cet
effet, appuyez sur la touche
(PUSH) sur le récipient de
poussière (cf. illustr. 2).
• Refermez la plaque du fonds
de sorte qu’elle s’encliquette de
manière audible.
Illustr. 3
Illustr. 4
Filtre de protection moteur HEPA
(dans le bac à poussière)
Nettoyage du support du ltre
• Débranchez le câble d’alimentation de la prise de courant.
• Pour désolidariser le récipient
de poussière, poussez la
touche vers le bas et enlevez
le récipient de poussière (cf.
l’illustr. 1).
• Videz le contenu du récipient
de poussière. (cf. illustr. 2)
• Déverrouilliez la garniture du ltre par une petite rotation dans
le sens UNLOCK. Enlevez-le
(cf. illustr. 3). Dans la deuxième
étape, vous désolidarisez le
pré-ltre nylon (4) du ltre
HEPA (3) par une rotation dans
le sens contraire du verrouillage. (cf. illustr. 4). Nettoyez le
pré-ltre nylon en le secouant
et le ltre HEPA en le brossant
légèrement.
• Remettez les éléments en
place.
• Verrouillez la garniture du ltre
dans le récipient de poussière
en le tournant dans le sens
LOCK jusqu’à la butée.
• Fixez de nouveau le récipient
de poussière jusqu’à ce qu’il
s’enclenche avec un clic.
Illustr. 5
À chaque troisième vidange ou en
cas de salissures importantes, nettoyez le ltre en faisant couler de
l’eau à travers le tissé du ltre dans
le sens contraire du ux d’air.
Ne remettre le récipient de poussière que s’il est entièrement sec!
ATTENTION:
Ne jamais laver les ltres dans
la machine à laver et ne jamais
utiliser un sèche-cheveux pour
le sécher.
Filtre d’échappement
Votre appareil est en outre équipé d’un ltre d’échappement.
Vous trouverez ce ltre sous le couvercle du ltre (13). Pour un
fonctionnement parfait du ltre nous vous recommandons de le
changer tous les 6 mois.
• Débranchez le câble d’alimentation de la prise de courant.
• Ouvrez la grille d’aération en appuyant sur le levier à côté
de la grille d’aération.
• Tirez alors sur la grille pour l’enlever. Retirez le ltre et
nettoyez-le comme décrit précédemment.
• Réinstallez le ltre correctement sur l‘appareil et fermez la
grille de ventilation (jusqu’au clic).
ATTENTION:
Prière de suivre cette indication très importante!
Le nettoyage peut être plus souvent nécessaire selon les conditions d’utilisation, par ex. en cas d’aspiration de poussière
ne. Si l’efcacité de votre aspirateur diminue, nettoyez les
ltres comme indiqué.
Si la puissance de votre aspirateur diminue soudainement
pendant le fonctionnement, cela peut être le signe d’un
bouchage de ltre.
Entretien et rangement
DANGER:
• Débranchez toujours l’appareil avant le nettoyage!
• En aucun cas plonger l’appareil dans de l’eau pour le
nettoyer. Vous risqueriez de provoquer une électrocution
ou un incendie.
ATTENTION:
• Ne pas utiliser de brosse en l de fer ou autres objets
abrasifs.
• Ne pas utiliser de détergents agressifs ou abrasifs.
Nettoyez les parois de l’appareil avec un torchon sec.
05-BS 1276.indd 15 08.10.2009 14:19:47 Uhr
Page 16

16
FRANÇAIS
Rangement
• Laissez l’appareil refroidir complètement.
• Enroulez complètement le câble.
• Introduisez le crochet de la brosse pour le sol dans la
position parking située au dos de l’appareil.
En cas de dysfonctionnements
• L’appareil ne fonctionne pas.
Solution:
Vériez son branchement au secteur.
Vériez la position de l’interrupteur.
• L’appareil n’aspire pas.
Cause possible:
Le réglage de la puissance d’aspiration est trop faible.
Solution:
Contrôlez la position du réglage.
ou
Cause possible:
Le récipient de poussière ou le ltre est souillé.
Solution:
Videz voire nettoyez les composantes.
ou
Cause possible:
Un corps étranger se trouve dans le exible d’aspiration ou
dans la tête d’aspiration.
Solution:
Contrôlez les accessoires en vue d’éventuels corps
étrangers.
Données techniques
Modèle:.............................................................................BS 1276
Alimentation: .............................................................230 V, 50 Hz
Consommation:
Puissance
nom.
: ............................................................1800 W
Puissance
max.
: ............................................................2400 W
Classe de protection: ..................................................................ΙΙ
Poids net: .............................................................................7,2 kg
Cet appareil a été contrôlé d’après toutes les directives européennes actuelles applicables, comme par exemple concernant
la compatibilité électromagnétique et la basse tension. Cet appareil a été fabriqué en respect des réglementations techniques
de sécurité les plus récentes.
Sous réserve de modications techniques.
Signication du symbole „Elimination“
Protégez votre environnement, ne jetez pas vos appareils
électriques avec les ordures ménagères.
Utilisez, pour l’élimination de vos appareils électriques, les
bornes de collecte prévues à cet effet où vous pouvez vous
débarrasser des appareils que vous n’utilisez plus.
Vous contribuez ainsi à éviter les impacts potentiels dans l’environnement et sur la santé de chacun, causés par une mauvaise
élimination de ces déchets.
Vous contribuez aussi au recyclage sous toutes ses formes des
appareils électriques et électroniques usagés.
Vous trouverez toutes les informations sur les bornes d’élimination des appareils auprès de votre commune ou de l’administration de votre communauté.
05-BS 1276.indd 16 08.10.2009 14:19:47 Uhr
Page 17

17
ESPAÑOL
Indicaciones generales de seguridad
Antes de la puesta en servicio de este aparato lea detenidamente el manual de instrucciones y guarde éste bien incluido la
garantía, el recibo de pago y si es posible también el cartón de
embalaje con el embalaje interior. En caso de dejar el aparato a
terceros, también entregue el manual de instrucciones.
• Solamente utilice el aparato para el uso privado y para el n
previsto. Este aparato no está destinado para el uso profesional. No lo utilice al aire libre. No lo exponga al calor, a la
entrada directa de rayos de sol, a la humedad (en ningún
caso sumerja el aparato en agua) y a los cantos agudos.
No utilice el aparato con las manos húmedas. En caso de
que el aparato esté húmedo o mojado retire de momento la
clavija de la caja de enchufe.
• Desconecte el aparato y siempre retire la clavija de la caja
de enchufe (por favor tire de la clavija y no del cable), cuando no quiera utilizar el aparato, montar piezas o en caso de
limpieza o defectos.
• No utilice el aparato sin vigilancia. En caso de salir de la
habitación, desconecte siempre el aparato. Retire la clavija
de la caja de enchufe.
• El aparato y el cable de alimentación de red se deben controlar regularmente para garantizar que no estén dañados.
En caso de que se comprobara un daño, no se podrá seguir
utilizando el aparato.
• No repare el aparato por su cuenta, sino vaya a un establecimiento autorizado. Para evitar peligros, deje sustituir un
cable defecto por uno de la misma calidad solamente por el
fabricante, nuestro servicio al cliente o una similar persona
cualicada.
• Solamente utilice accesorios originales.
• Por favor tenga atención a las “Indicaciones especiales de
seguridad…“ indicadas a continuación.
Niños y personas débiles
• Para la seguridad de sus niños no deje material de embalaje
(Bolsas de plástico, cartón, poliestireno etc.) a su alcance.
AVISO!
No deje jugar a los niños con la lámina. ¡Existe peligro
de asxia!
• Este equipo no está destinado al uso por personas (niños
incluidos) que tengan capacidades físicas, sensóricas o
mentales limitadas o una falta de experiencia y/o conocimientos. Sólo pueden utilizar el equipo si una persona
responsable por su seguridad se les vigile o se les instruye
sobre el uso.
• Los infantiles deberían ser vigilados, para asegurar que no
jueguen con el aparato.
Símbolos en este manual de instrucciones
Advertencias importantes para su seguridad están señaladas
en especial. Siga estas advertencias incondicionalmente, para
evitar accidentes y daños en el aparato:
AVISO:
Advierte ante los peligros para su salud y demuestra posibles
riesgos de herida.
ATENCIÓN:
Indica los posibles riesgos para el aparato u otros objetos.
INDICACIÓN:
Pone en relieve consejos e informaciones para usted.
Indicaciones especiales
• ¡No aspiren nunca agua u otro líquido!
• ¡No aspiren nunca cenizas calientes, objetos agudos o
cortantes!
• ¡No utilice el aparato en espacios húmedos!
• Nunca aspire sin ltro. ¡Siempre compruebe el correcto
ajuste de la bolsa que acaba de colocar!
• ¡Durante el funcionamiento mantenga apartado de la boquilla del aspirador, el pelo, piezas de ropa o extremidades del
cuerpo!
• ¡Mantenga la aspiradora apartada de fuentes de calor como
radiodores, estufas etc.!
Indicación de los elementos de manejo
1 Regulador de admisión
2 Manguera aspirante
3 Filtro HEPA
4 Preltro de nilón
5 Recipiente de llenado de polvo con ltro protector
del motor
6 Conectador / desconectador
7 Indicación de vaciado
8 Tecla para el enrollamiento de cable
9 Asa de transporte
10 Regulador de poder de aspiración
11 Cable
12 Ayuda para estacionar el aspirador de suelo
13 Cubierta del ltro - Filtro de salida
14 Conexión de la manguera
15 Boquilla para el suelo
(con gancho (sin imagen))
16 Tubo telescópico de aspiración
Accesorio
17 Tobera para parqué
18 Tobera para juntas y tobera de cepillo
19 Tobera de tapicería
Puesta en marcha
•
Introduzca el cabezal de empalme de la manguera de
aspiración en la conexión de la manguera, hasta que encaje
mecánicamente. Para soltar nuevamente la manguera, pulse
la tecla en el cabezal de empalme y extraiga la manguera.
• En caso de que sea necesario, encaje el tubo aspirador en
la empuñadura.
• Coloque la tobera de suelo , es decir el accesorio.
05-BS 1276.indd 17 08.10.2009 14:19:47 Uhr
Page 18

18
ESPAÑOL
Tubo telescópico de aspiración
Gracias al tubo aspirador regulable en altura
es posible adaptarlo de forma individual a
su medida. Desbloquee el acoplamiento
presionando la tecla en dirección de la echa.
Ajuste los tubos aspiradores a la medida que
desee. Para el bloqueo suelte la tecla hasta
que se oiga notablemente el encajar.
Uso del aparato
1. Desenrolle el cable necesitado.
ATENCIÓN:
• Por favor tire del cable solamente hasta la marcación
amarilla.
• Nunca tire hasta la marcación roja, ya que el enrollamiento de cable se podría estropear.
INDICACIÓN:
En caso de que la marcación roja esté visible, recoja el
cable hasta la marcación amarilla con ayuda de la tecla
para el enrollamiento de cable.
2. Introduzca la clavija en una caja de enchufe con tomatierra
230 V, 50 Hz, e instalada por la norma. Conecte el aparato
con el conectador/desconectador, pulsando la tecla con el
pie hacia abajo.
3. Ajuste el poder de aspiración con el regulador de poder de
aspiración (De MIN a MAX).
4. Aspire ahora en una velocidad constante. No es necesario
apretar.
ATENCIÓN:
Tenga atención con el alcanze del cable, ya que es limitado!
Regulador de poder de aspiración
Poder de
aspiración bajo: Para cortinas, telas delicadas.
Poder de
aspiración medio: Para moquetas de terciopelo con pelo
alto o suelos de textil.
Poder de
aspiración alto: Para moquetas robustas y suelos.
Regulador de admisión
Abra el regulador de admisión que se encuentra en
la empuñadura del tubo exible, para su regulación
de aire o para soltar piezas que se hayan pegado
en la tobera.
Desconexión y enrollameinto del cable de alimentación
1. Desconecte el aspirador en el conectador/desconectador y
retire la clavija de la caja de enchufe.
2. Mantenga la clavija en la mano.
3. Presione la tecla para el enrollamiento de cable y guie el
cable. Mantenga el cable para evitar que se enrolle.
Pieza sobrepuesta de tobera
Tobera para juntas,
tobera articulada: Para la aspiración de tapicería, cortinas y
en esquinas y en ranuras etc.
INDICACIÓN: Tobera „2 en 1“:
Plegada la puede utilizar como tobera
para juntas. Si quiere utilizar la tobera de
cepillo, tire del cepillo en dirección de la
echa, hasta que encaje mecánicamente.
Tobera tapicería: Para la limpieza de tapicería, cortinas etc.
Boquilla para el
suelo:
La tobera de suelo está equipada con ruedecillas para su fácil guía. Para la limpieza
de moquetas o supercies planas.
Suelos planos:
Empuje la palanca con el símbolo de cepillo „ “ con el pie hacia abajo. Los
cepillos están ahora visibles.
Moquetas:
Reajuste la palanca con el pie, al símbolo
„ “. Ahora están los cepillos
insertados.
Tobera para
parqué:
El cepillo para suelos de parqué está
equipado con ruedecillas para su fácil
dirección. Para supercies más grandes,
como parqué, laminado o baldosas, entre
otras cosas.
Soltar las toberas: Retire éstas girándolas levemente.
Mantenimiento
Filtro
Su aparato dispone de un sistema de ltros de 3 ltros. El sistema convencional de bolsa de llenado de polvo se ha sustituido
por un recipiente de llenado de polvo transparente. Este es capaz de absorber, por su alta velocidad de circulación, impurezas
graves y mínimas partículas otantes del aire aspirado.
La compra de bolsas de llenado de polvo se suprime.
Indicación electrónica de vaciado para el recipiente de
llenado de polvo
Mantenga la manguera de aspiración sin peso en el aire. Al
encenderse la indicación de vaciado del recipiente de llenado
de polvo, proceda de siguiente manera:
05-BS 1276.indd 18 08.10.2009 14:19:48 Uhr
Page 19

19
ESPAÑOL
Imagen 1
Vaciar el recipiente de llenado
de polvo
• Retire la clavija de la caja de
enchufe.
• Empuje la tecla para soltar
el recipiente de llenado de
polvo hacia abajo y retire el
recipiente de llenado de polvo
(véase imagen 1).
Imagen 2
• Coloque el recipiente de
llenado de polvo sobre un cubo
de basura. Vacíe el contenido
del recipiente de llenado de
polvo. Para ello, pulse la
tecla (PUSH) en el recipiente
de llenado de polvo (véase
imagen 2).
• Cierre la placa base, hasta que
encaje notablemente.
Imagen 3
Imagen 4
Filtro protector de motor HEPA
(en el recipiente colector de polvo)
Limpieza del elemento ltrante
• Retire la clavija de la caja de
enchufe.
• Empuje la tecla para soltar
el recipiente de llenado de
polvo hacia abajo y retire el
recipiente de llenado de polvo
(véase imagen 1).
• Vacíe el contenido del
recipiente de llenado de
polvo. (véase imagen 2).
• Abra la pieza insertada de ltro
girando un poco en dirección
UNLOCK. Extraiga ésta (véase
imagen 3). En un segundo
paso separe el preltro de
nilón
(4) del ltro HEPA (3)
girando
en el sentido contrario
del
bloqueo (véase imagen 4).
Limpie el preltro de nilón
sacudiéndolo y el ltro HEPA
cepillándolo suavemente.
• Inserte de nuevo los elementos.
• Bloquee la pieza insertada de
ltro en el recipiente de llenado
de polvo girando en dirección
LOCK hasta llegar al tope.
• Fije nuevamente el recipiente
de llenado de polvo, hasta que
éste encaje de forma audible.
Imagen 5
En cada tercer vaciado o en caso
de que haya graves impurezas
debe limpiar el ltro, dejando pasar
agua corriente por el ltro de tela
no tejida y en contra de la dirección
de soplado.
¡Recoloque éste sólo cuando se
haya secado por completo!
ATENCIÓN:
Por favor no lave nunca el ltro
en la lavadora y no utilice un
secador para secar el ltro.
Filtro de salida
Su aparato también dispone de un ltro de salida. Encuentra
este ltro bajo la cubierta de ltro (13). Para garantizar una
función impecable del ltro, recomendamos limpiar el ltro cada
6 meses.
• Retire la clavija de la caja de enchufe.
• Abra la rejilla de ventilación pulsando la palanca en la parte
lateral de la rejilla de ventilación.
• Ahora retire la rejilla tirando de ella hacia delante. Aparte el
ltro y limpie esté como ya indicado.
• Por favor coloque el ltro de forma correcta y cierre la rejilla
de ventilación (hasta que encaje).
ATENCIÓN:
¡Se ruega prestar atención a esta nota importante!
La limpieza puede ser necesaria también después de un corto
periodo de tiempo, por ejemplo al aspirar polvo muy no.
En caso de que la potencia de aspiración de su aspiradora se
reduzca, limpie por favor los ltros como indicado.
Si durante el funcionamiento la potencia de aspiración se
reduce de forma repentina, podría ser la causa de un atascamiento en los ltros.
Limpieza y almacenamiento
AVISO:
• ¡Antes de la limpieza retire siempre la clavija de red de la
caja de enchufe!
• Para la limpieza, en ningún caso sumergir el aparato en
agua. Podría causar un electrochoque o un incendio.
ATENCIÓN:
• No utilice un cepillo de alambre u objetos abrasivos.
• No utilice detergentes agresivos o abrasivos.
Limpie la carcasa de motor con un paño húmedo.
Almacenamiento
• Debe dejar enfriar por completo el aparato.
• Enrolle el cable por completo.
• Cuelgue por favor el gancho en la tobera de suelo en la
ayuda de estacionamiento que se encuentra en la parte
posterior del aparato.
05-BS 1276.indd 19 08.10.2009 14:19:48 Uhr
Page 20

20
ESPAÑOL
Reparación de fallos
• El aparato no tiene función.
Remedio:
Supervise la conexión de red.
Supervise la posición del interruptor.
• El aparato no aspira.
Causa probable:
La potencia de aspiración está ajustada muy baja.
Remedio:
Controle la posición del regulador
o
Causa probable:
El recipiente de llenado de polvo o los ltros están sucios.
Remedio:
Vacíe es decir limpie los componentes.
o
Causa probable:
En la manguera aspirante o en la tobera se encuentra un
cuerpo extraño.
Remedio:
Controle, si hay un cuerpo extraño en los accesorios.
Datos técnicos
Modelo:.............................................................................BS 1276
Suministro de tensión:...............................................230 V, 50 Hz
Consumo de energía:
P
nom.
: ...........................................................................1800 W
P
max.
: ............................................................................2400 W
Clase de protección: ...................................................................ΙΙ
Peso neto: ...........................................................................7,2 kg
Este aparato se ha examinado según las normativas actuales
y vigentes de la Comunidad Europea, como p.ej. compatibilidad electromagnética y directiva de baja tensión y se ha
construido según las más nuevas especicaciones en razón de
la seguridad.
No reservamos el derecho de efectuar modicaciones técnicas.
Signicado del símbolo „Cubo de basura“
Proteja nuestro medio ambiente, aparatos eléctricos no forman
parte de la basura doméstica.
Haga uso de los centros de recogida previstos para la eliminación de aparatos eléctricos y entregue allí sus aparatos
eléctricos que no vaya a utilizar más.
Ayudará en evitar las potenciales consecuencias, a causa de
una erronéa eliminación de desechos, para el medio ambiente
y la salud humana.
Con ello, contribuirá a la recuperación, al reciclado y a otras
formas de reutilización de los aparatos viejos eléctricos y
electrónicos.
La información cómo se debe eliminar los aparatos, se obtiene
en su ayuntamiento o su administración municipal.
05-BS 1276.indd 20 08.10.2009 14:19:49 Uhr
Page 21

21
PORTUGUÊS
Instruções gerais de segurança
Antes de pôr este aparelho a funcionar, leia muito atentamente
as instruções de emprego e guarde-as muito bem, juntamente
com o talão de garantia, o talão de compra e, tanto quanto
possível, a embalagem com os elementos interiores. Se puser
o aparelho à disposição de terceiros, entregue-lhes também as
Instruções de Utilização.
• Utilize o aparelho exclusivamente para ns privados e
para a nalidade para a qual o mesmo foi concebido. Este
aparelho não se destina a ns comerciais. Não o utilize ao
ar livre. Mantenha-o protegido do calor, de irradiação solar
directa, da humidade (não o imergir de forma alguma em
quaisquer líquidos) e de arestas aguçadas. Não utilize o
aparelho com as mãos molhadas. No caso de o aparelho
car húmido ou molhado, retire imediatamente a cha da
tomada.
• Sempre que não utilizar o aparelho, ou desejar montar
acessórios, ou queira limpá-lo, ou ainda em caso de avarias, deverá desligá-lo e retirar a cha da tomada (puxe pela
cha e não pelo o).
• O aparelho não deverá funcionar sem vigilância. Se se
ausentar do quarto, desligue sempre o aparelho. Retire a
cha da tomada de rede.
• O aparelho e o cabo de ligação à rede têm de ser regularmente examinados quanto a sinais de danicação. Se se
verica um dano, o aparelho não pode ser utilizado.
• Não tente reparar o aparelho, dirija-se a um técnico da especialidade, devidamente autorizado. Para evitar quaisquer
perigos, é favor substituir um o danicado por um o da
mesma qualidade. Tal deverá ser efectuado pelo fabricante,
pelos nossos serviços de assistência ou por outra pessoa
com as mesmas qualicações.
• Utilize apenas acessórios de origem.
• É favor observar as seguintes „Instruções especiais de
segurança“.
Crianças e pessoas débeis
• Para a segurança dos seus lhos, não deixe partes da
embalagem (sacos plásticos, papelão, esferovite, etc.) ao
alcance dos mesmos.
AVISO!
Não deixe crianças pequenas brincarem com folhas de
plástico. Perigo de asxia!
• Este aparelho não foi concebido para ser utilizado por
pessoas (inclusivamente por crianças) com limitações
das capacidades físicas, sensoriais ou psíquicas ou sem
experiência ou conhecimentos, a não ser que, para a sua
segurança, sejam vigiados por uma pessoa responsável ou
tenham recebido instruções da mesma, sobre o modo de
utilização do aparelho.
• Crianças devem ser vigiadas para evitar que brinquem com
o aparelho.
Símbolos nestas Instruções de uso
Indicações importantes para a sua segurança estão marcadas
de forma especial. Preste incondicionalmente atenção a estas
indicações, para evitar acidentes e estragos no aparelho:
AVISO:
Chama a atenção para perigos existentes para a sua saúde e
para possíveis riscos de ferimento.
ATENÇÃO:
Chama a atenção para possíveis perigos existentes para o
aparelho ou para outros objectos.
INDICAÇÃO: Realça sugestões e informações para si.
Instruções especiais de segurança
• Não aspire humidades nem líquidos!
• Não aspire cinzas quentes, nem objectos pontiagudos ou
aguçados!
• Não utilize o aparelho em espaços húmidos!
• Não aspire nunca sem saco. Após substituição do saco,
verique sempre se o mesmo se encontra na posição
correcta!
• Durante o funcionamento, mantenha a roupa, o corpo e os
cabelos afastados do bocal do aspirador!
• Mantenha o aspirador afastado de fontes de calor, tais
como radiadores, fogões, etc.!
Descrição dos elementos
1 Ventilador
2 Tubo exível
3 Filtro HEPA
4 Filtro de entrada de nylon
5 Recipiente do lixo com ltro de protecção do
motor
6 Interruptor
7 Indicação de esvaziamento
8 Botão para enrolamento do o
9 Punho para transporte
10 Regulador da potência de aspiração
11 Fio
12 Dispositivo para estacionamento
13 Tampa do ltro - Filtro de saída
14 Ligação para o tubo exível
15 Peça para aspirar o chão
(com gancho (sem imagem))
16 Tubo telescópico
Acessórios
17 Escova para soalhos
18 Bocal para frestas e para escovar
19 Bocal para aspirar estofos
Primeira utilização
• Ene a cabeça de ligação da mangueira de aspiração no
local para conexão com a mangueira, até esta encaixar
mecanicamente. Para voltar a soltar a mangueira, prima o
botão junto da cabeça de ligação e retire puxando a mangueira.
• Se necessário, introduza o tubo de aspiração na extremida-
de do tubo exível.
05-BS 1276.indd 21 08.10.2009 14:19:49 Uhr
Page 22

22
PORTUGUÊS
• Monte a peça para aspirar o chão nomeadamente os acessórios.
Tubo de Aspiração Telescópico
Através do tubo de aspiração ajustável na altura
é possível uma adaptação individual para a sua
altura corporal. Proceda ao desbloqueio do acoplamento deslocando a tecla na direcção da seta.
Desloque o tubo de aspiração para a posição
desejada. Para bloquear, solte a tecla, até se
ouvir que o acoplamento cou engatado.
Utilização do aparelho
1. Desenrole o comprimento necessário de o.
ATENÇÃO:
• Para desenrolar o o, é favor puxá-lo, no máximo, até
à marcação amarela.
• Não o puxe até à marcação vermelha, pois o dispositivo poderá estragar-se.
INDICAÇÃO:
Se a marcação vermelha for visível, puxe de novo o
cabo com ajuda do botão para recolha do mesmo, até à
marcação amarela.
2. Introduza a cha numa tomada com protecção de contactos
de 230 voltes, 50 Hz, instalada convenientemente. Ligue e
desligue o aparelho com o interruptor, premindo para baixo
o botão com o pé.
3. Seleccione a potência de aspiração no respectivo regulador
(MIN a MAX).
4. Aspire agora a uma velocidade constante. Não é necessário
exercer qualquer pressão.
ATENÇÃO:
Tome em consideração que o comprimento do o é limitado!
Regulador da potência de aspiração
Potência de
aspiração baixa: para cortinas, tecidos delicados.
Potência de
aspiração média: para alcatifas de pelo alto e solos
têxteis.
Potência de
aspiração elevada: para alcatifas, tapetes e solos robus-
tos.
Ventilador
Abra o ventilador que se encontra no punho do
tubo exível para regulação do ar, ou para soltar
objectos que se tenham cado presos ao bocal.
Desligar e enrolar o cabo da corrente
1. Desligue o aspirador com o interruptor Ligado/Desligado e
retire a cha da tomada.
2. Conserve a cha na mão.
3. Pressione o botão para enrolamento e vá puxando o o.
Segure neste para evitar que o mesmo bate contra qualquer
lado.
Peça de ligação para bocais
Bocal de fenda,
de articulação: Para aspirar estofos, cortinados, assim
como cantos, frestas, etc.
INDICAÇÃO: Bocal „duas peças
numa“: dobrada pode ser utilizada para
aspirar frestas. Se a quiser utilizar com
escova, basta puxar a parte da escova na
direcção da seta, até car engatada.
Bocal para aspirar
estofos:
Para a limpeza de estofos, cortinados, etc.
Peça para aspirar
o chão:
O bocal está equipado com rodas, a m
de deslizar melhor e para ser guiado mais
facilmente. Para aspirar alcatifas, tapetes
ou superfícies lisas.
Solos lisos:
Prima com o pé para baixo
a alavanca com o símbolo de escova
„ “. As escovas carão à vista.
Alcatifas, tapetes:
Ponha com o pé a alavanca no
símbolo „ “. As escovas são
agora recolhidas.
Escova para
soalhos:
A escova para soalhos de madeira
encontra-se equipada com rodinhas para
fácil condução. Para superfícies amplas,
como soalhos, ladrilhos, etc.
Para soltar os
bocais:
Remova-os, girando-os ligeiramente.
Manutenção
Filtros
O aspirador dispõe de 3 sistemas de ltragem. O sistema
tradicional de sacos de lixo foi substituído por um recipiente de
lixo transparente. Em consequência da alta velocidade com que
funciona, este remove não só a sujidade mais grosseira mas
também as partículas mais pequenas que se encontram no “ar
aspirado”.
Deixa de haver a compra de sacos de pó.
Indicação electrónica para esvaziamento do contentor
de pó
Segure o tubo exível no ar. Se a indicação de esvaziamento
para o contentor do pó brilha, proceda do seguinte modo:
05-BS 1276.indd 22 08.10.2009 14:19:49 Uhr
Page 23

23
PORTUGUÊS
Fig. 1
Despejar o recipiente do lixo
• Retire a cha da tomada.
• Empurre para baixo o botão
para soltar o contentor do pó
e retire o contentor do pó (veja
Fig. 1).
Fig. 2
• Segure o contentor do pó por
cima de um balde de lixo.
• Esvazie o conteúdo do
contentor do pó. Prima o botão
(PUSH) no contentor do pó
(veja Fig. 2).
• Volte a fechar a placa do
fundo, até a ouvir encaixar.
Fig. 3
Fig. 4
Filtro de protecção de motor
HEPA (no recipiente do lixo)
Limpeza das peças de ltragem
• Retire a cha da tomada.
• Empurre para baixo o botão
para soltar o contentor do pó
e retire o contentor do pó (veja
Fig. 1).
• Despeje o conteúdo do recipiente do pó. (veja Fig. 2).
• Desbloqueie o dispositivo de
montagem do ltro rodando-o
um pouco na direcção
UNLOCK. Retire o ltro (veja
Fig. 3). Num segundo passo,
separe o ltro de entrada de
nylon (4) do ltro HEPA (3)
rodando-o contra a direcção do
bloqueio (veja Fig. 4). Limpe
o ltro de entrada de nylon
batendo suavemente com ele
e o ltro HEPA escovando-o
suavemente também.
• Torne a montar as peças.
• Bloqueie o dispositivo do ltro
no contentor de pó rodando-o
na direcção de LOCK até ao
esbarro.
• Fixe de novo o recipiente do
pó, até este encaixar audivelmente.
Fig. 5
De três em três esvaziamentos
do recipiente do lixo, proceda
à lavagem do ltro à torneira,
deixando correr a água no sentido
contrário ao da aspiração. Torne a
montá-lo só depois de se encontrar
completamente enxuto!
ATENÇÃO:
Nunca lave os ltros na
máquina de lavar roupa e não
use nunca um secador para os
enxugar..
Filtro de saída
O aspirador dispõe ainda de um ltro de saída. Encontra este
ltro debaixo da cobertura do ltro (13). Para um bom funcionamento do ltro, recomendamos a sua limpeza de 6 meses.
• Retire a cha da tomada.
• Abra a grelha de ventilação, pressionando a alavanca que
se encontra ao lado da grelha.
• Remova-a então, puxando-a para a frente. Retire o ltro e
proceda à sua limpeza da forma descrita acima.
• Volte a colocar correctamente o ltro e feche a grelha de
ventilação (até encaixar).
ATENÇÃO:
Tome muita atenção à nota seguinte!
Poderá ser necessário proceder à limpeza dos ltros após um
curto tempo de utilização, dependendo tal dos materiais aspirados. No caso de poeiras nas, tal limpeza será necessária
mais cedo.
No caso de vericar que o seu aparelho aspira com menos
força, proceda à limpeza dos ltros da forma acima descrita.
Se o aspirador perder repentinamente força durante o funcionamento, tal poderá dever-se a uma obstrução dos ltros.
Limpeza e arrecadação
AVISO:
• Retire sempre a cha da tomada, antes de proceder à
limpeza do ferro de engomar!
• Não imergir de modo algum para limpeza o aparelho em
água. Tal poderia ter um choque eléctrico ou um fogo
como consequência.
ATENÇÃO:
• Não utilize uma escova de arame ou outros objectos abrasvos.
• Não utilize produtos de limpeza agressivos ou abrasivos.
Limpe a caixa com um pano seco.
05-BS 1276.indd 23 08.10.2009 14:19:50 Uhr
Page 24

24
PORTUGUÊS
Limpeza
• Antes de limpar o aspirador, retire a cha da tomada.
• Limpe a caixa com um pano seco.
• Pendure por favor o gancho do bocal da base no suporte na
parte de trás do aspirador.
Resolução de avarias
• O aparelho não funciona.
Solução:
Verique a conexão à rede de alimentação.
Verique a posição do interruptor.
• O aparelho não aspira.
Causa possível:
A potência de aspiração seleccionada é demaisado baixa.
Solução:
Controle a posição do regulador.
ou
Causa possível:
O depósito do pó e os ltros estão sujos.
Solução:
Esvazie e limpe estas componentes.
ou
Causa possível:
Encontra-se um corpo estranho na mangueira ou no bocal
de aspiração.
Solução:
Controle se os acessórios contêm corpos estranhos.
Características técnicas
Modelo:.............................................................................BS 1276
Alimentação da corrente: ..........................................230 V, 50 Hz
Consumo de energia:
P
nom.
: ............................................................................1800 W
P
max.
: ............................................................................2400 W
Categoria de protecção: .............................................................. ΙΙ
Peso líquido: .........................................................................7,2 kg
Este aparelho foi controlado nos termos das actuais directivas
da CEE aplicáveis, tais como inocuidade electromagnética e
directiva sobre baixa tensão, e fabricado de acordo com as mais
novas prescrições da segurança técnica.
Reserva-se o direito de alterações!
Signicado do símbolo „contentor do lixo“
Poupe o nosso meio ambiente, não deite aparelhos eléctricos
para o lixo doméstico.
Dirija-se ao locais destinados à recolha especial de aparelhos
eléctricos e entregue aí os aparelhos que não pretende continuar a utilizar.
Desta forma, contribuirá para ajudar a evitar os potenciais efeitos perniciosos que um falso depósito de objectos usados terão,
tanto no que diz respeito ao ambiente, como à saúde humana.
Dará igualmente a sua contribuição para o reaproveitamento de
materiais, para a reciclagem e outras formas de aproveitamento
de aparelhos eléctricos e electrónicos usados.
Receberá, nas autarquias e juntas de freguesia, informações
sobre os locais onde poderá entregar tais aparelhos.
05-BS 1276.indd 24 08.10.2009 14:19:50 Uhr
Page 25

25
ITALIANO
Norme di sicurezza generali
Prima di mettere in funzione questo apparecchio, leggere molto
attentamente le istruzioni per l’uso e conservarle con cura unitamente al certicato di garanzia, allo scontrino e, se possibile,
alla scatola di cartone con la confezione interna. Se passate
l‘apparecchio a terzi, consegnate anche le istruzioni per l‘uso.
• Utilizzare l’apparecchio esclusivamente per scopi privati
e conformemente al tipo di applicazione previsto. Questo
prodotto non è stato concepito ai ni di un impiego in ambito
industriale. Non utilizzarlo all’aperto. Proteggerlo dal calore,
nonché dall’esposizione diretta ai raggi solari e dall’umidità
(non immergerlo mai in sostanze liquide) e tenerlo a distanza da oggetti con spigoli aflati. Non utilizzare l’apparecchio
con le mani umide. Nel caso in cui si bagni o si inumidisca
l’apparecchio, staccare immediatamente la spina.
• Disattivare l’apparecchio e staccare sempre la spina dalla
relativa presa (prendendo in mano la spina, non tirando
il cavo) allorché non si utilizza l’apparecchio, quando si
applicano degli accessori oppure nel caso in cui lo si debba
pulire o si siano manifestate anomalie.
• Non mettere in funzione l’ apparecchio senza sorveglianza.
Spegnere sempre l’apparecchio, se si desidera uscire dalla
stanza. Estrarre la spina dalla presa.
• Controllare regolarmente che l‘apparecchio e il cavo non
presentino tracce di danneggiamento. In tal caso l‘apparecchio non deve più essere utilizzato.
• Non tentare di riparare l’apparecchio, bensì rivolgersi a un
tecnico autorizzato. Al ne di evitare l’insorgere di situazioni
di pericolo, si raccomanda di contattare il costruttore, il nostro servizio di assistenza tecnica o un tecnico ugualmente
qualicato per la sostituzione del cavo di alimentazione
difettoso con un cavo equivalente.
• Utilizzare esclusivamente accessori originali.
• Rispettare le seguenti “Speciali norme di sicurezza“.
Bambini e persone fragili
• Per sicurezza tenere l’imballaggio (sacchetto di plastica,
scatola, polistirolo, ecc.) fuori dalla portata dei bambini.
AVVISO!
Non lasciar giocare i bambini piccoli con la pellicola.
Pericolo di soffocamento!
• Quest’apparecchio non è destinato all’uso da parte di persone (compresi i bambini) con capacità siche, psichiche,
sensorie o intellettive limitate, o da persone sprovviste della
necessaria esperienza e conoscenza, ad eccezione del
fatto che ciò avvenga sotto la sorveglianza di una persona
responsabile ed addetta alla loro sicurezza, o che ricevano
da questa persona istruzioni su come debba essere utilizzato l’apparecchio.
• Evitare che i bambini giochino con l’apparecchio.
Simboli per questo manuale di istruzioni per l’ uso
Le indicazioni importanti per la propria sicurezza sono indicati
appropriatamente. Osservare assolutamente queste indicazioni,
per evitare incidenti e danni all’ apparecchio:
AVVISO:
Previene i rischi della propria salute ed indica possibili rischi
di ferite.
ATTENZIONE:
Indica possibili pericoli per l’ apparecchio o altri oggetti.
NOTA: Mette in risalto consigli ed informazioni.
Speciali norme di sicurezza
• Non utilizzare l’apparecchio per aspirare sostanze liquide o
umide.
• Non utilizzare l’apparecchio per aspirare ceneri ancora
calde oppure oggetti aflati o acuminati.
• Non usare l’apparecchio in locali umidi.
• Non utilizzare mai l’apparecchio senza ltro. Dopo aver usato l’aspirapolvere, accertarsi sempre che il ltro sia installato
correttamente nella posizione corrispondente.
• Durante l’utilizzo dell’apparecchio, tenere la bocchetta dell’aspiratore lontana da capelli, abiti e da altre parti del corpo.
• Tenere l’aspiratore lontano dalle fonti di calore quali i radiatori, il forno, ecc.
Elementi di comando
1 Grata di ventilazione
2 Tubo essibile di aspirazione
3 Filtro HEPA
4 Preltro di nylon
5 Contenitore della polvere con ltro per protezione
del mototre
6 Interruttore On/Off
7 Indicatore per lo svuotamento
8 Pulsante del sistema avvolgicavo
9 Impugnatura
10 Regolatore della potenza di aspirazione
11 Cavo
12 Scocca portaccessori
13 Copertura per ltro - Filtro di scarico
14 Collegamento del tubo essibile
15 Bocchetta per pavimenti
(con gancio (senza g.))
16 Tubo di aspirazione telescopico
Accessori
17 Bocchetto per pavimenti a parchetti
18 Bocchetta a spazzola e per giunti
19 Bocchetta divani
Messa in funzione
• Inserire la testina del tubo aspiratore nell‘apposito collega-
mento, afnché si incastri meccanicamente. Per togliere poi
il tubo, premere il tasto sulla testina ed estrarre il tubo.
• Eventualmente inlare il tubo di aspirazione nell’impugnatura.
• Montare la bocchetta pavimenti o un altro accessorio.
05-BS 1276.indd 25 08.10.2009 14:19:50 Uhr
Page 26

26
ITALIANO
Tubo di aspirazione a telescopio
Grazie al tubo di aspirazione regolabile in altezza
è possibile un adattamento ottimale alle condizioni
siche. Sbloccare l’aggancio premendo il tasto in
direzione della freccia. Portare il tubo di aspirazione all’altezza desiderata. Per bloccare sganciare il
tasto no allo scatto.
Utilizzo dell’apparecchio
1. Srotolare il cavo nella lunghezza necessaria .
ATTENZIONE:
• Si raccomanda di estrarre il cavo soltanto no al
contrassegno in colore giallo.
• Non tirare mai, in nessun caso, il cavo sino al contrassegno rosso, in quanto il dispositivo avvolgicavo
potrebbe danneggiarsi.
NO TA:
Se la tacca rossa è visibile, tirare nuovamente il cavo no
alla tacca gialla servendosi del tasto avvolgicavo.
2. Inserire la spina in una presa con contatto di terra regolarmente installata da 230 V, 50 Hz. Accendere l‘apparecchio
con l‘interruttore On / Off premendo verso il basso il tasto
con il piede.
3. Regolare la potenza di aspirazione servendosi dell’apposito
regolatore di potenza (MIN – MAX).
4. Utilizzare quindi l’apparecchio operando in modo da usare
una velocità sempre costante. Non è necessario esercitare
pressione sull’apparecchio.
ATTENZIONE:
Prestare attenzione al raggio d’azione consentito, il quale
dipende dalla lunghezza del cavo!
Regolatore della potenza di aspirazione
Potenza di
aspirazione bassa: per tende e materiali delicati.
Potenza di
aspirazione media: per tappeti in velluto a pelo lungo e per
pavimenti in tessuto.
Potenza di
aspirazione elevata: per pavimenti e tappeti robusti.
Grata di ventilazione
Aprire la grata di aerazione sull’impugnatura del
essibile per la regolazione dell’aria o per staccare
pezzi che aderiscono alla bocchetta.
Spegnere e avvolgere il cavo
1. Spegnere l’aspirapolvere premendo il tasto On/Off ed estrarre la spina dalla presa.
2. Tenere la spina in mano.
3. Premere il pulsante relativo al dispositivo avvolgicavo e
accompagnare il cavo con la mano. Si consiglia di tenere il
cavo, in modo da impedire movimenti violenti e disordinati
del medesimo.
Supporto bocchette
Bocchello per fughe,
spazzola e giunto Per la pulizia di imbottiti, tende, angoli,
fessure eccetera.
NO TA: Bocchetta „2 in 1“:
utilizzandola nella sua forma chiusa, questa
bocchetta può essere impiegata come bocchetta per giunti. Nel caso in cui si desideri
invece utilizzare la bocchetta a spazzola, è
necessario tirare la spazzola nella direzione
indicata dalla freccia, nché essa non si
innesti meccanicamente in posizione.
Bocchetta divani: Per la pulizia di poltrone, tendaggi, ecc.
Bocchetta
per pavimenti:
Il bocchetto per pavimenti è scorrevole
gra zie alle rotelle. Per la pulizia di tappeti o
di superci lisce.
Pavimenti lisci:
Con il piede abbassare la leva con il
simbolo della spazzola „ “. Le
spazzole diventano in questo modo visibili.
Tappeti:
Con il piede portare la leva sul simbolo
„ “. Le spazzole sono ora
invastrate.
Bocchetto per pavimenti a parchetti:
La spazzola per pavimenti di legno è
munita di rotelline, per scivolare meglio.
Per superci più grandi come parchetti,
laminato oppure piastrelle, ecc.
Staccare le
bocchette:
Si staccano girandole leggermente.
Manutenzione
Filtri
L’apparecchio dispone di 3 sistemi di ltri. Il sistema convenzionale del sacchettino da polvere è stato sostituito da un contenitore per la polvere trasparente. In questo raccoglipolvere tutto
viene girato a mulinello grazie all’elevata velocità di corrente
dall’aria “aspirata”: dai pezzi di sporco più grossi alle particelle
di polvere più ni.
Non serve più acquistare sacchetti per la polvere.
05-BS 1276.indd 26 08.10.2009 14:19:51 Uhr
Page 27

27
ITALIANO
Indicatore elettronico per lo svuotamento del contenitore
della polvere
Tenere all’aria il tubo essibile di aspirazione senza sottoporlo
a carico. Quando l‘indicatore per lo svuotamento si illumina,
proseguire come segue:
Fig. 1
Svuotare il sacchettino
• Staccare la spina dalla presa di
rete.
• Per estrarre il contenitore spingere il tasto all‘ingiù e togliere il
contenitore (vedi immagine 1).
Fig. 2
• Tenere il contenitore della
polvere sopra un secchio della
spazzatura. Svuotare il contenuto del contenitore. Per fare
ciò premere il tasto (PUSH) sul
contenitore (vedi immagine 2).
• Spingere nuovamente il
coperchio base, afnchè si
incastri udibilmente.
Fig. 3
Fig. 4
Filtro di protezione per motore
HEPA (nel raccoglipolvere)
Pulizia del supporto ltro
• Staccare la spina dalla presa di
rete.
• Per estrarre il contenitore spingere il tasto all‘ingiù e togliere
il contenitoreSchieben (vedi
immagine 1).
• Svuotare il contenuto del
contenitore (v. g. 2).
• Sbloccare il portaltro girando
brevemente in direzione
UNLOCK. Estrarlo (vedi
immagine 3). Come seconda
tappa togliere il preltro di
nylon (4) dal ltro HEPA (3)
girandolo in senso contrario
allo sbloccamneto . (vedi
immagine 4). Pulire il preltro di
nylon battendolo leggermente
e il ltro HEPA spazzolandolo
leggermente.
• Reinserire i pezzi.
• Bloccare il portaltro nel contenitore della polvere girandolo in
direzione LOCK no alla ne.
• Fissare di nuovo il contenitore
della polvere no a quando si
sento lo scatto di arresto.
Fig. 5
Dopo aver svuotato il raccoglipolvere tre volte o nel caso di molto
sporco, pulire il ltro mettendolo
sotto l’acqua corrente nella direzione opposta all’aspirazione.
Inserirlo nuovamente solo se è
completamete asciutto!
ATTENZIONE:
Non lavare mai i ltri nella
lavatrice e non usare un asciugacapelli per asciugare.
Filtro di scarico
L’apparecchio dispone inoltre di un ltro di scarico. Troverete il
ltro sotto la copertura del ltro (13). Per garantire una funzione
perfetta del ltro, raccomandiamo di pulirlo ogni 6 mesi.
• Staccare la spina dalla presa di rete.
• Aprire la griglia di ventilazione premendo la leva che si trova
al lato della griglia di ventilazione.
• Togliere quindi la grata tirandola in avanti. Estrarre il ltro e
pulirlo rispettando le indicazioni già fornite in precedenza.
• Reinserire nuovamente il ltro correttamente e chiudere la
griglia di ventilazione (afnchè si incastri).
ATTENZIONE:
Notare bene questa indicazione!
La pulizia può essere necessaria anche dopo brevi periodi,
a seconda delle condizioni dell’ uso, p. e. aspirando polvere
ne. Se la potenza di aspirazione dovesse diminuire, pulire il
ltro come descritto.
Se la potenza di aspirazione dovesse diminuire improvvisamente durante l’ uso, la causa potrebbe essere un
intasamento del ltro.
Pulizia e conservazione
AVVISO:
• Staccare sempre la spina prima della pulizia!
• In nessun caso immergere l‘apparecchio in acqua per
la pulizia. Ne potrebbe conseguire un corto circuito o
incendio.
ATTENZIONE:
• Non usare pagliette o altri oggetti abrasivi.
• Per la pulizia non usare detersivi forti o abrasivi.
Pulire l’alloggiamento servendosi di un panno asciutto.
Conservazione
• Lasciate raffreddare completamente l’apparecchio.
• Riavvolgere completamente il cavo.
• Appendere il gancio che si trova sulla spazzola per pavimenti nel dispositivo di stazionamento nella parte posteriore
dell‘ apparecchio.
05-BS 1276.indd 27 08.10.2009 14:19:51 Uhr
Page 28

28
ITALIANO
Rimozione guasti
• L’apparecchio è senza funzione.
Rimedio:
Esaminare il collegamento rete.
Esaminare la posizione dell’interruttore.
• L’apparecchio non aspira.
Possibile causa:
La potenza di aspirazione è impostata troppo bassa.
Rimedio:
Controllare la posizione del regolatore.
o
Possibile causa:
Il contenitore polvere oppure I ltri sono sporchi.
Rimedio:
Svuotare oppure lavare gli elementi.
o
Possibile causa:
Nel essibile o nell’ugello si trova un oggetto.
Rimedio:
Controllare gli accesori in caso di otturazioni dovute ad
oggetti.
Dati tecnici
Modello: ............................................................................BS 1276
Alimentazione rete: ...................................................230 V, 50 Hz
Consumo di energia:
P
nom.
: ...........................................................................1800 W
P
max.
: ............................................................................2400 W
Classe di protezione: ................................................................... ΙΙ
Peso netto: ........................................................................7,20 kg
Questo apparecchio è stato controllato sulla base di tutte le
direttive CE attuali in vigore in questo settore, quali per esempio
la normativa in materia di compatibilità elettromagnetica e la
direttiva in materia di bassa tensione, ed è stato costruito conformemente alle norme di sicurezza più moderne.
Con riserva di apportare modiche tecniche.
Signicato del simbolo „Eliminazione“
Salvaguardare l’ ambiente, gli elettrodomestici non vanno eliminati come riuti domestici.
Per l’ eliminazione degli elettrodomestici, fare uso dei posti di
raccolta previsti per questo tipo e porre quegli elettrodomestici
che non sono più in uso.
Si contribuisce così ad evitare un effetto potenziale sull’ ambiente e sulla salute, dovuto magari ad una eliminazione sbagliata.
Questo signica un contributo personale alla riutilizzazione, al
riciclaggio e altre forme di utilizzazione di elettrodomestici ed
apparecchi elettronici usati.
Si possono trovare le corrispondenti informazioni sugli appositi
luoghi di raccolta, nelle amministrazioni dei comuni.
05-BS 1276.indd 28 08.10.2009 14:19:52 Uhr
Page 29

29
ENGLISH
General Safety Instructions
Read the operating instructions carefully before putting the
appliance into operation and keep the instructions including the
warranty, the receipt and, if possible, the box with the internal
packing. If you give this device to other people, please also pass
on the operating instructions.
• The appliance is designed exclusively for private use and for
the envisaged purpose. This appliance is not t for commercial use. Do not use it outdoors. Keep it away from sources
of heat, direct sunlight, humidity (never dip it into any liquid)
and sharp edges. Do not use the appliance with wet hands.
If the appliance is humid or wet, unplug it immediately.
• When cleaning or putting it away, switch off the appliance
and always pull out the plug from the socket (pull the plug
itself, not the lead) if the appliance is not being used and
remove the attached accessories.
• Do not operate the machine without supervision. If you
leave the room you should always turn the device off.
Remove the plug from the socket.
• The device and the mains lead have to be checked regularly
for signs of damage. If damage is found the device must not
be used.
• Do not try to repair the appliance on your own. Always
contact an authorized technician. To avoid the exposure
to danger, always have a faulty cable be replaced only by
the manufacturer, by our customer service or by a qualied
person and with a cable of the same type.
• Use only original spare parts.
• Pay careful attention to the following “Special Safety Instructions“.
Children and Frail Individuals
• In order to ensure your children‘s safety, please keep all
packaging (plastic bags, boxes, polystyrene etc.) out of their
reach.
WARNING!
Caution! Do not allow small children to play with the foil
as there is a danger of suffocation!
• This device is not intended to be used by individuals (including children) who have restricted physical, sensory or mental
abilities and/or insufcient knowledge and/or experience, unless they are supervised by an individual who is responsible
for their safety or have received instructions on how to use
the device.
• Children should be supervised at all times in order to ensure
that they do not play with the device.
Symbols in these Instructions for Use
Important information for your safety is specially marked. It is
essential to comply with these instructions in order to avoid accidents and prevent damage to the machine:
WARNING:
This warns you of dangers to your health and indicates
possible injury risks.
CAUTION:
This refers to possible hazards to the machine or other
objects.
NOTE: This highlights tips and information.
Special Safety Instructions
• Do not suck up liquids!
• Do not suck up hot ashes or pointed or sharp objects!
• Do not use the device in damp rooms!
• Never use without the lter. Check that the lter is inserted
correctly!
• Hair, clothing and body parts away from the vacuum nozzle
during use!
• Keep the vacuum cleaner away from sources of heat like
radiators, ovens, etc.!
Overview of the Components
1 Air slide
2 Vacuum hose
3 HEPA lter
4 Nylon pre-lter
5 Dust container with motor protection lter
6 On/off switch
7 Change dust bag indicator
8 Cable-winding key
9 Carrying handle
10 Vacuum power regulator
11 Cable
12 Parking assistance
13 Filter cover - Outlet lter
14 Hose connection
15 Floor nozzle (with hook (not shown))
16 Telescopic suction tube
Accessories
17 Parquet brush
18 Groove and brush nozzle
19 Upholstery nozzle
Start-up
• Insert the connection head of the suction hose into the hose
connection until it locks into place mechanically. In order to
release the hose again, press the button on the connection
head and pull the hose out.
• Insert the vacuum tube into the handle if required.
• Then assemble the oor nozzle and/or the accessories.
Telescope Vacuum Pipe
The height-adjustable vacuum pipe enables
individual alignment to your height. Unlock the
coupling by pressing the key in the direction of the
arrow. Slide the vacuum pipe to the desired length.
To lock the device, release the key until you hear
it lock in place.
05-BS 1276.indd 29 08.10.2009 14:19:52 Uhr
Page 30

30
ENGLISH
Using the Appliance
1. Unwind the length of cable you require.
CAUTION:
• Pull out the cable up to the maximum length indicated
with the yellow mark.
• Never pull the cable out up to the red mark as the
cable winding can be damaged.
NOTE:
If the red mark is visible, pull in the cable with the help of
the cable winding button back to the yellow mark.
2. Insert the mains plug into a correctly installed 230 V, 50 Hz
power socket. Turn the vacuum cleaner on by pressing the
on/off switch down with your foot.
3. Set the vacuum power with the vacuum power regulator
(MIN to MAX).
4. Vacuum at a steady speed. There is no need to exert pressure.
CAUTION:
Pay attention to the range that can be covered with the cable
length!
Vacuum power regulator
Low vacuum power: For curtains and delicate fabrics.
Medium vacuum power: For long-pile velour carpets and textile
ooring.
High vacuum power: For sturdy rugs and oors.
Air Slide
Open the air slide on the hose handle in order to
regulate the airow or to clear any particles sticking
to the nozzle.
Switching off and Winding up the Mains Lead
1. Turn the vacuum cleaner off by the on/off switch and remove
the plug from the socket.
2. Keep the plug in your hand.
3. Press the cable winding button and guide the cable. Hold
the cable to avoid wrapping.
Nozzle Attachment
Crevice and
jointed nozzle: For vacuuming upholstery, curtains and in
corners and crevices etc.
NOTE: „2-in-1“ nozzle:
When this is folded together it can be
used as a groove nozzle. If you would like
to use the brush nozzle, pull the brush
section in the direction of the arrow until it
locks in place.
Upholstery nozzle: For cleaning upholstery, curtains etc.
Floor nozzle:
The oor nozzle is tted with rollers for
improved manoeuvrability. To clean carpets
or smooth surfaces.
Smooth oors:
Press down the lever with the brush symbol „ “ with your foot. The brush
is now visible..
Carpets:
Move the lever with your foot to the
„ “symbol. The brushes are now
retracted.
Parquet brush: The parquet brush is tted with rollers for
improved manoeuvrability. For large areas
such as parquet, laminate or tiles etc.
Releasing the
nozzles:
Pull these off while turning slightly.
Maintenance
Filter
Your machine has three lter systems. The traditional dust bag
system has been replaced by a transparent dust container. In
this, coarse dirt particles and tiny particles oating in the air are
swirled out of the suction air by the high speed of the air current.
It is therefore unnecessary to buy dust bags.
Electronic change indicator for the dust bag
Hold the hose up into air. If the change dust bag indicator lights
up, please proceed as follows:
Ill. 1
Emptying the Dust Container
• Remove the mains plug from
the socket.
• Push the button for releasing
the dust bag downwards and
remove the dust bag (see
Fig. 1).
05-BS 1276.indd 30 08.10.2009 14:19:52 Uhr
Page 31

31
ENGLISH
Ill. 2
• Hold the dust bag over a rubbish bin. Empty the contents
of the dust bag. In order to do
this, press the button (PUSH)
on the dust bag (see Fig. 2).
• Close the base plate again
so that it is heard to lock into
place.
Ill. 3
Ill. 4
HEPA Motor Protective Filter
(in the Dust Container)
Cleaning the Filter Element
• Remove the mains plug from
the socket.
• Push the button for releasing
the dust bag downwards and
remove the dust bag (see
Fig. 1).
• Empty the contents of the dust
bag (see illustration 2).
• Unlock the lter element by
turning briey in the direction of
UNLOCK. Then take it out (see
Figure 3). In the second step
separate the nylon pre-lter (4)
from the HEPA lter (3) by
turning against the lock .
(see Fig. 4). Clean the nylon
pre-lter by tapping out the
contents and the HEPA lter
by gently brushing out.
• Now replace the components.
• Lock the lter element in the
dust bag by turning it as far as
will go in the direction of LOCK.
• Attach the dust container again
by locking it in position
Ill. 5
Every third time the dust container
is emptied, or in the case of severe
soiling, clean the lter by allowing
water to ow through the lter fabric
against the direction in which the
vacuum cleaner blows. The dust
container should only be reinserted
when it is completely dry!
CAUTION:
Never wash the lter in the
washing machine, and please
do not use a hairdryer to dry it.
Outlet lter
The appliance is also equipped with an outlet lter. This lter can
be found under the lter cover (13). In order to ensure that the
lter works correctly, we recommend that you replace it every
six months.
• Remove the mains plug from the socket.
• Open the ventilation grille by pressing the lever on its side.
• Then pull the grille out towards the front. Remove the lter
and clean as described above.
• Please reinsert the lter correctly and close the air outlet
grille (until it locks into place)
CAUTION: Important note!
Cleaning may become necessary after a shorter time, depending on the conditions of use, e.g. when vacuuming ne dust.
If the suction power of your vacuum cleaner diminishes please
clean the lters as described.
If the suction power suddenly diminishes during operation this
may be due to the lters being locked.
Cleaning & maintenance
AVVISO:
• Always remove the mains lead before cleaning!
• Under no circumstances should you immerse the device
in water for cleaning purposes. Otherwise this might result
in an electric shock or re.
CAUTION:
• Do not use a wire brush or any abrasive items.
• Do not use any acidic or abrasive detergents.
Clean the casing with a dry cloth.
Storage
• Let the iron cool down completely.
• Wind the cable completely.
• Please insert the hook of the oor nozzle into the parking
assistant on the rear of the device.
Troubleshooting
• The Device Does Not Work.
Remedy:
Check the connection to the mains.
Check the position of the switch.
• The device does not suck up anything.
Possible Cause:
The suction power is set too low.
Remedy:
Check the position of the control switch.
or
05-BS 1276.indd 31 08.10.2009 14:19:53 Uhr
Page 32

32
ENGLISH
Possible Cause:
The dust container or the lters are dirty.
Remedy:
Empty or clean the components.
or
Possible Cause:
There is a foreign body in the suction tube or the nozzle.
Remedy:
Check the accessories for foreign bodies.
Noise development
The sound pressure level in the ear of an operator (LpA) was
measured according to DIN EN ISO 3744.
Sound pressure level detected: 80.0 dB(A) (no limit)
Technical Data
Model: ...............................................................................BS 1276
Power supply: ............................................................230 V, 50 Hz
Power consumption:
P
nom.
: ...........................................................................1800 W
P
max.
: ............................................................................2400 W
Protection class: .......................................................................... ΙΙ
Net weight: ........................................................................7,20 kg
This device has been tested according to all relevant current
CE guidelines, such as electromagnetic compatibility and low
voltage directives, and has been constructed in accordance with
the latest safety regulations.
Subject to technical changes without prior notice!
Meaning of the “Dustbin” Symbol
Protect our environment: do not dispose of electrical equipment
in the domestic waste.
Please return any electrical equipment that you will no longer
use to the collection points provided for their disposal.
This helps avoid the potential effects of incorrect disposal on the
environment and human health.
This will contribute to the recycling and other forms of reutilisation of electrical and electronic equipment.
Information concerning where the equipment can be disposed of
can be obtained from your local authority.
05-BS 1276.indd 32 08.10.2009 14:19:53 Uhr
Page 33

33
JĘZYK POLSKI
Ogólne wskazówki bezpieczeństwa
Przed uruchomieniem urządzenia proszę bardzo dokładnie
przeczytać instrukcję obsługi. Proszę zachować ją wraz z kartą
gwarancyjną, paragonem i w miarę możliwości również kartonem z opakowaniem wewnętrznym. Przekazując urządzenie
innej osobie, oddaj jej także instrukcję obsługi.
• Proszę wykorzystywać urządzenie jedynie dla prywatnego
celu, jaki został przewidziany dla urządzenia. Urządzenie to
nie zostało przewidziane do użytku w ramach działalności gospodarczej. Proszę nie korzystać z urządzenia na
zewnątrz. Proszę trzymać urządzenie z daleka od ciepła,
bezpośredniego promieniowania słonecznego, wilgoci (w
żadnym wypadku nie zanurzać w substancjach płynnych)
oraz ostrych krawędzi. Proszę nie obsługiwać urządzenia
wilgotnymi dłońmi. Jeżeli urządzenie jest wilgotne lub mokre, proszę natychmiast wyciągnąć wtyczkę (należy ciągnąć
za wtyczkę, nie za przewód).
• Jeżeli nie korzystacie Państwo z urządzenia, jeżeli chcecie
Państwo zamontować jakieś akcesoria, w celu wyczyszczenia lub w przypadku jakichkolwiek zakłóceń, proszę zawsze
wyłączyć urządzenie i wyjąć wtyczkę z gniazdka.
• Pracującego urządzenia nie należy pozostawiać bez nadzoru. Przed opuszczeniem pomieszczenia urządzenie należy
zawsze wyłączać i wyciągać wtyczkę sieciową z gniazda.
• Należy regularnie sprawdzać, czy urządzenie i kabel sieciowy nie są uszkodzone. W razie uszkodzenia należy przestać
korzystać z urządzenia.
• W razie awarii proszę nie naprawiać urządzenia samemu
lecz skorzystać z pomocy autoryzowanego specjalisty. Jeżeli przewód zasilający nieodłączalny ulegnie uszkodzeniu, to
powinien on być wymieniony u producenta lub w specjalnym
zakładzie naprawczym albo przez wykwalikowaną osobę w
celu uniknięcia zagrożenia.
• Proszę stosować tylko oryginalne akcesoria.
• Prosimy pamiętać o podanych dalej „Specjalnych wskazówkach dotyczących bezpiecznego użytkowania“.
Dzieci i osoby niepełnosprawne
• Dla bezpieczeństwa dzieci proszę nie zostawiać swobodnie
dostępnych części opakowania (torby plastikowe, kartony,
styropian itp.).
OSTRZEŻENIE!
Nie pozwalaj dzieciom bawić się folią.
Niebezpieczeństwo uduszenia!
• To urządzenie nie może być używane przez osoby (w tym
dzieci) o ograniczonych możliwościach zycznych, motorycznych lub umysłowych lub nie posiadające niezbędnego
doświadczenia i/lub wiedzy. Użytkowanie urządzenia przez
takie osoby jest możliwe wyłącznie pod nadzorem opiekuna
lub po otrzymaniu wskazówek dotyczących używania urządzenia.
• Nie pozwalaj dzieciom bawić się urządzeniem.
Symbole użyte w tej instrukcji obsługi
Ważne informacje dotyczące bezpieczeństwa użytkownika są
specjalnie wyróżnione. Koniecznie stosuj się do tych wskazówek, aby uniknąć wypadków i uszkodzenia urządzenia.
OSTRZEŻENIE:
Ostrzega przed zagrożeniami dla zdrowia i wskazuje na
potencjalne ryzyka obrażeń.
UWAGA:
Wskazuje na potencjalne zagrożenia dla urządzenia lub
innych przedmiotów.
WSKAZÓWKA:
Wyróżnia porady i informacje ważne dla użytkownika.
Specjalne wskazówki dotyczące bezpieczeń-
stwa pracy odkurzacza
• Proszę nie wciągać odkurzaczem cieczy lub wilgoci!
• Proszę nie wciągać odkurzaczem gorącego popiołu, przedmiotów ostrych i ostro zakończonych!
• Nie używaj urządzenia w pomieszczeniach wilgotnych.
• Proszę nigdy nie odkurzać bez ltra. Po włożeniu ltra
proszę sprawdzić, czy został założony prawidłowo!
• Podczas pracy odkurzacza proszę trzymać włosy, ubranie i
części ciała z daleka od końcówki!
• Proszę trzymać odkurzacz z daleka od źródeł ciepła takich
jak promienniki, piece itd.!
Przegląd elementów obłsugi
1 Zasuwa powietrzna
2 Wąż odkurzacza
3 Filtr HEPA
4 Nylonowy ltr wstępny
5 Pojemnik na kurz z ltrem zabezpieczającym
silnik
6 Wyłącznik
7 Wskaźnik opróżnienia
8 Przycisk zwijania kabla
9 Uchwyt do przenoszenia
10 Regulator siły ssania
11 Kabel
12 Element ułatwiający parkowanie
13 Pokrywka ltra - Filtr wylotowy
14 Przyłączenie węża
15 Rura zasysająca (z haczykiem (bez rys.))
16 Teleskopowa rura zasysająca
Akcesoria
17 Szczotka do parkietów
18 Dysza do fug i szczotkowa
19 Dysza do tapicerki
Uruchomienie
• Włóż końcówkę węża ssącego w przyłącze do węża tak,
aby było słychać mechaniczny odgłos zatrzaskiwania. Aby
odłączyć wąż, naciśnij przycisk znajdujący się na końcówce
i wyciągnij wąż.
• Proszę wsunąć rurę zasysającą w uchwyt.
• Proszę zamontować dyszę do podłogi ewent. akcesoria.
05-BS 1276.indd 33 08.10.2009 14:19:53 Uhr
Page 34

34
JĘZYK POLSKI
Teleskopowa rura ssąca
Ze względu na możliwość regulowania wysokości
rury ssącej możliwe jest jej indywidualne
dopasowywanie do wzrostu użytkownika. Proszę
zwolnić blokadę łączenia naciskając przycisk
w kierunku strzałki. Wyciągnąć rurę ssącą
na żądaną długość. Po zwolnieniu przycisku
umożliwiającego ponowne zaryglowanie, powinni
Państwo usłyszeć charakterystyczny dźwięk.
Używanie urządzenia
1. Proszę odwinąć wymagany odcinek kabla .
UWAGA:
• Kabel sieciowy można wyciągać maksymalnie do
żółtego znacznika.
• W żadnym wypadku proszę nie wyciągać kabla do
czerwonego znacznika, gdyż można w ten sposób
uszkodzić funkcję zwijania kabla. Tego typu uszkodzenia nie są objęte gwarancją.
WSKAZÓWKA:
Jeżeli widoczna jest czerwona kreska, dociągnij kabel do
żółtej kreski przy użyciu przycisku zwijania.
2. Proszę włożyć wtyczkę do przepisowo zainstalowanego
gniazdka z uziemieniem na 230 V, 50 Hz. Włącz urządzenie
wyłącznikiem głównym , naciskając przycisk nogą.
3. Siłę ssania proszę ustawić regulatorem siły ssania (MIN do
MAX).
4. Teraz można rozpocząć odkurzanie w równomiernym
tempie. Nie ma konieczności dociskania końcówek do
odkurzanej powierzchni.
UWAGA:
Proszę pamiętać, że zasięg odkurzacza ograniczony jest
długością kabla!
Regulator siły ssania
Niski stopień ssania: Do ranek, materiałów delikatnych.
Średni stopień ssania: Dywany welurowe i wykładziny dywa-
nowe.
Wysoki stopień ssania: Do mocnych dywanów i podłóg.
Zasuwa powietrzna
W celu regulacji przepływu powietrza lub odczepienia elementów przylegających do dyszy proszę
otworzyć zasuwę powietrzną.
Wyłączanie i zwijanie kabla zasilającego
1. Wyłącz odkurzacz podłogowy przy użyciu wyłącznika
głównego i wyciągnij wtyczkę z gniazda sieciowego.
2. Trzymaj wtyczkę w ręce.
3. Proszę wcisnąć przycisk zwijania kabla i wprowadzać przewód do odkurzacza. Proszę mocno trzymać przewód, żeby
zapobiec jego niekontrolowanym ruchom.
Nasadka z dyszą
Dysza do fug,
dysza przegubowa: Do odkurzania tapicerki, zasłon oraz w
rogach i szczelinach, itp.
WSKAZÓWKA: „2 w 1“ Dysza:
złożona nadaje się do stosowania jako
dysza do fug. Jeżeli chcą Państwo użyć
dyszy szczotkowej, proszę pociągnąć za
szczotkę w kierunku wskazywanym przez
strzałkę, aż mechanicznego zazębienia
się elementu.
Dysza do tapicerki: Do czyszczenia mebli wyściełanych,
zasłon, itd.
Rura zasysająca:
Dla ułatwienia prowadzenia końcówka
podłogowa jest wyposażona w rolki.
Do odkurzania dywanów lub gładkich
powierzchni.
Gładkie podłogi:
Wciśnij stopą dźwignię oznaczoną symbolem szczotki „ “. Wysuwają
się szczotki.
Dywany:
Ustaw stopą dźwignię na symbol
„ “. Szczotki są teraz schowane.
Szczotka do parkietów:
Szczotka do parkietów jest wyposażona
w rolki ułatwiające przesuwanie. Do odkurzania dużych powierzchni, np. parkietu,
laminatu lub pytek ceramicznych itp.
Zdjęcie dyszy: Dyszę proszę lekko odkręcić, a następnie
ściągnąć.
Konserwacja
Filtr
Państwa urządzenie wyposażone jest w 3 systemy ltrujące.
Tradycyjny system z workiem na kurz został zastąpiony przez
przezroczysty pojemnik na kurz. Pojemnik ten pochłania
większe zabrudzenia oraz niewielkie cząsteczki kurzu wprowadzane razem z silnym strumieniem powietrza zasysającego.
Odpada konieczność kupowania woreczków na kurz.
Elektroniczny wskaźnik opróżnienia zbiornika kurzu
Wąż ssący proszę trzymać w powietrzu nie odkurzając nim.
Jeżeli świeci wskaźnik opróżnienia zbiornika kurzu, postępuj w
następujący sposób:
Rys. 1
Opróżnienie pojemnika na kurz
• Proszę wyciągnąć wtyczkę z
gniazdka.
• Przesuń do dołu przycisk
blokady zbiornika kurzu i wyjmij
zbiornik (patrz rys. 1).
05-BS 1276.indd 34 08.10.2009 14:19:54 Uhr
Page 35

35
JĘZYK POLSKI
Rys. 2
• Trzymając zbiornik kurzu nad
koszem na śmieci, opróżnij
jego zawartość. Wciśnij w
tym celu przycisk (PUSH) na
zbiorniku kurzu (patrz rys. 2).
• Zamknij płytkę podłogową, aby
było słychać odgłos zatrzaskiwania.
Rys. 3
Rys. 4
Filtr HEPA zabezpieczający silnik
(w pojemniku kurzowym)
Czyszczenie wkładu ltra
• Proszę wyciągnąć wtyczkę z
gniazdka.
• Przesuń do dołu przycisk
blokady zbiornika kurzu i wyjmij
zbiornik (patrz rys. 1).
• Opróżnij zawartość zbiornika
kurzu (patrz rys. 2).
• Odrygluj wkład ltra, obracając
go krótko w kierunku UNLOCK.
Wyjmij wkład (patrz rys. 3).
Następnie wyjmij nylonowy
ltr wstępny (4) z ltra HEPA
(3), obracając go w kierunku
odryglowywania. (Patrz rys. 4).
Wytrzep nylonowy ltr wstępny,
a ltr HEPA delikatnie wyszczotkuj.
• Proszę ponownie zamontować
poszczególne elementy.
• Zarygluj wkład ltra w zbiorniku
kurzu, obracając go w kierunku LOCK aż do momentu
zatrzaśnięcia.
• Zamocuj z powrotem zbiornik
kurzu tak, aby było słychać
odgłos zatrzaskiwania.
Rys. 5
Po co trzecim opróżnieniu lub w
przypadku szczególnie silnych
zabrudzeń proszę czyścić ltr pod
bieżącą wodą, przepuszczając
wodę przez tworzywo ltra w kierunku odwrotnym do pęcherzyków.
Filtr proszę ponownie zakładać
dopiero po jego całkowitym
wyschnięciu!
UWAGA:
Filtrów nie wolno czyścić w
pralce a do suszenia nie wolno
używać suszarki do włosów.
Filtr wylotowy
Dodatkowo urządzenie wyposażone jest w ltr wylotowy. Ten
ltr znajduje się pod osłoną ltra (13). By zagwarantować
nienaganne funkcjonowanie ltra, zalecamy czyszczenie go co
6 miesięcy.
• Proszę wyciągnąć wtyczkę z gniazdka.
• Naciskając dźwignię z boku kratki wentylacyjnej, otwórz tę
kratkę.
• Następnie proszę wyjąć kratkę odciągając ją do przodu.
Proszę wyjąć ltr i wyczyścić go jak opisano powyżej.
• Załóż ltr w prawidłowy sposób i zamknij kratkę
wentylacyjną (aby było słychać odgłos zatrzaskiwania).
UWAGA:
Proszę przestrzegać tej ważnej wskazówki!
Czyszczenie może stać się konieczne także po krótszym czasie, w zależności od okoliczności użycia, np. przy odkurzaniu
drobnego kurzu.
W przypadku spadku mocy odkurzania proszę czyścić ltry
zgodnie z opisem.
Jeśli moc odkurzania spadnie nagle podczas pracy odkurzacza, może to oznaczać zapchane ltry.
Czyszczenie i konserwacja
OSTRZEŻENIE:
• Przed rozpoczęciem czyszczenia proszę zawsze
wyciągać wtyczkę z gniazdka!
• Urządzenia parze nie wolno do czyszczenia zanurzać w
wodzie. Może to doprowadzić do porażenia elektrycznego
lub pożaru.
UWAGA:
• Nie używaj szczotki drucianej ani innych podobnych
przed-miotów.
• Nie używaj ostrych lub ściernych środków czyszczących.
Obudowę należy czyścić suchą szmatką.
Przechowywanie
• Proszę poczekać, aż żelazko zupełnie ostygnie.
• Proszę w całości schować przewód.
• Zaczep haczyk dyszy podłogowej w uchwycie na tylnej
ściance urządzenia.
Eliminowanie usterek i zakłóceń
• Urządzenie nie działa.
Co robić:
Sprawdź podłączenie do sieci.
Sprawdź położenie wyłącznika.
• Urządzenie nie odkurza (brak ssania).
Możliwa przyczyna:
Ustawiona moc ssania jest za niska.
Co robić:
Sprawdź położenie regulatora.
05-BS 1276.indd 35 08.10.2009 14:19:54 Uhr
Page 36

36
JĘZYK POLSKI
lub
Możliwa przyczyna:
Zabrudzony zbiornik kurzu lub ltry.
Co robić:
Opróżnij lub oczyść w/w części.
lub
Możliwa przyczyna:
Ciała obce w wężu ssącym lub dyszy.
Co robić:
Sprawdź osprzęt, czy nie ma w nim ciał obcych.
Dane techniczne
Model: ...............................................................................BS 1276
Napięcie zasilające: ..................................................230 V, 50 Hz
Pobór mocy:
P
nom.
: ............................................................................1800 W
P
maxks.
: ..........................................................................2400 W
Stopień ochrony: ......................................................................... ΙΙ
Masa netto:.........................................................................7,20 kg
Niniejsze urządzenie odpowiada wymaganiom normy bezpieczeństwa użytkowania oraz spełnia wymagania dyrektywy niskonapięciowej i kompatybilności elektromagnetycznej.
Zastrzega się prawo do zmian technicznych!
WARUNKI GWARANCJI
Przyznajemy 24 miesiące gwarancji na produkt licząc od daty
zakupu.
W tym okresie będziemy bezpłatnie usuwać w terminie 14 dni
od daty dostarczenia wadliwego sprzętu z kartą gwarancyjną
do miejsca zakupu wszystkie uszkodzenia powstałe w tym
urządzeniu na skutek wady materiałów lub wadliwego wykonania, naprawiając oraz wymieniając wadliwe części lub (jeśli
uznamy za stosowne) wymieniając całe urządzenie na nowe.
Sprzęt do naprawy powinien być dostarczony w komplecie
wraz z dowodem zakupu oraz z ważną kartą gwarancyjną
do sprzedawcy w miarę możliwości w oryginalnym opakowaniu
lub innym odpowiednim dla zabezpieczenia przed uszkodzeniem. W razie braku kompletnego opakowania fabrycznego,
ryzyko uszkodzenia sprzętu podczas transportu do i z miejsca
zakupu ponosi reklamujący.
Naprawa gwarancyjna nie dotyczy czynności przewidzianych
w instrukcji obsługi, do wykonania których zobowiązany jest
użytkownik we własnym zakresie i na własny koszt.
Gwarancja nie obejmuje:
• mechanicznych, termicznych, chemicznych uszkodzeń
sprzętu i wywołanych nimi wad,
• uszkodzeń powstałych w wyniku działania sił zewnętrznych
takich jak wyładowania atmosferyczne, zmiana napięcia
zasilania i innych zdarzeń losowych,
• nieprawidłowego ustawienia wartości napięcia elektrycznego, zasilanie z nieodpowiedniego gniazda zasilania,
• sznurów połączeniowych, sieciowych, żarówek, baterii,
akumulatorów,
• uszkodzeń wyrobu powstałych w wyniku niewłaściwego
lub niezgodnego z instrukcją jego użytkowania, przechowywania, konserwacji, samowolnego zrywania plomb oraz
wszelkich przeróbek i zmian konstrukcyjnych dokonanych
przez użytkownika lub osoby niepowołane,
• roszczeń z tytułu parametrów technicznych wyrobu, o ile są
one zgodne z podanymi przez producenta,
• prawidłowego zużycia i uszkodzeń, które mają nieistotny
wpływ na wartość lub działanie tego urządzenia.
Karta gwarancyjna bez pieczątki sklepu, daty sprzedaży, nie
wypełniona, źle wypełniona, ze śladami poprawek, nieczytelna wskutek zniszczenia, bez możliwości ustalenia miejsca
sprzedaży oraz dołączonego dowodu zakupu jest nieważna.
Korzystanie z usług gwarancyjnych nie jest możliwe po upływie
daty ważności gwarancji. Gwarancja na części lub całe
urządzenie, które są wymieniane kończy się, wraz z końcem
gwarancji na to urządzenie.
Wszystkie inne roszczenia, wliczając w to odszkodowania są
wykluczone chyba, że prawo przewiduje inaczej. Roszczenia
wykraczające poza tą umowę nie są uwzględniane przez tą
gwarancję.
Gwarancja na sprzedany towar konsumpcyjny nie wyłącza, nie
ogranicza ani nie zawiesza uprawnień kupującego wynikających
z niezgodności towaru z umową.
Gwarancja oraz zawarte w niej warunki obowiązują na terenie
Rzeczpospolitej Polskiej.
Znaczenie symbolu „Pojemnik na śmieci“
Proszę oszczędzać nasze środowisko, sprzęt elektryczny nie
należy do śmieci domowych.
Proszę korzystać z punktów zbiorczych, przewidzianych do
zdawania sprzętu elektrycznego, i tam proszę oddawać sprzęt
elektryczny, którego już nie będą Państwo używać.
Tym sposobem pomagają Państwo unikać potencjalnych
następstw niewłaściwego usuwania odpadów, mających wpływ
na środowisko i zdrowie ludzi.
Tą drogą przyczyniają się Państwo do ponownego użycia,
do recyklingu i do innych form wykorzystania starego sprzętu
elektrycznego i elektronicznego.
Informacje, gdzie można zdać sprzęt, otrzymają Państwo w
swoich urzędach komunalnych lub w administracji gminy.
05-BS 1276.indd 36 08.10.2009 14:19:55 Uhr
Page 37

37
MAGYARUL
Általános biztonsági rendszabályok
A készülék használatba vétele előtt gondosan olvassa végig a
használati utasítást, és őrizze meg a garancialevéllel, a pénztári
nyugtával és lehetőleg a csomagolókartonnal, ill. az abban
lévő bélésanyaggal együtt! Amennyiben a készüléket harmadik
személynek adja tovább, a használati útmutatót is adja a
készülékhez.
• Kizárólag személyi célra használja a készüléket, és csupán
arra, amire való! A készülék nem ipari jellegű használatra
készült. Ne használja a szabadban! Ne tegye ki erős hőhatásnak, közvetlen napsugárzásnak és nedvességnek (semmi esetre se mártsa folyadékba), és óvja az éles szélektől!
Ne használja a készüléket vizes kézzel! Ha a készülék vizes
vagy nedves lett, azonnal húzza ki a konnektorból!
• Kapcsolja ki a készüléket és mindig húzza ki a csatlakozót
a dugaszoló aljzatból (a csatlakozót, ne pedig a vezetéket
húzza), ha nem használja a készüléket, tartozékokat szerel
fel rá, tisztítja vagy zavart észlel.
• Ne működtesse a készüléket felügyelet nélkül! Mindig
kapcsolja ki a készüléket, ha elhagyja a helyiséget! Húzza ki
a csatlakozót a dugaszoló aljzatból!
• A készüléket és a hálózati kábelt rendszeresen ellenőrizni
kell, hogy nincs-e rajta sérülés jele. Ha sérülést lát rajta, a
készüléket nem szabad használni.
• A kockázatok elkerülése végett ne maga javítsa a készüléket, hanem keressen fel egy erre kiképzett szakembert! Ha
hibás a csatlakozó kábel, csak a gyártótól, a vevőszolgálatunktól vagy hasonló képzettségű személytől kérjen helyette
azonos értékű másik kábelt!
• Csak eredeti tartozékokat használjon!
• Tartsa be az itt következő „Speciális biztonsági rendszabályokat“.
Gyermekek és legyengült személyek
• Gyermekei biztonsága érdekében ne hagyja általuk elérhető
helyen a csomagolóelemeket (műanyag zacskó, karton,
sztiropor stb.)!
FIGYELMEZTETÉS!
Kisgyermekeket ne engedjen a fóliával játszani. Fulladás
veszélye állhat fenn!
• A készülék nem arra való, hogy korlátozott zikai, érzékszervi vagy szellemi képességű személyek (beleértve a gyerekeket is) vagy tapasztalat ill. tudás hiányában használják,
kivéve, ha biztonságukért felelős személye felügyel rájuk
vagy utasításokat kaptak arra vonatkozólag, hogy hogyan
kell használni a készüléket.
• Gyermekeket nem szabad felügyelet nélkül hagyni, nehogy
játsszanak a készülékkel.
A használati útmutatóban található szimbólumok
Az Ön biztonságára vonatkozó utasítások kifejezetten meg
vannak különböztetve. Kérjük, mindenképpen ügyeljen ezekre
annak érdekében, hogy elkerülje a baleseteket és a készülék
károsodását:
FIGYELMEZTETÉS:
Egészségét károsító veszélyforrásokra gyelmeztet és rámutat a lehetséges sérülési lehetőségekre.
VIGYÁZAT:
Lehetéges veszélyre utal, mely a készülékben vagy más
tárgyakban kárt tehet.
TÁJÉKOZTATÁS: Tippeket és információkat emel ki.
Speciális biztonsági rendszabályok
• Ne szívjon fel a készülékkel nedvességet, ill. folyadékokat!
• Ne szívjon fel forró hamut, hegyes vagy éles tárgyakat!
• Ne használja a készüléket nedves helyiségekben!
• Soha ne porszívózzon lter nélkül! Behelyezés után mindig
ellenőrizze, hogy a lter megfelelően fekszik-e fel.
• Működés közben tartsa távol a porszívófejet a hajától,
ruházatától és a testrészeitől!
• Tartsa távol a porszívót olyan hőforrásoktól, mint pl. a
radiátorok, kályha stb.!
A kezelő elemek áttekintése
1 Légelzáró
2 Szívótömlő
3 HEPA szűrő
4 Nejlon előszűrő
5 Porgyűjtő motorvédő szűrővel
6 Be-/kikapcsológomb
7 Kiürítés jelző
8 Kábelfelcsévélő gomb
9 Hordozófül
10 Szívóteljesítmény-szabályzó
11 Kábel
12 Leállító támasz
13 Filterborító - Kibocsátólter
14 Tömlőcsatlakozó
15 Szívócső (akasztóval (ábra nélkül))
16 Teleszkópos szívócső
Tartozékok
17 Parkettakefe
18 Résszívó és kefés szívó
19 Kárpit-szívófej
Használatba vétel
• Dugja a szívócső összekötőfejét a tömlőcsatlakozásba,
míg az mechanikusan be nem pattan. Ha ki szeretné oldani
a tömlőt, nyomja meg az összekötőfejen lévő gombot és
húzza ki a tömlőt.
• Ha szükséges, húzza rá a szívócsövet a fogantyúra!
• Szerelje fel a padlószívó fejet , ill. a tartozékot!
05-BS 1276.indd 37 08.10.2009 14:19:55 Uhr
Page 38

38
MAGYARUL
Teleszkópos szívócső
Az állítható hosszúságú szívócsővel a testmérethez tetszőlegesen lehet igazodni. Oldja az összekapcsolás rögzítését úgy, hogy a nyíl irányába
nyomja a gombot! Állítsuk a csöveket a kívánt
hosszra. A rögzítéshez oldja ki a gombot, míg jól
hallhatóan be nem kattan!
A készülék használata
1. Tekerje le a kábelt a szükséges hosszúságban!
VIGYÁZAT:
• A hálózati kábelt csak a sárga jelölésig húzza ki!
• Semmi esetre se húzza egészen a piros jelölésig,
mert megsérülhet a kábelfelcsévélő.
TÁJÉKOZTATÁS:
Amennyiben a piros jelzés válik láthatóvá, húzza be a
vezetéket a vezetékcsévélő gomb segítségével a sárga
jelzésig.
2. Dugja a dugaszt előírásszerűen szerelt, 230 V, 50 Hz-es
érintésvédett konnektorba! A Ki-/bekapcsolót a lábával lefele
nyomva kapcsolja be a készüléket.
3. Állítsa be a szabályozóval a kívánt szívóteljesítményt (MINtól MAX-ig)!
4. Porszívózzon egyenletes sebességgel! A porszívót nem kell
rányomni a felületre!
VIGYÁZAT:
Ügyeljen a kábel hosszúsága által megszabott hatótávolságra!
Szívóteljesítmény-szabályozó
Kis szívóteljesítmény: függönyökhöz, érzékeny anyagokhoz.
Közepes
szívóteljesítmény: erősen bolyhos velúrszőnyegekhez és
szőnyegpadlóhoz.
Nagy szívóteljesítmény: masszív szőnyegekhez és padlóhoz.
Légelzáró
A légáram szabályozása vagy a fejre tapadt részek
leválasztása céljából nyissa ki a légelzárót!
Kikapcsolás és a vezeték felcsévélése
1. Kapcsolja ki a porszívót a be- és kikapcsoló gombbal és
húzza ki a csatlakozót a dugaszoló aljzatból.
2. Fogja a kezében a csatlakozót.
3. Nyomja meg a kábelfelcsévélő gombot , és vezesse meg
kézzel a begördülő kábelt! Tartsa biztosan, hogy nehogy
összetekeredjen!
Szívófej
Résszívó,
csuklós fej: Párnásbútor, függönyök, ill. sarkok, rések
stb. porszívózására.
TÁJÉKOZTATÁS: ,,2 1-ben“ fej:
Összecsukva, résszívófejként használható. Ha kefés fejként kívánja használni,
húzza a kefés részt a nyíl irányában a
mechanikus bekattanásig!
Kárpit-szívófej: Párnák, függönyök stb. tisztítására.
Szívócső: A padlószívóka az egyszerűbb felhelye-
zés érdekében görgőkkel van ellátva.
Szőnyegek vagy sima felületek tisztítására.
Sima padlók, aljzatok:
Nyomja le a lábával a kefejelű
„
“ kart. Így láthatóvá válnak
a kefék.
Szőnyegek:
Állítsa át a lábával az emelőkart a
„
“ jelre. A kefék így most
visszahúzódtak.
Parkettakefe: A parkettakefe görgőkkel van felszerelve,
hogy könnyebben lehessen mozgatni.
Olyan nagyobb felületekhez, mint parketta,
laminát vagy járólap, stb.
A szívófejek
kioldása:
Enyhén elforgatva, húzza ki őket.
Karbantartás
Filter
A készüléknek 3 szűrőrendszere van. A hagyományos porzsákrendszert átlátszó porgyűjtővel helyettesítettük. Ebben kavarog
a nagy áramlási sebesség folytán a nagyobb szennyeződés
csakúgy, mint a legapróbb lebegő porrészecskék.
Nem szükséges a porzsák használata.
Elektronikus kiürítés jelző a portartályhoz
Terhelés nélkül tartsa fel a szívótömlőt a levegőbe! Ha a portartály kiürítés jelzője világít, az alábbiak szerint járjon el:
1 ábra
A porgyűjtő ürítése
• Húzza ki a csatlakozó dugaszt
a konnektorból!
• Tolja lefele a gombot a portartály kioldásához és vegye ki
a portartályt (lásd 1. ábra).
05-BS 1276.indd 38 08.10.2009 14:19:55 Uhr
Page 39

39
MAGYARUL
2 ábra • Tartsa a portartályt egy
szemetesvödör fölé. Ürítse ki
a portartály tartalmát. Ehhez
nyomja meg a portartályon lévő
gombot (PUSH) (lásd a
2. ábrát).
• Csukja vissza a padlólemezt,
amíg az hallhatóan bepattan a
helyére.
3 ábra
4 ábra
HEPA motorvédő szűrő
(a portartályban)
A szűrőbetét tisztítása
• Húzza ki a csatlakozó dugaszt
a konnektorból!
• Tolja lefele a gombot a portartály kioldásához és vegye ki
a portartályt (lásd 1. ábra).
• Ürítse ki a portartály tartalmát
(lásd 2. ábra).
• Reteszelje ki a szűrőbetétet:
röviden fordítsa el az UNLOCK
irányába. Vegye ki (3. ábra).
A második lépésben válassza
le a nejlon előszűrőt (4) a
HEPA szűrőről (3): fordítsa el a
reteszelés irányával ellentétes
irányba (lásd a 4. ábrát). Kiveregetve tisztítsa meg a nejlon
előszűrőt , a HEPA szűrőt
pedig lazán kefélje ki.
• Helyezze vissza az alkatrészeket!
• Reteszelje el a portartályban
lévő szűrőbetétet: fordítsa el
ütközésig a LOCK irányába.
• Ismét rögzítse a portartályt,
amíg az hallhatóan be nem
pattan a helyére.
5 ábra
Minden harmadik ürítés után vagy
nagyobb elszennyeződés esetén
tisztítsa meg a ltert úgy, hogy a
fúvásiránnyal szemben vízsugarat
folyat át a szűrőgyapjún. Csak
teljes megszáradás után helyezze
vissza a ltert!
VIGYÁZAT:
Soha ne mossa a szűrőt
mosógépben és ne szárítsa
hajszárítóval.
Kibocsátólter
A porszívónak van még egy kibocsátóltere is. Ezt a szűrőt a
szűrőtakarás (13) alatt találhatja. Ahhoz, hogy a szűrő kifogástalanul működjön, ajánlatos minden 6 hónapban megtisztítani.
• Húzza ki a csatlakozó dugaszt a konnektorból!
• A szellőzőrács oldalán található fogantyú megnyomásával
tudja kinyitni a szellőzőrácsot.
• Utána húzza ki előre a rácsot! Vegye ki a ltert, és tisztítsa
meg a már leírt módon!
• Helyezze be helyesen a szűrőt és csukja be a szellőzőrácsot
(amíg be nem pattan a helyére).
VIGYÁZAT:
Vegye gyelembe az alábbi fontos tájékoztatást!
A használat körülményeitől függően, pl. nom por beszívása esetén, rövidebb időközökben is szükségessé válhat a
tisztítás.
Ha csökkenne a porszívó szívásteljesítménye, a leírt módon
tisztítsa meg a szűrőket!
Ha működés közben hirtelen lecsökken a szívásteljesítmény,
ez annak a jele lehet, hogy eldugultak a szűrők.
Tisztítás és tárolás
FIGYELMEZTETÉS:
•
Tisztítás előtt mindig húzza ki a készüléket a konnektorból!
• A készüléket semmiképpen ne merítse vízbe tisztítás
közben. Ez elektromos áramütést vagy tüzet okozhat.
VIGYÁZAT:
• Ne használjon drótkefét vagy más súroló hatású tárgyat.
• Ne használjon agresszív vagy súroló hatású tisztítószert.
A külső burkolatot száraz ruhával törölve tisztára!
Tárolás
• Hagyja a készüléket teljesen kihűlni.
• Csévélje fel teljesen a kábelt!
• Akassza be a padlószívó fejen található horgot a készülék
hátoldalán lévő parkolóállásba!
Hibaelhárítás
• A készülék nem működik.
Megoldás:
Ellenőrizze a hálózati csatlakozást.
Ellenőrizze a kapcsoló állását.
• A készülék nem szív.
Lehetséges ok:
A szívóteljesítmény túl alacsonyra van beállítva.
Megoldás:
Ellenőrizze a szabályzó állását.
vagy
05-BS 1276.indd 39 08.10.2009 14:19:56 Uhr
Page 40

40
MAGYARUL
Lehetséges ok:
A portartály vagy a szűrő szennyezett.
Megoldás:
Ürítse ki ill. tisztítsa meg a részeket.
vagy
Lehetséges ok:
A szívócsőbe vagy a fúvókába valami beszorult.
Megoldás:
Ellenőrizze, hogy nem szorult-e be valami a tartozékba.
Műszaki adatok
Modell: ..............................................................................BS 1276
Feszültségellátás: .....................................................230 V, 50 Hz
Teljesítményfelvétel:
P
nom.
: ...........................................................................1800 W
P
max.
: ............................................................................2400 W
Védelmi osztály: ..........................................................................ΙΙ
Nettó súly: ............................................................................7,2 kg
Ezt a készüléket az Európa Tanács minden vonatkozó aktuális
irányelve szerint (pl. elektromágnesesség-elviselő képesség
vagy kisfeszültség-elviselő képesség) ellenőriztük, és a legújabb
biztonságtechnikai előírások szerint készült.
A műszaki változtatások jogát fenntartjuk.
A „kuka“ piktogram jelentése
Kímélje környezetünket, az elektromos készülékek nem a
háztartási szemétbe valók!
Használja az elektromos készülékek ártalmatlanítására kijelölt
gyűjtőhelyeket, ott adja le azokat az elektromos készülékeit,
amelyeket többé már nem kíván használni!
Ezzel segítséget nyújt ahhoz, hogy elkerülhetők legyenek azok a
hatások, amelyeket a helytelen „szemétre dobás“ gyakorolhat a
környezetre és az emberi egészségre.
Ezzel hozzájárul az újrahasznosításhoz, a recyclinghoz és a
kiöregedett elektromos és elektronikus készülékek értékesítésének egyéb formáihoz.
Az önkormányzatoknál vagy a polgármesteri hivatalokban
tájékoztatást kaphat arról, hogy hova viheti a kiselejtezett
készülékeket.
05-BS 1276.indd 40 08.10.2009 14:19:56 Uhr
Page 41

41
УКРАЇНСЬКА
Загальні вказівки щодо безпеки
Перед прийняттям в експлуатацію цього приладу дуже
уважно читайте інструкцію з експлуатації та зберігайте її
разом з гарантійним талоном, касовим чеком та, по мірі
можливості, з картонною коробкою і внутрішньою упаковкою. У разі, що прилад буде передано третім особам, слід
передавати його разом з цією інструкцією з експлуатації.
• Використайте прилад виключно в приватних цілях та за
передбаченим призначенням. Прилад не призначено
для промислового використання. Не використовуйте
його на вулиці. Оберігайте його від спеки, прямого
сонячного опромінювання, вологи (в жодному разі не
опускайте у рідину) та гострих кутів. Не користуйтеся
приладом з вологими руками. Якщо прилад зволожився
або змокрів, невідкладно витягніть штепсельну вилку.
• Вимкніть прилад та обов’язково витягніть вилку з штепсельної розетки (тягніть за штекер, не за кабель), коли
не користуєтесь приладом, або монтуєте комплектуючі
деталі, або під час чищення або при дефектах.
• Не експлуатуйте прилад без огляду. Обовязково вимкніть прилад, коли ви покидаєте приміщення. Витягніть
штепсельну вилку з штепсельної розетки.
• Прилад та кабель живлення слід регулярно обстежити
на ознаки пошкоджень. При виявленні пошкоджень приладом заборонено користуватись.
• Не ремонтуйте прилад самі, але зверніться до авторизованого фахівця. Для запобігання загрозі пошкоджений кабель живлення слід замінити на еквівалентний
виключно виробником, або нашою сервісною службою
або іншою кваліфікованою особою.
• Користуйтеся виключно оригінальними комплектувальними деталями.
• Зверніть увагу на наступні “Спеціальні вказівки щодо
безпеки”.
Діти та немічні особи
• Для безпеки своїх дітей не залишайте доступними пакувальні матеріали (пластикові пакети, картонні коробки,
пенопласт тощо).
ЗАСТЕРЕЖЕННЯ!
Не дозволяйте малим дітям гратись із пливкою.
Існує загроза задухи!
• Цей прилад не призначений для використання людьми
(включаючи дітей) з обмеженими фізичними, чуттєвими
або розумовими здібностями, недостатнім досвідом та/
або знаннями – крім випадків, коли за ними доглядає
відповідальна за їх безпеку особа або вони отримали
вказівки щодо використання приладу.
• Дітям не дозволено гратись з цим приладом. Потрібен
догляд за ними.
Символи в цій інструкції з експлуатації
Важливі вказівки для Вашої безпеки спеціально відмічені.
Для запобігання нещасних випадків та пошкоджень приладу
обов’язково притримуйтесь цих вказівок.
ЗАСТЕРЕЖЕННЯ:
Попереджує про загрози для Вашого здоров’я та вказує
на можливі ризики травм.
УВАГА:
Вказує на можливі загрози для приладу або інших
предметів.
ВКАЗІВКА:
Виділяє підказки та інформацію для Вас.
Спеціальні правила безпечного користуван-
ня для цього приладу
• Забороняється всмоктувати пилососом вологі матеріали
і рідину!
• Забороняється всмоктувати пилососом гарячий попіл і
предмети з гострими краями!
• Забороняється використовувати пилосос в приміщеннях
с високою вологістю!
• Ніколи не користуйтеся пилососом без фільтру! Після
заміни фільтру переконайтеся в тому, що фільтр встановлено правильно!
• Під час користування пилососом будьте обережні і тримайте на безпечній відстані від сопла пилососу волосся,
одяг і частини тіла!
• Не залишайте пилосос поблизу від джерел тепла, таких
як радіатори опалювання, печі та тому подібне!
Огляд елементів для управління приладом
1 Заслінка для регулювання повітря
2 Шланг
3 Фільтр типу HEPA
4 Попередній фільтр із нейлону
5 Пилозбірник із фільтром для захисту мотору
6 Перемикач для вмикання і вимикання
7 Сигнал „очистіть пилосзбірник“
8 Клавіш для змотування кабелю
9 Ручка для транспортування
10 Регулятор інтенсивності всмоктування
11 Кабель
12 Допоміжне приладдя для зберігання пилососу
13 Кришка фільтру - Фільтр для випуску повітря
14 Місце підключення шлангу
15 Сопло на днищі (з гачком (без малюнка))
16 Труба пилососу, телескопічна
Приладдя
17 Щітка для паркету
18 Сопло для щілин і сопло з щіткою
19 Насадка для м‘яких меблів
05-BS 1276.indd 41 08.10.2009 14:19:56 Uhr
Page 42

42
УКРАЇНСЬКА
Ввід в експлуатацію
• Вставте трубку перехіднику всмоктувального шлангу в
сполучний елемент до глибини механічного з‘єднання.
Щоб знов вийняти шланг, натисніть клавіш на
сполучному елементі і витягніть шланг.
• Насуньте трубу на ручку, якщо вони були відокремлені.
• Змонтуйте сопло на днищі або додаткове приладдя.
Телескопічна труба для всмоктування
Труба для всмоктування є телескопічною і
може пристосовуватися до Вашого індивідуального зросту. Для пересування труб слід
натиснути клавіш в напрямку, що показано
стрілкою, і переставити труби до довжини, що
Вам потрібна. Для блокування труб слід відпустити клавіш, клацання кріплення означає, що
труби встали на місце належним чином.
Користування приладом
1. Витягніть кабель на довжину, що Вам потрібна.
УВАГА:
• Дозволяється витягувати кабель електричної
мережі максимально до жовтої позначки.
• Забороняється витягувати кабель до червоної
позначки - це може пошкодити систему
змотування кабелю!
ВКАЗІВКА:
Якщо Ви побачили червону позначку, натисніть клавіш
для змотування кабелю і втягніть його до жовтої
позначки.
2. Вставте вилку в розетку, що відповідає вимогам
захисту електричних приладів і має напругу 230 В,
50 Гц. Пилосос вмикається натискуванням перемикача
для вмикання/вимикання, причому перемикач можна
натискувати ногою.
3. За допомогою регулятору інтенсивності встановіть
міцність всмоктування (від MIN до MAX).
4. Ведіть сопло по підлозі рівномірно, без натискування.
УВАГА:
Під час праці звертайте увагу на довжину кабелю і не
перевищуйте безпечну для приладу відстань!
Регулятор інтенсивності всмоктування
Нижня ступінь: для штор і матеріалів, що легко
можна пошкодити.
Середня ступінь: для високоякісного килимового по-
криття підлоги та інших текстильних
покрить.
Висока ступінь: для міцних килимів і підлог.
Заслінка для повітря
Відкрийте заслінку для повітря на ручці шлангу,
щоб відрегулювати повітря або видалити
предмети з сопла.
Вимикання і змотування кабелю
1. Вимкніть пилосос натискуванням перемикача для
вмикання/вимикання, витягніть вилку з розетки.
2. Тримайте вилку в руці.
3. Натисніть клавіш для змотування кабелю і притримуйте
кабель, щоб забезпечити надійне і безпечне змотування.
Установка приладдя на сопло
Сопло для щілин і
сопло з щіткою:
ризначається для м‘яких меблів, штор,
кутів, щілин та іншого.
ВКАЗІВКА: Сопло „2 в 1“:
В складеному вигляді це сопло можна
використати для чистки щілин. Якщо
Вам потрібна функція щітки, потягніть
за цю деталь в напрямку стрілки до
упору (поки не почуєте клацання).
Насадка для
м‘яких меблів:
Для очищення м‘яких меблів, порт‘єр
та іншого
Насадка для
підлоги:
Насадка для підлоги має ролики
для більш легкого ковзання. Вона
призначена для очищення килимів або
гладких поверхонь.
Гладкі підлоги:
Натисніть важіль зі символом щітки
„ “ ногою. Щітки можна тепер
побачити.
Килими:
Переведіть важіль ногою в положення,
позначене символом „ “.
Тепер щітки увійшли всередину.
Щітка для
паркету:
Щітка для паркету має ролики для більш
легкого ковзання. Вона призначена для
поверхонь великого розміру, таких як
паркет, ламинат, плитка або тощо.
Зміна насадок: Знімайте насадку, злегка обертаючі її
навколо осі.
Технічний догляд
Фільтр
Ваш прилад має 3 системи фільтрів. Звичайна система
збору пилу і сміття в мішок була замінена на прозорий
контейнер. Сміття і найменші частинки пилу завихрюються в
контейнері завдяки високої швидкості потоку повітря.
Придбання мішків для збору сміття таким чином не
потрібне.
П
05-BS 1276.indd 42 08.10.2009 14:19:57 Uhr
Page 43

43
УКРАЇНСЬКА
Електронна сигналізація „очищення пилозбірнику“
Тримайте шланг без напруги у повітрі. Якщо сигнал
„очищення пилозбірнику“ засвітиться, зробіть наступні
операції:
Мал. 1
Очищення пилозбірнику
• Витягніть вилку з розетки
електроживлення.
• Натисніть вниз клавіш для
звільнення контейнеру пилозбірнику і зніміть його зі
кріплення (див. мал. 1).
Мал. 2
• Тримайте пилозбірник над
ємністю для сміття. Очистіть
контейнер - пилозбірник від
сміття. Для цього натисніть
на клавіш (PUSH), що
розташований на контейнері
(див. мал. 2).
• Закрийте пластину на
нижній стороні таким чином,
щоб вона встала на місце
(Ви почуєте клацання
блокування).
Мал. 3
Мал. 4
Фільтр захисту мотору
типу HEPA (у контейнері -
пилозбірнику)
Очищення вкладишу фільтру
• Витягніть вилку з розетки
електроживлення.
• Натисніть униз клавіш для
звільнення контейнеру пилозбірнику і зніміть його зі
кріплення (див. мал. 1).
• Очистіть контейнер від пилу і
сміття (див. мал. 2).
• Звільніть блокування
фільтрувального вкладишу,
для чого коротко поверніть
його у напрямку UNLOCK.
Витягніть вкладиш (див.
мал. 3). Друга операція:
відділіть попередній
нейлоновий фільтр (4) від
фільтру HEPA (3) шляхом
обертання у напрямку
проти замку блокування
(див. мал. 4). Очистіть
нейлоновий фільтр легким
постукуванням, а фільтр
HEPA обережно очистіть
щіткою.
• Поставте деталі на свої
місця.
• Закріпіть блокувальний
механізм вкладишу фільтру
в контейнері шляхом
обертання в напрямку LOCK
до упору.
• Поставте контейнер пилозбірник на місце таким
чином, щоб почути клацання
блокувального механізму.
Мал. 5
Після кожного третього
очищення або при наявності
сильного забруднення очистіть
фільтр під струменем води,
причому потік води має бути
спрямованим проти напрямку, в
якому через фільтр продувається
повітряний потік під час праці
приладу.
Фільтр слід ставити на місце
тільки після того, як він повністю
просохне!
УВАГА:
Ніколи не мийте фільтр
у пральній машині і не
використайте для сушки фен
для волосся.
Фільтр для вихідного повітря
Пилосос має фільтр для вихідного повітря. Ви знайдете
цей фільтр під кришкою (13). Щоб забезпечити бездоганну
працю фільтру, ми рекомендуємо проводити його очищення
кожні 6 місяців.
• Витягніть вилку з розетки електроживлення.
• Відкрийте решітку для доступу повітря, для чого
натисніть важіль, що знаходиться вверху на решітці.
• Після цього витягніть решітку у передньому напрямку.
Витягніть фільтр і очистіть його в такий засіб, як це було
описано вище.
• Поставте фільтр належним чином на місце і закрийте
решітку для доступу повітря таким чином, щоб почути
клацання блокувального механізму.
УВАГА:
Прийміть до уваги цю важливу інформацію!
Очищення може знадобиться раніше ніж рекомендовано,
залежно від умов експлуатації, наприклад, при
всмоктуванні дуже мілкого пилу. Якщо Ви почуєте, що
потужність Вашого пилососу зменшилася, очистіть фільтр
в такий засіб, як це описано вище.
Якщо потужність всмоктування зменшиться раптово
під час праці, то це може бути наслідком забруднення
фільтру.
05-BS 1276.indd 43 08.10.2009 14:19:58 Uhr
Page 44

44
УКРАЇНСЬКА
Очищення і зберігання
ПОПЕРЕДЖЕННЯ:
• Завжди витягуйте вилку з розетки електроживлення
перед початком очищення!
• Забороняється опускати прилад у воду з метою його
очищення. Це може призвести до електричного удару
або до пожежі.
УВАГА:
• Не використайте дротяні щітки або інші предмети, що
залишають подряпини.
• Не використайте їдкі або абразивні засоби для
очищення.
Корпус слід очищати м’якою тканиною.
Зберігання
• Дайте пилососу можливість остити до нормальної температури.
• Повністю втягніть кабель в корпус за допомогою намотувачу.
• Гачок сопла на днищі слід повісити на приладді на задній
стороні приладу.
Усунення неполадок
• Прилад не функціонує.
Допомога:
Перевірте, чи є пилосос включеним в мережу.
Перевірте положення перемикачу.
• Пилосос не всмоктує сміття.
Можливі причини:
Інтенсивність всмоктування встановлена дуже низькою.
Допомога:
Перевірте регулятор інтенсивності всмоктування.
або:
Можливі підстави:
Контейнер - пилозбірник або фільтри забруднені.
Допомога:
Видаліть сміття або очистіть належні елементи.
або:
Можливі причини:
В шлангу або в соплі знаходиться чужорідний предмет.
Допомога:
Перевірте пилосос на наявність чужорідних предметів.
Технічні параметри
Модель: ...........................................................................BS 1276
Подання живлення: .................................................230 В, 50 Гц
Споживання потужності:
P
ном.
: ...........................................................................1800 Вт
P
макс.
: ...........................................................................2400 Вт
Ггрупа електробезпечності: ...................................................... ΙΙ
Вага нетто: .......................................................................... 7,2 кг
Цей прилад було перевірено згідно всіх відповідних,
актуальних директив СЕ, наприклад щодо електромагнітної
сумісності та низьковольтної директиви, та збудовано з а
новітніми положеннями техніки безпеки.
Залишаємо за собою право на технічні зміни!
05-BS 1276.indd 44 08.10.2009 14:19:58 Uhr
Page 45

45
УКРАЇНСЬКА
05-BS 1276.indd 45 08.10.2009 14:19:58 Uhr
Page 46

D-47906 Kempen/Germany · Industriering Ost 40
Internet: http://www.clatronic.de · email: info@clatronic.de
Stünings Medien, Krefeld • 10/09
05-BS 1276.indd 46 08.10.2009 14:19:58 Uhr
 Loading...