

Page 1
Bedienungsanleitung/Garantie
Gebruiksaanwijzing/Garantie • Mode d’emploi/Garantie
Instrucciones de servicio/Garantía • Manual de instruções/Garantia
Istruzioni per l’uso/Garanzia • Bruksanvisning/Garanti
Instruction Manual/Guarantee • Instrukcja obsługi/Gwarancja
Návod k použití/Záruka • Használati utasítás/Garancia
Руководство по эксплуатации/Гарантия
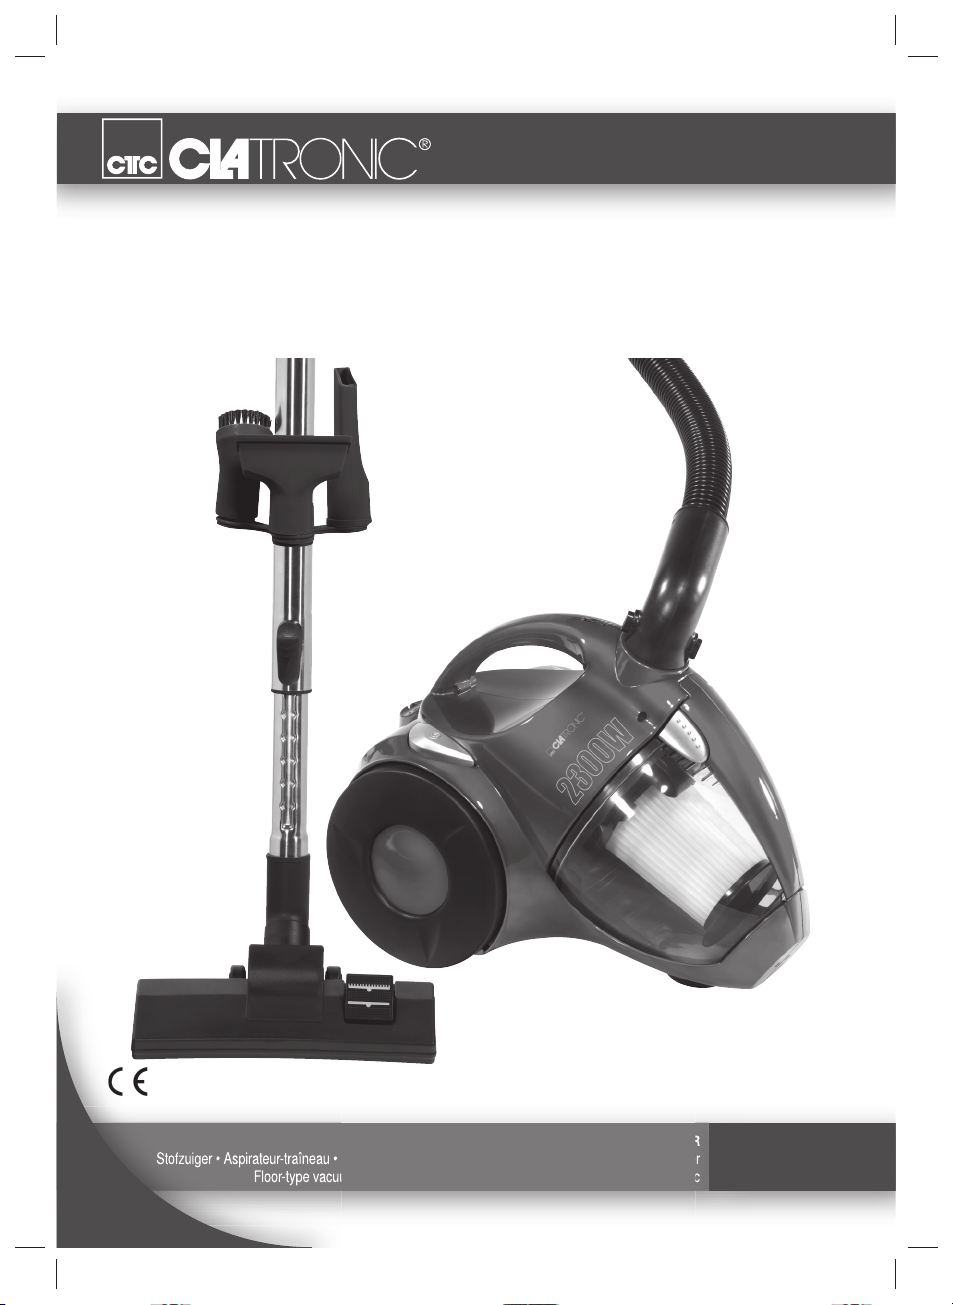
Stofzuiger • Aspirateur-traîneau • Aspiradora • Aspirador • Aspirapolvere a carrello • Gulvstøvsuger
Floor-type vacuum cleaner • Odkurzacz • Porszívó • Vysavač koberců • Пылесос
05-BS 1273.indd 105-BS 1273.indd 1 07.03.2008 8:24:20 Uhr07.03.2008 8:24:20 Uhr
BS 1273
BODENSTAUBSAUGER
Page 2

DEUTSCH
NEDERLANDS
FRANÇAIS
ESPAÑOL
PORTUGUÊS
ITALIANO
NORSK
ENGLISH
JĘZYK POLSKI
ČESKY
MAGYARUL
РУССКИЙ
DEUTSCH
DEUTSCH
NEDERLANDS
FRANÇAIS
ESPAÑOL
PORTUGUÊS
ITALIANO
NORSK
ENGLISH
JĘZYK POLSKI
ČESKY
MAGYARUL
РУССКИЙ
NORSK
Inhalt
Übersicht der Bedienelemente ................................... Seite 3
Bedienungsanleitung .................................................. Seite 4
Technische Daten ....................................................... Seite 7
Garantie ....................................................................... Seite 7
NEDERLANDS
Inhoud
Overzicht van de bedieningselementen ................... Pagina 3
Gebruiksaanwijzing .................................................. Pagina 8
Technische gegevens .............................................. Pagina 11
Garantie .................................................................... Pagina 11
FRANÇAIS
Sommaire
Liste des différents éléments de commande ..............Page 3
Mode d’emploi ............................................................. Page 12
Données techniques ................................................... Page 15
Garantie ....................................................................... Page 15
ESPAÑOL
Indice
Indicación de los elementos de manejo................... Página 3
Instrucciones de servicio.......................................... Página 16
Datos técnicos .......................................................... Página 19
Garantia .................................................................... Página 19
Innhold
Oversikt over betjeningselementene ............................ Side 3
Bruksanvisning ............................................................. Side 28
Tekniske data ............................................................... Side 30
Garanti .......................................................................... Side 31
ENGLISH
Contents
Overview of the Components ..................................... Page 3
Instruction Manual ....................................................... Page 32
Technical Data............................................................. Page 34
Guarantee ................................................................... Page 35
JĘZYK POLSKI
Spis tres´ci
Przegląd elementów obłsugi ..................................... Strona 3
Instrukcja obsługi ......................................................Strona 36
Dane techniczne .......................................................Strona 39
Gwarancja ................................................................. Strona 39
ČESKY
Obsah
Přehled ovládacích prvků ..........................................Strana 3
Návod k použití ..........................................................Strana 40
Technické údaje ........................................................Strana 42
Záruka ....................................................................... Strana 43
DEUTSCH
NEDERLANDS
FRANÇAIS
ESPAÑOL
PORTUGUÊS
ITALIANO
NORSK
ENGLISH
PORTUGUÊS
Índice
Descrição dos elementos ......................................... Página 3
Manual de instruções ............................................... Página 20
Características técnicas ........................................... Página 23
Garantía ................................................................... Página 23
MAGYARUL
Tartalom
A kezelőelemek áttekintése ........................................ Oldal 3
Használati utasítás ...................................................... Oldal 44
Műszaki adatok ........................................................... Oldal 47
Garancia ...................................................................... Oldal 47
ITALIANO
Indice
Elementi di comando ............................................... Pagina 3
Istruzioni per l’uso .................................................... Pagina 24
Dati tecnici ................................................................ Pagina 27
Garanzia ................................................................... Pagina 27
2
Содержание
Обзор деталей прибора ..............................................стр. 3
Руководство по эксплуатации .................................... стр. 48
Технические данные ...................................................стр. 51
Гарантия ....................................................................... стр. 51
РУССКИЙ
05-BS 1273.indd 205-BS 1273.indd 2 07.03.2008 8:24:24 Uhr07.03.2008 8:24:24 Uhr
JĘZYK POLSKI
ČESKY
MAGYARUL
РУССКИЙ
Page 3
Übersicht der Bedienelemente
Overzicht van de bedieningselementen • Liste des différents éléments de commande
Indicación de los elementos de manejo • Descrição dos elementos • Elementi di comando
Oversikt over betjeningselementene • Overview of the Components
Przegląd elementów obsługi • Přehled ovládacích prvků • A kezelőelemek áttekintése
Обзор деталей прибора
3
05-BS 1273.indd 305-BS 1273.indd 3 07.03.2008 8:24:24 Uhr07.03.2008 8:24:24 Uhr
Page 4

DEUTSCH
Allgemeine Sicherheitshinweise
Lesen Sie vor Inbetriebnahme dieses Gerätes die Bedienungsanleitung sehr sorgfältig durch und bewahren Sie diese inkl.
Garantieschein, Kassenbon und nach Möglichkeit den Karton
DEUTSCH
mit Innenverpackung gut auf. Falls Sie das Gerät an Dritte
weitergeben, geben Sie auch die Bedienungsanleitung mit.
• Benutzen Sie das Gerät ausschließlich für den privaten
und den dafür vorgesehenen Zweck. Dieses Gerät ist nicht
für den gewerblichen Gebrauch bestimmt. Benutzen Sie
es nicht im Freien . Halten Sie es vor Hitze, direkter
Sonneneinstrahlung, Feuchtigkeit (auf keinen Fall in Flüssigkeiten tauchen) und scharfen Kanten fern. Benutzen Sie
das Gerät nicht mit feuchten Händen. Bei feucht oder nass
gewordenem Gerät sofort den Netzstecker ziehen.
• Schalten Sie das Gerät aus und ziehen Sie immer den
Stecker aus der Steckdose (ziehen Sie am Stecker, nicht
am Kabel) wenn Sie das Gerät nicht benutzen, Zubehörteile
anbringen, zur Reinigung oder bei Störung.
• Betreiben Sie das Gerät nicht unbeaufsichtigt. Sollten Sie
den Arbeitsplatz verlassen, schalten Sie das Gerät bitte
immer aus, bzw. ziehen Sie den Stecker aus der Steckdose
(ziehen Sie am Stecker, nicht am Kabel).
• Prüfen Sie Gerät und Kabel regelmäßig auf Schäden. Ein
beschädigtes Gerät bitte nicht in Betrieb nehmen.
• Reparieren Sie das Gerät nicht selbst, sondern suchen Sie
bitte einen autorisierten Fachmann auf. Um Gefährdungen
zu vermeiden, ein defektes Netzkabel bitte nur vom Hersteller, unserem Kundendienst oder einer ähnlich qualifi zierten
Person durch ein gleichwertiges Kabel ersetzen lassen.
• Verwenden Sie nur Original-Zubehör.
• Beachten Sie bitte die nachfolgenden „Speziellen Sicherheitshinweise“.
Kinder und gebrechliche Personen
• Zur Sicherheit Ihrer Kinder lassen Sie keine Verpackungsteile (Plastikbeutel, Karton, Styropor, etc.) erreichbar liegen.
WARNUNG!
Lassen Sie kleine Kinder nicht mit Folie spielen.
Es besteht Erstickungsgefahr!
• Um Kinder oder gebrechliche Personen vor den Gefahren
elektrischer Geräte zu schützen, beachten Sie, dass dieses
Gerät nur unter Aufsicht verwendet wird. Dieses Gerät
ist kein Spielzeug. Lassen Sie kleine Kinder nicht damit
spielen.
Spezielle Sicherheitshinweise
• Saugen Sie keine Feuchtigkeit, bzw. Flüssigkeiten auf!
• Saugen Sie keine heiße Asche, spitze oder scharfe Gegenstände!
• Benutzen Sie das Gerät nicht in Feuchträumen!
• Saugen Sie niemals ohne Filter. Prüfen Sie stets den
korrekten Sitz der Filter nach dem Einsetzen!
• Halten Sie während des Betriebes Haare, Kleidung und
Körperteile von der Staubsaugerdüse fern!
• Halten Sie den Staubsauger von Wärmequellen wie Radiatoren, Öfen usw. fern!
• Beim Türeschließen darf das Kabel nicht eingeklemmt oder
an scharfen Kanten oder Ecken entlang gezogen werden.
• Rollen Sie nicht mit dem Staubsauger über das Kabel.
• Das Gerät darf nicht verwendet werden, um Glasscherben,
kleine Spielzeuge, Nadeln, Büroklammern, heiße Asche,
brennende Zigarettenstummeln oder Streichhölzer usw.
aufzusaugen.
Übersicht der Bedienelemente
1 Luftschieber
2 Schlauchanschluss
3 Saugleistungsregler
4 Tragegriff
5 Taste zur Kabelaufwicklung
6 Ein/Aus-Schalter
7 Parkhilfe
8 Abdeckung Auslassfi lter
9 Taste zum Lösen des Staubbehälter
10 Staubbehälter mit Motorschutzfi lter
11 Haken am Saugrohr
12 Bodendüse
13 Teleskop-Saugrohr
14 Zubehörhalterung
Zubehör
15 Parkettbürste
16 Turbobürste
17 Bürstdüse
18 Fugendüse
19 Polsterdüse
Inbetriebnahme
• Stecken Sie den Verbindungskopf des Saugschlauches
in den Schlauchanschluss, bis er mechanisch einrastet,
drücken Sie dazu bitte gleichzeitig die Tasten. Um den
Schlauch wieder zu lösen, drücken Sie bitte erneut die
Tasten am Verbindungskopf.
• Halten Sie die Tasten gedrückt und ziehen Sie dann den
Schlauch heraus.
• Stecken Sie ggf. das Saugrohr am Griffstück auf.
Benutzen des Gerätes
1. Montieren Sie das Zubehör.
2. Wickeln Sie die benötigte Kabellänge ab, stecken Sie den
Netzstecker in eine vorschriftsmäßig installierte Schutzkontaktsteckdose 230 V, 50 Hz und schalten Sie das Gerät mit
dem Ein-/ Ausschalter ein.
3. Stellen Sie die Saugleistung mit dem Saugleistungsregler
ein (Min bis Max).
4. Saugen Sie nun mit gleichmäßiger Geschwindigkeit. Andrücken ist nicht nötig.
Hinweis: Achten Sie auf die durch die Kabellänge begrenzte
Reichweite!
4
05-BS 1273.indd 405-BS 1273.indd 4 07.03.2008 8:24:25 Uhr07.03.2008 8:24:25 Uhr
Page 5
DEUTSCH
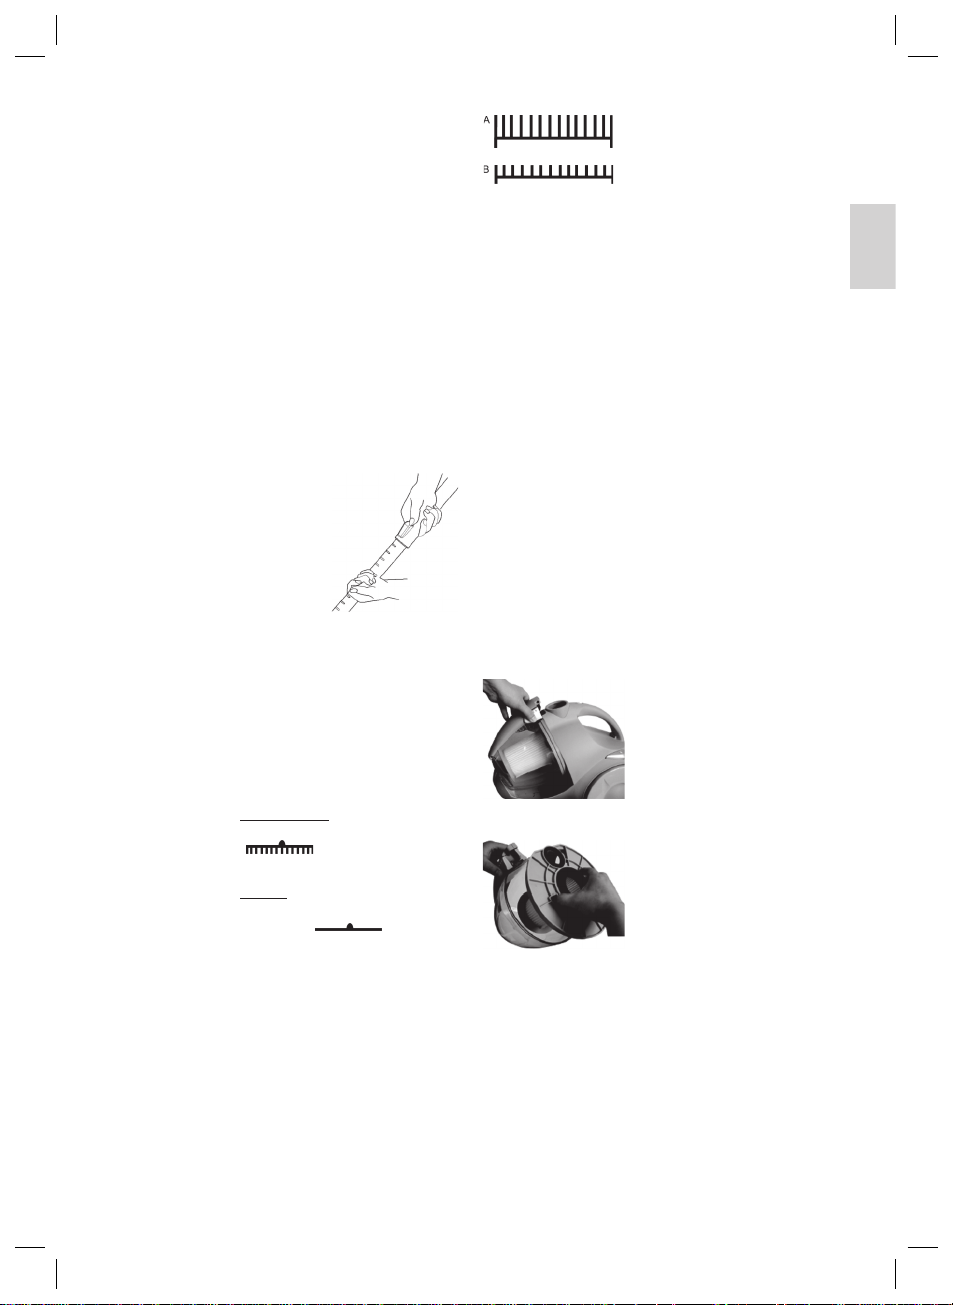
Saugleistungsregler
Niedrige Saugleistung: Für Gardinen, empfi ndliche Stoffe.
Mittlere Saugleistung: Für hochfl orige Veloursteppiche und
Hohe Saugleistung: Für robuste Teppiche und Fußböden.
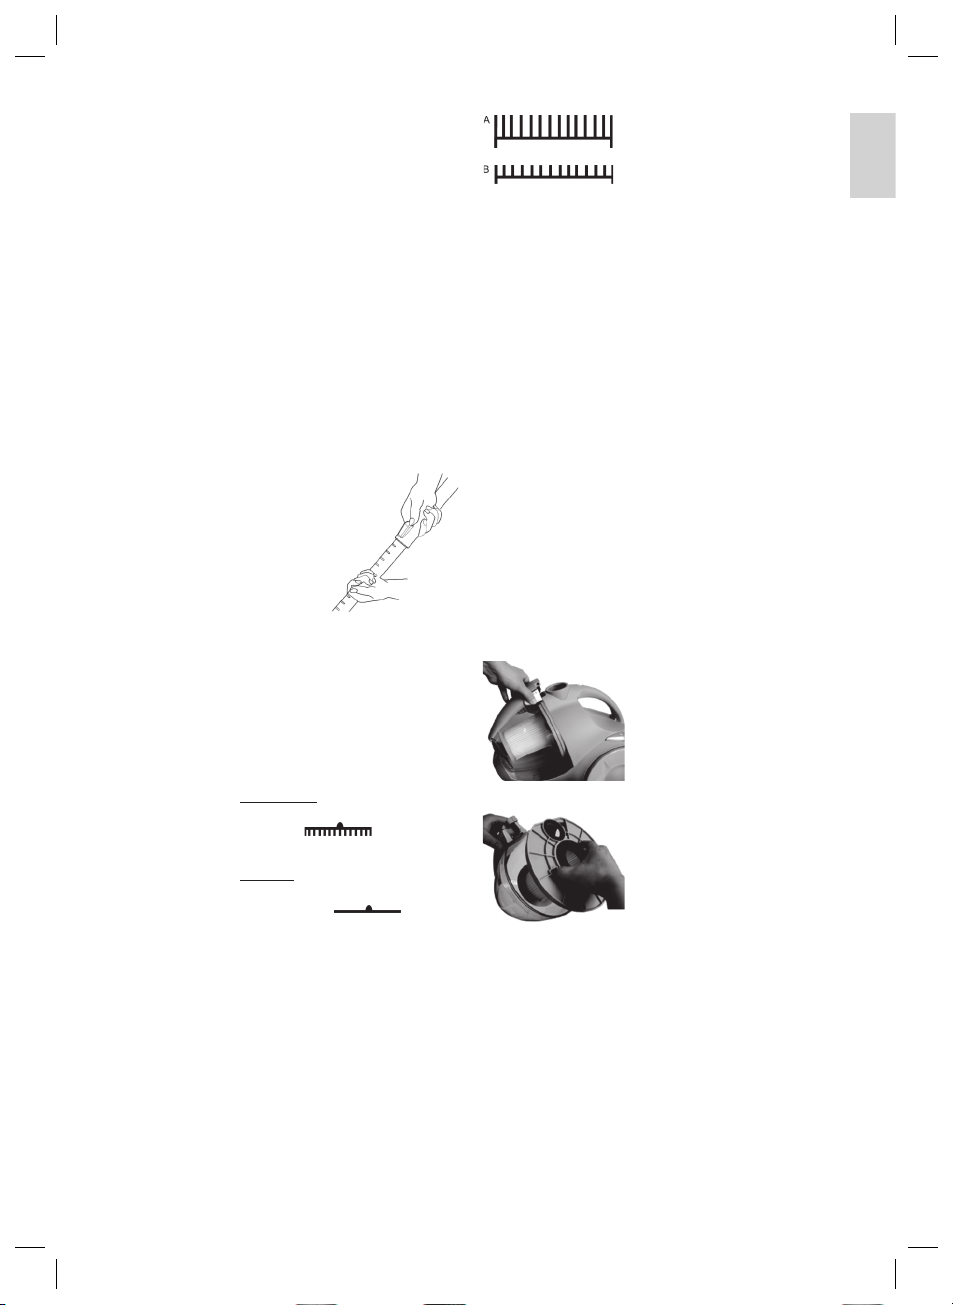
Aufwickelvorrichtung für Netzkabel
Bitte ziehen Sie das Netzkabel max. bis zur gelben Markierung.
Ziehen Sie das Kabel auf keinen Fall bis zur roten Markierung,
da die Kabelaufwicklung Schaden nehmen kann. Solche Schäden fallen nicht in den Garantieanspruch.
Aufwickeln
Drücken Sie die Taste für Kabelaufwicklung und führen Sie das
Kabel nach. Halten Sie das Kabel fest, um ein herumschlagen
zu vermeiden.
Teleskop-Saugrohr
Durch das höhenverstellbare Saugrohr,
wird eine individuelle Anpassung auf
Ihre Körpergröße ermöglicht.
Entriegeln Sie die Kupplung durch
Drücken der Taste in Pfeilrichtung.
Verschieben Sie die Saugrohre wie gewünscht. Zum Verriegeln lösen Sie die
Taste, bis es deutlich hörbar einrastet.
Düsenaufsätze
Fugen-, Bürstdüse: Zum Saugen von Polstern, Vorhängen
Polsterdüse: Zur Reinigung von Polstern, Vorhän-
Bodendüse: Zur Reinigung von Teppichen oder
Parkettbürste: Die Bodendüse ist zur leichteren
Turbobürste: Die Bodendüse ist zur leichteren
Textilböden.
und in Ecken und Schlitzen usw.
gen usw.
glatten Flächen.
Glatte Böden:
Drücken Sie den Hebel mit dem Bürstensymbol „
nieder. Die Bürsten sind jetzt sichtbar.
Teppiche:
Stellen Sie den Hebel mit dem Fuß um,
auf das Symbol „
Führung, mit Rollen ausgestattet.
Für größere Flächen, wie Parkett,
Laminat oder Fliesen u. a.
Führung, mit Rollen ausgestattet.
Die Bürste ist mit einer rotierenden
und einer schwingend gelagerten
Bürstwalze ausgestattet, die durch den
Luftstrom angetrieben wird. Entfernt
festgetretenen Schmutz, Tierhaare,
Fäden und Fusseln besonders
gründlich. Der Teppichfl or wird frisch
aufgebürstet.
“ mit dem Fuß
“.
Lösen der Düsen: Ziehen Sie diese unter leichtem
Luftschieber
Öffnen Sie den Luftschieber am Schlauchgriff zur Luftregulierung oder, um an der Düse haftende Teile zu lösen.
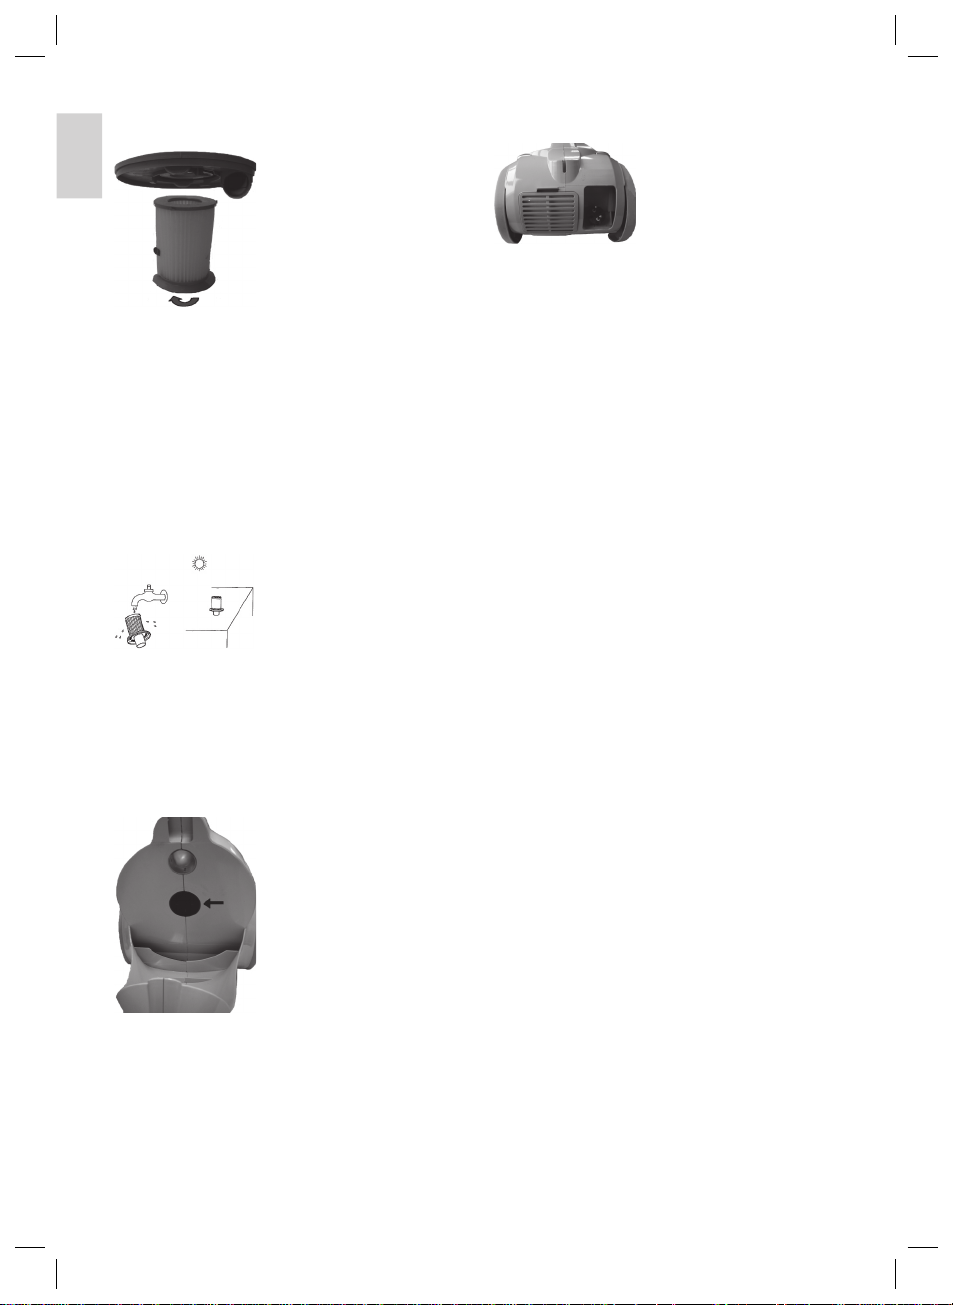
Filter
Ihr Gerät verfügt über 3 Filtersysteme. Das herkömmliche
Staubbeutelsystem wurde ersetzt durch einen transparenten
Staubbehälter. In ihm werden grober Schmutz und kleinste
Schwebepartikel durch die hohe Strömungsgeschwindigkeit aus
der „Saugluft“ gewirbelt.
Der Erwerb von Staubbeuteln entfällt.
Haben die Staubrückstände die MAX-Marke am Staubbehälter
erreicht oder lässt die Saugkraft nach, gehen Sie wie folgt vor:
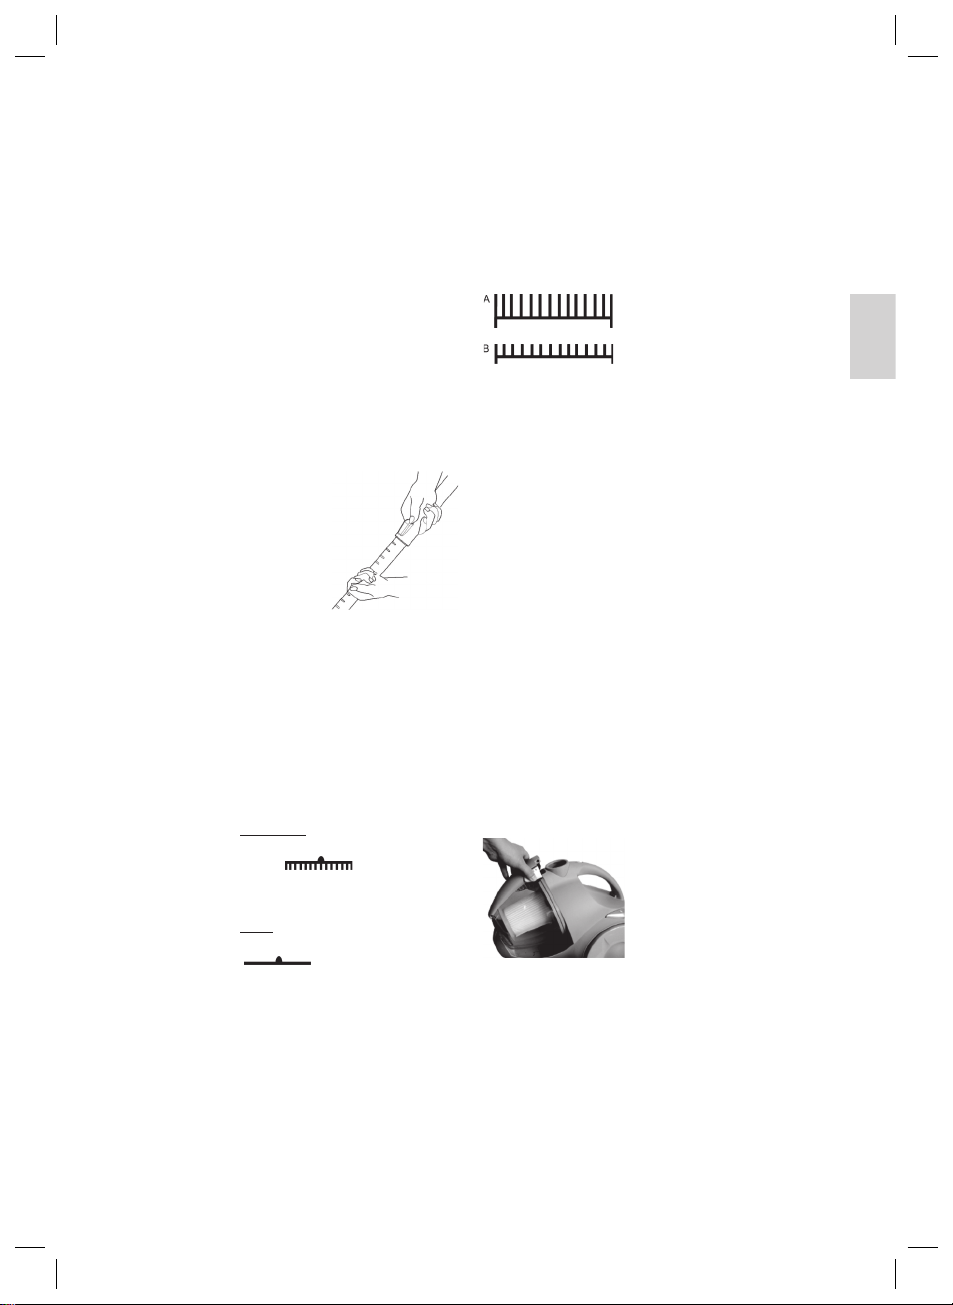
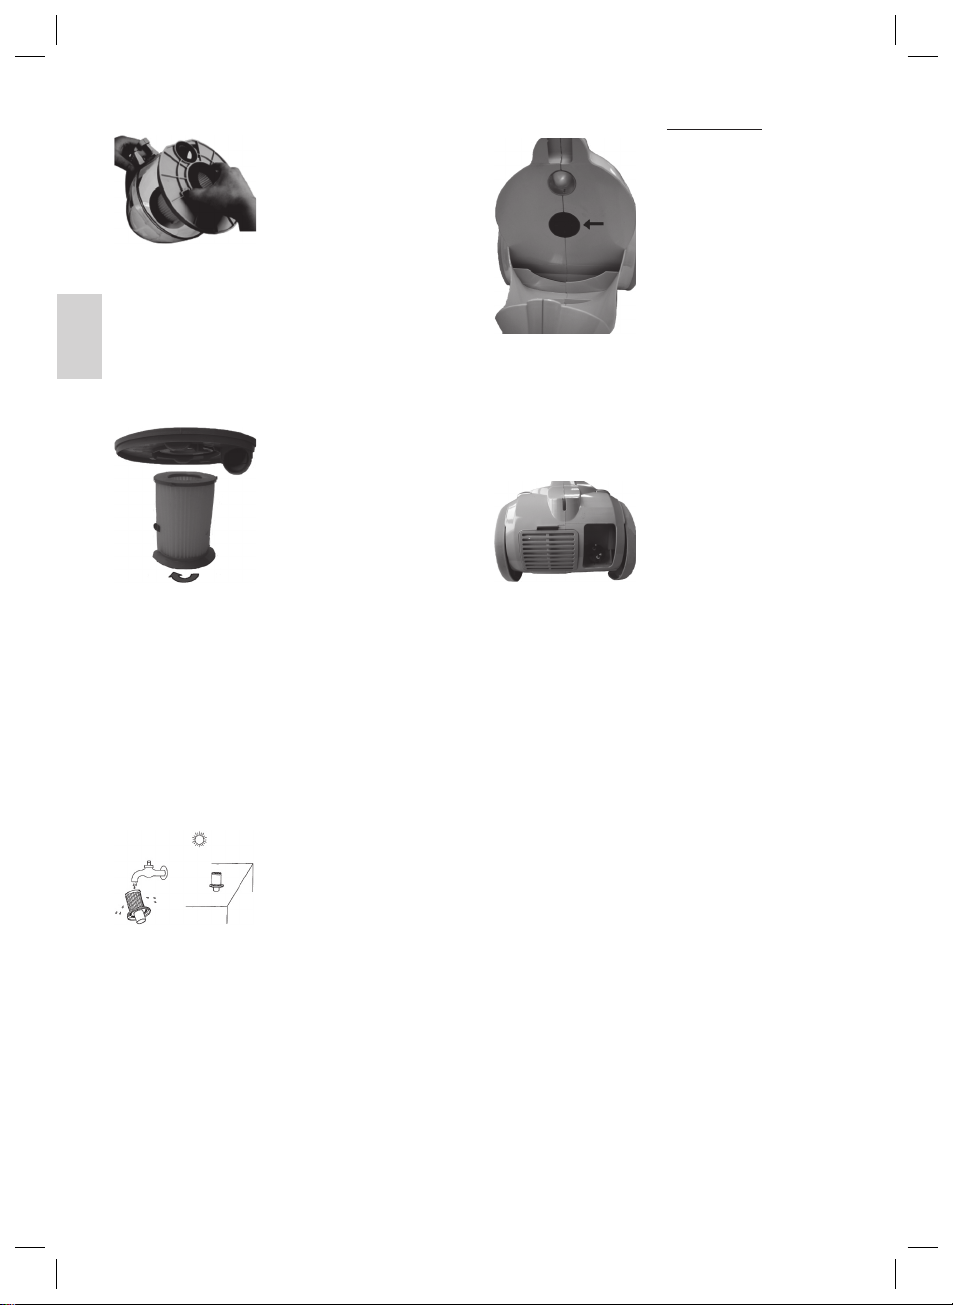
Abb. 1
Abb. 2 • Ziehen Sie vorsichtig den
Schieben Sie den Schalter an der
Bürste auf das Symbol A, dann wird
mehr Luft angesaugt. Beim Symbol (B)
entsprechend weniger. Das verstärkt
die Saugkraft.
Bitte beachten Sie, dass die Turbobürste nicht für glatte Böden z. B.
Parkett, Laminat u.a. geeignet ist,
die Oberfl äche könnte Schaden
nehmen.
Drehen ab.
Entleeren des Staubbehälters
• Drücken Sie die Taste zum
Lösen des Staubbehälter und
entnehmen Sie den Staubbehälter.
Filtereinsatz an den beiden
Halterungen heraus. Stellen
Sie den Staubbehälter ggf.
senkrecht hin.
• Entleeren Sie den Inhalt des
Staubbehälters. Setzen Sie im
Anschluss den Filtereinsatz
wieder ein. Achten Sie bitte
darauf, dass der Filtereinsatz
fest und in einer geraden
Position eingesetzt wird.
Befestigen Sie den Staubbehälter wieder, bis dieser hörbar
einrastet.
DEUTSCH
5
05-BS 1273.indd 505-BS 1273.indd 5 07.03.2008 8:24:25 Uhr07.03.2008 8:24:25 Uhr
Page 6
DEUTSCH
Abb. 3
DEUTSCH
Abb. 4
Motorschutzfi lter
(im Staubbehälter)
Reinigen des Filtereinsatzes
• Drücken Sie die Taste zum
Lösen des Staubbehälters und
entnehmen Sie den Staubbehälter (siehe Abb. 1).
• Entleeren Sie den Inhalt des
Staubbehälters (siehe Abb. 2).
Entriegeln Sie den Filtereinsatz durch kurzes Drehen im
Uhrzeigersinn (siehe Abb. 3).
Im zweiten Schritt lässt sich
der Filtereinsatz nach unten
herausnehmen. Reinigen
Sie den Motorschutzfi lter
durch Ausklopfen und sanftes
Ausbürsten.
• Setzen Sie die Bauteile wieder
ein.
• Befestigen Sie den Staubbehälter wieder, bis dieser hörbar
einrastet.
Nach jedem dritten Entleeren oder
bei stärkeren Verschmutzungen
reinigen Sie den Filter, indem Sie
fl ießendes Wasser entgegen der
Blasrichtung durch das Filtervlies
laufen lassen.
Setzen Sie diesen nur vollständig
getrocknet wieder ein!
Achtung: Waschen Sie bitte die
Filter niemals in der Waschmaschine und verwenden Sie
keinen Föhn zum Trocknen.
2. Einlassfi lter
Den Einlassfi lter fi nden Sie im
Staubbehälterraum, siehe Pfeil.
Drücken Sie die Taste zum Lösen
des Staubbehälters und entnehmen Sie den Staubbehälter. Ziehen
Sie den Filter nach vorn heraus.
Reinigen Sie den Einlassfi lter nach
ca. jeder 10. Staubbehälterentleerung, oder öfter, wenn es nötig ist.
Achten Sie bitte darauf, dass
der Filter immer sauber ist, da
sonst keine Luftzirkulation mehr
gewährleistet ist. Bei Bedarf
können Sie den Filter in warmem
Wasser, ohne Zusätze reinigen.
Setzen Sie diesen nur vollständig
getrocknet wieder ein.
Abb. 5
Bitte beachten Sie diesen wichtigen Hinweis!
Die Reinigung kann je nach Einsatzbedingungen, z. B beim
Saugen von feinen Staub, auch nach kürzerer Zeit nötig werden.
Sollte die Saugleistung Ihres Staubsaugers nachlassen, reinigen
Sie bitte die Filter, wie beschrieben.
Wenn die Saugleistung plötzlich während des Betriebes nachlässt, kann dies auch auf eine Verstopfung der Filter hinweisen.
Ersatz Motorschutz- sowie Auslassfi lter erhalten Sie bei unserer
Hotline.
,
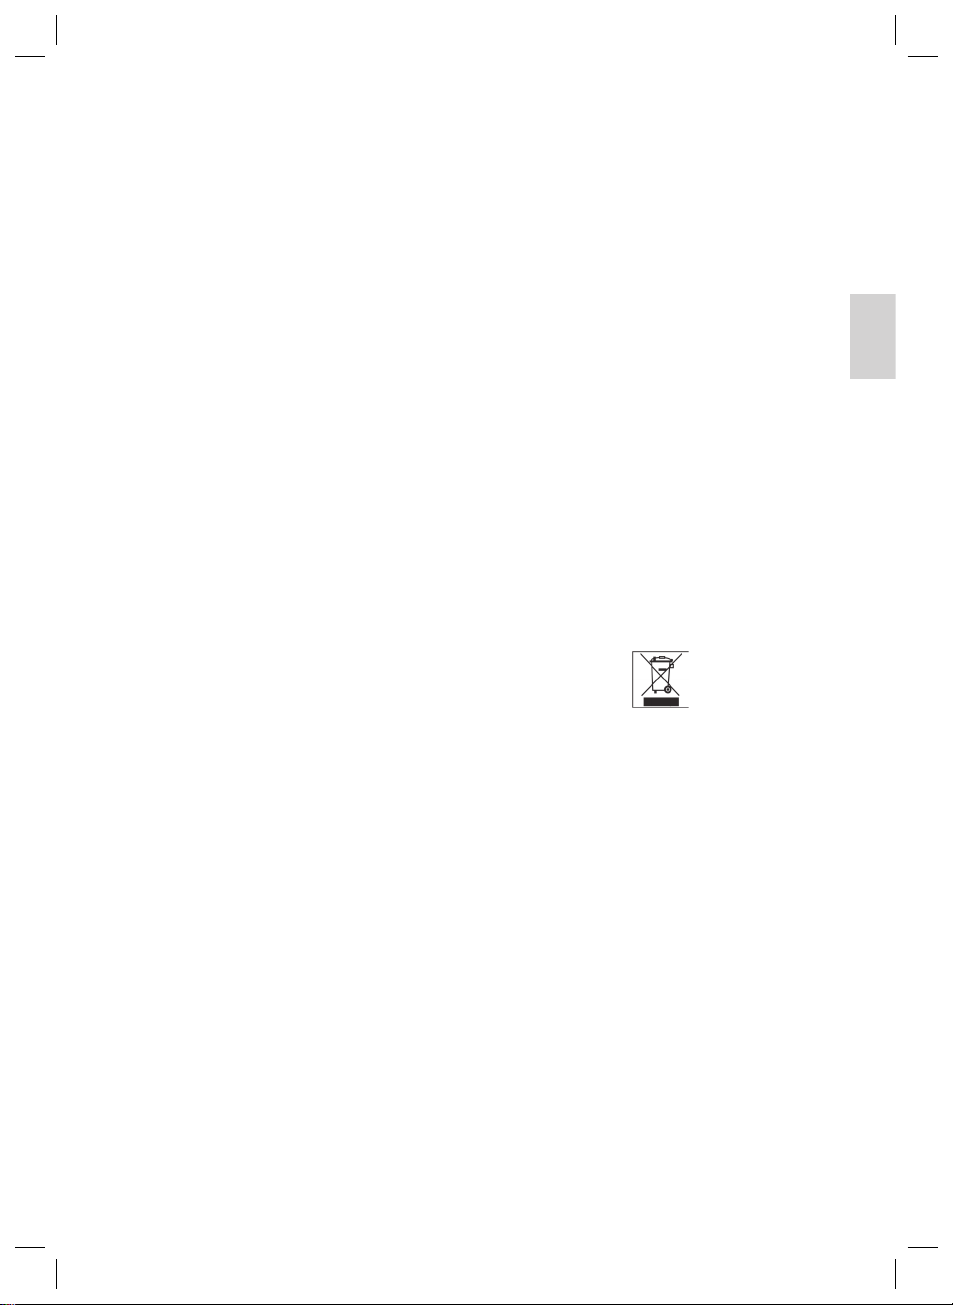
3. Auslassfi lter
Des Weiteren verfügt Ihr Gerät
über einen Auslassfi lter. Um eine
einwandfreie Funktion des Filters
zu gewährleisten, empfehlen wir
den Filter alle 6 Monate zu reinigen. Sie fi nden diesen Filter an der
hinteren Seite Ihres Gerätes hinter
einem Lüftungsgitter. Öffnen Sie
das Lüftungsgitter durch Drücken
des Hebels oben am Lüftungsgitter.
Ziehen Sie dann das Gitter nach
vorne heraus. Entnehmen Sie den
Filter und reinigen Sie diesen, wie
bereits beschrieben. Setzen Sie
den Filter wieder ein und schließen
Sie das Lüftungsgitter in umgekehrter Reihenfolge.
Reinigung und Aufbewahrung
Reinigung
• Ziehen Sie vor der Reinigung den Netzstecker aus der
Steckdose!
• Reinigen Sie das Gehäuse mit einem trockenen Tuch.
• Reinigen Sie den Motorschutzfi lter bei etwa jeder 3. Entleerung. Reinigen Sie den Filter in warmem Wasser, ohne
Zusätze. Setzen Sie diesen nur vollständig getrocknet ein.
Aufbewahrung
• Lassen Sie das Gerät vollständig abkühlen.
• Rollen Sie das Kabel komplett ein.
• Stellen Sie bitte das Gerät waagerecht hin und hängen
Sie den Haken am Teleskoprohr in die Parkhilfe (7) auf der
Rückseite des Gerätes ein.
Störungsbehebung
• Gerät ist ohne Funktion.
Abhilfe:
Überprüfen Sie den Netzanschluss.
Überprüfen Sie die Stellung des Schalters.
6
05-BS 1273.indd 605-BS 1273.indd 6 07.03.2008 8:24:27 Uhr07.03.2008 8:24:27 Uhr
Page 7
DEUTSCH
• Gerät saugt nicht.
Mögliche Ursache:
Der Staubbehälter oder die Filter sind verschmutzt.
Abhilfe:
Entleeren bzw. reinigen Sie die Bauteile.
Mögliche Ursache:
Im Saugschlauch oder der Düse befi ndet sich ein Fremdkörper.
Abhilfe:
Kontrollieren Sie das Zubehör auf Fremdkörper.
Geräuschentwicklung
Gemessen wurde der Schalldruckpegel am Ohr einer Bedienperson (LpA) in Übereinstimmung mit der DIN EN ISO 3744.
Ermittelter Schalldruckpegel: 78,0 dB(A) (kein Limit)
Sowohl Defekte an Verbrauchszubehör bzw. Verschleißteilen, als auch Reinigung, Wartung oder der Austausch von
Verschleißteilen, fallen nicht unter die Garantie und sind deshalb
kostenpfl ichtig!
Die Garantie erlischt bei Fremdeingriff.
Diese Garantie hat keine Auswirkungen auf die gesetzlichen
Ansprüche des Käufers und unterliegt dem geltenden Recht
des Landes, in dem der Ersterwerb des Gerätes durch den
Endkunden vom autorisierten Händler der Clatronic International
GmbH erfolgte.
Nach Ablauf der Garantiezeit können Reparaturen kostenpfl ichtig vom entsprechenden Fachhandel oder Reparaturservice
ausgeführt werden.
Technische Daten
Modell: .............................................................................. BS 1273
Spannungsversorgung: .................................220-240 V, 50/60 Hz
Leistungsaufnahme:
P
: ........................................................................... 1800 W
nom.
P
: ............................................................................ 2300 W
max.
Schutzklasse: ...............................................................................II
Nettogewicht: .....................................................................5,85 kg
Technische Änderungen vorbehalten!
Konformitätserklärung
Hiermit erklärt die Firma Clatronic International GmbH, dass sich
das Gerät BS 1273 in Übereinstimmung mit den grundlegenden
Anforderungen, der europäischen Richtlinie für elektromagnetische Verträglichkeit (2004/108/EG) und der Niederspannungsrichtlinie (93/68/EWG und 2006/95/EG) befi ndet.
Schonen Sie unsere Umwelt, Elektrogeräte gehören nicht in den
Hausmüll.
Nutzen Sie die für die Entsorgung von Elektrogeräten vorgesehenen Sammelstellen und geben dort Ihre Elektrogeräte ab, die
Sie nicht mehr benutzen werden.
Sie helfen damit die potenziellen Auswirkungen, durch falsche
Entsorgung, auf die Umwelt und die menschliche Gesundheit
zu vermeiden.
Sie leisten damit Ihren Beitrag zur Wiederverwertung, zum
Recycling und zu anderen Formen der Verwertung von Elektround Elektronik-Altgeräten.
Informationen, wo die Geräte zu entsorgen sind, erhalten Sie
über Ihre Kommunen oder die Gemeindeverwaltungen.
DEUTSCH
Nach der Garantie
Bedeutung des Symbols „Mülltonne“
Garantie
Wir übernehmen für das von uns vertriebene Gerät eine Garantie von 24 Monaten ab Kaufdatum (Kassenbon).
Innerhalb der Garantiezeit beseitigen wir unentgeltlich die Mängel des Gerätes oder des Zubehörs, die auf Material- oder Herstellungsfehler beruhen, durch Reparatur oder, nach unserem
Ermessen, durch Umtausch. Garantieleistungen bewirken weder
eine Verlängerung der Garantiefrist, noch beginnt dadurch ein
Anspruch auf eine neue Garantie!
Als Garantienachweis gilt der Kaufbeleg. Ohne diesen Nachweis
kann ein kostenloser Austausch oder eine kostenlose Reparatur
nicht erfolgen.
Im Garantiefall geben Sie bitte das komplette Gerät in der
Originalverpackung zusammen mit dem Kassenbon an Ihren
Händler.
7
05-BS 1273.indd 705-BS 1273.indd 7 07.03.2008 8:24:30 Uhr07.03.2008 8:24:30 Uhr
Page 8

NEDERLANDS
Algemene veiligheidsinstructies
Lees vóór de ingebruikname van dit apparaat de handleiding
uiterst zorgvuldig door en bewaar deze goed, samen met het
garantiebewijs, de kassabon en zo mogelijk de doos met de
binnenverpakking. Geef ook de handleiding mee wanneer u de
machine aan derden doorgeeft.
• Gebruik het apparaat uitsluitend privé en uitsluitend voor de
voorgeschreven toepassing. Dit apparaat is niet geschikt
NEDERLANDS
voor commercieel gebruik. Gebruik het apparaat niet buiten
Bescherm het tegen hitte, directe zonnestralen, vocht (in
geen geval in vloeistoffen dompelen) en scherpe randen.
Gebruik het apparaat niet met vochtige handen. Bij vochtig
of nat geworden apparaat onmiddellijk de stroomtoevoer
onderbreken.
• Schakel het apparaat uit en onderbreek altijd de stroomtoevoer (trek aan de stekker, nooit aan de kabel) wanneer u
het apparaat niet gebruikt, hulpstukken aanbrengt, reinigt of
wanneer storingen optreden.
• Laat het ingeschakelde apparaat niet zonder toezicht werken. Schakel het apparaat altijd uit of trek de stekker uit het
stopcontact (trek aan de stekker, niet aan de kabel) voordat
u de werkplek verlaat.
• Controleer regelmatig of het apparaat beschadigingen vertoont. Een beschadigd apparaat mag niet in gebruik worden
genomen.
• Repareer het apparaat nooit zelf, maar breng het naar een
geautoriseerde vakman. Voorkom gevaren en laat een
defecte kabel altijd alleen door de fabrikant, onze technische
dienst of een eender gekwalifi ceerde persoon vervangen
door een soortgelijke kabel.
• Gebruik alleen originele reserveonderdelen.
• Neem de onderstaande “Speciale veiligheidsinstructies“ in
acht.
Kinderen en gebrekkige personen
• Laat om veiligheidsredenen geen verpakkingsdelen (plasticzak, doos, piepschuim, enz.) binnen het bereik van uw
kinderen liggen.
WAARSCHUWING!
Laat kleine kinderen niet met de folie spelen. Er bestaat
gevaar voor verstikking!
• Waarborg dat het apparaat alléén onder toezicht wordt
gebruikt om kinderen of gebrekkige personen tegen de
gevaren van elektrische apparaten te beschermen. Dit
apparaat is geen speelgoed. Laat kleine kinderen hier niet
mee spelen.
Speciale veiligheidsinstructies
• Zuig nooit vocht of vloeistoffen op.
• Zuig nooit hete as, spitse of scherpe voorwerpen op!
• Gebruik het apparaat niet in vochtige ruimten!
• Zuig nooit zonder fi lter. Controleer altijd of de fi lter en na het
plaatsen correct zit!.
• Houd tijdens het zuig in haar een, kleding en lichaamsdelen
van de zuigmond verwijderd!
• Houd de stofzuiger ver verwijderd van warmtebronnen zoals
radiatoren, kachels enz.!
• Bij het sluiten van deuren mag de kabel niet ingeklemd of
langs scherpe randen of hoeken getrokken worden.
• Rol met de stofzuiger niet over de kabel.
• Het apparaat mag niet worden gebruikt om glasscherven,
klein speelgoed, spelden, paperclips, hete as, brandende
sigarettenpeuken of lucifers enz. op te zuigen.
.
Overzicht van de bedieningselementen
1 Luchtschuif
2 Slangaansluiting
3 Zuigkrachtregelaar
4 Handvat
5 Toets voor kabeloprolling
6 Aan-/uitschakelaar
7 Parkeerhulp
8 Afdekking uitlaatfi lter
9 Toets voor het openen van het stofvak
10 Stofvak met motorfi lter
11 Haak aan de zuigbuis
12 Vloermondstuk
13 Telescopische zuigbuis
14 Hulpstukkenhouder
Toebehoren
15 Parketmondstuk
16 Turbomondstuk
17 Borstelmondstuk
18 Voegenmondstuk
19 Textielmondstuk
Ingebruikname
• Steek de verbindingskop van de zuigslang in de slangaansluiting totdat deze mechanisch inklikt. Druk hiervoor
tegelijkertijd de toetsen in. Druk opnieuw de toetsen in aan
de verbindingskop om de slang weer te verwijderen.
• Houd de toetsen ingedrukt en trek dan de slang eruit.
• Steek eventueel de zuigbuis op de handgreep.
Bediening van het apparaat
1. Monteer het hulpstuk.
2. Rol de benodigde kabel lengte af, sluit de netsteker aan op
een correct geïnstalleerde en geaarde contactdoos 230 V,
50 Hz en schakel het apparaat in met de aan-/uitschakelaar.
3. Stel de zuigkracht in met behulp van de zuigkrachtregelaar
(Min tot Max).
4. Zuig nu met gelijkmatige snelheid. U hoeft geen druk uit te
oefenen.
Opmerking: let erop dat de kabel slechts een beperkte
reikwijdte heeft!
8
05-BS 1273.indd 805-BS 1273.indd 8 07.03.2008 8:24:30 Uhr07.03.2008 8:24:30 Uhr
Page 9
NEDERLANDS
Zuigkrachtregelaar
Geringe zuigkracht: voor gordijnen en gevoelige stoffen
Gemiddelde zuigkracht: voor hoogpolige tapijten en textiele
Hoge zuigkracht: voor robuuste tapijten en men vloerbe-
Oprolvoorziening voor netkabel
Trek de netkabel maximaal uit tot de gele markering. Trek
de netkabel in geen geval uit tot de rode markering, omdat
daardoor de kabeloprolling beschadigd kan worden. Dergelijke
schade valt niet onder de garantieverlening.
Oprollen
Druk op de toets voor de kabeloprolling en voer de kabel met u
mee. Houd de kabel vast zodat hij niet rondslingert.
Telescopische zuigbuis
De zuigbuis is in de hoogte verstelbaar,
hierdoor kunt u de buis naar wens aan
uw lichaamshoogte aanpassen.
Druk op de toets in pijlrichting om de
koppeling te ontgrendelen.
Verschuif de zuigbuis naar wens. Voor
de vergrendeling laat u de toets los
totdat zij duidelijk hoorbaar inklikt.
Mondstukken
Voegen-,
borstelmondstuk:
Textielmondstuk: Voor het reinigen van kussens,
Vloermondstuk: Voor de reiniging van tapijten of gladde
Parketmondstuk: Voor een gemakkelijke bediening is het
Turbomondstuk: Voor een gemakkelijke bediening is het
vloerbedekkingen
dekking in
Voor het afzuigen van kussens en
gordijnen en het schoonmaken van
hoeken en gleuven enz.
gordijnen enz.
oppervlakken.
Gladde vloeren:
Druk de hendel met het borstelsymbool
„
borstels zijn nu zichtbaar.
Tapijten:
Zet de hendel met de voet over naar
het symbool „
vloermondstuk voorzien van rolletjes.
Voor grotere oppervlakken zoals
parket, laminaat of tegels e.d.
vloermondstuk voorzien van rolletjes.
De borstel beschikt over een draaiende
en fl exibel gelagerde borstelrol die door
de luchtstroom wordt aangedreven.
Verwijdert heel grondig alle soorten
vastgelopen vuil, dierenharen, draden
en pluizen. De tapijtpool wordt weer
mooi en hoog.
“ met de voet omlaag. De
“.
Wanneer u de schakelaar aan de
borstel naar het symbool A schuift,
wordt meer lucht aangezogen. Bij
symbool (B) dienovereenkomstig
minder. Hierdoor wordt de zuigkracht
versterkt.
Denk erom: de turboborstel is niet
geschikt voor gladde vloeren zoals
parket, laminaat e.d. – het oppervlak
zou beschadigd kunnen worden.
Verwijderen
van het mondstuk:
Luchtschuif
Open de luchtschuif aan de slanggreep om de luchttoevoer
te regelen of om aan het mondstuk hangende deeltjes te
verwijderen.
Filter
Uw apparaat beschikt over 3 fi ltersystemen. Het gebruikelijke stofzaksysteem werd vervangen door een transparante
stofopvangbak. In deze bak worden grove verontreinigingen
en kleinste zweefdeeltjes door de hoge stroomsnelheid uit de
“zuiglucht” gewerveld.
U hoeft geen stofzakken meer te kopen.
Wanneer de stofresten de MAX-markering hebben bereikt of de
zuigkracht minder wordt, voert u de volgende stappen uit:
Afb. 1
Afb. 2
Trek het mondstuk terwijl u het licht
draait eraf.
Stofopvangbak legen
• Druk op de toets om de stofopvangbak te ontgrendelen en uit
het apparaat te nemen.
• Trek deze fi lterinzet voor-
zichtig aan beide houders
eruit. Zet de stofbak zonodig
verticaal neer.
• Leeg de stofbak. Plaats de fi lterinzet vervolgens weer terug.
Let op dat de fi lterinzet vast en
in een rechte positie geplaatst
wordt.
Bevestig de stofbak weer zodanig dat hij hoorbaar vast klikt.
NEDERLANDS
9
05-BS 1273.indd 905-BS 1273.indd 9 07.03.2008 8:24:30 Uhr07.03.2008 8:24:30 Uhr
Page 10
NEDERLANDS
Afb. 3
NEDERLANDS
Afb. 4
1. Motorveiligheidsfi lter
(in de stofopvangbak)
Reiniging van de fi lterinzet
• Druk op de toets om de stofopvangbak te ontgrendelen en uit
het apparaat te nemen (zie afb.
1).
• Leeg de stofbak (zie afbeelding
2). Ontgrendel de fi lterinzet
door deze even tegen de klok
in te draaien (zie afb. 3). Bij de
tweede stap kunt u de fi lterinzet naar beneden uitnemen.
Reinig de motorveiligheidsfi lter
door deze uit te kloppen en
zacht uit te borstelen.
• Plaats de onderdelen weer
terug.
• Bevestig de stofbak weer
zodanig dat hij hoorbaar vast
klikt.
Reinig de fi lter na ieder derde
leging of bij sterkere verontreinigingen, door stromend water tegen de
blaasrichting in door het fi ltervlies
te laten lopen. Plaats de fi lter
pas weer wanneer deze volledig
gedroogd is!
Plaats het fi ltervlies pas weer
wanneer het volledig gedroogd is!
Opgelet: Was de fi lter nooit in
de wasmachine en gebruik geen
föhn om hem te drogen.
2. Inlaatfi lter
De inlaatfi lter bevindt zich in
het stofvak, zie pijl. Druk op de
toets om de stofopvangbak te
ontgrendelen en uit het apparaat te
nemen. Trek de fi lter naar voren uit.
Reinig de inlaatfi lter na ongeveer
iedere tiende leging – of zo nodig
vaker. Zorg ervoor dat de fi lter
altijd schoon is, anders is geen
goede luchtcirculatie mogelijk.
Desgewenst kunt u de fi lter in
warm water zonder toevoegingen
reinigen. Plaats de fi lter pas nadat
hij volledig gedroogd is!
Afb. 5
Neem deze belangrijke aanwijzing in acht!
De reiniging kan al naargelang de toepassingsvoorwaarden bijv.
bij het zuigen van fi jnstof, ook al vroeger nodig zijn.
Wanneer het zuigvermogen van uw stofzuiger minder wordt,
reinigt u de fi lters zoals beschreven.
Wanneer het zuigvermogen tijdens het bedrijf plotseling minder
wordt, kan dit het gevolg zijn van een verstopte fi lter.
Reinigen en bewaren
Reinigen
• Trek vóór de reiniging eerst de netsteker uit de contactdoos!
• Reinig de buitenkant met een droge doek.
• Reinig de motorbeveiligingsfi lter na ongeveer iedere 3
leging. De fi lter bevindt zich achter de stofzak. Reinig de
fi lter in warm water zonder toevoegingen en plaats hem pas
wanneer hij volledig gedroogd is.
Bewaren
• Laat het apparaat volledig afkoelen.
• Rol de kabel volledig op.
• Zet het apparaat verticaal weg en hang de haak aan de
telescoopstang in de parkeerhulp (7) op de achterzijde.
Verhelpen van storingen
• Apparaat functioneert niet.
Maatregel:
Controleer de netaansluiting.
Controleer de stand van de schakelaar.
• Apparaat zuigt niet.
Mogelijk oorzaak:
De stofbak of de fi lters zijn verontreinigd.
Maatregel:
Leeg resp. reinig de onderdelen.
3. Uitlaatfi lter
Uw apparaat beschikt tevens over
een uitlaatfi lter. Om een optimale
werking van alle functies te waarborgen, adviseren wij u, de fi lter om
de 6 maanden te reinigen. Deze
fi lter bevindt zich aan het achterste
gedeelte van uw apparaat achter
een luchtrooster. Open het ventilatierooster door aan de hendel opzij
van het ventilatierooster te trekken.
Trek daarna het fi lter naar voor uit.
Verwijder de fi lter en reinig deze op
de reeds beschreven wijze. Plaats
de fi lter meer in het apparaat. Sluit
het luchtrooster in de omgekeerde
volgorde.
10
05-BS 1273.indd 1005-BS 1273.indd 10 07.03.2008 8:24:31 Uhr07.03.2008 8:24:31 Uhr
Page 11

NEDERLANDS
Mogelijk oorzaak:
In de zuigerslang of de mondstukken bevindt zich een
vreemd voorwerp.
Maatregel:
Controleer het toebehoren op vreemde voorwerpen.
Technische gegevens
Model: ...............................................................................BS 1273
Spanningstoevoer: ........................................220-240 V, 50/60 Hz
Opgenomen vermogen:
P
: ............................................................................ 1800 W
nom.
P
: ............................................................................ 2300 W
max.
Beschermingsklasse: .................................................................. ΙΙ
Nettogewicht: ......................................................................5,85 kg
Dit apparaat is gekeurd conform de op dit moment van toepassing zijnde CE-richtlijnen zoals bijvoorbeeld elektromagnetische
compatibiliteit en laagspanningsvoorschriften en is geconstrueerd volgens de nieuwste veiligheidstechnische voorschriften.
Technische wijzigingen voorbehouden!
Garantie
Voor het door ons geleverde apparaat verlenen wij een garantie
van 24 maanden vanaf koopdatum (kassabon).
Eventuele gebreken aan het apparaat of aan het toebehoren
die zijn ontstaan door productie- of materiaalfouten verhelpen
wij binnen deze periode kosteloos door middel van reparatie of,
naar ons oordeel, door vervanging. Eventuele garantiegevallen
verlengen noch de geldigheidsduur van de garantie, noch begint
daardoor een nieuwe garantieperiode!
Het koopbewijs geldt als garantiebewijs. Zonder dit bewijs kan
geen kosteloze reparatie of vervanging plaatsvinden.
Geef in garantiegevallen het complete apparaat in de originele
verpakking samen met de kassabon af bij uw handelaar.
Niet alleen defecten aan de hulpstukken of aan de slijtende
onderdelen, maar ook reiniging, onderhoud of de vervanging
van slijtende delen vallen niet onder de garantie en geschieden
altijd tegen berekening!
Bij ingrepen door derden komt de garantieverlening te vervallen.
Betekenis van het symbool ‘vuilnisemmer’
Bescherm ons milieu, elektrische apparaten horen niet in het
huisafval.
Maak voor het afvoeren van elektrische apparaten gebruik van
de voorgeschreven verzamelpunten en geef daar de elektrische
apparaten af die u niet meer gebruikt.
Daardoor helpt u de potentiële effecten te voorkomen die een
verkeerde afvoer op het milieu en de menselijke gezondheid
kunnen hebben.
Op deze wijze levert u uw bijdrage aan het hergebruik, de
recycling en andere verwerkingsvormen voor oude elektronische
en elektrische apparaten.
Voor informatie over verzamelpunten voor uw apparaten kunt u
contact opnemen met uw gemeente of gemeenteadministratie.
NEDERLANDS
Na de garantieperiode
Na afl oop van de garantieperiode kunnen reparaties tegen berekening worden uitgevoerd door de betreffende vakhandelaar of
de technische dienst.
11
05-BS 1273.indd 1105-BS 1273.indd 11 07.03.2008 8:24:32 Uhr07.03.2008 8:24:32 Uhr
Page 12

FRANÇAIS
Conseils généraux de sécurité
Lisez attentivement ce mode d’emploi avant de mettre l’appareil
en marche pour la première fois. Conservez le mode d’emploi
ainsi que le bon de garantie, votre ticket de caisse et si possible,
le carton avec l’emballage se trouvant à l’intérieur. Si vous
remettez l‘appareil à des tiers, veuillez-le remettre avec son
mode d‘emploi.
• N’utilisez cet appareil que pour un usage privé et pour les
taches auxquelles il est destiné. Cet appareil n’est pas
prévu pour une utilisation professionnelle. Ne l’utilisez pas
en plein air
soleil, de l’humidité (ne le plongez en aucun cas dans l’eau) et
des objets tranchants. N’utilisez pas cet appareil avec des
FRANÇAIS
mains humides. S’il arrive que de l’humidité ou de l’eau
atteignent l’appareil, débranchez aussitôt le câble d’alimentation.
• Arrêtez l’appareil et débranchez toujours le câble
d’alimentation de la prise de courant (tirez sur la fi che, pas
sur le câble) si vous n’utilisez pas l’appareil, si vous installez
les accessoires, pour le nettoyage ou en cas de panne.
• Ne laissez jamais fonctionner l’appareil sans surveil-
lance. Arrêtez toujours l’appareil ou débranchez le câble
d’alimentation (en tirant sur la fi che et non pas sur le câble)
si vous devez vous absenter.
• Contrôlez régulièrement l’appareil et le câble. Ne mettez pas
l’appareil en marche s’il est endommagé.
• Ne réparez pas l’appareil vous-même. Contactez plutôt
un technicien qualifi é. Pour éviter toute mise en danger,
ne faites remplacer le câble défectueux que par un câble
équivalent et que par le fabricant, notre service après-vente
ou toute personne de qualifi cation similaire.
• N’utilisez que les accessoires d’origine.
• Respectez les „Conseils de sécurité spécifi ques“ ci-dessous.
Enfants et personnes fragiles
• Par mesure de sécurité vis-à-vis des enfants, ne laissez pas
les emballages (sac en plastique, carton, polystyrène) à leur
portée.
• Pour protéger les personnes fragiles et les enfants des risques des appareils électriques, veillez à ce que cet appareil
ne soit utilisé que sous surveillance. Cet appareil n’est pas
un jouet. Ne laissez pas les enfants s’amuser avec.
. Protégez-le de la chaleur, des rayons directs du
DANGER!
Ne pas laisser les jeunes enfants jouer avec le fi lm. Il y a
risque d’étouffement!
Conseils de sécurité spécifi ques à cet appareil
• N’aspirez jamais d’emplacement humide ou de liquide !
• N’aspirez jamais de cendres chaudes, d’objets pointus ou
tranchants !
• N’utilisez jamais cet appareil dans des endroits humides !
• N’aspirez jamais sans fi ltre. Vérifi ez toujours que le fi ltre est
correctement installé !
• N’approchez jamais les embouts de l’appareil en utilisation
de cheveux, vêtements et parties du corps !
• Maintenez l’aspirateur à l’écart de sources de chaleur
comme radiateurs, fours, etc. !
• Il y a lieu d’éviter de coincer le câble au moment de la
fermeture de la porte ou de le faire passer par les arêtes ou
les coins coupants.
• Ne pas passer les roulettes de l’aspirateur sur le câble.
• Il ne faut pas utiliser l’appareil pour aspirer de bris de verre,
de petits jouets, d’aiguilles, de trombones, de cendres
chaudes, de mégots encore chauds ou d’allumettes, etc..
Liste des différents éléments de commande
1 Régulateur d’air
2 Raccordement du tuyau
3 Variateur de puissance d’aspiration
4 Poignée
5 Bouton de rangement du câble
6 Bouton Marche / Arrêt
7 Position parking
8 Chape fi ltre de sortie
9 Touche pour désolidariser le sac d’aspirateur
10 Récipient de poussière avec fi ltre de protection
du moteur
11 Crochet sur le tube d’aspiration
12 Embout pour les sols
13 Tuyau d’aspiration téléscopique
14 Support pour accessoires
Accessoire
15 Brosse aspirante pour parquet
16 Brosse aspirante turbo
17 Tête à brosse
18 Tête pour interstices
19 Embout à canapés
Avant la première utilisation
• Introduisez la tête de raccordement du fl exible d’aspiration
dans le raccordement du fl exible jusqu’au clic. Enfoncez
pour cela les boutons simultanément. Pour libérer le fl exible,
enfoncez à nouveau les boutons de la tête de raccordement.
• Maintenez les touches enfoncées et sortez le fl exible.
• Fixer si nécessaire le tuyau d’aspiration à la poignée.
Utilisation de l’appareil
1. Fixez l’accessoire souhaité.
2. Déroulez la longueur de câble désirée. Branchez-le dans
une prise de courant en bon état de fonctionnement de
230 V, 50 Hz. et mettez l’appareil en marche à l’aide du
bouton Marche/Arrêt.
3. Réglez la puissance d’aspiration à l’aide du variateur de
puissance (Min à Max).
4. Aspirez maintenant avec régularité. Il est inutile d’exercer
une pression pendant que vous aspirez.
Remarque: tenez compte du rayon d’action limité dû à la
longueur de câble!
12
05-BS 1273.indd 1205-BS 1273.indd 12 07.03.2008 8:24:32 Uhr07.03.2008 8:24:32 Uhr
Page 13
FRANÇAIS
Variateur de puissance d’aspiration
Faible puissance: pour rideaux, tissus fragiles.
Puissance moyenne: pour tapis à poil long et revêtements de
Forte puissance: pour tapis et moquettes robustes
Dispositif de rangement du câble d’alimentation
Vous êtes priés de ne dérouler le câble d’alimentation que
jusqu’à la marque jaune. Ne le déroulez en aucun cas jusqu’à
la marque rouge, cela risque d’endommager le dispositif. Tout
endommagement de ce type n’est pas couvert par la garantie.
Rangement du câble
Appuyez sur le bouton de rangement du câble tout en guidant
le câble. Maintenez le câble fermement entre vos doigts pour
éviter qu’il ne s’agite de façon incontrôlée.
Tuyau d’aspiration télescopique
Grâce au tuyau d’aspiration réglable
en hauteur, il est possible d’adapter
l’appareil à votre taille.
Déverrouillez l’accouplement en
pressant sur la touche en direction de
la fl èche.
Faites glisser les tuyaux d’aspiration
comme vous le souhaitez. Pour verrouiller, déverrouillez la touche jusqu’à
emboîtement par un bruit sec.
Embouts
Embout suceur et
brosse:
Embout à canapés: Pour le nettoyage de canapés, rideaux,
Embout pour les sols: Pour nettoyer les tapis ou surfaces
Brosse aspirante
pour parquet:
sol textiles
Pour aspirer les canapés, les rideaux,
les recoins et les fentes.
etc.
planes.
Sols lisses:
Poussez le levier portant le symbole de
brosse „
du pied. Les brosses sont maintenant
visibles.
Tapis:
Placez le levier sur le symbole
„
Pour faciliter son maniement, la
brosse aspirante pour le sol est munie
de rouleaux. Pour les surfaces plus
importantes, comme p. ex. le parquet,
le faux parquet ou les carrelages.
“ en bas à l’aide
“ à l’aide du pied.
Brosse aspirante turbo: Pour faciliter son maniement, la brosse
Pour libérer l’embout: Retirez-le en le dévissant légèrement.
Régulateur d’air
Ouvrez le régulateur d’air situé sur la poignée du tuyau pour
contrôler le débit d’air ou libérer un objet plaqué sur l’embout.
Filtre
Votre aspirateur dispose de 3 systèmes de fi ltres. Le système
classique du sac d’aspirateur a été remplacé par un sac
d’aspirateur transparent. Dans le bac, les particules de poussière les plus grosses comme les plus fi nes sont récupérées dans
l’air aspiré grâce à la grande vitesse du fl ux d’air.
Pas besoin d’acheter des sacs d’aspirateur.
Lorsque les résidus de poussière ont atteint les valeurs
maximum sur le récipient de poussière ou lorsque l’intensité
d’aspiration diminue, procédez comme suit:
Illustr. 1
aspirante pour le sol est munie de
rouleaux. La brosse est équipée d’un
rouleau à brosses à rotation et d’un
rouleau à brosses à roulement pivotant
entraîné par le fl ux d’air. Enlève en
profondeur toute salissure incrustée,
les poils d’animaux, les fi ls et peluches
sans laisser de trace. Le voile du tapis
est brossé pour donner un aspect frais.
Si vous poussez le commutateur sur la
brosse sur le symbole A, la tête aspire
davantage d’air. Avec le symbole (B),
elle en aspire moins. Ceci renforce la
force d’aspiration.
Attention, la brosse aspirante turbo
ne convient pas aux sols lisses, p.
ex. du parquet, du faux parquet, etc.,
car elle risquerait d’endommager
les surfaces.
Vider le récipient de poussière
• Actionnez la touche pour
désolidariser le récipient de
poussière et enlevez le récipient de poussière.
FRANÇAIS
13
05-BS 1273.indd 1305-BS 1273.indd 13 07.03.2008 8:24:33 Uhr07.03.2008 8:24:33 Uhr
Page 14
FRANÇAIS
Illustr. 2 • Retirer délicatement la gar-
FRANÇAIS
Illustr. 3
niture du fi ltre en la saisissant
sur les deux supports. En cas
de besoin, placez le récipient
de poussière à la verticale.
• Videz le contenu du récipient
de poussière. Par la suite,
remettez la garniture du fi ltre
en place. Prière de veiller à ce
que la garniture du fi ltre soit
bien fi xée dans une position
droite.
Fixez de nouveau le récipient
de poussière jusqu’à ce qu’il
s’enclenche avec un clic.
1. Filtre de protection du moteur
(dans le bac à poussière)
Nettoyage du support du fi ltre
• Actionnez la touche pour
désolidariser le récipient de
poussière et enlevez le récipient de poussière (voir fi g. 1).
• Videz le contenu du récipient
de poussière (cf. illustr. 2).
Déverrouillez la garniture du
fi ltre par un petit tour dans
le sens des aiguilles d’une
montre (cf. illustr. 3). Dans une
deuxième étape, il est possible
de retirer la garniture du fi ltre
par le bas. Pour nettoyer le
fi ltre du moteur, secouez-le et
brossez-le délicatement.
• Remettez les éléments en
place.
• Fixez de nouveau le récipient
de poussière jusqu’à ce qu’il
s’enclenche avec un clic.
À chaque troisième vidange ou
en cas de salissures importantes,
nettoyez le fi ltre en faisant couler
de l’eau à travers le tissé du fi ltre
dans le sens contraire du fl ux d’air.
Ne le remettez en place qu’une fois
le fi ltre entièrement séché!
Ne remettre le récipient de poussière que s’il est entièrement sec!
Attention: Ne jamais laver les
fi ltres dans la machine à laver et
ne jamais utiliser un sèche-cheveux pour le sécher.
Illustr. 4
Illustr. 5
Prière de suivre cette indication très importante!
Le nettoyage peut être plus souvent nécessaire selon les conditions d’utilisation, par ex. en cas d’aspiration de poussière fi ne.
Si l’effi cacité de votre aspirateur diminue, nettoyez les fi ltres
comme indiqué.
Si la puissance de votre aspirateur diminue soudainement pendant le fonctionnement, cela peut être le signe d’un bouchage
de fi ltre.
2. Filtre d’aspiration
Le fi ltre d’admission se trouve dans
le compartiment pour le récipient
de poussière, cf. la fl èche. Actionnez la touche pour désolidariser le
récipient de poussière et enlevez
le récipient de poussière. Retirez le
fi ltre vers l’avant. Nettoyez le fi ltre
d’entrée env. après chaque 10e
purge du récipient de poussière ou
même plus souvent, si nécessaire.
Veillez à ce que le fi ltre soit
toujours propre pour assurer la
circulation d’air. Vous pouvez, si
nécessaire, laver le fi ltre à l’eau
chaude sans détergent. Placez-le
à nouveau dans l’appareil lorsqu’il
est complètement sec.
3. Filtre d’échappement
Votre appareil est en outre équipé
d’un fi ltre d’échappement. Pour
un fonctionnement parfait du fi ltre
nous vous recommandons de le
changer tous les 6 mois. Ce fi ltre
se trouve à l’arrière de votre appareil derrière une grille d’aération.
Ouvrez la grille d’aération en
appuyant sur le levier à côté de
la grille d’aération. Tirez alors sur
la grille pour l’enlever. Retirez le
fi ltre et nettoyez-le comme décrit
précédemment. Placez à nouveau
le fi ltre dans l’appareil et refermez
la grille en procédant dans l’ordre
inverse.
Entretien et rangement
Entretien
• Débranchez toujours le câble d’alimentation de la prise de
courant avant le nettoyage!
• Nettoyez les parois de l’appareil avec un torchon sec.
• Lavez le fi ltre de protection du moteur après avoir vidé le bac à
poussière env.
3 fois. Celui-ci se trouve derrière le sac à poussière. Lavez
le fi ltre à l’eau chaude, sans détergent. Placez-le à nouveau
dans l’appareil lorsqu’il est complètement sec.
14
05-BS 1273.indd 1405-BS 1273.indd 14 07.03.2008 8:24:33 Uhr07.03.2008 8:24:33 Uhr
Page 15
FRANÇAIS
Rangement
• Laissez l’appareil refroidir complètement.
• Enroulez complètement le câble.
• Veuillez placer l’appareil à l’horizontale et accrochez
le crochez sur le tuyau télescopique dans le support
d’accrochage (7) sur le dos de l’appareil.
En cas de dysfonctionnements
• L’appareil ne fonctionne pas.
Solution:
Vérifi ez son branchement au secteur.
Vérifi ez la position de l’interrupteur.
• L’appareil n’aspire pas.
Cause possible:
Le récipient de poussière ou le fi ltre est souillé.
Solution:
Videz voire nettoyez les composantes.
Cause possible:
Un corps étranger se trouve dans le fl exible d’aspiration ou
dans la tête d’aspiration.
Solution:
Contrôlez les accessoires en vue d’éventuels corps
étrangers.
Données techniques
Modèle:.............................................................................BS 1273
Alimentation: .................................................220-240 V, 50/60 Hz
Consommation:
Puissance
Puissance
Classe de protection: ..................................................................ΙΙ
Poids net: ...........................................................................5,85 kg
Cet appareil a été contrôlé d’après toutes les directives européennes actuelles applicables, comme par exemple concernant la
compatibilité électromagnétique et la basse tension. Cet appareil
a été fabriqué en respect des réglementations techniques de
sécurité les plus récentes.
Sous réserve de modifi cations techniques.
: ............................................................ 1800 W
nom.
: ............................................................2300 W
max.
Garantie
Nous accordons une garantie de 24 mois à dater de la date
d’achat (ticket de caisse) pour l’appareil que nous vendons.
Pendant la durée de la garantie, nous éliminons gratuitement les
défauts de l’appa reil ou des accessoires découlant d’un vice de
matériau ou de fabrication au moyen d’une réparation ou, selon
notre estimation, au moyen d’un remplacement. Les prestations
dans le cadre de la garantie n’entraînent aucune prorogation
de la durée de garantie et ne donnent pas droit à une nouvelle
garantie !
Le justifi catif de garantie est le reçu. Sans ce justifi catif, aucun
remplacement gratuit ni aucune réparation gratuite ne peuvent
être effectués.
En cas de recours à la garantie, ramenez votre appareil
complet, dans son emballage d‘origine, accompagné de votre
preuve d‘achat, à votre revendeur.
Les défauts sur les accessoires ou les pièces d’usure ainsi que
le nettoyage, l’entretien ou le remplacement de pièces d’usure
ne sont pas garantis et sont donc payants !
En cas d’intervention étrangère, la garantie devient caduque.
Après la garantie
Après écoulement de la durée de garantie, les réparations
peuvent être effectuées, contre paiement, par le commerce
spécialisé ou le service de réparation.
Signifi cation du symbole „Elimination“
Protégez votre environnement, ne jetez pas vos appareils
électriques avec les ordures ménagères.
Utilisez, pour l’élimination de vos appareils électriques, les
bornes de collecte prévues à cet effet où vous pouvez vous
débarrasser des appareils que vous n’utilisez plus.
Vous contribuez ainsi à éviter les impacts potentiels dans
l’environnement et sur la santé de chacun, causés par une
mauvaise élimination de ces déchets.
Vous contribuez aussi au recyclage sous toutes ses formes des
appareils électriques et électroniques usagés.
Vous trouverez toutes les informations sur les bornes
d’élimination des appareils auprès de votre commune ou de
l’administration de votre communauté.
FRANÇAIS
15
05-BS 1273.indd 1505-BS 1273.indd 15 07.03.2008 8:24:35 Uhr07.03.2008 8:24:35 Uhr
Page 16

ESPAÑOL
Indicaciones generales de seguridad
Antes de la puesta en servicio de este aparato lea detenidamente el manual de instrucciones y guarde éste bien incluido la
garantía, el recibo de pago y si es posible también el cartón de
embalaje con el embalaje interior. En caso de dejar el aparato a
terceros, también entregue el manual de instrucciones.
• Solamente utilice el aparato para el uso privado y para el
fi n previsto. Este aparato no está destinado para el uso
profesional. No lo utilice al aire libre. No lo exponga al calor,
a la entrada directa de rayos de sol, a la humedad (en
ningún caso sumerja el aparato en agua) y a los cantos
agudos. No utilice el aparato con las manos húmedas. En
caso de que el aparato esté húmedo o mojado retire de
momento la clavija de la caja de enchufe.
• Desconecte el aparato y siempre retire la clavija de la caja
de enchufe (tire de la clavija no del cable), cuando no quiera
utilizar el aparato, montar piezas o en caso de limpieza o
defectos.
ESPAÑOL
• No utilice el aparato sin vigilancia. En caso de que tenga
que dejar su lugar de trabajo, desconecte siempre el
aparato o retire la clavija de la caja de enchufe (por favor tire
de la clavija y no del cable).
• Controle regularmente si el aparato o el cable tiene defectos. No ponga en servicio un aparato defecto.
• No repare el aparato por su cuenta, sino vaya a un establecimiento autorizado. Para evitar peligros, deje sustituir un
cable defecto por uno de la misma calidad solamente por el
fabricante, nuestro servicio al cliente o una similar persona
cualifi cada.
• Solamente utilice accesorios originales.
• Por favor tenga atención a las “Indicaciones especiales de
seguridad…“ indicadas a continuación.
• ¡Mantenga la aspiradora apartada de fuentes de calor como
radiodores, estufas etc.!
• Al cerrar la puerta el cable no se debe quedar pillado con
la puerta o ser arrastrado a lo largo de bordes cortantes o
esquinas.
• No pase con el aspirador sobre el cable.
• No debe utilizar el aparato para aspirar cascos de vidrio,
juguetes pequeños, agujas, clips, ceniza caliente, colillas
ardientes o cerillas etc..
Indicación de los elementos de manejo
1 Regulador de admisión
2 Conexión de la manguera
3 Regulador de poder de aspiración
4 Asa de transporte
5 Tecla para el enrollamiento de cable
6 Conectador / desconectador
7 Ayuda para estacionar el aspirador de suelo
8 Cobertura fi ltro de salida
9 Tecla para soltar el recipiente de llenado de polvo
10 Recipiente de llenado de polvo con fi ltro protector
del motor
11 Gancho en el tubo de aspiración
12 Boquilla para el suelo
13 Tubo telescópico de aspiración
14 Sujeción para el accesorio
Accesorio
15 Tobera para parqué
16 Cepillo turbo
17 Tobera de cepillo
18 Tobera para juntas
19 Tobera de tapicería
Niños y personas débiles
• Para la seguridad de sus niños no deje material de embalaje
(Bolsas de plástico, cartón, poliestireno etc.) a su alcance.
AVISO!
No deje jugar a los niños con la lámina. ¡Existe peligro
de asfi xia!
• Para proteger a niños o personas débiles del peligro de
aparatos eléctricos, tenga en cuenta que este aparato sólo
se puede utilizar bajo vigilancia. Este aparato no es ningún
juguete. No deje jugar a niños pequeños con ello.
Indicaciones especiales
• ¡No aspiren nunca agua u otro líquido!
• ¡No aspiren nunca cenizas calientes, objetos agudos o
cortantes!
• ¡No utilice el aparato en locales húmedos!
• Nunca aspire sin fi ltro. ¡Siempre compruebe el correcto
ajuste de la bolsa que acaba de colocar!
• ¡Durante el funcionamiento mantenga apartado de la boquilla del aspirador, el pelo, piezas de ropa o extremidades del
cuerpo!
16
05-BS 1273.indd 1605-BS 1273.indd 16 07.03.2008 8:24:35 Uhr07.03.2008 8:24:35 Uhr
• Introduzca el botón de unión del tubo de aspiración en la
conexión del tubo, hasta que éste encaje mecánicamente.
Para ello, se ruega presionar las teclas al mismo tiempo.
Para soltar de nuevo el tubo, presione otra vez las teclas en
el botón de unión.
• Mantenga las teclas presionadas y extraiga el tubo.
• En caso de que sea necesario, encaje el tubo aspirador en
la empuñadura.
1. Monte el accesorio.
2. Desenrolle el cable necesitado, introduzca la clavija en
una caja de enchufe con tomatierra 230 V, 50 Hz instalada
según reglamento y conecte el aparato con el conectador /
desconectador.
3. Ajuste el poder de aspiración con el regulador de poder de
aspiración (De Min a Max).
4. Aspire ahora en una velocidad constante. No es necesario
apretar.
Nota: ¡Tenga atención con el alcanze del cable, ya que es
limitado!
Puesta en marcha
Uso del aparato
Page 17
ESPAÑOL
Regulador de poder de aspiración
Poder de aspiración bajo: Para cortinas, telas delicadas.
Poder de aspiración medio: Para moquetas de terciopelo con
Poder de aspiración alto: Para moquetas robustas y suelos.
Dispositivo para el enrollamiento de cable
Por favor tire del cable solamente hasta la marcación amarilla.
Nunca tire hasta la marcación roja, ya que el enrollamiento de
cable se podría estropear. Dichos daños no caen en la garantía.
Enrollamiento
Presione la tecla para el enrollamiento de cable y guie el cable.
Mantenga el cable para evitar que se enrolle.
Tubo telescópico de aspiración
Gracias al tubo aspirador regulable en
altura es posible adaptarlo de forma
individual a su medida.
Desbloquee el acoplamiento presionando la tecla en dirección de la fl echa.
Ajuste los tubos aspiradores a la medida que desee. Para el bloqueo suelte la
tecla hasta que se oiga notablemente
el encajar.
Boquillas
Tobera para juntas,
tobera de cepillo:
Tobera tapicería: Para la limpieza de tapicería, cortinas
Boquilla para el suelo: Para la limpieza de moquetas o
Tobera para parqué: La tobera de suelo está equipada
Cepillo turbo: La tobera de suelo está equipada con
pelo alto o suelos de textil.
Para la aspiración de tapicería, cortinas y en esquinas y en ranuras etc.
etc.
superfi cies planas.
Suelos planos:
Empuje la palanca con el símbolo
de cepillo „ “ con el pie
hacia abajo. Los cepillos están ahora
visibles.
Moquetas:
Reajuste la palanca con el pie, al
símbolo „
con ruedecillas para su fácil guía.
Para superfi cies más grandes, como
parqué, laminado o baldosas, entre
otras cosas.
ruedecillas para su fácil guía. El cepillo
está equipado con un rodillo de cepillo
rotativo y oscilante que es impulsado
por la corriente de aire. Elimina
suciedad apisonada, pelo de animal,
hilos y pelusas de manera muy efi caz.
Al mismo tiempo se queda cepillado el
velo de la alfombra.
“.
Empuje el interruptor en el cepillo sobre el símbolo A, entonces se aspirará
más aire. En el caso del símbolo (B)
respectivamente menos. Esto aumenta
la fuerza de aspiración.
Por favor tenga en cuenta que el
cepillo turbo no es apropiado para
suelos lisos p.e. parqué, laminado,
entre otras cosas. La superfi cie se
podría estropear.
Soltar las toberas: Retire éstas girándolas levemente.
Pasador de aire
Abra el pasador de aire en la empuñadura de la manguera para
la regulación de aire o para soltar piezas que se hayan quedado
pegadas en la boquilla.
Filtro
Su aparato dispone de un sistema de fi ltros de 3 fi ltros. El sistema convencional de bolsa de llenado de polvo se ha sustituido
por un recipiente de llenado de polvo transparente. Este es capaz de absorber, por su alta velocidad de circulación, impurezas
graves y mínimas partículas fl otantes del aire aspirado.
La compra de bolsas de llenado de polvo se suprime.
Si los residuos de polvo han alcanzado la marcación-MAX en
el recipiente de llenado de polvo o si la fuerza de aspiración
disminuye, proceda de siguiente manera:
Imagen 1
Imagen 2
Vaciar el recipiente de llenado
de polvo
• Pulse la tecla para soltar el
recipiente de llenado de polvo
y retire éste.
• Extraiga con cuidado el
elemento fi ltrante por las dos fi jaciones. Dado el caso coloque
de forma vertical el recipiente
de llenado de polvo.
• Vacíe el contenido del
recipiente de llenado de polvo.
A continuación coloque nuevamente el elemento fi ltrante.
Preste por favor atención a que
el elemento fi ltrante esté bien
encajado y colocado en una
posición recta.
Fije nuevamente el recipiente
de llenado de polvo, hasta que
éste encaje de forma audible.
17
ESPAÑOL
05-BS 1273.indd 1705-BS 1273.indd 17 07.03.2008 8:24:35 Uhr07.03.2008 8:24:35 Uhr
Page 18

ESPAÑOL
Imagen 3
ESPAÑOL
Imagen 4
18
1. Filtro protector del motor
(en el recipiente colector de polvo)
Limpieza del elemento fi ltrante
• Pulse la tecla para soltar el
recipiente de llenado de polvo
y retire el recipiente de llenado
de polvo (vea imagen 1).
• Vacíe el contenido del
recipiente de llenado de polvo
(véase imagen 2). Desbloquee
el elemente fi ltrante, girando
brevemente en el sentido de
las agujas del reloj (véase
imagen 3). En el segundo paso
se deja el elemento fi ltrante sacar hacia abajo. Limpie el fi ltro
protector del motor sacudiendo
y cepillando el fi ltro muy suave.
• Inserte de nuevo los elementos.
• Fije nuevamente el recipiente
de llenado de polvo, hasta que
éste encaje de forma audible.
En cada tercer vaciado o en caso
de que haya graves impurezas
debe limpiar el fi ltro, dejando pasar
agua corriente por el fi ltro de tela
no tejida y en contra de la dirección
de soplado.
¡Recoloque éste sólo cuando se
haya secado por completo!
Atención: Por favor no lave
nunca el fi ltro en la lavadora y
no utilice un secador para secar
el fi ltro.
2. Filtro de entrada
El fi ltro de entrada se encuentra en
la cámara del recipiente de llenado
de polvo, véase fl echa. Pulse la
tecla para soltar el recipiente de
llenado de polvo y retire el recipiente de llenado de polvo. Extraiga
el fi ltro hacia hacia adelante. Limpie el fi ltro de admisión después
de aprox. cada décimo vaciado del
recipiente de llenado de polvo o
más veces, en caso de que fuera
necesario. Preste atención de
que el fi ltro esté siempre limpio,
ya que si no, no se podría garantizar la circulación de aire. En
caso de que sea necesario, puede
lavar el fi ltro en agua caliente, sin
aditivos. ¡Solamente coloque de
nuevo el fi ltro, cuando está seco
por completo!
Imagen 5
¡Se ruega prestar atención a esta nota importante!
La limpieza puede ser necesaria también después de un corto
periodo de tiempo, por ejemplo al aspirar polvo muy fi no.
En caso de que la potencia de aspiración de su aspiradora se
reduzca, limpie por favor los fi ltros como indicado.
Si durante el funcionamiento la potencia de aspiración se reduce de forma repentina, podría ser la causa de un atascamiento
en los fi ltros.
Limpieza y almacenamiento
Limpieza
• ¡Antes de cada limpieza retire la clavija de la caja de enchufe!
• Limpie la carcasa de motor con un paño húmedo.
• Limpie el fi ltro protector del motor aproximadamente
después de cada 3. vaciado. En caso de que sea necesario, lave el fi ltro en agua caliente, sin aditivos. Solamente
coloque de nuevo el fi ltro, cuando está seco por completo.
Almacenamiento
• Debe dejar enfriar por completo el aparato.
• Enrolle el cable por completo.
• Por favor coloque el aparato de forma horizontal y enganche
el gancho en el tubo telescópico en la ayuda de estacionamiento (7) que se encuentra en el lado posterior del
aparato.
• El aparato no tiene función.
Remedio:
Supervise la conexión de red.
Supervise la posición del interruptor.
• El aparato no aspira.
Causa probable:
El recipiente de llenado de polvo o los fi ltros están sucios.
Remedio:
Vacíe es decir limpie los componentes.
3. Filtro de salida
Su aparato también dispone de
un fi ltro de salida. Para garantizar
una función impecable del fi ltro,
recomendamos limpiar el fi ltro cada
6 meses. Este se encuentra en la
parte trasera de su aparato, detrás
de una rejilla de ventilación. Abra
la rejilla de ventilación pulsando
la palanca en la parte lateral de la
rejilla de ventilación. Ahora retire la
rejilla tirando de ella hacia delante.
Aparte el fi ltro y limpie esté como
ya indicado. Introduzca de nuevo el
fi ltro y cierre la rejilla de ventilación
en orden inverso.
Reparación de fallos
05-BS 1273.indd 1805-BS 1273.indd 18 07.03.2008 8:24:36 Uhr07.03.2008 8:24:36 Uhr
Page 19

ESPAÑOL
Causa probable:
En la manguera aspirante o en la tobera se encuentra un
cuerpo extraño.
Remedio:
Controle, si hay un cuerpo extraño en los accesorios.
Datos técnicos
Modelo:.............................................................................BS 1273
Suministro de tensión:...................................220-240 V, 50/60 Hz
Consumo de energía:
P
: ............................................................................ 1800 W
nom.
P
: ............................................................................ 2300 W
máx.
Clase de protección: ...................................................................ΙΙ
Peso neto: ..........................................................................5,85 kg
Este aparato se ha examinado según las normativas actuales
y vigentes de la Comunidad Europea, como p.ej. compatibilidad electromagnética y directiva de baja tensión y se ha
construido según las más nuevas especifi caciones en razón de
la seguridad.
No reservamos el derecho de efectuar modifi caciones técnicas.
Garantía
Para el aparato comercializado por nosotros nos responsabilizamos con una garantía de 24 meses a partir de la fecha de
compra (factura de compra).
Durante el período de garantía nos encargamos gratuítamente
de los defectos del aparato y de los accesorios, que se hayan
originado por defectos del material o de la fabricación. Dependiendo de nuestra estimación se realizará una reparación o un
cambio. ¡Los servicios de garantía no prolangan la garantía, ni
se incia por ello un período nuevo de garantía!
Como comprobante para la garantía es válido la factura de
compra. Sin este comprobante no se podrá realizar un cambio o
una reparación gratuíta.
En caso de garantía entregue el aparato completo en su
embalaje original junto con la factura a su agente comerciante.
¡Defectos en los accesorios de uso o en las piezas de desgaste,
como también la limpieza, mantenimiento o el recambio de
piezas de desgaste no recaen en la garantía e irán al cargo del
cliente!
En caso de intervención ajena se expira la garantía.
Signifi cado del símbolo „Cubo de basura“
Proteja nuestro medio ambiente, aparatos eléctricos no forman
parte de la basura doméstica.
Haga uso de los centros de recogida previstos para la eliminación de aparatos eléctricos y entregue allí sus aparatos eléctricos
que no vaya a utilizar más.
Ayudará en evitar las potenciales consecuencias, a causa de
una erronéa eliminación de desechos, para el medio ambiente
y la salud humana.
Con ello, contribuirá a la recuperación, al reciclado y a otras
formas de reutilización de los aparatos viejos eléctricos y
electrónicos.
La información cómo se debe eliminar los aparatos, se obtiene
en su ayuntamiento o su administración municipal.
ESPAÑOL
Después de la garantía
Después de haber expirado la garantía se pueden realizar las
reparaciones por el concesionario o por el servicio de reparaciones. Los gastos irán al cargo del cliente.
19
05-BS 1273.indd 1905-BS 1273.indd 19 07.03.2008 8:24:37 Uhr07.03.2008 8:24:37 Uhr
Page 20

PORTUGUÊS
PORTUGUÊS
Instruções gerais de segurança
Antes de pôr este aparelho a funcionar, leia muito atentamente
as instruções de emprego e guarde-as muito bem, juntamente
com o talão de garantia, o talão de compra e, tanto quanto
possível, a embalagem com os elementos interiores. Se puser
o aparelho à disposição de terceiros, entregue-lhes também as
Instruções de Utilização.
• Utilize o aparelho exclusivamente para fi ns privados e
para a fi nalidade para a qual o mesmo foi concebido. Este
aparelho não se destina a fi ns comerciais. Não o utilize
ao ar livre
. Mantenha-o protegido do calor, de irradiação
solar directa, da humidade (não o imergir de forma alguma
em quaisquer líquidos) e de arestas aguçadas. Não utilize o
aparelho com as mãos molhadas. No caso de o aparelho fi car
húmido ou molhado, retire imediatamente a fi cha da tomada.
• Sempre que não utilizar o aparelho, ou desejar montar
acessórios, ou queira limpá-lo, ou ainda em caso de
avarias, deverá desligá-lo e retirar a fi cha da tomada (puxe
pela fi cha e não pelo fi o).
• O aparelho não deverá funcionar sem vigilância. No caso
de ter de se ausentar do local onde o aparelho estiver a
funcionar, desligue-o sempre ou retire a fi cha da tomada
(puxe pela fi cha e não pelo fi o).
• Verifi que regularmente se o aparelho ou o fi o têm alguns
danos. Nunca ponha a funcionar um aparelho com quaisquer danos.
• Não tente reparar o aparelho, dirija-se a um técnico da especialidade, devidamente autorizado. Para evitar quaisquer
perigos, é favor substituir um fi o danifi cado por um fi o da
mesma qualidade. Tal deverá ser efectuado pelo fabricante,
pelos nossos serviços de assistência ou por outra pessoa
com as mesmas qualifi cações.
• Utilize apenas acessórios de origem.
• É favor observar as seguintes „Instruções especiais de
segurança“.
Crianças e pessoas débeis
• Para a segurança dos seus fi lhos, não deixe partes da
embalagem (sacos plásticos, papelão, esferovite, etc.) ao
alcance dos mesmos.
AVISO!
Não deixe crianças pequenas brincarem com folhas de
plástico. Perigo de asfi xia!
• Para proteger crianças ou pessoas débeis contra os perigos
de aparelhos eléctricos, preste atenção a que este aparelho
só seja utilizado sob vigilância. Estre aparelho não é um
brinquedo. Não deixe crianças brincar com ele.
Instruções especiais de segurança
• Não aspire humidades nem líquidos!
• Não aspire cinzas quentes, nem objectos pontiagudos ou
aguçados!
• Não utilize o aparelho em divisões com solos molhados!
• Não aspire nunca sem saco. Após substituição do saco,
verifi que sempre se o mesmo se encontra na posição
correcta!
• Durante o funcionamento, mantenha a roupa, o corpo e os
cabelos afastados do bocal do aspirador!
• Mantenha o aspirador afastado de fontes de calor, tais
como radiadores, fogões, etc.!
• O cabo não pode, ao fechar a porta, ser entalado ou
puxado ao longo de arestas e de cantos aguçados.
• Não passe com o aspirador por cima do cabo desenrolado.
• O aparelho não deve ser utilizado para aspirar cacos de
vidro, pequenos brinquedos, alfi netes, clipes, cinza quente,
beatas de cigarro ou fósforos por apagar, etc...
Descrição dos elementos
1 Ventilador
2 Ligação para o tubo fl exível
3 Regulador da potência de aspiração
4 Punho para transporte
5 Botão para enrolamento do fi o
6 Interruptor
7 Dispositivo para estacionamento
8 Tampa do fi ltro de escape
9 Tecla para soltar o recipiente do lixo
10 Recipiente do lixo com fi ltro de protecção do
motor
11 Gancho no tubo de aspiração
12 Peça para aspirar o chão
13 Tubo telescópico
14 Suporte de acessórios
Acessórios
15 Escova para soalhos
16 Escova turbo
17 Bocal com escova
18 Bocal para fendas
19 Bocal para aspirar estofos
Primeira utilização
• Introduza a cabeça de junção para o tubo fl exível na ligação
do mesmo, até este fi car mecanicamente encaixado, pressionando ao mesmo tempo as teclas. Para voltar a soltar o
tubo fl exível, pressione novamente as teclas da cabeça de
junção.
• Mantenha as teclas pressionadas e retire o mesmo tubo.
• Se necessário, introduza o tubo de aspiração na extremida-
de do tubo fl exível.
Utilização do aparelho
1. Faça a montagem dos acessórios.
2. Desenrole o fi o até ter o comprimento pretendido, introduza
a fi cha numa tomada com protecção de contactos, de
230 voltes, 50 Hz, devidamente instalada, e ligue o aparelho
carregando no interruptor.
3. Seleccione a potência de aspiração no respectivo regulador
(Min a Max).
4. Aspire agora a uma velocidade constante. Não é necessário
exercer qualquer pressão.
20
05-BS 1273.indd 2005-BS 1273.indd 20 07.03.2008 8:24:37 Uhr07.03.2008 8:24:37 Uhr
Page 21

PORTUGUÊS
Nota: tome em consideração que o comprimento do fi o é
limitado!
Regulador da potência de aspiração
Potência de aspiração baixa: para cortinas, tecidos delica-
Potência de aspiração média: para alcatifas de pelo alto e
Potência de aspiração elevada: para alcatifas, tapetes e solos
Dispositivo de enrolamento do fi o
Para desenrolar o fi o, é favor puxá-lo, no máximo, até à
marcação amarela. Não o puxe até à marcação vermelha,
pois o dispositivo poderá estragar-se. Tais estragos não estão
incluídos na garantia.
Enrolamento
Pressione o botão para enrolamento e vá puxando o fi o. Segure
neste para evitar que o mesmo bate contra qualquer lado.
Tubo de Aspiração Telescópico
Através do tubo de aspiração ajustável
na altura é possível uma adaptação
individual para a sua altura corporal.
Proceda ao desbloqueio do acoplamento deslocando a tecla na direcção
da seta.
Desloque o tubo de aspiração para a
posição desejada. Para bloquear, solte
a tecla, até se ouvir que o acoplamento
fi cou engatado.
Bocais
Bocal para frestas
e para escovar:
Bocal para aspirar
estofos:
Peça para aspirar
o chão:
Escova para soalhos: O bocal está equipado com rodas, a
dos.
solos têxteis.
robustos.
Para aspirar estofos, cortinados, assim
como cantos, frestas, etc.
Para a limpeza de estofos, cortinados,
etc.
Para aspirar alcatifas, tapetes ou
superfícies lisas.
Solos lisos:
Prima com o pé para baixo
a alavanca com o símbolo de escova
„ “. As escovas fi carão à
vista.
Alcatifas, tapetes:
Ponha com o pé a alavanca no
símbolo „
fi m de deslizar melhor e para ser guiado mais facilmente. Para superfícies
amplas, como soalhos, ladrilhos, etc.
“.
Escova turbo: O bocal está equipado com rodas,
Para soltar os bocais: Remova-os, girando-os ligeiramente.
Entrada de ar
Abra a entrada do ar que se encontra na extremidade do tubo
fl exível, no caso de pretender regular o ar ou para soltar as
peças que se encontrem no bocal.
Filtros
O aspirador dispõe de 3 sistemas de fi ltragem. O sistema
tradicional de sacos de lixo foi substituído por um recipiente de
lixo transparente. Em consequência da alta velocidade com que
funciona, este remove não só a sujidade mais grosseira mas
também as partículas mais pequenas que se encontram no “ar
aspirado”.
Deixa de haver a compra de sacos de pó.
Se os resíduos tiverem atingido a marcação MAX do recipiente
do lixo, ou se a potência de aspiração diminuir, proceda da
forma seguinte:
Fig. 1
a fi m de deslizar melhor e para ser
guiado mais facilmente. A escova está
equipada com um cilindro rotativo e
oscilante que é impulsionado pela
corrente de ar. Remove, com especial
efi cácia, sujidade que tenha sido
pisada, pêlos de animais, fi os e cotão.
Escova bem as alcatifas, dando-lhe um
aspecto fresco e limpo.
Empurre o conector na escova para o
símbolo A. Assim é aspirado mais ar.
No símbolo (B) é aspirado correspondentemente menos ar, o que reforça o
poder de sucção.
A escova turbo não é apropriada
para solos lisos, como soalhos,
ladrilhos, etc., pois poderá riscá-los.
Despejar o recipiente do lixo
• Pressione a tecla para soltar
o recipiente do lixo e retire o
mesmo.
PORTUGUÊS
21
05-BS 1273.indd 2105-BS 1273.indd 21 07.03.2008 8:24:38 Uhr07.03.2008 8:24:38 Uhr
Page 22

PORTUGUÊS
PORTUGUÊS
Fig. 2 • Retire cuidadosamente
Fig. 3
pegando-o por ambos os
suportes o dispositivo do fi ltro.
Coloque eventualmente o
recipiente do pó na vertical.
• Despeje o conteúdo do
recipiente do pó. Volte depois
a colocar o dipositivo do
pó. Preste atenção a que o
dispositivo seja bem colocado
numa posição direita.
Fixe de novo o recipiente do
pó, até este encaixar audivelmente.
1. Filtro para protecção do motor
(no recipiente do lixo)
Limpeza das peças de fi ltragem
• Pressione a tecla para soltar
o recipiente do lixo e retire-o
do respectivo compartimento
(consulte a fi g. 1).
• Esvazie o conteúdo do
recipiente para o pó (veja Fig.
2). Desbloqueie o dipositivo
do fi ltro rodando-o um pouco
no sentido dos ponteiros do
relógio (veja Fig. 3). No
segundo passo o dispositvo do
fi ltro deixa-se retirar para baixo.
Limpe o fi ltro de protecção do
motor, sacudindo-o e escovando-o cuidadosamente.
• Torne a montar as peças.
• Fixe de novo o recipiente do
pó, até este encaixar audivelmente.
De três em três esvaziamentos
do recipiente do lixo, proceda
à lavagem do fi ltro à torneira,
deixando correr a água no sentido
contrário ao da aspiração. Torne a
montá-lo só depois de se encontrar
completamente enxuto!
Torne a colocá-las só depois de
estar completamente secas!
Atenção: Nunca lave os fi ltros
na máquina de lavar roupa e não
use nunca um secador para os
enxugar.
Fig. 4
Fig. 5
Tome muita atenção à nota seguinte!
Poderá ser necessário proceder à limpeza dos fi ltros após um
curto tempo de utilização, dependendo tal dos materiais aspirados. No caso de poeiras fi nas, tal limpeza será necessária
mais cedo.
No caso de verifi car que o seu aparelho aspira com menos
força, proceda à limpeza dos fi ltros da forma acima descrita.
Se o aspirador perder repentinamente força durante o funcionamento, tal poderá dever-se a uma obstrução dos fi ltros.
2. Filtro de admissão
Encontra o fi ltro de admissão no
compartimento do recipiente do pó,
veja seta. Pressione a tecla para
soltar o recipiente do lixo e retire-o
do respectivo compartimento. Retire o fi ltro puxando-o para a frente.
Limpe o fi ltro de admissão após
cada 10.º despejo do recipiente
do lixo, ou mais vezes, se for necessário. Certifi que-se de que o
fi ltro está sempre limpo, pois de
contrário não haverá garantia de
o ar circular livremente. Poderá
lavá-lo em água quente, sem usar
detergentes. Volte a colocá-lo só
depois de estar completamente
enxuto!
3. Filtro de saída
O aspirador dispõe ainda de
um fi ltro de saída. Para um bom
funcionamento do fi ltro, recomendamos a sua limpeza de 6 meses..
Este encontra-se na parte traseira
do aspirador, por detrás de uma
grelha de ventilação. Abra a grelha
de ventilação, pressionando a
alavanca que se encontra ao lado
da grelha. Remova-a então, puxando-a para a frente. Retire o fi ltro
e proceda à sua limpeza da forma
descrita acima. Torne a colocar o
fi ltro e feche a grelha de ventilação
na sequência inversa.
Limpeza e arrecadação
Limpeza
• Antes de limpar o aspirador, retire a fi cha da tomada.
• Limpe a caixa com um pano seco.
• Proceda à limpeza do fi ltro protector ao motor depois de
ca. 3. esvaziamentos. O fi ltro encontra-se por trás do saco.
Lave-o em água quente, sem detergentes. Volte a colocá-lo
só depois de ter enxugado completamente.
22
05-BS 1273.indd 2205-BS 1273.indd 22 07.03.2008 8:24:38 Uhr07.03.2008 8:24:38 Uhr
Page 23

PORTUGUÊS
Arrecadação
• Deixar o ferro arrefecer completamente.
• Enrole o fi o até ao fi m.
• Coloque o aspirador em posição horizontal e pendure o
gancho do tubo telescópico no dispositivo de arrumação (7)
que se encontra nas costas do aparelho.
Resolução de avarias
• O aparelho não funciona.
Solução:
Verifi que a conexão à rede de alimentação.
Verifi que a posição do interruptor.
• O aparelho não aspira.
Causa possível:
O depósito do pó e os fi ltros estão sujos.
Solução:
Esvazie e limpe estas componentes.
Causa possível:
Encontra-se um corpo estranho na mangueira ou no bocal
de aspiração.
Solução:
Controle se os acessórios contêm corpos estranhos.
Características técnicas
Modelo:.............................................................................BS 1273
Alimentação da corrente: ..............................220-240 V, 50/60 Hz
Consumo de energia:
P
: ............................................................................ 1800 W
nom.
P
: ............................................................................ 2300 W
max.
Categoria de protecção: .............................................................. ΙΙ
Peso líquido: .......................................................................5,85 kg
Este aparelho foi controlado nos termos das actuais directivas
da CEE aplicáveis, tais como inocuidade electromagnética e
directiva sobre baixa tensão, e fabricado de acordo com as mais
novas prescrições da segurança técnica.
Reserva-se o direito de alterações!
Garantia
O aparelho vendido pela nossa empresa tem uma garantia de
24 meses a partir da data da compra (talão).
Durante o período de garantia, procederemos à remoção grátis
- por reparação, ou, segundo a nossa decisão, por substituição das defi ciências do aparelho ou dos acessórios que provenham
de erros de material ou de fabricação. A prestação de serviços
relacionados com a garantia não prolongarão a mesma, nem
iniciarão um novo prazo de garantia!
O talão de compra consistirá prova desta garantia. Sem o
mesmo, não será possível proceder-se a qualquer troca ou
reparação grátis.
Em caso de garantia, entregue o aparelho completo, juntamente com o talão de compra, na loja onde o mesmo foi comprado.
Não estão incluídos na garantia quaisquer defeitos de
acessórios ou de peças que se desgastem, nem a limpeza, a
manutenção ou a substituição de peças que se desgastem,
devendo tais despesas ser reembolsadas!
A garantia terminará sempre que tenha havido intervenção
alheia nos aparelhos.
Após a garantia
Após a expiração do prazo de garantia, poderão ser efectuados
arranjos por pessoal especializado, ou pelos nossos serviços de
reparações, contra reembolso.
Signifi cado do símbolo „contentor do lixo“
Poupe o nosso meio ambiente, não deite aparelhos eléctricos
para o lixo doméstico.
Dirija-se ao locais destinados à recolha especial de aparelhos eléctricos e entregue aí os aparelhos que não pretende
continuar a utilizar.
Desta forma, contribuirá para ajudar a evitar os potenciais efeitos perniciosos que um falso depósito de objectos usados terão,
tanto no que diz respeito ao ambiente, como à saúde humana.
Dará igualmente a sua contribuição para o reaproveitamento de
materiais, para a reciclagem e outras formas de aproveitamento
de aparelhos eléctricos e electrónicos usados.
Receberá, nas autarquias e juntas de freguesia, informações
sobre os locais onde poderá entregar tais aparelhos.
PORTUGUÊS
23
05-BS 1273.indd 2305-BS 1273.indd 23 07.03.2008 8:24:40 Uhr07.03.2008 8:24:40 Uhr
Page 24

ITALIANO
Norme di sicurezza generali
Prima di mettere in funzione questo apparecchio, leggere molto
attentamente le istruzioni per l’uso e conservarle con cura unitamente al certifi cato di garanzia, allo scontrino e, se possibile,
alla scatola di cartone con la confezione interna. Se passate
l‘apparecchio a terzi, consegnate anche le istruzioni per l‘uso.
• Utilizzare l’apparecchio esclusivamente per scopi privati
e conformemente al tipo di applicazione previsto. Questo
prodotto non è stato concepito ai fi ni di un impiego in ambito
industriale. Non utilizzarlo all’aperto . Proteggerlo dal calore,
nonché dall’esposizione diretta ai raggi solari e dall’umidità
(non immergerlo mai in sostanze liquide) e tenerlo a
distanza da oggetti con spigoli affi lati. Non utilizzare
l’apparecchio con le mani umide. Nel caso in cui si bagni o si
inumidisca l’apparecchio, staccare immediatamente la spina.
• Disattivare l’apparecchio e staccare sempre la spina dalla
relativa presa (si raccomanda di afferrare il connettore e
non il cavo quando si effettua questa operazione) allorché
non si utilizza l’apparecchio, quando si applicano degli
accessori oppure nel caso in cui lo si debba pulire o si siano
manifestate anomalie.
• Non mettere in funzione l’ apparecchio senza sorveglianza.
Se si dovesse assentarsi dal posto di lavoro, spegnere e
disconnettere sempre l’ apparecchio, (prendendo in mano la
spina, non tirando il cavo).
• Controllare periodicamente l’apparecchio per verifi care che
non vi siano danni. Non mettere in funzione l’apparecchio
nel caso in cui sia guasto.
ITALIANO
• Non tentare di riparare l’apparecchio, bensì rivolgersi a un
tecnico autorizzato. Al fi ne di evitare l’insorgere di situazioni
di pericolo, si raccomanda di contattare il costruttore, il nostro servizio di assistenza tecnica o un tecnico ugualmente
qualifi cato per la sostituzione del cavo di alimentazione
difettoso con un cavo equivalente.
• Utilizzare esclusivamente accessori originali.
• Rispettare le seguenti “Speciali norme di sicurezza“.
Bambini e persone fragili
• Per sicurezza tenere l’imballaggio (sacchetto di plastica,
scatola, polistirolo, ecc,) fuori dalla portata dei bambini.
AVVISO!
Non lasciar giocare i bambini piccoli con la pellicola.
Pericolo di soffocamento!
• Per proteggere i bambini o le persone con abilità ridotte dai
pericoli delle apparecchiature elettriche, fate in modo che
questo apparecchio venga impiegato solo sotto sorveglianza. Questo apparecchio non è un giocattolo. Non lasciate
che i bambini piccoli lo usino per giocare.
Speciali norme di sicurezza
• Non utilizzare l’apparecchio per aspirare sostanze liquide o
umide.
• Non utilizzare l’apparecchio per aspirare ceneri ancora
calde oppure oggetti affi lati o acuminati.
• Non utilizzare l’apparecchio in ambienti umidi.
• Non utilizzare mai l’apparecchio senza fi ltro. Dopo aver usato l’aspirapolvere, accertarsi sempre che il fi ltro sia installato
correttamente nella posizione corrispondente.
• Durante l’utilizzo dell’apparecchio, tenere la bocchetta
dell’aspiratore lontana da capelli, abiti e da altre parti del
corpo.
• Tenere l’aspiratore lontano dalle fonti di calore quali i
radiatori, il forno, ecc.
• Quando si chiude lo sportello prestare attenzione che il cavo
non rimanga impigliato o venga tirato lungo spigoli vivi o
angoli.
• Non passare con l’aspirapolvere sopra il cavo.
• L’apparecchio non deve essere impiegato per aspirare
schegge di vetro, giocattoli piccoli, aghi, graffe, cenere
bollente, mozziconi di sigaretta accesi o fi ammiferi e simili.
Elementi di comando
1 Grata di ventilazione
2 Collegamento del tubo fl essibile
3 Regolatore della potenza di aspirazione
4 Impugnatura
5 Pulsante del sistema avvolgicavo
6 Interruttore On/Off
7 Scocca portaccessori
8 Coperchio fi ltro di scarico
9 Tasto per togliere il sacchettino della polvere
10 Contenitore della polvere con fi ltro per protezione
11 Gancio nel tubo aspiratore
12 Bocchetta per pavimenti
13 Tubo di aspirazione telescopico
14 Supporto accessori
15 Bocchetto per pavimenti a parchetti
16 Spazzola aspirante turbo
17 Spazzola
18 Lancia per fughe
19 Bocchetta divani
del mototre
Accessori
Messa in funzione
• Inserire la testina di collegamento del fl essibile di aspirazione nel corrispettivo collegamento fi no al punto di arresto
meccanico, premendo a questo scopo contemporaneamente i tasti. Per sganciare il fl essibile, premere di nuovo i
tasti sulla testina di collegamento.
• Tenere premuti i tasti e poi estrarre il fl essibile.
•
Eventualmente infi lare il tubo di aspirazione nell’impugnatura.
Utilizzo dell’apparecchio
1. Montare gli accessori.
2. Srotolare il cavo in modo da ottenere la lunghezza desiderata e collegare quindi la spina in una presa con messa a terra
da 230 V, 50 Hz installata conformemente alle disposizioni
vigenti in materia. Successivamente, mettere in funzione
l’apparecchio azionando l’interruttore di attivazione/disattivazione (ON/OFF).
24
05-BS 1273.indd 2405-BS 1273.indd 24 07.03.2008 8:24:40 Uhr07.03.2008 8:24:40 Uhr
Page 25

ITALIANO
3. Regolare la potenza di aspirazione servendosi dell’apposito
regolatore di potenza (Min – Max).
4. Utilizzare quindi l’apparecchio operando in modo da usare
una velocità sempre costante. Non è necessario esercitare
pressione sull’apparecchio.
Avvertenza: prestare attenzione al raggio d’azione consentito, il
quale dipende dalla lunghezza del cavo!
Regolatore della potenza di aspirazione
Potenza di aspirazione bassa: per tende e materiali delicati
Potenza di aspirazione media: per tappeti in velluto a pelo lun-
Potenza di aspirazione elevata: per pavimenti e tappeti robusti
Dispositivo avvolgicavo per il cavo di allacciamento alla
rete
Si raccomanda di estrarre il cavo soltanto fi no al contrassegno
in colore giallo. Non tirare mai, in nessun caso, il cavo sino al
contrassegno rosso, in quanto il dispositivo avvolgicavo potrebbe danneggiarsi. I danni di questo genere non sono coperti da
garanzia.
Riavvolgimento del cavo
Premere il pulsante relativo al dispositivo avvolgicavo e
accompagnare il cavo con la mano. Si consiglia di tenere il
cavo, in modo da impedire movimenti violenti e disordinati del
medesimo.
Tubo di aspirazione a telescopio
Grazie al tubo di aspirazione regolabile
in altezza è possibile un adattamento
ottimale alle condizioni fi siche.
Sbloccare l’aggancio premendo il tasto
in direzione della freccia.
Portare il tubo di aspirazione all’altezza
desiderata. Per bloccare sganciare il
tasto fi no allo scatto.
Bocchette
Bocchetta a spazzola
e per giunti:
Bocchetta divani: Per la pulizia di poltrone, tendaggi, ecc.
Bocchetta
per pavimenti:
go e per pavimenti in tessuto
Per la pulizia di imbottiti, tende, angoli,
fessure eccetera.
Per la pulizia di tappeti o di superfi ci
lisce.
Pavimenti lisci:
Con il piede abbassare la leva con il
simbolo della spazzola „ “.
Le spazzole diventano in questo modo
visibili.
Tappeti:
Con il piede portare la leva sul simbolo
„
“.
Bocchetto per pavimenti a parchetti:
Spazzola aspirante
turbo:
Staccare le bocchette: Si staccano girandole leggermente.
Valvola di registro dell’aria
Aprire la valvola di registro dell’aria situata sull’impugnatura del
tubo fl essibile in modo da regolare la quantità di aria oppure per
staccare le parti rimaste aderenti alla bocchetta.
Filtri
L’apparecchio dispone di 3 sistemi di fi ltri. Il sistema convenzionale del sacchettino da polvere è stato sostituito da un contenitore per la polvere trasparente. In questo raccoglipolvere tutto
viene girato a mulinello grazie all’elevata velocità di corrente
dall’aria “aspirata”: dai pezzi di sporco più grossi alle particelle
di polvere più fi ni.
Non serve più acquistare sacchetti per la polvere.
Se i residui di polvere hanno raggiunto la marcatura MAX sul
contenitore della polvere oppure la potenza di aspirazione
diminuisce, proseguire in modo seguente:
Fig. 1
Il bocchetto per pavimenti è scorrevole
grazie alle rotelle. Per superfi ci più
grandi come parchetti, laminato oppure
piastrelle, ecc..
Il bocchetto per pavimenti è scorrevole
grazie alle rotelle. La spazzola è dotata
di un cilindro rotativo ed uno oscillante,
che vengono messi in azione dalla
corrente d’ aria. Elimina effi cacemente
qualsiasi sporcizia incrostata, peli di
animali, fi li e peli di tutti i generi. Il pelo
del tappeto così spazzolato ha un
aspetto fresco.
Spingere l‘interruttore che si trova sulla
spazzola sul simbolo A, così si aspira
più aria. Spingendolo sul simbolo (B)
se ne aspira meno. Così si intensifi ca
la forza di aspirazione.
Osservare che la spazzola aspirante
turbo non è adatta per pavimenti
lisci, p.e. parchetti, laminati, ecc.,
la superfi cie potrebbe essere
danneggiata.
Svuotare il sacchettino
• Premere il tasto per sbloccare
il sacchettino e prelevare il
sacchettino.
ITALIANO
25
05-BS 1273.indd 2505-BS 1273.indd 25 07.03.2008 8:24:40 Uhr07.03.2008 8:24:40 Uhr
Page 26

ITALIANO
Fig. 2 • Con cautela sfi lare l‘inserto
Fig. 3
ITALIANO
fi ltro afferrando i due supporti.
Mettere il contenitore per la
polvere eventualmente in
posizione verticale.
• Svuotare il contenitore
della polvere. Quindi reinserire
l‘inserto fi ltro. Badare che
l‘inserto fi ltro venga inserito
bene e diritto.
Fissare di nuovo il contenitore
della polvere fi no a quando si
sento lo scatto di arresto.
1. Filtro salvamotore
(nel raccoglipolvere)
Pulizia del supporto fi ltro
• Per sbloccare premere il tasto
del sacchettino da polvere e
prelevarlo (vedi disegno 1).
• Svuotare il contenitore della
polvere (v. fi g. 2). Sbloccare
l‘inserto fi ltro girando un po‘
in senso orario (v. fi g. 3). Nel
secondo passo è possibile estrarre l‘inserto fi ltro dal basso.
Pulire il fi ltro di protezione del
motore sbattendolo e spazzolandolo leggermente.
• Reinserire i pezzi.
• Fissare di nuovo il contenitore
della polvere fi no a quando si
sento lo scatto di arresto.
Dopo aver svuotato il raccoglipolvere tre volte o nel caso di molto
sporco, pulire il fi ltro mettendolo
sotto l’acqua corrente nella
direzione opposta all’aspirazione.
Reinserirlo solo quando è completamente asciutto!
Inserirlo nuovamente solo se è
completamete asciutto!
Attenzione: Non lavare mai i fi ltri
nella lavatrice e non usare un
asciugacapelli per asciugare.
Fig. 4
Fig. 5
Notare bene questa indicazione!
La pulizia può essere necessaria anche dopo brevi periodi, a
seconda delle condizioni dell’ uso, p. e. aspirando polvere fi ne.
Se la potenza di aspirazione dovesse diminuire, pulire il fi ltro
come descritto.
Se la potenza di aspirazione dovesse diminuire improvvisamente durante l’ uso, la causa potrebbe essere un intasamento del fi ltro.
2. Filtro di aspirazione
Il fi ltro d‘entrata si trova nel contenitore per la polvere, v. freccia.
Per sbloccare premere il tasto del
sacchettino da polvere e prelevarlo.
Estrarre il fi ltro tirandolo in avanti.
Pulre il fi ltro d‘ ammissione dopo
aver svuotato per ca 10 volte il
contenitore, oppure quando risulta
necessario. Osservare che il fi ltro
sia sempre pulito, per garantire
la circolazione d’ aria. In caso di
necessità, è possibile pulire il fi ltro
utilizzando dell’acqua calda senza
additivi. Si raccomanda di inserire
il fi ltro esclusivamente dopo averlo
asciugato perfettamente!
3. Filtro di scarico
L’apparecchio dispone inoltre di un
fi ltro di scarico. Per garantire una
funzione perfetta del fi ltro, raccomandiamo di pulirlo ogni 6 mesi.
Questo fi ltro è situato nella parte
posteriore dell’apparecchio, dietro
la griglia di areazione. Aprire la
griglia di ventilazione premendo la
leva che si trova al lato della griglia
di ventilazione. Togliere quindi la
grata tirandola in avanti. Estrarre
il fi ltro e pulirlo rispettando le indicazioni già fornite in precedenza.
Applicare nuovamente il fi ltro e
chiudere la griglia di aerazione,
effettuando nella sequenza inversa
le operazioni descritte.
Pulizia e conservazione
Pulizia
• Prima di procedere alla pulizia, è indispensabile staccare la
spina dalla presa di rete.
• Pulire l’alloggiamento servendosi di un panno asciutto.
• Pulire il fi ltro di protezione del motore ogni 3. svuotamenti.
Questo fi ltro è situato dietro il sacchetto di spolvero.
Pulire il fi ltro utilizzando dell’acqua calda senza additivi. Si
raccomanda di inserire il fi ltro esclusivamente dopo averlo
asciugato perfettamente.
26
05-BS 1273.indd 2605-BS 1273.indd 26 07.03.2008 8:24:41 Uhr07.03.2008 8:24:41 Uhr
Page 27

ITALIANO
Conservazione
• Lasciate raffreddare completamente l’apparecchio.
• Riavvolgere completamente il cavo.
• Appoggiare l‘ apparecchio verticalmente e appendere il
gancio del tubo telescopico nel dispositivo di stazionamento
(7) sul retro dell‘ apparecchio.
Rimozione guasti
• L’apparecchio è senza funzione.
Rimedio:
Esaminare il collegamento rete.
Esaminare la posizione dell’interruttore.
• L’apparecchio non aspira.
Possibile causa:
Il contenitore polvere oppure I fi ltri sono sporchi
Rimedio:
Svuotare oppure lavare gli elementi.
Possibile causa:
Nel fl essibile o nell’ugello si trova un oggetto.
Rimedio:
Controllare gli accesori in caso di otturazioni dovute ad
oggetti.
Dati tecnici
Modello: ............................................................................ BS 1273
Alimentazione rete: .......................................220-240 V, 50/60 Hz
Consumo di energia:
P
: ............................................................................ 1800 W
nom.
P
: ........................................................................... 2300 W
mass.
Classe di protezione: ................................................................... ΙΙ
Peso netto: .........................................................................5,85 kg
Questo apparecchio è stato controllato sulla base di tutte le
direttive CE attuali in vigore in questo settore, quali per esempio
la normativa in materia di compatibilità elettromagnetica e
la direttiva in materia di bassa tensione, ed è stato costruito
conformemente alle norme di sicurezza più moderne.
Con riserva di apportare modifi che tecniche.
Garanzia
Per l’apparecchio da noi messo in commercio ci assumiamo una
garanzia di 24 mesi dalla data di acquisto (scontrino).
Durante la garanzia noi ci impegniamo ad eliminare gratuitamente i guasti dell’apparecchio o degli accessori, dovuti a difetti
di materiale o di fabbricazione, riparandoli o, a nostra discrezione, sostituendoli. Le prestazioni in garanzia danno luogo a una
proroga della garanzia né danno diritto ad una nuova garanzia!
Per la garanzia è suffi ciente lo scontrino di acquisto. Senza
questo scontrino non sussiste il diritto né ad una sostituzione né
ad una riparazione gratuita.
Nel caso si ricorra alla garanzia, restituire al rivenditore
l’apparecchio completo in ogni sua parte, nell’imballaggio
originale unitamente allo scontrino.
La riparazione di pezzi d’uso ovvero soggetti a logoramento
come anche operazioni di pulizia e manutenzione o la sostituzione di pezzi soggetti a logoramento non rientrano nella garanzia
e quindi sono a pagamento!
La garanzia si annulla nel caso di intervento da parte di terzi.
Dopo la garanzia
Al termine della garanzia le riparazioni possono essere eseguite
deitro pagamento dal corrispettivo negozio specializzato o
servizio riparazioni.
ITALIANO
Signifi cato del simbolo „Eliminazione“
Salvaguardare l’ ambiente, gli elettrodomestici non vanno
eliminati come rifi uti domestici.
Per l’ eliminazione degli elettrodomestici, fare uso dei posti di
raccolta previsti per questo tipo e porre quegli elettrodomestici
che non sono più in uso.
Si contribuisce così ad evitare un effetto potenziale sull’ ambiente e sulla salute, dovuto magari ad una eliminazione sbagliata.
Questo signifi ca un contributo personale alla riutilizzazione, al
riciclaggio e altre forme di utilizzazione di elettrodomestici ed
apparecchi elettronici usati.
Si possono trovare le corrispondenti informazioni sugli appositi
luoghi di raccolta, nelle amministrazioni dei comuni.
27
05-BS 1273.indd 2705-BS 1273.indd 27 07.03.2008 8:24:42 Uhr07.03.2008 8:24:42 Uhr
Page 28

NORSK
Generelle sikkerhetsanvisninger
Les nøye gjennom bruksanvisningen før du tar apparatet i bruk.
Ta godt vare på bruksanvisningen, garantibeviset, kassalappen
og helst også esken med innvendig emballasje. Gis apparatet
videre til en tredjeperson, må bruksanvisningen også følge med.
• Apparatet må bare brukes til private formål og de formål
det der er beregnet på. Dette apparatet er ikke ment for
industriell bruk. Det må ikke benyttes utendørs. Hold det
i væsker) og skarpe kanter. Ikke bruk apparatet hvis du er
fuktig på hendende. Hvis apparatet har blitt fuktig eller vått,
må du trekke ut støpselet med en gang.
• Slå av apparatet og trekk alltid støpselet ut av stikkontakten (trekk i støpselet, ikke i ledningen) når du ikke bruker
apparatet, fest tilbehørsdeler for rengjøring eller ved feil.
• Ikke bruk apparatet uten oppsikt. Hvis du forlater arbeidsplassen, må du alltid slå apparatet av eller trekke støpselet
ut av stikkontakten (trekk i støpselet, ikke i ledningen).
• Kontroller jevnlig om det er skader på apparat og ledning.
Skadede apparater må ikke brukes.
• Ikke reparer apparatet selv. Oppsøk en autorisert fagmann.
Hvis en nettledning er defekt, må du sørge for at den kun
skiftes ut med en lik ledning, for slik å unngå farer. Dette må
gjøres av produsenten, vår kundetjeneste eller en lignende
kvalifi sert person.
• Bruk bare originaltilbehør.
• Legg merke til “Spesielle sikkerhetsanvisninger” nedenfor.
Barn og skrøpelige personer
• La aldri emballasjedeler ligge innenfor barns rekkevidde
(plastposer, kartong, styropor, osv.).
NORSK
ADVARSEL!
Ikke la små barn leke med plast. De kan kveles!
• Pass på at apparatet kun brukes under oppsikt for å beskytte barn og skrøpelige personer mot faren for elektrisk støt.
Apparatet er ikke et leketøy. Ikke la små barn leke med det.
unna varme, direkte solskinn, fuktighet (senk det aldri ned
Spesielle sikkerhetsanvisninger
• Ikke sug opp fuktighet eller væsker!
• Ikke sug opp varm aske, spisse eller skarpe gjenstander!
• Ikke bruk apparatet i våtrom!
• Bruk aldri støvsugeren uten fi lter. Kontroller at fi lteret sitter
korrekt etter at du har satt det inn!
• Hold hår, klær og kroppsdeler borte fra støvsugermunnstykket når støvsugeren er i drift!
• Hold støvsugeren borte fra varmekilder som radiatorer,
ovner osv.!
• Ledningen må ikke komme i klem i døråpninger eller trekkes
langsetter skarpe hjørner.
• Ikke rull over ledningen med støvsugeren.
• Apparatet må ikke brukes for å suge opp glasskår, små
leker, nåler, binders, varm aske, glødende sigarettstumper
eller brennende fyrstikker osv.
Oversikt over betjeningselementene
1 Spjeld
2 Slangetilkobling
3 Regulator for sugeeffekt
4 Bærehåndtak
5 Knapp for ledningsoppvikling
6 Av-/påbryter
7 Parkeringsstøtte
8 Deksel utsugingsfi lter
9 Knapp for å løsne støvbeholderen
10 Støvbeholder med motorfi lter
11 Krok på sugerøret
12 Gulvmunnstykke
13 Teleskopsugerør
14 Holder for tilbehør
Tilbehør
15 Parkettbørste
16 Turbobørste
17 Børstemunnstykke
18 Fugemunnstykke
19 Møbelmunnstykke
Ta i bruk apparatet
•. Stikk forbindelseshodet på sugeslangen inn i slangetilkoblingen. Den skal gå mekanisk i lås. Trykk da samtidig på de to
knappene. For å løsne slangen igjen trykker du en gang til
på knappene på forbindelseshodet.
•. Hold knappen inne og dra deretter ut slangen.
• Fest ev. røret til håndtaksdelen.
Bruke apparatet
1. Monter tilbehøret.
2. Kveile ut nødvendig ledningslengde, stikk deretter støpselet
inn i en forskriftsmessig installert jordet kontakt, 230 V,
50 Hz, og slå apparatet på med bryteren.
3. Still inn sugeeffekten med sugeeffektregulatoren (Min til
Max).
4. Arbeid med jevn hastighet. Det er ikke nødvendig å presse.
Tips: Husk på at lengden på ledningen gir deg begrenset
rekkevidde!
Sugeeffektregulator
Lav sugeeffekt: til gardiner, ømfi ntlige stoffer.
Middels sugeeffekt: til langhårede velurtepper og tekstilgulv.
Høy sugeeffekt: til robuste tepper og gulv.
Oppkveilingsmekanisme for ledningen
Ledningen må bare trekkes ut til det gule merket. Trekk aldri
ledningen helt til det røde merket, da ledningsoppkveilingen kan
ta skade av det. Slike skader går ikke inn under garantien.
Oppkveiling
Trykk på knappen for ledningsoppkveiling og styr ledningen i
riktig retning. Hold fast ledningen for å unngå at den slår rundt.
28
05-BS 1273.indd 2805-BS 1273.indd 28 07.03.2008 8:24:43 Uhr07.03.2008 8:24:43 Uhr
Page 29

NORSK
Teleskoprør
Røret kan justeres i høyden og dermed
tilpasses individuelt til din kroppshøyde.
Løsne koblingen ved å trykke på
knappen i pilretningen.
Skyv på rørene etter behov. For å låse
dem løsner du knappen til du hører at
den går i lås.
Munnstykkeelement
Fuge- og Børstemunnstykke:
Møbelmunnstykke: Til rengjøring av puter, gardiner osv.
Gulvmunnstykke: Til rengjøring av tepper eller glatte
Parkettbørste: Gulvmunnstykket har hjul for at det
Turbobørste: Gulvmunnstykket har hjul for at det
Løsne munnstykkene: Trekk dem forsiktig av.
Luftspjeld
Åpne luftspjeldet på slangehåndtaket for å regulere luften eller
for å løsne deler som har festet seg til munnstykket.
Filter
Apparatet har tre fi ltersystemer. Det tradisjonelle støvposesystemet er erstattet av en gjennomsiktig støvbeholder. Den høye
strømningshastigheten gjør at alt fra grovt smuss til de fi neste
svevepartikler virvles ut av “sugeluften” og inn i støvbeholderen.
Du slipper å kjøpe støvsugerposer.
Til støvsuging av møbler, gardiner og i
hjørner, sprekker osv.
fl ater.
Glatte gulv:
Trykk spaken med børstesymbolet
„
er nå synlige.
Tepper:
Bruk foten og sett spaken på symbolet
„
skal være lettere å skyve. Til større
fl ater, som parkett, laminat eller fl iser.
skal være lettere å skyve. Børsten har
én roterende og én svinglagret børstevalse. Begge drives av luftstrømmen.
Fjerner nedtråkket smuss, dyrehår,
tråder og lo svært effektivt. Teppefl oren
børstes opp igjen.
Hvis du skyver bryteren på børsten
til symbol A, suges det inn mer luft.
På symbol (B) suges det tilsvarende
mindre luft. Det forsterker sugekraften.
Merk at turbobørsten ikke er egnet
til glatte gulv, f.eks. parkett eller
laminat. Overfl aten kan bli skadet.
“ ned med foten. Børstene
“.
Hvis støvrestene har nådd MAX-merket på støvbeholderen eller
sugekraften blir dårligere, går du fram på følgende måte:
Ill. 1
Ill. 2
Ill. 3
Tømme støvbeholderen
• Trykk på knappen for å løsne
støvbeholderen og ta den ut.
• Trekk fi lterinnsatsen forsiktig
ut ved å ta tak i de to festene.
Sett gjerne støvbeholderen
loddrett.
• Tøm ut innholdet i støvbeholderen. Sett deretter inn igjen
fi lterinnsatsen. Pass på at
fi lterinnsatsen settes ordentlig
inn, i rett stilling.
Fest støvbeholderen igjen. Du
skal høre at den går i lås.
1. Beskyttelsesfi lter for motoren
(i støvbeholderen)
Rense fi lterinnsatsen
• Trykk på knappen for å løsne
støvbeholderen og ta den ut
(se ill. 1).
• Tøm ut innholdet i støvbeholderen (se ill. 2). Løsne fi lterinnsatsen ved å vri den kort med
klokken (se ill. 3). I neste trinn
kan du ta ut fi lterinnsatsen ved
å dra den nedover. Rengjør
motorbeskyttelsesfi lteret ved å
banke ut støvet og børste godt
ut av fi lteret.
• Sett komponentene inn igjen.
• Fest støvbeholderen igjen. Du
skal høre at den går i lås.
Etter hver tredje tømming eller
ved kraftigere skitt rengjør du
fi lteret ved å helle rennende vann
gjennom fi lterfl eecen mot blåseretningen. Ikke sett det inn igjen før
det er helt tørt!
Ikke sett det inn igjen før det er
helt tørt!
OBS!: Filteret må aldri vaskes
i vaskemaskin og aldri tørkes
med føner.
NORSK
29
05-BS 1273.indd 2905-BS 1273.indd 29 07.03.2008 8:24:43 Uhr07.03.2008 8:24:43 Uhr
Page 30

NORSK
Ill. 4
Ill. 5
2. Innsugingsfi lter
Innsugingsfi lteret fi nner du i støvbeholderrommet, se pilen. Trykk på
knappen for å løsne støvbeholderen og ta den ut. Dra fi lteret ut
forover. Rens innsugingsfi lteret ca.
hver 10. gang du tømmer støvbeholderen, eller oftere ved behov.
Sørg for at fi lteret alltid er rent,
ellers kan luftsirkulasjonen svikte.
Ved behov kan du rengjøre fi lteret i
varmt vann, uten tilsetninger. Vent
til det er helt tørt før du setter det
inn igjen!
3. Utslippsfi lter
I tillegg har apparatet et utslippsfi lter. For å sikre at fi lteret fungerer
Utbedre feil
• Apparatet fungerer ikke.
Tiltak:
Sjekk tilkoblingen til strømnettet.
Sjekk bryterens innstilling.
• Apparatet suger ikke opp.
Mulig årsak:
Støvbeholderen eller fi ltrene er tilsmusset.
Tiltak:
Tøm eller rengjør bestanddelene.
Mulig årsak:
Et fremmedlegeme sitter fast i slangen eller munnstykket.
Tiltak:
Sjekk tilbehøret for fremmedlegemer.
som det skal, anbefaler vi at du
rengjør det hver sjette måned.
Dette fi nner du i bakre del av
støvsugeren, bak et Ventilasjonsgitter. Åpne ventilasjonsgitteret ved
å trykke på spaken på siden av
gitteret. Trekk så gitteret ut forover.
Ta ut fi lteret og rengjør det slik det
er beskrevet. Sett fi lteret inn igjen
og lås ventilasjonsgitteret i motsatt
rekkefølge.
Modell: .............................................................................. BS 1273
Spenningsforsyning: .....................................220-240 V, 50/60 Hz
Inngangsstrøm:
P
: ............................................................................ 1800 W
nom.
P
: ............................................................................ 2300 W
max.
Beskyttelsesklasse: ..................................................................... ΙΙ
Tekniske data
Nettovekt: ...........................................................................5,85 kg
NB! Viktig opplysning!
Det kan også bli nødvendig å rengjøre fi ltrene oftere. Dette
avhenger av hva støvsugeren er brukt til, for eksempel å fjerne
NORSK
fi nt støv.
Hvis støvsugeren får redusert sugeeffekt, må du rengjøre
fi ltrene som beskrevet ovenfor.
Hvis sugeeffekten plutselig blir dårligere mens du bruker støvsu-
Dette apparatet har blitt testet i henhold til alle aktuelle CEretningslinjer som det rammes av, f.eks. elektromagnetisk
toleranse og direktiver om lavspenning. Det er laget i henhold til
dagens nyeste sikkerhetstekniske forskrifter.
Med forbehold om tekniske endringer!
geren, kan det være en indikasjon på at fi ltrene er tilstoppet.
Rengjøring og oppbevaring
Rengjøring
• Trekk støpselet ut av stikkontakten før rengjøring!
• Rengjør kassen med en tørr klut.
• Rengjør beskyttelsesfi lteret for motoren ca. ved hver 3.
tømming.
Rengjør fi lteret i varmt vann, uten tilsetningsmidler. Ikke sett
det inn igjen før det har tørket helt.
Oppbevaring
• La apparatet avkjøles helt.
• Rull ledningen helt opp.
• Sett apparatet vannrett og hekt kroken på teleskoprøret inn i
parkeringsstøtten (7) på baksiden av apparatet.
30
05-BS 1273.indd 3005-BS 1273.indd 30 07.03.2008 8:24:43 Uhr07.03.2008 8:24:43 Uhr
Page 31

NORSK
Garanti
For apparat som vi har solgt, påtar vi oss en garanti på 24
måneder fra kjøpsdato (kassalapp).
Innenfor garantitiden fjerner vi mangler på apparat eller tilbehør
uten omkostninger hvis manglene skyldes material- eller
produksjonsfeil. Dette gjør vi ved reparasjon eller – etter vår
vurdering – bytting.
Garantiytelser medfører ingen forlengelse av garantitiden, og det
oppstår heller ikke noe krav på en ny garanti på grunn av dette!
Som garantibevis gjelder kjøpsbeviset. Uten dette beviset kan
du ikke få byttet eller reparert apparatet gratis.
I forbindelse med garanti ber vi om at du gir hele apparatet i ori-
ginalemballasjen sammen med kassalappen til din forhandler.
Verken defekter på forbrukstilbehør og slitasjedeler eller rengjøring, vedlikehold og utskifting av slitasjedeler går inn under
garantien. Slike ting er derfor kostnadspliktige!
Garantien utgår ved inngrep utenfra.
Etter garantien
Etter at garantitiden har gått ut, kan reparasjoner utføres av den
aktuelle faghandelen eller reparasjonsservice mot betaling.
31
05-BS 1273.indd 3105-BS 1273.indd 31 07.03.2008 8:24:45 Uhr07.03.2008 8:24:45 Uhr
NORSK
Page 32

ENGLISH
General Safety Instructions
Read the operating instructions carefully before putting the
appliance into operation and keep the instructions including the
warranty, the receipt and, if possible, the box with the internal
packing. If you give this device to other people, please also pass
on the operating instructions.
• The appliance is designed exclusively for private use
and for the envisaged purpose. This appliance is not fi t
for commercial use. Do not use it outdoors
from sources of heat, direct sunlight, humidity (never dip it
into any liquid) and sharp edges. Do not use the appliance
with wet hands. If the appliance is humid or wet, unplug it
immediately.
• When cleaning or putting it away, switch off the appliance
and always pull out the plug from the socket (pull on the
plug, not the cable) if the appliance is not being used and
remove the attached accessories.
• Do not operate the machine without supervision. If you
should leave the workplace, always switch the machine off
or remove the plug from the socket (pull the plug itself, not
the lead).
• Check the appliance and the cable for damage on a regular
basis. Do not use the appliance if it is damaged.
• Do not try to repair the appliance on your own. Always
contact an authorized technician. To avoid the exposure
to danger, always have a faulty cable be replaced only by
the manufacturer, by our customer service or by a qualifi ed
person and with a cable of the same type.
• Use only original spare parts.
• Pay careful attention to the following “Special Safety Instructions“.
Children and Frail Individuals
• In order to ensure your children‘s safety, please keep all
packaging (plastic bags, boxes, polystyrene etc.) out of their
reach.
ENGLISH
WARNING!
Caution! Do not allow small children to play with the foil
as there is a danger of suffocation!
• In order to protect children or frail individuals from the hazards of electrical equipment, please ensure that this device
is only used under supervision. This device is not a toy. Do
not allow small children to play with it.
. Keep it away
Special Safety Instructions
• Do not suck up liquids!
• Do not suck up hot ashes or pointed or sharp objects!
• Do not use the appliance in humid rooms!
• Never use without the fi lter. Check that the fi lter is inserted
correctly!
• hair, clothing and body parts away from the vacuum nozzle
during use!
• Keep the vacuum cleaner away from sources of heat like
radiators, ovens, etc.!
• When the door is closed the cable must not be trapped or
pulled along sharp edges or corners.
• Do not roll over the cable with the vacuum cleaner.
• The device must not be used to vacuum up broken glass,
small toys, needles, paper clips, hot ash, burning cigarette
ends or matches etc.
Overview of the Components
1 Air slide
2 Hose connection
3 Vacuum power regulator
4 Carrying handle
5 Cable-winding key
6 On/off switch
7 Parking assistance
8 Cover of outlet fi lter
9 Button for releasing the new dust container
10 Dust container with motor protection fi lter
11 Hook on the suction tube
12 Floor nozzle
13 Telescopic suction tube
14 Accessory holder
Accessories
15 Parquet brush
16 Turbo brush
17 Brush nozzle
18 Crevice nozzle
19 Upholstery nozzle
Start-up
• Insert the connection head of the suction hose into the hose
connector until it locks in place. To do so, please press the
buttons simultaneously. In order to release the hose again,
please press the buttons once more on the connection
head.
• Keep the buttons pressed down and then pull out the hose.
• Insert the vacuum tube into the handle if required.
Using the Appliance
1. Fit on the accessory.
2. Unwind the necessary length of cable and insert the plug in
a duly installed 230 V/50 Hz protective contact socket.
3. Set the vacuum power with the vacuum power regulator
(Min to Max).
4. Vacuum at a steady speed. There is no need to exert
pressure.
Attention: pay attention to the range that can be covered with
the cable length.
Vacuum power regulator
Low vacuum power: For curtains and delicate fabrics
Medium vacuum power: For long-pile velour carpets and textile
fl ooring
High vacuum power: For sturdy rugs and fl oors
32
05-BS 1273.indd 3205-BS 1273.indd 32 07.03.2008 8:24:45 Uhr07.03.2008 8:24:45 Uhr
Page 33

ENGLISH
Cable winding device
Pull out the cable up to the maximum length indicated with the
yellow mark. Never pull the cable out up to the red mark as the
cable winding can be damaged. Said damages are not covered
by the warranty.
Winding
Press the cable winding button and guide the cable. Hold the
cable to avoid wrapping.
Telescope Vacuum Pipe
The height-adjustable vacuum pipe
enables individual alignment to your
height.
Unlock the coupling by pressing the key
in the direction of the arrow.
Slide the vacuum pipe to the desired
length. To lock the device, release the
key until you hear it lock in place.
Nozzle accessories
Groove and brush
nozzle:
Upholstery nozzle: For cleaning upholstery, curtains etc.
Floor nozzle: To clean carpets or smooth surfaces.
Parquet brush: The fl oor nozzle is fi tted with rollers for
Turbo brush: The fl oor nozzle is fi tted with rollers for
Releasing the nozzles: Pull these off while turning slightly.
For vacuuming upholstery, curtains and
in corners and crevices etc.
Smooth fl oors:
Press down the lever with the brush
symbol „ “ with your foot.
The brush is now visible..
Carpets:
Move the lever with your foot to the
„
improved manoeuvrability. For large
areas such as parquet, laminate or
tiles etc.
improved manoeuvrability. The brush is
equipped with a rotating and swivelling
brush roller driven by the air current.
Removes ground-in dirt, animal hairs,
threads and fl uff particularly thoroughly.
The carpet pile is brushed up to look
almost new.
Move the switch on the brush to Symbol A in order to increase the quantity
of suction air. In the case of symbol
(B) this is correspondingly less. This
increases the suction power.
Please note that the turbo brush is
not suitable for smooth fl oors, e.g.
parquet, laminate etc. as the surface
might be damaged.
“symbol.
Air Slide
Open the air slide on the hose handle in order to regulate the
airfl ow or to clear any particles sticking to the nozzle.
Filter
Your machine has three fi lter systems. The traditional dust bag
system has been replaced by a transparent dust container. In
this, coarse dirt particles and tiny particles fl oating in the air are
swirled out of the suction air by the high speed of the air current.
It is therefore unnecessary to buy dust bags.
Once the dust level has reached the MAX mark on the dust con-
tainer, or the suction power of the vacuum cleaner is reduced,
please proceed as follows:
Ill. 1
Ill. 2 • Pull the fi lter insert out care-
Ill. 3
Emptying the Dust Container
• Press the button to release the
dust container and remove it
from the vacuum cleaner.
fully by the two retainers. Move
the dust container to a vertical
position if necessary.
• Empty the contents of the dust
container. Then put the fi lter
insert back in position. Please
ensure that the fi lter insert is
reinstalled fi rmly in an upright
position.
Attach the dust container again
by locking it in position.
1. Motor Protective Filter
(in the Dust Container)
Cleaning the Filter Element
• Press the button to release
the dust container and then
remove it (see illustration 1).
• Empty the contents of the
dust container (see Illustration
2). Unlock the fi lter insert by
turning it a short distance in
a clockwise direction (see
Illustration 3). In the second
step the fi lter insert can be
pulled out towards the bottom.
Clean the motor protection fi lter
by tapping and gently brushing
out.
• Now replace the components.
• Attach the dust container again
by locking it in position.
ENGLISH
33
05-BS 1273.indd 3305-BS 1273.indd 33 07.03.2008 8:24:45 Uhr07.03.2008 8:24:45 Uhr
Page 34

ENGLISH
Every third time the dust container
is emptied, or in the case of severe
soiling, clean the fi lter by allowing
water to fl ow through the fi lter fabric
against the direction in which the
vacuum cleaner blows. The dust
container should only be reinserted
when it is completely dry!
Now place this back in position
once it has completely dried!
Caution: Never wash the fi lter
in the washing machine, and
please do not use a hairdryer
to dry it.
Ill. 4
Ill. 5
ENGLISH
Important note!
Cleaning may become necessary after a shorter time, depending on the conditions of use, e.g. when vacuuming fi ne dust.
If the suction power of your vacuum cleaner diminishes please
clean the fi lters as described.
If the suction power suddenly diminishes during operation this
may be due to the fi lters being locked.
2. Inlet fi lter
The inlet fi lter is to be found in
the dust fi lter compartment - see
the arrow. Press the button to
release the dust container and then
remove it. Pull the fi lter out towards
the front. Clean the inlet fi lter
approximately every tenth time the
dust container is emptied, or more
frequently if necessary. Please
ensure that the fi lter is always
clean, as otherwise air circulation cannot be guaranteed. If
necessary, the fi lter can also be
washed in warm water without any
additives. Place it back into place
only once it is completely dry!
3. Outlet fi lter
The appliance is also equipped
with an outlet fi lter. In order to ensure that the fi lter works correctly,
we recommend that you replace
it every six months. It is located
on the rear part of your appliance
behind a ventilation grid. Open
the ventilation grille by pressing
the lever on its side. Then pull the
grille out towards the front. Remove
the fi lter and clean as described
above. Fit the fi lter back into place
and close the ventilation grid by
following the steps above in the
opposite order.
Cleaning and storage
Cleaning
• Pull the plug out of the socket before cleaning!
• Clean the casing with a dry cloth.
• Clean the motor protection fi lter approximately every 3.
time the vacuum cleaner is emptied. Clean the fi lter in hot
water without additives. Put it back into place only once it is
completely dry.
Storage
• Let the iron cool down completely.
• Wind the cable completely.
• Please position the device horizontally and insert the hook
on the telescopic tube into the parking aid (7) on the back of
the device.
Troubleshooting
• The Device Does Not Work.
Remedy:
Check the connection to the mains.
Check the position of the switch.
• The device does not suck up anything.
Possible Cause:
The dust container or the fi lters are dirty.
Remedy:
Empty or clean the components.
Possible Cause:
There is a foreign body in the suction tube or the nozzle.
Remedy:
Check the accessories for foreign bodies.
Noise development
The sound pressure level in the ear of an operator (LpA) was
measured according to DIN EN ISO 3744.
Sound pressure level detected: 78.0 dB(A) (no limit)
Technical Data
Model: ...............................................................................BS 1273
Power supply: ................................................220-240 V, 50/60 Hz
Power consumption:
P
: ............................................................................ 1800 W
nom.
P
: ............................................................................ 2300 W
max.
Protection class: .......................................................................... ΙΙ
Net weight: .........................................................................5.85 kg
34
05-BS 1273.indd 3405-BS 1273.indd 34 07.03.2008 8:24:46 Uhr07.03.2008 8:24:46 Uhr
Page 35

ENGLISH
This device has been tested according to all relevant current
CE guidelines, such as electromagnetic compatibility and low
voltage directives, and has been constructed in accordance with
the latest safety regulations.
Subject to technical changes without prior notice!
Guarantee
The device supplied by our company is covered by a 24-month
guarantee starting on the date of purchase (receipt).
During the life of the guarantee any fault of the device or its
accessories ascribable to material or manufacturing defects will
be eliminated free of charge by repairing or, at our discretion, by
replacing it. The guarantee services do not entail an extension
of the life of the guarantee nor do they give rise to any right to a
new guarantee!
Proof of the guarantee is provided by the proof of purchase.
Without proof of purchase no free replacement or repair will be
carried out.
If you wish to make a claim under the guarantee please return
the entire machine in the original packaging to your dealer
together with the receipt.
Defects to consumables or parts subject to wearing as well as
cleaning, maintenance or the replacement of said parts are not
covered by the guarantee and hence are to be paid!
The guarantee lapses in case of unauthorized tampering.
After the Expiry of the Guarantee
After the expiry of the guarantee repairs can be carried by the
competent dealer or repair service against the payment of the
ensuing costs.
Meaning of the “Dustbin” Symbol
Protect our environment: do not dispose of electrical equipment
in the domestic waste.
Please return any electrical equipment that you will no longer
use to the collection points provided for their disposal.
This helps avoid the potential effects of incorrect disposal on the
environment and human health.
This will contribute to the recycling and other forms of reutilisation of electrical and electronic equipment.
Information concerning where the equipment can be disposed of
can be obtained from your local authority.
05-BS 1273.indd 3505-BS 1273.indd 35 07.03.2008 8:24:47 Uhr07.03.2008 8:24:47 Uhr
35
ENGLISH
Page 36

JĘZYK POLSKI
Przed uruchomieniem urządzenia proszę bardzo dokładnie
przeczytać instrukcję obsługi. Proszę zachować ją wraz z kartą
gwarancyjną, paragonem i w miarę możliwości również kartonem z opakowaniem wewnętrznym. Przekazując urządzenie
innej osobie, oddaj jej także instrukcję obsługi.
• Proszę wykorzystywać urządzenie jedynie dla prywatnego
• Jeżeli nie korzystacie Państwo z urządzenia, jeżeli chcecie
• Pracującego urządzenia nie należy pozostawiać bez
• Proszę regularnie kontrolować urządzenie pod kątem
• W razie awarii proszę nie naprawiać urządzenia samemu
• Proszę stosować tylko oryginalne akcesoria.
• Prosimy pamiętać o podanych dalej „Specjalnych wska-
Dzieci i osoby niepełnosprawne
• Dla bezpieczeństwa dzieci proszę nie zostawiać swobodnie
JĘZYK POLSKI
• Aby zabezpieczyć dzieci i osoby niepełnosprawne przed
Ogólne wskazówki bezpieczeństwa
celu, jaki został przewidziany dla urządzenia. Urządzenie to
nie zostało przewidziane do użytku w ramach działalności
gospodarczej. Proszę nie korzystać z urządzenia na
zewnątrz. Proszę
bezpośredniego pro
(w żadnym wypadku nie
oraz ostrych krawędzi.
wilgotnymi dłońmi. Jeżeli
proszę natychmiast
Państwo zamontować jakieś akcesoria, w celu wyczyszczenia lub w przypadku jakichkolwiek zakłóceń, proszę zawsze
wyłączyć urządzenie i wyjąć wtyczkę z gniazdka (proszę
pociągnąć za wtyczkę, nie za przewód zasilający).
nadzoru. Jeżeli opuszczają Państwo miejsce pracy, należy
zawsze pamiętać o wyłączeniu urządzenia, wzgl. wyjęciu
wtyczki z gniazda (należy ciągnąć za wtyczkę, nie za
przewód).
uszkodzeń. Proszę nie uruchamiać uszkodzonego
urządzenia.
lecz skorzystać z pomocy autoryzowanego specjalisty.
Jeżeli przewód zasilający nieodłączalny ulegnie uszkodzeniu, to powinien on być wymieniony u producenta
lub w specjalnym zakładzie naprawczym albo przez
wykwalifi kowaną osobę w celu uniknięcia zagrożenia.
zówkach dotyczących bezpiecznego użytkowania“.
dostępnych części opakowania (torby plastikowe, kartony,
styropian itp.).
OSTRZEŻENIE!
Nie pozwalaj dzieciom bawić się folią.
Niebezpieczeństwo uduszenia!
zagrożeniami związanymi z użytkowaniem urządzeń elektrycznych, pamiętaj, aby zawsze zapewnić należyty nadzór. To
urządzenie nie jest zabawką. Nie pozwól dzieciom bawić się
nim.
trzymać urządzenie z daleka od ciepła,
mieniowania słonecznego, wilgoci
zanurzać w substancjach płynnych)
Proszę nie obsługiwać urządzenia
urządzenie jest wilgotne lub mokre,
wyciągnąć wtyczkę.
Specjalne wskazówki dotyczące
bezpieczeństwa pracy odkurzacza
• Proszę nie wciągać odkurzaczem cieczy lub wilgoci!
• Proszę nie wciągać odkurzaczem gorącego popiołu, przedmiotów ostrych i ostro zakończonych!
• Proszę nie używać urządzenia w wilgotnych pomieszczeniach!
• Proszę nigdy nie odkurzać bez fi ltra. Po włożeniu fi ltra
proszę sprawdzić, czy został założony prawidłowo!
• Podczas pracy odkurzacza proszę trzymać włosy, ubranie i
części ciała z daleka od końcówki!
• Proszę trzymać odkurzacz z daleka od źródeł ciepła takich
jak promienniki, piece itd.!
• Uważaj, aby podczas zamykania drzwi nie przytrzasnąć
kabla ani nie ocierać nim o ostre krawędzie lub narożniki.
• Nie przejeżdżaj odkurzaczem po kablu.
• Odkurzacza nie wolno używać do zbierania potłuczonego
szkła, drobnych zabawek, igieł, spinaczy, gorącego popiołu,
żarzących się niedopałków papierosów lub zapałek.
Przegląd elementów obłsugi
1 Zasuwa powietrzna
2 Przyłączenie węża
3 Regulator siły ssania
4 Uchwyt do przenoszenia
5 Przycisk zwijania kabla
6 Wyłącznik
7 Element ułatwiający parkowanie
8 Osłona fi ltra wylotu
9 Przycisk do odblokowywania pojemnika na kurz
10 Pojemnik na kurz z fi ltrem zabezpieczającym
silnik
11 Haczyk na rurze ssącej
12 Rura zasysająca
13 Teleskopowa rura zasysająca
14 Uchwyt do akcesoriów
Akcesoria
15 Szczotka do parkietów
16 Turboszczotka
17 Dysza szczotkowa
18 Dysza do szczelin
19 Dysza do tapicerki
Uruchomienie
• Proszę umieścić głowicę łączącą giętkiej rury zasysającej
w podłączeniu dla rury giętkiej i połączyć mechanicznie
naciskając równocześnie przyciski. Aby ponownie zwolnić
rurę giętką proszę nacisnąć przyciski przy głowicy łączącej.
• Proszę nacisnąć i przytrzymać przyciski a następnie
wyciągnąć rurę giętką.
• Proszę wsunąć rurę zasysającą w uchwyt.
Używanie urządzenia
1. Proszę zamontować akcesoria.
2. Proszę wyciągnąć potrzebną długość kabla, włożyć wtyczkę
do przepisowo zainstalowanego gniazda ze stykiem
36
05-BS 1273.indd 3605-BS 1273.indd 36 07.03.2008 8:24:47 Uhr07.03.2008 8:24:47 Uhr
Page 37

JĘZYK POLSKI
ochronnym 230 V, 50 Hz, a następnie uruchomić urządzenie
wciskając włącznik.
3. Siłę ssania proszę ustawić regulatorem siły ssania (Min do
Max).
4. Teraz można rozpocząć odkurzanie w równomiernym
tempie. Nie ma konieczności dociskania końcówek do
odkurzanej powierzchni.
Wskazówka: proszę pamiętać, że zasięg odkurzacza ograniczony jest długością kabla!
Regulator siły ssania
Niski stopień ssania: Do fi ranek, materiałów delikatnych.
Średni stopień ssania: Dywany welurowe i wykładziny dywa-
Wysoki stopień ssania: Do mocnych dywanów i podłóg.
Zwijarka do kabla sieciowego
Kabel sieciowy można wyciągać maksymalnie do żółtego
znacznika.
W żadnym wypadku proszę nie wyciągać kabla do czerwonego
znacznika, gdyż można w ten sposób uszkodzić funkcję zwijania
kabla. Tego typu uszkodzenia nie są objęte gwarancją.
Zwijanie
Proszę wcisnąć przycisk zwijania kabla i wprowadzać przewód
do odkurzacza. Proszę mocno trzymać przewód, żeby zapobiec
jego niekontrolowanym ruchom.
Teleskopowa rura ssąca
Ze względu na możliwość regulowania
wysokości rury ssącej możliwe jest
jej indywidualne dopasowywanie do
wzrostu użytkownika.
Proszę zwolnić blokadę łączenia
naciskając przycisk w kierunku strzałki.
Wyciągnąć rurę ssącą na żądaną
długość. Po zwolnieniu przycisku
umożliwiającego ponowne zaryglowanie, powinni Państwo usłyszeć
charakterystyczny dźwięk.
Końcówki odkurzacza
Dysza do fug i dysza
szczotkowa:
Dysza do tapicerki: Do czyszczenia mebli wyściełanych,
Rura zasysająca: Do odkurzania dywanów lub gładkich
nowe.
Do odkurzania tapicerki, zasłon oraz w
rogach i szczelinach, itp.
zasłon, itd.
powierzchni.
Gładkie podłogi:
Wciśnij stopą dźwignię oznaczoną
symbolem szczotki „ “.
Wysuwają się szczotki.
Dywany:
Ustaw stopą dźwignię na symbol
„
“.
Szczotka do parkietów: Dla ułatwienia prowadzenia końcówka
Turboszczotka: Dla ułatwienia prowadzenia końcówka
Zdjęcie dyszy: Dyszę proszę lekko odkręcić, a
Zasuwa powietrza
Zasuwę powietrzną na uchwycie rury otwiera się w celu regulacji
powietrza lub aby umożliwić wypadnięcie przedmiotów, które
znajdują się w końcówce i nie mogą zostać wciągnięte przez
odkurzacz.
Filtr
Państwa urządzenie wyposażone jest w 3 systemy fi ltrujące.
Tradycyjny system z workiem na kurz został zastąpiony przez
przezroczysty pojemnik na kurz. Pojemnik ten pochłania
większe zabrudzenia oraz niewielkie cząsteczki kurzu wprowadzane razem z silnym strumieniem powietrza zasysającego.
Odpada konieczność kupowania woreczków na kurz.
Gdy kurz dojdzie do kreski MAX na zbiorniku kurzu lub gdy siła
ssania zacznie się zmniejszać, wykonaj następujące czynności:
Rys. 1
podłogowa jest wyposażona w rolki.
Do odkurzania dużych powierzchni,
np. parkietu, laminatu lub pytek
ceramicznych itp.
podłogowa jest wyposażona w rolki.
Szczotka jest wyposażona w jeden
wałek ułożyskowany obrotowo i
drugi – ułożyskowany oscylacyjnie,
napędzany przez strumień powietrza.
Usuwa szczególnie gruntownie wdeptany brud, sierść zwierzęcą, nitki i kłaki.
Odświeża wykładziny dywanowe.
Jeżeli przesuniesz przełącznik na
szczotce na symbol A, zwiększy się
przepływ zasysanego powietrza. Przy
ustawieniu na symbol (B) odpowiednio
mniej. Zwiększa to siłę ssania.
Pamiętaj, że turboszczotka nie może
być używana do gładkich podłóg,
np. parkietu. laminatu itp., ponieważ
mogłaby zniszczyć te powierzchnie.
następnie ściągnąć.
Opróżnienie pojemnika na kurz
• Naciśnij przycisk
odblokowujący pojemnik na
kurz i wyjmij pojemnik.
JĘZYK POLSKI
37
05-BS 1273.indd 3705-BS 1273.indd 37 07.03.2008 8:24:47 Uhr07.03.2008 8:24:47 Uhr
Page 38

JĘZYK POLSKI
Rys. 2 • Wyciągnij ostrożnie wkład
Rys. 3
JĘZYK POLSKI
fi ltra z obu uchwytów. W
razie potrzeby ustaw pionowo
zbiornik kurzu.
• Opróżnij zawartość zbiornika
kurzu. Następnie załóż z
powrotem wkład fi ltra. Zwróć
uwagę, aby wkład fi ltra był
założony mocno i prosto.
Zamocuj z powrotem zbiornik
kurzu tak, aby było słychać
odgłos zatrzaskiwania.
1. Filtr ochrony silnika
(w pojemniku kurzowym)
Czyszczenie wkładu fi ltra
• Naciśnij przycisk
odblokowujący pojemnik na
kurz i wyjmij pojemnik (patrz
rysunek 1).
• Opróżnij zawartość zbiornika
kurzu (patrz rys. 2). Odrygluj
wkład fi ltra, obracając go krótko
w kierunku ruchu wskazówek
zegara (patrz rys. 3). Następnie
można wyjąć wkład fi ltra,
wyciągając go do dołu. Proszę
oczyścić fi ltr ochronny silnika
przez wypukanie i delikatne
wyszczotkowanie.
• Proszę ponownie zamontować
poszczególne elementy.
• Zamocuj z powrotem zbiornik
kurzu tak, aby było słychać
odgłos zatrzaskiwania.
Po co trzecim opróżnieniu lub w
przypadku szczególnie silnych
zabrudzeń proszę czyścić fi ltr pod
bieżącą wodą, przepuszczając
wodę przez tworzywo fi ltra w kierunku odwrotnym do pęcherzyków.
Filtr proszę ponownie zakładać
dopiero po jego całkowitym
wyschnięciu!
Po całkowitym wysuszeniu włóż go
z powrotem!
Uwaga: Filtrów nie wolno
czyścić w pralce a do suszenia
nie wolno używać suszarki do
włosów.
Rys. 4
Rys. 5
Proszę przestrzegać tej ważnej wskazówki!
Czyszczenie może stać się konieczne także po krótszym czasie,
w zależności od okoliczności użycia, np. przy odkurzaniu
drobnego kurzu.
W przypadku spadku mocy odkurzania proszę czyścić fi ltry
zgodnie z opisem.
Jeśli moc odkurzania spadnie nagle podczas pracy odkurzacza,
może to oznaczać zapchane fi ltry.
2. Filtr wlotowy
Filtr wlotowy znajduje się w
komorze zbiornika kurzu,
patrz strzałka. Naciśnij przycisk
odblokowujący pojemnik na kurz
i wyjmij pojemnik. Wyciągnij
fi ltr, pociągając do przodu. Czyść
fi ltr wlotowy raz na 10 opróżnień
pojemnika na kurz, lub – w razie
potrzeby - częściej. Dopilnuj, aby
fi ltr był zawsze czysty, ponieważ
w przeciwnym razie nie będzie
zapewniony obieg powietrza.
W razie konieczności można
umyć fi ltr w ciepłej wodzie bez
dodawania środków czyszczących.
Tylko całkowicie suchy fi ltr można
wsadzić do odkurzacza!
3. Filtr wylotowy
Dodatkowo urządzenie
wyposażone jest w fi ltr wylotowy.
By zagwarantować nienaganne
funkcjonowanie fi ltra, zalecamy
czyszczenie go co 6 miesięcy. Filtr
ten znajduje się w tylnej części
urządzenia za kratką wentylacyjną.
Naciskając dźwignię z boku kratki
wentylacyjnej, otwórz tę kratkę.
Następnie proszę wyjąć kratkę
odciągając ją do przodu. Proszę
wyjąć fi ltr i wyczyścić go jak
opisano powyżej. Proszę wsadzić
fi ltr i zamknąć kratkę wentylacyjną
wykonując czynności w odwrotnej
kolejności.
Czyszczenie i przechowywanie
Czyszczenie
• Przed przystąpieniem do czyszczenia urządzenia proszę
wyciągnąć wtyczkę z gniazda!
• Obudowę należy czyścić suchą szmatką.
• Filtr zabezpieczający silnik proszę czyścić mniej więcej po
co 3. opróżnieniu. Filtr można umyć w ciepłej wodzie bez
dodawania środków czyszczących. Można go ponownie
założyć wtedy, gdy jest całkowicie suchy.
38
05-BS 1273.indd 3805-BS 1273.indd 38 07.03.2008 8:24:48 Uhr07.03.2008 8:24:48 Uhr
Page 39

JĘZYK POLSKI
Przechowywanie
• Proszę poczekać, aż żelazko zupełnie ostygnie.
• Proszę w całości schować przewód.
• Ustaw urządzenie poziomo i zawieś haczyk znajdujący
się na rurze teleskopowej na podpórce do parkowania (7)
znajdującej się na tylnej ściance urządzenia.
Eliminowanie usterek i zakłóceń
• Urządzenie nie działa.
Co robić:
Sprawdź podłączenie do sieci.
Sprawdź położenie wyłącznika.
• Urządzenie nie odkurza (brak ssania).
Możliwa przyczyna:
Zabrudzony zbiornik kurzu lub fi ltry.
Co robić:
Opróżnij lub oczyść w/w części.
Możliwa przyczyna:
Ciała obce w wężu ssącym lub dyszy.
Co robić:
Sprawdź osprzęt, czy nie ma w nim ciał obcych.
Dane techniczne
Model: ...............................................................................BS 1273
Napięcie zasilające: ......................................220-240 V, 50/60 Hz
Pobór mocy:
P
: ............................................................................ 1800 W
nom.
P
: .......................................................................... 2300 W
maxks.
Stopień ochrony: ......................................................................... ΙΙ
Masa netto:.........................................................................5,85 kg
Niniejsze urządzenie odpowiada wymaganiom normy
bezpieczeństwa użytkowania oraz spełnia wymagania dyrektywy niskonapięciowej i kompatybilności elektromagnetycznej.
Zastrzega się prawo do zmian technicznych!
WARUNKI GWARANCJI
Przyznajemy 24 miesiące gwarancji na produkt licząc od daty
zakupu.
W tym okresie będziemy bezpłatnie usuwać w terminie 14 dni
od daty dostarczenia wadliwego sprzętu z kartą gwarancyjną
do miejsca zakupu wszystkie uszkodzenia powstałe w tym
urządzeniu na skutek wady materiałów lub wadliwego wykonania, naprawiając oraz wymieniając wadliwe części lub (jeśli
uznamy za stosowne) wymieniając całe urządzenie na nowe.
Sprzęt do naprawy powinien być dostarczony w komplecie
wraz z dowodem zakupu oraz z ważną kartą gwarancyjną
do sprzedawcy w miarę możliwości w oryginalnym opakowaniu
lub innym odpowiednim dla zabezpieczenia przed uszkodze-
niem. W razie braku kompletnego opakowania fabrycznego,
ryzyko uszkodzenia sprzętu podczas transportu do i z miejsca
zakupu ponosi reklamujący.
Naprawa gwarancyjna nie dotyczy czynności przewidzianych
w instrukcji obsługi, do wykonania których zobowiązany jest
użytkownik we własnym zakresie i na własny koszt.
Gwarancja nie obejmuje:
• mechanicznych, termicznych, chemicznych uszkodzeń
sprzętu i wywołanych nimi wad,
• uszkodzeń powstałych w wyniku działania sił zewnętrznych
takich jak wyładowania atmosferyczne, zmiana napięcia
zasilania i innych zdarzeń losowych,
• nieprawidłowego ustawienia wartości napięcia elektrycznego, zasilanie z nieodpowiedniego gniazda zasilania,
• sznurów połączeniowych, sieciowych, żarówek, baterii,
akumulatorów,
• uszkodzeń wyrobu powstałych w wyniku niewłaściwego lub
niezgodnego z instrukcją jego użytkowania, przechowywania, konserwacji, samowolnego zrywania plomb oraz
wszelkich przeróbek i zmian konstrukcyjnych dokonanych
przez użytkownika lub osoby niepowołane,
• roszczeń z tytułu parametrów technicznych wyrobu, o ile są
one zgodne z podanymi przez producenta,
• prawidłowego zużycia i uszkodzeń, które mają nieistotny
wpływ na wartość lub działanie tego urządzenia.
Karta gwarancyjna bez pieczątki sklepu, daty sprzedaży, nie
wypełniona, źle wypełniona, ze śladami poprawek, nieczytelna wskutek zniszczenia, bez możliwości ustalenia miejsca
sprzedaży oraz dołączonego dowodu zakupu jest nieważna.
Korzystanie z usług gwarancyjnych nie jest możliwe po upływie
daty ważności gwarancji. Gwarancja na części lub całe
urządzenie, które są wymieniane kończy się, wraz z końcem
gwarancji na to urządzenie.
Wszystkie inne roszczenia, wliczając w to odszkodowania są
wykluczone chyba, że prawo przewiduje inaczej. Roszczenia
wykraczające poza tą umowę nie są uwzględniane przez tą
gwarancję.
Gwarancja na sprzedany towar konsumpcyjny nie wyłącza, nie
ogranicza ani nie zawiesza uprawnień kupującego wynikających
z niezgodności towaru z umową.
Gwarancja oraz zawarte w niej warunki obowiązują na terenie
Rzeczpospolitej Polskiej.
Znaczenie symbolu „Pojemnik na śmieci“
Proszę oszczędzać nasze środowisko, sprzęt elektryczny nie
należy do śmieci domowych.
Proszę korzystać z punktów zbiorczych, przewidzianych do
zdawania sprzętu elektrycznego, i tam proszę oddawać sprzęt
elektryczny, którego już nie będą Państwo używać.
Tym sposobem pomagają Państwo unikać potencjalnych
39
JĘZYK POLSKI
05-BS 1273.indd 3905-BS 1273.indd 39 07.03.2008 8:24:50 Uhr07.03.2008 8:24:50 Uhr
Page 40

ČESKY
Všeobecné bezpečnostní pokyny
Před uvedením tohoto přístroje do provozu si velmi pozorně
přečtěte návod k obsluze a tento návod spolu se záručním listem, pokladním blokem a podle možností i s obalem a vnitřním
vybavením obalu dobře uschovejte. Pokud budete přístroj
předávat třetím osobám, odevzdejte jim i tento návod k obsluze.
• Používejte tento přístroj výlučně pro soukromou potřebu a
pro stanovené účely. Tento přístroj není určen pro komerční
použití. Nepoužívejte jej v otevřeném prostoru
před horkem, přímým slunečním zářením,
případě jej neponořujte do kapalin) a sty
hranami. Nepoužívejte přístroj v případě, že
Jestliže dojde k navlhčení nebo namočení
vytáhněte zástrčku ze zásuvky.
• Přístroj vypněte a vždy vytáhněte zástrčku ze zásuvky (tahejte jen za zástrčku, nikdy ne za kabel), jestliže nebudete
přístroj používat, pokud chcete namontovat příslušenství
přístroje, při čištění nebo v případě poruchy.
• Přístroj nesmí zůstat v provozu bez dozoru. Jestliže musíte
pracoviště opustit, vždy přístroj vypněte, resp. vytáhněte
zástrčku ze zásuvky (vždy tahejte za zástrčku, nikdy ne za
kabel).
• Pravidelně kontrolujte přístroj a přívodní kabel z hlediska
poškození. Jestliže přístroj vykazuje nějakou závadu,
neuvádějte jej do provozu.
• Neopravujte přístroj vlastními silami, nýbrž vyhledejte
autorizovaného opraváře. Abyste eliminovali rizika, nechejte
poškozený přívodní kabel nahradit kabelem se stejnými
hodnotami pouze výrobcem, naším servisem pro zákazníky
nebo jinou kvalifi kovanou osobou.
• Používejte jen originální příslušenství.
• Respektujte prosím následující „Speciální bezpečnostní
pokyny“.
Děti a slabé osoby
• Z důvodu zajištění bezpečnosti Vašich dětí neponechávejte
v jejich dosahu žádné součásti obalu (plastové pytlíky,
kartón, styropor atd.).
VÝSTRAHA!
Zabraňte tomu, aby si malé děti hrály s fólií.
Hrozí nebezpečí udušení!
• Za účelem ochrany dětí a slabých osob před nebezpečím
elektrických přístrojů dbejte na to, aby byl tento přístroj
používán pouze pod dohledem. Tento přístroj není hračka.
Zabraňte tomu, aby si s ním hrály malé děti.
ČESKY
.
Chraňte jej
vlhkostí (v žádném
kem s ostrými
máte vlhké ruce.
přístroje, okamžitě
• Při zavírání dvířek nesmí být kabel přiskřípnut či tažen podél
ostrých hran či rohů.
• Vysavačem nepřejíždějte přes kabel.
• Přístroj nesmí být použit k vysávání skleněných střepů,
malých hraček, jehel, kancelářských sponek, horkému
popelu, doutnajících cigaretových nedopalků či zápalek atd.
Přehled ovládacích prvků
1 Vzduchový regulátor
2 Připojení hadice
3 Regulátor sacího výkonu
4 Transportní rukojeť
5 Tlačítko pro navíjení přívodního kabelu
6 Vypínač Zapnuto/Vypnuto
7 Parkovací pomůcka
8 Kryt fi ltru na výstupu
9 Tlačítko pro uvolnění nádoby na prach
10 Nádoba na prach s ochranným fi ltrem motoru
11 Háček na sací trubce
12 Podlahový nástavec
13 Teleskopická trubka
14 Upínací ústrojí příslušenství
Příslušenství
15 Parketový kartáč
16 Turbokartáč
17 Kartáčový nástavec
18 Nástavec pro vysávání spár
19 Hubice na vysávání čalounění
Uvedení do provozu
• Zastrčte spojovací hlavici sací hadice do přípoje hadice, až
mechanicky zaklapne; k tomu stiskněte současně tlačítka. K
uvolnění hadice stlačte znovu tlačítka na spojovací hlavici.
• Podržte tlačítka stlačená a hadici vytáhněte.
• Na rukojeť eventuálně nasaďte sací trubku.
Pouzívání přístroje
1. Namontujte příslušenství.
2. Kabel odviňte v potřebné délce, zástrčku zastrčte do
předpisově instalované zásuvky s ochranným kolíkem
230 V, 50 Hz a zapněte přístroj tlačítkem Zapnuto/Vypnuto.
3. Pomocí regulátoru sacího výkonu nastavte pozadovaný sací
výkon (Min až Max).
4. Vysávejte nyní rovnoměrnou rychlostí. Přitlačování nástavce
k podkladu není nutné.
Upozornění: Mějte na paměti, ze délka dosah vysavače je
omezen délkou kabelu!
Speziální bezpečnostní pokyny
• Nevysávejte zádnou vlhkost, resp. kapaliny!
• Nevysávejte horký popel, špičaté nebo ostré předměty!
• Nepouzívejte přístroj ve vlhkých prostorech!
• Nikdy nevysávejte bez fi ltrů. Vzdy po nasazení zkontrolujte
správné usazení fi ltrů!
• Během provozu vysavače dbejte na to, aby se do blízkosti
sacích nástavců nedostaly vlasy, části oblečení nebo těla!
• Neukládejte vysavač do blízkosti zdrojů tepla, jako jsou např.
radiátory, kamna atd.!
40
Regulátor sacího výkonu
Nízký sací výkon: pro záclony, citlivé materiály.
Střední sací výkon: pro velurové koberce a textilní podlaho-
vé krytiny-
Vysoký sací výkon: pro robustní koberce a podlahy.
Zařízení pro navíjení přívodního kabelu
Prosíme, vytahujte kabel maximálně jen ke zlutému označení.
05-BS 1273.indd 4005-BS 1273.indd 40 07.03.2008 8:24:50 Uhr07.03.2008 8:24:50 Uhr
Page 41

ČESKY
Nevytahujte kabel v zádném případě az k červenému označení,
protoze by mohlo dojít k poškození samonavíjecího zařízení.
Takovéto závady pak nespadají do záručního plnění.
Navíjení
Stiskněte tlačítko pro navíjení kabelu a “doveďte” kabel az do
tělesa přístroje. Drzte jej pevně, aby nedošlo k nezádoucímu
úderu do přístroje.
Teleskopická sací trubice
Výšková přestavitelnost sací trubice
umožňuje její individuální přizpůsobení
Vaší tělesné výšce.
Odjistěte spojku stlačením tlačítka ve
směru šipky.
Nastavte délku sací trubice podle
potřeby. K opětovnému zajištění tlačítko
uvolněte, až slyšitelně zaklapne.
Nástavce
Nástavec pro vysávání
spár, kartáčový
nástavec:
Hubice na vysávání
čalounění:
Podlahový nástavec: K čištění koberců nebo hladkých ploch.
Parketový kartáč: Podlahová hubice je pro snadnější
Turbokartáč: Podlahová hubice je pro snadnější
Uvolnění hubice: Stáhněte ji za lehkého otáčení.
K vysávání čalounění, záclon a v
rozích a štěrbinách.
K čištění čalounění, záclon atd.
Hladká podlaha:
Stlačte páku se symbolem kartáče
„
kartáčky vidět.
Koberce:
Přendejte páku nohou na symbol
„
pohybování vybavena kolečky. Pro
větší plochy, jako jsou parkety, laminát
či obkládací dlaždice aj.
pohybování vybavena kolečky. Kartáč
je vybaven rotujícím a vibračním
kartáčovým válcem, který je poháněn
proudem vzduchu. Důkladně
odstraňuje i zašlou špínu, zvířecí chlupy, vlákna a nitky. Čistě vykartáčuje
kobercový vlas.
Otočte spínač na kartáči na symbol
A, tím se bude nasávat více vzduchu.
U symbolu (B) adekvátně méně. To
zesiluje sací sílu.
Prosím dbejte nato,že turbokartáč
není vhodný pro hladké podlahy
např. parket, laminát aj. tyto povrchy
by se mohly poškodit.
“ nohou dolů. Nyní jsou
“.
Vzduchové šoupátko
Vzduchové šoupátko na rukojeti hadice otevřete buďto k regulaci
vzduchu nebo k uvolnění částic, ulpívajících na nástavci.
Filtry
Váš přístroj je vybaven 3 fi ltračními systémy. Tradičně používaný
systém pytlíku na prach byl nahrazen průhlednou nádobou na
prach. V něm jsou hrubé nečistoty a nejmenší neusazující se
částice v důsledku vysoké rychlosti proudění z “nasávaného
vzduchu” odloučeny.
Odpadá nutnost prachových sáčků.
Pokud usazeniny prachu dosáhly značky MAX na nádobě na
prach nebo pokud již sací síla ochabuje, postupujte následujícím
způsobem:
Obr. 1
Obr. 2 • Z obou držáků opatrně vyjměte
Obr. 3
Vyprázdnění nádoby na prach
• Pro uvolnění nádoby na prach
stiskněte tlačítko a nádobu na
prach vyjměte.
fi ltrační vložku. Popř. postavte
nádobu na prach kolmo.
• Vyprázdněte obsah nádoby na
prach. Opět nasaďte fi ltrační
vložku na připojení. Dbejte
prosím na to, aby fi ltrační
vložka byla nasazena pevně a
byla v rovné poloze.
Opět upevněte nádobu
na prach, dokud slyšitelně
nezaklapne.
1. Ochranný fi ltr motoru
(v odlučovači prachu)
Čištění fi ltrační vložky
• Pro uvolnění nádoby na prach
stiskněte tlačítko a nádobu na
prach vyjměte (viz obr. 1).
• Vyprázdněte obsah nádoby
na prach (viz obr. 2). Otevřete
fi ltrační vložku krátkým
otočením ve směru hodinových
ručiček (viz obr 3). Při druhém
kroku lze již fi ltrační vložku
vytáhnout směrem dolů.
Vyčistěte ochranný fi ltr motoru
vyklepáním a vykartáčováním
měkkým kartáčem.
• Součásti opět namontujte.
• Opět upevněte nádobu na
prach, dokud slyšitelně nezaklapne.
ČESKY
41
05-BS 1273.indd 4105-BS 1273.indd 41 07.03.2008 8:24:50 Uhr07.03.2008 8:24:50 Uhr
Page 42

ČESKY
Po každém třetím vyprázdnění
nebo v případě silného znečistění
fi ltr vyčistěte tak, že necháte tekoucí vodu proudit fi ltrační vložkou
proti směru proudění vzduchu.
Filtrační vložku nasaďte zpět až
poté, co dobře vyschne!
Pokud je zcela suchý, opět ho
nasaďte!
Pozor:
Filtr nikdy nemyjte v pračce
a pro vysoušení nepoužívejte
vysoušeč vlasů.
Obr. 4
Obr. 5
ČESKY
Prosím, dbejte na toto důležité upozornění!
Čištění může být podle způsobu využívání, např. při odsávání
jemného prachu, nutné i po kratším čase.
Pokud by se výkon sání Vašeho vysavače sníží, vyčistěte
prosím fi ltry, jak je to popsáno.
Pokud náhle během provozu bude výkon sání nevyhovující,
mohou být ucpány fi ltry.
2. Filtr nasávaného vzduchu
Sací fi ltr naleznete v prostoru nádoby na prach, viz šipka. Pro uvolnění
nádoby na prach stiskněte tlačítko
a nádobu na prach vyjměte. Ziehen
Vytáhněte fi ltr směrem dopředu.
Sací fi ltr vyčistěte po cca každém
10. vyprázdnění nádoby na prach,
nebo když to bude nutné, častěji.
Dbejte prosím na to, aby byl
fi ltr vždy čistý, neboť cirkulace
vzduchu není zajištěna jiným
způsobem. V případě potřeby jej
můzete vyčistit v teplé vodě, bez
přísad. Filtr vlozte zpět jen tehdy,
kdyz je uz zcela suchý!
3. Filtr odpadního vzduchu
Váš přístroje je dále vybaven
fi ltrem odpadního vzduchu. Pro
zajištění bezvadné funkce fi ltru
doporučujeme čistit jej každých
6 měsíců. Tento fi ltr se nachází
na zadní části Vašeho přístroje
za větrací mřízkou. Stisknutím
páčky na straně větrací mřížky
otevřte větrací mřížku. Poté mřížku
vytáhněte směrem dopředu.
Vyjměte fi ltr a vyčistěte jej
způsobem popsaným výše. Filtr
znovu nasaďte a zavřete mřízku.
Postupujte v obráceném pořadí
kroků.
Čištění
• Před čištěním vytáhněte zásuvku ze zástrčky!
• Těleso přístroje čistěte suchým hadříkem.
• Ochranný fi ltr motoru čistěte přibližně po každém 3.
vyprázdnění.
Filtr čistěte v teplé vodě, bez přísad. Zpět jej nasazujte jen
tehdy, jestlize je zcela suchý.
Ulození
• Nechte žehličku úplně vychladnout.
• Zcela naviňte kabel.
• Postavte zařízení vodorovně a zavěste háček na teleskopickou trubku do parkovacího zařízení (7) na zadní straně
zařízení.
• Spotřebič není funkční.
Náprava:
Zkontrolujte síťovou přípojku.
Zkontrolujte polohu spínače.
• Přístroj nesaje.
Možná příčina:
Nádoba na prach či fi ltry jsou znečištěné.
Náprava:
Vyprázdněte, příp. vyčistěte součástky.
Možná příčina:
V sací hadici nebo v hubici se nachází cizí těleso.
Náprava:
Zkontrolujte příslušenství na cizím tělese.
Model: ...............................................................................BS 1273
Pokrytí napětí: ...............................................220-240 V, 50/60 Hz
Příkon:
P
: ............................................................................ 1800 W
nom.
P
: ............................................................................ 2300 W
max.
Třída ochrany: .............................................................................ΙΙ
Čistá hmotnost: ..................................................................5,85 kg
Tento přístroj byl testován podle všech příslušných, v současné
době platných směrnic CE, jako je např. elektromagnetická
kompatibilita a direktiva o nízkonapěťové bezpečnosti, a byl
zkonstruován podle nejnovějších bezpečnostně-technických
předpisů.
Vyhrazujeme si technické změny!
Čištění a ulození
Odstranění poruch
Technické údaje
42
05-BS 1273.indd 4205-BS 1273.indd 42 07.03.2008 8:24:51 Uhr07.03.2008 8:24:51 Uhr
Page 43

ČESKY
Záruka
Na námi prodaný přístroj poskytujeme záruku v trvání 24 měsíců
od data prodeje (pokladní doklad).
Během záruční lhůty odstraníme bezplatně všechny vady
přístroje nebo příslušenství, které vzniknou v důsledku vad
materiálu nebo výrobních vad, a to opravou nebo, podle našeho
uvážení, formou výměny. Záruční plnění nemají za následek
ani prodloužení záruční doby, ani tím nevzniká nárok na novou
záruku!
Jako záruční doklad slouží doklad o koupi. Bez tohoto dokladu
nelze uskutečnit bezplatnou výměnu nebo bezplatnou opravu.
V případě uplatnění záruky předejte prosím kompletní přístroj
v originálním obalu spolu s pokladním dokladem Vašemu
obchodníkovi.
Jak na vady na spotřebním příslušenství, resp. dílech podléhajících rychlému opotřebení, tak i na čištění, údržbu nebo výměnu
dílů podléhajících rychlému opotřebení se záruka nevztahuje a
je proto nutno je uhradit!
Záruka zaniká v případě, že dojde k zásahu neautorizovanou
osobou.
Po uplynutí záruky
Po uplynutí záruční doby je možno za úplatu provést opravy v
příslušném odborném obchodě nebo opravně.
Význam symbolu „Popelnice“
Chraňte naše životní prostředí, elektropřístroje nepatří do
domovního odpadu.
Pro likvidaci elektropřístrojů použijte určených sběrných míst a
odevzdejte zde elektropřístroje, jestliže je už nebudete používat.
Pomůžete tak předejít možným negativním dopadům na životní
prostředí a lidské zdraví, ke kterým by mohlo dojít v důsledku
nesprávné likvidace.
Přispějete tím ke zhodnocení, recyklaci a dalším formám zhodnocení starých elektronických a elektrických přístrojů.
Informace o tom, kde lze tyto přístroje odevzdat k likvidaci,
obdržíte prostřednictvím územně správních celků nebo
obecního úřadu.
43
05-BS 1273.indd 4305-BS 1273.indd 43 07.03.2008 8:24:52 Uhr07.03.2008 8:24:52 Uhr
ČESKY
Page 44

MAGYARUL
Általános biztonsági rendszabályok
A készülék használatba vétele előtt gondosan olvassa végig a
használati utasítást, és őrizze meg a garancialevéllel, a pénztári
nyugtával és lehetőleg a csomagolókartonnal, ill. az abban
lévő bélésanyaggal együtt! Amennyiben a készüléket harmadik
személynek adja tovább, a használati útmutatót is adja a
készülékhez.
• Kizárólag személyi célra használja a készüléket, és csupán
arra, amire való! A készülék nem ipari jellegű használatra készült. Ne használja a szabadban ! Ne tegye ki erős
hőhatásnak, közvetlen napsugárzásnak és nedvességnek
(semmi esetre se mártsa folyadékba), és óvja az éles szélektől!
Ne használja a készüléket vizes kézzel! Ha a készülék vizes
vagy nedves lett, azonnal húzza ki a konnektorból!
• Kapcsolja ki a készüléket, és amikor nem használja, tartozékokat helyez rá, tisztítja, vagy ha zavart észlel, mindig húzza
ki a csatlakozó dugaszt a konnektorból!
• Ne működtesse a készüléket felügyelet nélkül! Ha elhagyja
a munkahelyet, mindig kapcsolja ki a készüléket, ill. húzza ki
a dugaszt a konnektorból (a dugasznál, és nem a kábelnél
fogva)!
• Rendszeresen ellenőrizze, hogy nincs-e a készüléken vagy
a kábelen sérülés! Sérült készüléket soha ne helyezzen
üzembe!
• A kockázatok elkerülése végett ne maga javítsa a készüléket, hanem keressen fel egy erre kiképzett szakembert! Ha hibás a csatlakozó kábel, csak a gyártótól, a
vevőszolgálatunktól vagy hasonló képzettségű személytől
kérjen helyette azonos értékű másik kábelt!
• Csak eredeti tartozékokat használjon!
• Tartsa be az itt következő „Speciális biztonsági rendszabályokat“.
Gyermekek és legyengült személyek
• Gyermekei biztonsága érdekében ne hagyja általuk elérhető
helyen a csomagolóelemeket (műanyag zacskó, karton,
sztiropor stb.)!
FIGYELMEZTETÉS!
Kisgyermekeket ne engedjen a fóliával játszani. Fulladás
veszélye állhat fenn!
• Annak érdekében, hogy a gyermekeket és legyengült
személyeket védje az elektromos áramütés veszélyétől,
vegye fi gyelembe, hogy a készüléket csak felügyelet mellett
szabad használni. A készülék nem játék. Ne engedje, hogy
kisgyermekek játsszanak vele.
Speciális biztonsági rendszabályok
• Ne szívjon fel a készülékkel nedvességet, ill. folyadékokat!
• Ne szívjon fel forró hamut, hegyes vagy éles tárgyakat!
• Ne használja a készüléket vizeshelyiségekben!
• Soha ne porszívózzon fi lter nélkül! Behelyezés után mindig
ellenőrizze, hogy a fi lter megfelelően fekszik-e fel.
• Működés közben tartsa távol a porszívófejet a hajától,
ruházatától és a testrészeitől!
• Tartsa távol a porszívót olyan hőforrásoktól, mint pl. a
radiátorok, kályha stb.!
• Az ajtó bezárásakor a kábelt nem szabad beszorítani vagy
éles perem és sarok mellett elhúzni.
• Ne húzza át a porszívót a kábelen.
• A készülékkel nem szabad üvegszilánkot, apró játékot, tűt,
gémkapcsot, forró hamut, égő cigarettacsikket és gyufát,
stb. felszívni.
A kezelő elemek áttekintése
1 Légelzáró
2 Tömlőcsatlakozó
3 Szívóteljesítmény-szabályzó
4 Hordozófül
5 Kábelfelcsévélő gomb
6 Be-/kikapcsológomb
7 Leállító támasz
8 Kibocsátó fi lter borítása
9 A porgyűjtő kioldógombja
10 Porgyűjtő motorvédő szűrővel
11 Akasztó a szívócsövön
12 Szívócső
13 Teleszkópos szívócső
14 Tartozékok rögzítése
Tartozékok
15 Parkettakefe
16 Turbókefe
17 Kefélő szívófej
18 Réstisztító szívófej
19 Kárpit-szívófej
Használatba vétel
• Dugja be a szívótömlő összekötőfejét a tömlőcsatlakozóba,
úgy, hogy mechanikusan bekattanjon! Ehhez egyszerre
nyomja a gombokat! Ha ki akarja oldani a tömlőt, nyomja
meg újra az összekötőfejen lévő gombokat!
• Tartsa a gombokat lenyomva, és így húzza ki a tömlőt!
• Ha szükséges, húzza rá a szívócsövet a fogantyúra!
A készülék használata
1. Szerelje fel a tartozékokat!
2. A kívánt hosszban húzza ki kábelt, dugja a dugaszt
előírásszerűen felszerelt 230 V, 50 Hz-es földelt konnektor-
MAGYARUL
ba, és a ki-/bekapcsológombbal kapcsolja be a készüléket!
3. Állítsa be a szabályozóval a kívánt szívóteljesítményt (Mintól Max-ig)!
4. Porszívózzon egyenletes sebességgel! A porszívót nem kell
rányomni a felületre!
44
05-BS 1273.indd 4405-BS 1273.indd 44 07.03.2008 8:24:52 Uhr07.03.2008 8:24:52 Uhr
Page 45

MAGYARUL
Figyelem: Ügyeljen a kábel hosszúsága által megszabott
hatótávolságra!
Szívóteljesítmény-szabályozó
Kis szívóteljesítmény: függönyökhöz, érzékeny anyagok-
Közepes szívóteljesítmény: erősen bolyhos velúrszőnyegekhez
Nagy szívóteljesítmény: masszív szőnyegekhez és pad-
Kábelfelcsévélő szerkezet
A hálózati kábelt csak a sárga jelölésig húzza ki! Semmi
esetre se húzza egészen a piros jelölésig, mert megsérülhet a
kábelfelcsévélő. Az ilyen meghibásodásokra nem érvényes a
garancia!
Felcsévélés
Nyomja meg a kábelfelcsévélő gombot, és vezesse meg kézzel
a begördülő kábelt! Tartsa biztosan, hogy nehogy összetekeredjen!
Teleszkópos szívócső
Az állítható hosszúságú szívócsővel
a testmérethez tetszőlegesen lehet
igazodni.
Oldja az összekapcsolás rögzítését
úgy, hogy a nyíl irányába nyomja a
gombot!
Állítsuk a csöveket a kívánt hosszra. A
rögzítéshez oldja ki a gombot, míg jól
hallhatóan be nem kattan!
Szívófejek
Résszívó és kefés
szívó:
Kárpit-szívófej: Párnák, függönyök stb. tisztítására.
Szívócső: Szőnyegek vagy sima felületek
Parkettakefe: A padlószívóka az egyszerűbb felhely-
hoz.
és szőnyegpadlóhoz.
lóhoz.
Párnásbútor, függönyök, ill. sarkok,
rések stb. porszívózására.
tisztítására.
Sima padlók, aljzatok:
Nyomja le a lábával a kefejelű
„
válnak a kefék.
Szőnyegek:
Állítsa át a lábával az emelőkart a
„
ezés érdekében görgőkkel van ellátva.
Olyan nagyobb felületekhez, mint
parketta, laminát vagy járólap, stb.
“ kart. Így láthatóvá
“ jelre.
Turbókefe: A padlószívóka az egyszerűbb
A szívófejek kioldása: Enyhén elforgatva, húzza ki őket.
Levegőszabályozó tolattyú
Nyissa fel a tömlőnyélen lévő levegőszabályozó tolattyút, hogy
leválassza a szívófejen megtapadt részeket!
Filter
A készüléknek 3 szűrőrendszere van. A hagyományos porzsákrendszert átlátszó porgyűjtővel helyettesítettük. Ebben kavarog
a nagy áramlási sebesség folytán a nagyobb szennyeződés
csakúgy, mint a legapróbb lebegő porrészecskék.
Nem szükséges a porzsák használata.
A következőképpen járjon el, ha a porszint elérte a porgyűjtő
MAX-jelzését, vagy alábbhagy a szívóerő:
1 ábra
2 ábra • Óvatosan húzza ki a
felhelyezés érdekében görgőkkel van
ellátva. A kefe egy forgó és egy vibráló
kefehengerből áll, amit légáram hajt
meg. Különös alapossággal távolítja
el a szőnyegbe taposott piszkot,
állatszőrt, cérnát és szöszt. A szőnyeg
szálait szépen kikeféli, a színek
felfrissülnek.
Tolja a kefén lévő kapcsolót az A jelre,
így több levegőt szív be a készülék.
A (B) jel esetén ennek megfelelően
kevesebb levegő szívódik be. Ez erősíti
a szívóerőt.
Kérjük vegye fi gyelembe, hogy
a turbókefe nem alkalmas sima
felületekhez mint pl. parkettához,
lamináthoz, stb. Kár keletkezhet a
felületben.
A porgyűjtő ürítése
• Nyomja meg a porgyűjtő
kioldógombját és vegye ki a
porgyűjtőt.
szűrőbetétet a két tartónál
fogva. Állítsa fel függőlegesen
a portartályt.
• Ürítse ki a portartály tartalmát.
Ezután ismét helyezze be a
szűrőbetétet. Ügyeljen arra,
hogy a szűrőbetét szorosan
illeszkedjen és egyenesen
helyezze bele.
Ismét rögzítse a portartályt,
amíg az hallhatóan bepattan
a helyére.
MAGYARUL
45
05-BS 1273.indd 4505-BS 1273.indd 45 07.03.2008 8:24:52 Uhr07.03.2008 8:24:52 Uhr
Page 46

MAGYARUL
3 ábra
4 ábra
MAGYARUL
1. Motorvédő fi lter
(a portartályban)
A szűrőbetét tisztítása
• A porgyűjtő kioldásához nyomja meg a gombot és és vegye
ki a porgyűjtőt (lásd 1 ábra).
• Ürítse ki a portartály tartalmát
(lásd 2. ábra). Az óramutató járásával megegyező
irányba elfordítva reteszelje
ki a szűrőbetétet (lásd 3.
ábra). A második lépésben
a szűrőbetétet lefele ki lehet
venni. Kiporolással és enyhe
keféléssel tisztítsa meg a
motorvédő szűrőt.
• Helyezze vissza az alkatrészeket!
• Ismét rögzítse a portartályt,
amíg az hallhatóan be nem
pattan a helyére.
Minden harmadik ürítés után vagy
nagyobb elszennyeződés esetén
tisztítsa meg a fi ltert úgy, hogy a
fúvásiránnyal szemben vízsugarat
folyat át a szűrőgyapjún. Csak
teljes megszáradás után helyezze
vissza a fi ltert!
Csak akkor helyezze vissza, ha
teljesen meg van száradva!
Vigyázat: Soha ne mossa a
szűrőt mosógépben és ne
szárítsa hajszárítóval.
2. Beszívófi lter
A beeresztő szűrőt a portartálytérben találja, lásd a nyilat. A
porgyűjtő kioldásához nyomja
meg a gombot és és vegye ki a
porgyűjtőt. Húzza ki előre a szűrőt.
A porgyűjtő kb. minden 10. ürítése
után tisztítsa meg az áteresztő
szűrőt, vagy ha szükséges,
gyakrabban. Kérjünk, ügyeljen
arra, hogy a szűrő mindig tiszta
legyen, mert különben nem
megoldott a légáramlás. Ha
szükséges, kimoshatja meleg
vízben, adalékanyag nélkül. Csak
akkor helyezze vissza, amikor már
teljesen megszáradt!
5 ábra
Vegye fi gyelembe az alábbi fontos tájékoztatást!
A használat körülményeitől függően, pl. fi nom por beszívása
esetén, rövidebb időközökben is szükségessé válhat a tisztítás.
Ha csökkenne a porszívó szívásteljesítménye, a leírt módon
tisztítsa meg a szűrőket!
Ha működés közben hirtelen lecsökken a szívásteljesítmény, ez
annak a jele lehet, hogy eldugultak a szűrők.
3. Kibocsátófi lter
A porszívónak van még egy
kibocsátófi ltere is. Ahhoz, hogy
a szűrő kifogástalanul működjön,
ajánlatos minden 6 hónapban
megtisztítani. Ez a fi lter a készülék
hátsó részében, a szellőzőrács
mögött található. A szellőzőrács
oldalán található fogantyú
megnyomásával tudja kinyitni a
szellőzőrácsot. Utána húzza ki
előre a rácsot! Vegye ki a fi ltert, és
tisztítsa meg a már leírt módon!
Tegye vissza a fi ltert, és fordított
sorrendben eljárva, zárja le a
szellőzőrácsot.
Tisztítás és tárolás
Tisztítás
• Tisztítás előtt húzza ki a dugaszt a konnektorból!
• A külső burkolatot száraz ruhával törölve tisztára!
• Kb. minden 3. ürítés után tisztítsa meg a motorvédő szűrőt!
Mossa ki a fi ltert meleg vízben, adalékszer nélkül! Akkor
helyezze vissza, amikor már teljesen megszáradt.
Tárolás
• Hagyja a készüléket teljesen kihűlni.
• Csévélje fel teljesen a kábelt!
• Kérjük, állítsa fel a készüléket függőlegesen és akassza be
a teleszkópos csövön található akasztót a készülék hátulján
található tartóba (7).
Hibaelhárítás
• A készülék nem működik.
Megoldás:
Ellenőrizze a hálózati csatlakozást.
Ellenőrizze a kapcsoló állását.
• A készülék nem szív.
Lehetséges ok:
A portartály vagy a szűrő szennyezett.
Megoldás:
Ürítse ki ill. tisztítsa meg a részeket.
46
05-BS 1273.indd 4605-BS 1273.indd 46 07.03.2008 8:24:53 Uhr07.03.2008 8:24:53 Uhr
Page 47

MAGYARUL
Lehetséges ok:
A szívócsőbe vagy a fúvókába valami beszorult.
Megoldás:
Ellenőrizze, hogy nem szorult-e be valami a tartozékba.
Műszaki adatok
Modell: .............................................................................. BS 1273
Feszültségellátás: .........................................220-240 V, 50/60 Hz
Teljesítményfelvétel:
: ............................................................................ 1800 W
P
nom.
P
: ............................................................................ 2300 W
max.
Védelmi osztály: ..........................................................................ΙΙ
Nettó súly:...........................................................................5,85 kg
Ezt a készüléket az Európa Tanács minden vonatkozó aktuális
irányelve szerint (pl. elektromágnesesség-elviselő képesség
vagy kisfeszültség-elviselő képesség) ellenőriztük, és a legújabb
biztonságtechnikai előírások szerint készült.
A műszaki változtatások jogát fenntartjuk.
Garancia
Garanciális igényeivel forduljon, kérem, a szerződéses
kereskedőjéhez!
A garancia igazolására a pénztári nyugta szolgál. E nélkül az
igazolás nélkül sem díjmentes csere, sem díjtalan javítás nem
végezhető.
Garanciális esetben eredeti csomagolásában adja át az alapkészüléket a pénztári bizonylattal együtt annak a kereskedőnek,
akitől a készüléket vásárolta!
Sem az elhasználódó tartozékokban, ill. kopó alkatrészekben
bekövetkező hibák, sem a tisztítás, karbantartás vagy a kopó
alkatrészek cseréje nem esik a garancia hatálya alá, következésképp térítésköteles.
Illetéktelen beavatkozás a garancia megszűnését eredményezi.
A „kuka“ piktogram jelentése
Kímélje környezetünket, az elektromos készülékek nem a
háztartási szemétbe valók!
Használja az elektromos készülékek ártalmatlanítására kijelölt
gyűjtőhelyeket, ott adja le azokat az elektromos készülékeit,
amelyeket többé már nem kíván használni!
Ezzel segítséget nyújt ahhoz, hogy elkerülhetők legyenek azok a
hatások, amelyeket a helytelen „szemétre dobás“ gyakorolhat a
környezetre és az emberi egészségre.
Ezzel hozzájárul az újrahasznosításhoz, a recyclinghoz és a
kiöregedett elektromos és elektronikus készülékek értékesítésének egyéb formáihoz.
Az önkormányzatoknál vagy a polgármesteri hivatalokban
tájékoztatást kaphat arról, hogy hova viheti a kiselejtezett
készülékeket.
A garanciális idő után
A garanciális idő eltelte után a megfelelő szakkereskedésben
vagy javítószolgálatnál végeztethet térítésköteles javításokat.
47
05-BS 1273.indd 4705-BS 1273.indd 47 07.03.2008 8:24:54 Uhr07.03.2008 8:24:54 Uhr
MAGYARUL
Page 48

РУССКИЙ
Общие указания по технике безопасности
Перед началом эксплуатации прибора внимательно
прочитайте прилагаемую инструкцию по эксплуатации и
сохраните ее в надежном месте, вместе с гарантийным
талоном, кассовым чеком и, по возможности, картонной
коробкой с упаковочным материалом. Если даете
кому-либо попользоваться прибором, обязательно дайте
впридачу данную инструкцию по эксплуатации.
• Пользуйтесь прибором только частным образом
и по назначению. Прибор не предназначен для
коммерческого использования. Не пользуйтесь
прибором под открытым небом . Предохраняйте
прибор от жары, прямых солнечных лучей, влажности
(ни в коем случае не погружайте его в воду) и ударов
об острые углы. Не прикасайтесь к прибору влажными
руками. Если прибор увлажнился или намок, тут же
выньте вилку из розетки.
• После эксплуатации, монтаже принадлежностей, чистке
или поломке прибора всегда вынимайте вилку из
розетки (тяните за вилку, а не за кабель).
• Не оставляйте включенные электроприборы без
присмотра. Если возникнет необходимость отлучиться,
то выключите электроприбор или выньте вилку из
розетки (тяните за вилку, а не за кабель).
• Регулярно осматривайте прибор и кабель на предмет
возможных повреждений. Ни в коем случае не включайте
прибор, имеющий повреждения.
• Ни в коем случае не ремонтируйте прибор
самостоятельно, а обращайтесь в таком случае за
помощью к специалисту, имеющему соответствующий
допуск. Из соображений безопасности, замена сетевого
шнура на равнозначный допускается только через
завод-изготовитель, нашу сервисную мастерскую или
соответствующего квалифицированного специалиста.
• Используйте только оригинальные запчасти.
• Пожалуйста, соблюдайте нижеследующие
„Специальные указания по технике безопасности“.
Дети и лица нуждающиеся в присмотре
• Из соображений безопасности для детей не оставляйте
лежать упаковку (пластиковые мешки, картон,
пенопласт и т.д.) без присмотра.
ПРЕДУПРЕЖДЕНИЕ!
Не позволяйте детям играть с полиэтиленовой
пленкой. Опасность удушья!
• Чтобы защитить детей и других лиц, нуждающихся
в уходе и присмотре, от поражения электротоком,
следите за тем, чтобы прибор не включался без
присмотра. Этот прибор – не игрушка. Не допускайте к
нему детей.
• Не пылесосьте горячую золу, острые или режущие
• Не пользуйтесь электроприбором во влажных
• Ни в коем случае не работайте без фильтра. После
• Во время работы держите пылесосную трубу на
• Держите пылесос на расстоянии от источников тепла
• При закрывании двери кабель не должен быть зажат
• Не возите пылесос по кабелю.
• Прибор нельзя использовать для сбора осколков стекла,
1 Воздушная заслонка
2 Разъем для подключения пылесосного шланга
3 Регулятор мощности
4 Ручка для переноски
5 Кнопка механизма сматывания сетевого
6 Выключатель ВКЛ/ВЫКЛ
7 Механизм крепления пылесосной трубы
8 Кожух выпускного фильтра
9 Кнопка разблокировки контейнера-
10 Контейнер-пылесборник с защитным фильтром
11 Крючок на всасывающей трубке
12 Щётка для пола
13 Телескопическая всасывающая трубка
14 Держатель принадлежностей
Принадлежности
15 Щетка для паркета
16 Турбощетка
17 Насадка-щётка
18 Щелевая насадка
19 Cопло для чистки тканей
• Вставьте соединительную головку пылесосного шланга
• Держите кнопки нажатыми и вытяните пылесосный
• При необходимости вставьте пылесосную трубу в
предметы!
помещениях!
каждой cмены фильтра обязательно проверьте его
правильную посадку!
расстоянии от волос, одежды и частей тела!
таких как: радиаторы, печи и т.д.
или натянут на острые края или углы.
мелких игрушек, игл, скрепок, горяей золы, горящих
окурков или спичек итд.
Обзор деталей прибора
шнура
пылесборника
мотора
Подготовка к работе
в гнездо, до механической фиксации, для этого нажмите
одновременно обе кнопки. Для снятия шланга, нажмите
обратно на кнопки у гнезда.
шланг.
рукоятку.
Специальные указания по технике
безопасности
• Не пользуйтесь пылесосом для удаления влажной пыли
или жидкостей!
РУССКИЙ
48
Порядок работы с электроприбором
1. Насадите необходимую принадлежность.
2. Отмотайте кабель на необходимую длину, вставьте
сетевую вилку в розетку с напряжением сети 230 В,
05-BS 1273.indd 4805-BS 1273.indd 48 07.03.2008 8:24:55 Uhr07.03.2008 8:24:55 Uhr
Page 49

РУССКИЙ
50 Гц, оснащенную устройством токовой защиты и
установленную в соответствии с предписаниями, затем
включите электроприбор, нажав на выключатель
ВКЛ/ВЫКЛ.
3. При помощи регулятора установите необходимую
мощность (Min до Max).
4. Пылесосьте с равномерной скоростью. Давить нет
необходимости.
Внимание: следите за радиусом захвата пылесоса,
ограниченного длиной отмотанного кабеля!
Регулятор мощности
Слабая мощность: для занавесей, тонкой материи
Средняя мощность: для велюровых и текстильных полов
Большая мощность: для грубых ковров и полов
Механизм сматывания сетевого шнура
Пожалуйста не вытягивайте сетевой шнур далее желтой
метки. И ни в коем случае не вытягивайте его до красной
метки, это может привести к поломке механизма
сматывания. Подобные поломки не попадают под гарантию.
Сматывание
Нажмите на кнопку механизма сматывания и помаленьку
подавайте кабель. Держите кабель крепко в руках, чтобы
предотвратить его хлестание.
Телескопическая пылесосная труба
Изменение длины всасывающей
труба позволяет Вам подобрать
удобную дпя Вашего роста рабочую
высоту.
Разблокируйте соединение, нажав
кнопку в направлении стрелки.
Отрегулируйте длину пылесосной
трубы. Для фиксации отпустите
кнопку, до четко слышимого щелчка.
Сопла-насадки
Узкое сопло и соплощетка:
Cопло для чистки
тканей:
Пылесосная труба: Для очистки ковров и гладких
с длинным ворсом
Для удаления пыли с мягкой
мебели, занавесей, а также из
труднодоступных углов, щелей и тд.
Для удаления пыли с мягкой мебели,
занавесей и т.д.
поверхностей.
Гладкие полы:
Нажмите ногой на рычаг с символом
щётки „
становятся видимыми.
Ковры:
Переключите ногой рычаг на символ
„
“. Теперь щетки
“.
Щетка для паркета: Для легкого скольжения щетка
Турбощетка: Для легкого скольжения щетка
Снятие сопел: Потянуть с легким
Воздушная заслонка
Для регулировки потока воздуха или для освобождения
сопла от присосавшихся к нему предметов откройте
воздушную заслонку, находящуюся на рукоятке.
Фильтр
Пылесос оснащен системой 3-х кратного фильтрования.
Распространенная система с разовым фильтром заменена
на прозрачный контейнер-пылесборник. Крупная и мелкая
пыль отфильтровывается, благодаря мощной, закрученной
струе воздуха.
Отпадает необходимость приобретения мешков для пыли.
Если контейнер-пылесборник наполнился до метки MAX
или мощность пылесоса уменьшилась, то поступайте
следующим образом:
Рис. 1
оснащена роликами. Для больших
полов: паркетных, линолиумных,
кафельных и т.п.
оснащена роликами. Щетка
оснащена вращающимися и
колеблющимися щетками-валками,
которые приводятся в движение
за счет потока воздуха. Особо
тщательно удаляет втоптанный
мусор, шерсть животных, нитки и
свалявшийся ворс. Щетка очень
хорошо прочесывает ковры.
Установите переключатель на
щётке на символ A, тогда будет
всасываться больше воздуха.
На символе (B) соответственно
меньше. Это усиливает силу
всасывания.
Пожалуйста учтите, турбощетка
не предназначена для гладких
полов, таких как паркет, ламинат
и т.п., она может повредить их
поверхность.
проворачиванием.
Опустошите контейнерпылесборник
• Нажмите кнопку
разблокировки контейнерапылесборника и вытащите
его.
РУССКИЙ
49
05-BS 1273.indd 4905-BS 1273.indd 49 07.03.2008 8:24:55 Uhr07.03.2008 8:24:55 Uhr
Page 50

РУССКИЙ
Рис. 2 • Осторожно вытяните
Рис. 3
фильтрующий элемент,
придерживая его с обеих
сторон. При необходимости
поставьте для этого пылесос
в вертикальное подложение.
• Удалите содержимое
Пылесборника. Затем снова
установите фильтрующий
элемент. Пожалуйста,
следите за тем, чтобы
фильтрующий элемент был
прочно и ровно закреплён.
Снова укрепите пылесборник
таким образом, чтобы был
слышен щелчёк фиксатора.
1. Защитный фильтр мотора
(в пылесборнике)
Очистка фильтра
• Нажмите кнопку
разблокировки контейнерапылесборника и вытащите
его (смотри рис. 1).
• Удалите содержимое
пылесборника (смотри рис.
2). Снимите с фиксатора
фильтрующий элемент,
немного повернув его по
часовой стрелке (смотри
рис. 3). На втором этапе
фильтрующий элемент
можно вынуть в направлении
вниз. Прочистите защитный
фильтр мотора, выколотив
его и прочистив мягкой
кисточкой.
• Вставьте все детали обратно.
• Снова укрепите пылесборник
таким образом, чтобы был
слышен щелчёк фиксатора.
После каждой третьей очистки
или при сильном загрязнении
промойте фильтр под проточной
водой, направив струю воды
против направления всасывания
воздуха. После полного
просыхания фильтра вставьте
его обратно!
Вставляйте его обратно только
после полного высыхания!
Внимание:
Ни в коем случае не мойте
фильтр в стиральной машине и
не сушите его под феном.
Рис. 4
Рис. 5
Пожалуйста учтите эти важные примечания!
Чистка фильтра может стать необходимой и через короткое
время, в зависимости от условий эксплуатации, например
если сосать очень мелкую пыль.
Если мощность пылесоса ослабла, прочистите фильтр, как
это было описано.
Если мощность пылесоса во время работы неожиданно
ослабеет, это может быть признаком закупорки фильтра.
2. Входной фильтр
Входной фильтр Вы найдёте в
месте крепления пылесборника,
смотри стрелку. Нажмите
кнопку разблокировки
контейнера-пылесборника и
вытащите его. Выньте фильтр в
направлении вперёд. Входной
фильтр необходимо прочищать
примерно после каждого
10 опустошения контейнерапылесборника или чаще, если
это вызывает необходимость.
Следите за тем, чтобы фильтр
был всегда чистым, иначе не
будет обеспечена свободная
циркуляция воздуха. При
необходимости его можно
промыть в теплой воде, без
добавок. Вставляйте его обратно
только после полной просушки!
3. Выпускной фильтр
Кроме всего электроприбор
оснащен выпускным фильтром.
Чтобы гарантировать
безотказную работу фильтра,
рекомендуется прочищать его
каждые 6 месяцев. Этот фильтр
находится на задней части
прибора за вентиляционной
решеткой. Откройте
вентиляционную решетку, нажав
на рычаг сбоку ее. После этого
вытяните решетку вперед.
Выньте фильтр и прочистите
его, как это уже было описано.
Вставьте фильтр обратно и
закройте вентиляционную
решетку в обратной
последовательности.
РУССКИЙ
50
05-BS 1273.indd 5005-BS 1273.indd 50 07.03.2008 8:24:55 Uhr07.03.2008 8:24:55 Uhr
Page 51

РУССКИЙ
Чистка и хранение
Чистка
• Перед чисткой выньте сетевую вилку из розетки!
• Протрите корпус сухой тряпкой.
• Прочищайте защитный фильтр мотора после каждой 3.
чистки мешка-пылесборника. Промойте фильтр в теплой
воде, без добавок. После полного высыхания вставьте
его обратно.
Хранение
• Дайте утюгу полностью остыть.
• Полностью смотайте кабель.
• Установите пылесос вертикально и вставьте крюк
телескопической трубы в парковочное приспособление
(7) на его обратной стороне.
Устранение неисправностей
• Прибор не функционирует.
Помощь:
Проверьте подключение электропитания.
Проверьте положение выключателя.
• Прибор не пылесосит.
Возможная причина:
Забился контейнер-пылесборник или фильтры.
Помощь:
Опустошите его и прочистите фильтры.
Возможная причина:
В пылесосном шланге или сопле застряло инородное
тело.
Помощь:
Проконтролируйте их на наличие инородных тел.
Гарантийное обязательство
Гарантийный срок на территории Российской Федерации
устанавливается полномочными представителями.
Кассовый чек является гарантийным талоном. Без него
невозможен бесплатный ремонт или замена изделия.
В случае возникновжния притензий по гарантии, предъявите
изделие в полнойкомплектации, с оригинальной
упаковкой и кассовым чеком торговой точке, продавшей
это изделие.
Дефекты изнашиваемых принадлежностей или трущихся
деталей, а также чистка, техобслуживание или замена
трущихся деталей не попадают под гарантию, и поэтому
проводятся за отдельную оплату!
Гарантия теряется при вскрытии изделия посторонними
лицами.
После гарантии
После окончания срока гарантии, ремонт изделий
производится за оплату, соответствующими мастерскими
или пунктами сервисного обслуживания.
Технические данные
Модель: ...........................................................................BS 1273
Электропитание: ..........................................220-240 В, 50/60 Гц
Потребляемая мощность:
P
: .........................................................................1800 ватт
nom.
P
: .........................................................................2300 ватт
max.
Класс защиты: ............................................................................ ΙΙ
Вес нетто: .......................................................................... 5,85 кг
Это изделение прошло все необходимые и актуальные
проверки, предписанные директивой СЕ, к прим. на
электромагнитную совместимость и соответствие
требованиям к низковольтной технике, оно было также
сконструировано и построено с учетом последних
требований по технике безопасности.
Мы оставляем за собой право на технические изменения!
51
05-BS 1273.indd 5105-BS 1273.indd 51 07.03.2008 8:24:57 Uhr07.03.2008 8:24:57 Uhr
РУССКИЙ
Page 52

05-BS 1273.indd 5205-BS 1273.indd 52 07.03.2008 8:24:57 Uhr07.03.2008 8:24:57 Uhr
Page 53

05-BS 1273.indd 5305-BS 1273.indd 53 07.03.2008 8:24:57 Uhr07.03.2008 8:24:57 Uhr
Page 54

D-47906 Kempen/Germany · Industriering Ost 40
Internet: http://www.clatronic.de · email: info@clatronic.de
05-BS 1273.indd 5405-BS 1273.indd 54 07.03.2008 8:24:57 Uhr07.03.2008 8:24:57 Uhr
Stünings Medien, Krefeld • 02/08
 Loading...