

Page 1
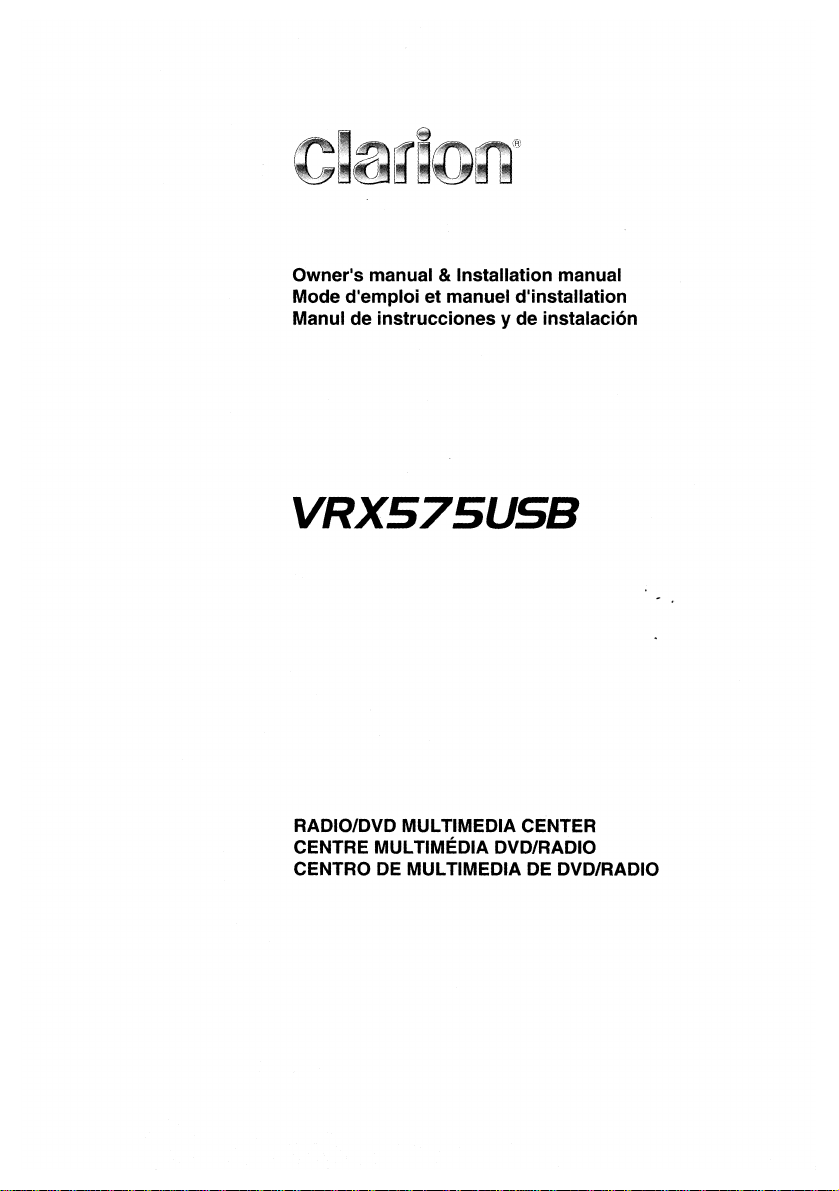
Owner's manual & Installation manual
et
Mode d'emploi
Manul de instrucciones y de instalaci6n
manuel d'installation
VRX575USB
RADIO/DVD MULTIMEDIA CENTER
CENTRE MULTIMEDIA DVD/RADIO
CENTRO DE MULTIMEDIA DE DVD/RADIO
Page 2

Page 3
7inVRX575USB UserManual
.IIIIB
- -0-""""
1.DESCRIPTION
1-1
Features
1-2 Expanding System
1-3 Information Guide
2.PRECAUTIONS
3.CONTROL
3-1
Button Functions
3-2 Remote Control
4.BUTTON AND TOUCH KEY OPERATION
4-1
User Guide
4-1-1 Power on Mode
4-1-2 Tuner Mode
4-1-3 DVD Mode .
4-1-4 Sound Mode
4-1-5 Adjust
4-1-6 Adjust
5.CAUTIONS
5-1
Liquid Crystal Panel/Generalities
5-2 Cleaning
6.DVD Video System
6-1
DVD Video Features
6-2 Discs
6-2-1 Playable Disc
6-2-2 CD Extra Disc
6-2-3 CD-R/CD-RW Disc (MP3, WMA)
6-2-4 DVD
6-2-5 Unsupported Disc Format
6-2-6 MP3 /
6-2-7 DivX Playback .
11111111111111111
_
'"'_
-.-,
,..,_
'::';;
Mode:
Mode:
At Tuner, iPod, USB Mode
At AUX, DVD Mode
± R/RW Disc
WMA
Playback
_ _
...
05
05
06
07
08
12
12
13
16
16
16
17
18
19
21
23
24
24
24
25
25
26
26
26
26
26
26
26
27
.
3
Page 4
6-2-8 Region Number
6-3 Registered Trademark
7. OPERATIONS .
7-1
DCP
7-2 Basic Operations
7-2-1 Power On/Off
7-2-2 Mode Selections
7-2-3 LCP Operations .
7-2-4 Audio Operations
7-2-5 Adjust Operations
2-Z0NE
7-2-6
7-3 Radio
7-4 DVD Video Player
7-4-1 Size of the Screen
7-4-2 Country Code
7-4-3 Parental Level .
7-4-4 Disc Loading .
7-4-5 Setting the DVD Video
7-5 Other Function
7-5-1
CDDA
7-5-2 MP3 and
8. USAGE
8-1
8-2 Setting USB
TROUBLESHOOTING
9.
10. SPECIFICATIONS
11. INSTALLATION
11-1
11-2 Main Unit Installation(Universal Mount)
11-3 Removing the Main Unit
11-4 Main Unit Installation(Fixed Mount)
11-5 Cautions on Wiring
11-6 Electrical Connection
OF
Setting iPod
Cautions on Installation
Function
WMA
PERIPHERAL
AND
WIRE CONNECTION
DEVICES
27
··································27
28
··················28
28
28
29
29
30
34
38
····························40
42
42
43
43
43
44
47
47
47
50
50
52
54
55
57
57
59
60
61
62
63
4
Page 5
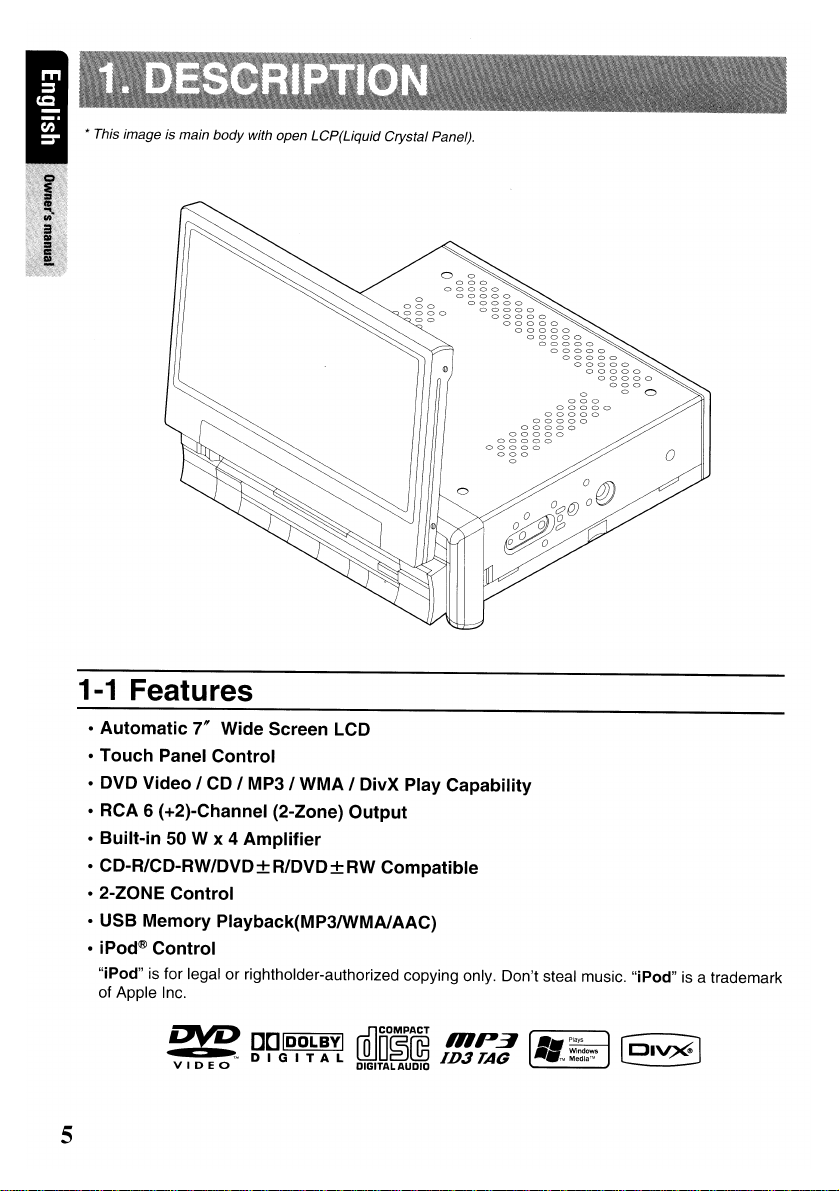
* This image is main body with open LCP(Liquid Crystal Panel).
1-1
Features
• Automatic7"Wide Screen LCD
• Touch Panel Control
• DVD Video
I CD I MP31 WMA I DivX Play Capability
• RCA 6 (+2)-Channel (2-Zone) Output
• Built-in
•
CD-R/CD-RW/DVD±R/DVD±RW
•
2-Z0NE
50 W x 4 Amplifier
Compatible
Control
• USB Memory Playback{MP3IWMAlAAC)
• iPod® Control
"iPod" is for legal or rightholder-authorized copying only. Don't steal music. "iPod"isa trademark
of Apple Inc.
~
v
IDE
()[]IDOLBVI
;M
DIGITAL
0
ffi]COMPACT
0
D~(lli
DIGITAL
AUDIO
HlP3
ID3
TAG
•..
PI~YS
.,
:~~~~:s
5
Page 6
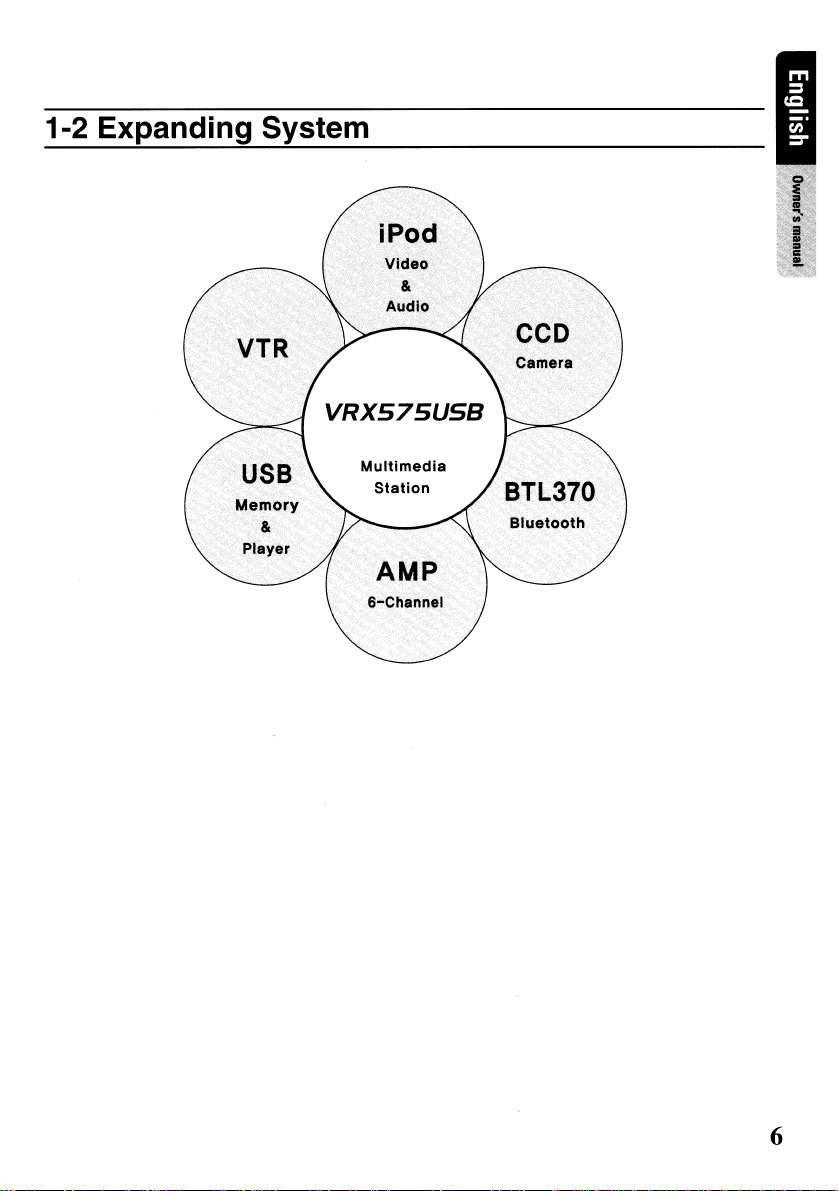
1-2
Expanding
System
6
Page 7
1-3 Information Guide
_mit
•
CLARION
FOR
Dear
Congratulationsonyour
you'll
There
www.clarion.com
We
have
short
information.
Register
GlD
III INFORMATIONS
Pour
PRODUCT
USA
and
Customer:
enjoy
your
are
and
Clarion
many
benefitstoregistering
made
product
easytocomplete.
at
www.clarion.com -
les
Etas
REGISTRATIONINFORMATION
Canada
only
purchaseofa
experience.
to
register
your
registration
Once
DE
L'ENREGISTREMENTDEPRODUITS CLARIO,N
Ie Canada seulenlent
www.clarion.com
Clarion
your
Clarion
simple
you1re
it's
easytokeep
w-ww~clgrlQn!~J}.m
mobile
electronic
product.Weinvite
product.
with
our
registered,wecan
easytouse
your
Clarion
products.Weare
youtovisit
website.
keep
you
informedofimportant
productupto
our
The
date.
confident
website
at
registration
form
that
is
product
...
II
ORMACION DEL REGISTRO
Para USA y Canada
eX[)erlenCla
orCH1ucto facti en nuestro sitlo. La forrna
ele,ctJc)rllc]ue
DEPRODUCTO
DfCIOUCIO electrC)nIC;Q
con
al
producto
oro,du(~to.
Oo(jrernc~s
de
La invitam os en
su producto
rnobile Clarion.
DE
rnev!1
Clarion.
OlrOO,OfC:lorlaJlle
de Cladon. EstafTios seguros que
de
la
tnt()rrriaClon
orc.ouctodeClarion actuallzado.
NaLls
SOr11ITleS
visiter notre site
C.LA,RION
facil
7
Page 8

For your safety, the driver should not watch the DVD videolTVNTR or operate the
controls while driving. Please note that watching and operating the DVD videolTVNTR
while driving are prohibited by law
in
some countries. Also, while driving, keep the
volume to a level at which external sounds can be heard.
CD
When the inside of the car is very cold and the playerisused soon after switching on the heater,
moisture may form on the disc (DVD/CD) or the optical parts of the player and proper playback
may not be possible. If moisture forms on the disc
moisture forms on the optical parts of the player, do not use the player for about one hour. The
condensation will disappear naturally allowing normal operation.
(2)
Driving on extremely bumpy roads which cause severe vibration may cause the sound to skip.
@ This unit uses a precision mechanism. Even
case, disassemble the unit, or lubricate the rotating parts.
@ This equipment has been tested and found to comply with the limits for a Class B digital device,
pursuant to Part 15 of the FCC Rules. These limits are designed to provide reasonable protection
against harmful interference
radiate radio frequency energy and,
may cause harmful interference to radio communications. However, there
interference will not occur
interference to radio or television reception, which can be determined by turning the equipment off
and on, the user
is
encouraged to consult the dealer or an experienced radiolTV technician for help.
in
a residential installation. This equipment generates, uses, and can
if
not installed and usedinaccordance with the instructions,
in
a particular installation. If this equipment does cause harmful
(DVD/CD), wipe it off with a soft cloth. If
in
the event that trouble arises, never open the
is
no guarantee that
8
Page 9
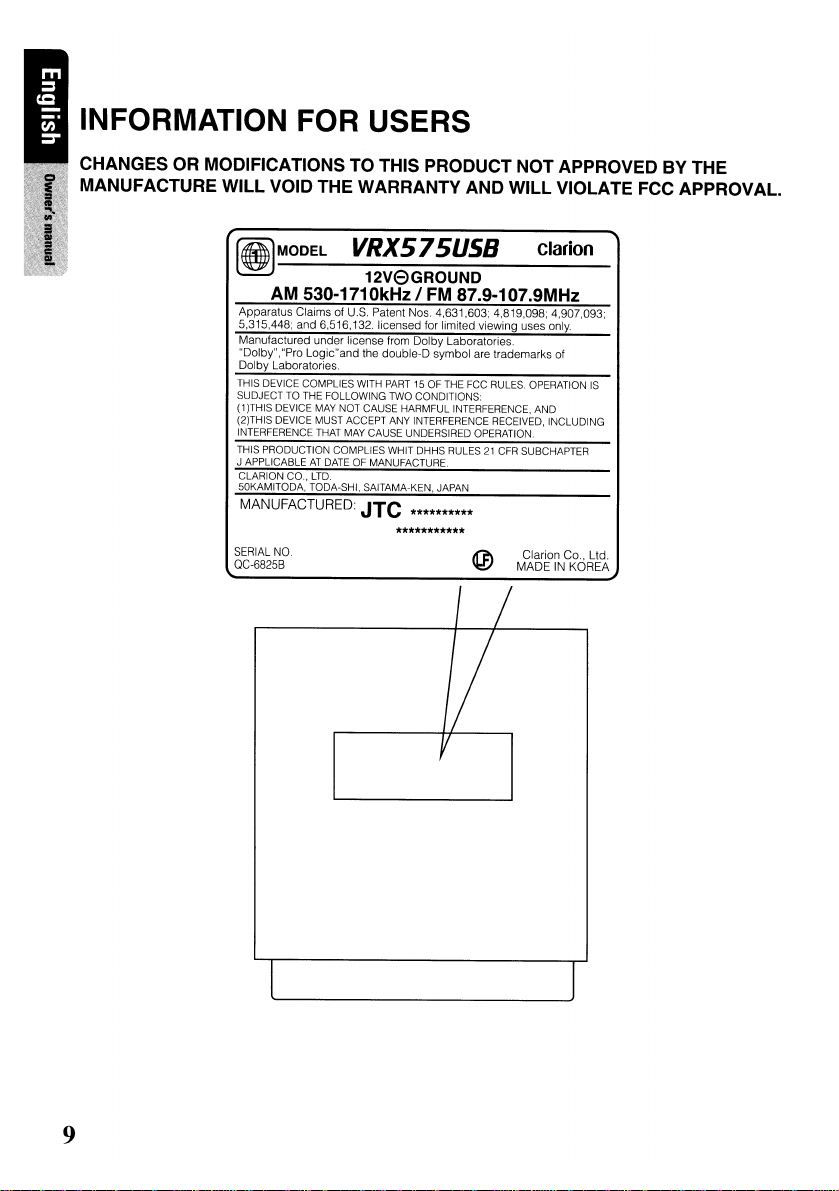
INFORMATION FOR USERS
CHANGES OR MODIFICATIONS TO THIS PRODUCT NOT APPROVED BY THE
MANUFACTURE WILL VOID THE WARRANTY AND WILL VIOLATE FCC APPROVAL.
[8)
MODEL
VRX575US8
Clarion
12V8GROUND
AM 530-1710kHz / FM 87.9-107.9MHz
Apparatus Claims of U.S. Patent Nos. 4,631,603; 4,819,098; 4,907,093;
5,315,448; and 6,516,132. licensed for limited viewing uses only.
Manufactured under license from Dolby Laboratories.
"Dolby","Pro Logic"and the double-D symbol are trademarks of
Dolby Laboratories.
THIS DEVICE COMPLIES WITH PART 15 OF THE FCC RULES. OPERATION
SUDJECT TO THE FOLLOWING TWO CONDITIONS:
(1)THIS DEVICE MAY NOT CAUSE HARMFUL INTERFERENCE, AND
(2)THIS DEVICE MUST ACCEPT ANY INTERFERENCE RECEIVED, INCLUDING
INTERFERENCE THAT MAY CAUSE UNDERSIRED OPERATION.
THIS PRODUCTION COMPLIES WHIT DHHS RULES21CFR SUBCHAPTER
J APPLICABLEATDATE OF MANUFACTURE.
CLARION CO.,
50KAMITODA, TODA-SHI, SAITAMA-KEN, JAPAN
MANUFACTURED:
LTD.
JTC
**********
***********
SERIAL
OC-68258
NO.
Clarion Co., Ltd.
MADE IN KOREA
IS
9
Page 10
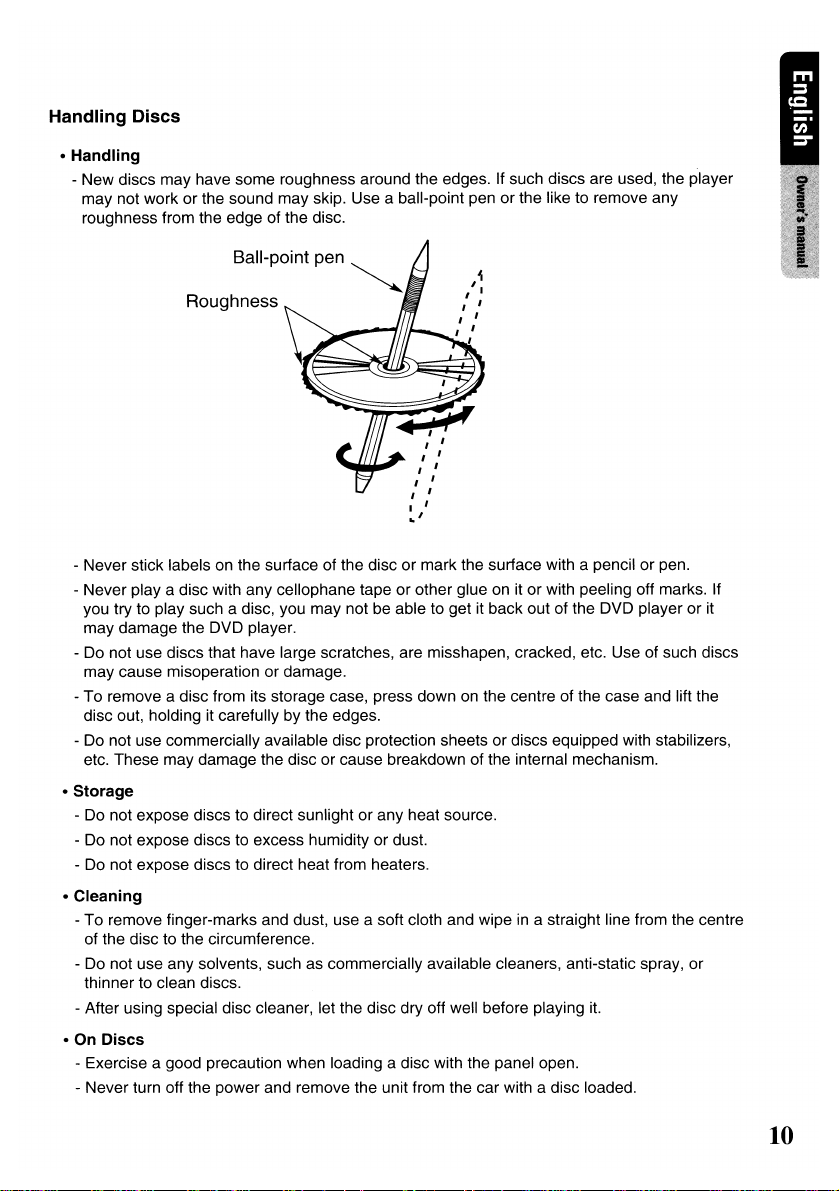
Handling Discs
• Handling
- New discs may have some roughness around the edges. If such discs are used, the player
may not work or the sound may skip. Use a ball-point pen or the like to remove any
roughness from the edge of the disc.
Ball-point pen
~
Roughness
- Never stick labels on the surface of the disc or mark the surface with a pencil or pen.
- Never
playa
you try to play such a disc, you may not be able to get it back out of the DVD player or it
may damage the DVD player.
- Do not use discs that have large scratches, are misshapen, cracked, etc. Use of such discs
may cause misoperation or damage.
- To remove a disc from its storage case, press down on the centre of the case and lift the
disc out, holding it carefully by the edges.
- Do not use commercially available disc protection sheets or discs equipped with stabilizers,
etc. These may damage the disc or cause breakdown of the internal mechanism.
• Storage
-Donot expose discs to direct sunlight or any heat source.
- Do not expose discs to excess humidity or dust.
Do
not expose discs to direct heat from heaters.
-
• Cleaning
- To remove finger-marks and dust, use a soft cloth and wipeina straight line from the centre
of the disc to the circumference.
- Do not use any solvents, such as commercially available cleaners, anti-static spray, or
thinner to clean discs.
- After using special disc cleaner, let the disc dry off well before playing
•OnDiscs
- Exercise a good precaution when loading a disc with the panel open.
- Never turn off the power and remove the unit from the car with a disc loaded.
disc with any cellophane tape or other glue on it or with peeling off marks.
it.
If
10
Page 11
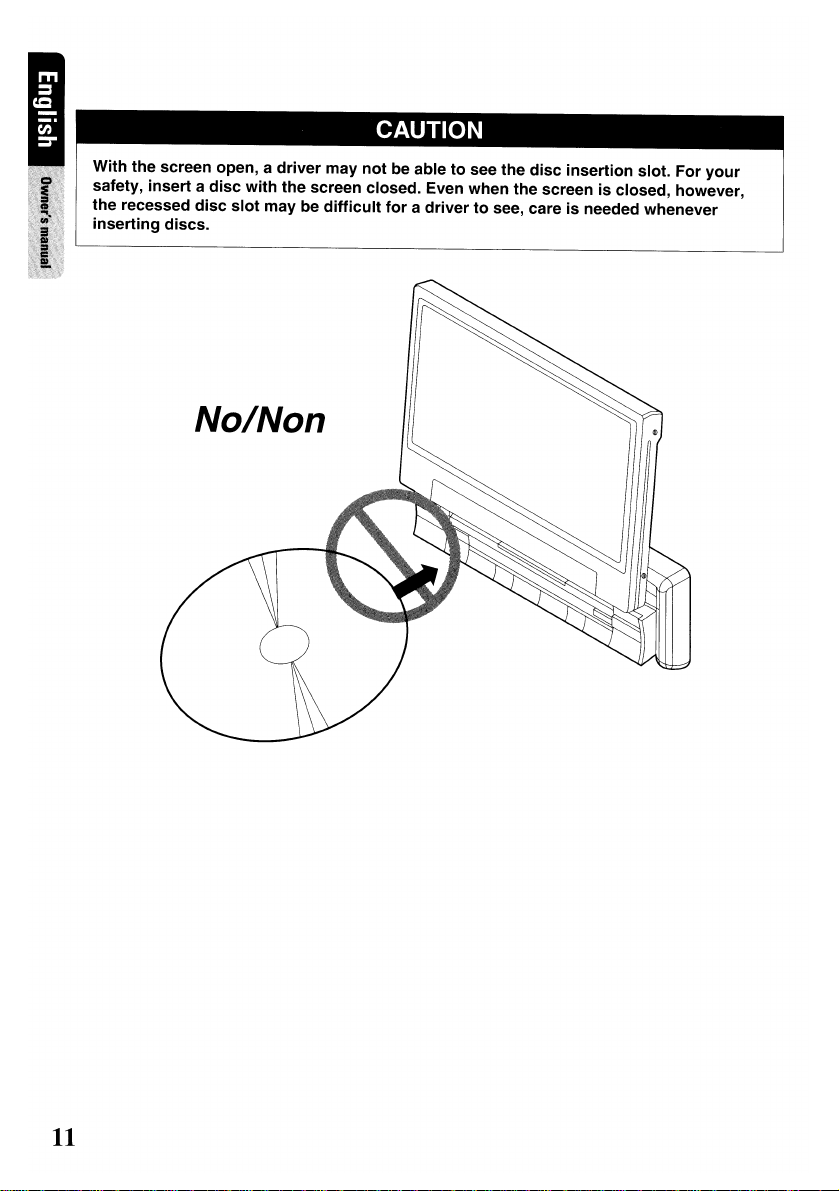
With the screen open, a
safety,
insertadisc
the recessed
inserting
discs.
disc
with
slot
No/Non
driver
may
not
the screen closed. Even when the screen is closed, however,
may be
difficult
be abletosee the
foradrivertosee, care is needed whenever
disc
insertion slot. For
your
11
Page 12
3-1
Button Functions
@
----@
I
I
4
G) I •
(2)
@ [+ VOL -] : To increase/decrease the volume (in a range from
@ [SOUND] : To enter/exit the SOUND mode
;.
:To remove the DCP (Detachable Control Panel)
~
: To eject the disc (press this button more than a second if the unitisin
power off)
•
®
2-Z0NE
ADJ
: To enter the
To exit the
: To enter/exit the ADJUST mode changing the settings
2-l0NE
2-l0NE
mode (press the [SOUND] button more than a second)
mode (keep pressing this button again)
Omin
middle of turning the
to 33max)
® [SOURCE] : To enter/exit the SOURCE mode
To change the operation mode when closing the LCP (such as TUNER mode)
•
POWER:
To turnonthe power (press the [SOURCE] button more than 2 seconds)
To turn off the power (press this button more than 2 seconds)
* If you press this button more than 2 seconds during turning the power off, the power of the
unit will be turned on.
(f) [OPEN] : To open/close the LCP
TILT:
•
To adjust the angle for the LCP, press and hold the [OPEN] button more than a second.
The LCP
is
moved to forward or backward. (There are 5 adjustable angles available)
12
Page 13
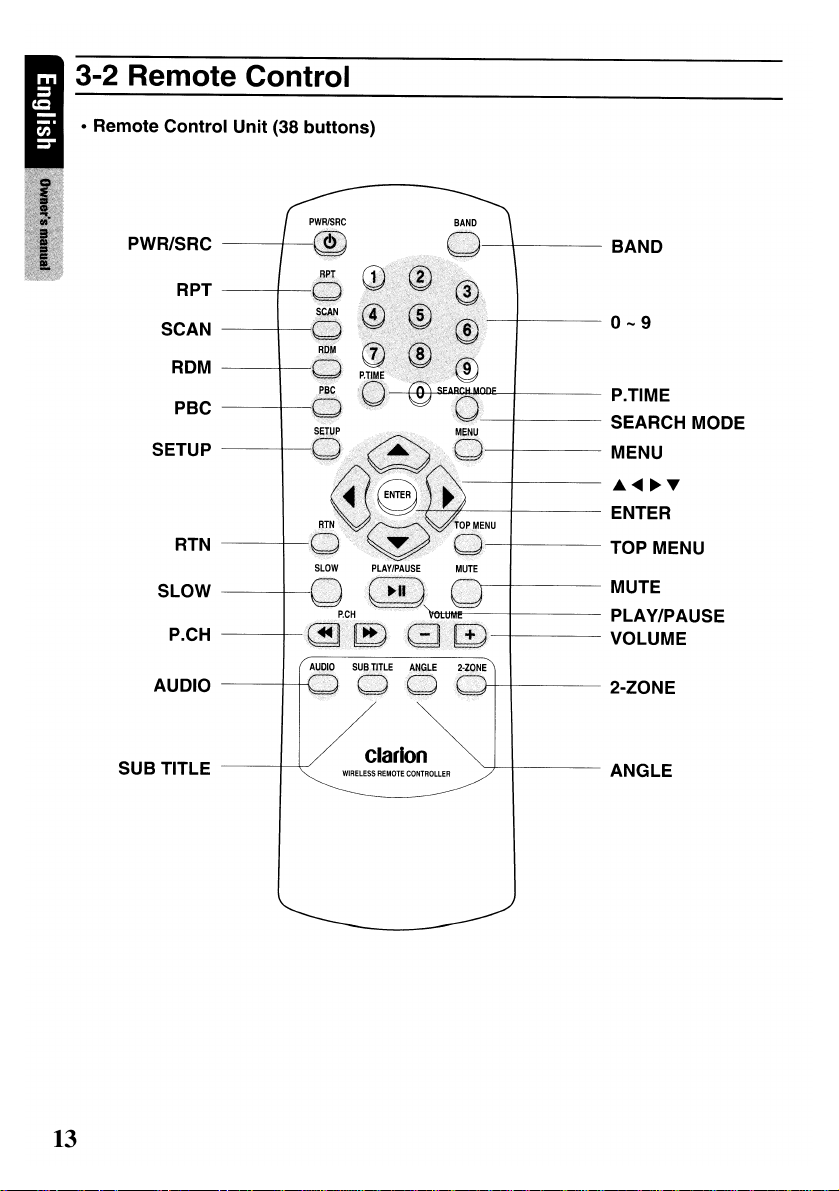
3-2 Remote
Control
• Remote
PWR/SRC
Control
RPT
SCAN
ROM
PBC
SETUP
RTN
SLOW
P.CH
AUDIO
Unit
(38
buttons)
BAND
0-9
P.TIME
SEARCH MODE
MENU
.......
~T
ENTER
TOP MENU
MUTE
PLAY/PAUSE
VOLUME
2-Z0NE
13
SUB TITLE
Clarion
WIRELESS
REMOTE
CONTROLLER
ANGLE
Page 14
•
Inserting
CD
Open the rear cover, and remove it and insert the AAA (SUM-4, IEC LR03/1.5V) batteries bundled
with the remote control unit
~
Using batteries improperly can cause them to explode. Take note of the following points:
• When replacing batteries, replace both batteries with new ones
•Donot short-circuit, disassemble or heat batteries.
• Do not dispose batteries into fire or flames.
• Dispose of spent batteries properly.
the
Batteries
in
the directions showninthe figure and then, close the rear cover.
AAA (SUM-4, lEG LR03/1.5V)
Batteries
Battery cover
•
Button
You can use the remote control unit to control this unit. The steering wheel remote control operation
work
CD
[PWRISRC] : To turn on/off the power (press this button more than 2 seconds)
~
[BAND]
@
[RPT] : To repeat chapter
@ [SCAN] : To scan tracks
@ [ROM] : To play tracks at random
® [PBC] : To turn on/off PBC function
([) [0-9] : To select the preset numberinthe Preset List screen of the TUNER mode
Functions
on
the MAIN zone even when the SUB zone is selected.
To switch the modes
: To switch reception bandinTUNER mode
in
DVD mode or repeat trackinCD/MP3 modes
in
To perform folder repeat
in
To scan chapters
To scan folders
To play folders at random
To input number of key pad screen
USB mode
in
MP3 mode
in
DVD mode and tracksinCD/MP3 modes
MP3 mode (keep pressing more than a second)
in
CD/MP3 modes
in
MP3 mode (keep pressing more than a second)
in
the Video CD mode
in
DVD mode
14
Page 15
® [P.TIME] : To turn on/off the playtime display
in
DVD mode
® [SEARCH MODE] : To switch the search mode (keep pressing more than a second
@ [SETUP] : To show the DVD SETUP screen while playing DVD
® [MENU] : To display stored menu
@
[AU
....
U~UT]
@)
[ENTER] : To select track, file, folder or item
@ [RTN] : To return to the previous screen from the list or menu screens
@ [TOP MENU] : To display top menu screen on DVD video disc
: To select a menu
To scroll the track/folder list screeninMP3 modes (only A
To switch to the previous screen display while the menu screen is being displayed.
® [SLOW] : To perform slow playback
in
DVD video disc
in
DVD mode
in
all modes
T)
® [PLAYIPAUSE] : To play or pause the video / audio media
To stop video playback in DVD video (keep pressing more than a second)
®)
[MUTE] : To turn mute on/off
@[P.CH]
@ [VOLUME] : To increase/decrease the volume
@ [AUDIO] : To switch the AUDIO function in DVD/CD modes
@ [SUB TITLE] : To display subtitle in DVD mode
When the mute is turned on,~appears at the top right of the screen.
(~~,~~):
To seek up/down in TUNER mode
To select the next higher or lower chapter numberinDVD mode
To perform fast-forward and fast backward (Keep pressing)inDVD/ iPod modes.
To select the next higher or lower trackinCD, MP3 modes
To select the next higher or lower track numbers in iPod mode.
® [ANGLE] : To switch the ANGLE function in DVD mode
when the ANGLE MARK is displayed (available only on multiple angles DVDs)
@ [2-Z0NE] : To turn on/off
To switch between main-zone and sub-zone when 2-Zone function is turned on
2-Z0NE
function
in
DVD mode)
• When SUB zoneisselected
SUB zone operations are supported, but button functions are limited as follows:
[VOLUME] buttons controls sound volume for MAIN zone source.
[MUTE] button controls audio mute function for MAIN zone source.
15
Page 16
4-1
User
Guide
4-1-1 Power
ON
Mode
"Long
press"
16
Page 17
4-1-2 Tuner Mode
17
Page 18
4-1-3 DVD Mode
----------------
18
Page 19
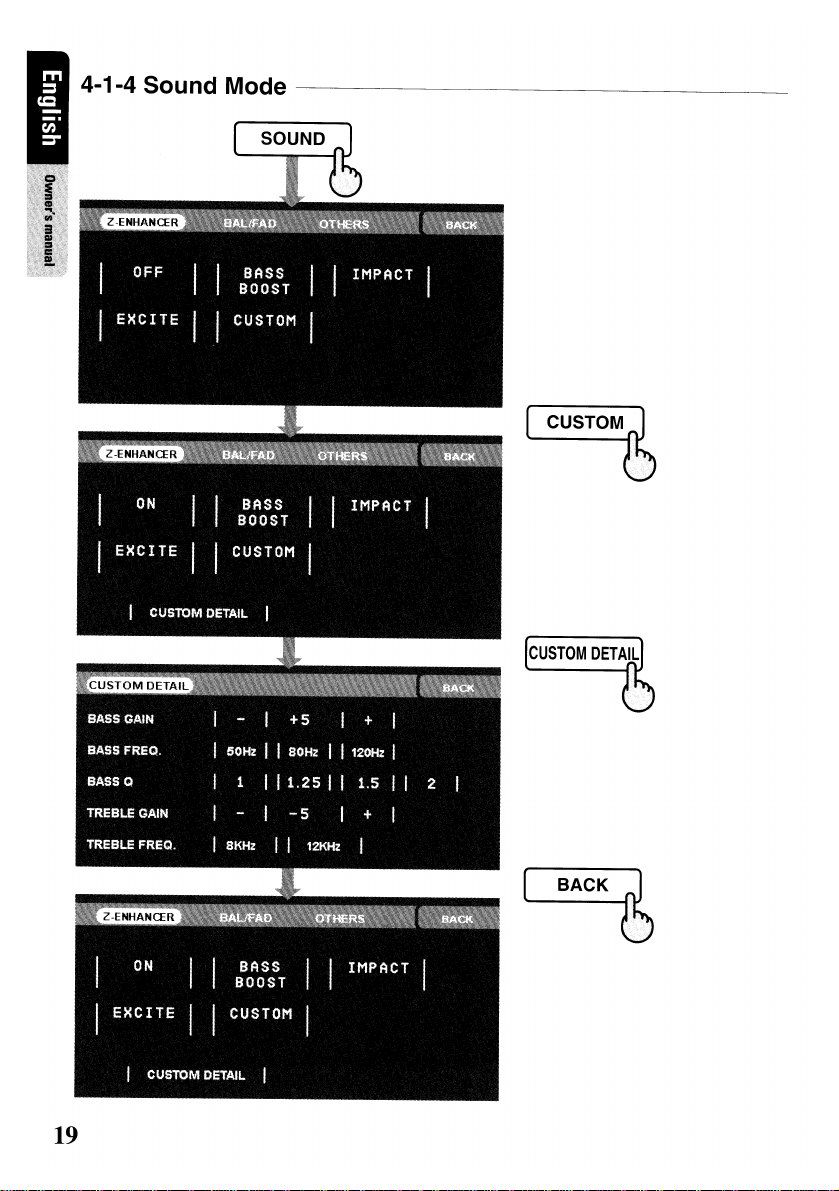
4-1-4 Sound Mode
----------------
19
Page 20
20
Page 21
4-1-5
Adjust
Mode:
At
Tuner, iPod, USB Mode
21
Page 22

22
Page 23

4-1-6
Adjust
Mode:
At
AUX, DVD Mode
23
Page 24

5-1
Liquid Crystal Panel/Generalities
* For a longerservice life, be sure
• Be sure to house the liquid crystal panel inside the main unit when parking the car outdoors for
long period of time. The liquid crystal panel will operate properly
60cC.
•Donot allow any liquidsonthe set from drinks, umbrellas etc. Doing so may damage the internal
circuitry.
• Do not disassemble or modify the set
•Donot draw the liquid crystal panel out and useitas a tray. Also, subjecting the liquid crystal panel
shocks may resultinbreakage, deformation or other damage.
Do
not let cigarettes burn the display. Doing so may damage or deform the cabinet.
•
•
If
a problem should occur, have the set inspected at your store of purchase.
• Do not insert objects or poke
the panel
• Do not place anything on the display when the panel
• The remote control unit may not work if the remote control sensor
•
In
this
• Small black and shiny spots inside the liquid crystal panel are normal for LCD products.
• The liquid crystal panel may stop temporarily when it opens or closes, when the engine stops or
when it
• The touch keys
with much force.
•
Do
malfunctioning of the touch keys.
is
tilted.
extremely cold weather, the display movement may slow down and the display may darken, but
is
not a malfunction. The display will work normally when the temperature increases.
is
cold.
on
the display operate when slightly touched.Donot press the touch key screen
not push the case surrounding the touch key panel with much force. This may cause
to
read the following cautions.
in
a temperature range of 0 to
in
any way. Doing so may resultindamage.
in
the space between the liquid crystal panel and the main unit when
is
tilted.
is
exposed to direct sunlight.
to
5-2 Cleaning
• Cleaning the cabinet
For tough dirt, apply some neutral detergent dilutedinwater to a soft cloth, wipe off the dirt
gently, wipe again with a dry cloth. Do not use benzene, thinner, car cleaner, etc., as these
substances may damage the cabinet or cause the paint to peel. Also, leaving rubber or plastic
products
• Cleaning the liquid crystal panel
The liquid crystal panel tends to collect dust, so wipeitoff occasionally with a soft cloth.
The surface
in
contact with the cabinet for long periods of time may cause stains.
is
easily scratched, so do not rub it with hard objects.
24
Page 25

DVD video is a high-quality digital video source that provides crisp and clear images. One 12cm
disc contains either one film or four hours of music.
6-1
DVD Video Features
This unit provides the following functionsinaddition to the high image quality and sound quality of
DVD video. The functions described
subtitles, angles, etc. differ with the DVD video disc. Refer to the instructions provided with the DVD
video. Some disc functions may operate differently from described
in
the section, "Features", for example, the recorded language,
in
this manual.
• Multi-Sound
DVD video can store up to 8 languages for one film; select the language of your preference.
The languages stored
on
the disc are indicated by the icon shown below.
@))
• Multi-Angle
A DVD video thatisfilmed from multiple angles allows you to select the angle of choice.
The number of recorded angles
• Sub-Picture (subtitle)
A DVD video can record subtitles for up to 32 languages and you can select the language of the
subtitles you wish to see.
The number of recorded subtitle languages
• Multi-Story
When a DVD video contains more than one story for a film, you can select the story you wish to
enjoy. The operation procedures vary with the disc; observe the instructions for selecting a story
provided during playback.
is
indicated by the icon shown below.
is
indicated by the icon shown below.
• Dolby Digital
Dolby Digital enables up to
surround system that is used
5.1
independent multi-channel audio reproductions, the same type of
in
cinemas.
• Menu Screen
Menus canbecalled up during DVD video playback to perform menu setting.
To display the menu, touch the key
~
SOURCE mode - [DVD] key - [CONTROL] key - [MENU] key
in
the following order:
25
Page 26

6-2 Discs
6-2-1 Playable Disc
This DVD video player can play the following discs.
~
v
IDE
[illm~~
0 DIGITAL AUDIO
§I~
I~':,!
6-2-2 CD Extra Disc
A CD Extra discisa discinwhich a total of two sessions have been recorded. The first session
Audio session and the second session is Data session. Your personally-created CDs with more than
second data sessions recorded cannot be playedonthis DVD video player. When you
Extra disc, only the first session will be recognized.
playa
is
CD
6-2-3 CD-R/CD-RW Disc (MP3, WMA)
This player can play audio CD format (MP3, WMA)onCD-R/CD-RW discs.
6-2-4 DVD+ R/RW Disc
This player can play MP3IWMA files recordedonDVD± R/RW discs.
6-2-5 Unsupported Disc Format
This DVD video player cannot play back DVD Audio, DVD-RAM, Photo CDs, etc.Itmay also not be
possible to play back CDs recorded
cracks, dust/dirt, dust/dirt
is played, it will take a long time to start playing. Also, it may not be possible to play depending
its recording conditions. You cannot play Super Audio CDs. Playback of the
CD player
6-2-6MP~MAPlayback
This unit can play back CD-R/CD-RW, DVD-R/RW and DVD+R/RW discsonwhich MP3IWMA
music data have been recorded.
is
not supported even if itisa hybrid disc.
on
on
player's lens, etc.) If a CD-R or CD-RW disc that has not been finalized
a CD-R unit and CD-RW unit. (Cause: disc characteristics,
on
~~~~~~~~~~~~-
26
Page 27

6-2-7
This player can play back DivX format file recordedonDVD± R/RW and CD-R/RW discs.
DivX
Playback
---------------
6-2-8 Region
The DVD video system assigns a region number to DVD video players and DVD discs by sales
area. The DVD video region number
Nu~ber~~~~~~~~~~~~~~~-
is
markedonthe disc jacket as shown below.
6-3 Registered Trademark
• This product incorporates copyright protection technology thatisprotected by U.S. patents and
other intellectual property rights. Use of this copyright protection technology must
by Macrovision, and
authorized by Macrovision. Reverse engineering or disassembly
• Manufactured under licence from Dolby Laboratories. "Dolby", "Pro Logic", and the double-D
symbol are trademarks of Dolby Laboratories.
is
• "iPod"
of Apple Inc.
• Windows
Corporationinthe United States and/or other countries.
• DivX, DivX Certified, and associated logos are trademarks of DivX Inc and are used under license.
for legal or rightholder-authorized copying only. Don't steal music. "iPod"isa trademark
Media™,
is
intended for home and other limited viewing uses only unless otherwise
the Windows® logo are trademarks, or registered trademarks of Microsoft
is
prohibited.
be
authorized
27
Page 28

7-1
DCP
The control panel can be detached to prevent theft. When detaching the control panel, store itinthe
DCP (Detachable Control Panel) case to prevent scratches. Please take the DCP with you when
leaving the car.
• Remove DCP
CD
Press the [SOURCE] button more than 2 seconds to turn off the power.
(2)
Press I •
• Attach DCP
CD
Hook the right side of the DCP to the right side of the main unit.
(2)
Settle the left side of the DCP to the main unit.
• Cautions
- When the Auto Panel function (see AUTO PANEL of chapter 17-2-5 Adjust OperationsI)is set to
"OFF" and you turn the power off, be sure to close the LCP for safe before removing the DCP.
- The DCP can easily be damaged by impact. After removing
impact.
- Remote control unit cannot be used when the DCP is removed.
- If the DCP is dirty, wipe it off by using a soft dry cloth.
;.
button and pull the left side of the DCP toward you, and remove it.
it,
be careful not to drop or give
7-2 Basic Operations
* When the unit is turned
maximum level
on,
starting
and
may
harm your hearings. Be careful about adjusting the volume.
stopping the engine with its volume raisedtothe
7-2-1 Power OnlOff
(1) Start the engine before using this unit. Be careful about using this unit for a long time without
running the engine. If you drain the car's battery too far, you may not be able to start the engine
and this can reduce the service life of the battery.
@I
(2) Press the [SOURCE] button more than 2 seconds. When the LCP is not open, press the
[OPEN] button. The unit automatically memorizes its last operation mode and will automatically
switch to display that mode.
EngineON
28
Page 29

7-2-2 Mode Selections
(1)
When the LCPisopen
CD
Press the [SOURCE] button to enterinthe SOUCRE mode.
(2)
Touch the desirable key.
(2) When the LCP is closed
CD
Press the [SOURCE] button to change operation mode.
(2)
Each time you press the [SOURCE] button, the operation mode changesinthe following order:
TUNER mode~DVD/CD Play mode~USB mode or iPod mode~AUX mode
@ When
2-l0NE
To switch to a SUB zone source, specify from the Source menu screen, or use the remote
control unit.
functionisON, the [SOURCE] button operates only for the MAIN zone.
7-2-3 LCP Operations
(1) Cautions
To prevent the battery from going dead, operate this unit with the engine running if possible.
When the liquid crystal panel is operating,
between the panel and main unit or the instrument panel of the care.
crystal panel by hand.
(2) Standing up the LCP
CD
Press the [OPEN] button. The LCP comes out and stands up automatically. The power of this
unit will be turned on.
(2)
Press the [OPEN] button more than a second to house LCP and press the button again to
raise
it,
if the LCP stopsinthe middle of its operation. The unit will enter the same display
mode as the display was
in
when last turned off.
be
careful not to get your hand or finger caught
Do
not move the liquid
29
Page 30

(3) Adjusting the angle of the LCP
CD
Every touching the [OPEN] key more than a second tilts LCP forward or backward.
The angle
11
~
If
the LCP stopsinerror during the adjustment of the angle and you touch the [OPEN] key
OO(Default
is
changed the following order:
angle)
--
100°--90°--80°--70°--80°--90°--100°--110°--...
more than a second, the LCP operates With opposition direction.
The adjusted angle is stored
in
memory. There are 5 adjustable angles available within the
range 70° to 110°.
(4) Housing the LCP
Press the [OPEN] button and the LCP is automatically housed. If you do not use the unit for a
long time or leave the car, please house the LCP.
;>.<:
Open or Close function might notbeworking properly if ACCisoff while opening or closing LCP or
is
moved by manually.
LCP
7-2-4 Audio Operations
Z-ENHANCER
BASS BOOST
IMPACT
EXCITE
SOUND
Z-ENHANCER
BAUFAD
OTHERS
CUSTOM DETAIL
SUB WOOFER VOL
M-BEX
HIGH PASS FILTER
LOW PASS FILTER
AMP CANCEL
BASS GAIN
BASS FREQ
BASSQ
TREBLE GAIN
TREBLE FREQ
30
Page 31

(1)
Adjusting the Z-ENHANCER
CD
Press the [SOUND] button. (This button performs only when the panelisopen.)
C£l
Touch the desirable item key(Z-ENHANCER, BAL/FAD, OTHERS).
@ Perform the adjustment explaining
@ Touch the [BACK] key to return to the previous screen.
in
the following sections.
ITEM
Z-ENHANCER
BASS BOOST
IMPACT
EXCITE
• BASS BOOST, IMPACT, EXCITE Setting
: Select favorite setting mode from these presets and touch respective the [ - ] or [ + ] keys to
adjust the level.
"BASS BOOST" emphasizes low sound.
"IMPACT" weakens intermediate sound and emphasizes both low sound and high sound.
"EXCITE" weakens intermediate sound and emphasizes both low sound and high sound.
:>.<:
BASS BOOST - detail adjustments
SET BASS TREBLE
+3
+2
+1
0
-1
-2
-3
DEFAULT SETTING
OFF
0
0
0
F = 80Hz, G=+12dB, 0=1 F=12KHz, G= 4dB
F = 80Hz, G=+10dB, 0=1 F=12KHz, G= 4dB
F = 80Hz, G=+ 8dB, 0=1 F=12KHz, G= 4dB
OdB,
0=1
0=1
F = 80Hz, G=+ 6dB,
F = 80Hz, G=+ 4dB, 0=1 F=12KHz, G= 4dB
F = 80Hz, G=+ 2dB, 0=1
F = 80Hz, G=+
RANGE
ON
or OFF
--
+3
-3
-3--+3
-3--+3
F=12KHz, G= 4dB
F=12KHz, G= 4dB
F=12KHz, G= 4dB
31
Page 32

* IMPACT - detail adjustments
SET
+3
+2
+1
o
-1
-2
-3
F = 80Hz, G=+10dB,
F = 80Hz, G=+ 8dB,
F = 80Hz, G=+ 8dB,
F = 80Hz,
F = 80Hz, G=+ 6dB,
F = 80Hz, G=+ 4dB,
F = 80Hz, G=+ 4dB,
BASS
G=+
6dB,
0=1
0=1
0=1
0=1
0=1
0=1
0=1
* EXCITE - detail adjustments
SET
+3
+2
+1
0 F = 50Hz, G=+ 6dB,
-1
-2
-3
• Custom Setting
: Touch the [CUSTOM] key and then touch the [CUSTOM DETAIL] key.
BASS controls low sound, TREBLE controls high sound.
CUSTOM
TREBLE GAIN
TREBLE FREO 12KHz 8KHz or 12KHz
DETAIL
BASS GAIN 0
BASS FREO 50Hz 50Hz or 80Hz or 120Hz
BASSO
F = 50Hz, G=+ 10dB,
F = 50Hz, G=+ 8dB,
F = 50Hz, G=+ 8dB,
F = 50Hz, G=+ 6dB,
F = 50Hz,
F = 50Hz, G=+ 4dB,
BASS
0=1
0=1
0=1
0=1
0=1
G=+
4dB,
0=1
0=1
DEFAULTSETIING
1 1 or 1.25or1.5 or 2
0
TREBLE
F=8KHz, G= +6dB
F=8KHz, G= +6dB
F=8KHz, G= +4dB
G=
G=
+4dB
OdB
F=8KHz,
F=8KHz, G= +2dB
F=8KHz, G= +2dB
F=8KHz,
TREBLE
F=12KHz,G=+8dB
F=12KHz, G= +8dB
F=12KHz, G= +6dB
F=12KHz,G=+6dB
F=12KHz,G=+4dB
F=12KHz, G= +4dB
F=12KHz, G= +2dB
RANGE
-6
....
+8
-6
....
+6
32
Page 33

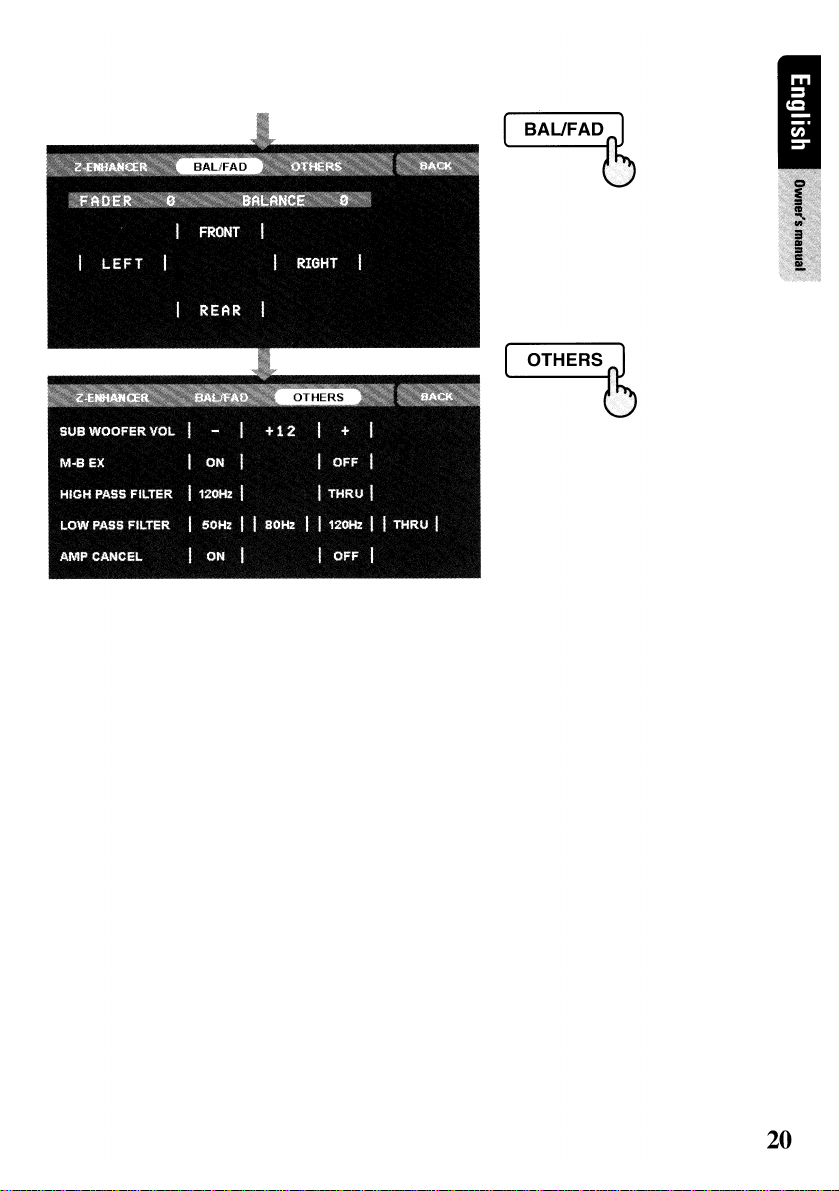
(2) Adjusting the BAL/FAD
• Touch the [BAUFAD] key.
• Touch the [FRONT] [LEFT] [RIGHT] [REAR] keys to control balance
They control a location adjustment of the sound. Their default settings are "CENTER".
KEY
P
FADER
BALANCE
(3) Adjusting the OTHERS
• Touch the [OTHERS] key
• Touch the value at right side to adjust the desirable function.
• "SUB WOOFER VOL" controls the volume level of the subwoofer.
• "M-BX ON" boosts low sound of below 50Hz.
• "HPF" controls the Output of POWER-AMP.
• "LPF" controls the Output of SUB-WOOFER.
• "AMP CANCEL" controls the using presence of built-in AMP.
If you use the external AMP, Built-in AMP is recommended to be turned off.
OTHERS
SUB WOOFER VOL 0
M-BEX
HIGH PASS FILTER
LOW PASS FILTER
AMP CANCEL
[FRONT)
[REAR]
[LEFT]
[RIGHT]
DEFAULTSETTING
OFF
THROUGH
50Hz
OFF
RANGE
0-12
0-12
0-13
0-13
50Hz or80Hz or 120Hz or THROUGH
&fader.
FUNCTION
Emphasize front speaker sound
Emphasize rear speaker sound
Emphasize left speaker sound
Emphasize right speaker sound
RANGE
-6 - +6
ON or OFF
120Hz
or
THROUGH
ON
orOFF
33
Page 34

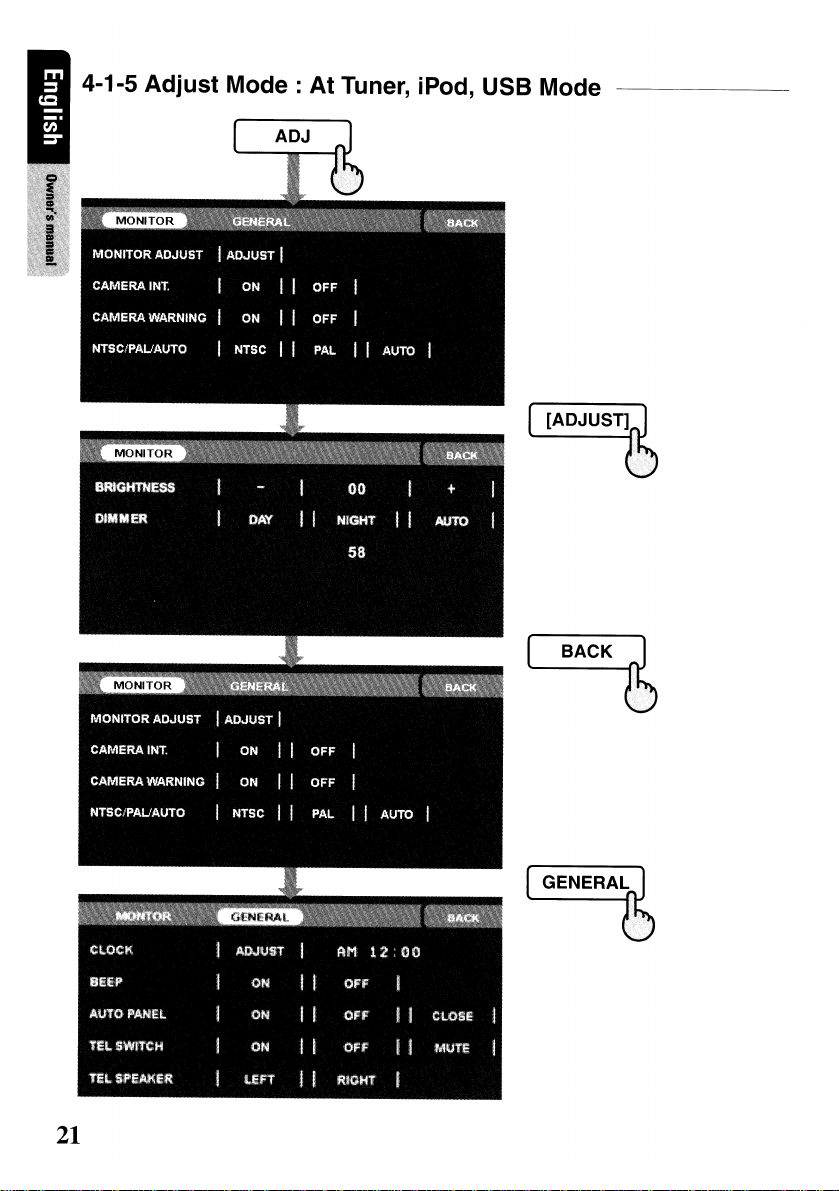
7-2-5
(1)
Adjust
~
item table
ADJ
Adjusting
(1-1)
Default
CD
Press the [ADJ] button.
~
Perform the adjustment.
@ Touch the [BACK] key to return to the previous screen.
Operations
MONITOR
GENERAL
the
MONITOR:AtTuner, iPod, USB
Screen
ADJUST
CAMERA INT.
CAMERA WARNING
NTSC/PALIAUTO
CLOCK
BEEP
AUTO PANEL
TEL SWITCH
TEL SPEAKER
Mode
BRIGHT
COLOR
HUE
DIMMER
(1-2) MONITOR ADJUST
Brightness
(1-2-1)
• Touch the [ADJUST] key to adjust brightness for display image.
• Touch the [ - ] key and screen becomes dark
• Touch the [
(1-2-2)
• Touch the [ADJSUT] key to adjust the brightness of LCP when the car lights are on/off.
[DAY] : Brightness of LCP is always set to maximum level.
[NIGHT] : Brightness of LCP is always set to user setting level
+] key and screen becomes bright
Dimmer
in
adjust mode.
34
Page 35

[AUTO] : According to the status of the car light, brightness of LCPischanged.
is
(When the car light
"NIGHT" setting can control the dimmer level by touching the [ - ] or [
(1-3) CAMERA INT.
• Touch the [ON] key to turn rear cameraonwhen reverse line is activated.
• Touch the [OFF] key to ignore reverse line not to
(1-4) CAMERA WARNING
• When you are using CCD camera, touch the [ON] key if you want to see the warning message
or touch the [OFF] key if you do not want
(1-5) NTSC/PALUAUTO
• To set the VTR system for AUX video input. When selecting AUTO mode, monitor will
automatically be selected the video system according to input video signal.
(2) Adjusting the MONITOR: At AUX, DVD Mode
off : Day color, when the car lightison
be
interrupted by camera.
to.
: Night color, Only
+ ] key.)
(2-1) Brightness
• Touch the [ADJUST] key to adjust brightness for display image.
• Touch the [ - ] key and screen becomes dark
• Touch the [
(2-2) Dimmer
• Touch the [ADJUST] key to adjust the brightness of LCP when the car lights are on/off.
[DAY] : Brightness of LCP
[NIGHT] : Brightness of LCP is always set to user setting level
[AUTO] : According to the status of the car light, brightness of LCP is changed.
(When the car light is off : DAY color, when the car light is
Only IINIGHT
+]
key and screen becomes bright
is
always set to maximum level.
in
adjust mode.
on
II
setting can control the dimmer level by touching the [-] or [+] key.
: NIGHT color)
35
Page 36

(2-3)
Color
• To adjust the color depth.
• If you touch the [ - ] key, the color depth will decrease.
If
you touch the [+] key, the color depth will increase.
•
(2-4)
Hue
•Ifyou touch the [ R ] key, red is emphasized.
If
you touch the [ G ] key, green is emphasized.
•
• Only NTSC, it can setup.
(3)
Adjusting
(3-1)
Default
• Press the [ADJ] button, then touch the [GENERAL] key.
• Perform the adjustment.
• Touch the [BACK] key to return to the previous screen.
the
GENERAL
Screen
GENERAL
BEEP
AUTO PANEL
TEL SWITCH
TEL SPEAKER
(3-2)
CLOCK
• Touch the [ADJUST] key to set up the time.
• Touch the [AM] or [PM] key.
• Touch the [ - ] or [
(3-3) BEEP
• When pressing Button or Key, Beep Sounds
• To turn on/off Beep, touch the [ON] or [OFF] key.
In
spite of "OFF" setting, the Warning sound comes out.
•
• When memorizing, Beep sounds longer.
+] key to change the time.
DEFAULT SETTING
ON
ON
OFF
RIGHT
RANGE
ON or OFF
ON or OFF or CLOSE
ON or OFF or MUTE
LEFT or RIGHT
36
Page 37

(3-4) AUTO PANEL
• ON : The LCP houses automatically after removing the DCP.
The LCP opens automatically after attaching the DCP.
(Automatic OPEN/CLOSE of the LCP)
OFF:
Regardless of the removal or attaching of DCP, the LCPisworked by the settings of the
•
user. (Passive OPEN/CLOSE of the LCP)
•
CLOSE:
(3-5) TEL SWITCH
• To set up the mobile phone interruption
• When you connect your mobile phone to this unit using a separately sold cable, you can listen to
your telephone calls on your car speakers.
ON
•
•
OFF:
MUTE:
•
(3-6) TEL SPEAKER
• To change the output speaker for the mobile phone when TEL SWITCH is "ON"
• During the mobile phone interrupts, setting this function is disabled.
• [LEFT] : To hear your telephone calls from the left speaker connected to this unit
• [RIGHT] : To hear your telephone calls from the right speaker connected to this unit
Set up the LCP automatically only after removing the DCP.
(Automatic CLOSE of the LCP)
: To listen to your telephone calls from the speakers connected to this unit (When listening to
your car speakers, you can adjust the volume level.)
To continue normal operation even when you use the telephone calls (When you set this
function to "OFF", disconnect the mobile phone from the cable or turn off the power of the
mobile phone.)
To mute the sound during your telephone (This functionisnot compatible with all mobile
telephones. Contact your local authorized Clarion dealer for information
installation and compatibility.)
on
proper
37
Page 38

7-2-6
(1) Description
2-Z~NE
The
2-l0NE
SUB zone (such as the rear monitor) by simultaneously operating two sources
unit. Thereby, plural listeners are allowed to enjoy separate audio/visual sources. The
function allows internal sources (TUNER, DVD, iPod) and external sources (AUX, etc.) to be
played
on
made from the main unit and from the remote control unit. The source sounds of the MAIN zone
are played back from the speakers of the vehicle side, and those of the SUB zone are from the
wireless headphone. Sound volume control
headphone.
When you
main-zone and sub-zone are set to the main source. If you press the [SOUND] button more than
a second, it will turn into the
2-l0NE
• The TUNER mode cannot be specified for the SUB zone.
• The steering wheel remote control operations work upon the MAIN zone even when the SUB
zone
If
•
2-l0NE
even when the interruptionisfinished.
• You cannot switch the MAIN and SUB zone when the front monitor locked screen or CCD
camera screen is displayed.
• The ON/OFF of the
MAIN zone and SUB zone. Controlling sources of MAIN zone and SUB zone can be
run
mode:
is
selected.
a mobile phone interrupt arises whenanexternal equipmentisspecified for the SUB zone, the
functionisautomatically turned off, and it does not resume to the
Function
functionisa function that outputs separate sounds/images from the MAIN zone and
the products for the first time,
OFF, DVD(CD), AUX, iPod
2-l0NE
~~~~~~~~~~~~~~
in
the one centre
2-l0NE
on
the SUB zoneisperformed by the wireless
2-l0NE
2-l0NE
source screen.
keepsupregardless of the OFF/ON of the engine and power.
functionisset to the OFF, both of the
2-l0NEONstatus
(2) Display
• To display the
2-l0NE
mode screen, press the [SOUND] button more than a second.
* To select a source which you want
38
Page 39

(3) Specification of conversion
• When the
by the mixture besides of the external source.
• The source conversion of the main-zone is available when the
the main-zone.
• The source conversion of the sub-zone
the main-zone.
• The source conversion of the main-zone and sub-zone
2-Z0NE
function turns on, the source of the main-zone and the sub-zoneismade up
is
available when the
is
like below.
2-Z0NE
2-Z0NE
setting mode sets up to
setting mode setsupto
~
RADIO
DVD
VISUAL(AUX) Y
iPOD Y
USB
NOTE
*3DVD
*1Y
Y
Y Y Y N N
VISUAL(AUX)
*1Y
Y Y
Y
Y Y
*1 : Receiving condition of some stations may be altered
*2 : To select the video mode of iPod when you watch
*3 : DVD operation can be done only
in
the main-zone.
*2
in
in
sub-zone.
iPOD (Video)
*1Y
N
2-Z0NE
mode.
RADIO
N
N
N
N
USB
N
N
N
N
39
Page 40

7-3 Radio
(1) Listening to the radio
CD
Press the [SOURCE] button and touch the [TUNER] key. The TUNER mode screen
displayed.
t£l
Press the [BAND] button on the remote control unit, or touch the [BAND] key to select the radio
band. Each time the key
FM1~FM2~FM3~AM1~AM2~FM1 ...
The default setting is "FM1".
@ Touch the
If
you keep touching the [I
If
you keep touching the
@ FREQUENCY MAP
[I
<l1li<l1li]
or
is
touched, the radio reception band changesinthe following order:
[~~
I]
key to seekupor seek down.
<l1li-.1]
key,
[~~
manual tuning willbedoneinthe direction of lower frequencies.
I]
key,
manual tuning willbedoneinthe direction of higher frequencies.
is
AREA
U.S.A
(2) Auto store
CD
The Auto Store is a function for storing up to 6 stations that are automatically tuned
sequentially. If 6 receivable stations cannot be received, a previously stored station remains at
the memory position.
t£l
Touch and hold the [AS] key more than 2 seconds. A beep sounds and the stations with good
reception are stored automatically to the preset channels.
BAND
FM1,2,3
AM1,2
RECEIVING
BAND(Hz)
87.9-107.9M
530-1710
K
STEP
SEEK(KHz)
200
10
STEP
MANU(KHz)
200
10
IF(Hz)
10.7M
450K
in
40
Page 41

(3) Memorizing the preset
• By touching preset number, preferred preset memories stations between 1 - 6 can be selected.
• To memorized preferred station, keep touching preset number until beep sound (for more than 3
seconds).
~
The display of preset memoried channel will be the same indication as receiving.
41
Page 42

7-4 DVD Video Player
7-4-1 Size
To change the screen size, touch the [OPTION] key,then touch the [SCREEN] key on the DVD
mode screen.
The [FULL], [NORMAL], [CINEMA] key is displayed
(1) Normal mode
Touch the [NORMAL] key to change the screen. There is a black zone at both left and right ends
of the screen.
(2) Cinema mode
Touch the [CINEMA] key to change the screen. The top and bottom areas of the screen are cut off.
of
the Screen
~~~~~~~~~~~~~~-
on
the screen.
(3) Full wide mode
Touch the [FULL] key to change the screen. The whole image elongates horizontally.
42
Page 43

7-4-2 Country Code
---------------
COUNTRY
CANADA
UNITED STATES
AMERICAN SAMOA
BERMUDA
PUERTO RICO
ST. PIERRE AND MIQUELON 8077
VIRGIN ISLANDS(U.S)
7-4-3ParentaILevel~~~~~----------~
You can change the level of parental lock. This function allows cutting scenes that are unfavorable
for children or replacing them automatically with other scenes prepared in advance. For example, by
replacing scenes of radical violence or portrayals of sex with safe scenes, you can make a troublefree story as if it were so from the beginning.
LEVEL7
LEVEL6
LEVEL4
LEVEL3
LEVEL1
*The standard differs
Initialpasswordis '0000'.
parental lock.
No Children,17orolder
Under 17 Requires Accompanying Parent or Adult Guardian
Parents Strongly Cautioned
Parental Guidance Suggested
General Audiences
to
the countries.
You
havetoseta
new
password except '0000', before you change the level
INPUT CODE
6765
8583
6583
6677
8082
8673
of
7-4-4 Disc Loading
Insert the discinthe middle of the insert slotinview of the label. Disc is played automatically after
loading.
Do no put the other things besides the disc into the disc insert slot. If you find out the inserting the
disc is not easy, it has the possibility of having other disc inside of the slot or having problem to the
product. You are not to use the 8cm disc.
* The driver is not able
(1) Watching the inserted disc
• Touch the [DVD] key on the SOURCE mode screen. The playback starts automatically.
to
see the disc insert slot. Insert the disc when the
LCP
is closed for
your
safety.
43
Page 44

Some videos can be played higher volume level than you wished. Turnitup a little at a
time after playing the video.
For the safety, drivers can not watch the video or use the remote control while they are
driving. Watching video and controlling
it
is illegalinsome countries, so your caution
needed.
(2) Ejecting the disc
• If you press the~button, the disc will come out.
• If you do not pull out the disc within 10 seconds after pressing the button, the disc will go inside
automatically. (Auto reloads)
Disc can be damaged if you insert it by force before auto reloading.
7-4-5 Setting the DVD Video
(1) Way of watching video
Playing mode is revitalized automatically after the disc loading, or touch the [DVD] key
SOURCE mode to enter the DVD mode. Then, the following screenisdisplayed when you touch
the display.
in
is
(2) Playing function
• Touch the
- Touch the
[~/II]
[~/II]
- Touch and hold the
- Touch and hold the
stop DVD.
key or the
key or the
[~/II]
[~/II]
[~
II] button to play/pause the playback
[~II]
button to resume the playback wheninresume stop mode.
key or the
key or the
[~II]
button more than a second to resume stop.
[~II]
button more than a secondinresume stop mode to
44
Page 45

• To operate menu items of the DVD menu, touch the [CONTROL] key, then touch the [MENU]
key. Use the "Cross-Key Pad" (
• Touch the [CONTROL] key, then touch the [10KEY] key. The "Ten-Key Pad" screen is
displayed. Input the chapter number that you want to play back with [0] to [9] key. Touch the
[ENT] key to enter the desirable track. Touch the [BACK] key to display the previous screen.
• If you want to change the title, press the [SEARCH MODE] button on remote control unit to
display the search mode. Then, press the desirable title number by using the [0] - [9] button and
press the [ENTER] button.
(3) Repeat and random playback
• Touch the [OPTION] key to use the following operation
• CHAPTER REPEAT
: Chapter repeat playback.
• TITLE REPEAT
: Title repeat playback.
• TITLE RANDOM
: Title random playback.
(4) Chapter skipping
• Touching the
• Touching the
is pressed again within about 2 seconds, playback starts from the beginning of the previous
track.
•
In
the case of some discs furnished with PBC function, when PBC is set to "ON", this operation
will cause the menu screen to be displayed.
[~~
I] key starts playback from the beginning of the next track.
[I
~~]
key starts playback from the beginning of the current track. When the button
....~...
TENT)
according to the disc contents menu.
45
1«
Current
...
Chapter Chapter
Down
.............
- -
-
--
4~
»1
-
--
..~~Up
~
Chapter
Page 46

(5) DVD SETUP
MODE
DVD SET
(5-1) Lang
aSD
LANG - To setupthe
•
• Sub Title - To set
• Audio - To set
• Disc - To set up the disc language.
• Version - To view
UP
aSD
up
the subtitle language.
up
the audio language.
an
information. (main micomdnd.., DVD version, s/w version)
Lang
Display
AUdio
Parental
language.
ITEM
aSD
Lang
Sub Title
Audio
Disc
Version
TV Display
TV
TYPE
Angle Mark
Screen Saver
Down Mix
Dual Mono
Dynamic
Change
Parent
Default
(5-2) Display
• TV display - To set up the screen size.
• TV type - To set up the TV type. (NTSC, PAL)
• Angle mark - To turn on/off the angle mark display.
• Screen saver - To turn on/off screen saver.
(5-3) Audio
• Down mix - LT/RT, stereo.
• Dual mono - stereo, L-mono, R-mono, MIX-mono.
• Dynamic - To set up the dynamic range.
(5-4) Parental
• Change - To set up a password for parental level.
up
• Parent - To set
• Default - To load the initial factory settings.
the parental level control.
46
Page 47

7-5 Other function
7-5-1 CODA
When playback is not started, press the [II~]button or touch the
(1) Touch the
than a second to stop durin9 the playback.
(2) Touching the
Touching the [I
touched again within about 2seconds, playback starts from the beginning of the previous track.
In
the case of some discs furnished with PBC function, when PBC is set to "ON", this operation
will cause the menu screen to be displayed.
(3) Touch the [OPTION] key to use three functions.
To cancel the play, touch the key of the function to cancel.
Touch the [BACK] key to return to previous screen.
TRACK
DISC
REPEAT:
DISC
RANDOM:
7-5-2 MP3 and WMA
• MP3 is the Audio compressed appliance and is classified by the Audio layer 3 MPEG of standards.
The compressed appliance is used helpfully by the PC users and also used broadly as a
compressed standard. This MP3 makes possible to compress the original audio data to the 1/10 of
the initial size with the high quality of the sound.
This means approximately 10 music CDs can be recordedinon CD-R disc and also we can listen
to music for a long time without changing CD through CD-RW.
• This DVD Player can not play the disc recorded by the CD-RW. Some CDs can not be used
which recorded in CD-R mode.
-----------------
[~/II]
key.
[~/II]
key to pause or resume the playback. Keep touching the
[~~
I] key starts playback from the beginning of the next track.
......
] key starts playback from the beginning of the current track. When this key is
REPEAT:
Track repeat playback. This operation plays back the selected track
recorded on the disc repeatedly.
Disc repeat playback. This operation plays back all tracks recorded on the disc
repeatedly.
Disc random playback. This operation plays back all tracks on the discinno
particular order.
[~/II]
--------------
key more
(1) Cautions
CD
File extension
Always keep the 'MP3' file to have 'MP3' or 'mp3' by using single byte letters. If you are not
specifying the extension like this or using another extension, you may not play. If users mix the
capital letter and small letter, the normal playing may not be worked.
for
making MP3
disc
47
Page 48

~
Logical format(File System)
Select the
"IS09660
level 1 or level 2" as a software format usedinMP3 file of the CO-R disc.
The normal playing may not be performed if it recorded by the other format.
in
The name of the folder and file can be represented
title is represented by the single byte alphabet and numbers of
folder and file. The name may be represented
title while MP3 is playing; however, the
31
in
error if you input more letters and numbers
and 27 to the name of the
than regulated.
@ Folder structure
The disc which has more than 8 level folders will conflict with the
IS09660
standard and the
playing is impossible.
@ The number of the file or folder
Total 255 file and folders are allowed. If the numbers of the file and folder are more than 256,
that files may not be plated.
Track is played according to the recording order by the user.
• Noise can be made to the encoder type of the software which is using during the record.
• To the damage of the file, the file may not be played or skipped to the next track.
If it is damaged seriously, it will be stopped.
(2) Working method
CD
Touch the
Keep touching the
Touch the
Keep touching the
Touch the
Touch the [ - ] or
[~/II]
key to pause or resume the playback.
[~/II]
[I
......
] or
[103
TAG] key to displayaninformation(artist, genre, composer, etc) has the selected
key more than a second to stop during the playback.
[~~
I] key to skip the track.
[~~
I]
key to play at fast forward, the key
[+]
key to display the track list of the previous or next folder.
[I
......
] to play at fast backward.
file.
48
Page 49

(Z)
Touch the [CONTROL] key to select the file or folder.
Touch the [
Touch the
Touch the [ENT] key to select the file
Touch the [BACK] key to return to previous screen
@ Touch the [10KEY] key to display the screen selecting the desired track number.
The Key Pad screen appears with the track number input mode. Input the number for the track
that you want to play back with [0] to [9] key, then touch the [ENT] key. Touch the [BACK] key
to return to previous screen.
@ Touch the [OPTION] to use functions.
To cancel the play, touch the function key again.
Touch the [BACK] key to return to the previous screen.
TRACK REPEAT: Track repeat playback.
TRACK SCAN : Track scan playback.
TRACK RANDOM: Track random playback.
FOLDER
FOLDER
FOLDER
....
][~] key to select the folder list or track list
[A]
[.]
key to select the fileinthe selected folder
REPEAT:
SCAN:
RANDOM:
Folder repeat playback.
Folder scan playback.
Folder random playback.
49
Page 50

8-1
Setting iPod
This unit can be used to control a Connected Apple iPod(iPod Mini, fourth generation, iPod nano,
iPod with video). The iPod versions higher than those noted
will not operate, or may operate improperly with unsupported versions. First, second and third
generation iPod cannot be used. When using an iPod, after connecting the iPod to the USB cable,
select the iPod mode by touching the [iPod] key on the SOURCE mode screen. Depending on the
iPod devices, iPod main screen displays can be different from others. The remote control unit
cannot be used to perform scan, repeat or random play. This unit can display the Podcast titles,
Artist names, Album titles, Song titles, Genre names, Playlist titles, Composer names registered
the iPod. Whether these functions are available or not depends on the iPod version. The iPod
used with the equalize function turned OFF. Donlt connect an iPod to the unit with a headset
connected to the iPod. During playback iPod with this unit, iPod operation might become impossible.
In
that case, please reset iPod. Please confirm the method of resetting iPod with the manual of
iPod.
(1)
Key
operation
• Touch the [iPod] key to switch the iPod modeonthe SOURCE screen.
• Touch the
• Keep touching the
• Touch the
• Keep touching the [I
• Track number can be displayed from
[~/II]
key to pause or resume the playback.
[~/II]
key more than a second to stop during the playback.
[I
<llI~]or[~~
I] key to select the next higher or lower track numbers.
~<llI]or[~~
I] key to perform fast-backward or fast-forward.
001
to 999 on the iPod mode screen.
in
side may not be playable. This unit
on
is
(2) Menu
• Touching the [MENU] button show the list like PODCASTS, PLAYLIST, ARTISTS, ALBUMS,
GENRES, SONGS, COMPOSERS, MUSIC, PHOTOS, VIDEOS, EXTRAS etc. Lists are
available from the iPod menu screen.
[.&.]
[T]
• Touch the
• Touch the [MENU] key, if you want to go back to the previous screen.
Option
(3)
• If you touch the [OPTION] key, below screen is displayed. iPod option has three keys that works
in
toggle.
key to scroll menu lists.
50
Page 51

• Each time you touch the first key (AUDIO), You can switch between AUDIO mode and VIDEO
mode.
If you want to play the audio mode, select the [AUDIO] key.
If you want to play the video mode, select the [VIDEO] key.
• You can able to select the REPEAT(repeat play), SHUFFLE(random play) function.
• The [REPEAT] key use to switch the repeat mode,
-+
REPEA
TALL-+REPEA
• The [SHUFFLE] key use to switch the shuffle ON/OFF mode:
• Touch the [BACK] key, if you want to go back to the previous screen.
TONE-+REPEAToff.
in
the order:
(4) Video
mode
You can view video data storedinthe iPod. But you cannot control and navigate with a CLARION
on
device
data, you must operate
CD
(£)
@ VIDEO screen
iPod video mode. It only allows you to control with the iPod device. To enjoy the video
Touch the [AUDIO] key worksintoggleonthe iPod option screen. You can change AUDIO
mode to VIDEO mode.
Select your desired video datainthe iPod unit.
bellow menu screen.
in
following order:
is
activated. When you touch the display and touch option key, you can get
51
Page 52

• Each time you touch the second key (AUX SENS MIDDLE), You can switch among (AUX SENS
LOW, AUX SENS MIDDLE, AUX SENS HIGH) to change the AUX audio volume.
• AUX SENS
• AUX SENS
• AUX SENS
• Each time you touch the third key (SCREEN), You can switch among (FULL SCREEN, NORMAL
SCREEN, CINEMA SCREEN) to change the display size.
@ To return to the iPod menu screen, touch the [VIDEO] key on the iPod option screen.
LOW:
Low volume.
MIDDLE:
HIGH:
Middle volume.
High volume.
8-2 Setting USB
USB(Universal Serial Bus) means the bus protocol to connect the optional devices. USB memory
may be connected and controlled. Main unit supports USB mass storage class devices and plays
back MP3, WMA, AAC files.
USB connector is
• Touch the [USB] key on the SOURCE mode screen to display USB mode screen.
• Track numbercan be displayed from
in
rear side of the unit.
001
to 999 on the USB mode screen.
S2
Page 53

• Touch the [FOLDER] figure to view the folder list, then [BACK] letters is displayed.
Touch the [BACK] key to return to the previous screen.
Touch the [ - ] or [
Touch the
Touch the
Keep touching the
• Touch the [OPTION] key.
REPEAT:
TRACK
TRACK
SCAN:
TRACK
About
• USB is an acronym for Universal Serial Bus, and refers to an external bus standard supporting
data transfer rates of 12 Mbps.
• This unit is compatible with USB 1.1/2.0 with maximum data transfer rates of 12 Mbps.
• USB memory devices that can be played by connecting to the unit's USB cable are limited to
those recognized as "USB mass storage class devices"; operation is not guaranteed with all USB
• Devices compatible with "USB Mass Storage Class" can be used merely by connecting to the
• Consult the manufacturer of your USB memory device for information regarding whether it is
• Audio files playable on this unit are limited to MP3IWMA files. For details, see the section "7-5-2
• This unit isn't compatible with USB Card-Reader (SO).
RANDOM:
FOLDER
FOLDER
FOLDER
memory devices.
host device, without need for special drivers or application software.
supported by "USB Mass Storage Class" standards.
MP3 and WMA"
USB
REPEAT:
SCAN:
RANDOM:
memory
+ ] key to display the track list of the previous or next folder.
[~/II]
key to pause or resume the playback.
[I"'~]or[~~
I] key to skip the track.
[~~
I] key to play at fast forward, the key
Track repeat playback.
Track scan playback.
Track random playback.
Folder repeat playback.
Folder scan playback.
Folder random playback.
[I"'~]
to play at fast backward.
53
Page 54

• General
PROBLEM
No Power(no sound)
No button activation
Wrong Display
Remote Controller is
not working
• DVD Player
PROBLEM
Unable to insert the disc
Noise sound and sound
skipping
Decreased sound quality
after the power on
No video display
Error display
"PARENTAL VIOLATION"
CAUSE
Disconnected fuse
Wrong Connection
Wrong operation due to the
interference from
microprocessor
Receiver is in the direct rays
of the sun
Out of battery power
CAUSE
Another disk isalready in the unit
Foreign elements are in the disc
insertion hole
Dirty CD
CD is damaged
(scratched and damaged)
Moisture on can effect the
performance while parking in the
humid area
Parking brake is released
Limited view function
SOLUTION
Change the new fuse. If fuse
is out again,please consult
with the store.
Turn the power off and
remove the DCP. Press reset
button. Please note that all
the memory will be removed
if the reset button is pressed.
Remote controller is not
working if the receiver is in
the direct sun rays.
Check the batteries.
SOLUTION
Eject the disc from the unit
Clean the disc insertion hole
Clean the CD with the soft
fabrics
Do not use damaged CD
Dry the unit for 1 hours while
the
pow~r
is on
Check the power brake.
Release the View function
change the level of PARENTAL
or
• iPod
control
Because the noise occurs on the unit, don't connect audio/video to aux-in after connecting the
iPod uses the cigar jack's power of your car. Make use of the aux-in and the USB cable.
•
About
the
noise
If portable audio-visual device is connected to this monitorinthe state where you connected with
the vehicles power supply for charge etc., a noise may occur rarely.
In
this case, please use portable audio-visual devices without connecting with a vehicles power
supply. Please use it with
* Make use
*
When
on
of
the iPod that the battery is charged. d
an iPod is connected to the unit, some iPod maynotbe charged.
the POWERofthe unit.
in
the internal battery of devices etc.
In
thatcase, turn
off
an
54
Page 55

FM
TUNER
Frequency range
Quieting sensitivity
Limiting sensitivity
Stereo separation
Frequency response
87.9MHz to 107.9MHz
20dBf
15dBf
20dB (1kHz)
100Hz to 7kHz
AM
TUNER
DVD PLAYER
MP3/WMA
AUDIO
AMPLIFIER
LCD
MONITOR
Frequency range
Usable sensitivity
System
Usable discs
Frequency response
Separation
Distortion
Sampling rate
Bit rate
Logical Format
Maximum poweroutput
Power output
Speaker impedance
Screen size
Display method
Drive
method
Pixels
530kHz to 1710kHz
40dBuV
versatile disc system with
Digital
CODA capable
video
DVD
17Hz to 20kHz(CD)(+3/
60dB
0.50/0
MPEG1 44.1 kHz/48kHz/32kHz
MPEG2 22.05kHz/24kHz/16kHz
MPEG1 32kbps to 320kbps
MPEG2 8kbps to 160kbps
(VBR)
IS09660
JOLIET or Romeo
50W x 4ch
27W x 4 (DIN 45324, +B
4 ohm (4 to 8 ohm)
7-inch wide type
154.0mm
Transmission type
TFT(thin-film transistor)
disc, Compact disc
..
3dB)
level1 , 2
=14V)
Width x 86.6 mm Height
TN
QVGA
TFT
active matrix driving
336,960(1440 x 234)
LCD
55
Page 56

GENERAL
Power source voltage
Ground
Current consumption
Auto antenna rated current
Dimension ofthe Main Unit
Weightofthe Main Unit 2.5kg
of
Dimension
Weight of the Remote control Unit
the Remote Control Unit
E
E
o
<.0
<.0
Z
LD
I
<.0
14.4VDC
(10.8 to 15.6V allowable)
Negative
4.0A(lW)
500mAIess
7"(W)
2-1/8" (W)
90g (including battery)
x2f'
(H) x
6-5/16"(0)
x1-1/8" (H) x6-1/8"
(0)
"9-------------.cao.
1
....-----.
,_
11
Power
Signal to Noise
6-3/4"
Output:
~
(172mm)
7"
(178mm)
18W RMS x 4 Channels at 4Q and1%THD+N
Ratio:
70dBA (reference: 1W into 4Q )
--+~
E
...
I_
i~
..
1 1
J
1!1-15/16
(SOmm)
* Specifications and design are subject to change without notice for further improvement.
56
Page 57

11-1 Cautions On Installation
(1) BEFORE STARTING
This set is exclusively for useincars with a negative ground 12 V power supply. Read these
instructions carefully. Be sure to disconnect the
prevent short circuits during installation.
(2) PACKAGE CONTENTS
CD
Main unit
(2)
Manuals
• Owner's manual
• Warranty
@ Power supply lead (For the main unit) .
@ RCA lead .
@ Bag for accessories of the main unit
Flat head screw
Sems hexagonal bolt
Electro tap 1
Machine screw
@ Bag for accessories of the main unit
Hook plate 2
Cord clamp 1
(J)
Universal mounting bracket 1
@ Remote control unit 1
&Installation manual················
card···
(M5'
8) 4
(M5'
8) 5
(M4'
3)
® Battery (for remote control unit) 2
(jQ)
Outer Escutcheon 1
® DCP Case 1
(No.1)
(No.2)
battery"
- " terminal before starting. This is to
Car battery
.
4
57
Page 58

(3)
GENERAL
CD
Do not open the case. There are no user serviceable parts inside.Ifyou drop anything into the
unit during installation, consult your dealer or an authorized CLARION service
(2)
Use a soft, dry cloth to clean the case. Never use a rough cloth, thinner, benzine, or alcohol,
etc. For tough dirt, apply a little cold or warm water to a soft cloth and wipe off the dirt gently.
CAUTIONS
(4) CAUTIONS ON
CD
Prepare all articles necessary for installing the main unit before starting.
(2)
This modelisused with the LCD panel slide forwards (shell loading system). On some types of
cars, the LCD panel may touch the dashboard or shift lever,
installed. Check that the set will not hamper operation of the shift lever before choosing the
place of installation.
@ Install the unit within 30° of the horizontal plane.
Max. 30
@ If you have to do any work on the car body, such as drilling holes, consult your car dealer
beforehand.
@ Use the enclosed screws for installation. Using other screws can cause damage.
Chassis Chassis
INSTALLATION
Dashboard
0
Shift lever
(check that it does not
touch the LCD.)
/
in
which case it cannot be
~
·
Max. 8mm (M5 screw)
t~a~age
® The source unit has mounting screw holes for NISSAN
vehicles.
N T
N
(N
marks) and TOYOTA(T marks)
58
Page 59

11-2 Main Unit Installation (Universal Mount)
(1) Place the universal mounting bracket into the instrument panel, use a screwdriver to bend each
stopper of the universal mounting bracket inward, then secure the stopper.
(2) Wire as shown
(3) Insert the main unit into the universal mounting bracket until it locks.
(4) Mount the outer escutcheon so that all the hooks are locked.
• Console opening dinensions
in
11-6.
Strap
*This part is not provided.
53mm
Stopper
Hole
Instrument
Panel
7
LUnviersal Mounting
Bracket
* Some
* Fasten the front stopper securely to prevent the main unit from coming loose.
59
car
for details.
models require special mounting kits for proper installation. Consult your Clarion dealer
Page 60

11-3 Removing The Main Unit
(1) When the rear of the main unit has been secured with the method showninthe follow figure
unfasten the special screw.
(2) Remove the outer escutcheon.
(3) Insert the hook plate into the universal mounting bracket, then pull the main unit out by the hook
plate. (Insert both the right and left edges of the hook plate.)
Instrument panel
2-Hook Plate
Outer
escutcheon
---I
:>:<:
Keep the hook plate. You cannot remove the main unit without disengaging the hook plate.
60
Page 61

11-4 Main Unit Installation (Fixed Mount)
(TOYOTA, NISSAN and other ISO/DIN
equipped vehicles)
This unit is designed for fixed installation in the dashboard.
If the vehicle is equipped with a factory-installed radio, install the main unit with the parts and
screws marked (*).
If the vehicle is not equipped with a factory-installed radio, obtain an installation kit to install the
main unit in the following procedure.
(1) Bend all of side stoppers with a nipper.
(2) Secure the mounting brackets to the chassis as shownin the follow figure. Holes are pre-tapped
for TOYOTA and NISSAN vehicles; modification, such as drilling new holes, of the mounting
brackets may be required for other models.
(3) Wire as shown in chapter 11-6.
(4) Secure the unit in the dashboard, and then reassemble the dashboard and the center panel.
4-Hexagonal screw
Mounting bracket *
(1
pair for the left and right sides)
"(M5X8)~@;
~
*~
*
~
~
Note 2
{l
~
* :The screws with this mark are enclosed
* :The parts and screws with this mark are used to install radio or included in the installation kit.
Note1:
Note 2 : If a hook on the installation bracket interferes with the unit, bend and flatten it with a nipper
In some cases, the center panel may require some modification (trimming, filling, etc.).
or a similar tool.
in
this set.
61
Page 62

11-5 Cautions
Be sure to turn the power off before wiring.Beparticularly careful where you route the wires.
Keep them well away from the engine, and exhaust pipe, etc. Heat may damage the wires.
If
the fuse should blow, check to see if the wiringiscorrect. If it
with the same amperage rating as the original.
To replace the fuse, remove the old fuse of the power supply lead and insert the new One.
* Power supply lead for the tuner amp
* Power supply lead for the main
* There are various types of fuse holder.
On
Wiring
unit:
unit:
3A FUSE
Do
is,
replace the fuse with a new one
15A FUSE
not let the battery side touch other metal parts.
* After the connection, fix the lead by a clamp or insulation tape for protection.
Fuse holder
62
Page 63

11-6 Electrical Connection
(1) Wire connection
* Disconnect the Negative(-) power cable from the battery before installation.
* RCA pins and connector cables are sold separately.
o
Red
Grey
Red
Black
Red
Blue
Yellow
Red
Green
White
Yellow
White
Red
Red
Black
Black
Grey
-========---
Grey
L
Right
Left
Right
Left
Right
Left
Video
Right
Left
Video
Audio(L)
iPod
r:c:lII
Cd1r'··
Front
Audio
Output
Rear
Audio
Output
Subwoofer
Output
2-Zone
Output
Visual
Input
Refer to the
next pages
~
~
~
6 Ch Amp
..
Rear Side
Monitor
Wireless Head phone
[$~~~~~~~~J
VTR
63
Black
Black
USB Cable
Black
Antenna
Page 64

(2) Power supply lead
To activate "Auto Mute-On when receiving phone call", connect right wire to the dedicated
connector in the vehicle
Yellow
Pi
~
rI
l
r
I
r
~J
~l
l
l
l
l
18n~n
Fuse Box
Filter &
J Black
15A
Violet
Violet / Black
Red
Grey
Grey / Black
White
White / Black
Green
Green / Black
Blue / White
Orange / White
Blue
Violet / White
Yellowish Green
~
E3~1
~
~
E3
Battery
Ground
0
Rear-Right(+)
Rear-Right(
ACC
Front-Right(+)
Front-Right(
Front-Left(+)
Front-Left(
Rear-Left(+)
Rear-Left(
Amp Remote On
Illumination
.:=::
Auto Antenna
I
Reverse
Parking Brake
-)
-)
-)
-)
NOTE
When you detach the power supply connector, please pull it out after release the lock part with a
minus driver etc.
64
Page 65

(3) Connecting the Accessories
CD
Connection to the external amplifier
The external amplifier can be connected unless the MCP (Multiple Channel Processor) is
connected. For detailed information, refer to the instruction manual of the MCP.
CZ)
Connection to the CCO camera for vehicle
The CCO camera for vehicle can be connected to the system expansion terminal on the main unit.
For detailed information, refer to the instruction sheet or manual for the CCO camera.
@ If the specified lead of the cellular phone is connected to the phone mute lead of the source
unit, the audio mute is available when the cellular telephone is used.
(4) Connecting the parking brake lead
Connect the lead to parking brake lamp earthinthe meter panel.
* Connecting the parking brake lead to lamp earth allows you to watch VTR/OVO video when the
parking brake is engaged.
* When the parking brake lead is not connected, the monitor will stay off.
(+)Lead to battery
(brake signal lead
65
)Cord parking
r:=.==::J--}
Connect these three leads
C
Parking brake
Parking brake lead
(Bright green)
Page 66

(5) Sample System
~
~
4ch -
4ch -
RCA
RCA
ClarIOn
4ch -
RCA
~
~
~
~
2ch - RCA
L!::::=====~W::CO
4ch -
~
RCA
~
~
Steening
Remocon
2Ch
~
- Mini -
Jack
~
2ch -
RCA
3ch -
L!::::::=====~W::CO
RCA
66
Page 67

Clarion Co., Ltd.
All
Rights Reserved.Copyright © 2007:Clarion Co., Ltd.
Printed
in
Korea / Impreso en Corea / ImprimeenCoree
2007/7 (V-VI)
QC-6825BA
Page 68

clarion·
Amoins d'une contre-indication, les produits Clarion achetes chez un revendeur Clarion auto rise sont garantis contre
tous les defauts de materiaux et de mise en oeuvre pour une periode d'un (1) an
Les produits Clarion notes ci-dessous (**) sont garantis contre tous les defauts de materiaux et de mise en oeuvre pour
une periode de deux (2) ans
ET
lorsque I'installation du produit est effectuee
** DRZ9255
Tous les cables, fils et autres accessoires Clarion achetes
tous les defauts de materiaux et de mise en
TOUS
SOUMIS
Les
conditionsdecette garantie limitee et I'etenduedela responsabilitedeClarion CorporationofAmerica
((
Clarion»)
1. UNE PREUVEDELA
DANS LE CAS D'UN PRODUIT LlSTE CI-DESSUS, BENEFICIANT
PREUVE DE
AUTORISE SONT REQUISES. TOUTE L'INFORMATION A PROPOS DES CENTRES
AUTORISES
2. Cette garantie limitee sera annulee
non autorise
3. Cette garantie limitee ne s'applique pas
dontIenumerodeserie a ete modifie, obstrue ou efface, ou qui ont ete raccordes, installes, ajustes ou repares
autrement
4. Cette garantie limitee ne couvre pas I'interference electrostatique produite ou non
Ie reglage
du lecteur
5. La seule responsabilite
remplacement
6. Le produit doit etre envoye
etre entierement assure
Clarion
7.
LES
INCLUANT
CLARION, NE
lIMITES
L'ELIMINATION
S'APPLIQUEAUPRODUIT
8.
AUCUNE
DECRITE
POURRAENAUCUN
INDIRECTS
PUISQUE
OUDELIMITERLARESPONSABILITEENCASDEDOMMAGES
OU
CETTE
9.
VOUS
10. Les lois de I'Etat de la Californie contr61ent totalement cette garantie limitee,son interpretation et sa mise en execution.
11
. Si vous eprouvez
avec Clarion ou visitez notre site
autorises Clarion de votre region. N'hesitez pas
aux
DXZ775USB DXZ675USB DXZ575USB
LES
PRODUITS
AUX
RESTRICTIONS DE
d'apres
cette garantie limitee sont les suivantes :
DATE D'ACHAT EST REQUISE POUR TOUTE REPARATION SOUS GARANTIEDECE PRODUIT.
LA
DATE0'ACHAT ET UNE PREUVE QUE L'INSTALLATION A ETE EFFECTUEE
DE
CLARION PEUT ETRE OBTENUEENCOMMUNIQUANT AUX ADRESSES LlSTEES CI-DESSOUS.
par
un centredeservices sous garantie Clarion.
qu'en
suivant les instructions fournies
de
la tetedelecture ou
pour
reparation.
du
produit, ala discretion absolue
n'assumera
PRODUITS
PRESCRITES
GARANTIE
EXCLUSIONS
GARANTIE
POUVEZ
adresses ci-dessous, afin
aucune
CLARION
TOUS
LES
SONTPAS COUVERTS
DES
CI-DESSUSETCE, EN
ENCOURUS
CERTAINS
PEUVENTNEPAS
lIMITEE
POSSEDER
des
GARANTIE LIMITEE DE CLARION 2007
PourIeCanadaetles
acompter de la date d'achat originelle, lorsqu'achetes chez 'un revendeur Clarion autorise
CLARION
GARANTIES
problemesdeperformance du produit
ACHETES
GARANTIE
des
de
Clarion,
aClarion
et
tous les fraisdetransport
responsabilite en casdeperteoude
ACHETES
ACHATS
IMPLICITENEPOURRA
CAS
ETATSNEPERI\tIETTENT PASDELIMITERLADUREE
EFFECTUES
PARLALOt
SERA
ETRE
TENUE
PAR
L'USAGEDUPRODUITOUL'IMPOSSIBILITE
VOUS OCTROIE DES DROITS
DES DROITS
Web
d'obtenir
parIerevendeur.
~euvre
CHEZ
pour
tout
dommage
aux
produits negliges, accidentes ou ayant subi un usage incorrect, ou
elements laser, ni les coUts de manutention
d'apres
cette garantie limitee, est restreinte ala reparation du produit ou au
dans
son emballage original ou
CHEZ
UN REVENDEUR AUTRE QU'UN REVENDEUR
LES
GARANTIES
DANSLECASOULES
SOUS
CES
DE QUINZE (15)
ACCORD
RESPONSABLE
S'APPLIQUER
SUPPLEMENTAIRES
aI'adresse ci-dessous afin
une resolutiondetout
Etats-Unis
seulement
acompter de la date d'achat originelle.
DFZ675MC
chez
pour
une periodede90
UN REVENDEUR NON AUTORISE PAR
SUPPLEMENTAIRES
encouru lors
par
Clarion.
de
Clarion.
doivent etre prepayes.
SUR
INTERNET
CONDITIONS,LAPERIODE DE
JOURS
S'ETENDRE
AVEC
LES
A VOUS.
a
communiquer
DPX11500 DPX1800 DPX2250
un revendeur autorise Clarion sont garantis contre
lIMITEESDECLARION
LOIS
A PARTIRDELA
AU-DELADELA
LIMITES
DES
LEGAUX
pendant
probleme relie
jours.
DECRITES CI-DESSOUS.
DE
LA
GA~A,NTIE
d'une
reparation effectuee
dans
un emballage equivalent. Le colisdoit
dommages
CHEZUNREVENDEUR
PRESCRITES
PERTESOUDOMMAGES
SELON
d'obtenir
avec les Centresdeservice Clarion,
encourus lors du transport.
APPLICABLESNEPERMETTENT
DIRECTS OU INDIRECTS,
PRECIS.
VOTRE LIEU DE RESIDENCE.
la periode garantie, veuillez
une liste
aux
CLARION
LlMIT~E
DE
DE
par
GARANTIE
DATE
PERIODEDEGARANTIE
PARLALOt
D'UTILISERLEPRODUIT.
DES
produits Clarion.
PARUNREVENDEUR
SERVICES SOUS GARANTIE
Ie vehicule, niIenettoyage ou
pourIeretrait ou la reinstallation
NON AUTORISE PAR
ET CE, EN ACCORD AVEC
D'ACHAT
GARANTIES
des
centresdeservice
SONT
DEUX (2) ANS, UNE
par
du personnel
CLARION
lIMITEE
ORIGINELLE.
CLARION
DIRECTS
IMPLICITES,
CES
LIMITATIONS
communiquer
AUTORISE,
PAS
QUI
NE
OU
LES
Aux Etats-Unis:
Clarion Corporation of America
Attn:Customer Service Manager
6200 Gateway Drive
CA.
Cypress,
1-800-GO-CLARION
www.clarion.com
90630
Au
Canada:
Clarion Canada
Centredeservices sous garantie
2239 Winston Park Drive
Oakville, Ontario
(905) 829-4600
www.c1arioncanada.com
Inc.
L6H
5R1
Page 69

281-0632-03
2007/1
clarion"
Except as noted, Clarion products purchased from an authorized Clarion dealer are warranted against all defects
materials and workmanship for a period of one (1) year from the date of original purchase.
The following Clarion products noted below
(2) year period from the date of original purchase when purchased from AND installed by an authorized Clarion dealer.
** DRZ9255 DXZ775USB DXZ675USB DXZ575USB DFZ675MC DPX11500 DPX1800 DPX2250
All Clarion cables, wires and other accessories if purchased from an authorized Clarion dealer are warranted against
all defects in materials and workmanship for ninety
ALL
PURCHASES OF CLARION PRODUCTS FROM NON-AUTHORIZED CLARION
TO FURTHER
The conditions of this Limited Warranty and the extent of responsibility of Clarion Corporation of America ("Clarion")
under this Limited Warranty are as follows:
1. PROOF OF DATE OF PURCHASE FROM AN AUTHORIZED CLARION DEALER
WARRANTY SERVICE OF THIS PRODUCT.
CLARION PRODUCTS NOTED ABOVE, PROOF OF DATE OF PURCHASE AND PROOF OF INSTALLATION BY AN
AUTHORIZED CLARION DEALER IS REQUIRED. INFORMATION ABOUT CLARION AUTHORIZED WARRANTY
SERVICE CENTERS MAY BE OBTAINED BY CONTACTING CLARION
2. This Limited Warranty will become void if service performed by anyone other than an approved Clarion Warranty
Service Center results in damage to the products.
3. This Limited Warranty does not apply to any product which has been subject to misuse, neglect oraccident,
or which has had the serial number altered, defaced or removed, or which has been connected, installed,
adjusted or repaired, other than
4. This Limited Warranty does not cover car static or other electrical interferences, tape head
cleaning or adjustments, or labor costs for the removal or reinstallation of the unit for repair.
5. The sole responsibility of Clarion underthis Limited Warranty shall be limited to the repair of the products
reptacementofthe
6. Product must be shipped in its original carton or equivalent carton, fully insured, with shipping charges prepaid.
Clarion will not assume any responsibility for any loss
7. CLARION PRODUCTS PURCHASED FROM A SOURCE OTHER THAN AN AUTHORIZED CLARION DEALER,
INCLUDING
CLARION DEALER,
ALLOWED
ELIMINATION OF WARRANTIES UNDER THESE CIRCUMSTANCES, THE
PERIOD
WARRANTY
product, at
ANY
AND
SHALL
BY
APPLICABLE
SHALLBEDEEMED TO BE FIFTEEN (15) DAYS FROM THE DATE OF ORIGINAL PURCHASE.
CLARION 2007 LIMITED WARRANTY
For USA
and
Canada
only
** are warranted against all defects
(90) days from the date of original purchase.
RESTRICTIONSASDESCRIBED BELOW.
IN
THE CASE OF THE TWO (2) YEAR LIMITED WARRANTY FOR THE
in
accordance with the instructions furnished by Clarion.
the
sole discretion ofClar-ion.
or
damage incurred in shipping.
ALL
PURCHASES VIA THE INTERNET FROM A NON INTERNET AUTHORIZED
NOT BE COVEREDBYANY
LAW.INTHE EVENT
CLARION LIMITED WARRANTY TO THE EXTENT
AND
TO THE EXTENT
in
materials and workmanship for a two
DEALERS
WILL
BE REQUIRED FOR
AT
THE ADDRESS LISTED BELOW.
or
laser pick-up
APPLICABLE
APPLICABLE
LAW
LIMITED WARRANTY
ARE
SUBJECT
PROHIBITS
in
or
8.
ALL
IMPLIED WARRANTIES EXCEPT TO THE EXTENT PROHIBITEDBYAPPLICABLE
GREATER DURATION THAN THE WARRANTY PERIOD SET FORTH ABOVE. UNDER NO CIRCUMSTANCES
SHALL
CLARIONBELIABLE
OF THE USE OR INABILITY TO USE THE PRODUCT. BECAUSE SOME STATES DO NOT
ON HOW LONG AN IMPLIED WARRANTY LASTS OR EXCLUSIONS OR LIMITATIONS OF INCIDENTAL OR
CONSEQUENTIAL DAMAGES, THE ABOVE LIMITATIONS OR EXCLUSIONS MAY NOT APPLY TO YOU.
9. THIS LIMITED WARRANTY GIVES
WHICH VARY FROM STATE TO STATE.
10.
The laws of the State of California shall govern and control this limited warranty, its interpretation and enforcement.
11.
Should you have any difficulties with the performance of this product during the warranty period, please call Clarion
or visit our web site for a listing of Authorized Warranty Service Centers
Clarion Customer Service at the address listed below for any service help you may need with Clarion products.
In
USA:
Clarion CorporationofAmerica
Attn:Customer Service Manager
6200
Gateway Drive
Cypress,
1-800-GO-CLARION
www.clarion.com
FOR ANY LOSS OR DAMAGE, DIRECT OR CONSEQUENTIAL, ARISING OUT
YOU
CA.
SPECIFIC LEGAL RIGHTS, AND
90630
YOU
MAY ALSO HAVE OTHER RIGHTS
in
your area.
In
Canada:
Clarion Canada
Warranty Service Center
2239
Winston
Oakville, Ontario
(905)
www.clarioncanada.com
Park
829-4600
LAW
You
may also contact the
Inc.
Drive
L6H
5R1
SHALL
ALLOW
HAVE NO
LIMITATIONS
 Loading...