

Page 1

TM
Page 2

SAFETY WARNINGS AND PRECAUTIONS
Please carefully read and follow these Safety Warnings and
Precautions before using the Joyride™ System.
• Only look at the screen when it is safe to do so and for a very short period
of time. If you need to study the screen or look at the screen for a prolonged period of time, pull over and stop the car so that you can safely
evaluate the information without risking danger to yourself or to others.
• Because operating certain parts of this system while driving can distract
your attention away from the road and possibly cause an accident or other
serious consequences, carry out the set up procedures and learn the basics
of the system before attempting to use it on the road.
• DONOT change systems settings or enter data manually (using your hands)
while driving. Stop the vehicle in a safe and legal manner before attempting
these operations. This is important since while setting up or changing some
functions, your attention might be distracted away from the road and you
may be tempted to remove your hands from the wheel.
i
Page 3

JoyRoute™ Navigation for
Manual Input Required
• When you see this symbol in the manual, it means, for your safety and the
• The Joyride™ system responds to voice commands, menu selections, and
• Turn volume down when turning the Joyride™ unit OFF. This will ensure
safety of others, the vehicle must be stopped to carry out the described
Joyride™ function or to change settings. Pull over in a safe and legal manner before attempting to manually access a function of the system.
shortcut keys. By memorizing the required voice commands and by training
the Joyride™ unit to recognize your custom commands, you will be able to
utilize the Joyride™ system in its full, functional capacity to increase safety
while you are driving.
NO hearing damage if the sound is too loud when you turn power back on.
Also ensure volume of system is not too loud so that outside traffic and
emergency vehicles can be heard.
ii
• Make sure all persons who use this system read all safety instructions and
precautions and follow all instructions carefully.
Page 4

• JoyRoute™ Navigation Program is not a substitute for your personal judgment. You must follow all traffic regulations and use your personal judgment and knowledge of safe driving practices. Do not follow JoyRoute™
Navigation instructions if it tells you to perform an unsafe or illegal maneuver, guides you into an area which you consider unsafe or places you in an
unsafe situation.
• All calculated routes that are provided by the JoyRoute™ Navigation
Program may not be the perfect route for you. The Program is intended to
get you to your destination, but may not provide the shortest or best route.
If you know shortcuts or other preferred ways to arrive at your destination,
use them.
• DO NOT rely on the Program to provide the best route in emergency situations. The JoyRoute™ Navigation Program database may not include all
facilities and streets necessary for emergency response and its navigation
maps may not reflect recent changes in roads, traffic controls, and driving
conditions. Use your own judgment and common sense in such situations.
iii
Page 5

JoyRoute™ Navigation for
iv
Page 6

COPYRIGHT NOTICES
JoyRoute™ Small Display
Copyright Information
Clarion Co., Ltd. 2000 - 2001
All Rights Reserved
Reproduction, adaptation, or translation without prior written authorization is prohibited,
except as allowed under applicable copyright laws.
Technology Notice
This product incorporates copyright protection technology that is protected by method
claims of certain U.S. patents and other intellectual property rights owned by Macrovision
Corporation and other rights owners. Use of this copyright protection technology must be
authorized by Macrovision Corporation, and is intended for home and other limited viewing
uses only unless otherwise authorized by Macrovision Corporation. Reverse engineering or
disassembly is prohibited.
Trademarks
Microsoft® and Windows® are either registered trademarks or trademarks of Microsoft
Corporation in the United States and/or other countries. Microsoft products are licensed to
OEMs by Microsoft Licensing, Inc., a wholly owned subsidiary of Microsoft Corporation.
CompactFlash Card: CompactFlash is a trademark of SanDisk Corporation.
v
Page 7

JoyRoute™ Navigation for
Navtech® is a registered trademark of Navigation Technologies.
Joyride™, JoyRoute™ and JoyRoute Plus™ are trademarks of Clarion Corporation of
America.
Microsoft®, Windows Media™, and the Windows Logo are trademarks or registered trademarks of Microsoft Corporation in the United States and/or other countries.
Portions based upon Microsoft Windows Media Technologies. Copyright© 1999 Microsoft
Corporation. All Rights Reserved. Microsoft , Windows Media™, and the Windows Logo are
trademarks of Microsoft Corporation in the United States and/or other countries.
CUE® AutoFM® Data Receiver is a registered trademark of CUE Corporation.
FCC Radio Interface Statement
Operation of the Joyride™ system is subject to the following two conditions imposed by the
Federal Communications Commission: (1) this system may not cause harmful interference,
and (2) this system must accept any interference received, including interference that may
cause undesired operation. Changes or modifications to the equipment without the express
permission of Clarion may void the authority to use the Joyride system.
vi
Page 8

JoyRoute™ Navigation for
Warranty
This Navigation User’s Manual creates no warranties, nor does it make any representations
regarding the Joyride™ system or JoyRoute™ Navigation software on behalf of Clarion. The
only warranty provided by Clarion to the purchaser is that contained in Clarion’s published
limited warranty for the Joyride™ system or JoyRoute™ Navigation software. All other purported warranties and representations regarding the quality, performance or the suitability of
the Joyride™ system or JoyRoute™ Navigation software are disclaimed.
Changes or modifications to the equipment without the express permission of Clarion may
void the warranty of the Joyride system.
Place the serial number sticker for your Joyride system here:
Serial Number
vii
Page 9

JoyRoute™ Navigation for
viii
Page 10

JoyRoute™ Navigation for
CONTENTS
Safety Warnings and Precautions . . . . . . . . . . . . . . . . . . . .i
Manual Input Required . . . . . . . . . . . . . . . . . . . . . . . . .ii
Copyright Notices . . . . . . . . . . . . . . . . . . . . . . . . . . . . .v
Contents . . . . . . . . . . . . . . . . . . . . . . . . . . . . . . . . . . . . . .ix
Software Installation - (Initially for Dealers) . . . . . . . . . . .xi
Getting Help . . . . . . . . . . . . . . . . . . . . . . . . . . . . . . . . . .xii
Shortcut Keys - Control Panel or Remote Controller . . . . . .xiii
Quick Views . . . . . . . . . . . . . . . . . . . . . . . . . . . . . . . . . . .xv
Map Mode . . . . . . . . . . . . . . . . . . . . . . . . . . . . . . . . . .xv
Turn-by-Turn Mode . . . . . . . . . . . . . . . . . . . . . . . . . . . .xvi
Freeway Mode . . . . . . . . . . . . . . . . . . . . . . . . . . . . . . .xvii
Zooming and Scrolling . . . . . . . . . . . . . . . . . . . . . . . . .xviii
1.Using Navigation on Small Display . . . . . . . . . . . . . . . .1
Using a CD Changer and USB Hub (optional) . . . . . . . .3
2.Getting Started . . . . . . . . . . . . . . . . . . . . . . . . . . . . . . .5
Starting the Navigation Program . . . . . . . . . . . . . . . . . . .5
3.Setting Destinations . . . . . . . . . . . . . . . . . . . . . . . . . . .9
Destination Methods . . . . . . . . . . . . . . . . . . . . . . . . . . .9
Using a Street Address . . . . . . . . . . . . . . . . . . . . . . . . . .11
Using Crossroads . . . . . . . . . . . . . . . . . . . . . . . . . . . . .14
Using a Point of Interest (POI) . . . . . . . . . . . . . . . . . . . .17
Using the Address Book . . . . . . . . . . . . . . . . . . . . . . . . .19
Using a Previous Destination . . . . . . . . . . . . . . . . . . . . .20
Using a City Center . . . . . . . . . . . . . . . . . . . . . . . . . . . .22
Using Longitude and Latitude . . . . . . . . . . . . . . . . . . . .23
Using Home . . . . . . . . . . . . . . . . . . . . . . . . . . . . . . . . .24
ix
Page 11

JoyRoute™ Navigation for
4.Navigation Display Modes . . . . . . . . . . . . . . . . . . . . . .27
Map Display Mode Options . . . . . . . . . . . . . . . . . . . . . .28
Tracing your Route . . . . . . . . . . . . . . . . . . . . . . . . . . . .30
Turn-By-Turn Mode . . . . . . . . . . . . . . . . . . . . . . . . . . .31
5.Other Navigation Options . . . . . . . . . . . . . . . . . . . . . . .33
Recalculating a Route . . . . . . . . . . . . . . . . . . . . . . . . . .33
Calculating an Alternate Route . . . . . . . . . . . . . . . . . . . .33
Storing Current Destination Information . . . . . . . . . . . . .34
Clearing Route Information . . . . . . . . . . . . . . . . . . . . . .35
6.Setting Preferences . . . . . . . . . . . . . . . . . . . . . . . . . . .37
Setting Route Preferences . . . . . . . . . . . . . . . . . . . . . . .37
Setting Display Options . . . . . . . . . . . . . . . . . . . . . . . . .39
Moving the Car Position . . . . . . . . . . . . . . . . . . . . . . . .40
Demo Mode . . . . . . . . . . . . . . . . . . . . . . . . . . . . . . . . .41
Selecting a Voice Scheme . . . . . . . . . . . . . . . . . . . . . . .43
Setting Voice Guide Type . . . . . . . . . . . . . . . . . . . . . . . .44
Checking Sensors . . . . . . . . . . . . . . . . . . . . . . . . . . . . .44
Inputting Your Home Destination . . . . . . . . . . . . . . . . . .46
Training Speech Commands . . . . . . . . . . . . . . . . . . . . . .48
Viewing Information About the Program . . . . . . . . . . . . .49
FAQs and Troubleshooting . . . . . . . . . . . . . . . . . . . . . . . . .50
Glossary . . . . . . . . . . . . . . . . . . . . . . . . . . . . . . . . . . . . . .52
x
Page 12
JoyRoute™ Navigation for
Software Installation - (Initially for Dealers)
Congratulations on your purchase of the JoyRoute™ Navigation software for Small Display!
Caution: When installing the software, do not turn the ignition (ACC power) switch OFF.
Also avoid pressing any buttons, keys or reset buttons. Hardware failures may result.
Installing Navigation
1. Turn on vehicle ignition.
2. Insert the CD installation disc, JoyRoute™ Navigation for Small Display into the in-dash
DVD drive.
3. At the “Install Navigation” screen press Enter. The Joyride™ system announces “the system
is attempting to install or run a program contained on the media inserted.” (If more than
one installation program exists, press to select “JoyRoute™ Navigation - Small Display.”)
4. Press key to select “Yes.”
5. Press key to select “No” to the question ”Perform Backup Now?” (Select “Cancel” to
abort the installation.)
A Please DO NOT INTERRUPT warning displays. Do not touch the faceplate or control panel while the following message displays: “Preparing to Install...”
Speech Training for Safety
Read the instruction to “Say the command word 3 times after the prompt.” A series of
Navigation speech commands start to display. Press Enterto start.
6.Reset Required – The installation prompts you to press Enterto reset to complete the
installation.
xi
Page 13

JoyRoute™ Navigation for
Getting Help
Context-SensitiveHelp
To get help from the screen you are currently viewing you can choose 1 of 3
ways.
1. Say “AutoPC.” Wait for the green “Listening” bar to appear, and then say
“Help.”
2. Press the Push-to-Talk (PTT) button in your car or on the remote controller
and then say “Help.”
3. Press the Helpbutton on the faceplate for specific instructions for a screen
you are currently viewing.
xii
Page 14
JoyRoute™ Navigation for Shortcut Keys
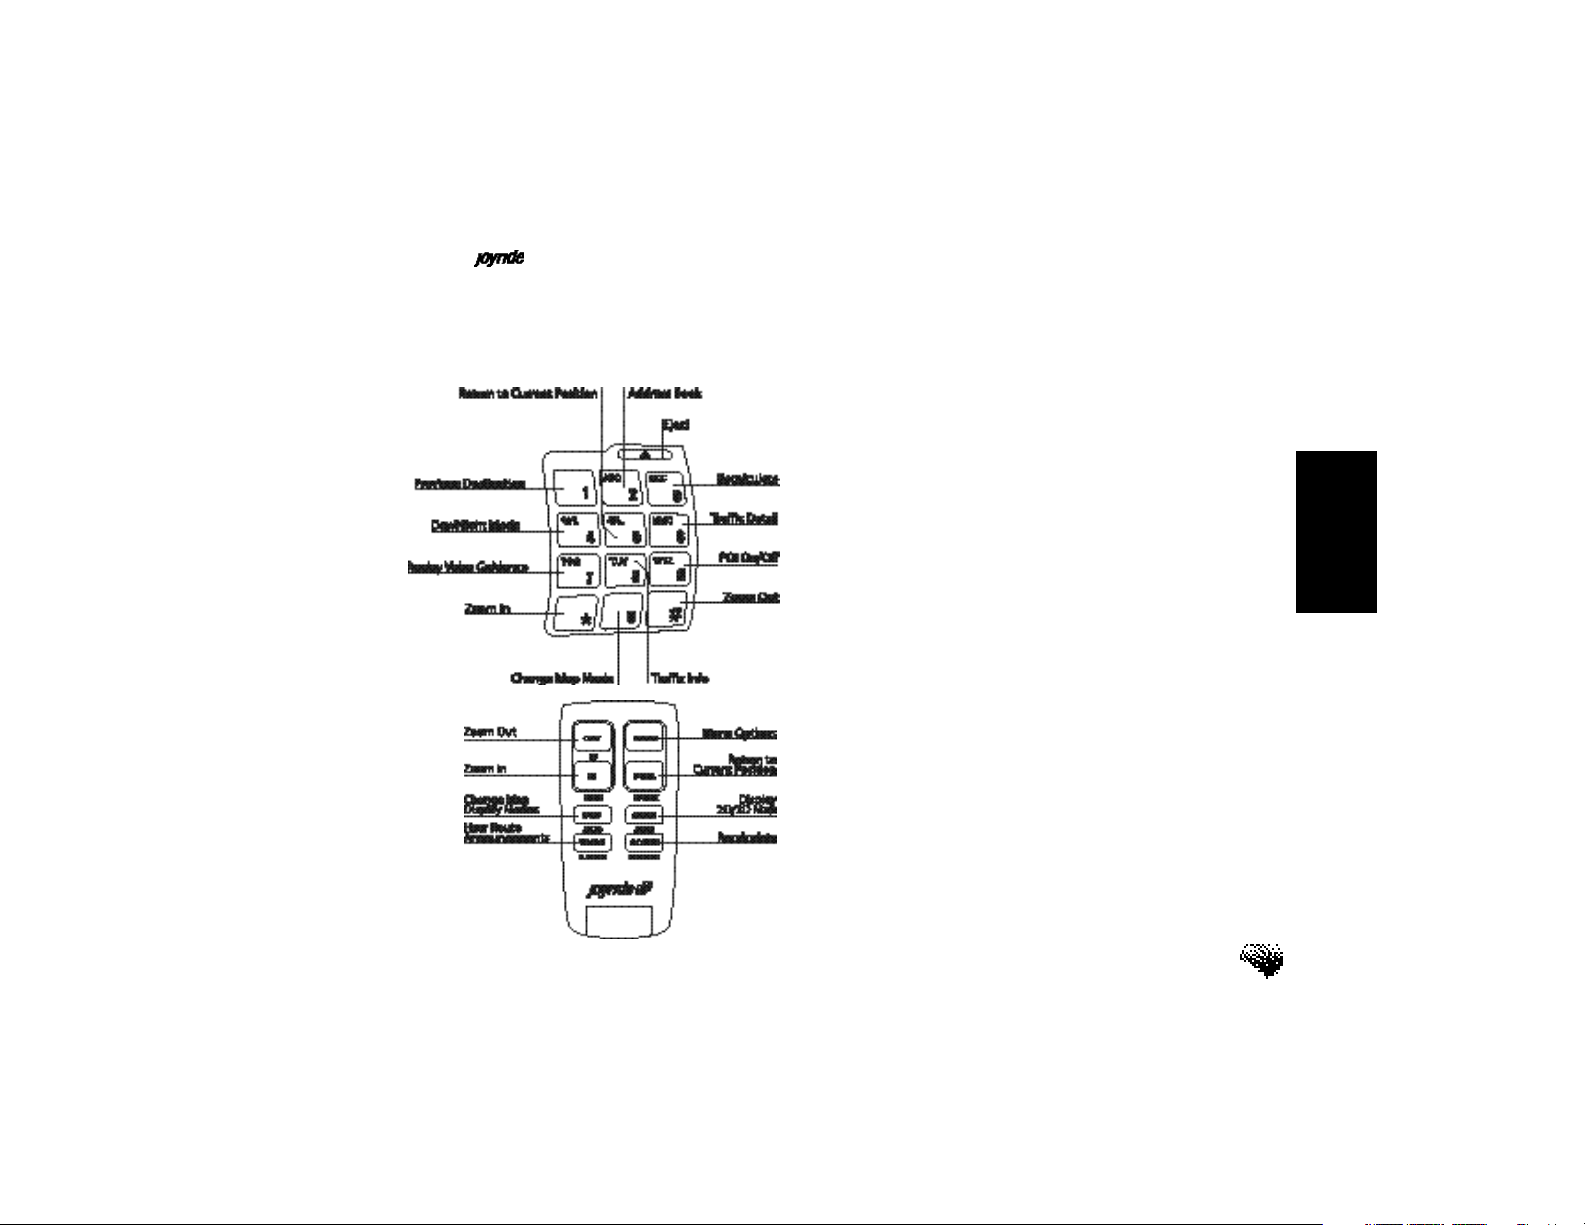
Shortcut Keys- Control Panel or Remote Controller
0- Change Map Mode: N-Up / H-Up / Map
/ Freeway
*-Zoom In
#-Zoom Out
1-Previous Destination
2-Address Book
3-Recalculate
4-Day / Night Mode
5-Return to Current Car Position
6-Traffic Detail (if CUE AutoFM software is
installed)
7-Repeat Voice Guidance
8-Traffic Information (if CUE AutoFM is
installed)
9-POI On/Off
Use the remote controller surface buttons
for quick access.
The switch on the side of the remote control
must be in the Win CE Mode (down).
xiii
Page 15

JoyRoute™ Navigation for
xiv
Page 16
JoyRoute™ Navigation for
Quick Views
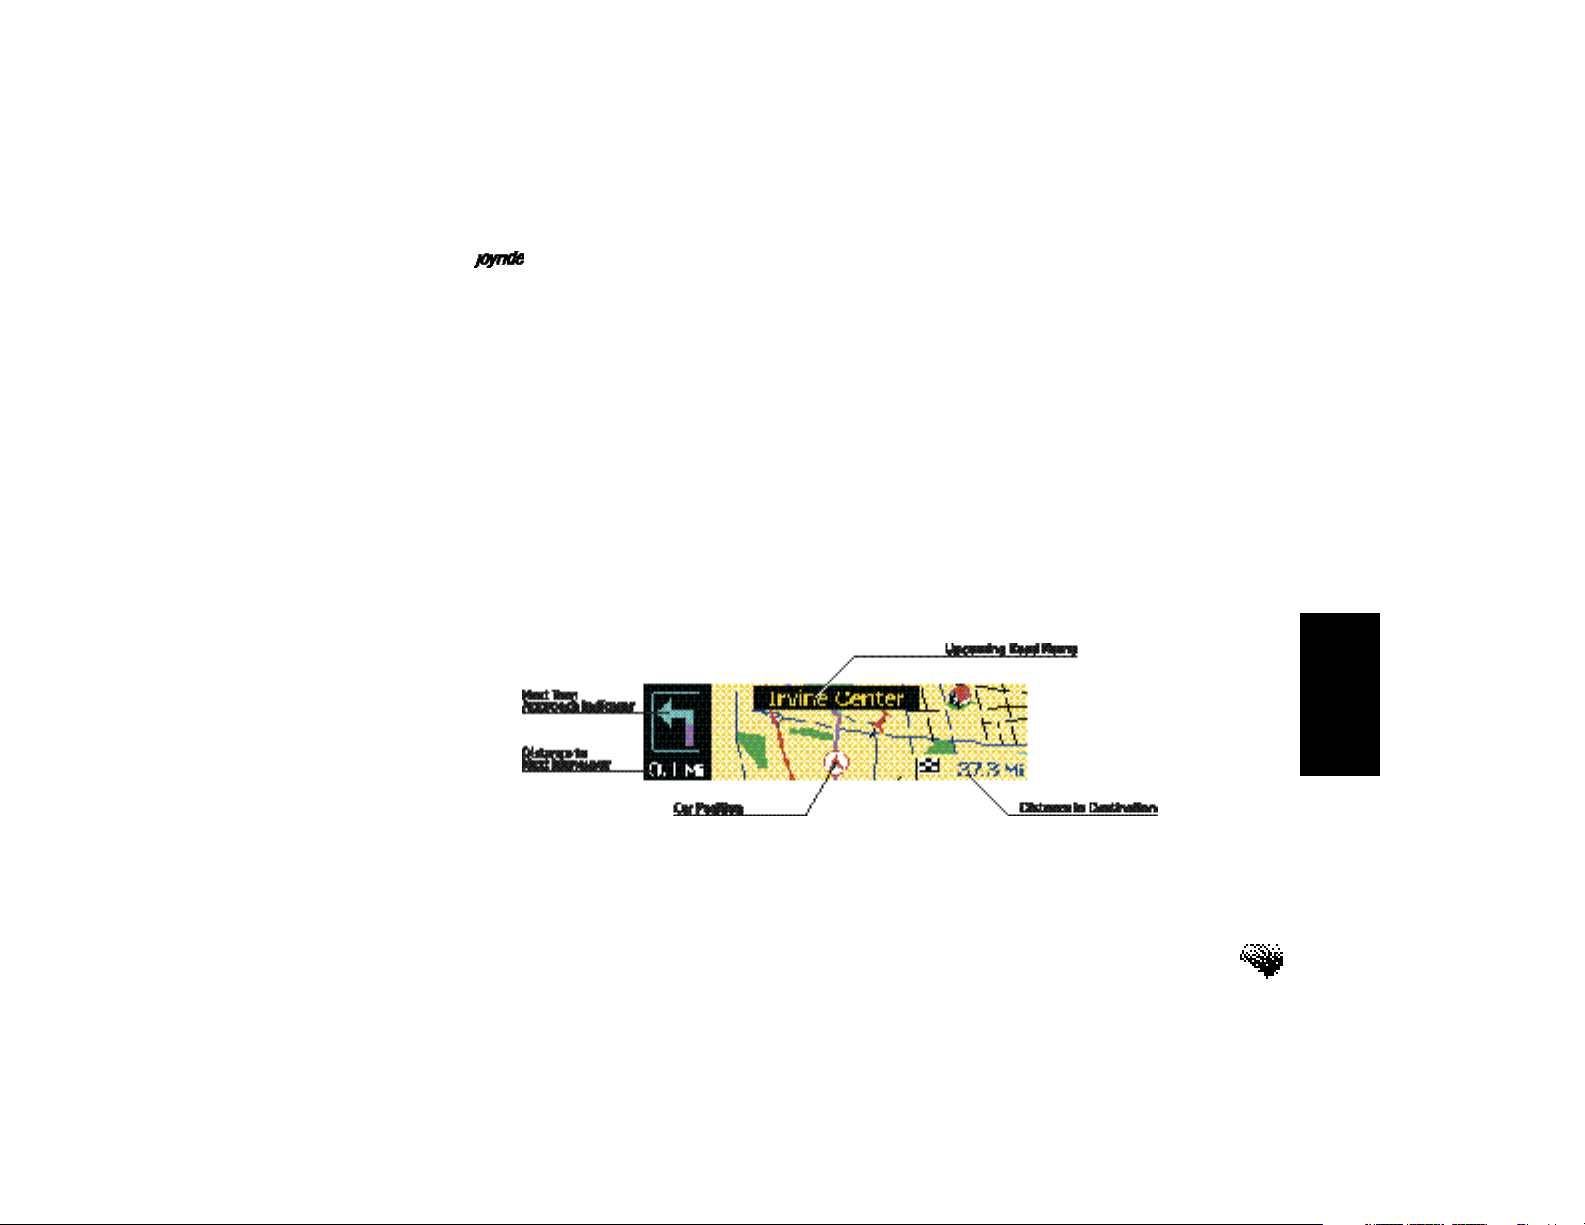
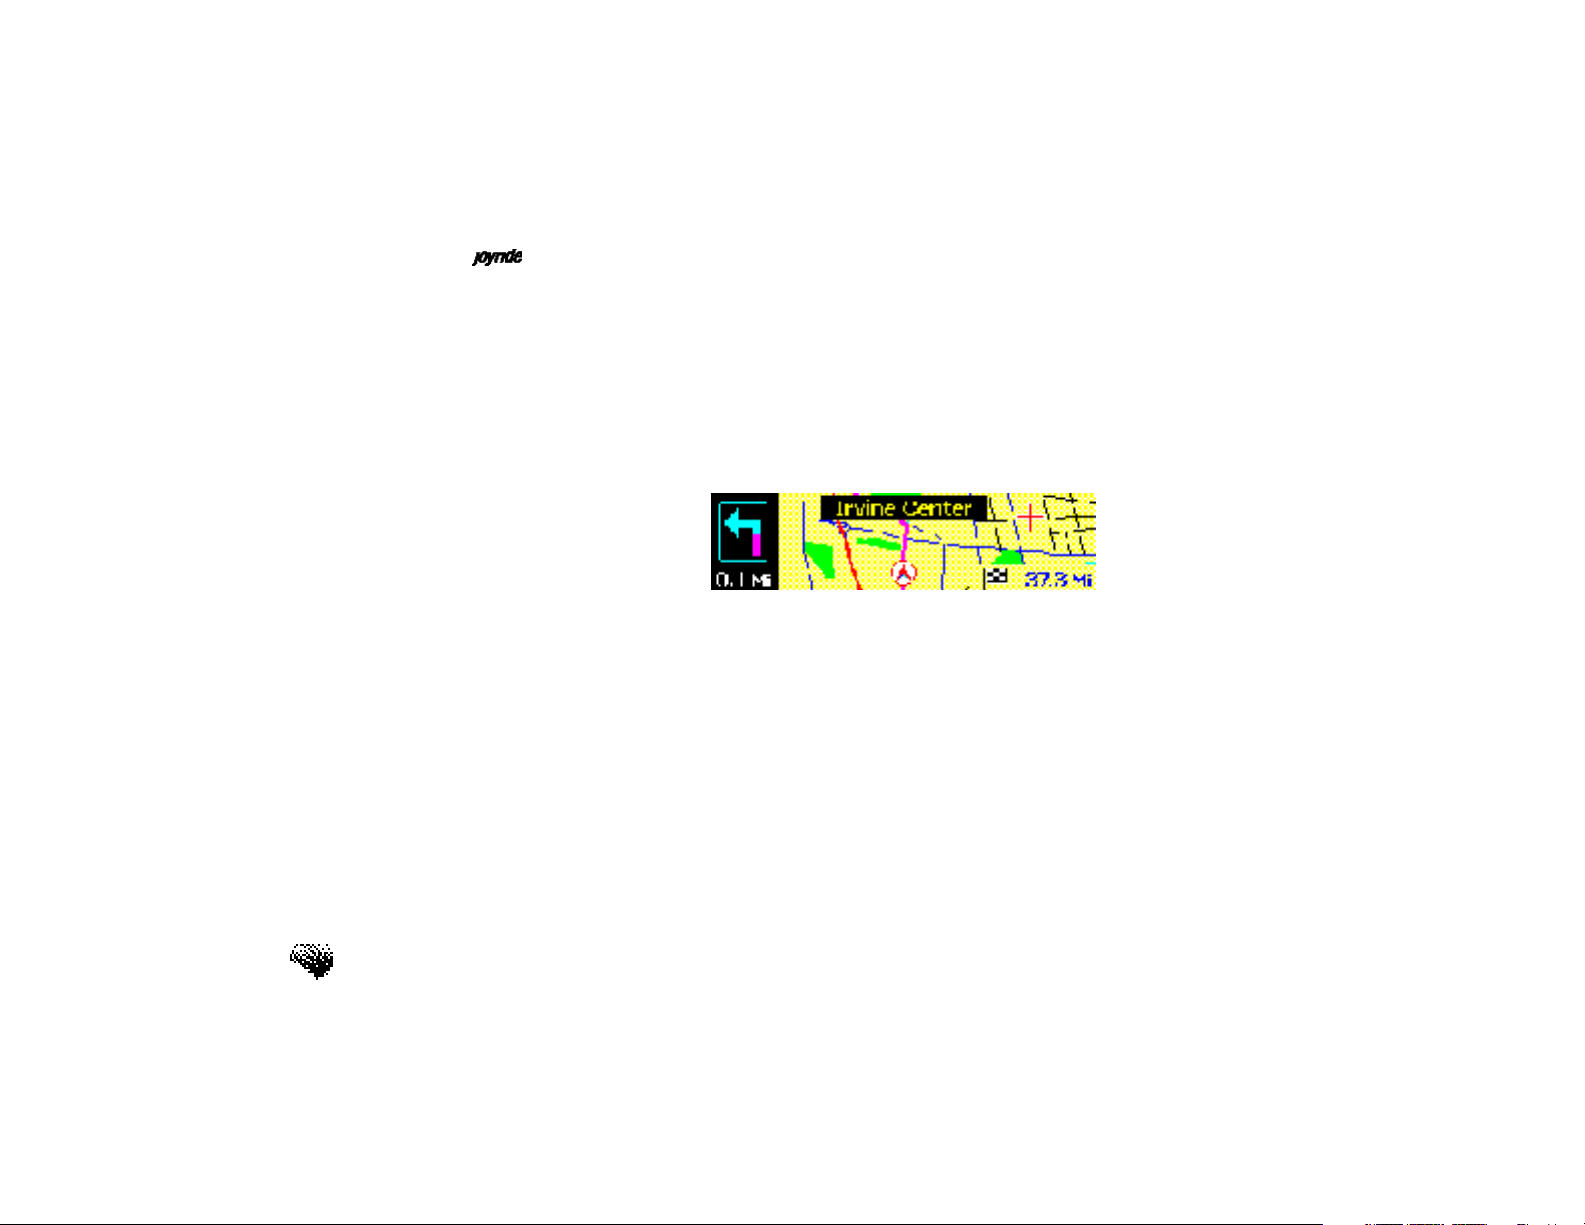
Map Mode
The Heading UPmap modeis the default view that displays when Navigation is launched.
Heading-Upand North-Upare the available map orientations. Depending on how you config-
ure Navigation, additional information can be displayed, such as estimated time to destination
or Freeway Auto-Pop, and images like the Turn-by-Turn, next-maneuverarrows which enhance
the guidance information for you. Next-maneuver arrows change in color to indicate how close
the vehicle is to the next required turn.
Quick Views
The Car Position Indicator represents your car’s position on the map during a calculated route.
It also appears on Freeway Mode views.
xv
Page 17
JoyRoute™ Navigation for
Press the shortcut
key “0” to change
the display map
modes
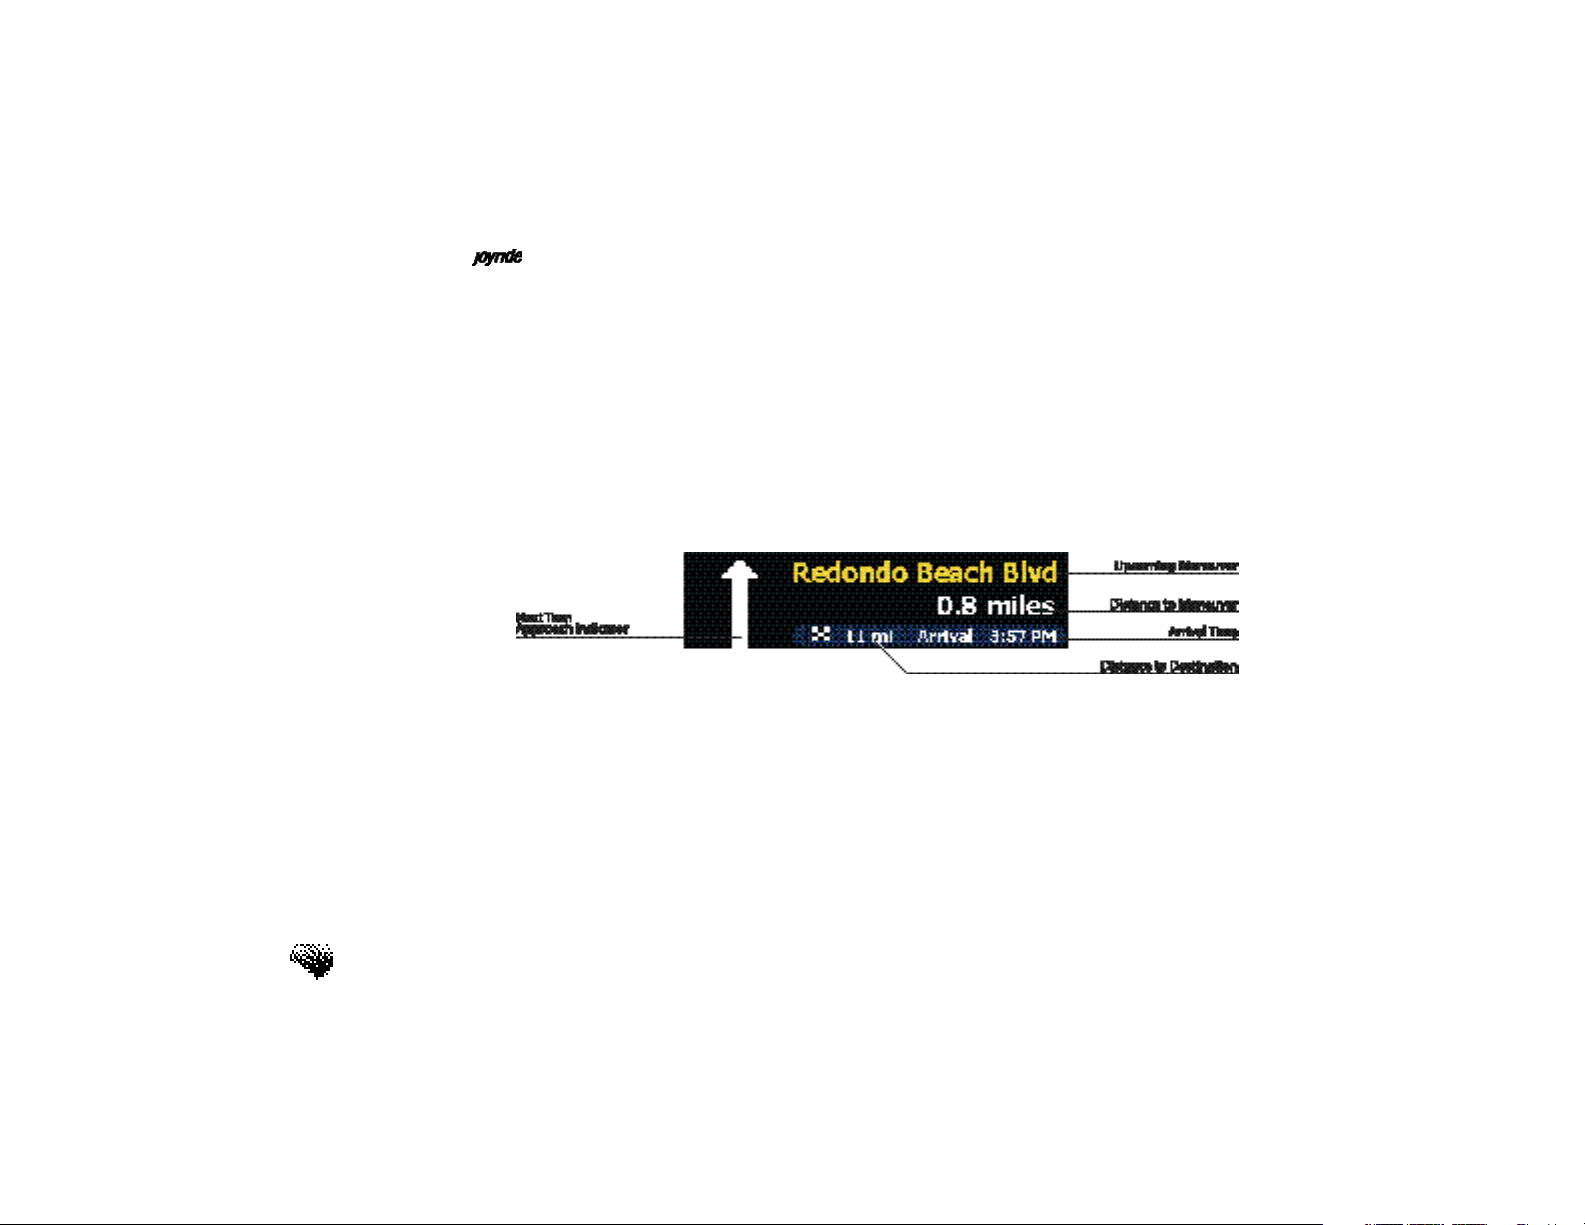
Turn-by-Turn Mode
Turn-by-Turnmode is an alternate view you can select during a calculated route to a destination. It shows upcoming maneuvers, the street names, distance to the next-maneuverand
estimated arrival time. The next-turn maneuver arrows fill and change in colorto indicate
how close the vehicle is to an upcoming turn.
The Car Position Indicator represents your car’s position on the map during a calculated, map
mode route. It also appears on Freeway Mode views.
xvi
Page 18
JoyRoute™ Navigation for
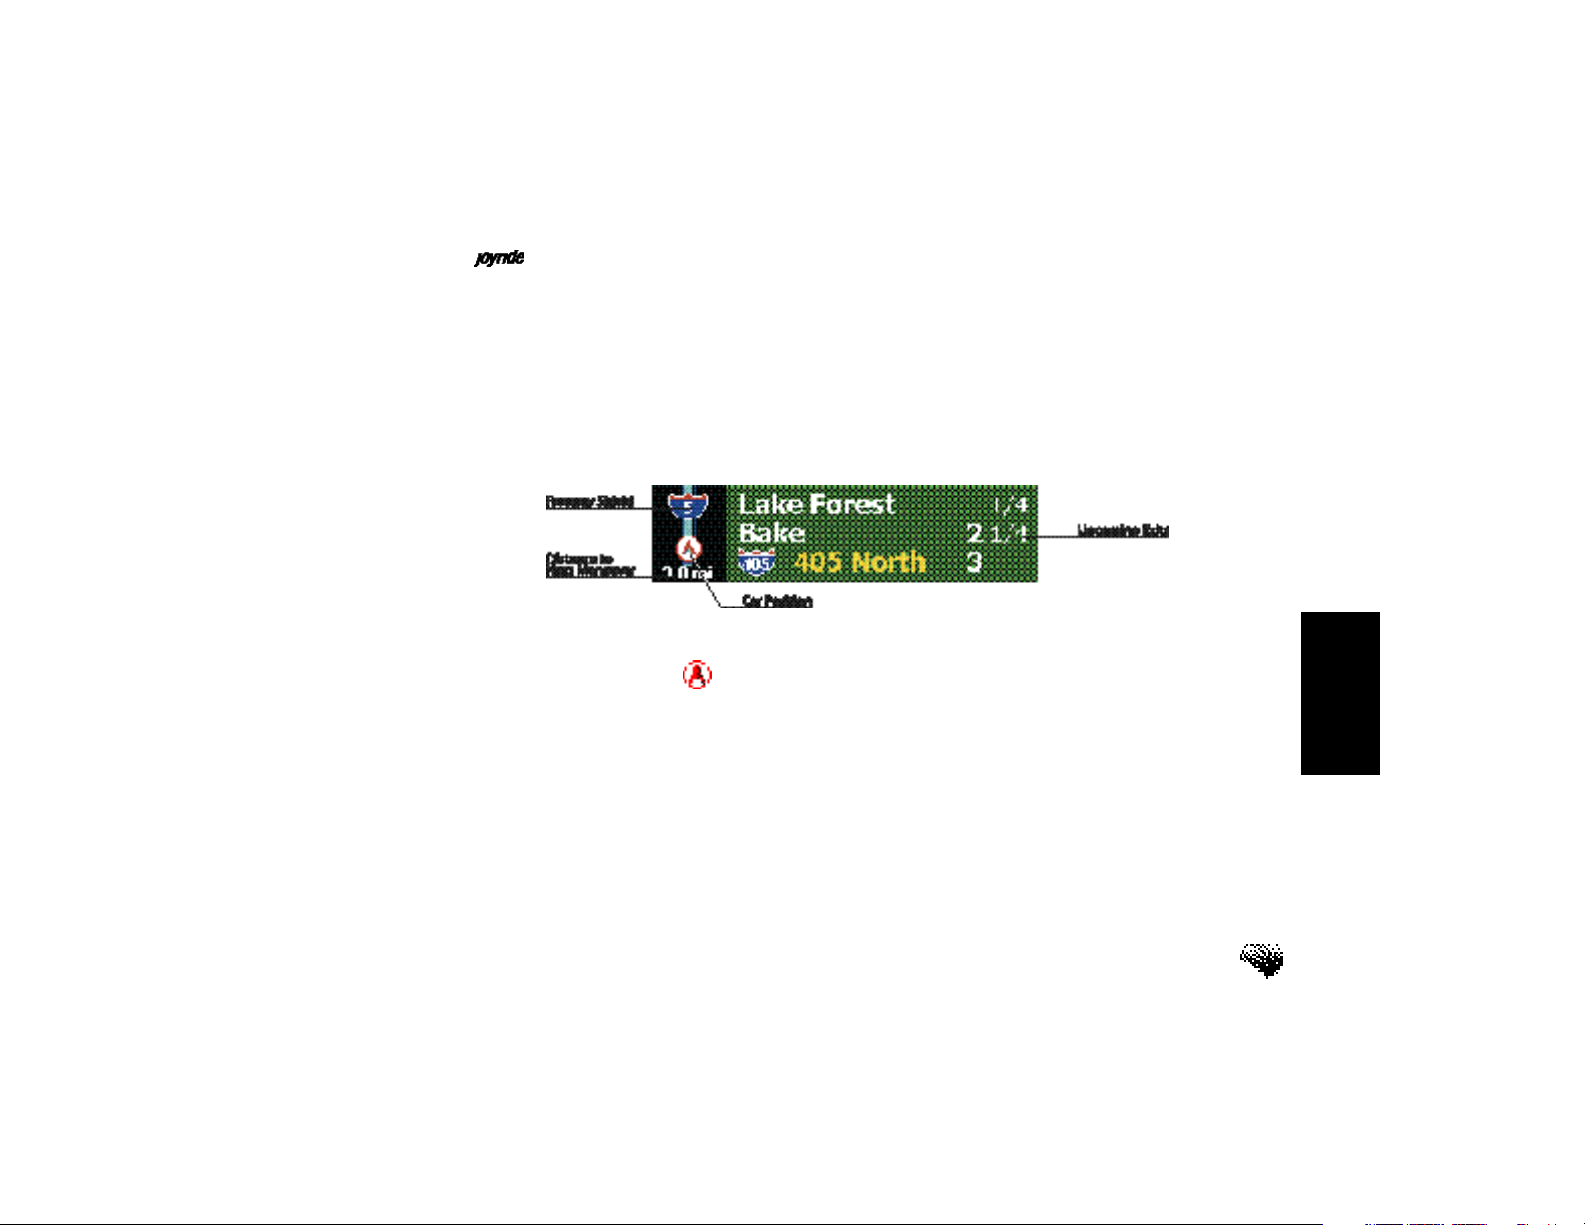
Freeway Mode
Freeway Mode is an alternate view that displays the next series of upcoming streets, freeways
by name, and distances to the next exit along a calculated route if the current car position is
on the calculated freeway route.
The Car Position Indicator displays your current car position and direction of travel on the
freeway form.
Quick Views
xvii
Page 19
JoyRoute™ Navigation for
Zooming and Scrolling
Shortcut key:
press * to zoom IN;
press # to zoom OUT.
Map scrollingis accomplished by using the Left, Right, Up or Down (navigation) keys
on the control panel or remote controller. Additionally, the remote controller joystick
handles 8-way scrolling (including diagonal scrolls). A red crossbar cursor displays as
a guide while scrolling.
xviii
Page 20

JoyRoute™ Navigation for
1. Using Navigation on Small Display
Welcome to the JoyRoute™ Navigation Software Program!
The Joyride™ system has an optionalGlobal Positioning System-based (GPS) navigation system
that provides turn-by-turninstructions using the computer’s wavefiles and Text-to-Speech(TTS)
to audibly guide you to a calculated destination. When selected, its TTSengine also reads back
street names at critical-turn maneuvers along a route. A Universal Serial Bus(USB) Navigation
module encloses Dead Reckoningsensor inputs(GPS, speed pulse, and gyro) for accurate car
positioningand interaction with your car’s speed pulsesignal.
Directional icons and trip information also appear on the mapdisplay. Based on information
you enter or select, JoyRoute™ Navigation software will automatically calculate a routeand
announce all maneuvers. Other features in the program allow you to preview the entire route,
calculate a route based on time or distance, or check the status of all the system components.
Using Navigation
Calibrating
the GPS
system for
accurate
car positioning
Self-initiated calibration - Depending on the make of car, when Navigation is first launched,
the system requires that the car be driven about 1/2 hour to calibrate the speed pulse information. This is required for accurate GPS car positioning.
During calibration it is likely that the car position may not update or will not match the road
traveled correctly. Calibration will only occur the first time navigation software is installed or if
the navigation software is reinstalled after a cold boot.
1
Page 21

JoyRoute™ Navigation for
Using speech commands, you can—
• Calculate a route to the nearest Place of Interest (POI), e.g., gas station or airport
• Calculate a route Home from any location
• Calculate a route using a contact address stored in the Address Book
Using the control panel keys, you can—
• Set a destinationbased on criteria like Street Address, a Point of Interest, or a contact location from the Address Book
• Set a destination based on Previous Destination, crossroads, city center or latitude
and longitudesettings
• Store current location in the Address Book
• Check the status of all GPS components
• Customize the program to suit your preferences
Using the remote controller, you can—
• Remotely set a destinationbased on Street Addresses, Points of Interest, Address
Book, Previous Destination, crossroads, city center or latitude and longitude settings
• Remotely store a current destination in the Address Book
• Remotely check the status of all the components
• Remotely customize the program to suit your preferences
2
Page 22

JoyRoute™ Navigation for
Using Navigation
Using a CD Changer and USB Hub(optional)
The Map CD
must remain in
the DVD drive
(or in the
optional UC-6
CD changer)
when running
Navigation
Navigation requires a Navigation Technologies (NAVTECH®) Map data disc that runs either in
the DVD driveor in an optional CD Changer. If you do not have the CD changer, place the
Navtech data discinto the DVD/CD drive. This will preclude using the drive for DVD movies
or music. If you are attaching two or more USB-type peripherals– like a USB Navigation unit
(UDR12), a CUE device or a CD changer(UC-6), a USB hubis recommended to supply the
appropriate power to each peripheral.
3
Page 23

JoyRoute™ Navigation for
4
Page 24

JoyRoute™ Navigation for Getting Started
2. Getting Started
The Navigation program requires a Navigation Technologies Map, CD or DVD disc (SDAL
Version 1.7), that you must insert in the DVD driveor CD changer. Joyride reads the map
discas you travel.
Important
When first starting navigation, or if the CD cartridge is ejected in a CD changer with data
discs, it will take approximately 2 minutes for the system to initialize.
Starting the Navigation Program
To start press POWER, insert the map CD; wait for initialization.
Using speech commands—
• Say “Auto PC” or press the Push-to-Talk (PTT) button voice substitute.
• Say, “Navigation” to advance to the program.
5
Page 25

JoyRoute™ Navigation for
Using the control panel—
1. Press the NAVbuttonon the faceplate to launch Navigation. OR Press the Start
key, then press to select Navigationand press ENT. Note the remote control
below.
2. The Navigation warning message appears. As required, press ENTto accept the
warning message. (The Navigation warning messageappears each time you start
Navigation.)
6
Page 26

JoyRoute™ Navigation for Getting Started
Using the remote controller—
1. To align the remote controller, point the “nose” of the remote controllertowards
the Infrared(black) panel below the Joyride display.
2. When the map displays, press MENUon the remote controller.
3. Rotate the joystickbutton up or down to select Enter Destination.
4. Press ENT. Select one of the Destination methods: Street Address, Cross Road,
Point of Interest, Address Book, Previous Destination, City Center, Longitude /
Latitude or Home.
7
Page 27

JoyRoute™ Navigation for
8
Page 28

JoyRoute™ Navigation for
RememberH-Up (Heading
Up) means the
map turns when
you turn.
Where do you
want to go?
Setting Destinations
3. Setting Destinations
On startup, the Navigation program may display a default location until the Global
Positioning System(GPS) initializes and acquires sufficient satelliteinformation (assuming
the USB Navigation Unit UDR12is installed). Note: If the current position remains in the
default location and does not match your current position, the car may need to be moved
so that the speed sensor can identify movement. The startup mode for the mapdisplay is
Heading Up (H-Up). This means that the map orientation changes to match where the car
(Car PositionIndicator) is heading.
H-Up also indicates that the map turns with you. Alternately, North Up(N-Up)indicates
actual North on a compassor road guide (the North icon compass is always at the top of
the display).
Destination Methods
To calculate a route and to get voice-guided instructions to your destination, you must first
select a method of defining a destination. To start, you select the Enter Destination option.
9
Page 29

JoyRoute™ Navigation for
From the Enter Destinationmenu, you can set a destination using:
At any time,
you can use
the remote
control to
select
Destination
options
These methods are described in the sections that follow.
When the system prompts you for input, use the keypad or use keys to enter letters or numbers
in the highlighted, edit box.
Press to move to the next or previous edit box.
To make corrections, press “*” to delete a characterin the selected edit box.
As necessary, allow the system’s “auto-complete” feature to assist you with data entry. As you enter
the first two or three letters of a city or street name, the program’s lookup and auto-complete feature will fill in the remaining characters.
• A Street Addressyou enter
• Crossroad(intersection) information you specify
• An entry in the Points of Interestdatabase (stored on the Map disc)
• An entry in the Address Book
• A Previous Destination
• City Centerinformation you specify
• Latitudeand Longitudeinformation you specify
• A pre-defined Homeaddress
10
Page 30

JoyRoute™ Navigation for Setting Destinations
Using a Street Address
To set a destination using a street address—
1. From the Navigation main screen, press MENU.
2. Press to choose Enter Destination, and then press ENT.
3. Press to choose Street Address, and then press ENT.
Where do you
want to go?
If you know the name of the city in which the address is located—
1.Select “Yes”when the system asks if you know the city name, and then press
ENT.
2. Enter the city name, and then press ENT. If, after entering the first two letters,
the system finds cities with similar spelling, it auto-completes the city name.
3. Select the desired city, and then press ENT.
11
Page 31

JoyRoute™ Navigation for
The Joyride™ system starts calculating a route and announces “I will begin navigating.“
What if you
don’t know
the city
name?
4. Enter the street address information as prompted, and then press ENT.
5. At the Destination Foundscreen, highlight Calculate, and then press ENTto cal-
culate a route. (If you only wish to store the information, highlight Store, and
then press ENTto save the destination in the Address Book.)
If you do NOT know the name of the city in which the address is located—
1. Select “No”when the system asks if you know the city name, and then press
ENT.
2. Enter the street name, and then press ENT.
3. At the Street Foundscreen, look at the upper, right corner of the screen to view
the number of street optionsfound. Press , if necessary, to locate the correct
variation of the street name, and then press ENT.
12
Page 32

JoyRoute™ Navigation for
Setting
a destination
using
different
methods
The Joyride™ system starts calculating a route and announces “I will begin navigating.“
If you only know the street name and not the building number of the address, press ENT at
the Address menu without entering any numbers. Navigation will take you to the street.
Setting Destinations
4. At the City Namescreen, look at the upper, right corner of the screen to
view the number of city optionsfound. Press to choose from the city
choices you determine is correct, and then press ENT.
5. From the Enter Street Addressedit boxes, enter a street address, and then
press ENT.
6. At the Destination Foundscreen, highlight Calculate, and then press ENT
to calculate a route. (If you only wish to store the information, highlight
Store, and then press ENTto save the destination in the Address Book.)
13
Page 33

JoyRoute™ Navigation for
Setting a
destination using
crossroads
Using Crossroads
To set a destination using Crossroad(intersection) information—
1. From the Navigation map display, press MENU.
2. Press to choose Enter Destination, and then press ENT.
3. Press to select Cross Road, and then press ENT.
If you know the name of the city in which the address is located—
1. Select ”Yes” when the system asks if you know the city name, and then
press ENT.
2. Enter a city name, and then press ENT.
3. At the Cities Foundscreen, press ENT. The First Street Name input form
appears next.
14
Page 34

JoyRoute™ Navigation for
The Joyride™ system starts calculating a routeand announces “I will begin navigating.“
Setting Destinations
4. Enter the name of the first cross street, and then press ENT.
5. At the Street Foundscreen, press ENT. The second street name input form
appears next.
6. Enter the name of the second street, and then press ENT. If you do not know
the name of the second street, press ENT
7. At the Intersection Foundscreen, press ENT.
8. As prompted, highlight Calculate, and then press ENTto calculate a route to the
destination. (If you only wish to store the address, highlight Store, and then
press ENTto save the destination in the Address Book.)
15
Page 35

JoyRoute™ Navigation for
If you do not know the name of the city in which the address is located—
1.Select “No”when the system asks if you know the city name, and then press
ENT.
What if you
don’t know the
city name?
16
2. Enter the name of the first cross street, and then press ENT.
3. Enter the name of the second street, or if you do not know the name of the
second street press ENT.
4. At the Street Foundscreen, press the, if necessary, to select the correct vari-
ation of the street name, and then press ENT.
5. At the Intersection Foundscreen, press ENT.
6. As prompted, highlight Calculate, and then press ENTto calculate a route to
the destination. (If you only wish to store the address, highlight Store, and
then press ENTto save the destination in the Address Book.)
The Joyride™ system starts calculating a route and announces “I will begin navigating.“
Page 36

JoyRoute™ Navigation for
Setting Destinations
For faster
contact name
searching, say
“Previous” or
“Next”
If the Joyride™
system does not find a corresponding match in the database, the system dis-
plays a “No Matched Cross Road” error message.
Using a Point of Interest (POI)
To set a destination using an entry in the POI database—
Using speech commands—
• From Navigation main screen, press MENU.
• Press to select Points of Interest, then say “Auto PC.”
• Say “Next.” Repeat “Next” to select Airport, Gas Station, Hospital,
Restaurant, Hotel, Parking, Home and so forth.
• Once a POI has been found, use “Next” or “Previous” to scroll through the
list, then say “Calculate” or “Go There.”
“Go There” is a user trained word that is typically trained when the
JoyRoute™ software is installed, or can be trained by accessing the Training
Speech Commands in the JoyRoute™ Settings menu.
Only the closest points of interest(POI) will be listed.
17
Page 37

JoyRoute™ Navigation for
Using the control panel—
1. From the Navigation main screen, press MENU.
POI finds the 40
closest locations,
noting distance
and direction
18
2 Press to choose Enter Destination, and then press ENT.
3. Press to choose Points of Interest(POI), and then press ENT.
4. Press and select the methodyou want to use to locate a useful place.
(Your choices are: POI from Car Position, POI from Destination, POI from
City Name, and POI from Name.)
5. Press ENT(Icons that represent points of interest by category—including
restaurants, gas stations, airports, parking, and more—will appear in the
display.) See Help / Shortcuts.
6. Press to select a category, and then press ENT.
7. Follow the prompts to set a destination to the selected location.
The Joyride™ system starts calculating a route and announces “I will begin navigating.“
Page 38

JoyRoute™ Navigation for
For faster contact
name searching,
say “Previous” or
“Next”
* - Speech training required
Setting Destinations
Using the Address Book
To set a destination using an entry in the Address book—
Using speech commands—
• From the Navigation main screen, say “Auto PC,” “Address Book.”
• Then say, “Locate” followed by the Contact Name, if previously recorded.
You can also say “Previous” or “Next” to advance to the next entry. You
can use “Previous” or “Next” or say “Letter” + a specific letter to go to the
letter matching the contact name in the Address Book.
• To continue, say “Select.”
• Say “Go There*.”
– OR –
• Say “Calculate.”The system sets the selectedaddressas the destination
and the routestarts to calculate.
19
Page 39

JoyRoute™ Navigation for
The Joyride™ system starts calculating a route and announces “I will begin navigating.“
Using a Previous Destination
Using the control panel—
1. Press MENUfrom the map display screen.
2. Press to select Address Book, and then press ENT.
3. Press to select a contactentry, and then press ENT.
4. A contact name displays. Press ENTto display the address. If the address is
not the desired address, press to choose the desired address. Press to
highlight Calculate, and then press ENT.
Shortcut key
“1” lists all
previous destinations.
* - Speech
training
required
20
The Previous Destinations list shows the last 20 recently used destinations.
To set a destination using a Previous Destination—
Using speech commands—
• From the Navigation main screen, say “Auto PC.”
• Say “Previous Destination*.”
Page 40

JoyRoute™ Navigation for Setting Destinations
• Say “Previous” or “Next.”
• Say “Go There.”
– OR –
• Say “Calculate.”
Using the control panel—
1. From the Navigation map display, press MENU.
2. Press to choose Enter Destination, and then press ENT.
3. Press to select Previous Destination, and then press ENT.
4. Press to select a previous destination from the list, highlight Calculate, and
then press ENT.
The Joyride™ system starts calculating a route and announces “I will begin navigating.“
21
Page 41

JoyRoute™ Navigation for
Using a City Center
To set a destination using a city center—
1. From the Navigation main screen, press MENU.
2. Press to choose Enter Destination, and then press ENT.
3. Press to select City Center, and then press ENT.
4. Enter a city namein the edit box, and then press ENTto view a list of city names
that correspond to your entry. Otherwise, press ENTto view a list of cities.
5. When you find the city center destinationyou want to use, press ENT.
6. Highlight Calculate, and then press ENT.
22
The Joyride™ system starts calculating a route and announces “I will begin navigating.“
Page 42

JoyRoute™ Navigation for Setting Destinations
Using Longitude and Latitude
To set a destination using longitude and latitudeinformation—
1. From the Navigation main screen, press MENU.
2. Press to choose Enter Destination, and then press ENT.
3. Press to select Longitude / Latitude, and then press ENT.
The Input Longitude screen appears next.
4. Press to enter the Longitude information in degrees, minutes, and seconds, and then press ENT. The Input Latitude screen appears next.
5. Press to enter the Latitude information in degrees, minutes, and seconds,
and then press ENT.
23
Page 43

JoyRoute™ Navigation for
The Joyride™ system starts calculating a route and announces “I will begin navigating. “
Using Home
6. At the confirmation screen, highlight Calculate, and then press ENTto calculate a
route to the Longitude or Latitude position you entered. If you only wish to store
the address, highlight Store, and then press ENTto save the information in your
Address Book.
To calculate a route Home—
To set up your Home destination, see Inputting Your HomeDestination in Setting
Destinations.
Using speech commands—
• Say “Auto PC.”
• Say “Home.”
24
Page 44

JoyRoute™ Navigation for
Setting Destinations
Using the control panel—
1. From the Navigation main screen, press MENU.
2. Press to select Enter Destination, and then press ENT.
3. Press to select Home.
4. Press ENT.
25
Page 45

JoyRoute™ Navigation for
26
Page 46

JoyRoute™ Navigation for
Navigation Display Modes
4. Navigation Display Modes
You have fourdisplay modeoptions for viewing animated route directions.
•Map mode: Heading-Up
• Map mode: North-Up
•Turn-by-Turn mode
•Freeway mode
Upon setting a destination and calculating a route, the system will display and highlight the
route on the map; the voice guidanceinstructions will tell you how to proceed, how far to
the next turn, where to turn, and what streets on which to turn.
Press “0” to
change mode
views: Map,
Turn-by-Turn or
Freeway mode
As an alternative to the map display, you can press “0” on the keypad to view route information in this sequence: H-Up, N-Up, Turn-By-Turn or Freeway formats.
In Turn-By-Turn or Freeway mode, the system will continue to announce the required
maneuvers. You can also press up or down keys to manually view the maneuvers all the way
to the destination. Press “5”to return to current car position. To go back to the Map display,
press “0” again or change display mode by using the menu options discussed on the next
page.
27
Page 47

JoyRoute™ Navigation for
Map Display Mode Options
Press “*” to Zoom
IN. Press “#” to
Zoom OUT for a
smaller view
Shortcut: Press “0”
to switch between
map display modes
As described below, you can change various settings, to enable other useful information on
the map during a calculated route. The options below are only a few of the several options.
To change the map scale—
Press the “*” or “#” keys on the keypad to set or change the viewing scale or
say “AutoPC” and then “Zoom In” or “Zoom Out.”
—OR—
Press MENUfrom the Navigation main screen. Press to select Map Scale,
and then press to change map scale values within a range of 165 feet to
32 miles.
To change the map display mode—
1. Press MENUfrom the Navigation main screen.
2. Press to select Display, then press to choose either H-Up Map, N-Up
Map, Turn-by-Turnor Freewaymode.
In Heading-Up mode, the current location indicator will point to the top of the display. In
North-Up mode, the map will always have North-UP on top. The car icon will not necessarily point north all the time. The current locationindicator will point North.
28
Page 48

JoyRoute™ Navigation for
Navigation Display Modes
To change the map color—
1. Press MENUfrom the Navigation main screen, Press to select Display
Settings, then press ENT.
Shortcut: Press “4”
to switch display
from Day to Night
2. Press again to select Display Settingsthen press to set Map Colorto Auto,
Dayor Night.
3. If you set the Map Color(Auto, Dayor Night) to Auto, Daymode will remain
until you turn on the driving lights. At this time Night mode will be active.
4. To change the default display mode, select Settings,then select the appropriate
option.
To view or hide the road nameturn-by-turn display—
1. Press to select Settings, then press ENT.
2. Press to select Display Settings, then press ENT. Press again to select, then
press to set Road Name: Onor Off.
29
Page 49

JoyRoute™ Navigation for
To view or hide the arrival timein the map display—
1. Press to select Settings, and then press ENT.
2. Press to select Display Settings.
3. Press to select Arrival Time, then press to set time On or Off.
Tracing your Route
To manage the trace displayoption—
1. Press to select Settings, and then press ENT.
2. Press to select Display Settings, andthen press ENT.
3. Press to select Traces Display, and then press ENT.
4. Press to set Traces Display Onor Off.
30
If the Traces Displayoption is enabled (On), the Map will track your progress for a total distance of 500 miles using an alternate highlight or tracking icon. The Trace Display menu
options allow you to turn this feature on or off as well as to delete current traces.
Page 50

JoyRoute™ Navigation for
Navigation Display Modes
Turn-By-Turn Mode
In Turn-By-Turnmode, you view pictogramsof the next maneuver (turn) and the distance to
the next turn or exit. See Quick Views. The guidance voice announces the road name to turn
on and the estimated time of arrival.
To preview a calculated route from the Turn-By-Turn screen—
Using speech commands—
• Say “Auto PC.”
• Say “Next” or “Previous” (next or previous sequential, calculated maneuver).
Using the control panel—
1. Press to toggle between “Next” and “Previous” calculated maneuver.
2. Press the “5”key on the keypad to return to the current position.
To hear the estimated time of arrival—
• Say “Auto PC.”
• Say “Arrival.”
31
Page 51

JoyRoute™ Navigation for
32
Page 52

JoyRoute™ Navigation for
Other Navigation Options
5. Other Navigation Options
Recalculating a Route
Shortcut: Press
“3” to re-calculate a route
Navigation automatically re-calculates the route when the driver deviates more than 50 yards
from the originally calculated route.
To manually re-calculatea route—
Press the “3”key on the keypad.
Calculating an Alternate Route
The Detour option allows you to calculate a different route from an existing calculated route.
To calculatean alternate route—
1. Choose Detour, and then press ENT.
2.Press the keys to select a distance option by which you want to vary
the route, and then press ENT.
3. Navigation calculates a new route and returns to the map or Turn-by-Turn
display.
33
Page 53

JoyRoute™ Navigation for
4. You can also use “Detour” speech command to calculate a new route.
When you select Detour, the Detourindicator appears in the Map Display.
Storing Current Destination Information
For ready reference and input, you can store your current car locationin the Joyride™ system
Address Bookusing the Save Current Positionoption.
To save your current positionin the Address Book—
Press and hold ENTfor 1second.
– OR –
1. From the Navigation main screen, press MENU.
34
2. Press to select Save Current Position, and then press ENT.
3. Press to highlight New (contact in Address Book) or Overwrite(existing
contact in Address Book), then press ENTto confirm your selection.
Page 54

JoyRoute™ Navigation for
Other Navigation Options
You can also save any address you select as a destination to Address Book by highlighting
the Store button, and then pressing Enter.
Clearing Route Information
To clear the current route using the control panel—
1. From the Navigation main screen, press MENU.
2. Press to select Clear Route, and then press ENT.
35
Page 55

JoyRoute™ Navigation for
36
Page 56

JoyRoute™ Navigation for
6. Setting Preferences
Options in the Settings menu allow you to customize system settings and visual preferences
you want to see and aid you while driving.
From the Settings menu, you can modify route calculation criteria, change display settings,
preview a route using the Demo Mode, change the voice scheme, check sensors, input home
destination information, and view information about the program. These options are explained
in further detail below.
Setting Route Preferences
The Route Preferencesoption in the Settings menu allows you to set route calculation criteria,
and decide whether the calculation should include or exclude motorways, toll roads, or ferries.
Setting Preferences
To set route calculation criteria—
1. Press MENUat the startup screen.
2. Press to select Settings, and then press ENT.
3. Press to select Route Preference, and then press ENT.
37
Page 57

JoyRoute™ Navigation for
4. Press to choose a setting, and then press ENT. Your choices here are: Fastest
or Shortest. (“Fastest” means the program will calculateroutes based on
speed limits. “Shortest” means the program will calculate routes based on distance.) Most of these settings are recommendations only. The “fastest” may
not appear to be fast.
5. When you are finished, press BACKrepeatedly to return to the map display.
To include or exclude road types—
1. Press MENUat the map display screen.
2. Press to select Settings, and then press ENT.
3. Press to select Route Preference, and then press ENT.
38
4. Press to choose a usage type, and then press ENT.
5. As prompted, select “Yes” to include the usage type in the calculation, or
“No” to exclude it.
Page 58

JoyRoute™ Navigation for
Setting Display Options
Setting Preferences
6. When you are finished, press BACKrepeatedly to return to the map display
screen.
To modify display settings—
1. Press MENUat the map display screen.
2. Press to select Settings, and then press ENT.
3. Press to select Display Settings, and then press ENT.
4. Press to select the display items you want to show or hide. (Your choices
are Map Color, Road Name, Arrival Time, Traces Display, andFreeway
Auto-Pop Up).
5. Press and choose Onor Offto view or hide the selected display item.
39
Page 59

JoyRoute™ Navigation for
6. When you are finished, press BACKrepeatedly to return to the map
display screen.
Moving the Car Position
The Move Car Positionoption allows you to calculate a destination by selecting an
address stored in the Address Book database. The car is then moved to that address.
You cannot activate Demo Mode or Move Car Position while the car is moving.
To move the car position—
1. From the Navigation main screen, press MENU.
2. Press to select Settings, and then press ENT.
3.Press to select Move Car Position, and then press ENT. The
Address Book list appears next.
4. From Address Book, select an address, highlight the Movetab, and
then press ENT.
40
Page 60

JoyRoute™ Navigation for
Demo Mode
The Demo option allows you to preview a route guidance calculation. When Demo Modeis turned
on the Joyride™ system simulates the vehicle traveling along the route that you have calculated for
demonstration purposes.
Setting Preferences
To use Demo mode—
1.Calculate a route to a destination (see Setting Destinationsin this chapter).
2. Press MENUat the map display screen.
3. Press to select Settings, and then press ENT.
4. Press to select Demo Mode.
5. Press to turn Demo Mode Onor Off.
6. Press BACK.
Demo Mode demonstrates the route using the current destination. The system continues to repeat the
demonstration until you turn Demo Mode off. If you have not entered a destination when you turn
41
Page 61

JoyRoute™ Navigation for
Demo Modeon, the system will display an error message. In Demo mode, the screen displays a
blinking Demo indicator.
When Demo Mode is on, note that you cannot do the following—
The system will prompt you to cancel Demo Mode if you attempt any of these operations.
GPSwill detect the current car positionafter exiting Demo mode. You can also simulate car
speed in Demo mode by inputting a virtual car speed.
• Move the car position
• Enter a destination
• Save the current position
• Return to the current position
To change the virtual car speedassociated with Demo Mode—
1. Press MENUat the map display screen.
2. Press to select Settings, and then press ENT.
42
3. Press to select Virtual Car Speed.
4. Press to select: 20miles (30 km), 50miles (60 km) or 70miles (100 km).
Page 62

JoyRoute™ Navigation for
Setting Preferences
Selecting a Voice Scheme
You can set the number of times Voice Guidance announces an upcoming maneuver.
To select a voice scheme—
1. From the Navigation main screen, press MENU.
2. Press to select Settings, and then press ENT.
3. Press to select Guidance Settings, and then press ENT.
4. Press to select Voice Scheme.
5. Press to change the setting to 2 Timesor 3 Times.
6. Press BACKrepeatedly until the main program appears.
If the system detects speed pulse(signal) or GPS, the car position will move back to the
current position.
43
Page 63

JoyRoute™ Navigation for
Setting Voice Guide Type
You can choose to listen to route instructions produced by pre-recorded wave files, hear a
combination of wavefiles and TTSfor road names shown in text on the map, or choose to
have the TTS speech engine read text-based road names only.
To select the voice guide type—
1. From the Navigation main screen, press MENU.
2. Press to select Settings, and then press ENT.
3. Press to select Guidance Settings, and then press ENT.
4. If necessary, press to select Voice Guide.
5. Press to select the type: Wave, Wave + TTSor TTS.
Checking Sensors
44
You can check the status of various GPS settings, including the number and location of GPS
satellites, car speed, gyroscopedirection, and validity of USB connections. At any time, press
BACK to return to the previous menu.
Page 64

JoyRoute™ Navigation for Setting Preferences
To check sensors and view the status of GPS-related equipment—
1. Press MENUat the map display screen.
2. Press to select Settings, and then press ENT.
3. Press to select Check Sensors, and then press ENT.
4. Press to scroll through the following information screens: Positioning, Check
GPS, Check Speed, Check Gyro, and Check Connection(networks).
5.To set the GPS signal for vehicle Positioning, press to select GPS + gyro +
speed pulseor GPSOnly.
6. GPS only mode can be used for cars that do not have the speed pulse signal
hooked up to the car.
45
Page 65

JoyRoute™ Navigation for
Inputting Your Home Destination
Note: Your must
first input Home
to Address Book
To quickly calculate a route home, you can pre-program a home address as a destination.
GPS must first detect your current car position.
Setting a Home destination
To set the Homedestination —
1. Press MENUat the map display screen.
2. Press to select Settings, and then press ENT.
3. Press to select Input Home, and then press ENT. Address book is
launched and a contact or list of contacts display.
4. Press to scroll through the list of contacts, and then press ENTto
select a contact.
46
Page 66

JoyRoute™ Navigation for
Setting Preferences
5. Press to highlight Set To Home, and then press ENT.A “Set to
Home” confirmation displays with an announcement. (To see Details
only press .)
6. Press BACKto return to Navigation.
Alternatively you can enter a destination using the Enter Destination, Street Address
option menu and “Store” the address in Address Book. Now when you attempt to find the
Home Address for setting “Home” it will already be in the Address Book.
A confirmation message box will appear momentarily to confirm your selection. Your
Home destination will now appear in the Address Book.Note that the Home destination
in Address Book is distinguished from other entries by the Home icon.
Once you set your Homedestination, you can use the “Home” speech command to
quickly calculate a route home. You can also highlight and select Calculate in Address
Book to start a calculated route.
47
Page 67

JoyRoute™ Navigation for
Training Speech Commands
The first time you install Navigation, the system may prompt you to train new custom speech
commands so that you can safely issue “hands free”Navigation commands.
To train speech commandsduring initial installation—
1. When prompted to train a word (i.e., Turn-by-Turn, Airport, Go There,
Previous Destination, Gas Station, Arrival, Hospital, or Display Map) press
ENT.
2. Wait for the prompting tone( ).
3.Yellow progress barsstart filling the first box. When the first progress bar
lights up, say the command word that appears in the upper left corner.
4. As promptedby the second and third progress bars, repeat the word two
more times.
A confirmation screen will appear when you have successfully trained a word. After a brief
pause, the next word will appear. Repeat the steps above for each new word.
48
Page 68

JoyRoute™ Navigation for
Setting Preferences
Viewing Information About the Program
To view program copyrightand software versioninformation—
1. Press MENUat the map display.
2. Press to select Settings, and then press ENT.
3. Select About Navigation, and then press ENT.
4. Press to view program information. (Provide this information when
calling for technical support.) The screen displays program version,
local language, copyright, database, and navigation engine information.
5.When you are finished, press BACKrepeatedly to return to the map dis-
play.
49
Page 69

JoyRoute™ Navigation for
FAQs and Troubleshooting
Q: Why does it take time for the navigation to work when it is first selected?
A: When the navigation application is launched it will take approximately 2 minutes for initial-
Q: Why do I see a different location on the map when the navigation is selected?
A: EachNavtech DCA map has a default location that is shown until the GPS is initialized. This
Q: How do I confirm the GPS is working properly?
A: By reviewing the Settings menu, GPS information, you can confirm the number of satellites
Q: Why is there no navigation display?
A: With ACC on, confirm the navigation application has been installed by viewing the
ization. Also, the navigation may require time for calibration. The user may need to drive for
about 1/2 hour to complete the calibration. This will only be required the first time the system is launched or after the program is reinstalled.
should take only a few moments or it will correct itself when the car is moving. If the current
location does not match the map, an ACC cycle or warm boot may be required.
the system is acquiring. If your GPS antenna is not located in a clear area or if you are under
a bridge or between tall buildings, no satellite may be seen. Move the car to a location
where there are no obstructions or move the GPS antenna to a better location.
Navigation menu from the shell menu. Confirm the Navtech CD or DVD is installed properly
and not upside down. Be sure the application has been launched.
50
Page 70

JoyRoute™ Navigation for FQA & Troubleshooting
Q: Why does night mode not work?
A: Confirm that the display mode color is set to Auto and confirm illuminator is con-
nected correctly (dealer may be required).
Q: If everything was installed and all wiring has been confirmed and the system does
not seem to work properly what can I do?
A: First try to turn the ignition (ACC cycle) OFF and ON. If problems still exists perform
a warm boot reset by using a ball point pen and pushing gently in on the faceplate
left side above and to the left of the volume knob. This will reset all software drivers.
51
Page 71

JoyRoute™ Navigation for
Glossary
Dead Reckoning - See GPS / Dead Reckoning Module.
DOP- Dilution of Precision. A collection of GPS data: factors like relative positions of satellites in
the sky, latitude and longitude, car location and time of day, that pinpoint an accurate destination
point.
Freeway Auto-Pop- Freeway mode automatically “pops up” when entering a freeway while following
a calculated route.
GPS- Global Positioning System that utilizes a network of satellites to pinpoint your position anywhere in the world.
GPS / Dead ReckoningModule- A Joyride™ system USB Navigation unit UDR12 attached to the
Joyride™ system source unit and required for receiving GPS satellite signals, gyro direction and vehicle speed pulse (signal) inputs for accurate car positioning.
GSM - Global System for Mobile communications standard. An international standard for digital,
wireless communication. The Joyride™ system interacts with GSM mobile phones.
Freeway Mode- A navigation display mode where upcoming freeway and street exits are viewed
during a calculated route.
52
Page 72

JoyRoute™ Navigation for Glossary
H-Up
Heading-Up - The default map orientation that reflects the direction in which the vehicle is moving
during a calculated route. See N-Up.
N-Up
North-Up -Map points North Up. Car icon moves in direction of travel.
Move Car Position- A method of setting a destination by accessing an address from Address Book.
POI- Point of Interest. A method of defining a destination using a Point of Interest (POI). POIs
include gas stations, airports, hotels and restaurants.The POI of choice can be speech-trained.
TTS
The Text-to-Speech engine used by the Joyride™ system to announce on-screen text information, e.g.,
road names, distance to destination and estimated arrival time shown on a map.
Turn-by-Turn
A navigation display mode selectable by the user that provides speech assistance during car maneuvers (from street to street or freeway to freeway) to assist a driver in reaching a destination. See
Freeway Mode.
Voice Tag- a trained speech recording assigned to a contact name and placed into Address Book.
Used to locate a contact by issuing a speech command.
Wave file- The pre-recorded, speaking voice you hear that makes route announcements: e.g., used
by the Joyride™ system, to issue the Turn-by-Turn voice guidance directions during a calculated route
to a destination.
53
Page 73

JoyRoute™ Navigation for
© Copyright Clarion Co., Ltd 2000 - 2001
Clarion Joyride™ Navigation Owner’s Manual
Part Number NAVIMAN100
54
 Loading...