

Page 1
Owner's
Mode
Manual de instrucciones
manual
d'emploi
&
Installation manual
et
manuel
d'installation
y
de
instalaci6n
CZ202
CD/USB/MP3/WMA RECEIVER
LECTEUR
RECEPTOR CD/USB/MP3/WMA
CD/USB/~JIP3/WMA
Page 2
CLARION
Dear Customer:
Congratulations
that you'll enjoy your Clarion experience.
There are many benefits to registering your product.
www.clarlon.com to register your Clarion product.
We
have made product registration simple with our easy to use website. The registration form
is short and easy to complete. Once you're registered,
product information.
Register at www.clarion.com- it's easy to keep your Clarion product up to date.
INFORMATIONS
Cher client:
Nous vous remercions d'avoir achete ce produit electronique mobile Clarion. Nous sommes
confiants que vous apprecierez votre experience Clarion.
II
y a beaucoup d'avantage a enregistrer votre produits. Nous vous invitons a visiter notre site
Web www.clarion.com pour enregistrer votre produit Clarion.
Nous avons facilite
Le
formulaire d'enregistrement est court et facile a completer. Lorsque vous etes enregistrer,
nous pouvons vous tenir informe des informations important de produits.
Enregistrer
a www.clarion.com- c'est facile de mettre a jour votre produit Clarion.
INFORMACION
Querido Cliente:
Felicitaciones por
usted gozara de
Hay muchas ventajas
www.clarion.com para registrar
Hemos hecho
de completar. Una vez que lo registre, podremos proporcionarle
Registrese
el
en
www.clarion.com -
PRODUCT REGISTRATION
For
USA
and
www.clarjon.com
on
your purchase of a Clarion mobile electronic products.
DE
L'ENREGISTREMENTDE
Pour les Etas Unis
Ia
tache d'enregistrement de produit simple et facile grace a notre site Web.
DEL
su
compra de producto electr6nico m6vil de Clarion. Estamos seguros que
su
experiencia con
al
registrar su producto.
registro de prod.Jcto facil
www.clarjon.com
REGISTRO
Para
USA
www.clarion.com
el
producto de Clarion.
su
producto de Clarion.
es
facil mantener
Canada
We
we
et
le Canada seulement
DE
PRODUCTO
y
Canada
Le
invitamos a que visite nuestro sitio
en
ruestro sitio. La forma de registro
su
producto de Clarion actualizado.
INFORMATION
only
We
are confident
invite you to visit our website
can keep you informed of important
nomas
PRODUITS
Ia
informacion de
CLARION
DE
CLARION
es
at
en
internet
corta y facil
su
producto.
Contents
Thank
you for purchasing this Clarion product.
• Please fully read this owner's manual before operating this equipment.
• Check
the
contents of the enclosed warranty
1.
FEATURES ....................................................................................................................... 2
2.
PRECAUTIONS ................................................................................................................ 2
Front
Panel/
USB Port ........................................................................................................................ 3
Remove
Attach the DCP .............................................................................................................. 3
3.
CONTROLS ...................................................................................................................... 4
Operational Panel ............................................................
Names
Remote Control (RCX001) ..........
Notes
4.
CAUTIONS
Handling Discs ............................................................................................................... 5
5.
OPERATIONS ................................................................................................................... 5
Basic Operations ............................................................................................................ 5
System Setup .........................................................................................
Audio Setup .....................................................
Radio Operations ........................
CD/MP3/WMA
USB Operations ............................................................................................................. 8
iPod
AUX Operations ............................................................................................................. 9
6.
TROUBLE SHOOTING ................................................................................................... 10
7.
ERROR DISPLAYS .........................................................................................................
8.
SPECIFICATIONS ..........................................................................................................
9.
INSTALLATION I WIRE CONNECTION GUIDE ............................................................ 12
Generalities .............................................................................................. 3
the DCP ........................................................................... ................................ 3
of Buttons ...................
of
remote control using ........................................................................................ 4
ON
HANDLING ............................................................................................. 5
Operations ..........
& iPhone Operations .............................................................................................. 8
...
......
...
................
...
card
and
store
...
........................ .
.....................................
...........................................
......
...
........................
... ~ ............
...........
..............................
...................
it
in a safe
/.
............................................ 4
.......
place with this manual.
.......
...............
..........................
............................ 7
.......
..
...................... 6
...
......
......
.......
.......
.......... 4
.......... 6
...... 4
: ...... 6
11
11
CZ202
Page 3
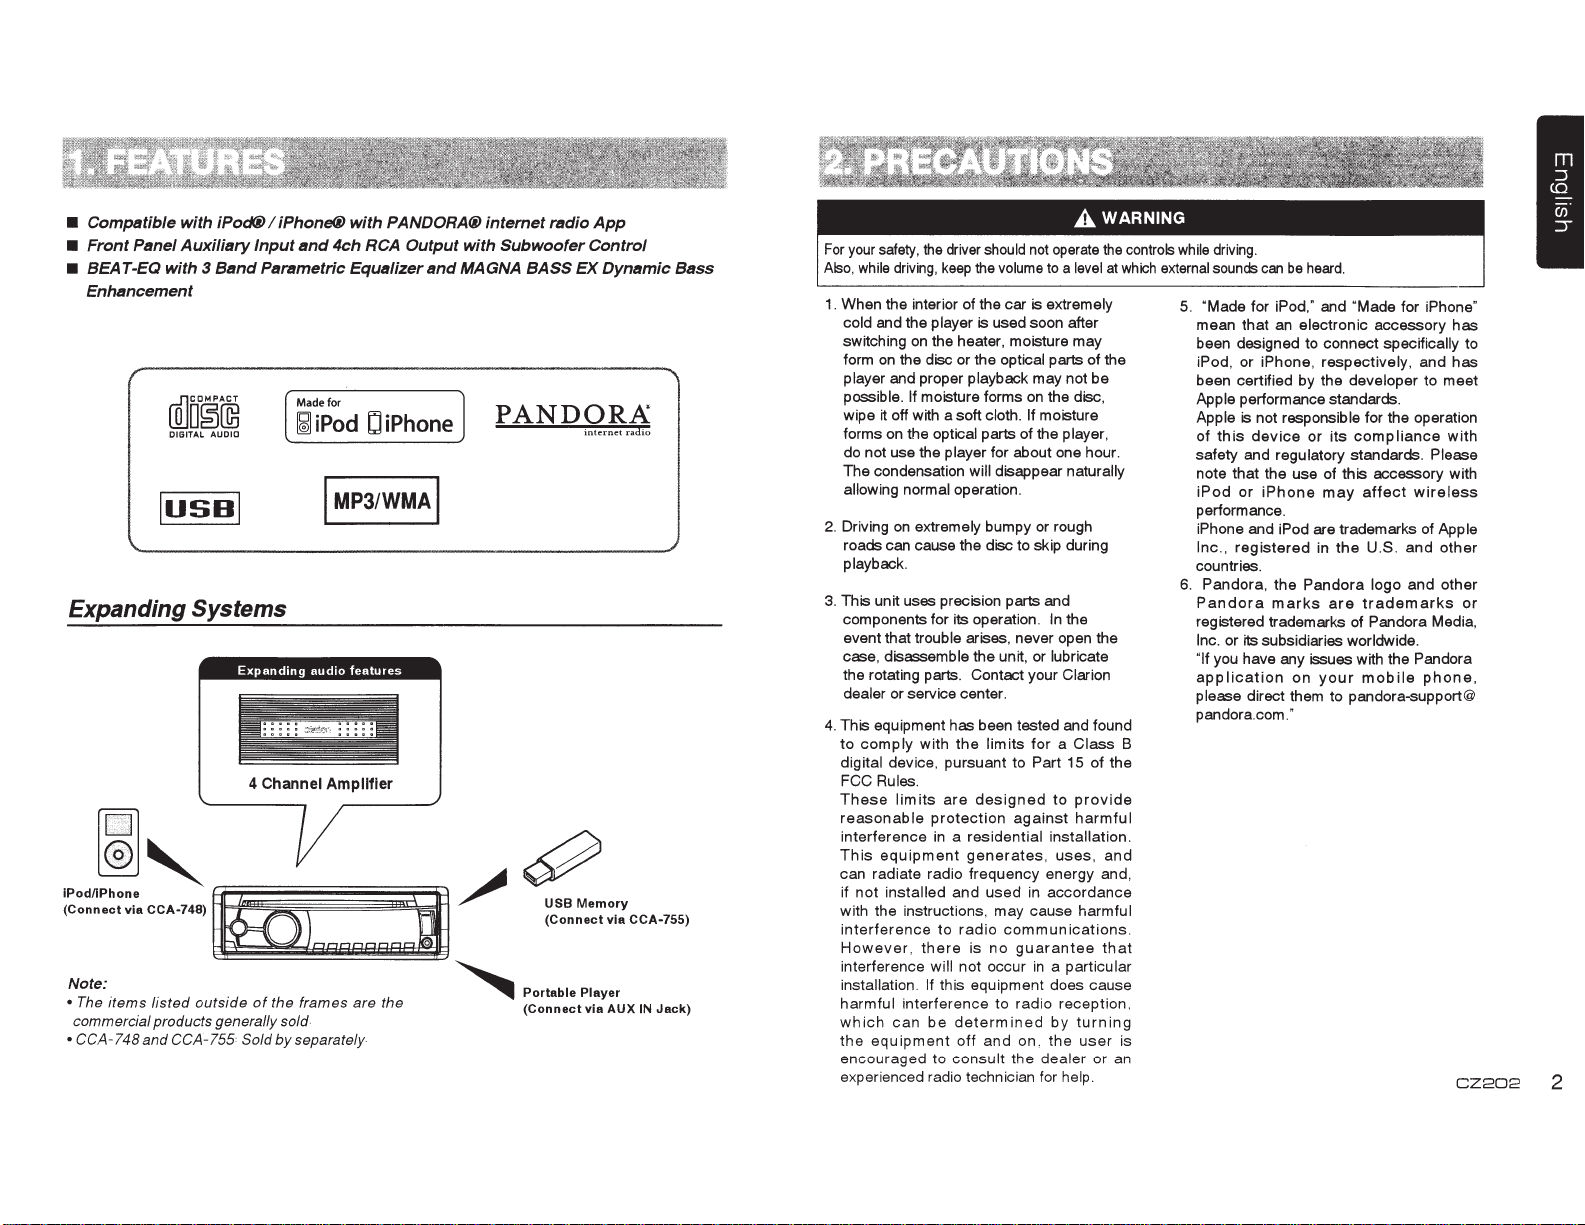
• Compatible with iPod(i) I iPhone®
•
Front
Panel
Auxiliary
• BEAT-EQ with 3
Enhancement
WJm~~
DIGITAL
I
usn
Input
Band
Parametric Equalizer
AUDIO
I
with
PANDORA@ internet radio
and
4ch RCA
Made for
~
iPod C iPhone
I
MP3/WMAI
Output
with
and
MAGNA BASS EX
App
Subwoofer
PANDORA
Control
Dynamic
internet
radio
Expanding Systems
Expanding
4 Channel
I,
~~:~~~:;:~
Note:
• The
commercial products generally sold
• CCA-748
items
CCA-748)
listed
outside
and
CCA-755 Sold
e
audio
features
Amplifier
LQRPPQ:i
of
the frames
by
are
separately
the
~
~
~
~c·:.:.:7:;:
Portable
(Connect
Player
via
CCA-755)
AUXIN
Jack)
Bass
For
your
safety,
the
Also,
while
1.
When the interior of the car is extremely
cold and the player is used soon after
switching
form on the disc or the optical parts of the
player and proper playback may not be
possible.
wipe it off with a soft cloth.
forms on the optical parts of the player,
do not use the player for about one hour.
The condensation
allowing
2. Driving
roads can cause the disc to skip during
playback.
3.
This unit uses precision parts and
components for its operation.
event that trouble arises, never open the
case, disassemble the unit, or lubricate
the rotating parts. Contact your Clarion
dealer or service center.
4. This equipment has been tested and found
to
comply
digital device, pursuant to Part 15 of the
FCC Rules.
These
reasonable
interference
This
equipment
can radiate radio frequency energy and,
if
not
installed
with the instructions,
interference
However,
interference will not occur
installation.
harmful
which
the
equipment
encouraged
experienced radio technician for help.
driver should not
driving,
keep
the
on
the heater, moisture may
If moisture forms on the disc,
normal operation.
on
lim
interference
can
will disappear naturally
extremely bumpy or rough
with
the
limits
its
are
designed
protection
in a residential
generates,
and
used
to
radio
there
is
no
If this equipment does cause
be
determined
off
and
to
consult
operate
volume
to a level
If moisture
In
the
for a Class
to
against
may
communications.
to
the
provide
harmful
installation.
uses,
in
accordance
cause harmful
guarantee
in
a particular
radio
reception,
by
turning
on.
the
user
dealer
or an
the
at
and
that
controls
which
B
is
while
driving.
external
sounds
can
be
heard.
5.
"Made for iPod," and "Made for iPhone"
mean that an electronic accessory
been designed to connect specifically to
iPod, or iPhone, respectively, and
been certified by the developer to
Apple performance standards.
Apple is not responsible for the operation
of
this
device
or
its
may
in
the
Pandora
are
your
compliance
affect
U.S.
logo
trademarks
mobile
safety and regulatory standards. Please
note that the use of this accessory with
iPod
or
performance.
iPhone and iPod are trademarks of Apple
Inc.,
countries.
6. Pandora,
Pandora
registered trademarks of Pandora Media,
Inc. or
"If you have any issues with the Pandora
application
please direct them to pandora-support@
pandora.com."
iPhone
registered
the
marks
its subsidiaries worldwide.
on
meet
wireless
and
other
and
other
phone,
has
has
with
or
CZ202
2
Page 4
87.9-107.9MHz
FM
FDLLOIMNG
Kens.
011
Clatloo
max
CONOrTIONS
TWO
.
t-ASLGP
tom
CZ202
GROUNO:o=15A
12V 9
530-1710kHZ
AM
THISOE\.ICEC0t.tPLIESIMTHPARTI50FTHEFCCRULES
OPERATION
I)THISOE\.1CEMI'YNOTC.AUSE~FULINTERFERENCE.~D
(
(2)THISOE\ACEMUSTACCEPT.MIYIHTERFERENCERECEJ'va)
INClliOINGIN'TERFERENCETHATMAYCAUSEUNOESIREO
OPERATlON
THISOE\ACE COMPUESWITHOHHSRULES21 CFRCI-WTERI
SUBCHAPTERJNPLICABLEATnATEOFM,.QIIIUFACTURE
llisfRdud:II'ICIIulhsac::hlologyo•r..dbyMcrosotCorpontion.nd
1M
c.annot
CLARIONCO
2.SHfNTOSHIN
7-
MN<UFI'CTUREO
THE
TO
SUBJECT
IS
•iltlot&
distritMAed
or
uud
LTO
.,
CHUQ.KU.SAITJtrdA.SHl.SNTAr.l4KEH.J.Y.AH
.
URF
·
body
Cleaning
Use a soft, dry
•
the
cloth
and
gently
any dirt or dust.
some
For tough dirt,
•
detergent
wipe off the dirt
with a dry
Do not use benzene, thinner, car
•
apply
diluted
cloth.
water to a soft
in
then wipe again
gently,
etc., as these substances may
the body or cause the paint to
leaving
rubber or
plastic products
contact with the body for
time may cause stains.
neutral
long
wipe off
cloth.
cleaner,
damage
peel. Also,
in
periods of
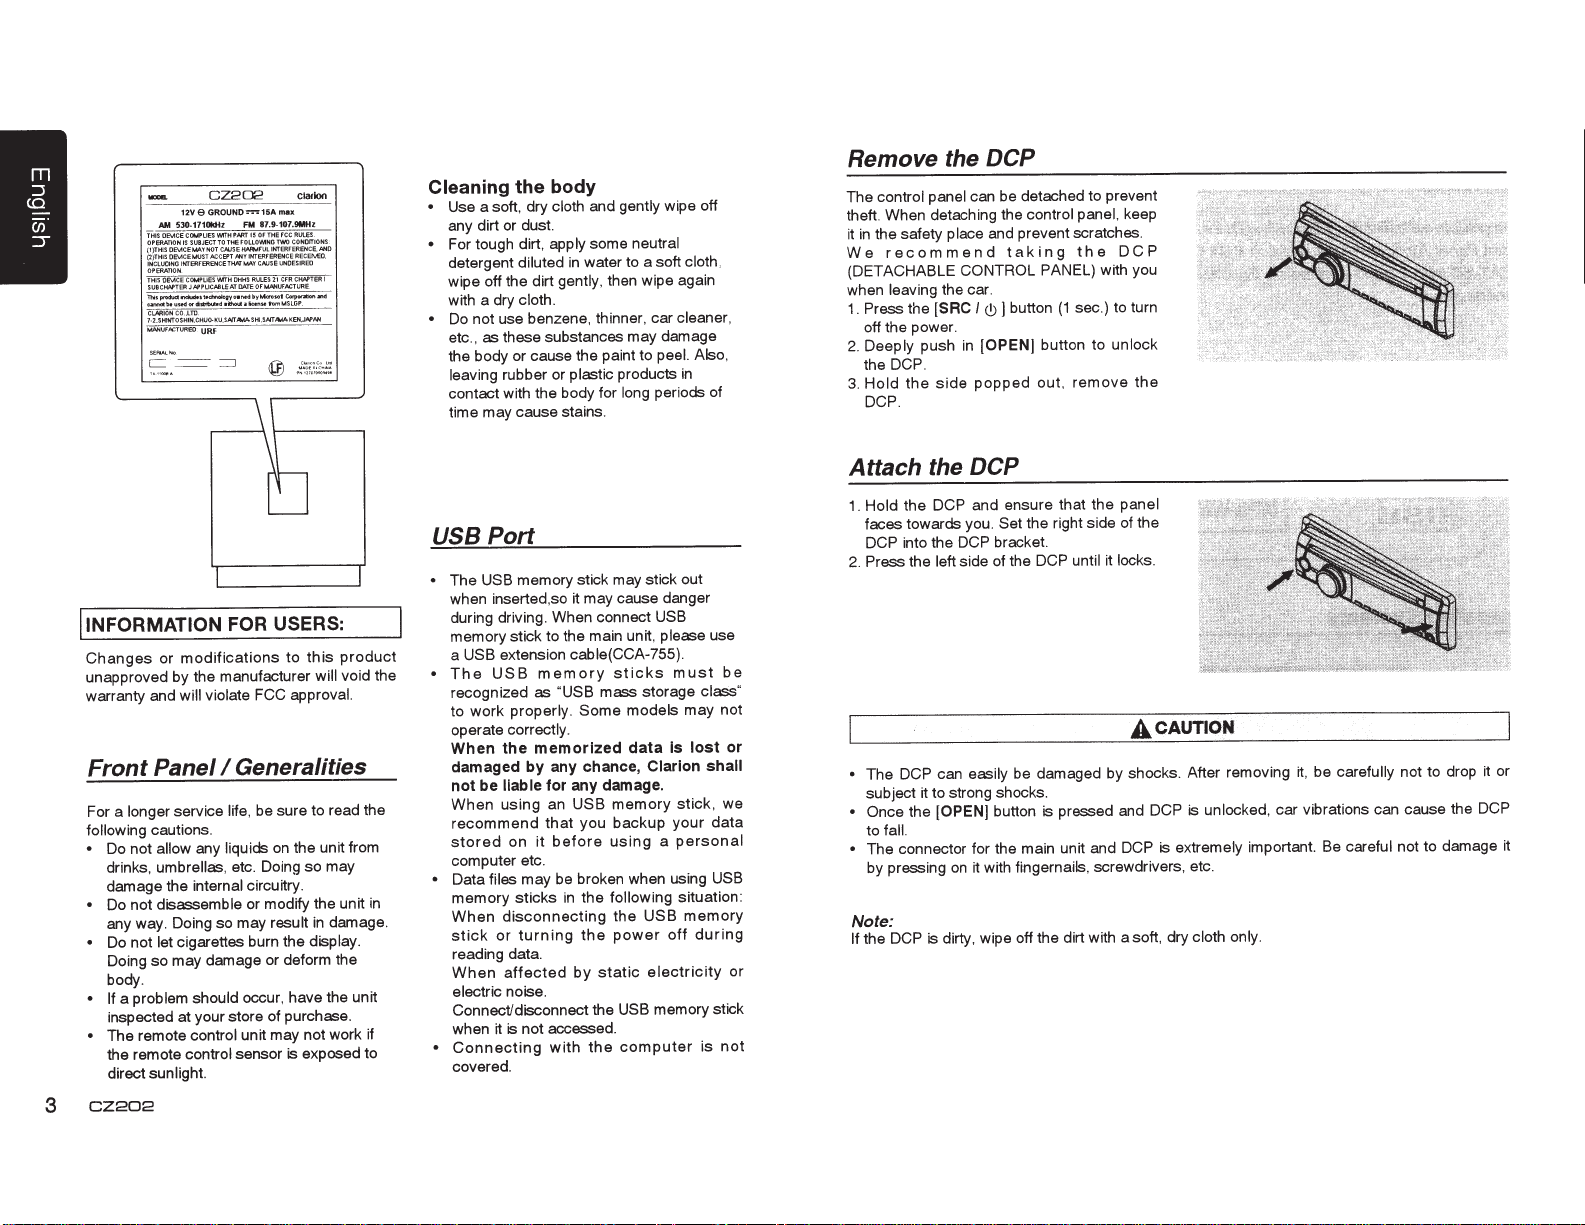
Remove the
control panel
The
DCP
can be detached to prevent
theft. When detaching the
the safety place
in
it
recommend
We
(DETACHABLE
leaving
when
1. Press the
and prevent scratches.
taking
CONTROL
the car.
I(!)]
[SAC
off the power.
[OPEN] button to
in
push
Deeply
2.
the DCP.
popped
side
the
Hold
3.
DCP.
control panel,
the
PANEL) with you
sec.) to turn
(1
button
remove
out,
keep
DCP
unlock
the
INFORMATION
I
modifications
Changes
or
unapproved by the manufacturer
Panel
longer
cautions.
allow any
umbrellas,
will violate
service
internal
warranty and
Front
For a
following
Do not
•
drinks,
damage the
Do not disassemble
•
any way. Doing so may
Do not let
•
Doing
cigarettes burn the display.
may damage or deform the
so
body.
problem should
a
• If
inspected at your store of purchase.
The remote
•
the remote
control
control
direct sunlight.
CZ202
3
USERS:
FOR
this
to
will
approval.
FCC
Generalities
I
be sure to read the
life,
the unit from
on
liquids
etc_ Doing
so
may
circuitry.
or modify the unit
damage.
in
result
occur, have the unit
unit may not work if
sensor is exposed to
product
void the
in
Port
USB
The USB
•
memory stick may stick out
when inserted,so it may cause danger
during driving. When connect
USB
memory stick to the main unit,
USB extension cable(CCA-755).
a
USB
The
•
recognized as
to work
operate
When
damaged
be
not
When
recommend
stored
memory
properly. Some models may not
correctly.
memorized
the
any chance,
by
for any damage.
liable
an
using
that
before
it
on
sticks
"USB mass
memory
USB
backup
you
using
storage
data
Clarion
a
computer etc.
•
memory
When
stick
sticks
disconnecting
turning
or
the following
in
the
power
the
USB
may be broken when using
files
Data
reading data.
When
affected
by
electricity
static
electric noise.
memory stick
Connect/disconnect the
USB
when it is not accessed.
Connecting
•
with
computer
the
covered.
please
must
lost
is
stick,
your
personal
situation:
memory
during
off
use
be
class"
or
shall
we
data
USB
or
not
is
Attach
Hold
1.
faces towards you.
the DCP
the DCP and ensure
the right side of the
Set
that
the
panel
DCP into the DCP bracket.
locks.
Press the
2.
The_
•
subject
side of the DCP until
left
easily
can
DC_P
to strong shocks.
1t
be damaged by shocks. After removing
it
CAUTION
A
• Once the [OPEN] button is pressed and DCP is
fall.
to
con~ector
The
•
by pressing
on
unit and DCP is
_main
~he
!or
fingernails, screwdrivers, etc .
With
1t
extremely
Note:
dirty, wipe off the dirt with a soft, dry
the DCP
If
is
unlocked,
cloth only.
be carefully not to drop
it,
car vibrations can cause the DCP
not to damage it
careful
important.
Be
or
it
Page 5
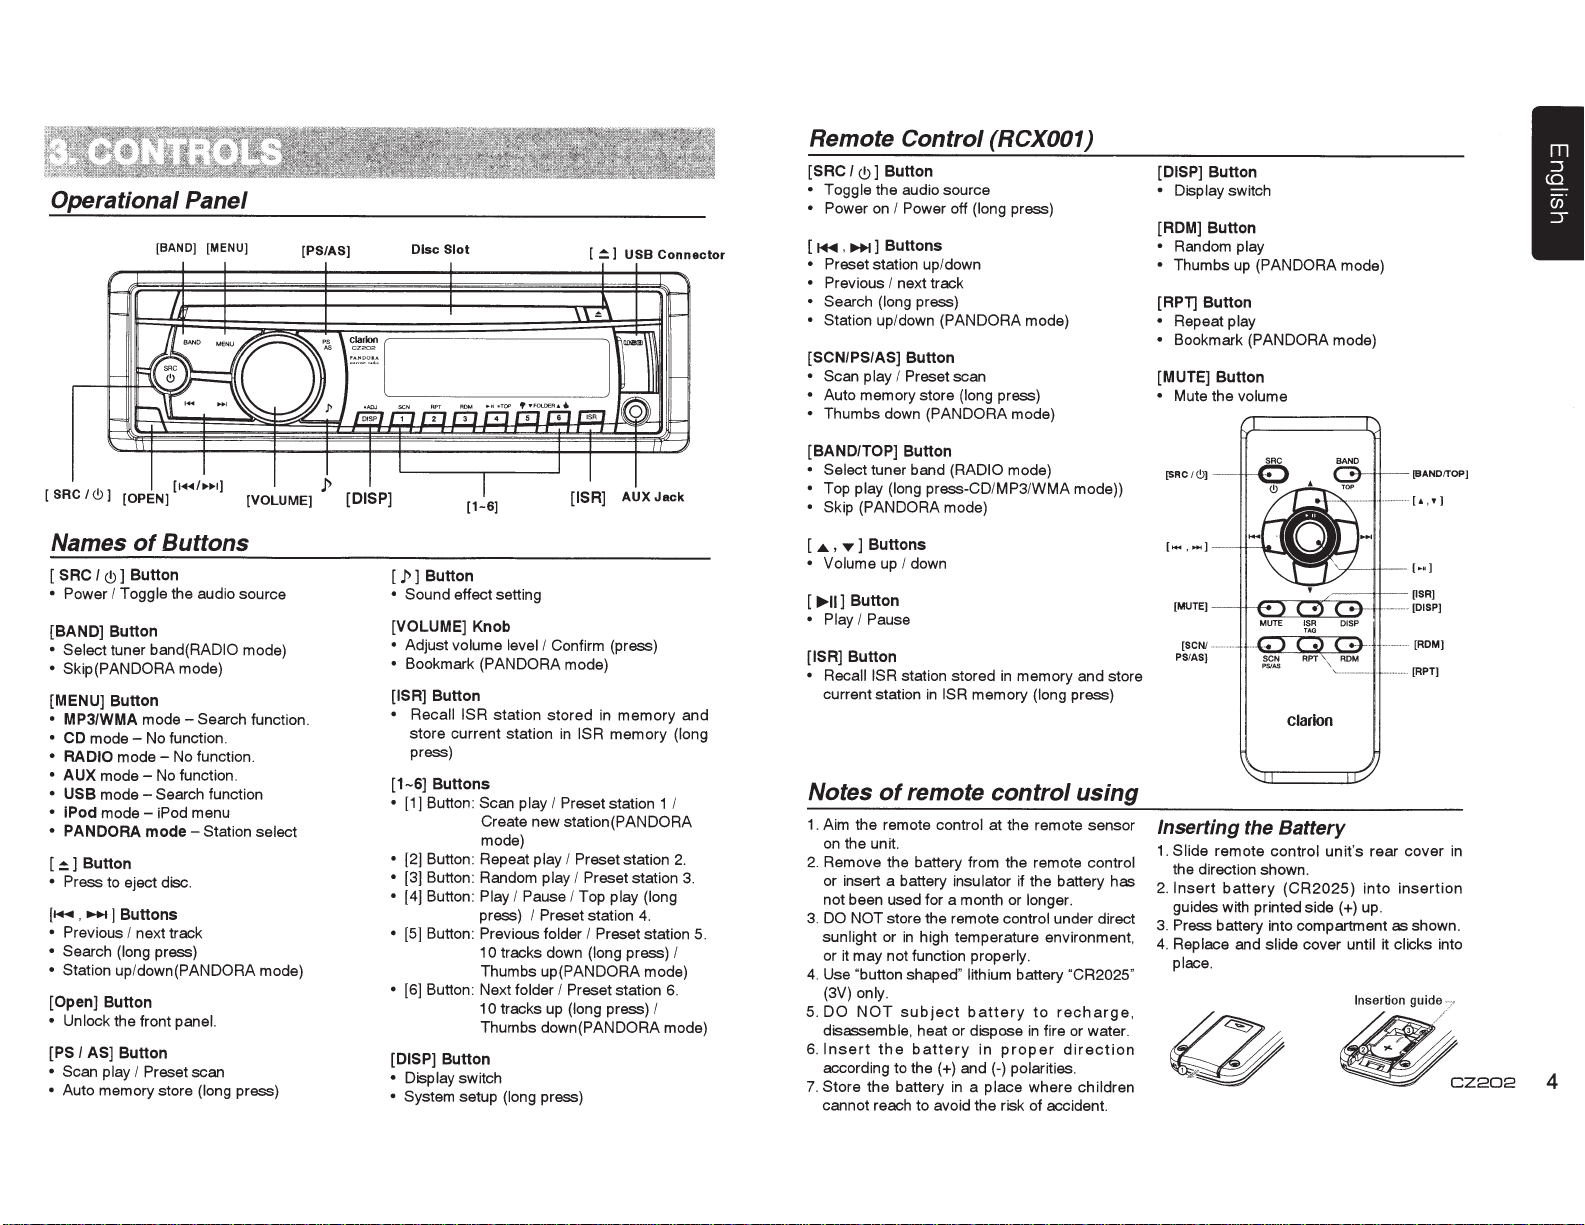
Operational Panel
[BAND] [MENU]
[PS/AS)
Disc
Slot
Remote
[SAC I<!)]
• Toggle
• Power
[
1+11
[
~
1
USB
Connector
,
• Preset
• Previous
•
Search
Station up/down
[SCN/PS/AS]
•
Scan play
•
Auto memory store
•
Thumbs down
Control
Button
the audio source
on
I
Power
lll+l
]
Buttons
station up/down
I
next track
(long
press)
Button
I
Preset
(PANDORA
(RCX001)
off
(long
(PANDORA
scan
(long
press)
press)
mode)
mode)
[DISP]
Button
• Display
[ROM]
•
• Thumbs up
[APT]
•
• Bookmark
[MUTE]
• Mute the volume
Button
Random
Button
Repeat
Button
switch
play
(PANDORA
play
(PANDORA
mode)
mode)
Names
[SAC
• Power
[BAND]
• Select
• Skip(PANDORA mode)
[MENU]
•
MP31WMA
•
CD
• RADIO
•
AUX
• USB
• IPod
•
PANDORA
[~]Button
• Press
(~
• Previous
• Search
• Station
[Open]
• Unlock
[PSI
•
Scan
•
Auto memory store
of
I<!)]
Button
I
Toggle
Button
tuner
Button
mode-
modemodemodemode-
to eject disc.
,
..,...
]
Buttons
I
next track
(long
up
/down(PANDORA
Button
the front panel.
AS]
Button
play
I
Buttons
the audio source
band(RADIO
mode-
Search function.
No function.
No
function.
No
function.
Search function
iPod
menu
mode-
Station
press)
Preset
scan
(long
mode)
select
mode)
press)
[
p]
Button
•
Sound effect setting
[VOLUME]
•
Adjust
•
Bookmark (PANDORA
[ISR]
• Recall ISR
store current station
press)
[
1-6]
• [1]
•
(2]
•
[3] Button:
•
[4] Button:
•
[5] Button:
•
[6] Button: Next
[DISP]
• Display
•
System setup
Knob
volume level
Button
station stored
Buttons
Button: Scan play
Create new station(PANDORA
mode)
Button: Repeat
Random
Play
I Pause
press)
Previous folder
1
0
tracks down
Thumbs up(PANDORA
folder
10
tracks up
Thumbs
Button
switch
(long
I
Confirm (press)
mode)
in
memory and
in
ISR
memory (long
I
Preset station
play
I
Preset station
play
I
Preset
I
Top
I
Preset station
down(PANDORA
press)
play (long
I
Preset station 5.
(long
I
Preset
station
(long
press)
press)
1
station
4.
mode)
I
mode)
[BAND/TOP]
• Select
•
Top
•
Skip
[
...._
,
T
• Volume
[
...,.11]
• Play
[ISR]
•
RecaiiiSR
current station
Button
tuner band
play (long press-CD/MP3/WMA mode))
(PANDORA mode)
]
Buttons
up
Button
I
Pause
Button
(RADIO
I down
station stored
in
ISR
memory
mode)
in
memory and store
(long
press)
[SRC!(!))
[MUTE]
[SCNf
PSI AS)
...
.
.......
[BANO/TOP]
[ROM]
[RPT]
--
....
........................
clarion
I
2.
3.
Notes
1.
2.
3.
I
6.
4.
5.
6.
7. Store the battery
of
remote
Aim the remote
on
the unit.
Remove the battery from the remote
or insert a battery
not been used for a month or
DO
NOT
sunlight
or it may not function
Use "button
(3V)
DO
disassemble, heat or dispose
Insert
according to
cannot reach to avoid the risk of accident.
store the remote
or
in
high temperature environment,
shaped" lithium
only.
NOT
subject
the
battery
the(+)
control
control
at the remote sensor
insulator if the battery
and(-)
in
control
properly.
battery
in
proper
a
place
longer.
under direct
battery
to
recharge,
in
fire or water.
polarities.
where
using
control
"CR2025"
direction
children
Inserting the Battery
1.
Slide
remote
has
the direction shown.
2.
Insert
battery
guides with printed
3.
Press
battery into compartment
4.
Replace
place.
and
control
(CR2025)
side(+)
slide
cover
unit's rear cover
into
up.
until
it
insertion
as
shown.
clicks
in
into
~
~CZ202
4
Page 6
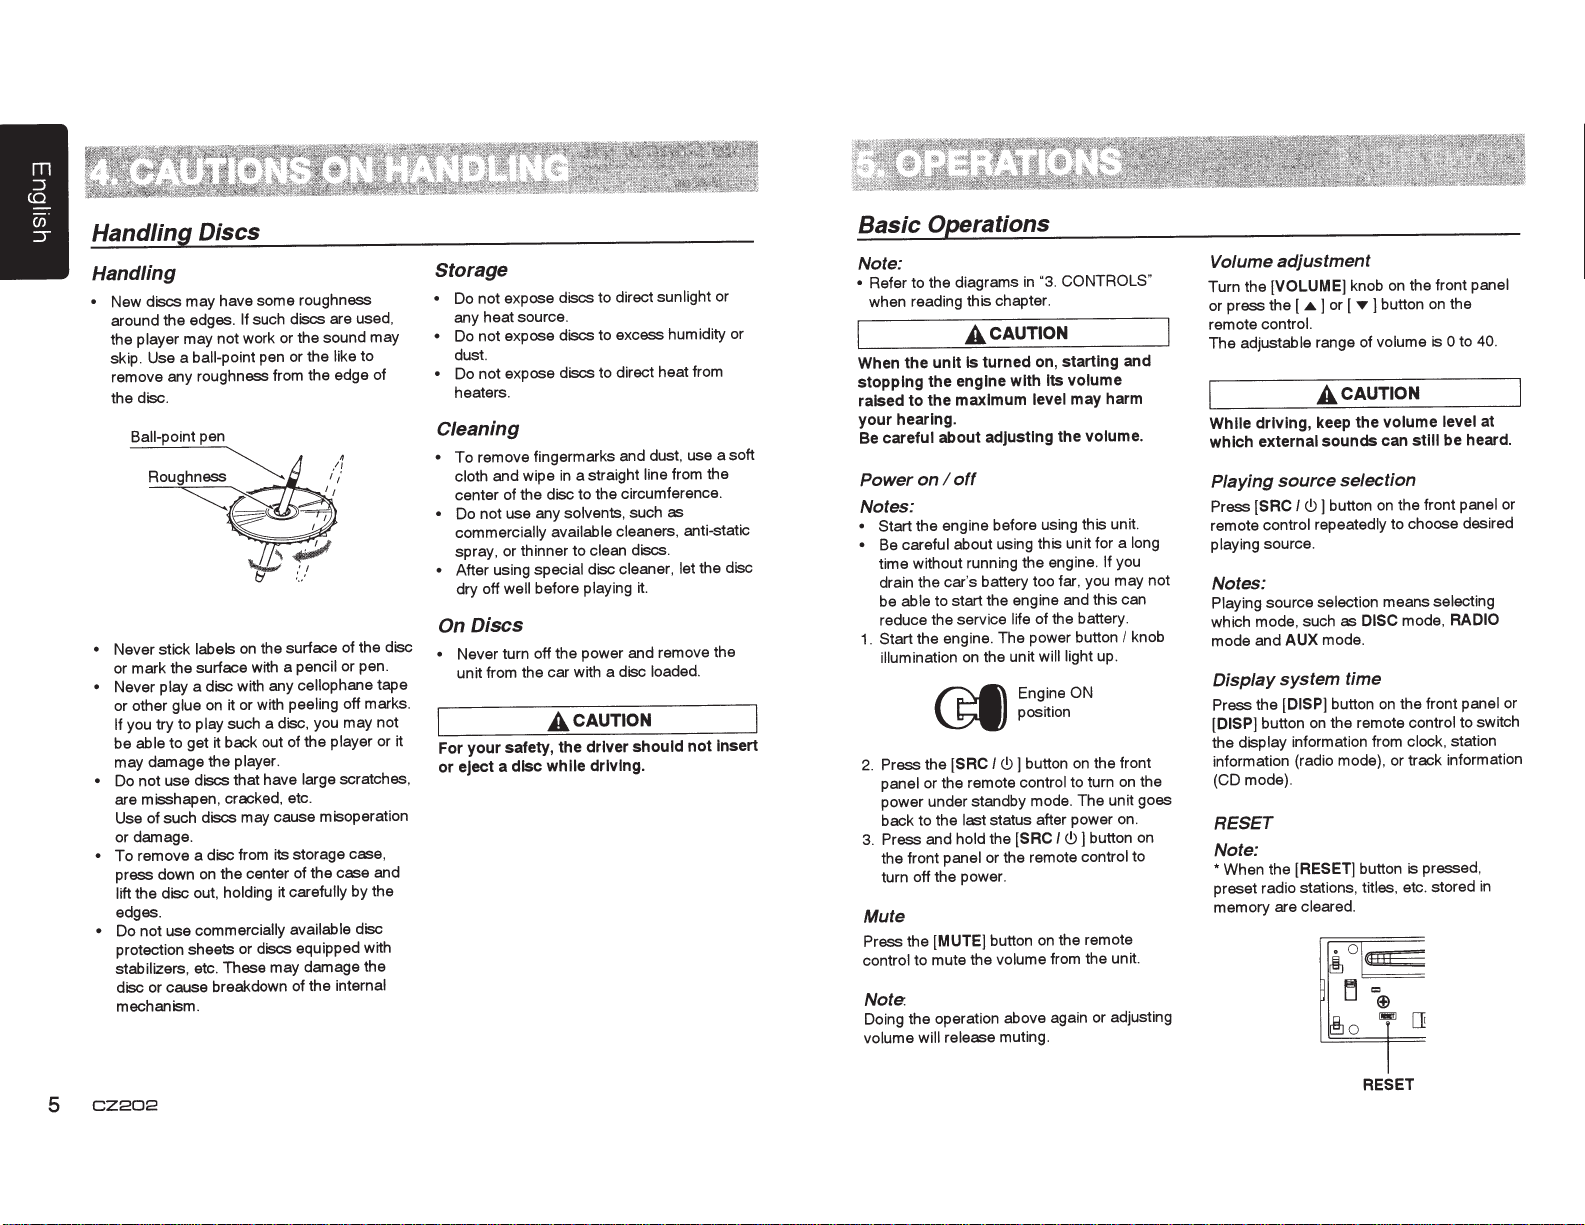
Handling Discs
tape
Storage
Do not expose discs to direct sunlight or
•
any heat source.
Do not expose discs to excess humidity or
•
dust.
Do not expose discs to direct heat from
•
heaters.
Cleaning
To
•
cloth and wipe
center of the disc to the circumference.
Do not use any solvents, such
•
commercially available cleaners. anti-static
spray, or thinner to clean discs.
After using special disc cleaner, let the disc
•
On
•
For your safety, the driver should
or eject a
Handling
New discs may have some roughness
•
around the edges. If
the player may not work or the sound may
skip. Use a
remove any roughness from the edge of
the disc.
Ball-point
~~.~~1
Never stick
•
or mark the surface with a pencil
Never play a disc with any cellophane
•
or other glue
you try to play such a disc, you may not
If
be able to get it back out of the player or it
may damage the player .
Do
•
are misshapen, cracked, etc.
Use of such discs may cause misoperation
or damage.
To
•
press down
lift the disc out, holding it
edges.
• Do not use commercially available
protection sheets or discs equipped with
stabilizers, etc . These
disc or cause breakdown of the internal
mechanism .
ball-point
~~,
use discs that have large scratches,
not
remove a disc from its storage case,
such discs are used,
pen or the like to
pen
~
....
'I
'•
• .•
carefully
damage the
may
I
I
.=
~
u
lJ
the surface of the disc
on
labels
it or with peeling off marks.
on
the center of the
on
or pen .
case and
by the
disc
remove fingermarks and dust, use a soft
well
dry off
a straight
in
before playing it.
line
from the
as
Discs
Never turn off the power and remove the
unit from the car with a disc loaded.
CAUTION
A
Insert
not
while driving.
disc
Basic
Operations
Note:
CONTROLS"
"3.
Refer to the diagrams
•
when reading this chapter.
When the
unit
stopping the engine with Its
raised to the maximum
in
CAUTION
A
turned on, starting and
Is
volume
may harm
level
your hearing.
careful about adjusting the volume.
Be
off
I
on
Power
Notes:
• Start the engine before using this unit.
Be careful about using this unit for a long
•
time without running the engine. If
drain the car's battery too far, you may not
be able to start the engine and this can
reduce the service
the engine. The power
Start
1.
illumination
~
~
2. Press the
panel or the remote control to turn
power under standby mode. The unit goes
back to the
Press and hold the
3.
the front panel or the remote control to
turn off the power .
[SAC
life of the battery.
will
the unit
on
Eng.i~eON
pos1t1on
button
]
c9
I
status after power on.
last
[SAC
I
button
light up.
the front
on
button on
c9]
you
I
on
knob
the
Mute
Press the [MUTE] button on the remote
control to mute the volume from the unit.
Note.
Doing the operation above again or adjusting
will release
volume
muting.
Volume
Turn the
or press the [
remote control.
The adjustable range of volume is
While driving, keep the volume level
which external sounds can
Playing
Press
remote control repeatedly to choose desired
playing source.
adjustment
[VOLUME]
.&
source
c9]
I
[SRC
knob
.,..
or [
]
CAUTION
A
selection
button
the front panel
on
] button
on
the
on
0
be heard.
still
the front panel or
to
40.
at
Notes:
Playing source selection means selecting
which mode, such as DISC mode,
and
mode
Display
Press the
button on the remote control to switch
[DISP)
the display information from clock, station
information (radio mode), or track information
(CD mode).
mode.
AUX
system
[DISP]
time
button
on
RADIO
the front panel or
RESET
Note:
the [RESET]
*When
preset radio stations, titles, etc. stored
memory are cleared.
button
pressed,
is
in
5
RESET
CZ202
Page 7

System Setup
In any
mode
,
press
and
hold
[DISP]
to
enter
button to
knob to adjust.
CLOCK
Press the [VOLUME] knob to enter
mode, rotate the (VOLUME] knob to set
press
minute, press and
confirm.
DX/LO (RADIO mode)
Rotate
local
•
•
AUX
Rotate the
Input
mode.
SCAN SVR:
Rotate the [VOLUME] knob to choose
SVR
SCROLL: ON/OFF
For track information
display panel:
When
ID3
TRACK->FOLDER->FILE->ALBUM->
>ARTIST->
When
one of the ID3 TAG information, the default is
Audio
Press the [
setting mode. First press
Rotate
BEAT
OFF
system setup.
select
options, rotate the (VOLUME]
[...,...]
or[...,..]
the
(VOLUME]
or distant at
LO:
Only
received.
OX:
can be received.
stations with strong
Stations with strong and weak signals
SENS {AUX
(VOLUME]
sensitivity
ON/OFF
{screen saver)
SCROLL
TAG information across the display, e.g.:
SCROLL
is
TRACK->
is
Setup
.P
]
button
the
(VOLUME]
EQ
in
this order:
->
B-BOOST
Press
button
hold
RADIO
mode)
LOW,
ON
ON,
...
OFF,
->
to
the (VOLUME] knob to
knob
to
mode.
knob to
MID
or
or
OFF.
that
is longer
the LCD
the
LCD
to
enter
shows
knob
to
IMPACT->
button
(...,...]
or
clock
setting
select
hour
choose
signal
can be
choose
HIGH
at
SCAN
than the
will scroll
TITLE-
will
display
sound
effect
current EO.
change
EXCITE
(..,....]
clock,
radio
AUX
AUX
the
the
->
TRACK, but user can adjust it to other
TAG information by press [DISP] button.
S-CTRL
Rotate the [VOLUME]
*
or
DIMMER:
Rotate
DIMMER
of vehicle
•
PANDORA: ON/OFF
Select
has
iPhone.
REARIS-W
Rotate the [VOLUME] knob to choose REAR
or
BEEP: ON/OFF
Rotate the [VOLUME] knob to choose button
beep sound
12/24H
Rotate the (VOLUME] knob to choose time
format: 12 or 24 hours.
CUSTOM
Rotate the [VOLUME] knob to change the
CUSTOM,
the press
including : BAS-G
(IPOD
mode):
ON/OFF
knob
{Simple
control)
Refer to
ON:
LCD dimmer
OFF : LCD always maximum brightness
regardless of the vehicle
OFF
not been
S-WOOFER {SUB-WOOFER).
ON
P9.
ON/OFF
the
[VOLUME]
ON
or
OFF.
is
turned
if the
installed
ON
or
and press the [VOLUME] knob,
[,....]
or
to choose
or
OFF.
knob
is
active when
ON.
small
PANDORA
on
your iPod touch or
OFF.
[..,...]
button to
->
BAS-F -> BAS-Q ->
ID3
S-CTRL
to
choose
small
light
light.
application
select
Audio Setup
MID-G
->
MID-F
->
MID-Q
->
TRE-G
->
rotate the [VOLUME] knob to
BAS-G
I
MID-G
I
BAS-F:
60
BAS-Q:
1
MID-F: 500
MID-Q: 0.5
TRE-F:
10.0K
Press
the
or
[..,...]
including:
I
80
.0
I
1.25
I
1 K
I
0.75
I
[
.P
button
I
100
I
12.5K
]
TRE-G: {-7)- {+7)
I
200
I
1.5
I
2.0
1.5K
I
2.5K
I
1.00
I
1.
I
15
.
0K
button,
to
select
select a
25
I
17.
then
USER
value.
5K
press
TRE-F,
[,....]
preset
BALANCE->
pass filter)
rotate the [VOLUME] knob to
BALANCE:LEFT 1-7->CENTER->RIGHT 1-7
FADER:FRONT 1-7->CENTER->REAR 1-7
M-BEX:
LPF:
THROUGH/80/120/160
SUBW
->
ON/OFF
VOL:
FADER->
S-W
{-6)-{+6)
M-B
VOL {Subwoofer Volume),
EX->
select
LPF(Iow
a
value.
Radio Operations
Select
tuner
as
playing
Press [SAC
enter
Selecting the
Press the [BAND] button
the remote control to select one radio band
among FM1, FM2, FM3, AM.
Manual
During
changed
Press the
to tune
Press the
remote
Auto
Press and hold
to seek a higher
To stop searching, repeat the operation
above or press other buttons having radio
functions.
I<.!>]
RADIO mode.
button once or more to
radio
tuning
manual
tuning, the frequency
in
steps.
[.....-.J
or
in
a higher
[.....-.J
or
control to
select
tuning
the [ ...,...
I
lower station.
[~
I
[~
Note:
When a station
and the station
it
Preset
Preset
scan
scan
is
received, searching stops
is
played.
receives
source
band
on
the panel
button
lower
station.
button
preset stations.
] or [
the
stations
on
on
..,....
or
on
will
be
the panel
the
] button
stored
in
preset memory
useful when searching for a desired station
memory.
1.
Press the [PSI AS] button.
2.
When a desired station is tuned
the
[PS/AS]
receiving that station.
in
order. This function is
button
again
to
in,
press
continue
Note:
Be
careful
not
AS] button for 1
the auto store function
starts storing stations.
Auto
store
Only
stations with sufficient signal strength
will
be detected and stored
Press and
start automatic station search.
To stop auto store, press other buttons
having radio functions.
to press and
second or longer,
hold
the [PS/AS] button
hold
will
begin and the unit
in
the memory.
{1
the [PS/
otherwise
sec.) to
Notes:
1 . After auto store, the previous stored
stations
will
2.
The unit
FM3 and
by
6 stations,
in
total.
AS
be overwritten.
has
4 bands, such
AM
. FM3 and
function. Each bands can store
CZ202
can store 24 stations
AM
as
FM1,
can store
FM2,
in
CZ202
6
Page 8
Radio Operations
Manual store
When one expected radio station has been
detected, press and hold
to store
the memory.
in
it
number button 1-6
Recall the stored stations
one numeric button among 1 to 6
Press
the panel to select
station.
the corresponding stored
Local seeking
only
ON,
is
seeking
LOCAL
When
radio stations with strong radio
signal could
CDIMP3/WMA Operations
This unit can playback MP3/WMA
files
Notes:
a
play
you
If
•
(Digital Rights Management), there will be
no audio.
To disable DAM
(Digital Rights Management)
When using Windows Media Player
Tool->
on
click
then under Copy settings, unclick the Check
box for copy project music. Then, reconstruct
files.
Personally
at your own responsibility.
constructed WMA files are used
Precautions when creating
file
WMA
Usable sampling rates and
MP3: Sampling
1.
Bit rate 8 kbps-320 kbps
2. WMA: Bit rate 8 kbps-320 kbps
File extensions
1.
CZ202
7
Always
".WMA"
add
to
file with active DRM
WMA
Options->
rate 8 kHz-48 kHz,
extension
file
a
MP3,
WMA
file
Copy Music tab,
bit rates
VBR
I
by using
those
9/10/11,
MP3/
". M
on
P3",
single
be received.
To select LOCAL
DISP
the [
..,...
press [
displays
OX
[VOLUME]
mode.
function, press and
the front
on
button
]
] button repeatedly until
the screen, and rotate the
on
select Local
knob to
panel,
or Distant
LO
Note:
number
The
received
mode
byte
other than specified or forget to add the
file extension, the
Files
2.
The
attempt
data.
*When
display may differ the play location.
*When
no sound part is caused between tunes.
Logical format (File system)
When writing
1.
disc
"IS09660 level1,
as the writing software
may not be possible
on
The
2.
displayed
but the title
alphabetical
an
Do not affix a name to a
3.
having the same name.
of
decrease after the
will
ON.
is
If you add a
letters.
without MP3/WMA
files will
or
another format.
folder
extension).
played soundlessly
be
play
to
files
VBR
MP3/WMA files
MP3/WMA file
CD-RW
name
the title
as
must be within 32
letters and numerals
file
files
are played, the
disc,
2 or
and
during
stations
radio
that
local seeking
extension
file
cannot be played.
will
data
M
without
are played, a
on a
please
Apple ISO
or
Joliet"
Normal play
format.
is
the disc
if
name
file
MP3/WMA play
single
inside a
file
hold
then
or
can be
play.
not
you
if
P3/WMA
time
play
little
CD-R
select
recorded
be
can
byte
(including
folder
CDIMP3/WMA
Folder structure
disc
A
hierarchical levels will
Number of files or folders
1. Up
folder.
Up
Tracks
2.
were recorded onto a disc. (Tracks may not
always
the
Some
3.
the type
recording.
with
999
to
3000 files
to
be
PC.)
noise
a
are
played
of
Operations
having
folder
be impossible.
can
files
can be played.
in
played
the order displayed
in
occur
may
encoder
than
more
recognized
be
the order that they
depending
software
used
while
per
Eject function
button , ejects the disc .
Just pressing the [
Notes:
you
If
•
reloading, this can damage the CD.
CD
a
If
•
seconds, the CD
(Auto reload).
Listening
the unit
in
the
Press
MP3/WMA mode.
the
When
mode, play
~]
into
CD
a
force
ejected
left
em) is
(12
to
[SAC
unit
starts
automatically reloaded
is
a disc already loaded
button to
]
(!)
I
CD/MP3/WMA
the
enters
automatically.
before
select
auto
for
the CD/
Loading a CD
CD
the
The
easily,
B
or
may not
of
plays
CD
there may
mark and
usable.
be
Insert
with
SLOT
automatically after loading.
label
facing up.
center
the
into
CD
a
Notes:
• Never insert foreign objects into the CD
SLOT.
the CD
If
•
be another CD
unit may require service.
• Discs without the
CO-ROMs
• Some CD-RICD-RW
not inserted
is
the mechanism or the
in
~~
cannot be played by this unit.
di9cs
Pausing play
8
Press
1.
"PAUSE"
To resume CD
2.
again.
Displaying
This unit can display title
disc.
SCROLL
When
on
on
15
DISP]
the [
MP31WMA disc
->
Track
Artist-> Track
->
Notes:
• If MP3/WMA
TITLE"
• Only ASCII characters can be displayed
Tags.
button to pause play.
4]
the [
appears
button to change the
Folder
appears
the
in
play,
titles
CD
OFF,
is
File title
->
.
..
disc has no
the display.
in
display.
press the [
data for
each time you press
Selecting a track
Track-up
1.
2.
3.
Track-down
1.
2.
3.
the [
Press
the beginning of the next track.
Each time you press the [
track advances ahead to the beginning of
the next track.
MP3/WMA
For
button
6]
[
tracks.
Press
the beginning of the current track .
Press
back
track.
MP3/WMA
For
button
] button to move ahead to
~
disc, press and
sec.) to move ahead to
(1
button to move back to
]
1+11
the [
button
]
1+11
the [
beginning
the
to
disc, press
sec.) to move back to
(1
Fast-forward/Fast-reverse
Fast-forward
Press
Fast-reverse
and
hold
the [
~]
button .
Album
->
103
~]
twice
the
of
end hold
button
4 ]
MP3/WMA
display.
title
->
TAG,
button, the
the
hold
+1
move
to
previous
the [
tracks.
-10
Title
"NO
in
0
5]
Page 9

CDIMP3/WMA Operations
Press and hold the [ ~ ] button .
*For
MP31WMA discs. it takes
until the
tracks.
the play time.
start
of
In
searching
addition, some errors may occur
Folder Select
This function allows you to
containing MP31WMA files and start playing
from the first track
1.
Press the [
Press the [
folder. Press the [ 5 ] button to move the
previous folder.
2.
To select a track, press the [
button.
in
the folder.
5]
or [
6]
button.
6 ] button to move the next
Search Function
1.
Press the [MENU] button to enter FOLD
mode. Press the
SCH
to enter the folder list search mode.
2.
Turn the
3.
[VOLUME]
Press the [VOLUME] button to enter the
file list search mode. And then the track
list appears
4.
Turn the [VOLUME] knob to select a track.
5.
Press the [VOLUME] knob to play.
* When
function
play
is
performed
knob to select a folder.
in
the display.
back
MP3 I WMA
in
Top function
The top function resets the CD player to the
first track of the disc. Press and hold the [
button
(1
1)
*
sec.) to play the first track (track
on
the disc.
In
case of
MP31WMA,
current folder
will be played.
some
~]
time
between
a folder
or [
1iJoo-H]
and
select
[VOLUME] button
file,
the current folder.
this
4 ]
No.
the first track of the
Other various
Scan
play
This function allows you to locate and play
in
1 0 seconds of all the tracks recorded
the first
on
a disc.
Press the [
play
functions
1 ] button to perform scan play.
Repeat play
This function allows you to play the current
repeatedly
track
being
played
repeatedly.
CD:
1.
Press the [ 2 ] button once or more until
"APT
ON"
repeat play.
2.
Press [ 2 ] button again to cancel repeat
playback,
MP3/WMA:
1.
Press the [ 2 ] button once
in
appears
"APT
or play a
the
MP31WMA
on
the LCD to perform
OFF"
appears
"TRACK RPT' appears on the display to
perform repeat play, and
lights on.
2.
For
MP3/WMA
repeatedly until
the display for folder repeat
3.
Press [ 2 ] button repeatedly until "RPT
OFF"
appears
repeat playback, and
off.
Random
This function allows you to play all tracks
recorded on a disc
Press
play.
play
the
files, press [ 2 ] button
"FOLD
RPT' appears
on the
display
"RPT'
in
[ 3 ] button to perform random
a random order.
track
currently
folder
on
the LCD.
or
more until
"RPT' segment
to
on
cancel
play.
segment goes
USB Operations
1.
Open the cover of the USB connector to the
Insert a USB cable (CCA-755) into the
right.
USB connector. Insert a USB device into
the
USB cable.
When connecting a
will read the files automatically.
2.
To remove the USB device, you should first
select another source or turn off the power.
in
order to avoid damaging the USB device.
Then take off the
cover to
Operation
the left.
is
same as MP31WMA operation.
3.
USB device, the unit
USB device. Open the
iPod & iPhone Operations
Connect
Connect
connector via CCA-748 cable.
When connecting a device, the unit
the files automatically. The track information
display
MENU
In the
button,rotate
"MUSIC"
Select
then rotate the
LISTS
SONGS I COMPOSERS, press and rotate the
[VOLUME] knob to
then press the
Select
then
MOVIES I MUSIC VIDEO I TV SHOWS I
VIDEO PODCASTS I RENTALS, press and
rotate the
option, then
confirm.
NOTE:
• VIDEO MENU item is different by the model
an
iPod
or
iPhone
on
the screen once playback start.
S-CTRL
"MUSIC",
OFF
mode,
the
or
[VOLUME]
"VIDEO".
press the [VOLUME] knob,
to
press
knob
the
will read
[MENU]
select
[VOLUME] knob to show PLAY
I
ARTISTS I ALBUMS I GENRES
select
a desired option,
[VOLUME] knob to confirm.
"VIDEO",
rotate
press the [VOLUME] knob,
the
[VOLUME] knob
to
show
[VOLUME] knob to select a desired
press
the
[VOLUME] knob
of connected iPod and language setting.
USB
to
I
Repeat
This function allows you to play the current
track repeatedly or play
iPodliPhone repeatedly.
1.
2.
play
tracks
all
Press the [ 2 ] button once or more until
"APT
ON"
repeat play.
Press [ 2 ] button repeatedly until "APT
OFF"
playback.
appears
appears
on
the LCD to perform
on
the LCD to cancel repeat
in
your
CZ202
8
Page 10

iPod
&
iPhone Operations
iPod
&
iPhone Operations
Random
This
recorded on a disc in a random order.
1 . Press [ 3 ] button repeatedly until
ROM"
play.
2. Press the [
"SONG
perform random play.
3.
Press [
OFF"
random playback.
Setting
Use
through
the
*The
1.
Press
system setup.
2. Press [
"S-CTRL".
3. Rotate the
"
•
•
play
function
this
USB
factory default setting
ON "
ON:
iPod.
OFF:
through your iPod.
allows
appears on the LCD for album random
3 ] button once
ROM"
appears
3 ]
button repeatedly until
appears
iPod
function
your
cable.
and
1+11
or
Operations are made through
Operations
on
simple
if
iPod connected to this unit via
hold
[
DISP
]
or
[
~
[VOLUME]
"
OFF
"
.
Notes:
•
When
performing
simple control mode, make the operations
slowly.
performed
may
•
When
simple
operate the iPod and the unit at the same
time, otherwise there may be unexpected
event happened.
•
Some
function.
dealer
do
iPod
This
desired alphabetical letters.
CZ202
9
If
repetitive
too
occur.
performing
or
not
support this function.
menu
function
quickly, unforeseen errors
control
iPod
mode,
models
Consult
website to confirm which models
alphabet search
searches
you
to
play
or
more until
on
the
the
LCD
to
control
you
wish
to
is"
OFF".
]
button
] button to select
knob to select
cannot
iPod
iPod
do
your
the
be
operations
operations
operations
please
not
support
nearest
subfolders
all
tracks
"ALBUM
LCD
"ROM
cancel
mode
operate
to
enter
your
made
using
are
using
do
this
Clarion
to
not
for
1.
Press the
menu mode.
2.
Press
between categories.
MUSIC:
GENRES,
VIDEO: MOVIES, MUSIC VIDEOS,
TV
RENTALS
3.
Press the
of the category are displayed.)
4.
Press and hold the
5.
Rotate the
desired letter to search.
6.
Press
perform search.
7.
Press the
Listening
You can listen
by
connecting
PANDORA
To
start streaming, connect the iPod/iPhone
with
When
PANDORA
DEVICE"
the
PANDORA
iPod/iPhone connected.
1.
Press
PANDONA
Selecting
Press
DATE"
knob and press the [
•
BY
•
A-Z: List in an alphabetical order
Go
to
alphabetical
Press the [
control to go to next station.
Press the [
control to go to previous station.
[MENU]
the
PLAYLIST, ARTISTS,
SHOWS, VIDEO PADCASTS,
the
[VOLUME]
button to select the iPod
[VOLUME]
SONGS, COMPOSERS
[VOLUME]
[VOLUME]
[DISP]
knob
to
knob. (The contents
(DISP]
button
knob to select the
button
again
knob to confirm.
ALBUMS,
to PANDORA
to
PANDORA
an
Application already installed.
PANDORA
the unit displays
in
PANDORA mode, please launch
the
mode.
a
station
the
[
MENU
or
"A-Z"
DATE: List in an created date order
next
station
~
1+11
iPod/iPhone
already launched.
APPLICATION
Application
[SRC/
(!)
from
]
button
by
rotating
VOLUME
or
order)
] button on the panel or remote
]
button on the panel or remote
"PLEASE
by
)
button
list
and
the
previous
internet
ON
operating the
to
select
[VOLUME]
] knob.
station(an
(1
that
LAUNCH
MOBILE
enter
switch
sec.).
to
next
radio
has
the
"BY
Thumbs
1 .
button on the remote control for the thumbs up.
2.
[SCN]
thumbs down.
up/down
Press the [
Press the ( 5 ] button on the panel or the
button
6 ]
button on the panel or the
on
the
remote
control
[ROM]
for
the
Notes:
• You can personalize your stations by ''thumbs
up"
or ''thumbs
• PANDORA
down allowed
If
you attempt to thumbs
beyond the limit, the current song continues
to playback.
BOOKMARK
Short-press the
buton on the remote control to Bookmark artist.
Long-press the
]
button
current artist of the song.
Creating
Short-press the [1] button on the panel to create
a new Station from the current artist.
AUX
Press
"AUX".
AUX
connector plugged into audio-in socket on the
front panel.
A UX
1. Press and hold the
2.
SENS".
on
Operations
[SRC
is just for audio content with 3.5mm
Input
Turn
the
down".
limits the number of thumbs
on their service.
artist
[VOLUME]
the
remote
new
stations
I
(!)
]
sensitivity
[VOLUME]
[VOLUME]
button on the panel to select
or
[DISP]
down songs
song
knob
knob
control
setting
button
knob
to
or
or
to
select
the [RPT ]
the (RPT
Bookmark
Jack
(1
sec.).
"AUX
Long-press the [1] button on the panel to
create a new song.
Notes:
If the name of the station you wish to create
for a song title
as the station name currently playing,
PLAY"
station will not be created.
Skip
Press
on
the remote control for the next song in
station.
appears
the
[BAND]
or
an artist name is the same
on
the
display
button on the panel
and
"NOW
the
or
Notes:
•
PANDORA
allowed on their service.
skip songs beyond the limit,
is displayed.
Play/Pause
Press the (
[~u]
button on the remote control for play/
pause.
3.
If
the output level
audio player is
knob
output level is
limits
4 ]
button on the panel
and
"HIGH",
choose
"LOW",
the
number
of
connected external
rotate
"LOW".
choose
of
If
you attempt to
"SKIP LIMIT'
or
[VOLUME]
And
"HIGH".
the
if
skips
the
Page 11
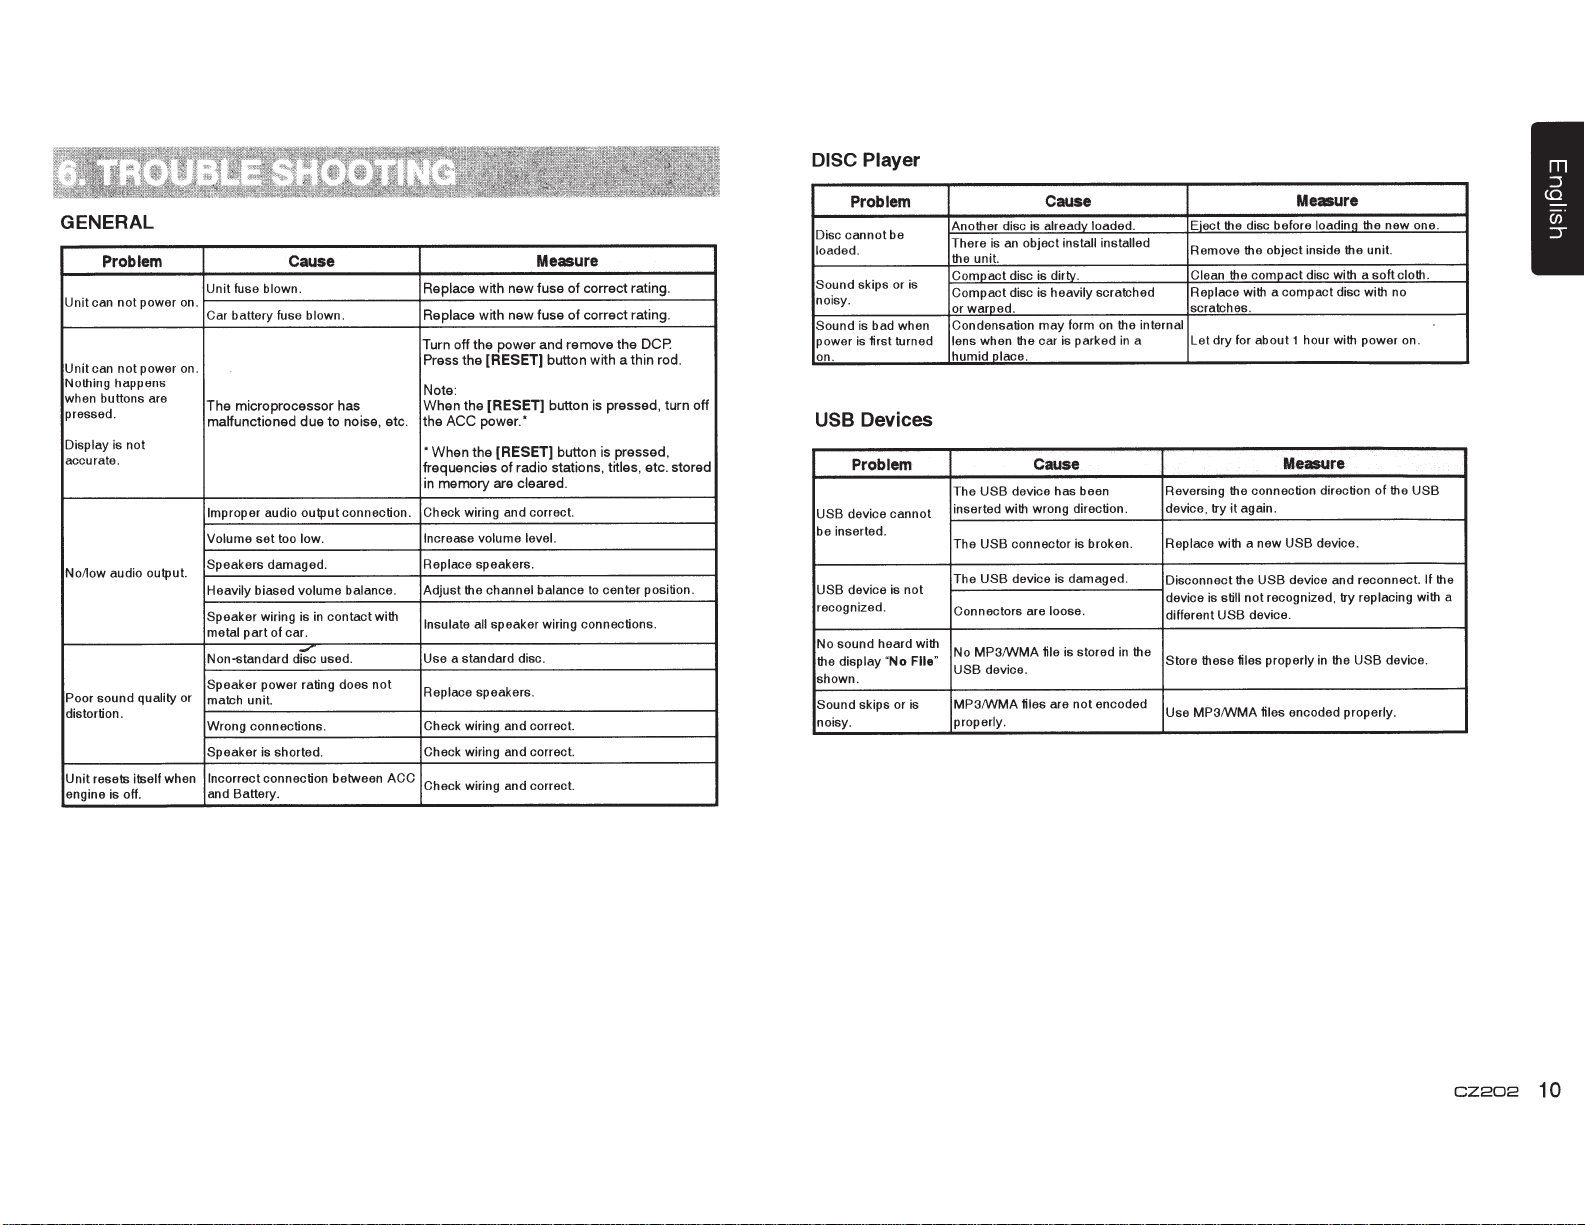
DISC Player
GENERAL
Problem
power on.
not
Unitcan
power
not
can
Unit
Nothing happens
when buttons are
pressed.
Display is not
accurate.
No/low audio output.
sound quality or
Poor
distortion.
resets itself when Incorrect
Unit
engine is off. and Battery.
Unit fuse blown.
battery fuse blown.
Car
.
on
microprocessor
The
malfunctioned
Improper
set
Volume
Speakers damaged.
Heavily biased volume balance. Adjust
Speaker wiring is
metal part of car.
Non-standard
Speaker power rating does
match unit.
Wrong connections.
Speaker is shorted.
Cause
Replace
Replace
the
off
Turn
the
Press
:
has
noise
to
due
audio output connection. Check wiring and correct.
too low.
contact with
in
used.
d~
connection between
Note
When
ACC
the
.
etc
,
*When
frequencies
memory
in
Increase
Replace speakers.
Insulate all
Use a standard disc.
not
Replace speakers.
Check wiring and correct.
Check wiring and correct.
ACC
Check wiring and correct.
the
the
the channel balance
Measure
fuse
new
with
fuse
new
with
and
power
[RESET]
[RESET]
power
volume
button
button
.*
[RESET]
radio stations,
of
cleared.
are
level.
speaker wiring connections.
correct
of
correct
of
remove
button
with
is
to
.
rating
rating.
DCP.
the
rod.
thin
a
turn
pressed,
pressed,
is
titles,
center position.
etc.
stored
off
Problem
Disc cannot be
loaded.
skips or is
Sound
noisy.
is bad when Condensation
Sound
first
power is
on.
Devices
USB
Another disc is already loaded. Eject
There is
unit.
the
Compact disc is dirty.
Compact disc is heavily scratched Replace with a compact disc with no
or warped. scratches.
turned lens when
humid place.
Problem
USB
The
USB device cannot
be inserted.
device is
USB
recognized .
display
skips or is
heard with
No
"
No sound
the
shown.
Sound
noisy. properly.
inserted with wrong direction . device, try
USB
The
USB
The
not
Connectors are loose.
MP3/WMA
No
File"
device.
USB
MP3/WMA files
Cause
disc before
object install installed
an
form
may
car is parked
the
on
the
in
internal
a
the
the
Remove
Clean the compact disc with a
Let dry for about 1 hour with power
Cause
connection direction of
still
USB
these
the
again.
it
the USB
not
device.
fifes
device has been Reversing
connector is broken. Replace with a new
device is damaged.
is stored
file
encoded
not
are
Disconnect
device is
different
the
in
Store
Use MP3/WMA files encoded properly.
Me•ure
the
new one.
unit.
soft
cloth.
.
on
foadino the
object inside
Measure
the USB
USB device.
the
device and reconnect.
recognized, try replacing with a
the USB
in
properly
If
device.
CZ202
10
Page 12

If
an
error occurs, one of the following displays is displayed.
Take the measures described below to solve the problem.
Display
3
ERROR
ERROR 5
If
an
error display other than the ones described above appears, press the [RESET] button. If the
Disc is inserted incorrectly. Eject the disc then reload it properly.
The disc format is
This is a failure
Cause
not
supported. Try another disc.
of
deck's mechanism. Consult your store
Measure
of
purchase.
problem persists, turn off the power and consult your store of purchase.
* When the [RESET] button is pressed, frequencies of radio stations, titles, etc.
memory are cleared.
stored
FM Tuner
Frequency range: 87.9-107.9MHz
Usable sensitivity: 8dBf
Frequency response: 30Hz-15kHz
Stereo separation: 30dB(1 kHz)
Signal/noise ratio: >55dB
AM
Tuner
Frequency range: 530-171
Usable sensitivity (SIN=20dB):
OkHz
30dB1J
CD Player
System: Disc digital audio system
in
Frequency response:
Signal/noise
Total harmonic distortion: Less than 0.1% (1kHz)
Channel separation: >60dB
20Hz-20kHz
ratio: >94dB
MP3/WMA mode
MP3
sampling rate:
MP3
bit
rate: 8 kbps
WMA
bit
rate: 8 kbps
Logical format:
8kHz
to
48kHz
to
320 kbps I VBR
to
320 kbps
IS09660
level 1 ,2
Joliet file system
(input impedance
level:
Aux-in
General
Power supply voltage:
14.4VDC (10.8
negative ground
Pre-Amp output voltage:
Fuse: 15A
Dimensions
Weight
Dimensions
Weight
(CD play mode: 1kHz,
2.0V
of
188mm Width x 58mm Height x
7-2/5(width)
of
the Main Unit:
of
43mm Width x
1-2/3(Width) x 2/5(Height) x 4-2/5(Depth)
of
the Remote Control Unit:
1.16oz. (36g)
7"
10
k!l
~
2V
the Main Unit:
X 2-7/25(Height) X 7-12/25(Depth)
the Remote Control unit:
(including battery)
178mm
or greater)
to
15.6V allowable),
OdB, 1 Ok!l
190mm Depth
2.871b.
(1.30kg)
11
mm Height x 113mm Depth
E
Ji
~
i.e
~
load)
50mm
11
CZ202
USB
Specification: USB 1.0/2.0
audio format:
Playable
MP3(.mp3):
WMA(.wma):
Audio Amplifier
Maximum power output:
180W
Speaker impedance: 4!1
.Input
Audio
High:
Mid:
Low: 1
MPEG
Ver 7/8/9.1/9.2
(45W X 4)
input
sensitivity:
320mV (at 1V output)
650mV (at 1V output)
.3V (at 1 V output)
1/2/Audio Layer-3
(4
to
8 Q allowable)
6-2/3" 170mm
II.
7-2/5"
188mm
Notes:
•
Specifications
to
change
without
improvement.
Power Output:
19W
RMS
x 4
and 1% THD+N
Signal to Noise Ratio:
94dBA (reference:
Channels
are
for
46mm
58mm
subject
further
.II~
and
design
notice
at
4!1
1W
into
4)
Page 13

CONTENTS
1)
Before Starting ...................................................................... 12
2)
Package Contents .................................................................
3)
General
4)
Cautions
5)
Installing
6)
Removing the Source Unit ....................................................
7)
Wiring and Connections ........................................................ 14
8)
Connecting the accessories ..................................................
1)
Before Starting
1.
This set
negative ground
2. Read these instructions
3.
Be
starting. This
installation. (Figure
2)
Package Contents
Source
Front panel ..........
Trim ring ........
Mounting bracket ......
Screws
L-key ..............................
Cautions ..................................................................
on
Installation
......................................................... 12
the Source Unit ...................................................... 12
is
exclusively
sure to disconnect the battery
is
for use
in
cars with a
12 V power supply.
carefully.
''terminal"
to prevent short circuits during
before
1)
unit ....
.. ..
...
M5x6
.................. ..................
...
...............
...
...
...
........
mm
........................................
.. ..
..
...............
..
.....
..
....
...
...................
....
.......................... 2
..........
..
.
1
..
......
..
.
...
.
...
..
Wire connector ..............
1
Remote control unit (with battery) .......
1
Owner's manual.
1
Warranty card ..........
4
Special screw (Front panel lock) .................
............. ..............
...
12
12
13
14
Car
battery
Figure
1
..
............................ 1
..
............. ......
.............
..
............
4)
Cautions on
1.
Prepare
installing
starting.
2.
Install
the unit within
horizontal plane.
3.1f
you have to do any work on the car
body, such as
Installation
all articles
the source unit before
necessary for
30°
of the
(Figure
drilling holes, consult
2)
your car
4.
Use the
installation.
Using other screws can cause
damage.
(Figure
dealer
enclosed
3)
Chassis
beforehand.
screws for
Chassis
11~·~···
Max. 6 mm (M5 screw)
Figure
2
5)
Installing
1.
Place
each stopper of the mounting bracket inward, then secure the stopper.
2.
Wire as shown
3.
Insert
4.
Take care
are locked.
the
Source Unit
the mounting bracket into the instrument
in
Section
the source unit into the mounting bracket
of
the top and bottom of the trim ring and mount
7)
.
panel, use a screwdriver to bend
until
Notes:
1.
Some
..
..
.....
1
1
1
1
2.
• Console
car models
Consult
Fasten the front stopper securely
your
opening dimensions
require
Clarion
special
dealer
mounting kits for proper
for
details.
to prevent the source unit from coming
it
locks.
Figure
3
it
so that all
installation.
the hooks
loose.
3)
General
1.
Do not open the case. There are no
user
drop anything into the unit during
installation, consult
authorized
Cautions
serviceable
Clarion
parts inside.
your
dealer
service center.
If
you
or an
2. Use a soft, dry
Never use a rough cloth,
benzine, or
apply
a
soft
cloth
cloth
alcohol
little cold
or warm water to a
and wipe off the dirt
to
clean the case.
thinner,
etc. For tough dirt,
gently.
I.._____
-Hole
_[]!
CZ202
12
Page 14
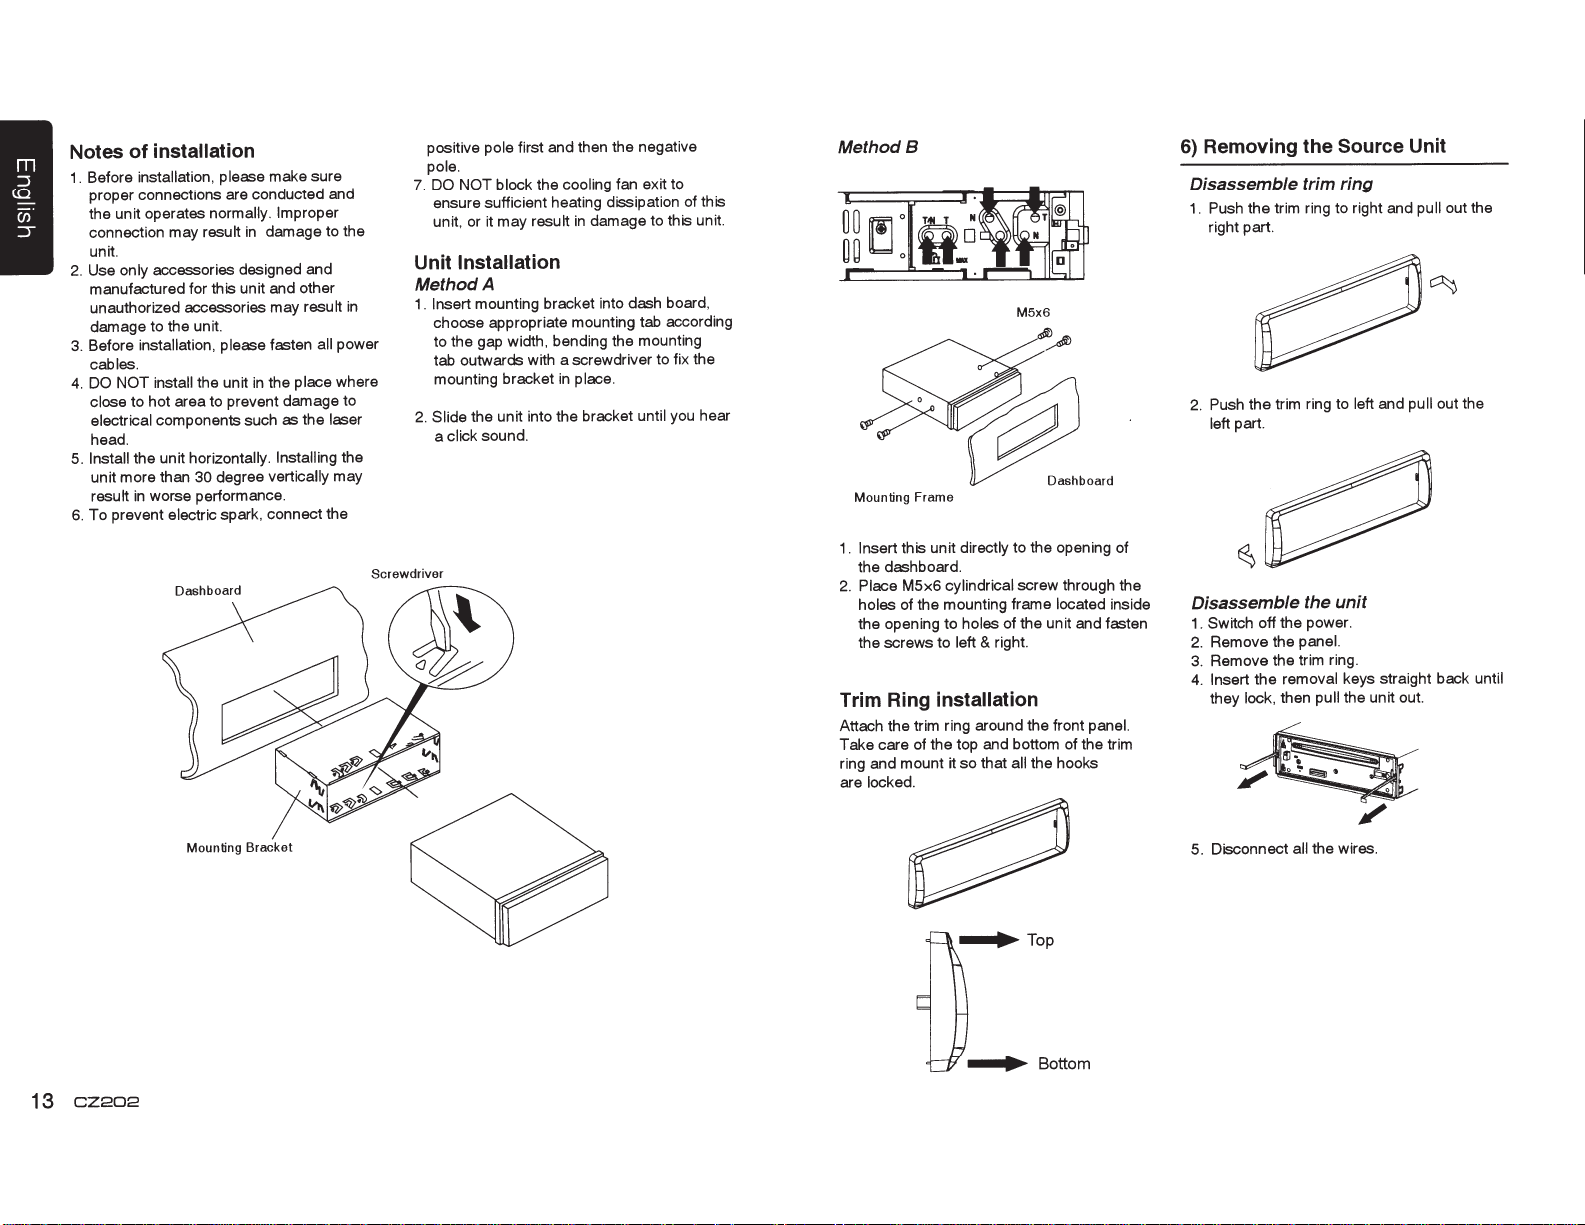
installation
of
Notes
installation, please
Before
1.
proper connections are conducted and
the unit operates
connection may
unit.
only
Use
2.
manufactured for this unit and other
unauthorized accessories may
damage to the unit.
installation, please
Before
3.
cables.
DO NOT install
4.
to hot area to prevent damage to
close
electrical
head.
the unit horizontally.
Install
5.
unit more than
in
result
To prevent
6.
result
accessories designed and
the unit
components such as the
30
worse performance.
electric spark, connect the
make sure
normally. Improper
damage to the
in
result
fasten
the place
in
Installing
vertically
degree
all
in
power
where
laser
the
may
positive
pole.
7.
Unit
Method
1 .
2.
Screwdriver
first and then the negative
pole
fan exit to
cooling
it
may
the
result
damage to this unit.
in
DO NOT block
ensure sufficient heating dissipation of this
or
unit,
Installation
A
mounting bracket into dash board,
Insert
choose appropriate mounting tab according
to the gap width, bending the mounting
tab outwards with a screwdriver to fix the
mounting bracket
the unit into the bracket
Slide
click sound.
a
in
place.
until you hear
Method
1.
2.
Trim Ring
Attach the trim ring around the front
Take care of the top and bottom of the trim
ring and mount
are
B
Mounting Frame
this unit
Insert
the dashboard.
Place
holes
the opening to
the screws to
cylindrical
M5x6
of the mounting frame
installation
locked.
M5x6
to the opening of
directly
screw through the
of the unit and fasten
holes
right.
&
left
all
that
so
it
located
the hooks
inside
panel.
Removing
6)
the
Disassemble trim
the trim ring to right and
Push
1.
right part.
Push the trim ring to
2.
part.
left
Disassemble the
Switch off the power.
1.
Remove the
2.
Remove the trim ring.
3.
Insert the
4.
they
lock,
panel.
removal
then
Source Unit
ring
and
left
unit
keys straight back
the unit out.
pull
out the
pull
pull out the
until
13
CZ202
Mounting
Bracket
5. Disconnect
the wires.
all
Page 15

7) Wiring and Connections
Steering
wheel
control terminal
Black
Black
White
Black
White
Gray L ft
111=====;c:::;;;:
Red
e
Right
Rear audio output (Left)/
Subwoofer
output
Front
}
audio
output terminal
1
Front
Front
Rear
Rear
Right
Right
(±)Gray
8 Gray/Black
Left
+White
8 White/Black
8 Purple/Black
(±)Green
Left
8 Green/Black
4-Speaker system
t
or
2-Speaker system
16-Pin Connector Extension Lead
(attached
to
the source unit)
Red wire (Power lead)
------Accessory
Blue/White wire(Ampli1ier turn-on lead and Auto antenna lead)
• Connect to remote turn-on lead
• Connect
Black wire (Ground lead)
it
to the
® 12V
of
car
power supply terminal for antenna
amplifier
~====-II(]E::J
(Black)
Antenna
Refer to
next
page
Front
Right
Front
Left
X
Not
used.
Insulate each wire
8) Connecting
(±)Green
8 Green/Black
the
accessories
Connect to vehicle chassis ground
Orange/White wire (Illumination lead)
Connect it
for illumination
to
the
car
power
supply
terminal
• Connecting to the external amplifier
External amplifiers can
be
connected to the 4 channel RCA output connections.
Ensure that the connectors are not grounded or shorted to prevent damage to the
unit.
CZ202
14
Page 16

Clarion Co., Ltd.
All
Rights
Reserved.
Printed in China
Copyright®
I
PN:
127075003862
2011: Clarion
lim
preso
Co., Ltd.
en
China
Page 17

'if'"iW
GARANTIE
clarion
Ce produit
ceuvre
Clarion
pour une duree
effectues chez
cablages, fils
Tous
defauts de
TOUT
SOUMIS A DES RESTRICTIONS
Les conditions de cette garantie
11
Ciarionll
DANS
1.
1
D
CENTRES
FIN
materiel
ACHAT DE
sous cette garantie
LE
1NSTALLATION
DE CE DOCUMENT.
2. Cette Garantie Limitee sera
ou entreprise qui
Cette Garantie Limitee
3.
vendu par marchand autorise
de
marchand autorise
un
et autres accessoires
et de mise
PRODUITS CLARION EFFECTUE
DE LA
CAS
SONT
DES SERVICES AUTORISES
nlest
Pour
an
(1)
un
en
limitee
limitee sont
GARANTIE LIMITEE
REQUISES. DES INFORMATIONS SUPPLEMENTAIRES
annulee
accredite comme
pas
pas
nlest
ou utilisation incorrects ou que
installes,
Cette Garantie Limitee ne couvre pas des interferences electrostatiques, electriques,
4.
ajustes ou
nettoyage de
retrait ou
le
responsabilite
La
5.
Ia
repares
de lecture
tete
Ia
reinstallation
de Clarion
autrement indique par
sous cette Garantie Limitee est
du produit, qui est sujet uniquement
dans son
Ce produit doit est
6.
livree
frais de transport doivent etre prepayes. Clarion nlassumera
du transport.
survenue
TOUS PRODUITS CLARION ACQUIS
7.
CLARION, INCLUANT TOUS ACHATS
AUTORISE
EN
PERMETTENT
LIMITEE QUI s•APPLIQUE
AUCUNE
8.
CI-DESSUS,
CAS
OU L
LIMITER
DIRECTS OU INDIRECTS, CES LIMITATIONS OU EXCLUSIONS
CETTE
9.
DROITS SUPPLEMENTAIRES SELON VOTRE LIEU
Les
10.
vous eprouvez des
Si
11.
avec
aux produits
lors
CLARION,
PAR
LES
ACCORD
ETRE
1
1MPOSSIBILITE DAUTILISATON
lois
AVEC
L
PAS
GARANTIE IMPLICITE NE POURRA
EN
CE,
ET
TENUE
LA
GARANTIE LIMITEE VOUS
1
1
de
RESPONSABLE
DUREE
Ia
de
etat
DES
NE
LIMITATIONS DEFINIES
1
ELIMINATION DES GARANTIES SOUS CES CONDITIONS,
PRODUIT SERA
AU
ACCORD
GARANTIES IMPLICITES,
Californie contr61ent
problemes de performance du produit pendant
Clarion
ou visitez notre site Web
Clarion.
Canada et
le
Clarion est garanti contre tous defauts de
compter de
a
Ia
Clarion.
Clarion achetes chez
ceuvre pour une
GRANANTIES DECAl CI-DESOUS.
DE
implication de
II
et
suivantes:
les
DE UN
PAR
dommage est survenu
un
si
un
un
applicable
les numeros
cas de radio cassette) ou
(en
a
a
de
discretion
Ia
emballage dlorigine
UNE
PAR
UN MARCHAND
VIA
COUVERTS
PAS
SONT
LIMITES DEFINIES
LES
AVEC
PERMETS
DES
DU PRODUIT. PUISQUE CERTAINS
DONNE
DES DROITS
totalement cette garantie
1
adresse
1
a
LIMITEE DE 1
les Etats-Unis seulement
date de vente
de quatre-vingt-dix
duree
CHEZ
Ia
(1)
CLARION
initiale
marchand autorise
un
UN MARCHAND
responsabilite
AN, UNE PREUVE
PEUVENT
Centre de Service et Garantie
aucun produit sujet
serie ont
ete modifies, obstrue ou efface, ou qui a
Clarion.
elements laser,
limitee
Clarion.
de
ou equivalent. Le
aucune responsabilite
ENTREMISE
PAR
QUINZE
DE
s•ETENDRE
OU
OU
AUTRE
VIRTUEL
LES
PAR
LOI. DANS
LA
(15)
AU-DELA DE
DOMMAGES DIRECTS
LIMITER
DE
LEGAUX
DE RESIDENCE.
ci-dessous afin
quand
(90)
de
ETRE OBTENUES
bien lors d
au
1
abus, negligence,
1
a
uniquement
colis
QU•UN
(ACHAT
GARANTIES LIMITEES
CAS
LE
PARTIR
JOURS
A
LOI. CLARION
LA
PAR
RESPONSABILITE
LA
PEUVENT NE
PRECIS. VOUS POUVEZ POSS.EDER DES
limitee,
d
son
periode de garantie,
Ia
1
obtenir une
1
NON-AUTORISE CLARION SERA
Clarion
D
ni
MARCHAND
OU
LA
ETATS
AN
1
ET
achat
Clarion, sont garantis contre tous
jours de
Corporation
1
ACHAT
CONCERNANT
1
service effectue par personne
un
CLARION
materiel
1
installation ont
1
date
Ia
ET UNE PREUVE
et de mise
1
achat initiale.
d
of
ADRESSES A
AUX
America
LES
ete
Clarion.
accidentes, installation
raccordes,
ete
ajustements ou
les
ni
manutention pour
Ia
a
relies
frais
les
remplacement
reparation ou
Ia
a
entierement assure et tous
etre
doit
cas
en
AUTORISE
INTERNET) QUI N
DE
LOIS APPLICABLES
LES
PERIODE
LA
DATE
LA
DE
PERIODE
INDIRECTS
OU
PAS
DE
NE POURRA
NE PERMETTENT
EN
s•APPLIQUER A VOUS.
interpretation et
resolution
au
perte ou dommages
de
PAR
1
PAS
EST
CLARION,
DE
D
GARANTIE DECRITE
DU
CAS
sa
veuillez
tout
de
ET CE,
GARANTIE
1
ACHAT INITIALE.
EN
1
UTILISATION
L
A
PAS
DOMMAGES
DE
execution.
en
mise
communiquer
probleme relie
en
LA
NE
AUCUN
DE
_,.
Etats-Unis:
Aux
Clarion
Corporation of America
Attn:Customer Service Manager
6200
Gateway
Drive
Cypress,
CA
1-800-GO-CLARION
www.clarion.com
90630
Canada:
In
Au
Clarion
Centre
2239 Winston
Ontario
Canada
Service
de
5R1
L6H
Park
www.clarion.com
Inc.
Garantie
et
Oakville,
Drive
(905)829-4600
Page 18

l=f'jWITfHJ
281-0639-00 2007/9
CLARION
clarion'
Clarion
This
workmanship for a period of
authorized Clarion dealer.
an
All Clarion cables,
defects
all
PURCHASES OF CLARION PRODUCTS FROM NON-AUTHORIZED CLARION
ALL
FURTHER WARRANTY
TO
The conditions
under this Limited Warranty are
PROOF OF
1.
WARRANTY
THE ADDRESS LISTED BELOW.
This Limited Warranty
2.
Service
This Limited Warranty does not apply
3.
or which has had the
adjusted or repaired, other than
This Limited Warranty does not cover car static
4.
cleaning
product purchased from
wires and other accessories if purchased from
materials and workmanship for ninety
in
this Limited Warranty and the extent
of
PURCHASE
OF
DATE
SERVICE OF THIS PRODUCT. CENTERS
will
Center
results
or adjustments, or
in
serial
For USA and Canada
authorized Clarion dealer
an
from the date
year
(1)
one
RESTRICTIONS AS DESCRIBED BELOW.
follows
as
become void if service performed by anyone other than
damage to the product.
number altered, defaced or removed, or which has been connected,
in
costs for the
labor
:
FROM
accordance with the instructions furnished by
AN
any product which has been subject to misuse,
to
1 YEAR
only
original purchase, when purchased from AND
of
days from the date
(90)
responsibility
of
AUTHORIZED CLARION DEALER
MAY BE
electrical interferences, tape head or laser
other
or
removal or
reinstallation
LIMITED
are warranted against
authorized
an
of
Clarion
of
OBTAINED
of
WARRANTY
defects
all
Clarion dealer
original purchase.
DEALERS ARE
Corporation
BE
WILL
CONTACTING CLARION AT
BY
approved Clarion
an
neglect
Clarion.
the unit for repair.
materials
in
installed
are warranted against
SUBJECT
America ("Clarion")
of
REQUIRED FOR
or accident,
installed,
pick-up
and
by
Warranty
The sole responsibility of
5.
the product, at the sole
replacement
Product
6.
Clarion will
CLARION PRODUCTS
7.
INCLUDING ANY AND
CLARION
ALLOWED
ELIMINATION OF WARRANTIES
PERIOD SHALL BE DEEMED
IMPLIED WARRANTIES
ALL
8.
GREATER
SHALL CLARION
THE USE OR INABILITY TO USE
HOW LONG
ON
CONSEQUENTIAL DAMAGES, THE ABOVE LIMITATIONS OR EXCLUSIONS
THIS LIMITED
9.
RIGHTS WHICH
laws
The
0.
1
Should
11.
Clarion
Clarion
of
must be shipped
not assume any responsibility for any
DEALER,
APPLICABLE
BY
DURATION
BE
AN
WARRANTY
VARY
State
of the
you have any difficulties with the performance of this product during the warranty period,
or visit our web site for a
Customer
Service
Clarion
in
PURCHASED FROM
ALL
SHALL NOT BE
THAN THE WARRANTY
LIABLE FOR
IMPLIED
FROM STATE TO STATE.
of California
at the
under this Limited Warranty
discretion of
equivalent carton,
original
its
PURCHASES VIA
LAW. IN
TO
EXCEPT
WARRANTY
GIVES YOU SPECIFIC
carton
COVERED
THE EVENT AND
UNDER
BE FIFTEEN
TO
ANY
THE PRODUCT.
govern and
shall
listing
address
or
loss
SOURCE OTHER
A
THE
BY ANY
THESE CIRCUMSTANCES,
(15)
THE EXTENT
PERIOD SET FORTH ABOVE.
LOSS OR
LASTS OR EXCLUSIONS OR LIMITATIONS OF INCIDENTAL OR
Authorized Warranty Service
of
listed below
Clarion.
or damage incurred
INTERNET FROM
DAYS FROM
DAMAGE,
BECAUSE SOME STATES DO NOT ALLOW LIMITATIONS
LEGAL
control this Limited Warranty, its interpretation and enforcement.
for any service
shall
fully
THAN AN
CLARION LIMITED
THE EXTENT
TO
THE DATE
PROHIBITED BY
DIRECT OR CONSEQUENTIAL, ARISING OUT OF
RIGHTS, AND
help you may need with
limited
be
to the repair of the product or
insured, with shipping charges prepaid.
shipping.
in
AUTHORIZED CLARION DEALEB,
NON INTERNET AUTHORIZED
A
THE EXTENT
WARRANTY
APPLICABLE
THE APPLICABLE LIMITED WARRANTY
OF ORIGINAL PURCHASE.
APPLICABLE
UNDER
MAY NOT
MAY ALSO
YOU
your area.
Centers
in
TO
PROHIBITS
LAW
NO
LAW SHALL
NO CIRCUMSTANCES
APPLY
HAVE
You
Clarion
HAVE
TO YOU.
OTHER
please call
also
may
products.
contact
USA:
In
Clarion Corporation
Attn:Customer
Gateway Drive
6200
Cypress, CA
1-800-GO-CLARION
www.clarion.com
Service
90630
America
of
Manager
Canada:
In
Clarion
Warranty
2239 Winston Park Drive
Oakville, Ontario
(905) 829-4600
www.clarion.com
Canada Inc.
Service
Center
L6H
5R1
 Loading...