

Citizen Movement Caliber C660 Setting Instructions Manual

Setting Instructions for Movement Caliber C660
Contents
(click on a topic)
1. Features
2. Before using this watch
3. Names of Components and Major Functions
4. Switching Modes (Display Functions)
5. Checking ‘0’ Position of Each Hand
6. Accessing Times and Dates of Major Cities
Around the World
7. Switching between the Analog and Digital Times
8. Hand Evacuation Function
9. Setting the Time
10. Setting the Date
11. Using the Race Timer
12. Using the Chronograph
13. Using the Timer
14. Using the Alarm
15. Using Zone Setting
16. About the All RESET Procedure
17. Functions Unique to this Solar Powered Watches
a. Insufficient Charge Warning Function
b. Time Setting Warning Function
c. Overcharging Prevention Function
d. Power Save 1
e. Power Save 2
18. General Reference for Charge Times
19. Notes Regarding Use of this Watch
20. Care of Your Timepiece
21. Specifications

Return to Table of Contents
1. FEATURES
This watch is a combination solar – powered watch that contains a solar cell in
its face that drives the watch hands, race time, chronograph, alarm and numerous
other functions by converting light energy into electrical energy.
It is also equipped with convenient functions including a power save mode that
reduces power consumption when light is not shining on the solar cell, UTC
(Coordinated Universal Time), and a world timer indicating the time and dates of
30 major cities around the world
2. BEFORE USING
This watch is a solar-powered watch. Before using, allow light to shine onto the watch so that it is
sufficiently charged.
An Eco Drive rechargeable battery is used in this watch to store electrical
energy. This rechargeable battery is a clean energy battery that does not contain
mercury or other toxic substances. Once fully charged, the watch will continue to
run for a maximum of 4 years without additional charging (when in the power save
2 mode).
[Proper Use of this Watch]
To use this watch comfortably, make sure to recharge it before it stops running
completely. There is no risk of overcharging the watch no matter how often it is
recharged
(Overcharging Prevention Function).
It is recommended that the watch be recharged everyday.
Return to Table of Contents

Return to Table of Contents
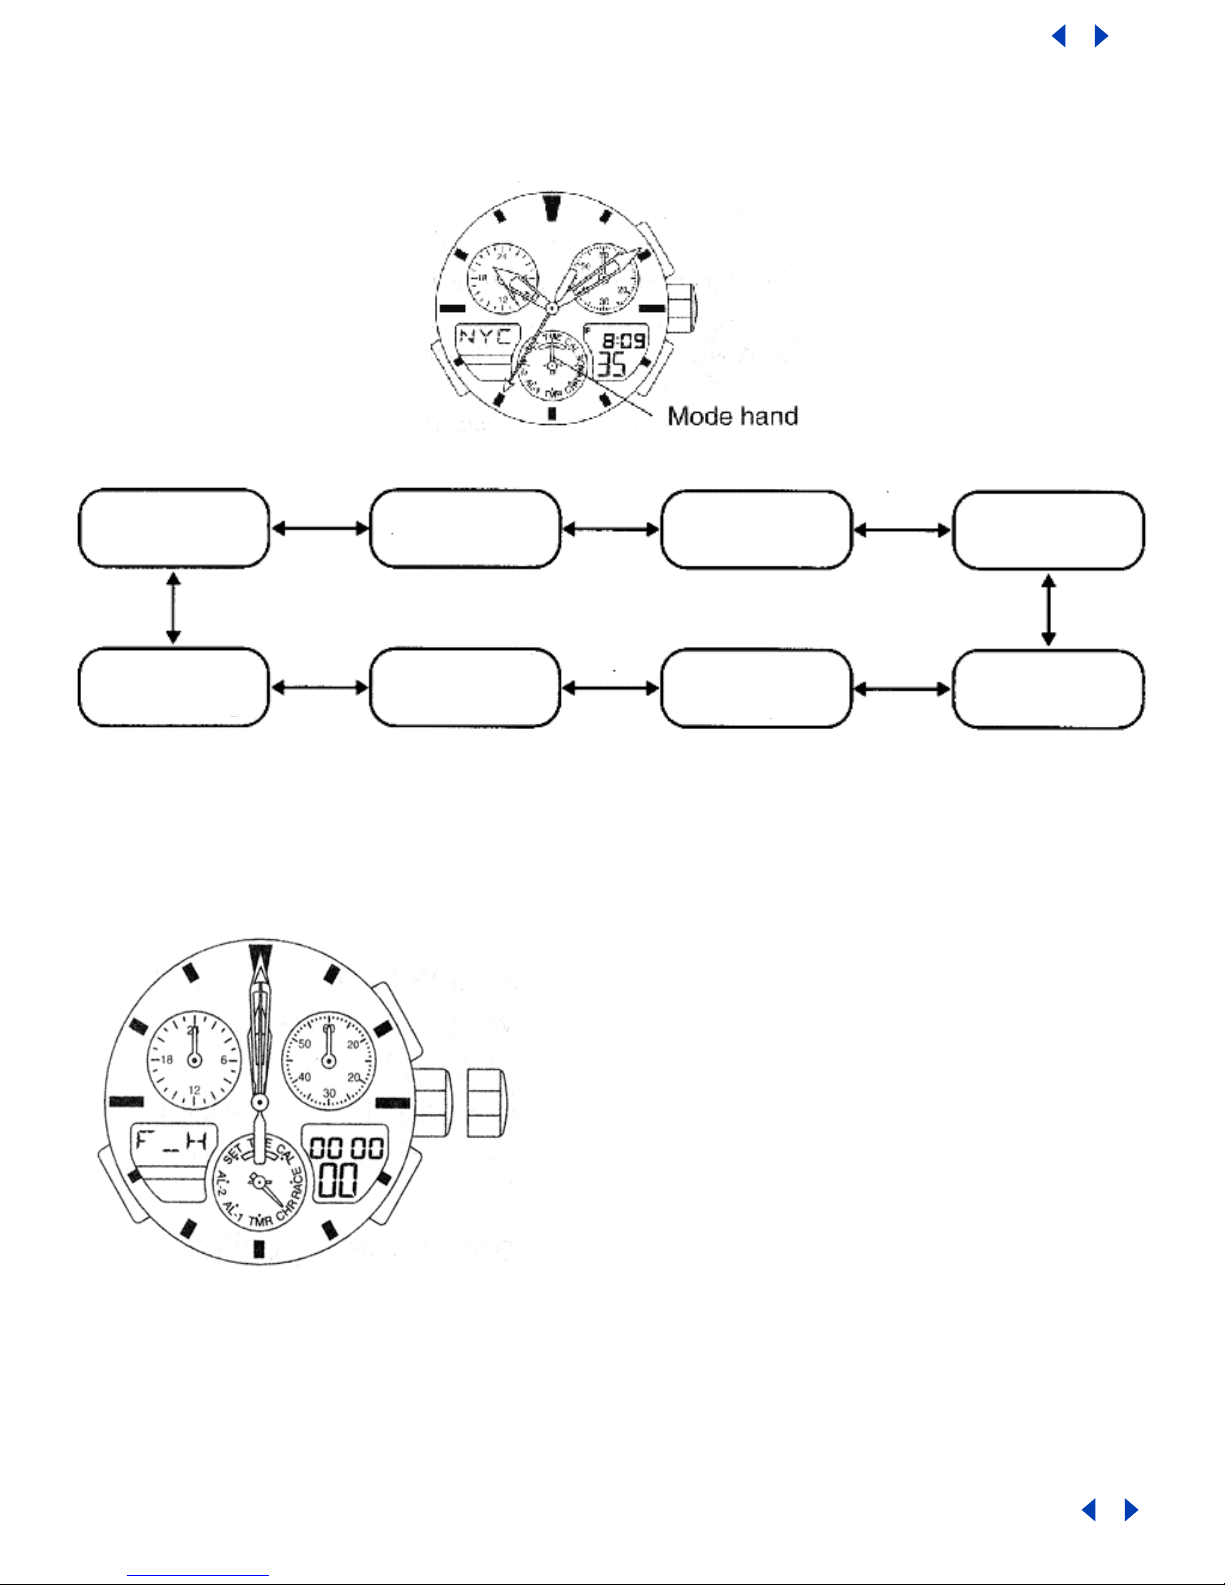
3. NAMES OF COMPONENTS AND MAJOR FUNCTIONS
Name /Mode Time Calendar Timer Chrono -
graph
Timer Alarm 1Alarm 2 Zone
Set
(1) Mode Hand TME CAL RACE CHR TMR AL-1 AL-2 SET
(2) Hour Hand Always Indicates Hours
(3) Minute Hand Always Indicates Minutes
(4) Second Hand Always Indicates Seconds Indicates the
remaining race time
(seconds).
Indicates the autochronograph
Indicates the
chronograph
measured
time
(seconds)
Always indicates Seconds
measured tim e
display (seconds)
(5) 24 Hour Hand Always indicates “24-Hour time” in conjunction with hour and minutes
(6) Function hand Always stopped at ‘0’ position
(standard position)
Indicates the
remaining race time
(minutes). Indicates
the auto-
chronograph
Indicates the
chronograph
measured
time
(Minutes)
Always stopped at ‘0’ position (standard
position)
measured tim e
display (minutes)
(7) Digital Display 1 Hours,
minutes,
seconds
City Name, SMT (when set to
daylight savings time)
Month, date,
day
Indicates the
remaining race time
(minutes, seconds).
Indicates the auto-
chronograph
measured tim e
display (minutes,
seconds)
Race Timer set
tim e (minutes)
Indicates the
chronograph
measured
time
(Minutes,
seconds,
1/100
seconds)
Chrono
Measured
time (hours)
Indicates
the timer’s
remaining
time
(minutes,
seconds)
Timer Set
time.
minutes
Hours, Minutes,
alarm (ON/OFF)
City Name (8) Digital Display 2
City
name
(SET/
OFF)
Charge indicator
(10) Crown Normal
Position
1st Click Time
(A) Button A
Normal Position
1st Click Switching Location to be
(B) Button B
Normal Position
1st Click Switching alarm (on/off) Switch
Normal Position
st
1
Click
Mode Switching
Correction
Calendar
Correct
Race Timer set
time correction
Adjust to 0
position
Timer Set
Correction
Alarm Correction Change
city
Name
Change Cities Start/ Stop Start/ Stop Start/ Stop Change Cities Change
city
name
corrected
____ Switching
Location to
____ Switching Location
to be corrected
___
be corrected
Changing the city Return Flight /
Reset
Split / Reset Return
Flight /
Reset
Switching Alarm
(ON/OFF)
Change
the city
name
SMT
(on/off)
Hand Evaluation (C) Button C
Hand Evaluation
Return to Table of Contents
Return to Table of Contents
4. SWITCHING THE MODE (DISPLAY FUNCTIONS)
In addition to the time and date modes, this watch is also equipped with three a
race timer, chronograph, countdown timer as well as alarm 1 and alarm 1. The mode
can be switched by turning the crown. Check the current mode with the mode hand.
<Switching the Mode>
TME
Time
Set
Zone Setting
CAL
Calendar
AL-2
Alarm 2
RACE
Race Timer
AL-1
Alarm 1
CHR
Chronograph
TMR
Timer
5. CHECKING O-POSITION OF EACH HAND
Before using this watch, check that the 0-position (based position of each hand)
is set correctly to ensure that the functions of the watch operate properly by
performing the following procedure.
<O-Position Check> 1. Turn the crown while in the normal
position to set the mode hand to the
chronograph [CHR) mode.
2. Pull the crown out to the first click (Oposition correction position). The
second, minute, hour, 24-hour and
Function hands rapidly advance to the 0position (12:00 position).
Note:
When each hand is not at the 0-position,
perform the "O-position correction"
procedure. If this 0-position is out of
alignment, each hand will not indicate the
correct position.
Return to Table of Contents

Return to Table of Contents
O-Position Correction (Setting to the Watch Base ‘0’ Position)
When setting the 0-position of each hand, always make sure to turn the crown
forward (clock-wise) to set each hand to its 0-position in the clockwise
direction.
1. Turn the crown while in the normal position to set the mode hand to the
chronograph [CHR] mode.
2. Pull the crown out to the second click (0-position correction position).
a. The second, minute, hour and 24 hour hands rapidly advance to the
position stored in memory.
b. "F-H" lights during digital display 2 indicating that the watch is in
the correction state.
3. Turning the crown forward (clockwise) allows correction to be made in the
positive direction. Turning the crown continuously allows the 0-position to be
corrected continuously. Turn the crown right or left to stop rapid
advancement.
4. Pressing button (A) switches the correction location between "HR" (24-hour,
hour and minute hands) and "SEC" (second hand) and “F-H” (function hand) each
time button (A) it is pressed.
5. Turn the crown forward (clockwise) to align each hand at the 0-position at
each correction location. Although correction can be made in the negative
direction by turning the crown backward (counter-clockwise), always make sure
to set the 0-position by turning the crown forward to ensure that the 0position is set correctly.
a. The 24-hour hand is corrected in conjunction with the hour and minute
hands.
6. After correcting, return the crown to the normal position.
a. After correcting the 0-position of each hand, reset the time, calendar
and other modes before using the watch.
Note:
None of the buttons on the watch operate during movement of each hand.
Operate the buttons only after the hands have stopped moving.
Function Hand
Minute / Hour / 24-hour
Hands
Second Hand
Return to Table of Contents
Return to Table of Contents
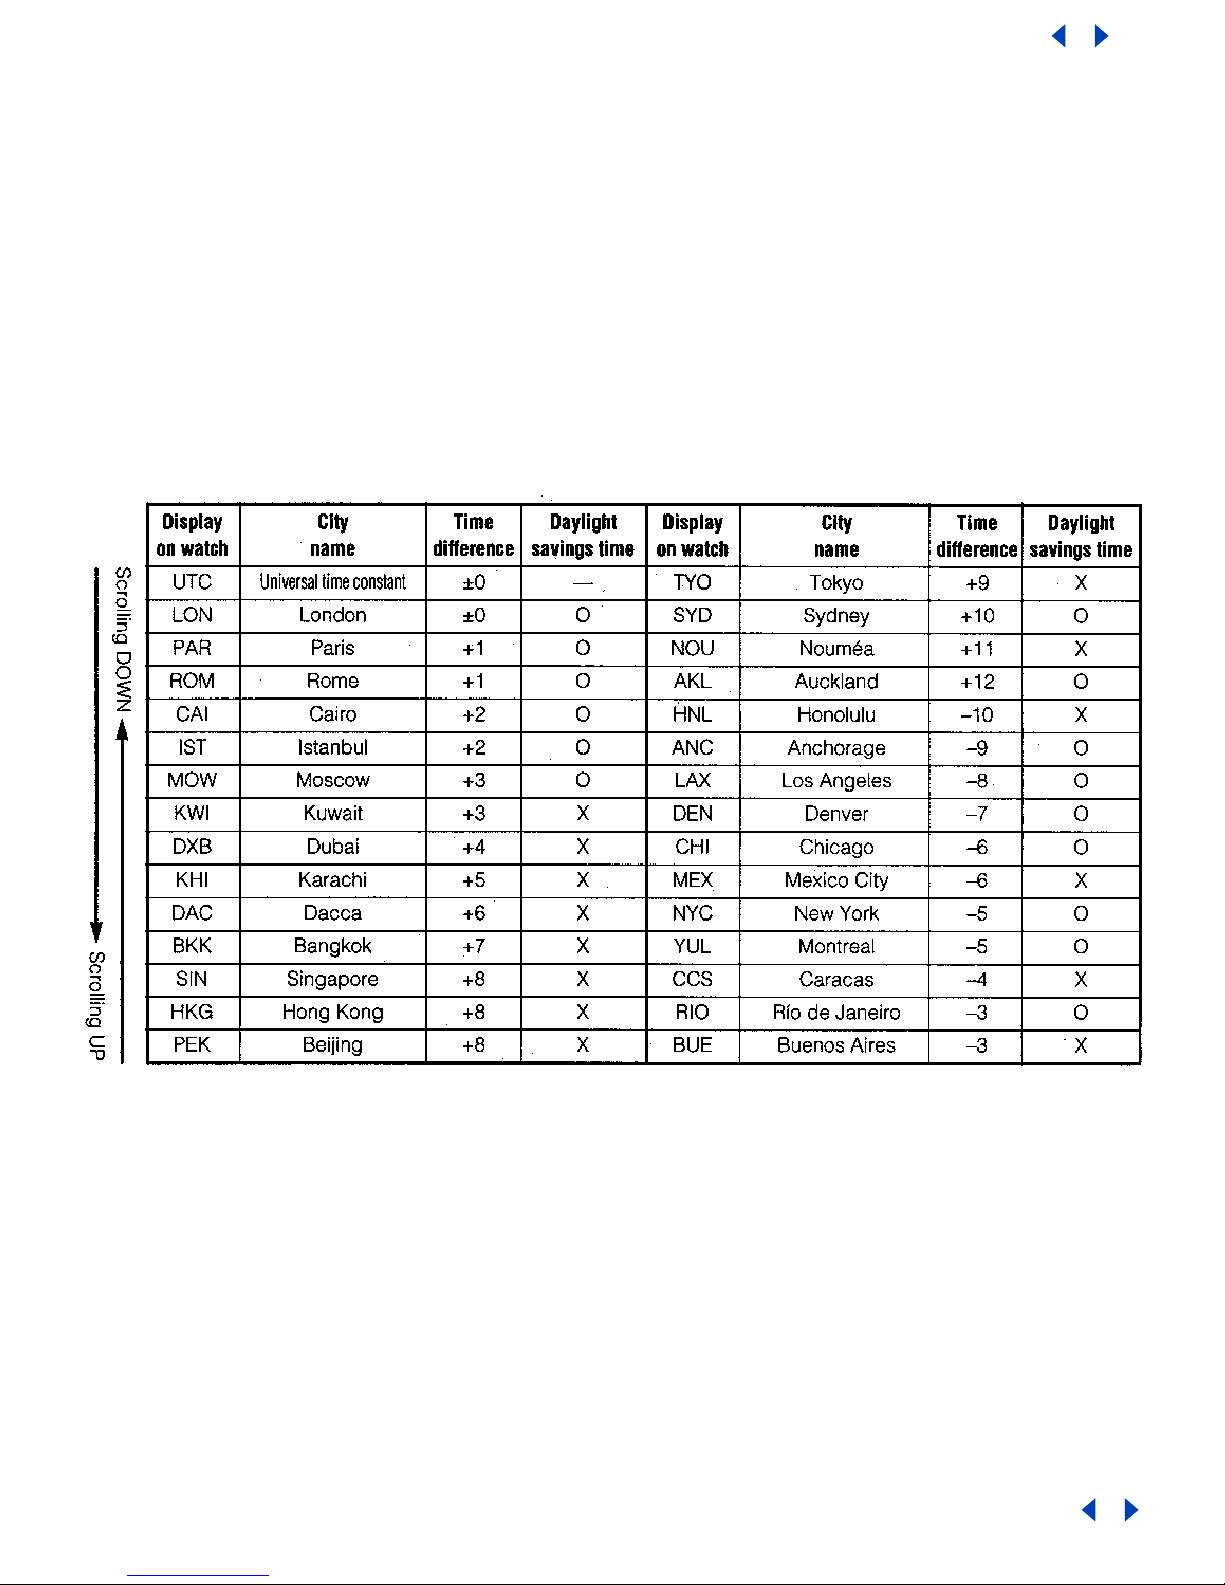
6. ACCESSING TIMES OR DATES OF MAJOR CITIES
The time of date of major cities pre-registered in this watch can be easily
accessed by pressing the buttons.
<Access Procedure>
1. Turn the crown to set the mode hand to the time [TME] or calendar
[CAL] mode.
2. When button (A) is pressed, the times or dates of major cities are
displayed while scrolling up each time it is pressed.
3. When button (B) is pressed, the times or dates of major cities are
displayed while scrolling down each time it pressed.
* Pressing button (A) or (B) continuously causes the display to
advance rapidly.
<Cities and UTC Time Difference Pre-registered in this Watch>
x Cities (regions) in which daylight savings time is used are indicated with
a 0, while those in which it is not are indicated with an X.
x The time difference and use of daylight savings time of each city are
subject to change by the particular country.
Return to Table of Contents
Return to Table of Contents
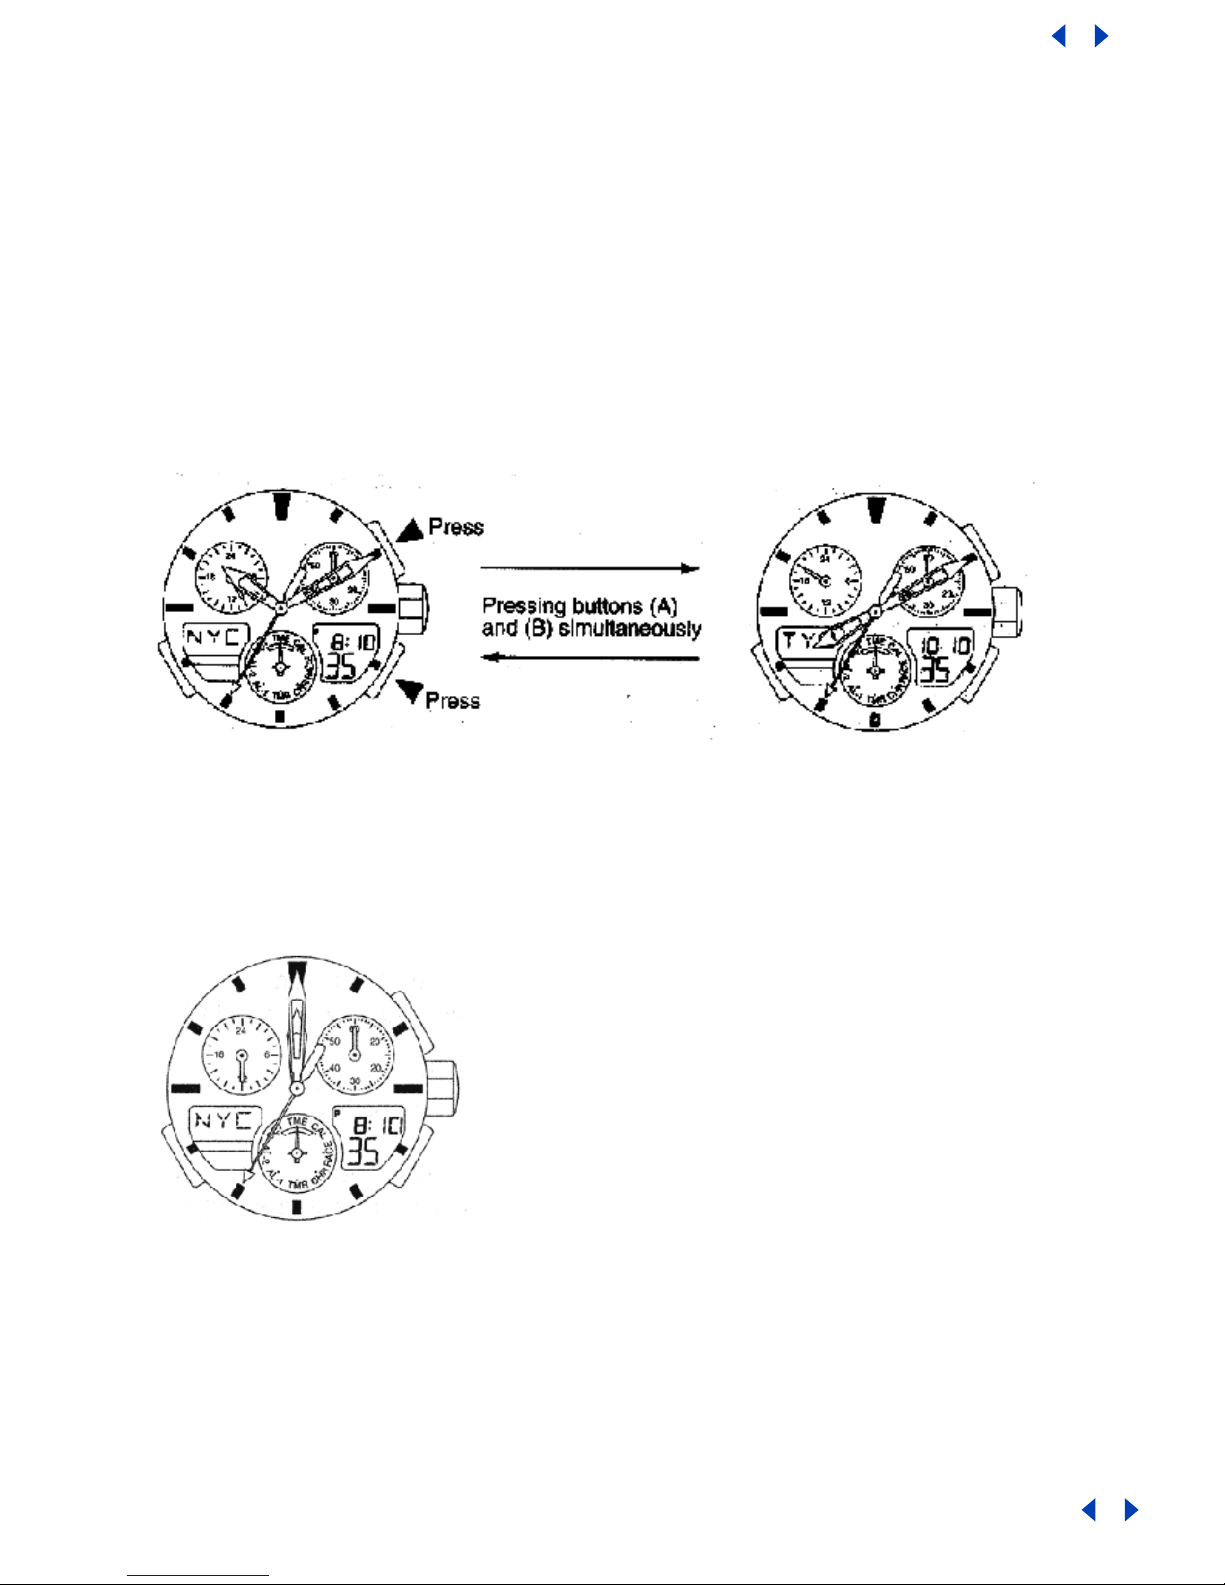
7. SWITCHING ANALOG TIME AND DIGITAL TIME
This watch is able to switch between analog time display and digital time
display.
<Switching Procedure>
1. Turn the crown to set the mode hand to the time [TME) mode.
2. Press button (A) and (B) simultaneously.
3. After a confirmation tone sounds, the watch switches the time of the city
displayed by analog display and the time of the city displayed by digital
display.
If buttons (A) and (B) are simultaneously pressed when in the calendar [CAL]
Mode, the watch switches the date of the city displayed by analog display and the
date of the city displayed by digital display (the times are switched at this
time as well).
8. HAND EVACUATION FUNCTION
The hand evacuation procedure allows the hour and minutes hands to be retracted
to the 12:00 position for clear viewing of the digital displays.
<Activating Hand Evacuation Method>
1. Pressing button (C (lower left))
for at least 2 seconds moves the
hour and minutes hands to the
12:00 position.
<Activating Hand Evacuation Method>
1. Pressing button (C (lower left))
moves the hour and minute hands
back to the position for normal
time indication
Return to Table of Contents
 Loading...