

Page 1
Read all instructions BEFORE
assembly and USE of product.
KEEP INSTRUCTIONS FOR
FUTURE USE.
Lea todas las instrucciones ANTES
de armar y USAR este producto.
CONSERVE LAS INSTRUCCIONES
PARA USO FUTURO.
IS0110.4ES
UrbanTM
Stroller
Owner's Manual
Manual del propietario
©2016 Artsana USA, INC. 04/16
Page 2
WARNINGWARNING
Failure to follow all warnings and instructions may result in
serious injury or death. For your child's safety, read the labels
and owner's manual before using the product.
• PLEASE SAVE OWNER'S MANUAL
FOR FUTURE USE.
• ADULT ASSEMBLY REQUIRED.
• NEVER LEAVE CHILD
UNATTENDED. Always keep child
in view while in the stroller.
• AVOID SERIOUS INJURY from
falling or sliding out. Always use
seat belt. After fastening buckles,
adjust belts to get a snug fit around
your child.
• AVOID FINGER ENTRAPMENT: Use
care when folding and unfolding
the stroller. Be certain the stroller
is fully opened and latched before
allowing your child near the
stroller.
• USE OF THE STROLLER with a
child weighing more than 50 lbs
(22.7 kg), will cause excessive wear
and stress on the stroller. Use the
stroller with only one child at a
time.
• Do not use Seat Insert with child
weighing more than 40lbs (18 kg).
• STROLLER TO BE USED only
at walking speed. Product not
intended for use while jogging,
skating, etc.
• TO PREVENT A HAZARDOUS,
UNSTABLE CONDITION, never
place purses, shopping bags,
parcels or accessory items on the
canopy or handle. Do not place
more than 10 lbs (4.5 kg) in the
storage basket.
2 3
• DO NOT use storage basket as a
child carrier.
• Avoid burns. Never put hot liquids
in cup holder. Max weight in cup
holder 1 lb (0.5 kg).
• NEVER ALLOW YOUR STROLLER to
be used as a toy.
• DISCONTINUE USING YOUR
STROLLER should it become
damaged or broken.
• AVOID STRANGULATION. DO
NOT place items with a string
around your child's neck, suspend
strings from this product, or attach
strings to toys.
• NEVER USE STROLLER ON STAIRS
or escalators. You may suddenly
lose control of the product and
your child may fall out. Also, use
extra care when going up or down
a step or curb.
• Do not attempt to attach any
infant car seat to the stroller
other than the Chicco KeyFit.
Injury or death may result when
attempting to use this stroller in
conjunction with infant car seats
from other manufacturers.
• Before use, remove and dispose
of all plastic bags and packaging
materials and keep them out of
reach of children.
Failure to follow all warnings and instructions may result in
serious injury or death. For your child's safety, read the labels
and owner's manual before using the product.
• Before assembly, check that the
product and all of its components
have not been damaged during
transportation.
• Do not use accessories, spare
parts, or any component not
supplied or approved by Chicco
as they may make the stroller
unsafe.
Using Chicco Infant Carrier with
stroller:
• ONLY USE the Chicco KeyFit®or
KeyFit® 30 infant car seat with this
product.
• Only use this product to transport
infants that are within the size and
weight limitations of the infant car
seat.
• FALL HAZARD: Always check that
infant car seat is securely attached
to stroller frame by pulling up on
the infant car seat.
• ALWAYS SECURE your child with
the carrier harness. Always make
sure child is properly harnessed in
the car seat.
• Refer to your infant car seat
owner's manual for additional
warnings and use instructions
before using this product.
Page 3
ADVERTENCIAADVERTENCIA
El incumplimiento de todas las advertencias e instrucciones
puede provocar lesiones graves o la muerte. Por la seguridad
de su hijo, lea las etiquetas y el manual del propietario antes
de utilizar el producto.
• CONSERVE EL MANUAL DE
PROPIETARIO PARA USO FUTURO.
• SE REQUIERE EL ARMADO DE UN
ADULTO.
• NUNCA DEJE AL NIÑO
DESATENDIDO. Cuando el niño
esté en el cochecito, vigílelo en
todo momento.
• EVITE LAS LESIONES GRAVES que
podrían producirse a causa de la
caída o deslizamiento del producto.
Recuerde siempre utilizar el
cinturón de seguridad. Después de
sujetar las hebillas, ajuste bien los
cinturones alrededor del niño.
• EVITE APRETARSE LOS DEDOS:
Tenga cuidado al plegar y desplegar
el cochecito. Asegúrese de que la
silla de paseo esté completamente
abierta y segura antes de permitir
que su hijo se acerque a ella.
• SI USA EL COCHECITO PARA un
niño que pese más de 50 libras
(22.7 kg), causará desgaste y
tensión excesiva en el cochecito.
Empléelo solamente con un niño a
la vez.
• No utilice la inserción del asiento
con niños que pesen más de 40
libras (18 kg).
• EL COCHECITO DEBE USARSE sólo
a velocidad de caminata. No debe
usar este producto mientras está
corriendo, patinando, etc.
• PARA EVITAR UNA INESTABILIDAD
PELIGROSA, nunca coloque
carteras, bolsas de compras,
paquetes o accesorios en la manija
o en la capota. No cargue más
de 10 libras (4.5 kg) en el cestillo
portaobjeto.
• NO utilice el cestillo portaobjeto
para transportar al niño.
• Evitar quemaduras, nunca
coloque líquidos calientes sobre
la bandeja soportes de vasos.
Peso máximos de dispositivo de
soporte para tazas 1 libra (0.5 kg).
• NUNCA PERMITA QUE EL
COCHECITO se utilice como
juguete.
• SUSPENDA EL USO DEL
COCHECITO si se daña o se rompe.
• EVITE LA ESTRANGULACIÓN. NO
coloque elementos con cuerdas
alrededor del cuello del niño, no
suspenda cuerdas de este producto
ni coloque cordones en los
juguetes.
• NUNCA UTILICE EL COCHECITO
EN ESCALERAS, ya sean comunes
o mecánicas. Puede perder
repentinamente el control de
la silla de paseo y su hijo puede
caerse. Asimismo, tenga extremo
cuidado cuando suba o baje un
escalón o cordón de vereda.
El incumplimiento de todas las advertencias e instrucciones
puede provocar lesiones graves o la muerte. Por la seguridad
de su hijo, lea las etiquetas y el manual del propietario antes
de utilizar el producto.
• No intente sujetar ningún
asiento de seguridad infantil al
cochecito que no sea el Chicco
KeyFit. Utilizar este cochecito con
asientos de seguridad infantil de
otros fabricantes puede provocar
lesiones o la muerte.
• Antes del uso, retire y deseche
todas las bolsas de plástico y
los materiales de embalaje y
manténgalos fuera del alcance de
los niños.
• Antes del armado, verifique que
no se hayan dañado el producto
ni sus componentes durante el
transporte.
• No utilice accesorios, piezas de
repuesto ni componentes que
no hayan sido suministrados
o aprobados por Chicco, ya
que podrían comprometer la
estabilidad del cochecito.
Uso del portabebés Chicco en el
cochecito:
• SÓLO UTILICE este producto con el
asiento para automóvil para niños
Keyfit® o Keyfit® 30 de Chicco.
No utilice ningún otro asiento
para automóvil para niños de otro
fabricante.
• Utilice este producto sólo para
transportar bebés que no superen
el tamaño o el peso permitido por
el producto.
• RIESGO DE CAÍDAS: Controle
siempre que el asiento para
automóvil para niños esté bien
sujetado a la estructura de la silla
de paseo, tirando del asiento hacia
arriba.
• ASEGURE SIEMPRE al niño con el
arnés del portabebés cuando utilice
este accesorio en el cochecito.
Si el niño ya se encuentra en el
portabebés, verifique que esté
asegurado con el arnés.
• Lea el manual incluido con el
portabebés Chicco antes de usarlo
en su cochecito.
4 5
Page 4
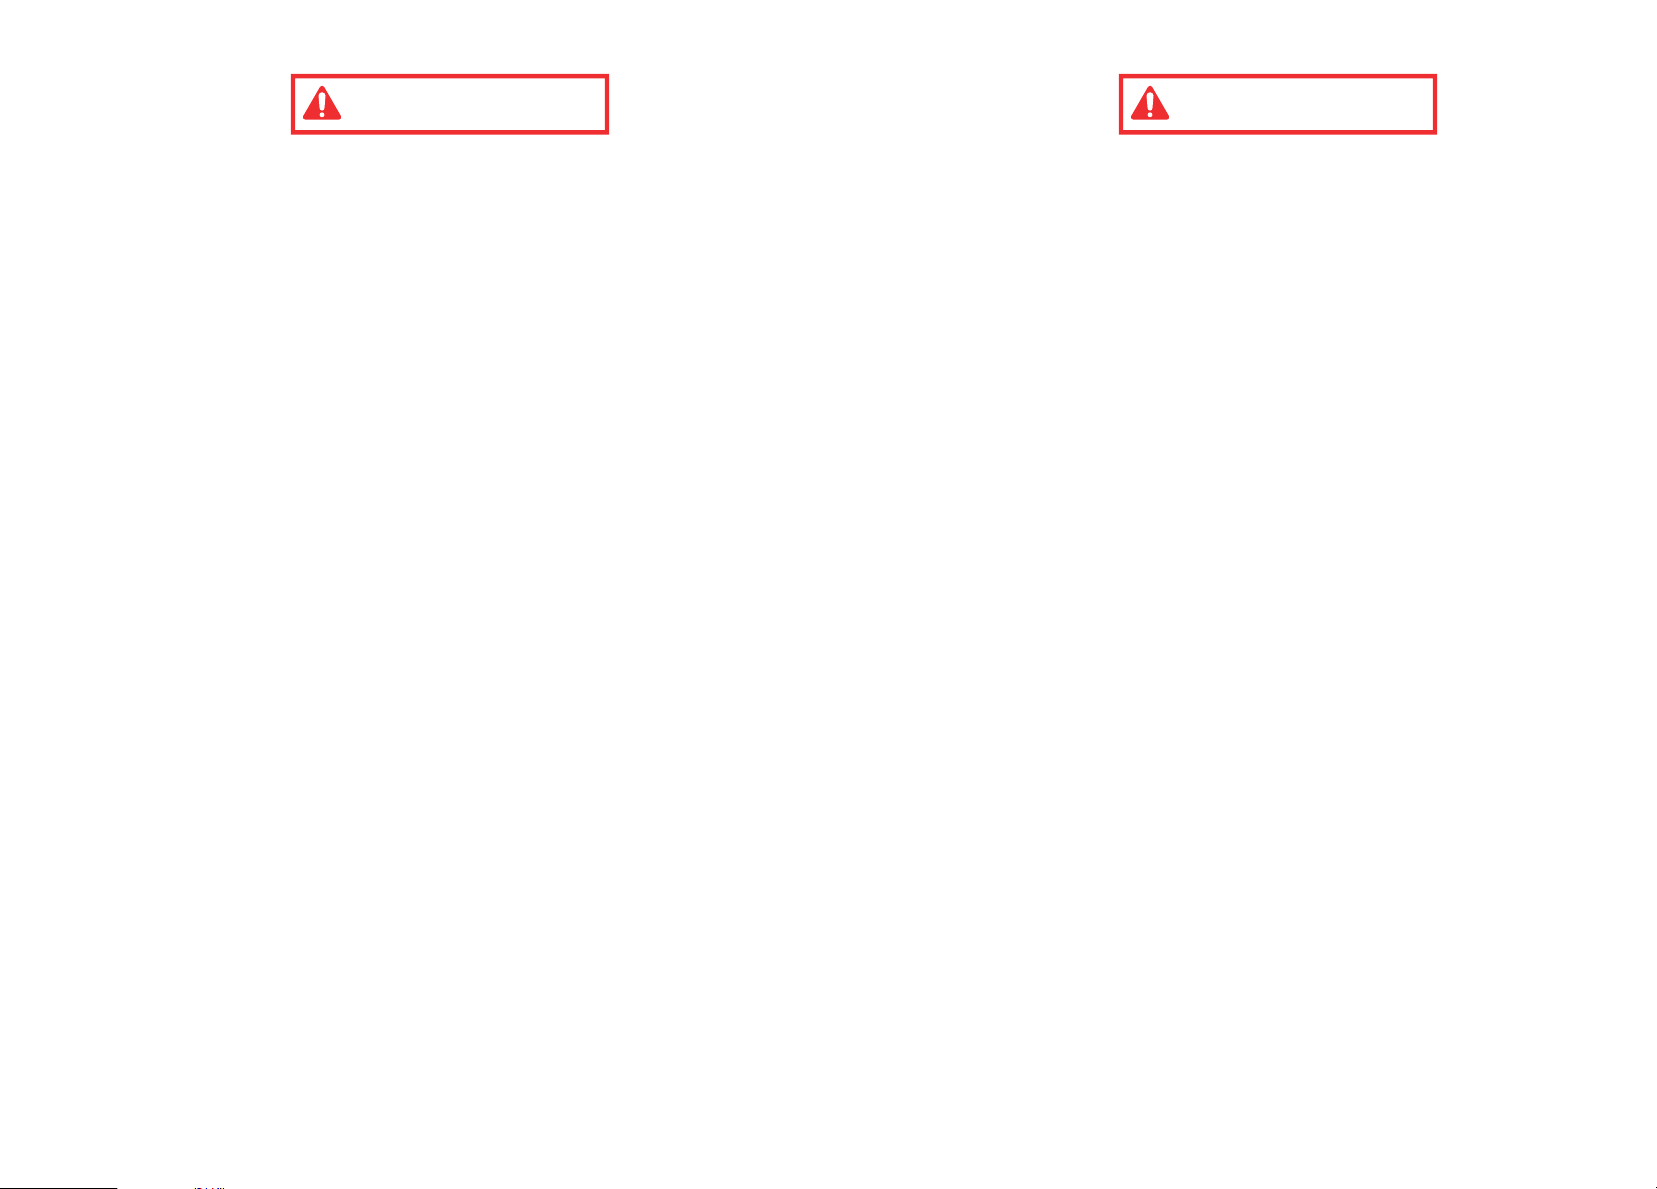
Components
Components
A.
B.
C.
Componentes
A. - Stroller Frame
A. - Estructura de la silla de paseo
B. - Front Wheels
B. - Ruedas delantera
C. - Rear Wheels
C. - Traseras delantera
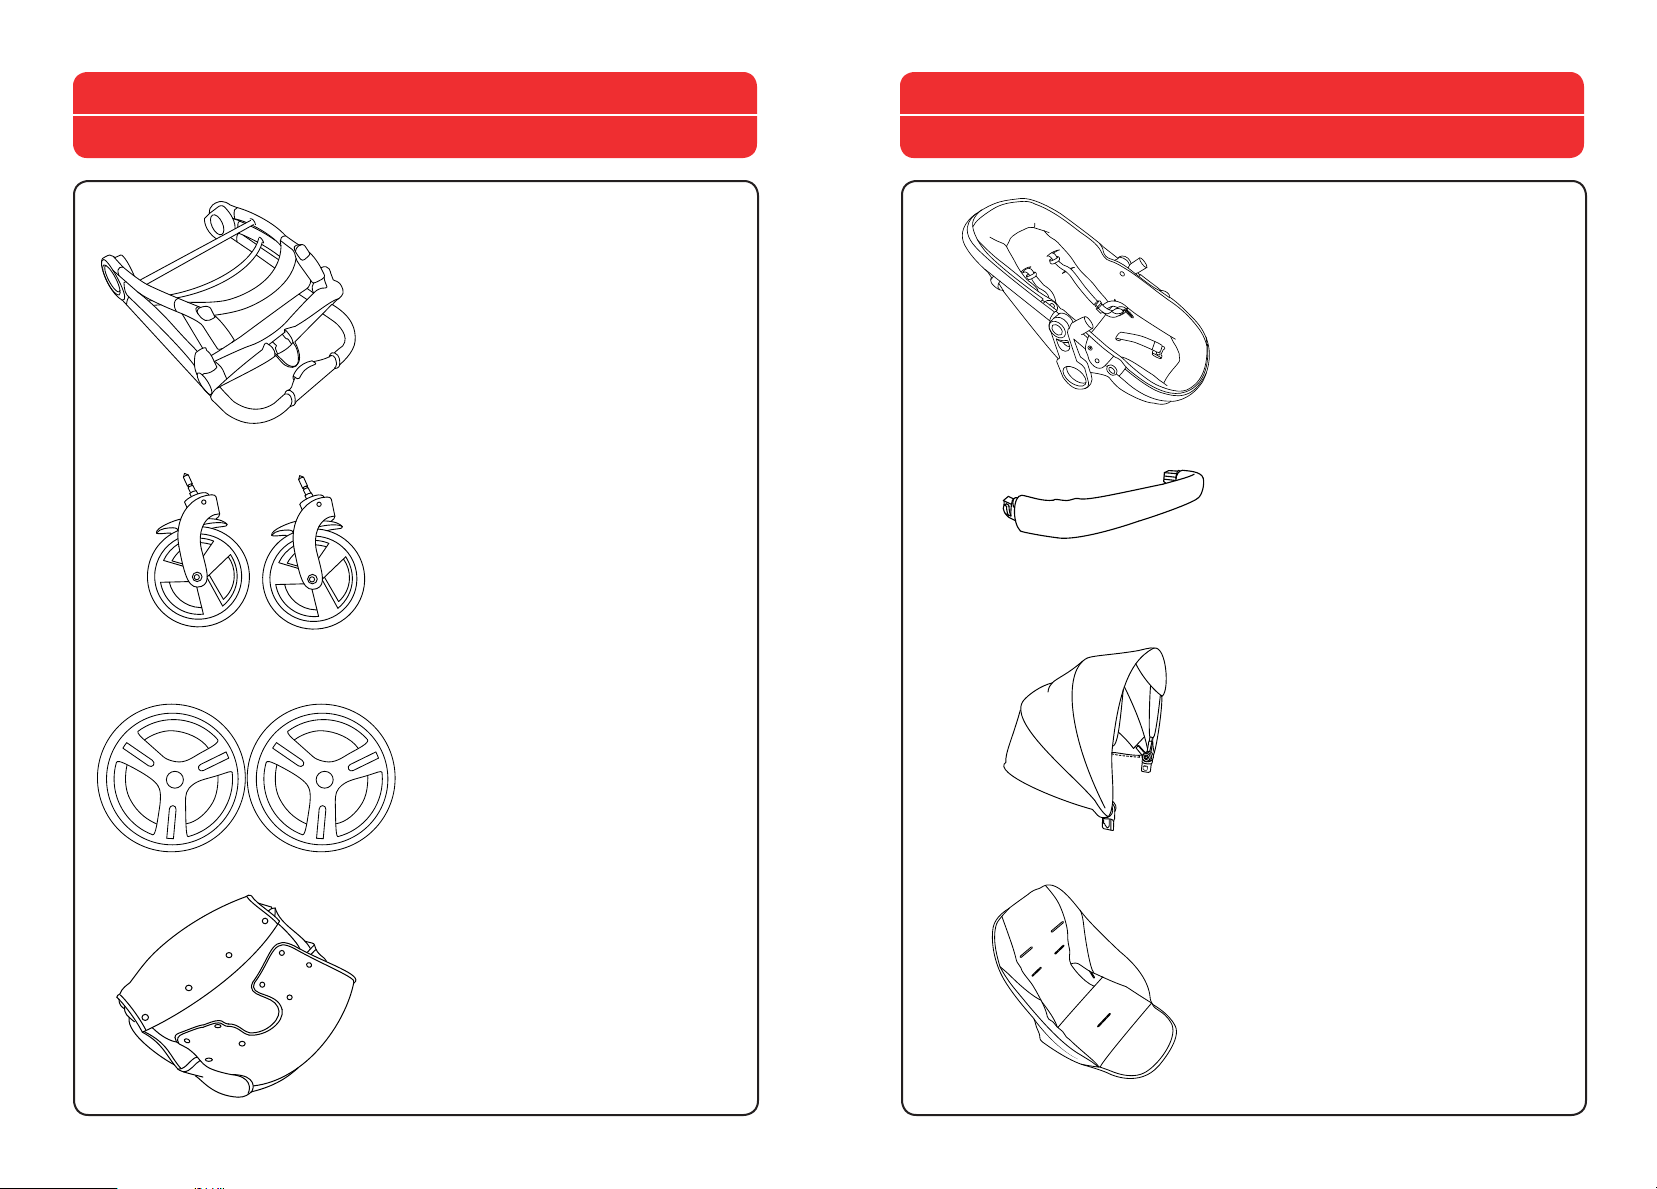
E.
F.
G.
Componentes
E. - Seat
E. - Asiento
F. - Bumper Bar
F. - Barra de protección
G. - Canopy
G. - Capota
H. - Seat Insert
H. - Cubierta del asiento
D.
H.
D. - Basket
D. - Cestillo
6 7
Page 5
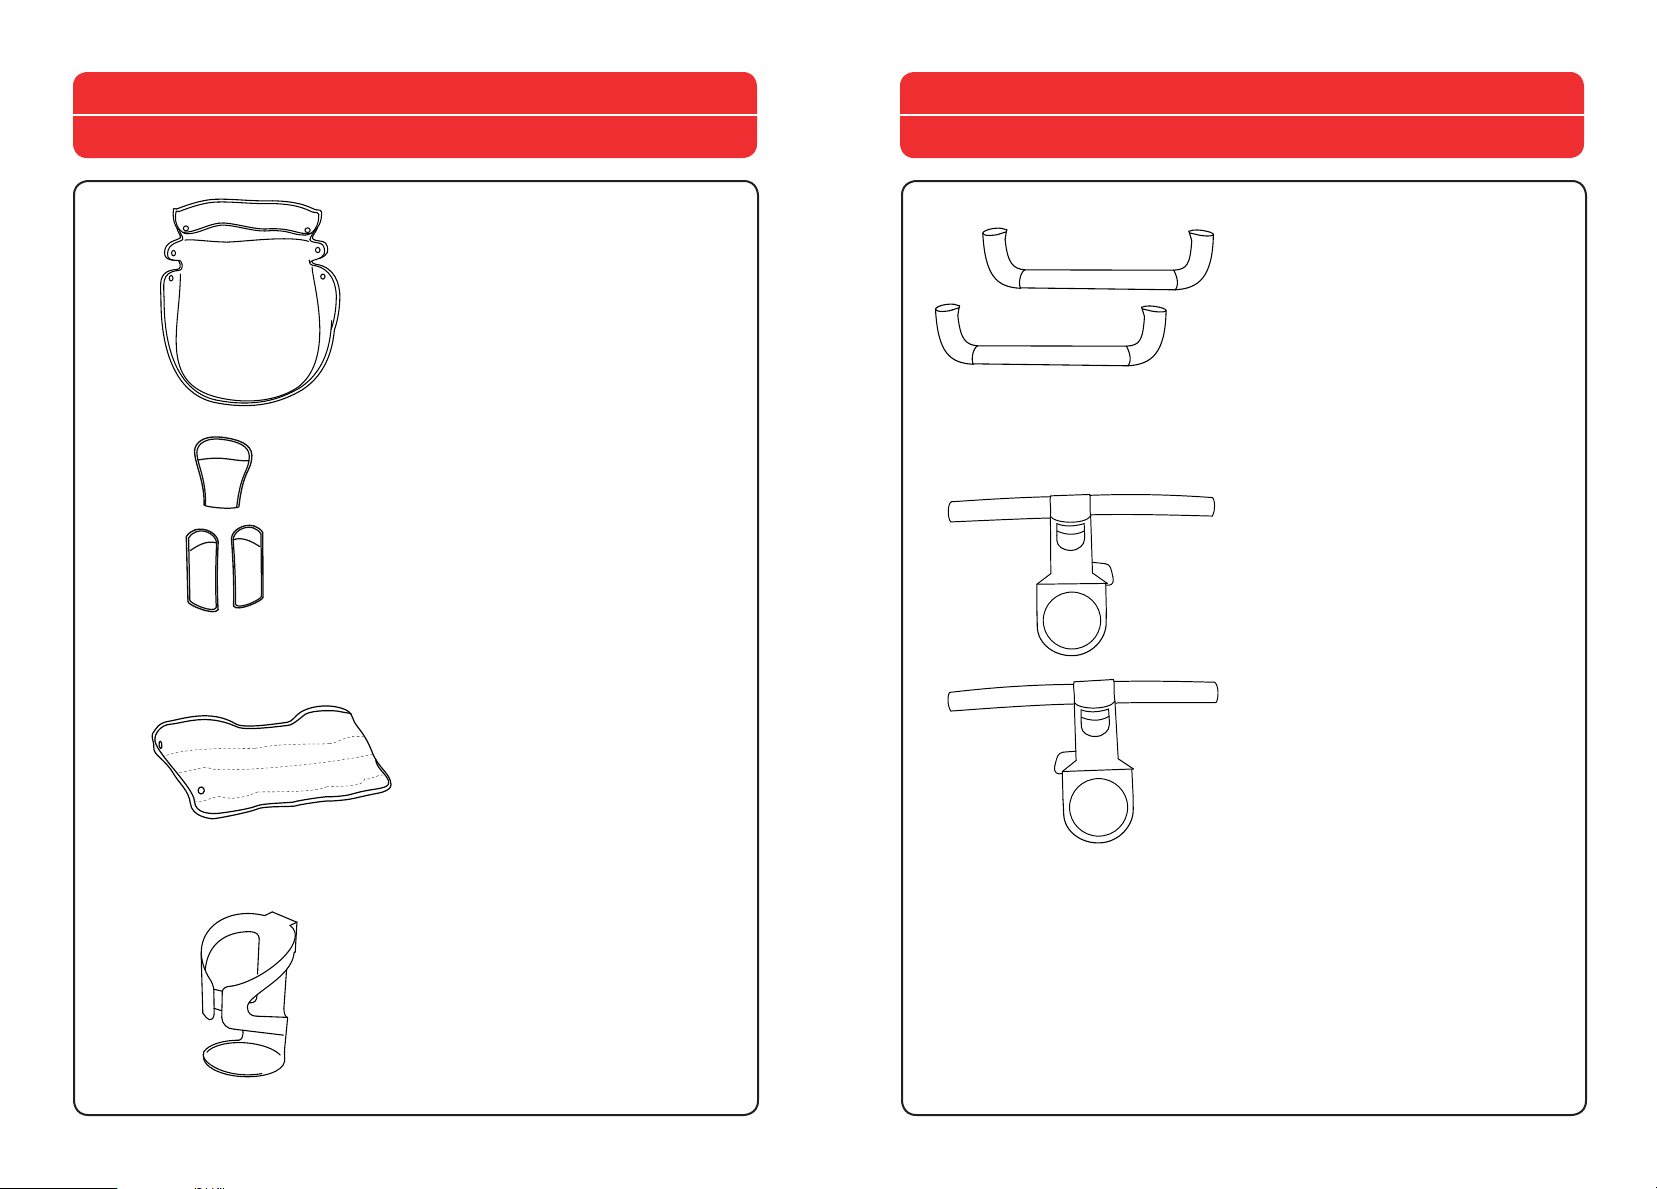
Components
Components
K.
Componentes
I.
J.
I. - Boot
I. - Funda
J. - Crotch Pad and Shoulder Pads
J. - Almohadilla para la entrepierna y
almohadillas para los hombros
K. - Hand Muff (select models)
K. - Manguito (modelos selectos)
M.
N.
Componentes
M. - KeyFit® Attachment Ends
M. - Extremos del accesorio KeyFit
N. - Left & Right KeyFit®
Attachment Side Hubs
N. - Cubos laterales izquierdo y
derecho del accesorio KeyFit
L. - Cupholder
L.
L. - Soportes de vaso
8 9
Page 6

How to Assemble Stroller
How to Assemble Stroller
Cómo armar el cochecito
WARNING
When opening the Stroller, ensure
that your child, or other children,
are at a safe distance. Ensure
that during these operations, the
movable parts of the Stroller do not
come into contact with your child.
1
ADVERTENCIA
Al abrir la silla de paseo, asegúrese
de que su hijo, u otros niños, se
encuentren a una distancia segura.
Asegúrese de que cuando realice
estas operaciones, las partes móviles
de la silla de paseo, no entren en
contacto con su hijo.
1. Locate the Gray Handle Release
Button on the Stroller Hub, as shown.
Push in the button and lift up on the
Stroller Handle.
1. Ubique el botón gris de liberación
de la manija en el cubo del cochecito,
como se muestra. Presione el botón y
levante la manija del cochecito.
2
Cómo armar el cochecito
2. With the Stroller Handle fully raised.
Pick up on the Stroller Handle and
swing out the Stroller's Front Legs
until a locking click is heard.
“CLICK!”
“¡CLIC!”
2. Con la manija del cochecito
completamente levantada, sujete la
manija y extienda las patas delanteras
del cochecito hasta que oiga un clic.
10 11
Page 7
How to Assemble Stroller
How to Assemble Stroller
3A
3B
“CLICK!”
“¡CLIC!”
Cómo armar el cochecito
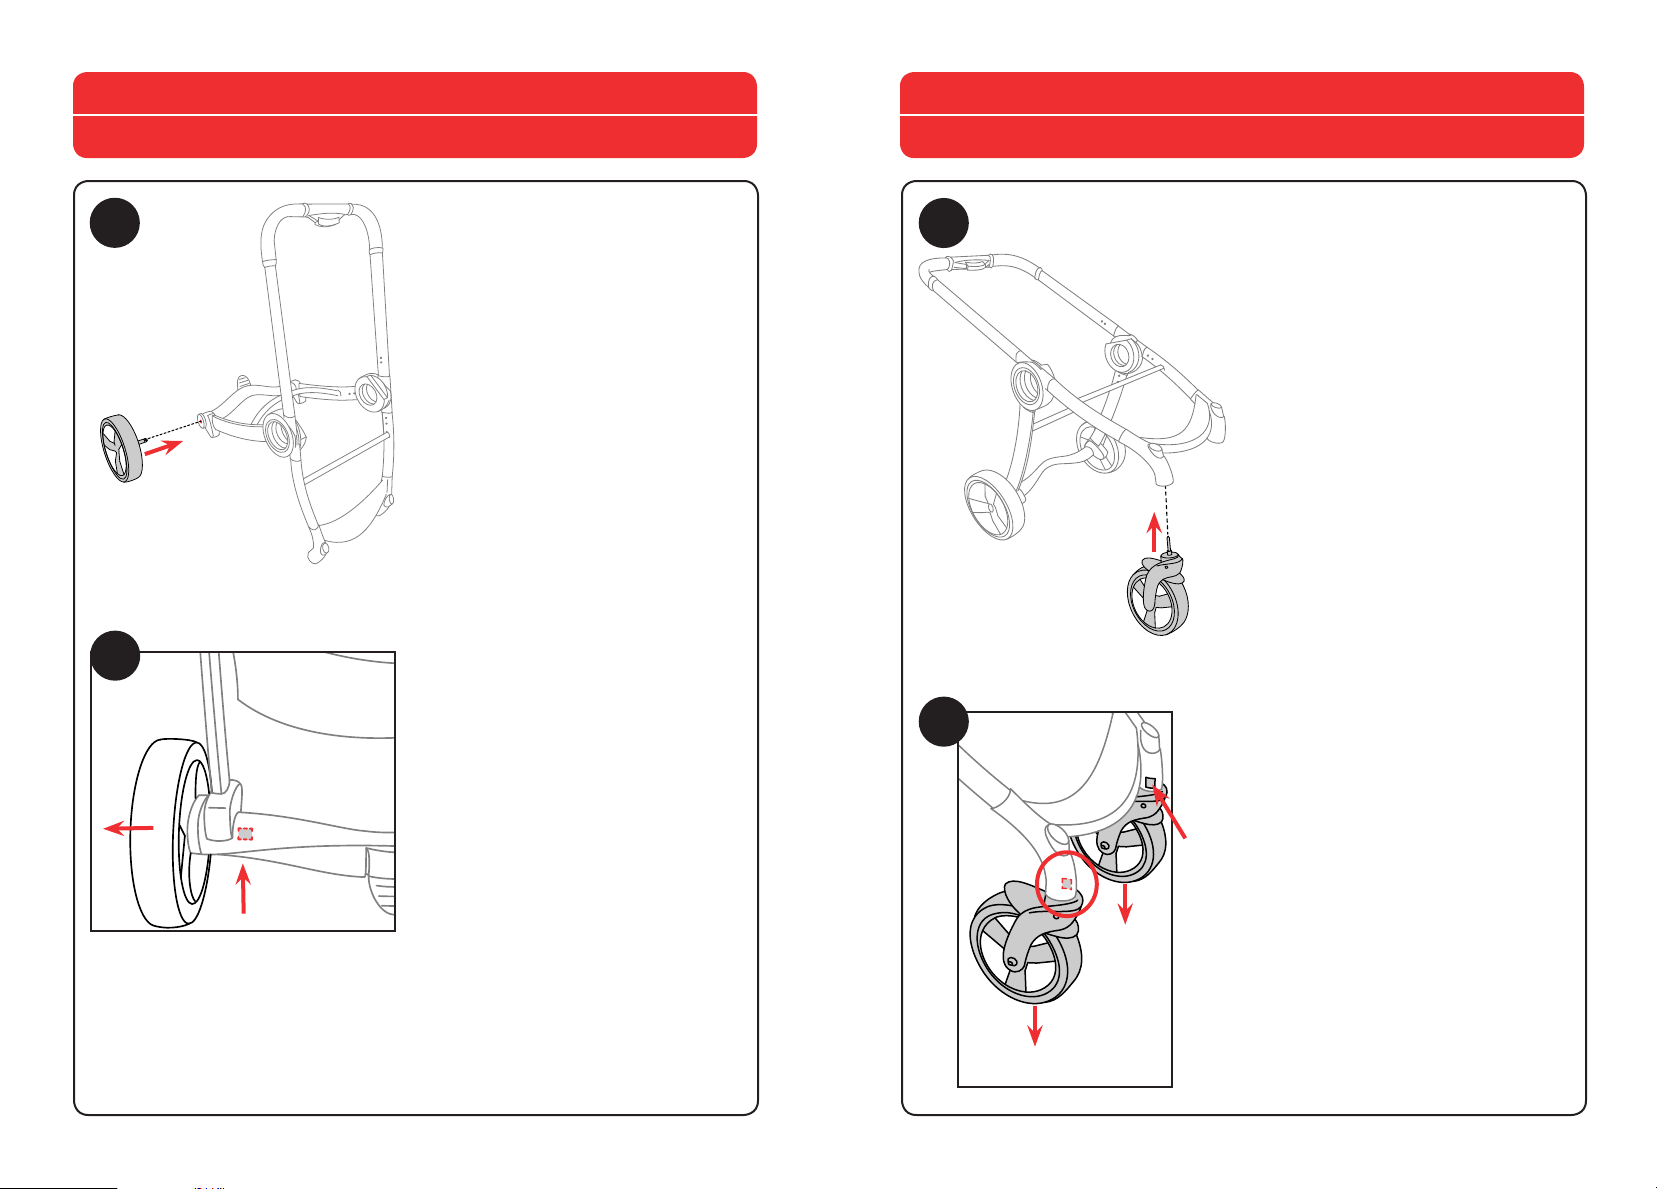
3A. Attach the Rear Wheels to the
Stroller Frame, line up and insert the
Rear Wheel Pin into the corresponding
opening on the Stroller Rear Leg, as
shown. Repeat for the other side.
3A. Coloque las ruedas traseras en
la estructura del cochecito: alinee e
inserte la clavija de la rueda trasera en
el orificio correspondiente en la pata
trasera del cochecito, como se
muestra. Repita del otro lado.
3B. To remove the Rear Wheels,
locate the Release Button under the
rear crossbar as shown. Push in on
the Release Button and, at the same
time, pull the wheel off of the Stroller
Frame. Repeat for the other side.
3B. Para quitar las ruedas traseras,
ubique el botón de liberación debajo
de la barra cruzada trasera, como
se muestra. Presione el botón de
liberación y, al mismo tiempo, tire de
la rueda para sacarla de la estructura
del cochecito. Repita del otro lado.
4A
4B
Cómo armar el cochecito
4A. Attach the Front Swivel Wheels
to the Stroller Frame, line up and
insert the Front Swivel Wheel Pin into
the corresponding opening on the
Stroller Front Leg, as shown. Repeat
for the other side.
4A. Coloque las ruedas delanteras
giratorias en la estructura del
cochecito: alinee e inserte la clavija
de la rueda delantera giratoria en el
orificio correspondiente en la pata
delantera del cochecito, como se
muestra. Repita del otro lado.
4B. To remove the Front Swivel,
locate the Release Buttons just above
the wheels (as shown). Push in on
the Release Button and, at the same
time, pull the wheel off of the Stroller
Frame. Repeat for the other side.
4B. Para quitar la rueda delantera
giratoria, ubique los botones de
liberación inmediatamente arriba
de las ruedas (como se muestra).
Presione el botón de liberación y, al
mismo tiempo, tire de la rueda para
sacarla de la estructura del cochecito.
Repita del otro lado.
12 13
Page 8
How to Assemble Stroller
How to Assemble Stroller
Cómo armar el cochecito
WARNING
Do not place more than 10 lbs
(4.5 kg) in the storage basket.
5A
5B
ADVERTENCIA
No cargue más de 10 libras (4.5 kg)
en el cestillo portaobjeto.
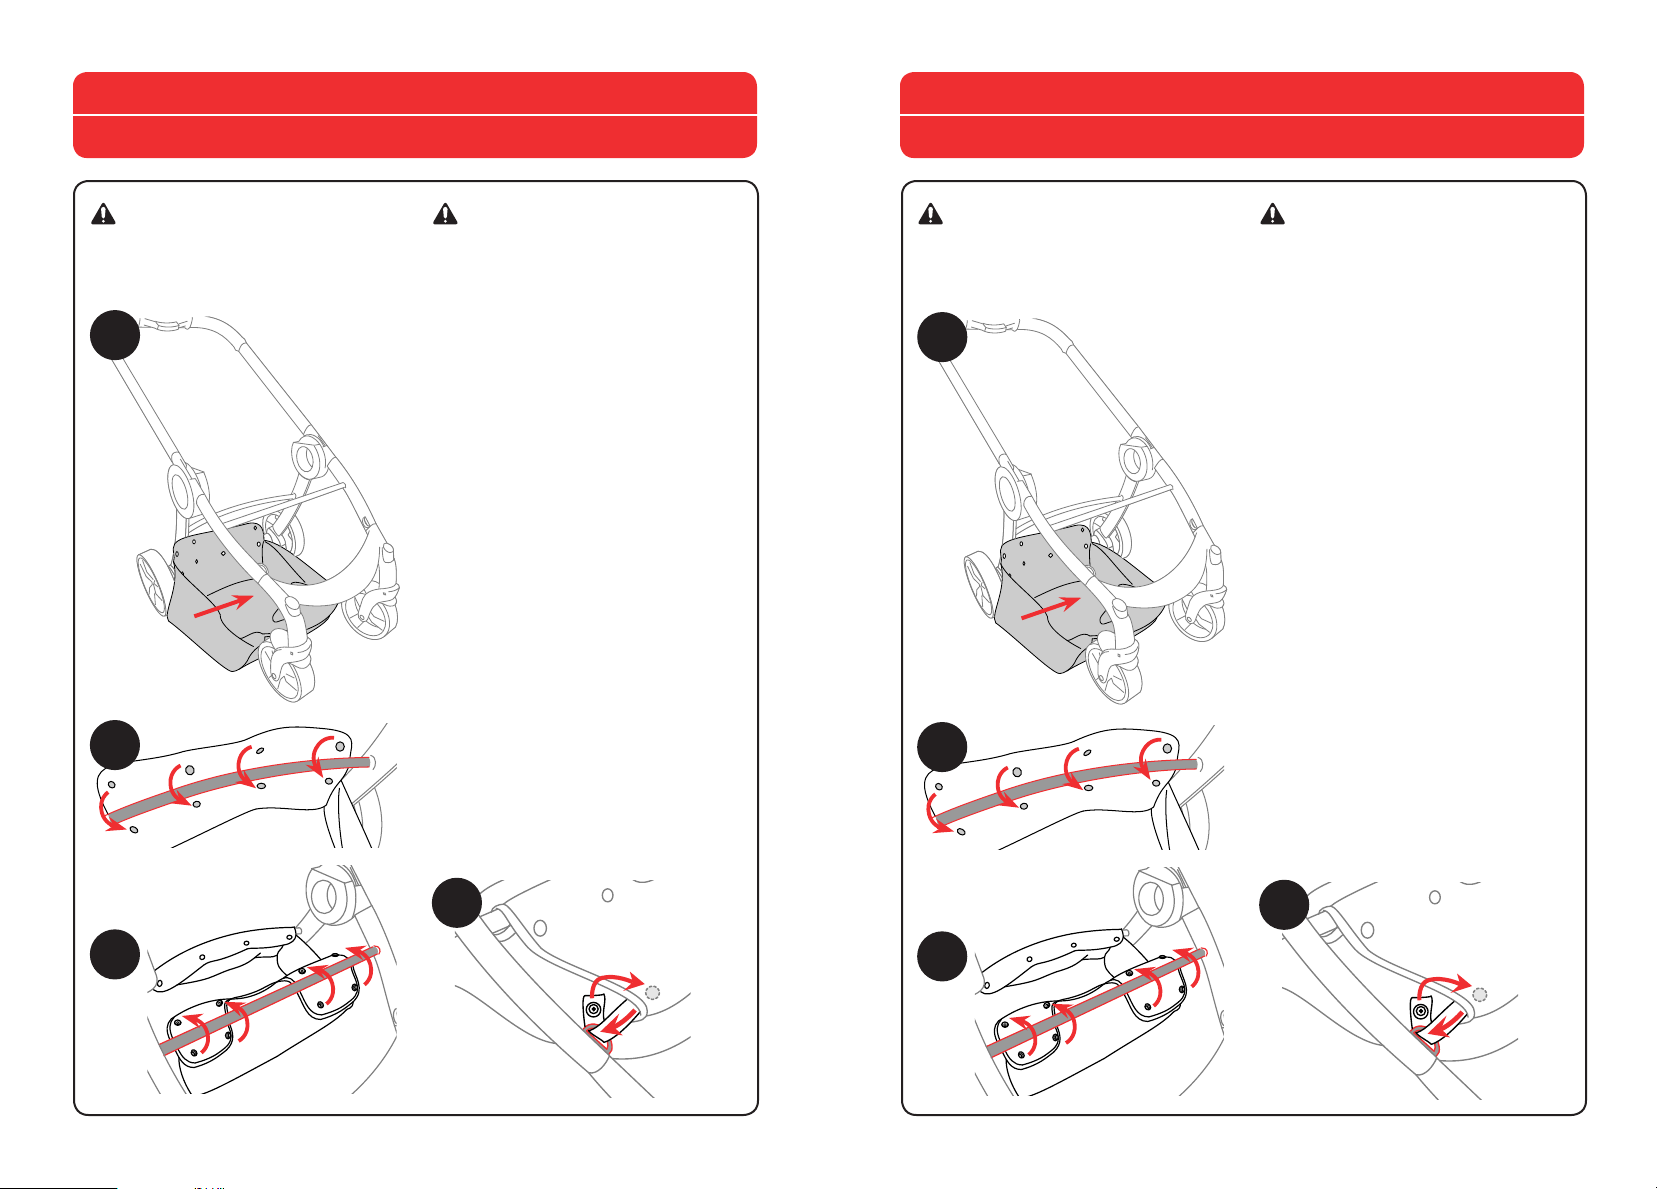
5A. Slide the Basket under the
Stroller Frame, line up the single flap
with the Rear Cross Bar (curved).
Wrap the flap around the Rear Cross
Bar and attach using the 4 snaps
(5B). Attach both Front Basket Flaps
to the Stroller frame by lining up the
flaps to the Front Cross Bar (straight)
and wrapping the flaps around the
Front Cross Bar. Then attach using
the 4 snaps (5C). Finally, locate two
Straps on the Front of the Basket,
thread the Straps through the
D-ring on the Front Stroller Legs
(as shown). Attach the snap to the
corresponding end inside the Basket.
Repeat for the other side. Note:
Thread the Straps through the
Basket side openings (5D).
Cómo armar el cochecito
WARNING
Do not place more than 10 lbs
(4.5 kg) in the storage basket.
5A
5B
ADVERTENCIA
No cargue más de 10 libras (4.5 kg)
en el cestillo portaobjeto.
5A. Deslice el cestillo por debajo
de la estructura del cochecito;
alinee la solapa única con la barra
cruzada trasera (curva). Coloque la
solapa alrededor de la barra trasera
y sujétela con los 4 broches (5B).
Sujete ambas solapas delanteras a
la estructura: alinee las solapas con
la barra cruzada delantera (recta) y
colóquelas alrededor de dicha barra.
Luego sujételas con los 4 broches
(5C). Por último, ubique las dos
correas en el frente del cestillo y
páselas por las arandelas en D en
las patas delanteras del cochecito
(como se muestra). Abroche en el
extremo correspondiente dentro del
cestillo. Repita del otro lado. Nota:
Pase las correas por los orificios
laterales del cestillo (5D).
5C
5D
5C
5D
14 15
Page 9
How to Assemble Seat
How to Assemble Seat
6A
Cómo armar el Asiento
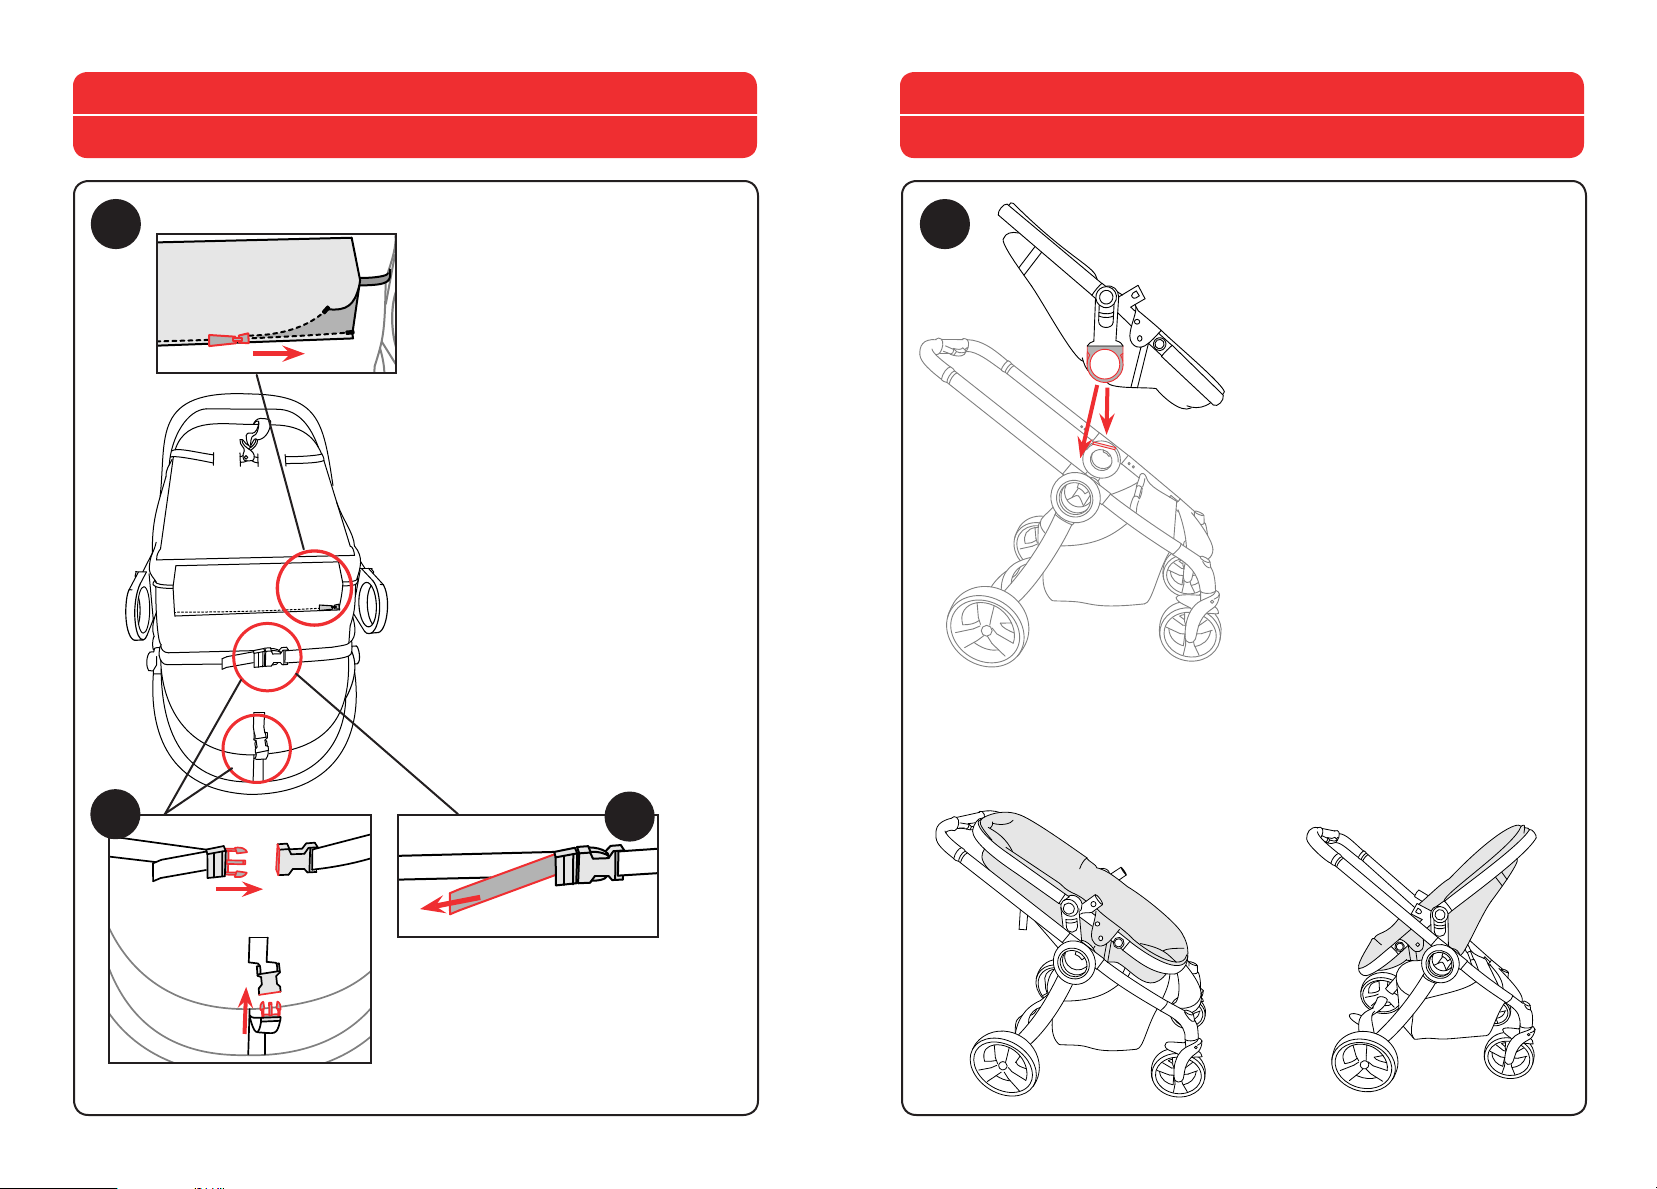
6A. Locate the Seat, flip the Seat over
make sure the Zipper is attached over
the Seat's Metal Cross wire as shown.
Then buckle both of the Footrest
Buckles on the lower end of the
Seat (6B). Tighten the Seat Buckle
strap (6C).
6A. Ubique y dé vuelta el asiento;
asegúrese de que el cierre esté
colocado sobre el alambre transversal
de metal del asiento, como se
muestra. Luego abroche ambas
hebillas del apoyapiés en el extremo
inferior del asiento (6B). Ajuste la
correa de la hebilla del asiento (6C).
7
“CLICK!”
“¡CLIC!”
Cómo armar el Asiento
7. Line up and insert the hubs on both
sides of the Seat into the hub slots on
the Stroller frame as shown. Pull up
on the Seat Frame to make sure the
Seat locks into position.
Note: The Seat can be attached in a
Forward Facing Position and a Parent
Facing Position as shown.
7. Alinee e inserte los cubos en ambos
lados del asiento en las ranuras
correspondientes en la estructura del
cochecito, como se muestra. Tire de
la estructura del asiento hacia arriba
para asegurarse de que el asiento se
trabe en la posición.
Nota: El asiento se puede colocar
mirando hacia delante o hacia los
padres, como se muestra.
Forward Facing Position Parent Facing Position
Posición mirando hacia
los padres
6B
Posición mirando hacia
delante
6C
16 17
Page 10

How to Assemble Seat Insert
How to Assemble Seat Insert
8A
8B
Cómo armar el Asiento
8A. Release the Harness, press on the
Harness Buckle Buttons to release the
5-point Harness Buckle as shown (8B).
Pinch together the Waist Belt Forks to
remove the Shoulder Harness Rings
(8C).
8A. Para abrir el arnés, presione los
botones en la hebilla para abrir la
hebilla del arnés con 5 puntos de
anclaje (8B). Apriete las hebillas del
cinturón para quitar las arandelas del
cinturón para los hombros (8C).
Cómo armar el Asiento
WARNING
Do not use Seat Insert with child
weighing more than 40 lbs (18 kg).
9
ADVERTENCIA
No utilice la inserción del asiento con
niños que pesen más de 40 libras (18 kg).
9. Lay the Seat Insert into the Seat
bottom and thread the Harness
Straps through the corresponding
openings on the Seat Insert as shown.
9. Coloque la cubierta del asiento en
la base del asiento y pase las correas
del cinturón para los hombros por
los orificios correspondientes en la
cubierta, como se muestra.
8C
18 19
Page 11

How to Use the Safety Harness
How to Use the Safety Harness
Cómo utilizar el cinturón de seguridad
WARNING
This stroller features three harness
positions. Always use a harness position
located ABOVE the child's shoulder line.
If multiple harness positions are above
the child's shoulder line, use the one
closest to it.
10A
ADVERTENCIA
Este cochecito tiene tres posiciones de
cinturón. Use siempre el cinturón en la
posición ENCIMA de la línea del hombro
del niño. Si múltiples posiciones del
cinturón están por encima de la línea del
hombro del niño, use la más cercana a
ésta.
10A. Slide the Crotch Pad onto the
Crotch Strap and the Shoulder Pads
(10B) onto the Shoulder Straps, as
shown.
10A. Deslice la almohadilla para
la entrepierna por la correa para la
entrepierna y las almohadillas para
los hombros (10B) por las correas
para los hombros, como se muestra.
11
Cómo utilizar el cinturón de seguridad
11. To fasten the Safety Harness
around your child.
11. Para sujetar el arnés de seguridad
A.
B.
alrededor de su niño.
11A & 11B. First insert the ends of
the waist belt through the Shoulder
Harness Strap rings.
11A y 11B. Primero, pase los
extremos del cinturón por las
arandelas de la correa para los
hombros.
11C. Then into the Harness Buckle.
Adjust the length of the Straps to
fit the child's shoulders and body
snugly.
11C. Luego por la hebilla del arnés.
10B
Regule el largo de las correas de
modo que se ajuste cómodamente a
los hombros y al cuerpo del niño.
C.
20 21
Page 12

Push Handle
To Attach Canopy
12
“CLICK!”
“¡CLIC!”
Manija de presión
12. The Push Handle has 3 locking
positions. With the Push Handle in
the Folded Position, slide the Push
Handle out to the 1st position. Then
squeeze the Gray Button to adjust
the Push Handle to the 2nd and 3rd
locking position. Make sure the Push
Handle clicks into place.
12. La manija de presión se traba en 3
posiciones. Con la manija de presión
en posición plegada, deslícela hasta
la primera posición. Luego apriete
el botón gris para ajustar la manija
a la segunda y la tercera posición.
Asegúrese de que la manija se trabe
en su lugar; escuchará un clic.
13
Installation de la capota
13. To attach the Canopy, insert the
Canopy Tongue into the corresponding
opening on the Seat Frame, as shown.
Pull on both sides of the Canopy to
make sure the Canopy is attached.
13. Para colocar la capota, inserte la
lengüeta de la capota en el orificio
correspondiente en la estructura del
asiento, como se muestra. Tire de
ambos lados de la capota para
asegurarse de que esté bien colocada.
3
2
1
3
2
1
22 23
Page 13

To Attach Canopy
Using the Canopy
14A
14B
A.
Installation de la capota
14A. Locate the Canopy Zipper and
bring together the zipper edges on the
Frame and Canopy. Pull the zipper up
and around to the other side of the
Canopy to close off the back edge, as
shown (14B & 14C).
14. Ubique el cierre de la capota y una
los bordes del cierre en la estructura
y en la capota. Suba el cierre hasta el
otro lado de la capota para cerrar el
borde trasero, como se muestra (14B
y 14C).
15A
15B
Cómo utilizar la capota
15A. To open the Canopy, pull the
front edge of the Canopy forward.
Reverse this step to close the Canopy.
15A. Para abrir la capota, tire del
borde delantero de la capota hacia
delante. Invierta este paso para cerrar
la capota.
15B. To Extend the Canopy, flip out
the Front Extension on the Canopy
as shown. Reverse this step to fold in
the Extension.
15B. Para extender la capota, suelte
14C
la extensión delantera de la capota
como se muestra. Revierte este paso
para plegar la extensión.
24 25
Page 14

Using the Canopy
To Attach Bumper Bar
16
Cómo utilizar la capota
16. To remove the Canopy, locate
the Release Button under the fabric,
as shown. Press in on the Release
Button and then pull out the Canopy
Tongue. Repeat for the other side.
16. Para quitar la capota, ubique el
botón de liberación debajo de la tela,
como se muestra. Presione el botón
de liberación y saque la lengüeta de la
capota. Repita del otro lado.
17A
17B
Installation du Barra de protección
17A. Insert the Bumper Bar Tongues
into the corresponding openings on
the Stroller frame. To release the
Bumper Bar press in on the buttons
located at the sides of the Bumper
Bar, as shown (17B).
17A. Inserte las lengüetas de la
barra de protección en los orificios
correspondientes en la estructura
del cochecito. Para soltar la barra
de protección, presione los botones
ubicados en los costados de la barra,
como se muestra (17B).
26 27
Page 15

How to Adjust the Backrest
How to Adjust the Footrest
18
Cómo ajustar el respaldo
18. To recline the Backrest, squeeze the
Backrest Clip and slide the Backrest
Clip down. To adjust the height of the
recline, slide the Backrest Clip up or
down to the desired position.
18. Para reclinar el respaldo, apriete
el gancho del respaldo y deslícelo
hacia abajo. Para ajustar la altura de
reclinación, deslice el gancho del
respaldo hacia arriba o hacia abajo
hasta alcanzar la posición deseada.
Cómo ajustar el apoyapiés
19
1. 2.
The Footrest can be adjusted to 4
positions.
19. Press in on both Footrest Buttons
and, at the same time, rotate the
Footrest up or down to the desired
position.
El apoyapiés se puede ajustar en 4
posiciones.
19. Presione ambos botones del
apoyapiés y, al mismo tiempo, rote
el apoyapiés hacia arriba o hacia
abajo hasta alcanzar la posición
deseada.
3. 4.
28 29
Page 16

Using the Brakes
Front Wheel Swivel Lock
Cómo utilizar los frenos
WARNING
Always apply the brakes whenever
the stroller is stationary. Never
leave the stroller on a sloped surface,
with a child onboard, even with the
brakes applied.
20
ADVERTENCIA
Siempre use la frenos cada vez la
silla de paseo está detenga. No
deje nunca la silla de paseo en una
superficie inclinada con el bebé
dentro, ni siquiera con los frenos
accionados.
20. To lock the Brakes, press down
on the Rear Brake Lever on the Rear
Cross Bar, as shown. To release the
Brakes lift up on the Rear Brake Lever.
20. Para trabar los frenos, presione
hacia abajo la palanca del freno
trasero en la barra cruzada trasera,
como se muestra. Para destrabar los
frenos, levante la palanca del freno
trasero.
Traba de la rueda delantera giratoria
The stroller has front Swivel/Fixed
wheels. It is recommended that
you use the Fixed Mode on uneven
surfaces and the Swivel Mode on
normal road surfaces. Make sure
you lock both front wheels.
21
La silla de paseo está dotada de
ruedas delanteras giratorias/fijas.
Se aconseja utilizar las ruedas fijas
sobre superficies irregulares y las
ruedas giratorias sobre el pavimento
uniforme. Asegurarse de que las dos
ruedas delanteras estén trabadas.
21. To release the Front Wheel into a
Swivel position, push down on the
Buttons located above both Front
Wheels, as shown. To lock the Front
Wheels push down again on the
Buttons and move the stroller forward.
The wheels will lock into a straight
position.
21. Para destrabar la rueda delantera
para que pueda girar, presione los
botones ubicados sobre las ruedas
delanteras, como se muestra. Para
trabar las ruedas delanteras, vuelva
a presionar los botones y mueva el
cochecito hacia delante. Las ruedas se
bloquearán en posición recta.
30 31
Page 17

Attach Parent Cup Holder
Attach Boot
Instale el apoyavasos para padres
WARNING
Never place a container weighing
more than 1 lb (0.5 kg) in the cup
holder.
22
ADVERTENCIA
No cargue más de 1 libras (0.5 kg) en
el cestillo portaobjeto.
22. Locate the Cup Holder Post on
the Push Handle as shown. Line up
the Post with the groove on the back
of the Cup Holder and slide the Cup
Holder down to secure it to the frame.
22. Ubique el soporte del
apoyavasos en la manija de
presión, como se muestra. Alinee
el soporte con la ranura en la parte
posterior del apoyavasos y deslice el
apoyavasos hacia abajo para sujetarlo
a la estructura.
23A
23B
Colocación de la funda
23A. To attach the Boot, Slide the top
end of the Boot under the Bumper Bar
and fit the bottom edge of the Boot
around the edge of the Footrest area
of the stroller (23B), as shown.
23A. Para colocar la funda, deslice
el extremo superior de la funda por
debajo de la barra de protección y
enganche el extremo inferior de la
funda en el borde del área del
apoyapiés del cochecito (23B),
como se muestra.
32 33
Page 18

Attach Boot
Attach Boot
24A
24B
Colocación de la funda
24A. Connect the two side snaps, one
located above the Bumper Bar and
the other located below the Bumper
Bar (24B), as shown. Repeat for the
other side.
24A. Una los dos broches laterales,
uno ubicado por encima de la barra
de protección (24A) y otro por debajo
de ella (24B), como se muestra.
Repita del otro lado.
25
Colocación de la funda
25. Then fold over the top flap on the
Boot and connect both snaps.
25. Luego doble la solapa superior en
la funda y una ambos broches.
34 35
Page 19

Hand Muff (Select Models)
Hand Muff (Select Models)
26
Manguito (modelos selectos)
26. To attach the Hand Muff, unzip
the zipper and wrap the Hand Muff
around the Push Handle, as shown.
Bring both sides of the zipper together
and zip up the Hand Muff.
26. Para sujetar el Manguito, abra
el cierre y envuelva el manguito
alrededor de la manija de empuje,
como se indica. Junte los dos lados
del cierre y cierre el Manguito.
27
Manguito (modelos selectos)
27. Snap together the 2 snap buttons
located on each end of the Hand
Muff. This will create 2 pockets for
your hands to slide into and push the
Stroller.
27. Broche los 2 botones con broche
ubicados en ambos extremos del
Manguito. Al hacerlo, se formarán 2
bolsillos en que puedan deslizar las
manos para empujar el cochecito.
36 37
Page 20

How to Adjust the Stroller Seat
How to Convert to a Carriage
28
Upright
Vertical
Cómo ajustar el respaldo
28. The Seat can be adjusted into
3 positions Upright, Reclined, and
Carriage. Push in on both Side
Buttons (shown in red) and rotate the
Seat into the desired position.
28. El asiento se puede ajustar en
3 posiciones: vertical, reclinado y
moisés. Presione ambos botones
laterales (se muestran en rojo) y rote
el asiento hasta alcanzar la posición
deseada.
29A
29B
Cómo convertirlo en moisés
29A. Remove the Bumper Bar (see
step 18) and recline the Backrest (see
step 19). Undo the Harness Buckle,
then remove the Shoulder Pads and
Crotch Pad (29B).
29A. Quite la barra de protección
(consulte el paso 18) y recline el
respaldo (consulte el paso 19).
Desenganche la hebilla del arnés y
luego quite las almohadillas para los
hombros y para la entrepierna (29B).
Reclined
Reclinado
Carriage
Moisés
38 39
Page 21

How to Convert to a Carriage
How to Convert to a Carriage
Cómo convertirlo en moisés
WARNING
Do not remove the Seat from the
Stroller frame with the child inside.
30
ADVERTENCIA
No quite el asiento de la estructura
del cochecito con el niño adentro.
30. Push in on both of the Side
Buttons (shown in red) and rotate the
Seat into the Carriage position.
30. Presione ambos botones laterales
(se muestran en rojo) y rote el asiento
hasta alcanzar la posición de moisés.
31A
Cómo convertirlo en moisés
31A. Release both Footrest Buckles
on the underside of the Seat fabric,
as shown. Then push Footrest area
down flat before use (31B).
31. Desabroche ambas hebillas del
apoyapiés en la parte inferior de la
tela del asiento, como se muestra.
Antes de utilizarlo, empuje el área
del apoyapiés hacia abajo hasta que
quede plana (31B).
31B
40 41
Page 22

How to Convert to a Carriage
Cómo convertirlo en moisés
Assemble KeyFit® Attachment
Armado del accesorio KeyFit
®
WARNING
The Carriage must only be used in a
horizontal position. Do not adjust to
a Lounge or Upright position.
32
ADVERTENCIA
El moisés se debe utilizar
únicamente en posición horizontal.
No lo coloque en posición reclinada
o vertical.
32. To Place the Carriage in Parent
Facing position, squeeze and pull up
on the Buttons on each side of the
Seat, shown in red. To re-attach
the Carriage line up the Hubs and
insert them into the corresponding
openings on the frame, as shown in
Step 7.
32. Para colocar el moisés en
posición mirando hacia los padres,
apriete y tire de los botones a cada
lado del asiento (se muestran en
rojo) hacia arriba. Para volver a
colocar el moisés, alinee los cubos
e insértelos en los orificios
correspondientes en la estructura,
como se muestra en el paso 7.
33
“CLICK!”
“CLIC”
Longer
Tube
Side
Lados más
largos del
tubo
Ends
Extremos
“CLICK!”
“CLIC”
KeyFit®
Logo
Logotipo
de KeyFit®
“CLICK!”
“CLIC”
“CLICK!”
“CLIC”
Side Hubs
Cubos laterales
33. Lay out the Side Hubs with the longer tube sides to the left of the Hubs.
Then place an end on each side of the Side Hub, making sure the End with the
KeyFit® Logo is on the right. Insert the Side Hub tubes into both Ends until the
snap buttons click into place.
33. Coloque los cubos laterales con los lados más largos del tubo hacia la
izquierda de los cubos. Luego ponga un extremo en cada costado del cubo
lateral y asegúrese de que el extremo con el logotipo de KeyFit® esté a la
derecha. Inserte los tubos del cubo lateral en ambos extremos hasta que los
botones de broche hagan clic.
42 43
Page 23

To Attach KeyFit® Attachment
To Attach KeyFit® Attachment
34
Installation du KeyFit® Insertar
34. Remove the Seat from the
Stroller Frame, as shown in Step 32.
Line up the Hubs on both sides of
the KeyFit® Attachment to the Hub
slots on the Stroller frame as shown.
Make sure that the "KeyFit®" Logo on
the adapter is at the FRONT of the
stroller frame, away from the handle.
“CLICK!”
“CLIC”
KeyFit®
Logo
Pull up on the KeyFit® Attachment to
make sure the KeyFit® is securely
attached to the Stroller Frame.
Note: The Infant Car Seat can be
attached in a Forward Facing
position and a Parent Facing position,
as shown.
34
Installation du KeyFit® Insertar
34. Quite el asiento de la estructura
del cochecito, como se muestra
en el paso 32. Alinee los cubos a
ambos lados del accesorio KeyFit®
con las ranuras correspondientes en
la estructura del cochecito, como
se muestra. Asegúrese de que el
logotipo de KeyFit® en el adaptador
“CLICK!”
“CLIC”
Logotipo
de KeyFit®
esté en el FRENTE de la estructura
del cochecito, alejado de la manija.
Tire del accesorio KeyFit® hacia
arriba para asegurarse de que esté
fijado firmemente a la estructura del
cochecito.
Nota: El asiento de seguridad infantil
se puede colocar mirando hacia
delante o hacia los padres, como se
muestra.
Forward Facing
Position
Parent Facing
Position
Posición
mirando hacia
delante
Posición
mirando hacia
los padres
44 45
Page 24

Using the KeyFit® Infant Seat
Cómo utilizar el asiento de seguridad infantil KeyFit
Using the KeyFit® Infant Seat
®
Cómo utilizar el asiento de seguridad infantil KeyFit
®
WARNING
ONLY USE a Chicco KeyFit®
infant car seat with this product.
Always make sure child is properly
harnessed in the car seat. Only use
this product to transport infants
that are within the size and weight
limitations of the infant car seat.
Refer to your infant car seat Owner's
Manual for additional warnings and
use instructions before using this
product.
ADVERTENCIA
UTILICE ÚNICAMENTE un asiento
de seguridad infantil Chicco KeyFit®
con este producto. Siempre verifique
que el niño esté correctamente
asegurado en el asiento de
seguridad. Utilice este producto
únicamente para transportar bebés
que no superen el tamaño o el
peso permitidos por el asiento de
seguridad infantil. Antes de utilizar
el producto, consulte el manual
del propietario del asiento de
seguridad infantil para familiarizarse
con las advertencias adicionales y las
instrucciones de uso.
35A
“CLICK!”
“CLIC”
35B
CLICK!
CLIC!
35A. With the KeyFit® Attachment
attached, Place the KeyFit® infant
carrier into the Stroller Frame. The
carrier can be attached in a forward
or rearward facing position. Make
sure infant carrier clicks into the
Stroller Frame on both sides.
KeyFit®
Logo
Logotipo
de KeyFit®
1
2
CHECK!
!
VERIFICAR!
Pull up on the infant carrier; make
sure it is secured to Stroller Frame
(35B). If the infant carrier is not
secured see Steps 33 and 34 to
make sure the KeyFit® Attachment
is assembled and attached correctly.
35A. Con el accesorio KeyFit®
sujetado, coloque el portabebés
KeyFit® en la estructura del
cochecito. El portabebés se puede
colocar mirando hacia delante o
hacia atrás. Asegúrese de que el
portabebés haga clic en la estructura
del cochecito en ambos lados.
Tire hacia arriba del portabebés;
asegúrese de que esté sujetado
firmemente a la estructura del
cochecito (35B). Si el portabebés no
está sujeto, consulte el paso 33 y 34
para asegurarse de que la barra de
protección esté correctamente
sujetada.
46 47
Page 25

Using the KeyFit® Infant Seat
Cómo utilizar el asiento de seguridad infantil KeyFit
How to Close the Stroller
®
Cómo cerrar la silla de paseo
36
36. To remove the KeyFit® infant
carrier, squeeze the Release Handle
on the back of the infant carrier and
lift up on the carrying handle.
36. Para quitar el portabebés
KeyFit®, presione la manija de
liberación ubicada en la parte
trasera del portabebés y levante
del mango de transporte.
WARNING
When folding the Stroller, make sure
that your child and other children
are at a safe distance. Ensure that
during the operations, the movable
parts of the Stroller do not come in
contact with your child.
37
ADVERTENCIA
Al plegar la silla de paseo, asegúrese
de que su hijo y otros niños se
encuentren a una distancia segura.
Asegúrese de que mientras realice
estas operaciones las partes móviles
de la silla de paseo no entren en
contacto con su hijo.
37. To Fold the Stroller, remove the
Seat or KeyFit® Attachment and
make sure the Front Wheels are in
Swivel Mode. Adjust the Handle to
the lowest position.
37. Para plegar el cochecito, quite el
asiento o el accesorio KeyFit®
y asegúrese de que las ruedas
delanteras estén en modo giratorio.
Ajuste la manija en la posición más
baja.
48 49
Page 26

How to Close the Stroller
How to Close the Stroller
38
Cómo cerrar la silla de paseo
38. Push in the Handle Release
Buttons on the inside of each Hub,
as shown. Fold the Handle down.
38. Presione los botones de
liberación de la manija en la parte
interior de cada cubo, como se
muestra. Pliegue la manija hacia
abajo.
39
Cómo cerrar la silla de paseo
39. Pull up on each Hub to fold the
Stroller Legs together to make the
Stroller more compact. The Wheels
can be removed (see steps 3B and
4B).
39. Tire de cada cubo hacia arriba
para plegar las patas del cochecito y
hacerlo más compacto. Se pueden
quitar las ruedas (consulte los pasos
3B y 4B).
50 51
Page 27

Cleaning and Maintenance
Limpieza y mantenimiento
This product requires regular maintenance. The cleaning and maintenance of the stroller must only be
carried out by an adult.
CLEANING
Please refer to the care label for instructions on cleaning the fabric parts of the stroller.
Periodically wipe clean plastic parts with a soft damp cloth. Always dry the metal parts to prevent the
formation of rust if the stroller has come into contact with water.
MAINTENANCE
Lubricate the moving parts only if necessary, with a light application of a silicone based lubricant.
Periodically check the condition of the wheels, and keep them clean of dust and sand. To avoid friction
that may prevent the correct operation of the stroller, ensure that all the movable plastic parts placed
along the metal frame are clean of dust, dirt or sand. Keep the stroller in a dry place. Prolonged
exposure to direct sunlight may cause the fabric to fade.
Las operaciones de limpieza y mantenimiento deben ser efectuadas exclusivamente por un adulto.
LIMPIEZA
Para limpiar las partes de tela consultar las etiquetas de lavado.
Limpiar periódicamente las partes de plástico con un paño húmedo. Si la silla entra en contacto con
agua salina, secar siempre las partes metálicas para evitar que se oxiden.
MANTENIMIENTO
Si fuera necesario, lubricar las partes móviles con aceite seco a la silicona. Controlar periódicamente el
estado de desgaste de las ruedas y mantenerlas limpias de polvo y arena. Asegurarse de que todas las
partes de plástico que se deslizan sobre los tubos de metal estén limpias de polvo, suciedad y arena,
para evitar roces que puedan comprometer el correcto funcionamiento de la silla de paseo. Mantener
la silla de paseo en un lugar seco. La exposición prolongada del sistema de seguridad para niños a la luz
directa del sol puede hacer que los materiales o la tela pierdan el color.
52 53
Page 28

For More Information
@
Más información
If you have any questions or comments about this product, or are missing any of
the parts please do not return this product to the store. Contact us in one of the
following ways:
Si tiene preguntas o sugerencias sobre este producto, o falta alguna de las partes,
no devuelva este producto a la tienda. Comuníquese con nosotros por alguno de
los siguientes medios:
(877)-424-4226
info.usa@artsana.com
www.chiccousa.com
1826 William Penn Way
Lancaster, PA 17601
54
55
Page 29

www.chiccousa.com
 Loading...