


CR-150 HD
Table of contents
 Loading...
The CR-150 HD
6" Refractor
Model #21017
INSTRUCTION MANUAL

TT
ABLE OF CONTENTSABLE OF CONTENTS
T
ABLE OF CONTENTS
TT
ABLE OF CONTENTSABLE OF CONTENTS
▲▲
INTRODUCTION INTRODUCTION
▲
INTRODUCTION
▲▲
INTRODUCTION INTRODUCTION
How to Use this Manual .................................................................................................................. 5
A Word of Caution .......................................................................................................................... 5
TheRefractor OpticalSystem.......................................................................................................6
▲▲
ASSEMBLING YOUR CR-150 HD ASSEMBLING YOUR CR-150 HD
▲
ASSEMBLING YOUR CR-150 HD
▲▲
ASSEMBLING YOUR CR-150 HD ASSEMBLING YOUR CR-150 HD
The CR-150 HDThe CR-150 HD
The CR-150 HD
The CR-150 HDThe CR-150 HD
Assembling the CG-5 Equatorial Mount............................................................. 9Assembling the CG-5 Equatorial Mount............................................................. 9
Assembling the CG-5 Equatorial Mount............................................................. 9
Assembling the CG-5 Equatorial Mount............................................................. 9Assembling the CG-5 Equatorial Mount............................................................. 9
Setting Up the Tripod ......................................................................................................... 9
Adjusting the Tripod Height ................................................................................................ 9
Attaching the Accessory Tray ............................................................................................ 10
Attaching the Equatorial Mount ......................................................................................... 11
Attaching the Telescope to the Mount .................................................................................15
Removing the Lens Cap ..................................................................................................... 16
Balancing the Telescope in R.A. ......................................................................................... 17
Balancing the Telescope in DEC ........................................................................................ 17
Adjusting the Mount in Altitude ......................................................................................... 18
Adjusting the Mount in Azimuth ........................................................................................ 18
Disassembling and Transporting Your CR-150 HD .............................................................19
Storing Your CR-150 HD .................................................................................................. 19
Technical Specification................................................................................................19
..........................................................................................................................................................................................................................................................
.............................................................................................................................
..........................................................................................................................................................................................................................................................
....................................................................................................................................................................................................................................................
..........................................................................................................................
....................................................................................................................................................................................................................................................
Attaching the R.A. Slow Motion Knob ..................................................................12
Attaching the Declination Slow Motion Knob ........................................................ 13
Attaching the Counterweight Bar and Counterweights ............................................. 14
..................................................................................................................................................................................................
.................................................................................................
..................................................................................................................................................................................................
44
4
44
77
7
77
88
8
88
▲▲
TELESCOPE BASICS TELESCOPE BASICS
▲
TELESCOPE BASICS
▲▲
TELESCOPE BASICS TELESCOPE BASICS
Attaching the Accessories ...............................................................................................................20
The Star Diagonal ............................................................................................................. 20
The Eyepiece ....................................................................................................................20
Focusing ........................................................................................................................................22
Attaching the Finder................................................................................................................22
Aligning the Finder ........................................................................................................................23
Image Orientation .......................................................................................................................... 24
Your First Look .............................................................................................................................24
Daytime Observing ...........................................................................................................24
Nighttime Observing ......................................................................................................... 25
Calculating Magnification ............................................................................................................... 26
Determining Field of View .............................................................................................................26
General Photography Hints .............................................................................................................27
▲ ▲
ASTRONOMY BASICS ASTRONOMY BASICS
▲
ASTRONOMY BASICS
▲ ▲
ASTRONOMY BASICS ASTRONOMY BASICS
The Celestial Coordinate System .....................................................................................................28
Motion of the Stars .........................................................................................................................29
Polar Alignment .............................................................................................................................30
Finding the Pole ............................................................................................................................. 31
Latitude Scales ..................................................................................................................32
Pointing at Polaris .............................................................................................................33
Declination Drift .............................................................................................................. 34
Polar Alignment Finders .................................................................................................... 35
Aligning the R.A. Setting Circle .........................................................................................35
..........................................................................................................................................................................................................................................
.....................................................................................................................
..........................................................................................................................................................................................................................................
......................................................................................................................................................................................................................................
...................................................................................................................
......................................................................................................................................................................................................................................
2020
20
2020
2828
28
2828
ii • Table of Contents

▲ ▲
CELESTIAL OBSERVING CELESTIAL OBSERVING
▲
CELESTIAL OBSERVING
▲ ▲
CELESTIAL OBSERVING CELESTIAL OBSERVING
Observing the Moon .......................................................................................................................36
Observing the Planets .....................................................................................................................37
Using the Lens Cap Aperture Stop.............................................................................................37
Observing the Sun ..........................................................................................................................37
Observing Deep-Sky Objects ...........................................................................................................38
Using the Setting Circles ....................................................................................................38
Star Hopping .....................................................................................................................39
Viewing Conditions ........................................................................................................................41
Transparency ....................................................................................................................41
Sky Illumination ...............................................................................................................41
Seeing ...............................................................................................................................41
▲ ▲
CELESTIAL PHOTOGRAPHY CELESTIAL PHOTOGRAPHY
▲
CELESTIAL PHOTOGRAPHY
▲ ▲
CELESTIAL PHOTOGRAPHY CELESTIAL PHOTOGRAPHY
Short Exposure Prime Focus ...........................................................................................................44
Piggyback ......................................................................................................................................46
Projection Photography ..................................................................................................................48
▲▲
TELESCOPE MAINTENANCE TELESCOPE MAINTENANCE
▲
TELESCOPE MAINTENANCE
▲▲
TELESCOPE MAINTENANCE TELESCOPE MAINTENANCE
Care and Cleaning of the Optics .......................................................................................................49
......................................................................................................................................................................................................................
...........................................................................................................
......................................................................................................................................................................................................................
........................................................................................................................................................................................................
....................................................................................................
........................................................................................................................................................................................................
........................................................................................................................................................................................................
....................................................................................................
........................................................................................................................................................................................................
3636
36
3636
4343
43
4343
4949
49
4949
▲ ▲
OPTIONAL ACCESSORIES OPTIONAL ACCESSORIES
▲
OPTIONAL ACCESSORIES
▲ ▲
OPTIONAL ACCESSORIES OPTIONAL ACCESSORIES
▲▲
THE MESSIER CATALOG THE MESSIER CATALOG
▲
THE MESSIER CATALOG
▲▲
THE MESSIER CATALOG THE MESSIER CATALOG
▲▲
LIST OF BRIGHT STARS LIST OF BRIGHT STARS
▲
LIST OF BRIGHT STARS
▲▲
LIST OF BRIGHT STARS LIST OF BRIGHT STARS
▲▲
FOR FURTHER READING FOR FURTHER READING
▲
FOR FURTHER READING
▲▲
FOR FURTHER READING FOR FURTHER READING
....................................................................................................................................................................................................................
..........................................................................................................
....................................................................................................................................................................................................................
........................................................................................................................................................................................................................
............................................................................................................
........................................................................................................................................................................................................................
............................................................................................................................................................................................................................
..............................................................................................................
............................................................................................................................................................................................................................
......................................................................................................................................................................................................................
...........................................................................................................
......................................................................................................................................................................................................................
5050
50
5050
5353
53
5353
5656
56
5656
5757
57
5757
Table of Contents • iii

INTRODUCTIONINTRODUCTION
INTRODUCTION
INTRODUCTIONINTRODUCTION
Welcome to the Celestron world of amateur astronomy! For more than a quarter of a
century, Celestron has provided amateur astronomers with the tools to explore the
universe. The line of Celestron refractors continues in this proud tradition. Each
telescope is made of the highest quality materials to ensure durability and stability.
And, your Celestron refractor is versatile — it will grow as your interest grows. All
this adds up to a telescope that will give you a lifetime of pleasure with a minimal
amount of maintenance. All you need to do is take the time to familiarize yourself
with your Celestron telescope and its operation.
4 • Introduction

How to Use This ManualHow to Use This Manual
How to Use This Manual
How to Use This ManualHow to Use This Manual
This manual is designed to instruct you in the proper use of your Celestron
refracting telescope. This includes assembly, initial use, and long term operation
and maintenance. There are four major sections to the manual. The first section
covers the proper procedure for setting up your Celestron refracting telescope.
The second section covers basic operations that are common to all telescopes. This
includes attaching the accessories, focusing, aligning the finderscope, and taking
your first look.
The third section deals with the basics of astronomy and using your telescope for
astronomical viewing. This includes polar alignment, aligning the setting circles and
using your Celestron for astronomical observations, both visual and photographic.
The last major section is on telescope maintenance, specifically on care and cleaning.
In addition to the major sections listed above, there is a list of optional accessories
for all models of Celestron refractors. This includes a brief description of the
accessory and its purpose.
Finally, there is a list of celestial objects visible through your Celestron telescope.
Included are the coordinates for each object, its brightness and a code which
indicates object type. In addition, there is a list of bright stars that can be used for
aligning the setting circles on the CG-5 equatorial mount.
You should keep your refractor manual handy until you have fully mastered your
telescope’s operation.
A Word of Caution!A Word of Caution!
A Word of Caution!
A Word of Caution!A Word of Caution!
WARNING !WARNING !
WARNING ! NEVER LOOK DIRECTLY AT THE SUN WITH THE NAKED EYE OR WITH
WARNING !WARNING !
Your Celestron refractor is designed to give you hours of fun and rewarding observations. However, there are a few things to consider before using your telescope that
will ensure your safety and protect your eyes and your equipment.
A TELESCOPE. PERMANENT AND IRREVERSIBLE EYE DAMAGE MAY
RESULT.
NEVER USE YOUR TELESCOPE TO PROJECT AN IMAGE OF THE SUN
ONTO ANY SURFACE. INTERNAL HEAT BUILD-UP CAN DAMAGE THE
TELESCOPE AND/OR ANY ACCESSORIES ATTACHED TO IT.
NEVER USE AN EYEPIECE SOLAR FILTER OR A HERSCHEL WEDGE.
INTERNAL HEAT BUILD-UP INSIDE THE TELESCOPE CAN CAUSE
THESE DEVICES TO CRACK OR BREAK, ALLOWING UNFILTERED
SUNLIGHT TO PASS THROUGH TO THE EYE.
NEVER LEAVE THE TELESCOPE UNSUPERVISED, EITHER WHEN CHILDREN ARE PRESENT OR ADULTS WHO MAY NOT BE FAMILIAR WITH
THE CORRECT OPERATING PROCEDURES OF YOUR TELESCOPE.
NEVER POINT YOUR TELESCOPE AT THE SUN UNLESS YOU HAVE THE
PROPER SOLAR FILTER. WHEN USING YOUR TELESCOPE WITH THE
CORRECT SOLAR FILTER, ALWAYS COVER THE FINDER. ALTHOUGH
SMALL IN APERTURE, THIS INSTRUMENT HAS ENOUGH LIGHT GATHERING POWER TO CAUSE PERMANENT AND IRREVERSIBLE EYE
DAMAGE. IN ADDITION, THE IMAGE PROJECTED BY THE FINDER IS
HOT ENOUGH TO BURN SKIN OR CLOTHING.
Introduction • 5
The Refractor OpticalThe Refractor Optical
The Refractor Optical
The Refractor OpticalThe Refractor Optical
SystemSystem
System
SystemSystem
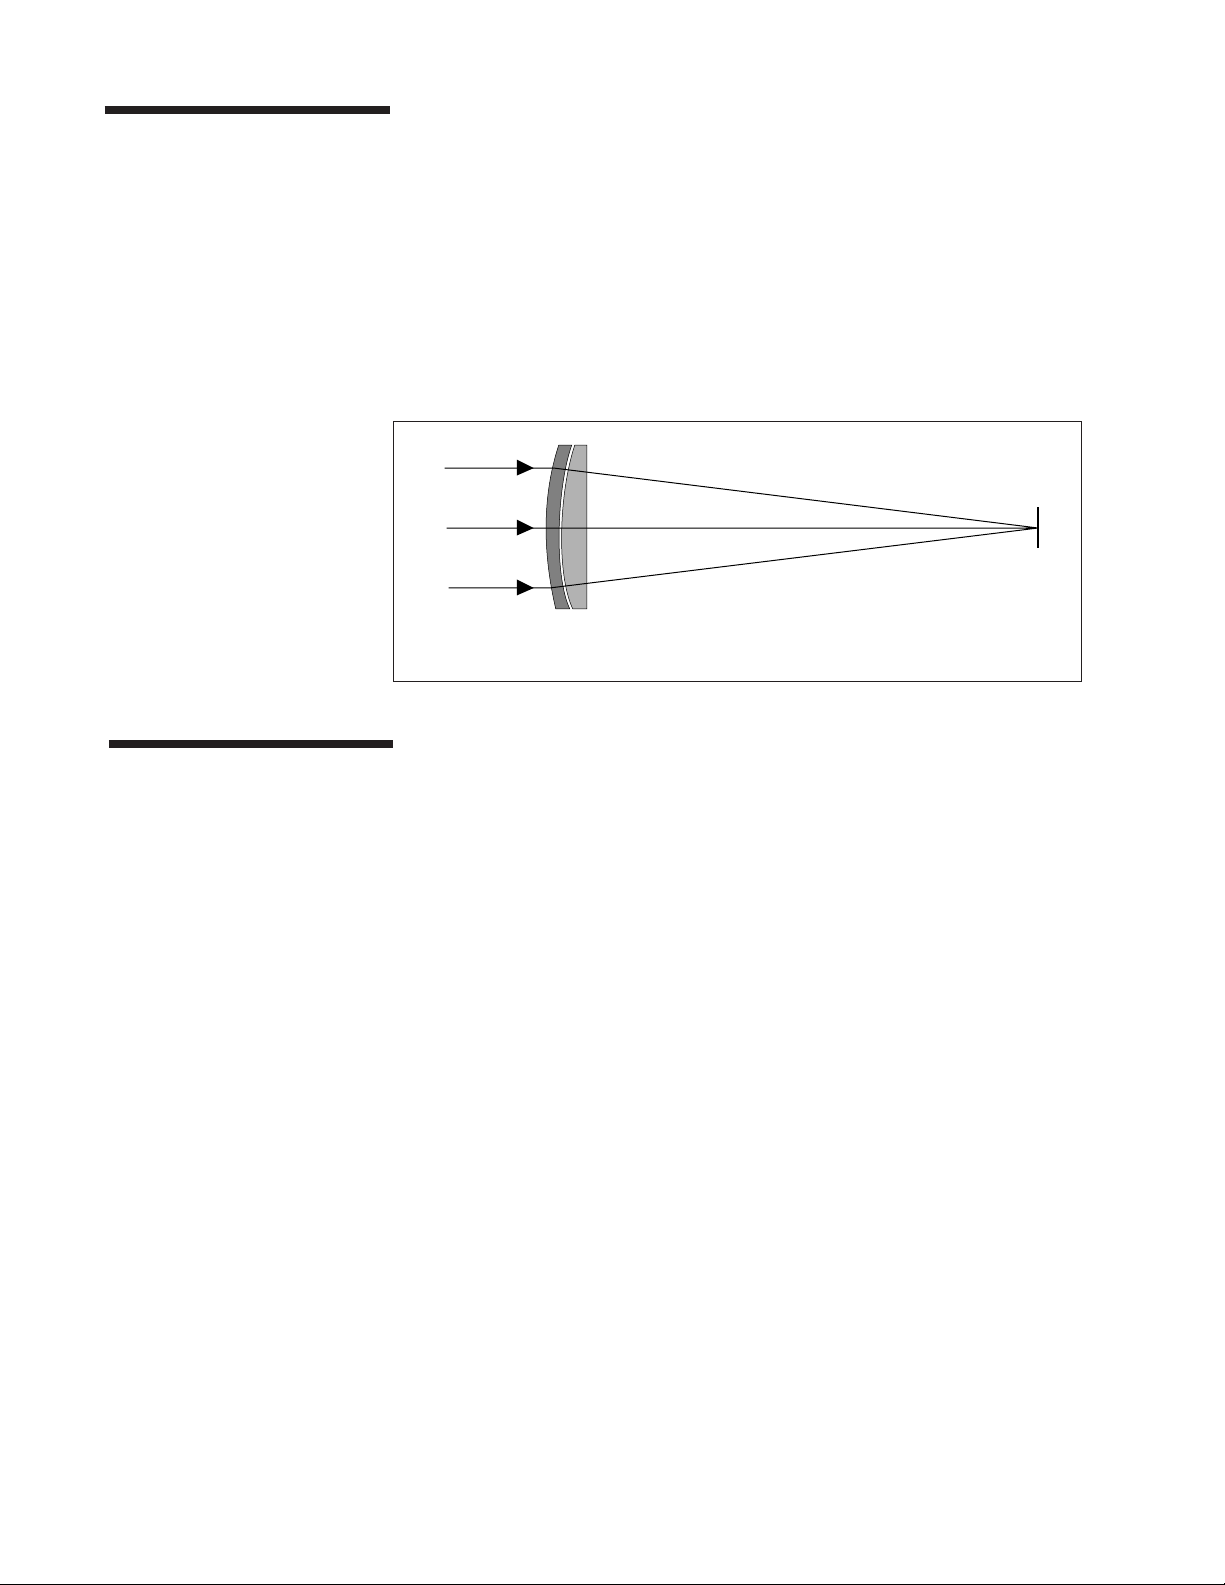
Developed in the early 1600s, the refractor is the oldest telescope design. It
derives its name from the method it uses to focus incoming light rays. The
refractor uses a lens to bend or refract incoming light rays, hence the name (see
Figure 1-1). Early designs used single element lenses. However, the single lens
acts like a prism and breaks light down into the colors of the rainbow, a phenomenon known as chromatic aberration. To get around this problem, a two-element
lens, known as an achromat, was introduced. Each element has a different index of
refraction allowing two different wavelengths of light to be focused at the same
point. Most two-element lenses, usually made of crown and flint glasses, are
corrected for red and green light. Blue light may still be focused at a slightly
different point.
Figure 1-1Figure 1-1
Figure 1-1
Figure 1-1Figure 1-1
This cross sectional diagram shows the light path of a classical two-element refractor.This cross sectional diagram shows the light path of a classical two-element refractor.
This cross sectional diagram shows the light path of a classical two-element refractor.
This cross sectional diagram shows the light path of a classical two-element refractor.This cross sectional diagram shows the light path of a classical two-element refractor.
The MountThe Mount
The Mount
The MountThe Mount
In the world of astronomy, there are basically two different types of mounts;
Altazimuth and equatorial. Both derive their names from the axial motion of the
mount. The Altazimuth moves vertically (altitude) and horizontally (azimuth)
relative to the horizon. The equatorial mount has its axis of rotation tilted so that
it can be aligned with the Earth’s axis of rotation. When this is done, the telescope
(when fitted with an optional clock drive) can track the stars. The directional
movements on this mount are North/South and East/West. The Celestron CR150 HD, 6 inch refractor uses a German equatorial mount called the CG-5 mount.
6 • Introduction

ASSEMBLING ASSEMBLING
ASSEMBLING
ASSEMBLING ASSEMBLING
AT POLARIS CAT POLARIS C
AT POLARIS C
AT POLARIS CAT POLARIS C
The CR-150 HD (#21017) refracting telescope is offered on a German equatorial
mount. The CR-150 HD is shipped in two boxes. The first box includes the
optical tube and all of the standard accessories, which include:
• 20mm Plossl Ocular 1-1/4"
• Star Diagonal 1-1/4"
• 2x Barlow Lens 1-1/4", with built-in Camera Adapter
• 9x50mm Finder and Bracket
• Lens Cap with 112mm aperture stop
The second box contains the tripod, equatorial mount and the hardware
needed to set it up. Included are the:
• CG-5 German Equatorial Mount
• Counterweight Bar
• Two 5.1Kg (11 lb.) Counterweights
• Declination (DEC) Slow Motion Knob
• Right Ascension (R.A.) Slow Motion Knob
• Adjustable Aluminium Tripod
• Accessory Tray
YY
OUR OUR
Y
OUR
YY
OUR OUR
C R - 1 5 0 H DC R - 1 5 0 H D
C R - 1 5 0 H D
C R - 1 5 0 H DC R - 1 5 0 H D
Unpacking YourUnpacking Your
Unpacking Your
Unpacking YourUnpacking Your
CR-150 HDCR-150 HD
CR-150 HD
CR-150 HDCR-150 HD
When setting up the telescope, find a large, clear area where the parts can be laid out
without fear of losing them. Start with the tripod and mount. Remove the contents of
the box and place them neatly on your work surface. Leave the optical tube in its box
until you are ready to attach it to the mount. Once your CR-150 HD has been
unpacked and assembled, you will not need the shipping boxes for everyday
storage and transportation. However, you should save them in case you decide to
ship your telescope via a common carrier.
The CR-150 HD • 7

16
15
The CR-150 HDThe CR-150 HD
The CR-150 HD
The CR-150 HDThe CR-150 HD
1
14
13
12
11
10
2
3
4
5
6
7
8
9
Figure 2-1
1. Lens Cap (not shown) 9. Leg Extension Clamp
2. Dovetail Slidebar 10. Latitude Adjustment Screw
3. Declination Lock 11. Focus Knobs
4. Declination Setting Circle 12. Eyepiece
5. Counterweight Shaft 13. Finderscope Bracket
6. Counterweights 14. Finderscope
7. Tripod Leg 15. Tube Mounting Rings
8. Accessory Tray 16. Optical Tube
8 • The CR-150 HD
Setting Up the TripodSetting Up the Tripod
Setting Up the Tripod
Setting Up the TripodSetting Up the Tripod
Adjusting the TripodAdjusting the Tripod
Adjusting the Tripod
Adjusting the TripodAdjusting the Tripod
HeightHeight
Height
HeightHeight
Assembling the CG-5 Equatorial Mount
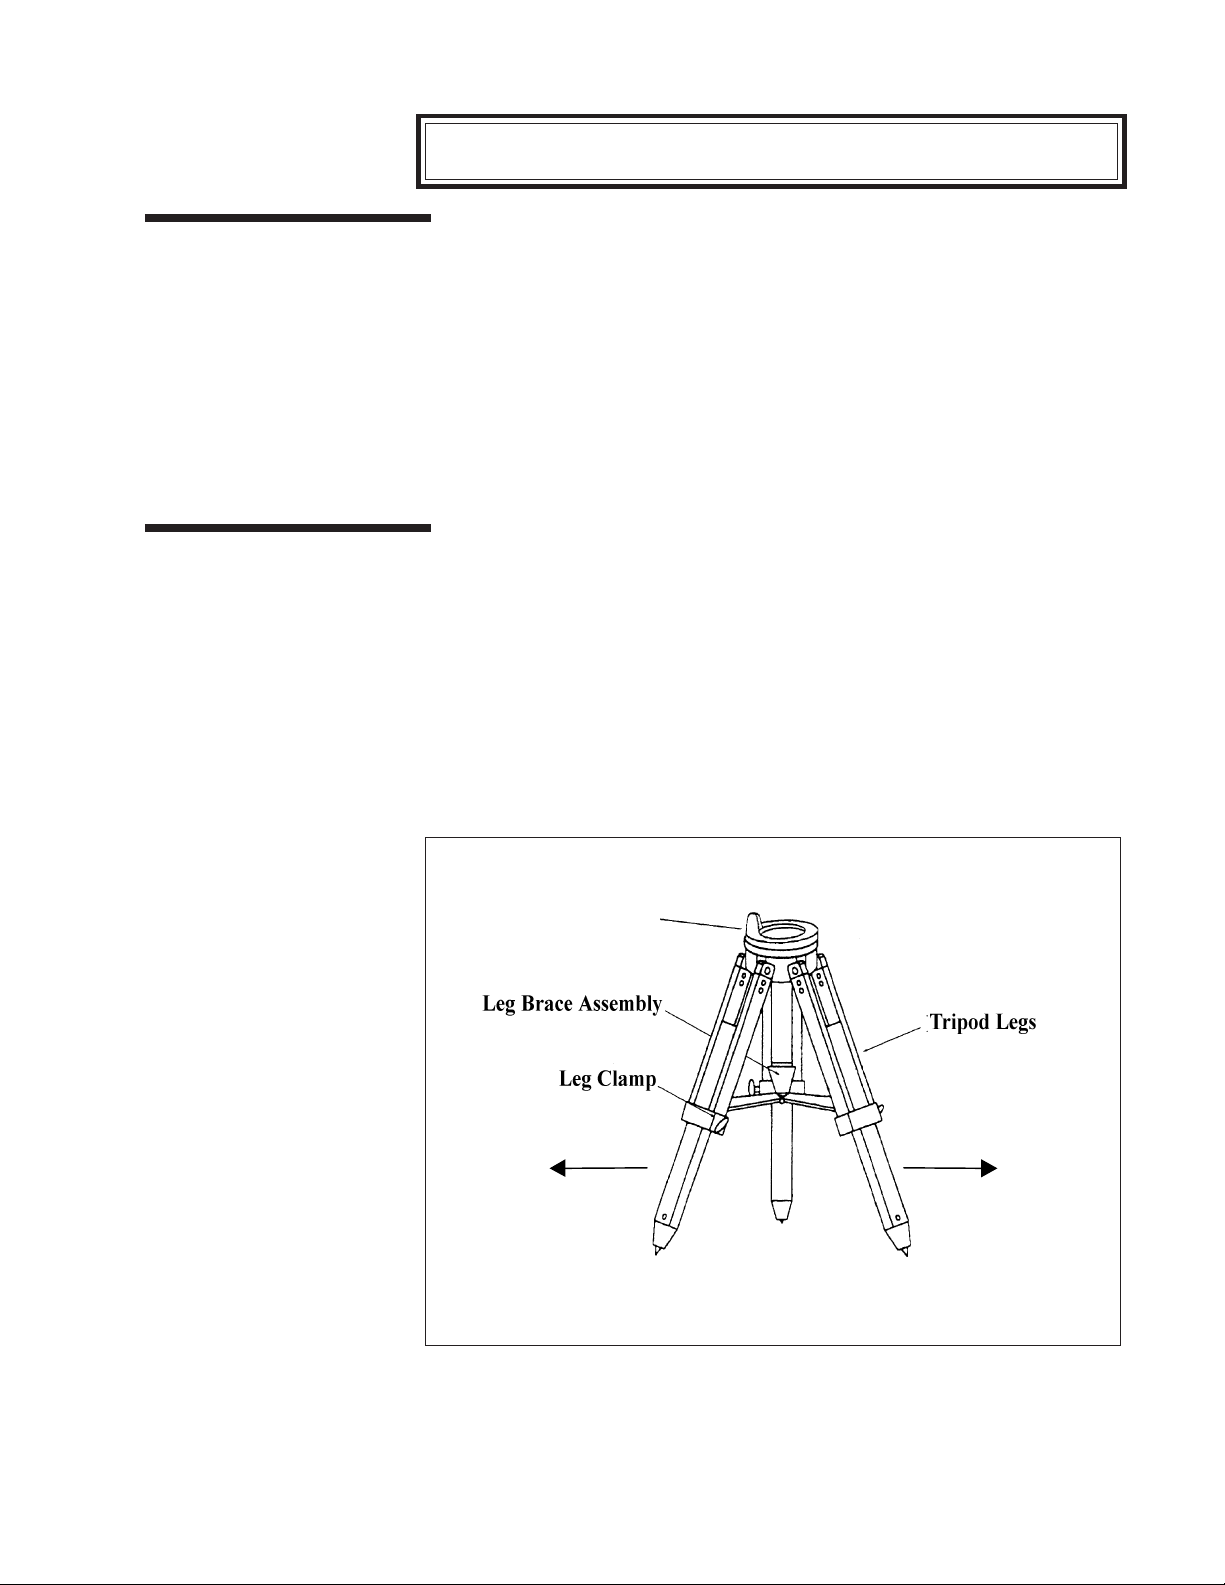
The tripod comes fully assembled with the metal plate, called the tripod head, that
holds the legs together at the top. In addition, the brackets that support the accessory tray are also attached to the tripod.
Stand the tripod upright and pull the tripod legs apart until the leg brace
assembly for the accessory tray is fully extended (see figure 2-2). The tripod
will now stand by itself. To increase the stability, tighten the bolts that hold
the legs to the tripod head (use the appropriate size wrench from the supplied
set). This will help minimize any flexure or wobble of the legs.
Once the tripod is set up, you can adjust the height at which it stands. To do
this:
1. Loosen the knob on the leg clamp so that the tripod leg can be adjusted.
2. Slide the center portion of the tripod leg away from the tripod head until it is at
the desired height.
3. Tighten the knobs on each leg clamp to hold the legs in place.
Tripod Head
Figure 2-2
Setting up the tripod requires nothing more than pulling the tripod legs away from the
tripod head. The height at which the tripod stands can be adjusted by sliding the slats
in the center of each leg toward or away from the tripod head.
The CR-150 HD • 9
Attaching the AccessoryAttaching the Accessory
Attaching the Accessory
Attaching the AccessoryAttaching the Accessory TrayTray
Tray
TrayTray
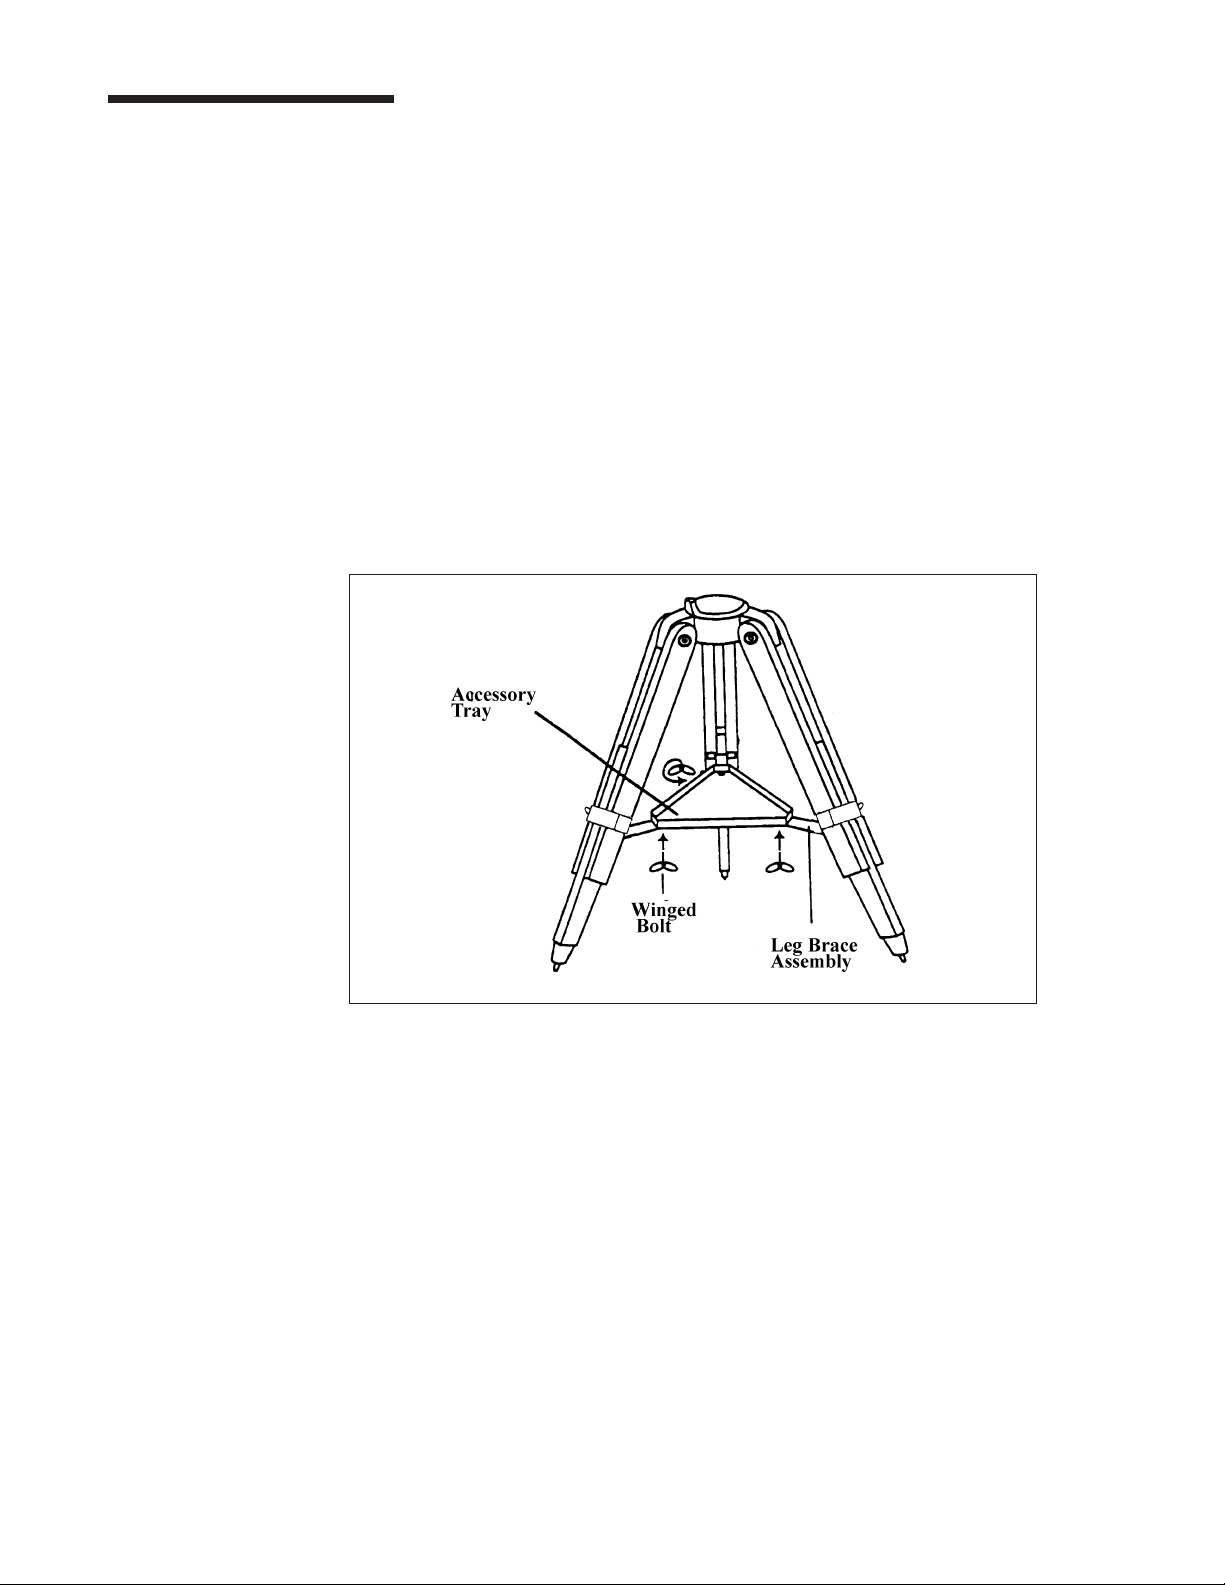
With the tripod set up, you are ready to attach the accessory tray to the tripod.
There are three wing bolts that hold the accessory tray to the bracket.
1. Locate the three wing bolts.
2. Place the accessory tray over the bracket and position it so the thread
holes in the accessory tray are above the slotted holes in the bracket.
3. Insert the wing bolts up through the slotted holes in the bracket (see figure
2-3).
4. Thread the wing bolts into the holes in the accessory tray.
5. Tighten the wing bolts fully.
With the accessory tray in place, the tripod will be much more stable making it
easier to attach the mount and telescope.
10 • The CR-150 HD
Figure 2-3Figure 2-3
Figure 2-3
Figure 2-3Figure 2-3
Attaching the EquatorialAttaching the Equatorial
Attaching the Equatorial
Attaching the EquatorialAttaching the Equatorial MountMount
Mount
MountMount
The equatorial mount allows you to tilt the telescope’s axis of rotation so that you
can track the stars as they move across the sky. The CG-5 mount is a German
equatorial mount that attaches to the tripod head (i.e., metal plate on the tripod). On
one side of the plate there is an “N” which signifies north. This side of the tripod will
face north when setting up for an astronomical observing session. Above the “N” is
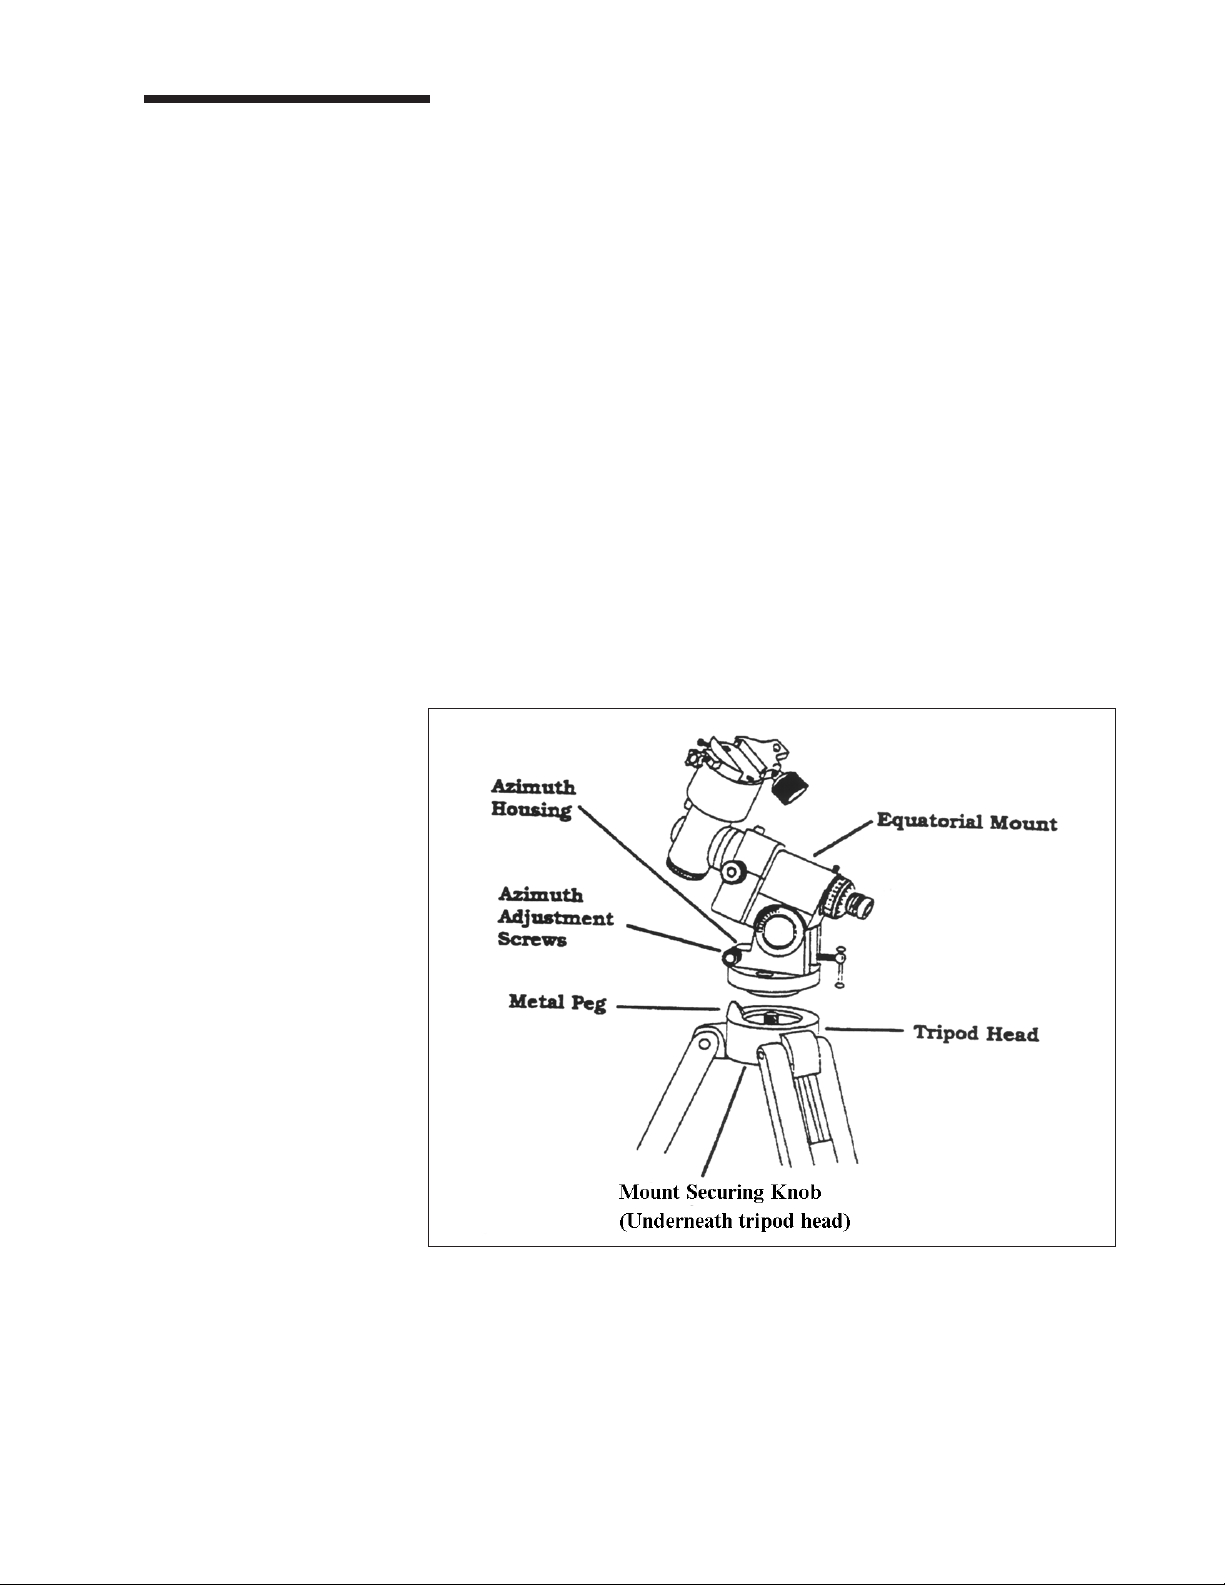
a peg about 3/4" high that points straight up. To attach the equatorial head:
1. Locate the azimuth adjustment screws on the equatorial mount.
2. Retract the screws so they no longer extend into the azimuth housing
(rectangular extrusion) on the mount.
they are needed later for polar alignment.they are needed later for polar alignment.
they are needed later for polar alignment.
they are needed later for polar alignment.they are needed later for polar alignment.
3. Hold the equatorial mount over the tripod head so that the azimuth housing
is above the metal peg.
4. Place the equatorial mount on the tripod head so that the two are flush.
5. Tighten the knob on the underside of the tripod head to hold the equatorial
mount firmly in place. The knob is already attached and can
removed.
Do NOT remove the screws sinceDo NOT remove the screws since
Do NOT remove the screws since
Do NOT remove the screws sinceDo NOT remove the screws since
NOTNOT
NOT be
NOTNOT
Figure 2-4Figure 2-4
Figure 2-4
Figure 2-4Figure 2-4
The CR-150 HD • 11
Attaching the R.A. Slow Motion Knob
With the mount securely in place, you are ready to attach some of the accessories
(the telescope tube will be added last). Start with the Right Ascension (R.A.) slow
motion knob. The R.A. slow motion knob allows you to make fine pointing adjustments in the direction the telescope is aiming (once it is attached to the mount). To
install the knob:
1. Locate the hard plastic shell under the R.A. shafts.
2. Remove either of the two oval tabs by pulling tightly.
3. Line up the flat area on the inner portion of the R.A. slow motion knob with
the flat area on the R.A. shaft.
4. Slide the R.A. slow motion knob onto the R.A. shaft.
The knob is a tension fit, so sliding it on holds it in place. As mentioned
above, there are two R.A. shafts, one on either side of the mount. It makes no
difference which shaft you use since both work the same. Use whichever one
you find more convenient. If, after a few observing sessions, you find the R.A.
slow motion knob is more accessible from the other side, pull firmly to remove
the knob, then install it on the opposite side.
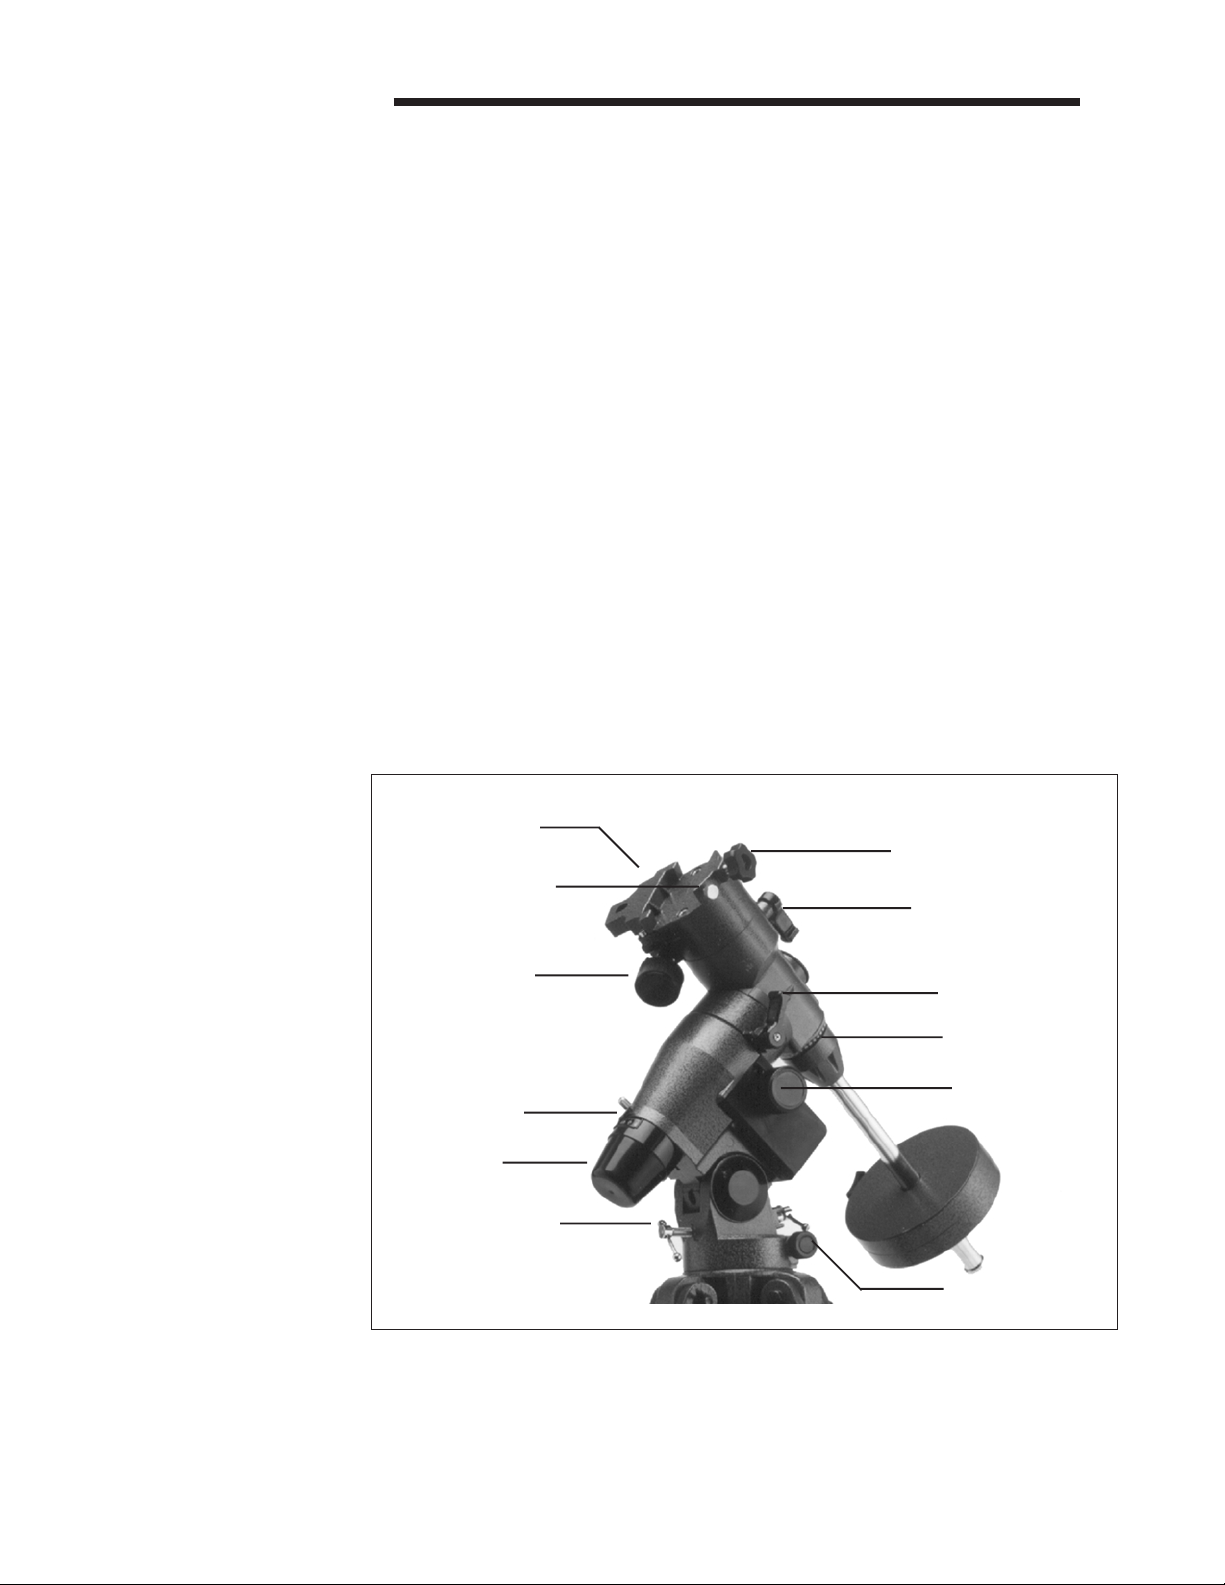
Mounting Platform
Mounting Platform
Safety Screw
DEC Slow Motion
Knob
R.A. Setting
Circle
Polar Housing
Cover
Altitude Adjustment
Control
Figure 2-5Figure 2-5
Figure 2-5
Figure 2-5Figure 2-5
Telescope
Mounting Screw
DEC Lock
Lever
RA Lock
Lever
Declination Setting
Circle
R.A. Slow Motion
Knob
Azimuth Adjustment
Controls
12 • The CR-150 HD
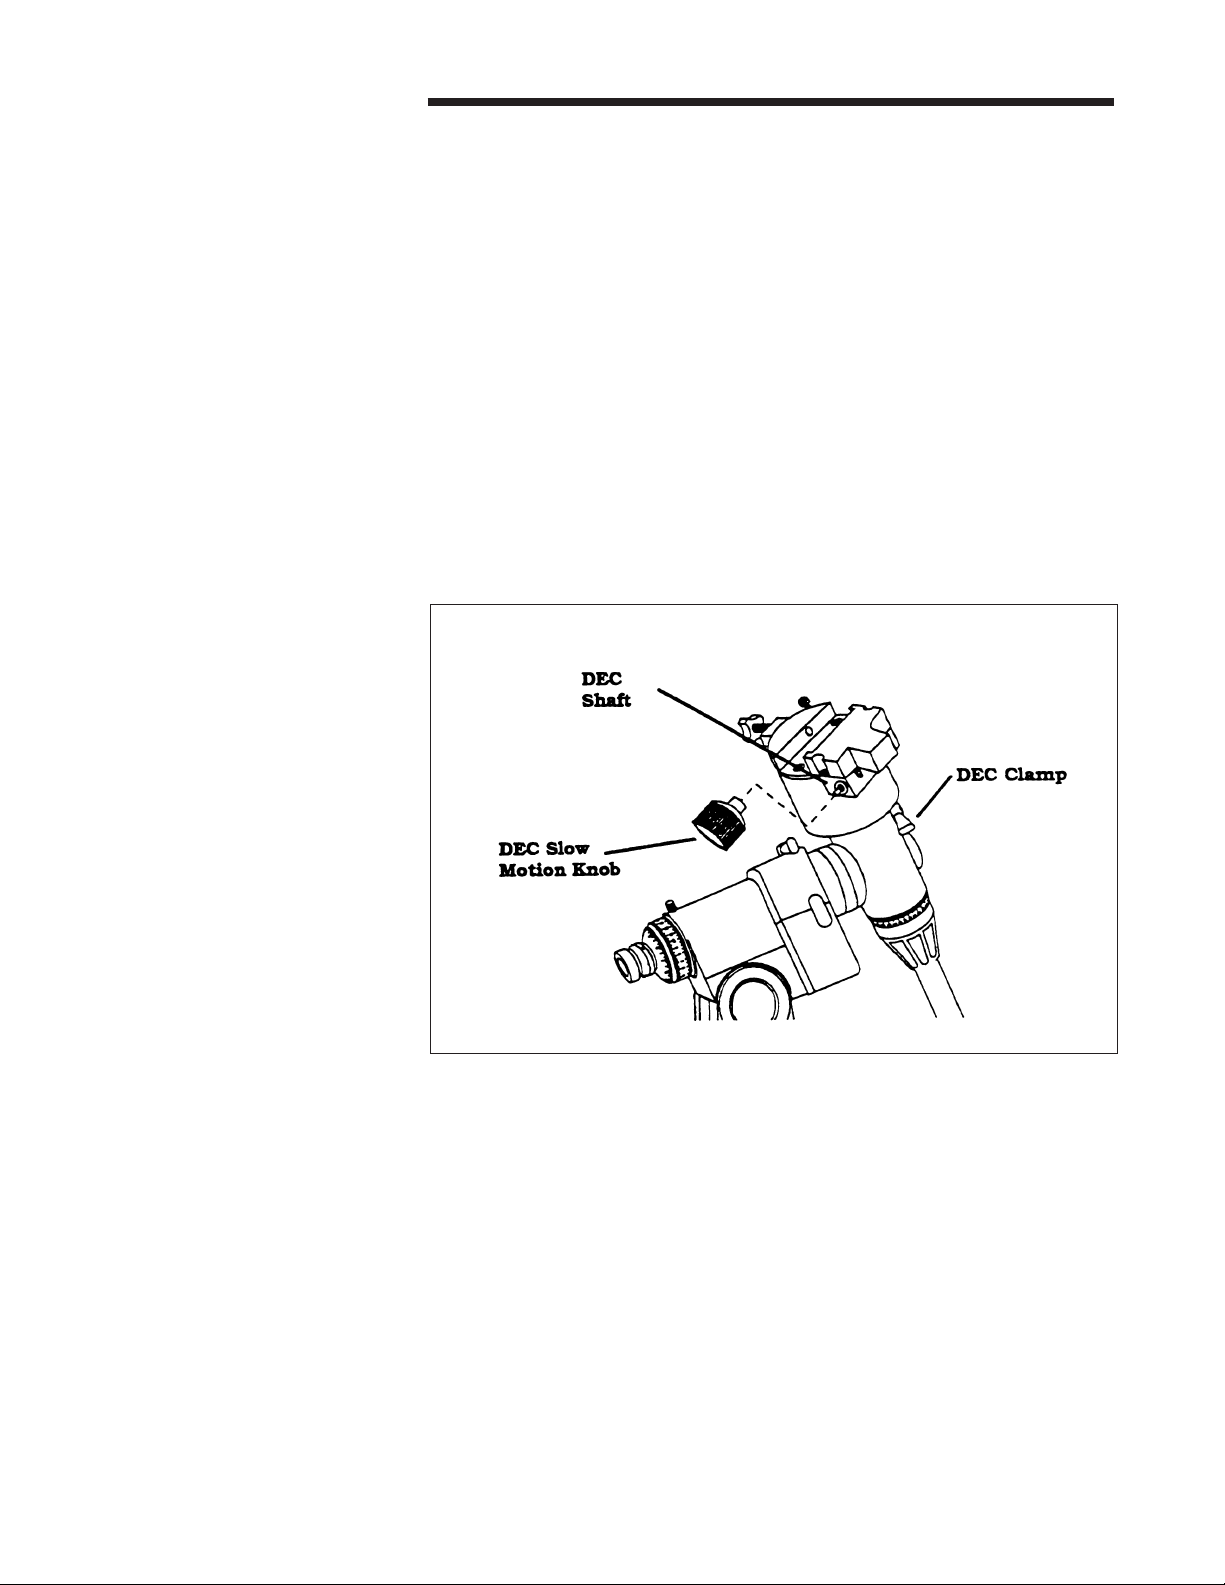
Attaching the Declination Slow Motion Knob
Like the R.A. slow motion knob, the DEC slow motion knob allows you to make fine
pointing adjustments in the direction the telescope is pointed.
The DEC slow motion knob attaches in the same manner as the R.A. knob. The shaft
that the DEC slow motion knob fits over is toward the top of the mount, just below
the telescope mounting platform. Once again, you have two shafts to choose from.
Use the shaft that is pointing toward the ground. This makes it easy to reach while
looking through the telescope, something which is quite important when you are
observing.
1. Line up the flat area on the inner portion of the DEC slow motion knob with
the flat area on the DEC shaft.
2. Slide the DEC slow motion knob over the DEC shaft (see figure 2-6).
Figure 2-6Figure 2-6
Figure 2-6
Figure 2-6Figure 2-6
The CR-150 HD • 13
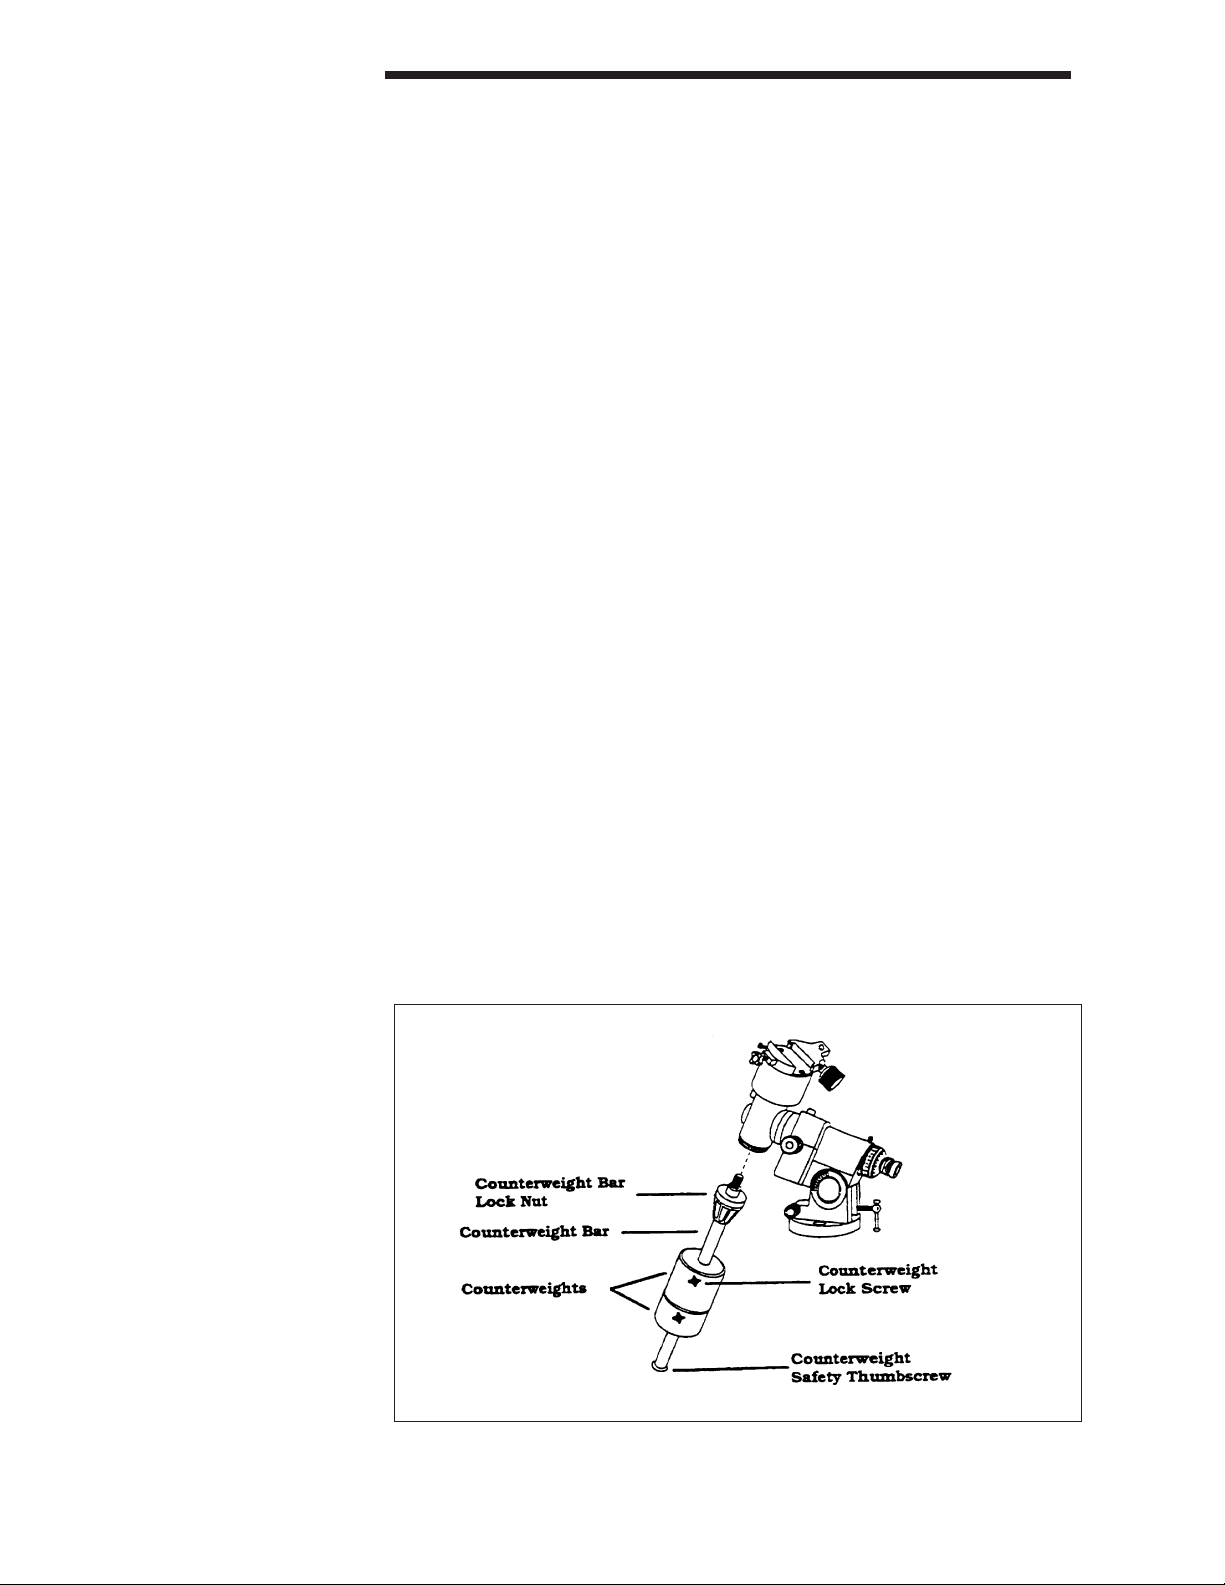
Attaching the Counterweight Bar and Counterweights
The last item to be mounted before the telescope tube is the counterweight bar and
counterweights. Used to balanced the telescope, the counterweight bar attaches to
the opposite side of the mount as the telescope. To install the counterweight bar:
1. Retract the counterweight bar lock nut by turning it counterclockwise. This
will expose the threads on the end of the counterweight bar.
2. Thread the counterweight bar into the mount completely. Once again,
threads into the mount opposite the telescope tubethreads into the mount opposite the telescope tube
threads into the mount opposite the telescope tube (see figure 2-7).
threads into the mount opposite the telescope tubethreads into the mount opposite the telescope tube
3. Tighten the counterweight bar lock nut fully for added support.
The counterweight bar is now installed. With the counterweight bar in place,
you are ready to attach the counterweights.
1. Lock the DEC clamp to hold the mount in place.
2. Remove the safety thumbscrew on the end of the counterweight bar.
3. Loosen the set screw on the counterweight itself so that the central hole of
the counterweight is unobstructed.
4. Slide the counterweight onto the counterweight bar. Move it high enough
to allow room for the second weight (see figure 2-7).
5. Tighten the set screw on the counterweight to hold it in position.
6. Repeat this process for the second weight.
7. Replace the safety thumbscrew on the end of the counterweight bar. The
thumbscrew will prevent the counterweights from sliding off the bar should
they ever become loose.
itit
it
itit
14 • The CR-150 HD
Figure 2-7Figure 2-7
Figure 2-7
Figure 2-7Figure 2-7
Attaching the TelescopeAttaching the Telescope
Attaching the Telescope
Attaching the TelescopeAttaching the Telescope to the Mountto the Mount
to the Mount
to the Mountto the Mount
NOTE:NOTE:
NOTE: Never loosen any of the knobs on the telescope tube or mount. Also, be sure
NOTE:NOTE:
With the mount fully assembled, you are ready to attach the telescope to the
mount.
The optical tube attaches to the mount using a dovetail slidebar that is fastened to
two tube rings that clamp around the tube.
Before you attach the optical tube, fully tighten the right ascension and declinationBefore you attach the optical tube, fully tighten the right ascension and declination
•
Before you attach the optical tube, fully tighten the right ascension and declination
Before you attach the optical tube, fully tighten the right ascension and declinationBefore you attach the optical tube, fully tighten the right ascension and declination
clamps. This will prevent the telescope from moving suddenly once attached to theclamps. This will prevent the telescope from moving suddenly once attached to the
clamps. This will prevent the telescope from moving suddenly once attached to the
clamps. This will prevent the telescope from moving suddenly once attached to theclamps. This will prevent the telescope from moving suddenly once attached to the
mount.mount.
mount.
mount.mount.
1. Loosen the hand knob on the side of the CG-5 mount.
2. Slide the dovetail bar that is attached to the telescope's tube rings onto the
mounting platform of the CG-5 mount (see figure 2-8).
3. Tighten the knob on the CG-5 mount to hold the telescope in place.
that the objective lens end of the telescope is pointing away from the ground at all
times.
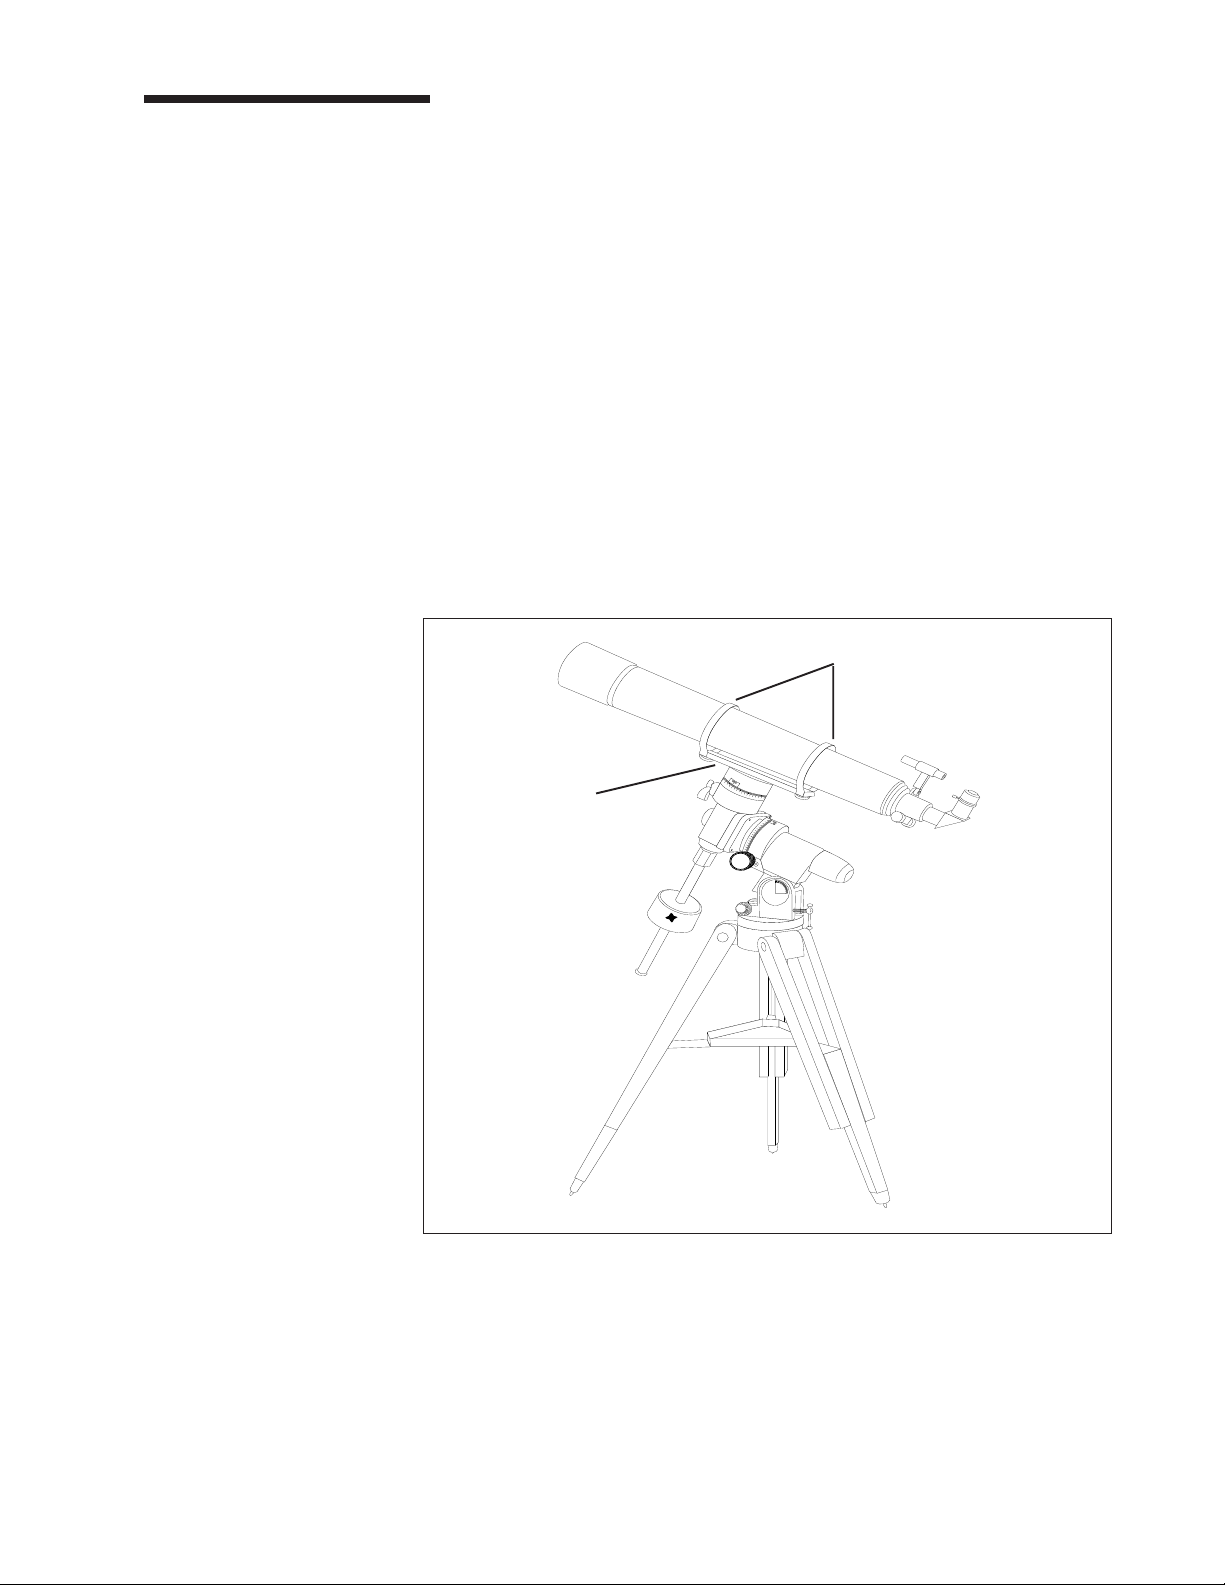
Tube RingsTube Rings
Tube Rings
Tube RingsTube Rings
DovetailDovetail
Dovetail
DovetailDovetail
BracketBracket
Bracket
BracketBracket
Figure 2-8Figure 2-8
Figure 2-8
Figure 2-8Figure 2-8
This illustration shows the optical tube mounted on the CG-5 mount. The dovetail slide
bar has been attached to the telescope tube and is ready to attach to the CG-5 mount.
The CR-150 HD • 15
Balancing the TelescopeBalancing the Telescope
Balancing the Telescope
Balancing the TelescopeBalancing the Telescope
in R.A.in R.A.
in R.A.
in R.A.in R.A.
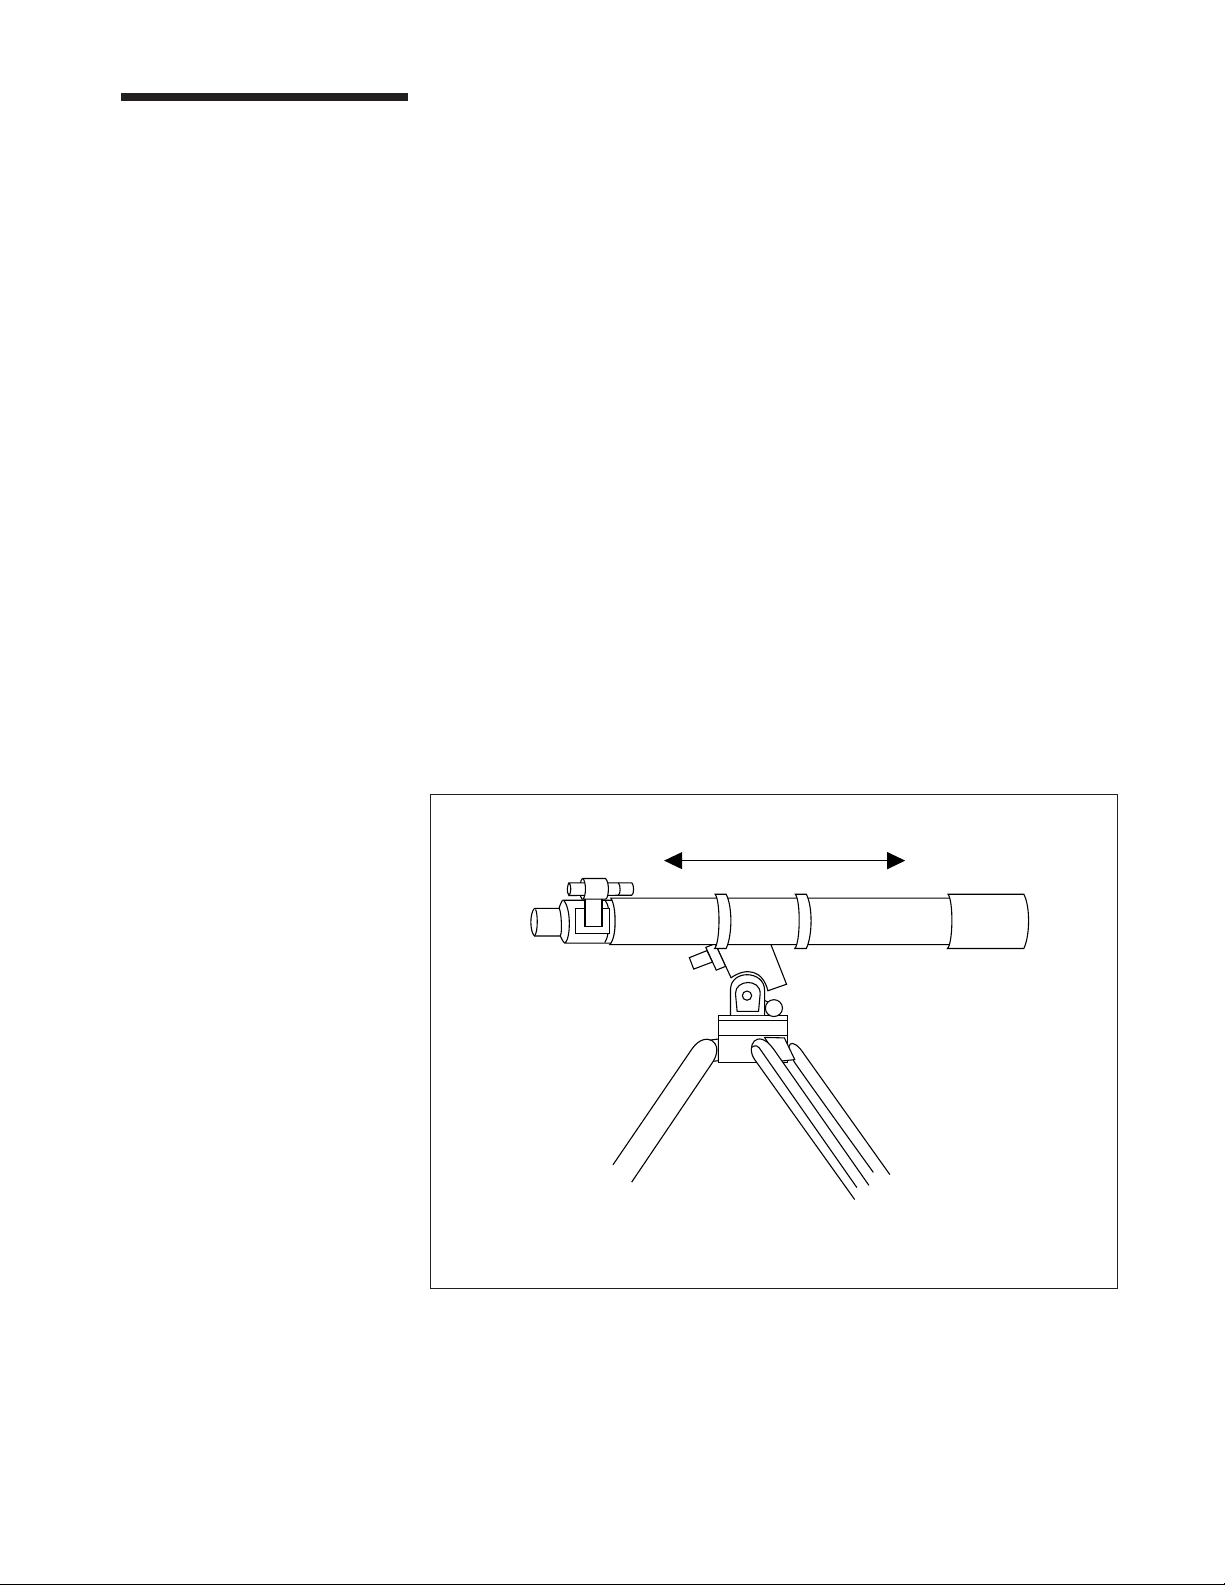
To eliminate undue stress on the mount, the telescope should be properly balanced
around the polar axis. In addition, proper balancing is crucial for accurate tracking if
using an optional motor drive. To balance the mount:
1. Release the R.A. Clamp and position the telescope off to one side of the
mount (make sure that the balance bracket thumbscrew is tight). The
counterweight bar will extend horizontally on the opposite side of the
mount (see figure 2-9).
2. Release the telescope —
“rolls.”
3. Loosen the set screw on one or both counterweights.
4. Move the counterweights to a point where they balance the telescope (i.e.,
it remains stationary when the R.A. clamp is released).
5. Tighten the set screw to hold the counterweight(s) in place.
These are general balance instructions and will reduce undue stress on the
mount. When taking astrophotos, this balance process should be done for the
specific area at which the telescope is pointing.
GRADUALLYGRADUALLY
GRADUALLY — to see which way the telescope
GRADUALLYGRADUALLY
16 • The CR-150 HD
Figure 2-9Figure 2-9
Figure 2-9
Figure 2-9Figure 2-9
The telescope should be balanced after all the standard accessories (i.e., star diagonal,
eyepiece, etc.) have been attached to the telescope. The correct procedure for attaching
these accessories is discussed in the section on “Telescope Basics.”
Balancing the TelescopeBalancing the Telescope
Balancing the Telescope
Balancing the TelescopeBalancing the Telescope
in DECin DEC
in DEC
in DECin DEC
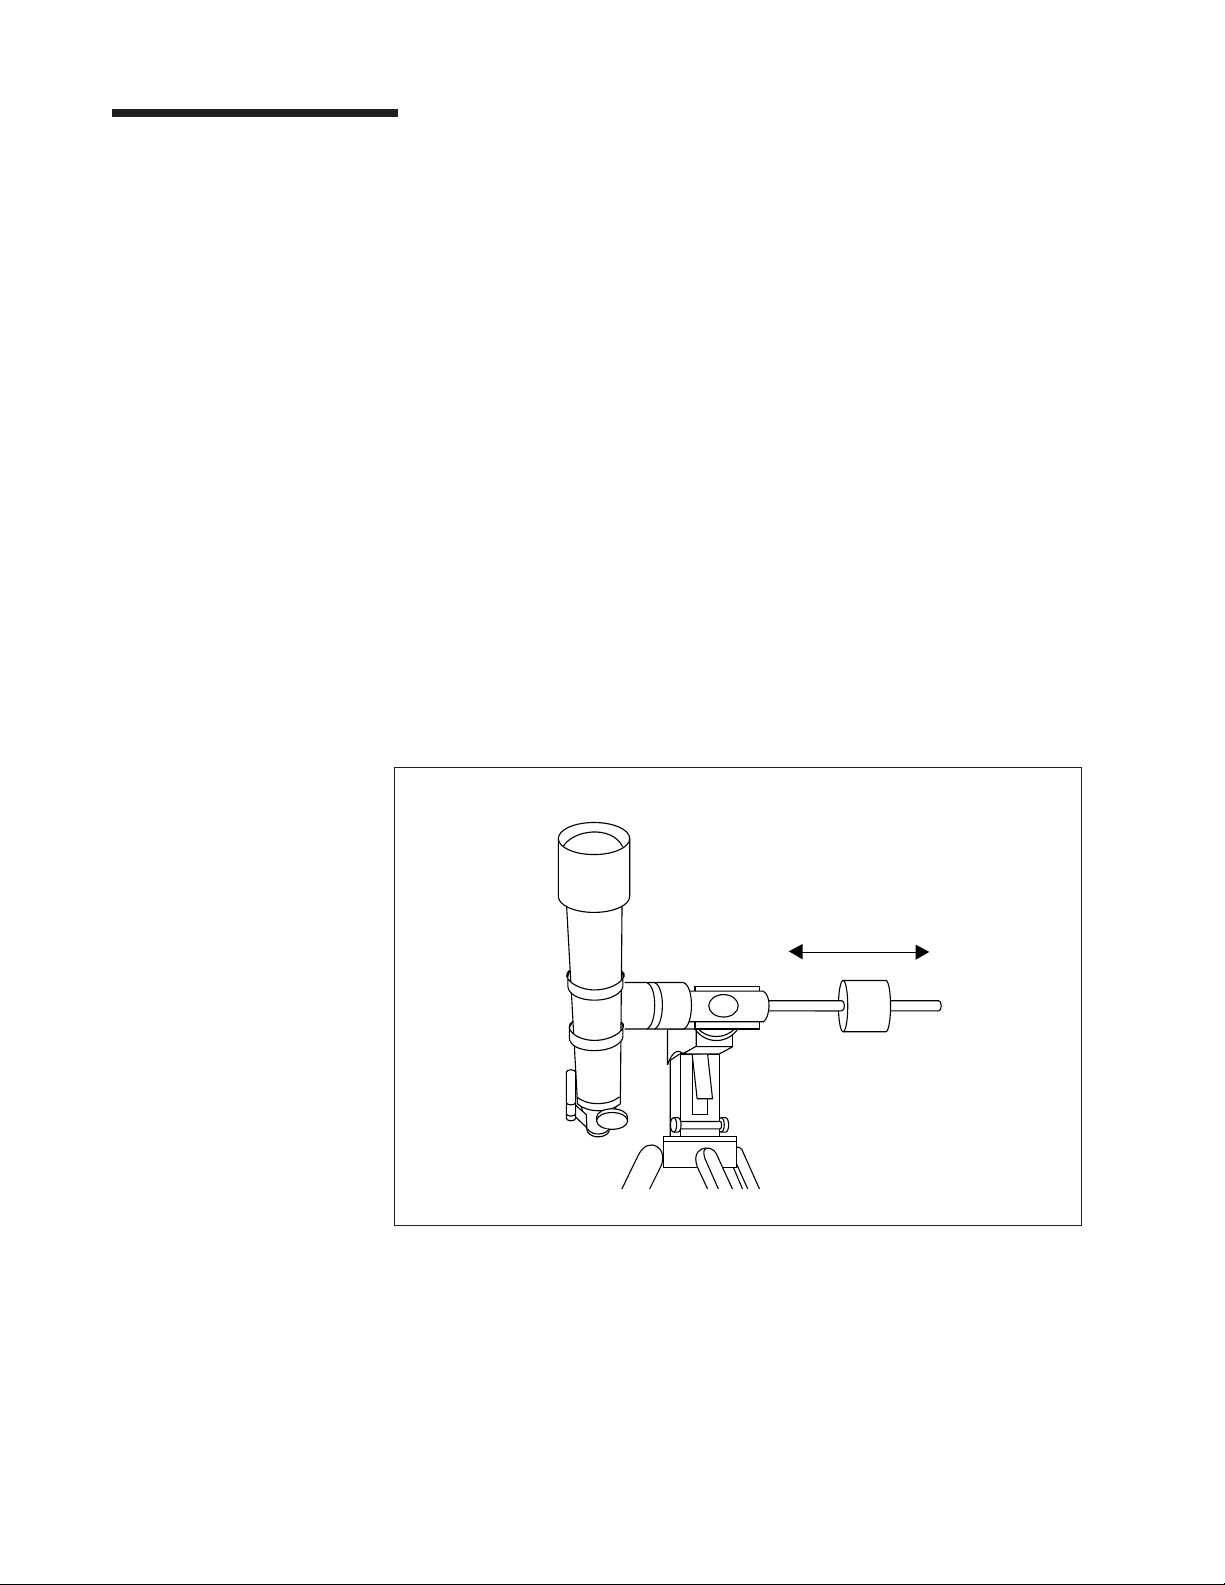
The telescope should also be balanced on the declination axis to prevent any
sudden motions when the DEC clamp is released. To balance the telescope in
DEC:
1. Release the R.A. clamp and rotate the telescope so that it is on one side
of the mount (i.e., as described in the previous section on balancing the
telescope in R.A.).
2. Lock the R.A. clamp to hold the telescope in place.
3. Release the DEC clamp and rotate the telescope until the tube is parallel
to the ground (see figure 2-10).
4. Release the tube —
the declination axis.
COMPLETELY!COMPLETELY!
COMPLETELY!
COMPLETELY!COMPLETELY!
5. Slightly loosen the balance bracket thumbscrew and slide the telescope
either forward or backward until it remains stationary when the DEC clamp
is released.
bracket thumbscrew is loose.bracket thumbscrew is loose.
bracket thumbscrew is loose.
bracket thumbscrew is loose.bracket thumbscrew is loose.
6. Tighten the thumbscrew firmly to hold the telescope in place.
Like the R.A. balance, these are general balance instructions and will reduce
undue stress on the mount. When taking astrophotographs, this balance
process should be done for the specific area at which the telescope is pointing.
GRADUALLYGRADUALLY
GRADUALLY — to see which way it rotates around
GRADUALLYGRADUALLY
DO NOT LET GO OF THE TELESCOPE TUBEDO NOT LET GO OF THE TELESCOPE TUBE
DO NOT LET GO OF THE TELESCOPE TUBE
DO NOT LET GO OF THE TELESCOPE TUBEDO NOT LET GO OF THE TELESCOPE TUBE
Do NOT let go of the telescope tube while the balanceDo NOT let go of the telescope tube while the balance
Do NOT let go of the telescope tube while the balance
Do NOT let go of the telescope tube while the balanceDo NOT let go of the telescope tube while the balance
Figure 2-10Figure 2-10
Figure 2-10
Figure 2-10Figure 2-10
As with R.A., the telescope should be balanced in DEC after all the standard accessories
(i.e., star diagonal, eyepiece, etc.) have been attached to the telescope.
The CR-150 HD • 17

Adjusting the MountAdjusting the Mount
Adjusting the Mount
Adjusting the MountAdjusting the Mount
in Altitudein Altitude
in Altitude
in Altitudein Altitude
Adjusting the MountAdjusting the Mount
Adjusting the Mount
Adjusting the MountAdjusting the Mount
in Azimuthin Azimuth
in Azimuth
in Azimuthin Azimuth
For the purpose of polar alignment, there are two directions in which the mount
can be adjusted; vertically, which is called altitude and horizontally, which is
called azimuth. There are several ways to align on the celestial pole, some of which
are discussed later in this manual. This section simply covers the correct movement
of the mount during the polar alignment process. To adjust the mount in altitude (i.e.,
raise or lower the angle of the polar axis), turn the altitude adjustment lever:
• Turning the lever clockwise increases the angle at which the polar axis is
pointing
• Turning the lever counterclockwise lowers the angle at which the polar axis is
pointing.
The latitude adjustment on the CG-5 mount has a range of 40°, starting at 20°
going up to 60°.
For rough adjustments in azimuth, simply pick up the telescope and tripod and
move it. For fine adjustments in azimuth:
1. Turn the azimuth adjustment screws located on either side of the azimuth
housing. While standing behind the telescope, the knobs are on the front
of the mount.
• Turning the right adjustment knob clockwise moves the mount toward the
right.
• Turning the left adjustment knob clockwise moves the mount to the left.
Both screws push off of the peg on the tripod head, which means you may
have to loosen one screw while tightening the other. The screw that holds the
equatorial mount to the tripod may have to be loosened slightly.
Figure 2-11Figure 2-11
Figure 2-11
Figure 2-11Figure 2-11
18 • The CR-150 HD
Loading...