

Page 1

CAT EYE VELO 1
CYCLOCOMPUTER
CC-VL100
®
U.S. Pat. Nos. 4642606/5236759/5226340/5264791
CCMVL1-990114 Printed in Japan 0687421
LIMITED WARRANTY
1-Year Warranty for Main Unit Only
(Accessories/Attachments and Battery Consumption excluded)
If trouble occurs during normal use, the part of the Main Unit will be repaired or replaced free of charge. The service must
be performed by Cat Eye Co., Ltd. To return the product, pack it carefully and remember to enclose the warranty certificate with instruction for repair. Please write or type your name and address clearly on the warranty certificate. Insurance,
handling and transportation charges to our service shall be borne by person desiring service.
(Address for service)
2-8-25, Kuwazu, Higashi Sumiyoshi-ku, Osaka 546-0041 Japan
Service & Research Address for United States Consumers:
Phone : 303-443-4595 Toll Free: 800-5CATEYE
Fax : 303-473-0006 e-mail : CatEyeUSA@aol.com
GARANTIE LIMITEE
1 An de Garantie Unité Principale Uniquement
(à l'exclusion des accessoires et de la pile)
Ce produit est garanti, sous réserve d'une utilisation normale, pendant une période d'un an. Les réparations effectuées dans le cadre de la
présente garantie sont gratuites et doivent être effectuées par CAT EYE Co., Ltd. Le produit à réparer doit être retourné à CAT EYE Co.,
Ltd. directement par l'acheteur. Tout produit retourné au département de réparation CAT EYE doit être soigneusement emballé et le
certificat de garantie ainsi que les instructions de réparation doivent accompagner le produit. Il est conseillé à l'acheteur d'écrire lisiblement
ou de dactylographier ses nom et adresse sur le certificat de garantie, afin que le produit lui soit directement retourné après réparation.
Le coût de l'assurance ainsi que les frais de manutention et de transport sont à charge de la personne souhaitant une réparation sous garantie.
(Adresse d'envoi pour réparation)
2-8-25, Kuwazu, Higashi Sumiyoshi-ku, Osaka 546-0041 Japon
GARANTIE
1 Jahr Garantie nur auf den Computer
(Die Zubehör-/Montageteile und Batterie sind von Garantieleistungen ausgeschlossen)
Falls während des normalen Gebrauchs Fehler auftreten, wird das entsprechende Teil des Computers kostenlos repariert oder ersetzt.
Die Reparatur muß von Cat Eye Co., Ltd durchgeführt werden. Wenn Sie das Gerät einsenden, packen Sie es sorgfältig ein und fügen
Sie die Garantiekarte sowie Reparaturhinweise anbei. Achten Sie darauf, Ihren Namen und Ihre Anschrift mit Schreibmaschine oder
in Druckbuchstaben deutlich lesbar auf die Garantiekarte zu schreiben. Versicherungskosten und Kosten für den Transport bis zu
unserem Kundendienst gehen zu Lasten der Person, die unseren Kundendienst in Anspruch nehmen möchte.
(Anschrift des Kundendienstes)
2-8-25 Kuwazu, Higashi Sumiyoshi-ku, Osaka, 546-0041 Japan
Attn.: CAT EYE Customer Service Section
GARANZIA LIMITATA
1 Anno di Garanzia soltanto sull'Unità Principale
(Gli accessori e la pila sono esclusi dalla garanzia)
In caso di problema durante l'impiego normale, l'unità principale verrà riparata o sostituita gratuitamente da Cat Eye Co., Ltd.. Al
momento del ritorno del prodotto occorre imballarlo con cura allegandovi il certificato di garanzia con le istruzioni per le riparazioni. Il nome e l'indirizzo dell'acquirente devono essere presenti in modo leggibile sul certificato di garanzia. Le spese di
assicurazione, di manutenzione e di spedizione al nostro Servizio Riparazioni saranno a carico del richiedente la riparazione.
(Indirizzo Servizio Riparazioni)
2-8-25 Kuwazu, Higashi Sumiyoshi-ku, OSAKA 546-0041, Giappone.
GARANTLE BEPALINGEN
1 jaar garantie op de computer unit
(bedrading, magneet, sensor, batterij en bevestigingsmateriaal uitgezonderd)
Indien er problemen optreden gedurende normaalgebruik, binnen de garantie periode, dan geschiedt r eparatie of vervanging kosteloos.
Dit dient door de fabrikant Cat eye Co. Ltd. uitgevoerd te worden. de computer moet door de importeur terug gezonden worden. Bij
terugzenden van de computer moet deze zorgvuldig verpakt worden en dient het garantie bewijs, de aankoopbon en een beschrijving
van het probleem meegezonden te worden. Verzekering- en verzend- en transportkosten zijn voor rekening van de koper.
GARANTÍA LIMITADA
1- Año de Garantía Sólo para la Unidad Principal
(Se excluyen Accesorios/Acoplamientos y Batería)
En caso de problemas durante su uso normal, la unidad principal será reparada o reemplazada sin coste alguno. El servicio
debe ser realizado por el distribuidor CAT EYE en su país. Para enviar el producto al servicio de reparación, empaquételo
primero cuidadosamente y no olvide incluir el certificado de garantía e instrucciones para el servicio de reparación. En el
certificado de garantía deberá constar su nombre y dirección completa. Los gastos de seguro, manipulación y transporte o
correo deberán correr a cargo de quien solicite dicho servicio.
(Service adres)
2-8-25, Kuwazu, Higashi Sumiyoshi-Ku, Osaka 546-0041 Japan
(Dirección para las reparaciones)
2-8-25, Kuwazu, Higashi Sumiyoshi-Ku, Osaka 546-0041 JAPAN
Pat. and Design Pat. Pending
Copyright© 1998 CAT EYE Co., Ltd.
2
CO
.,LTD.
Attn.: CAT EYE Customer Service Section
CAT EYE Service & Research Center
1705 14th St. 115 Boulder, CO 80302
CO
.,LTD.
Attn. : CAT EYE Customer Service Section
CO
.,LTD.
CO
.,LTD.
Att:Dipartamento Assistenza Clienti
CO
.,LTD.
Attn.: Cat eye consumer service section
CO
.,LTD.
ATT: CAT EYE Customer Service Section
Setting Values Cross Reference Table (The tire size is marked on both sides of the tire.)
Table de Correspondance des Valeurs de Réglage
Wertetabelle zur Einstellung des Radumfanges
Tabella delle Corrispondenze dei Valori di Regolazione
Tabel voor het bepalen van de wielomtrek (de bandenmaat staat vermeld aan beide zijden van de band)
Tabla de Valores (El tamaño de la rueda está marcado al lado de la llanta)
TIRE SIZE
dimension du pneu
Radgröße
dimensione del pneumatico
bandenmaat
Tamaña de rueda
20 x 1.75
24 x 1
24 x 3/4 Tubular
Tubular
24 x 1-1/8
24 x 1-1/4
24 x 1.75
24 x 2.00
24 x 2.125
26 x 1(559mm)
26 x 1(650c)
26 x 1.25
* The values listed here are not definitive information. Wheel circumference varies with the tire pressure.
* Les valeurs indiquées sont approximatives. La circonférence de roue varie en fonction de la pression de gonflage du pneu.
* Die angegebenen Zahlen sind nur Näherungswerte. Der Radumfang kann je nach Reifendruck verschieden sein.
* De waarden in de tabel zijn niet exact, de wielomtrek is ook afhankelijk van de bandenspanning en het profiel.
* Las medidas aquí mencionadas no son una información definitiva. La circunferencia del neumático varía con la presión del mismo.
Specifications/Caractéristiques techniques/Technische Daten/Caratteristiche tecniche/
specificaties/
Controller/
Systéme de contrôle
------------------------------------------------------------------4-bit 1-chip Microcomputer (Crystal Controlled Oscillator)
Display/
Afficheur
Sensor/
Détecteur
Operating Temperature Range/
Werking temperatuur/
#169-9770
Bracket Sensor Kit for Extra Large Fork (for CC-VL100)
Kit de Montage du collier de Détecteur pour fourcheextra large (pour CC-VL100)
Halterung und Radsensor für besonders große Gabeln (für CC-VL100)
Kit di Montaggio del collare del Sensore per forcelle "extra large" (per CC-VL100)
Sensor bevestiginset voor extra dikke vork (voor CC-VL100)
Kit abrazadera de sensor para horquilla extra larga
#169-9730
Heavy Duty Wire and Bracket Sensor Kit
Kit Fil Renforcè, Support et Détecteur
Draht und Halterung/Sensor-Kit für starke Beanspruchung
Cavo rinforzato e kit supporto dell’ unità principale e sensore
Dikke draad- en bracketset
Cable resistente y Kit Soporte del Sensor
#169-6560 [#169-6565]
Bracket Sensor Kit [Long]
Kit Support et Détecteur [Long]
Halterung/Sensor-Kit [lang]
Kit supporto dell'unità principale e sensore [Lungo]
Draadset [lang]
Kit Soporte del Sensor [Grande]
#169-6567 [#169-6562]
Center Mount Bracket Kit [Long]
Kit Support pour Montage Central [Long]
Halterungskit für Mittelmontage [lang]
Kit per montaggio del ciclocomputer al centro del manubrio [Lungo]
Draadset centrale bevestiging [lang]
Kit Soporte para Montaje Central [Grande]
#169-6568
Bracket Sensor Kit for Aero Bar
Kit Support et Détecteur pour Barre Aéro
Halterung/Sensor-Kit für Aero-Stange
Kit supporto sensore per ruote Aero
Draadset stuurpen bevestiging
Kit Soporte del Sensor para Manillar Aero
#169-6569
Stem Mount Bracket Kit
Kit Support pour Montage sur Broche de Guidon
Halterungskit für Montage am Lenkerschaft
Kit per montaggio sull'attacco del manubrio
Draadset stuurpen bevestiging
Kit Soporte para Montaje en Potencia
#169-9750 #169-6170
Attachment Kit (For Heavy Duty Wire) Attachment Kit
Kit de Gamitures (Pour fil renforcè) Kit de Gamitures
Befestigungsmaterial (Für Hochleistungskabel) Befestigungsmaterial
Guarnizioni da montare (Per cavo rinforzato) Guarnizioni da montare
Kabelbevestigingset (Voor dikke draad)
Elementos de fijación (Para cable resistente)
#169-9751 #169-6280
Attachment Kit (For CC-VL100) Universal Sensor Band
Kit de Gamitures (Pour CC-VL100) Collier Détecteur Universel
Befestigungsmaterial (Für CC-VL100) Universalmontageband für Sensor
Guarnizioni da montare (Per CC-VL100) Fascetta universale per fissaggio sensore
Kabelbevestigingset (Voor CC-VL100) Universele vorkklem
Elementos de fijación (Para CC-VL100)
#169-9760 #166-5120
Wheel Magnet for Composit Wheel
Pour roue composite
Für Verbundräder
Magnete per ruote
Voor o.a, carbonwielen
Para rueda de palos
#166-5150
Lithium Battery (CR2032)
Pile au Lithium (CR2032)
Lithiumbatterie (CR2032)
TIRE SIZE
L(cm) L(cm) L(cm) L(cm)
dimension du pneu
Radgröße
dimensione del pneumatico
bandenmaat
Tamaña de rueda
Tubular
26 x 1-1/8
150
26 x 1-3/8
175
26 x 1-1/2
178
26 x 1.40
179
26 x 1.50
191
26 x 1.75
189
26 x 1.95
192
26 x 2.00
196
26 x 2.1
191
26 x 2.125
195
26 x 2.35
195
Especificaciones
/Anzeige/Visualizzazione/Display/
/Sensor/Rivelatore/Sensor/
/Controler/Elaboratore/Controller/
Température d'utilisation
Rango de Temperatura de Funcionamiento ---------------------------------
Batteria al litio (CR2032)
Lithiumbatterij (CR2032)
Batería de Litio (CR2032)
(La dimension du pneu figure de chaque côté du pneu)
(die Radgröße entnehmen Sie der Aufschrift des Reifens)
(La dimensione del pneumatico figura su ogni lato del pneumatico)
TIRE SIZE
dimension du pneu
Radgröße
dimensione del pneumatico
bandenmaat
Tamaña de rueda
27 x 1
197
27 x 1-1/8
207
27 x 1-1/4
210
27 x 1-3/8
200
650 x 35A
199
650 x 38A
202
650 x 38B
205
700 x 18C
206
700 x 19C
207
700 x 20C
207
700 x 23C
208
Controlador
Pantalla
Sensor ------------------------------------
----------------------------------- Liquid Crystal Display
/zulässige Betriebstemperatur/Toegestane temp./
(para CC-VL100)
Kabelbevestigingset
Elementos de fijación
Banda Sensor Universal
Wheel Magnet
Aimant de Roue
Radmagnet
Magnete per ruota
Wielmagneet
Imán de Rueda
TIRE SIZE
dimension du pneu
Radgröße
dimensione del pneumatico
bandenmaat
Tamaña de rueda
700 x 25C
215
700 x 28C
216
700 x 30C
216
700 x 32C
217
209
700C Tubular
212
700 x 35C
211
700 x 38C
700 x 44C
207
209
209
210
No Contact Magnetic Sensor
0°C - 40°C(32°F - 104°F)
211
214
217
216
213
217
218
222
Page 2
E
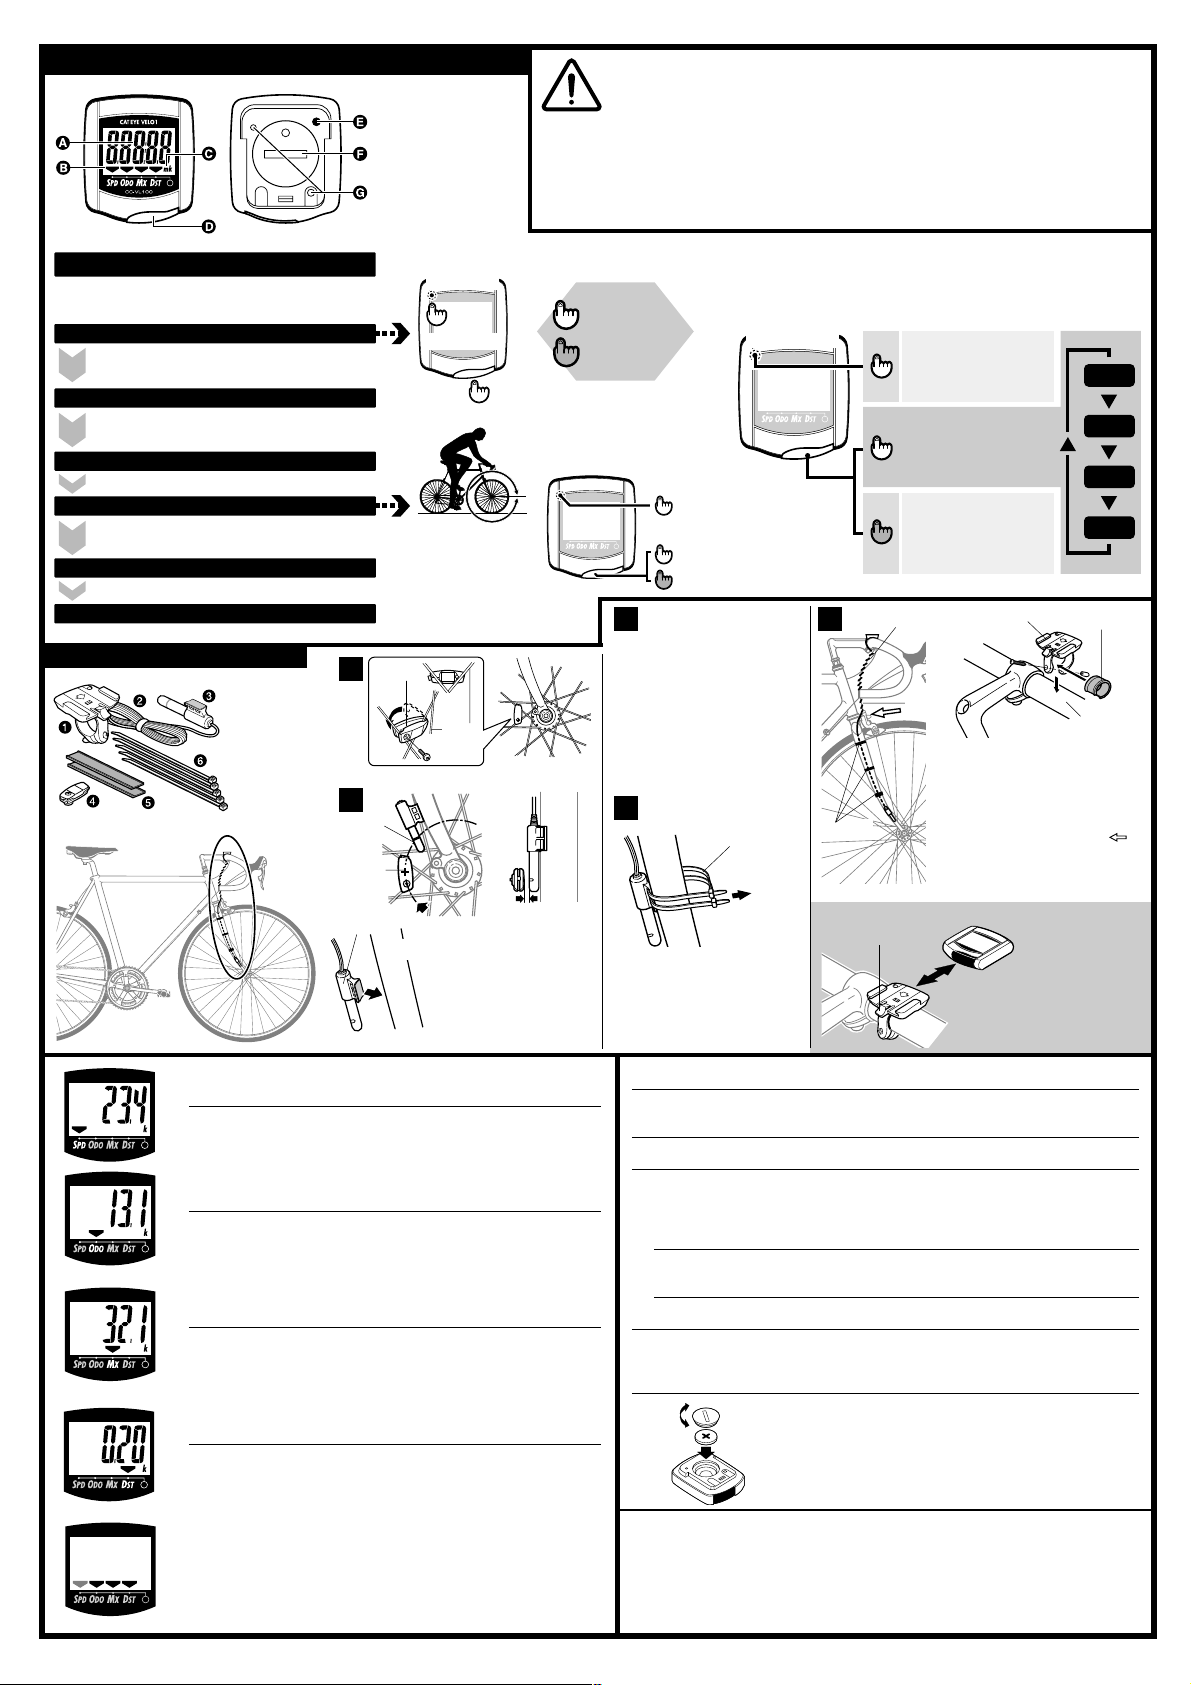
INSTRUCTION MANUAL
Main Unit Preparation
When using the unit for the first time or
after replacing battery, follow this procedure.
All Clear Operation
Press Main button and SET button simultaneously.
→All displays illuminate, and then "k" symbol flashes.
Scale Selection
Press Main button
and select "k (km)" or "m (mile)".
Press SET button to fix it
Wheel Circumference Setting
Increase the figure by Main button
(to increase rapidly, hold down the button).
Press SET button to fix it
Preparation Completed
How to Install
1 Bracket
2 Wire
3 Sensor
4 Magnet
5 Bracket
Rubber Pad
6 Nylon Ties
A.Data Display
B.Mode Symbol
C.Scale Symbol
D.Main Button
E.SET Button
F.Battery Case Cover
G.Contact
Measure the wheel circumference by traveling your
bike on the ground for one
full wheel revolution. Or "Selecting Values Cross Reference Table" tells you an approximate circumference
according to your tire size.
magnet
1
2
sensor's
marking
line
magnet's
center
sensor
front fork
All Clear
Operation
SET(on back)
Press
simultaneously
L
spoke
clearance (2mm)
Align the magnet's center
and the sensor's marking
line. Make sure of 2mm
clearance between the
magnet and sensor. Temporality attach the sensor
to the fork with the self-adhesive patch.
• Don't pay too much attention to your computer functions while riding. Keep your eyes
on the road and give due consideration to safe riding.
• Securely attach the magnet, sensor and bracket to your bicycle. Periodically check if
the screws and secure bands have loosened.
• Safely dispose of the old battery. Do not place it within children's reach. If swallowed
by mistake, consult a doctor immediately.
Do not leave the main unit exposed to direct sunlight. Never disassemble the main unit.
•
• For cleaning, use neutral detergent on soft cloth, and wipe off with dry cloth. Do not
apply paint thinner, benzine or alcohol, to avoid damages on the surface.
• If there is mud, sand or the like clogged between the button and the body, the movement of the button may be deteriorated. Softly wash away such objects with water.
Precautions
Button Operation
Just press
Hold down
In Wheel Circumference
Setting Display:
)
SET(on back
Completes setting
→Return to measuring
Increases the figure
Rapidly increases the figure
3
Test
Slide the main unit onto the
bracket according to ''How to Attach Main Unit to Bracket" (below). Spin the front wheel and
check if the scale symbol
flashes. (If not, adjust the relative
positions of the magnet and sensor again.) After the test, remove
the main unit.
4
Fix the sensor with the nylon ties.
Note: Fasten the ties securely.
In Ordinary Display
When you start/stop riding, the unit
automatically starts/stops measuring.
While measuring, the scale symbol "k" or "m" flashes.
SET(on back)
nylon tie
pull
5
nylon ties
How to Attach Main Unit to Bracket
In ODO display:
Wheel Size Setting
Changes the
display as in
the right figure
Resets data
(In MX or DST
display)
brake cable
wire
Secure the wire along the fork with
the nylon ties, and wind it round the
brake cable up to the handlebar.
Note: Allow enough wire length in
lever
slide
bracket
the area marked with
the illustration, to insure full
movement and unhindered
operation of the handlebar.
unit onto the
bracket from front until it clicks into position.
To remove it, pull it off
forward while pushing
down the lever.
SPD
ODO
MX
DST
rubber pad
handlebar
in
Slide the main
SPD Current Speed
0.0(4.0) - 100 km/h ±1 km/h [0.0(3.0) - 60 mph ±1] (under 60 km/h)
The data is updated once a second.
When it reaches 60km/h (or 60mph), the decimals are omitted.
ODO Total Distance (Odometer)
0.0 - 9999.9 km [mile] ±0.1 km [mile]
Continuously measured until battery wears down.
At 9999.9 km, it returns to zero and counting begins anew.
MX Maximum Speed
0.0(4.0) - 100 km/h ±1 km/h [0.0(3.0) - 60 mph ±1]
Displays the highest recorded speed. When it reaches 60 km/h (or 60
mph), the decimals are omitted. With reset operation, it returns to zero.
DST Trip Distance
0.00 - 999.99 km[mile] ±0.01 km[mile]
The trip distance from start to current point is displayed. With reset operation, it returns to zero.
Power Saving Function
When the main unit does not receive a signal, or a button has not been
pressed for about 70 minutes, the power supply is shut down and only
mode mark flashes . By pressing the Main button, or by receiving signal,
this function is released.
Trouble Shooting
No display.
Has the battery in the main unit worn out?
Replace it with a new one.
Incorrect data appears.
Do "All Clear" operation.
Current speed does not appear. (When current speed does not appear, first short-circuit
the contact on the back with metal; if the speed display appears, the main unit is normal
and the problem must be in the bracket or the sensor.)
Is there anything on the contact of the main unit or of the bracket?
Wipe the contact clean.
Is the distance between the sensor and the magnet too far?
Are the marking line of the sensor and the center of magnet aligned?
Adjust the position of the sensor and magnet again.
Is the wire broken?
Replace it with a new one.
Current speed does not appear in wet condition.
Wipe the contacts with dry cloth. Contacts can also be treated with a water repellent
silicon jell from an automotive parts store or hardware store. Do not use industrial
water repellent; it may damage the bracket.
close
open
Specifications
Applicable Wheel Circumference -- 112cm - 255cm (initial figure: 205 cm)
The length of the wire -------------- 70cm
Power Supply ------------------------ Lithium Battery (CR2032) x 1
Battery Life ---------------------------- Approx. 3 years
Dimension/Weight---------------------- 1-25/32” x 1-9/16” x 5/8” [45 x 40 x 15.5 mm ] / 0.85 oz. [24 g]
* The specifications and design are subject to change without notice.
How to Replace Battery
When the display becomes dim, the battery is at the end of its
useful life. Replace it with a new lithium battery (CR2032) with the
(+) pole upward. After replacing battery, be sure to perform "All
Clear" operation and set the scale and wheel size again, as in the
"Main Unit Preparation".
shorter than this period.)
(The life of the first factory-loaded battery may be
 Loading...