

Page 1
CO
.,L TD.
CO
.,L TD.CO.,L TD.
CO
.,L TD.CO.,L TD.
CATEYE ENDURO
CYCLOCOMPUTER
Model CC-ST250
U.S. Pat. Nos. 4636769/4642606/5236759/5226340
CCMST25-970422 Printed in Japan 0687265
Copyright© 1996 CATEYE Co., Ltd.
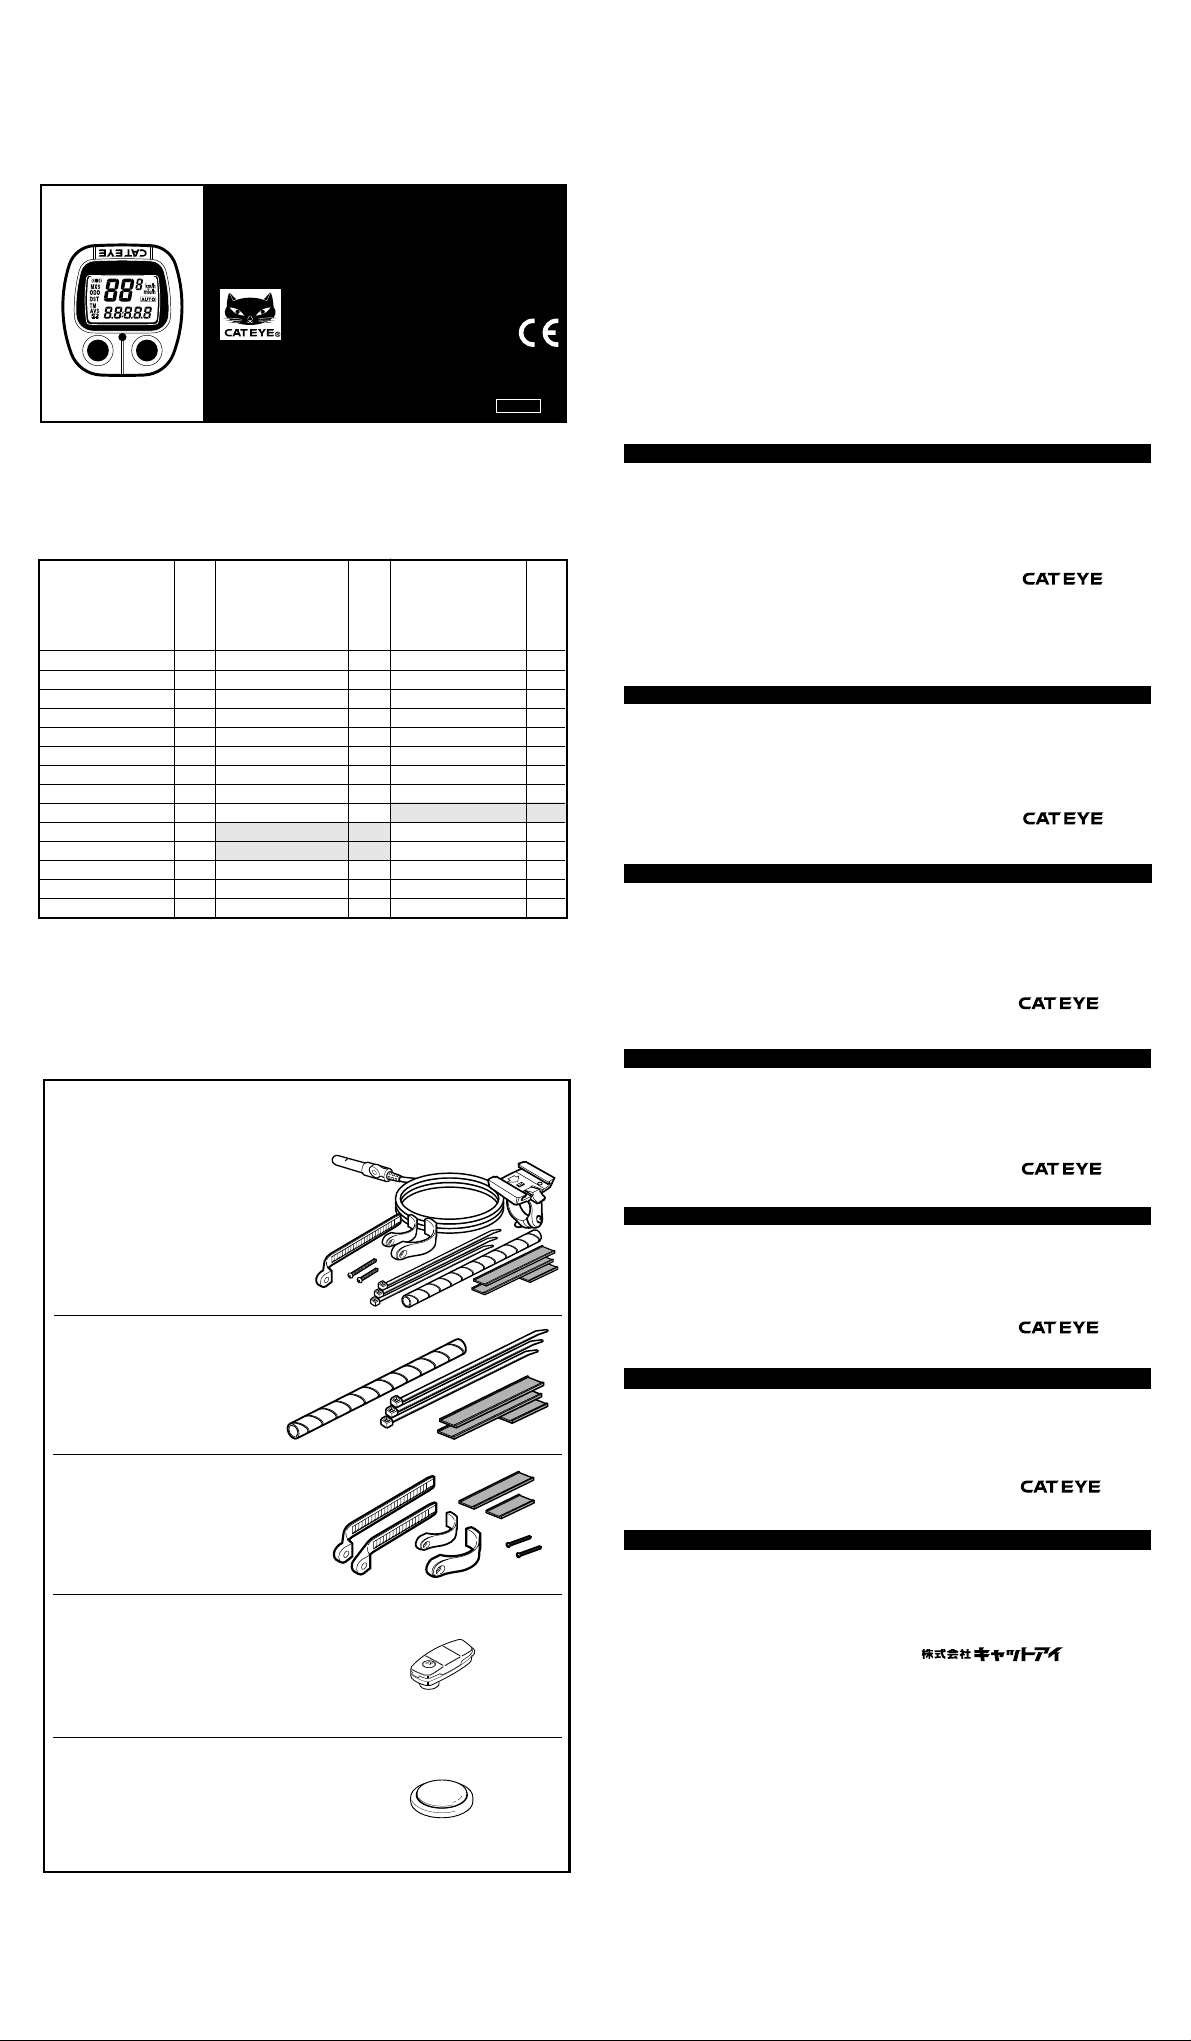
Setting Values Cross Reference Table (The tire size is marked on both sides of the tire.)
Table de Correspondance des Valeurs de Réglage (La dimension du pneu figure de chaque côté du pneu)
Wertetabelle zur Einstellung des Radumfanges (die Radgröße entnehmen Sie der Aufschrift des Reifens)
Tabel voor het bepalen van de wielomtrek (debandenmaatstaatvermeldaanbeidezijdenvandeband)
Tabella delle Corrispondenze dei Valori di Regolazione (La dimensione del pneumatico figura su ogni lato del pneumatico)
Tabla de Valores (El tamaño de la rueda está marcado al lado de la llanta)
タイヤ周長ガイド(タイヤサイズは通常タイヤの側面に記載されています)
TIRE SIZE L(cm) TIRE SIZE L(cm) TIRE SIZE L(cm)
dimension du pneu dimension du pneu dimension du pneu
Radgröße Radgröße Radgröße
bandenmaat bandenmaat bandenmaat
dimensione del pneumatico dimensione del pneumatico dimensione del pneumatico
Tamaño de rueda Tamaño de rueda Tamaño de rueda
タイヤサイズ タイヤサイズ タイヤサイズ
20 x 1.75 150 26 x 1.40 200 650 x 38B 211
24 x 1 175 26 x 1.50 199 700 x 18C 207
24 x 3/4 Tubular 178 26 x 1.75 202 700 x 19C 209
24 x 1-1/8 Tubular 179 26 x 1.95 205 700 x 20C 209
24 x 1-1/4 191 26 x 2.00 206 700 x 23C 210
24 x 1.75 189 26 x 2.1 207 700 x 25C 211
24 x 2.00 192 26 x 2.125 207 700 x 28C 214
24 x 2.125 196 26 x 2.35 208 700 x 30C 217
26 x 1(559mm) 191 27 x 1 215 700 x 32C 216
26 x 1(650c) 195 27 x 1-1/8 216 700C Tubular 213
26 x 1.25 195 27 x 1-1/4 216 700 x 35C 217
26 x 1-1/8 Tubular 197 27 x 1-3/8 217 700 x 38C 218
26 x 1-3/8 207 650 x 35A 209 700 x 44C 222
26 x 1-1/2 210 650 x 38A 212
Specifications/Caracteristiques techniques/Technische daten/Specificaties/
Caratteristiche tecniche/
Controller/Calculateur/Controler/Controleur/Elaboratore/
------------------------------------------------------------------ 4-bit 1-chip Microcomputer (Crystal Controlled Oscillator)
Display/Affichage/Anzeige/Display/Visualizzazione/
----------------------------------------------------------------------------------------------------------------- Liquid Crystal Display
Sensor/Détecteur/Sensor/Sensor/Rivelatore/
------------------------------------------------------------------------------------------------------- No Contakt Magnetic Sensor
Operating Temperature Range/Température d’utilisation/zulässige Betriebstemperatur/Toegestanetemp./Temperatura di utilizzo/使用温度範囲
------------------------------------------------------------------------------------------------------------ 0°C - 40°C(32°F - 104°F)
#169-9731
Heavy Duty Wire and Bracket Sensor Kit
Kit de Fil Renforce et Supports d'Unité Principale et de Détecteur
Nachrüstset mit Halterung, Sensor und verstärktem Sensorkabel
Extrasterkekabelenbracketsensorset
Filo Ultra Resistente e Attacco Completo
Kit Soporte del Sensor y Alambre de Servicio Pesado
ヘビー デューティワイヤ& ブラケットセンサーキット
Especificaciones
Pantalla
Sensor
/検知方式
/仕様
Contador
/表示方式
/制御方式
and Design Patented
3
LIMITED WARRANTY
1-Year Warranty for Main Unit Only
(Accessories/Attachments and Battery Consumption excluded)
If trouble occurs during normal use, the part of the Main Unit will be repaired or replaced free of charge. The service must be
performed by Cat Eye Co., Ltd. To return the product, pack it carefully and remember to enclose the warranty certificate with
instruction for repair. Please write or type your name and address clearly on the warranty certificate. Insurance, handling and
transportation charges to our service shall be borne by person desiring service.
(Address for service)
GARANTIE LIMITÉE
1 An de Garantie sur l'Unité Principale Uniquement
(Les accessoires et la pile sont exclus de la garantie)
En cas de problème en cours d'utilisation normale, l'unité principale sera réparée ou remplacée gratuitement.
Par Cat Eye Co., Ltd. Lors du renvoi du produit, il y a lieu de l'emballer soigneusement et de joindre le certificat
de garantie avec les instructions de réparation. Les nom et adresse de l'acheteur doivent figurer de manière
lisible sur le certificat de garantie. Les frais d'assurance, de manutention et d'envoi à notre Service Réparations
seront supportés par le demandeur de la réparation.
Adresse Service Réparations
BEGRENZTE GARANTIE
1-Jahr-Garantie: Auf den Computer
(Ersatzteile/Zubehörteile sowie Batterie nicht eingeschlossen)
Falls während des normalen Gebrauchs Fehler auftreten, wird das entsprechende Teil kostenlos repariert
oder ersetzt. Die Reparatur muß von CAT EYE Co., Ltd. durchgeführt werden, und das zu reparierende
Produkt muß direkt durch den Händler an CAT EYE Co., Ltd. gesandt werden. Bei der Rückgabe des
Gerätes zur Reparatur packen Sie es sorgfältig anbei. Achten Sie darauf, Ihren Namen und Ihre Anschrift
klar und deutlich lesbar auf die Garantiekarte zu schreiben, damit das Gerät so schnell wie möglich nach
Beendigung der notwendigen Reparatur/Einstellung an Sie zurückgesandt werden kann.
Anschrift bei Garantieansprüchen
z. H.: CAT EYE Kundendienstabteilung oder wenden Sie sich bitte an den entsprechenden Importeur.
GARANTLEBEPALINGEN
1 jaar garantie, alleen geldig op de computer (accessoires, aansluitingen en
gebruik van batterij uitgezonderd)
Mochtenerproblemenoptredengedurendenormaalgebruik,dangeschiedtreparatieofvervangingkosteloos.Ditdoentdoorde
fabrikantCateyeCo.,Ltd.uitgevoerdteworden.Bijterugzendingvandecomputermoetdezezorgvuldigverpaktwordenendienthet
garantiebewijseneenbeschrijvingvanhetprobleemmeegezondenteworden.Vermeldduidelijkuwnaamenadresinbloklettersof
getyptophetgarantiebewijs.Verzekerings-verzend-entransportkostenzijnvoorrekeningvandekoper.
Service adres:
GARANZIA LIMITATA
1 Anno di Garanzia soltanto sull'Unità Principale
(Gli accessori e la pila sono esclusi dalla garanzia)
In caso di problema durante l'impiego normale, l'unità principale verrà riparata o sostituita gratuitamente da Cat Eye Co., Ltd.. Al
momento del ritorno del prodotto occorre imballarlo con cura allegandovi il certificato di garanzia con le istruzioni per le riparazioni.
Il nome e l'indirizzo dell'acquirente devono essere presenti in modo leggibile sul certificato di garanzia. Le spese di assicurazione,
di manutenzione e di spedizione al nostro Servizio Riparazioni saranno a carico del richiedente la riparazione.
#169-9750
Attachment Kit
Kit de Gamitures
Befestigungsmaterial
Kabelbevestigingset
Guarnizioni da montare
Elementos de fijación
アタッチメントキット
#169-6280
Universal Sensor Band
Garniture Universelle pour Détecteur
Universal Befestigungsband
UniverseleSensorklemstrip
Guanizione Universale per Sensore
Banda del Sensor Universal
ユニバーサルセンサーバンド
#166-5120
Wheel Magnet
Aimant pour roue
Radmagnet
Wielmagneet
Magnete ruota
Iman de la rueda
ホイールマグネット
Indirizzo Servizio Riparazioni
GARANTIA LIMITADA
Se garantiza por un año únicamente el grupo central
(Los accesorios, aditamentos y el consumo de la pila están excluidos)
Si ocurriera alguna avería durante el uso normal, se reparará o sustituirá la pieza o el grupo central. Cat Eye Co., Ltd.
deberá realizar la reparación. Para devolver el producto, envuélvalo cuidadosamente y no olvide incluir el certificado de
garantía y las instrucciones para repararlo. Rogamos escribir claramente a mano o a máquina su nombre y dirección. Los
gastos de seguro, manipulación y transporte serán a cargo de la persona que solicite la reparación.
Dirección para las reparaciones:
製品保証について
1年保証:コンピュータのみ(付属品及び電池の消耗は除く)
正常な使用状態で万一故障した場合は無料で修理・交換いたします。保証書にお客様のお名前・ご住所・
ご購入日・故障状態をご記入の上、製品と共に当社宛て直接お送りください。お送りいただく際の送料は
お客様にてご負担願います。修理完了後、当社より郵送にてお届けさせていただきます。
[宛先]
2-8-25, Kuwazu, Higashi Sumiyoshi-ku, Osaka 546 Japan
Service & Research Address for United States Consumers:
Phone: 303-443-4595 Toll Free: 800-5CATEYE
Fax: 303-473-0006 e-mail: CatEyeUSA@aol.com
Attn.: CAT EYE Customer Service Section
CATEYE Service & Research Center
1705 14th St. 115 Boulder, CO 80302
CO
2-8-25, Kuwazu, Higashi Sumiyoshi-ku, Osaka 546 Japan
Attn.: CAT EYE Customer Service Section
.,L TD.
2-8-25, Kuwazu, Higashi Sumiyoshi-ku, Osaka 546 Japan
2-8-25,Kuwazu,HigashiSumiyoshi-ku,Osaka546Japan
2-8-25 Kuwazu, Higashi Sumiyoshi-ku, OSAKA 546, Giappone.
2-8-25, Kuwazu, Higashi Sumiyoshi-ku, Osaka 546 Japan
*アクセサリーパーツを別途販売していますのでご利用ください。
TEL:(06)719-2631FAX:(06)719-2362
terattentievan:Cateyeklantenservice
Att:Dipartamento Assistenza Clienti
Attn.: CAT EYE Customer Service Section
〒546大阪市東住吉区桑津2丁目8番25号
製品サービス課
#169-6180
Lithium Battery (CR1620)
Pile au lithium
Lithium-Batterie
LithumBatterij
Bateria al Litio
Bateria de Litio
リチ ウ ム電池
Page 2
E
ALL CLEAR
sporkes
rubber pad
sensor
band A
sensor
markingline
of sensor
center of
magnet
magnet
wire
OPEN
CLOSE
RESET
sensor band B
rubber pad
sensor band A
parallel
sensor band A
fork
sensor
about 2mm
spiral tube
rubber pad
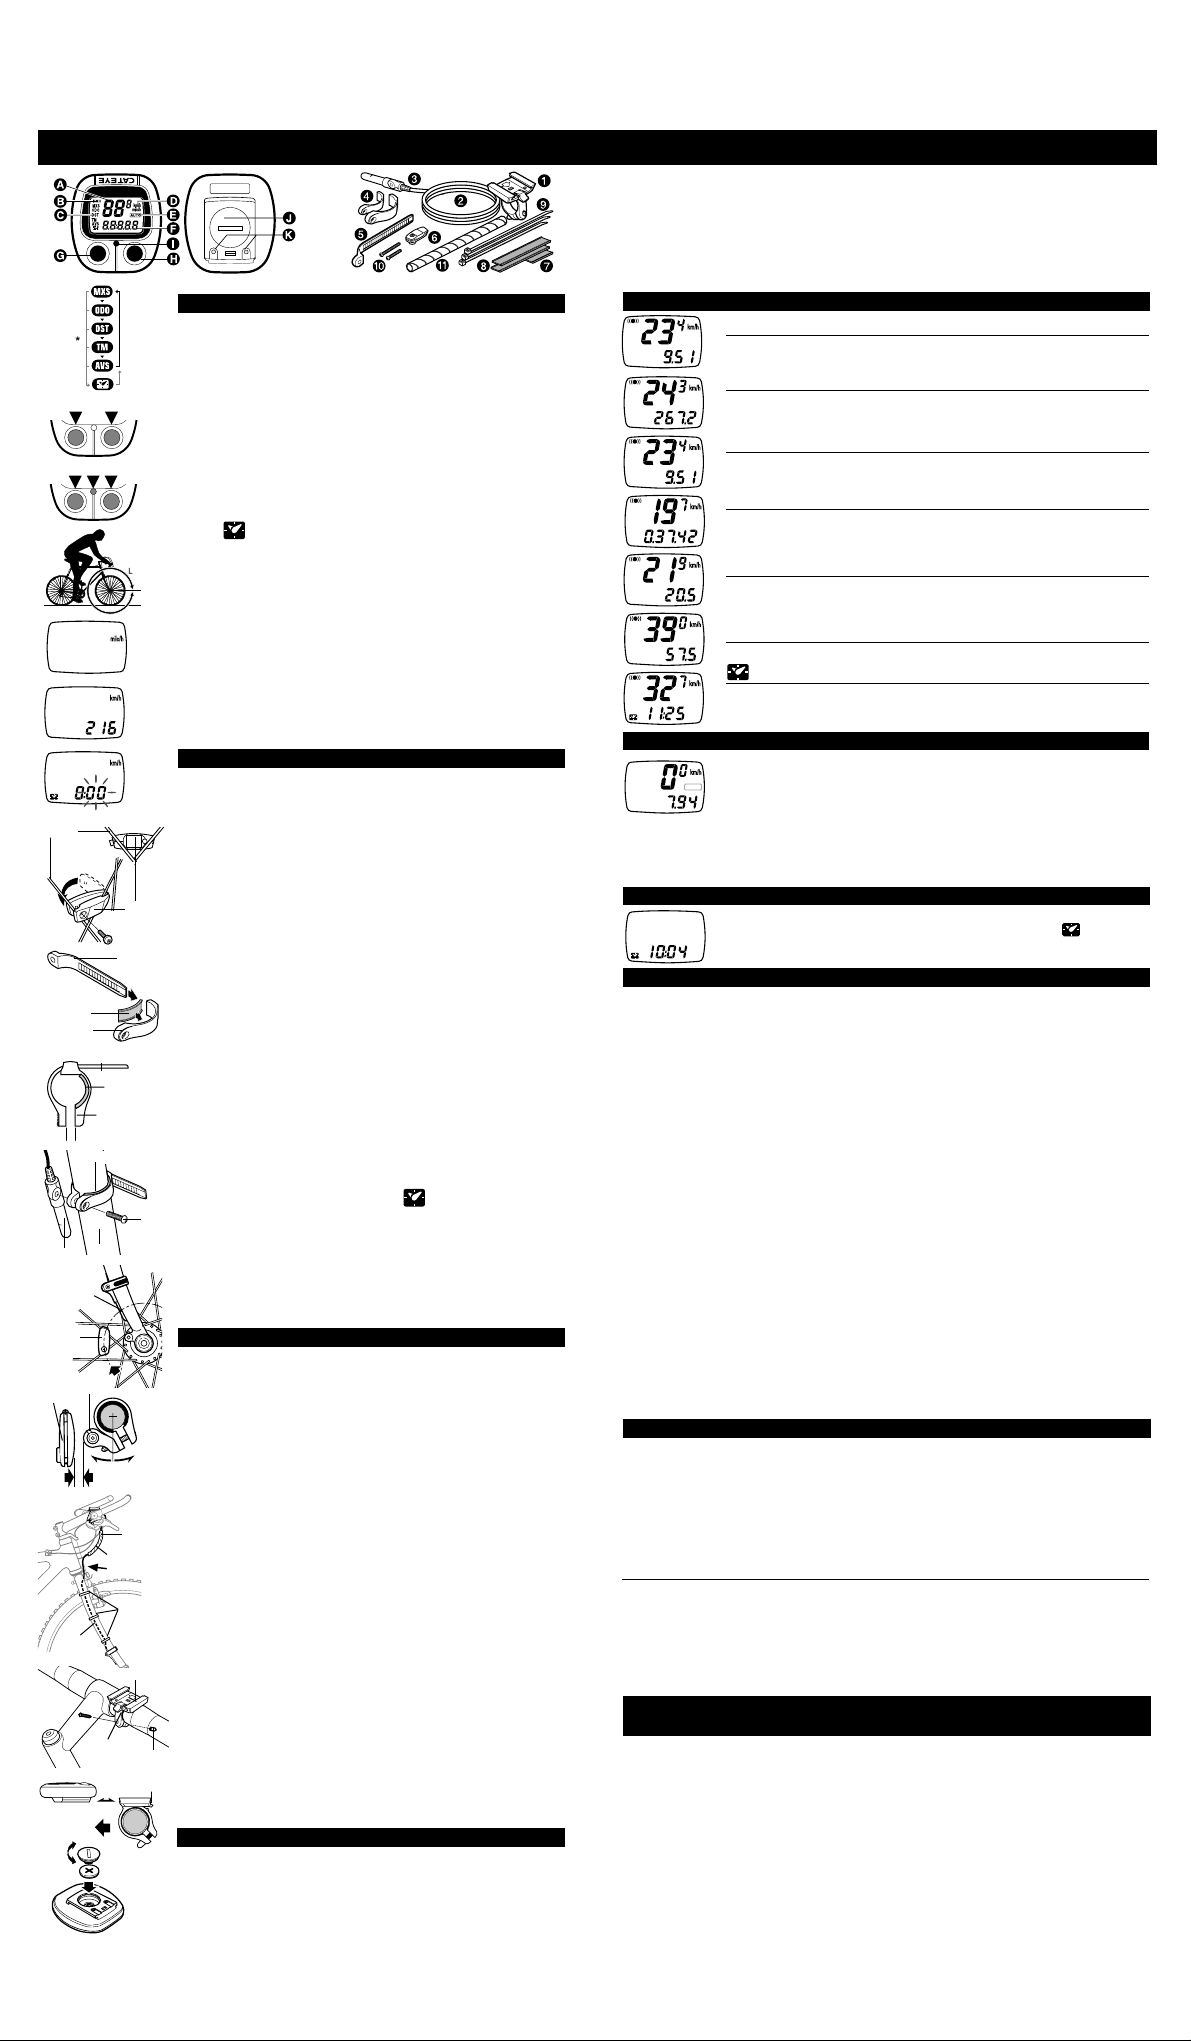
OPERATING INSTRUCTIONS
BUTTON FUNCTION
•M button (Fig.1)
Changes the display in the order shown in fig. 1, and data is displayed
on the sub-display. *If held over 2 seconds, 12-hour clock appears.
Fig.1
• S/S button
Starts and stops the measurement of trip distance and elapsed time.
During operation, speed scale symbol flashes. In Auto Function, this
button is invalid.
Fig.2
• SET Button
This is for setting the wheel circumference and clock time, switching on/
off Auto Function and to clear all present data and any irregularity.
When pressed in stop state in each mode, the following can be revised.
Fig.3
• In ODO mode --------------------- Wheel circumference
• In mode -----------------------12-hour clock
• In TM, DST or AVS mode ----- On/off the Auto function
Reset Operation: (Fig.2)
Select any mode except ODO, then press M button and S/S button si-
Fig.4
multaneously. MXS, AVS, DST and TM will become zero. (When done
in ODO, registered wheel circumference will be displayed.)
All Clear Operation: (Fig.3)
When M button, S/S and set buttons are pressed simultaneously, all
Fig.5
data stored (ODO, speed scale, Wheel circumference and clock time) is
erased. All displays illuminate, then mile/h symbol illuminates. This
should only be executed after replacing battery or when irregular display occurs due to static electricity, etc. Since all memories are erased,
Fig.6
set necessary data again according to "Main Unit Preparation".
MAIN UNIT PREPARATION
The following must be completed before operating.
Fig.7
(1) How to measure wheel circumference (L) of your bike (Fig.4)
Put a mark on the tire tread and ride the bike one full wheel revolution.
Mark the start and the end of the revolution on the ground and then
measure the distance between the two marks. This is your actual circumference. Or, the "Selecting Values Cross Reference Table" tells
you an approximate circumference according to tire size.
magnet
(2) Setting Speed Scale
Preform all clear operation. All displays will illuminate. Then mile/h
Fig.8
alone will be displayed as illustrated in fig.5. Km/h and mile/h are alternately displayed with each press of S/S button. Press M button to set
sensor
band B
desired speed scale. The display will change as fig. 6.
(3) Setting the wheel circumference (Fig.6)
The standard wheel circumference of 216 cm for 27" wheel is displayed.
When using 216 cm without revision, press M button. ODO will be displayed and 216 cm is set. For revision, press S/S button to increase the
Fig.9
number by one. To increase rapidly, hold down the button. When the
desired number appears, press M button. ODO will be displayed, and
the desired number is set.
(4) Resetting or changing the wheel circumference
Set main unit in ODO with M button, and stop it with S/S button. Press
Fig.10
SET button. The stored number will flicker on the sub-display. Revise
the number as desired according to the instructions in (3).
Setting the clock time (Fig.7)
Press M button over 2 seconds to select , and stop it with S/S button. Then press SET button, and minutes flash. Press S/S button to
screw
advance minutes by one. To advance rapidly, hold down the button. Set
the time one or two minutes ahead of the current time. Then press M
Fig.11
button, and hours will flash. Use S/S button the same way. Press SET
button to complete time setting. *When you press the SET button, the
undisplayed seconds will turn to zero. For accuracy, set by the radio
time signal.
MOUNTING TO BIKE
• The spokes must run correctly through the inside the magnet as in
fig.8.
Fig.12
• Attach the sensor with Sensor Bands-A-B to the right fork. Choose a
band that fits the fork diameter (S size for up to 24ø, L for oversize).
If the front fork is thick, use the longer screw.
1. Insert the band-B into the slit of the band-A, and put the rubber pad
Fig.13
outer cable
nyron ties
Fig.14
bracket
screw cap
Fig.15
lever
Fig.16
Fig.17
inside of the band-A(fig. 9). Adjust the length in order that the
screw-fastening part of the bands are parallel when mounted to
the fork(fig. 10). *To pull out the band B from band A, tug strongly.
2. Mount the adjusted bands to the fork along with the sensor, by
temporarily tightening the screw(fig. 11).
3. Align the magnet's center and the sensor's marking line(fig. 12),
and make sure of 2mm clearance between the magnet and sensor
(fig. 13). Then tighten the screw securely. Cut the excess of the
band-B with a nipper or the like.
• Secure the wire with nylon ties as shown in fig. 14. Wind the wire
round the outer cable and wrap these wires with the spiral tube. Adjust the length of the wire. Loosen the wire in the area marked with
the arrow so that the wire does not hinder handlebar operation.
• Use either 1mm- or 2 mm-thick pads if necessary, according to
handlebar diameter. Attach the bracket close to the handlebar stem
(fig. 15).
• Slide main unit onto the bracket from front until it clicks into position.
To remove, pull it off forward while pushing down the lever. (fig. 16)
•Test (Fig.16)
Mount main unit. If main display does not show any figures, press either
M button or S/S button to release from power saving function. Spin the
wheel to check if sensor pulse symbol flashes. If not, adjust relative
positions of magnet and sensor following the instructions.
HOW TO REPLACE THE BATTERY
Turn main unit over, remove battery case cover with coin and insert a
new lithium battery properly (CR1620 or CR1616) with the (+) pole upward (fig.17), and close the cover securely.
* Please make sure to do the All Clear operation after replacing bat-
tery, and to set the unit again.
A. Main Display (Speed)
B. Sensor Pulse Symbol
C. Mode Symbol
D. Speed Scale Symbol
E. Auto Mode Symbol
F. Sub-Display
G. M (Mode) Button
H. S/S (Start/Stop) Button
(Selected Function)
I. Set Button
J. Battery Case Cover
K. Contact
1. Bracket
2. Wire
3. Sensor
4. Sensor Bands-A (S)(L)
5. Sensor Bands-B
6. Magnet
7. Sensor Band Rubber Pad
8.
Bracket Rubber Pad (2 pcs.)
9. Nylon Tie (3 pcs.)
10. Sensor Band Screw (S)(L)
11. Spiral Tube
MEASURING AND DISPLAY FUNCTIONS
DST
ODO
DST
TM
AVS
MXS
SPD Current Speed
This is always displayed on the main display and updated once a second.
ODO Total Distance (Odometer) 0.0 - 9999.9 mile ±0.1 mile
This is continuously measured until battery wears down or all clear operation is
done. At 10,000 miles(km), it returns to zero and counting begins anew.
DST Trip Distance 0.00 - 999.99 mile ±0.01 mile
The trip distance from start to current point is displayed. With Reset operation,
it returns to zero.
TM Elapsed Time 0:00'00" - 9:59'59" ±0.003 %
Elapsed time is measured from start to current point, in units of hours, minutes
and seconds. At 10 hours, it returns to zero and counting begins anew. With
Reset operation, it returns to zero.
AVS Average Speed 0.0 - 65.0mile/h ±0.3 mile/h
The average speed from start to current point is displayed within 27 hours 46
minutes 39 seconds (99,999 seconds) or 999.99 miles (km). If either is exceeded, (.E) is displayed and calculation ceases.
MXS Maximum Speed 0.0(3.0) - 65 mile/h(27inch) ±1 mile/h
With Reset operation, it returns to zero and counting begins anew.
12-hour clock time 0:00' - 11:59' ±0.003 %
The current time is displayed by a 12-hour clock.
0.0(3.0) - 65 mile/h(27inch) ±1 mile/h under31 miles/h
AUTO (AUTOMATIC START/STOP) FUNCTION
This function switches the main unit to start or stop automatically, in which AUTO
symbol appears on the screen, and you are free from pressing S/S button each
AUTO
DST
time.
•How to switch on/off the Auto Function.
In TM, DST or AVS, this function switches on/off with each press of SET button.
When on, AUTO symbol appears. *With this function, it ceases measuring
elapsed time during a stop.
*2 seconds may be elapsed if mount the main unit to the bracket with this func-
tion on.
POWER SAVING FUNCTION
When main unit is left without receiving any signal for 60-70 minutes continuously, power supply is shut down and main unit will display ( ) only as the
figure. By pressing M button or S/S button, or by receiving signal, this function is
released.
TROUBLE SHOOTING
• The following situations do not indicate malfunction of the cyclocomputer. Check the
following before taking to repair.
* When current speed does not appear, short-circuit the contact on the back with metal.
The unit will function normally if the speed display appears.
Display response is slow.
----- Is it at a low t e m perature under 32°F(0°C)?
----- It returns to normal state when temperature rises.
No display.
----- Has the Lithi u m B a t t e r y i n t h e m a i n unit worn out?
----- Replace the Lithium Battery with a new one.
Incorrect data appear.
----- Execute "All Clear" operation.
Current speed does not appear.
----- Is there anything on the contact of the main unit or of the bracket?
----- Wipe the contact clean.
----- Is the distan c e b e t w e e n s e n s o r and magnet too far?
----- Are the marking line of the sensor and the center of magnet matched each other?
----- Refer to "Sensor/Magnet Mounting" and re-adjust correctly.
----- Is the wire broken?
----- Replace the Bracket & Sensor part with a new one.
Transmission signal loss in damp or wet conditions.
----- Contacts on the bracket might not be repelling wets efficiently.
----- Water or condensation may collect between the bracket sensor and the computer causing an
interruption in the data transmission. Wipe the contacts with dry cloth. Contacts can also be
treated with a water repellent silicon jell from an automotive parts or hardware store. Do not
use industrial water repellent; it may damage the bracket.
When the S/S button is pressed, the unit doesn't activate or stop.
----- Is the unit in the Auto function?
----- The S/S button doesn't function in the Auto function.
MAINTENANCE/PRECAUTIONS
• Do not leave the main unit exposed to direct sunlight when the unit is not in use.
• Do not disassemble the main unit, sensor and magnet.
• Don't pay too much attention to your computer's functions while riding! Keep your eyes on the
road and duly consider to traffic safety.
• Check relative position of sensor and magnet periodically.
• For cleaning, use neutral detergent on soft cloth, and wipe off later with dry cloth. Do not apply
paint thinner, benzine, or alcohol, to avoid damages on the surface.
• If there is mud, sand or the like clogs between the button and the body, the movement of the
button may be disturbed. Softly wash away such objects with water.
SPECIFICATIONS
Applicable Cycle Sizes 130cm - 229cm
Applicable Fork Diameter 11ø - 40ø (S:11 - 26ø L:21 - 40ø)
The length of the wire 70cm
Power Supply Lithium Battery (CR1620/CR1616) x 1
Battery Life Approx. 3 years(The life of the first factory-loaded battery may
Dimension/Weight 1-15/16" x 1-25/32" x 5/8" (49 x 45 x 16 mm) / 0.74 oz (21 g)
* The specifications and design are subject to change without notice.
be shorter than this period.)
 Loading...