


 Loading...
MO1002-EA
Operation Guide 3134 3205
Getting Acquainted
Congratulations upon your selection of this CASIO watch. To get the most out of your purchase, be sure to read this manual carefully.
•This watch does not have a time zone that corresponds to the UTC offset of –3.5 hours. Because of this, the radio-controlled timekeeping and World Time functions will not display the correct time for Newfoundland, Canada.
Applications
The built-in sensors of this watch measure direction, barometric pressure, temperature and altitude. Measured values are then shown on the display. Such features make this watch useful when hiking, mountain climbing, or when engaging in other such outdoor activities.
Warning!
•The measurement functions built into this watch are not intended for taking measurements that require professional or industrial precision. Values produced by this watch should be considered as reasonable representations only.
•The Moon phase indicator and tide graph data that appear on the display of this watch are not intended for navigation purposes. Always use proper instruments and resources to obtain data for navigation purposes.
•This watch is not an instrument for calculating low tide and high tide times. The tide graph of this watch is intended to provide a reasonable approximation of tidal movements only.
•When engaging in mountain climbing or other activities in which losing your way can create a dangerous or life-threatening situation, always be sure to use a second compass to confirm direction readings.
•Note that CASIO COMPUTER CO., LTD. assumes no responsibility for any damage or loss suffered by you or any third party arising through the use of this product or its malfunction.
Keep the watch exposed to bright light
l
Bright light
l |
l |
l |
l |
l |
l |
l |
l |
l |
l |
|
|||||||||
|
|
|
Solar cell
The electricity generated by the solar cell of the watch is stored by a built-in battery. Leaving or using the watch where it is not exposed to light causes the battery to run down. Make sure the watch is exposed to light as much as possible.
•When you are not wearing the watch on your wrist, position the face so it is pointed at a source of bright light.
•You should try to keep the watch outside of your sleeve as much as possible. Charging is reduced significantly if the face is covered only partially.
•The watch continues to operate, even when it is not exposed to light. Leaving the watch in the dark can cause the battery to run down, which will result in some watch functions being disabled. If the battery goes dead, you will have to re-configure watch settings after recharging. To ensure normal watch operation, be sure to keep it exposed to light as much as possible.
General Guide
• The illustration below shows which buttons you need to press to navigate between modes.
• In any mode, press L to illuminate the display.
Stopwatch |
Countdown |
Tide/Moon Data |
|
||
Mode |
Timer Mode |
Mode |
|
||
|
|
|
Press |
||
|
|
|
D. |
▲ |
|
▲ |
|
▲ |
▲ |
||
|
|
l ll |
ll |
|
|
|
|
ll |
|
||
|
|
l |
l |
|
|
|
|
llll |
|
||
▲ |
|
Data Recall |
▲ |
||
Alarm Mode |
Receive Mode |
||||
World Time Mode |
Mode |
||||
|
▲ |
▲ |
|
▲ |
|
Battery charges in the light. |
Battery discharges in the dark. |
|
Solar cell |
Bright light |
|
(Converts light to |
Electrical |
|
electrical power.) |
energy |
|
|
LEVEL 1 |
All |
|
LEVEL 1 |
|
|
functions |
|
|
||
|
LEVEL 2 |
|
LEVEL 2 |
|
|
|
enabled |
|
|
||
|
LEVEL 3 |
|
Dis- |
LEVEL 3 |
Some |
Charge |
LEVEL 4 |
|
charge |
LEVEL 4 |
functions |
|
disabled |
||||
|
|
|
|
|
Rechargeable battery
•The actual level at which some functions are disabled depends on the watch model.
•Frequent display illumination can run down the battery quickly and require charging. The following guidelines give an idea of the charging time required to recover from a single illumination operation.
Approximately five minutes exposure to bright sunlight coming in through a window
Approximately 50 minutes exposure to indoor fluorescent lighting
•Be sure to read “Power Supply” for important information you need to know when exposing the watch to bright light.
If the display of the watch is blank...
If the display of the watch is blank, it means that the watch’s Power Saving function has turned off the display to conserve power.
• See “Power Saving” for more information.
About This Manual
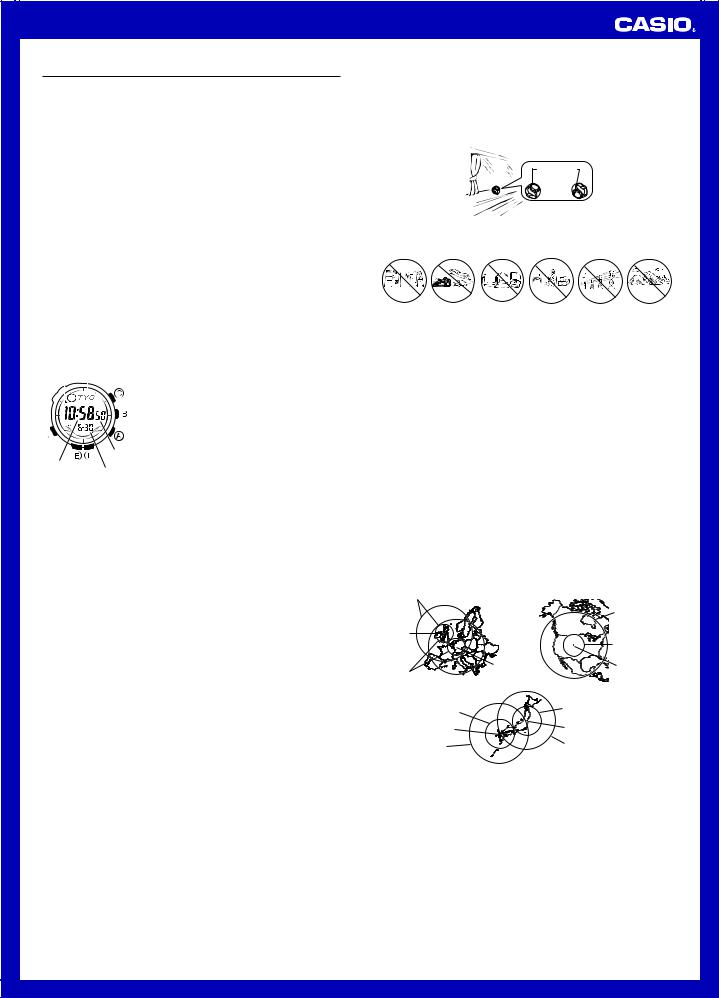
 (Light)
Module 3134
•Depending on the model of your watch, display text appears either as dark figures on a light background (Module 3134), or light figures on a dark background (Module 3205). All sample displays in this manual are shown using dark figures on a light background.
•Button operations are indicated using the letters shown in the illustration.
•Each section of this manual provides you with the information you need to perform operations in each mode. Further details and technical information can be found in the “Reference” section.
Module 3205
•You can use buttons A, B, and C to enter a sensor mode directly from the Timekeeping Mode or from another sensor mode. To enter a sensor mode from the Tide/Moon Data, Countdown Timer, Stopwatch, World Time, Alarm, Data Recall, or Receive Mode, first enter the Timekeeping Mode and then press the applicable button.
|
Sensor Modes |
|
|
Press C. ▲ |
Press B. |
▲ |
Press A. ▲ |
Digital |
Barometer/ |
|
|
Compass Mode |
Thermometer Mode |
Altimeter Mode |
|
|
Press D. |
|
|
1
Operation Guide 3134 3205
Radio-controlled Atomic Timekeeping
This watch receives a time calibration signal and updates its time setting accordingly.
•This watch is designed to pick up the time calibration signals transmitted in Germany (Mainflingen), England (Anthorn), the United States (Fort Collins) and Japan.
•See the information under “Signal Reception Troubleshooting” if you experience problems with time calibration signal reception.
Current Time Setting
This watch adjusts its time setting automatically in accordance with a time calibration signal. You also can perform a manual procedure to set the time and date, when necessary.
•The first thing you should do after purchasing this watch is to specify your Home City (the city where you normally will use the watch). For more information, see “To specify your Home City”.
•When using the watch outside the areas covered by the time signal transmitters, you will have to adjust the current time setting manually as required. See “Timekeeping” for more information about manual time settings.
•The U.S. time calibration signal can be picked up by the watch while in North America. The term “North America” in this manual refers to the area that consists of Canada, the continental United States, and Mexico.
•Using this watch in a country covered by a time calibration that is different from the countries it supports may result in incorrect time indication due to local application of summer time, etc.
To specify your Home City
PM indicator |
|
|
|
1. In the Timekeeping Mode, hold down E until |
|||||
|
|
|
the city code starts to flash, which indicates |
||||||
|
|
|
|
City code |
the setting screen. |
||||
|
|
l |
l l |
l l |
ll |
2. Press A (east) and C (west) to select the |
|||
|
|
city code you want to use as your Home City. |
|||||||
|
l |
|
|
|
|
|
l |
||
|
l |
|
|
|
|
|
|
|
|
|
l |
l |
l l |
l |
|
l |
LON : London |
||
|
|
|
l |
||||||
|
|
|
|
|
|
||||
|
|
|
|
|
|
|
|
|
PAR, BER : Paris, Berlin, Milan, Rome, |
|
|
|
|
|
|
|
|
|
Amsterdam, Hamburg, Frankfurt, |
|
|
|
|
|
|
|
|
|
Vienna, Barcelona, Madrid |
|
|
|
|
|
|
|
|
|
ATH : Athens |
|
|
|
|
|
|
|
|
Second |
HKG, TYO, SEL : Hong Kong, Tokyo, Seoul |
Hour : |
|
|
|
|
|
|
|
HNL : Honolulu |
|
Minute |
|
|
|
|
Month – Day |
ANC : Anchorage, Nome |
|||
LAX : Los Angeles, San Francisco, Las Vegas, Seattle/Tacoma,
Vancouver, Tijuana
DEN : Denver, El Paso, Edmonton, Culiacan
CHI : Chicago, Houston, Dallas/Fort Worth, New Orleans, Winnipeg,
Mexico City
NYC: New York, Detroit, Miami, Boston, Montreal
•For full information on city codes, see the “City Code Table”.
•Note that this watch does not have a city code that corresponds to Newfoundland.
3.Press E to exit the setting screen.
•Normally, your watch should show the correct time as soon as you select your Home City code. If it does not, it should adjust automatically after the next auto receive operation (in the middle of the night). You also can perform manual receive or you can set the time manually.
•The watch will receive the time calibration signal automatically from the applicable transmitter (in the middle of the night) and update its settings accordingly. For information about the relationship between city codes and transmitters, see “Time Calibration Signal Reception” and “Transmitters”.
•See the maps under “Approximate Reception Ranges” for information about the reception ranges of the watch.
•Under factory default settings, auto receive is turned off for all of the following city codes: HKG (Hong Kong), HNL (Honolulu), and ANC (Anchorage). For details about turning on auto receive for these city codes, see “To turn auto receive on and off”.
•You can disable time signal reception, if you want. See “To turn auto receive on and off” for more information.
Time Calibration Signal Reception
There are two different methods you can use to receive the time calibration signal: auto receive and manual receive.
• Auto Receive
With auto receive, the watch receives the time calibration signal automatically up to six times a day. When any auto receive is successful, the remaining auto receive operations are not performed. For more information, see “About Auto Receive”.
• Manual Receive
Manual receive lets you start a time calibration receive operation with the press of a button. For more information, see “To perform manual receive”.
Important!
•When getting ready to receive the time calibration signal, position the watch as shown in the nearby illustration, with its 12 o’clock side facing towards a window. This watch is designed to receive a time calibration signal late at night. Because of this, you should place the watch near a window as shown in the illustration when you take it off at night. Make sure there are no metal objects nearby.
12 o’clock
or
•Make sure the watch is facing the right way.
•Proper signal reception can be difficult or even impossible under the conditions listed below.
Inside or |
Inside a |
Near |
Near a |
Near high- |
Among or |
among |
vehicle |
household |
construction |
tension |
behind |
buildings |
|
appliances, |
site, airport, |
power lines |
mountains |
|
|
office |
or other |
|
|
|
|
equipment, |
sources of |
|
|
|
|
or a mobile |
electrical |
|
|
|
|
phone |
noise |
|
|
•Signal reception normally is better at night than during the day.
•Time calibration signal reception takes from two to seven minutes, but in some cases it can take as long as 14 minutes. Take care that you do not perform any button operations or move the watch during this time.
•The time calibration signal the watch will attempt to pick up depends on its current Home City code setting as shown below.
Home City Code |
Transmitter |
Frequency |
|
LON, |
Anthorn (England) |
60.0 kHz |
|
PAR, BER, ATH |
Mainflingen (Germany) |
77.5 kHz |
|
HKG*, TYO, SEL |
Fukushima (Japan) |
40.0 kHz |
|
Fukuoka/Saga (Japan) |
60.0 kHz |
||
|
|||
HNL*, ANC*, LAX, |
Fort Collins, Colorado |
60.0 kHz |
|
DEN, CHI, NYC |
(United States) |
||
|
*The areas covered by the HKG, HNL, and ANC city codes are quite far from the time calibration signal transmitters, and so certain conditions may cause problems with signal reception.
Approximate Reception Ranges
U.K. and German Signals |
U.S. Signal |
1,500 kilometers
2,000 miles
(3,000 kilometers)
Anthorn
600 miles
(1,000 kilometers)
Mainflingen |
Fort |
|
500 kilometers |
Collins |
|
Japan Signals |
|
|
500 |
500 |
|
kilometers |
||
kilometers |
||
|
||
Fukuoka/Saga |
Fukushima |
|
1,000 |
1,000 |
|
kilometers |
||
kilometers |
||
|
•Signal reception may not be possible at the distances noted below during certain times of the year or day. Radio interference also may cause problems with reception.
Mainflingen (Germany) or Anthorn (England) transmitters: 500 kilometers (310 miles)
Fort Collins (United States) transmitter: 600 miles (1,000 kilometers) Fukushima or Fukuoka/Saga (Japan) transmitters: 500 kilometers (310 miles)
•Even when the watch is within the reception range of the transmitter, signal reception will be impossible if the signal is blocked by mountains or other geological formations between the watch and signal source.
•Signal reception is affected by weather, atmospheric conditions, and seasonal changes.
2
Operation Guide 3134 3205
About Auto Receive
The watch receives the time calibration signal automatically up to six times a day. When any auto receive is successful, the remaining auto receive operations are not performed. The reception schedule (calibration times) depends on your currently selected Home City, and whether standard time or Daylight Saving Time is selected for your Home City.
Your Home City |
|
Auto Receive Start Times |
|
||||
|
|
1 |
2 |
3 |
4 |
5 |
6 |
LON |
Standard Time |
1:00 am |
2:00 am |
3:00 am |
4:00 am |
5:00 am |
Midnight* |
|
Daylight Saving Time |
2:00 am |
3:00 am |
4:00 am |
5:00 am |
Midnight* |
1:00 am* |
|
|
|
|
|
|
|
|
PAR |
Standard Time |
2:00 am |
3:00 am |
4:00 am |
5:00 am |
Midnight* |
1:00 am* |
BER |
Daylight Saving Time |
3:00 am |
4:00 am |
5:00 am |
Midnight* |
1:00 am* |
2:00 am* |
|
|||||||
|
|
|
|
|
|
|
|
ATH |
Standard Time |
3:00 am |
4:00 am |
5:00 am |
Midnight* |
1:00 am* |
2:00 am* |
|
Daylight Saving Time |
4:00 am |
5:00 am |
Midnight* |
1:00 am* |
2:00 am* |
3:00 am* |
|
|
|
|
|
|
|
|
HKG, |
Standard Time |
Midnight |
1:00 am |
2:00 am |
3:00 am |
4:00 am |
5:00 am |
SEL, |
|
|
|
|
|
|
|
TYO |
|
|
|
|
|
|
|
HNL, |
Standard Time and |
Midnight |
1:00 am |
2:00 am |
3:00 am |
4:00 am |
5:00 am |
ANC, |
Daylight Saving |
|
|
|
|
|
|
LAX, |
Time |
|
|
|
|
|
|
DEN, |
|
|
|
|
|
|
|
CHI, |
|
|
|
|
|
|
|
NYC |
|
|
|
|
|
|
|
|
|
|
|
|
|
*Next day |
|
Note
•When a calibration time is reached, the watch will receive the calibration signal only if it is in either the Timekeeping Mode or World Time Mode. Reception is not performed if a calibration time is reached while you are configuring settings.
•Auto receive of the calibration signal is designed to be performed early in the morning, while you sleep (provided that the Timekeeping Mode time is set correctly). Before going to bed for the night, remove the watch from your wrist, and put it in a location where it can receive the signal easily.
•The watch takes from two to 14 minutes to receive the time calibration signal whenever a calibration time is reached. Do not perform any button operation within 14 minutes before or after any one of the calibration times. Doing so can interfere with correct calibration.
•Remember that reception of the calibration signal depends on the current time in the Timekeeping Mode. The receive operation will be performed whenever the display shows any one of the calibration times, regardless of whether or not the displayed time actually is the correct time.
About the Receiving Indicator
The receiving indicator shows the strength of the calibration signal being received. For best reception, be sure to keep the watch in a location where signal strength is strongest. The receiving indicator is displayed while an auto or manual receive operation is in progress.
Receiving indicator
Weak |
|
Strong |
|
||
(Level 0) |
|
(Level 3) |
•Even in an area where signal strength is strong, it takes about 10 seconds for signal reception to stabilize enough for the receiving indicator to indicate signal strength.
•Use the receiving indicator as a guide for checking signal strength and for finding the best location for the watch during signal receive operations.
•Following reception of the time calibration signal and calibration of the
watch’s time setting, a “settings updated” indicator ( ) will remain on the display in all modes. The settings updated indicator (
 ) will not be displayed if signal reception was unsuccessful or after you adjust the current time setting manually.
•The settings updated indicator ( ) appears only when the watch is able to receive both time and date data successfully. It does not appear when only time data is received.
•The settings updated indicator ( ) indicates that at least one of the auto calibration signal receive operations was successful. Note, however, that the indicator disappears from the display each day at the start of the first auto receive operation of the day.
To perform manual receive
Receiving
lll |
||
l |
l |
|
l |
l |
|
l |
||
l |
|
l |
lll |
|
|
Receive successful
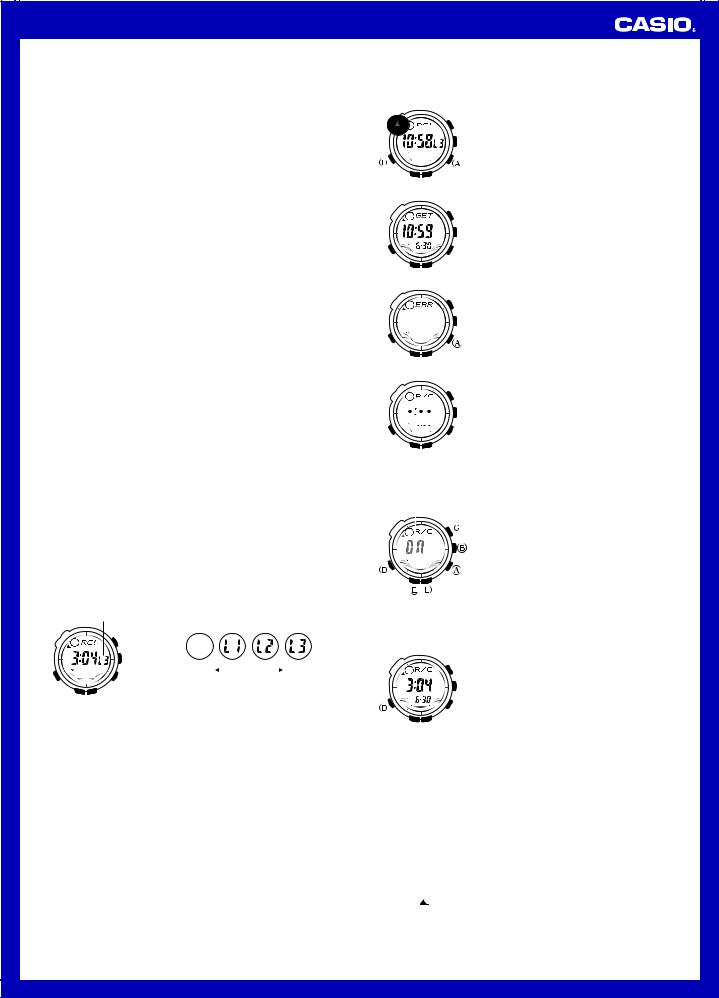
1.Enter the Receive Mode.
2.Place the watch on a stable surface so its 12 o’clock side is facing towards a window.
3.Hold down A for about two seconds until RC!
appears on the display.
•Time calibration signal reception takes from two to seven minutes, but in some cases it can take as long as 14 minutes. Take care that you do not perform any button operations or move the watch during this time.
•If the receive operation is successful, the reception date and time appear on the display, along with the GET indicator.
The watch will enter the Receive Mode if you press A or if you do not perform any button operation for about one or two minutes.
Receive failed
If there was a previously successful reception
If no reception has been successful
•If the current reception fails but a previous reception was successful, the display shows
the previous reception’s date and time, and the ERR indicator. 

 indicates that none of the reception operations have been successful during the current date.
The watch will enter the Receive Mode without changing the time setting if you press A or if you do not perform any button operation for about one or two minutes.
Note
•To interrupt a receive operation and return to the Receive Mode, press A.
To turn auto receive on and off
On/Off status
|
llll |
ll |
|
l |
lll |
||
l |
|
|
l |
l |
l |
||
|
ll |
|
l |
|
l |
|
l |
l |
|
l |
|
|
l |
l |
|
l |
|
l |
|
|
l |
||
|
l |
||
|
|
llll |
|
1.Enter the Receive Mode.
2.In the Receive Mode, hold down E until the current auto receive setting (ON or OFF) starts to flash. This is the setting screen.
•Note that the setting screen will not appear if the currently selected Home City is one that does not support time calibration reception.
3.Press A to toggle auto receive on (ON) and off (OFF).
4.Press E to exit the setting screen.
•For information about city codes that support signal receive, see “To specify your Home City”.
To check the latest signal reception results
Enter the Receive Mode.
• When receive is successful, the display shows the time and date that receive was successful.


 indicates that none of the reception
operations were successful.
• To return to the Timekeeping Mode, press D.
Signal Reception Troubleshooting
Check the following points whenever you experience problems with signal reception.
Problem |
Probable Cause |
What you should do |
Cannot perform |
•The watch is not in the Receive |
• Enter the Receive Mode |
manual receive. |
Mode. |
and try again. |
|
•Your current Home City is not |
• Select one of the cities |
|
one of the following: LON, PAR, |
to the left as your Home |
|
BER, ATH, HKG, SEL, TYO, |
City. |
|
HNL, ANC, LAX, DEN, CHI, or |
|
|
NYC |
|
Auto receive is |
•You changed the time setting |
• Perform manual signal |
turned on, but |
manually. |
receive or wait until the |
the settings |
•You changed the DST setting of |
next auto signal receive |
updated |
your Home City in the World |
operation is performed. |
indicator ( ) |
Time Mode. |
|
does not appear |
•You pressed a button while signal |
|
on the display. |
receive was in progress. |
|
|
|
|
3
Operation Guide 3134 3205
Problem |
Probable Cause |
What you should do |
Auto receive is |
• Even if receive is successful, the |
• Check to make sure the |
turned on, but |
settings updated indicator ( ) |
watch is in a location |
the settings |
disappears from the display |
where it can receive the |
updated |
each day when the first auto |
signal. |
indicator ( ) |
receive operation of the day is |
|
does not |
performed. |
|
appear on the |
• Time data (hour, minute, |
|
display. |
second) only was received |
|
|
during the last receive operation. |
|
|
The settings updated indicator |
|
|
( ) appears only when time |
|
|
data and date data (year, month, |
|
|
day) are both received. |
|
|
|
|
Time setting is |
• If the time is one hour off, the |
• Change the DST setting |
incorrect |
DST setting may be incorrect. |
to Auto DST. |
following signal |
• The Home City code setting is |
• Select the correct Home |
reception. |
not correct for the area where |
City code. |
|
you are using the watch. |
|
|
|
|
•For further information, see “Important!” under “Time Calibration SIgnal Reception” and “Radio-controlled Atomic Timekeeping Precautions”.
Digital Compass
A built-in bearing sensor detects magnetic north and indicates one of 16 directions on the display. Direction readings are performed in the Digital Compass Mode.
•You can calibrate the bearing sensor if you suspect the direction reading is incorrect.
•See “Using the Digital Compass While Mountain Climbing or Hiking” for some real-life examples of how to use this feature.
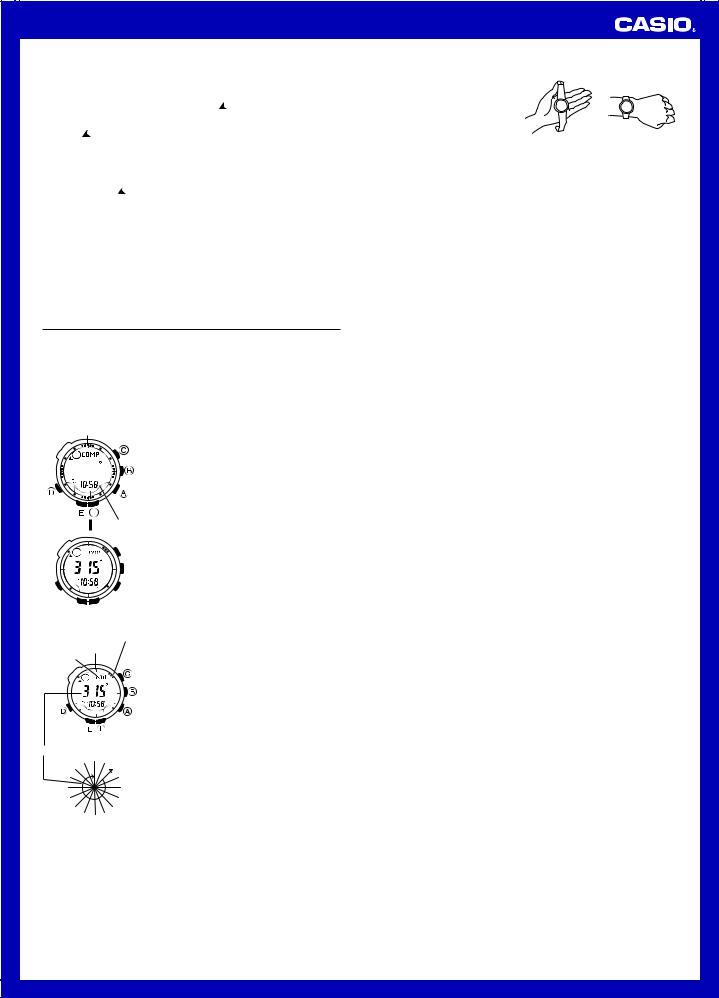
To enter and exit the Digital Compass Mode
12 o’clock position
Two seconds |
Current time |
▲
1.While in the Timekeeping Mode or in any of the other sensor modes, press C to enter the Digital Compass Mode.
•At this time, the watch will start a Digital Compass operation. After about two seconds, letters appear on the display to indicate the direction that the 12 o’clock position of the watch is pointing.
•The direction reading on the display is updated each second for up to 20 seconds, after which measurement stops automatically.
2.Press D to return to the Timekeeping Mode.
To take a direction reading
North pointer
12 o’clock position
Direction indicator
Angle value (in degrees)
270° |
NW NW NN |
W |
0° |
|||||
W |
|
|||||||
|
|
W |
|
|
|
N |
|
|
|
|
W |
|
|
|
N |
||
|
S |
|
|
|
|
N |
|
|
W |
|
|
|
|
E |
|||
SW |
|
|
|
|
|
|
|
NE |
W |
|
|
|
E |
N |
E |
||
S |
|
|
|
|
||||
|
S |
|
|
|
|
|
||
|
|
S |
|
|
|
E |
|
|
180° |
SSE SE |
ESE |
90° |
|||||
|
|
|
|
|
|
|
|
|
1.While the watch is in the Digital Compass Mode, place it on a flat surface, or if you are wearing the watch, make sure that your wrist is horizontal (in relation to the horizon).
2.Point the 12 o’clock position of the watch in the direction you want to measure.
3.Press C to start a Digital Compass
measurement operation.
•After about two seconds, the direction that the 12 o’clock position of the watch is pointing appears on the display.
•Also, four pointers appear to indicate magnetic north, south, east, and west.
•After the first reading is obtained, the watch continues to take direction readings automatically each second, for up to 20 seconds.
•While the watch is taking compass readings, it displays a direction angle, a direction indicator, and four direction pointers, all of which change dynamically when the watch is moved. The direction angle, direction indicator and direction pointers all disappear from the display after the compass reading operation is complete. Use the direction indicators imprinted on the bezel to record the indicated direction. For details, see “Using the Digital Compass While Mountain Climbing or Hiking”.
Note
• Note that taking a measurement while the watch is not horizontal (in relation to the horizon) can result in large measurement error.
•The margin of error for the angle value and the direction indicator is ±11 degrees. If the indicated direction is northwest (NW) and 315 degrees, for example, the actual direction can be anywhere from 304 to 326 degrees.
•Any ongoing direction measurement operation is paused temporarily while
the watch is performing an alert operation (daily alarm, Hourly Time Signal, countdown timer alarm) or while illumination is turned on (by pressing L). The measurement operation resumes for its remaining duration after the operation that caused it to pause is finished.
•The following table shows the meanings of each of the direction abbreviations that appear on the display.
Direction |
Meaning |
Direction |
Meaning |
Direction |
Meaning |
Direction |
Meaning |
|
N |
North |
NNE |
North- |
NE |
Northeast |
ENE |
East- |
|
northeast |
northeast |
|||||||
|
|
|
|
|
|
|||
E |
East |
ESE |
East- |
SE |
Southeast |
SSE |
South- |
|
southeast |
southeast |
|||||||
|
|
|
|
|
|
|||
S |
South |
SSW |
South- |
SW |
Southwest |
WSW |
West- |
|
southwest |
southwest |
|||||||
|
|
|
|
|
|
|||
W |
West |
WNW |
West- |
NW |
Northwest |
NNW |
North- |
|
northwest |
northwest |
|||||||
|
|
|
|
|
|
•See “Digital Compass Precautions” for other important information about taking direction readings.
Digital Compass Precautions
This watch features a built-in magnetic bearing sensor that detects terrestrial magnetism. This means that north indicated by this watch is magnetic north, which is somewhat different from true polar north. The magnetic north pole is located in northern Canada, while the magnetic south pole is in southern Australia. Note that the difference between magnetic north and true north as measured with all magnetic compasses tends to be greater as one gets closer to either of the magnetic poles. You also should remember that some maps indicate true north (instead of magnetic north), and so you should make allowances when using such maps with this watch.
Location
•Taking a direction reading when you are near a source of strong magnetism can cause large errors in readings. Because of this, you should avoid taking direction readings while in the vicinity of the following types of objects: permanent magnets (magnetic necklaces, etc.), concentrations of metal (metal doors, lockers, etc.), high tension wires, aerial wires, household appliances (TVs, personal computers, washing machines, freezers, etc.)
•Accurate direction readings are impossible while in a train, boat, air plane, etc.
•Accurate readings also are impossible indoors, especially inside ferroconcrete structures. This is because the metal framework of such structures picks up magnetism from appliances, etc.
Storage
•The precision of the bearing sensor may deteriorate if the watch becomes magnetized. Because of this, you should be sure to store the watch away from magnets or any other sources of strong magnetism, including: permanent magnets (magnetic necklaces, etc.) and household appliances (TVs, personal computers, washing machines, freezers, etc.)
•Whenever you suspect that the watch may have become magnetized, perform one of the calibration procedures under “Calibrating the Bearing Sensor”.
Calibrating the Bearing Sensor
You should calibrate the bearing sensor whenever you feel that the direction readings being produced by the watch are off. There are three different calibration methods available: magnetic declination correction, bidirectional calibration, and northerly calibration.
•Magnetic Declination Correction
With magnetic declination correction, you input a magnetic declination angle (difference between magnetic north and true north), which allows the watch to indicate true north.
You can perform this procedure when the magnetic declination angle is indicated on the map you are using.
Note that you can input the declination angle in degree units only, so you may need to round off the value specified on the map. If your map indicates the declination angle as 7.4°, you should input 7°. In the case of 7.6° input 8°, for 7.5° you can input 7° or 8°.
•Bidirectional Calibration and Northerly Calibration
Bidirectional calibration and northerly calibration calibrate the accuracy of the direction sensor in relation to magnetic north.
Use bidirectional calibration when you want to take readings within an area exposed to magnetic force. This type of calibration should be used if the watch becomes magnetized for any reason. With northerly calibration, you “teach” the watch which way is north (which you have to determine with another compass or some other means).
4
Operation Guide 3134 3205
Important!
•If you want to perform both bidirectional and northerly calibration, be sure to perform bidirectional calibration first, and then perform northerly calibration. This is necessary because bidirectional calibration cancels any existing northerly calibration setting.
•The more correctly you perform bidirectional calibration, the better the accuracy of the bearing sensor readouts. You should perform bidirectional calibration whenever you change environments where you use the bearing sensor, and whenever you feel that the bearing sensor is producing incorrect readings.
To perform magnetic declination correction
Magnetic declination angle direction
l |
ll |
l |
|
|
l |
|
|
l |
|
l |
|
l |
|
|
|
l |
l |
|
|
|
lll lll |
||
|
l |
|
l |
|
l |
|
l |
|
|
l |
|
l |
|
||
l |
|
l |
|
|
l |
|
l |
|
l |
l |
|
|
|
ll |
l |
|
|
|
|
Magnetic declination angle value
1.In the Digital Compass Mode, hold down E for about two seconds until the magnetic declination angle and magnetic declination angle direction values start to flash on the display. This is the setting screen.
2.Use A (+) and C (–) to change the magnetic declination angle and magnetic declination angle direction settings.
•You can select a value within the range of W 90° to E 90° with these settings.
•The following explains magnetic declination angle direction settings.
OFF: No magnetic declination correction performed. The magnetic declination angle with this setting is 0°.
E: When magnetic north is to the east (east declination)
W: When magnetic north is to the west (west declination)
•You can turn off (OFF) magnetic declination correction (which effectively makes the magnetic declination angle: 0°) by pressing A and C at the same time.
•The illustration, for example, shows the value you should input and the direction setting you should select when the map shows a magnetic declination of 1° West.
3.When the setting is the way you want, press E to exit the setting screen.
Precautions about bidirectional calibration
•You can use any two opposing directions for bidirectional calibration. You must, however, make sure that they are 180 degrees opposite each other. Remember that if you perform the procedure incorrectly, you will get wrong bearing sensor readings.
•Make sure that you do not move the watch while calibration of either direction is in progress.
•You should perform bidirectional calibration in an environment that is the same as that where you plan to be taking direction readings. If you plan to take direction readings in an open field, for example, calibrate in an open field.
To perform bidirectional calibration
|
ll ll |
1. In the Digital Compass Mode, hold down E |
||
l |
for about two seconds until the magnetic |
|||
|
l |
|||
l |
|
l |
|
|
l |
l |
|
||
|
ll ll |
declination angle and magnetic declination |
||
|
|
|
||
angle direction values start to flash on the display. This is the setting screen.
2. Press D to display the bidirectional calibration screen.
• At this time, the north pointer flashes at the 12 o’clock position to indicate that the watch is ready to calibrate the first direction.
3. Place the watch on a level surface facing any direction you want, and press C to calibrate the first direction.
• xxx is shown on the display while calibration is being performed. When calibration is successful, the display will show OK and x2x, and the north pointer flashes at the 6 o’clock position. This means that the watch is ready for calibration of the second direction.
4. Rotate the watch 180 degrees.
5. Press C again to calibrate the second direction.
•xxx is shown on the display while calibration is being performed. When calibration is successful, the display will show OK and the Digital Compass Mode (showing the angle value) screen.
•If xxx appears and then changes to ERR (error) on the calibration screen, it means that there is something wrong with the sensor. When ERR disappears after about one second, try performing the calibration again. If ERR keeps appearing, contact your original dealer or nearest authorized CASIO distributor to have the watch checked.
To perform northerly calibration
ll l lll |
1. In the Digital Compass Mode, hold down E |
|
l |
l |
for about two seconds until the magnetic |
ll l ll |
l |
|
l |
|
|
declination angle and magnetic declination angle direction values start to flash on the display. This is the setting screen.
2. Press D twice to display the northerly calibration screen.
• At this time, -N- (north) appears on the display.
3.Place the watch on a level surface, and position it so that its 12 o’clock position points north (as measured with another compass).
4.Press C to start the calibration operation.
•--- is shown on the display while calibration is being performed. When calibration is successful, the display will show OK and the Digital Compass Mode (with 0° shown as the angle value).
•If --- appears and then changes to ERR (error) on the calibration screen, it means that there is something wrong with the sensor. When ERR disappears after about one second, try performing the calibration again. If ERR keeps appearing, contact your original dealer or nearest authorized CASIO distributor to have the watch checked.
Using the Digital Compass While Mountain Climbing or Hiking
This section describes three real-life situations where you could use the watch’s built-in digital compass.
•To set a map and find your current location
Having an idea of your current location is important when mountain climbing or hiking. To do this, you need to “set the map”, which means to align the map so the directions indicated on it are aligned with the actual directions of your location. Basically what you are doing is aligning north on the map with north as indicated by the watch.
•To find the bearing to an objective
•To determine the direction angle to an objective on a map and head in that direction
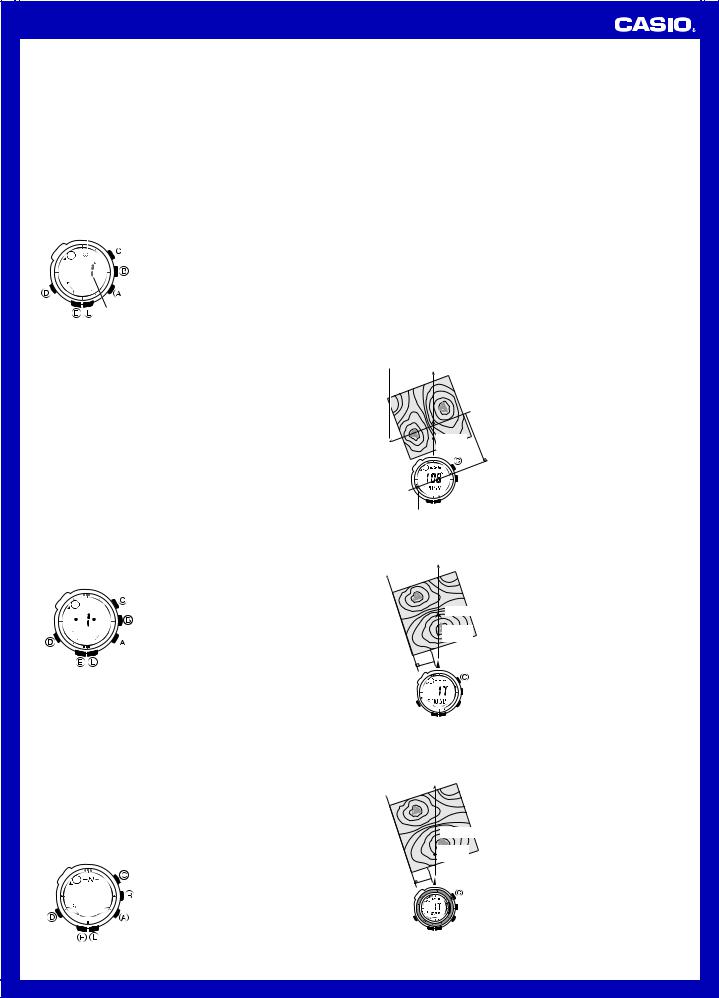
To set a map and find your current location
North indicated on the map
N |
Current |
location |
N


North indicated by north pointer
1.With the watch on your wrist, position it so the face is horizontal.
2.In the Timekeeping, Digital Compass,
Barometer/Thermometer, or Altimeter Mode, press C to take a compass reading.
•The reading will appear on the display after about two seconds.
3.Rotate the map without moving the watch so the northerly direction indicated on the map matches north as indicated by the watch.
•If the watch is configured to indicate magnetic north, align the map’s magnetic north with the watch indication. If the watch has been configured with a declination to correct to true north, align the map’s true north with the watch indication.
•This will position the map in accordance with your current location.
4.Determine your location as you check the geographic contours around you.
To find the bearing to an objective
N
N
 Objective
Current |
location |
12 o’clock position
1.Take a compass reading and then set the map so its northerly indication is aligned with north as indicated by the watch, and determine your current location.
•See “To set a map and find your current location” for information about how to perform the above step.
2.Set the map so the direction you want to travel on the map is pointed straight in front of you.
3.With the watch on your wrist, position it so the face is horizontal.
4.In the Timekeeping, Digital Compass,
Barometer/Thermometer, or Altimeter Mode, press C to take a compass reading.
•The reading will appear on the display after about two seconds.
5.Still holding the map in front of you, turn your body until north as indicated by the watch and the northerly direction on the map are aligned.
•This will position the map relative to your current location, so the bearing to your objective is straight ahead of you.
To determine the direction angle to an objective on a map and head in that direction
N
 Objective
Current location
N |
12 o’clock |
|
position |
||
|
Note
• The following procedure is possible only with a watch that has a rotary bezel.
1.Take a compass reading and then set the map so its northerly indication is aligned with north as indicated by the watch, and determine your current location.
•See “To set a map and find your current location” for information about how to perform the above step.
2.As shown in the illustration to the left, change your position so you (and the 12 o’clock position of the watch) are pointed in the direction of objective, while keeping the map aligned with the readings being produced by the watch.
5
Loading...