


PCR-T275
START-UP is QUICK and EASY!
Simple to use!
15 departments and 100 PLUs
Automatic Tax Calculations
Calculator function
User's Manual
CI
Canada
PCR-T275
Electronic Cash Register
CASIO COMPUTER CO., LTD.
6-2, Hon-machi 1-chome
Shibuya-ku, Tokyo 151-8543, Japan
(U. S. model)
(Canada model)

2
INTRODUCTION
E
IMPORTANT
FOR PROGRAMMING ASSISTANCE
PLEASE CALL TOLL FREE
1-800-638-9228
Thank you very much for purchasing this CASIO electronic cash register.
START-UP is QUICK and EASY!
Part-1 of this User's Manual can help you make a quick start.
Once you have mastered the QUICK START operations, you will undoubtedly want to expand your use of this
machine by studying other sections of Part-2.
Power supply
Your cash register is designed to operate on standard house-
hold current (120 V, 50/60 Hz). Do not overload the outlet by
plugging in too many appliances.
Cleaning
Clean the cash register exterior with a soft cloth which has
been moistened with a solution of a mild neutral detergent
and water, and wrung out.
Be sure that the cloth is thoroughly wrung out to avoid
damage to the printer.
Never use paint thinner, benzene, or other volatile solvents.
CASIO authorized service centers
If your CASIO product needs repair, or you wish to purchase
replacement parts, please call 1-800-YO-CASIO.
Original carton / package
If for any reason, this product is to be returned to the store
where purchased, it must be packed in the original carton/
package.
Location
Locate the cash register on a flat, stable surface, away from
heaters or areas exposed to direct sunlight, humidity or dust.
3
INTRODUCTION
E
Safety precautions
• To use this product safely and correctly, read this manual thoroughly and operate as instructed.
After reading this guide, keep it close at hand for easy reference.
Please keep all informations for future reference.
• Always observe the warnings and cautions indicated on the product.
About the icons
In this guide various icons are used to highlight safe operation of this product and to prevent injury to the
operator and other personnel and also to prevent damage to property and this product. The icons and
definitions are given below.
Indicates that there is a risk of severe injury or death if used incorrectly.
Indicates that injury or damage may result if used incorrectly.
Icon examples
To bring attention to risks and possible damage, the following types of icons are used.
The symbol indicates that it includes some symbol for attracting attention (including warning). In this triangle
the actual type of precautions to be taken (electric shock, in this case) is indicated.
The symbol indicates a prohibited action. In this symbol the actual type of prohibited actions (disassembly, in
this case) will be indicated.
The
symbol indicates a restriction. In this symbol the type of actual restriction (removal of the power plug
from an outlet, in this case) is indicated.
Warning!
Handling the register
Should the register malfunction, start to emit smoke or a strange odor , or otherwise behave abnormally,
immediately shut down the power and unplug the AC plug from the power outlet. Continued use
creates the danger of fire and electric shock.
• Contact CASIO service representative.
Do not place containers of liquids near the register and do not allow any foreign matter to get into it.
Should water or other foreign matter get into the register, immediately shut down the power and unplug
the AC plug from the power outlet. Continued use creates the danger of short circuit, fire and electric
shock.
• Contact CASIO service representative.
Should you drop the register and damage it, immediately shut down the power and unplug the AC plug
from the power outlet. Continued use creates the danger of short circuit, fire and electric shock.
• Attempting to repair the register yourself is extremely dangerous. Contact CASIO service representative.

4
INTRODUCTION
E
Warning!
Never try to take the register apart or modify it in any way. High-voltage components inside the register
create the danger of fire and electric shock.
• Contact CASIO service representative for all repair and maintenance.
Power plug and AC outlet
Use only a proper AC electric outlet. Use of an outlet with a different voltage from the rating creates the
danger of malfunction, fire, and electric shock. Overloading an electric outlet creates the danger of
overheating and fire.
Make sure the power plug is inserted as far as it will go. Loose plugs create the danger of electric
shock, overheating, and fire.
• Do not use the register if the plug is damaged. Never connect to a power outlet that is loose.
Use a dry cloth to periodically wipe off any dust built up on the prongs of the plug. Humidity can cause
poor insulation and create the danger of electric shock and fire if dust stays on the prongs.
Do not allow the power cord or plug to become damaged, and never try to modify them in any way.
Continued use of a damaged power cord can cause deterioration of the insulation, exposure of internal
wiring, and short circuit, which creates the danger of electric shock and fire.
• Contact CASIO service representative whenever the power cord or plug requires repair or maintenance.
Caution!
Do not place the register on an unstable or uneven surface. Doing so can cause the register —
especially when the drawer is open — to fall, creating the danger of malfunction, fire, and electric
shock.
Do not place the register in the following areas.
• Areas where the register will be subject to large amounts of humidity or dust, or directly exposed to hot or
cold air.
• Areas exposed to direct sunlight, in a close motor vehicle, or any other area subject to very high
temperatures.
The above conditions can cause malfunction, which creates the danger of fire.
Do not overlay bend the power cord, do not allow it to be caught between desks or other furniture, and
never place heavy objects on top of the power cord. Doing so can cause short circuit or breaking of the
power cord, creating the danger of fire and electric shock.
Be sure to grasp the plug when unplugging the power cord from the wall outlet. Pulling on the cord can
damage it, break the wiring, or cause short, creating the danger of fire and electric shoc k.
Never touch the plug while your hands are wet. Doing so creates the danger of electric shock. Pulling
on the cord can damage it, break the wiring, or cause short, creating the danger of fire and electric
shock.
Never touch the printer head and the platen.
5
E
Before you start
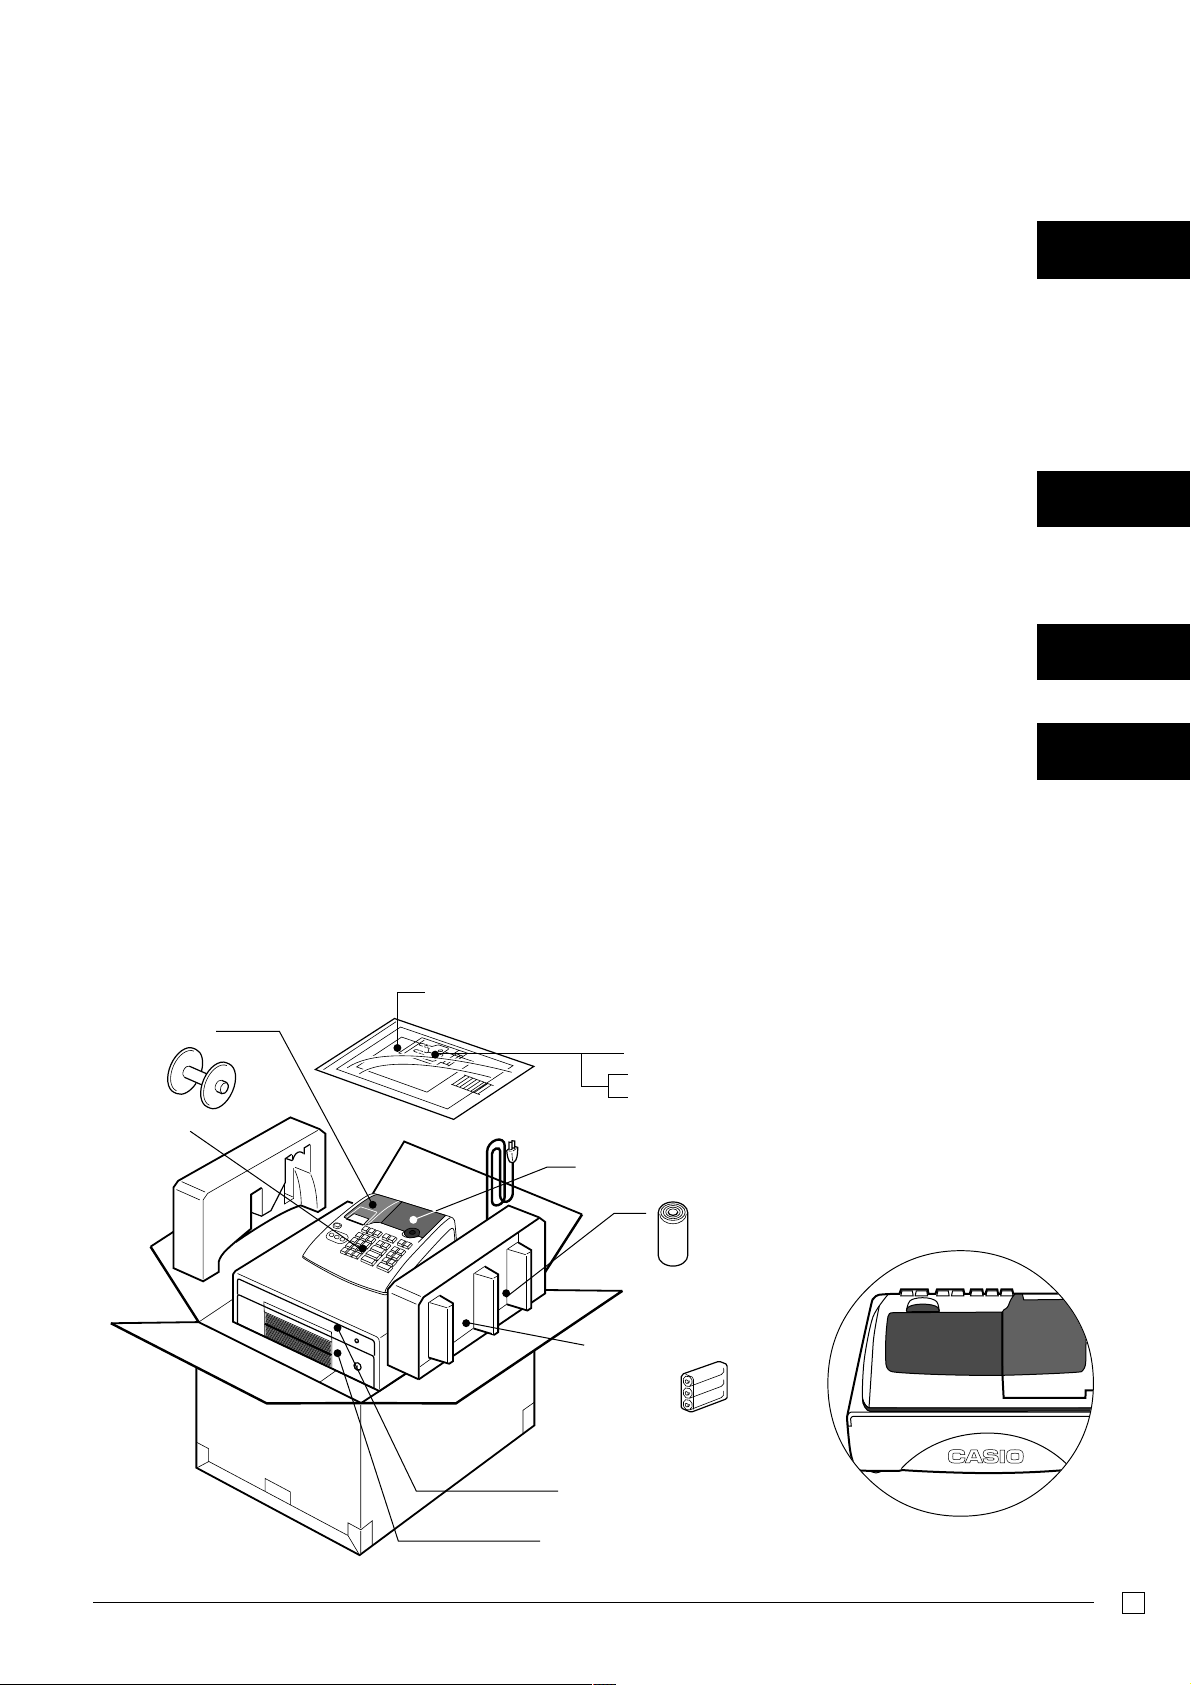
Unpacking
Contents
Getting to know your cash register ........................................................................................................... 6
Daily Job Flow........................................................................................................................................... 8
Part-1 QUICK START OPERATION ......................................................... 9
(You can operate this ECR on a basic level by reading the following sections)
1. Initialization ...................................................................................................................................... 9
2. To select the language..................................................................................................................... 9
3. Loading paper .................................................................................................................................. 10
4. Basic programming for QUICK START – TIME/DATE .................................................................... 11
5. Basic operation after basic programming ........................................................................................ 13
6. Daily management report................................................................................................................. 16
Part-2 CONVENIENT OPERATION .......................................................... 17
(Please keep these sections to expand your use.)
1. Various programming....................................................................................................................... 17
2. Various operations ........................................................................................................................... 29
Part-3 CALCULATOR FUNCTION............................................................ 36
1. Calculator mode............................................................................................................................... 36
Part-4 USEFUL INFORMATION ............................................................... 38
1. Troubleshooting ............................................................................................................................... 38
2. Specifications................................................................................................................................... 39
3. Warranty card .................................................................................................................................. 39
Rear customer display
12345&78
Operator display
Program key
Operator key
Keyboard
Drawer
Multipurpose tray
(only for Canada model)
Memory protection
batteries
Roll paper
Take-up reel
User’s manual
Drawer keys (2)
6
E
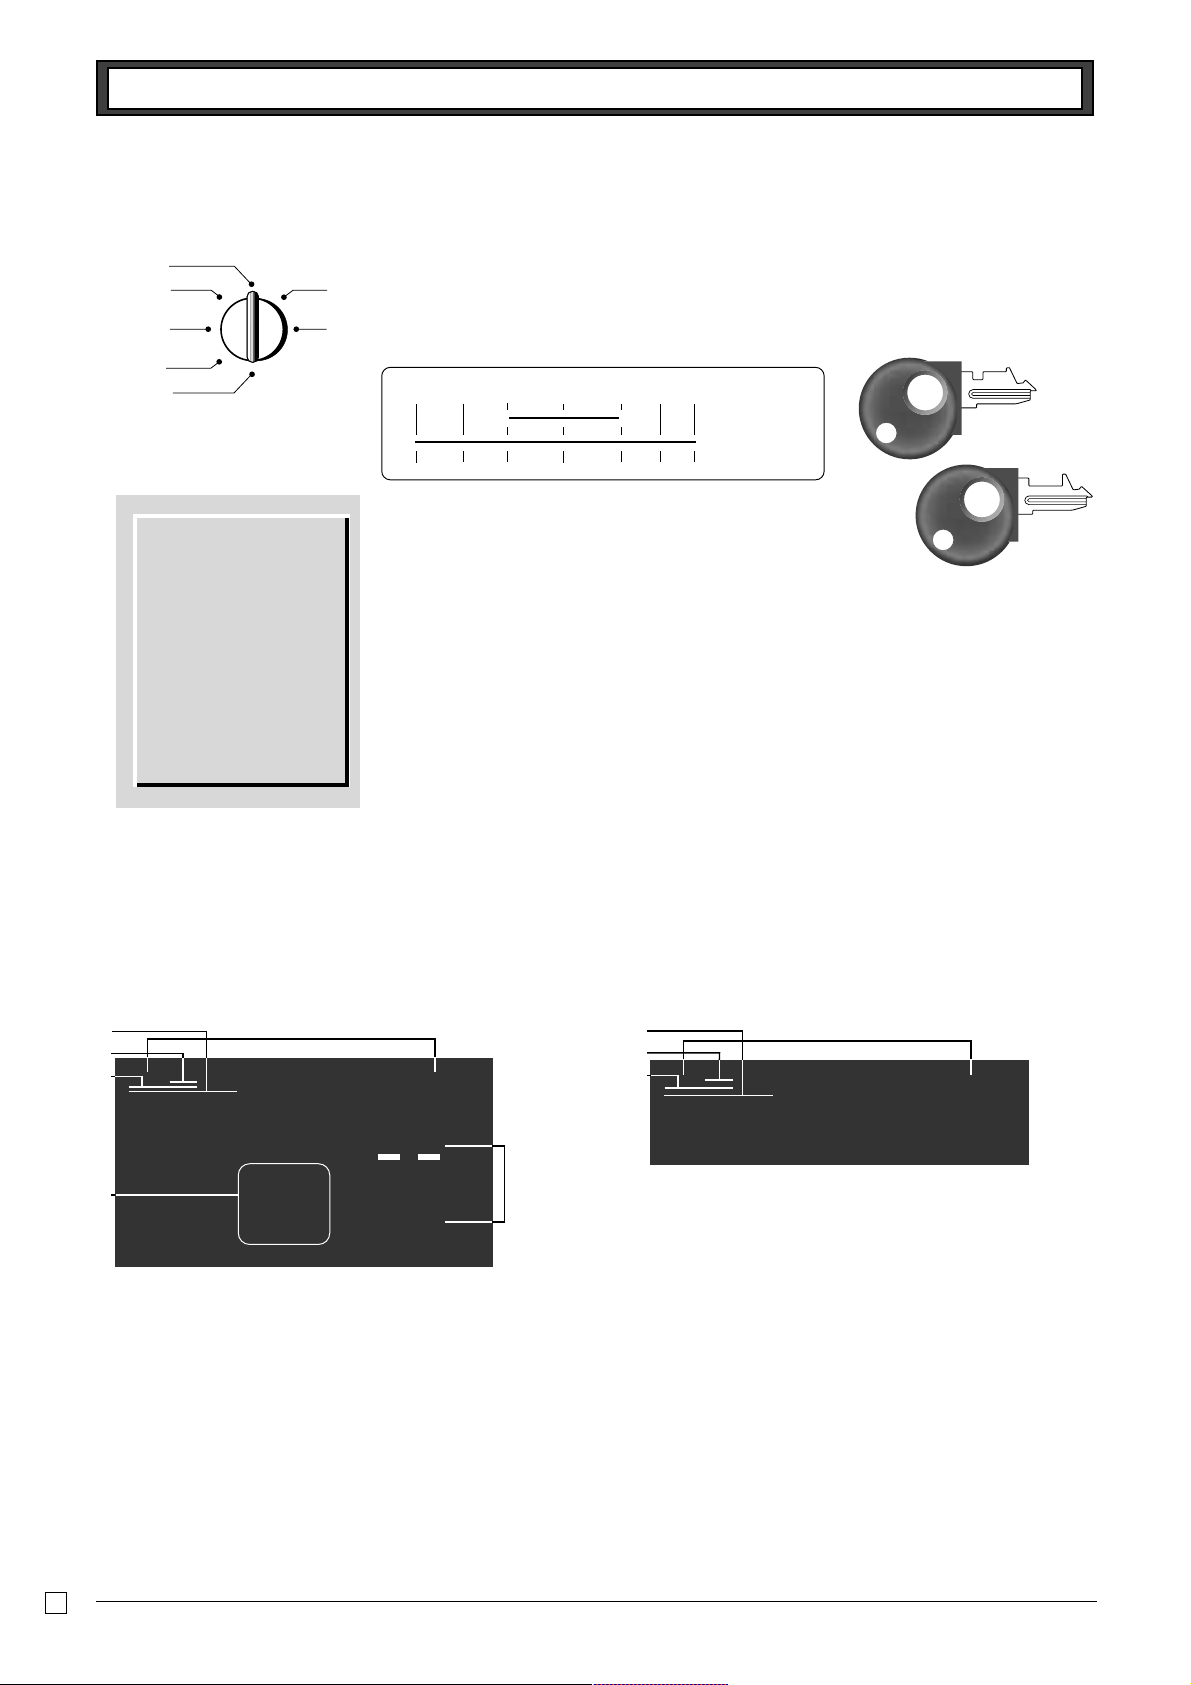
Getting to know your cash register
Note:
An error is generated
(E01 displayed)
whenever the position
of the mode switch is
changed during
registration or pro-
gramming.
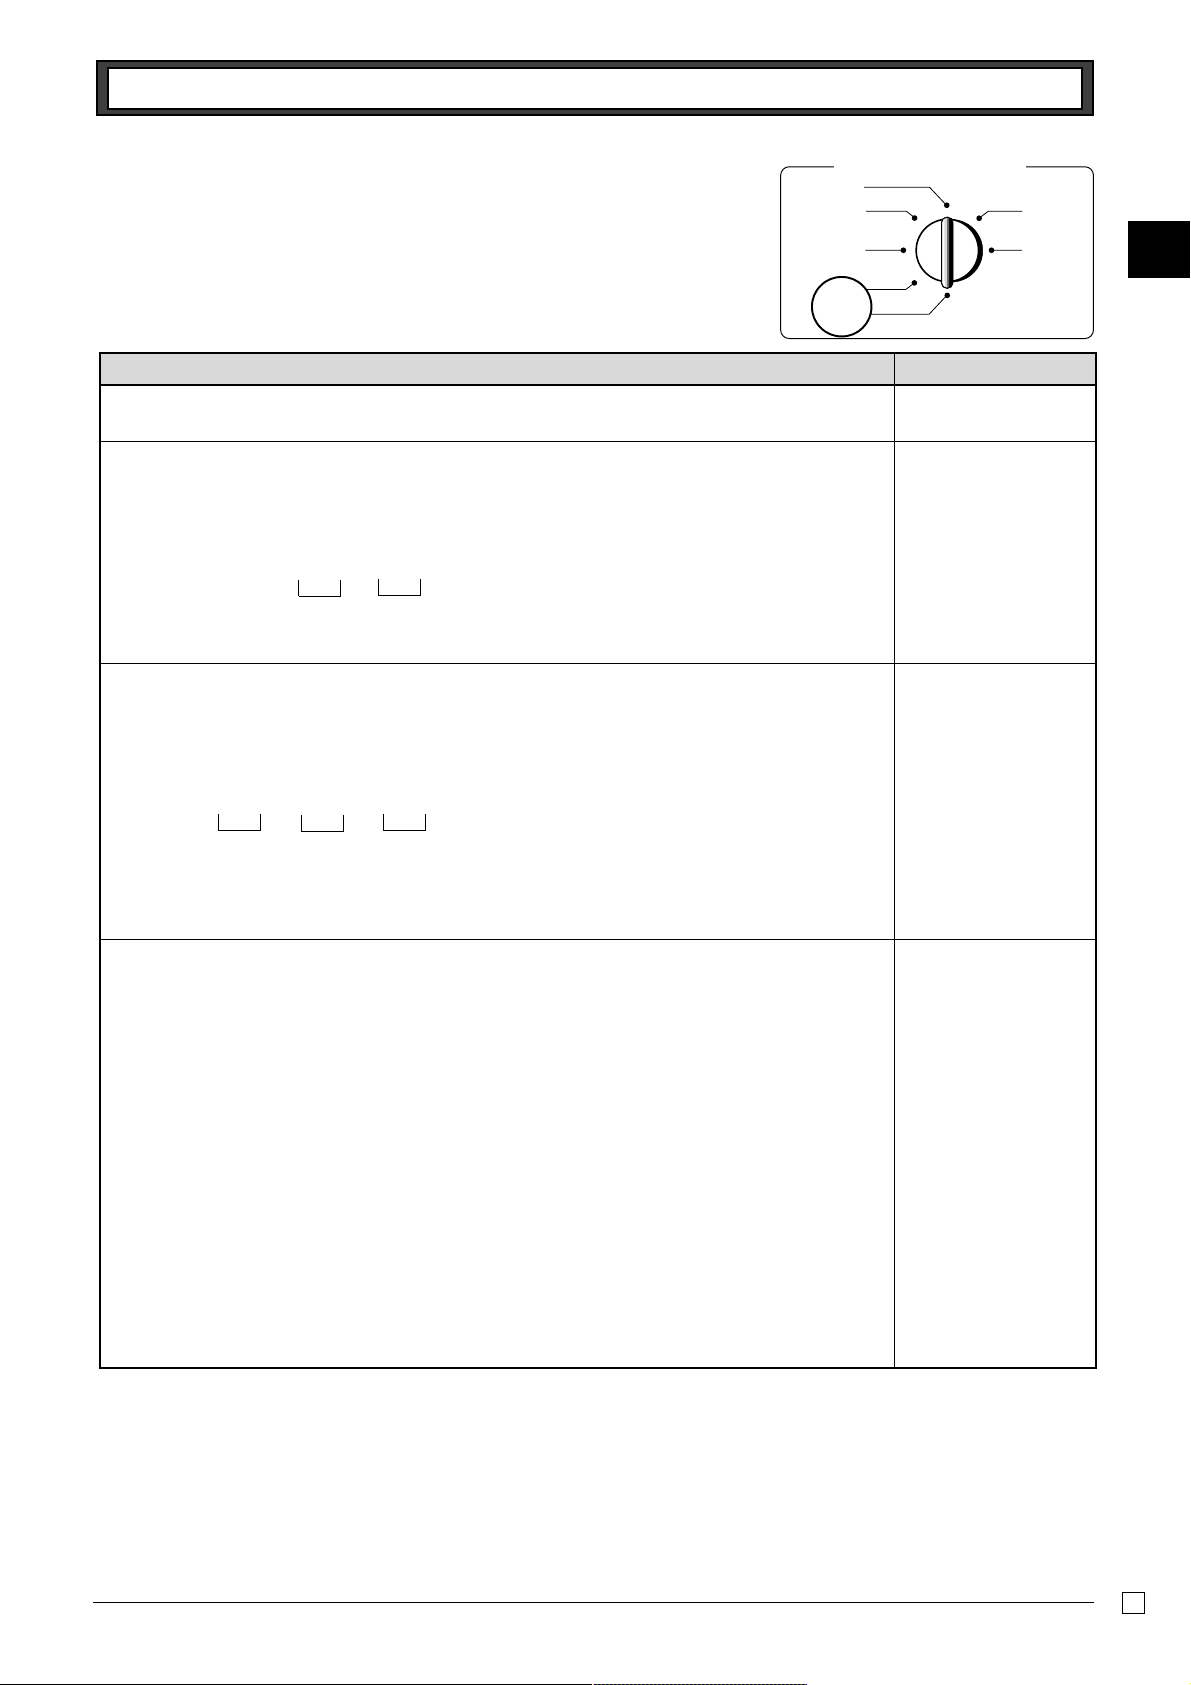
The position of the mode switch controls the type of operations you can perform on the cash
register. The PROGRAM Key (marked PGM) that comes with the cash register can be used
to select any mode switch setting, while the OPERATOR Key (marked OP) can be used to
select OFF, REG or CAL only.
OFF
In this position, the power of the cash register is off.
REG (Register)
This is the position used for registration of normal transactions.
RF (Refund)
This is the position used for registration of refunds.
CAL (Calculator)
This is the position used for calculator mode.
PGM (Programming)
This is the position used to program the cash register to suit the needs of your store.
X (Read)
This is the position used to produce reports of daily sales totals without clearing the totals.
Z (Reset)
This is the position used to produce reports of daily sales totals. This setting clears the totals.
CAL
REG
OFF
RF
PGM
X
Z
PGM RF OFF REG CAL X Z
●● OP Key
● ● PGM Key
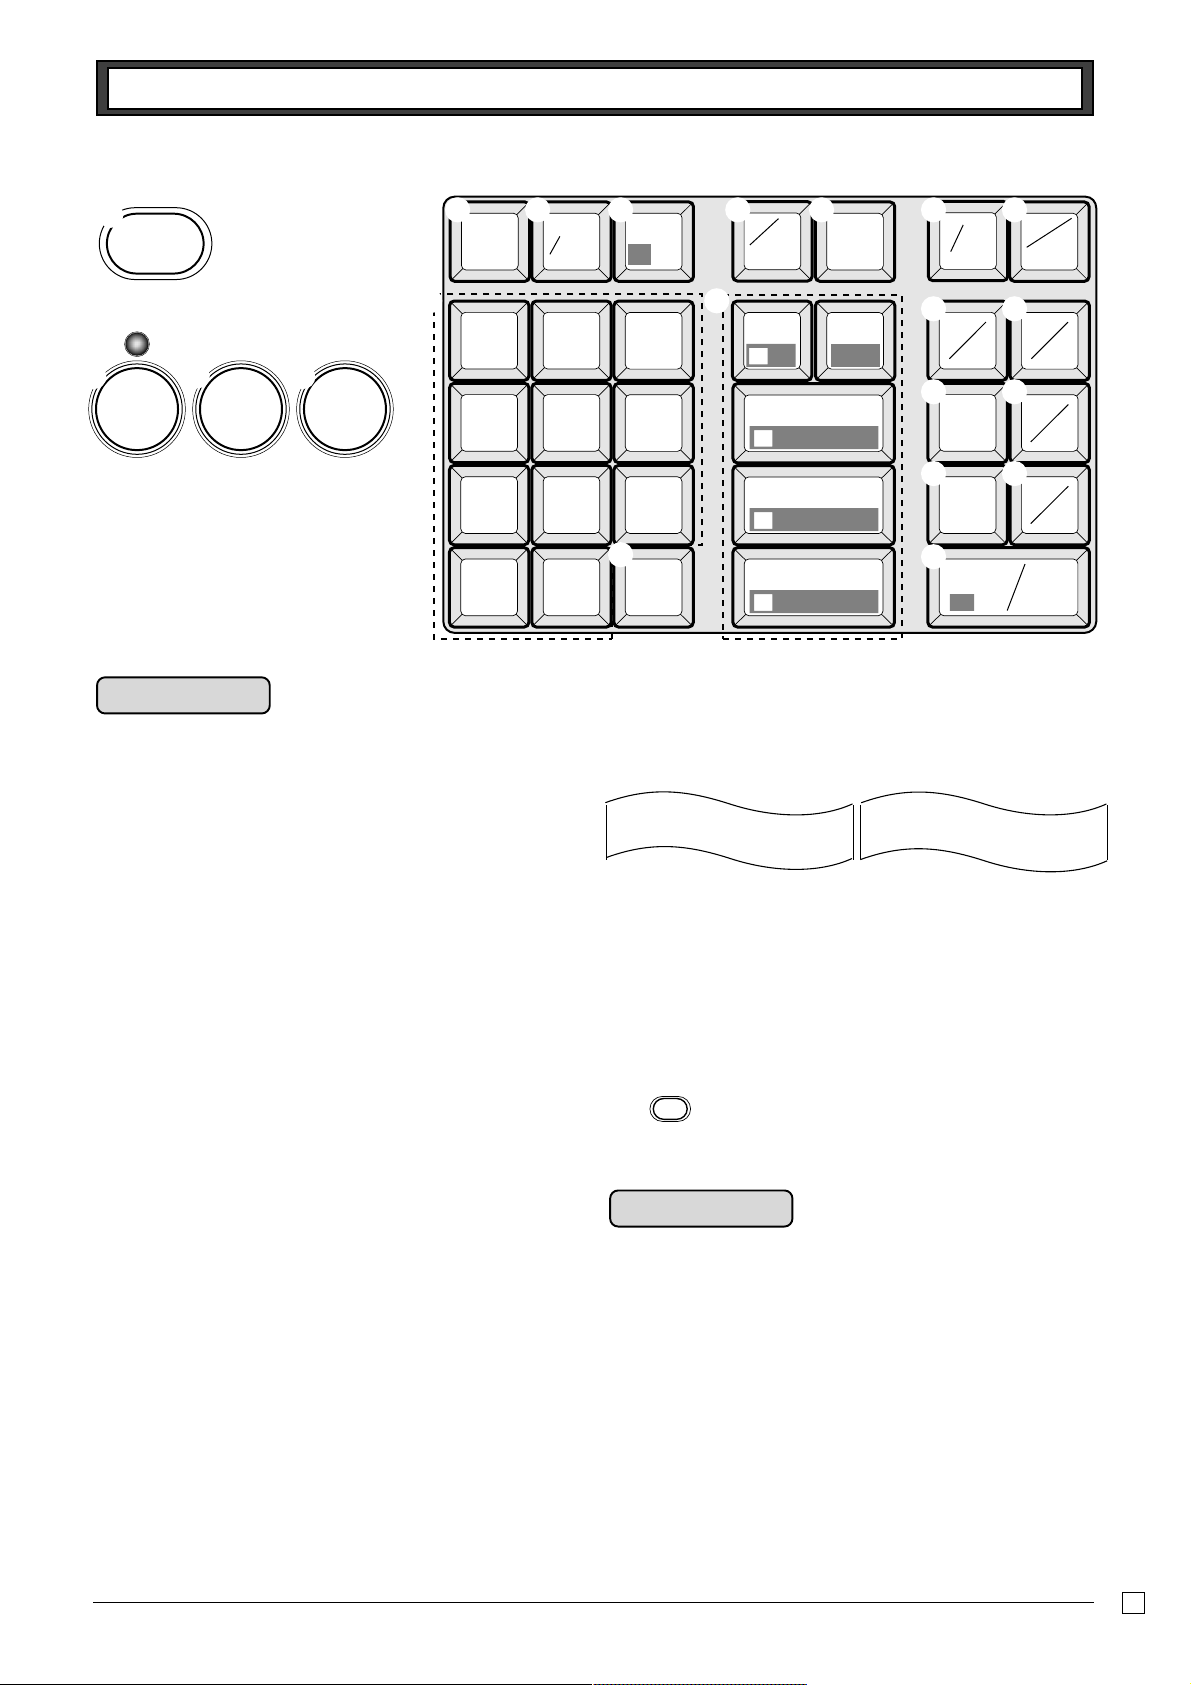
Getting to know your cash register
Displays
Rear customer display
Operator display
1 Total/Change indicator
The total or change indicator appears when a subtotal, total
or change is obtained. These indicators are also used for
department shift level.
2 Department number display
Anytime you press a department key to register a unit price,
the corresponding department number appears here.
3 PLU number display
Anytime you perform a PLU registration, the corresponding
PLU number appears here.
4 Number of repeat display
Anytime you perform “repeat registration” (page 13), the
number of repeats appears here.
Note that only one digit is displayed for the number of re-
peats.
5 Numeric display
Entered values (unit prices or quantities) and calculated val-
ues (subtotals, totals or change amount due) are displayed
here. The capacity of the display is 8 digits.
This part of the display can be used to show the current time
or date between registration (page 33).
6 Character display
In the character programming (P2) mode, it shows the last
entered character.
TOTAL
CHARACTER
CHANGE
2nd
DEPT:
3rd
@
^
$
#
%
!
12#45&78
A
@
$
#
%
12#45&78
OP
PGM
OP key
PGM key
7
E
Getting to know your cash register
Keyboard
7
1
0
4
8
2
00
5
9
3
.
6
FEED PLU
DEPT
SHIFT
ERR
.
CORR
—
DATE
TIME
CH
CHK
SUB
TOTAL
T/S2
PD
T/S1
RC
ST
MD
NS
#
×
/
FOR
CLK#
%
14
9
15
10
CA AMT
TEND
11
6
12
7
13
8
C
+
1
−
2
×
3
÷
4
5
=
AC
HELP
P APER
SAVING
POST
RECEIPT
NON-TAX
TAXABLE
OPEN
1 23
F
4 5 6 7
8 9
0 A
B
D
E
H
I
J
G
C
K
Certain keys have two functions; one
for register mode and one for calculator
mode.
In this manual, we will refer to specific
keys as noted below to make the
operations as easy to understand as
possible:
Register mode
Calculator mode
3
t AC key
5 i Memory recall key
7 :
Percent key
E ?, Z, ~ >, '
Numeric keys and 2-zero key
F " Decimal key
G H, J, K, L Arithmetic operation key
D p Equal key
A m Drawer open key
1 l Feed key
2 g Minus/Error correction key
3 y Clear key
4 h Multiplication/for/Date time key
5 i PLU (price look up) key
6 j Reference number/Department shift key
7 : Percent/Clerk number key
8 c Received on account/Tax shift 1 key
9 v Paidout/Tax shift 2 key
0 u Charge key
A m Check/No sale key
B k Subtotal key
C b Merchandise subtotal key
D p Cash amount tendered key
E ?, Z, ~ >, '
Numeric keys and 2-zero key
F " Decimal key
G G, S, D, F, [
Department keys
• Department 6 through 15 are specified by pressing the
j key (once or twice) respectively as follows:
jG →Department 6 jS→ Department 7…
j[ →Department 10 … jjG → Department 11
… jj[ → Department 15
H } Paper saving key
• Paper saving key is the key to save printing paper
(Journal compressed printing / No receipt issuing).
In these cases, the LED of this key lights.
I | Post receipt key
• Post receipt key is used for issuing receipt after transac-
tion. This key is effective if the printer is defined as printing
receipts. Refer to page 31.
J { Help key
• Help key is used for issuing assistant receipts such as
programming date/time, tax table etc.
K
OPEN
Printer open key
• Printer open key is used to open printer platen for setting/
replacing roll paper.
Normal printing
Compressed printing
DEPT01
DEPT01 T1 $2.00
DEPT02 T1 $3.00
$4.00
DEPT01
DEPT02
DEPT01 T1 $2.00
DEPT02 T1 $3.00
DEPT03 T1 $4.00
DEPT04 T1 $5.00
T2 $6.00
$1.00
8
E
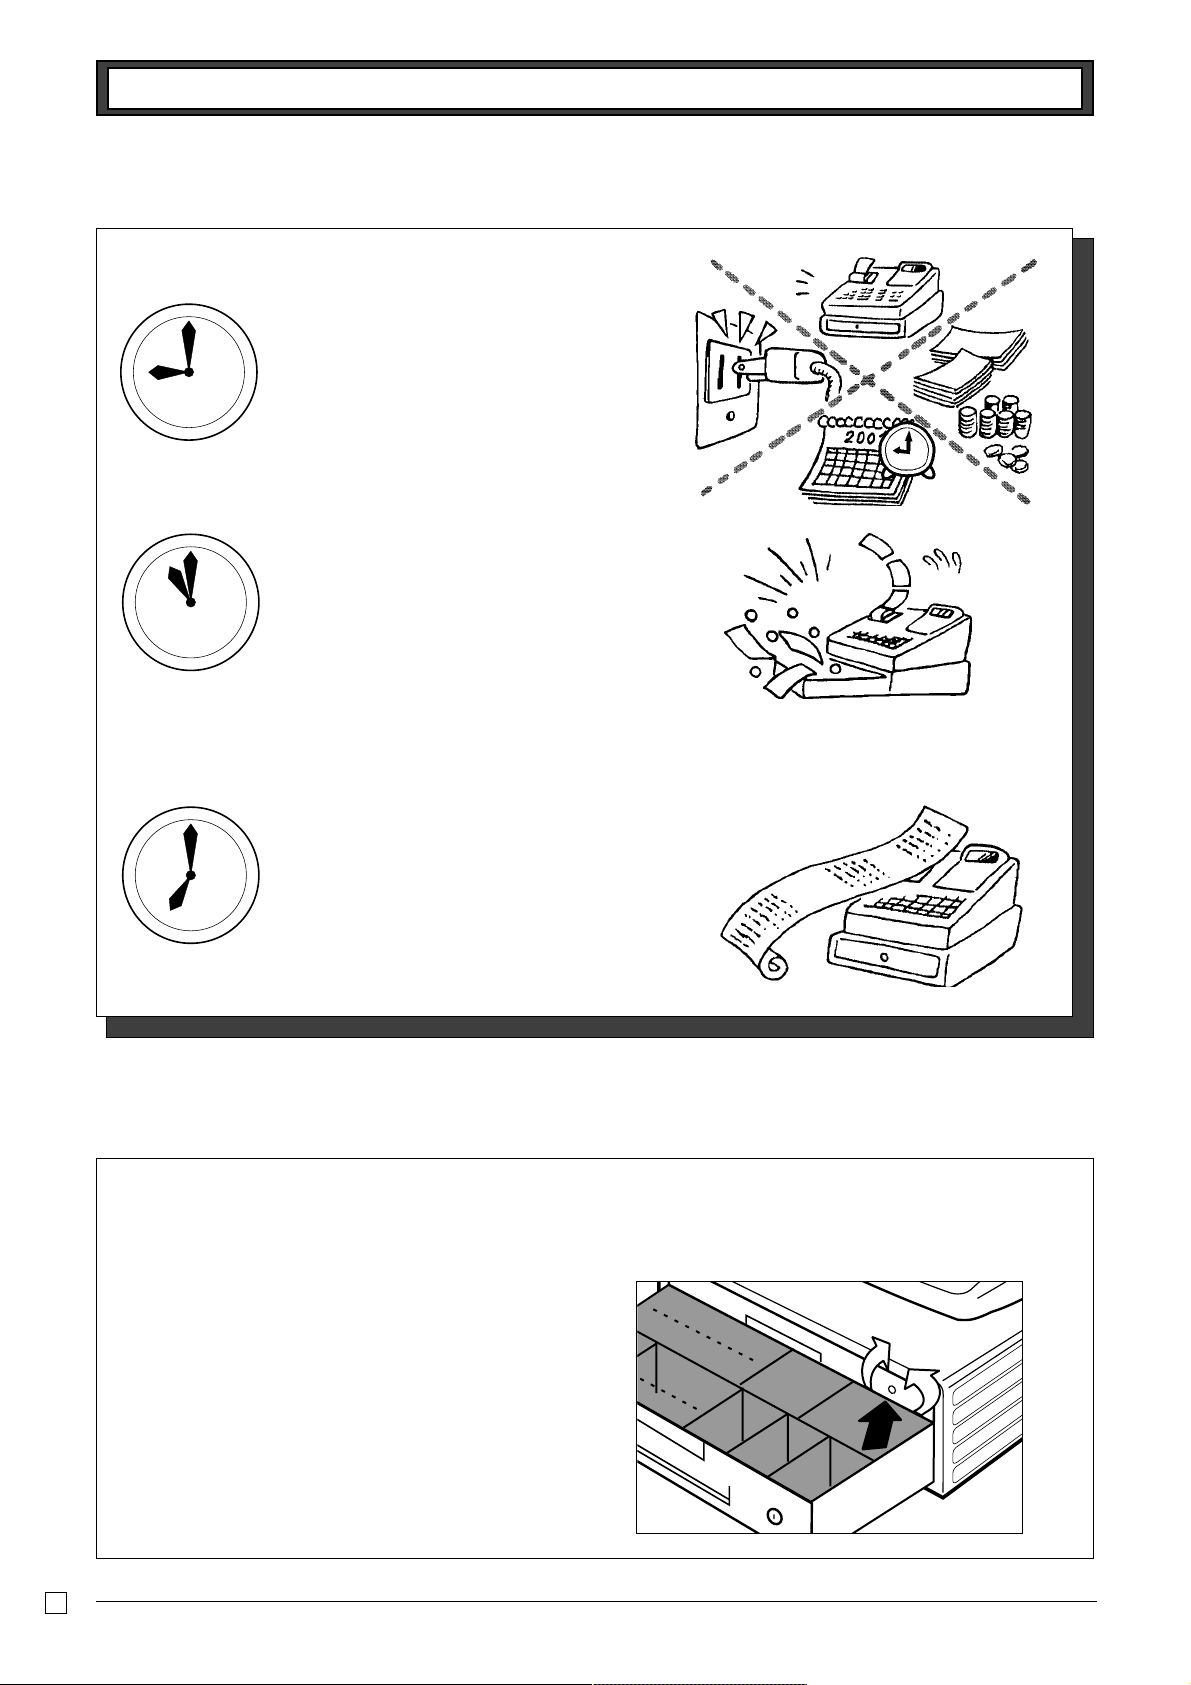
Daily Job Flow
Daily Job Flow
Before opening the store
1. Plugged in?
2. Enough roll paper?
3. Date and time is correct?
4. Enough small change in the drawer?
While the store is open
1. Registrations.
2. Issuing latest daily sales total if needed.
(Generating report by mode switch to
X position.)
After closing the store
1. Issuing daily sales total.
(Resetting report by mode switch to Z
position.)
2. Picking up money in the drawer.
3. Turn the mode switch to OFF.
To lock/unlock the multipurpose tray
A. Turn the lever (1) clockwise to lock the tray (the indicator becomes red).
B. Turn the lever (1) counterclockwise to unlock the tray (the indicator becomes green).
(A)
(B)
(1)
(only for Canada model)
9
Part-1
Part-1 QUICK START OPERATION
E
QUICK START OPERATION
Part-1
1. Initialization and loading memory protection battery
Important
You must initialize
the cash register
and install the
memory protection
batteries before you
can program the
cash register.
◗ To initialize the cash register
1. Set the mode switch to OFF.
2. Plug the power cord of the cash register into an AC outlet.
3. Load the memory protection batteries.
4. Set the Mode Switch to REG.
◗ To load the memory protection batteries
1. Open the platen arm.
2. Press down on the oval just behind the printer paper inlet, and slide the battery
compartment cover toward the back of the cash register.
3. Load 3 new SUM-3 (“AA”) type batteries into the compartment. Be sure that the plus
(+) and minus (–) ends of each battery are facing in the directions indicated by the
illustrations inside the battery compartment (Figure 1).
4. Slide the memory protection battery compartment cover back into place.
5. Replace the printer paper and printer cover.
REPLACE MEMORY PROTECTION BATTERIES AT LEAST ONCE EVERY
YEAR.
(Figure 1)
2. To select the language
You can select the default printing language depending on the requirements in your area.
Default language is English.
Example:
Change the languge to Spanish.
1. Set the mode switch to PGM.
2. Press the following keys.
Select numbers from list A.
X>>>{
▲
Language selections
A
English Z>>>
Spanish X>>>
French C>>>
10
Part-1 QUICK START OPERATION
E
5 Remove the journal paper from the
take-up reel.
6 Press the printer open key and open
the platen arm.
7 Remove the core of the paper.
8 Load new paper following the instruc-
tions “1. To load journal paper”.
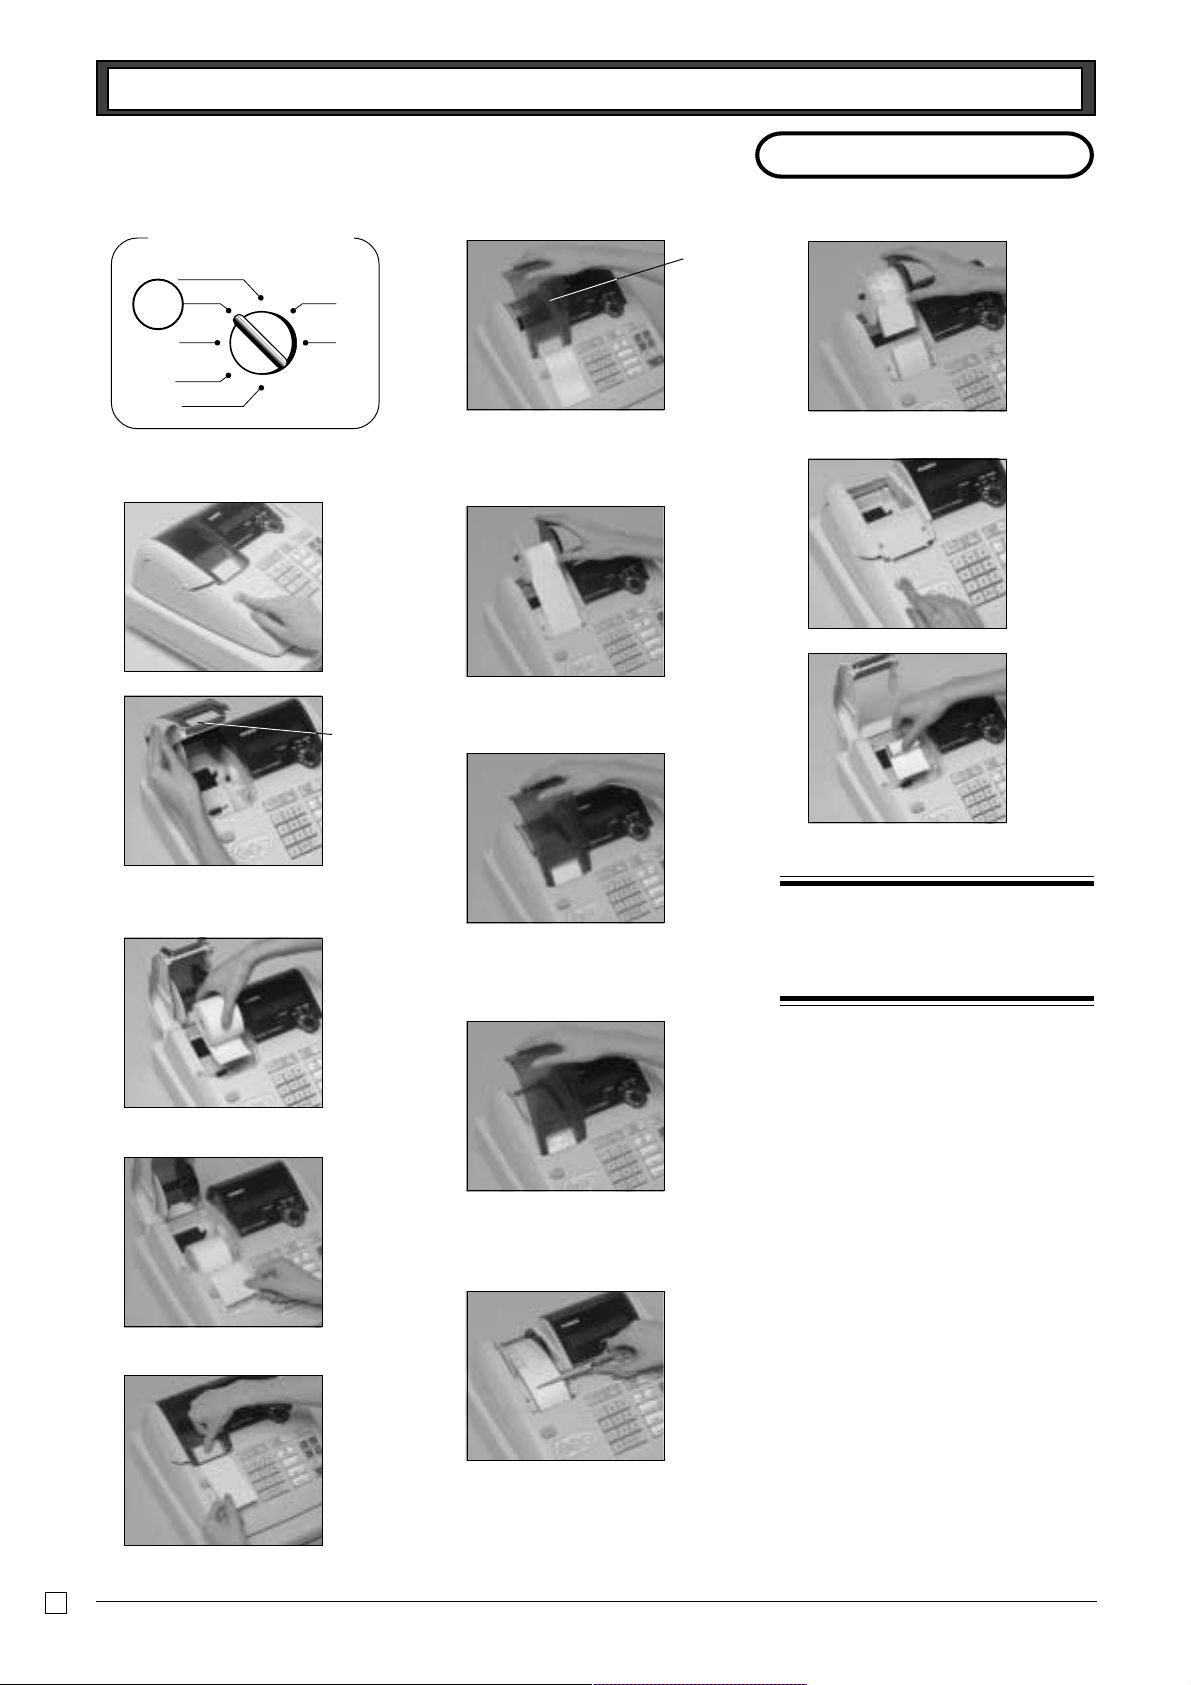
3. Loading paper roll
Mode switch to REG
CAL
REG
OFF
RF
PGM
X
Z
REG
1. To load journal paper
1 Pressing down the printer open key.
2 Open the platen arm.
3 Ensuring the paper is being fed from
the bottom of the roll, lower the roll
into the space behind the printer.
4 Put the leading end of the paper over
the printer.
5 Close the platen arm slowly until it
locks steadily.
◗ To load receipt paper
1 In case of defining the printer as
receipt printer, follow steps 1 through
5 of “To load journal paper”.
2 Pass the leading end of the receipt
paper through the paper outlet of the
printer cover.
3 Tear off any excess paper.
◗ To remove receipt paper
1 In case of defining the printer as
journal printer, follow steps 6 through
7 of “To remove a journal paper”.
◗ Caution
(in handling the thermal paper)
1. Never touch the printer head and platen.
2. Unpack the paper just before your use.
3. Avoid heat/direct sunlight.
4. Avoid dusty and humid places for storage.
5. Do not scratch the paper.
6. Do not keep the paper under the following
circumstances: High humidity and tempera-
ture/direct sunlight/contact with glue, thin-
ner or a rubber eraser.
Default printer definition is journal printer.
To print receipts, please refer to the
“Basic programming for QUICK START”
on the next page.
Options:Roll paper ••• P-5880T
6 Remove the printer cover by lifting up
the back.
7 Roll the paper onto the take-up reel a
few turns.
8 Set the left plate of the take-up reel
and place the reel into the register.
9 Press the l key to take up any
slack in the paper.
0 Replace the printer cover slowly.
2. To remove journal paper
1 Remove the printer cover by lifting up
the back.
2 Press the l key until approximately
20cm of the paper is fed from the
printer.
3 Cut off the roll paper.
4 Remove the take-up reel from the
printer and take off the left plate of the
reel.
platen arm
printer cover
11
Part-1
Part-1 QUICK START OPERATION
E
4. Basic programming for QUICK START
Mode switch
CAL
REG
OFF
RF
PGM
X
Z
PGM
P appears in mode display
Setting the current
date
Setting the current
time
P appears in mode display
Date
Year
Month
(to end the time setting)
(to end the date setting)
FOR PROGRAMMING ASSISTANCE, PLEASE CALL TOLL FREE 1-800-638-9228
Setting the printer
attribution
P appears in mode display.
Procedure
Purpose
1. Insert the PROGRAM key (marked “PGM”) and rotate to PGM position.
2. Press the following keys to set the current time.
Example: 13:18 PM = 1318
• Enter 4 digits
• 24-hour time format
3. Press the following keys to set the current date.
Example: July 19, 2003 = 030719
• Enter 6 digits
• Enter last 2 digits for year set. (2003 → 03)
4. Press the following keys to define the printer as a receipt printer or a journal printer.
Time
Minutes
Zk
ZCZ<h
y
Enter "1" for receipt.
Zk
?C?MZ>h
y
Zk
Zu
k
Programming
To define as a receipt printer
P appears in mode display.
Enter "0" for journal.
Zk
?u
k
To define as a journal printer
12
Part-1 QUICK START OPERATION
E
Procedure
Purpose
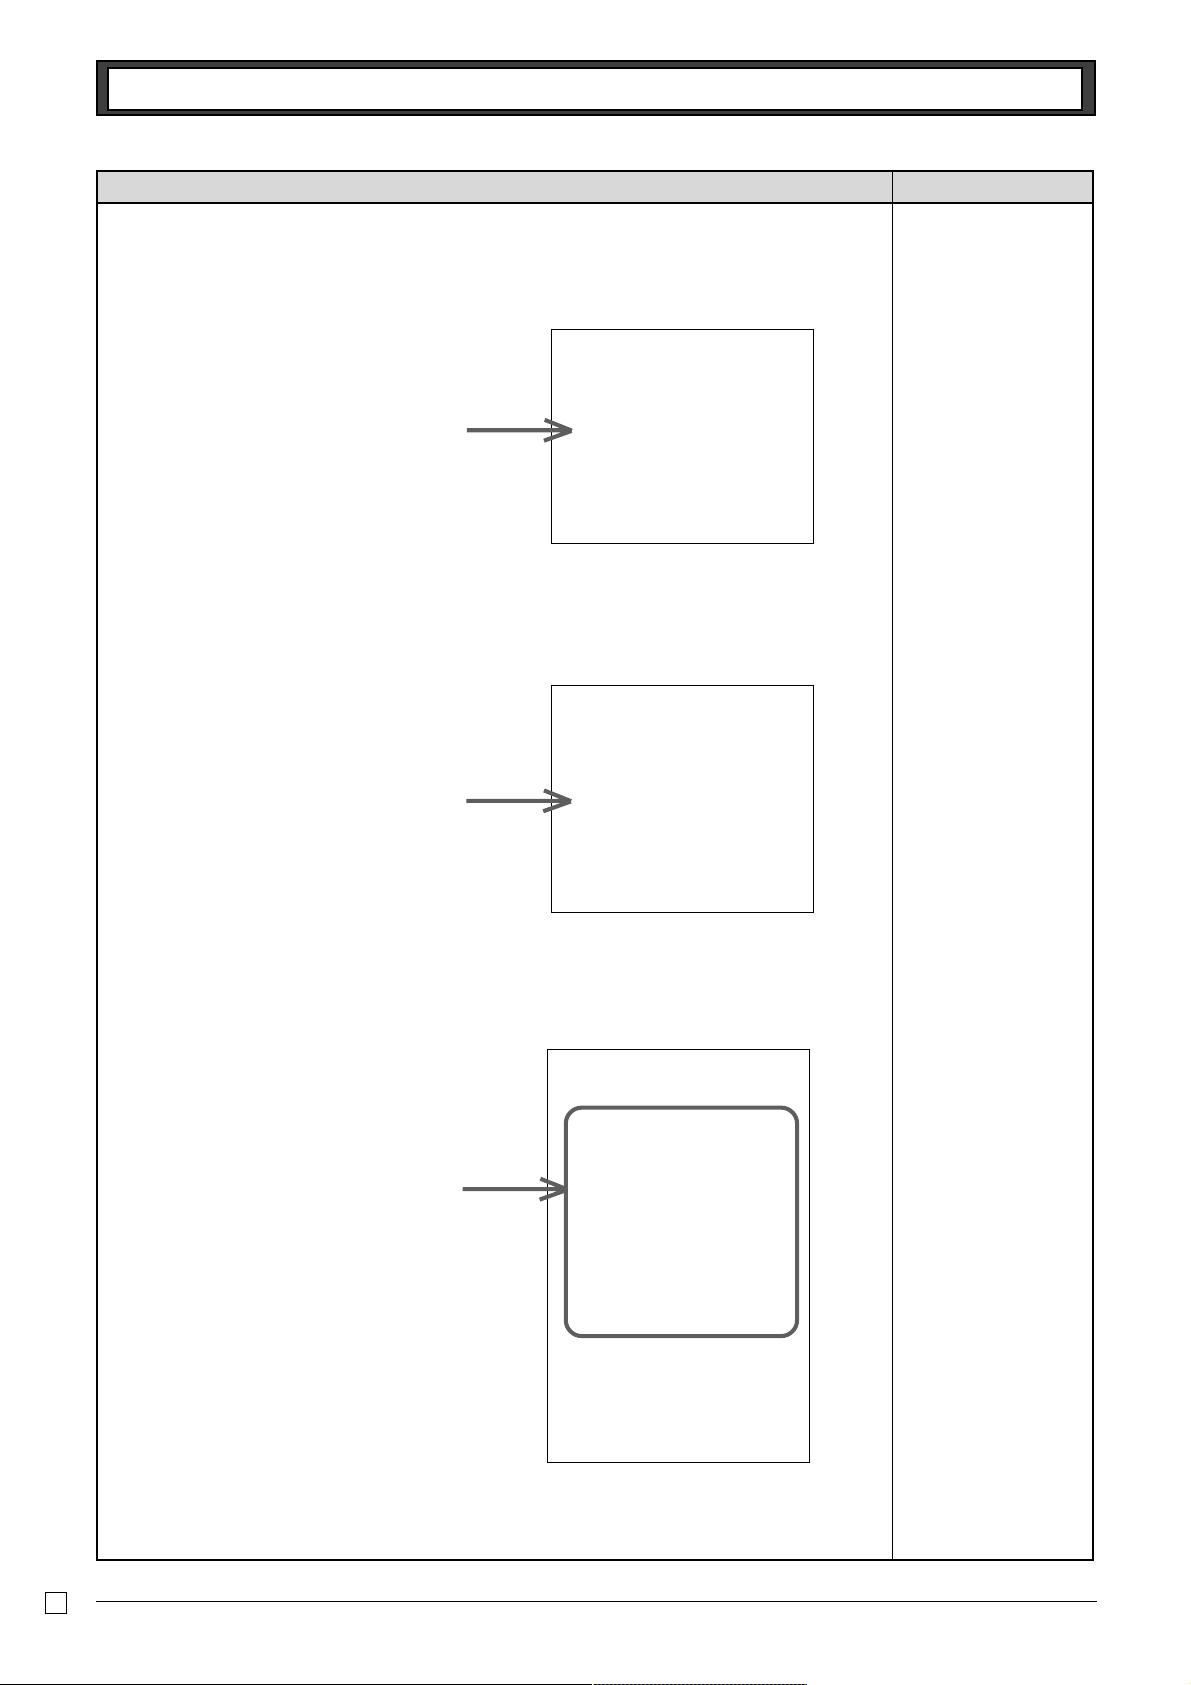
5. Follow the following steps.
5-1. Issue “Help directory report”.
{
X{
Setting the tax table.
ENTER NUMBER THEN
PRESS <HELP> KEY.
01.HOW TO PROGRAM
DATE AND TIME?
02.HOW TO PROGRAM
TAX TABLE?
:
:
09.LANGUAGE CHANGE
The following report is issued.
The following report is issued.
Select 02 (Tax table programming).
02.HOW TO PROGRAM
TAX TABLE?
•SELECT YOUR STATE AND
ENTER NUMBER THEN
PRESS <HELP> KEY.
0101:ALABAMA
0201:ALASKA
0301:ARIZONA
:
:
5001:WISCONSIN
5101:WYOMING
Select your state.
5-2. Issue “Tax table index report”.
5-3. Issue “State tax table code report”.
The following report is issued.
PLEASE SELECT YOUR
DISTRICT NUMBER FROM
BELOW TABLE.
1)TURN MODE KEY TO PGM.
2)3<SUBTOTAL>
3)025<SUBTOTAL>
SET TABLE1
4)XXXX <CASH>KEY.
SET TABLE2(IF NECESSARY)
5)XXXX <CASH>KEY.
6)<SUBTOTAL>
XXXX IS DISTRICT NUMBER
ALABAMA
0101: 4% State
0102: 4.5% State & Local
0103: 5% State & Local
:
:
0111: 9% State & Local
Follow these steps.
?Z?Z{
 Loading...