

Page 1

1
PERSONAL COMPUTER
FX-890P / Z-1 / Z-1GR
OWNER’S MANUAL
This manual has been written by a non-Japanese speaking CASIO fan to help other
non-Japanese speaking CASIO fans to make the best out of their FX-890P, Z-1GR,
Z-1GRa or Z-1GR pocket computer. It is based on the Japanese Z-1 users’ manual,
the FX-880 & PB2000C English manuals, and all kind of other information gathered
on the web. Even if most of the content is based on material with a CASIO copyright,
the company CASIO cannot be held responsible for any inaccuracy within this
document.
This document is not intended for any commercial purpose. Do not pay anything for
it, and use it at your own risk.
Thanks to Ledudu.com, Daniel Pratlong, Marcus von Cube, and all the other guys
whose information posted on the web helped me with this project.
Page 2

2
CONTENTS
1! Unit Configuration .................................................................................................. 5!
1.1! General Guide ................................................................................................. 5!
1.2! Operational Functions ..................................................................................... 6!
1.3! Symbol Display................................................................................................ 9!
1.4! Keyboard ....................................................................................................... 10!
1.4.1! Keytop Functions .................................................................................... 10!
1.4.2! Functions Noted Above the Keys ........................................................... 11!
1.5! Screen ........................................................................................................... 11!
1.5.1! Physical Lines and Logical Lines............................................................ 11!
1.5.2! Virtual Screen ......................................................................................... 11!
1.5.3! Screen Editor .......................................................................................... 12!
1.5.4! Display Contrast ..................................................................................... 12!
1.6! Display Characters ........................................................................................ 12!
1.7! Power Supply ................................................................................................ 13!
1.8! Auto Power Off .............................................................................................. 13!
1.9! SYSTEM* Self Test Function ........................................................................ 13!
2! Fundamental Operation ....................................................................................... 15!
2.1! CAL Mode ..................................................................................................... 15!
2.2! Formula Storage Function............................................................................. 15!
2.3! BASIC Mode.................................................................................................. 16!
2.4! C Mode.......................................................................................................... 17!
2.5! CASL Mode ................................................................................................... 17!
2.6! Assembler Mode ........................................................................................... 17!
3! Calculation Function ............................................................................................ 18!
3.1! Manual Calculation Preparations .................................................................. 18!
3.2! Manual Calculation Input and Correction ...................................................... 18!
3.3! Priority Sequence .......................................................................................... 20!
3.1! Scientific Calculations ................................................................................... 21!
3.1.1! Trigonometric and Inverse Trigonometric Functions .............................. 21!
4! Formula Storage Function ................................................................................... 22!
4.1! Utilization for Preparing Tables ..................................................................... 23!
5! BASIC Programming............................................................................................ 26!
5.1! Features of BASIC ........................................................................................ 26!
5.2! BASIC Program Configuration ...................................................................... 27!
5.2.1! BASIC Program Format.......................................................................... 27!
5.3! BASIC Program Input.................................................................................... 28!
5.3.1! Preparation ............................................................................................. 28!
5.3.2! Program input ......................................................................................... 28!
5.3.3! Program Editing ...................................................................................... 29!
5.4! BASIC Program Execution ............................................................................ 31!
5.4.1! Program Execution ................................................................................. 31!
5.4.2! Errors ...................................................................................................... 31!
5.5! Commands .................................................................................................... 32!
5.5.1! REM........................................................................................................ 33!
5.5.2! INPUT ..................................................................................................... 33!
5.5.3! PRINT ..................................................................................................... 33!
Page 3

3
5.5.4! END ........................................................................................................ 33!
5.5.5! IF – THEN............................................................................................... 33!
5.5.6! GOTO ..................................................................................................... 34!
5.5.7! FOR/NEXT.............................................................................................. 34!
5.5.8! READ/DATA/RESTORE......................................................................... 34!
5.5.9! GOSUB/RETURN................................................................................... 34!
5.5.10! Labels ................................................................................................... 35!
5.6! Operators ...................................................................................................... 36!
5.7! Constants and Variables ............................................................................... 37!
5.7.1! Constants................................................................................................ 37!
5.7.2! Variables................................................................................................. 38!
5.7.3! Summary ................................................................................................ 40!
5.8! BASIC Command Reference ........................................................................ 41!
5.8.1! Format elements..................................................................................... 41!
5.8.2! Manual Commands................................................................................. 42!
5.8.3! Fundamental Commands ....................................................................... 48!
5.8.4! Mathematical Functions.......................................................................... 57!
5.8.5! String Functions...................................................................................... 68!
5.8.6! Graphical Functions................................................................................ 73!
5.1! BASIC Commands Index .............................................................................. 75!
6! C Programming.................................................................................................... 76!
6.1! The Basics of C ............................................................................................. 76!
6.1.1! C and the other programming languages ............................................... 76!
6.1.2! Learning about C with your pocket computer ......................................... 77!
6.1.3! Meet the Casio C interpreter................................................................... 77!
6.2! C Program Input ............................................................................................ 78!
6.2.1! About the C Interpreter and Editor.......................................................... 78!
6.2.2! Activating the C mode............................................................................. 78!
6.2.3! Using the Editor ...................................................................................... 79!
6.1! C Program Execution .................................................................................... 82!
6.1.1! To execute a program............................................................................. 82!
6.1.1! Using Command line Operation.............................................................. 82!
6.1.2! Using the Trace Function........................................................................ 82!
6.2! Introduction to C ............................................................................................ 84!
6.2.1! Outputting characters ............................................................................. 84!
6.2.2! Variable types and operations ................................................................ 88!
6.2.3! Entering characters and values .............................................................. 90!
6.2.4! Using selection statements..................................................................... 92!
6.2.5! Using loops ............................................................................................. 94!
6.2.6! Defining functions ................................................................................... 99!
6.1! Constants and Variables ............................................................................. 102!
6.1.1! Local variables and global variables..................................................... 102!
6.1.2! Pointers and variable storage locations................................................ 103!
6.1.3! Data types and lengths ......................................................................... 104!
6.1.4! Assigning variable names and function names .................................... 104!
6.1.5! Data expressions .................................................................................. 104!
6.1.6! Storage classes .................................................................................... 106!
6.1.7! Arrays and pointers............................................................................... 107!
6.2! Operators .................................................................................................... 108!
6.2.1! Cast operator ........................................................................................ 110!
Page 4

4
6.3! C Command Reference............................................................................... 111!
6.3.1! Manual Commands............................................................................... 111!
6.3.1! Fundamental commands ...................................................................... 112!
6.3.1! Mathematical Functions........................................................................ 118!
6.3.2! String Functions.................................................................................... 123!
6.3.3! Graphical Functions.............................................................................. 125!
6.4! C Commands Index..................................................................................... 126!
Page 5
5
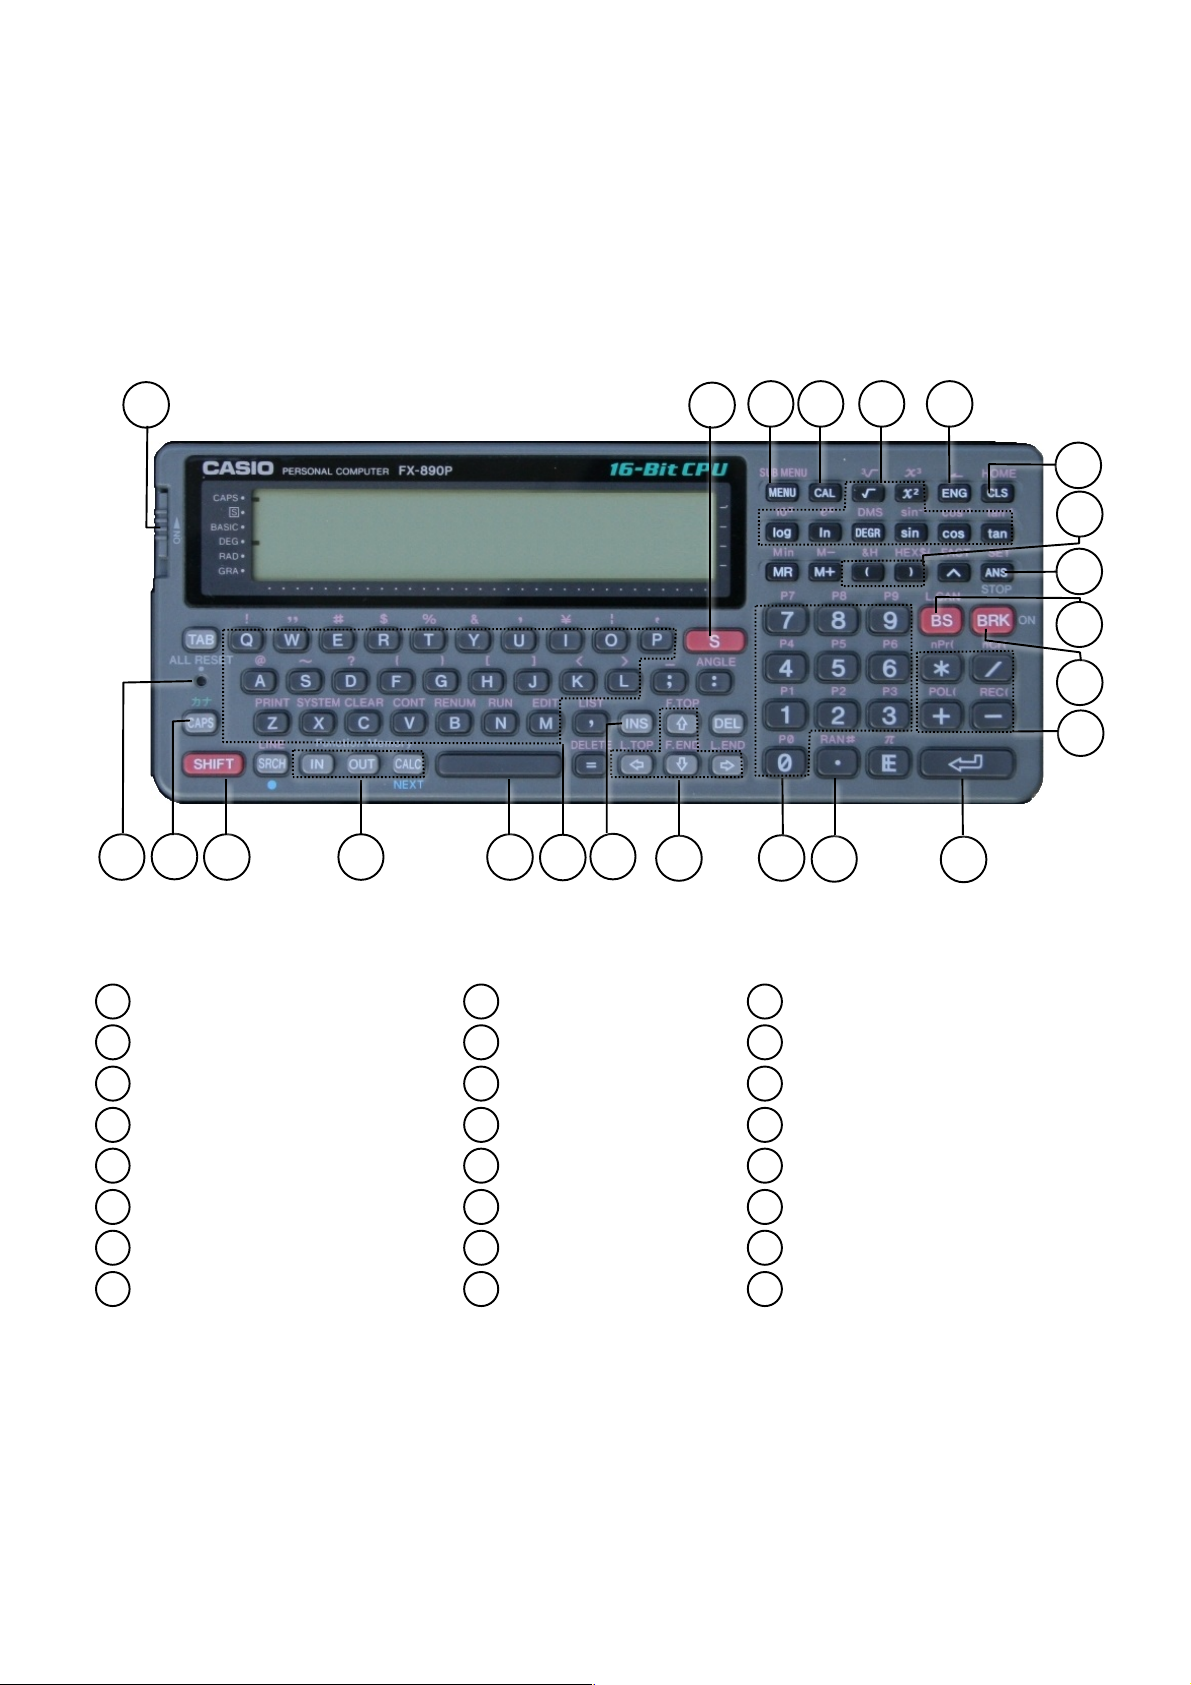
1 Unit Configuration
1.1 General Guide
Power Switch
Shift Key
Volatile Shift Key
Numeric Keys
Decimal Key
Arithmetic Operator Keys
Execute Key
Parentheses Keys
Answer Key
Engineering Key
Alphabet Keys
Space Key
CAPS Key
Cursor Keys
Insert/Delete Keys
Break Key
Backspace/Clear Line Key
Clear Screen / Home Key
Menu / Sub Menu Key
Calculator Key
Program Area Keys
Function Keys
Formula Storage Keys
ALL RESET Button
1 2 3
4
5
6
7
8 9 10
11
12
13
14
15
16
17
18
19
20
21
22
23
24
1 2 4 5 6
7
8
9
10
11
12
13
14
15
16
18
3
19
20
22
17
23
24
Page 6

6
1.2 Operational Functions
Power Switch
Slide up to switch power ON and down to switch power OFF.
Shift Key ( S )
Used to enter BASIC commands and symbols noted above the keys of the keyboard.
Each press of this key causes the symbol “[S]” to switch on and off on the display.
Throughout this manual, this key is represented by Shift in order to distinguish it from
the alphabetic S key.
Volatile Shift Key ( SHIFT )
Same function as the Shift key but needs to be held when pressing the various keys,
like on table top computers.
Numeric Keys ( 0 - 9 )
Enter the numeric values noted on each key.
Decimal Key ( . )
Enters a decimal point.
Arithmetic Operator Keys ( + , - , * , / )
Enter the arithmetic operators noted on the keys.
+ : Addition
- : Substraction
* : Multiplication
/ : Division
Execute Key (. . )
Finalizes entry of a calculation and produces the result. The function of this key is
equivalent to an “=” key on a standard calculator.
This key is also used to enter lines of a program and for actual execution of
programs.
Parentheses Keys ( ( , ) )
Enter parentheses in such parenthetical calculations as: 5 x (10+20).
Answer Key ( ANS )
Recalls the result of the most recently performed manual or program calculation.
Pressing this key during program execution causes the execution to be suspended
until the . . key is pressed (STOP displayed).
Engineering Key ( ENG , )
Converts a calculation result to an exponential display.
Alphabet Keys
Enter the alphabetic characters noted on each key.
Space Key ( SPC )
Enters a space
CAPS Key ( CAPS )
1
2 3 4
5
6 7 8
9
10
11
12
13
Page 7

7
Switches the alphabet keys between upper case and lower case characters. The
upper case mode is indicated by the “CAPS” symbol on the display.
Cursor Keys ( , , , )
Move the cursor on the screen. Each press moves the cursor in the direction noted
on the keys pressed, while holding down the keys causes continuous, high speed
movement. Each cursor key also takes on a different function when pressed in
combination with the [Shift] key.
KEY
FUNCTION
[Shift] +
..
Cursor left
Moves to beginning of logical line (L.TOP)
..
Cursor right
Moves to end of logical line (L.END)
..
Cursor up
Moves to File top in editor mode (F.TOP)
..
Cursor down
Moves to File end in editor mode (F.END)
Insert / Delete Keys ( INS , DEL )
INS inserts a space at the current cursor position by shifting everything from the
cursor position right one space to the right. Its function is different when editing C
programs though.
DEL deletes the character at the current cursor position and automatically fills in the
space by shifting everything to the right of the cursor one space to the left.
Holding down either of these keys causes continuous high-speed operation of the
respective function.
Break Key ( BRK )
Terminates manual operations, program execution, printer output, and LIST output.
Also reactivates the power supply when it has been interrupted by the Auto Power
OFF function.
Backspace / Clear Line Key ( BS / L.CAN )
Deletes the character located immediately to the left of the cursor and automatically
fills in the space created by shifting everything from the cursor position right one
space to the left.
In combination with the Shift key, clears the content of the line where the cursor is
located, and brings the cursor to the left of the screen.
Clear Screen / Home Key ( CLS / HOME )
Clears the content of the screen and locates the cursor at the upper left corner of the
screen.
In combination with the Shift key, locates the cursor at the upper left corner of the
screen.
14
15
16
17
18
Page 8
8
Menu / Sub Menu Key ( MENU / SUB MENU)
Used in combination with numeric keys to specify operational modes.
MENU 1 …. Serial Port communication mode
MENU 2 …. BASIC mode (program writing/editing)
MENU 3 …. C mode (program writing/editing)
MENU 4 …. CASL mode (program writing/editing)
MENU 5 …. ASSEMBLER mode (program writing/editing)
MENU 6 …. FX Statistics mode
MENU 7 …. Default configuration selection menu allowing to chose the default
configuration at switch ON (mode, default program file, display of the Carriage Return
characters ↵ ) and the current angle unit and printer mode.
In combination with the Shift key, allows within a specific mode to show the Sub
Menu of the mode.
Calculator Key ( CAL )
Switch to the CAL calculator mode.
Program Area Keys ( Shift P0 – P9 )
Executes the BASIC program in the corresponding program area in the CAL mode.
Specifies a program area for writing or editing in the BASIC mode.
Function Keys ( log , ln , sin , etc. )
Allow one-touch entry of often-used functions.
• Direct input functions
2√ , x2 , log , ln , DEGR , sin , cos , tan , ^p
• Shift functions
3√ , x3 , 10x , ex , DMS , sin-1, cos-1, tan-1, &H, HEX$, FACT
Formula Storage Keys ( IN , OUT , CALC )
Used when working with the formula storage fuction. See PART 4 FORMULA
STORAGE FUNCTION for details.
ALL RESET Button ( ALL RESET )
Clears all memory contents end enters the CAL mode. All important data should be
saved elsewhere before pressing this button. If pressing this button does not clear
memory contents, first press the P button and then press ALL RESET button again.
P Button ( P ) (rear panel)
Hardware reset button to halt misoperation caused by static electricity. Though
execution is interrupted, memory contents are retained. The ALL RESET button
should be used when the misoperation damages memory contents. Note that power
switches OFF and then ON again when the P button is pressed.
19
20
21
22
23
24
25
Page 9

9
1.3 Symbol Display
The symbols noted on the display illustrated below appear to show the current status
of a calculation
CAPS .
S .
BASIC .
DEG .
RAD .
GRA .
CAPS: Upper case alphabetic characters (lower cases when not displayed)
S : Shift mode (commands/functions marked above the keys can be input
BASIC: BASIC mode (BASIC program input, editing, execution)
DEG: Angle unit – degrees
RAD: Angle unit – radians
GRA: Angle unit – grads
Page 10

10
1.4 Keyboard
A look at the keyboard of the unit reveals characters and symbols located above the
keys. These are accessed using the CAPS and Shift keys.
1.4.1 Keytop Functions
Normal Mode
In this mode, each key inputs the characters, symbols, or commands noted on the
keys themselves. (this status is automatically set when power is switched ON and
immediately following a RESET procedure.)
EXAMPLE:
Operation Display
A A
E E
Lower Case Mode
Pressing the CAPS key shifts the alphabetic keys (only) to lower case characters,
indicated by the CAPS symbol disappearing from the display. Pressing the CAPS
key once locks the keyboard into the lower case mode, while pressing again returns
to upper case.
EXAMPLE:
Operation Display
CAPS A a
B b
D d
Page 11

11
1.4.2 Functions Noted Above the Keys
The BASIC one-key commands, and the symbols and commands noted above the
keys are entered when the corresponding keys are pressed following the Shift key.
Note, however, that pressing the numeric keys ( 0 - 9 ) after Shift in the CAL
mode executes the BASIC program in the corresponding program area.
EXAMPLE:
Operation Display
Shift Z PRINT
Shift * NPR(
1.5 Screen
The screen is a 32-column x 2-line liquid crystal display. Characters are formed by a
5 x 7 dot matrix.
1.5.1 Physical Lines and Logical Lines
The maximum display capacity of one line is 32 columns, but internally the unit is
capable of handling lines up to 255 characters long. The display capacity line (32
characters) is referred to as the physical line, while the internal capacity line is called
a logical line. A logical line is a continuous line of characters in which any column on
the extreme right of the screen is not a null.
One physical line →
One physical line →
1+2+3+4+5+6+7+8+9+10+11+12+12+14
+15+16+17_
One logical line, from the first character to the last
Pressing Shift moves the cursor to the beginning of the logical line, while Shift
. moves the cursor to the end of the logical line. These operations are useful in
determining the extent of logical lines.
1.5.2 Virtual Screen
The screen can display four lines at one time, and as the 5th line is input, the first line
scrolls off the top of the screen. Lines that scroll off of the screen can, however, be
brought back into view using the cursor ( / ) keys, because the unit is able to
store up to eight lines internally. These eight lines make up the virtual screen, while
the four lines actually displayed are called the actual screen.
1 AAAA
2 BBBB
3 CCCC
4 DDDD
5 EEEE
6 FFFF
Actual screen
(4 lines)
Virtual screen (8 lines)
7 GGGG
8 HHHH
Page 12

12
1.5.3 Screen Editor
Any program lines or data included on the virtual screen can be edited. First the
portion of the program or data is brought onto the actual screen, and then the cursor
is located at the position to be edited
1.5.4 Display Contrast
The display may appear dark or dim depending upon the strength of the batteries or
the viewing angle. The contrast of the display can be adjusted to the desired level by
rotating the control dial down darkens the display, while rotating it up lightens the
display.
A weak display when contrast is set to high level indicates weakened batteries, and
batteries should be replaced as soon as possible.
1.6 Display Characters
The relationship between characters and character codes is illustrated in the
following table.
Character Code Table
High-order digit
0
16
32
48
64
80
96
112
128
144
160
176
192
208
224
240
HEX
0
1 2 3 4 5 6 7 8 9 A B C D E F
0 0
SPC
0 @ P ` p
Ä
0
SPC
-
タ
ミ
≥
1 1
DEL
1 A Q a q ∫ 1 °
ア チ ム ≤ 円
2
2
LINE
TOP
INS
“ 2 B R b r √
2
┏
イ ツ メ ± 年
3
3 # 3 C S c s
´
3
┛
ウ テ モ 月
4
4
SHIFT
RELEASE
4 D T d t
∑ 4 `
エ ト ヤ 日
5
5
LINE
CANCEL
5 E U e u
Ω 5 .
オ ナ ユ 千
6
6
LINE
END
& 6 F V f v
6
ヲ カ ニ
ヨ 万
7
7
BEL
’ 7 G W g w
7
ァ キ ヌ
ラ
π
£
8
8
BS
( 8 H X h x
α 8 ィ ク ネ リ ♠
¢
9
9
CAPS
L-U
) 9 I Y i y
β 9 ゥ ケ ノ ル ♥
±
10
A
LF
* : J Z j z γ +
ェ コ ハ レ ♦
〒
11
B
HOME
+ ; K [ k { ε -
ォ サ ヒ ロ ♣
o
12
C
CLS
, < L ¥ l
|
θ n ャ シ フ
ワ
13
D
CR
- = M ] m
}
μ x ュ ス ヘ
ン
14
E
SHIFT
SET
. > ^ n
~
σ
-1
ョ セ ホ
¨ ∆
Low-order digit
15
F
CAPS
U-L
/ ? _ o
φ ッ ソ マ
°
\
CONTRAST
Page 13
13
Characters which cannot be displayed using keyboard input can be displayed using
the CHR$ function.
1.7 Power Supply
This unit is equipped with a main power supply (four AA Alkaline batteries) and a
backup power supply (one CR2032 lithium battery). Batteries should be replaced
whenever the display remains dim, even after contrast adjustment. Batteries should
also be replaced once every two years regardless of how much the unit has been
used.
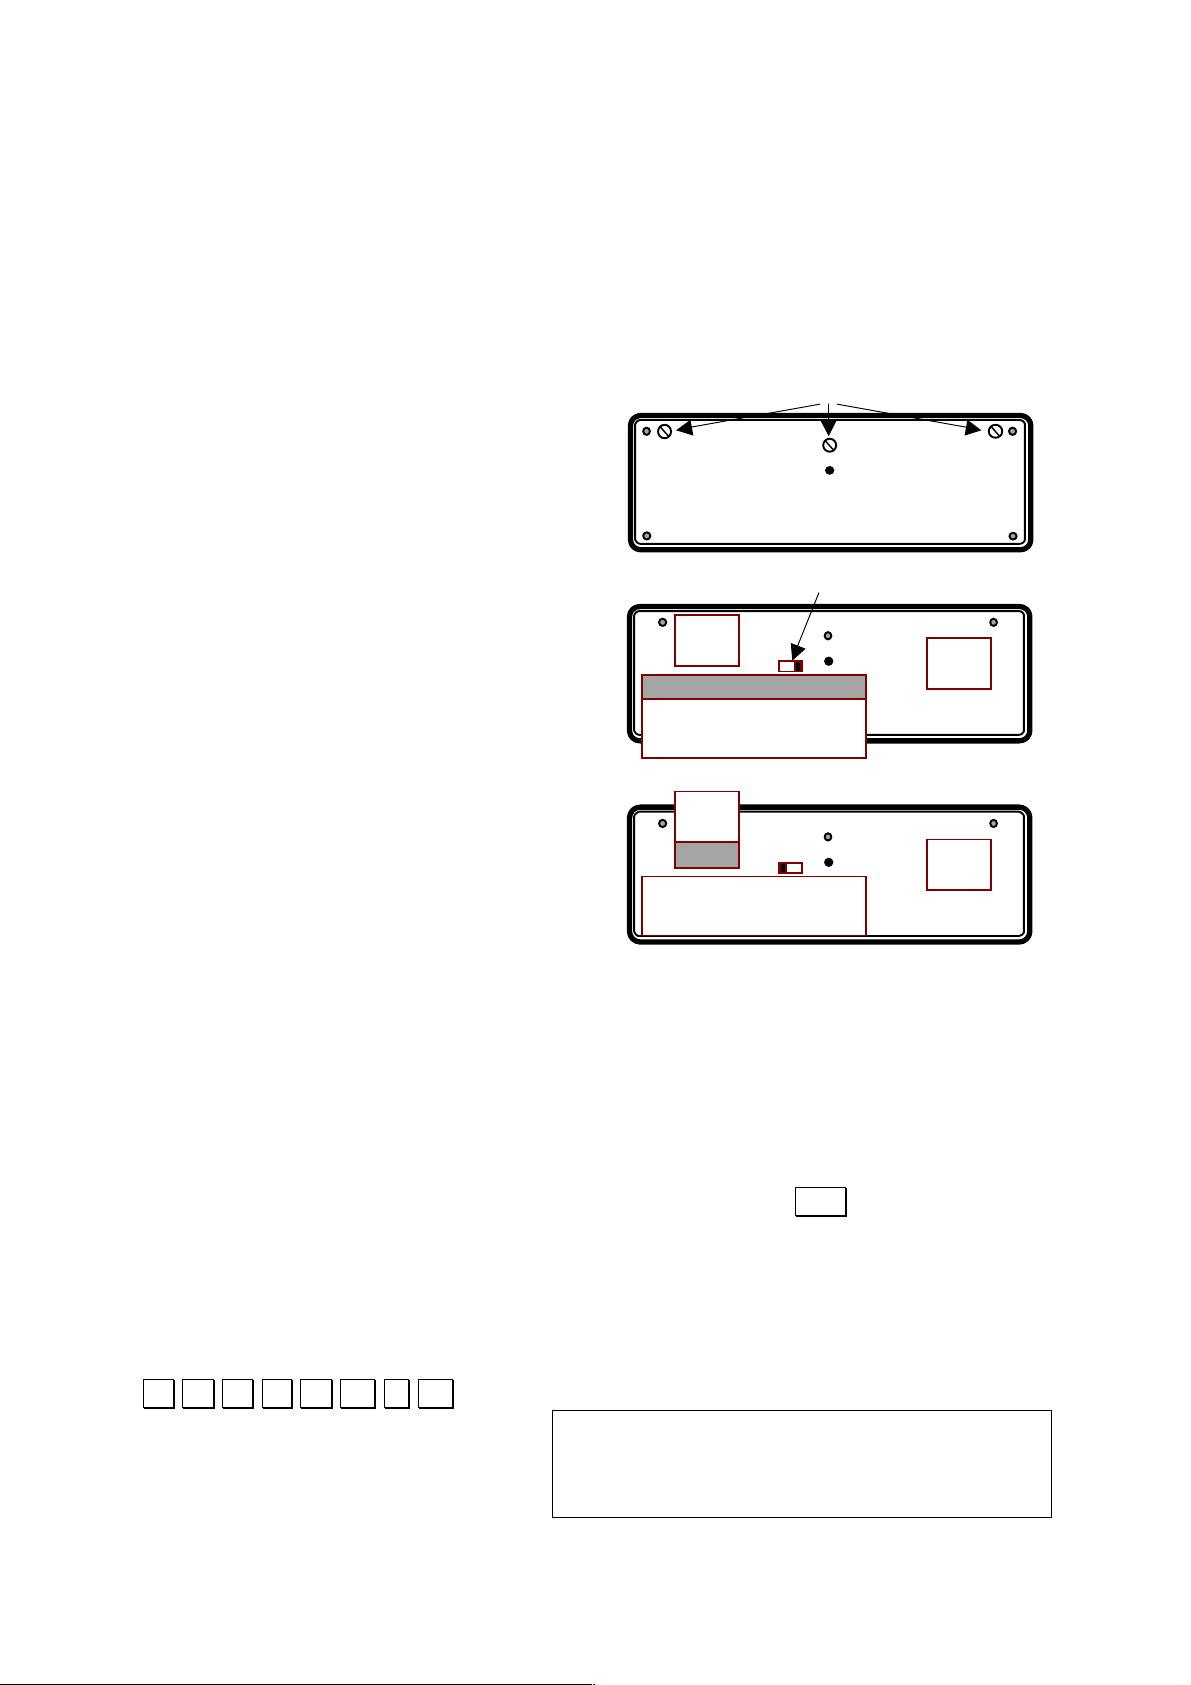
Battery Replacement
1) Switch the power of the unit OFF and
remove the rear panel of the unit after
removing the three screws holding it in
place.
2) To replace the four batteries of the main
power supply, position the internal switch to
the right, slide the cover of the battery
compartment and replace the four AA
batteries.
Put back the internal switch in its central
position
3) To replace the memory backup battery,
position the internal switch to the left, slide
the cover of the battery compartment and
replace the CR2032 battery.
Put back the internal switch in its central
position
4) Replace the rear panel on the unit and three screws to hold it in place.
1.8 Auto Power Off
The power of the unit is automatically switched OFF approximately 6 minutes after
the last key operation (except during program execution), or the last input for an
INPUT statement or PRINT statement. Power can be resumed by either switching
the power switch OFF and then ON again, or by pressing the BRK key.
Program and data contents are retained even when power is switched OFF, but
settings such as the number of digits or the mode (i.e. BASIC mode) are cancelled.
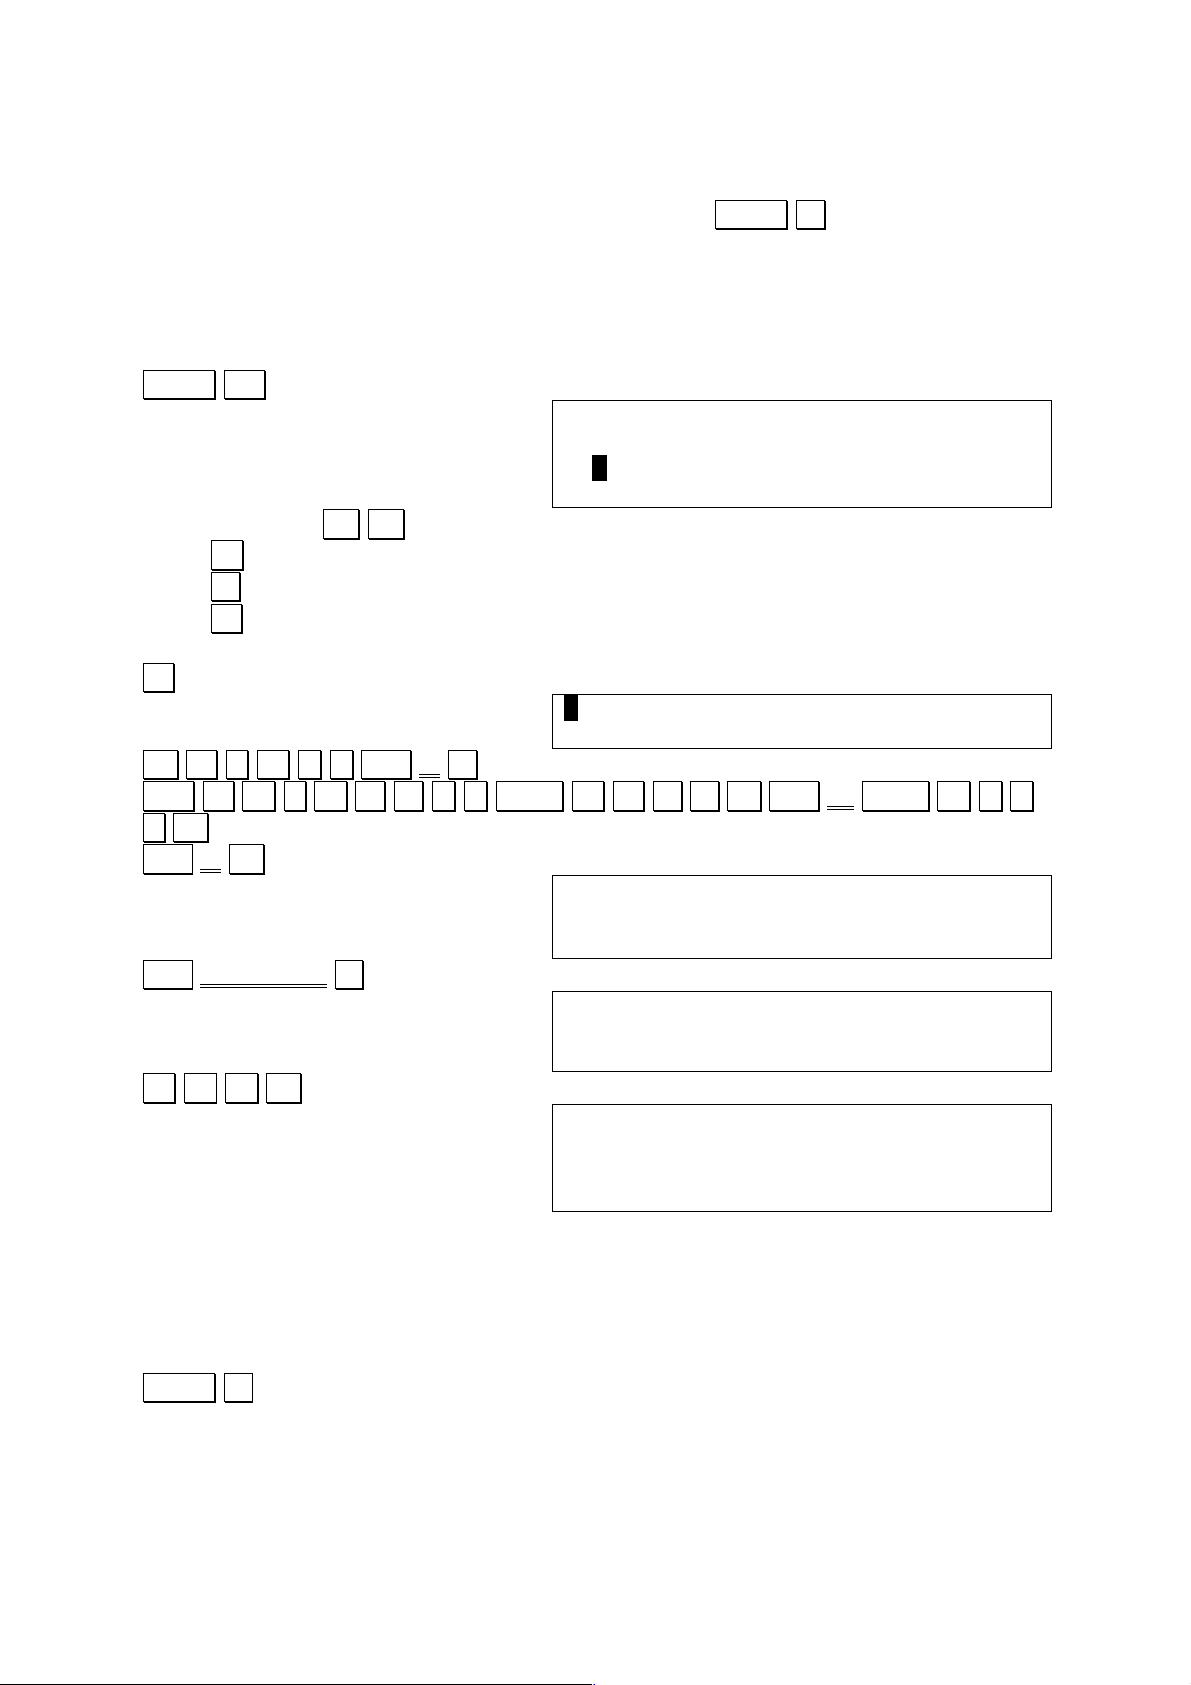
1.9 SYSTEM* Self Test Function
The unit has a powerful built-in self-test function you can address by entering the
following command:
.S Y S T E M * . .
[0]ROM [1]LCD [2]KEY [3]LB
[4]RAM [5]RAMW [6]RAMR [7]DISP
[8]3Pin Connector[9]DISPLOOP
[+]I/O
P
Screws
Switch
Page 14

14
Note: This hardware test will erase all programs and data stored in the unit.
Selecting one of the options of the self-test menu will allow following tests
0. Test of the Read Only Memory, computing check sum and XOR check
1. Test of the symbol displays, outside pixels, uneven pixels, even pixels, all
pixels together. Go from one test to another with the . . key.
2. Test of each key, starting with MENU and finishing with . . The computer
will ask to depress each key, notifying a successful result with the beeper.
3. Low Battery test. This allows testing the main battery and backup (SUB)
battery status. Press BRK key to go back to the SYSTEM* menu.
4. Test of the Random Access Memory. This test will return the amount of RAM
in the unit (main and optional extension pack) and test it by writing and
reading it, returning “CHECK OK” when successful. Press any key to go back
to SYSTEM* menu.
5. Writing test of the RAM. This is the first phase of the [4]RAM test.
6. Reading test of the RAM. This is the second phase of the [4]RAM test, and it
will work properly only if executed just after the writing test. Use the BRK key
to exit the test in case of an error.
7. Rest of the display and the beeper. Press the BRK key to go back to
SYSTEM* menu.
8. Test of the 3-pin connector.
9. Test of the display using a loop printing the character set. Exit the loop with
the BRK key.
+ Test of the Input / output port.
Exit the SYSTEM* menu by pressing the CAL key.
Page 15

15
2 Fundamental Operation
This section covers the various modes available with the computer using a series of
simple examples. These procedures should be mastered before attempting more
complex operations.
2.1 CAL Mode
The CAL mode is in effect each time the power of the unit is switched ON. Arithmetic
calculations, function calculations, formula storage calculations, program execution
can be performed in this mode.
EXAMPLE:
2.5+3.5-2=
OPERATION:
2 . 5 + 3 . 5 - 2 . .
3.5+3.5–2
4
The touch . . is used instead of the = key, operation is identical to that used in a
standard calculator.
The CAL mode can be entered from another mode by pressing the CAL key.
2.2 Formula Storage Function
The formula storage function makes it possible to store often-used formulas in
memory for calculation when values are assigned to variables. This function is
applied in the CAL mode using the IN , OUT , and CALC keys.
EXAMPLE:
Determining the selling price of a product by applying a profit rate based on the
purchase price and selling price.
SELLING PRICE = PURCHASE PRICE / (1 – PROFIT%)
KEY INPUT
CAL
S E L L = P U R C H A S E / ( 1 - P R O F I T ) IN.
Ensure that input of the formula is correct by pressing the OUT key.
OPERATION:
OUT
SELL=PURCHASE/(1–PROFIT)
SELL=PURCHASE/(1–PROFIT)_
Page 16

16
Now, calculate the selling prices of the following:
PURCHASE PRICE
PROFIT
$1000
30%
$960
25%
CALC
PURCHASE?_
1000 . .
PURCHASE?1000
PROFIT?_
0 . 3 . .
PURCHASE?1000
PROFIT?0.3
SELL= 1428.571429
CALC
PURCHASE?_
960 . .
PURCHASE?960
PROFIT?_
. 25 . .
PURCHASE?960
PROFIT?.25
SELL= 1280
As can be seen in this example, once a formula is input, it can be used repeatedly by
simply assigning values for the variables. See PART 4 FORMULA STORAGE
FUNCTION for details.
* The BRK key can be used to terminate this function.
2.3 BASIC Mode
The BASIC mode is used for the creation, execution and editing of BASIC programs.
The BASIC mode can be entered from another mode by pressing MENU 2 .
EXAMPLE:
Create and execute a program that calculates the sum of two values A and B.
PROGRAM INPUT
MENU 22
P 0 1 2 3 4 5 6 7 8 9 51146B
Ready P0
Shift P0.
10 A = 5 .
20 B = 6 .
30 P R I N T A + B . .
40 E N D . .
PROGRAM EXECUTION
R U N . .
RUN
11
Ready P0
Page 17
17
2.4 C Mode
The C mode is used for the creation, execution and editing of C programs. The C
mode can be entered from another mode by pressing MENU 3 .
EXAMPLE:
Create and execute a program that prints HELLO.
PROGRAM INPUT
MENU 32
< C >
F 0 1 2 3 4 5 6 7 8 9 51113B
F0>Run/Load/Source
You can use the cursor keys to select the program area 0 - 9
Press R (Run) to run the C program
Press L (Load) to load the C program for the interpreter
Press S (Source) to edit the C source code.
S.
O
M A I N ( ) Shift { .
SPC P R I N T F ( “ CAPS H E L L O Shift ¥ CAPS N ” ).
.;. . .
Shift } . .
main(){↵
printf(“HELLO¥n”);↵
}
Shift SUB MENU L.
Load F0
>
R U N . .
>run
HELLO
>
2.5 CASL Mode
The CASL mode is used for the creation, execution and editing of the assembler
language dedicated to the virtual machine COMET widely used in Japan to teach
computer science. The CASL mode can be entered from another mode by pressing
MENU 4..
2.6 Assembler Mode
Page 18

18
3 Calculation Function
This section covers fundamental arithmetic calculations and function calculations,
which are performed manually.
3.1 Manual Calculation Preparations
Switch the power of the unit ON
CAPS .
S .
BASIC .
DEG .
RAD .
GRA .
_
The display illustrated above appears whenever the power is switched ON. It
indicates the CAL mode in which manual calculations can be performed. Currently
specified angle units, however, is retained even when the power is switched OFF.
3.2 Manual Calculation Input and Correction
Perform the following fundamental calculations to become familiar with this mode.
EXAMPLE:
123 + 456 = 579
123 + 456 (Formula input)
123+456_
. . (Obtains result)
123+456
579
As can be seen here, the . . key is pressed in place of = . The * key is used for
multiplication and / is used for division.
The following procedure can be used to correct entered data.
EXAMPLE:
33 x 5 + 16 = 181
For the sake of example, the value 33 here will be mistakenly entered as 34.
34 * 5 + 16
34*5+16_
Press six times to move cursor back to position of 4. This can also be
accomplished by Shift L.TOP .
. .
34*5+16
3. (Replaces 4 with 3)
33*5+16
. .
33*5+16
181
Page 19

19
EXAMPLE:
33 x 5 + 16 = 181
For the sake of the example, the above calculation will be performed with the value
33 mistakenly entered as 34.
34 * 5 + 16 . .
34*5+16
186
. . (Move cursor to position for correction.)
34*5+16
186
3
33*5+16
186
. . (Re-execute calculation.)
33*5+16
181
Correction of entries can use following keys:
The INS key is used to insert spaces at the current cursor location for input of
characters or symbols.
The Shift DEL key is used to delete characters at the current cursor location.
ABCDEFGH
Shift DEL
ABCEFGH
The BS key can also be used to delete characters, but its operation is slightly
different from the Shift DEL .
ABCDEFGH
BS
ABDEFGH
Practice the following examples to become familiar with the fundamental calculation
procedure.
EXAMPLE 1:
9 + 7.8 6 – 3.5 x 2 = 3.3
OPERATION:
9 + 7.8 / 6 - 3.5 * 2 . .
9+7.8/6-3.5*2
3.3
EXAMPLE 2:
56 x (-12) (-2.5) = 268.8
OPERATION
56 * - 12 / - 2.5 . .
56*-12/-2.5
268.8
Negative values are entered by pressing the - key before entering the value.
Page 20

20
EXAMPLE 3:
(4.5 x 1075) x (-2.3 x 10
-78
) = -0.01035
OPERATION:
4.5 IE 75 * - 2.3 IE - 78 . .
4.5E75*-2.3E-78
-0.01035
Exponents are entered by pressing the IE key (or the alphabetic E key) before
entering the value.
EXAMPLE 4:
(23 + 456) x 567 = 271593
OPERATION:
23 + 456 . .
* 567 . .
23+456
479*567
271593
The last result obtained can be entered at any point in a subsequent calculation by
pressing the ANS key.
EXAMPLE 5:
81.3 / (5.6 + 8.9) = 5.6
↑ This process performed first
OPERATION:
5.6 + 8.9 . .
81.2 / ANS . .
5.6+8.9
14.5
81.2/ 14.5
5.6
3.3 Priority Sequence
Arithmetic, relational and logical operations are performed in the following priority
sequence:
1. ( , )
2. Functions
3. Power
4. Signs (+, -)
5. *, /, ¥, MOD
6. +, -
7. Relational operators
8. NOT
9. AND
10. OR, XOR
Page 21

21
3.1 Scientific Calculations
The scientific functions can be used either with BASIC programs or for manual
calculations. For the sake of the explanation, all the examples here will cover only
manual calculations.
3.1.1 Trigonometric and Inverse Trigonometric Functions
SIN (Sine), COS (Cosine), TAN (Tangent),
ARCSIN (Arc Sine), ARCCOS (Arc Cosine), ARCTAN (Arc Tangent).
These functions return a trigonometric function value for a given angle, or an angle
value of a given trigonometric function value. The ANGLE command should be used
to specify the unit for the angle value when these functions are used. Angle unit
specification is only required once for all subsequent trigonometric / inverse
trigonometric functions. Angle units can be specified using either the MODE
command or the ANGLE command.
• DEG (Degrees) ANGLE0 MODE4
• RAD (Radians) ANGLE1 MODE5
• GRAD (Grads) ANGLE2 MODE6
It is as well possible to use the MENU 7.
The relationship among these three specifications is:
90 Degrees = π/2 Radians = 100 Grads
The current angle unit is retained when the power of the unit is switched OFF, and
the angle unit becomes ANGLE0 (DEG) when ALL RESET button is pressed.
The value for π can be directly entered into a formula using “PI” (3.141592654).
EXAMPLE 1:
sin (30°) = 0.5
OPERATION:
Shift ANGLE 0 . .
sin 30 . .
ANGLE 0
SIN30
0.5
EXAMPLE 2:
cos (π/3) = 0.5
OPERATION:
Shift ANGLE 1 . .
cos ( π / 3 ) . .
ANGLE 1
COS(PI/3)
0.5
Page 22

22
4 Formula Storage Function
The formula Storage function is very useful when performing repeat calculations.
Three different keys are used when working with the formula Storage function.
IN key……. Stores presently displayed formula.
OUT key…… Displays formula stored in memory.
CALC key…. Assigns values to variables in formula, and displays formula
calculation result.
Sample Application
EXAMPLE:
Obtain the value for each of the value assigned to x when y = 3.43 cosx. (Calculate in
three decimal places.)
x
8°
15°
22°
27°
31°
y
OPERATION:
First, specify the angle unit and number of decimal places
MENU 7 , select the DEG unit using the ( / .. ) cursor keys. Exit the
angle units selection menu pressing the CAL key.
Shift SET F 3 . (Obtain in 3 decimal places by rounding off the 4th decimal place.)
Next, input a formula and press IN key to store it.
Y = 3 . 43 * COS X IN.
Press the OUT key to confirm that the formula has been stored.
CLS OUT
Y=3.43*COSX_
Then, start calculating by pressing the CALC key.
CALC
X?_
8 . .
X?8
Y= 3.397
. .
X?8
Y= 3.397
X?_
15 . .
X?8
Y= 3.397
X?15
Y=3.313
. .
Page 23

23
Y= 3.397
X?15
Y=3.313
X?_
22 . .
X?15
Y=3.313
X?22
Y= 3.180
. .
Y=3.313
X?22
Y= 3.180
X?_
27 . .
X?22
Y= 3.180
X?27
Y= 3.056
. .
Y= 3.180
X?27
Y= 3.056
X?_
31 . .
X?27
Y= 3.056
X?31
Y= 2.940
BRK
Y= 3.056
X?31
Y= 2.940
_
The CALC key can be used in place of the . . key to perform repeat calculations.
The BRK key can be used to terminate this function to automatically return to the
CAL mode.
4.1 Utilization for Preparing Tables
Multiple formulas can be written by separating with colons ( : ). Tables such as that
shown below can be easily prepared by using this method.
EXAMPLE:
Complete the following table. (Calculate in 3 decimal places by rounding off.)
X
Y
P=X*Y
Q=X/Y
4.27
8.17
6.07
2.71
1.17
6.48
9.47
4.36
Page 24

24
OPERATION:
SHIFT SET F 3 . . Specification of number of decimal
places
P = X * Y : Q = X / Y IN. Storing the formula
CALC
X?_
4 . 27 . .
X?4.27
Y?_
1 . 17 . .
X?4.27
Y?1.17
P= 4.996
. .
X?4.27
Y?1.17
P= 4.996
Q= 3.650
Continue to input the values of X and Y in this manner, and the values of P and Q will
be calculated in successive order and the table will be completed as shown below.
X
Y
P=X*Y
Q=X/Y
4.27
8.17
6.07
2.71
1.17
6.48
9.47
4.36
4.996
52.942
57.483
11.816
3.650
1.261
0,641
0.622
Variable names consist of up to 15 upper case or lower case alphabetic characters.
This means that variable names can be created which actually describe their
contents. Remarks can also be affixed following variable names by enclosing the
remarks within square brackets [ ]. Any character except for commas can be used
within the remarks brackets.
EXAMPLE:
Complete the following table. (Calculate in two decimal places by rounding off.)
Radius r (m)
Height h
(m)
Volume of a cylinder (V0=πr2h) (m3)
Volume of a cone (V1=1/3 V0)
(m3)
1.205
2.174
3.357
2.227
3.451
7.463
OPEARTION:
Shift SET F 2 . .
C Y L I N D E R Shift [ M 3 Shift ] = Shift π * R A D. .I. U.
.S Shift [ M Shift ] ^ 2 * H E I G H T Shift [ M. Shift ] :. C O.
.N E Shift [ M 3 Shift ] = C Y L I N D E. .R. / 3 IN.
Page 25

25
CALC
RADIUS[M]?_
1 . 205 . .
RADIUS[M]?1.205
HEIGHT[M]?_
2 . 227 . .
RADIUS[M]?1.205
HEIGHT[M]?2.227
CYLINDER[M3]= 10.16
. .
RADIUS[M]?1.205
HEIGHT[M]?2.227
CYLINDER[M3]= 10.16
CONE[M3]= 3.39
. .
HEIGHT[M]?2.227
CYLINDER[M3]= 10.16
CONE[M3]= 3.39
RADIUS[M]?_
2 . 174 .
CYLINDER[M3]= 10.16
CONE[M3]= 3.39
RADIUS[M]?2.174
HEIGHT[M]?_
And so on…
If the radius (r) and height (h) are input in this manner, volume (V0) of the cylinder
and volume (V1) of the cone will be calculated successively and the table will be
completed as shown below.
Radius r (m)
Height h
(m)
Volume of a cylinder (V0=πr2h) (m3)
Volume of a cone (V1=1/3 V0)
(m3)
1.205
2.174
3.357
2.227
3.451
7.463
10.16
51.24
262.22
3.39
17.08
88.07
IMPORTANT
1. Up to 255 characters can be stored using the IN key. Storing new formula clears
the currently stored formula.
2. Memory contents are retained even when power is switched OFF, either manually
or by the auto power OFF function.
3. The CALC key can only be used to execute numeric expressions stored using the
.IN. key.
4. An error is generated when an entry stored by the IN key is not a numeric
expression.
5. The same limitations that apply to BASIC variables apply to formula storage
function variables (see page 38).
6. Calculations are terminated under the following conditions:
- Pressing the BRK key.
- When an error is generated.
Page 26

26
5 BASIC Programming
Standard BASIC is employed as the programming language for this unit, and this
section covers application of the BASIC language.
5.1 Features of BASIC
1. BASIC is much easier to use than other programming languages such as
FORTRAN, making it suitable even for novices.
2. Writing programs is also easier because program creation, editing and execution
are all performed by interacting with the computer itself.
The following functions are also available:
1. High-precision calculations are made possible by display of numeric values with
10-digit mantissas and 2-digit exponents (13-digit mantissa and 2-digit exponents
for internal operations)
2. A wide selection of built-in functions makes operation easier.
Standard mathematical functions
SIN COS TAN ASN ACS ATN LOG LN EXP SQR ABS SGN INT FIX FRAC PI
ROUND RAN# DEG
Powerful string handling functions
CHR$ STR$ MID$ LEFT$ RIGHT$ HEX$ DMS$ ASC VAL LEN
High-level mathematical functions
POL REC NCR NPR HYPSIN HYPCOS HYPTAN HYPASN HYPACS HYPATN
CUR
3. 10 independent program areas
up to ten programs can be stored independently in memory at the same time (P0
– 9).
4. Extended variable names
Variable names up to 15 characters long can be used, making it possible to use
names that make contents easy to understand.
5. Powerful debugging function
A TRON command displays the number of the program line currently being
executed, making it possible to easily trace execution and locate mistakes in
programming.
6. Powerful screen editor
Programs can be easily modified and corrected on the screen.
7. Virtual screen function
Thought the actual physical display of the unit has a 32-column x 4-line capacity,
the virtual screen is 32 columns x 8 lines. The virtual screen can be easily
scrolled using the cursor keys.
1 AAAA
2 BBBB
3 CCCC
4 DDDD
5 EEEE
6 FFFF
Actual screen
(4 lines)
Virtual screen (8 lines)
7 GGGG
8 HHHH
Page 27

27
5.2 BASIC Program Configuration
5.2.1 BASIC Program Format
The following is a typical BASIC program, which calculates the volume of a cylinder.
EXAMPLE:
10 REM CYLINDER
20 R=15
30 INPUT “H=”;H
40 V=PI*R^2*H
50 PRINT “V=”;V
60 END
As can be seen, the BASIC program is actually a collection of lines (six lines in the
above program). A line can be broken down into a line number and a statement.
20 R=15
Line Statement
number
Computers execute programs in the order of their line numbers. In the sample
program listed above, the execution sequence is 10, 20, 30, 40, 50, 60. Program
lines can be input into the computer in any sequence, and the computer
automatically arranges the program within its memory in order from the smallest line
number to the highest. Lines can be numbered using any value from 1 to 65535.
20 R=15
40 V=PI*R^2*H
60 END
10 REM CYLINDER
30 INPUT “H=”;H
50 PRINT “V=”;V
10 REM CYLINDER
20 R=15
30 INPUT “H=”;H
40 V=PI*R^2*H
50 PRINT “V=”;V
60 END
Input sequence
Memory contents
Following the line number is a statement or statements which actually tell the
computer which operation to perform. The following returns to the sample program to
explain each statement in detail
10 REM CYLINDER
20 R=15
30 INPUT “H=”;H
40 V=PI*R^2*H
50 PRINT “V=”;V
60 END
REM stands for “remark”. Nothing in this line is executed.
Assigns the constant 15 (radius) to variable R.
Displays H= to prompt a value input for height.
Calculates volume (V) of cylinder.
Prints result of line 40
Ends program.
As can be seen, a mere six lines of programming handles quite a bit of data. Multiple
BASIC program lines can also be linked into a single line using colons.
EXAMPLE:
100 R==15:A=7:B=8
Such a program line is known as “multi-statement”.
Page 28
28
5.3 BASIC Program Input
5.3.1 Preparation
First, switch the power of the computer ON. At this time, the display should appear as
illustrated below.
CAPS .
S .
BASIC .
DEG .
RAD .
GRA .
_
This is the CAL mode, so the operation MENU 2 should first be performed to allow
input of BASIC programs. The display should now appear as illustrated below.
CAPS .
S .
BASIC .
DEG .
RAD .
GRA .
P 0 1 2 3 4 5 6 7 8 9 51146B
Ready P0
Note the BASIC indicator on the left of the screen indicates the BASIC mode. This is
the mode used for BASIC program input. The other indicators on tne display in the
BASIC mode have the following meanings.
P : Program area
0 – 9 : Program area numbers. The numbers of program areas which alreasy
contain programs are replaces by asteriks.
51146B : Capacity (number of bytes) remaining in area for writing programs and
data (free area). This number depends on the type of unit (FX-890P, Z1),
the presence of the optional RP-33 memory module, and will decrease
as storage space is used.
Ready P0 : Current program area = area 0. The current program area can be
switched by pressing Shift followed by the desired program area.
Previously stored programs can be deleted using one of two different procedures.
NEW : Deletes program stored in the current program area only.
NEW ALL : Clears all BASIC programs stored in memory.
5.3.2 Program input
The following input procedure inputs the sample program for calculation of the
volume of a cylinder.
10 R E M SPC C Y L I N D E R . .
20 R = 15 .
30 I N P U T Shift “ H = Shift “ ; H . .
40 V = P I * R ^ 2 * H . .
50 P R I N T Shift “ V = Shift “ ; V . .
60 E N D . .
Note that the . . key is pressed at the end of each line. A program line is not entered
into memory unless the . . key is pressed.
ONE KEY INPUT
The one-key BASIC commands help to make program input even easier.
Page 29
29
EXAMPLE:
Line 50 input
50 Shift PRINT Shift “ V = Shift “ ; V . .
5.3.3 Program Editing
The procedure used for making corrections or changes to a program depends upon
what step of program input the changes are to be made.
1. Changes in a line before . . key is pressed
2. Changes in a line after . . key is pressed
3. Changes within a program already input
4. Changes within a program following the EDIT command
Changes in a line before . . key is pressed
EXAMPLE:
20 E=15 mistakenly input for 20 R=15
10 REM CYLINDER
20 E=15_
. (Move cursor to E)
10 REM CYLINDER
20 E=15
.R. (Input correct character)
10 REM CYLINDER
20 R=15
. . (Editing complete)
10 REM CYLINDER
20 R=15
_
Note that once the desired changes are made, the . . key must be pressed to store
the entered line into memory.
Changes in a line after . . key is pressed
EXAMPLE:
40 V=P1*R^2*H mistakenly input for 40 V=PI*R^2*H
40 V=P1*R^2*H
_
. .. .. .. .. .. .. (Move cursor to 1)
40 V=P1*R^2*H
.I. (Input correct character)
40 V=PI*R^2*H
. . (Editing complete)
40 V=PI*R^2*H
_
Page 30

30
Again, the . . key must be pressed to store the corrected line into memory after
changes are made.
Changes within a program already input
The LIST command displays the program stored in the current program area form
beginning to end.
Shift LIST . .
10 REM CYLINDER
20 R=15
30 INPUT “H=”;H
40 V=PI*R^2*H
…
40 V=PI*R^2*H
50 PRINT “V=”;V
60 END
Ready P0_
The last line of the program is displayed when the LIST operation is complete.
.. .. .. .. .. ..
10 REM CYLINDER
20 R=15
30 INPUT “H=”;H
40 V=PI*R^2*H
The 8-line virtual screen of the computer now makes it possible to use the cursor
keys to scroll to preceding lines not shown on the display.
When a program greater than eight lines is stored in memory, the LIST operation
should be performed by specifying the line numbers to be displayed.
EXAMPLE:
Displaying from line 110 to line 160 on the virtual screen.
Shift LIST 110 - 160 . .
Note: The BRK key can be used to terminate the LIST operation. The Shift STOP
key suspends the operation, and listing can be resumed by pressing . . .
Changes within a program following the EDIT command
The EDIT command makes it easier to edit or review programs already stored in
memory.
Shift EDIT . .
CAPS .
S .
BASIC .
DEG .
RAD .
GRA .
10 REM CYLINDER
20 R=15
30 INPUT “H=”;H
40 V=PI+R^2*H
From the display, .. (or . .) advances to the following line, while .. (or Shift . .)
returns to the previous line.
Page 31

31
.. .. (displays line 30 to 60)
30 INPUT “H=”;H
40 V=PI+R^2*H
50 PRINT “V=”;V
60 END
Here, a correction will be made in line 40.
.. (Displays line 40 to 60, line 40 at the upper line of the display)
.. (Enables program editing)
40 V=PI+R^2*H
.. .. .. .. .. .. .. .*. . . (Moves cursor and makes correction)
40 V=PI*R^2*H
50 PRINT “V=”;V
60 END
BRK ( BRK key exits EDIT mode)
Ready P0
5.4 BASIC Program Execution
5.4.1 Program Execution
Once a BASIC program is stored in memory, it can be executed using one of the two
following procedures.
Using Shift (program area) in CAL mode
EXAMPLE: Shift P9
Executes the program in program area 9.
Entering RUN command in BASIC mode
EXAMPLE: Shift RUN . .
Executes the program in the current program area.
Execute the program input in the previous section to determine the volume of a
cylinder with a height ao 10 (radius is fixed at 15).
Shift RUN . .
RUN
H=?_
10 . .
H=?10
V= 7068.583471
Ready P0
_
5.4.2 Errors
At times, the results produced by a program are not what is expected. Such irregular
executions can be broadly divided under two major classifications.
Page 32

32
1. Executions that produce errors
2. Irregular execution that do not produce errors (mostly logic errors)
Execution that produce errors
Simple programming errors. This is the most common type of program error and is
generally caused by mistakes in program syntax. Such errors result in the following
message being displayed:
SN error P0-10
This message indicates that a syntax error has been detected in line 10 of the
program stored in program area 0. The indicated program line should be chacked
and corrected to allow proper execution.
Program logic errors. This type of error is generally caused by such illegal operations
as division by zero or LOG(0). Such errors result in the following message being
displayed:
MA error P0-10
As before, this message indicates that a mathematical error has been detected in line
10 of the program stored in program area 0. In this case, however, program lines
related to the indicated program line as well as indicated program line itself should be
examined and corrected. When an error message is displayed, the following
operations can be used in BASIC mode to display the line in which the error was
detected.
Shift LIST 10 . .
Shift EDIT 10 . .
Shift LIST . . .
Shift EDIT . . .
The periods contained in LIST . and EDIT . instruct the computer to automatically
display the last program line executed
Irregular execution that do not produce errors
Such errors are also caused by a flaw in the program, and must be corrected by
executing the LIST or EDIT command to examine the program to detect the problem.
The TRON command can also be used to help trace the execution of the program.
Entering T R O N . . puts trace mode ON. Now executing a BASIC program
displays the program area and line number as execution is performed, and halts
execution until . . is pressed. This allows confirmation of each program line, making
it possible to quickly identify problem lines. Executing .T R O F F . . cancels
the trace mode.
5.5 Commands
Though there are a variety of commands available in BASIC for use in programs, the
nine fundamental commands listed below are the most widely used.
The following program reads data items located within the program itself, with a
number of data items being read being determined by input from an operator. The
operator may input any value, but note that values greater than 5 are handled as 5
(because there are only 5 data items in line 180). The program then displays the sum
Page 33

33
of the data read from line 180, followed by the square root and cube root of the sum.
Program execution is terminated when the operator enters a zero.
10 S=0
20 RESTORE
30 INPUT N
40 IF N>5 THEN N=5
50 IF N=0 THEN GOTO 130
60 FOR I=1 TO N
70 READ X
80 S=S+X
90 NEXT I
100 GOSUB 140
110 PRINT S;Y;Z
120 GOTO 10
130 END
140 REM SQUARE/CUBE ROOT
150 Y=SQR S
160 Z=CUR S
170 RETURN
180 DATA 9,7,20,28,36
Clear current total assigned to S
Specifies read operation should begin with 1st data item
Input the number of data items to be read
Input of values greater than 5 should be treated as 5
Jump to line 130 when input is zero
This section is repeated the number of times specified
by operator input in line 30
Branch to subroutine starting from line 140
Displays contents of variables S,Y,Z
Jump to line 10
Program end
Remarks
Square root calculation
Cube root calculation
Return to statement following the GOSUB
Data read by READ statement in line 70
5.5.1 REM
The REM command (line 140) is actually short for the word “remarks”. The computer
disregards anything following a REM command, and so it is used for such purposes
as labels in order to make the program list itself easier to follow. Note that a single
quotation mark ( Shift ‘ ) can be used in place of the letters “REM”.
5.5.2 INPUT
The INPUT command (line 30) is used to allow input from the computer’s keyboard
during program execution. The data input are assigned to a variable immediately
following the INPUT command. In the above example, input numeric data are
assigned to the variable N. Note that a string variable must be used foe a string input.
EXAMPLE:
10 INPUT A$ (string input)
5.5.3 PRINT
The PRINT command (line 110) is used to display data on the computer’s display. In
this example, this command is used to display the results of the sum, square root and
cube root calculations.
5.5.4 END
The END command (line 130) brings execution of the program to an end, and can be
included anywhere within the program.
5.5.5 IF – THEN
The IF/THEN command (lines 40 and 50) is used for comparisons of certain
conditions, basing the next operation upon whether the comparison turns out to be
true of false. Line 40 checks whether or not value assigned to N is greater than 5,
Page 34

34
and assigns a value of 5 to N when the original value is greater. When a value of 5 or
less is originally assigned to N, execution proceeds to the next line, with N retaining
its original value.
Line 50 checks whether or not value assigned to N is zero. In the case of zero,
program execution jumps to nine 130, while execution proceeds to next line (line 60)
when N is any other value besides zero.
Note: Line 50 can also be abbreviated as follows:
50 IF N=0 THEN 130
5.5.6 GOTO
The GOTO command (lines 50 and 120) performs a jump to a specified line number
or program area. The GOTO statement in line 120 is an unconditional jump, in that
execution always returns to line 10 of the program whenever line 120 is executed.
The GOTO statement in line 50, on the other hand, is a conditional jump, because
the condition of the IF-THEN statement must be met before the jump to line 130 is
made.
Note: Program area jumps are specified as GOTO #2 (to jump to program area 2).
5.5.7 FOR/NEXT
The FOR/NEXT combination (line 60 and 90) forms a loop. All of the statements
within the loop are repeated the number of times specified by a value following the
word “TO” in the FOR statement.
In the example being discussed here, the loop is repeated N number of times, with
the value N being entered by the operator in line 30.
5.5.8 READ/DATA/RESTORE
These statements (lines 50, 180, 20) are used when the amount of data to be
handled is too large to require keyboard input with every execution. In this case, data
are included within the program itself. The READ command assigns data to
variables, the DATA statement holds the data to be read, and the RESTORE
command is used to specify from which point the read operation is to be performed.
In the program example here, the READ command reads the number of data items
specified by the input variable N. Though the DATA statement holds only five data
items, the RESTORE command in line 20 always returns the next read position to the
first data item, the READ statement never runs out of data to read.
5.5.9 GOSUB/RETURN
The GOSUB/RETURN commands (line 100 and 170) are used for branching to and
from subroutines. Subroutines (lines 140 to 170) are actually mini programs within
the main program, and usually represent routines that are performed repeatedly at
different locations within a program. This means that GOSUB/RETURN makes it
possible to write the repeated operation once, as a subroutine, instead of writing
each time it is needed within the main program.
Execution of the RETURN statement at the end of a subroutine returns execution of
the program back to the statement following the GOSUB command. In this sample
program, execution returns to line 110 after the RETURN command in line 170 is
executed.
Page 35

35
Note: GOSUB routines can also be used to branch to other program areas, as in
GOSUB #3 (branches to program area 3). Note, however, that a return must be
made back to original program area using the RETURN command before an END
command is executed.
5.5.10 Labels
You have the possibility to assign label names to program lines. This feature allows
an easier understanding of the program structure, especially GOTO and GOSUB
statements.
We will modify the program of chapter 5.5 using labels:
10 *Start:S=0
20 RESTORE
30 INPUT N
40 IF N>5 THEN N=5
50 IF N=0 THEN GOTO *Finish
60 FOR I=1 TO N
70 READ X
80 S=S+X
90 NEXT I
100 GOSUB *Root
110 PRINT S;Y;Z
120 GOTO *Start
130 *Finish:END
140 *Root:REM SQR/CUBE ROOT
150 Y=SQR S
160 Z=CUR S
170 RETURN
180 DATA 9,7,20,28,36
Clear current total assigned to S
Specifies read op. should begin with 1st data item
Input the number of data items to be read
Input of values greater than 5 is treated as 5
Jump to program end when input is zero
This section is repeated the number of times
specified by operator input in line 30
Branch to subroutine labeled Root
Displays contents of variables S,Y,Z
Jump to program begin
Program end
Remarks
Square root calculation
Cube root calculation
Return to statement following the GOSUB
Data read by READ statement in line 70
Label names follow the same rules as variable names, except that they are not
limited to 15 characters.
Page 36

36
5.6 Operators
The following are the operators used for calculations, which involves variables.
Arithmetic operators
Signs
Addition
Subtraction
Multiplication
Division
Power
Integer division
Integer remainder of integer division
+,+
*
/
^
¥
MOD
Relational operators
Equal to
Does not equal
Less than
Grater than
Less than or equal to
Grater than or equal to
=
<>, ><
<
>
=>, <=
=>, >=
Logical operators
Negation
Logical product
Logical sum
Exclusive OR
NOT
AND
OR
XOR
Operators
String operator
Concatenation
+
Relational operators
Relational operations can be performed only when the operators are both strings or
both numeric values.
With strings, character codes are compared one-by-one from the beginning of the
strings. This is to say that the first position of string A is compared to the first position
of string B, the second position of string A with the second position of string B, etc.
The result of the comparison is based upon the character codes of the first difference
between the strings detected, regardless of the length of the strings being compared.
EXAMPLES:
STRING A
STRING B
RESULT
ABC
ABC
A=B
ABC
ABCDE
A<B
ABC
XYZ
A<B (character code for A less than that for X)
XYZ
ABCDE
A>B (character code for X greater than that for A)
A result of -1 is returned when the result of a relational operation is true (condition
met), while 0 is returned when the return is false (conditions not met)
EXAMPLE:
10 PRINT 10>3 -1 returned because 10>3 is true
20 PRINT 7>1 0 returned because 7<1 is false
30 PRINT “ABC”=3XYZ” 0 returned because ABC=XYZ is false
40 END
Page 37

37
Logical Operators
The operands of logical operations are truncated to integers and the operation is
performed bit-by-bit to obtain the result.
X Y X AND Y
X OR Y
X XOR Y
NOT X
NOT Y
0 0 0 0 0 1 1
0 1 0 1 1 1 0
1 0 0 1 1 0 1
1 1 1 1 0 0 0
String Operators
Strings may be concatenated using a + sign. The result of the operation (including
intermediate results) may not exceed 255 characters.
EXAMPLE:
A$=”AD”+”1990”
The above example results in the string “AD1990” being assigned to variable A$.
Order of Operations
Arithmetic, relational and logical operations are performed in the following order of
precedence:
1. ( , )
2. Scientific function
3. Power
4. Sign (+, -)
5. *, /, ¥, MOD
6. Addition and subtraction
7. Relational operators
8. NOT
9. AND
10. OR, XOR
Operations are performed from left to right when the order of precedence is identical.
5.7 Constants and Variables
5.7.1 Constants
The following shows the constants included in the sample program of page 33:
PROGRAM
20 R=15
30 INPUT “H=”;H
40 V=PI*R^2*H
50 PRINT “V=”;V
CONSTANTS
15
“H=”
2
“V=”
Of these, 15 and 2 are numeric constants, while “H=” and “V=” are string constants.
Page 38

38
5.7.2 Variables
Numeric Variables
The following shows the numeric variables included in the sample program on page
33:
PROGRAM
20 R=15
30 INPUT “H=”;H
40 V=PI*R^2*H
NUMERIC VARIABLES
R
H
V
Numeric variables are so named because their contents are handled as numbers.
Numeric variable names can be up to 15 characters long, and are used within
programs to store calculation results or constants in memory. In the sample program,
the value 15 is stored in H, while V, which is the result of the calculation, holds the
value that represents the volume of the cylinder. As can be seen, assignment to a
variable is performed using the “=” symbol. This differs from an equal sign in that it
declares that what is to the right should be assigned to what is to the left. Actually, a
variable can be thought as a kind of box as illustrated below.
String Variables
Another type of variable is known as a string variable, which is used to store
character string data. String variable names are indicated by “$” following the name.
EXAMPLE:
10 A$=”AD” Assigns “AD” to string variable A$
20 INPUT “YEAR=”;B$ Assigns keyboard input to variable B$
30 C$=A$+B$ Assigns combination of A$ and B$ to C$
40 PRINT C$ Displays contents of C$
50 END
In the above program example, entering a year such as 1990 in line 20 results in a
display of AD1990 in line 40.
Note: Strings cannot be assigned to numeric variables such as A, and numeric
values cannot be assigned to string variables such as A$.
Array Variables
Both numeric variables and string variables can store only one data item per variable.
Because of this, large amounts of data are better-handled using array variables
(usually referred to as simply “arrays”). Before an array variable can be used within a
program, a DIM statement must appear at the beginning of the program to “declare”
to the computer that an array variable is to be employed.
V
PI*R^2*H
R
15
Page 39

39
EXAMPLE:
Declare array variable A for storage of 9 numeric data items.
10 DIM A (8)
Note: a declared value of 8 makes possible to store 9 data items.
EXAMPLE:
Recall value stored in element 4 of array A
Y=A(4)
Or
X=4:Y=A(X)
The value that specifies an element in an array (4 above) is called a subscript.
Until now, the only arrays covered have been those formed by a single line of
elements or “boxes”. These are known as “one-dimensional” arrays. Arrays may also
contain more than one dimension with elements connected vertically and horizontally
into two-dimensional and three-dimensional arrays.
EXAMPLE:
DIM A (2,3)
The declaration in this example sets up an array of three lines and four columns,
making it capable of storing 12 different values.
As with simple variables, arrays can also be declared to hold strings by using the “$”
symbol following the array variable name.
A(0)
A(1)
A(2)
A(3)
A(4)
A(5)
A(6)
A(7)
A(8)
A(0,0)
A(0,1)
A(0,2)
A(0,3)
A(1,0)
A(1,1)
A(1,2)
A(1,3)
A(2,0)
A(2,1)
A(2,2)
A(2,3)
Page 40

40
5.7.3 Summary
Variable types
The three following types of variable are available for use with this unit.
1. Numeric variables (up to 12-digit mantissa) A, a, NUMBER, POINTS
2. String variables (up to 255 characters) A$, STRING$
3. Array variables Numeric array A(10), XX(3,3,3)
String array A$(10), ARRAY$(2,2)
Variable names
Variable names can consist of upper, lower case or numeric characters, but a
numeric character cannot be used in the first position of the variable name (i.e. 1AE,
3BC$ are illegal).
Reserved words (see page 75) cannot be used as the leading characters of a
variable name (i.e. RUNON, LIST1$ are illegal).
The maximum length of a variable name is 15-character.
Arrays
1. Arrays are declared by DIM statements.
2. Elements described by subscripts, which are integer greater than 0. Fractions are
disregarded.
3. The number of dimensions is limited by stack capacity.
4. The maximum value of subscripts is limited by memory capacity.
Page 41

41
5.8 BASIC Command Reference
5.8.1 Format elements
The method for entering statements is explained below.
• Words in bold type are command or functions, and they must be entered as
shown.
• Braces indicate that one of the parameters enclosed must be specified.
• Commas contained in braces must be written in the position shown.
• Brackets indicate that the parameters enclosed may be omitted. Brackets
themselves are not entered.
• An asterisk indicates that the term preceding it may appear more than once.
• Numeric expressions – Constants, expressions and numeric variables (e.g. 10,
10+25, A, unit cost*quantity).
• String expressions – String constants, string variables and string expressions
(e.g. “ABC”, A$, A$+B$).
• Expressions – General term for numeric and string expressions
• Arguments – Elements used by commands and functions
• Can only be executed in a program.
• Can only be executed manually.
• Can be executed both manually and in a program.
• Function instruction that can be executed both manually and in a program.
EXAMPLE: MID$ function
MID$
(string array
,
position
[ ,
number of characters
] )
String expression
Numeric expression
Numeric expression
The term “string expression” under “string array” describes that array. Likewise,
“numeric expression” under “position” and “number of characters are descriptors.
Also, since the comma and number of characters are enclosed in brackets, they may
be omitted.
PM A
F
Page 42

42
5.8.2 Manual Commands
PASS
PURPOSE: Specifies or cancels a password
FORMAT:
PASS
“password”
String expression
EXAMPLE: PASS”TEXT”
PARAMETERS:
1. Registering a single password makes it the password for all BASIC program
areas (P0-P9) and for C language and Assembler program areas (F0-F9).
2. The password must be a string of 1-8 characters.
3. All characters after the first 8 are ignored when 9 or more characters are
entered.
EXPLANATION:
1. The password is used to protect programs.
2. The password can be registered in the CAL mode, BASIC mode, C mode.
3. Executing this command registers a password when no password previously
exists.
4. Executing PASS statement using a previously registered password cancels
the password. Specifying a password that is different from that registered
results in a “PR error”.
5. The following operations and commands cannot be executed when a
password is registered:
- Program write
- LIST, LIST ALL, LIST#, NEW, NEW ALL, NEW#, EDIT
NEW [ALL]
PURPOSE: Deletes a program.
FORMAT:
NEW [ALL]
EXAMPLE: NEW
EXPLANATION:
1. Deletes the program in the currently specified program area when ALL is
omitted. Variables are not cleared.
2. “Ready Pn” is displayed on the screen after the program is deleted, and the
computer stands for command input.
3. This command cannot be executed for program files that are password
protected.
4. Attempting to use this command in the CAL mode results in a “FC error”.
5. Specifying NEW ALL clears the programs in all program areas and all
variables.
6. This command cannot be included within a program.
A
M
Page 43

43
CLEAR
PURPOSE: Clears all variables and determines the memory mapping in accordance
with the parameters entered.
FORMAT:
CLEAR
[ [strings area size]
[ ,
assembler area size
,
variables area size ] ]
Numeric expression
Numeric expression
Numeric expression
EXAMPLE: CLEAR
CLEAR 400
CLEAR 4096,512,6144
PARAMETERS:
1. Strings area size: Determines the area used for strings. The initial setting
when ALL RESET is executed is 4096. The current value can be obtained
through FRE 3.
2. Assembler area size: Determines the area used for assembler programs. The
initial setting when ALL RESET is executed is 0. The current value can be
obtained through FRE 6.
3. Variables area size: It has to be bigger than the sum of strings and assembler
area sizes to avoid a “BS Error”. The current value can be obtained through
FRE 2.
EXPLANATION:
1. Clear all variables
2. Strings, assembler or variables areas cannot be set during program execution.
3. If assembler area size and variable area size are omitted, these values will
remain unchanged.
4. If strings area size is omitted, the CLEAR statement will clear all variables
without changing memory mapping.
SEE: FRE, SYSTEM
FRE
PURPOSE: Returns memory area size in accordance with argument.
FORMAT:
FRE
argument
Numeric expression
EXAMPLE: PRINT FRE 1
PARAMETERS: the argument can have the value 1-6:
1. Overall free memory (in Bytes)
2. Overall variables area size (in Bytes). FRE 2 = FRE 3 + FRE 4
3. String variables area size (in Bytes)
4. Numeric variables + assembler area size (in Bytes). FRE 4 > FRE 6
5. Free memory for string variables (in Bytes). FRE 5 <= FRE 3
6. Assembler area size (in Bytes)
A
F
Page 44

44
SYSTEM
PURPOSE: Shows main system status.
FORMAT: SYSTEM
EXAMPLE: SYSTEM
PRINT OFF TRACE OFF
CLEAR 4096,512,6144
FREE 83703 V:4096
_
EXPLANATION: Data returned by the SYSTEM statement are:
1. PRINT mode (ON/OFF)
2. TRACE mode (ON/OFF)
3. CLEAR followed by 3 numbers. These are the parameters of the last CLEAR
statement entered.
- First number is the memory area size in Bytes. This is what returns FRE 3.
- Second number is the assembler area size in Bytes. This is what returns
FRE 6
- Third is overall variables area size. This is what returns FRE 2
4. FREE followed by two numbers
- Total free area in Bytes. This is what returns FRE 1
- Variables free area in Bytes. This value is inferior or equal to memory area
size. This is what returns FRE 5.
SEE: FRE, CLEAR
SYSTEMP
PURPOSE: Shows memory status of BASIC program areas P0-P9.
FORMAT: SYSTEMP
EXAMPLE: SYSTEMP
P0[ 0] P1[ 0] P2[ 0]
P3[ 0] P4[ 0] P5[ 0]
P6[ 0] P7[ 0] P8[ 0]
P9[ 0]
EXPLANATION: The number following each Pn is the amount of Bytes the program
area is using. Value 0 shows that program area is empty.
SYSTEMF
PURPOSE: Shows memory status of file areas F0-F9.
FORMAT: SYSTEMF
EXAMPLE: SYSTEMF
F0[ 0] F1[ 0] F2[ 0]
F3[ 0] F4[ 0] F5[ 0]
F6[ 0] F7[ 0] F8[ 0]
F9[ 0]
EXPLANATION: The number following each Fn is the amount of Bytes the file area
is using (BASIC file, C or assembler program). Value 0 shows that file area is empty.
M
M
M
Page 45

45
LIST [ALL]
PURPOSE: Displays all or part of the currently specified program.
FORMAT:
[start line number]
[ -
[end line number] ]
Line number
Line number
LIST
[.]
[ALL]
*Label
Label name
EXAMPLE: LIST
LIST 100
LIST 100-300
LIST -400
LIST*Root
PARAMETERS:
1. Start line number: integer in the range of 1≤ line number ≤ 65535 (first line
number when omitted)
2. End line number: integer in the range of 1≤ line number ≤ 65535 (end line
number when omitted)
3. Label: Name of a label in the program.
EXPLANATION:
1. Displays the currently specified program in the range specified by the line
numbers.
2. A minus sign must be used as a delimiter between line numbers.
3. The following five examples illustrate specification of the display range.
a) LIST . . (All lines from beginning of program)
b) LIST 30 . . (Line 30)
c) LIST 50-100 . . (Lines 50 through 100)
d) LIST 200- . . (From line 200 through end of program)
e) LIST -80 . . (From beginning of program through line 80)
4. Using a period in place of the line number displays the most recently handled
(i.e. written, edited, executed). If a program is halted during execution by an
error, executing “LIST .”displays the line in which the error was generated.
5. When the specified start line number does not exist, the first line number
above that specified is taken as the start line number
6. When the specified end line number does not exist, the greatest line number
not exceeding that specified is taken as the end line number
7. The start line number must be smaller than the end line number.
8. Pressing the BRK key can halt LIST command execution.
9. Press the Shift STOP key to momentarily halt LIST command execution. To
restart execution, press the . . key or one of the alphanumeric keys
10. Specifying ALL displays all programs in sequence from area P0 to P9.
11. Specifying a label name after an asterisk will list
SEE: EDIT
M
Page 46

46
EDIT
PURPOSE: Enters the BASIC edit mode.
FORMAT:
[start line number]
Line number or period
EDIT
[.]
*Label
Label name
EXAMPLE: EDIT 100
PARAMETERS:
1. Start line number: integer in the range of 1 ≤ line number ≤ 65535 (first line
number when omitted)
2. Label: Name of a label in the program.
EXPLANATION:
1. Enters the BASIC edit mode and displays the program at the specified line
number, or at the specified label. The cursor is displayed and editing becomes
possible with either the .. or .. key is pressed.
2. Using a period in place of the line number displays the most recently handled
(i.e. written, edited, executed). If a program is halted during execution by an
error, executing “EDIT .”displays the line in which the error was generated
3. When the specified start line does not exist, the first line number above that
specified is taken as the start line number.
4. It is possible to change the line number in EDIT mode by using either .. or
.. key.
5. This mode is cancelled by pressing the BRK key.
SEE: LIST
VARLIST
PURPOSE: Displays variable names and array names.
EXAMPLE: VARLIST
EXPLANATION:
1. Displays all currently existing variable names and array names
2. Press the Shift STOP key to momentarily halt VARLIST command execution.
To restart execution, press the . . key or one of the alphanumeric keys
M
A
Page 47

47
RUN
PURPOSE: Executes a program.
FORMAT:
[start line number]
RUN
Line number or period
*Label
Label name
EXAMPLE: RUN
RUN 100
RUN*Root
PARAMETERS:
1. Start line number: Interger in the rage of 1 ≤ line number ≤ 65535
2. Label: Name of a label in the program.. Entering an unknown label will
generate an “UL error”.
EXPLANATION:
1. Execution starts from the beginning of the program when the line number or
label name is omitted.
2. When the specified start line does not exist, the first line number above that
specified is taken as the start line number.
3. Variable and array values are not cleared.
4. This command cannot be used within a program.
5. This command cannot be used in the CAL mode.
TRON
PURPOSE: Specifies the trace mode.
EXAMPLE: TRON
EXPLANATION:
1. Switches the trace mode ON.
2. All subsequent program execution is accompanied by a display of the area
name and line number. The first two lines are displayed, and execution is
suspended.
3. The program stays in the TRON mode until TROFF statement is executed or
the power is switched OFF
SEE: TROFF
TROFF
PURPOSE: Cancels the trace mode.
EXAMPLE: TROFF
EXPLANATION: Cancels the trace mode (entered using the TRON statement).
SEE: TRON
M
A
A
Page 48

48
5.8.3 Fundamental Commands
END
PURPOSE: Terminates program execution.
EXPLANATION:
1. Terminates program execution, and the computer stands for command input
2. Closes all files that are open
3. Variables and arrays are not cleared.
4. Any number of END statements can be used in a single program. Program
execution is terminated and open files are closed automatically at the end of a
program even if an END statement is not included.
STOP
PURPOSE: Temporarily halts program execution.
EXAMPLE: STOP
EXPLANATION:
1. Temporarily halts program execution. Program area and line number of the
STOP statement are displayed. Execution can be resumed by entering the
CONT command or pressing Shift CONT . ..
2. Open files, variable values and array values are retained as they are at the
point when execution is halted.
WAIT
PURPOSE: Pauses program execution for a certain time.
FORMAT:
WAIT
argument
Numeric expression
EXAMPLE: WAIT 100
EXPLANATION: The argument is the number of 10th of a second the program will
pause before resuming its execution. This instruction is useful to slow down screen
outputs that would be too fast to read.
P
P
P
Page 49

49
GOTO
PURPOSE: Branches unconditionally to a specified branch destination.
FORMAT:
branch destination line number
Line number
GOTO
# program area number
Single character; 0-9
*Label
Label name
EXAMPLE: GOTO 1000
GOTO #7
GOTO *Finish
PARAMETERS:
1. Branch destination line number: integer in the range of 1≤ line number ≤65535
2. Program area number: single character, 0-9
3. Label: Name of a label in the program.
EXPLANATION:
1. Specifying a line number causes program execution to jump to that line
number in the current program area.
2. Specifying a program area number causes program execution to jump to the
first line number of the specified program area.
3. Specifying a label name causes program execution to jump to that label in the
current program area.
4. An “UL error” is generated when the specified line number or label name does
not exist.
P
Page 50

50
GOSUB
PURPOSE: Jumps to a specified subroutine.
FORMAT:
branch destination line number
Line number
GOSUB
# program area number
Single character; 0-9
*Label
Label name
EXAMPLE: GOSUB 100
GOSUB #6
GOSUB *Root
PARAMETERS:
1. Branch destination line number: integer in the range of 1≤ line number ≤65535
2. Program area number: single character, 0-9
3. Label: Name of a label in the program.
EXPLANATION:
1. Program execution branches to the subroutine that starts at the specified line
number or label. Execution is returned from the subroutine by the RETURN
statement.
2. Subroutines can be nested up to 96 levels. Exceeding this value results in an
“OM error”
3. An “UL error” is generated when the specified line number or label name does
not exist.
4. CLEAR command cannot be used within a subroutine.
SEE: RETURN
RETURN
PURPOSE: Returns execution from a subroutine to the main program.
FORMAT: RETURN
EXAMPLE: RETURN
EXPLANATION:
1. Returns program execution to the statement immediately following the
statement that originally called a subroutine.
2. A “GS error” is generated when the RETURN statement is executed without
first executing a GOSUB statement.
SEE: GOSUB, ON GOSUB
P
P
Page 51

51
ON GOTO
PURPOSE: Jumps to a specified branch destination in accordance with a specified
branching condition.
FORMAT:
branch destination line number
Line number
ON
Condition
GOTO [
# program area number
]
Numeric expression
Single character; 0-9
*Label
Label name
branch destination line number
Line number
[ , [
# program area number
] ]*
Single character; 0-9
*Label
Label name
EXAMPLE: ON A GOTO 100, 200, 300
PARAMETERS:
1. Branch condition: Numeric expression truncated to an integer
2. Branch destination line number: integer in the range of 1≤ line number ≤65535
3. Program area number: single character, 0-9
4. Label: Name of a label in the program.
EXPLANATION:
1. The GOTO statement is executed in accordance with the value of the
expression used for the branch condition. For example, execution jumps to the
first branch destination when the value is 1, to the second destination when
the value is 2 etc.
2. Program execution does not branch and execution proceeds to the next
statement when the value of the condition is less than 1, or if a branch
destination corresponding to the value does not exist.
3. Up to 99 branch destinations may be specified.
SAMPLE PROGRAM:
10 INPUT “1 OR 23;A
20 ON A GOTO 40,50
30 END
40 PRINT ”ONE”:END
50 PRINT “TWO”
Execution jumps to line 40 if 1 . . is entered or to line 50 if 2 . . is entered.
SEE: ON GOSUB
P
Page 52

52
ON GOSUB
PURPOSE: Jumps to a specified subroutine in accordance with a specified
branching condition.
FORMAT:
branch destination line number
Line number
ON
Condition
GOSUB [
# program area number
]
Numeric expression
Single character; 0-9
*Label
Label name
branch destination line number
Line number
[ , [
# program area number
] ]*
Single character; 0-9
*Label
Label name
EXAMPLE: ON A GOSUB 1000, 1100, 1200
PARAMETERS:
1. Branch condition: Numeric expression truncated to an integer
2. Branch destination line number: integer in the range of 1≤ line number ≤65535
3. Program area number: single character, 0-9
4. Label: Name of a label in the program.
EXPLANATION:
1. The GOSUB statement is executed in accordance with the value of the
expression used for the branch condition. For example, execution jumps to the
first branch destination when the value is 1, to the second destination when
the value is 2 etc.
2. Program execution does not branch and execution proceeds to the next
statement when the value of the condition is less than 1, or if a branch
destination corresponding to the value does not exist.
3. Up to 99 branch destinations may be specified.
SEE: RETURN
P
Page 53

53
IF-THEN-ELSE / IF-GOTO-ELSE
PURPOSE: Executes the THEN statement or GOTO statement when the specified
condition is met. The ELSE statement is executed when the specified condition is not
met.
FORMAT:
THEN
statement
statement
IF
condition
[ : statement
ELSE
[ : statement
Numeric expression
GOTO
branch destination
branch destination
branch destination line number
Line number
With branch destination:
# program area number
] ]*
Single character; 0-9
*Label
Label name
EXAMPLE: IF A=0 THEN 300 ELSE 400
IF K$=”Y” THEN PRINT X ELSE PRINT Y
PARAMETERS:
1. Branch condition: Numeric expression truncated to an integer
2. Branch destination line number: integer in the range of 1≤ line number ≤65535
3. Program area number: single character, 0-9
4. Label: Name of a label in the program.
EXPLANATION:
1. The statement following the THEN clause is executed, or execution jumps to
the destination specified by the GOTO statement when the branch condition is
met.
2. If the branch condition is not met, the statement following the ELSE statement
is executed, or the program jumps to the specified branch destination.
Execution proceeds to the next program line when the ELSE statement is
omitted.
3. The format “IF A THEN –“ results in the condition being met when value of the
expression (A) is not 0 (absolute value of A > 10
-99
). The condition is not met
when the value of the expression is 0.
4. IF statements can be nested (an IF statement may contain other IF
statements). In this case, the THEN – ELSE statements are related by their
proximity. The GOTO – ELSE combinations have the same relationships.
IF – THEN IF THEN – ELSE IF – THEN ELSE – ELSE –
SAMPLE PROGRAM:
10 INPUT “1 TO 9”;A
20 IF (0<A)AND(A<10) THEN PRINT “GOOD!” ELSE 10
“GOOD!” is displayed for input values from 1 to 9. Re-input is requested for other
values.
P
Page 54

54
FOR-NEXT
PURPOSE: Executes the program lines between the FOR statement and NEXT
statement and increments the control variable, starting with the initial value.
Execution is terminated when value of the control variable exceeds the specified final
value.
FORMAT:
FOR
control variable
=
initial value
TO
final value
Numeric variable name
Numeric expression
Numeric expression
[ STEP
increment ]
Numeric expression
|
NEXT
[ control variable ]
[ ,
control variable
] *
Numeric variable name
Numeric variable name
EXAMPLE: FOR I=1 TO 10 STEP 0.1
|
NEXT I
PARAMETERS:
1. Control variable: numeric variable name. Array variables cannot be used.
2. Initial value: Numeric expression
3. Final value: Numeric expression
4. Increment: Numeric expression (default value = 1).
EXPLANATION:
1. None of the statements beyween FOR and NEXT are executed and the
program proceeds to the next executable statement after NEXT when the
initial value is greater than the final value.
2. Each FOR requires a corresponding NEXT.
3. FOR – NEXT loops can be nested (a FOR – NEXT loop can be placed inside
another FOR – NEXT loop). Nested loops must be structured as shown below
with NEXT appearing in inverse sequence of the FOR (e.g. FOR A, FOR B,
FOR C – NEXT C, NEXT B, NEXT A).
10 FOR I=1 TO 12 STEP 3
20 FOR J=1 TO 4 STEP 0.5
30 PRINT I,J
40 NEXT J
50 NEXT I
60 END
4. FOR – NEXT loops can be nested up to 29 levels.
5. The control variable may be omitted from NEXT. However, use of the control
variable in the NEXT statement is recommended when using nested loop, to
make the code easier to understand.
6. NEXT statements can be chained by including them under one NEXT
statement, separated by commas.
10 FOR I=1 TO 12 STEP 3
20 FOR J=1 TO 4 STEP 0.5
30 PRINT I,J
40 NEXT J,I
50 END
P
Page 55

55
7. The control variable retains the value that exceeds the final value (and
terminates the loop) when loop execution is complete.
With the loop FOR I=3 to 10 STEP 3 for example, the value of control variable
I is 12 when execution of the loop is complete.
8. Jumping out of a FOR – NEXT loop is also possible. In that case, the current
control variable value is retained in memory, and the loop can be resumed by
returning with a GOTO statement.
REM (‘)
PURPOSE: Allow remarks or comments to be included within a program. This
command in not executed.
FORMAT:
REM
comments
‘
String expression
EXPLANATION:
1. Including an apostrophe or REM statement following the line number indicates
that the following text is comments and should be ignored in program
execution.
2. The apostrophe may be included at the end of any executable statement to
indicate that the following text is comments. The REM statement can only be
used at the beginning of a line.
3. Any command following a REM statement is treated as comment and is not
executed.
SAMPLE PROGRAM:
10 REM This is a comment
20 ‘This is as well a comment
30 LET A=1: REM I can comment within a line
40 LET N=1 ‘The apostrophe does not require :
LET
PURPOSE: Assigns the value of an expression on the right side of an equation to the
variable on the left side.
FORMAT:
[LET] numeric variable name = Numeric expression
[LET] string variable name = String expression
EXPLANATION:
1. Assigns the value of an expression on the right side of an equation to the
variable on the left side
2. Numeric expressions can only be assigned to numeric variables, and string
expressions can only be assigned to string variables. A “TM error” is
generated when an attempt is made to assign a string expression to a numeric
variable, and vice versa.
3. LET may be omitted.
SAMPLE PROGRAM:
10 LET A=10
20 B=20 ‘LET statement is omitted
30 PRINT A;B
P
A
Page 56

56
DATA
PURPOSE: Holds data for Reading by the READ statement.
FORMAT:
DATA
[ data ]
[ ,
[ data ]
] *
Constant
Constant
EXAMPLE: DATA 10,5,8,3
DATA CAT,DOG,LION
PARAMETERS:
1. Data: String constants or numeric constants
2. String constants: Quotation marks are not required unless the string contains
a comma that is part of the data. A null data string (length 0) is assumed when
data is omitted from this statement.
EXPLANATION:
P
Page 57

57
5.8.4 Mathematical Functions
ABS
PURPOSE: Returns the absolute value of the argument.
FORMAT:
ABS
(argument)
Numeric expression
The parenthesis enclosing the argument can be omitted when the argument is a
numeric value or variable.
EXAMPLE: ABS (-1.1)
PARAMETERS: argument : numeric expression
SEE: SGN
ACS
PURPOSE: Returns the angle value for which cosine (angle value) = argument.
FORMAT:
ACS
(argument)
Numeric expression
The parenthesis enclosing the argument can be omitted when the argument is a
numeric value or variable.
EXAMPLE: ACS (0.1)
PARAMETERS: argument must be within the [-1 , +1] range
EXPLANATION:
1. The unit of the returned value is specified using the ANGLE function.
2. The returned value is in the [0, 180°] or [0 , π Radians ] range.
SEE: ANGLE, COS
ANGLE
PURPOSE: Specifies the angle unit.
FORMAT:
ANGLE
angle specification
Numeric expression
EXAMPLE: ANGLE 0
PARAMETERS: angle specification: Numeric expression truncated to an integer in
the range of 0 ≤ angle specification ≤ 3
EXPLANATION:
1. The angle units for the trigonometric functions can be specified using the
values 0,1 and 2.
0: DEG (Degrees)
1: RAD (Radians)
2: GRAD (Grads)
2. The relationships between the angle units are as follows:
90° = π/2 Radians = 100 Grads
3. ANGLE 0 is set whenever ALL RESET is executed.
4. The angle unit can also be specified using the MODE command.
SEE: MODE, SIN, COS, TAN
F
F
A
Page 58

58
ASN
PURPOSE: Returns the angle value for which sine (angle value) = argument.
FORMAT:
ASN
(argument)
Numeric expression
The parenthesis enclosing the argument can be omitted when the argument is a
numeric value or variable.
EXAMPLE: ASN (0.1)
PARAMETERS: argument must be within the [-1 , +1] range
EXPLANATION:
1. The unit of the returned value is specified using the ANGLE function.
2. The returned value is in the [0 , 180°] or [0 , π Radians ] range.
SEE: ANGLE, COS
ATN
PURPOSE: Returns the angle value for which tangent (angle value) = argument.
FORMAT: double atan(x) double x;
ATN
(argument)
Numeric expression
The parenthesis enclosing the argument can be omitted when the argument is a
numeric value or variable.
PARAMETERS: argument must be within the [-1x10
100
, +1x10
100
] range.
EXPLANATION:
1. The unit of the returned value is specified using the ANGLE function.
2. The returned value is in the [-90° , 90°] or [ -π/2 , π/2 Radians ] range.
SEE: ANGLE, TAN
COS
PURPOSE: Returns the value of the cosine of the argument.
FORMAT:
COS
(argument)
Numeric expression
The parenthesis enclosing the argument can be omitted when the argument is a
numeric value or variable.
EXAMPLE: COS (30)
PARAMETERS: argument: numeric expression (angle).
-1440° < argument < 1440°
-8π Radians < argument < 8π Radians
-1600 Grads < argument < 1600 Grads
EXPLANATION:
1. The unit of the argument is specified using the ANGLE function.
2. The returned value is in the [-1 , 1] range.
SEE: ANGLE, ACS, SIN, TAN
F
F
F
Page 59

59
CUR
PURPOSE: Returns the cubic root of the argument.
FORMAT:
CUR
(argument)
Numeric expression
The parenthesis enclosing the argument can be omitted when the argument is a
numeric value or variable.
EXAMPLE: Y = CUR (X)
PARAMETERS: argument: numeric expression.
SEE: SQR
EXP
PURPOSE: Returns the value of e
(argument)
.
FORMAT:
EXP
(argument)
Numeric expression
The parenthesis enclosing the argument can be omitted when the argument is a
numeric value or variable.
EXAMPLE: EXP (1)
PARAMETERS: argument must be within the [-230.2585092 , +230.2585092] range.
EXPLANATION:
1. The value of e is 2.7182818284590452353602874713526...
2. The returned value is in the ]0 , 10
100
[ range.
SEE: LN
FACT
PURPOSE: Returns factorial of argument.
FORMAT:
FACT
(argument)
Numeric expression
The parenthesis enclosing the argument can be omitted when the argument is a
numeric value or variable.
EXAMPLE: A = FACT(10)
PARAMETERS: argument must be an integer in the [0 , 69] range.
EXPLANATION:
1. Returns factorial of the argument: FACT (n) = n! = 1 x 2 x 3 x . . . x n
2. A fractional value as the argument generates an error.
SEE: NPR
FFF
Page 60

60
FIX
PURPOSE: Returns the integer part of the argument.
FORMAT:
FIX
(argument)
Numeric expression
The parenthesis enclosing the argument can be omitted when the argument is a
numeric value or variable.
EXAMPLE: FIX (-1.5)
PARAMETERS: argument : numeric expression
SEE: INT, FRAC
FRAC
PURPOSE: Returns the fractional part of the argument.
FORMAT:
FRAC
(argument)
Numeric expression
The parenthesis enclosing the argument can be omitted when the argument is a
numeric value or variable.
EXAMPLE: FRAC (3.14)
PARAMETERS: argument : numeric expression
EXPLANATION:
1. Returns the fractional art of the argument.
2. The sign (±) of the value is the same as that for the argument.
SEE: INT, FIX
HYPACS
PURPOSE: Returns the value for which hyperbolic cosine (value) = argument.
FORMAT:
HYPACS
(argument)
Numeric expression
The parenthesis enclosing the argument can be omitted when the argument is a
numeric value or variable.
EXAMPLE: HYPACS (150)
PARAMETERS: argument must be within the [1 , 5x1099[ range
EXPLANATION:
1. The mathematical formula for reverse hyperbolic cosine is :
acosh(x) = ln ( x + √ ) where ln is the natural logarithm .
2. The returned value is in the [-230.2585092 , +230.2585092] range.
SEE: HYPCOS, LN
FFF
x2 – 1
Page 61

61
HYPASN
PURPOSE: Returns the value for which hyperbolic sine (value) = parameter.
FORMAT:
HYPASN
(argument)
Numeric expression
The parenthesis enclosing the argument can be omitted when the argument is a
numeric value or variable.
EXAMPLE: HYPASN (-150)
PARAMETERS: argument must be within the ]-5x1099 , 5x1099[ range
EXPLANATION:
1. The mathematical formula for reverse hyperbolic sine is :
asinh(x) = ln ( x + √ ) where ln is the natural logarithm .
2. The returned value is in the [-230.2585092 , +230.2585092] range.
SEE: HYPSIN, LN
HYPATN
PURPOSE: Returns the value for which hyperbolic tangent (value) = argument.
FORMAT:
HYPATN
(argument)
Numeric expression
The parenthesis enclosing the argument can be omitted when the argument is a
numeric value or variable.
EXAMPLE: HYPATN (-0.3)
PARAMETERS: argument must be within the ]-1 , +1[ range
EXPLANATION:
1. The mathematical formula for reverse hyperbolic tangent is :
atanh(x) = ( ln (1+x) – ln (1-x) ) / 2 where ln is the natural logarithm .
2. The returned value is in the ]-10
100
, +10
100
[ range.
SEE: HYPTAN, LN
HYPCOS
PURPOSE: Returns the value of the hyperbolic cosine of the argument.
FORMAT:
HYPCOS
(argument)
Numeric expression
The parenthesis enclosing the argument can be omitted when the argument is a
numeric value or variable.
EXAMPLE: HYPCOS (30)
PARAMETERS: argument must be within the [-230.2585092 , +230.2585092] range.
EXPLANATION:
1. The mathematical formula for hyperbolic cosine is :
cosh(x) = (ex + e-x) / 2 where e is 2.7182818284590452353602874713526...
2. The returned value is in the [-1 , 5x1099[ range.
SEE: HYPACS, LN
F
x2 + 1
F
F
Page 62

62
HYPSIN
PURPOSE: Returns the value of the hyperbolic sine of the argument.
FORMAT:
HYPSIN
(argument)
Numeric expression
The parenthesis enclosing the argument can be omitted when the argument is a
numeric value or variable.
EXAMPLE: HYPSIN (1.5)
PARAMETERS: argument must be within the [-230.2585092 , +230.2585092] range.
EXPLANATION:
1. The mathematical formula for hyperbolic sine is :
sinh(x) = (ex - e-x) / 2 where e is 2.7182818284590452353602874713526...
2. The returned value is in the ]-5x1099 , 5x1099[ range.
SEE: HYPASN, LN
HYPTAN
PURPOSE: Returns the value of the hyperbolic tangent of the argument.
FORMAT:
HYPTAN
(argument)
Numeric expression
The parenthesis enclosing the argument can be omitted when the argument is a
numeric value or variable.
EXAMPLE: HYPTAN (2.5)
PARAMETERS: argument must be within the ]-1x10
100
, 10
100
[ range.
EXPLANATION:
1. The mathematical formula for hyperbolic tangent is :
tanh(x) = (ex - e-x) / (ex + e-x) where e is 2.71828182845904523536028747...
2. The returned value is in the ]-1 , 1[ range.
SEE: HYPATN, LN
INT
PURPOSE: Returns the largest integer that does not exceed the value of the
argument.
FORMAT:
INT
(argument)
Numeric expression
The parenthesis enclosing the argument can be omitted when the argument is a
numeric value or variable.
EXAMPLE: INT (-1.3)
PARAMETERS: argument : numeric expression
EXPLANATION:
1. Returns the largest integer, which does not exceed the value of the argument.
2. INT(x) is equivalent to FIX(x) when x is positive, and FIX(x)-1 when x is
negative.
SEE: FIX, FRAC
FFF
Page 63

63
LOG
PURPOSE: Returns the common logarithm of the argument.
FORMAT:
LOG
(argument)
Numeric expression
The parenthesis enclosing the argument can be omitted when the argument is a
numeric value or variable.
EXAMPLE: LOG (7922)
PARAMETERS: argument must be within the ]10
-100
, 10
100
[ range.
EXPLANATION:
1. The returned value is in the ]-100 , +100[ range.
SEE: LN
LN
PURPOSE: Returns the natural logarithm of the parameter
FORMAT:
LN
(argument)
Numeric expression
The parenthesis enclosing the argument can be omitted when the argument is a
numeric value or variable.
EXAMPLE: LN (1965)
PARAMETERS: argument must be within the ]10
-100
, 10
100
[ range.
EXPLANATION:
1. The returned value is in the [-230.2585092 , +230.2585092] range.
2. LN is the inverse function of EXP:
For any positive argument, EXP(LN(argument)) # argument.
SEE: EXP
NCR
PURPOSE: Returns the combination nCr for the values of n and r.
FORMAT:
NCR
( n value
,
r value )
Numeric expression
Numeric expression
EXAMPLE: X = NCR(70,35)
PARAMETERS: n value and r value should follow: 0 ≤ r ≤ n < 1010
EXPLANATION:
1. Returns the permutation: nCr = n! / (r! (n-r)! )
2. A fractional value as either n or r generates an error.
SEE: FACT, NPR
FFF
Page 64

64
NPR
PURPOSE: Returns the permutation nPr for the values of n and r.
FORMAT:
NPR
( n value
,
r value )
Numeric expression
Numeric expression
EXAMPLE: X = NPR(69,20)
PARAMETERS: n value and r value should follow: 0 ≤ r ≤ n < 1010
EXPLANATION:
1. Returns the permutation: nPr = n! / (n-r)!
2. A fractional value as either n or r generates an error.
SEE: FACT, NCR
PI
PURPOSE: Returns the value of π.
FORMAT: PI
EXPLANATION:
1. Returns the value of π.
2. The value of π used for internal calculations is 3.1415926536.
3. The displayed value is rounded off to 10 digits, so the value of π is displayed
as 3.141592654.
POL
PURPOSE: Converts rectangular coordinates (x, y) to polar coordinates (r, θ).
FORMAT:
POL
( x-coordinate
,
y-coordinate)
Numeric expression
Numeric expression
EXAMPLE: POL(3,2)
PARAMETERS: x- and y-coordinates: numeric expressions not both zero.
EXPLANATION:
1. Converts rectangular coordinates (x, y) to polar coordinates (r, Θ). The
following relational expressions are used at this time:
r = √ cosθ = x / √ sinθ = y / √
2. The value of r is automatically assigned to variable X, wile θ is automatically
assigned to variable Y
3. The value of θ is the ]-180°, 180°] or ]-π Radians, π Radians] range.
SEE: REC
F
F
F
x2 + y2
x2 + y2
x2 + y2
Page 65

65
RAN#
PURPOSE: Returns a random value in the range of 0 to 1.
FORMAT:
RAN#
(argument)
Numeric expression
The parenthesis enclosing the argument can be omitted when the argument is a
numeric value or variable.
EXAMPLE: RAN# * 10
PARAMETERS: argument : numeric expression
EXPLANATION:
1. Returns a random value in the ]-1, 1[ range.
2. Random numbers are generated from the same table when X=1.
3. The last random number generated is repeated when X=0.
4. Random numbers are generated from the random table when X=-1.
5. Random number generation begins with the same value each time a program
is executed. This means that the same series of numbers is generated unless
the argument of RAN# is omitted or is equal to -1.
EXAMPLE: RAN# * 10
REC
PURPOSE: Converts polar coordinates (r, θ) to rectangular coordinates (x, y).
FORMAT:
REC
( distance r
,
angle θ )
Numeric expression
Numeric expression
EXAMPLE: REC(10,15)
PARAMETERS: x- and y-coordinates: numeric expressions not both zero.
1. Distance r: numeric expression in the [0, 10
100
[ range.
2. Angle θ in the ]-1440°, 1440°[ or ]-8π Radians, 8π Radians[ range.
EXPLANATION:
1. Converts polar coordinates (r, θ) to rectangular coordinates (x, y). The
following relational expressions are used at this time:
x = r cosθ y = r sinθ
2. The value of x is automatically assigned to variable X, wile y is automatically
assigned to variable Y
SEE: POL
F
F
Page 66

66
ROUND
PURPOSE: Rounds the argument at the specified digit.
FORMAT:
ROUND
( argument
,
digit )
Numeric expression
Numeric expression
The parenthesis enclosing the argument can be omitted when the argument is a
numeric value or variable.
EXAMPLE: ROUND (A, -3)
PARAMETERS:
1. argument : numeric expression
2. digit: numeric expression truncated to an integer in the ]-100, 100[ range.
EXPLANATION:
Rounds the argument (to the nearest whole number) at the specified digit.
SEE: FIX, INT
SGN
PURPOSE: Returns a value, which corresponds, to the sign of the argument.
FORMAT:
SGN
(argument)
Numeric expression
The parenthesis enclosing the argument can be omitted when the argument is a
numeric value or variable.
EXAMPLE: SGN (A)
PARAMETERS: argument : numeric expression
EXPLANATION: Returns a value of -1 when the argument is negative, 0 when the
argument equals 0, and 1 when the argument is positive.
SEE: ABS
SIN
PURPOSE: Returns the value of the sine of the argument.
FORMAT:
SIN
(argument)
Numeric expression
The parenthesis enclosing the argument can be omitted when the argument is a
numeric value or variable.
EXAMPLE: SIN (PI/3)
PARAMETERS: argument: numeric expression (angle).
-1440° < argument < 1440°
-8π Radians < argument < 8π Radians
-1600 Grads < argument < 1600 Grads
EXPLANATION:
1. The unit of the argument is specified using the ANGLE function.
2. The returned value is in the [-1, 1] range.
SEE: ANGLE, ASN, COS, TAN
F
F
F
Page 67

67
SQR
PURPOSE: Returns the square root of the argument.
FORMAT:
SQR
(argument)
Numeric expression
The parenthesis enclosing the argument can be omitted when the argument is a
numeric value or variable.
EXAMPLE: SQR (4)
PARAMETERS: argument must be positive.
SEE: CUR
TAN
PURPOSE: Returns the value of the tangent of the argument.
FORMAT:
TAN
(argument)
Numeric expression
The parenthesis enclosing the argument can be omitted when the argument is a
numeric value or variable.
EXAMPLE: TAN (PI/3)
PARAMETERS: argument: numeric expression (angle).
-1440° < argument < 1440°
-8π Radians < argument < 8π Radians
-1600 Grads < argument < 1600 Grads
EXPLANATION:
1. The unit of the argument is specified using the ANGLE function.
2. argument must be different from 90° or 270° (π/2 or 3π/2 Radians).
3. The returned value is in the ]-1x10
100
, 10
100
[ range.
SEE: ANGLE, ATN, COS, SIN
F
F
Page 68

68
5.8.5 String Functions
ASC
PURPOSE: Returns the character code corresponding to the character in the first
(leftmost) position of a string.
FORMAT:
ASC
(string)
String expression
EXAMPLE: ASC (“A”)
PARAMETERS: String : string expression
EXPLANATION:
1. Returns the character code corresponding to a character. The character code
for the first (leftmost) character only is returned for a string of two or more
characters long.
2. A value of 0 is returned for a null string.
SEE: CHR$, Character code table page 12.
DEG
PURPOSE: Converts a sexagesimal value to a decimal value.
FORMAT:
DEG
( degrees
[ ,
minutes
[ ,
seconds ] ] )
Numeric expression
Numeric expression
Numeric expression
EXAMPLE: DEG (1, 30, 10)
PARAMETERS:
1. Degrees: numeric expression in the ]-10
100
, 10
100
[ range.
2. Minutes: numeric expression in the ]-10
100
, 10
100
[ range.
3. Seconds: numeric expression in the ]-10
100
, 10
100
[ range.
EXPLANATION: Converts the degrees, minutes and seconds of sexagesimal values
to decimal values as follows:
DEG(degrees, minutes, seconds) = degrees + minutes/60 + seconds/3600
SEE: DMS$
DMS$
PURPOSE: Converts a decimal value to a sexagesimal string.
FORMAT:
DMS$
( argument )
Numeric expression
EXAMPLE: DMS$ (1.52)
PARAMETERS: Argument: numeric expression in the ]-10
100
, 10
100
[ range.
EXPLANATION:
1. Converts decimal values to sexagesimal strings.
2. Minutes and seconds are not displayed when the argument is in the range of
numeric expressions ≥ 106. In this case, the absolute value of the argument is
converted to a string as it is.
SEE: DEG
F
F
F
Page 69

69
&H
PURPOSE: Converts the 1 through 4-digit hexadecimal value following &H to a
decimal value.
FORMAT:
&H
argument
Hexadecimal value
EXAMPLE: A = &HAF
PARAMETERS: Hexadecimal value in the [0, FFFF] range.
EXPLANATION:
1. The hexadecimal value is expressed using values 0 to 9, plus characters A to
F.
2. In the manual mode, &H is entered followed by the hexadecimal value.
Pressing . . produces the decimal equivalent.
Example: Shift &H 1 B 7 F . . → 7039
3. The following shows a typical example within a program. Since a numeric
variable cannot be used following &H, the hexadecimal value is appended to
&H as a string, and then converted to a decimal value using the VAL function.
SAMPLE PROGRAM:
10 REM &H SAMPLE
20 INPUT “&H”;A$
30 H=VAL(“&H”+A$)
40 PRINT “&H”;A$;”=”;H
50 GOTO 10
SEE: HEX$
HEX$
PURPOSE: Converts the argument (numeric value or numeric expression value) to a
string.
FORMAT:
HEX$
(argument)
Numeric expression
EXAMPLE: HEX$ (15)
PARAMETERS: Argument: numeric expression truncated to an integer in the
]-32769, 65536[ range. Values more than 32767 are converted by subtracting 65536.
EXPLANATION:
Returns a 4-digit hexadecimal string for a decimal value specified in the argument.
SEE: &H
A
F
Page 70

70
LEFT$
PURPOSE: Returns a substring of a specified length counting from the left of a
string.
FORMAT:
LEFT$
( string
,
number of characters )
String expression
Numeric expression
EXAMPLE: LEFT$ (“ABCDEF”, 3)
PARAMETERS:
1. String: string expression
2. Number of characters: numeric expression truncated to an integer in the [0 ,
256[ range.
EXPLANATION:
1. Returns the substring of a specified length from the left of a string.
2. The entire string is returned when the specified number of characters is
greater than the number of characters of the string.
SEE: MID$, RIGHT$
LEN
PURPOSE: Returns a value that represents the number of characters contained in a
string.
FORMAT:
LEN
(string)
String expression
EXAMPLE: LEN (A$)
PARAMETERS: String : string expression
EXPLANATION:
Returns a value that represents the number of characters contained in a string,
including characters that don’t appear on the display (character codes from &H0 &H1F) and spaces.
F
F
Page 71

71
MID$
PURPOSE: Returns a substring of a specified length from a specified position within
a string.
FORMAT:
MID$
( string
,
position
[ ,
number of characters ] )
String expression
Numeric expression
Numeric expression
EXAMPLE: MID$ (A$, 5, 3)
PARAMETERS:
1. String: string expression
2. Position: numeric expression truncated to an integer in the [0 , 256[ range.
3. Number of characters: numeric expression truncated to an integer in the
[0 , 256[ range. The default option is from the specified position to the end of
the string when this parameter is omitted.
EXPLANATION:
1. Returns the substring of a specified length from a specified position within a
string. A substring from the specified position to the end of the string when the
length of the substring is not specified.
2. A substring of length 0 (null) is returned when the specified position exceeds
the length of the string.
3. A substring from the specified position to the end of the string is returned
when the specified number of characters is greater than the number of
characters from the specified position to the end of the string.
SEE: RIGHT$, LEFT$
RIGHT$
PURPOSE: Returns a substring of a specified length counting from the right of a
string.
FORMAT:
RIGHT$
( string
,
number of characters )
String expression
Numeric expression
EXAMPLE: RIGHT$ (“ABCDEF”, 3)
PARAMETERS:
1. String: string expression
2. Number of characters: numeric expression truncated to an integer in the
[0 , 256[ range.
EXPLANATION:
1. Returns the substring of a specified length from the right of a string.
2. The entire string is returned when the specified number of characters is
greater than the number of characters of the string.
SEE: MID$, LEFT$
F
F
Page 72

72
STR$
PURPOSE: Converts the argument (numeric value or numeric expression value) to a
string.
FORMAT:
STR$
(argument)
Numeric expression
EXAMPLE: STR$ (123), STR$ (255+3)
PARAMETERS: Argument: numeric expression
EXPLANATION:
1. Converts decimal values specified in the argument to strings.
2. Converted positive values include a leading space and converted negative
values are preceded by a minus sign
SEE: VAL
VAL
PURPOSE: Converts a numeric character string to a numeric value.
FORMAT:
VAL
(string)
String expression
EXAMPLE: A=VAL (“345”)
PARAMETERS: string : string expression
EXPLANATION:
1. Converts a numeric character string to a numeric value.
2. Numeric characters are converted up to the point in the string that a nonnumeric character is encountered. All subsequent characters are disregarded
from the non-numeric character onwards. (i.e. VAL(“123A456”) = 123).
3. The value of this function becomes 0 when the length of the string is 0 or
when the leading character is non-numeric.
SEE: STR$, VALF
VALF
PURPOSE: Performs calculation of numeric expression expressed as string, and
returns the result.
FORMAT:
VALF
(string)
String expression
EXAMPLE: VALF (X$)
PARAMETERS: String : string expression
EXPLANATION:
1. Performs calculation of numeric expressions, which are expressed as strings,
and returns their results.
2. An error is generated when an intermediate of final result of calculation
exceeds 10
100
.
3. VALF cannot be used within a VALF argument.
FFF
Page 73

73
5.8.6 Graphical Functions
DRAW
PURPOSE: Draws a line segment between two graphic coordinates.
FORMAT:
DRAW [ ( x1
, y1 )
]
- ( x2
, y2 )
Numeric expression
Numeric expression
Numeric expression
Numeric expression
EXAMPLE: DRAW (0,0)-(50,50)
DRAW-(100,50)
PARAMETERS:
1. (x1, y1) are the coordinates of the first graphic coordinate. When omitted, the
computer will use the last graphic coordinate used in the program.
2. (x2, y2) are the coordinates of the second graphic coordinate.
3. x1 and x2 should be in the [0 , 191] range.
4. y1 and y2 should be in the [0 , 63] range, knowing [0 , 31] only is within the
actual screen, [32 , 63] being in the virtual screen that can be made visible
using the .. cursor keys.
SEE: DRAWC
DRAWC
PURPOSE: Erases a line segment between two graphic coordinates.
FORMAT:
DRAWC [ ( x1
, y1 )
]
- ( x2
, y2 )
Numeric expression
Numeric expression
Numeric expression
Numeric expression
EXAMPLE: DRAWC (0,0)-(50,50)
DRAWC-(100,50)
PARAMETERS:
1. (x1, y1) are the coordinates of the first graphic coordinate. When omitted, the
computer will use the last graphic coordinate used in the program.
2. (x2, y2) are the coordinates of the second graphic coordinate.
3. x1 and x2 should be in the [0 , 191] range.
4. y1 and y2 should be in the [0 , 63] range, knowing [0 , 31] only is within the
actual screen, [32 , 63] being in the virtual screen that can be made visible
using the .. cursor keys.
SEE: DRAWC
(0, 0) →x (191, 0)
Actual screen
(0, 31) (191,31)
↓
y
Virtual screen
(0, 63) (191, 63)
F
F
Page 74

74
POINT
PURPOSE: Returns the status of a pixel
FORMAT:
POINT
( x
, y )
Numeric expression
Numeric expression
EXAMPLE: POINT(50,50)
PARAMETERS: (x, y) is a graphic coordinate.
1. x should be in the [0 , 191] range.
2. y should be in the [0 , 63] range.
EXPLANATION: Value returned is 1 if the pixel is active (black), 0 if the pixel is
inactive.
F
Page 75

75
5.1 BASIC Commands Index
&H
69
LOAD#
ABS
57
LOCATE
ANGLE
57
LOG, LN
63
ASC
68
LPRINT
ASN, ACS, ATN
58
MID$
71
BEEP
NCR
63
CHR$
NEW [ALL]
42
CLEAR
43
NEW#
CLOSE
NPR
64
CLS
ON ERROR GOTO
CUR
59
ON GOSUB
52
DATA
56
ON GOTO
51
DEFSEG
OPEN
DEG
68
PASS
42
DIM
PAUSE
DMS$
68
PEEK
EDIT
46
PI
64
END
48
POKE
EOF
POL
64
ERASE
PRINT
ERL
PRINT#
ERR
RAN#
65
EXP
59
READ
FACT
59
READ#
FIX
60
REC
65
FOR - NEXT
54
REM (‘)
55
FRAC
60
RESTORE
FRE
43
RESTORE#
GOSUB
50
RESUME
GOTO
49
RETURN
50
HEX$
69
RIGHT$
71
HYPACS, HYPASN, HYPATN
60
ROUND
66
HYPCOS, HYPSIN, HYPTAN
61
RUN
47
IF – THEN/GOTO – ELSE
53
SAVE, SAVE ALL
INKEY$
SAVE#
INPUT
SET
INPUT#
SIN, COS, TAN
66
INPUT$
SQR
67
INT
62
STOP
48
LEFT$
70
STR$
72
LEN
70
TAB
LET
55
TRON, TROFF
47
LIST [ALL]
45
VAL, VALF
72
LIST#
VARLIST
46
LLIST
VERTIFY
LLIST#
WAIT
48
LOAD, LOAD ALL
WRITE#
Page 76

76
6 C Programming
6.1 The Basics of C
6.1.1 C and the other programming languages
Early history of C
C is a programming language that incorporates such concepts as module
programming and structural syntax along the lines of ALGOL. Another well-known
offshoot of ALGOL is PASCAL, and forebears of C are the CPL and BCPL
languages. Both CPL and ECPL were early innovations by Britain's Cambridge
University in an attempt to make ALGOL 60 easier to use. This concept crossed over
to the United States, Resulting in such languages as B and Mesa.
B language was developed as the notation of the UNIX operating system, and the
development of an improved UNIX notation produced today's C language.
Why C?
Until a number of years ago, the main programming languages for mainframe
computing devices were COBOL FORTRAN and PL/1, while microcomputers were
programmed using assembler or BASIC. Recently, however, there is a definite
movement toward the use of C for programming a variety of computers. But what has
made the C the language of choice for programming?
One reason is that C was developed for thr UNIX operating system. UNIX on the
other served as basis for the widely popular MS-DOS, which means that the UNIX
notation system is applied in a wide variety of software in use today.
Another reason is the wide appeal of C due to its distinctive features noted below.
Features of C
1. Wide applicability
C can be used in a wide range of programming applications, from numeric
calculations to machine control.
2. Simple program portability
Since C is a high level programming language, programs can be used on a wide
variety of computing devices.
3. Compact programs
The abundant operators and control structures that are built into C greatly simplify
complex processing. Compared with other languages, the rules that govern C are
relatively simple making program creation quick and easy.
4. Control structures based on structured programming
Structured programming allows easily mastered programs that are similar to human
thought patterns. This means that conditional branching and repeat loop controls are
all included.
5. A host of operators
C includes arithmetic operators, logical operators, relational operators, incremental /
decremental operators, bit logical operators, and bit shift operators.
Page 77

77
6. Pointer control
Unlike the memory addresses used in FORTRAN, COBOL and BASIC, C employs a
pointer to indicate memory locations.
7. Efficient use of memory
Memory and data management functions, as well as programs are very compact, for
more efficient memory utilization.
Thanks to this, C gives you the high level programming capabilities of FORTRAN and
Pascal, with all of the detailed processing of machine language.
6.1.2 Learning about C with your pocket computer
There once was a time that C could be seen running on large computers. A time
when it was only within the realm of programmers and system engineers. Since C
notation resembles that of machine language, it often appeared too difficult or
confusing for the casual user.
All of that changed with the introduction of the Casio PB-2000C pocket computer and
its successors. It is now possible for everyone to enjoy the many benefits of
programming in C. The full portability of the pocket computer format means that the
computer can go with you everywhere, so you can program and compute whenever
and wherever you want.
Since C interacts with many of the computer’s functions, it would be difficult to obtain
a solid grasp of its workings by simply reading this manual. We highly recommend
that you get as much hands on experience as possible with your pocket computer,
creating and running your own programs. This is the best way to learn about the
power and versatility of C.
The Casio pocket computer makes actually a very good teacher. Should you make a
mistake when inputting a program, error messages will appear on the display to
guide you back to the correct path. With each error you will be moving one more step
closer to the mastery of C. A trace function is also provided to give you valuable
insights of programs as they are executed.
6.1.3 Meet the Casio C interpreter
With most computers, C acts as a compiler language. A compiler translates the
program written in C into a machine language, which can directly be understood by
the computer. The program that the computer actually executes in the machine
language program.
Since the compiler must perform the three steps of compiling, linking and
execution for each program, they cannot be executed immediately after you enter
them. The two steps of compiling and linking require some time to perform.
The Casio pocket computers, on the other hand, feature a C interpreter. The
interpreter translates programs as you enter them, making it much easier to operate
than a compiler. Once you enter a program, all you have to do is enter the RUN
command to execute the program. Everyone who has ever worked with the BASIC
programming language will find this is a very familiar process.
Page 78

78
The few differences between the Casio interpreted C language and an ANSI
standard compiled C will be highlighted in this manual
6.2 C Program Input
6.2.1 About the C Interpreter and Editor
The unit provides you with both a C interpreter and editor. The interpreter is used to
execute programs. The editor is used for program creation and editing. Before getting
into the actual operations of the unit, perhaps it might be a good idea to first look at
these two functions in a little more detail.
About the C interpreter
There are two ways to process a C program: using a compiler or using an interpreter.
With the compiler, the program is first translated into machine language before it is
executed. This means that each time you write a program, all of the following
processes must be performed:
Program input → compiling → linking → execution.
With an interpreter, the program is entered and executed in the same environment,
for easier operation. The Casio unit features a C interpreter. After you enter the
program, all you have to do is enter the RUN command to execute it.
Throughout the rest of this manual, the C interpreter will be referred simply as an
“interpreter”.
About the C editor
An editor can be used to write everything from a few lines to an entire program.
Unlike the interpreter in which simple writing cannot be performed easily, the editor
lets you easily modify and correct programs.
The C editor is for writing and modifying C programs. You should note, however, that
you cannot execute programs while in the C editor. You can only execute from the
interpreter.
Throughout the rest of this manual, the C editor will be referred simply as an “editor”.
6.2.2 Activating the C mode
Besides the C mode, the unit also features calculator, formula, BASIC, CASL and
ASSEMBLER modes. Here, we will see how to select the C mode.
1. Switch the power of the unit ON.
_
The display indicates that the computer is in the CAL mode. This is the initial mode
when you switch the computer ON.
2. Press the MENU key.
MENU
< MENU >
1:F.COM 2:BASIC 3:C 4:CASL
5:ASMBL 6:FX 7:MODE
Page 79

79
3. Pressing the key 3 will lead to the C sub-menu allowing writing, compiling,
running and editing programs in C language.
.3.
< C >
F 0 1 2 3 4 5 6 7 8 9 51113B
F1>Run/Load/Source
You can use the cursor keys to select the program area 0 - 9
The S key allows to start writing the source code with the editor.
.S.
.
Note that the C language is case sensitive. Key words have to be written in lower
case characters only. Make sure the CAPS symbol is switched OFF before entering
a keyword.
.M A I N ( ) Shift { . .
main(){↵
.
< 2>
SPC .P R I N T F ( “ CAPS H E L L O Shift ¥ CAPS N ” .).
.;. . .
main(){↵
printf(“HELLO¥n”);↵
.
< 3>
Shift } . .
printf(“HELLO¥n”);↵
}↵
.
< 4>
This gives the following C program:
main(){
printf(“HELLO¥n”);
}
6.2.3 Using the Editor
The editor of the computer is used for creating and editing programs, as we saw with
our HELLO program. This section takes you further along the path of using the editor
effectively to create and edit useful C programs.
Entering the editor
You can enter the editor either from the MENU mode (by pressing 3 for the C
mode, and the S for the editor), or from the interpreter (by entering the EDIT
command).
Page 80

80
To create a new program from the MENU mode
1. Press the MENU key to enter in the main menu.
MENU
< MENU >
1:F.COM 2:BASIC 3:C 4:CASL
5:ASMBL 6:FX 7:MODE
2. Press the key 3 to enter in the C mode
.3.
< C >
F 0 1 2 3 4 5 6 7 8 9 51113B
F1>Run/Load/Source
Use the cursor keys to select an empty program area among areas 0 - 9
Enter the editor typing the S key.
.S.
.
You can start writing the new program.
To enter an existing program from the interpreter
After executing a program, you may want to edit it to make modifications. Just enter
the EDIT command followed by . ..
Moving the cursor
You can control cursor movement using the cursor keys in the editor as follows:
.. Cursor moves up
.. Cursor moves down
Cursor moves left
Cursor moves right
Moving the cursor to the beginning of a line
Use the following operation to move the cursor to the beginning (left end) of the
current line while in the editor:
Shift L.TOP
Moving the cursor to the end of a line
Use the following operation to move the cursor to the end (right end) of the current
line while in the editor:
Shift L.END
Scrolling the screen
Press the .. cursor key while the cursor is at the top line of the display to scroll the
display downward.
Press the .. cursor key while the cursor is at the bottom line of the display to scroll
the display upward.
Page 81

81
Editing a C program
Once in the editor, there are two modes for editing: the INSERT mode and the
OVERWRITE mode. Switch between these two modes by pressing the INS key.
The INSERT mode is automatically specified when you enter the editor. The insert
mode is indicated by a cursor thet looks like “_”. While the computer is in the INSERT
mode, any characters that you enter from the keyboard are inserted between any
characters already on the display.
You can specify the OVERWRITE mode by pressing the INS key. The OVERWRITE
mode is indicated by a cursor that looks like “_”. While the computer is in the
OVERWRITE mode, any character that you enter from the keyboard replace any
characters already at the current cursor position.
Search function
The editor search function lets you search through programs for specific character
strings. We will demonstrate the search function using the following display.
EDIT. .
main(){↵
printf(“HELLO¥n”);↵
}↵
< 1>
SRCH .P. .R.
main(){↵
printf(“HELLO¥n”);↵
}↵
search?pr_ < 1>
. .
The specified character string is located and displayed, with the cursor located at the
first letter of the string.
printf(“HELLO¥n”);↵
}↵
< 2>
The number in the lower right of the display indicates the program line number.
You can search for the next occurrence of the string without entering it again with the
Shift NEXT function (written for once under the CALC key).
Jumping to a specific line
The editor allows you to jump directly to a certain line using the Shift LINE function
and entering the line number:
Shift LINE 3
main(){↵
printf(“HELLO¥n”);↵
}↵
line?3_ < 1>
. .
Page 82

82
}↵
< 3>
Note that the line number displayed at the lower right is the one requested.
Now, let’s execute our program.
6.1 C Program Execution
6.1.1 To execute a program
You can exit the editor by pressing the SUB MENU key, which will go back to the C
mode menu.
Shift SUB MENU
< C >
F 0 * 2 3 4 5 6 7 8 9 51113B
F1>Run/Load/Source
Note that the program area 1 you just used for the short program is now shown as
occupied with a “*”.
You need to load the program into the interpreter, using the L key.
L.
Load F1
>_
Enter run and press . . to actually execute the program
.R U N . ..
>run
HELLO
>_
Success! Your computer has said HELLO to you.
6.1.1 Using Command line Operation
As you are using the interpreter, the screen always shows a “>_” prompt. In this
mode, you can enter four different commands followed by the . . key. Note that
these commands are not case sensitive.
RUN – executes the currently loaded program
EDIT – transfers to the editor
TRON – enters the TRACE mode
TROFF – exits the TRACE mode
6.1.2 Using the Trace Function
The trace function of the interpreter executes programs statement-by-statement to
let you see on the display the exact flow of all of the commands. This function comes
in very handy when debugging programs or when you wish to see the operation of
the control structure. When the trace function is activated, the computer is in the
TRACE mode.
Page 83

83
To illustrate operation of the TRACE mode, we will add a sub() procedure at the top
of our HELLO program, and call it in the main().
Here is how the modified program will look like:
sub(){
printf(“WORLD¥n”);
}
main(){
printf(“HELLO¥n”);
sub();
}
Loading and running this program will generate following output:
HELLO
WORLD
>_
With the TRACE function, it is possible to follow step by step the execution:
.T R O N . .
>tron
>_
.R U N . .
>run
(F1-5) printf(“HELLO¥n”);
Break?_
The display shows that execution is halted at line 5 of the program F1. The question
mark in the bottom line of the display indicates that the computer is asking if it should
execute line 5. Press . . to execute line 5.
. .
HELLO
(F1-6) sub();
Break?_
The display shows the result of the execution of line 5, and stands by for you to press
. . and execute line 6.
. .
Break?
(F1-2) printf(“WORLD¥n”);
Break?_
The execution of line 6 led the program to line 2, which is in the function sub().
. .
Break?
WORLD
>_
Page 84

84
To interrupt execution of the TRACE mode
Lets run again the program in TRACE mode:
.R U N . .
>run
(F1-5) printf(“HELLO¥n”);
Break?_
1. You can press T or . . to execute the line and carry on the TRACE mode.
2. You can press BRK to exit the program, but stay in TRACE mode. This is useful if
you want to re-run the program because you missed something.
To exit the TRACE mode
There are four different methods that you can use to exit the TRACE mode.
1. Enter the TROFF command and press . .. “TROFF” stands for trace off.
2. Exit the interpreter while entering the editor or the MENU mode. This
automatically exits the TRACE mode.
3. Switch the power of the computer OFF. This automatically exits the TRACE
mode.
4. Press N during TRACE mode execution when prompted “Break?_” to exit the
TRACE mode and finish executing the program.
Variable Test Function
During TRACE mode execution of a program, you can press D when prompted
“Break?_”.
.T R O N . .
.R U N . .
>run
(F1-5) printf(“HELLO¥n”);
Break?_
.D.
(F1-5) printf(“HELLO¥n”);
Break?d
var>
Entering the name of the variable followed by . . will give you the type and value of
the variable at this stage of the execution of the program.
Entering only . . will resume the TRACE mode execution.
6.2 Introduction to C
This chapter tells you about the important points and rules to remember when
creating C programs. Simply work with the example programs presented in this
chapter to become familiar with proper procedure. This chapter puts you on the route
to becoming a C programmer.
6.2.1 Outputting characters
Creating a program to output character strings
We have already some experience in chapter 6.2 with a few simple programs that
output lines of characters to the display. Here, let’s try understanding how it works.
Page 85

85
Enter the following program:
.M A I N ( ) Shift { . .
SPC .P R I N T F ( “ CAPS H CAPS O W SPC A R E SPC
.Y. .O. .U. Shift .?. Shift ¥ N ” .). .;. . .
SPC .P R I N T F ( “ CAPS F CAPS I N E , T H A N. .K.
SPC .Y. .O. .U. Shift ¥ N ” .). .;. . .
Shift } . .
printf(“How are you?¥n”);↵
printf(“Fine,thank you¥n”);↵
}↵
< 4>
The following shows how the program is stored in the source file:
main(){
printf(“How are you?¥n”);
printf(“Fine,thank you¥n”);
}
As already stated, C programs instructions are written using lower case characters.
Also note the following characters in lines 1 and 4 of the program:
main() {
………
}
These are called the function that makes up the C program. The word “main”
defines the function name, and the statements between the braces are actually
executed. Actually, you can assign your function any name you wish, but “main” is
special in that the computer will always begin execution from the function named
“main”.
Lines 2 and 3 contain two printf() statements. The printf() statement is actually a
function of C language that is used to output characters to the display. Such
functions are called standard functions. The character strings included within the
parenthesis following printf are what is output to the display. Note that a character
string is defined as such by being included within double quotation marks. A
character string or anything else that is included within the parentheses is called an
argument.
The “¥n” at the end of each printf() character string is called a newline character, and
advances the output to the left margin of the next line. Here the newline character is
at the end of the string, but you can also include it within the string to tell the
computer to go to the beginning of the next line.
Note that the newline character is noted “\n” in the ANSI C language. Nevertheless,
the backslash character (Ascii code 92) is not available on the pocket computer. The
character coded 92 is the Yen character (see chapter 1.6). Hence, every time a
backslash would be required in ANSI C, we will use the Yen character instead.
Page 86

86
Making your program easy to read
You have probably noticed by now that we have been writing and editing our C
programs in a certain format. The previous program was written and entered as:
main(){
printf(“How are you?¥n”);
printf(“Fine,thank you¥n”);
}
We could have just as easily written and input it as:
main(){
printf(“How are you?¥nFine,thank you¥n”);
}
Or even:
main(){printf(“How are you?¥nFine,thank you¥n”);}
The computer would execute the program identically in either case. The first format is
preferred, however, because it is much easier to read. Though you may not see the
need for such a format at this point, but when you start dealing with longer programs
you will greatly appreciate an easier to read format.
Creating a program to output numeric values
C programs can output octal, decimal, and hexadecimal values. Here, let’s create a
program that displays the vale 65 in its decimal, hexadecimal and floating-point
format, using a few more new techniques.
First, enter the editor and input the following:
/* Output Value */
main(){
printf(“D=%d H=%x F=%f¥n”65,65,65.0);
}
The first line is what we call a comment line. The computer reads everything between
/* and */ as a comment, and so they are ignored. You can use comment lines inside
of a program to point out certain features, or as memos for later reference.
Putting /* and */ around program statements is as well a good way to temporarily
forbid the interpreter executing them without deleting them for good.
The remainder of the program is quite similar to the one that we created to output
character strings to the display, but the argument for printf() looks a bit different. The
commas inside of the parentheses are there to separate arguments. This means that
the printf statement in this program has a total of four arguments.
printf(“D=%d H=%x F=%f¥n”65,65,65.0);
| 1st argument | | | 4th argument
| | 3rd argument
| 2nd argument
The arguments inside the parenthesis of printf tell the computer to print the following:
D=<65 as decimal integer> H=<65 as hexadecimal> F=<65.0 as floating point>
Page 87

87
Note that there is a direct relationship with
• the 1st % construction and the 2nd argument
• the 2nd % construction and the 3rd argument
• the 3rd % construction and the 4th argument.
printf(“D=%d H=%x F=%f¥n”65,65,65.0);
You just have to be careful to ensure that the proper % construction is matched with
the proper value, or else you will get strange results. Here is a list of some other %
constructions in addition to those noted above.
% construction
Output
%d
%x
%f
%s
%c
decimal integer
hexadecimal integer
floating point
string
single character
Now, let’s enter the RUN command to execute our program and look at the result.
.R U N . .
>run
D=65 H=41 F=65.000000
>_
Here we can see that the decimal equivalent of 65 is 65, the hexadecimal equivalent
is 41, and the floating-point equivalent is 65.000000.
Integer notation in C
In the previous program, the decimal value 65 was converted in accordance with
three corresponding % constructions. In some instances, however, you might want to
include the actual values as they are in printf() arguments, without conversion when
they are displayed. To do this, you have to specify the value as an integer constant.
With C, you can specify decimal, octal and hexadecimal values, as well as characters
as integer constant. Use the following formats to specify values or characters of
integer constants.
• 65 – displayed as decimal integer 65
• 0101 – displayed as octal value 101. Include 0 in the first digit of an octal value
to specify it as an integer constant.
• 0x41 – displayed as hexadecimal value 41. Include 0x in the first two digits of a
hexadecimal value to display it as an integer constant.
• ‘A’ – displayed as a single character. Include the character in single quotes.
If you go back to our last program and change the printf() arguments as noted below:
/* Output Value V2 */
main(){
printf(“D=%d O=%o H=%x C=%c¥n”65,0101,0x41, ‘A’);
}
Page 88

88
The following results would be displayed:
.R U N . .
>run
D=65 O=101 H=41 C=A
>_
6.2.2 Variable types and operations
Declaring variable types
With C programs, you have to declare the type of data that will be assigned to each
variable before you can use the variable. The following statement, for example, tells
the computer that the variable “x” will be used for the storage of integers:
int x;
The following table shows the other declarations that can be made for variables.
Declaration
Meaning
char
short
int
long
float
double
8-bit integer
16-bit integer
16-bit integer*
32-bit integer
32-bit single precision floating point
64-bit double precision floating point
Besides these, you can also include the declaration “unsigned” in front of any of the
integer declaration (except long) to indicate that the integer is unsigned (no
positive/negative sign)
*Note: the “int” declaration is hardware dependent, despite the fact it is the default
type in many cases, and the fastest for arithmetics. On the pocket computer, which
uses a 16-bit microprocessor, it refers to a 16-bit integer. But on other processors, it
may refer to 24-bit or 32-bit integers. For best portability, it is recommended to use
the “short” declaration instead, when possible.
Assigning values to variables
To see how to declare variables and also how to assign values, let’s write a program
that performs various operations using the values 49 and 12.
Enter the editor and input the following program.
/* Arithmetic Operations 1 */
main(){
short a,b,c,d,e;
a=49+12;printf(“%d “,a);
b=49-12;printf(“%d “,b);
c=49*12;printf(“%d “,c);
d=49/12;printf(“%d “,d);
e=49%12;printf(“%d¥n“,e);
Page 89

89
}
The first four operations are addition, subtraction, multiplication and division. The
value for “e” will be the modulus (remainder) of 49 divided by 12.
When you execute the program, the display should appear as follows:
.R U N . .
>run
61 37 588 4 1
>_
The following statement in the first line of the program declares that all five variables
will be for the storage of 16-bit integers.
Short a,b,c,d,e;
As you can see, you can use a single declaration for multiple variables by separating
the variables by commas.
In each of the following lines, the computer performs the calculation and assigns the
result to the corresponding variable. Then, the result is displayed by including the
variable as an argument in the printf() statement.
Using arrays
An array is a variable with depth. With an array, you use a single name followed by a
number to indicate the variable name. For example, a[0], a[1], a[2], a[3], a[4]
represent five memory areas within an array called “a[5]”. Note that the values
following the name must be enclosed within brackets.
With arrays, declaration of repetitive variables becomes very simple. Let’s go back to
our original program where we used variables “a” to “e” to store calculation results,
and use an array” a[5]” instead.
/* Arithmetic Operations 2 */
main(){
short a[5];
a[0]=49+12;printf(“%d “,a[0]);
a[1]=49-12;printf(“%d “,a[1]);
a[2]=49*12;printf(“%d “,a[2]);
a[3]=49/12;printf(“%d “,a[3]);
a[4]=49%12;printf(“%d¥n“,a[4]);
}
Note that like in BASIC, an array can have multiple dimensions. The array a[3][3]
would represent a total of nine values:
a[0][0] a[0][1] a[0][2]
a[1][0] a[1][1] a[1][2]
a[2][0] a[2][1] a[2][2]
Page 90

90
6.2.3 Entering characters and values
Entering a single character from the keyboard
Here we will create a program that outputs a character and its corresponding
character code in hexadecimal format. If you press the key for the letter “B”, for
example, the format will be:
Char=B Hex=0x42
The standard function getchar() is used to tell the computer to get one character
input from the keyboard. In most ANSI C compilers, this function is part of the
standard input / output library which complements the core of C language. You need
then to include this library with the following statement:
#include “stdio.h”
If you use mathematical functions, which are again not in the historical core of C
language, you need to include the mathematical library:
#include “math.h”
The C interpreter of your pocket computer does not need these instructions for a
compiler. Nevertheless, it is a good idea to add a comment reminding the need for
the standard libraries to help portability.
The following is the program that will accomplish our task:
/* Diplay character codes */
/* #include <stdio.h> */
main(){
int c;
c=getchar();
printf(“Char=%c Hex=0x%x¥n“,c,c);
}
The getchar() function only returns the character code, and so no argument is used
inside of the parenthesis. In the printf() function, %c specifies character format while
%x specifies hexadecimal format.
Try inputting and executing this program.
When you enter the RUN command, the interpreter executes the program until it
comes to the getchar() function. At that time, execution stops and the cursor flashes
at the bottom of the display waiting for further input. At this time, you should enter a
letter, number or symbol. The following shows the display that should result if you
enter the letter “Q”.
.R U N . .
.Q. . .
Q
Char=Q Hex=0x51
>_
This shows that the character code for “Q” is hexadecimal 51.
Page 91

91
Entering Values
Now, let’s try a program that calculates the sine and cosine of values that you enter
from the keyboard. Since we can be expecting decimal values for input and output,
we will be defining the variable as floating-point. The program to accomplish this task
would appear as follows:
/* Compute sine & cosine */
/* #include <stdio.h> */
/* #include <math.h> */
main(){
float x;
printf(“Input Value(DEG)“);
scanf(“%f”,&x);
angle(0); /* Degrees */
printf(“sin(%f)=%f¥n“,x,sin(x));
printf(“cos(%f)=%f¥n“,x,cos(x));
}
First, we must specify the variable x as floating point.
The scanf() function is used to get the entry of a value from the keyboard. Exactly the
opposite as the printf() function, the first argument of the scanf() determines the type,
and the value is assigned to the second argument. In the program here, we can see
that the first argument of scanf() is “%f”, to indicate floating point format. The second
argument is &x which is a pointer to the variable x. A pointer indicates the address in
memory of a variable. The second argument of the scanf() function must be a
pointer.
The statement “angle(0);” specifies the unit of angular measurement. You can specify
the unit by changing the argument of angle() as follows:
• angle(0) – degrees
• angle(1) – radians
• angle(2) – grads
The next statements are the now familiar printf().
After you input this program, enter the interpreter and execute it.
When the computer reaches the scanf() function, it displays the message “Input
Value(DEG)” and waits for input of a value. Here, let’s enter 60 and press the . .
key. This value is assigned to variable “x”, and the following appears on the display.
.R U N . .
60 . .
sin(60.000000)=0.866025
cos(60.000000)=0.500000
>_
Page 92

92
6.2.4 Using selection statements
Using the “if” selection statement
You can use the “if” statement to tell the computer to shift the flow of control if certain
conditions are met. The “if” statement has two basic formats.
1. if (condition) statement.
Here, the statement is executed if the condition is met (true = any value other than 0),
and not executed if the condition is not met (false = 0).
2. if (condition) statement 1
else statement 2
In this case, statement 1 is executed if the condition is met (true = any value other
than 0), while statement 2 is executed if the condition is not met (false = 0).
The “if – else” statement may contain multiple statements for the “if” and the “else”
statements. In the following example, please also note the proper format for easy
reading.
Note that the statements are aligned and also note the position of the braces.
if (condition){
Statement 1
Statement 2
}
else{
Statement 3
Statement 4
}
A program to solve quadratic equations
Here, we will create a program that produces two solutions for the following quadratic
equation: ax2 + bx + c = 0 (a ≠ 0)
In the above equation, it is assumed that a, b and c are real numbers.
The solution for the formula is:
- b ± √ (b2 – 4ac)
x=
2a
Also, the following is the discriminant which determines the following concerning the
solutions of the above equation:
• D = b2 – 4ac
• D>0 – Two different real solutions
• D=0 – Single real solution
• D<0 – Two different imaginary numbers (conjugate complex numbers)
In the program listed below, the discriminantr is used in the condition of a selection
statement with one operation being performed if D≥0 and another being performed
when D<0.
Page 93

93
/* Quadratic equation */
/* #include <stdio.h> */
/* #include <math.h> */
main(){
double a,b,c,D,q,r;
scanf(“%lf %lf %lf“,&a,&b,&c);
D=b*b-4.0*a*c;
if (d>=0){
q=(-b+sqrt(D))/a/2.0;
r=(-b-sqrt(D))/a/2.0;
printf(“%If, %If¥n“,q,r);
}
else{
r=sqrt(-D)/a/2.0;
q=-b/a/2.0;
printf(“%lf+%lfi “,q,r);
printf(“%lf-%lfi¥n“,q,r);
}
}
The variables “a”, “b” and “c” correspond to the “a”, “b”, and “c” in the quadratic
equation, while the “D” variable is the “D” of the discriminant. Variables “q” and “r” are
used for the two solutions. Note that all of the variables are specified as “double”,
meaning that they are for double-precision floating point values.
Note that the % construction in the scanf() function is “%lf”. The “f” portion specifies a
floating-point value, while the “l” stands for long, and means that the integer part of
the value is longer than normal.
Relational operators
The condition “D>=0” is called a relational operator. This tells the computer to
compare the value assigned to variable “D” with 0. If the value of “D” is greater than
or equal to 0, a value of 1 (TRUE) is returned to indicate true. If it is less than zero, a
0 (FALSE) is returned to indicate false. The following are the other relational
operators that can be used with C.
Operator
Example
Meaning
>
<
>=
<=
==
!=
i>j
i<j
i>=j
i<=j
i==j
i!=j
True (1) if i is greater than j, false (0) if not.
True (1) if i is less than j, false (0) if not.
True (1) if i is greater than or equal to j, false (0) if i is less than j
True (1) if i is less than or equal to j, false (0) if i is greater than j
True (1) if i is equal to j, false (0) if not.
True (1) if i is not equal to j, false (0) if it is.
Page 94

94
6.2.5 Using loops
Using the “while” loop
The “while” loop makes it possible to repeat execution of statements until a specific
condition is met. The format of the “while” loop is as follows:
while (condition)
Statement
The “while” loop first executes the condition. If the condition is met (true, returning a
value other than 0), the statement is executed, and execution loops back to the
“while” loop to evaluate the condition again. Whenever the condition is not met (false,
returning 0), execution of the “while” loop is ended.
You can have multiple statements in a while loop, but note the following format that
you should use in order to make the program easier to read:
while (condition){
Statement 1
Statement 2
.
.
Statement n
}
The closed brace should be directly under the “w” of the “while”. Keep the statements
indented.
Now, let’s create a program that uses the “while” loop. The program will output the
character codes for the characters “0” through “Z” as illustrated below:
Char(0) = Hex(0x30)
Char(1) = Hex(0x31)
…
Char(Z) = Hex(0x5A)
The following shows the program that produces such result.
/* Character codes */
/* #include <stdio.h> */
#define STR ‘0’
#define END ‘Z’
main(){
char ch;
ch=STR;
while (ch<=END){
printf(“Char(%c) = Hex(0x%x)¥n“,ch,ch);
getchar(); /* waits for return key */
ch++;
}
}
Page 95

95
Using the #define statement
Lines 3 and line 4 of the program contain the #define statement. The #define
statement defines a name for a particular string of characters. In the above program,
“#define STR ‘0’ “ tells the computer that anytime it comes across the name “STR”, it
should replace it with the character “0”. Likewise, “#define END ‘Z’ “ tells the
computer that the name “END” is to be replaced by the character ‘Z’.
The reason for using a #define statement is to make the program easier to read and
to change later. If, in the above program, we used the character ‘0’ a number of times
throughout the program and we wished to change all of them to ‘A’, it would be much
easier to change the #define statement once, rather than making multiple changes.
Incrementing and decrementing
The program here establishes the initial value for trhe variable “ch” as “0”, and tells it
to keep repeating the loop “while (ch<=END)”, in which END is the name that
represents the character “Z”. As long as “ch” is less than or equal to “Z”, the following
printf() statement is executed, and then the getchar() statement is executed.
This program does not really require input of any characters, but if we did not include
a getchar() statement here, the data produced by this program would simply scroll
across the display so quickly that we would not be able to use it. The getchar()
statement causes the computer to stop here and wait for input, so that you can read
the last line produced by the program. When you are ready to continue, simply press
the . . key.
Once execution continues past the “ch++;” statement, 1 is added to the value of “ch”.
“++” is called the increment operator. The following table shows how it is used, as
well as its opposite, the decrement operator.
Operator
Example
Meaning
++
--
++
--
++i
--i
i++
i--
Increment i by 1 and use the value.
Decrement i by 1 and use the value.
Use i and then increment it by 1.
Use i and then decrement it by 1.
As you can see here, the increment and decrement operators can be used either
before or after the value, with different results. For other useful operators, see page
108 of this manual.
Page 96

96
Using the “do – while” loop
The “do – while” loop is another method that you can use for repeat execution. The
format of the “do – while” loop is as follows:
do
Statement
while (condition);
Unlike the “while” loop, the “do – while” loop executes the statement first and then
checks whether or not the condition has been met or not. Note also the semicolon at
the end of the “while” line cannot be omitted.
Let’s use the “do – while” to find the Greatest Common Measure for two values.
/* Greatest Common Measure */
/* #include <stdio.h> */
main(){
int gcm,x,y;
x=56;
y=63;
printf(“¥nGCM(%d,%d) = ”,x,y);
do{
gcm=x; x=y%x; y=gcm;
}while (x!=0)
printf(“%d¥n”,gcm);
}
When you execute this program, the following result should be produced:
GCM(56,63) = 7
>_
Using the “for” loop
You can also use the “for” loop for repeat execution of statements. The format of the
“for” loop is as follows:
For (expression 1; expression 2; expression 3)
Statement
Note that there are three expressions inside of the parentheses of the “for” loop.
• Expression 1 initializes the counter variable, and is executed only once, before
the first pass of the loop.
• Expression 2 is the condition of the loop, so the loop continues to execute until
this condition is not met.
• Expression 3 performs an operation on the counter variable before the statement
in the loop is executed.
Page 97

97
Note the following:
for (i=0; i<10; i++)
printf(…)
This tells the computer to execute the printf() statement starting from a count of 0
which is incremented by 1 which each pass of the loop, until the count reaches 10.
As with the “if” and “while” loops, multiple statements within a “for” loop are enclosed
in braces.
Let’s write a program that squares all of the integer from 1 to 100.
/* 100 squares */
/* #include <stdio.h> */
main(){
int i;
for (i=1; i<=100; i++)
printf(“%8d %8d¥n”,i,i*i);
getchar(); /* waits ret key */
}
First, let’s look at the expressions contained in the parentheses following the “for”
statement and see what each of them mean.
• Expression 1 i=1 Initial value of counter is 1.
• Expression 2 i<=100 Repeat as long as I is less than or equal to 100.
• Expression 3 i++ Increment I by 1 with each pass of loop (i=i+1).
In effect, this tells the computer to keep repeating the loop starting with a counter
value of 1, and repeat the loop as long as the counter value is 100 or less.
In the next line, the “%8d” in the first argument tells the computer to display the
decimal value flush right in an 8-character block reserved on the display. Flush left
would be “%-8d”.
When you execute this program, the following result should be produced:
1 1
2 4 …
… 100 10000
>_
The following shows how the same loop could be written as a “for” loop and a “while”
loop. As you can see, the “for” loop is much easier to write and read.
For (expression 1; expression 2; expression 3)
Statement
⇑
⇓
expression 1;
while (expression 2){
Statement
expression 3
}
Page 98

98
Nested loops
The term nested loop means simply “loops inside of loops”. To better understand
how nested loops work, let’s have a look at a very short, simple representative
program.
/* nested loops example */
/* #include <stdio.h> */
main(){
float a[3][3];
int i,j;
for (i=0; i<3; i++)
for (j=0; j<3; j++)
scanf(“%f”,&a[i][j]);
}
The program uses a pair of “for” loops to read values from the keyboard and assign
them to a 3x3 2-dimensional array a[3][3]. Remember that such an array looks
something like the following:
a[0][0] a[0][1] a[0][2]
a[1][0] a[1][1] a[1][2]
a[2][0] a[2][1] a[2][2]
Considering just the loop counter (i and j) values, the above program executes as
follows:
First pass (i)
Second pass (i)
Third pass (i)
i=0
j=0
j=1
j=2
i=1
j=0
j=1
j=2
i=2
j=0
j=1
j=2
This means that values entered from the keyboard are read into “%f” by scanf() and
assigned to array a[3][3] in sequence by “&a[i][j] as “i” and “j” change values as noted
above.
Let’s expand on this program so that a second nested loop reads the values out of
the array and displays them on the screen.
/* nested loops example 2 */
/* #include <stdio.h> */
main(){
float a[3][3];
int i,j;
for (i=0; i<3; i++)
for (j=0; j<3; j++)
scanf(“%f”,&a[i][j]);
for (i=0; i<3; i++) {
for (j=0; j<3; j++)
printf(“%8.2f”,a[i][j]);
printf(“¥n”);
}
}
Page 99

99
We have now the value assignment nested loop we saw before, followed by a similar
set of loops to read and display the values after they are stored. The only new item is
the “%8.2f” which specifies that each value will be displayed in an area of at least 8
characters, with two decimal places (right flush).
.R U N . .
1 . . 2 . . 3 . . 4 . . 5 . . 6 . . 7 . . 8 . . 9 . .
1.00 2.00 3.00
4.00 5.00 6.00
7.00 8.00 9.00
>_
6.2.6 Defining functions
Function definition and program modules
Besides the standard functions, the C programming language lets you define your
own routines as functions to be called by later programs. We have seen a hint of this
already in the “main()” first line of our programs to define them as main functions.
Using the procedures presented here, you will ba able to break large programs down
into modules and then call up each module from the main() function. This means that
you will eventually build up your own library of functions that you can call up from
various programs as you need them.
Creating functions
The following is the format for function definition:
function type declaration function name (arguments)
argument type declaration;
{
declaration of variables used in the function
statements…
}
Function type
This part of the function declares the type of data that will be returned by the function.
This line may be omitted if the value to be returned is an integer (int) or if there is no
data returned. But a good programming discipline is to formally declare an “int” type
or a “void” type when nothing is returned.
Function name
You cannot use reserved words as function names, and you should not use names
already used for standard function names The following is a table of reserved words.
auto
default
float
register
(struct)
(volatile)
break
do
for
return
switch
while
case
double
goto
short
(typedef)
char
else
if
signed
(union)
const
(enum)
int
sizeof
unsigned
continue
extern
long
static
void
The standard functions are listed on page 113
Page 100

100
Arguments
Arguments are used to pass values to the function when it is called. If no values are
passed, the arguments can be omitted. If the arguments are omitted, the following
argument type declaration is also omitted.
Argument type declaration
Declares the types of the arguments specified above.
Note that ANSI C allows declaring arguments directly inside the parenthesis. The C
interpreter does not allow such a declaration.
Statements
The portion of the function between the braces is executed when the function is
called. Use the same format as that which we have seen for our main() programs.
EXAMPLE 1:
For illustrative purposes, let’s modify the program that squares all integers from 1 to
100 (see page 97) by performing the squaring calculation with a function.
/* 100 squares 2 */
/* #include <stdio.h> */
int isquare(x) /* square of int */
int x;
{
return (x*x);
}
main(){
int i;
for (i=1; i<=100; i++)
printf(“%8d %8d¥n”,i,isquare(i));
getchar(); /* waits ret key */
}
Returned value
The function isquare() that we have defined receives the argument, squares it, and
then returns the squared value. The line “return(i*i)” instructs the computer to square
the value of “x” and return it to the main() function.
When the main() function executes isquare(i), the value stored in the variable “I” is
passed to function isquare() as argument “x”. Note that the value only is passed, and
that variables x and i are different variables. There is no way for the function
isquare() to modify the content of variable i.
The “return” statement within isquare() will give the value of the square to the
expression isquare(i) in the main() function, and execution precedes to the printf
statement for output.
EXAMPLE 2:
We will rewrite the same program using now a function that returns floating-point
values.
 Loading...