


Casio CP-1260 Manual

PAGE
TABLE OF CONTENTS
INITIAL SETUP
Important Safety
Instructions.................... 2
Connecting your Unit......... 3
Charging the Batteries ....... 4
Switch Settings.................. 4
Tone/Pulse Service......... 4
Base Ringer On/Off ........ 4
Base Speaker Volume ........ 4
Important Feature
Information .................... 5
Programming the Handset
Ringer Volume & Tone ... 5
CORDLESS OPERATION
Standby Mode ................... 6
Placing a Call ..................... 6
Misdialing a Number.......... 6
Answering a Call ................ 6
Adjusting the Handset
Earpiece Volume ............ 6
Switching from Handset to
Speakerphone ................ 7
Status Indicator ................. 7
Low Battery Indicator ........ 7
Out of Range Alarm ........... 7
BASE OPERATION
Maximizing the Benefits of
the Speakerphone .......... 8
Placing a Call ..................... 8
Misdialing a Number.......... 8
Answering a Call ................ 8
Placing a Call On Hold ....... 9
Taking a Call Off Hold ........ 9
Mute .................................. 9
Switching from
Speakerphone to
Handset.......................... 9
PAGE/INTERCOM
Paging the Handset from
the Base Unit................ 10
Using the Intercom from
the Base Unit................ 10
Using the Intercom from
the Handset.................. 10
Answering a Call While
Using the Intercom ...... 11
Room Monitor ................. 11
3-WAY CONFERENCE
3-Way Conference Initiated
from Handset ............... 12
3-Way Conference Initiated
from Base .................... 12
AUTODIAL
Storing Autodial Numbers
into the Handset........... 13
Erasing Autodial Numbers
from the Handset ......... 13
Storing Autodial Numbers
into the Base Keypad.... 14
Erasing Autodial Numbers
from the Base............... 14
Using Autodial from the
Handset........................ 14
Dedicated One Touch
Autodial Buttons .......... 15
Using Autodial from the
Base ............................. 15
Programming Autodial
Pauses ......................... 16
Programming T one/Pulse
in Autodial ................... 1 6
1
ADDITIONAL
INFORMATION
Flash/Call Waiting ............ 17
Redialing ......................... 17
T one/Pulse Mixed Dialing. 17
Moving the CP-1260........ 18
T wo-Line Installation ....... 18
Multi-Line Installation...... 18
Cleaning the CP-1260...... 18
Changing the Digital
Security Code............... 18
Handset Battery
Installation ................... 19
Wall Mounting ................. 20
T r oubleshooting............... 21
Questions? Here’s How
to Reach Us ................. 22
Limited Warranty............. 23
FCC Requirements ........... 24
Accessories ..................... 25
PAGE
IMPORTANT SAFETY
2
INSTRUCTIONS
INSTALLATION
PAGE
3
INSTALLATION INSTRUCTIONS
1. Never install telephone wiring during a lightning storm.
2. Never install telephone jacks in wet locations unless the jack is specifically designed for wet locations.
3. Never touch uninsulated telephone wires or terminals unless the telephone line has been disconnected at the
network interface.
4. Use caution when installing or modifying telephone lines.
SAFETY PRECAUTIONS
When using your telephone equipment, basic safety precautions should always be followed to reduce the risk of
fire, electric shock and injury to persons, including the following:
1. Read and understand all instructions.
2. Follow all warnings and instructions marked on the product.
3. Unplug this product from the wall outlet before cleaning. Do not use liquid cleaners or aerosol cleaners. Use
a damp cloth for cleaning.
4. Do not use this product near water: for example, near a bath tub, wash bowl, kitchen sink or laundry tub, in
a wet basement, or near a swimming pool.
5. Do not place this product on an unstable cart, stand, or table. The product may fall, causing serious product
damage.
6. Slots and openings in the cabinet and the back or bottom are provided for ventilation. To protect it from
overheating, these openings must not be blocked or covered by placing the product on the bed, sofa, rug, or
other similar surface. This product should never be placed near or over a radiator or heat register. This
product should not be placed in an enclosed environment unless proper ventilation is provided.
7. Do not allow anything to rest on the power cord. Do not locate this product where the cord will be abused by
animals or persons walking on it.
8. Do not overload wall outlets and extension cords as this can result in the risk of fire or electric shock.
9. Never push objects of any kind into this product through cabinet slots as they may touch dangerous voltage
points or short out parts that could result in a risk of fire or electric shock.
10. Never spill liquid of any kind on the product.
11. To reduce the risk of electric shock, do not disassemble this product. Take it to a qualified service person
when service or repair work is required. Opening or removing covers may expose you to dangerous voltages
or other risks. Incorrect re-assembly can cause electric shock when the appliance is subsequently used.
12. Unplug this product from the wall outlet and refer servicing to qualified service personnel under the
following conditions:
A. When the power supply cord or plug is damaged or frayed.
B. If liquid has been spilled into the product.
C. If the product has been exposed to rain or water.
D. If the product does not operate normally by following the operating instructions. Adjust only those
controls that are covered by the operating instructions because improper adjustment of other controls
may result in damage and will often require extensive work by a qualified technician to restore the
product to normal operation.
E. If the product has been dropped or the cabinet has been damaged.
F. If the product exhibits a distinct change in performance.
13. Avoid using a telephone (other than a cordless type) during an electrical storm. There may be a remote risk
of electric shock from lightning.
14. Do not use the telephone to report a gas leak while near the leak.
15. You should use ONLY the power adapter supplied with the unit. If you need a replacement, please see
ACCESSORIES on page 25 to place an order.
SAVE THESE INSTRUCTIONS
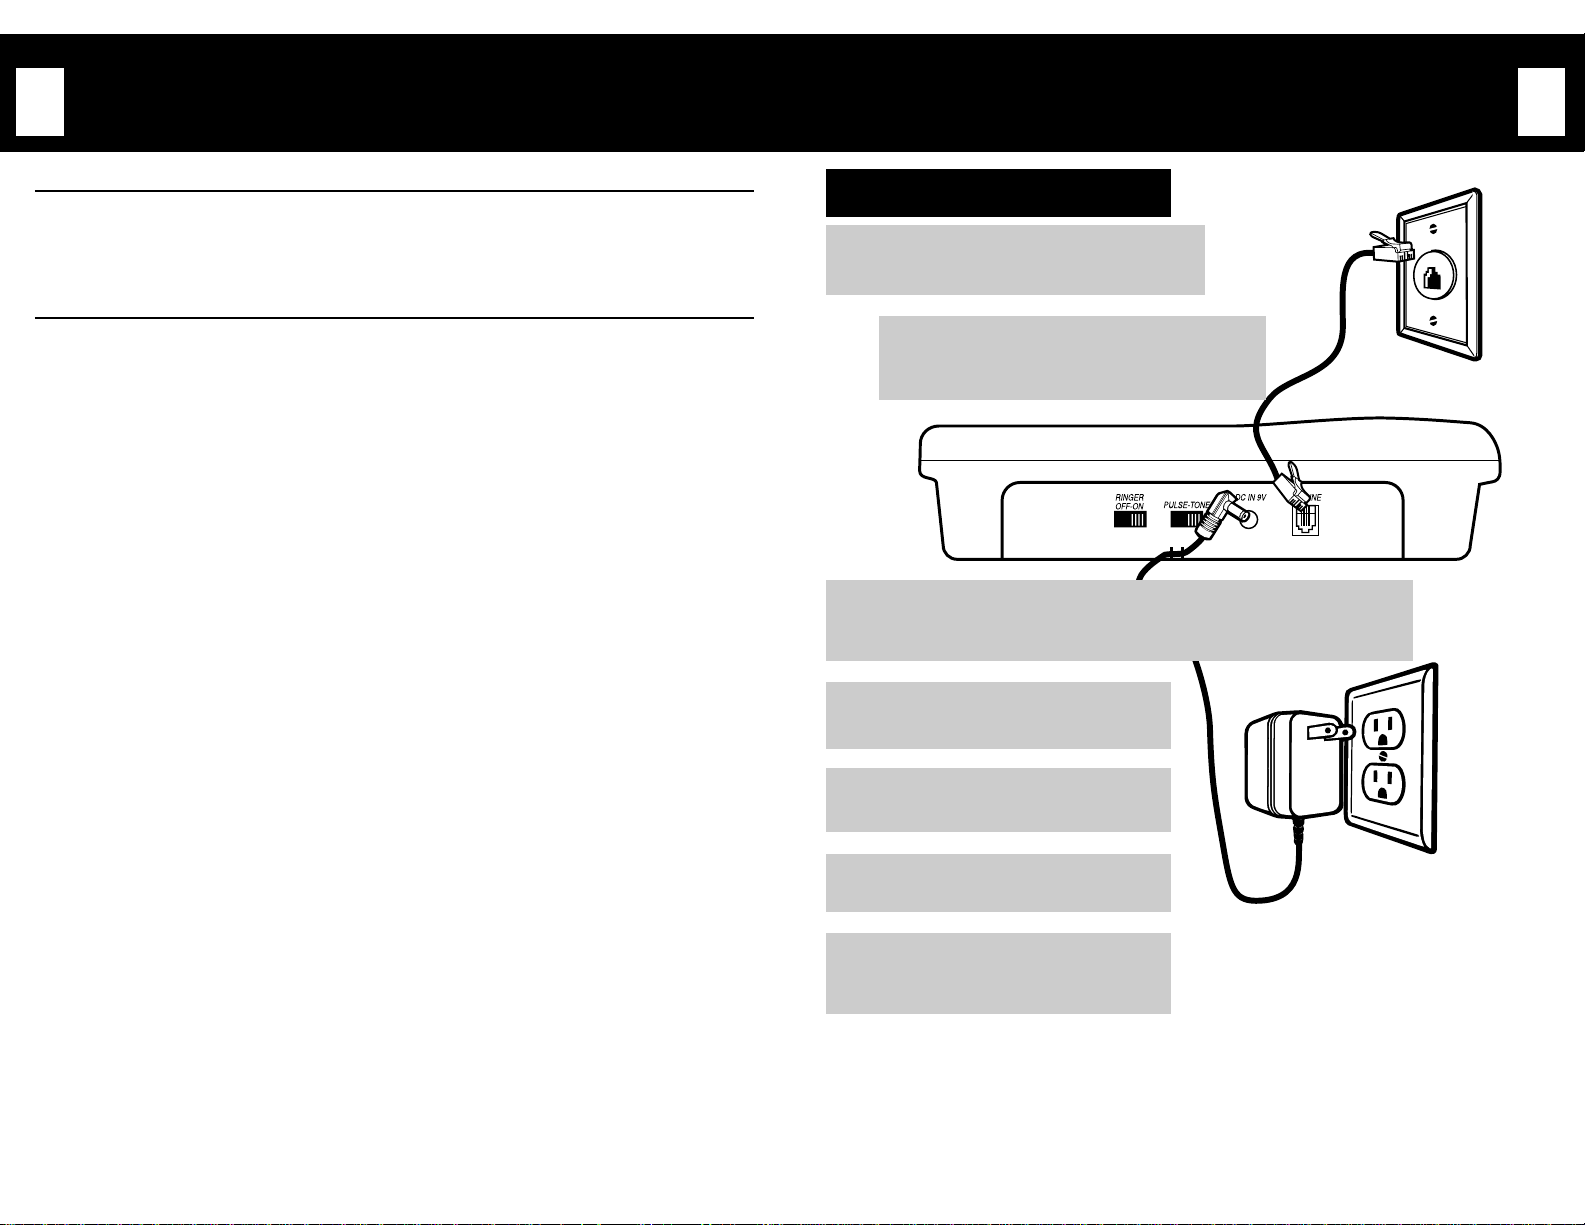
CONNECTING YOUR UNIT
Install the handset battery. See page 19,
1
“HANDSET BATTERY INSTALLATION.”
PLUG
the CP-1260’s telephone cord into a
telephone wall jack.
2
the cord into the back of the base unit.
CONNECT
of the unit.
3
underside of the unit) to prevent accidental disconnection.
PLUG
electrical wall outlet.
4
It may be necessary to set the TONE/
PULSE SWITCH (see page 4).
5
Raise the charging cradle antenna for
clear reception.
6
Place the handset (with battery pack
installed) in the cradle and charge for
7
12-15 hours.
NOTES:
■ Place the power cord so it does not create a trip hazard, or where it could become chafed and create a fire or electrical
hazard.
■ Use only the supplied AC Adapter, do not use any other AC adapters.
the AC Adapter Plug into the DC IN 9V jack on the back
ROUTE
the AC Adapter into an
PLUG
the other end of
the cord around the strain relief latch (on the

PAGE
PAGE
BATTERIES & SWITCH SETTINGS
4
CHARGING THE BATTERIES
Charge the batteries for 12-15 hours before
using the cordless handset for the first time.
The handset is always charging while it is in
the base unit and cannot be overcharged.
From fully charged, you should get 7 hours
continuous use and 14 days use when the
handset is in the standby mode (charging in
the base).
Check the AC Adapter to see that it is
connected correctly to the base unit
1
and wall outlet.
Place the handset in the base CP-1260
face up or face down. Make sure that
2
the STATUS INDICATOR on the base
unit is lit to indicate that the
CP-1260 is charging.
NOTES:
■ The battery pack will gradually discharge over a
long period of time even when it is not being used.
For the best performance, return the handset to the
base unit after each telephone call to charge the
battery.
■ If you must replace the battery pack during a
telephone call, complete the replacement of the
battery pack within 30 seconds, and you can return
to the original call.
SWITCH SETTINGS
The CP-1260 has two switches. The TONE/
PULSE SWITCH and BASE RINGER ON/OFF
SWITCH are on the back side of the base
CP-1260.
TONE/PULSE SERVICE
The TONE/PULSE SWITCH (on the back side
of the base unit) configures the unit to dial out
with either touchtone or pulse signals to
match the service supplied by your local
telephone company. The CP-1260 is shipped
with the TONE/PULSE SWITCH in the TONE
position for touchtone service. If you have
rotary or pulse service, set this switch to
PULSE.
PULSE = for Rotary dialing or Pulse
services
TONE = for T ouchtone service
BASE RINGER ON/OFF
The CP-1260 is shipped with the base ringer
ON/OFF SWITCH set to “ON.” To turn the
base ringer OFF, move the switch (located on
the left side of the CP-1260) to the “OFF”
position.
FEATURES & PROGRAMMING
IMPORTANT FEATURE
INFORMATION
The CP-1260 features include AutoTalk™ and
AutoStandby™ . AutoTalk allows you to
answer a call by just removing the handset
from the base so you don’t have to waste
time pushing buttons or flipping switches.
AutoStandby allows you to hang up by
simply returning the handset to the base.
The Ultra Clear
virtually eliminates background noise. This
innovative technology provides you with the
best possible reception during all your
conversations.
To protect you against misbilled calls which
might result from your phone being activated
by other equipment, the CP-1260 has Random
Code™ digital security which automatically
selects one of over 65,000 digital security
codes for the handset and base. Also, the
AutoSecure™ feature electronically locks your
phone when the handset is on the base.
AUTOMATIC DIGITAL SECURITY
CODE
This identification code is used to connect the
handset and the base unit. It protects
communication between the handset and
base, preventing unauthorized access to your
base unit, so that other cordless handsets
cannot make calls through your base unit. A
random digital security code is automatically
assigned out of 65,000 codes, the first time
you charge the handset in the base. If you
need to reset the security code, see page 18.
®
Noise Reduction Circuit
The handset ringer can be programmed to
ring with one of four ringer selections. There
are two distinct ringer tones in the handset
and each ringer tone has two different volume
levels.
PROGRAMMING
THE HANDSET RINGER
VOLUME AND TONE
In the standby mode, press
1
Each time
ringer tone setting changes and the
2
handset will ring for two seconds
with the chosen ringer tone to verify
your choice.
The handset will now use this ringer
tone and volume whenever it rings.
3
VOLUME
is pressed, the
5
VOLUME
.
BASE SPEAKER VOLUME
To control the speaker volume of the base,
adjust the VOLUME slide switch as desired.
Auto Talk, Auto Standby, Random Code, and Auto Secure are
proprietary trademarks of Uniden America Corporation.
PAGE
PAGE
6
CORDLESS TELEPHONE OPER
STANDBY MODE
The CP-1260 is in standby mode whenever it
is idle, waiting for a call. It is not necessary
to press TALK to disconnect the call. When
the handset is in talk mode and returned to
the base, it will automatically disconnect the
call and return to standby mode. You may
place the handset face up or face down in the
charging cradle to disconnect the call and
charge the handset.
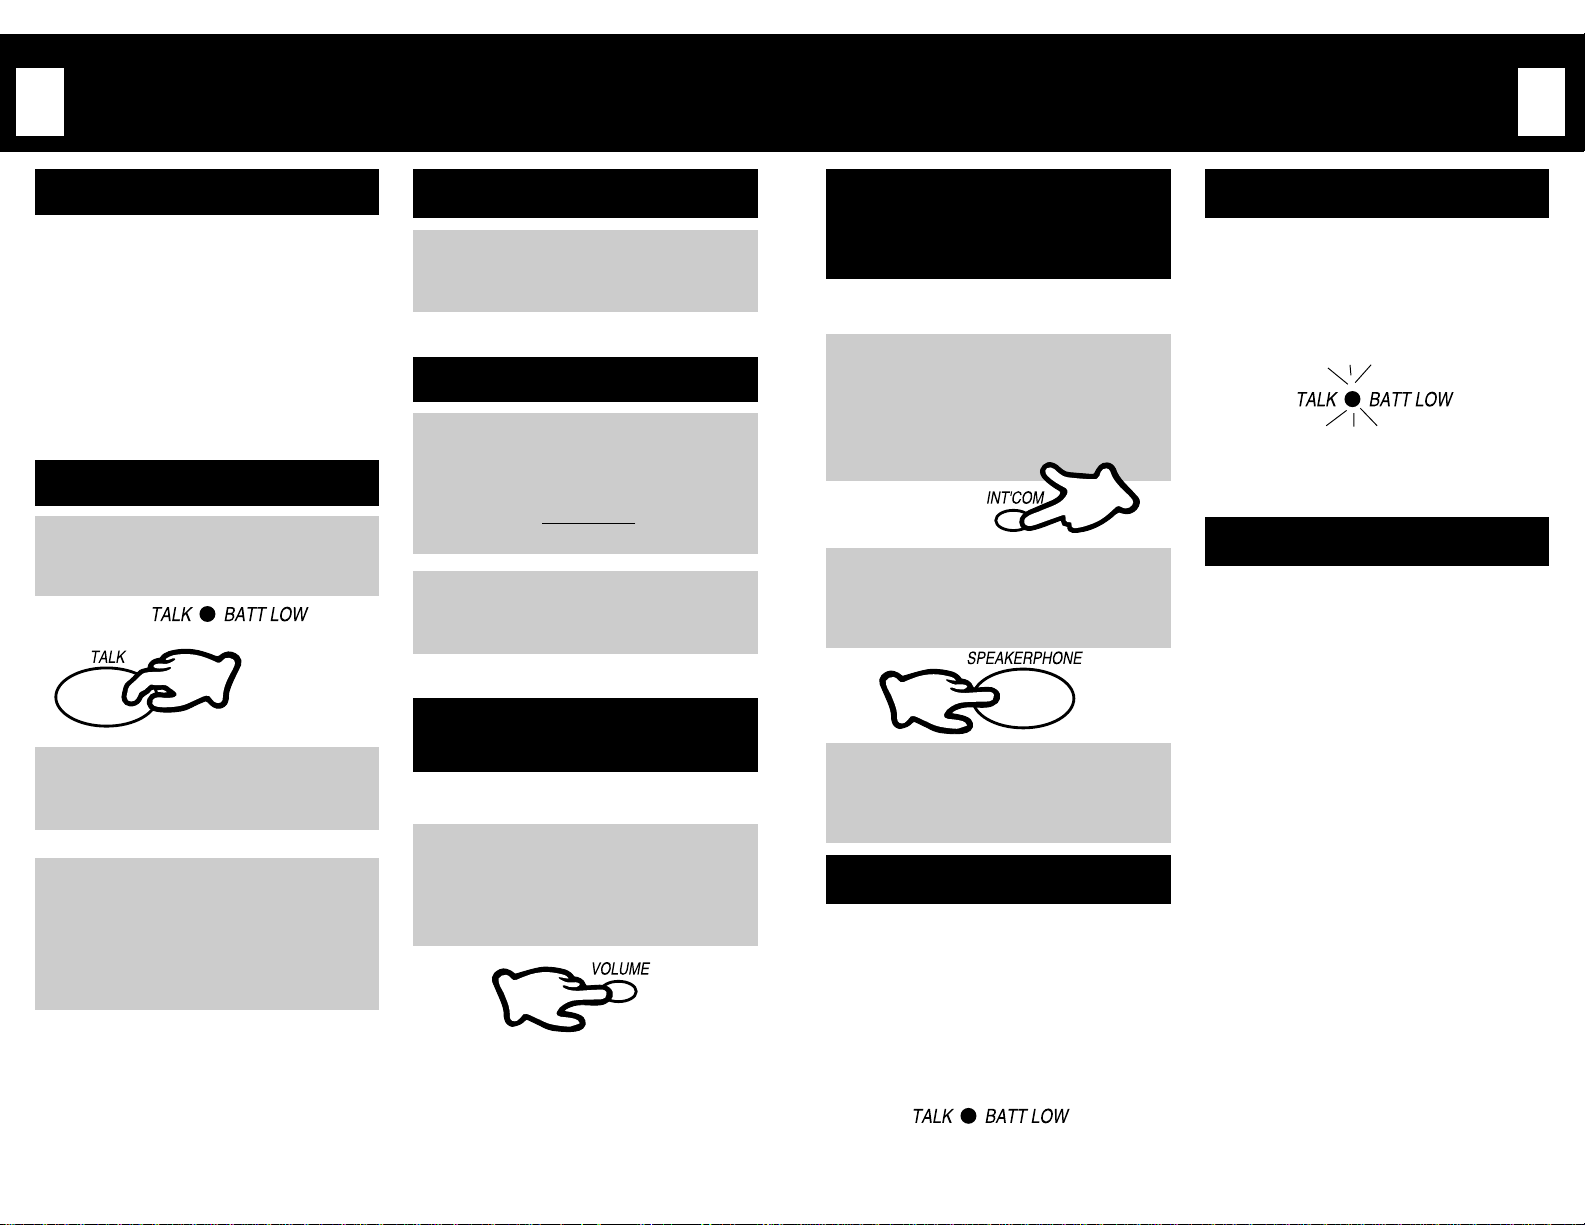
PLACING A CALL
Pick up the handset and press
TALK
1
2
3
NOTE:
■ The STATUS INDICATOR on the base will light solid to
show that the CP-1260 is in use.
. The TALK/BATT LOW
INDICATOR will light.
Wait for a dial tone and then dial the
phone number . The phone number
dialed can be up to 32 digits.
TALK
To hang up, press
handset to the base unit. The CP-1260
is now ready to answer a call. If you
put the handset in the base the
STATUS INDICATOR lights to show
the battery is charging.
or return the
MISDIALING A NUMBER
Press
TALK
twice (“off” and “on.”)
Wait for the dial tone and then dial the
1
correct number .
ANSWERING A CALL
If the cordless handset is out of the
charging cradle when the phone
1
rings, pick it up and press
the cordless handset is in the cradle,
pick it up (
to the caller .
To hang up, press
handset or return the handset to the
2
base unit.
do not press
TALK
TALK
TALK
). Speak
on the
. If
ADJUSTING THE HANDSET
EARPIECE VOLUME
There are three handset conversation volume
levels.
Press
VOLUME
level of the handset during a
1
conversation. The volume control
automatically stays at the selected
setting after each phone call.
NOTE:
■ When the CP-1260 is in standby mode, press
VOLUME
volume level (see page 5).
to change the ringer tone and ringer
to adjust the sound
SWITCHING FROM
A TION
SWITCHING FROM
HANDSET TO
SPEAKERPHONE
To switch from the cordless handset to the
speakerphone:
Press
INT’COM
while speaking on the handset to
1
place the call on hold. The STATUS
INDICATOR will flash on the base.
The intercom tone sounds on the
handset and base.
INTERCOM
Press
SPEAKERPHONE
2
The intercom mode is activated, but
the caller is still on hold.
To transfer to the base, press
on the handset. To cancel the
3
transfer, press
on the base.
STATUS INDICATOR
The STATUS INDICATOR (located on the base
unit) will light green whenever the handset is
in talk mode. It will also light when the
handset is actively charging in the base unit.
Place the handset face up or face down in the
charger for 12-15 hours before the first use
and after installing the handset battery or
when the BATT LOW INDICATOR flashes.
OUT OF RANGE ALARM
on the handset
or
on the base.
TALK
SPEAKERPHONE
7
LOW BATTERY INDICATOR
When the handset battery pack needs
recharging, the BATT LOW INDICATOR blinks.
If the phone is in use, the handset beeps. You
may also notice a reduction in the quality of
your cordless handset communications.
Return the cordless handset to the charging
cradle.
NOTE:
■ The batteries can be recharged many times, but if
you get a low battery indication even after 12-15
hours of charging, you should replace the battery
pack.
OUT OF RANGE ALARM
1. The CP-1260 cordless handset operates
like any other telephone handset. You can
use it in the yard, at the mailbox, or any
place within the operating range of the
base. If you move out of the base unit’s
operating range, you will hear a warning
tone. Move closer to the base unit to
deactivate the alarm. If you remain out of
range for too long, the CP-1260 will
disconnect from the line.
2. If the handset loses its security code, you
will also hear an alarm tone. See page 18
to reset this security code. Pick up the
handset and try your call again.
3. Interference from other appliances may
also cause the alarm to sound. To prevent
interference, move the base unit to another
location and orient the base unit antenna
to a vertical position.
BASE
PAGE
PAGE
OPERATION
8
MAXIMIZING THE BENEFITS
OF THE SPEAKERPHONE
■ One person at a time should speak while
using the speakerphone.
■ Reduce or eliminate background noise
such as the radio or television.
■ The extension phone and speakerphone
should not be used at the same time
unless you require a 3-way conference
with the caller.
■ Position yourself approximately 12 inches
away from the base microphone (located
at the front under the base) and speak
clearly.
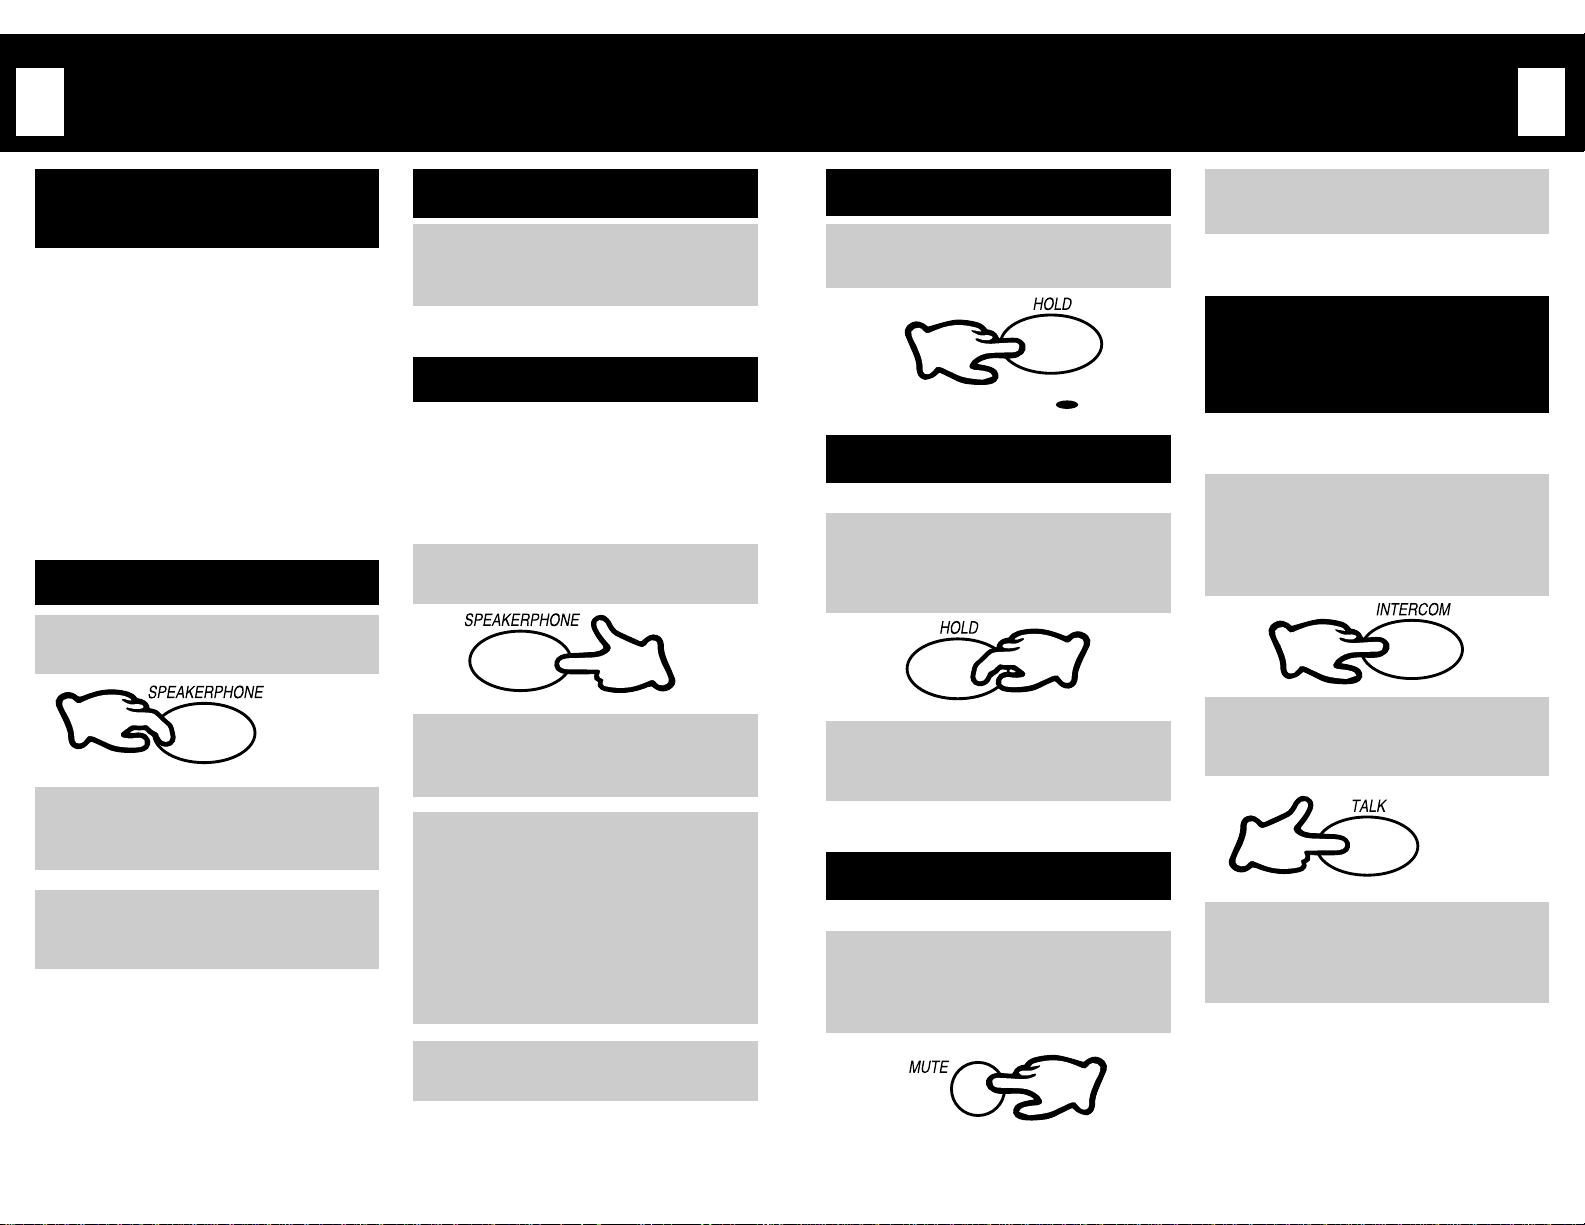
PLACING A CALL
Press
1
2
3
NOTES:
■ The SPEAKERPHONE INDICATOR on the base will
light to show that the CP-1260 is in use.
■ If you pick up the handset during a call with the
base, the call is switched to the handset.
SPEAKERPHONE
Wait for a dial tone and then dial the
phone number. The phone number
dialed can be up to 32 digits.
To hang up, press
SPEAKERPHONE
is now ready to answer a call.
.
. The CP-1260
MISDIALING A NUMBER
Press
SPEAKERPHONE
(“off” and “on.”) Wait for the dial tone
1
and then dial the correct number.
twice
ANSWERING A CALL
The speakerphone allows you to conduct
phone conversations without using the
handset.
If you decide to answer the call using the
base speakerphone:
SPEAKERPHONE
Press
.
1
Adjust the
(on the right side of the base) if
2
necessary.
Speak into the microphone (located
at the front under the base unit). You
3
will hear the outside party through the
speaker. (If you wish to speak
through the cordless handset, first
press
pick up the handset from the cradle.
If the handset is already out of the
cradle press
To hang up from the base, press
SPEAKERPHONE
4
VOLUME CONTROL
HOLD
on the base unit, then
TALK
.)
.
PLACING A CALL ON HOLD
Press
HOLD
on the base unit. The
HOLD INDICATOR will light.
1
TAKING A CALL OFF HOLD
There are a few ways to take a call off hold.
Press
SPEAKERPHONE
on the base again. The
1
SPEAKERPHONE INDICATOR will light
and the call will be taken off hold.
OR
Take the handset out of the base. The
call will now be connected to the
1
handset user only.
or
HOLD
MUTE
You can turn off the base microphone.
Press
MUTE
during a telephone call
to turn off the microphone. The
1
SPEAKERPHONE INDICATOR flashes
slowly.
To cancel mute, press
SPEAKERPHONE
2
MUTE
.
or
SWITCHING FROM
SPEAKERPHONE TO
HANDSET
To switch from the speakerphone to the
cordless handset:
Press
INTERCOM
speaking on the speakerphone to
1
place the call on hold. The STATUS
INDICATOR will flash. The intercom
tone sounds on the handset and base.
Press
INT’COM
handset. The intercom mode is
2
activated, but the caller is still on hold.
To transfer to the handset, press
SPEAKERPHONE
3
To cancel the transfer, press
on the handset.
on the base while
or
TALK
on the
on the base.
TALK
9
 Loading...