

Page 1
ELECTRONIC CASH REGISTER
CE
-
280
THANK YOU
YOUR RECEIPT
c
CALL AGAIN !
Year 2000
Compliance
GROCERY
DAIRY
H.B.A.
FROZEN
FOOD
CE-300
CE-280
£00
"80
DELICATESSEN
OPERATOR'S INSTRUCTION MANUAL
CI
Page 2
Introduction & Contents
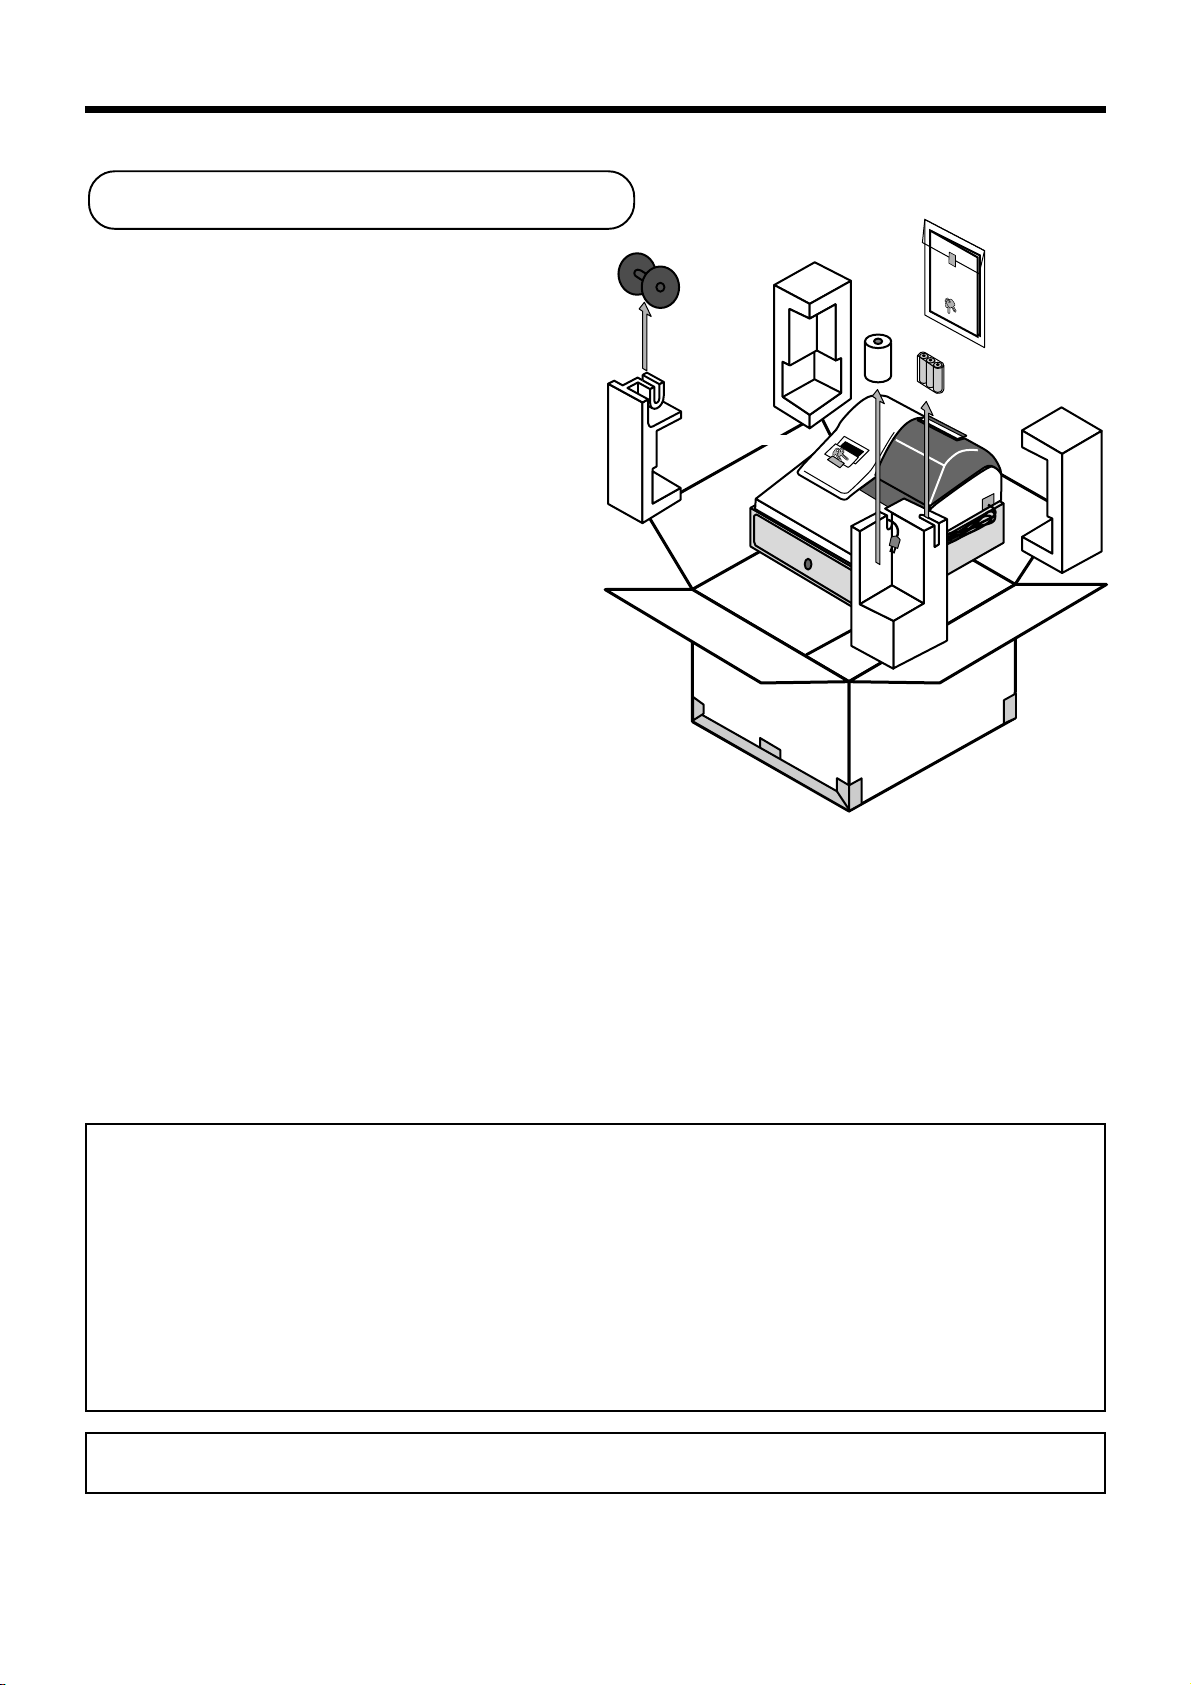
Unpacking the register
Welcome to the CASIO CE-280!
Congratulations upon your selection of a CASIO
Electronic Cash Register, which is designed to
provide years of reliable operation.
Operation of a CASIO cash register is simple
enough to be mastered without special training.
Everything you need to know is included in this
manual, so keep it on hand for reference.
If you need programming assistance, please
call 1-800-638-9228.
Take-up reel
Operator/Program key
Roll paper
Operators
Instruction
Manual
Operator's
instruction manual/
Drawer key
Memory backup batteries
(UM-3 "AA" × 3)
CASIO AUTHORIZED SERVICE CENTER
If your Casio product needs repair, or you wish to purchase replacement parts, please
call 1-800-YO-CASIO for the authorized service center nearest your home.
If for any reason this product is to be returned to the store where purchased, it must be
packed in the original carton/package.
GUIDELINES LAID DOWN BY FCC RULES FOR USE OF THE UNIT IN THE
U.S.A.
(Not applicable to other areas)
WARNING: This equipment generates, uses and can radiate radio frequency energy and if not installed and used
in accordance with the instruction manual, may cause interference to radio communications. It has been tested and
found to comply with the limits for a Class A computing device pursuant to Subpart J of Part 15 of the FCC Rules,
which are designed to provide reasonable protection against such interference when operated in a commercial
environment.
Operation of this equipment in a residential area is likely to cause interference in which case the user at his/her own
expense will be required to take whatever measures may be required to correct the interference.
The main plug on this equipment must be used to disconnect main power.
Please ensure that the socket outlet is installed near the equipment and shall be easily accessible.
Please keep all information for future reference.
2
Page 3
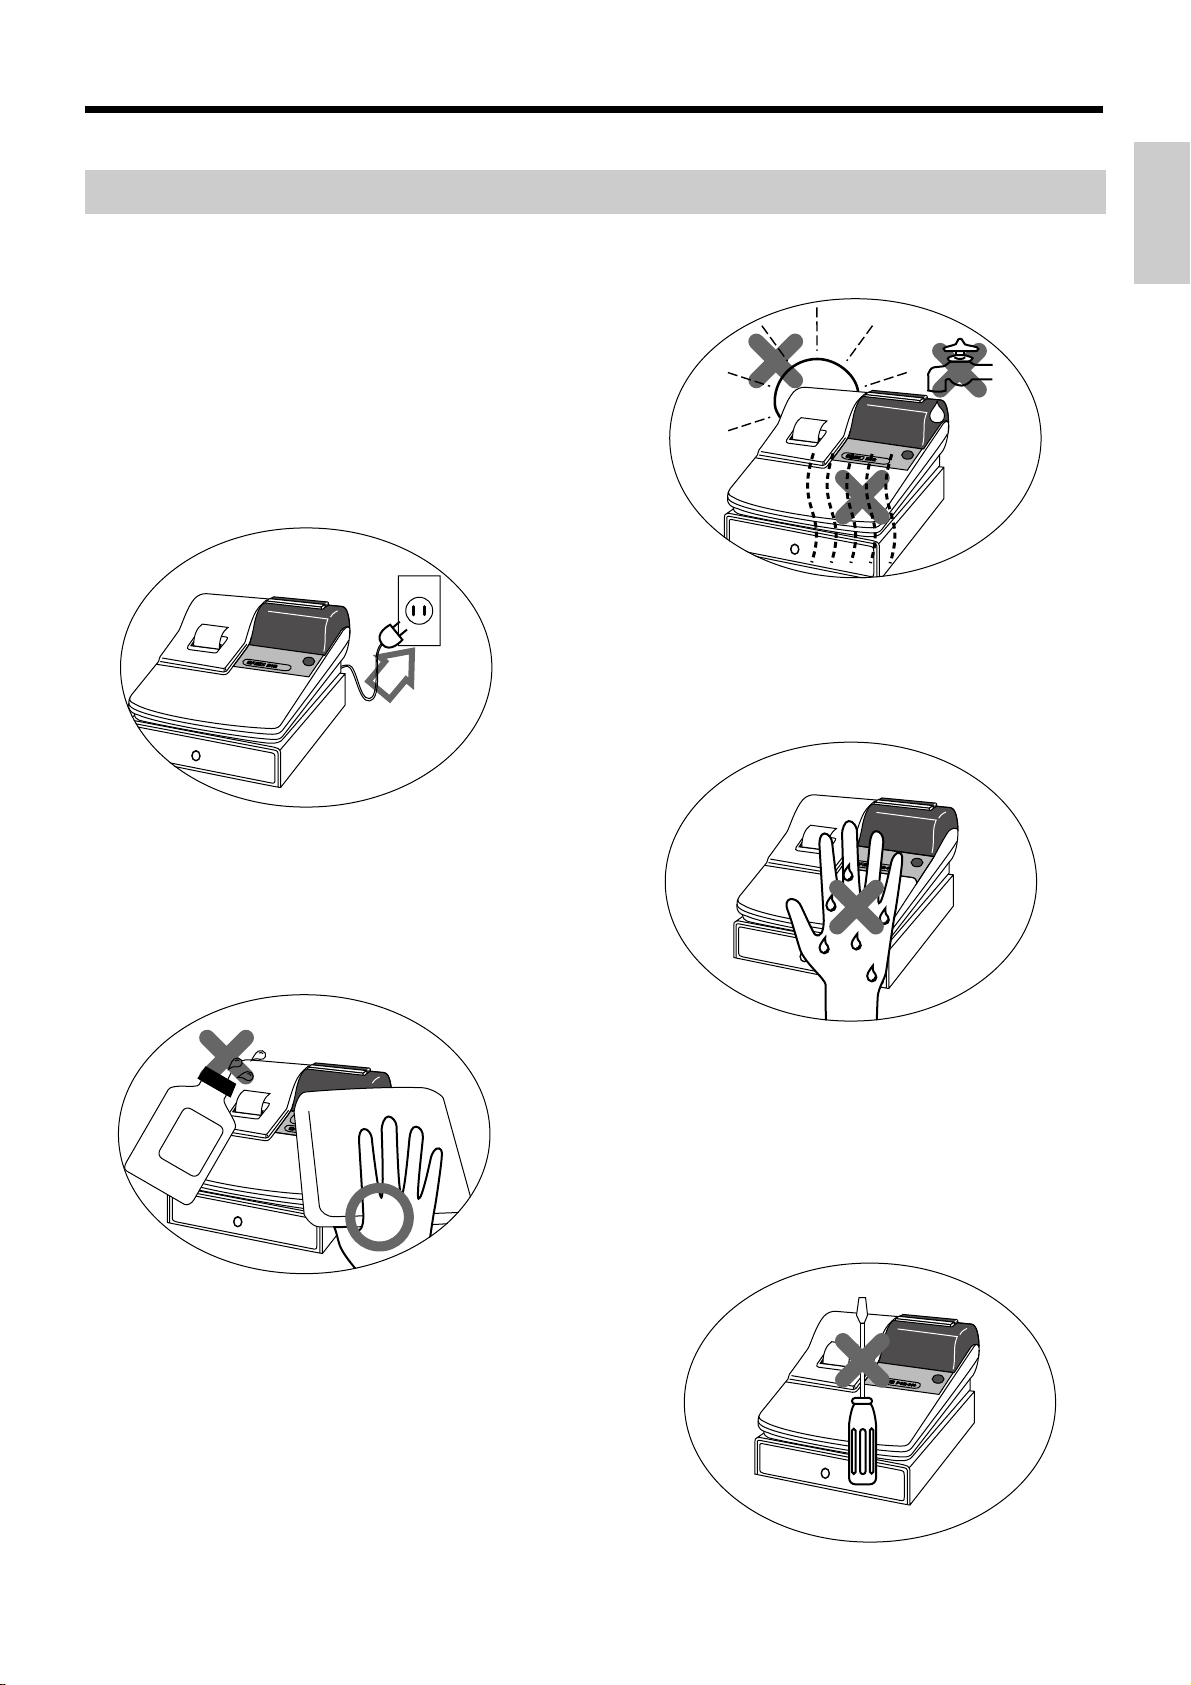
Important!
Before you do anything, be sure to note the following important precautions!
Do not locate the cash register where it will
be subjected to direct sunlight, high humidity,
splashing with water or other liquids, or high
temperature (such as near a heater).
Be sure to check the sticker on the side of
the cash register to make sure that its voltage matches that of the power supply in the
area.
Introduction & Contents
Never operate the cash register while your
hands are wet.
Never try to open the cash register or attempt your own repairs. Take the cash register to your authorized CASIO dealer for
repairs.
Use a soft, dry cloth to clean the exterior of
the cash register. Never use benzene, thinner, or any other volatile agent.
3
Page 4

Introduction & Contents
Introduction & Contents .........................................................2
Unpacking the register....................................................................................................... 2
Getting Started ........................................................................6
Remove the cash register from its box .............................................................................. 6
Remove the tape holding parts of the cash register in place............................................. 6
Install the three memory backup batteries......................................................................... 6
Plug the cash register into a wall outlet ............................................................................. 8
Insert the mode key marked "PGM" into the mode switch................................................. 8
Turn the mode key to the "REG" position.......................................................................... 8
To set the ink ribbon .......................................................................................................... 8
Install receipt/journal paper ............................................................................................... 9
To load 1-ply paper for printing of receipts...............................................................................9
To load 1-ply paper for printing of journal ..............................................................................10
To load 2-ply paper for printing of receipts............................................................................. 11
Set the date ..................................................................................................................... 12
Set the time ..................................................................................................................... 12
Select printouts receipt or journal .................................................................................... 12
Programming automatic tax calculation........................................................................... 13
Programming the U.S. tax table procedure ...........................................................................13
Introducing CE-280 ...............................................................18
General guide .................................................................................................................. 18
Mode key, drawer, mode switch.............................................................................................18
Displays .................................................................................................................................20
Keyboard ...............................................................................................................................22
Basic Operations and Setups ..............................................24
How to read the printouts ................................................................................................ 24
How to use your cash register ......................................................................................... 25
Displaying the time and date .................................................................................................26
Preparing coins for change....................................................................................................26
Preparing and using department keys............................................................................. 27
Registering department keys ................................................................................................. 27
Programming department keys.............................................................................................. 29
Registering department keys by programming data .............................................................. 30
Preparing and using PLUs............................................................................................... 31
Programming PLUs ...............................................................................................................31
Registering PLUs ...................................................................................................................32
Preparing and using discounts ........................................................................................ 34
Programming discounts ......................................................................................................... 34
Registering discounts ............................................................................................................35
Preparing and using reductions....................................................................................... 36
Programming for reductions ..................................................................................................36
Registering reductions ........................................................................................................... 37
Calculating the merchandise subtotal.............................................................................. 38
Shifting taxable 1/2 status of an item............................................................................... 39
Registering charge and check payments ........................................................................ 40
4
Page 5

Registering returned goods in the REG mode................................................................. 41
Registering returned goods in the RF mode.................................................................... 42
Registering money received on account ......................................................................... 43
Registering money paid out............................................................................................. 43
Making corrections in a registration................................................................................. 44
No sale registration.......................................................................................................... 46
Printing the daily sales reset report ................................................................................. 47
Convenient Operations and Setups ....................................48
Clerk control function, Post-finalization receipt format, General printing control,
Compulsory, Machine features ........................................................................................ 48
About the clerk control function .............................................................................................48
About post-finalization receipt................................................................................................ 49
Programming general printing control.................................................................................... 50
Programming compulsory and clerk control function .............................................................51
Programming read/reset report printing control ..................................................................... 52
Setting a store/machine number...................................................................................... 52
Programming to clerk ...................................................................................................... 53
Programming descriptors and messages ........................................................................ 54
Programming report descriptor, grand total, special character, report title,
receipt message and clerk name .................................................................................... 54
Programming department key descriptor............................................................................... 57
Programming PLU descriptor ................................................................................................ 58
Programming function key descriptor ....................................................................................59
Entering characters ......................................................................................................... 60
Department key programming ......................................................................................... 62
PLU feature programming ............................................................................................... 64
Percent key feature programming ................................................................................... 69
Currency exchange programming ................................................................................... 72
Other function key programming ..................................................................................... 75
Calculator functions ......................................................................................................... 76
Printing read/reset reports ............................................................................................... 78
Reading the cash register's program............................................................................... 84
Introduction & Contents
Troubleshooting ....................................................................88
When an error occurs ...................................................................................................... 88
When the register does not operate at all........................................................................ 89
In case of power failure ................................................................................................... 90
When the L sign appears on the display.......................................................................... 90
User Maintenance and Options............................................91
To replace the ink ribbon ................................................................................................. 91
To replace journal paper .................................................................................................. 92
To replace receipt paper .................................................................................................. 93
Specifications........................................................................94
Index.......................................................................................95
5
Page 6
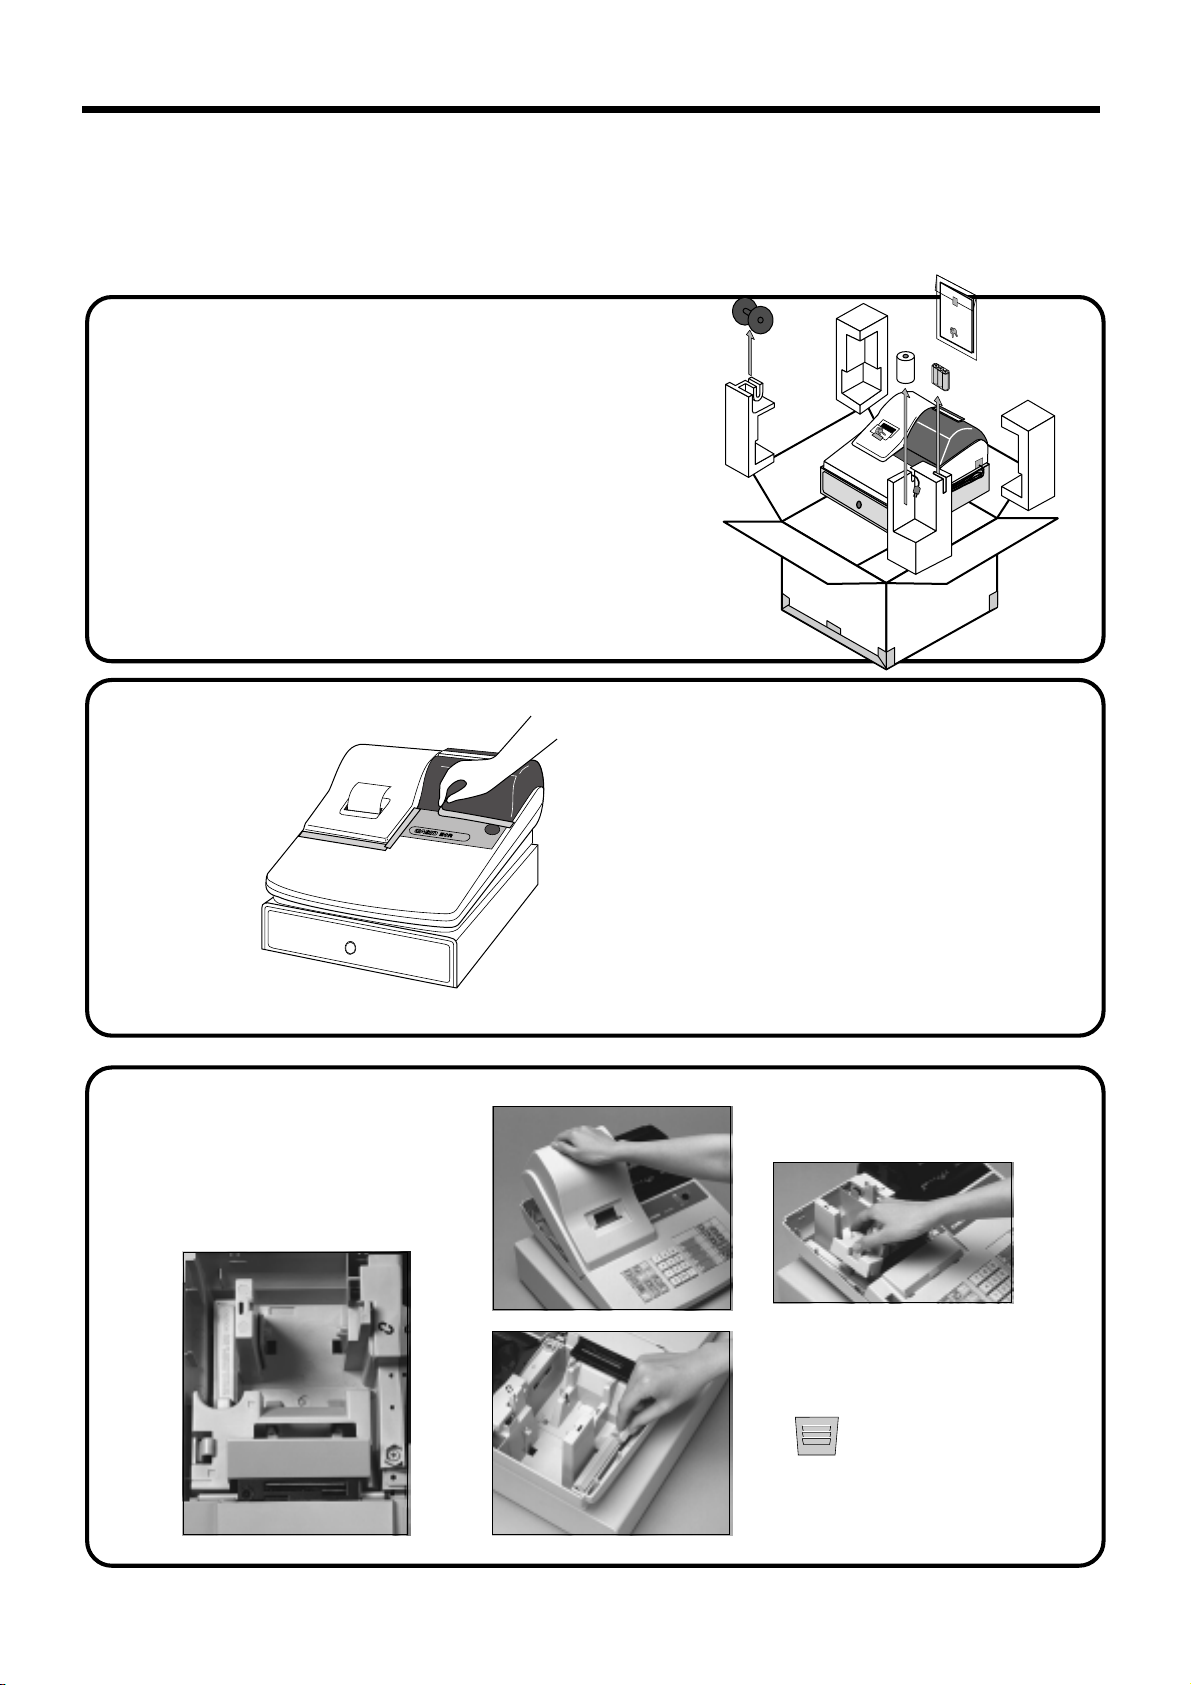
Getting Started
This section outlines how to unpack the cash register and get it ready to operate. You should read this part of the
manual even if you have used a cash register before. The following is the basic set up procedure, along with page
references where you should look for more details.
Operator's
Instruction
Manual
1.
Remove the cash register from its box.
Make sure that all of the parts and accessories
are included.
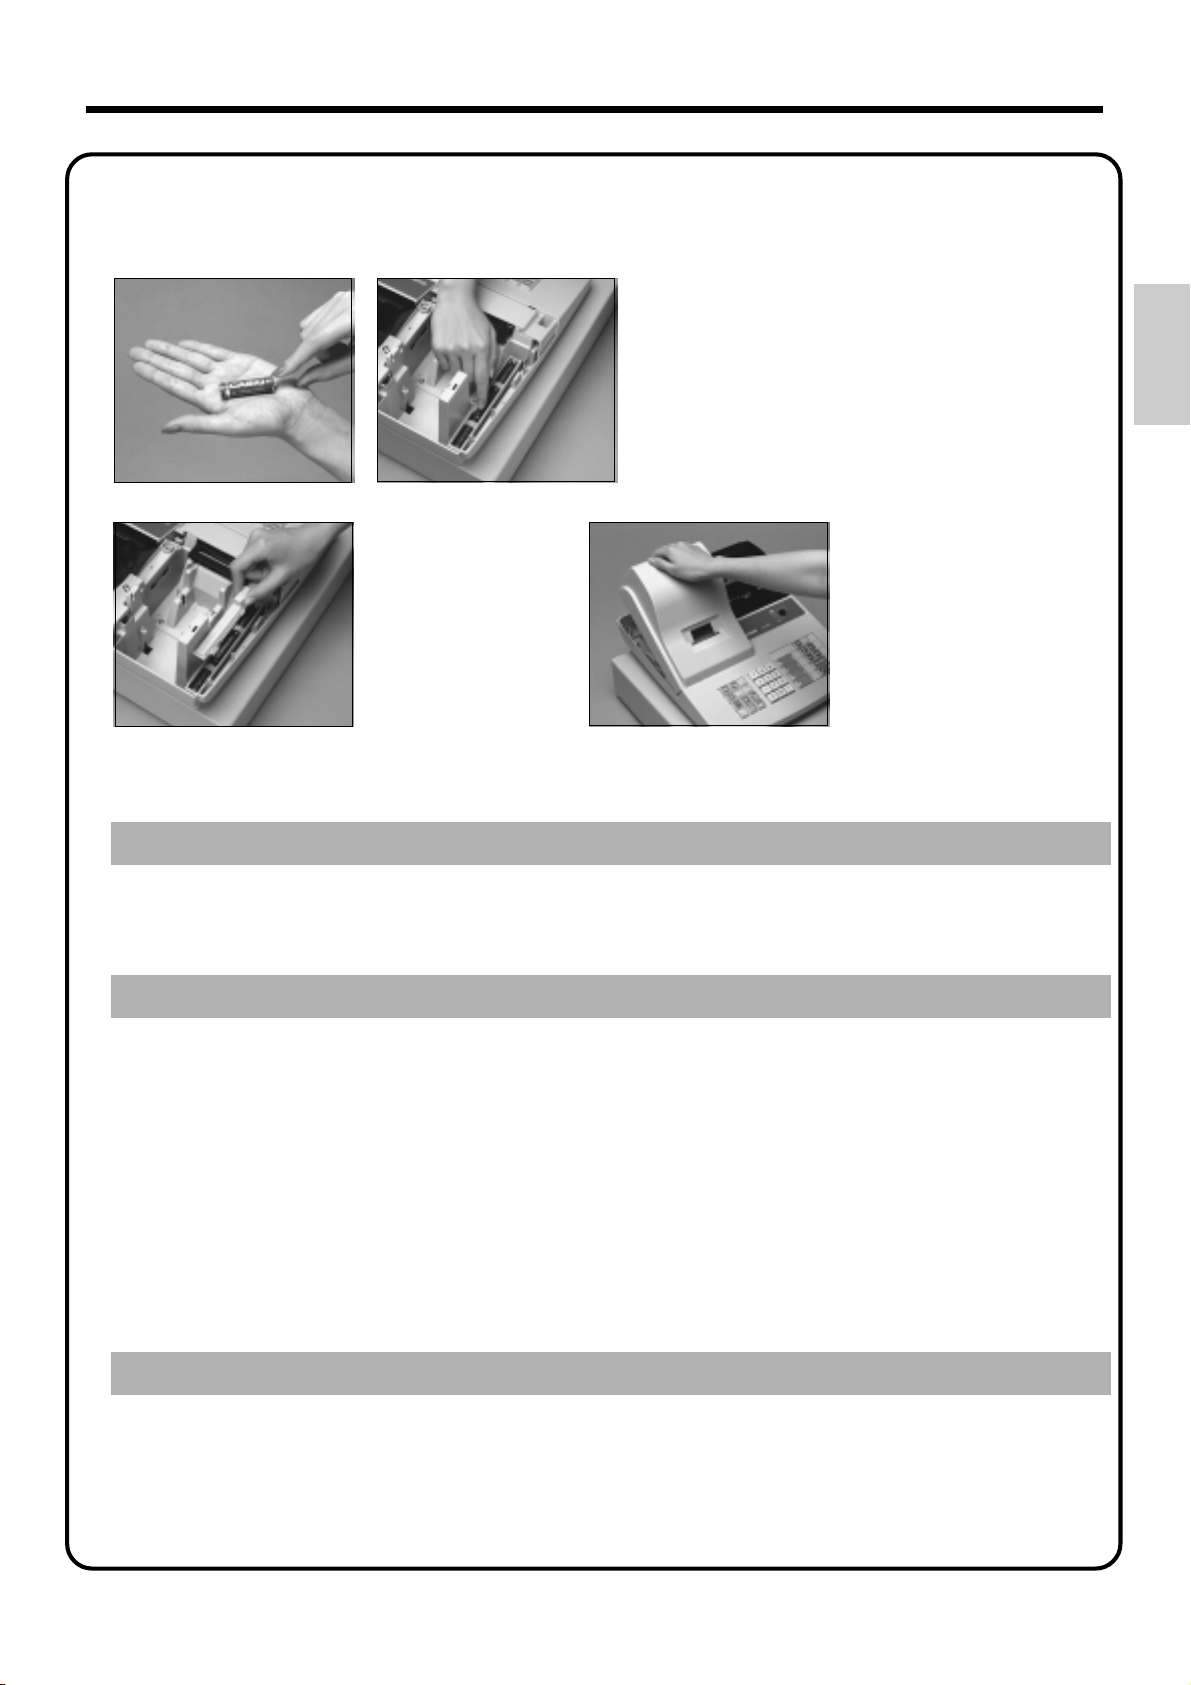
2.
Remove the tape holding parts
of the cash register in place.
Also remove the small plastic bag taped
to the printer cover . Inside you will find
the mode keys.
1. Remove the printer cover and
3.
6
Install the three
memory backup
batteries.
inner cover .
2. Remove the battery compartment cover. Pressing down
where the cover is marked
" " and pull it up.
Page 7
3.
Install the three memory backup batteries. (continued…)
3. Note the (+) and (–) markings in the battery
compartment. Load a set of three new SUM-3
("AA") batteries so that their positive (+) and
negative (–) ends are facing as indicated by the
markings.
4. Replace the battery compartment cover . 5. Replace the inner cover and printer cover .
Getting Started
Important!
These batteries protected information stored in your cash register's memory when there is
a power failure or when you unplug the cash register . Be sure to install these batteries.
Precaution!
Incorrectly using batteries can cause them to burst or leak, possibly damaging the interior
of the cash register . Note the following.
• Be sure that the positive (+) and negative (–) ends of the batteries are facing as marked in the
battery compartment when you load them into the unit.
• Never mix batteries of different types.
• Never mix old batteries with new ones.
• Never leave dead batteries in the battery compartment.
• Remove the batteries if you do not plan to use the cash register for long periods.
• Replace the batteries at least once every two years, no matter how much the cash register is
used during the period.
WARNING!
• Never try to recharge the batteries supplied with the unit.
• Do not expose batteries to direct heat, let them become shorted or try to take them apart.
Keep batteries out of the reach of small children. If your child should swallow a battery ,
consult a physician immediately .
7
Page 8
Getting Started
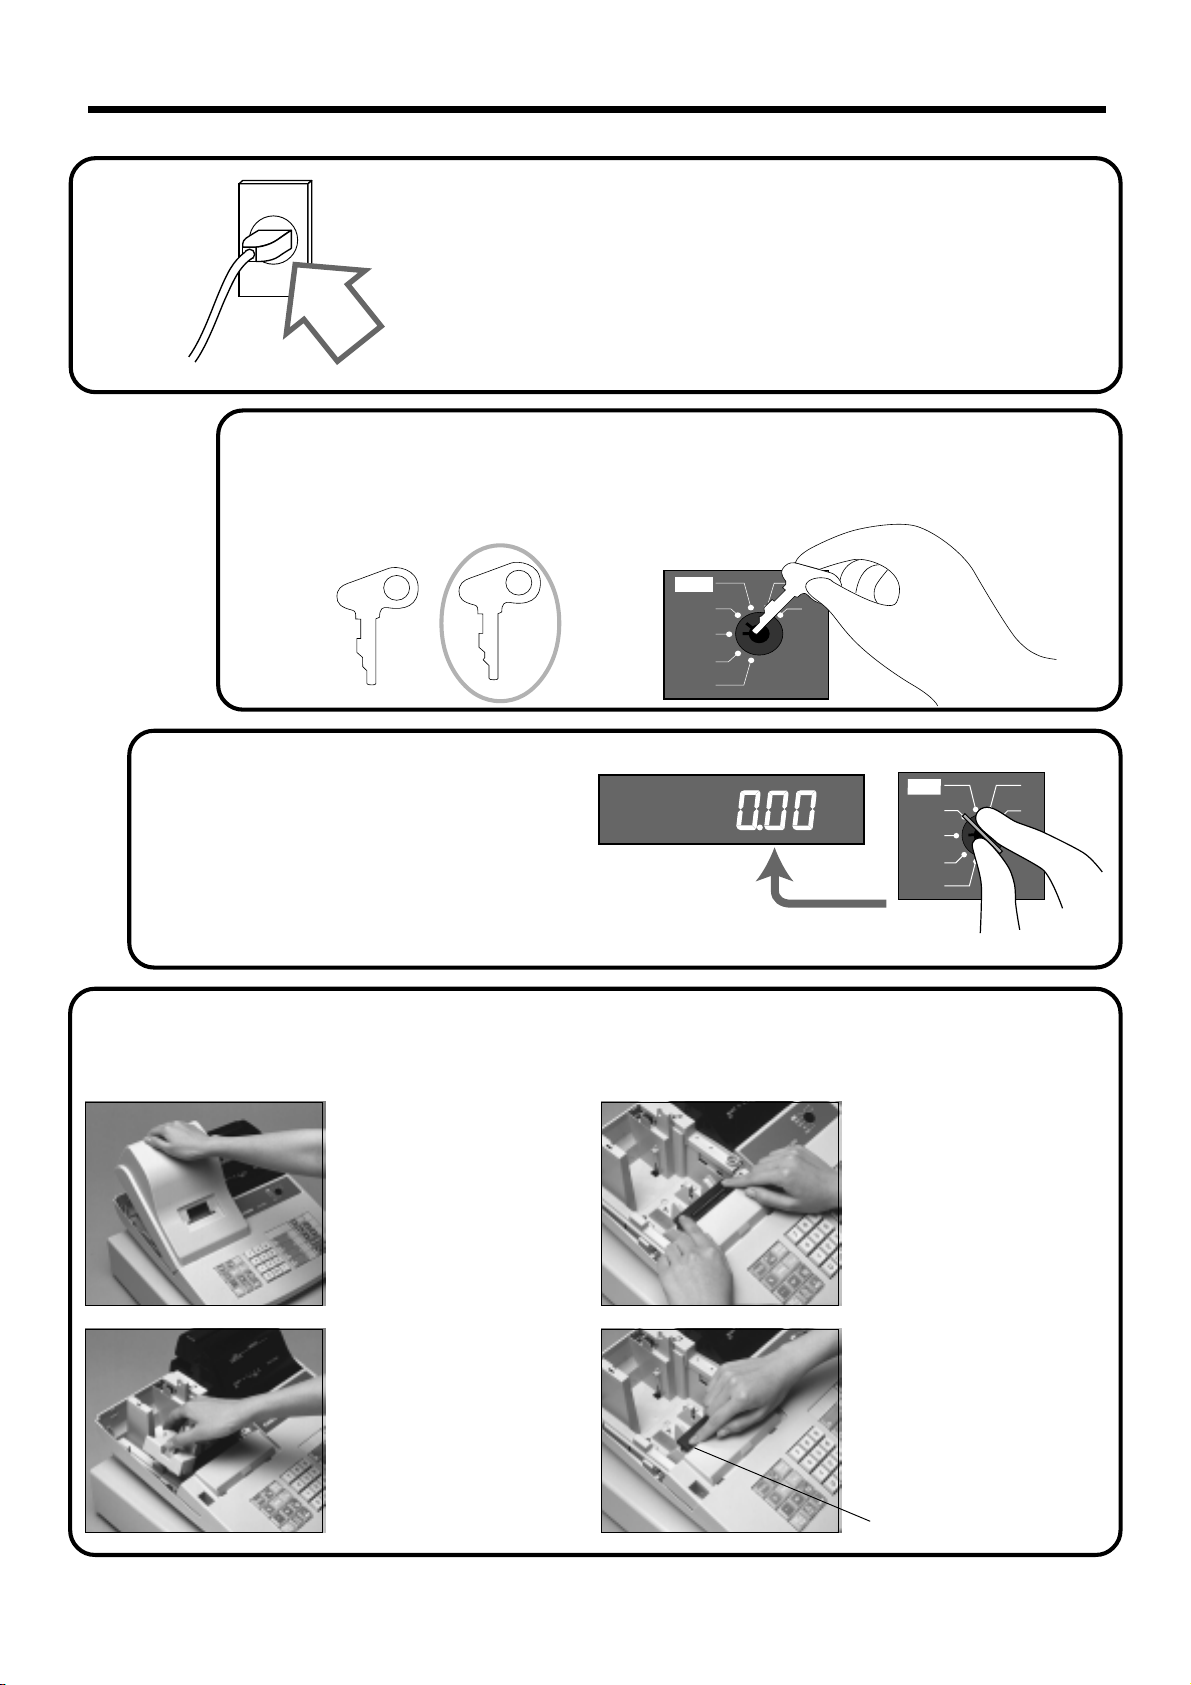
6.
4.
5.
Turn the mode key to the
"REG" position.
The display should change to the following.
Insert the mode key marked "PGM" into the mode switch.
About the mode key and mode switch, please refer to page-18, 19.
OP
A-A08
PGM
A-A08
Plug the cash register into a wall outlet.
Be sure to check the sticker on the side of the cash
register to make sure that its voltage matches that of the
power supply in your area. The printer will operate for
a few seconds.
CAL
REG
OFF
RF
PGM
A-A08
PGM
Z
X
Z
CAL
REG
OFF
RF
PGM
X
Z
8
7.
To set the ink ribbon
11
1
11
Remove the printer cover.
22
2
22
Remove the inner cover.
33
3
33
Load a new ink ribbon
cassette into the unit.
44
4
44
Turn the knob on the left
side of the cassette to take
up any slack in the ribbon.
Knob
Page 9
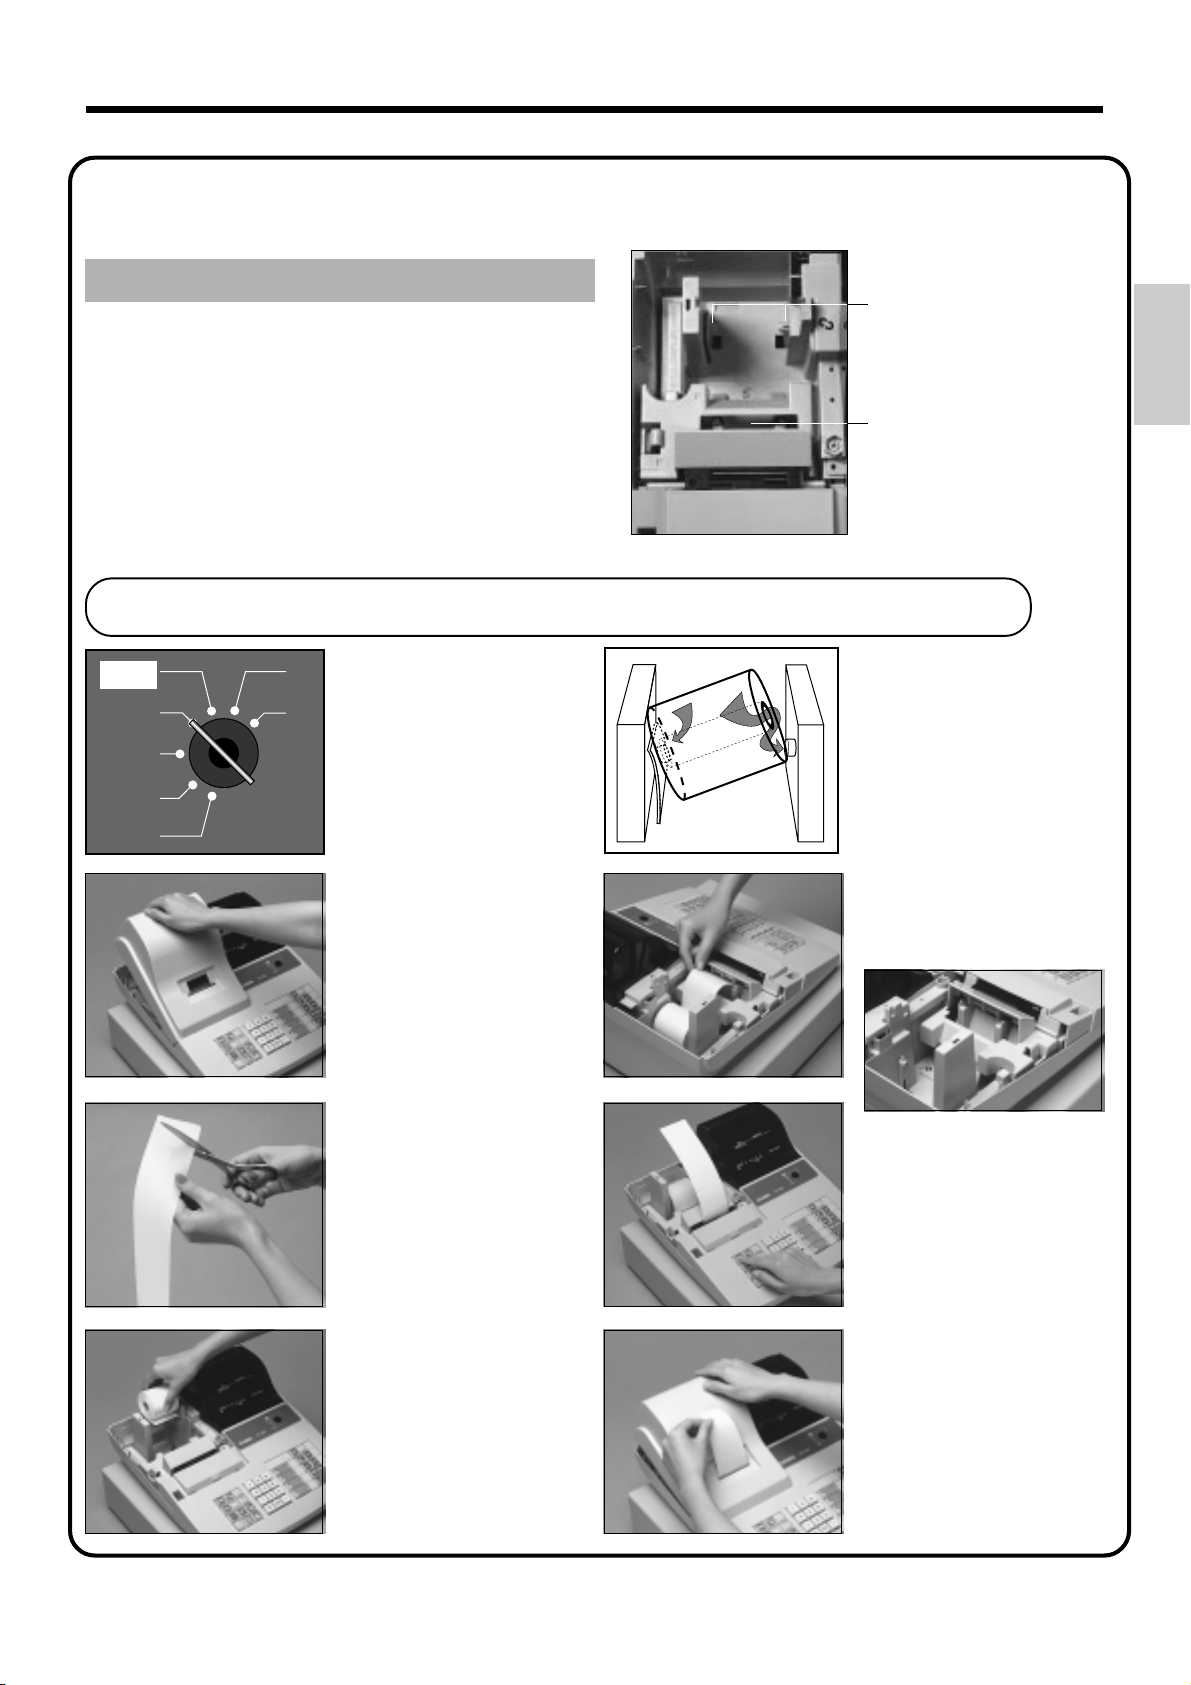
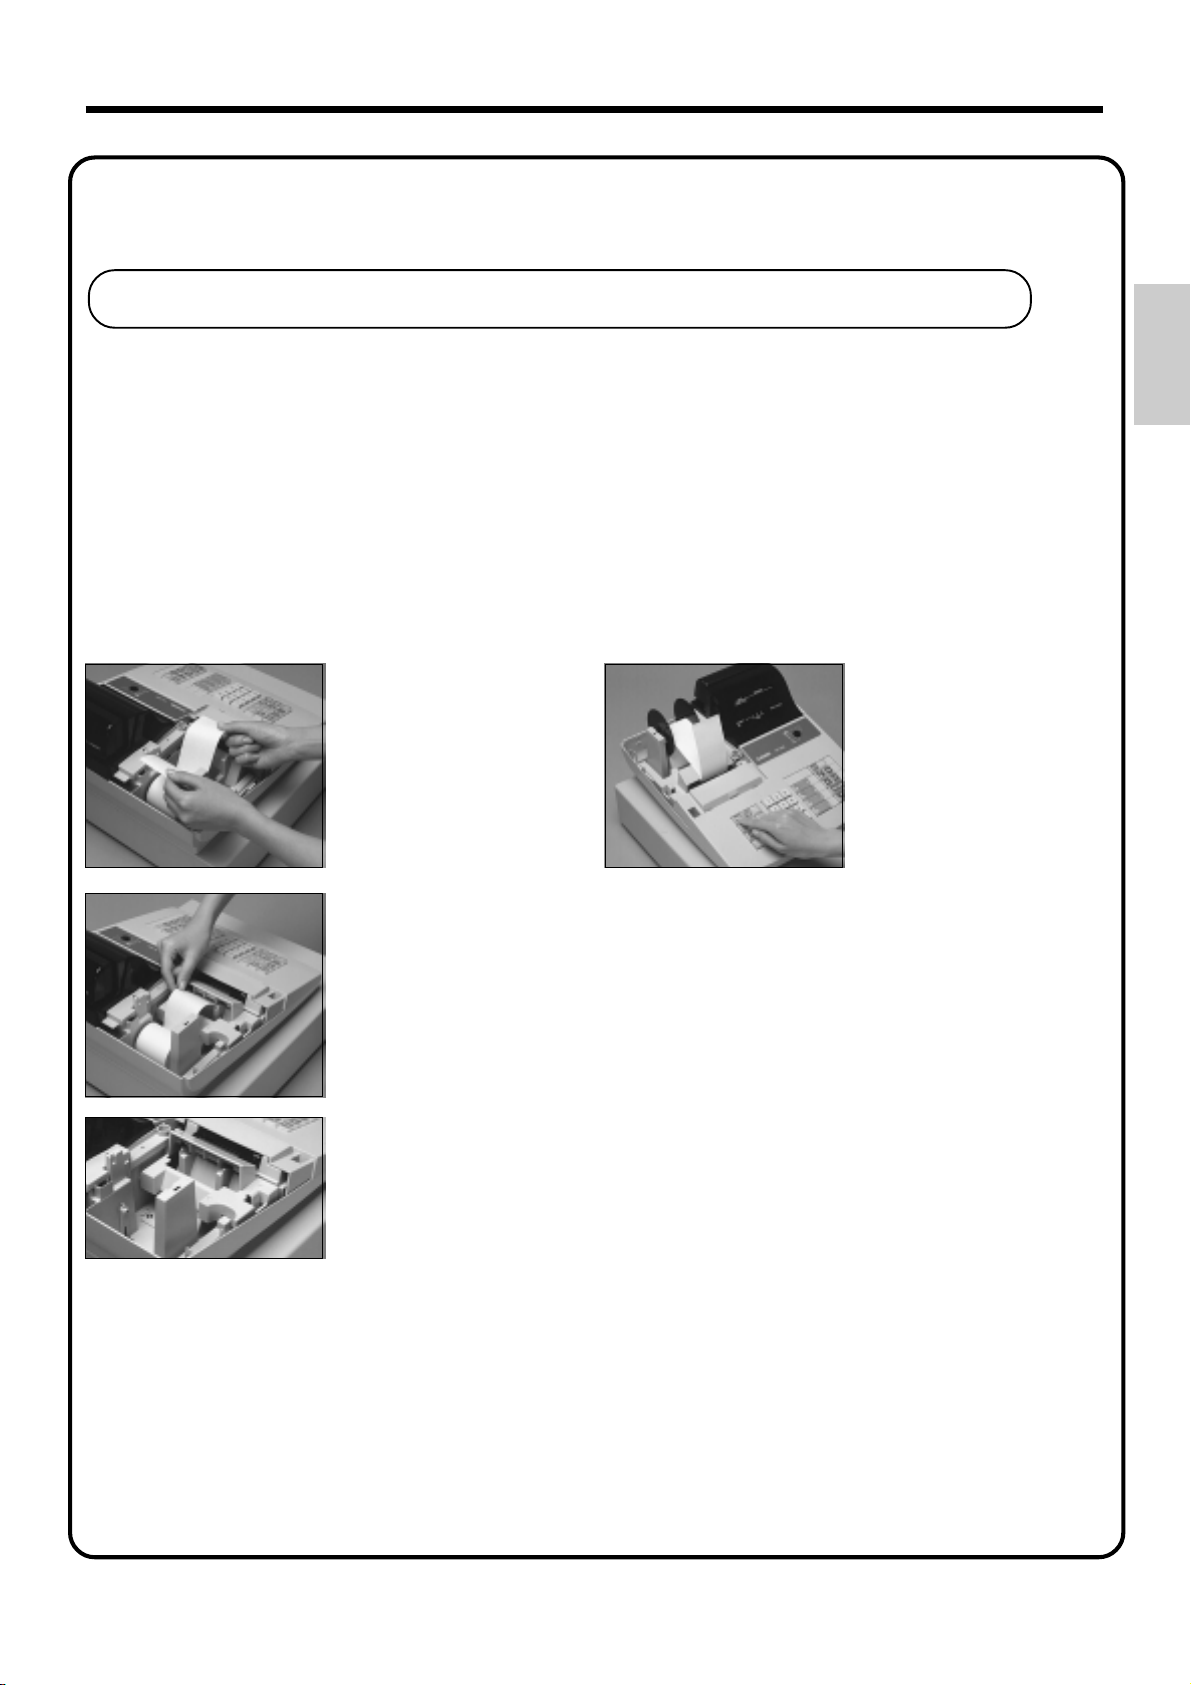
8.
Never operate the cash register without paper.
It can damage the printer.
Install receipt/journal paper.
Important!
Roll paper spindle
Paper inlet
To load 1-ply paper for printing of receipts
CAL
REG
OFF
RF
PGM
X
11
1
11
Z
Use a mode key to set the
mode switch to REG
position.
55
5
1
2
55
Work the paper roll gently
between the two spindles
so that they slip into the
center hubs of the roll.
Getting Started
22
2
22
Remove the printer cover.
33
3
33
Cut off the leading end of
the paper so it is even.
44
4
44
Ensuring the paper is being
fed from the bottom of the
roll, lower the roll into the
space behind the printer.
66
6
66
Insert paper to the paper
inlet.
77
7
77
Press the f key until
about 20 cm to 30 cm of
paper is fed from the
printer.
88
8
88
Replace the printer cover,
passing the leading end of
the paper through the cutter
slot. Tear off the excess
paper.
9
Page 10
Getting Started
8.
Follow steps
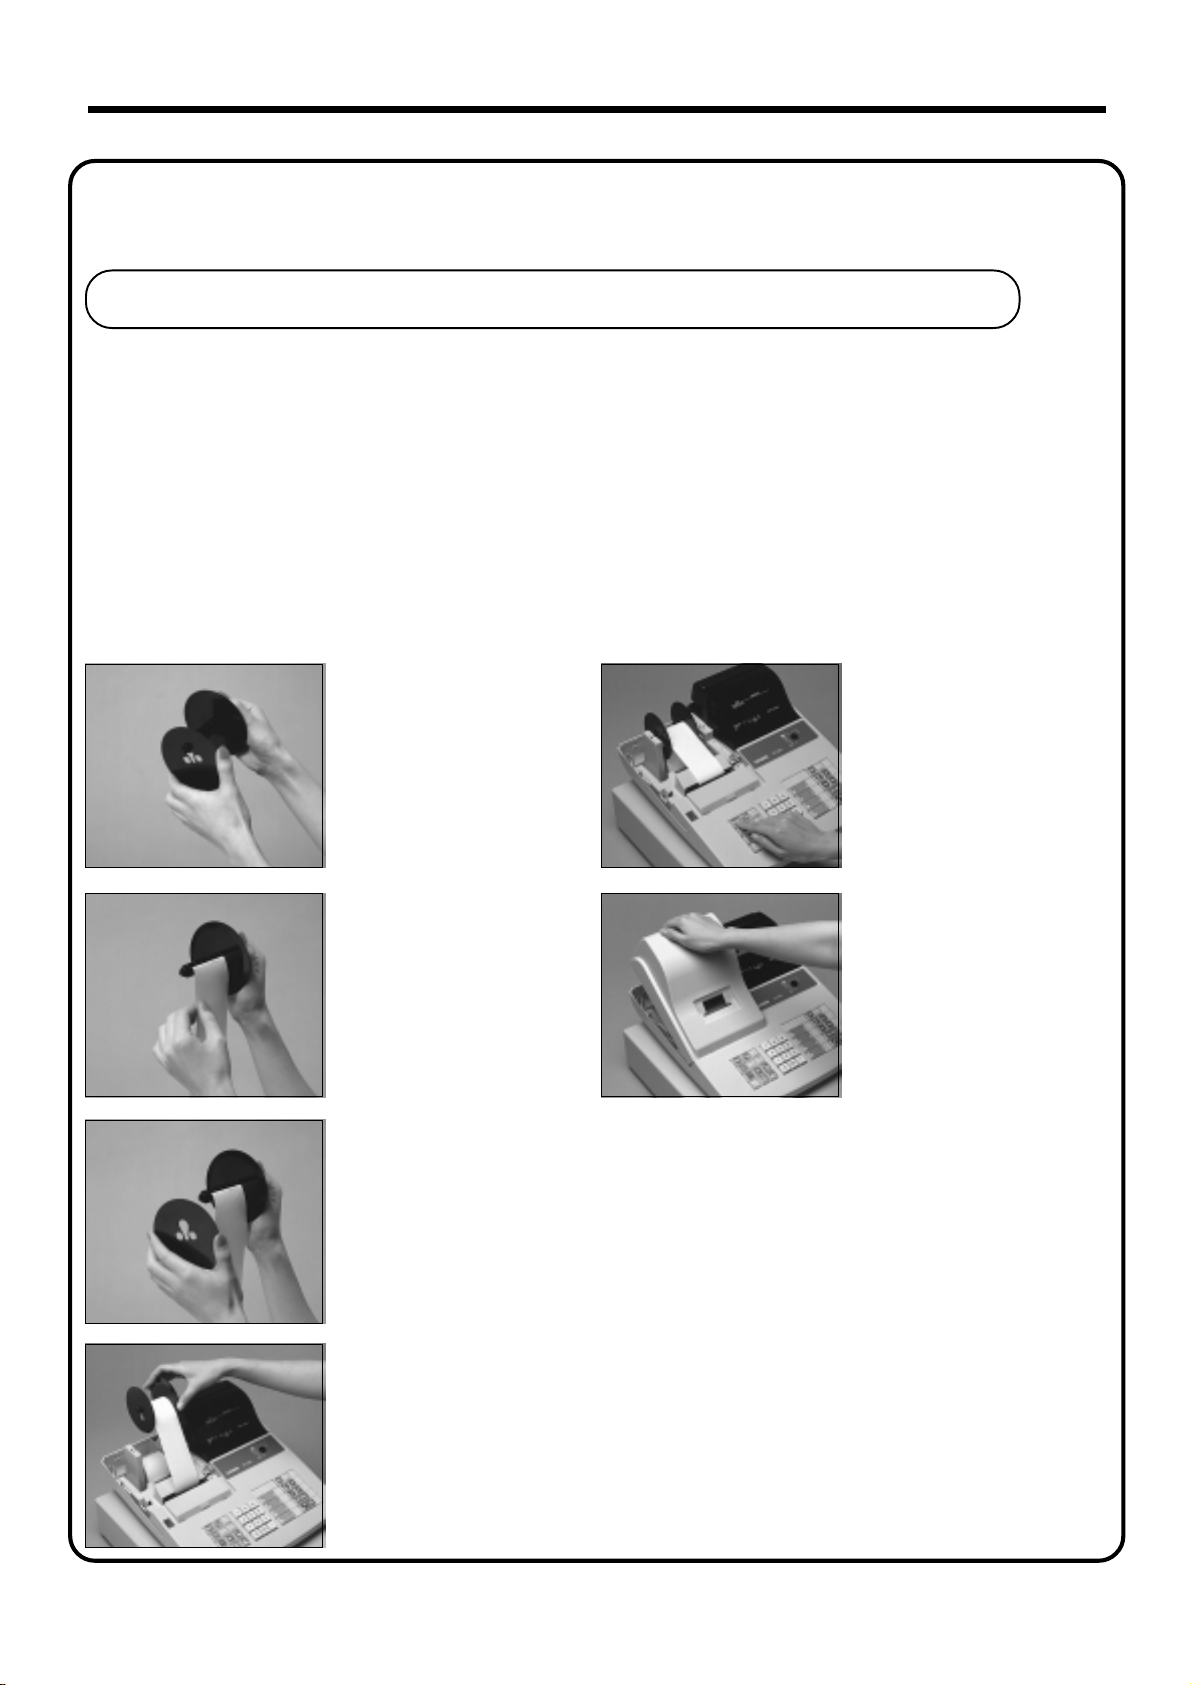
Install receipt/journal paper. (continued…)
To load 1-ply paper for printing of journal
11
1 through
11
77
7 under "To load 1-ply paper for printing of receipts" on the previous page.
77
88
8
88
Remove the flat side plate
of the take-up reel.
BB
B
BB
Press the f key to take
up any slack in the paper .
99
9
99
Slide the leading end of the
paper into the groove on
the spindle of the take-up
reel and wind it onto the
reel two or three turns.
00
0
00
Replace the flat side plate
of the take-up reel.
AA
A
AA
Place the take-up reel into
place behind the printer,
above the roll paper.
CC
C
CC
Replace the printer cover.
10
Page 11
8.
Install receipt/journal paper. (continued…)
To load 2-ply paper for printing of receipts
Follow steps
11
1 through
11
55
5 under "To load 1-ply paper for printing of receipts" above.
55
66
6
66
Separate the two sheets of
the paper.
77
7
77
88
8
88
Press the f key until
about 20 cm to 30 cm of
paper is fed from the
printer.
Getting Started
Join the ends of the paper
again and insert them into
the paper inlet.
99
9
99
Insert the leading end of the inner sheet (which will be
your journal) into the take-up reel, as described
starting from
88
8 under "To load 1-ply paper for printing of
step
88
journal."
00
0
00
Replace the printer cover, passing the leading end of the
outer sheet through the cutter slot. Tear off the excess
11
Page 12
Getting Started
c
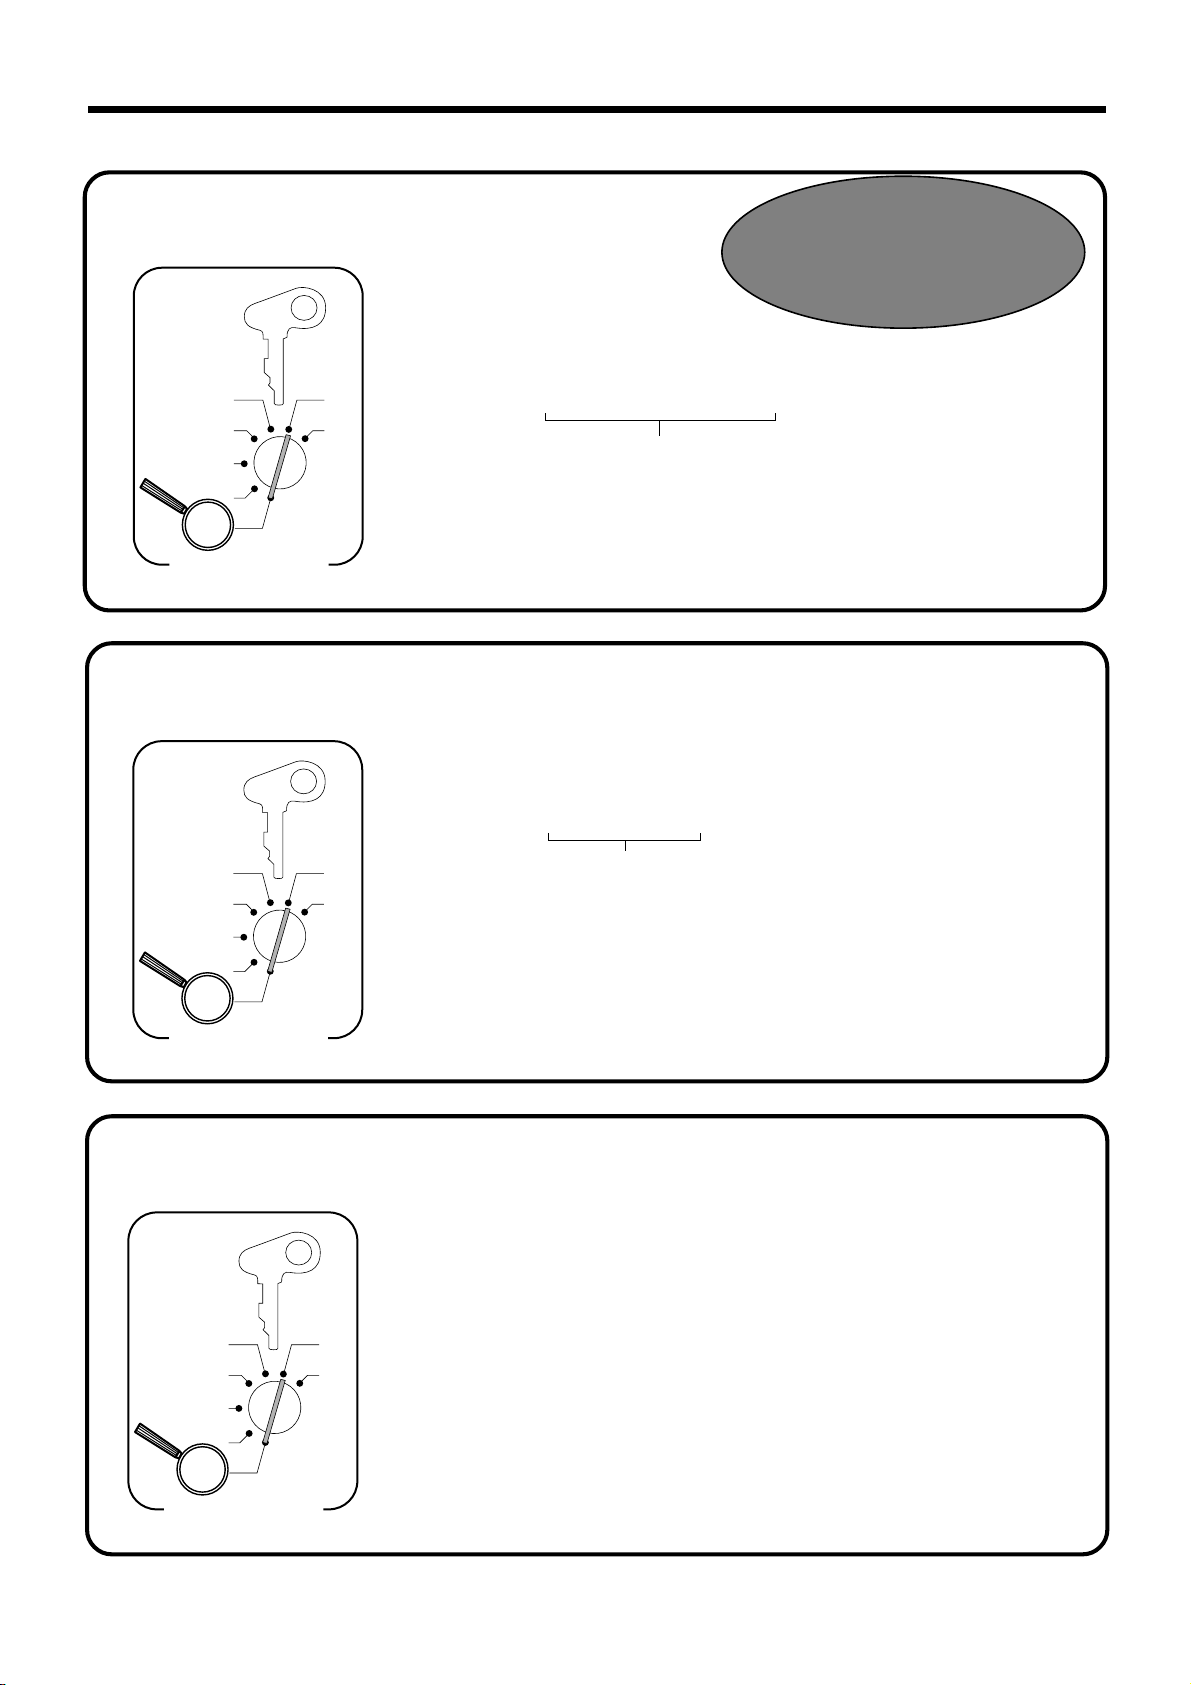
9.
Set the date.
CAL
REG
OFF
RF
PGM
Mode Switch
10.
PGM
A-A08
X
Z
Set the time.
PGM
A-A08
Year 2000
Compliance
6 1s 6 : : : : : : 6 x 6 C
Current date
Example:
December 21, 1999 2
May 11, 2000 2
6 1s 6 : : : : 6 x 6 C
991221
000511
CAL
REG
OFF
PGM
Mode Switch
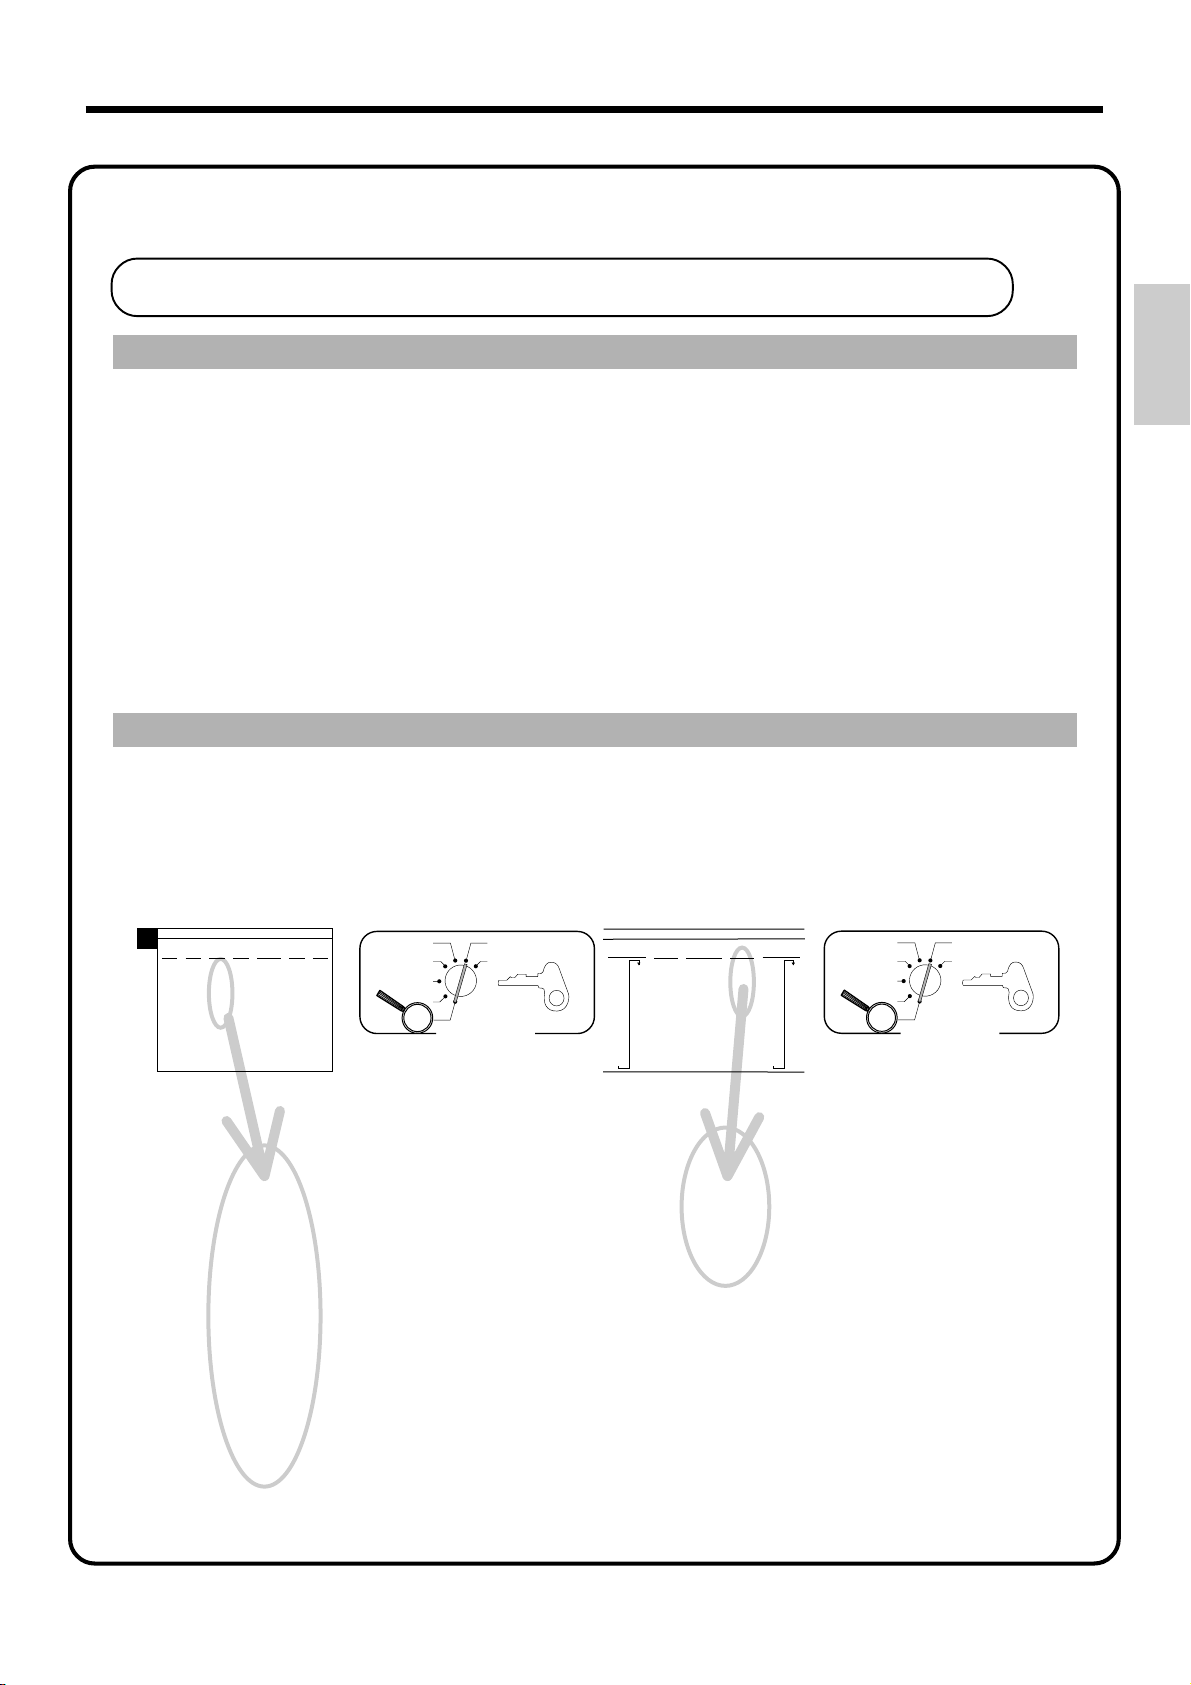
11.
CAL
REG
OFF
RF
PGM
X
Z
RF
Select printouts receipt or journal.
PGM
A-A08
Example:
08:20 AM
09:45 PM
6 1s 6 { } 6 h 6 s
X
Z
Note:
Be sure to select 0 (receipt) when you use 2-ply paper.
Current time
2 0820
2 2145
(24-hour military time format)
Issue receipt =
Print journal =
0
1
12
Mode Switch
Page 13
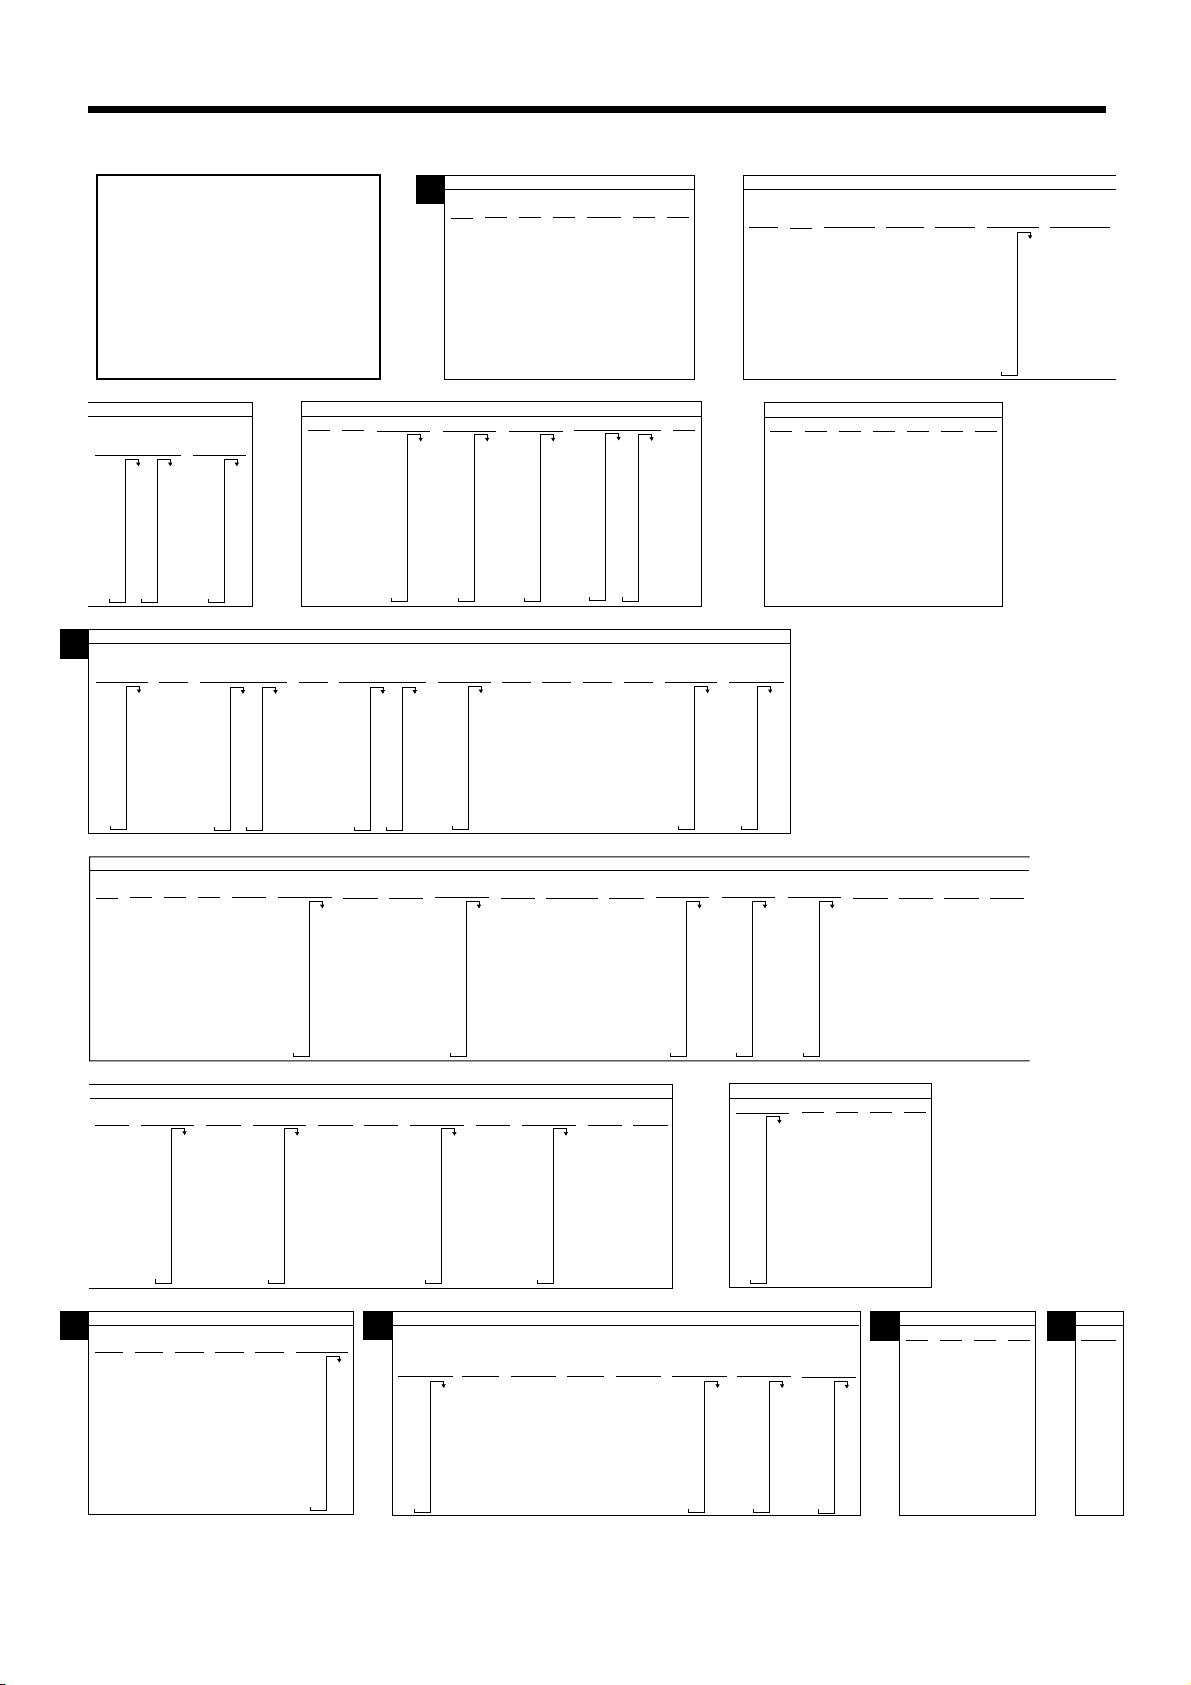
12.
Tax table programming
Programming automatic tax calculation
Important!
After you program the tax calculations, you also have to individually specify which
departments (page 29) and PLUs (page 31) are to be taxed.
For this cash register to be able to automatically register state sales tax, you must program its tax
tables with tax calculation data from the tax table for your state. There are three tax tables that you
can program for automatic calculation of three separate sales taxes.
Programming for the U.S. tax tables procedure
Find your state in the table (page 14 ~ 17) and input the data shown in the table.
State sales tax calculation data tables for all of the states that make up the United States are included
on the following pages. This data is current as of October 30, 1994.*
*Some data are revised after Oct. 30, 1994.
Important!
Be sure you use the state sales tax data specifically for your state. Even if your
state uses the same tax rate percentage as another state, inputting the wrong data
will cause incorrect result.
Getting Started
Programming procedure
Example 1 (Alabama 6% sales tax to Tax Table 1) Example 2 (Colorado 5.25% sales tax to Tax Table 2)
A
4%
110
ALABAMA
5%
6%
6%
0
0
0
1
1
1
1
1
1
10
10
8
30
29
24
54
73
20
49
41
40
69
58
55
89
70
110
90
109
Assign Tax Table 1
Terminate program
6%
7%
8%
(4+1+1)
0
0
0
0
1
1
1
1
1
1
1
1
10
9
7
6
20
21
18
36
35
31
54
49
43
70
64
56
85
78
68
110
92
81
107
93
106
CAL
REG
OFF
RF
PGM
X
Z
Mode Switch
4
PGM
A-A08
3s
4
0125s
0
1
1
8
24
41
58
G
G
G
G
G
G
G
4
0a
4
1a
4
1a
4
8a
4
24a
4
41a
4
58a
G
4
s
G
COLORADO
LOVELAND
5%
5%
4.5%
0
211
0
233
1
255
5
277
17
299
33
55
77
99
122
144
166
188
0
1
1
2
1
17
18
29
18
49
51
68
84
118
Assign Tax Table 2
(Table 3:0325)
5.25
5002
Terminate program
5.25%
5002
5.5%
5.25
172
0
190
1
209
6
227
17
245
27
263
45
281
63
299
81
99
118
136
154
CAL
REG
OFF
RF
PGM
X
Z
Mode Switch
4Z
3s
4Z
G
0225s
4
G
5^25a
4
G
5002a
G
4
s
PGM
A-A08
13
Page 14
Getting Started
C
U.S. TAX TABLES
ALASKA
HOMER
108
127
108
124
5.5%
0
145
1
163
1
181
8
208
27
227
45
245
63
263
81
281
99
299
308
327
6%
141
0
158
1
7
10
22
39
56
73
90
345
363
381
408
6.25%
10
21
37
54
70
86
103
119
6%
159
6
179
2
199
29
219
29
239
49
259
69
259
89
279
109
300
109
129
159
6.5%
130
0
0
146
1
1
161
7
7
176
10
192
20
207
35
223
51
238
67
253
83
269
99
284
115
299
6.75%
6.75
5002
111
A
4%
0
1
1
10
30
54
73
110
7.25
5002
103
23
38
53
69
84
99
115
130
146
7.25%
10
20
32
46
60
74
88
ARIZONA
6.5%
0
1
7
7
117
131
0
161
176
192
207
223
238
253
269
284
299
4%
0
1
1
12
37
0
10
20
34
48
64
80
96
6% 6.8%
5%
0
175
0
1
191
1
5
9
10
10
27
22
47
39
68
56
89
73
109
90
107
125
141
158
CALIFORNIA
7%
121
0
278
135
1
292
149
8
307
164
10
178
20
192
33
207
47
221
62
235
76
249
91
264
107
5%
110
10
29
49
69
89
0
1
1
7.25%
7.25
5002
111
126
141
6%
22
37
52
67
82
97
24
41
58
6.7%
0
1
7
7
ALABAMA
6%
0
1
1
8
20
40
55
70
90
109
156
171
186
201
216
231
246
261
276
291
7.5%
0
1
3
6
19
33
46
59
73
0
1
1
9
(4+1+1)
110
0
1
3
6
21
36
50
65
80
95
109
124
139
7.75%
7.75
5002
6%
7%
8%
0
0
107
8.25%
8.25
5002
0
1
1
1
1
7
6
21
18
35
31
49
43
64
56
78
68
92
81
93
106
7%
345
359
374
389
21
403
35
418
49
433
64
448
78
452
92
477
107
492
506
8.5%
0
1
1
5
17
29
41
52
64
76
88
1
1
10
20
36
54
70
85
153
168
183
198
212
227
242
256
271
286
300
315
330
0
1
1
7
111
123
135
147
158
170
182
194
205
LOS ANGELES
Parking
99
11
99
99
99
99
99
99
99
99
KENAI
2%
10%
0
1
0
1
1
25
75
104
114
124
134
144
154
HOMER/
SELDOVIA
3%
0
1
4
34
49
83
116
150
183
216
3%
4%
0
0
1
1
1
1
12
14
37
44
74
114
99
99
3%
0
1
4
25
34
75
127
155
177
227
ARKANSAS
5%
6%
0
1
1
10
20
40
60
80
110
HAINES
4%
19
37
62
0
1
1
8
24
41
58
0
1
2
6.8%
0
1
2
6
19
33
46
JUNEAU
4%
0
1
1
12
37
7%
0
1
1
7
21
35
49
64
78
92
107
7.5%
19
33
46
ALASKA
KENAI
5%
0
1
6
13
25
46
75
79
118
127
151
0
1
2
6
KENAI,SEWARD
& SOLDOTNA
177
184
218
5%
109
0
1
1
09
29
49
69
89
D
1.5%
2%
0
0
1
1
1
1
33
24
99
74
166
233
6.5%
6.45%
6.45
5002
0
17
17
23
38
53
69
84
99
115
130
DISTRICT OF COLUMBIA
D.C.
D.C.
5%
5.75%
0
5.75
1
5002
1
0
10
8
22
42
82
62
110
0
1
2
2.5%
COLORADO
7.25
5002
0
1
1
9
5%
0
1
2
17
29
49
7.3%
0
1
3
6
20
34
47
61
75
89
102
116
Combined
5.25%
5.25
5002
LOVELAND
5%
0
1
1
18
18
51
68
84
118
130
143
157
171
6%
16
33
50
66
83
109
0
1
1
9
7.5%
17
19
33
46
59
73
5.25%
5.25
5002
0
1
3
FLORIDA
5002
6.2%
6.2
106
6.1%
0
1
8
6%
108
124
6%
6.1
0
165
182
199
217
7%
0
1
2
8
24
21
41
35
58
49
74
64
91
78
92
107
7.5%
93
0
106
1
120
1
133
9
146
13
160
26
173
40
186
53
209
66
80
5002
1
0
2
17
17
24
41
58
74
7.5%
8%
0
0
19
33
46
59
73
G
0
1
1
3
1
6
6
18
31
3%
0
1
1
10
35
66
110
1
1
7
5.5%
0
1
6
17
27
45
63
81
99
118
136
154
8%
0
1
1
6
18
31
43
56
68
81
93
172
190
209
227
245
263
281
299
PANAMA
CITY
BEACH
6.5%
107
0
123
1
138
1
153
9
169
15
184
30
209
46
61
76
92
115
132
150
16
25
43
61
79
97
5.6%
0
1
7
103
122
141
160
179
5.25%
0
1
2
16
27
46
65
84
0
1
1
9
14
28
42
57
71
85
168
186
204
222
240
7%
5.75%
17
26
43
60
78
95
113
130
147
CONNECTICUT
198
218
109
6.35%
6.35
5002
GEORGIA
4%
5%
0
1
1
10
25
50
75
110
110
6.4%
6.4
5002
0
17
HAWAII
H
6%
0
0
1
1
1
1
10
10
20
20
40
35
60
50
80
67
85
110
4%
0
1
1
12
37
3.5%
3%
0
1
1
19
59
146
161
176
192
207
223
D.C.
6%
12
17
35
53
71
89
112
0
0
1
1
2
3
17
17
42
49
71
83
99
116
128
149
183
6.6%
6.6
5002
D.C.
6%
0
1
1
108
124
157
152
185
180
214
208
242
236
7%
0
1
4
17
21
35
49
64
78
92
107
121
D.C.
8%
0
0
1
1
1
1
8
12
24
16
41
27
58
39
74
50
91
62
75
90
112
17
41
69
97
135
149
3.6%
0
1
5
16
27
38
49
61
72
83
94
D.C.
0
1
6
6
264
291
319
347
375
9%
7.01%
7.01
5002
105
116
127
138
149
161
0
17
21
35
49
64
3.85%
0
1
2
16
37
63
COLORADO
7.1%
7.1
5002
F
4%
4.5%
0
1
2
17
37
62
25
50
75
109
125
150
104
118
0
1
5
9
7.2%
17
20
34
48
62
76
90
4%
211
0
233
1
255
5
277
17
299
33
55
77
99
122
144
166
188
7.25%
131
0
145
1
159
2
173
187
201
215
229
243
256
5%
175
209
20
40
60
80
109
14
Page 15
3%
115
IDAHO
4%
0
0
1
1
2
1
11
15
32
42
57
72
115
137
160
183
205
15
27
49
71
93
4.5%
0
1
2
227
5%
0
1
2
11
25
45
1%
148
1.25%
2%
5%
6%
0
0
0
0
109
129
0
1
1
6
1
12
8
25
24
46
41
67
58
88
1
1
119
1
1
1
39
24
74
1
49
I
6.25%
23
ILLINOIS
6.75%
6.75
5002
7%
22
36
50
65
79
93
108
6.5%
0
161
0
1
176
1
1
192
1
7
207
7
23
38
53
69
84
99
115
130
146
7.75%
7.5%
0
0
1
1
8
7.75
1
5002
1
0
6
6
19
33
46
8%
8.75%
0
8.75
1
5002
1
0
6
5
18
31
148
1%
0
1
1
49
INDIANA
5%
0
1
1
9
29
MARION County
4%
0
1
2
15
37
62
112
137
5%
15
37
49
62
87
0
1
2
RESTAURANT
6%
0
1
1
9
29
49
49
69
89
109
IOWA
4%
0
1
3
12
37
50
75
5.9%
5.9
5002
0
8
MARYLAND
4%
0
1
2
24
25
50
0
1
2
4.1%
5002
KANSAS
4.5%
0
4.1
1
1
0
11
12
33
55
77
99
122
144
166
188
211
4%
3%
0
0
1
1
2
2
12
16
37
49
62
82
87
116
112
149
7%
8.5%
0
0
1
1
1
1
7
5
21
17
35
29
49
41
64
52
78
64
92
76
107
88
99
111
112
132
153
173
193
4.5%
123
135
147
158
170
182
194
205
10
30
51
71
91
122
144
166
188
211
4.9%
214
0
479
744
499
765
520
785
540
806
561
826
581
846
602
867
622
887
642
908
663
928
683
948
704
969
724
989
LOUISIANA
6%
0
1
2
8
24
41
58
74
6%
0
0
1
1
1
6
8
24
41
58
74
91
108
115
130
146
17
23
38
53
69
84
99
1010
6%
0
1
7
7%
107
21
35
49
64
78
92
234
1
255
1
275
295
316
336
357
377
397
418
438
459
5%
0
0
1
1
6
1
10
11
27
33
47
55
67
77
87
99
109
129
5%
11
26
47
68
88
109
129
5.25%
5%
0
5.25
1
5002
1
9
29
7.5%
7%
0
161
1
176
1
192
7
207
21
223
35
238
49
253
64
269
284
299
315
330
MISSISSIPPI
7.25%
144
0
0
158
1
1
172
1
1
186
7
6
199
20
213
34
227
48
241
62
255
75
268
89
282
103
296
117
310
131
5.4%
194
0
435
212
1
453
231
1
472
249
9
490
268
27
509
287
46
305
64
324
83
342
101
361
120
379
138
398
157
416
175
8%
9%
0
0
1
1
7
2
4
6
16
324
337
351
365
379
393
406
106
16
29
27
42
38
55
49
67
61
80
72
93
83
94
105
8%
0
1
1
6
18
31
43
56
68
81
93
106
19
33
46
59
27
45
63
81
99
118
136
154
172
M
0
1
1
5
8.5%
123
0
135
1
147
1
158
5
170
17
182
29
194
41
205
52
64
76
88
99
111
5.5%
0
1
1
9
5%
110
10
20
40
60
80
105
5.65%
5.65
190
5002
209
0
8
MAINE
7%
6%
0
0
1
1
9%
0
1
1
5
16
27
38
49
61
72
83
94
16
33
50
66
83
109
9.25%
9.25
5002
7
1
2
1
0
9
7
21
35
49
64
78
92
100
0
5
Getting Started
6%
24
41
58
74
91
108
0
1
7
8
Meals Tax
0
1
1
8
6.15%
6.15
5002
5%
0
1
7
99
99
99
99
99
100
120
140
K
0
8
2.5%
19
59
99
139
179
KANSAS
6.4%
6.4
5002
0
7
MASSACHUSETTS
5%
0
1
1
9
29
6%
24
41
58
74
91
108
124
141
158
5%
0
1
2
19
20
40
0
1
1
118
140
162
183
205
3%
116
6.5%
6.5
5002
4.625%
0
1
13
10
32
54
75
97
3.1%
3.25%
3.5%
0
3.1
5002
5%
15
26
36
47
57
68
78
89
99
16
29
0
9.5%
0
1
1
5
0
1
1
9
110
121
131
142
152
163
173
184
194
107
138
169
199
230
261
292
0
1
1
15
46
76
MICHIGAN
1
1
16
49
83
0
7
227
248
270
291
313
335
356
378
399
421
443
10%
4%
108
135
162
187
0
323
1
353
1
384
14
415
0
1
1
4
14
24
34
44
54
64
74
84
94
0
1
7
12
31
54
81
42
71
99
128
157
185
KENTUCKY
6%
0
1
2
10
24
41
58
74
91
108
124
109
129
13
39
66
93
119
146
173
199
226
253
5%
0
1
6
10
25
46
67
88
3.75%
0
1
1
6%
24
41
58
74
6%
24
41
58
0
1
2
8
0
1
1
8
279
306
333
359
386
413
4%
0
1
1
12
37
62
87
112
L
MINNESOTA
6.5%
0
1
1
7
23
38
53
69
84
99
115
130
146
161
176
192
207
2%
124
174
224
24
74
4.225%
11
35
59
82
6.475%
0
1
13
7
23
38
54
69
84
100
115
131
146
MISSOURI
4.625%
0
1
13
10
32
54
75
97
160
175
190
227
248
270
291
313
335
356
378
399
421
443
4.725%
6.725%
6.725
5002
116
137
158
179
201
0
1
4
10
31
52
74
95
4.6%
0
0
1
1
1
1
10
32
54
76
97
118
140
162
183
205
MISSOURI
6.55%
162
0
177
1
193
9
208
7
223
22
239
38
254
53
270
68
285
83
301
99
316
114
332
129
145
7.225%
7.225
5002
107
128
149
170
4.8%
0
0
1
1
3
3
10
10
22
43
65
86
N
114
135
156
177
10
31
30
52
50
72
70
93
90
110
130
150
170
190
3%
0
1
3
16
49
83
116
149
183
4.75%
4.975%
0
1
1
3.5%
128
157
185
214
242
271
211
14
42
71
99
5.05%
19
39
59
79
98
118
138
158
178
4%
0
0
1
1
3
2
14
37
62
5.225%
5.1%
0
122
144
166
188
211
4.5%
14
33
55
77
99
1
1
9
29
49
68
88
107
0
1
6
5.225
5002
NEBRASKA
5%
233
255
277
299
14
322
29
49
115
133
151
169
0
1
2
118
136
154
172
0
1
5
9
0
1
15
8
26
44
62
80
98
5.5%
0
1
2
14
27
45
63
81
99
5.6%
187
205
223
241
258
276
294
312
330
348
366
383
190
209
227
5.625%
26
44
62
79
97
115
133
151
168
6%
0
1
1
8
24
41
58
5.725%
0
5.725
1
5002
1
8
6.5%
0
1
1
7
23
38
53
69
84
99
115
130
146
161
176
192
207
108
125
142
158
5.975%
175
0
192
1
209
2
225
8
242
25
259
41
276
58
292
75
309
92
326
342
359
376
3%
0
1
2
14
49
83
116
149
118
157
185
214
242
271
14
38
64
88
3.5%
0
1
6
392
410
299
326
357
6.1%
0
1
1
8
24
40
57
73
90
5.75%
5.75
5002
6.225%
24
40
56
72
88
104
120
136
152
0
1
2
8
6%
0
1
2
8
24
41
58
74
168
184
200
216
232
248
265
NEVADA
6.25%
23
39
55
71
87
103
119
135
151
6.3%
0
1
8
7
23
39
55
71
87
103
119
134
150
167
0
183
1
199
2
215
7
166
182
198
214
230
246
115
130
146
23
38
53
69
84
99
6.5%
0
1
1
7
6.425%
0
1
1
7
23
38
54
70
85
101
116
132
147
161
176
192
207
163
178
194
210
225
241
256
272
287
6.75%
6.75
5002
22
37
7%
0
1
0
1
7
7
21
35
49
64
78
92
107
15
Page 16
Getting Started
N
NEW HAMPSHIRE
7%
129
0
143
1
158
8
172
14
186
26
201
39
51
63
75
88
101
115
NEW MEXICO
6.1875%
6.187%
0
6.1875
1
5002
4
9
23
40
56
72
88
104
120
136
153
4%
3%
0
0
1
1
5
4
9
9
29
35
59
70
84
116
112
149
137
183
216
Rooms & Meals
7%
128
0
142
1
157
8
171
35
185
35
200
38
50
62
74
87
100
114
0
8
NORTH CAROLINA
4.5%
5%
0
188
1
211
6
233
9
255
25
277
53
299
75
322
95
122
144
166
109
129
Rooms & Meals
8%
0
1
4
35
35
35
37
50
62
5%
4%
0
0
1
1
6
5
10
12
27
33
47
58
67
83
87
112
109
137
129
CHROKEE
Reservations
6%
0
1
6
8
23
48
67
85
NEW JERSEY
3%
3.5%
0
0
1
1
1
1
14
17
42
41
71
71
100
117
128
157
185
214
5.25%
5.75%
5.25
5.75
6%
5002
24
41
58
74
91
0
1
7
10
22
38
56
72
88
108
124
3%
0
1
3
0
15
1
33
2
67
8
100
133
166
200
5002
0
1
2
10
24
41
58
74
108
124
7%
6%
150
0
0
164
1
1
178
1
8
100
125
192
10
207
21
35
50
64
78
92
107
121
135
6.25%
0
1
7
10
22
38
54
70
86
103
119
4%
4%
0
0
1
1
5
2
15
15
31
25
51
50
71
75
100
125
10
22
38
56
72
88
110
6%
141
158
120
146
173
200
226
253
6.5%
130
0
146
1
161
1
176
7
192
23
207
38
53
69
84
99
115
NORTH DAKOTA
5%
0
1
2
15
20
40
110
128
146
164
3.75%
0
1
6
13
40
67
93
5.5%
0
1
2
15
19
37
55
73
91
6.75%
6.75
5002
280
306
333
359
NEW YORK
182
200
219
107
6%
4.25%
0
1
1
11
35
58
82
105
129
152
176
199
223
7%
0
1
8
10
20
33
47
62
76
91
0
1
3
15
17
34
50
67
84
121
135
149
164
178
192
207
108
124
139
154
247
270
294
317
341
364
388
411
15
31
47
62
77
93
6.5%
0
1
2
7.25%
7.25
5002
170
185
200
216
231
4.375%
11
34
57
79
102
125
148
171
194
217
4.5%
239
0
1
4
100
122
144
167
189
211
7.5%
113
0
126
1
139
8
10
18
31
45
58
71
85
99
7%
8%
0
0
1
1
2
3
15
15
15
15
29
25
43
38
58
50
72
63
86
75
100
88
115
100
11
33
55
78
0
1
1
4.875%
4.875
ERIE
8%
0
1
10
10
17
29
42
55
67
80
92
O
5002
NEW MEXICO
5.175%
5.175
5002
SUFFOLK
County
105
0
119
1
131
9
144
10
17
29
42
54
67
79
92
5%
0
1
2
15
20
40
5.375%
5.575%
5.575
5002
MEIGS
0
1
3
16
17
34
50
67
83
100
117
5.75%
5.75
5002
Co.
6%
6.25%
134
0
1
2
15
16
32
5.25%
5.375
199
0
5002
217
1
11
9
28
47
66
85
104
123
142
161
180
8%
8.25%
8.5%
8.25
146
164
182
200
218
5002
5.75%
5.75
5002
8.5
5002
OHIO
100
117
6%
0
1
2
15
17
34
50
67
83
109
127
106
118
131
5.5%
0
1
2
15
18
36
54
72
90
0
1
3
15
15
30
46
61
76
92
107
PENNSYLVANIA
P
6%
0
1
1
10
17
34
50
67
84
110
T
0
1
1
11
33
55
77
99
122
144
166
6.5%
4.5%
123
138
153
169
184
200
215
230
188
211
110
117
134
OHIO
CUYAHOGA
Co.
115
128
5.5%
154
172
190
209
227
245
263
281
299
318
336
7%
115
0
128
1
3
15
15
28
42
57
71
85
100
RHODE ISLAND
R
6%
26
42
57
73
90
106
123
140
6%
354
372
390
7.75%
7.75
5002
7%
0
0
1
1
6
5
9
7
21
35
49
64
78
92
107
121
135
6.25%
0
0
1
1
2
2
10
10
24
23
41
39
58
55
74
71
87
7%
0
1
3
15
15
28
42
57
71
85
100
7%
150
0
150
1
167
5
184
10
210
17
217
34
234
50
250
50
250
67
84
0
1
11
10
27
45
63
81
99
119
136
149
164
178
192
207
221
235
249
264
115
10
23
38
53
69
84
99
6.5%
0
1
2
130
146
161
176
192
207
223
2%
0
1
1
24
74
S
3.25%
3%
0
0
1
1
1
7
16
15
49
46
83
76
116
107
138
169
199
230
261
292
SOUTH CAROLINA
4%
5%
0
1
5
10
10
25
20
50
40
75
60
112
80
137
109
129
6.75%
125
0
140
1
155
8
170
10
185
22
199
37
214
51
229
66
244
81
259
96
274
111
323
353
384
415
446
476
507
538
569
599
CHARLESTON
0
1
6
TENNESSE
7%
121
0
1
2
10
21
35
49
64
78
92
107
4%
6%
108
124
12
37
0
1
1
0
1
2
10
24
41
41
58
74
91
4.25%
4.25
5002
COUNTY
TAX
7.25%
0
1
10
10
20
34
48
61
75
89
103
117
130
144
158
172
185
4.5%
121
144
11
33
55
77
99
0
1
2
7.5%
5%
29
4%
0
1
1
12
37
7.75%
0
1
2
10
19
33
46
59
0
1
1
9
5002
7.75
5%
10
30
5.25%
5.25
5002
0
1
1
8%
OKLAHOMA
6%
0
1
1
8
24
41
58
SOUTH DAKOTA
5.5%
190
0
210
1
1
10
28
46
64
82
100
118
136
154
172
0
0
1
1
2
2
10
10
18
18
31
31
43
43
56
68
81
93
6.25%
8%
23
109
106
118
6.725%
7%
7.25%
7.375%
8%
8.25%
9.25%
10.25%
0
6.725
0
7.25
7.375
0
0
0
1
5002
1
5002
5002
1
1
7
6%
0
1
1
9
26
43
60
76
92
115
130
146
8.25%
8.25
5002
23
38
53
69
84
99
6.5%
0
1
1
7
161
176
192
207
108
122
6
8
22
37
51
65
79
94
107
121
135
8.5%
0
111
1
123
2
135
10
147
17
158
29
170
41
182
52
194
64
205
76
217
88
0
6
7%
0
149
1
4
7
21
35
49
64
78
92
8.75%
99
8.75
5002
1
1
1
6
6
18
18
31
30
42
54
66
78
90
103
0
1
1
4
1
5
4
16
14
27
24
37
34
48
43
59
70
81
91
16
Page 17
T
7.75%
0
1
5
6
19
32
45
58
70
83
5.125%
5%
0
5.125
1
5002
1
9
29
49
69
104
123
142
8.25%
8%
96
0
109
122
135
148
161
174
187
8.25
1
5002
1
6
18
31
5.25%
0
1
12
9
28
47
66
85
161
180
199
219
238
5.375%
5.375
5002
U
115
136
157
178
199
4.75%
10
31
52
73
94
206
230
254
278
303
327
351
375
399
424
7.5%
TEXAS
0
1
1
6
19
33
46
59
73
86
4.625%
4.625
5002
4%
107
4.125%
0
0
1
1
1
1
12
12
36
37
60
62
84
87
109
133
157
181
7.25%
7.25
5002
4%
0
1
1
12
37
7%
0
1
1
7
21
35
49
64
78
92
TEXAS
5.5%
0
1
1
9
27
45
63
81
99
118
137
221
0
242
1
263
1
284
305
326
347
368
389
410
155
173
191
209
5.625%
26
44
62
79
97
115
133
5%
0
1
1
9
29
104
123
142
161
180
0
1
1
8
5.25%
0
1
1
9
28
47
66
85
151
168
199
219
238
257
276
295
314
333
352
371
390
409
6%
0
1
1
8
24
41
58
5.375%
27
46
65
83
102
0
1
1
9
DALLAS
6%
0
1
1
9
25
42
59
27
45
63
81
99
118
136
154
172
5.5%
0
1
1
9
HOUSTON
(Harris
County)
6%
108
UTAH
190
209
0
1
1
8
24
41
58
74
91
5.75%
5.75
5002
6.125%
6.125
5002
5.875%
5.875
5002
6.25%
6.25%
0
6.25
1
5002
1
7
23
39
55
71
87
103
119
6.125%
6%
0
8
24
41
58
74
6.25%
6.125
0
5002
1
0
2
8
8
6.75%
125
0
288
140
1
303
155
3
318
170
8
333
185
22
348
199
37
362
215
51
377
229
66
392
244
81
407
259
96
422
274
111
7%
0
1
4
7
23
27
47
63
107
437
7.25%
0
7.25
1
5002
2
7
21
35
49
64
78
92
V
3%
100
133
166
200
ROANOKE CITY
W
7%
107
VERMONT
4%
0
1
4
13
10
33
25
66
50
VA BEACH
8.5%
0
112
1
122
1
137
11
144
12
162
33
166
37
187
55
188
62
211
77
87
0
1
1
7
21
35
49
64
78
92
104
118
0
1
2
99
20
34
48
62
76
90
7.2%
0
1
1
6
100
120
140
131
5%
10
20
40
80
0
1
2
9%
5002
8%
0
1
0
18
31
43
56
68
81
93
100
NORFOLK CITY
0
9
1
6
11
33
44
44
55
55
77
77
7.3%
129
0
143
1
156
1
170
6
184
19
198
33
211
47
225
61
239
74
252
88
102
115
0
1
21
14
34
59
84
114
134
159
184
Meal tax
9%
99
99
122
122
144
144
166
166
188
188
211
113
4%
214
234
259
284
314
334
359
384
414
434
459
7.5%
0
1
1
6
19
33
46
59
73
86
99
484
512
537
VIRGINIA
211
233
233
126
139
153
166
179
193
206
ARLINGTON
COUNTY
4%
0
1
2
12
37
62
87
112
137
CITY OF RICHMOND
Food tax
9.5%
205
89
0
99
1
110
1
121
5
131
15
142
26
152
36
163
47
173
57
184
68
194
78
7.55%
4.125%
0
0
1
1
3
2
6
7
19
19
32
33
46
46
59
59
72
72
85
98
111
4.5%
188
0
211
1
233
5
255
15
277
33
299
55
77
99
122
144
166
0
1
1
9
11
29
33
49
55
69
77
WASHINGTON
282
124
138
151
164
177
190
203
217
230
243
256
269
FAIRFAX
5.5%
0
1
4
11
14
33
55
77
99
122
144
9.5%
89
99
109
122
129
144
149
166
169
188
189
7.8%
7.8
2
0
7
19
32
44
57
70
83
FAIRFAX CITY
149
166
188
211
233
249
255
122
209
7.9%
0
1
2
6
18
31
44
56
Meals tax
6.5%
0
1
1
11
24
33
55
74
77
99
8%
0
1
1
6
18
31
124
144
166
174
188
211
104
14
18
30
43
55
67
80
92
8.1%
0
1
6
117
129
141
154
166
179
191
203
114
0
1
13
14
29
34
44
59
74
84
VIRGINIA
HAMPTON
Restaurant
7%
114
134
149
159
184
184
214
214
234
249
259
Combined
8.1%
8.1
2
0
6
18
30
43
55
67
80
284
LEESBURG
Meal tax
7%
107
0
1
1
6
18
30
42
54
67
79
91
103
21
35
49
64
78
92
115
128
140
152
164
176
189
201
213
225
237
249
0
1
1
7
8.2%
RICHMOND
Restaurant
7%
0
1
1
14
14
34
59
59
84
84
114
408
262
420
274
432
286
445
296
457
310
469
323
481
335
493
347
506
359
371
384
396
ALEXANDRIA
7.5%
7.5
5002
8.7%
0
1
1
5
17
28
NEWPORT
NEWS
7.5%
116
0
122
1
144
1
149
11
166
16
183
33
188
49
211
55
77
83
99
RICHMOND
7.5%
0
1
2
6
19
33
46
59
Restaurant
8%
0
1
5
14
34
44
44
59
59
84
84
114
114
134
134
159
Getting Started
WEST VIRGINIA
2%
3%
0
1
2
25
50
100
100
135
4%
5%
6%
0
0
0
1
1
2
1
5
12
35
37
70
0
1
1
2
2
5
5
20
16
40
33
50
67
84
100
116
4%
12
37
0
1
1
WISCONSIN
5%
0
1
1
10
21
41
61
81
110
118
136
154
172
27
45
63
81
99
5.5%
0
1
1
9
190
209
5.6%
116
133
0
1
1
8
26
44
62
80
98
3%
116
149
0
1
2
24
49
83
WYOMING
4%
5%
0
1
2
24
24
37
29
62
49
69
89
109
6%
0
0
1
1
2
3
24
24
34
51
68
84
17
Page 18
Introducing CE-280
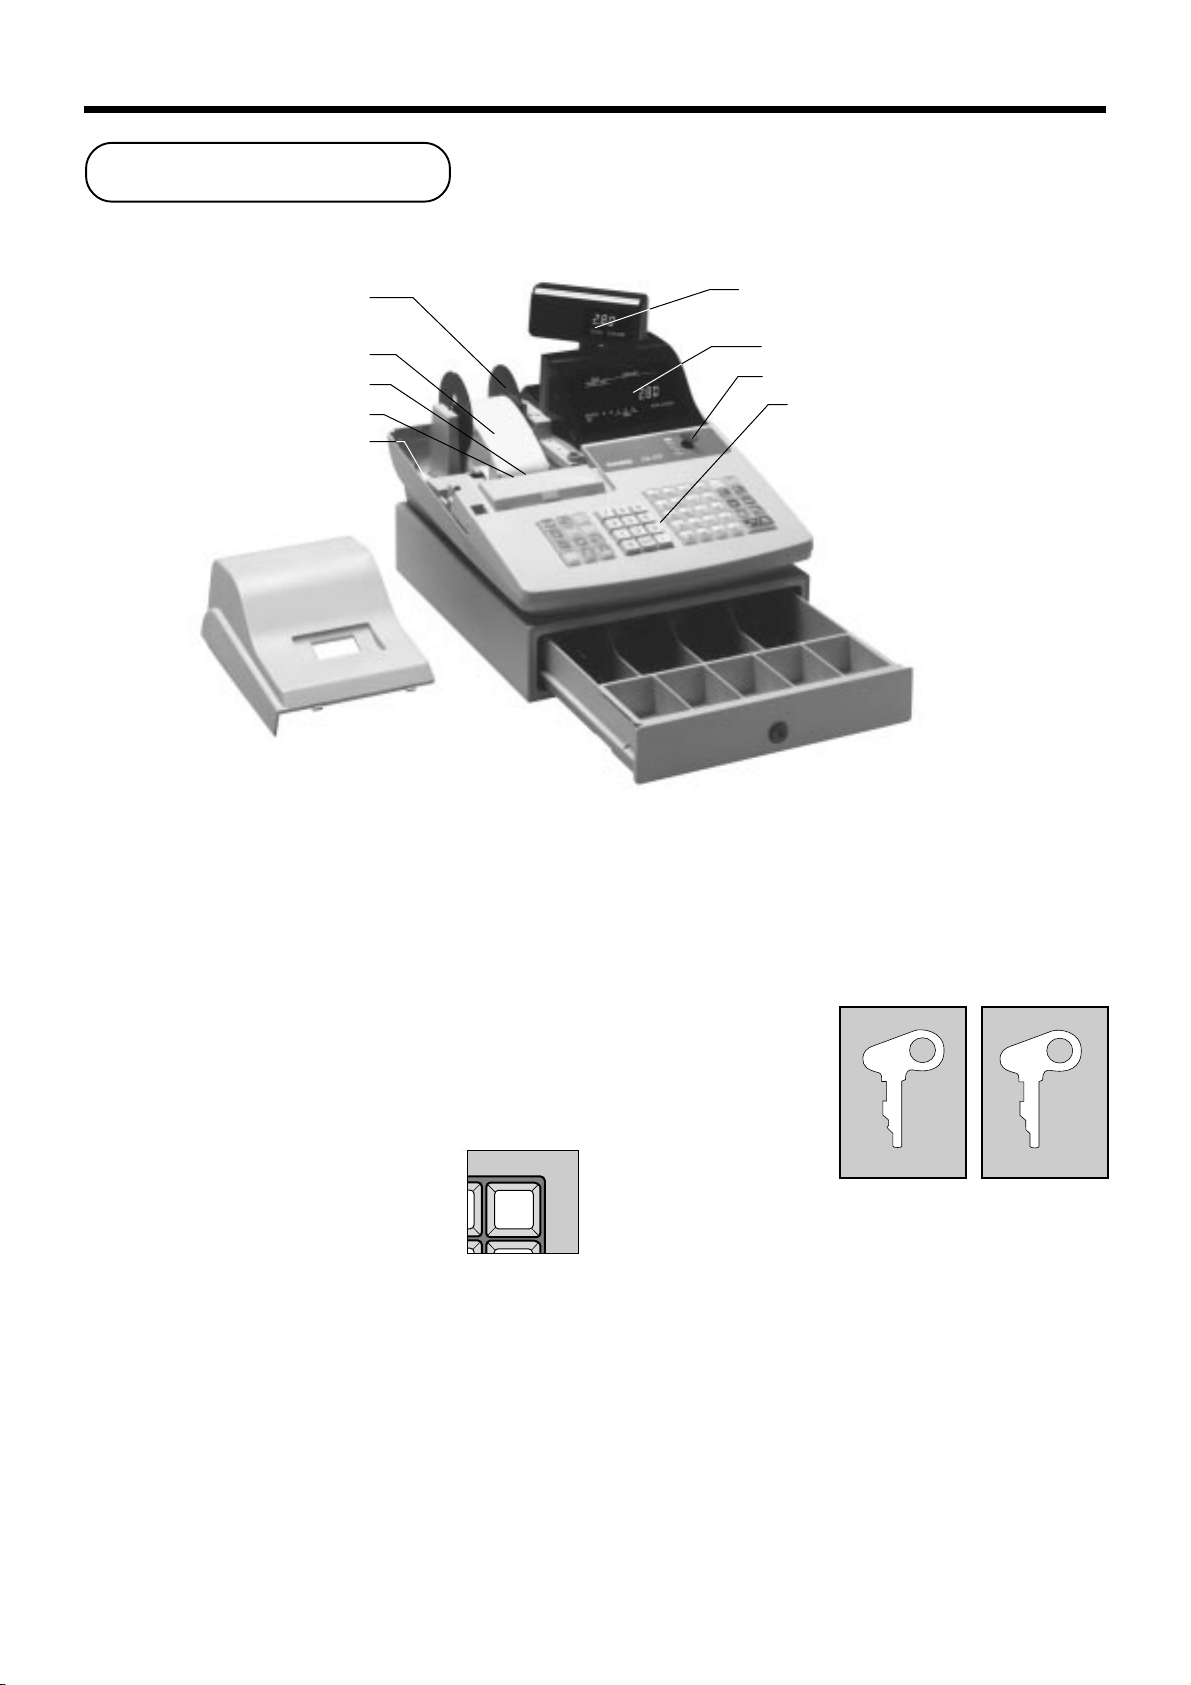
General guide
This part of the manual introduces you to the cash register and provides a general explanation of its various parts.
Take-up reel
Roll paper
Printer
Printer ink ribbon
Battery compartment
Printer cover
Battery compartment
Holds memory backup batteries (page 8).
Roll paper
You can use the roll paper to print receipts and a journal
(page 9 ~ 11).
Pop-up display
Main display
Mode switch
Keyboard
Drawer
Drawer lock
Mode key
There are two types of mode keys: the program key
(marked "PGM") and the operator key (marked "OP").
The program key can be used to set the mode switch to
any position, while the operator key can select the
REG, CAL and OFF position
Printer ink ribbon
Provides ink for printing of registration details on the
roll paper (page 6, 91).
Receipt on/off key
When you are using the printer for receipt
printer, you can use this key (in the REG
and RF modes only) to turn the printer on
RECEIPT
ON/OFF
and off. If a customer asks for a receipt
while receipt printing is turned off by this
key, you can issue a post-finalization receipt (page 49).
Note: Instead of the receipt on/off switch, receipt
issuance is controlled by this key .
18
PGM
A-A08
OP
A-A08
Program Operator
key key
Page 19
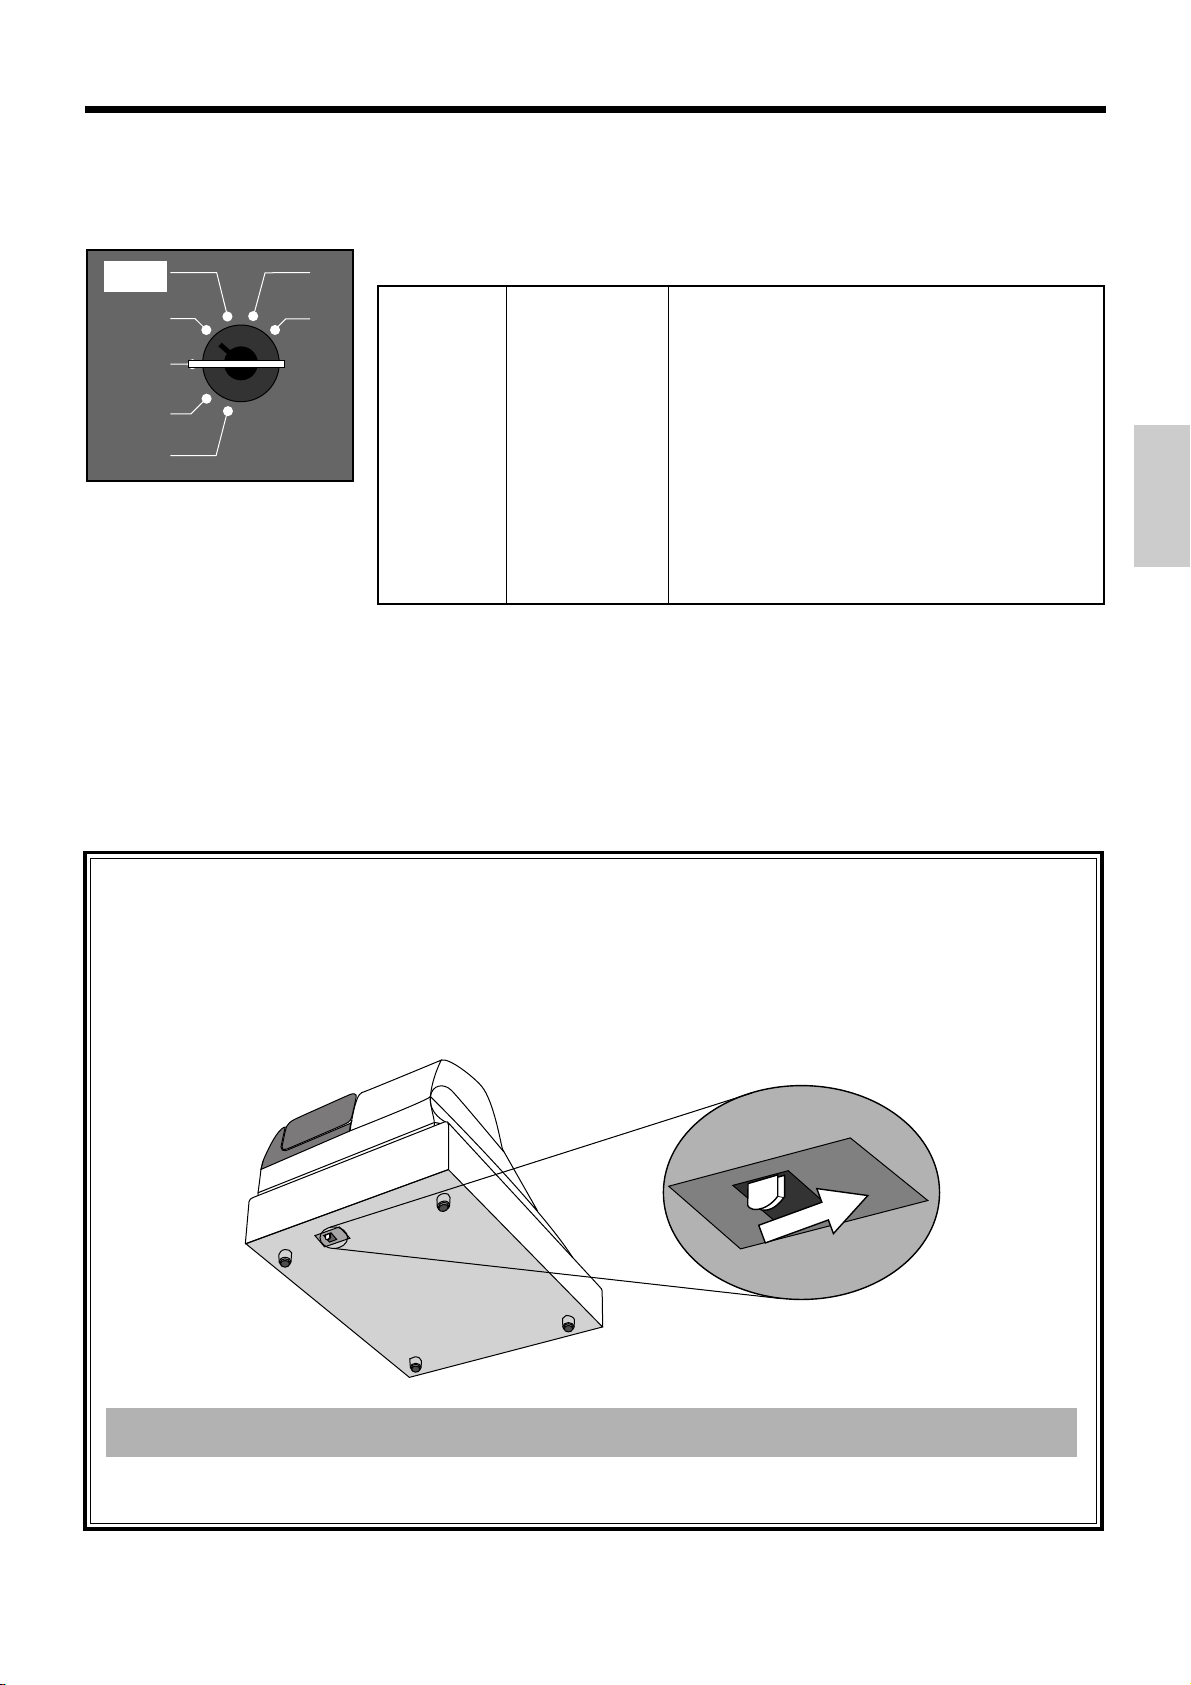
Mode switch
Use the mode keys to change the position of the mode
switch and select the mode you want to use.
CAL
REG
OFF
RF
PGM
X
Z
Mode Switch
—————————————————————————————————
Z RESET
—————————————————————————————————
X READ
—————————————————————————————————
CAL
—————————————————————————————————
REG REGISTER Use this mode for normal registration.
—————————————————————————————————
OFF STAND-BY Cash register standing by.
—————————————————————————————————
RF REFUND Use this mode to register refund transaction.
—————————————————————————————————
PGM PROGRAM
Mode Name Description
CALCULATOR
Drawer
The drawer opens automatically whenever you finalize
a registration and whenever you issue a read or reset
report. The drawer will not open if it is locked with the
drawer key .
Drawer lock
Use the drawer key to lock and unlock the drawer.
Reads sales data in memory and clears the data.
Reads sales data in memory without clearing the data.
Use this mode for calculator.
Use this mode for cash register programming.
Introducing CE-280
When the cash drawer does not open!
In case of power failure or the machine is in
malfunction, the cash drawer does not open
automatically. Even in these cases, you can open the
cash drawer by pulling drawer release lever (see
below).
Important!
The drawer will not open, if it is locked with a drawer lock key.
19
Page 20
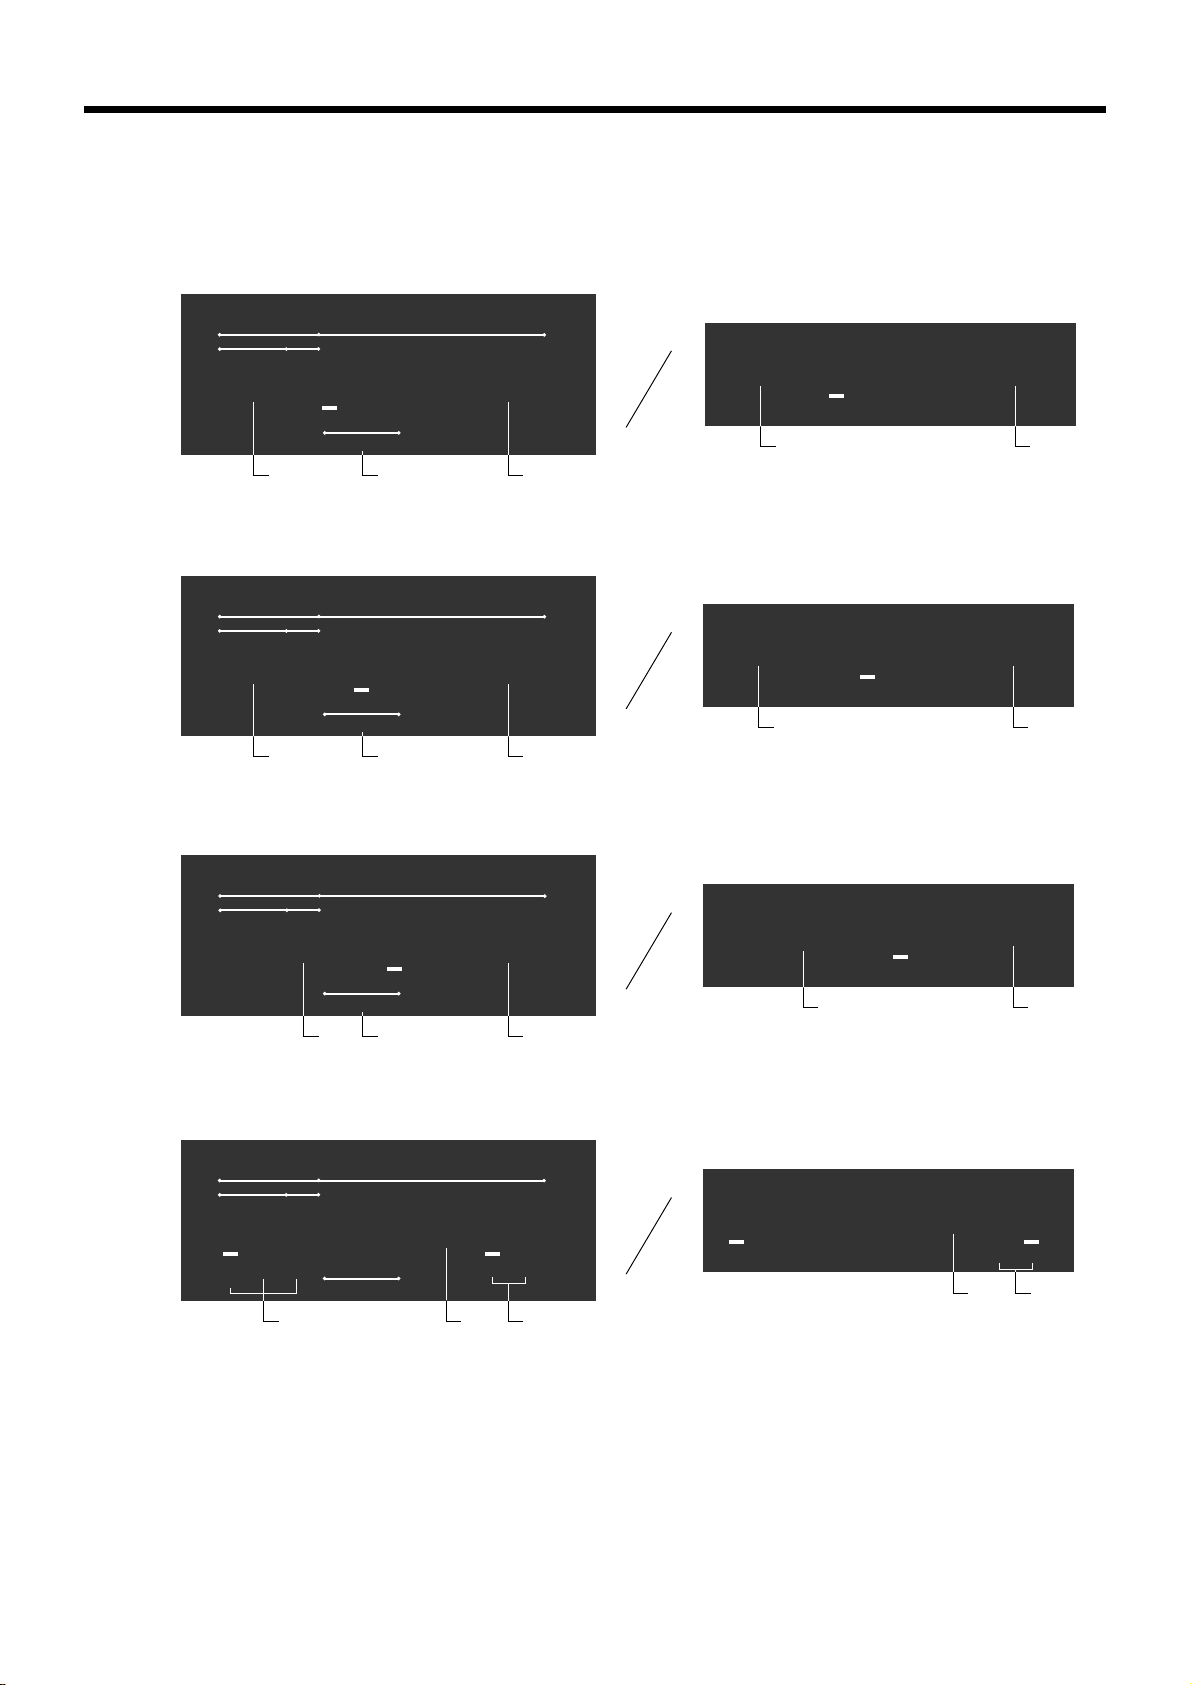
Introducing CE-280
Displays
Main Display Pop-up display
Department registration
DEPT RPT
01 !50
XZ
RECEIPT
ON
2
PLU registration
DEPT RPT
010 "50
XZ
RECEIPT
ON
3
Repeat registration
DEPT RPT
2 #50
XZ
RECEIPT
ON
123
TAX
4
123
TAX
4
123
TAX
513
AMOUNTPLU
01 !50
TOTAL CHANGE
2
1
AMOUNTPLU
TOTAL CHANGE
1
010 "50
TOTAL CHANGE
4
1
AMOUNTPLU
TOTAL CHANGE
1
2 #50
TOTAL CHANGE
5
TOTAL CHANGE
1
Totalize operation
DEPT RPT
XZ
RECEIPT
ON
20
7
123
TAX
AMOUNTPLU
1"34
TOTAL CHANGE
1
6
'66
TOTAL CHANGE
1
7
Page 21

1 Amount/Quantity
This part of the display shows monetary amounts. It
also can be used to show the current date and time.
2 Department number
When you press a department key to register a unit
price, the corresponding department number (01 ~ 80)
appears here.
3 PLU (Subdepartment number)
When you register a PLU (subdepartment) item, the
corresponding PLU (subdepartment) number
appears here.
4 Taxable sales status indicators
When you register a taxable item, the corresponding
indicator is lit.
5 Number of repeats
Anytime you perform a repeat registration (page 28,
32), the number of repeats appears here.
Note that only one digit is displayed for the number of
repeats. This means that a "5" could mean 5, 15
or even 25 repeats.
Introducing CE-280
6 Total/Change indicators
When the TOTAL indicator is lit, the displayed value
is monetary total or subtotal amount. When the
CHANGE indicator is lit, the displayed value is the
change due.
7 Receipt ON/OFF, X, Z indicators
Receipt ON/OFF: When the register issues receipts,
this indicator is lit. (REG/RF mode only)
X: Indicates X mode
Z: Indicates Z mode
21
Page 22
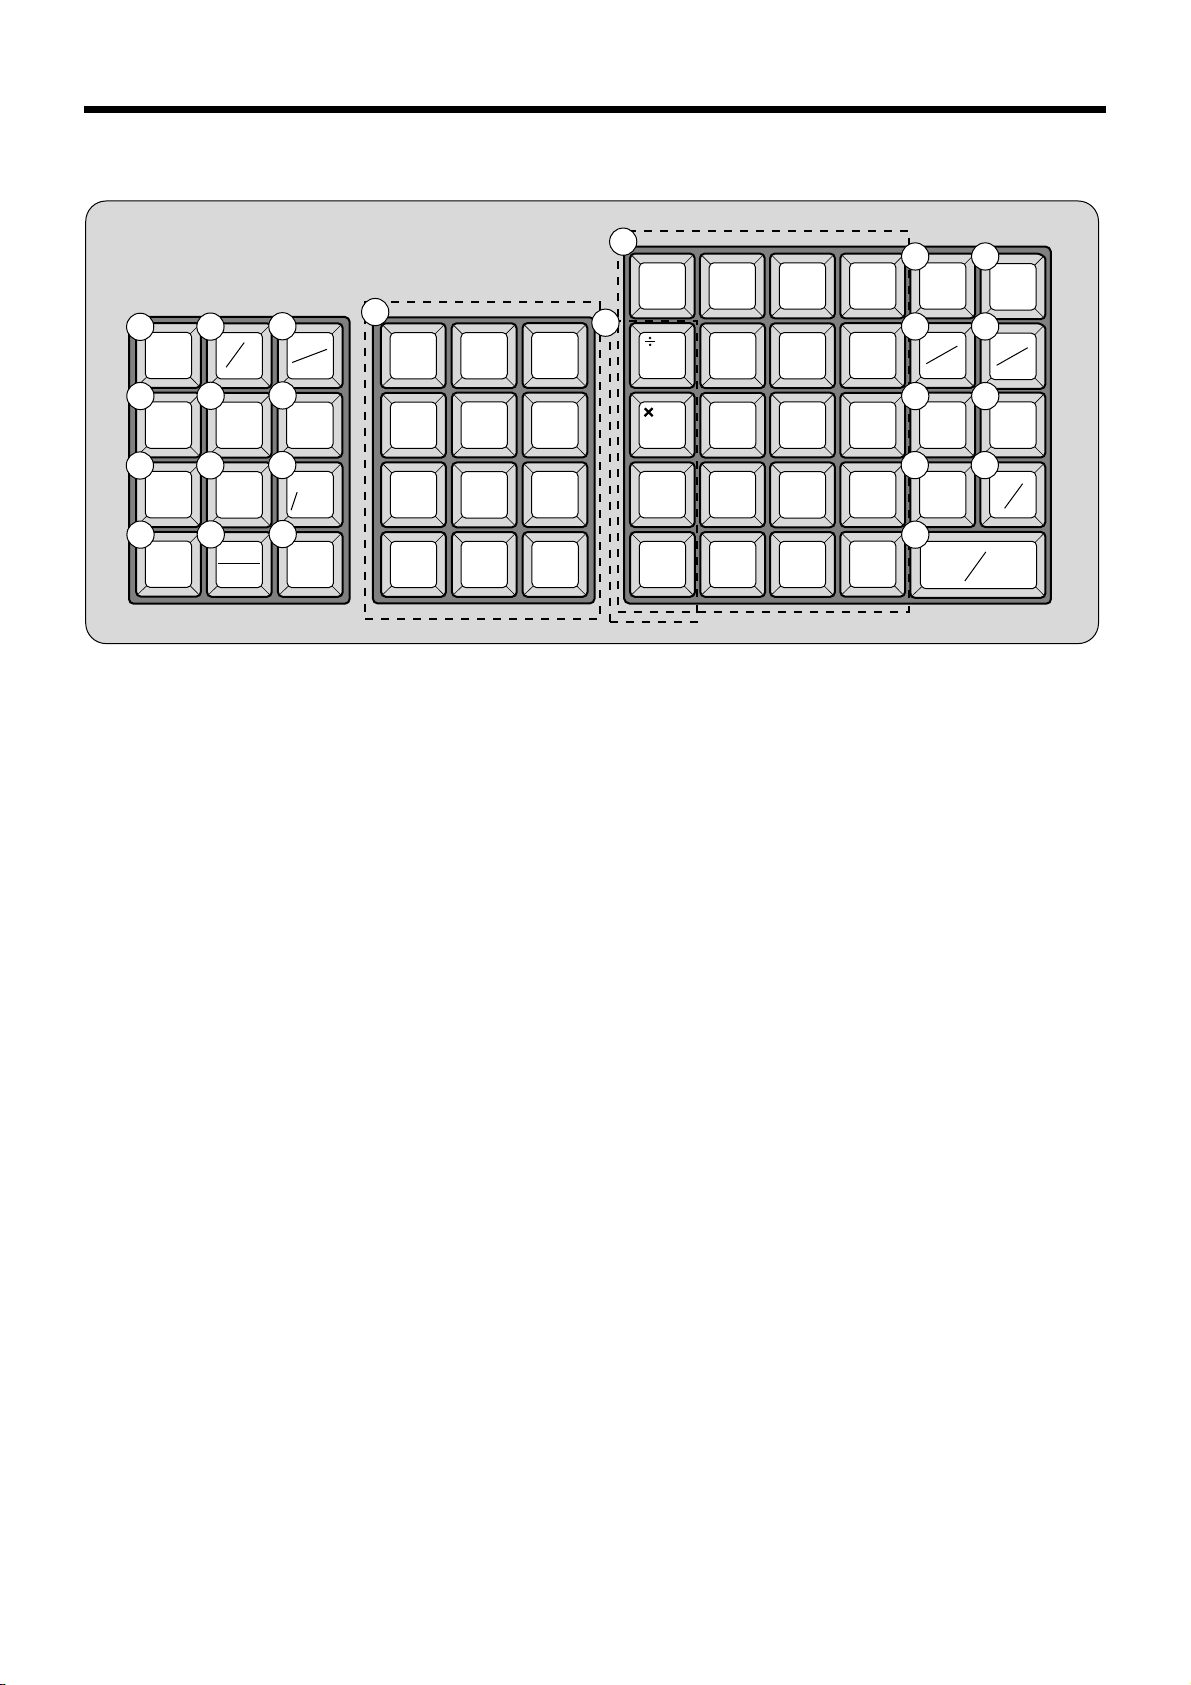
Introducing CE-280
Keyboard
C
13
789
456
123
000•
1 2 3
FEED
#
NS
4 5
-
PRICE
8
RF
11
ERR.CORR
CANCEL
%
7
10
POST
RECEIPT
/EXCHG
OPEN
6
PLU/
S.DEPT
9
X/FOR
12
C/AC
CLK #
DATE
TIME
• Register Mode
1 Paper feed key f
Hold this key down to feed paper from the printer.
2 Non-add/No sale key B
Non-add key: To print reference number (to identify a
personal check, credit card, etc.) during a transaction,
press this key after some numerical entries.
No sale key: Press this key to open the drawer without
registering anything.
3 Open/Clerk number key o
It is necessary to select one of these functions (page 51).
Open key: Press this key to temporarily release a limitation
on the number of digits that can be input for a unit price.
Clerk number key: Use this key to sign clerk on and off the
register.
4 Percent key p
Use this key to register premiums, discounts or manual
tax.
5 Price key :
Use this key to register unit prices for subdepartment.
6 PLU/Subdepartment key *
Use this key to input PLU (subdepartment) numbers.
7 Minus key m
Use this key to input values for subtraction.
8 Refund key R
Use this key to input refund amounts and void certain
entries.
24
14
65 70 75 80
45 50 55 60
25 30 35 40
51015 20
64 69 74 79
44 49 54 59
24 29 34 39
4 9 14 19
63 68 73 78
43 48 53 58
23 28 33 38
3 8 13 18
62 67 72 77
-
42 47 52 57
22 27 32 37
2 7 12 17
61 66 71 76
+
41 46 51 56
21 26 31 36
1 6 11 16
15
17 18
19 20
21
23
16
DEPT
SHIFT
RC
CH
T/S1
RECEIPT
ON/OFF
PD
CHK
22
CA
MD
AMT
SUB
TOTAL
= TEND
About tax shift 3, refer to page 39.
9 Multiplication/For/Date/Time key x
Use this key to input a quantity for a multiplication
operation and registration of split sales of packaged
items. Between transactions, this key displays the current
time and date.
0 Post receipt/Currency exchange key ;
Post receipt key: Press this key to produce a post-finalization receipt (page 49).
Currency Exchange key: Use this key for calculating
subtotal amounts or paying amount due in foreign currency (page 72).
A Error correct/Cancel key e
Use this key to correct registration errors and to cancel
registration of entire transactions.
B Clear key C
Use this key to clear an entry that has not yet been
registered.
C Ten key pad 0, 1, ~ 9, -, ^
Use these keys to input numbers.
D Department keys !, ", ~ %
Use these keys to register items to departments.
T/S2
ST
22
Page 23

E Department shift key d
Press this key to shift the department key number from 1
through 20 to 21 through 40, 41 to 60, 61 to 80 as follows.
! 2 Dept.1 dd! 2 Dept.41
" 2 Dept.2 dd" 2 Dept.42
::
% 2 Dept.20 dd% 2 Dept.60
d! 2 Dept.21 ddd! 2 Dept.61
d" 2 Dept.22 ddd" 2 Dept.62
::
d% 2 Dept.40 ddd% 2 Dept.80
F Receipt on/off key D
Press this key twice to change the status "receipt issue" or
"no receipt." This key is only effective when the "use
printer for receipt printer" in the printer control program is
selected. In case of "receipt issue", the "RECEIPT ON"
indicator is lit.
G Received on account/Tax status shift 1 key E
Received on account: Press this key following a numeric
entry to register money received for non-sale transactions.
Tax shift 1: Press this key without numeric entry to change
the Taxable 1 status of the next item.
H Paid out key/Tax status shift 2 key @
Paid out: Press this key following a numeric entry to
register money paid out from the drawer.
Tax shift 2: Press this key without numeric entry to change
the Taxable 2 status of the next item.
I Charge key h
Use this key to register a charge sale.
J Check key k
Use this key to register a check tender.
This key is also used for tax table 3 programming.
K Subtotal key s
Press this key to display and print the current subtotal
(includes add-on tax) amount.
L Merchandise subtotal key M
Press this key to display and print the current subtotal
(excludes add-on tax) amount.
M Cash amount tendered key a
Press this key to register a cash sale.
• Calculator Mode
2 Drawer open key B
4 Percent key p
B Clear/All clear key C
C Ten key pad 0, 1, ~ 9, -, ^
N Arithmetic operation key !, ", # and $
G Memory recall key *
L Equal key a
Introducing CE-280
23
Page 24
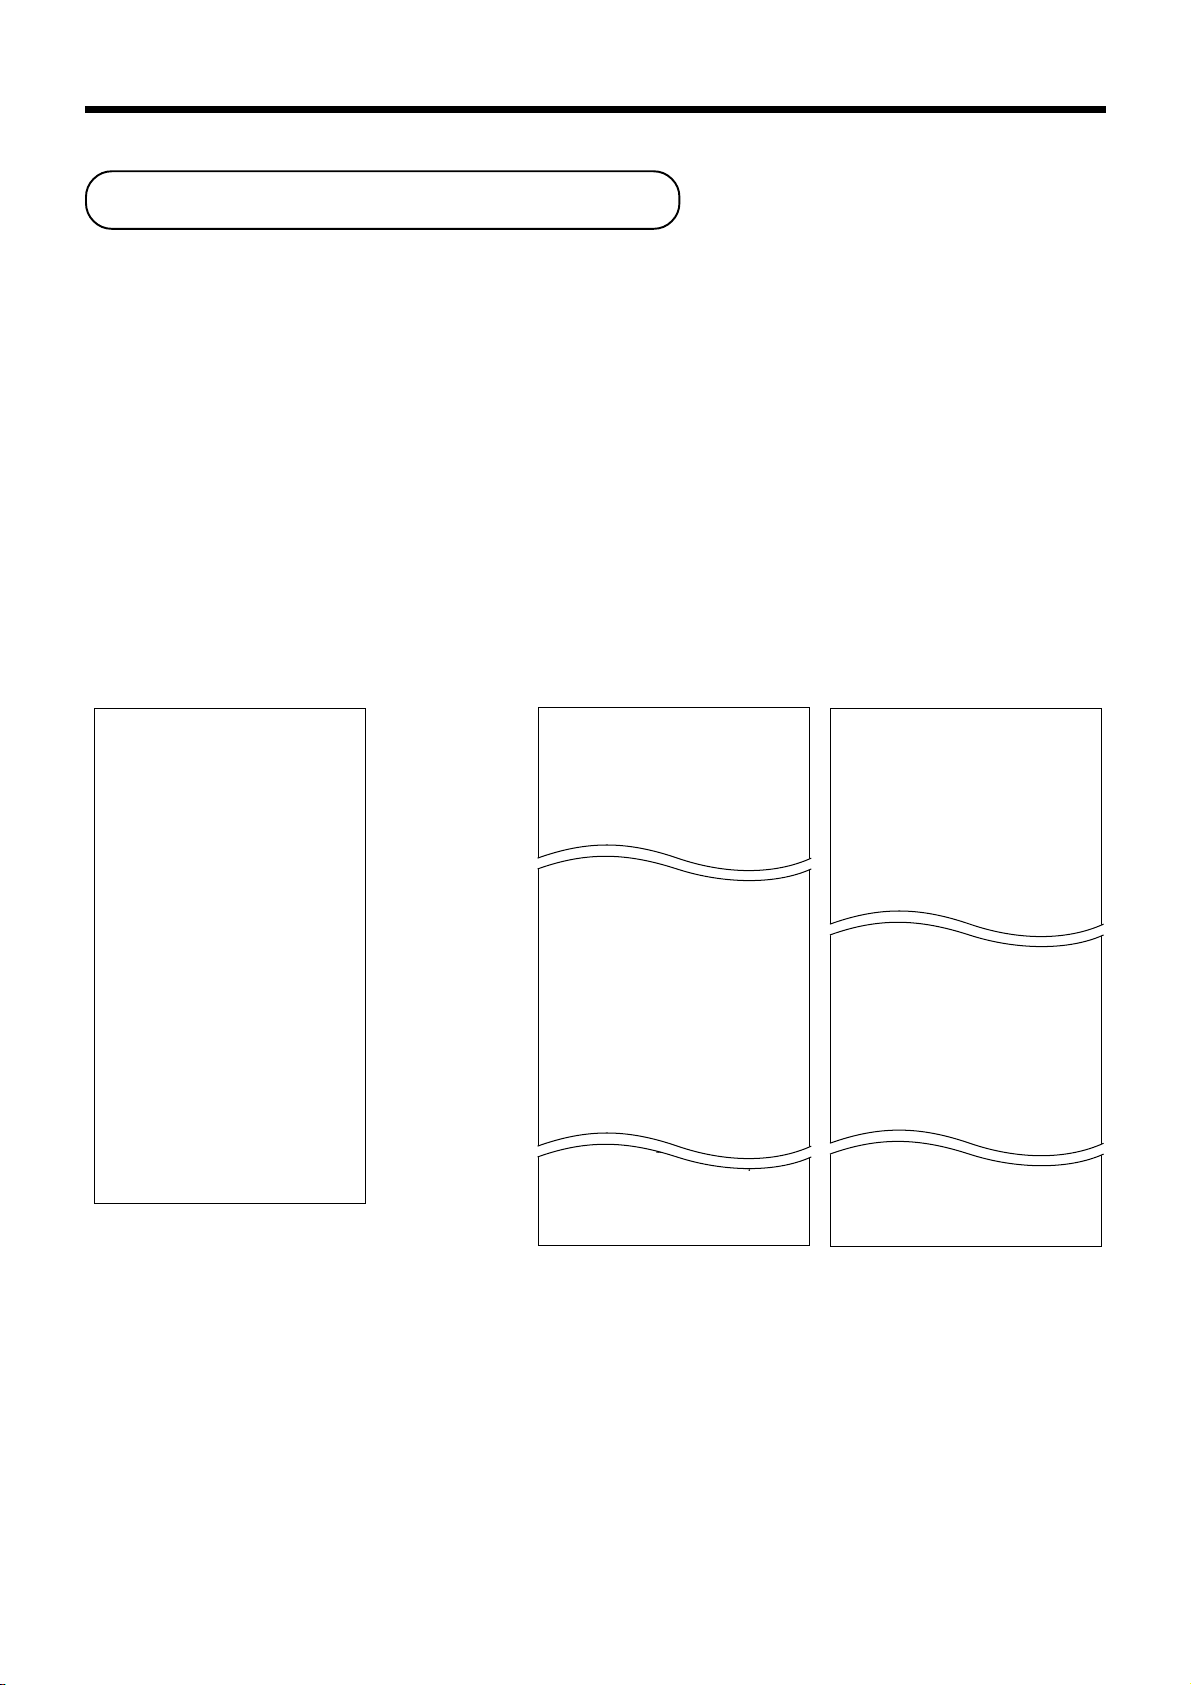
Basic Operations and Setups
How to read the printouts
• The journal and receipts are records of all transactions and operations.
• The contents printed on receipts and journal are identical, except the date printing line. (The date line is printed
on receipts and reports.)
• You can choose the journal skip function (page 50).
If the journal skip function is selected, the cash register will print the total amount of each transaction, and the
details of premium, discount and reduction operations only, without printing department and PLU item registrations on the journal.
• The following items can be skipped on receipts and journal.
• Time
• Consecutive number
• T axable status
• T axable amount
Receipt Sample
************************
* THANK YOU *
** CALL AGAIN **
* YOUR RECEIPT *
************************
* COMMERCIAL MESSAGE *
* COMMERCIAL MESSAGE *
* COMMERCIAL MESSAGE *
* COMMERCIAL MESSAGE *
* COMMERCIAL MESSAGE *
12-21-1999 12:34 0001
REG
DEPT01 ⁄¤ $1.00
DEPT02 ⁄¤ $2.00
5 X @1.00
DEPT03 ⁄¤ $5.00
TA1 $8.00
TX1 $0.40
TA2 $8.00
TX2 $0.80
TL $
CA $10.00
CG $0.80
7 No
C
01 000123
9.20
— Logo message
— Commercial message
— Date/Time/Machine No.
— Mode/Clerk/
Consecutive No.
— Item counter
Journal Sample Journal Sample
(Item lines Included) (Item lines Skipped)
12:33 0001
REG
DEPT01 ⁄ $1.00
DEPT02 ⁄ $2.00
TA1 $3.00
TX1 $0.15
CA $
2 No
12:34 0001
REG
DEPT01 ⁄¤ $1.00
DEPT02 ⁄¤ $2.00
5 X @1.00
DEPT03 ⁄¤ $5.00
TA1 $8.00
TX1 $0.40
TA2 $8.00
TX2 $0.80
TL $
CA $10.00
CG $0.80
7 No
12:35 0001
REG
DEPT01 ⁄¤ $1.00
DEPT02 ⁄¤ $2.00
5 X @1.00
DEPT03 ⁄¤ $5.00
C
01 000122
3.15
C
01 000123
9.20
C
01 000124
12:32 0001
REG
TA1 $3.00
TX1 $0.15
CA $
2 No
12:33 0001
REG
TA1 $3.00
TX1 $0.15
CA $
2 No
12:34 0001
REG
TA1 $3.00
TX1 $0.15
TA2 $5.00
TX2 $0.20
TL $
CA $10.00
CG $1.75
7 No
12:35 0001
REG
TA1 $3.00
TX1 $0.15
TA2 $5.00
TX2 $0.20
C
01 000121
3.15
C
01 000122
3.15
C
01 000123
8.35
C
01 000124
In the operation examples contained in this manual, the print samples are what would be produced if the roll paper
is being used for receipts. They are not actual size. Actual receipts are 58 mm wide. Also, all sample receipts and
journals are printout images.
24
Page 25
How to use your cash register
The following describes the general procedure you should use in order to get the most out of your cash register.
BEFORE business hours…
• Check to make sure that the cash register is
plugged in securely. Page 8
• Check to make sure there is enough paper
left on the roll. Page 9
• Read the financial totals to confirm that they are
all zero. Page 79
• Check the date and time. Page 26
DURING business hours…
• Register transactions. Page 27
• Periodically read totals. Page 78
AFTER business hours…
• Reset the daily totals. Page 47
• Remove the journal. Page 92
• Empty the cash drawer and leave it open. Page 19
• Take the cash and journal to the office.
Basic Operations and Setups
25
Page 26
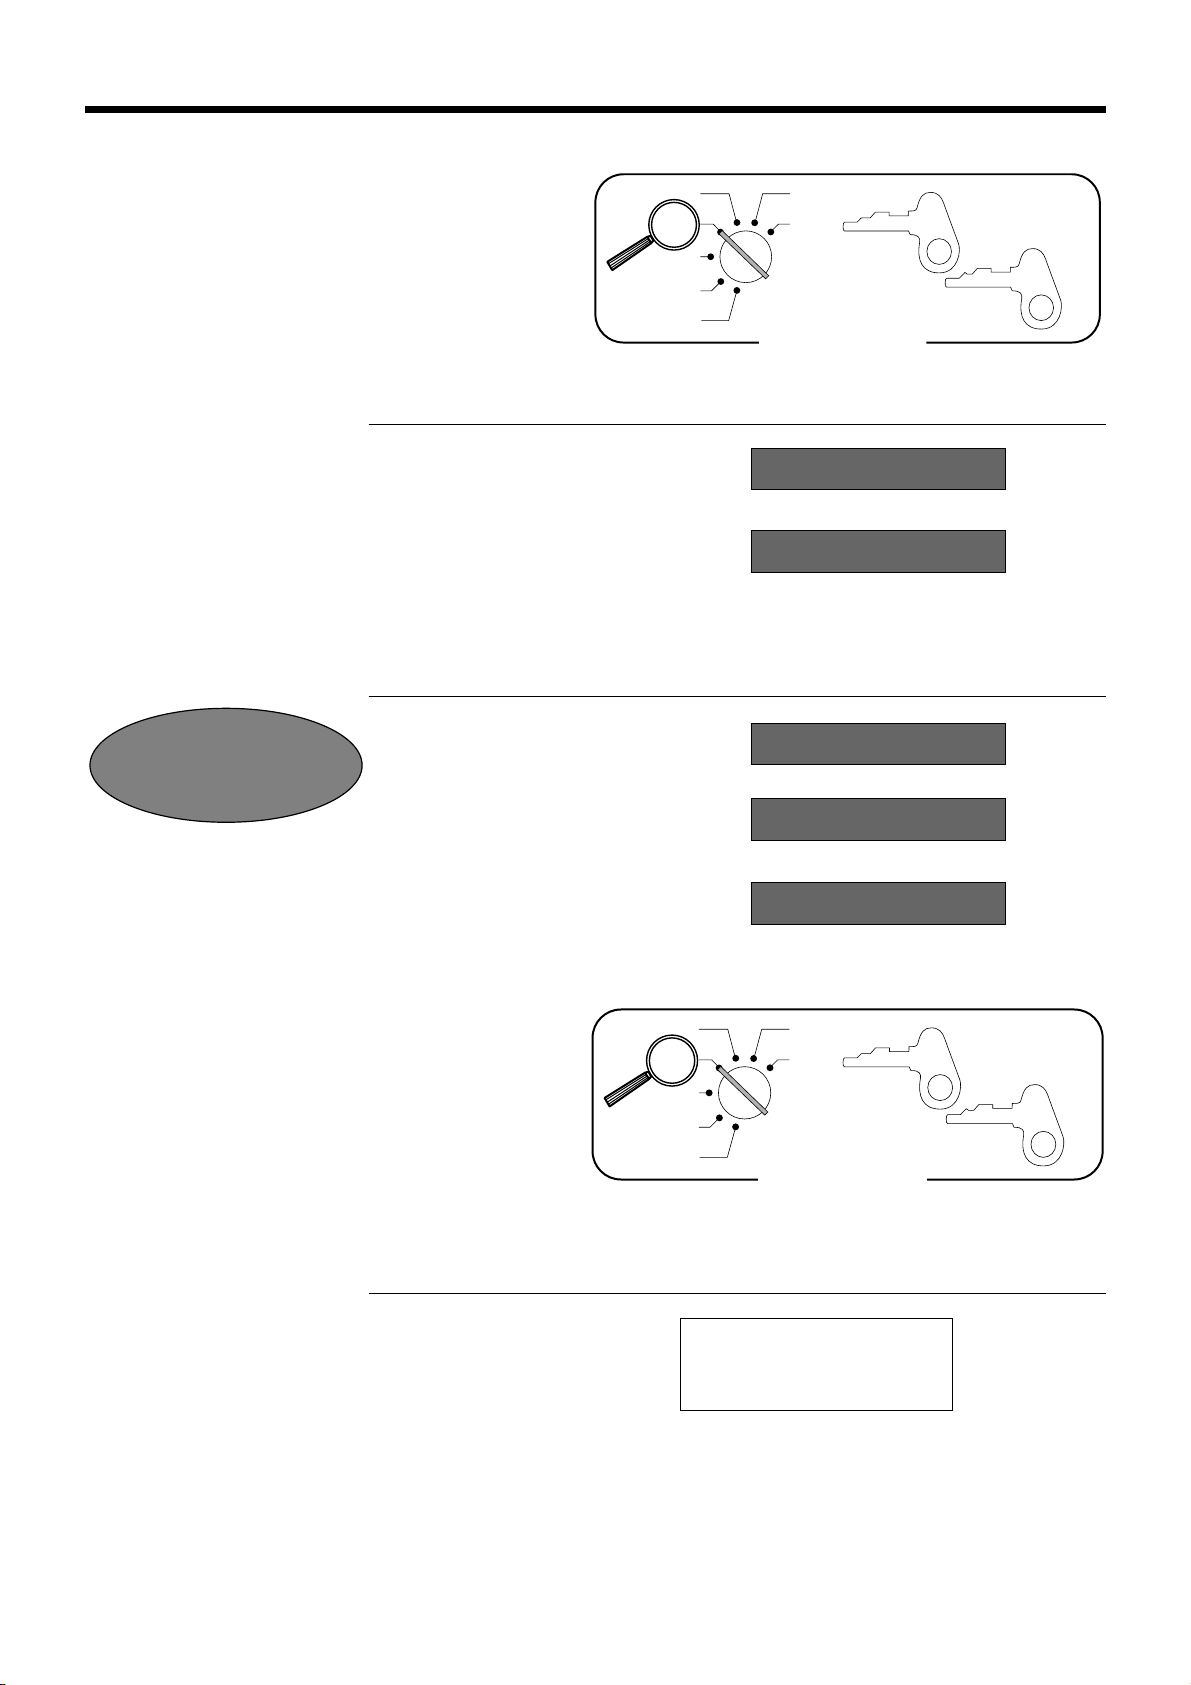
Basic Operations and Setups
Displaying the time and date
You can show the time or date on the display of the cash
register whenever there is no registration being made.
To display and clear the time
OPERATION DISPLAY
Time appears on the display Hour Minutes (24-hour system)
Clears the time display
To display and clear the date
OPERATION DISPLAY
c
Year 2000
Compliance
x
C
x
x
CAL
REG
OFF
RF
PGM
X
Z
A-A08
OP
Mode Switch
08-3~
~00
08-3!
(Time is displayed first)
12-21-1999
A-A08
PGM
Date appears on the display Month Day Year
Clears the date display
Preparing coins for change
You can use the following procedure to open the drawer
without registering an item. This operation must be
performed out of a sale.
(You can use the E key instead of the B key. See
page 43.)
Opening the drawer without a sale
OPERATION RECEIPT
C
B
~00
CAL
REG
OFF
RF
PGM
12-21-1999 08:35
REG 000001
#/NS ••••••••••••
X
Z
Mode Switch
A-A08
OP
A-A08
PGM
26
Page 27
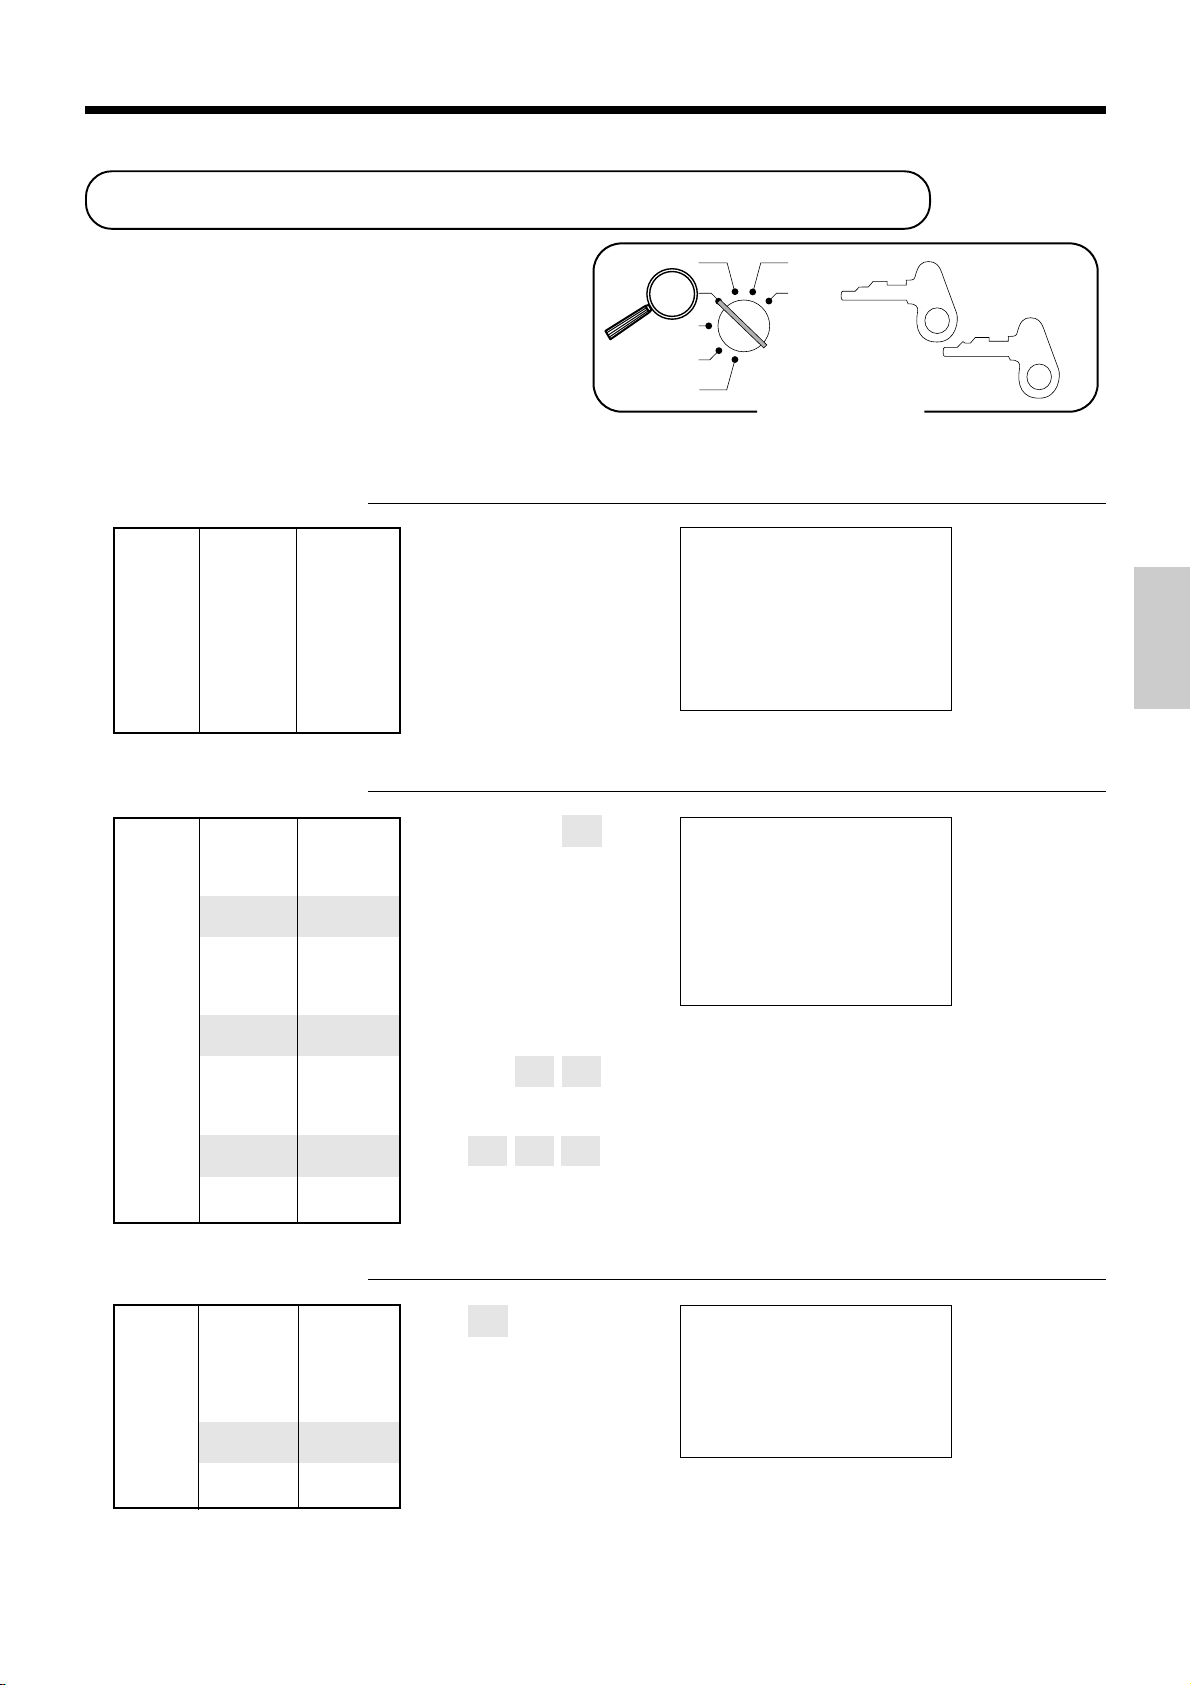
Preparing and using department keys
Registering department keys
The following examples show how you can use the
department keys in various types of registrations.
CAL
REG
OFF
RF
PGM
X
Z
Mode Switch
Single item sale
Example 1 OPERATION RECEIPT
Unit price $1.00
——————————
Quantity 1
1-
Unit price
Item ——————————
Dept. 1
——————————
Taxable 1/2
!
Department
—————————————
Payment Cash $1.15
a
Example 2 OPERATION RECEIPT
Unit price $1.00
——————————
Item 1 Quantity 1
——————————
Dept. 21
—————————————
Unit price $2.00
——————————
Item 2 Quantity 1
1-d!
Designating from department
21 to 40, press d once
(-2- shows),
41 to 60, press d twice,
(-3- shows),
61 to 80, press d three times
(-4- shows).
——————————
Dept. 41
2-
—————————————
Unit price $3.00
dd!
——————————
Item 3 Quantity 1
3-
——————————
Dept. 61
ddd!
—————————————
Payment Cash $10.00
a
12-21-1999 08:40
REG 000002
DEPT01 ⁄¤ $1.00
TA1 $1.00
TX1 $0.05
TA2 $1.00
TX2 $0.10
CA $
12-21-1999 08:45
REG 000003
DEPT21 $1.00
DEPT41 $2.00
DEPT61 $3.00
TL $
CA $10.00
CG $4.00
1.15
6.00
OP
A-A08
A-A08
— Date/time
— Mode/consecutive No.
Department No./
—
unit price
— Taxable amount 1
— Tax amount 1
— Taxable amount 2
— Tax amount 2
— Cash total amount
PGM
Basic Operations and Setups
Example 3 OPERATION RECEIPT
Unit price $3.00
——————————
Quantity 1
Item ——————————
Dept. 1
——————————
Taxable (1/2)→2
E3-!
Shifting taxable dept. to
nontaxable by depressing
E, @ before numeric.
a
12-21-1999 08:50
REG 000004
DEPT01 ¤ $3.00
TA2 $3.00
TX2 $0.30
CA $
—————————————
Payment Cash $3.30
— Tax status
— Taxable amount 2
— Tax amount 2
3.30
27
Page 28
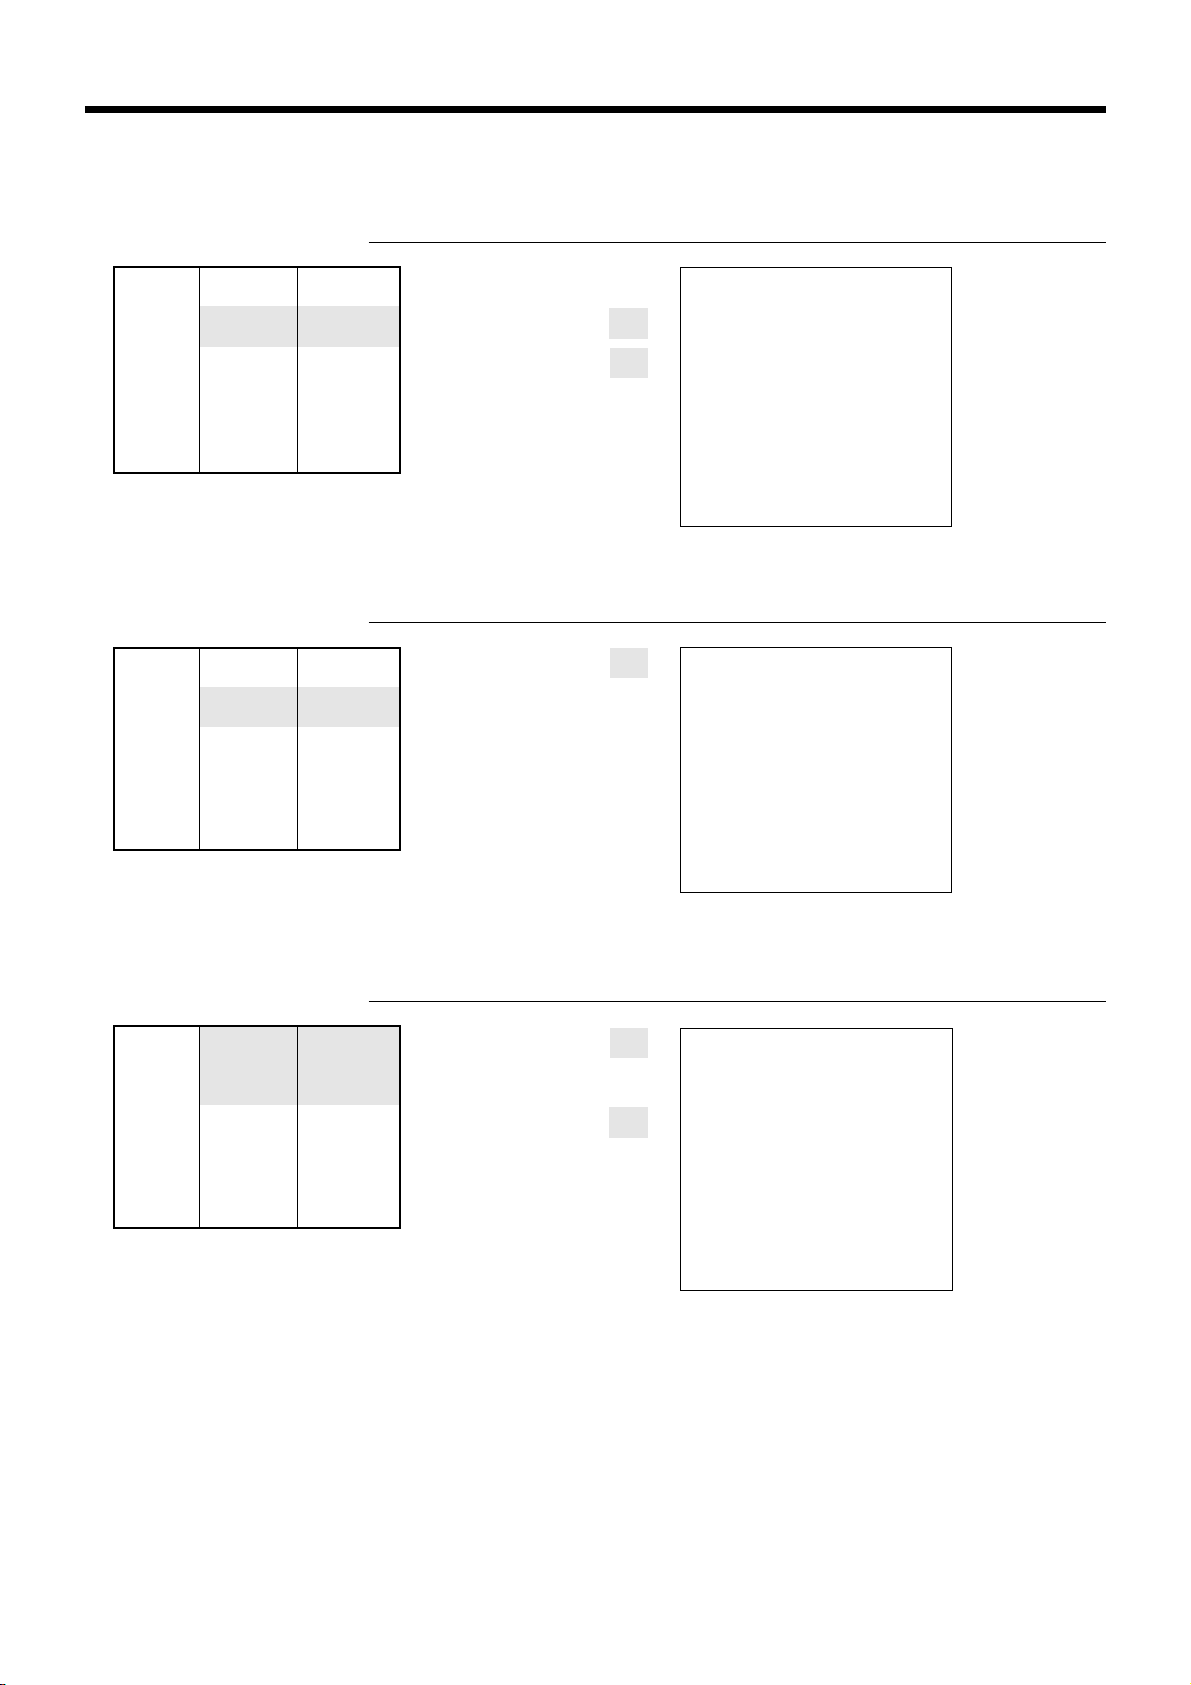
Basic Operations and Setups
Repeat
OPERATION RECEIPT
Unit price $1.50
——————————
Quantity 3
Item ——————————
Dept. 1
——————————
Taxable 1/2
—————————————
Payment Cash $10.00
Multiplication
Unit price $1.00
——————————
Quantity 12.5
Item ——————————
Dept. 1
——————————
Taxable 1/2
—————————————
Payment Cash $20.00
150!
!
!
s
10-a
12-21-1999 08:55
REG 000005
DEPT01 ⁄¤ $1.50
DEPT01 ⁄¤ $1.50
DEPT01 ⁄¤ $1.50
TA1 $4.50
TX1 $0.23
TA2 $4.50
TX2 $0.45
TL $
CA $10.00
CG $4.82
OPERATION RECEIPT
12^5x
Quantity
(4-digit integer/2-digit decimal)
1-!
s
20-a
12-21-1999 09:00
REG 000006
12.5 X @1.00
DEPT01 ⁄¤ $12.50
TA1 $12.50
TX1 $0.63
TA2 $12.50
TX2 $1.25
TL $
CA $20.00
CG $5.62
— Repeat
— Repeat
5.18
— Quantity/unit price
14.38
Split sales of packaged items
Unit price 4 for $10.00
——————————
Quantity 3
Item ——————————
Dept. 1
——————————
Taxable 1/2
—————————————
Payment Cash $10.00
OPERATION RECEIPT
3x
Quantity being purchased
(4-digit integer/2-digit decimal)
4x
Quantity being purchased
(4-digit integer/2-digit decimal)
10-!
Package price
12-21-1999 09:05
REG 000007
3 X
@4 / 10.00
DEPT01 ⁄¤ $7.50
TA1 $7.50
TX1 $0.38
TA2 $7.50
TX2 $0.75
TL $
CA $10.00
CG $1.37
s
10-a
— Quantity
— Package quantity/
unit price
8.63
28
Page 29
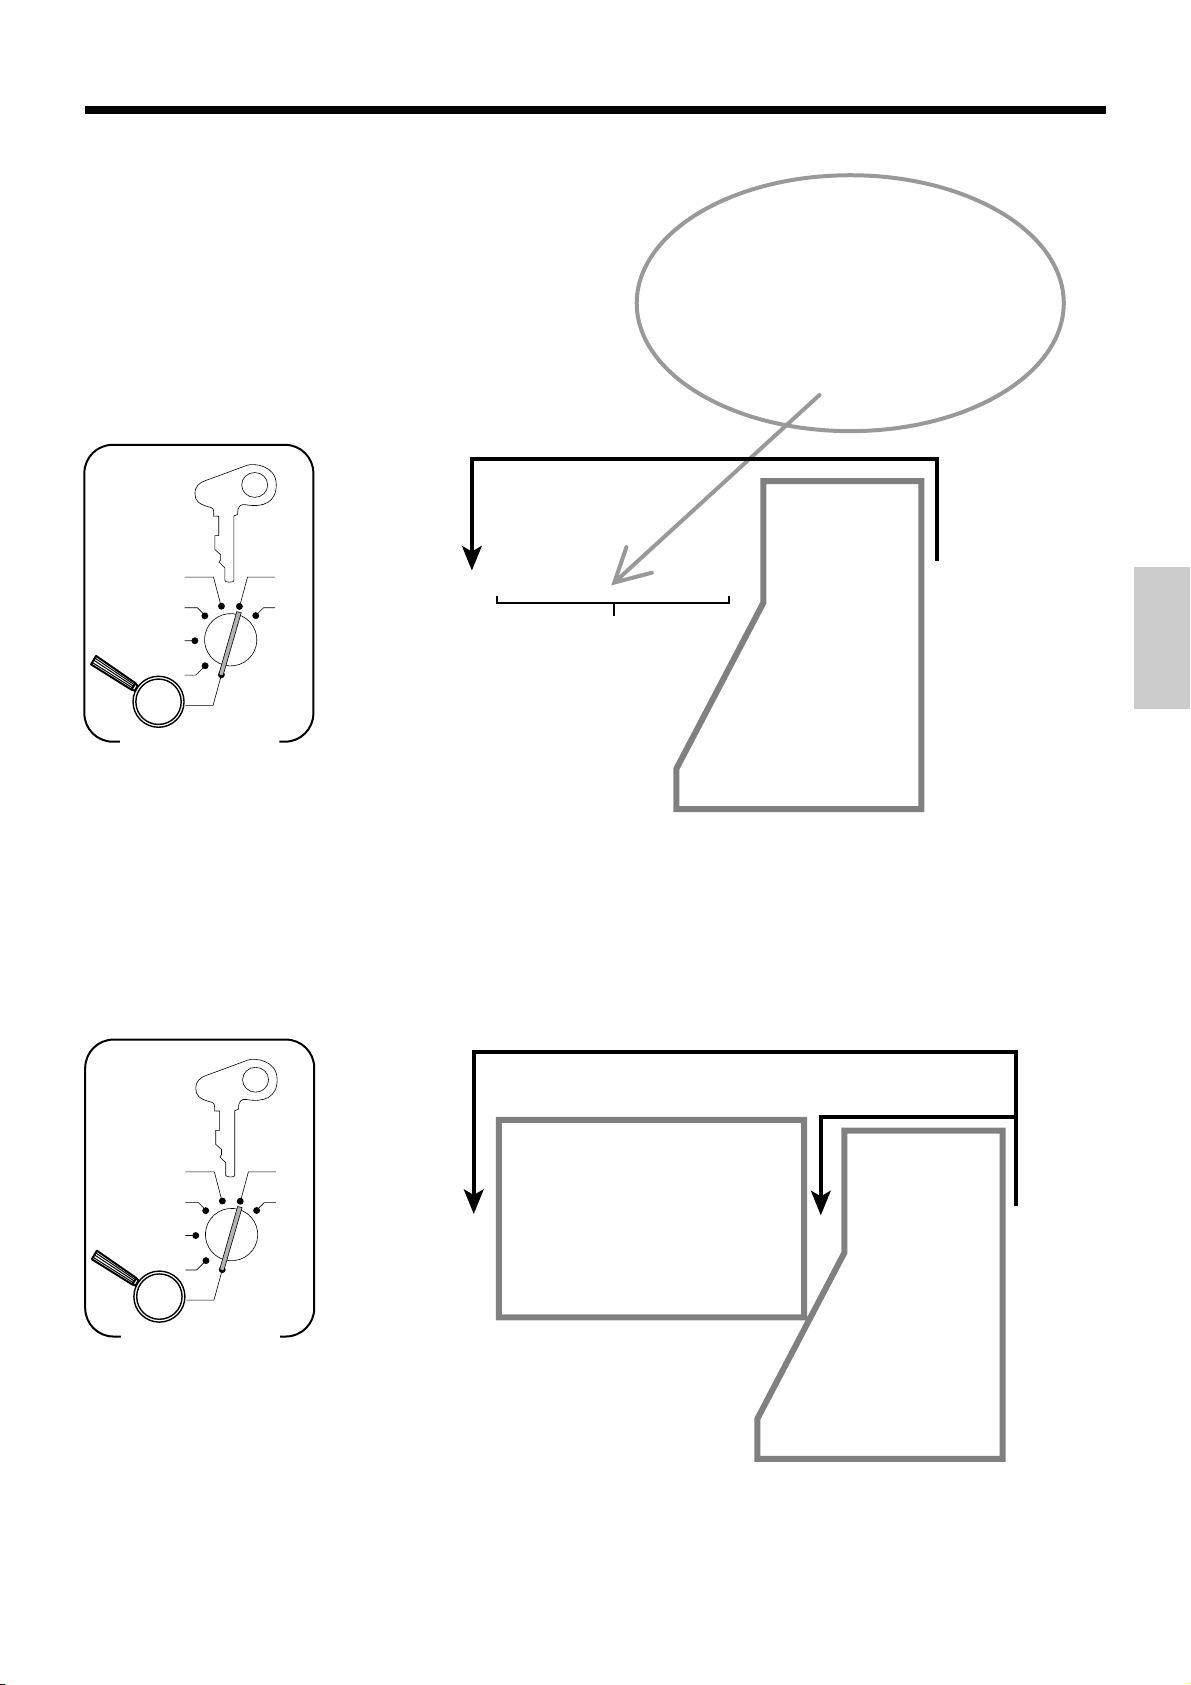
Programming department keys
To program a unit price for each department
PGM
A-A08
X
CAL
REG
OFF
RF
6 1s 6 : : : : : : 6 6 s
Z
Unit price
PGM
Mode Switch
Unit price
Example:
$1.00 2 100
$10.25 2 1025
$1234.56 2 123456
To another department
!
"
%
d! (Dept. 21)
d% (Dept. 40)
dd% (Dept. 60)
ddd% (Dept. 80)
(Dept. 1)
(Dept 2.)
:
(Dept. 20)
:
:
:
To program the tax calculation status for each department
Tax calculation status
This specification defines which tax table should be used for automatic tax calculation.
See page 13 for information on setting up the tax tables.
Note: If you require tax table 3, please refer to page 39.
Programming procedure
PGM
A-A08
CAL
REG
OFF
RF
X
Z
6 1s 6 6 6 s
PGM
Mode Switch
*
Use the k key for tax table 3 programming.
Note: Tax symbols
⁄
: Tax table 1
¤
: Tax table 2
‹
: Tax table 3
⁄¤
: Tax table 1 and 2
*
: Tax table 1, 2 and 3
Tax status for the departments are initialized as follow:
Department 01 ~ 10: Tax table 1 and 2,
Department 11 ~ 80: No tax calculation.
Different status to different department
• Tax table 1 :
• Tax table 2 :
• Tax table 3
*
• Tax table 1 & 2 :
E
@
:
k
E@
• Tax table 1, 2 & 3 :E@k
• No tax calculation :
B
ddd% (Dept. 80)
different department
dd% (Dept. 60)
Same status to
!
(Dept. 1)
"
(Dept. 2)
:
%
(Dept. 20)
d! (Dept. 21)
:
d% (Dept. 40)
:
:
Basic Operations and Setups
29
Page 30
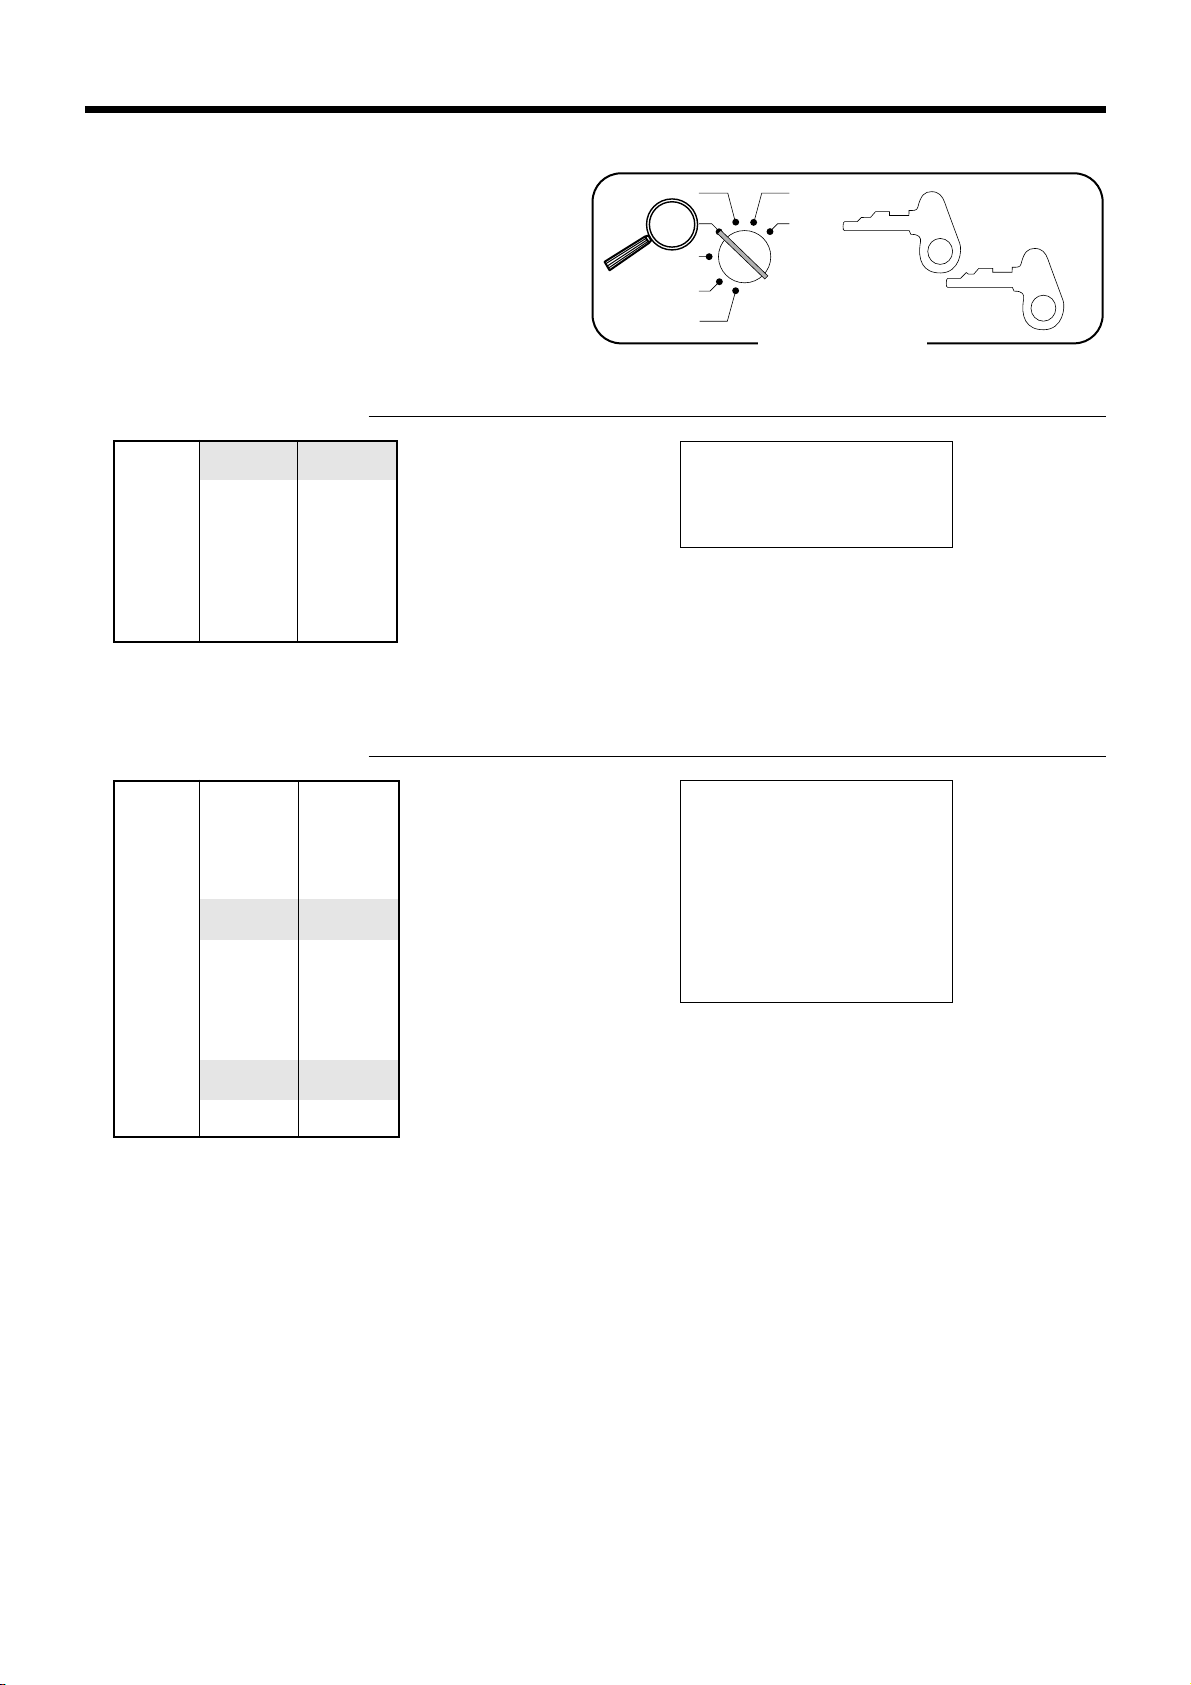
Basic Operations and Setups
Registering department keys by
programming data
Preset price
OPERATION RECEIPT
Unit price ($1.00)
—————————
Quantity 1
Item —————————
Dept. 2
—————————
Taxable No
—————————————
Payment Cash $1.00
Preset tax status (Add-on tax)
preset
OPERATION RECEIPT
"
a
CAL
REG
OFF
RF
PGM
X
Z
Mode Switch
12-21-1999 09:10
REG 000008
DEPT02 $1.00
CA $
1.00
OP
A-A08
— Department No./
unit price
A-A08
PGM
Unit price ($2.00)
—————————
preset
Quantity 5
Item 1 —————————
Dept. 3
—————————
—————————————
Taxable (1)
Unit price ($2.00)
—————————
preset
preset
Quantity 1
Item 2 —————————
Dept. 3
—————————
Taxable No
—————————————
Payment Cash $20.00
5x
#
E#
s
20-a
12-21-1999 09:15
REG 000009
5 X @2.00
DEPT03 ⁄ $10.00
DEPT03 $2.00
TA1 $10.00
TX1 $0.50
TL $
CA $20.00
CG $7.50
12.50
— Tax status
— Taxable Amount 1
— Tax amount 1
30
Page 31

Preparing and using PLUs
This section describes how to prepare and use PLUs.
CAUTION:
Before you use PLUs, you must first program the unit price and tax status for each PLU.
Programming PLUs
To program a unit price for each PLU
PLU No.
1 to 600
To new (not sequential) PLU
PGM
A-A08
CAL
REG
OFF
RF
X
Z
6 1s 6
PLU No.
* 6 : : : : : : 6 a 6 s
PGM
Mode Switch
To program tax calculation status for each PLU
Unit price
Example:
$1.00 2 100
$10.25 2 1025
$1234.56 2 123456
Different unit price
to next PLU
Same unit price
to next PLU
Unit price
PGM
A-A08
CAL
REG
OFF
RF
PGM
Mode Switch
X
Z
6 1s 6 6
Note: Tax symbols
⁄
: Tax table 1
¤
: Tax table 2
‹
: Tax table 3
⁄¤
: Tax table 1, and 2
*
: Tax table 1, 2, and 3
All PLUs are initialized as no tax calculation.
• Tax table 1 :
• Tax table 2 :
• Tax table 3
• Tax table 1 & 2 :
• Tax table 1, 2 & 3 :
• No tax calculation :
Note: If you require tax table 3, please refer to page 39.
*
Use the k key for tax table 3 programming.
Different status to different PLU
Same status
to different PLU
E
@
*
:
k
E@
E@k
PLU No.
B
Basic Operations and Setups
Same status to
the next PLU
6 * 6s
31
Page 32

Basic Operations and Setups
Registering PLUs
The following examples show how you can use PLUs in
various types of registrations.
Registering by subdepartment, see the "Convenient
Operations and Setups" on page 64.
PLU single item sale
OPERATION RECEIPT
Unit price ($2.50)
—————————
Quantity 1
Item —————————
PLU 14
—————————
Taxable (2)
—————————————
Payment Cash $3.00
PLU repeat
preset
preset
14
3-a
PLU code
*
s
CAL
REG
OFF
RF
PGM
X
Z
Mode Switch
12-21-1999 09:20
REG 000010
PLU014 ¤ $2.50
TA2 $2.50
TX2 $0.25
TL $
CA $3.00
CG $0.25
2.75
OP
A-A08
— PLU No./unit price
A-A08
PGM
Unit price ($2.50)
—————————
Quantity 3
Item —————————
PLU 14
—————————
Taxable (2)
—————————————
Payment Cash $10.00
PLU multiplication
Unit price ($1.20)
—————————
Quantity 15
Item —————————
PLU 2
—————————
Taxable (2)
—————————————
Payment Cash $20.00
preset
preset
preset
preset
OPERATION RECEIPT
14*
*
*
s
10-a
12-21-1999 09:25
REG 000011
PLU014 ¤ $2.50
PLU014 ¤ $2.50
PLU014 ¤ $2.50
TA2 $7.50
TX2 $0.75
TL $
CA $10.00
CG $1.75
OPERATION RECEIPT
15x
Quantity
(4-digit integer/2-digit decimal)
2*
s
20-a
12-21-1999 09:30
REG 000012
15 X @1.20
PLU002 ¤ $18.00
TA2 $18.00
TX2 $1.80
TL $
CA $20.00
CG $0.20
8.25
19.80
32
Page 33

PLU split sales of packaged item
OPERATION RECEIPT
Unit price
—————————–
(5for$20.00)
preset
Quantity 3
Item —————————–
PLU 28
—————————–
—————————————–
Taxable (2)
preset
Payment Cash $15.00
3x
Quantity
(4-digit integer/2-digit decimal)
5x
28*
s
15-a
12-21-1999 09:35
REG 000013
3 X
@5 / 20.00
PLU028 ¤ $12.00
TA2 $12.00
TX2 $1.20
TL $
CA $15.00
CG $1.80
13.20
33
Basic Operations and Setups
Page 34

Basic Operations and Setups
Preparing and using discounts
This section describes how to prepare and register discount.
Programming discounts
You can use the p key to register discounts (percentage decreases). The more detailed informations about the
discount (and premium) are described in the "Registering discounts and premiums" section in the "Convenient
Operations and setups" on page 70.
To program a rate to the p key
PGM
A-A08
6 1s 6 : : :
:
6 p 6 s
CAL
REG
OFF
RF
PGM
Mode Switch
X
Z
Example:
2
10%
5.5%
12.34%
2
2
To program tax status to the p key
PGM
A-A08
6 1s 6 6 p 6 s
CAL
REG
OFF
RF
PGM
Mode Switch
X
Z
Note: Tax symbols
⁄
: Tax table 1
¤
: Tax table 2
‹
: Tax table 3
⁄¤
: Tax table 1, and 2
*
: Tax table 1, 2, and 3
Tax status for the p key is initialized as tax table 1, 2 and 3.
Preset rate
10
5^5
12^34
• Tax table 1 :
• Tax table 2 :
• Tax table 3 :
• Tax table 1 & 2 :
• Tax table 1, 2 & 3 :
• No tax calculation :
E
@
k
E@
E@k
B
Note: If you require tax table 3, please refer to page 39.
34
Page 35

Registering discounts
The following example shows how you can use the p
key in various types of registration.
Discount for items and subtotals
OPERATION RECEIPT
CAL
REG
OFF
RF
PGM
X
Z
Mode Switch
A-A08
OP
A-A08
PGM
Unit price $5.00
—————————
Quantity 1
Item 1 —————————
Dept. 1
—————————
—————————————
Taxable (1)
Unit price
—————————
preset
($10.00)
preset
Quantity 1
Item 2 —————————
PLU 16
—————————
Taxable (2)
—————————————
Discount Rate (5%)
—————————————
Subtotal
discount
Rate 3.5%
—————————
Taxable 1 and 2
preset
preset
5-!
16*
p
Applies the preset discount
rate to the last item registered.
M
For this operation, hit this key
instead of s.
3^5p
The input value takes priority
of the preset value.
s
16-a
12-21-1999 10:40
REG 000014
DEPT01 ⁄ $5.00
PLU016 ¤ $10.00
5%
% ¤ -0.50
ST $14.50
3.5%
% ⁄¤ -0.51
TA1 $4.82
TX1 $0.24
TA2 $9.17
TX2 $0.92
TL $
CA $16.00
CG $0.85
—————————————
Payment Cash $16.00
• You can manually input rates up to 4 digits long (0.01% to 99.99%).
15.15
Taxable status of the
p key
• Whenever you perform a discount operation on the last item registered, the tax calculation for discount amount
is performed in accordance with the tax status programmed for that item.
• Whenever you perform a discount operation on a subtotal amount, the tax calculation for the subtotal
amount is performed in accordance with the tax status programmed for the
p key.
Basic Operations and Setups
35
Page 36

Basic Operations and Setups
Preparing and using reductions
This section describes how to prepare and register reductions.
Programming for reductions
You can use the m key to reduce single item or subtotal amounts. The following procedure lets you
program the tax calculation method for the m key.
To program tax calculation status
PGM
A-A08
CAL
REG
OFF
RF
PGM
Mode Switch
• Tax table 1 :
• Tax table 2 :
6 1s 6 6 m 6 s
X
Z
Note: Tax symbols
⁄
: Tax table 1
¤
: Tax table 2
‹
: Tax table 3
⁄¤
: Tax table 1, and 2
*
: Tax table 1, 2, and 3
Tax status for the m key is initialized as no tax calculation.
• Tax table 3 :
• Tax table 1 & 2 :
• Tax table 1, 2 & 3 :
• No tax calculation :
E
@
k
E@
E@k
B
Taxable status of the m key
The tax calculation for the reduction amount is performed in accordance with the tax status programmed for the
m key , regardless of whether the reduction is performed on the last item registered or a subtotal amount.
Note: If you require tax table 3, please refer to page 39.
To program preset reduction amount
Unit price
Example:
CAL
REG
OFF
RF
PGM
Mode Switch
36
PGM
A-A08
$1.00 2 100
$10.25 2 1025
X
Z
$1234.56 2 123456
6 1s 6 : : : : : : 6 m 6 s
Unit price
Page 37

Registering reductions
The following examples show how you can use the m
key in various types of registration.
Reduction for items
OPERATION RECEIPT
CAL
REG
OFF
RF
PGM
X
Z
Mode Switch
A-A08
OP
A-A08
PGM
Unit price $5.00
—————————
Quantity 1
Item 1 —————————
Dept. 1
—————————
Taxable (1)
—————————————
Reduction
Amount $0.25
preset
—————————————
Unit price ($6.00)
—————————
preset
Quantity 1
5-!
25m
Reduces the last amount
registered by the value input.
45*
m
s
11-a
12-21-1999 10:45
REG 000015
DEPT01 ⁄ $5.00
- -0.25
PLU045 ⁄ $6.00
- -0.50
TA1 $11.00
TX1 $0.55
TL $
CA $11.00
CG $0.20
10.80
Item 2 —————————
PLU 45
—————————
—————————————
Taxable (1)
Reduction
Amount ($0.50)
—————————————
preset
preset
Payment Cash $11.00
• You can manually input reduction values up to 7 digits long.
• The amount you input for the reduction is neither subtracted from the department nor PLU totalizer.
Reduction for subtotal
Unit price $3.00
—————————
Quantity 1
Item 1 —————————
Dept. 1
—————————
Taxable (1)
—————————————
preset
Unit price $4.00
—————————
Quantity 1
Item 2 —————————
Dept. 2
—————————
—————————————
Taxable (2)
Subtotal
Reduction
Amount $0.75
preset
—————————————
Payment Cash $7.00
OPERATION RECEIPT
3-!
4-"
s
75m
Reduces the subtotal by the
value input here.
s
12-21-1999 10:50
REG 000016
DEPT01 ⁄ $3.00
DEPT02 ¤ $4.00
- -0.75
TA1 $3.00
TX1 $0.15
TA2 $4.00
TX2 $0.40
TL $
CA $7.00
CG $0.20
7-a
Basic Operations and Setups
6.80
37
Page 38

Basic Operations and Setups
Calculating the merchandise subtotal
Use the operation shown below to calculate the merchandise subtotal, which includes the actual cost of
the merchandise only without the add-on tax.
Calculation merchandise subtotal
OPERATION DISPLAY
Unit price $1.00
—————————
Quantity 1
Item 1 —————————
Dept. 1
—————————
—————————————
Taxable (1)
preset
Unit price $2.00
—————————
Quantity 1
Item 2 —————————
Dept. 2
—————————
—————————————
Taxable (2)
preset
Unit price $3.00
—————————
Quantity 1
Item 3 —————————
Dept. 3
—————————
Taxable (1)
—————————————
preset
Payment Cash $10.00
1-!
2-"
3-#
10-a
CAL
REG
OFF
RF
PGM
X
Z
Mode Switch
01 !00
02 "00
03 #00
M
Calculates the merchandise subtotal.
s
Calculates the subtotal (with add-on tax).
&00
&40
#60
RECEIPT
A-A08
OP
A-A08
PGM
• For a partial tender operation, you should press the
38
12-21-1999 10:55
REG 000017
DEPT01 ⁄ $1.00
DEPT02 ¤ $2.00
DEPT03 ⁄ $3.00
ST $6.00
TA1 $4.00
TX1 $0.20
TA2 $2.00
TX2 $0.20
TL $
CA $10.00
CG $3.60
s key instead of the M key .
6.40
Page 39

Shifting taxable 1/2 status of an item
By pressing "Tax Shift" key, you can shift the taxable 1/
2 status of an item.
Calculation merchandise subtotal
OPERATION RECEIPT
Unit price $4.00
4-!
—————————
Quantity 1
Item 1 —————————
Dept. 1
———————––––
Taxable (2)
—————————————
preset
Pressing E changes the tax status
from Nontaxable to Taxable 1
2-"
Unit price $2.00
—————————
Item 2 —————————
Quantity 1
Dept. 2
Pressing @ changes the tax status
from Taxable 1 to Taxable 1, 2
6-#
———————––––
Taxable (No)→1
—————————————
Unit price $6.00
—————————
Quantity 1
Pressing @ changes the tax status
from Taxable 2 to Nontaxable
7-$
Item 3 —————————
Dept. 3
———————––––
Taxable (1)→1, 2
21-a
—————————————
Unit price $7.00
—————————
Quantity 1
Item 4 —————————
Dept. 4
———————––––
Taxable (2)→No
—————————————
Payment Cash $21.00
E
@
@
s
CAL
REG
OFF
RF
PGM
X
Z
Mode Switch
12-21-1999 11:00
REG 000018
DEPT01 ¤ $4.00
DEPT02 ⁄ $2.00
DEPT03 ⁄¤ $6.00
DEPT04 $7.00
TA1 $8.00
TX1 $0.40
TA2 $10.00
TX2 $1.00
TL $
CA $21.00
CG $0.60
20.40
A-A08
OP
A-A08
PGM
Basic Operations and Setups
Important!
• To change the tax status of the next item to be registered, be sure to press E, @ without
inputting any value.
(Note: You cannot change to tax status 3 during registration. Tax status 3 will only work if it is
programmed for a particular department or PLU.)
• If the last item registered is programmed as nontaxable, a premium/discount (p key) operation
on this item is always nontaxable.
In this case, you cannot manually change the tax status to Taxable 1 or 2 by pressing the E,
@ keys.
39
Page 40

Basic Operations and Setups
Registering charge and check payments
The following examples show how to register charges
and payments by check.
Check
OPERATION RECEIPT
Unit price $10.00
10-!
—————————
Quantity 1
Item —————————
Dept. 1
20-k
—————————
—————————————
Taxable (1)
preset
Payment Check $20.00
Charge
OPERATION RECEIPT
s
CAL
REG
OFF
RF
PGM
X
Z
Mode Switch
12-21-1999 11:05
REG 000019
DEPT01 ⁄ $10.00
TA1 $10.00
TX1 $0.50
TL $
CHK $20.00
CG $9.50
10.50
A-A08
OP
A-A08
PGM
Unit price $15.00
15-$
—————————
Quantity 1
Item —————————
Dept. 4
0123B
—————————
—————————————
Taxable (2)
preset
Reference Number 0123
—————————————
Payment Charge $16.50
Mixed tender (cash, charge and check)
OPERATION RECEIPT
Unit price $55.00
—————————
Quantity 1
Item —————————
Dept. 4
—————————
—————————————
Taxable (2)
preset
Check $30.00
—————————
Payment Cash $3.00
—————————
Charge $27.50
55-$
30-k
s
h
s
3-a
h
12-21-1999 11:10
REG 000020
DEPT04 ¤ $15.00
#/NS 0123
TA2 $15.00
TX2 $1.50
CH $
12-21-1999 11:15
REG 000021
DEPT04 ¤ $55.00
TA2 $55.00
TX2 $5.50
TL $
CHK $30.00
CA
CH $27.50
$3.00
16.50
60.50
— Reference No.
40
Page 41

Registering returned goods in the REG mode
The following example shows how to use the R key
in the REG mode to register goods returned by
customers.
OPERATION RECEIPT
Unit price $2.35
—————————
Quantity 1
235!
2-"
Item 1 —————————
Dept. 1
—————————
—————————————
Taxable (1)
Unit price $2.00
—————————
Quantity 1
preset
235!
Pressing R specifies that the
next item registered is a return.
Item 2 —————————
Dept. 2
—————————
Taxable (2)
—————————————
Unit price ($1.20)
—————————
preset
preset
You have to press R before
registering each returned item.
Quantity 1
Item 3 —————————
PLU 1
—————————
—————————————
Taxable (2)
preset
Unit price $2.35
—————————
Returned
Item 1
Quantity 1
—————————
Dept. 1
—————————
—————————————
Taxable (1)
Unit price ($1.20)
—————————
Returned
Item 3
Quantity 1
—————————
PLU 1
preset
preset
—————————
Taxable (2)
—————————————
preset
Payment Cash $2.20
1*
R
R
1*
s
a
CAL
REG
OFF
RF
PGM
X
Z
Mode Switch
12-21-1999 11:20
REG 000022
DEPT01 ⁄ $2.35
DEPT02 ¤ $2.00
PLU001 ¤ $1.20
RF ••••••••••••
DEPT01 ⁄ -2.35
RF ••••••••••••
PLU001 ¤ -1.20
TA2 $2.00
TX2 $0.20
CA $
2.20
A-A08
OP
A-A08
PGM
Basic Operations and Setups
41
Page 42

Basic Operations and Setups
Registering returned goods in the RF mode
The following examples show how to use the RF mode
to register goods returned by customers.
Normal refund transaction
OPERATION RECEIPT
Unit price $1.50
—————————
Returned
Item 1
Quantity 2
—————————
Dept. 1
—————————
Taxable 1
—————————————
Returned
Item 2
Unit price ($1.20)
—————————
Quantity 6
—————————
PLU 2
preset
—————————
Taxable 1
—————————————
Payment Cash $11.07
150!
!
6x
2*
s
a
CAL
REG
OFF
X
Z
A-A08
RF
PGM
Mode Switch
12-21-1999 11:25
RF
000023
——————————————–— RF mode symbol
DEPT01 ⁄ $1.50
DEPT01 ⁄ $1.50
6 X @1.20
PLU002 ¤ $7.20
TA1 $3.00
TX1 $0.15
TA2 $7.20
TX2 $0.72
CA $
11.07
PGM
Reduction of amounts paid on refund
OPERATION RECEIPT
Unit price $4.00
Returned
Item 1
—————————
Quantity 1
—————————
Dept. 3
—————————————
Reduction
Amount $0.15
—————————————
Returned
Item 2
Unit price ($1.20)
—————————
Quantity 1
—————————
preset
4-#
15m
2*
p
s
a
12-21-1999 11:30
RF
000024
DEPT03 ⁄ $4.00
- -0.15
PLU002 ¤ $1.20
5%
% ¤ -0.06
TA1 $4.00
TX1 $0.20
TA2 $1.14
TX2 $0.11
CA $
5.30
PLU 2
—————————————
Discount Rate (5%)
—————————————
preset
Payment Cash $5.30
Important!
To avoid miss registrations in the RF mode, return the mode switch to the former position immediately .
42
Page 43

Registering money received on account
The following example shows how to register money
received on account. This registration must be
performed out of a sale.
OPERATION RECEIPT
Received amount $700.00
7--E
Amount can be up to 8 digits.
CAL
REG
OFF
RF
PGM
X
Z
Mode Switch
12-21-1999 11:35
REG 000025
RC $700.00
A-A08
OP
A-A08
PGM
Registering money paid out
The following example shows how to register money
paid out from the register. This registration must be
performed out of a sale.
OPERATION RECEIPT
Paid out amount $1.50
150@
Amount can be up to 8 digits.
CAL
REG
OFF
RF
PGM
X
Z
Mode Switch
12-21-1999 11:40
REG 000026
PD $1.50
A-A08
OP
A-A08
PGM
Basic Operations and Setups
43
Page 44
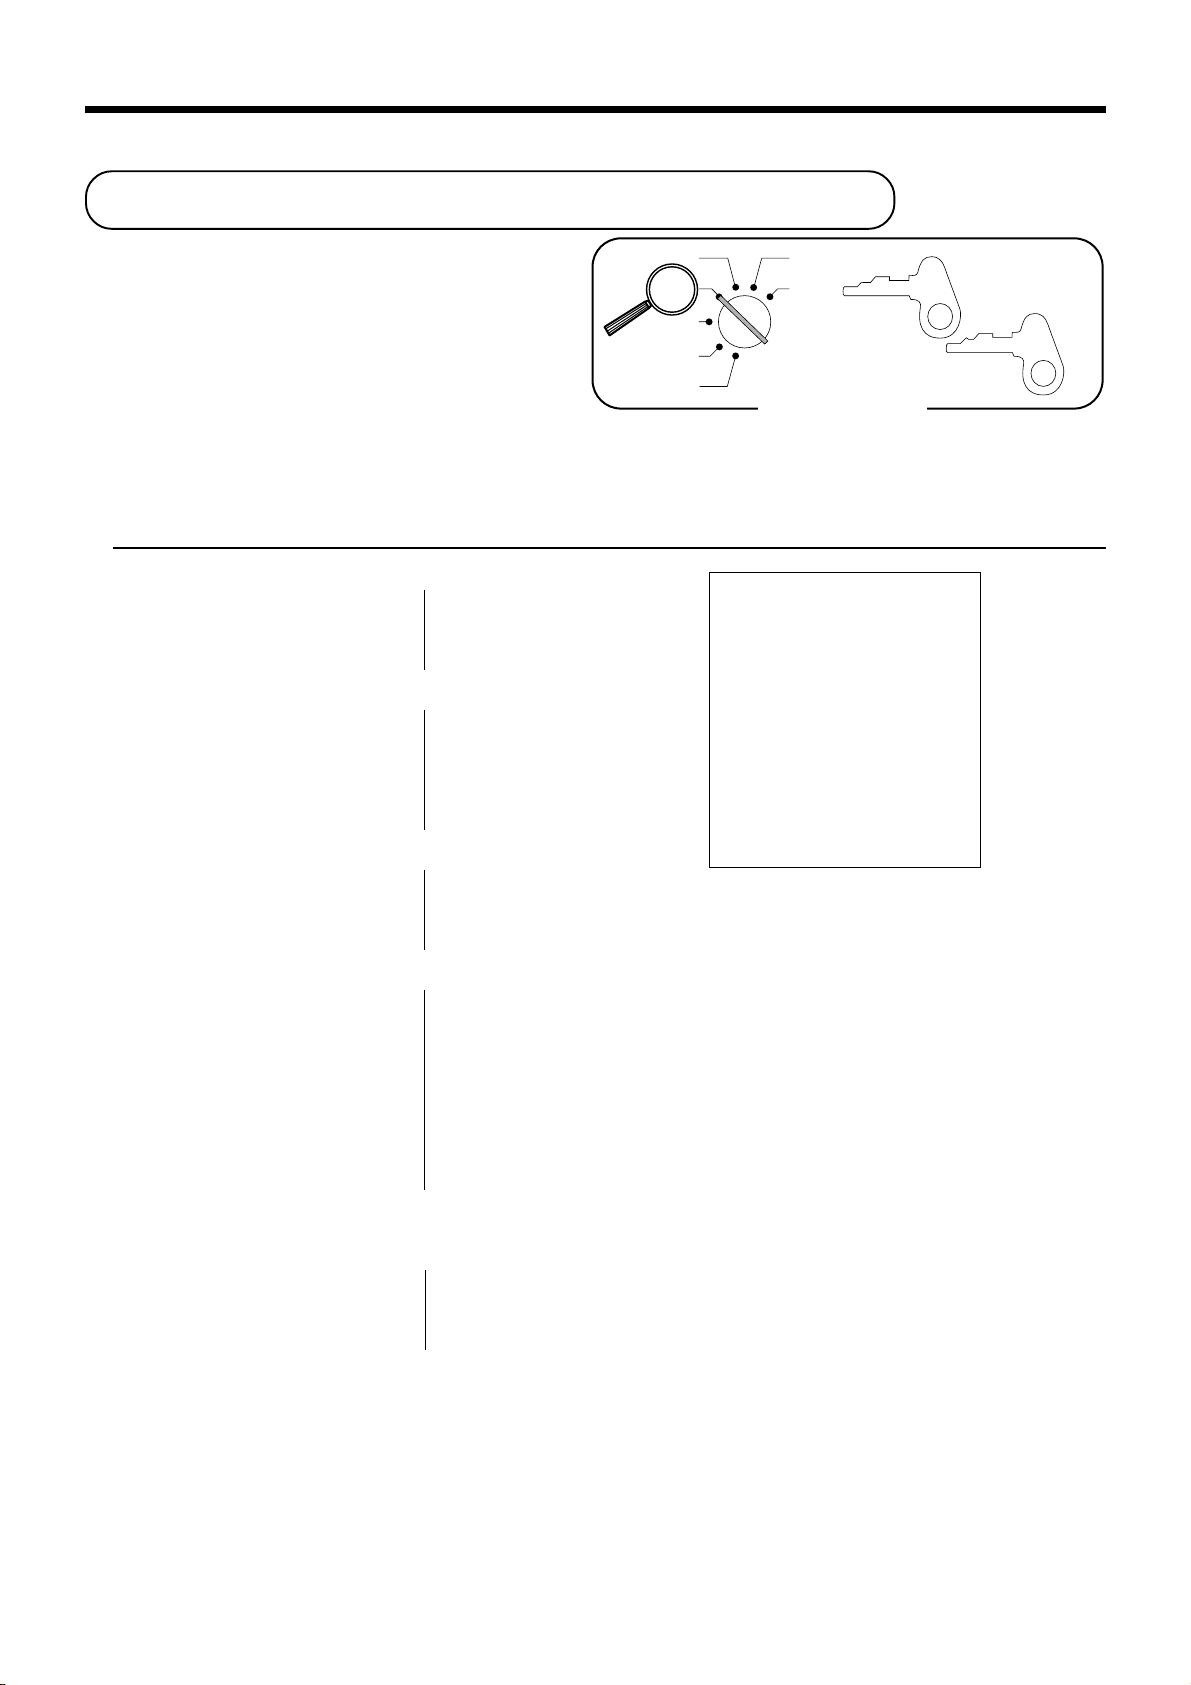
Basic Operations and Setups
Making corrections in a registration
There are three techniques you can use to make
corrections in a registration.
• To correct an item that you input but not yet
registered.
• To correct the last item you input and registered.
• To cancel all items in a transaction.
To correct an item you input but not yet registered
OPERATION RECEIPT
2-
1-!
12X
—
— Correction of unit price
C
—
—
C
— Correction of quantity
11X
2-"
2
—
—
CAL
REG
OFF
RF
PGM
X
Z
A-A08
OP
Mode Switch
12-21-1999 11:45
REG 000027
DEPT01 ⁄ $1.00
11 X @2.00
DEPT02 ¤ $22.00
PLU003 ⁄ $1.30
PLU015 ⁄ $10.00
TA1 $12.30
TX1 $0.62
TA2 $22.00
TX2 $2.20
TL $
CA $15.00
CH $22.12
37.12
A-A08
PGM
C
3*
15*
6-
C
15*
Enter subdepartment No. again.
10-:
s
10-
C
15-a
h
— Correction of PLU No.
—
—
— Correction of subdepartment unit price
(See page 67 for registering)
—
—
— Correction of partial tender amount
—
44
Page 45

To correct an item you input and registered
OPERATION RECEIPT
1-!
2-"
"
e
2*
e
5*
15*
6-:
e
15*
10-:
8x
4-$
e
6x
4-$
M
50p
—
— Clearance
—
—
— Correction of PLU No.
—
—
Correction of sub-
—
department unit price
—
—
— Correction of quantity
—
—
12-21-1999 11:50
REG 000028
DEPT01 ⁄ $1.00
DEPT02 ¤ $2.00
DEPT02 ¤ $2.00
CORR -2.00
PLU002 ¤ $1.20
CORR -1.20
PLU005 ⁄ $1.50
PLU015 ⁄ $6.00
CORR -6.00
PLU015 ⁄ $10.00
8 X @4.00
DEPT04 ¤ $32.00
CORR -32.00
6 X @4.00
DEPT04 ¤ $24.00
ST $38.50
50%
%- ⁄¤ -19.25
CORR $19.25
ST $38.50
5%
%- ⁄¤ -1.93
RF ••••••••••••
DEPT02 ¤ -2.00
CORR $2.00
RF ••••••••••••
DEPT02 ¤ -2.20
TA1 $11.87
TX1 $0.59
TA2 $22.50
TX2 $2.25
TL $
CA $30.00
CORR -30.00
CA $15.00
CH $22.21
37.21
e
M
5p
R2-"
e
R220"
s
30-a
e
15-a
h
— Correction of discount
—
—
— Correction of refund item
—
—
— Correction of partial tender
—
Basic Operations and Setups
45
Page 46

Basic Operations and Setups
To cancel all items in a transaction
OPERATION RECEIPT
1-!
2-"
3-#
4-$
12-21-1999 11:55
REG 000029
DEPT01 ⁄ $1.00
DEPT02 ¤ $2.00
DEPT03 ⁄ $3.00
DEPT04 ¤ $4.00
CANCEL ••••••••••••
M
Pressing M key is necessary to cancel
the transaction.
e
Important!
• Note that the number of items included in the transaction to be cancelled is limited (24 ~ 40
items), depending on the complexity of the transaction. If you try to cancel a transaction that
exceeds the limit, an error occurs.
In case of occurrence of this error, register these items in the RF mode.
• You can program the cash register that this cancel operation is not allowed.
No sale registration
You can use the following procedure to open the drawer
without registering a sale. This operation must be
performed out of a sale.
OPERATION RECEIPT
B
CAL
REG
OFF
RF
PGM
X
Z
A-A08
OP
Mode Switch
12-21-1999 12:00
REG 000030
#/NS ••••••••••••
A-A08
PGM
46
Page 47

Printing the daily sales reset report
This report shows daily sales totals.
OPERATION REPORT
X
CAL
REG
OFF
RF
PGM
Mode Switch
X
Z
Z
8
a
A-A08
PGM
12-21-1999 12:05
Z
000031
0000
DAILY
DEPT01 QT 15
$339.50
DEPT02 QT 19
$62.70
DEPT03 QT 31
$139.10
DEPT04 QT 23
$332.67
NON-LINK_DEPT QT 10
$94.90
-----------------------GRS QT 253
$1146.90
NET No 100
$1217.63
CAID $903.06
CHID $197.17
CKID $183.60
TA1 $732.56
TX1 $43.96
TA2 $409.72
TX2 $21.55
TA3 $272.50
TX3 $8.18
CANCEL No 2
$108.52
RF MODE No 2
$3.74
-----------------------CA No 81
$836.86
CH No 10
$197.17
CHK No 9
$183.60
- No 8
$3.00
%- No 10
$4.62
RF No 7
$27.79
CORR No 10
$12.76
#/NS No 5
RC No 2
$78.00
PD No 1
$6.80
-----------------------GT $0000001217.63
Z 0001
— Date/time
— Reset mode/consecutive No.
—
Report code/report title/reset symbol/
reset counter
— Department No./No. of items
— Department amount
*1
*1
— Non-link department No. of items
— Non-link department amount
— Gross No. of items
— Gross sales amount
— No. of customers
— Net sales amount
— Cash in drawer amount
— Charge in drawer amount
— Check in drawer amount
— Taxable amount 1
— Tax amount 1
— Taxable amount 2
— Tax amount 2
— Taxable amount 3
— Tax amount 3
*2
*2
*2
*2
*2
*2
— Cancellation count
— Cancellation amount
— Refund mode operation count
—
Refund mode operation amount
*3
*3
— Cash sales count
— Cash sales amount
— Charge sales count
— Charge sales amount
— Check sales count
— Check sales amount
— Subtraction count
— Subtraction amount
— Discount count
— Discount amount
— Refund key count
— Refund key amount
*3
*3
— Error correction count
— Error correction amount
— No sale count
— Received on Account count
— Received on Account amount
— Paid out count
— Paid out amount
— Non-resettable grand-sales total
Basic Operations and Setups
*1
Zero totalled departments (the amount and item numbers are both zero) are not printed.
*2
Taxable amount and tax amount are printed only the corresponding tax table is programmed.
*3
These items can be skipped by programming.
47
Page 48

Convenient Operations and Setups
This section describes more sophisticated setups and operations that you can use to suit the needs of your retail
environment.
Clerk control function,
Post-finalization receipt format,
General printing control,
Compulsory,
Machine features
About the clerk control function
CAL
REG
OFF
PGM
OP
A-A08
PGM
A-A08
X
X
Z
Z
RF
PGM
A-A08
To keep track of the registrations performed by
different clerks, specify the clerk control
function.
In case of selecting the clerk control function,
signing on operation is necessary before
registering, programming or issuing reports.
Clerk sign on
CAL
REG
OFF
RF
PGM
PGM
CAL
REG
OFF
RF
X
CAL
Z
REG
OFF
RF
PGM
X
CAL
Z
REG
OFF
RF
PGM
Mode Switch
X
Z
X
Z
OPERATION RECEIPT
Signing clerk 1 on:
1 6 o
12-21-1999 12:10
REG
C
01 000123
— Mode/clerk name/consecutive No.
Signing clerk 2 on: 2 6 o
○○○
DEPT01 $1.00
DEPT02 $2.00
5 X @1.00
DEPT03 $5.00
Signing clerk 20 on: 20 6 o
Clerk sign off
OPERATION
Signing clerk off:
0 6 o
• The current clerk is also signed off whenever you set the mode switch to OFF position.
Important!
• Once you select the clerk control function (page 51), the error code "E08" appears on the display
whenever
you try to perform a registration, a read/reset operation without signing on.
• You can choose either the clerk key function or the open key function.
• The signed on clerk is also identified on the receipt/journal.
48
Page 49

About post-finalization receipt
You can issue a receipt even if the cash register is not in the receipt mode.
The post -finalization receipt lets you issue a receipt after finalization of the transaction.
Note that all of the following conditions must be satisfied.
• The option "print receipts" is selected.
• The receipt issuance status must be OFF.
• The transaction must be finalized in the REG or RF mode using the a, h or k key.
Post-finalization receipt example
X
Z
Mode Switch
You can program the cash register to print the
transaction total only (below Total format) or full details
(below Detailed format) on the post-finalization receipt.
Note that if the transaction contains more than 45 lines
(including receipt header), the cash register prints in a
T otal format regardless of your programming.
OPERA TION RECEIPT
CAL
REG
OFF
RF
PGM
A-A08
OP
A-A08
PGM
Unit price $10.00
—————————
Quantity 1
Item 1 —————————
Dept. 1
—————————
Taxable 1
—————————————
Unit price $20.00
—————————
Quantity 1
Item 2 —————————
Dept. 2
—————————
Taxable 2
—————————————
Payment Cash $32.50
10-!
20-"
s
3250a
; Post-finalization receipt is issued.
Total format Detailed format
12-21-1999 12:35
REG 000123
CA $
Receipt is not issued.
If "Automatic issue" is selected, no need to press
12-21-1999 12:35
REG 000123
32.50
DEPT01 ⁄ $10.00
DEPT02 ¤ $20.00
TA1 $10.00
TX1 $0.50
TA2 $20.00
TX2 $2.00
TL $
CA $32.50
CG $0.00
32.50
;
key.
Important!
• You can issue only one post-finalization receipt per transaction.
Convenient Operations and Setups
49
Page 50

Convenient Operations and Setups
Programming general printing control
.noitareporednetgnirudenillatotbusehtfognitnirpsserppuS
.emittnerrucehttnirP
.lanruojnoetadehtpikS
.rebmunevitucesnocehtpikS
.lanruojtnirP/tpiecertnirP
/)eussicitamotua(yekezilaniFybtpiecertsopeussI
)eussilaunam(yektpiecertsoP
tpiecertsopehtnitamroflatoT/tamrofliateD
.tnuomaelbaxattnirP
.slobmysxattnirP
.dlosmetiforebmuntnirP
(.lanruojnosenilmetipikS
.lobmysretimiledtigiD
.lobmyslamiceD
LANRUOJPIKS
)
.desserpsiyekehtnehwlatotbustnirP
.noitcasnartagnizilaniferofebsnehpyhtnirP
.tpiecernoegassemogoltnirP
.tpiecernoegassemlaicremmoctnirP
a
b
c
a
b
c
a
b
c
a
b
a
b
a
b
0=oN
1=seY
0=seY
1=oN
0=seY
2=oN
0=seY
4=oN
0=tpieceR
1=lanruoJ
0=launaM
2=citamotuA
0=liateD
4=latoT
0=seY
1=oN
0=seY
2=oN
0=oN
4=seY
0=oN
1=seY
0=oN
2=seY
0=doireP
1=ammoC
0=doireP
2=ammoC
0=oN
1=seY
0=oN
4=seY
0=oN
2=seY
:
D
:
D
:
D
:
D
:
D
:
D
:
D
:
D
8
)c+b+a(
7
)c+b+a(
6
)c+b+a(
5
)b+a(
4
)b+a(
3
)b+a(
2
1
50
PGM
A-A08
CAL
REG
OFF
RF
PGM
Mode Switch
6 3s 6 0522s6
X
Z
6 : : :
D
8 D7 D6 D5 D4 D3 D2 D1
Note: After machine initilaization, D2 is set to "4" (Print logo message).
: :
: :
:
a 6 s
Page 51

Programming compulsory and clerk control function
ecroF s .noitazilaniferofebnoitarepo
"0"syawlA
"0"syawlA
"0"syawlA
.deussi
– "000"ro"00"sa
ngissA
ngissA o )metsysedockrelc("#KLC"ro"NEPO"sa
a
teser/daeryliadagniwollaerofebnoitaralcedyenomaecroF
.noitarepodaerlaicnanifdna
b
0=oN
2=seY
0=oN
4=seY
:
D
)b+a(
8
;
D
7
;
D
6
;
D
5
.deussisitpieceranehwreffubyekehtraelC
)edomGERniylnoevitceffE(
.deussisitroper/tpieceranehwffo-ngisotuamrofreP
.detcelessimetsysedockrelcehtevitceffeylnosisihT
.yalpsidemitgnirud"sdnoces"yalpsiD
.noitarepolecnactibihorP
a
b
sitroperteseryliadehtnehwrebmunevitucesnocehtteseR
a
b
a
b
0=oN
1=seY
0=oN
2=seY
0=oN
2=seY
0=seY
1=oN
0=oN
2=seY
0="00"
1="000"
0="NEPO"
4="#KLC"
:
D
:
D
:
D
:
D
)b+a(
4
3
)b+a(
2
)b+a(
1
PGM
A-A08
CAL
REG
OFF
RF
PGM
Mode Switch
6 3s 6 0622s6
X
Z
:
6
; ; ; :
D
8 D7 D6 D5 D4 D3 D2 D1
: :
:
a 6 s
Convenient Operations and Setups
51
Page 52

Convenient Operations and Setups
Programming read/reset report printing control
yadehtforebmunevitucesnoctsalehtdnatsrifehttnirP
.troperteserselasyliadehtno)egnar.oNevitucesnoc(
teser/daernoitcasnartdnatnemtrapednosenillatotorezpikS
.troper
.troperteser/daerULPnosenillatotorezpikS
.troperselasylruohnosenillatotorezpikS
.troperteser/daernooitarselasehttnirP
ehtnolatotdnargelbatteser-nonehtfognitnirpsserppuS
.troperteseryliad
.troper
"0"syawlA
PGM
A-A08
a
b
c
a
b
teser/daerehtnotnuocdnalatotedomFRfognitnirpsserppuS
4=seY
0=oN
0=seY
1=oN
0=seY
2=oN
0=seY
4=oN
0=oN
1=seY
0=oN
2=seY
0=oN
1=seY
:
D
:
D
:
D
:
D
6
)c+b+a(
5
)b+a(
4
3
;;
D2D
1
6 3s 6 0822s6
CAL
REG
OFF
RF
PGM
Mode Switch
X
Z
6
:
: :
D6 D5 D4 D3 D2 D1
:
; ;
a 6 s
Setting a store/machine number
You can set a 4-digit machine number to identify your machine. The machine number is printed on receipts/journal
for each transaction.
PGM
A-A08
CAL
REG
OFF
RF
PGM
Mode Switch
6 3s 6 0222s6
X
Z
12-21-1999 12:34 0001
REG
DEPT01 $1.00
DEPT02 $2.00
5 X @1.00
DEPT03 $5.00
C
01 000123
: :
D
— Date/time/machine No.
:
4 D3 D2 D1
:
a 6 s
52
Page 53

Programming to clerk
You can program up to 4-digit assigning number (clerk number), and trainee status of clerk (i.e. training cashier)
for each clerk.
Important!
This program is required only when the o key is assigned as "CLK#" by the general function
programming (code = 0622) on page 51.
Programming clerk number
PGM
A-A08
To other clerk
CAL
REG
OFF
RF
PGM
Mode Switch
Programming trainee status of clerk
PGM
A-A08
CAL
REG
OFF
RF
PGM
Mode Switch
X
Z
6 3s 6
X
Z
6 3s 6
Clerk No.
{
20
Clerk No.
1
{
20
1
:
:
07
}
67
}
s 6 : : : : a 6 s
Clerk number
To other clerk
Training clerk:
s 6
1
Normal clerk:
{
0
a 6 s
}
When a training clerk signs on, the cash register automatically enters the training mode.
In the training mode, no operations are affected on any totalizers nor counters.
The training mode symbols are printed in the columns of receipt entries produced in the training mode.
The cash register exits the training mode when the training clerk signs off.
Convenient Operations and Setups
53
Page 54

n
Convenient Operations and Setups
Programming descriptors and messages
The following descriptors and messages can be programmed;
• Report descriptor (such as gross total, net total, cash in drawer…)
• Grand total
• Special character (such as mode symbol, taxable symbol…)
• Read/reset report title • Messages (logo and commercial message)
• Clerk name • Function key descriptor
• PLU item descriptor • Department key descriptor
Programming report descriptor, grand total, special character, report title,
receipt message and clerk name
To other program code
PGM
A-A08
To the next memory No.
CAL
REG
OFF
RF
PGM
Mode Switch
yromeM
.oN
10
20
30
40
50
60
70
80
90
01
11
21
31
41
51
61
71
margorP
edoc
rotpircsedtropeR
10
X
6 2s 6
Z
latotssorG
latotteN
rewardnihsaC
rewardniegrahC
rewardnikcehC
1tnuomaelbaxaT
1xaT
2tnuomaelbaxaT
2xaT
3tnuomaelbaxaT
3xaT
latotnoitallecnaC
: : : :
Memory
No.
stnetnoCretcarahclaitinIsruoY
rewardnihsacycnerrucngieroF
rewardnikcehcycnerrucngieroF
latotedomdnufeR
tnuocedomrotaluclaC
latottnemtrapedknil-noN
Program
code
SSORG
TEN
DIAC
DIHC
DIKC
ACEC
KCEC
1AT
1XT
2AT
2XT
3AT
3XT
LECNAC
EDOMFR
LAC
s 6
TPED_KNIL-NON
Characters
☞
See "Entering characters" sectio
6 a 6 s
54
Page 55

yromeM
.oN
latotdnarG
1002
10
20
30
40
50
60
70
80
90
11
21
31
41
51
61
71
81
91
02
12
22
42
eltittropeR
10
20
30
40
50
60
70
80
90
01
margorP
edoc
latotdnarG
stnetnoCretcarahclaitinIsruoY
TG
retcarahclaicepS
).ae2(ytitnauQ/.oN/@/tnuomA
).ae2(remotsuC/tnuocmetI
).ae2(gnicirptilpS/noitacilpitluM
).ae1(3~1sutatselbaxaT
)1(sutatselbaxatllA
).ae2(lobmysycnerrucngieroF
).ae4(edomdnufeR/edomgeR
)4(edommargorP
).ae4(edomZ/X
edomgniniarT
32
42
lobmysgniniarT
)gniredneT(lobmyslatoT
lobmysegnahC
)tpiecertsoP(lobmyslatoT
)noitartsiger%(lobmyslatoT
gnidnesatadmargorp-otuA
gnivieceratadmargorp-otuA
margorp-otuA
egassemdnelamronmargorp-otuA
egassemdnerorremargorp-otuA
egassemdnedecrofmargorp-otuA
tropernoegassemlatoT
eltittroperyliaD
eltittroperULP
eltittroperselasylruoH
eltittroperpuorG
eltittroperkrelC
eltittroperlaicnaniF
eltittroperylhtnoM
eltittroper1-cidoireP
eltittroper2-cidoireP
eltittroperlaudividnI
$ @NoQT
NoCT
X /
⁄ ¤ ‹
*
* * * *
REG
RF
P
X Z
DAILY
PLU
HOURLY
GROUP
CLERK
FLASH
n (n= 1 ~ 6)
****
LT
GC
LT
TS
MGP
DNE
RORRE
**DNE**
LATOT
YLHTNOM
GNINIART
MGPDNES
MGPVCER
1-CIDOIREP
2-CIDOIREP
55
Convenient Operations and Setups
Page 56

Convenient Operations and Setups
yromeM
.oN
margorP
edoc
stnetnoCretcarahclaitinIsruoY
egassemtpieceR
10
20
30
40
50
60
23
70
80
90
01
yromeM
.oN
margorP
edoc
egassemogolfoenilts1
YOUR RECEIPT
egassemogolfoenildn2
egassemogolfoenildr3
egassemogolfoenilht4
egassemogolfoenilht5
THANK YOU
CALL AGAIN
egassemlaicremmocfoenilts1
egassemlaicremmocfoenildn2
egassemlaicremmocfoenildr3
egassemlaicremmocfoenilht4
egassemlaicremmocfoenilht5
stnetnoCretcarahclaitinIsruoY
krelC
C
10
20
30
40
50
60
70
80
90
01
11
70
21
31
41
51
61
71
81
91
02
10krelC
20krelC
30krelC
40krelC
50krelC
60krelC
70krelC
80krelC
90krelC
01krelC
11krelC
21krelC
31krelC
41krelC
51krelC
61krelC
71krelC
81krelC
91krelC
02krelC
01
C
02
C
03
C
04
C
05
C
06
C
07
C
08
C
09
C
10
C
11
C
12
C
13
C
14
C
15
C
16
C
17
C
18
C
19
C
20
56
Page 57

Programming department key descriptor
PGM
A-A08
CAL
REG
OFF
RF
6 2s 6
X
Z
☞
See "Entering characters" section.
Characters
PGM
Mode Switch
stnetnoCretcarahclaitinIsruoY
yektnemtrapeD
10tnemtrapeD
20tnemtrapeD
30tnemtrapeD
40tnemtrapeD
50tnemtrapeD
60tnemtrapeD
70tnemtrapeD
80tnemtrapeD
90tnemtrapeD
01tnemtrapeD
11tnemtrapeD
21tnemtrapeD
31tnemtrapeD
41tnemtrapeD
51tnemtrapeD
61tnemtrapeD
71tnemtrapeD
81tnemtrapeD
91tnemtrapeD
02tnemtrapeD
12tnemtrapeD
22tnemtrapeD
32tnemtrapeD
42tnemtrapeD
52tnemtrapeD
62tnemtrapeD
72tnemtrapeD
87tnemtrapeD
97tnemtrapeD
08tnemtrapeD
10TPED
20TPED
30TPED
40TPED
50TPED
60TPED
70TPED
80TPED
90TPED
01TPED
11TPED
21TPED
31TPED
41TPED
51TPED
61TPED
71TPED
81TPED
91TPED
02TPED
12TPED
22TPED
32TPED
42TPED
52TPED
62TPED
72TPED
87TPED
97TPED
08TPED
To another department
6
d! (Dept. 21)
d% (Dept. 40)
dd% (Dept. 60)
ddd% (Dept. 80)
!
(Dept. 1)
"
(Dept. 2)
:
%
(Dept. 20)
:
:
:
6 s
Convenient Operations and Setups
57
Page 58

Convenient Operations and Setups
Programming PLU descriptor
To new (not sequential) PLU
PGM
A-A08
To the next PLU
CAL
REG
OFF
RF
PGM
Mode Switch
.oNULPstnetnoCretcarahclaitinIsruoY
ULP
100
200
300
400
500
600
700
800
900
010
110
210
310
410
510
610
710
810
910
020
120
220
320
420
520
620
720
820
920
895
995
006
X
6 2s 6
Z
100ULP
200ULP
300ULP
400ULP
500ULP
600ULP
700ULP
800ULP
900ULP
010ULP
110ULP
210ULP
310ULP
410ULP
510ULP
610ULP
710ULP
810ULP
910ULP
020ULP
120ULP
220ULP
320ULP
420ULP
520ULP
620ULP
720ULP
820ULP
920ULP
895ULP
995ULP
006ULP
PLU No.
* 6
☞
100ULP
200ULP
300ULP
400ULP
500ULP
600ULP
700ULP
800ULP
900ULP
010ULP
110ULP
210ULP
310ULP
410ULP
510ULP
610ULP
710ULP
810ULP
910ULP
020ULP
120ULP
220ULP
320ULP
420ULP
520ULP
620ULP
720ULP
820ULP
920ULP
895ULP
995ULP
006ULP
Characters
See "Entering characters" section.
a 6 s
58
Page 59

Programming function key descriptor
PGM
A-A08
To other function key
CAL
REG
OFF
RF
PGM
Mode Switch
6 2s 6
X
Z
egrahC
kcehC
suniM
tnecreP
dnufeR
Characters
☞
See "Entering characters" section.
stnetnoCretcarahclaitinIsruoY
noitcnuF
derednettnuoma/hsaC
1tfihsxaT/tnuoccanodevieceR
2tfihsxaT/tuodiaP
-
%
lecnaC/tcerrocrorrE
egnahcxeycnerruC/tpiecertsoP
elasoN/dda-noN
latotbusesidnahcreM
6
AC
HC
KHC
CR
DP
FR
RROC
EC
SN/#
TSDM
Function key
6 s
59
Convenient Operations and Setups
Page 60

Convenient Operations and Setups
Entering characters
In this section, the method to enter descriptors or messages (characters) to the cash register during programming is
described.
Characters are specified by character keyboard or by codes. In the first half of this section, the usage of character
keyboard is described. In the latter half, inputting method by character code is described.
Using character keyboard
3
11
DEPT
SHIFT
1
FEED
3
12
67
2
CHAR.
SHIFT
4
PLU/
S.DEPT
8
789
456
ABCD E
abcd e
FGHI JK
fghi jk
LMNOPQ
lmnopq
345
890
DBL
SIZE
6
SPACE
7
C
5
1 Feed key
Hold this key down to feed paper from the printer.
2 Character shift key
Pressing this key shifts the character from the uppercase
letter to lower case letter and returns to the uppercase
letter in sequence.
3 Alphabet keys
Used input to characters.
4 PLU/Subdepartment key
Use this key to input PLU/Subdeparment numbers.
5 Double size letter key
Specifies that the next character you input to a double size
character. You must press this key before each double size
character.
6 Space key
Set a space by depression.
7 Clear key
Clears all input characters in the programming.
123
9
000•
10
RSTU V
rstu v
12
#-2
13
WXY Z
wxyz
8 Numeric keys
Used to enter program codes, memory number and
character codes.
9 Character fixed key
Enter when the alphabetic entry for a descriptor, name or
message has been completed.
0 Backspace/Character code fixed key
Registers one character with code (2 or 3 digit).
Clears the last input character, much like a back space
key. (Does not clear the double size letter key entry.)
A Department shift key
Use this key to shift the department key number from 1
through 20 to 21 through 40, 41 through 60 or 61 through
80.
B Program end key
Terminates the character programming.
C Character enter key
Registers the programmed characters.
#-1
Example:
Input "
enter "DBL SIZE", "A", "SHIFT", "p", "p", "l", "e", "SPACE", "SHIFT", "J", "SHIFT", "u", "i", "c", "e" -.
A
pple Juice",
60
Page 61

Entering characters by code
Characters are specified by codes. Every time you enter a character, choose character codes by the character code
list (below) and press the ^ key to settle it. After completion of entering characters, press the - key to fix
them.
Example: Input "
A
pple Juice", enter "255 ^ 65 ^ 112 ^ 112 ^ 108 ^ 101 ^ 32 ^ 74
^ 117 ^ 105 ^ 99 ^ 101 ^-."
Character code list
arahCedoCarahCedoCarahCedoCarahCedoCarahCedoCarahCedoCarahCedoC
ecapS23
!
=
#
$
%
&
'
(
)
*
+
,
.
/
0
33
43
53
63
73
83
93
04
14
24
34
44
54
64
74
1
2
3
4
5
6
7
8
9
:
;
<
•
>
?
84
94
05
15
25
35
45
55
65
75
85
95
06
16
26
36
@
A
B
C
D
E
F
G
H
I
J
K
L
M
N
O
46
56
66
76
86
96
07
17
27
37
47
57
67
77
87
97
P
Q
R
S
T
U
V
W
X
Y
Z
^
¥
[
\
]
08
18
28
38
48
58
68
78
88
98
09
19
29
39
49
59
£
a
b
c
d
e
f
g
h
i
j
k
l
m
n
o
69
p
79
q
89
r
99
s
001
t
101
u
201
v
301
w
401
x
501
y
601
z
701
fi
801
fl
901
‡
011
·
111
‚
211
Ç
311
ü
411
é
511
â
611
ä
711
à
811
å
911
ç
021
ê
121
ë
221
è
321
ï
421
î
521
ì
621
Ä
721
Å
821
921
031
131
231
331
431
531
631
731
831
931
041
141
241
341
arahCedoCarahCedoCarahCedoCarahCedoCarahCedoCarahCedoCarahCedoC
É
æ
Æ
ô
ö
ò
û
ù
ÿ
Ö
Ü
ø
⁄
¤
‹
›
441
á
541
í
641
ó
741
ú
841
ñ
941
Ñ
051
ß
151
Ê
251
¿
351
Ë
451
È
551171
{
651
|
751371
¡
851
§
951
¶
061
Ï
161
Î
261
Ì
361
Í
461
Á
561
Â
661
À
761
Õ
861
õ
961
Ô
071
Ò
Ú
271
Û
Ù
471
"
571
_
671
Ã
c
771391902522142
Ë
871491012622242
971591112722342
Ï
081691212822442
K
181791312922542
L
281891412032642
N
381991512132742
s
481002612232842
Ü
581102712332942
z
681202812432052
ä
781302912532152
c
881402022632252
ë
981502122732352
g
091602222
ï
191702322
k
291802422042
l
n
s
E
I
U
a
e
e
i
u
i
o
o
a
e
i
ö
ö
u
u
«
»
∂
∆
∫
∏
π
∑
Ø
ª
Ω
º
µ
Ÿ
832452
932
ezis
Convenient Operations and Setups
elbuoD
552
61
Page 62

Convenient Operations and Setups
Department key feature programming
There are two different methods you can use to assign features to department keys. With "Batch feature
programming", you can use a single operation to assign multiple features.
"Individual feature programming", on the other hand, let you assign features one-by-one. This method is
recommended for programming of special features to individual department keys.
Batch feature programming
When using this procedure to assign multiple features to departments, use 9-digit codes that you create using the
following procedure.
To another department key
PGM
A-A08
CAL
REG
OFF
RF
PGM
Mode Switch
63s6 : : : : ; ; ; : : 6
X
Z
D
9 D8 D7 D6 D5 D4 D3 D2 D1
ddd% (Dept. 80)
dd% (Dept. 60)
!
(Dept. 1)
"
(Dept. 2)
:
%
(Dept. 20)
d! (Dept. 21)
:
d% (Dept. 40)
:
:
6s
!, " ... %ddd
tnemtrapedevitageN
elasmetielgniS
noitacificepstimiltigidhgiH
1sutatselbaxaT
2sutatselbaxaT
3sutatselbaxaT
"000"syawlA
)05~00(knilpuorG
Note: If you require tax table 3, please refer to page 39.
0=oN
2=seY
0=oN
1=seY
tnacifingiS
rebmun
a
b
c
0=oN
1=seY
0=oN
2=seY
0=oN
4=seY
:
D
:
D
:
D
:
D
9
8
7
)c+b+a(
6
;;;
D5D4D
tnacifingiS
rebmun
tnacifingiS
rebmun
::
D2D
3
1
62
Page 63

Individual feature programming
With this procedure, you can assign individual features to specific departments. Please select the command code of
the contents you want to program, and follow the procedure below .
To another department key
PGM
A-A08
CAL
REG
OFF
RF
PGM
Mode Switch
dnammoC
edoc
6610tnemtrapedevitageN
6681elasmetielgniS
6651noitacificepstimiltigidhgiH
6630
6611)05~00(knilpuorG
6 3s 6
X
Z
1sutatselbaxaT
2sutatselbaxaT
3sutatselbaxaT
Command code
Program code
6
noitceles/stnetnoC
Different program
to the next dept.
Same program
s 6
to the next dept.
!
"
6
(Dept. 1)
(Dept. 2)
6 s
:
%
(Dept. 20)
d! (Dept. 21)
:
d% (Dept. 40)
:
dd% (Dept. 60)
:
ddd% (Dept. 80)
0=oN
2=seY
0=oN
1=seY
tnacifingiS
rebmun
a
b
c
0=oN
1=seY
0=oN
2=seY
0=oN
4=seY
tnacifingiS
rebmun
tnacifingiS
rebmun
:
:
:
:
margorP
edoc
)c+b+a(
Convenient Operations and Setups
::
To program a unit price to a department key, please refer to the page 29.
63
Page 64

Convenient Operations and Setups
PLU feature programming
There are two different methods you can use to assign features to PLUs. With "Batch feature programming", you
can use a single operation to assign multiple features.
"Individual feature programming", on the other hand, let you assign features one-by-one. This method is
recommended for programming of special features to individual PLUs.
Batch feature programming
When using this procedure to assign multiple features to PLUs, use 9-digit codes that you create using the
following procedure.
To new (not sequencial) PLU
PGM
A-A08
CAL
REG
OFF
RF
PGM
Mode Switch
6 3s 6
X
Z
6
ULPevitageN
elasmetielgniS
1sutatselbaxaT
2sutatselbaxaT
3sutatselbaxaT
Different program to the next PLU
PLU No.
: : : : ; : : ; ;
.ULP/tnemtrapedbussataerT
* 6
D
9 D8 D7 D6 D5 D4 D3 D2 D1
a
b
)tnemtrapedbusrof(noitacificepstimiltigidhgiH
a
b
c
6 a 6 s
0=oN
2=seY
0=oN
1=seY
0=ULP
4=.tpedbuS
tnacifingiS
rebmun
0=oN
1=seY
0=oN
2=seY
0=oN
4=seY
:
D
:
D
:
D
:
D
9
)b+a(
8
7
)c+b+a(
6
"0"syawlA
)08~00(kniltnemtrapeD
"00"syawlA
Note: If you require tax table 3, please refer to page 39.
64
;
D
5
tnacifingiS
rebmun
tnacifingiS
rebmun
::
D4D
3
;;
D2D
1
Page 65

Individual feature programming
With this procedure, you can assign individual features to specific PLUs. Please select the command code of the
contents you want to program, and follow the procedure below .
To another PLU
PGM
A-A08
CAL
REG
OFF
RF
PGM
Mode Switch
dnammoC
edoc
6610ULPevitageN
6681
6651)tnemtrapedbusrof(noitacificepstimiltigidhgiH
6630
6611)08~00(kniltnemtrapeD
6 3s 6
X
Z
6
elasmetielgniS
1sutatselbaxaT
2sutatselbaxaT
3sutatselbaxaT
Command code
PLU No.
.ULP/tnemtrapedbussataerT
s 6
Different program
to the next PLU
Same program
to the next PLU
* 6
noitceles/stnetnoCedocmargorP
Program code
a
b
a
b
c
6 a 6 s
0=oN
2=seY
0=oN
1=seY
0=ULP
4=.tpedbuS
tnacifingiS
rebmun
0=oN
1=seY
0=oN
2=seY
0=oN
4=seY
tnacifingiS
rebmun
tnacifingiS
rebmun
:
:
)b+a(
:
:
)c+b+a(
Convenient Operations and Setups
::
To program a unit price to a PLU or a subdepartment, please refer to the page 31.
65
Page 66

Convenient Operations and Setups
Registering example
Locking out and releasing high digit limitation
OPERATION RECEIPT
Unit price $10.50
—————————
Quantity 1
—————————
1050#
ERROR ALARM
(Exceeding max. digits)
Item Dept. 3
—————————
Taxable (1)
—————————
Max.digit (3)
—————————————
Payment Cash $20.00
preset
preset
Cancels limitations
for next entry
1050#
20-a
C
o
s
CAL
REG
OFF
RF
PGM
X
Z
Mode Switch
12-21-1999 12:40 0001
REG 000050
DEPT01 ⁄ $10.50
TA1 $10.50
TX1 $0.53
TL $
CA $20.00
CG $8.97
11.03
A-A08
OP
A-A08
PGM
Single item sales items
You can issue a receipt by simply touching the single item sales department or PLU. The following examples show how
you register single-item-sale departments. Registration of single item sale PLUs is identical.
Single item
OPERATION RECEIPT
Unit price $2.00
—————————
Quantity 1
—————————
Item Dept. 4
—————————
2-$
12-21-1999 12:45 0001
REG
DEPT04 ¤ $2.00
TA2 $2.00
TX2 $0.20
CA $
C
01 000051
2.20
Taxable 2
—————————
Sales status Single item
66
Page 67

Multiple item sale
OPERATION RECEIPT
Unit price $2.00
—————————
Quantity 1
—————————
Item 1 Dept. 3
—————————
Taxable 2
—————————
Sales status
Normal
2-#
5-$
Single item status is not
effective during transaction.
a
It is necessary to press the
finalize key .
12-21-1999 12:50 0001
REG
DEPT03 ¤ $2.00
DEPT04 ¤ $5.00
TA2 $7.00
TX2 $0.70
CA $
C
01 000052
7.70
——————————————–
Unit price $5.00
—————————
Quantity 1
—————————
Item 2 Dept. 4
—————————
Taxable 2
—————————
Sales status Single item
——————————————–
Payment Cash $7.70
Note: The single item sales department or PLU should be registered at the top of the transaction, otherwise the
transaction is not finalized. It is necessary to press a, h or k key.
Examples of registering subdepartments
Single item sale
OPERATION RECEIPT
Unit price $6.00
—————————
Quantity 1
Item —————————
PLU (subdepartment)
code
Subdept. 15
—————————
—————————————
Taxable (1)
preset
Unit price
Payment Cash $10.00
10-a
15*
6-:
s
12-21-1999 12:55 0001
REG
PLU015 ⁄ $6.00
TA1 $6.00
TX1 $0.30
TL $
CA $10.00
CG $3.70
C
01 000053
6.30
Convenient Operations and Setups
67
Page 68

Convenient Operations and Setups
Repeat
OPERATION RECEIPT
Unit price ($3.00)
—————————
Quantity 3
Item 1 —————————
Subdept. 15
—————————
Taxable (1)
—————————————
Unit price $2.00
—————————
Quantity 2
Item 2 —————————
Subdept. 15
—————————
Taxable (1)
—————————————
Payment Cash $20.00
Multiplication
Unit Price $6.00
—————————
Quantity 1.25
Item —————————
Subdept. 15
—————————
Taxable (1)
—————————————
Payment Cash $10.00
preset
preset
preset
preset
15*
Hit : without a unit price
recalls preset price.
15*
2-:
20-a
OPERATION RECEIPT
1^25x
Quantity
(4-digit integer/2-digit decimal)
15*
6-:
:
:
:
:
s
s
12-21-1999 13:00 0001
REG
PLU015 ⁄ $3.00
PLU015 ⁄ $3.00
PLU015 ⁄ $3.00
PLU015 ⁄ $2.00
PLU015 ⁄ $2.00
TA1 $13.00
TX1 $0.65
TL $
CA $20.00
CG $6.35
12-21-1999 13:05 0001
REG
1.25 X @6.00
PLU015 ⁄ $7.50
TA1 $7.50
TX1 $0.38
TL $
CA $10.00
CG $2.12
C
01 000054
13.65
C
01 000055
7.88
Split sales of packaged item
Unit Price
12 for $30.00
—————————
Quantity 7
Item —————————
Subdept. 37
—————————
—————————————
Taxable (1)
preset
Payment Cash $20.00
10-a
OPERATION RECEIPT
7x
Quantity being purchased
(4-digit integer/2-digit decimal)
12x
Package quantity
(4-digit integer/2-digit decimal)
37*
12-21-1999 13:10 0001
REG
7 X
@12 / 37.00
PLU037 ⁄ $17.50
TA1 $17.50
TX1 $0.88
TL $
CA $20.00
CG $1.62
C
01 000056
30-:
s
20-a
18.38
68
Page 69

Percent key feature programming
You can use the p key as discount key, premium key or manual tax key. In this section, detail information of p
key is described.
Programming to the p key
To program a discount/premium rate, please refer to the page 34.
PGM
A-A08
CAL
REG
OFF
RF
PGM
Mode Switch
p
6 3s 6 : : ; : ;
X
Z
)+%/-%rofylno(
noitubirttayeK
)+%/-%rofylno(
"0"syawlA
1sutatselbaxaT
)+%/-%rofylno(
2sutatselbaxaT
)+%/-%rofylno(
3sutatselbaxaT
)+%/-%rofylno(
D
7 D6 D5 D4 D3 D2 D1
2=pudnuor,1=ffotuc,0=ffodnuor,lortnocnoitcarF
egatnecrepdemmargorpedirrevootyrtnelaunamtibihorP
; ;
a
b
a
b
c
6 p 6 s
tnacifingiS
rebmun
0=-%
1=+%
4=xat-M
0=oN
2=seY
:
D
:
D
7
)b+a(
6
;
D
5
0=oN
1=seY
0=oN
2=seY
0=oN
4=seY
:
D
4
)c+b+a(
"0"syawlA
"0"syawlA
"0"syawlA
Note: If you require tax table 3, please refer to page 39.
;
D
;
D
;
D
3
2
Convenient Operations and Setups
1
69
Page 70

Convenient Operations and Setups
Registering discounts and premiums
Discount for Items and subtotals
CAL
REG
OFF
RF
PGM
X
Z
Mode Switch
Refer to "Preparing and using discounts" in "Basic Operations and Setups" on page 34.
Premium for Items and subtotals
OPERATION RECEIPT
Unit price
—————————
($10.00)
preset
Quantity 1
Item 1 —————————
Dept. 4
—————————
Taxable (2)
—————————————
preset
Premium Rate 7%
—————————————
Unit price ($5.00)
—————————
preset
Quantity 1
Item 2 —————————
PLU 32
—————————
Taxable (2)
—————————————
Subtotal
premium
Rate (5%)
—————————
Taxable (1 and 2)
—————————————
preset
preset
preset
$
7p
Applies the input value as a
premium rate (7%).
32*
M
For this operation, press
this key instead of s.
p
Applies the preset premium
rate (5%) to the subtotal.
s
20-a
12-21-1999 13:15 0001
REG
DEPT04 ¤ $10.00
7%
%+ $0.70
PLU032 ¤ $5.00
ST $15.70
5%
%+ ⁄¤ $0.79
TA2 $16.49
TX2 $1.65
TL $
CA $20.00
CG $1.86
C
01 000057
Payment Cash $20.00
18.14
A-A08
OP
A-A08
PGM
• You can manually input rates up to 4 digits long (0.01% to 99.99%).
Taxable status of the
p key
• Whenever you perform a discount/premium operation on the last item registered, the tax calculation for discount/premium amount is performed in accordance with the tax status programmed for that item.
• Whenever you perform a discount/premium operation on a subtotal amount, the tax calculation for the subtotal
amount is performed in accordance with the tax status programmed for the
p key.
70
Page 71

Registering manual tax
You can program the cash register to change the function
of the p key to that of a l (manual tax) key . The
l key is used to register manually entered tax
amounts.
CAL
REG
OFF
RF
PGM
X
Z
A-A08
OP
A-A08
PGM
Mode Switch
Important!
If you program the cash register to perform registrations with manually entered tax amounts, the
l key replaces the p key, so discount/premium registration will be impossible.
Also, please set the appropriate key descriptor to the key.
Example
OPERATION RECEIPT
Unit price
$10.00
—————————
Quantity 1
—————————
Item 1 Dept. 1
—————————
Taxable No
—————————
M-Tax Normal
—————————————
Unit price $20.00
—————————
Quantity 1
Item 2 —————————
Dept. 2
—————————
Taxable 2
—————————————
Payment Cash $33.00
10-!
50l
p key is assigned
to l key .
20-"
s
33-a
12-21-1999 13:20 0001
REG
DEPT01 $10.00
M-TAX $0.50
DEPT02 ¤ $20.00
TA2 $20.00
TX2 $2.00
TL $
CA $33.00
CG $0.50
C
01 000058
32.50
71
Convenient Operations and Setups
Page 72

Convenient Operations and Setups
Currency exchange programming
When the ; key is pressed, a current subtotal including tax is converted directly into foreign currency and the
result is displayed, and the subsequent finalization is handled using the foreign currency . The currency exchange
function is released by finalizing a transaction, partial tender operation, receipt issuance, or by pressing the s
key.
Currency exchange rate programming
CAL
REG
OFF
RF
PGM
PGM
A-A08
6 1s 6 : : :
X
Z
Example:
$1.00 = ¥110.50
¥100 = $0.9050
Integer
(Max. 4-digit)
221^105
0^905
Mode Switch
Currency exchange feature programming
PGM
A-A08
6 3s 6 : ; ; : ; : : 6 ; 6 s
CAL
REG
OFF
RF
X
Z
D
7 D6 D5 D4 D3 D2 D1
PGM
: : : : :
Decimal
(Max. 4-digit)
Preset rate
6 ; 6 s
72
Mode Switch
2=pudnuor,1=ffotuc,0=ffodnuor,lortnocnoitcarF
"0"syawlA
;ycnerrucngierofroflobmysyratenoM
0=lobmysycnerruclacoL
1=)margorpretcarahclaicepsehtni(1lobmysyratenoM
2=)margorpretcarahclaicepsehtni(2lobmysyratenoM
3=)margorpretcarahclaicepsehtni(3lobmysyratenoM
4=)margorpretcarahclaicepsehtni(4lobmysyratenoM
"0"syawlA
;ycnerrucngierofrofretimiledtigiD
2=ammoC,0=doireP
ycnerrucgniwollof)secalplamiced(edocmetsysyratenoM
;noitarepoegnahcxe
,0=ycnerruclacolsaemaS 0º ,1= 00º ,2= 0 3=
tnacifingiS
rebmun
tnacifingiS
rebmun
tnacifingiS
rebmun
tnacifingiS
rebmun
:
D
;;
D6D
:
D
;
D
:
D
:
D
7
5
4
3
2
1
Page 73

Registering foreign currency
1) Full amount tender in foreign currency
CAL
REG
OFF
RF
PGM
X
Z
Mode Switch
A-A08
OP
A-A08
PGM
* Pre-programmed exchange rate: ¥ 100 = $0.9
Important!
Tenders in a foreign currency can be registered using the a and k keys only. Other finalize
keys cannot be used.
OPERATION DISPLAY RECEIPT
10-!
20-"
;
50-;
(5,000)
a
5 Enter the unit price and press the
applicable department key.
5 Enter the next unit price and press
the applicable department key.
5 Press the
ing a numeric value. This operation converts the subtotal (including tax) dollar value into yen by
applying a pre-programmed exchange rate. The result is shown
on the display but not printed on
the receipt or journal.
5 Enter the amount tendered in yen
and press the
eration converts the entered yen
amount into dollars by applying a
pre-programmed exchange rate.
The result is shown on the display.
5 Press to finalize the transaction.
Note that you do not need to reenter the dollar amount.
The register automatically calculates the change amount due in
dollars and shows it on the display,
receipts and journal.
; key without enter-
; key. This op-
01 1~00
(Displays in $)
02 2~00
(Displays in $)
#333
(Displays in ¥: 3,333)
4%00
(Displays in $: 45.00)
1%00
(Displays in $)
12-21-1999 13:25 0001
REG
DEPT01 $10.00
DEPT02 $20.00
TL $
CE
CA ¥5,000
CA $45.00
CG $15.00
C
01 000059
30.00
Convenient Operations and Setups
73
Page 74

Convenient Operations and Setups
2) Partial tender in a foreign currency
* Pre-programmed exchange rate: ¥ 100 = $0.9
Important!
Partial tender in a foreign currency can be registered using the a key and k keys only.
Other finalization keys cannot be used, but the remaining tender can be finalized using any
finalize key.
OPERATION DISPLAY RECEIPT
10-!
20-"
;
20-;
(2,000)
a
5 Enter the unit price and press the
applicable department key.
5 Enter the next unit price and press
the applicable department key.
5 Press the
tering a numeric value. This operation converts the subtotal (including tax) dollar value into yen
by applying a pre-programmed
exchange rate. The result is
shown on the display but not
printed on the receipt or journal.
5 Enter the partial amount tendered
in yen and press the
This operation converts the entered yen amount into dollars by
applying a pre-programmed exchange rate. The result is shown
on the display.
5 Press the
cash tender for the yen partial
tender. Note that you do not need
to reenter the dollar amount.
The register automatically deducts the dollar equivalent of the
yen amount tendered from the
total amount due and shows the
amount on the display.
; key without en-
; key.
a key to specify
01 1~00
(Displays in $)
02 2~00
(Displays in $)
#333
(Displays in ¥: 3,333)
1(00
(Displays in $: 18.00)
1"00
(Displays in $)
12-21-1999 13:30 0001
REG
DEPT01 $10.00
DEPT02 $20.00
TL $
CE
CA ¥2,000
CA $18.00
CHK $12.00
C
01 000060
30.00
74
k
Press to finalize the transaction.
5
1"00
(Displays in $)
Page 75

Other function key feature programming
You can define a selection of features for the function keys by specifying an 6-digit program code for each key.
To other function key
PGM
A-A08
CAL
REG
OFF
RF
PGM
Mode Switch
a,h,k
1*
stnuoma
6 3s 6 : : : ; : : 6
X
Z
tnemyaplaitrapafoyrtnetibihorP
derednettnuomaehtfoyrtneecroF
D
6 D5 D4 D3 D2 D1
gnirednetdnalatotbusrofnoitacificepstimiltnuomahgiH
derednettnuomaehtfoyrtneehttibihorP
Function key
mumixaM
)9~0(eulav
forebmuN
)9~0(sorez
a
b
c
0=oN
1=seY
0=oN
2=seY
0=oN
4=seY
6 s
::
D6D
5
:
)c+b+a(
D
4
;
D
3
::
D2D
1
*1
High amounts limits:
"0"syawlA
mumixaM
1*
eudtnuomaegnahcrofnoitacificepstimiltnuomahgiH
)9~0(eulav
forebmuN
)9~0(sorez
High amount limitations are specified as 2-digits. The first digit you specify limits the maximum value of the
leftmost digit of the value within the range of 0 through 9. The second digit you specify indicates the number of
zeros in the limit value, again within the range of 0 through 9.
Example: $600.00 maximum 2 Enter 64.
Entering "00" clears the limitation.
Convenient Operations and Setups
75
Page 76

Convenient Operations and Setups
E, @
1*
stnuoma
(Refer to the previous page.)
gnirednetdnalatotbusrofnoitacificepstimiltnuomahgiH
mumixaM
)9~0(eulav
forebmuN
)9~0(sorez
::
D6D
5
"0000"syawlA
m
.ecnalabtidercawollA
noitacificepstimiltigidhgiH
1sutatselbaxaT
2sutatselbaxaT
3sutatselbaxaT
"000"syawlA
Note: If you require tax table 3, please refer to page 39.
Calculator functions
;;;;
D4D3D2D
0=oN
1=seY
tnacifingiS
rebmun
a
b
c
0=oN
1=seY
0=oN
2=seY
0=oN
4=seY
:
D
:
D
:
D
1
6
5
)c+b+a(
4
;;;
D3D2D
1
While registering at the REG mode, you can switch to
CAL mode and then return to REG mode to resume the
registration.
Example 1 (Calculation examples)
OPERATION DISPLAY
Clear
5+3-2= 5&3'2a &
(23-56)×78=
(4×3-6)/3.5+8=
12 % on 1500
4(3'6)3^5&8a )714285714
23'56(78a -257$
1500'(12p 18~
CAL
REG
OFF
RF
PGM
CC ç
X
Z
Mode Switch
A-A08
0
OP
A-A08
PGM
76
Page 77

Example 2 (Memory recall)
OPERATION DISPLAY/RECEIPT
Unit price $10.00
—————————
Quantity 1
Item 1 —————————
Dept. 1
—————————
—————————————
Taxable (1)
preset
Unit price $20.00
—————————
Quantity 1
Item 2 —————————
Dept. 2
—————————
Taxable (1)
—————————————
preset
Payment by 3 persons
Cash $10.50
each
Turn to REG
10-!
12-21-1999 13:35 0001
REG
DEPT01 ⁄ $10.00
DEPT02 ⁄ $20.00
20-"
s
Turn to CAL
* 3!5
Memory recall:
Recalls subtotal amount
$3a 1~5
Divides the subtotal by 3
persons
Turn to REG
*
Memory recall:
Recalls the result amount
a
*a
TA1 $30.00
TX1 $1.50
TL $
CA $10.50
CA $10.50
CA $10.50
CG $0.00
*a
C
01 000061
31.50
Programming calculator mode control
nehwrewardnepO
a
)noitartsigergnirud,evitceffetoN(
nehwrewardnepO
tnirP
a
PGM
A-A08
B
)noitartsigergnirud,evitceffetoN(
"0000"syawlA
.edomLACnidesserpsi
6 3s 6 1022s6
CAL
REG
OFF
RF
PGM
Mode Switch
X
Z
6
.edomLACnidesserpsi)lauqe(
a
b
.troperyliadehtnotnuocdnalatot)lauqe(
c
0=oN
1=seY
0=oN
2=seY
0=seY
4=oN
:
D
)c+b+a(
5
;;;;
D4D3D2D
1
Convenient Operations and Setups
: ; ; ; ; a 6 s
D5 D4 D3 D2 D1
77
Page 78

Convenient Operations and Setups
Printing read/reset reports
• Read report
You can print read reports at any time during the business day without affecting the data stored in the cash
register's memory .
• Reset report
You should print reset reports at the end of the business day.
Important!
• The reset operation issues a report and also clears all sales data from the cash register's memory .
• Be sure to perform the reset operations at the end of each business day . Otherwise, you will not
be able to distinguish between the sales data for different dates.
To print the individual department, PLU/subdepartment read report
This report shows sales for specific departments or PLU/subdepartments.
OPERATION REPORT
CAL
REG
OFF
RF
PGM
X
Z
A-A08
PGM
Mode Switch
8
• Specifying a department
*
Dept. 01 ~ 20 !, "..%
Dept. 21 ~ 40 d!..d%
Dept. 41 ~ 60 dd!.. dd%
Dept. 61 ~ 80 ddd!..ddd%
• Specifying a PLU
**
1 ~ 600*
*
**
12-21-1999 17:05 0001
X
C01 000250
X
DEPT01 QT 15
29.6% $339.50
DEPT02 QT 19
5.46% $62.70
PLU001 QT 31
12.12% $139.10
PLU002 QT 23
29% $332.67
-----------------------TOTAL QT 88
76.19% $873.97
— Date/time/machine No.
— Read mode/clerk/consecutive No.
— Read symbol
— Department No./No. of items
— Sales ratio/department amount
— PLU No./No. of items
— Sales ratio/PLU amount
— Total No. of items
— Total amount
78
8
s
After you finish to select departments, PLU/subdepartments, press s to terminate.
Page 79

To print the financial read report
This report shows gross sales, net sales, cash in drawer and check in drawer.
OPERATION REPORT
CAL
REG
OFF
RF
PGM
Mode Switch
8
Money declaration
X
Z
A-A08
*1
PGM
12-21-1999 17:10 0001
X
C01 000251
FLASH
GROSS QT 1216
$21954.50
NET No 523
$27733.12
CAID $27289.10
# $27270.00
$19.10
CHID $398.00
CKID $332.67
X
— Date/time/machine No.
— Read mode/clerk/consecutive No.
— Report title/read symbol
— Gross No. of items
— Gross amount
— Net No. of customers
— Net amount
— Cash in drawer (b)
— Declared amount (a)
— Difference (b) - (a)
— Charge in drawer
— Check in drawer
(Cash in drawer amount B)
8
x
*1
Money declaration:
Count how much cash is in the drawer and input this amount (up to 8-digits).
The cash register will automatically compare the input with the cash in drawer in the memory and print the
difference between these two amounts.
Note that if money declaration is required by programming (page 51), you cannot skip this procedure.
To print the group read report
This report shows group totals.
OPERATION REPORT
CAL
REG
OFF
RF
PGM
X
Z
A-A08
PGM
Mode Switch
8
6a
12-21-1999 17:15 0001
X
C01 000252
0006
GROUP
01
•••••••• QT 16
0.24% $54.50
02
•••••••• QT 25
0.09% $21.33
03
•••••••• QT 132
0.12% $90.78
•••••••• QT 6
0.02% $4.50
-----------------------TOTAL QT 156
0.47% $332.67
X
— Date/time/machine No.
— Read mode/clerk/consecutive No.
— Report code/report title/read
symbol
— Group 01/No. of items
— Sales ratio/group 01 amount
— Total of non-group link PLUs
— Total No. of items
— Total amount
Convenient Operations and Setups
79
Page 80

Convenient Operations and Setups
To print the daily sales read/reset report
This report shows sales except for PLUs.
OPERATION REPORT
X
CAL
REG
OFF
RF
PGM
Mode Switch
8
X
Z
Read Reset
PGM
A-A08
CAL
REG
OFF
RF
PGM
Mode Switch
X
Z
Z
A-A08
PGM
Money declaration
(Cash in drawer amount B)
8
a
12-21-1999 17:20 0001
Z
C01 000253
0000
DAILY
DEPT01 QT 1015
47.07% $10339.50
DEPT02 QT 19
31.87% $7000.70
DEPT03 QT 31
18.84% $4139.10
DEPT04 QT 23
1.51% $332.67
NON-LINK_DEPT QT 10
0.43% $94.90
-----------------------GRS QT 1253
$21960.90
NET No 545
$30217.63
CAID $29903.06
# $29903.06
$0.00
CHID $197.17
CKID $183.60
TA1 $732.56
TX1 $43.96
TA2 $409.72
TX2 $21.55
Z 0001
*1
— Date/time/machine No.
— Reset mode/clerk/consecutive No.
—
Report code/report title/reset symbol/
reset counter
— Department No./No. of items
— Sales ratio/department amount
—
Non-link department No. of items
*5
*2
*2
— Non-link department amount
— Gross No. of items
— Gross sales amount
— No. of customers
— Net sales amount
— Cash in drawer amount (b)
— Declared amount (a)
— Difference (b) - (a)
— Charge in drawer amount
— Check in drawer amount
— Taxable amount 1
— Tax amount 1
— Taxable amount 2
— Tax amount 2
*3
*3
*3
*3
TA3 $272.50
TX3 $8.18
CANCEL No 2
$108.52
RF MODE No 2
$3.74
CAL No 10
-----------------------CA No 81
$836.86
CH No 10
$197.17
CHK No 9
$183.60
- No 8
$3.00
% No 10
$4.62
RF No 7
$27.79
CORR No 10
$12.76
#/NS No 5
RC No 2
$78.00
PD No 1
$6.80
-----------------------C
01 No 12
$127.63
TRAINING
C
02 No 6
$27.63
TRAINING
C
03 No 24
-----------------------GT $0000351217.63
000001---¶000253
— Taxable amount 3
— Tax amount 3
*3
*3
— Cancellation count
— Cancellation amount
— Refund mode operation count
— Refund mode operation amount
— CAL mode operation count
*4
*4
— Cash sales count
— Cash sales amount
— Charge sales count
— Charge sales amount
— Check sales count
— Check sales amount
— Subtraction count
— Subtraction amount
— Discount count
— Discount amount
— Refund key count
— Refund key amount
*4
*4
— Error correction count
— Error correction amount
— No sale count
— Received on Account count
— Received on Account amount
— Paid out count
— Paid out amount
— Clerk 1/clerk 1 sales count
— Clerk 1 sales amount
—
Training clerk
—
— Non-resettable grand-sales total
— Consecutive No. range of the day
*4
*4
*1
Money declaration:
Count how much cash is in the drawer and input this amount (up to 8-digits).
The cash register will automatically compare the input with the cash in drawer in the memory and print the
difference between these two amounts.
Note that if money declaration is required by programming (page 51), you cannot skip this procedure.
*2
Zero totaled departments (the amount and item numbers are both zero) are not printed.
*3
Taxable amount and tax amount are printed only the corresponding tax table is programmed.
*4
These items can be skipped by programming.
*5
The "*" symbol is printed on the reset report, memory overflow occurred in the totalizer.
80
Page 81

To print the PLU/subdepartment read/reset report
This report shows sales for PLUs/subdepartments.
OPERATION REPORT
PGM
CAL
REG
CAL
REG
OFF
RF
Mode Switch
X
Z
8
1a
X
X
Z
Z
Read
PGM
A-A08
Reset
PGM
A-A08
12-21-1999 17:25 0001
0001
PLU001 QT 16
0.24% $54.50
PLU002 QT 25
0.09% $21.33
PLU003 QT 132
0.12% $90.78
PLU200 QT 6
0.02% $4.50
-----------------------TOTAL QT 156
100% $21960.90
OFF
RF
PGM
Mode Switch
8
1a
To print the hourly sales read/reset report
Z
C01 000254
PLU
Z 0001
— Date/time/machine No.
— Read mode/clerk/consecutive No.
— Report code/report title/reset
symbol/reset counter
— PLU001/No. of items
— Sales ratio/PLU001 amount
— Total No. of items
— Total amount
This report shows hourly breakdowns of sales.
OPERATION REPORT
CAL
REG
OFF
RF
PGM
X
Z
Read
PGM
A-A08
Mode Switch
8
2a
X
CAL
REG
OFF
RF
PGM
X
Z
Z
Mode Switch
8
Reset
PGM
A-A08
12-21-1999 17:30 0001
Z
C01 000255
0002
HOURLY
00:00-01:00 No 6
$4.50
01:00-02:00 No 25
$21.33
02:00-03:00 No 132
$90.78
23:00-24:00 No 1
$1.50
-----------------------TOTAL No 56
$1338.40
Z 0001
— Date/time/machine No.
— Read mode/clerk/consecutive No.
— Report code/report title/reset
symbol/reset counter
— Time range/No. of customers
— Sales amount
— Total No. of customers
— Total amount
Convenient Operations and Setups
2a
81
Page 82

Convenient Operations and Setups
To print the monthly sales read/reset report
This report shows monthly breakdowns of sales.
OPERATION REPORT
PGM
CAL
REG
OFF
RF
PGM
CAL
REG
OFF
RF
Mode Switch
Mode Switch
X
Z
8
3a
X
X
Z
Z
8
3a
Read
PGM
A-A08
Reset
PGM
A-A08
12-21-1999 17:35 0001
Z
C01 000256
0003 MONTHLY Z 0001
1
•••• No 6
$4.50
2
•••• No 25
$21.33
3
•••• No 132
$90.78
31
•••• No 1
$1.50
-----------------------TOTAL No 56
$1338.40
— Date/time/machine No.
— Read mode/clerk/consecutive No.
— Report code/report title/reset
symbol/reset counter
— Date of a month/No. of customers
— Sales amount
— Total No. of customers
— Total amount
82
Page 83

To print the periodic 1/2 sales read/reset reports
These reports show sales breakdowns of sales by any two kinds of period you want.
OPERATION REPORT
X
CAL
REG
OFF
RF
PGM
Mode Switch
8
X
Z
Read Reset
PGM
A-A08
CAL
REG
OFF
RF
PGM
Mode Switch
X
Z
Z
8
A-A08
PGM
100 (Periodic-1)/
300 (Periodic-2)
8
a
12-30-1999 17:40 0001
Z
C01 000257
0200 PERIODIC-1 ZZ0001
DEPT01 QT 1015
47.07% $10339.50
DEPT02 QT 19
31.87% $7000.70
DEPT03 QT 31
18.84% $4139.10
DEPT04 QT 23
1.51% $332.67
NON-LINK_DEPT QT 10
0.43% $94.90
-----------------------GRS QT 1253
$21960.90
NET No 545
$30217.63
CAID $29903.06
CHID $197.17
CKID $183.60
TA1 $732.56
TX1 $43.96
TA2 $409.72
TX2 $21.55
TA3 $272.50
TX3 $8.18
CANCEL No 2
$108.52
RF MODE No 2
$3.74
CAL No 10
200 (Periodic-1)/
400 (Periodic-2)
— Date/time/machine No.
— Reset mode/clerk/consecutive No.
—
Report code/report title/reset symbol/
reset counter
— Department No./No. of items
— Sales ratio/department amount
—
Non-link department No. of items
— Non-link department amount
— Gross No. of items
— Gross sales amount
— No. of customers
— Net sales amount
— Cash in drawer amount
— Charge in drawer amount
— Check in drawer amount
— Taxable amount 1
— Tax amount 1
— Taxable amount 2
— Tax amount 2
— Taxable amount 3
— Tax amount 3
*2
*2
*2
*2
*2
*2
— Cancellation count
— Cancellation amount
— Refund mode operation count
—
Refund mode operation amount
— CAL mode operation count
*1
*1
*3
*3
*3
8
a
-----------------------CA No 81
$836.86
CH No 10
$197.17
CHK No 9
$183.60
- No 8
$3.00
% No 10
$4.62
RF No 7
$27.79
CORR No 10
$12.76
#/NS No 5
RC No 2
$78.00
PD No 1
$6.80
-----------------------C
01 No 12
$127.63
TRAINING
C
02 No 6
$27.63
TRAINING
C
03 No 24
$217.63
— Cash sales count
— Cash sales amount
— Charge sales count
— Charge sales amount
— Check sales count
— Check sales amount
— Subtraction count
— Subtraction amount
— Discount count
— Discount amount
— Refund key count
— Refund key amount
*3
*3
— Error correction count
— Error correction amount
— No sale count
— Received on Account count
— Received on Account amount
— Paid out count
— Paid out amount
— Clerk 1/clerk 1 sales count
— Clerk 1 sales amount
—
Training clerk
—
Convenient Operations and Setups
*1
Zero totalled departments (the amount and item numbers are both zero) are not printed.
*2
Taxable amount and tax amount are printed only the corresponding tax table is programmed.
*3
These items can be skipped by programming.
83
Page 84

Convenient Operations and Setups
Reading the cash register's program
To print unit price/rate program (except PLU)
OPERATION REPORT
CAL
REG
OFF
RF
PGM
X
Z
Mode Switch
8
1s
A-A08
PGM
12-21-1999 09:30 0001
P1
P1
DEPT01 ⁄ @1.00
DEPT02 ¤ @2.00
DEPT03 ⁄¤ @3.00
DEPT04 ⁄ @4.00
DEPT78 @5.00
DEPT79 @79.00
DEPT80 @80.00
- ⁄ @0.00
% ⁄ 12.34%
CE 0.09
8
s
*1
Department without being programmed are not printed on this report.
000010
••••••••••••••••••••
— Date/time/machine No.
— Mode/consecutive No.
— Program read symbol
— Dept. No./tax status/unit price
— Reduction preset amount
— Percent rate
— Currency exchange rate
*1
84
Page 85

To print key descriptor, name, message program (except PLU)
OPERATION REPORT
CAL
REG
OFF
RF
PGM
X
Z
Mode Switch
8
2s
8
s
A-A08
PGM
12-21-1999 09:35 0001
P2
000011
P2
••••••••••••••••••••
GROSS 01
NET 02
CAID 03
CHID 04
CKID 05
CECA 06
CECK 07
TA1 08
TX1 09
TA2 10
TX2 11
TA3 12
TX3 13
CANCEL 14
RF MODE 15
CAL 16
NON-LINK_DEPT 17
MDST 02
CHK 03
PD 04
ON/OFF 05
PRC 06
#/NS 43
CE 44
- 45
% 46
DEPT01 01
DEPT02 02
DEPT03 03
DEPT79 04
DEPT80 80
C
01 01
C
02 02
C
19 03
C
20 20
GT 01
$ @NoQT 01
NoCT 02
X / 03
⁄ ¤ ‹ 04
* 05
* * * * 06
REG
RF
09
SRVC TL 26
CHECK-# 27
DAILY
PLU
HOURLY
PERIODIC-1 04
PERIODIC-2 09
10
OPEN CHECK 11
01
07
P
08
01
02
03
— Date/time/machine No.
— Mode/consecutive No.
— Program read symbol
— Gross character
— Net character
— Cash in drawer character
— Charge in drawer character
— Check in drawer character
— Foreign currency cash character
— Foreign currency check character
— Taxable amount 1 character
— Tax 1 character
— Taxable amount 2 character
— Tax 2 character
— Taxable amount 3 character
— Tax 3 character
— Cancellation total character
— Refund mode total character
— CAL mode count character
— Non link department character
— MD/ST key descriptor
— Check key descriptor
— Paid out key descriptor
— #/NS key descriptor
— Currency exchange key descriptor
— Minus key descriptor
— Percent key descriptor
— Department 1 key character
— Department 2 key character
— Department 3 key character
— Department 80 key character
— Clerk 01 character
— Clerk 02 character
— Clerk 20 character
— Grand total character
—
Special character
—
—
Report header
—
—
Convenient Operations and Setups
02
YOUR RECEIPT
03
CALL AGAIN
10
Receipt message
—
85
Page 86

Convenient Operations and Setups
To print the print control, compulsory clerk program (except PLU)
OPERATION REPORT
CAL
REG
OFF
RF
PGM
X
Z
Mode Switch
8
3s
8
s
A-A08
PGM
12-21-1999 09:40 0001
P3
000012
P3
••••••••••••••••••••
0122 00000012
0222 00000000
0522 00000100
0622 00000004
0822 00401000
1022 00000000
0125
5%
0000
5002
0225
10%
0000
5002
0325
0%
0001
0.74
C
01 01
00 0000
C
02 02
00 0000
C
20 06
00 0000
DEPT01 01
0000000000 @1.00
DEPT02 02
0000000000 @2.00
DEPT80 03
0000000000 @0.00
— Date/time/machine No.
— Mode/consecutive No.
— Program read symbol
— Print control
— Tax table 1
— Tax table 2
— Tax table 3
— Clerk name
— Training flag/secret No.
— Dept. No.
— Sales status/unit price
*1
MDST 00000000
CHK 00002100
PD 00000000
ON/OFF 00000000
CA 00000100
TL 00000000
CH 00002100
RC 00000000
00000000
QT 00000000
OPEN 00000000
CORR 00000000
RF 00000000
PRC 00000000
#/NS 00000000
CE 00000000
- 00000000
% 00000000
*1
Department without being programmed are not printed on this report.
— Check key program
— Paid out key program
— Cash key program
— Charge key program
— Received on account key program
— Currency exchange key program
— Minus key program
— Percent key program
86
Page 87

To print the PLU program
OPERATION REPORT
CAL
REG
OFF
RF
PGM
X
Z
Mode Switch
8
6s
8
s
A-A08
PGM
12-21-1999 09:45 0001
P6
000013
P6
•••••••••••••••••••
PLU001 ⁄ 001
0000100000 @1.00
PLU002 002
0000000000 @2.00
PLU003 003
0000000000 @3.00
PLU004 004
0000000000 @4.00
PLU005 005
0000000000 @5.00
PLU006 006
0000200000 @6.00
PLU007 ¤ 007
0000000000 @7.00
PLU008 008
0000000000 @8.00
PLU009 009
0000000000 @9.00
PLU010 010
0000000000 @10.00
PLU599 ¤ 599
0000200000 @599.00
PLU600 600
0000000000 @600.00
— Date/time/machine No.
— Mode/consecutive No.
— Program read symbol
— Item character/tax symbol
— Status program/unit price
*1
PLU without being programmed are not printed on this report.
Convenient Operations and Setups
87
Page 88

Troubleshooting
This section describes what to do when you have problems with operation.
When an error occurs
Errors are indicated by an error tone. When this happens, you can usually find out what the problem is as
illustrated below .
ERROR TONE
Does the display show an error code?
No Yes
48
4
4
4
4
4
4
4
4
4
4
edocrorrEgninaeMnoitcA
degnahcnoitisophctiwsedoM
10E
80E
.detavitca
72E .llufreffublecnacnoitcasnarT.noitcasnartehtezilaniF
13E
.latotbus
33E
53E
83E
49E
.timil
.detavitca
.notazilaniferofeb
krelcagniretnetuohtiwnoitartsigeR
ylnosraepparorresihT.rebmun
sinoitcnuflortnockrelcehtnehw
noitcasnartafonoitazilaniF
ehtgnimrifnoctuohtiwdetpmetta
detpmettanoitarepoezilaniF
.rednettnuomagniretnetuohtiw
teserpsdeecxetnuomaegnahC
tuohtiwnoitarepoteser/daeR
rorresihT.rewardnihsacgniralced
sinoitcnufsihtnehwylnosraeppa
.rorreretnirPevomerdna,fforewopehtnruT
stiothctiwsedomehtnruteR
ehtezilanifdnagnitteslanigiro
.noitarepo
.rebmunkrelcaretnE
ehtsserP s .yek
.derednettnuomaehtretnE
.derednettnuomatupni-eR
.noitaralcedyenommrofreP
.retnirpehtmorfrepapdemmaj
4
Press C key and check the appropriate section of this manual for the operation you want to perform.
88
Page 89

Troubleshooting
When the register does not operate at all
Perform the following check whenever the cash register enter an error condition as soon as you switch it on.
The results of this check are required by service personnel, so be sure to perform this check before you
contact a CASIO representative for servicing.
Start
Is register plugged in?
Yes
Is power on?
Yes
No
No
Do figures appear on the display?
Yes
Do key function?
Yes
Does paper feed?
Yes
No No
Plug in the power cord.
Set the mode switch to any position other than OFF.
No No
Is the electrical outlet active?
Yes
Use other outlet.
Contact CASIO service
representative.
Is the mode switch position
correct?
Yes
NoNo
Set to correct position.
Contact CASIO service
representative.
Is paper loaded correctly?
Yes
Load paper.
T roubleshooting
Printing becomes light?
Yes
Install new ink ribbon.
Contact CASIO service
representative.
No
Contact CASIO service
representative.
89
Page 90

Troubleshooting
In case of power failure
If the power supply to the cash register is cut by a power failure or any other reason, simply wait for
power to be restored. The details of any on-going transaction as well as all sales data in memory are
protected by the memory backup batteries.
• Power failure during a registration
The subtotal for items registered up to the power failure is retained in memory. You will be able to continue with
the registration when power is restored.
• Power failure during printing a read/reset report
The data already printed before the power failure is retained in memory. You will be able to issue a report when
power is restored.
• Power failure during printing of a receipt and the journal
Printing will resume after power is restored. A line that was being printed when the power failure occurred is
printed in full.
• Other
The power failure symbol is printed and any item that was being printed when the power failure occurred is
reprinted in full.
Important!
Once receipt/journal printing or printing of a report starts, it can be stopped only by interruption of
power to the cash register.
When the L sign appears on the display
About the low battery indicator…
The following shows the low battery indicator.
l ~00
If this indicator appears when you switch the cash register on, it can mean one of three things:
• No memory backup batteries are loaded in the cash register.
• The power of the batteries loaded in the unit is below a certain level.
• The batteries loaded in the unit are dead.
To clear this sign, press
C key.
Important!
Whenever the low battery indicator appears on the display, load a set of three new batteries as
soon as possible. If there is a power failure or you unplug the cash register when this indicator
appears, you will lose all of your sales data and settings.
BE SURE TO KEEP THE POWER CORD OF THE CASH REGISTER
PLUGGED IN WHENEVER YOU REPLACE THE BATTERIES.
90
Page 91

User Maintenance and Options
To replace the ink ribbon
11
1
11
Remove the printer cover.
22
2
22
Cut the journal paper and
feed the remaining paper
from the printer.
55
5
55
Load a new ink ribbon
cassette into the unit.
66
6
66
Turn the knob on the left
side of the cassette to take
up any slack in the ribbon.
33
3
33
Remove the inner cover.
44
4
44
Pull up on the right side of
the ribbon cassette where
marked with the word
"PULL", to release it.
Knob
77
7
77
Reload the roll paper and replace the printer cover .
Troubleshooting and
User Maintenance
Important!
Use only the IR-91PL2 ribbon (purple). Other types of ink ribbons can damage the printer.
Never try to extend the life of an ink ribbon by replenishing the ink.
Once an ink ribbon is in place, press the B key to test for correct operation.
91
Page 92

User Maintenance and Options
To replace journal paper
CAL
REG
OFF
RF
PGM
X
Z
22
2
22
Press f to feed about 20
cm of paper.
33
3
33
Cut the journal paper at the
point where nothing is
printed.
11
1
11
Set the mode switch to the
REG position and remove
the printer cover.
77
7
77
Cut the journal paper as
shown in the photograph.
88
8
88
Press f to feed the
remaining paper from the
printer.
44
4
44
Remove the journal take-up
reel from its holder.
55
5
55
Remove the flat plate from
the side of the take-up reel.
66
6
66
Slide the printed journal
from the take-up reel.
99
9
99
Do not pull the paper out of
the printer by hand. It can
damage the printer.
00
0
00
Remove the old paper roll
from the cash register.
AA
A
AA
Load new paper as
described on page 10 of
this manual.
92
Page 93

User Maintenance and Options
To replace receipt paper
CAL
REG
OFF
RF
PGM
X
Z
22
2
22
Cut the receipt paper as
shown in the photograph.
33
3
33
Press f to feed the
remaining paper from the
printer.
11
1
11
Set the mode switch to the
REG position and remove
the printer cover.
44
4
44
Do not pull the paper out of
the printer by hand. It can
damage the printer.
55
5
55
Remove the old paper roll
from the cash register.
Options
WT-73 wetproof cover
The optional wetproof cover protects the keyboard from moisture damage.
66
6
66
Load new paper as
described on page 9 of this
manual.
User Maintenance and Options
93
Page 94

Specifications
Input method
Entry: 10-key system; Buffer memory 8 keys (2-key roll over)
Department: Full key system
Display Amount 8 digits (Zero suppression); Department No.; PLU No.;
No. of repeats; TOTAL; CHANGE; X mode; Z mode; Receipt On/Off
Printer
Printer: Single sheet impact dot matrix printer (Receipt or journal printing)
24 digits (Amount 10 digits/descriptor 8, 12 or 24 digits)
Journal: Automatic take up roll winding
Print speed: 2.5 lines/sec.
Feed speed: 2.5 lines/sec.
Paper roll: 58 mm × 80 mm Ø (Max.)
2-ply paper roll 58 mm × 80 mm Ø (Max.)
CASIO CP-5880
Calculations Entry 10 digits; Registration 7 digits; Total 10 digits
Chronological data
Date print: Automatic date printout on receipt or journal
Automatic calendar
Time print: Automatic time printout on receipt or journal
Time display: 24-hour system
Alarm Entry confirmation signal; Error alarm
Totalizers
Contents
Category
Department 80
PLU 600
Hourly sales 24
*
Clerk
Transaction 27 or or or
Non resettable
grand sales total 12 digits
Reset counter 6
Consecutive No. 1
*
Available only when the clerk control function is active on the cash register.
Memory protection
No. of Amount No. of items Count No. of Periodic
Totalizers (10 digits) (4 digits) (4 digits) customers Totalizers
(4 digits)
(4 digits integer/
2 digits decimal)
(4 digits integer/
2 digits decimal)
20
1
4 digits
The effective service life of the memory protection batteries (three new SUM-3 or UM-3 type
batteries batteries) is approximately one year from installation into the machine.
Power supply/ As noted on the plate affixed to right side of register.
Power consumption
Operating temperature 32°F ~ 104°F (0°C ~ 40°C)
Humidity 10 ~ 90%
Dimensions and Weight 10
" (H) × 13
19/32
" (W) × 15
11/16
" (D)/14 lbs 9 oz.......... with small size drawer
9/32
* Specifications and design are subject to change without notice.
94
Page 95

Index
A
Amount tender compulsory ................................75
Arithmetic operation key....................................23
B
Battery compartment .......................................... 18
C
Calculator mode ...........................................19, 76
Cancel (key)........................................................22
Cancel (registration) ........................................... 46
Cash amount tendered key..................................23
Change preparation.............................................26
Character entering ..............................................60
Charge (key) ....................................................... 23
Charge (registration)...........................................40
Check (key) ........................................................23
Check (registration) ............................................40
Clear (key) ..........................................................22
Clear (operation).................................................44
Clerk name ...................................................54, 56
Clerk number key ...............................................22
Clerk sign on/off................................................. 48
Commercial message....................................24, 50
Consecutive number .....................................24, 51
Correction ...........................................................45
Currency exchange .............................................72
D
Daily sales report..........................................47, 80
Date & time display............................................ 26
Date & time setting.............................................12
Department descriptor ........................................ 57
Department key ..................................................22
Department registration ......................................27
Department report...............................................78
Department shift key ....................................23, 27
Discount..............................................................34
Display................................................................20
Drawer .......................................................... 18, 19
Drawer key .........................................................19
Drawer open key.................................................23
Drawer release lever ...........................................19
E
Equal key ............................................................23
Error code ...........................................................88
Error correct key................................................. 22
Error correct registration ....................................45
F
Feed key..............................................................22
Financial report...................................................79
G
Grand total ..........................................................47
H
High amount limitation ......................................75
High digit limitation ........................................... 66
I
Ink ribbon (location)........................................... 18
Ink ribbon (replacement) ....................................91
Ink ribbon (set) .....................................................8
Item counter........................................................ 24
J
Journal ................................................................24
Journal skip...................................................24, 50
K
Key (Drawer key) ...............................................19
Key (Mode key)..................................................18
Key (Operator key) .............................................18
Key (Program key) .............................................18
Keyboard ......................................................18, 22
Key descriptor...............................................57, 59
L
Load 1-ply paper for journal .............................. 10
Load 1-ply paper for receipt .................................9
Load 2-ply paper ................................................11
Logo message ...............................................24, 50
Low battery indicator .........................................90
M
Machine number...........................................24, 52
Main display .......................................................20
Manual tax key ...................................................71
Memory backup battery........................................6
Memory recall ....................................................77
Message ........................................................24, 50
Minus key (reduction) ........................................36
Mode key ............................................................18
Mode switch .......................................................19
Money declaration ........................................79, 80
Multiplication key ..............................................22
Multiplication registration ......................28, 32, 68
Specifications
95
Page 96

Index
N
Negative department.....................................62, 63
Negative PLU (subdepartment) ....................64, 65
Non-add key .......................................................22
Non-add registration...........................................40
Non-resettable grand total ..................................47
No sale key .........................................................22
No sale registration............................................. 46
O
Open key.............................................................22
Open key operation.............................................66
Operator key ....................................................... 18
P
Paid out key ........................................................23
Paid out registration............................................ 43
Paper feed key ....................................................22
Paper installation ..........................................9 ~ 11
Percent key .........................................................22
Percent registration.......................................35, 70
Periodic report ....................................................83
PLU descriptor ...................................................58
PLU key..............................................................22
PLU registration .................................................32
Pop-up display ....................................................20
Post receipt .........................................................49
Post receipt key...................................................22
Power failure ...................................................... 90
Premium .............................................................70
Preset price (department)....................................29
Preset price (PLU) ..............................................31
Preset price (subdepartment) ..............................31
Price key ............................................................. 22
Printer cover .......................................................18
Printout selection (Receipt/Journal) ............. 12, 50
Program key........................................................18
Program read ..............................................84 ~ 87
Q
Refund mode ......................................................19
Refund mode registration ...................................42
Register mode.....................................................19
Repeat counter ....................................................20
Repeat registration..................................28, 32, 68
Report descriptor ................................................ 54
Report title ....................................................54, 55
Reset report...........................................47, 80 ~ 83
Return operation ...........................................41, 42
Roll paper installation ..................................9 ~ 11
Roll paper specification......................................94
S
Single item sale ............................................66, 67
Split pricing ............................................ 28, 33, 68
Store number (machine number) ..................24, 52
Subdepartment.................................................... 64
Subtotal compulsory...........................................51
Subtotal key ........................................................23
Subtotal printing .................................................50
Subtotal registration............................................28
T
T ake-up reel........................................................18
Tax calculation status (department)........ 29, 62, 63
Tax calculation status (discount/premium)...34, 69
Tax calculation status (PLU/subdept.)....31, 64, 65
Tax calculation status (reduction).................36, 76
Tax shift ........................................................27, 39
Tax table .....................................................14 ~ 17
Time setting ........................................................12
Training clerk ...............................................53, 80
V
W
X
X indicator ..........................................................20
X mode ...............................................................19
X report (Read report) ................................78 ~ 83
R
Read report .................................................78 ~ 83
Receipt on/off indicator......................................20
Receipt on/off key ..............................................22
Received on account key ....................................22
Received on account registration........................ 43
Reduction (minus key) .......................................36
Refund key..........................................................22
Refund key registration ......................................41
96
Y
Z
Z indicator ..........................................................20
Z mode................................................................19
Z report (Reset report)..........................47, 80 ~ 83
Page 97

LIMITED WARRANTY: ELECTRONIC CASH REGISTERS
This product, except the battery, is warranted by Casio to the original purchaser to be free from defects in material and workmanship under normal use for a period,
from the data of purchase, of one year for parts and 90 days for labor. For one year , upon proof of purchase, the product will be repaired or replaced (with the same
or a similar model) at Casio's option, at a Casio Authorized Service Center without charge for parts. Labor will be provided without charge for 90 days. The
terminal resident software and programmable software, if any, included with this product or any programmable software which may be licensed by Casio or one
of its authorized dealers, is warranted by Casio to the original licensee for a period of ninety (90) days from the date of license to conform substantially to
published specifications and documentation provided it is used with the Casio hardware and software for which it is designed.
For a period of ninety (90) days, upon proof of license, Casio will, at its option, replace defective terminal resident software or programmable software, correct
significant program errors, or refund the license fee for such software. Significant program errors will be significant deviations from written documentation or
specifications. These are your sole remedies for any breach of warranty. In no event will Casio's liability exceed the license fee, if any, for such software. This
warranty will not apply if the product has been misused, abused, or altered.
Without limiting the foregoing, battery leakage, bending of the unit, a broken display tube, and any cracks or breaks in the display will be presumed to have
resulted from misuse or abuse. To obtain warranty service you must take or ship the product, freight prepaid, with a copy of the sales receipt or other proof of
purchase and the date of purchase, to a Casio Authorized Service Center. Due to the possibility of damage or loss, it is recommended when shipping the product
to a Casio Authorized Service Center that you package the product securely and ship it insured. CASIO HEREBY EXPRESSLY DISCLAIMS ALL OTHER
WARRANTIES, EXPRESS OR IMPLIED, INCLUDING ANY IMPLIED WARRANTY OF MERCHANTABILITY OR OF FITNESS FOR A PARTICULAR
PURPOSE. NO RESPONSIBILITY IS ASSUMED FOR ANY INCIDENTAL OR CONSEQUENTIAL DAMAGES, INCLUDING WITHOUT LIMITATION
DAMAGES RESUL TING FROM MA THEMATICAL INACCURACY OF THE PRODUCT OR LOSS OF STORED DATA. SOME ST ATES DO NOT ALLOW
THE EXCLUSION OR LIMITATION OF INCIDENTAL OR CONSEQUENTIAL DAMAGES, SO THE ABOVE LIMITATIONS OR EXCLUSIONS MAY
NOT APPLY TO YOU. This warranty gives you specific rights, and you may also have other rights which vary from state to state.
CASIO, INC.
570 MOUNT PLEASANT AVENUE,
P. O. BOX 7000, DOVER, NEW JERSEY 07801 U.S.A.
Model:.........................................Serial Number:......................................Date of Purchase:........................................
Your Name:....................................................................................................................................................................
Address:........................................................................................................................................................................
Dealer's Name:..............................................................................................................................................................
Address:........................................................................................................................................................................
Index
97
Page 98

CASIO COMPUTER CO., LTD.
6-2, Hon-machi 1-chome
Shibuya-ku, Tokyo 151-8543, Japan
MO9909-A Printed in Malaysia
Imprimé en Malaisie
CE-280*INC
 Loading...