

Page 1
CDP-130
EN/ES
USER’S GUIDE
Please keep all information for future reference.
Safety Precautions
Before trying to use the Digital Piano, be sure to read
the separate “Safety Precautions”.
GUÍA DEL USUARIO
Guarde toda la información para futuras consultas.
Precauciones de seguridad
Antes de intentar usar el piano digital, asegúrese de
leer las “Precauciones de seguridad” separadas.
EnglishEspañol
CDP130-ES-1A
Page 2
TO REDUCE THE RISK OF FIRE OR ELECTRIC SHOCK, REFER SERVICING TO QUALIFIED SERVICE PERSONNEL.
IMPORTANT SAFETY INSTRUCTIONS
1. Read these instructions.
2. Keep these instructions.
3. Heed all warnings.
4. Follow all instructions.
5. Do not use this apparatus near water.
6. Clean only with dry cloth.
7. Do not block any ventilation openings. Install in accordance with the manufacturer’s instructions.
8. Do not install near any heat sources such as radiators, heat registers, stoves, or other apparatus (including amplifiers) that
produce heat.
9. Do not defeat the safety purpose of the polarized or grounding-type plug. A polarized plug has two blades with one wider
than the other. A grounding type plug has two blades and a third grounding prong. The wide blade or the third prong are
provided for your safety. If the provided plug does not fit into your outlet, consult an electrician for replacement of the
obsolete outlet.
10.Protect the power cord from being walked on or pinched particularly at plugs, convenience receptacles, and the point where
they exit from the apparatus.
11.Only use attachments/accessories specified by the man
12.Use only with the cart, stand, tripod, bracket, or table specified by the manufacturer, or sold with the
apparatus. When a cart is used, use caution when moving the cart/apparatus combination to avoid injury
from tip-over.
13.Unplug this apparatus during lightning storms or when unused for long periods of time.
14.Refer all servicing to qualified service personnel. Servicing is required when the apparatus has been
damaged in any way, such as power-supply cord or plug is damaged, liquid has been spilled or objects
have fallen into the apparatus, the apparatus has been exposed to rain or moisture, does not operate normally, or has been
dropped.
The apparatus shall not be exposed to dripping or splashing and that no objects filled with liquids, such as
placed on the apparatus.
The power indicator being unlit does not mean the apparatus is completely disconnected from the MAINS.
When you need to have the apparatus completely disconnected from the MAINS, you must unplug the power cord. For that
purpose, locate the apparatus in a way that secures easy access to the power cord.
1 - 16
1 - 16
ufacturer.
Mode 3
**
1
*
X
0 - 127
0 - 127
9nH v = 1 - 127
O
X
O
OO
9nH v = 0, 8nH v =
X
vases, shall be
2
*
Bank select
Modulation
Data entry
OOOOO
(MSB only)
O
Volume
Pan
Expression
Declaration of Conformity
Model Number: CDP-130
Trade Name: CASIO COMPUTER CO., LTD.
Responsible party: CASIO AMERICA, INC.
Address: 570 MT. PLEASANT AVENUE, DOVER, NEW JERSEY 07801
Telephone number: 973-361-5400
This device complies with Part 15 of the FCC Rules, Operation is subject to the following two conditions:
(1) This device may not cause harmful interference, and (2) this device must accept any interference received, including
interference that may cause undesired operation.
This equipment has been tested and found to comply with the limits for a Class B digital device, pursuant to Part 15 of the FCC
Rules. These limits are designed to provide reasonable protection against harmful interference in a residential installation. This
equipment generates, uses and can radiate radio frequency energy and, if not installed and used in accordance with the
instructions, may cause harmful interference to radio communications. However, there is no guarantee that interference will not
occur in a particular installation. If this equipment does cause harmful interference to radio or television reception, which can be
determined by turning the equipment off and on, the user is encouraged to try to correct the interference by one or more of the
following measures:
• Reorient or relocate the receiving antenna.
• Increase the separation between the equipment and receiver.
• Connect the equipment into an outlet on a circuit different from that to which the receiver is connected.
• Consult the dealer or an experienced radio/TV technician for help.
Model: CDP-130 Version : 1.0
Function Transmitted Recognized Remarks
1
1 - 16
NOTICE
Default
Changed
Basic
Channel
X
Mode 3
Default
Messages
Altered
Mode
0 - 127
Tr ue voice
Note
Number
9nH v = 0
X
9nH v = 1 - 127
O
Note ON
Note OFF
Velocity
X
X
Key’s
Ch’s
After
Touch
OXOOO
7
0, 3216, 38
Pitch Bender
FCC WARNING
Changes or modifications not expressly approved by the party responsible for compliance could void the user’s authority to
operate the equipment.
10
X
11
Control
Change
Page 3
Important!
Please note the following important information before using this product.
• Before using the AD-A12150LW Adaptor to power the product, be sure to check the AC Adaptor for any damage first. Carefully
check the power cord for breakage, cuts, exposed wire and other serious damage. Never let children use an AC adaptor that is
seriously damaged.
• The product is not intended for children under 3 years.
• Use only CASIO AD-A12150LW adaptor.
• The AC adaptor is not a toy.
• Be sure to disconnect the AC adaptor before cleaning the product.
English
Declaration of Conformity According to EU Directive
Manufacturer:
CASIO COMPUTER CO., LTD.
6-2, Hon-machi 1-chome, Shibuya-ku, Tokyo 151-8543, Japan
This mark applies in EU countries only.
● Any reproduction of the contents of this manual, either in part or its entirety, is prohibited. Except for your own, personal
use, any other use of the contents of this manual without the consent of CASIO is prohibited under copyright laws.
● IN NO EVENT SHALL CASIO BE LIABLE FOR ANY DAMAGES WHATSOEVER (INCLUDING, WITHOUT LIMITATION,
DAMAGES FOR LOSS OF PROFITS, BUSINESS INTERRUPTION, LOSS OF INFORMATION) ARISING OUT OF THE
USE OF OR INABILITY TO USE THIS MANUAL OR PRODUCT, EVEN IF CASIO HAS BEEN ADVISED OF THE
POSSIBILITY OF SUCH DAMAGES.
● The contents of this manual are subject to change without notice.
● The actual appearance of the product may be different from that shown in the illustrations in this User’s Guide.
● Company and product names used in this manual may be registered trademarks of others.
Responsible within the European Union:
CASIO EUROPE GmbH
Casio-Platz 1, 22848 Norderstedt, Germany
EN-1
Page 4
Contents
General Guide ...........................EN-3
Getting Ready to Play ..............EN-4
Preparing the Music Stand ..............................EN-4
Connecting a Pedal Unit..................................EN-4
Power Supply .................................................. EN-4
Playing the Digital Piano..........EN-5
Turning on Power and Playing ........................EN-5
Using Headphones.......................................... EN-5
Using a Damper Pedal ....................................EN-6
Changing Keyboard Response to
Touch Pressure (Touch Response).................EN-6
Selecting and Playing a Tone..........................EN-7
Playing Demo Songs.......................................EN-7
Layering Two Tones........................................EN-8
Using Hall ........................................................EN-8
Using Reverb...................................................EN-8
Using Chorus...................................................EN-9
Changing the Pitch (Transpose, Tuning)......... EN-9
Using the Metronome ....................................EN-10
Connecting External
Devices ....................................EN-11
Connecting to a Computer ............................ EN-11
MIDI Settings................................................. EN-12
Outputting Keyboard Notes to
Audio Equipment ........................................... EN-12
Reference ................................EN-13
Troubleshooting.............................................EN-13
Specifications ................................................EN-14
Operating Precautions...................................EN-15
MIDI Implementation Chart
Included Accessories
● Music Stand
● Pedal
● Leaflets
• Safety Precautions
• Other (Warranty, etc.)
Items included as accessories are subject to change without notice.
Separately Available Accessories
• You can get information about accessories that
are separately for this product from the CASIO
catalog available from your retailer, and from the
CASIO website at the following URL.
http://world.casio.com/
EN-2
Page 5
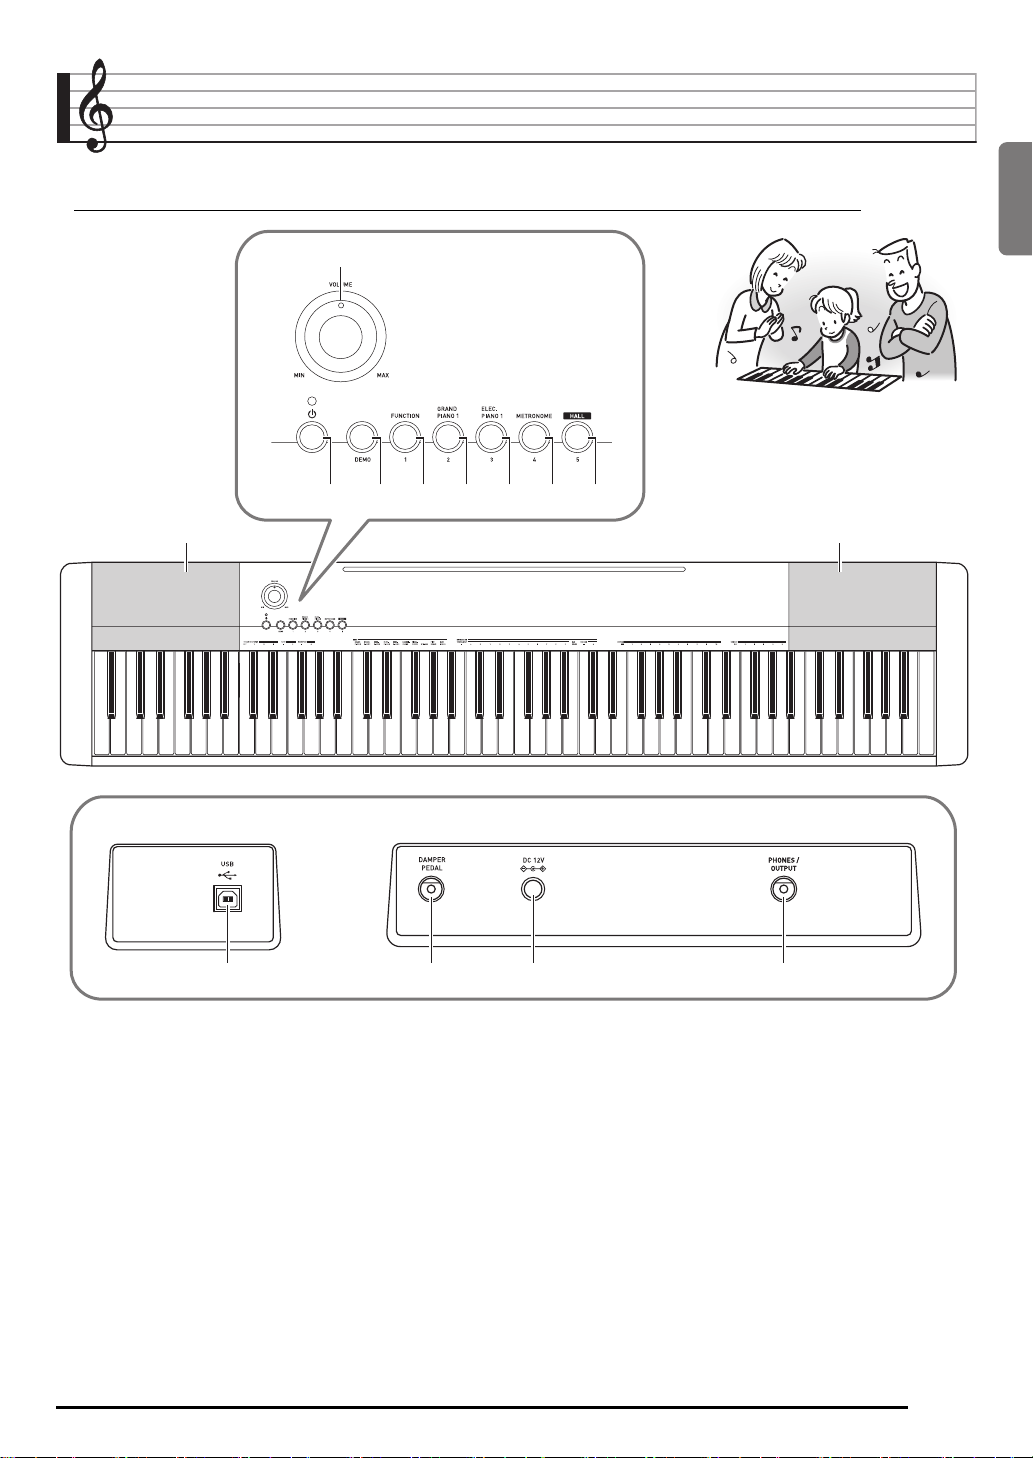
General Guide
• In this manual, the term “Digital Piano” refers to the CDP-130.
• In this manual, buttons and other controllers are identified using the numbers shown below.
1
32 45678
99
English
■ Back
bk
VOLUME knob ☞EN-5
1
P (POWER) button ☞EN-5
2
DEMO button ☞EN-7
3
FUNCTION button ☞EN-6, 7, 8, 9, 10, 12
4
GRAND PIANO 1 button ☞EN-7, 8
5
ELEC PIANO 1 button ☞EN-7
6
METRONOME button ☞EN-10
7
bl bm
HALL button ☞EN-5, 8
8
Speakers
9
USB port ☞EN-11
bk
DAMPER PEDAL jack ☞EN-4
bl
DC 12V terminal ☞EN-4
bm
PHONES/OUTPUT jack ☞EN-5
bn
bn
EN-3
Page 6
Getting Ready to Play
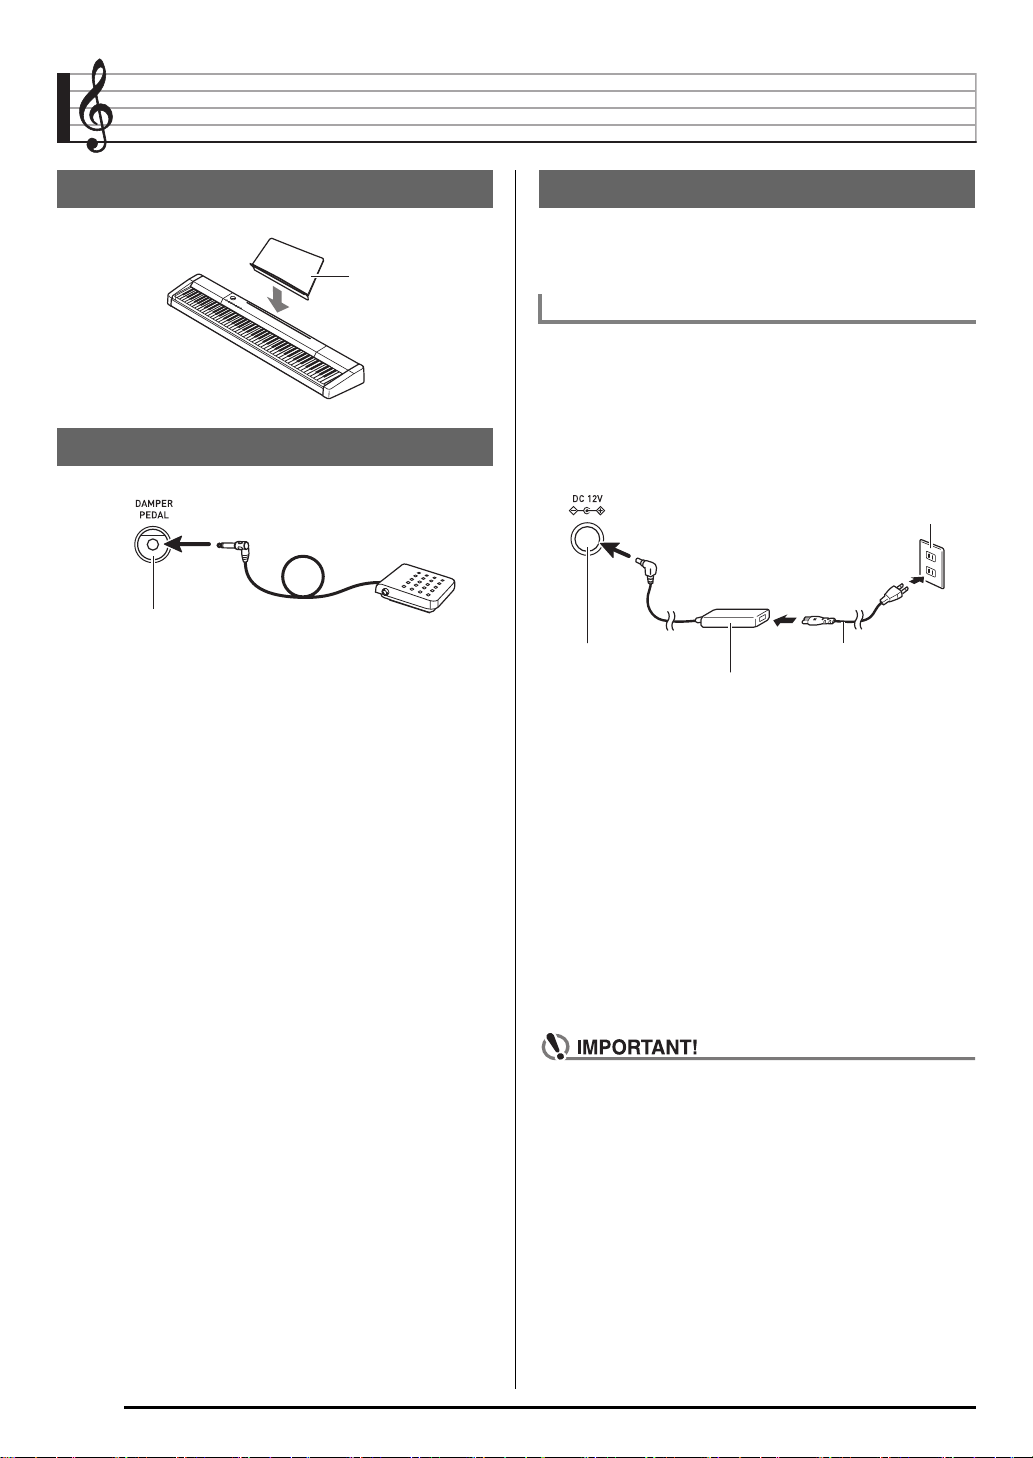
Preparing the Music Stand
Music stand
Connecting a Pedal Unit
DAMPER PEDAL jack
Power Supply
Your Digital Piano runs on standard household power. Be
sure to turn off power whenever you are not using the Digital
Piano.
Using the AC Adaptor
Use only the AC adaptor (JEITA Standard, with unified
polarity plug) that comes with this Digital Piano. Use of a
different type of AC adaptor can cause malfunction of the
Digital Piano.
Specified AC Adaptor: AD-A12150LW
• Use the supplied power cord to connect the AC adaptor as
shown in the illustration below.
Household power outlet
DC 12V terminal Power cord
AC adaptor
• Configuration and type depends on
your geographic location.
Note the following important precautions to avoid
damage to the power cord.
During Use
• Never pull on the cord with excessive force.
• Never repeatedly pull on the cord.
• Never twist the cord at the base of the plug or connector.
During Movement
• Before moving the Digital Piano, be sure to unplug the AC
adaptor from the power outlet.
During Storage
• Loop and bundle the power cord, but never wind it around
the AC adaptor.
EN-4
• Never connect the AC adaptor (JEITA Standard, with
unified polarity plug) that comes with this Digital Piano
to any other device besides this Digital Piano. Doing so
creates the risk of malfunction.
• Make sure the Digital Piano is turned off before
plugging in or unplugging the AC adaptor.
• The AC adaptor will become warm to the touch after
very long use. This is normal and does not indicate
malfunction.
Page 7

Playing the Digital Piano
11
22 44 8833 55 66 77
English
Turning on Power and Playing
1.
Press 2 (P).
This turns on power.
• To turn off the Digital Piano, press
2.
Try playing something on the keyboard. Use 1
to adjust volume.
• Turning off the Digital Piano causes most current
settings to be cleared. The Digital Piano will revert to
initial settings the next time you turn it on.
Once you turn it on it remains on until you turn it off
again.
• Pressing
Piano into a standby state. Minute amounts of current
continue to flow within the Digital Piano in the standby
state. If you do not plan to use the Digital Piano for a
long time or if there is a lightning storm in your area, be
sure to unplug the AC adaptor from the power outlet.
to turn off power actually puts the Digital
2
Auto Power Off
If you do not perform any operation for 30 minutes, the Digital
Piano will turn off automatically.
2
again.
Using Headphones
Using headphones cuts off output from the built-in speakers,
which means you can practice playing even late at night
without disturbing others.
• Be sure to turn down the volume level before connecting
headphones.
PHONES/OUTPUT jack
• Headphones do not come with the Digital Piano.
• Use commercially available headphones. See page EN-2
for information about options.
• Do not listen to very high volume output over
headphones for long period. Doing so creates the risk
of hearing damage.
• If you are using headphones that require an adaptor
plug, make sure you do not leave the adaptor plugged
in when removing the headphones.
■ Disabling Auto Power Off
You can disable Auto Power Off to ensure that power is not
turned off automatically during a concert, etc.
1.
While holding down 8, turn on power.
Auto Power Off will be disabled.
EN-5
Page 8

Playing the Digital Piano
Using a Damper Pedal
Connecting a pedal to the DAMPER PEDAL jack makes it
possible to use the pedal as a damper pedal (page EN-4).
Pressing the damper pedal while playing will cause the notes
you play to reverberate for a very long time.
Changing Keyboard Response to
Touch Pressure
(Touch Response)
Touch Response alters tone volume in accordance with
keyboard pressure (speed). This provides you some of the
same expressivity you get on an acoustic piano.
Pressing fast produces
louder notes.
Pressing slowly produces
softer notes.
Do not try to use too much
pressure.
Changing Touch Response Sensitivity
Use the procedure below to control how much the volume of
played notes change in accordance with playing speed.
Select the setting that best matches your playing style.
1.
While holding down 4, press one of the keys
in the TOUCH RESPONSE area of the keyboard
to specify the Touch Response sensitivity.
Off (OFF) Touch Response is turned off. Sound
volume is fixed, regardless of key press
speed.
Type1 (1) Normal Touch Response
Type2 (2) More sensitive Touch Response than Type 1
Type3 (3) Less sensitive Touch Response than Type 1
• The initial default Touch Sensitivity setting is Type1.
EN-6
Page 9

Selecting and Playing a Tone
The Digital Piano comes with 10 built-in tones.
• The names of the tones are marked above the keyboard keys to which they are assigned.
Playing the Digital Piano
English
To select a tone
1.
Select the tone you want.
To select GRAND PIANO 1 or ELEC PIANO 1
• Press one of
To select one of the other tones
• While holding down
corresponds to the tone you want to select.
or 6 to select the one you want.
5
, press the keyboard key that
4
Playing Demo Songs
Your Digital Piano comes with five built-in demo tunes.
Song No. Song Name
1 Prélude [Suite bergamasque]
2 Étude Op.25-9 “Butterflies”
3 Original
4 Gavotte [Französische Suite 5]
5 Nessun Dorma [Turandot]
1.
Press 3.
This will start playback of the demo songs.
2.
To change demo playback to a different song,
press a button from
to specify a song number.
3.
Press 3 again to stop playback.
Playback of the demo songs will continue in an endless
loop until you press
• If Auto Power Off (page EN-5) is enabled, the Digital
Piano will turn off if 30 minutes (six minutes under
battery power) elapse without any keyboard operation
being performed. Use the procedure under “Disabling
Auto Power Off” (page EN-5) for information about how
to disable Auto Power Off.
(Song 1) to 8 (Song 5)
4
to stop it.
3
EN-7
Page 10

Playing the Digital Piano
Layering Two Tones
You can use the following procedure to layer two different
tones (such as piano and strings) so they sound
simultaneously when you press a keyboard key.
1.
While holding down 4 press down the
keyboard key for the first tone you want to layer
and then the key for the second tone.
Example: First press the HARPSICHORD key and then
the STRINGS key.
Using Reverb
Reverb adds reverberation to notes. You can change the
duration of the reverb.
1.
While holding down 4, press a key within the
REVERB area of the keyboard to adjust the
reverb length.
OFF Turns off reverb.
1 to 10 The larger the number selected, the longer
the reverb duration.
HARPSICHORD
STRINGS
2.
To unlayer the keyboard, select another tone by
pressing
“Selecting and Playing a Tone” (page EN-7).
or by using the procedure under
5
Using Hall
The Hall function lets you instantly configure the Digital Piano
to play with the acoustic effect of a classic concert hall.
1.
Press 8 (HALL) to turn on the Hall function.
2.
To turn off the Hall function, press 8 again.
• The initial default Hall function setting is off.
• The reverb setting turns off automatically whenever the Hall
function is turned on. When you turn off the Hall function,
the reverb setting will return to whatever it was before you
turned on the Hall function.
• The initial default reverb setting is 6.
• Changing the reverb setting (including turning it off) while
the Hall function is turned on will turn off the Hall function.
EN-8
Page 11

Using Chorus
Chorus is a function that adds depth and breadth to notes. It
makes you sound as if you are playing multiple instruments.
1.
While holding down 4, press a key within the
CHORUS area of the keyboard to select a
chorus type.
There are five chorus types, plus an off setting.
• The actual effect produced by chorus depends on the
tone you are using.
The initial default chorus setting is OFF.
Changing the Pitch
(Transpose, Tuning)
Playing the Digital Piano
1.
While holding down 4, press the minus (–) or
plus (+) key within the TRANSPOSE area of the
keyboard to change the setting.
• Each press of a key increases or decreases the current
setting by 1.
• To return to the initial default setting, press the minus
(–) and plus (+) keys at the same time.
Fine Tuning (Tuning)
Use the tuning feature when you need to adjust the pitch
slightly to play along with another musical instrument. Also,
some artists perform their music with slightly altered tuning.
You can use the tuning feature to adjust tuning so it exactly
matches a performance on a CD.
• The tuning feature specifies the frequency of the A4 note.
You can set a frequency within the range of 415.5 to
465.9 Hz. The initial default setting is 440.0 Hz.
English
Changing the Pitch in Semitone Steps
(Transpose)
The transpose feature lets you change the pitch, in semitone
steps. A simple operation lets you instantly change the pitch
to match that of a singer.
• The transpose setting range is –12 to +12 semitones.
The initial default transpose setting is 0.
1.
While holding down 4, press the minus (–) or
plus (+) key within the TUNE area of the
keyboard to change the tuning.
• Each press of a key increases or decreases the current
setting by 0.1 Hz.
• To return to the initial default setting (440.0 Hz), press
the minus (–) and plus (+) keys at the same time.
EN-9
Page 12

Playing the Digital Piano
Using the Metronome
1.
Press 7.
• This starts the metronome.
2.
To change the beat, hold down 4 as you press
the BAR BEATS key.
• Keep 4 depressed as you advance to step 3, below.
3.
Hold down 4 as you press one of the
METRONOME TEMPO/BEAT keys to select a
beat setting.
4.
While holding down 4, use the METRONOME
TEMPO/BEAT keys to specify a tempo value in
the range of 30 to 255 beats per minute.
• Each press of the + or – key raises or lowers the tempo
value by 1.
• You can use the value input keys (0 to 9) to enter a
specific three-digit. Be sure to input all three digits.
Example: To enter “96”, press keys 0, 9, 6.
5.
Press 7 to turn off the metronome.
• To return to the initial default setting (tempo value:120),
press the + and – keys at the same time in step 4.
• You can specify beats per measure value of 0, 1, 2, 3,
4, 5, 6, 7, 8, or 9. Specifying 0 as the setting plays a
straight click, without any chime. This setting lets you
practice with a steady beat.
To adjust the metronome volume
You can perform the following procedure at any time,
regardless of whether or not the metronome is sounding.
1.
While holding down 4, use the METRONOME
VOLUME keys to change a volume value in the
range of 0 to 42.
• Each press of the + or – key raises or lowers the
metronome volume value by 1.
• To return to the initial default setting, press – and + at the
same time.
EN-10
Page 13

Connecting External Devices
44
English
Connecting to a Computer
You can connect the Digital Piano to a computer and
exchange MIDI data between them. You can send play data
from the Digital Piano to commercially available music
software running on your computer, or you can send MIDI
data from your computer to the Digital Piano for playback.
Minimum Computer System Requirements
The following shows the minimum computer system
requirements for sending and receiving MIDI data. Check to
make sure that your computer complies with these
requirements before connecting the Digital Piano to it.
• Operating System
Windows® XP (SP2 or later)
Windows Vista®
Windows® 7
Windows® 8
Mac OS® X (10.3.9, 10.4.11, 10.5.X, 10.6.X, 10.7.X,
10.8.X)
*1: Windows XP Home Edition
Windows XP Professional (32-bit)
*2: Windows Vista (32-bit)
*3: Windows 7 (32-bit, 64-bit)
*4: Windows 8 (32-bit, 64-bit)
•USB port
*2
*3
*4
*1
Connecting the Digital Piano to Your
Computer
• Make sure you follow the steps of the procedure below
exactly. Connecting incorrectly can make data send
and receive impossible.
1.
Turn off the Digital Piano and then start up your
computer.
• Do not start up the music software on your computer
yet!
2.
After starting up your computer, use a
commercially available USB cable to connect it
to the Digital Piano.
B connector
USB cable
(A-B type)
A connector
Digital Piano USB port
Computer USB port
• Never connect to a computer that does not conform to
the above requirements. Doing so can cause problems
with your computer.
3.
Turn on the Digital Piano.
• If this is the first time you are connecting the Digital
Piano to your computer, the driver software required to
send and receive data will be installed on your
computer automatically.
4.
Start up commercially available music software
on your computer.
EN-11
Page 14

Connecting External Devices
5.
Configure the music software settings to select
one of the following as the MIDI device.
CASIO USB-MIDI: For Windows Vista, Windows 7,
USB Audio Device : For Windows XP
• For information about how to select the MIDI device,
see the user documentation that comes with the music
software you are using.
• Be sure to turn on the Digital Piano first before starting
up your computer’s music software.
• Once you are able to connect successfully, there is no
problem with leaving the USB cable connected when you
turn off your computer and/or Digital Piano.
• This Digital Piano conforms to General MIDI Level 1 (GM).
• For detailed specifications and connections that apply to
MIDI data send and receive by this Digital Piano, see the
latest support information provided by the website at the
following URL.
http://world.casio.com/
Windows 8, Mac OS X
MIDI Settings
Local Control
There are times when exchanging data with a computer when
you may not want the Digital Piano to sound notes you play on
its keyboard. The local control setting lets you do just that.
1.
While holding down 4, press a key within the
LOCAL area of the keyboard to change the local
control setting.
• The initial default local control setting is ON. Selecting
OFF for this setting disables output from the Digital
Piano’s speakers.
LOCAL
ONOFF
Keyboard Channel
A keyboard channel is the channel used for sending Digital
Piano data to a computer. You can select the channel you
want for sending Digital Piano data to a computer.
• The keyboard channel setting range is 01 to 16.
The initial default keyboard channel setting is 01.
1.
While holding down 4, press the minus (–) or
plus (+) key within the KEYBOARD CH area of
the keyboard to change the keyboard channel.
• Each press of a key increases or decreases the current
setting by 1.
• To return to the initial default setting (01), press the
minus (–) and plus (+) keys at the same time.
KEYBOARD CH
+
-
Outputting Keyboard Notes to
Audio Equipment
Connection requires commercially available connecting cords,
supplied by you. The connecting cords should have a stereo
standard plug on one end and a plug that matches the
configuration of the external device on the other end.
• Turn off the external device when making connections.
After connecting, turn down the Digital Piano and
external device volume levels whenever turning power
on or off.
• After connecting, turn on the Digital Piano and then the
external device.
• If keyboard notes sound distorted when they are
sounded from external audio equipment, lower the
Digital Piano’s volume setting.
Stereo standard plug
Audio equipment, amplifier,
etc
.
Digital Piano PHONES/OUTPUT jack
EN-12
Page 15

Reference
Troubleshooting
Symptom Action
Included Accessories
I can’t find something that should be here. Carefully check inside all of the packing materials.
Power Requirements
Power will not turned on. Correctly attach the AC adaptor (page EN-4).
Sound
Nothing happens when I press any keyboard key. Adjust the volume setting (page EN-5).
Notes keep sounding, without stopping. Turn power off and then back on to initialize all Digital Piano settings
Some notes are cut off while they are playing. Notes are cut off whenever the number of notes being sounded
The volume or tone setting I made has changed. • Adjust the volume setting (page EN-5).
Output volume does not change even though is
change my keyboard touch.
In certain keyboard ranges, the volume and tone
quality sound are slightly different from those in other
keyboard ranges.
With some tones, octaves do not change at the far
ends of the keyboard.
The pitch of the notes does not match other
accompanying instruments or sounds strange when
played long with other instruments.
The reverb of notes seems to change suddenly. • Check and adjust the reverb setting (page EN-8).
Computer Connection
I can’t exchange data between the Digital Piano and
a computer.
(page EN-5).
exceeds the maximum polyphony value of 48 (24 for some tones).
This does not indicate malfunction.
• Turn power off and then back on to initialize all Digital Piano
settings (page EN-5).
• Change the Touch Response setting (page EN-6).
• Turn power off and then back on to initialize all Digital Piano
settings (page EN-5).
This is due to system limitations. It does not indicate malfunction.
This is due to system limitations. It does not indicate malfunction.
• Check and adjust the transpose (page EN-9) and tuning settings
(page EN-9).
• Turn power off and then back on to initialize all Digital Piano
settings (page EN-5).
• Turn power off and then back on to initialize all Digital Piano
settings (page EN-5).
• Check to make sure that the USB cable is connected to the Digital
Piano and computer, and that the device is selected correctly with
your computer’s music software settings (page EN-11).
• Turn off the Digital Piano and then exit the music software on your
computer. Next, turn the Digital Piano back on and then restart the
music software on your computer.
English
EN-13
Page 16

Reference
Specifications
Model CDP-130BK/CDP-130SR
Keyboard 88-key piano keyboard
Touch Response 3 types, Off
Maximum Polyphony 48 notes (24 for certain tones)
Tones
Built-in Tones 10; with layer
Hall On, Off
Reverb 1 to 10, Off
Chorus 1 to 5, Off
Demo Songs 5 songs
Metronome
Beats 0, 1, 2, 3, 4, 5, 6, 7, 8, 9
Tempo Range 30 to 255
Other Functions
Transpose ±1 octaves (–12 to +12 semitones)
Tuning A4 = 415.5 to 465.9Hz (Initial Default: 440.0Hz)
MIDI 16 multi-timbre received
Inputs/Outputs
USB port TYPE B
Damper Pedal jack Standard jack
Phones/Output jack Stereo standard jack
Output Impedance: 3Ω, Output Voltage: 1.5V (RMS) MAX
Power Jack 12V DC
Power Supply
AC Adaptor AD-A12150LW
Auto Power Off 30 minutes after last key operation. Auto Power Off can be disabled.
Speakers (12cm × 6cm oval) × 2
Output 8W + 8W
Power Consumption 12V = 18W
Dimensions 132.2 × 28.6 × 12.9cm (52
Weight Approximately 10.8kg (23.8 lbs)
• Design and specifications are subject to change without notice.
• The AC adaptor can be used safely in areas up to 4,000 meters above sea level.
1
/16 × 11 1/4 × 5 1/16 inch)
EN-14
Page 17

Reference
Operating Precautions
Be sure to read and observe the following operating precautions.
■ Location
Avoid the following locations for this product.
• Areas exposed to direct sunlight and high humidity
• Areas subjected to temperature extremes
• Near a radio, TV, video deck, or tuner
The above devices will not cause malfunction of the product, but interference from the product can cause audio or video
interference of a nearby device.
■ User Maintenance
• Never use benzine, alcohol, thinner, or other chemical agents to clean the product.
• To clean the product or its keyboard, wipe with a soft cloth moistened in a weak solution of water and a mild neutral detergent.
Wring all excess moisture from the cloth before wiping.
■ Included and Optional Accessories
Use only accessories that are specified for use with this product. Use of unauthorized accessories creates the risk of fire, electric
shock, and personal injury.
■ Weld Lines
Lines may be visible on the exterior of the product. These are “weld lines” that result from the plastic molding process. They are not
cracks or scratches.
■ Musical Instrument Etiquette
Always be aware of others around you whenever using this product. Be especially careful when playing late at night to keep the
volume at levels that do not disturb others. Other steps you can take when playing late at night are closing the window and using
headphones.
English
EN-15
Page 18

1 - 16
1 - 16
X
Mode 3
*1:Depends on tone
*1:Depende del tono
1
*
0 - 127
0 - 127
**:no relation
**:sin relación
**
X
O
9nH v = 1 - 127
O
9nH v = 0, 8nH v =
X
OO
2
*
Bank select
Modulation
Data entry
Volume
OOOOO
(MSB only)
O
Pan
Expression
Model: CDP-130 Version : 1.0
1
1 - 16
X
Mode 3
0 - 127
9nH v = 1 - 127
O
MIDI Implementation Chart
True voice
Number
Note ON
Velocity
Function Transmitted Recognized Remarks
Default
Changed
Basic
Channel
Default
Messages
Altered
Mode
Note
X
9nH v = 0
X
Note OFF
Key’s
After
X
Ch’s
Touch
OXOOO
0, 3216, 38
Pitch Bender
X
7
10
11
Control
Change
Page 19

O : Yes
2
*
3
*
.
X : No
Hold 1
Sostenuto
Soft pedal
Reverb send
Chorus send
OOOOO
XXXOX
O
6466679193
RPN LSB, MSB
O
2
*
XXX
O
X
X
O
OXO
0 - 127
XXX
OO
O
O
O
XOXOX
X
O
X
*3: En este producto, la función Hall se considera como un tipo de reverberación.
*3: With this product, the Hall function is treated as one type of reverb.
*2: For details, see MIDI Implementation at http://world.casio.com/.
*2: Si desea más información, vea Implementación MIDI en http://world.casio.com/
Mode 2 : OMNI ON, MONO
Mode 4 : OMNI OFF, MONO
100, 101
Program
:True #
Change
System Exclusive
: Song Pos
: Song Sel
: Tune
System
Common
: Clock
: Commands
System
Real Time
Reset all controller
: All sound off
:
: Local ON/OFF
: All notes OFF
: Active Sense
: Reset
Aux
Messages
Remarks
Mode 1 : OMNI ON, POLY
Mode 3 : OMNI OFF, POLY
Page 20

This recycle mark indicates that the packaging conforms to
the environmental protection legislation in Germany.
Esta marca de reciclaje indica que el empaquetado se
ajusta a la legislación de protección ambiental en Alemania.
C
MA1310-A Printed in China
 Loading...