

Page 1
USER’S GUIDE
GUÍA DEL USUARIO
Please keep all information for future reference.
Guarde toda información para tener como referencia futura.
Safety Precautions
Before trying to use the piano, be sure to read
the separate “Safety Precautions”.
Precauciones de seguridad
Antes de intentar usar el piano, asegúrese de
leer las “Precauciones de seguridad” separadas.
ES
AP400/400CYES1A
Page 2
IMPORTANT SAFETY INSTRUCTIONS
1. Read these instructions.
2. Keep these instructions.
3. Heed all warnings.
4. Follow all instructions.
5. Do not use this apparatus near water.
6. Clean only with dry cloth.
7. Do not block any ventilation openings. Install in accordance with the manufacturer’s instructions.
8. Do not install near any heat sources such as radiators, heat registers, stoves, or other apparatus (including amplifiers) that produce
heat.
9. Do not defeat the safety purpose of the polarized or grounding-type plug. A polarized plug has two blades with one wider than the
other. A grounding type plug has two blades and a third grounding prong. The wide blade or the third prong are provided for your
safety. If the provided plug does not fit into your outlet, consult an electrician for replacement of the obsolete outlet.
10. Protect the power cord from being walked on or pinched particularly at plugs, convenience receptacles, and the point where they exit
from the apparatus.
11. Only use attachments/accessories specified by the manufacturer.
12. Use only with the cart, stand, tripod, bracket, or table specified by the manufacturer, or sold with the
apparatus. When a cart is used, use caution when moving the cart/apparatus combination to avoid injury
from tip-over.
13. Unplug this apparatus during lightning storms or when unused for long periods of time.
14. Refer all servicing to qualified service personnel. Servicing is required when the apparatus has been damaged in any way, such as
power-supply cord or plug is damaged, liquid has been spilled or objects have fallen into the apparatus, the apparatus has been
exposed to rain or moisture, does not operate normally, or has been dropped.
The apparatus shall not be exposed to dripping or splashing and that no objects filled with liquids, such as vases, shall be placed on the
apparatus.
The power indicator being unlit does not mean the apparatus is completely disconnected from the MAINS.
When you need to have the apparatus completely disconnected from the MAINS, you must unplug the power cord. For that purpose, locate
the apparatus in a way that secures easy access to the power cord.
Declaration of Conformity
Model Number: AP-400
Trade Name: CASIO COMPUTER CO., LTD.
Responsible party: CASIO AMERICA, INC.
Address: 570 MT. PLEASANT AVENUE, DOVER, NEW JERSEY 07801
Telephone number: 973-361-5400
This device complies with Part 15 of the FCC Rules, Operation is subject to the following two conditions:
(1) This device may not cause harmful interference, and (2) this device must accept any interference received, including interference that
may cause undesired operation.
CAUTION
RISK OF ELECTRIC SHOCK DO NOT OPEN
CAUTION: TO REDUCE THE RISK OF ELECTRIC SHOCK, DO NOT REMOVE COVER (OR
BACK). NO USER -SERVICEABLE PARTS INSIDE. REFER SERVICING TO QUALIFIED SERVICE
PERSONNEL.
The lightning flash with arrowhead symbol, within an equilateral triangle, is intended to alert
the user to the presence of uninsulated “dangerous voltage” within the product’s enclosure
that may be of sufficient magnitude to constitute a risk of electric shock to persons.
The exclamation point within an equilateral triangle is intended to alert the user to the
presence of important operating and maintenance (servicing) instructions in the literature
accompanying the product.
Page 3

NOTICE
This equipment has been tested and found to comply with the limits for a Class B digital device,
pursuant to Part 15 of the FCC Rules. These limits are designed to provide reasonable protection
against harmful interference in a residential installation. This equipment generates, uses and can
radiate radio frequency energy and, if not installed and used in accordance with the instructions,
may cause harmful interference to radio communications. However, there is no guarantee that
interference will not occur in a particular installation. If this equipment does cause harmful
interference to radio or television reception, which can be determined by turning the equipment off
and on, the user is encouraged to try to correct the interference by one or more of the following
measures:
• Reorient or relocate the receiving antenna.
• Increase the separation between the equipment and receiver.
• Connect the equipment into an outlet on a circuit different from that to which the receiver is
connected.
• Consult the dealer or an experienced radio/TV technician for help.
FCC WARNING
Changes or modifications not expressly approved by the party responsible for compliance could
void the user’s authority to operate the equipment.
TO REDUCE THE RISK OF FIRE OR ELECTRIC SHOCK, REFER SERVICING TO QUALIFIED
SERVICE PERSONNEL.
Page 4
Company and product names used in this manual may be registered trademarks of others.
p
This mark applies in EU countries only.
Manufacturer:
CASIO COMPUTER CO.,LTD.
6-2, Hon-machi 1-chome, Shibuya-ku, Tokyo 151-8543, Japan
Responsible within the European Union:
CASIO EUROPE GmbH
Bornbarch 10, 22848 Norderstedt, Germany
This mark applies to the AP-400V only.
Please kee
all information for future reference.
Page 5

Contents
Assembling the Stand .............................................................................................. E-24
Unpacking................................................................. E-24
To assemble the stand ............................................. E-24
To connect cables..................................................... E-26
To install the music stand..........................................E-27
To install the headphones hook ................................E-27
General Guide ................................... E-2
TONE/SETTING Button.............................................. E-3
Saving Settings and Using Operation Lock ................ E-3
Power Supply.................................... E-4
Connections...................................... E-5
Connecting Headphones ............................................ E-5
Connecting Audio Equipment or an Amplifier ............. E-5
Bundled and Optional Accessories............................. E-5
Playing with Different Tones ........... E-6
Selecting and Playing a Tone..................................... E-6
Adjusting the Brilliance of a Tone ............................... E-8
Layering Two Tones ................................................... E-8
Using Effects............................................................... E-9
Using the Digital Piano’s Pedals................................. E-9
Using the Metronome ............................................... E-10
Playing a Piano Duet ................................................ E-11
Playing Back Built-in Songs .......... E-12
Playing Back All of the Built-in Songs....................... E-12
Playing Back a Specific Music Library Song............. E-12
Practicing with a Music Library Song........................ E-13
Recording and Play Back............... E-14
Tracks....................................................................... E-14
Recording Your Keyboard Play ................................ E-15
To play back from digital piano memory................... E-16
Deleting Recorded Data ........................................... E-17
Configuring Settings with the
Keyboard ......................................... E-18
To configure settings with the keyboard....................E-18
Keyboard Keys Used for Configuring Settings..........E-19
Parameter List...........................................................E-20
Tone selection .......................................................E-20
Brilliance (BRILLIANCE)........................................E-20
Reverb (REVERB)................................................. E-20
Chorus ...................................................................E-20
Song Select (SONG SELECT) ..............................E-20
Tempo (TEMPO) ...................................................E-20
Metronome Beat (METRONOME BEAT)............... E-20
Song volume..........................................................E-20
Metronome Volume ...............................................E-20
Touch Response (TOUCH RESPONSE) ..............E-21
Keyboard Key (Transpose).................................... E-21
Keyboard tuning (Tuning) ......................................E-21
Send Channel........................................................E-22
Local Control..........................................................E-22
Operation Tone......................................................E-22
Setup Memory .......................................................E-22
Operation Lock ......................................................E-22
Connecting to the MIDI Terminal ..............................E-23
Reference......................................... E-28
Troubleshooting ........................................................E-28
Product Specifications............................................... E-29
Operating Precautions ..............................................E-30
Appendix .....................................A-1
Tone List..............................................................A-1
Song List..............................................................A-1
MIDI Implementation Chart
E-1
Page 6
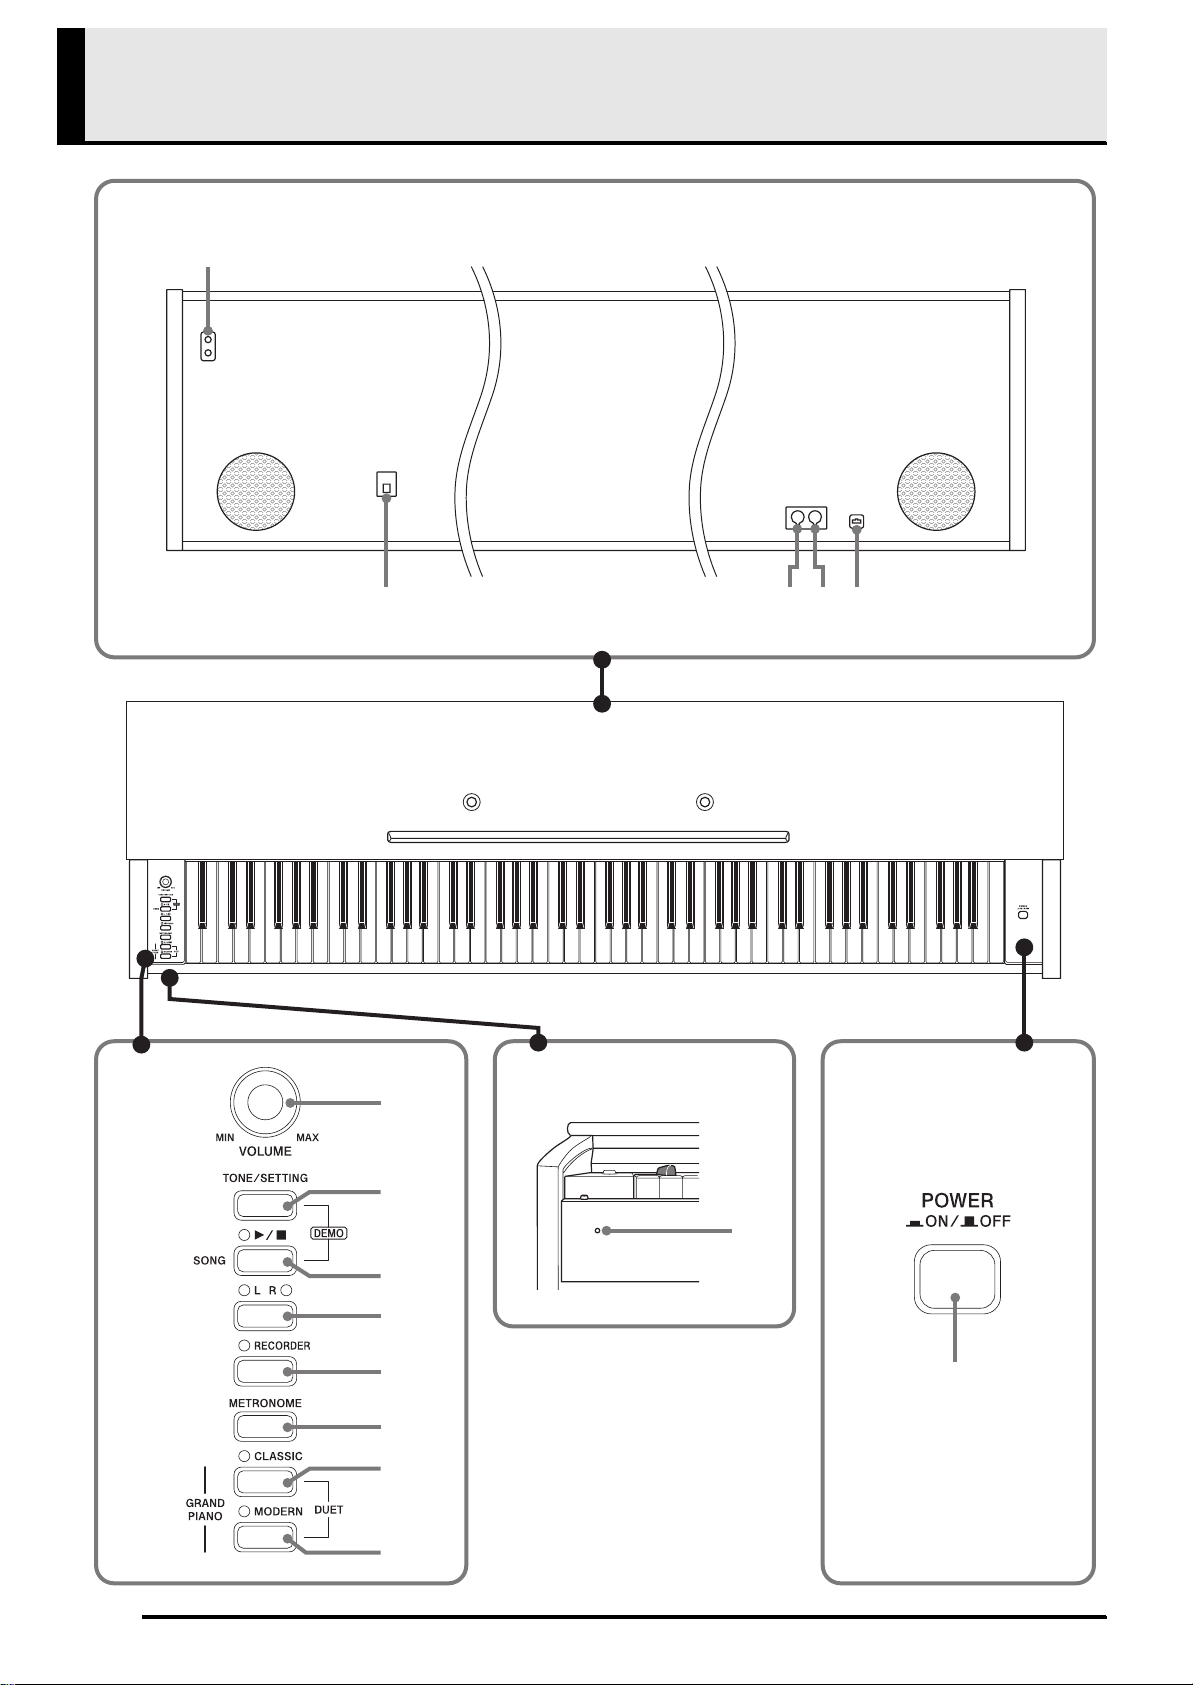
General Guide
Bottom
1
*
* The power cord of the AP-400 is hard-wired to the digital piano.
Front
Rear
4 532
E-2
6
7
8
9
bk
bl
bm
bn
Front
bo
bp
Page 7
General Guide
CAUTION
• Make sure that the cover is fully open whenever you are playing on the keyboard. A partially open cover can suddenly close
unexpectedly and pinch your fingers.
NOTE
• The names shown here are always indicated in bold when they appear within the text of this manual.
1 PHONES jack
2 AC power jack
3 MIDI IN terminal
4 MIDI OUT terminal
5 Pedal connector
6 VOLUME controller
7 TONE/SETTING button
8 SONG X/
button
9 LR button
bk RECORDER button
bl METRONOME button
bm GRAND PIANO (CLASSIC) button
bn GRAND PIANO (MODERN) button
bo Power lamp
bp POWER button
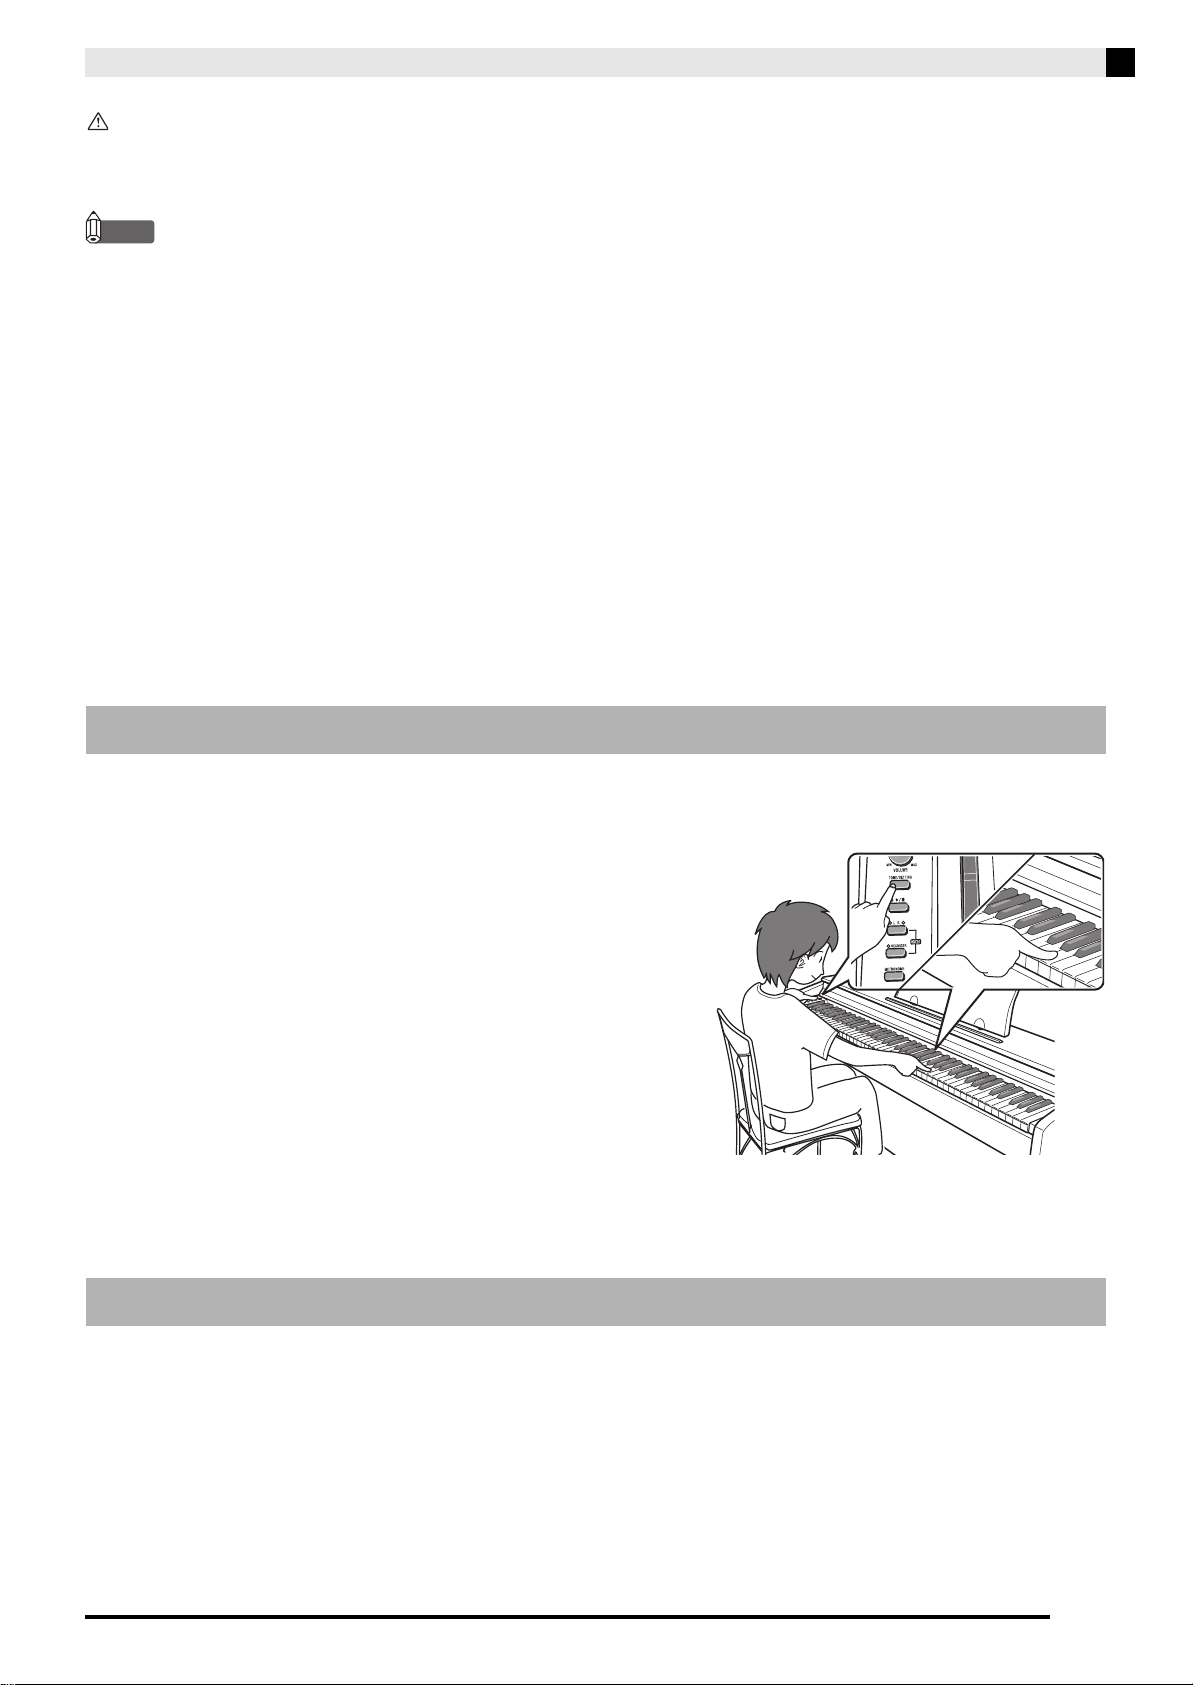
TONE/SETTING Button
The TONE/SETTING button is used when configuring a variety of different digital piano settings. The following
are TONE/SETTING button basics.
z To change a setting, hold down the TONE/SETTING button
as you press the keyboard key that is assigned the setting
you want to select.
An operation confirmation tone will sound whenever you
press a keyboard key to configure a setting.
Example: “Selecting a Tone Using the Keyboard Keys” on
page E-7.
z For details about operations and settings, see “Configuring Settings with the Keyboard” on page E-18.
Saving Settings and Using Operation Lock
Your digital piano lets you save its current settings, and lock its buttons to protect against operation errors. For
details, see “bq Setup Memory” and “br Operation Lock” on page E-22.
E-3
Page 8
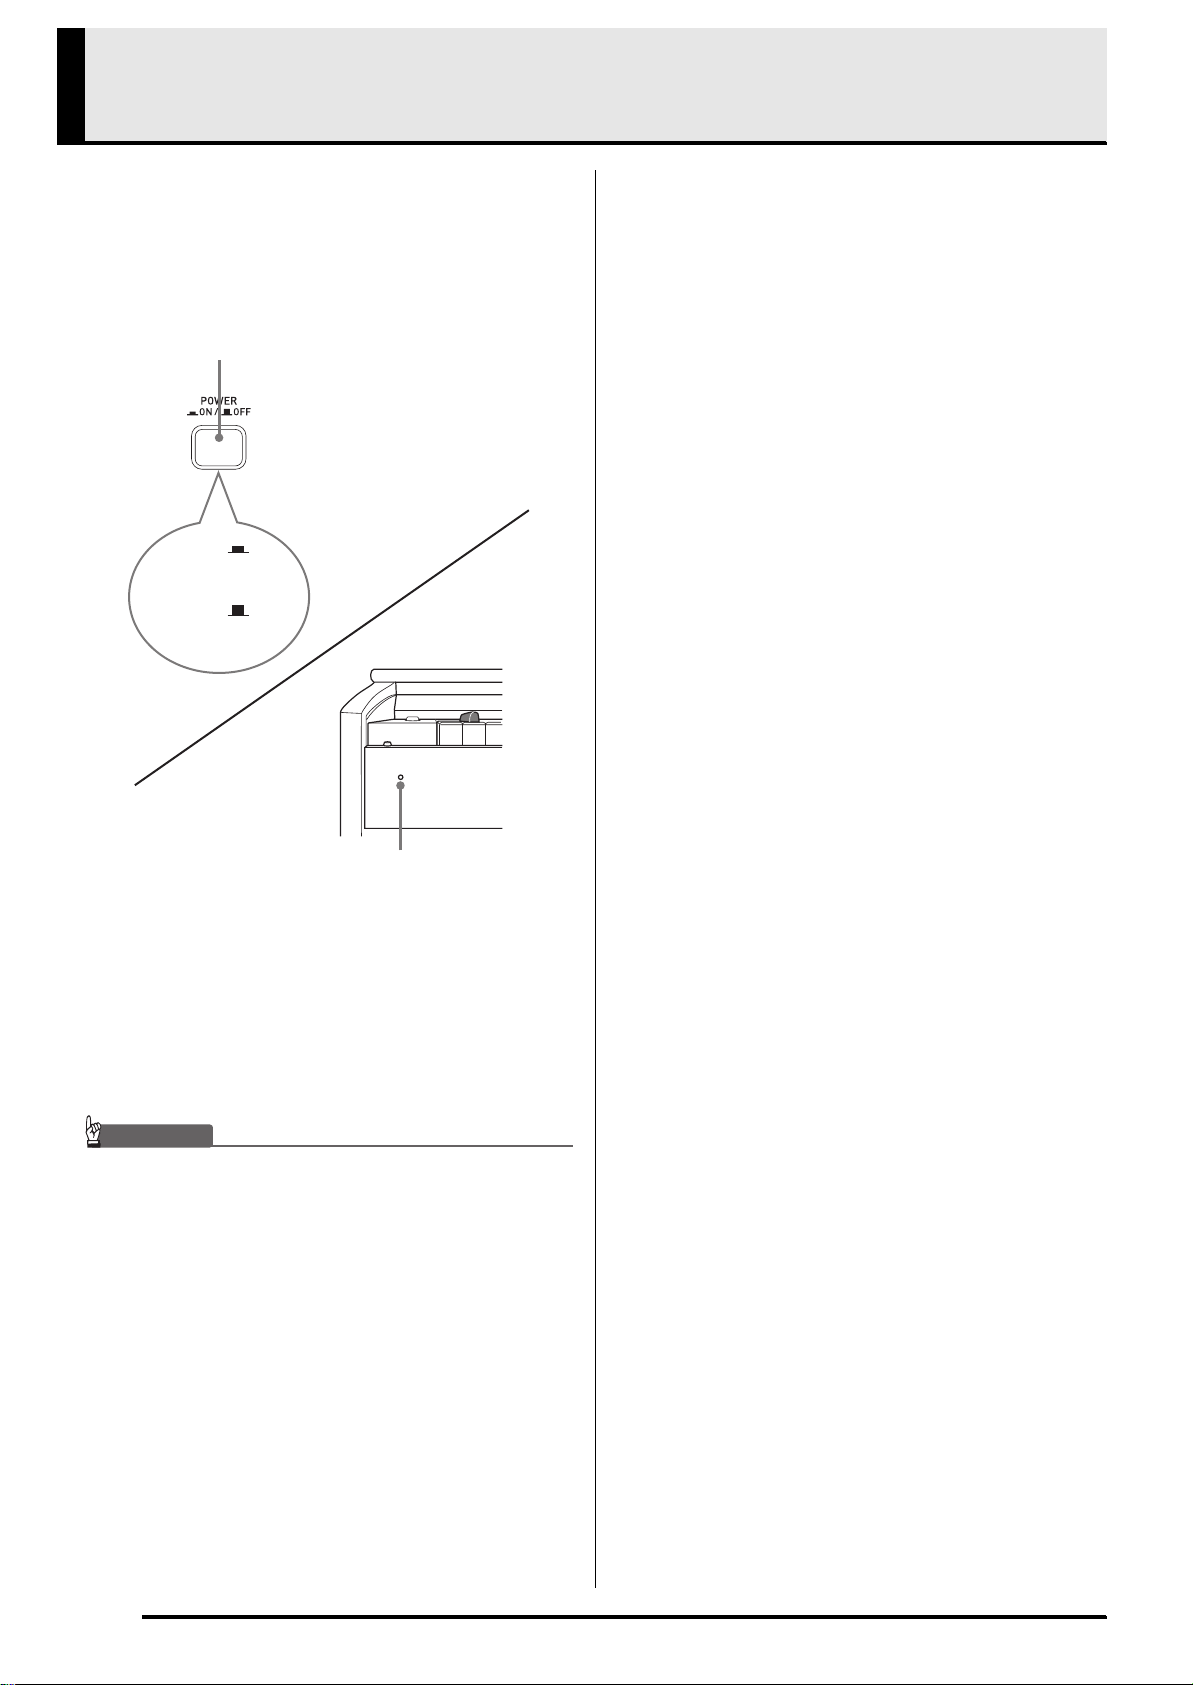
Power Supply
Your digital piano runs on standard household power.
Be sure to turn off power whenever you are not using
the digital piano.
Make sure that the POWER button is in the
1.
OFF position (raised).
POWER button
ON
(Power lamp on)
OFF
(Power lamp off)
Front
Power lamp
Connect the power cord that comes with the
2.
digital piano to the AC power jack on the
bottom of the digital piano.*
* AP-400V only
Plug the power cord into a household power
3.
outlet.
IMPORTANT!
• Always make sure that the POWER button is the OFF
position before plugging in or unplugging the power cord.
• The shape of the power cord plug and household power
outlet receptacle differ according to country and
geographical area. The illustration shows just one
example of the shapes that are available.
• The power cord of the AP-400 is hard-wired to the digital
piano.
z Make sure the power lamp is completely turned off
before unplugging the power cord from the power
outlet. Be sure to read and observe all of the safety
precautions concerning power supply.
E-4
Page 9
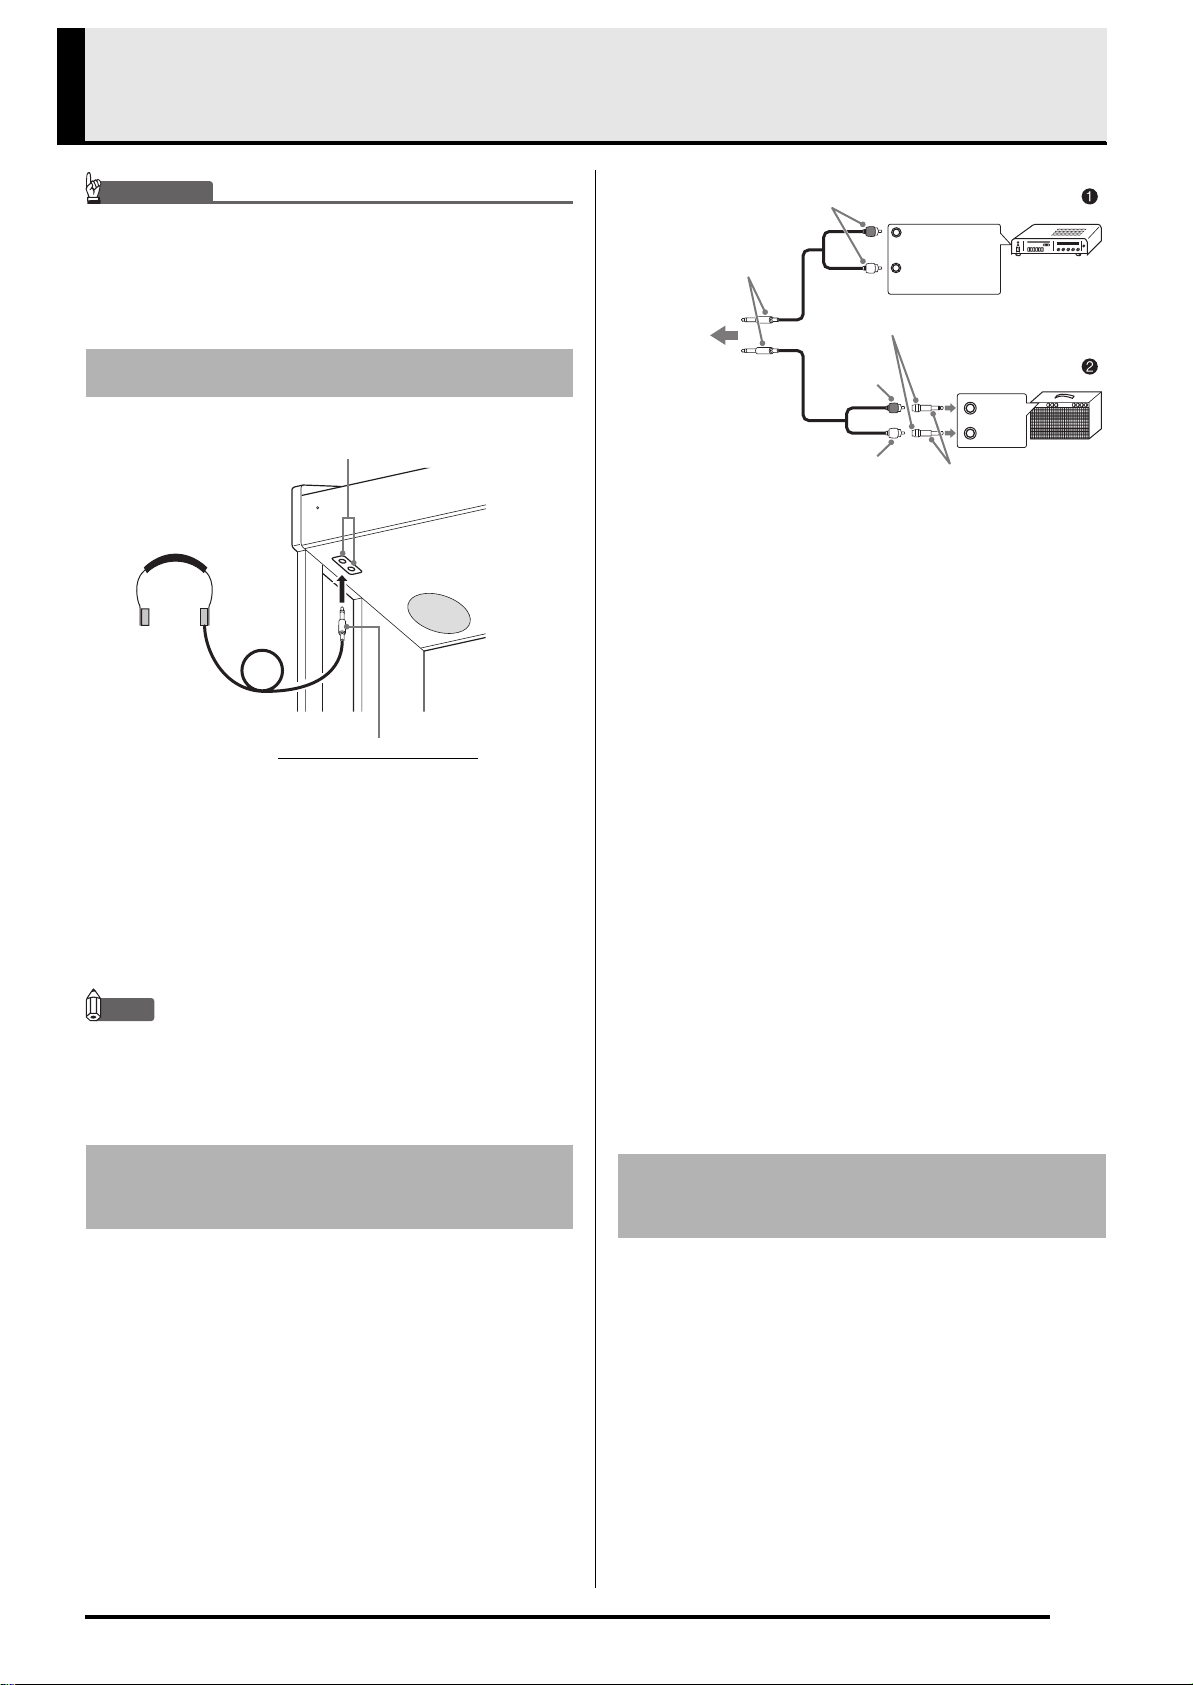
Connections
IMPORTANT!
• Whenever connecting something to the digital piano, first
use the VOLUME controller to set the volume to a low
level. After connecting, you can adjust the volume to the
level you want.
Connecting Headphones
PHONES jack
Headphones
Stereo standard plug
Connect commercially available headphones to the
PHONES jack. Connecting headphones to the
PHONES jack cuts off output to the speakers, which
means you can practice even late at night without
bothering others. To protect your hearing, make sure
that you do not set the volume level too high when
using headphones.
NOTE
• Be sure to push the headphones plug into the PHONES
jack as far as it will go. If you don’t, you may hear sound
from only one side of the headphones.
Audio amplifier AUX IN jack, etc.
RIGHT
(Red)
LEFT
(White)
Pin jack
Pin plug
(red)
Pin plug
(white)
Keyboard amplifier, etc.
Standard plug
Guitar amplifier
INPUT 1
INPUT 2
Stereo standard plug
To digital
piano’s
PHONES
jack
Pin plug
■ Connecting Audio Equipment (Figure 1)
Use commercially available connecting cords
(Standard Plug × 1, Pin Plugs × 2) to connect as shown
in Figure 1. Make sure that the end of the cord that
you connect to the digital piano is a stereo standard
plug. A monaural standard plug will result in output of
only one of the two stereo channels. Normally, you
should set the input selector of the audio equipment to
the terminal where the digital piano is connected (AUX
IN, etc.) Adjust volume using the digital piano’s
VOLUME controller.
■ Connecting a Music Amplifier (Figure 2)
Connect the connecting cord* to one of the types of
amplifiers shown in Figure 2.
Adjust volume using the digital piano’s VOLUME
controller.
* Digital Piano: Stereo standard plug
Amplifier: Inputs signals for the left and right
channels. Not connecting either plug will
result in output of only one of the two
stereo channels.
Connecting Audio Equipment
or an Amplifier
You can connect audio equipment or a music amplifier
to the digital piano and then play through external
speakers for more powerful volume and better sound
quality.
Bundled and Optional
Accessories
Use only accessories that are specified for use with this
digital piano. Use of unauthorized accessories creates
the risk of fire, electric shock, and personal injury.
E-5
Page 10
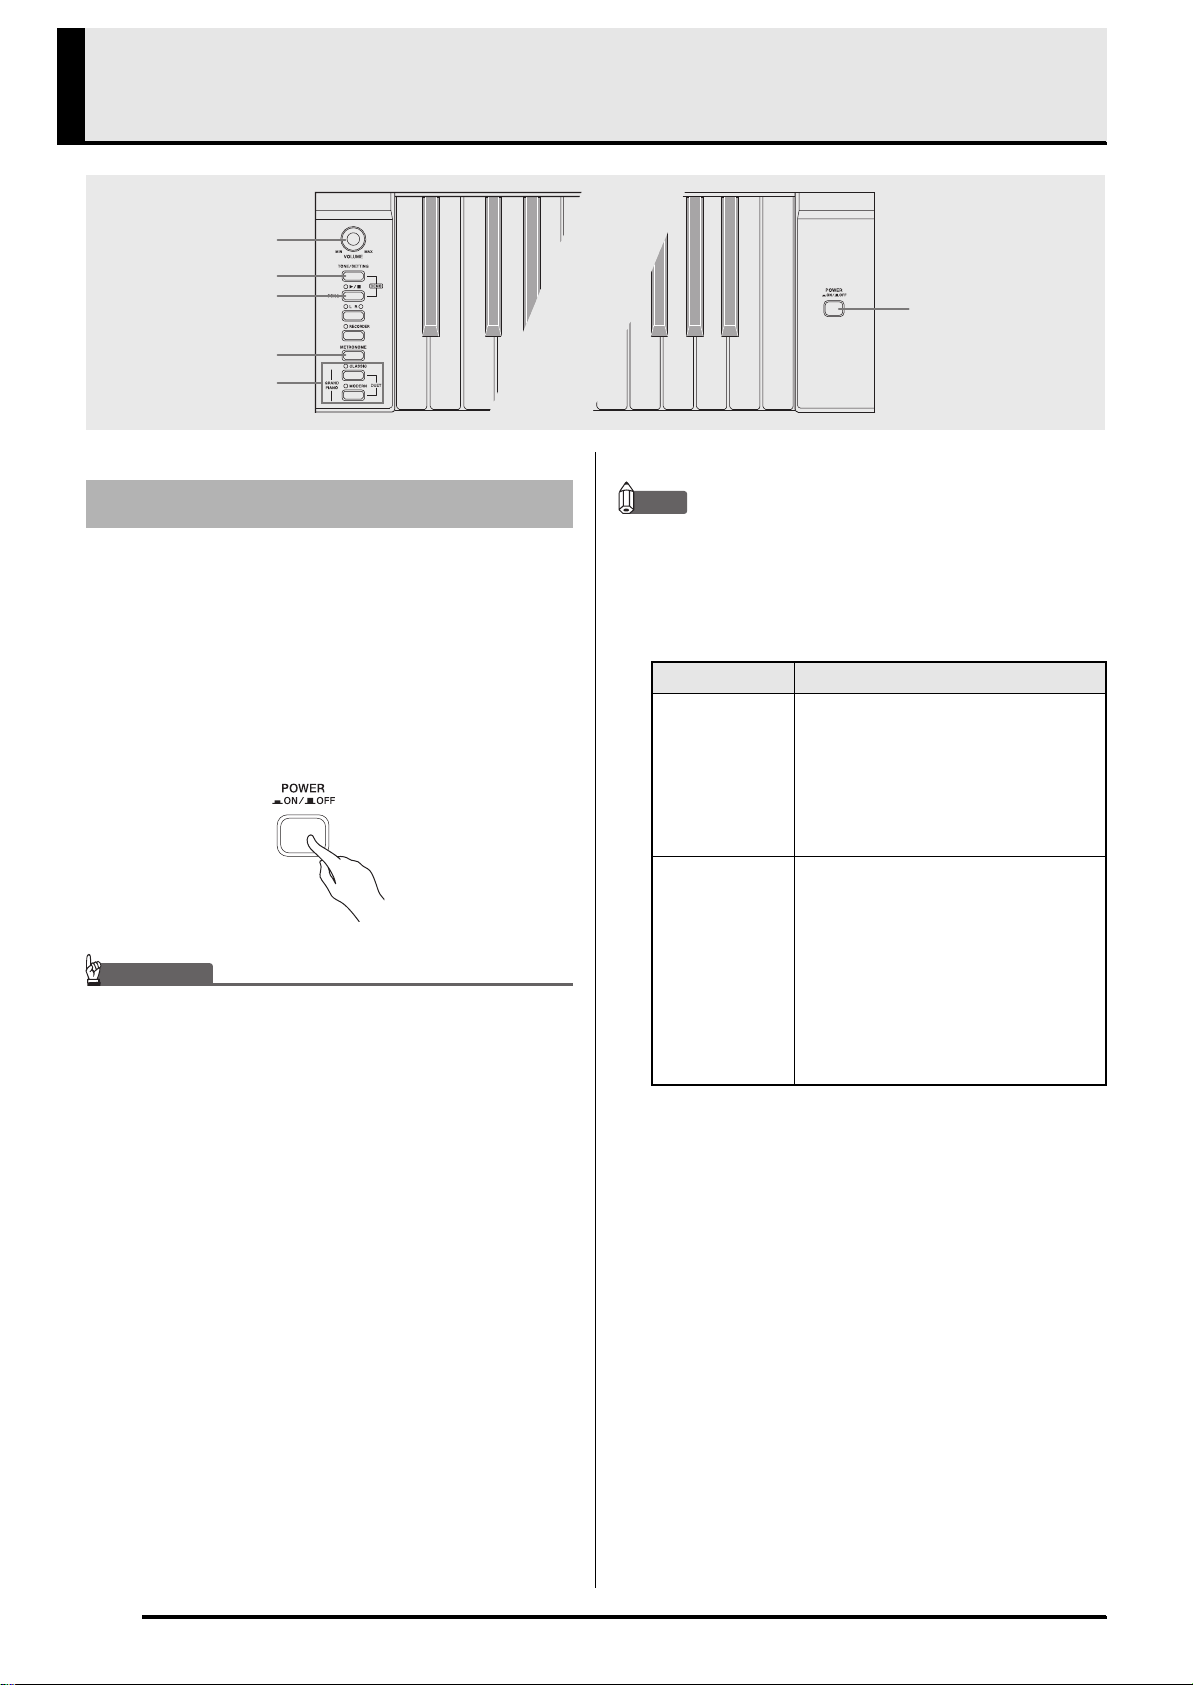
Playing with Different Tones
VOLUME
TONE/SETTING
SONG /
METRONOME
GRAND PIANO
POWER
Selecting and Playing a Tone
This digital piano has 11 built-in tones.
* You can select these tones using keyboard keys. The
name of the tones assigned to each keyboard key is
marked above the keys. For details about selecting
these tones, see “Selecting a Tone Using the
Keyboard Keys” on page E-7.
Press the POWER button to turn on the
1.
digital piano.
IMPORTANT!
• When you turn on the piano, it performs a power up
operation in order to initialize its system. During system
initialization, the LR button lamps flash for about six
seconds to let you know that system initialization is in
progress.
NOTE
• Grand Piano Tones (MODERN, CLASSIC)
Your digital piano has a total of 11 built-in tones. The
MODERN and CLASSIC tones are stereo sampled tones
that can be selected using the GRAND PIANO buttons.
Try using the GRAND PIANO tones to familiarize
yourself with their distinctive sounds and characteristics.
Tone Name Characteristics
This tone provides a bright and hard
grand piano sound. The volume and
timbre of this tone is quick to
MODERN
CLASSIC
respond to different keyboard
pressures, and it has relatively strong
reverb. This tone is a good choice for
dynamic and lively performances.
This is a natural piano tone that
closely resembles the sound of an
acoustic grand piano. Though reverb
and other effects are kept to a
minimum, doing so enhances the
impact of operating the piano pedals
(acoustic resonance), for musically
delicate expressions. This tone is a
good choice for lesson and practice
sessions.
Select the tone you want.
2.
z Press one of the GRAND PIANO buttons to select
either a modern sound (MODERN) or a classic sound
(CLASSIC).
• A lamp will light above the currently selected
button.
z See “Selecting a Tone Using the Keyboard Keys” on
page E-7 for information about selected other tones.
Use the VOLUME controller to adjust the
3.
volume level.
Try playing something on the digital piano.
4.
E-6
Page 11
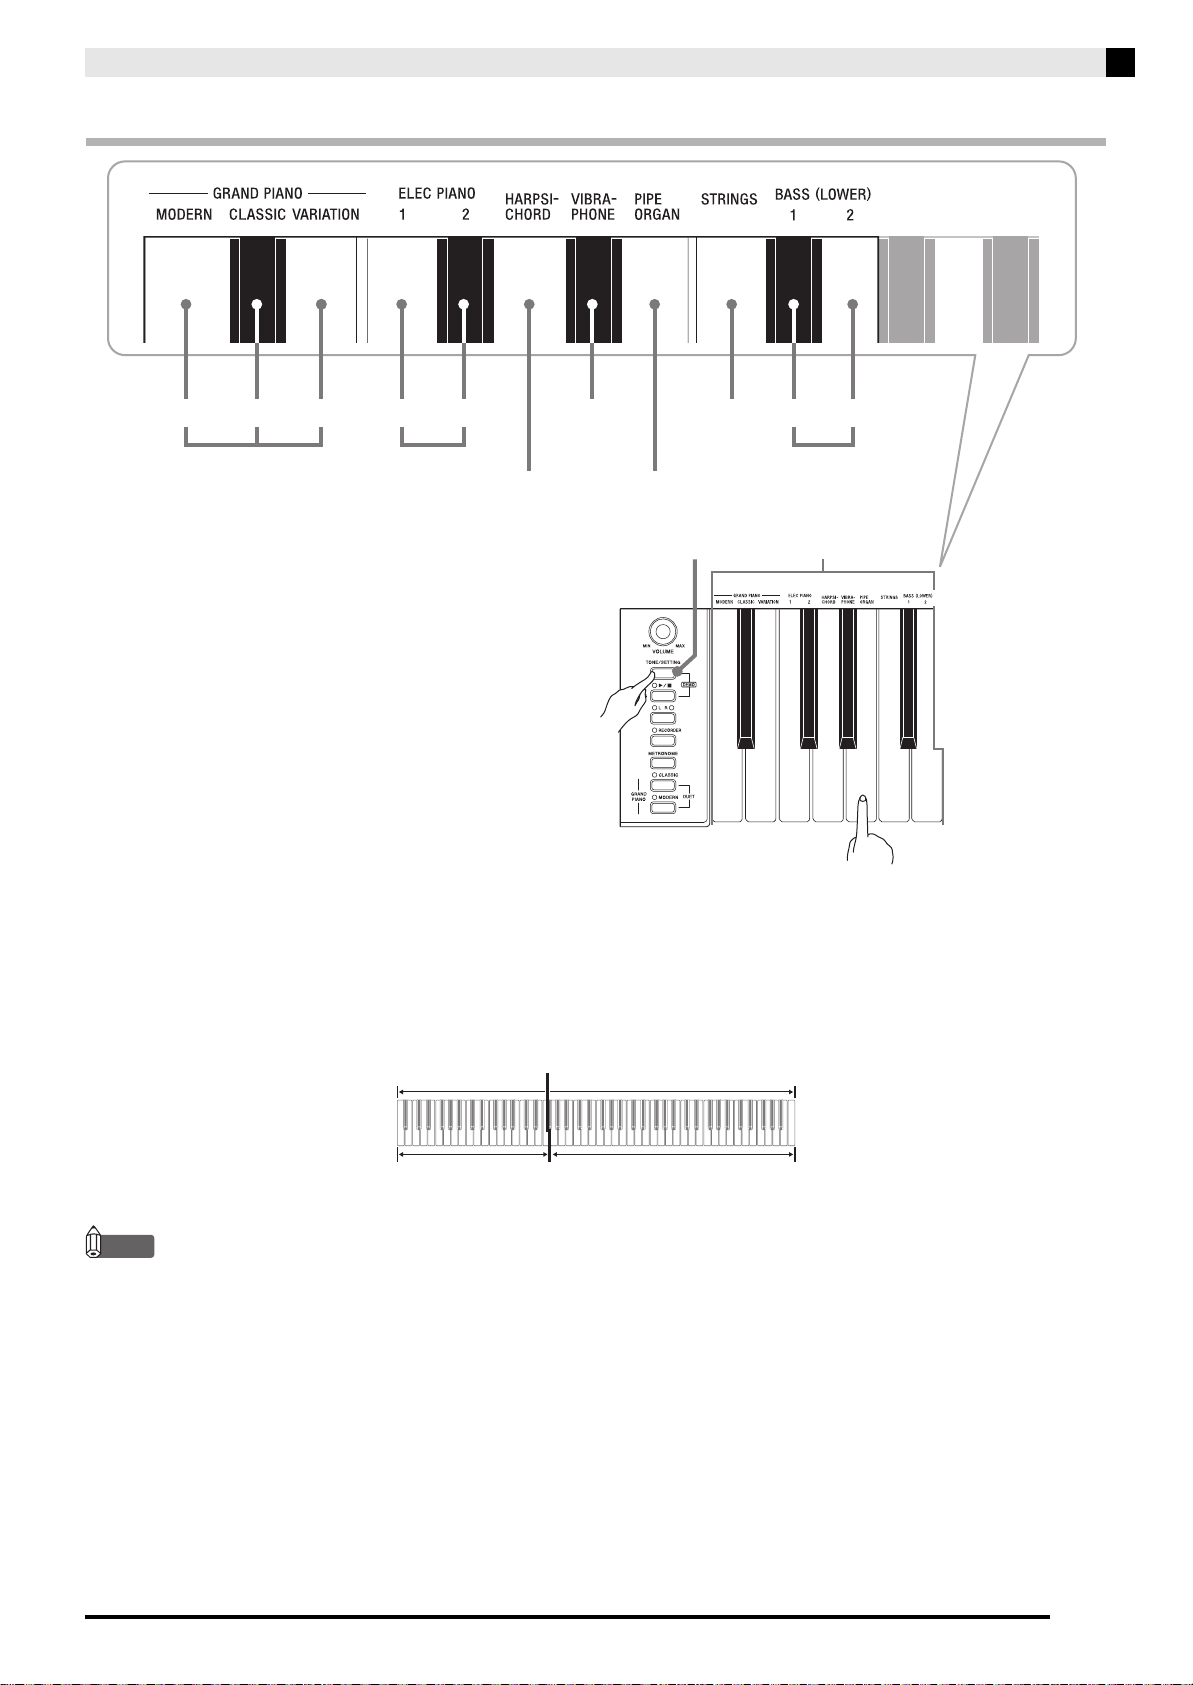
Selecting a Tone Using the Keyboard Keys
Playing with Different Tones
ʬʊʽ
MODERN
While holding down the TONE/SETTING
1.
ɹʳʁʍɹ
ʚʴɲ˂ʁʱʽ
VARIATION
CLASSIC
GRAND PIANO
ɺʳʽʓʞɬʘ ɲʶɹʒʴʍɹʞɬʘ
±²
1
ELEC PIANO
ʝʠʳʟɳʽ
2
HARPSICHORD
ʙ˂ʡʁɽ˂ʓ ʛɮʡɴʵɶʽ
VIBRAPHONE STRINGS 1
PIPE ORGAN
TONE/SETTING button
ʃʒʴʽɺʃ
±²
BASS (LOWER)
ʣ˂ʃᴥͲᬩᴦ
Tone Setting Keys
2
button, press the keyboard key that
corresponds to the tone you want to select.
Example: Pipe Organ
■ Bass Tones (BASS 1, BASS 2)
Selecting either of the two bass tones (BASS 1, BASS 2) on the right side of the tone setting keys in step 1 of the above
procedure will assign the selected bass tone to the low range (left side) of the keyboard. The high range (right side)
will be assigned the tone that was selected when you pressed the BASS 1 or BASS 2 key.
• The BASS 1 and BASS 2 keys let you effectively split the keyboard between two different tones.
Low Range High Range
BASS 1 PIPE ORGAN
Split Point
(Currently selected tone.)
NOTE
• To return the keyboard to a single tone, select any tone other than BASS 1 or BASS 2.
• You cannot select BASS 1 or BASS 2 when recording to Track 2.
E-7
Page 12
Playing with Different Tones
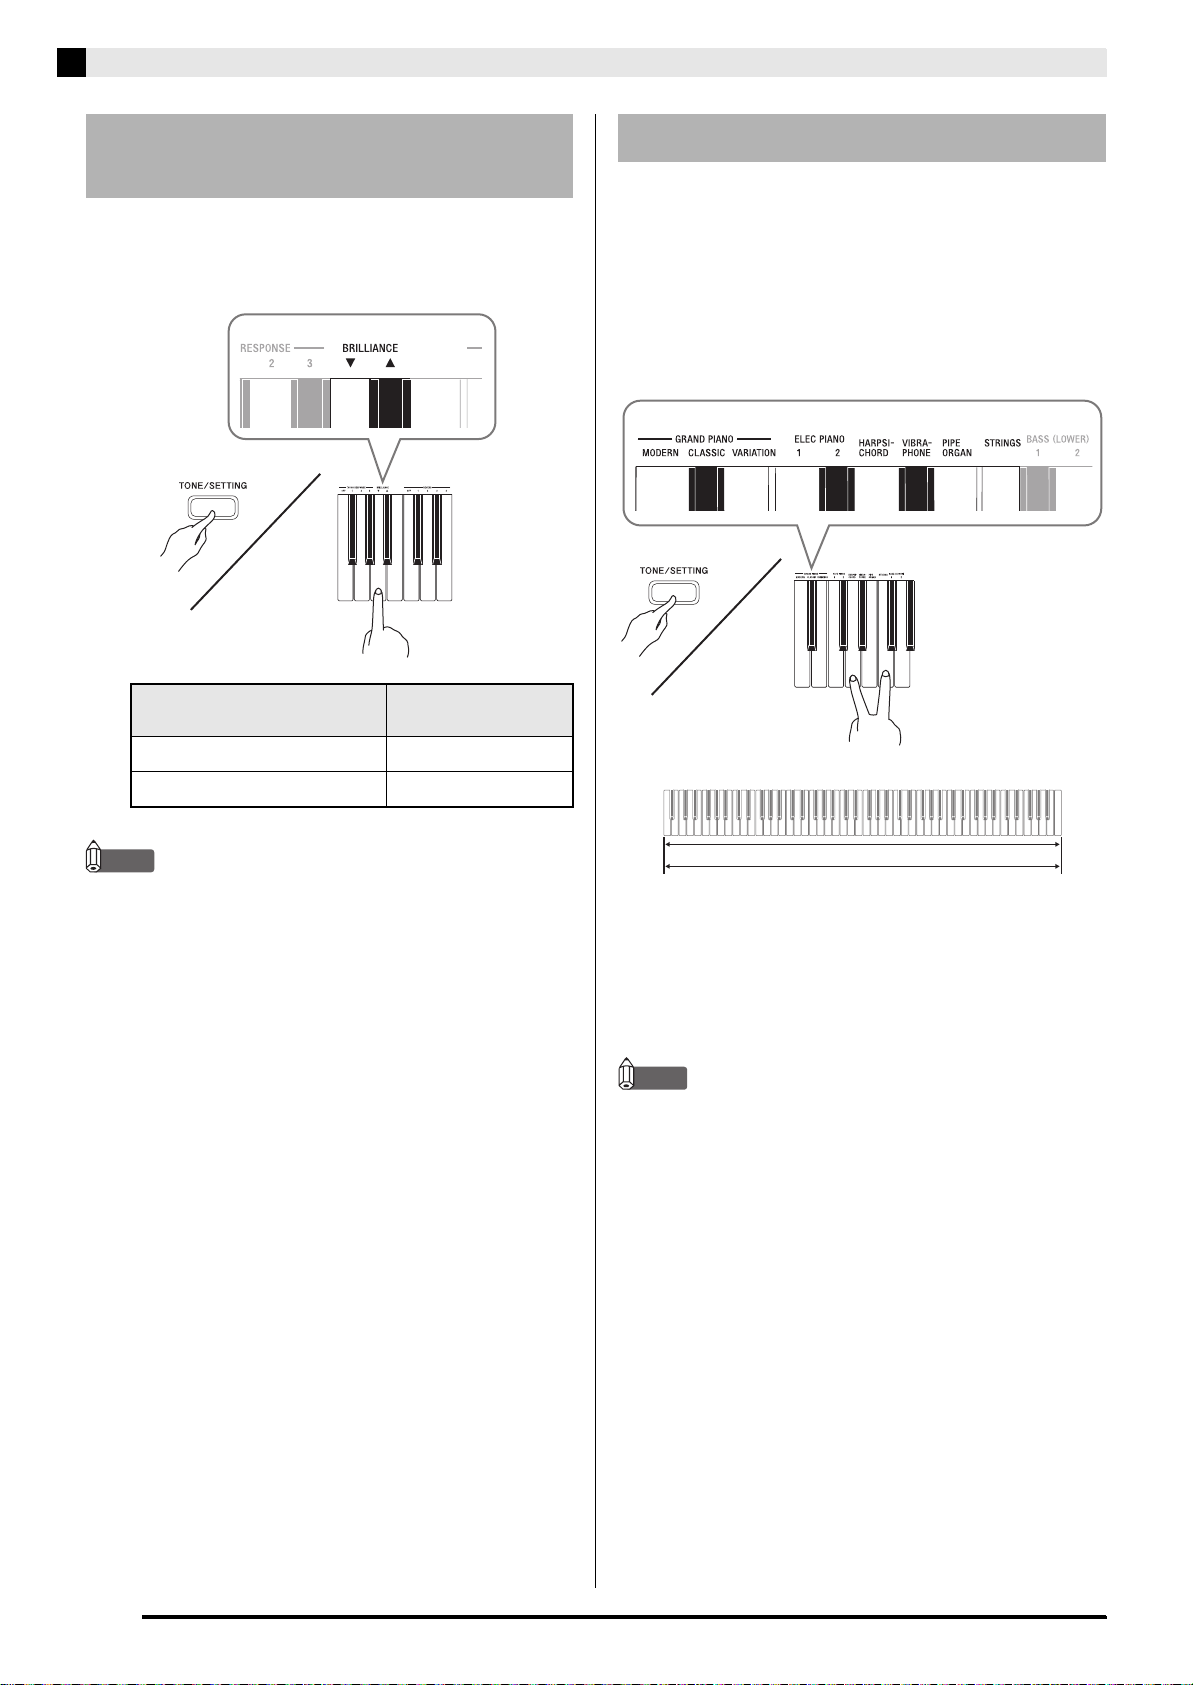
Adjusting the Brilliance of a
Tone
While holding down the TONE/SETTING
1.
button, use the BRILLIANCE keys to specify
a brilliance value in the range of –3 to 3.
For this type of sound:
Mellower and softer
Press this keyboard
key:
T
Layering Two Tones
Use the following procedure to layer two tones, so they
sound at the same time.
While holding down the TONE/SETTING
1.
button, simultaneously press the keyboard
keys that correspond to the two tones that
you want to layer.
Example: To layer HARPSICHORD and STRINGS.
Brighter and harder
NOTE
• To return a tone to its initial default setting, press T and
S at the same time.
S
HARPSICHORD
STRINGS
To unlayer the keyboard, select another tone
2.
by pressing the GRAND PIANO button or by
using the procedure under “Selecting a Tone
Using the Keyboard Keys” (page E-7).
NOTE
• You cannot layer the BASS 1 or BASS 2 tone with another
tone.
• You cannot perform the layer operation when recording
to Track 2.
E-8
Page 13

Playing with Different Tones
Using Effects
Reverb. . . .Makes your notes resonate.
Chorus . . .Adds more breadth to your notes.
To configure reverb and chorus effect
settings
While holding down the TONE/SETTING
1.
button, press the REVERB or CHORUS
keyboard key.
OFF 1 2 3 4
CHORUS selection keys
Using the Digital Piano’s
Pedals
Your digital piano comes equipped with three pedals:
damper, soft, and sostenuto
Soft pedal
Sostenuto pedal
Pedal Functions
z Damper Pedal
Pressing the damper pedal while playing will cause
the notes you play to reverberate for a very long
time.
• When a GRAND PIANO tone (MODERN,
CLASSIC, VARIATION) is selected as the tone,
pressing this pedal will cause notes to reverberate
(acoustic resonance) just like the damper pedal on
an acoustic grand piano. Half-pedal operation
(pressing the pedal part way) is also supported.
Damper pedal
Example: Selecting Reverb 4
•Reverb Value
To do this: Select this setting:
Turn off reverb OFF
1: Room
Turn on reverb
•Chorus Value
To do this: Select this setting:
Turn off chorus OFF
Turn on chorus
2: Small Hall
3: Large Hall
4: Stadium
1: Light Chorus
2: Medium Chorus
3: Deep Chorus
4: Flanger (Whooshing effect)
z Soft Pedal
Pressing this pedal while playing suppresses notes
played on the keyboard after the pedal was pressed,
and makes them sound softer.
z Sostenuto Pedal
Only the notes of the keys that are depressed when
this pedal is pressed are sustained until the pedal is
released.
E-9
Page 14

Playing with Different Tones
Using the Metronome
Press the METRONOME button.
1.
• This starts the metronome.
• The lamp above the SONG X/ button flash in time
with the metronome beat.
To change the beat, hold down the TONE/
2.
SETTING button as you press one of the
METRONOME BEAT keys to select a beat
setting.
Press the METRONOME button or SONG
4.
X/ button to turn off the metronome.
NOTE
• To return the tempo setting to the default tempo of the
currently selected Music Library tune, press the + and –
keys at the same time in step 3. Pressing + and – while
recording will return the tempo value to 120.
To adjust the metronome volume
NOTE
• You can perform the following procedure at any time,
regardless of whether or not the metronome is sounding.
While holding down the TONE/SETTING
1.
button, use the METRONOME VOLUME
keys to specify a volume value in the range of
0 to 42.
• For details about using the keyboard keys for
settings, see “Keyboard Keys Used for Configuring
Settings” on page E-19.
• Each press of the T orS key raises or lowers the
metronome volume value by 1.
• You can specify a beat value of 0, 2, 3, 4, or 6 as the
beat. Specifying 0 as the setting plays a straight click,
without any chime. This setting lets you practice with
a steady beat.
While holding down the TONE/SETTING
3.
button, use the TEMPO keys to specify a
tempo value in the range of 20 to 255 beats
per minute.
NOTE
• To return to the initial default setting, press T and S at
the same time.
• Each press of the + or – key raises or lowers the
tempo value by 1.
• You can use the value input keys (0 to 9) to enter a
specific value. Be sure to input all three digits.
Example: To enter “96”, press keys 0, 9, 6.
E-10
Page 15

Playing with Different Tones
6
6
Playing a Piano Duet
You can use the Duet Mode to split the piano’s
keyboard in the center so two people can play a duet.
The left and right side keyboards have virtually the
same range. The left pedal operates as the left side
damper pedal, while the right pedal is the right side
damper pedal.
The Duet Mode is the perfect way to conduct lessons,
with the teacher playing on the left side as the student
playing the same song on the right side.
Keyboard
Split point
Left keyboard Right keyboard
C3 C4 C5 C6 C3 C4 C5 C
(middle C) (middle C)
Pedals
Changing the Octaves of the Keyboards
You can change the ranges of the left and right
keyboards in octave units from their initial default
settings. This comes in handy, for example, if the initial
default range is not enough when one person is
playing the left hand part and another person is
playing the right hand part.
While holding down the MODERN and
1.
CLASSIC GRAND PIANO buttons, press the
keyboard key of C that you want located at
C4 (middle C) of the left keyboard.
Left side damper pedal
Left and right side
damper pedal
Press one of the GRAND PIANO buttons
1.
Right side damper pedal
(MODERN or CLASSIC) to select the piano
tone you want to use for the duet.
NOTE
• You can use only the MODERN or CLASSIC tone for a
duet.
Press the MODERN and CLASSIC GRAND
2.
PIANO buttons at the same time.
• This will enter the Duet Mode and split the keyboard.
The GRAND PIANO lamp will flash momentarily to
let you know when the Duet Mode is entered.
To exit the Duet Mode, press either the
3.
MODERN or CLASSIC GRAND PIANO
button.
Example: Press the keyboard key of the leftmost C will
assign the range shown below.
Left keyboard Right keyboard
C4 C5 C6 C7 C3 C4 C5 C
(Pressed key)
1 octave higher than initial
While holding down the MODERN and
2.
setting
Unchanged
CLASSIC GRAND PIANO buttons, press the
keyboard key of C that you want located at
C4 (middle C) of the right keyboard.
NOTE
• You can return the keyboards to their initial default
ranges by exiting and then re-entering the Duet Mode.
IMPORTANT!
• The digital piano also will exit the Duet Mode if you use
the TONE/SETTING button and tone setting keyboard
keys to select a tone in step 3.
• You cannot use the Duet Mode while recording.
E-11
Page 16

Playing Back Built-in Songs
TONE/SETTING
SONG /
LR
IMPORTANT!
• After you select a built-in song, it can take a number of
seconds for the song data to be loaded. While the data is
being loaded, the keyboard keys and button operations
will be disabled. Selecting a song while playing
something on the keyboard will cause sound output of
the keyboard notes to stop.
Playing Back All of the Built-in
Songs
Your digital piano comes with a Music Library of 60
built-in tunes. You can play all 60 tunes in sequence,
from beginning to end.
While holding down the TONE/SETTING
1.
button, press the SONG X/ button.
• This will start repeat demo playback of the built-in
songs in sequence, from 01 through 60.
• You can play along with a song on the keyboard as it
is playing. The tone assigned to the keyboard is the
one that is preset for the song that is playing.
• You can select a specific song during demo playback.
For details, see step 2 under “Playing Back a Specific
Music Library Song”.
Press the SONG X/ button again to stop
2.
built-in song play.
NOTE
• The tune selection and playback stop operations
described above are the only operations that are possible
during demo tune play.
• Built-in tune MIDI data is not output during built-in
song play.
Playing Back a Specific Music
Library Song
Find the song number of the song you want to
1.
play in the song list on page A-1.
To change to another song, hold down the
2.
TONE/SETTING button as you use the
SONG SELECT keys to specify a song
number.
• Each press of the + or – key raises or lowers the song
number by 1.
• You can use the value input keys (0 to 9) to enter a
specific song number. Be sure to input all two-digits.
Example: To select song 08, enter 0 and then 8.
IMPORTANT!
• Be sure to allow a bit of time between + and – key
operations. Performing a series of + and – key operations
too quickly can cause some of the operations to be
skipped.
E-12
Page 17

Press the SONG X/ button.
3.
• This starts the playback of the song.
To stop playback, press the SONG X/
4.
button again.
• Playback will stop automatically when the end of the
song is reached.
NOTE
• Pressing the + and – keys at the same time will select
song number 01.
• You also can adjust the playback tempo and volume of
the song. See “Configuring Settings with the Keyboard”
on page E-18 for more information.
• Built-in tune MIDI data is not output during built-in
song play.
Practicing with a Music
Library Song
Playing Back Built-in Songs
You can turn off the left hand part or right hand part of
a song and play along on the piano.
NOTE
• The Music Library includes duet tunes (song numbers
12, 37, and 45). While a duet is selected, you can turn off
the first piano <Primo> or second piano <Secondo> tone
and play along with the song.
• A number of tunes have tempo changes part way
through in order to produce specific musical effects.
PREPARATION
• Select the song you want to practice and adjust the
tempo. See “Configuring Settings with the Keyboard” on
page E-18.
Use the LR button to turn off a part.
1.
• Each press of the LR button cycles through the part
settings as shown below. The indicator lamps above
the button show which part is turned off.
Left hand Right hand
Both parts
on
Press the SONG X/ button.
2.
• This starts playback, without the part you turned off
in step 1.
Play the missing part on the keyboard.
3.
To stop playback, press the SONG X/
4.
Right hand
part off
Left hand
part off
button again.
E-13
Page 18

Recording and Play Back
SONG /
RECORDER
METRONOME
LR
You can store the notes you play in digital piano
memory for later playback.
Tracks
A track is a container of recorded data, and a song
consists of two tracks: Track 1 and Track 2. You can
record each track separately and then combine them so
they play back together as a single song.
While playing
back. . .
Song
Track 1
Record
■ Recorded Data Storage
• Starting a new recording deletes any data that was
previously recorded in memory.
• Should power fail during recording, all of the data in
the track you are recording will be deleted.
IMPORTANT!
• CASIO COMPUTER CO., LTD. takes no responsibility
for any damages, lost profits, or claims by third parties
arising from the deletion of recorded data due to
malfunction, repair, or for any other reason.
■ Using the RECORDER Button
Each press of the RECORDER button cycles through
the recording options in the sequence shown below.
Track 2
Record
■ Memory Capacity
• You can record approximately 5,000 notes in digital
piano memory.
• When remaining memory capacity is 100 notes or
less, the track lamp flashes at high speed to alert
you.
• Recording stops automatically if the number of
notes in memory exceeds the maximum.
■ Recorded Data
• Keyboard play
• Tone used
• Pedal operations
• Reverb and chorus settings (Track 1 only)
• Tempo setting (Track 1 only)
• Layer setting (Track 1 only)
Playback
Standby
Lit Flashing Off
Record
Standby
Normal
E-14
Page 19

Recording Your Keyboard Play
After recording to either of the tracks of a song, you can
record to the other track while listening to playback
what you recorded in the first track.
To record to a specific track of a song
Press the RECORDER button twice so its
1.
lamp is flashing.
• At this time the L lamp will flash to indicate that the
digital piano is standing by for recording to Track 1.
Recording and Play Back
Start playing something on the keyboard.
4.
• Recording will start automatically.
To stop recording, press the SONG X/
5.
button again.
• This will cause the RECORDER button and LR
button lamps to change from flashing to lit.
• To play back the track you just recorded, press the
SONG X/ button.
After you are finished recording or playing
6.
back, press the RECORDER button so its
lamp goes out.
Use the LR button to select the track to which
2.
you want to record.
• Make sure that the indicator lamp for the record track
is flashing.
Track 1: L lamp
Track 2: R lamp
Example: Track 1 Selected
Select the tone and effects (Track 1 only) you
3.
want to use in your recording.
• Tone (page E-6)
• Effect (page E-9)
NOTE
• If you want the metronome to sound while you are
recording, configure the beat and tempo settings, and
then press the METRONOME button. See “Using the
Metronome” on page E-10 for more information.
E-15
Page 20

Recording and Play Back
To record to one track of a song while
listening to the playback of the other
track
Press the RECORDER button so its lamp is
1.
lit.
Press the LR button until the lamp of only the
2.
track to which you want to play back is lit.
Press the RECORDER button so its lamp is
3.
flashing.
• This will cause the L lamp to flash.
Use the LR button to select the track to which
4.
you want to record.
• Make sure that the indicator lamp for the record track
is flashing.
Example: To listen to playback of Track 1 as you record
to Track 2
To play back from digital piano
memory
Press the RECORDER button so its lamp is
1.
lit.
NOTE
• When a song has something recorded in both tracks, you
can turn off one track and play back just the other track,
if you want. Whether a track is on or off is indicated by
the lamps above the LR button. Each press of the LR
button cycles through the different possible track on/off
settings.
Press the SONG X/ button.
2.
• This starts playback of the song and/or track you
selected.
NOTE
• You can change the tempo setting as a track is playing.
•Press the SONG X/ button again to stop playback.
Lit (Play) Flashing (Record Standby)
Select the tone and effects (Track 1 only) you
5.
want to use for your recording.
Press the SONG X/ button or play
6.
something on the keyboard.
• This will start both playback of the recorded track
and recording to the other track.
To stop recording, press the SONG X/
7.
button.
E-16
Page 21

Deleting Recorded Data
The following procedure deletes a specific track of a
song.
IMPORTANT!
• The procedure below deletes all of the data of the
selected track. Note that the delete operation cannot be
undone. Check to make sure you really do not need the
data in digital piano memory before you perform the
following steps.
Press the RECORDER button so its lamp is
1.
lit.
Press the RECORDER button again so its
2.
lamp is flashing.
Recording and Play Back
Use the LR button to select the track you
3.
want to delete.
• This causes the lamp of the selected track to flash.
Keep the RECORDER button depressed until
4.
its lamp changes from flashing to lit.
Example: To delete Track 2
Press the LR button.
5.
• This deletes the selected track and enters playback
standby.
• To cancel the delete operation, press the RECORDER
button in place of the LR button.
NOTE
• Only the digital piano’s LR button and RECORDER
button are operational from step 4 until you actually
perform the delete operation in step 5. No other button
operation can be performed.
E-17
Page 22

Configuring Settings with the Keyboard
TONE/SETTING
In addition to selecting tones and Music Library tunes,
you also can use the TONE/SETTING button in
combination with the keyboard keys to configure
effect, keyboard touch, and other settings.
To configure settings with the
keyboard
Use the “Parameter List” on page E-20 to find
1.
the setting you want to configure, and note its
details.
Use “Keyboard Keys Used for Configuring
2.
Settings” on page E-19 to find the location on
the keyboard for configuring the setting you
want.
While holding down the TONE/SETTING
3.
button, press the keyboard key for the setting
you want to configure.
• The digital piano will sound an operation tone after it
configures the setting.
Example: To lower the transpose setting by one
semitone by pressing the T keyboard key
once.
Release the TONE/SETTING button to
4.
complete the setting procedure.
NOTE
• You can configure the digital piano so no operation tone
sounds in step 3. For details, see “bp Operation Tone”
under “Parameter List” on pages E-20 - E-22.
■ Keyboard Setting Operation Types
There are three types of operations that you can
perform while configuring settings with the keyboard
keys: Type A, Type B, and Type C.
Type A: Direct input
Example: Pressing the STRINGS keyboard key to
select the STRINGS tone
Type B: Raising or lowering a setting using the + and
– or T and S keyboard keys
• Holding down a key raises or lowers the setting at
high speed.
• To return to the initial default setting, press both
keys at the same time.
Type C: Value input using the numeric keys (0 to 9)
Example: To enter “120”, press keys 1, 2, 0.
E-18
Transpose T key
NOTE
• You can find out what operation type applies to each
setting by checking the “Operation Type” in the
“Parameter List” on page E-20.
Page 23

Configuring Settings with the Keyboard
Keyboard Keys Used for Configuring Settings
• The numbers 1 through br correspond to the same numbers in the “Parameter List” on page E-20.
[Left keyboard]
[Left keyboard]
Tone selection
1
[Overall]
[Center keyboard]
6
Tempo
Metronome beat
7
Touch Response
bk
Song select
5
Brilliance
2
3
Reverb
[Right keyboard]
OFF
12 3 4 − +
Chorus
4
Keyboard Key (Transpose)
bl
Keyboard tuning (Tuning)
bm
Song volume
8
Metronome volume
9
Send Channel
bn
Local Control
bo
OFF ON OFF ON OFF ON OFF ON
Operation tone
bp
Setup Memory
bq
Operation lock
br
E-19
Page 24

Configuring Settings with the Keyboard
Parameter List
■ Tones
Parameter Settings
Tone selection See page E-6.
1
Brilliance
2
(BRILLIANCE)
Reverb
3
(REVERB)
Chorus Off (OFF), 1 to 4
4
Default: GRAND
PIANO
(MODERN)
–3 to 0 to 3
Default: 0
Off (OFF), 1 to 4
Default: 2
Default: Off
Operation
Type
(page E-18)
A Assigns a tone to the
B Specifies the brilliance of
A Specifies the reverb of
A Controls the breadth of
Description Remarks
keyboard.
(page E-6)
notes.
(page E-8)
notes.
(page E-9)
notes.
(page E-9)
• Chorus is not available in the Duet Mode.
• When tones are layered, Chorus is applied
only to the second tone you select for
layering.
• Turning on Chorus while a bass tone is
selected will apply the effect to the bass
tone only. Chorus will not be applied to
the high-range tone.
■ Song/Metronome
Parameter Settings
Song Select
5
(SONG
SELECT)
Tempo
6
(TEMPO)
Metronome
7
Beat
(METRONOME
BEAT)
Song volume 00 to 42
8
Metronome
9
Volume
01 to 60
Default: 01
020 to 255
Default: 120
0, 2, 3, 4, 6
Default: 4
Default: 42
00 to 42
Default: 36
Operation
Type
(page E-18)
B (+/–)
C (0 to 9)
B (+/–)
C (0 to 9)
A Specifies the metronome
B Sets the volume level of
B Specifies the metronome
Description Remarks
Selects a Music Library
tune.
(page E-12)
Specifies the tempo of
Music Library songs, the
metronome, recording and
playback, etc.
(page E-10)
beat.
(page E-10)
Music Library playback.
volume.
(page E-10)
• Always enter two-digits when using the
number keys (0 to 9) to input a value.
Example: To input 8, enter 0, 8 (leading
zero required).
• This setting cannot be changed while
recording.
• Always enter three digits when using the
number keys (0 to 9) to input a value.
Example: To input 90, enter 0, 9, 0 (leading
zero required).
• During recording, pressing + and – at the
same time sets a value of 120.
• The metronome beat setting cannot be
changed while playback of a Music
Library tune is in progress.
• This setting cannot be changed while
recording.
E-20
Page 25

■ Keyboard
Parameter Settings
Touch Response
bk
(TOUCH
RESPONSE)
Keyboard Key
bl
(Transpose)
Keyboard
bm
tuning (Tuning)
Off (OFF), 1 to 3
Default: 2
–12 to 0 to 12
Default: 0
–99 to 0 to 99
Default: 0
Operation
Type
(page E-18)
A Specifies the relative touch
B Raises or lowers the tuning
B Raises or lowers the
Description Remarks
of the keyboard keys.
Setting a smaller value
causes lighter touch to
produce more powerful
sound.
of the digital piano in
semitone steps.
overall pitch of the digital
piano in 1-cent steps (100
cents = 1 semitone) from
the standard pitch of A4 =
440 Hz.
Configuring Settings with the Keyboard
• The transpose setting cannot be
configured while Music Library playback
is in progress and in the Duet Mode.
• Raising the key of the digital piano can
cause notes the highest notes in the range
of a tone to become distorted.
• The pitch setting cannot be changed while
playback of a Music Library tune is in
progress.
E-21
Page 26

Configuring Settings with the Keyboard
■ MIDI and Other Settings
Parameter Settings
Send Channel 01 to 16
bn
Local Control Off, On
bo
Operation Tone Off, On
bp
Setup Memory Off, On
bq
Operation Lock Off, On
br
Default: 01
Default: On
Default: On
Default: Off
Default: Off
Operation
Type
(page E-18)
B Specifies one of the MIDI
A Selecting “Off” for Local
A Selecting “Off” disables
A When “On” is selected for
A Selecting “On” for this
Description Remarks
channels (1 through 16) as
the Send Channel, which is
used for sending MIDI
messages to an external
device.
Control cuts off the digital
piano’s sound source, so
no sound is produced by
the digital piano when
keys are pressed. Turn off
local control when you
want to sound only the
connected MIDI device.
sounding of the operation
tone whenever a keyboard
key is pressed while the
TONE/SETTING is
depressed.
this setting, the digital
piano will remember its
current settings*1, and
restore them when it is
turned on again.
When “Off” is selected,
settings
initial defaults whenever
the digital piano is turned
on.
setting locks the digital
piano’s buttons (except for
the power button and the
buttons required for
unlock), so no operation
can be performed.
Turn on operation lock
when you want to protect
against unintentional
button operations.
*2
are reset to their
• The Local Control setting cannot be
changed while playback of a Music
Library tune is in progress.
• This setting is retained even when the
digital piano is turned off.
• The operation tone setting cannot be
changed while Music Library playback is
in progress, while the metronome is
sounding, and during recording.
• To clear current setup memory contents,
turn the Setup Memory setting off and
then back on again.
• The Setup Memory setting cannot be
changed while Music Library playback is
in progress, while the metronome is
sounding, in the Duet Mode, and during
recording.
*1 The following settings are not
remembered.
• Duet Mode
• Tune LR (part) setting
• Local Control
*2 Except for the operation tone on/off
setting.
• The operation lock setting cannot be
changed while Music Library playback is
in progress, while the metronome is
sounding, and during recording.
E-22
Page 27

Connecting to the MIDI
MIDI IN
MIDI OUT
OUTININ
Terminal
■ What is MIDI?
MIDI is a standard for digital signals and connectors
that allows musical instruments, computers, and other
devices, regardless of manufacturer, to exchange data
with each other.
NOTE
• For details about MIDI implementation, visit:
http://world.casio.com/
■ MIDI Connections
Connecting your computer or other external MIDI
device to the digital piano’s MIDI OUT/IN terminals
makes it possible for them to exchange MIDI messages
and record and playback keyboard notes on the
connected device.
Commercially available
Computer
USB port
USB-MIDI interface
MIDI IN
MIDI OUT
Configuring Settings with the Keyboard
Commercially available
MIDI OUT/IN terminals on
MIDI cable
bottom of piano
OUT
■ MIDI Settings
You can use the procedure in “Configuring Settings
with the Keyboard” (page E-18) to configure MIDI
settings. See page E-22 for a description of the settings
and information about how to configure them.
E-23
Page 28

Assembling the Stand
Unpacking
PREPARATION
• This stand does not include any of the tools required for
assembly. It is up to you to prepare a large Philips head
(+) screwdriver for assembly.
A
C
E
F
G
H
I
J
K
B
D
Part Qty
4
6
1
2
2
4
2
CAUTION
• Assembly of the stand should be performed by at least
two people working together.
• This stand should be assembled on a flat surface.
• Do not remove the tape securing the keyboard cover in
place until assembly is complete. Removing the tape can
cause the keyboard cover to open and close during
assembly, creating the risk of personal injury to your
hands and fingers.
• Take care that you do not pinch your fingers between
parts when assembling them.
To assemble the stand
Attach side panels A and B to crosspiece D.
1.
Secure the side panels using four E screws.
• When installing part 2, slide the brackets 3 into the
slots in either end crosspiece D. If the brackets 3 are
not inserted into the ends of the crosspiece D as far as
they will go, the E screws will not be able to enter
into the screw holes of the brackets 3, which can strip
the threads of the screws.
• Cover the screw heads with the caps J.
J
L
M
IMPORTANT!
• If anything is missing or damaged, contact your local
CASIO service provider.
• Note that use of any unauthorized parts or components
can cause damage to the stand and/or the digital piano.
1
1
z Before starting stand assembly, unfasten the band 1
that bundles the pedal cable in the back of crosspiece
, and extend the cable.
D
1
A
E
J
D
E
3
2
Slide back panel C into the grooves 4 of the
2.
side panels.
C
4
B
E-24
Page 29

Assembling the Stand
Use the two screws I to secure the top left
3.
and right edges of the back panel C to the
brackets 5 of side panels A and B.
• At location 6, slip the G clip onto to the I screw
before installing the screw.
6
G
I
Next, secure the bottom of the back panel C
4.
5
I
with the six F screws.
B
C
A
Place the piano onto the stand.
6.
IMPORTANT!
• In order to ensure you do not get your fingers pinched
between the piano and the stand, grasp the piano on its
sides (not its ends) at the locations marked with stars ()
in the illustration.
At least 10cm
9
At least 10cm
F
Adjust the height adjustment screw 7 to
5.
provide support so crosspiece D does not
bow downwards when the pedals are
pressed.
7D
IMPORTANT!
• Pressing the pedals without adjusting height adjustment
screw 7 can result in damage to crosspiece D. Always
make sure you adjust height adjustment screw 7 before
operating the pedals.
• At this time the screws on the bottom of the piano
should hook into the cutouts in the stand
8
brackets 9.
Back of piano
Bracket cutout
9
8
Stand side panel
E-25
Page 30

Assembling the Stand
First, use the two H butterfly bolts to secure
7.
the back of the piano to the stand. Next, use
the two K screws to secure the front of the
piano.
H
K
IMPORTANT!
• The butterfly bolts H and screws K keep the piano from
slipping off the stand. Never use the piano without the
butterfly bolts H and screws K installed.
Plug the power cord that comes with the
3.
digital piano into the AC power jack on the
bottom of the digital piano.
* AP-400V only
IMPORTANT!
• The shape of the power cord plug and household power
outlet receptacle differ according to country and
geographical area. The illustration shows just one
example of the shapes that are available.
• The power cord of the AP-400 is hard-wired to the digital
piano.
*
Power Cord
To connect cables
Orienting the pedal plug as shown in the
1.
illustration, plug it into the pedal connector on
the bottom of the piano.
• Secure the pedal cord with the clip G.
Pedal plug
G
Check to make sure that the POWER button
2.
is in the OFF position (raised). If power is on,
press the POWER button to turn it off.
Plug the power cord into a household power
4.
outlet.
Household power outlet
CAUTION
• The screws of the stand can work loose due to the effects
of temperature and humidity changes, vibration, etc.
Because of this, you need to periodically check the
screws for proper tightness. Retighten any loose screws
you find.
• To power the digital piano, use a power outlet that
allows easy access when plugging in or unplugging the
power cord.
E-26
Page 31

To install the music stand
Install the music stand by inserting its pegs
1.
into the holes in the top of the piano.
To install the headphones
hook
Assembling the Stand
Insert the headphones hook L into the two
1.
holes on the bottom of the piano.
Use screw M to secure the headphones hook
2.
in place.
L
M
E-27
Page 32

Reference
Troubleshooting
Problem Cause Action See Page
No sound is
produced when I
press a keyboard
key.
The pitch of the
digital piano is off.
No sound is
produced when I try
to play back a built-in
song or a recorded
song.
When I play
something on the
digital piano, my
connected external
MIDI sound source
does not sound.
Buttons do not
operate.
Tone, tempo and
other settings are not
initialized when the
digital piano is
turned on.
A tone’s quality and
volume sounds
slightly different
depending where it is
played on the
keyboard.
When I press a
button, the note that
is sounding cuts out
momentarily or there
is a slight change in
how effects are
applied.
1. The VOLUME controller is set to
“MIN”.
2. Headphones are connected to the
digital piano.
3. MIDI Local Control is turned off. 3. Turn on the Local Control setting. ) E-22
1. The digital piano’s key setting is
something other than “0”.
2. Digital piano tuning is incorrect. 2. Adjust digital piano tuning, or turn the
1. The VOLUME controller is set to
“MIN”.
2. Headphones are connected to the
digital piano.
1. The digital piano’s send channel is
different from the send channel of the
external MIDI sound source.
2. The volume or expression setting of
the external sound source is “0”.
Operation Lock is turned on. Turn off Operation Lock or turn the digital
Setup Memory is turned on. Turn off Setup Memory. ) E-22
This is an unavoidable result of the digital sampling process,*
* Multiple digital samples are taken for the low range, middle range, and high range of the original
musical instrument. Because of this, there may be a very slight difference in tonal quality and
volume between sample ranges.
This happens when the sounds of multiple parts are sounding at the same time while using layer,
using the Duet Mode, playing back a built-in tune, recording, etc. Pressing a button when one of these
conditions exists will cause the effect setting that is built into the tone to change automatically, which
causes the notes to cut out momentarily or causes a slight change in how effects are being applied.
1. Rotate the VOLUME controller more
towards “MAX”.
2. Unplug the headphones from the
digital piano.
1. Change the key setting to “0”, or turn
digital piano power off and then back
on again.
digital piano off and then back on
again.
1. Rotate the VOLUME controller more
towards “MAX”.
2. Unplug the headphones from the
digital piano.
1. Change the send channel settings of
the digital piano and/or the external
MIDI sound source so they are the
same.
2. Adjust the volume and expression
settings of the external sound source.
piano off and then back on again.
and does not indicate malfunction.
) E-6
) E-5
) E-21
) E-21
) E-6
) E-5
) E-22
) External
sound
source
user’s guide
) E-22
E-28
Page 33

Reference
Product Specifications
All of the items in these specifications apply to the AP-400 and AP-400V, unless specifically noted otherwise.
Model AP-400/AP-400V
Keyboard 88-key piano keyboard, with Touch Response
Maximum Polyphony 128 notes
Tones 11
• Layer (excluding bass tones)
• Split (Low-range bass tones only)
Effects Brilliance (–3 to 0 to 3), Reverb (4 types), Chorus (4 types), Acoustic Resonance
Metronome • Beats: 0, 2, 3, 4, 6
• Tempo Range: 20 to 255
Duet Adjustable tone range (–2 to 0 to 1 octaves)
Music Library • Number of Songs: 60
• Song volume: Adjustable
• Part On/Off: L, R
Recorder • Functions: Real-time recording, playback
• Number of Song: 1
• Number of Tracks: 2
• Capacity: Approximately 5,000 notes total
• Recorded Data Protection: Built-in flash memory
Pedals Damper, soft, sostenuto
Other Functions • Touch Select: 3 types, Off
• Transpose: ±1 octaves (–12 to 0 to 12)
• Tuning: A4 = 440.0 Hz ±99 cents (variable)
• Operation Lock
MIDI 16-channel multi-timbre receive
Inputs/Outputs • PHONES jack: Stereo standard jacks × 2
Output impedance: 470Ω
Output Voltage: 22V (RMS) MAX
• MIDI OUT/IN terminals
• Pedal connector
Speakers
Power Requirements AP-400 : 120V
Power Consumption AP-400 : 60W
Dimensions Digital Piano and Stand: 139.5 (W) × 42.7 (D) × 83.8 (H) cm (54
Weight Digital Piano and Stand: approximately 44.5 kg (98.1 lbs)
φ
12cm × 2 + φ 5cm × 2 (Output 20W + 20W)
AP-400V : 220-240V
AP-400V : 60W
15
/16 × 16 13/16 × 33 inch)
• Specifications and designs are subject to change without notice.
• The power cord of the AP-400 is hard-wired to the digital piano.
• The power cord of the AP-400V is detachable.
E-29
Page 34

Reference
Operating Precautions
Be sure to read and observe the following operating
precautions.
■ Location
Avoid the following locations for this product.
• Areas exposed to direct sunlight and high
humidity
• Areas subjected to temperature extremes
• Near a radio, TV, video deck, or tuner
The above devices will not cause malfunction of
the product, but the product can cause interference
in the audio or video of a nearby device.
■ User Maintenance
• Never use benzene, alcohol, thinner, or other
chemical agents to clean the product.
• To clean the product or its keyboard, wipe with a
soft cloth moistened in a weak solution of water
and a mild neutral detergent. Wring all excess
moisture from the cloth before wiping.
• Any reproduction of the contents of this manual,
either in part or its entirety, is prohibited. Except
for your own, personal use, any other use of the
contents of this manual without the consent of
CASIO is prohibited under copyright laws.
• IN NO EVENT SHALL CASIO BE LIABLE FOR
ANY DAMAGES WHATSOEVER (INCLUDING,
WITHOUT LIMITATION, DAMAGES FOR LOSS
OF PROFITS, BUSINESS INTERRUPTION, LOSS
OF INFORMATION) ARISING OUT OF THE USE
OF OR INABILITY TO USE THIS MANUAL OR
PRODUCT, EVEN IF CASIO HAS BEEN
ADVISED OF THE POSSIBILITY OF SUCH
DAMAGES.
• The contents of this manual are subject to change
without notice.
■ Included and Optional Accessories
Use only accessories that are specified for use with
this product. Use of unauthorized accessories creates
the risk of fire, electric shock, and personal injury.
■ Weld Lines
Lines may be visible on the exterior of the product.
These are “weld lines” that result from the plastic
molding process. They are not cracks or scratches.
■ Musical Instrument Etiquette
Always be aware of others around you whenever
using this product. Be especially careful when
playing late at night to keep the volume at levels that
do not disturb others. Other steps you can take when
playing late at night are closing the window and
using headphones.
E-30
Page 35

Appendix/Apéndice
Tone List/Lista de tonos
Program
Tone Name/
Nombre de tonos
GRAND PIANO
(MODERN)
GRAND PIANO
(CLASSIC)
GRAND PIANO
(VARIATION)
ELEC PIANO 1 4 48 128
ELEC PIANO 2 5 48 64
HARPSICHORD 6 48 128
VIBRAPHONE 11 48 128
PIPE ORGAN 19 48 128
STRINGS 49 48 128
BASS 1 32 48 128
BASS 2 32 49 64
Change/
Cambio de
programa
04864
0 49 64
0 50 128
Bank Select
MSB/
MSB de
selección de
banco
Maximum
Polyphony/
Polifonía
máxima
Song List/Lista de canciones
No./Nº Song Name/Nombre de canciones
01 Nocturne Op.9-2
02 Fantaisie-Impromptu Op.66
03 Étude Op.10-3 “Chanson de l’adieu”
04 Étude Op.10-5 “Black Keys”
05 Étude Op.10-12 “Revolutionary”
06 Étude Op.25-9 “Butterflies”
07 Prélude Op.28-7
08 Valse Op.64-1 “Petit Chien”
09 Valse Op.64-2
10 Moments Musicaux 3
11 Impromptu Op.90-2
12 Marche Militaire 1 (Duet)
13 Frühlingslied [Lieder Ohne Worte Heft 5]
14 Fröhlicher Landmann [Album für die Jugend]
15 Von fremden Ländern und Menschen [Kinderszenen]
16 Träumerei [Kinderszenen]
17 Tambourin
Menuet BWV Anh.114 [Clavierbüchlein der Anna Magdalena
18
Bach]
19 Inventio 1 BWV 772
20 Inventio 8 BWV 779
21 Inventio 13 BWV 784
22 Praeludium 1 BWV 846 [Das Wohltemperierte Klavier 1]
23 Le Coucou
24 Gavotte
25 Sonatina Op.36-1 1st Mov.
26 Sonatine Op.20-1 1st Mov.
27 Sonate K.545 1st Mov.
28 Sonate K.331 3rd Mov. “Turkish March”
29 Rondo K.485
30 Für Elise
31 Marcia alla Turca
32 Sonate Op.13 “Pathétique” 1st Mov.
33 Sonate Op.13 “Pathétique” 2nd Mov.
34 Sonate Op.13 “Pathétique” 3rd Mov.
35 Sonate Op.27-2 “Moonlight” 1st Mov.
36 Rhapsodie 2
37 Waltz Op.39-15 (Duet)
38 Liebesträume 3
39 Blumenlied
40 La Prière d’une Vierge
41 Csikos Post
42 Humoresque Op.101-7
43 Melodie [Lyrische Stücke Heft 2]
44 Sicilienne Op.78
45 Berceuse [Dolly] (Duet)
46 Arabesque 1
47 La Fille aux Cheveux de Lin [Préludes]
48 Passepied [Suite bergamasque]
49 Gymnopédie 1
50 Je Te Veux
51 Salut d’Amour
52 The Entertainer
53 Maple Leaf Rag
54 L’arabesque [25 Etüden Op.100]
55 La Styrienne [25 Etüden Op.100]
56 Ave Maria [25 Etüden Op.100]
57 Le retour [25 Etüden Op.100]
58 La chevaleresque [25 Etüden Op.100]
59 No.13 [Études de Mécanisme Op.849]
60 No.26 [Études de Mécanisme Op.849]
A-1
Page 36

Model AP-400 Version : 1.0
MIDI Implementation Chart
Function Transmitted Recognized Remarks
Basic
Channel
Mode
Note
Number
Velocity
After
Touch
Pitch Bender
Control
Change
Default
Changed
Default
Messages
Altered
Note ON
Note OFF
Key’s
Ch’s
0,32
6, 38
100, 101
120
121
1 - 16
1 - 16
Mode 3
X
21 - 108 0 - 127
O
9nH v = 1 - 127
X
8nH v = 64
X
X
X
1 - 16
1 - 16
Mode 3
X
0 - 127*1True voice
O
9nH v = 1 - 127
9nH v = 0.8nH V =
X
O
**
*1: Depends on tone
*1: Depende del tono.
**: no relation
**:sin relación
XO
O
1
7
10
11
16
17
18
19
64
66
67
76
77
78
80
81
82
83
91
93
X
X
O
X
X
X
X
X
X
O
O
O
X
X
X
X
X
X
X
X
O
X
X
O
O
O
O
O
O
O
O
O
O
O
O
O
O
O
O
O
O
O
O
O
O
O
O
O
O
Bank select
Modulation
Data entry
Volume
Pan
Expression
DSP Parameter0*2
DSP Parameter1*2
DSP Parameter2*2
DSP Parameter3*2
Damper
Sostenuto
Soft pedal
Vibrato rate
Vibrato depth
Vibrato delay
DSP Parameter4*2
DSP Parameter5*2
DSP Parameter6*2
DSP Parameter7*2
Reverb send
Chorus send
RPN LSB, MSB*3
All sound off
Reset all controller
Program
Change
:True #
System Exclusive
System
Common
: Song Pos
: Song Sel
: Tune
System
Real Time
Aux
: Clock
: Commands
: Local ON/OFF
: All notes OFF
Messages
: Active Sense
: Reset
Remarks
Mode 1 : OMNI ON, POLY
Mode 3 : OMNI OFF, POLY
O
0 - 127
OO
X
X
X
O
O
X
O
X
X
*2 : For details, see MIDI Implementation at http://world.casio.com/.
*2 : Si desea más información, vea Implementación MIDI en http://world.casio.com/
*3 : Pitch Bend Sensitivity, Fine Tune, Coarse Tune, Modulation Depth, Null
*3 : Sensibilidad de inflexión de tono, afinación precisa, afinación poco precisa, profundidad de modulación, nulo
*4 : Universal Real-time Exclusive Messages: Master Volume, Master Balance, Master Fine Tuning, Master Coarse Tuning, Reverb Parameter,
Chorus Parameter, GM System Message
*4 : Mensajes exclusivos de sistemas universales en tiempo real: Volumen maestro, balance maestro, afinación precisa maestra, afinación
poco precisa maestra, parámetro de reverberación, parámetro de coro, mensaje de sistema GM
*5 : This model’s System Exclusive Message
• For details about footnotes 3 through 5, see MIDI Implementation at http://world.casio.com/
*5 : Mensaje exclusivo del sistema de este modelo
• Si desea más información sobre los pies de página 3 a 5, vea Implementación MIDI en http://world.casio.com/
Mode 2 : OMNI ON, MONO
Mode 4 : OMNI OFF, MONO
O
0 - 127
O
O
*4, *5
X
X
X
X
X
X
X
.
.
.
O : Yes
X : No
Page 37

This recycle mark indicates that the packaging conforms to
the environmental protection legislation in Germany.
Esta marca de reciclaje indica que el empaquetado se
ajusta a la legislación de protección ambiental en Alemania.
C
MA0804-A Printed in China
AP400/400CYES1A
 Loading...