


INSTRUCTION MANUAL
XVL 3 USA
APPLICARE
TARGA
CARATTERISTICHE
2013/09
Edition 01

Via Emilia, 45
40011 Anzola dell’Emilia (BO)
ITALY
+ 39 051 6505111
+ 39 051 732178
Þcarpigiani.com
We wish to thank you for purchasing one of Carpigiani’s machines.
Since 1993, Carpigiani manufactures utilising the Quality Control Management System that is today certified according to UNI-EN-ISO 9001-2008.
Carpigiani’s machines conform to the requirements of the following European Directives:
t “Machinery” Directive 2006/42/EC;
t “Low Voltage” Directive 2006/95/EC;
t “EMC” Directive 2004/108/EC;
t “PED” Directive 97/23/EC;
t Regulation 2004/1935/EC relating to “Materials and articles in contact with foodstuffs”.
This manual contains the ORIGINAL INSTRUCTIONS and can be reproduced, transmitted, copied and filed in a
retrieval system or translated in other languages ONLY by prior written agreement with Carpigiani.
The purchaser has the right to make copies only for his/her own use.
Carpigiani’s policy pursues constant research and development and therefore it reserves the right to make changes
and revisions whenever deemed necessary and without being bound to the purchaser for any previous statements.
EDITION DATE MODIFICATIONS
01 2013/09
EDITOR VERIFIED APPROVED
AM AS RV

XVL 3 USA
GENERAL INDEX
FOREWORD .......................................................................................... 6
Instruction manual .................................................................................................... 6
Purpose ...................................................................................................................... 6
Manual structure ....................................................................................................... 6
Additional documentation ........................................................................................ 6
Standard symbols ...................................................................................................... 7
Qualification of the personnel .................................................................................. 7
Safety ......................................................................................................................... 8
Warning ...................................................................................................................... 8
1. GENERAL INFORMATION .............................................................9
1.1 General information ...............................................................................9
1.1.1 Manufacturer’s identification data ............................................................... 9
1.1.2 Maintenance information .............................................................................. 9
1.1.3 Information for the user .............................................................................. 10
1.2 Information about the machine ..............................................................10
1.2.1 General information ..................................................................................... 10
1.2.2 Technical features ....................................................................................... 10
1.2.3 Location of machine groups ....................................................................... 11
1.3 Intended use ......................................................................................... 11
1.4 Noise ..................................................................................................... 11
1.5 Machine storage .................................................................................. 12
1.6 Disposal of packing materials ............................................................12
1.7 WEEE (Waste Electrical and Electronic Equipment) ......................... 12
1.8 Bacterial contamination detection ..................................................... 12
2. INSTALLATION.............................................................................. 14
2.1 Space necessary to use the machine ................................................ 14
2.2 Water supply connection .................................................................... 14
2.3 Machine with air-cooled condenser ...................................................14
2.4 Machines with water-cooled condenser ........................................... 14
2.4.1 Water pressure valve adjustment .............................................................. 14
2.5 Electrical connection ........................................................................... 15
2.5.1 Replacing the power cable ......................................................................... 15
2013/09 - Ed. 01 - EN
3

XVL 3 USA
2.6 Location ................................................................................................ 15
2.7 Refilling ................................................................................................. 15
2.8 Machine testing.................................................................................... 15
3. INSTRUCTIONS FOR USE ........................................................... 16
3.1 Machine safety warnings .................................................................... 16
3.2 Machine configuration ........................................................................ 16
3.3 Commands ........................................................................................... 17
3.3.1 Touchpad ...................................................................................................... 17
3.4 Dispenser levers ..................................................................................30
3.4.1 Modifying the quantity of product dispensed ........................................... 30
3.4.2 Self closing ................................................................................................... 30
3.5 Machines fed by pump and semi-submersible pump ............................30
3.6 Gravity-fed machines – feed needle ................................................... 31
3.7 Preliminary operations, washing and sanitising ............................... 31
3.8 Commissioning the machine .............................................................. 31
3.8.1 Starting the machine that has a pump ..............................................................31
3.8.2 Starting a gravity-fed machine ................................................................... 32
3.8.3 Dry filling (if present) ................................................................................... 32
3.9 Production ............................................................................................ 33
3.10 Pasteurisation (for the “SP” machines) ............................................. 34
3.11 Daily cleaning – Opening and closing procedures ...............................34
3.11.1 Daily closing procedures ........................................................................... 34
3.11.2 Daily opening procedure ............................................................................. 36
4. SAFETY DEVICES ......................................................................... 38
4.1 Alarms ................................................................................................... 38
4.1.1 Blackout ....................................................................................................... 40
5.
DISASSEMBLY, CLEANING AND REASSEMBLY OF THE
PARTS IN CONTACT WITH THE PRODUCT ...........................41
5.1 General information ............................................................................. 41
5.2 Washing conditions ............................................................................. 41
5.3 Suggestions .......................................................................................... 41
5.4 How to use cleaning/sanitising solution ........................................... 41
5.5 Daily cleaning ....................................................................................... 42
4
2013/09 - Ed. 01 - EN

XVL 3 USA
5.6 Scheduled cleaning ............................................................................. 42
5.6.1 Mix emptying ................................................................................................ 42
5.6.2 Pump-fed machines - Removing the pumps from the hoppers .............. 42
5.6.3 Gravity-fed machines .................................................................................. 43
5.6.4 Remove hopper beaters ............................................................................. 43
5.6.5 Hopper cleaning .......................................................................................... 43
5.6.6 Machine with pump – pump removal ......................................................... 45
5.6.7 Gravity-fed machines – removal of the feed needle ................................ 47
5.6.8 Disassembly of the spigot door ................................................................. 48
5.6.9 Disassembly of beaters ............................................................................. 50
5.6.10 Disassembly of the drip drawer, the drip tray and the hopper lid ........... 51
5.6.11 Cleaning and sanitising of the components ............................................. 51
5.6.12 Reassembly of the hopper beater .............................................................. 51
5.6.13 Reassembly of the beater .......................................................................... 52
5.6.14 Reassembly of the dispensing spigot door............................................... 52
5.6.15 Machine with pump – reassembling the pump ......................................... 53
5.6.16 Gravity-fed machines – reassembly of the feed needle .......................... 55
5.6.17 Reassembling drip trays, drip drawer and hopper lid ........................................ 55
5.6.18 Complete sanitisation of the machine ....................................................... 56
Draining the cleaning/sanitising solution .................................................. 56
6. MAINTENANCE ............................................................................ 57
6.1 Type of intervention ............................................................................. 57
6.2 Water-cooling ....................................................................................... 58
6.3 Ordering spare parts ........................................................................... 58
6.4 Supplied accessories .......................................................................... 59
7. TROUBLESHOOTING GUIDE ...................................................... 60
2013/09 - Ed. 01 - EN
5
XVL 3 USA
FOREWORD
Instruction manual
In writing this manual, the European Community directives on safety standards as well as on free circulation
of industrial products within the E.C. were taken into
due account.
Purpose
This manual was conceived taking machine users’
needs into due account.
Issues regarding the correct use of the machine have
been analysed in order to keep the longstanding quality
features characterising CARPIGIANI’s machines all over
the world unchanged.
A significant part of this manual refers to the conditions
required for using the machine and, above all, to the
necessary procedures to follow while cleaning and during routine and special maintenance.
Nevertheless, this manual cannot meet all demands in
detail. In case of doubts or missing information, please
apply to:
Manual structure
This manual is divided in sections, chapters and subchapters in order to be consulted more easily.
Section
A section is the part of the manual identifying a specific
topic related to a machine part.
Chapter
A chapter is that part of a section describing an assembly or concept relevant to a machine part.
Subchapter
It is that part of a chapter detailing the specific component of a machine part.
Any person in charge of using the machine must
have first read and fully understood the parts of the
manual that refer to his/her competence and in particular:
t the Operator must have read the chapters regard-
ing machine start-up, the functioning of the machine
units and the prescribed safety precautions;
t a skilled technician involved in the installation, main-
tenance, repair, etc., of the machine must read all
parts of this manual.
Via Emilia, 45
40011 Anzola dell’Emilia (BO)
ITALY
+ 39 051 6505111
+ 39 051 732178
Þ carpigiani.com
Additional documentation
Along with an instruction manual, each machine is
also supplied with additional documentation:
t Spare parts list: a list of spare parts provided with
the machine for its routine maintenance.
t Wiring diagram: a diagram of wiring connections
placed in the machine.
WARNING
Before using the machine read the instruction
manual carefully.
Pay attention to the safety instructions.
6
2013/09 - Ed. 01 - EN

Standard symbols
ELECTRIC SHOCK
DANGER
This warns personnel concerned that the operation described could cause electric shock if not
carried out while respecting safety norms.
XVL 3 USA
PROTECTION
This symbol located next to description means
that the operator must use personal protection
against an implicit risk of accident.
DANGER FROM HIGH
TEMPERATURES
This warns personnel concerned that the operation described could cause burns and scalds if not
carried out while respecting safety norms.
DANGER
MOVING PARTS
This warns personnel concerned about the presence of moving organs and the risk of physical injury if safety norms are not respected.
CRUSHING
HAZARD
This warns personnel concerned about the risk of
having a finger, hand or other body part crushed
if the described operation is not carried out while
respecting safety norms.
GENERAL
HAZARD
This warns personnel concerned that the operation described may cause injury if not carried out
respecting safety norms.
NOTE
This points out significant information for the personnel concerned.
Qualification of the personnel
Personnel using/working on the machine can be differentiated according to training and responsibility as
follows:
OPERATOR
This term identifies unqualified personnel who
have no specific technical qualifications and
who can carry out only simple tasks such as
operating the machine using the controls on
the keyboard, loading and unloading product used during production, loading of any consumable materials,
basic maintenance operations (cleaning, removing simple obstruction, controlling instrumentation, etc.).
MAINTENANCE ENGINEER
He/she is a skilled engineer for the operation
of the machine under normal conditions; he/
she is able to carry out interventions on me-
chanical parts and all adjustments, as well as
maintenance and repairs. He/she is qualified for interventions on electrical and refrigeration components.
CARPIGIANI ENGINEER
He/she is a skilled engineer that the manufac-
turer has assigned to field interventions for
complex operations under particular condi-
tions or in accordance with agreements made
with the machine’s owner.
WARNING
This warns personnel concerned that the non-observance of warning may cause loss of data and
damage to the machine.
2013/09 - Ed. 01 - EN
7

XVL 3 USA
Safety
When using the machine be aware that drive mechanisms (rotary motion), high voltage components and
parts subject to high temperatures may cause serious
injury/damage to persons and things.
The person in charge of plant safety must check
that:
t any incorrect use or handling is avoided;
t safety devices are not removed or tampered with;
t the machine undergoes regular maintenance;
t only original spare parts are used especially with
regards to those components with safety functions
(e.g., protection microswitches, thermostats, etc.);
t suitable personal protective equipment is worn;
t great care is taken during hot product cycles;
t particular attention is paid to moving parts.
To achieve the above, the following is necessary:
t at the work station an instruction manual relevant to
the machine must be available;
t the documentation must be carefully read and re-
quirements must consequently be met;
t only adequately skilled personnel should be as-
signed to electrical equipment and machinery.
Warning
When installing the machine, insert a differential thermomagnetic circuit breaker on all poles of the line, adequately sized to the absorption power shown on machine data plate and with contact opening of 3 mm at
least.
t Never put your hand into the machine during pro-
duction and cleaning operations. Before carrying out
any maintenance operation, make sure that the machine is in the Stop position and the main switch has
been switched OFF.
t Using a jet of pressurized water to wash the machine
is forbidden.
t Removing panels in order to reach the machine in-
side before the machine has been disconnected
from the power supply is forbidden.
t Carpigiani will not respond to accidents that might
happen during use, cleaning and/or maintenance of
its machines if the specified safety norms have not
been complied with.
IMPORTANT
Ensure that technical personnel does not carry out operations that are not within their capabilities, knowledge
and responsibility.
NOTE
According to the norms in force, a SKILLED ENGINEER is a person who, thanks to his/her:
t training, experience and education;
t knowledge of rules, prescriptions and interven-
tions on accident prevention;
t knowledge of machine operating conditions
is able to recognize and avoid any danger and has
also been authorised by the person in charge of
plant safety to carry out all types of interventions.
8
2013/09 - Ed. 01 - EN

XVL 3 USA
1. GENERAL INFORMATION
1.1 General information
1.1.1 Manufacturer’s identification data
The machine has a data plate that was assigned to the machine when it was manufactured, showing the manufacturer’s data, machine type and serial number.
A copy of the machine data plate can be found on the first page of this manual.
Fig. 01
1.1.2 Maintenance information
All operations of routine maintenance are hereby described in the “Maintenance” section. Any additional operation
requiring a radical intervention on the machine must be cleared with the manufacturer who will also examine the
possibility of a factory technician field intervention.
2013/09 - Ed. 01 - EN
9

XVL 3 USA
1.1.3 Information for the user
t Carpigiani is at the disposal of the user
for any clarification or necessary/integrative information regarding the functioning of the machine or any improvement modifications to the machine.
t Contact the area distributor in the event of any prob-
lems or the manufacturer if a distributor is not available.
t Customer Service is available at any time to respond
to customer requirements regarding the functioning
of the machine, requests for spare parts or technical
assistance that may eventually be necessary.
1.2 Information about the machine
1.2.1 General information
It is an electronic machine for the production and instant distribution of soft ice cream that has the following
main characteristics:
t refrigerated upper hopper;
t electronic control of product consistency via the
“Hard-o-tronic” system;
t automatic pasteurisation system of the product con-
tained in the hopper and cylinder during non-production periods (e.g., at night) (only for “SP” machines);
t Dry Filling (only for “DF” machines);
t Mixer (only for “M” machines).
Carpigiani recommends always using top quality raw
materials in the production of ice cream and confectionery products to satisfy the most demanding requirements of customers. Any cost saving of the mix used
affects the quality and much greater losses will occur
with respect to the economic savings.
Taking into account everything mentioned above,
the following recommendations should be taken
into account:
t only you produce the mix using top quality natural
products, or receive supplies from serious and trustworthy companies;
t make sure the used mix is appropriate for the ma-
chines in terms of composition and viscosity. If in
doubt, please check with your authorized Carpigiani
dealer;
t carefully follow the mix preparation instructions that
are supplied by the supplier;
t do not modify suggested recipes without knowing
the characteristics of the ingredients;
t taste the final product and place it on sale only if you
are completely satisfied;
t request that your personnel always keeps the ma-
chine clean.
Contact only the Carpigiani Technical Assistance Service for any repairs to the machine.
1.2.2 Technical features
INSTALLED
POWER
OUTPUT
MODEL *
75g
CONES
HOUR **
HOPPER
/
CAPACITY
FLAVOURS
ELECTRICAL POWER
SUPPLY ***
CONDENSER
***
l V Ph Hz kW Kg
XVL 3
USA
666 13 + 13 2+1 208230 3 60 Air 510
* Available in the following models:
XVL 3 SP (with an automatic pasteurising system);
XVL 3 DF (with a Dry Filling system).
XVL 3 M (with mixer)
** The hourly production and mix quantity for each ice cream can vary depending on the temperature and type of
mix used and on the increase in volume (overrun) required.
*** Also available with a water-cooled condenser and other types of electrical power supply.
Performances refer to room temperature of 25°C at a water temperature of 20°C in the condenser.
NET
WEIGHT
10
2013/09 - Ed. 01 - EN

1.2.3 Location of machine groups
Fig. 02
XVL 3 USA
50 cm
158 cm
86 cm
1
2
3
4
1 Hopper lid
2 Control panel
1.3 Intended use
The machine must only be used for the production of ice
cream and patisserie products, in compliance with what
has been stated in paragraph 1.2.1 “General information”,
and within the operating limits indicated here below.
t Supply voltage: ±10%
t Min. air temperature: 10°C
t Max. air temperature: 43°C
t Min. water temperature: 10°C
t Max. water temperature: 30°C
t Min. water pressure: 0.15 MPa (1.5 bar)
t Max. water pressure: 0.8 MPa (8 bar)
t Max. relative humidity: 85%
This machine has been designed for use in rooms not
subject to explosion-proof laws and therefore it can only
be used in rooms that conform to a normal atmosphere.
3 Dispensing spigot door
4 Drip tray
1.4 Noise
Equivalent continuous A-weighted sound pressure in
the working place is less than 70 dB(A) for both watercooled and air-cooled machines.
2013/09 - Ed. 01 - EN
11

XVL 3 USA
1.5 Machine storage
The machine must be stored in a dry and damp-free
environment.
Before storing the machine, cover it with a sheet to protect it against dust and dirt.
1.6 Disposal of packing materials
When removing the machine from its packaging, subdivide the packing materials into the various types and
dispose of them in accordance with the norms in force
in the destination country.
WARNING
It is forbidden to dispose of packaging materials
in the environment.
1.8 Bacterial contamination
detection
A qualified bacteriologist must periodically analyse
product samples to check for the presence of bacteria.
The bacteria count in the samples should be below the
following figures:
Standard Plate Count (SPC) ................................ 50.000
Coliforms .................................................................... 10
If the bacteria count exceeds the above-mentioned figures, there is a source of bacterial contamination. This
source must be immediately identified and eliminated. A
high bacteria count means that the product is not fit for
consumption and a correct cleaning and sanitization of
the machine must be carried out to eliminate the continued bacterial contamination of the product.
GENERAL
HAZARD
Do not leave packaging materials within reach of
children because they could cause suffocation.
1.7 WEEE (Waste Electrical and
Electronic Equipment)
In conformity with the European Directives
2006/66/EC, on batteries and accumulators
and waste batteries and accumulators, and
2002/96/EC, also known as WEEE, the presence of this symbol on the side of the product
or packaging means that the product must not
be disposed of with solid urban waste. Instead, it is the
user’s responsibility to dispose of this product by returning it to a collection point designated for the recycling/treatment of electrical and electronic equipment
waste.
Differentiated collection of this waste material helps to
optimise the recovery and recycling of any reclaimable
materials and also reduces the impact on human health
and the environment.
For more information concerning the correct disposal of
this product, please contact your local authority or the
retailer where this product was purchased.
NOTE
Soft yogurt normally has a high bacteria count. In
any case, coliform bacteria contamination IS NOT
ACCEPTABLE in any type of product. The following information will help you prevent coliform bacteria contamination problems.
The following list indicates the possible sources of bacterial contamination and the methods to prevent it.
SOURCES OF
CONTAMINATION
Operator contact.
Residues / deposits of
material (milk clots).
HOW TO PREVENT
CONTAMINATION
t Wash hands and forearms
thoroughly.
t Wear rubber gloves in case
of skin cuts or other skin
conditions.
t Wash hands several times a
day.
t Use the appropriate brushes.
t To clean thoroughly, scrub
parts and components to
prevent the formation of milk
clots because milk clots are
fertile material for the proliferation of bacteria that could
contaminate the fresh milk.
12
2013/09 - Ed. 01 - EN

XVL 3 USA
SOURCES OF
CONTAMINATION
Worn or damaged
parts.
Cleaning and
wrong hygienic
procedures.
HOW TO PREVENT
CONTAMINATION
t Lubricate all rubber parts
that come into contact with
the mix using a food-grade
lubricant.
t Replace damaged O-rings
only with original spare
parts.
t Systematically check the
drip drawers to avoid excessive dripping.
t The container in which the
parts are washed must be
perfectly clean and contain
enough detergent/sanitising solution to completely
cover even the largest components. Use the brushes to
clean and sanitise the machine regularly.
t Use the appropriate brush-
es, lubricants and disposable cloths.
t Store and use the detergents
as per the manufacturer’s instructions.
t Have expert personnel clean
the machine. Ensure the personnel can complete cleaning procedures coherently,
correctly and without interruption.
t Leave the sanitising solution
in the cylinder and hopper at
least for the time suggested
by the manufacturer of the
sanitising solution.
t Each time after use, wash
and sanitise the utensils
used for cleaning and the
tube containing the lubricant. Always replace the cap
on the tube.
t Machine components and
brushes must be left to airdry. Do not put them back
into the machine whilst they
are wet or damp.
t Always carry out the daily
cleaning procedure. Regularly clean the outside of the
machine and the dispenser
with a sanitized cloth.
SOURCES OF
CONTAMINATION
Wrong method of
storing the mix.
HOW TO PREVENT
CONTAMINATION
t Use leftovers of mixes with
the oldest date first. Be careful of the expiry date.
t Put the mix directly in the
fridge. Do not accumulate
mix outside in direct sunlight
before putting it in the fridge.
t In the fridge, leave at least
2-3 cm of space between
the mix and other products
to allow air to circulate.
t The mix must not be left at
ambient temperature for
long periods of time.
t The storage temperature of
the hopper must be maintained at 4.4°C (40°F). Storage temperatures above
4.4°C would permit the
multiplication of bacteria to
dangerous levels within less
than one hour.
t Once the mix has been
placed inside the hopper,
place the lid on the hopper
to store the mix at the correct temperature and minimise the possibility of contamination.
2013/09 - Ed. 01 - EN
13

XVL 3 USA
2. INSTALLATION
2.1 Space necessary to use the
machine
The machine must be positioned so that there is enough
space for air to freely circulate. Also make sure that the
air vent on the top of the machine remains free of any
objects.
Space for access to the machine must be left free in order to enable the operator to act without constraint and
also to immediately leave the working area if necessary.
The machine also requires free space on the side to extract the drip trays.
It is also advisable to have a minimum access to the
operating area of the machine of at least 150 cm, and
about 45 cm. of space on the side of the machine to allow fro extracting drip trays.
NOTE
Insufficient air circulation affects operation and
the output capacity of the machine.
Fig. 03
50 cm
only air versions
2.2 Water supply connection
Connect the machine to a drinking water supply that has a pressure of no more than
0.8 MPa (8 bar).
2.3 Machine with air-cooled condenser
Machines with an air-cooled condenser must
be installed leaving a minimum distance (at
least 50 cms) above the chimney for the free
circulation of the condensate air.
NOTE
An insufficient air circulation affects operation and
output capacity of the machine.
2.4 Machines with water-cooled
condenser
A water-cooled machine must be connected
to a mains water supply or to a cooling tower
to operate it.
The water must have a pressure of between 0.15 MPa
and 0.8 MPa (1.5-8 bar) and a flow rate at least equal to
the estimated hourly consumption.
45 cm
for drawers
extraction
10 cm
150 cm
WARNING
Machines with water-cooled condenser must
have 10 cm. of free space along the sides.
Machines with an air-cooled condenser must be
installed leaving a minimum distance (at least 50
cms) above the chimney for the free circulation of
the condensate air.
Connect the inlet pipe marked by the “Water Inlet” plate
to the water supply by installing a shut-off valve and
the outlet pipe marked by the “Water Outlet” plate to a
drainage pipe by installing a shut-off valve.
2.4.1 Water pressure valve adjustment
IMPORTANT
If the water pressure valve needs be reset, this
operation must be carried out only by skilled
personnel.
NOTE
Water consumption increases if the temperature of
the inlet water is above 20°C.
WARNING
Do not leave the machine in a room with a temperature below 0°C without first draining the water from the condenser system.
14
2013/09 - Ed. 01 - EN

XVL 3 USA
2.5 Electrical connection
Before connecting the machine to the mains
supply, check that the machine voltage indicated on the data plate corresponds with the
mains supply voltage.
Position a class D section thermomagnetic circuit
breaker switch correctly rated to the absorption power
required and with a contact opening of at least 3 mm.
The machines are delivered with a 5 wire cable: the blue
wire must be connected to the neutral lead.
IMPORTANT
The yellow/green ground wire must be connected to an
adequate ground plate.
2.5.1 Replacing the power cable
Should the machine’s power cable become
damaged, it must be replaced immediately
with one with similar characteristics.
The replacement must be carried out only by a skilled
technician.
2.6 Location
The machine is equipped with wheels to facilitate its positioning. There are mechanical
brakes that once engaged stop the machine
from being moved about and ensure that it is
maintained in a safe position.
2.7 Refilling
The type of motor installed in the machine is a
lubricated-for-life motor. No checking/replacing or topping up is necessary.
The correct quantity of gas for the refrigeration circuit
is put in by Carpigiani when testing the machine. A new
machine does not need any topping up or refilling.
If it becomes necessary to top up or fill the system with
gas, the procedure must be carried out in conditions of
safety and by a qualified technician capable of establishing the cause of the anomaly prior to topping up.
2.8 Machine testing
The machine is tested by Carpigiani at the end
of the assembly procedure. The foreseen operational and production functions are checked.
Machine testing on the end user’s premises
must be carried out by skilled technicians or
by one of Carpigiani’s engineers.
After positioning the machine and making the correct
connections, carry out all operations necessary for functionality check and operational testing of the machine.
Fig. 04
2013/09 - Ed. 01 - EN
15
XVL 3 USA
3. INSTRUCTIONS FOR USE
3.1 Machine safety warnings
When using industrial equipment and plant, be aware
that drive mechanisms (rotary motion), high voltage
components, as well as parts subject to high temperatures may cause serious injury/damage to persons and
things.
The person/s in charge of plant safety must check
that:
t any incorrect use or handling is avoided;
t safety devices are not removed or tampered with;
t the machine undergoes regular maintenance;
t only original spare parts are used especially with
regards to those components with safety functions
(e.g., protection microswitches, thermostats, etc.);
t suitable personal protective equipment is worn;
t great care is taken during hot product cycles.
To achieve the above, the following is necessary:
t at the work station an instruction manual relevant to
the machine must be available;
t the documentation must be carefully read and re-
quirements must consequently be met;
t only adequately skilled personnel should be as-
signed to electrical equipment and machinery;
t ensure that technical personnel do not carry out op-
erations that are not within their capabilities, knowledge and responsibilities.
3.2 Machine configuration
The machine is composed of a motor for operating the
beater unit, a cooling system with a water-cooled or aircooled condenser and electronic management of the
main functions.
The preparation of soft ice cream occurs by placing the cold mix (+4°C) inside the hoppers and starting an automatic production cycle until the set programmed optimum consistency of the ice cream is
reached.
The mix enters into the whipping cylinders already
mixed with air. The ice cream is produced only at the
moment in which it is served.
By using the ice cream dispenser levers positioned on
the front of the machine, a portion of soft ice cream requested will be dispensed.
Simultaneously, an equal quantity of mix passes from
the upper refrigerated hoppers to the whipping cylinder.
DANGER FROM HIGH
TEMPERATURES
Be extremely careful during pasteurisation phase;
contact could cause burns.
Fig. 05
16
2013/09 - Ed. 01 - EN

XVL 3 USA
3.3 Commands
3.3.1 Touchpad
The machine is equipped with a keypad fitted on the front panel; each button is marked by an explanatory symbol
of the assigned function.
Fig. 06
1
1 Stop the machine from functioning
2 Production
3 Information
4 Touch screen display
5 Increment/Decrement
6 Confirm
32
4
NOTE
7
5
7 Cleaning
8 Storage/Alarm Reset
9 Pasteurisation (if applicable)
6
8
9
The display is touch screen with 7 sensitive zones:
NOTE
When the touchpad accepts a command it will produce a beeping sound.
2013/09 - Ed. 01 - EN
17

XVL 3 USA
3.3.2 Functions
BUTTONS DESCRIPTION OF FUNCTIONS
STOP
In this mode the machine is Stopped and the corresponding LED is turned on.
From Stop it is possible to access any machine function.
To change function, it is ALWAYS NECESSARY to first Stop the machine.
The display shows date and time, and the indication of the hopper mix level.
WHY IN STOP ??
With the machine in
Stop mode for more
than 30 seconds.
WASH TODAY!
With the machine in
Stop mode for more
than 24 hours.
If the machine is Stopped with mix in the hopper, after 30 seconds the display will show
the message “Why in STOP?” to alert the operator to activate Production, Pasteurisation, or Storage mode.
To reset the alarm press . See alarms.
A time starts running if Stop is activated with mix in the hopper.
If the timer runs for more than 24 hours the display will show the message “Wash To-
day!”.
18
The user must carry out machine washing procedure before restarting Production.
Press the
key to cancel the alarm message from the display. See alarms.
2013/09 - Ed. 01 - EN

BUTTONS DESCRIPTION OF FUNCTIONS
INFO whilst in Stop
mode
Pressing the Info
key whilst in Stop mode, the display visualises the following
functions that can be selected directly on the touch screen:
t Pasteurisation history (only past. version)
XVL 3 USA
Functions that can be
selected from INFO
whilst the machine is in
Stop mode:
t Pasteurisation
history (only past.
version)
t Event history
t Key locking
t Settings
INFO –
PASTEURISATION
HISTORY
With the machine in
Stop mode press:
t Events history
t Key locking
t Settings
Press the
key to go back to the previous page.
Pressing Pasteurisation Log
tions.
.
the display shows the list of succesful Pasteurisa-
t INFO
t PASTEURISATION
HISTORY
INFO – EVENT
HISTORY
With the machine in
Stop mode press:
t INFO
t EVENT HISTORY
To browse through the events use the Up and Down keys.
Pressing Event Log
the display shows a list of events, including function chang-
es, alarms and Pasteurisation phases.
To browse through the events use the Up and Down keys.
NOTE
The maximum number of logged events is 1000.
2013/09 - Ed. 01 - EN
Once this number is reached, every new event causes the cancellation of the oldest.
ccurs the oldest event is removed.
19

XVL 3 USA
BUTTONS
INFO – KEY
LOCKING
The key locking button is present in all functions of the machine. Pressing and holding the
Lock icon
the current function) will lock the touchpad, except for those inside the display, so that it
can be cleaned without accidentally activating a different function.
With the machine in
Stop mode press:
t INFO
t KEY LOCKING
To unlock the touchpad, press any key. The Lock icon will reappear. Press and hold it for 10
seconds to reactivate the touchpad.
INFO - SETTINGS
Pressing the Settings
selected directly on the touch screen:
With the machine in
Stop mode press:
t INFO
t SETTINGS
Functions that can be selected from SETTINGS
mode:
t Setting the time
t Display
t Setting the machine
DESCRIPTION OF FUNCTIONS
for about 10 seconds (wait for the visualisation of the display to return to
key, the display visualises the following functions that can be
t Setting the time
t Display
t Setting the machine
INFO – SETTING
THE TIME
With the machine in
Stop mode press:
t INFO
t SETTINGS
t SETTING THE TIME
Pressing the Setting the time
key, the display visualises:
Pressing the hour the key background turns grey and the Up and Down keys
activate so that the hour can be changed. To confirm press the button on the display to
deselect it.
Follow the same procedure to update the minutes and the date.
20
2013/09 - Ed. 01 - EN

XVL 3 USA
BUTTONS
INFO - DISPLAY
With the machine in
Stop mode press:
t INFO
t SETTINGS
t DISPLAY
DESCRIPTION OF FUNCTIONS
Pressing the Display
Pressing the display key activates the display brightness bar (intensity of the backlight-
ing) and the Up
and Down keys activate to change the current value.
key, the display visualises:
Confirm with .
2013/09 - Ed. 01 - EN
21

XVL 3 USA
BUTTONS
INFO – MACHINE
SETTING
With the machine in
Stop mode press:
t INFO
t
SETTINGS
t
MACHINE SETTING
(Programming)
DESCRIPTION OF FUNCTIONS
Press Settings to access the first step in operator programming.
To browse throught the steps, use the Up and Down keys. The display shows
the first operator programming step, i.e., U07 - Language: Eng. The value can be
changed using the left and right arrows on the screen. See programming table.
De-
Step
U07 Linguaggio Language Ita Esp Ita
U08 Ora Avvio Prod. Start Prod. Time 00 23+no+auto 08
U09 Ora Avv.Pas-Con Start Past. Stor. 00 23+no 02
U10 Abilita Beep Liv Lev. Beep Enable No Yes Yes
U13 Extra Agitaz.Vas Extra Hop.Agit. 0 3 3
U14 Tempo Mixer Mixer Time 0 20 0
U15 Lato Attivo Active Side 1 3 3
Display ITA Display ENG Min Max
fault
Notes
U07 - Language: Setting the language in Italian, English, German or Spanish.
U08 - Start Prod. Time: Setting of the start hour of automatic Production. If set at “No”
automatic Production will not start. If set at “auto” automatic Production starts as soon
as the Pasteurisation cycle has been completed.
U09 - Start Past. Stor.:
For pasteurising machines: Setting of the start hour of automatic Pasteurisation. If set at
“No” automatic Pasteurisation will not start.
For non-pasteurising machines: Setting of the start hour of automatic Storage. If set at
“No” automatic Storage will not start.
U10 - Lev. Beep Enable: If set at “Yes” an intermittent acoustic beep sounds when the
medium level is uncovered, except when the machine is in Stop mode.
U13 - Hopper Extra Beat.: Enable/disable hopper rotor periodical activation in Production and Storage functions (0 = not enabled, 1 = enabled only for left side, 2 = enabled
only for right side, 3 = enables both sides).
U14 - Mixer Time: The length of time the mixer will run in seconds when its button has
been pressed.
U15 - Active Side: There are three settings (1, 2 or 3). Set the side on which to operate.
1= Left side
2= Right side
22
3= Both sides
To exit programming, simply do not press any key for about 1 minute or press
on the display. The machine will return to the previous menu. If any changes have been
made, when leaving the programming section the display will show the message “Table
Updated M.”.
2013/09 - Ed. 01 - EN

XVL 3 USA
BUTTONS
INFO from
Production mode
Functions that can be
selected from INFO
whilst the machine is in
Production mode:
t Cones and Software
Versions
t Setting
t Modify Set Hot
t Key locking
INFO – CONES AND
SOFTWARE VERSIONS
DESCRIPTION OF FUNCTIONS
Pressing the
key whilst in Production mode, the display visualises the following
functions that can be selected directly on the touch screen:
t Cones and Software Versions
t Setting (if present)
t Modify Set Hot
t Key locking
Use the key to return to the previous page.
Pressing the Cones and software versions
key, the display visualises the
read-only page that reports the following data:
t Daily cones
t Total cones
t SW versions
With the machine
in production mode
press:
t INFO
t CONES AND SOFT-
WARE VERSIONS
INFO - SETTING
(if present)
With the machine
in production mode
press:
t INFO
t SETTING
To return to the previous function press the key.
Press to access the freezing cycle menu (if present).
To return to the previous function press the key or wait 15 seconds.
2013/09 - Ed. 01 - EN
23

XVL 3 USA
BUTTONS
INFO – MODIFY
SET HOT
With the machine
in production mode
press:
t INFO
t MODIFY SET HOT
INFO - KEY LOCKING
DESCRIPTION OF FUNCTIONS
Whent
keys activate so that the HOT setting can be changed.
After setting the desired value, to confirm press the button on the display to deselect it..
If
Pressing and holding the Lock icon
except for the keys inside the display. To permit the front panel to be cleaned without ac-
cidentally activating functions, the machine returns to the previous function.
is pressed its background turns grey and the Up and Down
is pressed again, the new value will not be saved.
for about 10 seconds will lock the touchpad,
With the machine
in production mode
press:
t INFO
t KEY LOCKING
INFO whilst in
Cleaning mode
Functions that can be
selected whilst in INFO
mode with the machine
in Cleaning mode:
t Key locking
To unlock the touchpad, press any key. The Lock icon will reappear. Press and hold it for
10 seconds to reactivate the touchpad.
Pressing the
functions that can be selected directly on the touch screen:
t Key locking
Pressing and holding the Lock icon for about 10 seconds will lock the touchpad,
except for the keys inside the display. To permit the front panel to be cleaned without ac-
cidentally activating functions, the machine returns to the previous function.
To re-enable the keys, press any key and the window with the lock appears. Pressing the
Key locking key for 10 seconds, all keys are re-enabled.
key whilst in Cleaning mode, the display visualises the following
24
Use the Back key
to return to the previous menu.
2013/09 - Ed. 01 - EN

XVL 3 USA
BUTTONS
INFO whilst in
Pasteurisation mode
Functions that can be
selected whilst in INFO
mode with the machine
in Pasteurisation mode:
t Key locking
INFO whilst in
Storage mode
Functions that can be
selected whilst in INFO
mode with the machine
in Storage mode:
t Key locking
DESCRIPTION OF FUNCTIONS
Pressing the
key whilst in Pasteurisation mode, the display visualises the follow-
ing functions that can be selected directly on the touch screen:
t Key locking
Pressing and holding the Lock icon for about 10 seconds will lock the touchpad,
except for the keys inside the display. To permit the front panel to be cleaned without accidentally activating functions, the machine returns to the previous function.
To unlock the touchpad, press any key. The Lock icon will reappear. Press and hold it for
10 seconds to reactivate the touchpad.
Use the Back key
Pressing the
to return to the previous menu.
key whilst in Storage mode, the display visualises the following func-
tions that can be selected directly on the touch screen:
t Key locking
Pressing and holding the Lock icon for about 10 seconds will lock the touchpad,
except for the keys inside the display. To permit the front panel to be cleaned without ac-
cidentally activating functions, the machine returns to the previous function.
To unlock the touchpad, press any key. The Lock icon will reappear. Press and hold it for
10 seconds to reactivate the touchpad.
Use the Back key
to return to the previous menu.
CLEANING
Functions that can
be selected whilst in
Cleaning mode:
t Beating
t Heated beating
t Pump
Pressing the Cleaning
key the display visualises the following functions that can
be selected directly on the touch screen:
t Beating
t Heated beating
t Pump
The last line visualises the temperature of the cylinder and the consistency of the product .
The keys that can be activated have a coloured icon (blue or red) and once pressed the
background becomes grey.
2013/09 - Ed. 01 - EN
The keys that cannot be activated have a grey icon. Refer to the key
display.
The two functions
and can run at the same time.
on the above
25

XVL 3 USA
BUTTONS
CLEANING – BEATING
Press:
t CLEANING
t BEATING
CLEANING – PUMP
Press:
t CLEANING
t PUMP
DESCRIPTION OF FUNCTIONS
Press Beating
When the motor is functioning, the background of the relative function becomes grey.
After 3 minutes the symbol returns to a white background and the motor switches off.
The Beating function is used to wash the cylinder and facilitate the emptying of the
product from the cylinder.
Pressing the Pump
deactivated.
When the motor is functioning, the background of the relative function becomes grey.
After 30 seconds the symbol returns to a white background and the pump switches off.
The function is used to load the mix from the hopper to the cylinder and to pressurize
the cylinder to facilitate the dispensing of the product.
to start/stop the beater motor.
key (only machines with a pump), the pump motor is activated/
CLEANING - HEATED
BEATING
Press:
t
CLEANING
t
HEATED BEATING
Pressing Heated Beating the beater motor with heating is activated/deactivated.
When Heated Beating is activated the background of the function becomes grey.
The cylinder is heated until a set temperature is reached.
On reaching this temperature the symbol changes back to the white background and
Heated Beating is deactivated.
26
2013/09 - Ed. 01 - EN

BUTTONS DESCRIPTION OF FUNCTIONS
PRODUCTION
Production can be accessed only if there is a minimum level of mix in the hopper.
XVL 3 USA
Press
Where:
key, to access the followin menu:
The hopper level.
: more than half full, : less than half full, : less than mini-
mum.
Number of cones that can be dispensed with less than minimum mix. It
appears only when mix falls below minimum level required.
Hopper temperature. If <40°C the temperature color is blue.
If >=40°C the temperature color is red.
Arrow visible if the hopper is cooling.
Set consistency to be reached.
PRODUCTION –
CHANGE OF
FLAVOUR
Mix not ready for dispensing. When consistency is reached the icon will
change to
Current consistency.
Arrow visible if the cylinder is cooling.
Days left until washing is required
14
The machine brings the ice cream in the cylinder to the right consistency every 10 min-
utes. Press the
FLAVOR CHANGE PROCEDURE
Pressing the
corresponding side will be stopped. Beating is activated and the pump operates for one
minute to empty the cylinder and the hopper. If after one minute the hopper and cylinder
key to force this time. The consistency will conform to the set value.
.
key for 10 seconds the icon will turn grey and cooling on the
2013/09 - Ed. 01 - EN
are not empty, press the cone button
further minute
At this point it is possible to fill the empty hopper with a different flavour.
To exit the emptying procedure, press the
turn blue again.
again to reactivate the function for a
key for 10 seconds. The icon will
27

XVL 3 USA
BUTTONS
PRODUCTION
VERSIONS WITH
MIXER
DESCRIPTION OF FUNCTIONS
VERSIONS WITH MIXER AND WATER DISPENSING
The third line of the display shows the information indicated as follows on the third line
of the display:
Standard machine.
The cone indicates machine in Production mode.
Key not active.
Machine with water dispensing
The cone indicates machine in Production mode. Key not active.
The sprayer key is a non active key
(grey).
Machine with a mixer.
The cone indicates machine in Production mode.
Grey key not active.
The mixer key is active (blue).
Machine with mixer and water dispensing
The cone indicates machine in Production mode. Key not active.
The mixer key is active (blue), acting as
a toggle. The mixer stops automatically
after a programmed timer expires or by
pressing the mixer key.
The sprayer key is a non active key
(grey).
STORAGE/ALARM
RESET
Storage mode stars automatically every day at an established time.
Storage has the function of bringing the mix in the hopper and cylinder to 4°C.
Once Storage mode is activated the display shows the following:
To start manually Storage press the key.
The button also allows to reset the alarms that might be shown on the display.
28
2013/09 - Ed. 01 - EN

BUTTONS DESCRIPTION OF FUNCTIONS
PASTEURISATION
Pasteurisation can only be done if the hopper is more than half full.
XVL 3 USA
Press and holdPasteurisation
Where:
Hopper mix level.
: more than half full, : less than half full : less
than minimum.
Hopper temperature. If <40°C then the temperature is blue.
If >=40°C then the is red.
Arrows next to the temperature: Up if heating and Down if cooling.
Cylinder temperature. If <40°C then the temperature is blue.
for 5 seconds, the display will show the following:
If >=40°C then the temperature is red.
Active function: heating. Do not dispense product.
If the machine pasteurises, the Pasteurisation cycle occurs automatically every
day at a predetermined time (if set in User Programming).
When the machine is in Production or Storage mode at the time set for pasteurisation, it
automatically goes into Pasteurisation mode.
To start Pasteurisation manually, press and hold Pasteurisation
If Pasteurisation is not completed successfully, the machine will NOT be able to be set
to Production until a Pasteurisation cycle has been completed correctly.
During the Pasteurisation cycle, the product in the hopper or in the cylinder is heated
to 65°C, maintained at this temperature for 30 minutes (fixed) and then cooled until the
storage temperature is reached.
When the procedure is finished the display shows
of the week, confirming that Pasteurisation cycle has been completed correctly.
along with the hour and the day
for 5 seconds.
2013/09 - Ed. 01 - EN
29

XVL 3 USA
3.4 Dispenser levers
To dispense the product, place a cup or a
cone underneath the spigot door and, with
the machine in production mode, slowly lower
the dispenser lever.
As soon as the product starts to come out, move the
cup or cone with a circular motion to give the ice cream
a conical shape.
Once a sufficient amount of product has been dispensed, close the dispenser lever and move the cup or
cone quickly downwards to give the portion a pointed tip.
The product dispenser lever can also be easily removed by lifting it upwards.
In this way it can also be used as a key to stop the machine from being used.
Fig. 07
3.4.1 Modifying the quantity of product
dispensed
To modify the quantity of product dispensed by the various levers, carry out the following procedure:
t Remove the ice cream dispenser levers (5).
t Adjust the three knobs. Rotating them in a coun-
ter-clockwise direction the quantity of product dispensed is reduced. Rotating them in a clockwise
direction increases the quantity.
Fig. 10
3.4.2 Self closing
The machine is equipped with an automatic return system that brings the ice cream dispenser lever to rest
automatically.
This occurs via a spring system connected to the dispensing piston.
NOTE
Fig. 08
t Open the spigot door cover panel
Fig. 09
When the symbol is visualised in Production mode, remove a cone by lowering the dispenser lever until it stops. Re-position the lever in
the closed position.
3.5 Machines fed by pump and
semi-submersible pump
5
The pump allows a variation in the proportion of air/mix
sent to the cooling cylinders. Therefore, within certain
limits, it allows to adjust the volume increase (overrun)
suitable to the type of mix used. By turning the middle
lever counter-clockwise the overrun is increased.
Fig. 11
30
2013/09 - Ed. 01 - EN

XVL 3 USA
3.6 Gravity-fed machines – feed
needle
Instructions for achieving and maintaining the good
functioning of the machine.
t Always keep the level of the mix in the hopper high
(at least more than half). The mix in the hopper is
stored at 4°C whether in Production mode or Storage mode.
t During the day periodically stir the mix in the hopper
using a spatula to avoid the separation of the mix,
especially after the machine has been stopped for
long periods in Storage mode.
t Always use a fluid mix free of large lumps. A very
dense mix with large lumps could block the slot of
the feed needle thereby stopping the loading of the
whipping cylinder.
t Keep the cursor of the feed needle (pos. 52) in a po-
sition that permits the mix to fall correctly from the
hopper into the whipping cylinder. Rotating the slot of
the cursor so that it is aligned with the lower diameter
hole, the quantity of mix that drops into the hopper
is reduced. Rotating the slot of the cursor in correspondence to the upper hole diameter, the quantity of
mix is increased that drops into the cylinder.
t Position the feed needle in such a way that the entry
hole of the product is turned towards the centre of
the hopper.
t Do not exceed the production parameters indicated
in paragraph 1.2.2 and maintain regularity in the distribution of cones and tubs. Exceeding the limits of
production capacity indicated could block the machine. In this case the alarm message “ICE” could
appear on the display. If this occurs, reset the functionality of the machine as follows:
Place the machine in Stop mode.
Remove the feed needle to allow a free fall of mix
into the cylinder.
Place the machine in Cleaning mode for a few minutes.
Ensure that a liquid product pours out from dis-
pensing tap.
Replace the feed needle checking that the cursor
is sufficiently open.
Switch on the machine again and put it into Pro-
duction mode. Wait for it to stop and then commence distribution again.
Fig. 12
3.7 Preliminary operations,
washing and sanitising
Before using the machine for the first time, thorough-
ly clean all components as well as sanitising the parts
that come into contact with the ice cream.
Refer to section 5 of this manual for machine disassembly and cleaning procedures.
NOTE
Cleaning and sanitisation are operations that must
be carried out with maximum care to ensure production quality and compliance with required hygienic norms.
3.8 Commissioning the machine
After installing the machine in compliance with the instructions contained in the “Installation” chapter of this
manual and after thoroughly washing and sanitising the
machine, proceed as follows:
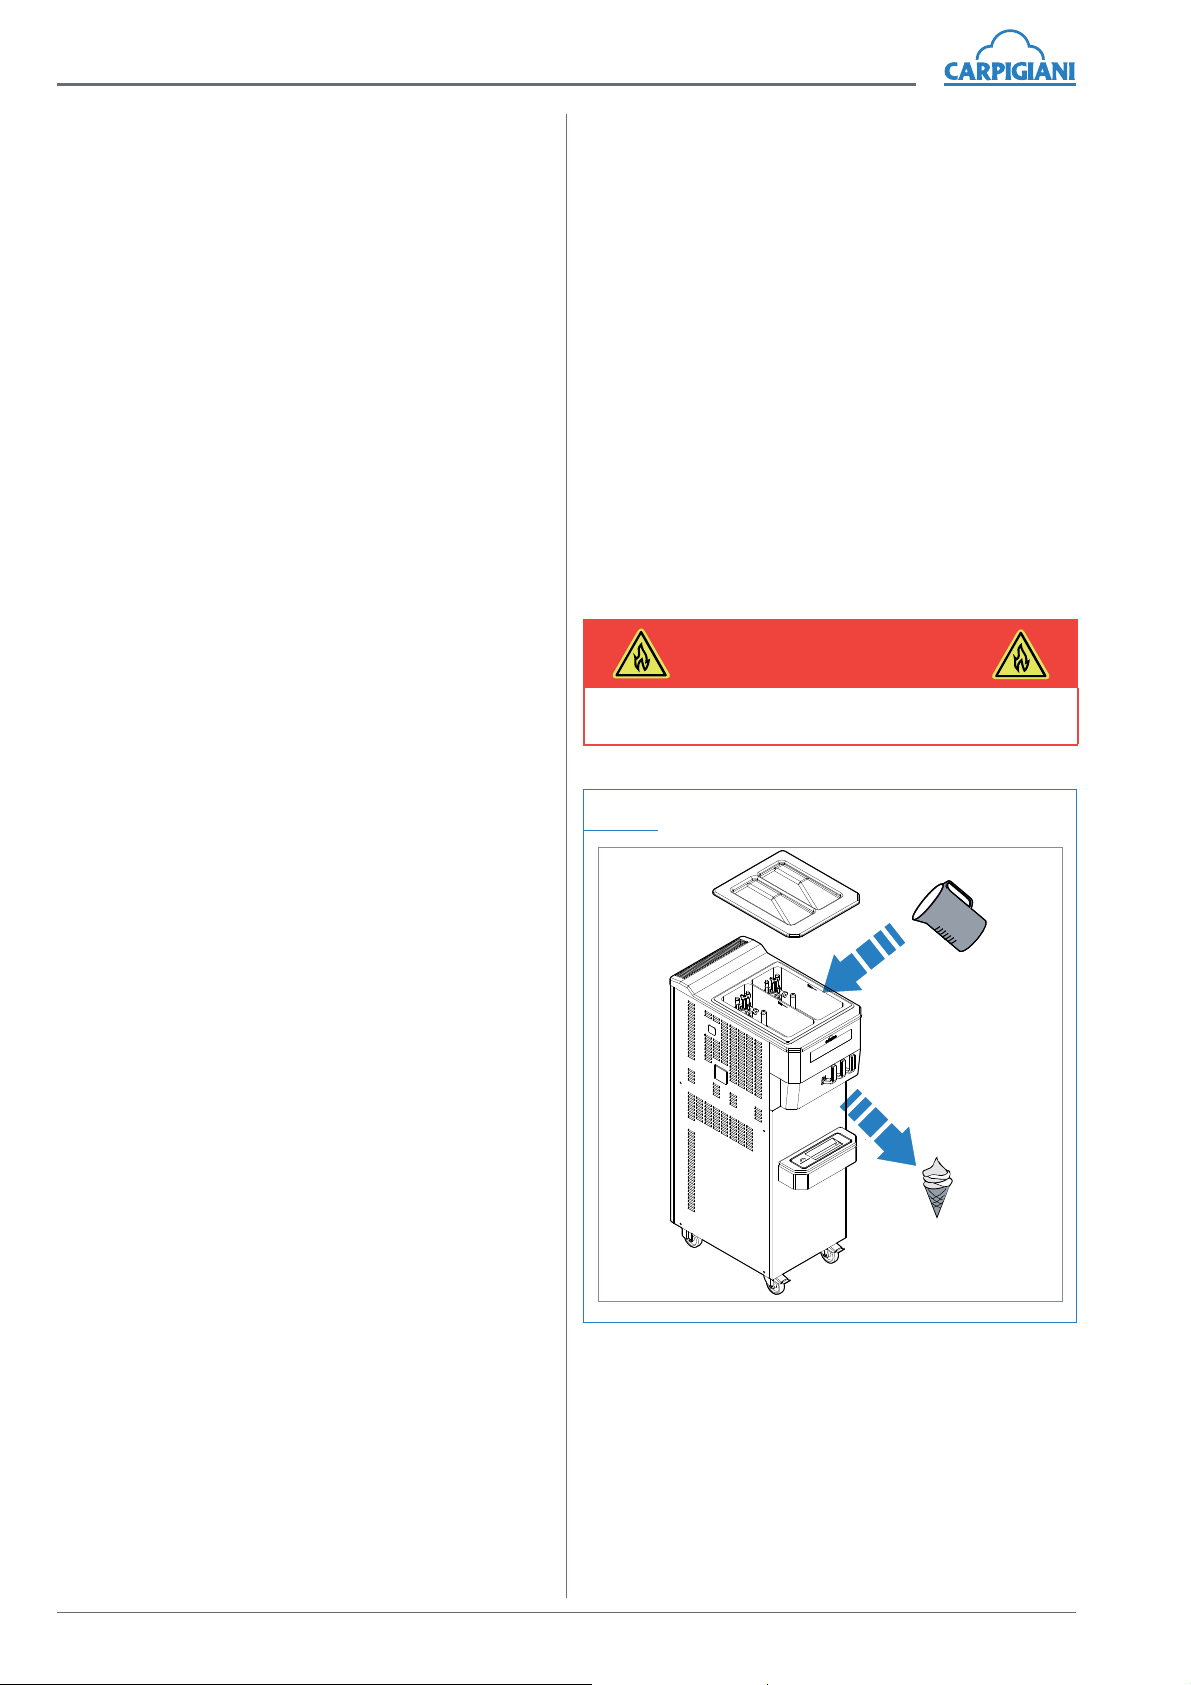
3.8.1 Starting the machine that has a pump
Take the compression hose from the tray and plunge it
into the cleaning/sanitising solution for the amount of
time indicated by the manufacturer of the product used.
Loading the hopper:
t Take a tub of mix from the refrigerator.
NOTE: Load a mix that has a temperature of 4-5°C.
t Place a bucket under the spigot door and pour a
small quantity of mix (approximately 100 ml) into the
hoppers, lower the ice cream dispenser levers and
let the mix flow completely out so as to eliminate any
residues of water and detergent/sanitising solution.
Bring the ice cream dispenser levers back to the
original position and continue to pour the mix so that
it fills the cylinder by gravity.
t
When the cylinder is full and the hopper almost empty,
press the
verify the correct operation of the pump (the flow of
the mix must be a good jet). In the event of fault, refer
to paragraph 6.1. To deactivate the function press the
key again.
Fig. 13
key and then press the key to
2013/09 - Ed. 01 - EN
31

XVL 3 USA
Assembling the compression hose:
t
With clean, sanitised hands (or wearing disposable
gloves) take the compression hose from the detergent/sanitising solution, ensure that the solution
does not remain into the tube and place it onto the
bottom of the hopper.
t Rotate the compression hose counter-clockwise in or-
der to align it with the pump. Insert the connecting pipe
into the pump and rotate it until it is fastened.
t Pour the mixture into the hoppers until they are full.
NOTE
The level of mix in the hoppers must never exceed
the height of the feed needle.
t Cover the hopper with the lid.
t Place the machine in Production mode by pressing
the
t After few minutes the product can be dispensed.
key.
NOTE
The level of mix in the hoppers must not exceed
the maximum level indicated on the hopper walls.
Fig. 14
MAX
MIN
t Cover the hopper with the lid.
t Place the machine in Production mode by pressing
the
t After few minutes the product can be dispensed..
3.8.2 Starting a gravity-fed machine
Take the feed needle from the tray and immerse it in
the detergent/sanitising solution for the amount of time
indicated by the manufacturer of the product used.
Loading the hopper:
t Take a tub of mix from the refrigerator. NOTE: Use a
mix that has a temperature of 4°C/5°C.
t Place a bucket under the spigot door and pour a
small quantity of mix (approximately 100 ml) into the
hoppers, lower the ice cream dispenser levers and
let the mix flow completely out so as to eliminate any
residues of water and detergent/sanitising solution.
Bring the ice cream dispenser levers back to their
original positions and continue to pour the mix so
that it fills the cylinder by gravity.
t During this phase only the cylinders are filled. The
hopper remains
lowing operations.
Assembly of the feed needle:
t With clean and sanitised hands (or wearing disposable
gloves), remove the feed needle from the sanitising solution
tube,
t Pour the mixture into the hoppers until they are full.
key.
almost
empty to carry out the fol-
ensure that the solution does not remain into the
and insert it into the bottom of the hopper.
3.8.3 Dry filling (if present)
WARNING
All machines preset for the dry filling function must
be connected to the drinking water mains system. If
the microbiological characteristics of the water are
not periodically checked and/or the powder food
preparations used are not sterile, CARRYING OUT
PASTEURISATION HEAT TREATMENT IS HIGHLY
RECOMMENDED each time they are loaded and
topped up.
LOADING THE MIX - How to carry out a Dry Filling
after cleaning and sanitising machine
Carrying out a DF procedure must take place only once
the machine has been cleaned. The DF procedure is
enabled if the Medium level or the Minimum level is uncovered (and consequently the Medium level).
With clean, sanitised hands (or wearing disposable
gloves) proceed as described below.
t Turn the tap on the top of the machine and point it
towards the inside of hopper.
t The machine is in Stop mode. Press the key.
The display visualises:
t By pressing the key the display shows:
If no key is pressed within ten seconds the display
returns to the standard view.
32
2013/09 - Ed. 01 - EN

XVL 3 USA
By pressing the
t The Up and Down keys are activated so
that the operator can change the liter quantity.
t
The quantity can be modified by using the
arrow keys in steps of 0.1 l. If no key is pressed for
ten seconds the visualisation returns to the standard
display.
t To start the DF procedure, press the key.
t
At this point add the powder mix. In the meantime, clean
the upper part of the machine with a sanitised cloth and
close the lid of the hopper (Refer to paragraph 3.7).
t If the DF procedure is carried out with the minimum
level uncovered (and the previous function was
Stop), after completing the DF procedure, the mixing and the loading for 30” with pump, the display
visualised as follows:
key the display shows:
3.9 Production
Production can be accessed only if there is a minimum level of mix in the hopper.
Pressing the key
Where:
Hopper mix level.
than half full,
Number of cones that can be dispensed
with less than minimum mix. It appears
only when mix falls below minimum level
required.
Hopper temperature. If <40°C the temperature color is blue.
If >=40°C the temperature color is red.
Arrow visible if the hopper is cooling.
Set consistency to be reached.
Mix not ready for dispensing. When consistency is reached the icon will change to
the display visualises:
: more than half full, : less
: less than minimum.
to indicate to de-pressurise the cylinder by pulling
the relevant lever.
t After pulling the lever, on the display is shown:
to indicate to de-pressurise the cylinder by pulling
the relevant lever.
t After a few minutes the beating stops and the ma-
chine is ready for production.
2013/09 - Ed. 01 - EN
.
Actual consistency (HOT).
Arrow visible if the cylinder is cooling.
Days left until washing is required.
14
33

XVL 3 USA
Versions with mixer and water dispensing
The three keys are visualised as follows:
Standard machine.
The cone indicates machine in Production mode.
Key not active.
Machine with water dispensing
The cone indicates machine in Production
mode. Key not active.
The sprayer key is a non
active key (grey).
Machine with mixer.
The cone indicates machine in Production
mode. Grey key not active. The mixer is an active (blue) key.
Machine with mixer
and water dispensing
The cone indicates machine in Production
mode. Key not active.
The mixer key is active
(blue), acting as a toggle.
The mixer stops automatically after a programmed timer expires or by
pressing the mixer key.
The sprayer key is a non
active key (grey).
NOTE
During the production phase it is recommended
to activate the “Key locking” function described in
paragraph 3.3.2 of this manual.
3.10 Pasteurisation
(for the “SP” machines)
The machine is equipped with a function that allows to
carry out Pasteurisation automatically every day at an
established time.
Pasteurisation can also be activated manually by pressing the pasteurisation key.
The product, whether in the hopper or the cylinder, is
heated to 65°C and maintained at this temperature for
30 minutes. Then it is cooled until the storage temperature has been reached.
At the end of the cycle the display visualises “Pasto
End” which means that the pasteurisation process has
been carried out correctly.
Pasteurisation cannot be started if the hopper is less
than half full.
3.11 Daily cleaning – Opening and
closing procedures
3.11.1 Daily closing procedures
With clean, sanitised hands (or wearing disposable
gloves) carry out the following procedures:
t Keep the machine in Production mode.
Disassembly and cleaning of the components:
t Remove the hopper cover, wash, sanitise and rinse
it in a container.
t Clean the outside part of the hoppers by using a
clean, sanitised cloth.
Fig. 15
NOTE
When the level indicator lights up, only a pre-set number of portions can be dispensed after which the dispensing keys are locked until the hopper is filled with
mix.
NOTE
When the symbol is visualised in Production mode, remove a cone by lowering the dispenser lever until it stops. Re-position the lever in
the closed position.
34
2013/09 - Ed. 01 - EN

t
Reposition the lid onto the hopper after sanitization.
Fig. 16
t Remove the drip drawers on the side of the machine,
wash, sanitise and rinse them.
Fig. 17
XVL 3 USA
t Grab the panel with your hands at the pins a pull
outwards, so as to have the slots stick out and remove the panel completely.
Fig. 19
Fig. 20
NOTE
Notify an authorised technician if any mix leaks in
the drip drawers.
t Reposition the drip drawers onto the machine.
t Remove the dispenser levers (5).
t Using both hands, grip the upper part of the spigot
door cover panel and pull forward.
Fig. 18
5
t Wash and sanitise the spigot door cover panel and
the ice cream dispenser levers.
t Fill a bucket with cleaning/sanitising solution. Dip the
provided brush into the cleaning/sanitising solution
and clean the spigot door dispenser and the spigot
door itself (especially the piston area) several times.
Fig. 21
2013/09 - Ed. 01 - EN
35

XVL 3 USA
t
Spray the sanitising solution on the spigot door’s
dispensing point and on the spigot door, particularly
in the area of the piston.
Fig. 22
t Clean the spigot door area, the steel part underneath
it, the machine front and all “splash” areas with a
clean, sanitised cloth, carefully removing any kind of
dampness and product or cleaning/sanitising solution residues.
t Re-assemble the spigot door cover panel and the
ice cream dispenser levers.
Fig. 23
Prepare the machine for the pasteurisation night
cycle (for “SP” machines)
t Open the lid of the hoppers to check the level of the
mix.
t Fill the hoppers with mix at least up to the medium
level.
t Keep the machine in Production mode.
WARNING
If the mix in the hopper is below the medium level
the Pasteurisation cycle will not start.
The Pasteurisation cycle is automatic and occurs overnight at the set time.
3.11.2 Daily opening procedure
With clean, sanitised hands (or wearing disposable
gloves) carry out the following procedures.
Disassembly and cleaning of the lid:
t Remove the hopper lid, wash, sanitise and rinse it in
a container.
t Clean the outside part of the hopper by using a
clean, sanitised cloth.
t Remove the drip tray and its cover; wash, sanitise,
rinse it and then reassemble on the machine.
Fig. 24
Fig. 25
t Reposition the lid onto the hopper after sanitization.
Fig. 26
36
2013/09 - Ed. 01 - EN

XVL 3 USA
5
Spigot door area sanitising:
t Extract the dispenser levers (5).
t Using both hands, grip the upper part of the spigot
door cover panel and pull forward.
Fig. 27
t Grab the panel with your hands at the pins a pull
outwards, so as to have the slots stick out and remove the panel completely.
Fig. 19
solution and clean the spigot door dispenser and the
area of the spigot door piston several times.
Fig. 30
t Spray the cleaning/sanitising solution on the spigot
door dispenser and the spigot door itself, particularly
in the piston area.
Fig. 31
Fig. 29
t Wash and sanitise the spigot door cover panel and
the ice cream dispenser levers.
t Fill a bucket with cleaning/sanitising solution. Im-
merse the supplied brush into the cleaning/sanitising
t Clean the spigot door area, and the machine front
with a clean, sanitised cloth, carefully removing any
kind of dampness and product or cleaning/sanitising
solution residues.
t Re-assemble the spigot door cover panel and the
ice cream dispenser levers.
Fig. 32
t Make sure the machine is in Production mode and
ready to serve.
2013/09 - Ed. 01 - EN
37

XVL 3 USA
4. SAFETY DEVICES
4.1 Alarms
The machine communicates possible alarms by showing messages on the display and flashing the warning triangle.
If an alarm is triggered but then correct functioning is restored, the alarm remains visible on the display without
flashing.
To reset the warning message press Storage/Reset
The machine can be used in Production even if there is an alarm, except in the case of critical alarms. In this latter
case, press Stop and do not use the machine until the machine is repaired.
Below is a list of possible alarms:
ALARM
Mix Out
Add Mix
Safety Therm.C.1
(TESC1)
Safety Therm.C.2
(TESC2)
Safety Therm. Hop
(TESV)
Overload Beat.1
(PTMA1)
Overload Beat.2
(PTMA2)
The display shows
When the hopper mid-level sensor is uncovered the display shows the corre-
sponding symbol
Left cylinder safety thermostat triggered.
The machine Stops.
Right cylinder safety thermostat triggered.
The machine Stops.
Hopper safety thermostat triggered.
The machine Stops.
Left beater motor bimetal thermal protector triggered.
The machine Stops.
Right beater motor bimetal thermal protector triggered.
The machine Stops.
.
DESCRIPTION
when the mix falls below the minimum level.
.
Pressure Switch
Overload Compres
Overload MP1/MP2
(ptmp1/2)
Al. Hopper Probe1
38
(PR)
(RTC)
(TEV1)
Pressure switch triggered.
The machine Stops:
t after the number of occurrences programmed;
t if the pressure switch remains open for 3 consecutive minutes.
If the machine was Pasteurizing, the Pasteurisation must be repeated.
Compressor motor thermal relay.
The machine Stops.
Pump motors 1 and 2 thermal protector.
The machine Stops
Left hopper probe malfunction.
Since the alarm is critical, the machine Stops during Production, Storage and
Pasteurisation.
.
2013/09 - Ed. 01 - EN

XVL 3 USA
ALARM
Al. Hopper Probe2
(TEV2)
Al. Cyl.1 Probe
(TEC1)
Al. Cyl.2 Probe
(TEC2)
Al. IceHop. Probe
(TGV)
Spigot Opened
(IMS)
Al. Evap. Probe
(TE1)
Al. Evap. Probe
(TE2)
DESCRIPTION
Right hopper probe malfunction.
Since the alarm is critical the machine Stops during Production, Storage, and
Pasteurisation..
Cylinder 1 probe malfunction.
Since the alarm is critical the machine Stops in Storage and Pasteurisation.
Since consistency can be controlled during Production the machine does not
Stop if in Production mode..
Cylinder 2 probe malfunction.
Since the alarm is critical the machine Stops in Storage and Pasteurisation.
Since consistency can be controlled during Production the machine does not
Stop if in Production mode.
Hopper evaporator probe malfunction.
The alarm Stops the machine.
Magnetic Safety Switch (IMS)
Left cylinder evaporator probe alarm.
The alarm Stops the machine.
Right cylinder evaporator probe alarm.
The alarm Stops the machine.
Power supply returns after power loss.
Power On
IceCylinder
(ICE)
Timeout Prd.
Belt alarm
(DELTA TGV-TEV)
Wash in n days
(Wash)
Do Not Serve !
Blackout table is checked if the machine was in Pasteurisation or Production
mode.
The event is logged in any function.
Cylinder anti-ice.
This alarm may be due to insufficient mix feeding into the cylinder.
Refrigeration problems; the product does not harden.
Check the quantity of mix in the cylinder, the hopper pump, and the refrigeration
apparatus.
The hopper beater does not rotate.
Check the insertion of beater in its seat.
During Production, the display shows “
(14 in the example) before the machine must be washed.
A forced washing may be required if the machine is left in Stop mode for 24
hours with mix in the hopper.
See WEEKLY CLEANING.
In the case of a “Wash today!” alarm, the alarm must be first reset by pressing
the Storage key, to open the piston for cleaning the machine.
In Production, each time the consistency drops below the programmed value,
the
icon appears on the display
”, meaning that there are N days
Switch Phases
Pasto Needed!
2013/09 - Ed. 01 - EN
It is necessary to invert the two phases on the three-phase cable so that the
beater turns in the correct direction.
When the machine is Stopped with mix in the hopper for more than 60 minutes,
the TEV temperature is checked to see if it is equal or greater than 15°C. If this
is the case, Pasteurisation is required. In this situation, when Production is
pressed the machine will automatically start Pasteurisation.
39

XVL 3 USA
ALLARME
Why in STOP ??
Table Updated M.
Table Updated R.
Communic.Error P
If the machine is left in Stop with mix in the hopper, after 30 seconds the flashing message “Why in STOP ??” will appear on the display, accompanied by a
periodic beeping sound. This alerts the operator to select either Production,
Pasteurization, or Storage mode.
The message disappears when Storage is pressed.
Message shown every time the programming table is changed.
Message shown every time the programming table is changed remotely.
Communication errors with the touchpad.
When this symbol is visualised in Production mode, extract a cone and
lower the dispenser lever until it stops. Re-position the lever in the closed
position.
DESCRIZIONE
4.1.1 Blackout
In the case of a power loss, if the machine was in Cleaning mode, when power returns the machine shifts to Stop.
If the machine was in Pasteurisation heating phase or pause, when power returns the machine will continue with the
function it was performing when power was lost. The display will show the message Power On.
If the machine was in Pasteurisation cooling phase, when the power returns the machine will check the TEV temperature and the duration of the blackout. If the length of time is greater than the duration indicated in the table, the
machine will completely repeat the Pasteurisation cycle, memorizing the alarm “Mancata Tensione” or “Power On”
in the event log.
If the duration is less than the table values, the machine will continue from the point it was at when the power loss
occurred.
TEV TEMPERATURE TIME
68°C ÷ 50°C 30 minutes
49°C ÷ 15°C 10 minutes
14°C ÷ 10°C 20 minutes
9°C ÷ 4°C 2 hours
If the machine was in Production or Storage, when power returns the machine will check the TEV temperature. If it is
below a level set by the manufacturer then the machine will continue with the same function as before, showing the
Power On alarm on the display. If TEV is greater than this value and the time exceeds the values in the table above,
the Pasteurisation cycle will be repeated.
40
2013/09 - Ed. 01 - EN

XVL 3 USA
5.
DISASSEMBLY, CLEANING
AND REASSEMBLY OF THE
PARTS IN CONTACT WITH
THE PRODUCT
5.1 General information
Cleaning and sanitisation are operations that
must be carried out with utmost care on a
regular basis and at the end of each production run to guarantee production quality and
compliance with required hygienic norms.
Letting dirt dry out can greatly increase the risk of ring
marks, spots and damage to surfaces.
Removing dirt is much easier if it is done immediately
after use as some elements containing acid and saline substances could corrode the surfaces. Prolonged
soaking is not recommended.
5.2 Washing conditions
Avoid using solvents, alcohol or detergents that
could damage machine components or pollute the
functional production parts.
To sanitise leave the disassembled parts in sanitised
lukewarm water for the time recommended by the manufacturer (use the sanitising product following the in-
structions of the manufacturer) and rinse them before
reassembling.
When the washing procedure has been completed and
before reassembling components, dry each one thoroughly with a clean, soft cloth suitable for use with
foodstuffs, in order to remove any traces of humidity
rich in mineral salts and chlorine that could attack the
metal surfaces and leave opaque traces.
Carpigiani recommends the use of a cleaning/sanitising solution to wash the machine.
The use of a cleaning/sanitising solution optimises the
washing and sanitising procedures in that it eliminates
two phases of the procedure (a rinse and a washing
phase). Basically the use of a cleaning/sanitising solution saves time by facilitating and simplifying washing/
sanitising procedures.
During the cleaning procedures, Carpigiani recommends to use the supplied brushes that must be washed
and sanitized before and after use
When manually washing never use powder or abrasive
products, abrasive sponges or pointed utensils which can
dull surfaces, remove or deteriorate the protective film
that is present on the surface thus scoring the surface.
Never ever use metal scouring pads or synthetic abrasives whose scouring action could remove ferrous parts
and risk causing oxidisation or making the surfaces vulnerable.
Avoid using detergents that contain chlorine and its components. The use of these detergents such as bleach,
ammoniac, hydrochloric acid and decalcifiers can attack
the composition of the steel, marking it and oxidising it
irreparably and damaging the “plastic” parts.
Do not use dishwashers and their detergent products.
The use of a cleaning/sanitising solution allows to optimise the washing and sanitising process since it avoids
two procedure phases (i.e. a rinse and a washing phase);
basically the use of a cleaning/sanitising solution allows
saving time by facilitating and simplifying washing/sanitising procedures.
WARNING
Every time the machine is washed and the parts
that come into contact with the ice cream mix are
disassembled, it is essential to carry out a visual
control of all its parts made of thermosetting materials; plastics, elastomers, silicone and metal (for
example, scrapers, pump gears, beaters, etc…). All
parts must be whole, not worn, without cracks or
splits, or opaque if originally polished/ transparent.
Carpigiani declines all responsibility for any damage caused by imperfection and/or undetected
breakages and not promptly solved by the replacement with genuine spare parts and is available for
consultation and for any specific request made by
the customer.
5.4 How to use cleaning/sanitising solution
Follow the instructions on the label of the
product used to prepare the cleaning/sanitising solution.
5.3 Suggestions
Use a mild detergent solution to wash parts.
Manually wash parts in water (max 60°C) using a mild
detergent and the supplied cleaning brushes.
Use drinking water (bacteriologically pure) to rinse the
parts.
2013/09 - Ed. 01 - EN
Washing/sanitisation by immersion of components
t Manually remove the bulk residues using the sup-
plied brushes.
t Remove finer residues with a jet of water.
41

XVL 3 USA
t
Dip the parts to be cleaned into the cleaning/sanitising solution.
t Allow to soak in the solution for the time indicated by
the manufacturer.
t Rinse the parts with care, using plenty of clean drink-
ing water.
5.5 Daily cleaning
Cleaning and sanitisation operations must be carried
out daily with the utmost care and attention every time
the machine is switched on and switched off to guarantee the quality of the product. Respect hygienic standards by scrupulously following the instructions provided
in paragraph 3.11.
5.6 Scheduled cleaning
The machine is equipped with an automatic system
which activates cleaning of the parts in contact with the
product at scheduled times.
5.6.1 Mix emptying
t Place a bucket under the dispenser spigot door.
t Press the button .
t Lower the dispenser lever and drain out all the prod-
uct from the cylinder.
Fig. 33
Such system, called “WASH”, inhibits the dispensing
function when the scheduled time comes.
WARNING
Cleaning and sanitising procedures have to be carried out with the utmost care on a regular basis according to the scheduled date shown on the machine display to ensure production quality and the
compliance with the necessary hygienic rules.
During Production th display shows the number of days
until the next required washing:
When the schedules wash day arrives, Production is inhibited and the machine will not accept that function.
The display shows:
t
Select the function and then select .
NOTE
It is recommended to select the Heated Beating
to make emptying the cylinder easier if ice
cream is still inside.
t
When the mix becomes liquid, press the
continues to drain out the mix.
t Remove the hopper lid.
5.6.2 Pump-fed machines - Removing the
pumps from the hoppers
t Rotate the connection hose (207) until its notch is
aligned with the pin on the pump, pull it forward so as
to disconnect it from the pump.
t Remove the compression hose (32) by rotating it 90°
and removing it from its seat in the hopper. At this point
open the dispenser lever and continue to drain out the
mix.
Fig. 34
key and
To reset the machine to the number of days programmed
in Wash Days, the machine must first be washed.
42
207
32
2013/09 - Ed. 01 - EN

t
Disassemble the pump by rotating it 45° clockwise
and by taking it out frontally.
t Remove the pump shaft (96) and the seal by taking
it out frontally.
Fig. 35
96
t Repeat the previous operations on the second hopper.
t Insert the O-ring in the supplied plug and insert it
into the pump housing hole so as to close the hopper.
Fig. 36
XVL 3 USA
5.6.4 Remove hopper beaters
t Remove the beaters in the hopper by pulling them
upwards.
Fig. 37
A
5.6.5 Hopper cleaning
t Pour clean warm water into the hopper.
WARNING
5.6.3 Gravity-fed machines - Removing
the feed neddles.
t Remove the feed needles from the bottom of the
hopper.
Fig. 38
Never exceed the maximum level indicated on the
hopper walls.
t Use the supplied brushes to clean the sides of the
hopper, the level sensors, the beater shafts and interstice (A) and the hopper. Using the smallest brush,
clean the seat of the compression hose or the feed
needle on the bottom of the hopper. Discharge water from the hoppers using the dispenser levers and
repeat many times the operation until clean water is
obtained.
t Repeat the two previous procedures by using a
cleaning/sanitising solution.
Fig. 39
2013/09 - Ed. 01 - EN
43

XVL 3 USA
t
Position a bucket underneath the spigot door, lower
the dispenser levers and allow the solution to flow.
Fig. 40
t Select the function and then select . Let
the machine operate for 10 seconds.
t Press the button and discharge the water com-
pletely.
t Rinse with warm water until clean water comes out.
t Remove the plug from the pump housing hole.
Fig. 41
t Spray the cleaning/sanitising solution around the
pump housing hole. Immerse a fine brush in the
cleaning/sanitising solution and clean the pump
housing hole several times.
NOTE
The plug and its O-ring must be washed and
sanitised.
44
2013/09 - Ed. 01 - EN

5.6.6 Machine with pump – Pump disassembling
Fig. 42
236
1270
XVL 3 USA
1270
1138
96
39
243
38
1178
202
99A
1107
1131
271
38A
245
206
99
99A
1107
1131
1117
8
207
1126
8
8 Pump knob
31 Membrane valve
32 Compression hose
38 Driven gear
38A Driving gear
39 Pump body
96 Pump shaft
99 Suction pipe
99A Air inlet pipe
202 Pump cover
206 Spring
207 Connection pipe
32
1131
31
236 Plug
243 Pump body seal
245 Pump valve
271 Pump regulator
1107 O-ring
1117 O-ring
1126 O-ring
1131 O-ring
1138 O-ring
1178 O-ring
1270 O-ring
2013/09 - Ed. 01 - EN
45

XVL 3 USA
t Remove the seal (243) and the two O-rings (1138).
Fig. 43
243
1138
t Remove the pump regulator (271) from the pump
cover (202) by rotating it clockwise until the notch
located on the regulator is aligned with the pin on the
pump cover and pull it out. Use the O-ring extractor (1131) to remove the two O-rings located on the
pump regulator.
t Remove the spring (206) and the pump valve (245).
Fig. 44
t Remove the two air inlet pipes (99A) from the pump
cover (202), pushing and rotating them until the
notches positioned on the pipes are aligned with the
pins situated on the pump cover.
t Remove the plugs (236) and the O-ring (1270) from
the air inlet pipes (99A).
t Remove the O-rings (1107) from the air inlet pipes
(99A).
Fig. 45
236
1270
1270
99A
1107
202
t Keep the suction pipe (99) vertical, rotate it until the
notch is aligned with the pin situated on the pump.
t Use an O-ring extractor to take the O-ring (1131) out
from the suction pipe (99).
271
1131
245
206
Fig. 46
1131
202
99
t Unscrew the two knobs and separate the pump cov-
er (202) from the pump body (39).
46
2013/09 - Ed. 01 - EN

t
Use an O-ring extractor to remove the O-ring (1178).
t Remove the gears (38-38A).
Fig. 47
39
38a
38
1178
XVL 3 USA
5.6.7 Gravity-fed machines – removal of
the feed needle
Proceed as follows to remove the feed needle:
t Remove the cursor of the feed needle (52).
t Remove the needle O-ring (1131).
Fig. 49
202
52
t Remove the connection pipe (207) from the com-
pression hose (32).
t Remove the O-rings (1117), (1126), (1131) and the
valve (31).
Fig. 48
1117
207
1126
32
1131
31
1131
2013/09 - Ed. 01 - EN
47

XVL 3
5.6.8 Disassembly of the spigot door
Fig. 50
214
30
1188
303
7 Dispensing door
8 Knob
5 Dispenser levers
30A Piston
WARNING
Before disassembling the dispensing spigot door,
make sure the hoppers and the cylinders are empty, and the machine is in stop mode.
1147
1147
7
5
8
214 Adjusting screw
303 O-ring
1147 O-ring
1188 O-ring
t Grab the panel with your hands at the pins a pull out-
wards, so as to have the slots stick out and remove
the panel completely.
Fig. 19
t Remove the dispenser levers (5).
t Using both hands, grip the upper part of the spigot
door cover panel and pull forward.
Fig. 51
48
5
2013/03 - Ed. 02 - EN

XVL 3 USA
Fig. 53
t
With the help of a dispenser lever (5), push the adjusting screw (214) upwards to free the ring from its
position on the piston (302) and to completely remove the screw.
t Take the piston out (if necessary, use a dispenser le-
ver (5) to do this operation).
t Use an O-ring extractor to take out:
The O-rings (1147, 303) of the piston.
The O-rings of the dispensing spigot door (1188).
Fig. 56
30
1147
303
Fig. 54
t Unscrew the knobs (8) and remove the dispensing
spigot door.
Fig. 55
1188
2013/09 - Ed. 01 - EN
8
49

XVL 3 USA
5.6.9 Disassembly of beaters
Fig. 57
28
21
430
25
24
21 Beater
24 Idler
25 End Pusher
28 Seal
430 Scraper blades
t Remove the beaters (21) from its seat in the cylinder,
being careful not to knock the walls of the cylinder.
Fig. 58
28
430
28
t Remove the idler (24) the scraper blades (430) and
the end pusher (25) from the shaft.
Fig. 60
21
430
25
24
21
21
t Let the seal (28) slide on the beater axle and remove it.
Fig. 59
28
WARNING
The seal is very important for cylinder tightness.
Check its wear on a regular basis according to the
maintenance plan (Refer to paragraph 6.1). Furthermore always lubricate the seal properly during
washing operations.
25
24
430
t For sliding scraper blades beater, remove the scrap-
er blades (430) from the shaft, by sliding along the
agitator guide.
Fig. 61
21
430
430
430
50
50
2013/09 - Ed. 01 - EN

5.6.10 Disassembly of the drip drawer, the
drip tray and the hopper lid
XVL 3 USA
WARNING
t Take the drip drawers out from their seats on the side
of the machine.
Fig. 62
t
Remove the drip tray and relevant cover.
Fig. 63
To carry out the following operations, your hands
must be clean and sanitized, or you must wear disposable gloves.
t Fill a sink with cleaning/sanitising solution prepared
according to the manufacturer’s indications.
t Use the provided brushes and vigorously brush all
components and holes found on the same components (the holes on the pump, suction pipes, nonreturn valves, pump seal and its interstice, beater
scraper blade, etc...).
t Dip the components into the cleaning/sanitising so-
lution and let it work for the time indicated by the
manufacturer.
t Rinse the parts with care by using plenty of drinking water.
t Place the components onto a clean, sanitised tray
and let them air-dry.
t Dip a big brush into the cleaning/sanitising solution
and clean the cylinder.
t Dip a brush in the cleaning/sanitising solution and
clean the pump housing holes, the compression hoses
on the hopper bottom and the sides of the hoppers.
t Spray the cleaning/sanitising solution on the bottom
of the cylinder and on the hopper walls.
t Repeat the last three steps a few times.
t Disassemble the hopper lid.
Fig. 64
5.6.11 Cleaning and sanitising of the components
WARNING
5.6.12 Reassembly of the hopper beater
t Replace the beater in its seat, ensuring that it is en-
gaged correctly
Fig. 65
5.6.13 Reassembly of the beater
t For sliding scraper blades beater, replace the six
scraper blades (430) on the shaft.
Fig. 66
21
430
430
For the use of cleaning/sanitising solution, refer to
the manufacturer’s instructions on the label of the
product used.
2013/09 - Ed. 01 - EN
430
51

XVL 3 USA
t
Replace the end pusher (25) - see picture - so that is
engages correctly in the seat of the beater
t Insert the idler (24) into the beater through the end
pusher. Insert the scraper blades (430).
Fig. 67
25
piston square notch is aligned with the rectangular
opening on the front of the spigot door.
t Lubricate and replace the two O-rings (1188).
Fig. 70
24
430
t Lubricate the inner sides of the seal (28) and its seat on
the beater shaft. Let the seal slide onto the beater shaft.
Fig. 68
28
303
1188
t Insert the dispensing spigot door on the front panel
and tighten it using the knobs (8) properly.
Fig. 71
30
1147
NOTE
Check the beater seal for integrity. Replace if worn
or damaged.
out the replacement.
t Insert the beater assemblies into the cylinders, turn-
ing and pushing them until they engage in rear hub.
Fig. 69
5.6.14 Reassembly of the dispensing spig-
t Lubricate and replace the piston O-rings (1147, 303).
t Lubricate the pistons (30) and insert them into their
seat in the dispensing spigot door, making sure the
Refer to the maintenance plan to carry
21
ot door
8
t With the help of a dispenser lever (5), reassemble the
adjusting screw (214),
on the piston.
Fig. 72
to reposition the ring in its seat
52
2013/09 - Ed. 01 - EN

XVL 3 USA
Replace the spigot door cover panel.
t
t Reassemble the dispenser levers (5) onto the spigot
door.
Fig. 72
5.6.15 Reassembling the pump
t Lubricate and insert the O-ring (1117) on the con-
nection pipe (207).
t Insert the connection pipe (207) assembly in the
compression hose (32).
Fig. 75
207
32
5
t Leave the sanitized compression hoses on the tray.
They will be mounted during the “mix preparation
procedure”.
t Lubricate and insert the O-rings (1138) onto the
pump body.
t Lubricate and insert the seals (243) in the pump
body.
Fig. 76
Fig. 73
1117
207
t Lubricate and insert the O-rings (1126), (1131) and
the valve (31) on the compression hose (32).
Fig. 74
1126
32
243
1138
t Lubricate and insert the O-ring (1178) on the pump body.
t Lubricate the surface of the pump gears (38-38A)
and their seat in the pump body and insert them into
the pump body (39).
WARNING
Do not lubricate the teeth of the gears. Carry out
checks on wear as instructed in paragraph 6.1.
Fig. 77
39
38A
1131
31
2013/09 - Ed. 01 - EN
38
1178
53

XVL 3 USA
Lubricate and insert the two O-rings (1131) on the
t
pump regulator (271).
Fig. 78
271
1131
t Lubricate and insert the O-ring (1131) on the suction
pipe (99).
t Holding the pump cover insert the suction pipe (99)
by pushing and turning it counterclockwise.
t Insert the pump regulator (271) on the pump cover
aligning the pump regulator notch to the pin on the
pump cover and turning to lock it.
Fig. 81
271
Fig. 79
1131
99
t Insert the spring (206) and the valve (245) into the
pump cover.
Fig. 80
245
206
t Lubricate and insert the O-rings (1107) onto the air
inlet pipes (99A).
t Insert the O-rings (1270) into the two plugs (236) on
the air inlet pipes (99A).
t Insert the two air inlet pipes (99A) on the pump cov-
er aligning the pipe notch with the pin on the pump
cover and turning the pipes until they are locked.
Fig. 82
236
1270
1270
99A
54
1107
2013/09 - Ed. 01 - EN

Make sure the machine is in Stop mode and lubricate
t
the pump shaft (96). Position it in the rear hole of mix
hopper, pushing it and rotating it slightly until it engages the drive hub. Hold the pump body assembly,
with the blocking pin hook on the right. Keeping your
thumbs over the pump gears so that they remain in
place, push and turn the pump clockwise until the
shaft is aligned with the driving gear. Now turn the
pump counterclockwise until it locks into the blocking pin.
Fig. 83
96
XVL 3 USA
5.6.16 Gravity-fed machines – reassembly
of the feed needle
t Lubricate the O-ring (1131).
t Reassemble the feed needle.
Fig. 85
96
t Assemble the pump cover with the feeding pipe
downwards onto the pump body and turn the two
knobs tightly.
Fig. 84
t Leave the sanitized feed needle on the tray. They will
be mounted during the “mix preparation procedure”.
5.6.17 Reassembling drip trays, drip drawer
and hopper lid
t Insert the drip trays into their slots in the side of the
machine.
Fig. 86
2013/09 - Ed. 01 - EN
t
Position the front drip drawer and its cover.
Fig. 87
55

XVL 3 USA
t
Cover the hopper with lid.
Fig. 88
t Open the spigot door cover panel, immerse the sup-
plied brush in the detergent/sanitising solution and
brush the dispensing point of the spigot door. Repeat the operation twice
t Wipe the exterior of machine with a sanitised cloth.
Repeat the operation twice and close the spigot
door cover panel.
t Leave the cleaning/sanitising solution in the hopper
for the time indicated by the manufacturer.
Draining the cleaning/sanitising solution
t Place an empty bucket underneath the door and
lower the dispensing handles.
Fig. 89
5.6.18 Complete sanitisation of the machine
The machine must be sanitised before the mix is poured
into the hopper.
NOTE
After cleaning and sanitised the machine and,
more precisely, after closing the front spigot door
of the machine, operate the machine in Produc-
tion mode (by pressing the
minutes. After 60 minutes, the machine no longer
accepts the
to the pasteurisation function. In other words,
carry out the “Complete sanitisation of the machine“ and “Mix Preparation“ within 60 minutes,
then push the
t With the machine in Stop mode, pour the detergent/
sanitising solution into the hopper up to the maximum level and leave it to drain into the cylinder.
t Using the brush, clean the mix level sensor, the
whole surface of the mix hopper, the surface of the
mix pump and the outside of the hopper beater.
key and automatically passes
key.
key) within 60
t Drain all of the cleaning/sanitising solution, press the
key then press to remove the last resi-
dues of solution. The beater must not work for more
then 5 seconds, then press
t Fill the tank with drinking water to rinse it out thor-
oughly and repeat the previous operation.
.
WARNING
Do not keep the beater running for more than
the time strictly needed to complete washing
and sanitisation. Mix butterfat lubricates beater
blades; without this lubrication the beater blades
wear out quickly.
t Press the key and then press and let the
beater operate for approximately 5 seconds. Press
the
t Pour a little cleaning/sanitising solution into a bucket.
key .
56
t Refer to the paragraph 3.8 of this manual for filling
the tank and starting production.
2013/09 - Ed. 01 - EN

XVL 3 USA
6. MAINTENANCE
WARNING
Never put your hands into the machine while it is
in Production or Cleaning mode. Before performing any maintenance, make sure the machine has
been placed in Stop mode and the main switch has
been switched OFF.
6.1 Type of intervention
WARNING
Any maintenance operation requiring that the machine protective panels be opened, must be performed with the machine in Stop mode and with
machine disconnected from the electrical power
supply. The cleaning or lubricating of moving parts
is forbidden. Repairs on the machine or its electrical, mechanical, pneumatic or refrigeration system must be performed by authorised, qualified
personnel and in accordance with routine and extraordinary maintenance as agreed with the customer with regards to specific service methods on
the basis of destination of use of the machine.
How to check condition of gears:
This check must be carried out during the periodical
cleaning of the machine.
Disconnect the compr
the cylinder. If all parts of the pump are correctly assembled and the gears are OK the pump produces a
strong stream of mix (fig. 90), If all parts of the pump are
correctly assembled but the gears are worn the stream
of mix is very weak (fig. 91).
Fig. 90
ession hose after depressurising
Procedures necessary for the good operation
of the machine are such that most maintenance is completed during the Production cycle.
Maintenance operations, such as the cleaning of parts
coming into contact with the product and disassembling the beater, are to be normally carried out at the
end of each work shift, thereby keeping maintenance
effort at a minimum.
Below is a list of normal maintenance operations:
t Cleaning and replacement of beater seal
Cleaning must be carried out on the set date indicated on the display. The part should be replaced if it is
noticeably worn and mix is leaking into drip drawer.
t Cleaning of the beater assembly
Cleaning must be carried out on the set date indicated on the display.
t Cleaning of the dispensing head
Cleaning must be carried out on the set date indicated on the display.
t Cleaning of the pump unit
Cleaning must be carried out on the set date indicated on the display.
Fig. 91
How to avoid wear of the gears:
t Do not operate the pump without mix inside the hop-
per or only with water for more than a few seconds:
the fat/grease content of the mix acts as a lubricant
for the gears (like the oil of a car). Without the mix the
gears would wear much more quickly.
2013/09 - Ed. 01 - EN
57

XVL 3 USA
No foreign object must enter the pump, not even a
t
little piece of plastic, a tomato skin, a piece of straw
that may have accidentally fallen into the hopper;
they could block the feed and damage the gears.
t During cleaning operations handle the gears with
care. Their correct operation could be jeopardised if
they are accidentally dropped.
t Cleaning of blades, drip drawer and tray support
shelf.
It must be performed daily with neutral soaps and
ensuring that detergents are never used inside the
beater unit.
t Cleaning and sanitisation:
It must be carried out on the set date indicated on
the display according to the procedures indicated in
section 5 of the manual.
WARNING
To clean the machine and its parts never use abrasive sponges which could scratch the surfaces.
6.2 Water-cooling
For those machines equipped with a watercooled condenser, all water must be drained
out of the condenser at the end of selling season to avoid any trouble should the machine
be stored in an environment where the temperature may drop below 0°C.
After closing the water inlet pipe, withdraw drain pipe
from its seat and let water flow out from circuit.
6.3 Ordering spare parts
When one or more parts are worn out or broken, place
the order through your local distributor.
58
2013/09 - Ed. 01 - EN

6.4 Supplied accessories
Fig. 92
1188 1178
1138
236
772
772A
772B
772C
028
830
830A
XVL 3 USA
475
303
031
072
Key:
28
Beater shaft seal
31 Membrane valve
72 O-ring extractor
236 Blanking plug for pump hole
236A Plug
243 Body pump seal
303 O-ring
475 Kit case
772 Brushes
830 Carpilube tube
830A Lubrifilm tube
840 Cleaning spatula
236A
1270
243
1103
1107
1117
1126
1131
1147
1287
1103 O-ring
1107 O-ring
1117 O-ring
1126 O-ring
1131 O-ring
1138 O-ring
1147 O-ring
1178 O-ring
1188 O-ring
1270 O-ring
1287 O-ring
840
2013/09 - Ed. 01 - EN
59

XVL 3 USA
7. TROUBLESHOOTING GUIDE
IRREGULARITY CAUSE PROCEDURE TO FOLLOW
Compressor starts and then
stops after a few seconds.
Mix or ice cream leaks out
from above and below the
piston even though the spigot
door is closed.
Mix leaks out of the drip drawer.
t If it’s a water-cooled machine: the water
is not circulating.
t If it’s an air-cooled machine: the air is not
circulating.
t Piston without O-ring or the O-ring is
worn out.
t Seal missing or worn out.
t Open water inlet cock and check that
pipe is not squashed or bent.
t Check that the machine is positioned
so that there is enough space for air to
circulate freely from the bottom upwards
(leave at least 50 cm clearance above the
chimney).
t Check the condenser is not blocked by
dust or other things and eventually call
the customer service for cleaning.
t Call customer service if necessary.
t Stop the machine and install or replace it
with a new one if worn out.
t Stop the machine and install it if missing.
If worn out, replace it with a new one.
The dispenser lever is hard to
operate.
Ice cream comes out from
front lid.
Low ice cream overrun.
t Dry sugar on piston.
t O-ring missing or not properly fitted.
t Front lid knobs not tightened evenly.
t Pump not adjusted correctly.
t Stop the machine and wash thoroughly
and grease the pistons and the O-ring
with edible fat.
t Stop the machine and check then act ac-
cordingly.
t Stop machine, loosen and tighten them
again.
t Adjust the position of the central knob of
the pump.
60
2013/09 - Ed. 01 - EN


CARPIGIANI
Via Emilia, 45
40011 Anzola dell’Emilia (BO) Italy
+39 051 6505111
+39 051 732178
Þ carpigiani.com
 Loading...