

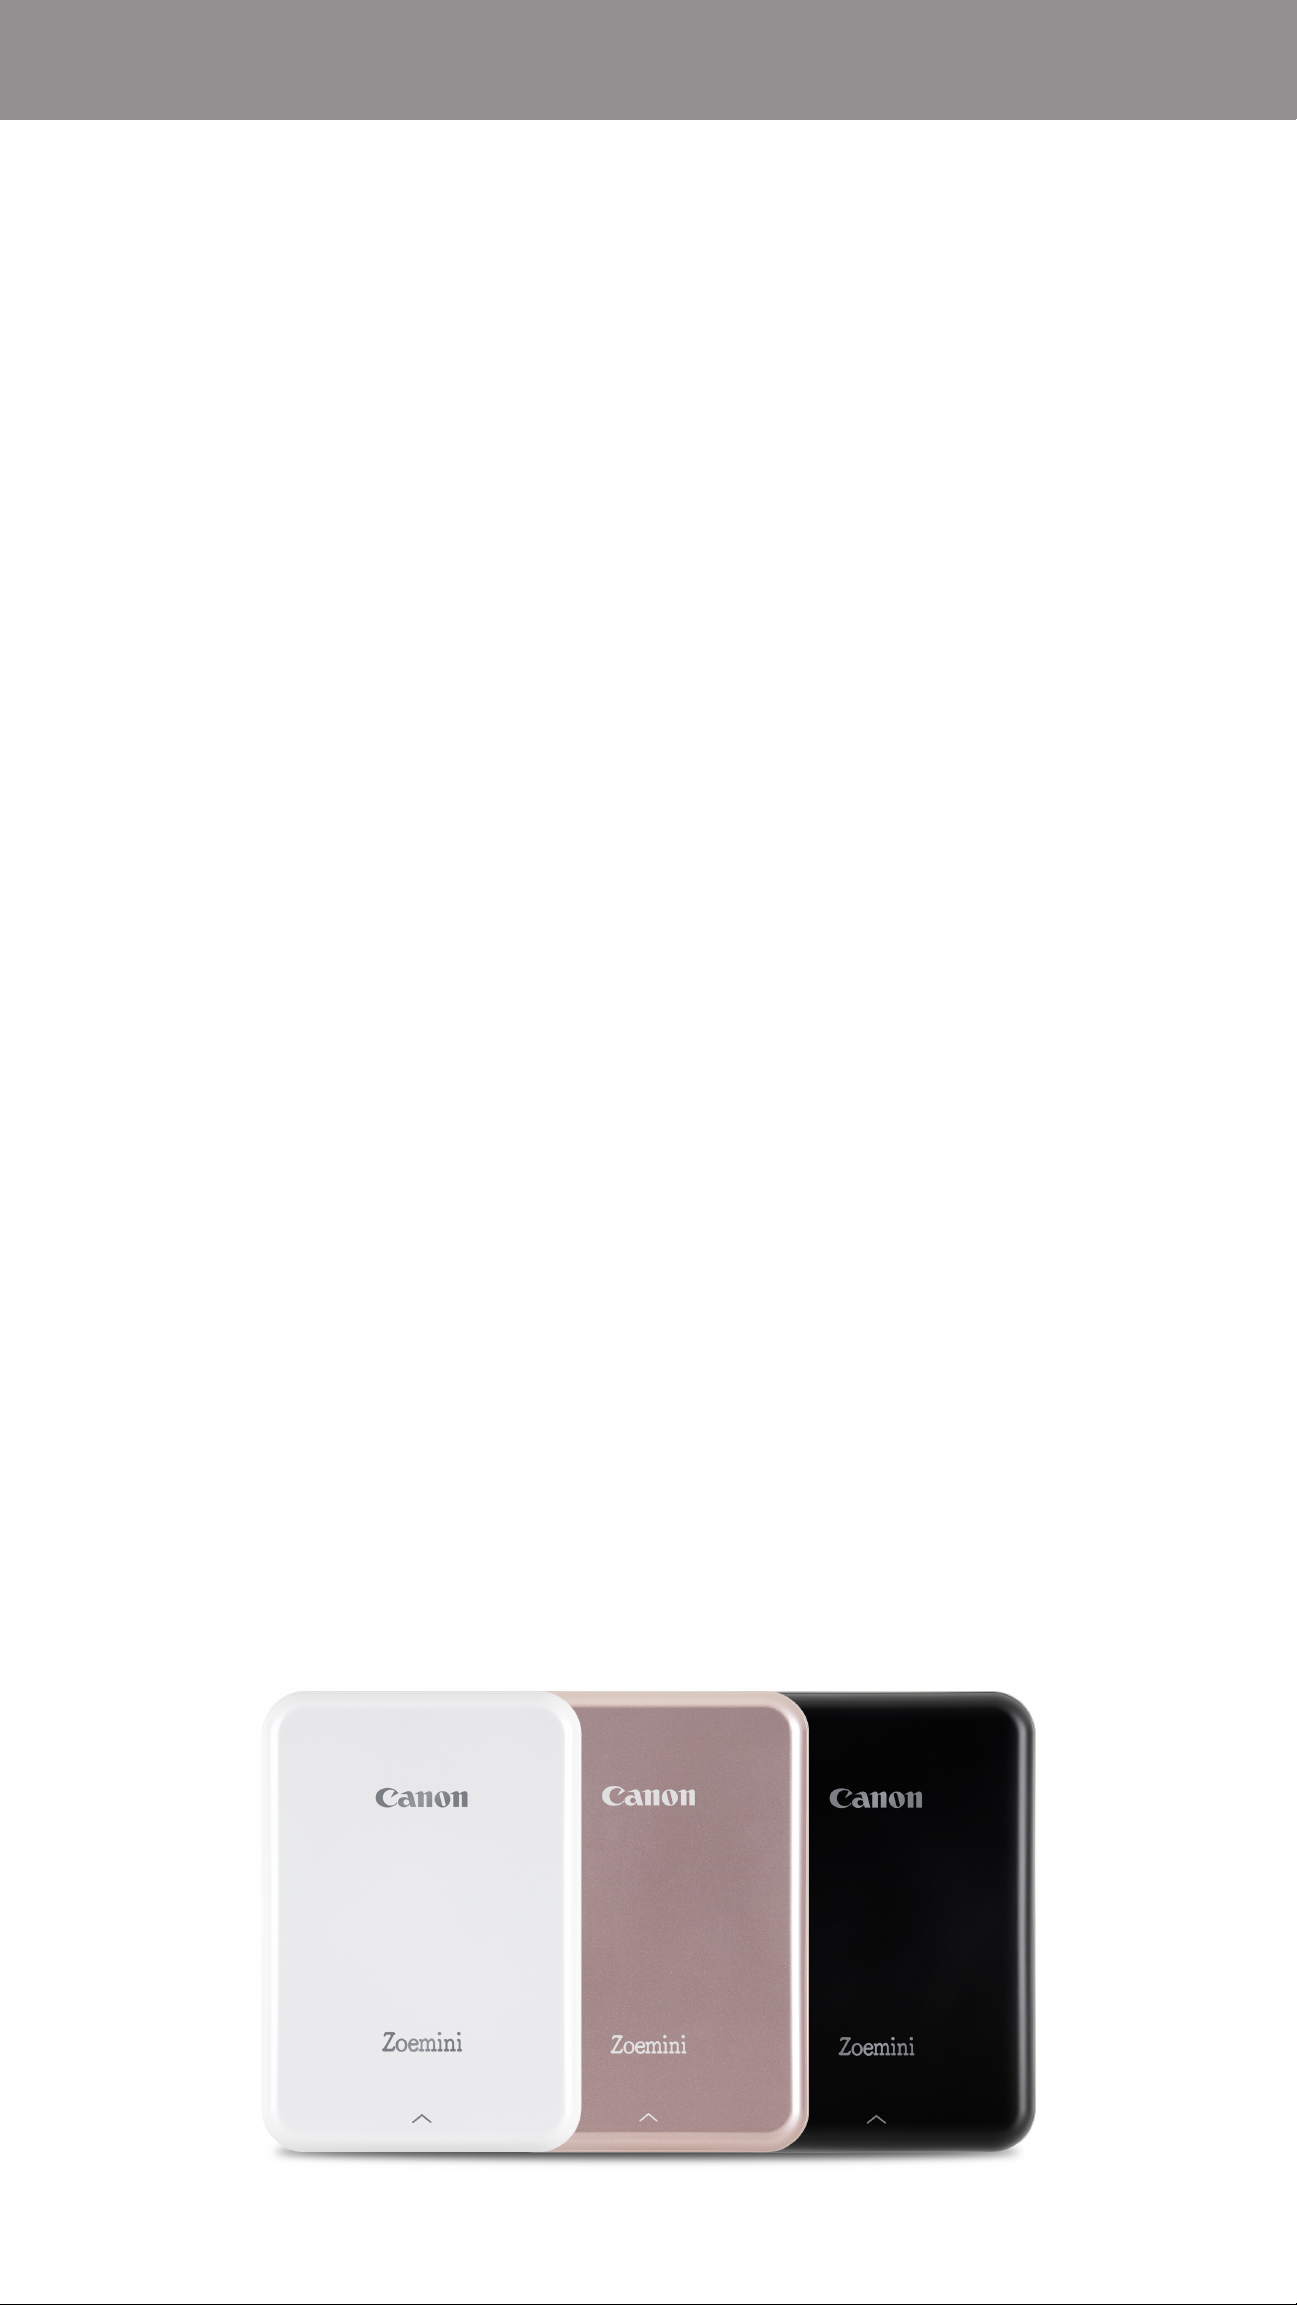
Page 1

Mini Photo Printer
User Manual
Page 2
CONTENTS
SAFETY INFORMATION
PRINTER OVERVIEW
PRINTER SETUP
A) Charge Printer
B) Power On
C) Load Paper
INSTALLING APP
PAIRING DEVICE & PRINTER
USER INTERFACE
Home Screen / Main Menu
Camera Mode
Photo Gallery
Print Photos
Edit Photos
Using Tile Print
Using Collage Print
Share Photos
Save Photos
Send to Mini Print
SPECIFICATIONS
2
Page 3

SAFETY INFORMATION
READ BEFORE USE
Please read the following instructions and safety precautions before using the Printer.
For regulatory and additional safety information, refer to the Regulation and Safety
Information sheet included in your printer package contents.
ABOUT SYMBOLS
CAUTION
Indicates information that if ignored, could
result in accidental injury caused by improper
use of the equipment. These must be
observed for safe operation.
Instructions or content are important
and must be followed accordingly.
NOTE
NOTE
• Do not use or leave the product under direct sunlight. Also avoid areas subject to
rapid temperature changes, high humidity, dust and dirt.
• When operating in extreme weather, the printer might not print. Let the printer
temperature adjust to recommended operating temperature of 15º to 32ºC,
before attempting to print again.
• When charging, please charge the printer in an environment with the
recommended temperature of 15º to 32ºC.
CAUTION
• In areas with low humidity, the printer may build up a static electric charge.
Take precautions before handling the printer.
• Keep the printer away from liquids or containers of liquids.
• Keep the ventilation openings clear of any objects that could block them.
• Do not under any circumstances dismantle the printer. If the product is not
functioning properly, please contact the dealer you purchased this product from or
Canon Service & Support at www.canon-europe.com/Support.
• Do not improperly dispose of the product as it may cause personal injury or harm.
Please dispose of the product in accordance with local regulations.
• Do not handle near Medical Electrical Equipment. Weak magnetism is emitted by
this product. Do not stand near implanted electronic devices, such as a cardiac
pacemaker. Please see your doctor if the printer does come close to such a device.
• Disassembling the battery may cause leakage, explosion, damage or personal injury.
• Do not use the printer if the battery or product has swelled.
• Never expose the battery to high temperature, direct heat, or dispose by incineration.
3
Page 4
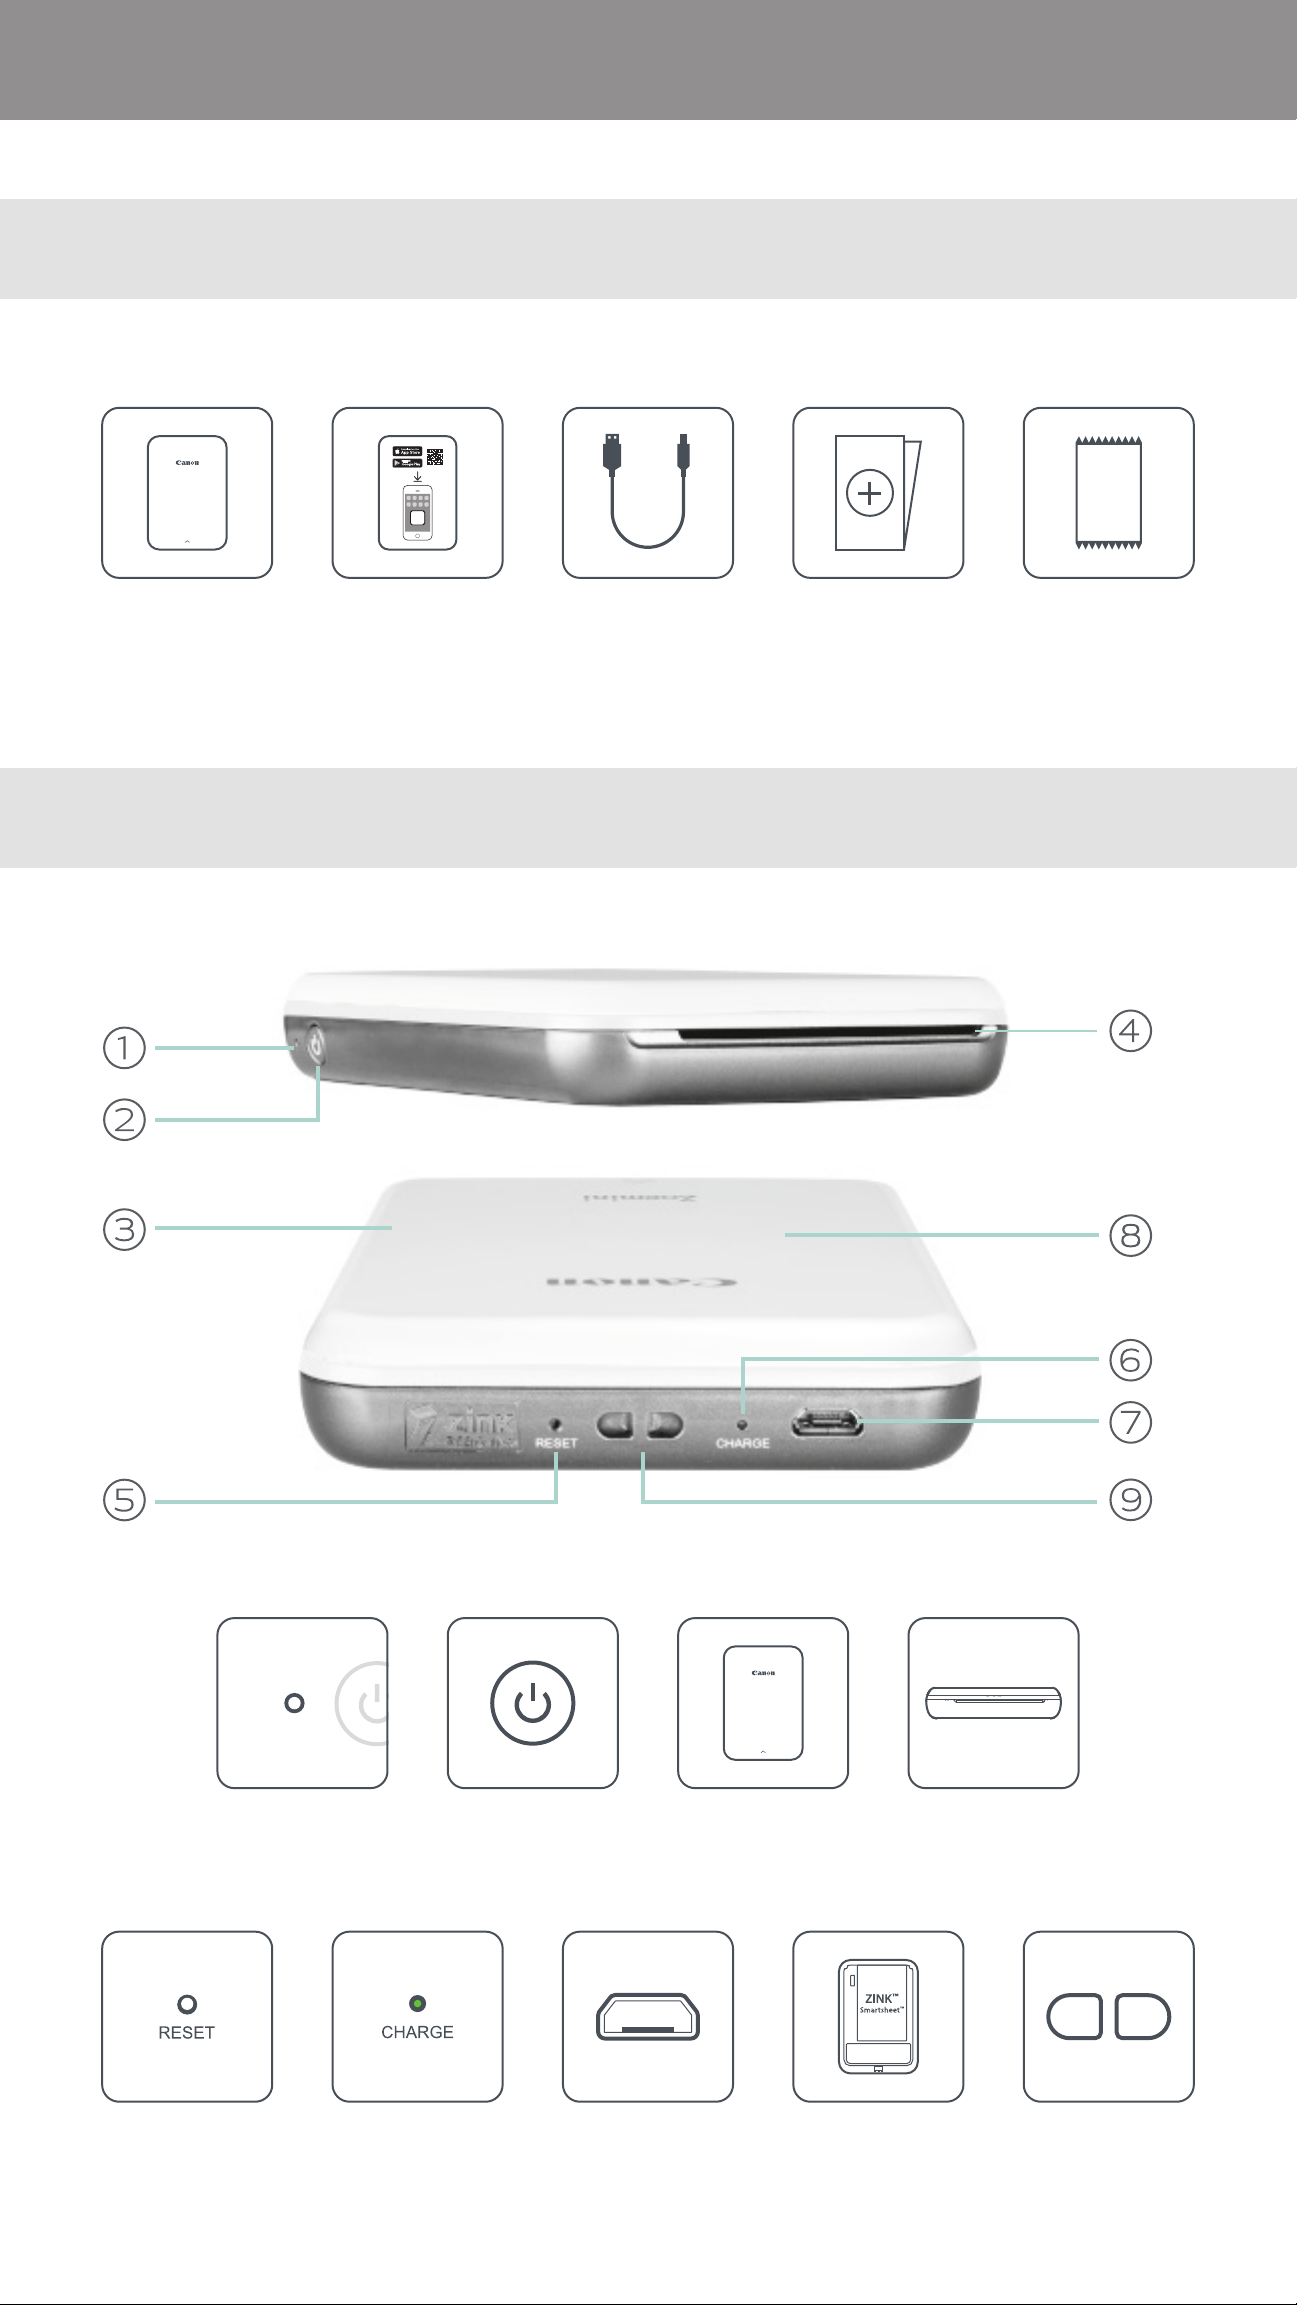
PRINTER OVERVIEW
SUPPLIED ITEMS
Mini Print
Mini Photo Printer Quick Start Guide USB Cable Regulation and Safety
Information sheet
PRODUCT FEATURES
CANON ZINK™
Photo Paper
(10 sheets)
Reset button
⑤
Power LED light
①
⑥
Power button
②
Charging LED light
USB port
⑦
(for charging)
Top cover
③
Paper output slot
④
Paper tray
⑧
(visible with top cover open)
Wristband eyelet
⑨
4
Page 5
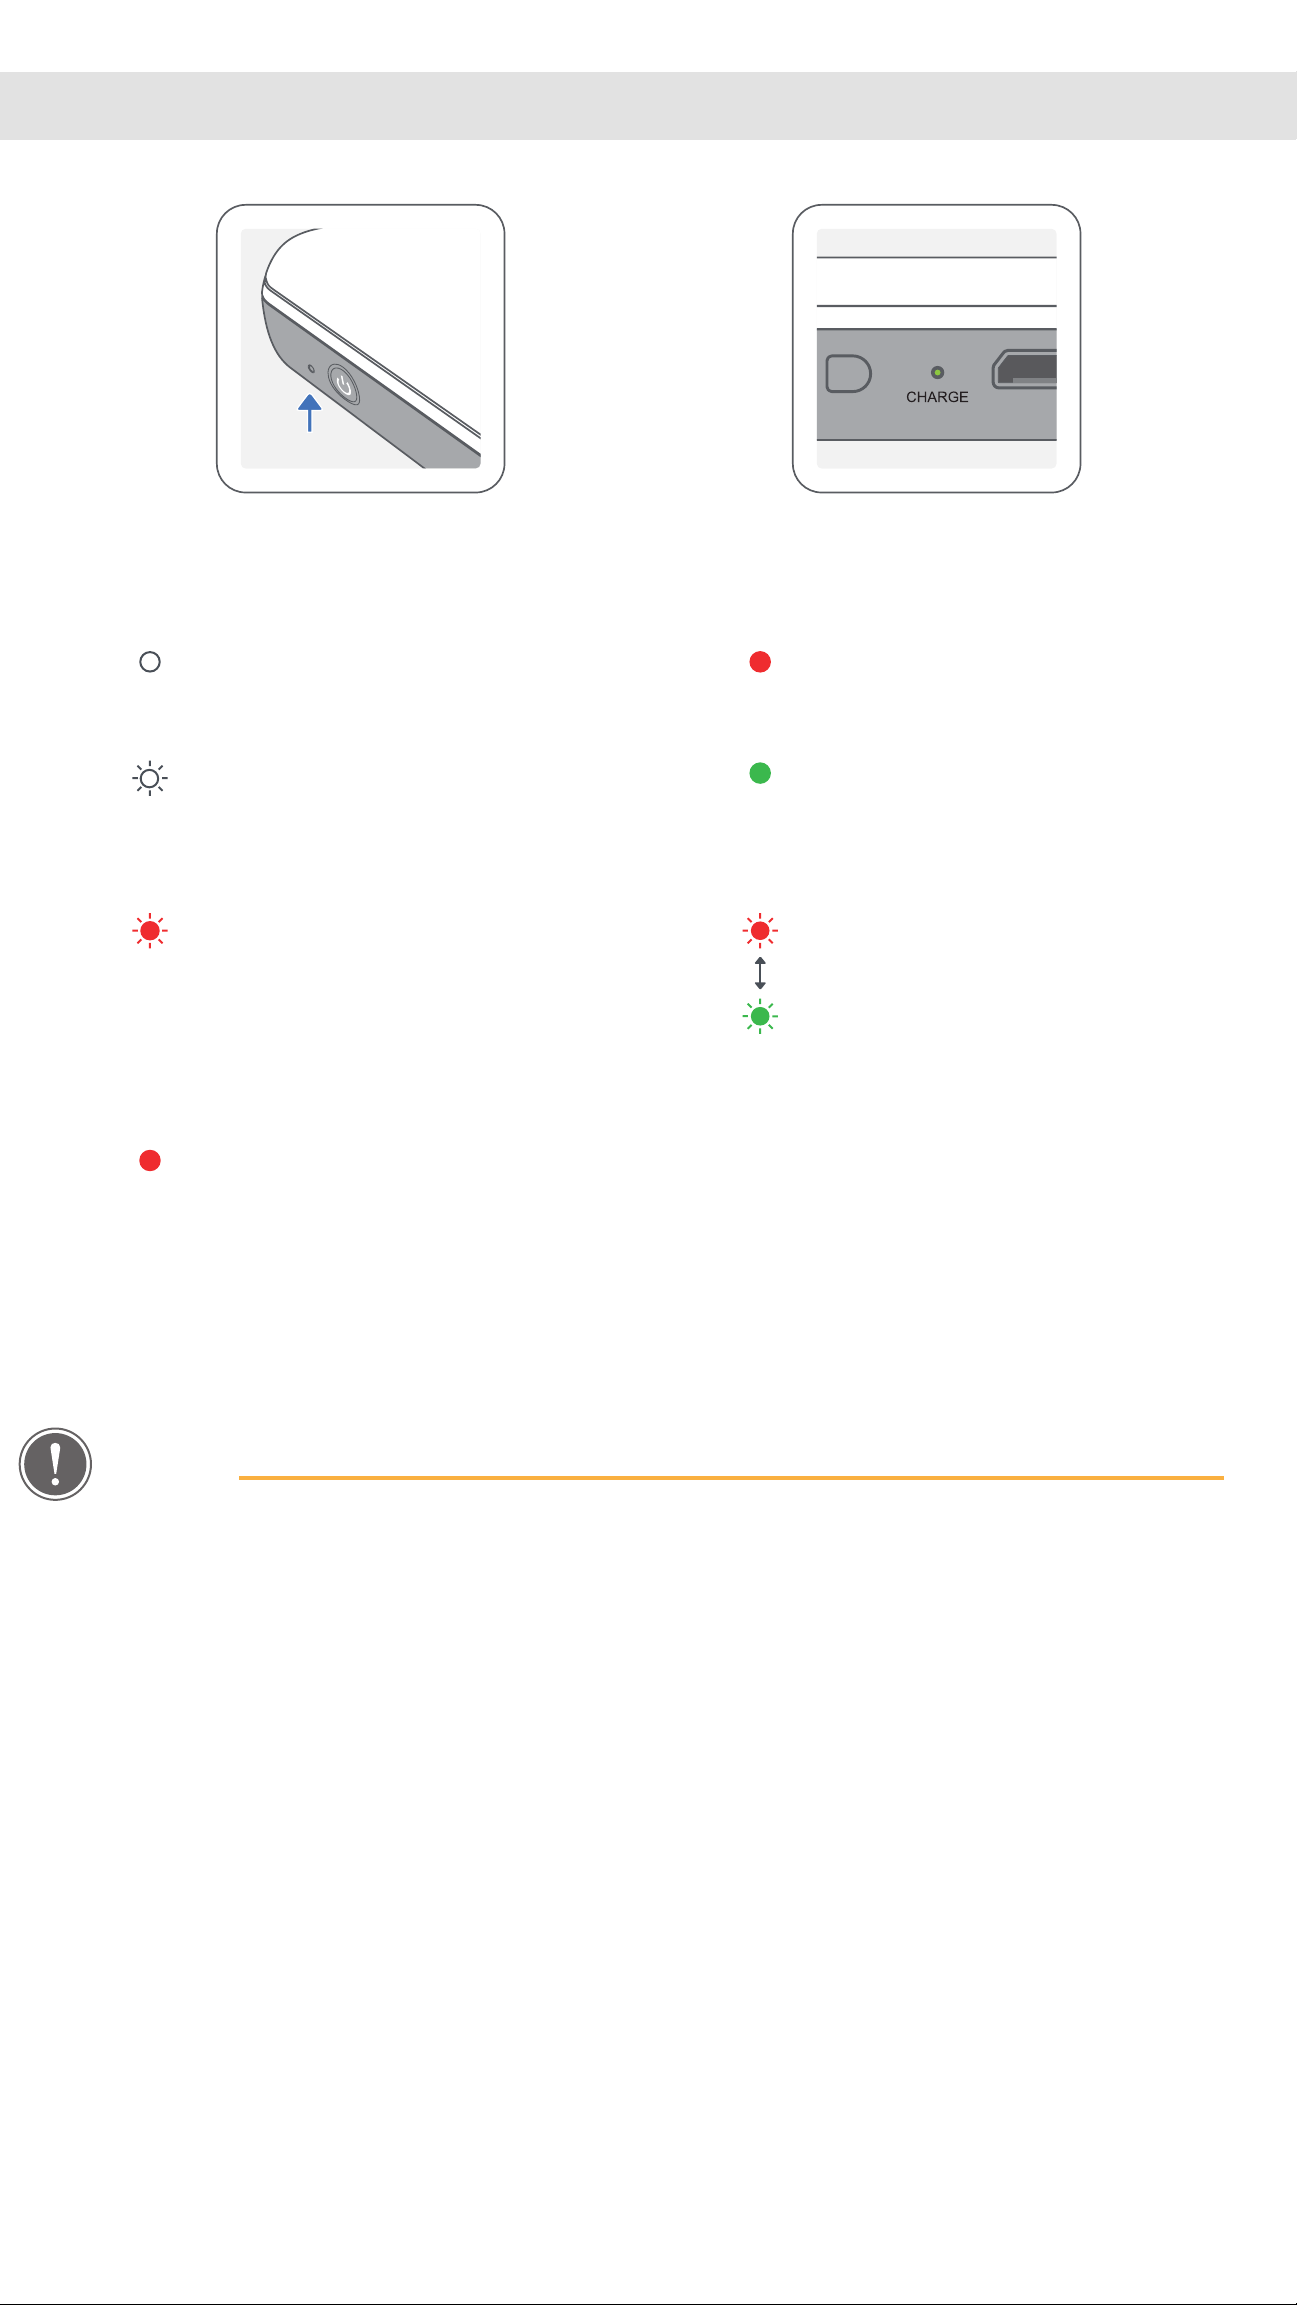
POWER & CHARGING LED Indicator Lights
POWER CHARGING
White – Printer is powered on Red - Charging
White flashing – Printing /
Processing / Cooling
Red flashing – No paper /
Cover open / Paper jam /
Low battery / storage full /
other errors
Red - Firmware updating
Green - Charge completed
Red & Green flashing
alternatively - Charging error
NOTE
MAINTAINING YOUR CANON MINI PRINTER
• Use a soft, dry cloth to clean the product. Do not clean with a damp cloth or
volatile liquids such as paint thinner.
• Keep the top cover closed to avoid dust and other particles from entering the
inside of your printer.
• Use and keep your printer in the recommended environment of 15º to 32º C and
40-55% relative humidity.
• Keep your printer firmware up-to-date. To check if your firmware needs to be
upgraded, open the Canon Mini Print app, go to the Main Menu > Printer Settings >
Select the connected printer > then tap "Firmware Upgrade".
-- Make sure your mobile device has a Internet connection before checking. If you
need to upgrade/update the firmware, your printer must be charged to 50% or
higher or connected to a power source.
• Make sure you’re using the latest Canon Mini Print app version. If your apps don’t
automatically update, go to your app store to check if you need to update.
5
Page 6
PRINTER SETUP
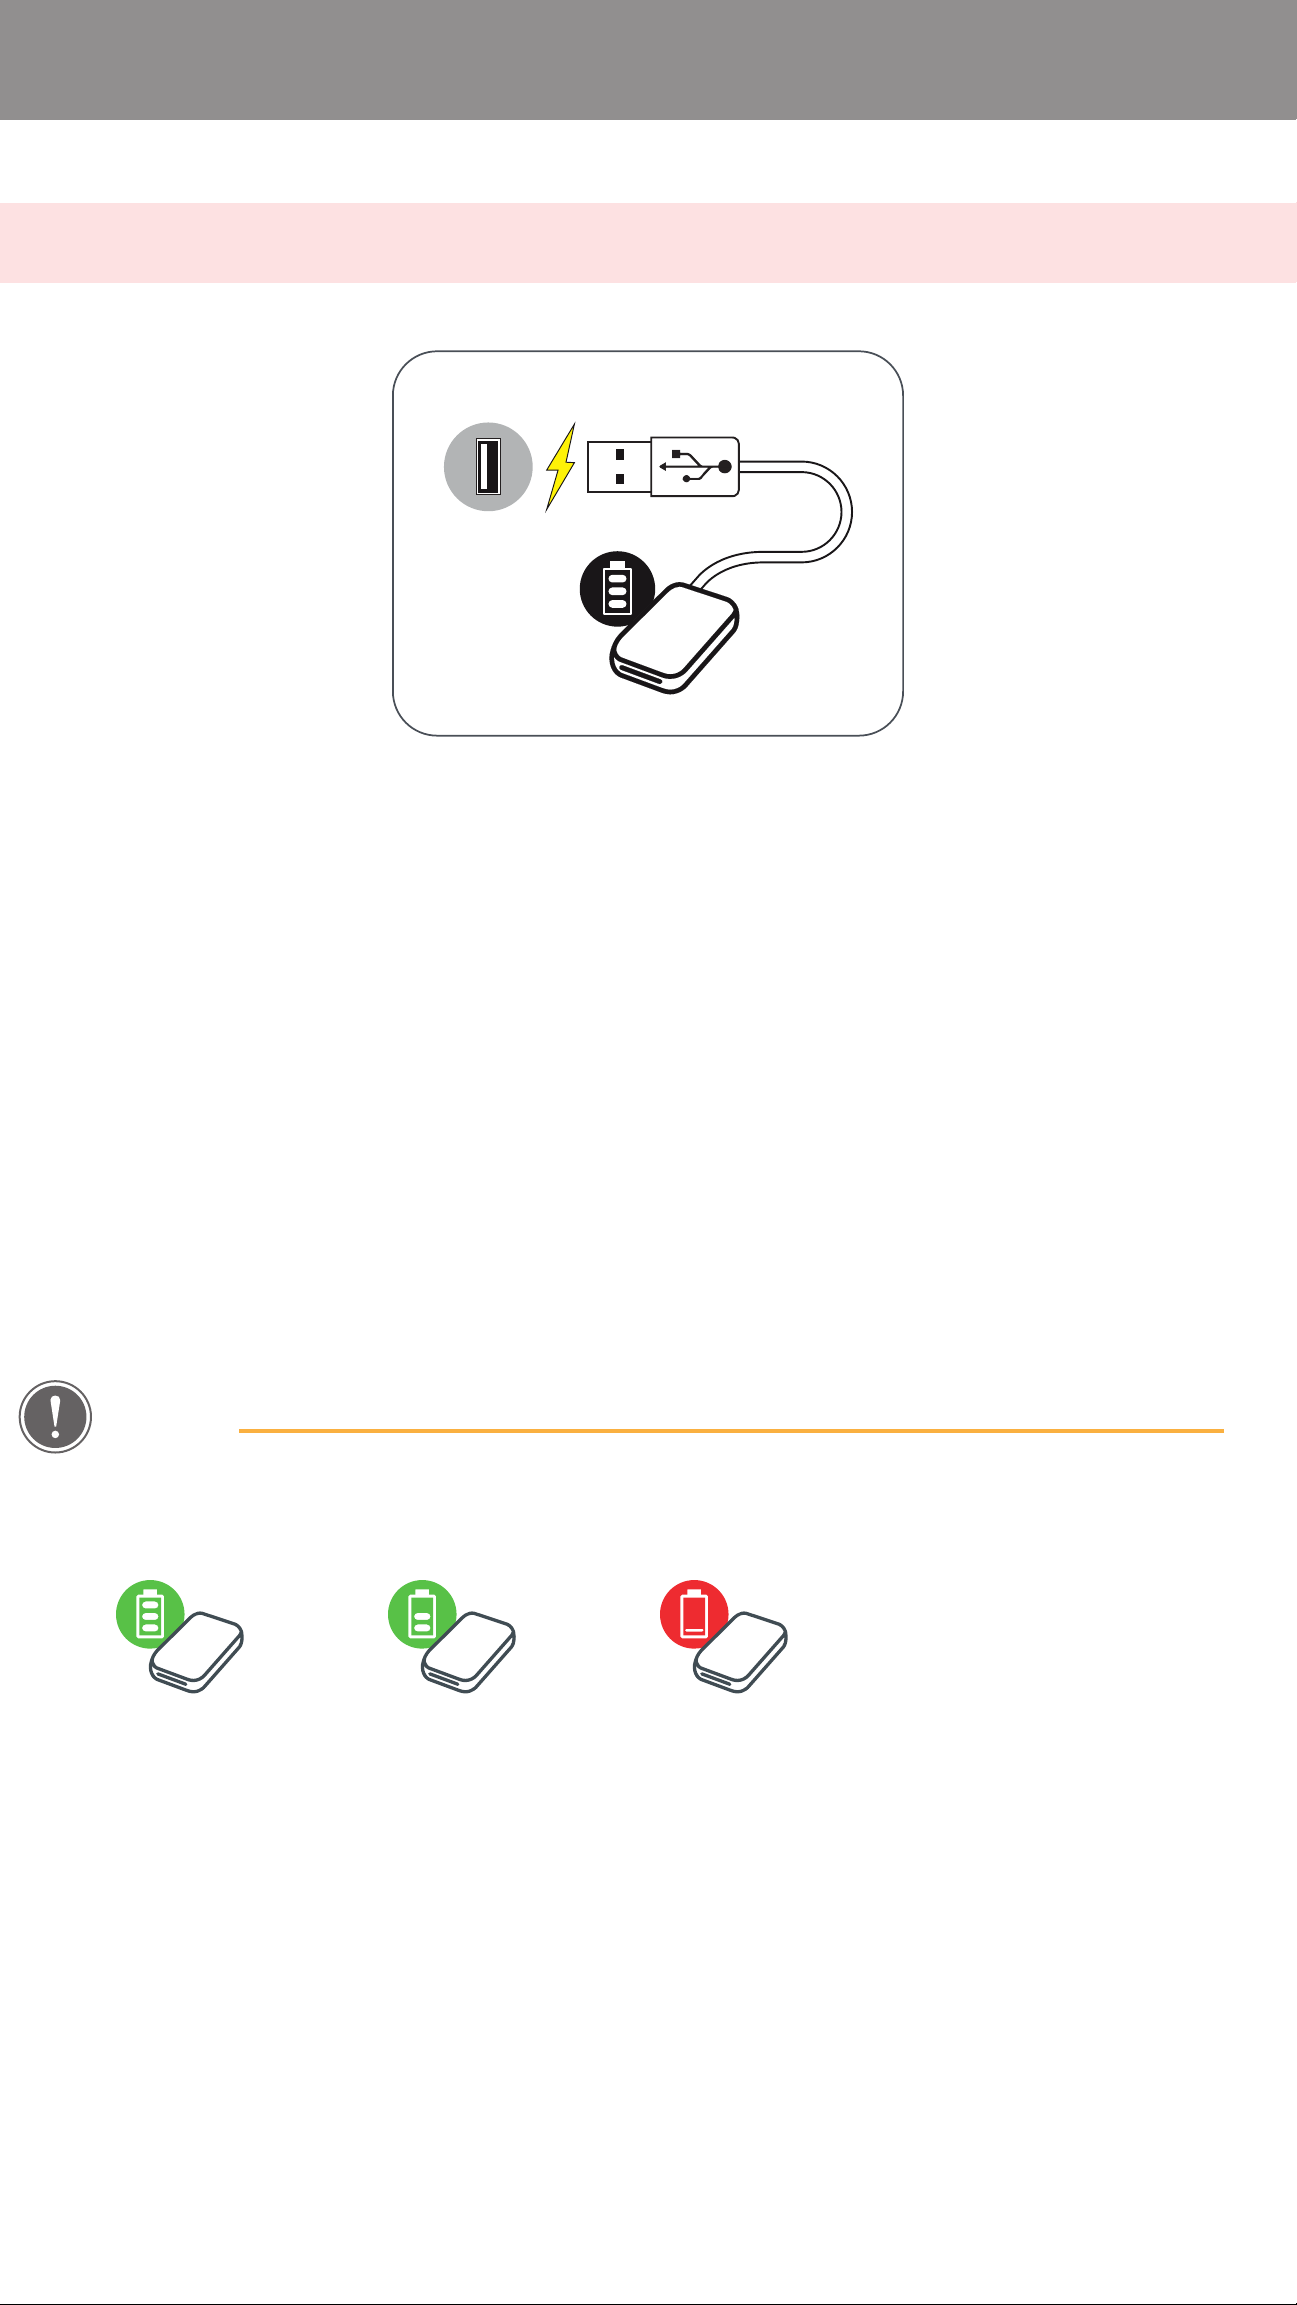
A CHARGE PRINTER
Printer uses a built-in battery. Before using the printer, fully charge
the battery using the USB cable provided.
Insert the smaller end of the supplied USB cable into the
①
Printer and the other end into a chargeable USB adapter.
The charging LED light will turn red to indicate charging.
②
Once fully charged, the charging LED will turn green.
③
-- Operating time may vary depending on the battery status,
operational status and environment conditions.
NOTE
Battery Status Icon (shown in App)
FULL MID LOW
About USB Cable
HANDLE THE USB CABLE WITH CARE WHILE CHARGING
• Do not place any heavy objects on top of the cable.
• Do not place the USB cable near heat.
• Do not scratch, damage, twist or pull hard on the cable.
• Do not plug or unplug the cable with wet hands.
• Avoid too high/too low temperature or humid condition.
• Please unplug the USB cable from power source after charging.
• Please use supplied USB cable for charging.
6
Page 7
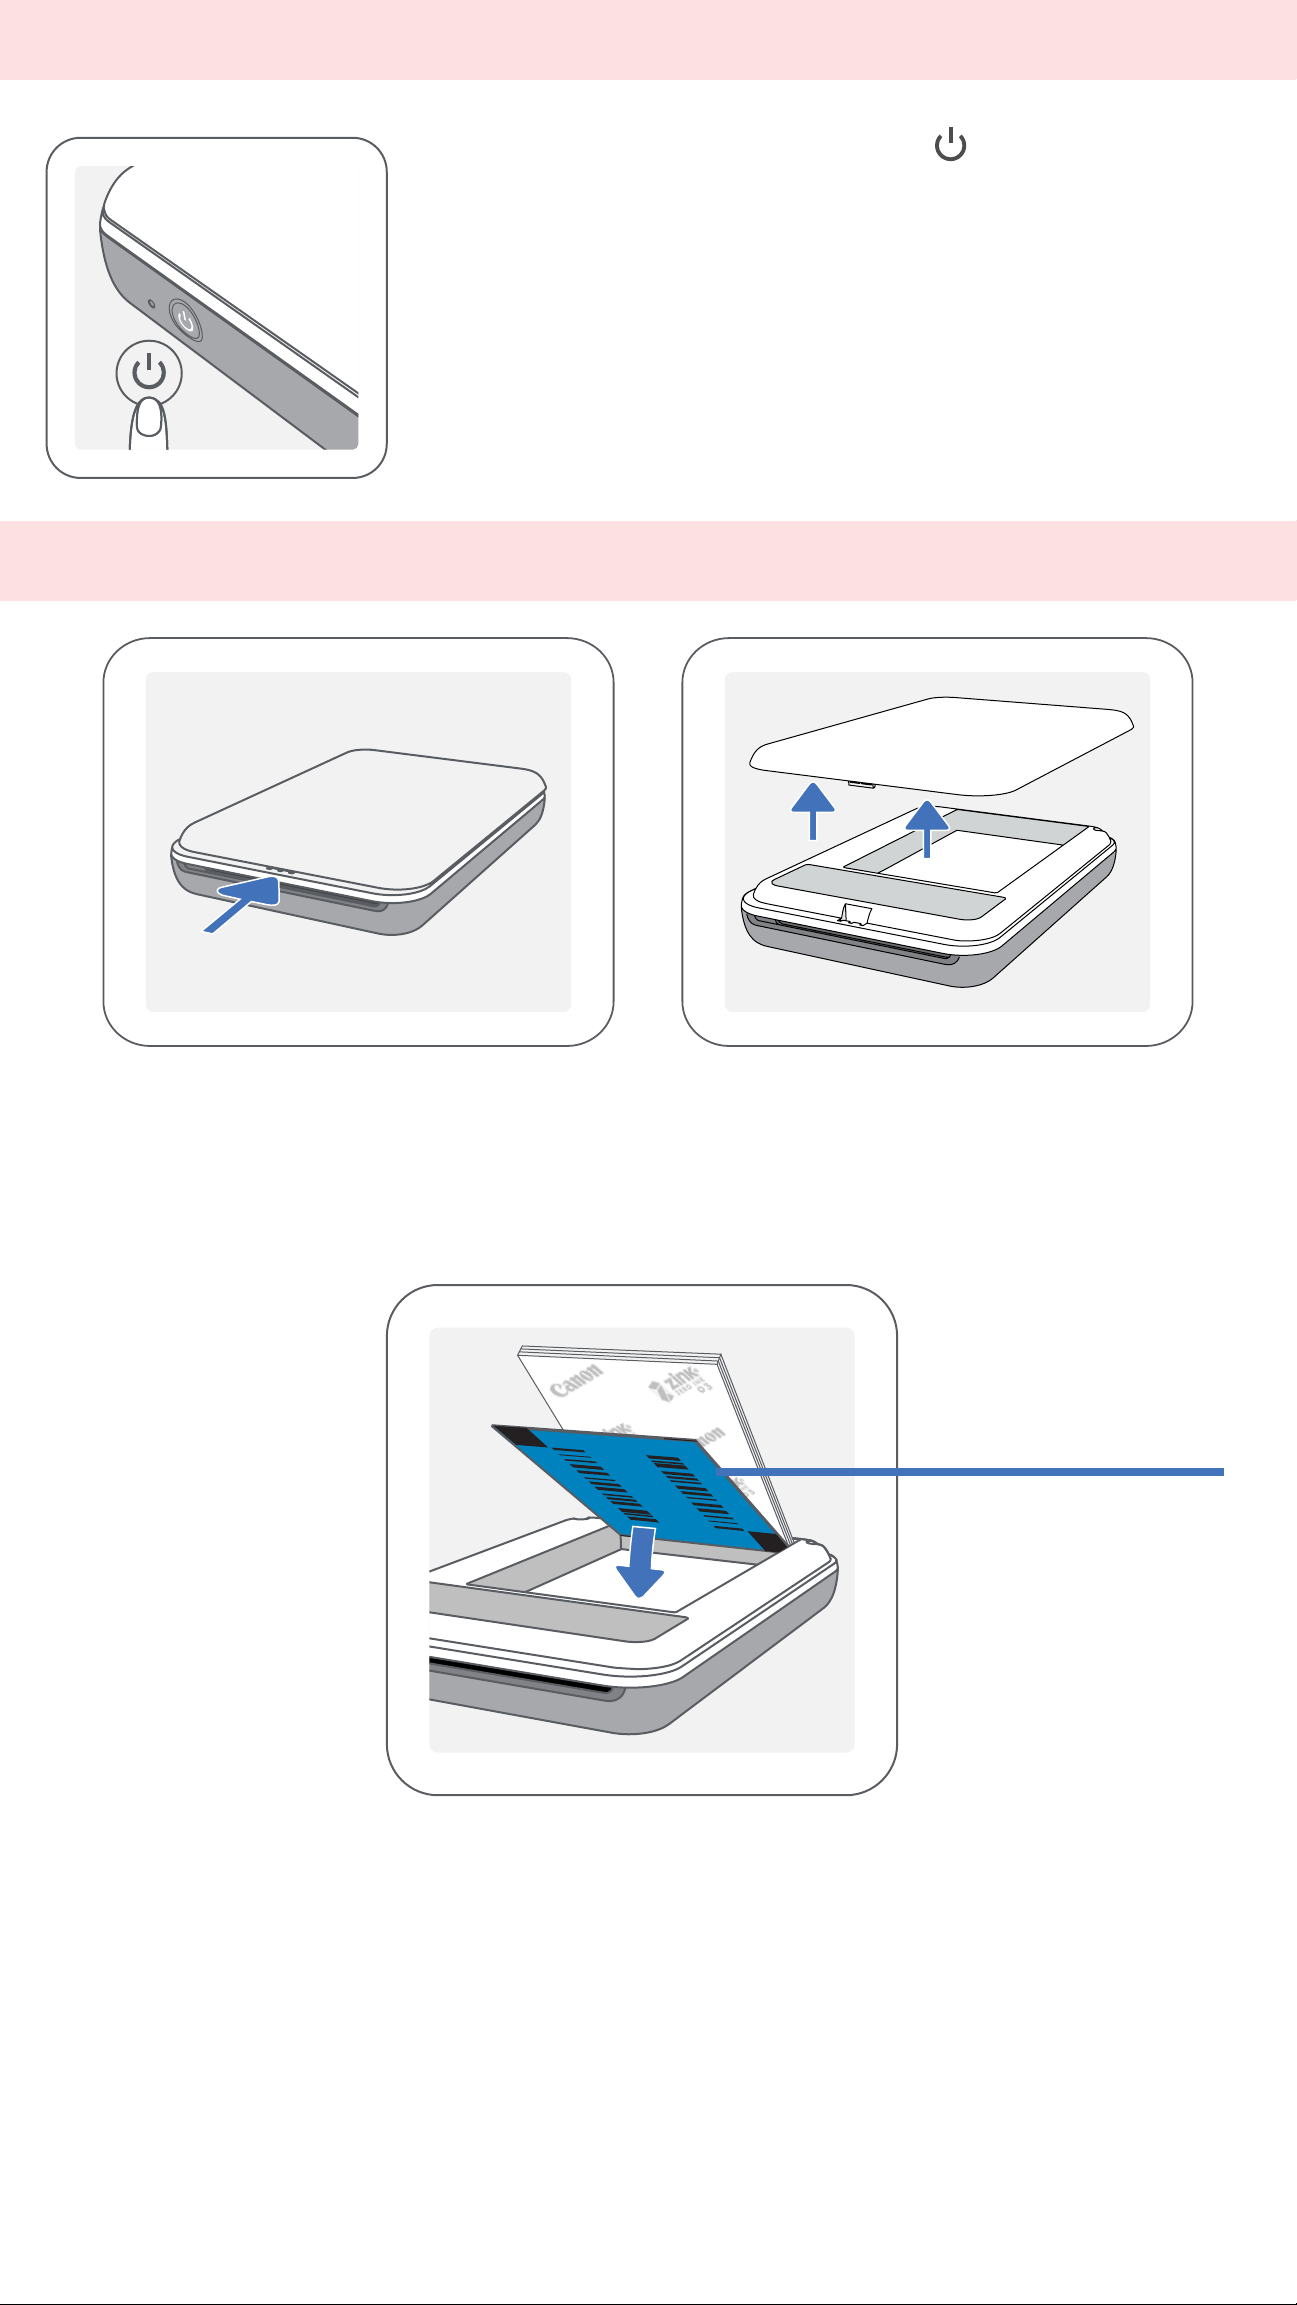
B POWER ON
①
-- The LED indicator will flash as the printer is powering on.
②
Press and hold the Power button ( ) until the LED
indicator light turns on.
When the LED indicator turns to a steady white light, the
printer is ready to print.
C LOAD PAPER
Remove the top cover by sliding it forward in the direction of the arrow.
①
Open a single pouch of photo paper (10 sheets + blue SMART SHEET™).
②
Blue SMART SHEET™
on bottom with photo
All logos facing down.
papers on top.
Place all 10 photo paper sheets and the one SMART SHEET™ into the
③
photo paper compartment.
-- Stack the photo paper on top of the blue SMART SHEET™, making sure
the blue barcode and the photo paper logos are facing down.
Place the top cover back onto the printer. It should click into place when
④
closed properly.
-- The blue SMART SHEET™ will be sent through the printer automatically
before the first print.
7
Page 8

NOTE
WHEN USING PAPER
• Only load 10 ZINK™ photo paper sheets and 1 SMART SHEET™. Do not load more
as it can result in paper jams or printing errors.
• For optimal print results, use ZINK™ photo paper for Canon Zoemini printers.
--You may purchase additional photo paper within the Canon Mini Print App by
tapping "Buy Paper" in the main menu.
• If there is a paper jam, simply turn the printer OFF and ON to automatically clear
the paper jam. Don’t try to pull the paper out.
• While the printer is printing, don’t pull or tug on the photo paper.
• Handle photo paper carefully to avoid damage or bending.
• Keep the paper clean when loading. If paper is dirty or damaged it may result in a
paper jam or print error.
• Don’t open a new pouch of paper until you are ready to load it into your printer.
• Don’t expose photo paper to direct sunlight or moisture.
• Don’t leave your photo paper in an area where the temperature or humidity is out
of the suggested conditions indicated on the pouch. It may reduce the quality of
the printed photo.
ABOUT THE SMART SHEET™
• Each pouch of photo paper contains 10 sheets of photo paper and 1 blue SMART
SHEET™.
• Load the SMART SHEET™ and photo paper from within the same pouch for
optimal print quality. Each SMART SHEET™ is specifically tuned for the pouch of
paper it is contained in.
• The SMART SHEET™ will be sent through the printer automatically before the first
print to clean the printer and optimize print quality for that specific paper pouch
(10 sheets).
• Keep the SMART SHEET™ and only discard after you have printed all 10 sheets
of photo paper in the pouch. If print quality is not as expected, you can reuse the
SMART SHEET™ if the paper is still from the same pouch. Simply slide the SMART
SHEET™ with its barcode-side down underneath the remaining photo paper.
• Using a SMART SHEET™ from another pouch may result in reduced print quality.
8
Page 9
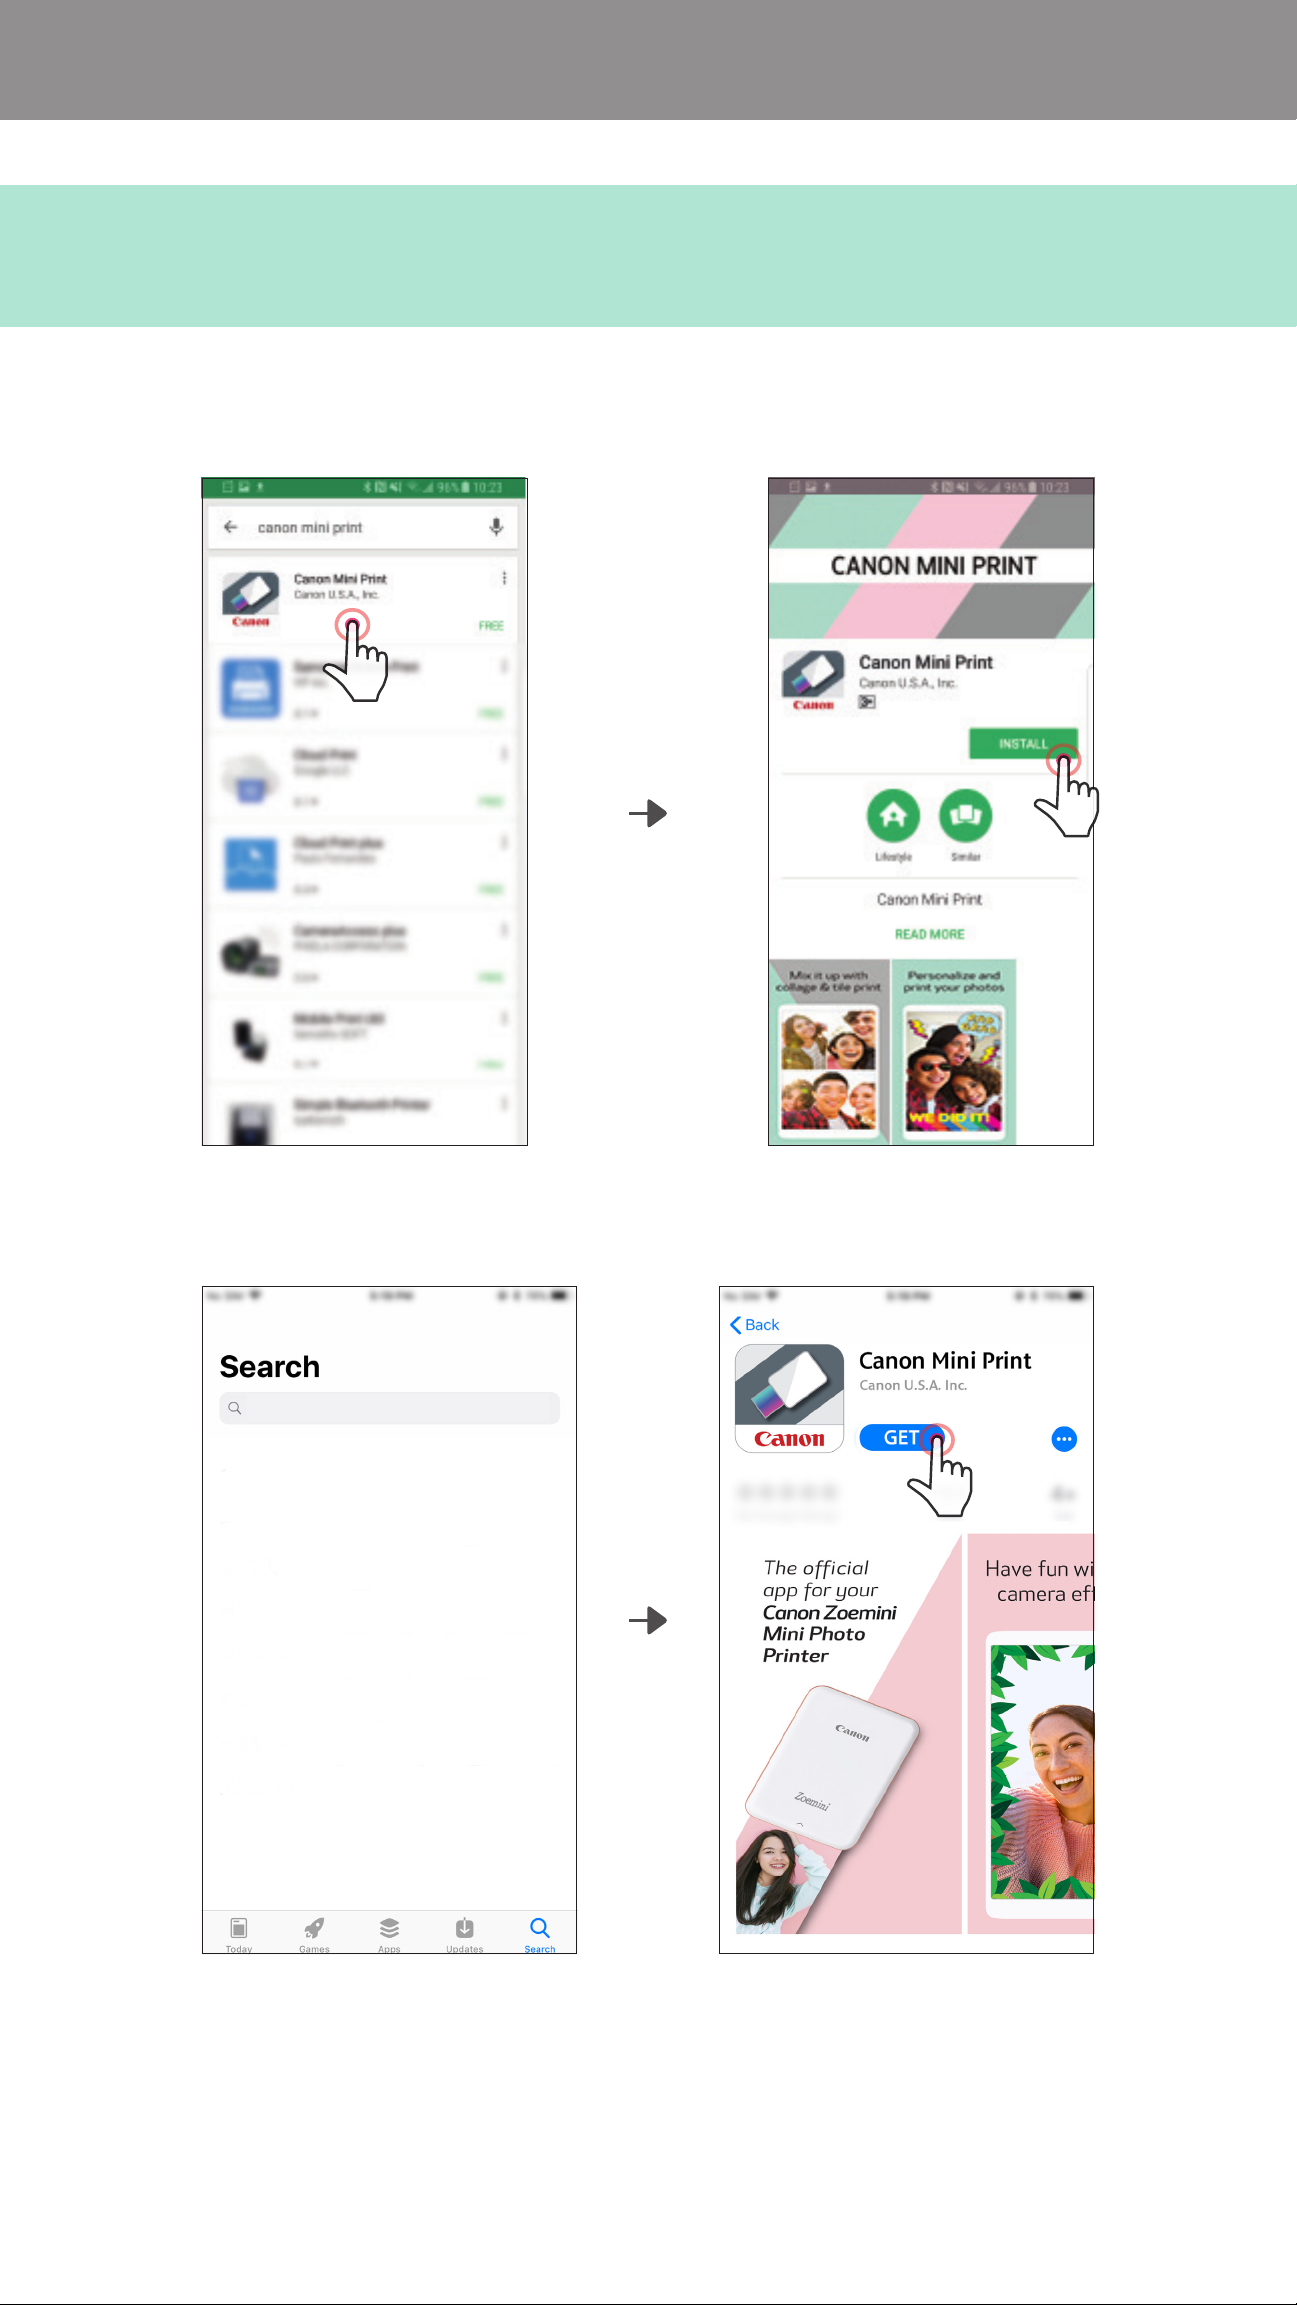
INSTALLING APP
OPTION
SEARCH FOR "Canon Mini Print" IN APP STORES
For Android™ - from Google Play™
①
Canon Mini Print
For iOS® - from the App Store®
9
Page 10

Mini Print
OPTION
USING QR CODE SCAN THE QR CODE ON THE "Quick Start Guide"
For Android For iOS
②
OPTION
In your device browser GO TO https://app.canonminiprint.com/
OPTION
USING NFC For Android
③
④
10
Page 11

PAIRING MOBILE DEVICE & CANON MINI PRINTER
Turn on the printer by pressing and holding the Power button until the LED
①
indicator light turns on.
Open mobile device "Settings" to enable Bluetooth and pair it with the printer.
②
PAIRING DEVICE & PRINTER
Android Pairing
OPTION A - Add the printer to the app. Tap on the icon on the top right
③
and choose your printer.
The icon will change to indicate battery level when connected.
11
Page 12

—
OPTION B - Add the printer to the app. Go to "Printer Settings" in the
③
main menu, tap "Add Printer" and choose your printer.
Your printer will appear in the "Printers" list and the icon will change to
indicate battery level when connected.
OR
—
12
Page 13

iOS Pairing
Turn on the printer by pressing and holding the Power button until the
①
LED indicator light turns on.
Open mobile device "Settings" to enable Bluetooth and pair it with the printer.
②
13
Page 14

OPTION A - Add the printer to the app. Tap on the icon on the top right
③
and choose your printer.
The icon will change to indicate battery level when connected.
—
OPTION B - Add the printer to the app. Go to "Printer Settings" in the
③
main menu, tap "Add Printer" and choose your printer.
Your printer will appear in the "Printers" list and the icon will change to
indicate battery level when connected.
OR
—
14
Page 15

Android Pairing (with NFC)
On your mobile device, ensure that NFC and Bluetooth are enabled.
①
Open the Canon Mini Print app.
②
Place your mobile device on top of the printer.
③
The printer will pair automatically with the mobile device.
④
NOTE
Printer Status Icon (shown in App)
Add new
printer
About Pairing
• One printer can be paired with only one iOS/Android device.
• One iOS/Android device can be connected to multiple printers.
To pair an additional printer, go to Printer Settings in the Main Menu
and tap "Add Printer"
• Search for and pair a printer named "Canon Mini Printer (xx:xx)". Match the last 4
Printer not
connected
Printer connected
(battery status shown)
digits of the MACnumber (xx:xx) on the label inside the printer.
• Bluetooth searching and transferring may fail depending on the environment.
Check the Bluetooth condition on your mobile device and try again.
15
Page 16

USER INTERFACE
HOME SCREEN
Main Menu
Online Albums¹
Facebook
Instagram
Google Drive
Dropbox
Printer Status
Photo GalleryCamera Mode
iCloud (iOS only)
MAIN MENU
View in-app messages
Access paired printer information & settings
View & delete images in print queue
Access App information & settings
View Online User Manual & FAQ
Purchase photo paper from Online Store
Check App version, User
Agreement and Privacy Statement
App experience, features, and available Online Albums may vary depending on your device and region.
1) Internet Connection Required. Requires active social media or Cloud account(s) to use.
16
Page 17

CAMERA MODE
On the Home Screen, tap [ ] to take a photo. (Optional, tap on the
①
icons at the bottom to take a photo with effects.)
Once you’ve taken a photo , you can Print, Edit, Share, or Save.
②
To print, tap [ ].
③
Back
Camera Select
Tile Print
Flash
Image
Adjustment
Frames Face Distort* AR Live Filter*
* Face detection in image required
17
Page 18

PHOTO GALLERY
In the Photo Gallery you can browse photos in gallery view, by folders, or by calendar.
On the Home Screen, tap [ ] to view the Photo Gallery.
①
Once you’ve selected a photo , you can Print, Edit, Share, or Save.
②
To print, tap [ ].
③
All Photos - Gallery Folder View Calendar View
18
Page 19

PRINT PHOTOS
When you are ready, tap [ ] to print
①
your photo.
Make sure that the printer is on and
paired/connected.
A progress screen will appear to show
②
that your image is Sending to Printer
and Printing.
The Power LED Light will flash white,
don’t exit or close the app until your
print is complete.
Note about Print Queue: Your image will be
stored in the Print Queue if your printer is not
on and connected when you send a print. To
release the print, simply turn your printer on
and reconnect, you will be asked if you want
to print the images in your queue. To view or
delete images in the queue, go to the Main
Menu > Print Queue.
Sending to Printer
Printing
NOTE
• The printed image may differ from the original image because the "screen
technology" used to display color on a mobile device is different than the "print
technology" used to print color on paper (thermal transfer printing).
• Do not pull the paper out by force during printing or paper jam.
• Do not open the top cover during printing. It may affect print quality.
• If the printer is vibrated or shaken, photo print quality may be affected.
19
Page 20

EDIT PHOTOS
You can customize your image with edits like filters, stickers, text, and more.
Tap the icons on the bottom bar of your screen
①
Customize as you wish!
②
Don’t forget to Save, Share, or Print your changes before you exit the screen.
③
Image
Adjustment
Brightness Contrast Saturation RGB Flip
Frames Text Face Distort* AR Filter*
Stickers Image Filter Drawing
(vertical)
Flip
(horizontal)
Rotate
* Face detection in image required.
20
Page 21

USING TILE PRINT
Use the Tile Print function to print a single photo onto multiple sheets so you
can create a larger tiled print.
When you're ready to print, tap [ ] and tap the tiled choice of 2 x 2 or 3
①
x 3 prints. (Lines will appear to show how your image will be split.)
Tap [ ] to print your tiles and then put them together to create a
②
larger tiled print.
SMART SHEET, the ZINK Technology and ZINK Trademarks are owned by ZINK Holdings LLC. Used under license.
Apple, the Apple logo, iPad, iPad Air, iPad Pro, and iPhone are trademarks of Apple Inc., registered in the United
States and other countries. App Store is a service mark of Apple Inc. iOS is a trademark or registered trademark of
Cisco in the United States and other countries and is used under license. Android, Google Play and the Google Play
logo are trademarks of Google LLC. Bluetooth is a registered trademark of Bluetooth SIG. Wi-Fi is a registered
trademark of the Wi-Fi Alliance. All other third-party product names, brand names and logos are trademarks of
their respective owners.
21
Page 22

USING COLLAGE PRINT
Use the Collage function to print up to 4 photos on one 2x3 sheet.
Open your photos in the Photo Gallery or from Online Albums
①
Tap [ ] to view the collage template choices and select one you want
②
to use (you can choose from 2, 3, or 4 photos in a template)
Check off the number of photos needed for the template and tap "Select"
③
Adjust the images in your collage as you'd like and then tap [ ] or share/save.
④
22
Page 23

SHARE PHOTOS
You can easily share or save your images and edits.
When you’re ready, tap [ ] to open the options on your device
①
Share with a listed app, or save to your device’s photo storage.
②
Android iOS
23
Page 24

SAVE PHOTOS
You can easily save your images to the Canon folder in the app.
When you’re ready, tap [ ] save your image.
①
To view your saved images, tap [ ], then tap "Folder", and then "Local -
②
Canon"
To delete a photo from the Canon Folder in
①
the app, tap [ ] to view the Photo Gallery
Tap "Folder", then "Local - Canon"
②
Tap the trashcan, then select the photo(s)
③
you wish to delete permanently.
24
Page 25

SEND TO MINI PRINT
Send a photo in your device’s photo gallery or camera roll to the Canon Mini Print app.
For Android
Find a photo in your device Gallery and tap the share button
①
Tap the Mini Print Icon to send the photo to the app so you can edit and print.
②
For iOS
Find a photo in your device Gallery and tap the share button
①
OPTION A - Tap "Open in Mini Print" to send the photo to the app editing screen
②
where you can edit and print.
OPTION B - Tap the "Print to Canon" to send the photo directly to the print queue.
②
Editing Screen Print Queue
25
Page 26

SPECIFICATIONS
Power Source
Charging Speed
Dimension
Weight
Connectivity
Compatible OS
Print Technology
Print Resolution
Internal rechargeable battery 500 mAh Li-Polymer 7.4 V
Approximately 90 minutes (Full Charge)
118.3 mm (L) x 82.4 mm (W) x 18.7 mm (H)
160 g
Bluetooth 4.0
iOS 9.0 or above & Android 4.4 or above
ZINK™
314 x 400 dpi (dots per inch)
Borderless Printing
Compatible Paper
Paper Capacity
Memory
Environmental
Parameters
Yes
Canon ZINK™ Photo Paper: ZP-2030-20 (20 sheets)
ZP-2030-50 (50 sheets)
2" x 3" / Peel-and-stick back / Smudge-free /
Water & tear resistant
Up to 10 sheets of ZINK™ photo paper + 1 SMART SHEET™
512Mb
• Recommended Printer Operating, Charging, and Storage
Temperature: 15º to 32º C
• Recommended Printer Operating, Charging, and Storage
Automatic Power-off
Power Adapter
* Subject to change without notice
Humidity: 40-55% RH
• Operating Temperature: 5º to 40ºC
• Operating Humidity: <70% RH
None / 3 minutes / 5 minutes / 10 minutes (selectable in-app)
Output current: 1A (min) Voltage: 5V
26
Page 27

Only for European Union and EEA (Norway, Iceland and Liechtenstein)
These symbols indicate that this product is not to be disposed of
with your household waste, according to the WEEE Directive
(2012/19/EU), the Battery Directive (2006/66/EC) and/or
national legislation implementing those Directives.
If a chemical symbol is printed beneath the symbol shown
above, in accordance with the Battery Directive, this indicates that a heavy metal
(Hg = Mercury, Cd = Cadmium, Pb = Lead) is present in this battery or accumulator
at a concentration above an applicable threshold specified in the Battery Directive.
This product should be handed over to a designated collection point, e.g., on an
authorized one-for-one basis when you buy a new similar product or to an authorized
collection site for recycling waste electrical and electronic equipment (EEE) and
batteries and accumulators. Improper handling of this type of waste could have
a possible impact on the environment and human health due to potentially hazardous
substances that are generally associated with EEE. Your cooperation in the correct
disposal of this product will contribute to the effective usage of natural resources.
For more information about the recycling of this product, please contact your local
city office, waste authority, approved scheme or your household waste disposal
service or visit www.canon-europe.com/weee, or www.canon-europe.com/battery.
CEL-SX4WA210
 Loading...