

Page 1
PUB. DIM-388
DIGIT AL VIDEO CAMCORDER
Instruction Manual
CAMESCOPE ET LECTEUR VIDEO NUMÉRIQUES
Mode d’emploi
VIDEOCÁMARA Y GRAB ADORA DIGIT AL
Manual de Instrucciones
ENGLISH
FRANÇAIS
ESPAÑOL
Mini
D
igitaligital
Videoideo
Cassette
A (NTSC)
E
F
Es
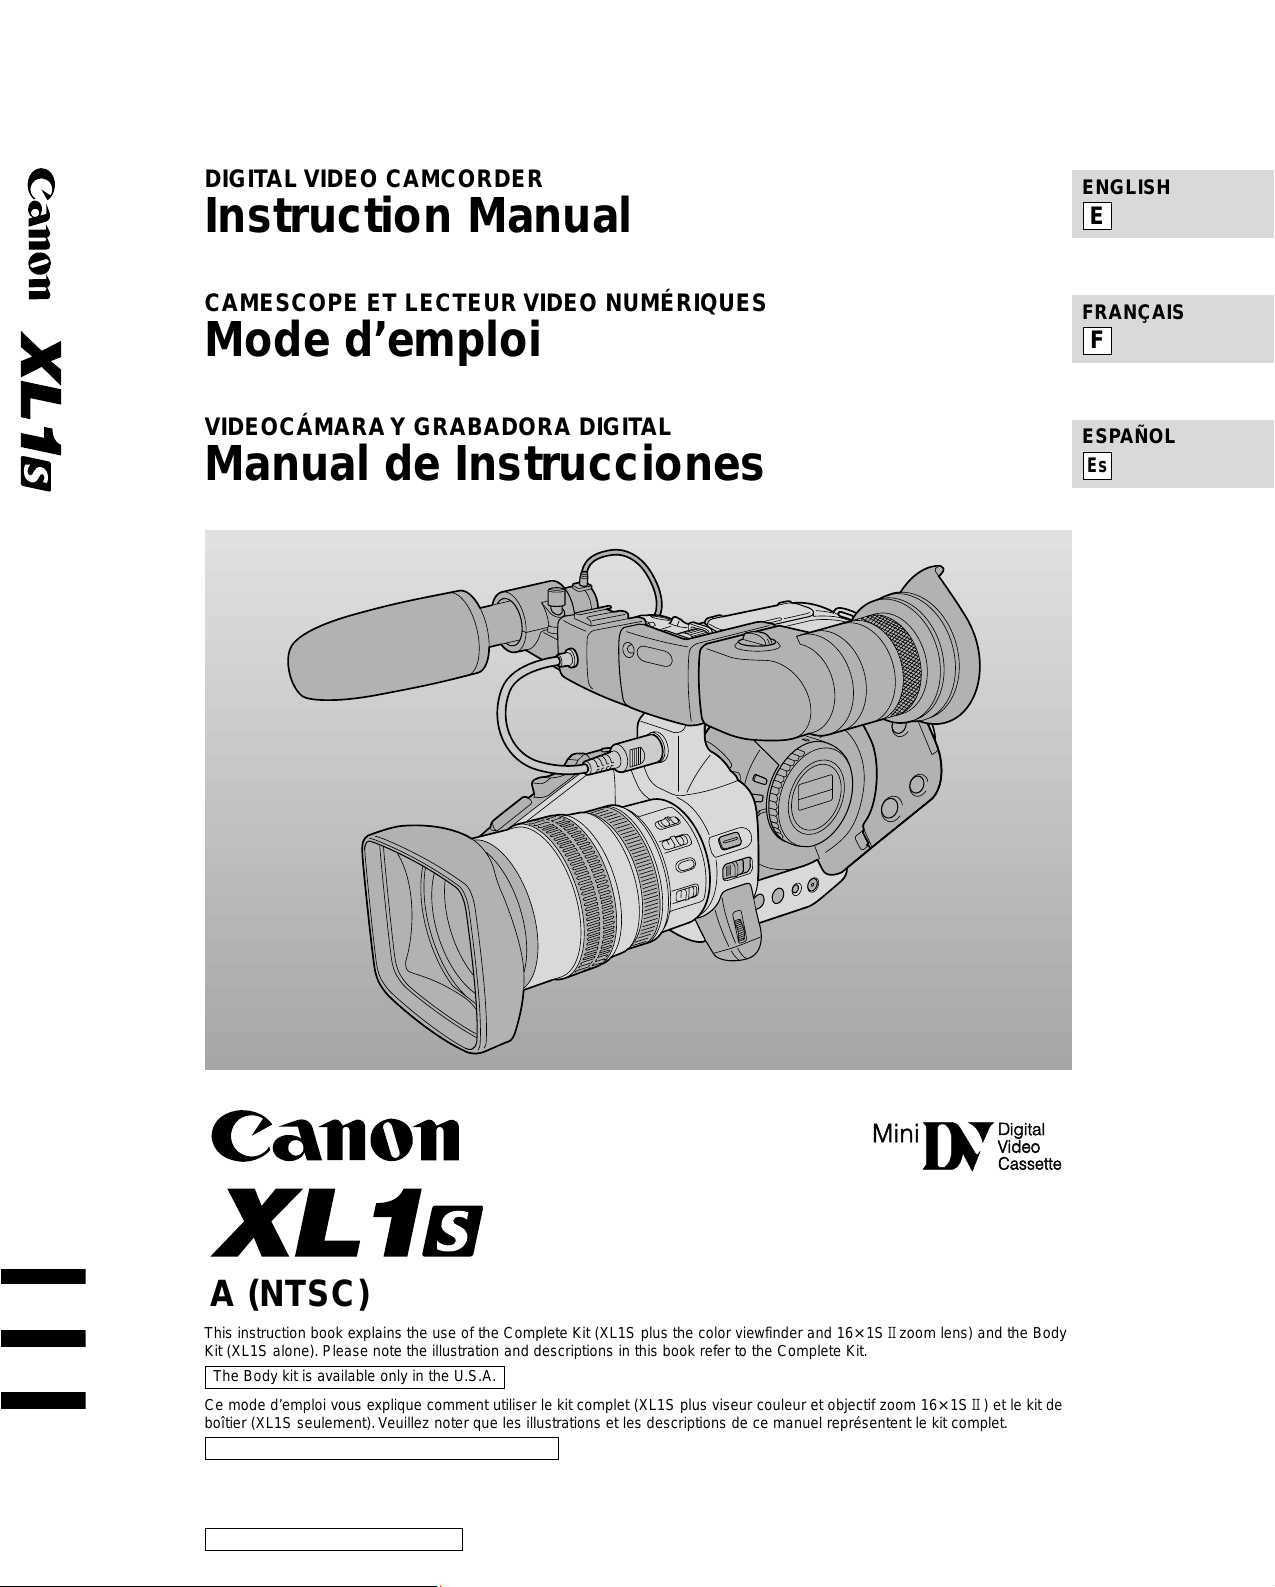
This instruction book explains the use of the Complete Kit (XL1S plus the color viewfinder and 16× 1S2zoom lens) and the Body
Kit (XL1S alone). Please note the illustration and descriptions in this book refer to the Complete Kit.
Ce mode d’emploi vous explique comment utiliser le kit complet (XL1S plus viseur couleur et objectif zoom 16× 1S2) et le kit de
boîtier (XL1S seulement).Veuillez noter que les illustrations et les descriptions de ce manuel représentent le kit complet.
Este manual de instrucciones explica el uso del Equipo Completo (XL1S más el visor en color y el objetivo zoom IS2de 16×) y
del Body Kit (sólo la XL1S). Tenga a bien tener presente que las ilustraciones y las descripciones de este manual se refieren al
Equipo Completo.
PUB. DIM-388
The Body kit is available only in the U.S.A.
Le kit de boîtier n’est disponible qu’aux Etats-Unis.
Unicamente en el “equipo completo”
Page 2
Introduction
2
E
WARNING:
TO REDUCE THE RISK OF FIRE OR ELECTRIC SHOCK, DO NOT EXPOSE THIS PRODUCT TO RAIN
OR MOISTURE.
Important Usage Instructions
Digital Video Camcorder, XL1SA Systems.
This device complies with Part 15 of the FCC Rules.Operation is subject to the following two conditions: (1) This
device may not cause harmful interference, and (2) this device must accept any interference received, including
interference that may cause undesired operation.
Note:This equipment has been tested and found to comply with the limits for class B digital device, pursuant to Part
15 of the FCC Rules.These limits are designed to provide reasonable protection against harmful interference in a
residential installation.This equipment generates, uses and can radiate radio frequency energy and, if not installed
and use in accordance with the instructions, may cause harmful interference to radio communications.However, there
is no guarantee that interference will not occur in a particular installation. If this equipment does cause harmful
interference to radio or television reception, which can be determined by turning the equipment off and on, the user is
encouraged to try to correct the interference by one or more of the following measures:
• Reorient or relocate the receiving antenna.
• Increase the separation between the equipment and receiver.
• Connect the equipment into an outlet on a circuit different from that to which the receiver is connected.
• Consult the dealer or an experienced radio/TV technician for help.
Use of shielded cable is required to comply with class B limits in Subpart B of Part 15 of FCC Rules.
Do not make any changes or modifications to the equipment unless otherwise specified in the manual.
If such changes or modifications should be made, you could be required to stop operation of the equipment.
Canon U.S.A.Inc.
One Canon Plaza, Lake Success, NY 11042, U.S.A.
Tel No.(516)328-5600
WARNING:
TO REDUCE THE RISK OF ELECTRIC SHOCK AND TO REDUCE ANNOYING INTERFERENCE, USE
THE RECOMMENDED ACCESSORIES ONLY.
COPYRIGHT WARNING:
Unauthorized recording of copyrighted materials may infringe on the rights of copyright owners and
be contrary to copyright laws.
Important Warning
CAUTION:
TO REDUCE THE RISK OF ELECTRIC SHOCK, DO
NOT REMOVE COVER (OR BACK). NO USER-
SERVICEABLE PARTS INSIDE. REFER SERVICING
TO QUALIFIED SERVICE PERSONNEL.
CAUTION:
TO PREVENT ELECTRIC SHOCK, MATCH WIDE BLADE OF PLUG TO WIDE SLOT,FULLY INSERT.
The lightning flash with arrowhead symbol, within an
equilateral triangle, is intended to alert the user to
the presence of uninsulated “dangerous voltage”
within the product’s enclosure, that may be of
sufficient magnitude to constitute a risk of electric
shock to persons.
The exclamation point, within an equilateral triangle,
is intended to alert the user to the presence of
important operating and maintenance (servicing)
instructions in the literature accompanying the
product.
CAUTION
RISK OF ELECTRIC SHOCK
DO NOT OPEN
Page 3
Introduction
3
E
IMPORTANT SAFETY INSTRUCTIONS
In these safety instructions the word “product”refers to
the Canon Digital Video Camcorder DM-XL1SA and all
its accessories.
1. Read Instructions — All the safety and operating
instructions should be read before the product is
operated.
2. Retain Instructions — The safety and operating
instructions should be retained for future reference.
3. Heed Warnings — All warnings on the product and in
the operating instructions should be adhered to.
4. Follow Instructions — All operating and maintenance
instructions should be followed.
5. Cleaning — Unplug this product from the wall outlet
before cleaning. Do not use liquid or aerosol
cleaners.The product should be cleaned only as
recommended in this manual.
6. Accessories — Do not use accessories not
recommended in this manual as they may be
hazardous.
7. Avoid magnetic or electric fields — Do not use the
camera close to TV transmitters, portable
communication devices or other sources of electric or
magnetic radiation.They may cause picture
interference, or permanently damage the camera.
8. Water and Moisture — Hazard of electric shock —
Do not use this product near water or in rainy/moist
situations.
9. Placing or Moving — Do not place on an unstable
cart, stand, tripod, bracket or table.The product may
fall, causing serious injury to a child or adult, and
serious damage to the product.
A product and cart combination should
be moved with care.Quick stops,
excessive force, and uneven surfaces
may cause the product and cart
combination to overturn.
10.Power Sources — The CA-910A Compact Power
Adapter should be operated only from the type of
power source indicated on the marking label. If you
are not sure of the type of power supply to your
home, consult your product dealer or local power
company. Regarding other power sources such as
battery power, refer to instructions in this manual.
11.Polarization — The CA-910A Compact Power
Adapter is equipped with a polarized 2-prong plug (a
plug having one blade wider than the other).
The 2-prong polarized plug will fit into the power
outlet only one way.This is a safety feature. If you are
unable to insert the plug fully into the outlet, try
reversing the plug.If the plug still fails to fit, contact
your electrician to replace your obsolete outlet. Do
not defeat the safety purpose of the polarized plug.
12.Power Cord Protection — Power cords should be
routed so that they are not likely to be walked on or
pinched by items placed upon or against them. Pay
particular attention to plugs and the point from which
the cords exit the product.
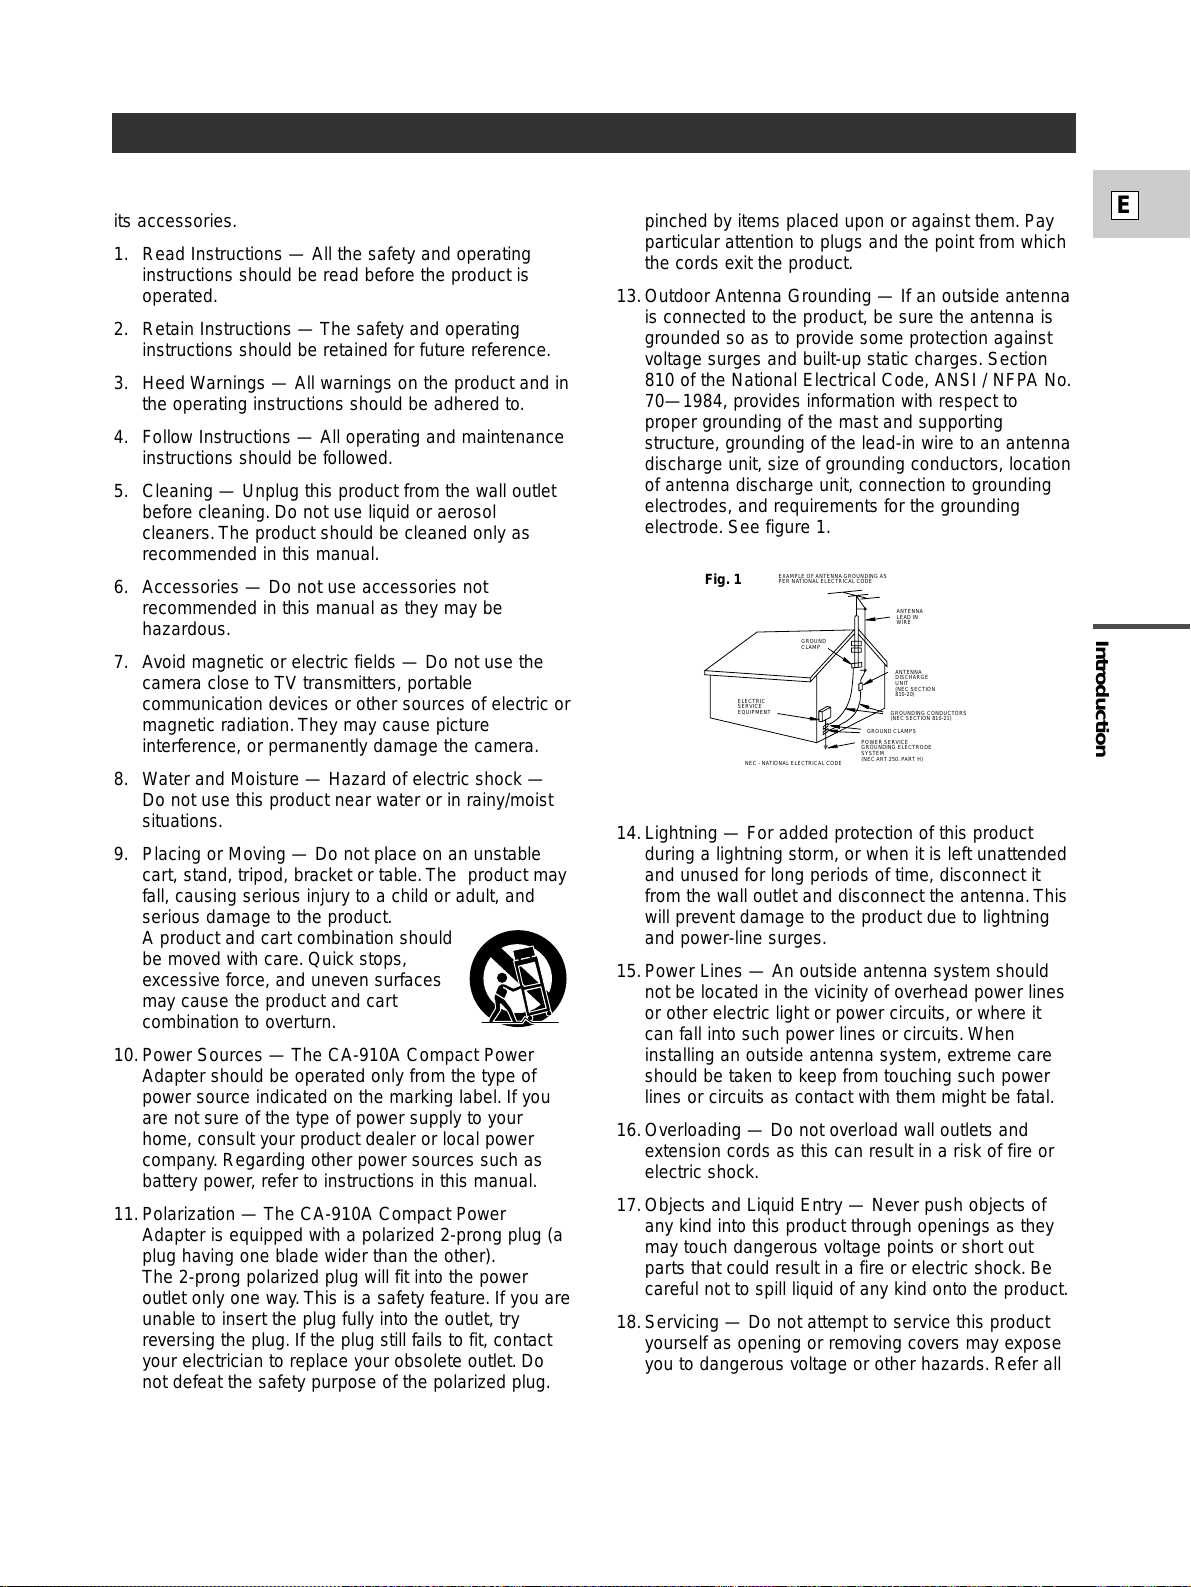
13.Outdoor Antenna Grounding — If an outside antenna
is connected to the product, be sure the antenna is
grounded so as to provide some protection against
voltage surges and built-up static charges.Section
810 of the National Electrical Code, ANSI / NFPA No.
70—1984, provides information with respect to
proper grounding of the mast and supporting
structure, grounding of the lead-in wire to an antenna
discharge unit, size of grounding conductors, location
of antenna discharge unit, connection to grounding
electrodes, and requirements for the grounding
electrode. See figure 1.
14.Lightning — For added protection of this product
during a lightning storm, or when it is left unattended
and unused for long periods of time, disconnect it
from the wall outlet and disconnect the antenna.This
will prevent damage to the product due to lightning
and power-line surges.
15.Power Lines — An outside antenna system should
not be located in the vicinity of overhead power lines
or other electric light or power circuits, or where it
can fall into such power lines or circuits.When
installing an outside antenna system, extreme care
should be taken to keep from touching such power
lines or circuits as contact with them might be fatal.
16.Overloading — Do not overload wall outlets and
extension cords as this can result in a risk of fire or
electric shock.
17.Objects and Liquid Entr y — Never push objects of
any kind into this product through openings as they
may touch dangerous voltage points or short out
parts that could result in a fire or electric shock. Be
careful not to spill liquid of any kind onto the product.
18.Ser vicing — Do not attempt to ser vice this product
yourself as opening or removing covers may expose
you to dangerous voltage or other hazards.Refer all
servicing to qualified service personnel.
EXAMPLE OF ANTENNA GROUNDING AS
PER NATIONAL ELECTRICAL CODE
ANTENNA
LEAD IN
WIRE
ANTENNA
DISCHARGE
UNIT
(NEC SECTION
810-20)
GROUNDING CONDUCTORS
(NEC SECTION 810-21)
GROUND CLAMPS
POWER SERVICE
GROUNDING ELECTRODE
SYSTEM
(NEC ART 250. PART H)
NEC - NATIONAL ELECTRICAL CODE
ELECTRIC
SERVICE
EQUIPMENT
GROUND
CLAMP
Fig. 1
Page 4
Introduction
4
E
19.Damage Requiring Ser vice — Disconnect this
product from the wall outlet and all power sources
including battery, and refer servicing to qualified
service personnel under the following conditions:
a.When the power-supply cord or plug is damaged.
b.If any liquid has been spilled onto, or objects have
fallen into, the product.
c.If the product has been exposed to rain or water.
d.If the product does not operate normally even if
you follow the operating instructions. Adjust only
those controls that are covered by the operation
instructions. Improper adjustment of other controls
may result in damage and will often require
extensive work by a qualified technician to restore
the product to its normal operation.
e.If the product has been dropped or the cabinet has
been damaged.
f. When the product exhibits a distinct change in
performance.This indicates a need for service.
20.Replacement Parts — When replacement parts are
required, be sure the service technician has used
replacement parts that are specified by Canon or that
have the same characteristics as the original part.
Unauthorized substitutions may result in fire, electric
shock or other hazards.
21.Safety Check — Upon completion of any service or
repairs to this product, ask the service technician to
perform safety checks to determine that the product
is in safe operating order.
Page 5

Making a Sound Check .................................... 54
Using the Custom Keys .................................... 55
Changing the custom keys setting ................ 55
Operating the CSTM KEY button ................ 56
Fading In and Out Between Scenes.................. 58
Using a Canon Speedlite for Flash
Photography (optional) .................................... 60
Using the Color Bars ........................................ 61
Recording the Viewfinder Information ............ 62
Recording with the Interval Timer.................... 63
Setting the Self-Timer ...................................... 64
Using the DV Control ...................................... 65
~ When Making Manual Adjustments ~
Adjusting the Focus (for autofocus lenses) ...... 66
Adjusting the Exposure .................................... 67
Using AE Shift .................................................. 68
Using the Custom Preset .................................. 69
Using the Zebra Pattern .................................... 71
Recording the PC Screen or other equipment
using CLEAR SCAN ...................................... 72
Adjusting the Gain ............................................ 73
Adjusting the White Balance ............................ 74
Playing back a Cassette .................................... 76
Displaying Date, Time and Camera Data
(Data Code)...................................................... 79
Searching the Tape
(Photo Search/Date Search/Index Search) ...... 81
Returning to a Pre-Marked Position.................. 82
Connections for Playback on a TV Screen ...... 83
Editing to a VCR .............................................. 84
Dubbing to/from a Cassette with Digital
Video Equipment .............................................. 86
Recording from a VCR, TV or Analog Camera
(Analog Line-in)................................................ 88
Important Usage Instructions.............................. 2
IMPORTANT SAFEY INSTRUCTIONS .......... 3
Thank you for choosing a Canon........................ 7
Introducing the XL1S.......................................... 8
Finding Your Way Around the XL1S.................. 9
Attaching and Detaching the Color Viewfinder Unit
...
13
Mounting and Unmounting XL Lenses ............ 14
Adjusting the Color Viewfinder Unit................ 16
Attaching the Provided Microphone ................ 18
Powering the XL1S .......................................... 19
Loading a Cassette ............................................ 22
Supporting the Camera...................................... 24
Using the Menus .............................................. 25
Using the Wireless Controller/Tally Lamps...... 30
Setting the Date and Time ................................ 32
Basic Recording ................................................ 35
Zooming (for Zoom Lenses) ............................ 38
Turning the SuperRange Optical Image
Stabilizer On/Off (16× IS
2lens) .................... 40
Using the ND Filter (for appropriate lenses).... 41
Taking Still Pictures (Photo Mode) .................. 42
Choosing the Movie Mode (Normal/Frame) .... 44
Searching and Reviewing While Recording .... 45
Using the Various Recording Programs ............ 46
Easy Recording ............................................ 49
Auto .............................................................. 49
Manual .......................................................... 49
Spotlight........................................................ 49
Giving priority to shutter speed
(shutter-priority: Tv) .................................... 50
Giving priority to the aperture
(aperture-priority: Av).................................. 50
Selecting the Audio Mode ................................ 51
Setting the Audio Input – Two Channel Recording
....
52
Setting the Audio Input – 4 Channel Recording....
53
Introduction
5
E
Contents
Introduction
Preparation
Recording
Playback
Editing
Page 6

Introduction
6
E
Recording Over Existing Scenes
(AV Insert Editing) ............................................ 90
Audio Dubbing.................................................. 93
Selecting the Audio Output .............................. 96
Notes on Using the Batteries ............................ 98
Camera Holding Styles .................................. 101
Function settings saved at POWER off
or with the STANDBY button ........................ 102
Maintenance .................................................... 104
Cautions ...................................................... 104
Storage ........................................................ 104
Maintenance ................................................ 105
Using the camera abroad ............................ 105
Condensation .............................................. 106
Troubleshooting .............................................. 107
The XL1S System Diagram
(Availability differs from area to area) .......... 110
Optional Accessories ...................................... 111
Screen Displays .............................................. 114
Specifications .................................................. 120
Index................................................................ 121
Menu at a Glance ............................................ 122
Additional Information
The serial number of this product may be found on the bottom
of the camera. No others have the same serial number as
yours.You should record the number and other vital
information here and retain this book as a permanent record of
your purchase to aid identification in case of theft.
Date of Purchase
Dealer Purchased From
Dealer Address
Dealer Phone No.
Model Name XL1SA
Serial No.
Page 7
Introduction
7
E
Thank you for choosing a Canon
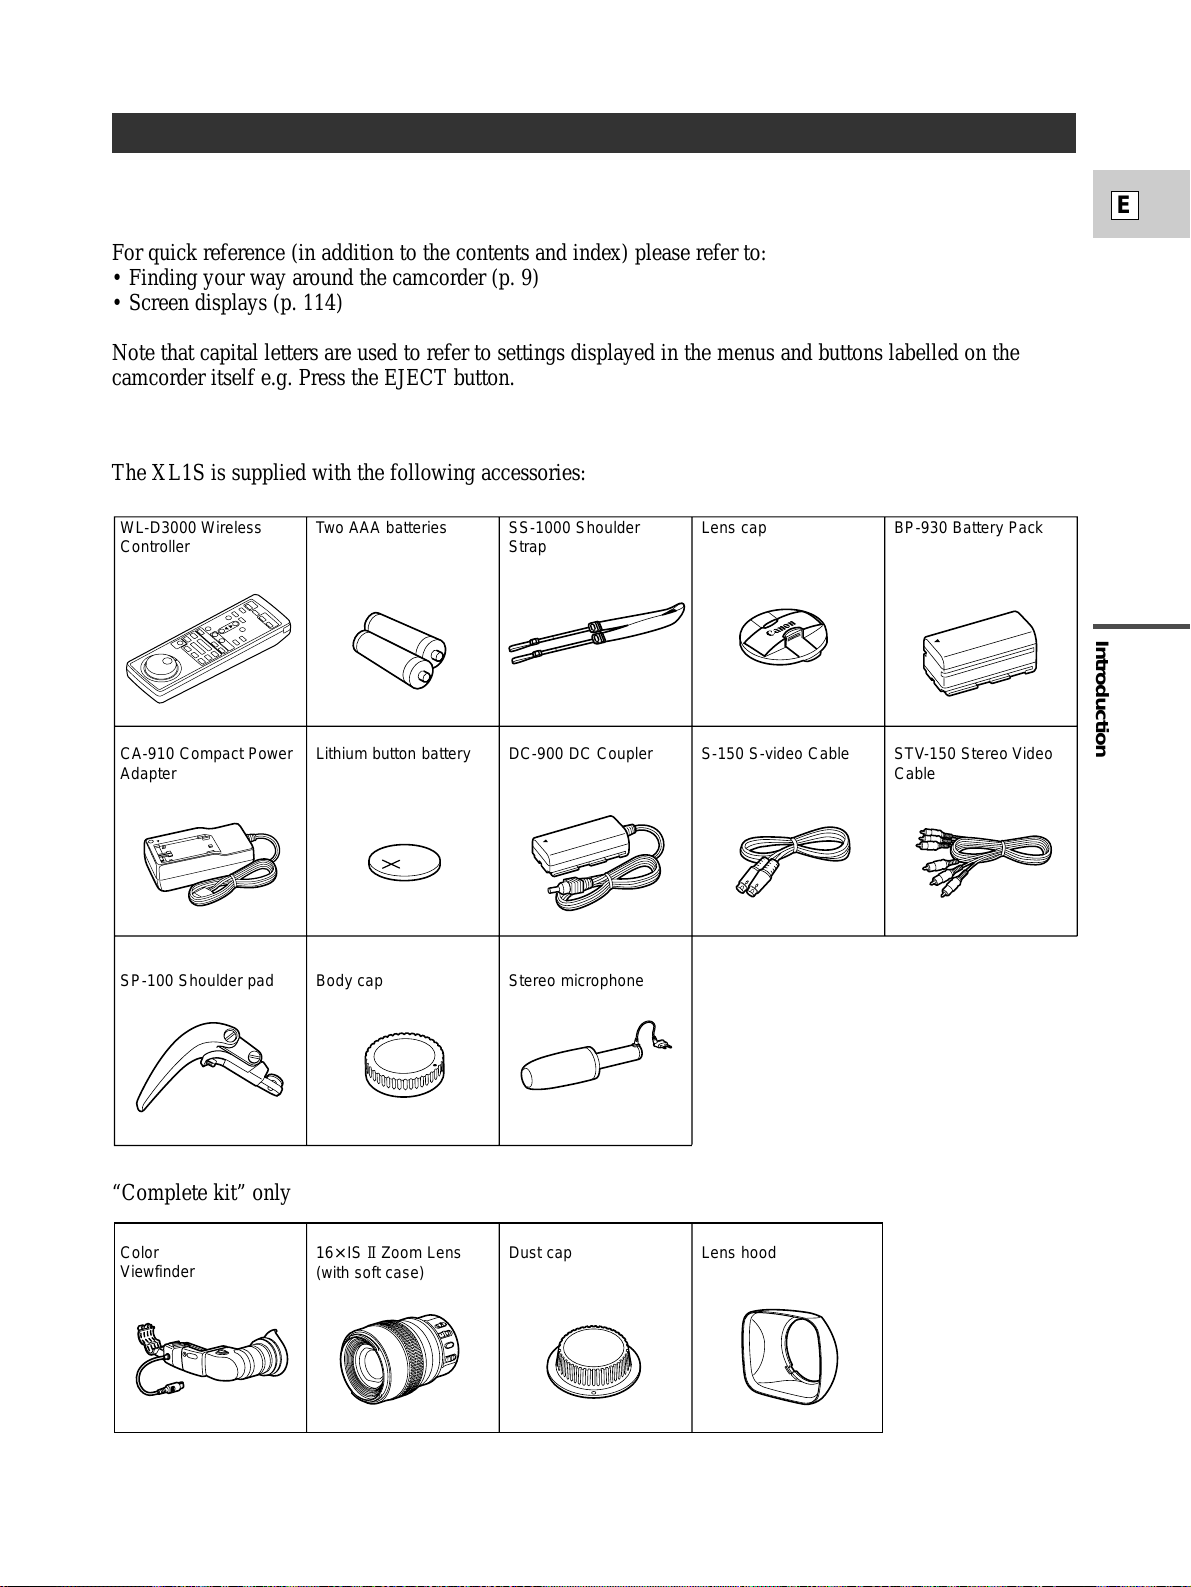
The XL1S is supplied with the following accessories:
“Complete kit” only
WL-D3000 Wireless
Controller
Two AAA batteries SS-1000 Shoulder
Strap
Lens cap BP-930 Battery Pack
CA-910 Compact Power
Adapter
Lithium button battery DC-900 DC Coupler S-150 S-video Cable STV-150 Stereo Video
Cable
SP-100 Shoulder pad Body cap Stereo microphone
Color
Viewfinder
16× IS II Zoom Lens
(with soft case)
Dust cap Lens hood
First, we’d like to thank you for purchasing this Canon camcorder. Its advanced technology makes it very
easy to use — you will soon be making high-quality videos which will give you pleasure for years to come.
For quick reference (in addition to the contents and index) please refer to:
• Finding your way around the camcorder (p. 9)
• Screen displays (p. 114)
Note that capital letters are used to refer to settings displayed in the menus and buttons labelled on the
camcorder itself e.g. Press the EJECT button.
Page 8
Introduction
8
E
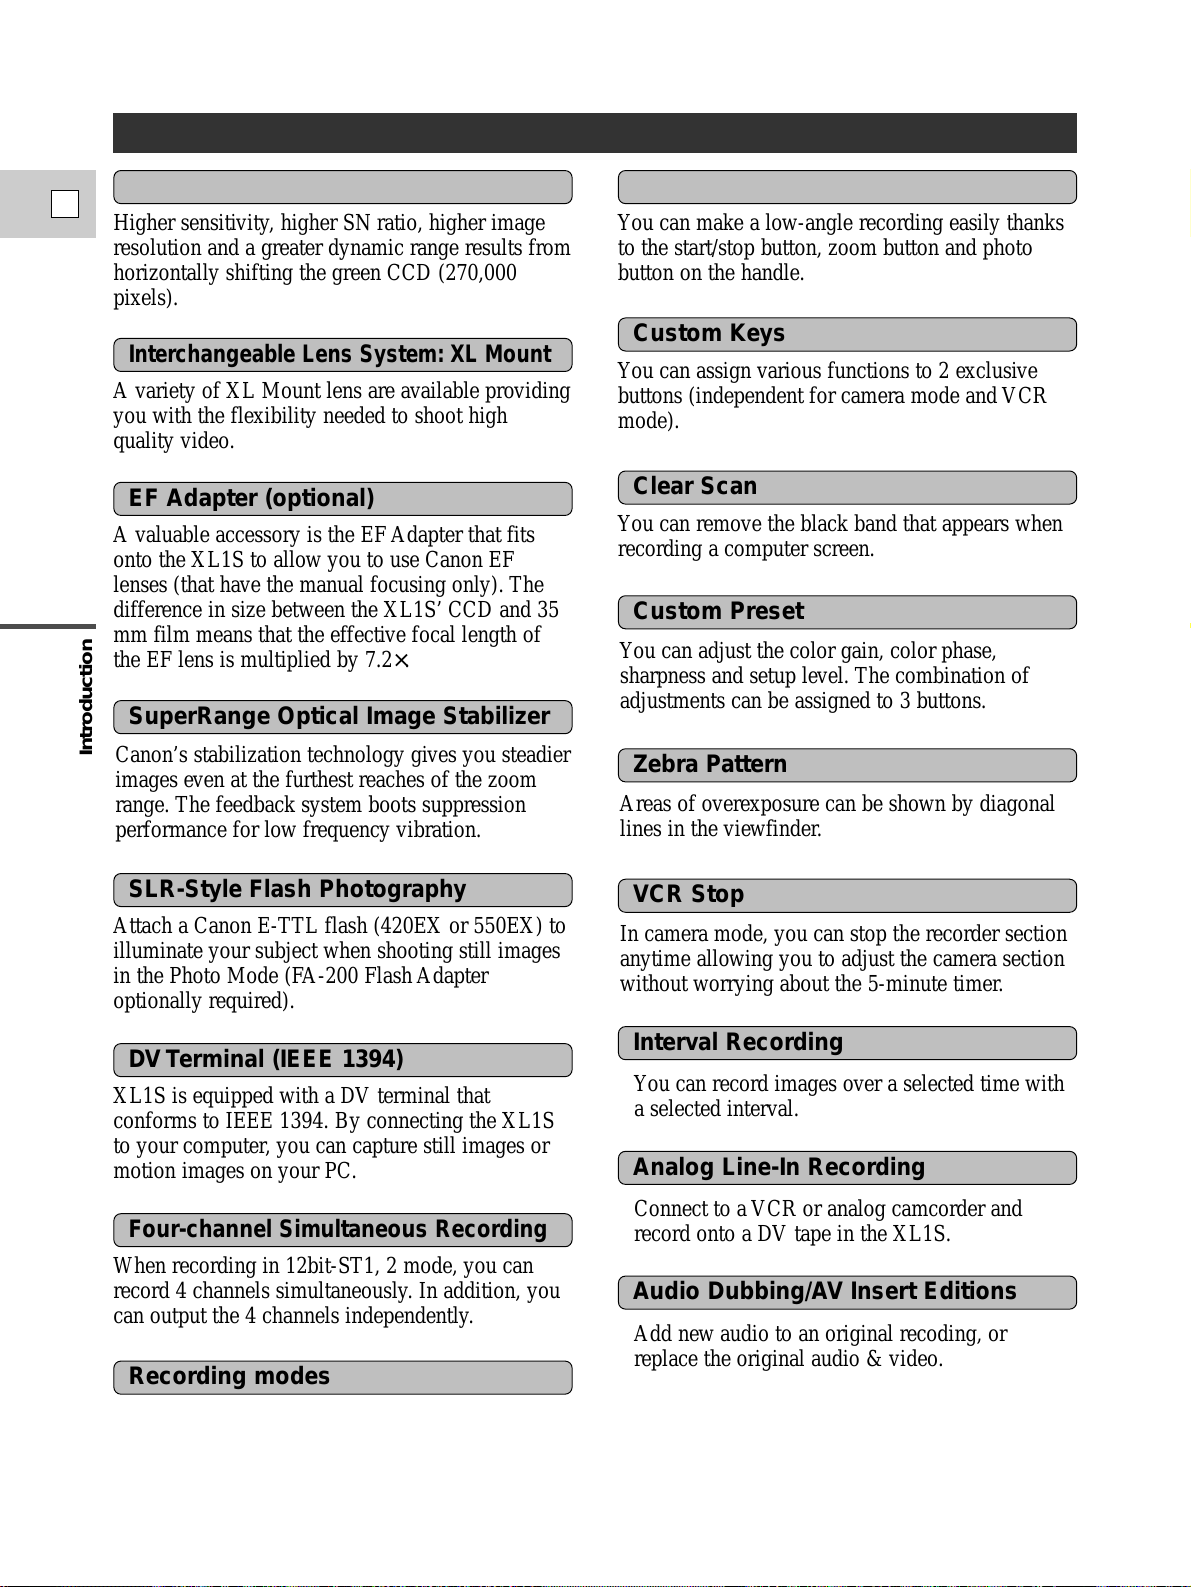
You can adjust the color gain, color phase,
sharpness and setup level. The combination of
adjustments can be assigned to 3 buttons.
Canon’s stabilization technology gives you steadier
images even at the furthest reaches of the zoom
range. The feedback system boots suppression
performance for low frequency vibration.
Introducing the XL1S
Higher sensitivity, higher SN ratio, higher image
resolution and a greater dynamic range results from
horizontally shifting the green CCD (270,000
pixels).
You can make a low-angle recording easily thanks
to the start/stop button, zoom button and photo
button on the handle.
3CCD System with Pixel Shift Technology
A variety of XL Mount lens are available providing
you with the flexibility needed to shoot high
quality video.
Interchangeable Lens System: XL Mount
A valuable accessory is the EF Adapter that fits
onto the XL1S to allow you to use Canon EF
lenses (that have the manual focusing only). The
difference in size between the XL1S’CCD and 35
mm film means that the effective focal length of
the EF lens is multiplied by 7.2×.
EF Adapter (optional)
Attach a Canon E-TTL flash (420EX or 550EX) to
illuminate your subject when shooting still images
in the Photo Mode (FA-200 Flash Adapter
optionally required).
SLR-Style Flash Photography
XL1S is equipped with a DV terminal that
conforms to IEEE 1394. By connecting the XL1S
to your computer, you can capture still images or
motion images on your PC.
DV Terminal (IEEE 1394)
When recording in 12bit-ST1, 2 mode, you can
record 4 channels simultaneously. In addition, you
can output the 4 channels independently.
Four-channel Simultaneous Recording
Low-angle Recoding
You can assign various functions to 2 exclusive
buttons (independent for camera mode and VCR
mode).
Custom Keys
You can remove the black band that appears when
recording a computer screen.
Clear Scan
SuperRange Optical Image Stabilizer
Custom Preset
Areas of overexposure can be shown by diagonal
lines in the viewfinder.
Zebra Pattern
In camera mode, you can stop the recorder section
anytime allowing you to adjust the camera section
without worrying about the 5-minute timer.
You can record images over a selected time with
a selected interval.
Connect to a VCR or analog camcorder and
record onto a DV tape in the XL1S.
Add new audio to an original recoding, or
replace the original audio & video.
VCR Stop
Interval Recording
Analog Line-In Recording
Audio Dubbing/AV Insert Editions
XL1S has 6 recording modes : Easy Recording,
Auto, Tv, Av, Manual and Spotlight.
Recording modes
Page 9
Preparation
9
E
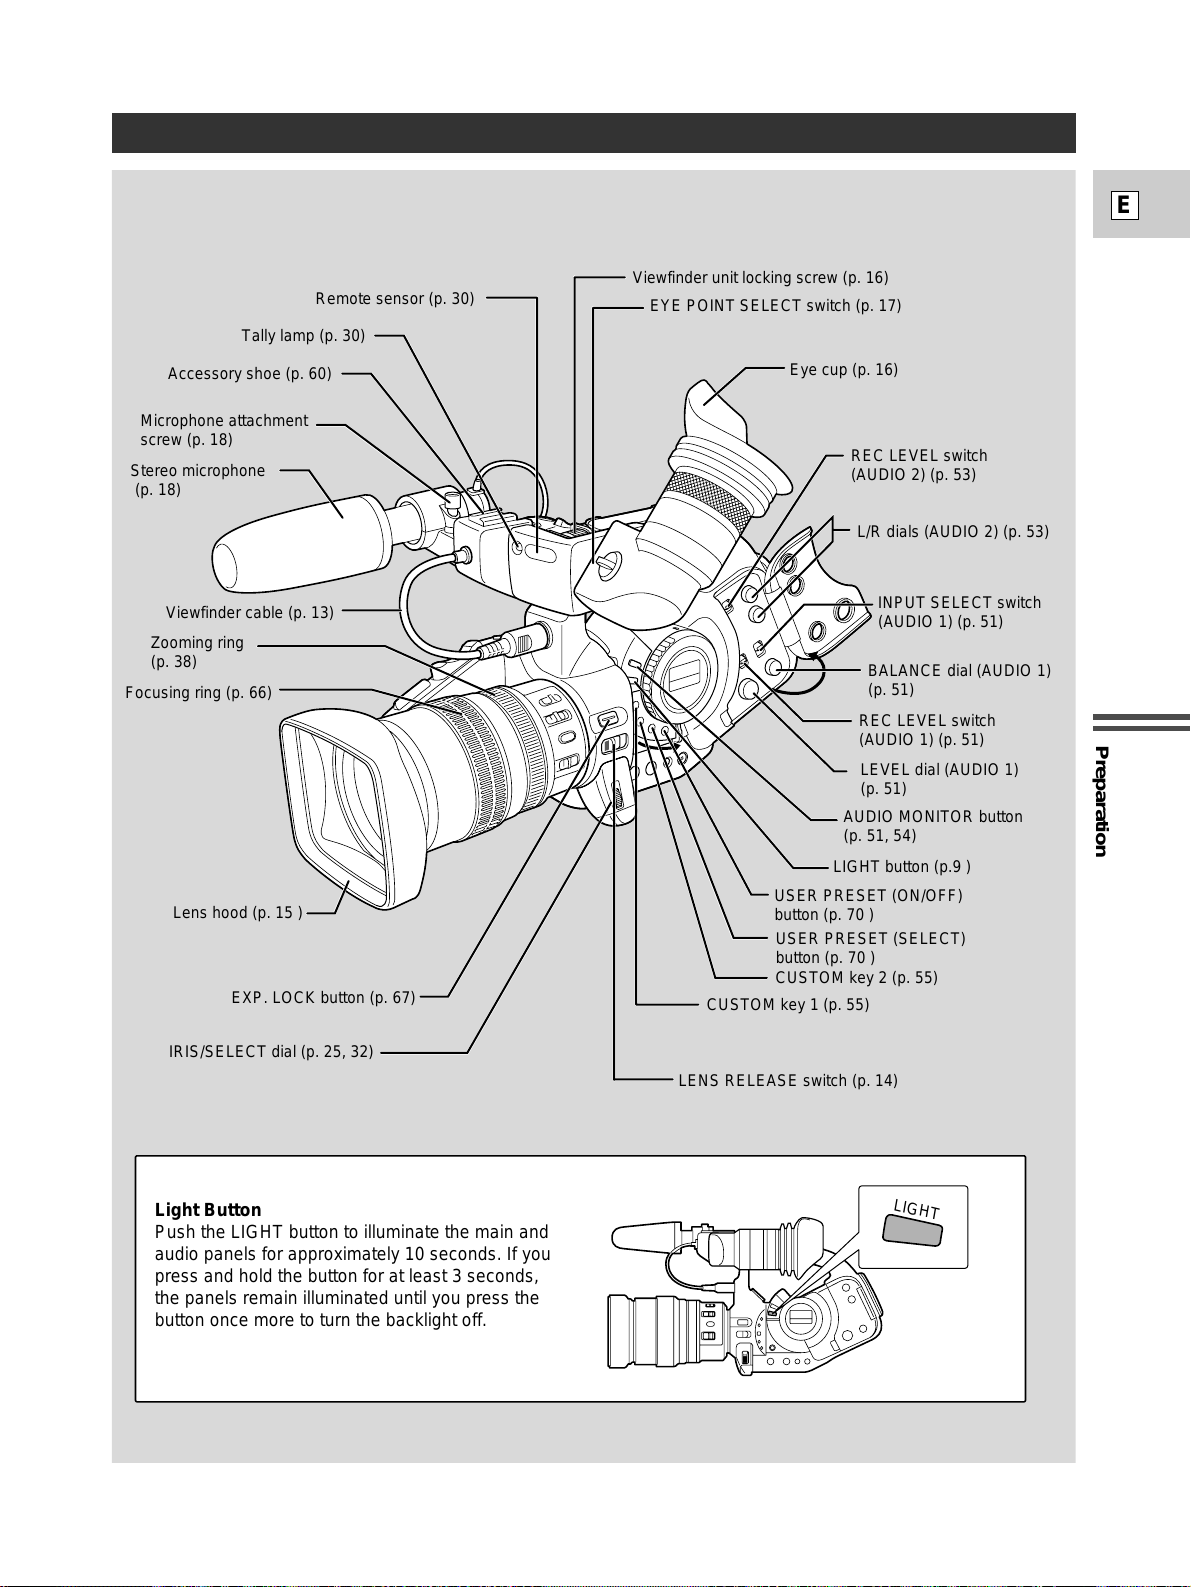
Finding Your Way Around the XL1S
LIGHT
Remote sensor (p. 30)
Tally lamp (p. 30)
Accessory shoe (p. 60)
Stereo microphone
(p. 18)
Viewfinder cable (p. 13)
Zooming ring
(p. 38)
Focusing ring (p. 66)
Lens hood (p. 15 )
EXP. LOCK button (p. 67)
IRIS/SELECT dial (p. 25, 32)
EYE POINT SELECT switch (p. 17)
Viewfinder unit locking screw (p. 16)
Eye cup (p. 16)
REC LEVEL switch
(AUDIO 2) (p. 53)
L/R dials (AUDIO 2) (p. 53)
INPUT SELECT switch
(AUDIO 1) (p. 51)
BALANCE dial (AUDIO 1)
(p. 51)
REC LEVEL switch
(AUDIO 1) (p. 51)
LEVEL dial (AUDIO 1)
(p. 51)
AUDIO MONITOR button
(p. 51, 54)
LIGHT button (p.9 )
LENS RELEASE switch (p. 14)
CUSTOM key 1 (p. 55)
USER PRESET (ON/OFF)
button (p. 70 )
USER PRESET (SELECT)
button (p. 70 )
CUSTOM key 2 (p. 55)
Microphone attachment
screw (p. 18)
Light Button
Push the LIGHT button to illuminate the main and
audio panels for approximately 10 seconds. If you
press and hold the button for at least 3 seconds,
the panels remain illuminated until you press the
button once more to turn the backlight off.
Page 10
Preparation
10
E
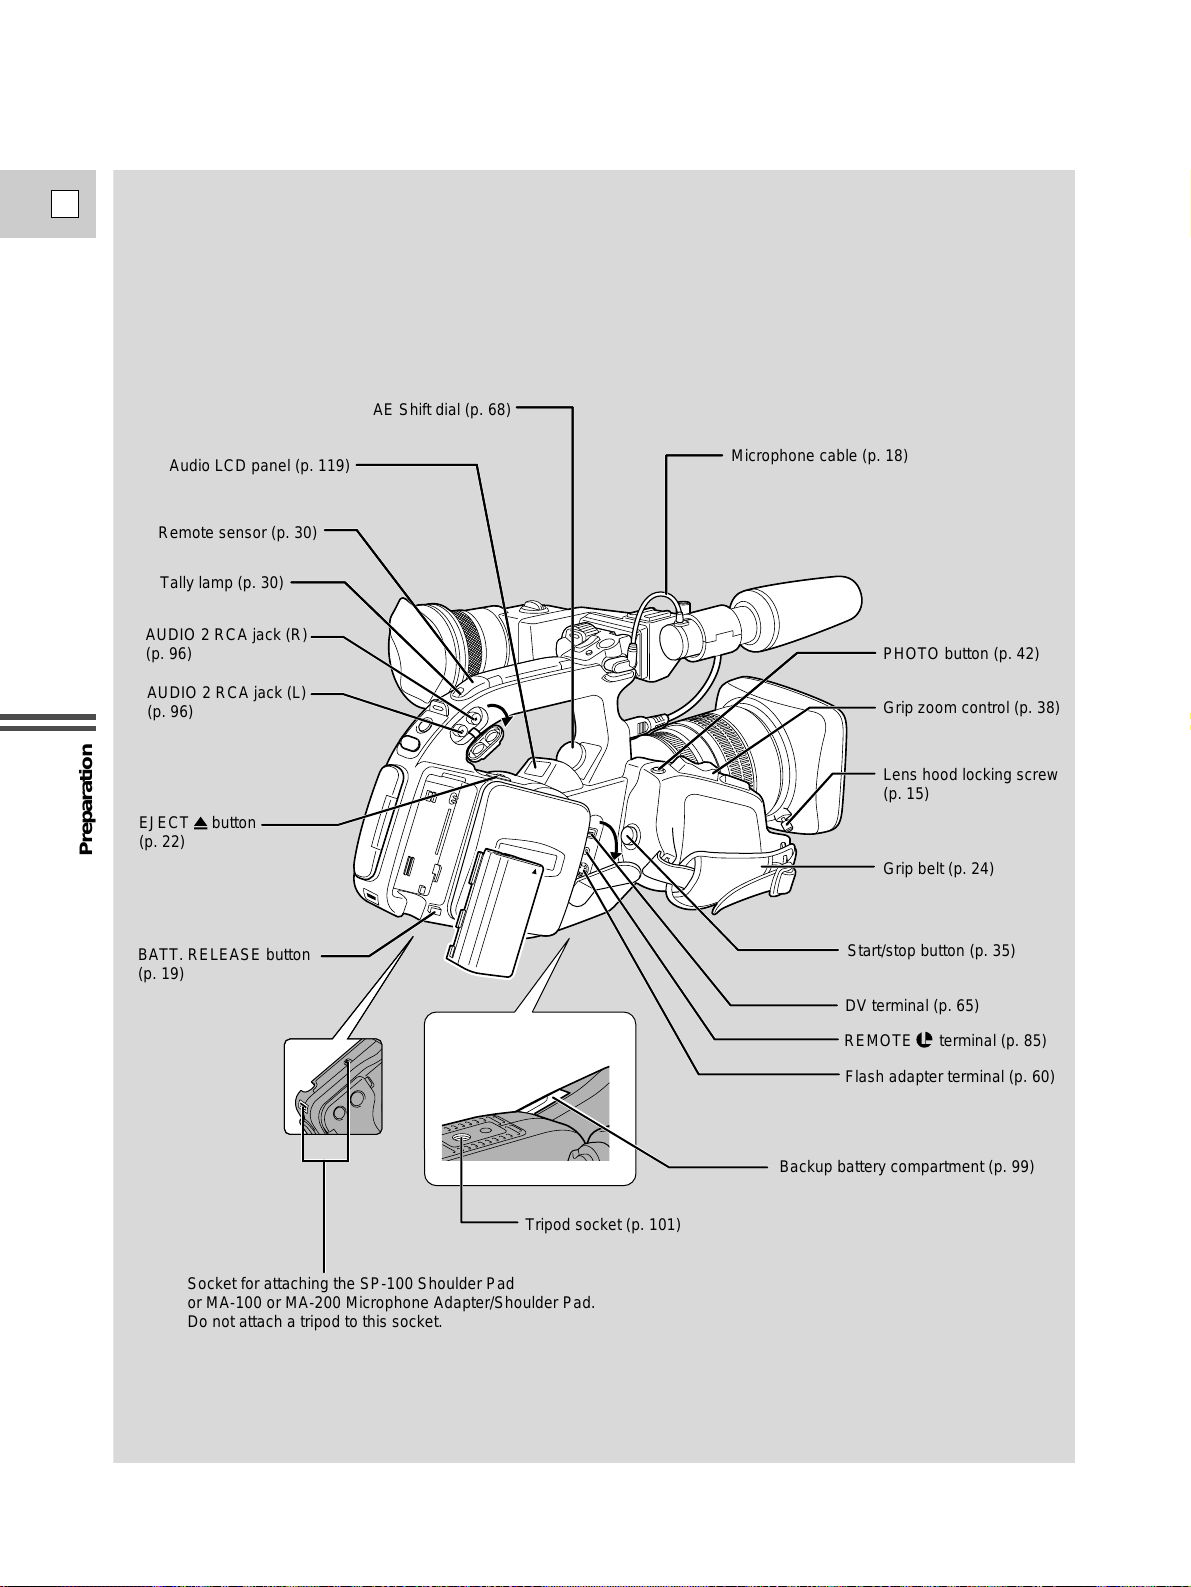
AE Shift dial (p. 68)
Audio LCD panel (p. 119)
Remote sensor (p. 30)
Tally lamp (p. 30)
AUDIO 2 RCA jack (R)
(p. 96)
AUDIO 2 RCA jack (L)
(p. 96)
EJECT button
(p. 22)
BATT. RELEASE button
(p. 19)
Microphone cable (p. 18)
PHOTO button (p. 42)
Grip zoom control (p. 38)
Lens hood locking screw
(p. 15)
Grip belt (p. 24)
Start/stop button (p. 35)
DV terminal (p. 65)
REMOTE terminal (p. 85)
Flash adapter terminal (p. 60)
Backup battery compartment (p. 99)
Tripod socket (p. 101)
Socket for attaching the SP-100 Shoulder Pad
or MA-100 or MA-200 Microphone Adapter/Shoulder Pad.
Do not attach a tripod to this socket.
Page 11
Preparation
11
E
T
W
PHOTO
START/STOP
LOCK
REC
AUDIO DUB.
AV INSERT
SHUTTER
REC
SEARCH
EVF DISPLAY
ON/OFF
D.E./BARS
SELECT
ON/OFF
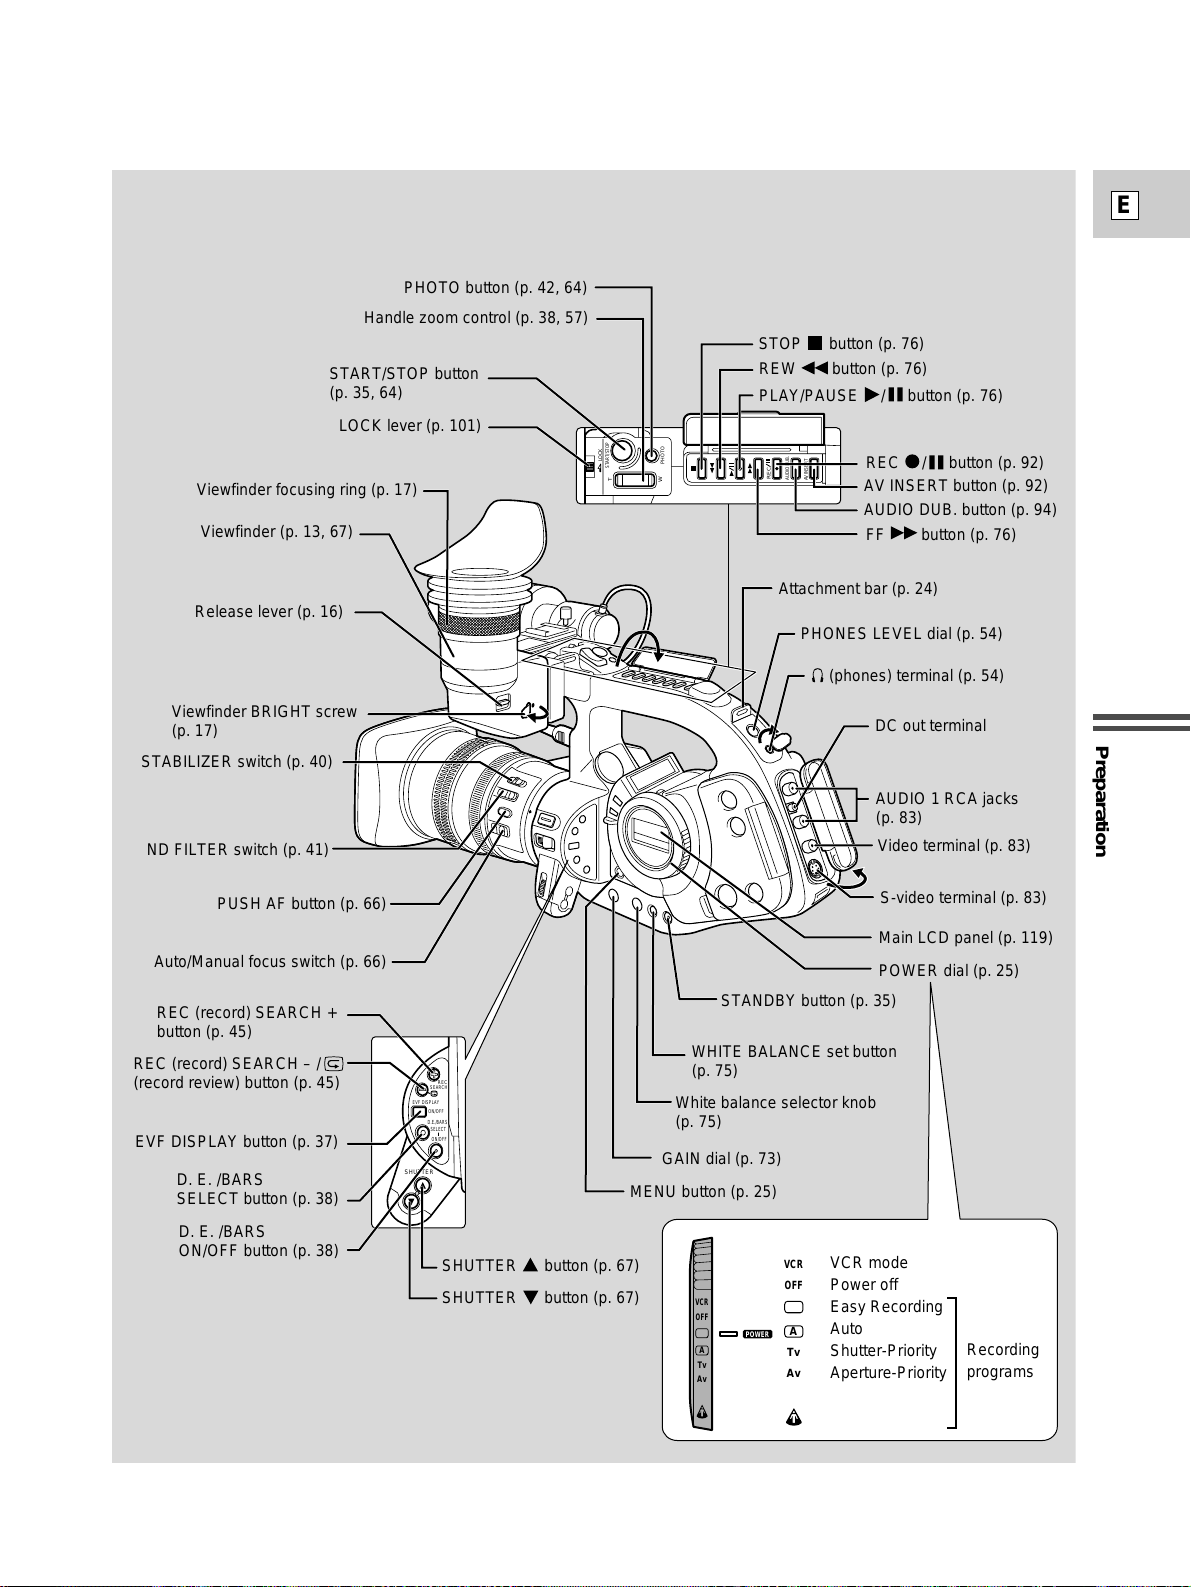
Handle zoom control (p. 38, 57)
START/STOP button
(p. 35, 64)
LOCK lever (p. 101)
PHOTO button (p. 42, 64)
PLAY/PAUSE / button (p. 76)
STOP button (p. 76)
REW button (p. 76)
REC / button (p. 92)
AUDIO DUB. button (p. 94)
AV INSERT button (p. 92)
Viewfinder focusing ring (p. 17)
Viewfinder (p. 13, 67)
Release lever (p. 16)
Viewfinder BRIGHT screw
(p. 17)
STABILIZER switch (p. 40)
ND FILTER switch (p. 41)
Auto/Manual focus switch (p. 66)
PUSH AF button (p. 66)
Attachment bar (p. 24)
PHONES LEVEL dial (p. 54)
(phones) terminal (p. 54)
Video terminal (p. 83)
DC out terminal
AUDIO 1 RCA jacks
(p. 83)
S-video terminal (p. 83)
POWER dial (p. 25)
Main LCD panel (p. 119)
STANDBY button (p. 35)
WHITE BALANCE set button
(p. 75)
White balance selector knob
(p. 75)
GAIN dial (p. 73)
MENU button (p. 25)
REC (record) SEARCH +
button (p. 45)
REC (record) SEARCH – /
(record review) button (p. 45)
EVF DISPLAY button (p. 37)
D. E. /BARS
SELECT button (p. 38)
D. E. /BARS
ON/OFF button (p. 38)
SHUTTER button (p. 67)
SHUTTER button (p. 67)
POWER
VCR
OFF
Tv
Av
M
A
VCR
OFF
Tv
Av
M
A
VCR mode
Power off
Easy Recording
Auto
Shutter-Priority
Aperture-Priority
Manual
Spotlight
Recording
programs
(camera mode)
FF button (p. 76)
Page 12
Preparation
12
E
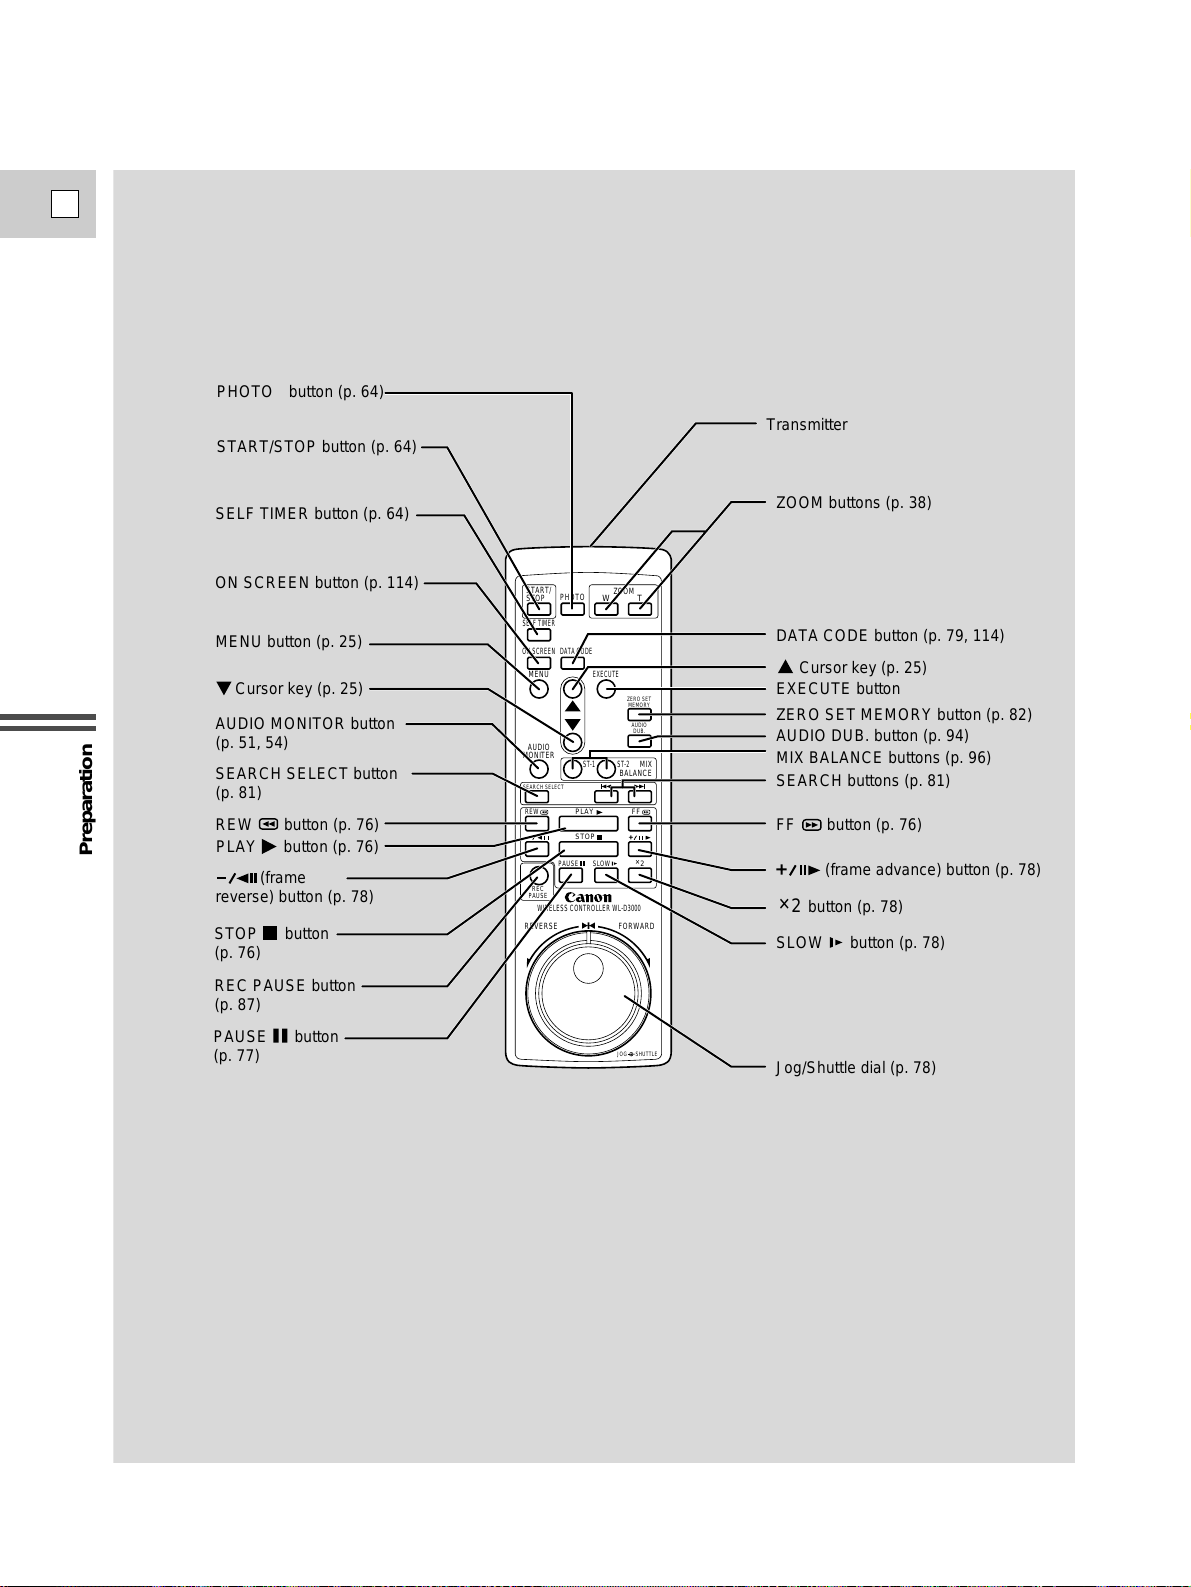
PHOTO button (p. 64)
Transmitter
START/STOP button (p. 64)
SELF TIMER button (p. 64)
ON SCREEN button (p. 114)
MENU button (p. 25)
Cursor key (p. 25)
AUDIO MONITOR button
(p. 51, 54)
SEARCH SELECT button
(p. 81)
REW button (p. 76)
PLAY button (p. 76)
(frame
reverse) button (p. 78)
STOP button
(p. 76)
REC PAUSE button
(p. 87)
PAUSE button
(p. 77)
START/
STOP
SELF TIMER
MENU
AUDIO
MONITER
SEARCH SELECT
REW
REC
PAUSE
WIRELESS CONTROLLER WL-D3000
REVERSE FORWARD
PHOTO
DATA CODEON SCREEN
EXECUTE
PLAY
STOP
PAUSE SLOW
ZOOM
WT
ZERO SET
MEMORY
AUDIO
DUB.
ST-2ST-1
MIX
BALANCE
FF
2
+
JOG SHUTTLE
ZOOM buttons (p. 38)
DATA CODE button (p. 79, 114)
Cursor key (p. 25)
EXECUTE button
ZERO SET MEMORY button (p. 82)
AUDIO DUB. button (p. 94)
MIX BALANCE buttons (p. 96)
SEARCH buttons (p. 81)
FF button (p. 76)
(frame advance) button (p. 78)
button (p. 78)
2
+
SLOW button (p. 78)
Jog/Shuttle dial (p. 78)
Page 13
Preparation
13
E
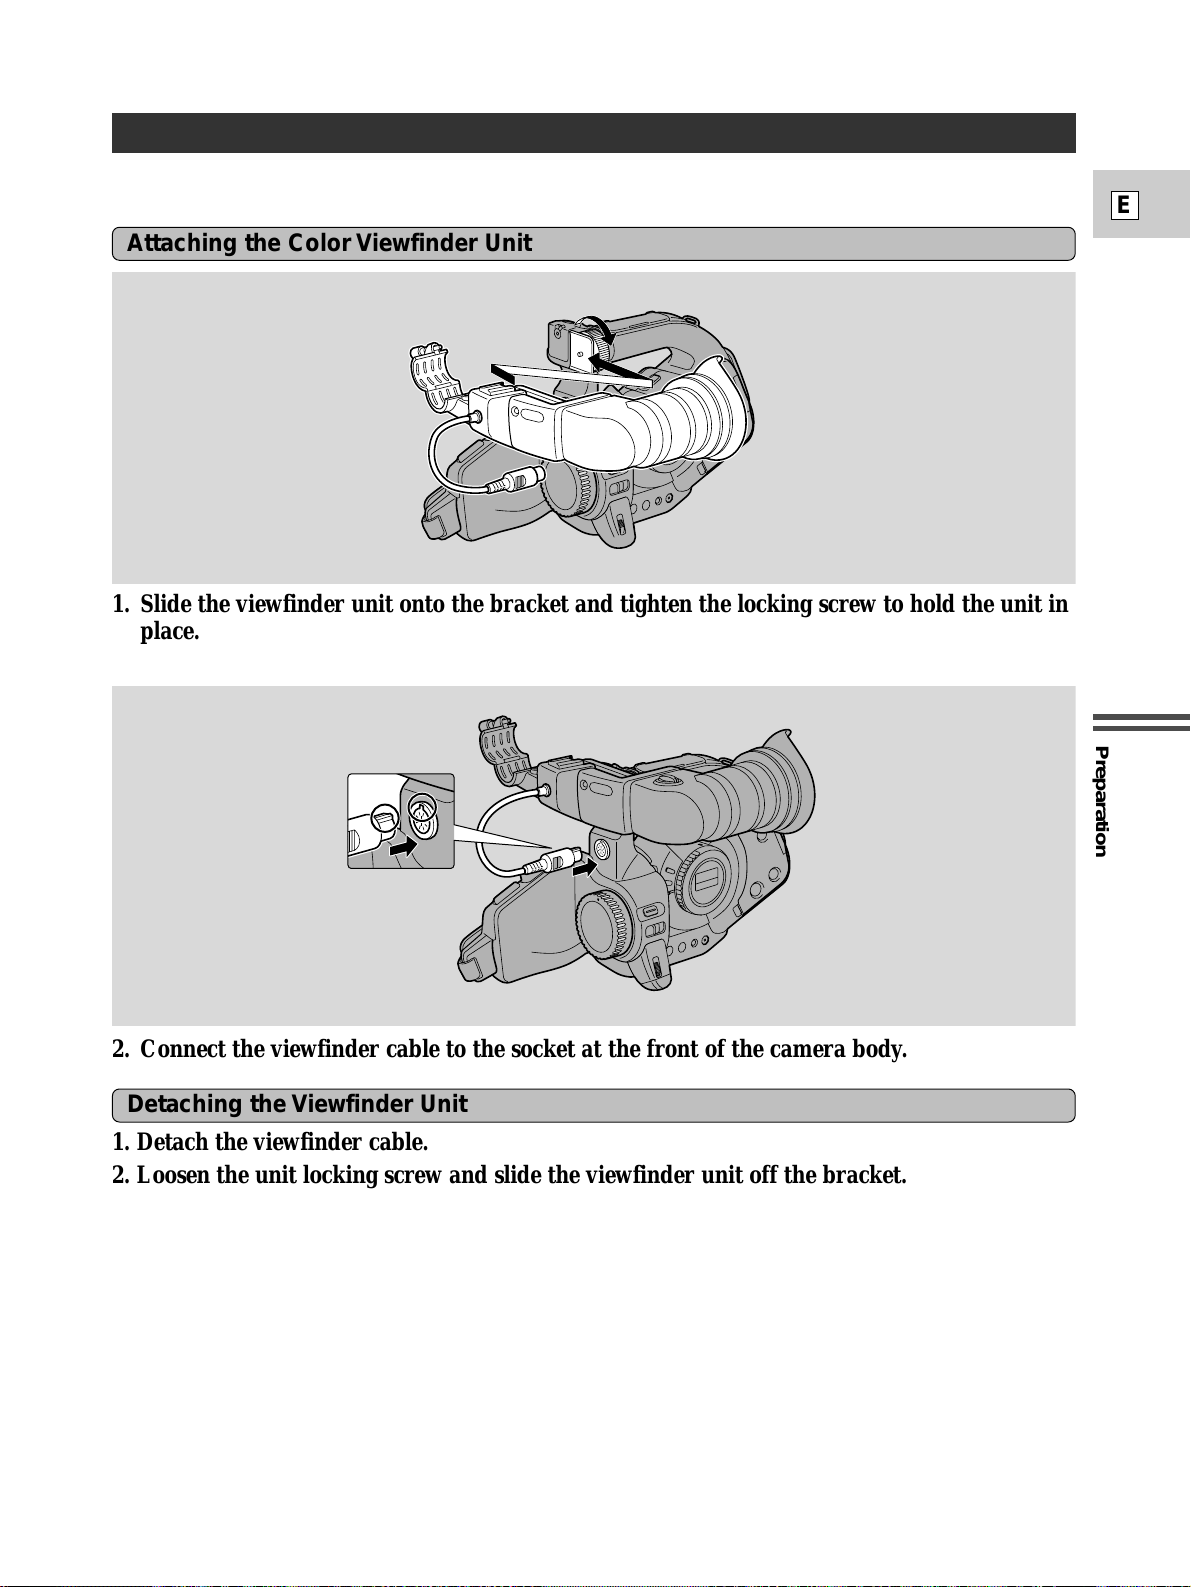
• If you are a Body Kit user, refer to the viewfinder instruction manual.
1. Slide the viewfinder unit onto the bracket and tighten the locking screw to hold the unit in
place.
2. Connect the viewfinder cable to the socket at the front of the camera body.
Attaching the Color Viewfinder Unit
1. Detach the viewfinder cable.
2. Loosen the unit locking screw and slide the viewfinder unit off the bracket.
Detaching the Viewfinder Unit
Attaching and Detaching the Color Viewfinder Unit
Page 14
Preparation
14
E
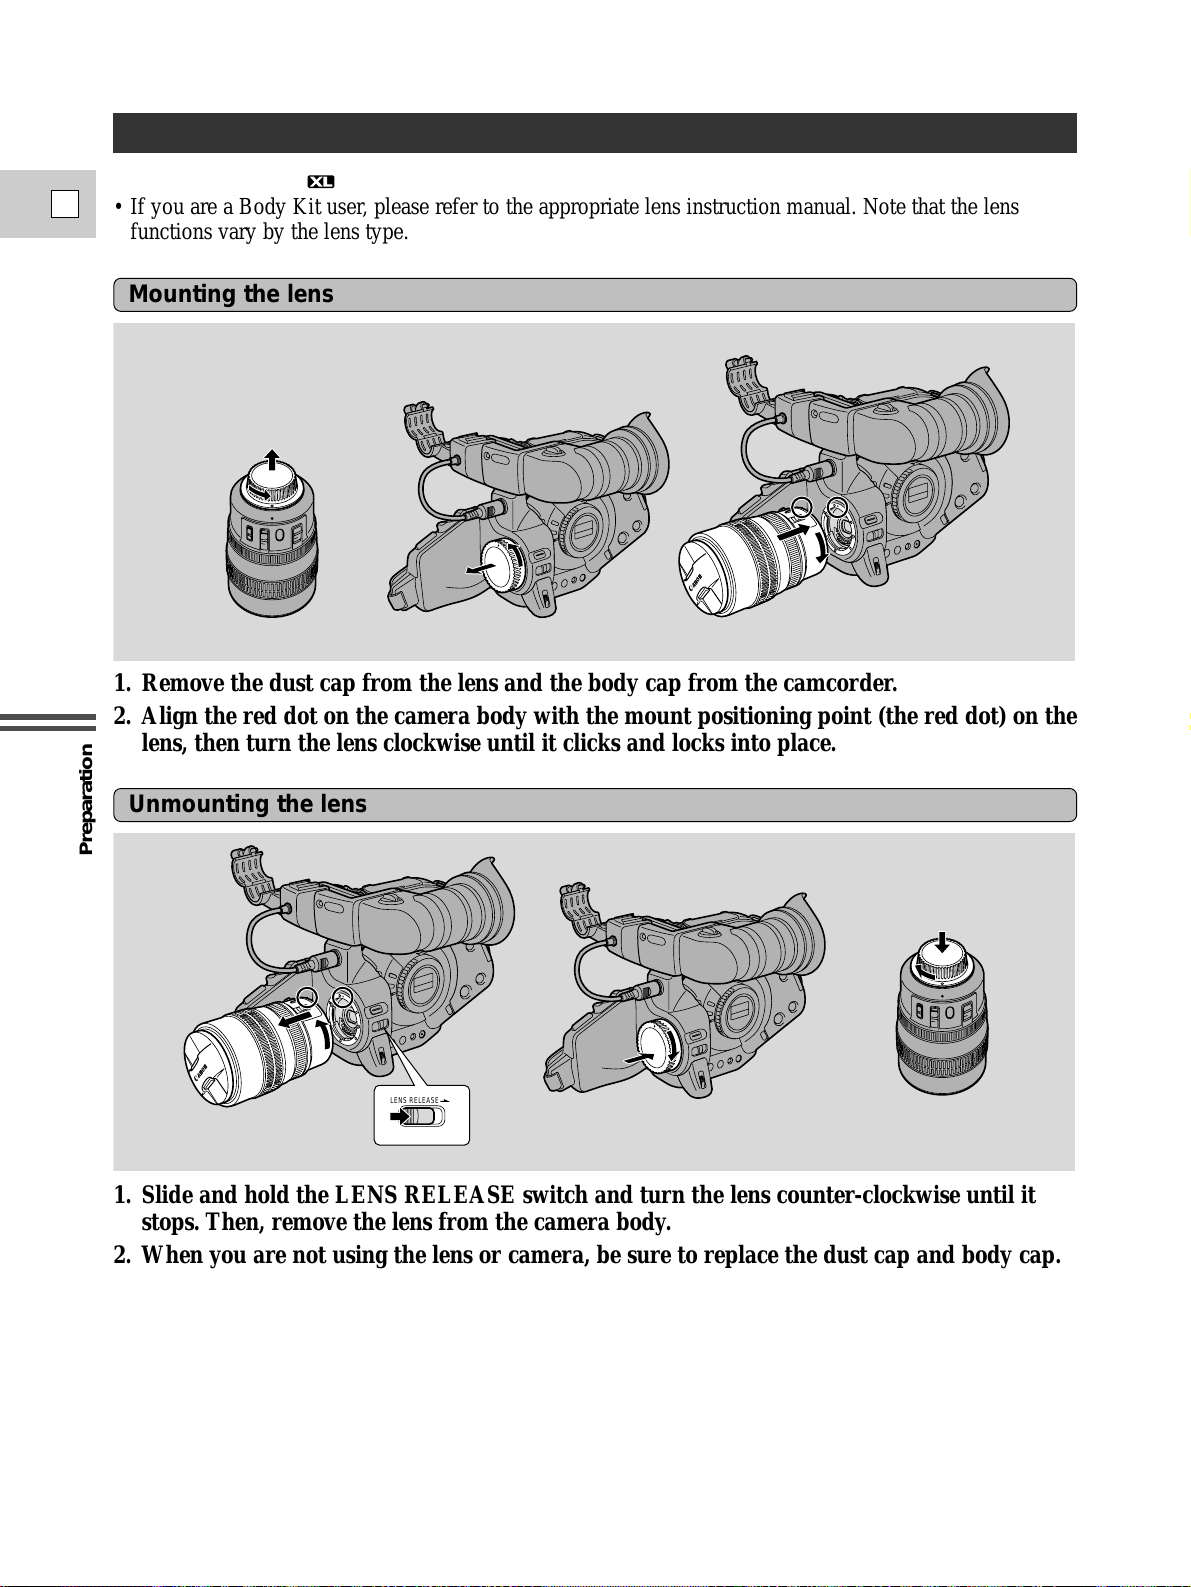
Any lens bearing the mark can be used with this camcorder.
• If you are a Body Kit user, please refer to the appropriate lens instruction manual. Note that the lens
functions vary by the lens type.
1. Remove the dust cap from the lens and the body cap from the camcorder.
2. Align the red dot on the camera body with the mount positioning point (the red dot) on the
lens, then turn the lens clockwise until it clicks and locks into place.
Mounting the lens
1. Slide and hold the LENS RELEASE switch and turn the lens counter-clockwise until it
stops. Then, remove the lens from the camera body.
2. When you are not using the lens or camera, be sure to replace the dust cap and body cap.
Unmounting the lens
Mounting and Unmounting XL Lenses
LENS RELEASE
Page 15
Preparation
15
E
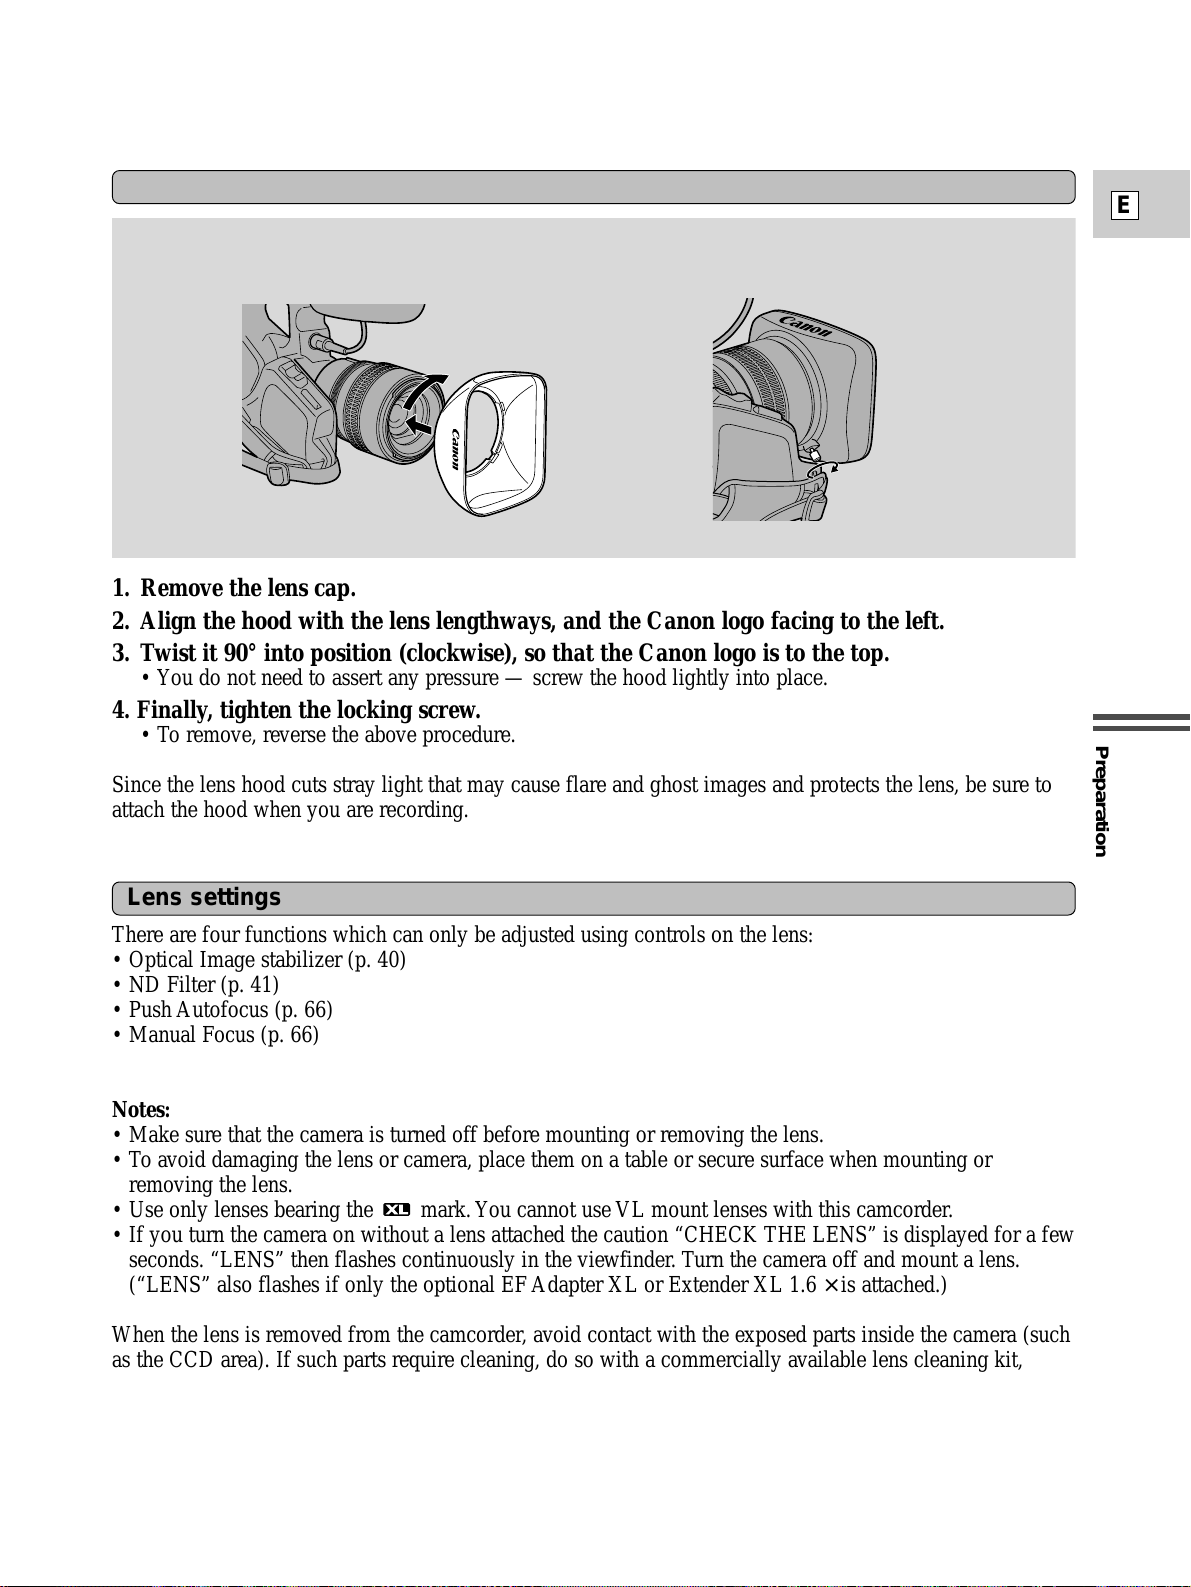
1. Remove the lens cap.
2. Align the hood with the lens lengthways, and the Canon logo facing to the left.
3. Twist it 90° into position (clockwise), so that the Canon logo is to the top.
• You do not need to assert any pressure — screw the hood lightly into place.
4. Finally, tighten the locking screw.
• To remove, reverse the above procedure.
Since the lens hood cuts stray light that may cause flare and ghost images and protects the lens, be sure to
attach the hood when you are recording.
Attaching the Lens Hood
There are four functions which can only be adjusted using controls on the lens:
• Optical Image stabilizer (p. 40)
• ND Filter (p. 41)
• Push Autofocus (p. 66)
• Manual Focus (p. 66)
Notes:
• Make sure that the camera is turned off before mounting or removing the lens.
• To avoid damaging the lens or camera, place them on a table or secure surface when mounting or
removing the lens.
• Use only lenses bearing the mark. You cannot use VL mount lenses with this camcorder.
• If you turn the camera on without a lens attached the caution “CHECK THE LENS” is displayed for a few
seconds. “LENS” then flashes continuously in the viewfinder. Turn the camera off and mount a lens.
(“LENS” also flashes if only the optional EF Adapter XL or Extender XL 1.6
× is attached.)
When the lens is removed from the camcorder, avoid contact with the exposed parts inside the camera (such
as the CCD area). If such parts require cleaning, do so with a commercially available lens cleaning kit,
making sure that the camera is turned off first.
Lens settings
Page 16
Preparation
16
E
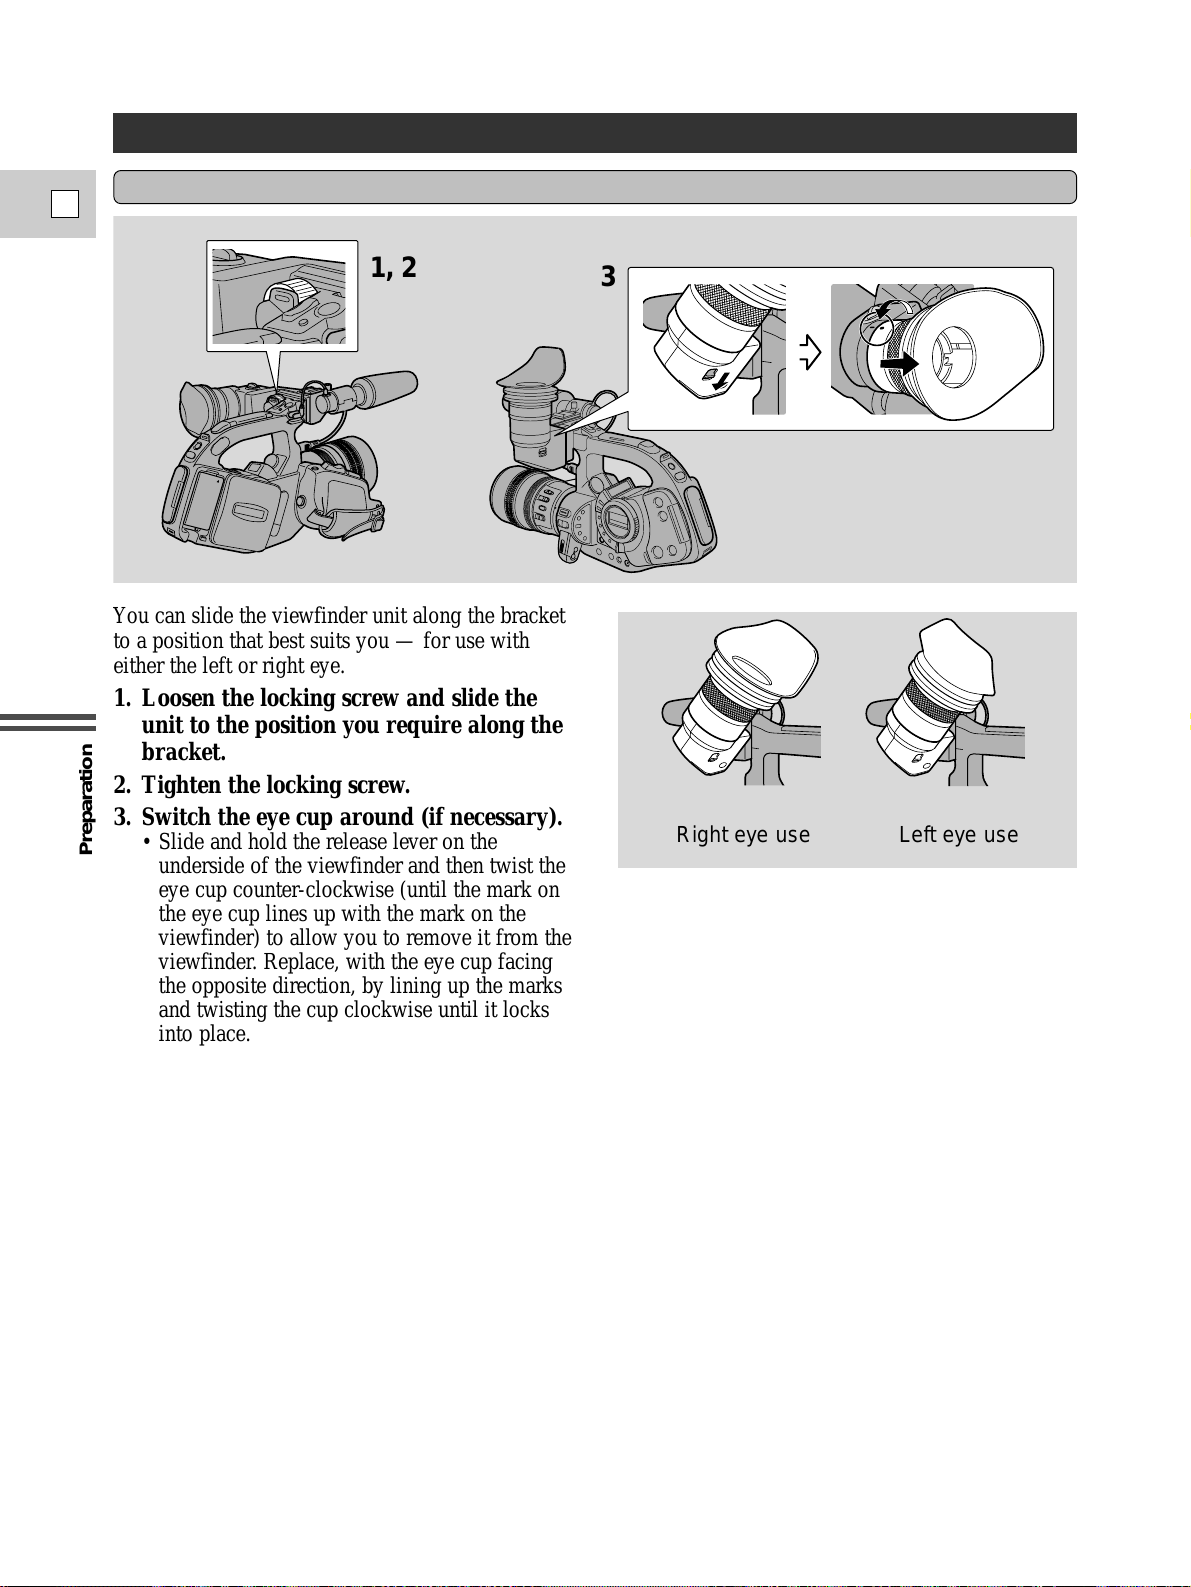
You can slide the viewfinder unit along the bracket
to a position that best suits you — for use with
either the left or right eye.
1. Loosen the locking screw and slide the
unit to the position you require along the
bracket.
2. Tighten the locking screw.
3. Switch the eye cup around (if necessary).
• Slide and hold the release lever on the
underside of the viewfinder and then twist the
eye cup counter-clockwise (until the mark on
the eye cup lines up with the mark on the
viewfinder) to allow you to remove it from the
viewfinder. Replace, with the eye cup facing
the opposite direction, by lining up the marks
and twisting the cup clockwise until it locks
into place.
Adjusting for left eye/right eye operation
Adjusting the Color Viewfinder Unit
1, 2
3
Right eye use
Left eye use
Page 17
Preparation
17
E
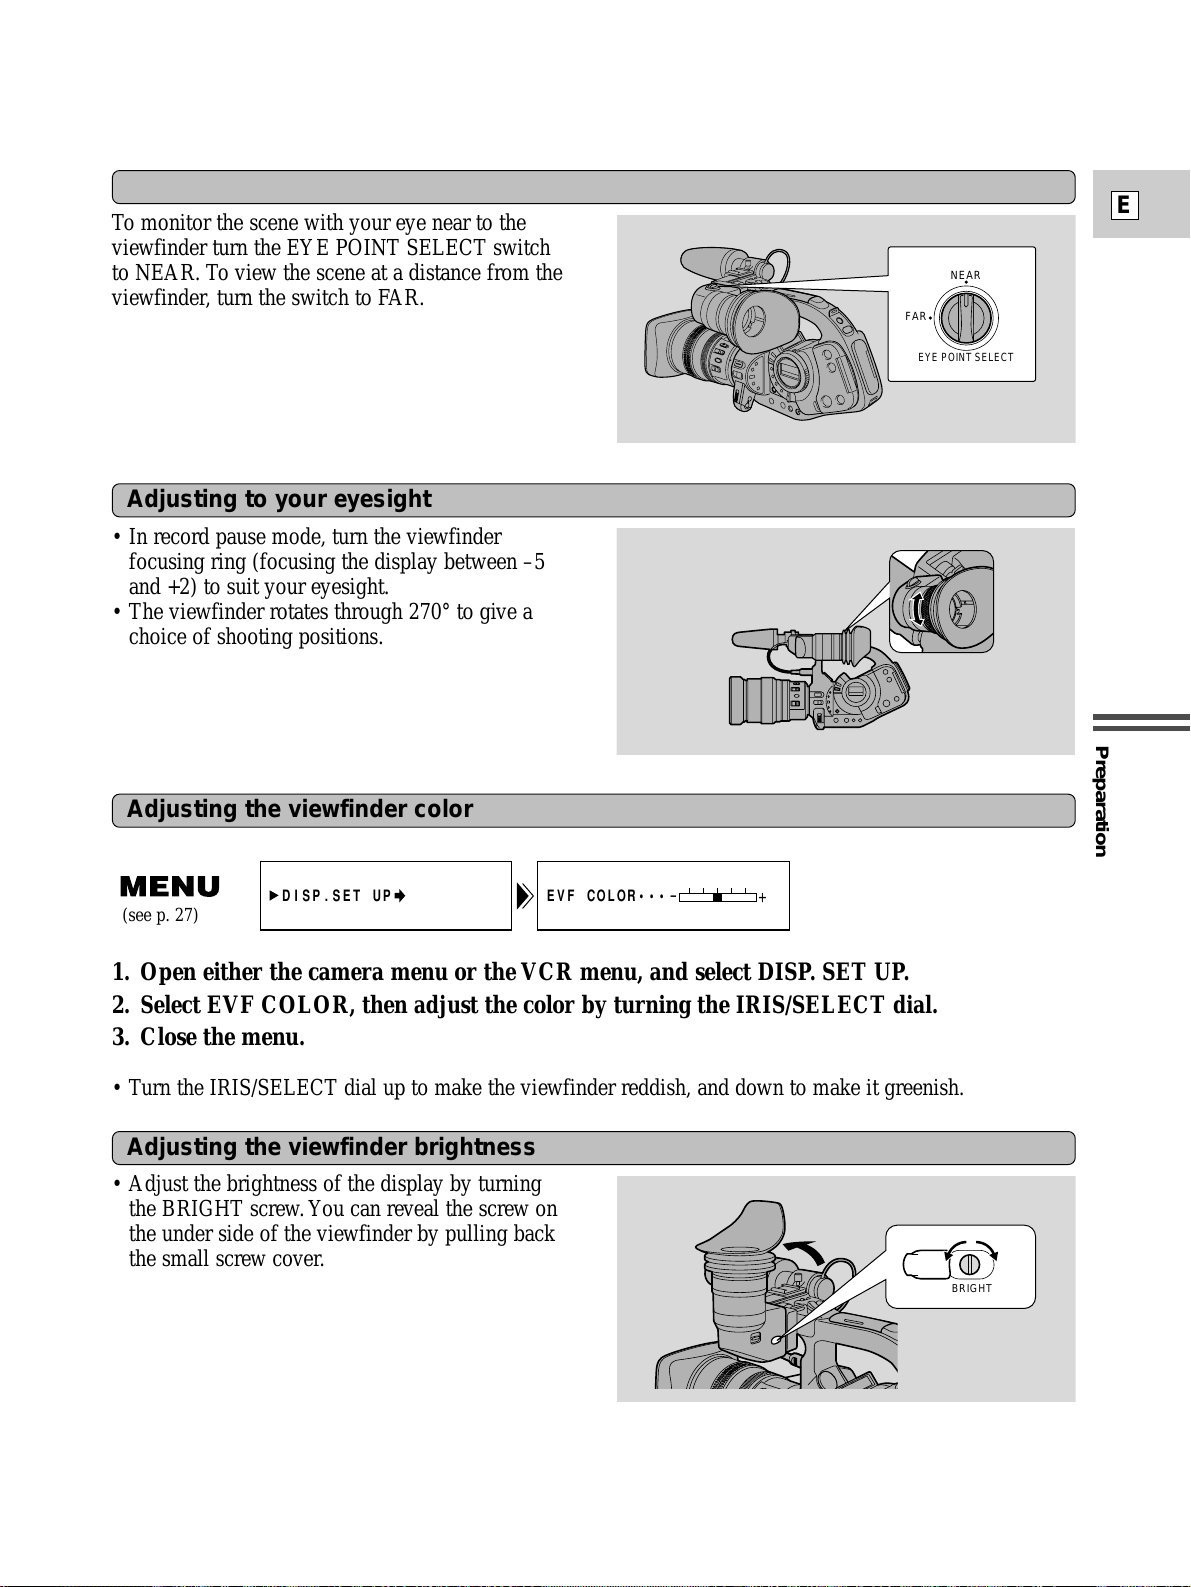
To monitor the scene with your eye near to the
viewfinder turn the EYE POINT SELECT switch
to NEAR. To view the scene at a distance from the
viewfinder, turn the switch to FAR.
Adjusting to your viewing point
• In record pause mode, turn the viewfinder
focusing ring (focusing the display between –5
and +2) to suit your eyesight.
• The viewfinder rotates through 270° to give a
choice of shooting positions.
Adjusting to your eyesight
1. Open either the camera menu or the VCR menu, and select DISP. SET UP.
2. Select EVF COLOR, then adjust the color by turning the IRIS/SELECT dial.
3. Close the menu.
• Turn the IRIS/SELECT dial up to make the viewfinder reddish, and down to make it greenish.
Adjusting the viewfinder color
Adjusting the viewfinder brightness
• Adjust the brightness of the display by turning
the BRIGHT screw. You can reveal the screw on
the under side of the viewfinder by pulling back
the small screw cover.
BRIGHT
DISP.SET UP EVF COLOR•••
-
+
(see p. 27)
NEAR
FAR
EYE POINT SELECT
Page 18
Preparation
18
E
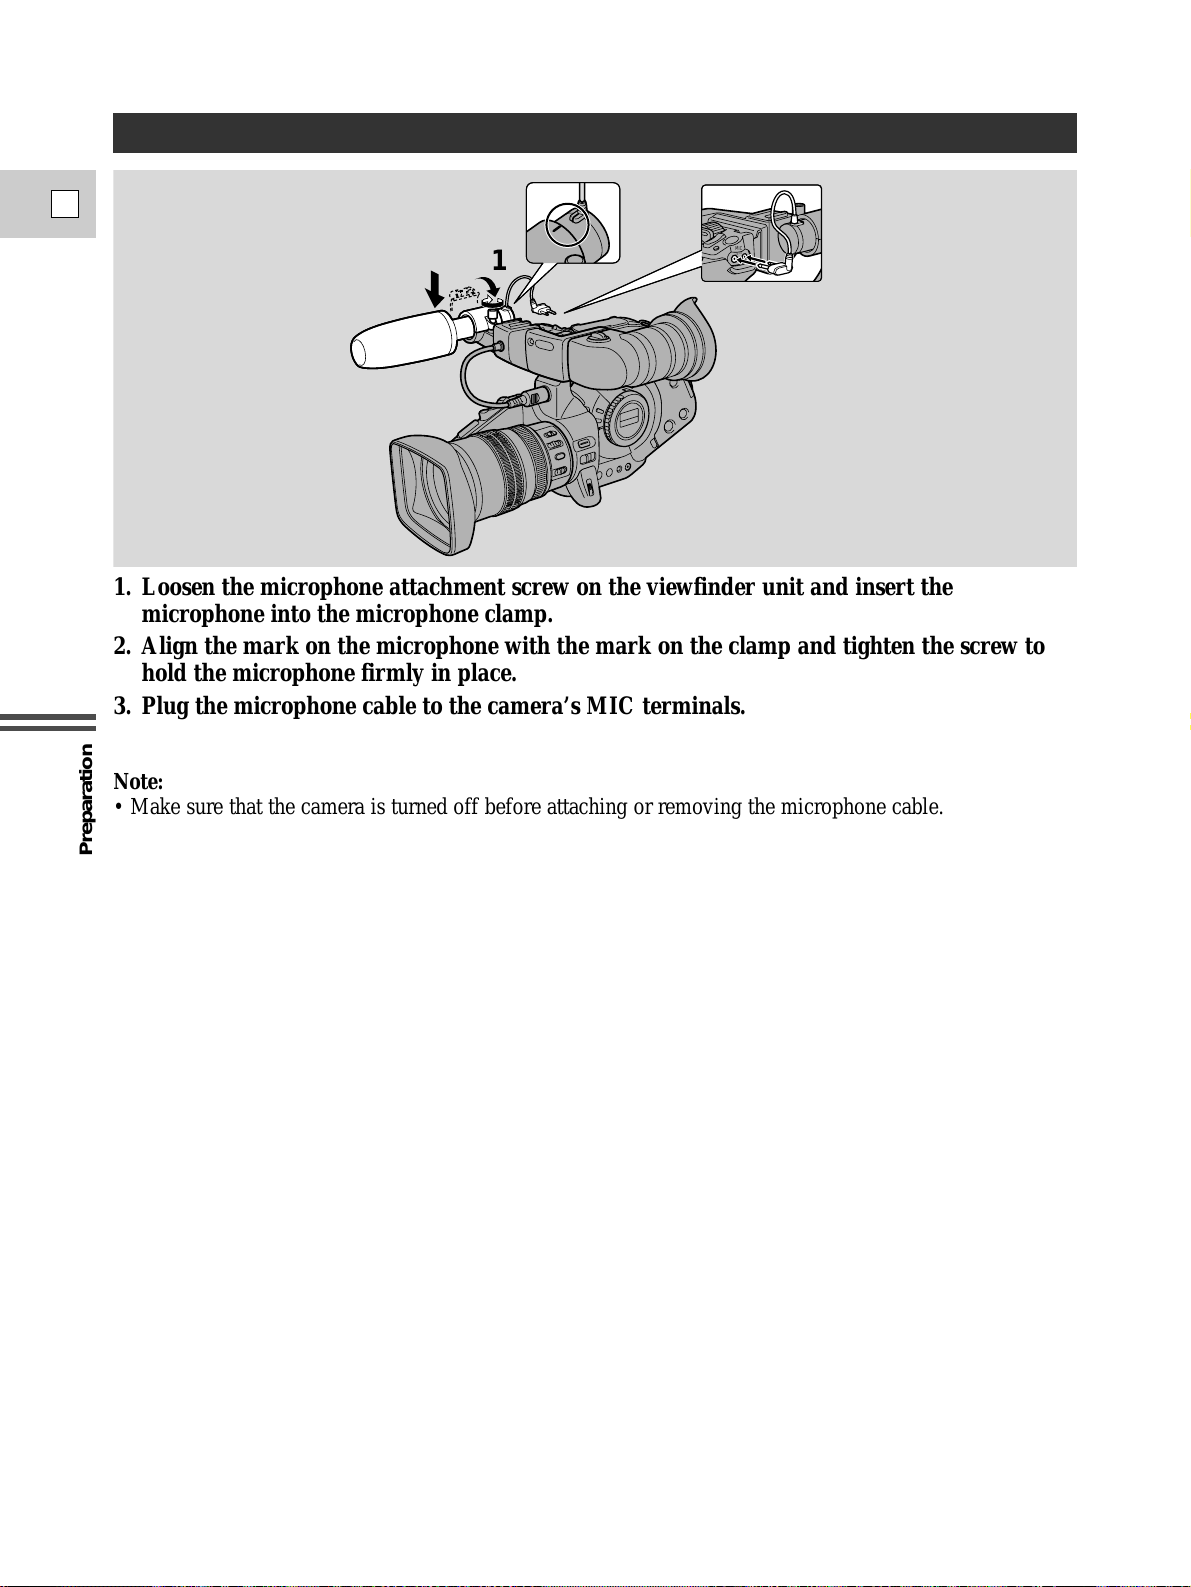
1. Loosen the microphone attachment screw on the viewfinder unit and insert the
microphone into the microphone clamp.
2. Align the mark on the microphone with the mark on the clamp and tighten the screw to
hold the microphone firmly in place.
3. Plug the microphone cable to the camera’s MIC terminals.
Note:
• Make sure that the camera is turned off before attaching or removing the microphone cable.
1
2
3
3
M
IC
D
C
IN
Attaching the Provided Microphone
Page 19
Preparation
19
E
Powering the XL1S
Before operating your camera, you will need to use the power adapter to:
provide power from an AC outlet
or
charge a battery pack
Notes:
• The power adapter converts current from a household power socket (100–240 V AC, 50/60 Hz) to the DC
current used by your camera.
• If the adapter is used next to a TV, it may cause the TV to emit noise — move the adapter away from the
TV or the antenna cable.
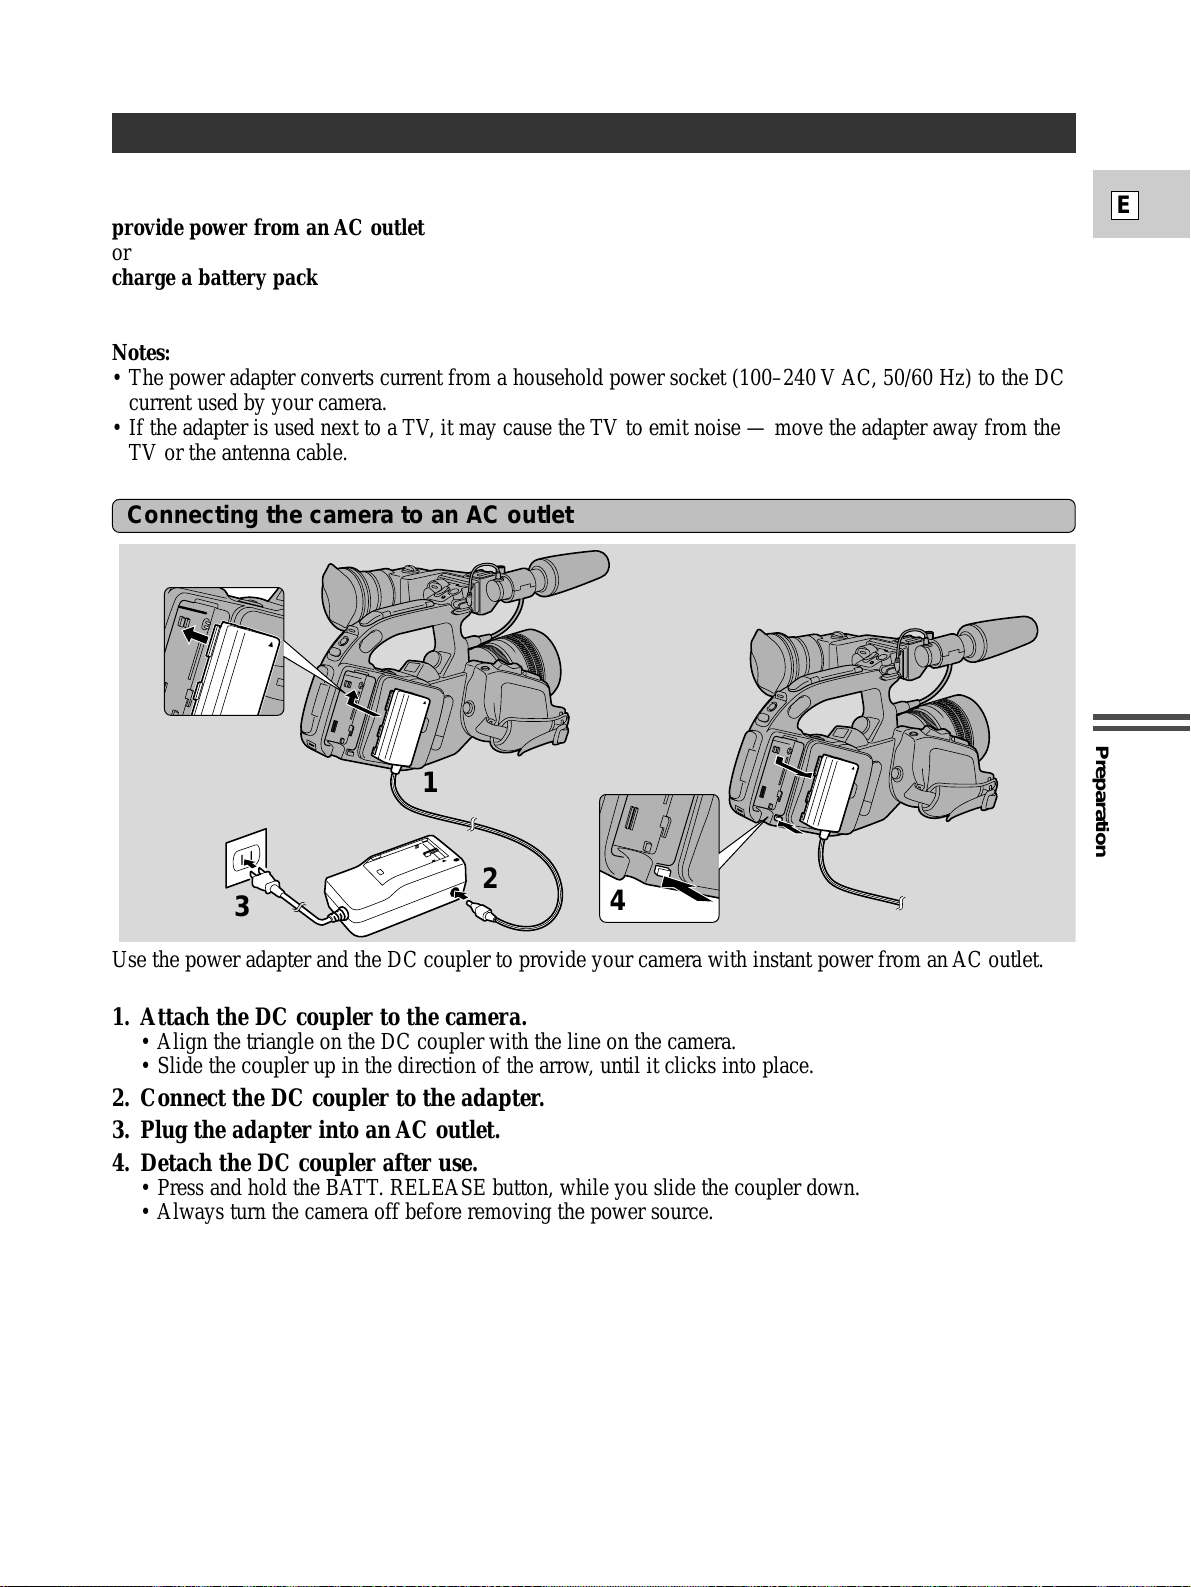
Connecting the camera to an AC outlet
Use the power adapter and the DC coupler to provide your camera with instant power from an AC outlet.
1. Attach the DC coupler to the camera.
• Align the triangle on the DC coupler with the line on the camera.
• Slide the coupler up in the direction of the arrow, until it clicks into place.
2. Connect the DC coupler to the adapter.
3. Plug the adapter into an AC outlet.
4. Detach the DC coupler after use.
• Press and hold the BATT. RELEASE button, while you slide the coupler down.
• Always turn the camera off before removing the power source.
1
2
3
4
Page 20
Preparation
20
E
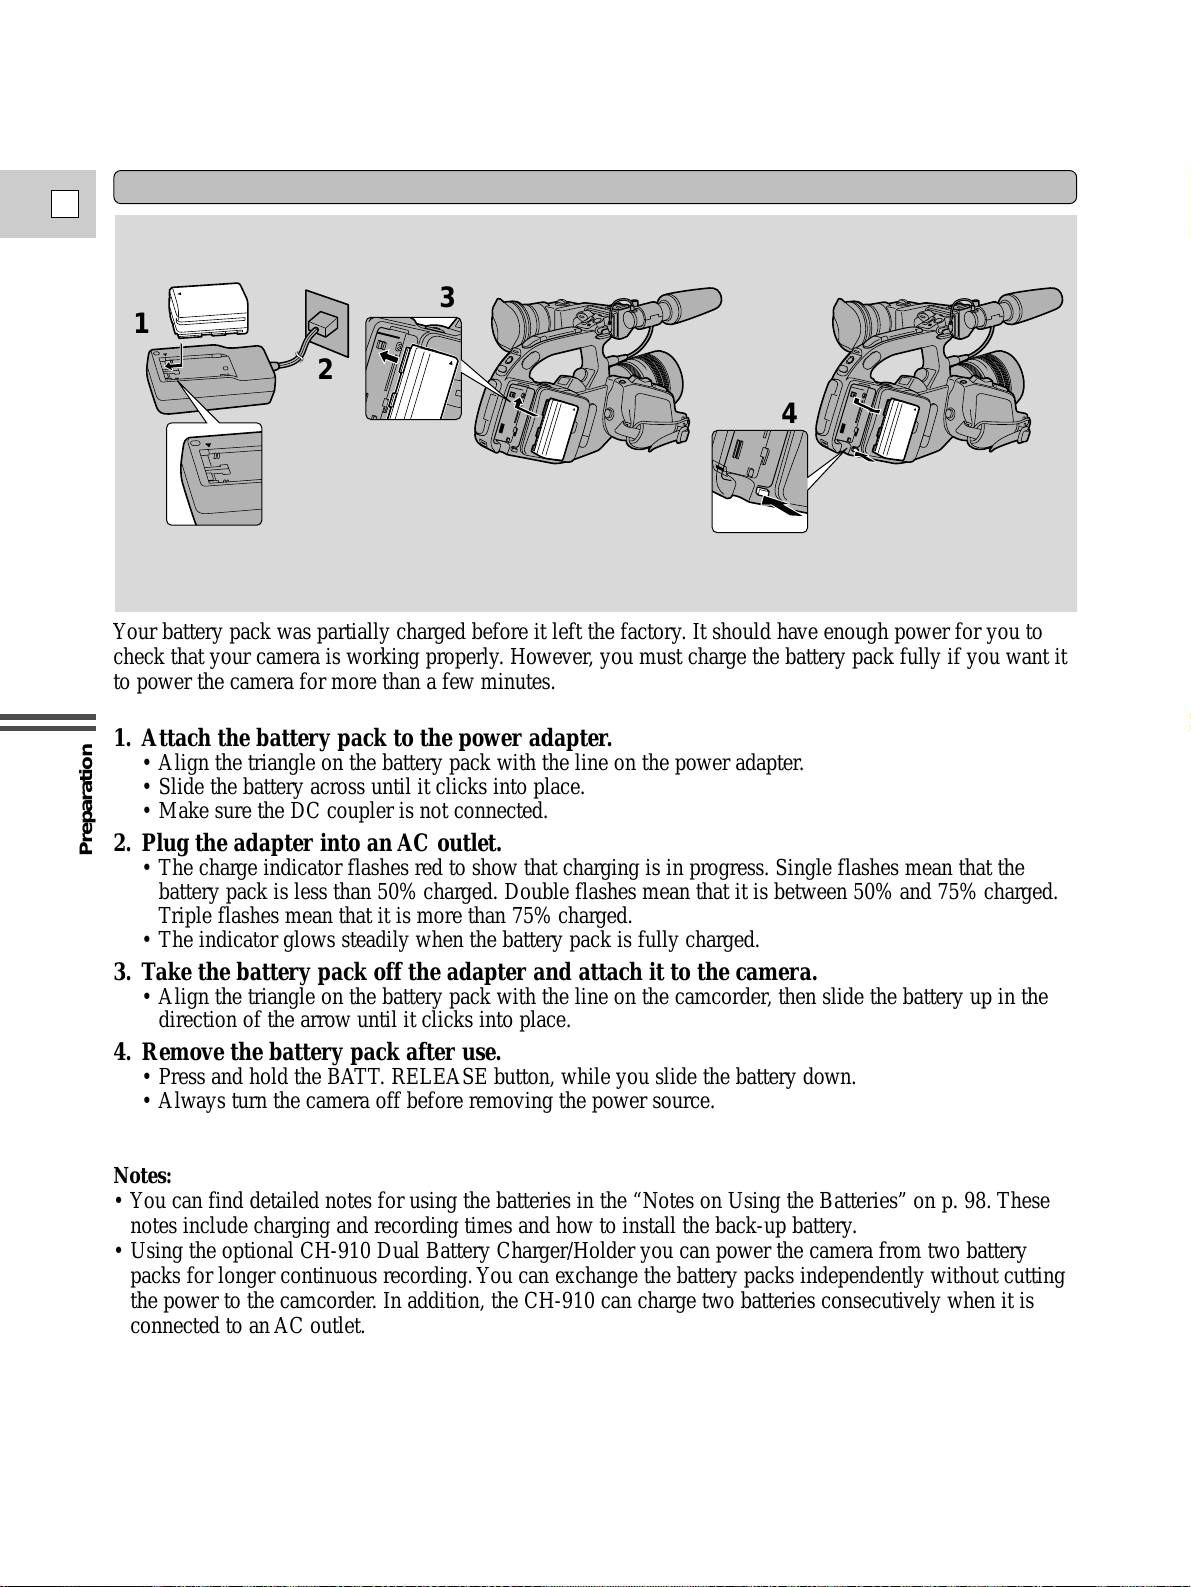
Charging and attaching the battery pack
Your battery pack was partially charged before it left the factory. It should have enough power for you to
check that your camera is working properly. However, you must charge the battery pack fully if you want it
to power the camera for more than a few minutes.
1. Attach the battery pack to the power adapter.
• Align the triangle on the battery pack with the line on the power adapter.
• Slide the battery across until it clicks into place.
• Make sure the DC coupler is not connected.
2. Plug the adapter into an AC outlet.
• The charge indicator flashes red to show that charging is in progress. Single flashes mean that the
battery pack is less than 50% charged. Double flashes mean that it is between 50% and 75% charged.
Triple flashes mean that it is more than 75% charged.
• The indicator glows steadily when the battery pack is fully charged.
3. Take the battery pack off the adapter and attach it to the camera.
• Align the triangle on the battery pack with the line on the camcorder, then slide the battery up in the
direction of the arrow until it clicks into place.
4. Remove the battery pack after use.
• Press and hold the BATT. RELEASE button, while you slide the battery down.
• Always turn the camera off before removing the power source.
Notes:
• You can find detailed notes for using the batteries in the “Notes on Using the Batteries” on p. 98. These
notes include charging and recording times and how to install the back-up battery.
• Using the optional CH-910 Dual Battery Charger/Holder you can power the camera from two battery
packs for longer continuous recording. You can exchange the battery packs independently without cutting
the power to the camcorder. In addition, the CH-910 can charge two batteries consecutively when it is
connected to an AC outlet.
3
4
1
2
Page 21

Preparation
21
E
CA-910 Compact Power Adapter
Specifications
Power supply 100–240 V AC, 50–60 Hz
Power consumption 16 W
Rated output Adapter mode: 6.0 V, 1.7 A DC
Charger mode: 8.4 V, 1.2 A DC
Operating temperature range 32ºF–104ºF (0ºC–40ºC)
Dimensions 2 1/2 × 5 × 1 3/4
in (63 × 127.5 × 43 mm)
Weight 10 7/8
oz (310 g)
Weight and dimensions are approximate.
Errors and omissions excepted.
Sbject to change without notice.
When replacement of power supply is required, please return it to the responsible nearest Canon Service
Center and please replace it with the same type number CA-910 or equivalent.
The Adapter can be used with a power suppy between 100 and 240 V AC. For areas where 120 V AC
power is not usecd, you will need a special plug adapter.
Contact your nearest Canon Service Center for further information.
Page 22

Preparation
22
E
Loading a Cassette
1. Make sure that you have inserted a power source.
2. Slide the EJECT 5 button across to release the cover.
• Wait a couple of seconds for the cassette compartment to open automatically.
3. Load or unload the cassette.
• Insert the cassette gently with the window facing out.
• Remove the cassette by pulling it straight out.
4. Press the P mark on the compartment until it clicks.
5. Click the cover back into place.
* D is a trade mark.
Notes:
• After loading a cassette, use record search (p. 45) to find the point where you want to start recording.
• Do not interfere with the cassette compartment while it is opening or closing automatically, or attempt to
close the cover.
• Do not leave the cassette in the camera after use — return it to its case and store it in a cool, clean, dry
place.
• Close the inner door before closing the outer door.
EJECT
この部
分
を先に閉じてください。
C
L
O
S
E
T
H
IS
F
IR
S
T
.
この部
分
を先に閉じてください。
この部
分
を先に閉じてください。
Loading and unloading
Use videocassettes marked with the D logo only.*
Page 23
Preparation
23
E
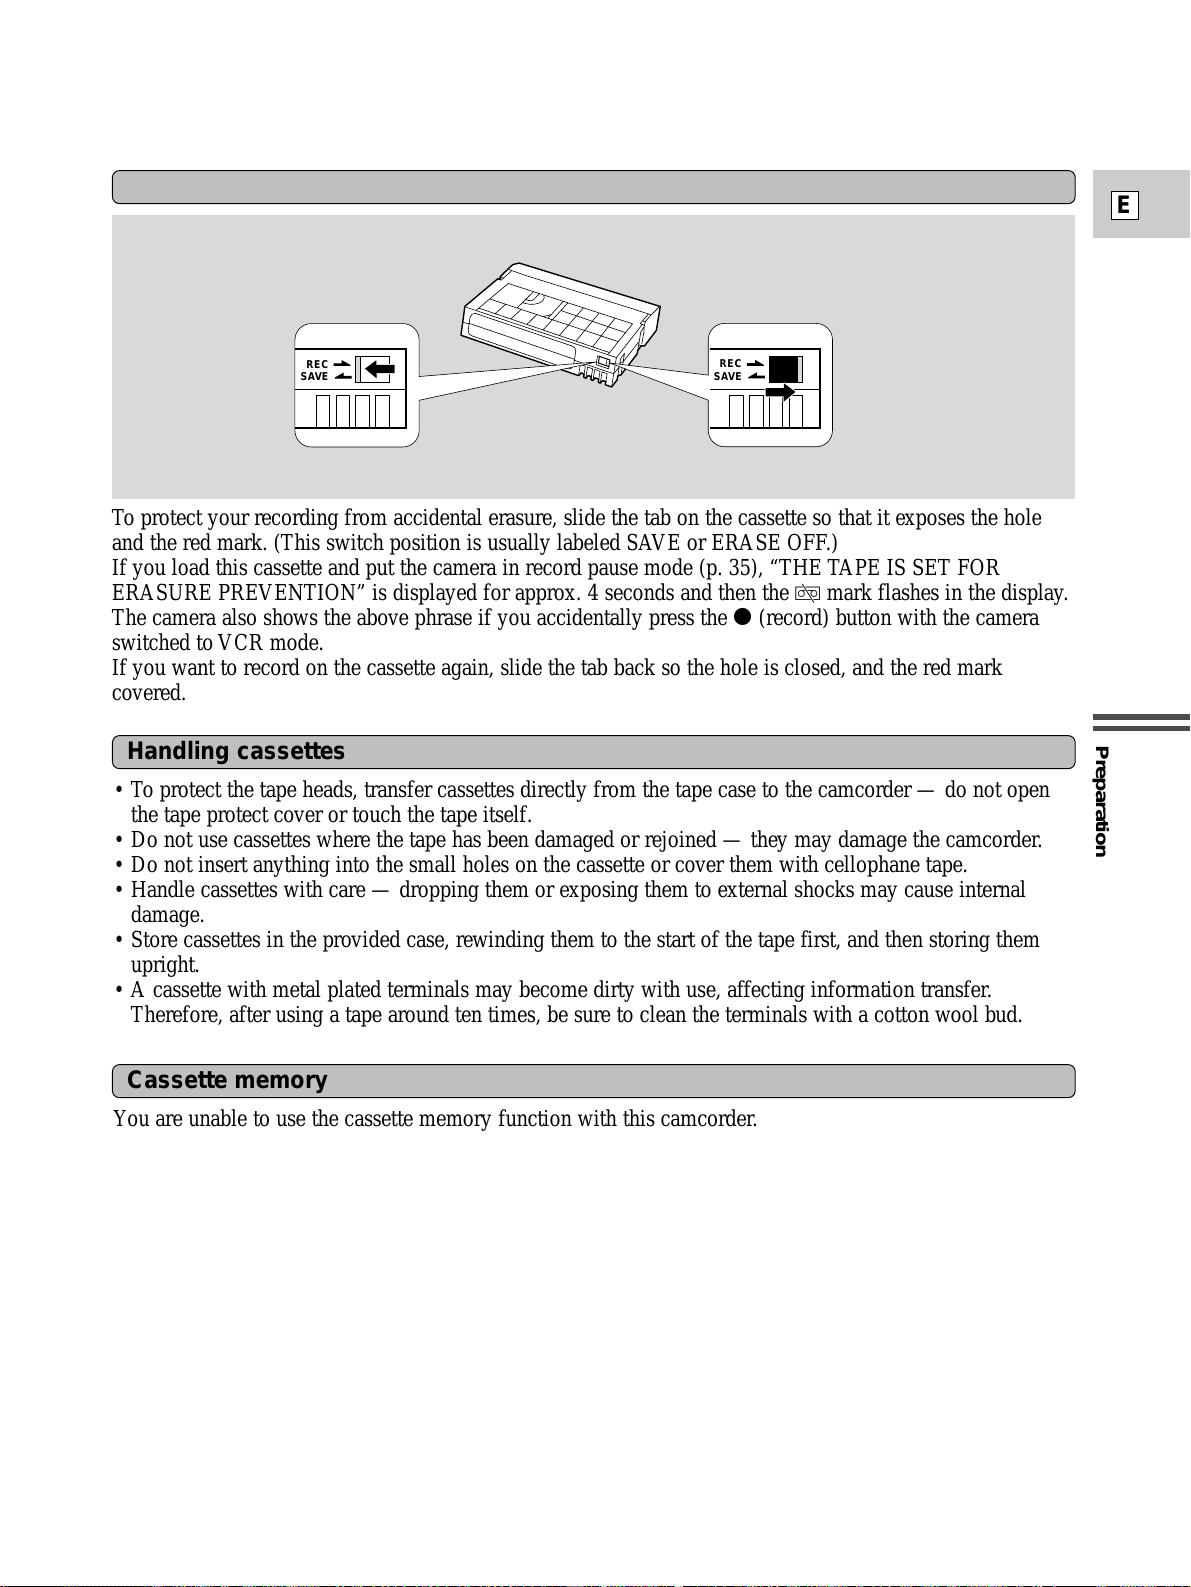
Protecting tapes from accidental erasure
To protect your recording from accidental erasure, slide the tab on the cassette so that it exposes the hole
and the red mark. (This switch position is usually labeled SAVE or ERASE OFF.)
If you load this cassette and put the camera in record pause mode (p. 35), “THE TAPE IS SET FOR
ERASURE PREVENTION” is displayed for approx. 4 seconds and then the v mark flashes in the display.
The camera also shows the above phrase if you accidentally press the 2 (record) button with the camera
switched to VCR mode.
If you want to record on the cassette again, slide the tab back so the hole is closed, and the red mark
covered.
SAVE
REC
SAVE
REC
Cassette memory
You are unable to use the cassette memory function with this camcorder.
Handling cassettes
• To protect the tape heads, transfer cassettes directly from the tape case to the camcorder — do not open
the tape protect cover or touch the tape itself.
• Do not use cassettes where the tape has been damaged or rejoined — they may damage the camcorder.
• Do not insert anything into the small holes on the cassette or cover them with cellophane tape.
• Handle cassettes with care — dropping them or exposing them to external shocks may cause internal
damage.
• Store cassettes in the provided case, rewinding them to the start of the tape first, and then storing them
upright.
• A cassette with metal plated terminals may become dirty with use, affecting information transfer.
Therefore, after using a tape around ten times, be sure to clean the terminals with a cotton wool bud.
Page 24

Preparation
24
E
Supporting the Camera
• For extra comfort and control, attach the shoulder
pad to the camera.
• Clip the adapter unit onto the base of the
camcorder and tighten the fixing screw using a
coin.
• When you are not using the shoulder pad, fold it
in towards the camera until it clicks into the
storage position.
Prepare the lens cap
Attach the SP-100 shoulder pad
Adjust the grip belt
Attach the shoulder strap
• Attach/remove the lens cap as shown.
Notes:
• Place the camera on a table or secure surface when attaching the shoulder pad, grip belt or strap.
• Adjust the length of the grip belt strap so that
you can operate the start/stop button and zoom
control effectively.
• For extra security and portability, attach the
shoulder strap before using the camera.
• Pass the ends through the attachment bars and
adjust the length as shown.
• Be careful not to leave the viewfinder exposed to bright sunlight, or it may damage the LCD. (The light
is concentrated by the viewfinder lens.) Either turn the EYE POINT SELECT switch to the FAR
setting, or change the angle of the viewfinder to move it out of direct sunlight.
Page 25
Preparation
25
E
Using the Menus
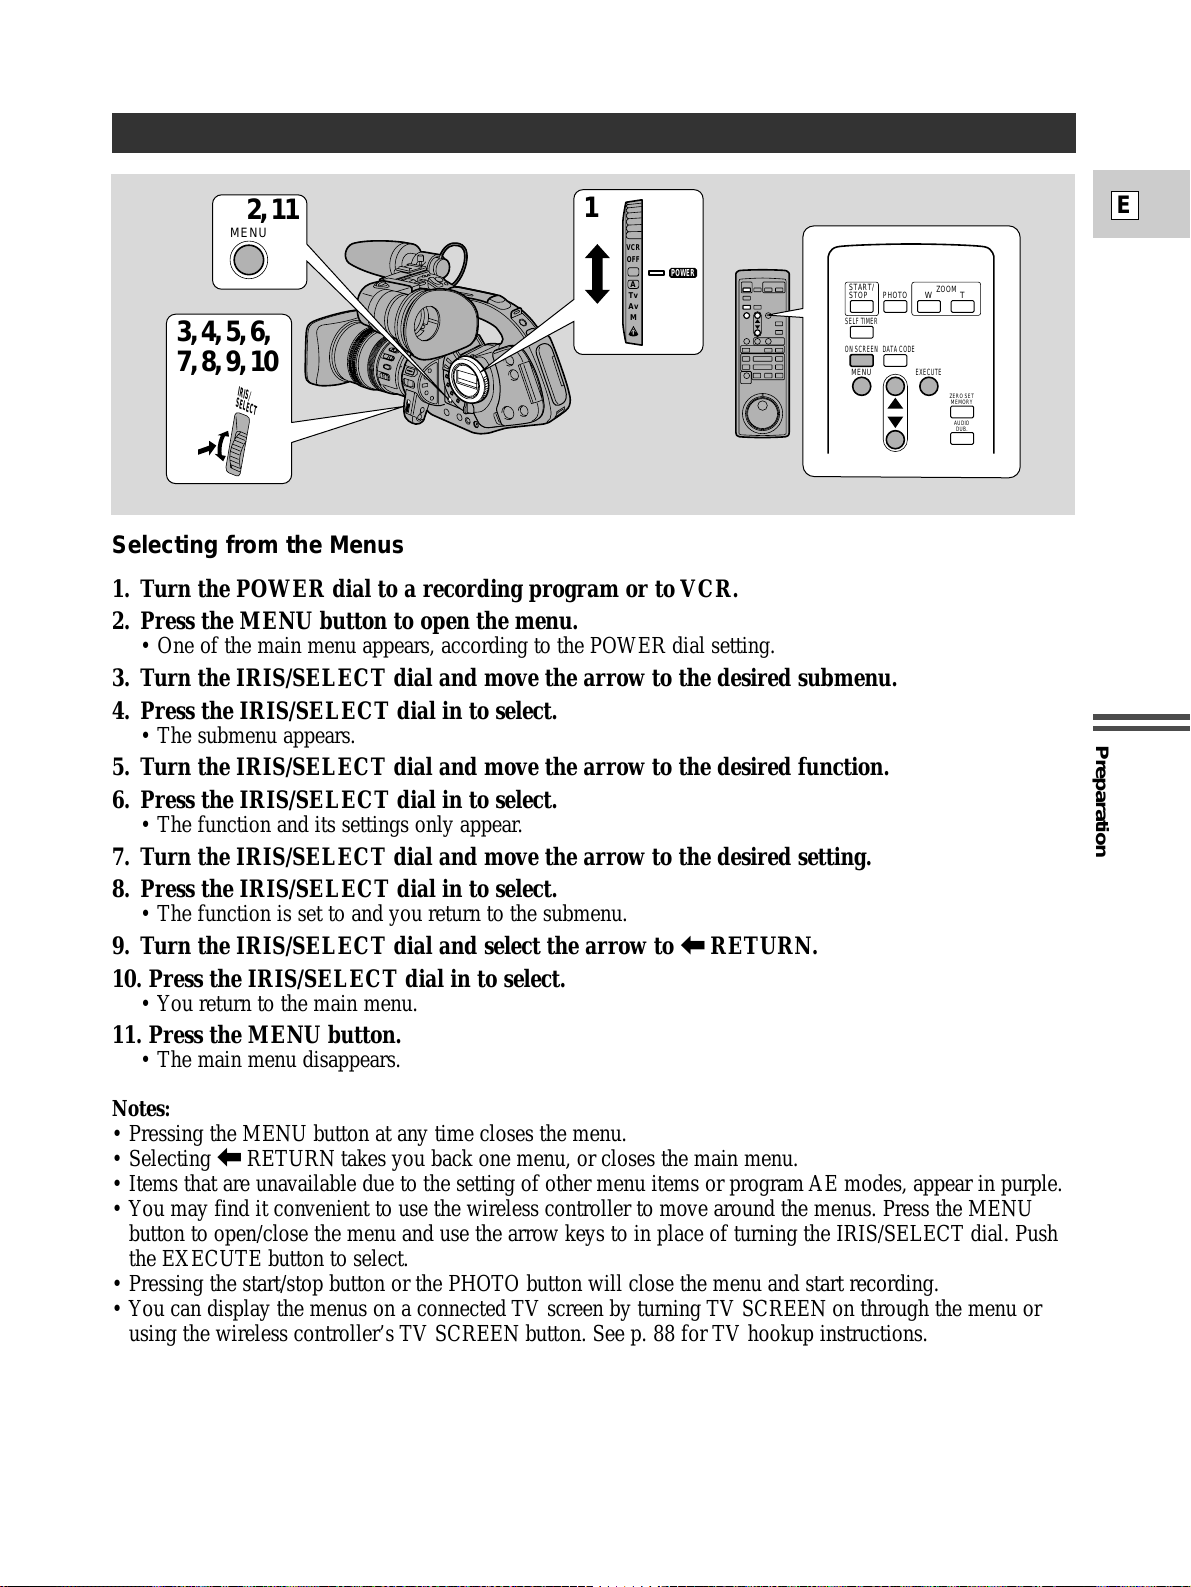
Selecting from the Menus
1. Turn the POWER dial to a recording program or to VCR.
2. Press the MENU button to open the menu.
• One of the main menu appears, according to the POWER dial setting.
3. Turn the IRIS/SELECT dial and move the arrow to the desired submenu.
4. Press the IRIS/SELECT dial in to select.
• The submenu appears.
5. Turn the IRIS/SELECT dial and move the arrow to the desired function.
6. Press the IRIS/SELECT dial in to select.
• The function and its settings only appear.
7. Turn the IRIS/SELECT dial and move the arrow to the desired setting.
8. Press the IRIS/SELECT dial in to select.
• The function is set to and you return to the submenu.
9. Turn the IRIS/SELECT dial and select the arrow to [ RETURN.
10. Press the IRIS/SELECT dial in to select.
• You return to the main menu.
11. Press the MENU button.
• The main menu disappears.
Notes:
• Pressing the MENU button at any time closes the menu.
• Selecting
[ RETURN takes you back one menu, or closes the main menu.
• Items that are unavailable due to the setting of other menu items or program AE modes, appear in purple.
• You may find it convenient to use the wireless controller to move around the menus. Press the MENU
button to open/close the menu and use the arrow keys to in place of turning the IRIS/SELECT dial. Push
the EXECUTE button to select.
• Pressing the start/stop button or the PHOTO button will close the menu and start recording.
• You can display the menus on a connected TV screen by turning TV SCREEN on through the menu or
using the wireless controller’s TV SCREEN button. See p. 88 for TV hookup instructions.
POWER
VCR
OFF
Tv
Av
M
A
MENU
3, 4, 5, 6,
7, 8, 9, 10
2, 11
1
IRIS/
SELECT
PHOTO
SELF TIMER
WT
ZOOM
START/
STOP
AUDIO
DUB.
ZERO SET
MEMORY
DATA CODEON SCREEN
MENU
EXECUTE
Page 26

Preparation
26
E
● CAM. MENU
Appears when the POWER dial is set to camera
mode.
There are 6 (+1) submenus within the CAM.
MENU.
q To camera set up submenu
w To custom preset submenu
e To VCR set up submenu
r To display set up submenu
t To system submenu
y To custom key submenu
u Close the main menu
q Camera set up submenu
q Movie mode
w 16:9 effect
e Zebra pattern
r Zebra pattern level
t Grip zoom control
y Handle-top zoom control
u Clear scan
i Return
w Custom preset submenu
o Preset No.
!0 Color gain
!1 Color phase
!2 Sharpness
!3 Setup level
!4 Return
e VCR set up submenu
!5 Record mode
!6 Audio mode
!7 Audio 1 input sensitivity
!8 Audio 2 input sensitivity
!9 Power save
@0 Self timer
@1 To INTERVAL TIMER submenu
@2 Return
SEL. SE TSET
MEN UCL OSE
CAM. MENU
CAM. S ET UP
CSTM PRES ET
VCR SE T UP
DI SP. SET UP
SYSTEM
CUSTOM KEYS
RET URN
q
w
e
r
t
y
u
SEL. SE TSET
MEN UCL OSE
C
M
1
Z
Z
Z
Z
C
AM. S E T UP
OV I E MODE NORMA L
6:9 OFF
EBRA OFF
EBRA L EVEL 9 0
OOM GR I P VAR I ABLE
OOM HANDL E MED IUM
L EAR SCAN –––
RET URN
••
••••••••
•••••••
•
•••
•
••
q
w
q
e
r
t
y
i
u
SEL. SETSET
MEN UCL OSE
C
P
C
C
S
S
STM PRESET
RESET N o.
<1>
OLOR GA I N
OLOR PHASE
HARPNESS
ETUP LEVEL
RET URN
-
+
GR
-
+
-
+
••
••
•
•••
•
o
!0
w
!1
!2
!3
!4
SEL. SETSET
MEN UCL OSE
V
R
A
A
P
A
S
CR SE T UP
EC MODE SP
UD IO 1 I N L IN E
UD IO 2 I N L IN E
WR SAV E OSHUT F F
UD I O MODE 1 2 bit ST – 1
ELF T. O F
RET URN
INTERVAL
F
••••
••
••
••••
••
•••••
!5
!7
e
!8
!9
!6
@0
@1
@2
List of Menus
Turn to the appropriate page for a detailed explanation of each function.
Page 27
Preparation
27
E
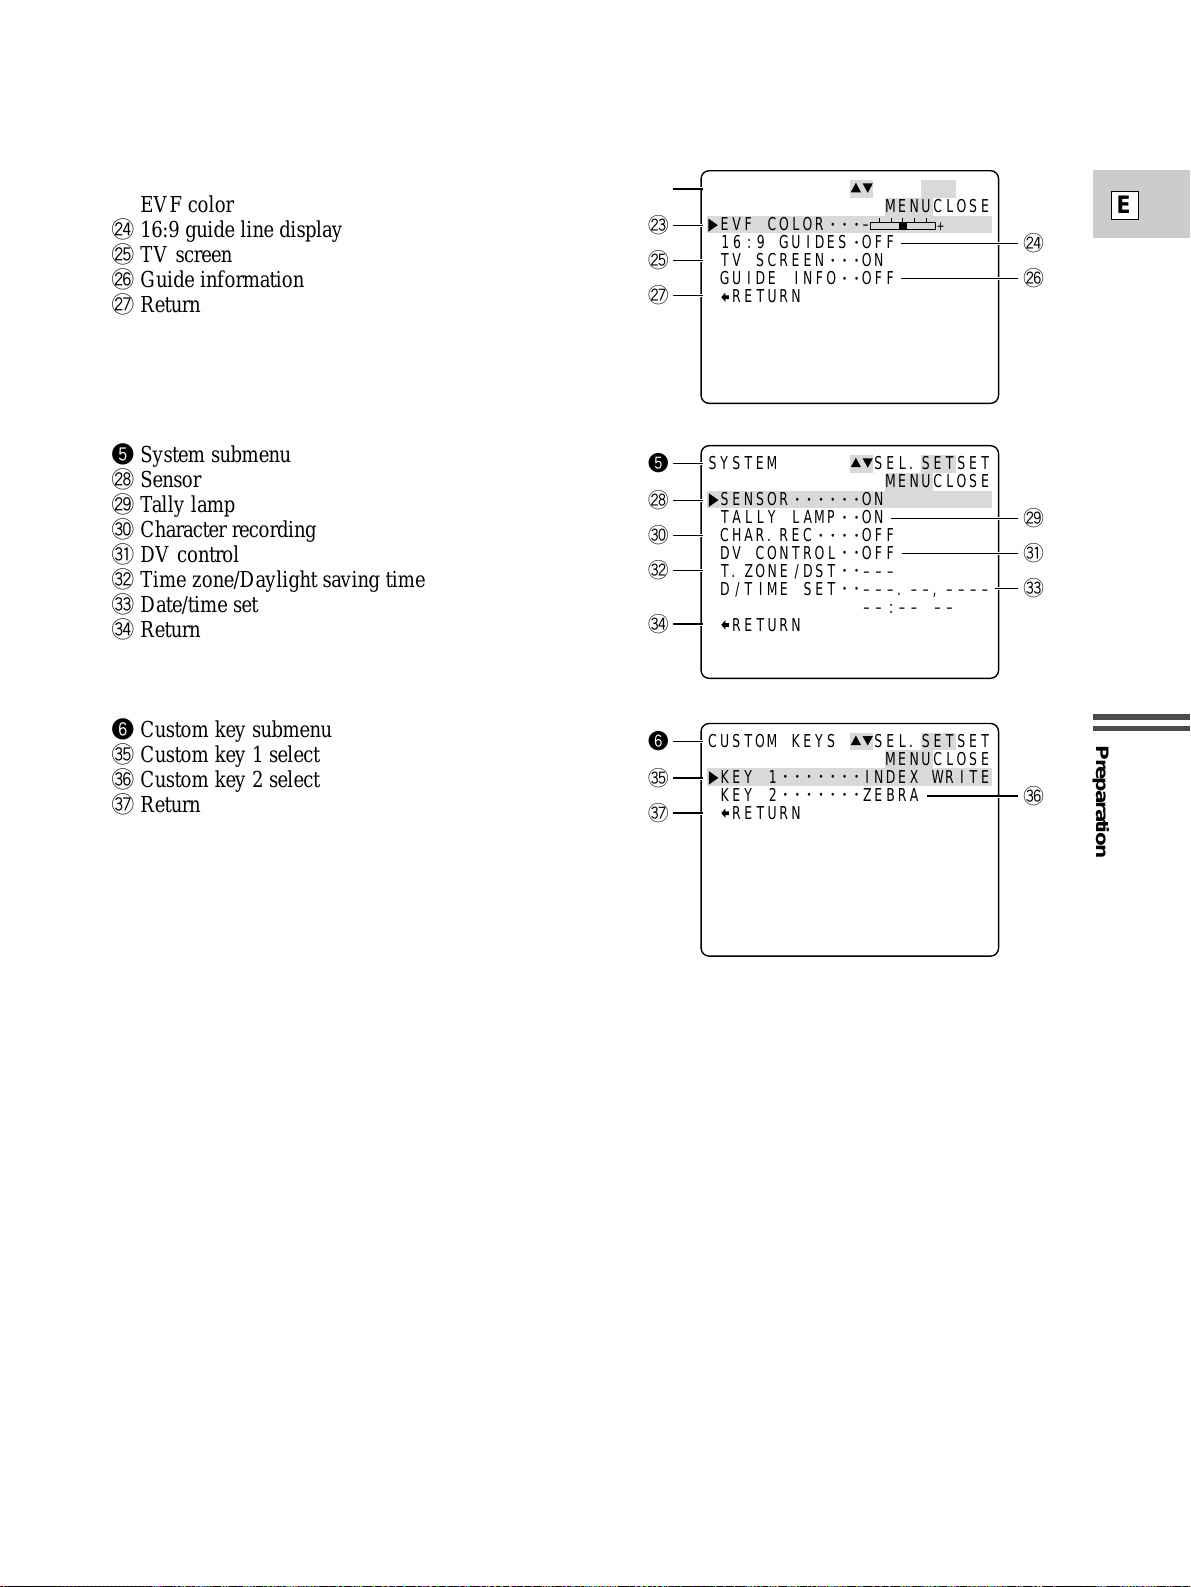
r Display set up submenu
@3 EVF color
@4 16:9 guide line display
@5 TV screen
@6 Guide information
@7 Return
t System submenu
@8 Sensor
@9 Tally lamp
#0 Character recording
#1 DV control
#2 Time zone/Daylight saving time
#3 Date/time set
#4 Return
y Custom key submenu
#5 Custom key 1 select
#6 Custom key 2 select
#7 Return
SEL. SE TSET
MEN UCL OSE
D
E
1
T
G
ISP. SET UP
VF COLOR
6:9 GUIDES OFF
VSCREEN ON
UI DE I N FO OFF
RET URN
-
+
•••
•
•••
••
@3
@4
r
@5
@6
@7
SEL. SE TSET
MEN UCL OSE
S
S
T
C
D
T
D
YSTEM
ENSOR ON
ALLY LAMP ON
HAR. REC OFF
VCONTROL OFF
. ZONE / DST –––
/TIME SET –––. ––, ––––
––: –– ––
RET URN
••••••
••
••••
••
••
••
@8
@9
t
#0
#1
#2
#3
#4
SEL. SE TSET
MEN UCL OSE
C
K
K
USTOM K EYS
EY 1 I NDEX WR I TE
EY 2 ZEBRA
RET URN
•••••••
•••••••
#5
#6
#7
y
Page 28
Preparation
28
E
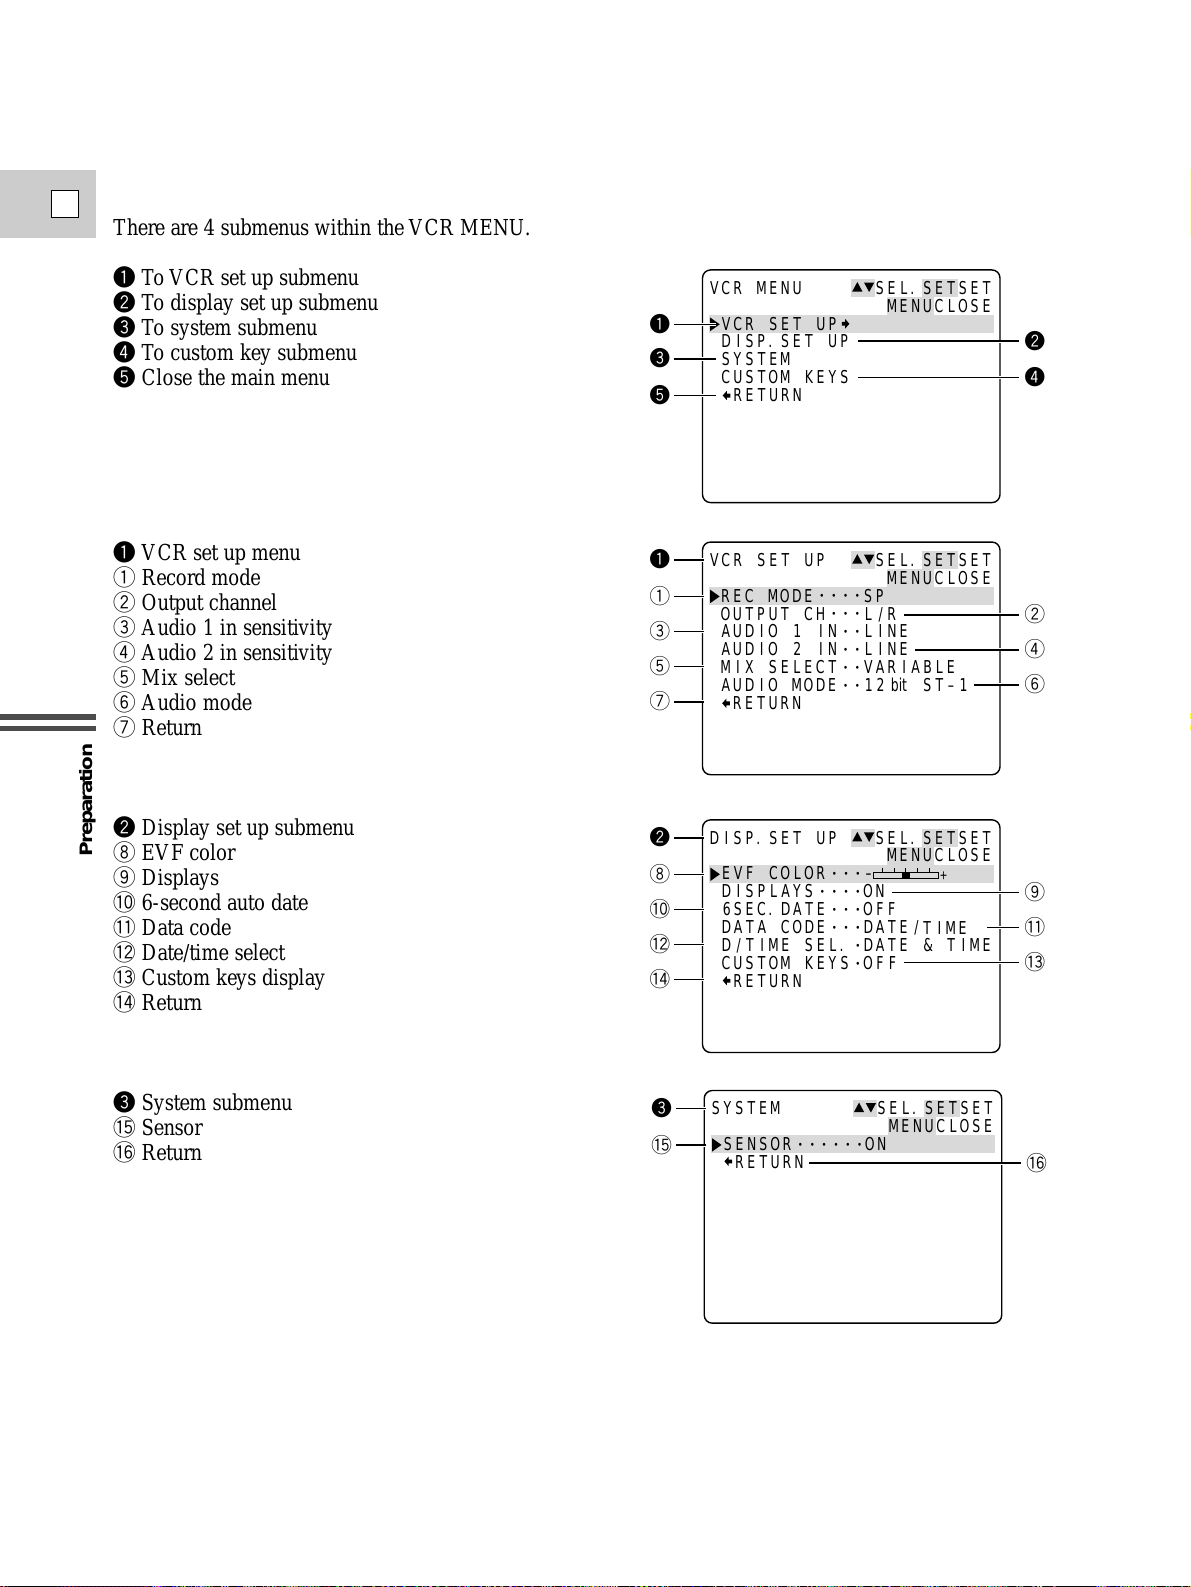
● VCR MENU
Appears when the POWER dial is set to VCR.
There are 4 submenus within the VCR MENU.
q To VCR set up submenu
w To display set up submenu
e To system submenu
r To custom key submenu
t Close the main menu
q VCR set up menu
q Record mode
w Output channel
e Audio 1 in sensitivity
r Audio 2 in sensitivity
t Mix select
y Audio mode
u Return
w Display set up submenu
i EVF color
o Displays
!0 6-second auto date
!1 Data code
!2 Date/time select
!3 Custom keys display
!4 Return
e System submenu
!5 Sensor
!6 Return
SEL. SETSET
MEN UCL OSE
VCR MENU
VCR SE T UP
DI SP. SET UP
SYSTEM
CUSTOM KEYS
RET URN
q
w
e
r
t
q
q
e
t
u
w
i
!0
!2
!4
e
!5
••••
•••
••
••
••
••
•••
••••
•••
•••
-
DAT E /
•
•
SEL. SETSET
MEN UCL OSE
SEL. SETSET
MEN UCL OSE
F
SEL. SE TSET
MEN UCL OSE
V
CR SE T UP
R
EC MODE SP
O
UTPUT CH L / R
A
UD IO 1 I N L I NE
A
UD IO 2 I N L I NE
M
I X SE LECT VAR I ABL E
A
UD I O MODE 1 2 bit ST – 1
RET URN
D
ISP. SET UP
E
VF COLOR
D
ISPLAYS ON
6
SEC. DATE OFF
D
ATA CODE
D
/TIME SEL. DATE
C
USTOM K EYS O F
RET URN
SSYSTEM
ENSOR ON
RET URN
••••••
+
TIME
&TIME
w
r
y
o
!1
!3
!6
Page 29
Preparation
29
E
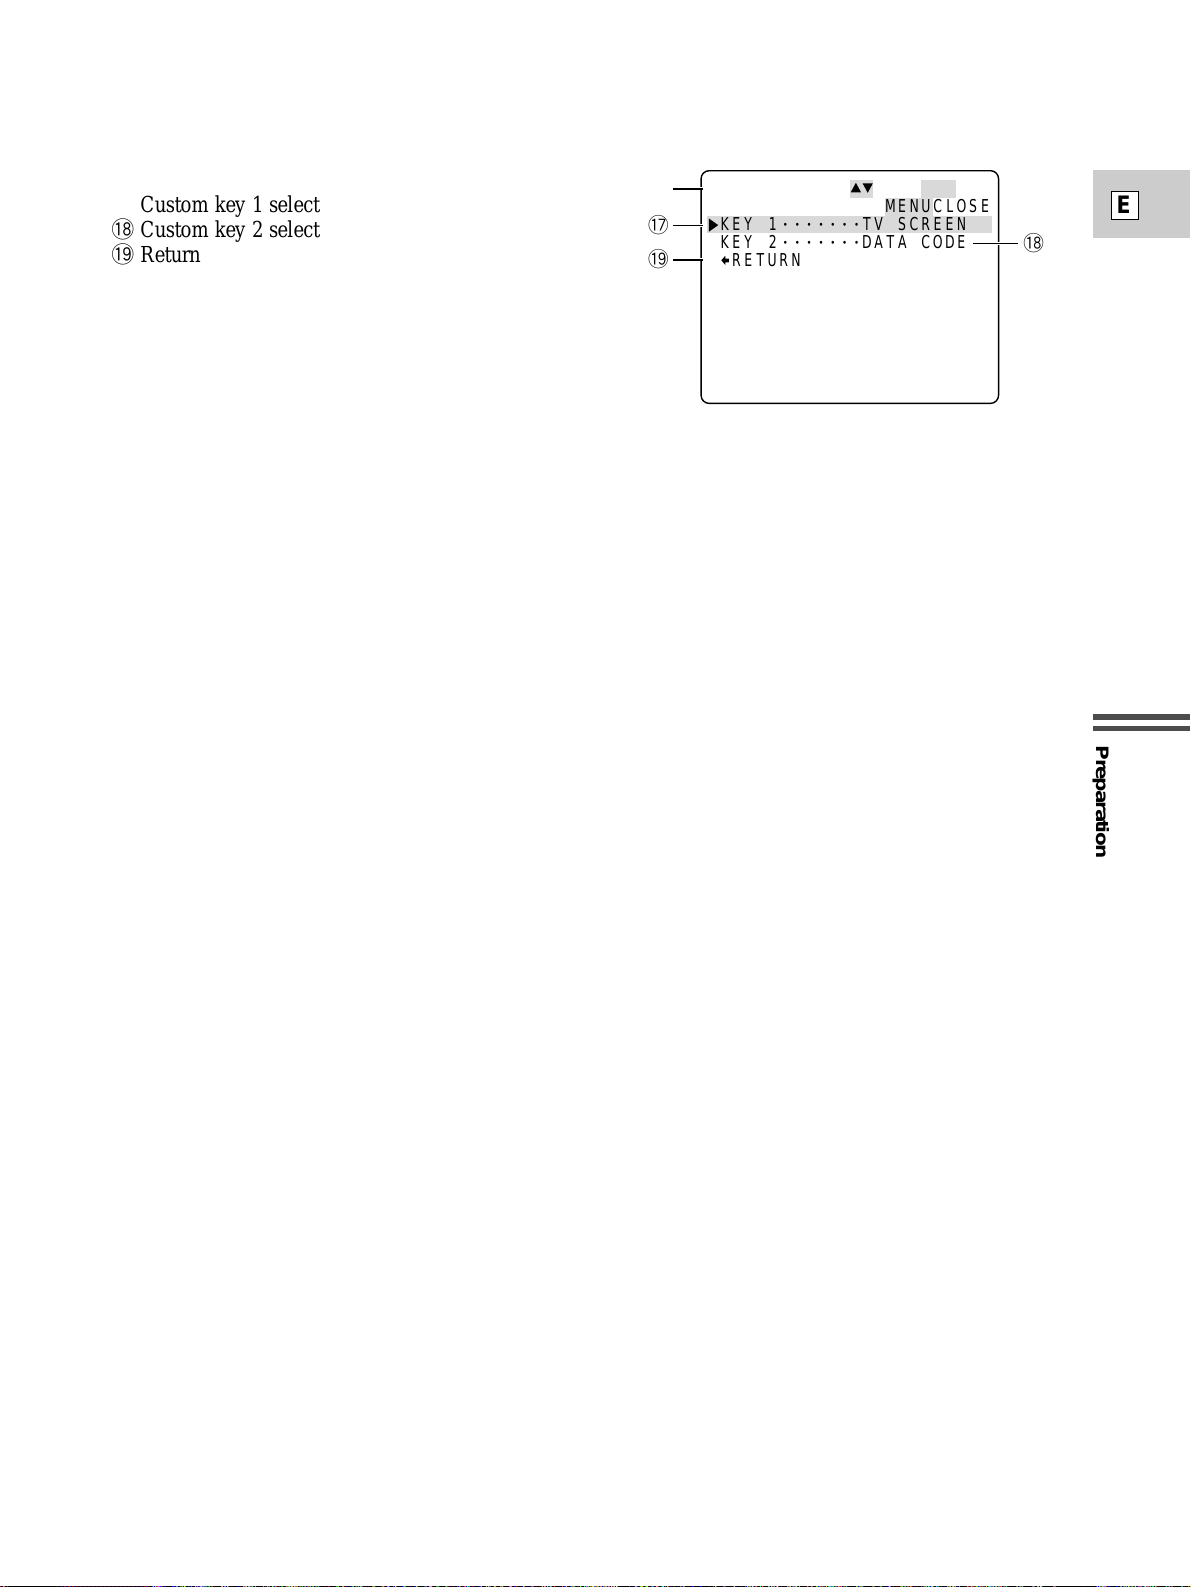
r Custom key submenu
!7 Custom key 1 select
!8 Custom key 2 select
!9 Return
SEL. SE TSET
MEN UCL OSE
C
K
K
USTOM K EYS
EY 1 TV SCREEN
EY 2 DAT A CODE
RET URN
•••••••
•••••••
!7
!8
!9
r
Page 30
Preparation
30
E
Using the Wireless Controller/Tally Lamps
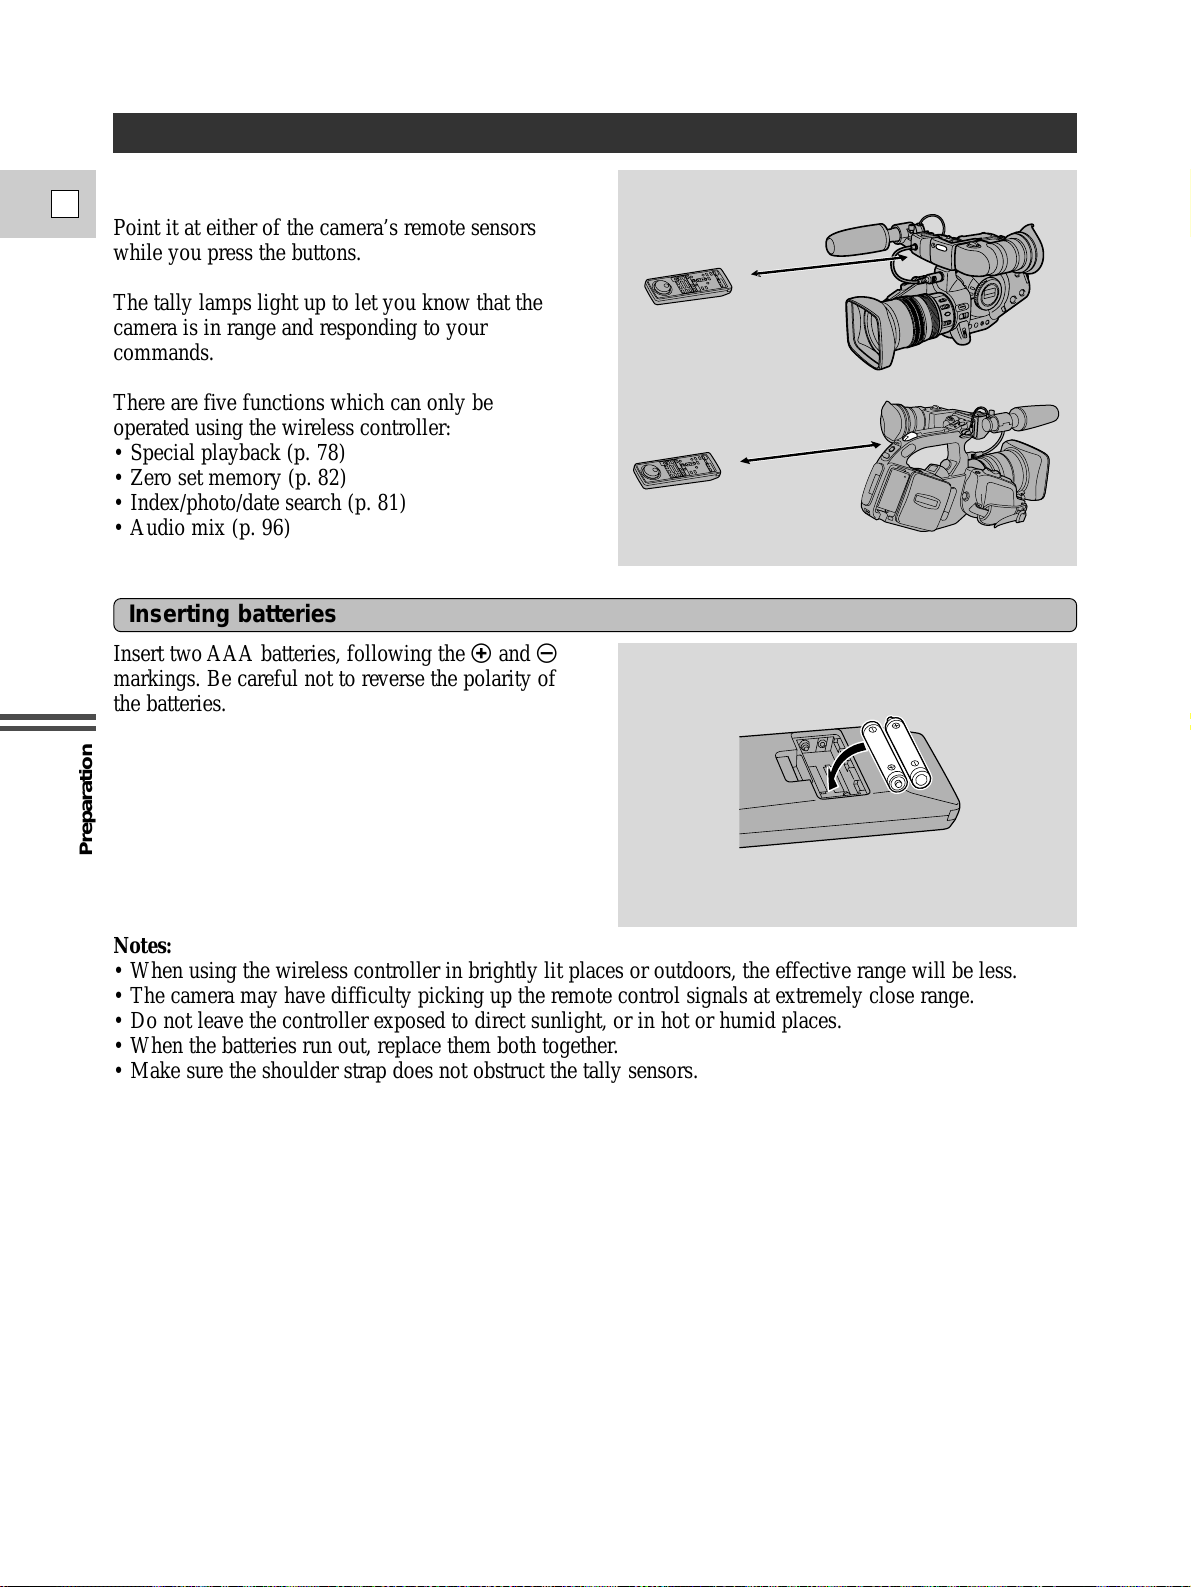
The supplied wireless controller can operate the
camera from a distance of up to 16 feet (5 m).
Point it at either of the camera’s remote sensors
while you press the buttons.
The tally lamps light up to let you know that the
camera is in range and responding to your
commands.
There are five functions which can only be
operated using the wireless controller:
• Special playback (p. 78)
• Zero set memory (p. 82)
• Index/photo/date search (p. 81)
• Audio mix (p. 96)
Insert two AAA batteries, following the = and -
markings. Be careful not to reverse the polarity of
the batteries.
Inserting batteries
Notes:
• When using the wireless controller in brightly lit places or outdoors, the effective range will be less.
• The camera may have difficulty picking up the remote control signals at extremely close range.
• Do not leave the controller exposed to direct sunlight, or in hot or humid places.
• When the batteries run out, replace them both together.
• Make sure the shoulder strap does not obstruct the tally sensors.
Page 31
Preparation
31
E
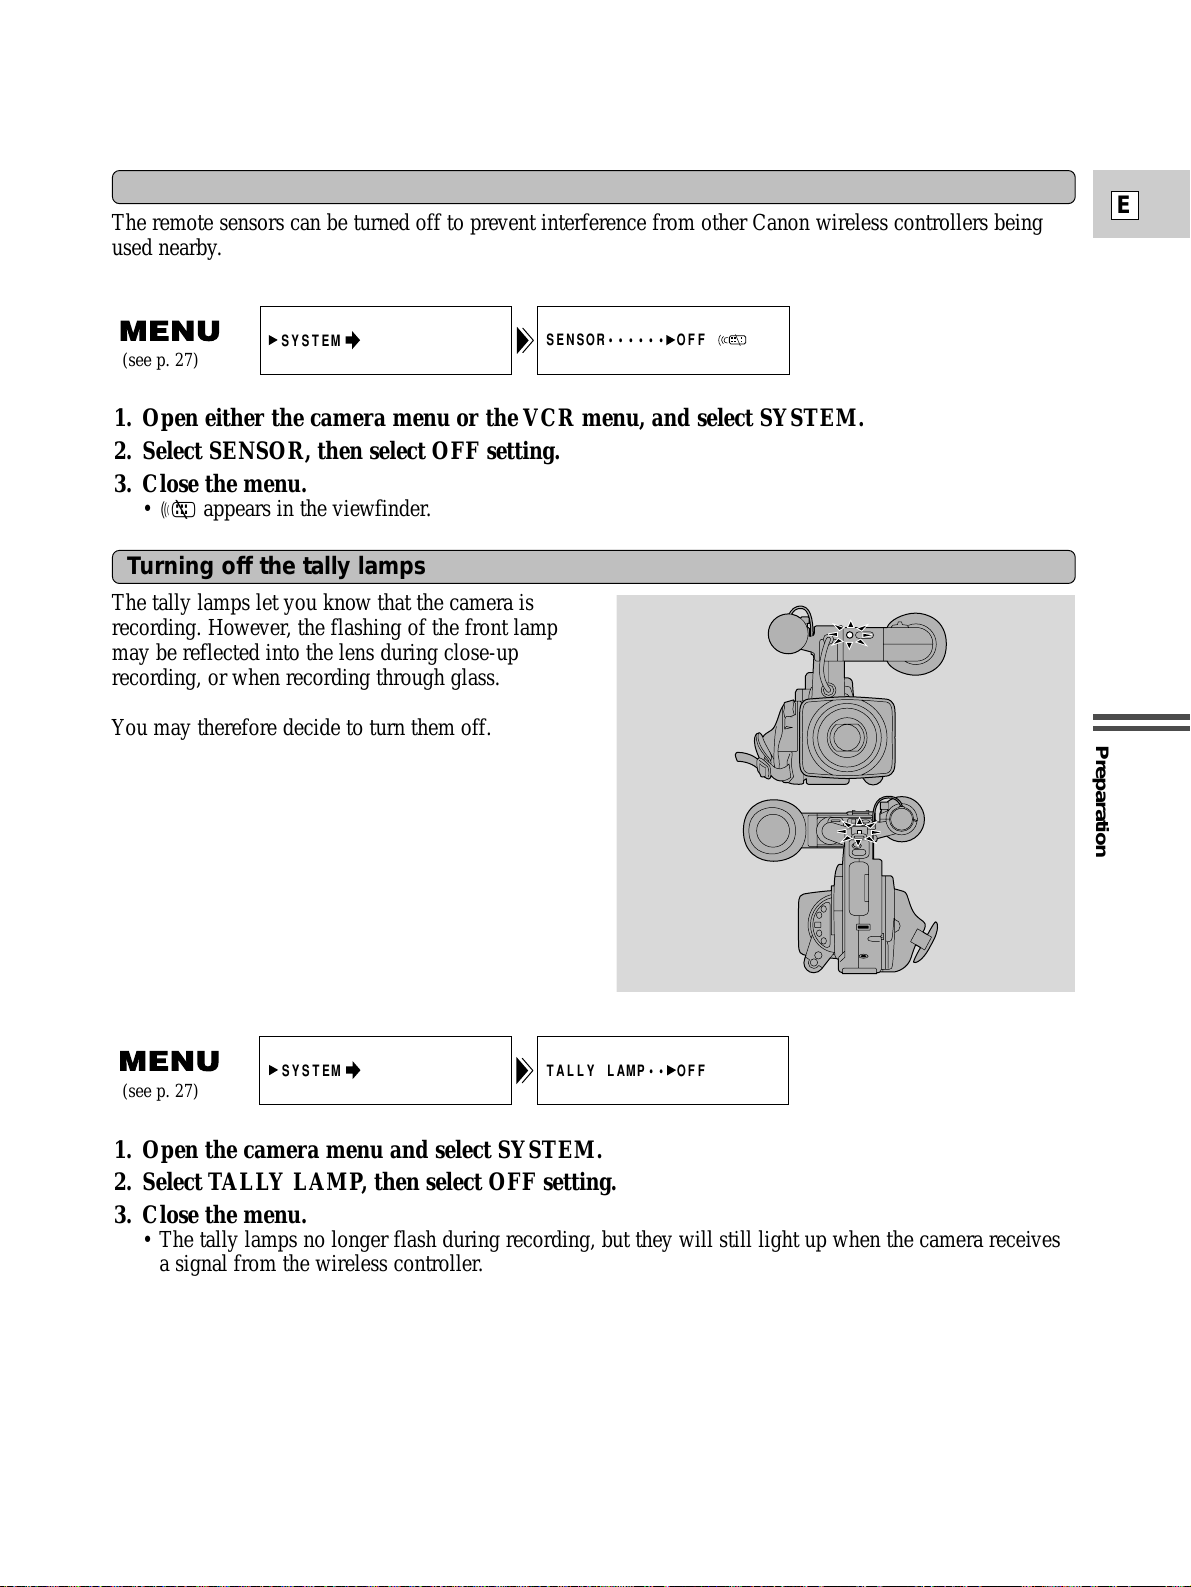
Turning off the tally lamps
The tally lamps let you know that the camera is
recording. However, the flashing of the front lamp
may be reflected into the lens during close-up
recording, or when recording through glass.
You may therefore decide to turn them off.
TALLY LAMP•• OFF
SYSTEM
1. Open the camera menu and select SYSTEM.
2. Select TALLY LAMP, then select OFF setting.
3. Close the menu.
• The tally lamps no longer flash during recording, but they will still light up when the camera receives
a signal from the wireless controller.
SENSOR•••••• OFF
SYSTEM
The remote sensors can be turned off to prevent interference from other Canon wireless controllers being
used nearby.
Turning off the remote sensors
1. Open either the camera menu or the VCR menu, and select SYSTEM.
2. Select SENSOR, then select OFF setting.
3. Close the menu.
• B appears in the viewfinder.
(see p. 27)
(see p. 27)
Page 32
Preparation
32
E
Setting the Date and Time
The date and/or time display forms part of the data code. You can choose to display or hide it during
playback (see p. 79).
Set the date and time display when you first start using your camera. Install the backup battery before you
begin (see p. 99).
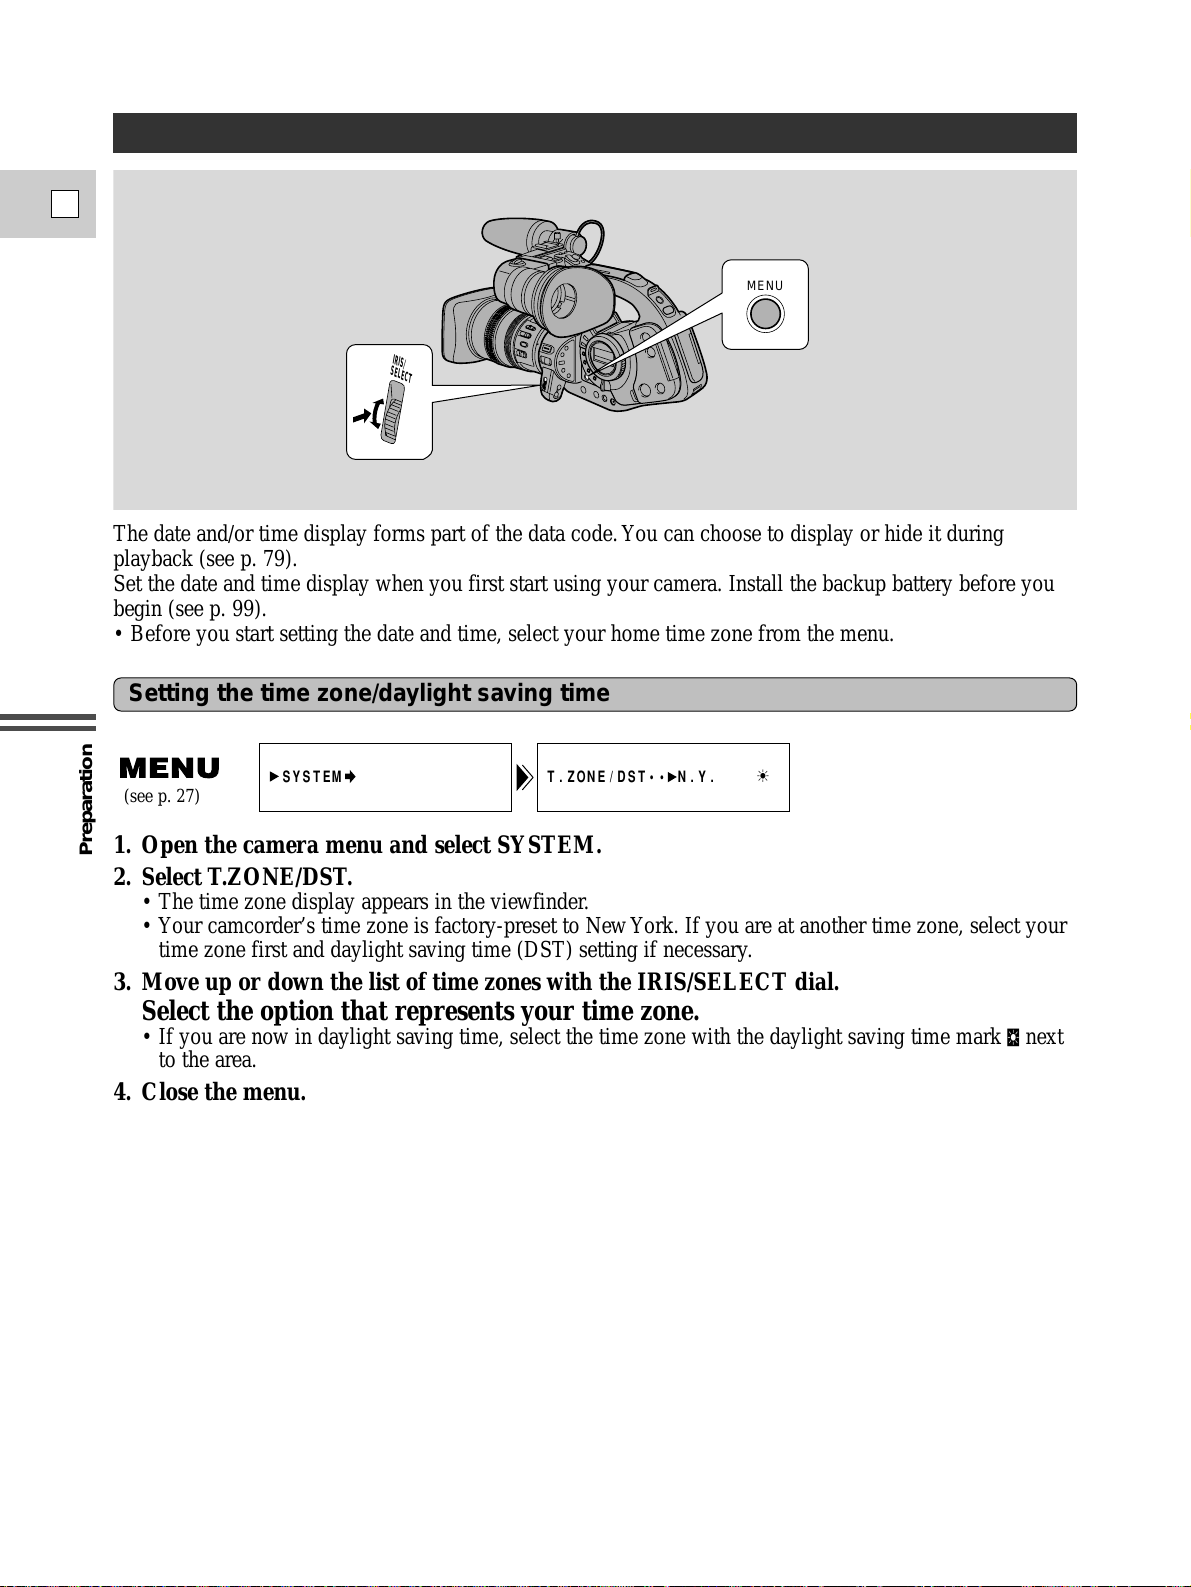
• Before you start setting the date and time, select your home time zone from the menu.
1. Open the camera menu and select SYSTEM.
2. Select T.ZONE/DST.
• The time zone display appears in the viewfinder.
• Your camcorder’s time zone is factory-preset to New York. If you are at another time zone, select your
time zone first and daylight saving time (DST) setting if necessary.
3. Move up or down the list of time zones with the IRIS/SELECT dial.
Select the option that represents your time zone.
• If you are now in daylight saving time, select the time zone with the daylight saving time mark C next
to the area.
4. Close the menu.
IRIS/
SELECT
MENU
Setting the time zone/daylight saving time
(see p. 27)
SYSTEM
T.ZONE/DST•• N.Y. U
Page 33
Preparation
33
E
Notes:
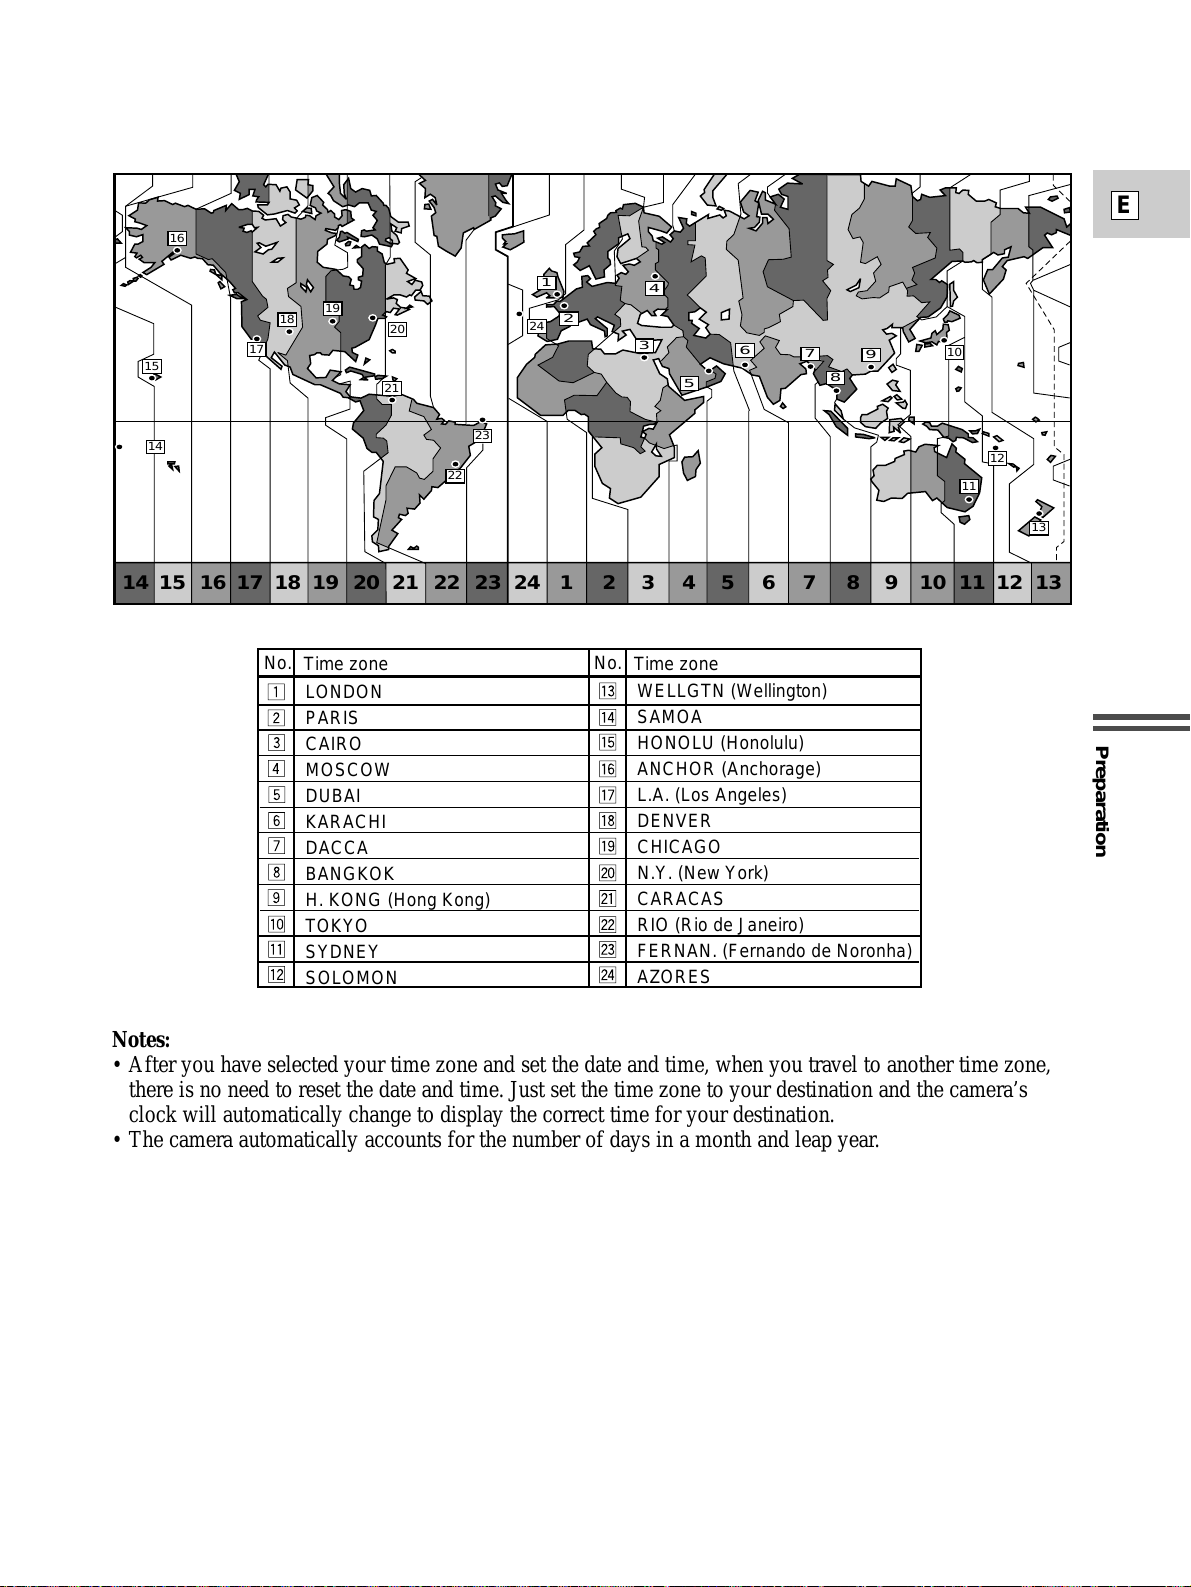
• After you have selected your time zone and set the date and time, when you travel to another time zone,
there is no need to reset the date and time. Just set the time zone to your destination and the camera’s
clock will automatically change to display the correct time for your destination.
• The camera automatically accounts for the number of days in a month and leap year.
16
1
19
18
17
15
14
20
21
23
22
2
24
4
3
6
5
7
9
8
10
12
11
13
24 1 2 3 4 5 6 7 8 9 10 11 12 1314 15 16 17 18 19 20 21 22 23
No.
Time zone
LONDON
PARIS
CAIRO
MOSCOW
DUBAI
KARACHI
DACCA
BANGKOK
H. KONG (Hong Kong)
TOKYO
SYDNEY
SOLOMON
No.
Time zone
WELLGTN (Wellington)
SAMOA
HONOLU (Honolulu)
ANCHOR (Anchorage)
L.A. (Los Angeles)
DENVER
CHICAGO
N.Y. (New York)
CARACAS
RIO (Rio de Janeiro)
FERNAN. (Fernando de Noronha)
AZORES
Page 34
Preparation
34
E
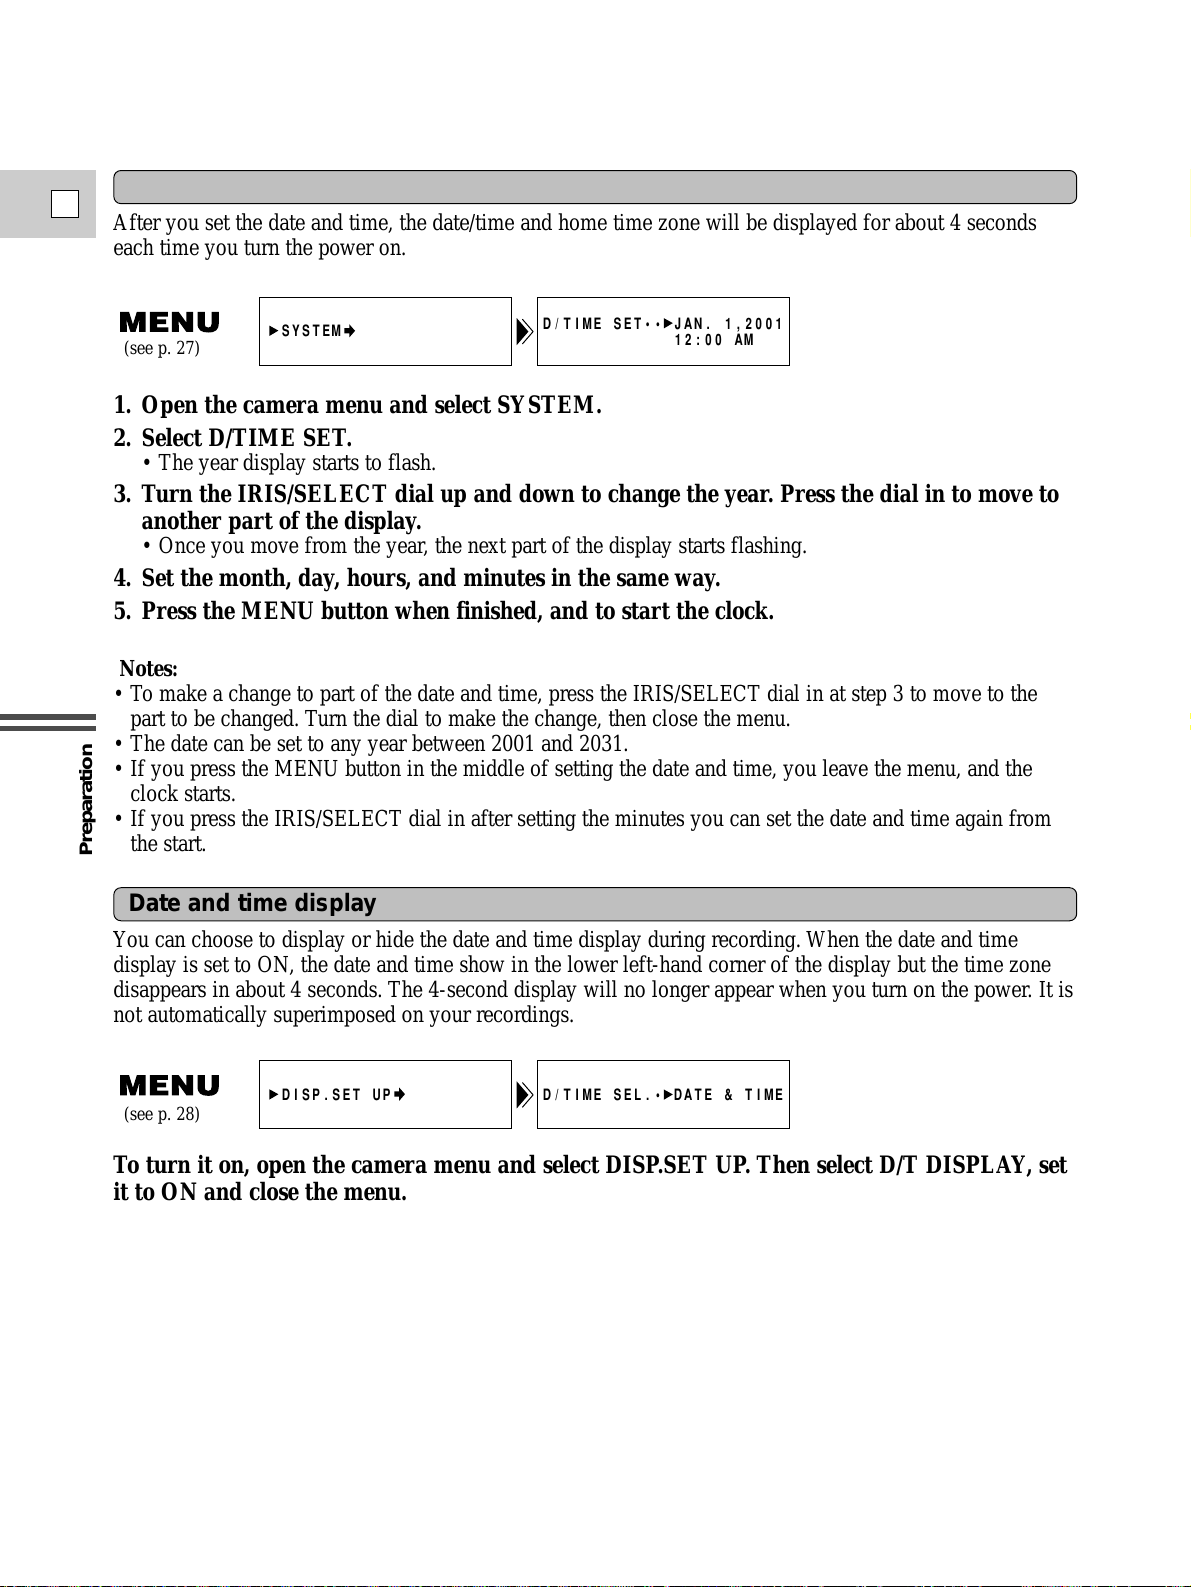
1. Open the camera menu and select SYSTEM.
2. Select D/TIME SET.
• The year display starts to flash.
3. Turn the IRIS/SELECT dial up and down to change the year. Press the dial in to move to
another part of the display.
• Once you move from the year, the next part of the display starts flashing.
4. Set the month, day, hours, and minutes in the same way.
5. Press the MENU button when finished, and to start the clock.
Notes:
• To make a change to part of the date and time, press the IRIS/SELECT dial in at step 3 to move to the
part to be changed. Turn the dial to make the change, then close the menu.
• The date can be set to any year between 2001 and 2031.
• If you press the MENU button in the middle of setting the date and time, you leave the menu, and the
clock starts.
• If you press the IRIS/SELECT dial in after setting the minutes you can set the date and time again from
the start.
Setting the clock
(see p. 27)
To turn it on, open the camera menu and select DISP.SET UP. Then select D/T DISPLAY, set
it to ON and close the menu.
Date and time display
(see p. 28)
After you set the date and time, the date/time and home time zone will be displayed for about 4 seconds
each time you turn the power on.
You can choose to display or hide the date and time display during recording. When the date and time
display is set to ON, the date and time show in the lower left-hand corner of the display but the time zone
disappears in about 4 seconds. The 4-second display will no longer appear when you turn on the power. It is
not automatically superimposed on your recordings.
SYSTEM
D/TIME SET•• JAN. 1,2001
12:00 AM
DISP.SET UP
D/TIME SEL.• DATE & TIME
Page 35
Recording
E
35
Basic Recording
• Attach a power source (p. 19).
• Load a cassette (p. 22).
• Remove the lens cap and fasten the shoulder pad (p. 24).
• Adjust the viewfinder (p. 16).
• Choose your grip — side or top (p. 24).
You may also want to install the backup battery (p. 79) in order to set the date and time display (p. 79).
POWER
VCR
OFF
Tv
Av
M
A
1
2
START/STOP
2
STANDBY
Before you start recording
To record
Using the STANDBY button
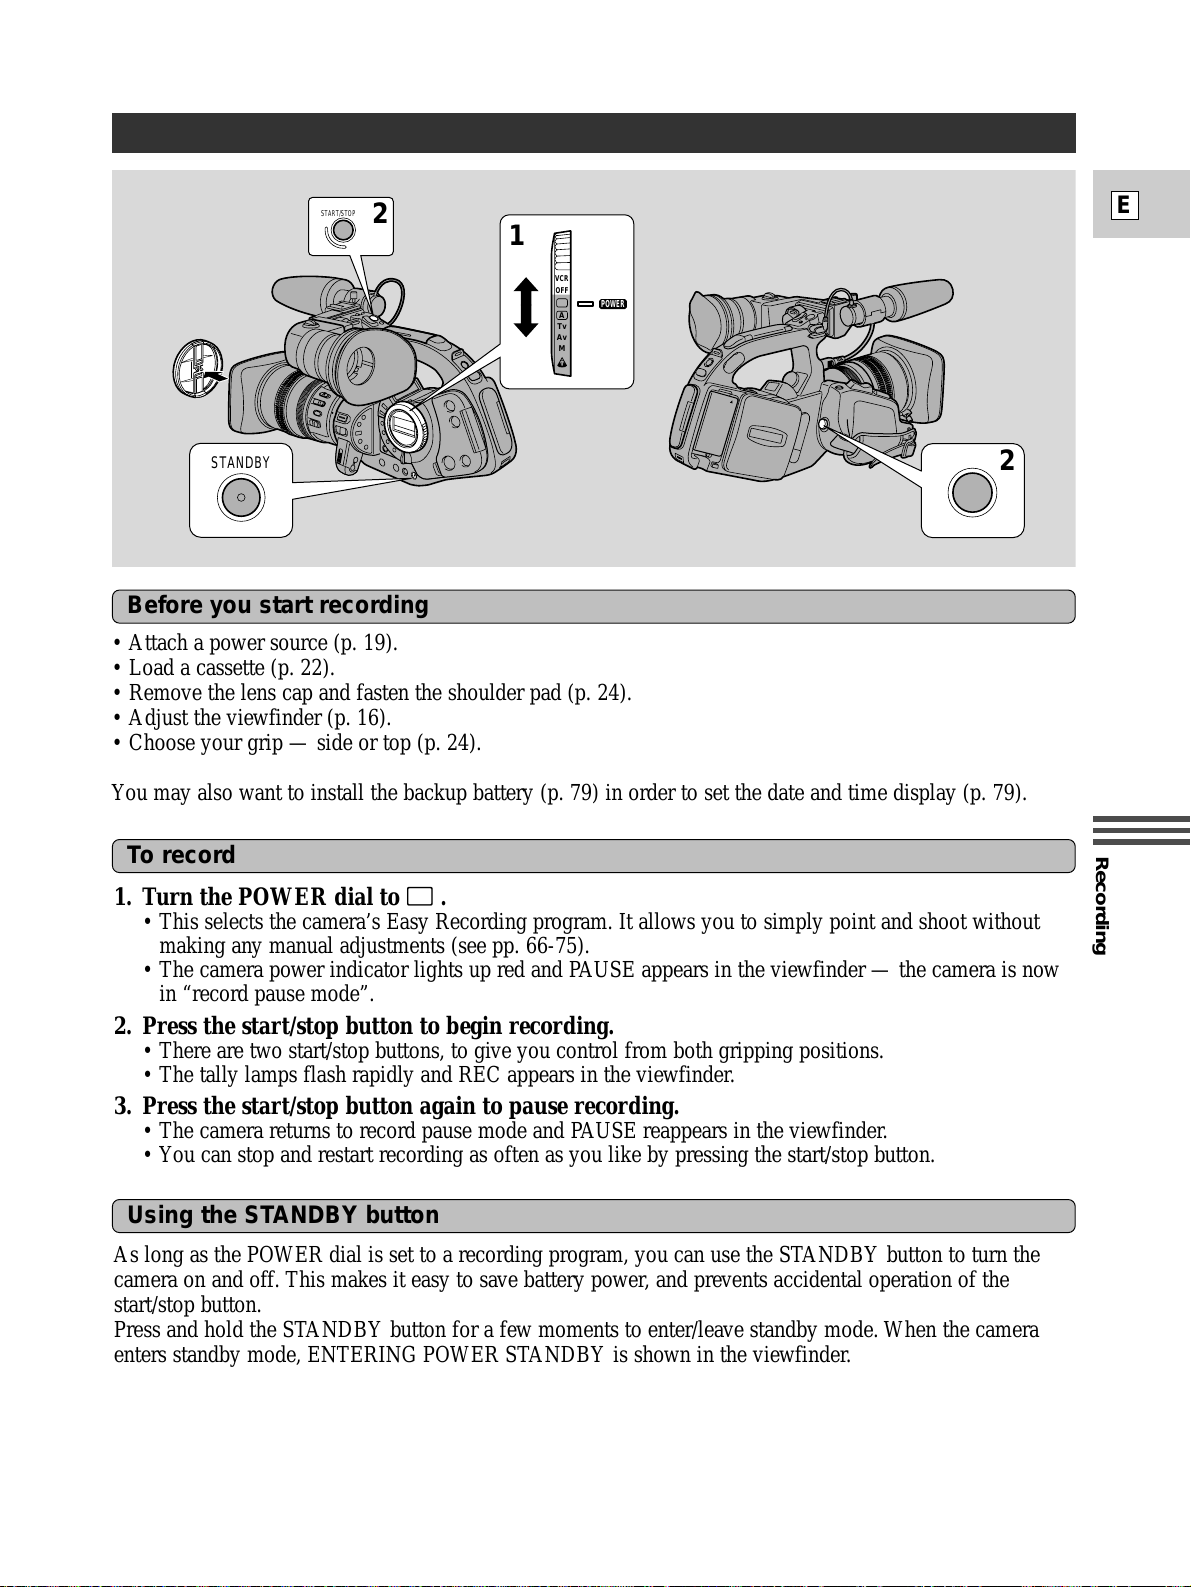
1. Turn the POWER dial to [ .
• This selects the camera’s Easy Recording program. It allows you to simply point and shoot without
making any manual adjustments (see pp. 66-75).
• The camera power indicator lights up red and PAUSE appears in the viewfinder — the camera is now
in “record pause mode”.
2. Press the start/stop button to begin recording.
• There are two start/stop buttons, to give you control from both gripping positions.
• The tally lamps flash rapidly and REC appears in the viewfinder.
3. Press the start/stop button again to pause recording.
• The camera returns to record pause mode and PAUSE reappears in the viewfinder.
• You can stop and restart recording as often as you like by pressing the start/stop button.
As long as the POWER dial is set to a recording program, you can use the STANDBY button to turn the
camera on and off. This makes it easy to save battery power, and prevents accidental operation of the
start/stop button.
Press and hold the STANDBY button for a few moments to enter/leave standby mode. When the camera
enters standby mode, ENTERING POWER STANDBY is shown in the viewfinder.
Page 36
Recording
E
36
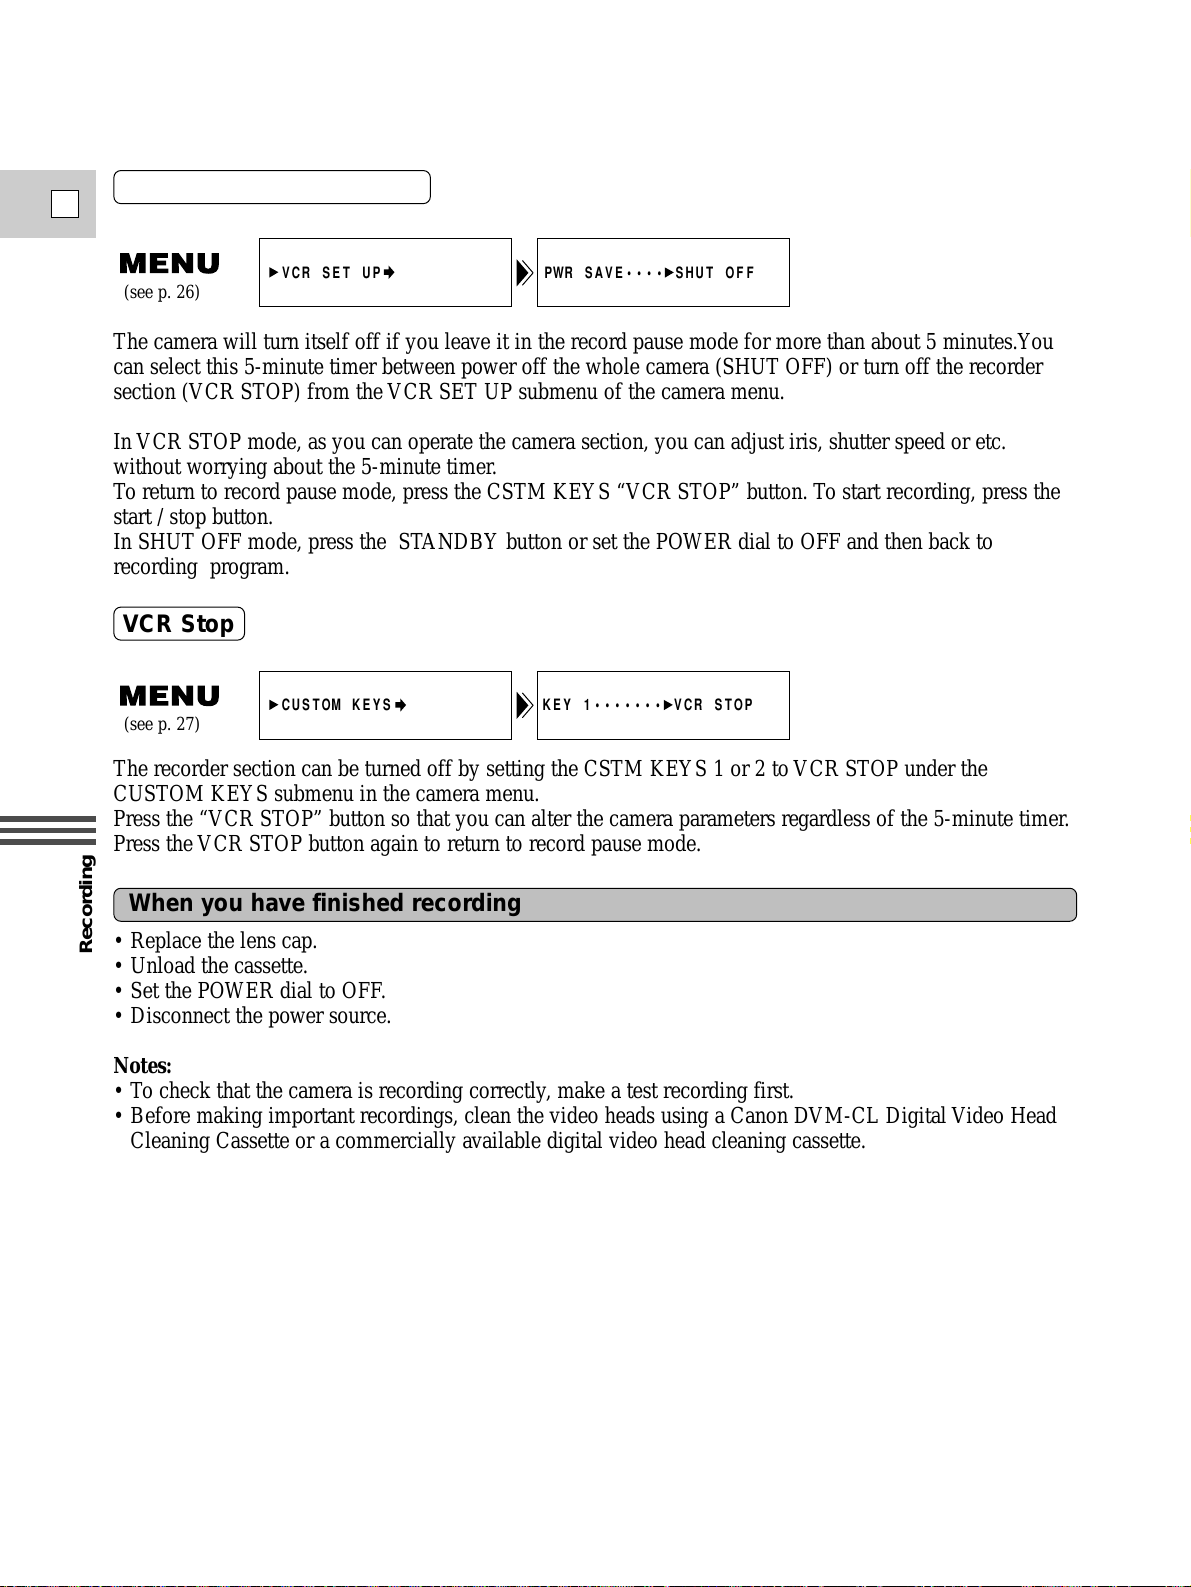
The recorder section can be turned off by setting the CSTM KEYS 1 or 2 to VCR STOP under the
CUSTOM KEYS submenu in the camera menu.
Press the “VCR STOP” button so that you can alter the camera parameters regardless of the 5-minute timer.
Press the VCR STOP button again to return to record pause mode.
When you have finished recording
Five-minute Auto Shut off
VCR Stop
KEY 1••••••• VCR STOP
CUSTOM KEYS
(see p. 27)
PWR SAVE•••• SHUT OFF
VCR SET UP
(see p. 26)
• Replace the lens cap.
• Unload the cassette.
• Set the POWER dial to OFF.
• Disconnect the power source.
Notes:
• To check that the camera is recording correctly, make a test recording first.
• Before making important recordings, clean the video heads using a Canon DVM-CL Digital Video Head
Cleaning Cassette or a commercially available digital video head cleaning cassette.
The camera will turn itself off if you leave it in the record pause mode for more than about 5 minutes.You
can select this 5-minute timer between power off the whole camera (SHUT OFF) or turn off the recorder
section (VCR STOP) from the VCR SET UP submenu of the camera menu.
In VCR STOP mode, as you can operate the camera section, you can adjust iris, shutter speed or etc.
without worrying about the 5-minute timer.
To return to record pause mode, press the CSTM KEYS “VCR STOP” button. To start recording, press the
start / stop button.
In SHUT OFF mode, press the STANDBY button or set the POWER dial to OFF and then back to
recording program.
Page 37
Recording
E
37
Turning the camera recording displays ON/OFF
You can record and play back a tape in SP (standard play) and LP (long play) modes. LP extends tape usage
by 1.5 times.
You can’t add sound (audio dubbing) or images (AV insert) to a tape that has been recorded in LP mode.
If you plan to use either of these functions later, record in SP mode.
Changing the recording mode (SP/LP)
(see p. 26)
To change to LP mode, open either the camera menu or the VCR menu and select VCR SET
UP. Then select REC MODE, set it to LP and close the menu.
Notes:
• When recording and playing back tapes in LP mode, the nature of the tape and usage conditions may
affect recording, mosaic-like noise may appear in the image and the sound may be distorted during
playback. For important recordings, therefore, set the camera to SP mode.
• If you record in both modes on the same tape, the picture may become distorted during playback and the
time code may not be written correctly.
• A tape recorded in LP mode on other digital equipment may produce mosaic-like noise and the sound
may become distorted when played back on this camcorder, and vice versa.
/
/
/
/
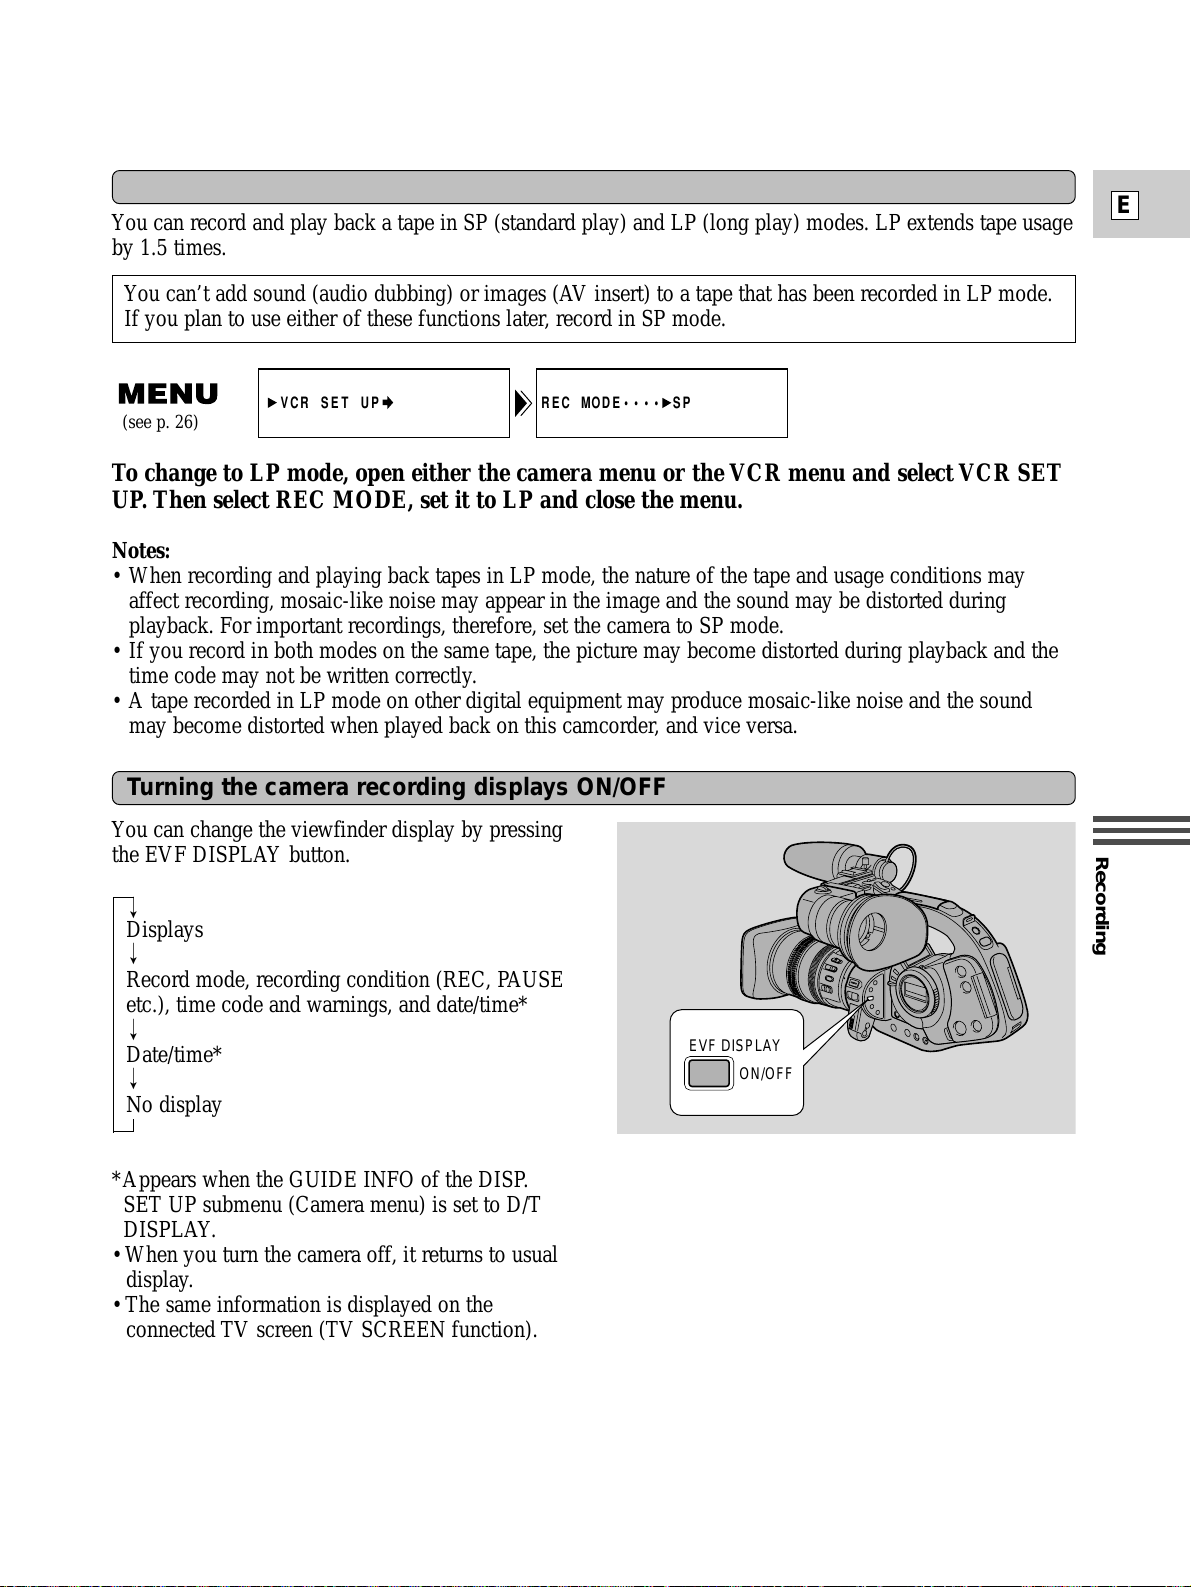
You can change the viewfinder display by pressing
the EVF DISPLAY button.
Displays
Record mode, recording condition (REC, PAUSE
etc.), time code and warnings, and date/time*
Date/time*
No display
*Appears when the GUIDE INFO of the DISP.
SET UP submenu (Camera menu) is set to D/T
DISPLAY.
• When you turn the camera off, it returns to usual
display.
• The same information is displayed on the
connected TV screen (TV SCREEN function).
REC MODE•••• SPVCR SET UP
EVF DISPLAY
ON/OFF
Page 38
Recording
E
38
Zooming (for Zoom Lenses)
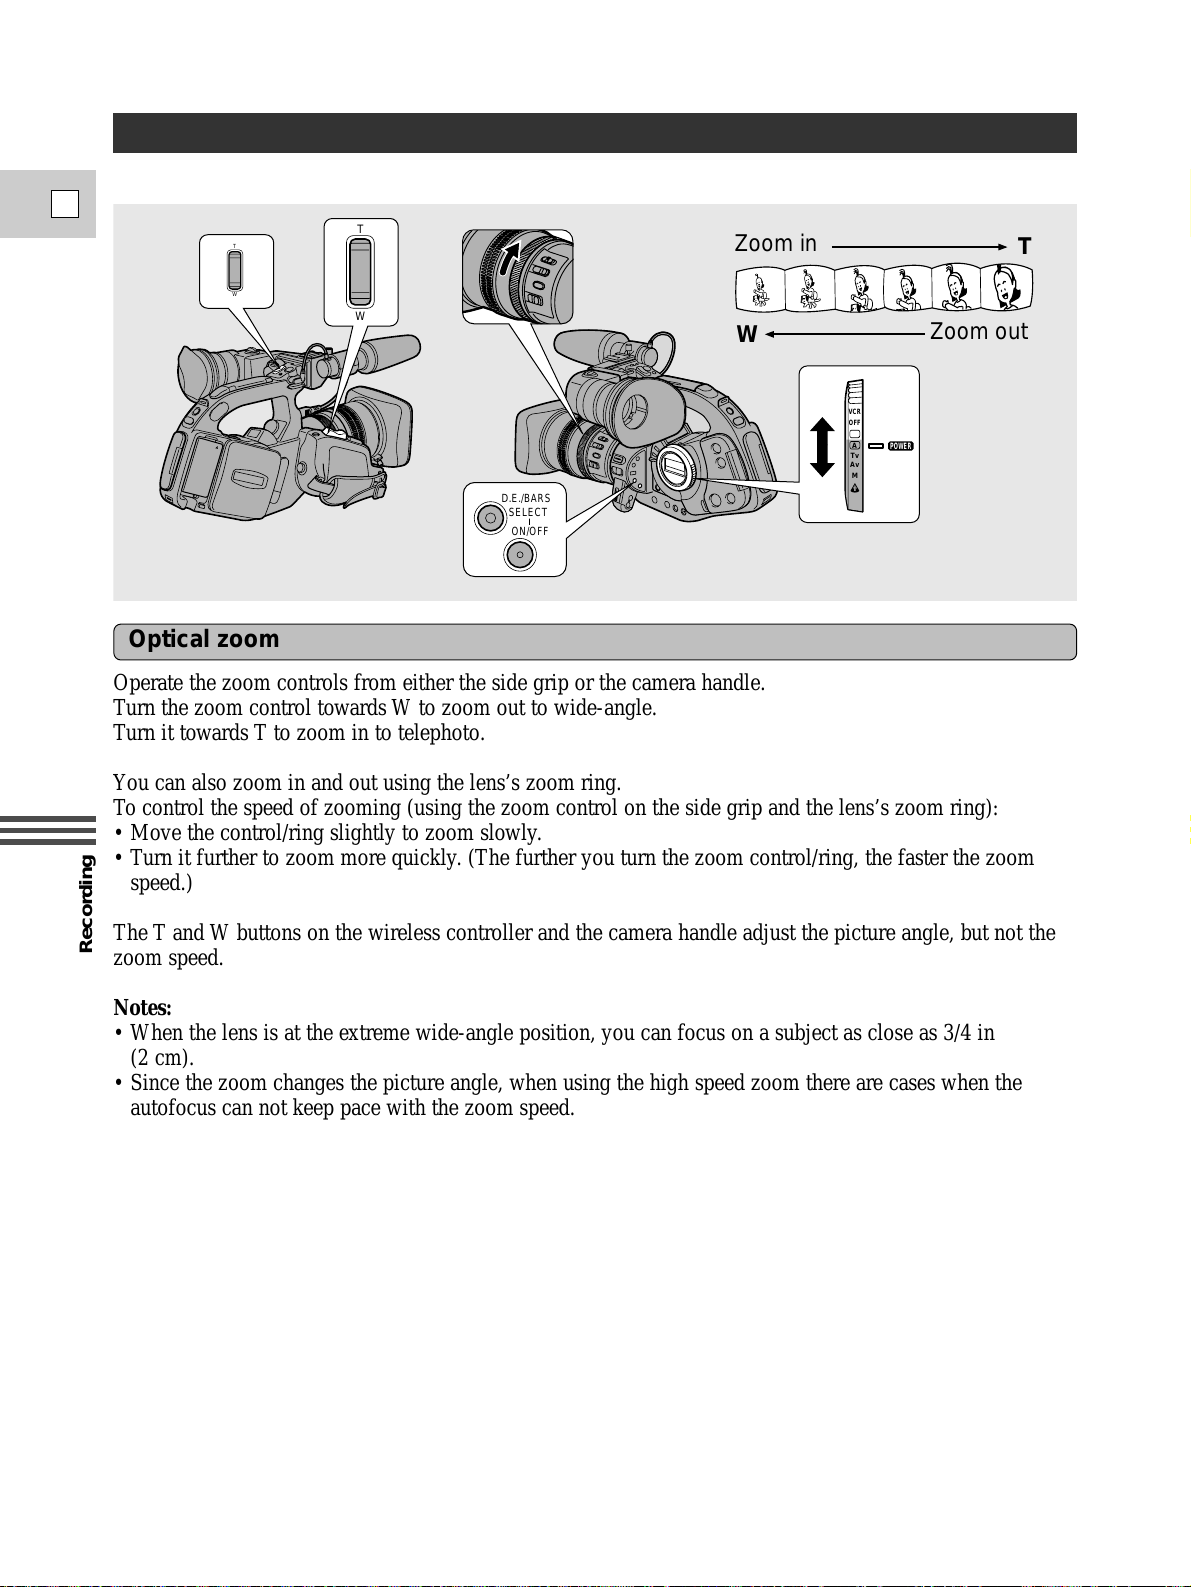
Operate the zoom controls from either the side grip or the camera handle.
Turn the zoom control towards W to zoom out to wide-angle.
Turn it towards T to zoom in to telephoto.
You can also zoom in and out using the lens’s zoom ring.
To control the speed of zooming (using the zoom control on the side grip and the lens’s zoom ring):
• Move the control/ring slightly to zoom slowly.
• Turn it further to zoom more quickly. (The further you turn the zoom control/ring, the faster the zoom
speed.)
The T and W buttons on the wireless controller and the camera handle adjust the picture angle, but not the
zoom speed.
Notes:
• When the lens is at the extreme wide-angle position, you can focus on a subject as close as 3/4 in
(2 cm).
• Since the zoom changes the picture angle, when using the high speed zoom there are cases when the
autofocus can not keep pace with the zoom speed.
Optical zoom
• Refer to the appropriate lens instruction manual. Note that the lens functions vary by the lens type.
T
W
T
Zoom in
W
W
VCR
OFF
A
Tv
Av
M
D.E./BARS
SELECT
ON/OFF
T
Zoom out
POWER
Page 39
Recording
E
39
2× digital zoom
Activate the digital zoom to double the camera’s zoom range.
The zoom control continues to work as usual — the camera automatically switches between optical
zooming and digital zooming.
• Image resolution is slightly lower when the magnification exceeds the optical zoom range.
1. Turn the POWER dial to any recording program.
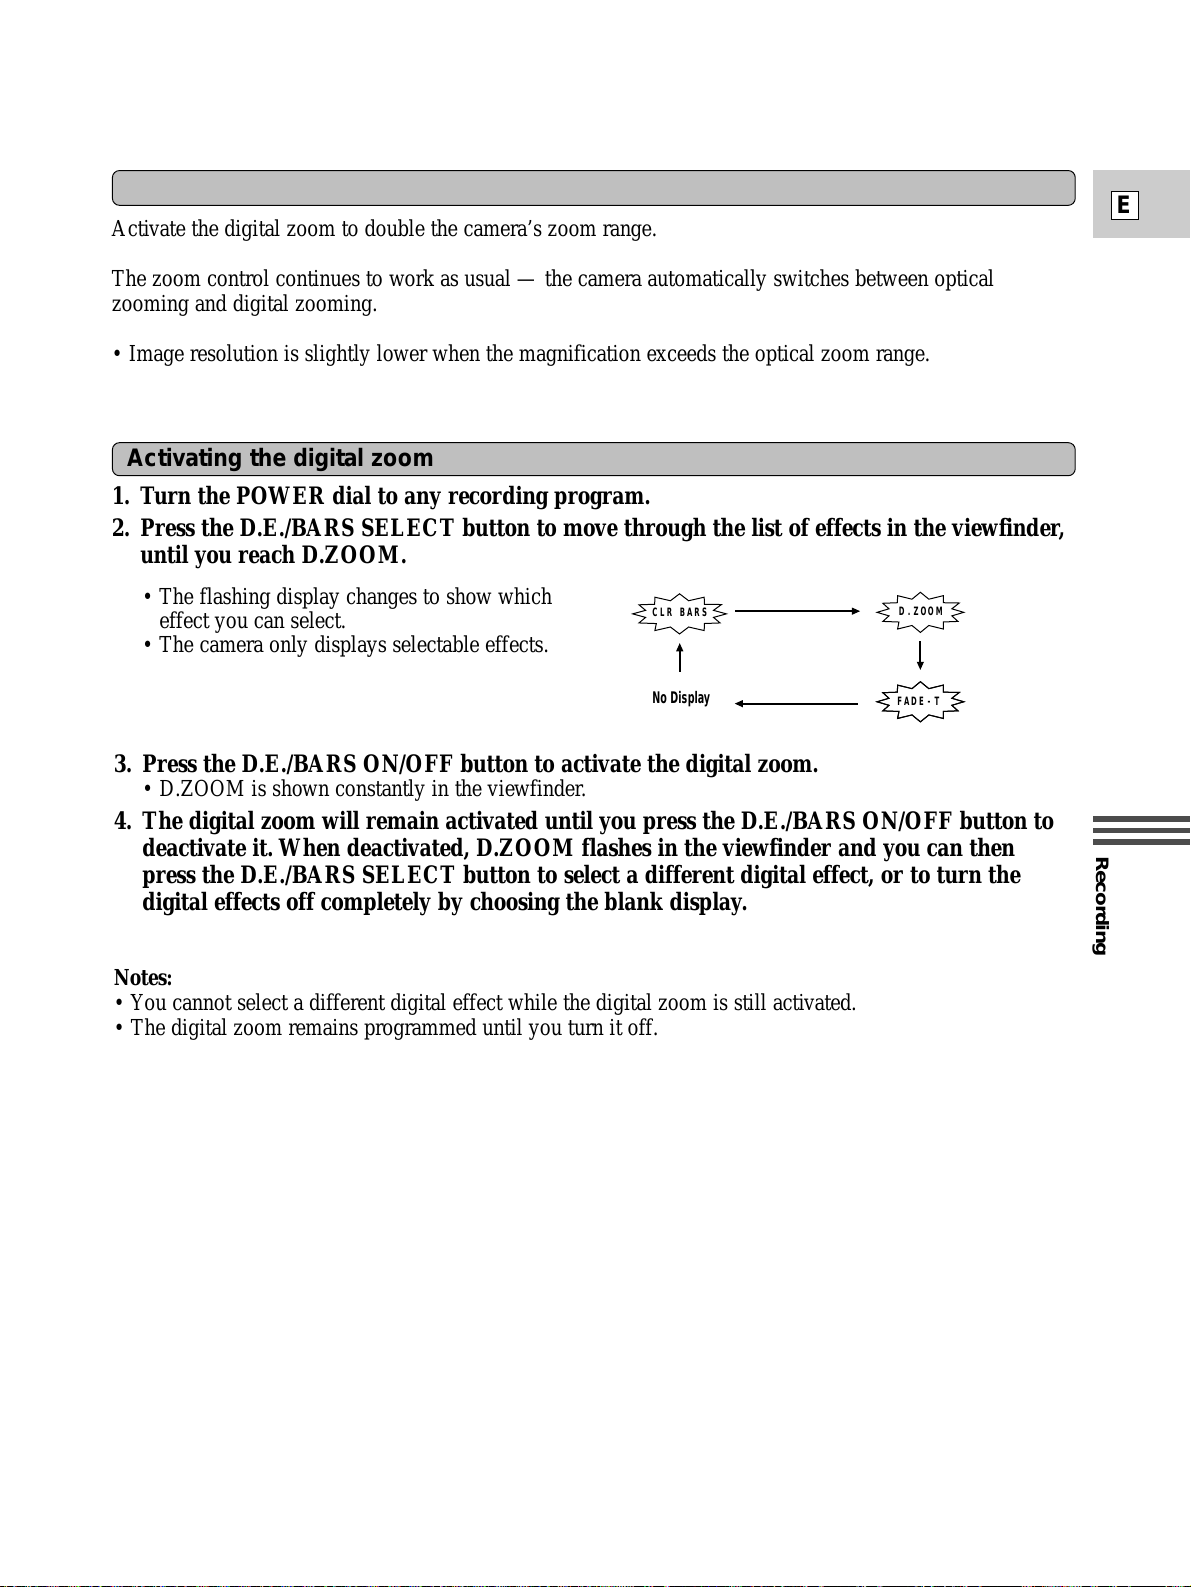
2. Press the D.E./BARS SELECT button to move through the list of effects in the viewfinder,
until you reach D.ZOOM.
Activating the digital zoom
3. Press the D.E./BARS ON/OFF button to activate the digital zoom.
• D.ZOOM is shown constantly in the viewfinder.
4. The digital zoom will remain activated until you press the D.E./BARS ON/OFF button to
deactivate it. When deactivated, D.ZOOM flashes in the viewfinder and you can then
press the D.E./BARS SELECT button to select a different digital effect, or to turn the
digital effects off completely by choosing the blank display.
Notes:
• You cannot select a different digital effect while the digital zoom is still activated.
• The digital zoom remains programmed until you turn it off.
E-TFAD
No Display
OOMD.Z
BCLR SAR
• The flashing display changes to show which
effect you can select.
• The camera only displays selectable effects.
Page 40
Recording
E
40
Turning the SuperRange Optical Image Stabilizer On/Off (16× IS2 lens)
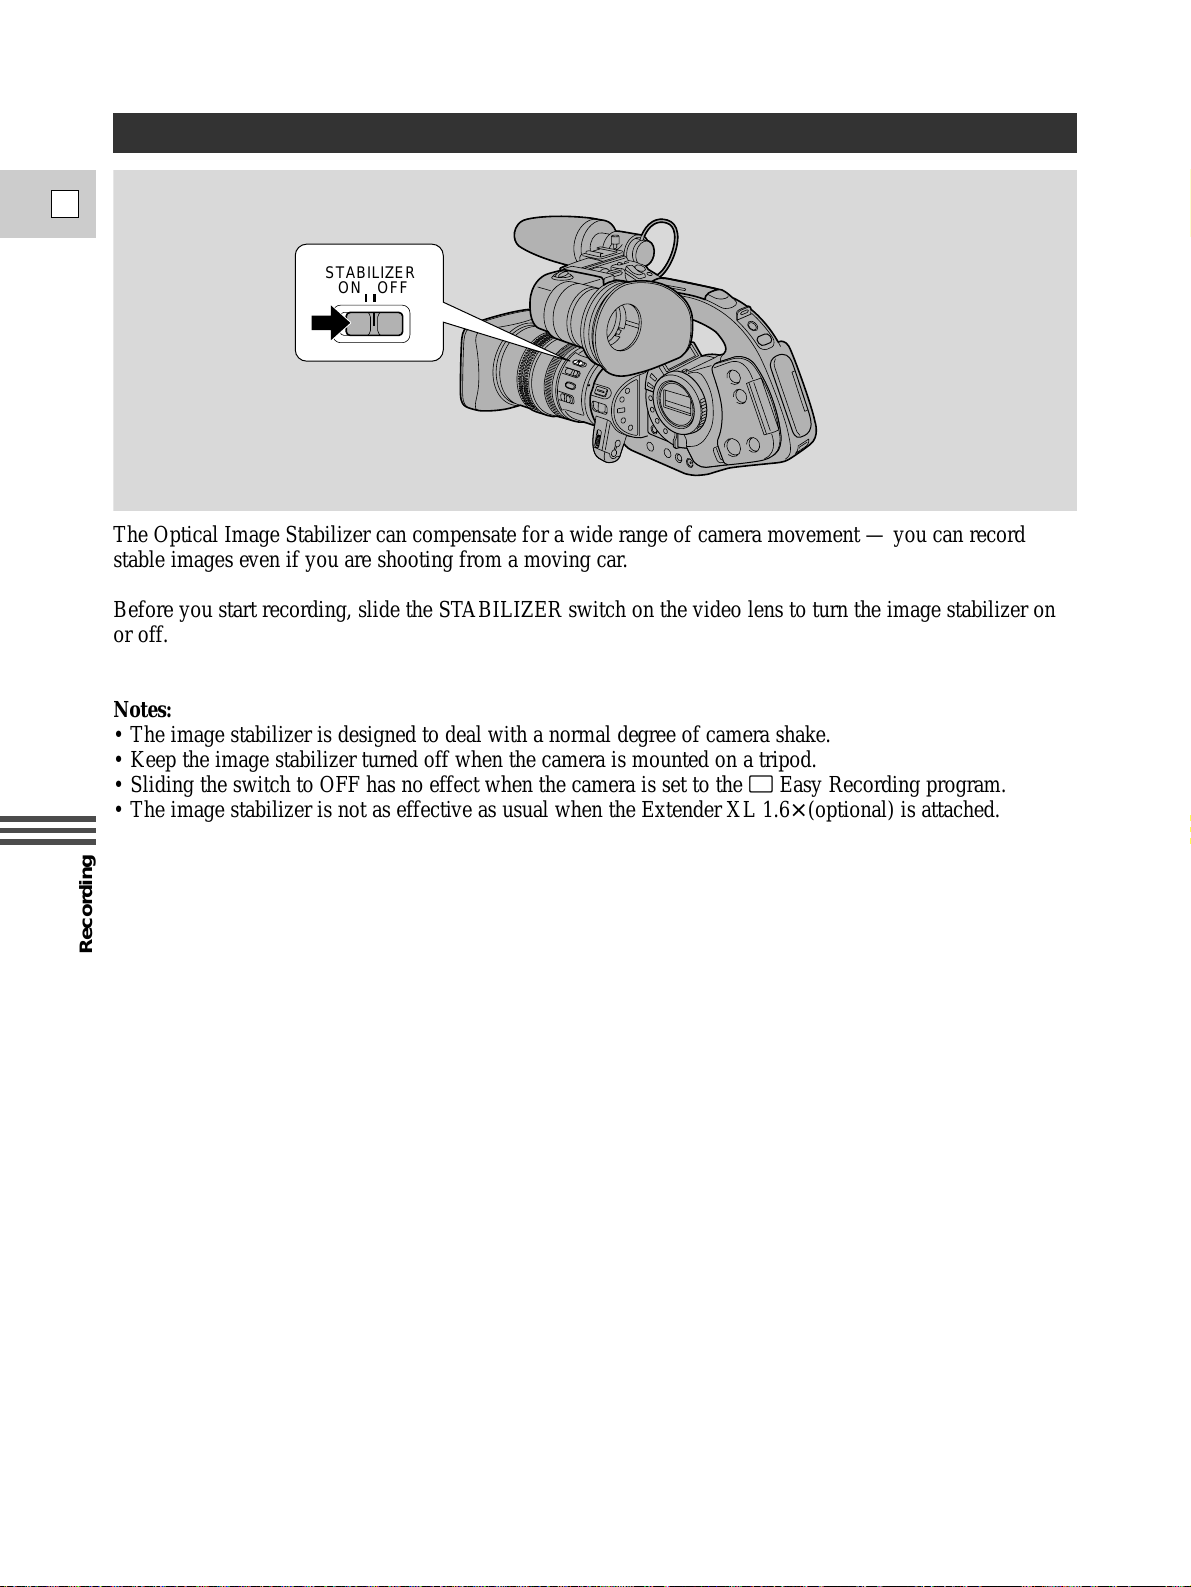
ON
STABILIZER
OFF
The Optical Image Stabilizer can compensate for a wide range of camera movement — you can record
stable images even if you are shooting from a moving car.
Before you start recording, slide the STABILIZER switch on the video lens to turn the image stabilizer on
or off.
Notes:
• The image stabilizer is designed to deal with a normal degree of camera shake.
• Keep the image stabilizer turned off when the camera is mounted on a tripod.
• Sliding the switch to OFF has no effect when the camera is set to the [ Easy Recording program.
• The image stabilizer is not as effective as usual when the Extender XL 1.6× (optional) is attached.
Page 41
Recording
E
41
On bright days or when recording very bright scenes, despite the iris being at its smallest aperture, blurring
of the image may occur. In such cases, using an ND filter should remove this problem.
The 16× IS2 zoom lens XL comes with a built-in ND filter.
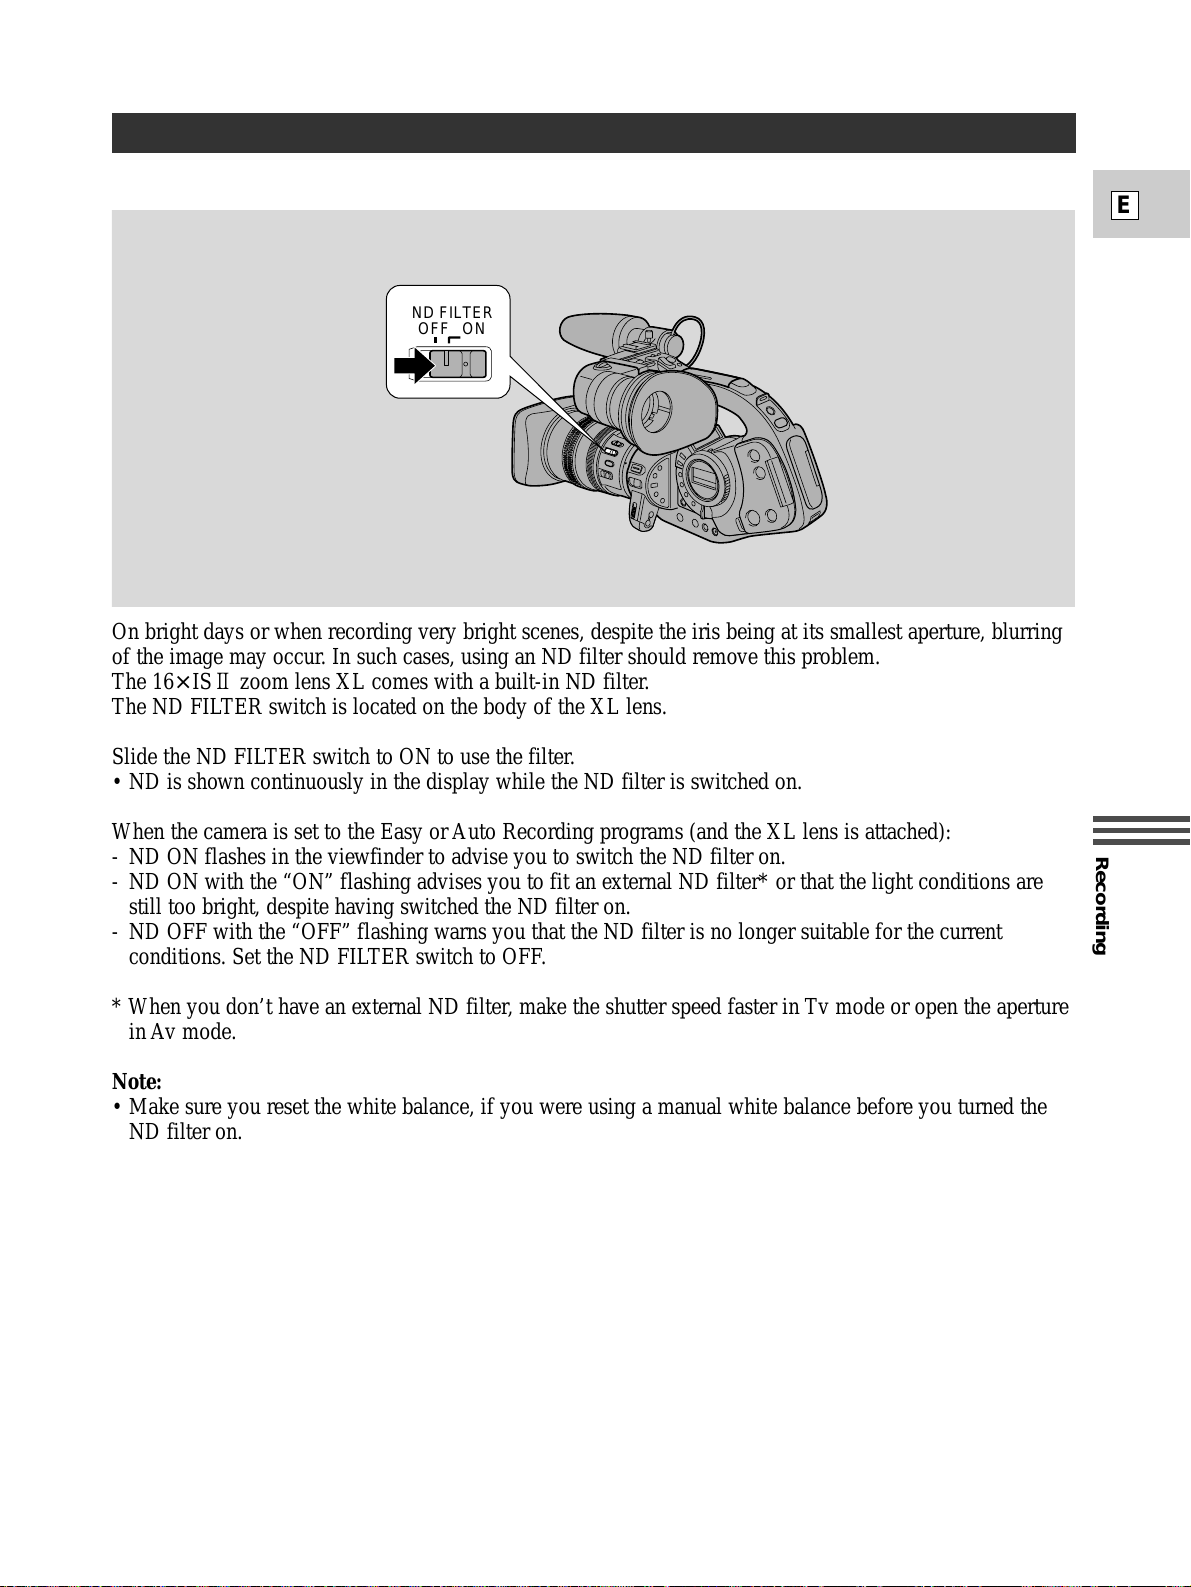
The ND FILTER switch is located on the body of the XL lens.
Slide the ND FILTER switch to ON to use the filter.
• ND is shown continuously in the display while the ND filter is switched on.
When the camera is set to the Easy or Auto Recording programs (and the XL lens is attached):
- ND ON flashes in the viewfinder to advise you to switch the ND filter on.
- ND ON with the “ON” flashing advises you to fit an external ND filter* or that the light conditions are
still too bright, despite having switched the ND filter on.
- ND OFF with the “OFF” flashing warns you that the ND filter is no longer suitable for the current
conditions. Set the ND FILTER switch to OFF.
* When you don’t have an external ND filter, make the shutter speed faster in Tv mode or open the aperture
in A v mode.
Note:
• Make sure you reset the white balance, if you were using a manual white balance before you turned the
ND filter on.
OFF
ND FILTER
ON
Using the ND Filter (for appropriate lenses)
• Refer to the appropriate lens instruction manual. Note that the lens functions vary by the lens type.
Page 42
Recording
E
42
Taking Still Pictures (Photo Mode)
You can record still pictures like a photograph. The camera records the picture and sound to tape for
approximately 6 seconds. The exposure is automatically adjusted.
Also, starting your shooting with a still photo makes it easy to find the beginning again later with the Photo
Search function (p. 81).
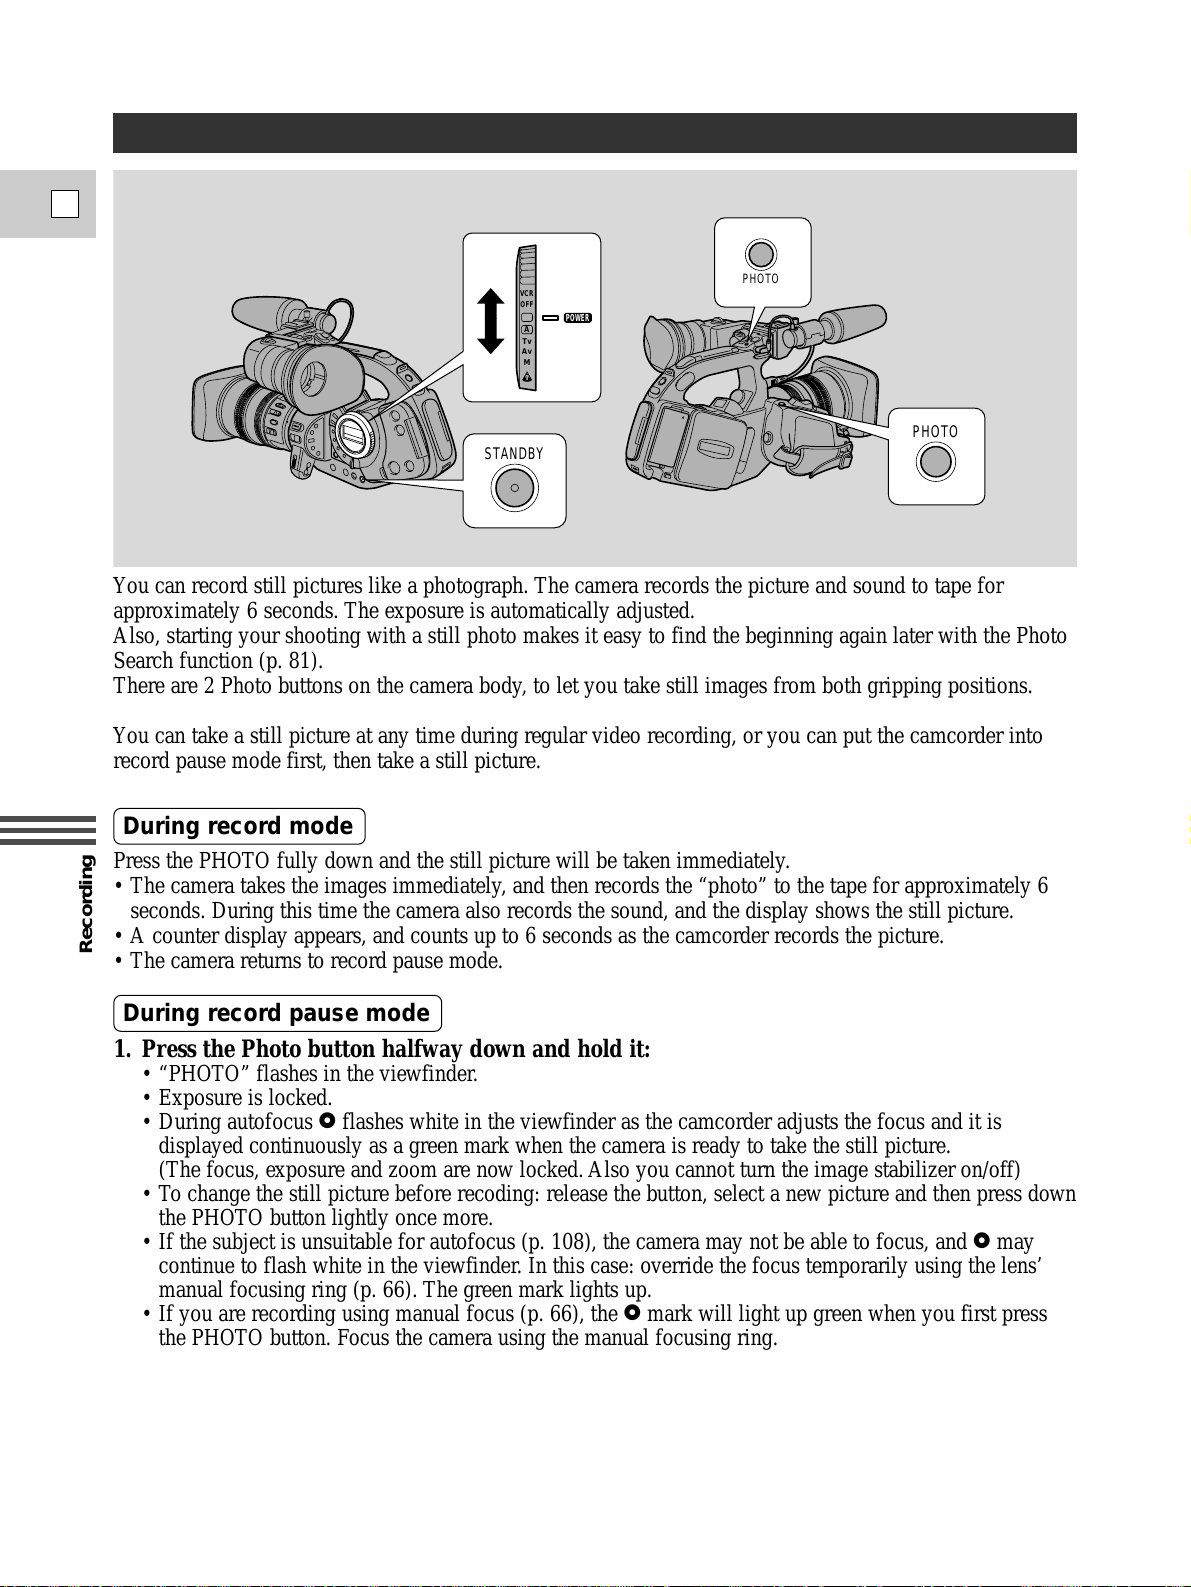
There are 2 Photo buttons on the camera body, to let you take still images from both gripping positions.
You can take a still picture at any time during regular video recording, or you can put the camcorder into
record pause mode first, then take a still picture.
Press the PHOTO fully down and the still picture will be taken immediately.
• The camera takes the images immediately, and then records the “photo” to the tape for approximately 6
seconds. During this time the camera also records the sound, and the display shows the still picture.
• A counter display appears, and counts up to 6 seconds as the camcorder records the picture.
• The camera returns to record pause mode.
POWER
VCR
OFF
Tv
Av
M
A
STANDBY
PHOTO
PHOTO
1. Press the Photo button halfway down and hold it:
• “PHOTO” flashes in the viewfinder.
• Exposure is locked.
• During autofocus
F flashes white in the viewfinder as the camcorder adjusts the focus and it is
displayed continuously as a green mark when the camera is ready to take the still picture.
(The focus, exposure and zoom are now locked. Also you cannot turn the image stabilizer on/off)
• To change the still picture before recoding: release the button, select a new picture and then press down
the PHOTO button lightly once more.
• If the subject is unsuitable for autofocus (p. 108), the camera may not be able to focus, and F may
continue to flash white in the viewfinder. In this case: override the focus temporarily using the lens’
manual focusing ring (p. 66). The green mark lights up.
• If you are recording using manual focus (p. 66), the F mark will light up green when you first press
the PHOTO button. Focus the camera using the manual focusing ring.
During record mode
During record pause mode
Page 43
Recording
E
43
2. Press the PHOTO button fully down to take the still picture.
• The camera takes the image immediately, and then records the “photo” to the tape for approximately 6
seconds. During this time the camera also records the sound, and the display shows the still picture.
• A counter display appears, and counts up to 6 seconds as the camera records the picture. Fdisappears
from the display.
• The camera returns to record pause mode.
Notes:
• While the camera records the still, you cannot use the camera functions (POWER dial/STANDBY button
do not respond until recording is complete). This applies even when you haven’t loaded a cassette.
• The wireless controller’s PHOTO button has no half-way setting, press the button and the camera soon
takes the “photo”.
• Only take “photos” where it is bright enough to see the image in the viewfinder.
• For even greater versatility, attach a Canon Speedlite for flash photography (available as optional
accessories, see page 60), when taking still pictures from record pause mode.
Page 44
Recording
E
44
Choosing the Movie Mode
(Normal/Frame)
The Frame mode can be used when you want to look at a video, scene by scene, free from field slippage
(the “flicker” that normally occurs when you pause a video). The vertical resolution of the image is
improved by 1.5×. During playback, pause the video at any time if you would like to view a crystal clear
still image in the display or on a connected TV screen. It is also possible to transfer your favorite still
pictures to a PC for image enhancement and print out.
Since the frame rate is close to that of a movie, this mode can be used to create “cinematic-like appearance.”
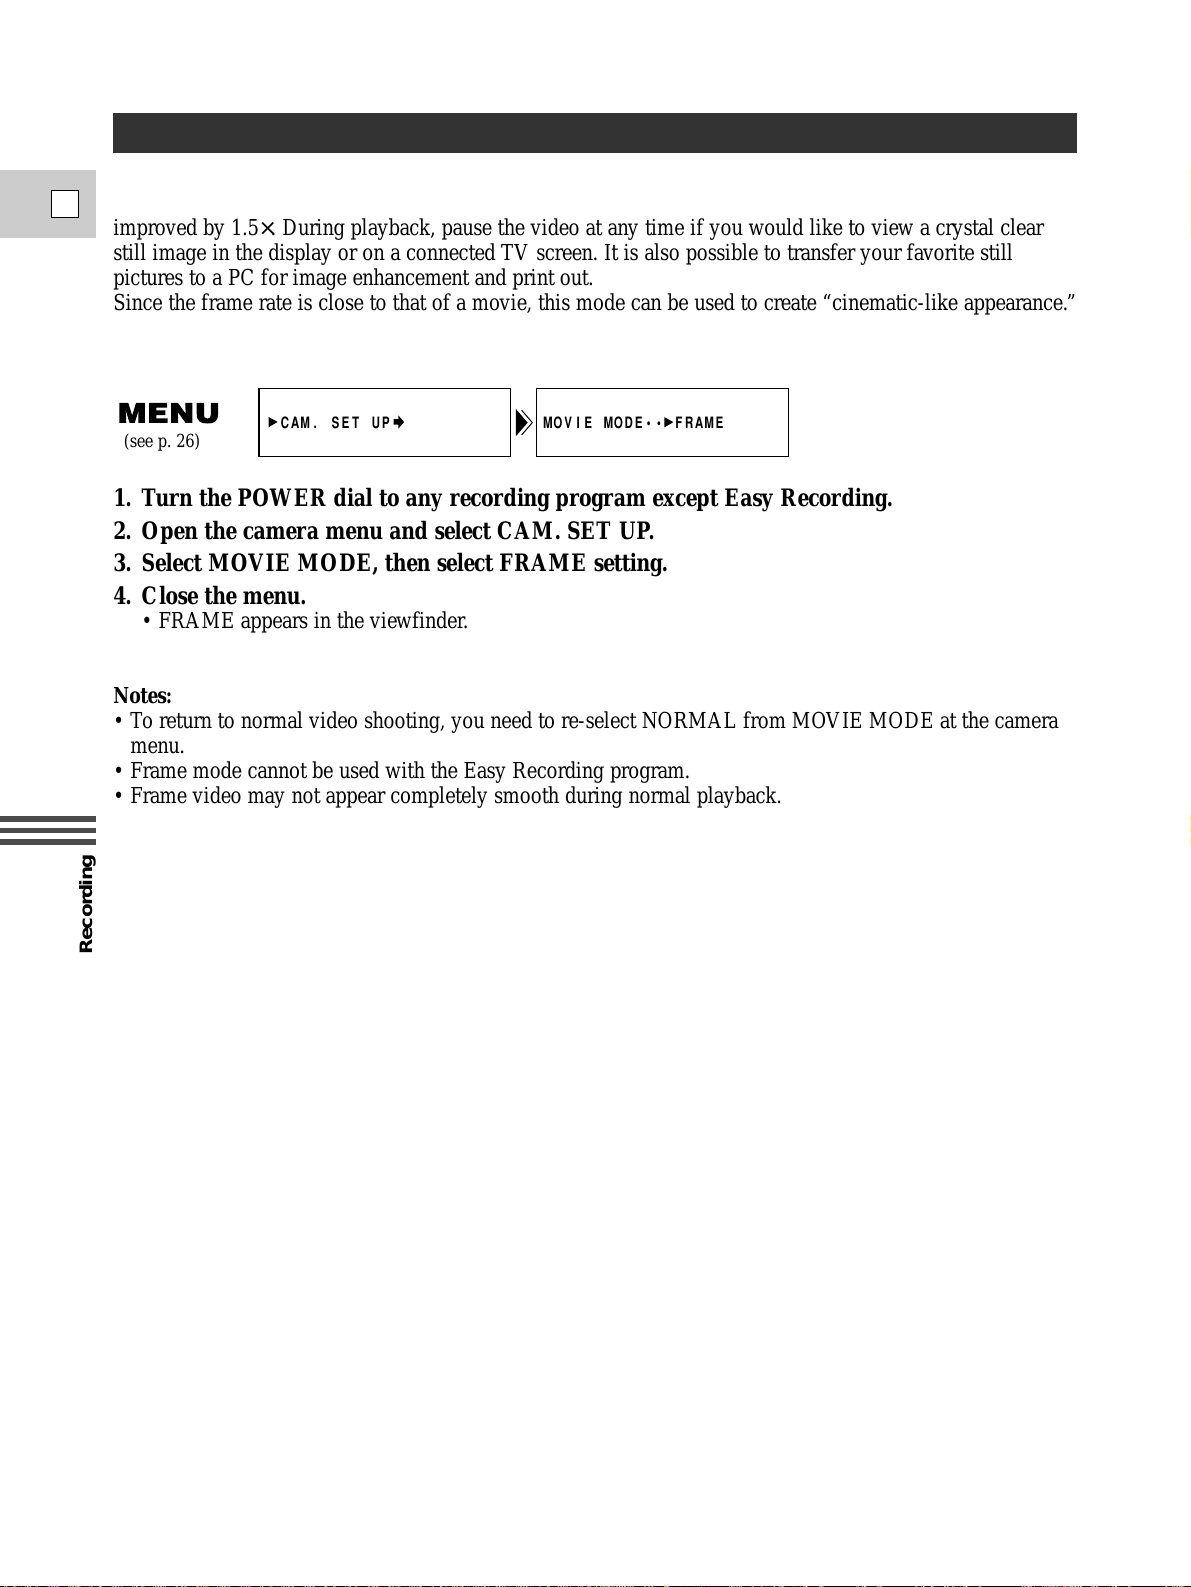
1. Turn the POWER dial to any recording program except Easy Recording.
2. Open the camera menu and select CAM. SET UP.
3. Select MOVIE MODE, then select FRAME setting.
4. Close the menu.
• FRAME appears in the viewfinder.
Notes:
• To return to normal video shooting, you need to re-select NORMAL from MOVIE MODE at the camera
menu.
• Frame mode cannot be used with the Easy Recording program.
• Frame video may not appear completely smooth during normal playback.
MOVIE MODE•• FRAME
CAM. SET UP
(see p. 26)
Page 45
Recording
E
45
Searching and Reviewing While Recording
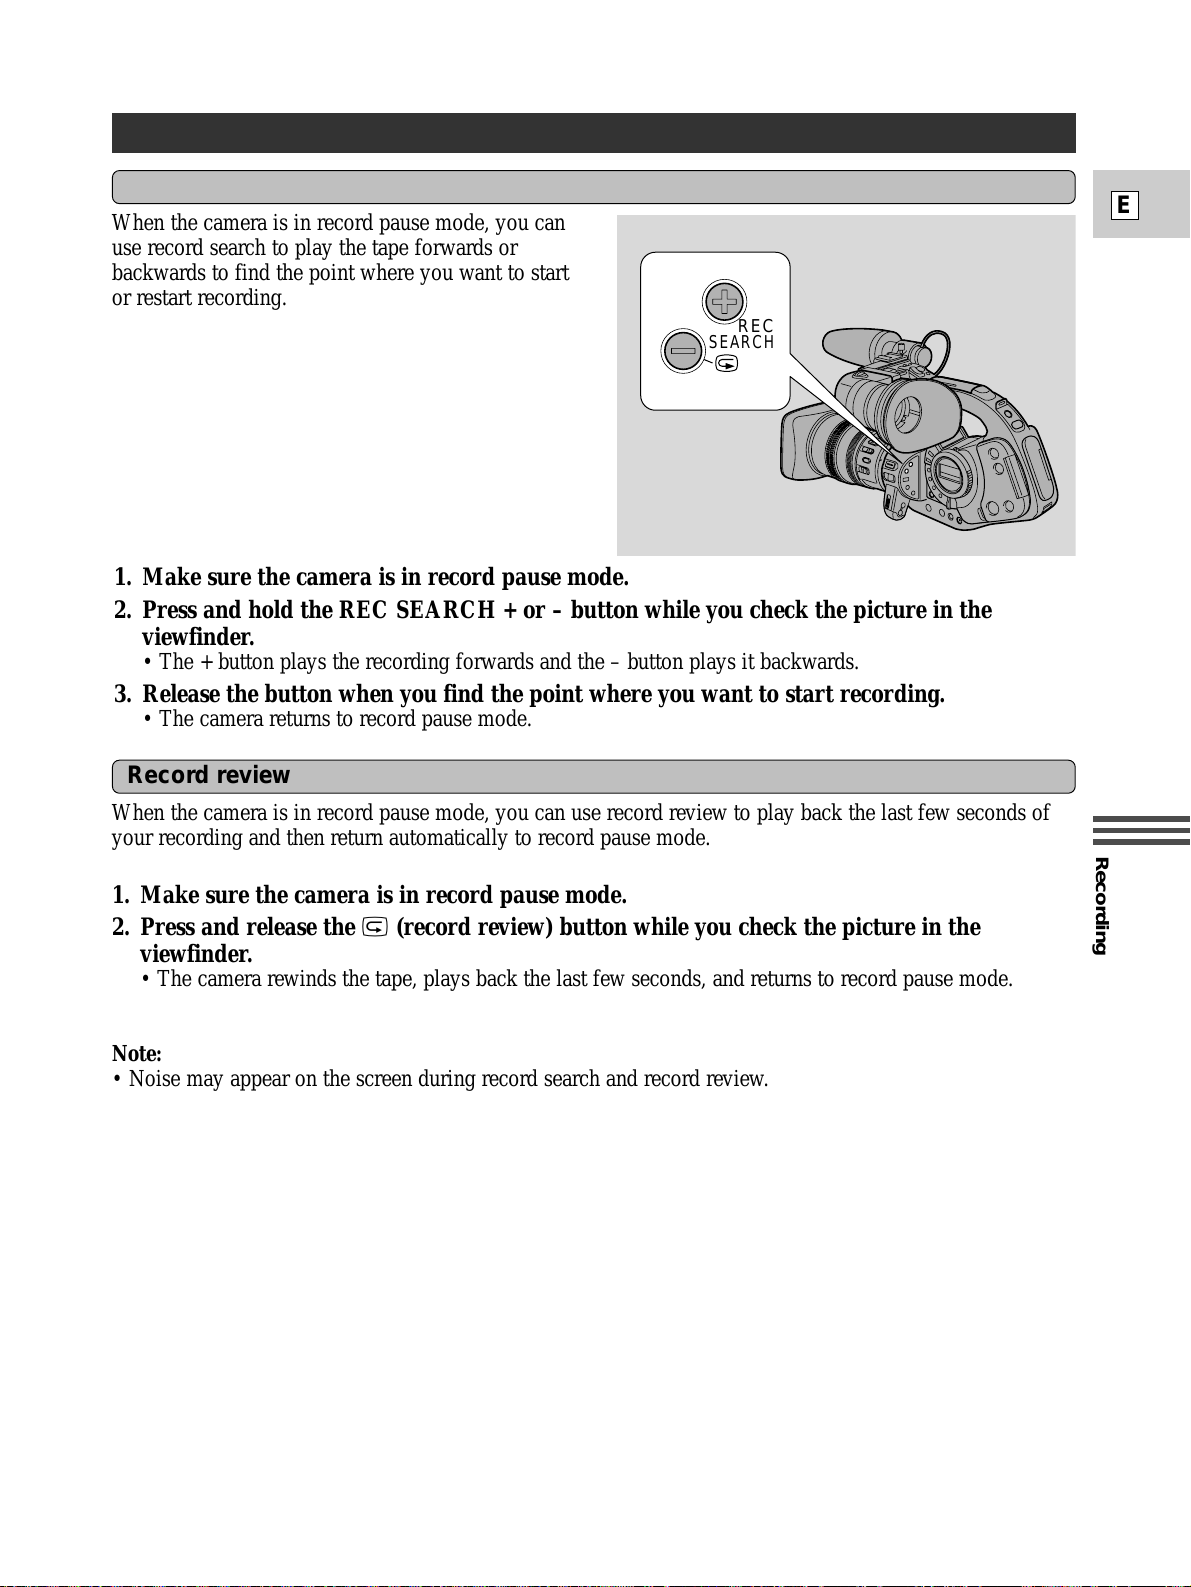
When the camera is in record pause mode, you can use record review to play back the last few seconds of
your recording and then return automatically to record pause mode.
1. Make sure the camera is in record pause mode.
2. Press and release the c (record review) button while you check the picture in the
viewfinder.
• The camera rewinds the tape, plays back the last few seconds, and returns to record pause mode.
Note:
• Noise may appear on the screen during record search and record review.
REC
SEARCH
When the camera is in record pause mode, you can
use record search to play the tape forwards or
backwards to find the point where you want to start
or restart recording.
Record search
Record review
1. Make sure the camera is in record pause mode.
2. Press and hold the REC SEARCH + or – button while you check the picture in the
viewfinder.
• The + button plays the recording forwards and the – button plays it backwards.
3. Release the button when you find the point where you want to start recording.
• The camera returns to record pause mode.
Page 46
Recording
E
46
Using the Various Recording Programs
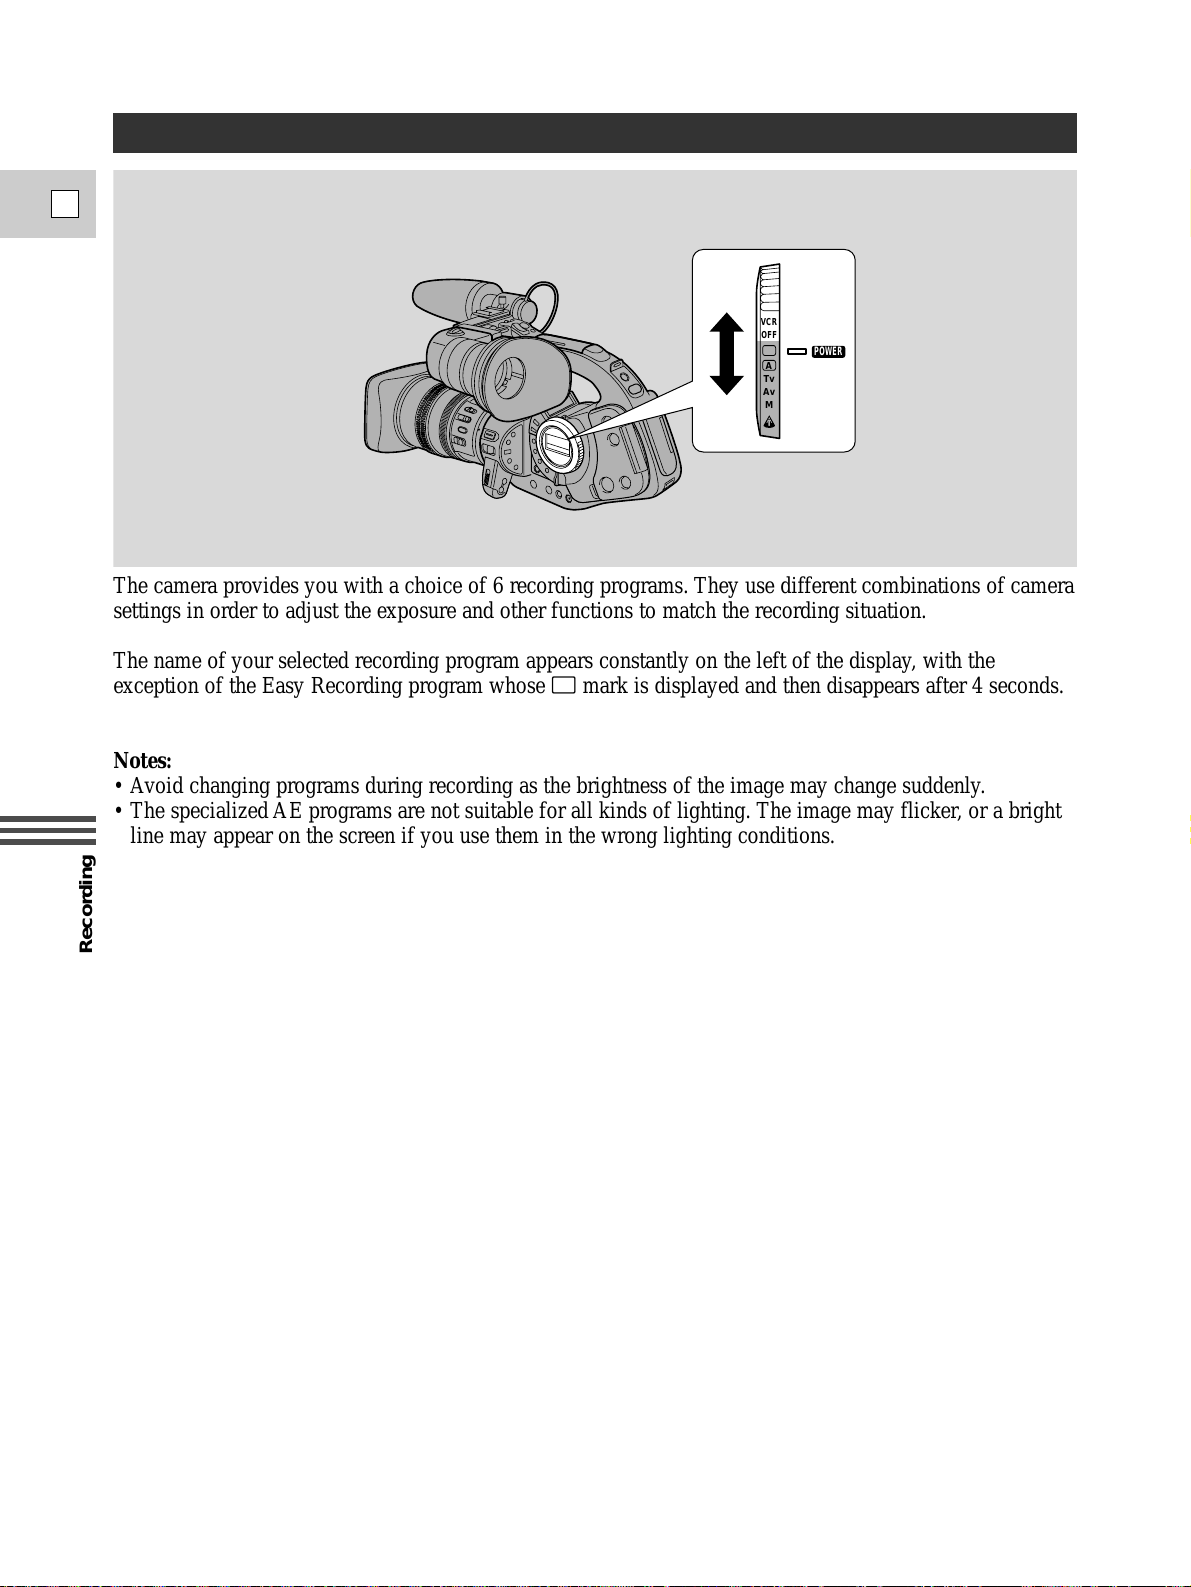
The camera provides you with a choice of 6 recording programs. They use different combinations of camera
settings in order to adjust the exposure and other functions to match the recording situation.
The name of your selected recording program appears constantly on the left of the display, with the
exception of the Easy Recording program whose [ mark is displayed and then disappears after 4 seconds.
Notes:
• Avoid changing programs during recording as the brightness of the image may change suddenly.
• The specialized AE programs are not suitable for all kinds of lighting. The image may flicker, or a bright
line may appear on the screen if you use them in the wrong lighting conditions.
POWER
VCR
OFF
Tv
Av
M
A
Page 47
Recording
47
Recording
E
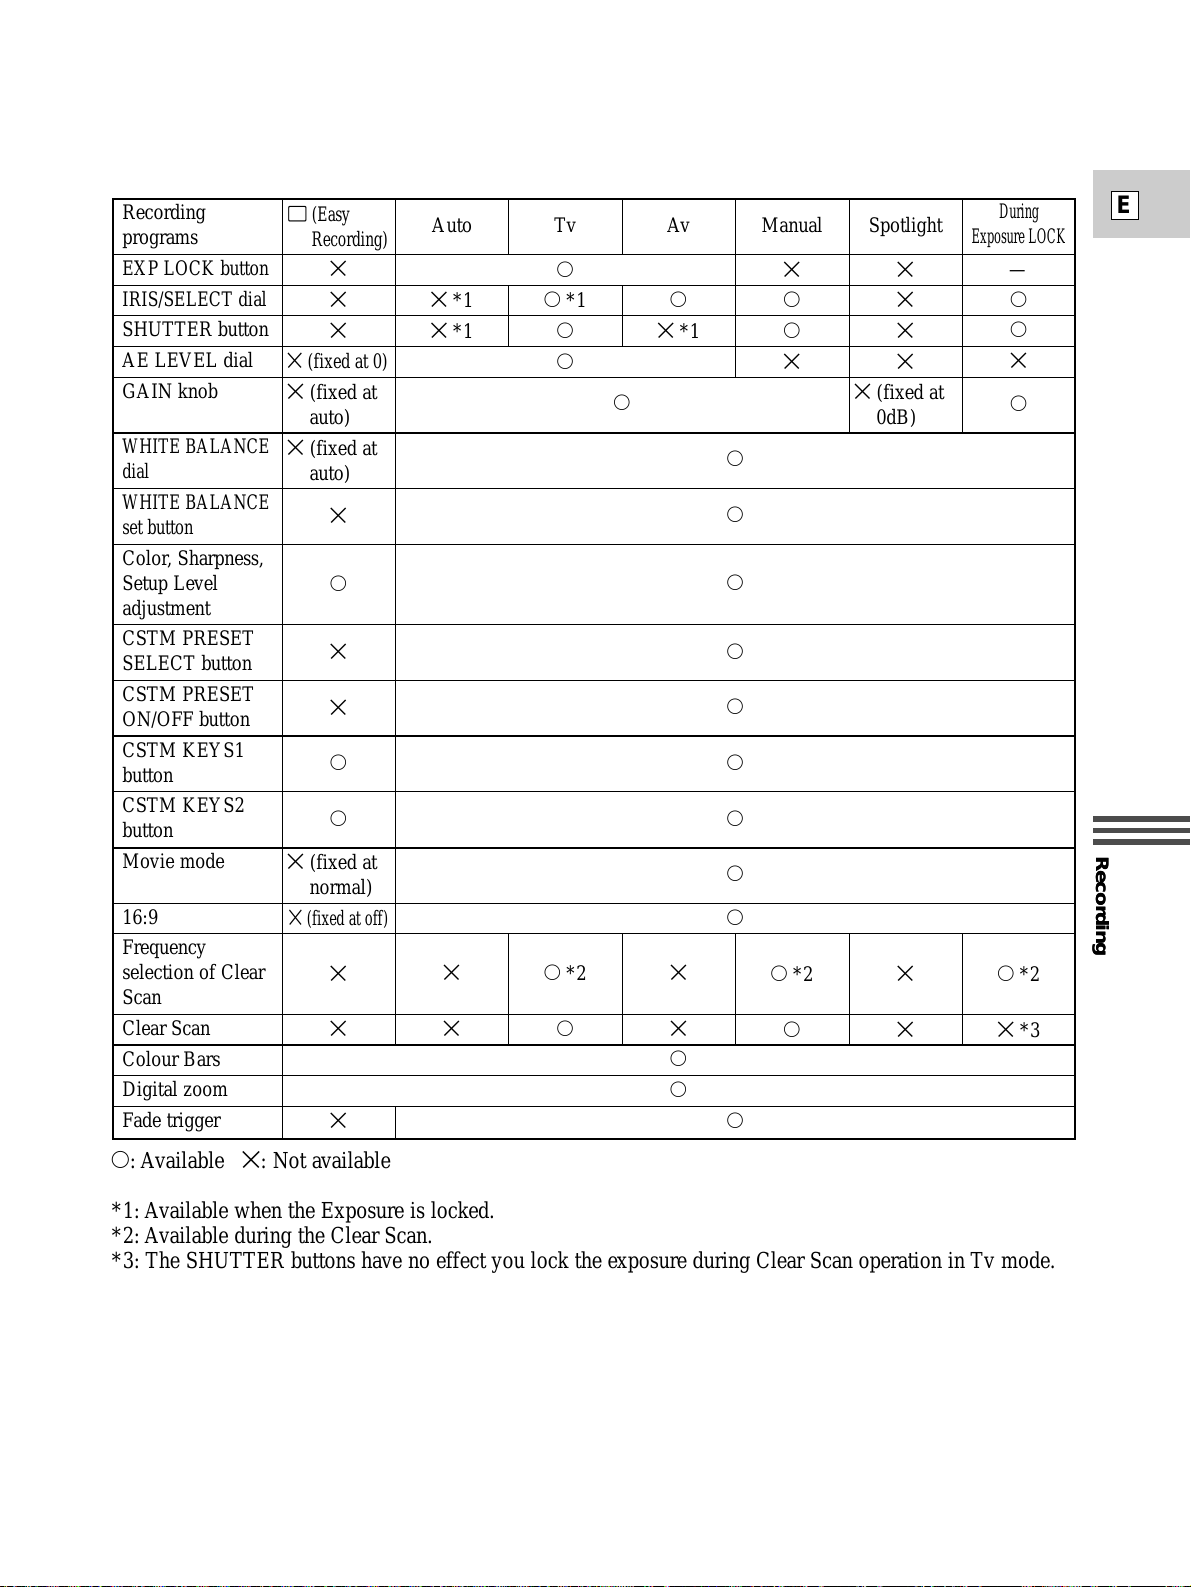
Availablity of functions in each recording program.
Recording
programs
EXP LOCK button
IRIS/SELECT dial
SHUTTER button
AE LEVEL dial
GAIN knob
WHITE BALANCE
dial
WHITE BALANCE
set button
Color, Sharpness,
Setup Level
adjustment
CSTM PRESET
SELECT button
CSTM PRESET
ON/OFF button
CSTM KEYS1
button
CSTM KEYS2
button
Movie mode
16:9
Frequency
selection of Clear
Scan
Clear Scan
Colour Bars
Digital zoom
Fade trigger
h: Available i: Not available
*1: Available when the Exposure is locked.
*2: Available during the Clear Scan.
*3: The SHUTTER buttons have no effect you lock the exposure during Clear Scan operation in Tv mode.
[ (Easy
Recording)
i
i
i
i (fixed at 0)
i (fixed at
auto)
i (fixed at
auto)
i
h
i
i
h
h
i (fixed at
normal)
i (fixed at off)
i
i
i
Auto
i *1
i *1
i
i
Tv
h
h *1
h
h
h *2
h
Av
h
i *1
i
i
h
h
Manual
i
h
h
i
h *2
h
Spotlight
i
i
i
i
i (fixed at
0dB)
i
i
During
Exposure LOCK
—
h
h
i
h
h *2
i *3
h
h
h
h
h
h
h
h
h
h
h
Page 48
Recording
E
48
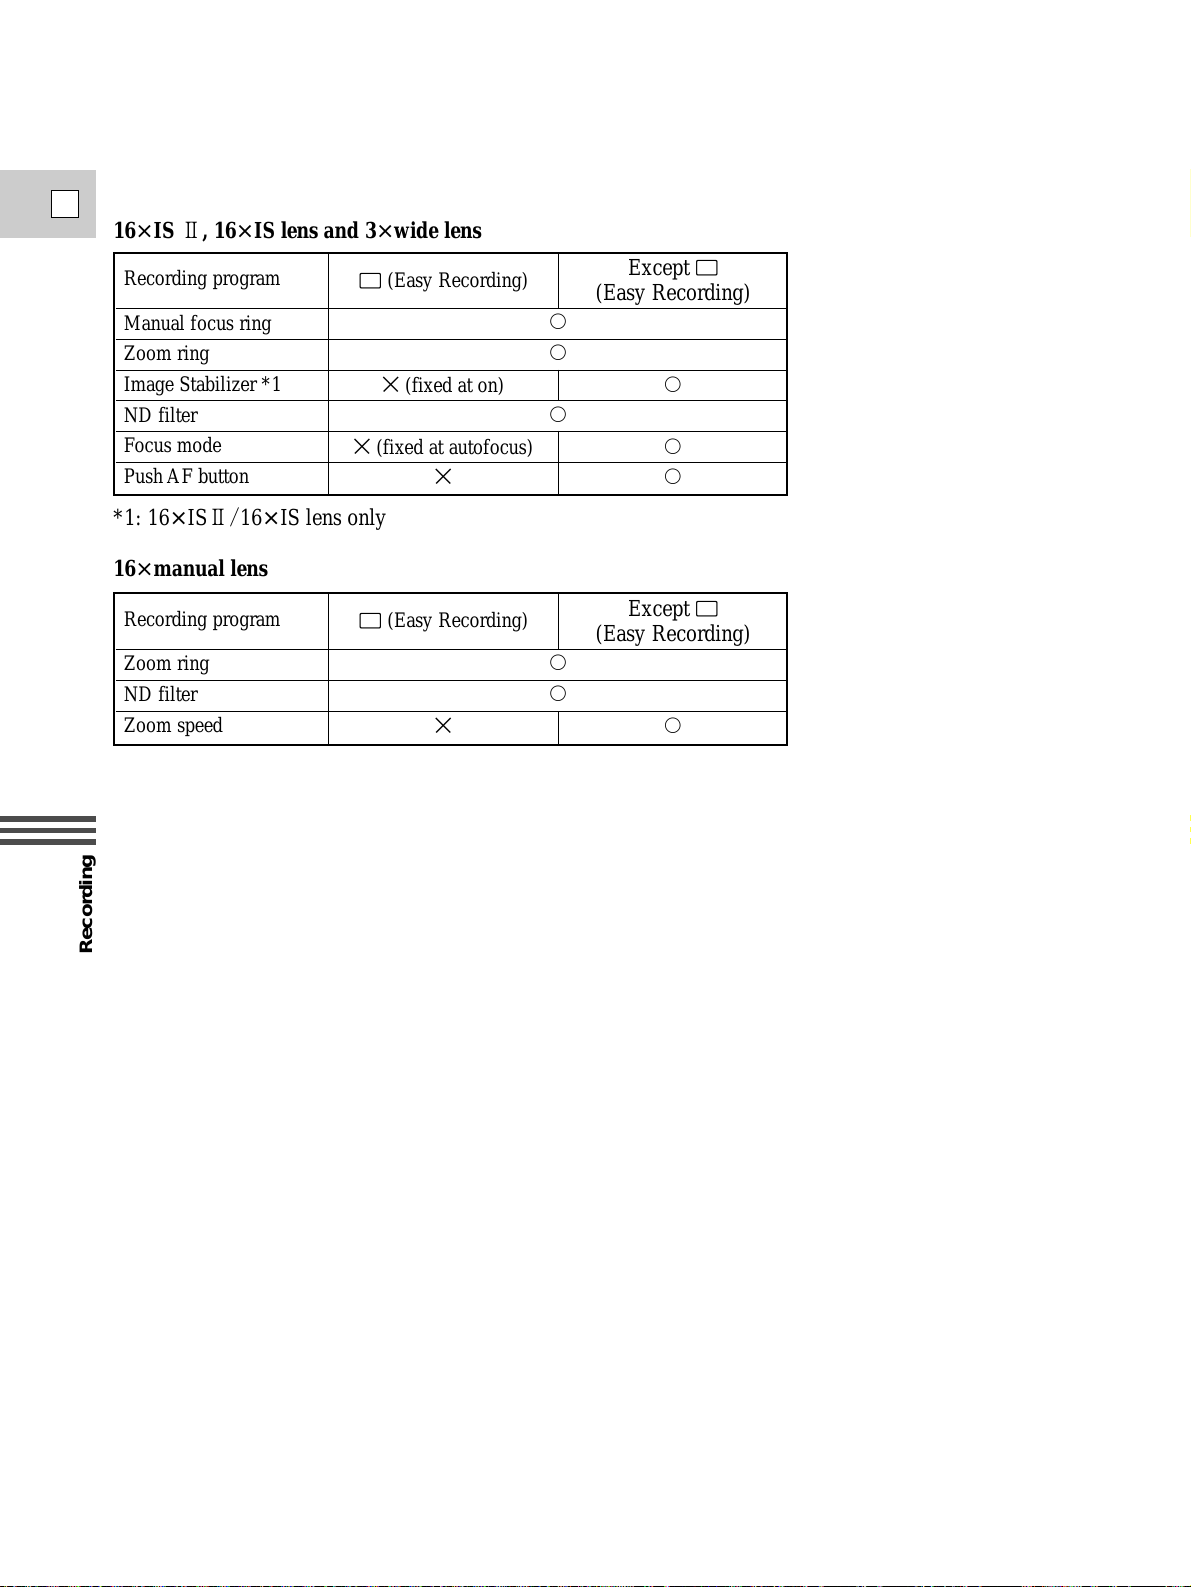
Available functions in recording programs vary by the lens type.
16× IS 2,16× IS lens and 3× wide lens
Recording program
Manual focus ring
Zoom ring
Image Stabilizer *1
ND filter
Focus mode
Push AF button
[
(Easy Recording)
i (fixed at on)
i (fixed at autofocus)
i
Except [
(Easy Recording)
h
h
h
*1: 16× IS2/16× IS lens only
h
h
h
16× manual lens
Recording program
Zoom ring
ND filter
Zoom speed
[
(Easy Recording)
i
Except [
(Easy Recording)
h
h
h
Page 49
Recording
E
49
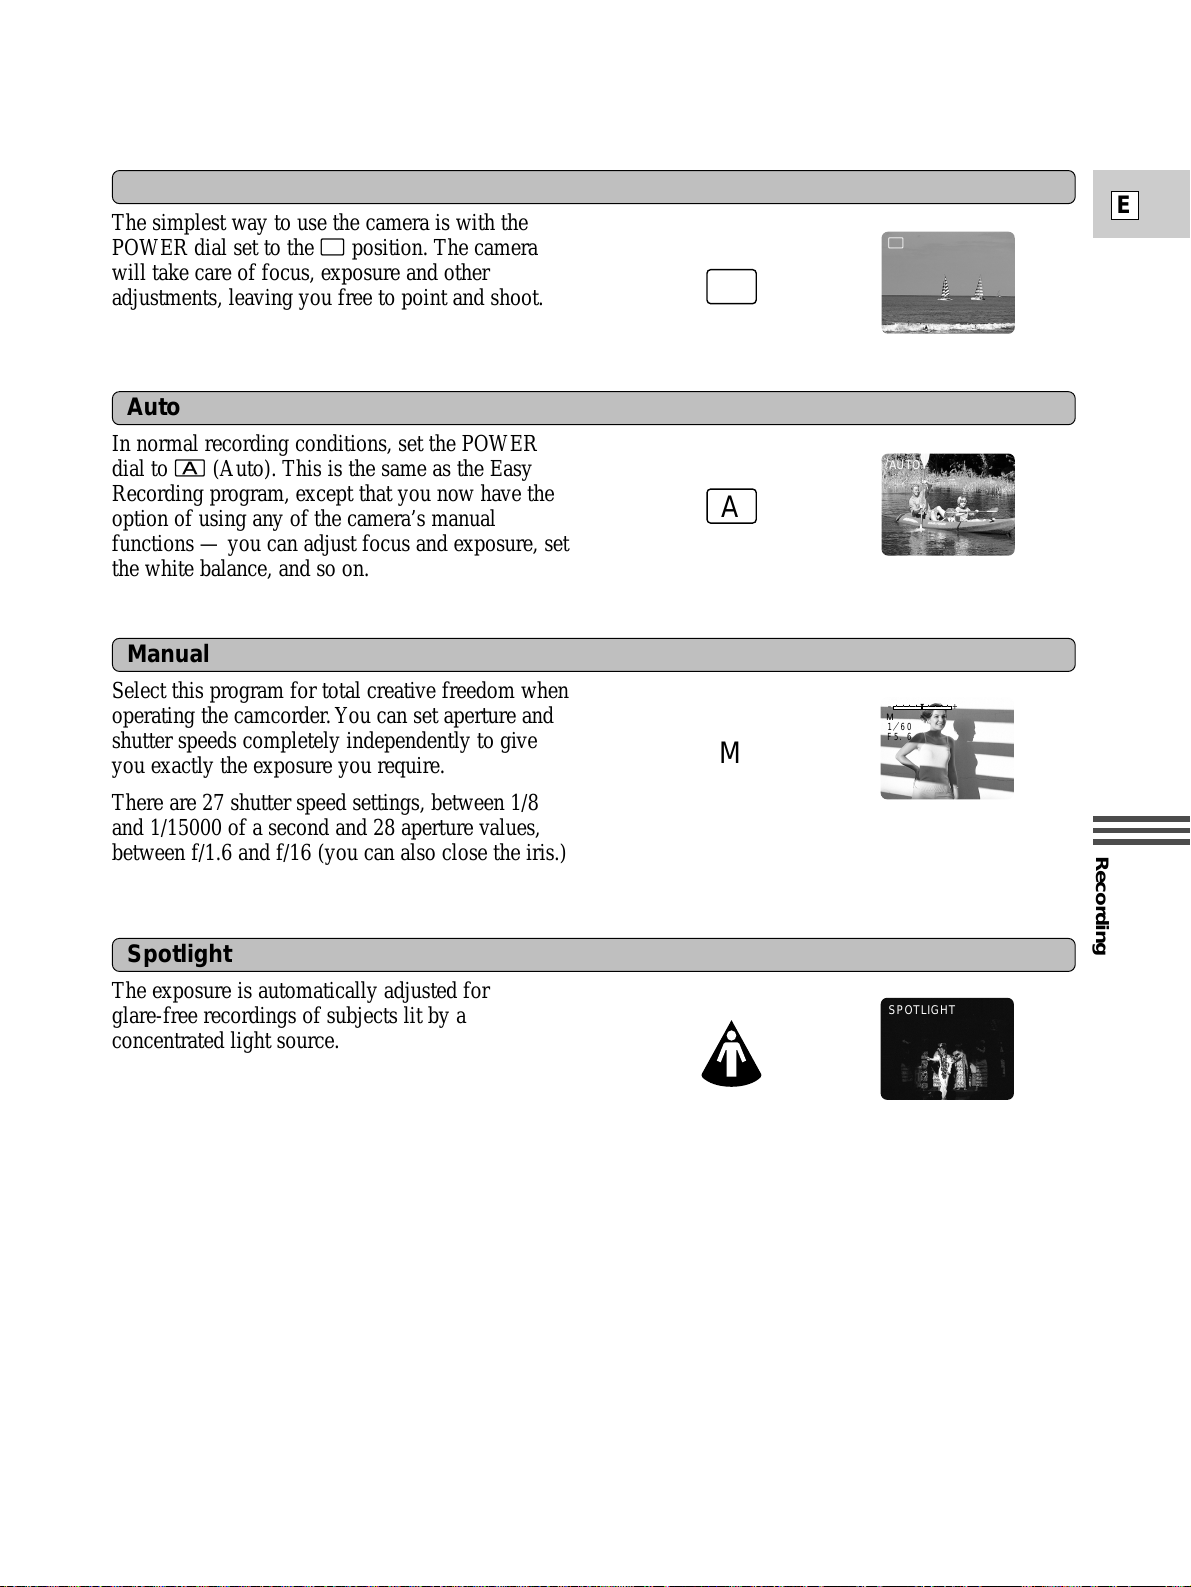
Select this program for total creative freedom when
operating the camcorder. You can set aperture and
shutter speeds completely independently to give
you exactly the exposure you require.
There are 27 shutter speed settings, between 1/8
and 1/15000 of a second and 28 aperture values,
between f/1.6 and f/16 (you can also close the iris.)
Manual
Spotlight
The exposure is automatically adjusted for
glare-free recordings of subjects lit by a
concentrated light source.
Auto
In normal recording conditions, set the POWER
dial to n (Auto). This is the same as the Easy
Recording program, except that you now have the
option of using any of the camera’s manual
functions — you can adjust focus and exposure, set
the white balance, and so on.
A
M
AUTO
SPOTLIGHT
The simplest way to use the camera is with the
POWER dial set to the [ position. The camera
will take care of focus, exposure and other
adjustments, leaving you free to point and shoot.
Easy Recording
[
+
–
1
F
/
60
5. 6
M
Page 50
Recording
E
50
Use this program to let you select the aperture (iris
diameter) to give you maximum control over the
depth of field.
A large F number (a small aperture) gives a greater
depth of field.
Giving priority to the aperture (aperture-priority: Av)
Av F2.8
Use this program to let you select the shutter
speed.
The camera sets the appropriate aperture
(F number) automatically to give the correct
exposure.
When you turn the POWER dial to Tv, the current
shutter speed is shown in the viewfinder. Select
your desired shutter speed by pressing the
SHUTTER
r and t buttons.
Giving priority to shutter speed (shutter-priority:Tv)
You can choose 12 shutter speeds between 1/8 and 1/15,000 of a second and also CS (Clear Scan) mode.
• If you try to set a shutter speed that is either too high or too low for the shooting conditions, the indicator
flashes in the viewfinder. In this case, increase or decrease the setting until the flashing stops, or slide the
ND FILTER switch ON/OFF as appropriate before changing the setting.
Note:
• When recording in extreme low-light conditions, we recommend the use of a Canon Speedlite or Video
Light (available as optional accessories, see page 60).
• Under very bright conditions when you have set the F number to f/16, blurring of the image may occur.
Check the image in the viewfinder while setting the aperture.
• When a lens that has a built-in ND filter is attached, if you switch the filter on, the intensity of the light is
reduced and the image in the viewfinder may go dark. In such a case, switch the filter off and change the
aperture setting.
• When shooting in the [ (Easy Recording) or n (Auto) programs on bright sunny days outdoors, the
camera may display “ND ON”/“ND OFF” repeatedly. In this case, it may be effective to switch to the Av
recording program and adjust the setting of the F number to between f/5.6 and f/11 (the shutter speed may
become higher than usual).
The camera sets the appropriate shutter speed automatically to give the correct exposure. When you turn the
POWER dial to Av the current F number is shown in the viewfinder. Select your desired F number by
turning the IRIS/SELECT dial.
You can choose 8 F numbers between f/1.6 and f/16, and CLOSE to shut the iris completely. If you try to
set an F number that is too high or too low for the shooting conditions, the indicator flashes in the
viewfinder. In this case, increase or decrease the setting until the flashing stops.
Note:
• The camera memorizes the latest Tv or Av value until a new value is set except when you change the
exposure after locking the exposure.
Turning off the camcorder or changing the recording program does not erase the stored value.
Tv 1000
Tv
Av
Page 51
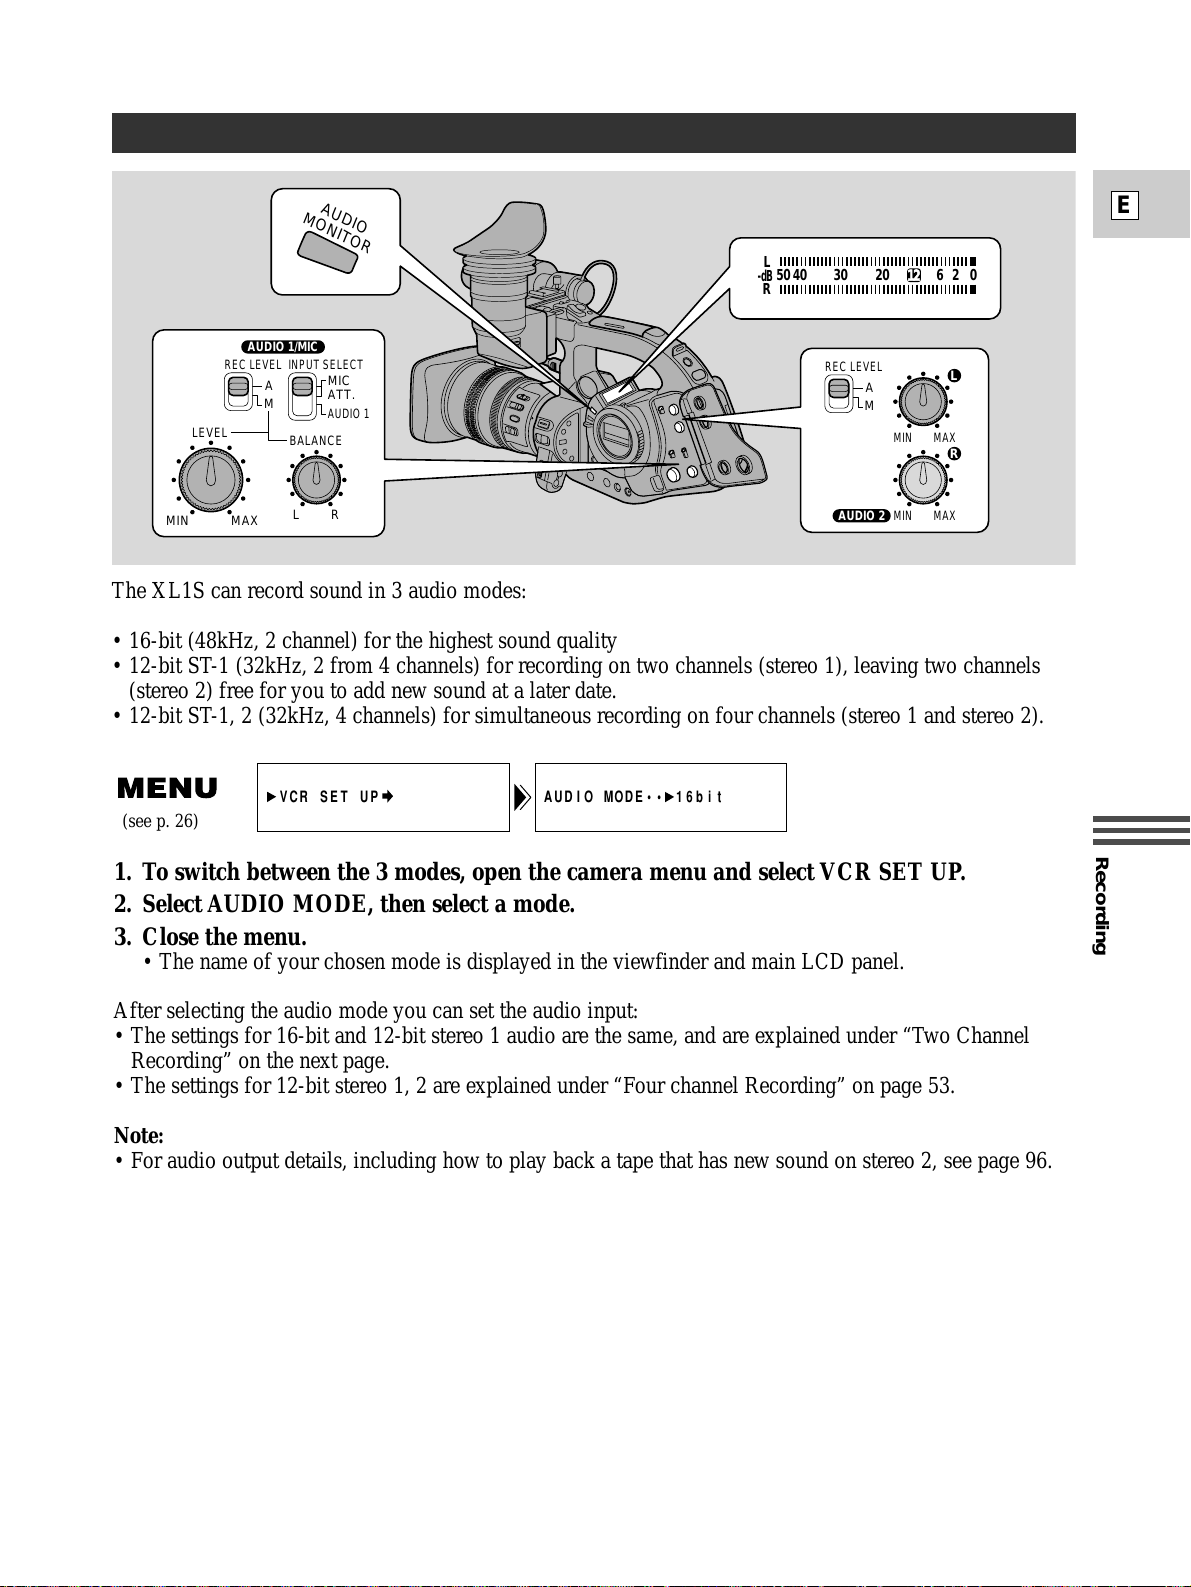
Recording
E
51
The XL1S can record sound in 3 audio modes:
• 16-bit (48kHz, 2 channel) for the highest sound quality
• 12-bit ST-1 (32kHz, 2 from 4 channels) for recording on two channels (stereo 1), leaving two channels
(stereo 2) free for you to add new sound at a later date.
• 12-bit ST-1, 2 (32kHz, 4 channels) for simultaneous recording on four channels (stereo 1 and stereo 2).
AUDIO MODE•• 16bit
VCR SET UP
Selecting the Audio Mode
REC LEVEL
A
M
INPUT SELECT
MIC
ATT.
AUDIO 1
MIN MAX
LR
BALANCE
LEVEL
AUDIO 1/MIC
REC LEVEL
A
M
MIN MAX
MIN MAX
L
R
AUDIO 2
AUDIO
MONITOR
026
20
40
30
50
R
L
-dB
12
1. To switch between the 3 modes, open the camera menu and select VCR SET UP.
2. Select AUDIO MODE, then select a mode.
3. Close the menu.
• The name of your chosen mode is displayed in the viewfinder and main LCD panel.
After selecting the audio mode you can set the audio input:
• The settings for 16-bit and 12-bit stereo 1 audio are the same, and are explained under “Two Channel
Recording” on the next page.
• The settings for 12-bit stereo 1, 2 are explained under “Four channel Recording” on page 53.
Note:
• For audio output details, including how to play back a tape that has new sound on stereo 2, see page 96.
(see p. 26)
Page 52
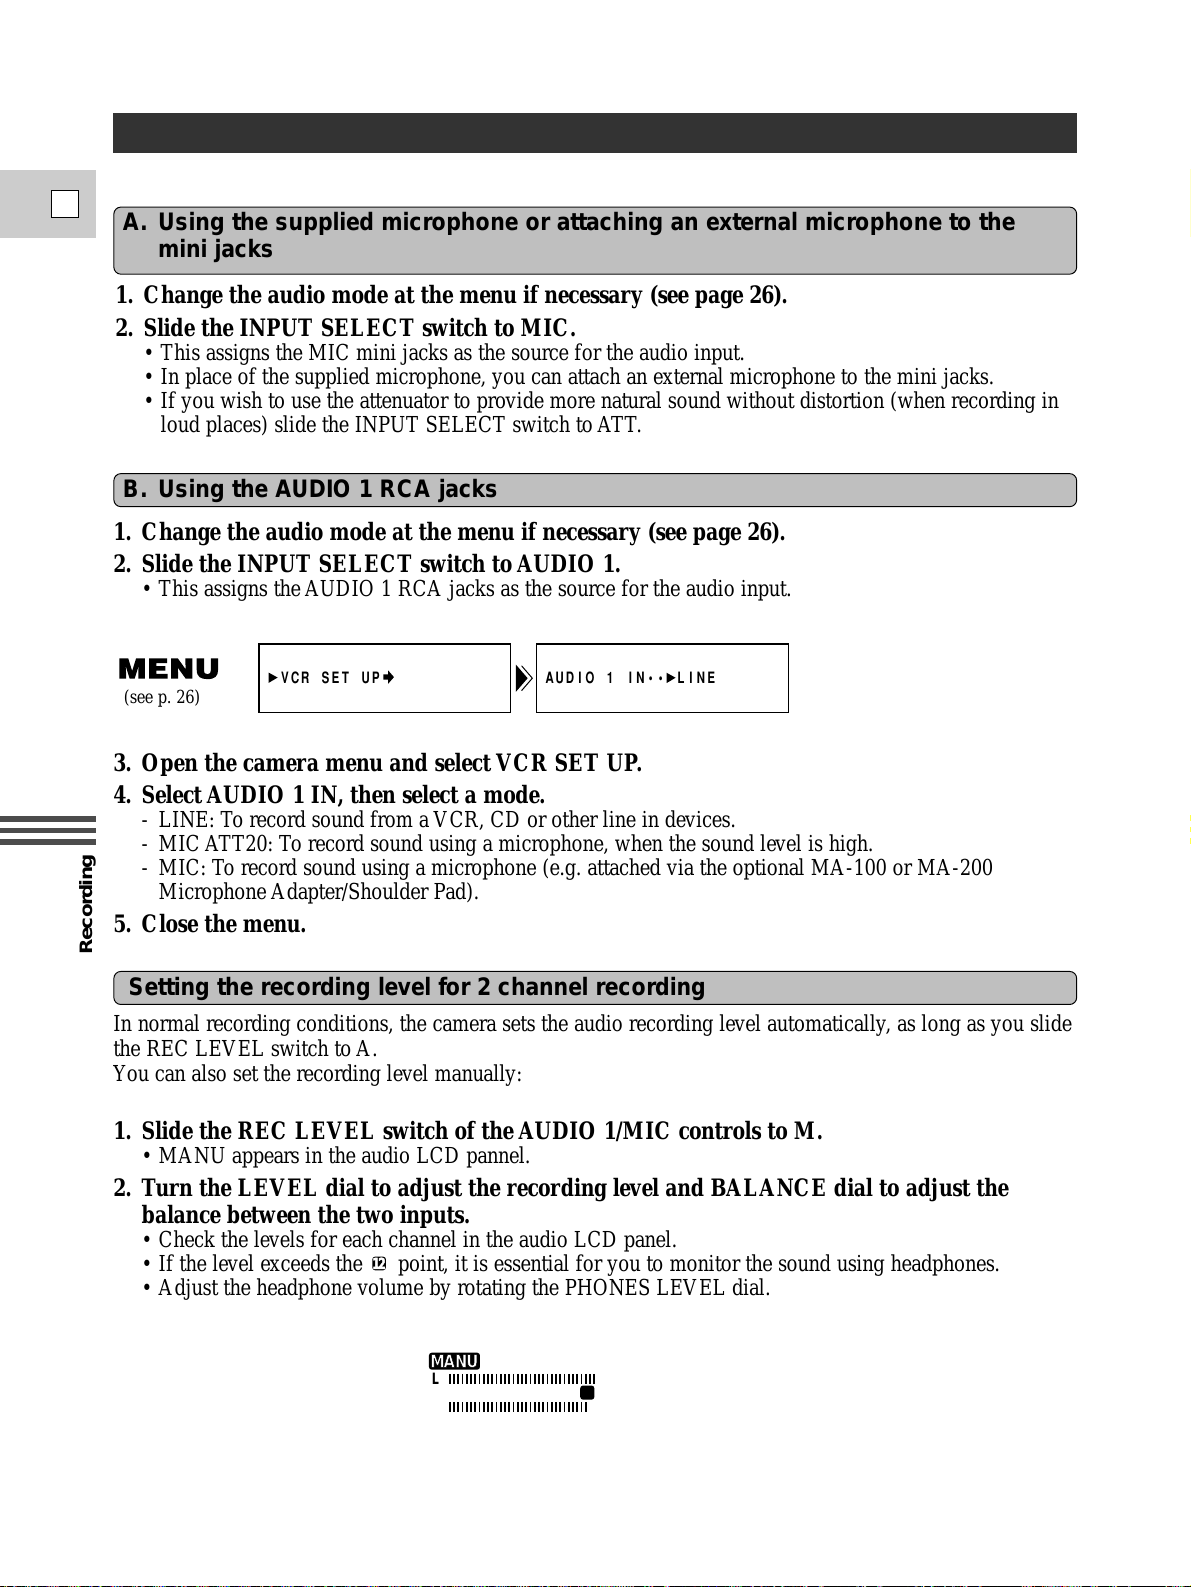
Recording
E
52
Set the input for Stereo 1 in one of two ways, A or B, depending on the source for the input:
Setting the Audio Input — Two Channel Recording
1. Change the audio mode at the menu if necessary (see page 26).
2. Slide the INPUT SELECT switch to AUDIO 1.
• This assigns the AUDIO 1 RCA jacks as the source for the audio input.
In normal recording conditions, the camera sets the audio recording level automatically, as long as you slide
the REC LEVEL switch to A.
You can also set the recording level manually:
1. Slide the REC LEVEL switch of the AUDIO 1/MIC controls to M.
• MANU appears in the audio LCD pannel.
2. Turn the LEVEL dial to adjust the recording level and BALANCE dial to adjust the
balance between the two inputs.
• Check the levels for each channel in the audio LCD panel.
• If the level exceeds the point, it is essential for you to monitor the sound using headphones.
• Adjust the headphone volume by rotating the PHONES LEVEL dial.
12
Setting the recording level for 2 channel recording
A. Using the supplied microphone or attaching an external microphone to the
mini jacks
(see p. 26)
3. Open the camera menu and select VCR SET UP.
4. Select AUDIO 1 IN, then select a mode.
- LINE: To record sound from a VCR, CD or other line in devices.
- MIC ATT20: To record sound using a microphone, when the sound level is high.
- MIC: To record sound using a microphone (e.g. attached via the optional MA-100 or MA-200
Microphone Adapter/Shoulder Pad).
5. Close the menu.
1. Change the audio mode at the menu if necessary (see page 26).
2. Slide the INPUT SELECT switch to MIC.
• This assigns the MIC mini jacks as the source for the audio input.
• In place of the supplied microphone, you can attach an external microphone to the mini jacks.
• If you wish to use the attenuator to provide more natural sound without distortion (when recording in
loud places) slide the INPUT SELECT switch to ATT.
B. Using the AUDIO 1 RCA jacks
VCR SET UP
AUDIO 1 IN•• LINE
MANU
L
-dB
40
30
50
R
20
12
026
Page 53
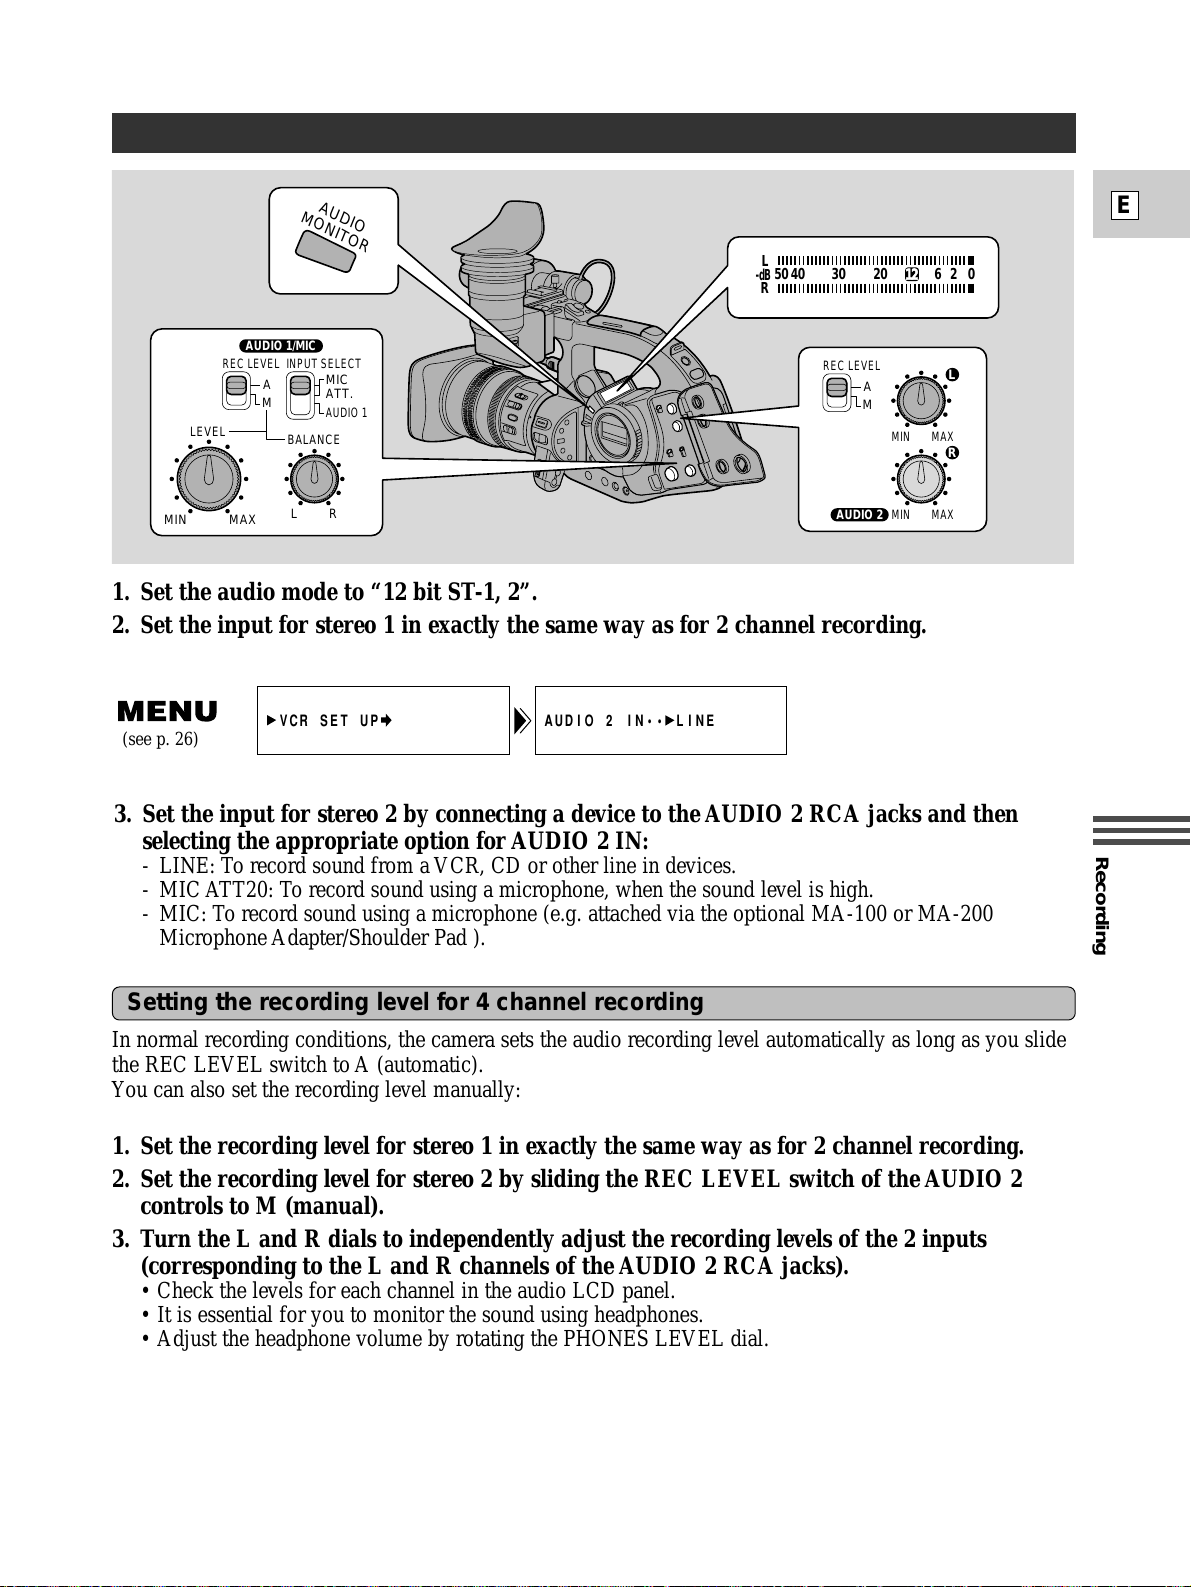
Recording
E
53
In normal recording conditions, the camera sets the audio recording level automatically as long as you slide
the REC LEVEL switch to A (automatic).
You can also set the recording level manually:
1. Set the recording level for stereo 1 in exactly the same way as for 2 channel recording.
2. Set the recording level for stereo 2 by sliding the REC LEVEL switch of the AUDIO 2
controls to M (manual).
3. Turn the L and R dials to independently adjust the recording levels of the 2 inputs
(corresponding to the L and R channels of the AUDIO 2 RCA jacks).
• Check the levels for each channel in the audio LCD panel.
• It is essential for you to monitor the sound using headphones.
• Adjust the headphone volume by rotating the PHONES LEVEL dial.
Setting the recording level for 4 channel recording
1. Set the audio mode to “12 bit ST-1, 2”.
2. Set the input for stereo 1 in exactly the same way as for 2 channel recording.
AUDIO 2 IN•• LINE
VCR SET UP
3. Set the input for stereo 2 by connecting a device to the AUDIO 2 RCA jacks and then
selecting the appropriate option for AUDIO 2 IN:
- LINE: To record sound from a VCR, CD or other line in devices.
- MIC ATT20: To record sound using a microphone, when the sound level is high.
- MIC: To record sound using a microphone (e.g. attached via the optional MA-100 or MA-200
Microphone Adapter/Shoulder Pad ).
(see p. 26)
Setting the Audio Input — 4 Channel Recording
REC LEVEL
A
M
INPUT SELECT
MIC
ATT.
AUDIO 1
MIN MAX
LR
BALANCE
LEVEL
AUDIO 1/MIC
REC LEVEL
A
M
MIN MAX
MIN MAX
L
R
AUDIO 2
AUDIO
MONITOR
026
20
40
30
50
R
L
-dB
12
Page 54
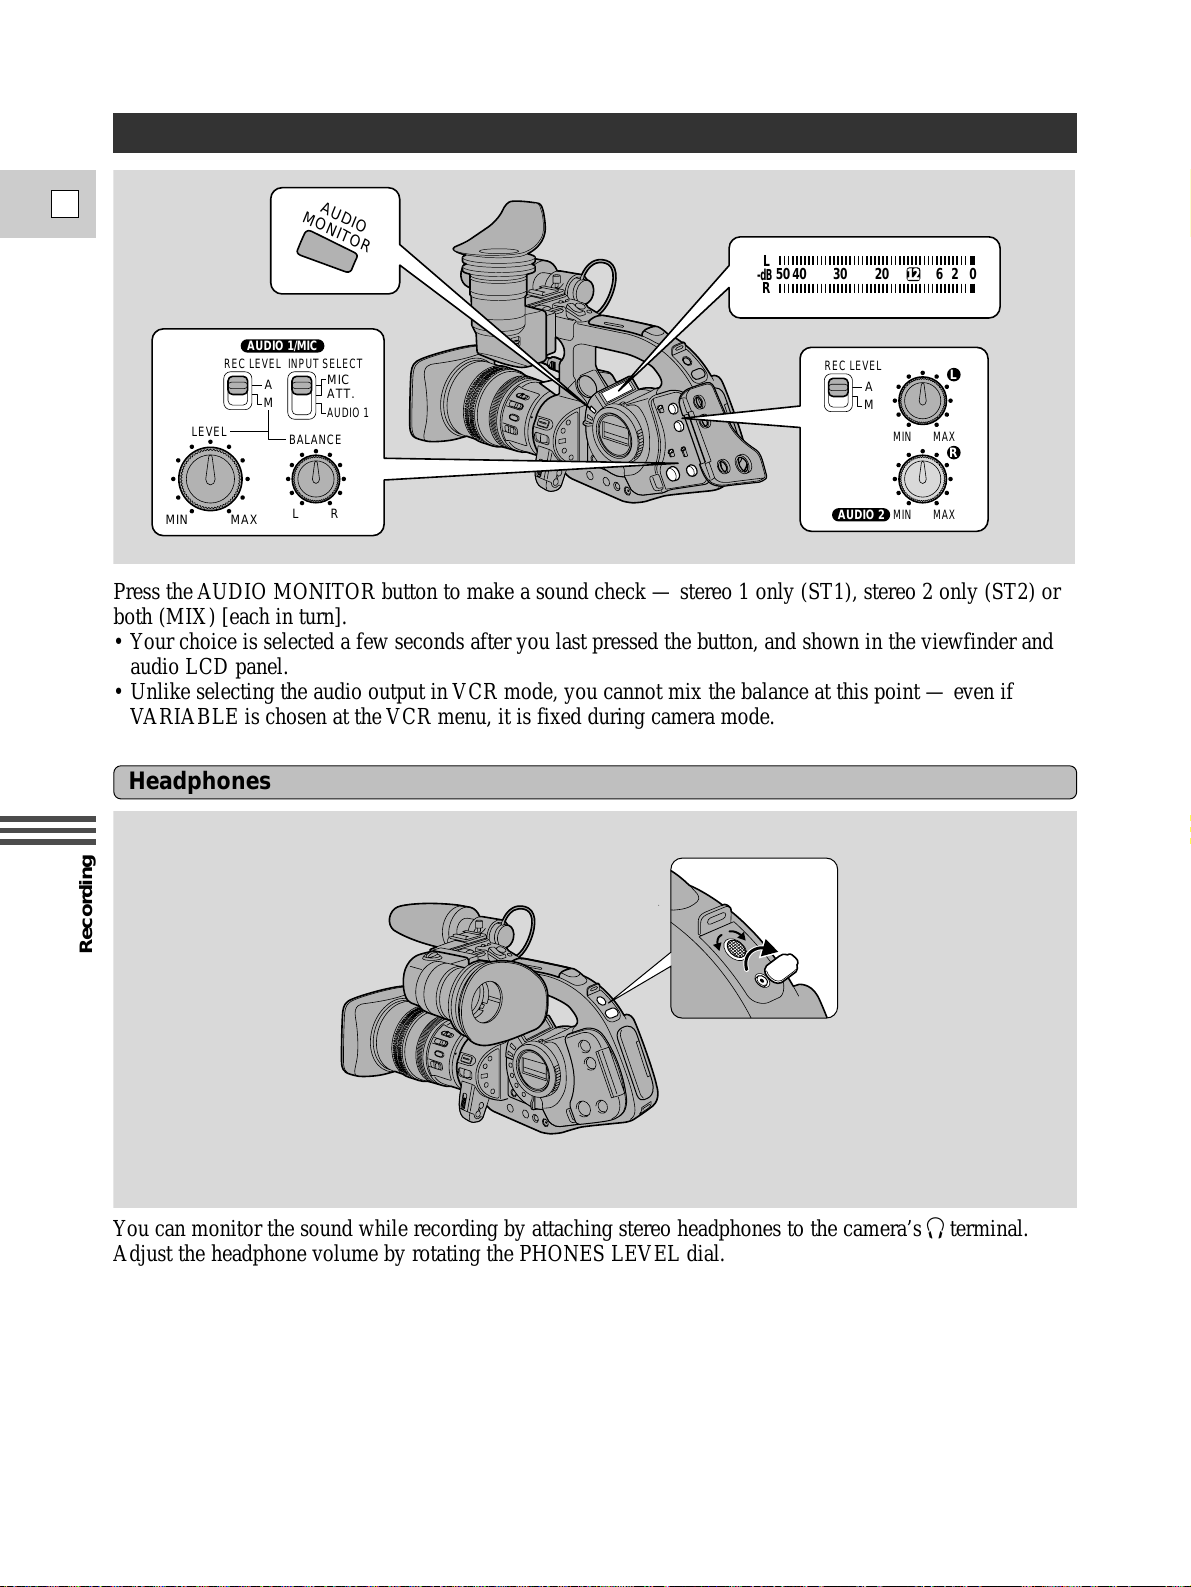
Recording
E
54
Press the AUDIO MONITOR button to make a sound check — stereo 1 only (ST1), stereo 2 only (ST2) or
both (MIX) [each in turn].
• Your choice is selected a few seconds after you last pressed the button, and shown in the viewfinder and
audio LCD panel.
• Unlike selecting the audio output in VCR mode, you cannot mix the balance at this point — even if
VARIABLE is chosen at the VCR menu, it is fixed during camera mode.
You can monitor the sound while recording by attaching stereo headphones to the camera’s H terminal.
Adjust the headphone volume by rotating the PHONES LEVEL dial.
Headphones
Making a Sound Check
REC LEVEL
A
M
INPUT SELECT
MIC
ATT.
AUDIO 1
MIN MAX
LR
BALANCE
LEVEL
AUDIO 1/MIC
REC LEVEL
A
M
MIN MAX
MIN MAX
L
R
AUDIO 2
AUDIO
MONITOR
026
20
40
30
50
R
L
-dB
12
Page 55
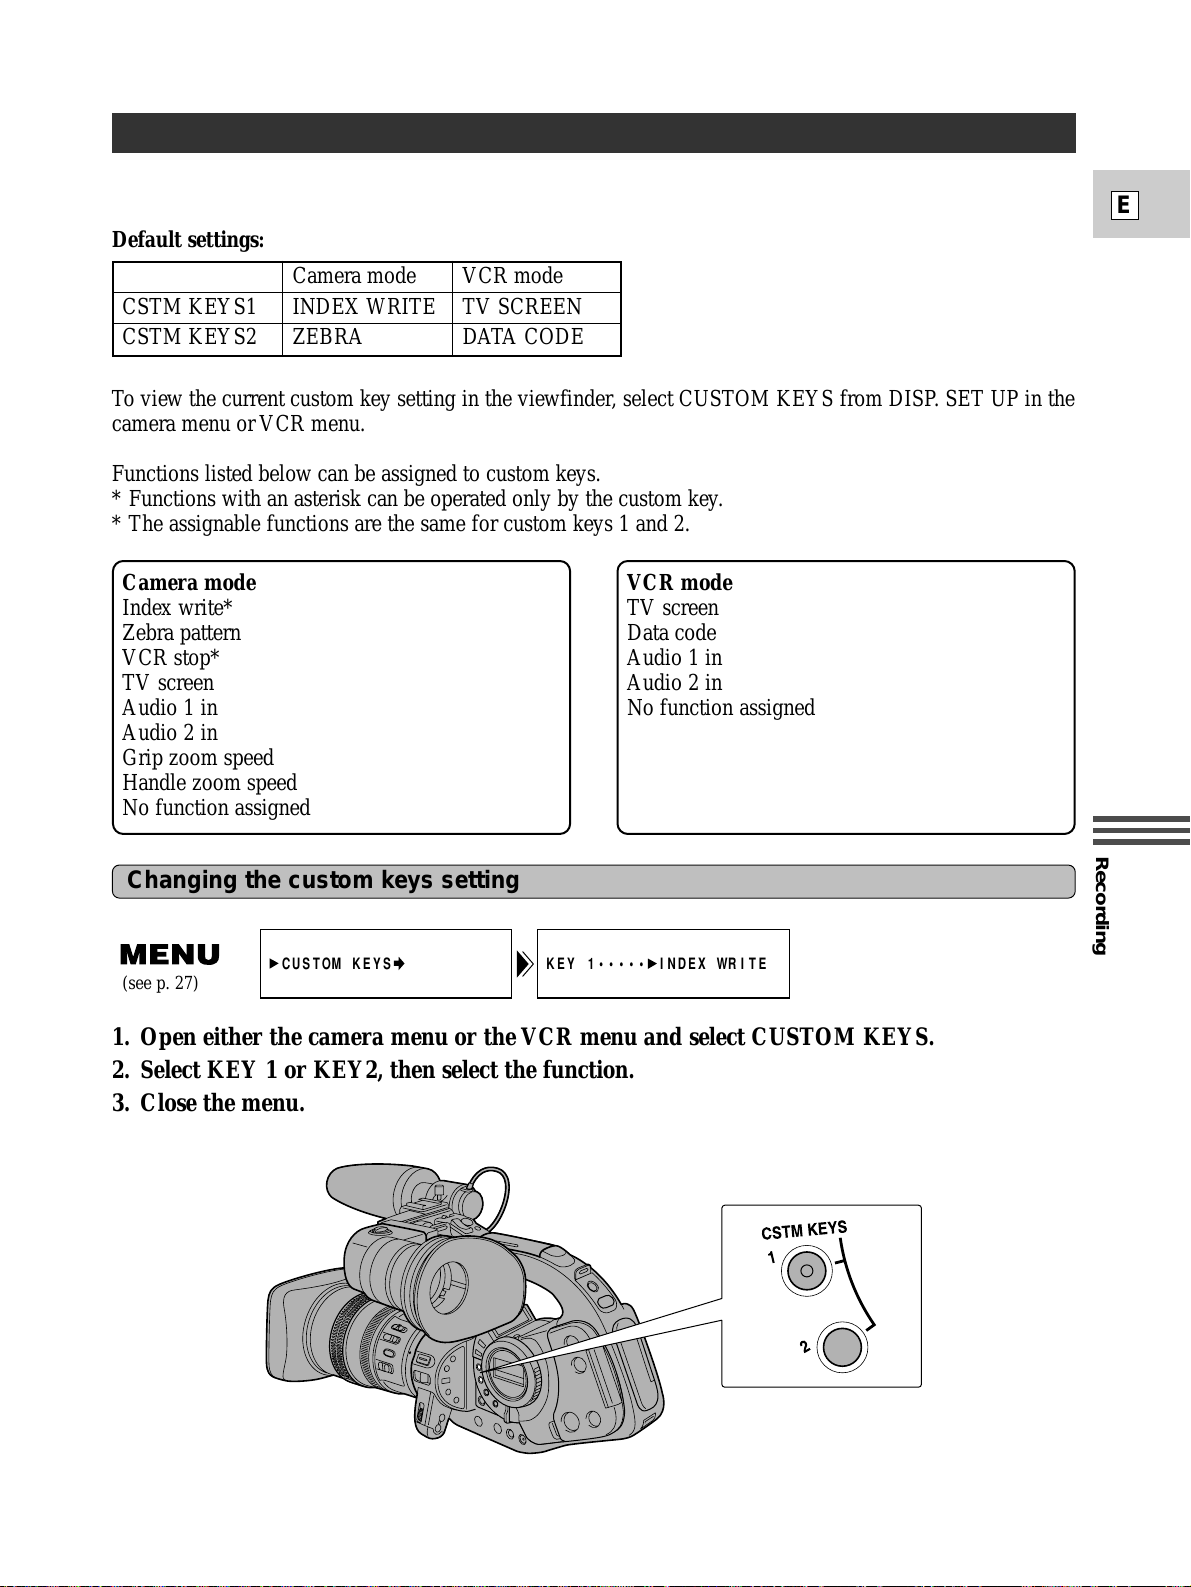
Recording
E
55
Changing the custom keys setting
Using the Custom Keys
You can assign frequently used functions to the custom keys (for camera mode and VCR mode
independently). This allows you to customize the camera to your recording situations.
Default settings:
Camera mode VCR mode
CSTM KEYS1 INDEX WRITE TV SCREEN
CSTM KEYS2 ZEBRA DATA CODE
To view the current custom key setting in the viewfinder, select CUSTOM KEYS from DISP. SET UP in the
camera menu or VCR menu.
Functions listed below can be assigned to custom keys.
* Functions with an asterisk can be operated only by the custom key.
* The assignable functions are the same for custom keys 1 and 2.
Camera mode
Index write*
Zebra pattern
VCR stop*
TV screen
Audio 1 in
Audio 2 in
Grip zoom speed
Handle zoom speed
No function assigned
VCR mode
TV screen
Data code
Audio 1 in
Audio 2 in
No function assigned
1. Open either the camera menu or the VCR menu and select CUSTOM KEYS.
2. Select KEY 1 or KEY2, then select the function.
3. Close the menu.
KEY 1••••• INDEX WRITECUSTOM KEYS
(see p. 27)
Page 56
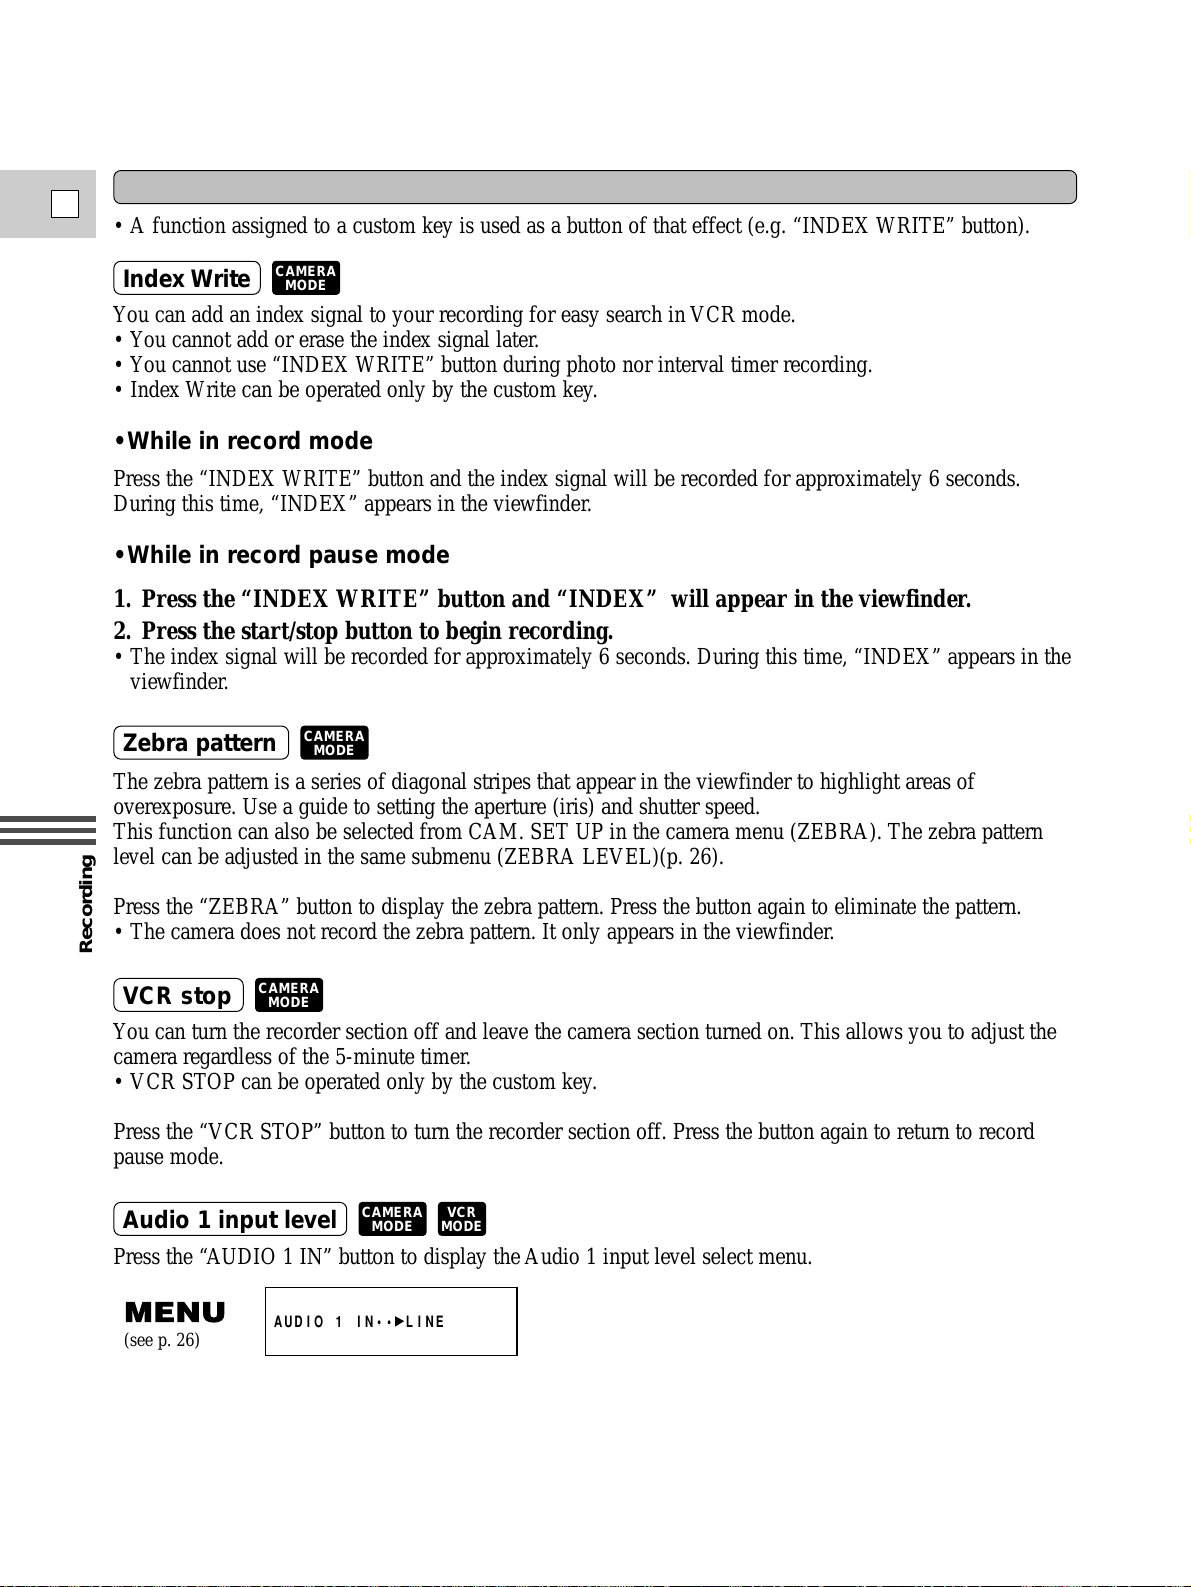
Recording
E
56
Operating the CSTM KEY button
Index Write
Zebra pattern
VCR stop
Audio 1 input level
• A function assigned to a custom key is used as a button of that effect (e.g. “INDEX WRITE” button).
You can add an index signal to your recording for easy search in VCR mode.
• You cannot add or erase the index signal later.
• You cannot use “INDEX WRITE” button during photo nor interval timer recording.
• Index Write can be operated only by the custom key.
• While in record mode
Press the “INDEX WRITE” button and the index signal will be recorded for approximately 6 seconds.
During this time, “INDEX” appears in the viewfinder.
• While in record pause mode
1. Press the “INDEX WRITE” button and “INDEX” will appear in the viewfinder.
2. Press the start/stop button to begin recording.
• The index signal will be recorded for approximately 6 seconds. During this time, “INDEX” appears in the
viewfinder.
The zebra pattern is a series of diagonal stripes that appear in the viewfinder to highlight areas of
overexposure. Use a guide to setting the aperture (iris) and shutter speed.
This function can also be selected from CAM. SET UP in the camera menu (ZEBRA). The zebra pattern
level can be adjusted in the same submenu (ZEBRA LEVEL)(p. 26).
Press the “ZEBRA” button to display the zebra pattern. Press the button again to eliminate the pattern.
• The camera does not record the zebra pattern. It only appears in the viewfinder.
You can turn the recorder section off and leave the camera section turned on. This allows you to adjust the
camera regardless of the 5-minute timer.
• VCR STOP can be operated only by the custom key.
Press the “VCR STOP” button to turn the recorder section off. Press the button again to return to record
pause mode.
Press the “AUDIO 1 IN” button to display the Audio 1 input level select menu.
1. Select the input level from MIC, MIC ATT 20 (mic level with attenuator 20dB), LINE.
2. Close the menu by pressing the IRIS/SELECT dial.
AUDIO 1 IN•• LINE
(see p. 26)
CAMERA
MODE
CAMERA
MODE
CAMERA
MODE
CAMERA
MODE
VCR
MODE
Page 57
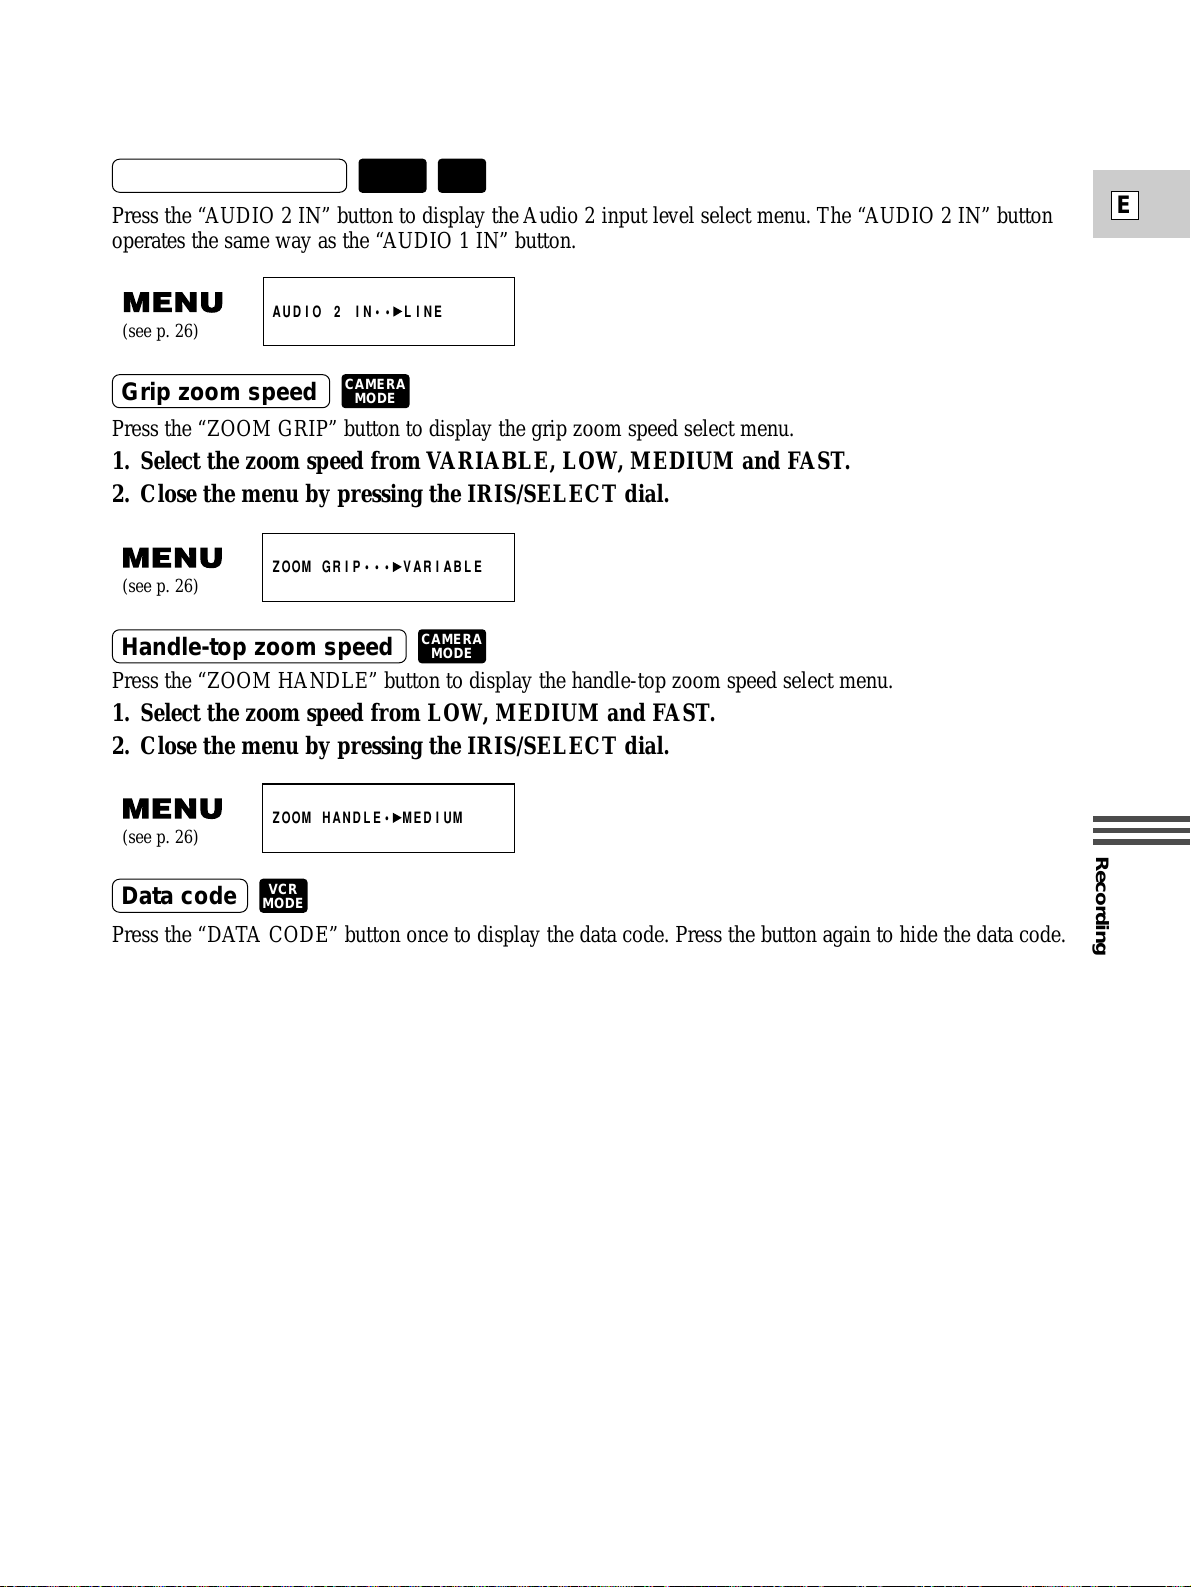
Recording
E
57
Grip zoom speed
Audio 2 input level
Press the “AUDIO 2 IN” button to display the Audio 2 input level select menu. The “AUDIO 2 IN” button
operates the same way as the “AUDIO 1 IN” button.
Press the “ZOOM GRIP” button to display the grip zoom speed select menu.
1. Select the zoom speed from VARIABLE, LOW, MEDIUM and FAST.
2. Close the menu by pressing the IRIS/SELECT dial.
Press the “ZOOM HANDLE” button to display the handle-top zoom speed select menu.
1. Select the zoom speed from LOW, MEDIUM and FAST.
2. Close the menu by pressing the IRIS/SELECT dial.
Press the “DATA CODE” button once to display the data code. Press the button again to hide the data code.
AUDIO 2 IN•• LINE
(see p. 26)
ZOOM GRIP••• VARIABLE
(see p. 26)
ZOOM HANDLE• MEDIUM
(see p. 26)
Handle-top zoom speed
Data code
CAMERA
MODE
CAMERA
MODE
VCR
MODE
VCR
MODE
CAMERA
MODE
Page 58
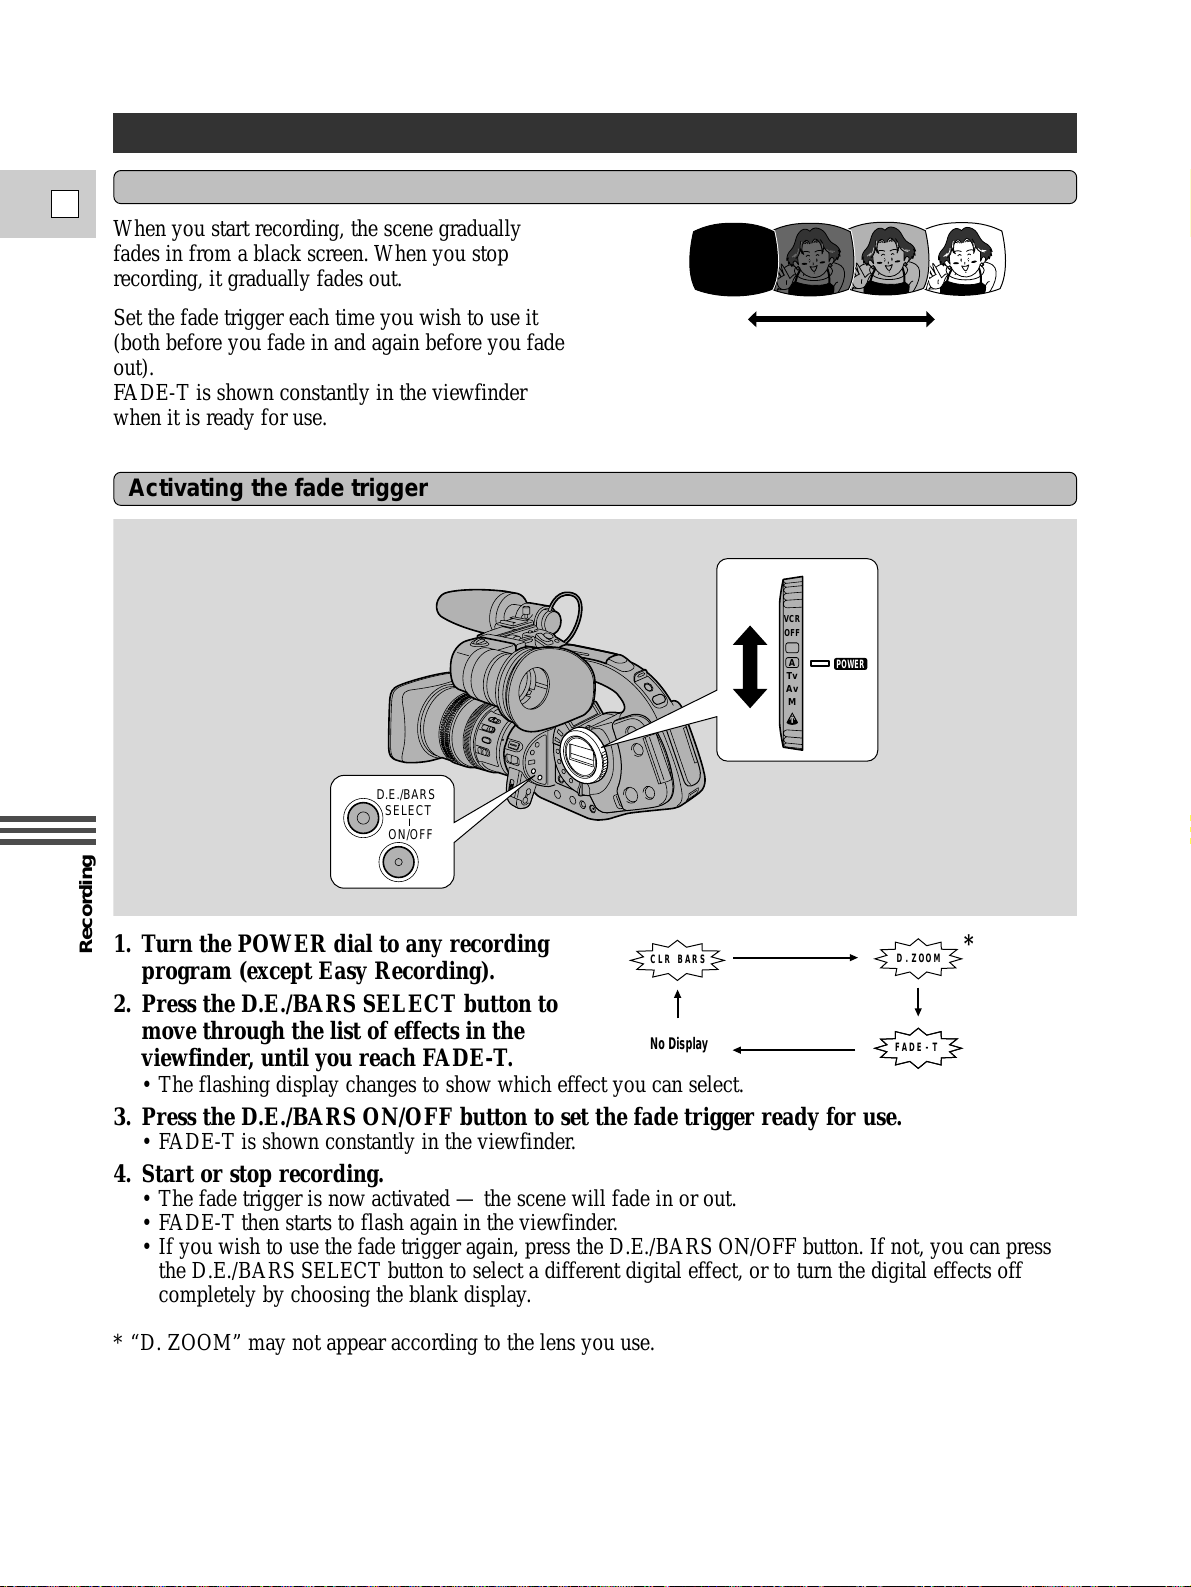
Recording
E
58
Set the fade trigger each time you wish to use it
(both before you fade in and again before you fade
out).
FADE-T is shown constantly in the viewfinder
when it is ready for use.
1. Turn the POWER dial to any recording
program (except Easy Recording).
2. Press the D.E./BARS SELECT button to
move through the list of effects in the
viewfinder, until you reach FADE-T.
D.E./BARS
SELECT
ON/OFF
POWER
VCR
OFF
Tv
Av
M
A
Activating the fade trigger
When you start recording, the scene gradually
fades in from a black screen. When you stop
recording, it gradually fades out.
Fade trigger
Fading In and Out Between Scenes
E-TFAD
No Display
OOMD.Z
BCLR SAR
• The flashing display changes to show which effect you can select.
3. Press the D.E./BARS ON/OFF button to set the fade trigger ready for use.
• FADE-T is shown constantly in the viewfinder.
4. Start or stop recording.
• The fade trigger is now activated — the scene will fade in or out.
• FADE-T then starts to flash again in the viewfinder.
• If you wish to use the fade trigger again, press the D.E./BARS ON/OFF button. If not, you can press
the D.E./BARS SELECT button to select a different digital effect, or to turn the digital effects off
completely by choosing the blank display.
* “D. ZOOM” may not appear according to the lens you use.
*
Page 59
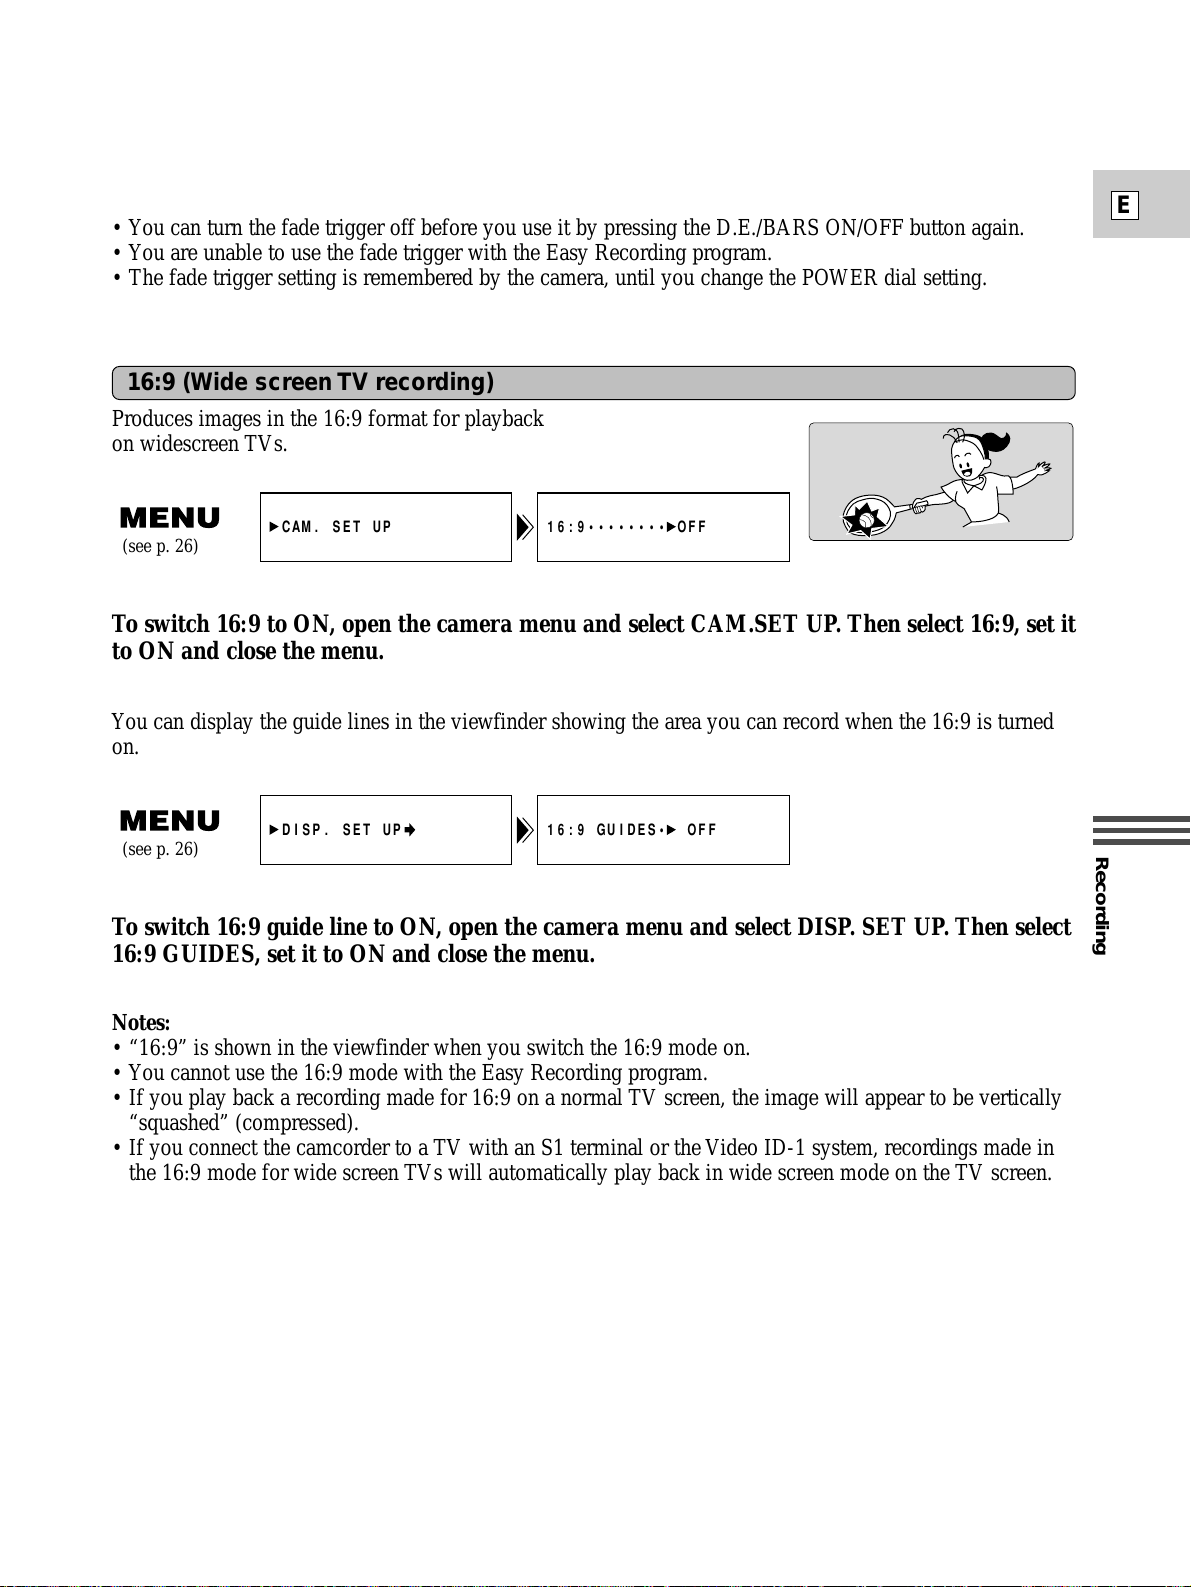
Recording
E
59
Notes:
• You cannot select a different digital effect while the fade trigger is still turned on.
• You can turn the fade trigger off before you use it by pressing the D.E./BARS ON/OFF button again.
• You are unable to use the fade trigger with the Easy Recording program.
• The fade trigger setting is remembered by the camera, until you change the POWER dial setting.
16:9 (Wide screen TV recording)
Produces images in the 16:9 format for playback
on widescreen TVs.
To switch 16:9 to ON, open the camera menu and select CAM.SET UP. Then select 16:9, set it
to ON and close the menu.
Notes:
• “16:9” is shown in the viewfinder when you switch the 16:9 mode on.
• You cannot use the 16:9 mode with the Easy Recording program.
• If you play back a recording made for 16:9 on a normal TV screen, the image will appear to be vertically
“squashed” (compressed).
• If you connect the camcorder to a TV with an S1 terminal or the Video ID-1 system, recordings made in
the 16:9 mode for wide screen TVs will automatically play back in wide screen mode on the TV screen.
16:9•••••••• OFFCAM. SET UP
(see p. 26)
You can display the guide lines in the viewfinder showing the area you can record when the 16:9 is turned
on.
To switch 16:9 guide line to ON, open the camera menu and select DISP. SET UP. Then select
16:9 GUIDES, set it to ON and close the menu.
16:9 GUIDES•• OFFDISP. SET UP
(see p. 26)
Page 60
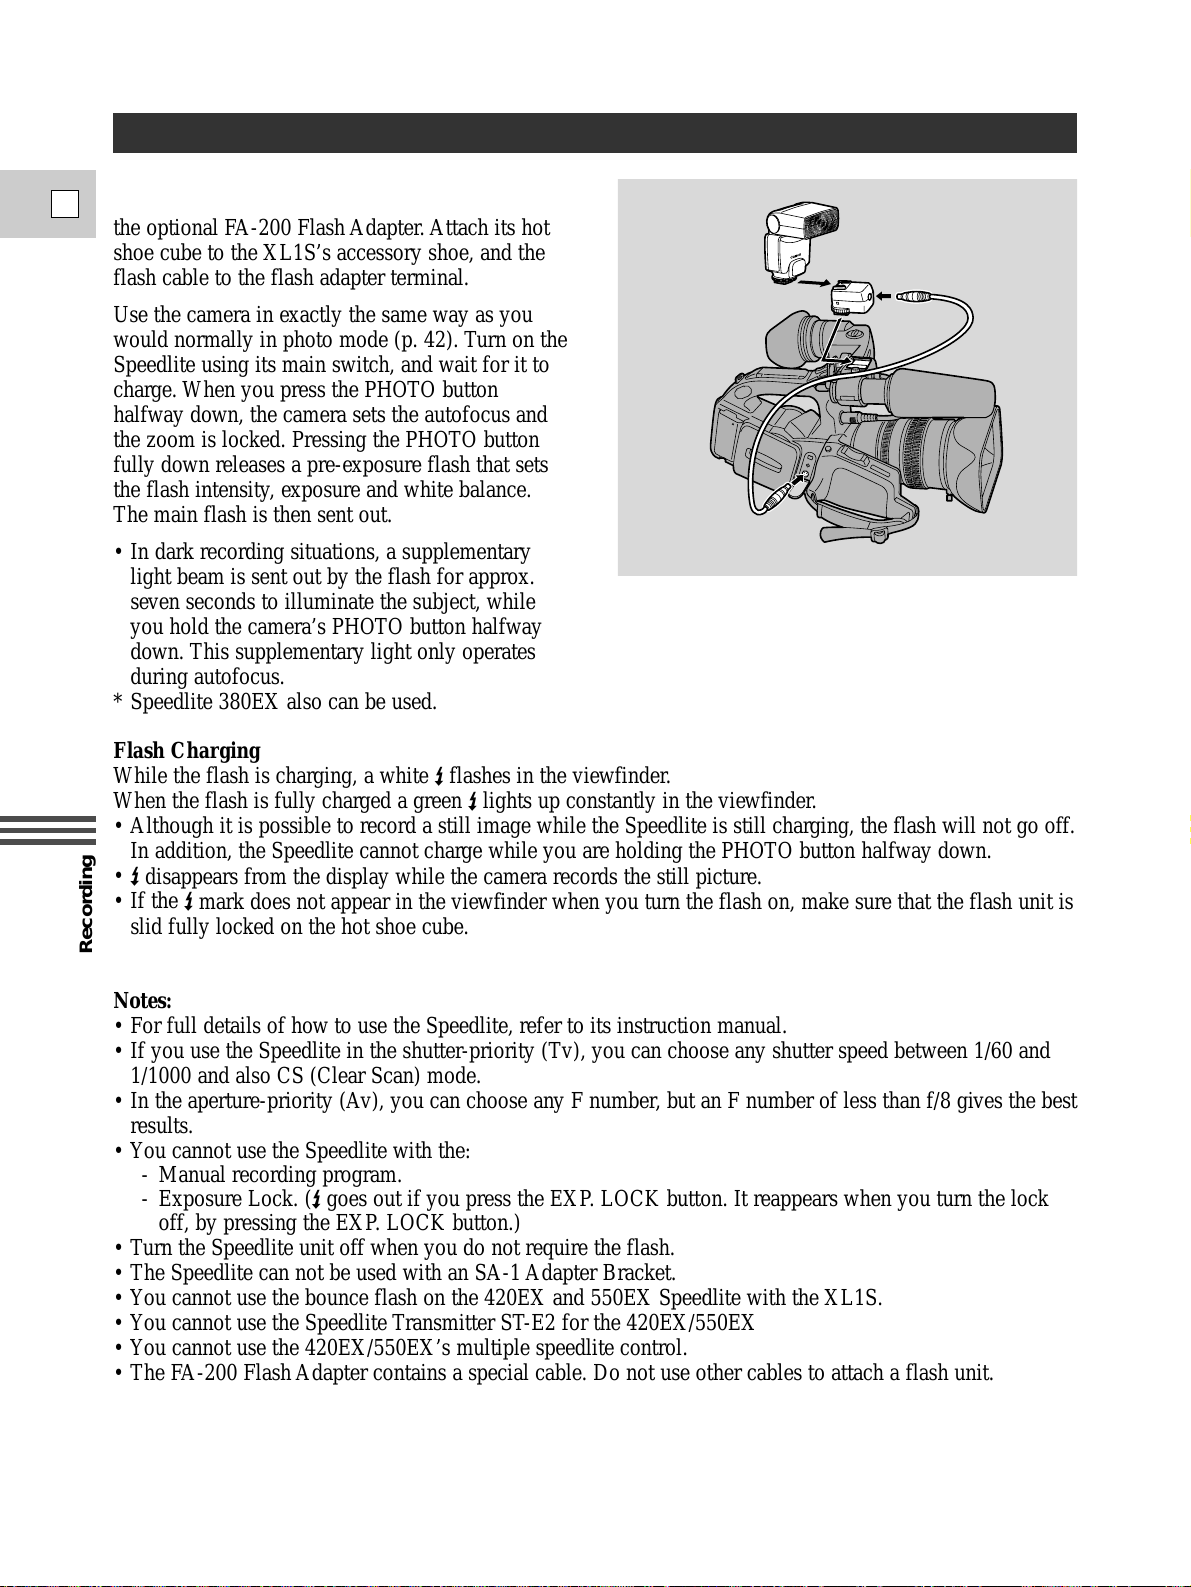
Recording
E
60
Using a Canon Speedlite for Flash Photography
(optional)
For SLR-style flash photography, attach a Canon
Speedlite 420EX or 550EX* to the camera using
the optional FA-200 Flash Adapter. Attach its hot
shoe cube to the XL1S’s accessory shoe, and the
flash cable to the flash adapter terminal.
Use the camera in exactly the same way as you
would normally in photo mode (p. 42). Turn on the
Speedlite using its main switch, and wait for it to
charge. When you press the PHOTO button
halfway down, the camera sets the autofocus and
the zoom is locked. Pressing the PHOTO button
fully down releases a pre-exposure flash that sets
the flash intensity, exposure and white balance.
The main flash is then sent out.
• In dark recording situations, a supplementary
light beam is sent out by the flash for approx.
seven seconds to illuminate the subject, while
you hold the camera’s PHOTO button halfway
down. This supplementary light only operates
during autofocus.
* Speedlite 380EX also can be used.
Flash Charging
While the flash is charging, a whiteSflashes in the viewfinder.
When the flash is fully charged a greenSlights up constantly in the viewfinder.
• Although it is possible to record a still image while the Speedlite is still charging, the flash will not go off.
In addition, the Speedlite cannot charge while you are holding the PHOTO button halfway down.
•
S disappears from the display while the camera records the still picture.
• If the
S mark does not appear in the viewfinder when you turn the flash on, make sure that the flash unit is
slid fully locked on the hot shoe cube.
Notes:
• For full details of how to use the Speedlite, refer to its instruction manual.
• If you use the Speedlite in the shutter-priority (Tv), you can choose any shutter speed between 1/60 and
1/1000 and also CS (Clear Scan) mode.
• In the aperture-priority (Av), you can choose any F number, but an F number of less than f/8 gives the best
results.
• You cannot use the Speedlite with the:
- Manual recording program.
- Exposure Lock. (Sgoes out if you press the EXP. LOCK button. It reappears when you turn the lock
off, by pressing the EXP. LOCK button.)
• Turn the Speedlite unit off when you do not require the flash.
• The Speedlite can not be used with an SA-1 Adapter Bracket.
• You cannot use the bounce flash on the 420EX and 550EX Speedlite with the XL1S.
• You cannot use the Speedlite Transmitter ST-E2 for the 420EX/550EX
• You cannot use the 420EX/550EX’s multiple speedlite control.
• The FA-200 Flash Adapter contains a special cable. Do not use other cables to attach a flash unit.
• You cannot use a flash with an EF lens nor 14× full manual lens attached to the XL1S.
Page 61
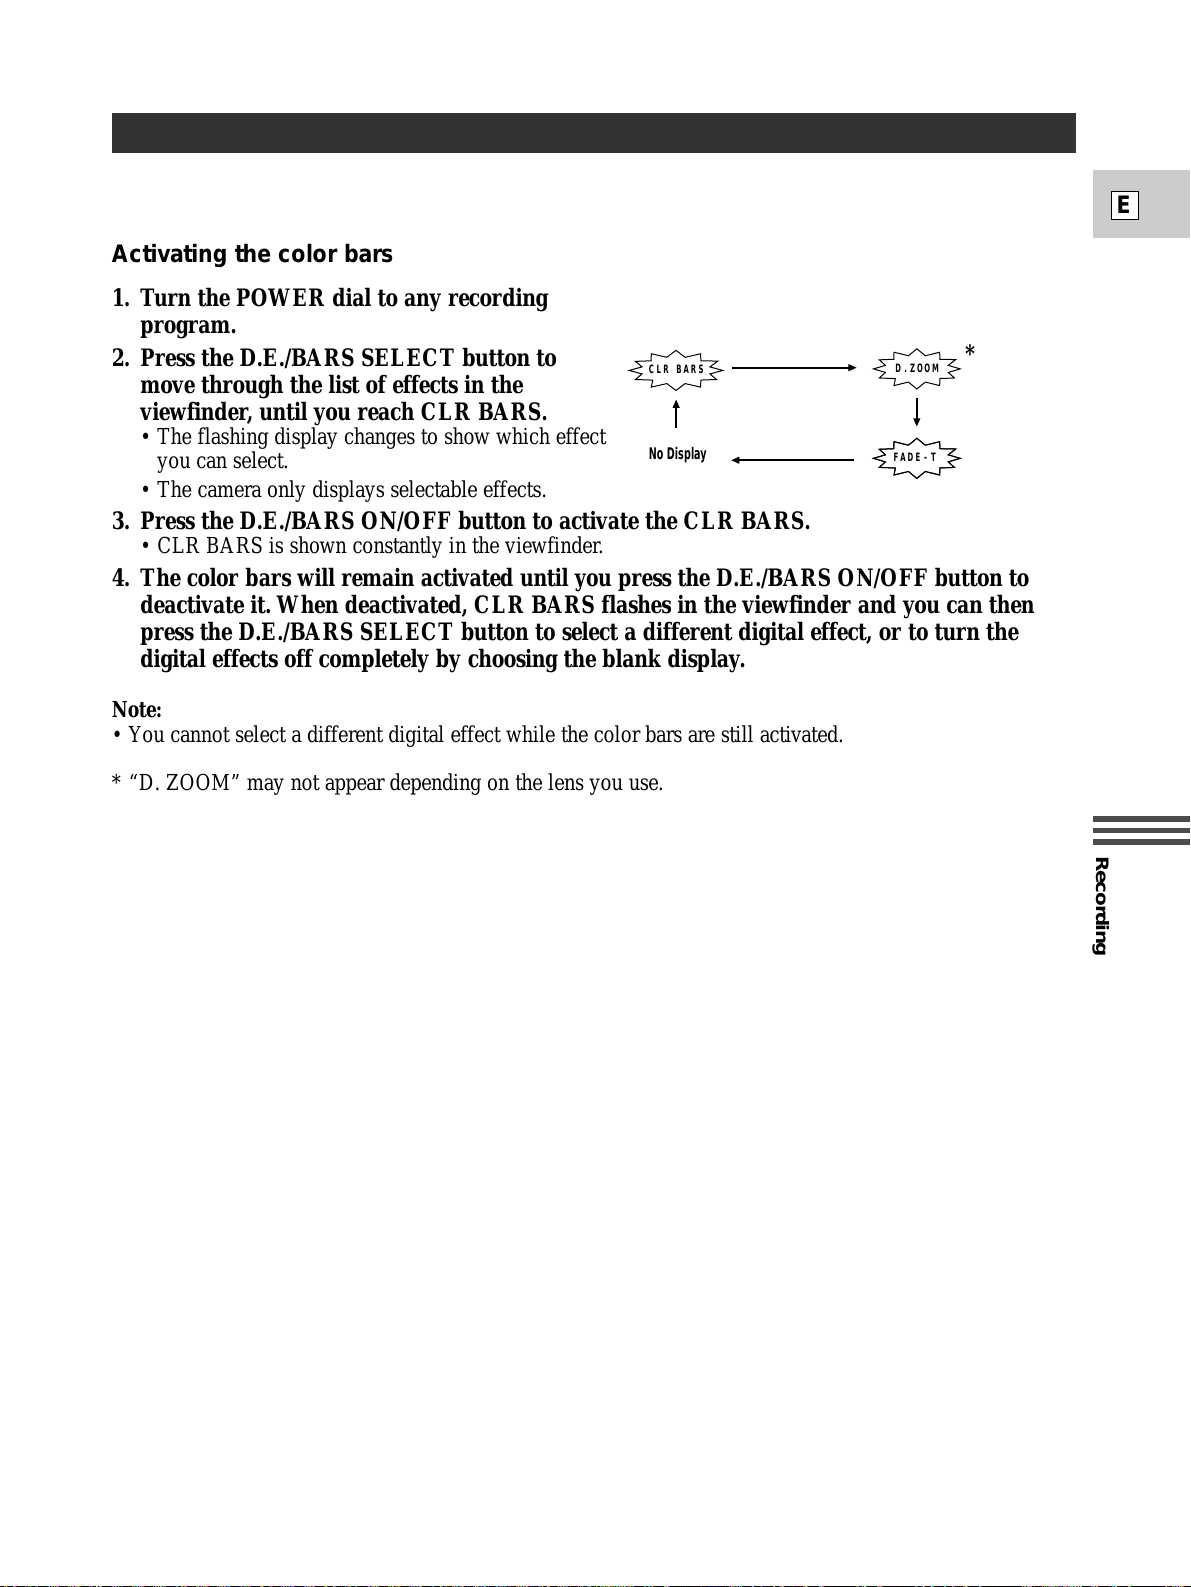
Recording
E
61
Using the Color Bars
The XL1S is able to record industry standard SMPTE
color bars.
Activating the color bars
1. Turn the POWER dial to any recording
program.
2. Press the D.E./BARS SELECT button to
move through the list of effects in the
viewfinder, until you reach CLR BARS.
• The flashing display changes to show which effect
you can select.
E-TFAD
No Display
OOMD.Z
BCLR SAR
• The camera only displays selectable effects.
3. Press the D.E./BARS ON/OFF button to activate the CLR BARS.
• CLR BARS is shown constantly in the viewfinder.
4. The color bars will remain activated until you press the D.E./BARS ON/OFF button to
deactivate it. When deactivated, CLR BARS flashes in the viewfinder and you can then
press the D.E./BARS SELECT button to select a different digital effect, or to turn the
digital effects off completely by choosing the blank display.
Note:
• You cannot select a different digital effect while the color bars are still activated.
* “D. ZOOM” may not appear depending on the lens you use.
*
Page 62
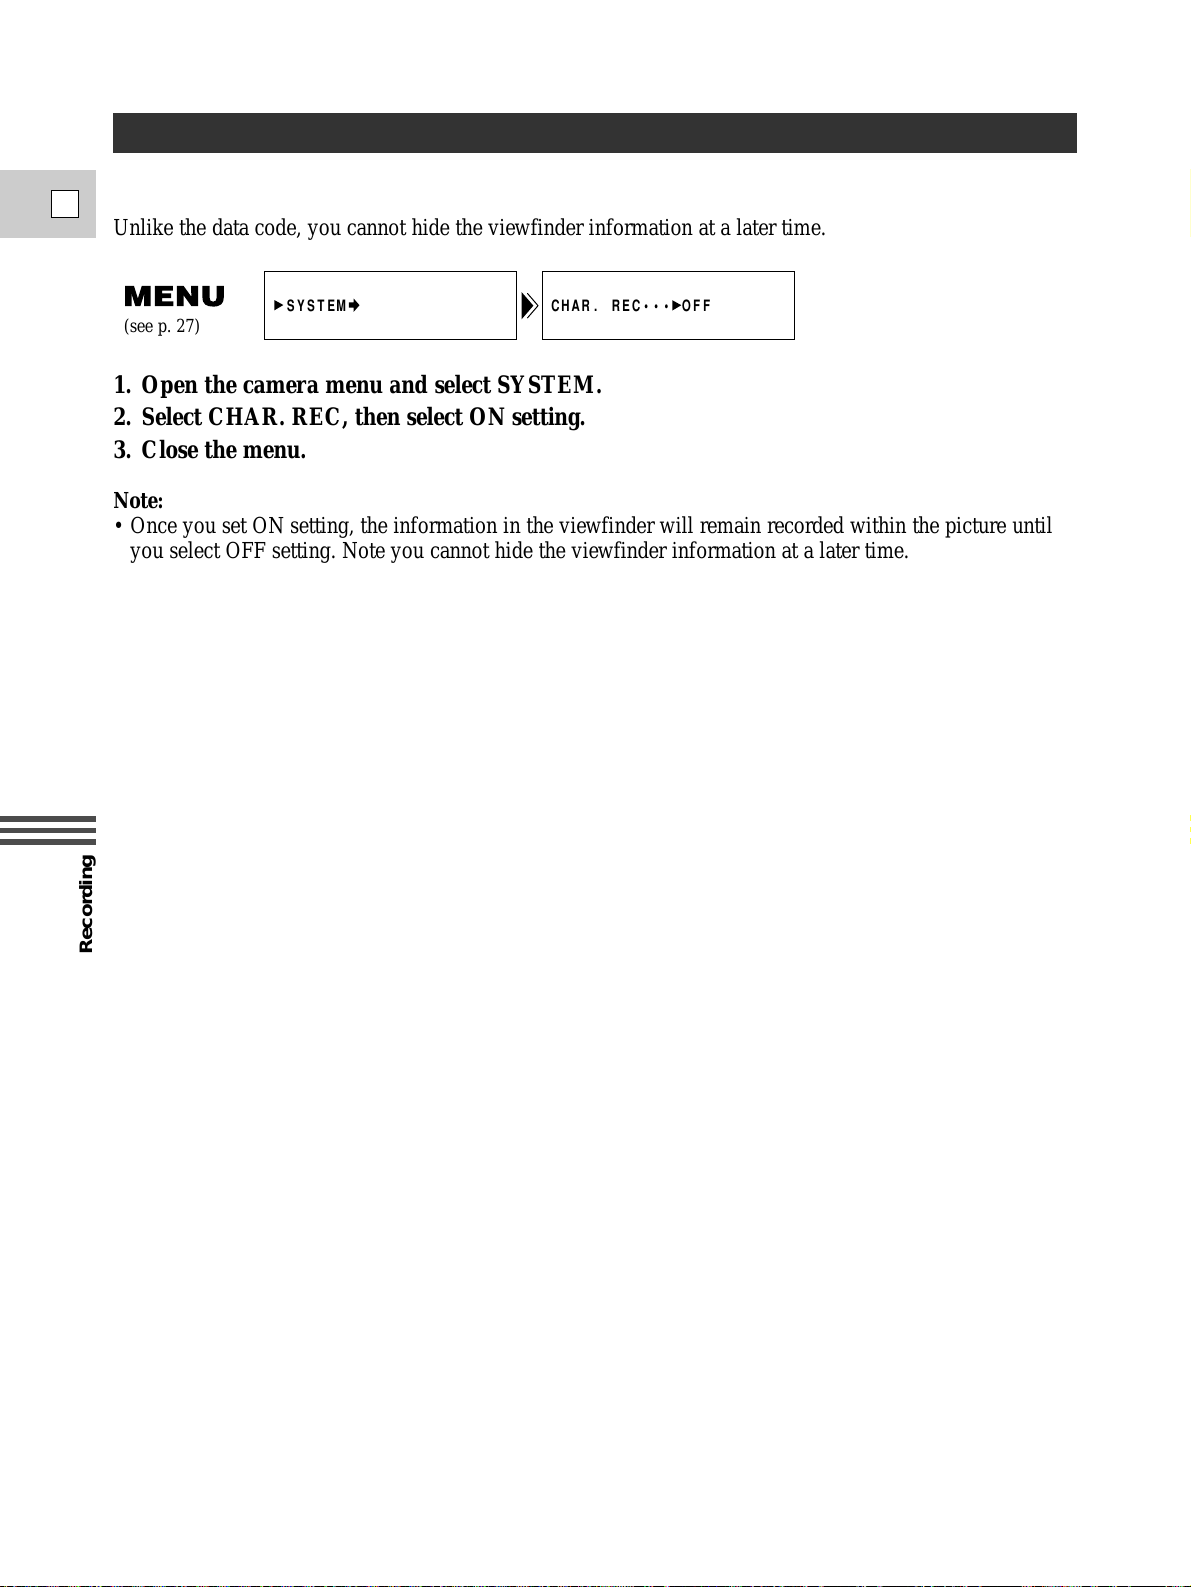
Recording
E
62
Recording the Viewfinder Information
You can record the information (such as date and time) displayed in the viewfinder superimposed within the
picture.
Unlike the data code, you cannot hide the viewfinder information at a later time.
1. Open the camera menu and select SYSTEM.
2. Select CHAR. REC, then select ON setting.
3. Close the menu.
Note:
• Once you set ON setting, the information in the viewfinder will remain recorded within the picture until
you select OFF setting. Note you cannot hide the viewfinder information at a later time.
CHAR. REC••• OFF
SYSTEM
(see p. 27)
Page 63
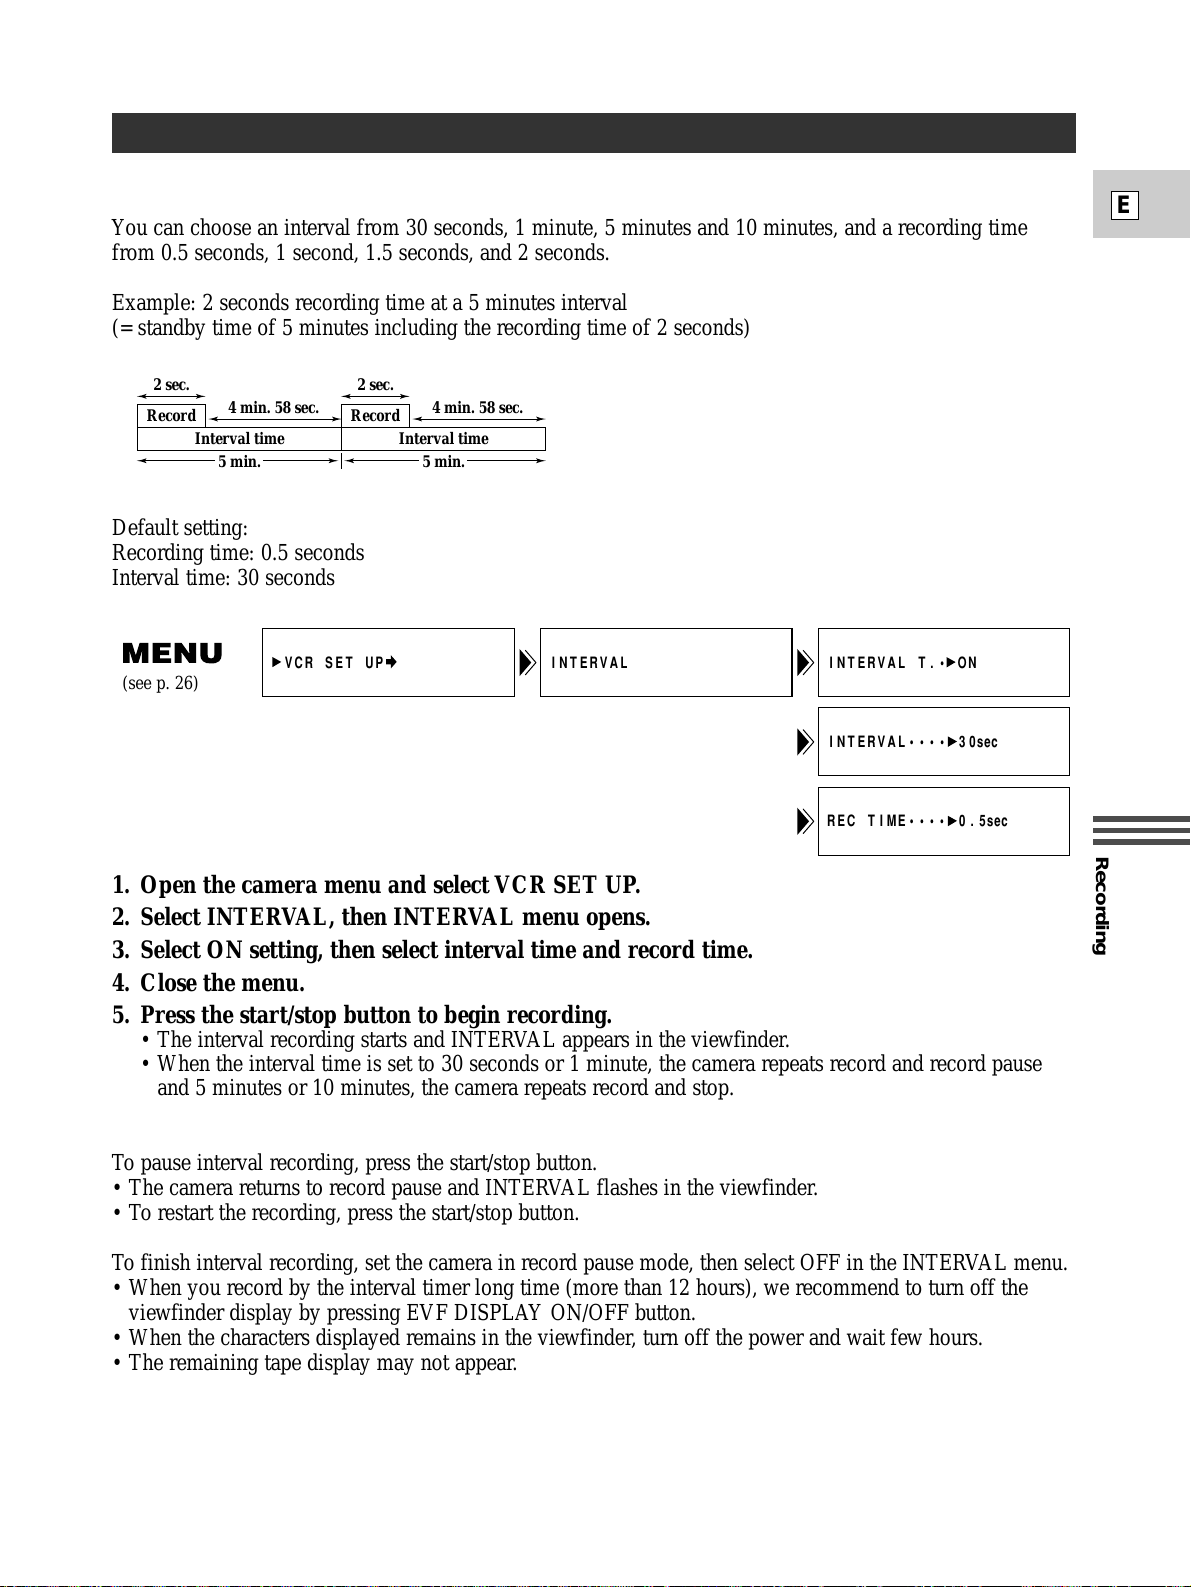
Recording
E
63
Recording with the Interval Timer
With the interval timer, you can record images over a selected time with a selected interval. This function is
useful when shooting flowers, animals, and other natural events.
You can choose an interval from 30 seconds, 1 minute, 5 minutes and 10 minutes, and a recording time
from 0.5 seconds, 1 second, 1.5 seconds, and 2 seconds.
Example: 2 seconds recording time at a 5 minutes interval
(= standby time of 5 minutes including the recording time of 2 seconds)
Default setting:
Recording time: 0.5 seconds
Interval time: 30 seconds
1. Open the camera menu and select VCR SET UP.
2. Select INTERVAL, then INTERVAL menu opens.
3. Select ON setting, then select interval time and record time.
4. Close the menu.
5. Press the start/stop button to begin recording.
• The interval recording starts and INTERVAL appears in the viewfinder.
• When the interval time is set to 30 seconds or 1 minute, the camera repeats record and record pause
and 5 minutes or 10 minutes, the camera repeats record and stop.
To pause interval recording, press the start/stop button.
• The camera returns to record pause and INTERVAL flashes in the viewfinder.
• To restart the recording, press the start/stop button.
To finish interval recording, set the camera in record pause mode, then select OFF in the INTERVAL menu.
• When you record by the interval timer long time (more than 12 hours), we recommend to turn off the
viewfinder display by pressing EVF DISPLAY ON/OFF button.
• When the characters displayed remains in the viewfinder, turn off the power and wait few hours.
• The remaining tape display may not appear.
INTERVAL
VCR SET UP
INTERVAL T.• ON
INTERVAL•••• 30sec
REC TIME•••• 0.5sec
(see p. 26)
Interval time
5 min.
5 min.
Record
2 sec.
4 min. 58 sec.
Interval time
Record
2 sec.
4 min. 58 sec.
Page 64
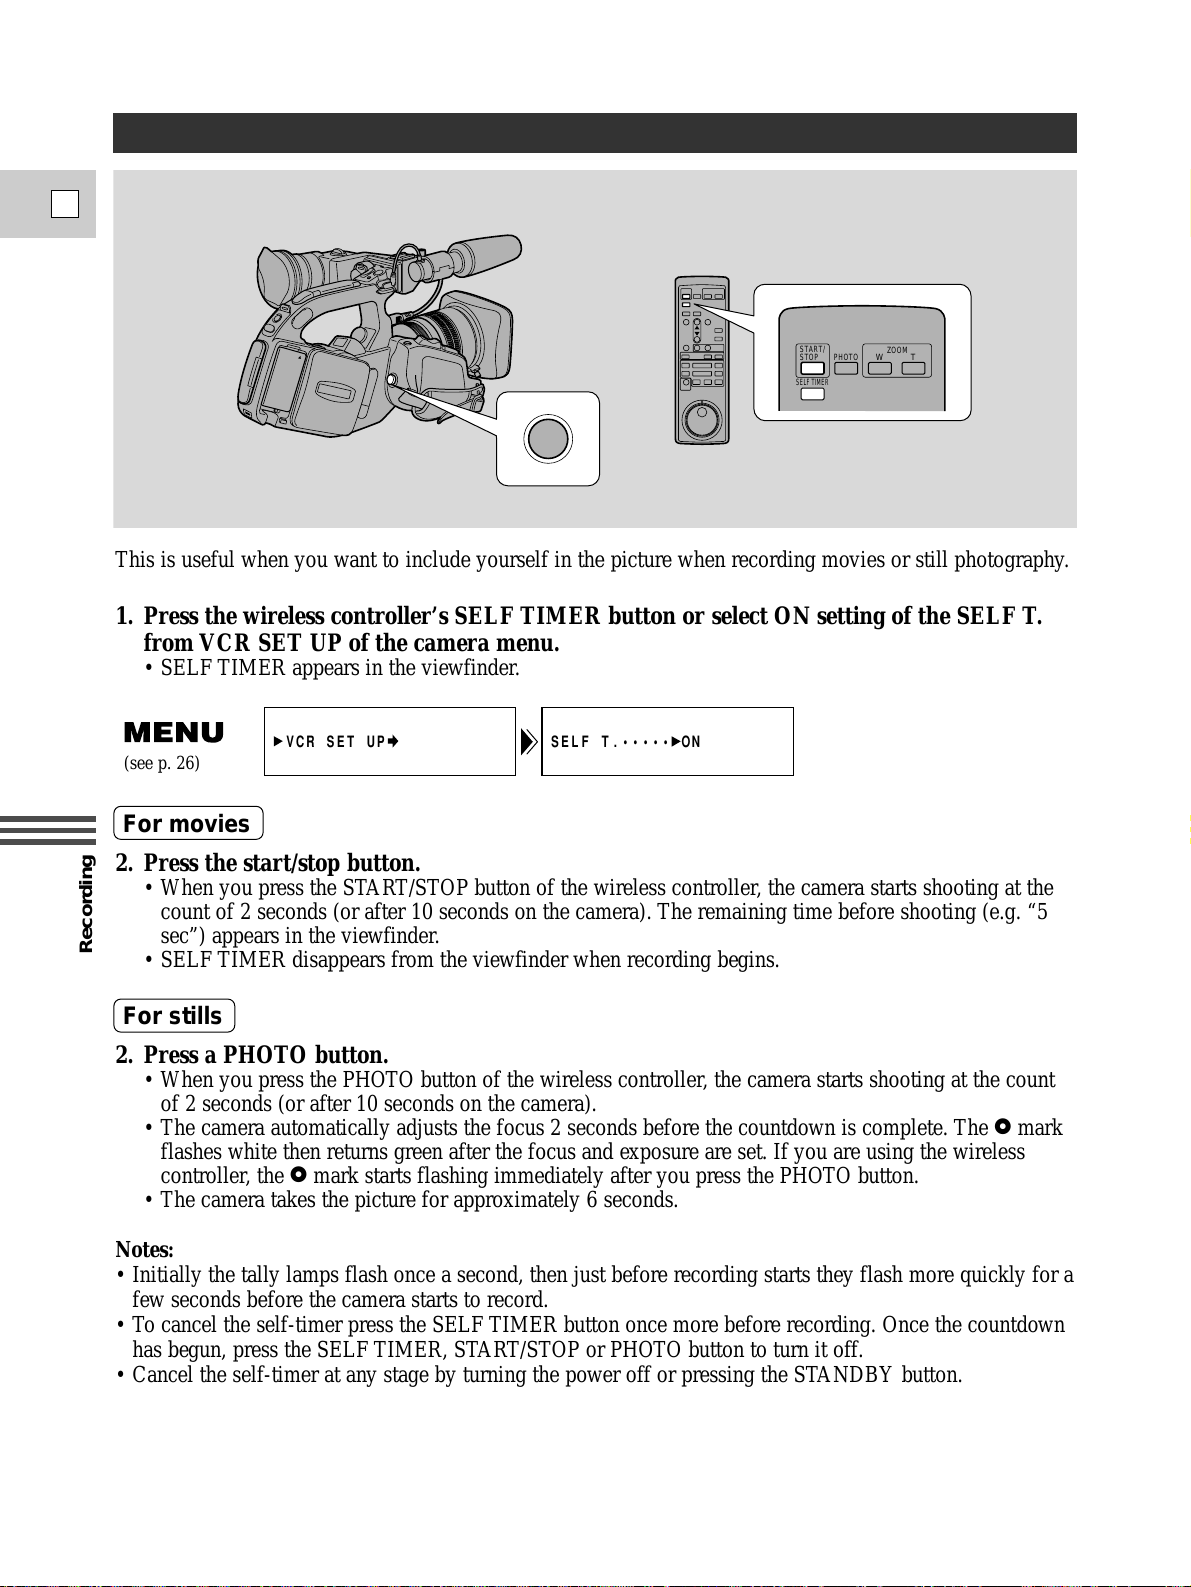
Recording
E
64
Setting the Self-Timer
This is useful when you want to include yourself in the picture when recording movies or still photography.
1. Press the wireless controller’s SELF TIMER button or select ON setting of the SELF T.
from VCR SET UP of the camera menu.
• SELF TIMER appears in the viewfinder.
2. Press the start/stop button.
• When you press the START/STOP button of the wireless controller, the camera starts shooting at the
count of 2 seconds (or after 10 seconds on the camera). The remaining time before shooting (e.g. “5
sec”) appears in the viewfinder.
• SELF TIMER disappears from the viewfinder when recording begins.
2. Press a PHOTO button.
• When you press the PHOTO button of the wireless controller, the camera starts shooting at the count
of 2 seconds (or after 10 seconds on the camera).
• The camera automatically adjusts the focus 2 seconds before the countdown is complete. The F mark
flashes white then returns green after the focus and exposure are set. If you are using the wireless
controller, the F mark starts flashing immediately after you press the PHOTO button.
• The camera takes the picture for approximately 6 seconds.
Notes:
• Initially the tally lamps flash once a second, then just before recording starts they flash more quickly for a
few seconds before the camera starts to record.
• To cancel the self-timer press the SELF TIMER button once more before recording. Once the countdown
has begun, press the SELF TIMER, START/STOP or PHOTO button to turn it off.
• Cancel the self-timer at any stage by turning the power off or pressing the STANDBY button.
• If you press the SELF TIMER button when the recording displays have been turned off (p. 37), the self
timer display does not appear in the viewfinder, until you press the start/stop/PHOTO button to start the
countdown.
PHOTO
SELF TIMER
WT
ZOOM
START/
STOP
SELF T.••••• ON
VCR SET UP
(see p. 26)
For movies
For stills
Page 65
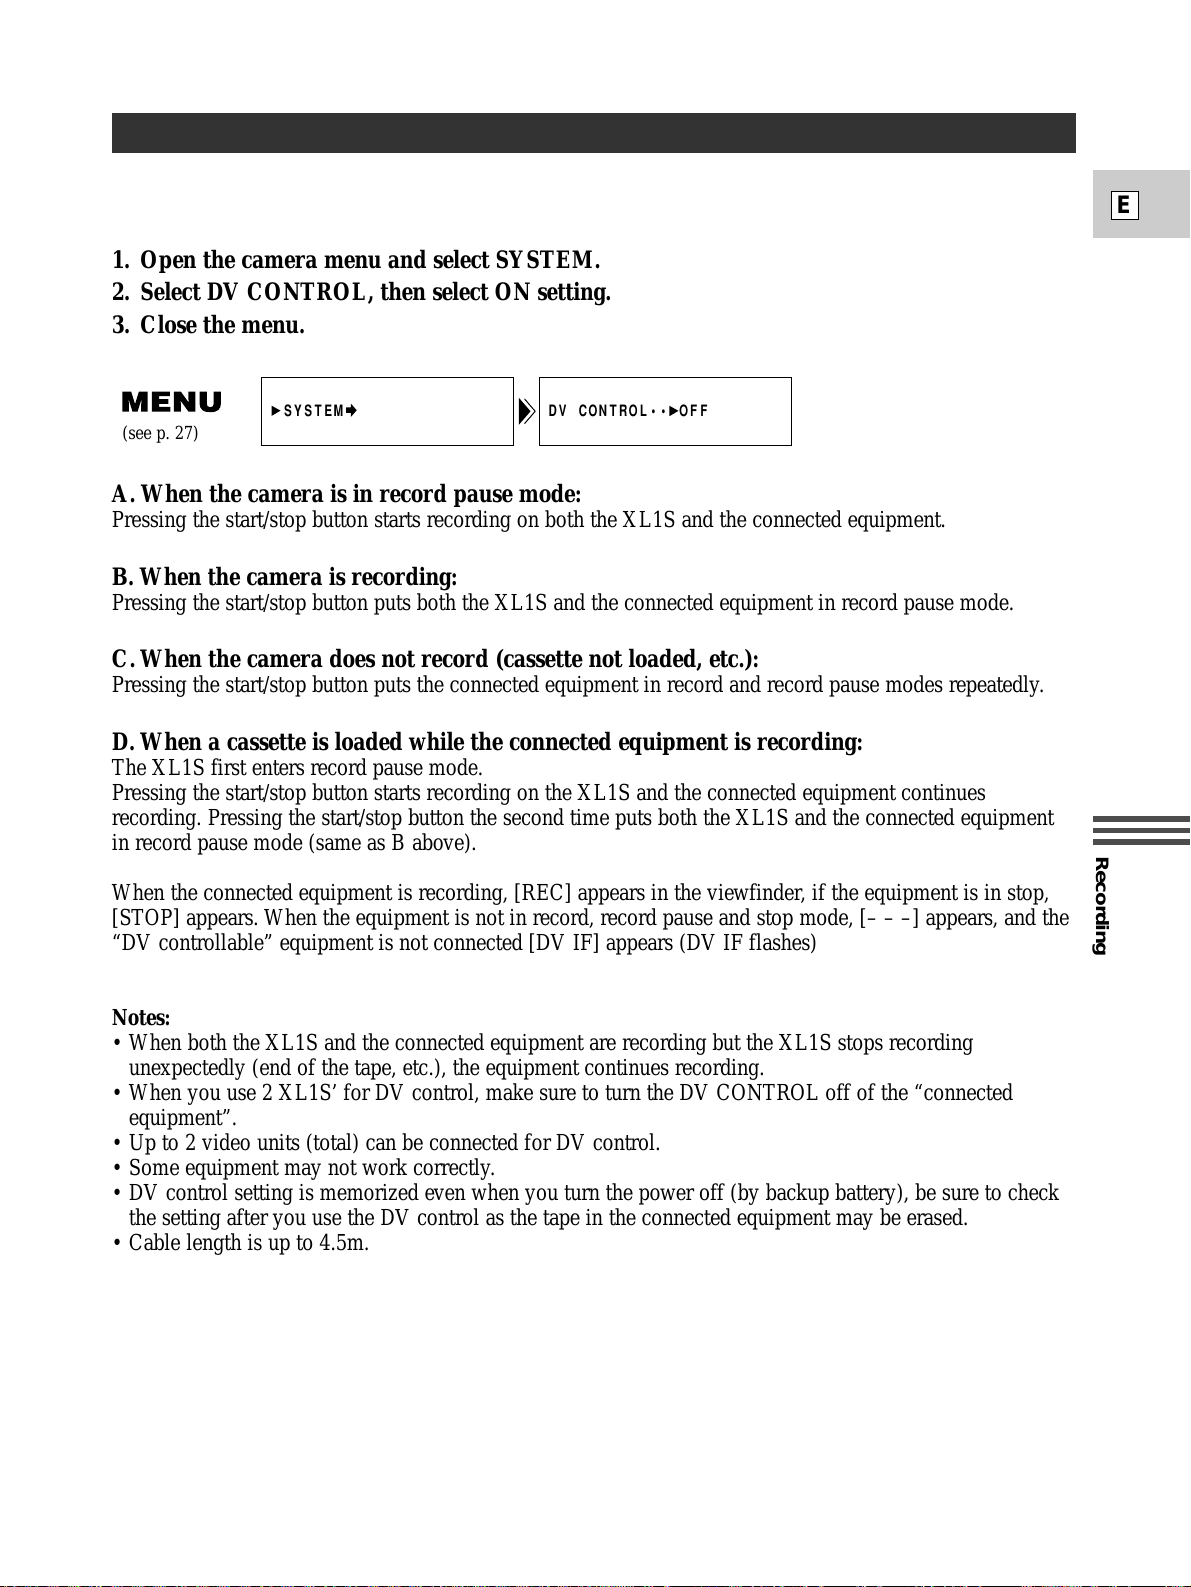
Recording
E
65
Using the DV Control
When equipment such as another camcorder or video recording device, is connected to the XL1S with a DV
cable, its record/record pause operation can be controlled by pressing the XL1S’ start/stop button.
1. Open the camera menu and select SYSTEM.
2. Select DV CONTROL, then select ON setting.
3. Close the menu.
A. When the camera is in record pause mode:
Pressing the start/stop button starts recording on both the XL1S and the connected equipment.
B. When the camera is recording:
Pressing the start/stop button puts both the XL1S and the connected equipment in record pause mode.
C. When the camera does not record (cassette not loaded, etc.):
Pressing the start/stop button puts the connected equipment in record and record pause modes repeatedly.
D. When a cassette is loaded while the connected equipment is recording:
The XL1S first enters record pause mode.
Pressing the start/stop button starts recording on the XL1S and the connected equipment continues
recording. Pressing the start/stop button the second time puts both the XL1S and the connected equipment
in record pause mode (same as B above).
When the connected equipment is recording, [REC] appears in the viewfinder, if the equipment is in stop,
[STOP] appears. When the equipment is not in record, record pause and stop mode, [– – –] appears, and the
“DV controllable” equipment is not connected [DV IF] appears (DV IF flashes)
Notes:
• When both the XL1S and the connected equipment are recording but the XL1S stops recording
unexpectedly (end of the tape, etc.), the equipment continues recording.
• When you use 2 XL1S’ for DV control, make sure to turn the DV CONTROL off of the “connected
equipment”.
• Up to 2 video units (total) can be connected for DV control.
• Some equipment may not work correctly.
• DV control setting is memorized even when you turn the power off (by backup battery), be sure to check
the setting after you use the DV control as the tape in the connected equipment may be erased.
• Cable length is up to 4.5m.
DV CONTROL•• OFF
SYSTEM
(see p. 27)
Page 66
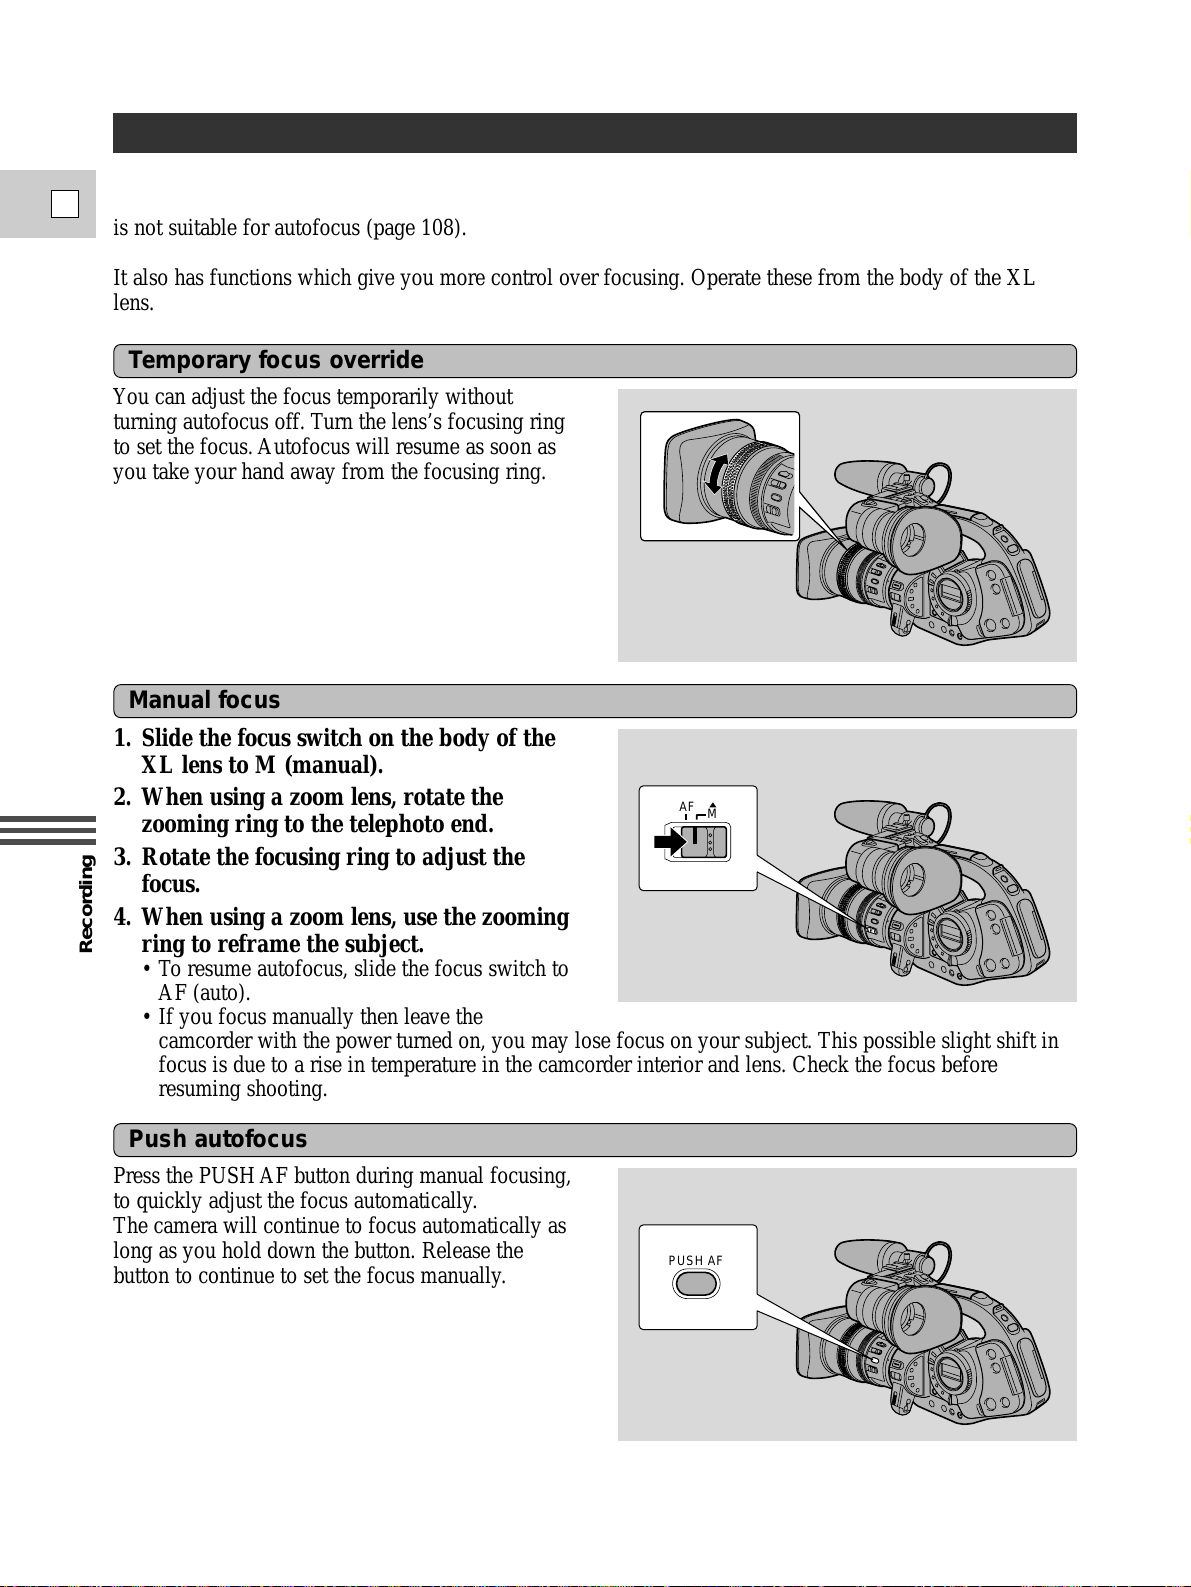
Recording
E
66
Adjusting the Focus (for autofocus lenses)
The camera can focus automatically. All you have to do is point it, and whatever is in the center of the
display will usually be in sharp focus. If it does not seem to be focusing well, it may be because the subject
is not suitable for autofocus (page 108).
It also has functions which give you more control over focusing. Operate these from the body of the XL
lens.
Manual focus
1. Slide the focus switch on the body of the
XL lens to M (manual).
2. When using a zoom lens, rotate the
zooming ring to the telephoto end.
3. Rotate the focusing ring to adjust the
focus.
4. When using a zoom lens, use the zooming
ring to reframe the subject.
• To resume autofocus, slide the focus switch to
AF (auto).
• If you focus manually then leave the
camcorder with the power turned on, you may lose focus on your subject. This possible slight shift in
focus is due to a rise in temperature in the camcorder interior and lens. Check the focus before
resuming shooting.
You can adjust the focus temporarily without
turning autofocus off. Turn the lens’s focusing ring
to set the focus. Autofocus will resume as soon as
you take your hand away from the focusing ring.
Temporary focus override
Press the PUSH AF button during manual focusing,
to quickly adjust the focus automatically.
The camera will continue to focus automatically as
long as you hold down the button. Release the
button to continue to set the focus manually.
Push autofocus
AF
M
PUSH AF
Page 67
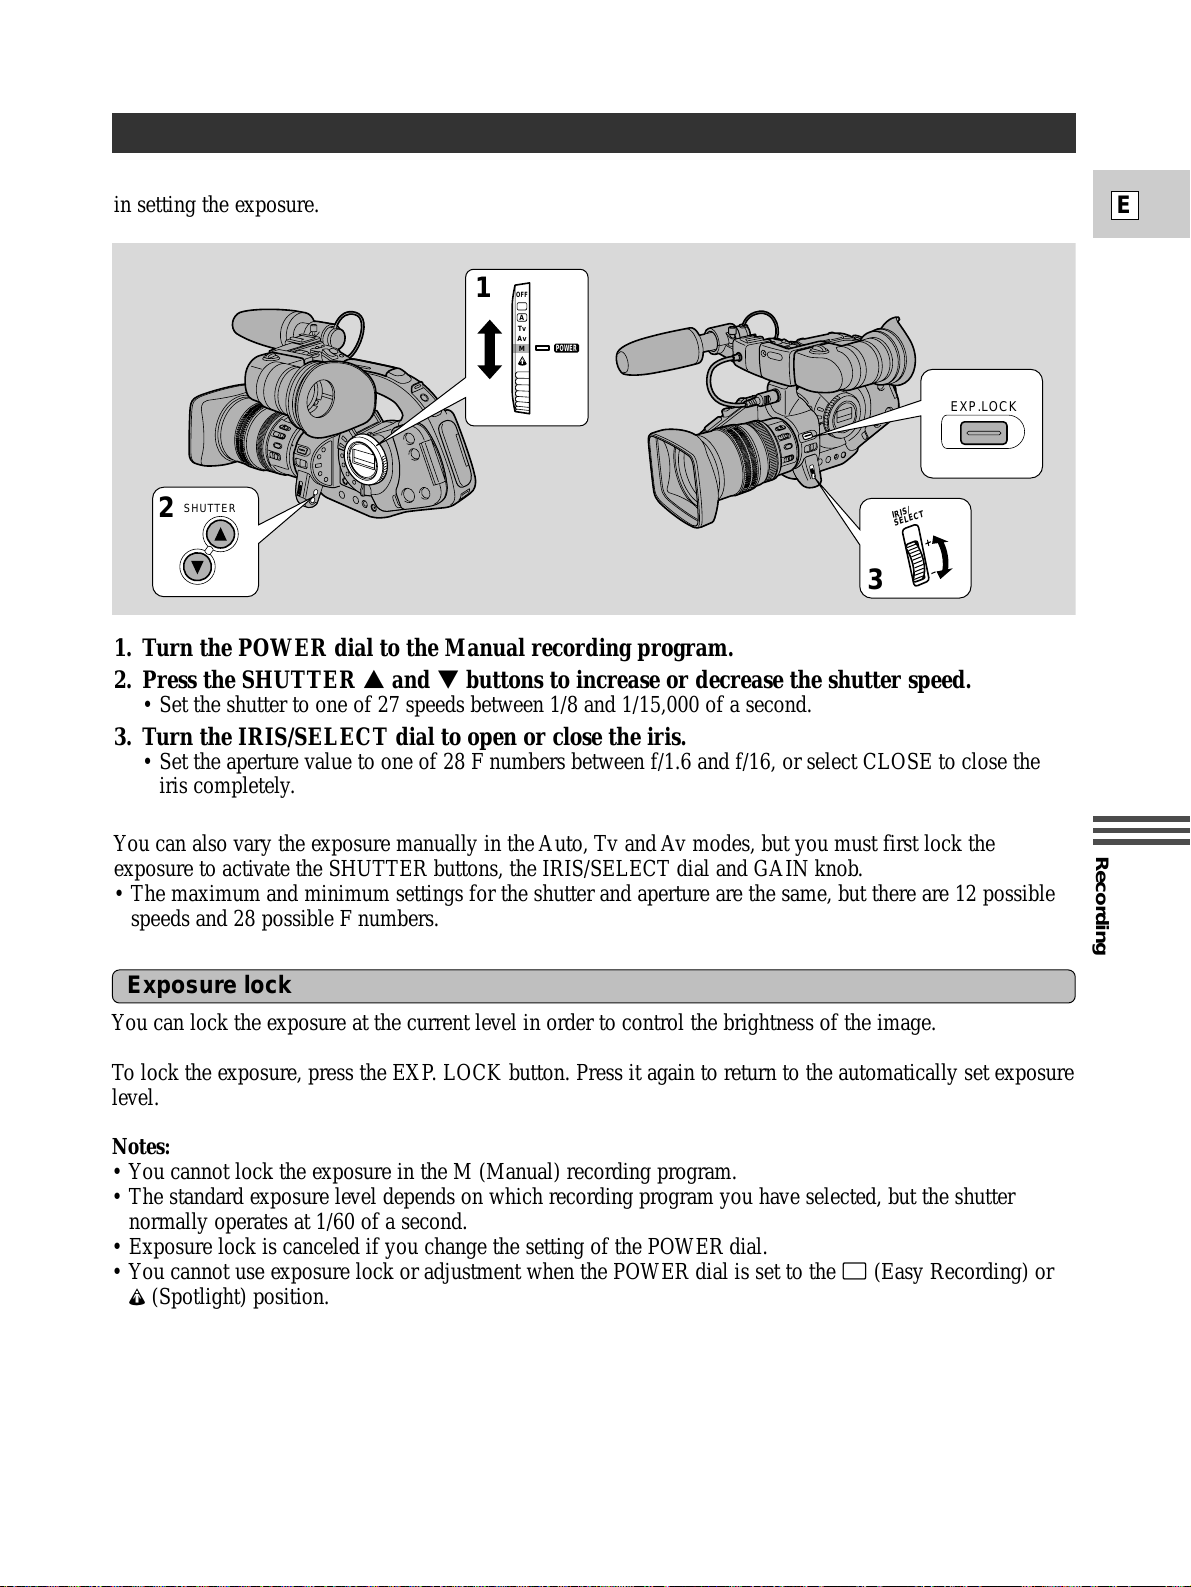
Recording
E
67
Adjusting the Exposure
Notes:
• You cannot lock the exposure in the M (Manual) recording program.
• The standard exposure level depends on which recording program you have selected, but the shutter
normally operates at 1/60 of a second.
• Exposure lock is canceled if you change the setting of the POWER dial.
• You cannot use exposure lock or adjustment when the POWER dial is set to the [ (Easy Recording) or
e (Spotlight) position.
EXP.LOCK
SHUTTER
POWER
1
2
3
IRIS/
SELECT
OFF
Tv
Av
A
M
You can lock the exposure at the current level in order to control the brightness of the image.
To lock the exposure, press the EXP. LOCK button. Press it again to return to the automatically set exposure
level.
Exposure lock
1. Turn the POWER dial to the Manual recording program.
2. Press the SHUTTER r and t buttons to increase or decrease the shutter speed.
• Set the shutter to one of 27 speeds between 1/8 and 1/15,000 of a second.
3. Turn the IRIS/SELECT dial to open or close the iris.
• Set the aperture value to one of 28 F numbers between f/1.6 and f/16, or select CLOSE to close the
iris completely.
You can also vary the exposure manually in the Auto, Tv and Av modes, but you must first lock the
exposure to activate the SHUTTER buttons, the IRIS/SELECT dial and GAIN knob.
• The maximum and minimum settings for the shutter and aperture are the same, but there are 12 possible
speeds and 28 possible F numbers.
Set the aperture value (of the iris) and the shutter speeds independently to give you total creative freedom
in setting the exposure.
Page 68
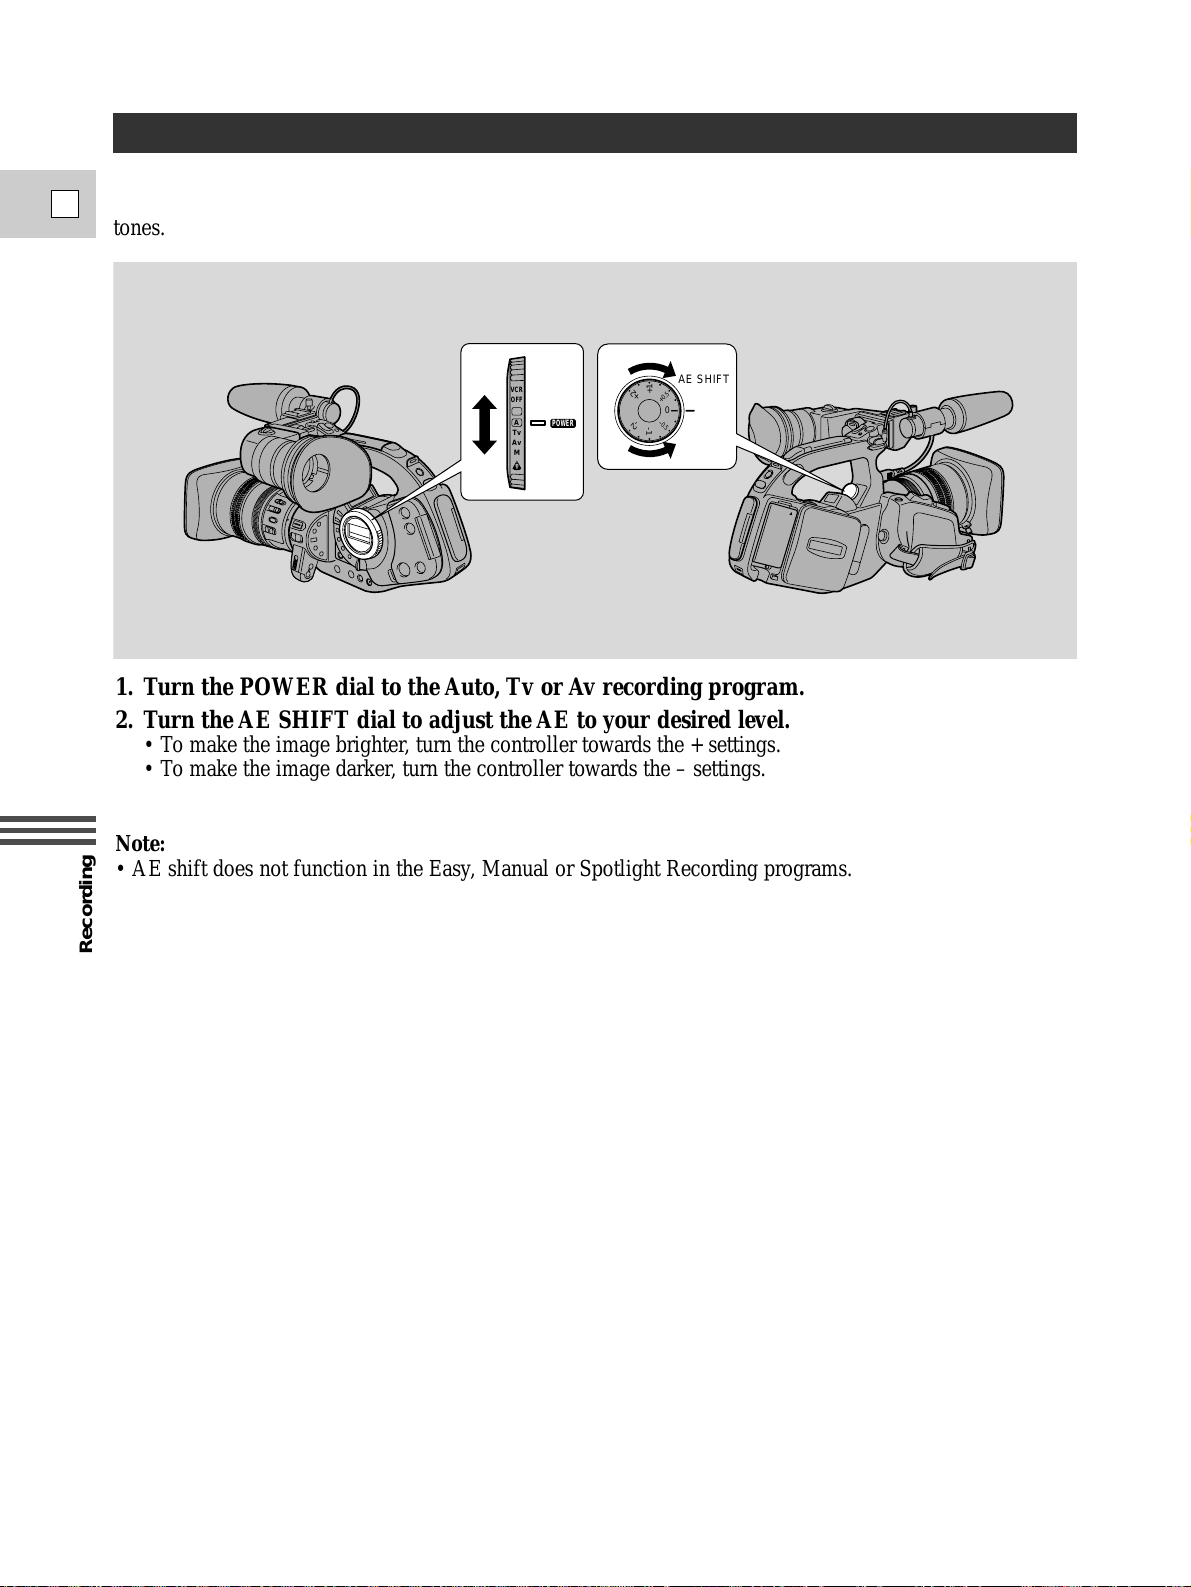
Recording
E
68
By controlling the level of the automatic exposure (AE) function, you can lighten or darken the image
slightly. This allows you to compensate for backlit subjects or subjects with predominately dark or light
tones.
Using AE Shift
1. Turn the POWER dial to the Auto, Tv or Av recording program.
2. Turn the AE SHIFT dial to adjust the AE to your desired level.
• To make the image brighter, turn the controller towards the + settings.
• To make the image darker, turn the controller towards the – settings.
Note:
• AE shift does not function in the Easy, Manual or Spotlight Recording programs.
+1
+
0.5
0
-
0.5
-1
-2
+2
AE SHIFT
POWER
VCR
OFF
Tv
Av
M
A
Page 69
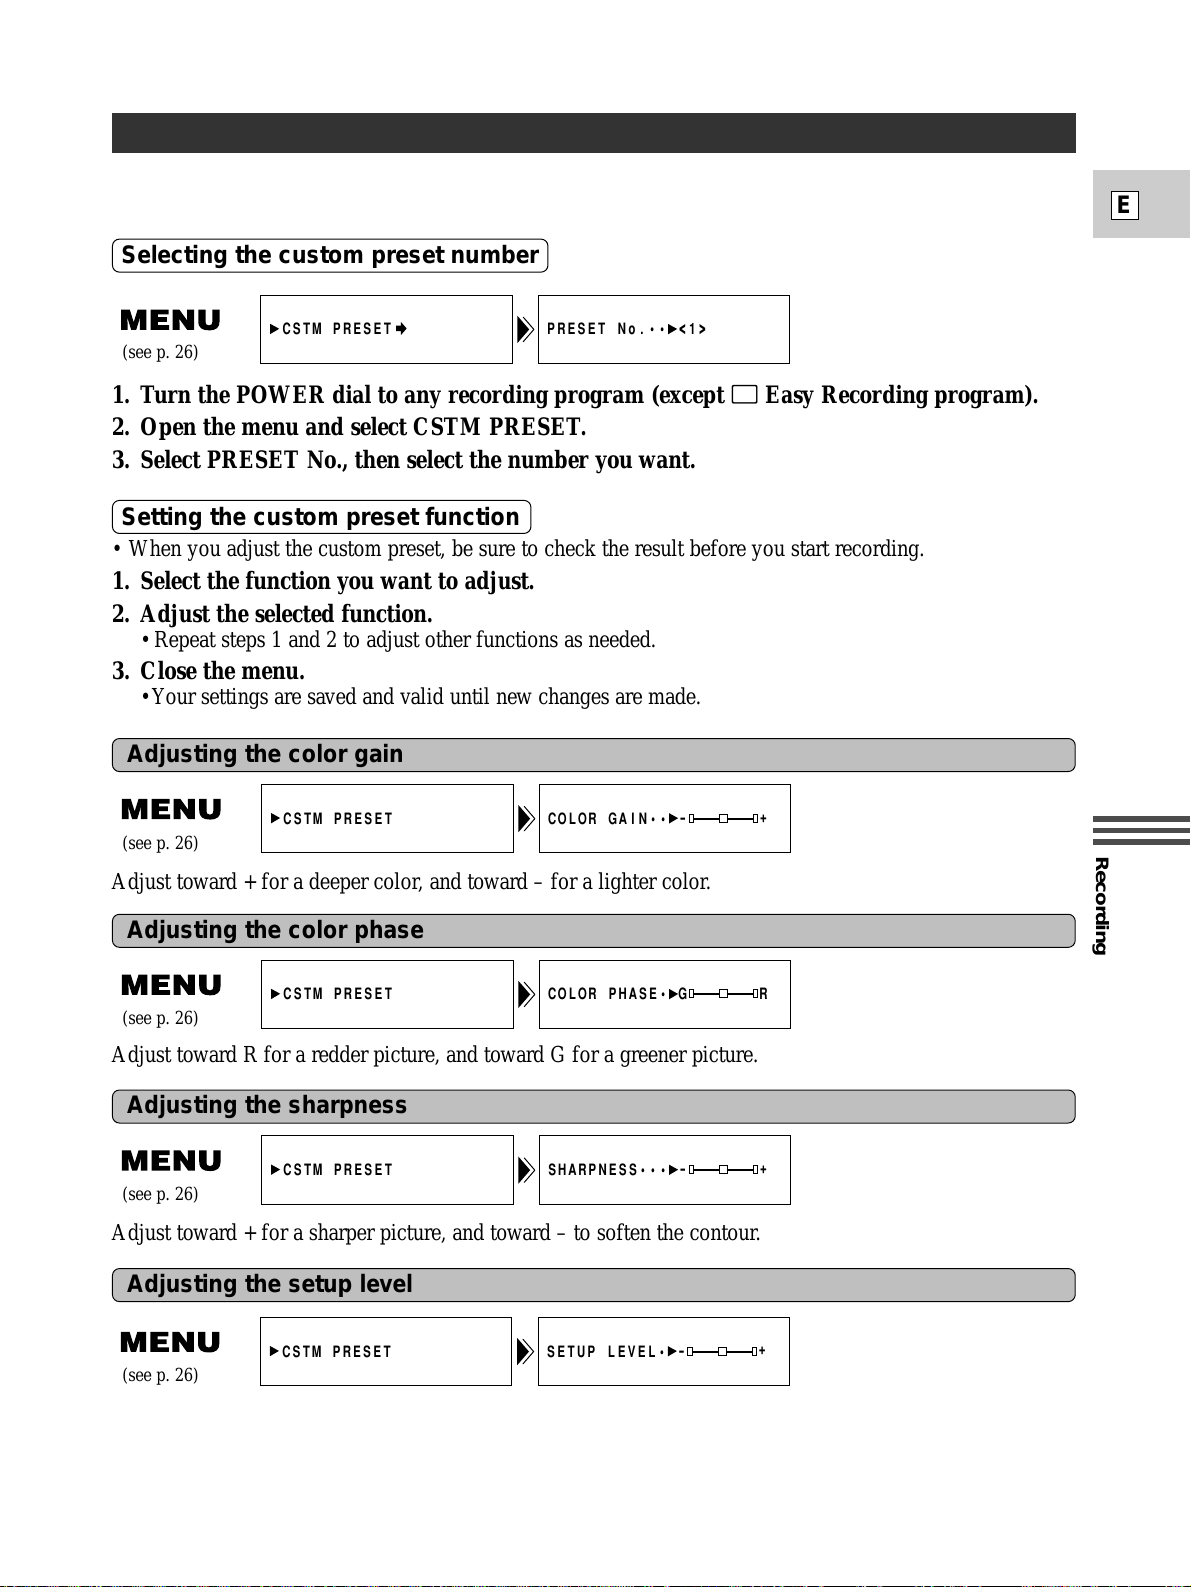
Recording
E
69
Using the Custom Preset
You can alter the color gain, color phase, sharpness and setup level for more creative videos. You can also
save these settings under three custom preset and use them at any time.
1. Turn the POWER dial to any recording program (except [ Easy Recording program).
2. Open the menu and select CSTM PRESET.
3. Select PRESET No., then select the number you want.
• When you adjust the custom preset, be sure to check the result before you start recording.
1. Select the function you want to adjust.
2. Adjust the selected function.
• Repeat steps 1 and 2 to adjust other functions as needed.
3. Close the menu.
• Your settings are saved and valid until new changes are made.
Adjust toward + for a deeper color, and toward – for a lighter color.
Adjusting the color gain
Selecting the custom preset number
Setting the custom preset function
Adjust toward R for a redder picture, and toward G for a greener picture.
Adjusting the color phase
Adjust toward + for a sharper picture, and toward – to soften the contour.
Adjusting the sharpness
Adjust toward + for a brighter picture, and toward – for a darker picture.
Adjusting the setup level
(see p. 26)
COLOR GAIN••
CSTM PRESET
-
+
(see p. 26)
COLOR PHASE•
CSTM PRESET
GR
(see p. 26)
SHARPNESS•••
CSTM PRESET
-
+
(see p. 26)
SETUP LEVEL•
CSTM PRESET
-
+
(see p. 26)
CSTM PRESET
PRESET No.•• <1
>
Page 70
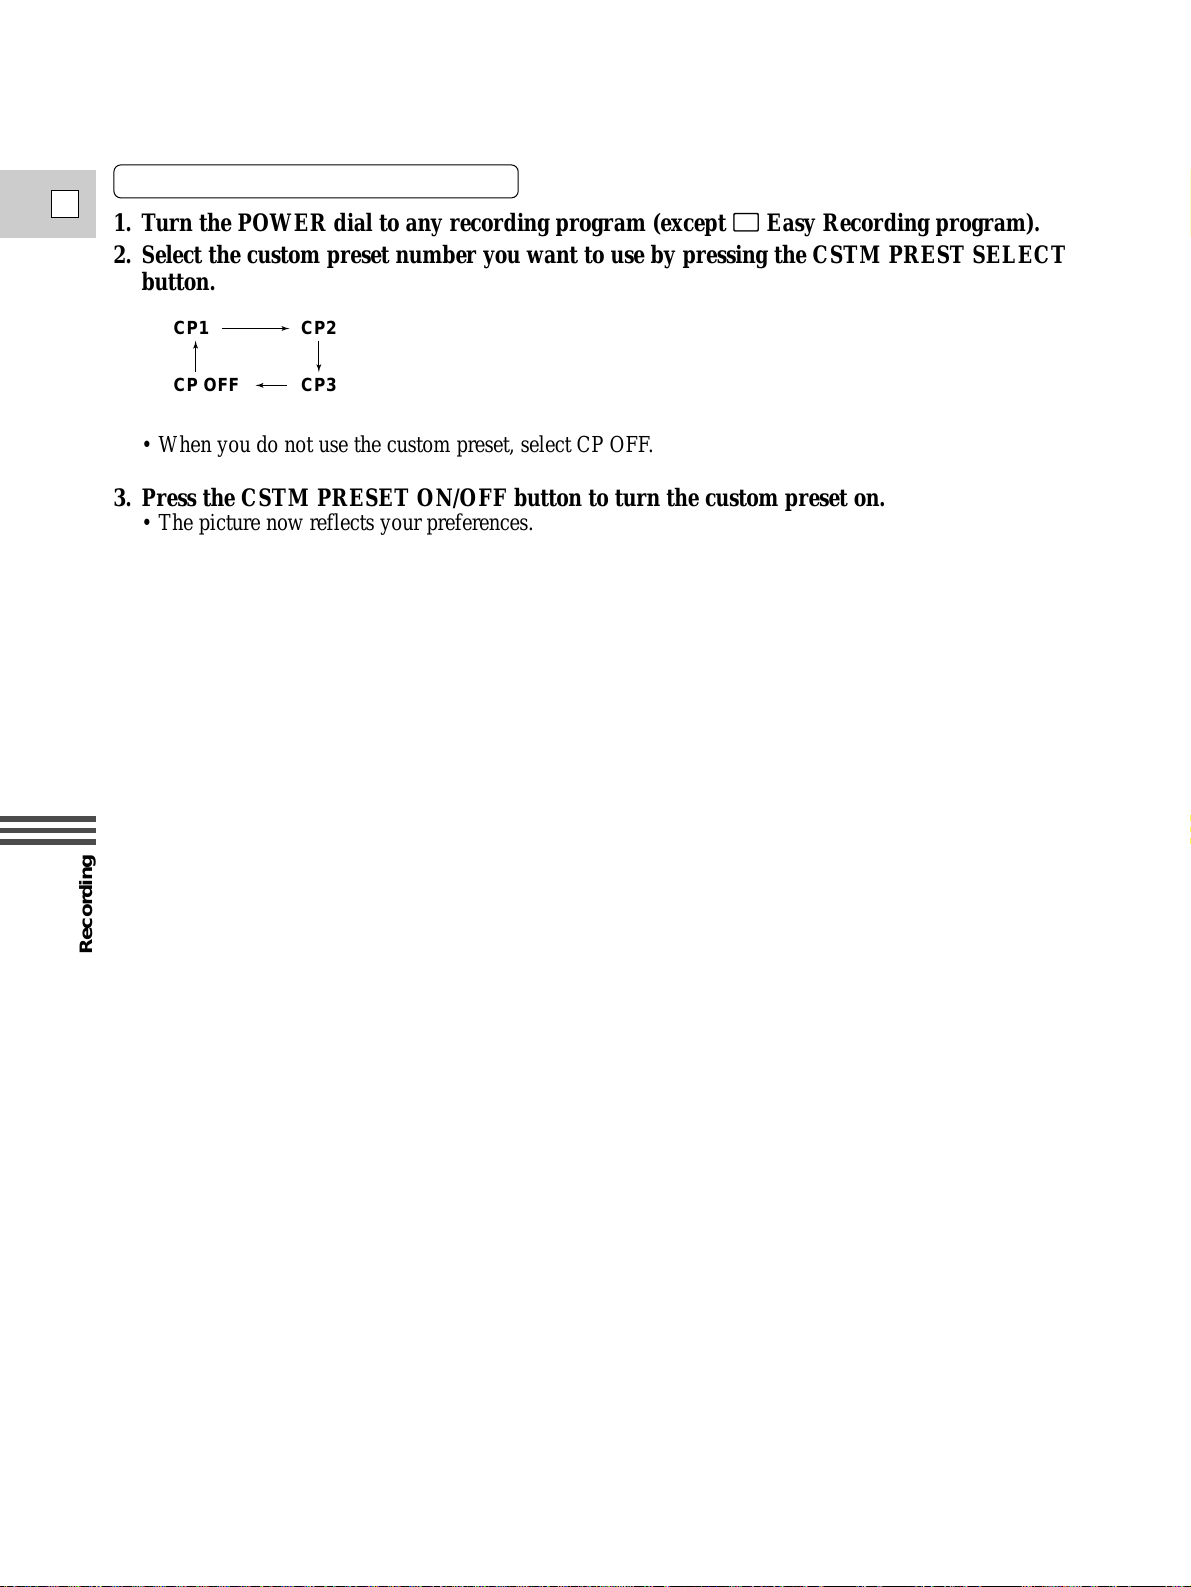
Recording
E
70
1. Turn the POWER dial to any recording program (except [ Easy Recording program).
2. Select the custom preset number you want to use by pressing the CSTM PREST SELECT
button.
• When you do not use the custom preset, select CP OFF.
3. Press the CSTM PRESET ON/OFF button to turn the custom preset on.
• The picture now reflects your preferences.
CP1 CP2
CP OFF CP3
Using the custom preset function
Page 71
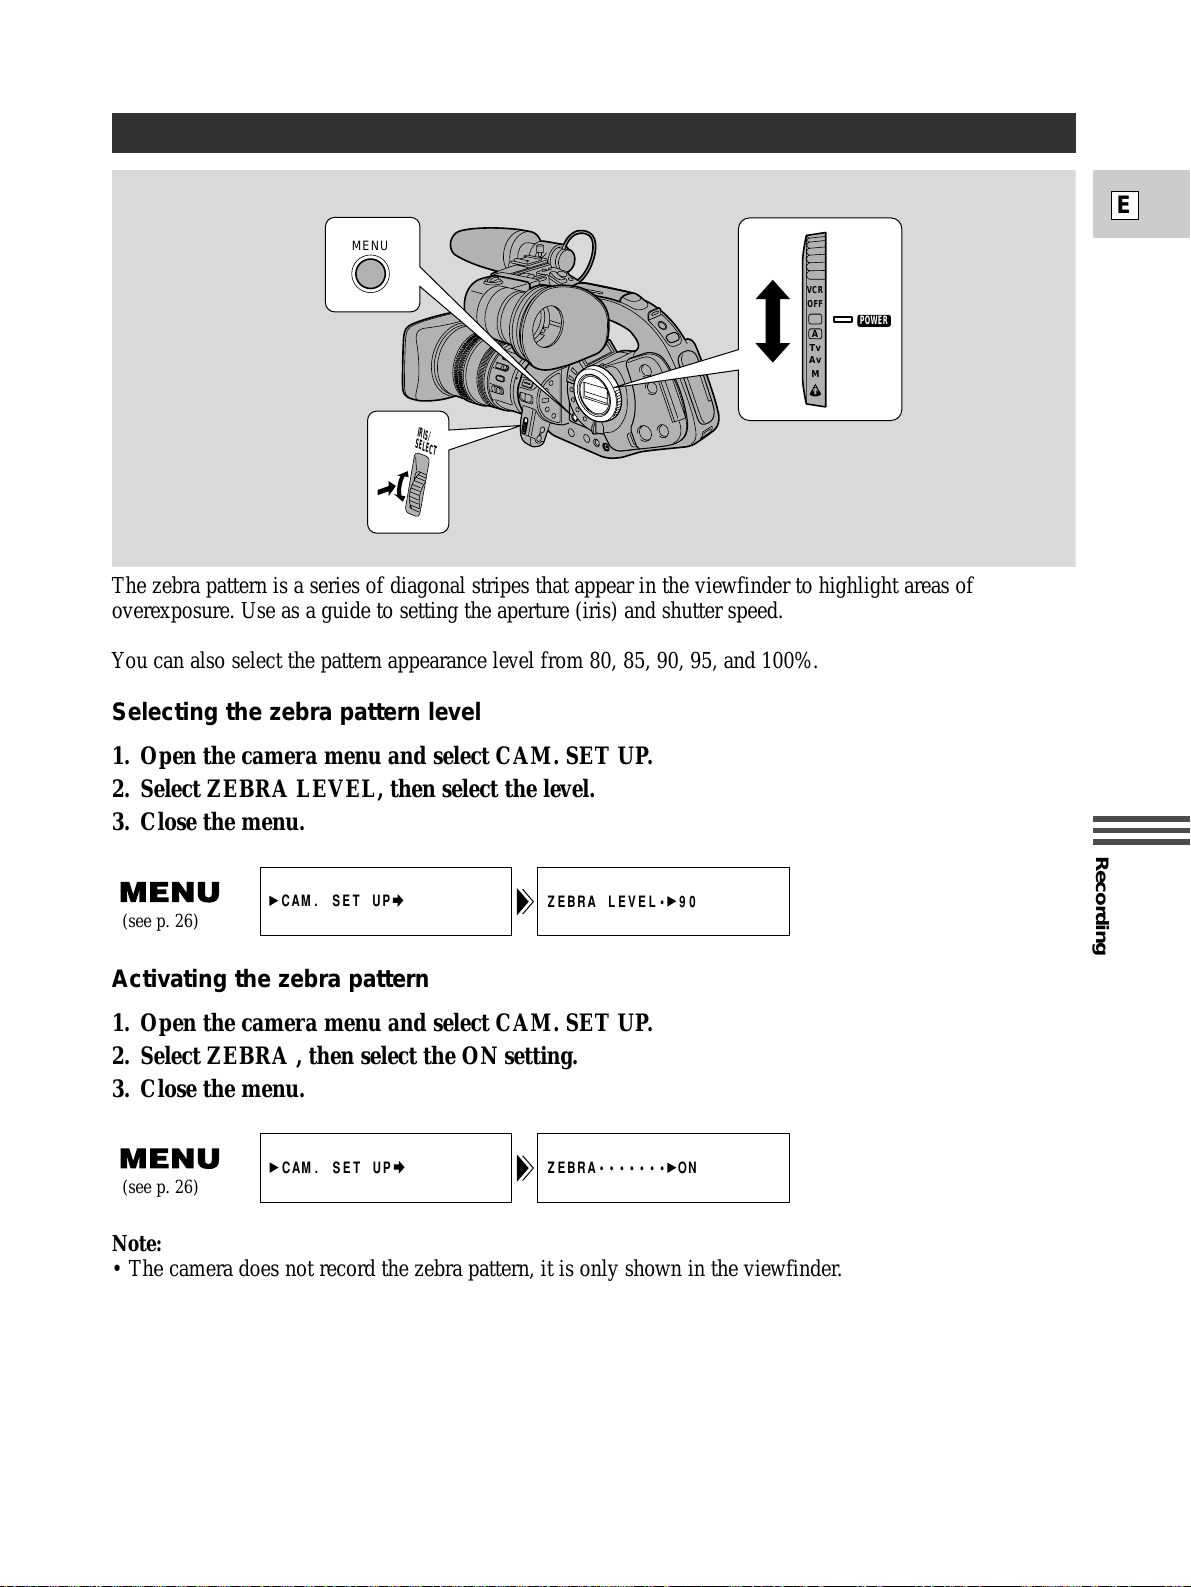
Recording
E
71
The zebra pattern is a series of diagonal stripes that appear in the viewfinder to highlight areas of
overexposure. Use as a guide to setting the aperture (iris) and shutter speed.
You can also select the pattern appearance level from 80, 85, 90, 95, and 100%.
Selecting the zebra pattern level
1. Open the camera menu and select CAM. SET UP.
2. Select ZEBRA LEVEL, then select the level.
3. Close the menu.
Activating the zebra pattern
1. Open the camera menu and select CAM. SET UP.
2. Select ZEBRA , then select the ON setting.
3. Close the menu.
Using the Zebra Pattern
POWER
VCR
OFF
Tv
Av
M
A
MENU
IRIS/
SELECT
ZEBRA••••••• ONCAM. SET UP
(see p. 26)
ZEBRA LEVEL• 90
CAM. SET UP
(see p. 26)
Note:
• The camera does not record the zebra pattern, it is only shown in the viewfinder.
Page 72
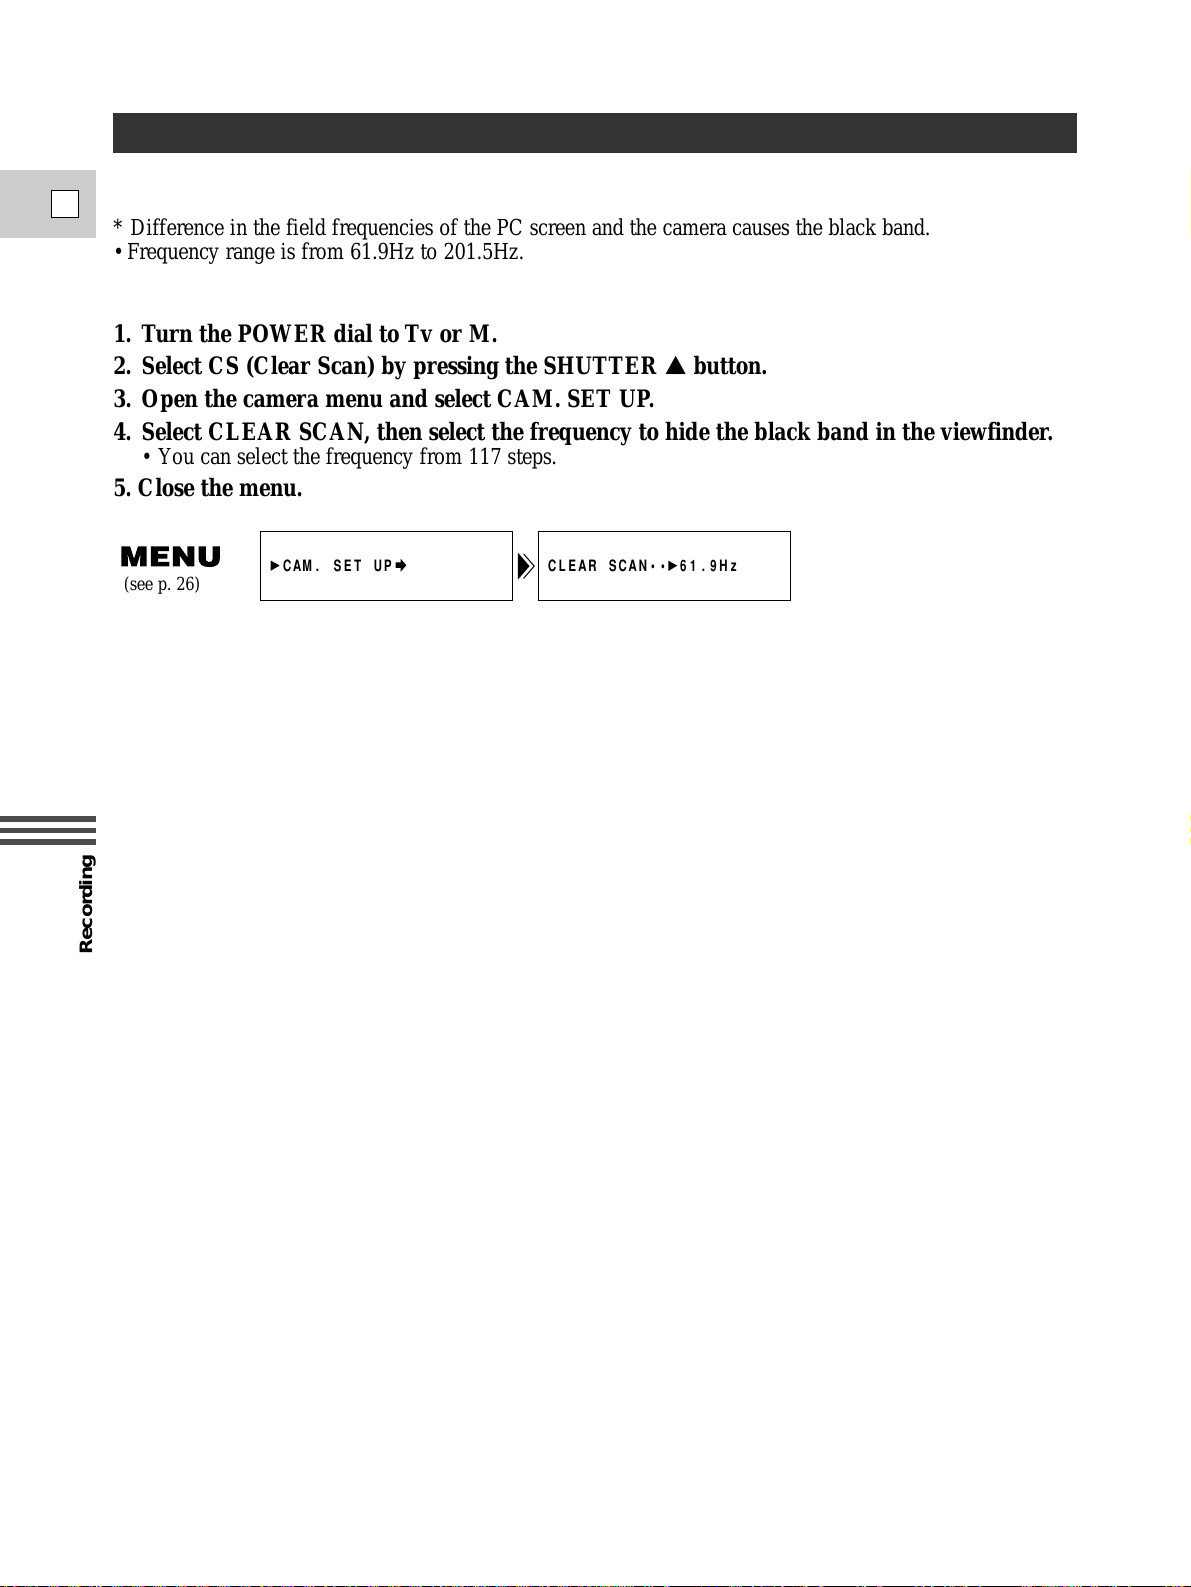
Recording
E
72
Recording the PC Screen or other equipment using CLEAR SCAN
By using the Clear Scan function, you can record the PC screen or other equipment without annoying black
band* on the picture.
* Difference in the field frequencies of the PC screen and the camera causes the black band.
• Frequency range is from 61.9Hz to 201.5Hz.
1. Turn the POWER dial to Tv or M.
2. Select CS (Clear Scan) by pressing the SHUTTER r button.
3. Open the camera menu and select CAM. SET UP.
4. Select CLEAR SCAN, then select the frequency to hide the black band in the viewfinder.
• You can select the frequency from 117 steps.
5. Close the menu.
CLEAR SCAN•• 61.9Hz
CAM. SET UP
(see p. 26)
Page 73
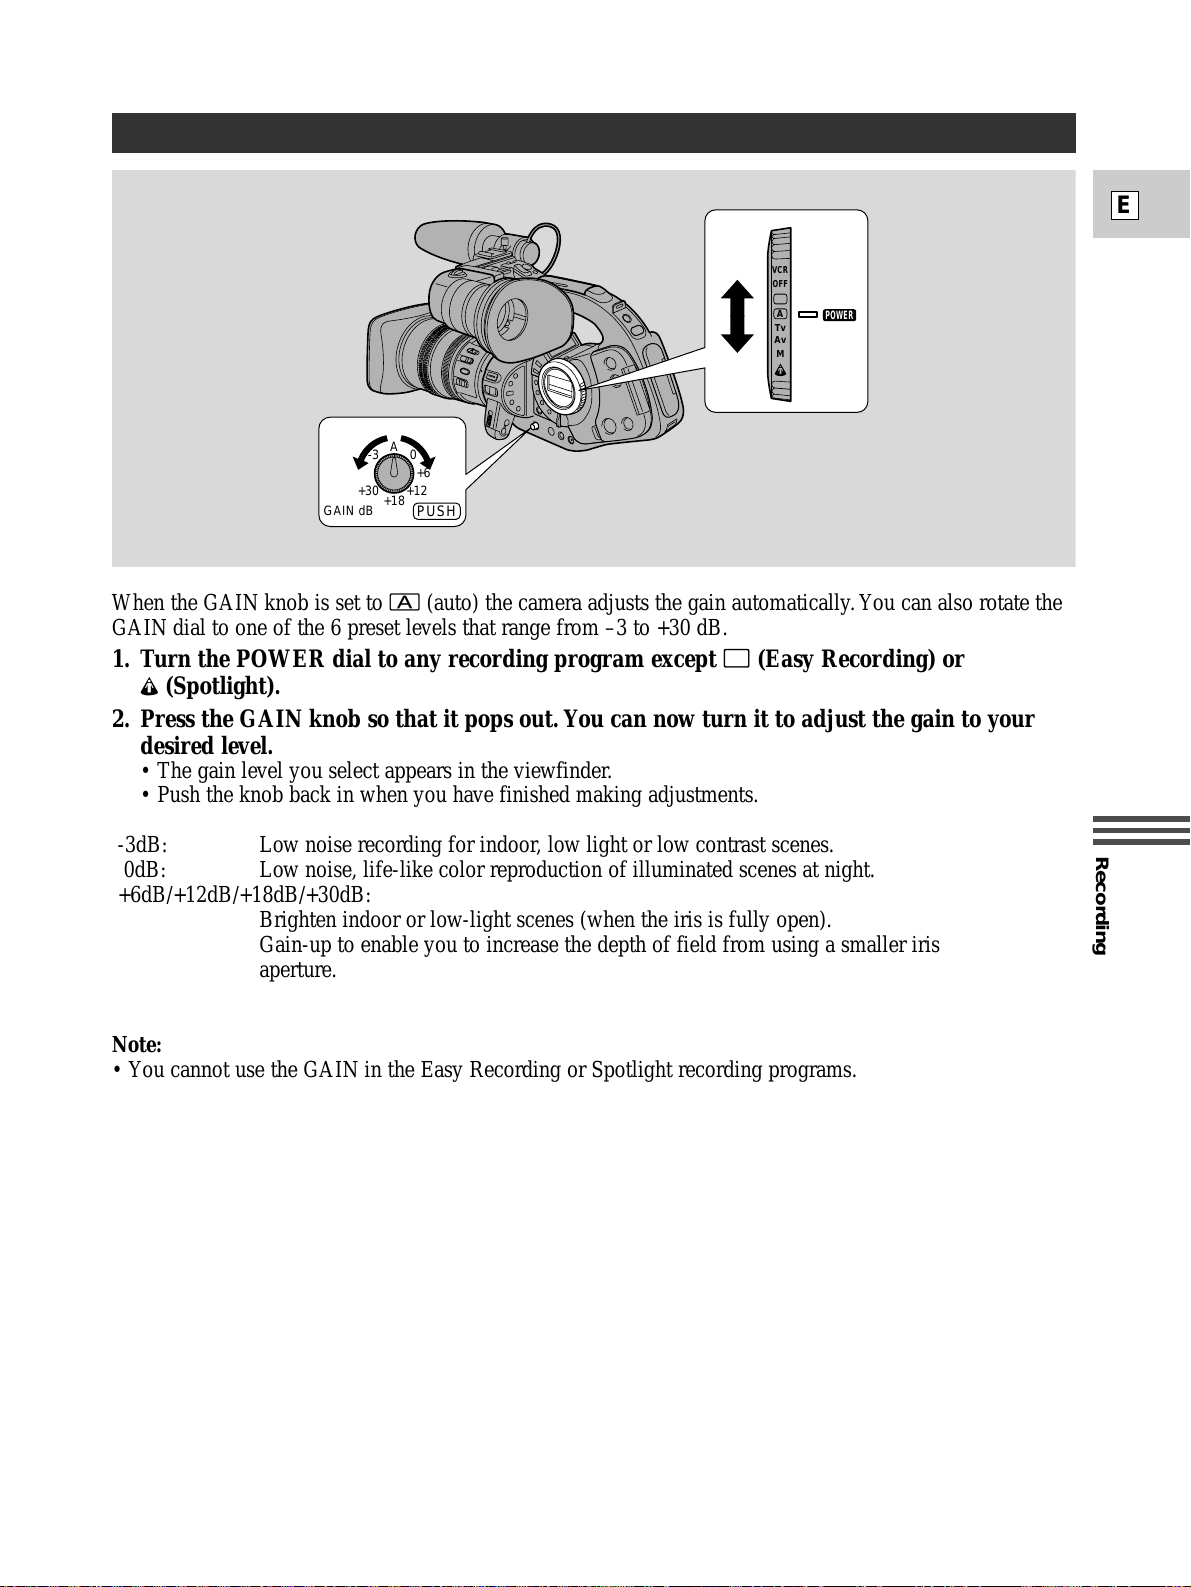
Recording
E
73
When the GAIN knob is set to
n
(auto) the camera adjusts the gain automatically. You can also rotate the
GAIN dial to one of the 6 preset levels that range from –3 to +30 dB.
1. Turn the POWER dial to any recording program except [ (Easy Recording) or
e (Spotlight).
2. Press the GAIN knob so that it pops out. You can now turn it to adjust the gain to your
desired level.
• The gain level you select appears in the viewfinder.
• Push the knob back in when you have finished making adjustments.
-3dB: Low noise recording for indoor, low light or low contrast scenes.
0dB: Low noise, life-like color reproduction of illuminated scenes at night.
+6dB/+12dB/+18dB/+30dB:
Brighten indoor or low-light scenes (when the iris is fully open).
Gain-up to enable you to increase the depth of field from using a smaller iris
aperture.
Note:
• You cannot use the GAIN in the Easy Recording or Spotlight recording programs.
Adjusting the Gain
POWER
VCR
OFF
Tv
Av
M
A
A
+18
0-3
+12+30
+6
GAIN dB
PUSH
Page 74
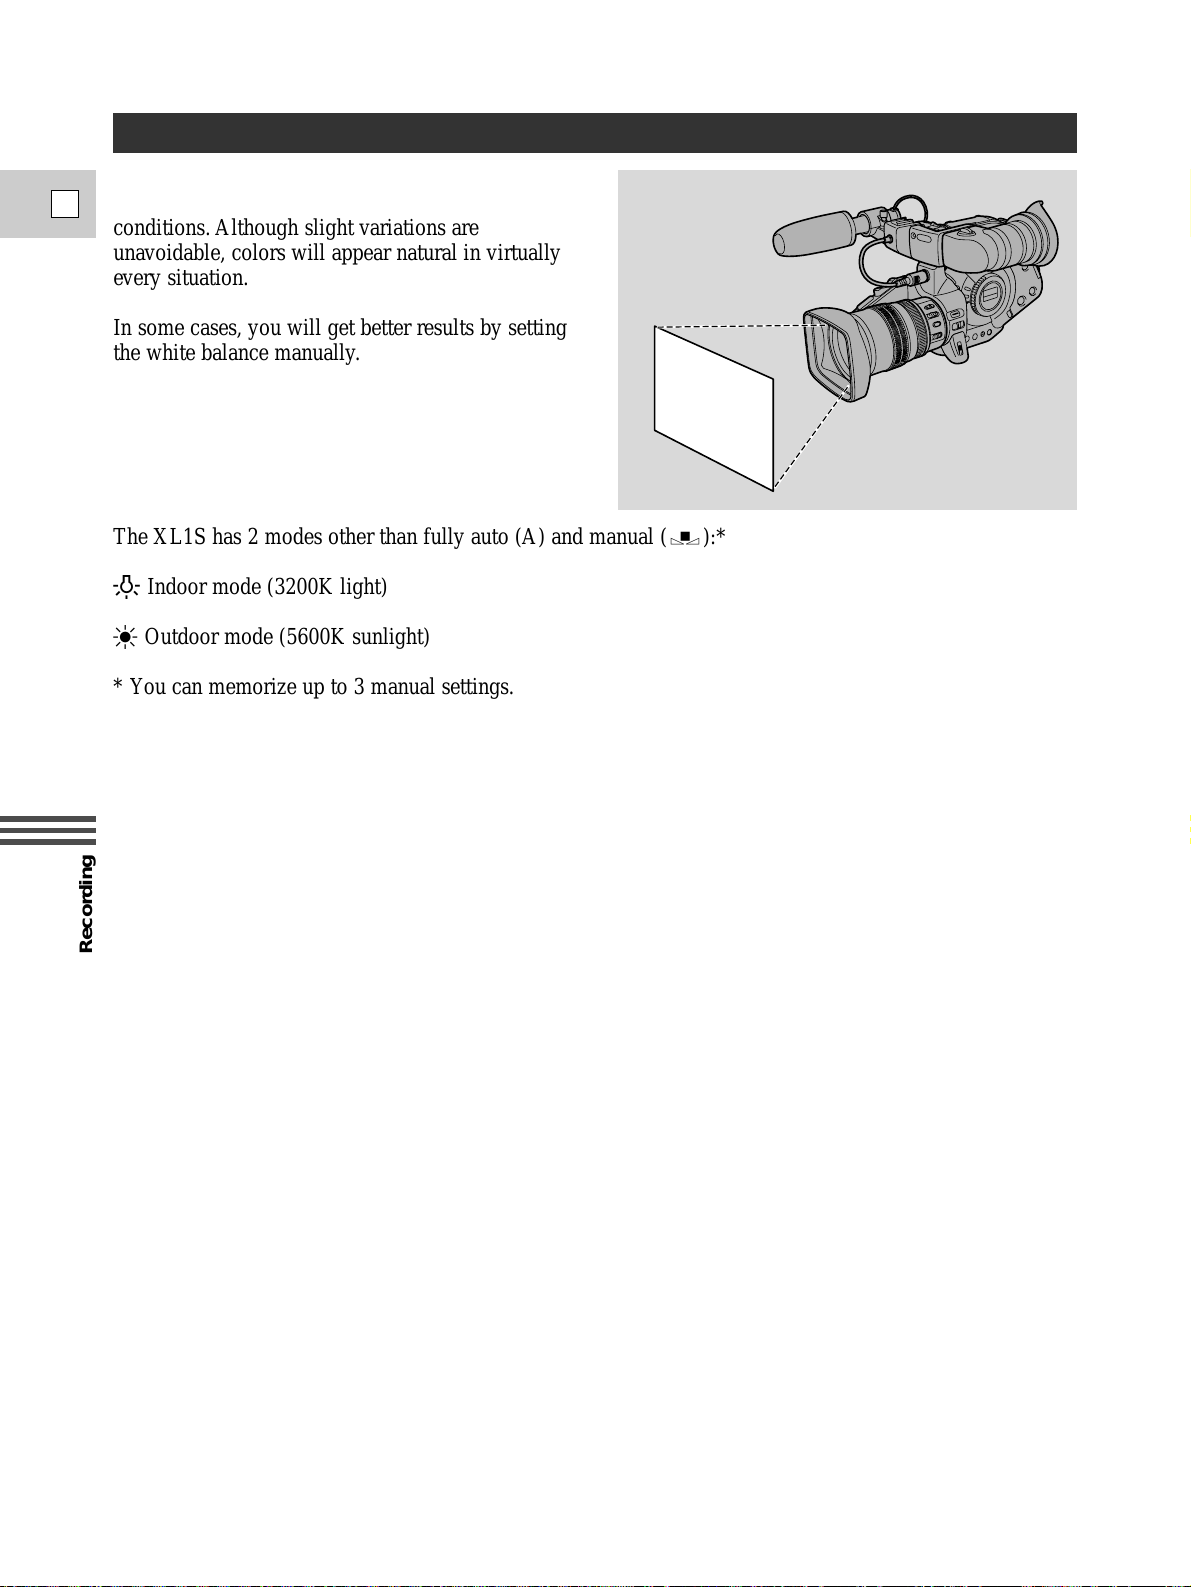
Recording
E
74
Adjusting the White Balance
The camera’s auto white balance system
compensates for a wide range of lighting
conditions. Although slight variations are
unavoidable, colors will appear natural in virtually
every situation.
In some cases, you will get better results by setting
the white balance manually.
The XL1S has 2 modes other than fully auto (A) and manual (W):*
T
Indoor mode (3200K light)
U
Outdoor mode (5600K sunlight)
* You can memorize up to 3 manual settings.
Page 75
Recording
E
75
1. Turn the POWER dial to any recording program (except the [ Easy Recording
program).
2. Press the white balance selector knob so that it pops out. You can now turn it to choose
between A for auto white balance,
T
for indoor lighting,Ufor outdoor lighting, or turn it
to the right (1, 2 or 3) to set the white balance manually.
•T/Uappears in the viewfinder when you set the white balance to the indoor/outdoor modes.
Setting the white balance manually
When you select the number by turning the knob to the right, you can set the white balance manually.
a) Point the camera at a white object (such as a sheet of paper) and if you are using a zoom lens, zoom in
until it fills the display.
• Keep the camera pointing to the white object until you have finished setting the white balance.
b) Press the WHITE BALANCE W set button.
• W flashes quickly in the viewfinder and then remains lit, to show that the camera has set the white
balance.
• Depending on the light source, the flashing may at times change to a slower speed, rather than remain
lit. The result will remain better than with the auto setting, and you can continue recording.
c) Turn the white balance selector knob back to A to return to the auto setting. Push the knob back in when
you have finished making selections.
d) You can recall any of the 3 manual white balance settings by turning the knob to the desired number.
Setting the white balance manually will probably work better than auto white balance when shooting:
• Subjects with one dominant color, such as sky, sea or forest.
• Close-ups.
• In rapidly changing lighting conditions.
• In places lit by certain types of fluorescent or mercury vapor lights.
Setting the white balance
Notes:
• If the lighting conditions change, reset the white balance by first returning to the auto setting, and then
reselecting the manual balance.
• Try to record with light from a single source. Correct white balance cannot be obtained for two types of
lighting at once.
• You cannot set the white balance manually or use the indoor/outdoor modes when the POWER dial is set
to the [ (Easy Recording) program. If you are already using a mode other than auto, the white balance
returns to auto while you are in the [ (Easy Recording) program.
• If you shoot with studio/video lighting, use the
T
(indoor) mode.
• If you shoot under fluorescent lights use the automatic white balance or set the balance manually, since
the camera may not adjust the white balance correctly in the
T
mode.
• When you turn the camera off, the camera remembers your white balance setting.
Page 76
Playback
E
76
Playing back a Cassette
You can use the viewfinder for instant, on-the-spot playback.
To play back your recordings on a TV, see p. 83.
To use the wireless controller, see p. 30.
Notes:
• To avoid accidental recording, make sure that you slide the tab on the cassette so that it exposes the hole
(the switch position is usually labelled SAVE or ERASE OFF).
• You cannot play back a tape recorded in ´SP or ´LP modes.
1. Attach a power source and turn the POWER dial to VCR.
2. Load the cassette.
3. Press the PLAY e button to start playback.
• To end playback, press the STOP 3 button.
• To wind the tape forwards, stop playback and press the FF 1 button.
• To wind the tape backwards, stop playback and press the REW ` button.
• If the playback picture is rough (mosaic-like noise), clean the video heads using a Canon DVM-CL
Digital Video Head Cleaning Cassette or a commercially available digital video head cleaning cassette.
POWER
VCR
OFF
Tv
Av
A
REC
AUDIO DUB.
AV INSERT
SEARCH SELECT
REW
PAUSE SLOW
PLAY
STOP
FF
2
+
Page 77
Playback
E
77
Playback Pause
To view the video as a still picture press the PAUSE a button. To resume normal playback, press it again,
or press the PLAY e button. The camera automatically goes into stop mode after about five minutes’
playback pause.
Edit Search
When the camera is in playback pause, you can use edit search to play the tape forwards or backwards to
find the point where you want to start or restart editing.
Press and hold the edit search + and – buttons (the REC SEARCH buttons) during playback, while you
check the picture in the viewfinder.
• The + button plays the recording forwards and the – button plays it backwards.
Release the button when you find the point where you want to start editing.
• The camera returns to playback pause.
Fast Forward Playback
To play back the recording at about 9.5 times normal speed, press and hold the FF 1 button during
normal playback or press and hold the FF 1 button during normal fast forward.
Rewind Playback
For reverse playback at about 9.5 times normal speed, press and hold the REW ` button during normal
playback or press and hold the REW ` button during normal rewind.
Other playback modes
Page 78
Playback
E
78
Note:
• Mosaic-like noise appears on the screen during some of the VCR modes.
These can only be operated from the wireless controller (p. 30).
Frame Advance
To play back frame by frame, press the +/ae button repeatedly during playback pause.
Press and hold to play back continuous frame advance.
Frame Reverse
To play back on reverse frame by frame, press the –/4a button repeatedly during playback pause.
Press and hold to play back continuous frame reverse.
Slow Forward Playback
To play back at about 1/5 normal speed, press the SLOW M button during normal playback.
Press the PLAY e button to return to normal playback.
Slow Reverse Playback
To play back in reverse at about 1/5 normal speed, press the –/4a button and then the SLOW M button
during normal playback.
Press PLAY e to return to normal playback.
Reverse Playback
To play back in reverse at normal speed, press the –/4a button during normal forward playback.
Press the PLAY e button to return to normal forward playback.
Forward ×2 Playback
Press the ×2 button during normal playback.
Press the PLAY e button to return to normal playback.
Reverse ×2 Playback
Press the –/4a button and then the ×2 button during normal playback.
Press the PLAY e button to return to normal playback.
Special playback
Shuttle Dial
Use the shuttle dial in play or playback pause
mode to control the playback speed and direction.
Turn the shuttle dial to different angles (see figure)
to select slow, ×1 and ×2 playback modes (both
forward and reverse), as well as fast forward and
rewind playback. Turn it fully to the left/right to
rewind/fast forward while the tape is stopped.
Jog Dial
Turn the Jog dial during playback or playback
pause for frame advance/reverse or slow
forward/slow reverse playback (depending on how
far you turn the dial).
• When you stop turning the dial, the camcorder
goes into playback pause mode.
REVERSE FORWARD
Reverse playback
Reverse
×
2 playback
Rewind playback
Slow reverse
playback
Playback pause
REVERSE FORWARD
Slow foward
playback
Forward
×
1 playback
Forward
×
2 playback
Fast forward playback
Page 79
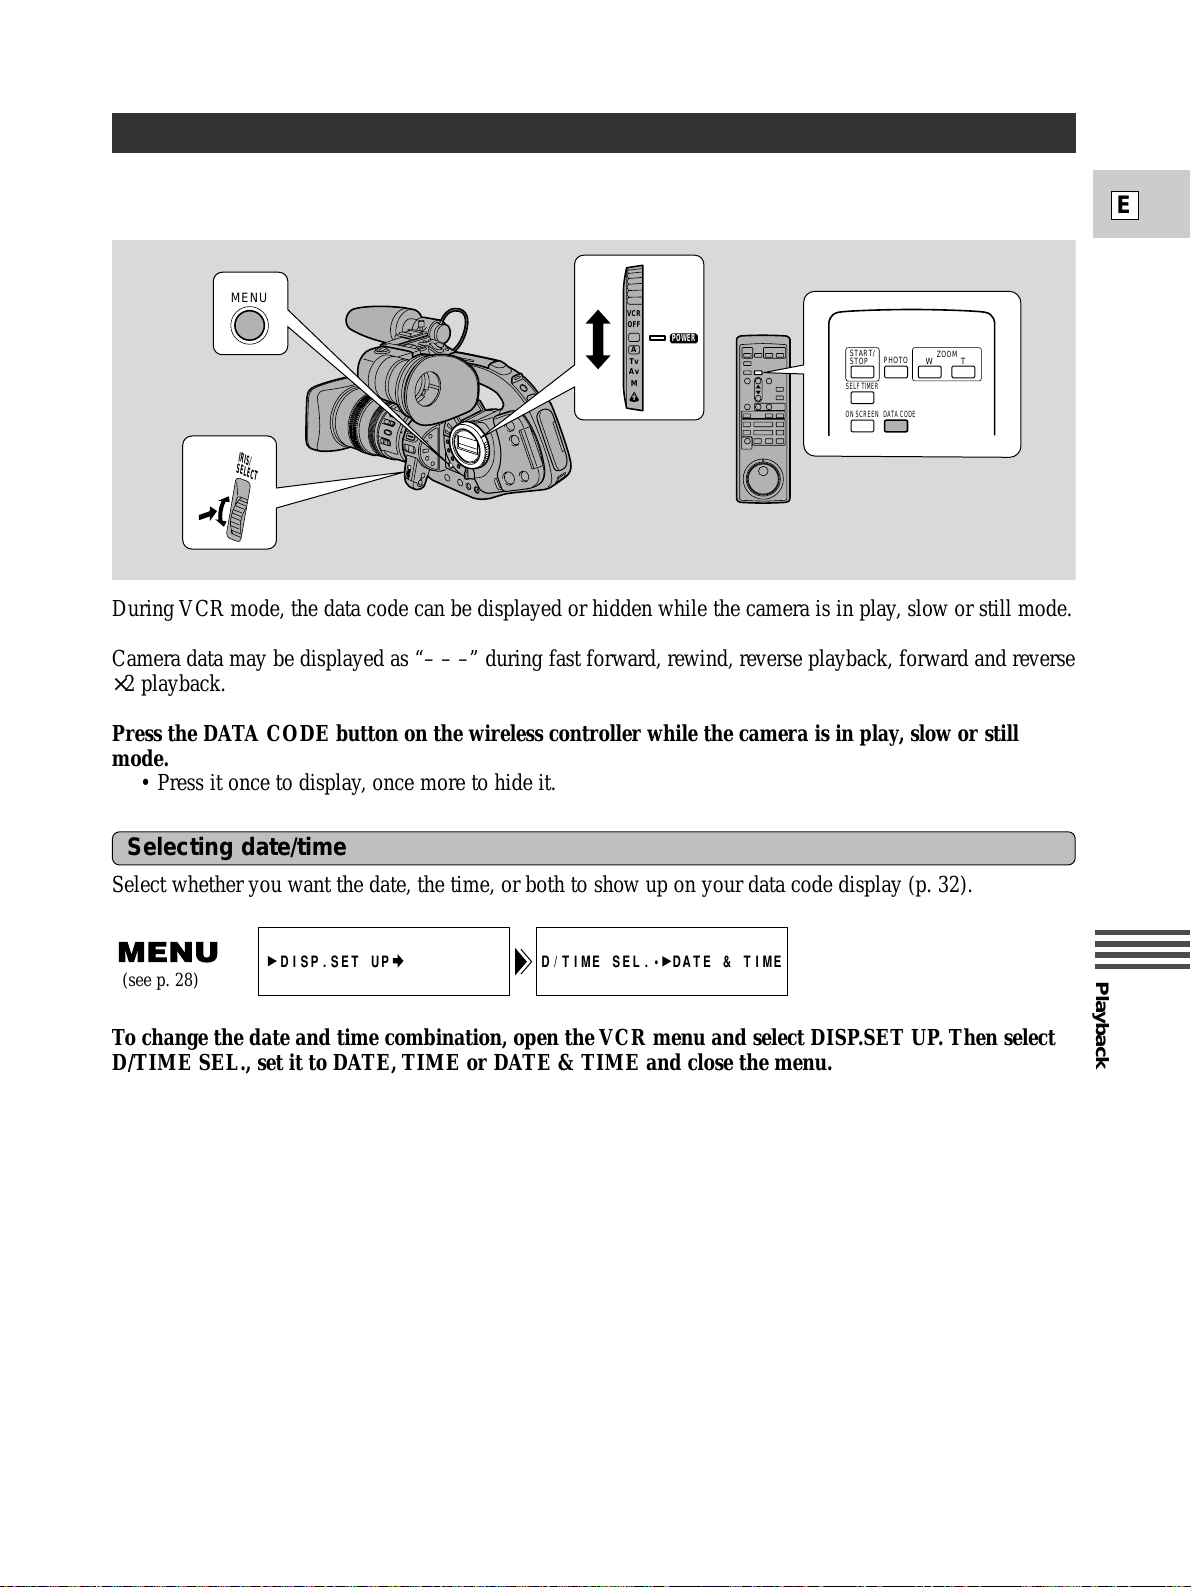
Playback
E
79
A data code, containing the date and time the recording was made and other camera data (shutter speed and
exposure settings) is automatically recorded on a special data section of the tape.
Displaying Date,Time and Camera Data (Data Code)
D/TIME SEL.• DATE & TIME
DISP.SET UP
During VCR mode, the data code can be displayed or hidden while the camera is in play, slow or still mode.
Camera data may be displayed as “– – –” during fast forward, rewind, reverse playback, forward and reverse
×2 playback.
Press the DATA CODE button on the wireless controller while the camera is in play, slow or still
mode.
• Press it once to display, once more to hide it.
Select whether you want the date, the time, or both to show up on your data code display (p. 32).
(see p. 28)
POWER
VCR
OFF
Tv
Av
M
A
MENU
IRIS/
SELECT
PHOTO
SELF TIMER
WT
ZOOM
START/
STOP
DATA CODEON SCREEN
Selecting date/time
To change the date and time combination, open the VCR menu and select DISP.SET UP. Then select
D/TIME SEL., set it to DATE, TIME or DATE & TIME and close the menu.
Page 80
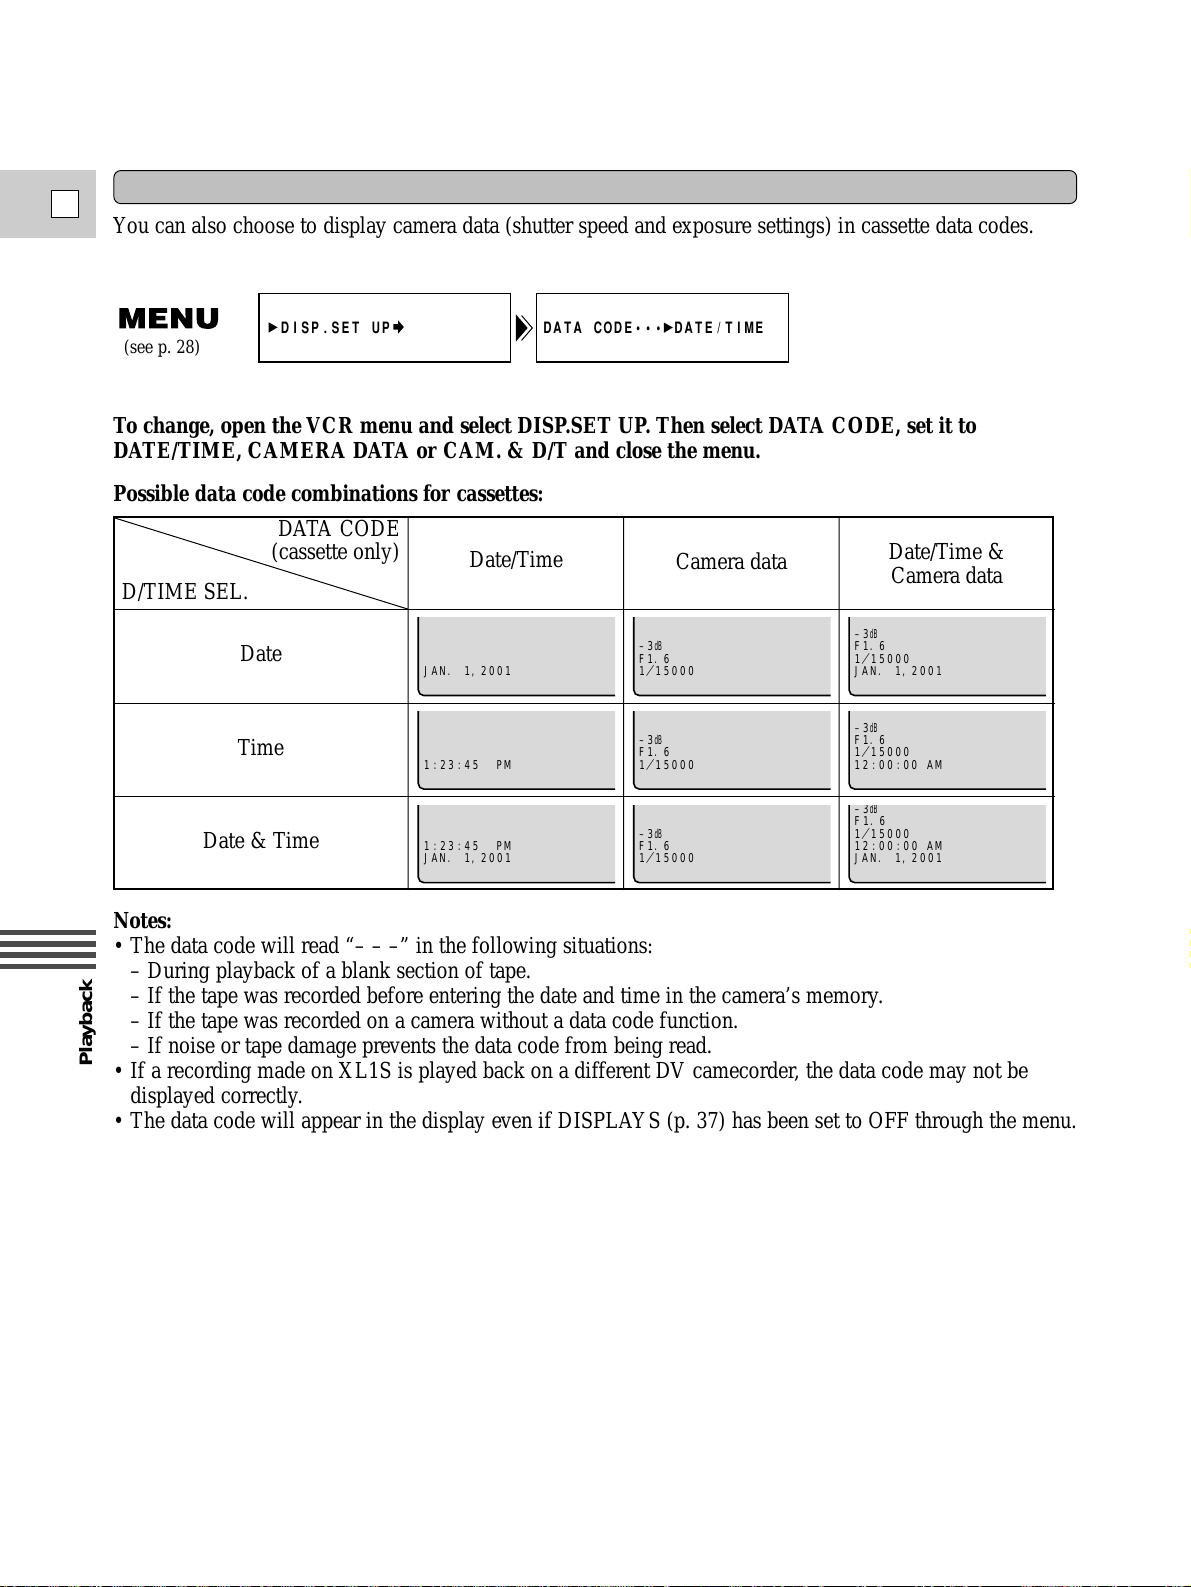
Playback
E
80
Setting the data code
You can also choose to display camera data (shutter speed and exposure settings) in cassette data codes.
To change, open the VCR menu and select DISP.SET UP. Then select DATA CODE, set it to
DATE/TIME, CAMERA DATA or CAM. & D/T and close the menu.
DATA CODE••• DATE/TIME
DISP.SET UP
(see p. 28)
Possible data code combinations for cassettes:
DATA CODE
(cassette only)
D/TIME SEL.
Date
Time
Date & Time
Date/Time
Camera data
Date/Time &
Camera data
JAN. 1, 0201
–3
dB
F1. 6
1
/
15000
– 3
dB
F1. 6
1
/
15000
2001.
JAN
, 1
1:23:45 PM
– 3
dB
F1. 6
1
/
15000
– 3
dB
F1. 6
1
/
15000
AM12:00 :00
1:23:45 PM
JAN. 1, 0201
– 3
dB
F1. 6
1
/
15000
– 3
dB
F1. 6
1
/
15000
2001.
AM
JAN
12:00 :00
, 1
Notes:
• The data code will read “– – –” in the following situations:
– During playback of a blank section of tape.
– If the tape was recorded before entering the date and time in the camera’s memory.
– If the tape was recorded on a camera without a data code function.
– If noise or tape damage prevents the data code from being read.
• If a recording made on XL1S is played back on a different DV camecorder, the data code may not be
displayed correctly.
• The data code will appear in the display even if DISPLAYS (p. 37) has been set to OFF through the menu.
Page 81
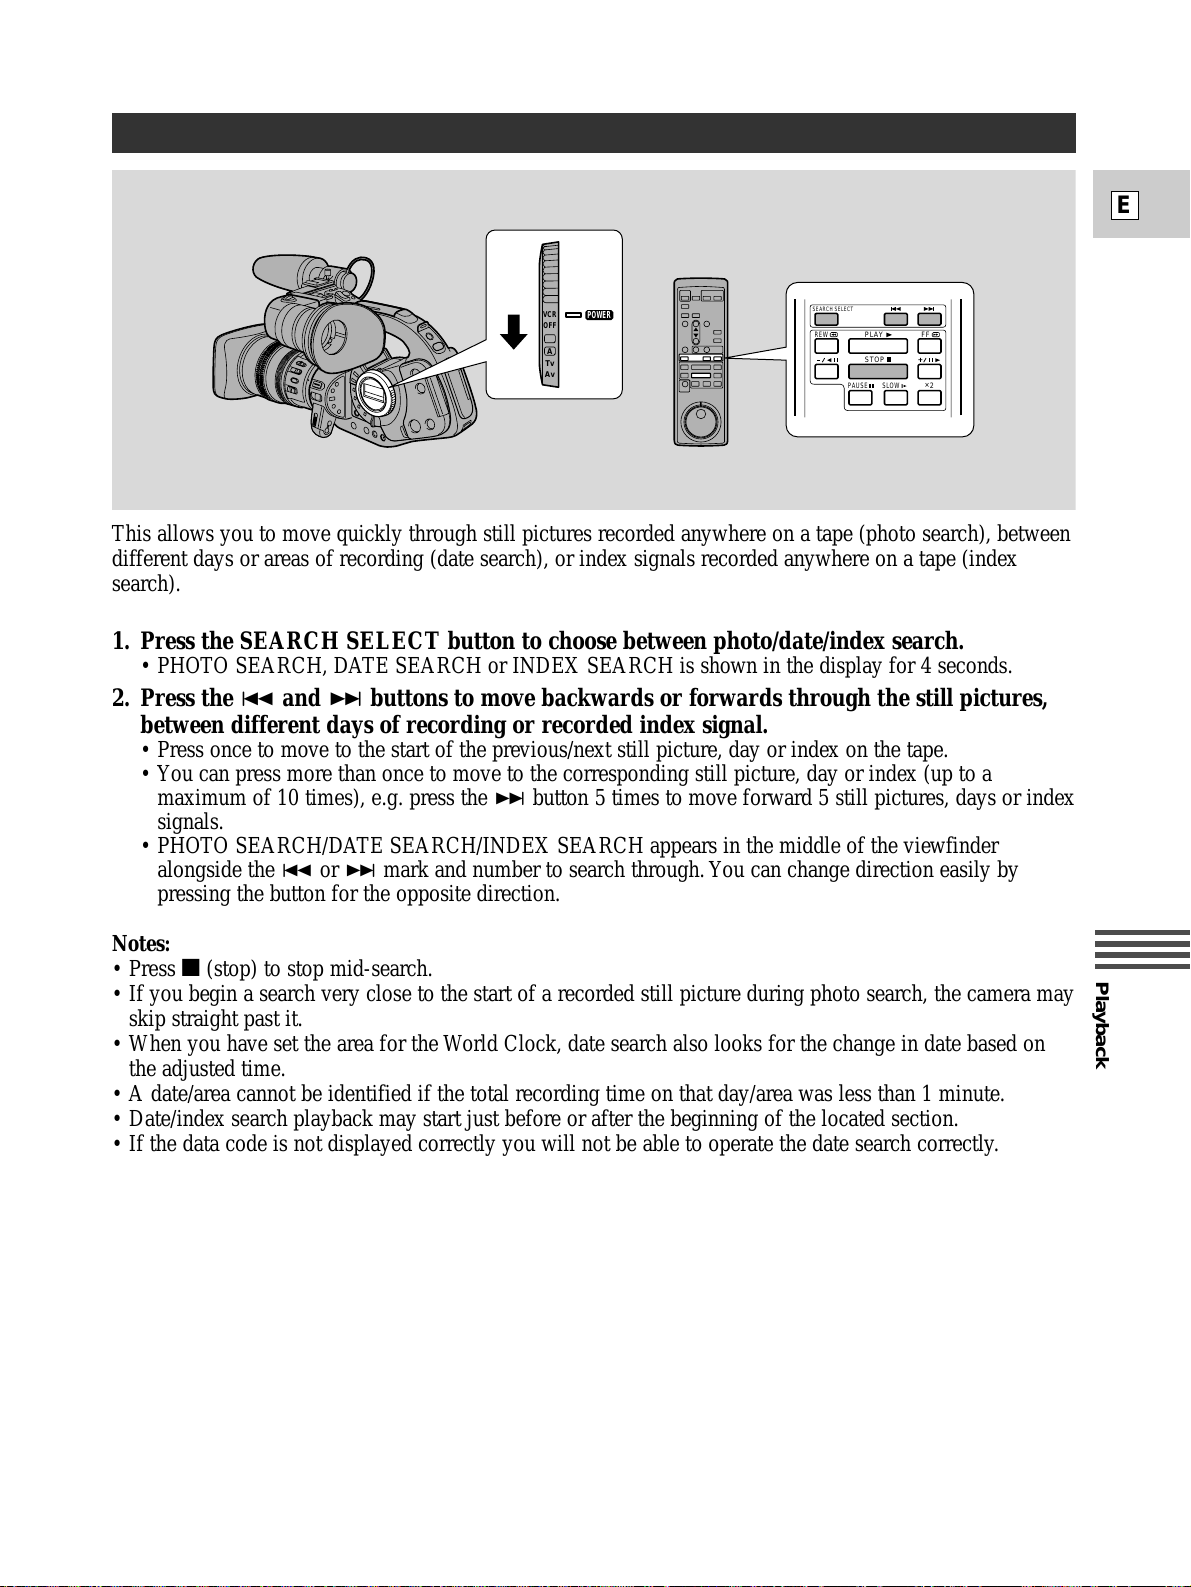
Playback
E
81
Searching the Tape (Photo Search/Date Search/Index Search)
This allows you to move quickly through still pictures recorded anywhere on a tape (photo search), between
different days or areas of recording (date search), or index signals recorded anywhere on a tape (index
search).
1. Press the SEARCH SELECT button to choose between photo/date/index search.
• PHOTO SEARCH, DATE SEARCH or INDEX SEARCH is shown in the display for 4 seconds.
2. Press the - and + buttons to move backwards or forwards through the still pictures,
between different days of recording or recorded index signal.
• Press once to move to the start of the previous/next still picture, day or index on the tape.
• You can press more than once to move to the corresponding still picture, day or index (up to a
maximum of 10 times), e.g. press the + button 5 times to move forward 5 still pictures, days or index
signals.
• PHOTO SEARCH/DATE SEARCH/INDEX SEARCH appears in the middle of the viewfinder
alongside the - or + mark and number to search through. You can change direction easily by
pressing the button for the opposite direction.
Notes:
• Press 3 (stop) to stop mid-search.
• If you begin a search very close to the start of a recorded still picture during photo search, the camera may
skip straight past it.
• When you have set the area for the World Clock, date search also looks for the change in date based on
the adjusted time.
• A date/area cannot be identified if the total recording time on that day/area was less than 1 minute.
• Date/index search playback may start just before or after the beginning of the located section.
• If the data code is not displayed correctly you will not be able to operate the date search correctly.
POWER
VCR
OFF
Tv
Av
A
SEARCH SELECT
REW
PAUSE SLOW
PLAY
STOP
FF
2
+
Page 82
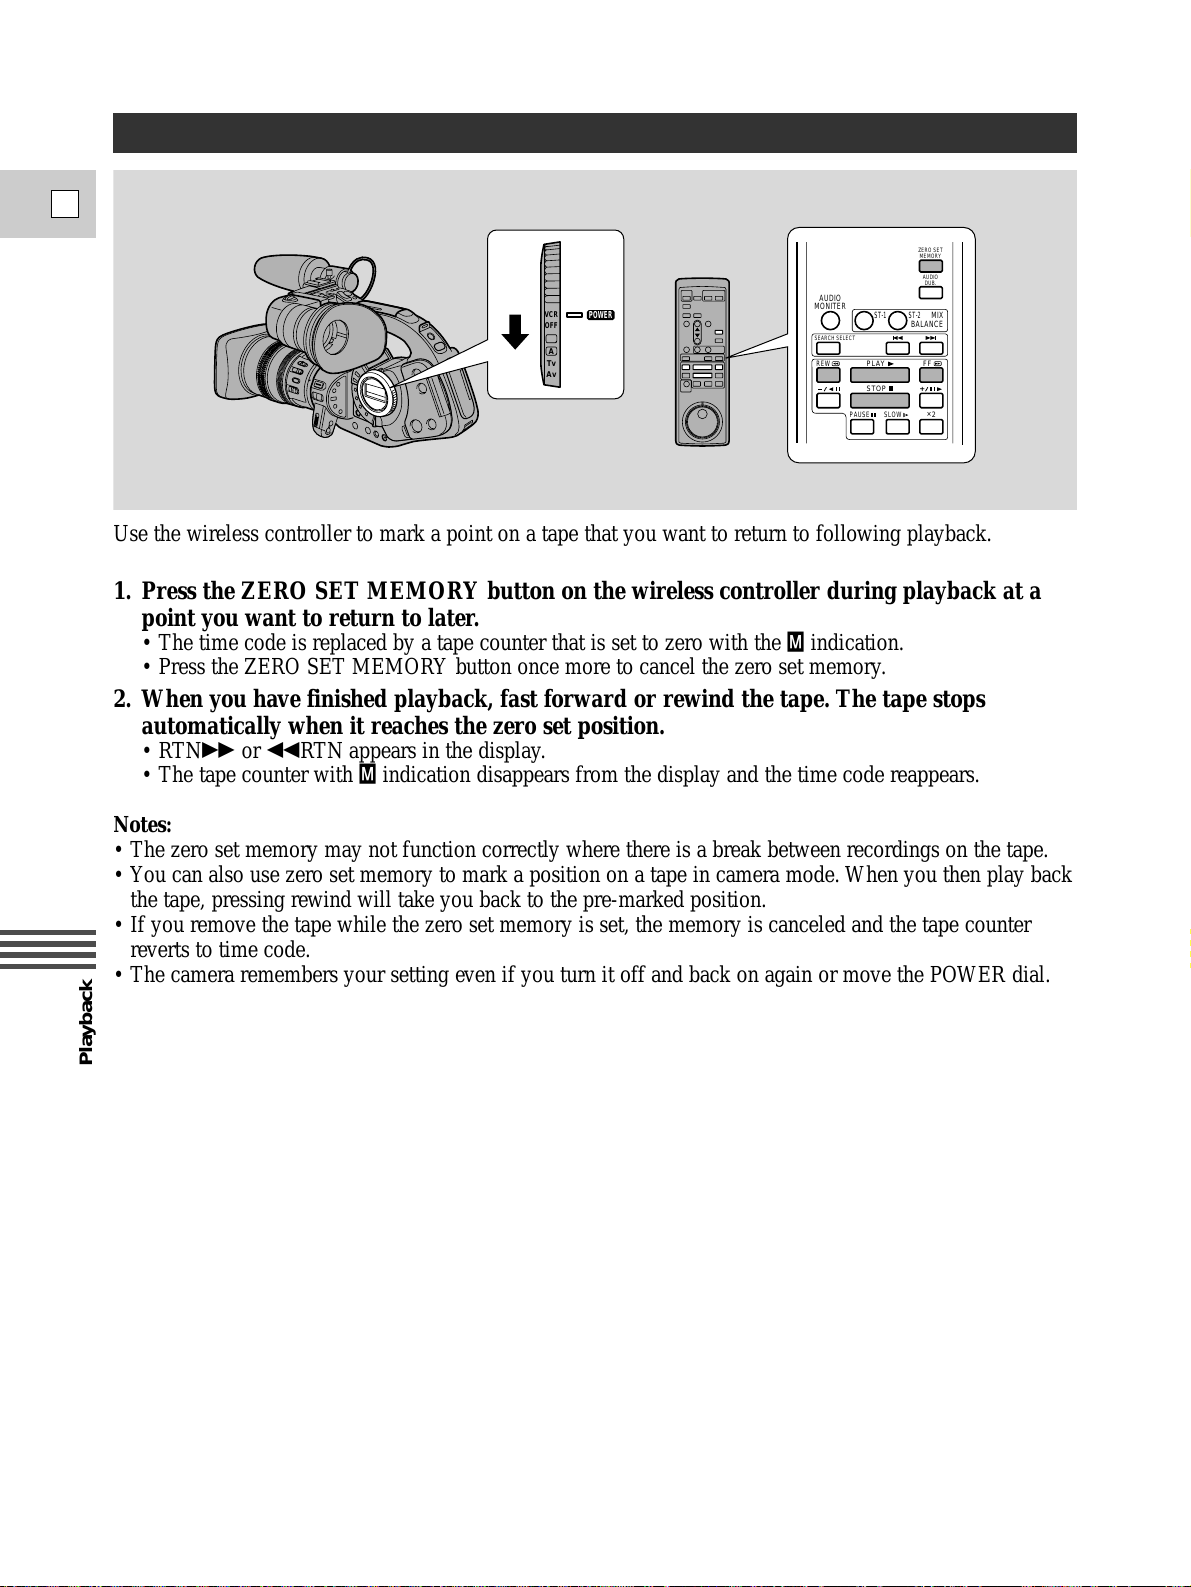
Playback
E
82
Returning to a Pre-Marked Position
Use the wireless controller to mark a point on a tape that you want to return to following playback.
1. Press the ZERO SET MEMORY button on the wireless controller during playback at a
point you want to return to later.
• The time code is replaced by a tape counter that is set to zero with the Âindication.
• Press the ZERO SET MEMORY button once more to cancel the zero set memory.
2. When you have finished playback, fast forward or rewind the tape. The tape stops
automatically when it reaches the zero set position.
•RTN1 or `RTN appears in the display.
• The tape counter with
Â
indication disappears from the display and the time code reappears.
Notes:
• The zero set memory may not function correctly where there is a break between recordings on the tape.
• You can also use zero set memory to mark a position on a tape in camera mode. When you then play back
the tape, pressing rewind will take you back to the pre-marked position.
• If you remove the tape while the zero set memory is set, the memory is canceled and the tape counter
reverts to time code.
• The camera remembers your setting even if you turn it off and back on again or move the POWER dial.
POWER
VCR
OFF
Tv
Av
A
AUDIO
MONITER
AUDIO
DUB.
SEARCH SELECT
ZERO SET
MEMORY
MIX
BALANCE
ST-2ST-1
REW
PAUSE SLOW
PLAY
STOP
FF
2
+
Page 83
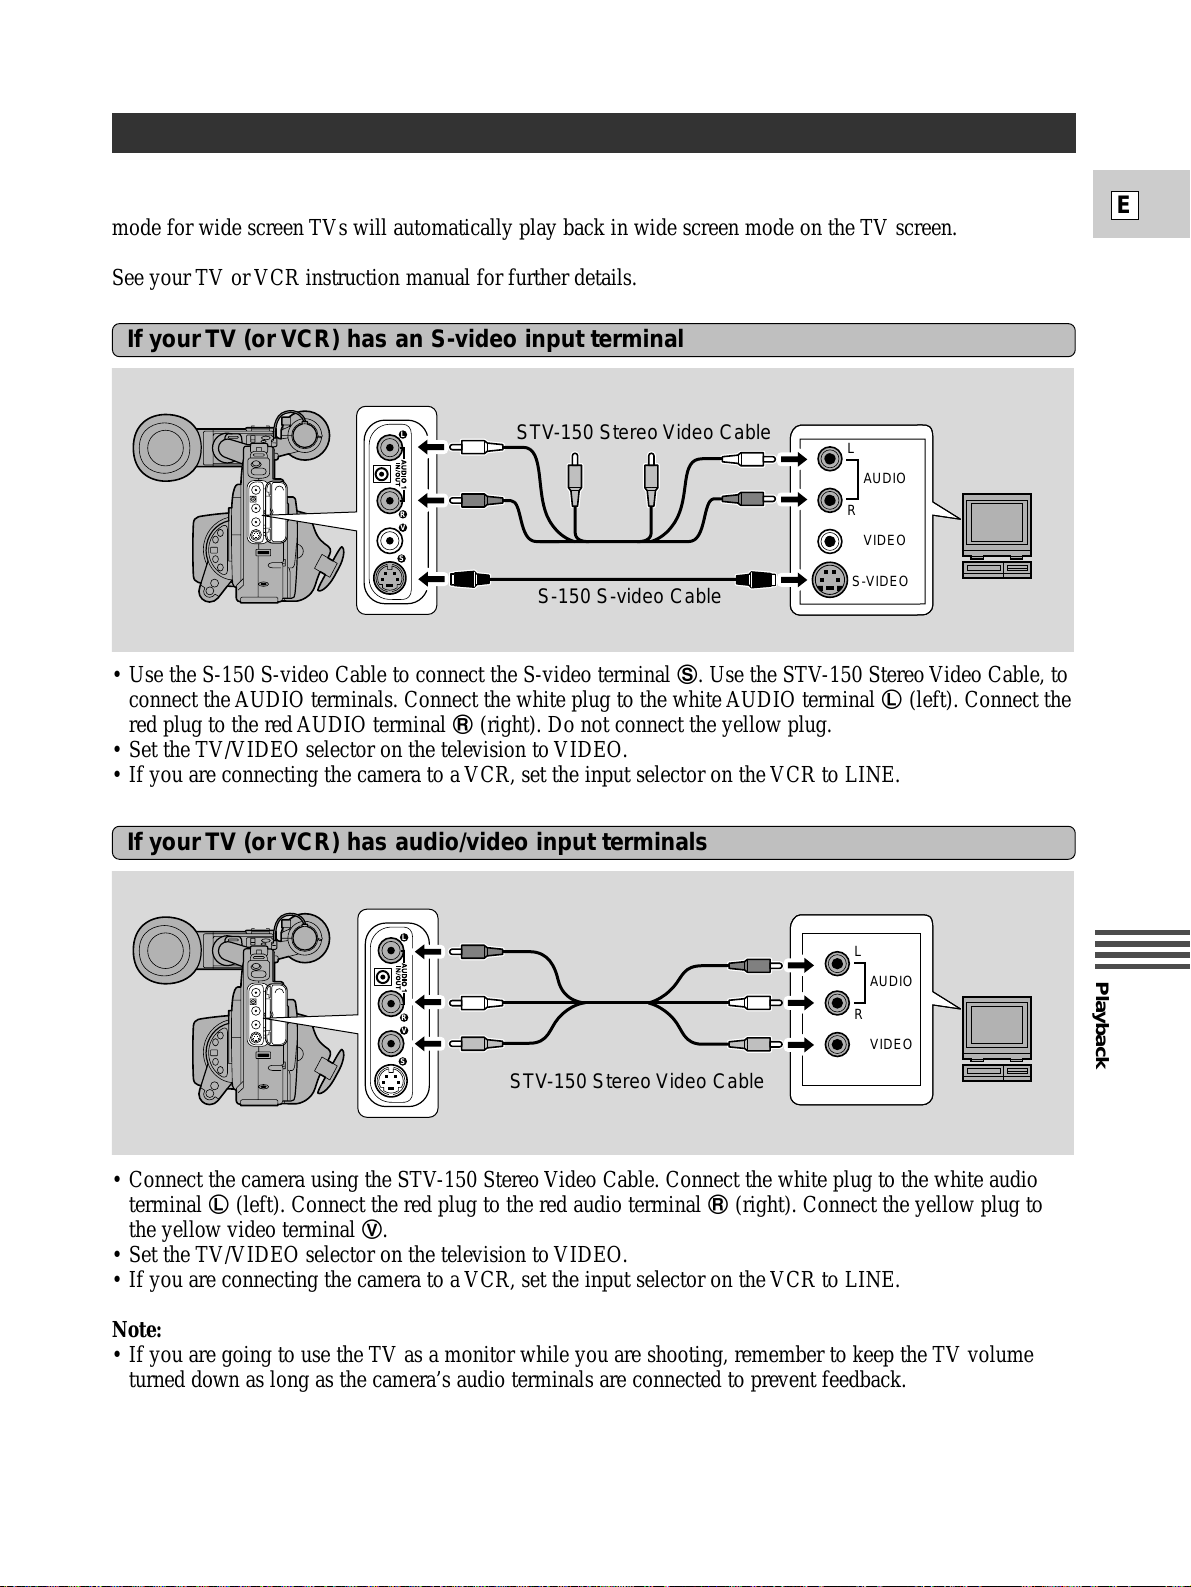
Playback
E
83
Connections for Playback on a TV Screen
For higher picture quality, we recommend playing back recordings on a TV with an S (S1) terminal. If you
connect the camcorder to a TV with an S1 terminal or the Video ID-1 system, recordings made in the 16:9
mode for wide screen TVs will automatically play back in wide screen mode on the TV screen.
See your TV or VCR instruction manual for further details.
• Use the S-150 S-video Cable to connect the S-video terminal d. Use the STV-150 Stereo Video Cable, to
connect the AUDIO terminals. Connect the white plug to the white AUDIO terminal 7 (left). Connect the
red plug to the red AUDIO terminal 9 (right). Do not connect the yellow plug.
• Set the TV/VIDEO selector on the television to VIDEO.
• If you are connecting the camera to a VCR, set the input selector on the VCR to LINE.
L
R
V
S
S-VIDEO
VIDEO
STV-150 Stereo Video Cable
S-150 S-video Cable
R
L
AUDIO
If your TV (or VCR) has an S-video input terminal
If your TV (or VCR) has audio/video input terminals
• Connect the camera using the STV-150 Stereo Video Cable. Connect the white plug to the white audio
terminal 7 (left). Connect the red plug to the red audio terminal 9 (right). Connect the yellow plug to
the yellow video terminal 0.
• Set the TV/VIDEO selector on the television to VIDEO.
• If you are connecting the camera to a VCR, set the input selector on the VCR to LINE.
Note:
• If you are going to use the TV as a monitor while you are shooting, remember to keep the TV volume
turned down as long as the camera’s audio terminals are connected to prevent feedback.
If your TV is already hooked up to a VCR, you can connect the camera to the VCR instead of the TV.
Follow the instructions above.
L
R
V
S
STV-150 Stereo Video Cable
L
AUDIO
R
VIDEO
Page 84
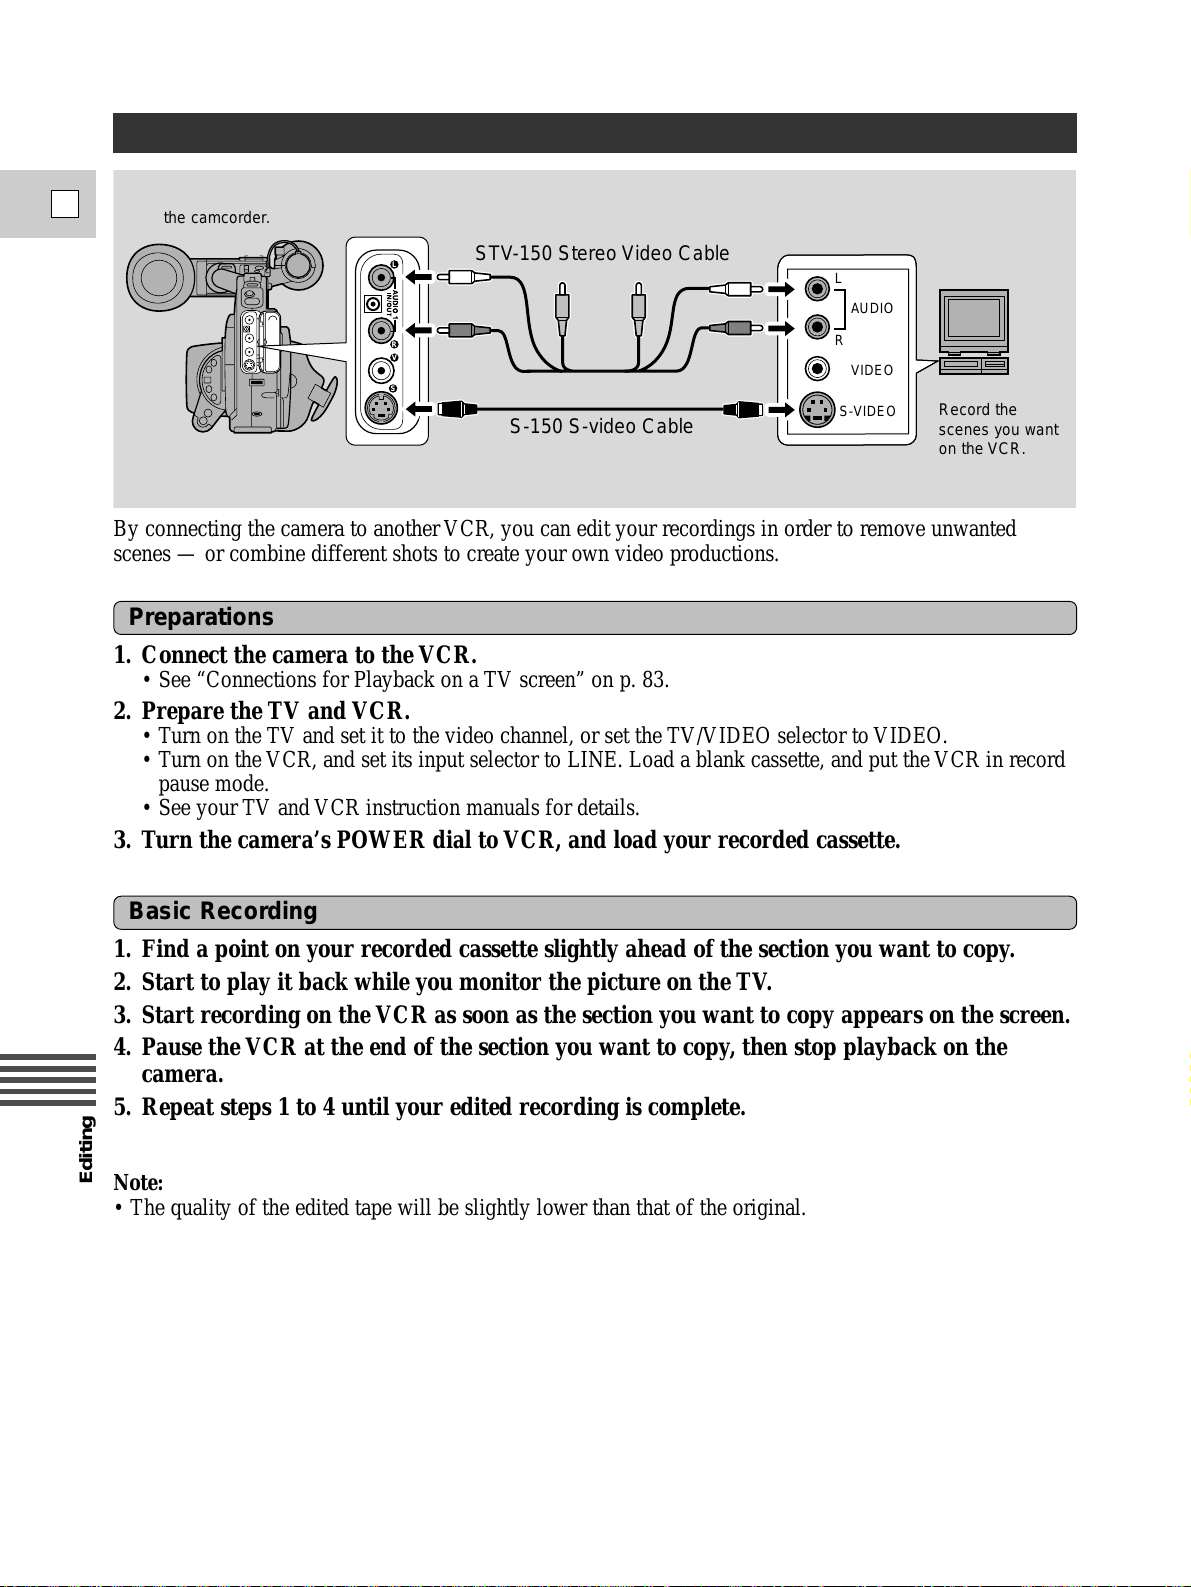
Editing
E
84
L
R
V
S
S-VIDEO
STV-150 Stereo Video Cable
S-150 S-video Cable
VIDEO
R
L
AUDIO
Editing to a VCR
1. Find a point on your recorded cassette slightly ahead of the section you want to copy.
2. Start to play it back while you monitor the picture on the TV.
3. Start recording on the VCR as soon as the section you want to copy appears on the screen.
4. Pause the VCR at the end of the section you want to copy, then stop playback on the
camera.
5. Repeat steps 1 to 4 until your edited recording is complete.
Note:
• The quality of the edited tape will be slightly lower than that of the original.
By connecting the camera to another VCR, you can edit your recordings in order to remove unwanted
scenes — or combine different shots to create your own video productions.
1. Connect the camera to the VCR.
• See “Connections for Playback on a TV screen” on p. 83.
2. Prepare the TV and VCR.
• Turn on the TV and set it to the video channel, or set the TV/VIDEO selector to VIDEO.
• Turn on the VCR, and set its input selector to LINE. Load a blank cassette, and put the VCR in record
pause mode.
• See your TV and VCR instruction manuals for details.
3. Turn the camera’s POWER dial to VCR, and load your recorded cassette.
Preparations
Basic Recording
Playback the tape on
the camcorder.
Record the
scenes you want
on the VCR.
Page 85
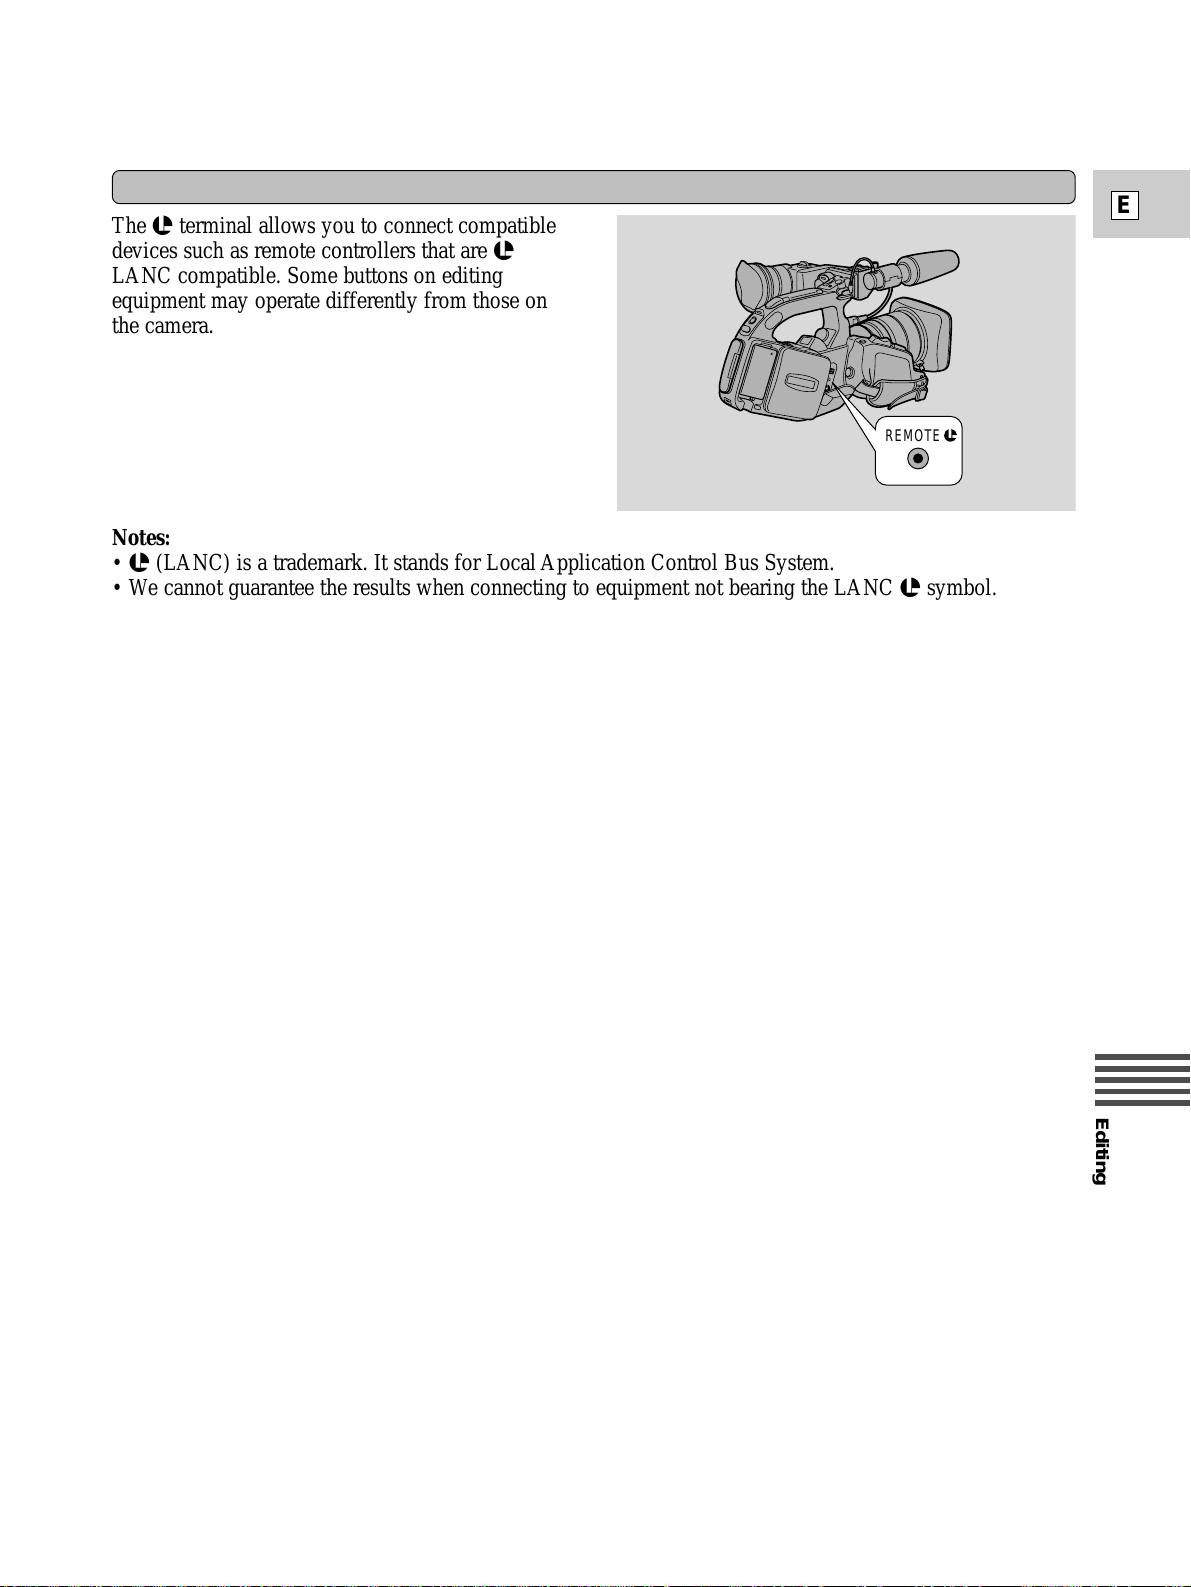
Editing
E
85
The m terminal allows you to connect compatible
devices such as remote controllers that are m
LANC compatible. Some buttons on editing
equipment may operate differently from those on
the camera.
m
(LANC) terminal
Notes:
• m (LANC) is a trademark. It stands for Local Application Control Bus System.
• We cannot guarantee the results when connecting to equipment not bearing the LANC m symbol.
REMOTE
Page 86
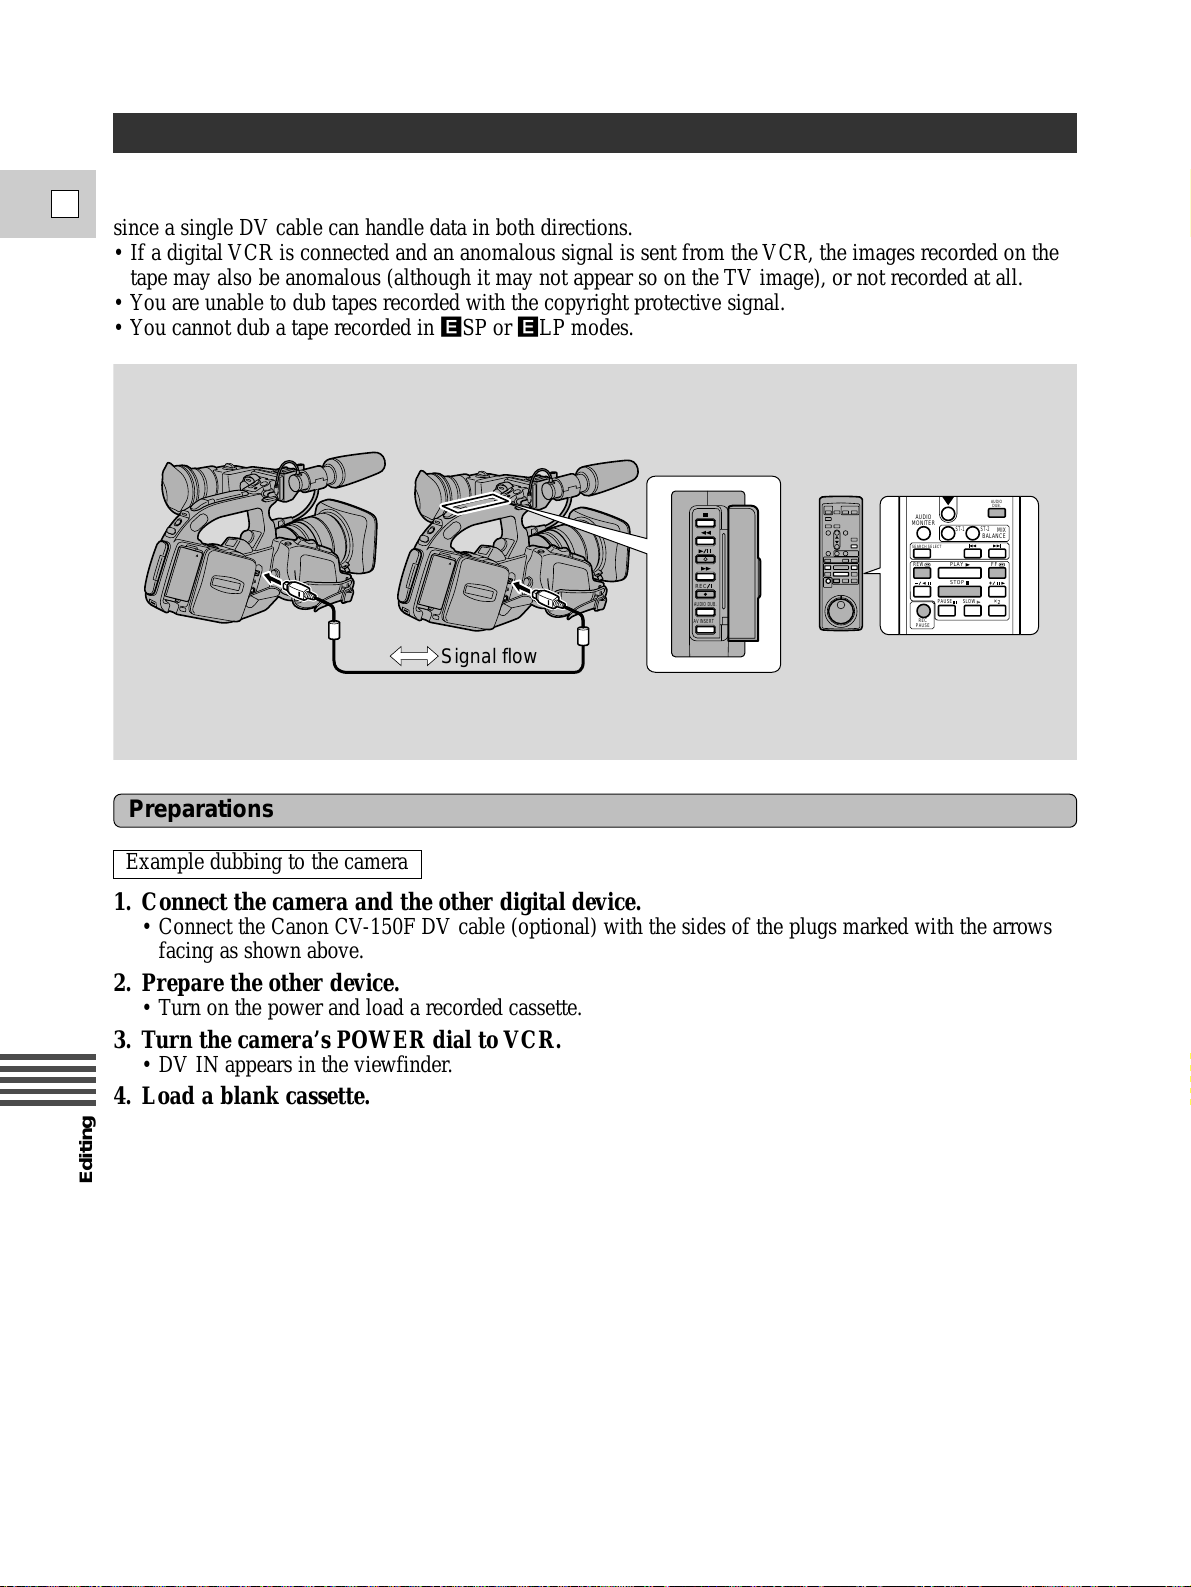
Editing
E
86
REC
AUDIO DUB.
AV INSERT
Signal flow
AUDIO
MONITER
REC
PAUSE
AUDIO
DUB.
SEARCH SELECT
MIX
BALANCE
ST-2ST-1
REW
PAUSE SLOW
PLAY
STOP
FF
2
+
1. Connect the camera and the other digital device.
• Connect the Canon CV-150F DV cable (optional) with the sides of the plugs marked with the arrows
facing as shown above.
2. Prepare the other device.
• Turn on the power and load a recorded cassette.
3. Turn the camera’s POWER dial to VCR.
• DV IN appears in the viewfinder.
4. Load a blank cassette.
Dubbing to/from a Cassette with Digital Video Equipment
Digital video equipment fitted with the DV terminal lets you edit, copy and transfer data digitally, with
virtually no generation loss in image and sound quality. The DV terminal is for both line-in and line-out,
since a single DV cable can handle data in both directions.
• If a digital VCR is connected and an anomalous signal is sent from the VCR, the images recorded on the
tape may also be anomalous (although it may not appear so on the TV image), or not recorded at all.
• You are unable to dub tapes recorded with the copyright protective signal.
• You cannot dub a tape recorded in
´SP or ´LP modes.
Preparations
Example dubbing to the camera
Page 87
Editing
E
87
Dubbing
1. Find a point on your recorded cassette slightly before the section you want to copy and set
it to playback pause mode.
2. Press the camera’s REC PAUSE button.
• The camcorder enters record pause mode.
3. Start playback on the other digital device while you monitor the picture.
4. Press the play/pause e/a button on the camera body or the PAUSE a on the wireless
controller.
• Recording starts.
5. When you get to the point where you want to stop recording, press the stop button or the
pause button.
• Recording stops.
6. Stop playback on the other device.
Notes:
• If the cable is not connected properly, or if the cable is unconnected when you press REC PAUSE, the
camera displays the caution ‘‘CHECK THE DV INPUT.’’An anomalous image may also flash onto the
screen.
• Blanks between recordings on the playback tape are recorded as anomalous images on the tape that is
being recorded to.
Copyright signal
Certain pre-recorded software tapes are copyright protected. If you try to play back such a cassette,
“COPYRIGHT PROTECTED PLAYBACK IS RESTRICTED” appears in the viewfinder for a few seconds
and then the camera displays a blank blue screen; you cannot view the contents of the cassette.
If you try to record from such a tape via the digital cable “COPYRIGHT PROTECTED DUBBING
RESTRICTED” appears in the viewfinder; you cannot record the contents of the tape.
Page 88
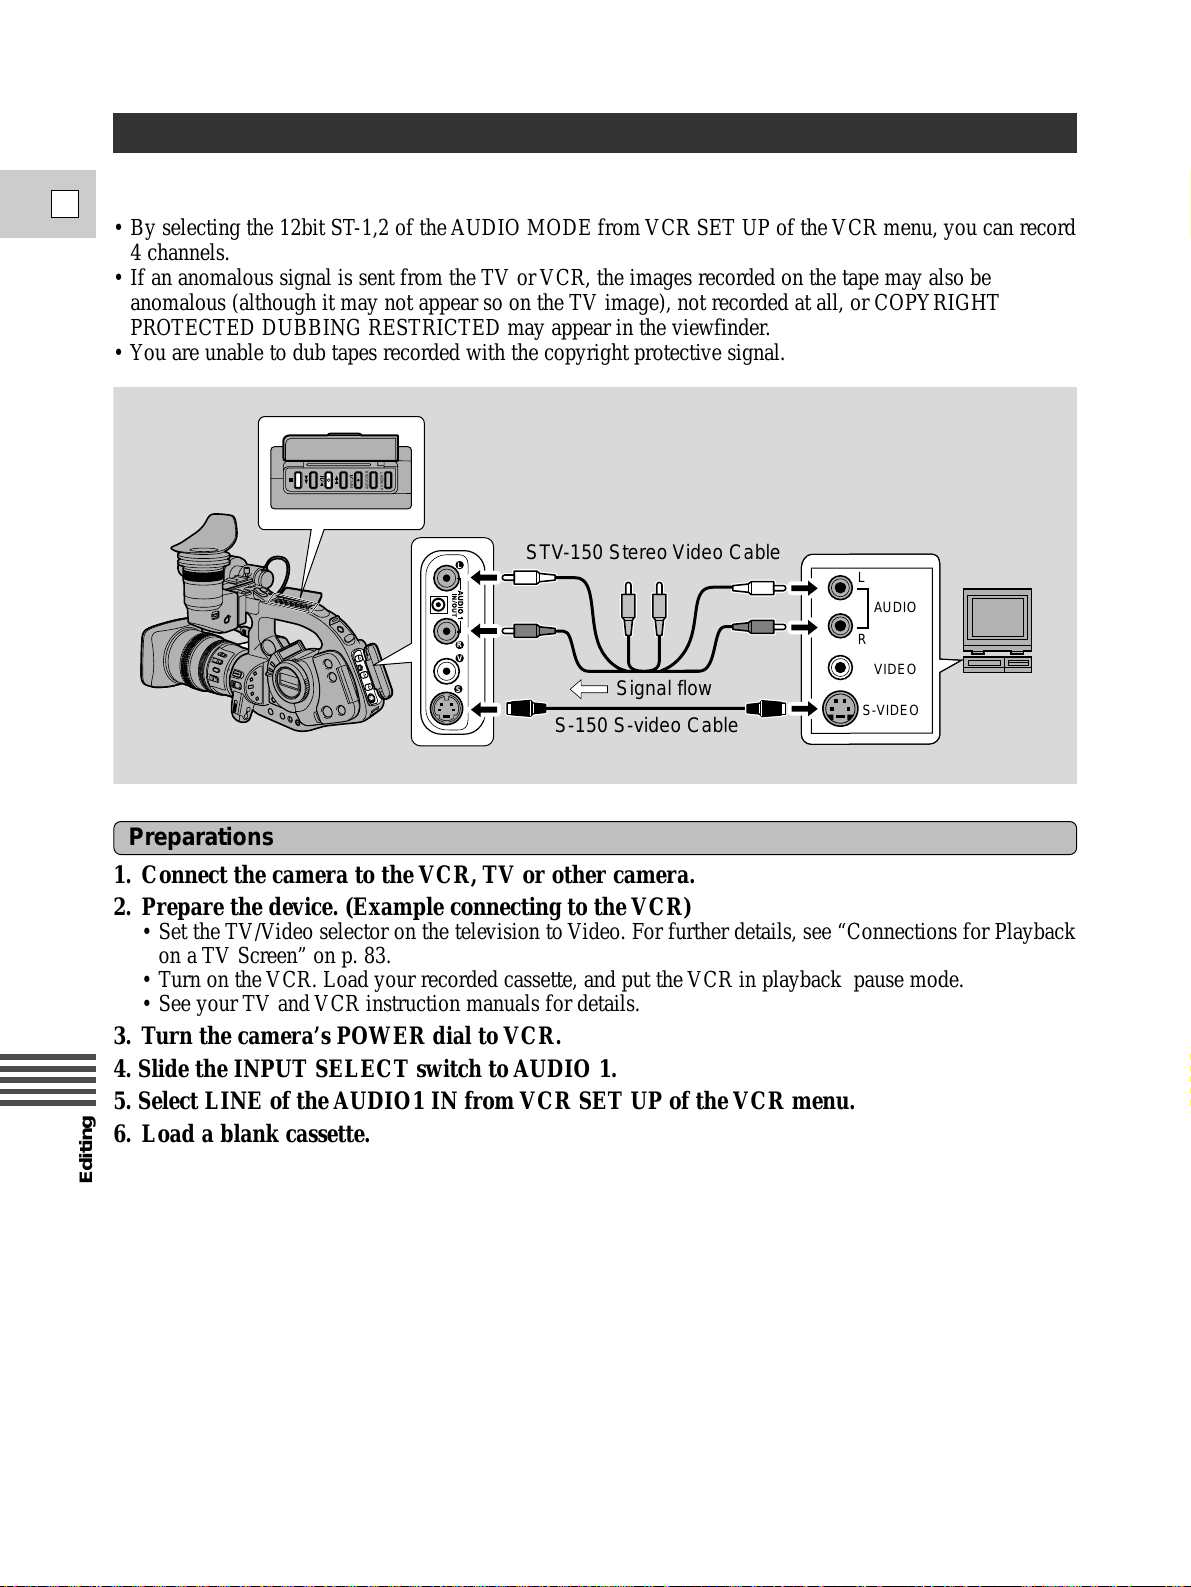
Editing
E
88
Preparations
1. Connect the camera to the VCR, TV or other camera.
2. Prepare the device. (Example connecting to the VCR)
• Set the TV/Video selector on the television to Video. For further details, see “Connections for Playback
on a TV Screen” on p. 83.
• Turn on the VCR. Load your recorded cassette, and put the VCR in playback pause mode.
• See your TV and VCR instruction manuals for details.
3. Turn the camera’s POWER dial to VCR.
4. Slide the INPUT SELECT switch to AUDIO 1.
5. Select LINE of the AUDIO1 IN from VCR SET UP of the VCR menu.
6. Load a blank cassette.
Signal flow
REC
AUDIO DUB.
AV INSERT
L
R
V
S
STV-150 Stereo Video Cable
S-150 S-video Cable
S-VIDEO
VIDEO
R
L
AUDIO
Recording from a VCR,TV or Analog Camera (Analog Line-in)
You can record a video played on your VCR or analog camcorder (for digital camcorder, see p. 86) or a TV
program onto a tape in the XL1S, if the TV or other device has audio/video outputs.
• By selecting the 12bit ST-1,2 of the AUDIO MODE from VCR SET UP of the VCR menu, you can record
4 channels.
• If an anomalous signal is sent from the TV or VCR, the images recorded on the tape may also be
anomalous (although it may not appear so on the TV image), not recorded at all, or COPYRIGHT
PROTECTED DUBBING RESTRICTED may appear in the viewfinder.
• You are unable to dub tapes recorded with the copyright protective signal.
Page 89
Editing
E
89
Dubbing
1. Find a point on your recorded cassette slightly before the section you want to copy and set
it to playback pause mode.
2. Press the REC PAUSE button.
• S-video and audio IN/OUT terminals work as input terminals.
• The camera enters record pause mode.
3. Start playback on the other device or turn on the TV to see the desired program while you
monitor the picture.
4. Press the play pause e/a button on the camera body or PAUSE a button on the wireless
controller.
• Recording starts.
5. When you get to the point where you want to stop recording, press the stop button or the
pause button.
• Recording stops.
6. Stop playback on the other device.
Note:
• You can monitor the picture in the viewfinder.
Page 90
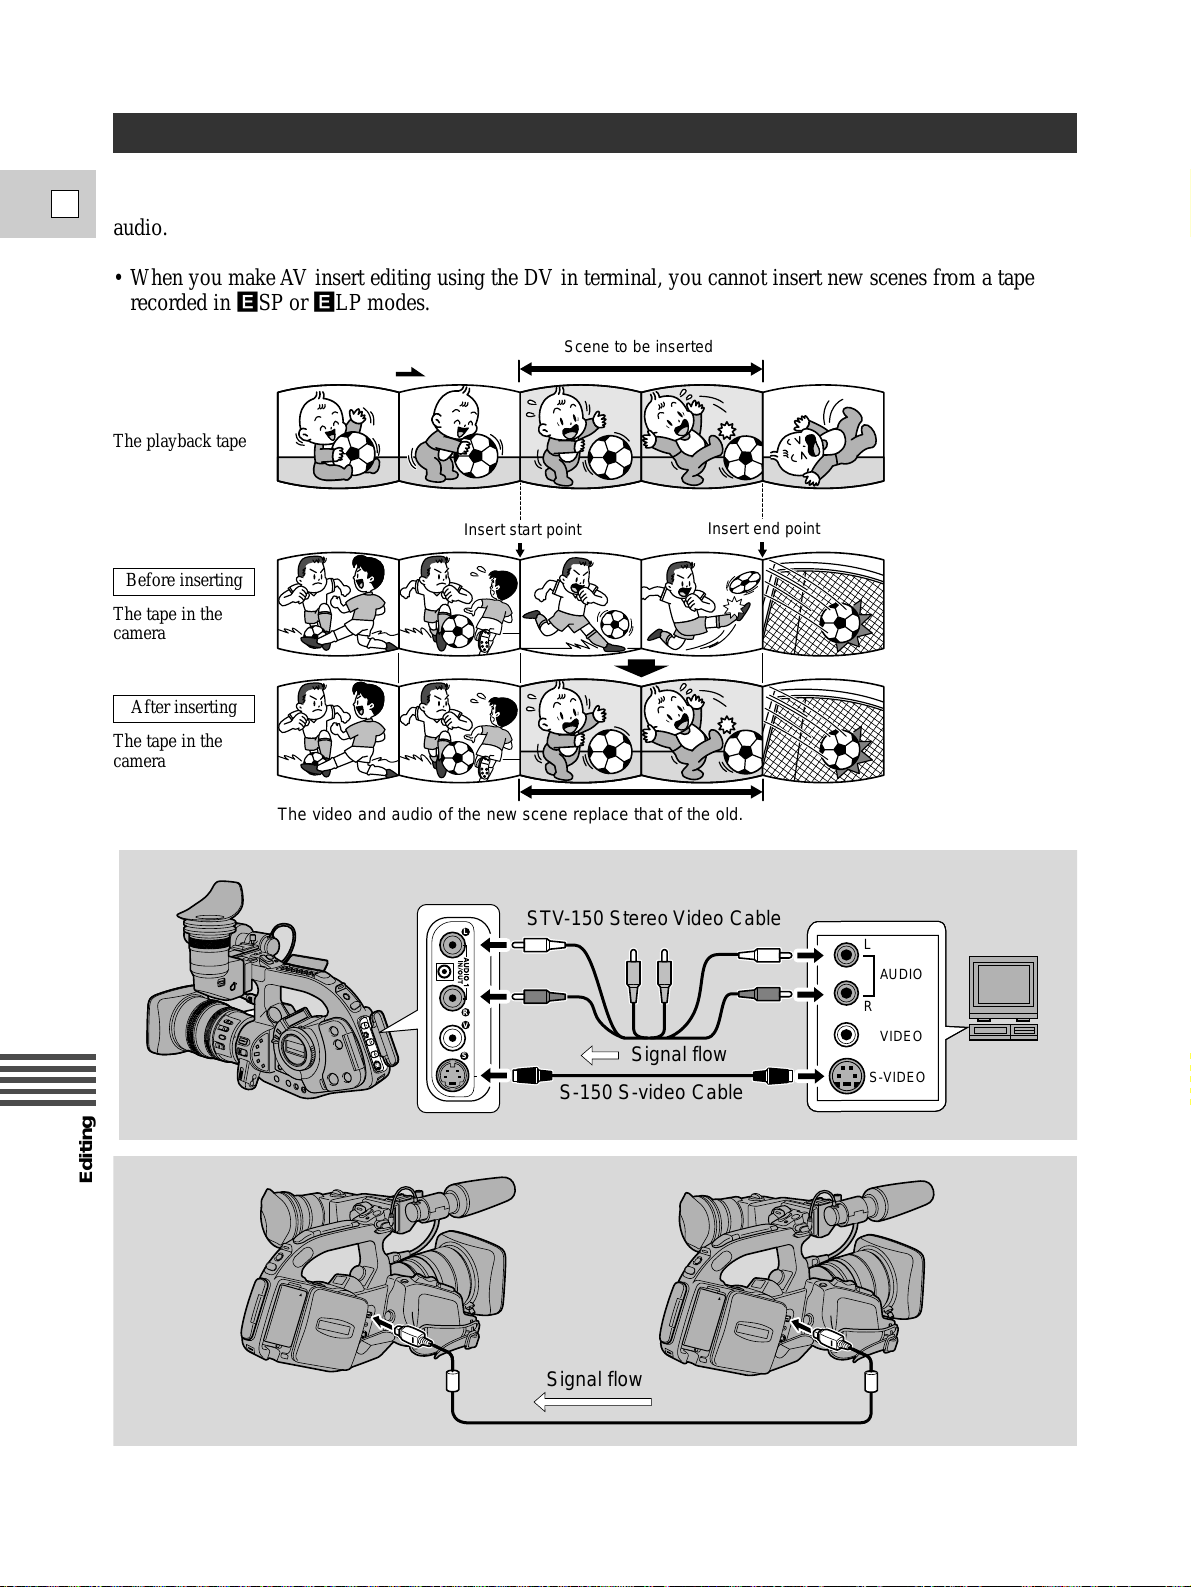
Editing
E
90
Recording Over Existing Scenes (AV Insert Editing)
You can insert new scenes from your VCR or other camcorder onto your pre-recorded tape using the
XL1S’s analog line-in or DV in terminals. Original video and audio will be replaced with the new video and
audio.
• When you make AV insert editing using the DV in terminal, you cannot insert new scenes from a tape
recorded in ´SP or ´LP modes.
The video and audio of the new scene replace that of the old.
The playback tape
Before inserting
After inserting
The tape in the
camera
The tape in the
camera
Insert start point
Insert end point
Scene to be inserted
Signal flow
L
R
V
S
S-VIDEO
STV-150 Stereo Video Cable
S-150 S-video Cable
VIDEO
R
L
AUDIO
Signal flow
Page 91
Editing
E
91
Preparations
The tape in the camera:
When using the XL1S’s AV insert function, only record to tapes recorded in SP mode with continuously
recorded time codes.
If there are non-recorded portions or portions recorded in a mode other than SP mode on the tape, recording
will stop.
The playback tape:
Use only tapes without non-recorded portions.
If there are non-recorded portions or changes in the recording mode, you may not be able to insert AV
correctly.
You cannot insert AV in the following cases:
• The playback tape has been poorly recorded.
• During special playback: fast forward playback, rewind playback or slow playback etc. (analog only).
TV:
You cannot insert AV from a TV program with anomalous synchronized signals, such as when the program
itself received poor signals.
1. Connect the camera to the VCR.
2. Prepare the VCR and TV.
• Set the TV/Video selector on the television to Video. For further details, see “Connections for Playback
on a TV Screen” on p. 83.
• Turn on the VCR and load a recorded cassette.
• See your TV and VCR instruction manuals for details.
3. Slide the INPUT SELECT switch to AUDIO 1.
4. Select LINE of the AUDIO1 IN from VCR SET UP of the VCR menu.
5. Turn the camera’s POWER dial to VCR and load a recorded cassette.
• Make sure the REC/SAVE tab on the cassette has been slid to REC (closed position).
Example recording from a VCR
Page 92
Editing
E
92
Editing
1. On the VCR, locate a point 3 seconds before the scene to be inserted. Set the VCR to
playback pause mode.
2. On the camera, press PLAY and locate the recording start point. Set the camera to
playback pause mode.
• You can use the playback buttons on the body of the camera or the special playback functions on the
wireless controller in the same way as in playback mode.
3. Press the AV INSERT button.
• AV INSERT and 2a appear in the viewfinder.
4. Play back the cassette in the VCR.
5. To start inserting, press the play pause e/a button on the camera.
• 2a changes to 2.
6. To stop inserting, press the STOP button on the camera.
• Inserting stops and AV INSERT disappears from the viewfinder. The camera returns to stop mode.
• If instead of pressing STOP you press play pause e/a, the camera returns to the AV insert pause
mode.
• If you set the zero set memory at the position on the tape where you want to stop inserting, every time
you return to that point, the camera will cancel its AV inserting and enter stop mode.
7. Stop playback on the VCR.
Page 93
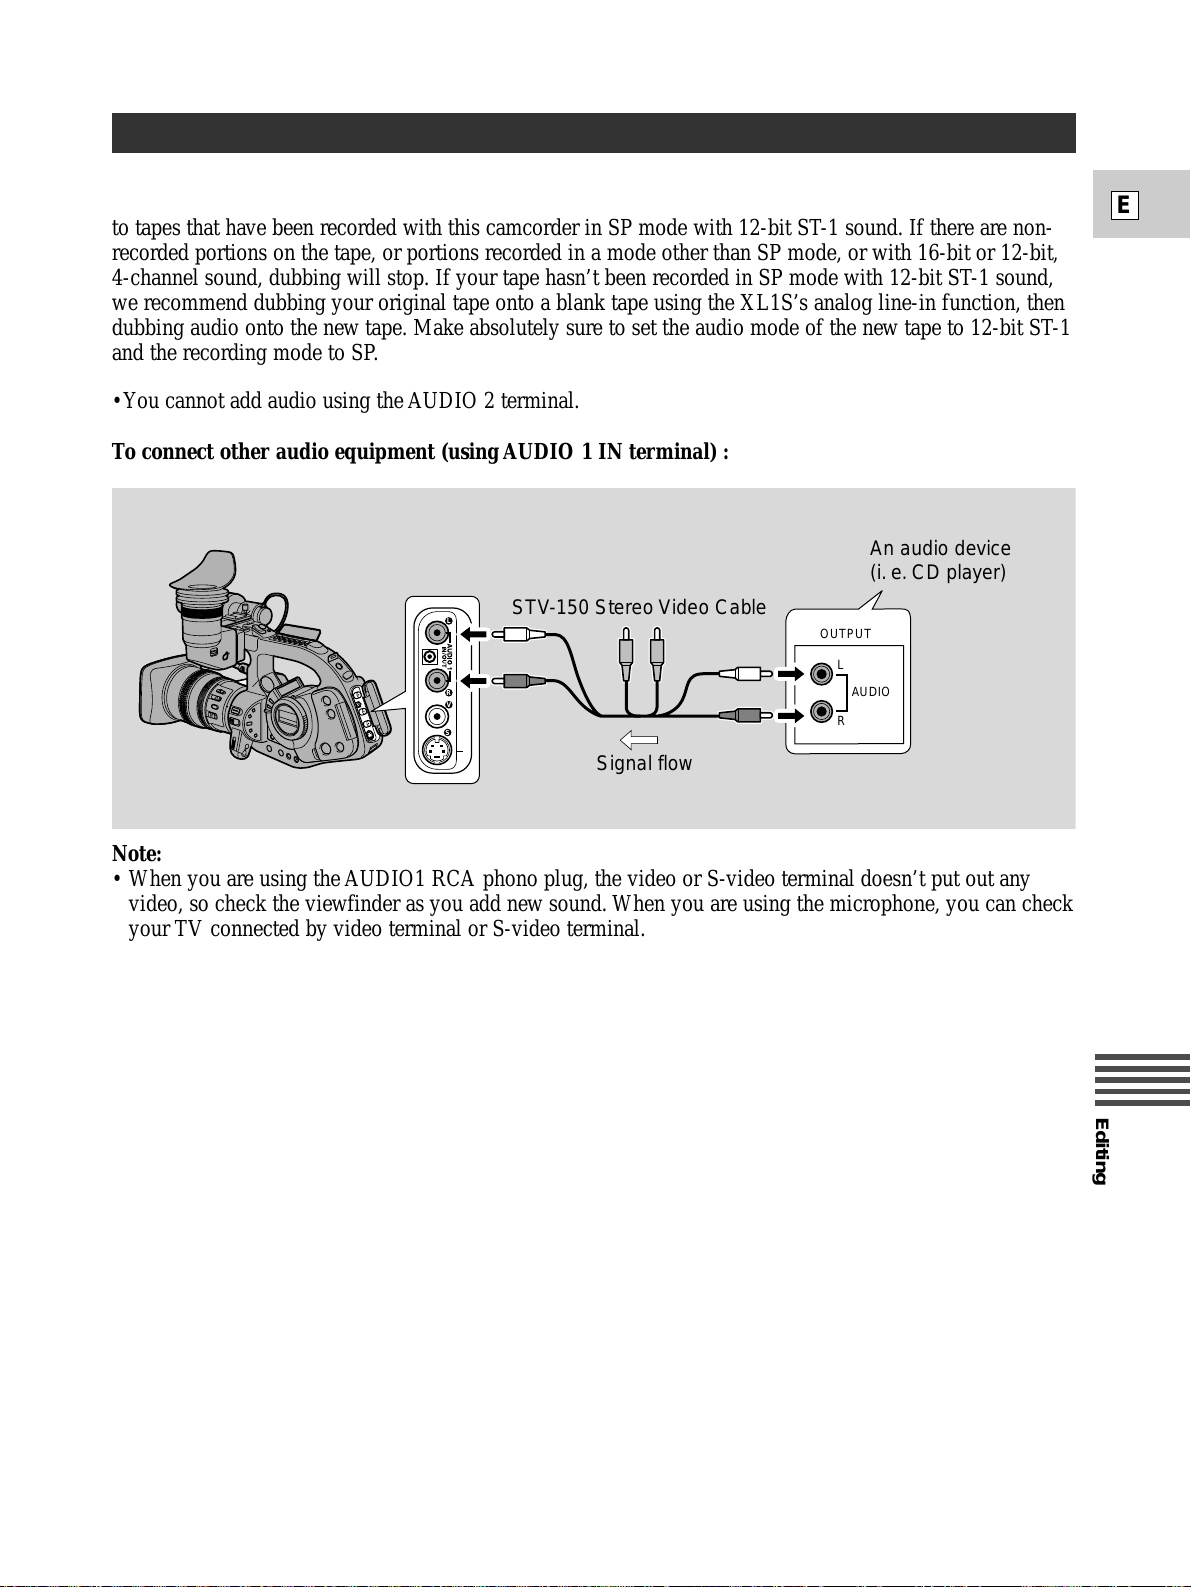
Editing
E
93
Audio Dubbing
You can add sound to the original sound on a pre-recorded tape from audio products (AUDIO 1) or with the
provided or external microphone (MIC). The original sound will not be erased. For best results, add sound
to tapes that have been recorded with this camcorder in SP mode with 12-bit ST-1 sound. If there are non-
recorded portions on the tape, or portions recorded in a mode other than SP mode, or with 16-bit or 12-bit,
4-channel sound, dubbing will stop. If your tape hasn’t been recorded in SP mode with 12-bit ST-1 sound,
we recommend dubbing your original tape onto a blank tape using the XL1S’s analog line-in function, then
dubbing audio onto the new tape. Make absolutely sure to set the audio mode of the new tape to 12-bit ST-1
and the recording mode to SP.
• You cannot add audio using the AUDIO 2 terminal.
R
L
L
R
V
S
AUDIO
OUTPUT
An audio device
(i. e. CD player)
STV-150 Stereo Video Cable
Signal flow
To connect other audio equipment (using AUDIO 1 IN terminal) :
Note:
• When you are using the AUDIO1 RCA phono plug, the video or S-video terminal doesn’t put out any
video, so check the viewfinder as you add new sound. When you are using the microphone, you can check
your TV connected by video terminal or S-video terminal.
Page 94
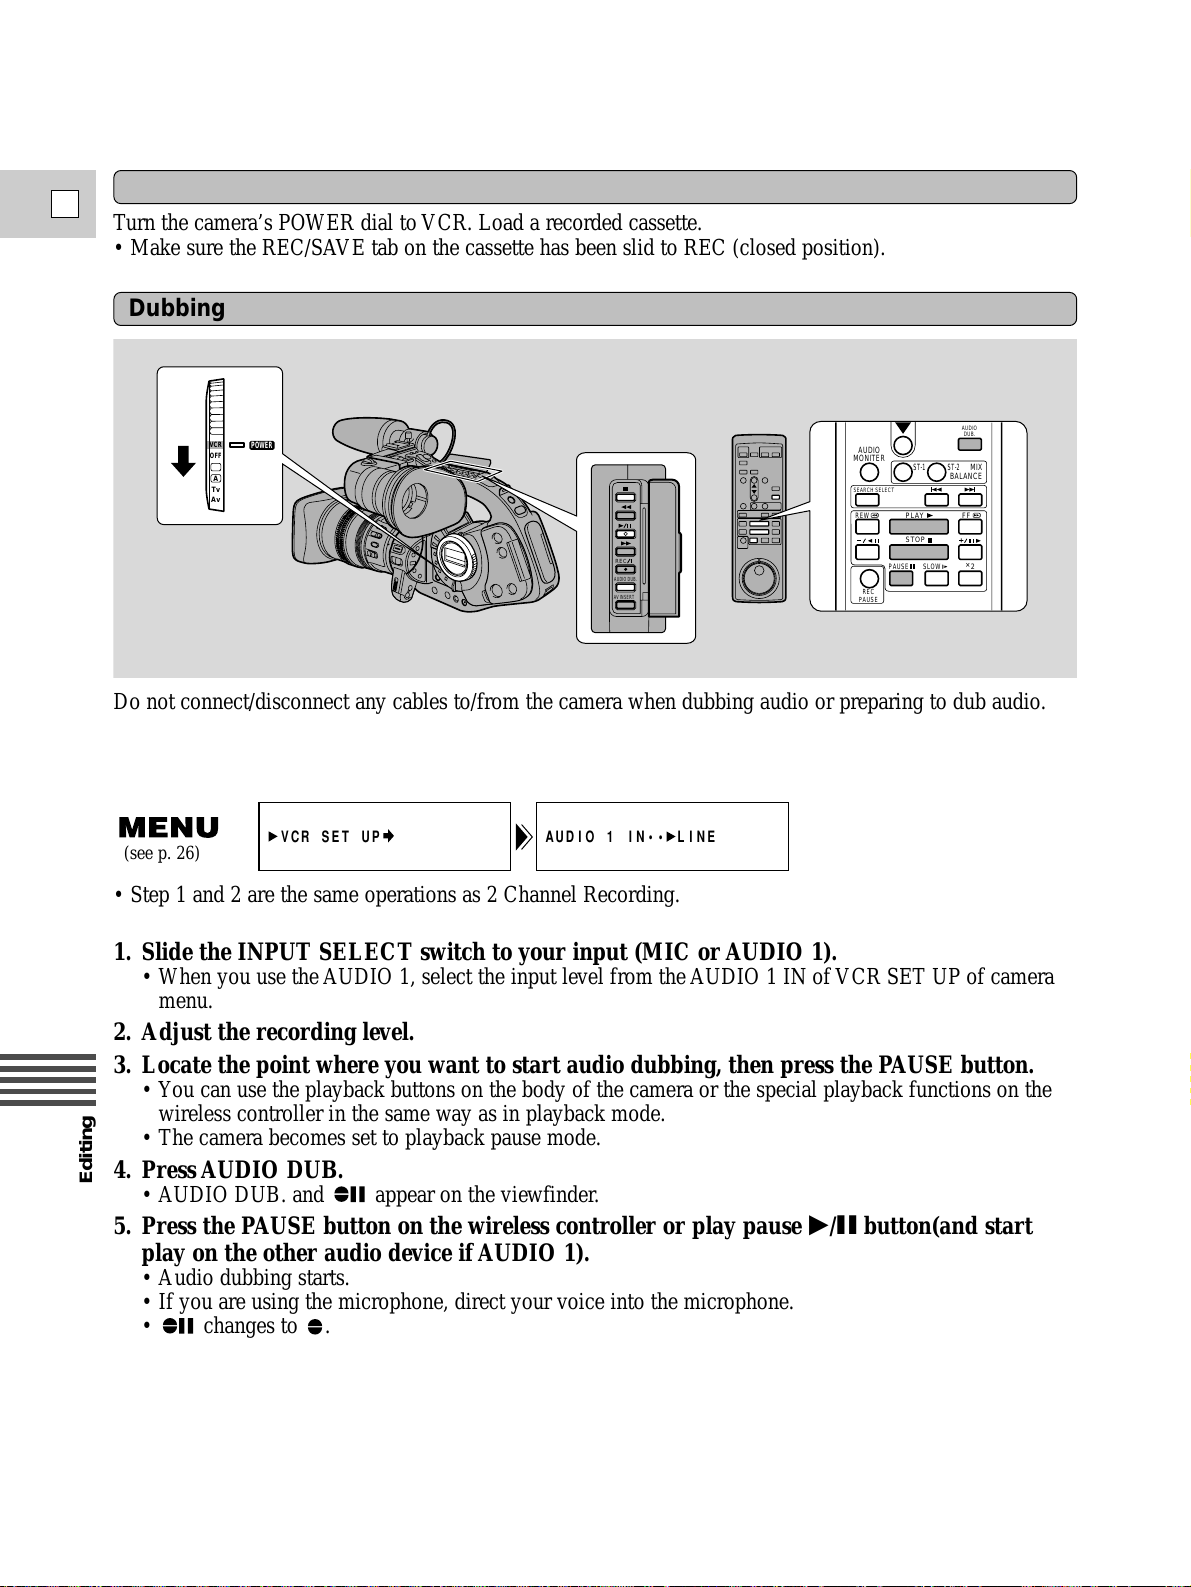
Editing
E
94
Preparations
Turn the camera’s POWER dial to VCR. Load a recorded cassette.
• Make sure the REC/SAVE tab on the cassette has been slid to REC (closed position).
Dubbing
Do not connect/disconnect any cables to/from the camera when dubbing audio or preparing to dub audio.
• Step 1 and 2 are the same operations as 2 Channel Recording.
1. Slide the INPUT SELECT switch to your input (MIC or AUDIO 1).
• When you use the AUDIO 1, select the input level from the AUDIO 1 IN of VCR SET UP of camera
menu.
2. Adjust the recording level.
3. Locate the point where you want to start audio dubbing, then press the PAUSE button.
• You can use the playback buttons on the body of the camera or the special playback functions on the
wireless controller in the same way as in playback mode.
• The camera becomes set to playback pause mode.
4. Press AUDIO DUB.
• AUDIO DUB. and appear on the viewfinder.
5. Press the PAUSE button on the wireless controller or play pause e/a button(and start
play on the other audio device if AUDIO 1).
• Audio dubbing starts.
• If you are using the microphone, direct your voice into the microphone.
• changes to .
AUDIO
MONITER
REC
PAUSE
AUDIO
DUB.
SEARCH SELECT
MIX
BALANCE
ST-2ST-1
REW
PAUSE SLOW
PLAY
STOP
FF
2
+
POWER
VCR
OFF
Tv
Av
A
REC
AUDIO DUB.
AV INSERT
AUDIO 1 IN•• LINE
VCR SET UP
(see p. 26)
Page 95
Editing
E
95
6. When you get to the point where you want to stop dubbing, press the STOP button (and
then stop play on the other audio device if AUDIO 1).
• Audio dubbing stops and AUDIO DUB. disappears from the viewfinder.
• The camera returns to stop mode.
• You can also set zero set memory (p.82) at the place you want to stop audio dubbing, then every time
you return to that position, audio dubbing will cancel.
• If instead of pressing STOP you press PAUSE, the camera will return to the playback pause mode.
Notes:
• You cannot use the DV terminal while adding sound.
•
You might want to adjust the audio mix (p.96) when playing back a tape with added sound.
• There may be a loss of sound quality if you add sound to a tape recorded on a camera other than the
XL1S.
• After adding sound 3 or more times to the same place on a tape, there may be some loss in sound quality.
Page 96
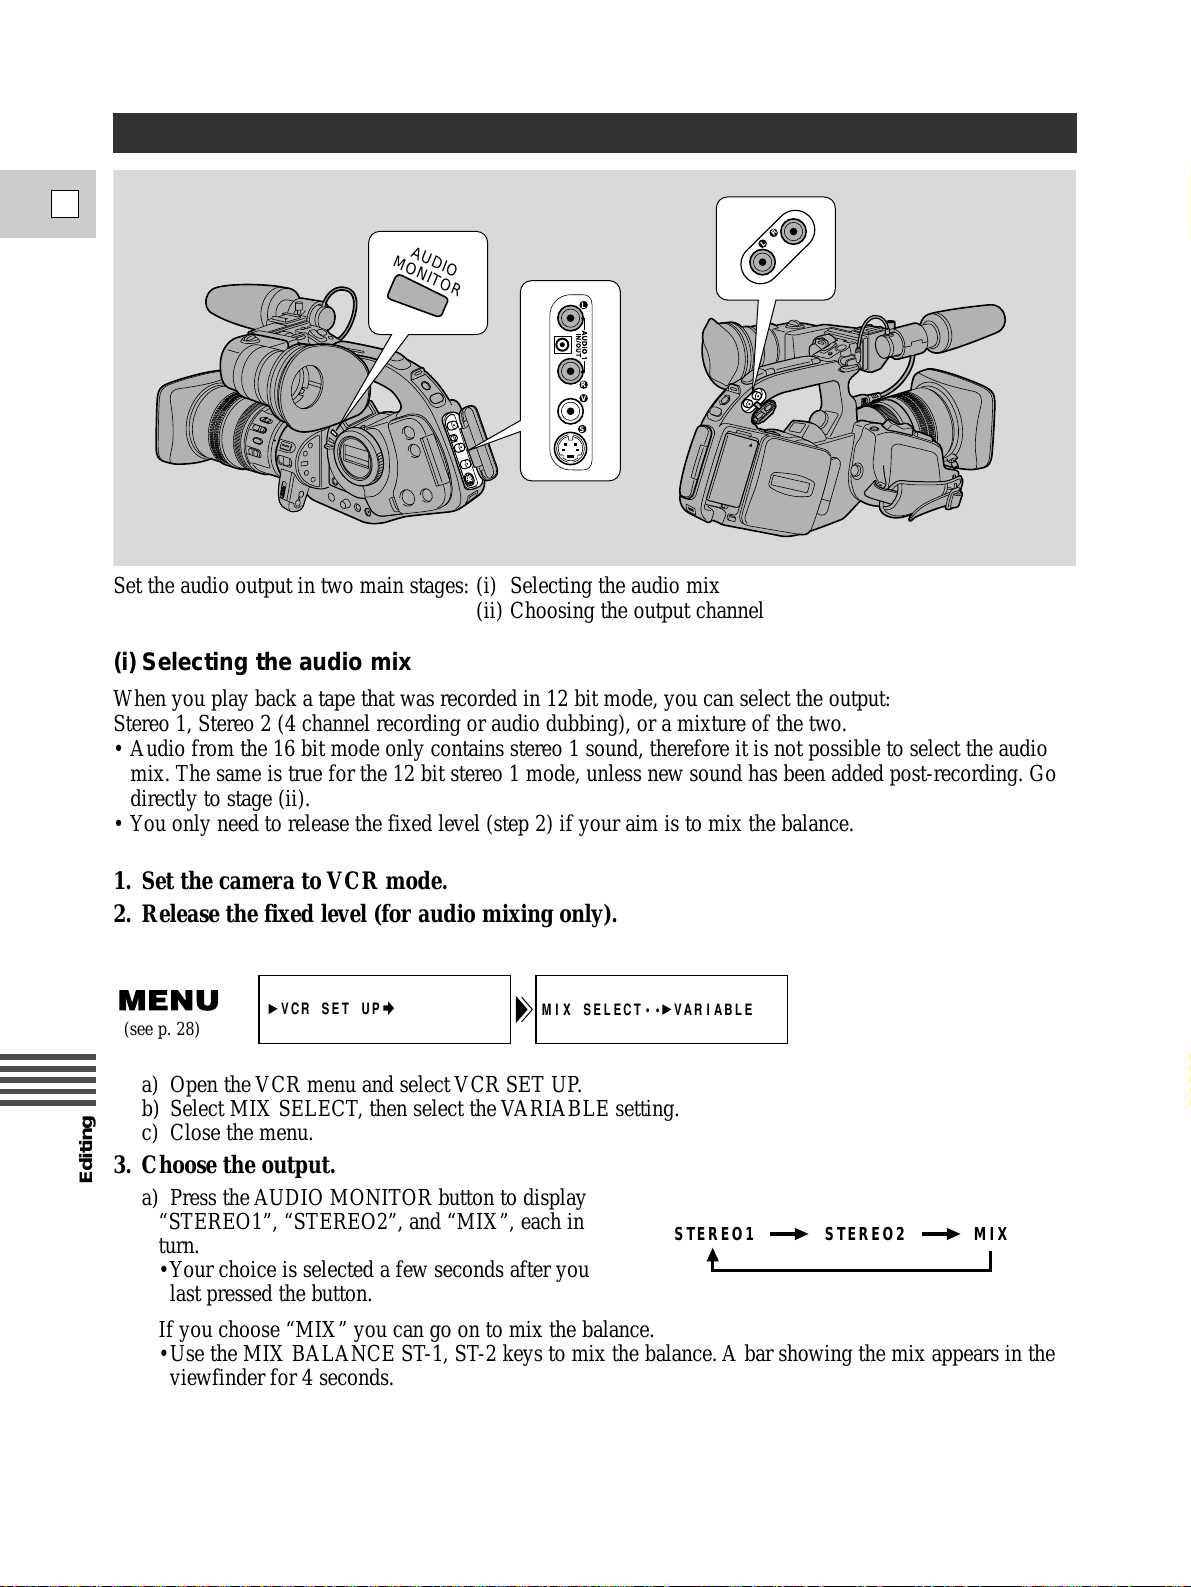
Editing
E
96
a) Press the AUDIO MONITOR button to display
“STEREO1”, “STEREO2”, and “MIX”, each in
turn.
•Your choice is selected a few seconds after you
last pressed the button.
If you choose “MIX” you can go on to mix the balance.
•Use the MIX BALANCE ST-1, ST-2 keys to mix the balance. A bar showing the mix appears in the
viewfinder for 4 seconds.
Set the audio output in two main stages: (i) Selecting the audio mix
(ii) Choosing the output channel
(i) Selecting the audio mix
When you play back a tape that was recorded in 12 bit mode, you can select the output:
Stereo 1, Stereo 2 (4 channel recording or audio dubbing), or a mixture of the two.
• Audio from the 16 bit mode only contains stereo 1 sound, therefore it is not possible to select the audio
mix. The same is true for the 12 bit stereo 1 mode, unless new sound has been added post-recording. Go
directly to stage (ii).
• You only need to release the fixed level (step 2) if your aim is to mix the balance.
MIX SELECT•• VARIABLE
VCR SET UP
Selecting the Audio Output
L
R
V
S
L
R
AUDIO
MONITOR
STEREO1 MIXSTEREO2
1. Set the camera to VCR mode.
2. Release the fixed level (for audio mixing only).
(see p. 28)
a) Open the VCR menu and select VCR SET UP.
b) Select MIX SELECT, then select the VARIABLE setting.
c) Close the menu.
3. Choose the output.
Page 97
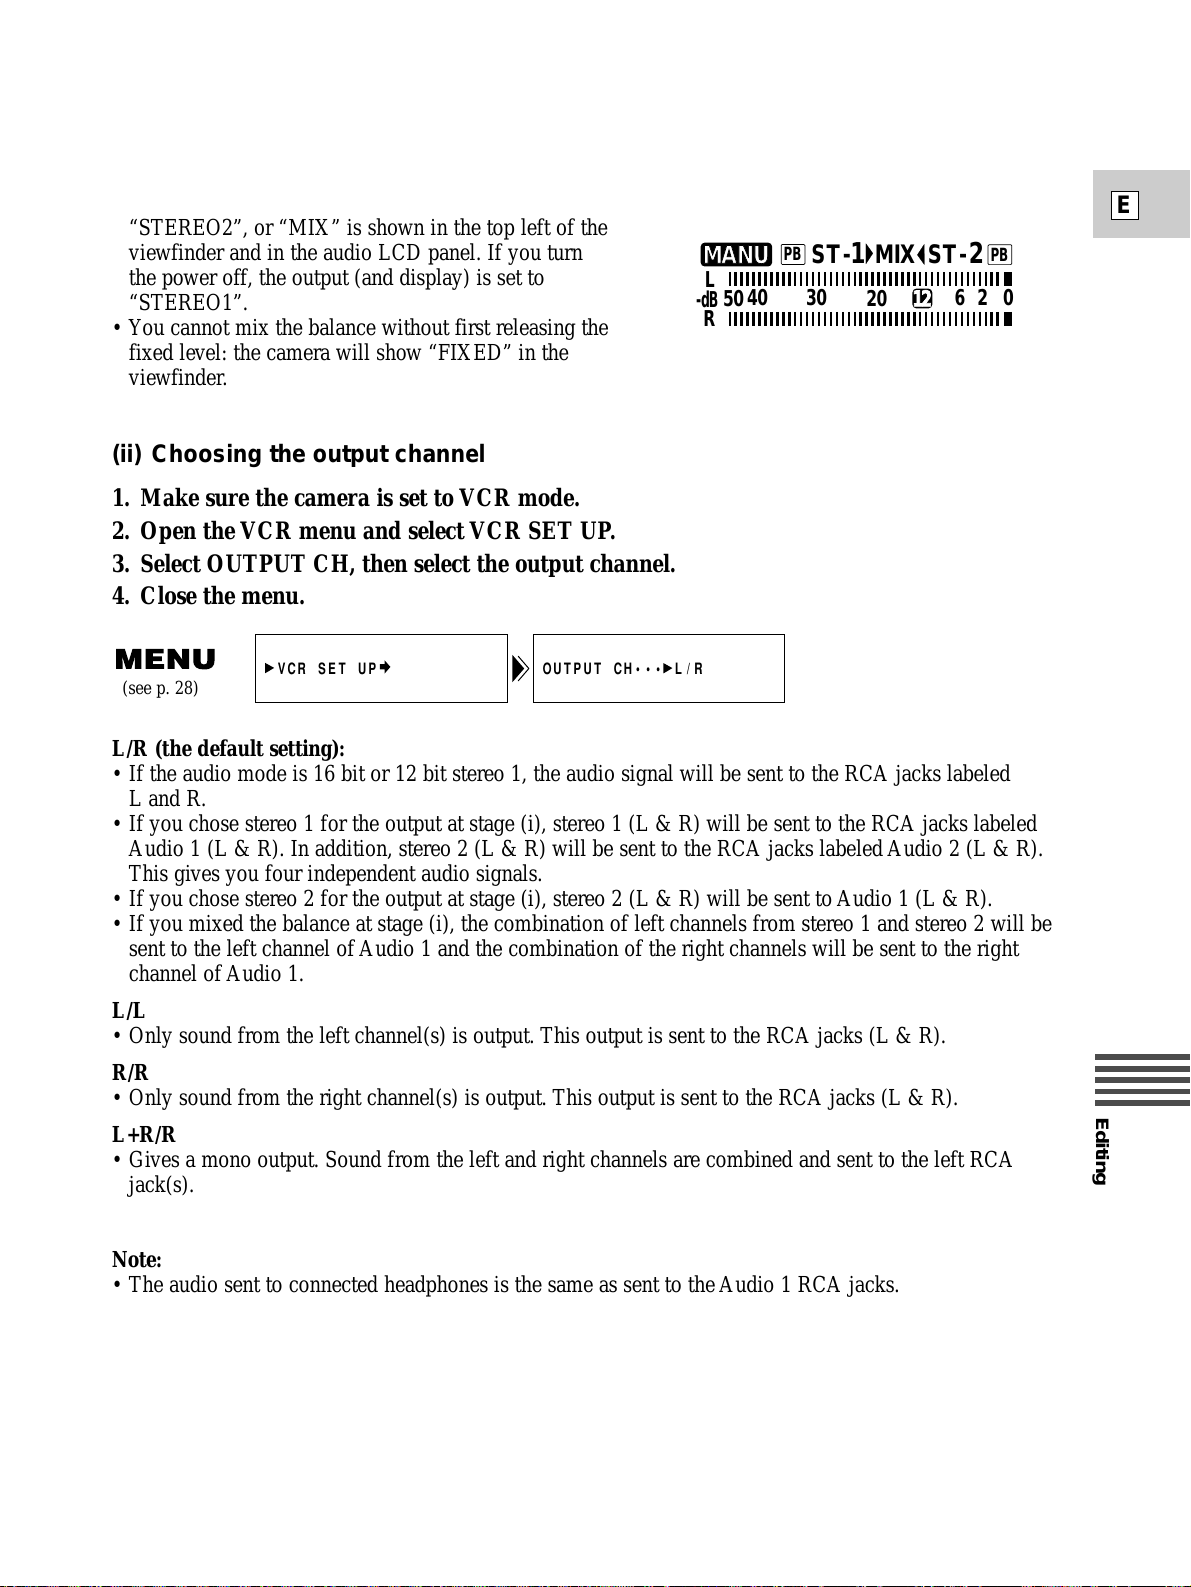
Editing
E
97
(ii) Choosing the output channel
1. Make sure the camera is set to VCR mode.
2. Open the VCR menu and select VCR SET UP.
3. Select OUTPUT CH, then select the output channel.
4. Close the menu.
Notes:
• When you have chosen the output, “STEREO1”,
“STEREO2”, or “MIX” is shown in the top left of the
viewfinder and in the audio LCD panel. If you turn
the power off, the output (and display) is set to
“STEREO1”.
• You cannot mix the balance without first releasing the
fixed level: the camera will show “FIXED” in the
viewfinder.
OUTPUT CH••• L/RVCR SET UP
026
20
40
30
ST-1MIX ST-
2
50
R
L
-dB
12
MANU
PB
PB
L/R (the default setting):
• If the audio mode is 16 bit or 12 bit stereo 1, the audio signal will be sent to the RCA jacks labeled
L and R.
• If you chose stereo 1 for the output at stage (i), stereo 1 (L & R) will be sent to the RCA jacks labeled
Audio 1 (L & R). In addition, stereo 2 (L & R) will be sent to the RCA jacks labeled Audio 2 (L & R).
This gives you four independent audio signals.
• If you chose stereo 2 for the output at stage (i), stereo 2 (L & R) will be sent to Audio 1 (L & R).
• If you mixed the balance at stage (i), the combination of left channels from stereo 1 and stereo 2 will be
sent to the left channel of Audio 1 and the combination of the right channels will be sent to the right
channel of Audio 1.
L/L
• Only sound from the left channel(s) is output. This output is sent to the RCA jacks (L & R).
R/R
• Only sound from the right channel(s) is output. This output is sent to the RCA jacks (L & R).
L+R/R
• Gives a mono output. Sound from the left and right channels are combined and sent to the left RCA
jack(s).
Note:
• The audio sent to connected headphones is the same as sent to the Audio 1 RCA jacks.
(see p. 28)
Page 98
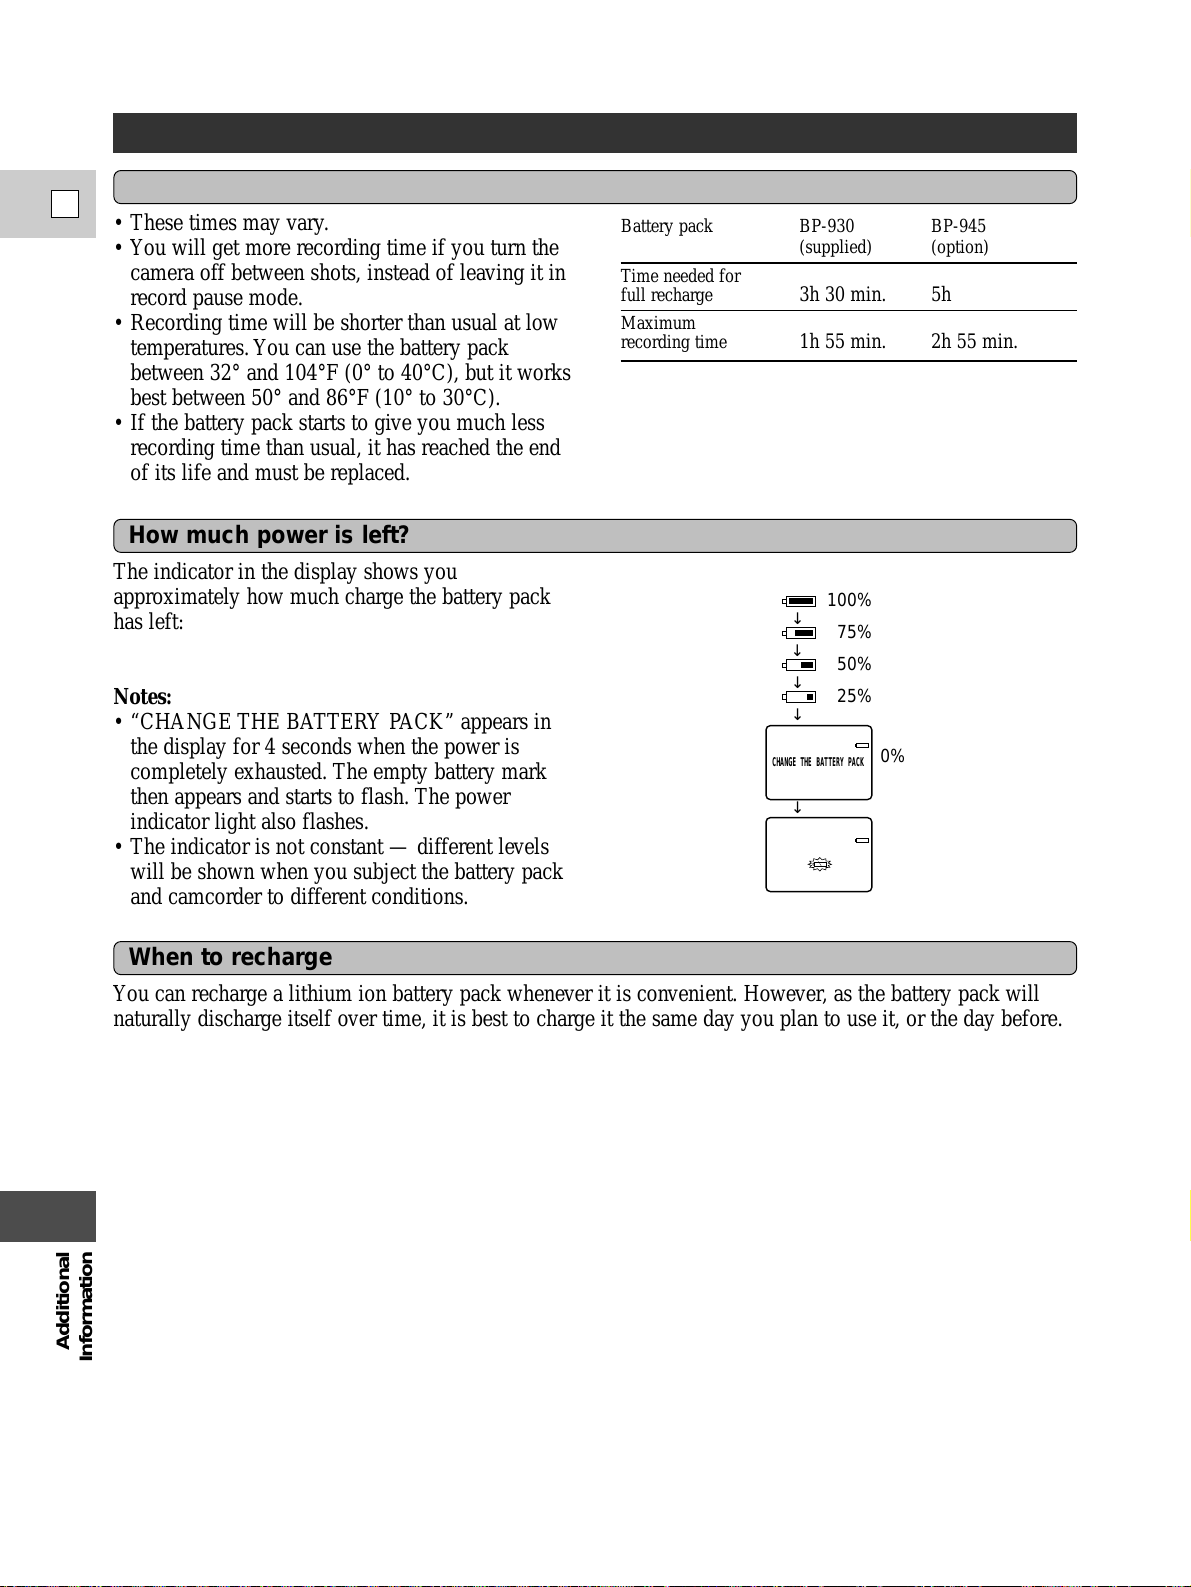
Additional
Information
E
98
Notes on Using the Batteries
Charging and recording times
Battery pack BP-930 BP-945
(supplied) (option)
Time needed for
full recharge 3h 30 min. 5h
Maximum
recording time 1h 55 min. 2h 55 min.
• These times may vary.
• You will get more recording time if you turn the
camera off between shots, instead of leaving it in
record pause mode.
• Recording time will be shorter than usual at low
temperatures. You can use the battery pack
between 32° and 104°F (0° to 40°C), but it works
best between 50° and 86°F (10° to 30°C).
• If the battery pack starts to give you much less
recording time than usual, it has reached the end
of its life and must be replaced.
↓
↓
↓
↓
100%
75%
50%
25%
0%
↓
CH
AN
G
ET
HE
BA
TT
E
R
YPAC
K
The indicator in the display shows you
approximately how much charge the battery pack
has left:
Notes:
• “CHANGE THE BATTERY PACK” appears in
the display for 4 seconds when the power is
completely exhausted. The empty battery mark
then appears and starts to flash. The power
indicator light also flashes.
• The indicator is not constant — different levels
will be shown when you subject the battery pack
and camcorder to different conditions.
How much power is left?
When to recharge
You can recharge a lithium ion battery pack whenever it is convenient. However, as the battery pack will
naturally discharge itself over time, it is best to charge it the same day you plan to use it, or the day before.
Page 99
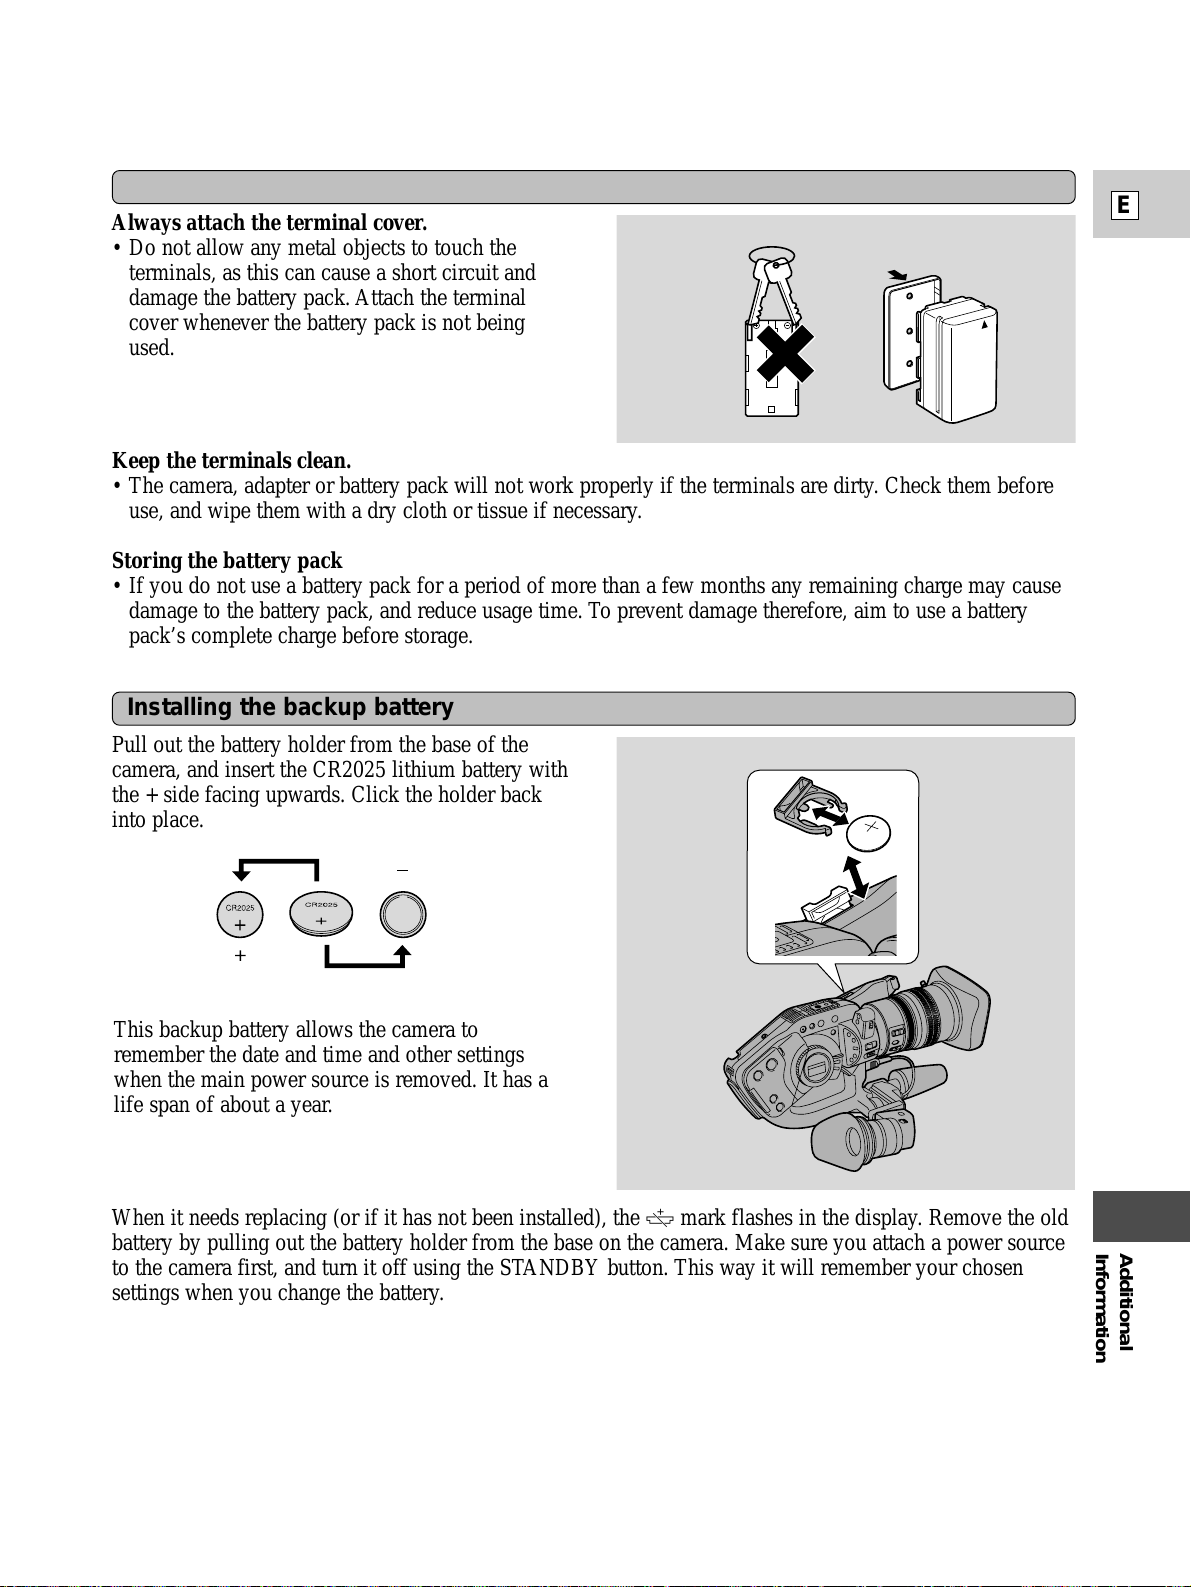
Additional
Information
E
99
Taking care of the battery pack
Always attach the terminal cover.
• Do not allow any metal objects to touch the
terminals, as this can cause a short circuit and
damage the battery pack. Attach the terminal
cover whenever the battery pack is not being
used.
Installing the backup battery
Pull out the battery holder from the base of the
camera, and insert the CR2025 lithium battery with
the + side facing upwards. Click the holder back
into place.
Keep the terminals clean.
• The camera, adapter or battery pack will not work properly if the terminals are dirty. Check them before
use, and wipe them with a dry cloth or tissue if necessary.
Storing the battery pack
• If you do not use a battery pack for a period of more than a few months any remaining charge may cause
damage to the battery pack, and reduce usage time. To prevent damage therefore, aim to use a battery
pack’s complete charge before storage.
When it needs replacing (or if it has not been installed), the
j mark flashes in the display. Remove the old
battery by pulling out the battery holder from the base on the camera. Make sure you attach a power source
to the camera first, and turn it off using the STANDBY button. This way it will remember your chosen
settings when you change the battery.
This backup battery allows the camera to
remember the date and time and other settings
when the main power source is removed. It has a
life span of about a year.
Page 100
Additional
Information
E
100
Cautions:
• Do not pick up the battery using tweezers or other metal tools — this will cause a short circuit.
• Wipe the battery with a clean, dry cloth to ensure proper contact.
• Keep the back-up battery out of reach of children — if it is swallowed, contact a physician immediately,
as the battery case may break down and the battery fluids damage the stomach and intestines.
• Do not disassemble, heat, or immerse the battery in water, to avoid the risk of explosion.
DANGER!
Treat the battery pack with care.
• Keep it away from fire (or it might explode).
• Do not expose the battery pack to temperatures greater than 140°F (60°C). Do not leave it near a heater,
or inside a car in hot weather, for example.
• Do not try to disassemble or modify it.
• Do not drop or knock it.
• Do not get it wet.
WARNING!
• The battery used in this device may present a fire or chemical burn hazard if mistreated. Do not
recharge, disassemble, heat above 212°F (100°C) or incinerate.
• Replace the battery with a Sony, Hitachi Maxell, Sanyo or Panasonic CR2025, or Duracell DL2025. Use
of another battery may present a risk of fire or explosion.
 Loading...