

Canon S70 User Manual
ENGLISH
Windows/Macintosh Windows Macintosh
Software Starter Guide For Version 20
Software Starter Guide
(For the Canon Digital Camera Solution Disk Version 20)
You must install the software bundled on the Canon
Digital Camera Solution Disk before connecting the
camera to the computer.
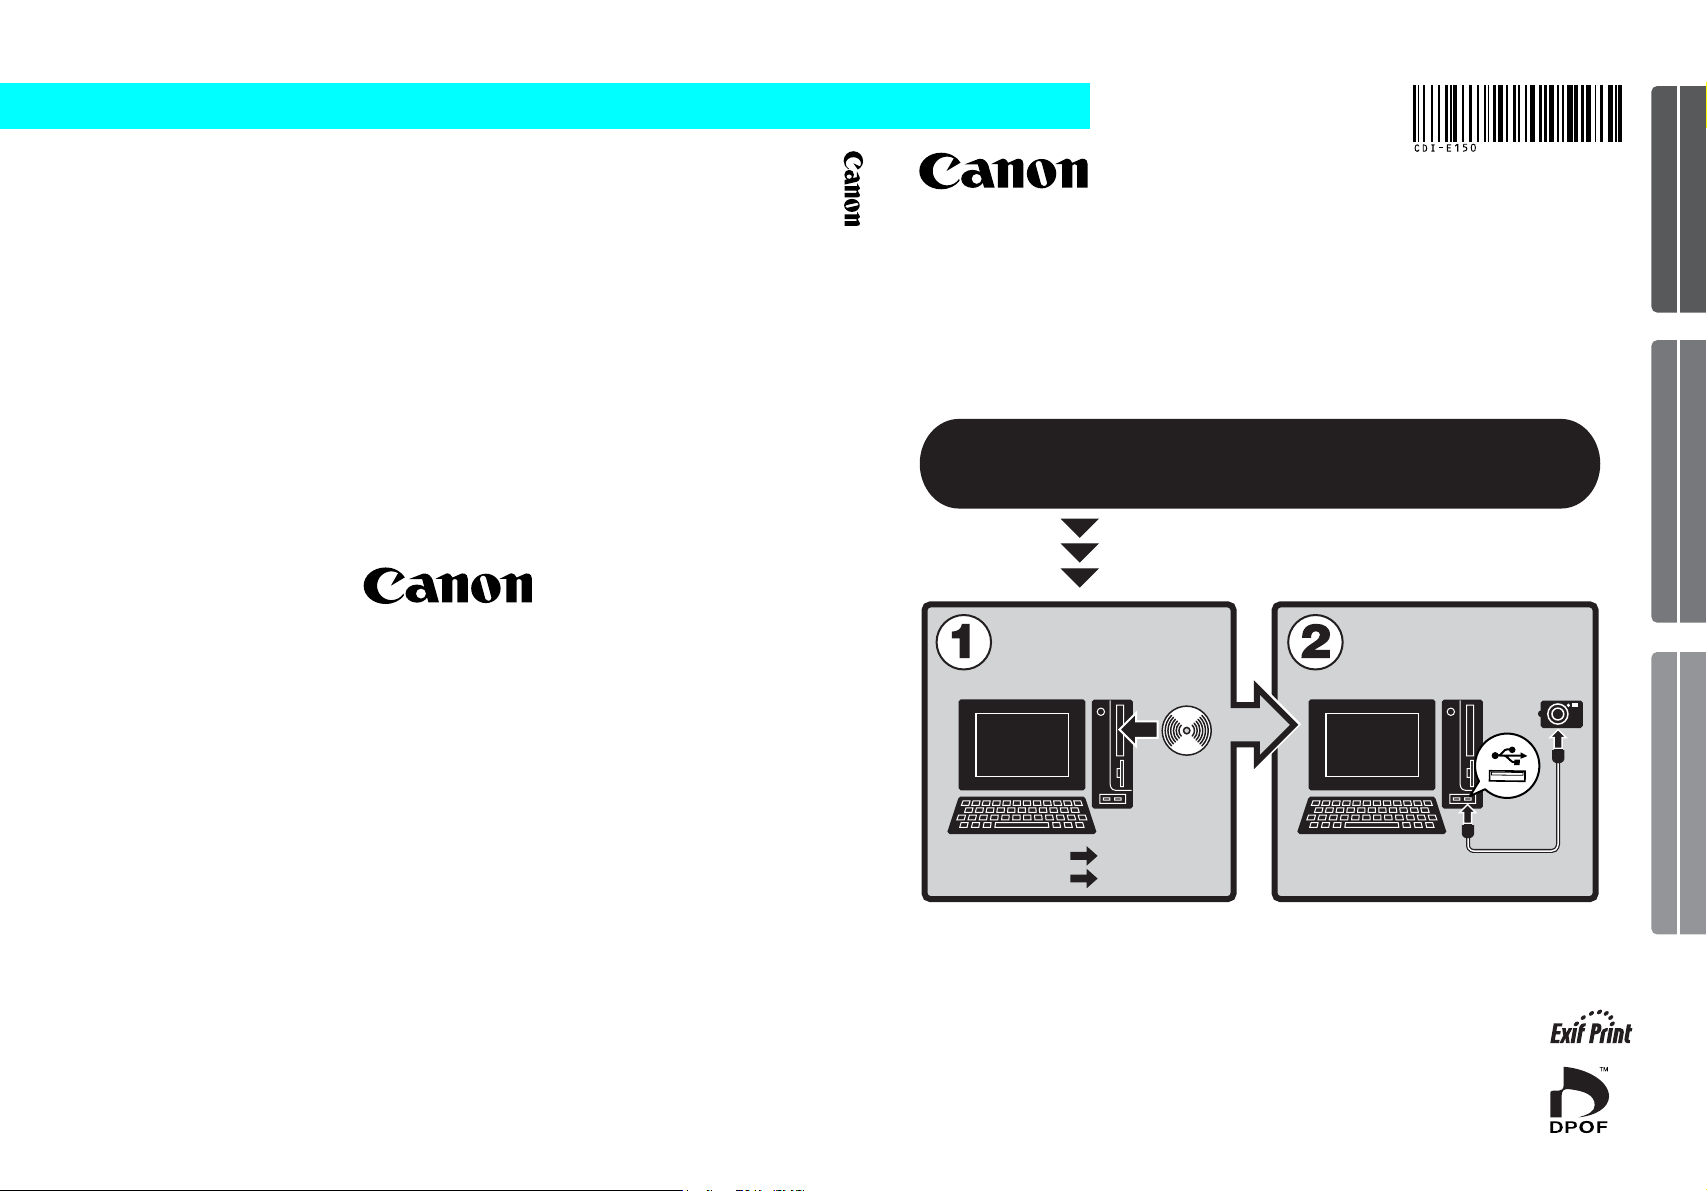
Install the software.
Windows
Macintosh
p. 10
p. 49
Connect the camera
to the computer.
CDI-E150-010 xx04xxxx © 2004 CANON INC. PRINTED IN JAPAN
• This guide explains how to install the software programs and
briefly introduces their functions and operating procedures.
• Please read the software license agreement in this guide before
using the software. By using the software, you agree to be
bound by the terms of the agreement.

SAFETY PRECAUTIONS
The precautions noted within this guide are intended to instruct you in the safe and correct use of
the products and to prevent injuries or damage to yourself, other persons and property. Please
read and ensure that you understand them before proceeding to other sections of the guide.
Warnings This symbol indicates topics that could lead to death or serious injury if
ignored or handled incorrectly.
Warnings
• Do not play the supplied CD-ROM(s) in any CD player that does not support data CDROMs. Playing the CD-ROM(s) in an audio CD player (music player) could damage the
speakers. It is also possible to suffer from hearing loss from listening with headphones to
the loud sounds of a CD-ROM played on a music CD player.
Disclaimer
• While every effort has been made to ensure that the information contained in this guide is
accurate and complete, no liability can be accepted for any errors or omissions. Canon
reserves the right to change the specifications of the hardware and software described
herein at any time without prior notice.
• No part of this guide may be reproduced, transmitted, transcribed, stored in a retrieval
system, or translated into any language in any form, by any means, without the prior
written permission of Canon.
• Canon makes no warranties for damages resulting from corrupted or lost data due to a
mistaken operation or malfunction of the camera, the software, the CompactFlash™ cards
(CF cards), personal computers, peripheral devices, or use of non-Canon CF cards.
Canon Customer Support
For Canon Customer Support contacts, please see the Canon Limited Warranty supplied with
your camera.
ArcSoft Customer Support
North America
46601 Fremont Blvd., Fremont, CA 94538
Tel: (510) 440-9901 (Mon. - Fri., 8:30 AM - 5:30 PM PST)
E-mail: support@arcsoft.com
Other Regions
Please see the ArcSoft web site: http://www.arcsoft.com/maininternational.html.
Trademark Acknowledgments
• Canon and PowerShot are trademarks of Canon Inc.
• ArcSoft, the ArcSoft logo, ArcSoft PhotoImpression and ArcSoft VideoImpression are trademarks
or registered trademarks of ArcSoft, Inc.
• Adobe is a trademark of Adobe Systems Incorporated.
• CompactFlash is a trademark of SanDisk Corporation.
• Macintosh, Mac OS and QuickTime are trademarks of Apple Computer Inc., registered in the
United States and other countries.
•Microsoft
Corporation in the United States and/or other countries.
• Other names and products not mentioned above may be registered trademarks or trademarks of
their respective companies.
Copyright © 2004 Canon Inc. All rights reserved.
®
and Windows® are either registered trademarks or trademarks of Microsoft

READ CAREFULLY BEFORE USING
Canon Software License Agreement
IMPORTANT - READ THIS AGREEMENT BEFORE USING THE SOFTWARE ON THE CD-ROM IN THIS
BOX. BY USING THE SOFTWARE, YOU AGREE TO BE BOUND BY THE TERMS OF THIS AGREEMENT.
This is a license agreement (the “Agreement”) between you and Canon Inc. (“Canon”).
IF YOU DO NOT AGREE TO THE TERMS AND CONDITIONS OF THIS AGREEMENT, DO NOT USE THE
SOFTWARE PROGRAM ON THE CD-ROM (INCLUDING ALL SOUND AND IMAGE DATA) AND THE
USER MANUAL IN THIS BOX (COLLECTIVELY, THE “SOFTWARE”) AND PROMPTLY RETURN THE
SOFTWARE TO YOUR POINT OF PURCHASE FOR A REFUND.
In consideration of the right to use the SOFTWARE, you agree to abide by the terms and
conditions of this Agreement.
1. LICENSE: Canon grants you the personal, non-exclusive right to use the SOFTWARE only on a single
computer. You may physically transfer the SOFTWARE from one computer to another provided that the
SOFTWARE is used on only one computer at a time. You shall not install or use the SOFTWARE on a
network, multiple CPU, multiple site arrangement, or any other hardware configuration where the
SOFTWARE is accessible to more than one CPU or to more than one user.
With respect to the sound and image data (“Data”) contained in the Software, which are to be
downloaded to the applicable Canon digital camera product, Canon grants you a personal, nonexclusive license to use the Data on a single Canon digital camera product only.
YOU SHALL NOT ASSIGN, SUBLICENSE, RENT, LEASE, LOAN, CONVEY OR OTHERWISE USE,
TRANSFER, COPY, TRANSLATE, CONVERT TO ANOTHER PROGRAMMING LANGUAGE, ALTER,
MODIFY, DECOMPILE OR DISASSEMBLE THE SOFTWARE, IN WHOLE OR IN PART, EXCEPT AS
EXPRESSLY PROVIDED IN THIS AGREEMENT.
2. BACK-UP COPY: You may make one copy of the SOFTWARE solely for back-up purposes, or copy the
SOFTWARE onto the permanent storage device (e.g. a hard disk) of your computer and retain the
original for back-up purposes. Any other copying of the SOFTWARE is a violation of this Agreement.
You must reproduce and include the copyright notice on the back-up copy.
3. SUPPORT AND UPDATES: Neither Canon, nor its subsidiaries, dealers or distributors will be responsible
for providing maintenance or support for use of the SOFTWARE. No updates, fixes or support will be
made available for the SOFTWARE.
4. LIMITED WARRANTY AND LIMITATION OF LIABILITY: It is your responsibility to choose, maintain
and match the hardware and software components of your computer system. Thus Canon does not
guarantee uninterrupted service or correction of errors or that the functions or performance of the
SOFTWARE will meet your requirements. THE SOFTWARE IS LICENSED ON AN “AS IS” BASIS AND
WITHOUT WARRANTY OR CONDITION OF ANY KIND. The CD-ROM storing the SOFTWARE is
warranted only against defective material under normal use for a period of ninety (90) days after
purchase from an authorized Canon dealer as evidenced by your sales receipt. Your sole remedy for a
defective CD-ROM shall be replacement of the same without charge when returned by you at your
expense to your point of purchase and proven to be defective upon inspection. The Replacement CDROM will be warranted for the remainder of the original ninety (90) day warranty period of the
defective CD-ROM. The limited warranty does not apply if the failure of the CD-ROM resulted from
accident, abuse or misapplication of the SOFTWARE and shall not extend to anyone other than the
original user of the SOFTWARE.
EXCEPT AS SPECIFICALLY SET FORTH IN THIS PARAGRAPH 4, CANON, CANON’S SUBSIDIARIES,
DISTRIBUTORS AND DEALERS DISCLAIM ALL WARRANTIES, OR CONDITIONS, EXPRESS OR
IMPLIED, INCLUDING ANY WARRANTY OR CONDITION OF MERCHANTABILITY OR FITNESS FOR
A PARTICULAR PURPOSE, WITH RESPECT TO THE SOFTWARE.
NEITHER CANON NOR ANY OF CANON’S SUBSIDIARIES, DISTRIBUTORS OR DEALERS IS LIABLE
FOR ANY DAMAGES HOWSOEVER CAUSED, INCLUDING WITHOUT LIMITATION, DIRECT,
CONSEQUENTIAL OR INCIDENTAL LOSS OR DAMAGE INCLUDING LOSS OF PROFITS, EXPENSE
OR INCONVENIENCE HOWSOEVER CAUSED OR ARISING OUT OF THE SOFTWARE OR THE USE
THEREOF.
i

ii
NEITHER CANON, NOR ANY OF CANON’S SUBSIDIARIES, DISTRIBUTORS OR DEALERS SHALL
HAVE ANY OBLIGATION TO INDEMNIFY YOU AGAINST ANY CLAIM OR SUIT BROUGHT BY A
THIRD PARTY ALLEGING THAT THE SOFTWARE OR THE USE THEREOF INFRINGES ANY
INTELLECTUAL PROPERTY OF SUCH THIRD PARTY.
SOME STATES, PROVINCES OR LEGAL JURISDICTIONS DO NOT ALLOW THE EXCLUSION OF
IMPLIED WARRANTIES, OR THE LIMITATION OR EXCLUSION OF LIABILITY FOR INCIDENTAL OR
CONSEQUENTIAL DAMAGES, OR PERSONAL INJURY OR DEATH RESULTING FROM NEGLIGENCE
ON THE PART OF THE SELLER, SO THE ABOVE DISCLAIMERS AND EXCLUSIONS MAY NOT APPLY
TO YOU.
5. TERM: This Agreement is effective upon your using the SOFTWARE and remains in effect until
expiration of all copyright interests in the SOFTWARE unless earlier terminated. You may terminate this
Agreement by destroying the SOFTWARE. This Agreement will also terminate without notice to you if
you fail to comply with any of the terms of this Agreement and you must then promptly return the
SOFTWARE. In addition, Canon may enforce its other legal rights.
6. U.S. GOVERNMENT RESTRICTED RIGHTS NOTICE:
The SOFTWARE is a “commercial item,” as that term is defined at 48 C.F.R. 2.101 (Oct 1995),
consisting of “commercial computer software” and “commercial computer software documentation,”
as such terms are used in 48 C.F.R. 12.212 (Sept 1995). Consistent with 48 C.F.R. 12.212 and 48 C.F.R.
227.7202-1 through 227.72024 (June 1995), all U.S. Government End Users shall acquire the
SOFTWARE with only those rights set forth herein. Manufacturer is Canon Inc./30-2, Shimomaruko 3chome, Ohta-ku, Tokyo 146-8501, Japan.
7. EXPORT RESTRICTIONS: You agree to comply with all export laws and restrictions and regulations of
the country involved, and not to export or re-export, directly or indirectly, the SOFTWARE in violation of
any such laws and restrictions and regulations, or without all necessary approvals.
8. SEVERABILITY:
In the event that any provision of this Agreement is declared or found to be illegal by any court or
tribunal of competent jurisdiction, such provision shall be null and void with respect to the jurisdiction
of that court or tribunal and all the remaining provisions of this Agreement shall remain in full force and
effect.
9. CONTROLLING LAW: The terms of this Agreement as it relates to purchases of the Software in the
United States of America shall be governed and construed in all respects in accordance with the laws
and regulations of the State of New York, without reference to choice of law principles. The terms of
this Agreement as it relates to purchases of the Software in Canada shall be governed by the laws of
the province of Ontario.
10.OWNERSHIP: All rights, including but not limited to copyrights and trade secret rights, to the
SOFTWARE belong to Canon, its affiliated corporations and third party licensors. Your use of the
SOFTWARE is subject to the laws of the United States, and Canada, and other applicable copyright and
trademark laws, and nothing in this Agreement constitutes a waiver of the rights of Canon, its affiliated
corporations and third party licensors under such laws. You only own the CD-ROM media in which the
Software is stored. Except as expressly provided herein, no license or right, express or implied, is hereby
conveyed or granted by Canon to you for any intellectual property of Canon. Nothing contained in
Paragraph 1 shall be construed to give Canon any ownership rights in any images, graphics or textual
material that you save in connection with the Software.
You may not modify, remove or delete any or all copyright notices (i) which are contained in the
Software, including any copy thereof, and (ii) which are on the original CD-ROM and on the medium of
a back-up copy made pursuant to Section 2 above.
11.ACKNOWLEDGEMENT: BY USING THE SOFTWARE, YOU ACKNOWLEDGE THAT YOU HAVE
READ THIS AGREEMENT, UNDERSTOOD IT, AND AGREE TO BE BOUND BY ITS TERMS AND
CONDITIONS. YOU ALSO AGREE THAT THIS AGREEMENT IS THE COMPLETE AND EXCLUSIVE
STATEMENT OF AGREEMENT BETWEEN YOU AND CANON CONCERNING THE SUBJECT MATTER
HEREOF AND SUPERSEDES ALL PROPOSALS OR PRIOR AGREEMENTS, VERBAL OR WRITTEN,
AND ANY OTHER COMMUNICATIONS BETWEEN THE PARTIES RELATING TO THE SUBJECT
MATTER HEREOF. NO AMENDMENT TO THIS AGREEMENT SHALL BE EFFECTIVE UNLESS SIGNED
BY A DULY AUTHORIZED OFFICER OF CANON.

Table of contents
Read This First 3
It’s so Simple! Make Prints Right at Home Like a Pro ...................... 4
Unbounded Possibilities with Entertaining Software .....................6
System Requirements ........................................................................ 8
Using the Software on the Windows Platform
– Preparations 10
Installing the Software and USB Driver .......................................... 10
Using the Software on the Windows Platform
– The Basics 15
Downloading Images to the Computer .......................................... 15
Printing Images ................................................................................21
Using the Software on the Windows Platform
– Advanced Techniques 26
The ZoomBrowser EX Windows ......................................................26
ZoomBrowser EX Features .............................................................. 32
Checking Images before Downloading .......................................... 34
Replaying Movies ............................................................................. 36
Editing Movies .................................................................................37
Converting RAW Images ................................................................. 38
Operating the Shutter Remotely .................................................... 41
Merging Panoramic Images - PhotoStitch ...................................... 44
Enjoy Customizing Your Camera with the My Camera Settings ... 45
1
Using the Software on the Macintosh Platform
– Preparations 49
Installing the Software .................................................................... 49
Using the Software on the Macintosh Platform
– The Basics 51
Downloading Images to the Computer .......................................... 51
Printing Images ................................................................................55

Table of contents
2
Using the Software on the Macintosh Platform
– Advanced Techniques 58
The ImageBrowser Windows .......................................................... 58
ImageBrowser Features ...................................................................64
Checking Images before Downloading .......................................... 66
Replaying Movies ............................................................................. 68
Editing Movies .................................................................................69
Converting RAW Images ................................................................. 70
Operating the Shutter Remotely .................................................... 72
Merging Panoramic Images - PhotoStitch ...................................... 75
Enjoy Customizing Your Camera with the My Camera Settings ... 76
Appendices 80
About the CD-ROMs Supplied with the Solution Disk ..................80
Uninstalling the Software ............................................................... 84
Memory Card Folder Structure ....................................................... 87
Troubleshooting .............................................................................. 88
Information about Your Camera 96
Information Common to All Models .............................................. 96
PowerShot G6 ..................................................................................98
PowerShot S70 ................................................................................. 98
Index ................................................................................................. 99
Using the PDF Manuals
The following PDF-format manuals (hereafter PDF manuals) are provided to
explain the features and procedures for using ZoomBrowser EX and
ImageBrowser.
• ZoomBrowser EX Software User Guide (Windows)
• ImageBrowser Software User Guide (Macintosh)
Adobe Reader or Adobe Acrobat Reader must be installed to read
the aforementioned PDF manuals. If one of these applications is
not already installed on your computer, download it from the
following website.
http://www.adobe.com/products/acrobat/readstep2.html
Viewing PDF Manuals
Viewing Manuals Downloaded from a Website
These PDF-format manuals are available on the Canon website. Use your
browser program to download these manuals from the following URL:
http://web.canon.jp/Imaging/information-e.html

Read This First
This chapter explains what you can accomplish using the camera with the software contained
on the Canon Digital Camera Solution Disk.
It also lists the computer system configurations required to use the software.
About this Guide
• The explanations in this guide are based on Windows XP and Mac OS X v10.3. If you are
using another version of these operating systems, the actual screen contents and
procedures may vary slightly from those shown.
• The following terms are used in this guide.
Mac OS X is used for Mac OS X (v10.1.5-v10.3)
Memory card is used for CF cards, SD cards and PC cards.
3
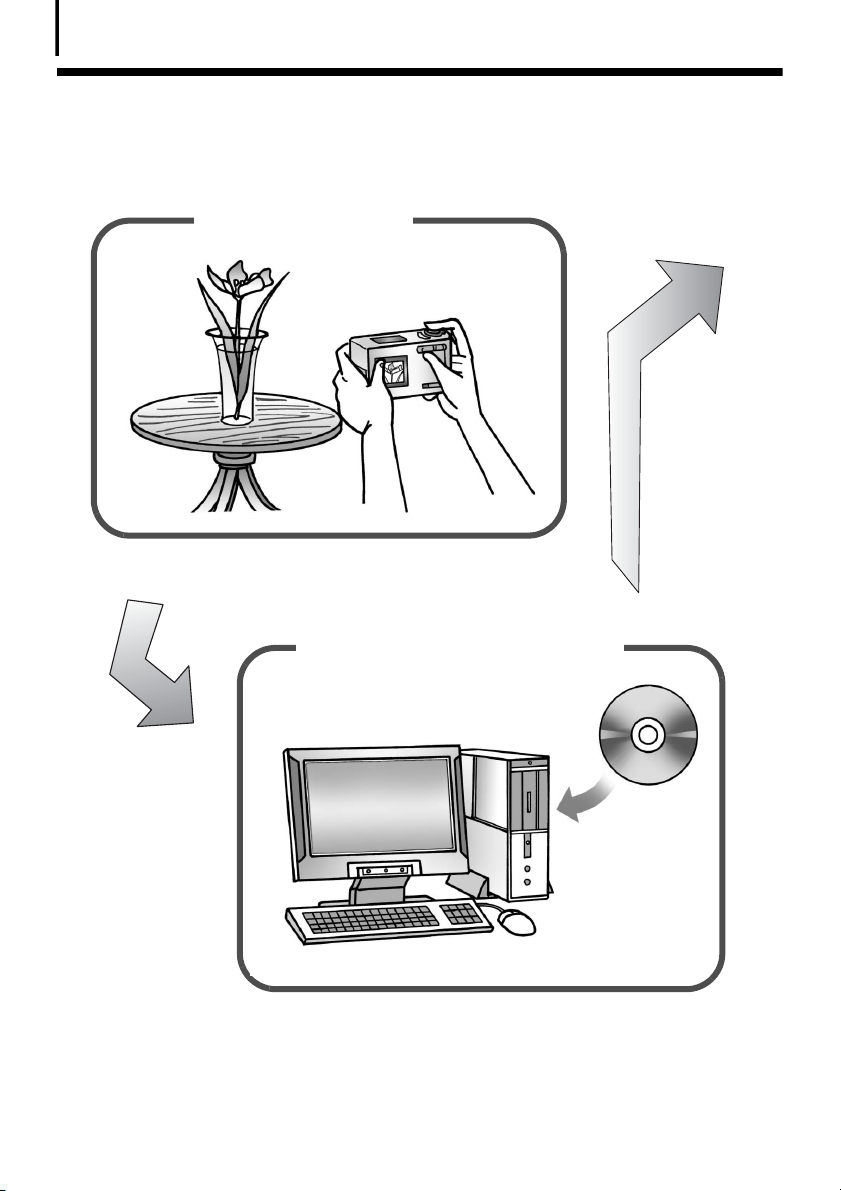
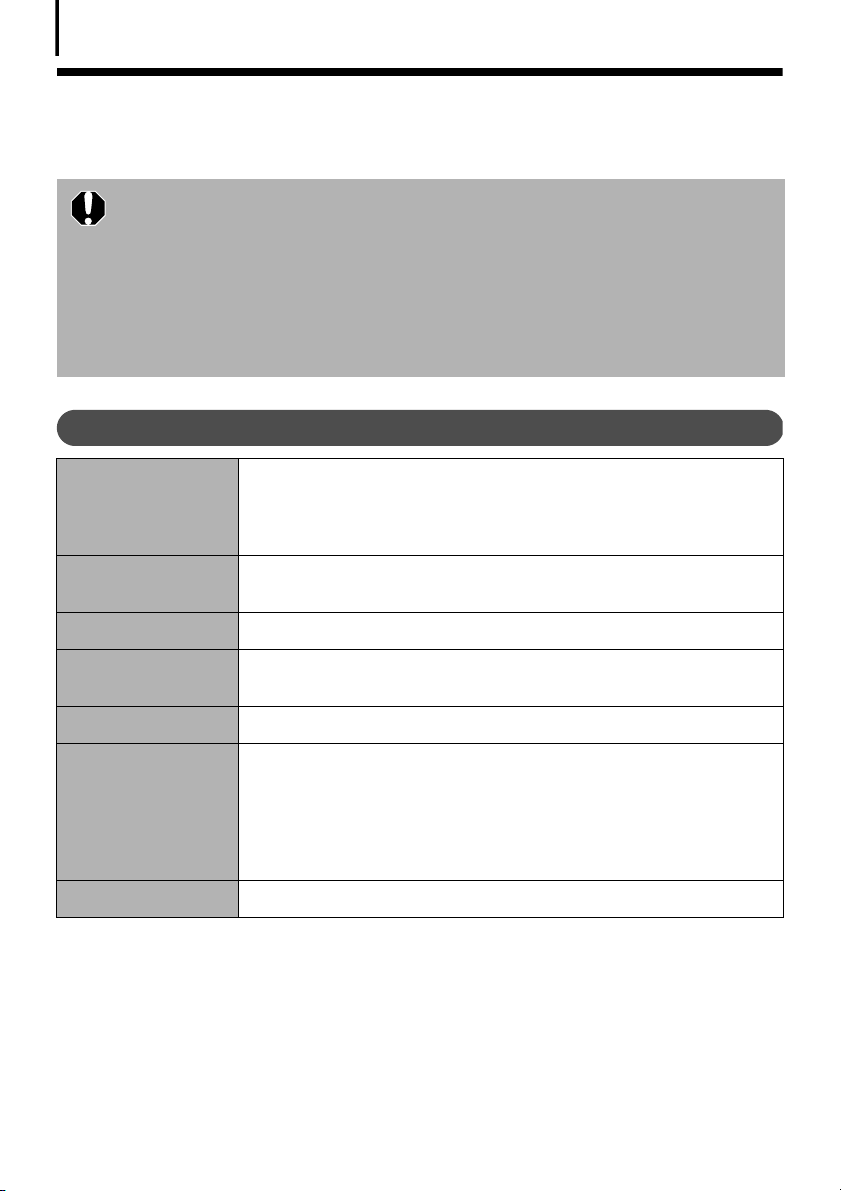
It’s so Simple! Make Prints Right at Home Like a Pro
4
It’s so Simple! Make Prints Right at Home
Like a Pro
Shoot the images
See your Camera User Guide for shooting instructions.
Windows (p. 10)
Macintosh (p. 49)
Install the software on the
computer
Just install the software once at the beginning.
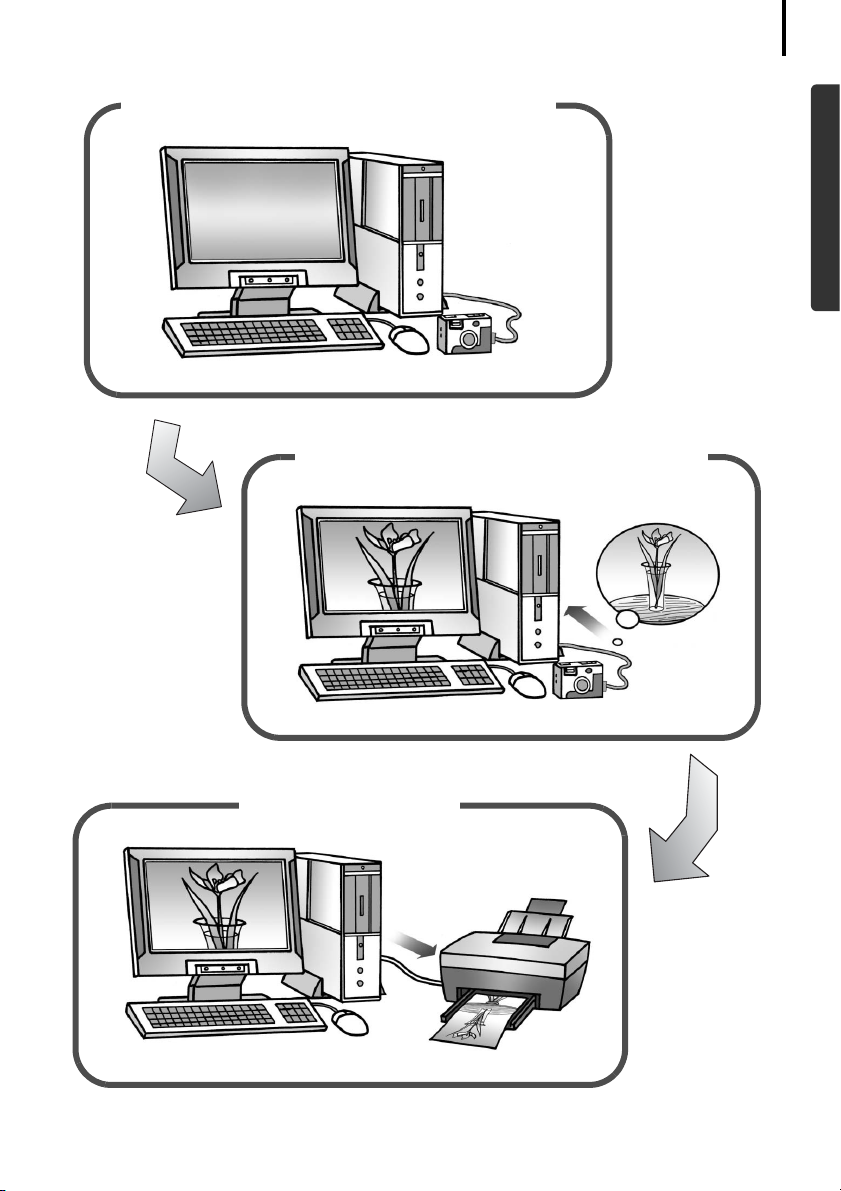
Connect the camera to the computer
Download images to the computer
Windows (p. 15)
Macintosh (p. 51)
5
(p. 97)
Print the images
Windows (p. 21)
Macintosh (p. 55)
Unbounded Possibilities with Entertaining Software
6
Unbounded Possibilities with Entertaining
Software
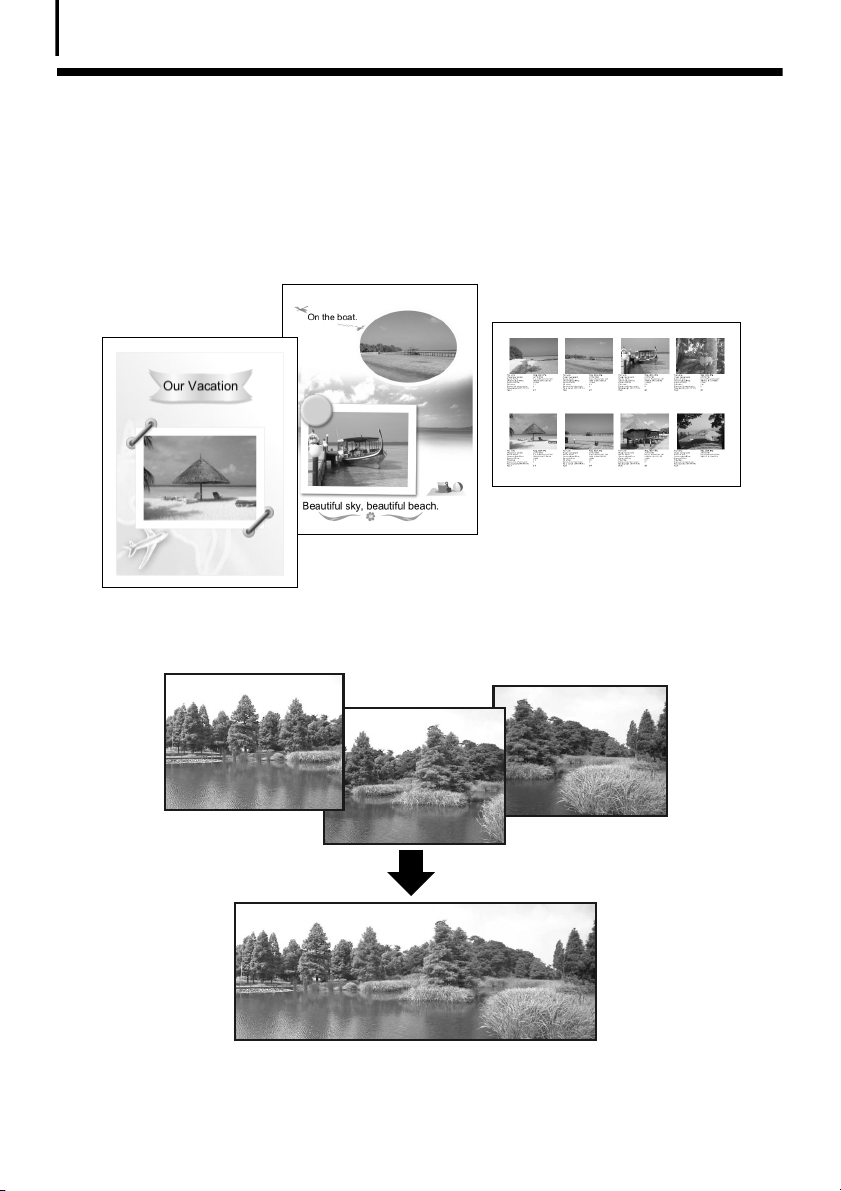
Print a Variety of Layouts
Print with the diverse layouts available in PhotoRecord (Windows) and ImageBrowser
(Macintosh). The examples shown are from PhotoRecord (Windows).
Make your own photo
album of precious
moments.
Confirm all your images in one glance with
index (contact sheet) printing.
Stitch a Panorama Together
Create a panoramic image from a series of images with PhotoStitch.
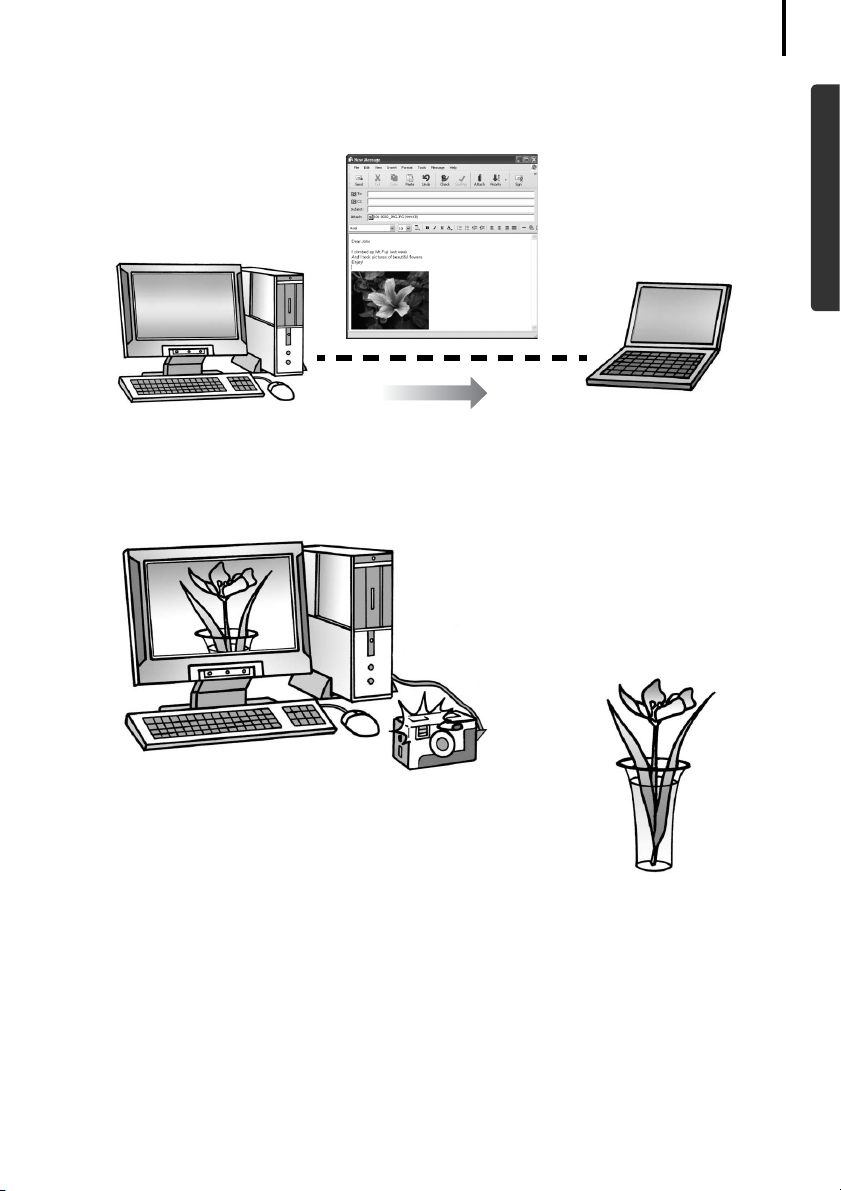
Send an Image as an E-mail Attachment
Attach an image to an e-mail message by starting your mail software from within
ZoomBrowser EX (Windows) or ImageBrowser (Macintosh).
Operate the Camera Shutter from the Computer
Release the camera’s shutter from the computer with ZoomBrowser EX (Windows) or
ImageBrowser (Macintosh). The recorded image is saved directly to your computer.
7
Release the shutter from the computer.
Edit a Movie
You can create and edit movies: link movies and stills that have been downloaded to your
computer, add background music, superimpose titles and other text, and apply various effects
to the movies.
Convert a RAW Format Image
RAW images are extremely high-quality images that are free of the resolution loss associated
with compression processing. However, since RAW images are created with a special image
format, it is necessary to convert them to standard image file formats, such as TIFF or JPEG. You
can make fine adjustments to the image quality and coloration when they are converted.
System Requirements
8
System Requirements
Please install the software on a computer meeting the following minimum requirements.
• A CD-ROM drive is required to install the software.
• All procedures performed with a connection to a USB 2.0 compliant board are
not guaranteed.
• A sound card is required to play movie file audio tracks under Windows.
• With Windows, QuickTime 6.5 is required to play or edit movies or to save
images merged with PhotoStitch in the QuickTime VR format. QuickTime is
included on the Canon Digital Camera Solution Disk.
• Macintosh software cannot be used on disks formatted in the UFS (Unix File
System) format.
Windows
OS Windows 98 Second Edition (SE)
Windows Me
Windows 2000 Service Pack 4
Windows XP (including Service Pack 1)
Computer Model The above OS should be pre-installed on computers with built-in USB
ports.
CPU Pentium 500 MHz or higher processor
RAM Windows 98 SE/Windows Me: 128 MB or more
Interface USB
Free Hard Disk
Space
Display 1,024 x 768 pixels/High Color (16 bit) or better
Windows 2000/Windows XP: 256 MB or more
•Canon Utilities
- ZoomBrowser EX: 250 MB or more
(Including the PhotoRecord printing program)
- PhotoStitch: 40 MB or more
•Canon Camera TWAIN Driver: 25 MB or more
•Canon Camera WIA Driver: 25 MB or more

Macintosh
OS Mac OS X (v10.1.5-v10.3)
9
Computer Model The above OS should be pre-installed on computers with built-in USB
CPU PowerPC G3/G4/G5
RAM 256 MB or more
Interface USB
Free Hard Disk
Space
Display 1,024 x 768 pixels/32,000 Colors or better
ports.
•Canon Utilities
- ImageBrowser: 200 MB or more
- PhotoStitch: 40 MB or more
10
Using the Software on the Windows
Platform – Preparations
This chapter explains the basic procedures for installing the software and connecting the
camera to a computer. Read this material before you connect the camera to the computer.
Installing the Software and USB Driver
Start by installing the software from the Canon Digital Camera Solution Disk.
• You must install the software before you connect the camera to the
computer.
• Users of Windows XP and Windows 2000 must first log in as an Administrator
(computer system administrator) to install programs.
Items to Prepare
• Your camera and computer
• Canon Digital Camera Solution Disk
• Interface cable supplied with the camera
Installation Procedures
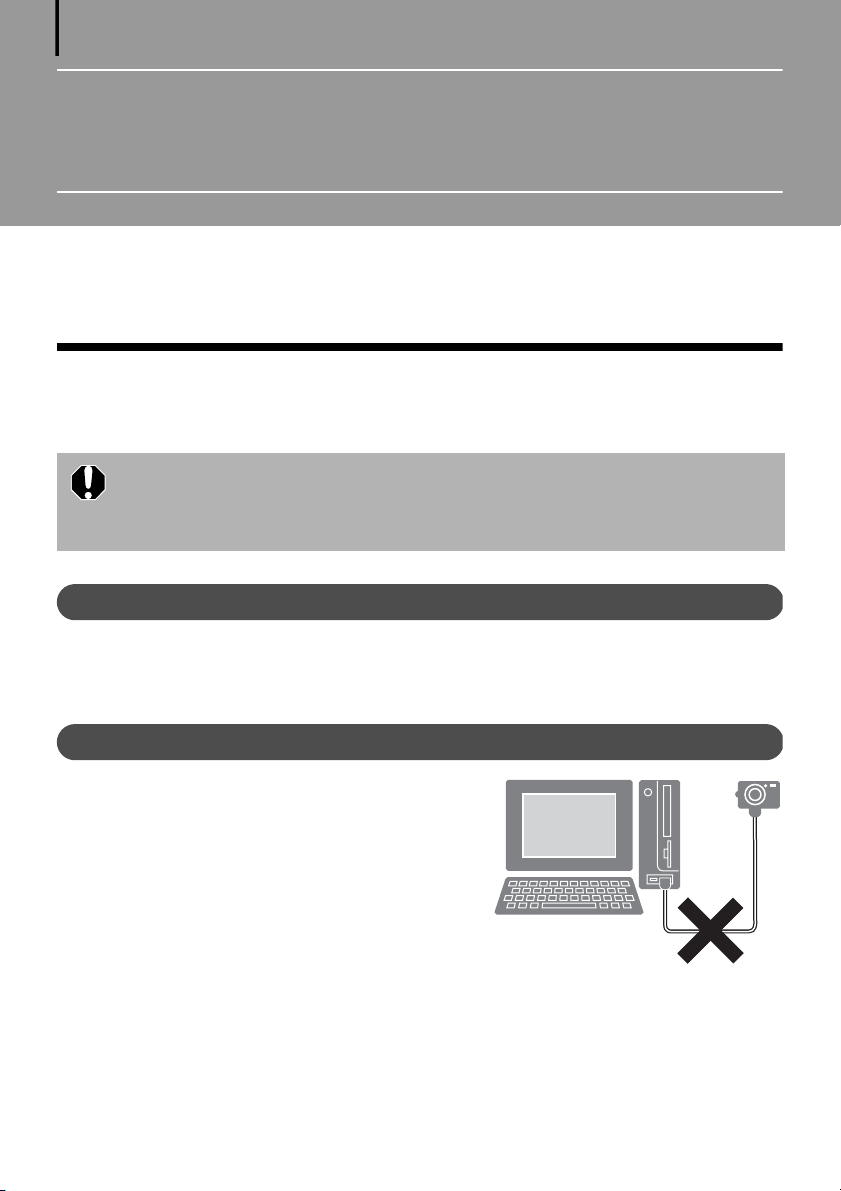
Confirm that the camera is NOT connected to
1
the computer.
If it is, disconnect the cable. The software cannot
be properly installed if the camera is connected to
the computer at the start.
2 Close any programs that are running.
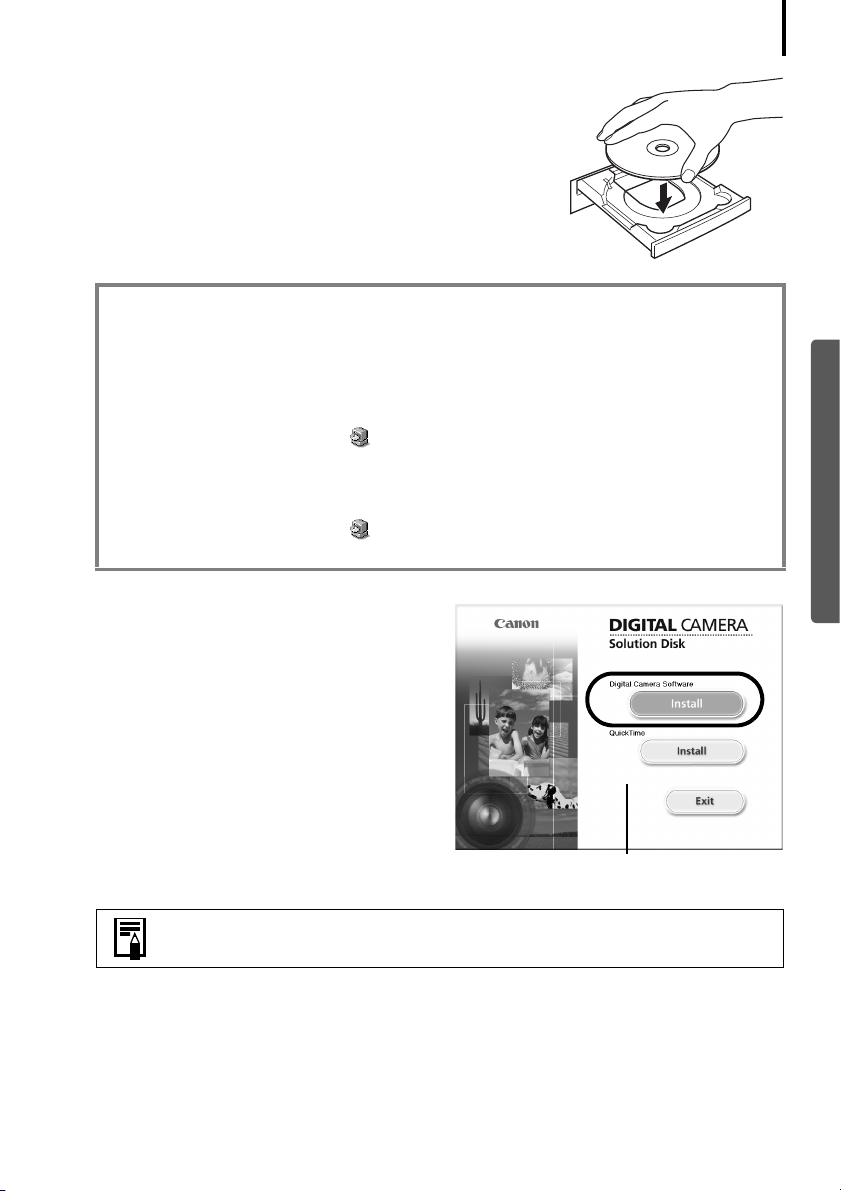
3 Place the Canon Digital Camera Solution Disk in the
computer’s CD-ROM drive.
If the installer panel does not appear automatically, use the
following procedures.
How to Display the Installer Panel
Use the following procedures to display the installer panel if it does not appear
automatically.
Windows XP
1. Select [My Computer] from the [Start] menu.
2. Right-click the CD-ROM icon and select [Open].
3. Double-click the [Setup.exe] icon.
Windows 2000, Windows Me, Windows 98 SE
1. Double-click the [My Computer] icon on the desktop.
2. Right-click the CD-ROM icon and select [Open].
3. Double-click the [Setup.exe] icon.
Some computers may not display the [.exe] file name extension as shown above.
4 Click the Digital Camera Software
[Install] button.
11
Installer Panel
Follow any instructions to restart your computer, if they appear. If the
following window appears, continue with the installation.
Installing the Software and USB Driver
12
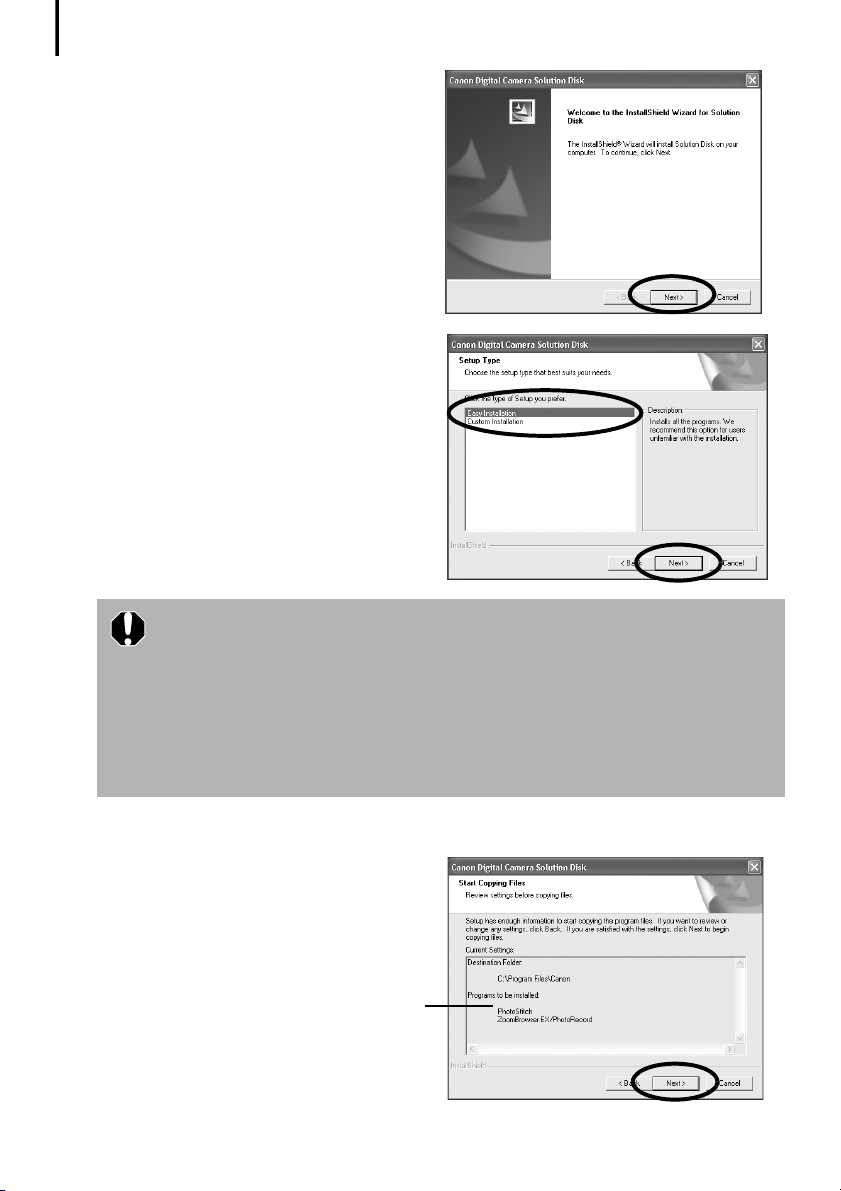
5 Click [Next].
6 Select [Easy Installation] as the setup
type and click [Next].
Select [Custom Installation] to select
programs individually for installation.
When [Custom Installation] is Selected
The USB driver (the software for connecting) is required when the camera
is connected to the computer with an interface cable. Ensure that you
select a USB driver from below (the appropriate one for your operating
system).
•Windows 2000/Windows 98 SE: Canon Camera TWAIN Driver
•Windows Me: Canon Camera WIA Driver
With Windows XP, the USB driver supplied with the Windows operating
system is used so there is no need to install a USB driver.
7 Click [Yes] if you agree to all of the terms of the software license agreement.
8 Review the installation settings and
click [Next].
Follow the onscreen instructions to
proceed.
The items displayed here differ according to
the software installed.
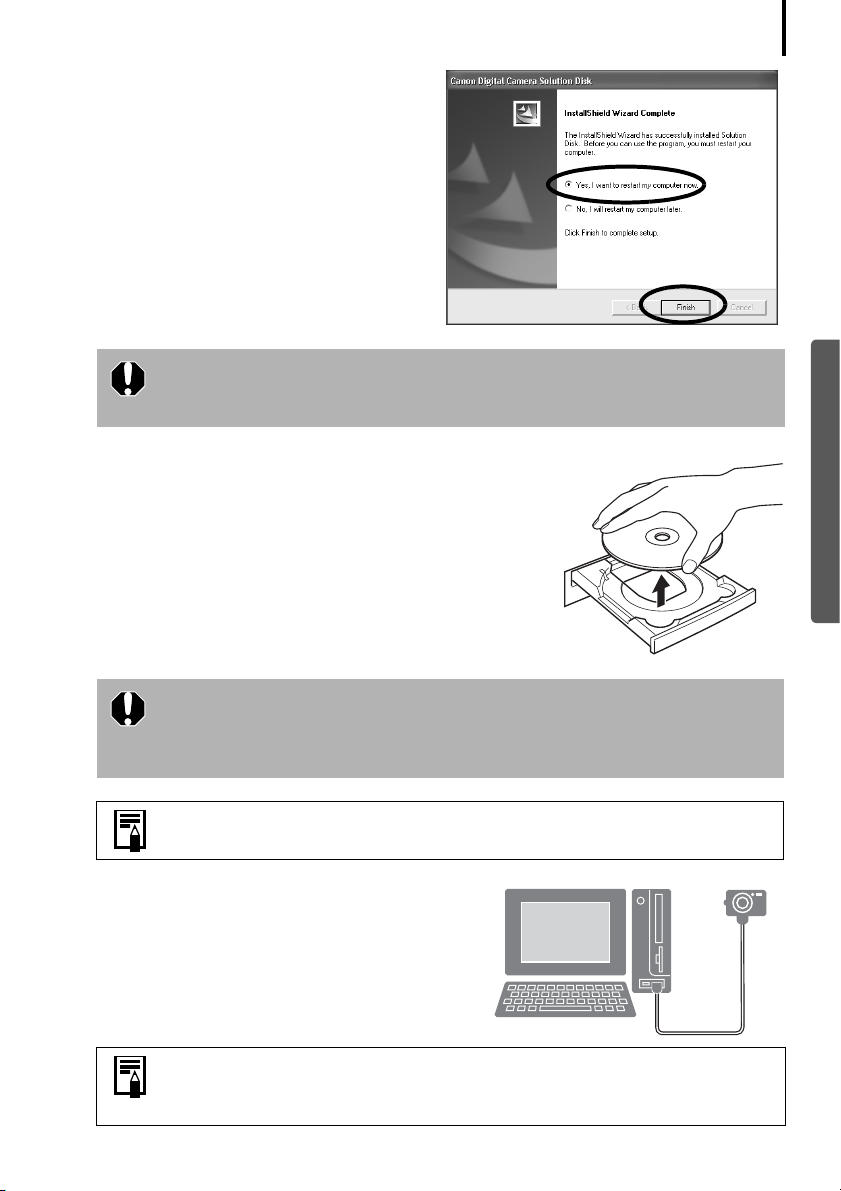
9 When the installation is over, select
[Yes, I want to restart my computer
now.] and click [Finish].
At this stage, do NOT remove the Solution
Disk from the CD-ROM drive yet.
Users of Windows XP and Windows 2000 must log in as an Administrator
(computer system administrator) after restarting to carry out the
subsequent procedures.
10 Remove the disk from the CD-ROM drive when your
normal desktop screen appears after restarting.
This concludes the software installation.
Continue by connecting the camera to the computer so
that the USB driver can be utilized.
13
If you installed a USB driver, so far the required files have only been
copied to your computer. You must now connect the camera to the
computer with the interface cable to complete the installation and
prepare the driver for use.
See Uninstalling the Software (p. 84) to delete the installed programs.
11 Attach the camera to the computer with the
interface cable and set the camera to the
correct mode for connecting.
Procedures for attaching the camera to the computer and placing the
camera in the correct mode for connecting vary between camera models.
See Information about Your Camera (p. 96).
Installing the Software and USB Driver
14
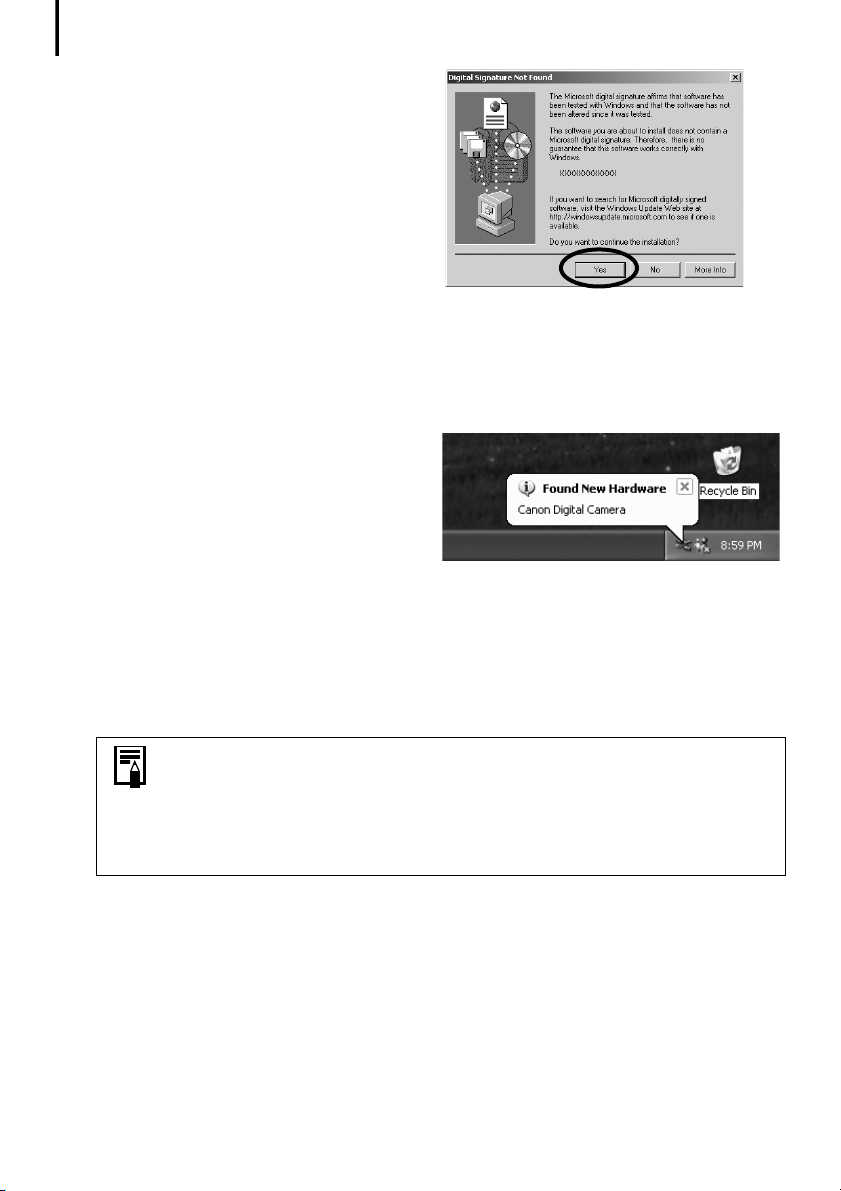
If the Digital Signature Not Found window
appears, click [Yes].
The USB driver will automatically finish installing onto the computer when you attach the
camera and open a connection.
Dialogs similar to the following will appear during this process (first time the camera is
connected to a computer only).
Windows XP
The dialog on the right will appear after a
few moments.
Windows 2000/Windows Me/Windows 98 SE
Restart the computer according to the instructions if you are prompted to do so by a
message.
A dialog allowing you to set the default settings will display after installation. See Using
the Software on the Windows Platform – The Basics (p. 15) for the subsequent
procedures.
•See USB driver installation not proceeding well in the Troubleshooting
section (p. 88) if you are having problems installing the USB driver.
•See Uninstalling the USB Driver (p. 85) to delete the USB driver installed
with these procedures.
•See If You Were Using ZoomBrowser EX Version 2 or 3 (p. 95) if you
were previously using either version.
This concludes the software and USB driver installation and the procedures for connecting the
camera to the computer.
You may now download camera images to the computer (p. 15).
Using the Software on the Windows
Platform – The Basics
This chapter explains the procedures for using ZoomBrowser EX to download the camera's
images to the computer and print them.
Read this chapter after completing the preparations in the Using the Software on the Windows
Platform
Downloading Images to the Computer
Begin by downloading the images to your computer. The downloading procedure is slightly
different according to whether you are using a camera to computer connection (see below) or
a memory card reader (p. 19).
– Preparations section.
You can also display an index of the camera or memory card images to check
them before downloading or download them selectively. For instructions, see
Checking Images before Downloading (p. 34).
15
Camera to Computer Connection
Attach the supplied interface cable to the computer’s USB port and the camera’s
1
DIGITAL Terminal. Prepare the camera for communication with the computer.
Procedures for attaching the camera to the computer and placing it in
the correct mode for connecting vary between camera models. See
Information about Your Camera (p. 96).
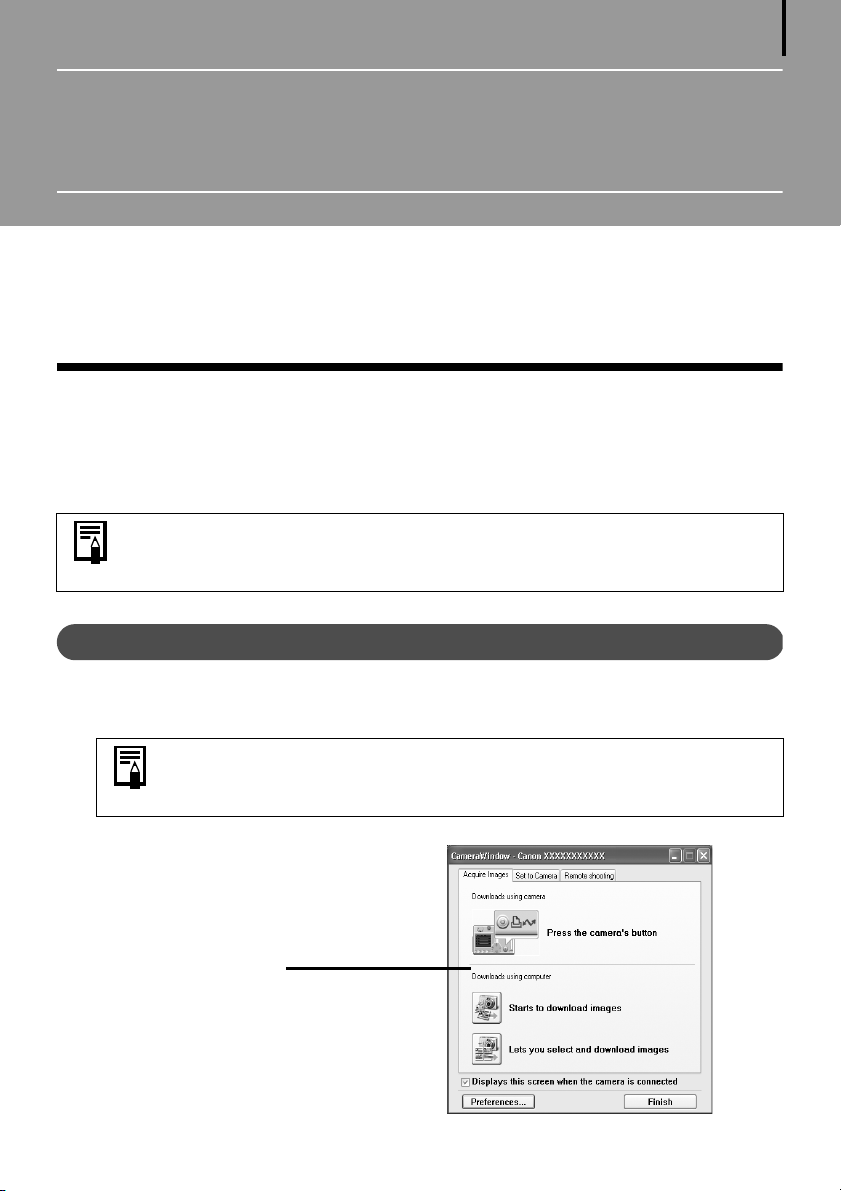
The Camera Control Window will appear.
Camera Control Window
Downloading Images to the Computer
16
First Time Camera is Connected to a Computer
Set the following settings the first time you connect the camera to the computer. These
procedures are not required from the second connection onward.
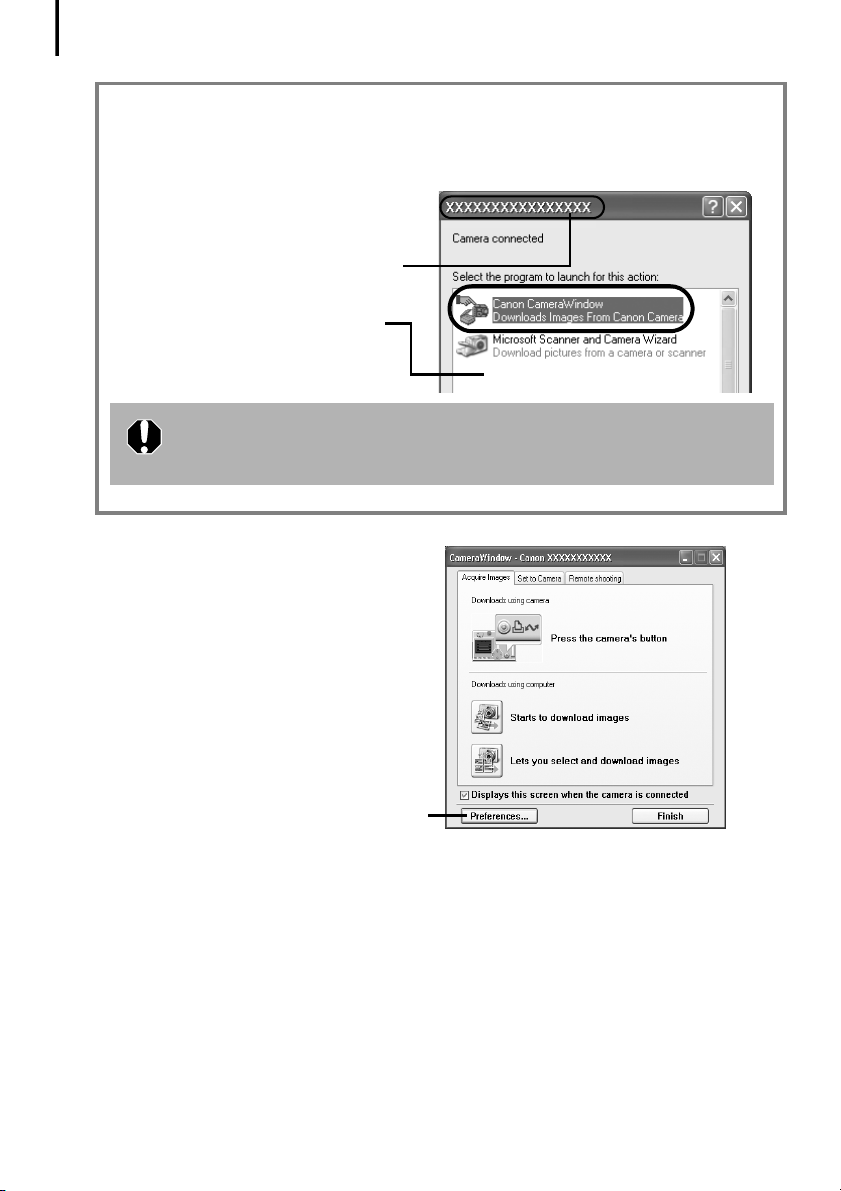
Select [Canon CameraWindow] when a
dialog (Events dialog) similar to that on
the right displays and click [OK].
Your camera model name or "Canon
Camera" will appear here.
Different programs may display
according to your computer setup.
If this Events dialog does not appear, click the [Start] menu and select
[Programs] or [All Programs], followed by [Canon Utilities], [Camera
Window] and [Camera Window].
2 Download the images.
Download the images using the camera or
the computer. By default, the downloaded
images are saved into the [My Pictures]
folder.
You can adjust the settings, such as the type
of image downloaded and the destination
folder, by clicking [Preferences].
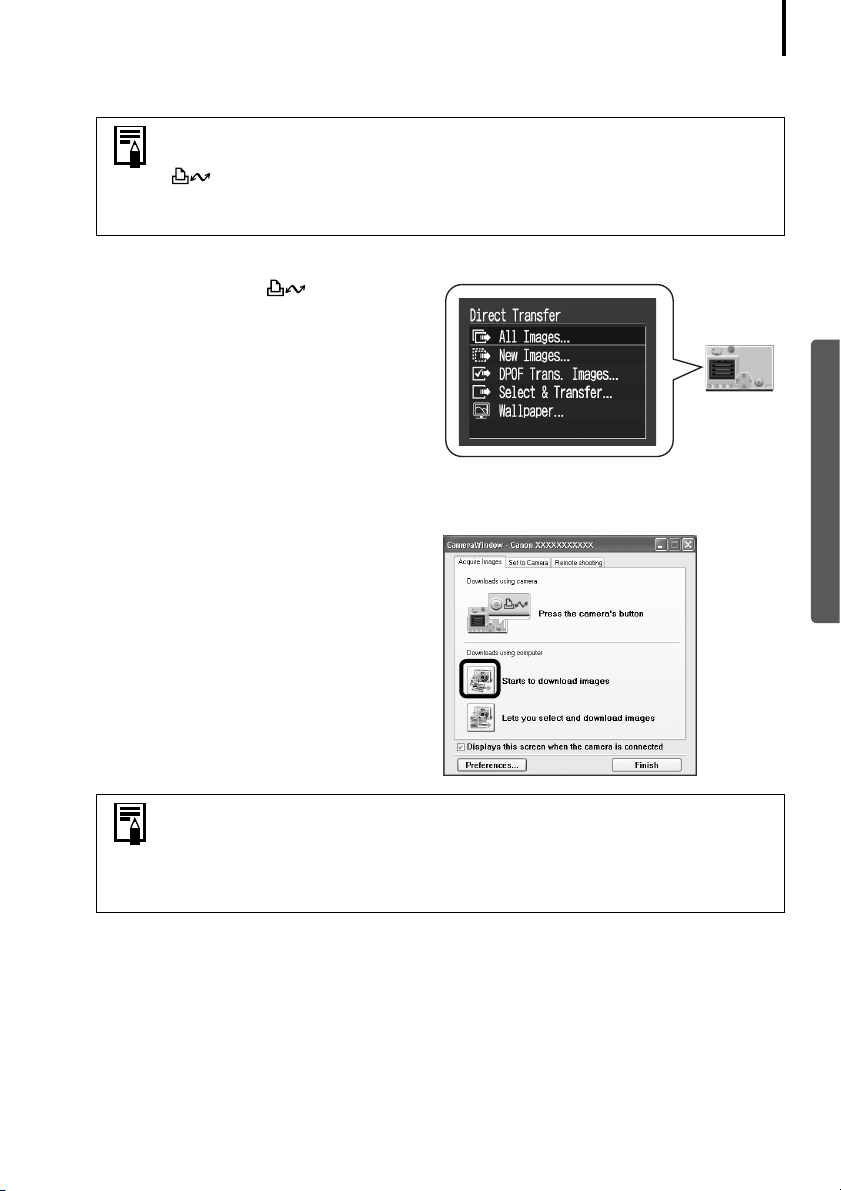
Using the Camera to Download Images (Direct Transfer Function)
• If the conditions are right for the Direct Transfer function, the Direct
Transfer settings menu will appear in the LCD monitor. In addition, the
(Print/Share) button will light if your camera is equipped with one.
• See the Camera User Guide for instructions regarding Direct Transfer
settings and procedures.
Set the Direct Transfer settings on the
camera and press the (Print/Share)
button or the [SET] button.
Using the Computer to Download Images
Click [Starts to download images].
17
• By default, all the images that have yet to be downloaded will
download.
• To download images that have had their transfer settings set with the
camera, click [Preferences] and select [Images whose transfer settings
were specified with the camera] as the image type to be downloaded.
The downloaded images will be saved into folders according to their shooting date.

Downloading Images to the Computer
18
By default, when downloading is complete,
the thumbnails (tiny versions) of the
downloaded images display in
ZoomBrowser EX’s Main Window.
Thumbnail
Shows the folder where the images are
saved.
Next, print out the images (p. 21).
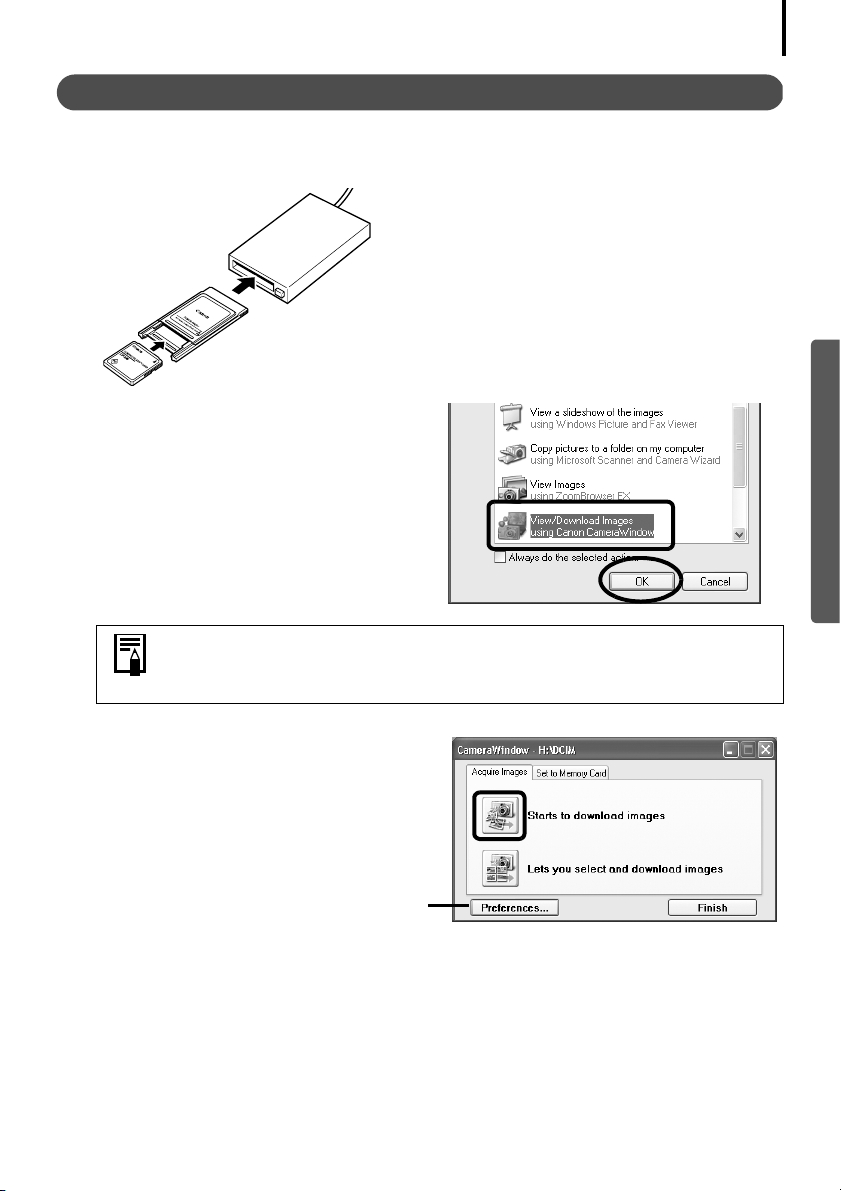
Memory Card Connection
Insert the memory card into the reader.
1
Use a separately sold card adapter (PCMCIA adapter) if required.
See the manual for the memory card for its connection and handling instructions.
(2) Insert the loaded adapter into the slot.
(1) Place the memory card in an adapter if required.
The card adapter and memory card shape may vary according
to the type of memory card your camera utilizes.
2 Select [View/Download Images using
Canon CameraWindow] when the
dialog to the right appears and click
[OK].
The Camera Control Window will display.
19
If the dialog above fails to appear, click the [Start] menu and select
[Programs] or [All Programs], followed by [Canon Utilities], [Camera
Window] and [Camera Window], and proceed to Step 3.
3 Click [Starts to download images].
You can adjust the settings, such as the type
of image downloaded and the destination
folder, by clicking [Preferences].

Downloading Images to the Computer
20
• By default, all the images that have yet to be downloaded will
download to the [My Pictures] folder.
• To download images that have had their transfer settings set with the
camera, click [Preferences] and select [Images whose transfer settings
were specified with the camera] as the image type to be downloaded.
•See Memory Card Folder Structure (p. 87) for information about
memory card folder structures and file names.
The downloaded images are saved into folders according to the shooting date.
By default, when the download is complete, the thumbnails (tiny versions) of the
downloaded images display in ZoomBrowser EX’s main window.
Next, print out the images (p. 21).

Printing Images
This section explains the basic procedures for using PhotoRecord, a printing utility program. See
the program’s [Help] menu for more details.
• Movies cannot be printed.
•With images shot by Exif 2.2 (called Exif Print) compatible cameras, shooting
information such as the shooting settings and mode can be included with
the images. This data is then used to correct the images to obtain better
prints.
• PhotoRecord automatically carries out image correction (by default) both
with images shot with Exif 2.2 compatible cameras and other images,
yielding high-quality prints.
1 Click [Print] in the Main Window, followed by [Layout Print].
21
2 Click [1. Select Images] and select
images.
The background of the selected image(s) will
turn blue.
Printing Images
22
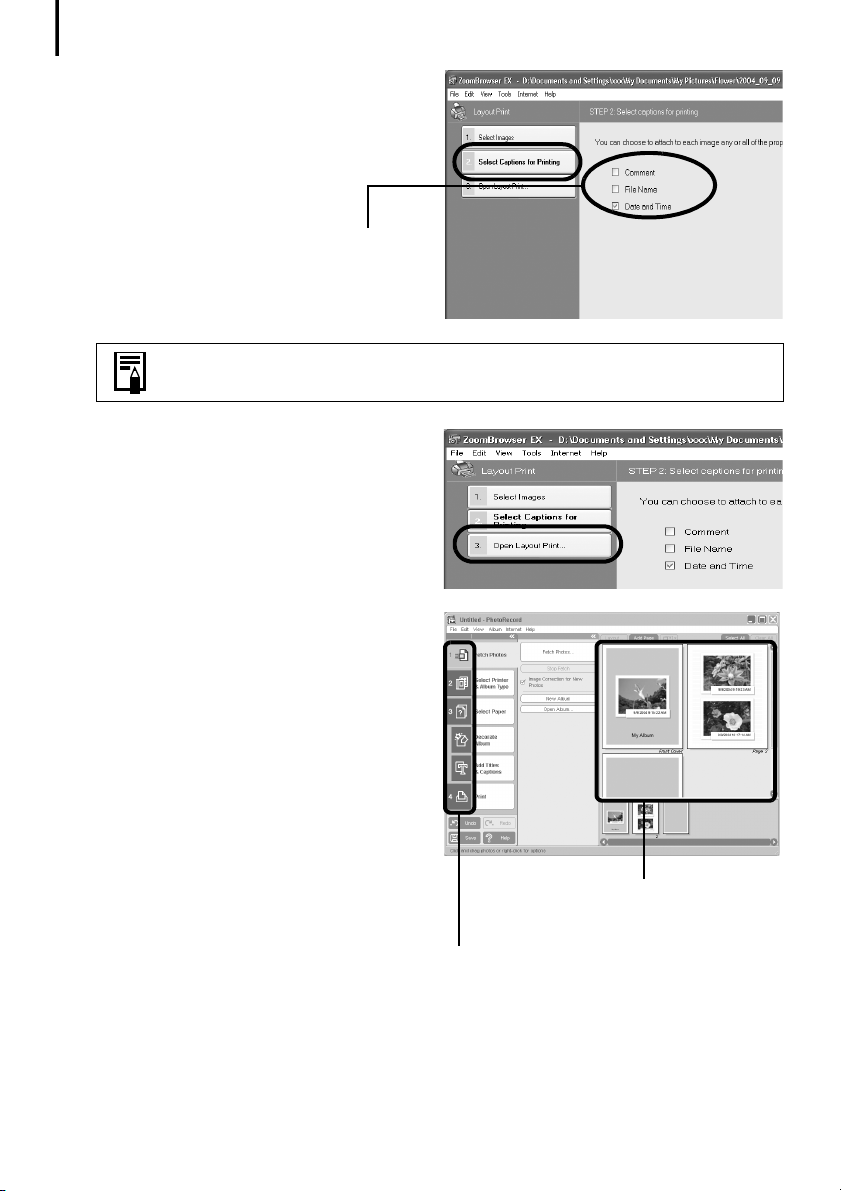
3 Click [2. Select Captions for Printing]
and place a check mark beside the type
of information that will be printed with
the images.
If you select [Date and Time], for example,
you can print the images with their shooting
dates and times included.
You can add a comment to an image in the Properties Window (p. 31).
4 Click [3. Open Layout Print].
PhotoRecord will start, displaying the
selected image and the information
selected in Step 3 in the Album window.
In addition, the steps that will take you
through the printing process will display on
the left side. Follow the steps in order to
proceed.
Album Window
The selected images display
here.
The printing procedures display here.
From this point onward, the procedures vary according to whether you select Full Page
Print (prints one image per page) or Layout and Print (prints an arrangement of images on
each page).
Full Page Print
This option prints one image per page.
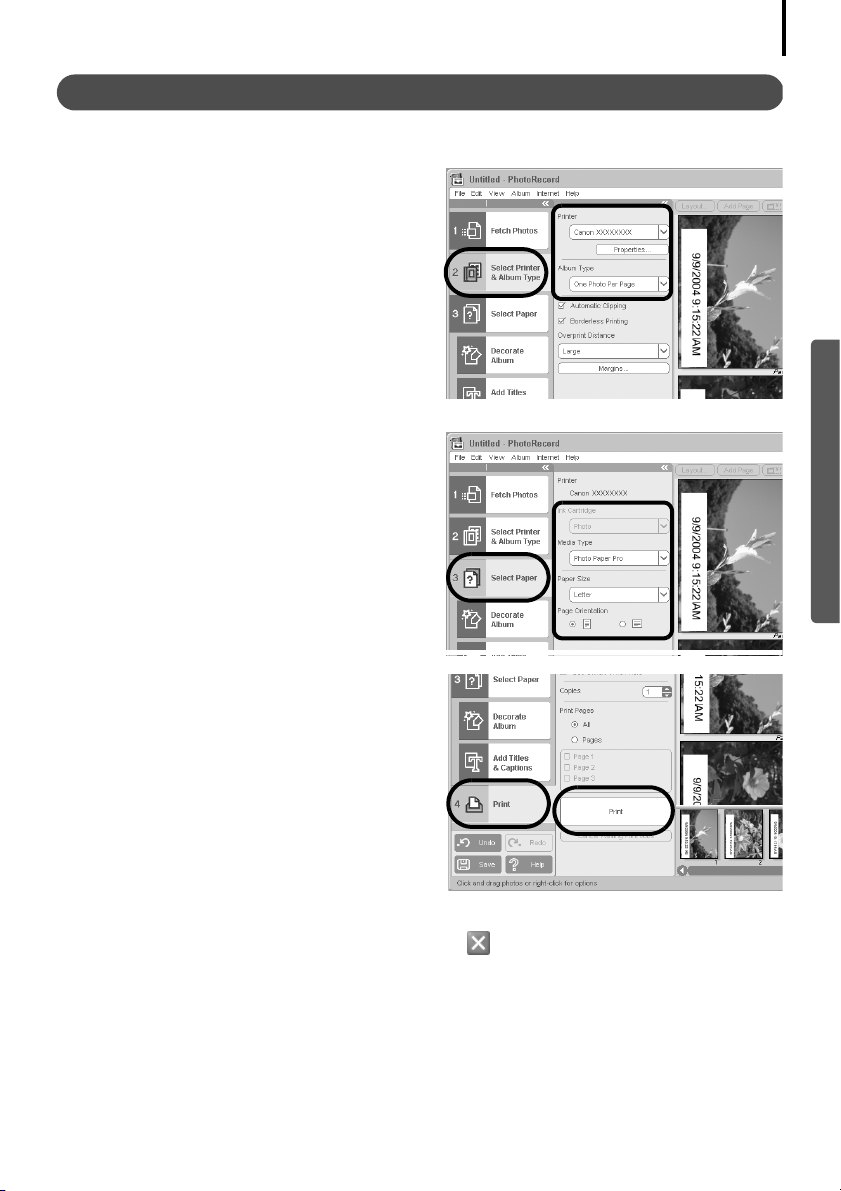
1 Click [2 Select Printer & Album Type].
Once you have chosen a printer, select
[One Photo Per Page] or [One Photo Per
Sheet] in the Album Type category.
2 Click [3 Select Paper] and select the
paper size and orientation.
23
3 Click [4 Print], confirm the number of
copies and other printing settings, and
click [Print].
This will start printing.
To close PhotoRecord after printing is complete, click . Click [Yes] to save the album or [No]
to close it without saving. The ZoomBrowser EX window will reappear when the save
procedure is complete.
Printing Images
24
Layout and Print
This option prints multiple images on a single page as in a photo album.
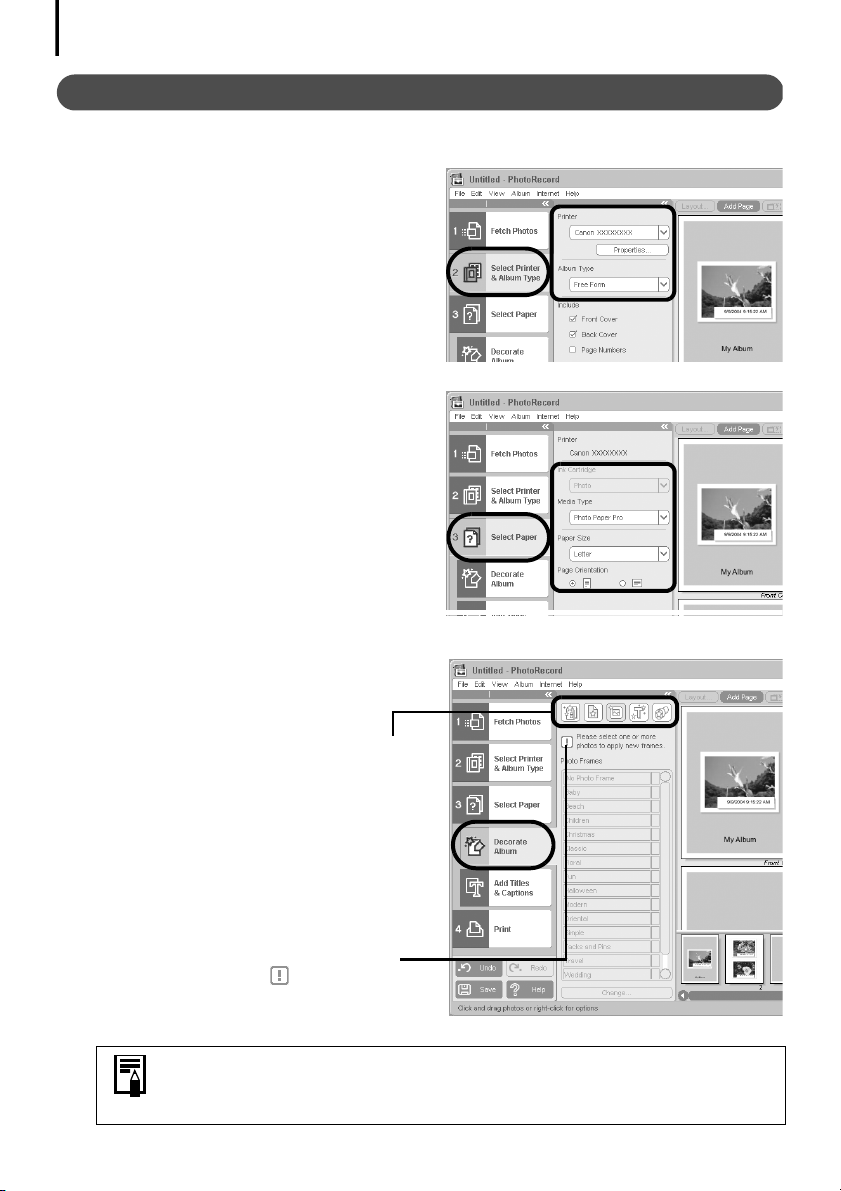
1 Click [2 Select Printer & Album Type].
Once you have chosen a printer, select
[Free Form] in the Album type category.
2 Click [3 Select Paper] and select the
paper size and orientation.
3 Click [Decorate Album] and change the
design of the image background and
border as desired.
Click the [Themes], [Backgrounds], [Photo
Frames], [Text Frames] or [Clipart] button to
switch between selections.
Perform the procedures according to the
instructions beside the symbol.
• The [Themes] category provides consistent designs for use throughout
an entire album.
•You can also click [Add Titles & Captions] to add text as a title or caption.
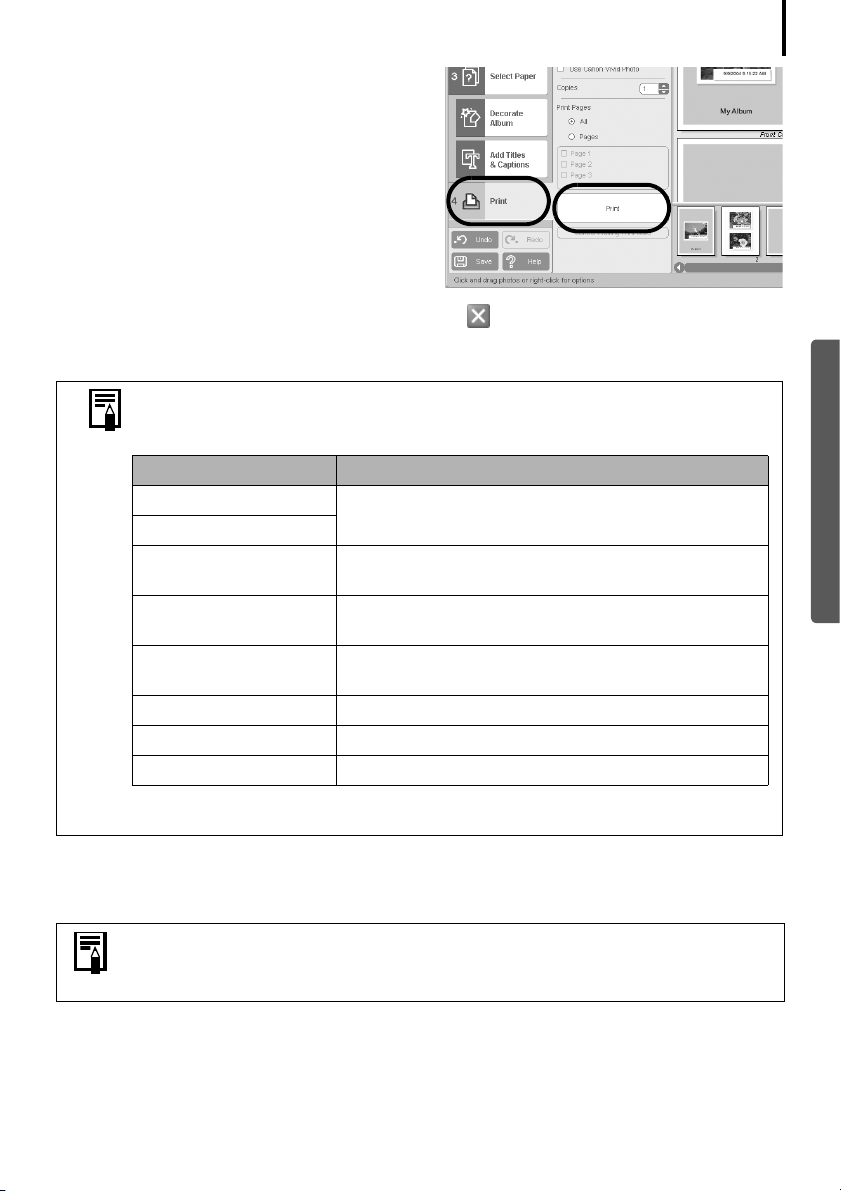
4 Click [4 Print], confirm the number of
copies and other printing settings, and
click [Print].
This will start printing.
To close PhotoRecord after printing is complete, click . Click [Yes] to save the album or [No]
to close it without saving. The ZoomBrowser EX window will reappear when the save
procedure is complete.
There are numerous varieties of albums. Select one to suit your purposes.
Please note that the available album types may vary slightly according to
the printer in use.
Album Type Description
One Photo Per Page
One Photo Per Sheet
Free Form
Contact Sheet
Fixed Size Photo
Mosaic Lines up the specified number of images and prints.
Perforated Paper Prints on perforated paper.
8-Sticker Label Prints on 8-label sheets.
* The shooting information displayed in ZoomBrowser EX and the Exif data
that can be printed using PhotoRecord differ slightly.
This chapter explained the ZoomBrowser EX basics. Once you have mastered them, try the
advanced techniques.
Using the Software on the Windows Platform
Prints one image on each sheet of paper.
Allows images to be freely positioned on the page
and printed.
Prints thumbnails of the images and their shooting
data (Exif data*).
Allows image heights and widths to be specified and
prints.
– Advanced Techniques (p. 26).
25
• A PDF-format manual for ZoomBrowser EX is also available. It provides
further information about the program's features and procedures. See Using
the PDF Manuals (p. 2).
26
Using the Software on the Windows
Platform – Advanced Techniques
This chapter explains various ZoomBrowser EX features.
Proceed to this chapter once you have mastered the basic ZoomBrowser EX procedures in the
Using the Software on the Windows Platform – The Basics chapter.
The ZoomBrowser EX Windows
This section describes the principal ZoomBrowser EX windows: the Main Window, Viewer
Window and Properties Window.
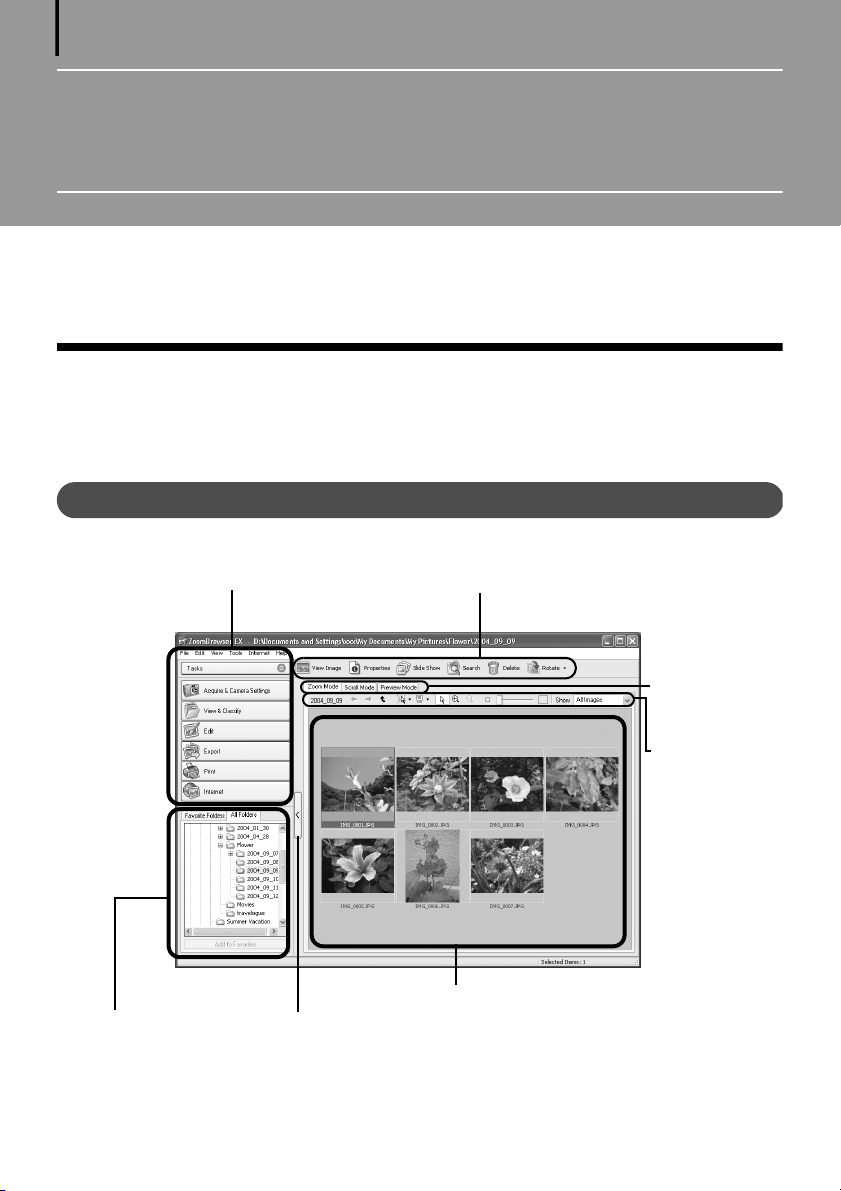
Main Window
This window is for displaying and organizing images downloaded to the computer.
Task Area (p. 27)
Function Buttons (p. 29)
Folders Area (p. 27)
Display Mode
(p. 28)
Display Control
Panel (p. 29)
Browser Area (p. 27)
Switches between showing and hiding
the Task Area and Folders Area.
 Loading...