

zPlease read the Read This First section (p. 4).
zPlease also see the Canon Digital Camera Software Starter Guide Disk and the Direct Print User Guide.
Camera User Guide
ENGLISH
DIGITAL CAMERA
Camera User Guide
CANON INC.
30-2 Shimomaruko 3-chome, Ohta-ku,
Tokyo 146-8501, Japan
Europe, Africa & Middle East
CANON Europa N.V.
PO Box 2262, 1180 EG Amstelveen, The N etherlands
CANON (UK) LTD
For technical support, pleas e contact the Canon Help Desk:
P.O. Box 431, Wallington, Surrey, SM6 0XU, UK
Tel: (08705) 143723 Fax: (08705) 143340
http://www.canon.co.uk/Support/index.asp
CANON COMMUNICATION & IMAGE
FRANCE S.A.
102 Avenue du Général de Gaulle,
92257 LA GARENNE COLOMBES CEDEX, France
Tél : Hot line 08 25 00 29 23
http://www.cci.canon.fr
CANON DEUTSCHLAND GmbH
Postfach 100401, 47704 Krefeld, Germany
Customer Hotline: 0180/5006022 (0,12 € / Min.)
www.canon.de
CANON ITALIA S.P.A.
Via Milano 8, I-20097 San Donato Milanese (MI), Italy
Tel: 02/8248.1 Fax: 02/8248.4604
Pronto Canon: 02/8249.2000
E-mail: supporto@canon.it http://www.canon.it
CANON ESPAÑA S.A.
C/Joaquin Costa, 41 – 28002 Madrid, Spain
Tel. Atención al Cliente: 901.301.301
Help Desk: 906.301.255
http://www.canon.es
CANON BELGIUM N.V. / S.A.
Bessenveldstraat 7, B – 1831 Diegem, Belgium
Tel.: (02) 722.04.11 Fax: (02) 721.32.74
Helpdesk : 0900-10627
http://www.canon.be
CANON LUXEMBOURG S.A.
Rue des Joncs 21, L-1818 Howald, Luxembourg
Tel.: (0352) 48 47 961 Fax: (0352) 48 47 96232
Helpdesk : 900-74100
http://www.canon.lu
CANON NEDERLAND N.V.
Neptunusstraat 1, 2132 JA Hoofddorp, The Netherlands
Tel.: 023 – 5 670 123 Fax: 023 – 5 670 124
Helpdesk: 023 – 5 681 681
http://www.canon.nl
CANON DANMARK A/S
Knud Højgaards Vej 1, DK-2860 Søborg, Danmark
Phone: +45 44 88 26 66
http://www.canon.dk
CANON NORGE AS
Hallagerbakken 110, Postboks 33, Holmlia, 1201 Oslo,
Norway
Tlf: 22 62 93 21 Faks: 22 62 06 15
E-mail: helpdesk@canon.no
http://www.canon.no
Finland
CANON OY
Huopalahdentie 24, 00350 Helsinki,Finland
Puhelin: 010 54420 Fax 010 544 30
HelpDesk 020 366 466 (1,47 snt/min + pvm)
(ma-pe klo 9:00 - 17:30)
Sähköposti: helpdesk@canon.fi
Internet: www.canon.fi
CANON SVENSKA AB
Gustav III:s Boulevard 26, S-169 88 Solna, Sweden
Helpdesk: 08-744 8620 Fax 08-744 8527
http://www.canon.se
CANON (SCHWEIZ) AG
Industriestrasse 12, 8305 Dietlikon, Switzerland
Consumer Imaging Group
Tel. 01-835-61 61
Hotline 0900 57 55 20 (CHF 2.13/min)
http://www.canon.ch
Austria
CANON GES.M.B.H.
Zetschegasse 11, A - 1230 Wien, Austria
Helpdesk Tel.: 01 66 146 412
Fax: 01 66 146 413
http://www.canon.at
Portugal
SEQUE – SOC. NAC. EQUIP., S.A.
Pr. Alegria, 58 – 2ºC, 1269-149 Lisboa
Telef: (+351) 21 324 28 30 Fax: (+351) 21 347 27 51
E-mail: info@seque.pt http://www.seque.pt
Eastern Europe
CANON CEE GMBH
Oberlaaerstr 233, A-1100 Wien, Austria
Tel.: +43 1 680 88-0 Fax: +43 1 680 88-422
CIS
CANON NORTH-EAST OY
Huopalahdentie 24, 00350 Helsinki, Finland
Tel.: +358 10 544 00 Fax: +358 10 544 10
http://www.canon.ru
CEL-SE3BA210 © 2004 CANON INC. Printed in the EU

* Default setting {: Setting selection is possible. U: Setting can only be selected for the first image.
–: Setting selection is not possible.
: Setting remains in effect even when the camera is turned off.
The default for the settings changed by the menu and button operations can be restored all at once except for
[Date/Time], [Language] and [Video System] (p. 68).
(1) Selectable only in manual focus.
(2) Can be set after AE lock is set.
(3) AE lock only is available.
(4) Cannot be adjusted when the photo effect is set to [Sepia] or [ B/W].
(5) The white balance is set to [AUTO].
(6) The white balance [Flash] cannot be set.
(7) The ISO speed is automatically set by the camera.
(8) ISO [AUTO] cannot be selected.
Trademark Acknowledgements
z
Canon and PowerShot are trademar ks of Canon.
z
CompactFlash is a trademark of SanDisk Corporation.
z
iBook and iMac are trademarks of Apple Computer, Inc.
z
Macintosh, PowerBook, Power Mac intosh and
QuickTime are trademarks of Apple Comput er, Inc,
registered in the United States and other countries.
z
Microsoft, Windows, and Window s NT are either
registered trademarks or trademarks of Microsoft
Corporation in the Unit ed States and/or other countries.
z
Other names and products not mentioned above may be
registered trademarks or trademarks of their re spective
companies.
Use of genuine Canon accessories is
recommended.
This product is desi gned to perform opti mally when used
with genuine Canon accessor ies. Canon shall not be
liable for any damage to this pro duct and/or accidents
such as fire, etc., caus ed by the malfunction of non genuine Canon acc essories (e.g., a leakage and/or
explosion of a battery pack). Please note that this
warranty does not apply to repairs arising out of the
malfunction of non -genuine Canon accessories, alt hough
you may request such repairs on a chargeable basis.
169
Disclaimer
z
While every effort h as been made to ens ure that the
information contained i n this guide is accurate and
complete, no liabili ty can be accepted for any err ors or
omissions.
z
Canon Inc. reserv es the right to change the
specifications of th e hardware and software descri bed
herein at any time without pr ior notice.
z
No part of this guide may be repro duced, transmitted,
transcribed, stored in a retrieval system, or translated
into any language in any for m, by any means, without
the prior written permission of Canon Inc.
z
Canon makes no warrant ies for damages resulting f rom
corrupted or lost data due to a mi staken operation or
malfunction of the camera, the soft ware, the
CompactFlash™ cards (CF cards) , personal
computers, peripheral devices, or use of non-Canon CF
cards.
1
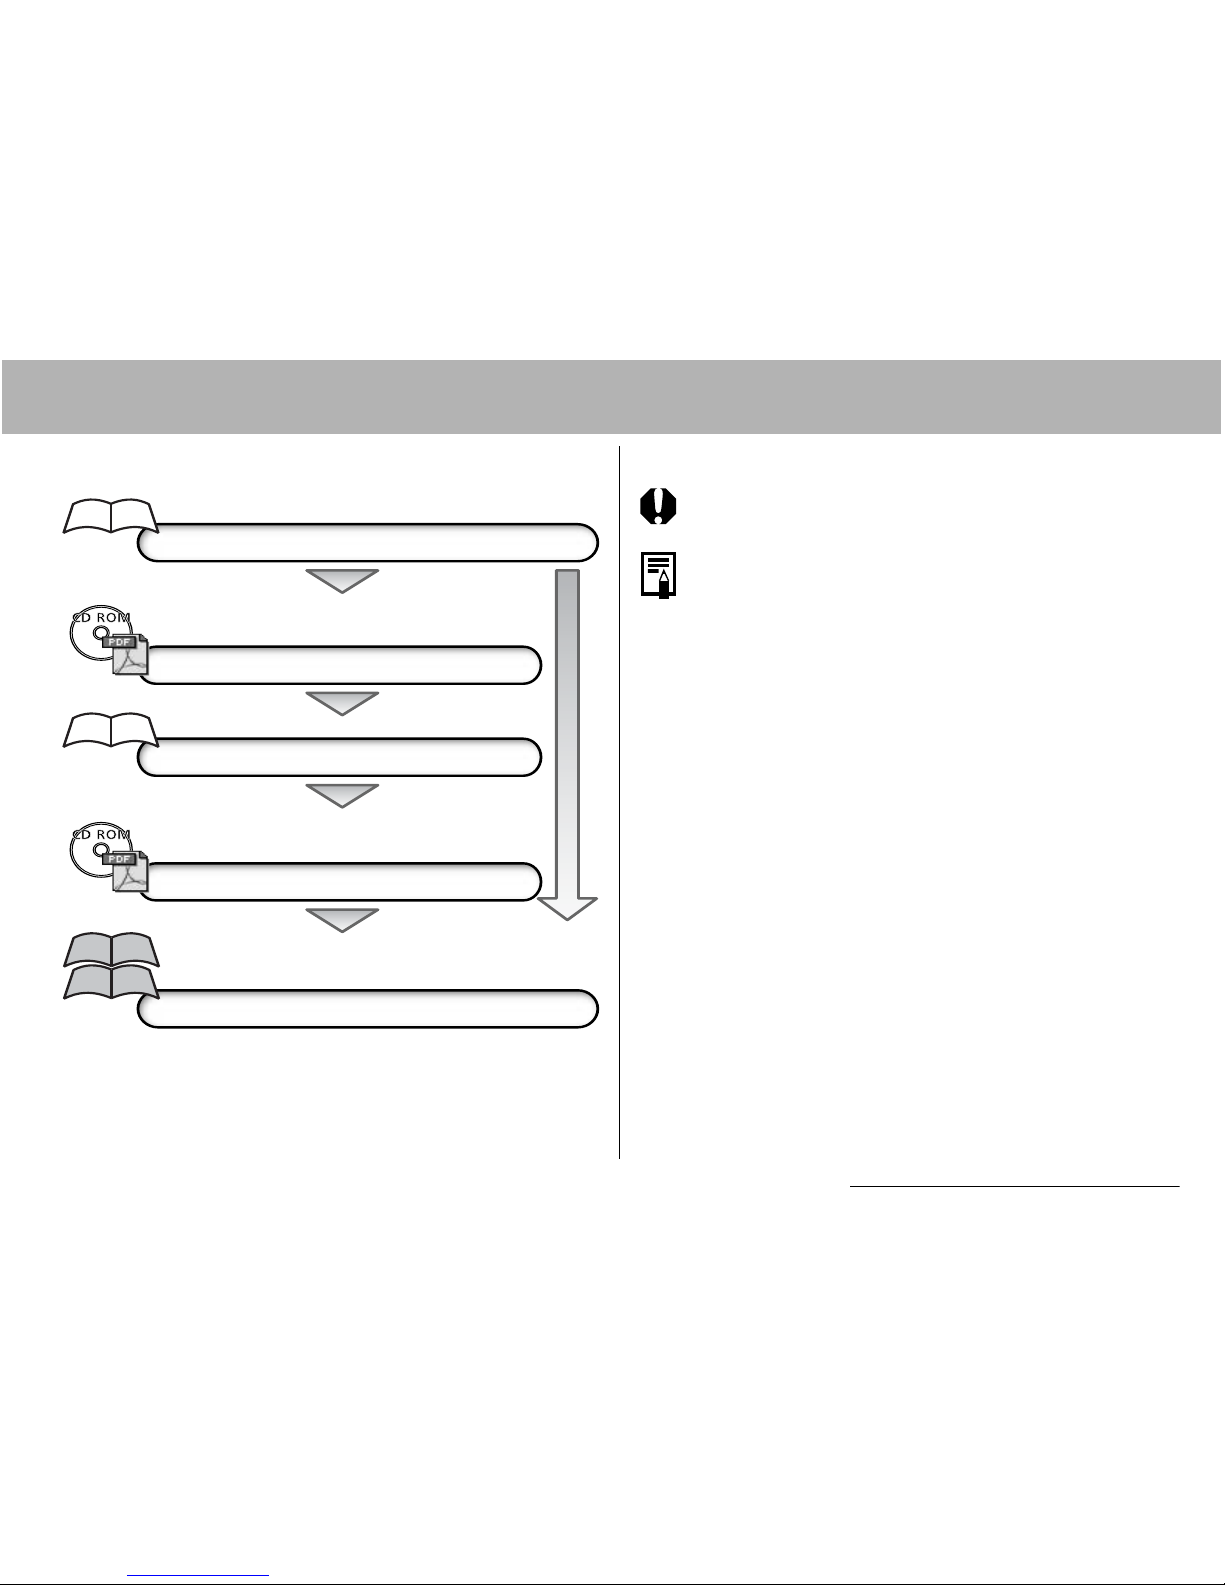
Flowchart and Reference Guides
This Guide
Shooting with the Camera
Canon Digital Camera Software
Starter Guide Disk
Installing the Software
This Guide
Connecting the Camera to a Computer
Canon Digital Camera Software
Starter Guide Disk
Downloading Images to a Computer
Direct Print User Guide
Printer User Guide
Using the Printer and Printing
Symbols Used
:This mark denotes issues that may affect the
camera's operation.
:This mark denotes additional topics that
complement the basic operating procedures.
2
Table of Contents
Items marked with are lists or charts that
summarize camera functions or procedures.
Components Guide. . . . . . . . . . . . . . . . . . . . . . . . . 10
Controls . . . . . . . . . . . . . . . . . . . . . . . . . . . . . . . . . 12
Installing the Batteries/CF Card . . . . . . . . . . . . . . . 14
Turning the Power On/Off. . . . . . . . . . . . . . . . . . . . 19
Setting the Date/Time. . . . . . . . . . . . . . . . . . . . . . . 21
Setting the Language . . . . . . . . . . . . . . . . . . . . . . . 23
Using the Viewfinder and the LCD Monitor . . . . . . 24
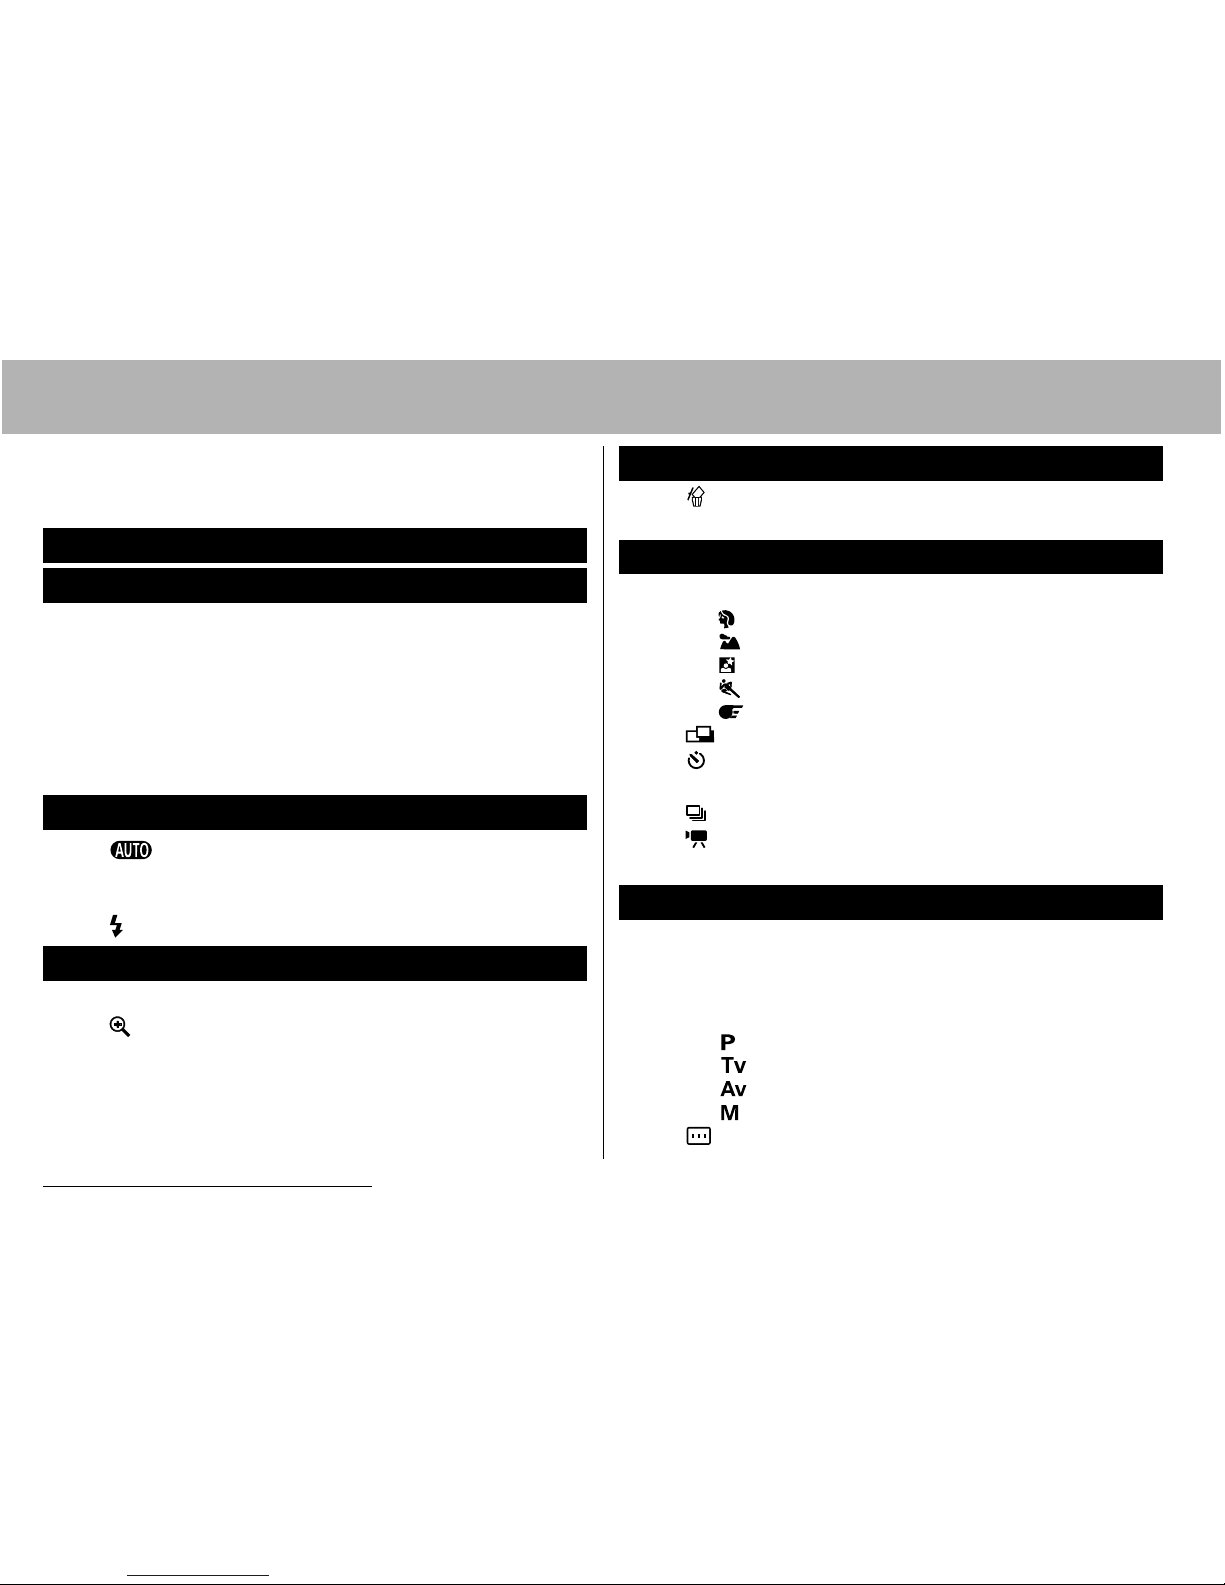
Auto Mode . . . . . . . . . . . . . . . . . . . . . . . . . . . 27
Reviewing an Image Right after Shooting . . . . . . . 30
Changing the Resolution and Compression . . . . . . 32
Using the Built-in Flash. . . . . . . . . . . . . . . . . . . . 34
Displaying Images Individually . . . . . . . . . . . . . . . . 39
Magnifying Images . . . . . . . . . . . . . . . . . . . . . . 40
Viewing Images in Sets of Nine (Index Playback) . 41
JUMP Jumping Between Images . . . . . . . . . . . . . . 42
Read This First
Chapter 1. Preparing the Camera
Chapter 2. Shooting-The Basics
Chapter 3. Playback-The Basics
Erasing Images Individually . . . . . . . . . . . . . . . . 43
Erasing All Images . . . . . . . . . . . . . . . . . . . . . . . . . 44
Using the Mode Dial (Image Zone) . . . . . . . . . . . . 45
Portrait
Landscape
Night Scene
Fast Shutter
Slow Shutter
Shooting Panoramic Images (Stitch Assist) . . . 47
Using the Self-timer . . . . . . . . . . . . . . . . . . . . . 49
Digital Zoom . . . . . . . . . . . . . . . . . . . . . . . . . . . . . . 50
Continuous Shooting . . . . . . . . . . . . . . . . . . . . 52
Movie Mode . . . . . . . . . . . . . . . . . . . . . . . . . . . 53
Viewing/Editing Movies . . . . . . . . . . . . . . . . . . . . . 57
Selecting Menus and Settings . . . . . . . . . . . . . . . . 61
Resetting the Settings to Default . . . . . . . . . . . . . . 68
Registering Settings to the Shortcut Button . . . . . . 69
Using the Mode Dial (Creative Zone) . . . . . . . . . . . 71
Program AE
Setting the Shutter Speed
Setting the Aperture
Manually Setting the Shutter
Selecting an AF Frame. . . . . . . . . . . . . . . . . . . 75
Chapter 4. Erasing
Chapter 5. Useful Shooting Functions
Chapter 6. Shooting-Advanced Functions

3
Switching between Light Metering Modes . . . . 76
Adjusting the Exposure . . . . . . . . . . . . . . . . . . . . . 78
Adjusting the Tone (White Balance) . . . . . . . . . . . 79
Changing the ISO Speed. . . . . . . . . . . . . . . . . . . . 81
Changing the Photo Effect. . . . . . . . . . . . . . . . . . . 82
Auto Exposure Bracketing (AEB Mode) . . . . . . . . 84
Focus Bracketing (Focus-BKT Mode) . . . . . . . . . . 85
Locking the Exposure Setting (AE Lock) . . . . . . . . 86
Locking the Flash Exposure Setting (FE Lock) . . . 87
Switching between Built-in Flash Adjustment Settings . .
88
Switching the Timing at which the Flash Fires . . . 90
Shooting Images at Set Intervals (Intervalometer) 91
Shooting Problem Subjects for the Autofocus . . . . 93
Switching between Focus Settings . . . . . . . . . . . . 97
Saving Custom Settings . . . . . . . . . . . . . . . . . . 98
Rotating Images in the Display . . . . . . . . . . . . . . 100
Attaching Sound Memos to Images . . . . . . . . . 101
Automated Playback (Slide Show) . . . . . . . . . . . 102
Protecting Images . . . . . . . . . . . . . . . . . . . . . . . . 106
Setting the Power Saving Function . . . . . . . . . . . 107
Setting the Auto Rotate Function. . . . . . . . . . . . . 108
Resetting the File Numbers . . . . . . . . . . . . . . . . . 110
Customizing the Camera (My Camera Settings) . 111
Chapter 7. Playback-Advanced Functions
Chapter 8. Camera Settings
Downloading Images to a Computer . . . . . . . . . . 115
Downloading Directly from a CF Card . . . . . . . . . 117
Viewing Images on a TV Set . . . . . . . . . . . . . . . . 118
About Printing . . . . . . . . . . . . . . . . . . . . . . . . . . . 119
Print Settings (DPOF Print Settings) . . . . . . . . . . 121
Image Transmission Settings (DPOF Transfer Order) .
126
List of Messages . . . . . . . . . . . . . . . . . . . . . . . . . 128
Troubleshooting . . . . . . . . . . . . . . . . . . . . . . . . . . 130
Using the Wireless Controller (Sold Separately) . 135
Using Conversion Lenses (Sold Separately). . . . 137
Using the Power Kits (Sold Separately) . . . . . . . 140
Replacing the Date Battery . . . . . . . . . . . . . . . . . 144
Camera Care and Maintenance . . . . . . . . . . . . . 145
Specifications . . . . . . . . . . . . . . . . . . . . . . . . . . . 146
Photo Tips and Information . . . . . . . . . . . . . . . . . 154
Index . . . . . . . . . . . . . . . . . . . . . . . . . . . . . . . . . . 157
Functions Available in Each Shooting Mode. . . . 166
Chapter 9. Additional Features
Appendix

4
Read This First
Please Read
Test Shots
Before you try to photograph important subjects, we
highly recommend that you shoot several trial
images to confirm that the camera is operating and
being operated correctly. Please note that Canon
Inc., its subsidiaries and affiliates, and its distributors
are not liable for any consequential damages arising
from any malfunction of a camera or accessory,
including CompactFlash™ cards, that results in the
failure of an image to be recorded or to be recorded
in a format that is machine sensible.
Warning Against Copyright Infringement
Please note that Canon digital cameras are intended
for personal use and should never be used in a
manner that infringes upon or contravenes
international or domestic copyright laws and
regulations. Please be advised that in certain cases
the copying of images from performances,
exhibitions, or commercial properties by means of a
camera or other device may contravene copyright or
other legal rights even if the image was shot for
personal use.
Warranty Limitations
For information on your camera's warranty, please
refer to the Canon European Warranty System
(EWS) Booklet supplied with your camera.
For Canon Customer Support contacts, please
see rear of this booklet or the European Warranty
System (EWS) Booklet.

5
Camera Body Temperature
If your camera is used for prolonged periods, the
camera body may become warm. Please be aware
of this and take care when operating the camera for
an extended period.
About the LCD Monitor
The LCD monitor is produced with extremely highprecision manufacturing techniques. More than
99.99% of the pixels operate to specification. Less
than 0.01% of the pixels may occasionally misfire or
appear as red or black dots. This has no effect on
the recorded image and does not constitute a
malfunction.
Video Format
Please set the camera's video signal format to the
one used in your region before using it with a TV
monitor (p. 67).
Language Setting
Please see page 23 to change the language setting.
Please read through the "Read This First" section
(p. 4) before using your camera.
Safety Precautions
z Before using the camera, please ensure that you
read and understand the safety precautions
described below. Always ensure that the camera is
operated correctly.
z The safety precautions noted on the following
pages are intended to instruct you in the safe and
correct operation of the camera and its accessories
to prevent injuries or damage to yourself, other
persons and equipment.
z In the next few pages, the term "equipment" refers
primarily to the camera, its batteries, separately
sold battery charger and separately sold compact
power adapter.

6
Warnings
zDo not aim the camera directly into the sun or at other intense
light sources which could damage your eyesight.
zDo not trigger the flash in close proximity to human or animal
eyes. Exposure to the intense light produced by the flash may
damage eyesight. In particular, remain at least one meter (39
inches) away from infants when using the flash.
zStore this equipment out of the reach of children and infants.
Accidental damage to the camera or batteries by a child could
result in serious injury. In addition, placement of the strap around a
child’s neck could result in asphyxiation.
zDo not attempt to disassemble or alter any part of the
equipment that is not expressly described in this guide.
Disassembly or alteration may result in high-voltage electrical
shock. Internal inspections, alterations and repairs should be
conducted by qualified service personnel authorized by your
camera distributor or a Canon Customer Support Help Desk.
zTo avoid the risk of high-voltage electrical shock, do not touch
the flash portion of the camera if it has been damaged.
Similarly, never touch internal portions of the equipment that
become exposed as a result of damage. There is a risk of highvoltage electrical shock. Please take the first opportunity to consult
your camera distributor or a Canon Customer Support Help Desk.
zStop operating the equipment immediately if it emits smoke or
noxious fumes. Failure to do so may result in fire or electrical
shock. Immediately turn the camera's power off, remove the
batteries and unplug the power cord from the power outlet. Confirm
that smoke or fume emissions have ceased. Please consult your
camera distributor or the closest canon Customer Support Help
Desk.
zStop operating the equipment immediately if it is dropped or
the casing is damaged. Failure to do so may result in fire or
electrical shock. Immediately turn the camera's power off, remove
the batteries or unplug the power cord from the power outlet.
Please consult your camera distributor or the closest Canon
Customer Support Help Desk.
zDo not allow the equipment to come into contact with, or
become immersed in, water or other liquids. Do not allow
liquids to enter the interior. The camera has not been waterproofed.
If the exterior comes into contact with liquids or salt air, wipe it dry
with a soft, absorbent cloth. In the event that water or other foreign
substances enter the interior, immediately turn the camera's power
off and remove the batteries or unplug the power cord from the
power outlet. Continued use of the equipment may result in fire or
electrical shock. Please consult your camera distributor or the
closest Canon Customer Support Help Desk.
zDo not use substances containing alcohol, benzene, thinners
or other flammable substances to clean or maintain the
equipment. The use of these substances may lead to fire.

7
zRemove the power cord on a regular periodic basis and wipe
away the dust and dirt that collects on the plug, the exterior of
the power outlet and the surrounding area. In dusty, humid or
greasy environments, the dust that collects around the plug over
long periods of time may become saturated with humidity and
short-circuit, leading to fire.
zDo not cut, damage, alter or place heavy items on the power
cord. Any of these actions may cause an electrical short circuit,
which may lead to fire or electrical shock.
zDo not handle the power cord if your hands are wet. Handling it
with wet hands may lead to electrical shock. When unplugging the
cord, ensure that you hold the solid portion of the plug. Pulling on
the flexible portion of the cord may damage or expose the wire and
insulation, creating the potential for fires or electrical shocks.
zUse only the recommended power accessories. Use of power
sources not expressly recommended for this equipment may lead
to overheating, distortion of the equipment, fire, electrical shock or
other hazards.
zDo not place the batteries near a heat source or expose them
to direct flame or heat. Neither should you immerse them in
water. Such exposure may damage the batteries and lead to the
leakage of corrosive liquids, fire, electrical shock, explosion or
serious injury.
zDo not attempt to disassemble, alter or apply heat to the
batteries. There is serious risk of injury due to an explosion.
Immediately flush with water any area of the body, including the
eyes and mouth, or clothing that comes into contact with the inner
contents of a battery. If the eyes or mouth contact these
substances, immediately flush with water and seek medical
assistance.
zAvoid dropping or subjecting the batteries to severe impacts
that could damage the casings. It could lead to leakage and
injury.
zDo not short-circuit the battery terminals with metallic objects,
such as key holders. It could lead to overheating, burns and other
injuries.
zBefore you discard a battery, cover the terminals with tape or
other insulators to prevent direct contact with other objects.
Contact with the metallic components of other materials in waste
containers may lead to fire or explosion. Discard the batteries in
specialized waste facilities if available in you area.
zPlease use Canon AA-size NiMH batteries and charger
recommended for use with these batteries. Use of another
charger may cause batteries to overheat or deform, posing risk of
fire injury and damage to the surroundings.
zDisconnect the battery charger or the compact power adapter
from both the camera and power outlet after recharging and
when the camera is not in use to avoid fires and other hazards.
zThe camera terminal of the separately sold compact power
adapter is designed for exclusive use with your camera. Do not
use it with other products or batteries. There is a risk of fire and
other hazards.
8
zExercise due caution when screwing on the separately sold
wide converter, tele-converter and conversion lens adapter. If
they loosen, fall off and shatter, the glass shards may cause an
injury.
CAUTIONS
zAvoid using, placing or storing the equipment in places
subject to strong sunlight or high temperatures, such as the
dashboard or trunk (boot of a car. Exposure to intense sunlight
and heat may cause the batteries to leak, overheat or explode,
resulting in fire, burns or other injuries. High temperatures may also
cause deformation of the casing. Ensure that there is good
ventilation when using the battery charger to charge the batteries.
zDo not store the equipment in humid or dusty areas. Storage in
such areas could lead to fire, electrical shock or other damage.
zBe careful not to bang the camera or subject it to strong
impacts or shocks that could lead to injury or damage the
equipment when wearing or holding it by the strap.
zBe careful not to cover the flash with your fingers or clothing
when shooting. The flash may be damaged and emit smoke or
noise. In addition, do not touch the surface of the flash after taking
several pictures in rapid succession. Either action could result in
burns.
zDo not operate the flash with dirt, dust or other items stuck to
its lens. The resulting heat build-up could damage the flash.
zEnsure that the battery charger or compact power adapter is
plugged into a power outlet of the specified rating, not over
the specified rating. The plug of the battery charger or compact
power adapter varies according to region.
zDo not use the battery charger or compact power adapter if
the power cord is damaged or if the plug is not fully inserted
into the power outlet.
zDo not allow metal objects (such as pins or keys) or dirt to
contact the charger terminals or plug.
zIf your camera is used for prolonged periods, the camera body
may become warm. Please take care when operating the camera
for an extended period as your hands may experience a burning
sensation.

9
Preventing Malfunctions
Avoid Strong Magnetic Fields
Never place the camera in close proximity to electric
motors or other equipment generating strong
electromagnetic fields. Exposure to strong magnetic
fields may cause malfunctions or corrupt image data.
Avoid Condensation Related Problems
Moving the equipment rapidly between hot and cold
temperatures may cause condensation (water
droplets) to form on its external and internal surfaces.
You can avoid this by placing the equipment in an
airtight, resealable plastic bag and letting it adjust to
temperature changes slowly before removing it from
the bag.
If Condensation Forms Inside the Camera
Stop using the camera immediately if you detect
condensation. Continued use may damage the
equipment. Remove the CF card, batteries or
compact power adapter from the camera and wait
until the moisture evaporates completely before
resuming use.
Extended Storage
When not using the camera for extended periods of
time, remove the batteries from the camera or battery
charger and store the equipment in a safe place.
Storing the camera for extended periods with
batteries installed will cause battery leakage and
damage the camera.
10 1. Preparing the Camera
1. Preparing the Camera
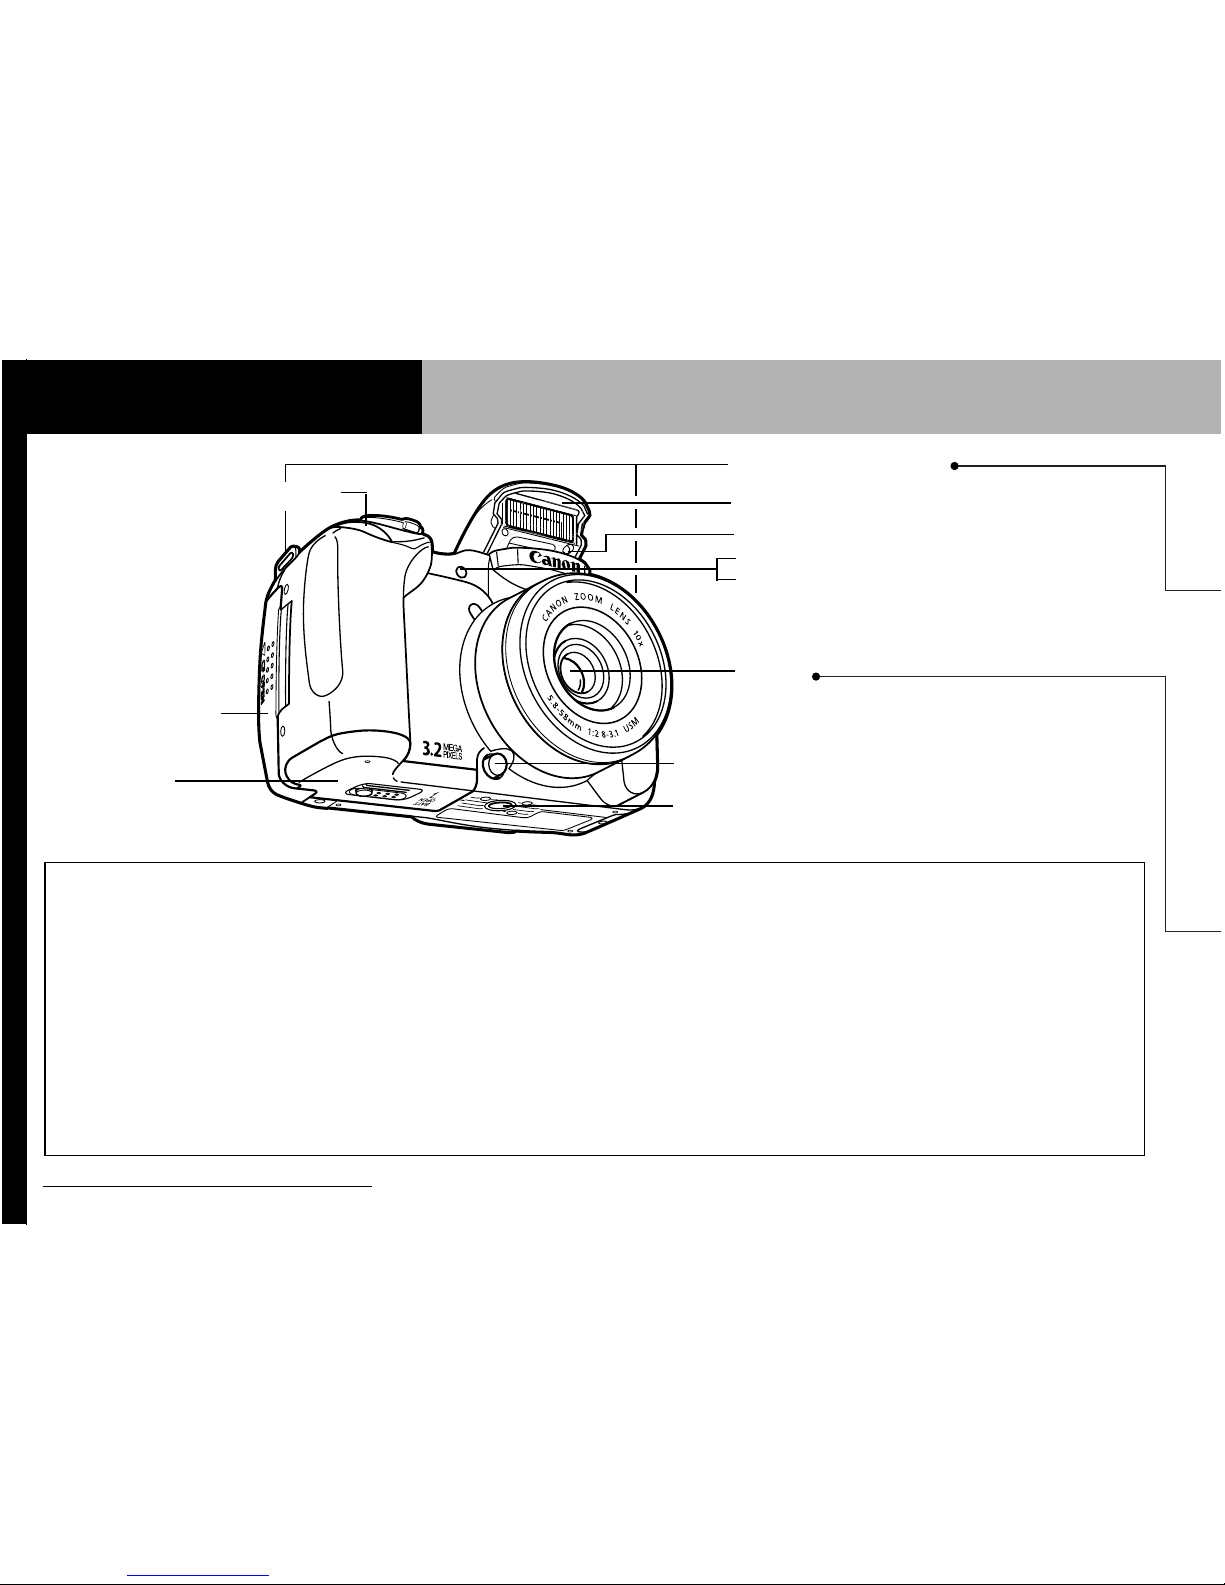
Components Guide
*
The following cables are used to connect the camera
to a computer or printer.
Computer:
Interface Cable IFC-400PCU (supplied
with the camera)
Direct Print Compatible Printers (Sold Separately):
z
CP Printers: Interface Cable IFC-400PCU (supplied
with the camera) or the Direct Interface Cable
DIF-100 (supplied with the printer).
z
Bubble Jet Printers
• Bubble Jet Direct Compatible Printers: Please refer
to your Bubble Jet printer user guide.
• PictBridge Compliant Printers: Interface Cable
IFC-400PCU (supplied with the camera)
z
PictBridge Compliant Non-Canon Printers: Interface
Cable IFC-400PCU (supplied with the camera)
Please refer to the System Map or the Direct Print User
Guide supplied with the camera for direct print
compatible printer information.
Tripod Socket
Battery Cover
p. 14, 141
Ring Release Button p. 138
Lens
CF Card Slot Cover
p. 15
Red-eye Reduction Lamp p. 36
Flash p. 34, 35, 36
Self-timer Lamp p. 49
Tally Lamp p. 53, 65
Neck Strap Mounts
Remote Sensor
1. Preparing the Camera 11
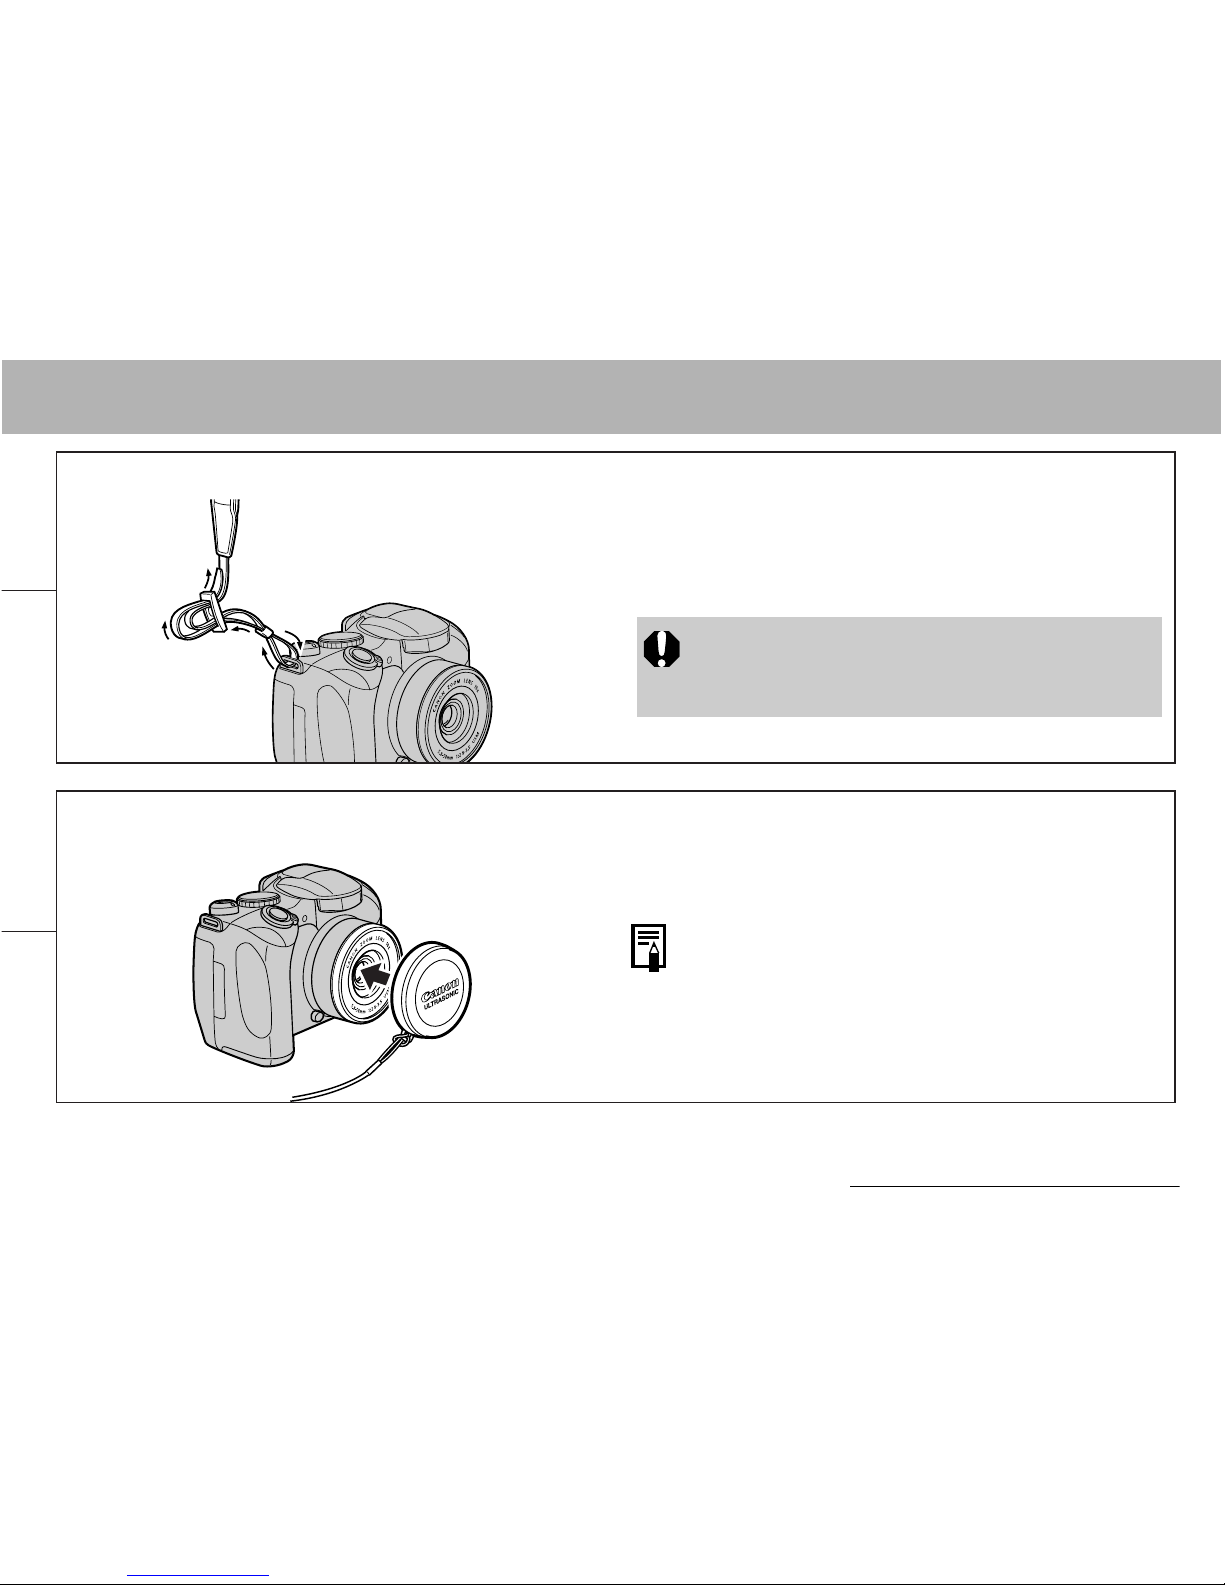
Attaching the Neck Strap
Attach the strap as illustrated.
Check that the strap does not come loose from the
strap mount when pulled. Perform the same steps
on the other side of the camera.
Avoid waving the camera about or catching it
on other items when suspending it from the
strap.
Attaching the Lens Cap
Fit the lens cap over the lens casing so that it
covers the entire lens. Always replace the lens cap
after use.
Attach the lens cap cord to the strap.
Remove the lens cap before turning on the
camera's power.
12 1. Preparing the Camera
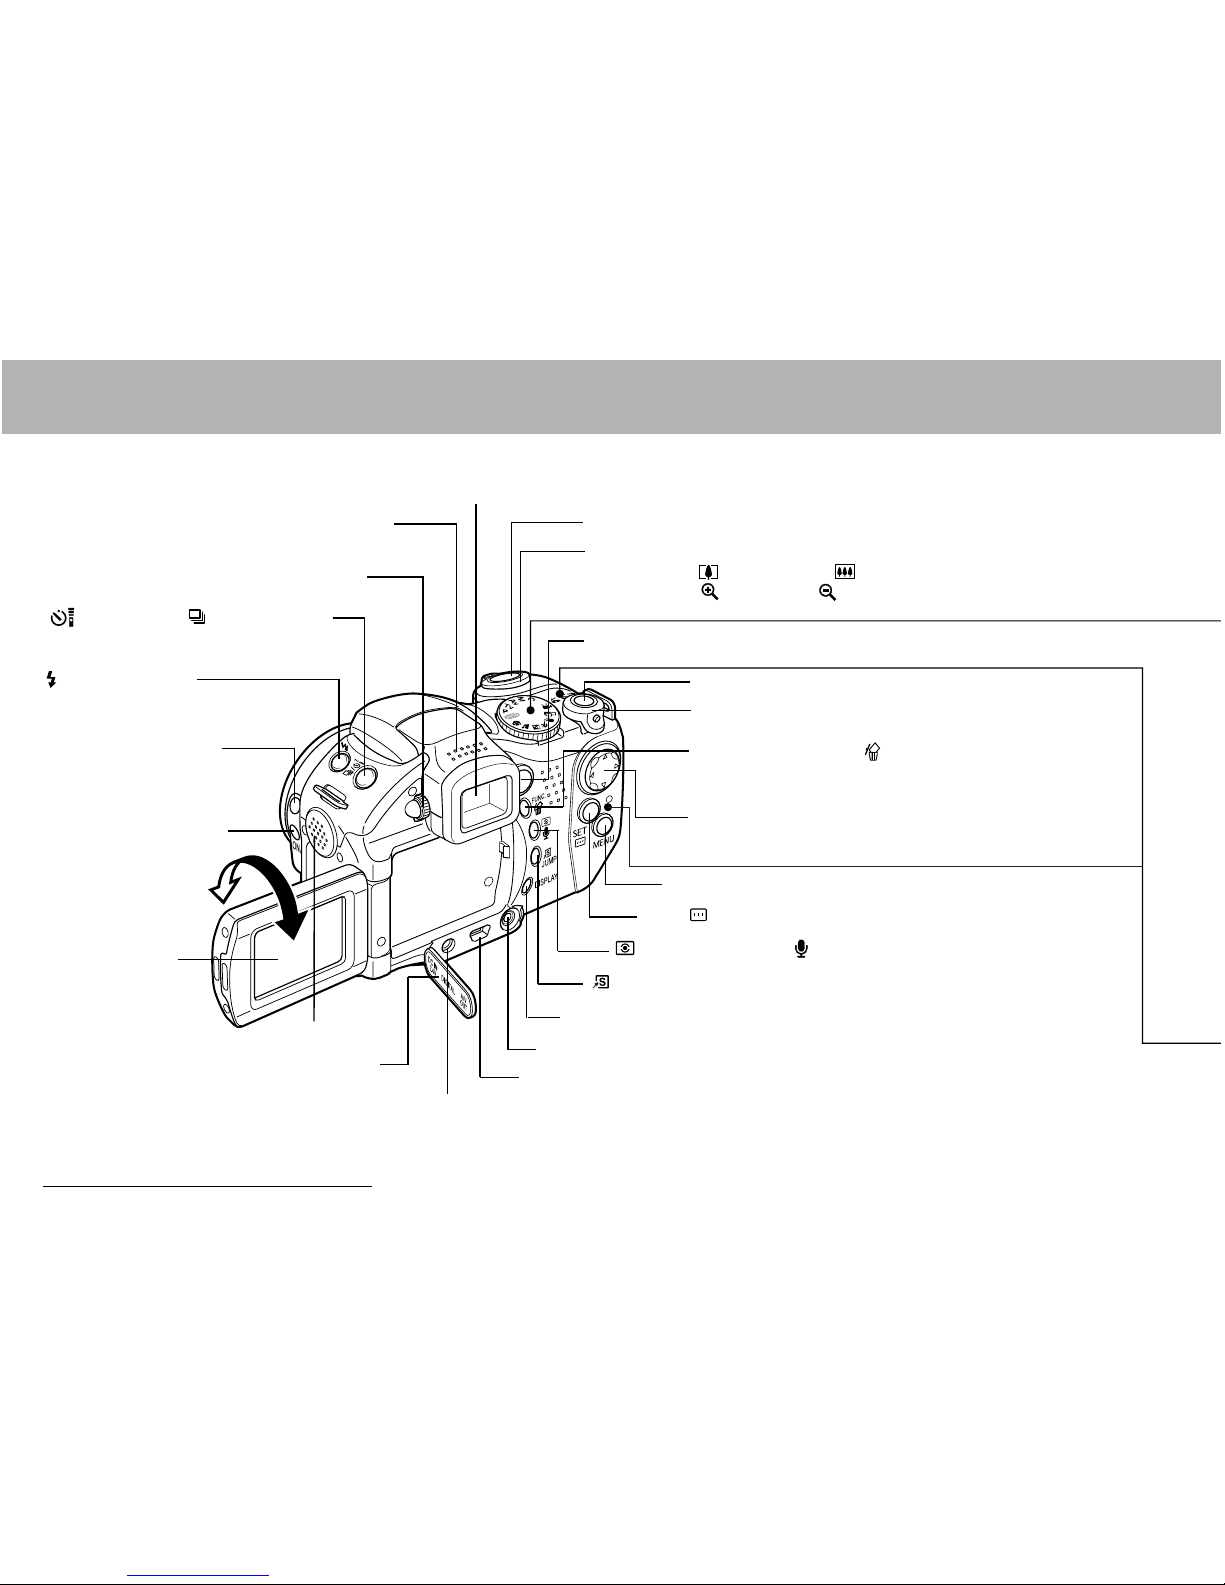
Controls
Mode Lever p. 20
Viewfinder p. 24, 26
Shutter button p. 28
(Flash) Button
p. 35
Diopter Adjustment Dial p. 26
(Self-timer)/ (Continuous)
Button p. 49, 52
MF (Manual Focus)
Button p. 95
IS (Image Stabilizer)
Button p. 29
Speaker
Omni Selector
S(Up) T(Down) W(Left) X(Right)
SET/ (AF Frame Selector) Button p. 75
MENU Button p. 62
FUNC. (Function)/ (Single Image Erase)
Button p. 43, 61
(Light Metering) / (Microphone) Button p. 76, 101
(Shortcut)/JUMP Button p. 42, 69
DISPLAY Button p. 24
A/V OUT(Audio/Video Out) Terminal p. 118
DIGITAL Ter mi n al p. 116
DC IN Ter mi n al p. 143
LCD Monitor
p. 26
Terminal Cover
Movie Button p. 53
OFF Button
Zoom Lever
Shooting: (Telephoto)/ (Wide Angle) p. 27, 50
Playback: (Zoom in)/ (Zoom out) p. 40
Microphone

1. Preparing the Camera 13
Mode Dial
Use the mode dial to switch between
the Shooting modes.
z : Auto p. 27
The camera automatically selects
settings.
z Image Zone p. 45
The camera automatically selects
settings according to the image
composition type.
: Portrait
: Landscape
: Night Scene
: Fast Shutter
: Slow Shutter
: Stitch Assist p. 47
: Movie p. 53
z Creative Zone p. 71
The user selects exposure, aperture
or other settings to achieve special
effects.
: Program AE
: Shutter Speed-priority AE
: Aperture-priority AE
: Manual Exposure
: Custom
The indicator lights or blinks when the shutter button is pressed or the following operations are
underway.
z Power/Mode Indicator
Orange:Shooting mode
Green: Playback mode/Printer connection
Yellow: Computer connection
zzzz Indicator
Blinking Red:Recording to CF card/Reading CF card/Erasing from CF card/Transmitting data
(during a computer connection)
14 1. Preparing the Camera
Installing the Batteries/CF Card
Install the batteries and the CF card to get
ready for shooting.
Please use four AA-size alkaline batteries or
separately sold nickel metal hydride (NiMH)
batteries.
The use of the separately sold Compact Power
Adapter CA-PS700 is recommended to power the
camera during long usage sessions (p. 143).
The separately sold battery charger kit lets you
use rechargeable NiMH batteries to power the
camera (p. 140).
See Battery Performance (p. 150).
For information about the Battery and Charger Kit
and AA-size rechargeable NiMH batteries, see
the System Map (separate from this guide).
When the indicator blinks, the camera is writing,
reading, erasing or transmitting an image to or
from the card. Do not perform the following or
image data may be lost or corrupted:
zDo not shake the camera.
zDo not turn off the power or open the CF card
slot cover or the battery cover.
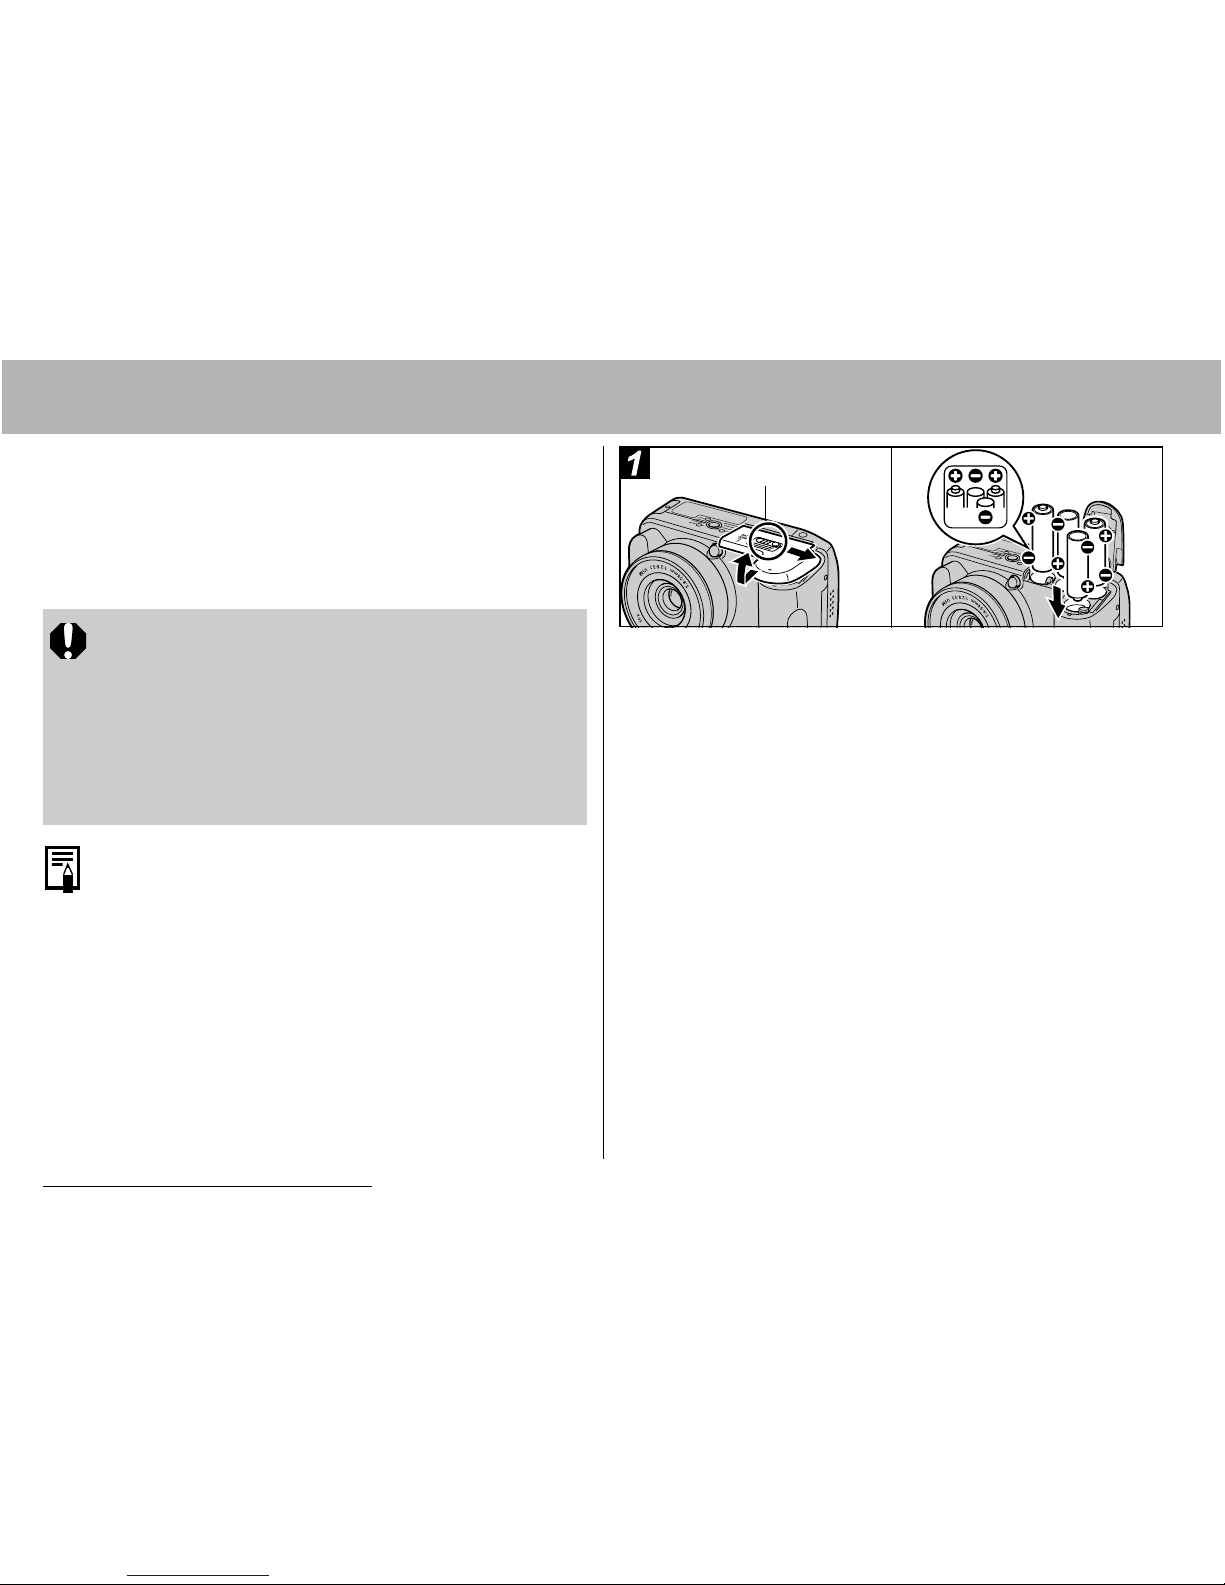
aaaaBe sure that the camera power is off
(p. 19). Slide the battery cover lock in
the direction of the arrow and open
the cover.
bbbbInsert the batteries as shown.
z You can check the orientation the batteries
should go in on the seal inside the battery
compartment.
ccccClose the battery cover.
a
b
Battery cover lock
1. Preparing the Camera 15
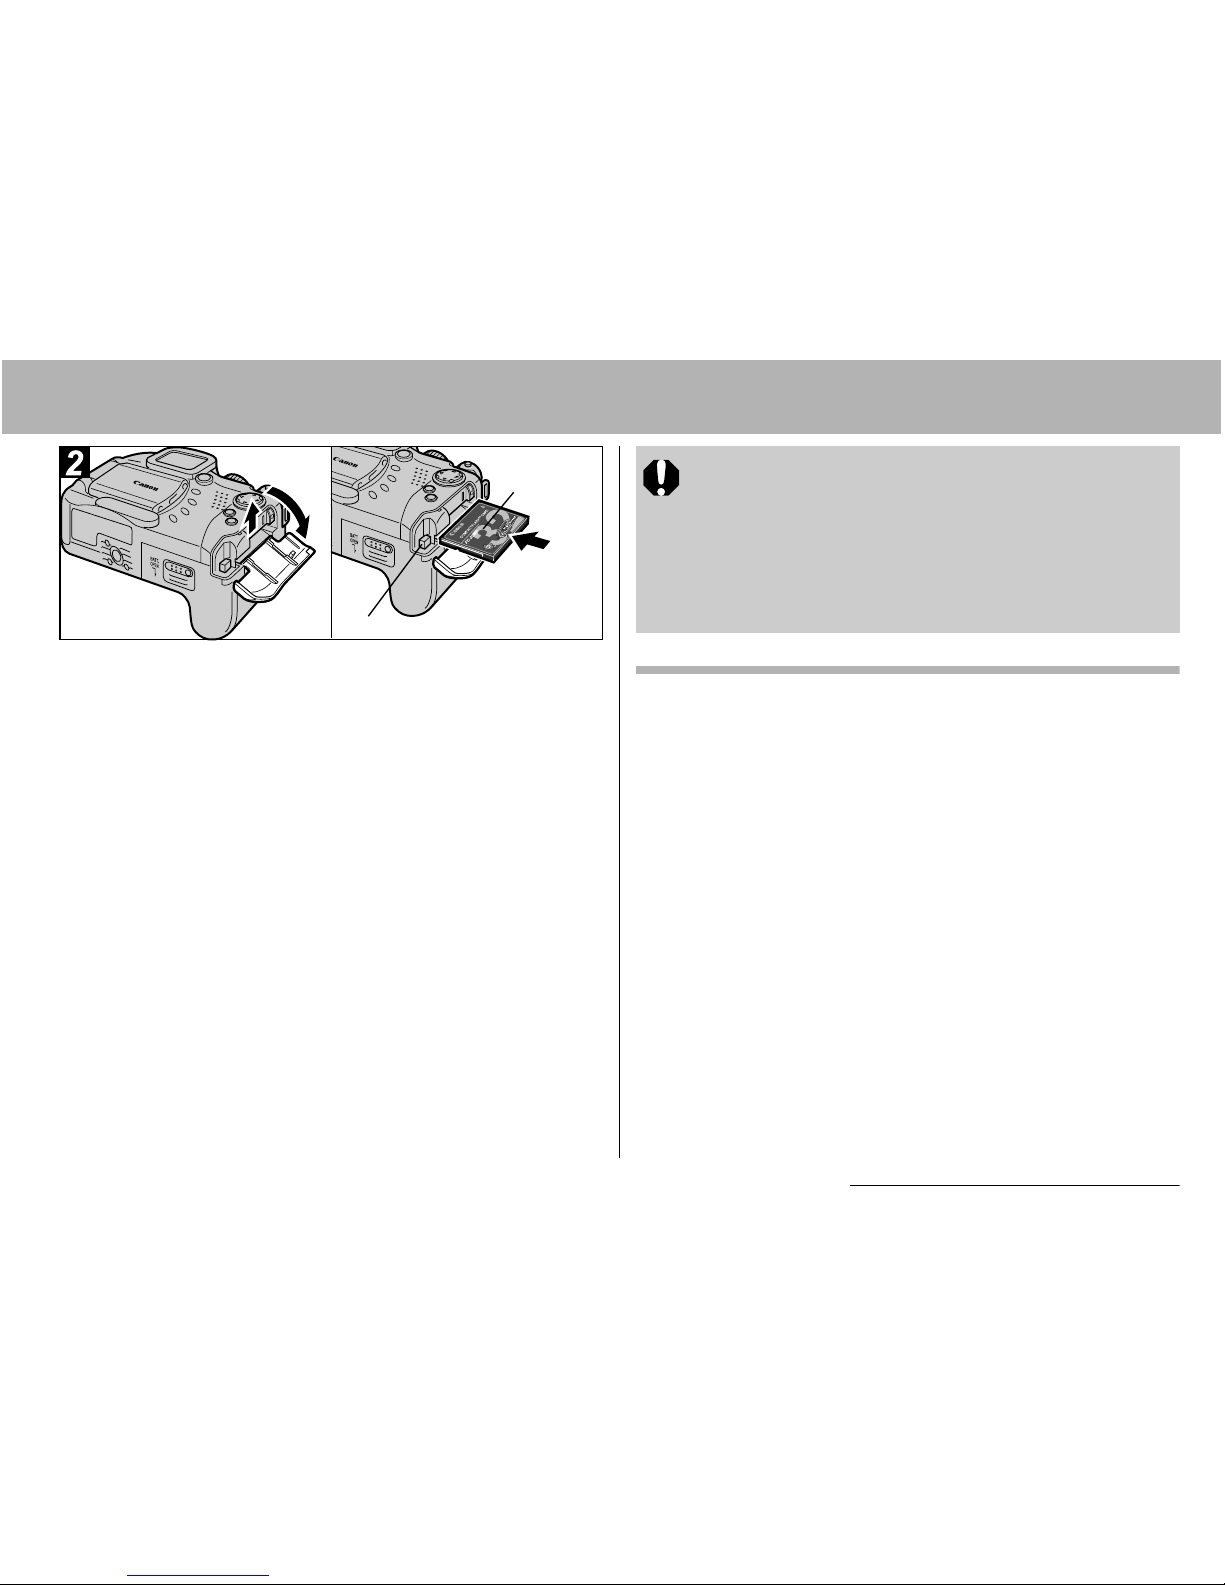
aSlide the CF card slot cover in the
direction of the arrow, and open it.
bInsert the CF card with the label
facing up, then close the CF card slot
cover.
z Push the card in until the CF card eject button
fully extends. To remove the CF card, push the
CF card eject button and pull the card out.
b
CF card Eject Button
Label
a
Proper Battery Handling
z
Use AA-size alkaline or Canon AA-size NiMH batteries
(sold separately) only. For information on handling the
AA-size rechargeable NiMH batteries, see Using the
Power Kits (Sold Separately) (p. 140).
z
Since the performance of alkaline batteries may
differ according to brand, the operating time of the
batteries you purchase may not be as long as the
batteries that came with the camera.
z
Camera operating time may shorten at low temperatures
when alkaline batteries are used. Also due to their
specifications, alkaline batteries may expire faster than
NiMH batteries. If you are using the camera in cold areas
or for a long time, we recommend using Canon’s AA-size
NiMH Battery Kit (a four-piece set).
zSee CF Cards and Estimated Capacities
(Recordable Images) (p. 151).
zYou are recommended to use CF cards that
have been formatted in your camera (p. 18).
The card supplied with the camera may be
used without further formatting.

16 1. Preparing the Camera
z
While it is possible to use AA-size nickel-cadmium
batteries, performance is unreliable and their use is not
recommended.
zzzz
Never mix unused and partially used batteries.
Always load four fresh (or fully recharged) batteries
at the same time.
zzzz
Be careful to load the batteries with their positive (+)
and negative (-) ends in the right direction.
zzzz
Never mix batteries of different types or from
different manufacturers. All four batteries should be
identical.
z
Before inserting the batteries, wipe the battery terminals
well with a dry cloth. Oil from one's skin or other dirt may
cause a considerable reduction in the number of
recordable images or reduce usage time.
z
Battery performance deteriorates at low temperatures
(especially with alkaline batteries). If you are using the
camera in cold areas and batteries are running down
faster than they should, you may be able to restore
performance by placing batteries in an inner pocket to
warm them up prior to use. But be careful that you don’t
put the batteries into a pocket together with a metal key
chain or other metallic objects, as these objects may
cause batteries to short-circuit.
z
If you do not plan to use the camera for a long time,
remove the batteries from the camera and store them in
a safe place. Batteries may leak and damage the camera
if left installed during prolonged periods of non-use.
WARNING
Never use damaged batteries or batteries whose
outer seal is completely or partially missing or
peeled off, as there is risk that such batteries may
leak, overheat, or burst. Always check the seals on
store-bought batteries before loading them, as
some batteries may come with defective seals. Do
not use batteries with defective seals.
Never use batteries that look like this.
Batteries with all or part of the seal
(electrical insulation sheath) peeled off.
The positive electrode (plus terminal) is flat.
The negative terminal is correctly formed
(protruding from the metal base), but the
seal does not extend up over the edge of the
metal base.
1. Preparing the Camera 17
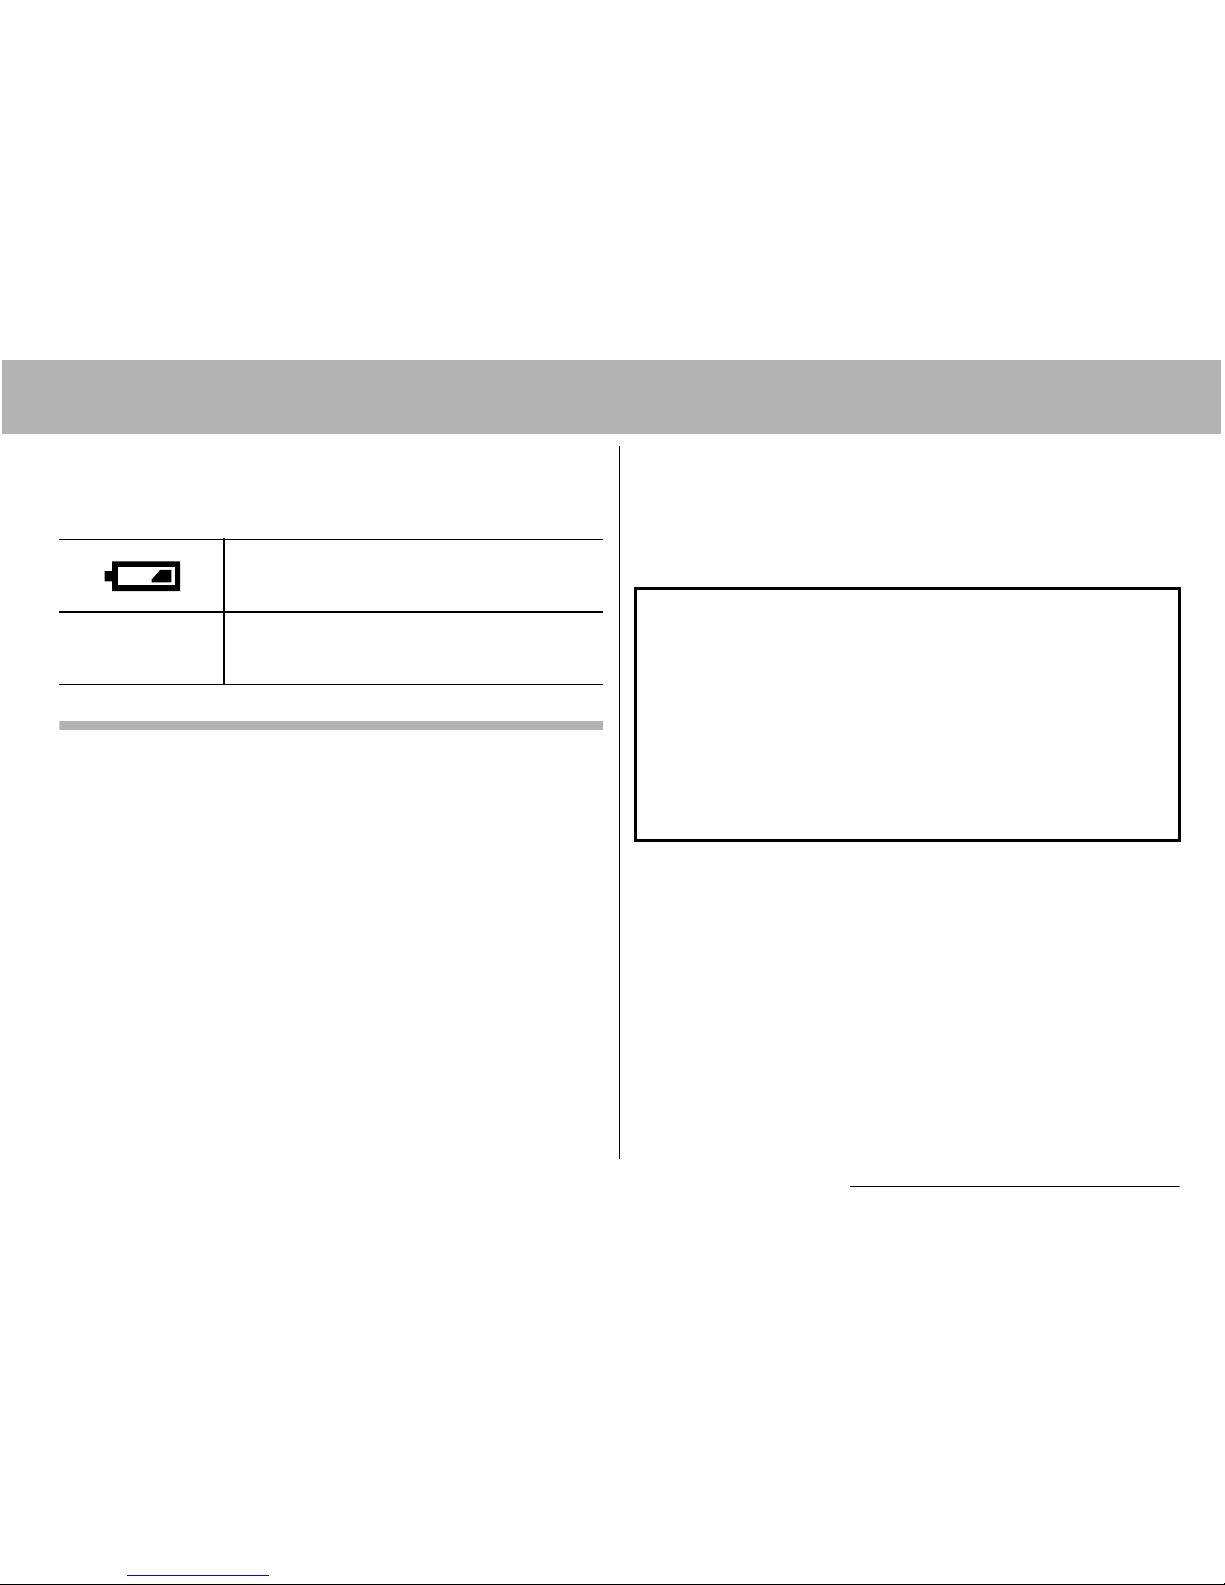
Battery Status Indications
The following icons or messages indicate the battery
status on the LCD monitor (or viewfinder).
CF Card Handling Precautions
z CF cards are high-precision electronic devices. Do
not bend, force, or subject them to shocks or
vibration.
z Do not attempt to disassemble or alter a CF card.
z Moving a CF card rapidly between temperature
extremes may cause condensation to form in the
card, leading to potential malfunctions. To avoid
condensation formation, place the CF card in a
sealed plastic bag before moving it into a different
temperature zone and allow it to adjust slowly to
the new temperature. If condensation forms on the
CF card, put it aside until the water droplets have
evaporated completely.
z Place the CF card in the supplied case for storage.
Batteries are beginning to run low. Replace or
recharge the batteries if you wish to continue
using the camera.
Change the
batteries
Batteries are fully depleted and the camera
can no longer operate. You should replace the
batteries immediately.
z Do not use or store CF cards in the following types
of locations.
- Locations subject to dust or sand
- Locations subject to high humidity and high
temperatures
Microdrives are a recording medium with a hard
disk. Their merits are a large capacity and a low
price per megabyte of capacity. However, they can
be more susceptible to vibrations and shocks than
CF cards, which use durable flash memories.
Please be careful, therefore, not to subject the
camera to vibrations or shocks when using a
microdrive, especially while recording or playing
back.
18 1. Preparing the Camera
Formatting a CF Card
You should always format a new CF card or one from
which you wish to erase all images and other data.
If the camera does not work properly, the
inserted CF card may be malfunctioning.
Reformatting the CF card may solve the
problem.
When a non-Canon brand CF card is
malfunctioning, reformatting it may solve the
problem.
CF cards formatted in another camera,
computer or peripheral device may not operate
correctly. When that happens, reformat the CF
card with this camera.
The capacity of the CF card displayed after
formatting will be less than the rated capacity
of the CF card. This is not a malfunction of the
CF card or camera.
Please note that formatting (initializing) a CF
card erases all data, including protected
images and other file types. Please check the
contents of the CF card before formatting it.
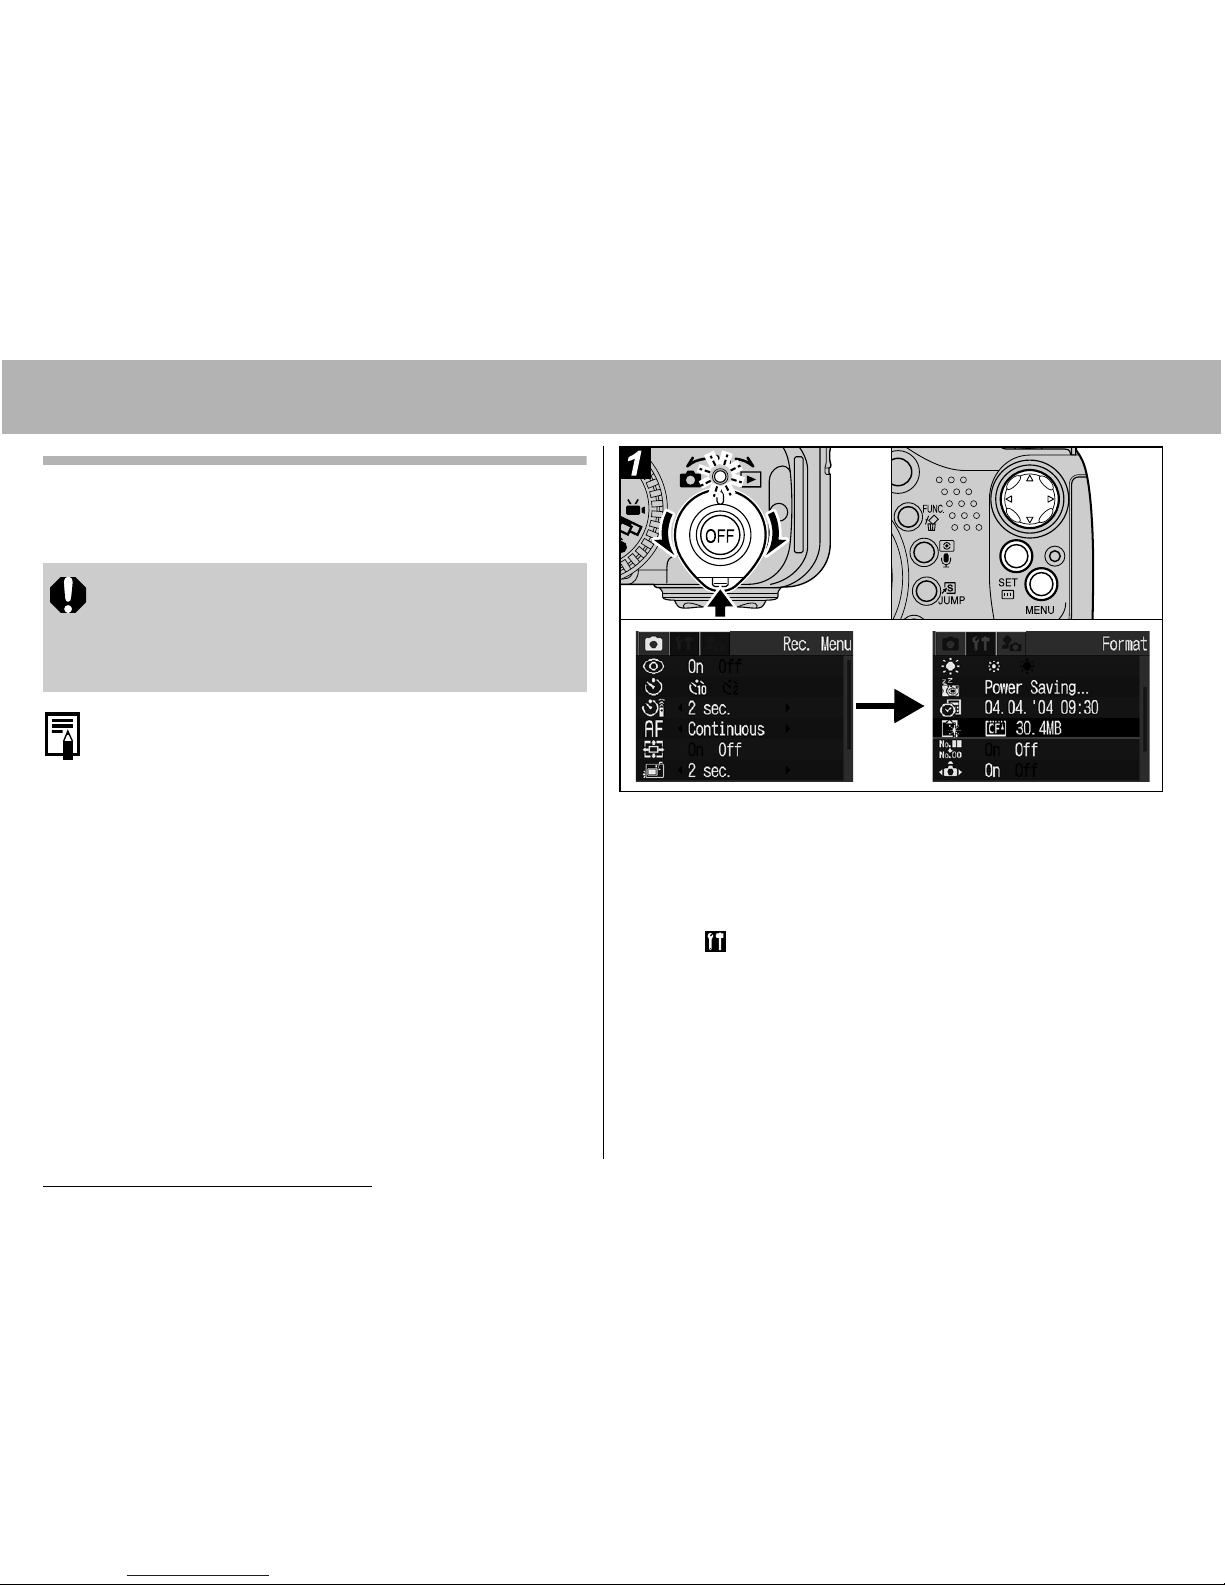
aaaaTurn the power on (p. 19).
bbbbPress the MENU button, and then the
XXXX arrow on the omni selector.
The [ (Set up)] menu appears.
ccccSelect [Format] using the SSSS or TTTT
arrow on the omni selector, then
press the SET button.
b
c
a

1. Preparing the Camera 19
aaaaSelect [OK] using the WWWW or XXXX arrow
on the omni selector, then press the
SET button.
The indicator blinks red and formatting starts. Wait
until the indicator goes off.
z To cancel instead of erasing, select [Cancel] and
press the SET button.
bbbbPress the MENU button.
b
a
Indicator
Turning the Power On/Off
The power/mode indicator remains lit while the power of
the camera is on. The power/mode indicator indicates
the state of the camera as follows.
Orange:Shooting mode
Green: Playback mode/Printer connection mode*
Yellow: Computer connection mode*
Off: The power of the camera is off.
*
For printer connection mode, see the Direct Print User
Guide. For computer connection mode, see the
Canon Digital Camera Software Starter Guide Disk.
You will hear a start-up sound and see the startup image when the power comes on (p. 111).
The start-up image does not appear when the
viewfinder display is on in Shooting mode or
the A/V OUT terminal is connected to a TV.
Be careful not to touch the lens when shooting.
Please also refrain from forcing the lens with
fingers or other objects. It could lead to
malfunctions or damage the camera. If this
occurs, turn the camera off and back on.
Turning on the camera without the start-up
sound and image
Press and hold the button, then turn on the
power. You can also turn the power on with the
LCD monitor closed.

20 1. Preparing the Camera
aaaaTurn the mode lever to (Shooting)
or (Playback) while pressing the
release button.
The power/mode indicator lights orange or green.
bbbbPress the OFF button to turn the
power off.
ab
Switching Between Shooting and Playback
You can quickly switch between Shooting mode and
Playback mode. This is convenient when you wish to
shoot again after checking or deleting an image
immediately after it is shot.
Shooting Mode Playback Mode
Turn the mode lever to (Playback) while
pressing the release button (p. 39).
z The camera switches to Playback mode, but the
lens does not retract (the lens will retract if you turn
the mode lever to (Playback) once more)
Playback Mode Shooting Mode
Remove the lens cap and press the shutter button
halfway.
You can also turn the mode lever to (Shooting)
while pressing the release button (p. 27).
1. Preparing the Camera 21
Setting the Date/Time
The first time the camera power is turned on or
whenever the lithium battery charge is low,
start from Step .
Setting the date and time settings does not
cause the date/time stamp to appear on
images. For printing images with the date on
them, refer to the Direct Print User Guide or
Canon Digital Camera Software Starter Guide
Disk.
See Replacing the Date Battery (p. 144).
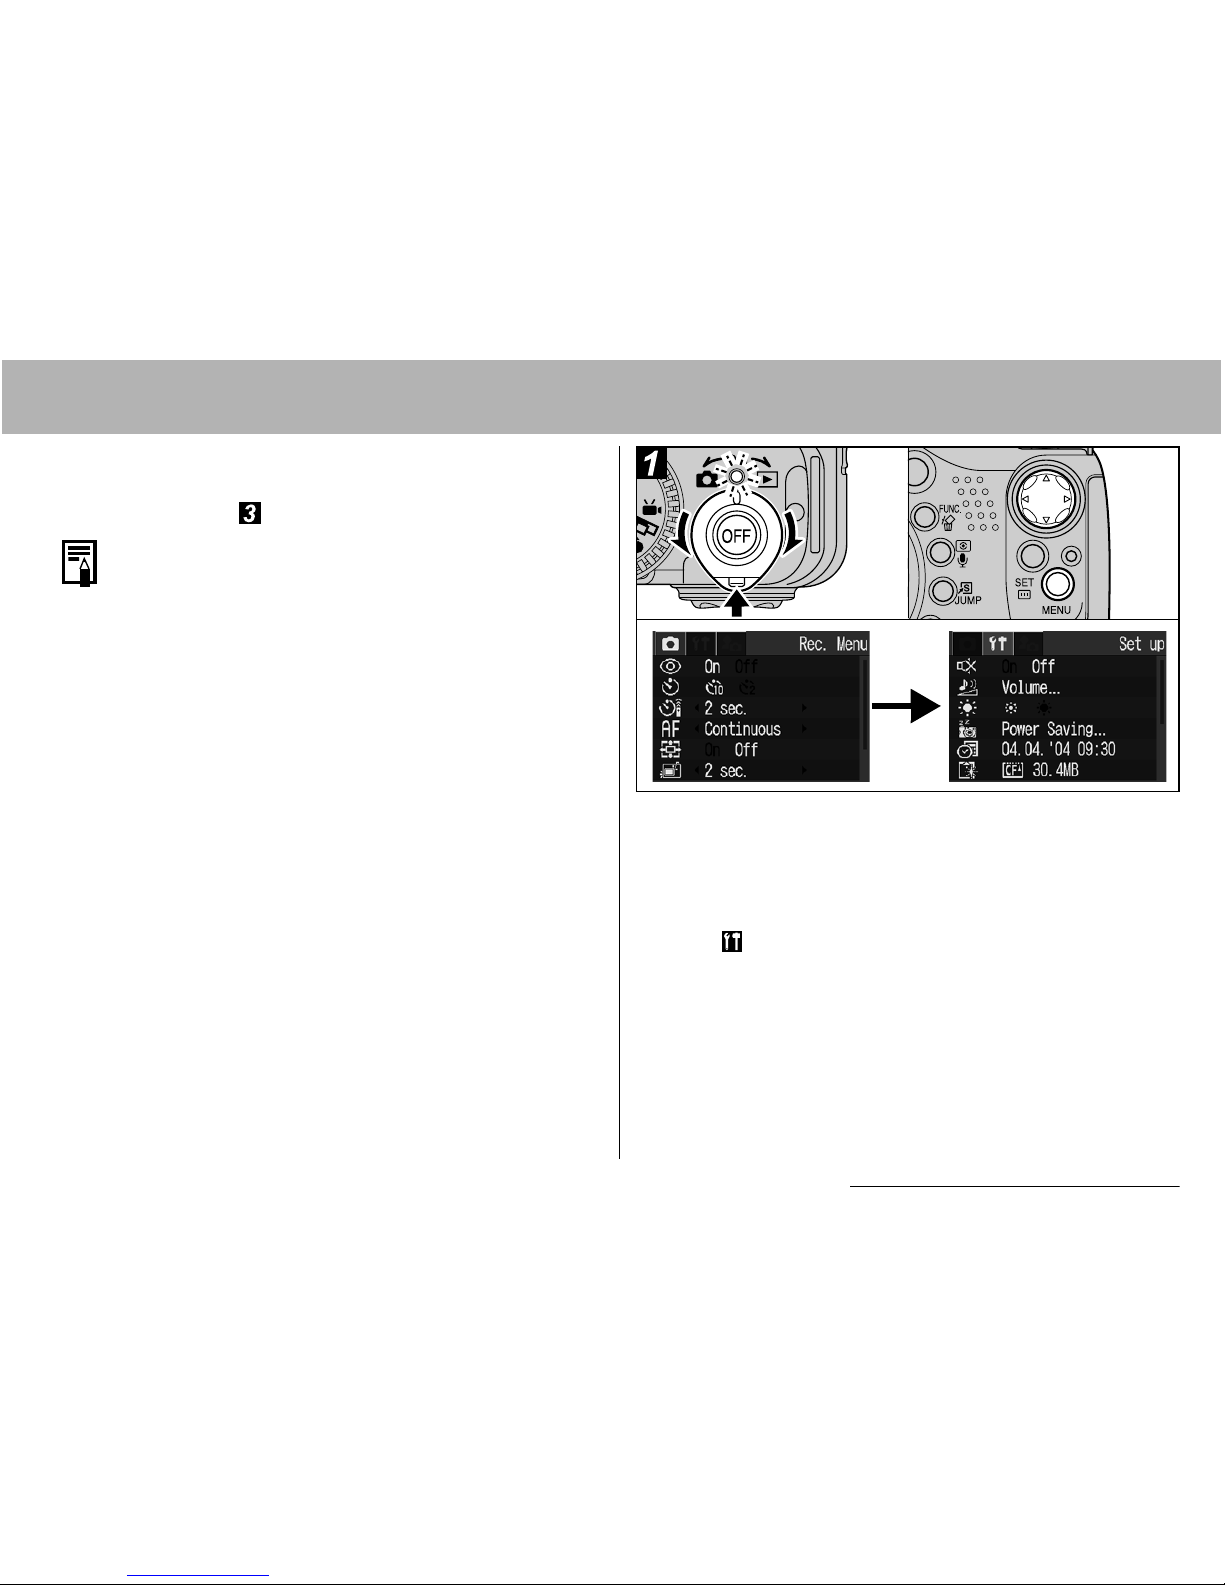
aaaaTurn the power on (p. 19).
bbbbPress the MENU button, and then the
XXXX arrow on the omni selector.
The [ (Set up)] menu appears.
b
a

22 1. Preparing the Camera
aaaaSelect [Date/Time] using the SSSS or TTTT
arrow on the omni selector, then
press the SET button.
a
aaaaSet the date and time.
z Select the item you wish to set using W or X
and set its value using the S or T arrow on the
omni selector.
bbbbCheck that the date and time display
correctly, press the SET button and
press the MENU button.
z The date can be set up to the year 2037.
a
b
1. Preparing the Camera 23
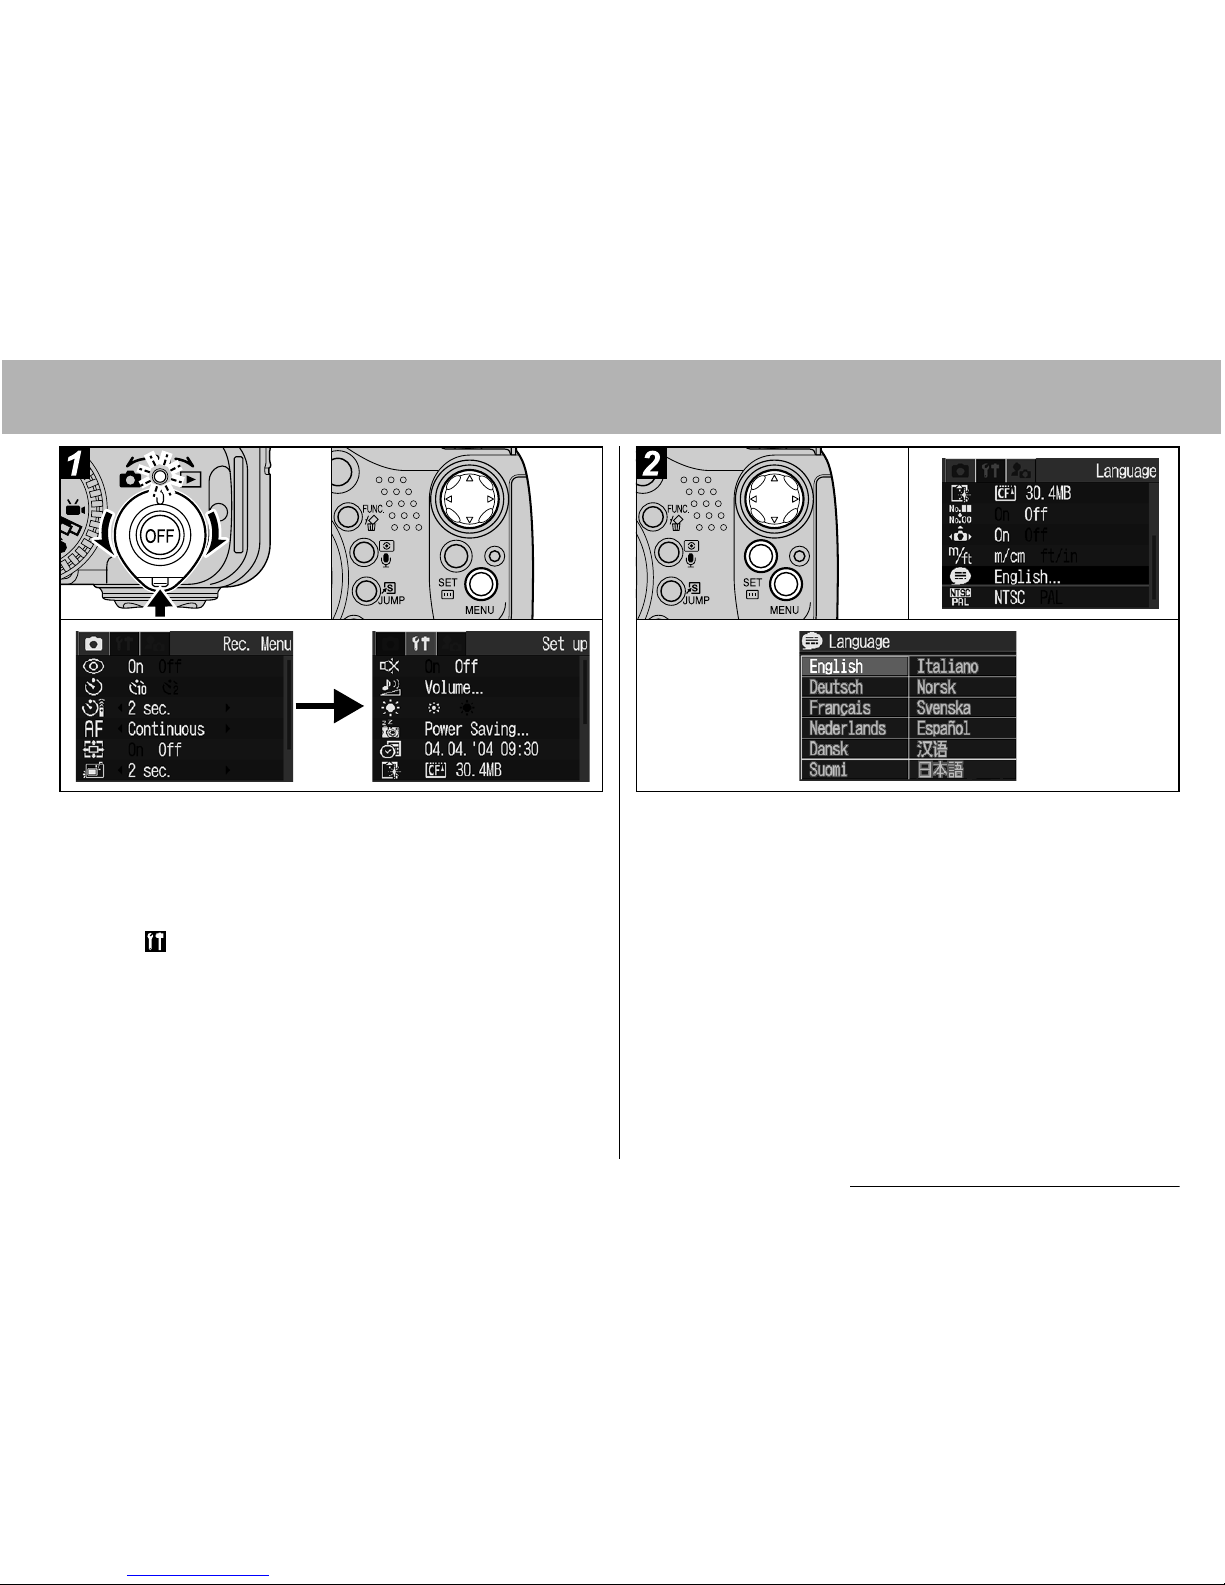
Setting the Language
aaaaTurn the power on (p. 19).
bbbbPress the MENU button, and then the
XXXX arrow on the omni selector.
The [ (Set up)] menu appears.
z In Playback mode, you can change the
language by holding the SET button while you
press the JUMP button. This function cannot be
used during movie playback or during a printer
connection.
b
a
aaaaSelect [Language] using the SSSS or TTTT
arrow on the omni selector, then
press the SET button.
bbbbSelect a language using the SSSS, TTTT, WWWW
or XXXX arrow on the omni selector, then
press the SET button.
ccccPress the MENU button.
c
b
a
a
b
24 1. Preparing the Camera
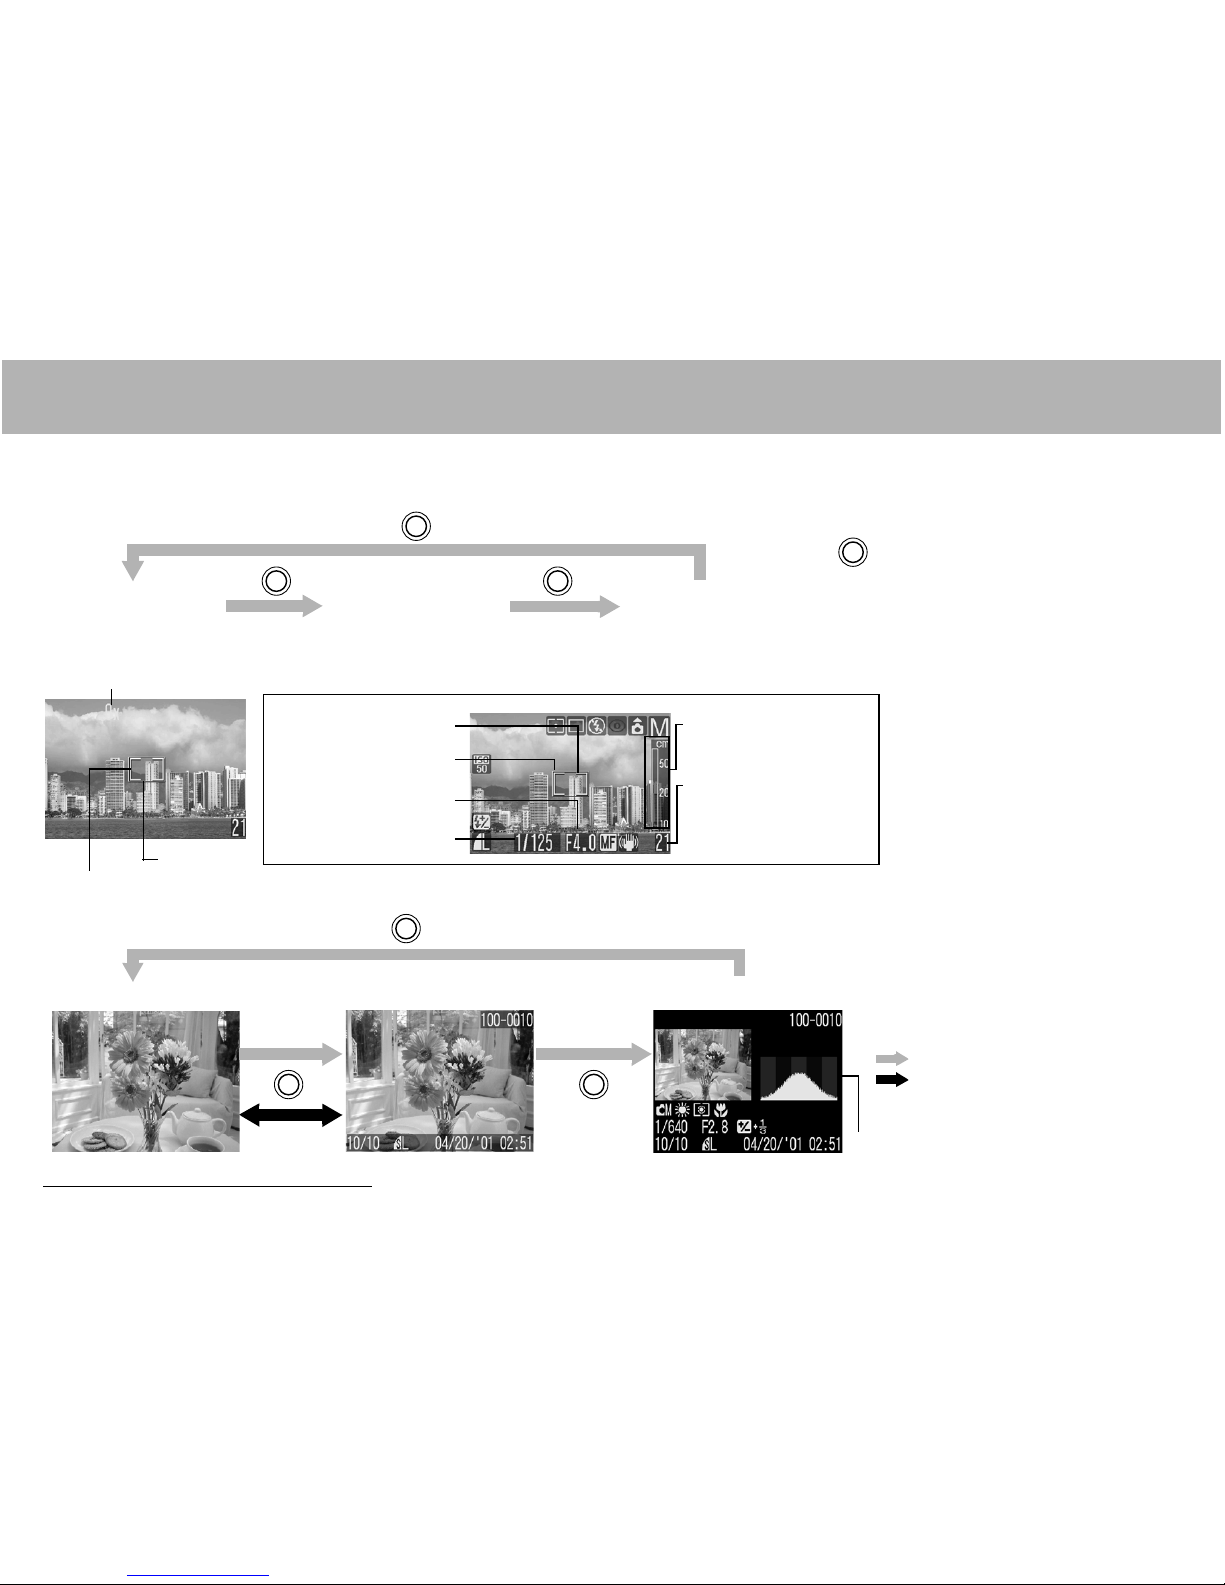
Using the Viewfinder and the LCD Monitor
Viewfinder Display
(Information View)
Pressing the DISPLAY button switches the LCD monitor display mode.
A
lso, closing the LCD monitor causes the viewfinder to display.
Shooting Mode
LCD Monitor Display
(No Information)
LCD Monitor Display
(Information View)
About the AF Frame
Green: Focusing Complete
Yellow:Focusing Difficulty
*The AF frame does not
appear when it is set to Auto
or during Reverse Display.
MF Indicator
Shots Remaining or
Remaining Movie
Time/Elapsed Time
(Shooting Mode)
Aperture Value
Shutter Speed
AF Frame
Spot Metering Frame
Playback Mode
Detailed Display
Standard Display
Single Image Playback
Index Playback
: Press the DISPLAY button
No Information
Histogram (p. 154)
The combined optical
zoom and digital zoom
factor displays.
AF Frame
Spot Metering Frame
1. Preparing the Camera 25
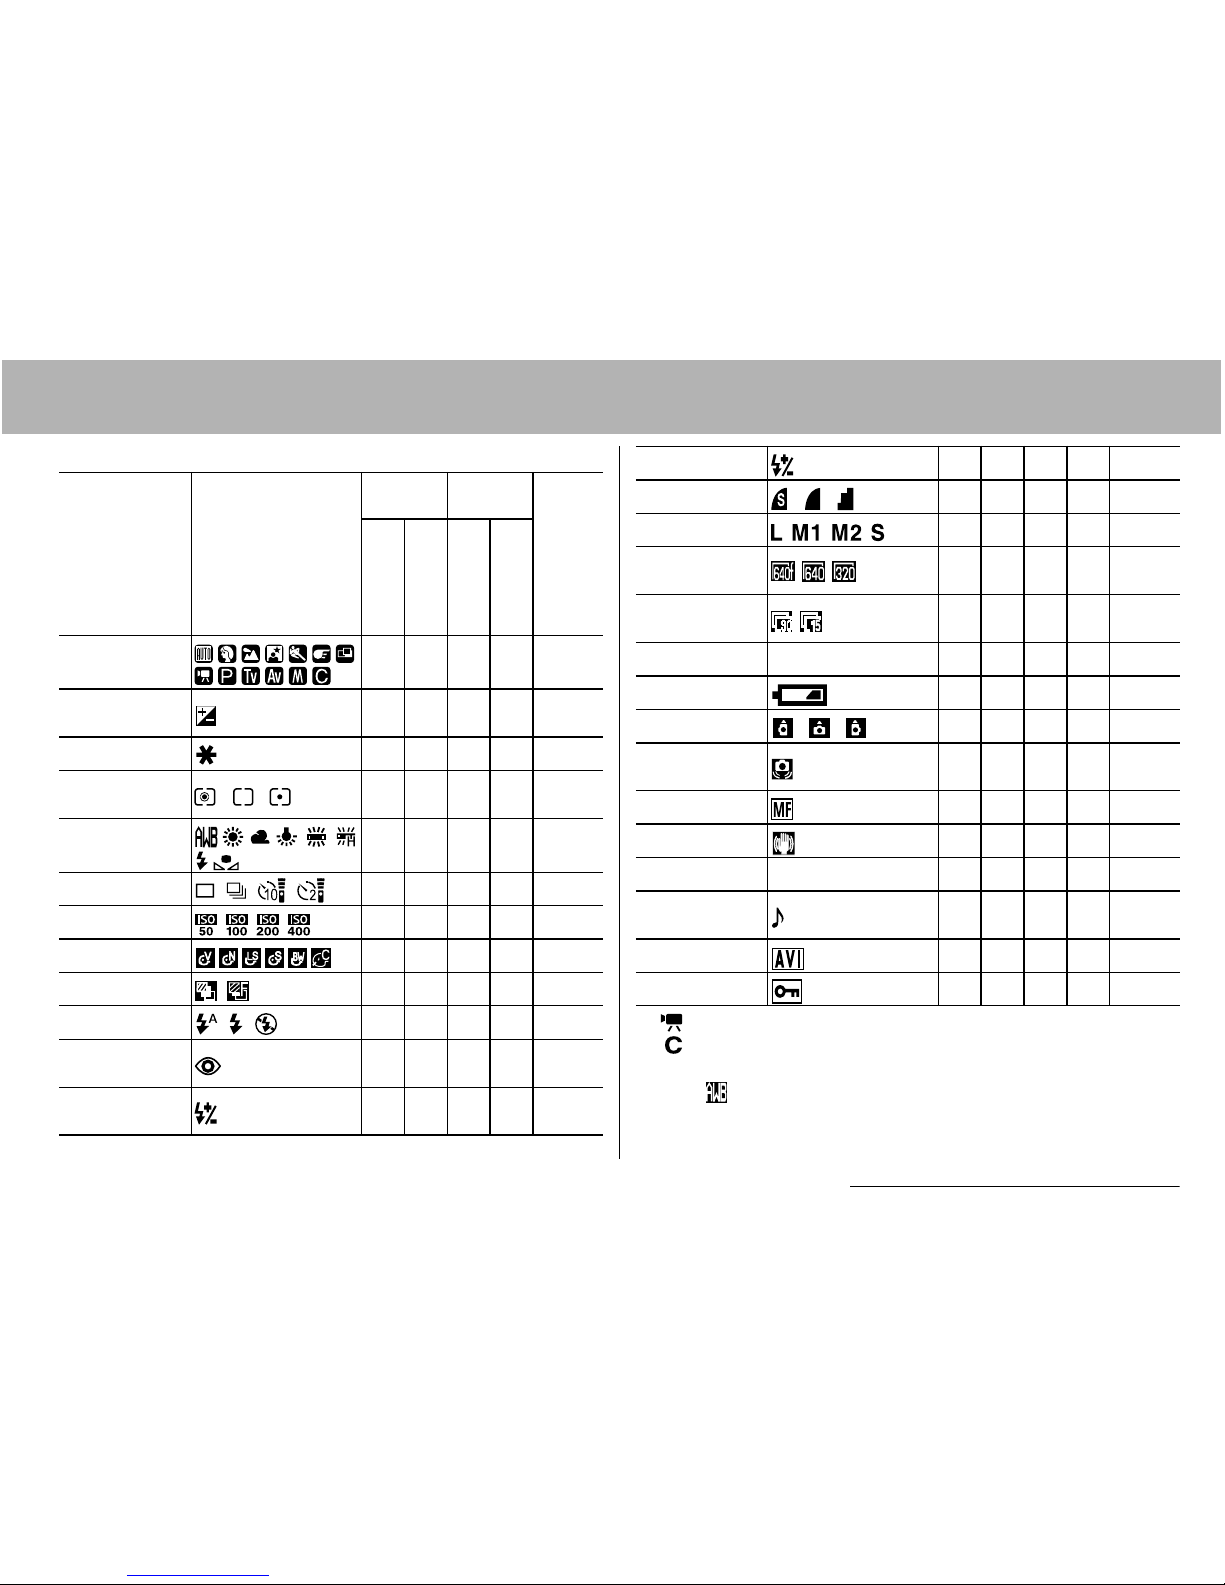
Display Contents
Function Icon
Shooting
Mode
Playback
Mode
Reference Page
Information View
No Information
Detailed Display
Standard Display
Shooting
Modes
{ –
*1{*2
–
p. 45, 71
Exposure
Compensation
{ – {
*3
–p.78
AE Lock/FE Lock
{{––
p. 86, 87
Light Metering
Mode
{ – { –p.76
White Balance
(WB)
*4
{ – { –p.79
Drive Mode { –––
p. 49, 52
ISO Speed { – { –p.81
Photo Effect { – { –p.82
Bracket { – – – p. 84
Flash { – – – p. 34
Red-eye
Reduction
{ – – – p. 36
Flash Exposure
Compensation
{ – {
*3
–p.89
-2 – +2
*1
(Movie) appears even in No Information display mode.
*2
(Custom) does not appear.
*3
The value for each content also appears.
*4
The icon does not display in Playback mode.
*5
Zoom powers reflect the combined optical and digital zoom
effects. "10x" is the telephoto-end setting of the optical zoom.
Flash Output { – – – p. 89
Compression { – {{ p. 32
Resolution { – {{ p. 32
Resolution
(Movies)
{ – { –p.32
Frame Rate
(Movies)
{ – { –p.32
Digital Zoom
*5
{{– – p. 50
Low Battery {{{{ p. 17
Auto Rotate { – – – p. 108
Camera Shake
Warning
{{– – p. 26
Manual Focus {{– – p. 95
Image Stabilizer
{ – – – p. 29
Movie Recording
{{– – p. 53
Sound Memo
(WAVE file)
––{{ p. 101
Movie – – {{ p. 57
Protection Status
––{{ p. 106
10x 13x 16x 20x 25x 32x
z
(red)
26 1. Preparing the Camera
Even in the no information display mode,
shooting information appears for approximately 6
seconds (shooting information may not appear
depending on the camera settings at that time).
The camera shake warning icon will appear
on the LCD monitor (or viewfinder) in low light
conditions while the camera is preparing to
shoot. When this icon appears, use one of the
following shooting methods.
- Set the flash to On or Auto
- Set the image stabilizer function to On (p. 29)
- Fix the camera to a tripod
Please note that image information recorded
by this camera may not display correctly on
other cameras and image information recorded
by other cameras may not display correctly on
this camera.
Overexposure Warning
Overexposed portions of the image blink. The
overexposure warning appears at the following
times.
When reviewing an image right after it is shot
in the LCD monitor (information view) or in the
viewfinder
In the detailed display mode of the Playback
mode
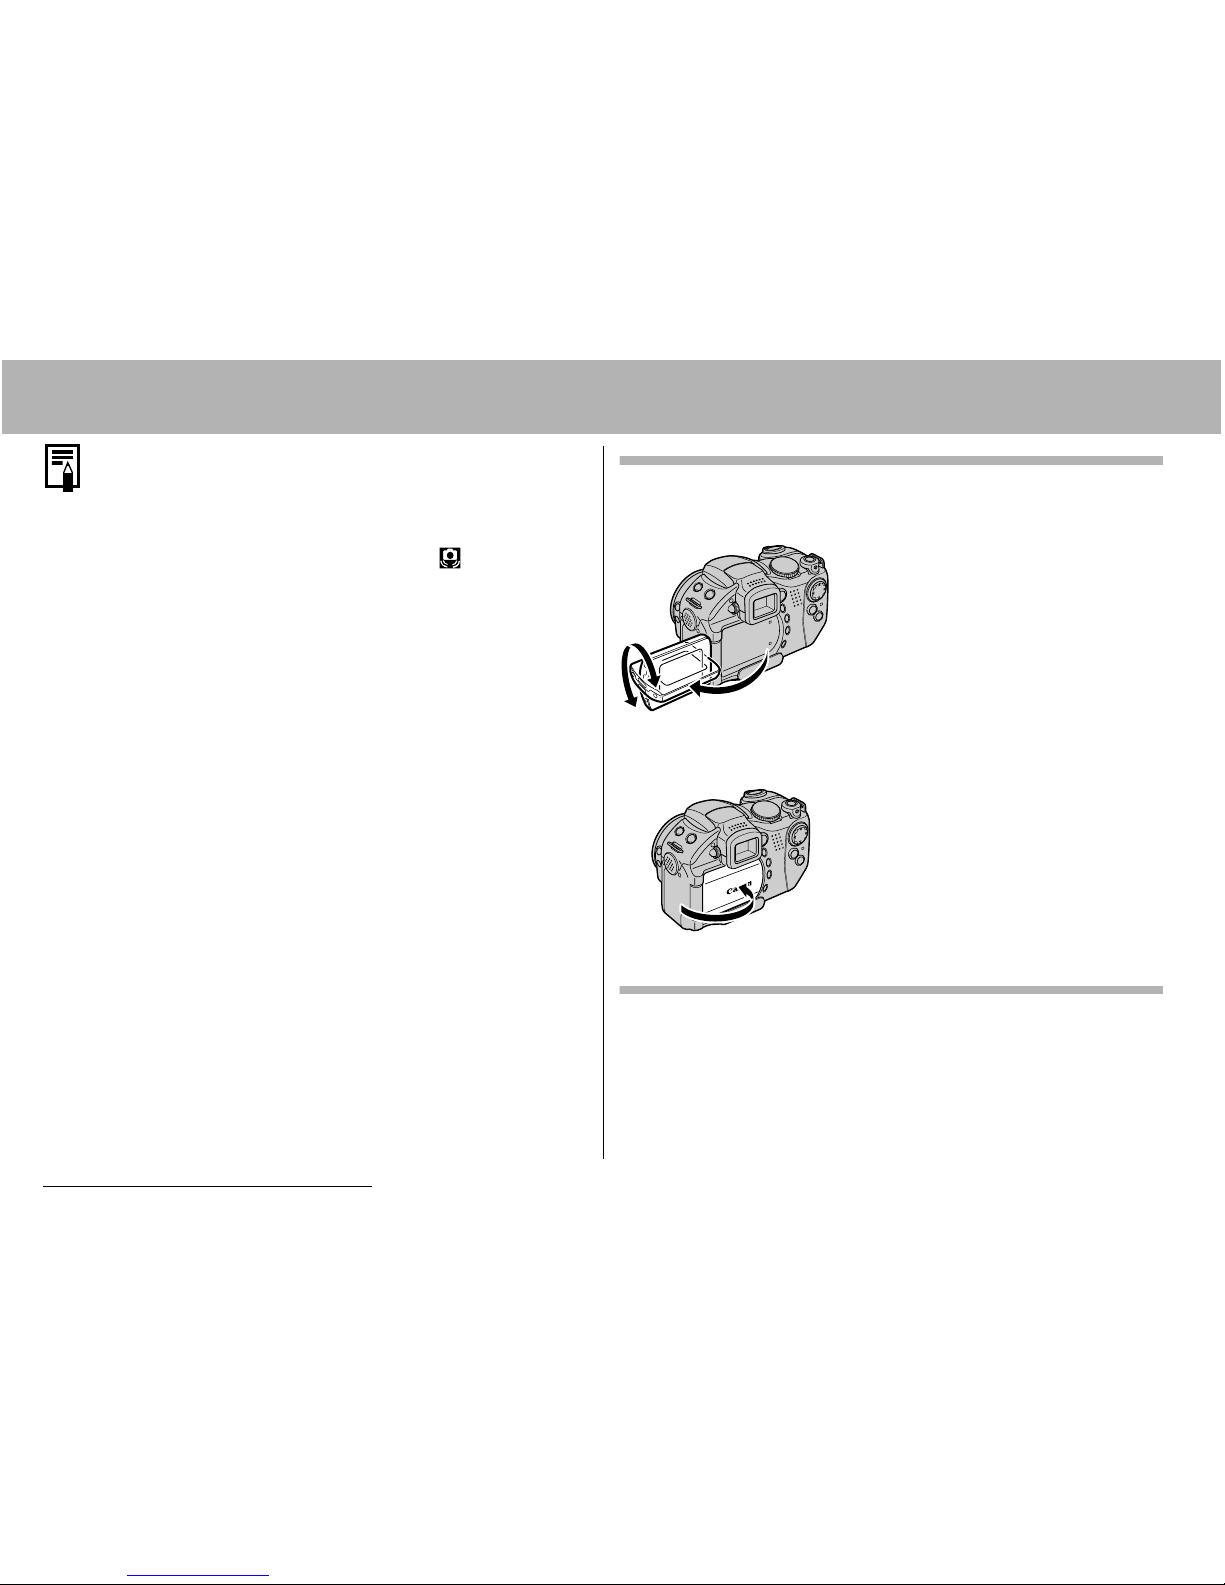
Using the LCD Monitor
The LCD monitor can be opened to the following
range of positions.
Opened from right to left 180
degrees. Tilted forward 180
degrees toward the lens or
backward 90 degrees.
z
When the LCD monitor is
opened left 180 degrees and
tilted 180 degrees toward the
lens, the displayed image is
automatically flipped and
reversed (the Reverse Display
function) so that it appears
correctly from in front of the lens.
Fold the LCD monitor back
against the camera body until it
clicks into place.
z If it is not fully closed, the
image will appear reversed.
Always keep the LCD monitor
closed to protect it when the
camera is not in use.
Using the Viewfinder
If the surroundings are too bright (for example, when
you are shooting outdoors) and images on the LCD
monitor are not clear, use the viewfinder for shooting.
Adjust the viewfinder focus with the diopter
adjustment dial (p. 12) so the displayed information
(p. 24) appears clearly.
a
b
2. Shooting-The Basics 27
2. Shooting-The Basics
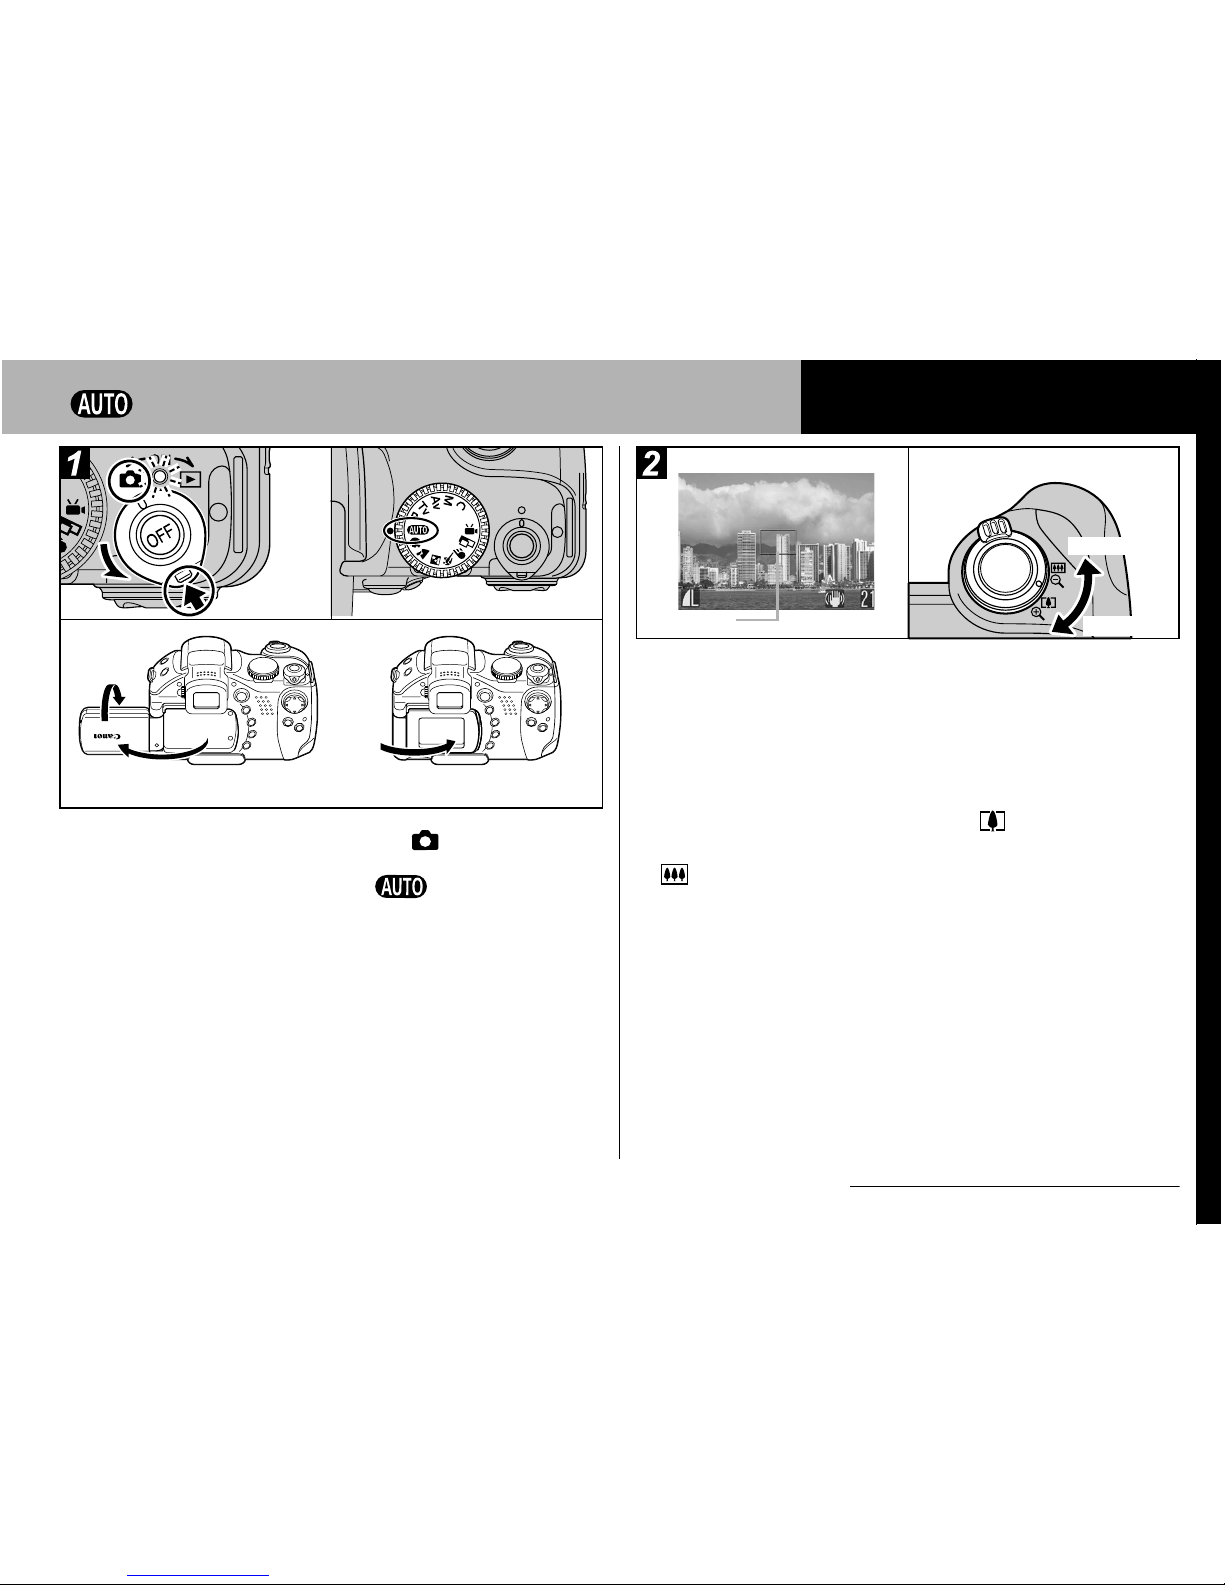
Auto Mode
aaaaTurn the mode lever to (Shooting).
bbbbSet the mode dial to .
ccccIf you are using the LCD monitor,
open it.
z The LCD monitor can also be rotated. When the
LCD monitor is tilted 180 degrees, the displayed
image is automatically flipped and reversed (the
Reverse Display function) so that it appears
correctly from in from of the lens (you can
disable the Reverse Display function (p. 65)).
b
Standard shooting
a
Seen from the lens side
c
aaaaAim the camera at the subject.
bbbbUse the zoom to achieve the desired
composition in the LCD monitor (or
viewfinder).
z Turning the zoom lever toward magnifies the
subject (telephoto). Turning the zoom lever toward
decreases the size of the subject (wide angle).
The speed at which the magnification change is
determined by the way the zoom lever is turned.
Turning the zoom lever in one swift movement
completely to the right/left enables fast zooming.
For slow zooming, slowly turn the zoom lever
halfway.
z The angle of view can be adjusted within the 38 to
380 mm range, in 35mm film equivalent.
b
Wide angle
Telephoto
a
AF Frame
28 2. Shooting-The Basics
z The combined use of the digital zoom and optical
zoom enables magnified shooting up to approx.
32x (p. 50). The digital zoom cannot be used with
some shooting modes (p. 166). Images become
coarser the more they are digitally zoomed.
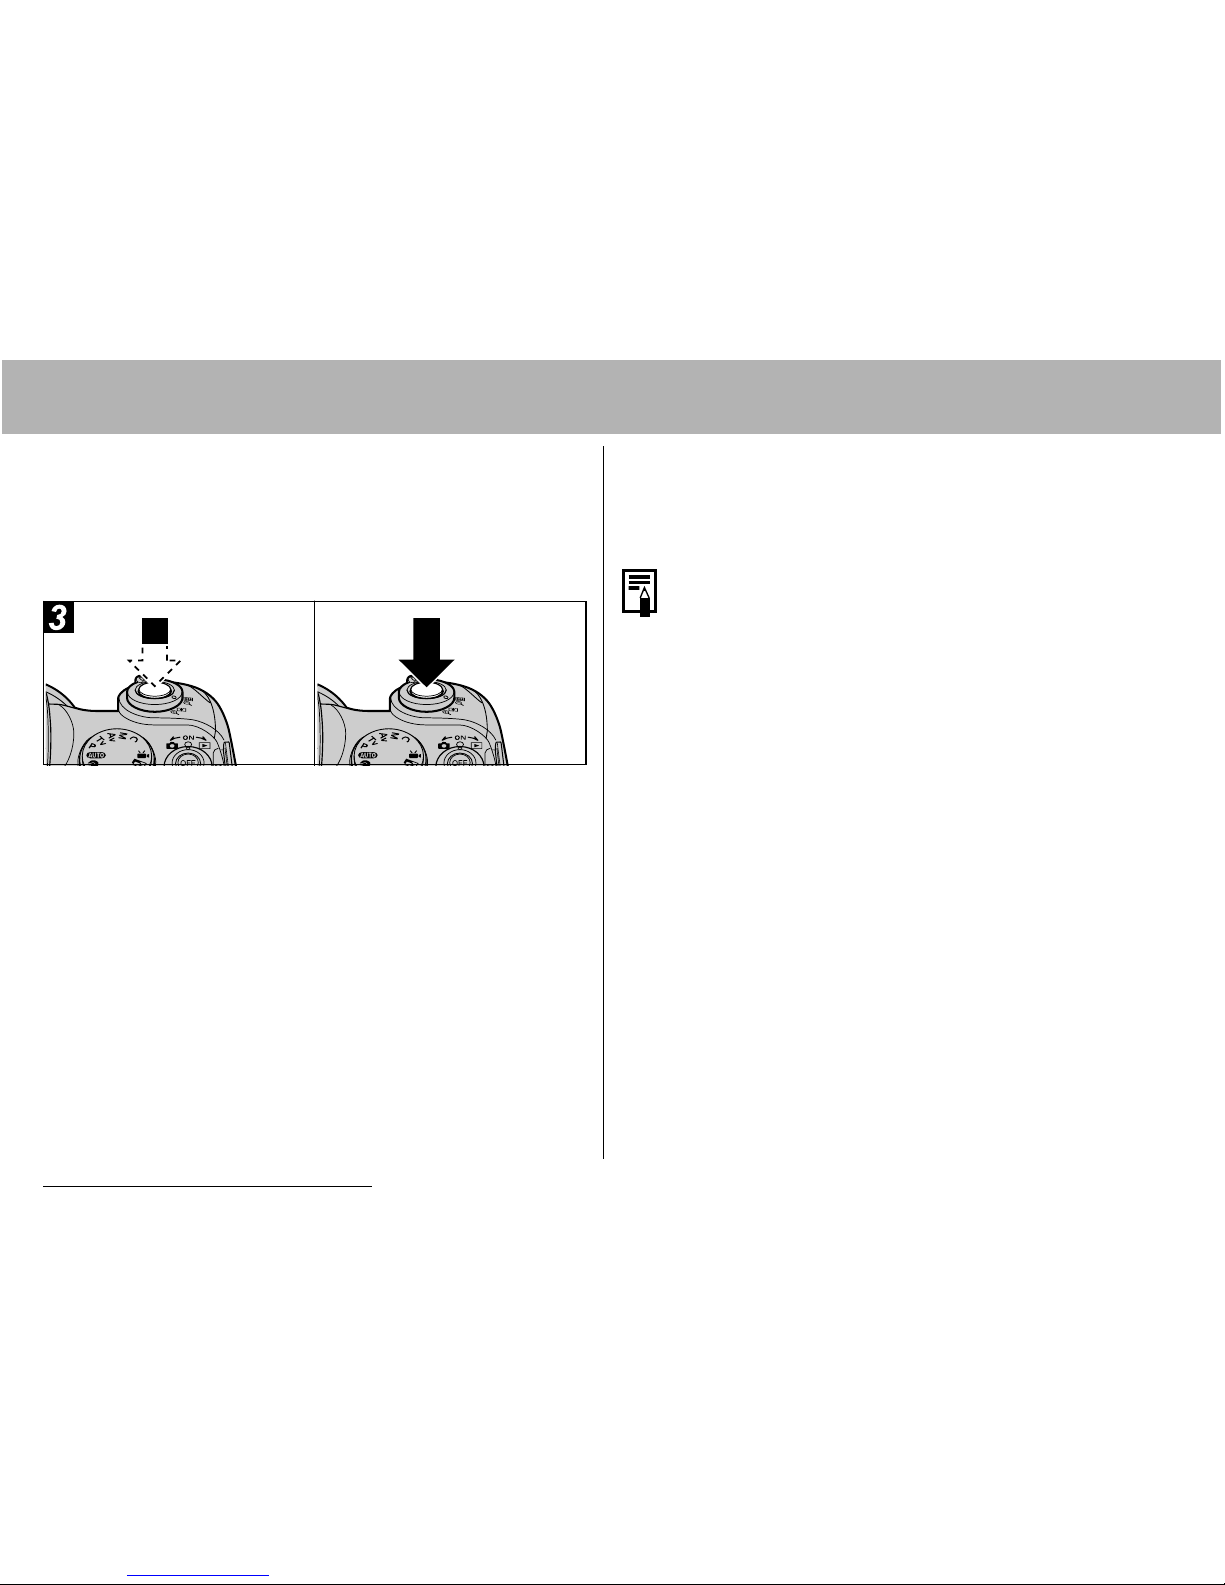
aaaaLightly press the shutter button
(pressing halfway) to focus.
Two beeps will sound when the camera has finished
focusing, and the AF frame appears green.
z The AF frame will light yellow and the beep will
sound one time if the subject is difficult to focus
on. When the AF frame is set to Auto, it will not
appear.
z The shutter speed and aperture value are
automatically determined and show on the LCD
monitor (or viewfinder). The exposure
compensation (p. 78) and focus (p. 95) are also
automatically set.
a
b
bbbbPress the shutter button all the way.
You will hear the shutter sound when the shot is
complete. Do not move the camera until you hear
this sound. The picture appears for two seconds.
See page 166 for settings that can be changed
in this mode.
The LCD monitor and viewfinder have a field of
vision of approximately 100% of the actual
shooting image.
Images are first saved into the camera's
internal memory before being recorded onto
the CF card, allowing the next images to be
taken immediately as long as sufficient space
is available in the internal memory.
The indicator blinks red while data is recorded
onto the CF card.
The beep and shutter sound can be set to On/
Off using the menu (p. 66).
If the shutter sound is set to [Off] and the mute
option is set to [Off], the camera will beep once
when the shutter button is pressed all the way.
Shots cannot be taken while the flash is
charging.
 Loading...