

Canon Powershot S20, C831002 - PowerShot S20 3.2MP Digital Camera, S10 - PowerShot S10 2MP Digital Camera Software Starter Manual
Macintosh Windows
Software Starter Guide
To Download Images to a Computer
for
Windows
for
Macintosh
Install the Software P.5 P.39
Connect the Camera to a Computer P.7 P.40
Start the Software and Download Images P.15 P.45
Start ZoomBrowser EX (Windows) or PowerShot Browser (Macintosh
computers) and load images onto the computer.
This is the software guide for both PowerShot S10 and PowerShot S20 digital cameras.
This guide explains the installation method and features of
the software for loading and processing images on a computer that have
been shot with a Canon PowerShot S10 or PowerShot S20 digital camera.
Read the agreement in this guide before using the software on
the supplied CD-ROM. By using the software,
you agree to be bound by the terms of the agreement.
There are precautions that you should take before installing the USB
driver software. Ensure that you read this guide before installing it.
Software Starter Guide

READ CAREFULLY BEFORE USING!
CANON SOFTWARE LICENSE AGREEMENT
IMPORTANT - READ THIS AGREEMENT BEFORE USING THE SOFTWARE ON THE CD-ROM IN
THIS BOX. BY USING THE SOFTWARE, YOU AGREE TO BE BOUND BY THE TERMS OF THIS
AGREEMENT.
This is a license agreement (the “Agreement”) between you and Canon Inc. (“Canon”).
IF YOU DO NOT AGREE TO THE TERMS AND CONDITIONS OF THIS AGREEMENT, DO NOT
USE THE SOFTWARE PROGRAM ON THE CD-ROM AND THE USER MANUAL IN THIS BOX
(COLLECTIVELY, THE “SOFTWARE”) AND RETURN THE SOFTWARE WITHIN 30 DAYS FROM
THE DATE OF PURCHASE TO YOUR POINT OF PURCHASE FOR A REFUND.
In consideration of the right to use the SOFTWARE, you agree to abide by the terms and
conditions of this Agreement.
1. LICENSE: Canon grants you the non-exclusive right to use the SOFTWARE only on a
single computer. You may physically transfer the SOFTWARE from one computer to
another provided that the SOFTWARE is used on only one computer at a time. You
shall not install or use the SOFTWARE on a network, multiple CPU, multiple site
arrangement, or any other hardware configuration where the SOFTWARE is accessible
to more than one CPU or to more than one user.
YOU SHALL NOT ASSIGN, SUBLICENSE, RENT, LEASE, LOAN, CONVEY OR OTHERWISE USE,
TRANSFER, COPY, TRANSLATE, CONVERT TO ANOTHER PROGRAMMING LANGUAGE,
ALTER, MODIFY, DECOMPILE OR DISASSEMBLE THE SOFTWARE, IN WHOLE OR IN PART,
EXCEPT AS EXPRESSLY PROVIDED IN THIS AGREEMENT.
2. BACK-UP COPY: You may make one copy of the SOFTWARE solely for back-up
purposes, or copy the SOFTWARE onto the permanent storage device (e.g. a hard disk)
of your computer and retain the original for back-up purposes. Any other copying of
the SOFTWARE is a violation of this Agreement. You must reproduce and include the
copyright notice on the back-up copy.
3. SUPPORT AND UPDATES: Canon is not responsible for providing maintenance or
support for use of the SOFTWARE. No updates, fixes or support will be made available
for the SOFTWARE.
4. LIMITED WARRANTY AND LIMITATION OF LIABILITY: It is your responsibility to choose,
maintain and match the hardware and software components of your computer system.
Thus Canon does not guarantee uninterrupted service or correction of errors or that
the functions or performance of the SOFTWARE will meet your requirements. THE
SOFTWARE IS LICENSED ON AN “AS IS” BASIS AND WITHOUT WARRANTY OF ANY
KIND. The CD-ROM storing the SOFTWARE is warranted only against defective material
under normal use for a period of ninety (90) days after purchase from an authorized
Canon dealer as evidenced by your sales receipt. Your sole remedy for a defective CDROM shall be replacement of the same without charge when returned by you at your
expense to your point of purchase and proven to be defective upon inspection. The
Replacement CD-ROM will be warranted for the remainder of the original ninety (90)
day warranty period of the defective CD-ROM. The limited warranty does not apply if
the failure of the CD-ROM resulted from accident, abuse or misapplication of the
SOFTWARE and shall not extend to anyone other than the original user of the
SOFTWARE.
EXCEPT AS SPECIFICALLY SET FORTH IN THIS PARAGRAPH 4, CANON, CANON’S
SUBSIDIARIES, DISTRIBUTORS AND DEALERS DISCLAIM ALL WARRANTIES, EXPRESS OR
IMPLIED, INCLUDING ANY WARRANTY OF MERCHANTABILITY OR FITNESS FOR A
PARTICULAR PURPOSE, WITH RESPECT TO THE SOFTWARE.

i
NEITHER CANON NOR ANY OF CANON’S SUBSIDIARIES, DISTRIBUTORS OR DEALERS IS
LIABLE FOR ANY DAMAGES HOWSOEVER CAUSED, INCLUDING WITHOUT LIMITATION,
DIRECT, CONSEQUENTIAL OR INCIDENTAL LOSS OR DAMAGE INCLUDING LOSS OF
PROFITS, EXPENSE OR INCONVENIENCE HOWSOEVER CAUSED OR ARISING OUT OF THE
SOFTWARE OR THE USE THEREOF.
NEITHER CANON, NOR ANY OF CANON’S SUBSIDIARIES, DISTRIBUTORS OR DEALERS
SHALL HAVE ANY OBLIGATION TO INDEMNIFY YOU AGAINST ANY CLAIM OR SUIT
BROUGHT BY A THIRD PARTY ALLEGING THAT THE SOFTWARE OR THE USE THEREOF
INFRINGES ANY INTELLECTUAL PROPERTY OF SUCH THIRD PARTY.
5. TERM: This Agreement is effective upon your using the SOFTWARE and remains in
effect until expiration of all copyright interests in the SOFTWARE unless earlier
terminated. You may terminate this Agreement by destroying the SOFTWARE. This
Agreement will also terminate without notice to you if you fail to comply with any of
the terms of this Agreement and you must then promptly return the SOFTWARE. In
addition, Canon may enforce its other legal rights.
6. U.S. GOVERNMENT RESTRICTED RIGHTS NOTICE: The SOFTWARE is provided with
restricted rights. Use, duplication or disclosure is subject to restrictions as set forth in
either subparagraph (c) (1) (ii) of the Rights in Technical Data and Computer software
clause at DFARs 252.227-7013 or subparagraph (c) (1) and (2) of the Commercial
Computer Software Restricted Rights Clause at FAR 52.227-19, as applicable.
7. SEVERABILITY: In the event that any provision of this Agreement is declared or found
to be illegal by any court or tribunal of competent jurisdiction, such provision shall be
null and void with respect to the jurisdiction of that court or tribunal and all the
remaining provisions of this Agreement shall remain in full force and effect.
8. CONTROLLING LAW: The terms of this Agreement as it relates to purchases of the
Software in the United States of America shall be governed and construed in all
respects in accordance with the laws and regulations of the State of New York, without
reference to choice of law principles. The terms of this Agreement as it relates to
purchases of the Software in Canada shall be governed by the laws of the province of
Ontario.
9. OWNERSHIP: All rights, including but not limited to copyrights and trade secret rights,
to the SOFTWARE belong to Canon, its affiliated corporations and third party licensors.
Your use of the SOFTWARE is subject to the United States, Canada and other applicable
copyright and trademark laws and nothing in this Agreement constitutes a waiver of
the rights of Canon, its affiliated corporations and third party licensors under such laws.
Nothing contained in Paragraph 1 shall be construed to give Canon any ownership
rights in any images, graphics or textual material that you save in connection with the
Software.
10. ACKNOWLEDGEMENT: BY USING THE SOFTWARE, YOU ACKNOWLEDGE THAT YOU
HAVE READ THIS AGREEMENT, UNDERSTOOD IT, AND AGREE TO BE BOUND BY ITS
TERMS AND CONDITIONS. YOU ALSO AGREE THAT THIS AGREEMENT IS THE
COMPLETE AND EXCLUSIVE STATEMENT OF AGREEMENT BETWEEN YOU AND CANON
CONCERNING THE SUBJECT MATTER HEREOF AND SUPERSEDES ALL PROPOSALS OR
PRIOR AGREEMENTS, VERBAL OR WRITTEN, AND ANY OTHER COMMUNICATIONS
BETWEEN THE PARTIES RELATING TO THE SUBJECT MATTER HEREOF. NO AMENDMENT
TO THIS AGREEMENT SHALL BE EFFECTIVE UNLESS SIGNED BY A DULY AUTHORIZED
OFFICER OF CANON.

ii
Disclaimer
• While every effort has been made to ensure that the information contained in this guide is
accurate and complete, no liability can be accepted for any errors or omissions. Canon Inc.
reserves the right to change the specifications of the hardware and software described
herein at any time without prior notice.
• No part of this guide may be reproduced, transmitted, transcribed, stored in a retrieval
system, or translated into any language in any form, by any means, without the prior
written permission of Canon Inc.
• Canon Inc. makes no warranties for damages resulting from corrupted or lost data due to a
mistaken operation or malfunction of the camera, the software, the CompactFlash™ cards
(CF cards), personal computers, peripheral devices, or use of non-Canon CF cards.
Trademark Acknowledgments
• Canon and PowerShot are trademarks of Canon Inc.
• Adobe, Adobe PhotoDeluxe and Photoshop are trademarks of Adobe Systems Incorporated.
• CompactFlash is a trademark of SanDisk Corporation.
• IBM is a registered trademark of International Business Machines Corporation.
• iBook and iMac are trademarks of Apple Computer, Inc.
• Macintosh, PowerBook, Power Macintosh and QuickTime are trademarks of Apple Computer
Inc., registered in the United States and other countries.
• Microsoft, Windows and Windows NT are either registered trademarks or trademarks of
Microsoft Corporation in the United States and/or other countries.
• Other names and products not mentioned above may be registered trademarks or trademarks of
their respective companies.
Copyright © 2000 Canon Inc. All rights reserved.
This guide explains the software used with both the PowerShot S10 and PowerShot S20.
All instructions apply to both models unless otherwise noted. The screen examples in this
guide were taken with a PowerShot S10 connected unless otherwise noted.

1
Using the Software on the
Windows Platform
Introducing the Software ........................................... 2
System Requirements.................................................. 4
Installing the Software ............................................... 5
Connecting the Camera to a Computer ..................... 7
Connecting to a USB Port ....................................................... 8
Installing the Driver Software................................................. 10
Connecting to a Serial Port (COM Port) ................................ 13
Connecting via a CF Card Reader or PC Card Slot ................ 14
From Loading to Printing .......................................... 15
Basic Procedures for Using ZoomBrowser EX.......... 21
Displaying Images ................................................................. 21
Organizing Images................................................................ 23
Saving Computer Images to a CF Card in the Camera .......... 24
Editing Camera Slide Shows ................................................. 24
Stitching Panoramas Together with PhotoStitch .................... 25
Editing and Applying Special Effects to Images ..................... 26
Printing Images ..................................................................... 27
Loading Images with TWAIN-Compliant Application
Programs (Adobe PhotoDeluxe, Photoshop, etc.) ....... 28
Troubleshooting the Driver Software Installation ... 30
Troubleshooting the Computer Connection ............ 58
Customer Support ..................................................... 59

2
Introducing the Software
This section introduces the powerful software programs provided on the supplied CD-ROM
for the Windows platform.
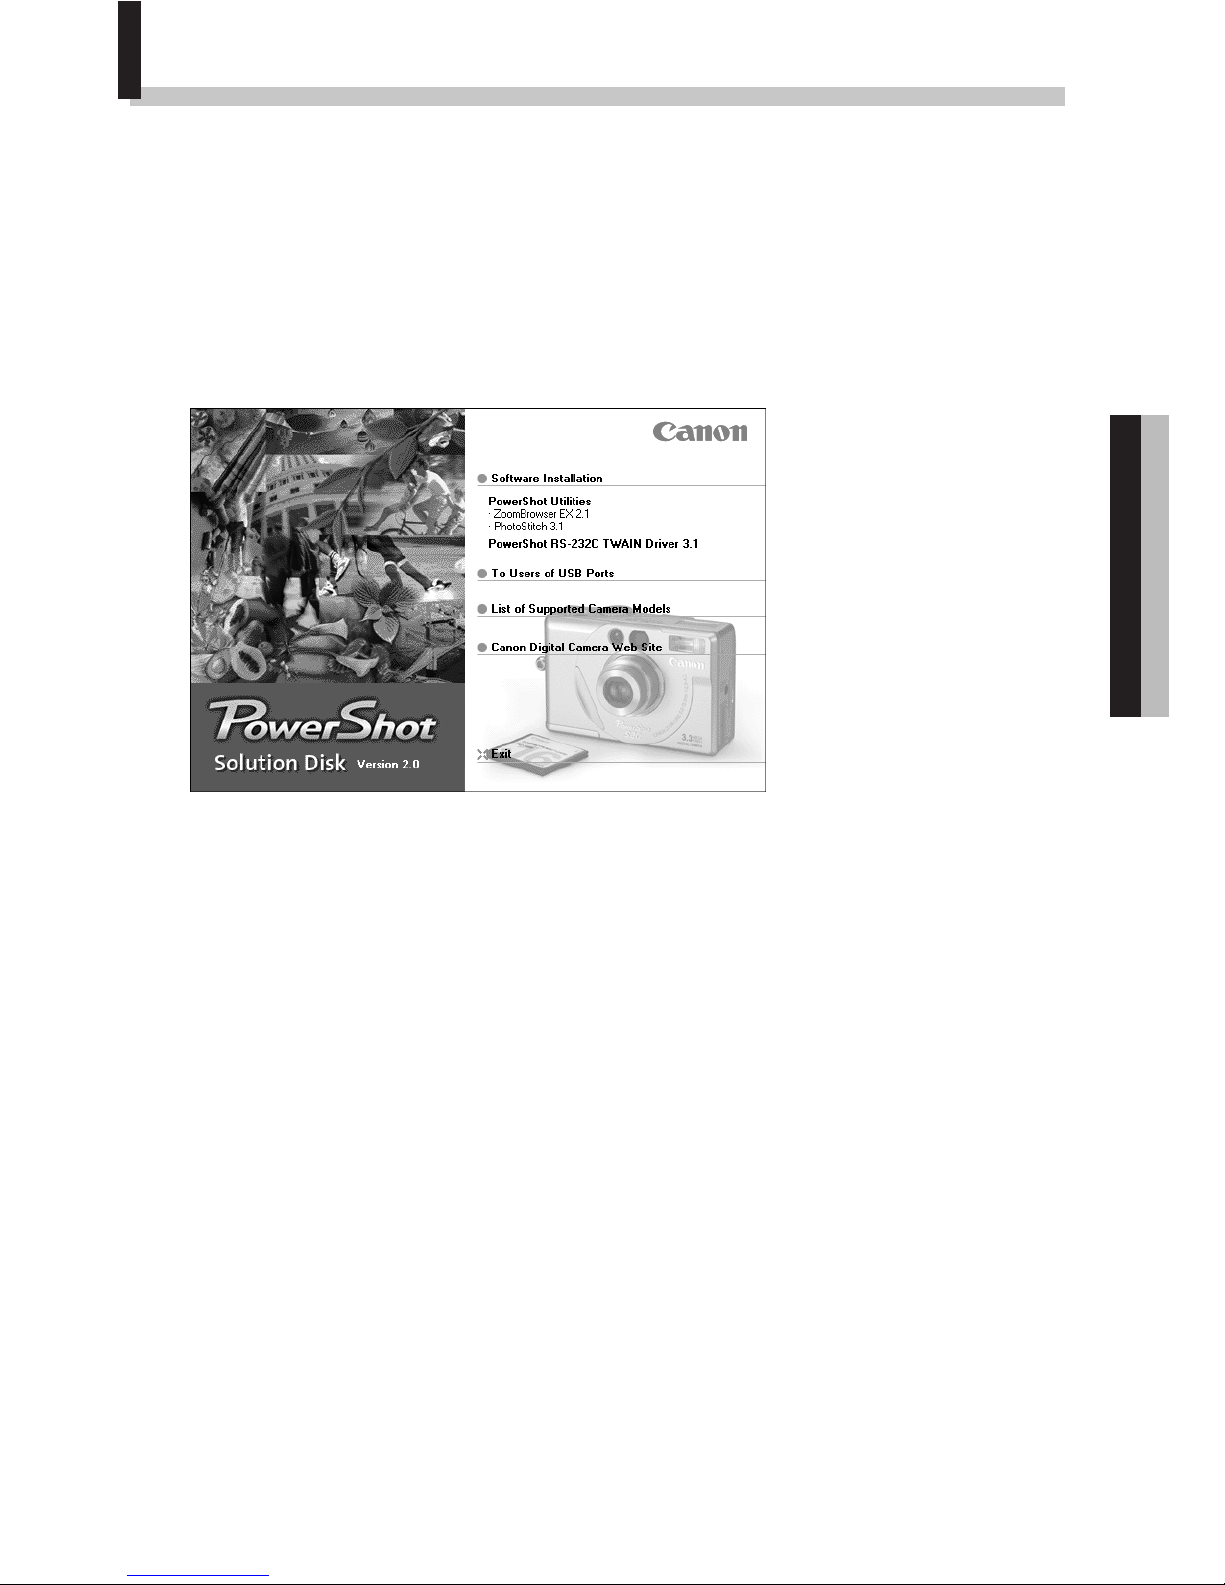
PowerShot Solution Disk
ZoomBrowser EX
To load PowerShot S10/S20 images, start ZoomBrowser EX.
PowerShot S10/S20 Connection Functions
(Also effective for CF card readers or PC card readers)
• Displays the camera images.
• Downloads camera images to the computer.
• Saves computer images to a CF card in the camera.
• Edits slide shows for replay by the camera.
• Automatically starts and displays camera images when the camera is connected to a
USB port.
Image File Management Functions
• Displays, moves, copies or deletes images stored on computer disks.
• Displays all the files in a specified folder at once and zooms them in and out to
facilitate visual searches.
• Displays files in chronological order in a window that looks like a time tunnel.
Image Printing Functions
• Prints multiple images on the same page using the PhotoRecord printing utility.
• Performs auto layouts.
• Allows you to effortlessly place frames or backgrounds around your images for artistic
effect.
• Lets you create your own exclusive albums.
Supports PhotoStitch Panoramas
• Allows you to select camera images or images registered with ZoomBrowser EX and
start PhotoStitch to merge a series of images into a panorama in a few simple steps.
Supports the Adobe PhotoDeluxe Photo Retouching Program
• Starts the Adobe PhotoDeluxe photo retouching program so you can edit and apply
special effects to your images.

3
Windows
PhotoStitch
• Automatically arranges images shot in Stitch Assist mode into the correct order and
effortlessly merges them.
• Merges any number of images horizontally or vertically, or in a matrix format.
• Makes images with straight lines appear natural not crooked when merged. (Select the
Wide display format)
• A 360 degrees scene shot in several frames can be merged into a 360 degrees image
and saved in the QuickTime VR format, making it appear as if you were standing in the
middle of the image looking about in all directions.
TWAIN Drivers
PowerShot USB TWAIN Driver
PowerShot RS-232C TWAIN Driver
These are the driver utility programs that work within TWAIN-compliant application
programs, such as Adobe PhotoDeluxe and Photoshop, to load camera images
directly into the application program. (The USB TWAIN Driver is for use with a USB
interface. The RS-232C TWAIN Driver is for use with a serial port interface.)
Neither TWAIN Driver can be used as a stand-alone software program.
Adobe PhotoDeluxe (separate CD-ROM)
• Allows you to edit images and effortlessly create greeting cards, birthday cards and
calendars.
If the accompanying CD-ROM with the PowerShot S10 is a PowerShot S10 Solution
Disk, this CD-ROM is for exclusive use with the PowerShot S10. It cannot be used
with a PowerShot S20.

4
System Requirements
The following system requirements must be met to install and operate the software.
• A CD-ROM drive is required to install the software.
• QuickTime 3.0 or higher is required to save images in the QuickTime VR format that
have been merged in PhotoStitch.
•Computer Model
IBM PC/AT compatible
•OS
Windows 95, Windows 98 (including Second Edition)
or Windows NT 4.0 (Service Pack 3 or higher required)
•CPU
Pentium 75 MHz or better
•RAM
32 MB or more (Windows 95/98)
64 MB or more (Windows NT 4.0)
•Interface
USB (Limited to pre-installed Windows 98 systems)
RS-232C (Serial/COM port)
•Free Hard Disk Space
PowerShot Utilities
ZoomBrowser EX: 120 MB or more
(Including the PhotoRecord printing utility)
PhotoStitch: 40 MB or more
PowerShot USB TWAIN Driver: 15 MB or more
PowerShot RS-232C TWAIN Driver: 15 MB or more
Adobe PhotoDeluxe Home Edition: 140 MB or more
•Display
800 x 600 pixels, 256 colors minimum
1,024 x 768 pixels, 16 bit color or more recommended
5
Windows
Installing the Software
Installing from the PowerShot Solution Disk
1.
Close any application programs that are running.
2. Place the supplied Solution Disk in the CD-ROM drive.
The installer panel will automatically display.
• If the installer panel does not automatically display, use the following procedures
to start it.
1. Double-click the [My Computer] icon on the desktop, and double-click the CD-ROM
icon.
2. Double-click the [Setup] icon.
3. Click [Software Installation].
4.
Select the install location and click the [Next] button.

6
5. Select the software that you wish to install.
• Select [Standard Setup] for a typical installation.
• Select [Custom Setup] if you wish to install only the minimum required programs.
Software Installed with the Standard Setup Option
PhotoStitch
PowerShot RS-232C TWAIN Driver
ZoomBrowser EX
PhotoRecord (prints images registered with ZoomBrowser EX)
OpenPage Print Component (software driver used by PhotoRecord)
• Follow the on-screen instructions to proceed with the installation.
6. Click the [Finish] button when the installation is complete and the
installer panel appears again.
Installing Adobe PhotoDeluxe Home Edition
For installation instructions, place the Adobe PhotoDeluxe CD-ROM in the drive and
click [ReadMe & Guide] and [Install Guide] in the window that displays.
The serial number shown during installation will be required for the user
registration process.
If You Will Be Connecting via a USB Port
You must install a separate USB driver and the PowerShot USB TWAIN Driver.
Please see page 10 for installation instructions.
7
Windows
Connecting the Camera to a Computer
There are three interfaces that can be used to connect the camera to a computer. Once a
connection is established using one of the three interfaces, you can start the software
and begin to load the camera images. (➔ p. 15 or 28)
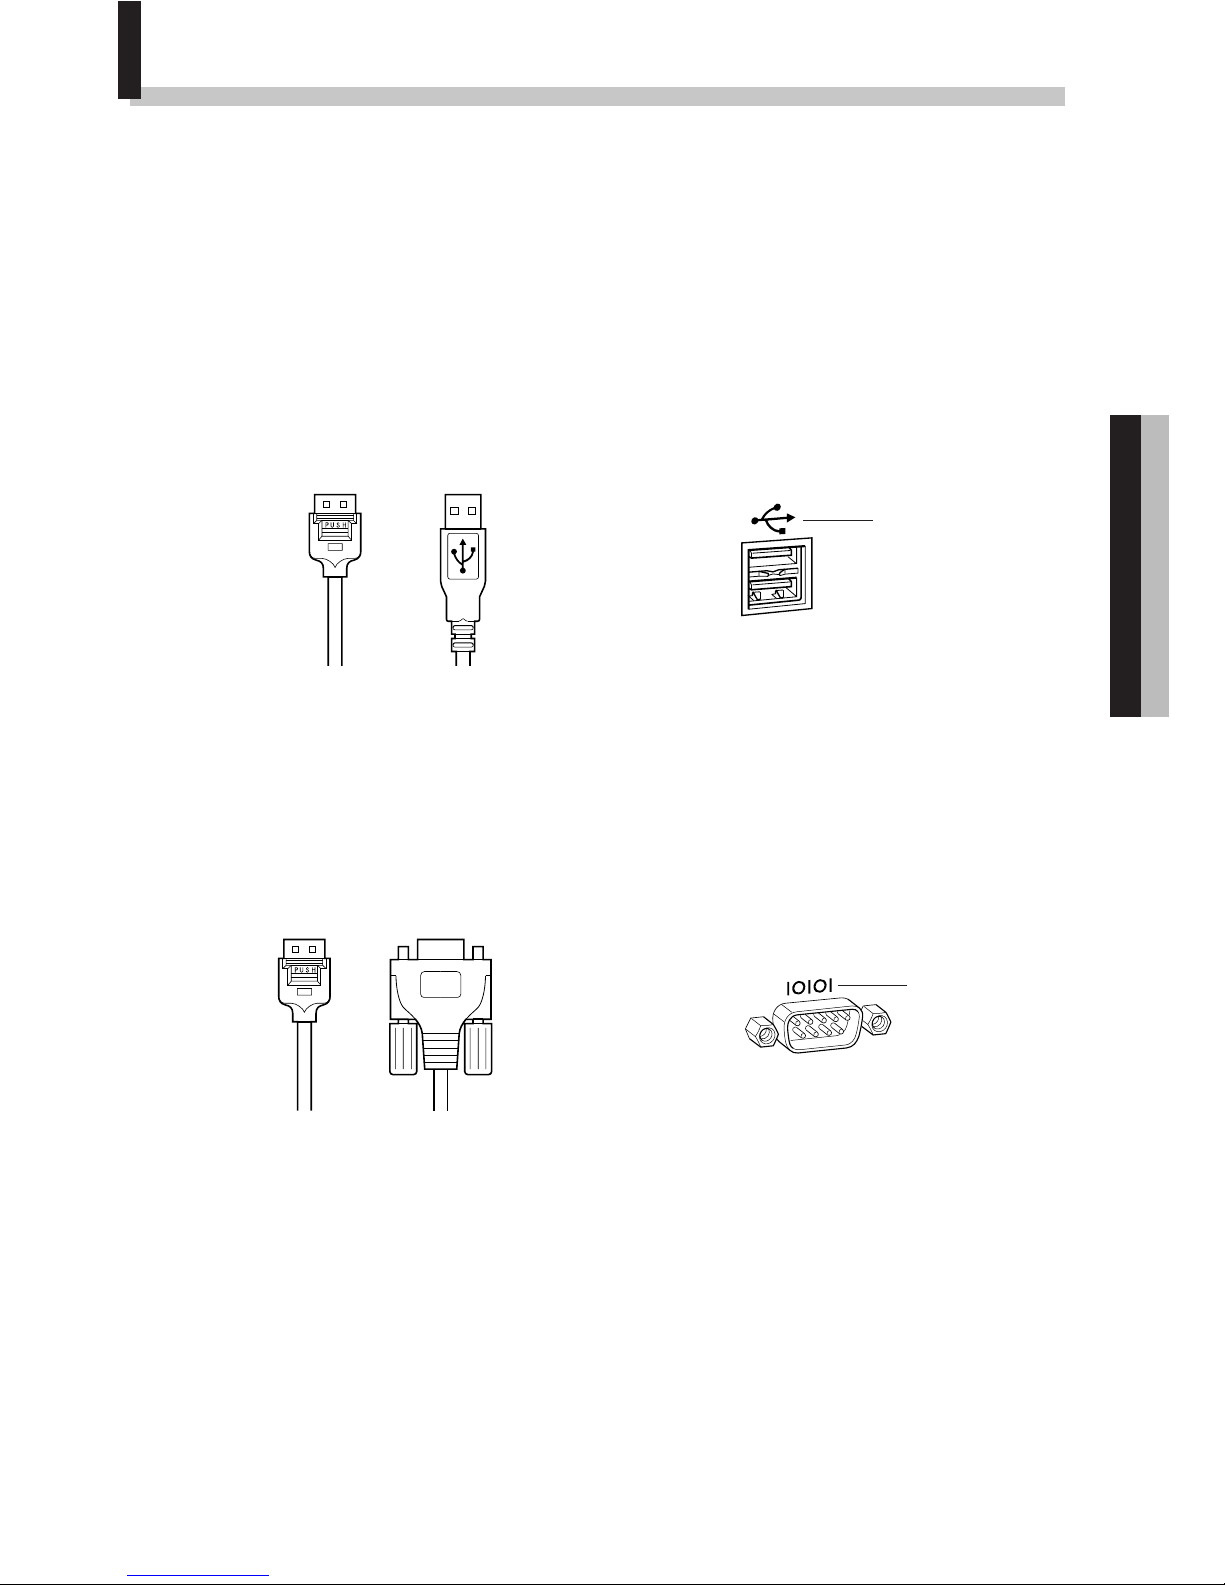
Connecting to a USB Port (➔ p. 8)
If your computer is equipped with a USB port such as that shown below, you can
connect the camera to it with the supplied USB cable.
• The USB interface transfers data more rapidly than the serial interface and can start
the image loading software automatically.
• The camera will not operate correctly with a USB port controlled by the Windows 95
or Windows NT 4.0 operating system.
Connecting to a Serial Port (COM Port) (➔ p. 13)
If your computer is equipped with a serial port such as that shown below, you can
connect the camera to it with the supplied serial cable.
Connecting via a CF Card Reader or PC Card Slot (➔ p. 14)
If your computer is equipped with a CF card reader or PC card slot, you can place the
camera’s CF card into either device to establish a direct connection.
Computer’s USB Port
Connectors on Ends of USB Cable
To the Camera
To the Computer
USB Ports are
identified with
this mark.
Computer’s Serial Port
Connectors on Ends of Serial Cable
To the Camera
To the Computer
Serial Ports are
identified with
this mark.

8
Connecting to a USB Port
Requirements for the USB Interface
• The USB interface can only be used to connect the camera to computers
purchased with Windows 98 preinstalled (clean installation). The USB ports on
computers running versions of Windows 98 upgraded from Windows 3.1 or
Windows 95 may not operate correctly.
• Connect the USB cable directly to one of the computer’s main USB ports. The
interface may not function correctly if the camera is connected via a USB HUB.
• The interface may not function correctly while other USB devices, excluding USB
mice and keyboards, are connected. If this problem arises, detach the camera
and the other devices, and reconnect the camera only.
• Do not connect more than one camera to the USB ports of the same computer
at the same time. The cameras may not operate correctly.
Important
Please do not place your computer into standby mode while this camera is
connected to its USB port. If the computer is placed into standby mode while
the camera is connected to the USB port, do NOT disconnect the USB cable
from the camera or computer. Try to revive the computer. If the USB cable is
detached while the computer is in standby mode, some models of computer
may not return to active mode correctly. For instructions regarding the
standby mode, please consult the manual accompanying your computer and
operating software.
9
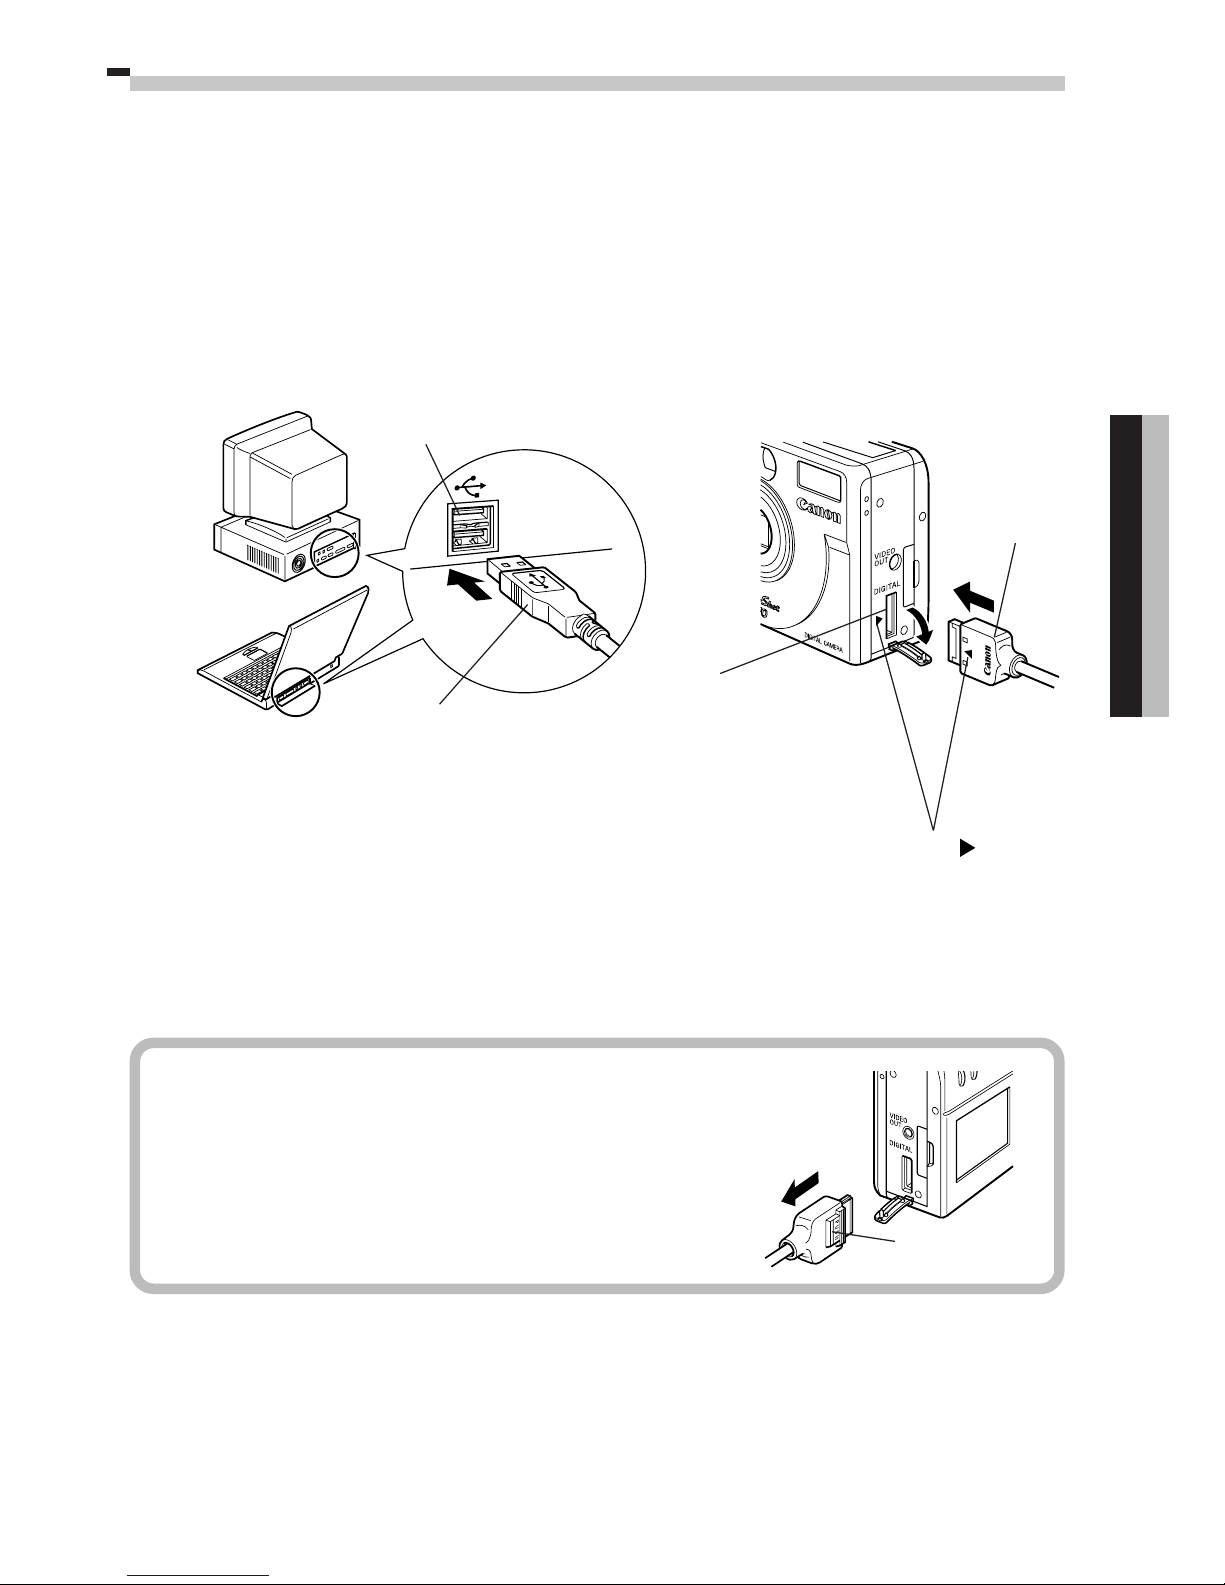
Windows
PUSH Button
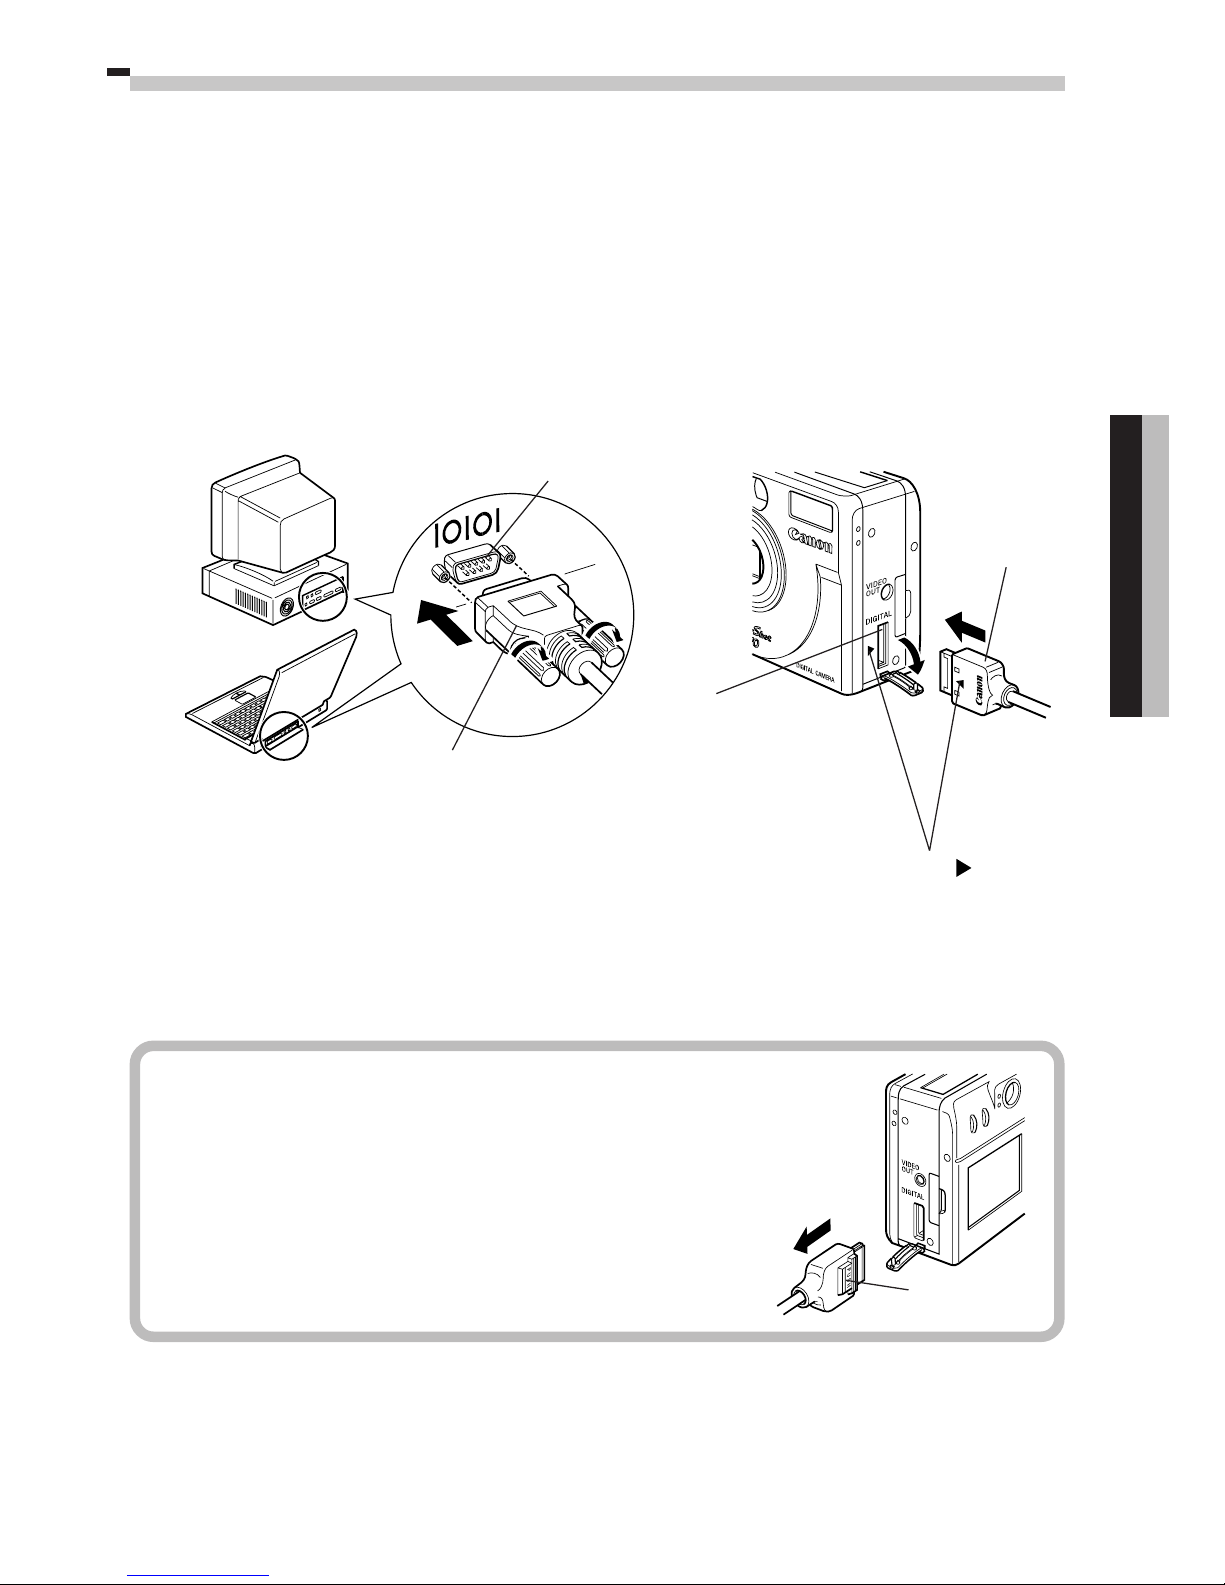
1. Attach the supplied USB cable to a USB port directly on the computer
and to the DIGITAL terminal of the PowerShot S10/S20 as shown below.
• There is no need to turn the camera or computer power off when attaching or
detaching the USB cables.
• Please consult your computer’s manual for the location of the USB ports.
• The camera can be connected to any USB port on computers that feature more
than one.
2. Install the USB driver and the PowerShot USB TWAIN Driver (First connec-
tion only). (➔ pp. 10-12)
USB Port
USB Cable
DIGITAL Terminal
1. Open the DIGITAL
terminal cover by slipping
a fingernail under the top
edge and pulling down.
2. Insert the cable so that the
marks on
the cable and camera align.
Always press the [PUSH] button on the connector to
detach the cable from the camera’s DIGITAL terminal.
USB Cable
Precaution for Unplugging Cables from the
DIGITAL Terminal

10
• Your computer may prompt you to insert the CD-ROM containing your Windows system
software during the installation. Have the Windows disk handy in case it is required.
1.
Attach the PowerShot S10/S20 to the computer's USB port and turn the
mode dial to the
position (➔ p. 8).
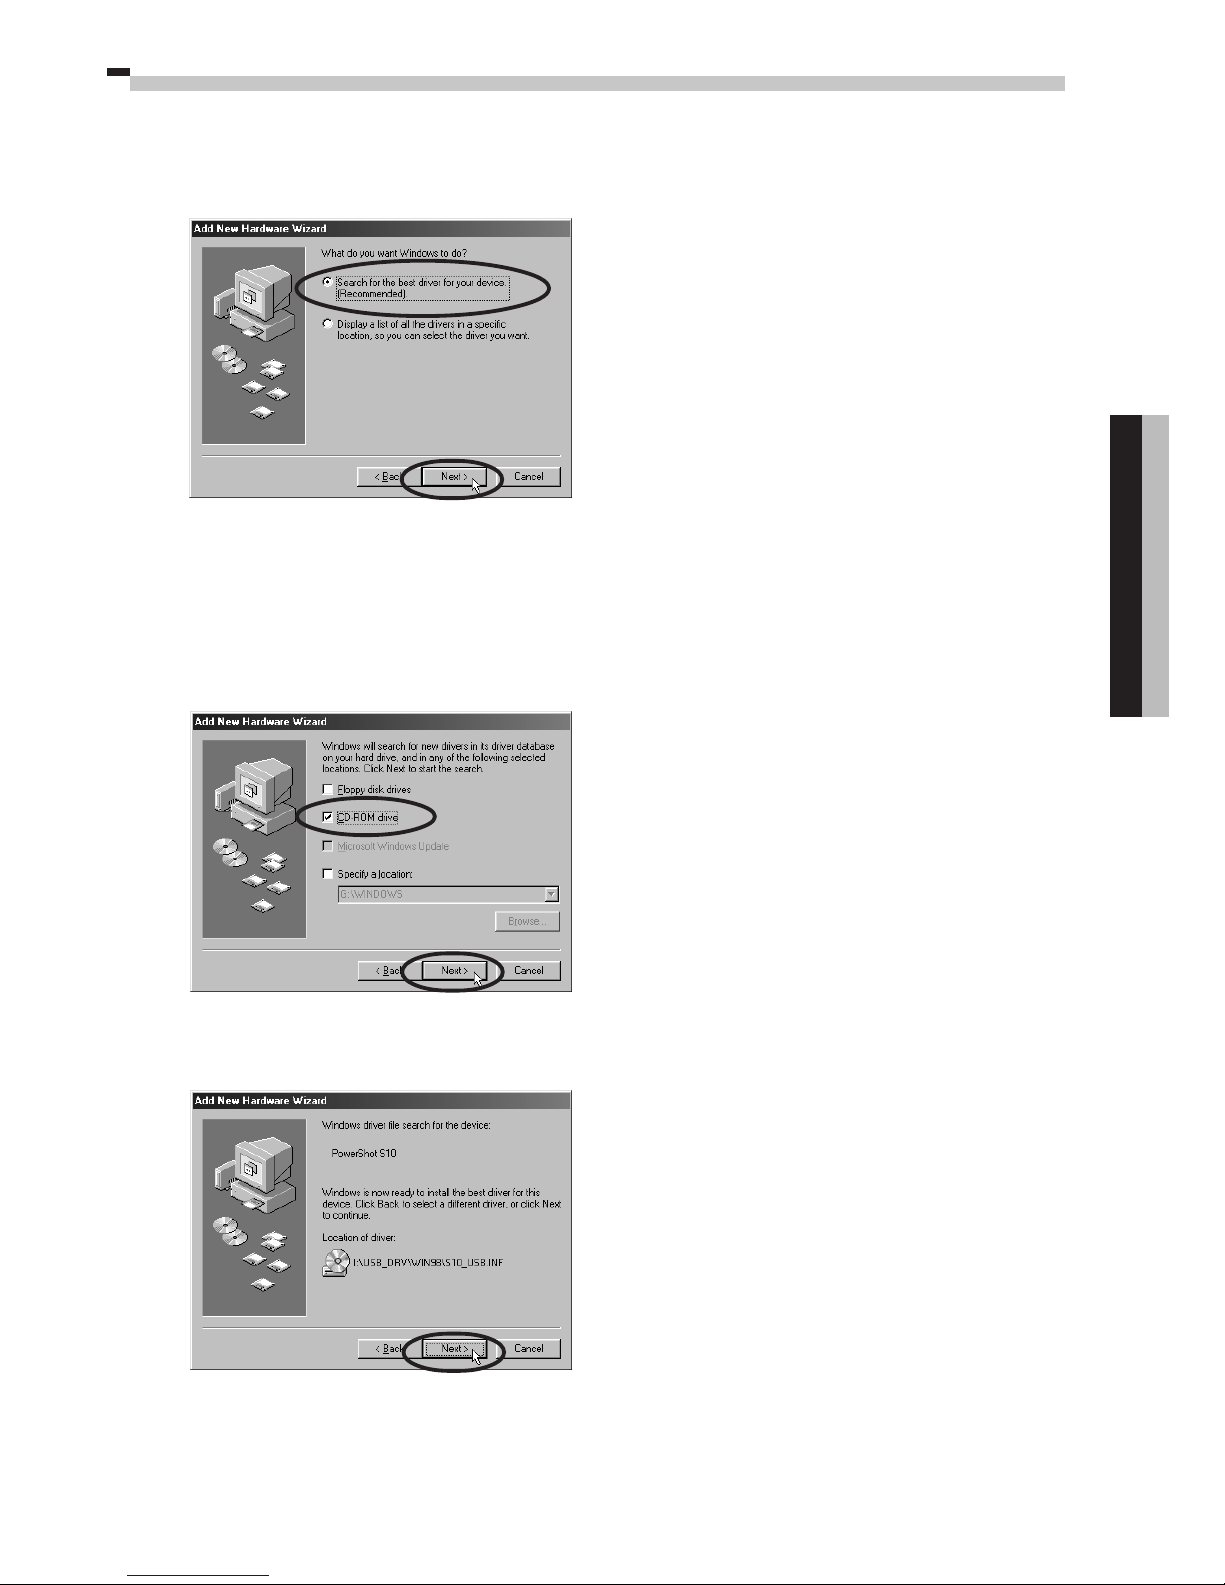
The [Add New Hardware Wizard] will appear after a moment.
2.
Read the dialog and click the [Next] button.
The dialog will change to the search selection dialog.
What to Do if the Installation Does Not Proceed Properly
Read the Troubleshooting the Driver Software Installation section on page 30 if the
installation cancels itself during the procedure, if the installation does not proceed as
described in these procedures, or if you think that the drivers are not properly installed.
Installing the Driver Software
(Preinstalled Windows 98 Systems) First USB Connection Only
Note Regarding Installation
• The driver installation process will install two programs: USB Driver and
PowerShot USB TWAIN Driver.
• Do not cancel the installation partway through. Allow the procedure to finish completely
before exiting. The camera may not operate correctly if the installation is incomplete.
• The driver installation is only required the first time the camera is connected via the
USB interface. It is not required from the second time onward.
11
Windows
3. Select the [Search for the best driver for your device (Recommended)]
option and click the [Next] button.
The dialog will change to one that allows you to specify the search location.
4. Select the [CD-ROM drive] option.
5. Place the PowerShot Solution Disk in the CD-ROM drive and click the
[Next] button.
6.
Read the dialog and click the [Next] button.

12
The file copying process will initiate.
When all the necessary files have been copied, the dialog will state that the
installation is complete.
• Your computer may prompt you to place the CD-ROM containing the Windows
system software into the CD-ROM drive. See the box below.
7. Read the dialog and click the [Finish] button.
The [PowerShot S10 Event] or [PowerShot S20 Event] dialog will display to allow
you to select application programs. (➔ p. 15 Step 4, p. 28 Step 3)
• If a dialog prompts you to restart your computer, remove the Disk from the
CD-ROM drive and restart the computer as prompted.
What to Do If You Are Prompted for the Windows System
Disk during the Driver File Copying Process
If prompted for the Windows system disk, replace the PowerShot Solution Disk with it and
perform the requested procedures. If a dialog states that the [usbscan.sys] file cannot be
found, click the [Browse] button and specify the location as the [WIN98] folder on the
Windows system CD-ROM. Be sure to specify [WIN98] on the Windows system CD-ROM,
not the location for the [usbscan.sys] file that appears in the dialog.
Do not click the [Cancel] button
while copying is in progress.
13
Windows
Connecting to a Serial Port (COM Port)
1.
Shut down the computer and turn the camera’s mode dial to the Off
position.
2. Attach the supplied serial cable to a serial port on the computer and to
the camera’s DIGITAL terminal as shown below.
• Please consult your computer’s manual for the location of the serial port.
3.
Turn on the computer and start Windows.
Precaution for Unplugging Cables from the
DIGITAL Terminal
Serial Cable
Serial Port (COM Port)
DIGITAL Terminal
1. Open the DIGITAL terminal
cover by slipping a
fingernail under the top
edge and pulling down.
2. Insert the cable so that the
marks on
the cable and camera align.
Always press the [PUSH] button on the connector to
detach the cable from the camera’s DIGITAL terminal.
PUSH Button
Serial Cable
14
Connecting via a CF Card Reader or PC Card Slot
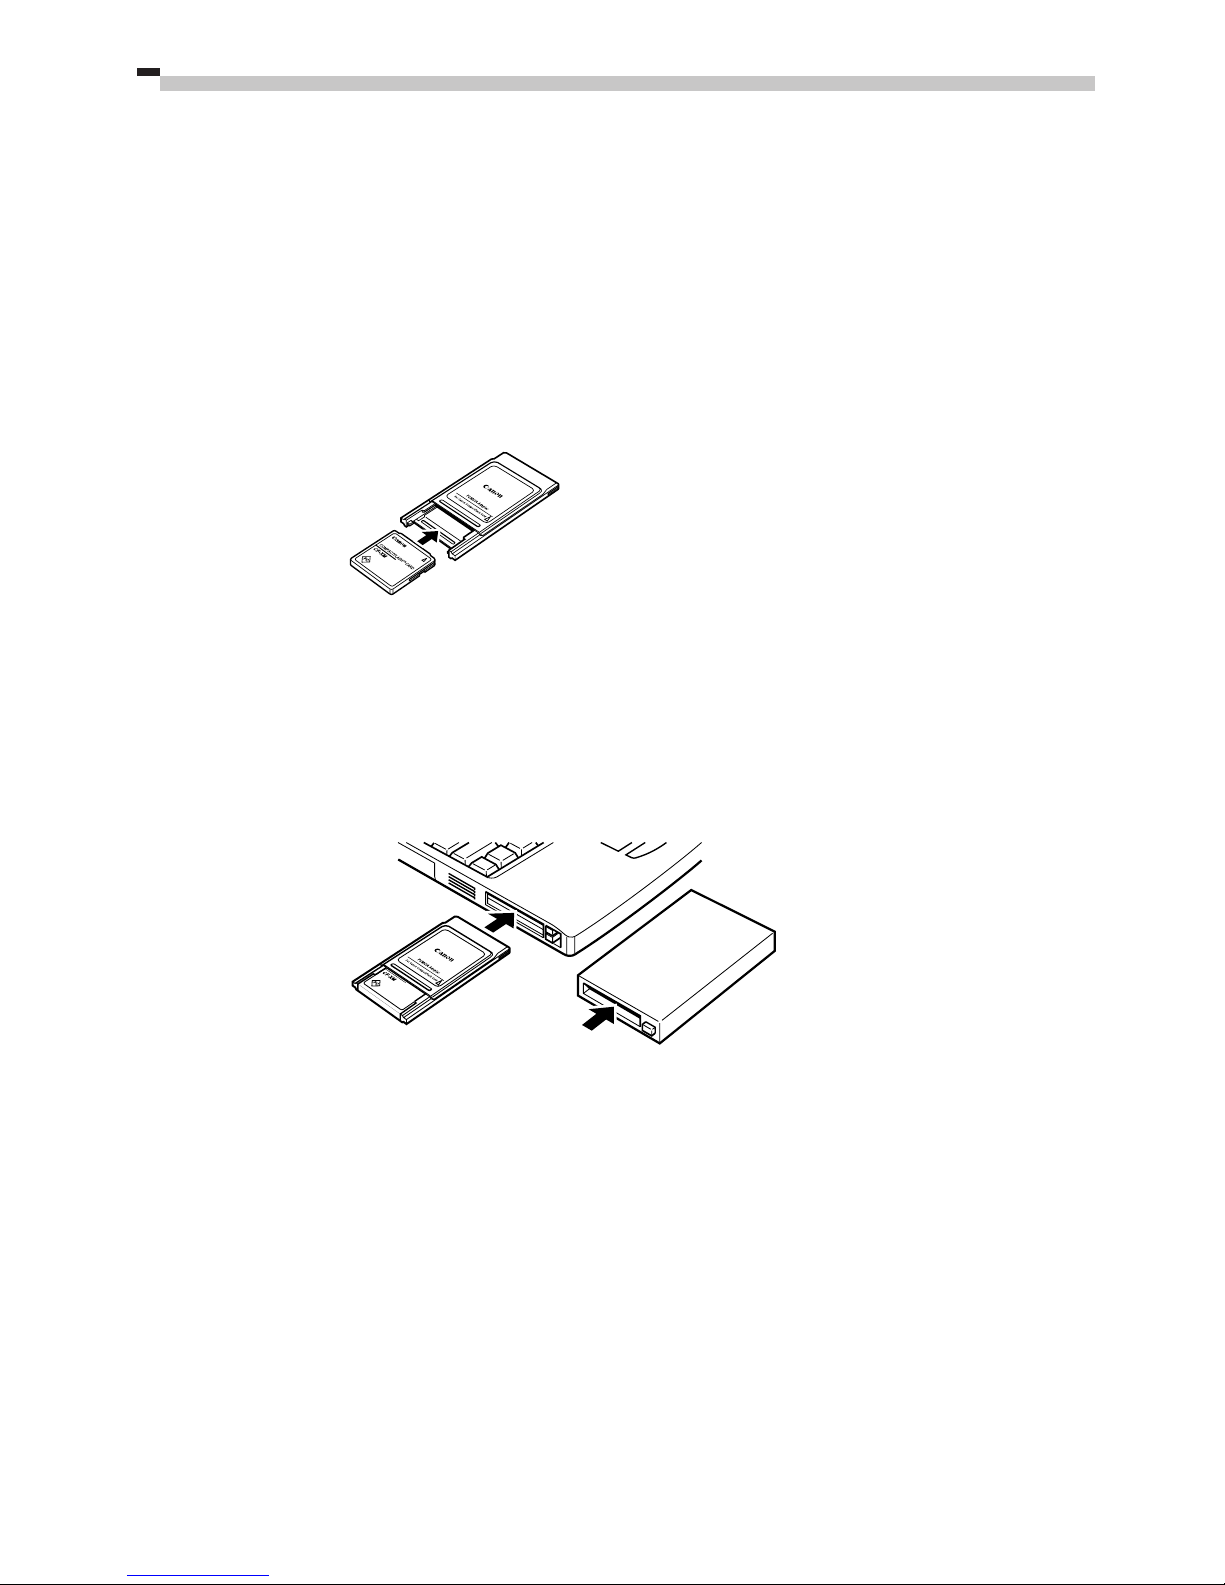
To load images directly from a CF card to a computer, eject the card from the camera,
place it in a separately sold PC card adapter (PCMCIA card adapter) and insert the
assembly into the PC card slot as shown below.
The adapter is not required if your computer is equipped with a CF card reader. Place the
CF card directly into the reader.
1. Place the CF card in the PC card adapter.
2. Insert the assembly into the computer’s PC card slot or a PC card reader
attached to the computer.
The requirements for the power being on or off when the PC card adapter is
inserted differ according to the product. Please consult the manuals accompanying
your equipment.
Place CF Card in Adapter
Insert into Slot

15
Windows
Starting ZoomBrowser EX
1.
Open a connection between the camera and computer.
• Connecting to a USB Port (➔ p. 8)
• Connecting to a Serial Port (➔ p. 13)
• Connecting via a CF Card Reader or PC Card Slot (➔ p. 14)
2.
Turn the camera’s mode dial to the position.
3. Start ZoomBrowser EX.
• Double-click the [Canon PowerShot] icon on the desktop.
• If the [Canon PowerShot] icon does not appear on the
desktop, click the Windows [Start] button and select
[Programs], [Canon PowerShot Utilities], [ZoomBrowser
EX] and [ZoomBrowser EX].
Quick Tips will automatically display. Read these tips to
quickly understand operating procedures.
4. Use one of the three interfaces to display the camera window.
USB Interface
The [PowerShot S10 Event] or [PowerShot
S20 Event] dialog will appear so that you
can select an application to start when you
connect the camera to a USB port. Select
ZoomBrowser EX and click the [OK] button.
ZoomBrowser EX will start and thumbnail
images will display in the camera window.
(➔ p. 17)
From Loading to Printing
This section provides a simple explanation of the procedures for using ZoomBrowser EX to
load and print images. Please refer to the ZoomBrowser EX Help file for more details.
Auto Save and Batteries
When the camera is connected to a computer and powered by a 2CR5 lithium
battery or Battery Pack NB-5H, a message will ask if you wish to remain connected
after approximately five minutes without a camera control being accessed. If you
select [No], the camera will shut down after approximately one minute (PC icon
disappears from the display panel). You can restore the connection by pressing
the shutter button (PC icon displays in the display panel).
Canon PowerShot Icon
16
Settings for Applications that Start Automatically
• Follow the procedures below to start ZoomBrowser EX without first displaying the
[PowerShot S10 Event] or [PowerShot S20 Event] dialog.
1. Open the [My Computer] window while the camera is connected to the
computer via the USB interface.
2. Open the [Control Panel] and select [Scanners and Cameras] and either
[PowerShot S10] or [PowerShot S20].
3. Click the [Properties] button and display the [Events] tab.
4. A list of applications registered for automatic starting will display. Remove the
checks beside every program except for ZoomBrowser EX. Click the [OK] button.
ZoomBrowser EX will now start automatically the next time you connect the camera. If the
[Disable device events] option has a check mark, the automatic start will be turned off.
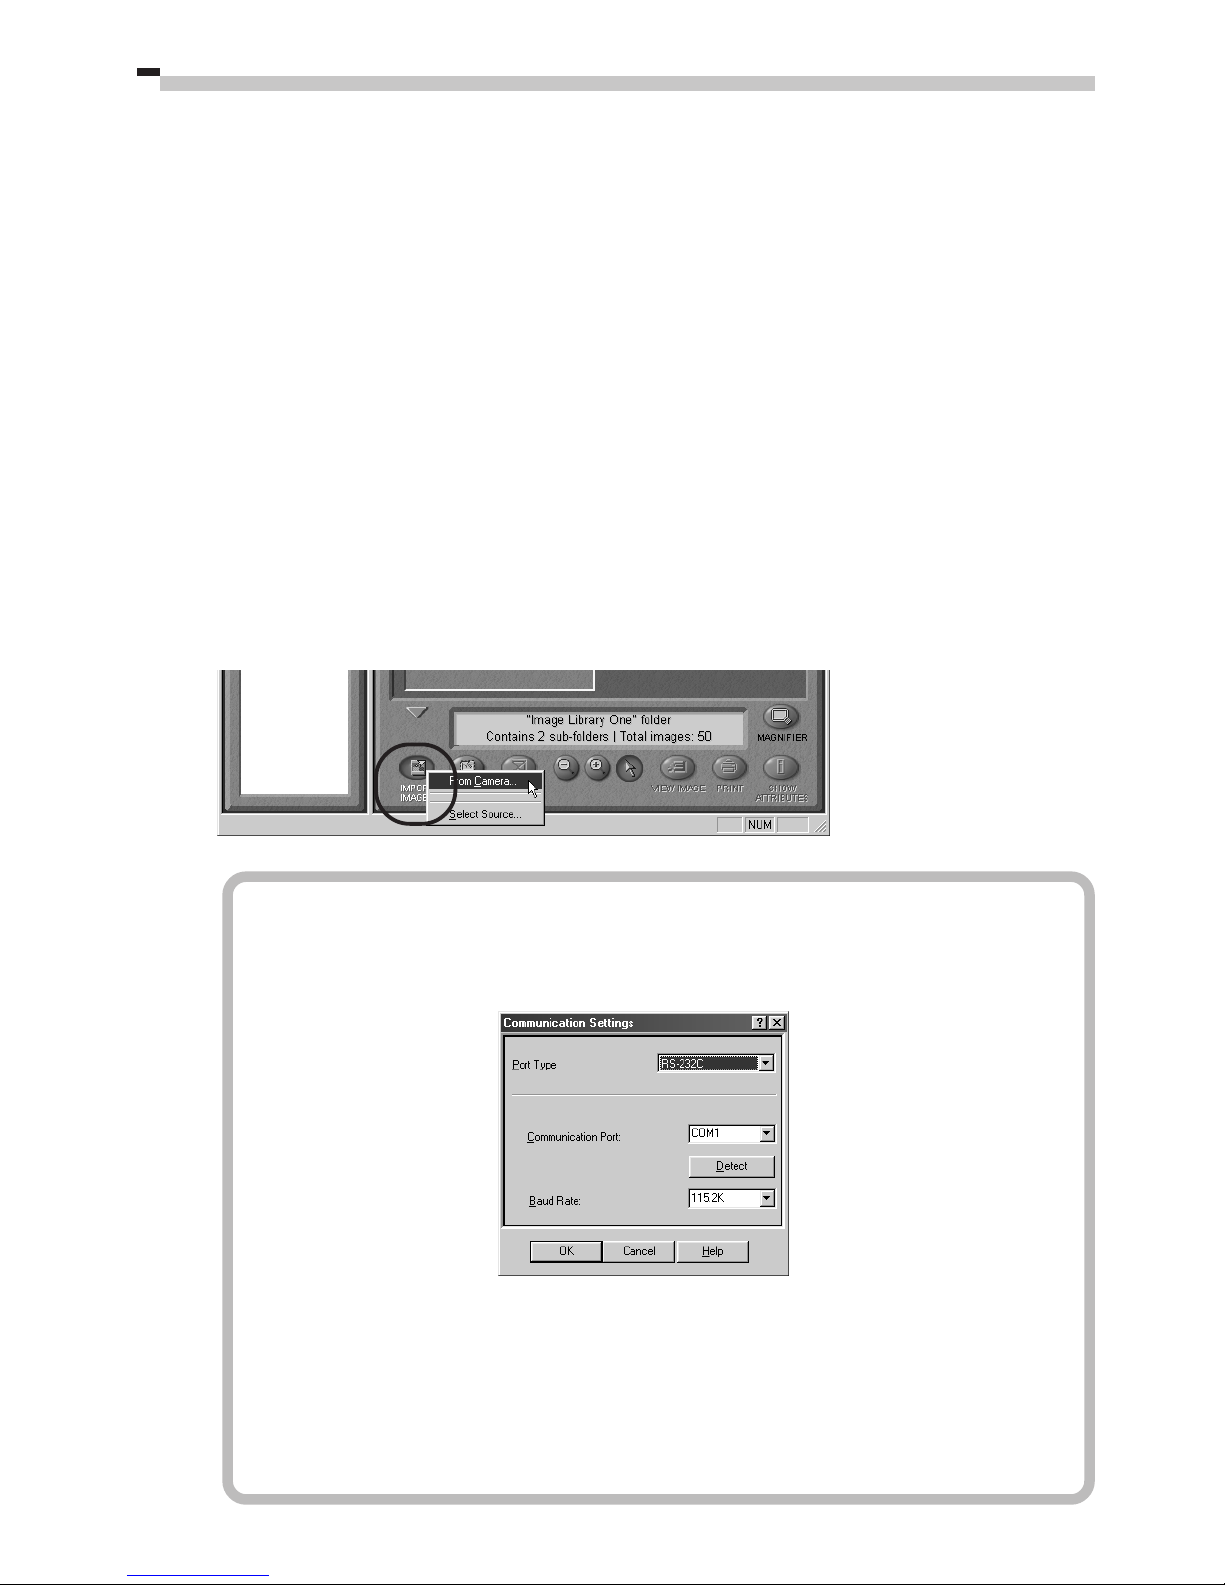
Serial Interface
Click the [IMPORT IMAGES] button and select [From Camera]. Thumbnail images
will display in the camera window. (➔ p. 17)
Having Trouble Connecting to the Computer?
If the settings for the COM port are not correct, the [Communication Settings]
dialog will display. (It will not display if you are connecting via a USB port.)
• Set the port type, port name and baud rate settings and click the [OK] button.
• Select [RS-232C] for the port type. For the port name, select the port to
which the interface cable is connected. If you are uncertain about the port
to which it is connected, click the [Detect] button.
• There is usually no need to change the baud rate setting from 115.2 K,
but if you are having trouble with the connection, try a slower baud rate.
17
Windows
PC Card Reader or PC Card Slot Interface
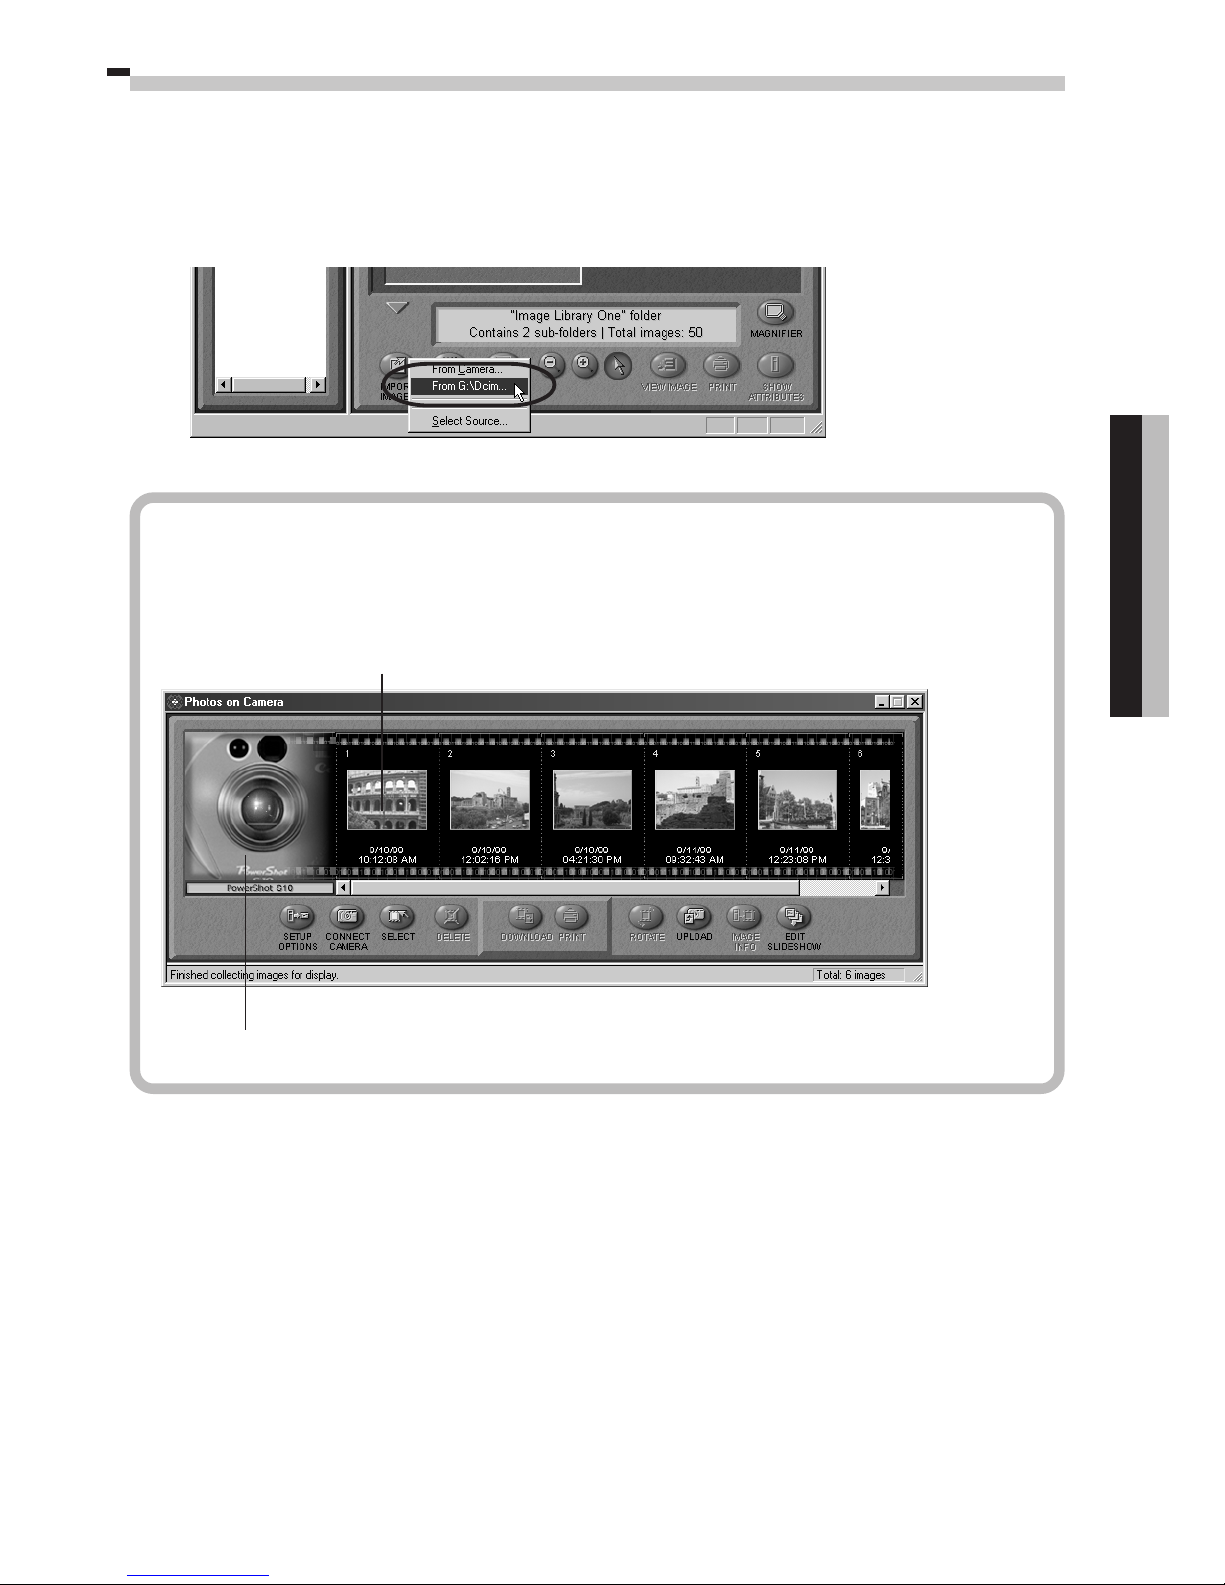
Click the [IMPORT IMAGES] button and select [From Dcim]. Thumbnail images will
display in the camera window.
ZoomBrowser EX Camera Window
The camera window will open when a connection to a camera or CF card is initiated.
Thumbnail (small) images will display.
Thumbnail
The image of the connected camera or CF card will display.
 Loading...