


 Loading...
Remote UI Guide
IMPORTANT:
Read this manual carefully before using your printer. |
ENG |
Save this manual for future reference. |
Remote UI Guide


 How This Manual Is Organized
Chapter 1 Before You Start
Chapter 2 Various Functions of the Remote UI
Chapter 3 Appendix
●Notice
To view the manuals in PDF format, Adobe Reader/Adobe Acrobat Reader is required. If Adobe Reader/Adobe Acrobat Reader is not installed on your system, please download it from the Adobe Systems Incorporated website.
•Considerable effort has been made to ensure that this manual is free of inaccuracies and omissions. However, as we are constantly improving our products, if you need an exact specification, please contact Canon.
•The GIF images on the Remote UI are created using Photoshop by Adobe Systems Incorporated.

Contents
Preface . . . . . . . . . . . . . . . . . . . . . . . . . . . . . . . . . . . . . . . . . . . . . . . . . . . . . . . . . iv How To Use This Manual . . . . . . . . . . . . . . . . . . . . . . . . . . . . . . . . . . . . . . . . . . . iv
Symbols Used in This Manual . . . . . . . . . . . . . . . . . . . . . . . . . . . . . . . . . . . . . . iv Buttons Used in This Manual . . . . . . . . . . . . . . . . . . . . . . . . . . . . . . . . . . . . . . . iv Displays Used in This Manual . . . . . . . . . . . . . . . . . . . . . . . . . . . . . . . . . . . . . . v Abbreviations Used in This Manual . . . . . . . . . . . . . . . . . . . . . . . . . . . . . . . . . . v
Legal Notices . . . . . . . . . . . . . . . . . . . . . . . . . . . . . . . . . . . . . . . . . . . . . . . . . . . . .vi
Trademarks. . . . . . . . . . . . . . . . . . . . . . . . . . . . . . . . . . . . . . . . . . . . . . . . . . . . . vi Copyright . . . . . . . . . . . . . . . . . . . . . . . . . . . . . . . . . . . . . . . . . . . . . . . . . . . . . . vi Disclaimers. . . . . . . . . . . . . . . . . . . . . . . . . . . . . . . . . . . . . . . . . . . . . . . . . . . . vii
Chapter 1 Before You Start
Features and Benefits of the Remote UI . . . . . . . . . . . . . . . . . . . . . . . . . . . . . 1-2 System Requirements . . . . . . . . . . . . . . . . . . . . . . . . . . . . . . . . . . . . . . . . . . . . 1-5 Starting the Remote UI . . . . . . . . . . . . . . . . . . . . . . . . . . . . . . . . . . . . . . . . . . . 1-6
Starting the Remote UI. . . . . . . . . . . . . . . . . . . . . . . . . . . . . . . . . . . . . . . . . . 1-6 Logging On the Remote UI . . . . . . . . . . . . . . . . . . . . . . . . . . . . . . . . . . . . . . 1-8
Screen Layout of the Remote UI. . . . . . . . . . . . . . . . . . . . . . . . . . . . . . . . . . . 1-11
Chapter 2 Various Functions of the Remote UI
Displaying/Managing the Printer Status (Device Manager) . . . . . . . . . . . . . . 2-2
Display Procedure . . . . . . . . . . . . . . . . . . . . . . . . . . . . . . . . . . . . . . . . . . . . . 2-3 Displaying the Current Status ([Status] Page) . . . . . . . . . . . . . . . . . . . . . . . . 2-4 Displaying/Changing the Printer Information ([Information] Page) . . . . . . . . 2-11 Confirming the Availabilities of the Optional Accessories ([Features] Page) . . . 2-14 Displaying/Changing the Network Settings ([Network] Page) . . . . . . . . . . . 2-15
Displaying/Operating the Jobs (Job Manager) . . . . . . . . . . . . . . . . . . . . . . . 2-17
Displaying/Operating the Print Jobs (Pause/Resume/Delete, etc.) . . . . . . . 2-17 Displaying/Operating the Jobs Stored in a Box (Resume/Delete) . . . . . . . . 2-21
Operating Procedure . . . . . . . . . . . . . . . . . . . . . . . . . . . . . . . . . . . . . . . 2-21 Changing the Box Settings. . . . . . . . . . . . . . . . . . . . . . . . . . . . . . . . . . . 2-25
Displaying the Print Log Page . . . . . . . . . . . . . . . . . . . . . . . . . . . . . . . . . . . 2-28
Printing Files Directly (Direct Print) . . . . . . . . . . . . . . . . . . . . . . . . . . . . . . . . 2-30 Displaying/Changing the Printer Settings (Device Settings). . . . . . . . . . . . 2-31
Operating Procedure . . . . . . . . . . . . . . . . . . . . . . . . . . . . . . . . . . . . . . . . . . 2-32 Changing Date and Time . . . . . . . . . . . . . . . . . . . . . . . . . . . . . . . . . . . . . . . 2-33
ii

Displaying/Changing the Links (Support Links) . . . . . . . . . . . . . . . . . . . . . .2-38
Display Procedure . . . . . . . . . . . . . . . . . . . . . . . . . . . . . . . . . . . . . . . . . . . . .2-38
Changing the Links . . . . . . . . . . . . . . . . . . . . . . . . . . . . . . . . . . . . . . . . . . . .2-39
Chapter 3 Appendix
Changing the Remote UI Settings . . . . . . . . . . . . . . . . . . . . . . . . . . . . . . . . . . .3-2 Creating/Registering/Changing a Key and Its Certificate . . . . . . . . . . . . . . . .3-4
Creating a Key and Its Certificate . . . . . . . . . . . . . . . . . . . . . . . . . . . . . . . . . .3-6 Installing a Key/Certificate File on the Printer . . . . . . . . . . . . . . . . . . . . . . . .3-12 Registering a Key and Its Certificate in the Printer . . . . . . . . . . . . . . . . . . . .3-14 Specifying a Key as the Default Key . . . . . . . . . . . . . . . . . . . . . . . . . . . . . . .3-16 Checking a Certificate . . . . . . . . . . . . . . . . . . . . . . . . . . . . . . . . . . . . . . . . . .3-17 Deleting a Key and Its Certificate. . . . . . . . . . . . . . . . . . . . . . . . . . . . . . . . . .3-19 Deleting a Key/Certificate File Installed on the Printer. . . . . . . . . . . . . . . . . .3-20
Changing the Job Log Display Settings . . . . . . . . . . . . . . . . . . . . . . . . . . . . .3-21
Printing an Encrypted Secured Print Job
(Only When the Hard Disk Is Installed) . . . . . . . . . . . . . . . . . . . . . . . . . . . . . .3-23
Index . . . . . . . . . . . . . . . . . . . . . . . . . . . . . . . . . . . . . . . . . . . . . . . . . . . . . . . . . .3-27
iii

Preface
Thank you for purchasing this Canon product.
Please read this manual thoroughly before operating the printer in order to familiarize yourself with its capabilities, and to make the most of its many functions.
After reading this manual, store it in a safe place for future reference.
How To Use This Manual
Symbols Used in This Manual
The following symbols are used in this manual to indicate operational requirements or clarification.
IMPORTANT Indicates operational requirements and restrictions. Be sure to read these items carefully in order to operate the printer correctly, and to
|
avoid damage to the printer. |
|
NOTE |
Indicates a clarification of an operation, or contains additional |
|
explanations for a procedure. Reading these notes is highly |
||
|
||
|
recommended. |
Buttons Used in This Manual
The following button names are a few examples of how buttons to be pressed are expressed in this manual:
•Buttons on Computer Operation Screen: [Button Name]
Example: [OK] [Change]
iv
Displays Used in This Manual
Displays used in this manual may differ from those on your computer depending on the system environment.
The buttons which you should press are marked with a  as shown below. When multiple buttons can be pressed on the screenshot of computer operation screen, all buttons are marked. Select the button which suits your needs.
1 Select [Administrator Mode] or [End-User Mode].
Click this button for operation.
Abbreviations Used in This Manual
In this manual, product names and model names are abbreviated as follows:
Microsoft Windows Vista operating system: |
Windows Vista |
Microsoft Windows operating system: |
Windows |
v

Legal Notices
Trademarks
Canon, the Canon logo, and LBP are trademarks of Canon Inc.
Adobe, Adobe Acrobat, Adobe Reader, and Photoshop are trademarks of Adobe Systems Incorporated.
Microsoft, Windows, and Windows Vista are trademarks or registered trademarks of Microsoft Corporation in the U.S. and/or other countries.
Netscape and Netscape Navigator are trademarks of Netscape Communications Corporation.
RSA is a trademark of RSA Security Inc.
Ethernet is a trademark of Xerox Corporation.
UNIX is a registered trademark of The Open Group in the United States and other countries.
Other product and company names herein may be the trademarks of their respective owners.
Copyright
Copyright 2007 by Canon Inc. All rights reserved.
No part of this publication may be reproduced or transmitted in any form or by any means, electronic or mechanical, including photocopying and recording, or by any information storage or retrieval system without the prior written permission of Canon Inc.
vi

Disclaimers
The information in this manual is subject to change without notice.
CANON INC. MAKES NO WARRANTY OF ANY KIND WITH REGARD TO THIS MATERIAL, EITHER EXPRESS OR IMPLIED, EXCEPT AS PROVIDED HEREIN, INCLUDING WITHOUT LIMITATION, THEREOF, WARRANTIES AS TO MARKETABILITY, MERCHANTABILITY, FITNESS FOR A PARTICULAR PURPOSE OF USE OR AGAINST INFRINGEMENT OF ANY PATENT. CANON INC. SHALL NOT BE LIABLE FOR ANY DIRECT, INCIDENTAL, OR CONSEQUENTIAL DAMAGES OF ANY NATURE, OR LOSSES OR EXPENSES RESULTING FROM THE USE OF THIS MATERIAL.
vii

viii
|
|
|
|
|
|
Before You Start |
1 |
|
|
CHAPTER |
|
|
|
|
This chapter describes the features of the Remote UI and procedure for starting the Remote
UI.
Features and Benefits of the Remote UI . . . . . . . . . . . . . . . . . . . . . . . . . . . . . . . . . . . . . 1-2
System Requirements . . . . . . . . . . . . . . . . . . . . . . . . . . . . . . . . . . . . . . . . . . . . . . . . . . . 1-5
Starting the Remote UI . . . . . . . . . . . . . . . . . . . . . . . . . . . . . . . . . . . . . . . . . . . . . . . . . . . 1-6
Starting the Remote UI . . . . . . . . . . . . . . . . . . . . . . . . . . . . . . . . . . . . . . . . . . . . . . . . . . . . . . . . .1-6
Logging On the Remote UI . . . . . . . . . . . . . . . . . . . . . . . . . . . . . . . . . . . . . . . . . . . . . . . . . . . . .1-8
Screen Layout of the Remote UI. . . . . . . . . . . . . . . . . . . . . . . . . . . . . . . . . . . . . . . . . . . 1-11
1-1
1
Before You Start
Features and Benefits of the Remote UI
The Remote UI is software that allows you to manage the printer using a web browser. By accessing the printer from the web browser via a TCP/IP network, you can check the printer status, operate jobs, and specify various settings. The Remote UI has the following features.
NOTE
Depending on the printer model or availability of the optional accessories for the printer, the display screen images and the controllable or specifiable options vary. For more details, see "Chapter 2 Various Functions of the Remote UI".
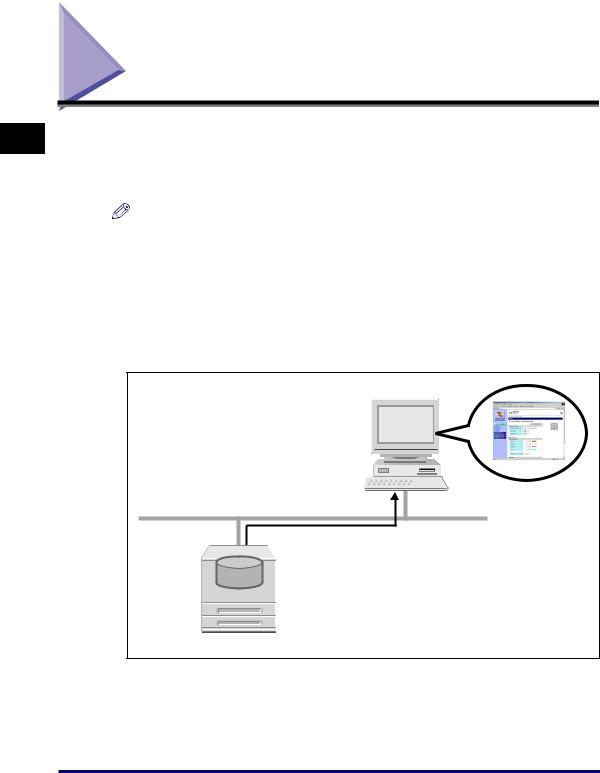
■Software other than a web browser is not required.
Because the software required for using the Remote UI (a web server) is built in this printer, you do not need to have software other than a web browser ready. Running the web browser and specifying the IP address display the Remote UI screen and allows you to use the Remote UI.
Web Browser
TCP/IP (HTTP)
Web
Server
Remote UI
Printer
1-2 Features and Benefits of the Remote UI
■You can check the printer status from a computer on the network.
The Remote UI allows you to access the printer via a network and display the current status, various information, and job processing.You can manage the printer from a remote computer without moving to the printer.
1
Before You Start
Features and Benefits of the Remote UI |
1-3 |
■You can specify or operate various printer settings from a computer.
The Remote UI allows you to pause or resume jobs, operate the jobs in the boxes, and specify various settings. You can operate or specify the settings for the printer from the computer without using the printer's control panel. There are Administrator Mode and End-User Mode, and the Administrator mode allows only the administrator to perform the settings and operation related to the printer management.
1
Before You Start
1-4 Features and Benefits of the Remote UI

System Requirements
Operation of the Remote UI in the following system environment is guaranteed.
Web Browser |
Netscape Navigator 6.0 or later |
|
Internet Explorer 4.01SP1 or later |
Operating System |
An operating system on which the above web browser can run |
Display |
Resolution: 800 x 600 pixels or more |
|
Display colors: 256 or more |
NOTE
Software other than the above one, such as a web server, is not required. (A web server is built in the printer.)
1
Before You Start
System Requirements |
1-5 |
1
Before You Start
Starting the Remote UI
Starting the Remote UI
Start the Remote UI using a web browser.
1 Start the web browser.
2 Enter the following URL in the address entry field, then press the [ENTER] key on your keyboard.
http://<the IP address of this printer>/
When you want to specify the settings with the Remote UI using SSL encrypted communication, enter "https://<the IP address or name of the printer>". If the [Security Alert] dialog box or other dialog box appears, follow the directions in the message.
1-6 Starting the Remote UI
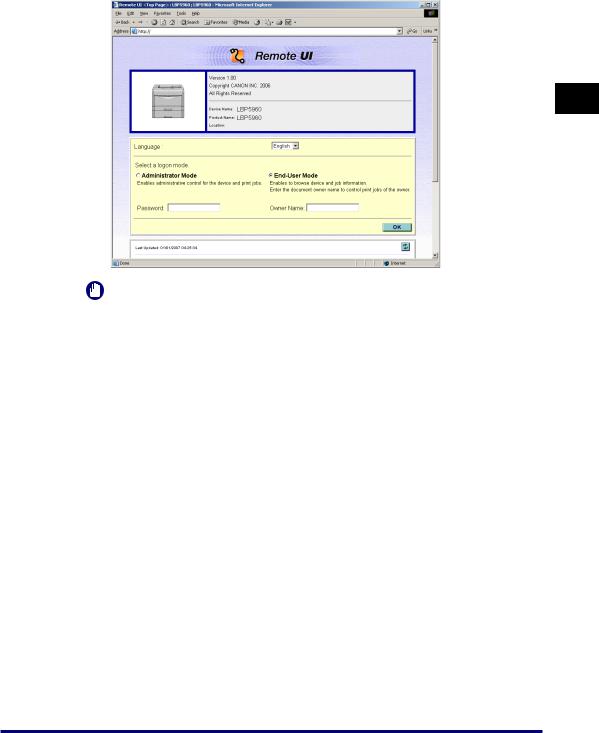
The screen of the Remote UI is displayed.
1
Before You Start
IMPORTANT
•If you are not sure about the IP address of this printer, ask the administrator of the printer.
•If the host name of the printer is registered in the DNS server, you can enter ["hostname"."domain name"] instead of the IP address.
Example: http://my_printer.xy_dept.company.com/
•If the screen of the Remote UI is not displayed, make sure that the entered IP address or ["hostname"."domain name"] is correct.When the screen of the Remote UI is not displayed even if the entered address is correct, consult your network administrator.
•SSL encrypted communication can be used only when an optional hard disk is installed. To use SSL encrypted communication, a key and its certificate need to have been created and the key needs to have been registered as the default key. For details on the SSL encrypted communication function and the procedure for registering a key, see "Creating/Registering/Changing a Key and Its Certificate," on
p.3-4.
•If the Remote UI does not start when SSL is enabled, there is a possibility that the file related to key management is broken. From the control panel, select INTERFACE MENU NETWORK MENU REMOTE UI SET. SSL, and then make sure that OFF is specified. After that, restart the printer, and then regenerate the key and certificate and specify the settings for SSL from the Remote UI. After the key management and SSL setting, restart the printer again.
•You cannot connect the computer to the printer via a proxy server. If you are using
aproxy server, perform the following setting. (The setting varies depending on the network environment. Consult your network administrator.)
-On the settings for the proxy server of the web browser, add the IP address of this printer to [Exceptions] (The addresses that do not use the proxy server).
Starting the Remote UI |
1-7 |

1
Before You Start
•Configure the web browser so that you can use Cookie.
•If multiple Remote UIs are running simultaneously, the latest setting is effective. It is recommended that only one Remote UI should be running at a time.
Logging On the Remote UI
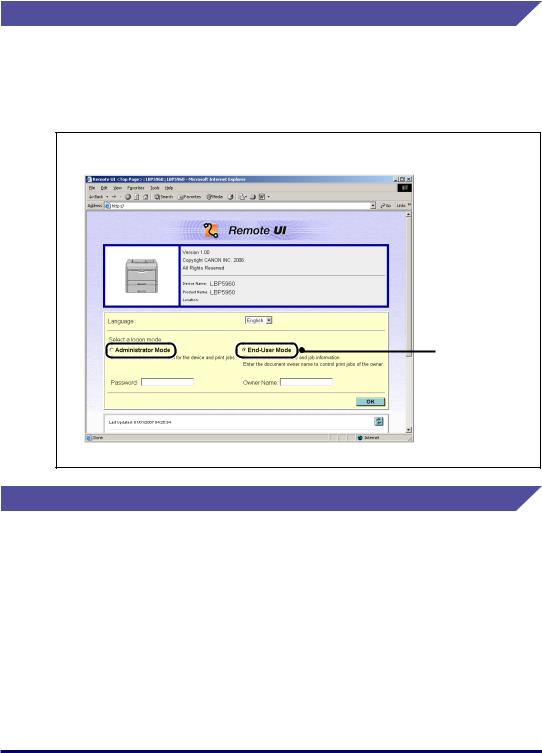
You log on to the Remote UI. Log on in [Administrator Mode] or in [End-User Mode].
■Administrator Mode
By logging on in Administrator Mode, you can perform all the operations and settings of the Remote UI. When you log on to the Remote UI, you need to enter the password specified in [Administrator Settings] (See p. 2-13) in the [Information] page in [Device Manager].
NOTE
The password is not specified by default. Log on to the Remote UI without entering a password.
■End-User Mode
By logging on in End-User Mode, you can check the device status, confirm the settings, and view the jobs. Although it is possible to log on without entering any value for [Owner Name]/[User Name], logging on by entering the owner name enables to delete the jobs of the owner whose name corresponds with the owner name.
NOTE
The value to be entered for [Owner Name]/[User Name] is the user name you entered when logging on to the computer.
1-8 Starting the Remote UI

1 Select [Administrator Mode] or [End-User Mode].
1
Before You Start
2 If you select [Administrator Mode], enter the values for [Password], and if you select [End-User Mode], enter the value for [Owner Name]/[User Name] as needed.
 NOTE
NOTE
[Owner Name] is displayed as [User Name] depending on the printer model you are using.
Starting the Remote UI |
1-9 |

3 Click [OK].
You log on to the Remote UI.
1
Before You Start
1-10 Starting the Remote UI
Screen Layout of the Remote UI
When you log on to the Remote UI, the following screen is displayed.
1
Before You Start
■ Buttons displayed on the left side of the screen
Goes back to the Top page (Log-on page) of the Remote UI.
Displays the [Device Manager] menu. The [Device Manager] menu consists of the [Status], [Information], [Features], and [Network] pages.
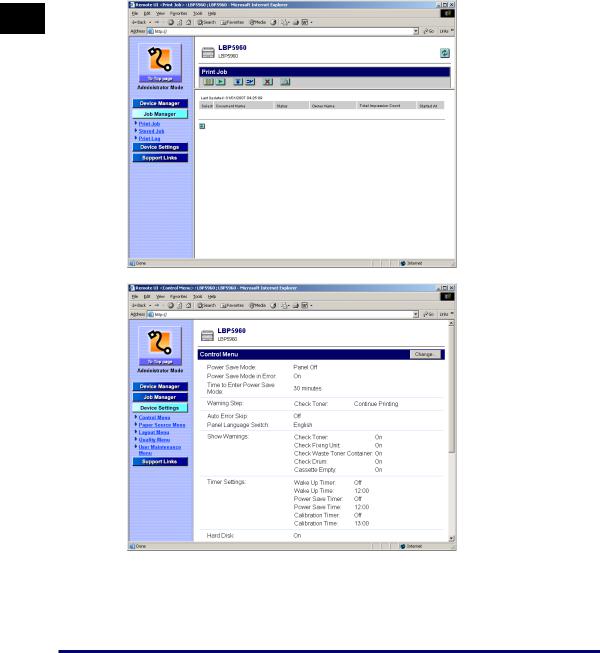
Displays the [Job Manager] menu. The [Job Manager] menu consists of the [Print Job], [Stored Job]*1, and [Print Log] pages.
Displays the [Direct Print] menu*2.
Displays the [Device Settings] menu. The [Device Settings] menu consists of the [Control Menu], [Paper Source Menu], [Layout Menu], [Quality Menu], and [User Maintenance Menu] pages.
Displays the [Support Links] page.
*1 Displayed only when an optional hard disk is installed.
*2 Not displayed depending on the printer model you are using.
Screen Layout of the Remote UI |
1-11 |
1
Before You Start
■ Buttons displayed on the right side of the screen
Updates the information in the currently displayed page to the latest one. The currently displayed page is not updated automatically in the Remote UI. Obtain the latest information about the device by clicking this button.
If the page is scrolled down, moves the scroll box up to the top of the page.
Displays the previous page.
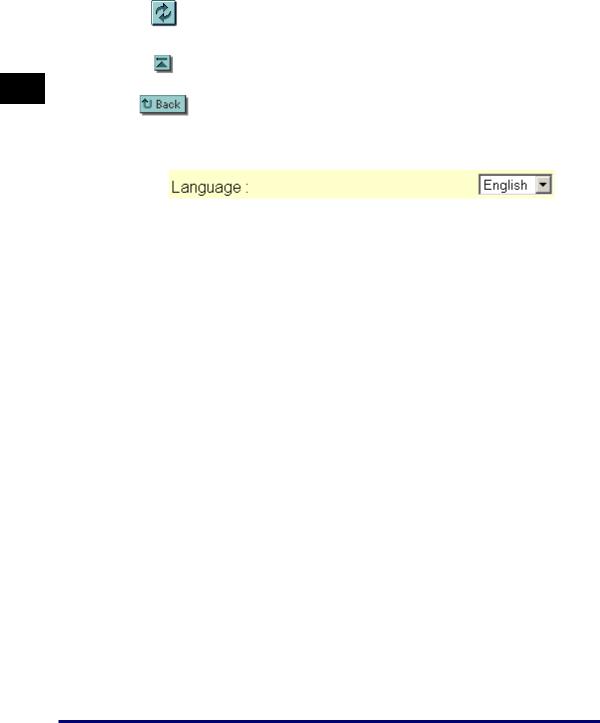
■ Language Switch (Top Page only)
You can select the display language for the Remote UI. When the Remote UI is displayed for the first time, the display language is selected according to the display language setting of the printer's control panel.
1-12 Screen Layout of the Remote UI

Various Functions of the Remote UI 2
CHAPTER
This chapter describes the printer information that can be displayed and the options that can be specified in the Remote UI.
Displaying/Managing the Printer Status (Device Manager) . . . . . . . . . . . . . . . . . . . . . . . 2-2
Display Procedure . . . . . . . . . . . . . . . . . . . . . . . . . . . . . . . . . . . . . . . . . . . . . . . . . . . . . . . . . . . .2-3 Displaying the Current Status ([Status] Page) . . . . . . . . . . . . . . . . . . . . . . . . . . . . . . . . . . . . . . .2-4 Displaying/Changing the Printer Information ([Information] Page) . . . . . . . . . . . . . . . . . . . . . .2-11 Confirming the Availabilities of the Optional Accessories ([Features] Page) . . . . . . . . . . . . . .2-14 Displaying/Changing the Network Settings ([Network] Page) . . . . . . . . . . . . . . . . . . . . . . . . . .2-15
Displaying/Operating the Jobs (Job Manager) . . . . . . . . . . . . . . . . . . . . . . . . . . . . . . . . 2-17
Displaying/Operating the Print Jobs (Pause/Resume/Delete, etc.) . . . . . . . . . . . . . . . . . . . . . .2-17 Displaying/Operating the Jobs Stored in a Box (Resume/Delete) . . . . . . . . . . . . . . . . . . . . . . .2-21 Displaying the Print Log Page . . . . . . . . . . . . . . . . . . . . . . . . . . . . . . . . . . . . . . . . . . . . . . . . . .2-28
Printing Files Directly (Direct Print). . . . . . . . . . . . . . . . . . . . . . . . . . . . . . . . . . . . . . . . . 2-30 Displaying/Changing the Printer Settings (Device Settings) . . . . . . . . . . . . . . . . . . . . . . 2-31
Operating Procedure . . . . . . . . . . . . . . . . . . . . . . . . . . . . . . . . . . . . . . . . . . . . . . . . . . . . . . . . .2-32
Changing Date and Time . . . . . . . . . . . . . . . . . . . . . . . . . . . . . . . . . . . . . . . . . . . . . . . . . . . . . .2-33
Displaying/Changing the Links (Support Links) . . . . . . . . . . . . . . . . . . . . . . . . . . . . . . . 2-38
Display Procedure . . . . . . . . . . . . . . . . . . . . . . . . . . . . . . . . . . . . . . . . . . . . . . . . . . . . . . . . . . .2-38
Changing the Links . . . . . . . . . . . . . . . . . . . . . . . . . . . . . . . . . . . . . . . . . . . . . . . . . . . . . . . . . .2-39
2-1

2
Various Functions of the Remote UI
Displaying/Managing the Printer Status (Device Manager)
By obtaining information from the printer, you can display the current printer status and printer information in the Remote UI. If you have logged on in Administrator Mode, you can perform utility work, change the settings for the security or network etc. from the Remote UI. [Device Manager] consists of the following four pages.
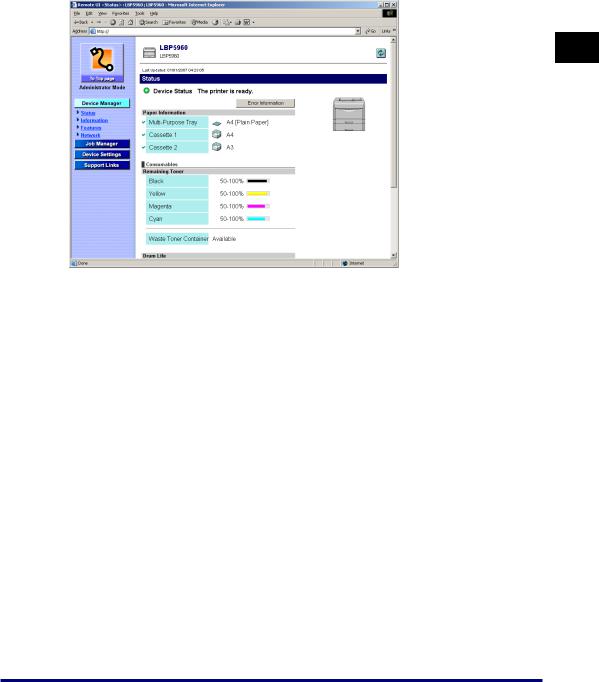
■[Status] Page
Displays the current printer status. You can also perform Configuration Page Print and a soft reset.
■[Information] Page
Displays the device name and information about the installation site and management. You can also change the device information and management settings.
■[Features] Page
Displays the capacity of the RAM, availability of the optional accessories, and total number of the printed pages.
■[Network] Page
Displays the settings for the network. You can also change the network settings.
2-2 Displaying/Managing the Printer Status (Device Manager)
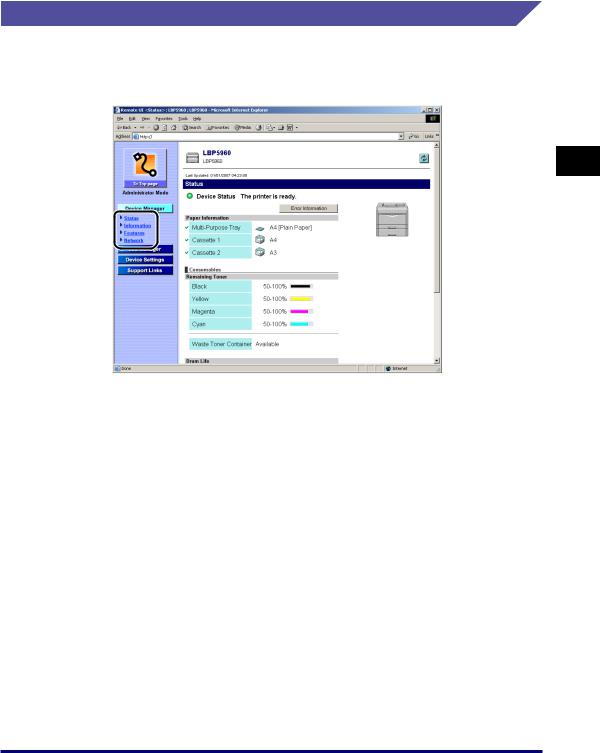
Display Procedure
1 Select any one of [Status], [Information], [Features], or [Network] from the [Device Manager] menu.
2
Various Functions of the Remote UI
Displaying/Managing the Printer Status (Device Manager) |
2-3 |
2
Various Functions of the Remote UI
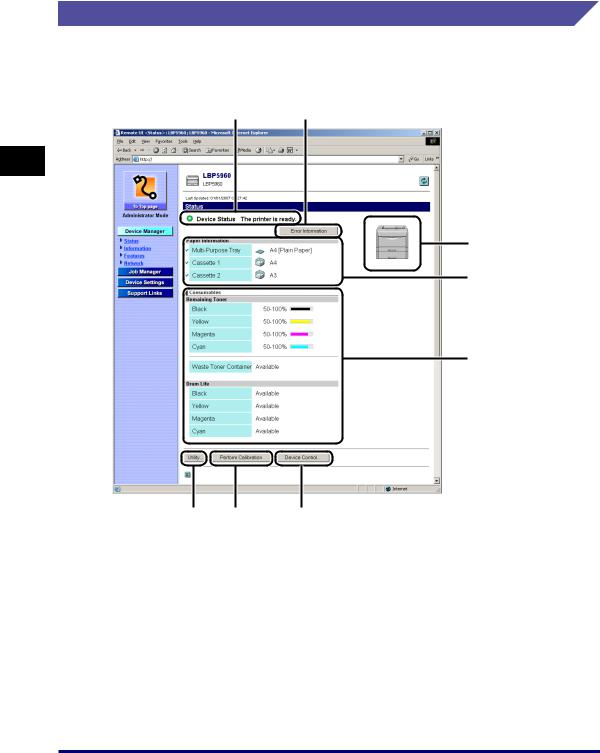
Displaying the Current Status ([Status] Page)
Displays the current printer status such as the amount of paper or toner remaining. If you have logged on in Administrator Mode, you can perform Configuration Page Print or a soft reset.
ab
c
d
e
h g f
2-4 Displaying/Managing the Printer Status (Device Manager)
a[Device Status]
Displays the current printer status with the indicator and a status message. The colors of the indicator indicate the printer status as follows.
Color of Indicator |
Printer Status |
Remedy |
|
|
|
|
|
(Gray) |
Offline (The printer does not |
Place the printer online and |
|
receive print data) |
print. |
||
|
|||
|
|
|
|
(Green) |
Normal (The printer is ready to |
|
|
print) |
|
||
|
|
||
|
|
|
|
|
The printer requires some |
Click [Error Information], then |
|
(Yellow) |
remedy although the job is not |
follow the displayed directions. |
|
|
affected. (A Warning message is |
|
|
|
being displayed) |
|
|
|
|
|
|
|
Cannot print for some reason |
|
|
(Red) |
(An Error message is being |
|
|
|
displayed) |
|
|
|
|
|
b[Error Information]
When clicked, displays information about the error occurring in the printer.
c[Device Image]
Displays an image of the printer. The displayed image varies depending on the availability of the paper source option.
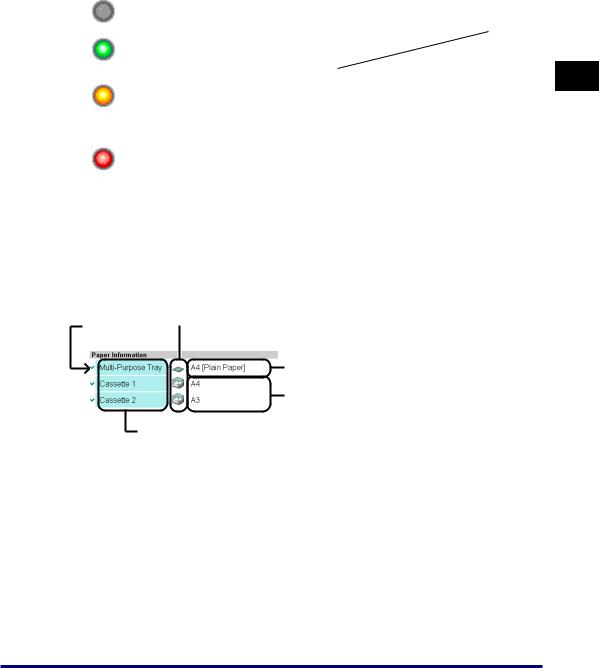
d[Paper Information]
Displays information about the paper source.
(A) (B)
(B)
(C)
(D)
 (E)
(E)
(A): The available paper sources
(B): The icons that indicate the amount of paper remaining in each paper source (C): The paper sizes and paper types*
*Depending on the system environment, paper types are not displayed. (D): The paper sizes in each paper source on the upper; paper names on the
lower*
*The paper names are displayed only when they are specified. (E): The names of each paper source
2
Various Functions of the Remote UI
Displaying/Managing the Printer Status (Device Manager) |
2-5 |
2
Various Functions of the Remote UI
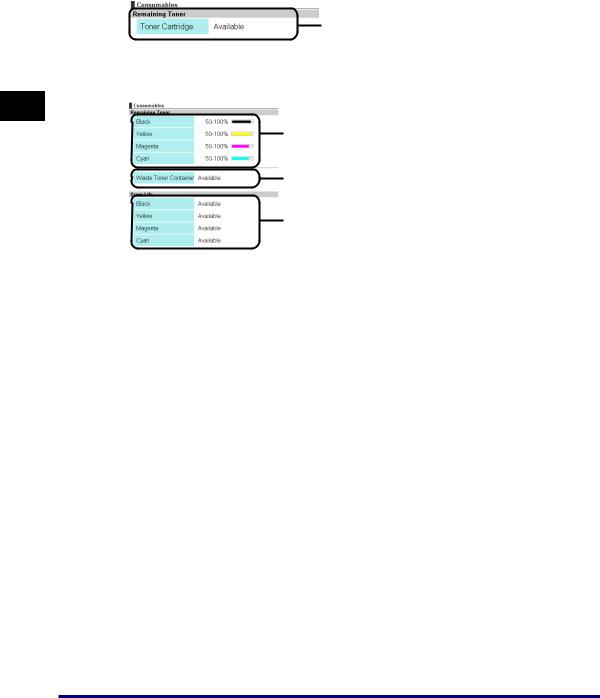
e[Consumables]
Displays information about the consumables.
For a black-and-white printer
(F)
(F): The status of the toner cartridge
For a color printer
(G)
(H)
(I)
(G): The amount of toner remaining in each cartridge
(H): The status of the waste toner container (LBP5960 only) (I): The status of each drum (LBP5960 only)
2-6 Displaying/Managing the Printer Status (Device Manager)
Loading...