

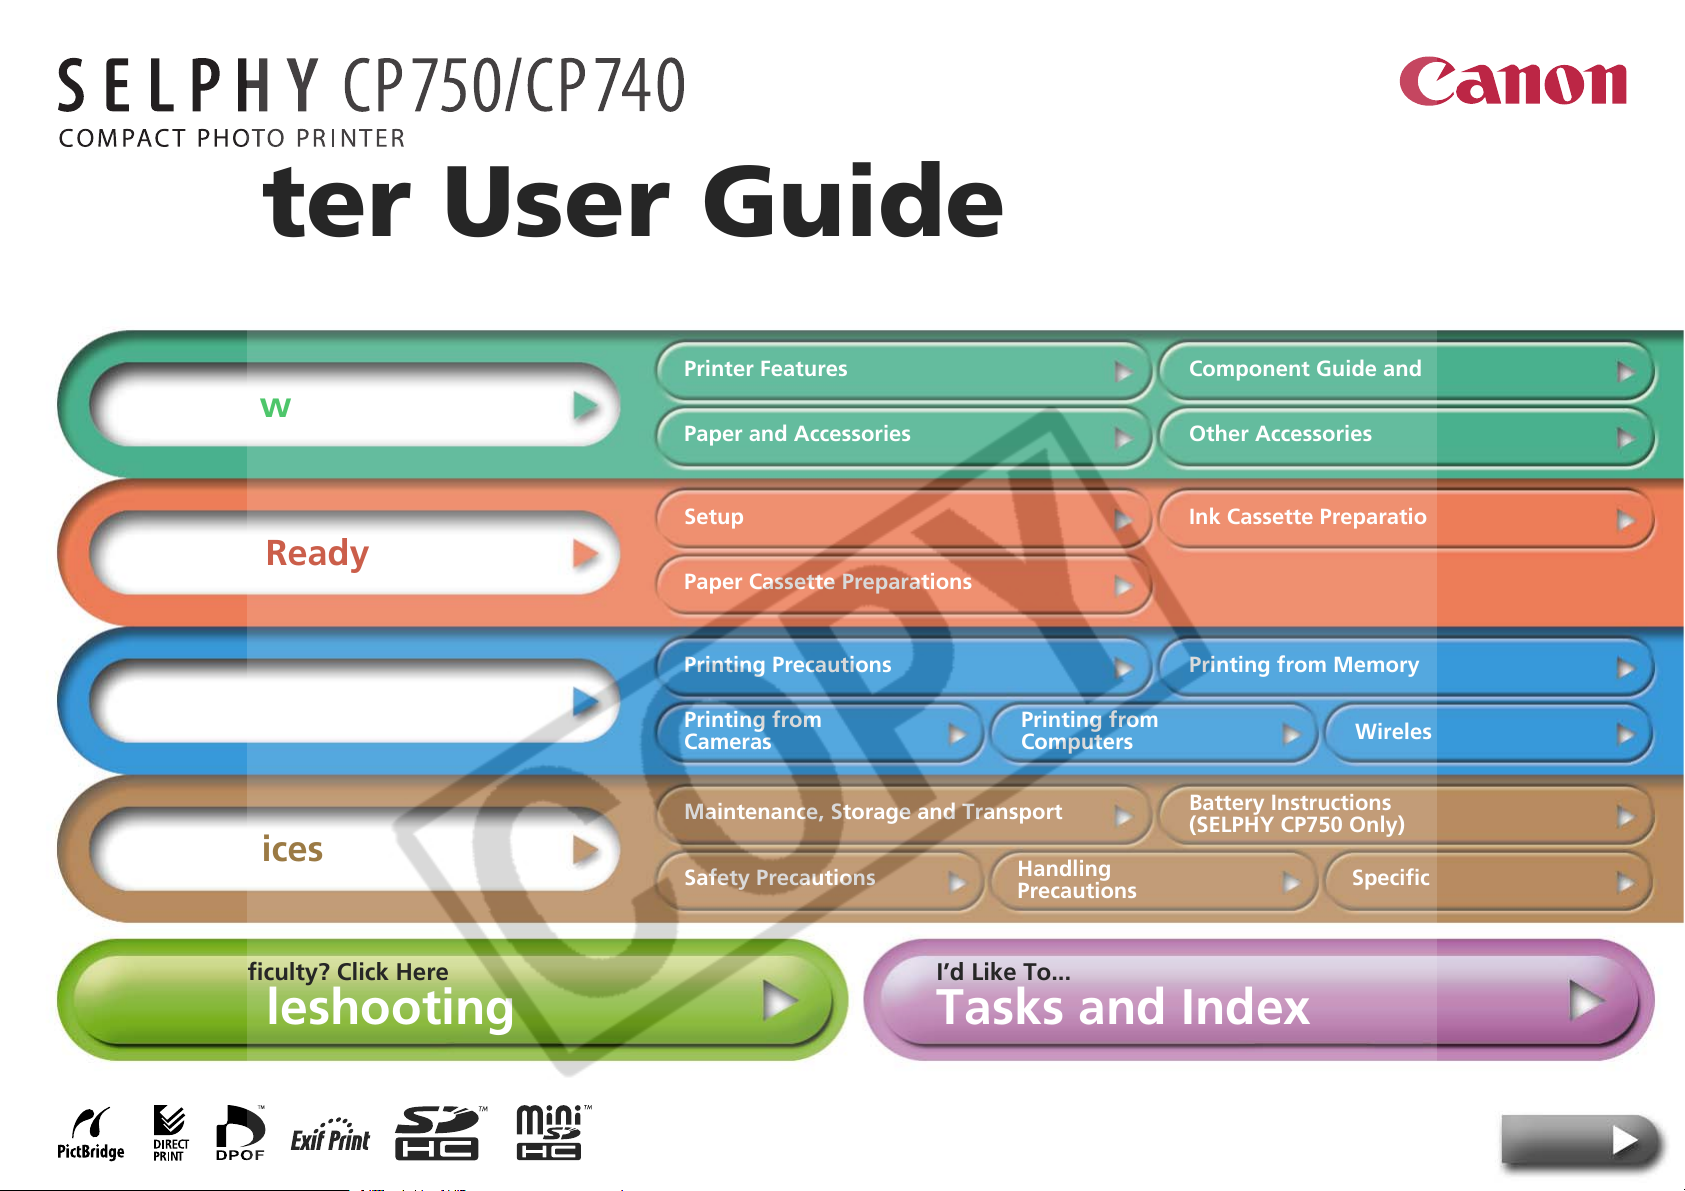
Printer User Guide
Printer Features Component Guide and Functions
Overview
Paper and Accessories Other Accessories
Setup Ink Cassette Preparations
Getting Ready
Paper Cassette Preparations
Printing Precautions Printing from Memory Cards
Printing
Appendices
Having Difficulty? Click Here
Troubleshooting
Printing from
Cameras
Maintenance, Storage and Transport
Safety Precautions
I’d Like To...
Printing from
Computers
Handling
Precautions
Tasks and Index
Wireless Printing
Battery Instructions
(SELPHY CP750 Only)
Specifications
Next
Return to Cover Page
Getting Ready Printing AppendicesOverview
Introduction
Before using your printer for the first time, read through the “Safety Precautions” (p. 39) and “Handling Precautions” (p. 41).
Symbols Used in This Guide
This mark denotes issues that may affect the printer’s operation.
This mark denotes additional topics that complement the basic operating procedures.
This printer supports a variety of storage media from SD* memory
cards to MultiMediaCards**. Please see page 13 for the types of
memory cards that are supported.
* SD is an acronym for Secure Digital.
** Reduced-Size MultiMediaCard is displayed as RS-MMC.
In this guide, all these card types are referred to as “memory cards.”
In addition, “camera” in this guide refers to all digital still cameras
and digital video cameras supported by the SELPHY CP750/CP740
printers.
.
Warning Against Copyright Infringement
Please respect all copyrights. Use of images produced by the SELPHY
CP750/CP740 for purposes other than personal entertainment may be
prohibited by law.
Warranty Limitations
This printer’s warranty is only effective in the country of sale. If a
problem arises while the printer is in use abroad, please convey it back
to the country of sale before proceeding with a warranty claim to a
Canon Customer Support center.
Communication Settings for Cameras
Depending on the model of the camera, it may be necessary to
change the communication settings prior to connecting the camera to
the printer.
• For EOS 5D, EOS 10D, EOS 20D, EOS 30D, EOS 300D/DIGITAL Rebel
and EOS 350D/DIGITAL Rebel XT cameras, set [Communication] in
the camera’s menu to [PTP], or [Print/PTP] or [Print/PC]. See the user
guide supplied with the camera for details.
• For non-Canon cameras, see the user guide supplied with the
camera for details on communication settings.
Illustrations and Screen Shots
This guide primarily uses illustrations of the SELPHY CP750 and its LCD
monitor. Unless otherwise noted, the instructions are the same for the
SELPHY CP740.
Similarly, the screen shots from the LCD monitor show a “P” for the
Postcard-Size ink cassette. The camera examples in this guide show
digital still cameras.
Troubleshooting Tasks and Index
2
NextBack
Return to Cover Page
Overview
Getting Ready Printing Appendices
Printer Features
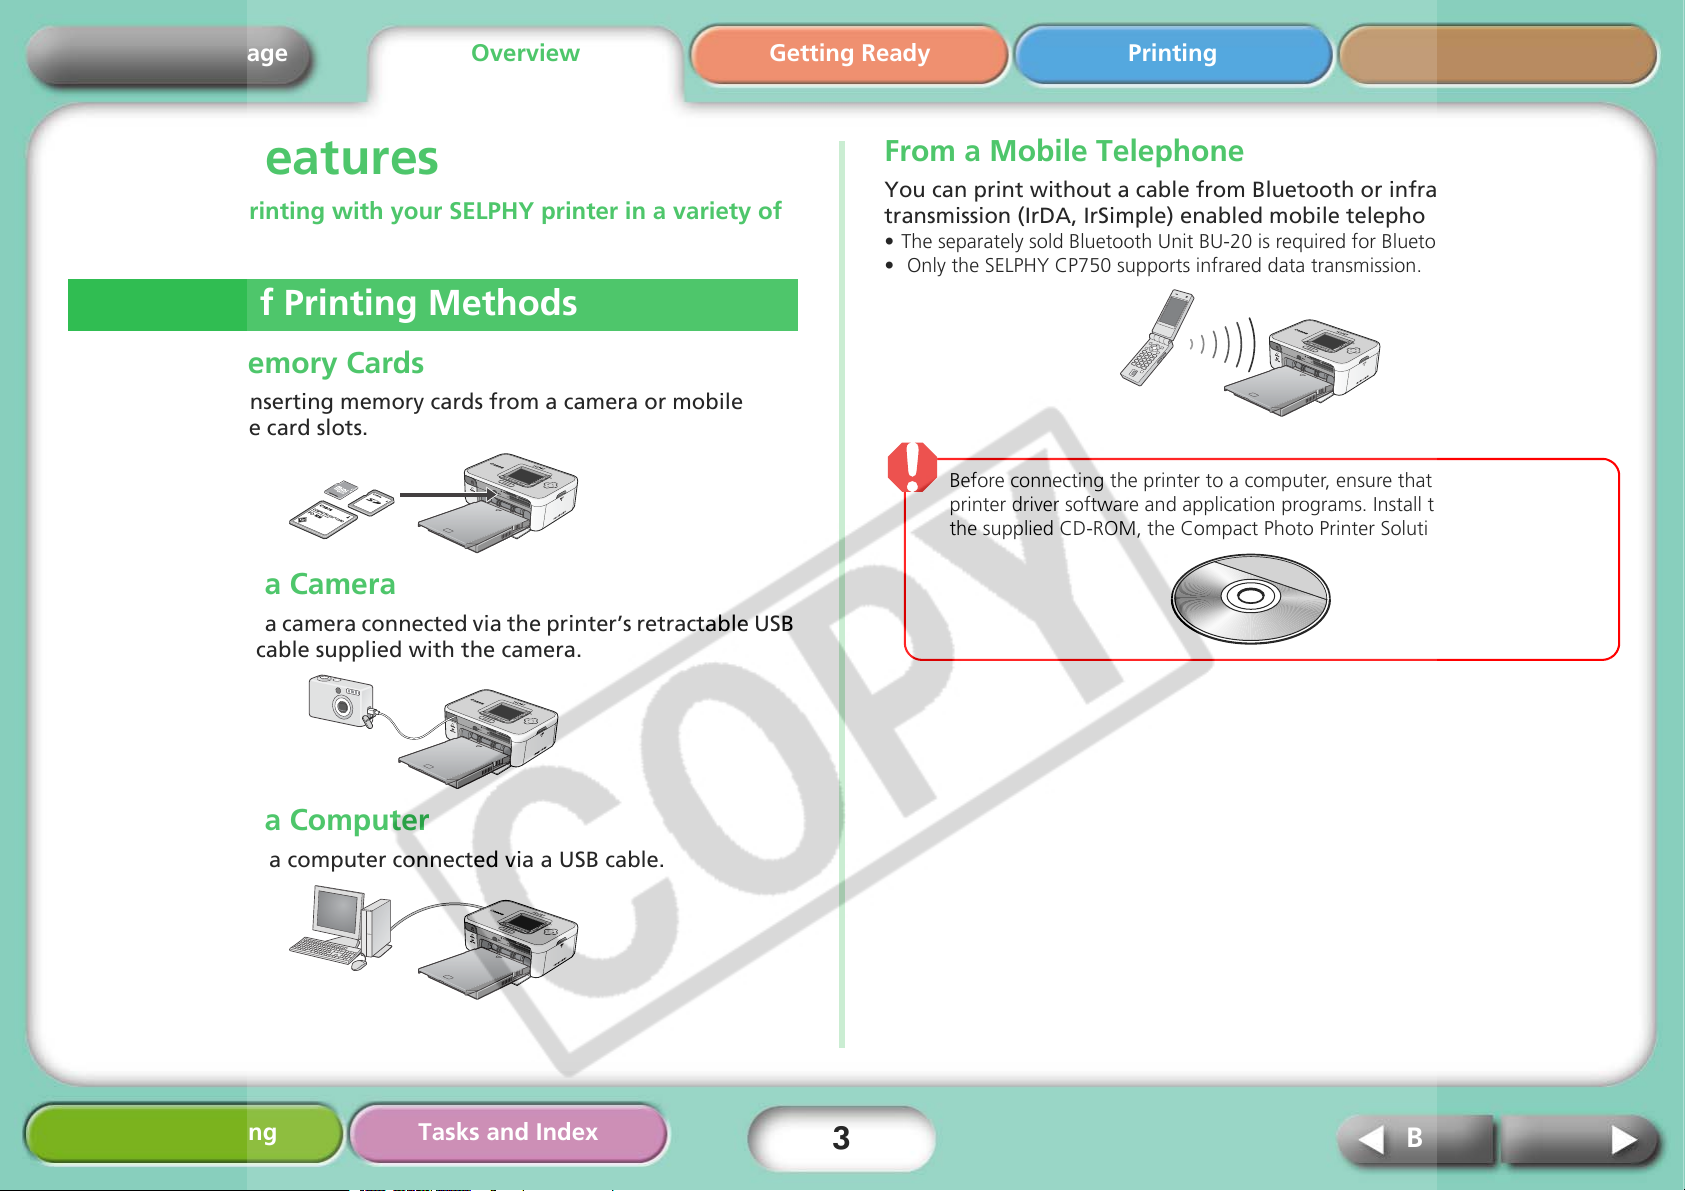
You can enjoy printing with your SELPHY printer in a variety of ways.
A Choice of Printing Methods
Print from Memory Cards
You can print by inserting memory cards from a camera or mobile
telephone into the card slots.
Connected to a Camera
You can print from a camera connected via the printer’s retractable USB
cable or via a USB cable supplied with the camera.
From a Mobile Telephone
You can print without a cable from Bluetooth or infrared data
transmission (IrDA, IrSimple) enabled mobile telephones.
• The separately sold Bluetooth Unit BU-20 is required for Bluetooth connections.
• Only the SELPHY CP750 supports infrared data transmission.
Before connecting the printer to a computer, ensure that you install the
printer driver software and application programs. Install the software from
the supplied CD-ROM, the Compact Photo Printer Solution Disk.
Connected to a Computer
You can print from a computer connected via a USB cable.
Troubleshooting Tasks and Index
3
NextBack
Return to Cover Page
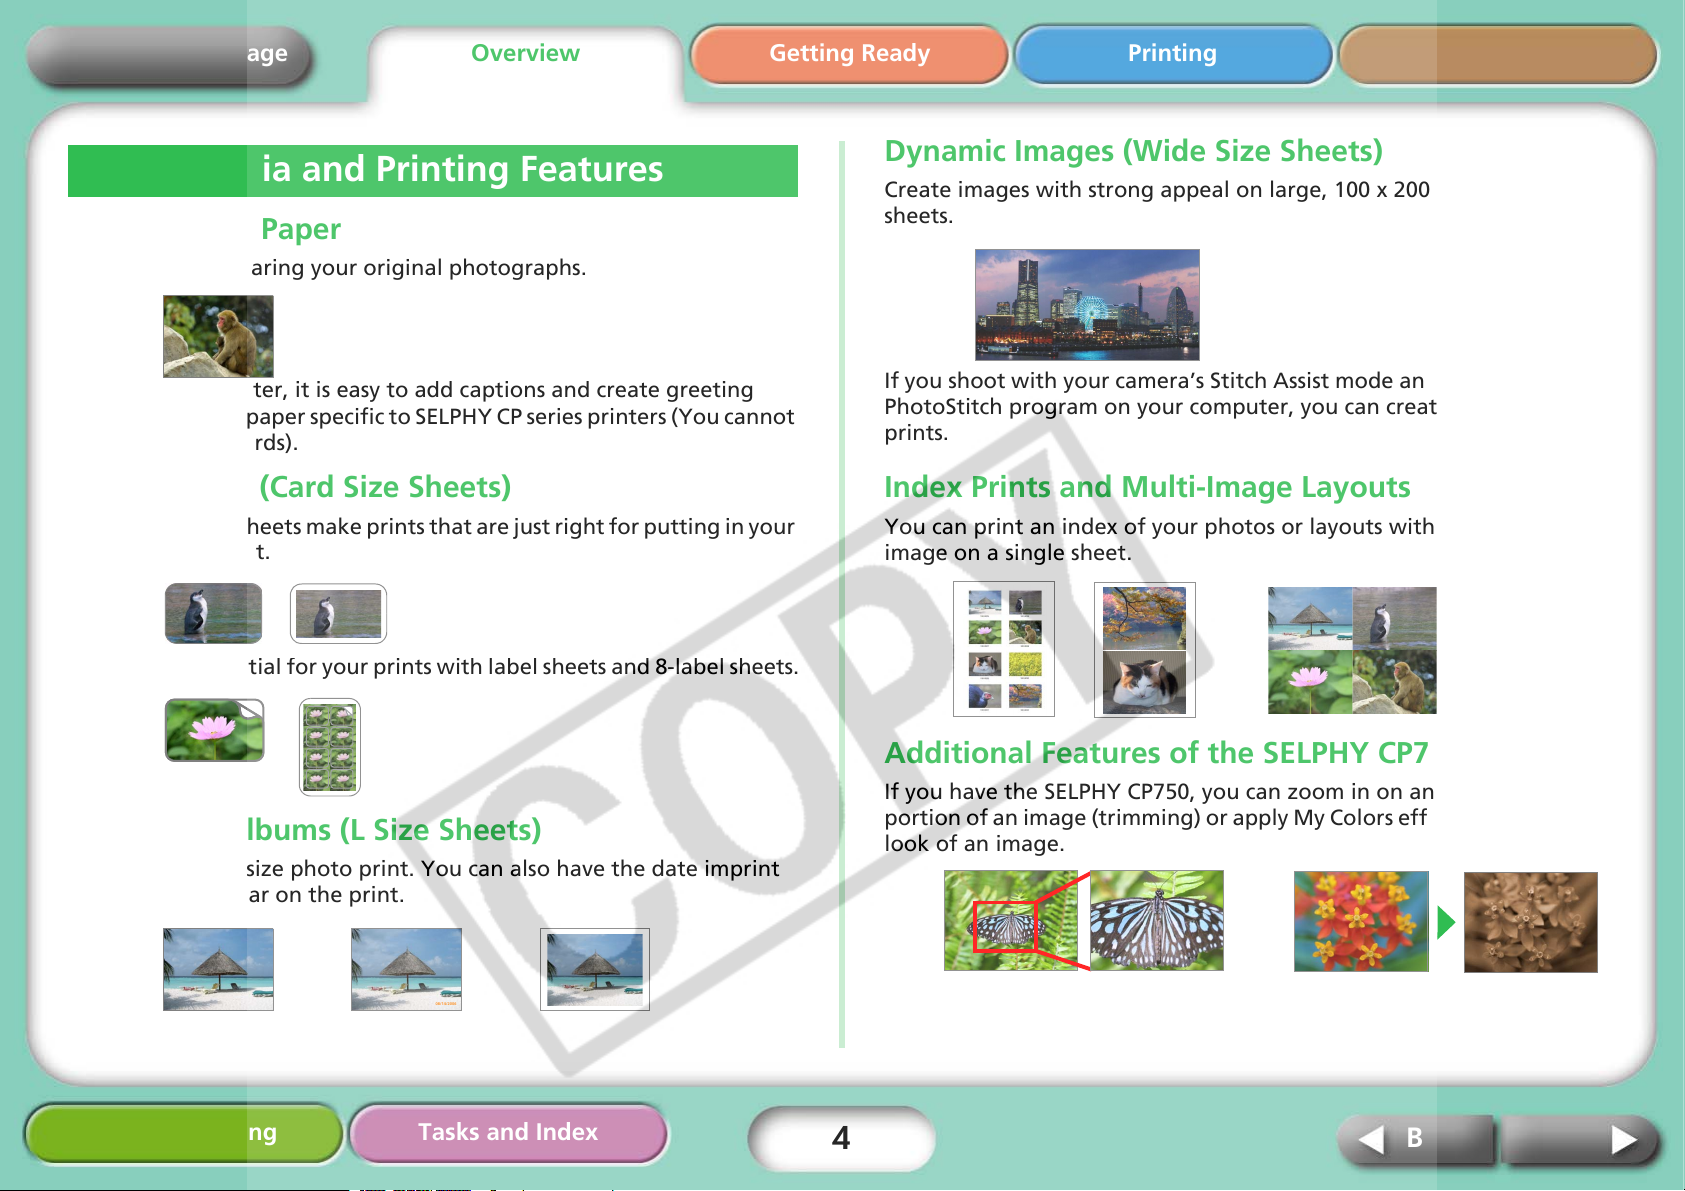
Paper Media and Printing Features
Postcard Size Paper
Print postcards bearing your original photographs.
Getting Ready Printing AppendicesOverview
Dynamic Images (Wide Size Sheets)
Create images with strong appeal on large, 100 x 200 mm (4 x 8 in.)
sheets.
Using your computer, it is easy to add captions and create greeting
cards. Always use paper specific to SELPHY CP series printers (You cannot
use regular postcards).
Smaller Sizes (Card Size Sheets)
Credit card sized sheets make prints that are just right for putting in your
organizer or wallet.
Expand the potential for your prints with label sheets and 8-label sheets.
Perfect for Albums (L Size Sheets)
Prints a standard size photo print. You can also have the date imprint
and borders appear on the print.
If you shoot with your camera’s Stitch Assist mode and use the supplied
PhotoStitch program on your computer, you can create panoramic
prints.
Index Prints and Multi-Image Layouts
You can print an index of your photos or layouts with more than one
image on a single sheet.
Additional Features of the SELPHY CP750
If you have the SELPHY CP750, you can zoom in on and print a single
portion of an image (trimming) or apply My Colors effects to change the
look of an image.
08/14/2006
Troubleshooting Tasks and Index
4
NextBack
Return to Cover Page
Getting Ready Printing AppendicesOverview
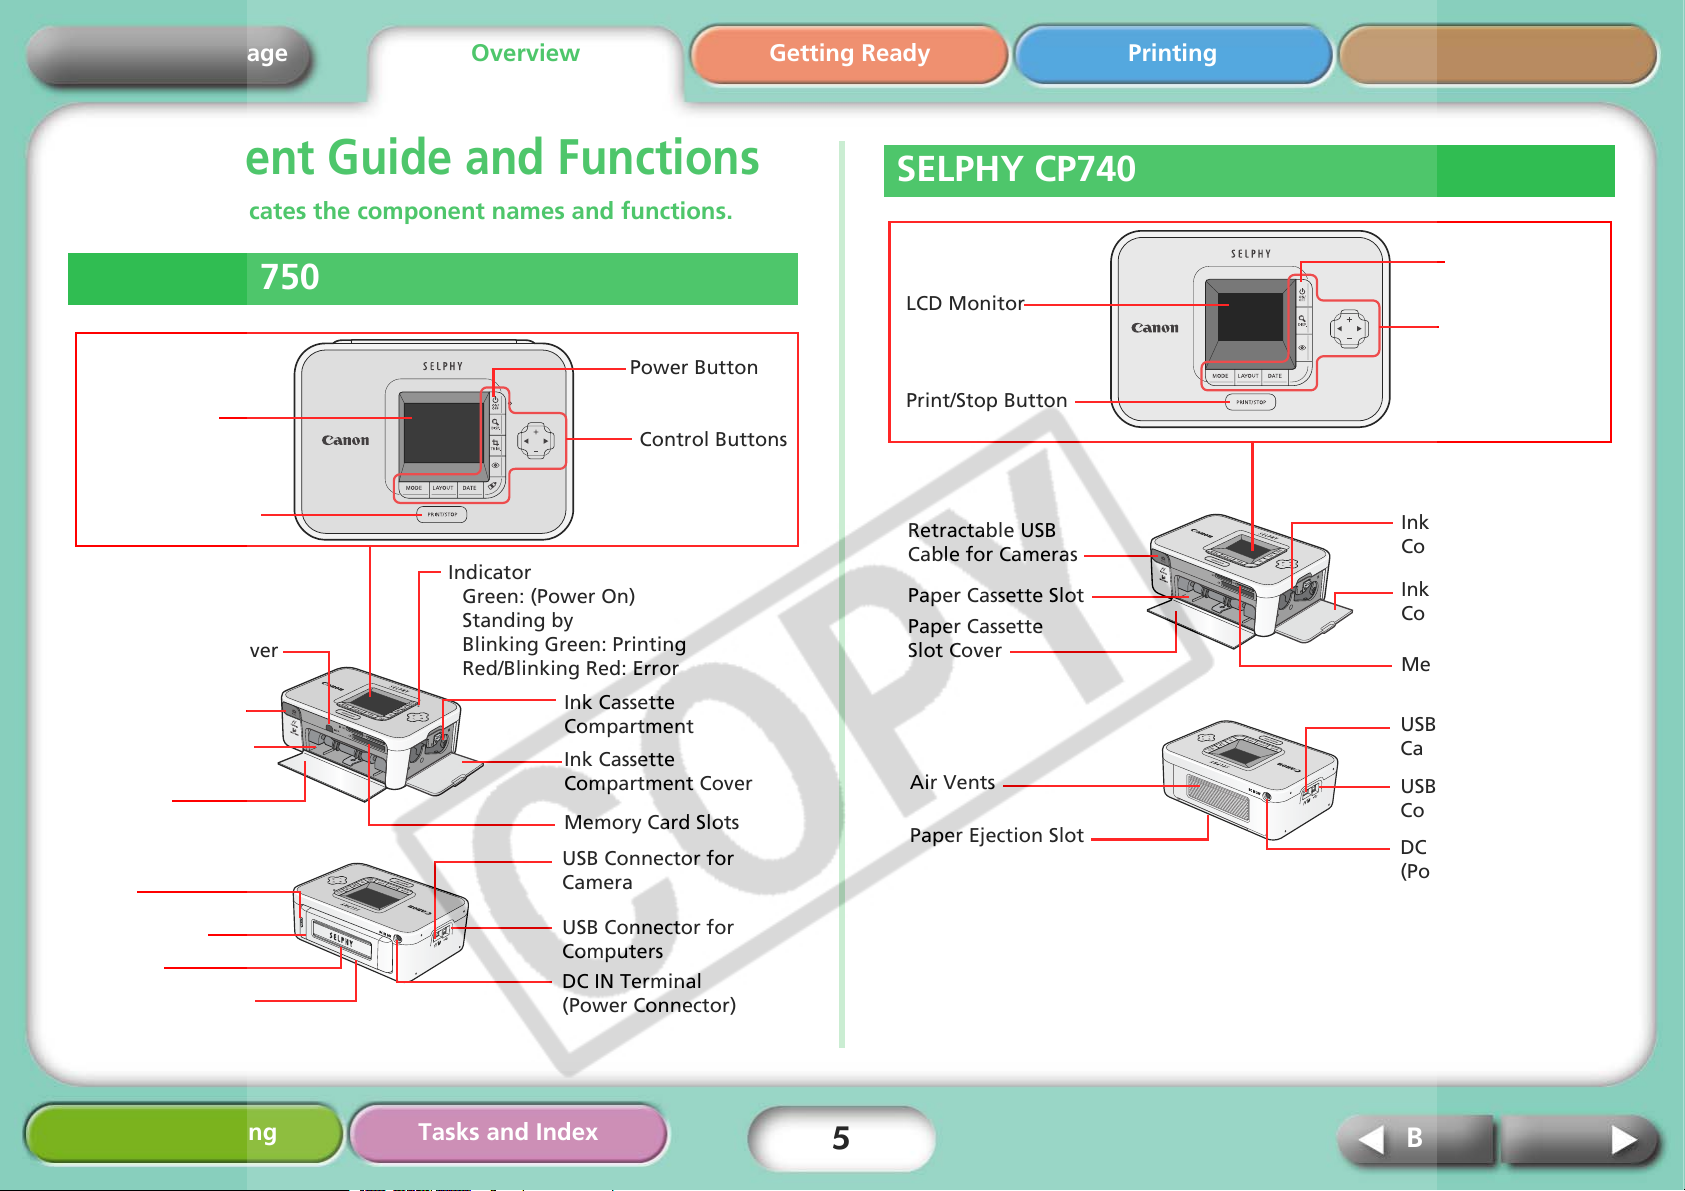
Component Guide and Functions
This section indicates the component names and functions.
SELPHY CP750
Power Button
LCD Monitor
Control Buttons
Print/Stop Button
Indicator
Green: (Power On)
Standing by
Infrared Data Receiver
Retractable USB
Cable for Cameras
Paper Cassette Slot
Paper Cassette
Slot Cover
Battery Cover Eject
Lever
Blinking Green: Printing
Red/Blinking Red: Error
Ink Cassette
Compartment
Ink Cassette
Compartment Cover
Memory Card Slots
USB Connector for
Camera
SELPHY CP740
LCD Monitor
Print/Stop Button
Retractable USB
Cable for Cameras
Paper Cassette Slot
Paper Cassette
Slot Cover
Air Vents
Paper Ejection Slot
Power Button
Control Buttons
Ink Cassette
Compartment
Ink Cassette
Compartment Cover
Memory Card Slots
USB Connector for
Camera
USB Connector for
Computers
DC IN Terminal
(Power Connector)
Battery Cover
Air Vents
Paper Ejection Slot
Troubleshooting Tasks and Index
USB Connector for
Computers
DC IN Terminal
(Power Connector)
5
NextBack

Return to Cover Page
Getting Ready Printing AppendicesOverview
Paper and Accessories
Select the correct size for the purpose.
Some items are not sold in some regions.
Postcard Size
Paper Cassette:
Paper Cassette PCP-CP200
Standard Paper + Ink*:
Color Ink/Paper Set KP-36IP (36 Sheets)
Color Ink/Paper Set KP-72IP (72 Sheets)
Color Ink/Paper Set KP-108IP (108 Sheets)
Card Size
Paper Cassette*:
Card Size Paper Cassette PCC-CP100
Standard Paper + Ink:
Color Ink/Paper Set KC-36IP (36 Sheets)
POSTCARD SIZE
CARD SIZE
L Size
Paper Cassette:
L Size Paper Cassette PCL-CP200
Standard Paper + Ink:
Color Ink/Paper Set KL-36IP (36 Sheets)
Wide Size
Paper Cassette:
Wide Size Paper Cassette PCW-CP100
Standard Paper + Ink:
Color Ink/Paper Set KW-24IP (24 Sheets)
L SIZE
WIDE
Full-Page Labels + Ink:
Color Ink/Full-Size Label Set KC-18IF (18 Sheets)
8-Label Sheets + Ink:
Color Ink/Label Set KC-18IL (18 Sheets)
* Depending on the region, the card size paper cassette may be supplied also with
the printer.
Troubleshooting Tasks and Index
6
Use a paper cassette/ink cassette specified for use in SELPHY CP series
printers. Paper and ink cassettes specified for use in ES series printers cannot
be used.
The sheet sizes are as follows. Postcard Size: 100 x 148 mm (4 x 6 in.). Card
Size: 54 x 86 mm (2.1 x 3.4 in.). L Size: 89 x 119 mm (3.5 x 4.7 in.). Wide:
100 x 200 mm (4 x 8 in.)
NextBack
Return to Cover Page
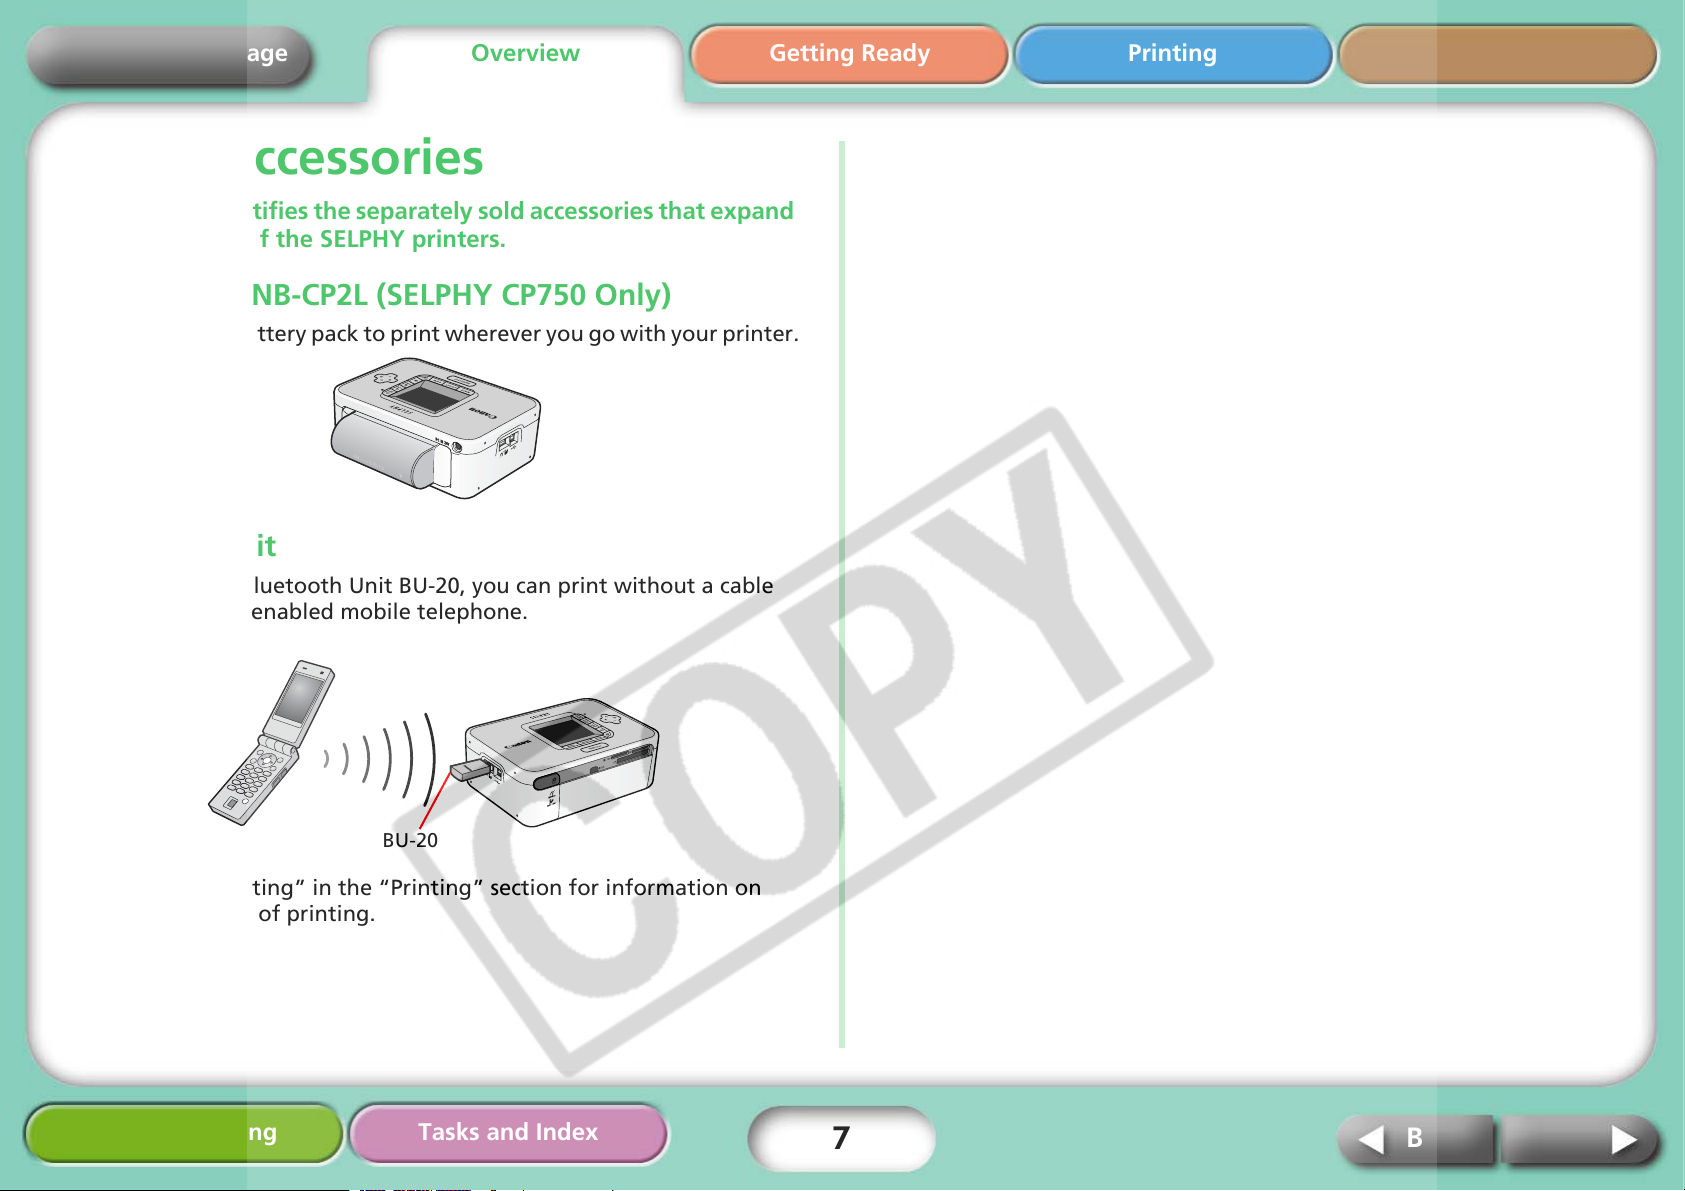
Other Accessories
This section identifies the separately sold accessories that expand the capabilities of the SELPHY printers.
Battery Pack NB-CP2L (SELPHY CP750 Only)
You can use the battery pack to print wherever you go with your printer.
Bluetooth Unit
If you install the Bluetooth Unit BU-20, you can print without a cable
from a Bluetooth enabled mobile telephone.
Getting Ready Printing AppendicesOverview
BU-20
See “Wireless Printing” in the “Printing” section for information on
using this method of printing.
Troubleshooting Tasks and Index
7
NextBack
Return to Cover Page
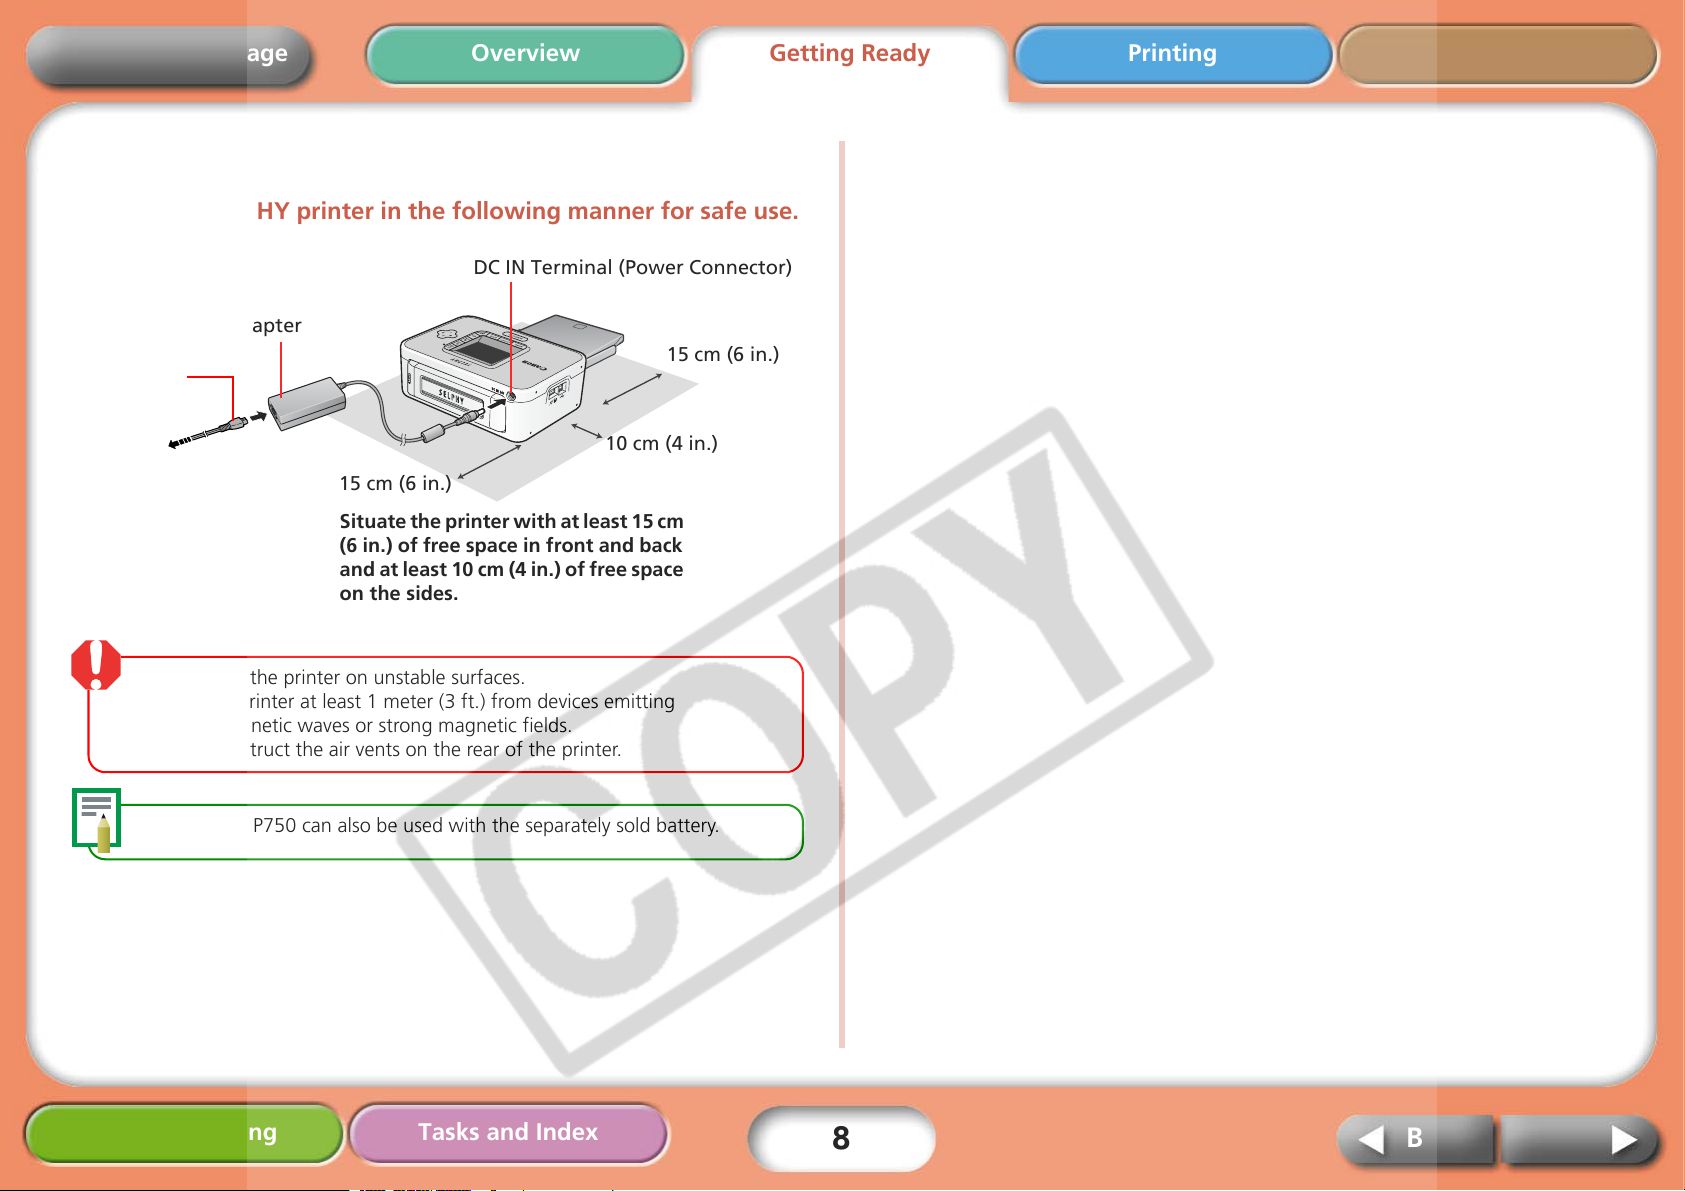
Setup
Set up your SELPHY printer in the following manner for safe use.
DC IN Terminal (Power Connector)
Compact Power Adapter
15 cm (6 in.)
Power Cord
Getting Ready
Printing AppendicesOverview
To a power outlet
• Do not set the printer on unstable surfaces.
• Keep the printer at least 1 meter (3 ft.) from devices emitting
electromagnetic waves or strong magnetic fields.
• Do not obstruct the air vents on the rear of the printer.
The SELPHY CP750 can also be used with the separately sold battery.
10 cm (4 in.)
15 cm (6 in.)
Situate the printer with at least 15 cm
(6 in.) of free space in front and back
and at least 10 cm (4 in.) of free space
on the sides.
Troubleshooting Tasks and Index
8
NextBack
Return to Cover Page
Getting Ready Printing AppendicesOverview
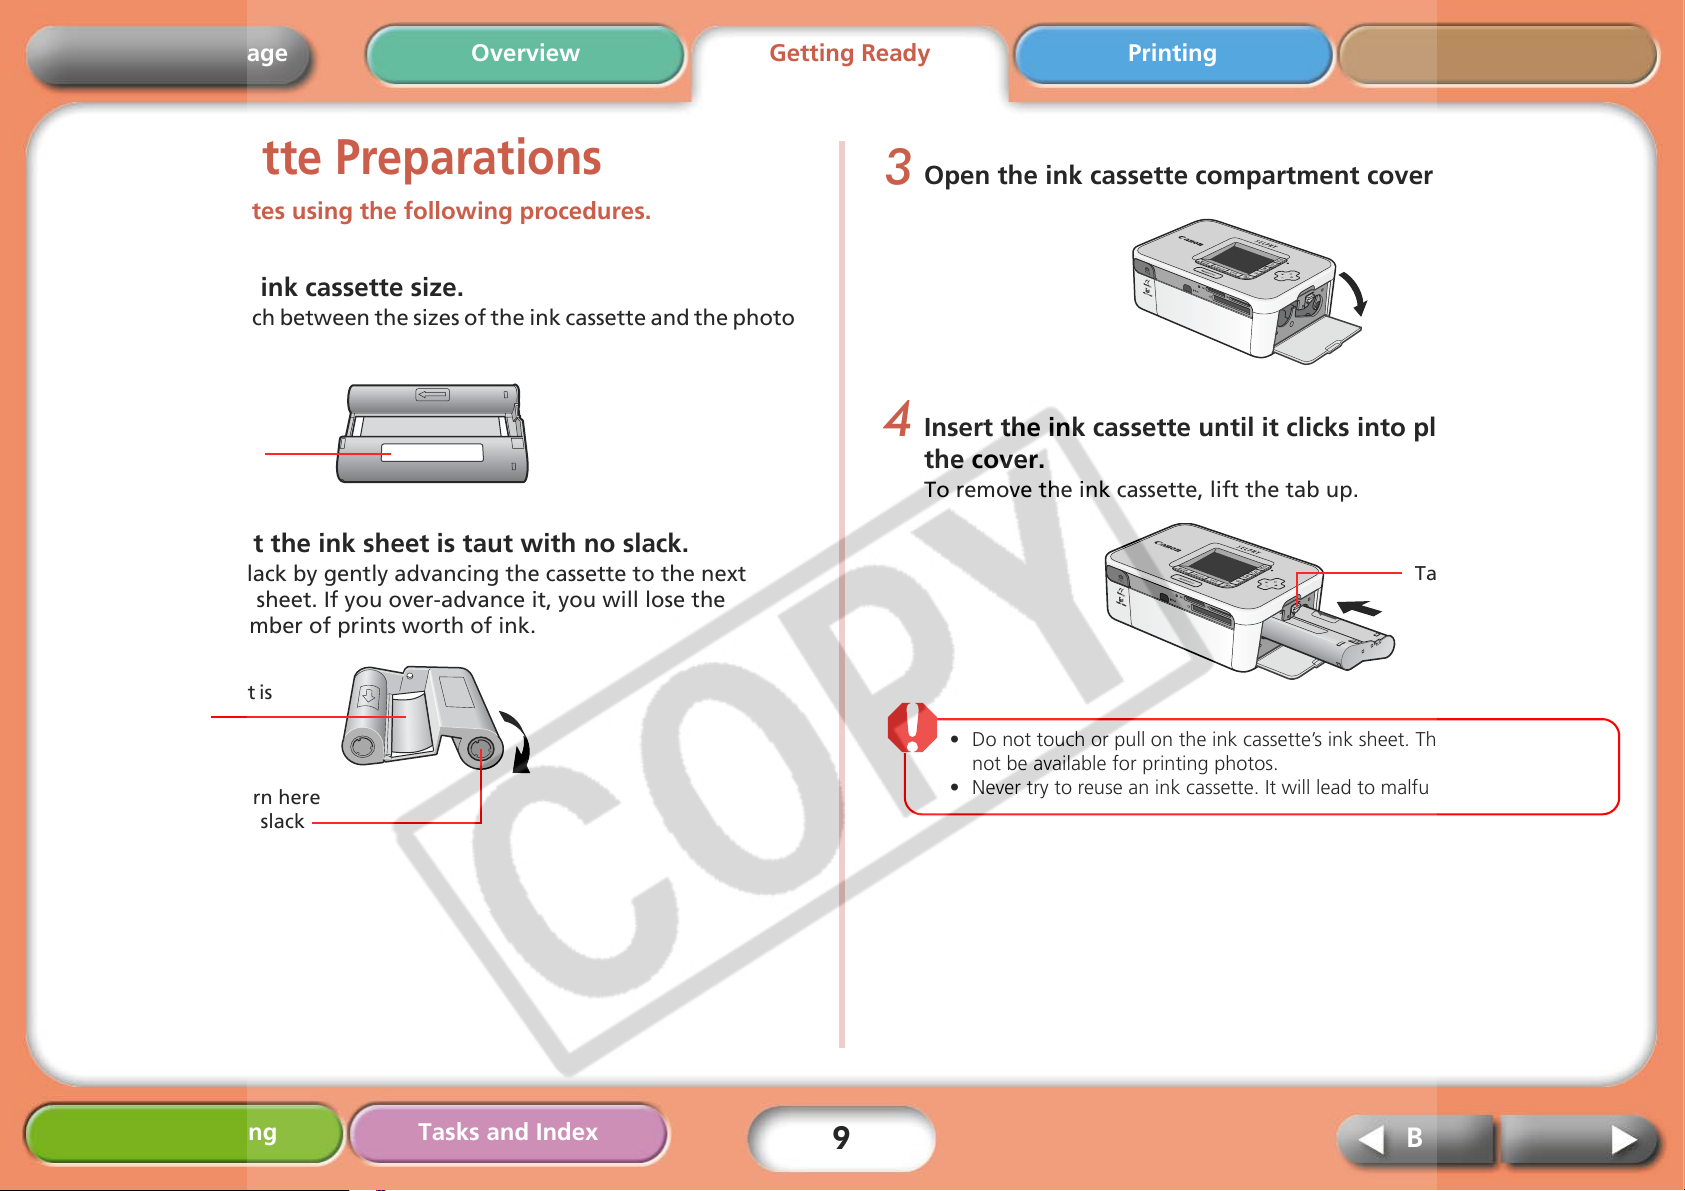
Ink Cassette Preparations
Install ink cassettes using the following procedures.
1 Confirm the ink cassette size.
Confirm a match between the sizes of the ink cassette and the photo
paper.
Size Indication
2 Confirm that the ink sheet is taut with no slack.
Take up any slack by gently advancing the cassette to the next
portion of ink sheet. If you over-advance it, you will lose the
equivalent number of prints worth of ink.
If the ink sheet is
slack...
…push and turn here
to take up the slack
3 Open the ink cassette compartment cover.
4 Insert the ink cassette until it clicks into place and close
the cover.
To remove the ink cassette, lift the tab up.
Tab
• Do not touch or pull on the ink cassette’s ink sheet. Those portions will
not be available for printing photos.
• Never try to reuse an ink cassette. It will lead to malfunctions or damage.
Troubleshooting Tasks and Index
9
NextBack
Return to Cover Page
Ori
Getting Ready Printing AppendicesOverview
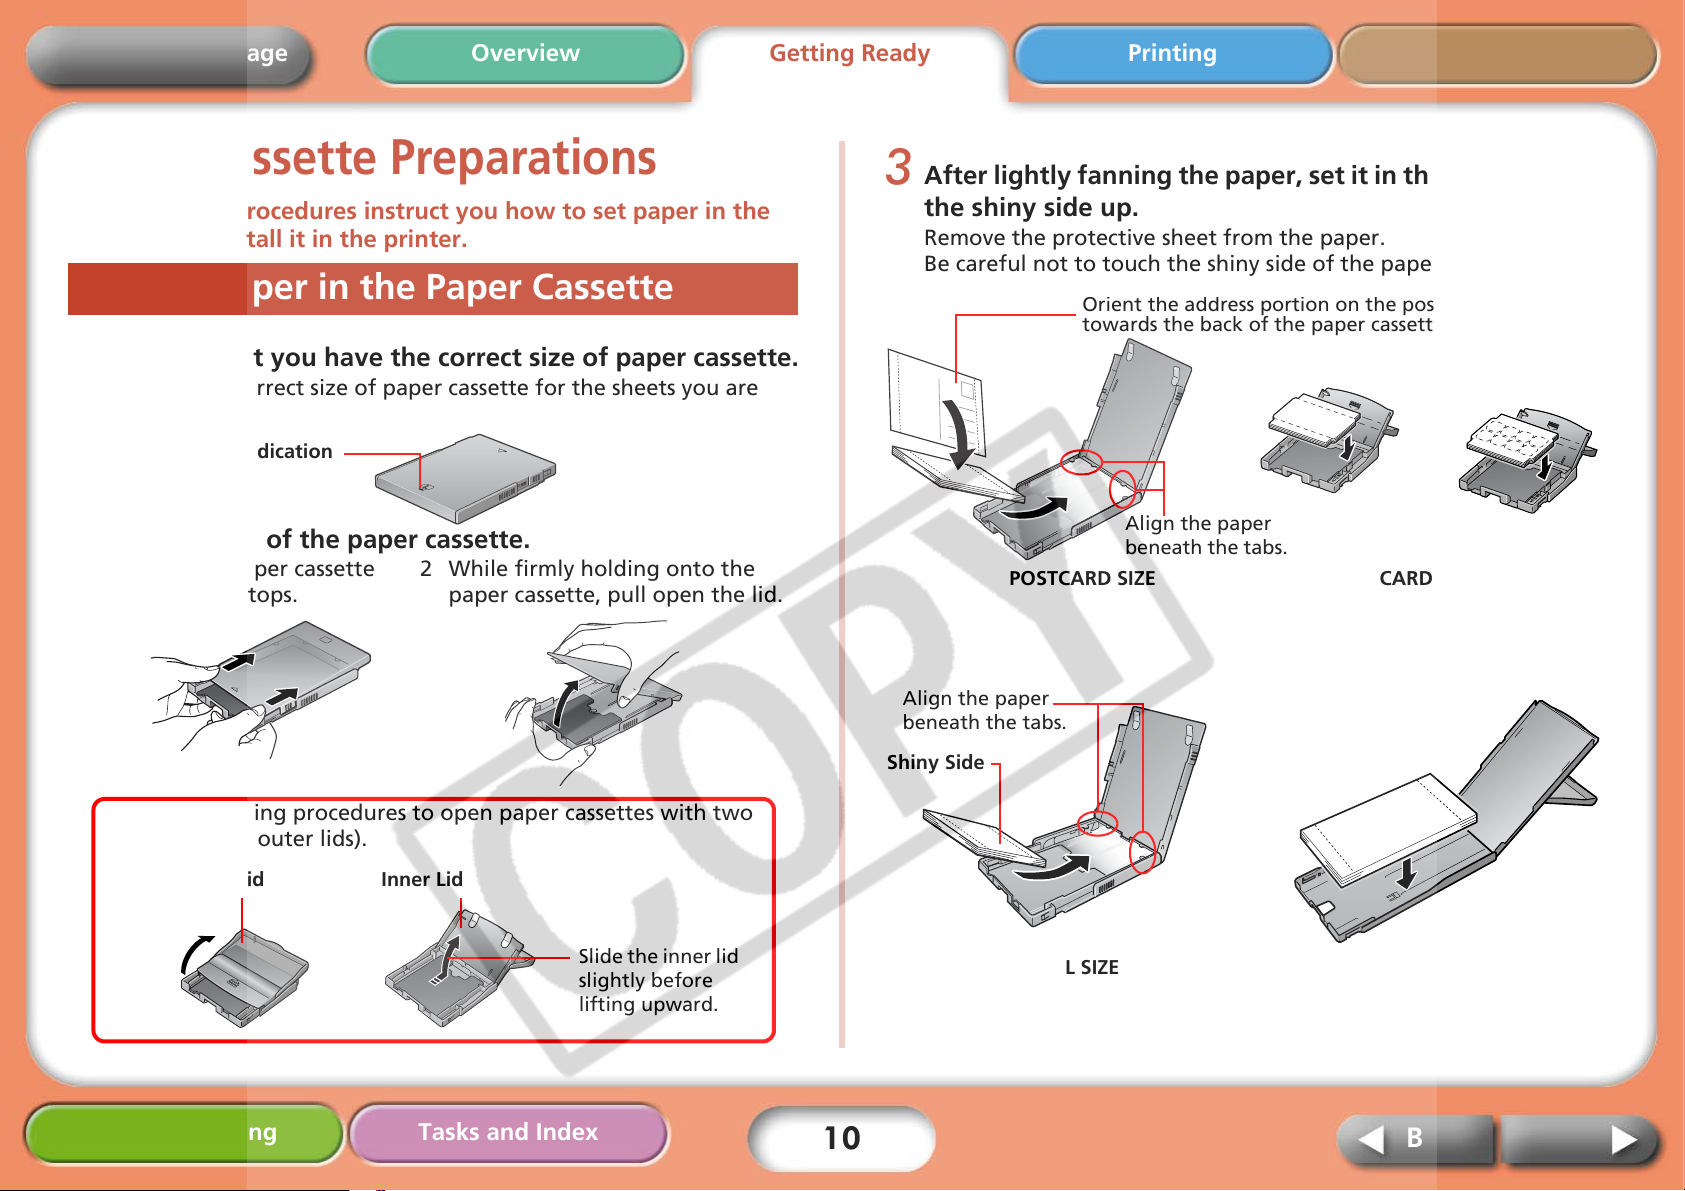
Paper Cassette Preparations
The following procedures instruct you how to set paper in the cassette and install it in the printer.
Setting Paper in the Paper Cassette
1 Confirm that you have the correct size of paper cassette.
Prepare the correct size of paper cassette for the sheets you are
using.
Size Indication
2 Open the lid of the paper cassette.
1 Slide the paper cassette
lid until it stops.
2 While firmly holding onto the
paper cassette, pull open the lid.
3 After lightly fanning the paper, set it in the cassette with
the shiny side up.
Remove the protective sheet from the paper.
Be careful not to touch the shiny side of the paper.
ent the address portion on the postcards
towards the back of the paper cassette.
Align the paper
beneath the tabs.
POSTCARD SIZE CARD SIZE
Align the paper
beneath the tabs.
Use the following procedures to open paper cassettes with two
lids (inner and outer lids).
Outer Lid Inner Lid
Slide the inner lid
slightly before
lifting upward.
Troubleshooting Tasks and Index
10
Shiny Side
L SIZE
WIDE
NextBack
Return to Cover Page
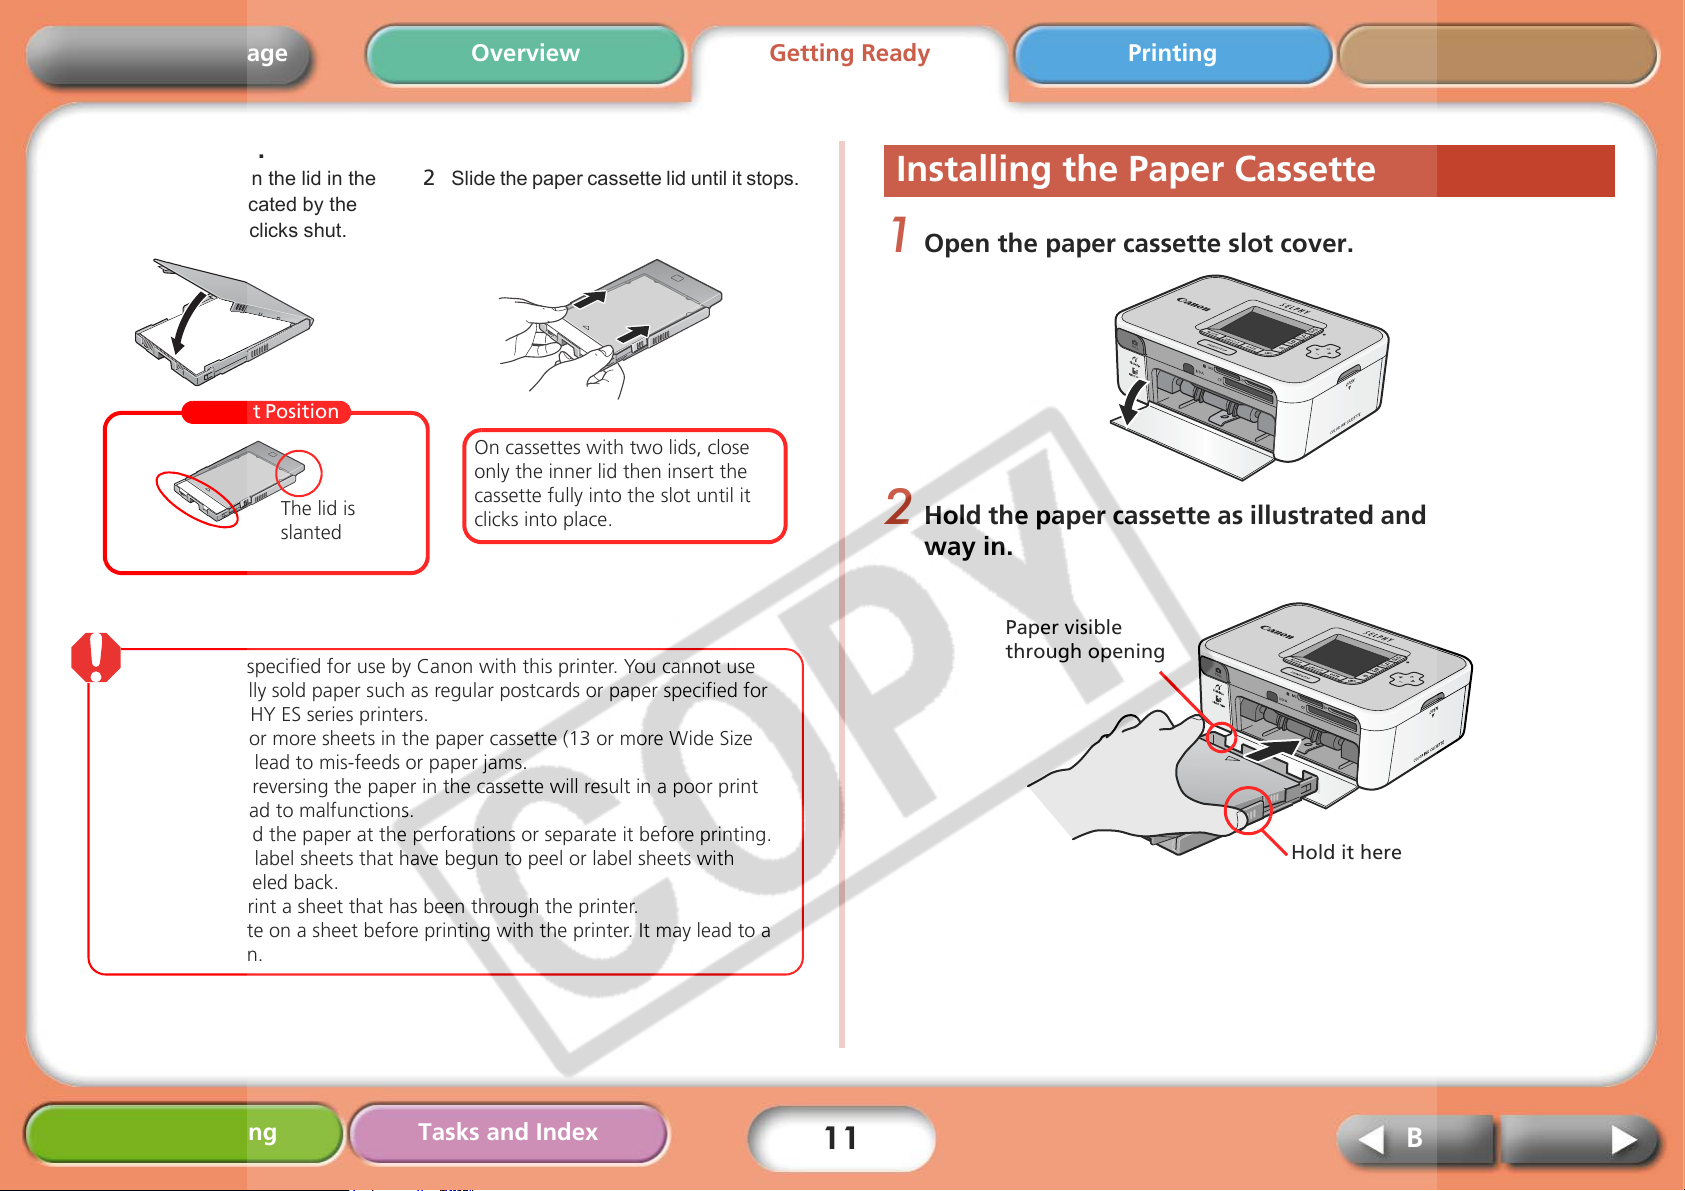
4 Close the lid.
1 Push down on the lid in the
direction indicated by the
arrow until it clicks shut.
Correct Position
Slightly open
• Use paper specified for use by Canon with this printer. You cannot use
commercially sold paper such as regular postcards or paper specified for
use in SELPHY ES series printers.
• Placing 19 or more sheets in the paper cassette (13 or more Wide Size
sheets) will lead to mis-feeds or paper jams.
• Mistakenly reversing the paper in the cassette will result in a poor print
and may lead to malfunctions.
• Do not bend the paper at the perforations or separate it before printing.
• Do not use label sheets that have begun to peel or label sheets with
portions peeled back.
• Do not reprint a sheet that has been through the printer.
• Do not write on a sheet before printing with the printer. It may lead to a
malfunction.
The lid is
slanted
Getting Ready Printing AppendicesOverview
2 Slide the paper cassette lid until it stops.
On cassettes with two lids, close
only the inner lid then insert the
cassette fully into the slot until it
clicks into place.
Installing the Paper Cassette
1 Open the paper cassette slot cover.
2 Hold the paper cassette as illustrated and insert it all the
way in.
Paper visible
through opening
Hold it here
Troubleshooting Tasks and Index
11
NextBack
Return to Cover Page
Printing Precautions
This section explains the precautions that should be observed when printing.
These precautions are applicable to all of the printing methods,
including “Printing from Memory Cards,” “Printing from Cameras,”
“Printing from Computers” and “Wireless Printing.”
• Do not pull out the paper cassette or open the ink cassette cover just after
turning on the printer or while printing. This will lead to malfunctions.
• During printing, the paper will pass in and out four times. Do not touch or
pull on the paper during this process. It may lead to injuries or
malfunctions.
• Placing 19 or more sheets in the paper cassette (13 or more Wide Size
sheets) will lead to mis-feeds or paper jams. Moreover, do not let 10 or
more sheets of printed paper collect on top of the paper cassette.
• Printing temporarily ceases if the printer interior rises past a certain
temperature. Since printing will automatically resume when the
temperature lowers, please wait a moment. (This may occur when the
ambient temperature is high or numerous prints have been produced
continuously.)
• Do not print on printed paper.
Getting Ready AppendicesOverview
Printing
Troubleshooting Tasks and Index
12
NextBack
Return to Cover Page
Getting Ready Printing AppendicesOverview
Printing from Memory Cards
• SELPHY printers support image data conforming to the Design rule for
Camera File system (Exif compliant) and DPOF (Ver. 1.00) standard.
• Use memory cards that have been initialized in a camera. The images may
not be recognized on memory cards formatted in a computer.
Please refer to the user guide included with your memory card for handling
instructions.
Inserting Memory Cards
1 Press and hold the printer’s power button until the start-
up image appears on the LCD monitor.
Press and hold until the image appears.
SD Slot
• SD Memory Card
• miniSD Card*1
•microSD Card*2
• SDHC Memory Card
• miniSDHC Card*1
• microSDHC Card*2
MS Slot
• Memory Stick
• Memory Stick PRO
• Memory Stick Duo
• Memory Stick PRO Duo
• Memory Stick micro*2
CF Slot
•CF Card
• Microdrive
• xD-Picture Card*2
• MultiMediaCard
•MMCplus Card
•MMCmobile Card
•MMCmicro Card *2
• RS-MMC Card
*1 Align the card with the guides on the lower portion of
the slot and insert.
*2 A specialized adapter is required (For xD-Picture Cards,
purchase a CompactFlash card Adapter for xD-Picture
Cards separately.)
2 Insert the memory card into the appropriate card slot
with the label facing up.
The memory card will project slightly from the card slot. An image
saved onto the memory card will appear in the LCD monitor.
Do not insert more than one card at a time into the card slots.
Troubleshooting Tasks and Index
13
Removing Memory Cards
1 Grasp the protruding portion of the card
and pull it out.
NextBack
Return to Cover Page
Getting Ready Printing AppendicesOverview
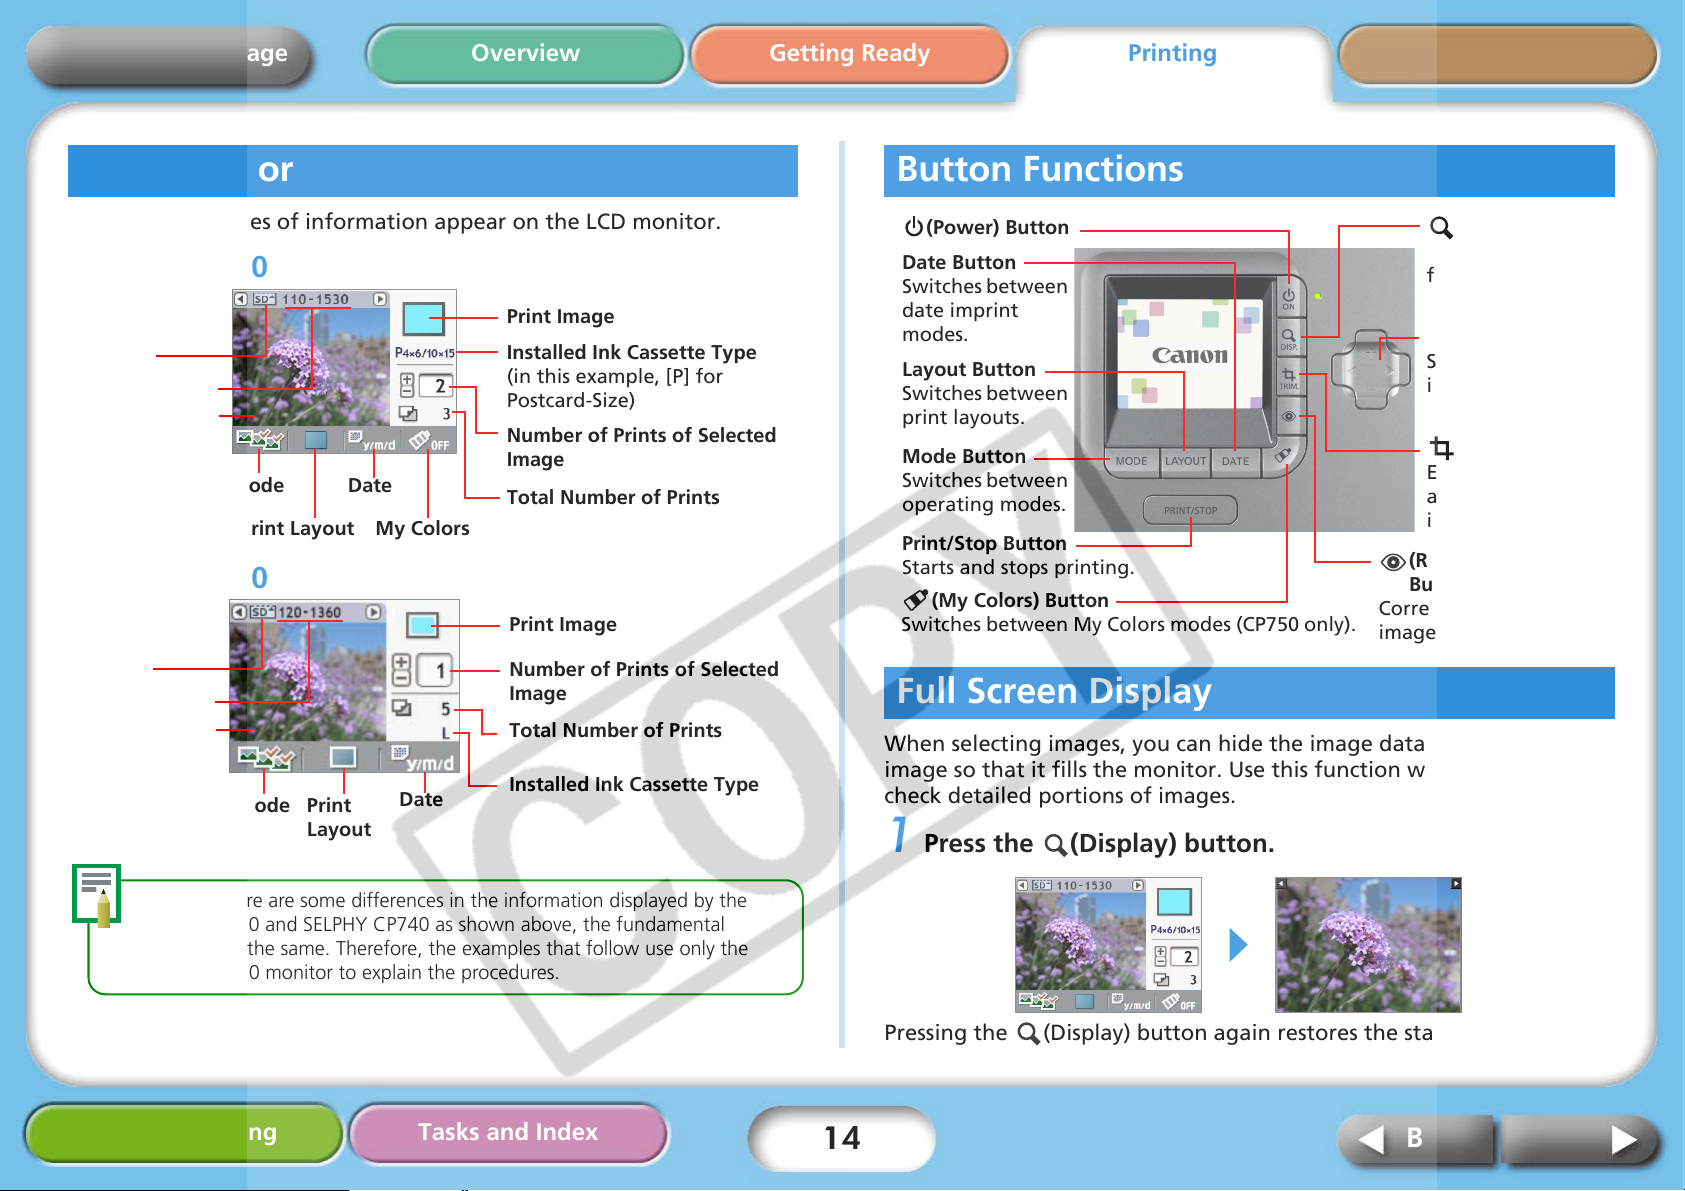
LCD Monitor
The following types of information appear on the LCD monitor.
SELPHY CP750
Card slot with
memory card
inserted
Image Number
Selected Image
Mode
Print Layout
SELPHY CP740
Card slot with
memory card
inserted
Image Number
Selected Image
Mode
Date
Print
Layout
My Colors
Date
Print Image
Installed Ink Cassette Type
(in this example, [P] for
Postcard-Size)
Number of Prints of Selected
Image
Total Number of Prints
Print Image
Number of Prints of Selected
Image
Total Number of Prints
Installed Ink Cassette Type
Button Functions
(Power) Button
Date Button
Switches between
date imprint
modes.
Layout Button
Switches between
print layouts.
Mode Button
Switches between
operating modes.
Print/Stop Button
Starts and stops printing.
(My Colors) Button
Switches between My Colors modes (CP750 only).
Corrects the red-eye in
images shot with a flash.
(Display) Button
Displays images at
full size on the
monitor.
W X + – Buttons
Switches between
images and sets the
number of prints.
(Trimming) Button
Enlarges and prints
a portion of the
image (CP750 only)
(Red-Eye Correction)
Button
Full Screen Display
When selecting images, you can hide the image data and show the
image so that it fills the monitor. Use this function when you wish to
check detailed portions of images.
1 Press the (Display) button.
Although there are some differences in the information displayed by the
SELPHY CP750 and SELPHY CP740 as shown above, the fundamental
elements are the same. Therefore, the examples that follow use only the
SELPHY CP750 monitor to explain the procedures.
Troubleshooting Tasks and Index
14
Pressing the (Display) button again restores the standard view.
NextBack
Return to Cover Page
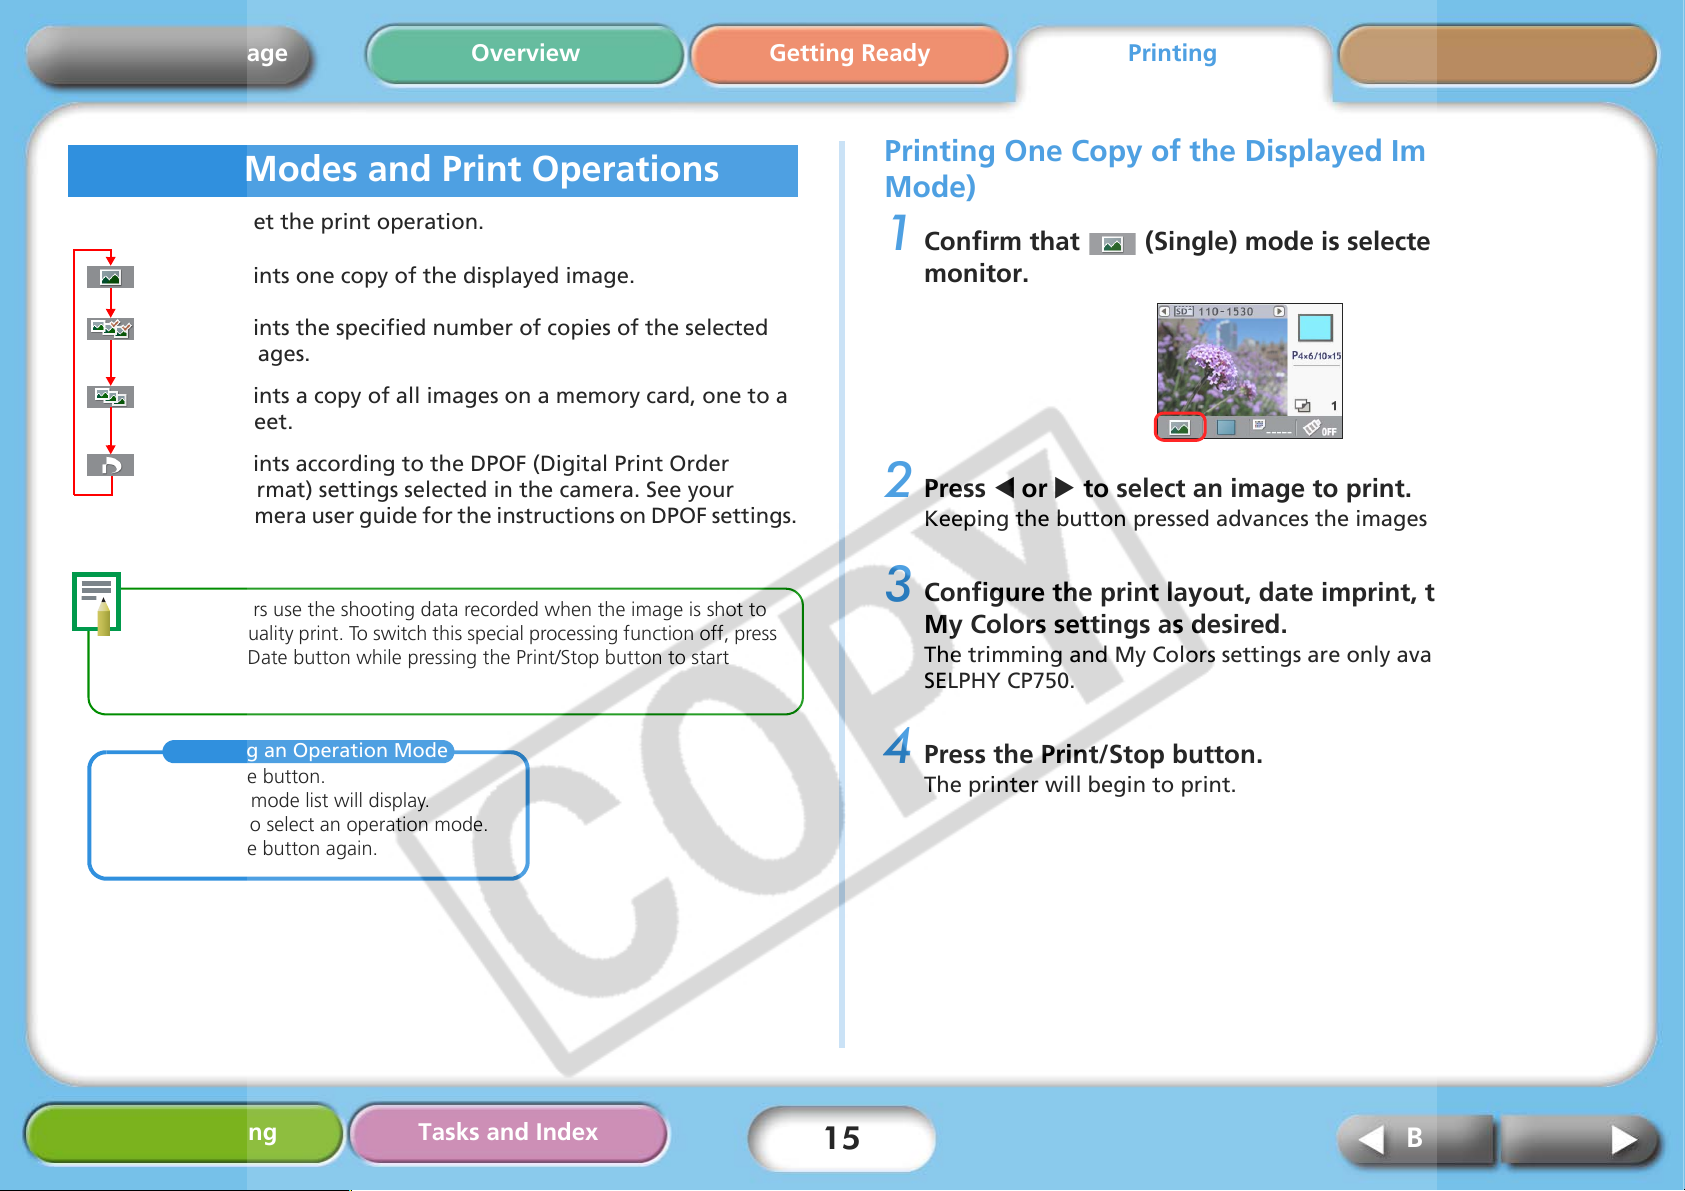
Selecting Modes and Print Operations
Select a mode to set the print operation.
(Single) Prints one copy of the displayed image.
(Select) Prints the specified number of copies of the selected
images.
(All) Prints a copy of all images on a memory card, one to a
sheet.
(DPOF) Prints according to the DPOF (Digital Print Order
Format) settings selected in the camera. See your
camera user guide for the instructions on DPOF settings.
Getting Ready Printing AppendicesOverview
Printing One Copy of the Displayed Image (Single Mode)
1 Confirm that (Single) mode is selected in the LCD
monitor.
2 Press W or X to select an image to print.
Keeping the button pressed advances the images more quickly.
SELPHY printers use the shooting data recorded when the image is shot to
print a finer quality print. To switch this special processing function off, press
and hold the Date button while pressing the Print/Stop button to start
printing.
Selecting an Operation Mode
1. Press the Mode button.
The operation mode list will display.
2. Press W or X to select an operation mode.
3. Press the Mode button again.
Troubleshooting Tasks and Index
15
3 Configure the print layout, date imprint, trimming and
My Colors settings as desired.
The trimming and My Colors settings are only available on the
SELPHY CP750.
4 Press the Print/Stop button.
The printer will begin to print.
NextBack

Return to Cover Page
Printing the Specified Number of Copies of the Selected Images
1 Confirm that (Select) mode is selected in the LCD
monitor.
Getting Ready Printing AppendicesOverview
5 Configure the print layout, date imprint and My Colors
(color effects) settings as desired.
These settings apply to all of the images selected in Steps 3 and 4.
The My Colors setting is only available on the SELPHY CP750.
6 Confirm the settings displayed on the LCD monitor.
Confirm that the required number of sheets is in the paper cassette.
2 Press W or X to select images to print.
Keeping the button pressed advances the images more quickly.
3 Press + or – to select the number of copies to print.
Keeping the button pressed advances the values more quickly.
Number of copies of the
displayed image
4 Repeat Steps 2 and 3 to select and set the number of
copies for the desired images.
Total Number of Prints
to Be Printed
7 Press the Print/Stop button.
The printer will begin to print. When the printing is complete, all of
the copy settings will reset to zero.
When you select (Index) for the print layout, set the number of copies
to print to 1. Even if you set a multiple number of copies to print, only one
image at a time will print.
Troubleshooting Tasks and Index
16
NextBack

Return to Cover Page
Printing One Copy of All Images on the Card
1 Confirm that (All) mode is selected in the LCD
monitor.
2 Configure the print layout, date imprint and My Colors
settings as desired.
These settings apply to all of the images. The My Colors setting is
only available on the SELPHY CP750.
Getting Ready Printing AppendicesOverview
You can create an index of all the images on a memory card by selecting the
(All) mode, setting the print layout to (Index) and printing.
Printing According to the DPOF Settings Selected in the Camera
1 Use the camera to select the images and number of
copies you desire.
Methods for configuring print settings may vary between camera
models. See your camera user guide.
2
Confirm that (DPOF) mode is selected in the LCD monitor
You will not be able to select the DPOF mode if DPOF data is not
contained on the memory card.
.
3 Confirm the settings displayed on the LCD monitor.
Confirm that the required number of sheets is in the paper cassette.
Total Number of Prints
to Be Printed
4 Press the Print/Stop button.
The printer will begin to print.
Troubleshooting Tasks and Index
17
The [Print Type] selected in
the camera will display.
Total Number of Prints to
Be Printed
3 Press the Print/Stop button.
The printer will begin to print.
The date imprint will print according to the DPOF settings. You cannot
configure the date imprint with the printer’s Date button in this case. Neither
can you specify a print layout.
NextBack

Return to Cover Page
Getting Ready Printing AppendicesOverview
Print Layout Settings
Select a print layout.
(1 Image Borderless) Prints without borders.
(1 Image Bordered) Prints with a white border.
(2 Images Borderless) Prints two images without
borders on a single sheet.
(2 Images Bordered) Prints two images with a
white border on a single
sheet.
(4 Images Borderless) Prints 4 images without
borders on a single sheet.
(4 Images Bordered) Prints 4 images with a
white border on a single
sheet.
(8 Images Borderless) Prints 8 images without
borders on a single sheet.
Example on a
card sized sheet.
(8 Images Bordered) Prints 8 images with a
white border on a single
sheet.
(This layout setting cannot
be selected when using
card sized sheets.)
(Index) Prints eight images on a
single sheet along with
their image numbers.
(Image numbers do not
print on the card sized
sheets.)
Troubleshooting Tasks and Index
18
NextBack

Return to Cover Page
1 Press the Layout button and select a print layout from the
list that displays, then press the Layout button again.
The total number of
sheets will change
according to the print
layout selection.
Getting Ready Printing AppendicesOverview
• Layouts which can be selected will differ according to the printing mode.
Mode
Layout (Single) (Select) (All)
(1 Image Borderless)
(1 Image Bordered) {{{—
(2 Images Borderless)
(2 Images Bordered) — {{—
(4 Images Borderless) — {{—
(4 Images Bordered) — {{—
(8 Images Borderless) U
(8 Images Bordered) — U
(Index)*4 — {{U
{: selectable
—: cannot be selected
U: selectable with conditions
*1 The print type will depend on the camera settings. The print type cannot be
configured from the printer.
*2 This layout can be selected only when the camera’s print type is configured to
“standard”. Prints one image without borders.
*3 This layout can be selected only when using card sized sheets.
*4 This layout cannot be selected when using card sized sheets.
*5 This layout can be selected only when the camera’s print type is configured to
“index”
{{{U
— {{—
*3
{{—
*4
U
*4
(DPOF)
—
*1
*2
*5
Troubleshooting Tasks and Index
19
NextBack

Return to Cover Page
Getting Ready Printing AppendicesOverview
Date Imprint Settings
You can select whether or not to include the date imprint and its format.
(No Imprint)
(Year/Month/Day)
(Month/Day/Year)
(Day/Month/Year)
Does not include the date
imprint.
Prints the date in the Year/
Month/Day format.
2007/04/30
2007/04/30
Prints the date in the Month/
Day/Year format.
04/30/2007
04/30/2007
Prints the date in the Day/
Month/Year format.
1 Press the Date button. Press W or X to select whether or
not to include the date imprint, then press the Date
button again.
• The date used in the date imprint is the shooting date in the Exif data
included with each image data.
• If the image data does not contain Exif information, the file modification
date is used as the date imprint.
• The date imprint cannot be used when the (Index) print layout is
used.
• The date imprint cannot be printed on card sized sheets using the
(8 Images) print layout.
30/04/2007
30/04/2007
Troubleshooting Tasks and Index
20
NextBack

Return to Cover Page
Getting Ready Printing AppendicesOverview
My Colors Settings (SELPHY CP750 Only)
This function applies color effects to images.
(Off) No effects applied.
(B/W) Prints the image in black and
white.
(Sepia) Prints the image in a sepia
tone (a faded brown tint).
(Vivid) Prints the image in vivid
colors.
(Neutral) Prints the image in restrained
colors.
1 Press the (My Colors) button. Select the color effect
you want from the list that displays, and press the
(My Colors) button again.
• The My Colors effect cannot be used in the (DPOF) mode.
• The color effect setting is reset when the print is completed.
Red-Eye Correction Settings
When the subject’s eyes appear red in the image taken using a flash, this
function allows you to print out a corrected image.
1 Press the (Red-Eye Correction) button. Press W or X to
select whether or not to perform red-eye correction, then
press the (Red-Eye Correction) button again.
Red-eye is corrected for all the selected images and the images are
printed out.
(Positive Film) Prints like positive film with
natural and brilliant colors.
Troubleshooting Tasks and Index
21
NextBack

Return to Cover Page
• Red-eye cannot be corrected when the (B/W) or (Sepia) My
Colors effects have been selected.
• Depending on the image, red-eye may not be automatically detected or
optimally corrected.
Examples
- Faces that appear extremely small, large, dark or bright in relation to
the overall image.
- Faces turned to the side or at a diagonal, or faces with a portion
hidden.
Trimming Settings (SELPHY CP750 Only)
This function prints a select portion of an image.
Getting Ready Printing AppendicesOverview
2 Press the (Display) button.
The display will switch into a mode allowing you to set the print area
size and orientation.
3 Press the + and – buttons to adjust the size of the print
area.
Press the W and X buttons to rotate the frame 90 degrees.
4 Press the (Display) button.
The display will switch back into the mode for setting the frame
position.
The trimming function can only be used in the (Single) mode.
1 Press the (Trimming) button.
The image will display at full size on the LCD monitor.
Troubleshooting Tasks and Index
22
NextBack

Return to Cover Page
5 Press the W, X, + and – buttons to shift the print area as
desired.
Pressing the (Display) button again will switch back to the mode
for setting the print area size and orientation.
+
WX
–
6 When you finish the adjustments, press the
(Trimming) button.
Getting Ready Printing AppendicesOverview
7 Press W or X to select (OK), and press the
(Trimming) button again to conclude the trimming
settings.
To cancel the trimming settings, select (Cancel).
The trimming setting is reset when the print is completed. If you press the
(Trimming) button again after printing has completed however, the
trimming frame will reappear in the same location. Use this trimming setting
when you want to print multiple trimmed copies of the same image.
Troubleshooting Tasks and Index
23
NextBack

Return to Cover Page
Getting Ready Printing AppendicesOverview
Printing from Cameras
These procedures are for printing images from a camera connected to the printer.
Camera Check
On cameras that support printing via this method, icons such as
(PictBridge) or (Direct Print) will appear on the camera’s LCD monitor
when the camera is connected to the printer.
PictBridge is an industry standard that allows any digital camera or video
camera, regardless of the manufacturer or model, to print images directly to
a printer without using a computer.
1 Pull the retractable USB cable from the printer and attach
it to the camera.
Up to approximately 30 cm (12 in.)
If the connector on the retractable USB cable does not match the
camera’s terminal, connect the camera using the USB cable supplied
with the camera.
USB Connector
for Camera
Connecting the Camera
Connect the camera to the printer with the following procedures.
Before you connect the camera to the printer, ensure there are no memory
cards in the printer or that the printer is not connected to a computer.
Troubleshooting Tasks and Index
24
• When connecting a camera to the printer to print, you are recommended
to power the camera from a power outlet to avoid having the camera
cancel the print partway for lack of battery charge. If you are using a
battery, ensure that it is fully charged or new.
• To have the retractable USB cable recoil, pull it lightly forward, then while
holding the cable let it retract into the printer.
• The cable can be extended approximately 30 cm (12 in.). Be careful not to
over-extend it, which may lead to malfunctions.
NextBack

Return to Cover Page
Getting Ready Printing AppendicesOverview
Printing from a Camera
This section provides a simple explanation of the procedures using a
Canon-brand camera as an example. For a more detailed explanation,
see your camera’s user guide. (Camera User Guide or Direct Print User
Guide in the case of a Canon camera)
1 Press and hold the power button until the start-up image
appears in the LCD monitor.
2 Switch the camera’s power on and prepare the camera to
play back images.
The (PictBridge) or (Direct Print) icon will appear on the
camera’s LCD monitor.
3 Press the camera’s (Print/Share) button.
With some cameras, you may have to press the SET button twice in
place of the (Print/Share) button.
The printer will begin to print.
Before you detach the USB cable from the camera, switch off the
printer by holding down the power button.
Printing is also possible from non Canon-brand cameras which
support PictBridge. For detailed information, refer to your camera’s
user guide.
• When printing on wide size sheets, the print area may differ as follows
according to the icon ( or ) displayed in the camera’s LCD monitor.
(PictBridge) The image will print over the entire area of the sheet.
(Direct Print) The right end of the image will be blank. (You can use
this space to write text with an oil-based pen.)
Troubleshooting Tasks and Index
25
• Depending on the camera, full page printing is possible by switching the
transmission method from “Auto” to (PictBridge).
NextBack

Return to Cover Page
Getting Ready Printing AppendicesOverview
Printing with Various Settings
If you are using a Canon-brand camera, you can configure the following
settings and print. (Some functions may not be supported by some
models.) See your Camera User Guide or the Direct Print User Guide for
detailed instructions about each procedure.
1 Confirm that the (PictBridge) or (Direct Print) icon
appears on the camera’s LCD monitor.
2 Press the SET button.
A screen similar to the following will appear on the camera’s LCD
monitor. Change the settings as desired.
(PictBridge)
Print Effect Settings
Trimming Settings
Date Imprint, Image
Number Print Settings
Number of Copies
Settings
Paper Size, Type, Layout
Settings
3 Select [Print] and press the SET button.
The printer will begin to print.
• ID Photo
If you select [ID Photo] in the [Paper Settings] or [Style] settings category,
you can print identity photos at a specified size.
• Movie Print
You can extract still photos from a movie at set intervals and print them in
rows on a single sheet.
After you select a movie, press the (Print/Share) button.
(Direct Print)
Monitor, Border, Date
Imprint Settings
Number of Copies
Settings
Trimming Settings
Troubleshooting Tasks and Index
26
• For more information on ID photos and movie prints, see the Direct
Print User Guide supplied with the camera.
NextBack

Return to Cover Page
Getting Ready Printing AppendicesOverview
Printing from Computers
This section explains how to connect the printer to a computer to print.
Computer System Requirements
You computer must meet the minimum requirements listed below to
enable printing from the computer.
Windows
OS: Windows 2000 Service Pack 4, Windows XP
(including Service Pack 1 and Service Pack 2)
Windows Vista
Configuration: One of the above operating systems pre-
installed on a computer with built-in USB
ports.
CPU: Windows 2000/Windows XP:
Pentium 500 MHz or higher
Windows Vista:
Pentium 1.3 GHz or higher
RAM: Windows 2000/Windows XP:
256 MB or more
Windows Vista: 512 MB or more
Display: 1,024 x 768 pixels or more
High Color (16 bit) or better
Macintosh
OS: Mac OS X (v10.3-v10.4)
Configuration: One of the above operating systems pre-
installed on a computer with built-in USB
ports.
CPU: PowerPC G3/G4/G5 or Intel processor
RAM: 256 MB or more
Interface: USB
Free Hard Disk Space: Canon Utilities
ImageBrower: 200 MB or more
PhotoStitch: 40 MB or more
Canon SELPHY Printer Driver:
(required during installation)
Display: 1,024 x 768 pixels or more
32,000 colors or better
• Please note that Canon cannot guarantee operation with all computers even if they
comply with the noted system requirements.
• The software for Macintosh computers cannot be used on disks formatted with the
UFS (Unix File System).
4 MB or more
Interface: USB
Free Hard Disk Space: Canon Utilities
ZoomBrower EX: 200 MB or more
Easy-PhotoPrint: 65 MB or more
PhotoStitch: 40 MB or more
Canon SELPHY Printer Driver:
(required during installation)
Troubleshooting Tasks and Index
4 MB or more
27
This guide uses examples based on Windows XP and Mac OS X (v10.3). If
you use a different version of operating system, the procedures or screens
may differ slightly.
NextBack

Return to Cover Page
Getting Ready Printing AppendicesOverview
Precautions for Printing via Computers
Please note the following points. To print from a computer, refer to the following procedures.
Software Installation
Installing the Printer Driver
• Before you connect the printer to a computer, ensure there are no
memory cards in the printer or cameras connected to the printer.
• Connect the printer directly to a port on the computer with the USB
cable. It may not operate correctly via a USB hub.
• The printer may not operate correctly if another USB device (excluding
USB mice and keyboards) is used at the same time. Remove the other USB
device and reconnect the USB cable between the printer and computer.
• Do not allow the computer to go into standby (or sleep) mode when the
printer is connected to a USB port. If the computer enters this mode,
wake it up with the USB cable connected.
TWindows
1 Place the supplied Compact Photo Printer Solution Disk
• Do not connect the printer to the computer until after you have installed
the printer driver.
• You must login to the computer as an administrator before beginning
installation.
into the computer’s CD-ROM drive.
2 Click [Select Printer] in the printer
driver window, followed by the
name of your printer model.
Flow of Operations
Install the Software Connect to the Computer Use the Software to
Print
3 Follow the onscreen instructions.
When you are prompted to attach
the printer partway through,
attach the printer to the computer
and turn the printer on.
USB Terminal
Troubleshooting Tasks and Index
28
Commercially
available USB Cable
USB Connector for Computers
4 Click the [Finished] or [Restart] button when it appears.
This completes the driver installation.
NextBack

Return to Cover Page
Getting Ready Printing AppendicesOverview
TMacintosh
1 Place the supplied Compact Photo Printer Solution Disk into
the computer’s CD-ROM drive and double-click the (CPSD
Installer) icon in the CD-ROM window.
2 Click [Select printer] in the
printer driver window and
select your printer. Click
[Agree], select [Easy Install],
followed by [Install].
3 Follow the onscreen
instructions. Restart the
computer when prompted.
4 Attach the printer to the
computer and turn the printer on.
5 Open the [Utilities] folder on the start-up disk and double-
click the [Printer Settings Utility] icon.
6 Click [Add (Printer)] and select [USB] followed by your printer.
Finish by clicking the [Add] button and closing the window.
This completes the driver installation.
Installing the Application Software
TWindows
1 Place the supplied CD-ROM into the computer’s CD-ROM drive.
If the CD-ROM is already in the computer and the window below
does not appear, then take the CD-ROM out once and put it back in.
2 Click [Easy Installation] in the
application software section,
followed by [OK] and [Install].
3
Follow the onscreen instructions.
Remove the CD-ROM once the
installation is complete.
TMacintosh
1 Place the supplied CD-ROM into the computer’s CD-ROM drive
and double-click the (CPSD Installer) icon in the CD-ROM
window.
2 Click [Install] in the application
software section, followed by
[Easy Install] and [Next].
Troubleshooting Tasks and Index
29
3 Follow the onscreen
instructions.
Remove the CD-ROM once the
installation is complete.
NextBack

Return to Cover Page
Introduction to the Supplied Programs
Getting Ready Printing AppendicesOverview
Macintosh
ImageBrowser
Windows
ZoomBrowser EX
Easy-PhotoPrint
In addition to printing images, this
multifunction program is capable of
managing, displaying, editing and
exporting images.
For printing instructions, click the [Help]
menu and select [ZoomBrowser EX Help],
followed by [How do I?].
A versatile program capable of
printing various layouts in a few simple
steps.
For printing instructions, see the help
topics summoned by clicking the [?] button
in the [3 Layout/Print] tab.
In addition to printing images, this
multifunction program is capable of
managing, displaying, editing and
exporting images.
For printing instructions, click the [Help]
menu and select [ImageBrowser Help]
followed by a topic related to printing.
Programs Common to Windows/Macintosh
PhotoStitch
A program that takes multiple images
shot using functions such as the
camera’s Stitch Assist mode and
merges them into a single panoramic
image. You can create dynamic
panoramas if you print the merged
images on the wide-size sheets.
(PhotoStitch does not feature a
separate printing function.)
You can download detailed guides to ZoomBrowser EX (Windows) and
ImageBrowser (Macintosh) from the following website (available in English
only).
http://web.canon.jp/Imaging/information-e.html
Troubleshooting Tasks and Index
30
NextBack

Return to Cover Page
Getting Ready Printing AppendicesOverview
Wireless Printing
These procedures are for printing images over a wireless connection such as infrared data transmission (IrDA, IrSimple) or Bluetooth.
• When printing via a wireless connection, be sure there are no memory
cards in the printer, and that the printer is not connected to a camera or
computer.
• You cannot print via a wireless connection between the printer and a
computer.
• The maximum image data size that can be transmitted is 2.5 MB.
Printing Via Infrared Data Transmission (SELPHY CP750 Only)
This section explains how to print images from a mobile telephone
which supports infrared data transmission (IrDA, IrSimple).
Supported Devices
Check whether or not your mobile telephone has the required functions
for infrared data transmission enabled printing.
• Sending a large image may require a data transfer time of five minutes or
more.
• Mail and address book information cannot be printed.
• Mobile telephone security settings prevent printing of images
downloaded from the Internet and images downloaded from a URL sent
by email.
• Movies cannot be printed.
• The printer may not be able to print images saved onto the memory card
of some types of mobile telephones.
• The position and orientation (horizontal or vertical) of images for printing
is set automatically by the printer. Since images are enlarged or reduced
to fit the paper size, the edges of the image may be cropped with certain
combinations of image and paper sizes.
• Data transmission times are long when the data sizes are large.
Accordingly, it may take some time before printing starts.
The data transfer is initiated from the mobile telephone. See the user guide
for your mobile telephone for details.
1 Check the printer to ensure that no memory cards are
inserted, the Bluetooth unit is not attached or that a
camera is not connected via a USB cable.
Requirement 1: Built-in infrared wireless port supporting IrDA or
IrSimple.
Requirement 2: Built-in camera capable of recording and saving image
data (JPEG images of 2.5 MB or less).
Troubleshooting Tasks and Index
31
2 Press and hold the printer’s power button until the start-
up image appears in the LCD monitor.
NextBack

Return to Cover Page
Getting Ready Printing AppendicesOverview
3 Aim the mobile telephone’s infrared port at the printer’s
infrared data receiver and initiate data transfer from the
telephone.
See the user guide for your mobile telephone for instructions for
configuring the infrared data settings and for printing.
Up to approximately
20 cm (7.9 in.)
Hold the mobile telephone within 10
degrees of the sensor in any direction
The distance over which infrared signals can be
transmitted and received varies according to the mobile
telephone model and operating system.
While data is being transmitted, a screen similar to the following will
appear in the printer’s LCD monitor and the indicator will blink
green. If the transfer is not working well, reposition the mobile
telephone closer and directly in front of the infrared data receiver
and reinitiate the transfer.
Printing via a Bluetooth Connection
This section explains how to print images from a Bluetooth enabled
mobile telephone.
Supported Devices
Check whether or not your mobile telephone has the required functions
for Bluetooth enabled printing.
Requirement 1: Built-in Bluetooth capabilities that support OPP (Object
Push Profile) or BIP (Basic Imaging Profile). See the user
guide for your mobile telephone for information on
the profiles supported.
Requirement 2: Built-in camera capable of recording and saving image
data (JPEG images of 2.5 MB or less).
• Mail and address book information cannot be printed.
• Mobile telephone security settings prevent printing of images
downloaded from the Internet and images downloaded from a URL sent
by email.
• Movies cannot be printed.
• The printer may not be able to print images saved onto the memory card
of some types of mobile telephones.
• The position and orientation (horizontal or vertical) of images for printing
is set automatically by the printer. Since images are enlarged or reduced
to fit the paper size, the edges of the image may be cropped with certain
combinations of image and paper sizes.
• Data transmission times are long when the data sizes are large.
Accordingly, it may take some time before printing starts.
The printer will begin printing after the transmission is complete.
Troubleshooting Tasks and Index
32
NextBack

Return to Cover Page
The data transfer is initiated from the mobile telephone. See the user guide
for your mobile telephone for details.
1 Check the printer to ensure that no memory cards are
inserted or that a camera is not connected via a USB
cable.
2 Confirm that the separately sold Bluetooth Unit BU-20 is
installed.
Getting Ready Printing AppendicesOverview
A screen similar to the following will appear in the printer’s LCD
monitor while data is being transmitted. The Bluetooth Unit BU-20
will also blink blue. Do not break the Bluetooth connection until
transmission is complete. If the connection is broken, turn the
printer off and then on again before reinitiating printing.
The printer will begin printing after the transmission is complete.
3 Press and hold the printer’s power button until the start-
up image appears in the LCD monitor.
4 Initiate the data transfer from the Bluetooth enabled
mobile telephone.
See the user guide for your Bluetooth Unit for instructions for
connecting and printing. If prompted by the mobile telephone for a
device to connect to, select [Canon SELPHY CP750/CP740-xx:xx:xx
(where x refers to a numerical digit)]. The maximum transmission
distance for a Bluetooth enabled device is approximately 10 m (32.8
ft.) (may vary according to the operating environment).
BU-20
Up to approximately
10 m (32.8 ft.)
Once you have finished Bluetooth enabled printing, remove the
Bluetooth Unit from the printer or turn off the printer.
Troubleshooting Tasks and Index
33
NextBack

Return to Cover Page
Getting Ready PrintingOverview
Appendices
Maintenance, Storage and Transport
This section explains how maintain, store and transport the printer.
Maintenance
Internal Care
If fine stripes appear on printed images, there is a possibility that dirt or
dust has become lodged inside the printer. Use the supplied cleaner to
remove the dirt or dust.
1 Remove the ink cassette.
2 Insert the cleaner with the arrow side upward all the way
into the slot, then remove it, repeating this two or three
times.
Exterior Care
Wipe the exterior with a soft, dry cloth.
Never apply solvents, such as benzine or thinners, or detergent to the
printer. These substances may damage the exterior or peel the finish.
Care of the Back
Clean the dust from the air vents on the back. Dust will get on the ink
sheet if it enters from the air vents, preventing the printer from printing
cleanly. If dust becomes lodged on the ink sheet, use a blower brush to
remove it so that you do not touch the ink sheet.
Slide the cleaner in
and out 2 or 3 times.
Troubleshooting Tasks and Index
34
NextBack

Return to Cover Page
Storage
Main Unit
• Detach the power cord of the compact power adapter from the power
outlet.
• Remove the paper and ink cassettes from the printer for storage.
Store the paper cassettes with the lids closed. Remove the sheets of paper,
place them into their bag and replace them in their box, storing them flat.
Store the ink cassette in a bag so that dust does not get on it.
• Store the printer flat so that dust does not enter into it.
If you must store
it vertically,
please orient it in
this position.
Getting Ready Printing AppendicesOverview
Printed Paper
• If you store your prints in albums, select albums with photo covers
made of nylon, polypropylene or cellophane.
Other materials may cause the images to change color or transfer ink.
• Avoid storing prints in the following types of places to prevent the
image quality from deteriorating.
• Places with high temperatures (40°C/104°F or higher)
• Places with high humidity or dusty places
• Places subject to direct sunlight
• Prints may change color over time depending on their storage
conditions and the passing of time.
Transport
• Remove the paper and ink cassettes and close the covers.
• Transport the printer wrapped in a soft cloth to avoid scratching it.
Dust entering the printer may prevent it from printing cleanly.
Troubleshooting Tasks and Index
35
NextBack

Return to Cover Page
Getting Ready Printing AppendicesOverview
Battery Instructions (SELPHY CP750 Only)
You can print at an outside location that lack power outlets if you attach the separately sold battery pack to the SELPHY CP750.
This product is designed to achieve excellent performance when used
with genuine Canon accessories. Canon shall not be liable for any
damage to this product and/or accidents such as fire, etc., caused by
the malfunction of non-genuine Canon accessories (e.g., a leakage
and/or explosion of a battery pack). In such cases, this warranty will
not apply and repairs of genuine Canon accessories will be conducted
on a chargeable basis.
• Battery Pack NB-CP1L cannot be used in this printer.
• Do not use a battery other than that specified by Canon with this
product.
• Do not lose the battery pack terminal cover. It is required for battery
storage.
Attaching the Battery
Use the following procedures to attach Battery Pack NB-CP2L to the printer.
1 Remove the battery pack terminal cover.
Battery Pack
Terminal Cover
2 Press the battery cover eject lever downward to remove
the battery cover from the printer.
3 Attach the battery to the printer.
Slide the battery in the direction of the first arrow and press in the
direction of the second until it clicks into place.
Troubleshooting Tasks and Index
36
NextBack

Return to Cover Page
Getting Ready Printing AppendicesOverview
Charging the Battery
Use the following procedures to charge the battery.
1 Attach the battery to the printer.
2 Connect the power cord to the compact power adapter
and plug it in a power outlet. Connect the compact
power adapter connector to the printer.
Indicator
To a power outlet
While the battery is charging, the indicator will light orange. When
charging is complete, the indicator will turn off. The battery will
cease charging if you turn on the printer during the process. When
you turn the printer off again, it will resume charging.
3 After the battery is charged, detach the connector of the
compact power adapter from the printer.
The battery is now ready to power the printer.
• It takes approximately 2 hours 30 minutes to bring a depleted battery
pack to a full charge state (based on standard Canon testing criteria).
- Charge it within a temperature range of 5 to 40 °C (41 to 104 °F).
- The charging time varies according to the ambient temperature and
charge state.
• The printer will automatically turn off when powered by the battery if the
printer is not used for five minutes or more.
Detaching the Battery
Troubleshooting Tasks and Index
37
1 Press the battery cover eject lever downward to remove
the battery.
NextBack

Return to Cover Page
Getting Ready Printing AppendicesOverview
2 Attach the battery pack terminal cover onto the battery.
3 Attach the battery cover onto the printer.
Push the battery cover in the direction indicated by the arrow until
it clicks into place.
Remaining Battery Charge
The printer indicator will begin to blink orange when the battery charge
is low. In addition, a message may appear on a connected camera’s LCD
monitor or the printer’s LCD monitor. Recharge the battery or exchange
it for a fully charged one.
Battery Handling
To protect the battery and prevent a decline in performance, do not charge
it continuously for more than 24 hours.
• This is a lithium ion battery pack so there is no need to completely use
or discharge it before recharging.
• It can be charged at any charge state.
• You are advised to charge the battery on the day of use, or one day
before, to ensure a full charge.
• Even charged battery packs continue to discharge naturally.
• The battery life should be considered over when the usable time is
severely limited even after the prescribed charging time.
• Replace it with a new battery.
Battery Storage
• After you finish using the battery, attach the battery pack terminal
cover and store it at a cool temperature (0°-30°C/32°-86°F).
Storing the battery fully charged for long periods of time (about 1 year)
shortens the battery life and causes its performance to decline. When you do
not use it for long period of time, fully charge it once a year and store after
fully discharging it in the printer.
Troubleshooting Tasks and Index
38
NextBack

Return to Cover Page
Getting Ready Printing AppendicesOverview
Safety Precautions
Use this equipment correctly according to the following precautions to avoid the risk of injury, fire, electrical shock, malfunctions and other hazards.
Please also be sure to read “Handling Precautions” (p. 41).
• Equipment refers to the printer, compact power adapter, ink
cassettes, paper cassettes and paper.
Equipment
WARNINGS
Do not play the supplied CD-ROM(s) in any CD player that does not
support data CD-ROMs. Playing the CD-ROM(s) in an audio CD player
(music player) could damage the speakers. It is also possible to suffer
from hearing loss from listening with headphones to the loud sounds
of a CD-ROM played on a music CD player.
• Do not insert or drop metallic objects or flammable substances into the
equipment interior. Immediately switch off the printer power and remove
the power cord from the power outlet. (If powering it by battery, remove
the battery.)
• Do not touch metal parts of the devices or the power plug during
thunderstorms.
Immediately stop using the equipment and distance yourself from it.
• Do not use flammable solvents such as alcohol, benzene, or paint thinner
to clean the equipment.
• Do not rest heavy objects on the power cord or plug, pull on it with
excessive force or damage it.
• Do not use a power source (compact power adaptor, battery) that is not
specified for the equipment.
• Remove the power cord on a regular periodic basis and wipe away the dust
and dirt that collects on the plug, the exterior of the power outlet and the
surrounding area.
• Do not handle the power cord if your hands are wet.
• Store the equipment in a place where it cannot be reached by children.
• Do not disassemble or modify the equipment.
• If the equipment is dropped or the casing becomes damaged, do not
continue operation.
• Stop operating the equipment immediately if it emits smoke or noxious
fumes.
• Do not allow water or other liquids to enter the interior of the equipment.
If the equipment is subjected to water droplets or damp salty air, gently wipe it
with a soft, absorbent cloth.
Troubleshooting Tasks and Index
39
NextBack

Return to Cover Page
Getting Ready Printing AppendicesOverview
CAUTIONS
• Do not stick any part of your hand into the printer interior.
• Do not use or store the equipment in the following types of places.
Humid or dusty areas, places subject to heavy vibrations, places near flames, places
subject to strong sunlight, or hot places such as an automobile trunk or dash-
board.
• Do not attach metallic pins or allow dirt to collect on the power plug or
recharging connectors.
• Do not use the compact power adapter for any other equipment except
this printer, use it beyond its rated capacity or voltage, or leave the plug
partially inserted into a power outlet.
• Remove the compact power adapter power cord from the power outlet
when not using the printer.
Leaving it plugged in for long periods of time may pose the risk of heat generation
or deformation.
• Do not touch the paper or remove the paper cassette while printing is in
progress.
To Prevent Malfunctions and Damage Caused by Electromagnetic Fields
• Never position the equipment close to motors to other devices that
generate strong electromagnetic fields. Moreover, do not use it near
televisions or AM radios.
Battery (SELPHY CP750 Only)
WARNINGS
• Do not place the battery pack near a heat source or expose it to direct
flame or heat.
• The battery pack should not be immersed in water.
• Do not attempt to disassemble, alter or apply heat to the battery pack.
• Avoid dropping or subjecting the battery pack to severe impacts that could
damage the casing.
• Use only recommended battery pack and accessories.
There is a risk of the battery exploding or leaking. In the event that a battery leaks
and the eyes, mouth, skin or clothing contact these leaked substances, immediately flush with water.
• When you are not using the printer, remove the battery and store it
properly.
• Do not place anything, such as tablecloths, carpets, bedding or cushions, on
top of the battery charger while it is charging.
There is a risk of heat generation or deformation if it is left connected for a long
period of time.
To Prevent Condensation
• You can avoid condensation by placing the equipment in an airtight,
resealable plastic bag and letting them adjust to temperature changes
slowly before removing them from the bag. In the event that condensation
does form within the equipment, keep it at room temperature until the
water droplets evaporate naturally before using it.
Troubleshooting Tasks and Index
40
• Before you discard a battery, cover the terminals with tape or other
insulators to prevent direct contact with other objects.
Contact with the metallic components of other materials in waste containers may
lead to fire or explosions.
NextBack

Return to Cover Page
Getting Ready Printing AppendicesOverview
Handling Precautions
This section explains the precautions that you should take in handling the equipment.
Equipment
• Do not apply excessive force to the paper cassette.
Force or impact on the cassette may result in paper jams or equipment
damage.
• Do not switch the power on/off repeatedly when you do not intend
to print.
The printer initialization process consumes ink and the equivalent of several
pages could be wasted.
• Be careful not to spray the equipment with insecticides or volatile
substances. In addition, do not store the equipment in contact with
rubber or vinyl products for long periods of time.
These materials may cause deformation of the printer’s casing.
• Do not handle the ink cassettes with wet or sweaty hands.
• Do not touch the springs of the paper cassette. If the springs are bent
or deformed, paper will not feed correctly into the printer.
Spring
• Do not touch the print side (shiny side) of the paper with your fingers.
Always hold the paper along the edges (outside the perforated border).
Be sure that hands are dry before touching the paper. Sharp objects will
scratch the paper surface. Keep the paper surface free from fingerprints,
dust, water droplets, etc.
• Use a non-soluble ink pen to write on the paper sheets.
• Please avoid the following actions as they may result in color change,
color fading or color bleeding.
• Sticking any type of adhesive tape onto the print surface.
• Allowing print surfaces to come into contact with vinyl or plastic.
• Applying alcohol or other volatile solvents to the print surface.
• Leaving print surfaces tightly pressed against any other surfaces or objects
for prolonged periods.
Battery (SELPHY CP750 Only)
• Keep the battery terminals clean at all times.
Dirty terminals result in a poor connection. Before recharging or using the
battery, polish the terminals with a slender, soft tipped cotton swab.
• Do not carry or store the battery pack with metal objects with sharp
edges, such as paper clips and pins. Always put the terminal cover on
the battery pack’s terminal when carrying it or before storing it.
• Although the battery pack’s maximum operating range is 5 to 40 °C
(41 to 104 °F), the optimal range is 10 to 30 °C (50 to 86 °F).
Battery performance will temporarily drop in cold environments, such as ski
hills.
• If the battery status is low, the finished print may not be ejected into
the print output receptacle completely.
If that occurs, replace the battery with a fully charged one or use the compact
power adaptor.
• Do not place any foreign objects in the print output receptacle (on the
top of the paper cassette).
Troubleshooting Tasks and Index
41
NextBack

Return to Cover Page
Specifications
Compact Photo Printer SELPHY CP750/CP740
All data is measured according to standard Canon testing procedures.
We reserve the right to change specifications without notice.
Printing Method: Dye-sublimation thermal transfer (with overcoating)
Print Resolution: 300 x 300 dpi
Gradation: 256 shades per color
Ink: Dedicated ink cassette (Y/M/C/overcoating)
Paper: Postcard size, L size, card size (full page label sheets,
8-label sheets), wide size
Print Sizes: Borderless Bordered
Postcard Size
(4 x 6 in.)
L Size 89.0 x 119.0 mm
Card Size 54.0 x 86.0 mm
Wide Size
(4 x 8 in.)
Printing Speed: Printing from Memory
Postcard Size Approx. 1 min. 17 sec. Approx. 58 sec.
L Size Approx. 1 min. 7 sec. Approx. 50 sec.
Card Size Approx. 45 sec. Approx. 31 sec.
Wide Size Approx. 1 min. 35 sec. Approx. 1 min. 13 sec.
100.0 x 148.0 mm
(3.94 x 5.83 in.)
(3.50 x 4.69 in.)
(2.13 x 3.39 in.)
22.0 x 17.3 mm
(0.87 x 0.68 in.)
(per 8-label sheet)
100.0 x 200.0 mm
(3.94 x 7.87 in.)
(The print area may vary according to the camera
model used.)
Cards
91.4 x 121.9 mm
(3.60 x 4.80 in.)
79.2 x 105.3 mm
(3.12 x 4.15 in.)
50.0 x 66.7 mm
(1.97 x 2.63 in.)
91.4 x 121.9 mm
(3.60 x 4.80 in.)
Connected to Cameras*
Getting Ready Printing AppendicesOverview
* When connected to a Canon compact digital camera with built-in DIGIC III.
Printing speeds may vary with other cameras. In addition, these figures were
derived using standard Canon testing procedures and may vary according to
usage conditions.
Feeding System: Automatic paper feed from paper cassette
Ejection System: Automatic paper ejection on top of paper cassette
LCD Monitor: CP750: 2.4-inch type, TFT color LCD
CP740: 2.0-inch type, color LCD
Interface:
USB Connecting to a Canon Direct Print compliant camera/
Pictbridge compliant devices:
USB compliant Type A connector, Retractable USB
cable*
* Mini-B plug, 30 cm (12 in.)
Connecting to a PC:
USB compliant Type B connector
Wireless IrDA, IrSimple (Print Beam) (CP750 only):
Image transfer via vNote over IrOBEX or IrMC
Bluetooth (Print Beam):
Bluetooth Unit BU-20 required (sold separately)
Device compatibility: Built-in Bluetooth and
support for OPP (Object Push Profile) or BIP
(Basic Imaging Profile)
Memory Cards SD Memory Card, miniSD Card, microSD Card*, SDHC
Memory Card, miniSDHC Card, microSDHC Card*,
MultiMediaCard, MMCplus Card, MMCmobile card,
MMCmicro card*, RS-MMC Card, CF (CompactFlash)
card, Microdrive, xD-Picture Card*, Memory Stick,
Memory Stick PRO, Memory Stick Duo, Memory Stick
PRO Duo, Memory Stick Micro*
*Requires special adapter
(Purchase the CompactFlash Card Adapter for xDPicture Card separately)
Troubleshooting Tasks and Index
42
NextBack

Return to Cover Page
Getting Ready Printing AppendicesOverview
Operating
Temperatures:
Operating Humidity: 20 – 80%
Power Source: Compact Power Adapter CA-CP200
Power Consumption: 60 W or less (4 W or less on standby)
Dimensions: CP750: 179.0 x 127.1 x 63.0 mm (7.05 x 5.00 x 2.48 in.)
Weight (Printer only): CP750: Approx. 960 g (33.9 oz.)
5° – 40°C (41° – 104°F)
Battery Pack NB-CP2L
CP740: 179.0 x 127.1 x 63.0 mm (7.05 x 5.00 x 2.48 in.)
CP740: Approx. 940 g (33.2 oz.)
Compact Power Adapter CA-CP200
Rated Input: 100 – 240 V AC (50/60 Hz)
117 – 150VA
1.5 A (100 V) – 0.75 A (240 V)
Rated Output: 24 V DC, 2.2 A
Operating
Temperatures:
Dimensions: 122.0 x 60.0 x 30.5 mm (4.80 x 2.36 x 1.20 in.)
Weight: Approx. 310 g (10.9 oz.)
0° – 45°C (32° – 113°F)
(excluding power cord)
Battery Pack NB-CP2L (SELPHY CP750 Only)
Type Rechargeable lithium-ion battery
Nominal Voltage: 22.2 V DC
Nominal Capacity: 1200 mAh
Charge Cycles: Approx. 300 times
Number of Prints* L Size Approx. 36 prints
Postcard Size Approx. 36 prints
Card Size Approx. 72 prints
Wide Size Approx. 24 prints
* Test conditions:
Normal temperature (23°C/73°F), Canon images, continuous print.
The above data may vary according to the printing environment and the
image to be printed.
Operating
Temperatures:
Dimensions: 110.0 x 40.7 x 37.5 mm (4.33 x 1.60 x 1.48 in.)
Weight: Approx. 230 g (8.11 oz.)
If the ambient temperature is low, the battery performance will be reduced and
the low battery warning will display early. Under these conditions, warm the
battery up in a pocket right before use to restore the battery performance.
5° – 40°C (41° – 104°F)
Troubleshooting Tasks and Index
43
NextBack

Return to Cover Page
Getting Ready Printing AppendicesOverview
Troubleshooting
This section has solutions for when the printer does not operate as expected or an error symbol is displayed.
You Think There is a Problem
If the solutions below do not remedy your problem, contact the retail
outlet or a Canon customer support center.
Problems with the Main Printer Unit and Power
Q Power will not turn on.
Has the plug come out of the power outlet? (p. 8)
Î
Î Is the connector of the compact power adapter securely connected
to the printer’s DC IN terminal? (p. 8)
Î Did you try pressing the power button for a long moment? (p. 5)
Î Battery Pack
• Is the battery sufficiently charged?
• When installing it, did you press on the battery until it clicked
into place? (p. 36)
Î Check that you are using the correct combination of paper, paper
cassette and ink cassette.
Î Is the printer connected to more than one device at once?
Do not connect simultaneously to a camera, memory card or
computer.
Î Is there paper in the paper cassette? Is the paper cassette inserted all
the way in?
Î Is the ink cassette inserted all the way in?
Î Is the ink sheet slack?
Î Are you using the number of paper sheets indicated?
Î Were the perforated portions of the paper folded over or separated
before printing?
Î The printer will temporarily stop when it exceeds a certain
temperature. This is not a malfunction. Wait until the temperature
drops and the printer resumes. The following may cause
overheating.
• Continuous printing
• High ambient temperature
• Vent on rear of printer has been obstructed, raising the internal
temperature of the printer.
A message will appear on the computer display if you are connected
to a computer when this happens, but you should wait until printing
resumes without cancelling the print.
Printing Problems
Q Cannot Print
Is the printer power turned on? (p. 5)
Î
Î Is the ink cassette empty?
Replace the ink cassette.
Troubleshooting
Tasks and Index
44
Î Printing from Memory Cards
• Is the memory card inserted all the way into the slot with the
label facing upward?
• Do the images conform to the Design rule for Camera File
system?
NextBack

Return to Cover Page
Getting Ready PrintingOverview
Appendices
Î Printing from Cameras
• Recheck the camera and printer connection status.
• Does the firmware of the Canon-brand camera support the
printer?
• Does the camera battery have a sufficient charge?
Replace the battery with a fully charged or new battery, or use
the compact power adapter for the camera.
Î Printing from Computers
• Did you install the printer driver according to the correct
procedures?
• Is the printer connected directly to a port on the computer with
the USB cable?
The printer may not operate correctly if it is connected to a USB
hub.
• A USB cable for connecting the printer to a computer is not
supplied with the product. Please use a commercially available
USB cable.
Problems Exclusive to Windows
• Is the printer set to offline?
Right-click the printer icon and cancel the offline setting.
Problems Exclusive to Macintosh
• Is the printer registered on the Printer List?
Q Cannot Print a Particular Image
Î
Image data may be corrupted.
Î Only JPEG images can be printed.
Î Images larger than 8,000 x 6,000 pixels cannot be printed.
Q Cannot Print the Date Imprint
Printing from Memory Cards
Î
• Set a date imprint option with the printer’s Date button.
• If you are using DPOF settings, the date imprint settings are
configured on the camera.
Î Printing from Cameras or Mobile Telephones
• Date imprint settings are configured on those devices not the printer.
Q Cannot Configure the Selected Mode, Print Layout, Date
Imprint and Number of Prints
Some options cannot be selected or may not be available depending
Î
on the selected combination of mode, print layout, date imprint and
number of prints.
Q Cannot Print Cleanly
Q Image Does Not Appear When Memory Is Inserted
Î
Is the memory card inserted all the way into the correct slot with the
label facing up?
Î Do the images conform to the Design rule for Camera File system?
Troubleshooting Tasks and Index
45
Î
Is the ink sheet or paper dirty?
Î Is dirt lodged within the printer?
Use the supplied cleaner to remove the dirt.
Î Has condensation formed within the printer?
Leave it to dry at room temperature for some time.
Î Is it placed near a device with a strong electromagnetic or magnetic
field?
Set it at least one meter (3 ft.) apart.
NextBack

Return to Cover Page
Getting Ready PrintingOverview
Appendices
Q Colors on the Computer Display and the Print Are
Different
Color generation methods are different for computer displays and
Î
printers. Moreover, the variance may be attributable to the
environment in which the display is viewed (color and strength of the
light) or to the display’s color adjustment settings.
Windows
• You can adjust the colors and brightness in the Printer
Properties dialog. Start in the [Tools] menu in ZoomBrowser EX
by selecting [Preferences] and the [Printing] tab. Place a check
mark beside [Use ZoomBrowser EX print function]. In the Print
dialog, click the printer [Properties] button and adjust the
colors in the [Image Adjustment] tab.
Macintosh
• Adjust the color balance in the [Color] section.
Q After using the computer to cancel a print in progress,
an image that had already been printed was printed
again when I resumed printing.
Î
When you restart printing on a Macintosh after cancelling, an
already printed image prints again when printing resumes.
Paper Problems
Q Paper Will Not Fit into Cassette
Î
Does the paper size match the size of the paper cassette?
Q Paper is Not Being Advanced Properly
Î
Check the paper and paper cassette to see that they are correctly
inserted.
Q Frequent Paper Jams
Î
Has too much paper been placed in the paper cassette?
Do not place 19 or more sheets in the cassette (13 or more for widesize sheets).
Î Have 10 or more sheets collected on the paper output tray?
Î Is the paper folded or bent?
Q Can’t Print the Specified No. of Prints. Accumulating
Paper
Î
The following actions waste ink sheet capacity.
• Repeatedly turning the printer on/off without printing.
• Cancel printing while printing is in progress.
• Pulling on the ink sheet.
• Taking out the ink cassette when the paper runs out while
printing multiple copies. (Do not remove the ink cassette when
removing and refilling the paper cassette.)
Troubleshooting Tasks and Index
46
NextBack

Return to Cover Page
Getting Ready PrintingOverview
Appendices
Error Symbols
When the printer encounters some kind of problem, a symbol appears
in the LCD monitor to indicate the error type. Take the action
recommended for the error symbol. Error messages will also display in a
camera’s LCD monitor when the camera is connected to the printer.
Cannot Display Image
• The image thumbnail (a tiny image included for checking the
image) may not be included with the image data. In this case,
the image data still is printed.
• The image file may be corrupted. In this case, the image
cannot be printed.
No Images on Memory Card
• Check to see if a memory card is in the printer.
• Check to see if the memory card is properly inserted all the
way into the slot.
• Check to see whether there are any images on the memory
card.
Paper Error/No Paper
• Confirm that the paper cassette is firmly inserted all the way
into the printer.
• Confirm that there is paper in the paper cassette.
• If the paper is not feeding correctly into the printer, remove
the paper cassette as well as any paper left in the printer.
• Check to see if there is any paper in the paper cassette of a
size that cannot be printed.
Paper Jam
• Turn the power off and then back on.
• Contact a customer support center if the paper will not come
out even when the power is turned back on.
No Ink
• Confirm that the ink cassette is inserted.
• If the ink cassette is spent, replace it with a new one.
• Check the paper and ink combination for a mismatch.
Cannot Read Image
• You attempted to print the following type of image.
• Image shot on another camera or as another data type
• Image downloaded to and edited on a computer
• Image exceeding the 8,000 x 6,000 pixel limits
• Image with corrupted data
• Press the Print/Stop button to return to the prior screen.
Troubleshooting Tasks and Index
47
Ink cassette and paper stock are mismatched
• Make sure the ink cassette and paper stock are not
mismatched.
NextBack

Return to Cover Page
Getting Ready PrintingOverview
Appendices
Ink Cassette Error
• Turn the power off and then back on.
• Remove the ink cassette and take the slack out of the ink
sheet before replacing it. If this does not fix the problem,
replace the ink cassette with a new one. Contact a customer
support center if you cannot remove the ink cassette.
Low Battery (SELPHY CP750 Only)
• Recharge the battery or replace it with a charged one. Or
connect the compact power adapter.
Connection Failed
• Cannot print via a wireless connection. Check the printer and
camera positions, their distance from each other and the
camera’s settings.
USB Device Not Supported
• Disconnect the retractable USB cable or USB connector from
the device.
USB Hub Connected
• Disconnect the retractable USB cable or USB connector from
the USB hub.
Other Errors
• Switch the power off and then back on (on the camera too if
it is connected).
• Contact a customer support center if the same error appears
again.
Connection Broken
• The connection was broken during a wireless printing session.
Check the printer and camera positions and their distance
from each other and redo the procedure.
Troubleshooting Tasks and Index
48
NextBack

Return to Cover Page
Getting Ready Printing AppendicesOverview
Tasks and Index
Click the page number of a topic to jump to that topic.
I want to print the shooting date on the photo. Î p. 20
I want to create a label.
I want to print an index of all the images on a memory card.
I want to print with borders around images.
I want to print in sepia or monochrome (SELPHY CP750 only).
I want to enlarge and print a portion of an image (trimming)
(SELPHY CP750 only)
.
Î p. 6, p. 18
Î p. 17
Î p. 18
Î p. 21
Î
p. 22
I want to know if I can connect the printer to my computer.
I want to print images from my mobile telephone.
I want to know which types of paper are sold.
I want to use the printer in a place with no electricity
(SELPHY CP750 only).
I want to protect the photos I have printed.
I want to know the printer specifications.
An error mark appeared on the LCD monitor
and I want to understand what to do.
Î p. 31, p. 32
Î p. 27
Î p. 6
Î p. 36
Î p. 35
Î p. 42
Î p. 47
I want to understand the information on the LCD monitor.
I want to display an image at a larger size.
I want to know the supported types of memory card.
I want to connect and print using my camera.
Troubleshooting
Tasks and Index
Î p. 14
Î p. 14
Î p. 13
Î
p. 24
49
NextBack

Return to Cover Page
Getting Ready Printing AppendicesOverview
• Windows, Windows Vista and the Windows Vista logo are trademarks of Microsoft
Corporation, registered in the U.S. and other countries.
• Macintosh, the Mac logo, Quick Time and the QuickTime logo are trademarks of Apple
Computer, Inc., registered in the U.S. and other countries.
• The SDHC logo and miniSDHC logo are trademarks.
• Portions of the code used in this firmware are based in part on the work of the Independent
JPEG Group.
• No part of this guide may be reproduced, transmitted, transcribed, stored in a retrieval system,
or translated into any language in any form, by any means, without the prior written
permission of Canon.
• While every effort has been made to ensure that the information contained in this guide is
accurate and complete, no liability can be accepted for any errors or omissions. Canon reserves
the right to change the specifications of the hardware and software described herein at any
time without prior notice.
• Canon makes no warranties for damages resulting from corrupted or lost data due to a
mistaken operation or malfunction of the camera, the printer, the software, the memory cards,
personal computers, peripheral devices, or use of non-Canon memory cards.
CDP-E056-010 © 2007 CANON INC.
Troubleshooting Tasks and Index
50
Back
 Loading...