

Canon PIXMA MP140 Series Quick Start Manual
Photo All-in-One
Quick Start Guide

Getting Help from Canon
Help Us Help You Better
Before you contact Canon, please record the following information.
Serial Number (located on the inside of the product): ________________________________________
Model Number (located on the top of the product): __________________________________________
Setup CD-ROM number (located on the CD-ROM): _________________________________________
Purchase Date: _____________________________________________________________________
Customer Technical Support Sequence*
1.Internet — www.canontechsupport.com
For quick and comprehensive self-help in an intuitively guided interactive troubleshooting
environment, the place to start is our helpful tech support web site. In addition, the latest driver
downloads, answers to frequently asked questions, product information, and “where to buy”
instructions are found here.
2.Email Tech Support — www.canontechsupport.com
For individual attention to a special issue, try emailing our friendly technical support representatives,
specially trained to communicate quick, easy, and logical solutions to your inquiries within 24 hours.
3.Toll-Free Live Tech Support — (1-800-828-4040)
This option provides live telephone technical support, free of service charges, MondaySaturday (excluding holidays), during your product’s 1 year limited warranty period.
Telephone Device for the Deaf (TDD) support is available at (1-866-251-3752).
4.Extended Service and Support — www.canonesp.com
Canon CarePAK Extended Service Plan is a cost-attractive and easy-to-use extended service
program that provides up to three full years of service and support coverage at a very attractive
price. CarePAK offers toll-free Canon technical support and includes Canon’s superb
InstantExchange product replacement program. For further information about extending your
Canon service and support, call (1-800-385-2155), or visit our Web site at www.canonesp.com.
CarePAK must be purchased during your product’s warranty period.
For more information and updated program specifics, please visit our web site at
www.canontechsupport.com.
* Support program specifics are subject to change without notice.
Photo All-in-One
Quick Start Guide

Canon PIXMA MP140 series Photo All-in-One Quick Start Guide.
Copyright
This manual is copyrighted by Canon U.S.A., Inc. with all rights reserved. Under the copyright laws,
this manual may not be reproduced in any form, in whole or in part, without the prior written consent
of Canon U.S.A., Inc.
© 2007 Canon U.S.A., Inc.
Disclaimer
Canon U.S.A., Inc. has reviewed this manual thoroughly in order that it will be an easy-to-use
guide to your Canon PIXMA MP140 series Photo All-in-One. All statements, technical information
and recommendations in this manual and in any guides or related documents are believed reliable,
but the accuracy and completeness thereof are not guaranteed or warranted, and they are not
intended to be, nor should they be understood to be, representation or warranties concerning the
products described.
Specifications are subject to change without notice.
ENERGY STAR
As an
ENERGY STAR
the
All information regarding non-Canon products was compiled from publicly available information. No
representation is made regarding the accuracy thereof.
About Consumables
Consumables (ink tanks / FINE Cartridges) are available for 5 years after production has stopped.
Trademarks
z Microsoft and Windows are either registered trademarks or trademarks of Microsoft Corporation in
the U.S. and/or other countries.
z Windows Vista is either a registered trademark or trademark of Microsoft Corporation in the United
States and/or other countries.
z Macintosh and Mac are trademarks of Apple Computer, Inc., registered in the U.S. and other
countries.
z Adobe and Adobe RGB (1998) are either registered trademarks or trademarks of Adobe Systems
Incorporated in the United States and/or other countries.
Canon U.S.A., Inc.
One Canon Plaza
Lake Success, NY 11042
®
Partner, Canon Inc. has determined that this product meets
®
guidelines for energy efficiency.

Table of Contents
Before Using the Machine .............................2
Operation Panel..............................................2
Turning the Machine On and Off ....................4
Handling Original Documents.........................5
Loading Printing Paper ...................................7
Copying .........................................................13
Making Copies.............................................. 13
Using Other Copy Functions......................... 13
Changing the Copy Settings.........................13
Printing from Your Computer......................14
Printing with Windows...................................14
Printing with Macintosh.................................15
Scanning Images ..........................................16
Scanning Methods........................................16
Routine Maintenance ...................................17
List of Maintenance Codes...........................17
When Printing Becomes Faint or Colors
Are Incorrect .................................................18
Printing the Nozzle Check Pattern................19
Examining the Nozzle Check Pattern ........... 20
Print Head Cleaning......................................21
Print Head Deep Cleaning............................21
Aligning the Print Head.................................22
Replacing a FINE Cartridge..........................24
Keeping the Best Printing Results ................ 31
Cleaning Your Machine ................................32
Troubleshooting ...........................................36
An Error Code Is Displayed on the LED....... 37
The LEDs Cannot Be Seen At All.................39
Cannot Install the MP Drivers.......................39
Cannot Connect to Computer Properly......... 41
Print Results Not Satisfactory.......................42
Printing Does Not Start.................................47
Paper Does Not Feed Properly.....................48
Paper Jams...................................................49
Error Message Appears on the Screen ........ 51
Appendix .......................................................53
How to Use the Documentation Provided..... 53
Reading the On-screen Manuals..................54
Specifications................................................55
Safety Precautions .......................................57
Legal Limitations...........................................61
Users in the U.S.A. .......................................62
Index ..............................................................66
1
Before Using the Machine
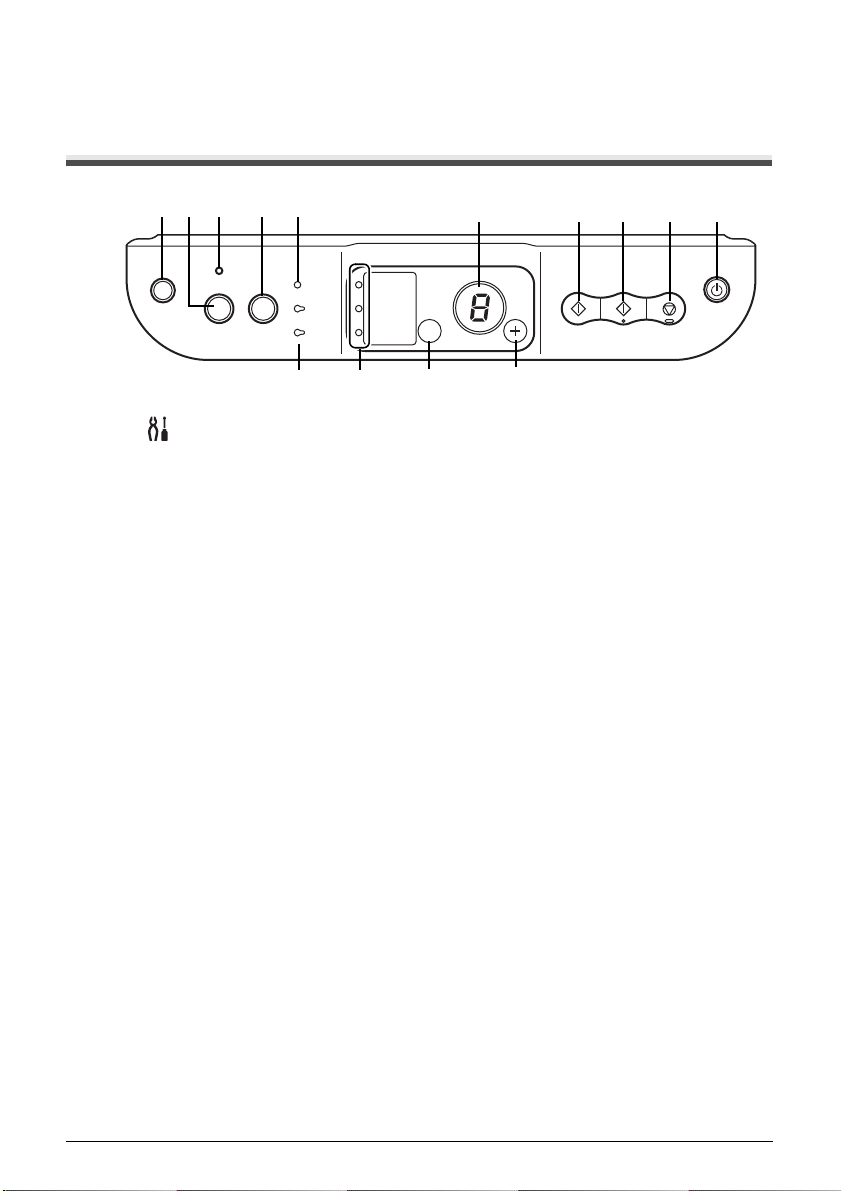
Operation Panel
(1) (2) (3) (4) (5) (6) (10)(7) (8) (9)
(11) (12) (13) (14)
(1) (Maintenance) button
Accesses the Maintenance menu.
(2) Fit to Page button
Enables/disables the Fit-to-Page copying.
(3) Fit-to-Page Lamp
Lights when Fit-to-Page copying is enabled.
(4) SCAN button
Opens the MP Navigator to scan a document to your computer according to the settings
selected. To use this button, the machine must be connected to a computer.
(5) Alarm Lamp
Lights or flashes orange when an error, such as paper-out or ink-out, occurs.
(6) LED (Light Emitting Diode)
Displays the number of copies, Maintenance menu selections or the operational status.
(7) Black button*
Starts black & white copying. Also, press this button to confirm settings or operations.
(8) Color button*
Starts color copying. Also, press this button to confirm settings or operations.
(9) Stop/Reset button
Cancels the current operation and returns the machine to standby mode.
(10) ON/OFF button / POWER Lamp
Turns the machine on and off. Before turning on the machine, make sure the Document
Cover is closed.
(11) Black/Color Ink Lamp
Lights or flashes to show the ink status.
(12) Paper Lamp
Displays the selected paper size and type for copying.
(13) Paper button
Switches the paper size and type for copying.
For information on how to switch between A4 and LTR paper sizes, see “Changing the
Copy Settings” on page 13.
2 Before Using the Machine

(14) + button
Increases the number of copies.
* In the software applications or manuals, the Black and Color buttons are collectively called
the Start or OK button.
Note
POWER Lamp and Alarm Lamp
You can check the status of the machine by the POWER and Alarm lamps.
z POWER lamp off: The machine is off.
z POWER lamp lit green: The machine is ready to print.
z POWER lamp flashing green: The machine is getting ready to print, or printing is in progress.
z Alarm lamp lit orange: An error has occurred and the machine is not ready to print.
For details, see “An Error Code Is Displayed on the LED” on page 37.
z POWER lamp flashes green and Alarm lamp flashes orange alternately: An error that requires
contacting your Canon Service representative may have occurred. For details, see “An Error
Code Is Displayed on the LED” on page 37.
3Before Using the Machine
Turning the Machine On and Off
Turn on the machine before printing.
Turning On the Machine
Before turning on the machine, confirm the following.
z The FINE Cartridges are installed properly.
z The machine is connected to your computer (or a compatible device).
z The MP Drivers are installed.
Note
If preparatory operations above are not complete, follow your setup sheet to complete them.
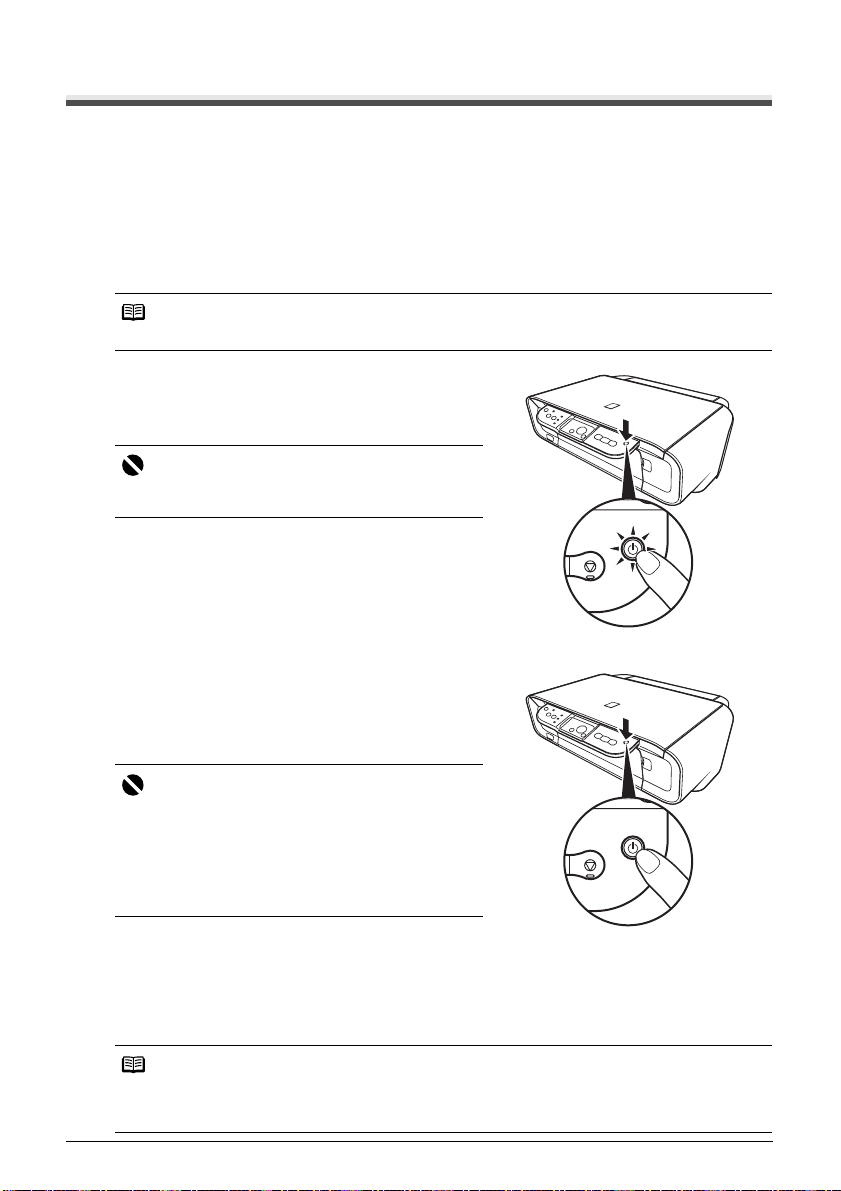
1 Press the ON/OFF button.
The POWER lamp flashes and then remains lit
green.
Important
If the ALARM lamp begins to flash orange, see “An
Error Code Is Displayed on the LED” on page 37.
2 If you are using the machine connected to a
computer, turn on your computer.
Turning Off the Machine
1 To turn off the machine, press the ON/OFF
button.
When the POWER lamp stops flashing, the
machine is turned off.
Important
About the Power Plug
When removing the power plug after turing off the
machine, be sure to confirm that the POWER lamp is
not lit. If the power plug is removed from the wall outlet
with the POWER lamp still lit or flashing green, the
machine may become unable to print.
See “Keeping the Best Printing Results” on page 31.
z To Save Energy
The LED goes out if the machine is not operated for about five minutes*.
Perform a print operation to restore the display.
*You cannot change the wait time before the LED goes out.
Note
When you want to restore the display, perform a print operation or press any button except ON/
OFF button. When you press the ON/OFF button while the machine is in Screen-saver mode, the
machine turns off.
4 Before Using the Machine
Handling Original Documents
This section describes how to load the original document on the Platen Glass.
Original Document Requirements
The original documents you load on the Platen Glass for copying or scanning must meet these
requirements:
Document
type
Size (W x L)
Thickness
z Paper documents
z Photographs
z Books, catalogs, or magazines
Max. 8.5 x 11.7 inches / 216 x 297 mm
Max. 0.79 inches / 20 mm
Loading Original Documents
Load originals to copy or scan on the Platen Glass.
Note
Make sure any glue, ink, correction fluid, or the like on the original document is completely dry
before loading it on the Platen Glass.
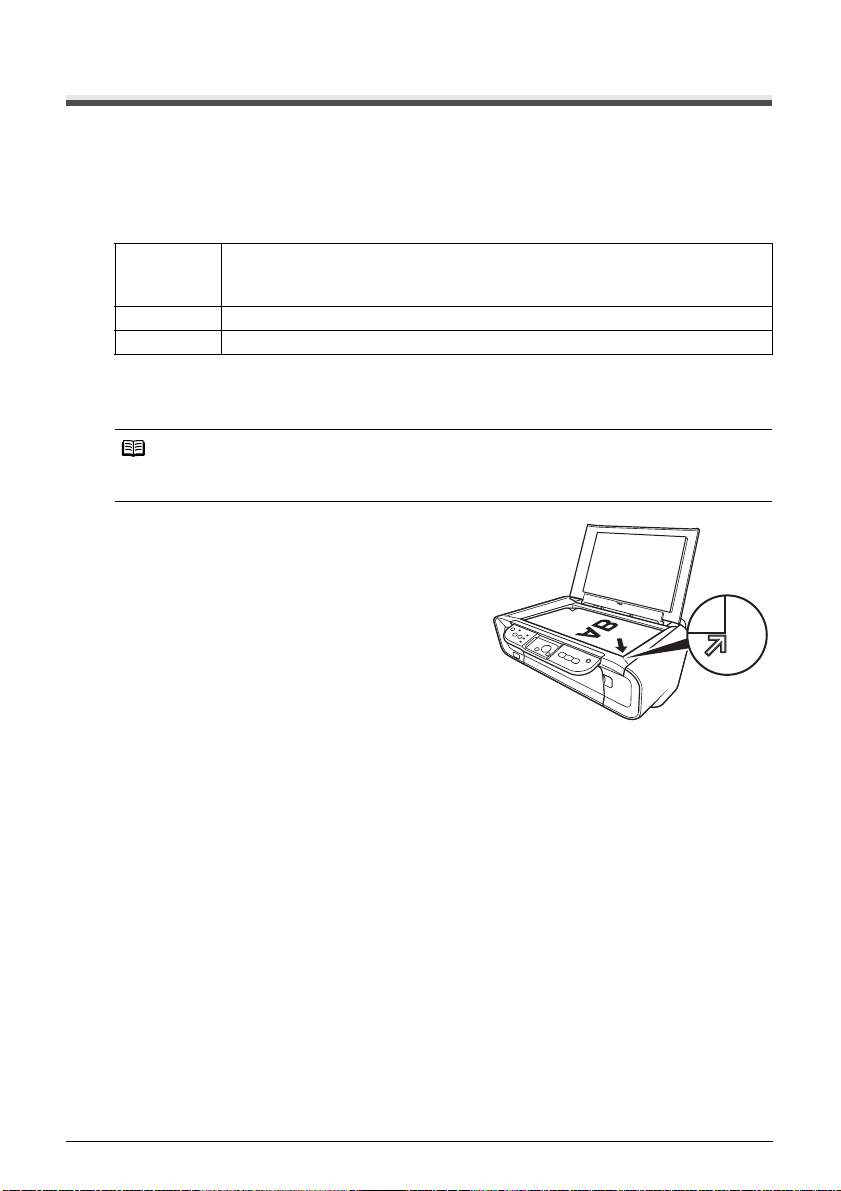
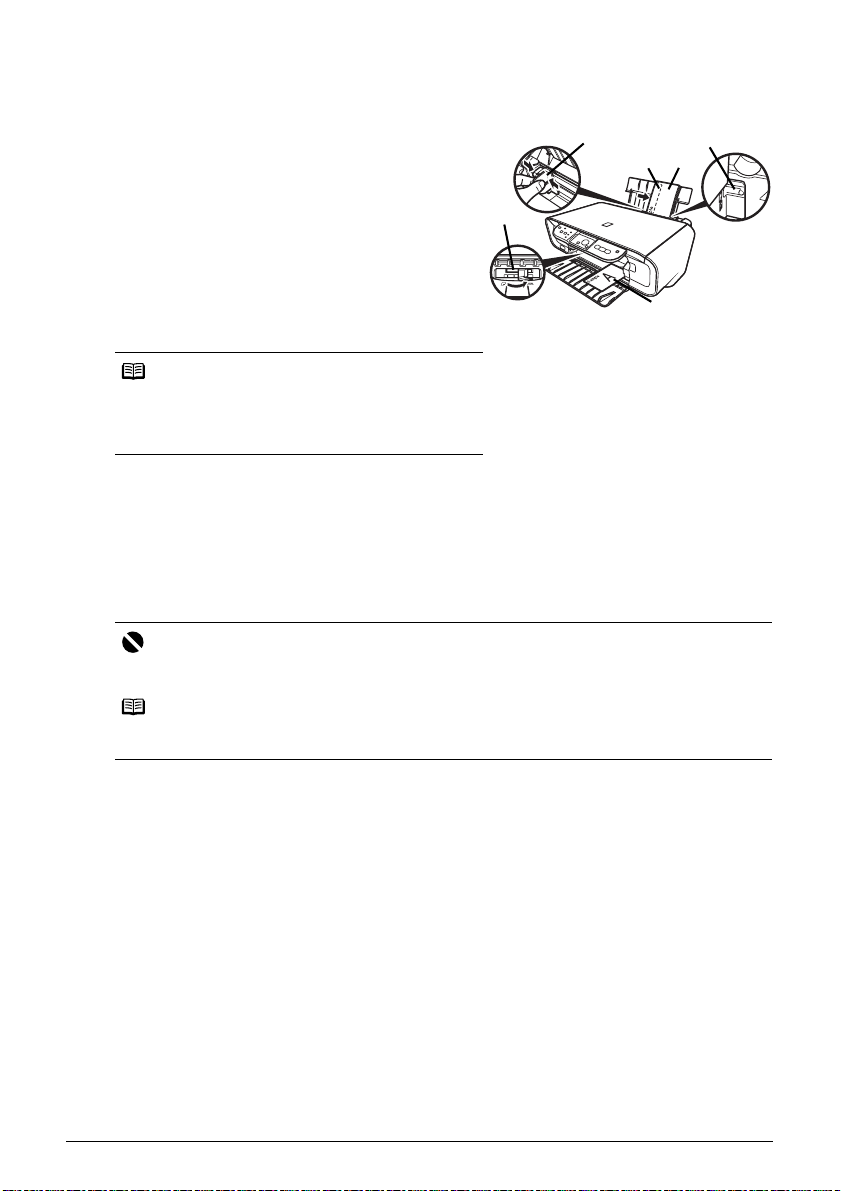
1 Load the original document on the Platen
Glass.
(1) Lift the Document Cover.
(2) Load the original on the Platen Glass.
Place the original face down on the Platen
Glass.
Align the upper left corner of your original with
the alignment mark as shown in the figure on
the right.
5Before Using the Machine

Important
z Do not place any objects weighing more than 4.4 lb / 2 kg on the Platen Glass.
z Do not press or put weight on the original with pressure exceeding 4.4 lb / 2 kg.
Doing so may cause the scanner to malfunction or the Platen Glass to break.
Note
z The machine cannot scan the area within approximately 0.04 inches / 1 mm of the front and
right edges of the Platen Glass.
z You can also scan originals that are up to 0.79 inches / 20 mm thick, such as books. Set them
on the Platen Glass in the same way as paper documents.
2 Gently close the Document Cover.
6 Before Using the Machine
Loading Printing Paper
This section describes how to load printing paper in the Auto Sheet Feeder.
Using Specialty Media
Canon recommends that you use Canon genuine media to ensure optimal print quality.
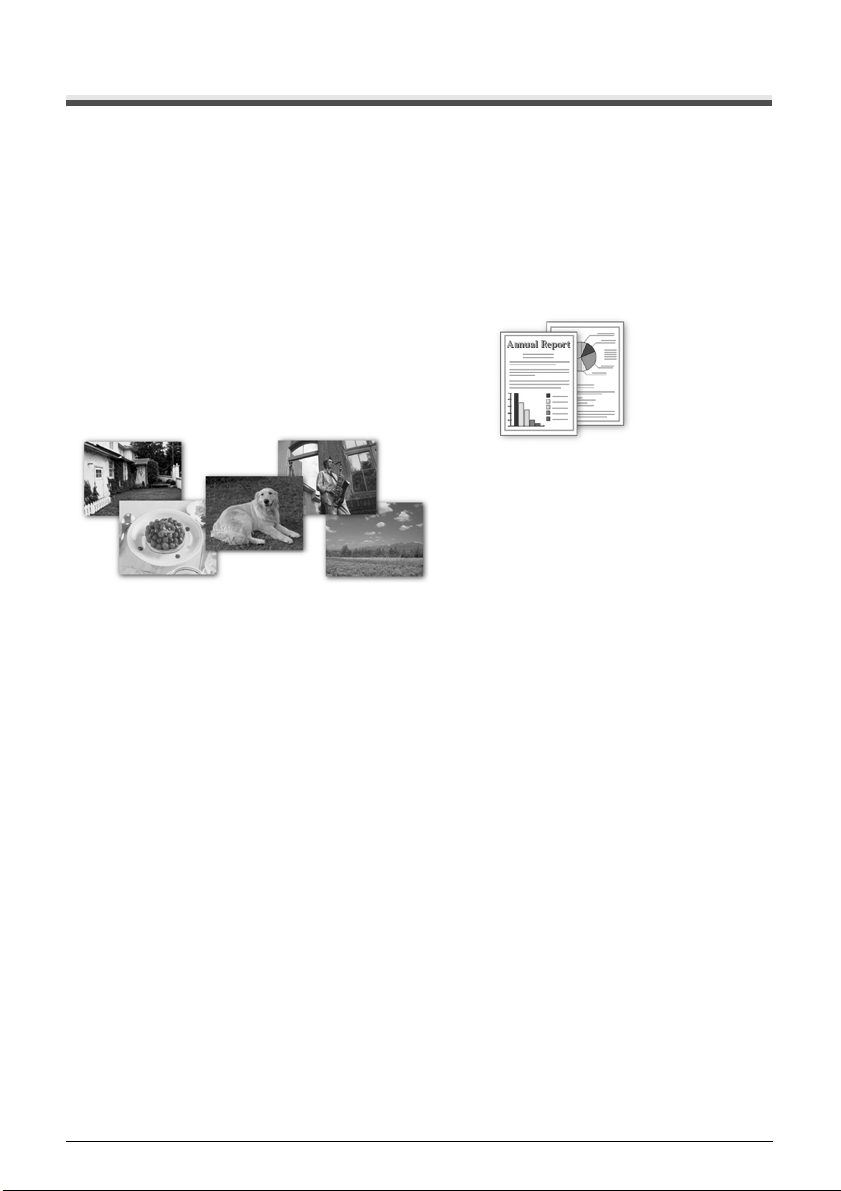
z Photo Quality Media
z Glossy Photo Paper
z Matte Photo Paper
z Photo Paper Plus Double Sided
z Photo Paper Plus Glossy
z Photo Paper Plus Semi-gloss
z Photo Paper Pro
z Photo Stickers
z Media Suited for Business
Documents
z High Resolution Paper
7Before Using the Machine
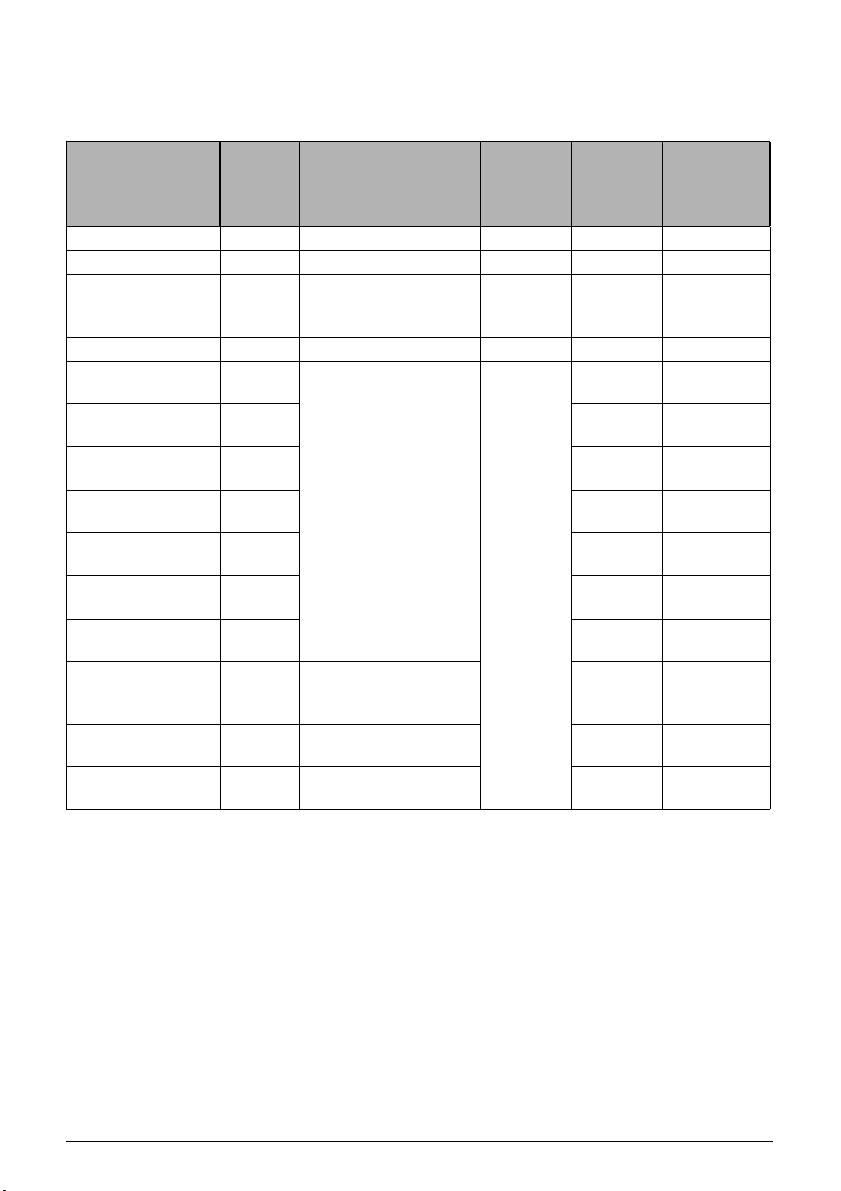
Paper Handling
z Recommended Paper and Requirements
Media Type
Plain Paper
Envelopes
High Resolution
Paper
*7
*2
*2
*1
Model
Paper Support Load
Limit
Paper
Output
Tray Load
Limit
Paper
Thickness
*6
Lever
Printer
Driver
Setting for
Media Type
— 100 sheets 50 Left Plain Paper
— 10 envelopes 1 Right Envelope
HR-101N 80 sheets 50 Left High
Resolution
Paper
Super White Paper SW-201 80 sheets 50 Left Plain Paper
Glossy Photo
*3
Paper
Glossy Photo Paper
“Everyday Use”
Matte Photo Paper MP-101 Left Matte Photo
Photo Paper Glossy GP-502 Left Glossy
GP-401 A4, Letter, 5" x 7" /
127.0 x 177.8 mm, and
GP-501 Left Glossy
*3
8" x 10" / 203.2 x 254.0
mm: 10 sheets
4" x 6" / 101.6 x 152.4
mm, Wide and Credit
card: 20 sheets
*8
Left Glossy
Photo Paper
Photo Paper
Paper
Photo Paper
Photo Paper Plus
Semi-gloss
*3
Photo Paper Pro
SG-101,
SG-201
*3
PR-101 Left Photo Paper
Left Photo Paper
Plus Glossy
Pro
Photo Paper Plus
*3
Glossy
Photo Paper Plus
Double Sided
PP-101 Left Photo Paper
PP-101D 1 sheet Left Photo Paper
*2*5
Plus Glossy
Plus Double
Sided
*4
Photo Stickers
PS-101 1 sheet Left Photo Paper
Plus Glossy
*2
T-Shirt Transfers
TR-301 1 sheet Right T- Shi rt
Transfers
*1 Paper with a Model Number is Canon specialty media. Refer to the instruction manual
supplied with the paper for detailed information on the printable side and notes on handling
paper. For information on the paper sizes available for each Canon genuine paper, visit our
website. You may not be able to purchase some Canon genuine papers depending on the
country or region of purchase. Paper is not sold in the US by Model Number. Purchase
paper by name.
*2 Available only when printing from your computer.
*3 When loading paper in stacks, the print side may be marked as it is fed in or sheets may be
stuck to one another causing them not to be fed properly. In this case, load one sheet at a
time.
*4 You can specify the print setting easily by using the Easy-Photo Print provided with the
Setup CD-ROM.
®
*5 This paper cannot be used in Macintosh
.
8 Before Using the Machine

*6 If the corners or edges of the paper are smudged, try to print with the Paper Thickness Lever
set to the right. It may improve print quality.
Reset the Paper Thickness Lever to the left when you finish printing.
For details on the Paper Thickness Lever, refer to “Inside View” in “Main Components” of the
User’s Guide on-screen manual.
*7 Proper feeding of paper may not be possible at the maximum capacity depending on the
type of paper or environmental conditions (either very high or low temperature and humidity).
In such cases, reduce the sheets of paper you load at a time to around half (around
0.2 inches / 5 mm in paper stack height).
*8 We recommend that you remove the previously printed sheet from the Paper Output Tray
before continuously printing to avoid blurs and discoloration.
Important
z If you select “Photo Paper” when copying, use the following paper types for best printing results:
GP-401, GP-501, GP-502, PP-101, SG-201.
z Put unused paper back into the package, and store them avoiding heat, humidity, and direct
sunlight.
z Do not touch the printed surface nor stack the printed sheets until the ink is fixed.
Note
For a detailed description of printing media types, refer to “Printing Media” in the User’s Guide onscreen manual.
z Media Types You Cannot Use
Do not use the following types of paper. Using such paper will not only produce unsatisfactory
results, but can also cause the machine to jam or malfunction. Additionally, when printing on A5
or smaller sized paper, do not use paper thinner than a post card, including plain paper or
notepad paper cut to a small size.
z Folded, curled, or wrinkled paper
z Damp paper
z Paper that is too thin (weighing less than 17 lb / 64 gsm)
z Paper that is too thick (plain paper, except for Canon genuine paper, weighing more than
28 lb / 105 gsm)
z Picture postcards
z Postcards affixed with photos or stickers
z Envelopes with double flaps
z Envelopes with sticker flaps
z Envelopes with an embossed or treated surface
z Envelopes with pressure seals
z Any type of paper with holes
z Paper that is not rectangular
z Paper bound with staples or glue
z Paper with adhesives
z Paper decorated with glitter, etc.
9Before Using the Machine
Loading Paper
Important
z If you cut plain paper to 4" x 6" / 101.6 x 152.4 mm, 5" x 7" / 127.0 x 177.8 mm, or 2.13" x 3.39"
/ 54.0 x 86.0 mm (credit card-size) for a trial print, it can cause paper jams.
z You cannot print on postcards affixed with photos or stickers.
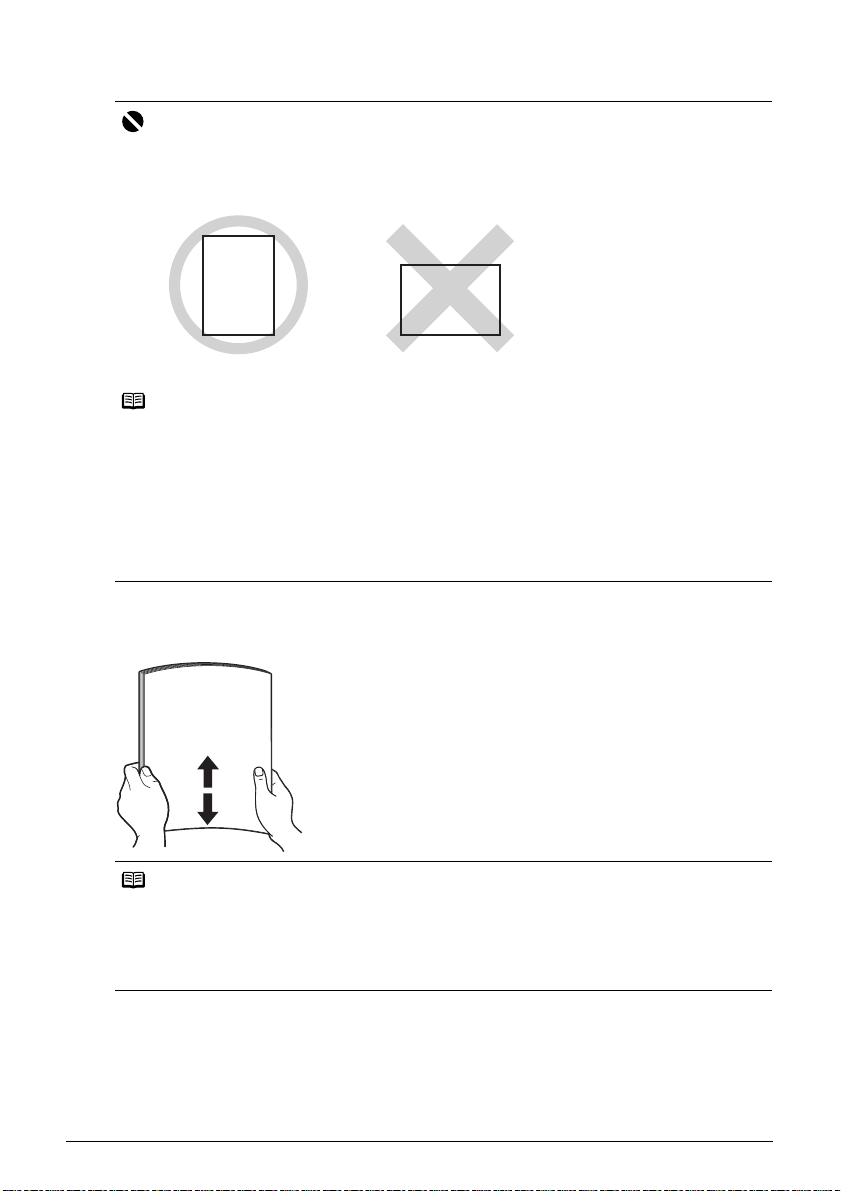
z Always load paper in portrait orientation (A). Loading paper in landscape orientation (B) can
cause the paper to be jammed.
(A) (B)
Note
z We recommend using genuine Canon photo media when printing photographs. For details on
the specialty media Canon provides for use with its various printers, refer to “Compatible Media
Types” in the User’s Guide on-screen manual.
When Printing on Plain Paper
z You can use general copy paper or Canon’s Super White Paper. When printing on both sides,
we recommend Canon’s Super White Paper Double-Sided.
Paper size:
– Standard sizes: A4, B5, A5, Letter, and Legal
– Non-standard sizes: 2.13" x 3.39" to 8.5" x 23" / 54.0 x 86.0 mm to 215.9 x 584.2 mm
Paper weight: 17 to 28 lb / 64 to 105 gsm
1 Align the edges of the paper before loading it.
Note
z Loading paper without aligning the edges may cause paper jams.
z If paper is curled, hold the opposing curled corners and gently bend them in the opposite
direction until the paper becomes completely flat. See “Paper is curled.” on page 45.
z To avoid curling, handle paper as follows.
– Put unused paper back into the package and keep them on a level surface.
– Take out only the necessary number of sheets from the package, just before printing.
10 Before Using the Machine

2 Prepare to load paper.
(1)
(1)
(A)
(1) Open the Paper Support.
(2) Pull out the Paper Support Extension.
(3) Open the Paper Output Tray.
(4) Adjust the position of the Paper Thickness
Lever.
Set it to the right when printing on envelopes or
T-shirt transfers, and left when printing on any
other type of paper. See “Paper Handling” on
page 8.
Note
If the corners or edges of the paper are smudged, try
to print with the Paper Thickness Lever set to the right.
It may improve print quality.
Reset the Paper Thickness Lever to the left when you
finish printing.
For details on the Paper Thickness Lever, refer to
“Inside View” in “Main Components” of the User’s
Guide on-screen manual.
3 Load the paper.
(1) Load the paper in the Auto Sheet Feeder with
the print side facing UP.
(2) Align the paper stack against the right side of
the Auto Sheet Feeder.
(3) Pinch the Paper Guide and slide it against the
left side of the paper stack.
(2)
(4)
(3)
(2)
(3)
* Do not load higher than the Load Limit
Mark (A).
11Before Using the Machine
Loading Envelopes
(2)
Use either European DL or US Comm. Env. #10-sized envelope.
1 Load the envelopes against the right side of
the Auto Sheet Feeder.
Load with the address side facing UP and the rear
flaps DOWN on the left.
Up to 10 envelopes can be loaded at once.
(3)
2 Pinch the Paper Guide and slide it against the
left side of the envelope.
3 Set the Paper Thickness Lever to the right.
(A) Printing orientation
(B) Make sure the flaps are folded.
Note
Reset the Paper Thickness Lever to the left when you
finish printing. For details on the Paper Thickness
Lever, refer to “Inside View” in “Main Components” of
the User’s Guide on-screen manual.
4 Specify the settings in the printer driver.
(1) Select Envelope in Media Type.
(2) Select the size for envelopes.
In Windows
In Macintosh, select DL Envelope or #10 Envelope in Paper Size.
(3) Select Landscape in Orientation.
Important
Be sure to set the printer driver setting properly. If you do not, the address will be printed in the
wrong direction.
Note
For details on printer driver settings, see “Printing with Windows” on page 14 or “Printing with
Macintosh” on page 15.
®
, select DL Env. or Comm. Env. #10 in Page Size.
(B)
(C)
(1)
(A)
12 Before Using the Machine

Copying
Making Copies
This section describes the basic procedure to make copies.
1 Turn on the machine and load paper.
2 Press the + button repeatedly to select the number of copies (max. 20 copies).
Note
By pressing the + button repeatedly, F will be displayed. The number of copies will be set as
20.
3 Press the Paper button repeatedly to select the paper size and type.
4 Load the original document on the Platen Glass.
5 Press the Color button for color copying, or the Black button for black & white
copying.
Using Other Copy Functions
Fit-to-Page Copy
Copies images so that they are automatically reduced or enlarged to fit the paper size.
Changing the Copy Settings
You can switch the default size for paper loaded in the Auto Sheet Feeder between A4 and
Letter.
1 Press the Maintenance button repeatedly until d appears.
2 Press the Black button to select A4, or the Color button to select Letter as the
default paper size.
13Copying

Printing from Your Computer
This section describes the procedure for basic printing.
Printing with Windows
Note
Depending on your application program, operations may differ. For details, refer to the instruction manual
of your application.
The steps described in this section are for printing in Windows XP SP2.
Turn on the machine and load the paper in the machine.
1
2 Create a document or open a file to print using an appropriate application software.
3 Select Print on the application software’s File
menu.
4 Make sure that Canon XXX Printer (where
“XXX” is your machine’s name) is selected in
Select Printer, and click Preferences (or
Properties).
5 Specify the required settings and click OK.
Note
For details on the printer driver functions, click Help or
Instructions to view the online help or the Printer
Driver Guide on-screen manual. Instructions is only
displayed when the on-screen manuals are installed.
6 Click Print (or OK).
14 Printing from Your Computer
Printing with Macintosh
Note
Depending on your application program, operations may differ. For details, refer to the instruction manual
of your application.
The steps described in this section are for printing in Mac OS X v.10.4.x.
Turn on the machine and load the paper in the machine.
1
2 Create a document or open a file to print using an appropriate application software.
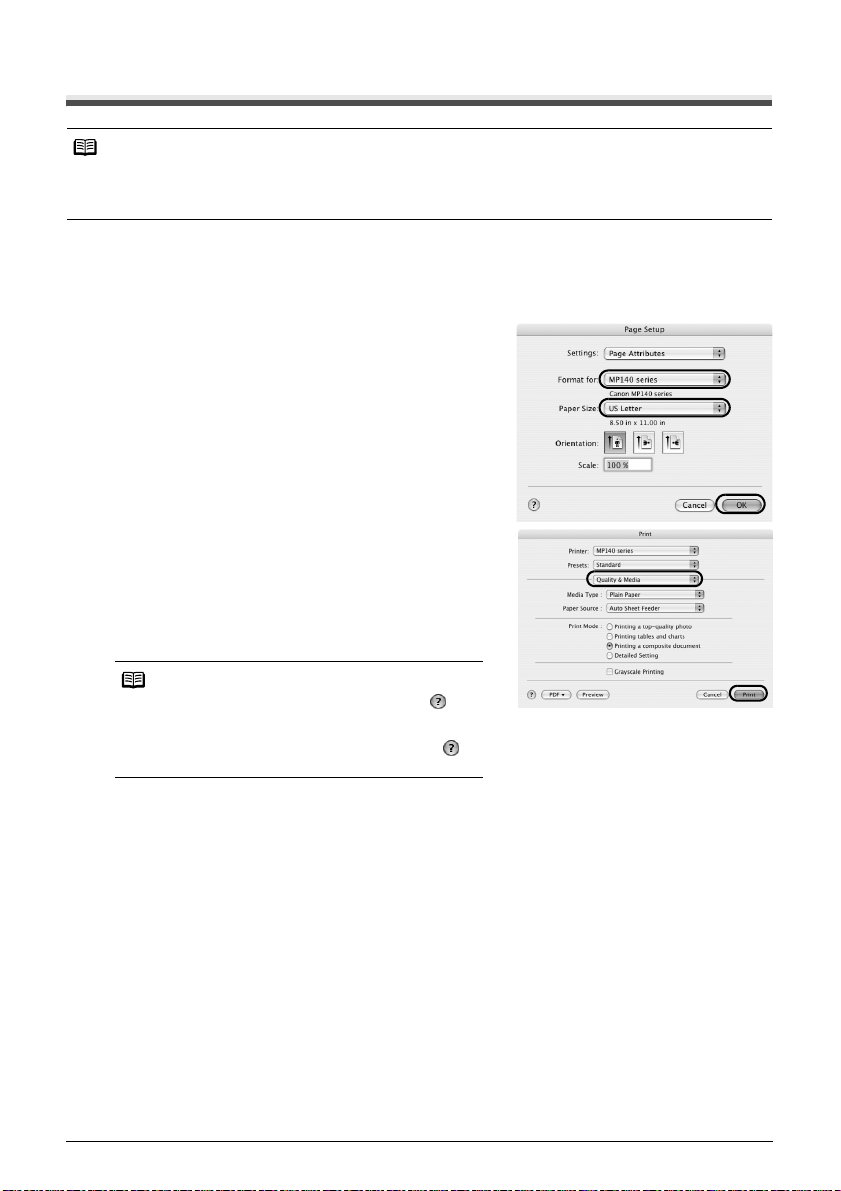
3 Select Page Setup on the application
software’s File menu.
4 Confirm that your machine’s name is selected
in Format for.
5 Select the desired paper size in Paper Size.
6 Click OK.
7 Select Print on the application software’s File
menu.
8 Select Quality & Media in the pop-up menu.
9 Specify the required settings.
Note
For details on the printer driver functions, click to
view the Printer Driver Guide on-screen manual. If the
on-screen manuals are not installed, the Printer Driver
Guide on-screen manual is not displayed even if is
clicked.
10 Click Print.
15Printing from Your Computer

Scanning Images
You can scan images from the machine to a computer without printing them and save them in
popular file formats, such as JPEG, TIFF, bitmap, or PDF. If you are scanning printed text, you can
use the OCR (Optical Character Recognition) software to convert it to text data.
Scanning Methods
Scanning Using The MP Navigator
Using MP Navigator, you can scan originals loaded on the Platen Glass and view images saved
on your computer. Scanned documents can be previewed and be easily printed and edited
according to your needs.
You can use the bundled software applications to edit or print the document you have scanned.
For detailed operations of the MP Navigator, refer to the Scanning Guide on-screen manual.
Scanning Using the Operation Panel of the Machine
1 Turn on the machine.
2 Load the original document on the Platen Glass.
3 Press the SCAN button.
The MP Navigator opens.
Note
The subsequent procedure varies depending on your settings. For details, refer to the
Scanning Guide on-screen manual.
Scanning from an Application Software
You can scan an image from TWAIN- or WIA- (Windows XP only) compliant application software
and handle the scanned image in the application software. For detailed operations, refer to the
Scanning Guide on-screen manual.
16 Scanning Images
Routine Maintenance
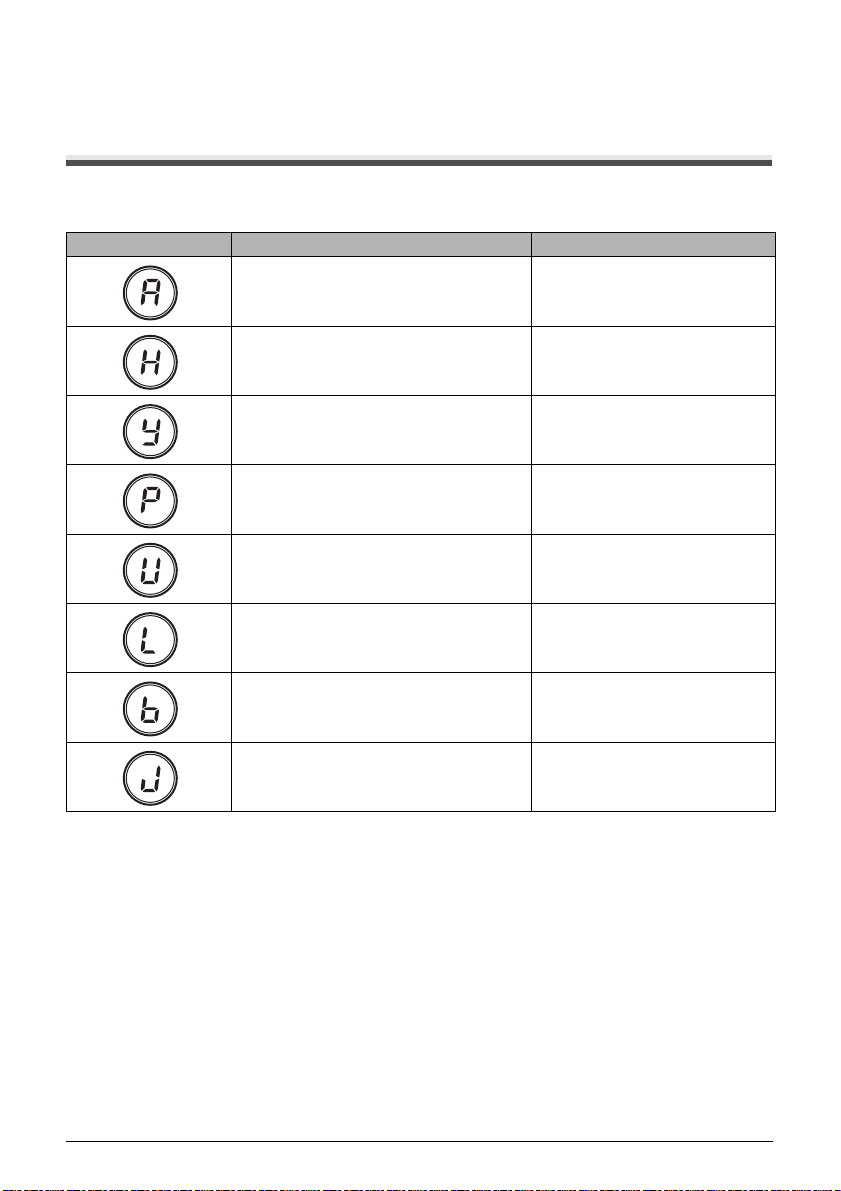
List of Maintenance Codes
To perform maintenance of the machine, press the Maintenance button repeatedly until the desired
code is displayed on the LED, then press the Black or Color button.
Maintenance Code Operation See
Prints the nozzle check pattern. “Printing the Nozzle Check
Pattern” on page 19
Performs the Print Head Cleaning. “Print Head Cleaning” on
Performs the Print Head Deep Cleaning. “Print Head Deep Cleaning” on
Prints the head alignment sheet. “Aligning the Print Head” on
Scans the head alignment sheet. “Aligning the Print Head” on
Prints the current head alignment
setting.
Cleans the paper feed roller. “Cleaning the Paper Feed
Cleans the bottom plate. “Cleaning the Bottom Plate
page 21
page 21
page 22
page 22
“Aligning the Print Head” on
page 22
Rollers (Roller Cleaning)” on
page 33
(Bottom Plate Cleaning)” on
page 33
17Routine Maintenance
When Printing Becomes Faint or Colors Are Incorrect
When printing becomes faint or colors are incorrect, the print head nozzles on FINE Cartridges are
probably clogged. Print the nozzle check pattern to confirm the condition of the nozzles and then
perform Print Head Cleaning.
If print results are not satisfactory, performing Print Head Alignment may improve print quality.
Note
Before performing maintenance
z Make sure that the orange protective tape is removed from the bottom of a FINE Cartridge.
z Increase the Print Quality setting in the printer driver settings.
See “Print Results Not Satisfactory” on page 42.
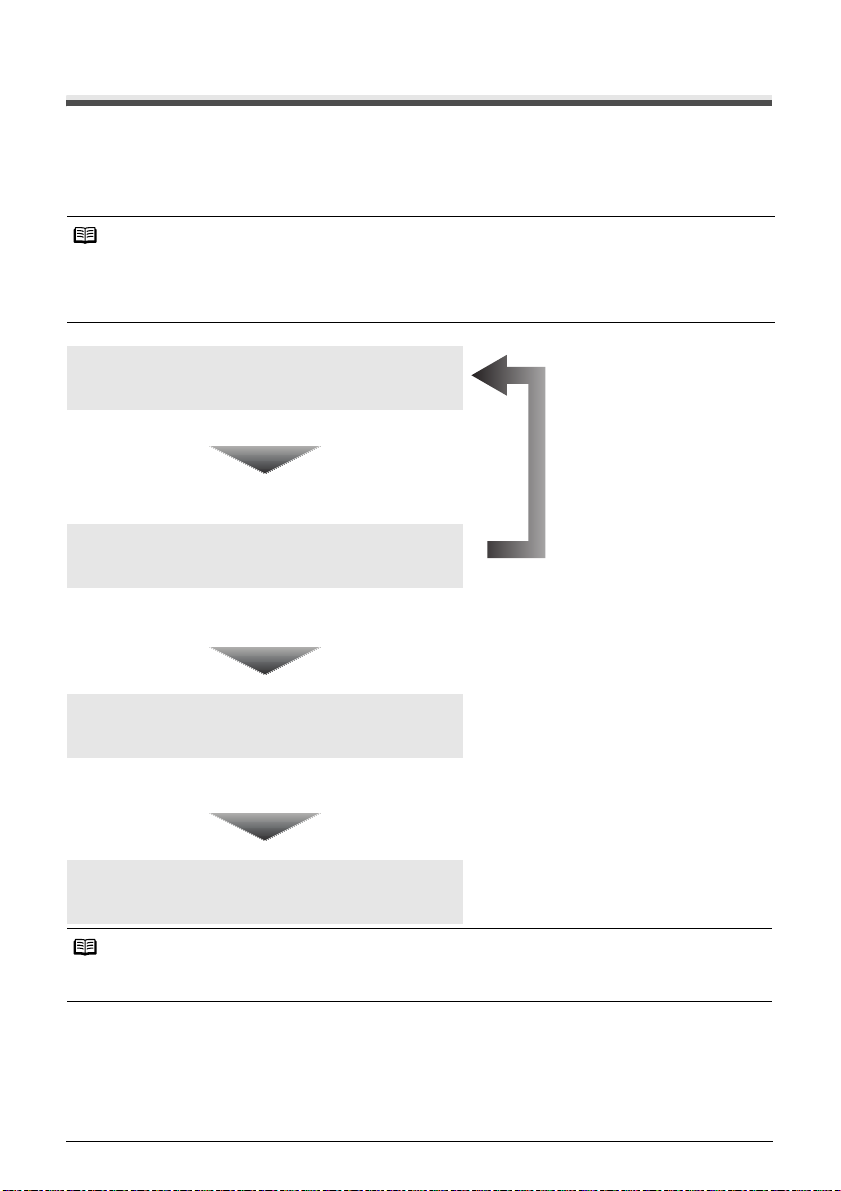
Step 1
See “Printing the Nozzle Check Pattern” on page 19.
If lines are missing or if white streaks appear After cleaning the
Print Head, print
and examine the
nozzle check
pattern.
Step 2
See “Print Head Cleaning” on page 21.
If the problem is not resolved after performing
Print Head Cleaning twice
Step 3
See “Print Head Deep Cleaning” on page 21.
If the problem is not resolved after performing
Print Head Deep Cleaning twice
Step 4
See “Replacing a FINE Cartridge” on page 24.
Note
If the straight line is misaligned or the Print Head position is misaligned, align the Print
Head position. See “Aligning the Print Head” on page 22.
18 Routine Maintenance
 Loading...