

Page 1

How to Use This Manual
Printing This Manual
MC-4194-V1.00
Page 1 of 988 pagesCanon MP640 series On-screen Manual
Basic Guide
Describes the summary of
this product.
Advanced Guide
Describes the detailed
function of this product.
Troubleshooting
Page 2

How to Use This Manual
Advanced Guide
Printing This Manual
Printing on DVD/CDs
Contents
Page 2 of 988 pagesMP640 series Basic Guide
MP-3833-V1.10
Overview of the Machine
Main Components
How to Navigate Menus on the LCD
Printing from a Memory Card
Printing Photos Saved on the Memory Card /
USB Flash Drive
Using Various Functions
Inserting the Memory Card
Inserting the USB Flash Drive
Copying
Making Copies
Using Various Copy Functions
Printing Photos from Printed Photos
Reprinting Printed Photos
Using Various Functions
Other Usages
Printing the Template Forms such as Notebook
Paper
Printing Photos Directly from Your Digital
Camera or Mobile Phone
Machine Settings
Useful Software Applications
Loading Paper / Originals
Loading Paper
Loading Originals
Routine Maintenance
Replacing an Ink Tank
When Printing Becomes Faint or Colors Are
Incorrect
Cleaning the Paper Feed Roller
Cleaning the Pad in the Cassette
Scanning
Forwarding Scanned Data to the Computer
Using Various Scan Functions
Printing from Your Computer
Printing Photos (Easy-PhotoPrint EX)
Printing Documents (Windows)
Printing Documents (Macintosh)
Appendix
Legal Limitations on Use of Your Product and
Use of Images
Tips on How to Use Your Machine
Page 3

Page 3 of 988 pagesOverview of the Machine
Troubleshooting
Contents
Advanced Guide
> Overview of the Machine
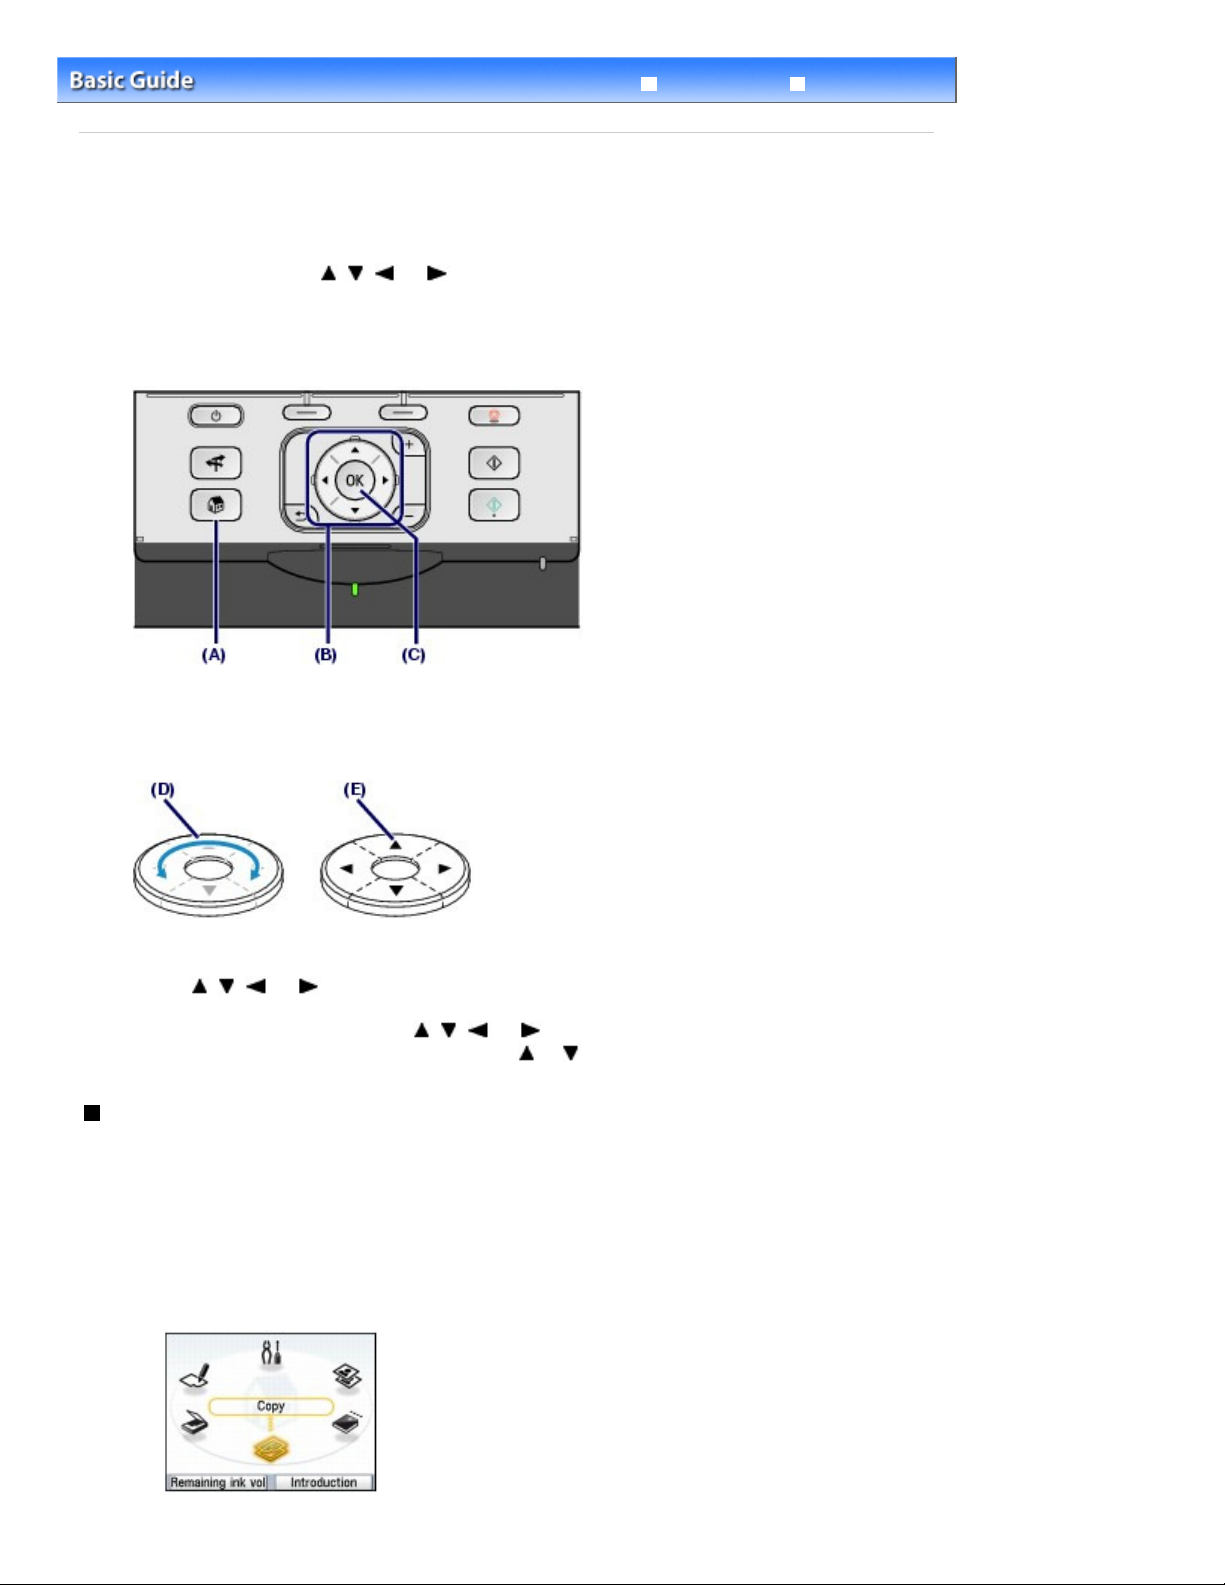
Overview of the Machine
This section shows the component names of the machine and describes the basic operations you need
to know before using it.
Main Components
Front View
Rear View
Inside View
Operation Panel
How to Navigate Menus on the LCD
Selecting Menus on the HOME Screen
Selecting Setting Items
Other Operations
Page top
Page 4

Page 4 of 988 pagesMain Components
>
Contents
Overview of the Machine
Main Components
Front View
Rear View
Inside View
Operation Panel
Front View
> Main Components
Advanced Guide
Troubleshooting
(1)
Document Cover
Open to load an original on the Platen Glass.
(2)
Operation Panel
Use to change the settings of the machine or to operate it.
Operation Panel
See
LCD (Liquid Crystal Display)
(3)
Displays messages, menu selections, and the operation status. You can also preview photos on the LCD
before printing.
.
Note
The LCD will turn off if the machine is not operated for about 5 minutes. To restore the
display, press any button except the
(4)
Paper Support
Raise and tip back to load paper in the Rear Tray.
(5)
Paper Guides
Slide to align with both sides of the paper stack.
(6)
Rear Tray
Load photo paper or envelopes which you can use on the machine. Two or more sheets of the same size
and type of paper can be loaded at the same time, and fed automatically one sheet at a time.
Loading Paper
See
.
ON
button or perform the print operation.
Page 5

(7)
Paper Output Tray
Opens automatically when printing or copying starts and printed paper is ejected.
(8)
Output Tray Extension
Open to support the printouts. Open it when printing or copying.
(9)
Platen Glass
Load an original to copy or scan.
Page 5 of 988 pagesMain Components
(10)
Cassette
Load A4, B5, A5, or Letter-sized plain paper and insert it into the machine. Two or more sheets of the same
size of plain paper can be loaded at the same time, and fed automatically one sheet at a time.
Loading Paper
See
(11)
Direct Print Port
Connect a PictBridge compliant device such as a digital camera or the optional Bluetooth Unit BU-30* to print
directly.
Printing Photos Directly from Your Digital Camera or Mobile Phone
See
You can also insert a USB flash drive to this port.
See Inserting the USB Flash Drive.
* The Bluetooth Unit is not available in some countries or regions depending on the local laws and
regulations. For details, contact the service center.
.
.
Warning
Do not connect any equipment other than PictBridge compliant devices, the optional
Bluetooth Unit BU-30, and USB flash drives to the Direct Print Port of the machine. This
may cause fire, electric shock, or damage to the machine.
Important
Do not touch the metal casing.
Do not use the USB cable longer than around 10 feet / 3 meters to connect any PictBridge
compliant device to the machine since it may affect the operation of other peripheral
devices.
(12)
Infrared Port
Use this port to print from a mobile phone with wireless infrared communication.
See Printing Photos from a Wireless Communication Device.
(13)
Card Slot Cover
Open to insert a memory card.
See Inserting the Memory Card.
(14)
Scanning Unit Detection button
Locks the Scanning Unit (Cover) while the Document Cover is open. This button is pressed down when the
Document Cover is closed, so that you can open the Scanning Unit (Cover). (You do not need to touch this
button.)
Page 6

with the computer.
Page 6 of 988 pagesMain Components
For information on the Scanning Unit (Cover), see Scanning Unit (Cover)
Rear View
(15)
Wired LAN Connector
Plug in the LAN cable to connect the machine to a LAN.
Important
Do not touch the metal casing.
Note
Remove the LAN connector cap before connecting the LAN cable.
.
(16)
USB Port
Plug in the USB cable to connect the machine with a computer.
Important
Do not touch the metal casing.
Do not plug in or unplug the USB cable while the machine is printing or scanning originals
(17)
Rear Cover
Detach to remove jammed paper.
(18)
Power Cord Connector
Plug in the supplied power cord.
Inside View
Ink lamps
(19)
Light or flash red to indicate the ink tank status.
Page 7

See Checking the Ink Status.
(20)
Print Head Lock Lever
Locks the Print Head into place.
Important
Do not raise this lever after installing the Print Head.
(21)
Print Head Holder
Install the Print Head.
(22)
Scanning Unit (Cover)
Scans originals. Open it to replace ink tanks, to check ink lamps, or to remove jammed paper inside the
machine. When opening the Scanning Unit (Cover), lift it with the Document Cover closed.
(23)
Inner Cover
Close it when printing on paper.
(24)
Card Slot
Insert a memory card.
See Inserting the Memory Card.
Access lamp
(25)
Lights or flashes to indicate the memory card status.
See Inserting the Memory Card.
Page 7 of 988 pagesMain Components
Note
For details on installing the Print Head and ink tanks, refer to the printed manual:
Started.
Getting
Operation Panel
(1)
ON button
Turns the power on or off. Before turning on the power, make sure that the Document Cover is closed.
Important
Disconnecting the power plug
When disconnecting the power plug after turning off the power, be sure to confirm that
the
Power
Print Head is not protected.
lamp is not lit. If the power plug is disconnected from the wall outlet while the
Power
lamp is lit or flashing, the machine may become unable to print properly since the
(2)
Buttons to use when navigating menus on the LCD
See
How to Navigate Menus on the LCD
(3)
OK button
Selects a menu or setting item.
.
Page 8

jammed paper.
Page 8 of 988 pagesMain Components
See
How to Navigate Menus on the LCD
Resolves an error when printing is in progress or resumes the machine's normal operation after removing
(4)
[+] [-] buttons
Specifies the number of copies to copy or print.
(5)
Stop button
Cancels operation when a print, copy, or scan job is in progress.
Black button
(6)
Starts black & white copying, scanning, etc.
(7)
Color button
Starts color printing, copying, or scanning.
Wi-Fi lamp
(8)
Lights or flashes blue to indicate the wireless LAN status.
Lights: Wireless LAN active is selected.
Flashes: Printing or scanning over wireless LAN. Also flashes while searching for wireless LAN access
point during setup and when connecting to the access point.
Alarm lamp
(9)
Lights or flashes orange when an error occurs, such as paper-out or ink-out.
Power lamp
(10)
Lights green after flashing when the power is turned on.
.
Page top
Page 9
Page 9 of 988 pagesHow to Navigate Menus on the LCD
Troubleshooting
Contents
>
Overview of the Machine
Advanced Guide
> How to Navigate Menus on the LCD
How to Navigate Menus on the LCD
This machine allows you to print photos on a memory card or USB flash drive, make copies, or scan an
original without a computer. To operate the machine, you can turn around the Easy-Scroll Wheel on the
,
,
Operation Panel or press the
select setting items on the LCD, then press the
This section describes the basic operation to navigate menus on the
items necessary for printing.
, or button on the
OK
button.
Easy-Scroll Wheel to navigate menus or
HOME
screen and to select setting
Using the Easy-Scroll Wheel (B)
The
Easy-Scroll Wheel
The
Easy-Scroll Wheel can be used in two ways. You can operate the machine either way.
(D) Turn around the Easy-Scroll Wheel with your finger to select items.
Or
(E) Press the
When it is indicated in this guide that the
operation procedure, i.e., "the Easy-Scroll Wheel
is used to select menus or setting items.
,
,
, or
button to select items.
,
,
, or
button can be used, it is also described in the
(the or button)".
Selecting Menus on the HOME Screen
HOME
The
To start printing photos on a memory card or USB flash drive, copying, or scanning, select menus on the
HOME
1.
screen will appear when the power is turned on or when the
screen.
Press the
The
HOME
screen will appear.
HOME
button (A).
HOME
button is pressed.
Page 10
wireless LAN, change settings of the machine, or print the
Page 10 of 988 pagesHow to Navigate Menus on the LCD
Turn around the
2.
button (C).
OK
You can also use the
The selected menu screen will appear.
The following menus are available on the
Copy
Memory card
Easy photo reprint
Settings
Photo index sheet
Scan
Easy-Scroll Wheel
or
:
:
:
:
button on the
:
:
(B) to select the menu to use, and press the
Easy-Scroll Wheel
HOME
screen.
You can change copy scale or erase dark frame or shade of
bound part when copying a book. And also you can copy an
original in various layouts.
See Copying.
You can print photos saved on a memory card of your digital
camera or USB flash drive.
See Printing from a Memory Card.
You can scan printed photos and print them easily. You can
specify the number of copies for each photo. You can also
print photos on sicker paper.
Printing Photos from Printed Photos
See
You can maintain the condition of the machine, configure
template forms such as notebook paper, etc.
See
When Printing Becomes Faint or Colors Are Incorrect
Cleaning the Paper Feed Roller
the Template Forms such as Notebook Paper .
For details on the wireless LAN setup, refer to the printed
manual:
Getting Started
You can easily print photos on a memory card or USB flash
drive using the Photo Index Sheet.
See Using Photo Index Sheet to print .
You can forward scanned data to your computer or save
them on a memory card or USB flash drive inserted into the
machine with the Operation Panel.
See
Scanning
.
(B) to select the menu.
.
, Machine Settings
.
, or
,
Printing
Selecting Setting Items
The displayed screen varies depending on the menu you selected, but the operation is the same.
This section describes the procedure to select a setting item, using the operation to change the print
quality on the print confirmation screen in Select and print of Memory card as an example.
Use the
1.
the
Use the
2.
press the
Easy-Scroll Wheel
button (C).
OK
Easy-Scroll Wheel
button.
OK
(the
(the
or button) (B) to select Standard, and press
button) to select High(quality-priority), and
or
Page 11

The screen will return to the print confirmation screen in Select and print.
Other Operations
Page 11 of 988 pagesHow to Navigate Menus on the LCD
Selecting Items at the Bottom of the LCD
You can use the two
You can press the right
select the item on the left. The displayed items vary depending on the screen.
Function
Function
buttons (F) to select items displayed at the bottom of the LCD.
button to select the item on the right, and the left
Function
Returning to the Previous Screen
You can press the
Back button (G) to return to the previous screen.
Performing the Frequently-Used Functions with Easy Operation
You can use the
instructions displayed on the screen. You can also display the information on the functions or
instructions on how to load paper.
1.
Press the
The NAVI screen will appear.
NAVI
NAVI
button (H) to perform the frequently-used functions easily, just by following the
button (H).
button to
Page 12

Note
When you press the
appear.
button while the NAVI screen appears, the
Back
HOME
Page 12 of 988 pagesHow to Navigate Menus on the LCD
screen will
Use the
2.
OK
Follow the instructions on the LCD.
Easy-Scroll Wheel
button.
(the
or button) to select the item, and press the
Canceling Printing, Copying, or Scanning
You can press the
Stop
button (I) to cancel a print, copy, or scan job in progress.
Page top
Page 13

Page 13 of 988 pagesPrinting from a Memory Card
Troubleshooting
Contents
Advanced Guide
> Printing from a Memory Card
Printing from a Memory Card
You can preview each photo from a memory card or USB flash drive on the LCD, to select and print the
desired photo.
You can also print your favorite photos in various layouts or use them for making a calendar or sticker.
Printing Photos Saved on the Memory Card / USB Flash Drive
Changing the Settings
Using Various Functions
Printing Photos in Various Layouts
Changing the Display
Cropping Photos / Searching Photos by a Specified Date
Correcting Images
Printing Photos with Shot Date or File Number
Inserting the Memory Card
Before Inserting the Memory Card
Inserting the Memory Card
Removing the Memory Card
Inserting the USB Flash Drive
Inserting the USB Flash Drive
Removing the USB Flash Drive
Page top
Page 14

You need to prepare:
Page 14 of 988 pagesPrinting Photos Saved on the Memory Card / USB Flash Drive
Troubleshooting
Contents
Advanced Guide
> Printing from a Memory Card > Printing Photos Saved on the Memory Card / USB Flash Drive
Printing Photos Saved on the Memory Card / USB Flash Drive
Preview each photo from the memory card or USB flash drive on the LCD, to select and print the desired
photo.
This section describes the procedure to print borderless photos on 4" x 6" / 10 x 15 cm photo paper.
For the operation, see the notes and operation procedure described in the reference page.
A memory card with saved photos. See Before Inserting the Memory Card
.
A USB flash drive with saved photos. See
Paper for photo printing. See Media Types You Can Use
Inserting the USB Flash Drive
1. Prepare for printing.
Turn on the power.
(1)
Operation Panel
See
Load paper.
(2)
Loading Paper
See
Here we load 4" x 6" / 10 x 15 cm photo paper in the Rear Tray.
.
.
.
.
Note
Load A4 or Letter-sized plain paper in the Cassette. Load other sizes or types of paper in
the Rear Tray.
Open the Paper Output Tray gently, and open the Output Tray Extension.
(3)
Page 15

2.
Insert a memory card or USB flash drive.
Page 15 of 988 pagesPrinting Photos Saved on the Memory Card / USB Flash Drive
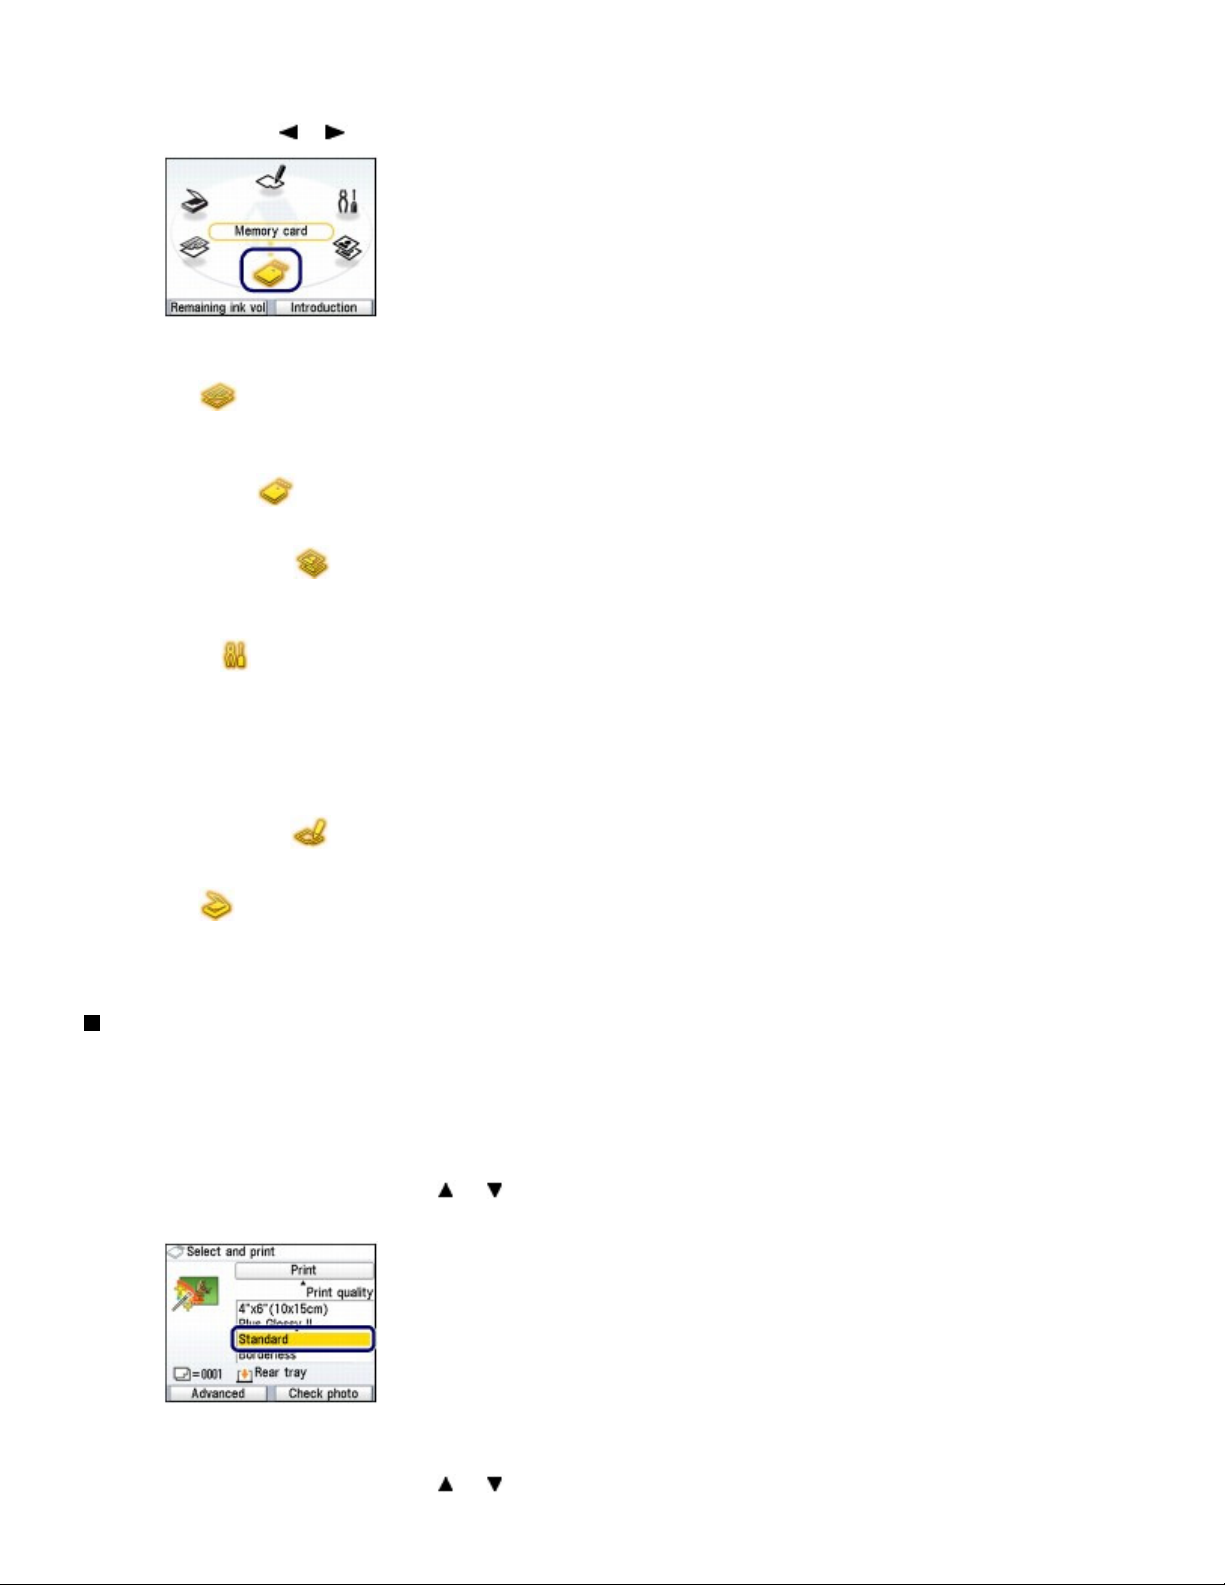
Select Memory card
(1)
See Selecting Menus on the HOME Screen.
Select Select and print
(2)
Insert the memory card or USB flash drive.
(3)
Memory card:
Insert it WITH THE LABELED SIDE FACING TO THE LEFT into the Card Slot. For the types of memory card
compatible with the machine and locations to insert them, see
USB flash drive:
Insert it into the Direct Print Port. See Inserting the USB Flash Drive.
The photo selection screen will appear.
on the
HOME
, and press the
screen, and press the
button.
OK
Inserting the Memory Card.
OK
button.
(A) USB flash drive
Page 16

(B) Memory card
Advanced Guide
Note
The screen can also be changed to the photo selection screen in Select and print of
Memory card by inserting a memory card or USB flash drive while the
any screen of Copy and Easy photo reprint appears.
You can also select useful printing functions other than Select and print.
See
Using Various Functions
Do not insert memory card and USB flash drive at the same time. Also do not insert two or
more memory cards at the same time.
When Read/write attribute is set to Writable from USB PC or Writable from LAN PC, you
cannot print image data from the memory card using the Operation Panel on the machine.
To print image data from the memory card, select Advanced settings in Device settings of
Settings on the
For details, refer to the on-screen manual:
* You can print image data from the USB flash drive regardless of the setting in Read/write
attribute.
HOME
3. Select photos to print.
HOME
screen or
.
screen, and set Read/write attribute to Not writable from PC.
.
Page 16 of 988 pagesPrinting Photos Saved on the Memory Card / USB Flash Drive
Use the
(1)
Press the [
(2)
Easy-Scroll Wheel
(the
button) (C) to display the photo to print.
or
Note
may appear on the LCD while reading photos. If you use the Easy-Scroll Wheel
button) to display the photo while
or
not be selected.
] or [-] button (D) to specify the number of copies.
+
appears on the LCD, the desired photo may
(the
Repeat the procedures of (1) and (2) to specify the number of copies for each
(3)
photo.
Note
Other options
To change the display of photos, see
To crop photos (Trimming), see
To search photos by a specified date (Search), see
by a Specified Date
Press the
(4)
The print confirmation screen will appear.
OK
.
button (E).
Changing the Display.
Cropping Photos / Searching Photos by a Specified Date
Cropping Photos / Searching Photos
.
Page 17

4.
Start printing.
Auto photo fix will appear.
Confirm the page size, media type, print quality, etc.
(1)
Here we confirm that 4"x6" (10x15cm) is selected for Page size and the type of loaded photo paper for
Media type.
Page 17 of 988 pagesPrinting Photos Saved on the Memory Card / USB Flash Drive
To change the settings, use the
and press the
Selecting Setting Items
See
OK
button (G).
and
Easy-Scroll Wheel (the or
Changing the Settings.
button) (F) to select the item to change,
Note
When Plain paper is selected for Media type and A4 or 8.5"x11" (LTR) for Page size,
Cassette will appear for Paper source.
When other sizes or types of paper are selected, Rear tray will appear.
Confirm that the selected paper is loaded in the correct paper source.
Confirm the number of sheets to be used for printing the selected photos.
(2)
Press the right
(3)
Function
button (H) to select Check photo, and confirm the
selected photos and number of copies for each photo.
Press the OK button (G) to return to the print confirmation screen.
Press the
(4)
The machine starts printing photos.
Color
button (I).
Note
If you press the left
You can correct photos automatically or manually if you select Auto photo fix.
See
Using Various Functions
Press the
Printing does not start if you press the
You can display the Memory card menu screen and select other useful printing functions, if
you press the Back button after printing is completed. If you press the
remove the memory card or USB flash drive, the
To remove the memory card, see
To remove the USB flash drive, see
Stop
Function button (J) to select Advanced, Date setting, File no. setting, and
button to cancel printing.
Changing the Settings
You can use the Easy-Scroll Wheel
media type, or print quality to print.
For the setting operation, see
Selecting Setting Items
.
Black
button.
HOME
Removing the Memory Card
Removing the USB Flash Drive
(the or
button) to change the print settings such as page size,
.
HOME
screen will appear.
.
.
button or
Page 18

Page size
Advanced Guide
(1)
Select the page size of the paper to print: 4"x6" (10x15cm), A4, etc.
Media type
(2)
Select the media type of the paper to print: Plus Glossy II, Plain paper, etc.
Note
If you do not select the page size and media type correctly, the machine may feed paper
from the wrong paper source or may not print with the proper print quality.
See
Paper Source to Load Paper
Print quality
(3)
Adjust the print quality: High(quality-priority) or Standard.
Borderless print
(4)
Select bordered or borderless print: Bordered or Borderless.
.
Page 18 of 988 pagesPrinting Photos Saved on the Memory Card / USB Flash Drive
Note
When Plain paper is selected for Media type, you cannot select Borderless.
If the ratio of the height to the width differs from the image data when Borderless is
selected, a portion of the image may not be printed depending on the size of the media
used.
Paper source
(5)
The paper source for the selected page size and media type appears on the screen.
When A4 or Letter-sized plain paper is selected, Cassette will appear.
When other sizes or types of paper are selected, Rear tray will appear.
Confirm that the selected paper is loaded in the paper source displayed on the screen.
For details on the paper source setting, refer to the on-screen manual:
.
Note
The settings of the page size, media type, print quality, image correction, borderless print, etc.
are retained, and these settings will appear next time when Memory card menu is selected
even if the power is turned off and on.
Combination of some items cannot be specified depending on the function.
Using Photo Index Sheet to print
Thumbnails of photos on the memory card or USB flash drive are printed on A4 or Letter-sized paper
(this printed sheet is called Photo Index Sheet). You can select photos, number of copies, page size, etc.
on this sheet, and print them.
Select Photo index sheet
For details on the operation, refer to the on-screen manual:
on the
HOME
screen, and Index sheet print
Advanced Guide
.
.
Page 19

Page 19 of 988 pagesPrinting Photos Saved on the Memory Card / USB Flash Drive
Page top
Page 20

Page 20 of 988 pagesUsing Various Functions
Troubleshooting
Contents
> Printing from a Memory Card
Advanced Guide
> Using Various Functions
Using Various Functions
HOME
You can print photos in various ways when you select Memory card
also use the useful functions to print photos.
For details, refer to the on-screen manual:
Advanced Guide
.
on the
screen. You can
Printing Photos in Various Layouts
You can select various layouts on the Memory card menu screen. You can also select DPOF print.
Layout print
Sticker print Captured info print
Photo index print Print all photos
ID photo size print
Calendar print
Changing the Display
You can change the display of photos by pressing the left
at the bottom of the screen. You can also select Slide show.
Function
button when Change display appears
Thumbnail display
Full-screen display
Enlarged display
Cropping Photos / Searching Photos by a Specified Date
You can specify the function by pressing the right
screen.
Function
button when Edit appears at the bottom of the
Page 21

Wide (16:9) Standard (4:3)
Trimming
Page 21 of 988 pagesUsing Various Functions
Search
Correcting Images
You can correct images by pressing the left
appears at the bottom of the screen. You can correct images automatically or manually, such as
adjusting brightness, contrast, and color hue, or add effects to images.
Auto photo fix ON (Default)
Function
button to select Auto photo fix when Advanced
Printing Photos with Shot Date or File Number
You can print photos with shot date or file number by pressing the left
setting or File no. setting when Advanced appears at the bottom of the screen.
Function
button to select Date
Date setting
File no. setting
Page 22

Page 22 of 988 pagesUsing Various Functions
Page top
Page 23

with the machine if it is formatted on a computer.
Advanced Guide
Page 23 of 988 pagesInserting the Memory Card
Advanced Guide
Contents
> Printing from a Memory Card > Inserting the Memory Card
Inserting the Memory Card
Before Inserting the Memory Card
The following types of memory cards and image data are compatible with the machine.
Important
If you took and saved photos on a type of memory card that does not guarantee the operation on
your digital camera, the image data may be unreadable on the machine or damaged. For information
on memory cards that your digital camera guarantees operation, refer to the instruction manual
supplied with your digital camera.
Format the memory card with a digital camera compliant with the Design rule for Camera File system
(Exif 2.2/2.21 compliant), TIFF (Exif 2.2/2.21 compliant). The memory card may not be compatible
Memory Cards that Do Not Require a Card Adapter
SD Secure Digital memory card
SDHC memory card
MultiMediaCard
MultiMediaCard Plus
Troubleshooting
Compact Flash (CF) Card
Supports Type I/II (3.3 V)
Microdrive
Memory Stick
Memory Stick PRO
Memory Stick Duo
Memory Stick PRO Duo
Memory Cards that Require a Card Adapter
Important
Be sure to attach the special card adapters to the following memory cards before inserting to
the Card Slot.
If one of the following memory cards is inserted without the card adapter, you may not be able
to remove the memory card. In this case, refer to " Troubleshooting " in the on-screen manual:
.
miniSD Card
miniSDHC Card
*1
*1
microSD Card
microSDHC Card
xD-Picture Card
xD-Picture Card Type M
xD-Picture Card Type H
*1
*1
*2
*2
*2
Page 24

Advanced Guide
Attach a special card adapter if your memory card requires one.
Page 24 of 988 pagesInserting the Memory Card
RS-MMC
Memory Stick Micro
*1
Use the special "SD Card Adapter".
*2
Requires purchase of a separate compact flash card adapter for xD-Picture Card.
*3
Use the special card adapter.
*4
Use the special Duo size adapter or full size adapter.
*3
*4
Printable Image Data
This machine accepts images taken with a camera compliant with the Design rule for Camera File
system (Exif 2.2/2.21 compliant), TIFF (Exif 2.2/2.21 compliant). Other image or movie types such as
RAW images cannot be printed.
Inserting the Memory Card
Important
When a memory card is inserted into the Card Slot, the
is flashing, the machine is accessing the memory card. In this case, do not touch the area around
the Card Slot.
Access
lamp is lit. When the
Access
lamp
Note
When Read/write attribute is set to Writable from USB PC or Writable from LAN PC, you cannot print
image data from the memory card or save scanned data on the memory card using the Operation
Panel of the machine. After using the Card Slot as the memory card drive of a computer, remove
the memory card, select Advanced settings in Device settings of Settings on the
then set Read/write attribute to Not writable from PC.
For details, refer to the on-screen manual:
When you use a computer to edit or enhance photos saved on a memory card, be sure to print them
from the computer. If you use the Operation Panel, the photos may not be printed properly.
1.
Prepare your memory card.
See
Memory Cards that Require a Card Adapter
2.
Turn on the power, and open the Card Slot Cover.
.
.
HOME
screen,
Page 25

3.
Insert only one memory card into the Card Slot.
The location to insert a memory card varies depending on each type of memory card. Insert your memory card
straightforward WITH THE LABELED SIDE FACING TO THE LEFT into the Card Slot, according to the insert
location in the figure below.
When the memory card is inserted properly, the
Be sure to attach the card adapter for memory card with the mark
Slot as shown below.
For Memory Stick Duo, Memory Stick PRO Duo,
Access
or Memory Stick Micro (with the Duo size adapter)
For SD Secure Digital memory card, SDHC memory card, MultiMediaCard, MultiMediaCard Plus,
miniSD Card
microSD Card
Memory Stick, Memory Stick PRO,
, miniSDHC Card
, microSDHC Card
,
,
Memory Stick Micro (with the full size adapter)
or RS-MMC
:
lamp (A) will light up.
(asterisk), and then insert it into the Card
:
,
Page 25 of 988 pagesInserting the Memory Card
For Compact Flash (CF) Card, Microdrive,
xD-Picture Card , xD-Picture Card Type M , or xD-Picture Card Type H
Important
Part of the memory card will protrude from the Card Slot, but do not force it into the slot any
further. This can damage the machine or the memory card.
Make sure that the memory card is correctly oriented before inserting it into the Card Slot. If
you force the memory card into the Card Slot in the wrong orientation, the memory card or the
machine can be damaged.
:
Page 26

Do not insert more than one memory card at a time.
while the machine is reading or writing data from/to the memory card. If you remove the
4.
Close the Card Slot Cover.
Removing the Memory Card
Important
If you used the Card Slot as the memory card drive of a computer, you must perform the "safe
removal" operation on your computer before physically removing the memory card from the
machine.
- In Windows, if you are connecting the machine with a USB cable, right-click the removable disk
icon and click Eject. If Eject does not appear on the screen, make sure that the
lit, and then remove the memory card.
If you used the Card Slot via the LAN, you do not need to perform the "safe removal" operation
on your computer.
- In Macintosh, drag (Mount drive) into the Trash.
Access
Page 26 of 988 pagesInserting the Memory Card
lamp is
1.
Open the Card Slot Cover.
Make sure that the
2.
Hold the part of the memory card that is protruding and remove it straightforward from the machine.
Access
lamp is lit, and remove the memory card.
Important
Do not remove the memory card while the
memory card or turn off the power while the
memory card can be damaged.
3.
Close the Card Slot Cover.
Access
lamp is flashing. The
Access
lamp is flashing, the data saved on the
Access
lamp flashes
Page top
Page 27

Page 27 of 988 pagesInserting the USB Flash Drive
Advanced Guide
Contents
> Printing from a Memory Card > Inserting the USB Flash Drive
Inserting the USB Flash Drive
Inserting the USB Flash Drive
Note
Before inserting the USB flash drive
If your USB flash drive cannot be inserted into the Direct Print Port of the machine, you may be
required to use an extension cable for the USB flash drive. Purchase it at electronics retail stores.
Some USB flash drives may have recognition problem, and these devices may not guarantee proper
operation of the machine.
You may not be able to use USB flash drives with security function.
For information on image data that can be printed with this machine, see
"Before Inserting the Memory Card".
Printable Image Data
in
1. Insert the USB flash drive into the Direct Print Port.
Make sure that the USB flash drive is correctly oriented before inserting it straightforward into the Direct Print
Port.
Troubleshooting
Removing the USB Flash Drive
1. Make sure that the machine is not reading or writing data from/to the USB flash
drive.
Check if the reading or writing operation is completed on the LCD.
Important
Do not remove the USB flash drive or turn off the power while the machine is operating.
Note
If your USB flash drive has the access lamp, refer to the instruction manual supplied with the
USB flash drive to check if the reading or writing operation is completed on the USB flash
drive.
2.
Remove the USB flash drive.
Hold the USB flash drive and remove it straightforward from the machine.
Page 28

Page 28 of 988 pagesInserting the USB Flash Drive
Page top
Page 29

Page 29 of 988 pagesCopying
Troubleshooting
Contents
Advanced Guide
> Copying
Copying
You can copy in the various methods such as enlarging/reducing or copying two original pages onto a
single sheet of paper.
Making Copies
Changing the Settings
Using Various Copy Functions
Page top
Page 30

You need to prepare:
Page 30 of 988 pagesMaking Copies
Advanced Guide
Contents
> Copying
> Making Copies
Making Copies
This section describes the procedure to copy a document of A4 size on plain paper.
For the operation, see the notes and operation procedure described in the reference page.
Originals to copy. See
Originals You Can Load
.
Troubleshooting
Paper for printing. See Media Types You Can Use
1.
Prepare for copying.
Turn on the power.
(1)
Operation Panel
See
Load paper.
(2)
Loading Paper
See
Here we make sure that A4 plain paper is loaded in the Cassette.
.
.
Note
Load A4, B5, A5, or Letter-sized plain paper in the Cassette. Load other sizes or types of
paper in the Rear Tray.
.
Open the Paper Output Tray gently, and open the Output Tray Extension.
(3)
Select Copy
(4)
See Selecting Menus on the HOME Screen.
on the
HOME
screen, and press the
OK
button.
Page 31

Load an original on the Platen Glass.
Advanced Guide
(5)
See Loading Originals.
Page 31 of 988 pagesMaking Copies
Load the original WITH THE SIDE TO COPY FACING DOWN and align it with the alignment mark
shown below.
Then close the Document Cover gently.
Note
For details on the types and conditions of the original which can be copied, see
You Can Load
Characters and lines written with a light colored pen or highlight pen may not be copied
properly.
.
Originals
as
2.
Start copying.
Confirm the page size, media type, magnification, etc.
(1)
Here we confirm that 100% is selected for Magnification, A4 for Page size, and Plain paper for Media type.
To change the settings, use the Easy-Scroll Wheel
and press the
Selecting Setting Items
See
OK
button (B).
Changing the Settings.
and
or button) (A) to select the item to change,
(the
Note
When Plain paper is selected for Media type and A4, B5, A5, or 8.5"x11" (LTR) for Page
size, Cassette will appear for Paper source.
When other sizes or types of paper are selected, Rear tray will appear.
Confirm that the selected paper is loaded in the correct paper source.
You can check the preview of print result if you press the right
select Preview.
Refer to the on-screen manual:
You can select various copy functions, such as Two-sided copy, Borderless copy, 2-on-
1 copy, and Frame erase, if you press the left
See
Using Various Copy Functions
.
.
Function
Function
button (D) to select Special copy.
button (C) to
Page 32

white copying.
Advanced Guide
Advanced Guide
Page 32 of 988 pagesMaking Copies
Press the [
(2)
Press the
(3)
The machine starts copying.
Remove the original on the Platen Glass after copying is completed.
] or [-] button (E) to specify the number of copies.
+
button (F) for color copying, or the
Color
Black
Important
Do not open the Document Cover or move the loaded original until copying is completed.
button (G) for black &
Note
Press the
Repeat the procedures from (5) of step 1 to copy another original.
You can exit the Copy menu and display the
button to cancel copying.
Stop
Changing the Settings
You can use the Easy-Scroll Wheel
media type, or print quality to print.
For the setting operation, see
Magnification
(1)
Specify the enlargement/reduction manner. You can specify the copy scale by selecting the optional
number or the page size: A4 to A5, A4 to B5, etc. If you do not want to enlarge/reduce the page size,
select 100%.
For details, refer to the on-screen manual:
Intensity
(2)
Specify the intensity when you want to make the darkened/lightened copy. You can also set the intensity to
automatically adjust according to the original.
For details, refer to the on-screen manual:
Selecting Setting Items
(the or
HOME
screen if you press the
button) to change the print settings such as page size,
.
.
.
HOME
button.
(3)
(4)
Page size
Select the page size of the paper to print: A4, 8.5"x11" (LTR), etc.
Media type
Select the media type of the paper to print: Plain paper, Plus Glossy II, etc.
Page 33

Note
Advanced Guide
If you do not select the page size and media type correctly, the machine may feed paper
from the wrong paper source or may not print with the proper print quality.
See
Paper Source to Load Paper
Print quality
(5)
Adjust the print quality according to the original to copy: High(quality-priority), Standard, etc. The available
print quality settings depend on the paper selected for Media type.
Paper source
(6)
The paper source for the selected page size and media type appears on the screen.
When A4, B5, A5, or Letter-sized plain paper is selected, Cassette will appear.
When other sizes or types of paper are selected, Rear tray will appear.
Confirm that the selected paper is loaded in the paper source displayed on the screen.
For details on the paper source setting, refer to the on-screen manual:
.
.
Note
If Two-sided copy is selected, select A4 or 8.5"x11" (LTR) for Page size and Plain paper for
Media type.
If 2-on-1 copy or 4-on-1 copy is selected, select A4 or 8.5"x11" (LTR) for Page size.
If Borderless copy is selected, select 8.5"x11" (LTR), A4, 4"x6" (10x15cm), or 5"x7"
(13x18cm) for Page size and any types of paper except Plain paper for Media type.
If Borderless copy is selected, slight cropping may occur at the edges since the copied image
is enlarged to fill the whole page.
The settings of the page size, media type, print quality, automatic intensity, etc. are retained,
and these settings will appear next time when the Copy menu is selected even if the power is
turned off and on.
Combination of some items cannot be specified depending on the function.
If you select Fast (speed-priority) with the media type set to Plain paper and the quality is not
as good as expected, select Standard or High(quality-priority) and then try copying again.
Page 33 of 988 pagesMaking Copies
Page top
Page 34

Page 34 of 988 pagesUsing Various Copy Functions
Contents
> Copying
> Using Various Copy Functions
Using Various Copy Functions
You can make various kinds of copies if you press the left
bottom of the Copy screen.
For details, refer to the on-screen manual:
Two-sided copy Borderless copy
Advanced Guide
Function
.
Advanced Guide
Troubleshooting
button to select Special copy at the
2-on-1 copy
Image repeat
Trimming
4-on-1 copy
Frame erase
Masking
Page top
Page 35

Page 35 of 988 pagesPrinting Photos from Printed Photos
Troubleshooting
Contents
Advanced Guide
> Printing Photos from Printed Photos
Printing Photos from Printed Photos
You can reprint printed photos in various layouts.
Reprinting Printed Photos
Using Various Functions
Printing Photos in Various Layouts
Correcting Images
Page top
Page 36

Advanced Guide
You need to prepare:
Page 36 of 988 pagesReprinting Printed Photos
Troubleshooting
Contents
Printing Photos from Printed Photos > Reprinting Printed Photos
>
Advanced Guide
Reprinting Printed Photos
Reprint printed photos.
This section describes the procedure to scan printed photos and print them on 4" x 6" / 10 x 15 cm photo
paper.
Note
You cannot save scanned images with this function.
To save scanned images on the computer, memory card, or USB flash drive, refer to the on-screen
manual:
.
Printed photos.
Paper for photo printing. See Media Types You Can Use
1.
Prepare for reprinting printed photos.
Turn on the power.
(1)
Operation Panel
See
Load paper.
(2)
See Loading Paper in the Rear Tray .
.
.
Here we load 4" x 6" / 10 x 15 cm photo paper in the Rear Tray.
Open the Paper Output Tray gently, and open the Output Tray Extension.
(3)
Select Easy photo reprint
(4)
When the guidance screen appears, press the
(5)
2.
Load photos on the Platen Glass to scan.
on the
HOME
screen, and press the
button again.
OK
OK
button.
Page 37

Open the Document Cover.
Advanced Guide
(1)
Load the photos WITH THE SIDE TO SCAN FACING DOWN on the Platen
(2)
Page 37 of 988 pagesReprinting Printed Photos
Glass.
See Loading Originals
(A) To load four photos on the Platen Glass
(B) To load two photos on the Platen Glass
.
Note
Place the photo(s) at least 0.4 inches / 10 mm away from and in square with the edges of
the Platen Glass.
When loading two or more photos at the same time, place them at least 0.4 inches / 10 mm
apart from each other. If photos are placed closer, they may be scanned as a single
image.
The Skew Correction function automatically compensates for photos placed at an angle of
up to approximately 10 degrees.
Slanted photos with a long edge of 7.1 inches / 180 mm or more cannot be corrected.
If
appears on the preview screen, check the followings and reset the photos properly
to scan them again.
- The slant is not too large.
- The photos are not placed too close to the edge of the Platen Glass.
Photos smaller than approximately 1 inch / 25 mm square will not be scanned properly.
The types of photos listed below may not be scanned properly.
- Photos that are non-rectangular or irregular shaped (such as cut out photos)
- Photos that are entirely white
- Photos that have white surrounds
The borders of bordered photos may not be scanned properly. Crop photos if necessary.
Refer to the on-screen manual:
.
3. Select a menu option to print scanned photos.
Close the Document Cover gently, and press the
(3)
The machine starts scanning.
OK
button.
Important
The photos are rescanned before printing starts. Do not open the Document Cover or move the
loaded photos until printing is completed.
Select Select and print
(1)
, and press the
OK
button.
Note
You can also select useful printing functions other than Select and print.
Use the
(2)
Press the [
(3)
See
Using Various Functions
Easy-Scroll Wheel
] or [-] button to specify the number of copies.
+
.
(the
button) to display a photo to print.
or
Page 38

Note
white.
If
appears next to the photo on the screen, it may not have been scanned properly.
Press the Back
message, and repeat the procedures from step 2 to scan the photo again.
Other options
To change the display of photos, see
(You can also select Full-screen display and Enlarged display other than Normal screen
display.)
To crop photos (Trimming), see
Repeat the procedures of (2) and (3) to specify the number of copies for each
(4)
button, and press the left
Cropping Photos / Searching Photos by a Specified Date
Function
Changing the Display.
button to select Rescan. Confirm the
.
photo.
Page 38 of 988 pagesReprinting Printed Photos
Press the
(5)
4. Start printing.
Confirm the page size, media type, print quality, etc.
(1)
Here we confirm that 4"x6" (10x15cm) is selected for Page size and the type of loaded photo paper for
Media type.
Note
To change the settings, select each item, and press the OK button.
See Changing the Settings.
The settings of the page size, media type, print quality, etc. are retained, and these
settings will appear next time when the Easy photo reprint menu is selected even if the
power is turned off and on.
Confirm the number of sheets to be used for printing the selected photos.
(2)
Note
You can correct photos automatically or manually, if you press the left
select Advanced.
See
Using Various Functions
OK
button.
Function button to
.
Press the
(3)
The machine starts printing.
Remove the photos on the Platen Glass after printing is completed.
button to print in color, or the
Color
Note
Press the
You can exit the Easy photo reprint menu and display the
HOME
button after printing is completed. Confirm the message and select Yes to delete the
button to cancel printing.
Stop
button to print in black &
Black
HOME
screen, if you press the
Page 39

scanned image data.
Page 39 of 988 pagesReprinting Printed Photos
Page top
Page 40

Page 40 of 988 pagesUsing Various Functions
Troubleshooting
Contents
Printing Photos from Printed Photos
>
Advanced Guide
> Using Various Functions
Using Various Functions
This section introduces a few of the useful functions in the Easy photo reprint menu.
For details, refer to the on-screen manual:
Advanced Guide
.
Printing Photos in Various Layouts
You can select a layout and print photos other than Select and print.
Sticker print
Print all photos
Correcting Images
You can correct images by pressing the left
screen. You can correct images automatically or manually, such as adjusting brightness, contrast, and
color hue, or apply the fade restoration.
Function
button when Advanced appears at the bottom of the
Brightness Contrast
Page top
Page 41

Page 41 of 988 pagesScanning
Troubleshooting
Contents
Advanced Guide
> Scanning
Scanning
You can forward scanned data to your computer, and edit or process them with the supplied software
application. You can also save scanned data on a memory card or USB flash drive inserted into the
machine.
Forwarding Scanned Data to the Computer
Preparing for Scanning with the Operation Panel
Forwarding Scanned Data to the Computer
Using Various Scan Functions
Page top
Page 42

whatsoever, even within the warranty period of the machine.
Advanced Guide
with the computer.
Page 42 of 988 pagesForwarding Scanned Data to the Computer
Troubleshooting
Contents
>
Scanning > Forwarding Scanned Data to the Computer
Advanced Guide
Forwarding Scanned Data to the Computer
You can forward scanned data to the computer with the USB cable or via a network.
This section describes the procedure to detect the type of original automatically with Auto scan, and
forward the scanned data to the computer connecting with the USB cable, according to the settings
specified with MP Navigator EX.
For other operations to save scanned data on a memory card or USB flash drive and to scan originals
from the computer, refer to the on-screen manual:
Advanced Guide
Important
Please note that Canon shall not be liable for any damage or loss of the data for any reason
Note
You can select Auto scan only when forwarding scanned data to the computer with the USB
cable.
The machine can detect the following types of originals with Auto scan: photo, postcard, business
card, magazine, newspaper, text document, and DVD/CD. For other originals, use the computer to
specify the type or size of originals and scan them.
For details, refer to the on-screen manual:
.
.
Preparing for Scanning with the Operation Panel
Before scanning originals, check the following:
Are the necessary software applications (MP Drivers and MP Navigator EX) installed?
Install MP Drivers and MP Navigator EX from the Setup CD-ROM
or have been uninstalled. To install MP Drivers and MP Navigator EX, select MP Drivers and MP
Navigator EX in Custom Install.
Are the type of original and processing method specified with MP Navigator EX?
When you forward scanned data to the computer with the Operation Panel, you can specify the
settings such as the type of original and processing method in Preferences of MP Navigator EX.
For details on the settings, refer to the on-screen manual:
Does the original to be scanned meet the requirements for the original to be loaded on the Platen
when they have not been installed
Advanced Guide
.
Glass?
For details, see Originals You Can Load
.
If the Machine Is Connected via USB or Wired LAN
Confirm that the connection with USB cable or LAN cable between the machine and the computer is
physically secure.
Important
Do not plug in or unplug the USB cable or LAN cable while the machine is scanning originals
If the Machine Is Connected over a Network
When you use a computer connected over a network, check the following:
Is the machine selected in the settings screen of the Canon IJ Network Scan Utility (Windows) or
Canon IJ Network Scanner Selector (Macintosh)?
For details on the setting procedure, refer to the on-screen manual:
Is the Canon IJ Network Scan Utility/Canon IJ Network Scanner Selector running?
For details, refer to the instructions for scanning over a network in the on-screen manual:
.
Guide
Advanced Guide
.
Advanced
Page 43

If You Are Using Mac OS X v.10.3.9
Application to launch when scanner button is pressed, then click OK.
with a software application.
Advanced Guide
You need to set MP Navigator EX as the starting software application in Image Capture under
Applications of Mac OS X.
Select Applications on the Go menu, and double-click the Image Capture icon.
(1)
Click Options at lower left of the scanner window, select MP Navigator EX 3 in
(2)
To quit Image Capture, select Quit Image Capture on the Image Capture menu.
Note
If Options does not appear, select Preferences on the Image Capture menu, click Scanner, and
click Use TWAIN software whenever possible to clear the option. Then quit Image Capture and
restart it.
Forwarding Scanned Data to the Computer
1.
Select the scan operation.
Turn on the power.
(1)
Operation Panel
See
.
Page 43 of 988 pagesForwarding Scanned Data to the Computer
Select Scan
(2)
Use the
(3)
on the
HOME
Easy-Scroll Wheel
screen, and press the
(the
or button) to select PC
the OK button.
The computer selection screen will appear.
Select the computer to forward scanned data, and press the
(4)
Here we select USB.
The original type selection screen will appear.
Note
For the network connection, select the computer name to forward scanned data in the list.
For the connection via USB only, only USB appears on the LCD.
Select the type of original, and press the OK button.
(5)
Here we select Auto scan.
OK
button.
OK
, and press
button.
Note
If the computer connected over a network is selected in (4), Auto scan does not appear
on the LCD.
The types of original other than Auto scan are Document and Photo. If you select other
than Auto scan, you can save all scanned data in a PDF file, attach it to mail, or open it
For details, refer to the on-screen manual:
2.
Load an original on the Platen Glass.
.
Page 44

Make sure to load the original correctly according to the type of original that you have selected.
Advanced Guide
Advanced Guide
See Loading Originals.
Note
Characters and lines written with a light colored pen or highlight pen may not be scanned
properly.
Page 44 of 988 pagesForwarding Scanned Data to the Computer
3.
Press the
MP Navigator EX will be started, the original will be scanned according to the settings specified with MP
Navigator EX, and then the scanned data will be forwarded to the computer.
Scanning... will appear while scanning the original.
If you want to scan another original, load it on the Platen Glass, and press the
Remove the original on the Platen Glass after scanning is completed.
Color
or
button to start scanning.
Black
Color
or
Black
Important
Do not turn off the power while the machine is operating.
Do not open the Document Cover or move the loaded original until scanning is completed.
Note
Press the
The position or size of the original may not be scanned correctly depending on the type of
original.
If the scan is not performed correctly, refer to the on-screen manual:
change the settings in Document Type and Document Size of MP Navigator EX to match the
original and scan it again.
When the program selection screen appears:
The program selection screen may appear after performing step 3.
If the program selection screen appears, select MP Navigator EX Ver3.0 and click OK.
To start MP Navigator EX automatically without displaying the program selection screen, follow
the procedure below.
- For Windows Vista users, refer to "For Windows Users" in "
- For Windows XP users, select MP Navigator EX Ver3.0 as the software application to be
HOME
button to exit the Scan menu and display the
screen manual:
used in the program selection screen, select Always use this program for this action, then
click OK.
.
HOME
screen.
Troubleshooting
" of the on-
button again.
to
Page top
Page 45

Advanced Guide
Page 45 of 988 pagesUsing Various Scan Functions
Troubleshooting
Contents
>
Scanning > Using Various Scan Functions
Advanced Guide
Using Various Scan Functions
You can forward the data scanned with the machine to a computer, and also save them on a USB flash
drive or memory card inserted into the machine.
For details, refer to the on-screen manual:
Advanced Guide
.
Selecting a Device to Save the Scanned Data
Scanned data can be saved on the USB flash drive or memory card inserted into the machine. You
can specify the document type (Document or Photo) and data format (PDF or JPEG) for the data to
be scanned.
USB flash drive
Memory card
Selecting Various Processing Methods
To forward the scanned data to the computer, you can select the processing method for scanned
data if other than Auto scan is selected for the type of original.
Save to PC Save as PDF file
Attach to E-mail
Open with application
Note
Options for scan operation can be specified with MP Navigator EX.
For details, refer to the on-screen manual:
.
Page 46

Page top
Page 46 of 988 pagesUsing Various Scan Functions
Page 47

Page 47 of 988 pagesPrinting from Your Computer
Troubleshooting
Contents
Advanced Guide
> Printing from Your Computer
Printing from Your Computer
This section describes the procedure to print documents or photos with a computer.
You can easily print photos taken with your digital camera by using Easy-PhotoPrint EX supplied with the
machine.
Printing Photos (Easy-PhotoPrint EX)
Using Various Functions of Easy-PhotoPrint EX
Printing Documents (Windows)
Printing Documents (Macintosh)
For Mac OS X v.10.5.x
For Mac OS X v.10.4.x or Mac OS X v.10.3.9
Page top
Page 48

Page 48 of 988 pagesPrinting Photos (Easy-PhotoPrint EX)
Troubleshooting
Contents
> Printing from Your Computer
Advanced Guide
> Printing Photos (Easy-PhotoPrint EX)
Printing Photos (Easy-PhotoPrint EX)
Print image data saved on your computer by using Easy-PhotoPrint EX supplied with the machine.
This section describes the procedure to print borderless photos on 4" x 6" / 10 x 15 cm photo paper.
For details on Easy-PhotoPrint EX, refer to the on-screen manual:
Advanced Guide
Note
The screens used in this section are for printing with Windows. The operations are also the same
for printing with Macintosh.
Install Easy-PhotoPrint EX from the
uninstalled. To install Easy-PhotoPrint EX, select Easy-PhotoPrint EX in Custom Install.
1.
Prepare for printing.
Make sure that the machine is turned on.
(1)
Operation Panel
See
Load paper.
(2)
Loading Paper
See
.
.
Setup CD-ROM
when it has not been installed or has been
.
Here we load 4" x 6" / 10 x 15 cm photo paper in the Rear Tray.
Note
Load A4 or Letter-sized plain paper in the Cassette and other sizes or types of paper
such as photo paper in the Rear Tray.
Open the Paper Output Tray gently, and open the Output Tray Extension.
(3)
2.
Start Easy-PhotoPrint EX, and select Photo Print.
Start Easy-PhotoPrint EX.
(1)
Double-click (Easy-PhotoPrint EX) on the desktop.
Click Here: Easy-PhotoPrint EX
Page 49

Page 49 of 988 pagesPrinting Photos (Easy-PhotoPrint EX)
Select the Go menu, Applications, Canon Utilities, Easy-PhotoPrint EX, then double-click Easy-
PhotoPrint EX.
Note
To start Easy-PhotoPrint EX from Solution Menu, double-click (Solution Menu) on the
desktop and click (Print photos or albums, etc.).
Solution Menu
See
To start Easy-PhotoPrint EX from the Start menu, select All Programs (or Programs), Canon
Utilities, Easy-PhotoPrint EX, then Easy-PhotoPrint EX.
To start Easy-PhotoPrint EX from Solution Menu, click (Solution Menu) in the Dock and
click
Solution Menu
See
Click Photo Print.
(2)
(Print photos or albums, etc.).
.
.
Note
You can select Album, Calendar, Stickers, etc., besides Photo Print.
See Using Various Functions of Easy-PhotoPrint EX.
3.
Select a photo to print.
Select the folder in which images are saved.
(1)
Click the image to print.
(2)
The number of copies appears as "1", and the image you selected appears in the selected image area (A).
You can select two or more images at the same time.
Note
To print two or more copies, click (Up arrow) to change the number of copies.
To cancel the selection, click the image to cancel in the selected image area and click
(Delete Imported Image). You can also use
copies to zero.
You can also correct or enhance the selected image.
See Using Various Functions of Easy-PhotoPrint EX.
Click Select Paper.
(3)
(Down arrow) to change the number of
Page 50

4. Select the loaded paper.
Advanced
wrong paper source or may not print with the proper print quality.
Advanced Guide
Make sure that your machine's name is selected in Printer.
(1)
Make sure that Automatically Select is selected in Paper Source.
(2)
Note
For details on other settings for Paper Source, refer to the on-screen manual:
Guide
.
Page 50 of 988 pagesPrinting Photos (Easy-PhotoPrint EX)
Select the size and type of the loaded paper in Paper Size and Media Type.
(3)
Here we select 4"x6" 10x15cm in Paper Size and the type of the loaded photo paper in Media Type.
Note
If you select A4 or Letter-sized plain paper when Automatically Select is selected in Paper
Source, the machine feeds the paper from the Cassette. If you select other sizes or types
of paper such as photo paper, the machine feeds the paper from the Rear Tray.
If you select the wrong page size or media type, the machine may feed paper from the
Click Layout/Print.
(4)
5.
Select a layout and start printing.
Select the layout of the photo.
(1)
Here we select Borderless (full).
The preview will appear in the selected layout for confirmation of the required print result.
Note
You can change the direction of photo or crop photos (trimming) to print.
For details on the operation, refer to the on-screen manual:
.
Page 51

Click Print.
(2)
Note
Page 51 of 988 pagesPrinting Photos (Easy-PhotoPrint EX)
To cancel a print job in progress, press the
on the printer status monitor. After canceling the print job, blank sheets of paper may be
ejected.
To display the printer status monitor, click Canon XXX Printer (where "
name) on the taskbar.
Click the printer icon in the Dock to display the list of print jobs in progress.
To cancel a print job in progress, select the desired job in the Name list and click Delete.
To temporarily stop a job in progress, click Hold. To temporarily stop all the jobs in the list, click
Pause Printer (or Stop Jobs). After canceling the print job, blank sheets of paper may be
ejected.
button on the machine or click Cancel Printing
Stop
XXX
" is your machine's
Page top
Page 52

Page 52 of 988 pagesUsing Various Functions of Easy-PhotoPrint EX
Advanced Guide
Contents
PhotoPrint EX
> Printing from Your Computer >
Printing Photos (Easy-PhotoPrint EX)
> Using Various Functions of Easy-
Using Various Functions of Easy-PhotoPrint EX
This section introduces a few of the useful functions of Easy-PhotoPrint EX.
For details, refer to the on-screen manual:
Advanced Guide
.
Creating Your Own Prints
You can create an album or calendar using your photos.
Album
Calendar
Troubleshooting
Stickers
Layout Print
Correcting Images
You can use Red-Eye Correction, Face Sharpener, Digital Face Smoothing, Brightness, Contrast,
etc. to adjust, correct, or enhance images automatically or manually.
Brightness
Page top
Page 53

Page 53 of 988 pagesPrinting Documents (Windows)
Advanced Guide
Contents
> Printing from Your Computer
> Printing Documents (Windows)
Printing Documents (Windows)
This section describes the procedure to print a document of A4 size on plain paper.
For details, refer to the on-screen manual:
Advanced Guide
.
Note
Operations may vary depending on your software application. For details on the operation, refer to
the instruction manual of your application.
The screens used in this section are for printing with Windows Vista operating system Ultimate
Edition (hereafter referred to as "W indows Vista").
1. Make sure that the machine is turned on.
Operation Panel
See
2.
Load paper.
Loading Paper
See
Here we make sure that A4 plain paper is loaded in the Cassette.
.
.
Troubleshooting
Note
Load A4, B5, A5, or Letter-sized plain paper in the Cassette and other sizes or types of paper
such as photo paper in the Rear Tray.
3.
Open the Paper Output Tray gently, and open the Output Tray Extension.
4.
Create (or open) a document to print using an appropriate software application.
5.
Open the printer driver setup window.
Select Print on the File menu or the command bar in your software application.
(1)
The Print dialog box will appear.
Make sure that your machine's name is selected.
(2)
Note
If another printer's name is selected, click and select your machine's name.
Click Preferences (or Properties).
(3)
Page 54

6. Specify the required print settings.
Advanced Guide
wrong paper source or may not print with the proper print quality.
Advanced Guide
Select Business Document in Commonly Used Settings.
(1)
Note
When the print object such as Business Document or Photo Printing is selected in
Commonly Used Settings, the items in Additional Features will be selected automatically.
The settings suitable for the print object such as media type or print quality will also
appear.
When you specify two or more copies in Copies, the Collate check box will be selected.
Page 54 of 988 pagesPrinting Documents (Windows)
Make sure of the displayed settings.
(2)
Here we make sure that Plain Paper in Media Type, Standard in Print Quality, A4 in Printer Paper Size, and
Automatically Select in Paper Source are selected.
Note
The settings can be changed.
However, after changing Printer Paper Size, confirm that the setting for Page Size on the
Click OK.
(3)
Page Setup sheet matches the setting set in the software application.
For details, refer to the on-screen manual:
If you select A4, B5, A5, or Letter-sized plain paper when Automatically Select is selected
in Paper Source, the machine feeds the paper from the Cassette. If you select other sizes
or types of paper such as photo paper, the machine feeds the paper from the Rear Tray.
If you select the wrong page size or media type, the machine may feed paper from the
.
Note
For details on the printer driver functions, click Help or Instructions to view the online help or
the on-screen manual:
Main and Maintenance sheets if the on-screen manual is installed on your computer.
. The Instructions button appears on the Quick Setup,
Page 55

Advanced Guide
Advanced Guide
Page 55 of 988 pagesPrinting Documents (Windows)
You can name the changed settings and add to Commonly Used Settings.
For details, refer to the on-screen manual:
If the Always Print with Current Settings check box is selected, the current settings will be
applied from the next print job onward. Some software applications may not have this
function.
To display the preview to confirm the print result, select the Preview before printing check
box. Some software applications may not have a preview function.
You can specify the detailed print settings on the Main sheet or Page Setup sheet.
For details, refer to the on-screen manual:
7.
Start printing.
Click Print (or OK) to start printing.
.
.
Note
To cancel a print job in progress, press the
on the printer status monitor. After canceling the print job, blank sheets of paper may be
ejected.
To display the printer status monitor, click Canon XXX Printer (where "
name) on the taskbar.
If printed ruled lines are misaligned or print results are unsatisfactory, adjust the print head
position.
Aligning the Print Head
See
.
button on the machine or click Cancel Printing
Stop
XXX
" is your machine's
Page top
Page 56

Page 56 of 988 pagesPrinting Documents (Macintosh)
Advanced Guide
Contents
> Printing from Your Computer > Printing Documents (Macintosh)
Printing Documents (Macintosh)
This section describes the procedure to print a document of A4 size on plain paper.
For details, refer to the on-screen manual:
Advanced Guide
.
Note
Operations may vary depending on your software application. For details on the operation, refer to
the instruction manual of your application.
For Mac OS X v.10.5.x
1.
Make sure that the machine is turned on.
Operation Panel
See
.
2. Load paper.
Loading Paper
See
Here we make sure that A4 plain paper is loaded in the Cassette.
.
Troubleshooting
Note
Load A4, B5, A5, or Letter-sized plain paper in the Cassette and other sizes or types of paper
such as photo paper in the Rear Tray.
3. Open the Paper Output Tray gently, and open the Output Tray Extension.
4.
Create (or open) a document to print using an appropriate software application.
5. Open the Print dialog box.
Select Print on the File menu in your software application.
The Print dialog box will appear.
Note
If the dialog box below appears, click
(Down arrow).
6.
Specify the required print settings.
Make sure that your machine's name is selected in Printer.
(1)
Page 57

Select the page size of the loaded paper in Paper Size.
wrong paper source or may not print with the proper print quality.
Advanced
Advanced Guide
(2)
Here we select A4.
Select Quality & Media in the pop-up menu.
(3)
Select the media type of the loaded paper in Media Type.
(4)
Here we select Plain Paper.
Note
If you select A4, B5, A5, or Letter-sized plain paper when Automatically Select is selected
in Paper Source, the machine feeds the paper from the Cassette. If you select other sizes
or types of paper such as photo paper, the machine feeds the paper from the Rear Tray.
If you select the wrong page size or media type, the machine may feed paper from the
Page 57 of 988 pagesPrinting Documents (Macintosh)
Make sure that Automatically Select is selected in Paper Source.
(5)
Note
For details on other settings for Paper Source, refer to the on-screen manual:
Guide
.
Select the print quality in Print Quality.
(6)
Here we select Standard.
Note
For details on the print quality, refer to the on-screen manual:
.
Note
For details on the printer driver functions, click
Options, Borderless Printing, or Duplex Printing & Margin screen.
The preview appears on the left of the dialog box to confirm the print result. Some software
applications may not have a preview function.
(Question) on the Quality & Media, Color
Page 58

7.
Start printing.
Click Print to start printing.
Note
Click the printer icon in the Dock to display the list of print jobs in progress.
To cancel a print job in progress, select the desired job in the Name list and click Delete.
To temporarily stop a job in progress, click Hold. To temporarily stop all the jobs in the list, click
Pause Printer. After canceling the print job, blank sheets of paper may be ejected.
If printed ruled lines are misaligned or print results are unsatisfactory, adjust the print head
position.
Aligning the Print Head
See
.
For Mac OS X v.10.4.x or Mac OS X v.10.3.9
Note
The screens used in this section are for printing with Mac OS X v.10.4.x.
1.
Make sure that the machine is turned on.
Operation Panel
See
.
Page 58 of 988 pagesPrinting Documents (Macintosh)
2.
Load paper.
Loading Paper
See
Here we make sure that A4 plain paper is loaded in the Cassette.
.
Note
Load A4, B5, A5, or Letter-sized plain paper in the Cassette and other sizes or types of paper
such as photo paper in the Rear Tray.
3.
Open the Paper Output Tray gently, and open the Output Tray Extension.
4. Create (or open) a document to print using an appropriate software application.
5.
Specify the page size.
Select Page Setup on the File menu in your software application.
(1)
The Page Setup dialog box will appear.
Make sure that your machine's name is selected in Format for.
(2)
Select the page size of the loaded paper in Paper Size.
(3)
Here we select A4.
Click OK.
(4)
Page 59

6.
wrong paper source or may not print with the proper print quality.
Advanced
Advanced Guide
Specify the required print settings.
Select Print on the File menu in your software application.
(1)
The Print dialog box will appear.
Make sure that your machine's name is selected in Printer.
(2)
Select Quality & Media in the pop-up menu.
(3)
Select the media type of the loaded paper in Media Type.
(4)
Here we select Plain Paper.
Note
If you select A4, B5, A5, or Letter-sized plain paper when Automatically Select is selected
in Paper Source, the machine feeds the paper from the Cassette. If you select other sizes
or types of paper such as photo paper, the machine feeds the paper from the Rear Tray.
If you select the wrong page size or media type, the machine may feed paper from the
Page 59 of 988 pagesPrinting Documents (Macintosh)
Make sure that Automatically Select is selected in Paper Source.
(5)
Note
For details on other settings for Paper Source, refer to the on-screen manual:
Guide
.
Select the print quality in Print Quality.
(6)
Here we select Standard.
Note
For details on the print quality, refer to the on-screen manual:
.
Note
For details on the printer driver functions, click
Options, Special Effects, Borderless Printing, or Duplex Printing & Margin screen.
To display the preview to confirm the print result, click Preview. Some software applications
may not have a preview function.
(Question) on the Quality & Media, Color
Page 60

7.
Start printing.
Click Print to start printing.
Note
Click the printer icon in the Dock to display the list of print jobs in progress.
To cancel a print job in progress, select the desired job in the Name list and click Delete.
To temporarily stop a job in progress, click Hold. To temporarily stop all the jobs in the list, click
Stop Jobs. After canceling the print job, blank sheets of paper may be ejected.
If printed ruled lines are misaligned or print results are unsatisfactory, adjust the print head
position.
Aligning the Print Head
See
.
Page 60 of 988 pagesPrinting Documents (Macintosh)
Page top
Page 61

Page 61 of 988 pagesOther Usages
Advanced Guide
Contents > Other Usages
Troubleshooting
Other Usages
This section introduces the procedure to print the template forms such as notebook paper, etc., the
setting items of the machine, and the function to print directly from a digital camera or mobile phone.
This section also introduces useful software applications you can use with the machine.
Printing the Template Forms such as Notebook Paper
Printing the Various Template Forms
Printing Photos Directly from Your Digital Camera or Mobile Phone
Printing Photos from a PictBridge Compliant Device
Printing Photos from a Wireless Communication Device
Machine Settings
Useful Software Applications
Solution Menu
My Printer
Easy-WebPrint EX
Page top
Page 62

You need to prepare:
Page 62 of 988 pagesPrinting the Template Forms such as Notebook Paper
Advanced Guide
Contents
>
Other Usages
> Printing the Template Forms such as Notebook Paper
Printing the Template Forms such as Notebook Paper
This section describes the procedure to select and print the template forms.
A4, B5, or Letter-sized plain paper. See
Media Types You Can Use
.
Troubleshooting
1.
Prepare for printing.
Turn on the power.
(1)
Operation Panel
See
Make sure that A4, B5, or Letter-sized plain paper is loaded in the Cassette.
(2)
See Loading Paper in the Cassette .
Open the Paper Output Tray gently, and open the Output Tray Extension.
(3)
2.
Select a template form.
Select Settings
(1)
Select Template print
(2)
Use the
(3)
Easy-Scroll Wheel
print, and press the
.
on the
button.
OK
HOME
screen, and press the
, and press the
(the
or button) to select a template form to
OK
button.
OK
button.
Page 63

3.
Start printing.
Confirm Page size and Duplex/simplex printing.
(1)
To change the setting, use the Easy-Scroll Wheel
press the
Note
For details on the available template forms, see
OK
button.
Printing the Various Template Forms.
or button) to select the item to change, and
(the
Note
You can only select A4, B5, or 8.5"x11" (LTR) for Page size. B5 may not be available
depending on the selected template. The media type is limited to Plain paper and cannot be
changed.
Page 63 of 988 pagesPrinting the Template Forms such as Notebook Paper
Press the [
(2)
Press the
(3)
The machine starts printing.
] or [-] button to specify the number of copies.
+
Color
or
Black
button.
Printing the Various Template Forms
You can print the following templates with Template print.
Notebook paper 1
8 mm spacing
Notebook paper 2
7 mm spacing
Notebook paper 3
6 mm spacing
Graph paper 1
Graph 5 mm
Graph paper 2
Graph 3 mm
Checklist
List with checkboxes
Page 64

Vertical type
Page 64 of 988 pagesPrinting the Template Forms such as Notebook Paper
Staff paper 1
Staff paper 10 staves
Staff paper 2
Staff paper 12 staves
Monthly schedule
Calendar type
Handwriting paper
Rows of three lines
Weekly schedule
Page top
Page 65

You can easily print image data with wireless infrared communication from your mobile phone.
Page 65 of 988 pagesPrinting Photos Directly from Your Digital Camera or Mobile Phone
Troubleshooting
Contents
>
Other Usages
Advanced Guide
> Printing Photos Directly from Your Digital Camera or Mobile Phone
Printing Photos Directly from Your Digital Camera or Mobile
Phone
Printing Photos from a PictBridge Compliant Device
You can connect the PictBridge compliant device to this machine with a USB cable that is recommended
by the device's manufacturer, and print saved images directly.
For details on how to print saved images connecting the PictBridge compliant device, refer to the on-
screen manual:
For details on the print settings on the PictBridge compliant device, refer to the instruction manual
supplied with the device.
Advanced Guide
.
Connectable devices:
Any PictBridge compliant device can be connected to this machine regardless of the manufacturer or
model as long as it is compliant with the PictBridge Standard.
Important
Do not use the USB cable longer than around 10 feet / 3 meters to connect any PictBridge compliant
device to the machine since it may affect the operation of other peripheral devices.
Note
PictBridge is the Standard to print your photos directly without using a computer, connecting a
device such as a digital still camera, digital camcorder, or camera-equipped mobile phone.
(PictBridge) A device with this mark is PictBridge compliant.
Printable image data format:
This machine accepts images* taken with a camera compliant with the Design rule for Camera File
system and PNG files.
* Exif 2.2/2.21 compliant
Note
When printing from the PictBridge compliant device, set the print quality with the Operation Panel on
the machine. You cannot set the print quality on the PictBridge compliant device.
Printing Photos from a Wireless Communication Device
Page 66

If the optional Bluetooth Unit BU-30 is connected to the machine, you can print image data with wireless
communication from Bluetooth compatible mobile phones or computers.
For details on the operation, refer to the on-screen manual:
Advanced Guide
.
Page 66 of 988 pagesPrinting Photos Directly from Your Digital Camera or Mobile Phone
Page top
Page 67

Page 67 of 988 pagesMachine Settings
Troubleshooting
Contents
>
Other Usages
Advanced Guide
> Machine Settings
Machine Settings
This section describes the items you can set or change in Device settings of the Settings menu. For
details on setting or changing, refer to the on-screen manual:
Advanced Guide
.
Plain paper feed settings
Selects the paper source (Rear Tray or Cassette) in which you load plain paper. The machine feeds
plain paper from the Cassette by default. Use this setting to change the paper source for plain
paper to the Rear Tray.
Print settings
Prevent paper abrasion
Use this setting only if the print surface becomes smudged.
Extended copy amount
Selects the amount of image that extends off the paper when making borderless copies.
Auto Photo Fix setting
Selects whether or not to prioritize printing Exif information saved on a photo when Auto photo fix ON
is selected.
LAN settings
Change wireless/wired
Switches between wired LAN and wireless LAN. You can also disable LAN connection.
Wireless LAN setup
Configures the wireless LAN connection according to an access point or connection environment. If
the access point supports the WPS (Wi-Fi Protected Setup), you can configure a wireless LAN
easily. The access point settings can also be configured manually.
For details, refer to the printed manual:
Getting Started
Confirm LAN settings
Displays the wireless or wired LAN configurations of the machine on the LCD, or prints this
information from the machine.
Other settings
.
Configures other network settings including the machine's network name, IPv4/IPv6 settings,
memory card sharing, W SD (Web Services on Devices) setting, etc.
Reset LAN settings
Sets the machine network settings back to the default.
Advanced settings
Page 68

Date display
when the optional Bluetooth Unit is connected to the machine.
Selects the format of date that is printed or displayed on the screen.
Read/write attribute
Selects whether to use the Card Slot of the machine as the memory card drive of a computer.
Quiet mode
Enables this function if you want to reduce the operating noise of the machine, such as when using
the machine at night (when copying, printing from the memory card, printing from the PictBridge
compliant device, printing with wireless communication, etc.).
Guide display settings
Changes the time interval before the guide display, such as Change set. and Copy, appears at the
top of the LCD, or hides the guide display.
Key repeat
Enables to increase or decrease numbers rapidly by pressing and holding down the button when
inputting numbers. When this setting is disabled, holding down the button is the same as pressing
it once.
Page 68 of 988 pagesMachine Settings
Mobile phone print setting
Specifies paper or image correction when you print from the wireless communication device.
Bluetooth settings
Changes the Bluetooth settings, such as the device name or passkey. This setting appears only
PictBridge print settings
Specifies paper, print quality, etc. when you print from the PictBridge compliant device.
Language selection
Changes the language for LCD messages and menus.
Reset setting
Sets the machine settings back to the default. (However, the settings configured in LAN settings, the
values set for the print head alignment, the setting in Read/write attribute, and the language set in
Language selection will not be reset.)
Page top
Page 69

Page 69 of 988 pagesUseful Software Applications
Troubleshooting
Contents
>
Other Usages
Advanced Guide
> Useful Software Applications
Useful Software Applications
The machine can be used with useful software applications such as Solution Menu, My Printer, and Easy
-WebPrint EX.
Solution Menu
With Solution Menu, you can start the software applications supplied with the machine or display the
operating instructions.
Double-click (Solution Menu) on the desktop.
Click Here: Solution Menu
Click
(Solution Menu) in the Dock.
* The screens below are for Windows Vista.
Click the button of a function to use.
After starting Solution Menu, click the button on the title bar to reduce the window size.
Note
Install Solution Menu from the
uninstalled. To install Solution Menu, select Solution Menu in Custom Install.
The buttons displayed on the screen may vary depending on the country or region of purchase.
To start Solution Menu from the Start menu, select All Programs (or Programs), Canon Utilities,
Solution Menu, then Solution Menu.
To start Solution Menu from the menu bar, select the Go menu, Applications, Canon Utilities, Solution
Menu, then double-click Solution Menu.
Setup CD-ROM
when it has not been installed or has been
My Printer
With My Printer, you can display the printer driver setup window. It also provides you with the information
on how to take an action when you have trouble with the operation.
My Printer is not available in Macintosh.
Page 70

Double-click (My Printer) on the desktop.
Note
You can also start My Printer from Solution Menu or the taskbar.
Install My Printer from the
install My Printer, select My Printer in Custom Install.
To start My Printer from the Start menu, select All Programs (or Programs), Canon Utilities, My
Printer, then My Printer.
Setup CD-ROM when it has not been installed or has been uninstalled. To
Page 70 of 988 pagesUseful Software Applications
Easy-WebPrint EX
Easy-WebPrint EX provides quick and easy printing of web pages for Internet Explorer. You can print web
pages automatically resized to fit the paper width without cutting off the sides of pages, or preview and
select the desired web pages to print.
Easy-WebPrint EX is not available in Windows 2000 and Macintosh.
Important
It is unlawful to reproduce or edit the copyrighted work of another person without permission from
the copyright holder, except for personal use, use within the home, or other use within the limited
scope as defined by the copyright. Additionally, reproducing or editing photographs of people may
infringe on portrait rights.
When Easy-WebPrint EX is installed, it adds a toolbar to your Internet Explorer screen. The toolbar is
available whenever Internet Explorer is running.
The clip function, for example, allows you to clip desired parts of web pages and edit them to print.
Page 71

Page 71 of 988 pagesUseful Software Applications
For details on printing web pages, click
(Help) to view the online help.
Note
Installing Easy-WebPrint EX
If Easy-WebPrint EX is not installed, the guidance for installation of Easy-WebPrint EX may appear
from the taskbar on the desktop.
To install Easy-WebPrint EX, click the displayed guidance and follow the instructions on the screen.
You can also install Easy-WebPrint EX from the
To install Easy-WebPrint EX, select Easy-WebPrint EX in Custom Install.
To install Easy-WebPrint EX on your computer, Internet Explorer 7 or later is required and the
computer must be connected to the Internet.
Setup CD-ROM
.
Page top
Page 72

Page 72 of 988 pagesLoading Paper / Originals
Troubleshooting
Contents
Advanced Guide
> Loading Paper / Originals
Loading Paper / Originals
This section describes types of paper or originals you can load, how to load printing paper in the Rear
Tray or Cassette, and how to load originals to copy or scan.
Loading Paper
Paper Source to Load Paper
Loading Paper in the Cassette
Loading Paper in the Rear Tray
Media Types You Can Use
Media Types You Cannot Use
Loading Originals
Loading Originals
How to Load Originals for Each Function
Originals You Can Load
Page top
Page 73

when printing.
Page 73 of 988 pagesLoading Paper
Troubleshooting
Contents
> Loading Paper / Originals
Advanced Guide
> Loading Paper
Loading Paper
Paper Source to Load Paper
Loading Paper in the Cassette
Loading Paper in the Rear Tray
Media Types You Can Use
Media Types You Cannot Use
Paper Source to Load Paper
The machine has two paper sources to feed paper; Cassette and Rear Tray.
You can load paper in either one of the paper sources, depending on the page size and media type of
paper. Paper is fed from the Cassette or Rear Tray depending on the selection of the page size or media
type.
See Media Types You Can Use
Note
When printing, select the correct page size and media type. If you select the wrong page size or
media type, the machine may feed paper from the wrong paper source or may not print with the
proper print quality.
For details on how to load paper in each paper source, see
Loading Paper in the Rear Tray .
.
Loading Paper in the Cassette
or
Loading Plain Paper in the Cassette
When you use A4, B5, A5, or Letter-sized plain paper, load it in the Cassette.
The machine feeds paper from the Cassette automatically by selecting plain paper (A4, B5, A5, or
Letter size) in the print settings with the Operation Panel or the printer driver when printing.
For details on how to change the paper source setting, refer to the on-screen manual:
.
Guide
Advanced
Loading Photo Paper in the Rear Tray
When you use photo paper, load it in the Rear Tray.
The machine feeds paper from the Rear Tray automatically by selecting the media types other than
plain paper, such as photo paper, in the print settings with the Operation Panel or the printer driver
When you use plain paper other than A4, B5, A5, or Letter size, also load it in the Rear Tray.
Page 74

Page 74 of 988 pagesLoading Paper
Page top
Page 75

Align the edges of paper. If paper is curled, flatten it.
Advanced Guide
Page 75 of 988 pagesLoading Paper in the Cassette
Contents
> Loading Paper / Originals >
Loading Paper
> Loading Paper in the Cassette
Loading Paper in the Cassette
You can load only A4, B5, A5, or Letter-sized plain paper in the Cassette.
Load other sizes or types of paper in the Rear Tray.
See Media Types You Can Use
Note
Advice for printing on plain paper
We recommend Canon genuine photo paper for printing photos.
For details on the Canon genuine paper, see Media Types You Can Use
You can use general copy paper.
For the page size and paper weight you can use for this machine, see
1.
Prepare paper.
.
.
Media Types You Can Use
Advanced Guide
Troubleshooting
.
Note
Align the edges of paper neatly before loading. Loading paper without aligning the edges may
cause paper jams.
If paper is curled, hold the curled corners and gently bend them in the opposite direction until
the paper becomes completely flat.
For details on how to flatten curled paper, refer to "
2. Load paper.
Pull out the Cassette from the machine.
(1)
.
Troubleshooting" in the on-screen manual:
Load the paper stack WITH THE PRINT SIDE FACING DOWN and THE
(2)
LEADING EDGE TO THE FAR SIDE, and align it against the right side of the
Cassette.
Slide the Paper Guide (A) to align with the mark of page size.
(3)
Page 76

The Paper Guide (A) will stop when it aligns with the corresponding mark of page size.
Note
There may be a little space between the Paper Guide (A) and the paper stack.
Slide the Paper Guide (B) on the left to align completely with the side of the
(4)
paper stack.
Note
Do not load sheets of paper higher than the Load Limit Mark (C).
Page 76 of 988 pagesLoading Paper in the Cassette
Insert the Cassette into the machine.
(5)
Push the Cassette all the way into the machine.
3.
Open the Paper Output Tray gently, and open the Output Tray Extension.
Note
After loading paper
When using the machine to copy or print without a computer, select the size and type of the
loaded paper for Page size and Media type of the print settings in each menu of the
screen.
See Changing the Settings in "Printing Photos Saved on the Memory Card / USB Flash Drive" or
Changing the Settings
When printing with a computer, select the size and type of the loaded paper in Printer Paper
Size (or Paper Size) and Media Type in the printer driver.
in "Making Copies".
HOME
Page 77

Page 77 of 988 pagesLoading Paper in the Cassette
See
Printing Documents (Windows)
Printing Documents (Macintosh) .
or
Page top
Page 78

Align the edges of paper. If paper is curled, flatten it.
Page 78 of 988 pagesLoading Paper in the Rear Tray
Contents
> Loading Paper / Originals >
Loading Paper
> Loading Paper in the Rear Tray
Loading Paper in the Rear Tray
You can load photo paper or envelopes in the Rear Tray.
Loading Photo Paper
Important
If you cut plain paper into small size such as 4" x 6" / 10 x 15 cm, 4" x 8" / 101.6 x 203.2 mm,
5" x 7" / 13 x 18 cm, or 2.16" x 3.58" / 55.0 x 91.0 mm (Card size) to perform trial print, it can
cause paper jams.
1.
Prepare paper.
See
Prepare paper.
in "Loading Paper in the Cassette".
Advanced Guide
Troubleshooting
2.
Load paper.
Open the Paper Support, raise it, then tip it back.
(1)
Open the Paper Output Tray gently, and open the Output Tray Extension.
(2)
Slide the Paper Guides (A) to open them, and load the paper in the center of the
(3)
Rear Tray WITH THE PRINT SIDE FACING YOU.
Important
Always load paper in the portrait orientation (B). Loading paper in the landscape
orientation (C) can cause paper jams.
Page 79

Slide the Paper Guides (A) to align them with both sides of the paper stack.
(4)
Do not slide the Paper Guides too hard. The paper may not be fed properly.
Page 79 of 988 pagesLoading Paper in the Rear Tray
Note
Do not load sheets of paper higher than the Load Limit Mark (D).
Note
After loading paper
When using the machine to copy or print without a computer, select the size and type of the
loaded paper for Page size and Media type of the print settings in each menu of the
screen.
HOME
Page 80

See Changing the Settings in "Printing Photos Saved on the Memory Card / USB Flash Drive" or
with the printer driver properly.
Changing the Settings
When printing with a computer, select the size and type of the loaded paper in Printer Paper
Size (or Paper Size) and Media Type in the printer driver.
See
Printing Documents (Windows)
in "Making Copies".
or
Printing Documents (Macintosh) .
Loading Envelopes
You can print on European DL and US Comm. Env. #10-sized envelopes.
The address is automatically rotated and printed according to the envelope's direction by specifying
Important
You can only print on envelopes with the computer.
Do not use the following envelopes. They could jam in the machine or cause the machine to
malfunction.
- Envelopes with an embossed or treated surface
- Envelopes with a double flap (or sticker flaps)
- Envelopes whose gummed flaps are already moistened and adhesive
Page 80 of 988 pagesLoading Paper in the Rear Tray
1. Prepare envelopes.
Press down on all four corners and edges of the envelopes to flatten them.
If the envelopes are curled, hold the opposite corners and gently twist them in the
opposite direction.
If the corner of the envelope flap is folded, flatten it.
Use a pen to press the leading edge in the inserting direction flat and sharpen the
crease.
The figures above show a side view of the leading edge of the envelope.
Important
The envelopes may jam in the machine if they are not flat or the edges are not aligned. Make
sure that no curl or puff exceeds 0.1 inches / 3 mm.
2.
Load envelopes.
Open the Paper Support, raise it, then tip it back.
(1)
See
Load paper.
Open the Paper Output Tray gently, and open the Output Tray Extension.
(2)
in "Loading Photo Paper" of "Loading Paper in the Rear Tray".
Page 81

Page 81 of 988 pagesLoading Paper in the Rear Tray
See
Load paper.
Slide the Paper Guides (A) to open them, and load the envelopes in the center of
(3)
in "Loading Photo Paper" of "Loading Paper in the Rear Tray".
the Rear Tray WITH THE ADDRESS SIDE FACING YOU.
The folded flap of the envelope will be faced down on the left side.
Up to 10 envelopes can be loaded at once.
Slide the Paper Guides (A) to align them with both sides of the envelopes.
(4)
Do not slide the Paper Guides too hard. The envelopes may not be fed properly.
(B) Rear side
(C) Address side
3.
Specify the settings with the printer driver.
Select Envelope in Commonly Used Settings on the Quick Setup sheet.
(1)
Select DL Env. or Comm. Env. #10 in the Envelope Size Setting window.
(2)
Select Landscape in Orientation.
(3)
Select Envelope in Media Type.
(1)
Select DL Envelope or #10 Envelope in Paper Size.
(2)
Select the landscape orientation in Orientation.
(3)
Important
If you do not specify the envelope size or orientation properly, the address will be printed
upside down or will be turned to 90 degrees.
Note
In Windows, if the print result is upside down, open the printer driver setup window, select
Envelope in Commonly Used Settings, then select the Rotate 180 degrees check box in
Additional Features.
For details on the printer driver settings, see Printing Documents (Windows) or
Printing
Page 82

Page 82 of 988 pagesLoading Paper in the Rear Tray
Documents (Macintosh)
.
Page top
Page 83

Approx. 150
A4, B5, A5, and Letter /
Approx. 50
A4, Letter / 8.5" x 11", 5"
Page 83 of 988 pagesMedia Types You Can Use
Troubleshooting
Contents
> Loading Paper / Originals >
Loading Paper
Advanced Guide
> Media Types You Can Use
Media Types You Can Use
Choose paper suitable for printing, for the best print results. Canon provides you various types of paper
to enhance the fun of printing, such as stickers as well as papers for photo or document. W e
recommend the use of Canon genuine paper for printing your important photos.
Media Types
Commercially available papers
Name of
Paper
<Model
No.>
Plain Paper
(Recycled
*2
paper)
Envelopes
*1
*4
Rear Tray
*3
sheets
10 envelopes
Paper Load Limit
Cassette
8.5" x 11": Approx. 150
sheets
Not loadable
Paper Output
Tray Load
Limit
sheets
*5
*6
Settings in Media Type
Operation
Panel
Plain paper
-
Printer
Driver
Plain Paper
Envelope
Canon genuine papers
Name of Paper
<Model No.>
For printing photos:
Photo Paper Pro
Platinum
<PT-101>
Photo Paper Pro
II
<PR-201>
Glossy Photo
Paper "Everyday
Use"
<GP-501>
Photo Paper
*1
*7
*7
*7
Glossy
<GP-502>
*7
x 7" / 13 x 18 cm, and 8"
x 10" / 20 x 25 cm: 10
sheets
4" x 6" / 10 x 15 cm: 20
sheets
Paper Load Limit
Rear Tray
Cassette
Not
loadable
Paper
Output Tray
Load Limit
*6 Pro Platinum
*5
Pro II
Glossy Photo
Paper
Glossy Photo
Paper
Settings in Media Type
Operation
Panel
Printer
Driver
Photo Paper
Pro Platinum
Photo Paper
Pro II
Glossy Photo
Paper
Glossy Photo
Paper
Photo Paper Plus
Glossy II
<PP- 201>
Photo Paper Plus
Semi-gloss
<SG-201>
Matte Photo
Paper
*7
*7
Plus Glossy II Photo Paper
Plus Glossy II
Plus Semi-
gloss
Photo Paper
Plus Semi-
gloss
Matte Photo
Paper
Matte Photo
Paper
Page 84

<MP-101>
Advanced Guide
For printing business documents:
Page 84 of 988 pagesMedia Types You Can Use
High Resolution
Paper
<HR-101N>
For creating your own prints:
T-Shirt
80 sheets
*4
1 sheet
Transfers
<TR-301>
Photo Stickers
<PS-101>
*1
Paper with a Model Number is Canon genuine paper. Refer to the instruction manual supplied with
*4
1 sheet Glossy Photo
*8, *9
Not
loadable
Not
loadable
*5
*5
50 sheets
*6
-
-
Paper
High
Resolution
Paper
T-Shirt
Transfers
Glossy Photo
Paper
the paper for detailed information on the printable side and notes on handling paper. For information on
the page sizes available for each Canon genuine paper, visit our website. You may not be able to
purchase some Canon genuine papers depending on the country or region of purchase. Paper is not
sold in the US by Model Number. Purchase paper by name.
*2
Proper feeding of paper may not be possible at the maximum capacity depending on the type of paper
or environmental conditions (either very high or low temperature or humidity). In such cases, reduce the
number of paper you load at a time to less than half (100% recycled paper can be used).
*3
A4, B5, A5, or Letter-sized plain paper can be loaded only when Rear tray is selected for Plain paper
feed settings in Device settings of the Settings menu.
For details on the settings, refer to the on-screen manual:
*4
Available only when printing from your computer.
*5
Feeding this paper from the Cassette can damage the machine. Always load in the Rear Tray.
*6
We recommend that you remove the previously printed sheet from the Paper Output Tray before
Advanced Guide
.
continuously printing to avoid blurs and discoloration.
*7
When loading paper in stacks, the print side may become marked as it is fed or paper may not feed
properly. In this case, load one sheet at a time.
*8
When scanning printed photos to print onto sticker paper, be sure to select Sticker print in Easy photo
reprint. If Sticker print is selected, the type of paper cannot be selected.
See Printing Photos in Various Layouts
.
When printing photos saved on a memory card or USB flash drive onto sticker paper, be sure to select
Sticker print in Memory card menu. If Sticker print is selected, the type of paper cannot be selected.
See Printing Photos in Various Layouts
.
When printing photos saved on your mobile phone onto sticker paper, select Stickers for the page size in
Mobile phone print setting.
Refer to the on-screen manual:
*9
You can easily specify print settings for sticker paper with Easy-PhotoPrint EX provided on the
CD-ROM
. Install it on your computer.
Advanced Guide
.
Setup
You can use the following page sizes.
Note
To specify the page size and media type when printing photos saved on a PictBridge compliant
device or mobile phone, refer to the on-screen manual:
.
Page Sizes
Page 85

Note
A4, B5, A5, and Letter sizes
You can load plain paper of the following page sizes in the Cassette:
Plain paper of other sizes cannot be loaded in the Cassette. Load them in the Rear Tray.
In Macintosh, Choukei 3 and Choukei 4 are not available.
Standard sizes:
Letter (8.50 x 11.00 inches / 215.9 x 279.4 mm)
Legal (8.50 x 14.00 inches / 215.9 x 355.6 mm)
A5 (5.83 x 8.27 inches / 148.0 x 210.0 mm)
A4 (8.27 x 11.69 inches / 210.0 x 297.0 mm)
B5 (7.17 x 10.12 inches / 182.0 x 257.0 mm)
4" x 6" (4.00 x 6.00 inches / 10 x 15 cm)
4" x 8" (4.00 x 8.00 inches / 101.6 x 203.2 mm)
5" x 7" (5.00 x 7.00 inches / 13 x 18 cm)
8" x 10" (8.00 x 10.00 inches / 20 x 25 cm)
L (3.50 x 5.00 inches / 89.0 x 127.0 mm)
2L (5.00 x 7.01 inches / 127.0 x 178.0 mm)
Hagaki (3.94 x 5.83 inches / 100.0 x 148.0 mm)
Hagaki 2 (7.87 x 5.83 inches / 200.0 x 148.0 mm)
Comm. Env. #10 (4.12 x 9.50 inches / 104.6 x 241.3 mm)
DL Env. (4.33 x 8.66 inches / 110.0 x 220.0 mm)
Choukei 3 (4.72 x 9.25 inches / 120.0 x 235.0 mm)
Choukei 4 (3.54 x 8.07 inches / 90.0 x 205.0 mm)
Youkei 4 (4.13 x 9.25 inches / 105.0 x 235.0 mm)
Youkei 6 (3.86 x 7.48 inches / 98.0 x 190.0 mm)
Card (2.16 x 3.58 inches / 55.0 x 91.0 mm)
Wide (4.00 x 7.10 inches / 101.6 x 180.6 mm)
Page 85 of 988 pagesMedia Types You Can Use
Non-standard sizes:
You can also specify a custom size within the following range.
Minimum size:
Maximum size:
2.17 x 3.58 inches / 55.0 x 91.0 mm (Rear Tray)
5.83 x 8.27 inches / 148.0 x 210.0 mm (Cassette)
8.50 x 26.61 inches / 215.9 x 676.0 mm (Rear Tray)
8.50 x 11.69 inches / 215.9 x 297.0 mm (Cassette)
Paper Weight
17 to 28 lb / 64 to 105 g/m2 (except for Canon genuine paper)
Do not use heavier or lighter paper (except for Canon genuine paper), as it could jam in the machine.
Notes on Storing Paper
Take out only the necessary number of paper from the package, just before printing.
To avoid curling, when you do not print, put unused paper back into the package and keep it on a
level surface. And also, store it avoiding heat, humidity, and direct sunlight.
Notes on Paper for Full-page Borderless Printing
You cannot use A5, B5, and Legal-sized paper, and envelopes for full-page borderless printing.
You can use plain paper for full-page borderless printing only when printing from a computer.
However, this may result in lower print quality. We recommend using plain paper for a trial print.
Page top
Page 86

Page 86 of 988 pagesMedia Types You Cannot Use
Troubleshooting
Contents
> Loading Paper / Originals >
Loading Paper
Advanced Guide
> Media Types You Cannot Use
Media Types You Cannot Use
Do not use the following types of paper. Using such paper will cause not only unsatisfactory results, but
also the machine to jam or malfunction.
Folded, curled, or wrinkled paper
Damp paper
2
Paper that is too thin (weighing less than 17 lb / 64 g/m
Paper that is too thick (weighing more than 28 lb / 105 g/m2, except for Canon genuine paper)
Paper thinner than a postcard, including plain paper or notepad paper cut to a small size (when
printing on paper smaller than A5)
Picture postcards
Postcards affixed with photos or stickers
Envelopes with a double flap (or sticker flaps)
Envelopes with an embossed or treated surface
Envelopes whose gummed flaps are already moistened and adhesive
Any type of paper with holes
Paper that is not rectangular
Paper bound with staples or glue
Paper with adhesives
Paper decorated with glitter, etc.
)
Page top
Page 87

Page 87 of 988 pagesLoading Originals
Troubleshooting
Contents
Advanced Guide
> Loading Paper / Originals > Loading Originals
Loading Originals
Loading Originals
How to Load Originals for Each Function
Originals You Can Load
This section describes the procedure to load originals on the Platen Glass.
You may have to load the original in a different position depending on the function you selected in Copy,
Easy photo reprint, or Scan. Load the original in the correct position according to the selected function. If
you do not load the original correctly, it may not be scanned properly.
Important
After loading the original on the Platen Glass, be sure to close the Document Cover before starting
to copy or scan.
Loading Originals
You can load originals to copy or scan on the Platen Glass.
1. Load an original on the Platen Glass.
Open the Document Cover.
(1)
Important
Do not place any object on the Document Cover. It will fall into the Rear Tray when the
Document Cover is opened and cause the machine to malfunction.
Do not hold the LCD or the Operation Panel.
Load the original WITH THE SIDE TO COPY OR SCAN FACING DOWN on the
(2)
Platen Glass.
Make sure of the proper position to load the original for each function.
See
How to Load Originals for Each Function
.
Important
Be sure to observe the following when loading the original on the Platen Glass.
- Do not place any objects weighing 4.4 lb / 2.0 kg or more on the Platen Glass.
- Do not put any pressure of 4.4 lb / 2.0 kg or more on the Platen Glass, such as pressing
down the original.
Failure to observe the above may cause the Scanner to malfunction or the Platen Glass to
break.
Page 88

2.
Close the Document Cover gently.
Page 88 of 988 pagesLoading Originals
Page top
Page 89

Page 89 of 988 pagesHow to Load Originals for Each Function
Troubleshooting
Contents
> Loading Paper / Originals > Loading Originals
Advanced Guide
> How to Load Originals for Each Function
How to Load Originals for Each Function
Load originals to make copy
Select in the Scan menu
- USB flash drive or Memory card to scan originals
- PC to scan magazine, newspaper, or text document
Select the Photo index sheet menu to scan the Photo Index
Sheet
Scan magazine, newspaper, or text document with a software
application on a computer
Load the original WITH THE SIDE TO SCAN FACING DOWN to be aligned with the alignment mark
.
Important
The machine cannot scan the shaded area (A) (0.04 inches / 1 mm from the edges of the
Platen Glass).
Load printed photos in Easy photo reprint
Select PC in the Scan menu and scan printed photo, postcard,
business card, or DVD/CD
Scan printed photo, postcard, business card, or DVD/CD with a
software application on a computer
Page 90

Load the original WITH THE SIDE TO SCAN FACING DOWN in an appropriate way according to the
number of originals.
Load only one original
Load the original at least 0.4 inches / 10 mm away from the edges of the Platen Glass.
Load two or more originals
Place two or more originals at least 0.4 inches / 10 mm away from the edges of the Platen Glass
and at least 0.4 inches / 10 mm apart from each other.
Page 90 of 988 pagesHow to Load Originals for Each Function
(A) 0.4 inches / 10 mm
Note
The Skew Correction function automatically compensates for the originals placed at an angle
of up to approximately 10 degrees.
Slanted photos with a long edge of 7.1 inches / 180 mm or more cannot be corrected.
Page top
Page 91

Page 91 of 988 pagesOriginals You Can Load
Contents
> Loading Paper / Originals > Loading Originals > Originals You Can Load
Originals You Can Load
You can copy or scan the following originals.
Types of originals:
Size (W x L):
Text document, magazine, or newspaper
Printed photo, postcard, business card, or DVD/CD
Max. 8.5 x 11.7 inches / 216 x 297 mm
Advanced Guide
Troubleshooting
Page top
Page 92

when the print result is faint, or to take an action when paper does not feed properly.
Page 92 of 988 pagesRoutine Maintenance
Troubleshooting
Contents
Advanced Guide
> Routine Maintenance
Routine Maintenance
This section describes the procedure to replace ink tanks when they run out of ink, to clean the machine
Replacing an Ink Tank
Replacing Procedure
Checking the Ink Status
When Printing Becomes Faint or Colors Are Incorrect
Printing the Nozzle Check Pattern
Examining the Nozzle Check Pattern
Cleaning the Print Head
Cleaning the Print Head Deeply
Aligning the Print Head
Cleaning the Paper Feed Roller
Cleaning the Pad in the Cassette
Page top
Page 93

Advanced Guide
white printing is specified.
Page 93 of 988 pagesReplacing an Ink Tank
Troubleshooting
Contents
Routine Maintenance > Replacing an Ink Tank
>
Advanced Guide
Replacing an Ink Tank
When ink runs out while printing is in progress, an error message will appear on the LCD or your
computer screen. Make sure which ink tank has run out of ink and replace it with a new one.
Note
If the error message appears, confirm the displayed message and take an appropriate action.
For details, refer to "An Error Message Is Displayed on the LCD" in " Troubleshooting
screen manual:
For information on the compatible ink tanks, refer to the printed manual:
If print results become faint or white streaks appear despite sufficient ink levels, see
Becomes Faint or Colors Are Incorrect
.
Getting Started
.
" of the on-
.
When Printing
Replacing Procedure
When the ink tanks run out of ink, follow the procedure below to replace them.
Important
Handling ink
To maintain optimal print quality, we recommend the use of specified Canon brand ink tanks. Refilling
the ink is not recommended.
If you remove an ink tank, replace it immediately. Do not leave the machine with ink tanks removed.
Use new ink tanks for replacement. Installing used ink tanks may cause the nozzles to clog.
Furthermore, with such ink tanks, the machine will not be able to inform you when to replace the ink
tanks properly.
Once an ink tank has been installed, do not remove it from the machine and leave it out in the open.
This will cause the ink tank to dry out, and the machine may not operate properly when it is
reinstalled. To maintain optimal printing quality, use an ink tank within six months of first use.
Note
Color ink may be consumed even when printing a black-and-white document or when black-and-
Every ink is also consumed in the standard cleaning and deep cleaning of the Print Head, which
may be necessary to maintain the machine's performance. When an ink tank is out of ink, replace it
immediately with a new one.
1.
Make sure that the power is turned on, and open the Paper Output Tray gently.
2.
Lift the Scanning Unit (Cover) until it stops.
The Print Head Holder moves to the replacement position.
Page 94

Caution
Do not hold the Print Head Holder to stop or move it forcibly. Do not touch the Print Head Holder
until it stops completely.
Important
Do not place any object on the Document Cover. It will fall into the Rear Tray when the
Document Cover is opened and cause the machine to malfunction.
If the Document Cover is open, you cannot open the Scanning Unit (Cover). Be sure to lift the
Scanning Unit (Cover) with the Document Cover closed.
Do not hold the LCD or the Operation Panel.
Do not touch the metallic parts or other parts inside the machine.
If the Scanning Unit (Cover) is left open for more than 10 minutes, the Print Head Holder moves
to the right. In this case, close and reopen the Scanning Unit (Cover).
Page 94 of 988 pagesReplacing an Ink Tank
Note
The machine may make operating noise when the Print Head Holder moves to the replacement
position.
3. Remove the ink tank with the lamp flashing fast.
Push the tab (A) and lift the ink tank to remove.
Do not touch the Print Head Lock Lever (B).
Important
Handle the ink tank carefully to avoid staining of clothing or the surrounding area.
Discard the empty ink tank according to the local laws and regulations regarding disposal of
consumables.
Note
Do not remove two or more ink tanks at the same time. Be sure to replace ink tanks one by one
Page 95

when replacing two or more ink tanks.
Page 95 of 988 pagesReplacing an Ink Tank
For details on ink lamp flashing speed, see
4. Prepare the new ink tank.
Take a new ink tank out of its package, pull the orange tape ( ) in the direction
(1)
of the arrow to peel it off, then remove the film (
Important
Make sure that the film is completely removed from the air hole (C).
If the air hole is blocked with the remaining film, ink may leak out or may not eject properly.
Checking the Ink Status.
).
Hold the orange protective cap (D) as indicated in the figure below, then twist
(2)
and remove it from the bottom of the ink tank.
Remove the protective cap while holding it to prevent the ink from staining your fingers.
Discard the protective cap once it is removed.
Important
Do not touch the electrical contacts (E) on the ink tank. It can cause the machine to
malfunction or become unable to print.
Important
If you shake the ink tank, the ink may spill out and stain your hands and the surrounding area.
Be careful to handle the ink tank.
Do not squeeze the side of ink tanks as this may cause the ink to leak out.
Be careful not to stain your hands and the surrounding area with ink on the removed
protective cap.
Do not reattach the protective cap once you have removed it. Discard it according to the local
laws and regulations regarding disposal of consumables.
Page 96

Do not touch the open ink port once the protective cap is removed, as this may prevent the ink
Advanced Guide
from being ejected properly.
5. Install the new ink tank.
Insert the front end of ink tank into the Print Head at a slant.
(1)
Make sure that the position of the ink tank matches the label.
Page 96 of 988 pagesReplacing an Ink Tank
Press the mark
(2)
(Push) on the ink tank until the ink tank snaps firmly into
place.
Make sure that the ink lamp lights up red.
Important
You cannot print if the ink tank is installed in the wrong position. Be sure to install the ink tank in
the correct position according to the label on the Print Head Holder.
You cannot print unless all the ink tanks are installed. Be sure to install all the ink tanks.
6.
Close the Scanning Unit (Cover) gently.
Caution
Be sure to hold the Scanning Unit (Cover) firmly using both hands, and be careful not to get
your fingers caught.
Important
Do not hold the LCD or the Operation Panel.
Note
If the error message appears after the Scanning Unit (Cover) is closed, refer to "
Troubleshooting" in the on-screen manual:
When you start printing after replacing the ink tank, the machine starts cleaning the Print Head
automatically. Do not perform any other operations until the machine completes the cleaning of
.
Page 97

the Print Head.
If printed ruled lines are misaligned or the print head position is misaligned, adjust the print head
position.
Aligning the Print Head
See
The machine may make noise during operation.
.
Page 97 of 988 pagesReplacing an Ink Tank
Page top
Page 98

Page 98 of 988 pagesChecking the Ink Status
Contents
Routine Maintenance
>
Replacing an Ink Tank
>
> Checking the Ink Status
Checking the Ink Status
You can check the ink status on the LCD or with the ink lamps.
With the LCD on the Machine
Make sure that the power is turned on, and press the
(1)
Press the left
(2)
Check if any symbol (A) appears on the remaining ink volume screen.
Sufficient ink is left for printing if no symbol appears.
The ink with
Function
(Ink low) is low. Prepare a new ink tank.
button.
Advanced Guide
HOME
button.
Troubleshooting
Note
You can also check the ink status on a screen of the LCD displayed while printing.
With the Ink Lamps
Make sure that the power is turned on, and open the Paper Output Tray gently.
(1)
Lift the Scanning Unit (Cover) until it stops.
(2)
See
Lift the Scanning Unit (Cover) until it stops.
Check the ink lamps.
(3)
Close the Scanning Unit (Cover) after confirming the ink lamp status.
in "Replacing Procedure".
Ink lamp is on
The ink tank is correctly installed and there is sufficient ink left for printing.
Ink lamp is flashing
Flashing slowly (at around 3-second intervals)
...... Repeats
Ink is low. Prepare a new ink tank.
Flashing fast (at around 1-second intervals)
Page 99

...... Repeats
Advanced Guide
Advanced Guide
The ink tank is installed in the wrong position or it is empty. Make sure that the ink tank is installed in the
correct position as indicated by the label on the Print Head Holder. If the position is correct but the lamp
flashes, there has been an error and the machine cannot print. Check the error message displayed on the
LCD.
Refer to "Troubleshooting" in the on-screen manual:
Ink lamp is off
The ink tank is not installed properly or the function for detecting the remaining ink level is disabled. If the ink
tank is not installed properly, press the mark
does not click into place, make sure that the orange protective cap has been removed from the bottom of
the ink tank.
If the ink lamp is still off after reinstalling the ink tank, there has been an error and the machine cannot print.
Check the error message displayed on the LCD.
Refer to "Troubleshooting" in the on-screen manual:
(Push) on the ink tank until the ink tank clicks into place. If it
.
.
Page 99 of 988 pagesChecking the Ink Status
Page top
Page 100

Advanced Guide
Are Misaligned:
Page 100 of 988 pagesWhen Printing Becomes Faint or Colors Are Incorrect
Troubleshooting
Contents
Routine Maintenance
>
Advanced Guide
> When Printing Becomes Faint or Colors Are Incorrect
When Printing Becomes Faint or Colors Are Incorrect
If print results are blurred or colors are not printed correctly, the pint head nozzles are probably clogged.
Follow the procedure below to print the nozzle check pattern, check the print head nozzle condition, then
clean the Print Head.
If printed ruled lines are misaligned or print results are otherwise unsatisfactory, aligning the Print Head
may improve print quality.
Important
Do not rinse or wipe the Print Head and ink tanks. This can cause trouble with the Print Head and ink
tanks.
Note
Before performing maintenance
Open the Scanning Unit (Cover) and make sure that all lamps on the ink tanks are lit red.
If not, see
Increasing the print quality in the printer driver settings may improve the print result.
For details, refer to the on-screen manual:
Checking the Ink Status
and take an appropriate action.
.
When the Print Results Are Blurred or Uneven:
Step 1
See Printing the Nozzle Check Pattern.
See Examining the Nozzle Check Pattern.
If there are missing lines or horizontal white streaks in the
pattern:
After cleaning the Print Head, print
and examine the nozzle check
pattern.
Step 2
Cleaning the Print Head
See
If the problem is not resolved after cleaning the Print Head
twice:
Step 3
Cleaning the Print Head Deeply
See
Note
When you have performed the procedure until step 3 and the problem has not been resolved, turn
off the power and clean the Print Head deeply again after 24 hours. If the problem is still not
resolved, the Print Head may be damaged. Contact the service center.
.
.
When the Print Results Are Not Even such as the Ruled Lines
Aligning the Print Head
See
.
 Loading...