

Canon MP980 Series, PIXMA MP620B, MP620 Series Network Setup Manual

ENGLISHFRANÇAIS
Guide de dépannage réseau
Network Setup Troubleshooting
1
ENGLISH
Network Setup Troubleshooting
This manual describes troubleshooting tips for problems you may encounter when
setting up.
If you do not nd a description for your trouble here, refer to "Troubleshooting" in the on-screen manual:
Basic Guide/Advanced Guide.
•
Troubles in Setup/Connections
■
5.4 The Another acc ess point with the same SSID exists is displayed during setup P.5
5.5 The
New port could not be created is displayed during setup P.5
5.6 The
Set Printer IP Address dialog box is displa yed during setup P.5
5.7 The
Enter Password dialog box is displayed during setup P.6
5.8 The
You have connected the printer to an unsecured wireles s network is
displayed durin g setup P.6
5.9 The
Communication w ith the Card Slot failed is dis played during setup P.6
5.10 The
The Card Slot i s already mapped as Network Drive to this computer is
displayed durin g setup P.7
5.11 The
Cannot map any more drives, because all the drive l etters are assigned is
displayed durin g setup P.7
5.12 The
Timeout error screen is di splayed during WPS setup P.7
2 Cannot connect to the access point (the access point is not detected)
P.2
2.1 The target acce ss point is not detected P.2
2.2 Cannot connect to the target access point P.2
2.3 Using the machi ne in a multiple access point setup P.2
3 How to set a network key/network password
P.3
1 Connection checklist
P.2
3.1 About Network K ey (Windows)/Network Password (Macin tosh) P.3
3.2 How to set a WE P/WPA/WPA2 key P.3
4.1 The machine is not detected P.3
4.2 No machine is d etected after the network settings a re changed in Windows
P.3
4 Cannot connect to the machine (the machine is not detected)
P.3
5.1 The Access Poin ts dialog box is displayed during se tup P.4
5.2 The
An access point could not be detected is displayed during setup P.4
5.3 The
Printer could n ot be connected to the specified acc ess point is displayed
during setup P.5
5 The following screen is displayed during setup
P.4
8 Changing the port name
P.7
6 Re-setting the machine
P.7
7 The admin password set to the machine was forgotten
P.7
Restoring the Machine to the Factory Settings
■
Specications
■
2 MP620 series
P.10
1 MP980 series
P.9
1 Initializing using the machine's Operation Panel
P.8
2
Troubles in Setup/Connections
1 Connection checklist
Before you proc eed to Troubleshooting, conf irm the following:
2.1 The target access point is not detected
Refer to “1 Con nection checklist” on page 2 and mak e sure there is no problem.
If the machine or your computer cannot communicate with the target access point, follow the
procedure below.
•
•
a
Ensure that the access point is o n and then click Update in the Acces s Points dialog box.
b
If the access point is still not detected, move your machine closer t o the access point and
remove possible obstructions, then click Update.
c
Ensure that your computer can com municate with the access point.
d
Unplug the access point from the power outlet and plug it in, then cl ick Update.
Using your acce ss point’s utility software, check if your acce ss point is set to the stealth mode,
i.e., set not t o broadcast its SSID, or is set to r eject clients whose SSID is set to ANY. If so, click
Manual Setup and enter the access point’s SSID in SSID. For de tails, refer to “5.1 The Access
Points dialog b ox is displayed during setup” on pag e 4.
•
2.3 Using the machine in a multiple access point setup
Confirm the fol lowing the access point to be used c an communicate with the machine and the
computer.
Windows XP may automatical ly connect to an unintended access p oint. Follow the steps below to
make your acces s point the highest priority.
a
Select Start and Connect To.
b
Right click Wirele ss Network Connection and select Pro perties.
c
Click Wireless Net works tab and confirm that Use Windows to configure my wireles s net-
work settings i s checked.
d
Confirm that the target access po int is displayed in the Preferred ne tworks list.
If the access p oint is not set to the top in the li st, select and move the access point to the top
of the list usi ng the Move up.
If multiple net works are available when using Macin tosh, select System Preferences, select
Network, select AirPort and click Advanced (Mac OS X v.10.4.x/v.10.3.9: select Network Port
Configuration), then change the priority of the network name that you want to use. If the network
name is not set to the highest priority, select and mo ve it to the top of the list (the hi ghest priority).
2 Cannot connect to the access point (the access point is not detected)
The USB cable i s securely connected to the correct port.
The machine is turned on and the network device is on.
If it is, turn it off and then turn it on again.
If the firewall function of your security software is turned on, a message may appear w arning that
Canon software is attempting to access the network. If the warning message appears, set the secu-
rity software t o always allow access.
When using a ro uter, connect the machine an d computer to the LAN side (same net work segment).
The machine’s LAN setting is configured according to your conn ection method.
To connect over wireless LAN, set Change wireless/wired to Wi reless LAN active. To connect
over wired LAN, set it to Wired LAN active.
For the procedu re, refer to “Machine’s LAN Setting” in the pri nted manual: Getting Started.
If you have cha nged the machine’s LAN setting, set up the mach ine again following the procedures
in “Install the Software” and onward in the printed manual: Getting Started.
□
□
□
□
□
Confirm the fol lowing before setting up on a wirele ss LAN:
There is no bar rier or obstacle between the access point and the machine.
The access poin t is operating in IEEE802.11b or IEEE80 2.11g (2.4 GHz).
□
□
2.1 The target access point is not detected (continued)
The wireless ch annel to be used may be limited depe nding on wireless network devices in stalled
in the computer. Confirm the wireless chann els available for the network device . For details,
refer to the ma nual provided with your computer or your wireless network device. Make s ure that
the channel set to the access point is valid to com municate with the computer, confirmed above.
If not, change the channel set to the access point.
If MAC address filtering is enabled, we recommend that you register the machine’s MAC address
to the access p oint before entering setup. To confi rm the MAC address of the machine, r efer to
“About Network Communication” - “Troubleshooting” in the on-screen m anual: Advanced Guide.
If the access p oint’s IP address filt ering is enabled, disable it during setup. After setup is complete, turn the IP filteri ng feature back on.
If Client-to-Cl ient Blocking is enabled, an access point may be capable of blocking all direct
transmission am ong clients associated to it. If suc h feature is enabled, disable this f eature while
using the machi ne.
•
•
•
•
2.2 Cannot connect to the target access point
Refer to “1 Con nection checklist” on page 2 and mak e sure there is no problem.
Confirm the net work name/SSID of the target access point and set the machine to use the identical network nam e/SSID. If the network name/SSID is different i n the machine and the access
point, the mach ine cannot connect to the access poi nt. For details, refer to “5.1 The Acce ss
Points dialog b ox is displayed during setup” on pag e 4.
•
•
This machine does not support WPA/WPA2-Enterprise. When you select an access point
set to use WPA/WPA2-Enterprise, it is grayed out and cannot be set up.
•
Make sure that the machine and the access point can communicate with each other under t his
setting. When e ncryption is set to the access point , set up the encryption of the machi ne to
match the setti ngs of the access point. If the WEP/ WPA/WPA2 (encryption key) is different in
the machine and the access point, the machine canno t communicate with the access point. For
details, refer to “3.2 How to set a WEP/WPA/WPA2 key” on page 3.
•
3
ENGLISH
3 How to set a network key/network password
3.1 About Network Key (Windows)/Network Password (Macintosh)
An encryption k ey used in wireless networks. As using passwords, settings must match among
the access poin t, the machine, and the computer. A WEP key is used in the WEP authentication
method, while P assphrase or Pre-Shared Key is used in the WPA/WPA2 authentication method.
Names of network keys vary depending on your access point or application software.•
3.2 How to set a WEP/WPA/WPA2 key
When using WEP•
The key length, key format, the key to use (out of 1 to 4), and the authentication meth od must
match among the access point, the machine, and the computer.
For access poin ts that use automatically generated WEP keys, u se the hexadecimal key format
for the machine .
If you do not k now the access point WEP key, refer to documentati on provided with the access
point or contac t its manufacturer.
Example:
Using 64 bit ke y length, when the string “canon” is entered, an access point generates the fol-
lowing codes.
- Key 1: C9 42 28 B8 AE
- Key 2: 87 C0 FB 05 6B
- Key 3: 9A 15 FB F6 F3
- Key 4: 62 56 67 58 44
In order to com municate with such an access point, you must configure the machine to us e the
key generated b y the access point by entering it in hexadecimal format.
Normally, select Auto for the Authentication. Otherwise, select Open Sys tem or Shared Key according to the setting of the access point.
When entering a WEP key in Network Key or Network Password on the Access Points
screen, the key number is set to 1 and the Authentication is set to Auto. The key length and
format are base d upon value of the entered key.
When using AirPort, conrm the settings in Wireless Security of AirPort Admin Utility.•
Select 64 bit if 40 bit WEP is selected for the Key Length in the AirPort Base Station.
Select 1 for Key ID. Otherwise the computer will not be able to communicate with the
machine via the access point.
–
–
3.2 How to set a WEP/WPA/WPA2 key (continued)
When using WPA/WPA2•
The authenticat ion method, passphrase, and dynamic encryption type must match on the ac cess
point, the mach ine, and the computer.
Enter the passp hrase configured on the access point (a sequence of between 8 and 63 alp hanumeric character s, or a 64-character hexadecimal num ber). If you do not know the passphr ase,
refer to the ma nual provided with the access point, or consult its manufacturer.
Select either T KIP (Basic Encryption) or AES (Secure Encryptio n) for the dynamic encryption
method.
This machine supports WPA-PSK (WPA-Personal) or WPA2-PSK (WPA2-Personal). WPA/
WPA2-Enterprise is not supported.
•
4 Cannot connect to the machine (the machine is not detected)
4.2
No machine is detected after the network settings are changed in Windows
Wait until the IP address is assigned to th e computer. You may ne ed to restart your computer.
Search for the machine again after confirming a val id IP addre ss is assigned to the computer.
4.1 The machine is not detected
Refer to “1 Con nection checklist” on page 2 and mak e sure there is no problem.
If the access p oint is configured to use access con trol, register the IP address or the MAC ad-
dress of the ma chine or disable the access control.
Confirm the net work name/SSID of the target access point and set the machine to use the identical network nam e/SSID. If the network name/SSID is different i n the machine and the access
point, the mach ine cannot connect to the access poi nt. For details, refer to “5.1 The Acce ss
Points dialog b ox is displayed during setup” on pag e 4.
Make sure that the machine and the access point can communicate with each other under t his
setting. When e ncryption is set to the access point , set up the encryption of the machi ne to
match the setti ngs of the access point. If the WEP/ WPA/WPA2 (encryption key) is different in
the machine and the access point, the machine canno t communicate with the access point. For
details, refer to “3.2 How to set a WEP/WPA/WPA2 key” on page 3.
The wireless ch annel to be used may be limited depe nding on wireless network devices in stalled
in the computer. Confirm the wireless chann els available for the network device . For details,
refer to the ma nual provided with your computer or your wireless network device.
Make sure that the channel set to the access point is valid to communicate with the com puter,
confirmed above . If not, change the channel set to the access point.
•
•
•
•
•
4
5 The following screen is displayed during setup
5.1 The Access Points dialog box is displayed during setup
The Acc ess Points dialog box is displayed w hen:
- No access poi nt is detected.
- Multiple acce ss points are detected.
Select the targ et access point, then perform necess ary operation such as setting of enc ryption.
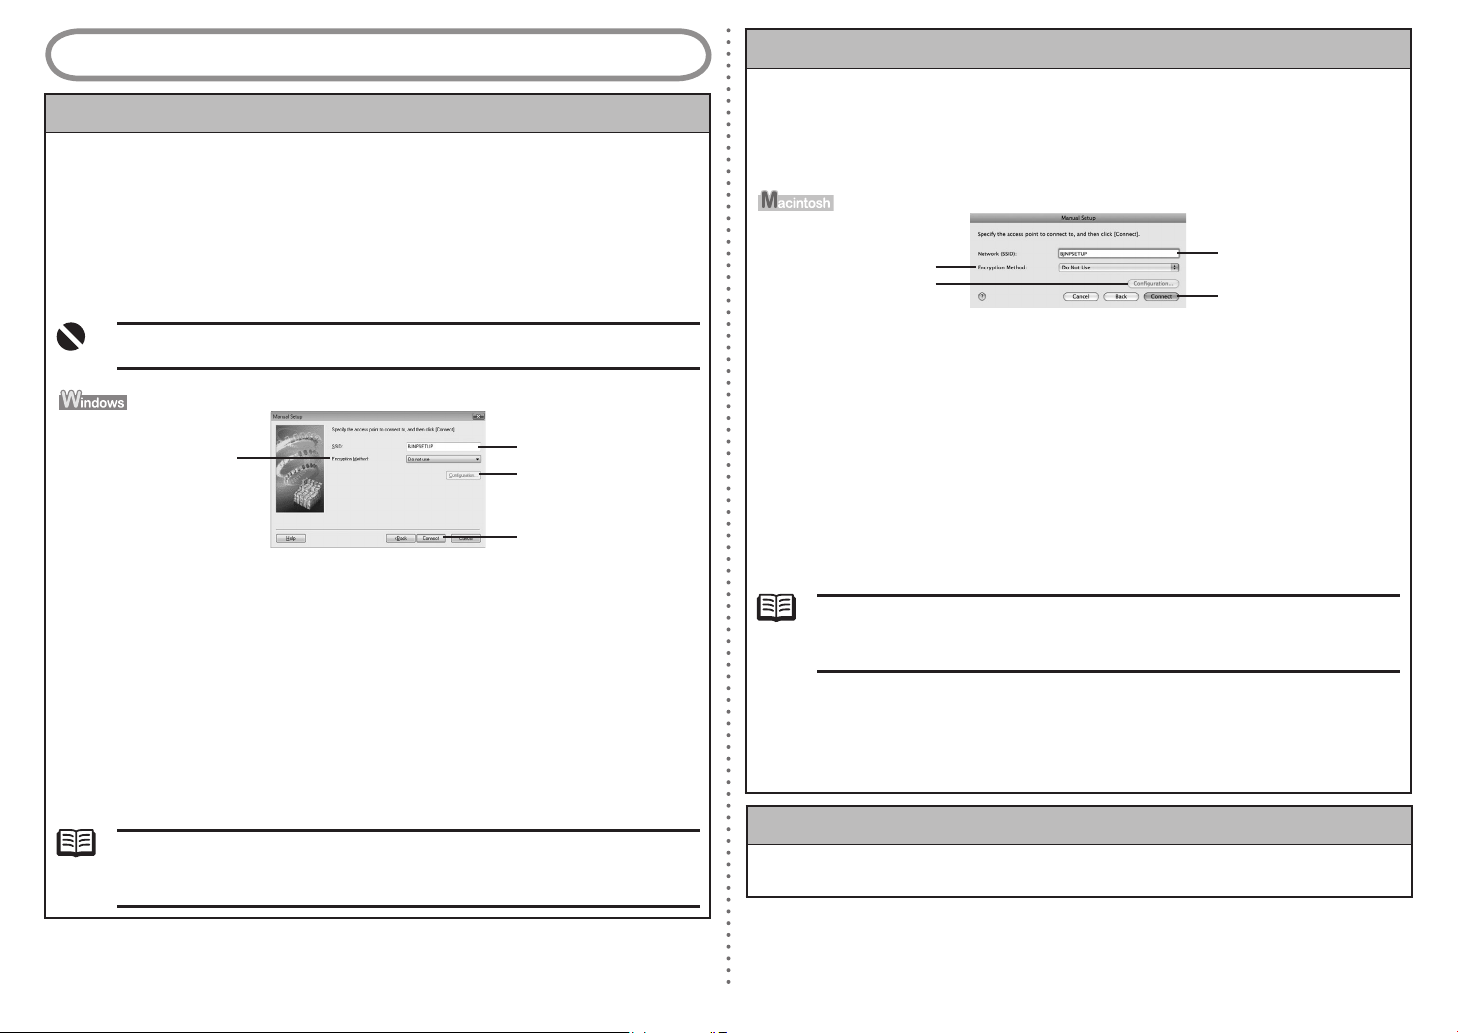
If yo u want to specify access point manually, click Manual Setup in the Access Points dialog box.
Enter the setti ngs for the target access point in t he Manual Setup dialog box, then cli ck Connect.
The target acce ss point is searched with the specif ied settings.
For changing se ttings of the access point, refer to the manual provided with the access point or
contact its man ufacturer.
If you connect to a network that is not protected with security measures, there is a risk of
disclosing data such as your personal information to a third party.
•
(A) SSID
Enter the SSID set to the access point. The SSID is case sensi tive. When using AirPort, en ter the
network name (S SID) in alphanumeric characters.
SSID is also ca lled ESS-ID. For details, refer to t he manual provided with your access point or
contact its man ufacturer.
(B) Encryption Method
Do not use
Select to disab le encryption.
Use WEP
Transmission is encrypted using the WEP key you specified.
Use WPA
Transmission is encrypted using the passphrase (WPA/WPA2 key) you specified.
The actual encr yption key is renewed automatically at a certain time interval, making t he trans-
mission harder to break.
•
•
•
If a WEP key/Passphrase (WPA/WPA2 key) has not been set, a detailed settings dialog box
is displayed. To change the settings, click the Conguration in the Manual Setup dialog
box. For details, refer to “3.1 About Network Key (Windows)/Network Password (Macintosh)”
on page 3.
•
5.1 The Access Points dialog box is displayed during setup (continued)
(C) Configurati on
The detailed se ttings dialog box is displayed. The network pas sword (WEP) or the network key
(WPA/WPA2) selected i n Encryption Method can be confirmed and changed.
(D) Connect
Connects to the specified access point.
(A) Network (SS ID)
Enter the Netwo rk (SSID) set to the access point. The Network (SSID) is case sensitive. When
using AirPort, enter the Network (SSID) in alphanumeric characters.
SSID is also ca lled ESS-ID. For details, refer to t he manual provided with your access point or
contact its man ufacturer.
(B) Encryption Method
Do not use
Select to disab le encryption
Use WEP
Transmission is encrypted using the password (WEP key) you specified.
Use WPA
Transmission is encrypted using the passphrase (WPA/WPA2 key) you specified.
The actual encr yption key is renewed automatically at a certain time interval, making t he trans-
mission harder to break.
•
•
•
If a password (WEP key)/passphrase (WPA/WPA2 key) has not been set, a detailed settings dialog box is displayed. To change the settings, click the Conguration in the Manual
Setup dialog box. For details, refer to “3.1 About Network Key (Windows)/Network Pass-
word (Macintosh)” on page 3.
•
(C) Configurati on
The detailed se ttings dialog box is displayed. The password (W EP key) or the passphrase (WPA/
WPA2 key) selected in Encryption Method can be confirm ed and changed.
(D) Connect
Connects to the specified access point.
(B)
(A)
(D)
(C)
5.2 The An access point could not be detected is displayed during setup
This messa ge is displayed when no access point is detected. Cl icking the OK display s the Access
Points dialog b ox. For details, refer to “2.1 The target acces s point is not detected” on page 2.
(B)
(A)
(C)
(D)
5
ENGLISH
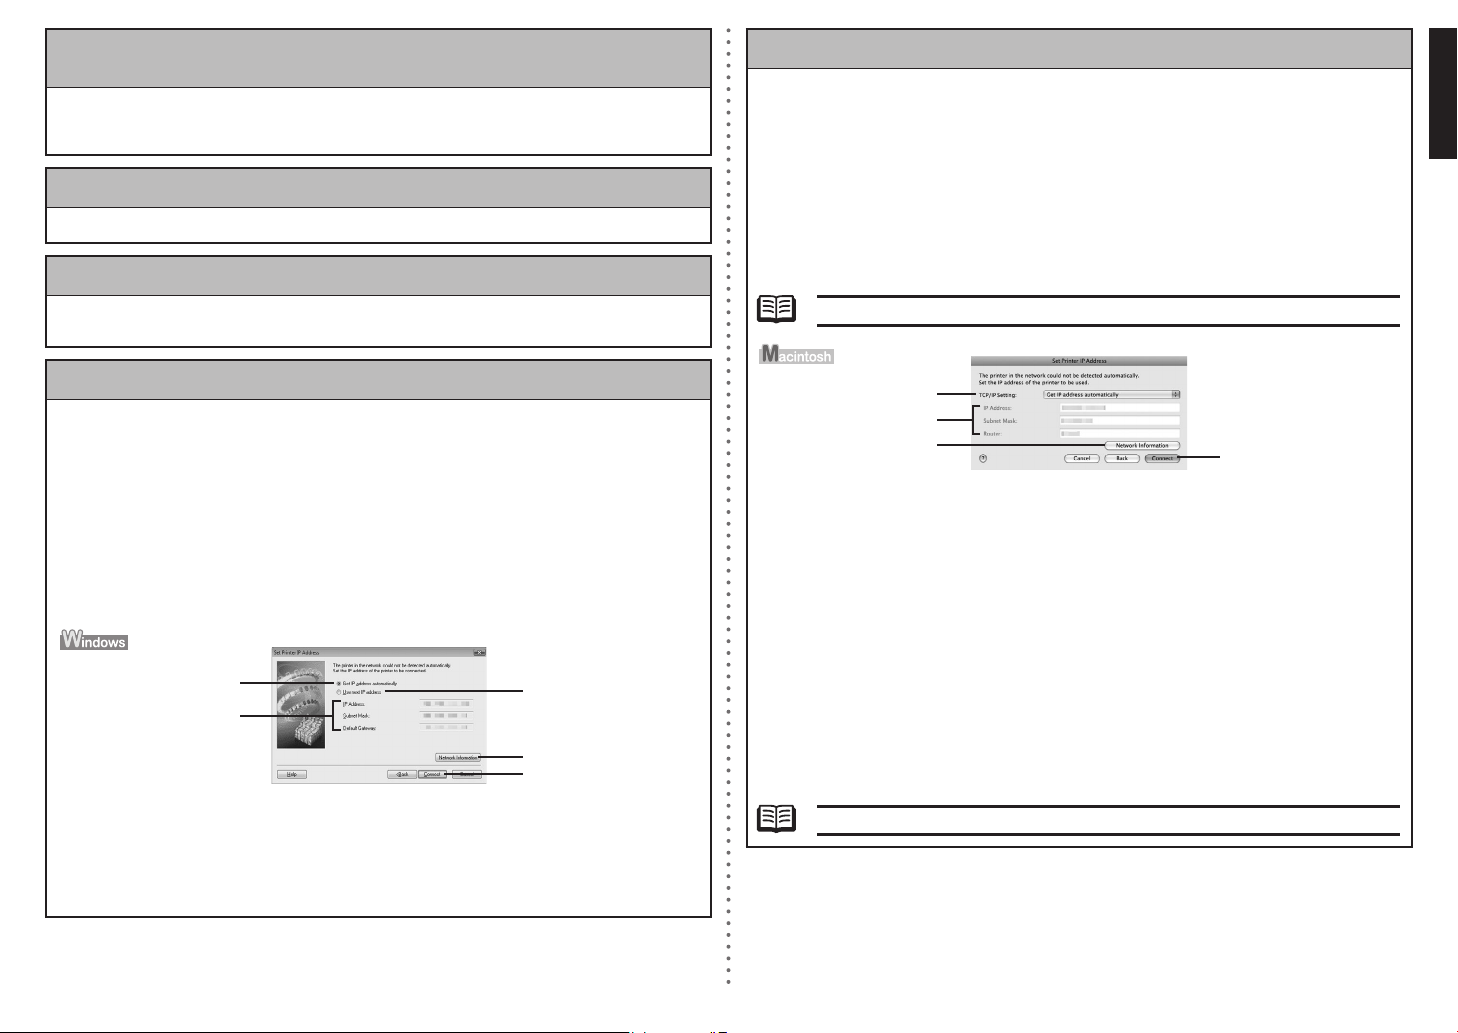
5.6 The Set Printer IP Address dialog box is displayed during setup
The following d ialog box is displayed if no machine was detected on the network. Make s ure of the
following, and click the Connect.
The network devices are turned on, and the mac hine and the computer are conne cted to the net-
work.
The machine and the computer are connected with the USB cable.
The IP address to be set f or the machine is displayed on the S et Printer IP Address dialog box.
If it is different from th e address you want to set for the ma chine, select Use next IP address
and enter the d esired IP a ddress.
(If the machine is turned off, the Set Printer IP Addr ess dialog box does not appear.)
•
•
•
If it still fai ls, specify the IP address of the machine and c lick Connect to retry the detection of the
machine.
(A) Get IP address automat ically
Select to use a n IP addres s provided by a DHCP server. This requires that th e DHCP func tion is
enabled on the router or access point.
(B) Use next IP address
Select to manua lly specify an IP address, for example if there is no DHCP server functionality in
the network env ironment in which you are using the machine.
5.3 The Printer could not be connected to the specied access point is displayed
during setup
This message is displayed when the machine could no t connect to the target access point .
Clicking the OK displays the Access Points dialog b ox. For details, refer to “2.2 Canno t connect
to the target a ccess point” on page 2.
5.4 The Another access point with the same SSID exists is displayed during setup
Cancel the curr ent setup and change the SSID of the access point, then start the setup again.
5.5 The New port could not be created is displayed during setup
Uninstall the M P Drivers, then setup the machine again followi ng the procedures in “Install the
Software” and o nward in the printed manual: Getting Started.
5.6 The Set Printer IP Address dialog box is displayed during setup (continued)
(C) IP Address/Subnet Mask/Default Gateway
Enter each valu e to specify a fixed IP address when Use next I P Address is selected.
(D) Network Inf ormation
Displays the Ne twork Information dialog box.
Click this butt on to confirm network settings when your access point or your machine ca nnot be
detected automa tically during setup for use over th e network. This button is enabled when an
access point wa s not detected or could not be conne cted.
(E) Connect
Searches for th e machine with the specified setting s.
If the machine is still not be detected with a spec ified IP ad dress, refer to “4.1 The machine is not
detected” on pa ge 3.
Clicking the Back displays the Access Points dialog box.•
(A) TCP/IP Setting
Select Get IP address auto matically or Use following IP address. Sel ect Get IP address
automatically t o use an IP address provided by a DHCP server. This requires that the DHCP
function is ena bled on the router. Select Use fo llowing IP address to manually specify an IP
address, for ex ample if there is no DHCP server functionality in the network environment in which
you are using t he machine.
(B) IP Address/Subnet Mask/Router
Enter each valu e to specify a fixed IP address when Use next I P address i s selected.
(C) Network Inf ormation
Displays the Ne twork Information dialog box.
Click this butt on to confirm network settings when your access point or your machine ca nnot be
detected automa tically during setup for use over th e network. This button is enabled when an
access point wa s not detected or could not be conne cted.
(D) Connect
Searches for th e machine with the specified setting s.
If the machine is still not be detected with a spec ified IP ad dress, refer to “4.1 The machine is not
detected” on pa ge 3.
Clicking the Back displays the Access Points dialog box.•
(A)
(C)
(D)
(B)
(A)
(B)
(C)
(D)
(E)

6
5.7 The Enter Password dialog box is displayed during setup
The Enter Passw ord dialog box is displayed if an ad ministrator password is set to the m achine
which has alrea dy been set up.
Admin Password
Enter the admin istrator password you have set. The administrat or password consists of
alphanumeric ch aracters and is no longer than 32 ch aracters. T he password is case sensitive.
For security, your entry will be displayed by “*” (ast erisks) for Windows and “●” (bullets ) for
Macintosh.
5.8
The You have connected the machine to an unsecured wireless network is displayed during setup
Security is not configured on the access point.
The machine can still be used, so continue the setu p procedure to complete it.
If you connect to a network that is not protected with security measures, there is a risk of
disclosing data such as your personal information to a third party.
•
5.9
The Communication with the Card Slot failed is displayed during setup
This message is displayed when installation of the network drive of the Card Slot fails during
setup.
Wait for a while, then click Retry.
(A) Retry
Click to retry the network setup of the Card Slot.
(B) Skip
Click to contin ue installation without the network setup of the Card Slot.
If it fails aga in after clicking Retry, follow the procedure below.
Make sure that the computer is communicating with t he network properly, then try again.
Disable the Win dows Firewall function, or open port 137:139 to allow communication with the
machine followi ng the procedure below. For information on other security softwa re, refer to its
instruction man ual or contact its manufacturer.
•
•
If you disabled the rewall function, disconnect your network from the Internet. To do this,
congure your router not to connect to the Internet or WAN.
•
To disable the Windows Firewall:
a)
Open the screen for setting Windows Firewall.
Windows Vista
Click Start > C ontrol Panel > Allow a program throu gh Windows Firewall. User Ac-
count Control screen appears, click Continue.
Windows XP/2000
Click Start > C ontrol Panel > Security Center > Windows Firewall.
•
•
b)
Select the Gene ral tab, check Off, then click OK.
5.9
The Communication with the Card Slot failed is displayed during setup (continued)
To open port 13 7:139:
a)
Open the screen for setting Windows Firewall.
Windows Vista
Click Start > C ontrol Panel > Allow a program throu gh Windows Firewall. User Ac-
count Control screen appears, click Continue.
Windows XP/2000
Click Start > C ontrol Panel > Security Center > Windows Firewall.
•
•
b)
Select the Exce ptions tab, and click Add port.
c)
On the Add a Port dialo g box, input the following informati on, and click OK.
- Name: Input a ny name for the port.
- Port number: Input “137”.
- TCP/UDP: Select TCP.
d)
Repeat steps b and c.
On the Add a Po rt dialog box, input the same information as you did in step c except for
selecting UDP i n TCP/UDP.
e)
Use the same pr ocedure to open the other ports (138 TCP, 138UDP, 139TCP, and 139UDP).
f)
Confirm that th e port names are added on the Except ions sheet, and click OK.
Change the work group name to “WORKGROUP” following the procedure below.•
a)
Open the System Propert ies screen.
Windows Vista
Click Start, ri ght-click Computer, select Propertie s, then click Change settings in the
Computer name, domain, and workgroup settings column. User Account C ontrol
screen appears, click Continue.
Windows XP/2000
Right-click My Computer, then select Properties.
•
•
b)
Select the Computer Nam e tab, then click Change.
c)
Change the workgroup na me to “WORKGROUP”, then click OK.
If the problem is not resolved, click Skip to complete the installation without the network
setup of the Card Slot. After installation is complete, to mount the Card Slot using the Canon
IJ Network Tool, refer to “Using the Card Slot over a Network” in “About Network Communication” in “Appendix” of the on-screen manual: Advanced Guide. To mount the Card
Slot manually, refer to “Cannot Mount the Card Slot” in “About Network Communication” in
“Troubleshooting” of the on-screen manual: Advanced Guide.
•
Make sure that a memory card is inserted in the Car d Slot. If it is not inserted, inser t it.•
Depending on the Mac OS version, the authentication screen may appear. If it appears, click
OK.
If the problem is not resolved, click Skip to complete the setup without the network setup
of the Card Slot. To mount the Card Slot manually, refer to “Cannot Mount the Card Slot” in
“About Network Communication” in “Troubleshooting” of the on-screen manual: Advanced
Guide.
•
•
 Loading...