

Canon Microfilm Scanner 800II Instruction Manual

INSTRUCTIONS
Be sure to read this instructions before you use the equipment.
Keep this instructions on hand for reference to ensure optimum performance.
ENGLISH
CE-IE-323-02cover 08.6.5, 11:10 AMPage 1 AdobePageMaker6.5J/PPC

FCC REGULATIONS (For 120V models)
This equipment has been tested and found to comply with the limits for a Class A digital device, pursuant to Part 15 of the FCC Rules. These
limits are designed to provide reasonable protection against harmful interference when the equipment is operated in a commercial environment. This equipment generates, uses, and can radiate radio frequency energy and, if not installed and used in accordance with the instruction
manual, may cause harmful interference to radio communications. Operation of this equipment in a residential area is likely to cause harmful
interference in which case the user will be required to correct the interference at his own expense.
Do not make any changes or modifications to the equipment unless otherwise specified in the manual. If such changes or modifications should
be made, you could be required to stop operation of the equipment.
RADIO INTERFERENCE REGULATIONS (For 120V models)
This digital apparatus does not exceed the Class A limits for radio noise emissions from digital apparatus as set out in the Interference-causing
equipment standard entitled "Digital Apparatus", ICES-003 of the Industry Canada.
RÈGLEMENT SUR LE BROUILLAGE RADIOÉLECTRIQUE (For 120V models)
Cet appareil numérique respecte les limites de bruits radioélectriques applicables aux appareils numériques de Classe A prescrites dans la
norme sur le matériel brouilleur: "Appareils Numériques", NMB-003 édictée par l'Industrie Canada.
For CA, USA Only
Included battery contains Perchlorate Material Å| special handling may apply.
See http://www.dtsc.ca.gov/hazardouswaste/perchlorate/ for detail.
IMPORTANT
1 Transmission or transfer of all or any part of the contents of this document is prohibited.
2 The contents of this document are subject to change without prior notice.
3 Every effort has been made to ensure that the information contained in this manual is correct.
If any error or omission is found, please contact the manufacturer.
4 Notwithstanding the preceding item 3, Canon Electronics Inc. is not responsible for any
damages, direct or indirect, arising from or related to the use of this equipment.
Trademarks
• Microsoft and Windows are registered trademarks of Microsoft Corporation in the United
States and other countries.
• ISIS is a trademark of EMC corporation, in the United States.
• Adaptec is a registered trademark of ADAPTEC Inc.
• Kodak is a trademark of Eastman Kodak Co, of the U.S.
• 3M is a trademark of the Minnesota Mining Manufacturing Co. of the U.S.
• TUSCAN is a trademark of the TUSCAN Corporation.
All other company or product names used in this document are trade marks or registered trademarks of their respective holders.
Copyright © 2007 CANON ELECTRONICS INC. All Rights Reserved
CE-IE-323-02cover 08.6.5, 11:10 AMPage 2 AdobePageMaker6.5J/PPC

Introduction
Introduction
Thank you for purchasing this Canon Microfilm Scanner
800II.
The Microfilm Scanner 800II is a desktop universal microfilm scanner that features a large A3-format screen. Images
projected on the screen can be output directly to a dedicated printer connected to the scanner or downloaded as
image data onto a computer connected to the scanner.
Optional carriers provide support for a wide variety of film
types, including roll film, microfiche and aperture cards.
Read the instructions in this manual carefully to ensure that
you make the best possible use of your scanner, and keep
this manual handy for future reference.
– 1 –
CE-IE-323-01 07.5.14, 11:05Page 1 AdobePageMaker6.5J/PPC
Introduction
Conventions Used in These
Instructions
The symbols and icons used in this manual are described
below. Take the time to read and understand this information before reading the rest of the manual.
(➞ P.XX)
A number preceded by an arrow and enclosed in parentheses indicates the number of the page on which you will
find more information about the preceding statement or
paragraph.
WARNING
Warnings are provided for your safety and contain
extremely important information. Failure to observe
the instructions provided in a warning could result in
death or serious injury to yourself or your co-workers.
CAUTION
Caution notices are also provided for your safety and
contain important information. Failure to observe the
instructions provided in a caution notice could result in
serious injury to yourself or your co-workers or damage to the equipment.
IMPORTANT
These important notes contain important information
on procedures that must be followed or actions that
must be avoided. Failure to observe a request could
result in damage to the equipment or a malfunction.
Notes
Notes provide additional tips or advice that can save
you time and effort in using the scanner.
– 2 –
CE-IE-323-01 07.5.14, 11:05Page 2 AdobePageMaker6.5J/PPC

Contents
Contents
Introduction ...................................................... 1
Conventions Used in These Instructions............ 2
Contents............................................................ 3
Before You Begin... .......................................... 4
Safety Notes....................................................... 4
Choosing a Safe Location........................ 4
Power Supply........................................... 6
Important Warnings ............................................ 7
Features ............................................................. 9
Operation Modes.............................................. 10
Checking the Box Contents.............................. 11
Important Components and Their Functions .... 12
Using the Operation Panel Keys ...................... 13
Operation Panel ..................................... 13
Operation Keyboard (optional)............... 14
Optional Products............................................. 15
Preparing the Carrier........................................ 16
Lenses.............................................................. 17
Fitting and Replacing Lenses ................ 17
Preparing the Printer ........................................ 18
Preparing the Computer ................................... 19
Hardware Requirements ........................ 19
Operating System Requirements........... 19
Connecting Via SCSI ............................. 20
Connecting Via USB .............................. 21
Connecting to a Computer ..................... 21
Other ...................................................... 21
Switching On .................................................... 22
Switching Off .................................................... 22
Scanner Recognition ........................................ 23
In the Case of Windows 98/Me .............. 23
In the Case of Windows 2000/XP .......... 24
Notes for Software ........................................... 27
Installing the Software ........................... 27
Using CapturePerfect 1.0 ...................... 28
Focusing the Image ............................... 30
Enlarging and Reducing the Image ....... 31
Rotating the Image ................................ 31
Printing or Scanning the Image ........................ 32
Selecting the Polarity ............................. 32
Brightness Adjustment ........................... 33
Selecting the Paper for Printing ............. 34
Selecting the Scan Size ......................... 35
Setting the Scanning Position ................ 35
Trimming/Border settings....................... 36
Special Features............................................. 37
Storing the Lens Magnification ......................... 37
Storing a Zoom Setting .......................... 37
Function Keys .................................................. 38
Programming Function Keys ................. 38
Functions that Can Be Assigned to the
Function Keys ........................................ 39
Function Key Labels .............................. 41
“Add on” Setting ............................................... 42
Setting the Add On................................. 42
Setting the Caption ................................ 44
Setting the Date and Time ..................... 45
Setting the Auto Clear Time ............................. 47
Maintenance and Troubleshooting............... 48
Replacing the Lamp ......................................... 48
Routine Cleaning.............................................. 50
Cleaning the Screen and Main Unit ....... 50
Cleaning the Lens .................................. 50
Cleaning Mode ................................................. 51
Cleaning the Fuser Roller ...................... 51
Troubleshooting ............................................... 52
Automatic Border Removal and Skew
Correction .............................................. 53
User Call Errors................................................ 54
Service Call Errors ........................................... 55
Using the Scanner.......................................... 30
Adjusting the Image ......................................... 30
CE-IE-323-01 07.5.14, 11:05Page 3 AdobePageMaker6.5J/PPC
Specifications ................................................. 56
Index ................................................................ 57
– 3 –
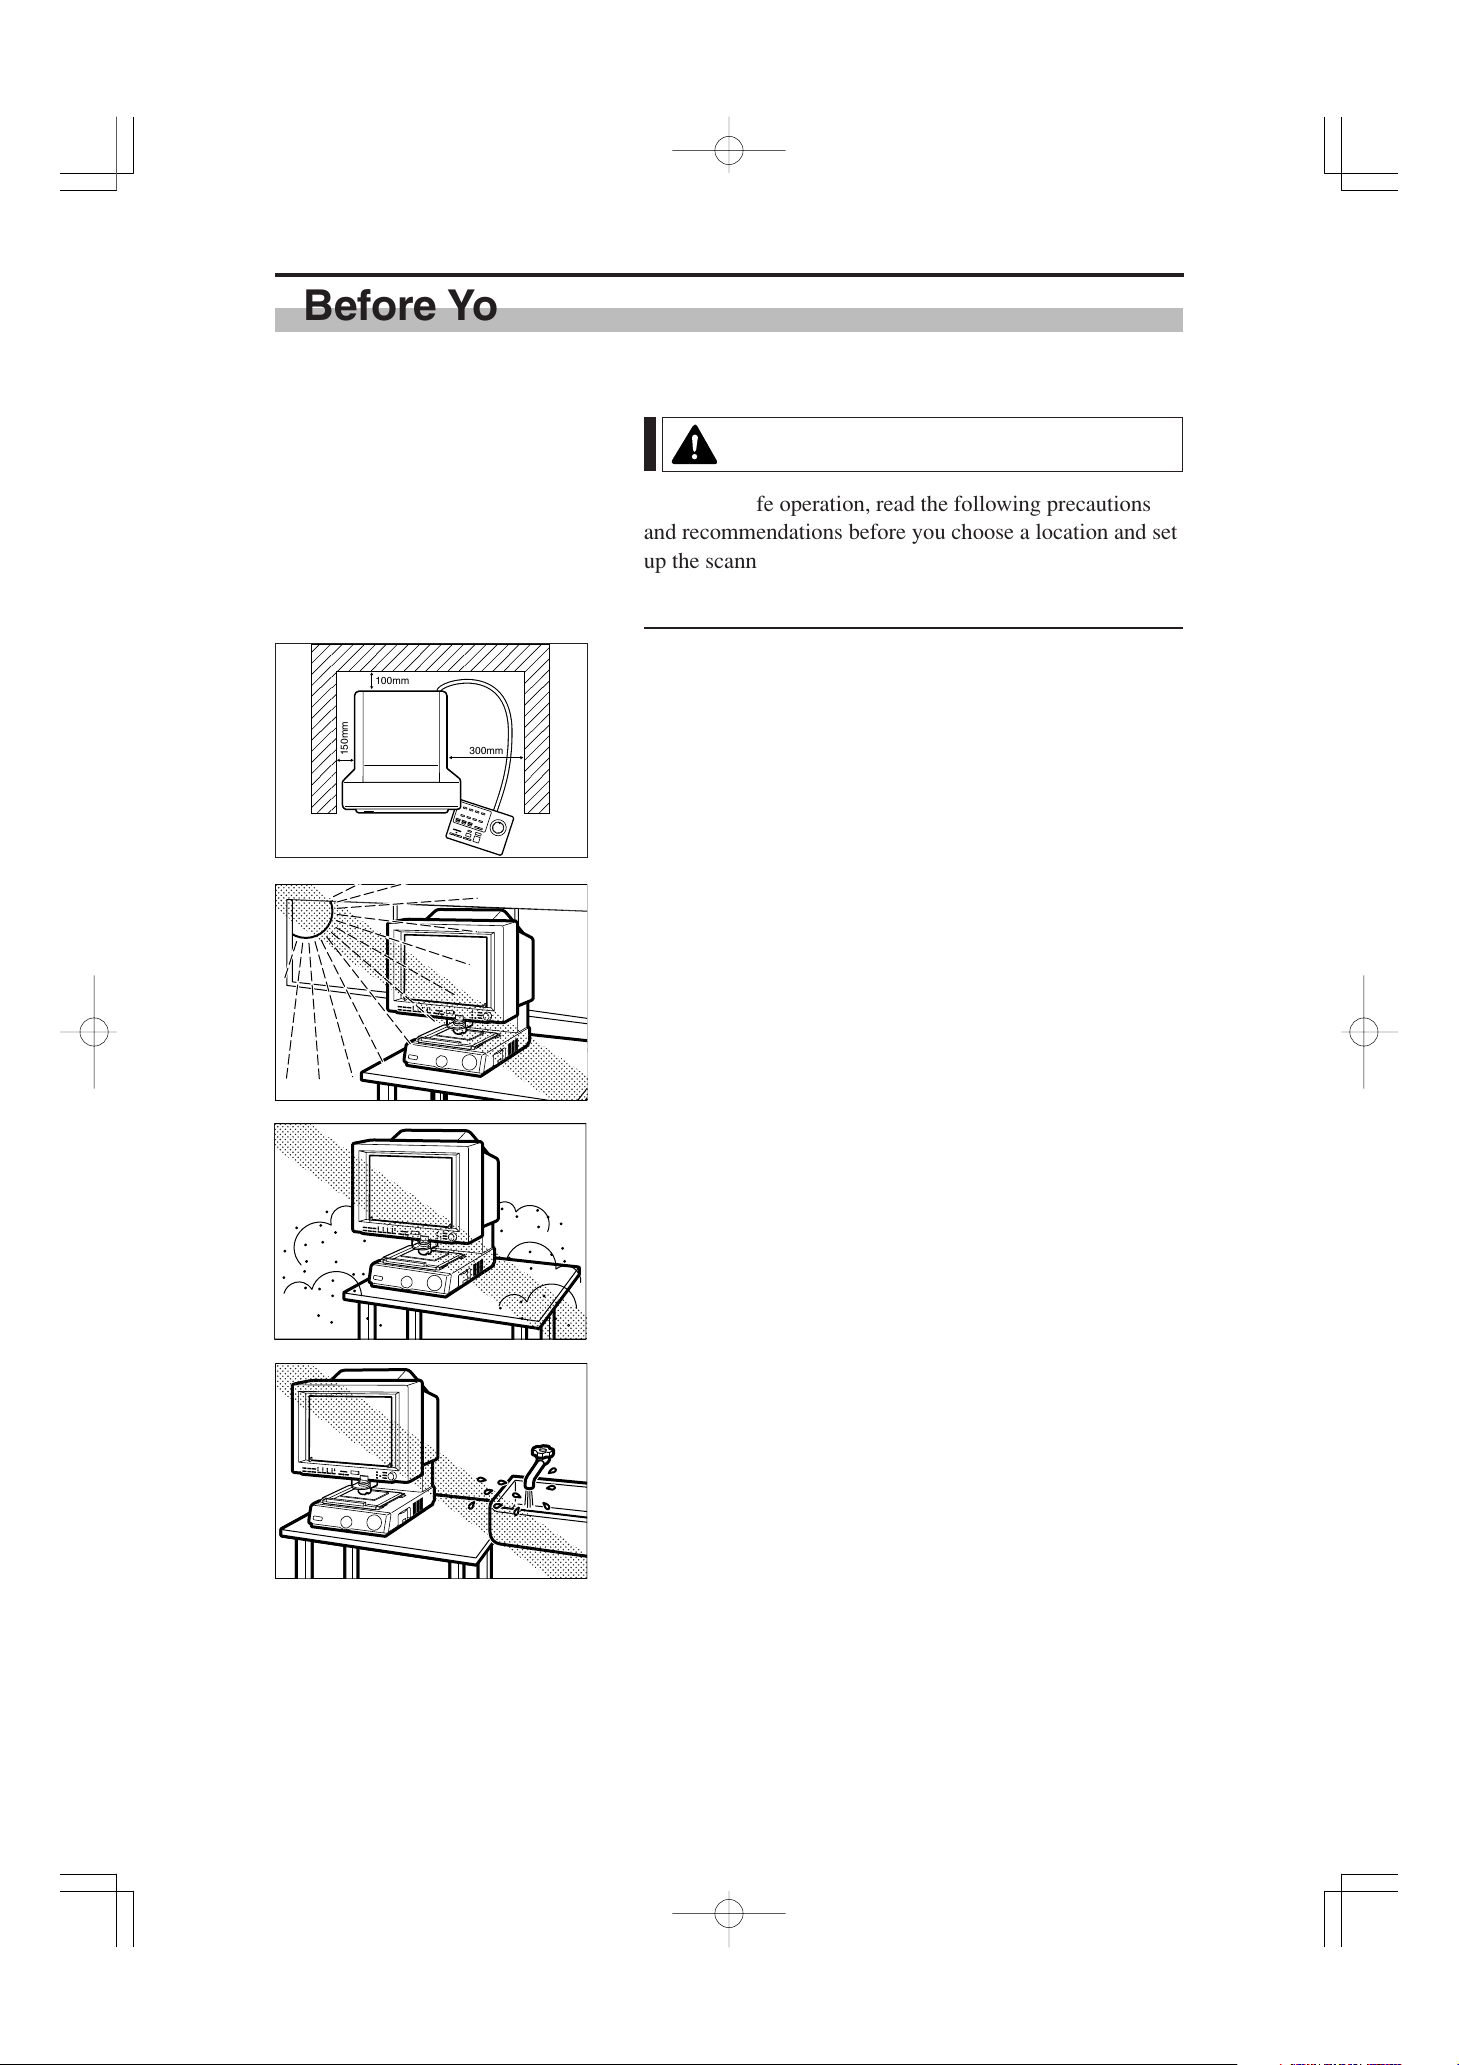
100mm
150mm
300mm
Before You Begin...
Before You Begin...
Safety Notes
To ensure safe operation, read the following precautions
and recommendations before you choose a location and set
up the scanner.
Choosing a Safe Location
❏ To ensure adequate space for operation, maintenance
and ventilation, ensure that there is ample space around
the scanner on all sides.
❏ Avoid locations exposed to direct sunlight.
When direct sunlight is unavoidable, use curtains to
protect the scanner.
❏ Avoid dusty locations.
Dust can adversely affect internal scanner components.
❏ Avoid locations close to taps, water heaters or humidifi-
ers where the scanner would be exposed to high temperatures or moisture.
❏ Avoid locations affected by fumes from ammonia,
acetone or other volatile chemicals. Never use any kind
of volatile or flammable spray or aerosol near the
scanner.
– 4 –
CE-IE-323-01 07.5.14, 11:05Page 4 AdobePageMaker6.5J/PPC
Before You Begin...
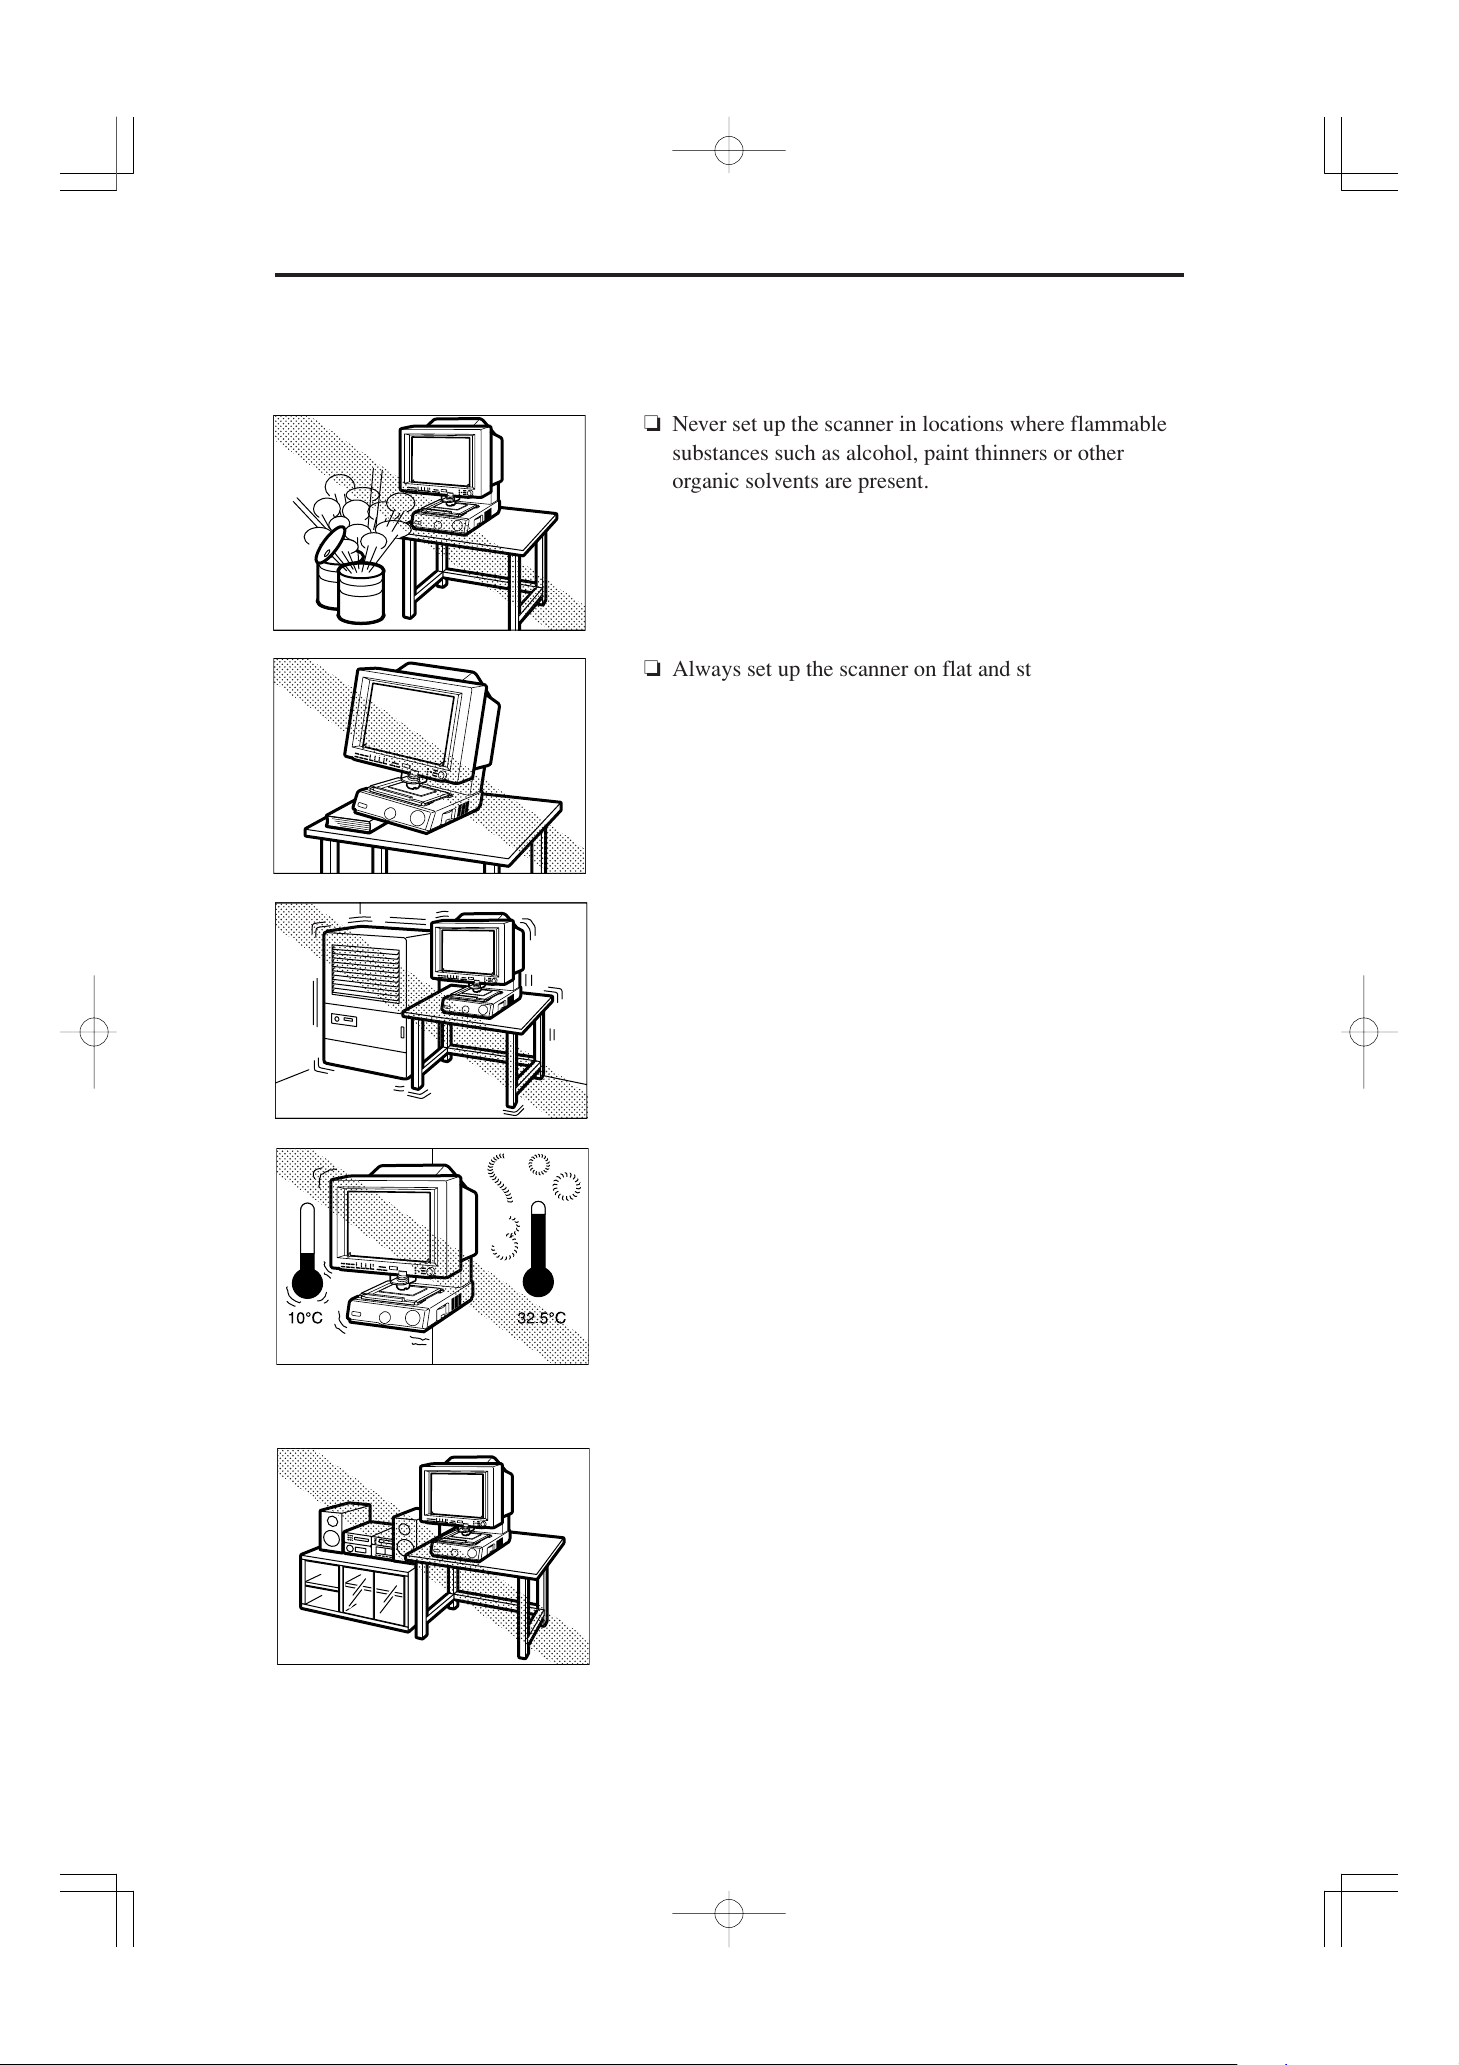
❏ Never set up the scanner in locations where flammable
substances such as alcohol, paint thinners or other
organic solvents are present.
❏ Always set up the scanner on flat and stable surface that
can support the weight of the scanner (47 kg).
❏ Choose a location that is free of excessive vibration.
❏ Avoid locations that are subject to extreme or sudden
changes in temperature.
Condensation formed inside the scanner can adversely
affect print quality. The temperature and humidity
ranges for optimum scanner operation are as follows:
Temperature: 10°C to 32.5°C (50°F to 90.5°F)
Humidity: 10% to 85% RH (condensation free)
Use Fileprint 470 in a work environment that is suitable for
Fileprint 470.
❏ Do not set up the scanner close to equipment that can
generate strong magnetic fields, such as speakers, radios
or televisions.
– 5 –
CE-IE-323-01 07.5.14, 11:06Page 5 AdobePageMaker6.5J/PPC

Before You Begin...
Power Supply
❏ Power should always be supplied from a rated power
outlet.
❏ Do not place objects on the power cord and position the
cord so that it will not be stepped on by people working
around the scanner.
❏ Do not bundle the power cord or wrap it around objects
such as table or chair legs.
❏ Do not attempt to unplug the scanner by pulling on the
power cord. Grasp the plug itself firmly to remove it.
To ensure safe operation, always ground the scanner.
Note that the scanner should never be grounded by
connecting the ground lead to a gas or water pipe.
If you are unsure of any aspects of the power supply,
consult your authorized Canon dealer or your power
supplier.
– 6 –
CE-IE-323-01 07.5.14, 11:06Page 6 AdobePageMaker6.5J/PPC

Before You Begin...
Important Warnings
WARNING
● Always observe these warnings when using the
scanner. Failure to follow these warnings could
result in injury due to fire or electric shock.
● Do not set up the scanner in a location close to
flammable solvents such as alcohol and paint
thinners.
● Do not cut, damage or modify the power cord, do not
pull or bend the power cord excessively, and do not
place heavy objects on the power cord.
● Never plug in or unplug the power cord with wet
hands.
● Do not place objects on top of the scanner as such
objects could fall and cause injury. Do not plug the
scanner into a multi-socket adapter.
● Do not knot or bundle the power cord, and ensure
that the plug is pushed fully into the power outlet.
● Use only the power cord supplied with the scanner.
● Do not attempt to disassemble or modify the scan-
ner. There are no user-serviceable parts inside the
scanner.
● Do not use flammable sprays or aerosols near the
scanner.
● Switch the scanner off and unplug the power cord
before cleaning the scanner.
● To clean the unit, use a cloth lightly dampened with
water or a mild detergent.
● If the scanner emits an unusual noise, odor, smoke or
sparks, or if the scanner will not function when
switched on, immediately switch the scanner off,
unplug the power cord and contact an authorized
Canon dealer or service center.
● Before you move the scanner even a short distance,
switch the scanner off and unplug the power cord.
– 7 –
CE-IE-323-01 07.5.14, 11:06Page 7 AdobePageMaker6.5J/PPC

Before You Begin...
CAUTIONS
● Do not set up the scanner on sloping, wobbly or
otherwise unstable surfaces or in locations affected
by excessive vibration. The scanner could cause
injury if it falls over or slides off the surface.
● Do not block the ventilation slots as this could result
in a fire due to the build up of heat inside the scanner.
● Do not place vessels containing liquids (cups, vases,
etc.) or small metal objects (paper clips, staples,
necklaces, etc.) on top of the scanner. Liquids or
metal objects falling into the scanner could cause an
electric shock or fire. If any liquids or metal objects
fall into the scanner, immediately switch the scanner
off, unplug the power cord and contact an authorized Canon dealer or service center.
● Do not set up the scanner in dusty or humid
locations as this could result in an electric shock or
fire.
● Do not place heavy objects on top of the scanner as
such objects could fall and cause injury.
● Use only a power supply having the rated voltage.
The use of other voltages could result in a fire or
electric shock.
● Always unplug the power cord by grasping the plug
itself. Pulling on the power cord can damage the
cord so that the core wires are exposed or snapped
and could cause a fire or electric shock.
● Do not use an extension power cord as this could
cause a fire or electric shock.
● Keep the area around the power outlet free of obstacles to ensure that the scanner can be unplugged
quickly in the event of an emergency.
● Take care not to tip water or flammable solvents
such as alcohol, thinners or benzene into the scanner
as this could result in a fire or electric shock.
● If the scanner will be left unused for a lengthy
period, always unplug the scanner as a safety measure.
● Avoid touching internal scanner components when
you perform routine cleaning or maintenance such
as changing the lamp. Some internal components
generate high temperatures or high voltages. To
avoid injury such as burns or electric shocks, take
care also that metal objects such as necklaces or
bracelets do not come into contact with internal
scanner components.
● To avoid injury when you are moving the scanner,
take care not to put your hands on the metal
protrusions on the underside of the scanner unit.
– 8 –
CE-IE-323-01 07.5.14, 11:06Page 8 AdobePageMaker6.5J/PPC

Before You Begin...
Features
The Canon Microfilm Scanner 800II features the following:
❏ Large-format screen, small footprint
Despite providing a large A3-size screen, this compact
universal microfilm scanner is small enough to fit on a
desktop.
❏ Internal SCSI-USB converter
SCSI-USB converter is built-in, so you can use both
SCSI and USB interfaces. See “Preparing the Computer” (➜ P.19)
❏ Automatic film selection
The scanner’s automatic film polarity detection function
saves you the trouble of switching the polarity when
you are scanning both negative and positive film.
❏ Support for different film formats
With its wide range of optional roll carriers, fiche
carriers and Auto Carriers, this scanner can handle a
wide variety of film formats, including microfiche,
aperture cards and roll film.
❏ Automated and motorized operation
Simple keystrokes can be used to control editing functions such as screen image adjustment and border
removal as well as other scanner functions.
❏ Different operation modes to suit your circumstances
The MS800II scanner has 2 operation modes:
“ReaderPrinter mode”, in which the image on the screen
is sent directly to a dedicated printer, and “Scanner
mode”, in which the scanner is connected to a personal
computer and the scanned image data is downloaded to
the computer. You can select whichever mode best suits
your needs. The operation mode is set by the service
technician at installation. See “Operation Modes” on
P.10 for more information.
– 9 –
CE-IE-323-01 07.5.14, 11:06Page 9 AdobePageMaker6.5J/PPC
Before You Begin...
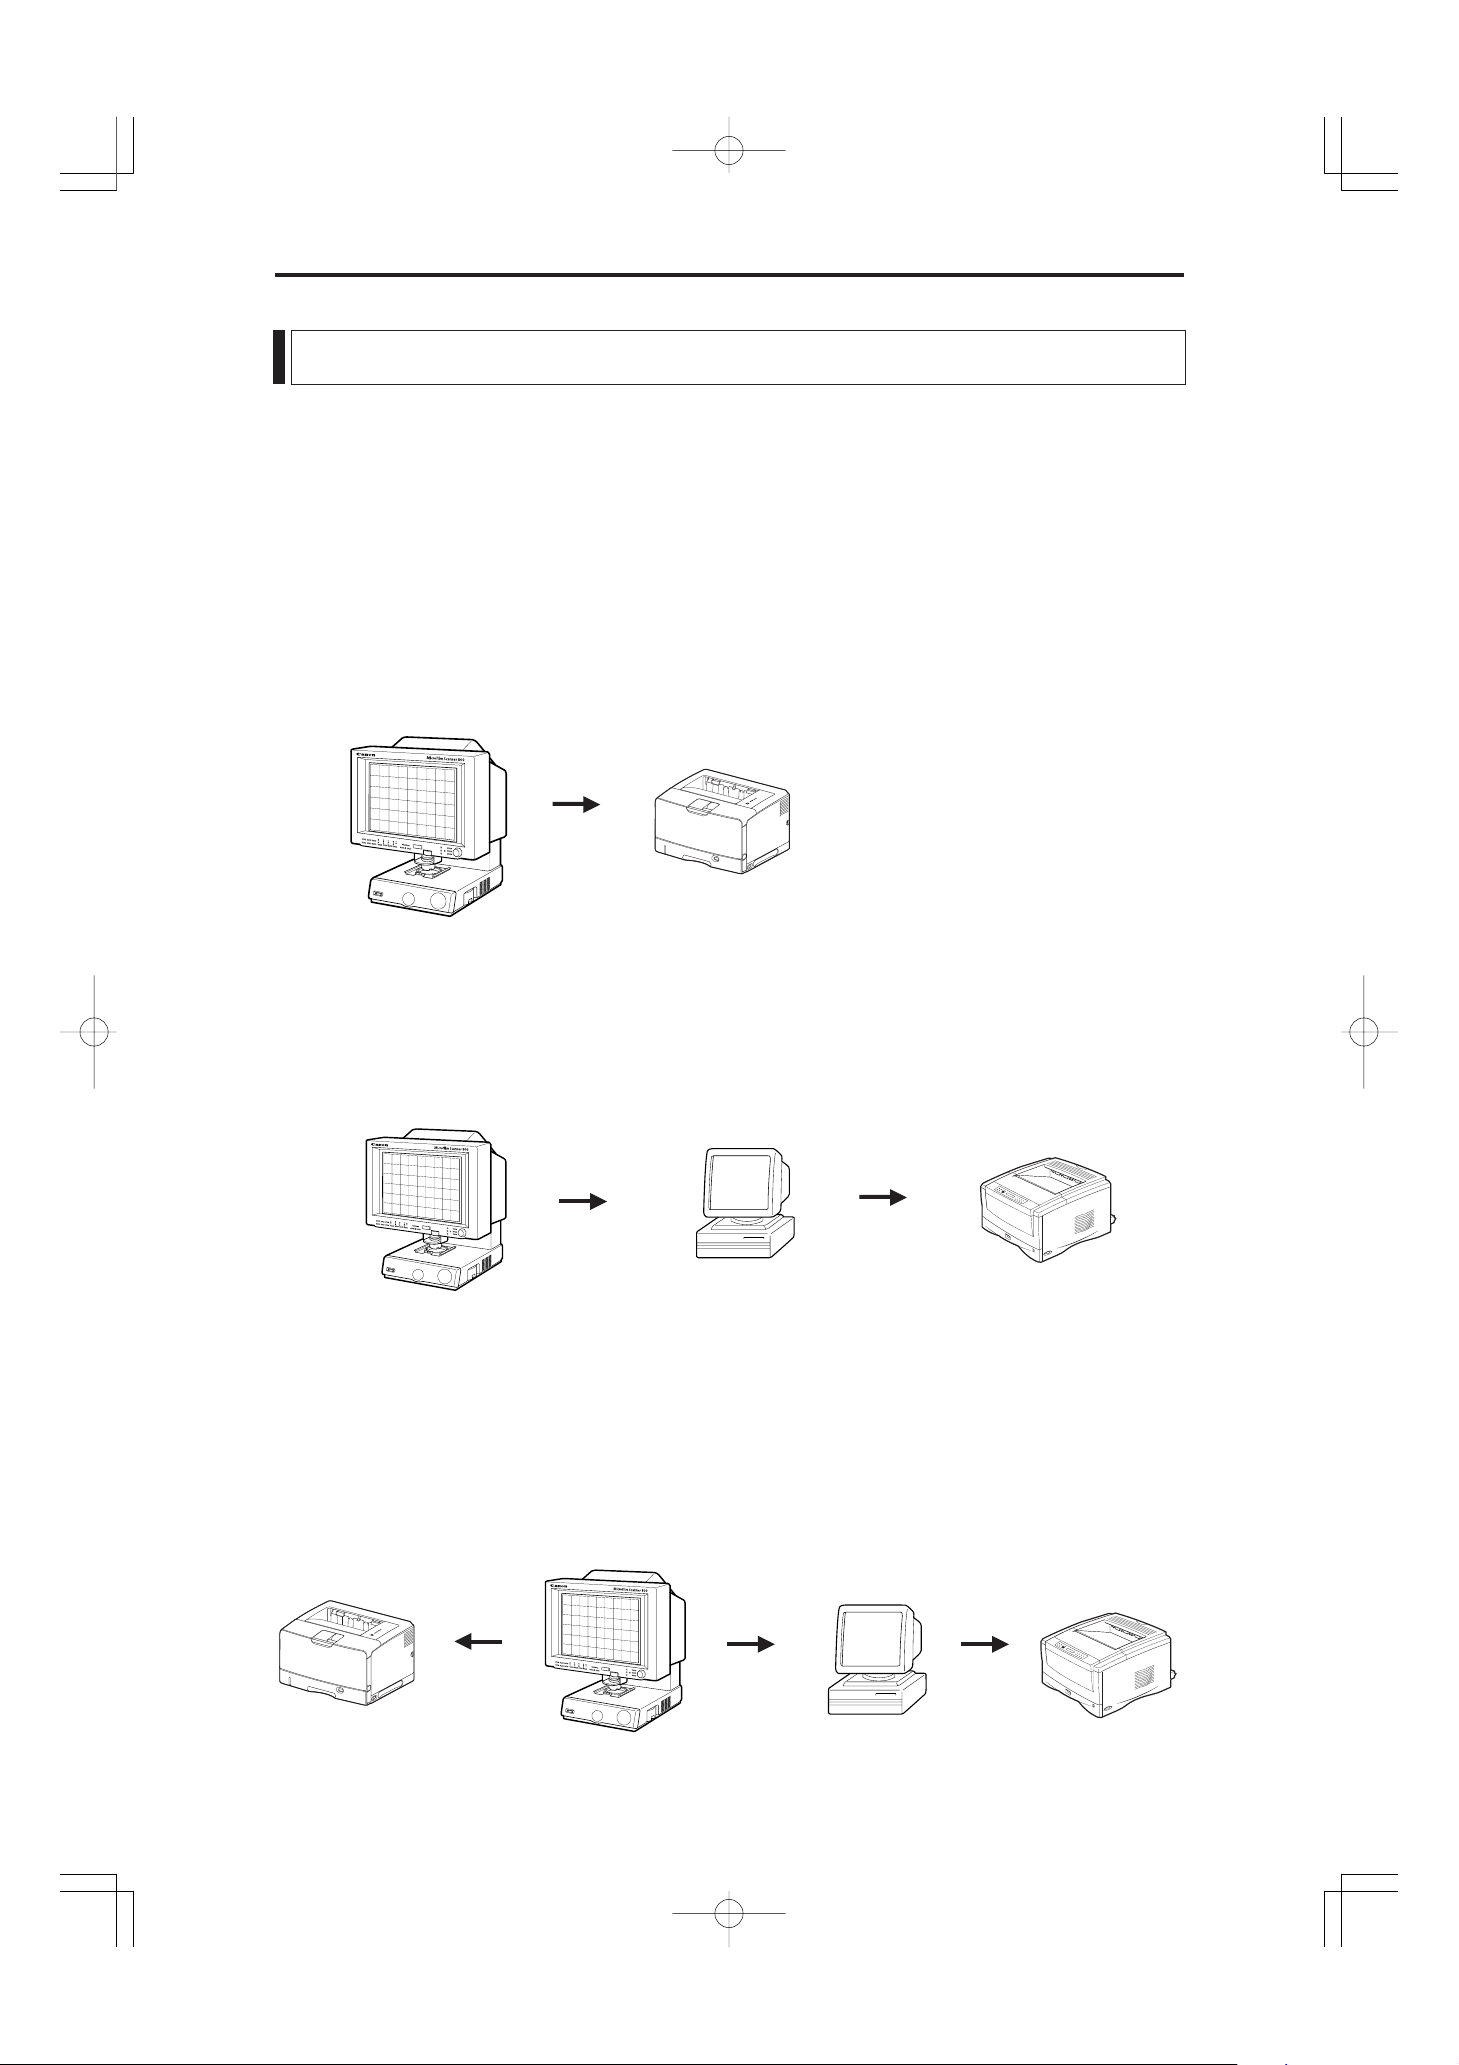
Operation Modes
The MS800II scanner has 2 operation modes: “Reader/Printer mode”, in which the image on the
screen is sent directly to a dedicated printer, and “Scanner mode”, in which the scanner is connected
to a personal computer and the scanned image data is downloaded to the computer to be printed on
a printer connected to the computer. The connected devices and operation procedures for the two
modes differ. Select the mode that best matches your system setup.
The operation mode is set by the service technician at installation. Contact your authorized Canon
service representative for details.
❏ Reader/Printer mode
This configuration consists of the Microfilm Scanner 800II with a FilePrint 470 printer. Screen images are sent
directly to the FilePrint 470 using the control panel on the Microfilm Scanner 800II. To switch from this mode
to Scanner mode, contact your Canon service technician.
Print
File Print 470
Microfilm Scanner 800II
❏ Scanner mode
This configuration consists of the Microfilm Scanner 800II with a computer and printer. Application software is
used to download screen images to the computer connected to the Microfilm Scanner 800II as image data. The
downloaded image data can then be sent to the printer connected to the computer. To switch from this mode to
ReaderPrinter mode, contact your Canon service technician.
Picture deta
Computer
Microfilm Scanner 800II
Print
Printer
❏ Reader/Printer/Scanner mode (factory default):
Select this mode when you want to use both Reader/Printer mode and Scanner mode. You switch
between the two modes by assigning a switching function to one of the function keys. This mode
also allows you to use the MS800II as a scanner in Reader/Printer mode and scan images from
your computer. However, you should switch to Scanner when you want to scan from the computer since some scanner keys cannot be used in Reader/Printer mode.
Reader Printer mode
Print
FilePrint 470
Microfilm Scanner 800II
CE-IE-323-01 07.5.14, 11:06Page 10 AdobePageMaker6.5J/PPC
Picture deta
– 10 –
Scanner mode
Computer
Print
(Printer)
INST
RUCTIONS
Be sure to read this instr
uctions before you use the equipment.
Keep this instructio
ns on hand for referenc
e to ensure optimum performance
E
N
G
L
IS
H
INSTR
UCTION
S
Be
sure to r
ead this
instructio
ns before you u
se
the equ
ipmen
t.
Kee
p th
is in
struc
tions
on ha
nd fo
r re
ference
to ens
ure optimum performanc
e
E
N
G
L
IS
H
Before You Begin...
STAND-BY
WARTEPOSITION
ATTENTE
ENESPERA
ATTESA
スタンバイ
ADD-ON
AUFDRUCKEN
MARQUE AÑADIR
AGGIUNTA
アドオン
MARGIN RAND MARGE MARGEN MARGINE
マージン
SHARPNESS
SCHÄRFE NETTETÉ NITIDEZ
NITIDEZZA
シャープネス
PICTURE BILD IMAGE IMAGEN IMMAGINE
ピクチャー
SCANNER SCANNER SCANNER ESCANER SCANNER
スキャナ
READER-PRINTER
READER-PRINTER
LECTEUR-REPRODUCTEUR
LECTOR-IMPRESOR
LETTORE-STAMPATORE
リーダープリンタ
NEWFILE
NEUEDATEI
NOUVEAUFICHIER
ARCHIVO NUEVO
NUOVOFILE
ニューファイル
IN
S
T
R
U
C
T
I
O
N
S
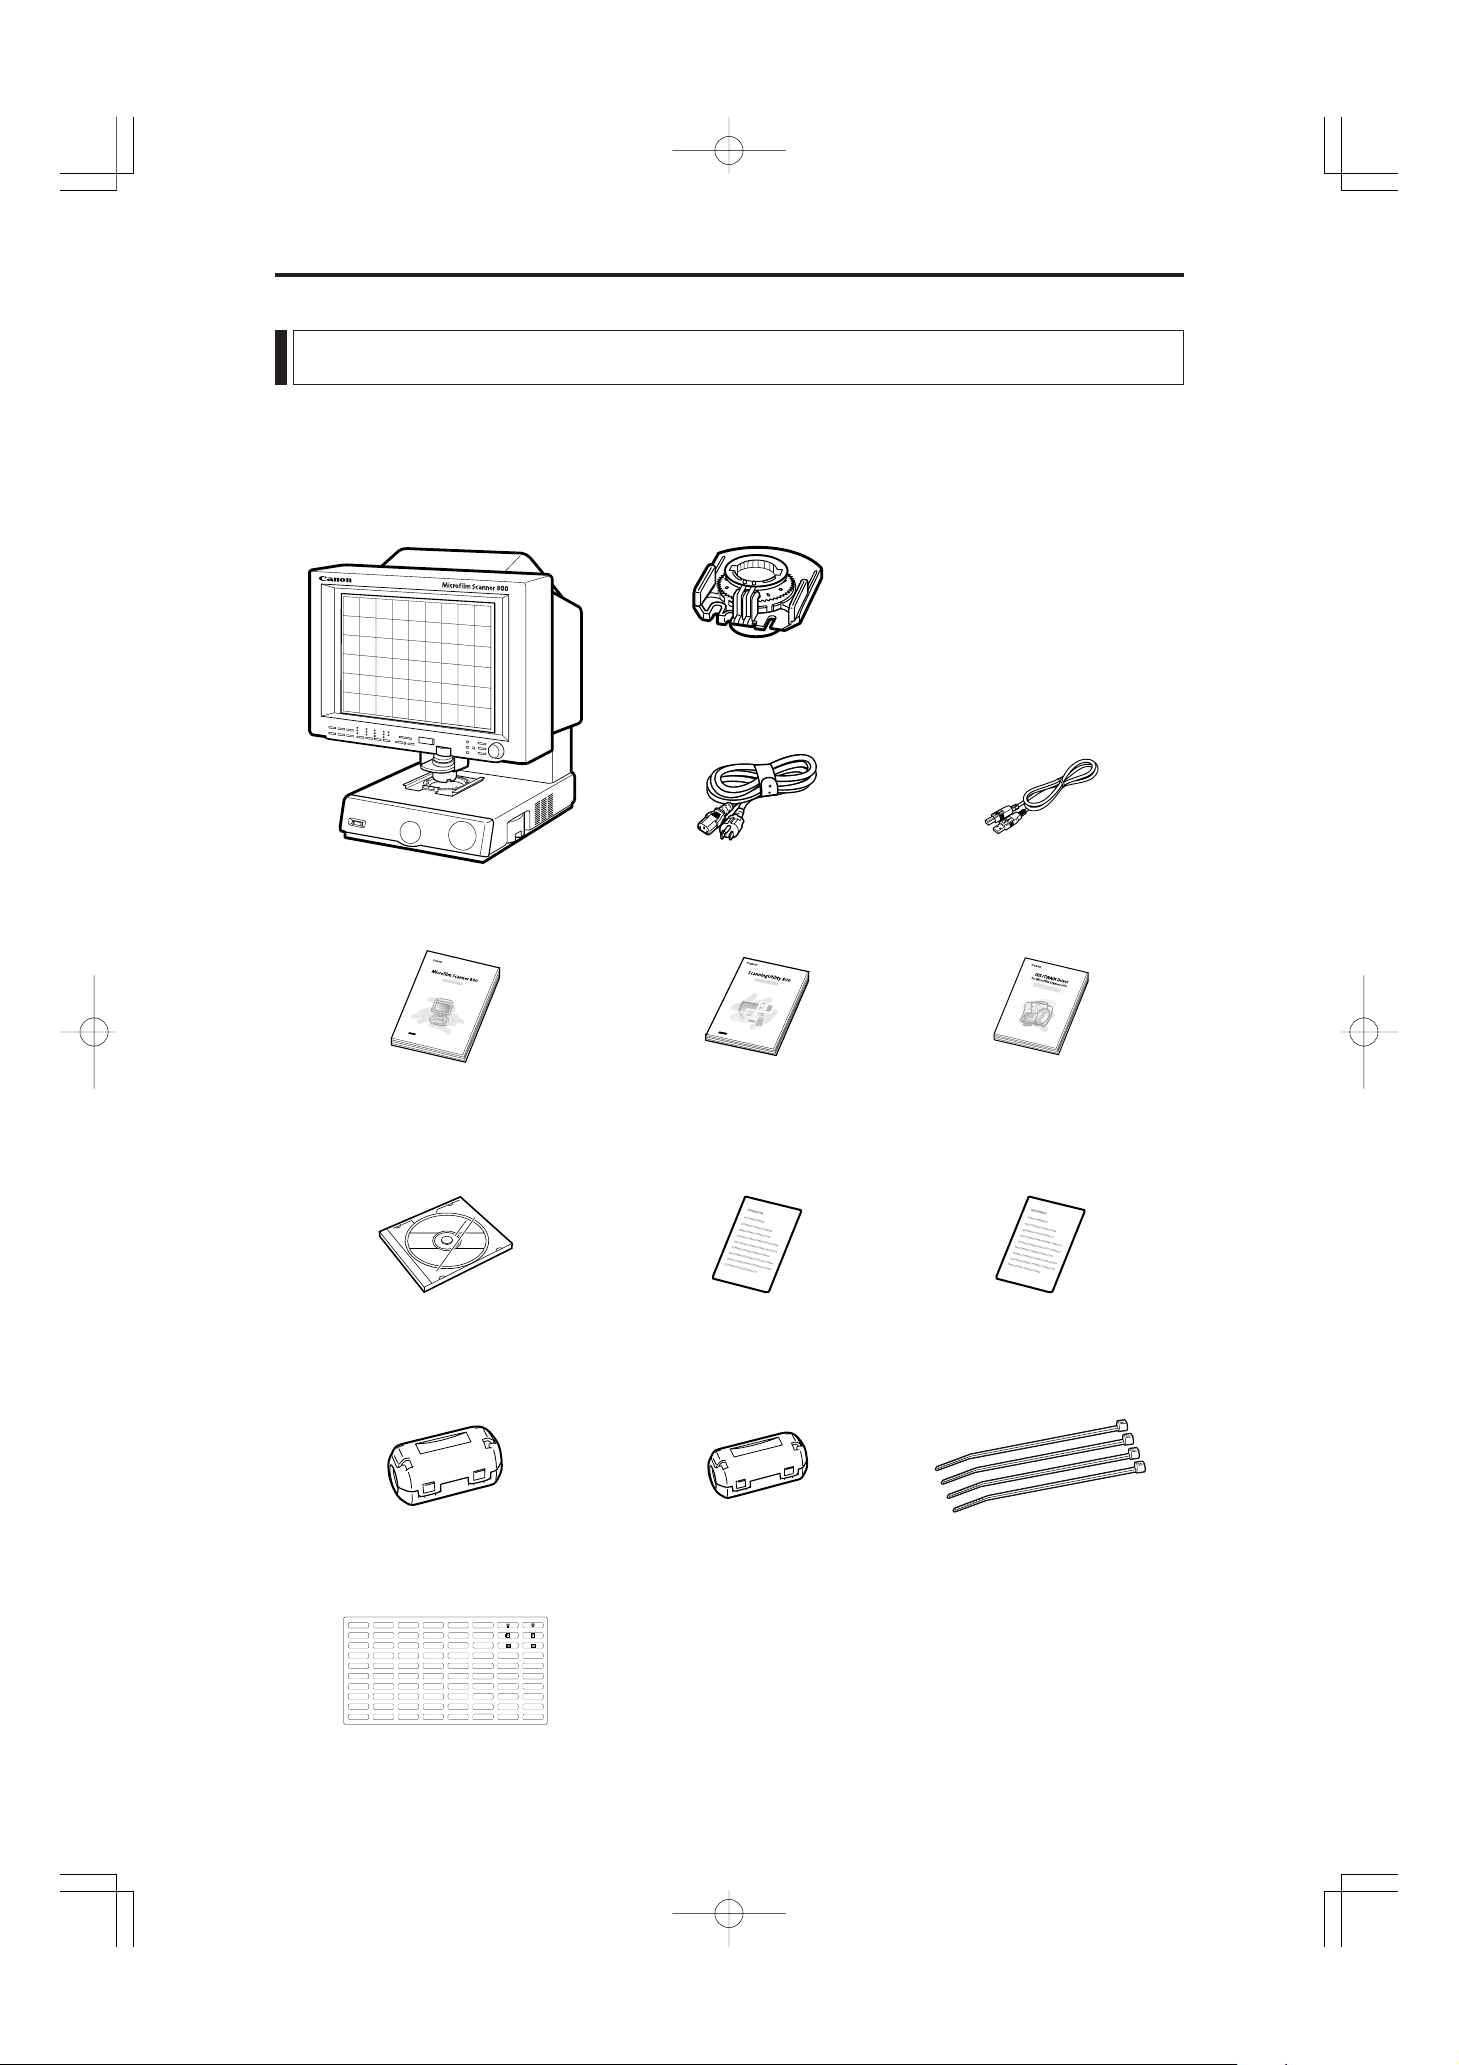
Checking the Box Contents
The Microfilm Scanner 800II package contains the items listed below. If any of these items is
missing, contact your Canon service outlet for assistance.
Lens holder
Microfilm Scanner 800II
Microfilm Scanner 800II
Instructions
Setup CD-ROM
Power cord
Scanning Utility 800
Instructions
Software Licence
Agreement
USB cable
ISIS/TWAIN Driver
Instructions
Warranty Card
(USA and Canada only)
Ferrite core
(for SCSI cable)
Ferrite core
(for USB cable)
Cable Clamper x 4
(for fixing a ferrite core)
Function key labels
– 11 –
CE-IE-323-01 07.5.14, 11:06Page 11 AdobePageMaker6.5J/PPC
1
2
3
4
9
8
7
6
5
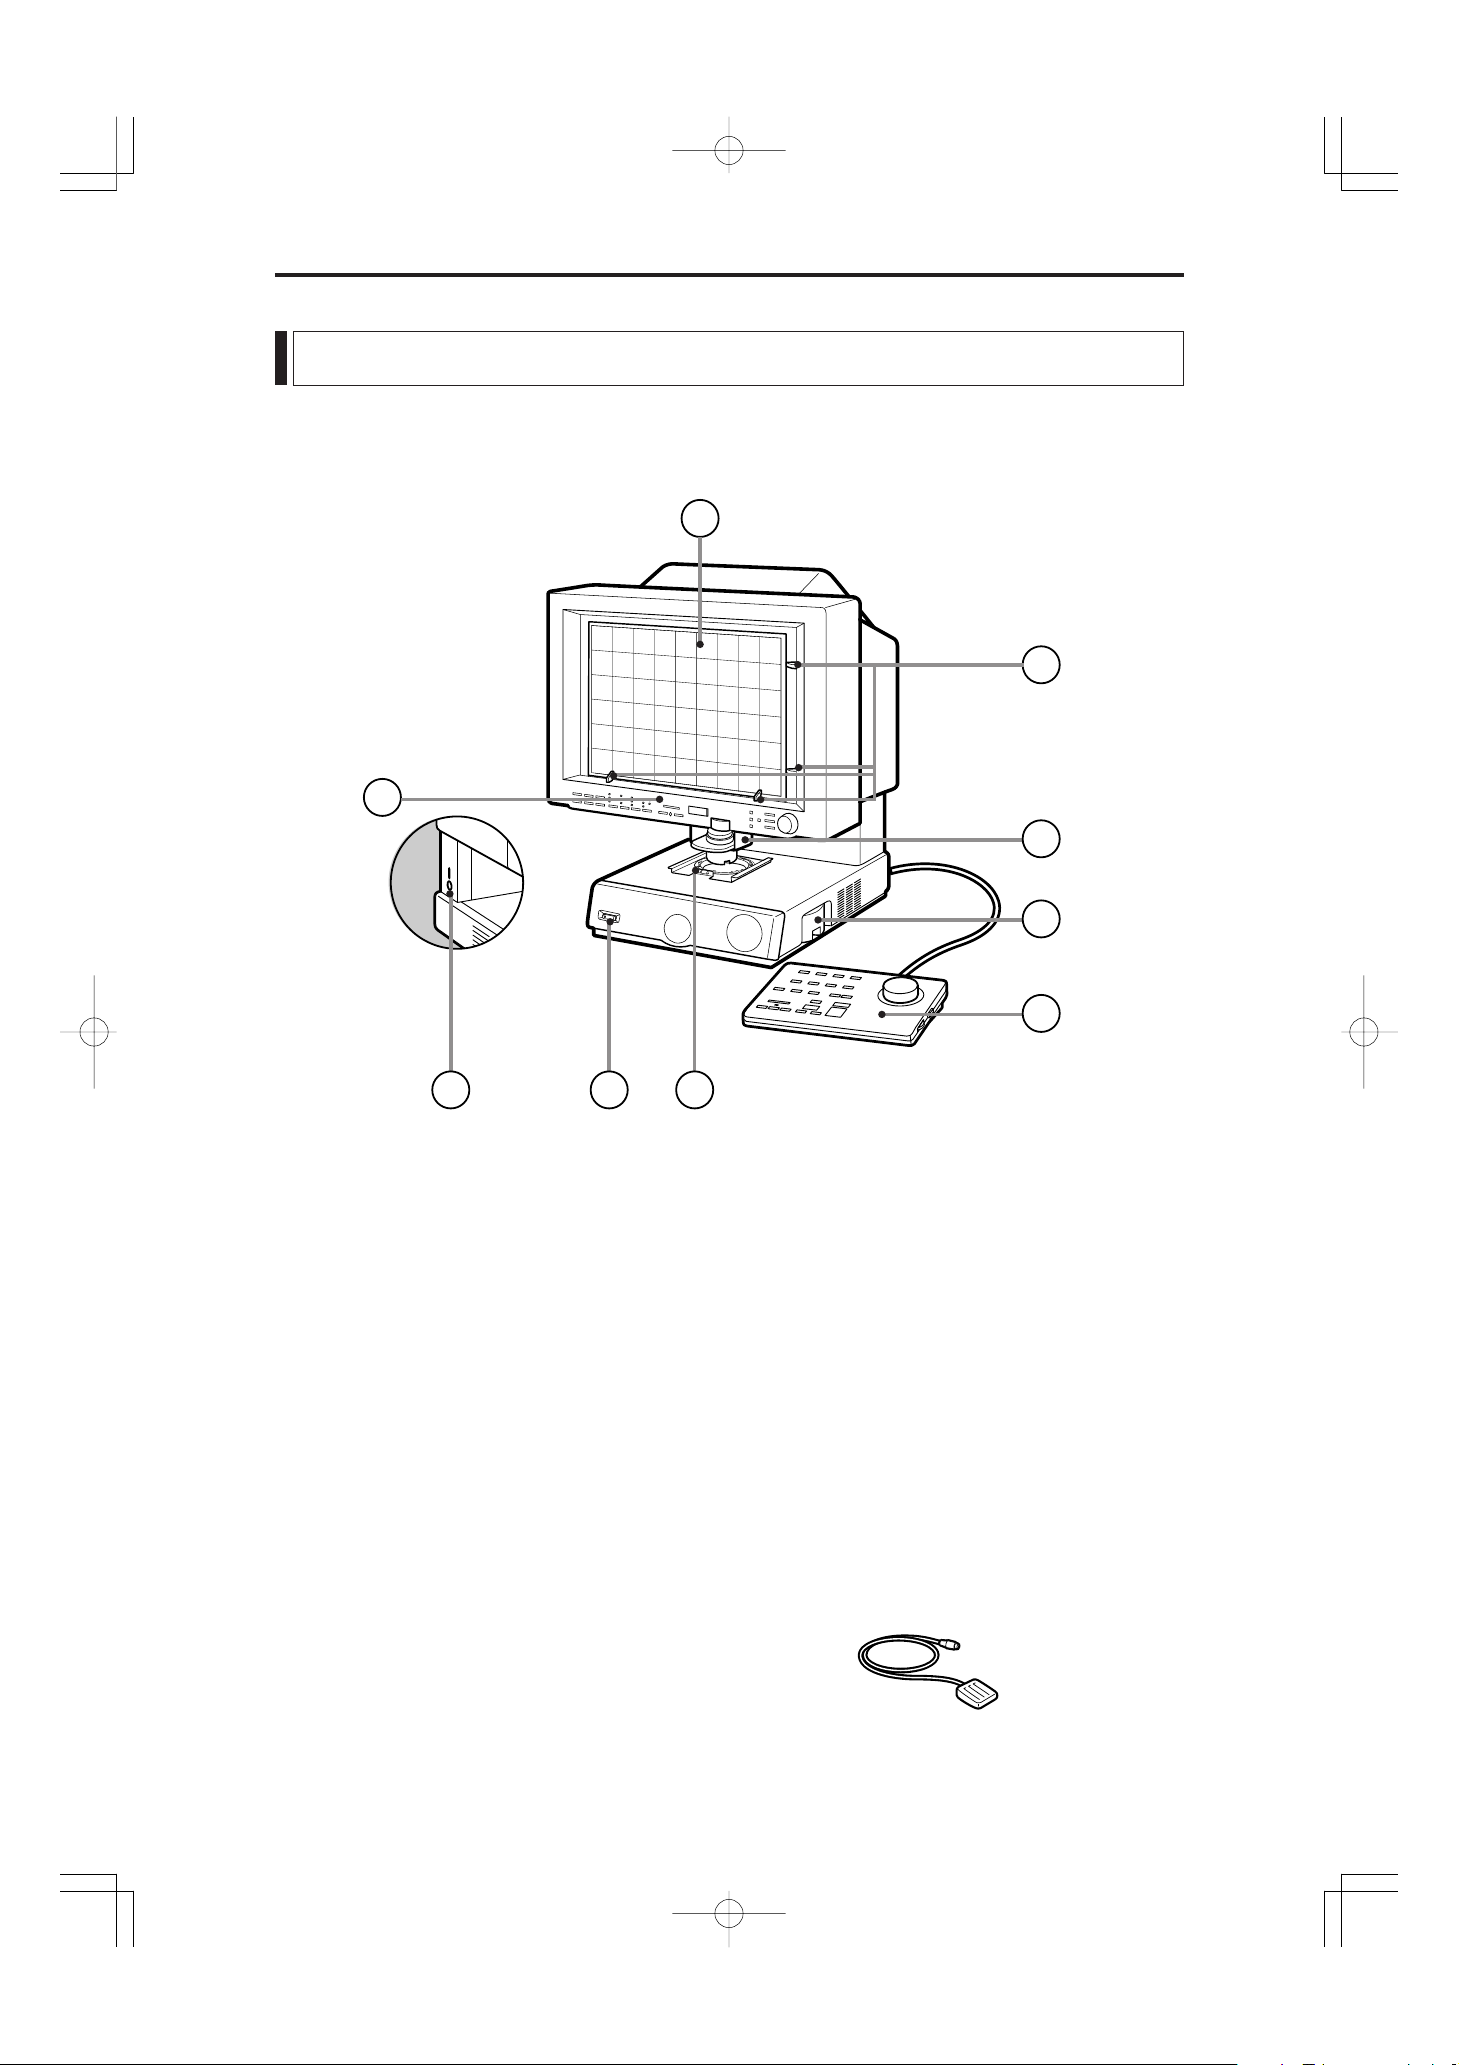
Before You Begin...
Important Components and Their Functions
Take a few moments to familiarize yourself with the names and functions of the main components
of the scanner, as described below.
1 Screen
Shows enlarged projections of the images on
the microfilm.
2 Framing Kit (optional)
When a specified area is to be scanned, use
this cursor to set the size of the scanned area.
3 Lens holder
Holds the lens.
4 Lamp unit
Holds the lamp that illuminates the image.
Remove this unit to change the lamp.
5 Carrier pad
Holds the film carrier.
6 Power switch
Switches the scanner on and off.
7 DIN connector
Use this socket to connect a motorized carrier
(optional).
8 Operation panel
Use these buttons to specify the image adjustment and operation mode settings.
9 Operation keyboard (optional)
Provides easy access to all the operation panel
controls.
!º Foot switch (optional)
An underfoot switch that provides the same
function as the Start key on the operation
panel.
– 12 –
CE-IE-323-01 07.5.14, 11:06Page 12 AdobePageMaker6.5J/PPC

ZOOM
M1
M
2
M
3
AF
FOCUS
ROTATE
AE
F1 F2F
3
F
5
F
4
F
6
1 2
3
4
5
6
11
8
10
14
16
7
17
15
13
12
9
Before You Begin...
Using the Operation Panel Keys
Operation Panel
1 Function keys Settings such as printing or scanning parameters and
operation modes can be stored in a function key and the
stored operation mode recalled instantly simply by pressing the function key. Settings are stored in a function key
using the application software or by programming the
function key (➜ P.38).
2 Negative/Positive key Selects one of three modes: Positive prints from negative
film, positive prints from positive film, or automatic film
polarity detection.
3 Trimming/Border key When scanning or printing, use this key to trim part of the
image or to remove the black border around the image.
4 Scanning Position key Used to specify whether the reference position for scanning
or printing is the center of the screen or the left edge. This
key is also used to specify scanning of 2 consecutive
pages.
5 Paper Select/Scan Size key In Reader Printer mode, this key selects the paper size used
for printing. In Scanner mode, this key selects the scan
size.
6 Brightness indicator Shows the brightness adjustment set using the Brightness
keys or the setting for adjustments such as the margin size
or sharpness.
7 Brightness adjustment keys The
and keys are used to manually adjust the brightness of the printed or scanned image. The AE key specifies
automatic adjustment.
8 Error/User Mode display Displays an error message (user call or service call) or the
selected user mode. This display also shows the number of
copies in ReaderPrinter mode.
9 User Mode keys Selects the user mode and can be used to set the number of
copies in ReaderPrinter mode.
!º Clear/Stop key Used to stop scanning or printing and to change the user
mode setting.
!¡ Start key In Reader Printer mode, the Start key starts printing. In
Scanner mode, this key starts a scan in Semi-Auto mode.
!™ Preset Zoom keys These keys are used to store the magnification settings for
zoom or fixed-focus lenses and to automatically adjust the
scanner to the stored magnification.
– 13 –
CE-IE-323-01 07.5.14, 11:06Page 13 AdobePageMaker6.5J/PPC

P 2 P 3 P 4
P1
P4P3
P2
1
23
9
7
8
10
11
21
6
12
24
2
22
18
24
3
20
19
Before You Begin...
!£ AF (Auto Focus) key Used to automatically focus the image.
!¢ ZOOM (enlarge/reduce) key Used to enlarge or reduce the size of the image projected
on the screen. Press the ZOOM key and then use the
control knob to enlarge and reduce the image on the screen.
FOCUS key Adjusts the focus of the image projected on the screen.
Press the FOCUS button and then turn the control knob
until the image on the screen is in focus.
!§ ROTATE key Rotates the image projected on the screen. Press the
ROTATE key and then turn the control knob. The image
rotates to match the rotation of the control knob.
!¶ Control knob Turn this knob to adjust the image after the ZOOM, FO-
CUS or ROTATE key has been pressed.
Operation Keyboard (optional)
!•
Image adjust selection key
!ª
Image adjust mode indicators
Selects the image adjustment mode (zoom, focus or rotate).
These indicators show the image adjustment mode selected
using key !•.
@º Image adjust control dial After selecting the image adjustment mode, turn this dial to
adjust the image.
@¡ Rotate key Rotates the image 90° clockwise or counterclockwise.
@™ Film control knob When a motorized carrier is installed, this knob feeds
through the film. Turn the knob to the right to advance the
film and to the left to rewind the film. (Note that this knob
cannot be used with the FS Controller I.)
@£ RESET key Restores the default settings for each setting mode.
@¢ Paper Select key Selects the paper cassette or multipurpose tray in
CE-IE-323-01 07.5.14, 11:06Page 14 AdobePageMaker6.5J/PPC
Disabled key Not used by the Microfilm Scanner 800II.
ReaderPrinter mode.
– 14 –

Before You Begin...
Optional Products
In addition to the accessories provided in the product
package, a number of optional accessories that are required
for using the scanner, such as carriers and lenses, are also
sold, as well as other optional accessories that can be
purchased as needed. Contact your nearest authorized
Canon Dealer for details.
Carriers (➞ P.16 “Preparing the Carrier”)
Carriers can be used for all types of film, including cartridge film, microfiche, jacket film and aperture cards.
Because the scanner does not come with a carrier, purchase
the carrier best suited to your needs.
Installation Kit (➞ P.16 “Preparing the Carrier”)
Some carriers require the Installation Kit. Contact your
nearest authorized Canon service outlet for details.
Lenses (➞ P.17 “Lenses”)
One fixed-focus lens and four zoom lenses are provided for
the MS800II. Because the scanner does not come with a
lens, purchase the lenses best suited to your needs.
Framing Kit (➞ P.36 “Trimming/Border settings”)
This unit allows you to select a part of the image projected
onto the scanner screen (trimming). This Framing Kit is
required in order to use the Trimming function provided in
the scanner.
Operation Keyboard (➞ P.13 “Using the Operation
Panel Keys”)
This keyboard provides a handy way to access the functions provided on the operation panel.
Foot Switch
This is an underfoot switch that provides the same function
as the Start key on the operation panel.
64MB Additional Memory
To scan in grayscale mode from the application software
additional memory must be installed in the scanner.
Contact your nearest authorized Canon Dealer for details.
FilePrint 470 (➞ P.18 “Preparing the Printer”)
A dedicated printer for the Microfilm Scanner 800II when
it is used in Reader Printer mode.
– 15 –
CE-IE-323-01 07.5.14, 11:06Page 15 AdobePageMaker6.5J/PPC

Before You Begin...
Preparing the Carrier
The list below shows all the optional film carriers that can
be installed on the Canon Microfilm Scanner 800II. For
more details about these optional carriers, consult your
Canon dealer or authorized Canon service outlet. For
information on carrier installation and operation, refer to
the instructions provided with the carrier.
Note
Some carriers require the optional installation kit.
Fiche Carrier 190R II
A film carrier for viewing microfiche (up to 105 x 190
mm), jackets and aperture cards.
Auto Carrier 100C (AC100C)
A motorized automatic carrier for 16 mm cartridge film
(ANSI, ANSI ENCLOSED *1, Kodak Ektamate or 3M)
that features high-speed automatic loading and rapid film
feeding and display.
FS Controller I
A motorized automatic carrier for 16 mm cartridge film
(ANSI, Kodak Ektamate or 3M). This carrier is required
for reading film marked with blips for image search and
retrieval.
Roll/Fiche Carrier 200
This carrier is required for reading 16 or 35 mm standard
open reel film, 16 mm cartridge film (ANSI, Kodak
Ektamate or 3M), microfiche (up to 105 x 190 mm),
jackets or aperture cards.
*1 ANSI ENCLOSED cartridges are as stipulated in ANSI MS-15.
*2 TUSCAN M-type refers to TUSCAN cartridges with a 3M-type core.
– 16 –
CE-IE-323-01 07.5.14, 11:06Page 16 AdobePageMaker6.5J/PPC
Before You Begin...
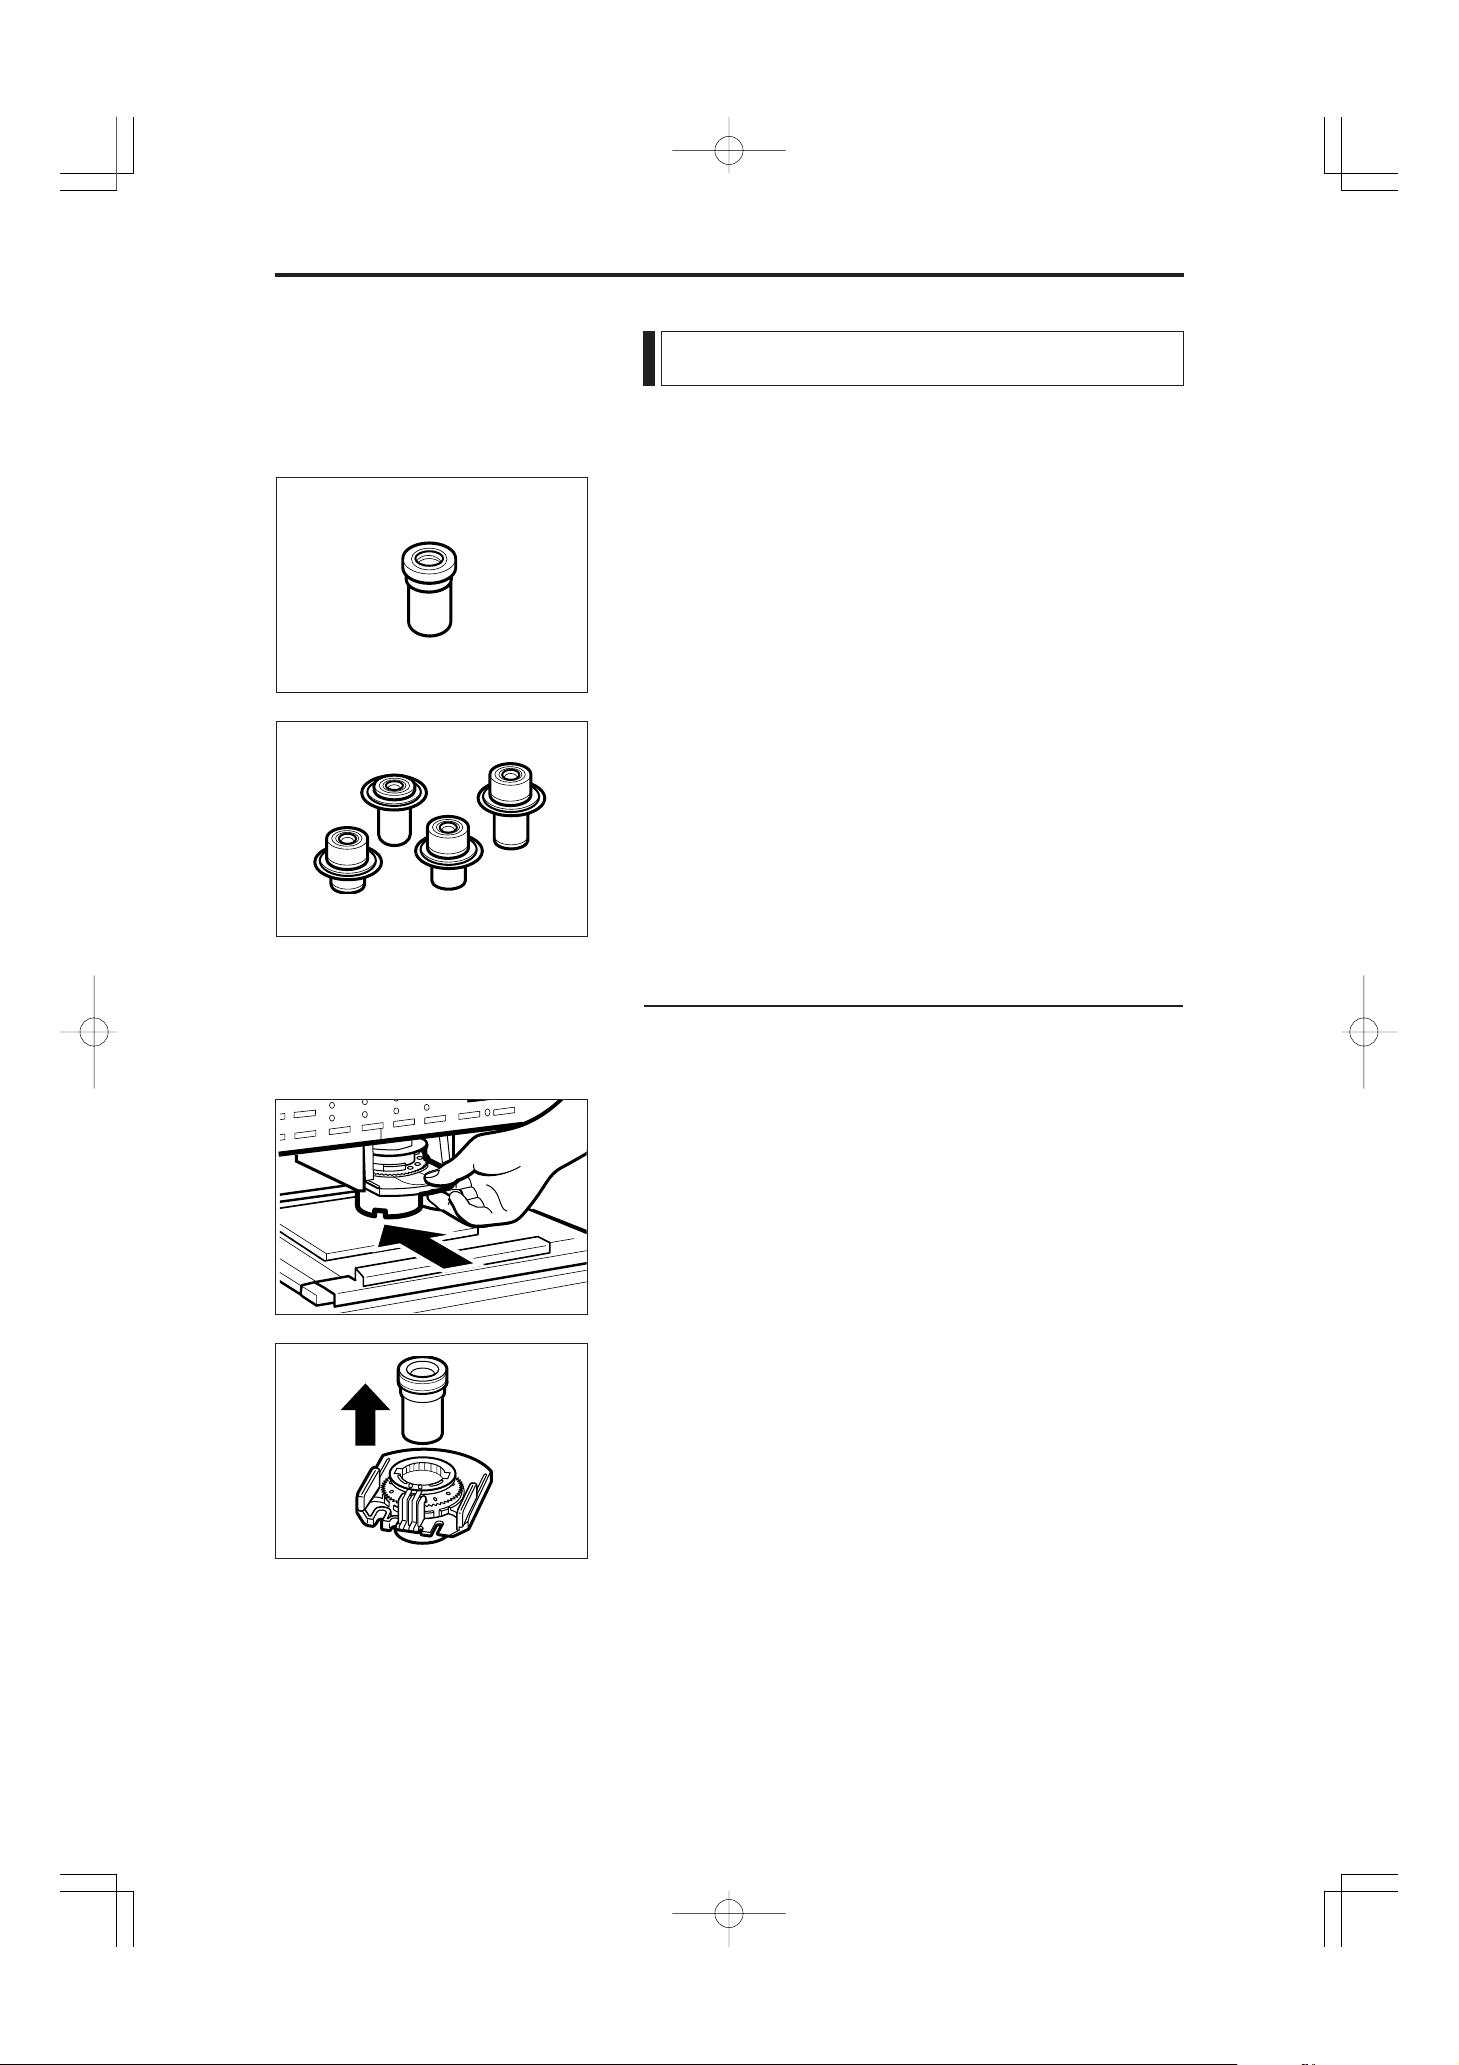
Lenses
The types of lenses that can be used with this scanner are
described below.
Fixed-focus Lenses
GZ X57 (57x)
Zoom Lenses
GZ X7-X7.5 (7x to 7.5x)
GZ X9-X16 (9x to 16x)
GZ X14-X30 (14x to 30x)
GZ X20-X50 (20x to 50x)
Fitting and Replacing Lenses
Use the procedure below to fit or change the lens.
1 Grasp the lens holder firmly and slide it out of the lens
holder bracket.
2 If a lens is already fitted in the holder, use one hand to
support the base of the lens holder, taking care to ensure
that the lens does not fall out.
– 17 –
CE-IE-323-01 07.5.14, 11:06Page 17 AdobePageMaker6.5J/PPC
 Loading...