

Page 1

LiDE 220
Online Manual
Read Me First
Useful Functions Available on the Machine
Overview of the Machine
Scanning
Troubleshooting
English
Page 2

Contents
Read Me First. . . . . . . . . . . . . . . . . . . . . . . . . . . . . . . . . . . . . . . . . . . . . . . . . . . . 6
Symbols Used in This Document. . . . . . . . . . . . . . . . . . . . . . . . . . . . . . . . . . . . . 7
Trademarks and Licenses. . . . . . . . . . . . . . . . . . . . . . . . . . . . . . . . . . . . . . . . . . . 8
Search Tips. . . . . . . . . . . . . . . . . . . . . . . . . . . . . . . . . . . . . . . . . . . . . . . . . . . . . 12
Notes on Operation Explanations. . . . . . . . . . . . . . . . . . . . . . . . . . . . . . . . . . . . 14
Useful Functions Available on the Machine. . . . . . . . . . . . . . . . . . . . . . . . . . . . . 15
View Photos Easily Using My Image Garden. . . . . . . . . . . . . . . . . . . . . . . . . . . . . . . . . . . 16
Connection Methods Available on the Machine. . . . . . . . . . . . . . . . . . . . . . . . . . . . . . . . . 18
Overview of the Machine. . . . . . . . . . . . . . . . . . . . . . . . . . . . . . . . . . . . . . . . . . . 19
Safety Guide. . . . . . . . . . . . . . . . . . . . . . . . . . . . . . . . . . . . . . . . . . . . . . . . . . . . . . . . . . . . 20
Safety Precautions. . . . . . . . . . . . . . . . . . . . . . . . . . . . . . . . . . . . . . . . . . . . . . . . . . . . . . . . . . . . . . . . . . 21
Regulatory and Safety Information. . . . . . . . . . . . . . . . . . . . . . . . . . . . . . . . . . . . . . . . . . . . . . . . . . . . . 22
Main Components. . . . . . . . . . . . . . . . . . . . . . . . . . . . . . . . . . . . . . . . . . . . . . . . . . . . . . . . 25
Placing Items. . . . . . . . . . . . . . . . . . . . . . . . . . . . . . . . . . . . . . . . . . . . . . . . . . . . . . . . . . . 27
Place the Item on the Platen. . . . . . . . . . . . . . . . . . . . . . . . . . . . . . . . . . . . . . . . . . . . . . . . . . . . . . . . . . 28
Using the Stand. . . . . . . . . . . . . . . . . . . . . . . . . . . . . . . . . . . . . . . . . . . . . . . . . . . . . . . . . . . . . . . . 29
Items You Can Place & How to Place Items. . . . . . . . . . . . . . . . . . . . . . . . . . . . . . . . . . . . . . . . . . . . . . 31
Maintenance. . . . . . . . . . . . . . . . . . . . . . . . . . . . . . . . . . . . . . . . . . . . . . . . . . . . . . . . . . . . 33
Precautions for Safe Transport of the Machine. . . . . . . . . . . . . . . . . . . . . . . . . . . . . . . . . 34
Legal Limitations on Use of Your Product and Use of Images. . . . . . . . . . . . . . . . . . . . . . 35
Specifications. . . . . . . . . . . . . . . . . . . . . . . . . . . . . . . . . . . . . . . . . . . . . . . . . . . . . . . . . . . 36
Scanning. . . . . . . . . . . . . . . . . . . . . . . . . . . . . . . . . . . . . . . . . . . . . . . . . . . . . . . 38
Scanning from a Computer. . . . . . . . . . . . . . . . . . . . . . . . . . . . . . . . . . . . . . . . . . . . . . . . . 39
Scanning with IJ Scan Utility. . . . . . . . . . . . . . . . . . . . . . . . . . . . . . . . . . . . . . . . . . . . . . . . . . . . . . . . . . 40
What Is IJ Scan Utility (Scanner Software)?. . . . . . . . . . . . . . . . . . . . . . . . . . . . . . . . . . . . . . . . . . 41
Starting IJ Scan Utility. . . . . . . . . . . . . . . . . . . . . . . . . . . . . . . . . . . . . . . . . . . . . . . . . . . . . . . . . . . 43
Easy Scanning with Auto Scan. . . . . . . . . . . . . . . . . . . . . . . . . . . . . . . . . . . . . . . . . . . . . . . . . . . . 44
Scanning Documents. . . . . . . . . . . . . . . . . . . . . . . . . . . . . . . . . . . . . . . . . . . . . . . . . . . . . . . . . . . . 45
Scanning Photos. . . . . . . . . . . . . . . . . . . . . . . . . . . . . . . . . . . . . . . . . . . . . . . . . . . . . . . . . . . . . . . 46
Scanning with Favorite Settings. . . . . . . . . . . . . . . . . . . . . . . . . . . . . . . . . . . . . . . . . . . . . . . . . . . 47
Scanning Items Larger than the Platen (Image Stitch). . . . . . . . . . . . . . . . . . . . . . . . . . . . . . . . . . 48
Scanning Multiple Items at One Time. . . . . . . . . . . . . . . . . . . . . . . . . . . . . . . . . . . . . . . . . . . . . . . 52
Page 3

Saving after Checking Scan Results. . . . . . . . . . . . . . . . . . . . . . . . . . . . . . . . . . . . . . . . . . . . . . . . 55
Sending Scanned Images via E-mail. . . . . . . . . . . . . . . . . . . . . . . . . . . . . . . . . . . . . . . . . . . . . . . . 58
Extracting Text from Scanned Images (OCR). . . . . . . . . . . . . . . . . . . . . . . . . . . . . . . . . . . . . . . . . 61
IJ Scan Utility Screens. . . . . . . . . . . . . . . . . . . . . . . . . . . . . . . . . . . . . . . . . . . . . . . . . . . . . . . . . . . 64
IJ Scan Utility Main Screen. . . . . . . . . . . . . . . . . . . . . . . . . . . . . . . . . . . . . . . . . . . . . . . . . . . 65
Settings Dialog. . . . . . . . . . . . . . . . . . . . . . . . . . . . . . . . . . . . . . . . . . . . . . . . . . . . . . . . . . . . . 67
Save Settings Dialog. . . . . . . . . . . . . . . . . . . . . . . . . . . . . . . . . . . . . . . . . . . . . . . . . . . . . . . 113
Image Stitch Window. . . . . . . . . . . . . . . . . . . . . . . . . . . . . . . . . . . . . . . . . . . . . . . . . . . . . . . 116
Scanning with ScanGear. . . . . . . . . . . . . . . . . . . . . . . . . . . . . . . . . . . . . . . . . . . . . . . . . . . . . . . . . . . . 120
What Is ScanGear?. . . . . . . . . . . . . . . . . . . . . . . . . . . . . . . . . . . . . . . . . . . . . . . . . . . . . . . . . . . . 121
Scanning with Advanced Settings Using ScanGear. . . . . . . . . . . . . . . . . . . . . . . . . . . . . . . . . . . 123
Starting ScanGear. . . . . . . . . . . . . . . . . . . . . . . . . . . . . . . . . . . . . . . . . . . . . . . . . . . . . . . . . 124
Scanning in Basic Mode. . . . . . . . . . . . . . . . . . . . . . . . . . . . . . . . . . . . . . . . . . . . . . . . . . . . 125
Scanning in Advanced Mode. . . . . . . . . . . . . . . . . . . . . . . . . . . . . . . . . . . . . . . . . . . . . . . . . 127
Scanning Multiple Documents at One Time with ScanGear. . . . . . . . . . . . . . . . . . . . . . . . . 129
Correcting Images and Adjusting Colors with ScanGear. . . . . . . . . . . . . . . . . . . . . . . . . . . . . . . . 133
Correcting Images (Unsharp Mask, Reduce Dust and Scratches, Fading Correction, etc.). 134
Adjusting Colors Using a Color Pattern. . . . . . . . . . . . . . . . . . . . . . . . . . . . . . . . . . . . . . . . . 138
Adjusting Saturation and Color Balance. . . . . . . . . . . . . . . . . . . . . . . . . . . . . . . . . . . . . . . . 140
Adjusting Brightness and Contrast. . . . . . . . . . . . . . . . . . . . . . . . . . . . . . . . . . . . . . . . . . . . 142
Adjusting Histogram. . . . . . . . . . . . . . . . . . . . . . . . . . . . . . . . . . . . . . . . . . . . . . . . . . . . . . . . 144
Adjusting Tone Curve. . . . . . . . . . . . . . . . . . . . . . . . . . . . . . . . . . . . . . . . . . . . . . . . . . . . . . 148
Setting Threshold. . . . . . . . . . . . . . . . . . . . . . . . . . . . . . . . . . . . . . . . . . . . . . . . . . . . . . . . . . 151
ScanGear Screens. . . . . . . . . . . . . . . . . . . . . . . . . . . . . . . . . . . . . . . . . . . . . . . . . . . . . . . . . . . . 152
Basic Mode Tab. . . . . . . . . . . . . . . . . . . . . . . . . . . . . . . . . . . . . . . . . . . . . . . . . . . . . . . . . . . 153
Advanced Mode Tab. . . . . . . . . . . . . . . . . . . . . . . . . . . . . . . . . . . . . . . . . . . . . . . . . . . . . . . 160
Input Settings. . . . . . . . . . . . . . . . . . . . . . . . . . . . . . . . . . . . . . . . . . . . . . . . . . . . . . . . . . . . . 166
Output Settings. . . . . . . . . . . . . . . . . . . . . . . . . . . . . . . . . . . . . . . . . . . . . . . . . . . . . . . . . . . 168
Image Settings. . . . . . . . . . . . . . . . . . . . . . . . . . . . . . . . . . . . . . . . . . . . . . . . . . . . . . . . . . . . 171
Color Adjustment Buttons. . . . . . . . . . . . . . . . . . . . . . . . . . . . . . . . . . . . . . . . . . . . . . . . . . . 176
Preferences Dialog. . . . . . . . . . . . . . . . . . . . . . . . . . . . . . . . . . . . . . . . . . . . . . . . . . . . . . . . 179
Scanner Tab. . . . . . . . . . . . . . . . . . . . . . . . . . . . . . . . . . . . . . . . . . . . . . . . . . . . . . . . . . . . . 180
Preview Tab. . . . . . . . . . . . . . . . . . . . . . . . . . . . . . . . . . . . . . . . . . . . . . . . . . . . . . . . . . . . . . 181
Scan Tab. . . . . . . . . . . . . . . . . . . . . . . . . . . . . . . . . . . . . . . . . . . . . . . . . . . . . . . . . . . . . . . . 183
Color Settings Tab. . . . . . . . . . . . . . . . . . . . . . . . . . . . . . . . . . . . . . . . . . . . . . . . . . . . . . . . . 184
Save Settings Tab. . . . . . . . . . . . . . . . . . . . . . . . . . . . . . . . . . . . . . . . . . . . . . . . . . . . . . . . . 186
Placing Items (When Scanning from a Computer). . . . . . . . . . . . . . . . . . . . . . . . . . . . . . . . . . . . 187
Adjusting Cropping Frames (ScanGear). . . . . . . . . . . . . . . . . . . . . . . . . . . . . . . . . . . . . . . . . . . . 189
Page 4

General Notes (ScanGear). . . . . . . . . . . . . . . . . . . . . . . . . . . . . . . . . . . . . . . . . . . . . . . . . . . . . . 193
Scanning with Scanner Driver. . . . . . . . . . . . . . . . . . . . . . . . . . . . . . . . . . . . . . . . . . . . . . . . . . . . . . . . 194
Image Corrections and Color Adjustments. . . . . . . . . . . . . . . . . . . . . . . . . . . . . . . . . . . . . . . . . . 195
General Notes (Scanner Driver). . . . . . . . . . . . . . . . . . . . . . . . . . . . . . . . . . . . . . . . . . . . . . . . . . 199
Updating the Scanner Driver. . . . . . . . . . . . . . . . . . . . . . . . . . . . . . . . . . . . . . . . . . . . . . . . . . . . . 200
Obtaining the Latest Scanner Driver. . . . . . . . . . . . . . . . . . . . . . . . . . . . . . . . . . . . . . . . . . . 201
Before Installing the Scanner Driver. . . . . . . . . . . . . . . . . . . . . . . . . . . . . . . . . . . . . . . . . . . 202
Installing the Scanner Driver. . . . . . . . . . . . . . . . . . . . . . . . . . . . . . . . . . . . . . . . . . . . . . . . . 203
Useful Information on Scanning. . . . . . . . . . . . . . . . . . . . . . . . . . . . . . . . . . . . . . . . . . . . . . . . . . . . . . . 204
Adjusting Cropping Frames in the Image Stitch Window. . . . . . . . . . . . . . . . . . . . . . . . . . . . . . . . 205
Resolution. . . . . . . . . . . . . . . . . . . . . . . . . . . . . . . . . . . . . . . . . . . . . . . . . . . . . . . . . . . . . . . . . . . 206
Data Formats. . . . . . . . . . . . . . . . . . . . . . . . . . . . . . . . . . . . . . . . . . . . . . . . . . . . . . . . . . . . . . . . . 208
Placing Items (When Scanning from a Computer). . . . . . . . . . . . . . . . . . . . . . . . . . . . . . . . . . . . . . . . . 187
Scanning Using the Scanner Buttons. . . . . . . . . . . . . . . . . . . . . . . . . . . . . . . . . . . . . . . . 211
What Are Scanner Buttons?. . . . . . . . . . . . . . . . . . . . . . . . . . . . . . . . . . . . . . . . . . . . . . . . . . . . . . . . . 212
Scanning and Saving Items as PDF Files (PDF Buttons). . . . . . . . . . . . . . . . . . . . . . . . . . . . . . . . . . . 213
Scanning Items and Saving the Scanned Images (AUTO SCAN Button). . . . . . . . . . . . . . . . . . . . . . . 214
Scanning and Printing/Copying Items (COPY Button). . . . . . . . . . . . . . . . . . . . . . . . . . . . . . . . . . . . . . 215
Scanning Items and Sending the Scanned Images (SEND Button). . . . . . . . . . . . . . . . . . . . . . . . . . . 216
Scanner Button Settings via IJ Scan Utility. . . . . . . . . . . . . . . . . . . . . . . . . . . . . . . . . . . . . . . . . . . . . . 217
Troubleshooting. . . . . . . . . . . . . . . . . . . . . . . . . . . . . . . . . . . . . . . . . . . . . . . . . 220
Problems with Scanning. . . . . . . . . . . . . . . . . . . . . . . . . . . . . . . . . . . . . . . . . . . . . . . . . . 221
Problems with Scanning. . . . . . . . . . . . . . . . . . . . . . . . . . . . . . . . . . . . . . . . . . . . . . . . . . . . . . . . . . . . 222
Error Message "Release the lock switch..." Is Displayed. . . . . . . . . . . . . . . . . . . . . . . . . . . . . . . 223
Scanner Does Not Work. . . . . . . . . . . . . . . . . . . . . . . . . . . . . . . . . . . . . . . . . . . . . . . . . . . . . . . . 224
Scanner Driver Does Not Start. . . . . . . . . . . . . . . . . . . . . . . . . . . . . . . . . . . . . . . . . . . . . . . . . . . 225
Error Message Appears and the Scanner Driver Screen Does Not Appear. . . . . . . . . . . . . . . . . 226
Scanner Buttons Do Not Work. . . . . . . . . . . . . . . . . . . . . . . . . . . . . . . . . . . . . . . . . . . . . . . . . . . . 227
When a Scanner Button Is Pressed, an Unexpected Application Starts. . . . . . . . . . . . . . . . . . . . 228
Cannot Scan Multiple Items at One Time. . . . . . . . . . . . . . . . . . . . . . . . . . . . . . . . . . . . . . . . . . . 229
Cannot Scan Properly with Auto Scan. . . . . . . . . . . . . . . . . . . . . . . . . . . . . . . . . . . . . . . . . . . . . . 230
Slow Scanning Speed. . . . . . . . . . . . . . . . . . . . . . . . . . . . . . . . . . . . . . . . . . . . . . . . . . . . . . . . . . 231
"There is not enough memory." Message Is Displayed. . . . . . . . . . . . . . . . . . . . . . . . . . . . . . . . . 232
Computer Stops Operating during Scanning. . . . . . . . . . . . . . . . . . . . . . . . . . . . . . . . . . . . . . . . . 233
Scanned Image Does Not Open. . . . . . . . . . . . . . . . . . . . . . . . . . . . . . . . . . . . . . . . . . . . . . . . . . 234
Position or Size of the Image Cannot be Detected Correctly When Scanning Using the Scanner
Buttons. . . . . . . . . . . . . . . . . . . . . . . . . . . . . . . . . . . . . . . . . . . . . . . . . . . . . . . . . . . . . . . . . . . . . . 235
Page 5

Scan Results Not Satisfactory. . . . . . . . . . . . . . . . . . . . . . . . . . . . . . . . . . . . . . . . . . . . . . . . . . . . . . . . 236
Scan Quality (Image Displayed on the Monitor) Is Poor. . . . . . . . . . . . . . . . . . . . . . . . . . . . . . . . 237
Scanned Image Is Surrounded by Extra White Areas. . . . . . . . . . . . . . . . . . . . . . . . . . . . . . . . . . 238
Cannot Scan at the Correct Size. . . . . . . . . . . . . . . . . . . . . . . . . . . . . . . . . . . . . . . . . . . . . . . . . . 239
Item Is Placed Correctly, but the Scanned Image Is Slanted. . . . . . . . . . . . . . . . . . . . . . . . . . . . 240
Scanned Image Is Enlarged (Reduced) on the Computer Monitor. . . . . . . . . . . . . . . . . . . . . . . . 241
Problems with Installation/Downloading. . . . . . . . . . . . . . . . . . . . . . . . . . . . . . . . . . . . . . 242
Cannot Install the Scanner Driver. . . . . . . . . . . . . . . . . . . . . . . . . . . . . . . . . . . . . . . . . . . . . . . . . . . . . 243
Installation Is Unsuccessful (Insufficient Free Hard Disk Space). . . . . . . . . . . . . . . . . . . . . . . . . . . . . . 244
Installation Is Unsuccessful (Insufficient Memory). . . . . . . . . . . . . . . . . . . . . . . . . . . . . . . . . . . . . . . . . 245
About Inkjet Printer/Scanner/Fax Extended Survey Program. . . . . . . . . . . . . . . . . . . . . . . . . . . . . . . . 246
Page 6
Read Me First
Notes on Online Manual Usage
How to Print
Notes on Online Manual Usage
• Reproduction, diversion or copying of any text, photo or image published in the Online Manual
(hereinafter referred to as "this guide"), in whole or in part, is prohibited.
• In principle, Canon shall change or delete the contents of this guide without prior notice to customers.
In addition, Canon may suspend or stop the disclosure of this guide due to unavoidable reasons.
Canon shall not be liable for any damage suffered by customers as a result of changes in or deletion
of information in this guide, or suspension/stoppage of disclosure of this guide.
• Although the contents of this guide have been prepared with utmost care, please contact the service
center if you find any incorrect or missing information.
• In principle, the descriptions in this guide are based on the product at the time of its initial sale.
• This guide does not disclose the manuals of all the products sold by Canon. See the manual supplied
with the product when using a product that is not described in this guide.
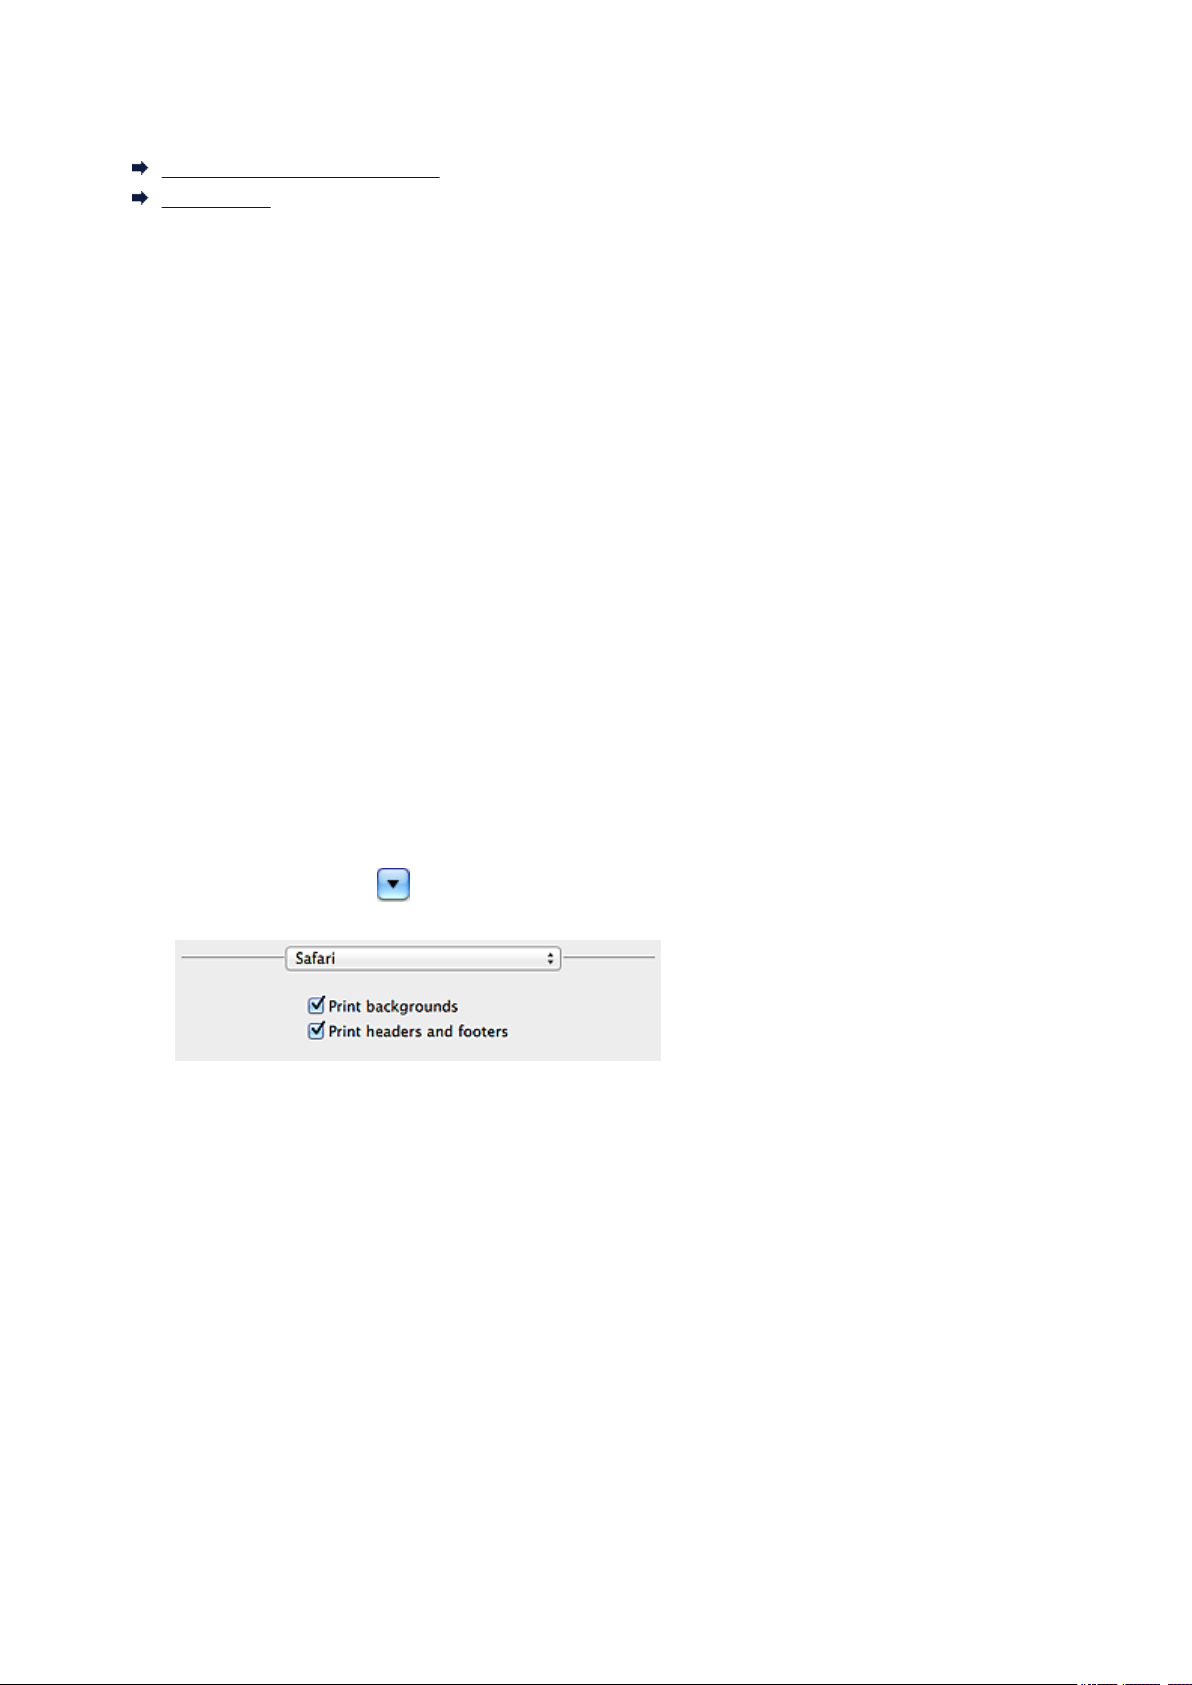
How to Print
Use the print function of your Web browser to print this guide.
To print background colors and images, follow the steps below to display the Print dialog options, then
select the Print backgrounds checkbox.
1. Click Print... from the File menu.
2. Click Show Details or (Down Arrow).
3. Select Safari from the pop-up menu.
6
Page 7

Symbols Used in This Document
Warning
Instructions that, if ignored, could result in death or serious personal injury caused by incorrect
operation of the equipment. These must be observed for safe operation.
Caution
Instructions that, if ignored, could result in personal injury or material damage caused by incorrect
operation of the equipment. These must be observed for safe operation.
Important
Instructions including important information. To avoid damage and injury or improper use of the
product, be sure to read these indications.
Note
Instructions including notes for operation and additional explanations.
Basic
Instructions explaining basic operations of your product.
Note
• Icons may vary depending on your product.
7
Page 8

Trademarks and Licenses
• Microsoft is a registered trademark of Microsoft Corporation.
• Windows is a trademark or registered trademark of Microsoft Corporation in the U.S. and/or other
countries.
• Windows Vista is a trademark or registered trademark of Microsoft Corporation in the U.S. and/or other
countries.
• Internet Explorer is a trademark or registered trademark of Microsoft Corporation in the U.S. and/or
other countries.
• Mac, Mac OS, AirPort, Safari, Bonjour, iPad, iPhone and iPod touch are trademarks of Apple Inc.,
registered in the U.S. and other countries. AirPrint and the AirPrint logo are trademarks of Apple Inc.
• IOS is a trademark or registered trademark of Cisco in the U.S. and other countries and is used under
license.
• Google Cloud Print, Google Chrome, Android, Google Play and Picasa are either registered trademarks
or trademarks of Google Inc.
• Adobe, Photoshop, Photoshop Elements, Lightroom, Adobe RGB and Adobe RGB (1998) are either
registered trademarks or trademarks of Adobe Systems Incorporated in the United States and/or other
countries.
• Photo Rag is a trademark of Hahnemühle FineArt GmbH.
• Bluetooth is a trademark of Bluetooth SIG, Inc., U.S.A. and licensed to Canon Inc.
Note
• The formal name of Windows Vista is Microsoft Windows Vista operating system.
Copyright (c) 2003-2004, Apple Computer, Inc. All rights reserved.
Redistribution and use in source and binary forms, with or without modification, are permitted provided
that the following conditions are met:
1. Redistributions of source code must retain the above copyright notice, this list of conditions and the
following disclaimer.
2. Redistributions in binary form must reproduce the above copyright notice, this list of conditions and
the following disclaimer in the documentation and/or other materials provided with the distribution.
3. Neither the name of Apple Computer, Inc. ("Apple") nor the names of its contributors may be used to
endorse or promote products derived from this software without specific prior written permission.
THIS SOFTWARE IS PROVIDED BY APPLE AND ITS CONTRIBUTORS "AS IS" AND ANY EXPRESS
OR IMPLIED WARRANTIES, INCLUDING, BUT NOT LIMITED TO, THE IMPLIED WARRANTIES OF
MERCHANTABILITY AND FITNESS FOR A PARTICULAR PURPOSE ARE DISCLAIMED. IN NO
EVENT SHALL APPLE OR ITS CONTRIBUTORS BE LIABLE FOR ANY DIRECT, INDIRECT,
INCIDENTAL, SPECIAL, EXEMPLARY, OR CONSEQUENTIAL DAMAGES (INCLUDING, BUT NOT
LIMITED TO, PROCUREMENT OF SUBSTITUTE GOODS OR SERVICES; LOSS OF USE, DATA, OR
PROFITS; OR BUSINESS INTERRUPTION) HOWEVER CAUSED AND ON ANY THEORY OF
LIABILITY, WHETHER IN CONTRACT, STRICT LIABILITY, OR TORT INCLUDING NEGLIGENCE OR
OTHERWISE) ARISING IN ANY WAY OUT OF THE USE OF THIS SOFTWARE, EVEN IF ADVISED OF
THE POSSIBILITY OF SUCH DAMAGE.
Apache License
Version 2.0, January 2004
http://www.apache.org/licenses/
TERMS AND CONDITIONS FOR USE, REPRODUCTION, AND DISTRIBUTION
8
Page 9

1. Definitions.
"License" shall mean the terms and conditions for use, reproduction, and distribution as defined by
Sections 1 through 9 of this document.
"Licensor" shall mean the copyright owner or entity authorized by the copyright owner that is granting
the License.
"Legal Entity" shall mean the union of the acting entity and all other entities that control, are controlled
by, or are under common control with that entity. For the purposes of this definition, "control" means
(i) the power, direct or indirect, to cause the direction or management of such entity, whether by
contract or otherwise, or (ii) ownership of fifty percent (50%) or more of the outstanding shares, or (iii)
beneficial ownership of such entity.
"You" (or "Your") shall mean an individual or Legal Entity exercising permissions granted by this
License.
"Source" form shall mean the preferred form for making modifications, including but not limited to
software source code, documentation source, and configuration files.
"Object" form shall mean any form resulting from mechanical transformation or translation of a Source
form, including but not limited to compiled object code, generated documentation, and conversions to
other media types.
"Work" shall mean the work of authorship, whether in Source or Object form, made available under
the License, as indicated by a copyright notice that is included in or attached to the work (an example
is provided in the Appendix below).
"Derivative Works" shall mean any work, whether in Source or Object form, that is based on (or
derived from) the Work and for which the editorial revisions, annotations, elaborations, or other
modifications represent, as a whole, an original work of authorship. For the purposes of this License,
Derivative Works shall not include works that remain separable from, or merely link (or bind by name)
to the interfaces of, the Work and Derivative Works thereof.
"Contribution" shall mean any work of authorship, including the original version of the Work and any
modifications or additions to that Work or Derivative Works thereof, that is intentionally submitted to
Licensor for inclusion in the Work by the copyright owner or by an individual or Legal Entity
authorized to submit on behalf of the copyright owner. For the purposes of this definition, "submitted"
means any form of electronic, verbal, or written communication sent to the Licensor or its
representatives, including but not limited to communication on electronic mailing lists, source code
control systems, and issue tracking systems that are managed by, or on behalf of, the Licensor for
the purpose of discussing and improving the Work, but excluding communication that is
conspicuously marked or otherwise designated in writing by the copyright owner as "Not a
Contribution."
"Contributor" shall mean Licensor and any individual or Legal Entity on behalf of whom a Contribution
has been received by Licensor and subsequently incorporated within the Work.
2. Grant of Copyright License. Subject to the terms and conditions of this License, each Contributor
hereby grants to You a perpetual, worldwide, non-exclusive, no-charge, royalty-free, irrevocable
copyright license to reproduce, prepare Derivative Works of, publicly display, publicly perform,
sublicense, and distribute the Work and such Derivative Works in Source or Object form.
3. Grant of Patent License. Subject to the terms and conditions of this License, each Contributor hereby
grants to You a perpetual, worldwide, non-exclusive, no-charge, royalty-free, irrevocable (except as
stated in this section) patent license to make, have made, use, offer to sell, sell, import, and
otherwise transfer the Work, where such license applies only to those patent claims licensable by
such Contributor that are necessarily infringed by their Contribution(s) alone or by combination of
9
Page 10

their Contribution(s) with the Work to which such Contribution(s) was submitted. If You institute patent
litigation against any entity (including a cross-claim or counterclaim in a lawsuit) alleging that the
Work or a Contribution incorporated within the Work constitutes direct or contributory patent
infringement, then any patent licenses granted to You under this License for that Work shall terminate
as of the date such litigation is filed.
4. Redistribution. You may reproduce and distribute copies of the Work or Derivative Works thereof in
any medium, with or without modifications, and in Source or Object form, provided that You meet the
following conditions:
1. You must give any other recipients of the Work or Derivative Works a copy of this License; and
2. You must cause any modified files to carry prominent notices stating that You changed the files;
and
3. You must retain, in the Source form of any Derivative Works that You distribute, all copyright,
patent, trademark, and attribution notices from the Source form of the Work, excluding those
notices that do not pertain to any part of the Derivative Works; and
4. If the Work includes a "NOTICE" text file as part of its distribution, then any Derivative Works that
You distribute must include a readable copy of the attribution notices contained within such
NOTICE file, excluding those notices that do not pertain to any part of the Derivative Works, in at
least one of the following places: within a NOTICE text file distributed as part of the Derivative
Works; within the Source form or documentation, if provided along with the Derivative Works; or,
within a display generated by the Derivative Works, if and wherever such third-party notices
normally appear. The contents of the NOTICE file are for informational purposes only and do not
modify the License. You may add Your own attribution notices within Derivative Works that You
distribute, alongside or as an addendum to the NOTICE text from the Work, provided that such
additional attribution notices cannot be construed as modifying the License.
You may add Your own copyright statement to Your modifications and may provide additional or
different license terms and conditions for use, reproduction, or distribution of Your modifications,
or for any such Derivative Works as a whole, provided Your use, reproduction, and distribution of
the Work otherwise complies with the conditions stated in this License.
5. Submission of Contributions. Unless You explicitly state otherwise, any Contribution intentionally
submitted for inclusion in the Work by You to the Licensor shall be under the terms and conditions of
this License, without any additional terms or conditions. Notwithstanding the above, nothing herein
shall supersede or modify the terms of any separate license agreement you may have executed with
Licensor regarding such Contributions.
6. Trademarks. This License does not grant permission to use the trade names, trademarks, service
marks, or product names of the Licensor, except as required for reasonable and customary use in
describing the origin of the Work and reproducing the content of the NOTICE file.
7. Disclaimer of Warranty. Unless required by applicable law or agreed to in writing, Licensor provides
the Work (and each Contributor provides its Contributions) on an "AS IS" BASIS, WITHOUT
WARRANTIES OR CONDITIONS OF ANY KIND, either express or implied, including, without
limitation, any warranties or conditions of TITLE, NON-INFRINGEMENT, MERCHANTABILITY, or
FITNESS FOR A PARTICULAR PURPOSE. You are solely responsible for determining the
appropriateness of using or redistributing the Work and assume any risks associated with Your
exercise of permissions under this License.
8. Limitation of Liability. In no event and under no legal theory, whether in tort (including negligence),
contract, or otherwise, unless required by applicable law (such as deliberate and grossly negligent
acts) or agreed to in writing, shall any Contributor be liable to You for damages, including any direct,
indirect, special, incidental, or consequential damages of any character arising as a result of this
License or out of the use or inability to use the Work (including but not limited to damages for loss of
10
Page 11

goodwill, work stoppage, computer failure or malfunction, or any and all other commercial damages
or losses), even if such Contributor has been advised of the possibility of such damages.
9. Accepting Warranty or Additional Liability. While redistributing the Work or Derivative Works thereof,
You may choose to offer, and charge a fee for, acceptance of support, warranty, indemnity, or other
liability obligations and/or rights consistent with this License. However, in accepting such obligations,
You may act only on Your own behalf and on Your sole responsibility, not on behalf of any other
Contributor, and only if You agree to indemnify, defend, and hold each Contributor harmless for any
liability incurred by, or claims asserted against, such Contributor by reason of your accepting any
such warranty or additional liability.
END OF TERMS AND CONDITIONS
11
Page 12
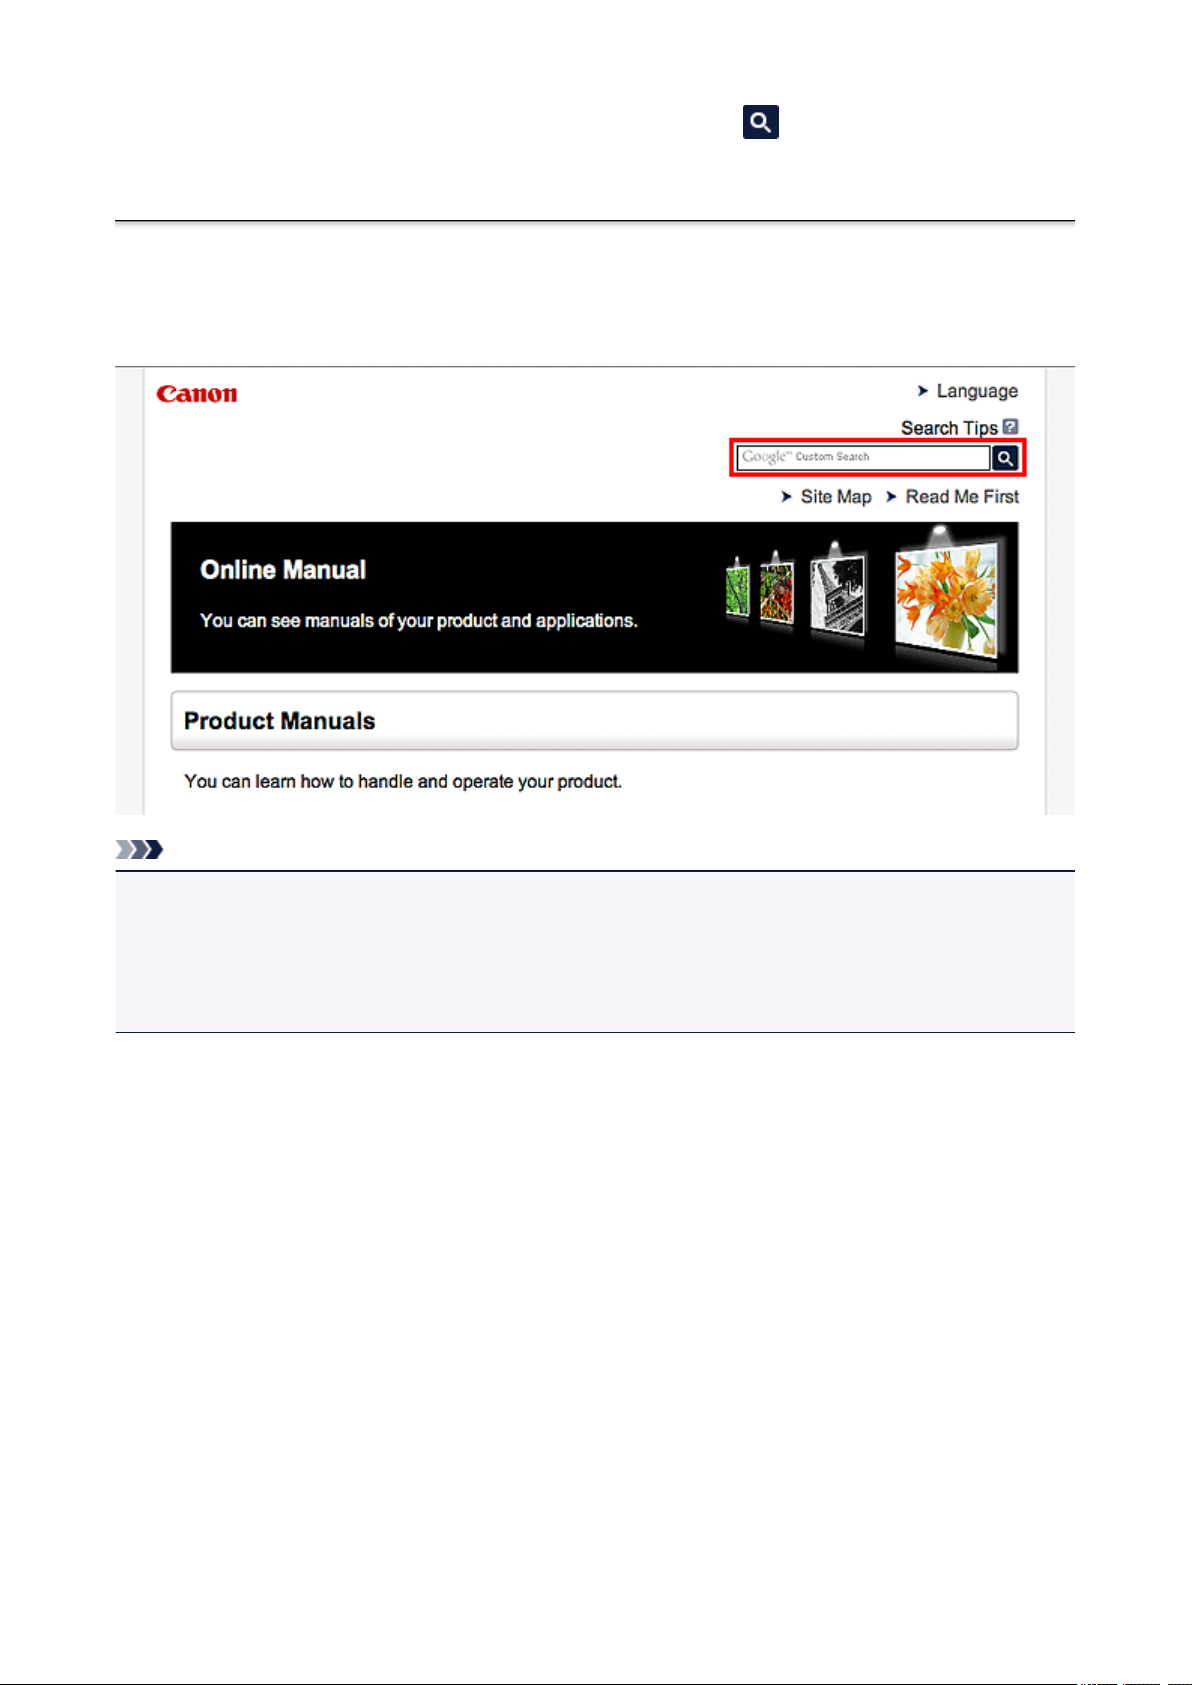
Enter keywords in the search window and click (Search).
You can search for target pages in this guide.
Search Tips
You can search for target pages by entering keywords in the search window.
Note
• The displayed screen may vary.
• When searching from this page or the "Home" page without entering your product's model name or your
application's name, all products supported by this guide will be considered for the search.
If you want to narrow down the search results, add your product's model name or your application's
name to the keywords.
• Searching for Functions
Enter your product's model name and a keyword for the function you want to learn about
Example: When you want to learn how to load paper
Enter "(your product's model name) load paper" in the search window and perform a search
• Troubleshooting Errors
Enter your product's model name and a support code
Example: When the following error screen appears
Enter "(your product's model name) 1000" in the search window and perform a search
12
Page 13

Note
• The displayed screen varies depending on your product.
• Searching for Application Functions
Enter your application's name and a keyword for the function you want to learn about
Example: When you want to learn how to print collages with My Image Garden
Enter "My Image Garden collage" in the search window and perform a search
• Searching for Reference Pages
Enter your model name and a reference page title*
* You can find reference pages more easily by entering the function name as well.
Example: When you want to browse the page referred to by the following sentence on a scanning
procedure page
Refer to "Color Settings Tab" for your model from Home of the Online Manual for details.
Enter "(your product's model name) scan Color Settings Tab" in the search window and perform a
search
13
Page 14

Notes on Operation Explanations
In this guide, most of the operations are described based on the windows displayed when OS X Mavericks
v10.9 is used.
14
Page 15

Useful Functions Available on the Machine
View Photos Easily Using My Image Garden
Connection Methods Available on the Machine
15
Page 16
View Photos Easily Using My Image Garden
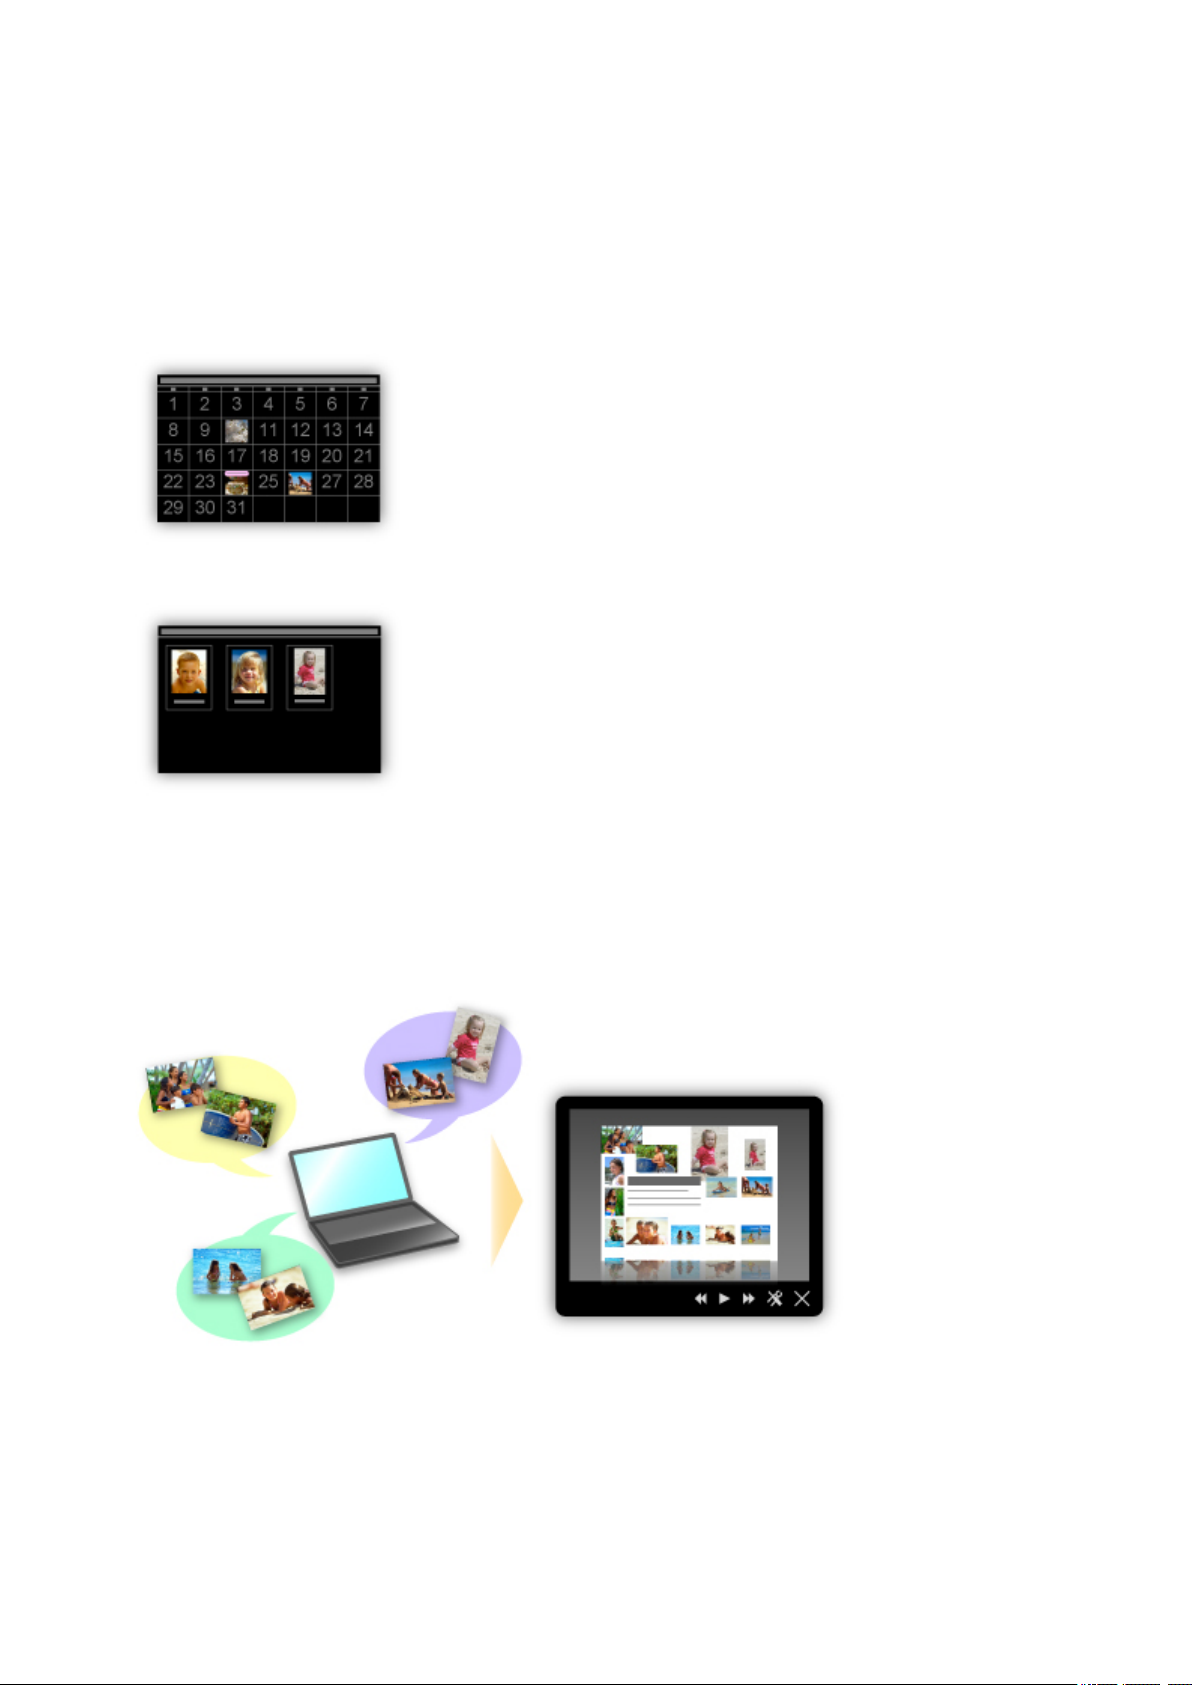
Organize Images Easily
In My Image Garden, you can register the names of people and events to photos.
You can organize photos easily as you can display them not only by folder but also by calendar, event,
and person. This also allows you to find the target photos easily when you search for them later on.
<Calendar View>
<People View>
Display Recommended Items in Slide Shows
Based on the information registered to photos, Quick Menu automatically selects the photos on your
computer and creates recommended items such as collages and cards. The created items appear in slide
shows.
Place Photos Automatically
Delightful items are created easily as the selected photos are placed automatically according to the
theme.
16
Page 17

Other Various Functions
My Image Garden has many other useful functions.
Refer to "What You Can Do with My Image Garden" for details.
17
Page 18

Connection Methods Available on the Machine
The following connection methods are available on the machine.
USB Connection
USB Connection
Connect the scanner and a computer with a USB cable. Prepare a USB cable.
18
Page 19

Overview of the Machine
Safety Guide
Safety Precautions
Regulatory and Safety Information
Main Components
Placing Items
Place the Item on the Platen
Items You Can Place & How to Place Items
Maintenance
Precautions for Safe Transport of the Machine
Legal Limitations on Use of Your Product and Use of Images
Specifications
19
Page 20

Safety Guide
Safety Precautions
Regulatory and Safety Information
20
Page 21

Safety Precautions
Choosing a location
• Do not install the machine in a location that is unstable or subject to excessive vibration.
• Do not install the machine in locations that are very humid or dusty, in direct sunlight, outdoors, or
close to a heating source.
To avoid the risk of fire or electric shocks, use the machine under the operating environment specified
in the On-screen Manual.
• Do not push the scanner into a narrow cabinet or put a tablecloth on it or place on a thick rug. If the
scanner generates heat by doing so, it may cause damage.
• Do not set up in areas where there are excessive fluctuations in temperature. Also do not move the
scanner from low-temperature areas to high temperature areas. Condensation may cause image
errors. Leave the scanner enough time to gradually adapt to the new conditions before use.
• Do not place the scanner in areas with high humidity, areas subject to direct sunlight, areas with high
temperatures and areas near flame sources. Fire or electrical shock may result.
• Leave enough space (approximately 8 in. (20 cm)) around the scanner when setting up.
Power supply
• When unplugging the USB cable, always pull on the main body. Pulling the cable may damage the
wires and lead to fire or electrical shock.
• Do not apply excessive force to plug or unplug USB cable.
• Do not damage or modify the USB cable.
• Do not place heavy objects on, pull or excessively bend, twist or tie the USB cable.
• Do not twist or tie the USB cable.
• Plug the USB cable completely into the connector.
Working around the machine
• When setting up the stand, read carefully the paper manual for setting up the stand and place the
scanner on the stand correctly.
• Keep the document cover closed except when necessary.
• Never put your hands or fingers in the scanner while it is scanning.
• Hold the scanner firmly with both hands at two ends when carrying it.
• Do not place any objects on the scanner, especially paper clips, staples and other metallic part or
containers filled with alcohol, thinners or other flammable liquid.
• Always release the scanner lock before connecting the scanner to a computer.
Running the scanner while it is locked will damage the scanner.
• When loading a thick book on the platen glass, do not press hard on the document cover.
The platen glass may break.
• Do not release the document cover until it completely opens/closes.
• Do not place items that weigh 2.0 kg (4.4 lbs.) or more on the platen glass. Also, do not press heavily
(i.e., more than 2.0 kg (4.4 lbs.)) on the document cover or the platen glass.
• Do not drop heavy books or objects on the scanner. Also do not give a shock to the platen glass. The
platen glass may break.
• When not in use for extended periods, unplug the USB cable for safety.
21
Page 22

Regulatory and Safety Information
For models containing lithium battery
• Dispose of used batteries according to the local regulations.
• Risk of explosion if battery is replaced by an incorrect type.
Users in the U.S.A.
FCC Notice (U.S.A. Only)
For 120V, 60Hz model
Model Number: K10403
This device complies with Part 15 of the FCC Rules. Operation is subject to the following two conditions:
(1) This device may not cause harmful interference, and (2) this device must accept any interference
received, including interference that may cause undesired operation.
Note: This equipment has been tested and found to comply with the limits for a Class B digital device,
pursuant to Part 15 of the FCC Rules. These limits are designed to provide reasonable protection against
harmful interference in a residential installation. This equipment generates, uses and can radiate radio
frequency energy and, if not installed and used in accordance with the instructions, may cause harmful
interference to radio communications.
However, there is no guarantee that interference will not occur in a particular installation. If this equipment
does cause harmful interference to radio or television reception, which can be determined by turning the
equipment off and on, the user is encouraged to try to correct the interference by one or more of the
following measures:
• Reorient or relocate the receiving antenna.
• Increase the separation between the equipment and receiver.
• Connect the equipment into an outlet on a circuit different from that to which the receiver is
connected.
• Consult the dealer or an experienced radio/TV technician for help.
Use of a shielded cable is required to comply with Class B limits in Subpart B of Part 15 of the FCC Rules.
Do not make any changes or modifications to the equipment unless otherwise specified in the manual. If
such changes or modifications should be made, you could be required to stop operation of the equipment.
Canon U.S.A., Inc.
One Canon Park
Melville, New York 11747
1-800-652-2666
Only for European Union and EEA (Norway, Iceland and Liechtenstein)
This symbol indicates that this product is not to be disposed of with your household waste, according to
the WEEE Directive (2012/19/EU) and national legislation. This product should be handed over to a
designated collection point, e.g., on an authorized one-for-one basis when you buy a new similar product
or to an authorized collection site for recycling waste electrical and electronic equipment (EEE). Improper
handling of this type of waste could have a possible negative impact on the environment and human
22
Page 23

health due to potentially hazardous substances that are generally associated with EEE. At the same time,
your cooperation in the correct disposal of this product will contribute to the effective usage of natural
resources. For more information about where you can drop off your waste equipment for recycling, please
contact your local city office, waste authority, approved WEEE scheme or your household waste disposal
service. For more information regarding return and recycling of WEEE products, please visit www.canon-
europe.com/weee.
Korisnici u Srbiji
Ovaj simbol označava da ovaj proizvod ne sme da se odlaže sa ostalim kućnim otpadom, u skladu sa
WEEE Direktivom (2012/19/EU) i nacionalnim zakonima. Ovaj proizvod treba predati određenom centru
za prikupljanje, npr. na osnovi "jedan-za-jedan" kada kupujete sličan novi proizvod, ili ovlašćenom centru
za prikupljanje za reciklažu istrošene električne i elektronske opreme (EEE). Nepravilno rukovanje ovom
vrstom otpada može da ima moguće negativne posledice po životnu sredinu i ljudsko zdravlje usled
potencijalno opasnih materijala koji se uglavnom vezuju za EEE. U isto vreme, vaša saradnja na
ispravnom odlaganju ovog proizvoda će doprineti efikasnom korišćenju prirodnih resursa. Za više
informacija o tome gde možete da predate vašu staru opremu radi recikliranje, vas molimo, da
kontaktirate lokalne gradske vlasti, komunalne službe, odobreni plan reciklaže ili Gradsku čistoću. Za više
informacija o vraćanju i recikliranju WEEE proizvoda, posetite stranicu www.canon-europe.com/weee.
India only.
This product is not to be disposed of with your household waste, according to the e-waste (Management
and Handling) Rules, 2011.
This product should be handed over to a designated collection point, e.g., to an authorized collection site
for recycling waste electrical and electronic equipment (EEE). Improper handling of this type of waste
could have a possible negative impact on the environment and human health due to potentially hazardous
substances that are generally associated with EEE. At the same time, your cooperation in the correct
disposal of this product will contribute to the effective usage of natural resources. For more information
regarding return and recycling of WEEE products, please visit http://www.canon.co.in/environment/.
Also, this product complies with the "India E-waste Rule 2011" and prohibits use of lead, mercury,
hexavalent chromium, polybrominated biphenyls or polybrominated diphenyl ethers in concentrations
exceeding 0.1 % by weight and 0.01 % by weight for Cadmium, except for the exemptions set in Schedule
II of the Rule.
Environmental Information
Reducing your environmental impact while saving money
Power Consumption and Activation Time
The amount of electricity a device consumes depends on the way the device is used. This product is
designed and set in a way to allow you to reduce your electricity costs. After the last print it switches to
23
Page 24

Ready Mode. In this mode it can print again immediately if required. If the product is not used for a time,
the device switches to its Power Save Mode. The devices consume less power (Watt) in these modes.
If you wish to set a longer Activation Time or would like to completely deactivate the Power Save Mode,
please consider that this device may then only switch to a lower energy level after a longer period of
time or not at all.
Canon does not recommend extending the Activation Times from the optimum ones set as default.
Energy Star
The Energy Star® programme is a voluntary scheme to promote the development and purchase of
energy efficient models, which help to minimise environmental impact.
Products which meet the stringent requirements of the Energy Star® programme for both environmental
benefits and the amount of energy consumption will carry the Energy Star® logo accordingly.
®
Paper types
This product can be used to print on both recycled and virgin paper (certified to an environmental
stewardship scheme), which complies with EN12281 or a similar quality standard. In addition it can
support printing on media down to a weight of 64g/m2, lighter paper means less resources used and a
lower environmental footprint for your printing needs.
Regulatory Model Code (RMC) is for identification and proof that the product complies with the
regulations. Please note that RMC is different from the marketing model number of the product.
24
Page 25
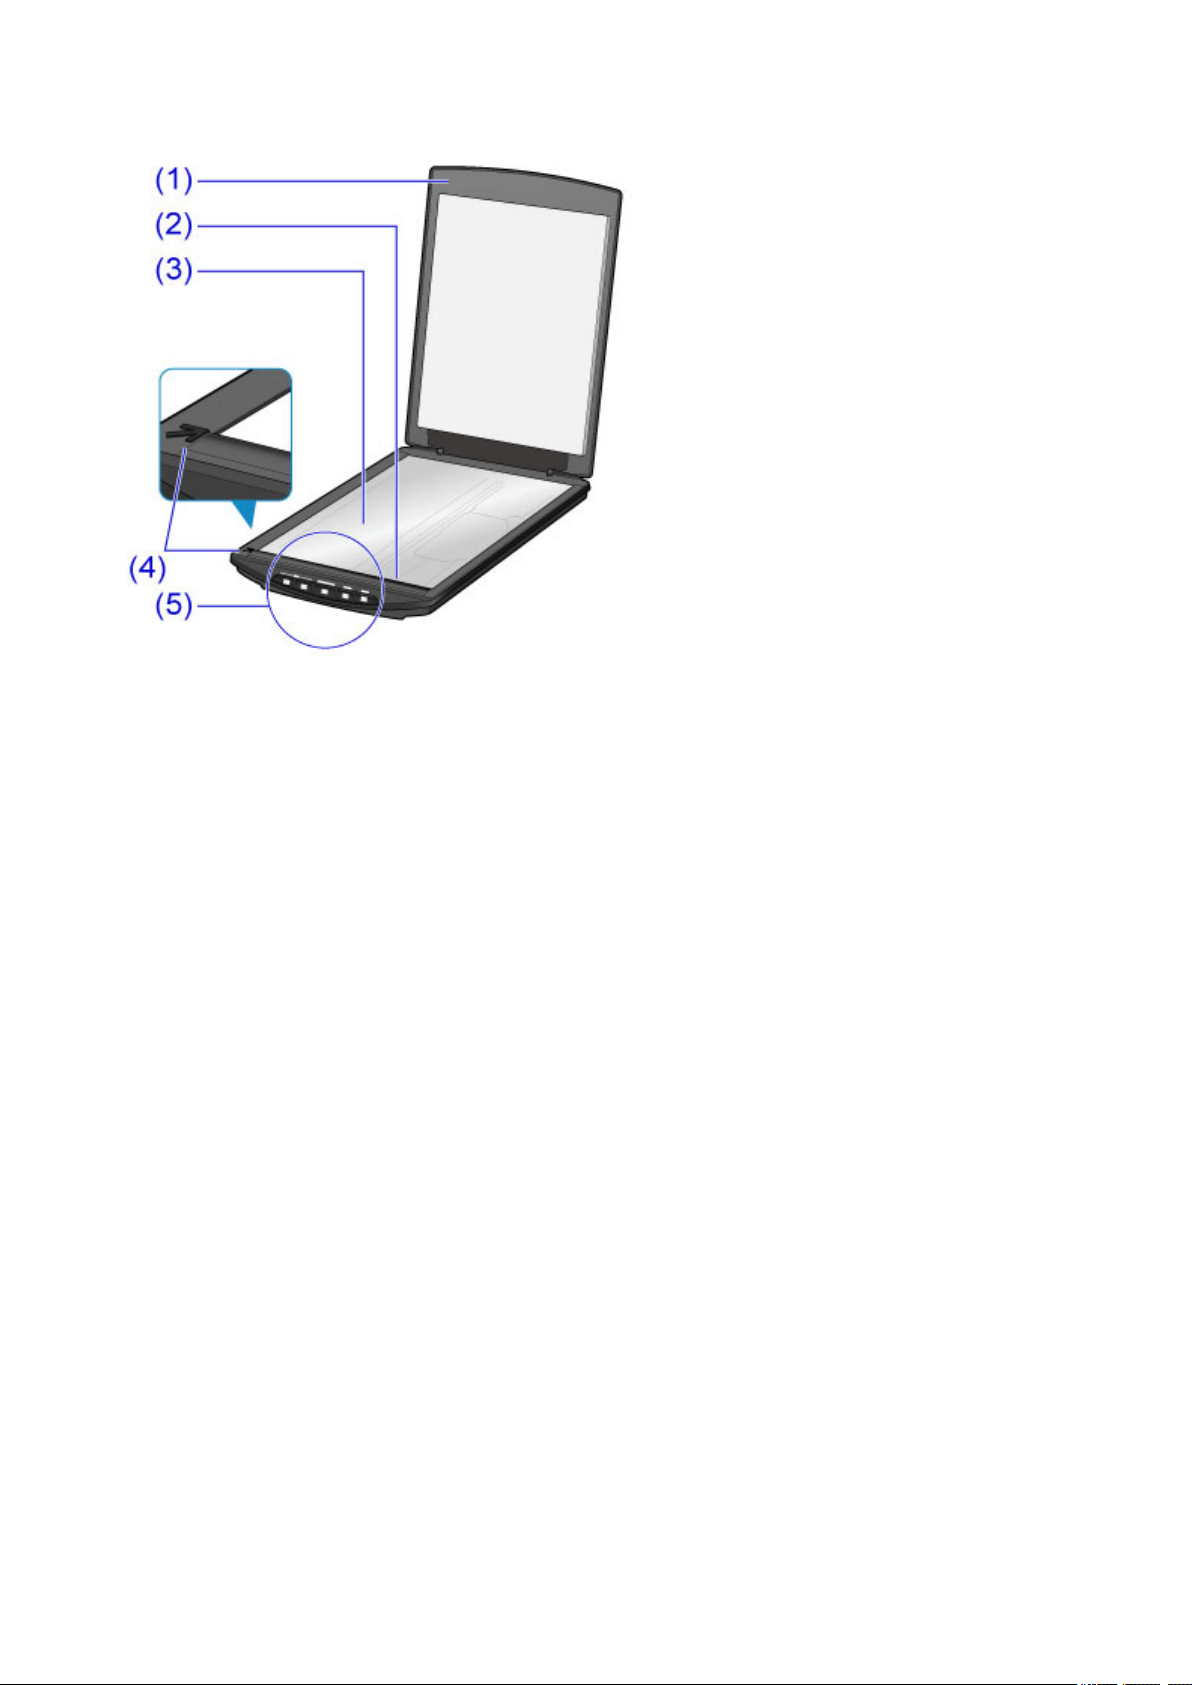
Main Components
(1) document cover
Presses down the placed item.
(2) scanning unit
The main part of the scanner that emits light and scans items.
(3) platen
Place the item to be scanned.
(4) alignment mark
Align a corner of the item with this mark.
(5) scanner buttons
You can scan easily according to your purpose by simply pressing a button.
25
Page 26
PDF buttons
SCAN START button
FINISH button
AUTO SCAN button
COPY button
SEND button
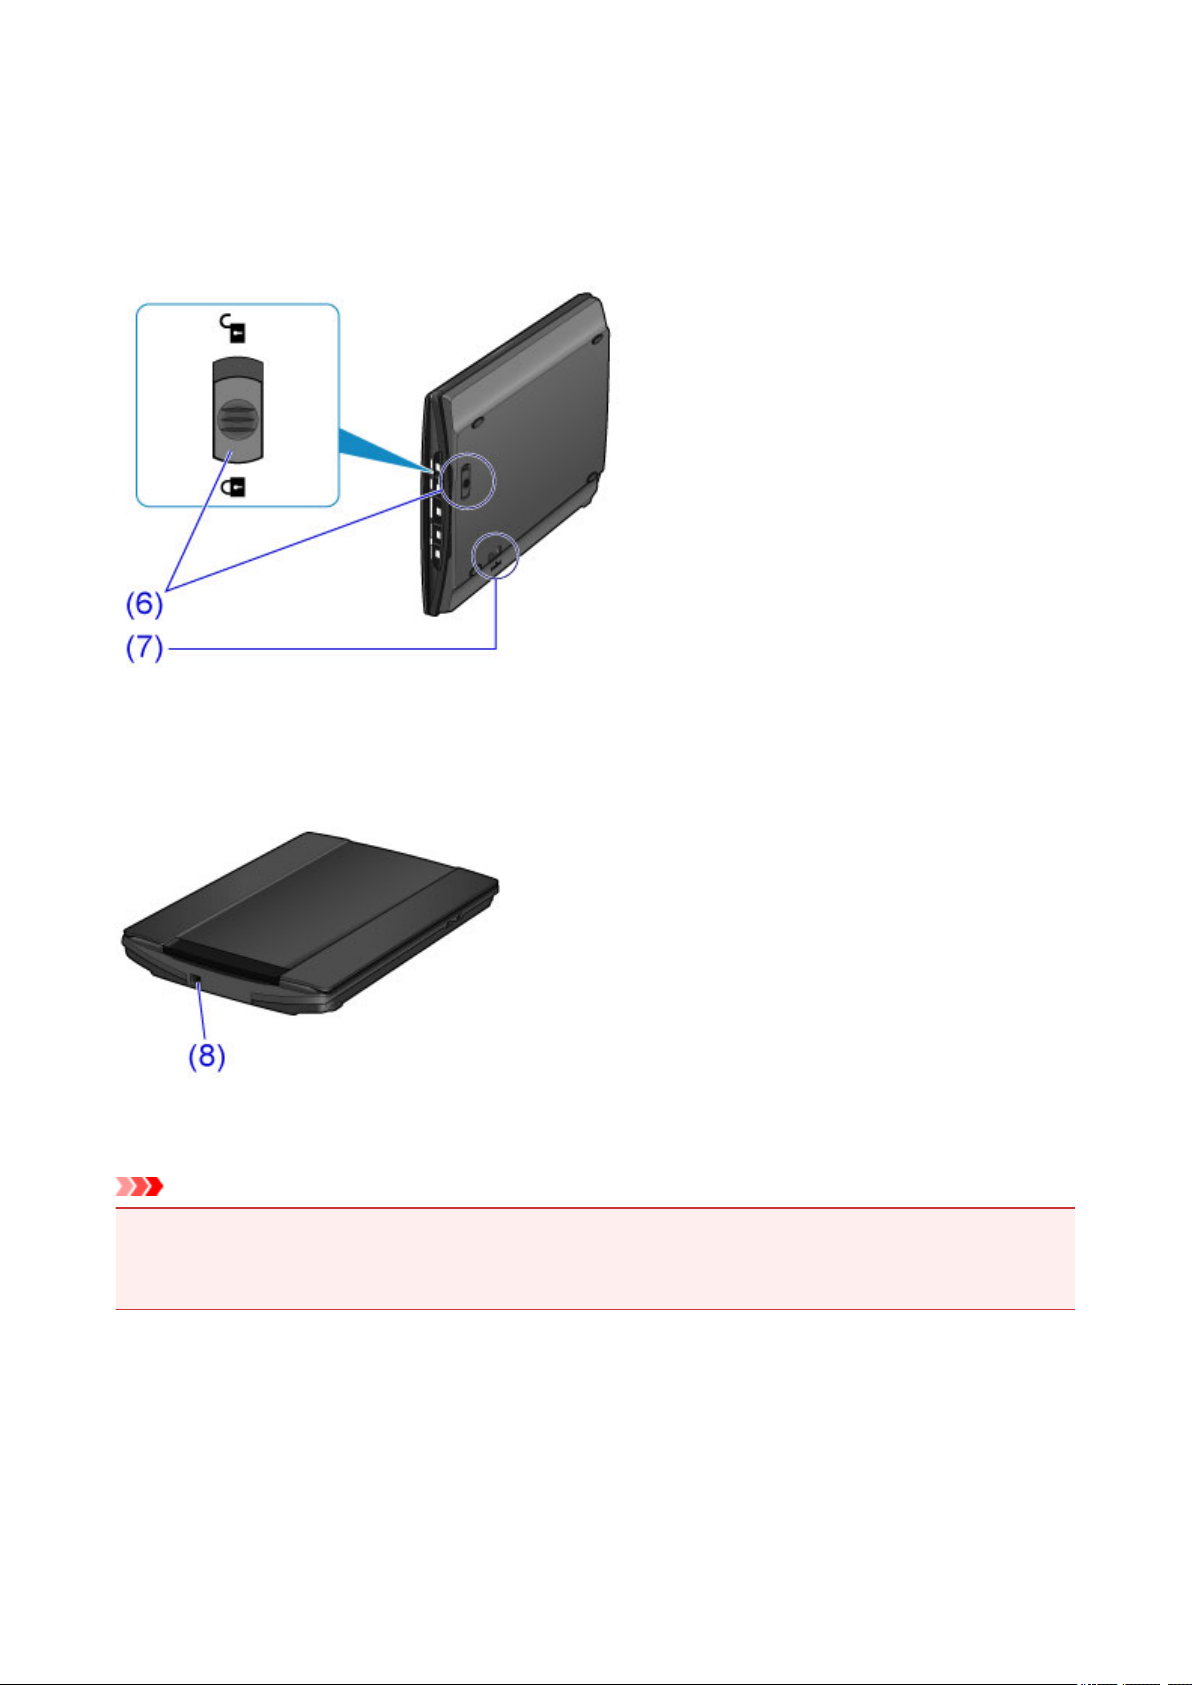
(6) scanner lock switch
Lock or unlock the scanning unit.
(7) stand locking slot
Insert the hook of the stand when setting the scanner upright.
(8) USB connector
Connect the supplied USB cable.
Important
• There is no power switch or power lamp on this scanner. No AC adapter or power cord is required.
When you connect a computer and the scanner with the USB cable and turn on the computer, the
scanner also turns on.
26
Page 27

Placing Items
Place the Item on the Platen
Items You Can Place & How to Place Items
27
Page 28
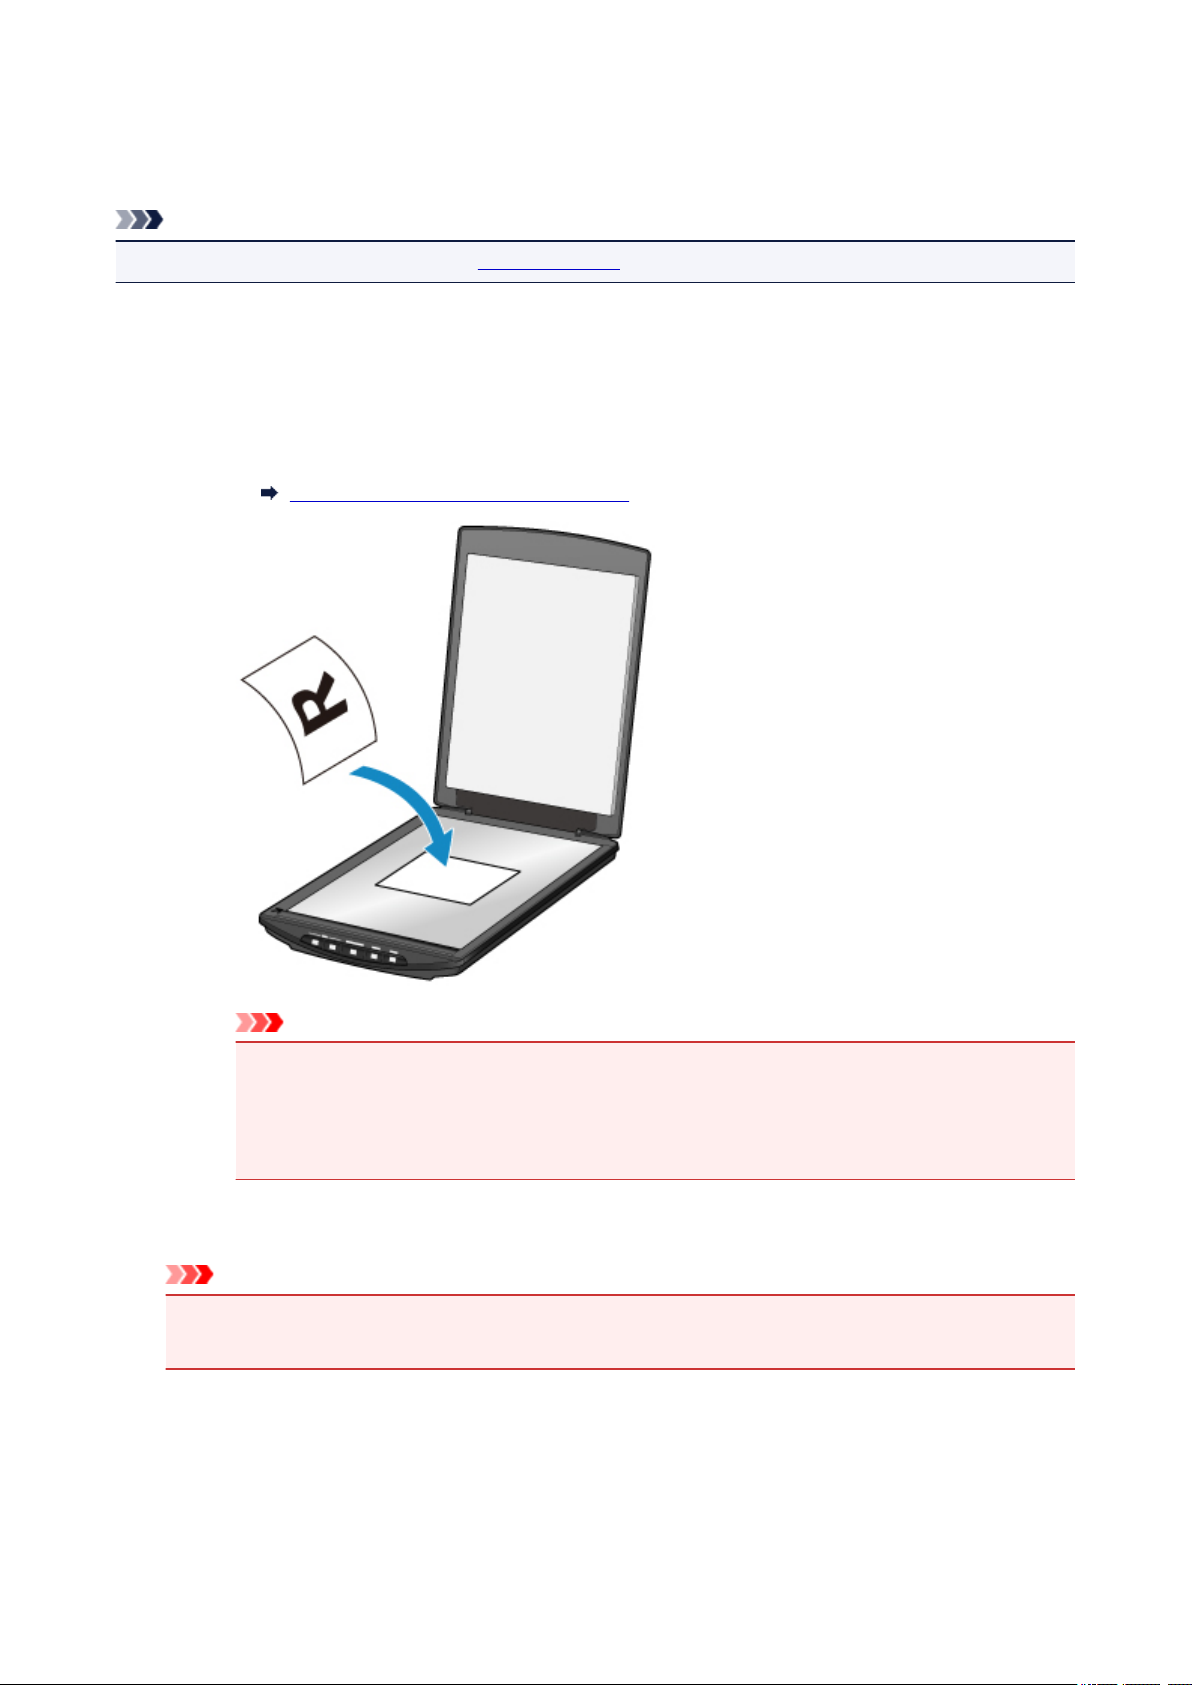
Place the Item on the Platen
Place the item you want to scan on the platen.
Note
• To scan by using the stand, refer to "Using the Stand".
Place the item on the platen.
1.
Open the document cover.
1.
Place the item on the platen with the side to scan facing down.
2.
Items You Can Place & How to Place Items
Important
•
Be sure to observe the following when placing the item on the platen. The scanner may not work
correctly or the glass may break.
Do not place any objects weighing 4.4 lb (2 kg) or more on the platen
•
Do not put any pressure of 4.4 lb (2 kg) or more on the platen
•
2. Close the document cover gently.
Important
•
After placing the item on the platen, be sure to close the document cover properly before starting
to scan.
28
Page 29
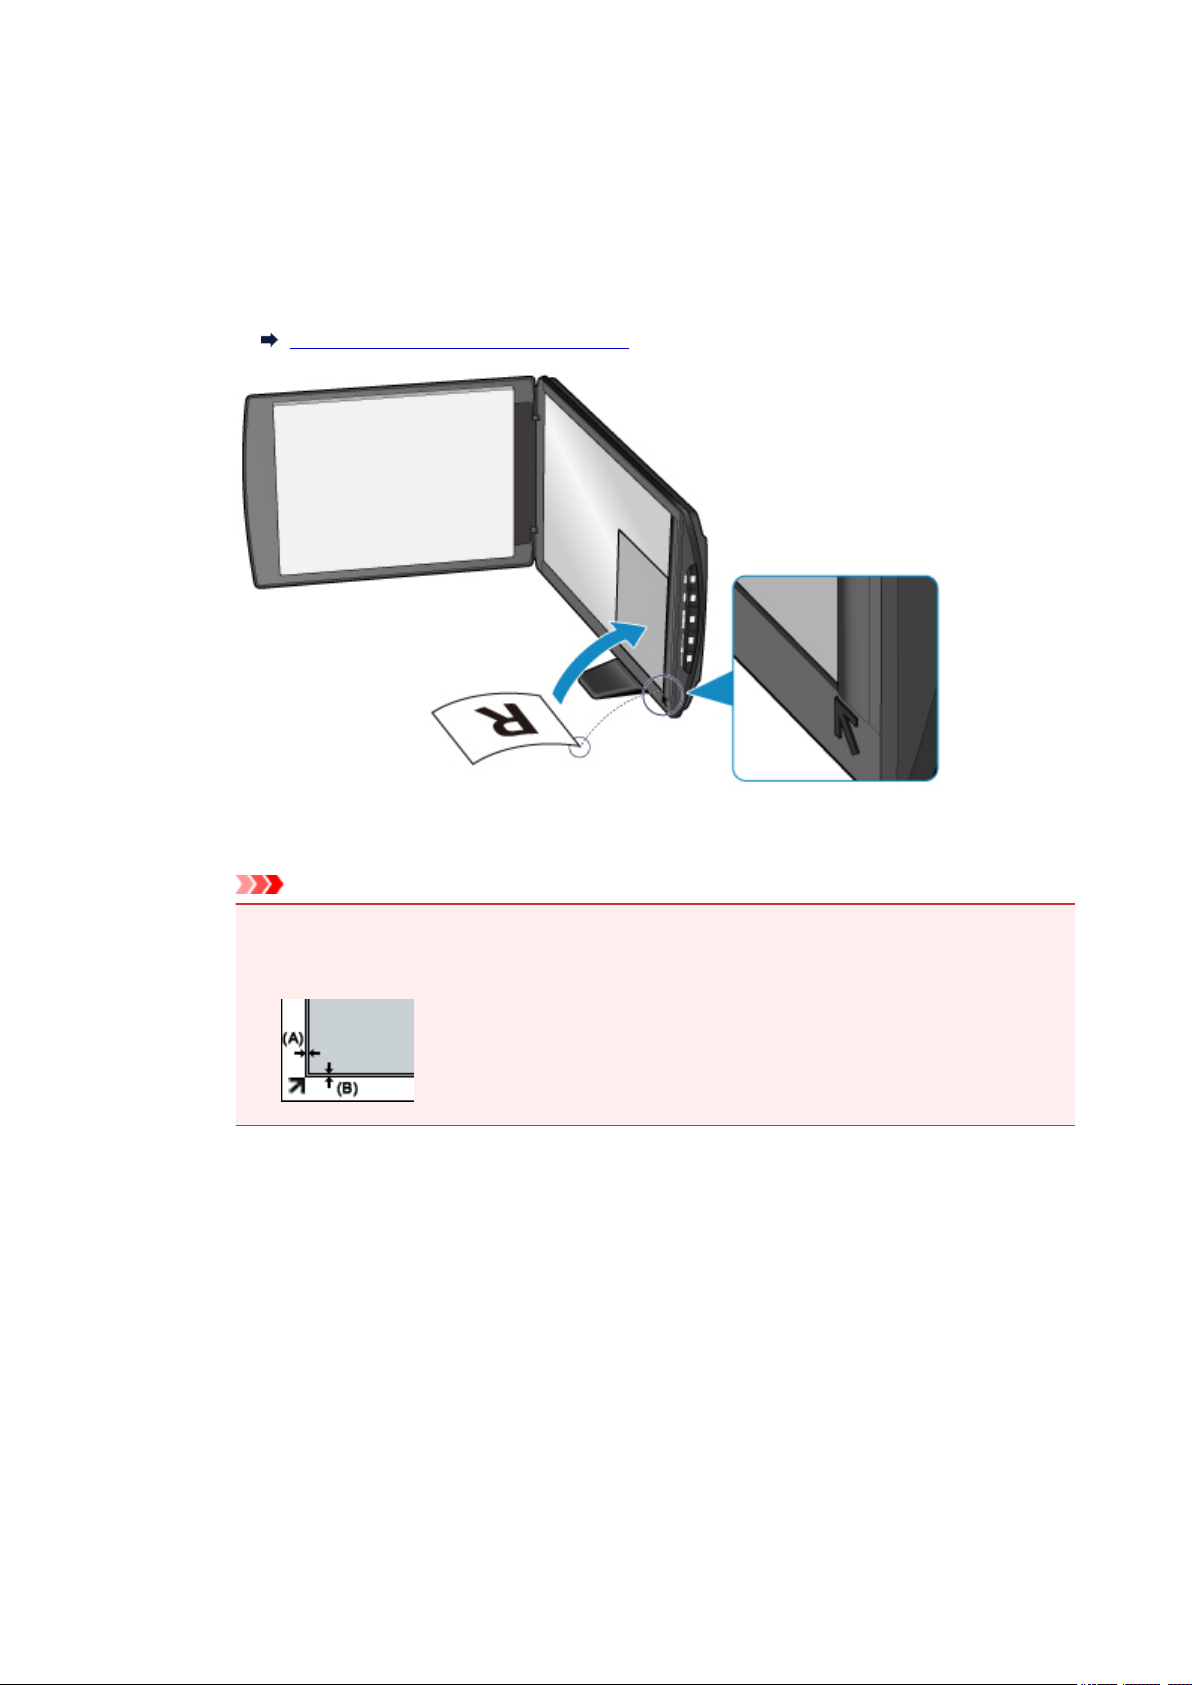
Using the Stand
1. Place the item on the platen.
1. Open the document cover.
2.
Place the item with the side to scan facing the platen and align it with the alignment mark.
Items You Can Place & How to Place Items
Important
•
If you open the document cover wide, the scanner may fall over.
•
Portions placed over (A) (0.094 inch (2.4 mm) from the left edge of the platen) or (B) (0.106 inch (2.7
mm) from the front edge) cannot be scanned.
2. Close the document cover gently.
While scanning, hold the document cover lightly with your hand to keep it closed.
29
Page 30
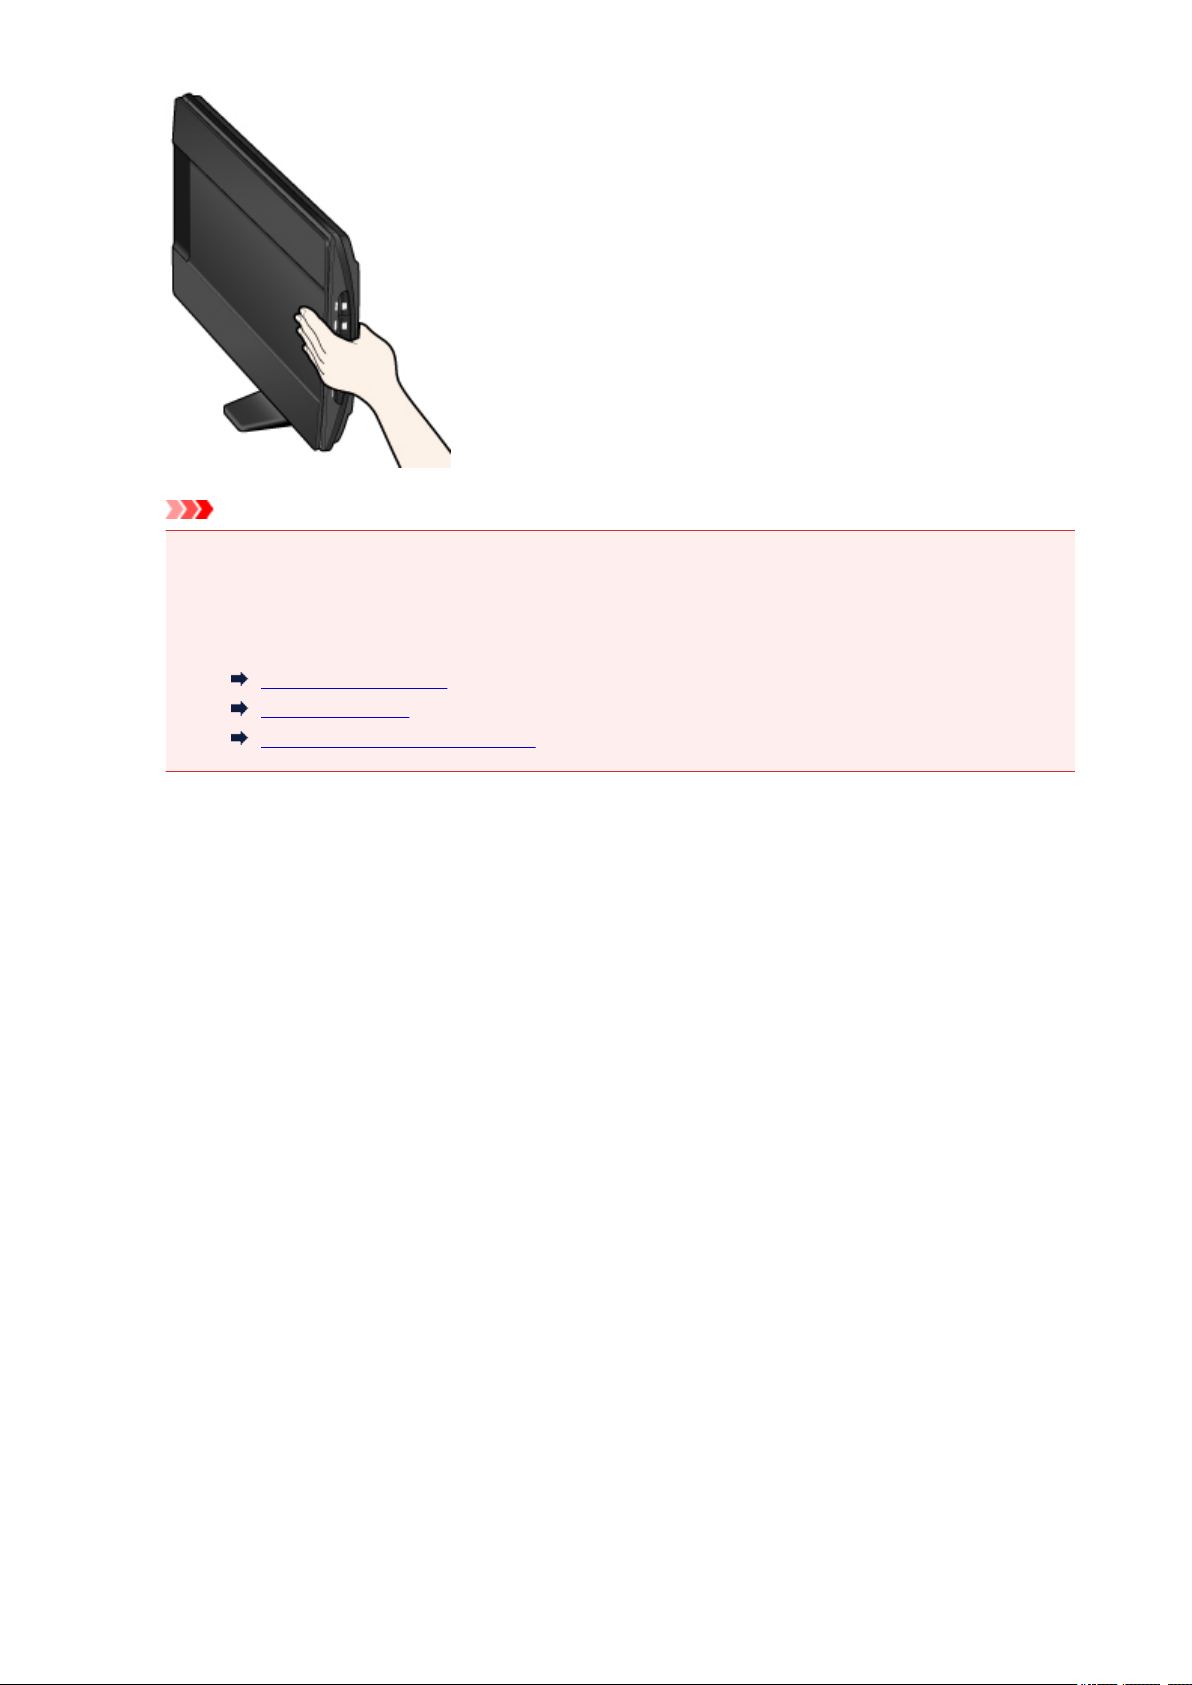
Important
When scanning with the scanner positioned upright, do not subject it to vibration during operation.
•
The correct image results may not be obtained (for example, images blur).
When using the scanner in the upright position, the item type may not be detected automatically.
•
Specify the item type and scan.
Scanning Documents
Scanning Photos
Scanning with Favorite Settings
30
Page 31

Items You Can Place & How to Place Items
The position to place an item may vary depending on the item to be scanned. Place the item in the correct
position according to the item to be scanned. If you do not place the item correctly, it may not be scanned
correctly.
The items you can place on the platen are as follows.
Property Details
Document, magazine, or newspaper
Types of items
Size (width x height) Max. 8.5 inches x 11.7 inches (21.6 cm x 29.7 cm)
Placing the Item to Be Aligned with the Alignment Mark ( )
When scanning documents, magazines, or newspapers
When scanning by specifying a standard size (A4, Letter, etc.)
Place the item with the side to scan facing down and align it with the alignment mark ( ).
Printed photo, postcard, business card, or disc (BD/DVD/CD, etc.)
Portions placed on the diagonally striped area cannot be scanned.
Important
• Portions placed over (A) (0.094 inch (2.4 mm) from the left edge of the platen) or (B) (0.106 inch (2.7
mm) from the front edge) cannot be scanned.
Placing the Item in the Center of the Platen
When scanning one printed photo, postcard, business card or BD/DVD/CD
Place the item at least 0.4 inch (1 cm) away from the edges of the platen, with the side to scan facing
down.
31
Page 32

Portions placed on the diagonally striped area cannot be scanned.
Placing Multiple Items
When scanning multiple printed photos, postcards, or business cards
Place the items at least 0.4 inch (1 cm) away from the edges of the platen, with the side to scan facing
down.
Place them at least 0.4 inch (1 cm) apart from each other as well.
You can place up to four E-sized or L-sized items or two 2L-sized or postcard-sized items.
Portions placed on the diagonally striped area cannot be scanned.
(A)0.4 inch (1 cm)
Note
• Positions of slanted items (up to approximately 10 degrees) are corrected automatically by the Skew
Correction function. Slanted photos with a long edge of approximately 7.1 inches (18 cm) or more
cannot be corrected.
• Non-rectangular or irregular shaped photos (such as photos that have been cut to various shapes)
may not be scanned correctly.
32
Page 33

Maintenance
Important
• Disconnect the USB cable from the computer before cleaning the machine.
• Do not use tissue paper, paper towels, rough-textured cloth, or similar materials for cleaning so as not
to scratch the surface.
• Never use alcohol, thinner, benzene, etc. The exterior may deform, discolor, or dissolve.
With a soft dry cloth, wipe the platen (A), the inner side of the document cover (white sheet) (B), and the
exterior (C). For stubborn dirt, clean with a well wrung damp cloth, then wipe off moisture with a soft dry
cloth. Wipe thoroughly, especially the glass surface so as not to leave any residue.
Important
• Do not press the document cover or platen heavily. The glass may break and cause injury.
• Wipe off moisture thoroughly. Scanning with moisture left on the glass surface and document cover
may affect the image.
• Do not wet the connectors or metal parts on the rear side of the machine. If they get wet, wipe them
thoroughly with a dry cloth.
• Do not wipe with a wet cloth that has not been wrung well or directly spray water or detergent onto the
machine. Moisture may get inside the machine and adhere to the inner side of the platen or sensor,
causing an image defect or malfunction.
33
Page 34

Precautions for Safe Transport of the Machine
When relocating the machine, make sure of the following.
Important
• Pack the machine in a sturdy box so that it is placed with its bottom facing down, using sufficient
protective material to ensure safe transport.
• When a shipping agent is handling transport of the machine, have its box marked "FRAGILE" or
"HANDLE WITH CARE" with the bottom of the machine facing down.
1.
Disconnect the USB cable.
2.
Secure the document cover with adhesive tape to keep it closed.
3.
Move the scanner lock switch on the bottom of the machine to the direction of the lock mark
(
), then pack the machine in the bag.
4.
Cover the four sides of the machine with the protective material when packing the machine
in the box.
34
Page 35

Legal Limitations on Use of Your Product and Use of Images
It may be unlawful to make copies of, scan, print, or use reproductions of the following documents.
The list provided is non-exhaustive. When in doubt, check with a legal representative in your jurisdiction.
• Paper money
• Money orders
• Certificates of deposit
• Postage stamps (canceled or uncanceled)
• Identifying badges or insignias
• Selective service or draft papers
• Checks or drafts issued by governmental agencies
• Motor vehicle licenses and certificates of title
• Traveler's checks
• Food stamps
• Passports
• Immigration papers
• Internal revenue stamps (canceled or uncanceled)
• Bonds or other certificates of indebtedness
• Stock certificates
• Copyrighted works/works of art without permission of copyright owner
35
Page 36

Specifications
General Specifications
Scanner type Flatbed
Sensor type CIS
Light source 3-color (RGB) LED
4800 x 4800 dpi
Optical resolution *
Selectable resolution 25 - 19200 dpi (ScanGear)
Scanning bit depth
Interface
Maximum document size A4/Letter (8.5" x 11.7"/216 x 297 mm)
Scanner buttons 5 buttons (PDF x 2, AUTO SCAN, COPY, SEND)
Operating environment
Power supply
* Optical resolution represents the maximum sampling rate based on ISO
14473.
Color: 48 bit (16 bit input for each color (RGB))/48 bit or 24 bit output (16 bit or
8 bit output for each color (RGB))
Grayscale: 16 bit or 8 bit output
Hi-Speed USB *
* The fastest speed in Hi-Speed USB mode on Windows PC. Transfer time is
not included. Scanning speed varies according to the item types, scan settings,
or specifications of the computer.
Temperature: 41 to 95 °F (5 to 35 °C)
Humidity: 10 - 90 % RH (no condensation)
Supplied via USB port (No external adapter required)
In operation: 2.5 W
Stand-by: 1.4 W *1
Power consumption
External dimensions
Weight Approx. 3.4 lb (1.6 kg.)
Off: 11 mW *1
*1 USB connection to PC.
Approx. 9.9 (W) x 14.4 (D) x 1.6 (H) inches
Approx. 250 (W) x 365 (D) x 39 (H) mm
Minimum System Requirements
Conform to the operating system's requirements when higher than those given here.
Windows
Windows 8, Windows 8.1
Operating system
Windows 7, Windows 7 SP1
Windows Vista SP1, Windows Vista SP2
Windows XP SP3 32-bit only
36
Page 37

Browser
Internet Explorer 8 or later
3.1 GB
Hard disk space
Display XGA 1024 x 768
Note: For bundled software installation.
The necessary amount of hard disk space may be changed without notice.
Mac OS
Operating system Mac OS X v10.6.8 or later
Browser Safari 5 or later
1.5 GB
Hard disk space
Display XGA 1024 x 768
• An internet connection is required to view the Online Manual.
• Windows: .NET Framework 4 or 4.5 must be installed to use the Windows software.
• Windows: A CD-ROM Drive or internet connection is required during software installation.
• Windows: XPS Essentials Pack is required to print on Windows XP.
• Windows: Operation can only be guaranteed on a computer with Windows 8.1, Windows 8, Windows
7, Windows Vista or Windows XP pre-installed.
• Windows: Some functions may not be available with Windows Media Center.
• Mac OS: Hard Disk must be formatted as Mac OS Extended (Journaled) or Mac OS Extended.
• Mac OS: For Mac OS, an internet connection is required during software installation.
• Windows: The TWAIN driver (ScanGear) is based on the TWAIN 1.9 Specification and requires the
Data Source Manager bundled with the operating system.
Note: For bundled software installation.
The necessary amount of hard disk space may be changed without notice.
Information in this guide is subject to change without notice.
37
Page 38

Scanning
Scanning from a Computer
Scanning Using the Scanner Buttons
38
Page 39

Scanning from a Computer
Scanning with IJ Scan Utility
Scanning with ScanGear
Scanning with Scanner Driver
Useful Information on Scanning
Placing Items (When Scanning from a Computer)
39
Page 40

Scanning with IJ Scan Utility
What Is IJ Scan Utility (Scanner Software)?
Starting IJ Scan Utility
Easy Scanning with Auto Scan Basic
Scanning Documents
Scanning Photos
Scanning with Favorite Settings
Scanning Items Larger than the Platen (Image Stitch)
Scanning Multiple Items at One Time
Saving after Checking Scan Results
Sending Scanned Images via E-mail
Extracting Text from Scanned Images (OCR)
IJ Scan Utility Screens
40
Page 41

What Is IJ Scan Utility (Scanner Software)?
IJ Scan Utility is an application that allows you to easily scan documents, photos, etc.
You can complete from scanning to saving at one time by simply clicking the corresponding icon in the IJ
Scan Utility main screen.
What You Can Do with IJ Scan Utility
Scan Easily according to Purposes
You can scan by simply clicking an icon such as Auto to scan easily, Document to sharpen text in a
document or magazine for better readability, or Photo to scan with settings suitable for photos,
according to the item type or your purpose.
Note
• Refer to "IJ Scan Utility Main Screen" for details on the IJ Scan Utility main screen.
Save Scanned Images Automatically
Scanned images are automatically saved in a preset folder. You can change the folder as required.
Note
• The default save folder is the Pictures folder.
• Refer to "Settings Dialog" for how to specify a folder.
Integrate with Applications
You can utilize scanned images through integration with other applications; display scanned images in
your favorite application, attach them to e-mails, extract text from images, and more.
41
Page 42

Important
• Some functions are available only when My Image Garden is installed.
Note
• Refer to "Settings Dialog" for how to set the applications to integrate with.
42
Page 43

Starting IJ Scan Utility
From the Go menu of Finder, select Applications, then double-click the Canon Utilities folder, IJ Scan
Utility folder, and then Canon IJ Scan Utility2 icon to start IJ Scan Utility.
43
Page 44

Easy Scanning with Auto Scan
You can scan easily by automatically detecting the item type.
Important
• The following types of items may not be scanned correctly. In that case, adjust the cropping frames
(selection boxes; scan areas) in the screen displayed by clicking Driver in the IJ Scan Utility main
screen and scan again.
• Photos that have a whitish background
• Items printed on white paper, hand-written documents, business cards, etc.
• Thin items
• Thick items
1.
Place items on the platen of your scanner.
Placing Items (When Scanning from a Computer)
2.
Start IJ Scan Utility.
3.
Click Auto.
Scanning starts.
Note
• Click Cancel to cancel the scan.
• To apply suitable corrections based on the item type, click Settings..., then select the Apply
recommended image correction checkbox in the Settings (Auto Scan) dialog.
• Scanned images are saved in the folder set for Save in in the Settings (Auto Scan) dialog displayed
by clicking Settings.... In the Settings (Auto Scan) dialog, you can also make advanced scan settings.
• Refer to the following pages to scan by specifying the item type.
Scanning Photos
Scanning Documents
Scanning with Favorite Settings
44
Page 45

Scanning Documents
You can scan items placed on the platen with settings suitable for documents.
1. Place the item on the platen.
Placing Items (When Scanning from a Computer)
2. Start IJ Scan Utility.
3.
Click Settings..., then set the paper size, resolution, etc. in the Settings (Document Scan)
dialog as required.
When setting is completed, click OK.
4.
Click Document.
Scanning starts.
Note
• Click Cancel to cancel the scan.
• Scanned images are saved in the folder set for Save in in the Settings (Document Scan) dialog
displayed by clicking Settings.... In the Settings (Document Scan) dialog, you can also make
advanced scan settings.
45
Page 46

Scanning Photos
You can scan photos placed on the platen with settings suitable for photos.
1. Place the photo on the platen.
Placing Items (When Scanning from a Computer)
2. Start IJ Scan Utility.
3.
Click Settings..., then set the paper size, resolution, etc. in the Settings (Photo Scan)
dialog as required.
When setting is completed, click OK.
4.
Click Photo.
Scanning starts.
Note
• Click Cancel to cancel the scan.
• Scanned images are saved in the folder set for Save in in the Settings (Photo Scan) dialog displayed
by clicking Settings.... In the Settings (Photo Scan) dialog, you can also make advanced scan
settings.
46
Page 47

Scanning with Favorite Settings
You can scan items placed on the platen with your favorite settings saved beforehand.
This is convenient for saving frequently used settings or when specifying scan settings in detail.
1. Start IJ Scan Utility.
Click Settings..., then set the item type, resolution, etc. in the Settings (Custom Scan)
2.
dialog as required.
When setting is completed, click OK.
Note
Once the settings are made, you can scan with the same settings from the next time.
•
3.
Place the item on the platen.
Placing Items (When Scanning from a Computer)
4.
Click Custom.
Scanning starts.
Note
• Click Cancel to cancel the scan.
• Scanned images are saved in the folder set for Save in in the Settings (Custom Scan) dialog
displayed by clicking Settings.... In the Settings (Custom Scan) dialog, you can also make advanced
scan settings.
47
Page 48

Scanning Items Larger than the Platen (Image Stitch)
You can scan the left and right halves of an item larger than the platen and combine them back into one
image. Items up to approximately twice as large as the platen are supported.
Note
• The following explains how to scan from the item to be placed on the left side.
1.
Start IJ Scan Utility.
2.
Click Settings..., then set the item type, resolution, etc. in the Settings (Scan and Stitch)
dialog as required.
When setting is completed, click OK.
3.
Click Stitch.
The Image Stitch window appears.
4.
In Select Output Size, select an output size according to the paper size.
5. Make sure that Scan from Left is selected in Scan Direction.
48
Page 49

6.
Place the item that is to be displayed on the left side of the screen face-down on the platen.
7.
Click Start Scanning Image 1.
The first item is scanned and appears in 1.
Note
•
Click Cancel to cancel the scan.
8. Place the item that is to be displayed on the right side of the screen face-down on the
platen.
49
Page 50

9. Click Start Scanning Image 2.
The second item is scanned and appears in 2.
Note
• Click Cancel to cancel the scan.
10.
Adjust the scanned images as required.
Use the Toolbar to rotate or zoom in/out, or drag the images to adjust their positions.
Note
•
Select the Adjust cropping frames checkbox to specify the area to be saved.
50
Page 51

Adjusting Cropping Frames in the Image Stitch Window
• To scan an item again, select the image in the Preview area or the thumbnail at the top of the
screen, then click (Delete). The selected image is deleted, allowing you to scan the item
again.
11. Click Save.
The combined image is saved.
Note
• Refer to "Image Stitch Window" for details on the Image Stitch window.
• You can make advanced scan settings in the Settings (Scan and Stitch) dialog displayed by clicking
Settings....
51
Page 52

Scanning Multiple Items at One Time
You can scan two or more photos (small items) placed on the platen at one time and save each image
individually.
Important
• The following types of items may not be scanned correctly. In that case, adjust the cropping frames
(selection boxes; scan areas) in the screen displayed by clicking Driver in the IJ Scan Utility main
screen and scan again.
• Photos that have a whitish background
• Items printed on white paper, hand-written documents, business cards, etc.
• Thin items
• Thick items
Using Auto Scan:
Whether there are multiple items or not is detected automatically. Click Auto and scan.
Easy Scanning with Auto Scan
Not Using Auto Scan:
In the Settings dialog, set Paper Size to Auto scan and scan.
Note
• The screens for scanning with favorite settings are used as examples in the following descriptions.
1.
Place the items on the platen.
Placing Items (When Scanning from a Computer)
2.
Start IJ Scan Utility.
3. Click Settings....
The Settings dialog appears.
4. Click Custom Scan.
52
Page 53

5.
Select Select Source according to the items to be scanned.
6. Select Auto scan for Paper Size, then click OK.
53
Page 54

The IJ Scan Utility main screen appears.
Note
• Refer to the following pages for details on the setting items in the Settings dialog.
Settings (Document Scan) Dialog
Settings (Photo Scan) Dialog
Settings (Custom Scan) Dialog
7.
Click Custom.
Multiple items are scanned at one time.
Note
Click Cancel to cancel the scan.
•
Scanned images are saved in the folder set for Save in in the corresponding Settings dialog displayed
•
by clicking Settings.... In each Settings dialog, you can also make advanced scan settings.
54
Page 55

Saving after Checking Scan Results
You can check the scan results, then save the images to a computer.
Important
• You cannot check the scan results before saving when scanned using Auto scan or the scanner
buttons.
Note
• The screens for scanning photos are used as examples in the following descriptions.
1.
Start IJ Scan Utility.
2.
Click Settings....
The Settings dialog appears.
3.
Click Photo Scan.
4. Select the Check scan results checkbox, then click OK.
55
Page 56

The IJ Scan Utility main screen appears.
Note
• Refer to the following pages for details on the setting items in the Settings dialog.
Settings (Document Scan) Dialog
Settings (Photo Scan) Dialog
Settings (Custom Scan) Dialog
Settings (Scan and Stitch) Dialog
Settings (Driver) Dialog
5.
Click Photo.
Scanning starts.
When scanning is completed, the Save Settings dialog appears.
Note
•
Click Cancel to cancel the scan.
6. Change the image order or file save options as required.
You can change the image order or file save options in the Save Settings dialog.
56
Page 57

Note
• The default save folder is the Pictures folder.
7. Click OK.
Scanned images are saved according to the settings.
57
Page 58

Sending Scanned Images via E-mail
You can send scanned images via e-mail.
Note
• The screens for scanning photos are used as examples in the following descriptions.
Start IJ Scan Utility.
1.
2.
Click Settings....
The Settings dialog appears.
3.
Click Photo Scan.
4. Select Attach to e-mail in Application Settings, then select an e-mail client.
58
Page 59

5.
Click OK.
Note
• You can add e-mail clients to use for attachments from the pop-up menu.
• If None (Attach Manually) is selected, manually attach scanned and saved images to e-mail.
The IJ Scan Utility main screen appears.
Note
•
Refer to the following pages for details on the setting items in the Settings dialog.
59
Page 60

Settings (Auto Scan) Dialog
Settings (Document Scan) Dialog
Settings (Photo Scan) Dialog
Settings (Custom Scan) Dialog
Settings (Driver) Dialog
6. Click Photo.
Scanning starts.
When scanning is completed, the specified e-mail client starts and the images will be attached to a new
message.
Note
• Click Cancel to cancel the scan.
• The scanned images are saved according to the settings made in the Settings dialog.
When the Check scan results checkbox is selected in the Settings dialog, the Save Settings
•
dialog appears. After you set the save options and click OK, the scanned images are saved and
automatically attached to a new message of the specified e-mail client.
7.
Specify the recipient, enter the subject and message, then send e-mail.
Refer to the manual of your e-mail client for e-mail settings.
60
Page 61

Extracting Text from Scanned Images (OCR)
Scan text in scanned magazines and newspapers and display it in your text editor.
Note
• You can extract text when scanning via Document, Custom, or Driver.
• The screens for scanning documents are used as examples in the following descriptions.
1.
Start IJ Scan Utility.
2.
Click Settings....
The Settings dialog appears.
3.
Click Document Scan.
Note
•
For Resolution, only 300 dpi or 400 dpi can be set when Start OCR is selected in Application
Settings.
4. Select Start OCR for Application Settings, then select the application in which you want
to display the result.
61
Page 62

5.
Click OK.
Note
• If a compatible application is not installed, the text in the image is extracted and appears in your
text editor.
Text to be displayed is based on Document Language in the Settings (General Settings)
dialog. Select the language you want to extract in Document Language and scan.
• You can add the application from the pop-up menu.
The IJ Scan Utility main screen appears.
62
Page 63

Note
• Refer to the following pages for details on the setting items in the Settings dialog.
Settings (Document Scan) Dialog
Settings (Custom Scan) Dialog
Settings (Driver) Dialog
6. Click Document.
Scanning starts.
When scanning is completed, the scanned images are saved according to the settings, and the extracted
text appears in the specified application.
Note
• Click Cancel to cancel the scan.
• Text displayed in your text editor is for guidance only. Text in the image of the following types of
documents may not be detected correctly.
• Documents containing text with font size outside the range of 8 points to 40 points (at 300 dpi)
• Slanted documents
• Documents placed upside down or documents with text in the wrong orientation (rotated
characters)
• Documents containing special fonts, effects, italics, or hand-written text
• Documents with narrow line spacing
• Documents with colors in the background of text
• Documents containing multiple languages
63
Page 64

IJ Scan Utility Screens
IJ Scan Utility Main Screen
Settings Dialog
Settings (Auto Scan) Dialog
Settings (Document Scan) Dialog
Settings (Photo Scan) Dialog
Settings (Custom Scan) Dialog
Settings (Scan and Stitch) Dialog
Settings (Driver) Dialog
Settings (AUTO SCAN) Dialog
Settings (PDF) Dialog
Settings (COPY) Dialog
Settings (SEND) Dialog
Settings (General Settings) Dialog
Save Settings Dialog
Image Stitch Window
64
Page 65

IJ Scan Utility Main Screen
From the Go menu of Finder, select Applications, then double-click the Canon Utilities folder, IJ Scan
Utility folder, and then Canon IJ Scan Utility2 icon to start IJ Scan Utility.
You can complete from scanning to saving at one time by simply clicking the corresponding icon.
Product Name
Displays the name of the product that IJ Scan Utility is currently set to use.
If the displayed product is not the one you want to use, select the desired product from the list.
Auto
Detects the item type automatically and saves them to a computer. The data format for saving will also
be set automatically.
Save settings and the response after scanning can be specified in the Settings (Auto Scan) dialog.
Document
Scans items as documents and saves them to a computer.
Scan/save settings and the response after scanning can be specified in the Settings (Document Scan)
dialog.
Photo
Scans items as photos and saves them to a computer.
Scan/save settings and the response after scanning can be specified in the Settings (Photo Scan)
dialog.
Custom
Scans items with your favorite settings and saves the images to a computer. The item type can be
automatically detected.
Scan/save settings and the response after scanning can be specified in the Settings (Custom Scan)
dialog.
Stitch
Displays the Image Stitch window in which you can scan the left and right halves of an item larger than
the platen and combine the scanned images back into one image.
Scan/save settings and the response after scanning can be specified in the Settings (Scan and Stitch)
dialog.
Driver
Allows you to make image corrections and color adjustments when scanning.
Scan/save settings and the response after scanning can be specified in the Settings (Driver) dialog.
Instructions
Opens this guide.
65
Page 66

Settings...
Displays the Settings dialog in which you can specify the scan/save settings and the response after
scanning.
66
Page 67

Settings Dialog
There are three tabs in the Settings dialog: (Scanning from a Computer), (Scanning Using the
Scanner Buttons), and (General Settings). When you click a tab, the view in the red frame switches and
you can make advanced settings to functions on each tab.
(Scanning from a Computer) Tab
You can specify how to respond when scanning from IJ Scan Utility or My Image Garden.
Settings (Auto Scan) Dialog
Settings (Document Scan) Dialog
Settings (Photo Scan) Dialog
Settings (Custom Scan) Dialog
Settings (Scan and Stitch) Dialog
Settings (Driver) Dialog
(Scanning Using the Scanner Buttons) Tab
You can specify how to respond when scanning using the scanner buttons.
Settings (AUTO SCAN) Dialog
Settings (PDF) Dialog
Settings (COPY) Dialog
Settings (SEND) Dialog
67
Page 68

Important
• When the Settings dialog is displayed from My Image Garden, the (Scanning Using the Scanner
Buttons) tab does not appear.
(General Settings) Tab
You can set the product to use, file size restriction on e-mail attachment, language to detect text in
images, and folder in which to save images temporarily.
Settings (General Settings) Dialog
68
Page 69

Settings (Auto Scan) Dialog
Click Auto Scan on the (Scanning from a Computer) tab to display the Settings (Auto Scan) dialog.
In the Settings (Auto Scan) dialog, you can make advanced scan settings to scan by automatically
detecting the item type.
(1) Scan Options Area
(2) Save Settings Area
(3) Application Settings Area
Important
• When the Settings dialog is displayed from My Image Garden, the setting items for Application
Settings do not appear.
Supported Items
Photos, postcards, business cards, magazines, newspapers, documents, and BD/DVD/CD.
Important
• To scan the following types of items, specify the item type and size in the Settings (Document Scan)
dialog, Settings (Photo Scan) dialog, or Settings (Custom Scan) dialog, then click Photo,
Document, or Custom in the IJ Scan Utility main screen. You cannot scan correctly with Auto.
• A4 size photos
• Text documents smaller than 2L (5 inches x 7 inches) (127 mm x 178 mm), such as paperback
pages with the spine cut off
• Items printed on thin white paper
• Long narrow items such as panoramic photos
• Reflective disc labels may not be scanned as expected.
• Place items to be scanned on the platen correctly. Otherwise, items may not be scanned correctly.
69
Page 70

Refer to "Placing Items (When Scanning from a Computer)" for how to place items.
Note
• To reduce moire in scans, set Select Source to Magazine in the Settings (Document Scan) dialog or
Settings (Custom Scan) dialog, then click Document or Custom in the IJ Scan Utility main screen.
(1) Scan Options Area
Apply recommended image correction
Applies suitable corrections automatically based on the item type.
Important
• The color tone may differ from the source image due to corrections. In that case, deselect the
checkbox and scan.
Note
• Scanning takes longer than usual when you enable this function.
(2) Save Settings Area
File Name
Enter the file name of the image to be saved. When you save a file, the date and four digits are
appended to the set file name in the "_20XX0101_0001" format.
Note
• When you select the Save to a subfolder with current date checkbox, the date and four digits
are appended to the set file name.
Save in
Displays the folder in which to save the scanned images. To change the folder, specify the
destination folder in the dialog displayed by selecting Add... from the pop-up menu.
The default save folder is the Pictures folder.
Important
• When the Settings dialog is displayed from My Image Garden, this option does not appear.
Data Format
Auto is selected. The following data formats are automatically applied according to the item type
when saving.
• Photos, postcards, BD/DVD/CD, and business cards: JPEG
• Magazines, newspapers, and documents: PDF
Important
• The save format may differ depending on how you place the item.
Placing Items (When Scanning from a Computer)
JPEG Image Quality
You can specify the image quality of JPEG files.
70
Page 71

PDF Compression
Select the compression type for saving PDF files.
Standard
It is recommended that you normally select this setting.
High
Compresses the file size when saving, allowing you to reduce the load on your network/server.
Create a PDF file that supports keyword search
Select this checkbox to convert text in images into text data and create PDF files that support
keyword search.
Note
• PDF files that are searchable in the language selected in Document Language on the
(General Settings) tab of the Settings dialog are created.
Save to a subfolder with current date
Select this checkbox to create a current date folder in the folder specified in Save in and save
scanned images in it. The folder will be created with a name such as "20XX_01_01"
(Year_Month_Date).
If this checkbox is not selected, files are saved directly in the folder specified in Save in.
(3) Application Settings Area
Open with an application
Select this when you want to enhance or correct the scanned images.
You can specify the application from the pop-up menu.
Send to an application
Select this when you want to use the scanned images as they are in an application that allows you to
browse or organize images.
You can specify the application from the pop-up menu.
Send to a folder
Select this when you also want to save the scanned images to a folder other than the one specified in
Save in.
You can specify the folder from the pop-up menu.
Attach to e-mail
Select this when you want to send e-mails with the scanned images attached.
You can specify the e-mail client you want to start from the pop-up menu.
Do not start any application
Saves to the folder specified in Save in.
Note
• Specify the application or folder in the dialog displayed by selecting Add... from the pop-up menu.
Instructions
Opens this guide.
71
Page 72

Defaults
You can restore the settings in the displayed screen to the default settings.
72
Page 73

Settings (Photo Scan) Dialog
Click Photo Scan on the (Scanning from a Computer) tab to display the Settings (Photo Scan) dialog.
In the Settings (Photo Scan) dialog, you can make advanced scan settings to scan items as photos.
(1) Scan Options Area
(2) Save Settings Area
(3) Application Settings Area
Important
• When the Settings dialog is displayed from My Image Garden, the setting items for Application
Settings do not appear.
(1) Scan Options Area
Select Source
Photo is selected.
Color Mode
Select the color mode in which to scan the item.
Paper Size
Select the size of the item to be scanned.
When you select Custom, a screen in which you can specify the paper size appears. Select a Unit,
then enter the Width and Height, and then click OK.
73
Page 74

Note
• Click Defaults to restore the specified settings to the default settings.
Resolution
Select the resolution of the item to be scanned.
The higher the resolution (value), the more detail in your image.
Resolution
Image Processing Settings
Click (Right Arrow) to set the following.
Important
• When Color Mode is Black and White, Image Processing Settings is not available.
Sharpen outline
Emphasizes the outline of the subjects to sharpen the image.
(2) Save Settings Area
File Name
Enter the file name of the image to be saved. When you save a file, the date and four digits are
appended to the set file name in the "_20XX0101_0001" format.
Note
• When you select the Save to a subfolder with current date checkbox, the date and four digits
are appended to the set file name.
Save in
Displays the folder in which to save the scanned images. To change the folder, specify the
destination folder in the dialog displayed by selecting Add... from the pop-up menu.
The default save folder is the Pictures folder.
Important
• When the Settings dialog is displayed from My Image Garden, this option does not appear.
Data Format
Select the data format in which to save the scanned images.
You can select JPEG/Exif, TIFF, or PNG.
Important
• You cannot select JPEG/Exif when Color Mode is Black and White.
JPEG Image Quality
You can specify the image quality of JPEG files.
74
Page 75

Important
• This appears only when JPEG/Exif is selected in Data Format.
Save to a subfolder with current date
Select this checkbox to create a current date folder in the folder specified in Save in and save
scanned images in it. The folder will be created with a name such as "20XX_01_01"
(Year_Month_Date).
If this checkbox is not selected, files are saved directly in the folder specified in Save in.
Check scan results
Displays the Save Settings dialog after scanning.
Important
• When the Settings dialog is displayed from My Image Garden, this option does not appear.
(3) Application Settings Area
Open with an application
Select this when you want to enhance or correct the scanned images.
You can specify the application from the pop-up menu.
Send to an application
Select this when you want to use the scanned images as they are in an application that allows you to
browse or organize images.
You can specify the application from the pop-up menu.
Send to a folder
Select this when you also want to save the scanned images to a folder other than the one specified in
Save in.
You can specify the folder from the pop-up menu.
Attach to e-mail
Select this when you want to send e-mails with the scanned images attached.
You can specify the e-mail client you want to start from the pop-up menu.
Do not start any application
Saves to the folder specified in Save in.
Note
• Specify the application or folder in the dialog displayed by selecting Add... from the pop-up menu.
Instructions
Opens this guide.
Defaults
You can restore the settings in the displayed screen to the default settings.
75
Page 76

Settings (Document Scan) Dialog
Click Document Scan on the (Scanning from a Computer) tab to display the Settings (Document
Scan) dialog.
In the Settings (Document Scan) dialog, you can make advanced scan settings to scan items as
documents.
(1) Scan Options Area
(2) Save Settings Area
(3) Application Settings Area
Important
• When the Settings dialog is displayed from the Scan screen of My Image Garden, the setting items for
Application Settings do not appear.
(1) Scan Options Area
Select Source
Select the type of item to be scanned.
• Scanning documents: Document
• Scanning magazines: Magazine
Color Mode
Select the color mode in which to scan the item.
76
Page 77

Paper Size
Select the size of the item to be scanned.
When you select Custom, a screen in which you can specify the paper size appears. Select a Unit,
then enter the Width and Height, and then click OK.
Note
• Click Defaults to restore the specified settings to the default settings.
Resolution
Select the resolution of the item to be scanned.
The higher the resolution (value), the more detail in your image.
Resolution
Note
• Only 300 dpi or 400 dpi can be set when Start OCR is selected in Application Settings.
Image Processing Settings
Click (Right Arrow) to set the following.
Note
• When Color Mode is Black and White, only Reduce gutter shadow, Correct slanted text
document, and Detect the orientation of text document and rotate image appear.
Apply Auto Document Fix
Select this checkbox to sharpen text in a document or magazine for better readability.
Important
• The color tone may differ from the source image due to corrections. In that case, deselect
the checkbox and scan.
Note
• Scanning takes longer than usual when you enable this function.
Sharpen outline
Emphasizes the outline of the subjects to sharpen the image.
Reduce show-through
Sharpens text in an item or reduces show-through in newspapers, etc.
Reduce moire
Reduces moire patterns.
Printed materials are displayed as a collection of fine dots. "Moire" is a phenomenon where
uneven gradation or a stripe pattern appears when such photos or pictures printed with fine dots
are scanned.
77
Page 78

Note
• Scanning takes longer than usual when you enable Reduce moire.
Reduce gutter shadow
Reduces gutter shadows that appear between pages when scanning open booklets.
Note
• Click Driver in the IJ Scan Utility main screen and scan to correct gutter shadows when
scanning non-standard size items or specified areas.
Refer to "Gutter Correction" for details.
Correct slanted text document
Detects the scanned text and corrects the angle (within -0.1 to -10 degrees or +0.1 to +10
degrees) of the document.
Important
• The following types of documents may not be corrected properly since the text cannot be
detected correctly.
• Documents in which the text lines are inclined more than 10 degrees or the angles vary
by line
• Documents containing both vertical and horizontal text
• Documents with extremely large or small fonts
• Documents with small amount of text
• Documents containing figures/images
• Hand-written text
• Documents containing both vertical and horizontal lines (tables)
Note
• Scanning takes longer than usual when you enable Correct slanted text document.
Detect the orientation of text document and rotate image
Automatically rotates the image to the correct orientation by detecting the orientation of text in
the scanned document.
Important
• Only text documents written in languages that can be selected from Document Language
in the Settings (General Settings) dialog are supported.
• The orientation may not be detected for the following types of settings or documents since
the text cannot be detected correctly.
• Resolution is outside the range of 300 dpi to 600 dpi
• Font size is outside the range of 8 points to 48 points
• Documents containing special fonts, effects, italics, or hand-written text
• Documents with patterned backgrounds
In that case, select the Check scan results checkbox and rotate the image in the Save
Settings dialog.
78
Page 79

(2) Save Settings Area
File Name
Enter the file name of the image to be saved. When you save a file, the date and four digits are
appended to the set file name in the "_20XX0101_0001" format.
Note
• When you select the Save to a subfolder with current date checkbox, the date and four digits
are appended to the set file name.
Save in
Displays the folder in which to save the scanned images. To change the folder, specify the
destination folder in the dialog displayed by selecting Add... from the pop-up menu.
The default save folder is the Pictures folder.
Important
• When the Settings dialog is displayed from My Image Garden, this option does not appear.
Data Format
Select the data format in which to save the scanned images.
You can select JPEG/Exif, TIFF, PNG, PDF, or PDF (Multiple Pages).
Important
• You cannot select JPEG/Exif when Color Mode is Black and White.
• When Start OCR is selected in Application Settings, you cannot select PDF or PDF (Multiple
Pages).
PDF Compression
Select the compression type for saving PDF files.
Standard
It is recommended that you normally select this setting.
High
Compresses the file size when saving, allowing you to reduce the load on your network/server.
Important
• This appears only when PDF or PDF (Multiple Pages) is selected in Data Format.
• When Black and White is selected in Color Mode, this option does not appear.
JPEG Image Quality
You can specify the image quality of JPEG files.
Important
• This appears only when JPEG/Exif is selected in Data Format.
Create a PDF file that supports keyword search
Select this checkbox to convert text in images into text data and create PDF files that support
keyword search.
Important
• This appears only when PDF or PDF (Multiple Pages) is selected in Data Format.
79
Page 80

Note
• PDF files that are searchable in the language selected in Document Language on the
(General Settings) tab of the Settings dialog are created.
Save to a subfolder with current date
Select this checkbox to create a current date folder in the folder specified in Save in and save
scanned images in it. The folder will be created with a name such as "20XX_01_01"
(Year_Month_Date).
If this checkbox is not selected, files are saved directly in the folder specified in Save in.
Check scan results
Displays the Save Settings dialog after scanning.
Important
• When the Settings dialog is displayed from My Image Garden, this option does not appear.
(3) Application Settings Area
Open with an application
Select this when you want to enhance or correct the scanned images.
You can specify the application from the pop-up menu.
Send to an application
Select this when you want to use the scanned images as they are in an application that allows you to
browse or organize images.
You can specify the application from the pop-up menu.
Send to a folder
Select this when you also want to save the scanned images to a folder other than the one specified in
Save in.
You can specify the folder from the pop-up menu.
Attach to e-mail
Select this when you want to send e-mails with the scanned images attached.
You can specify the e-mail client you want to start from the pop-up menu.
Start OCR
Select this when you want to convert text in the scanned image into text data.
You can specify the application from the pop-up menu.
Do not start any application
Saves to the folder specified in Save in.
Note
• Specify the application or folder in the dialog displayed by selecting Add... from the pop-up menu.
Instructions
Opens this guide.
Defaults
You can restore the settings in the displayed screen to the default settings.
80
Page 81

Settings (Custom Scan) Dialog
Click Custom Scan on the (Scanning from a Computer) tab to display the Settings (Custom Scan)
dialog.
In the Settings (Custom Scan) dialog, you can make advanced scan settings to scan according to your
preference.
(1) Scan Options Area
(2) Save Settings Area
(3) Application Settings Area
Important
• When the Settings dialog is displayed from the Scan screen of My Image Garden, the setting items for
Application Settings do not appear.
(1) Scan Options Area
Select Source
Select the type of item to be scanned. Select Auto to detect the item type automatically and to set
Color Mode, Paper Size, and Resolution automatically as well.
Important
• Item types supported by Auto are photos, postcards, business cards, magazines, newspapers,
documents, and BD/DVD/CD.
81
Page 82

• To scan the following types of items, specify the item type or size. You cannot scan correctly with
Auto.
• A4 size photos
• Text documents smaller than 2L (5 inches x 7 inches) (127 mm x 178 mm), such as
paperback pages with the spine cut off
• Items printed on thin white paper
• Long narrow items such as panoramic photos
• Reflective disc labels may not be scanned as expected.
• Place items correctly according to the type of item to be scanned. Otherwise, items may not be
scanned correctly.
Refer to "Placing Items (When Scanning from a Computer)" for how to place items.
Note
• To convert text in the image into text data after scanning, specify Select Source instead of
selecting Auto.
• To reduce moire, set Select Source to Magazine.
Color Mode
Select the color mode in which to scan the item.
Note
• Only Color is available when Select Source is Auto.
Paper Size
Select the size of the item to be scanned.
When you select Custom, a screen in which you can specify the paper size appears. Select a Unit,
then enter the Width and Height, and then click OK.
Note
• Only Auto is available when Select Source is Auto.
• Click Defaults in the screen in which you can specify the paper size to restore the specified
settings to the default settings.
Resolution
Select the resolution of the item to be scanned.
The higher the resolution (value), the more detail in your image.
Resolution
Note
• Only Auto is available when Select Source is Auto.
• Only 300 dpi or 400 dpi can be set when Start OCR is selected in Application Settings.
82
Page 83

Image Processing Settings
Click (Right Arrow) to set the following. Available setting items vary by Select Source.
• When Select Source is Auto:
Apply recommended image correction
Applies suitable corrections automatically based on the item type.
Important
• The color tone may differ from the source image due to corrections. In that case,
deselect the checkbox and scan.
Note
• Scanning takes longer than usual when you enable this function.
• When Select Source is Photo:
Important
• When Color Mode is Black and White, Image Processing Settings is not available.
Sharpen outline
Emphasizes the outline of the subjects to sharpen the image.
• When Select Source is Magazine or Document:
Note
• When Color Mode is Black and White, only Reduce gutter shadow, Correct slanted text
document, and Detect the orientation of text document and rotate image appear.
Apply Auto Document Fix
Select this checkbox to sharpen text in a document or magazine for better readability.
Important
• The color tone may differ from the source image due to corrections. In that case,
deselect the checkbox and scan.
Note
• Scanning takes longer than usual when you enable this function.
Sharpen outline
Emphasizes the outline of the subjects to sharpen the image.
Reduce show-through
Sharpens text in an item or reduces show-through in newspapers, etc.
Reduce moire
Reduces moire patterns.
Printed materials are displayed as a collection of fine dots. "Moire" is a phenomenon where
uneven gradation or a stripe pattern appears when such photos or pictures printed with fine
dots are scanned.
Note
• Scanning takes longer than usual when you enable Reduce moire.
83
Page 84

Reduce gutter shadow
Reduces gutter shadows that appear between pages when scanning open booklets.
Note
• Click Driver in the IJ Scan Utility main screen and scan to correct gutter shadows when
scanning non-standard size items or specified areas.
Refer to "Gutter Correction" for details.
Correct slanted text document
Detects the scanned text and corrects the angle (within -0.1 to -10 degrees or +0.1 to +10
degrees) of the document.
Important
• The following types of documents may not be corrected properly since the text cannot
be detected correctly.
• Documents in which the text lines are inclined more than 10 degrees or the angles
vary by line
• Documents containing both vertical and horizontal text
• Documents with extremely large or small fonts
• Documents with small amount of text
• Documents containing figures/images
• Hand-written text
• Documents containing both vertical and horizontal lines (tables)
Note
• Scanning takes longer than usual when you enable Correct slanted text document.
Detect the orientation of text document and rotate image
Automatically rotates the image to the correct orientation by detecting the orientation of text
in the scanned document.
Important
• Only text documents written in languages that can be selected from Document
Language in the Settings (General Settings) dialog are supported.
• The orientation may not be detected for the following types of settings or documents
since the text cannot be detected correctly.
• Resolution is outside the range of 300 dpi to 600 dpi
• Font size is outside the range of 8 points to 48 points
• Documents containing special fonts, effects, italics, or hand-written text
• Documents with patterned backgrounds
In that case, select the Check scan results checkbox and rotate the image in the Save
Settings dialog.
(2) Save Settings Area
File Name
Enter the file name of the image to be saved. When you save a file, the date and four digits are
appended to the set file name in the "_20XX0101_0001" format.
84
Page 85

Note
• When you select the Save to a subfolder with current date checkbox, the date and four digits
are appended to the set file name.
Save in
Displays the folder in which to save the scanned images. To change the folder, specify the
destination folder in the dialog displayed by selecting Add... from the pop-up menu.
The default save folder is the Pictures folder.
Important
• When the Settings dialog is displayed from My Image Garden, this option does not appear.
Data Format
Select the data format in which to save the scanned images.
You can select JPEG/Exif, TIFF, PNG, PDF, PDF (Multiple Pages), or Auto.
Important
• When Auto is selected, the save format may differ depending on how you place the item.
Placing Items (When Scanning from a Computer)
• You cannot select JPEG/Exif when Color Mode is Black and White.
• When Start OCR is selected in Application Settings, you cannot select PDF, PDF (Multiple
Pages), or Auto.
Note
• Auto appears only when Auto is selected for Select Source.
JPEG Image Quality
You can specify the image quality of JPEG files.
Important
• This appears only when JPEG/Exif or Auto is selected in Data Format.
PDF Compression
Select the compression type for saving PDF files.
Standard
It is recommended that you normally select this setting.
High
Compresses the file size when saving, allowing you to reduce the load on your network/server.
Important
• This appears only when PDF, PDF (Multiple Pages), or Auto is selected in Data Format.
• When Black and White is selected in Color Mode, this option does not appear.
Create a PDF file that supports keyword search
Select this checkbox to convert text in images into text data and create PDF files that support
keyword search.
Important
• This appears only when PDF, PDF (Multiple Pages), or Auto is selected in Data Format.
85
Page 86

Note
• PDF files that are searchable in the language selected in Document Language on the
(General Settings) tab of the Settings dialog are created.
Save to a subfolder with current date
Select this checkbox to create a current date folder in the folder specified in Save in and save
scanned images in it. The folder will be created with a name such as "20XX_01_01"
(Year_Month_Date).
If this checkbox is not selected, files are saved directly in the folder specified in Save in.
Check scan results
Displays the Save Settings dialog after scanning.
Important
• This does not appear when Select Source is Auto.
• When the Settings dialog is displayed from My Image Garden, this option does not appear.
(3) Application Settings Area
Open with an application
Select this when you want to enhance or correct the scanned images.
You can specify the application from the pop-up menu.
Send to an application
Select this when you want to use the scanned images as they are in an application that allows you to
browse or organize images.
You can specify the application from the pop-up menu.
Send to a folder
Select this when you also want to save the scanned images to a folder other than the one specified in
Save in.
You can specify the folder from the pop-up menu.
Attach to e-mail
Select this when you want to send e-mails with the scanned images attached.
You can specify the e-mail client you want to start from the pop-up menu.
Start OCR
Select this when you want to convert text in the scanned image into text data.
You can specify the application from the pop-up menu.
Do not start any application
Saves to the folder specified in Save in.
Note
• Specify the application or folder in the dialog displayed by selecting Add... from the pop-up menu.
Instructions
Opens this guide.
86
Page 87

Defaults
You can restore the settings in the displayed screen to the default settings.
87
Page 88

Settings (Scan and Stitch) Dialog
Click Scan and Stitch on the (Scanning from a Computer) tab to display the Settings (Scan and
Stitch) dialog.
In the Settings (Scan and Stitch) dialog, you can make advanced scan settings for scanning items larger
than the platen.
(1) Scan Options Area
(2) Save Settings Area
(3) Application Settings Area
Important
• When the Settings dialog is displayed from the Scan screen of My Image Garden, the setting items for
Application Settings do not appear.
(1) Scan Options Area
Select Source
Select the type of item to be scanned.
• Scanning photos: Photo
• Scanning documents: Document
• Scanning magazines: Magazine
Note
• To reduce moire, set Select Source to Magazine.
88
Page 89

Color Mode
Select the color mode in which to scan the item.
Resolution
Select the resolution of the item to be scanned.
The higher the resolution (value), the more detail in your image.
Resolution
Image Processing Settings
Click (Right Arrow) to set the following. Available setting items vary by Select Source.
Important
• When Color Mode is Black and White, Image Processing Settings is not available.
• When Select Source is Photo:
Sharpen outline
Emphasizes the outline of the subjects to sharpen the image.
• When Select Source is Magazine or Document:
Sharpen outline
Emphasizes the outline of the subjects to sharpen the image.
Reduce show-through
Sharpens text in an item or reduces show-through in newspapers, etc.
Reduce moire
Reduces moire patterns.
Printed materials are displayed as a collection of fine dots. "Moire" is a phenomenon where
uneven gradation or a stripe pattern appears when such photos or pictures printed with fine
dots are scanned.
Note
• Scanning takes longer than usual when you enable Reduce moire.
(2) Save Settings Area
File Name
Enter the file name of the image to be saved. When you save a file, the date and four digits are
appended to the set file name in the "_20XX0101_0001" format.
Note
• When you select the Save to a subfolder with current date checkbox, the date and four digits
are appended to the set file name.
Save in
Displays the folder in which to save the scanned images. To change the folder, specify the
destination folder in the dialog displayed by selecting Add... from the pop-up menu.
The default save folder is the Pictures folder.
Important
• When the Settings dialog is displayed from My Image Garden, this option does not appear.
89
Page 90

Data Format
Select the data format in which to save the scanned images.
You can select JPEG/Exif, TIFF, PNG, PDF, or PDF (Multiple Pages).
Important
• You cannot select JPEG/Exif when Color Mode is Black and White.
PDF Compression
Select the compression type for saving PDF files.
Standard
It is recommended that you normally select this setting.
High
Compresses the file size when saving, allowing you to reduce the load on your network/server.
Important
• This appears only when PDF or PDF (Multiple Pages) is selected in Data Format.
• When Black and White is selected in Color Mode, this option does not appear.
Create a PDF file that supports keyword search
Select this checkbox to convert text in images into text data and create PDF files that support
keyword search.
Important
• This appears only when PDF or PDF (Multiple Pages) is selected in Data Format.
Note
• PDF files that are searchable in the language selected in Document Language on the
(General Settings) tab of the Settings dialog are created.
JPEG Image Quality
You can specify the image quality of JPEG files.
Important
• This appears only when JPEG/Exif is selected in Data Format.
Save to a subfolder with current date
Select this checkbox to create a current date folder in the folder specified in Save in and save
scanned images in it. The folder will be created with a name such as "20XX_01_01"
(Year_Month_Date).
If this checkbox is not selected, files are saved directly in the folder specified in Save in.
Check scan results
Displays the Save Settings dialog after scanning.
Important
• When the Settings dialog is displayed from My Image Garden, this option does not appear.
90
Page 91

(3) Application Settings Area
Open with an application
Select this when you want to enhance or correct the scanned images.
You can specify the application from the pop-up menu.
Send to an application
Select this when you want to use the scanned images as they are in an application that allows you to
browse or organize images.
You can specify the application from the pop-up menu.
Send to a folder
Select this when you also want to save the scanned images to a folder other than the one specified in
Save in.
You can specify the folder from the pop-up menu.
Do not start any application
Saves to the folder specified in Save in.
Note
• Specify the application or folder in the dialog displayed by selecting Add... from the pop-up menu.
Instructions
Opens this guide.
Defaults
You can restore the settings in the displayed screen to the default settings.
91
Page 92

Settings (Driver) Dialog
Click Driver on the (Scanning from a Computer) tab to display the Settings (Driver) dialog.
In the Settings (Driver) dialog, you can specify how to save images when scanning items by starting the
scanner driver from IJ Scan Utility and how to respond after saving them.
(1) Save Settings Area
(2) Application Settings Area
Important
• When the Settings dialog is displayed from My Image Garden, the setting items for Application
Settings do not appear.
(1) Save Settings Area
File Name
Enter the file name of the image to be saved. When you save a file, the date and four digits are
appended to the set file name in the "_20XX0101_0001" format.
Note
• When you select the Save to a subfolder with current date checkbox, the date and four digits
are appended to the set file name.
Save in
Displays the folder in which to save the scanned images. To change the folder, specify the
destination folder in the dialog displayed by selecting Add... from the pop-up menu.
The default save folder is the Pictures folder.
Important
• When the Settings dialog is displayed from My Image Garden, this option does not appear.
92
Page 93

Data Format
Select the data format in which to save the scanned images.
You can select JPEG/Exif, TIFF, PNG, PDF, or PDF (Multiple Pages).
Note
• When PDF or PDF (Multiple Pages) is selected, images up to 9600 pixels x 9600 pixels can be
scanned.
• When the Enable large image scans checkbox is selected in Save Settings, or when Start
OCR is selected in Application Settings, you can select JPEG/Exif, TIFF, or PNG.
JPEG Image Quality
You can specify the image quality of JPEG files.
Important
• This appears only when JPEG/Exif is selected in Data Format.
PDF Compression
Select the compression type for saving PDF files.
Standard
It is recommended that you normally select this setting.
High
Compresses the file size when saving, allowing you to reduce the load on your network/server.
Important
• This appears only when PDF or PDF (Multiple Pages) is selected in Data Format.
Create a PDF file that supports keyword search
Select this checkbox to convert text in images into text data and create PDF files that support
keyword search.
Important
• This appears only when PDF or PDF (Multiple Pages) is selected in Data Format.
Note
• PDF files that are searchable in the language selected in Document Language on the
(General Settings) tab of the Settings dialog are created.
Save to a subfolder with current date
Select this checkbox to create a current date folder in the folder specified in Save in and save
scanned images in it. The folder will be created with a name such as "20XX_01_01"
(Year_Month_Date).
If this checkbox is not selected, files are saved directly in the folder specified in Save in.
Enable large image scans
Select this checkbox to scan images up to 50000 pixels x 50000 pixels and 4.0 GB.
Important
• When this checkbox is selected, you cannot select Send to an application, Send to a folder,
Attach to e-mail, or Start OCR.
• When the Settings dialog is displayed from My Image Garden, this option does not appear.
93
Page 94

Note
• When this checkbox is not selected, images up to 10208 pixels x 14032 pixels can be scanned.
Check scan results
Displays the Save Settings dialog after scanning.
Important
• When the Settings dialog is displayed from My Image Garden, this option does not appear.
(2) Application Settings Area
Open with an application
Select this when you want to enhance or correct the scanned images.
You can specify the application from the pop-up menu.
Send to an application
Select this when you want to use the scanned images as they are in an application that allows you to
browse or organize images.
You can specify the application from the pop-up menu.
Send to a folder
Select this when you also want to save the scanned images to a folder other than the one specified in
Save in.
You can specify the folder from the pop-up menu.
Attach to e-mail
Select this when you want to send e-mails with the scanned images attached.
You can specify the e-mail client you want to start from the pop-up menu.
Start OCR
Select this when you want to convert text in the scanned image into text data.
You can specify the application from the pop-up menu.
Do not start any application
Saves to the folder specified in Save in.
Note
• Specify the application or folder in the dialog displayed by selecting Add... from the pop-up menu.
Instructions
Opens this guide.
Defaults
You can restore the settings in the displayed screen to the default settings.
94
Page 95

Settings (PDF) Dialog
Click PDF on the (Scanning Using the Scanner Buttons) tab to display the Settings (PDF) dialog.
In the Settings (PDF) dialog, you can specify how to respond when saving images to a computer as PDF
files after scanning them using the scanner button.
(1) Scan Options Area
(2) Save Settings Area
(3) Application Settings Area
(1) Scan Options Area
Select Source
Document is selected.
Color Mode
Select the color mode in which to scan the item.
Paper Size
Select the size of the item to be scanned.
When you select Custom, a screen in which you can specify the paper size appears. Select a Unit,
then enter the Width and Height, and then click OK.
95
Page 96

Note
• Click Defaults to restore the specified settings to the default settings.
Resolution
Select the resolution of the item to be scanned.
The higher the resolution (value), the more detail in your image.
Resolution
Image Processing Settings
Click (Right Arrow) to set the following.
Note
• When Color Mode is Black and White, only Reduce gutter shadow, Correct slanted text
document, and Detect the orientation of text document and rotate image appear.
Apply Auto Document Fix
Select this checkbox to sharpen text in a document or magazine for better readability.
Important
• The color tone may differ from the source image due to corrections. In that case, deselect
the checkbox and scan.
Note
• Scanning takes longer than usual when you enable this function.
Sharpen outline
Emphasizes the outline of the subjects to sharpen the image.
Reduce show-through
Sharpens text in an item or reduces show-through in newspapers, etc.
Reduce moire
Reduces moire patterns.
Printed materials are displayed as a collection of fine dots. "Moire" is a phenomenon where
uneven gradation or a stripe pattern appears when such photos or pictures printed with fine dots
are scanned.
Note
• Scanning takes longer than usual when you enable Reduce moire.
Reduce gutter shadow
Reduces gutter shadows that appear between pages when scanning open booklets.
Note
• Click Driver in the IJ Scan Utility main screen and scan to correct gutter shadows when
scanning non-standard size items or specified areas.
Refer to "Gutter Correction" for details.
Correct slanted text document
Detects the scanned text and corrects the angle (within -0.1 to -10 degrees or +0.1 to +10
degrees) of the document.
96
Page 97

Important
• The following types of documents may not be corrected properly since the text cannot be
detected correctly.
• Documents in which the text lines are inclined more than 10 degrees or the angles vary
by line
• Documents containing both vertical and horizontal text
• Documents with extremely large or small fonts
• Documents with small amount of text
• Documents containing figures/images
• Hand-written text
• Documents containing both vertical and horizontal lines (tables)
Note
• Scanning takes longer than usual when you enable Correct slanted text document.
Detect the orientation of text document and rotate image
Automatically rotates the image to the correct orientation by detecting the orientation of text in
the scanned document.
Important
• Only text documents written in languages that can be selected from Document Language
in the Settings (General Settings) dialog are supported.
Settings (General Settings) Dialog
• The orientation may not be detected for the following types of settings or documents since
the text cannot be detected correctly.
• Resolution is outside the range of 300 dpi to 600 dpi
• Font size is outside the range of 8 points to 48 points
• Documents containing special fonts, effects, italics, or hand-written text
• Documents with patterned backgrounds
(2) Save Settings Area
File Name
Enter the file name of the image to be saved. When you save a file, the date and four digits are
appended to the set file name in the "_20XX0101_0001" format.
Note
• When you select the Save to a subfolder with current date checkbox, the date and four digits
are appended to the set file name.
Save in
Displays the folder in which to save the scanned images. To change the folder, specify the
destination folder in the dialog displayed by selecting Add... from the pop-up menu.
The default save folder is the Pictures folder.
Important
• When the Settings dialog is displayed from My Image Garden, this option does not appear.
97
Page 98

Data Format
You can select PDF or PDF (Multiple Pages).
PDF Compression
Select the compression type for saving PDF files.
Standard
It is recommended that you normally select this setting.
High
Compresses the file size when saving, allowing you to reduce the load on your network/server.
Important
• When Black and White is selected in Color Mode, this option does not appear.
Create a PDF file that supports keyword search
Select this checkbox to convert text in images into text data and create PDF files that support
keyword search.
Note
• PDF files that are searchable in the language selected in Document Language on the
(General Settings) tab of the Settings dialog are created.
Save to a subfolder with current date
Select this checkbox to create a current date folder in the folder specified in Save in and save
scanned images in it. The folder will be created with a name such as "20XX_01_01"
(Year_Month_Date).
If this checkbox is not selected, files are saved directly in the folder specified in Save in.
(3) Application Settings Area
Open with an application
Select this when you want to enhance or correct the scanned images.
You can specify the application from the pop-up menu.
Send to an application
Select this when you want to use the scanned images as they are in an application that allows you to
browse or organize images.
You can specify the application from the pop-up menu.
Send to a folder
Select this when you also want to save the scanned images to a folder other than the one specified in
Save in.
You can specify the folder from the pop-up menu.
Do not start any application
Saves to the folder specified in Save in.
Note
• Specify the application or folder in the dialog displayed by selecting Add... from the pop-up menu.
98
Page 99

Instructions
Opens this guide.
Defaults
You can restore the settings in the displayed screen to the default settings.
99
Page 100

Settings (AUTO SCAN) Dialog
Click AUTO SCAN on the (Scanning Using the Scanner Buttons) tab to display the Settings (AUTO
SCAN) dialog.
In the Settings (AUTO SCAN) dialog, you can specify how to respond when saving images to a computer
after scanning them using the scanner button by automatically detecting the item.
(1) Scan Options Area
(2) Save Settings Area
(3) Application Settings Area
Supported Items
Photos, postcards, business cards, magazines, newspapers, documents, and BD/DVD/CD.
Important
• To scan the following types of items, specify the item type and size in the Settings (Document Scan)
dialog or Settings (Photo Scan) dialog, then click Document or Photo in the IJ Scan Utility main
screen. You cannot scan correctly with Auto.
• A4 size photos
• Text documents smaller than 2L (5 inches x 7 inches) (127 mm x 178 mm), such as paperback
pages with the spine cut off
• Items printed on thin white paper
• Long narrow items such as panoramic photos
• Reflective disc labels may not be scanned as expected.
• Place items correctly according to the type of item to be scanned. Otherwise, items may not be scanned
correctly.
Refer to "Placing Items (When Scanning from a Computer)" for how to place items.
100
 Loading...